

Aukey DR03 User Manual

User Manual
Dual Dash Cameras

Contents
English
Deutsch
Français
Español
Italiano
日本語
01 - 11
12 - 22
23 - 33
34 - 44
45 - 55
56 - 65

Thank you for purchasing the AUKEY DR03 Dual Dash Cameras. Please
read this user manual carefully and keep it for future reference. If you
need any assistance, please contact our support team with your
product model number and Amazon order number.
Package Contents
Dual Dash Cameras (front and rear camera)
Dual-Port USB Car Charger
4m / 13ft USB Mini-B Cable
7m / 23ft USB Mini-B Cable
Suction Mount for Front Camera
Sticker Mount for Front Camera
Two Sticker Mounts for Rear Camera
Four Spare 3M Stickers
Six Cable Clips
TrimRemovalTool
User Manual
Warranty Card
Optional Accessory: The AUKEY GM-32 GPS Antenna provides accurate
position and speed data to the DR03 that is saved and displayed on
recorded videos. This extended information may support your case in any
driving disputes or incidents.
Note: Please use a Class 10 microSD memory card (Max 128GB) for
reliable recording and performance. Format the microSD card in the
dash camera before first use.
Visitwww.aukey.com/downloadstodownloadthelatestfirmware.
- 01 -
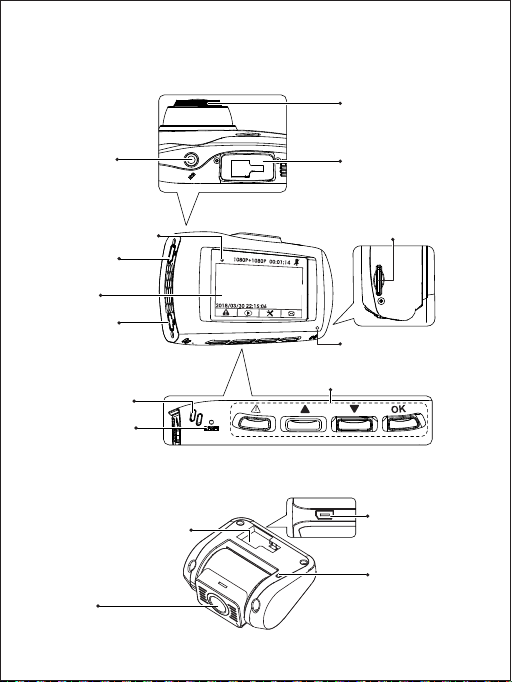
Product Diagram
Front Camera
Lens
GPS Input
Screen Indicator
USB Mini-B
Power Input
Screen
USB Mini-B
AV Input
Microphone
Reset Button
Rear Camera
Mount Locking Clip
Lens
- 02 -
Mount Locking Clip
MicroSD Card Slot
Inward LED
Status Indicator
Control Buttons
USB Mini-B
AV Output
Outward LED
Status Indicator

Specifications
Model
Image Sensor
CPU
Screen
Angle of View
Aperture
Exposure Value
Recording Resolutions
Image Format
Sound Recording
Recording Modes
Gravity Sensor Sensitivity
microSD Card
Input
Operating Temperature
Materials
Dimensions
DR03
Sony Exmor IMX323 2.19-megapixel
CMOS sensor
Novatek NT96663
2.7” LCD
Front camera: 170° Rear camera: 160°
Front camera: f/2.0 Rear camera: f/2.0
-1.0, -2/3, -1/3, +0.0, +1/3, +2/3, +1.0
Dual camera: 1080p (30 fps)
Front camera only: 1080p (30 fps),
720p (60 fps), 720p (30 fps),
WVGA, VGA
JPEG
On / off
Loop, Motion Detection, Time-Lapse,
and Emergency Recording
Low / Middle / High sensitivity
Class 10 or higher, 128GB Max
DC 5V 1A–2A
-20°C - 65°C (-4°F - 149°F)
ABS, PC, glass
Front camera: 96 x 55 x 39mm /
3.76” x 2.16” x 1.52”
Rear camera: 54 x 50 x 28mm /
2.13” x 1.97” x 1.1”
- 03 -

System LED Indicators
There are four indicators in total. Each camera unit has an LED
indicator that faces outside (to let others know you have cameras
active). The front camera has an LED indicator which faces inside
and an on-screen indicator (both for your reference). The outward
LED indicators on both cameras can be switched off if you want the
dash camera system to be less visible to people outside. Go to Setup
> Detect Led > select Off > press OK.
Outward LED
Status Indicators
Solid Green
Flashing Green
Inward LED
Status Indicator
Solid Green
Flashing Green
Screen
Indicator
Off
Flashing Red
Meaning
On; not recording
On; recording
Note: In Motion Detection mode, only the inward LED indicator will
be on in standby. Once motion is detected, all indicators will operate
the same as normal recording.
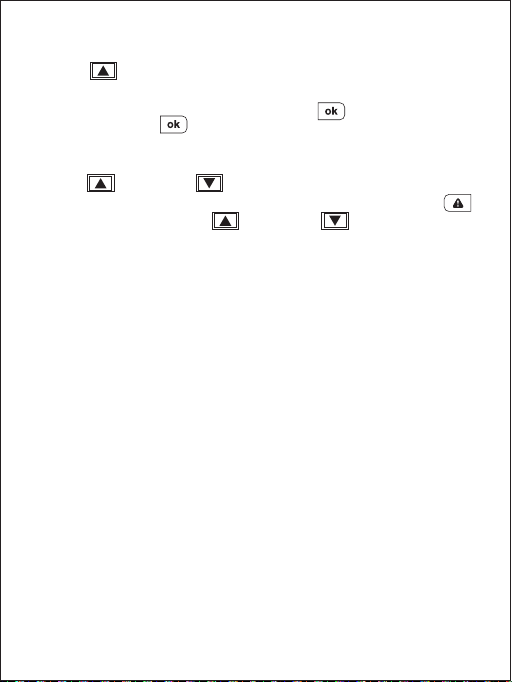
Control Buttons
Button
Recording Mode
Enter Emergency
Recording mode
View playlist (short press)
Turn on/off Audio
Recording (long press)
Open Setup menu
(short press)
Take a snapshot
(long press)
Toggle screen view
and turn off the screen
Reset
Short press to restart the device (this won’t affect saved files)
Button
Playlist &
Setup Menu
Return to
previous menu
Move up
Move down
Enter/Confirm
- 04 -
Playback Mode
Return to
playlist / Stop
Delete/Rewind
Lock & Unlock /
Fast-forward
Play/Pause

There are 3 screen view options– dual view, front camera, and rear
camera. When dash camera is powered on, press the OK button to
switch views or switch off the screen (recording continues). ‘Screen
Saver’ setting can also be used to automatically switch off the screen
after 1 or 3 minutes.
Using a microSD Card
The camera doesn’t include internal storage and requires a microSD
card (Class 10+ recommended and 128GB Max supported) to
function. A 128GB microSD card should store over 16 hours of 1080p
recordings. Use a high-quality, branded card for maximum reliability.
Insert a microSD card into the front camera microSD card slot. Later,
when the camera is powered on, format it (‘Format’ option in Dash
Camera ‘Setup’) to prepare the card for first use in the dash camera.
Formatting will permanently erase any data on the microSD card. For
best performance, format periodically (after backing up any important
files). ‘Format Warning’ in ‘Settings’ can be switched on to remind you
to do this.
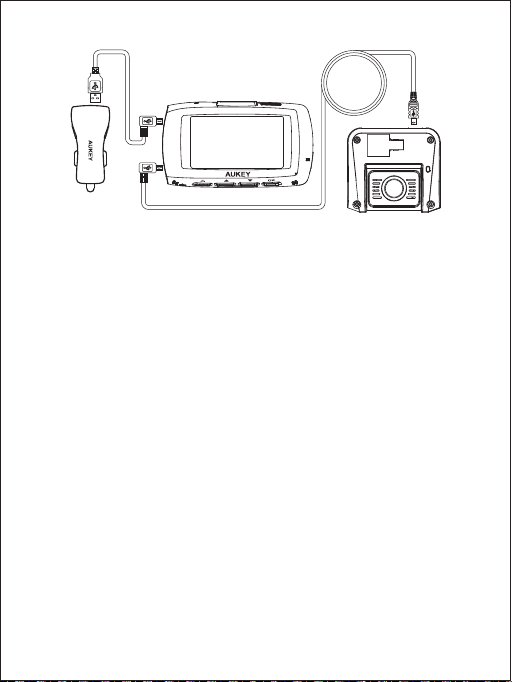
Installation & Powering On/Off
The diagram below shows the parts and exact way the cables must
be connected. You may wish to connect and test the dash camera
system before proper, long-term installation in your vehicle. For
convenient testing in your home, a power bank or wall charger with
1A or 2A USB port can be used instead of the car charger.
- 05 -
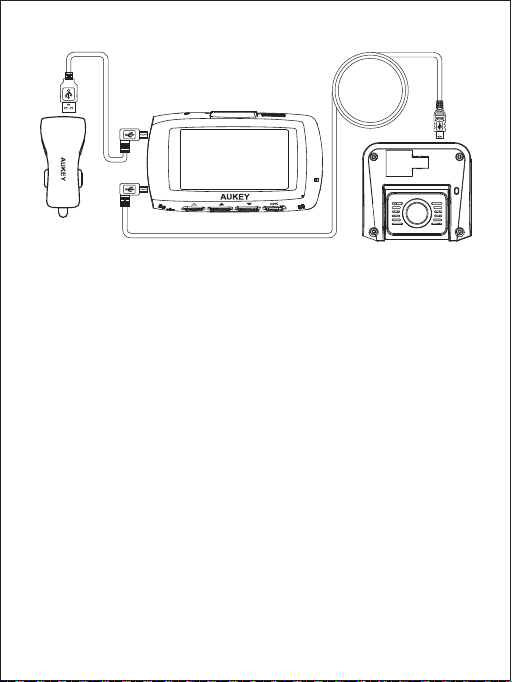
4m / 13ft USB Mini-B Cable 7m / 23ft USB Mini-B Cable
Dual-Port
USB Car Charger Rear Camera
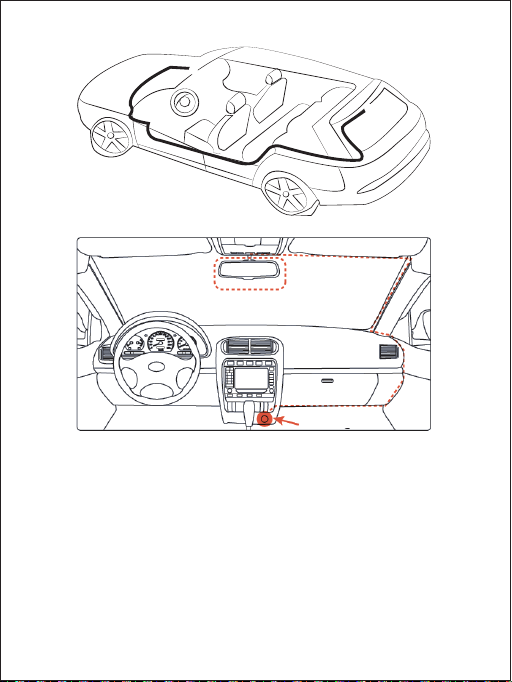
For optimal performance, install the AUKEY DR03 front/rear camera in the
1.
top-center of your front/rear windshield, facing directly ahead/behind.
For the front camera, use either the sticker mount or suction mount. They
both have separate tilt and pivot adjustment. The rear camera is
mounted with its fixed-position sticker mount (there is also a blank spare).
This camera has a tiltable lens barrel to adapt to any rear windshield
angle
Use the 7m/23ft Mini-B Cable (with mini-B connectors at both ends) to
2.
connect the two cameras. The L-shapedmini-B connector plugs into
the Mini-B AV Input of the front camera and the other end into the
Mini-B AV Output of the rear camera
Connect the 4m/13ft USB Mini-B Cable (with a standard USB-A
3.
connector at one end) to one of the car charger ports and to the
front camera Mini-B Power Input
Cable routing should be as shown in the following two diagrams. Use the
4.
cable clips to help fix the two cables conveniently and safely. A trim
removal tool is included for concealment of cables behind trim and
carpeting for a tidier finish
Front Camera
- 06 -

①
②
Windshield
Best mounting location
Connect to car
charger
Caution: AUKEY is not responsible for any damage caused to or by
the air bag due to incorrect placement of the device or its cables.
To power on, insert the car charger into your car’s 12V socket. After
5.
powering on each time you start your car, the system will start
recording automatically. To power off, disconnect the car charger
or connected mini-B cable
Note: Use the included cables to ensure optimum performance of
AUKEY DR03.
- 07 -

Video Recording
Separate files are created for the recordings from front and rear
camera, so you can view each camera’s footage separately and at
full size. The recordings are unaffected by choice of screen view or
switching the screen off.
Loop Recording: Recording will begin automatically after powering
●
on with a microSD card in the device. Each recorded file is up to ten
minutes long, with old footage being replaced when microSD card
storage is full
Motion Detection Recording: Switch on motion detection in ‘Setup.’
●
This function is designed to monitor when you’ve parked and left your
vehicle but requires a continuous power supply. It will record video
each time motion is detected by the front or rear camera
Time-Lapse Recording: Switch on time-lapse recording in ‘Setup.’ This
●
function will capture a picture per second to make a video played at
30fps
Emergency Recording
● Manual File Backup
Press to back up the current file so that it won’t be overwritten. A
icon will appear in the top left of the LCD screen to indicate a
protected emergency recording is in progress
Auto File Backup
●
Once the G-sensor is activated by a sudden impact, the device will
automatically make a recording and protect it from being overwritten.
Adjust G-sensor sensitivity in the ‘Setup’ menu
Note: Enter the playlist or setup menu (or disconnect power) to end
emergency recording mode.
- 08 -

Snapshot
●
Hold down for 3 seconds to take a snapshot while in recording mode
●
The snapshot files are located in the \AUKEY\PHOTO folder on the
microSD card
●
The icon will be shown after you take a snapshot. This won’t
interrupt the video recording
Audio Recording
Turn on/off audio recording by long-pressing when in recording
mode (or by adjusting in ‘Setup’ menu). When audio recording is on,
in-car audio will be recorded during video recording. Voicing details
of possible hazards that may develop, especially when off-camera,
may provide useful information. You can even use it to record car
license plate numbers that may not be captured on the video.
USB File Transfer
Connect the Dash Camera (with card inside) to your computer
1.
using your own USB mini-B data cable (the included cable is for
power only). It should be recognized as a removable device (with
a USB connector image displayed on-screen)
Find the video recording files located in the \AUKEY\MOVIE folder
2.
(or \AUKEY\PHOTO for snapshots)
3.
Copy the files to your computer
MicroSD Card File Transfer
Shut down the device (by disconnecting the power cable) and
1.
eject the microSD card
Insert the microSD card into a computer microSD card slot or reader
2.
and your computer will automatically detect the microSD card
Find the video recording files located in the \AUKEY\MOVIE folder
3.
(or \AUKEY\PHOTO for snapshots)
4.
Copy the files to your computer
- 09 -
Viewing Photos and Videos
Press to enter the playlist
1.
View photos or videos by choosing either ‘Photo File’ or ‘Video File’
2.
Select the file you want to view and press
3.
For videos, press again to begin playback
4.
Deleting and Locking/Unlocking Photos and Videos
Press to delete or to lock/unlock a photo or video file after
●
selecting it from the playlist. If a video is being played, press
to stop it and then press to delete or to lock/unlock
Once deleted, photos and videos can’t be recovered
●
If you lock a photo or video, it will be protected and not overwritten
●
Product Care & Use
Ensure cameras and mounts are firmly fixed in place before use to
●
avoid falls
Keep away from liquids, extreme heat, and strong magnetic fields
●
Avoid touching the lens surface. It may be cleaned with a cotton
●
swab or lens cleaning paper. If any dirt is difficult to remove, a
non-abrasive glasses lens cleaner may be used. Don’t use corrosive
solutions
Keep important videos and photos backed up elsewhere to protect
●
against file corruption or loss caused by any SD card issues
- 10 -

Warranty & Customer Support
For questions, support, or warranty claims, please contact us at the
address below that corresponds with your region. Please include your
Amazon order number and product model number.
Amazon US orders: support.us@aukey.com
Amazon EU orders: support.eu@aukey.com
Amazon CA orders: support.ca@aukey.com
Amazon JP orders: support.jp@aukey.com
*Please note, AUKEY can only provide after sales service for products purchased directly
from AUKEY. If you have purchased from a different seller, please contact them directly for
service or warranty issues.
- 11 -

Vielen Dank, dass Sie sich für die Doppel-Dashcam DR03 von AUKEY
entschieden haben. Bitte lesen Sie sich diese Bedienungsanleitung
aufmerksam durch und bewahren Sie sie gut auf. Sollten Sie
darüber hinaus Fragen oder Probleme haben, hilft Ihnen unser
freundlicher Kundenservice gerne weiter. Halten Sie dann bitte die
Produktmodellnummer und Ihre Amazon-Bestellnummer bereit.
Lieferumfang
2 Dashcams (vorn und hinten)
USB-Autoladegerät mit 2 Anschlüssen
USB-Mini-B-Kabel 4 m
USB-Mini-B-Kabel 7 m
Saugnapfhalter für die Frontkamera
Klebehalter für die Frontkamera
2 Klebehalter für die Rückfahrkamera
4 Ersatzklebestreifen von 3M
6 Kabelhalter
Werkzeug zur (De-)Montage von Verkleidungen
Bedienungsanleitung
Garantiekarte
Optionales Zubehör: Die GPS-Antenne GM-32 von AUKEY überträgt
an die DR03 genaue Daten zu Position und Geschwindigkeit, die bei
aufgezeichneten Videos angezeigt und gespeichert werden. Diese
zusätzlichen Informationen könnten bei Streitigkeiten mit
Versicherungen oder Unfällen hilfreich sein.
Hinweis: Für eine zuverlässige Leistung empfehlen wir eine microSD-Karte
der Klasse 10 (max. 128 GB) und Formatierung in der der Dashcam vor der
ersten Verwendung.
Unter www.aukey.com/downloadskönnen Sie die aktuelle Firmware
herunterladen.
- 12 -

Produktbilder
Frontkamera
Objektiv
GPS-Eingang
Bildschirmanzeige
Netzeingang
USB-Mini-B
Bildschirm
AV-Eingang
USB-Mini-B
Mikrofon
Reset-Taste
Rückfahrkamera
Verschlussklemmenhalter
Objektiv
- 13 -
Verschlussklemmenhalter
microSD-Kartensteckplatz
LED-Statusanzeige innen
Steuertasten
AV-Ausgang
USB-Mini-B
LED-Statusanzeige
außen

Technische Daten
Modell
Bildsensor
Prozessor
Bildschirm
Bildwinkel
Blende
Belichtungswert
Aufnahmeauflösungen
Bildformat
Tonaufnahme
Aufnahmemodi
Empfindlichkeit des
Schwerkraftsensor
microSD-Karte
Eingang
Betriebstemperatur
Materialien
Abmessungen
DR03
Sony Exmor IMX323
CMOS-Sensor 2,19 Megapixel
Novatek NT96663
2,7 Zoll LCD
Frontkamera: 170° Rückfahrkamera: 160°
Frontkamera: f/2,0 Rückfahrkamera: f/2,0
-1,0, -2/3, -1/3, +0,0, +1/3, +2/3, +1,0
Doppelkamera: 1080p (30 BpS)
nur Frontkamera: 1080p (30 BpS),
720p (60 BpS), 720p (30 BpS),
WVGA, VGA
JPEG
an/aus
Endlosaufzeichnung, Bewegungserkennung,
Zeitraffer und Notfallaufnahmemodus
gering/mittel/hoch
Klasse 10 oder höher, max. 128 GB
5 V/1 A – 2 A (Gleichstrom)
-20°C - 65°C
ABS, PC, Glas
Frontkamera: 96 x 55 x 39 mm
Rückfahrkamera: 54 x 50 x 28 mm
- 14 -

System-LED-Anzeigen
Insgesamt gibt es 4 Anzeigen. Jede Kameraeinheit verfügt über eine
LED-Anzeige, die nach außen zeigt (damit andere wissen, dass die
Kamera aktiv ist). Die Frontkamera besitzt eine LED-Anzeige, die nach
innen zeigt, und eine On-Screen-Anzeige (beide zu Ihrer Information).
Die LED-Anzeigen außen können an beiden Kameras ausgeschaltet
werden, wenn Sie nicht wünschen, dass die Kameras von außen
ungewollte Aufmerksamkeit erregen. Gehen Sie einfach auf Setup >
LED erkennen > wählen Sie Aus > und drücken Sie auf OK.
LEDStatusanzeigen
außen
grün leuchtend
grün blinkend
LEDStatusanzeige
innen
grün leuchtend
grün blinkend
Bildschirmanzeige
aus
rot blinkend
Bedeutung
an; keine Aufnahme
an; Aufnahme
Hinweis: Im Bewegungserkennungsmodus ist nur die LED-Anzeige
innen im Stand-by an. Sobald eine Bewegung erkannt wird, sind alle
Anzeigen wie bei der normalen Aufnahme im Betrieb.
Steuertasten
Aufnahmemodus
Taste
Notfallaufnahmemodus
aufrufen
Wiedergabeliste
ansehen (kurz drücken)
Audioaufnahme
einschalten/ausschalten
(lang drücken)
Setup-Menü öffnen
(kurz drücken)
Schnappschuss aufnehmen
(lang drücken)
Wiedergabeliste &
Setup-Menü
zu vorherigem
Menü
zurückkehren
nach oben
nach unten
Wiedergabemodus
zu Wiedergabeliste
zurückkehren/
Stopp
Löschen/
Zurückspulen
Sperren &
Entsperren/
Vorspulen
- 15 -

Bildschirmanzeige
umschalten und
Bildschirm ausschalten
Reset-
Zum Neustart des Geräts kurz drücken (gespeicherte Dateien
Taste
bleiben erhalten)
Es gibt 3 Bildschirmansichtsoptionen: Doppelansicht, Frontkamera
und Rückfahrkamera. Wenn die Dashcam an ist, drücken Sie die
Taste OK, um zwischen den Ansichten zu wechseln, oder schalten Sie
den Bildschirm aus (Aufnahme läuft weiter). Durch die Einstellung
„Bildschirmschoner“ kann der Bildschirm auch automatisch nach
einer Minute oder drei Minuten abgeschaltet werden.
Enter/Bestätigen
Play/Pause
Verwendung einer microSD-Karte
Die Kamera hat keinen internen Speicher. Aus diesem Grund ist eine
microSD-Karte erforderlich (Klasse 10+ empfohlen und max. 128 GB
unterstützt), damit sie ordnungsgemäß funktioniert. Auf einer
microSD-Karte mit 128 GB lassen sich über 16 Stunden Videoaufnahmen
mit 1080p speichern. Wir empfehlen die Verwendung einer hochwertigen
Markenkarte für maximale Zuverlässigkeit. Setzen Sie eine microSD-Karte
in den microSD-Kartensteckplatz der Frontkamera ein. Wenn die Kamera
an ist, formatieren Sie die Karte (Option „Formatieren“ im „Setup“ der
Dashcam), damit die Karte für den ersten Einsatz in der Dashcam bereit
ist. Durch das Formatieren werden alle Daten auf der microSD-Karte
unwiederbringlich gelöscht. Für eine optimale Leistung empfehlen wir
regelmäßiges Formatieren (nach einem Back-up wichtiger Dateien). In
den „Einstellungen“ können Sie „Formatierungserinnerung“ aktivieren, um
sich daran erinnern zu lassen.
Installation & An-/Ausschalten
In der nachstehenden Grafik sind alle Komponenten und die
Verkabelung ersichtlich. Sie sollten das Dashcam-System einmal
testen, bevor Sie alle Komponenten endgültig in Ihrem Wagen
befestigen. Um das System zu Hause bequem testen zu können,
empfehlen wir Ihnen die Verwendung einer Power Bank oder eines
Ladegeräts mit einem USB-Anschluss (1 A oder 2 A).
- 16 -
USB-Mini-B-Kabel 4 m USB-Mini-B-Kabel 7 m
USBAutoladegerät mit 2 Anschlüssen Rückfahrkamera
Für eine optimale Leistung empfiehlt sich die Anbringung der
1.
Front-/Rückfahrkamera DR03 von AUKEY oben mittig an der
Windschutz-/Heckscheibe – mit gerader Ausrichtung nach vorn/hinten.
Zur Befestigung der Frontkamera können Sie entweder den Klebe- oder
Saugnapfhalter verwenden. Beide verfügen über eine separate
Neigungs- und Drehpunktverstellung. Die Rückfahrkamera wird mithilfe
des fixen Klebehalters befestigt (Ersatzklebestreifen inbegriffen). Dank
dem kippbaren Objektivtubus lässt sich die Kamera je nach Winkel der
Heckscheibe passend ausrichten.
Verwenden Sie das 7 m lange USB-Mini-B-Kabel zur Verbindung der
2.
beiden Kameras. Der L-förmige Mini-B-Steckverbinder wird mit dem
Mini-B-AV-Eingang der Frontkamera verbunden und das andere
Ende mit dem Mini-B-AV-Ausgang der Rückfahrkamera.
Verbinden Sie das 4 m lange USB-Mini-B-Kabel (mit einem
3.
standardmäßigen USB-A-Steckverbinder an einem Ende) mit
einem der Anschlüsse des Autoladegeräts und mit dem
Mini-B-Netzeingang der Frontkamera.
Die Kabelführung können Sie den nachfolgenden beiden Grafiken
4.
entnehmen. Verwenden Sie die Kabelhalter zur praktischen und
sicheren Befestigung der beiden Kabel. Mithilfe des mitgelieferten
Werkzeugs zur (De-)Montage von Verkleidungen/Teppichen lassen
sich die Kabel unauffällig verlegen.
Frontkamera
- 17 -
①
②
Windshield
Best mounting location
Connect to car
charger
Vorsicht: AUKEY ist nicht haftbar für Schäden am oder durch den Airbag
infolge einer fehlerhaften Positionierung des Produkts oder der Kabel.
5.
Um das System zu aktivieren, verbinden Sie das Autoladegerät mit
der 12-V-Buchse Ihres Wagens. Beim Start des Wagens schaltet sich
das System ein und beginnt automatisch mit der Aufnahme. Um
das System zu deaktivieren, trennen Sie das Autoladegerät oder
das verbundene Mini-B-Kabel.
Hinweis: Verwenden Sie die mitgelieferten Kabel, um die optimale
Funktionsweise der DR03 von AUKEY zu gewährleisten.
- 18 -

Videoaufnahme
Die Aufnahmen von Front- und Rückfahrkamera werden in separaten
Dateien gespeichert, damit Sie sich das Filmmaterial jeder Kamera in
voller Größe einzeln ansehen können. Die Aufnahmen sind unabhängig
davon, welche Bildschirmansicht aktiviert ist oder ob der Bildschirm aus ist.
Endlosaufzeichnung: Die Aufnahme beginnt automatisch nach dem
●
Einschalten, sofern sich eine microSD-Karte im Gerät befindet. Jede
Datei ist bis zu 10 Minuten lang, wobei altes Filmmaterial überschrieben
wird, sobald die microSD-Karte voll ist.
Bewegungserkennungsaufzeichnung: Schalten Sie im „Setup“ die
●
Bewegungserkennung ein. Diese Funktion ist für das Parken geeignet,
wenn Sie Ihr Fahrzeug verlassen. Allerdings ist dafür eine Dauerstromversorgung erforderlich. Sobald die Front- oder Rückfahrkamera eine
Bewegung erkennt, wird die Videoaufnahme gestartet.
Zeitrafferaufzeichnung: Schalten Sie im „Setup“ die Zeitrafferaufzeich-
●
nung ein. Bei dieser Funktion wird ein Bild pro Sekunde aufgenommen
und ein Video mit 30 BpS erstellt.
Notfallaufnahme
● Manuelles Datei-Back-up
Drücken Sie , um die aktuelle Datei zu speichern, damit diese nicht
überschrieben wird. Oben links im LCD-Bildschirm erscheint das
Symbol . Eine geschützte Notfallaufnahme ist gerade im Gange.
Automatisches Datei-Back-up
●
Wird der Beschleunigungssensor durch einen plötzlichen Aufprall
aktiviert, wird der schreibgeschützte Aufnahmemodus automatisch
aktiviert. Die Empfindlichkeit des Beschleunigungssensors können Sie
im Menü „Setup“ einstellen.
Hinweis: Durch Öffnen der Wiedergabeliste oder des Setup-Menüs (oder
durch Trennung vom Strom) können Sie den Notfallaufnahmemodus
verlassen.
- 19 -
 Loading...