

Page 1

USER’S
MANUAL
rev. 2.0
Valid for any of the below software versions
or above:
• Control Firmware 2.0
• Media Firmware 2.0
• Android APP. 2.0
• IOS APP 2.0
Page 2

2
USER’S MANUAL
bit Play HD /
Index
1. bit Play HD - bit Play HD SSD DESCRIPTION ......................................................................................................................3
1.1 SAFETY CONSIDERATIONS ................................................................................................................................................3
1.2 PACKAGING CONTENT ........................................................................................................................................................4
1.3 DIMENSIONS AND FASTENING .........................................................................................................................................5
2. DESCRIPTION OF THE CONNECTION PANELS ..................................................................................................................6
3. REMOTE DESCRIPTION ............................................................................................................................................................9
3.1 ARC (Advance Remote Control) REMOTE ........................................................................................................................9
3.2 USR (User Remote Control) REMOTE ............................................................................................................................ 10
3.3 DRC MP Remote control (optional) ................................................................................................................................ 11
3.3.1 NAVI COMMAND ...................................................................................................................................................... 11
3.3.2 BIT PLAY HD SETTINGS ......................................................................................................................................... 11
4 CONNECTIONS ......................................................................................................................................................................... 12
4.1 POWER SUPPLY AND REMOTE CONTROL ................................................................................................................... 12
4.2 AUDIO OUTPUT SIGNALS ................................................................................................................................................ 13
4.2.1 ANALOG OUTPUT SIGNALS ................................................................................................................................... 13
4.2.2 S/PDIF DIGITAL OUTPUT SIGNALS ..................................................................................................................... 14
4.2.3 S/PDIF DIGITAL OUTPUT SIGNALS WITH HI-DEFINITION VOLUME CONTROL ........................................ 15
4.2.4 HOW TO CONNECT THE bit Play HD TO THE AUDISON bit DMI .................................................................... 16
4.3 VIDEO OUTPUT SIGNALS ................................................................................................................................................. 17
4.3.1 COMPOSITE VIDEO SIGNAL ................................................................................................................................... 17
4.3.2 HDMI VIDEO SIGNAL .............................................................................................................................................. 17
4.4 AUX/OPTICAL INPUT AUTO SWITCH ........................................................................................................................... 18
4.5 STORAGE DEVICES/EXTERNAL FILE READING ......................................................................................................... 20
4.6 INFRARED RECEIVER ........................................................................................................................................................ 21
4.7 Wi-Fi AND MOBILE DEVICES .......................................................................................................................................... 21
5 HOW TO USE THE bit Play HD WITH AN EXTERNAL MONITOR ................................................................................. 22
6 HOW TO USE THE bit Play HD ON MOBILE DEVICES .................................................................................................... 24
6.1 ANDROID DEVICES ............................................................................................................................................................ 24
6.1.1 DOWNLOAD THE AUDISON bit Play HD APP from PLAY STORE ................................................................... 24
6.1.2 ANDROID DEVICES SETUP ..................................................................................................................................... 25
6.1.3 AUDISON APP FOR ANDROID ................................................................................................................................33
6.2 APPLE IOS DEVICES .......................................................................................................................................................... 38
6.2.1 DOWNLOAD THE AUDISON bit Play HD APP from APP STORE ..................................................................... 38
6.2.2 Apple DEVICES SETUP ............................................................................................................................................ 38
6.2.3 AUDISON APP FOR IOS ........................................................................................................................................... 42
6.2.4 AIRPLAY .....................................................................................................................................................................47
7 MAIN SYSTEM SETTINGS ..................................................................................................................................................... 48
7.1 INTERNAL HDD INSTALLATION...................................................................................................................................... 48
7.1.1 INTERNAL HDD FORMAT ....................................................................................................................................... 49
7.2 EXTERNAL MONITOR GRAPHIC RESOLUTION ...........................................................................................................50
7.3 SELECT SYSTEM LANGUAGE ..........................................................................................................................................51
7.4 SELECT AUDIO/VIDEO LANGUAGE ................................................................................................................................ 51
7.5 RESTORING FACTORY SETTINGS ..................................................................................................................................52
8 TROUBLESHOOTING .............................................................................................................................................................. 53
8.1 MEDIA FIRMWARE UPGRADE ......................................................................................................................................... 53
8.2 CONTROL FIRMWARE UPGRADE ................................................................................................................................... 53
8.3 FAQ ......................................................................................................................................................................................55
9 TECHNICAL SPECIFICATIONS ............................................................................................................................................. 59
Page 3

3
1. BIT PLAY HD - BIT PLAY HD SSD DESCRIPTION
1. For the safety of the driver and third parties, the driver should not watch any video and/or operate the controls of
the device while driving. While driving, we also recommend to adjust the volume to a level that allows you to hear
sounds from outside the vehicle. The law prohibits the display and use of video while driving. For this reason, the
unit is equipped with a function that inhibits the viewing of such content, unless the car is parked and the parking
brake is engaged (see sections 2.1 and 4.3). We accept no responsibility if you choose to ignore this warning and
do not install the product correctly to inhibit video content while in motion.
2. Operate the bit Play HD only when the internal temperature is between 0°C (32°F) and 55°C (131°F). The bit Play HD
must be a minimum of 3 cm (1.5”) from other structures and there must be good air circulation around the chassis.
3. Make sure your car has a 12VDC negative ground.
4. Make sure the location you choose for the product and its accessories does not affect the vehicle’s other mechanical
and electrical devices.
5. Make sure the power cable does not short circuit during installation and connection.
6. Use extreme caution when cutting or drilling the car chassis, checking that there is no electrical wiring or structural
elements underneath.
7. Use rubber grommets to protect wires running through holes in metal and use proper materials if close to
heat-generating devices.
8. Make sure all the cables are properly secured along their entire length. Also, make sure their outer protective jacket
is flame resistant and self-extinguishing. Secure the wiring near the terminals.
SAFE SOUND
Use common sense while listening; long exposure to excessive sound levels may damage your hearing. Safety while
driving must always come rst.
1.1 SAFETY CONSIDERATIONS
USER’S MANUAL
bit Play HD /
1
Page 4
4
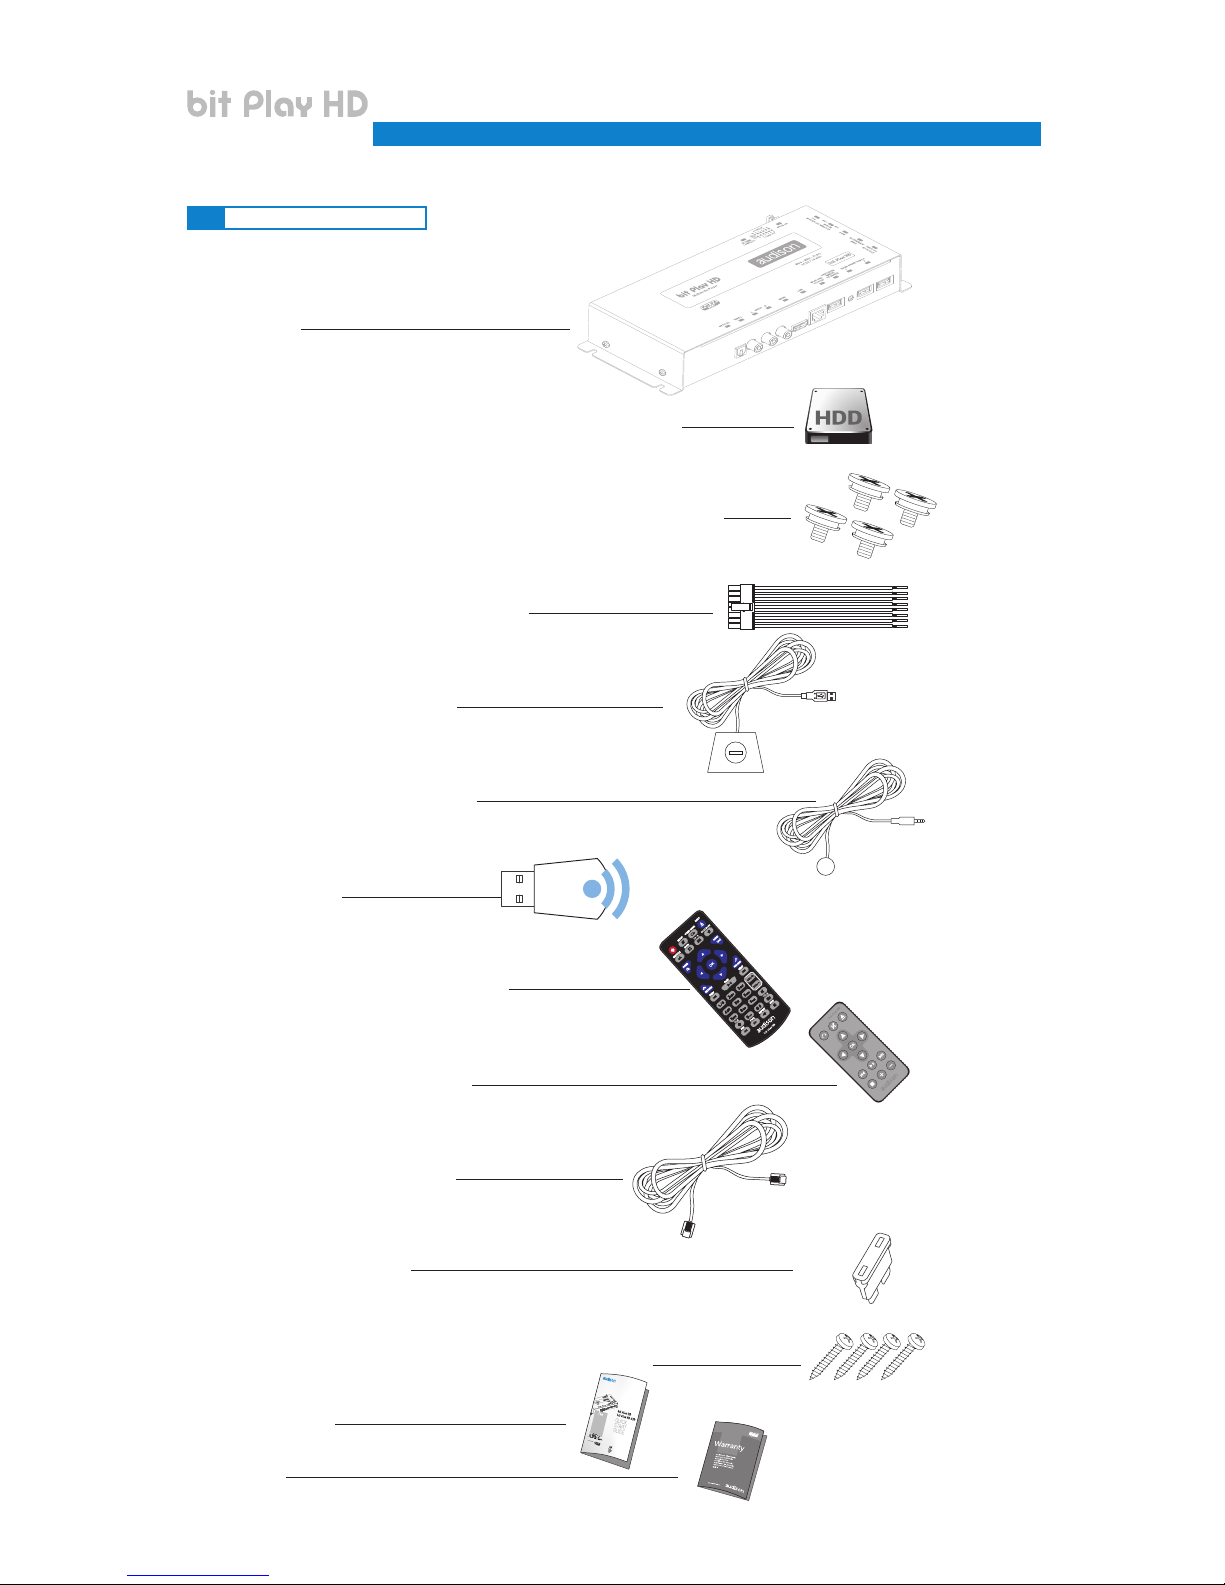
1.2 PACKAGING CONTENT
- bit Play HD:
- 2,5” SATA 250GB SSD HARD DISK (only for the bit Play HD SSD):
- NR. 4 Hard Disk assembling/fastening screws (only for the bit Play HD):
- Input/Rem cable with multi-pin connector:
- 2 m. (79 in.) USB extension cable:
- 5 m. (196 in.) infrared receiver cable:
- Wi-Fi USB dongle:
- ARC remote (Advanced Remote Control):
- USR remote (User Remote Control):
- 1m (40 in.) AC-LINK (RJ12) cable
- NR. 1 (3A) replacement fuse:
- NR. 4 4.2 x 20 mm crosshead self-tapping fastening screws:
- Quick Start Guide:
- Warranty:
USER’S MANUAL
bit Play HD /
3 A
1
Page 5
5
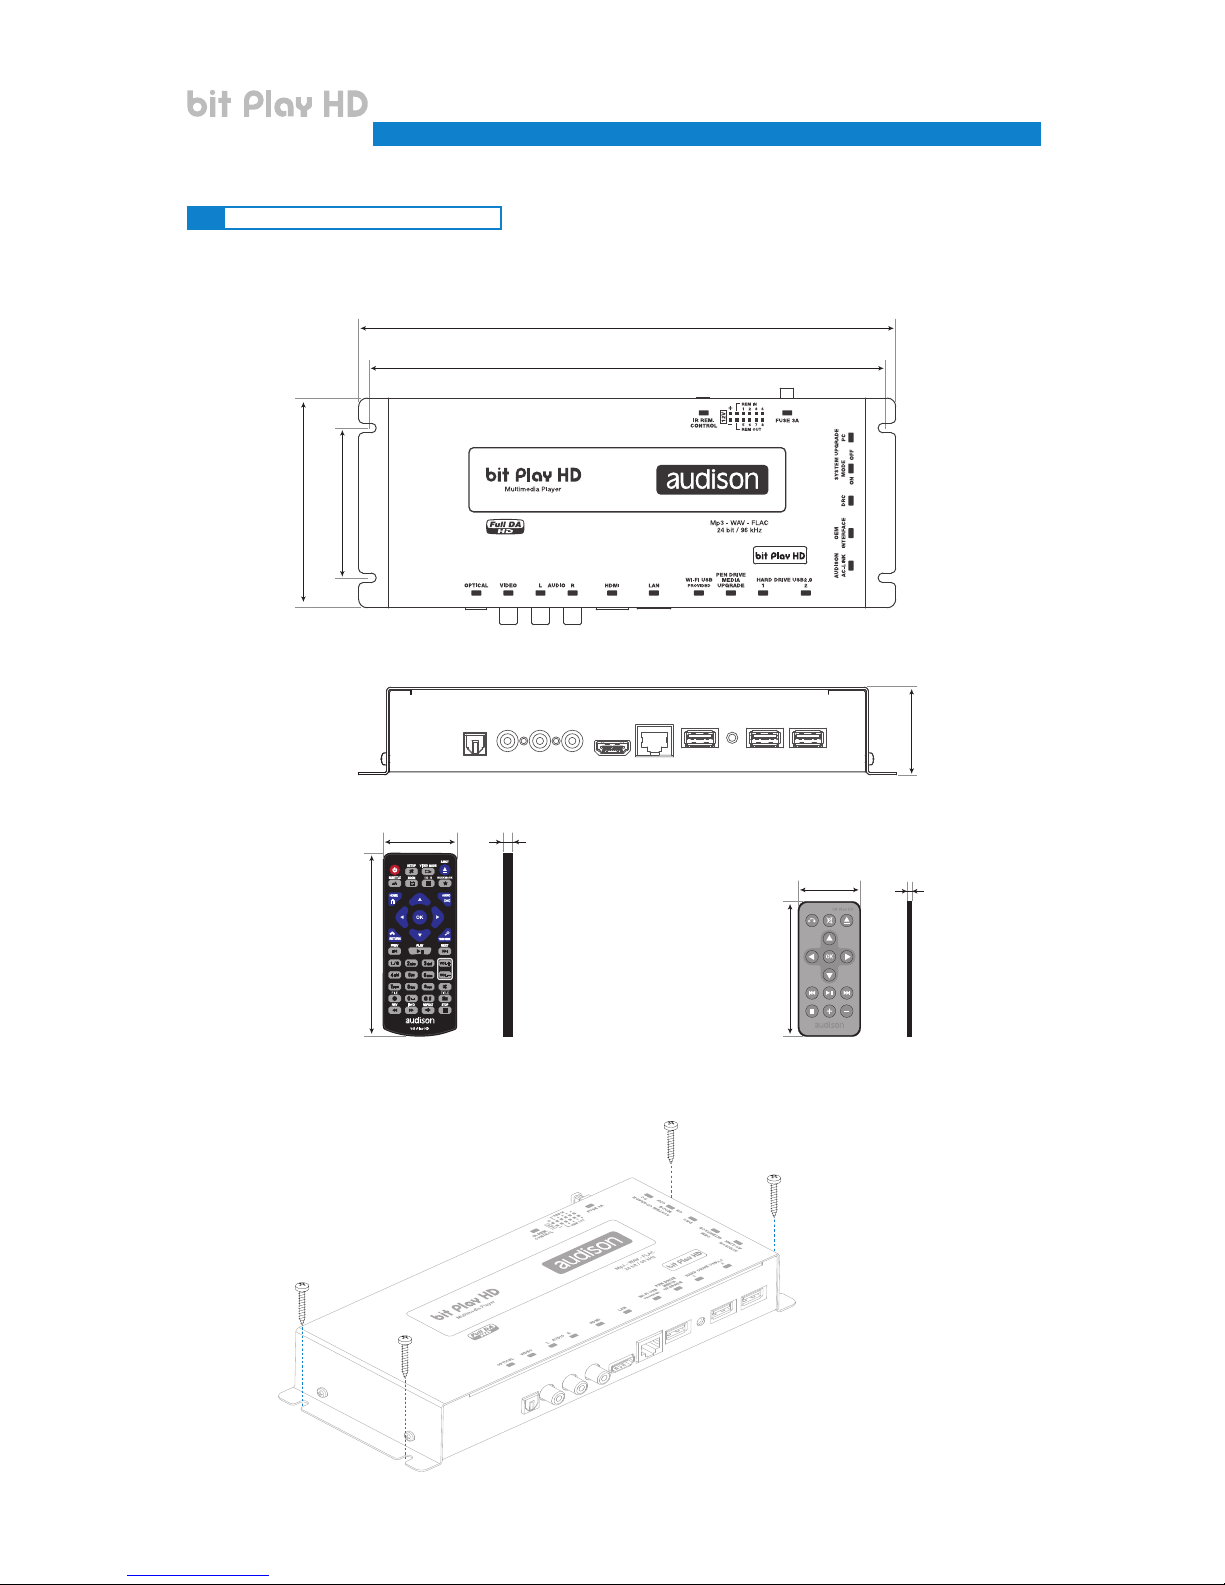
1.3 DIMENSIONS AND FASTENING
Fastening:
Dimensions:
249 mm (9.80 in.)
70 mm (2.76 in.)
98 mm (3.86 in.)
41 mm (1.61 in.)
239 mm (9.4 in.)
ARC Advanced Remote Control
USR User Remote Control
47 mm (1.85 in.)
40 mm (1.57 in.) 8 mm (0.31 in.)
85 mm (3.34 in.)
15 mm (0.59 in.)
115 mm (4.52 in.)
USER’S MANUAL
bit Play HD /
4,2 x 20 mm (0,16 x 0.78 in.)
1
Page 6
6
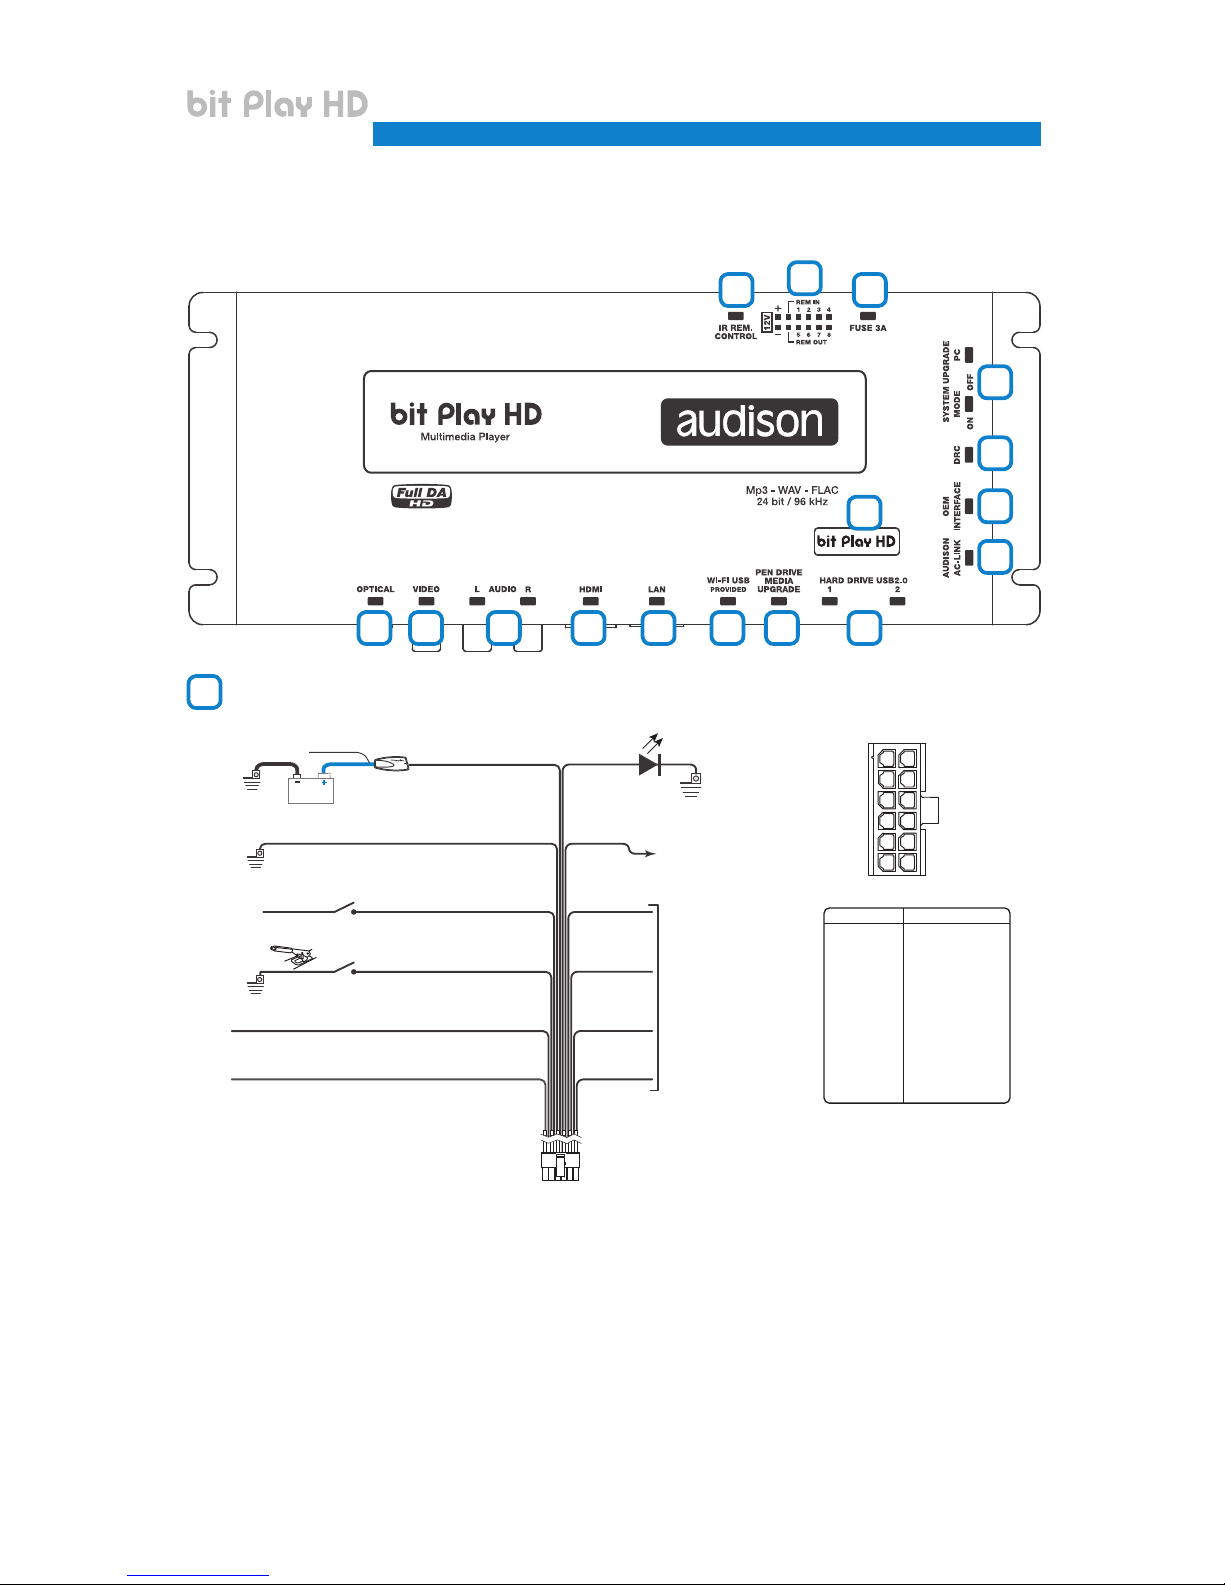
2. DESCRIPTION OF THE CONNECTION PANELS
The bit Play HD comes with a 12-pin multi-pin connector through which you can manage the power and different
control connections.
A +12 VOLT - RED: 12V positive connection terminal from the car power supply.
B -12 VOLT GROUND - BLACK: negative power connection terminal (GND).
C REMOTE IN - BLUE: input to turn on the bit Play HD through the audio signal source Remote Out
D BRAKE - GREEN: this terminal prevents viewing video contents while driving. Connect this terminal to the
parking brake on the power supply side, and the “1A MONITOR” terminal to the power or consent terminal
to enable the monitor used.
E 1A MONITOR - ORANGE: consent terminal to enable the external monitor. This terminal reaches +12V
when the vehicle parking brake is engaged. The 1A MONITOR terminal can be connected to the power
consent terminal of the external monitor or directly to the power supply (MAX. 1 A).
USER’S MANUAL
bit Play HD /
3
98764 5
1
1
2
15
12
10 11
16
13
14
A G
H
I
B
C
D
E
F
STATUS LED
Pink
Blue/White
LED
+12 Volt
Ground
REMOTE OUT
White
+ DSWC IN
White
- DSWC IN
Gray
+ DSWC OUT
Gray
Orange
Green
Blue
Black
Red
Brown
- DSWC OUT
REM IN
Amplifier
Steering
wheel
control
external
interface
FUSE HOLDER
Not provided.
Suggested fuse
3 A delayed
Ground
+ 12 V
Ground
Ground
BRAKE
REMOTE IN
GROUND
1 A Monitor
OPTICAL / AUX SEL
FRONT VIEW
Battery
Max 20 cm / 7.5 in.
COLOUR DESCRIPTION
1: red +12V
2: blue REM IN
3: green BRAKE
4: brown + OPTICAL/AUX SEL
5: white +D SWC IN
6: gray +D SWC OUT
7: black -12V
8: blue/white REM OUT
9: orange +1A MONITOR
10: pink + STATUS LED
11: white -D SWC IN
12: gray -D SWC OUT
+12V 1
REM IN 2
BRAKE 3
OPTICAL
AUX SEL 4
+ DSWC IN 5
+ DSWC OUT 6
7 - 12V
8 REM OUT
9 + 1A MONITOR
10 + STATUS LED
11 - DWSC IN
12 - DWSC OUT
2
Page 7
7
F OPTICAL/AUX SEL BROWN: this terminal can be used for AUX and OPTICAL IN on the products with
OPTICAL/SEL AUX SEL activation input.
G STATUS LED PINK: connect a LED (not supplied) as shown in the gure (optional). This LED duplicates
the one in the infrared receiver sensor (see section 2). If the LED flashes, the product is processing information
and is not ready, while if it starts normally the bit Play HD is ready for use.
H REMOTE OUT - BLUE/WHITE: output to remotely control other devices/ampliers connected to the bit Play HD.
After turning on, the device takes 2 seconds to output the REM OUT signal. This output has a current
capacity of 130 mA.
I STEERING WHEEL CONTROL: terminals for future use.
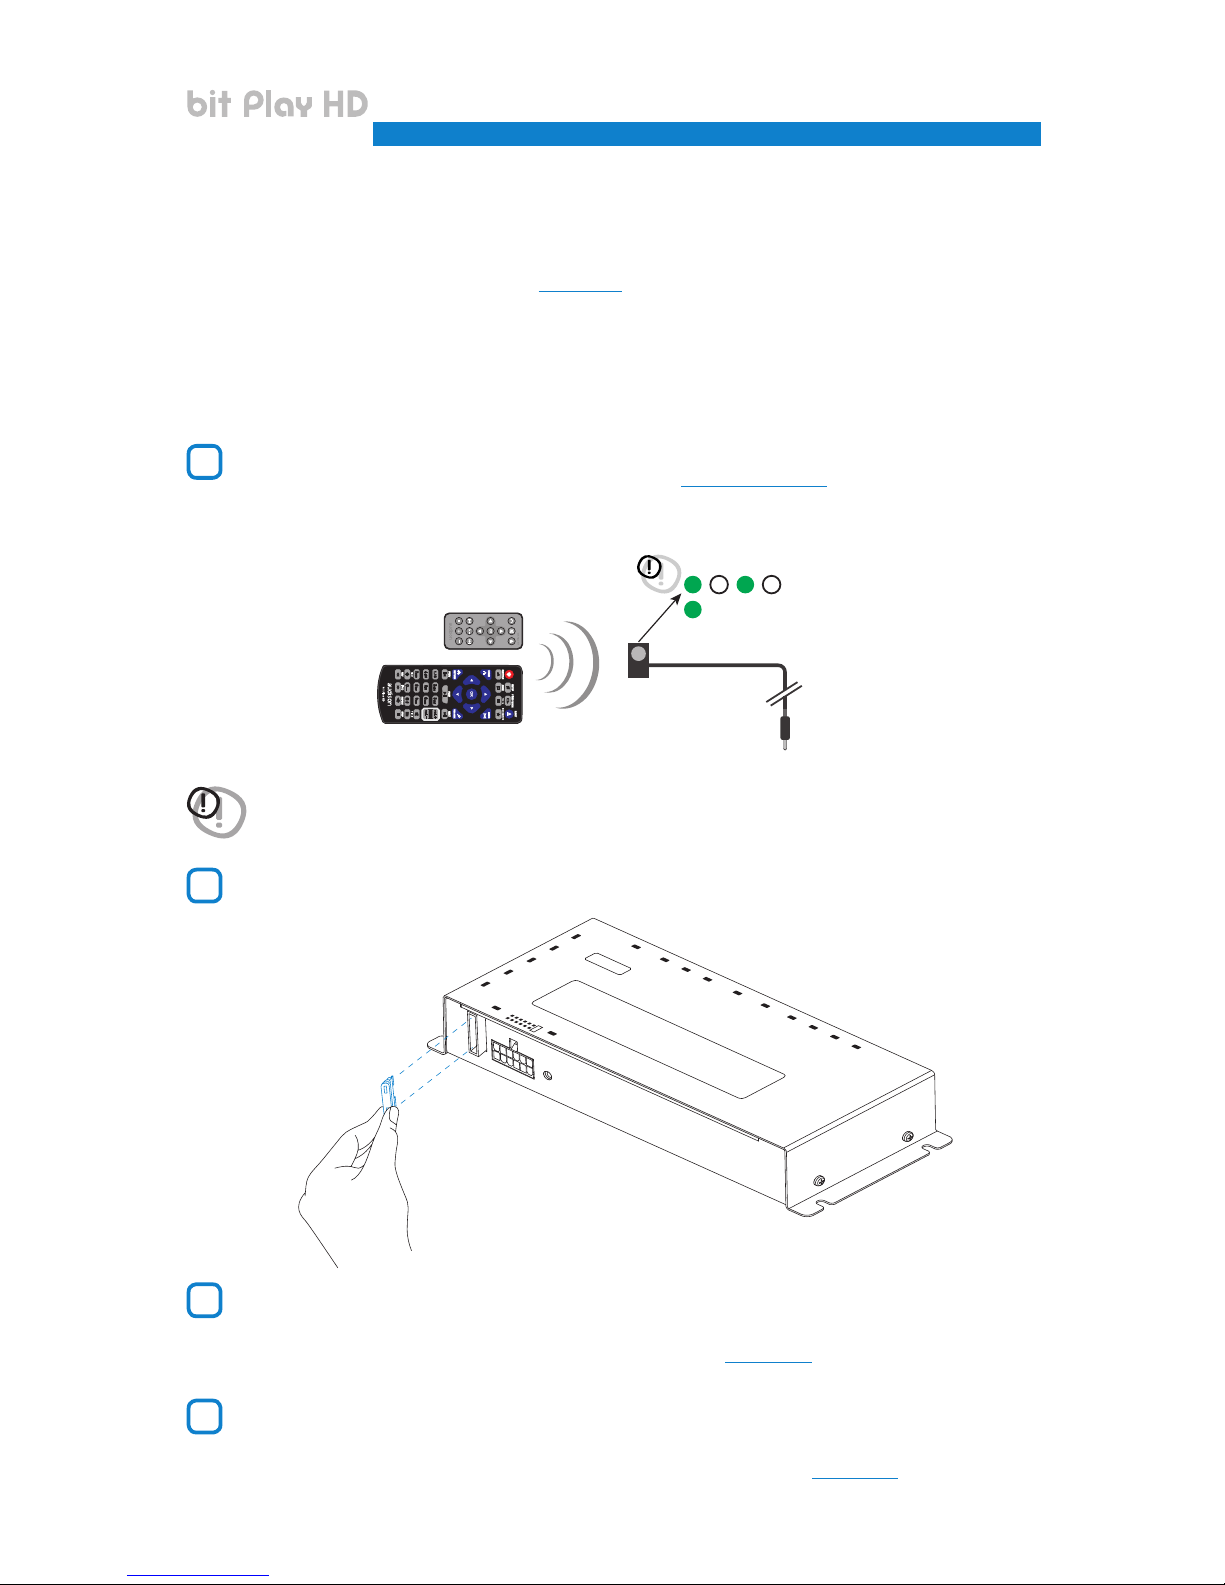
IR REM CONTROL: connector for the infrared receiver of the bit Play HD remote controls supplied with the
product. Point the remote at the sensor from within 2 meters (see sections 3.1 and 3.2). The sensor incorporates a
green status LED. If the LED flashes, the product is processing information and is not ready. If it starts
normally, the bit Play HD is ready for use.
FUSE: blade 3A protection fuse. If you need to replace the fuse, use only the same type and value of the original.
OPTICAL: connect a bre optic cable with a TOSLINK connector to a processor or Audison amplier with S/PDIF
optical input. In this way, you create a Full DA system capable of achieving a new quality benchmark that goes
well beyond the CD standard, since you can play FLAC encoded audio les up to 24 bit/96 kHz. This output is
subject to volume control via the remote or APP for mobile devices (see section 6.).
VIDEO: composite video output for an external monitor, 75-Ohm impedance. Connect an RCA male cable with
75-Ohm impedance to an external monitor. The external display is enabled by connecting the consent
terminal (active at +12V) to the power supply of the monitor (Max. Consumption 1A) or to the appropriate
monitor terminal. Default resolution set to 480P; to modify the video resolution see section 7.2.
INFRARED RECEIVER
STATUS LED
bit Play HD OPERATE
... WAIT
WARNING: if you choose to use the bit Play HD using the APP, the management via remote control may be disabled.
USER’S MANUAL
bit Play HD /
2
3
4
5
3A
2
Page 8
8
AUDIO L-R: stereo output. Analog connection for a processor or amplier. The output volume is controlled via
the remote (see sections 3.1 and 3.2) or Android App for mobile devices.
LAN: plug not enabled, used for future applications.
HDMI: HDMI video output for high denition external monitors. External display is enabled by connecting the
consent terminal (active at +12V) to the power supply of the monitor (Max. Consumption 1A) or to the
appropriate monitor terminal. To modify the video resolution see section 7.2
Wi-Fi USB: USB plug to connect the Wi-Fi DONGLE and interface with external mobile devices (see section 6).
PEN DRIVE MEDIA UPGRADE: button to enable bit Play HD rmware updates (see section 8.1).
HARD DRIVE USB 2.0: USB plugs to connect external data storage devices (Hard Disk, Pen Drive, DVD ROM ...).
Compatible storage device formats: FAT 32, NTFS, HFS+, EXT 3.
AUDISON AC-LINK: connection plug to control the volume of Audison processors with an AC LINK connection.
By connecting the AC LINK cable and the DRC to the bit Play HD, it is possible to build a system with
High Denition volume control (see section 4.2.3).
OEM INTERFACE: plug not enabled, used for future applications.
DRC: connection to remotely control the DRC volume (OPTIONAL) of the bit Play HD (see section 12).
SYSTEM UPGRADE: switch to enable bit Play HD rmware updates (see section 8.2).
WARNING: Audison assumes no responsibility for the loss of data from USB storage devices connected to the bit Play HD.
To prevent malfunction or damage, please observe the following:
- Do not disconnect USB devices while copying or executing a le.
- Carefully read the manual of the USB mass storage device used.
- Do not touch the USB terminals with your hands or metal objects.
- Do not strike the USB mass storage device.
- Do not modify or disassemble the USB mass storage device.
- Use only certied USB mass storage devices.
Avoid using and storing USB mass memories in the following places:
- In a car exposed to direct sunlight or high temperatures.
- In damp areas or near corrosive substances.
WARNING: for the USB memory device to work properly, the folders it includes must not contain more than 99 les.
Make sure the music tracks are divided into folders according to their extension (mp3, Wav, Flac), with special
attention to not include les that are not supported by the bit Play HD.
USER’S MANUAL
bit Play HD /
6
8
7
9
10
11
12
13
14
15
STATUS LOGO: the bit Play HD incorporates an internal control that manages the state of the product;
The BLUE logo indicates:
the bit Play HD is on.
The flashing RED logo indicates:
the “UPGRADE MODE” switch is “ON”; the product is ready for rmware updates.
The flashing BLUE logo indicates:
the “UPGRADE MODE” switch is “ON”; the product rmware is updating.
16
2
Page 9
9
3 REMOTE DESCRIPTION
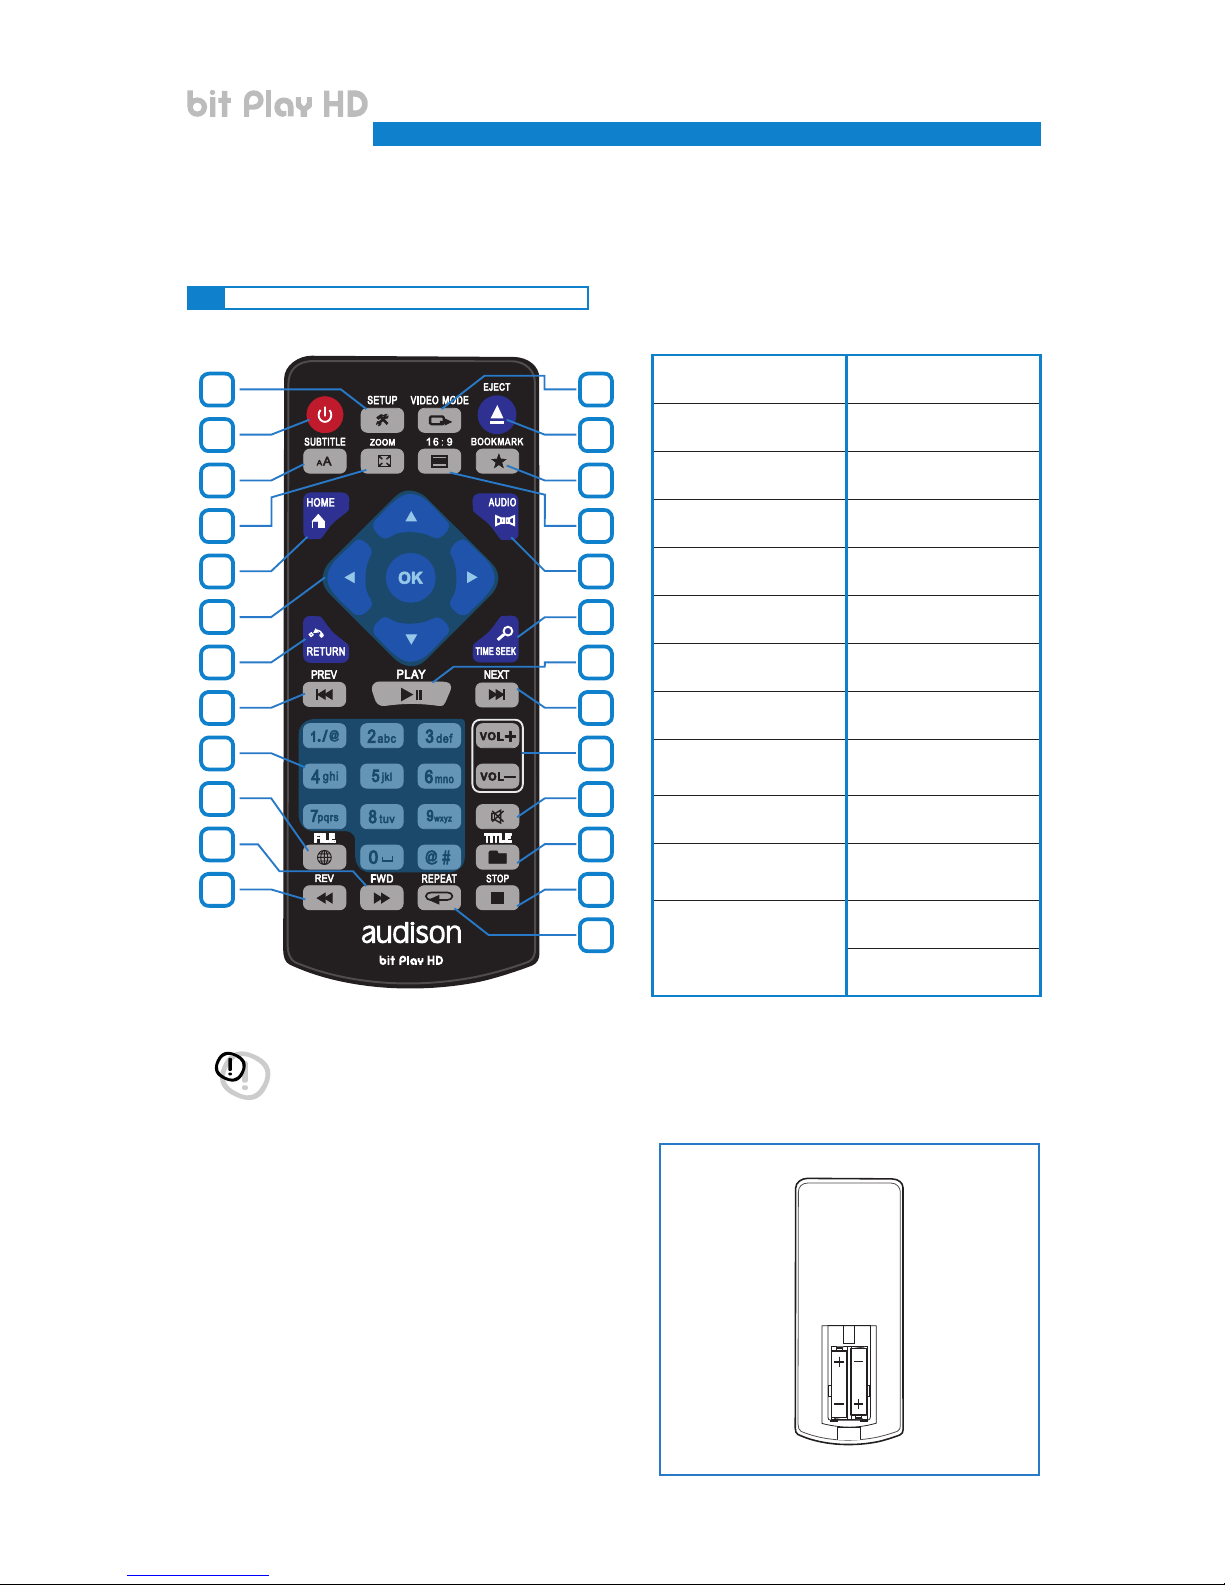
3.1 ARC (Advanced Remote Control) REMOTE
1. SETUP:
open the Settings Menu.
13. FWD: fast-forward Audio/
Video tracks.
2. POWER:
bit Play HD power on/off.
14. REV: rewind Audio/Video
tracks.
3. SUBTITLE:
select Video subtitle language.
15. VIDEO MODE: change the
video resolution.
4. ZOOM:
zoom in Video mode.
16. EJECT: extract DVD from
the external player if installed.
5. HOME:
go to the main menu.
17. 16:9:
select 16:9 video format.
6. CURSORS: navigate the bit
Play HD internal menus.
18. BOOKMARK:
bookmark function.
7. RETURN: return to the
previous menu.
19. AUDIO:
select Video audio language.
8. PREV: select previous
Audio/Video tracks.
20. TIME SEEK:
seek rendering time.
9. PLAY/PAUSE: audio/Video
track Play/Pause.
21. VOLUME:
VOL+ -> increase volume.
VOL- -> decrease volume.
10. NEXT:
select next Audio/Video track.
22. MUTE:
audio muting.
11. ALPHA NUMERIC
KEYBOARD: alpha numeric
interface keyboard.
23. TITLE: show the title of the
current le.
12. FILE: transfer le key. 24. STOP:
stop Audio/Video tracks.
25. REPEAT
repeat Audio/Video tracks.
NOTES ON USING THE REMOTE.
1. Point the remote at the bit Play HD control infrared sensor
which can receive input at 30° in all directions.
2. Remove the batteries if you will not be using the remote
for more than a month.
3. Do not store the remote in a place subject to direct sunlight
or near heat sources.
4. The remote batteries last 6 months under normal use. If the
remote does not work, replace the batteries.
5. Use only AAA 1.5 V batteries.
6. Do not recharge, disassemble, heat or expose the batteries
to heat.
7. Insert the batteries in the remote with the correct polarity
(+) and (-).
8. Keep the batteries and the remote control out of the reach
of children.
*
WARNING: AAA batteries not included in the package.
*
USER’S MANUAL
bit Play HD /
1
7
4
2
8
5
3
11
15
16
18
17
19
20
9
10
21
22
23
24
25
12
14
13
6
INSERT THE
BATTERIES.
Remove the back
cover. Insert the
AAA batteries with
the correct polarity
(+) and (-). Close
the cover.
REMOVE THE
BATTERIES.
Remove the back
cover. Remove
the batteries and
replace them if
necessary. Close
the cover.
3
Page 10
10
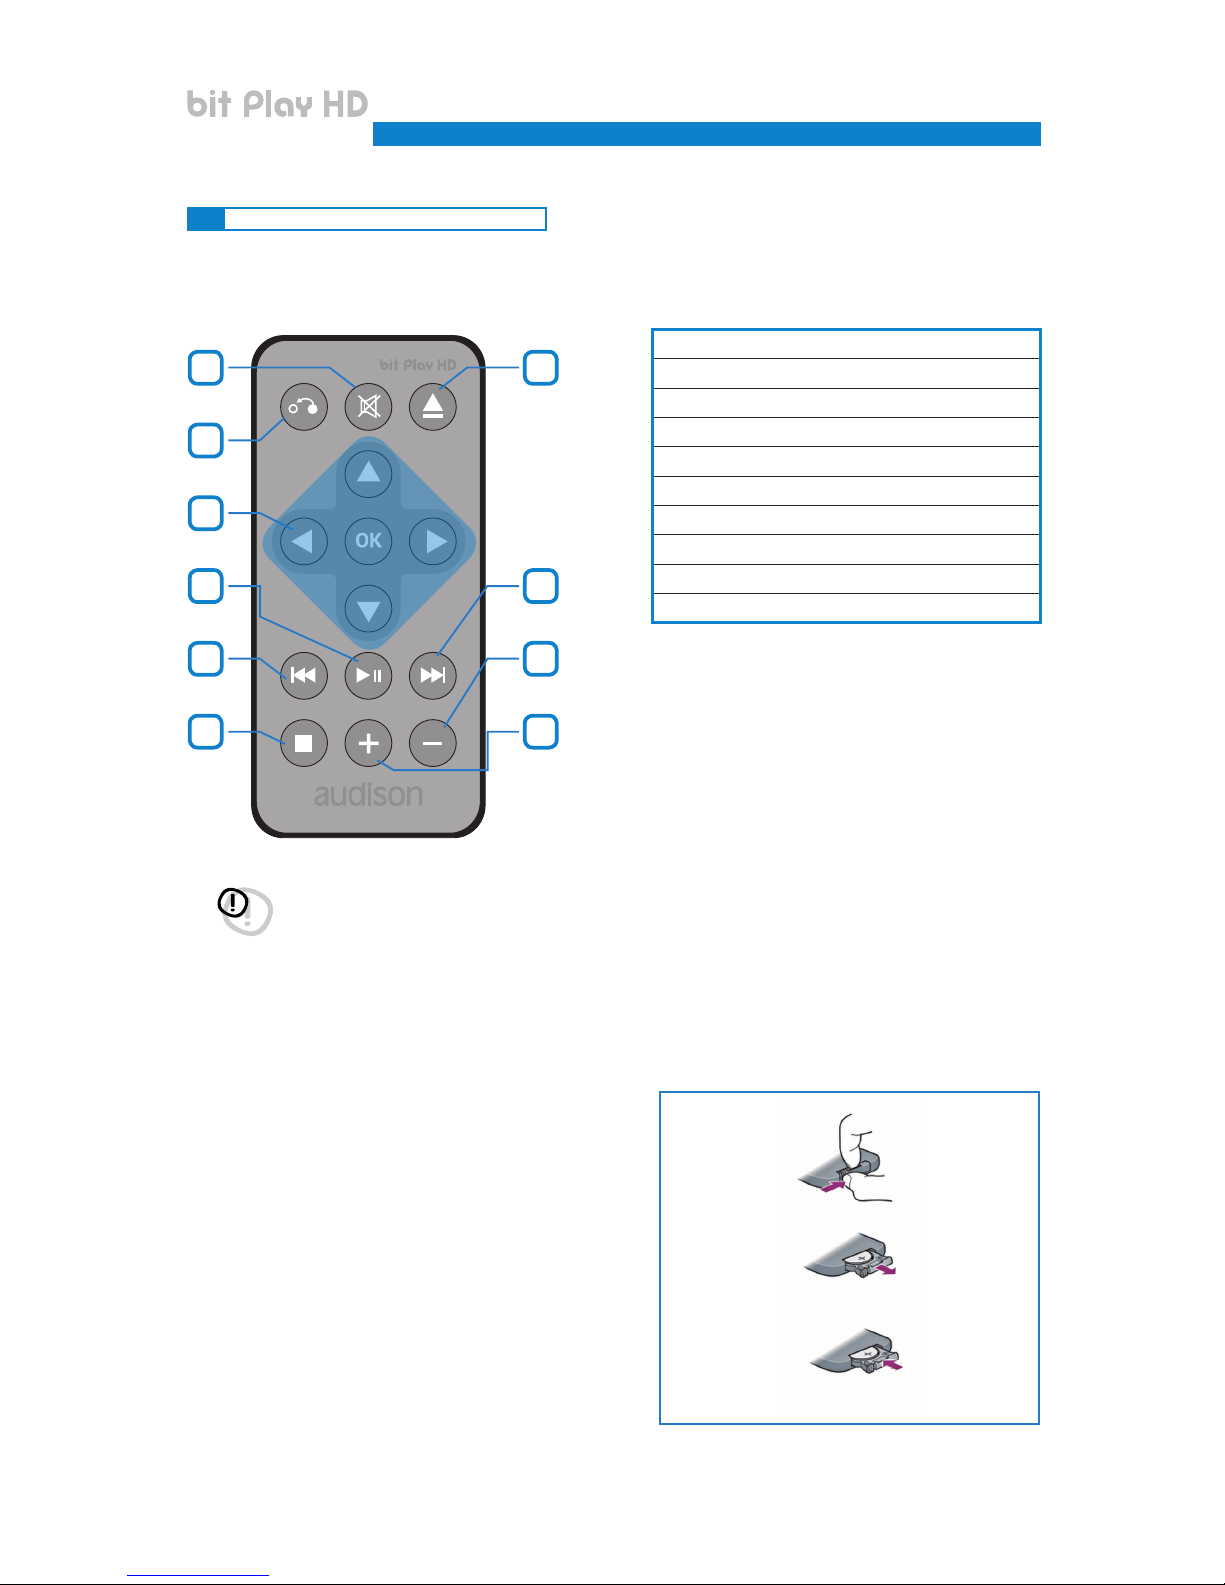
3.2 USR (User Remote Control) REMOTE
1. MUTE: enable / disable Audio muting.
2. RETURN: return to the previous menu.
3. CURSORS: cursors to navigate the menu.
4. PLAY/PAUSE: Audio/Video track Play/Pause.
5. PREV: select previous track.
6. NEXT: select next track.
7. STOP: stop Audio/Video tracks.
8. EJECT: extract DVD from the external player if installed.
9. VOLUME -: decrease audio volume.
10. VOLUME +: increase audio volume.
NOTES ON USING THE REMOTE.
1. Point the remote at the bit Play HD control infrared sensor
which can receive input at 30° in all directions.
2. Remove the battery if you will not be using the remote for
more than a month.
3. Do not store the remote in a place subject to direct sunlight
or near heat sources.
4. The remote battery last 6 months under normal use. If the
remote does not work, replace the battery.
5. Use only coin CR 2025 3 V batteries.
6. Do not recharge, disassemble, heat or expose the battery
to heat.
7. Insert the battery in the remote with the correct polarity
(+) and (-).
8. Keep the battery and the remote control out of the reach
of children.
INSERT THE
BATTERY.
Slide the back
cover downwards.
Insert the CR2025
3 V battery with the
correct polarity
(+) and (-).
Close the cover
REMOVE THE
BATTERY.
Slide the back
cover downwards.
Remove the
battery and
replace it if
necessary.
Close the cover.
*
1 8
4 6
2
5 9
3
106
*
WARNING: CR2025 battery not included in the package.
USER’S MANUAL
bit Play HD /
3
Page 11

11
3.3 DRC MP REMOTE CONTROL (Optional)
When the DRC MP is connected to an Audison bit Play HD
(see section 4.2.3)
, the DRC MP “Navi Command” function is
enabled. When activated, the player menu can be browsed with the use of the multi-function Joystick and the available
keys, like when using the remote control.
This menu enables the user to set the time for the player stand-by
mode, after the turn off signal has been sent to the “Remote-In”. By
default it is set to fteen minutes, but it can be set to 1 to 60 minutes or
disabled. This function ensures that the bit Play HD restart time drops
to zero in case of temporary lack of power supply (i.e. start&stop
vehicles or similar), pausing the tracks being reproduced and starting
them again when the ignition is on.
3.3.1 NAVI COMMAND
3.3.2 BIT PLAY HD SETTINGS
Press to go back to main Menu
Press to activate
NAVI COMMAND
menu
Available only with
bit Play HD connected
3 sec
3 sec
“bit Play HD” menu active
NEXT TRACK
PLAY; PAUSE
STOP
PREV TRACK
By enabling the Navi Command function through the DRC MP, it is
possible to interact with the bit Play HD connected to the system.
With this menu it is possible to operate in the same way as with the
remote control supplied with the bit Play HD, to access all the main
navigation menu features through the DRC MP joystick.
Menu
Left
Menu Down
ESC ENTER
Volume -
Menu
Right
Volume +
+
-
Menu UP
Press ESC to go back to main Menu
USER’S MANUAL
bit Play HD /
3
Page 12
12
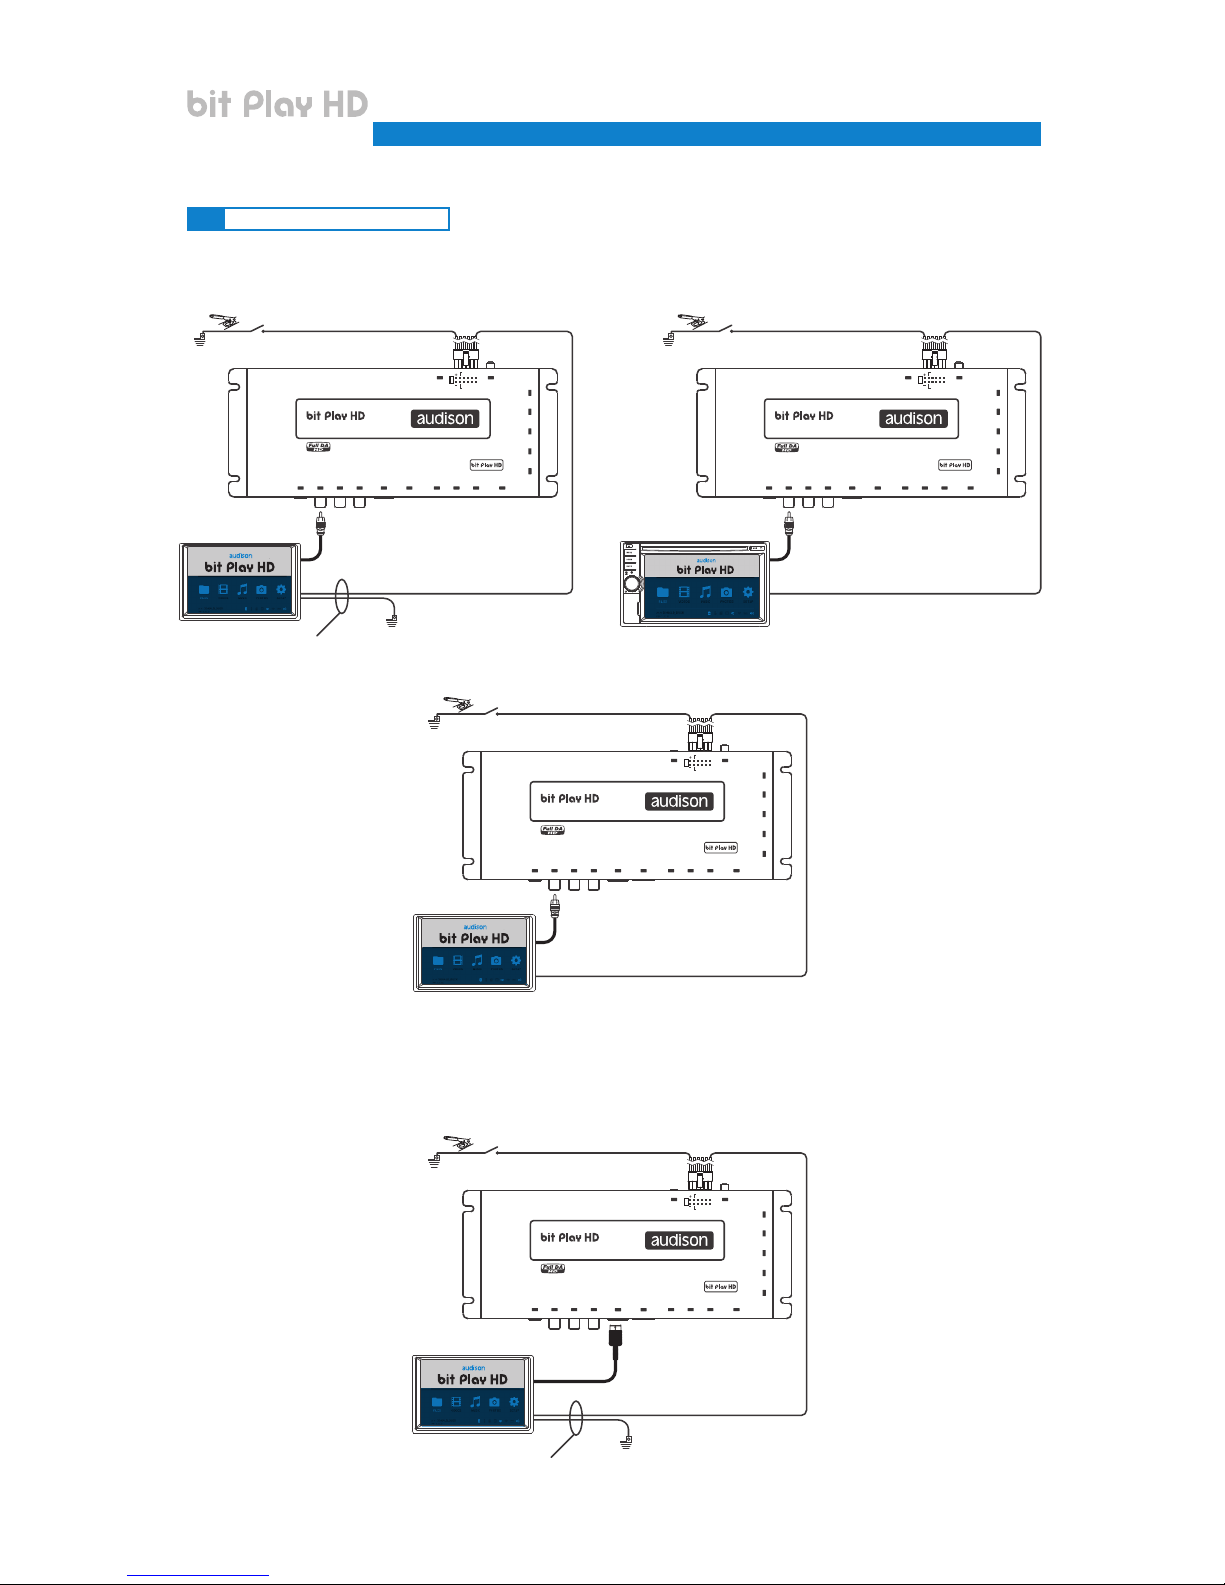
4. CONNECTIONS
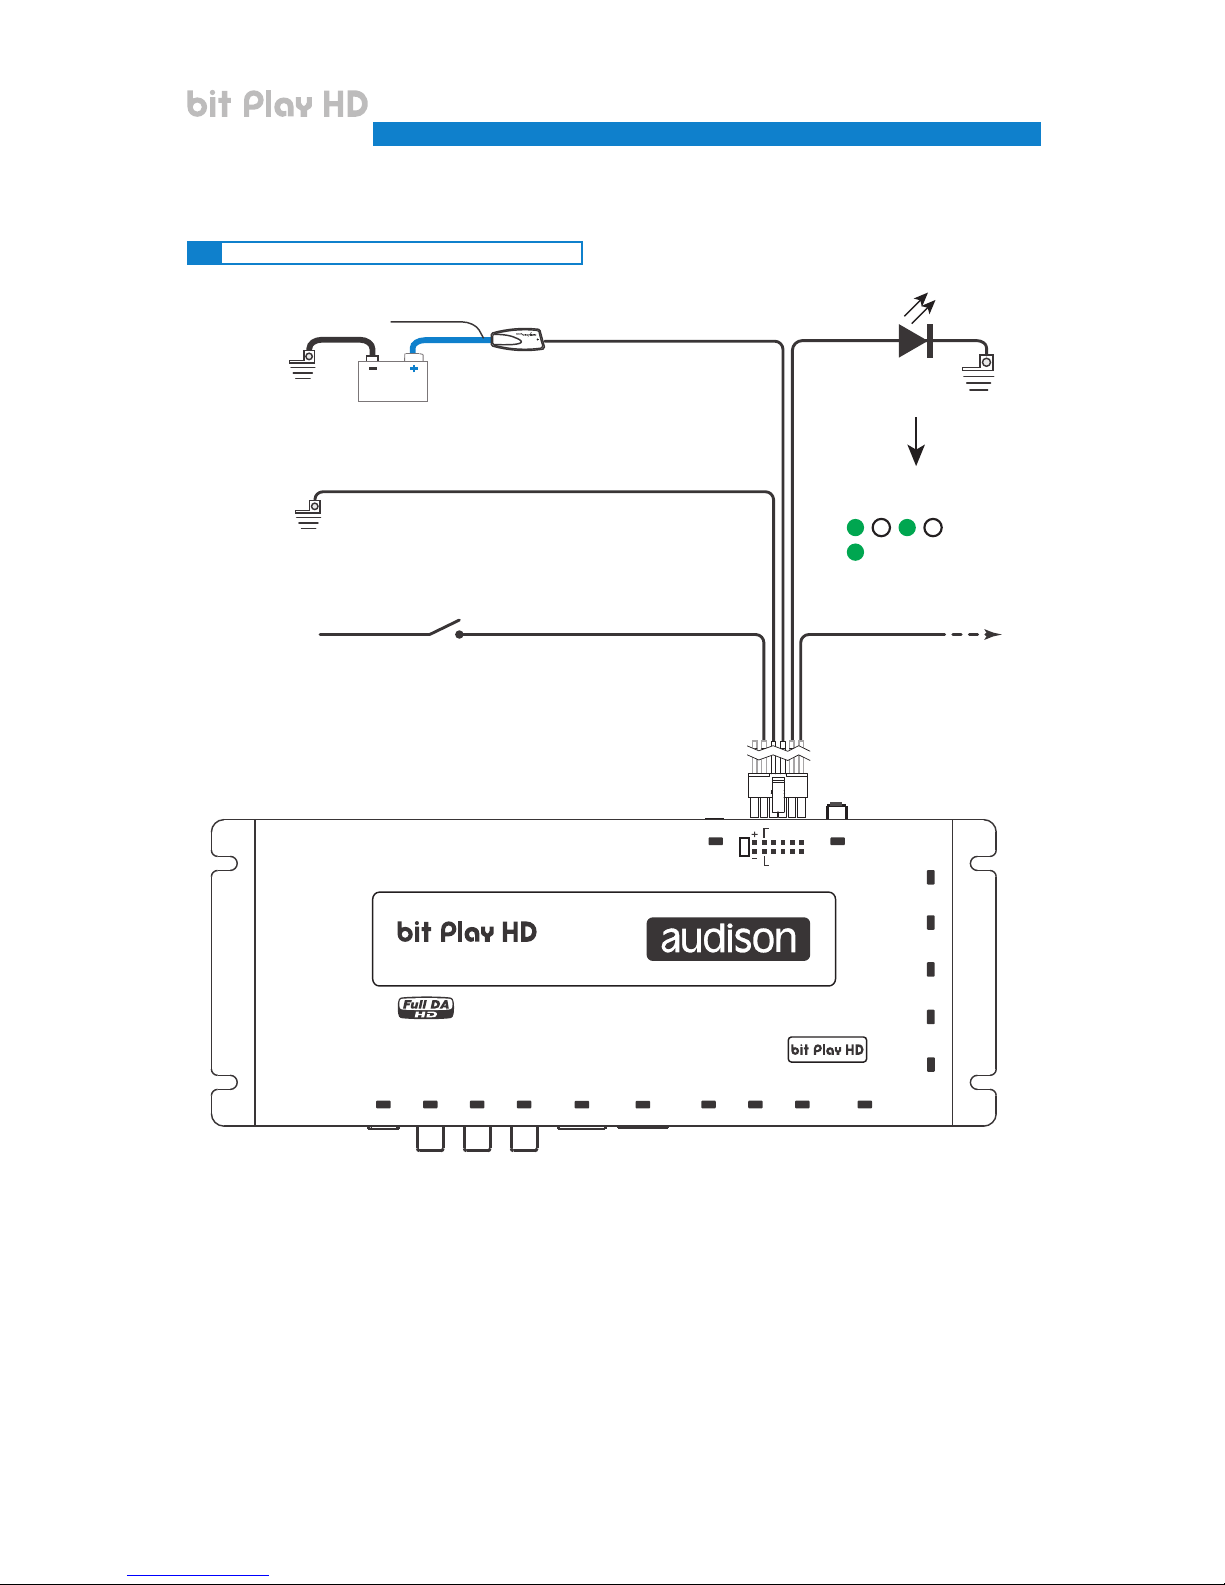
4.1 POWER SUPPLY AND REMOTE CONTROL
TURN THE bit Play HD ON AND OFF
The bit Play HD is on when the logo on the top cover turns blue. You can turn it on/off by connecting the Remote In
terminal to an external source or the car subkey terminal.
USER’S MANUAL
bit Play HD /
AUDISON
AC-LINK
OEM
INTERFACE
DRC
ON OFF
MODE
SYSTEM UPGRADE
PC
IR REM.
CONTROL
FUSE 3A
OPTICAL VIDEO
AUDIOL
R
HDMI
Mp3 - WAV - FLAC
24 bit / 96 kHz
Multimedia Player
LAN
WI-FI USB
PROVIDED
1
HARD DRIVE USB2.0
2
PEN DRIVE
MEDIA
UPGRADE
5 6 7 8
3
41 2
REM OUT
REM IN
12V
STATUS LED
Pink
(optional)
LED
+12 Volt
Ground
Blue
Black
Red
FUSE HOLDER
Not provided.
Suggested fuse
3 A delayed
Ground
+ 12 V
Ground
REMOTE IN
GROUND
Battery
Max 20 cm / 7.5 in.
Blue/White
to other
device
REMOTE OUT
LED STATUS
bit Play HD OPERATING
... WAIT
4
Page 13
13
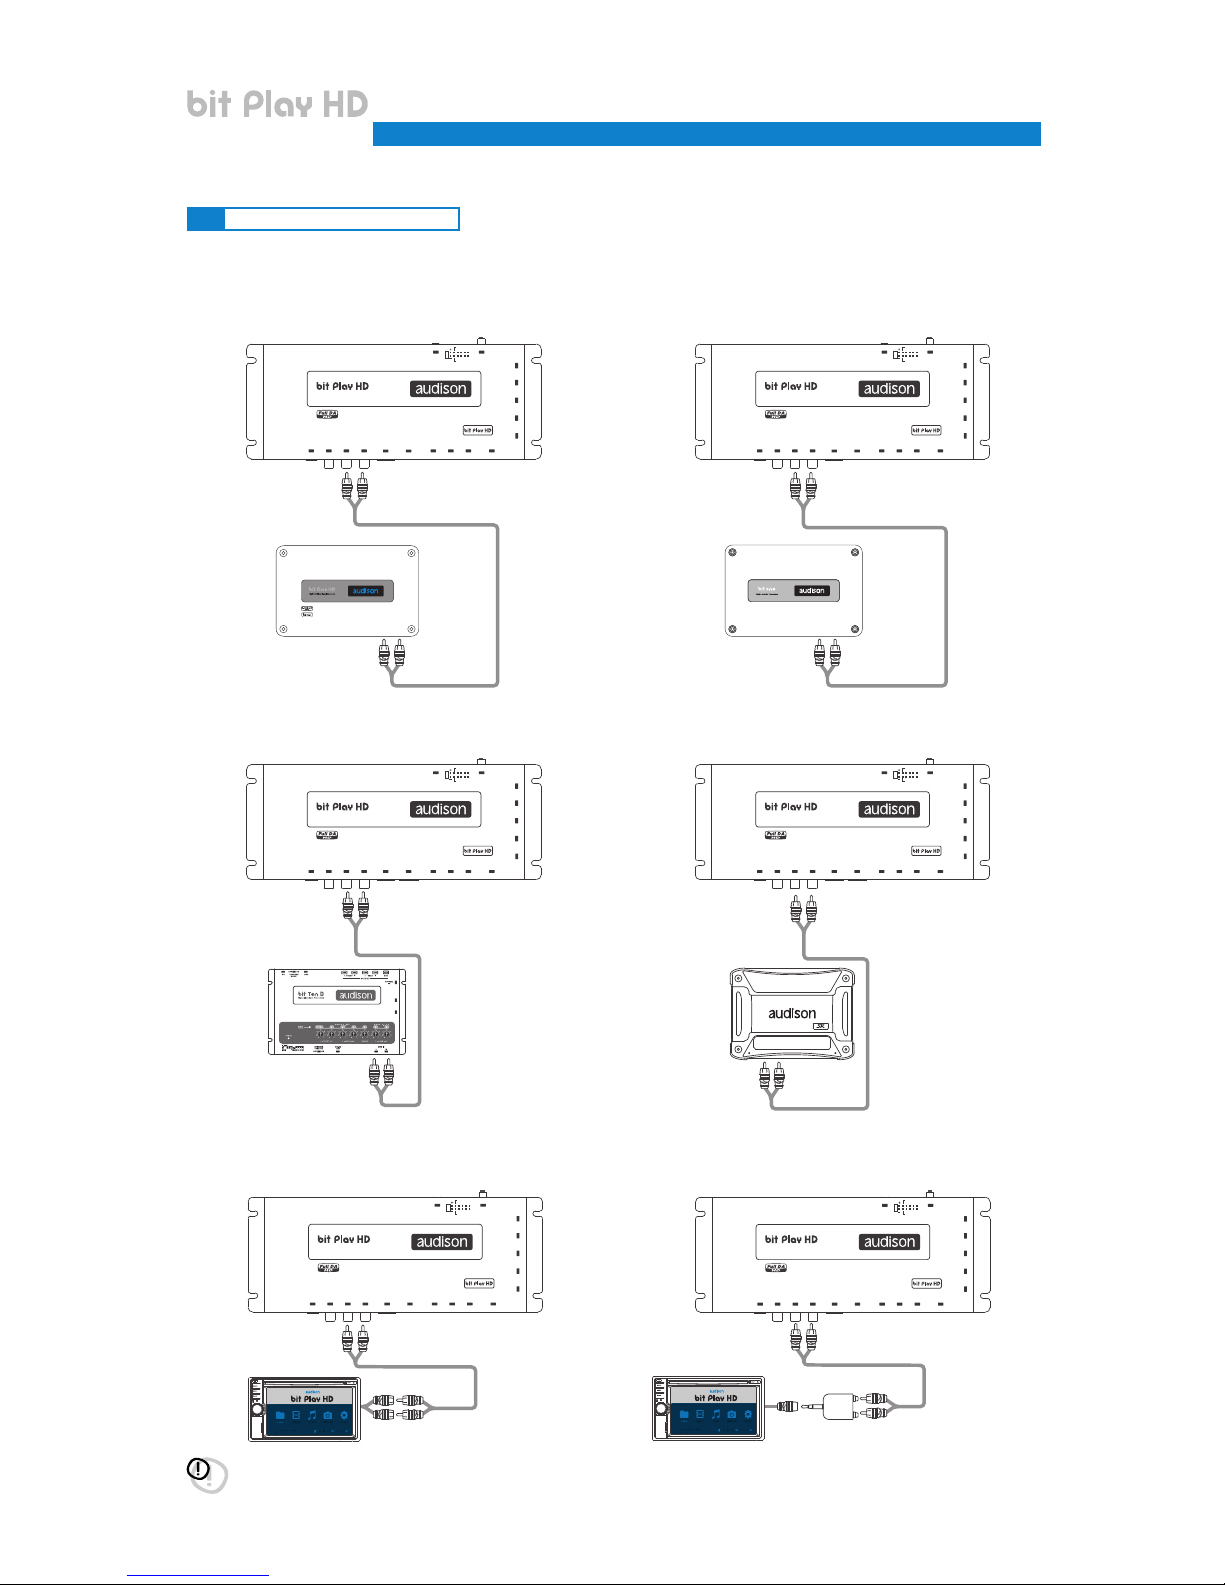
4.2 AUDIO OUTPUT SIGNALS
4.2.1 ANALOG OUTPUT SIGNALS
*
AUX 1/2
AUX
AUDISON
AC-LINK
OEM
INTERFACE
DRC
ON OFF
MODE
SYSTEM UPGRADE
PC
IR REM.
CONTROL
FUSE 3A
OPTICAL VIDEO
AUDIOL
R
HDMI
Mp3 - WAV - FLAC
24 bit / 96 kHz
Multimedia Player
LAN
WI-FI USB
PROVIDED
1
HARD DRIVE USB2.0
2
PEN DRIVE
MEDIA
UPGRADE
5 6 7 8
3
41 2
REM OUT
REM IN
12V
AUDISON
AC-LINK
OEM
INTERFACE
DRC
ON OFF
MODE
SYSTEM UPGRADE
PC
IR REM.
CONTROL
FUSE 3A
OPTICAL VIDEO
AUDIOL
R
HDMI
Mp3 - WAV - FLAC
24 bit / 96 kHz
Multimedia Player
LAN
WI-FI USB
PROVIDED
1
HARD DRIVE USB2.0
2
PEN DRIVE
MEDIA
UPGRADE
5 6 7 8
3
41 2
REM OUT
REM IN
12V
PHONE
REM
IN
REM
OUT
12V
KEY
SW
INPUTS
MUTE IN
FLFR RRRL
AD Link
AC Link
AUDISON
AC-LINK
OEM
INTERFACE
DRC
ON OFF
MODE
SYSTEM UPGRADE
PC
IR REM.
CONTROL
FUSE 3A
OPTICAL VIDEO
AUDIOL
R
HDMI
Mp3 - WAV - FLAC
24 bit / 96 kHz
Multimedia Player
LAN
WI-FI USB
PROVIDED
1
HARD DRIVE USB2.0
2
PEN DRIVE
MEDIA
UPGRADE
5 6 7 8
3
41 2
REM OUT
REM IN
12V
AUDISON
AC-LINK
OEM
INTERFACE
DRC
ON OFF
MODE
SYSTEM UPGRADE
PC
IR REM.
CONTROL
FUSE 3A
OPTICAL VIDEO
AUDIOL
R
HDMI
Mp3 - WAV - FLAC
24 bit / 96 kHz
Multimedia Player
LAN
WI-FI USB
PROVIDED
1
HARD DRIVE USB2.0
2
PEN DRIVE
MEDIA
UPGRADE
5 6 7 8
3
41 2
REM OUT
REM IN
12V
SD
AUDISON
AC-LINK
OEM
INTERFACE
DRC
ON OFF
MODE
SYSTEM UPGRADE
PC
IR REM.
CONTROL
FUSE 3A
OPTICAL VIDEO
AUDIOL
R
HDMI
Mp3 - WAV - FLAC
24 bit / 96 kHz
Multimedia Player
LAN
WI-FI USB
PROVIDED
1
HARD DRIVE USB2.0
2
PEN DRIVE
MEDIA
UPGRADE
5 6 7 8
3
41 2
REM OUT
REM IN
12V
SD
PRE IN
AUDISON
AC-LINK
OEM
INTERFACE
DRC
ON OFF
MODE
SYSTEM UPGRADE
PC
IR REM.
CONTROL
FUSE 3A
OPTICAL VIDEO
AUDIOL
R
HDMI
Mp3 - WAV - FLAC
24 bit / 96 kHz
Multimedia Player
LAN
WI-FI USB
PROVIDED
1
HARD DRIVE USB2.0
2
PEN DRIVE
MEDIA
UPGRADE
5 6 7 8
3
41 2
REM OUT
REM IN
12V
ANALOG OUTPUT TO
bit One HD AUX INPUTS
ANALOG OUTPUT TO
bit One AUX INPUTS
ANALOG OUTPUT TO
bit Ten AUX INPUTS
ANALOG OUTPUT TO
PRE-AMPLIFIER INPUTS
ANALOG OUTPUT TO
HEAD UNIT RCA AUX INPUT
ANALOG OUTPUT TO
HEAD UNIT RCA AUX INPUT
STEREO
ANALOG OUTPUT
STEREO
ANALOG OUTPUT
STEREO
ANALOG OUTPUT
STEREO
ANALOG OUTPUT
STEREO
ANALOG OUTPUT
STEREO
ANALOG OUTPUT
RCA JACK
ADAPTER
JACK 3.5
AUX INPUT
RCA
AUX INPUT
HEAD UNIT HEAD UNIT
NOT PROVIDED
NOT PROVIDED
L
L
L
L
L
L
L
R
LL
L
L
L
L
R
R
R
R
R
R
RR
R
R
R
R
*
WARNING: volume is controlled by the bit Play HD
USER’S MANUAL
bit Play HD /
4
Page 14
14
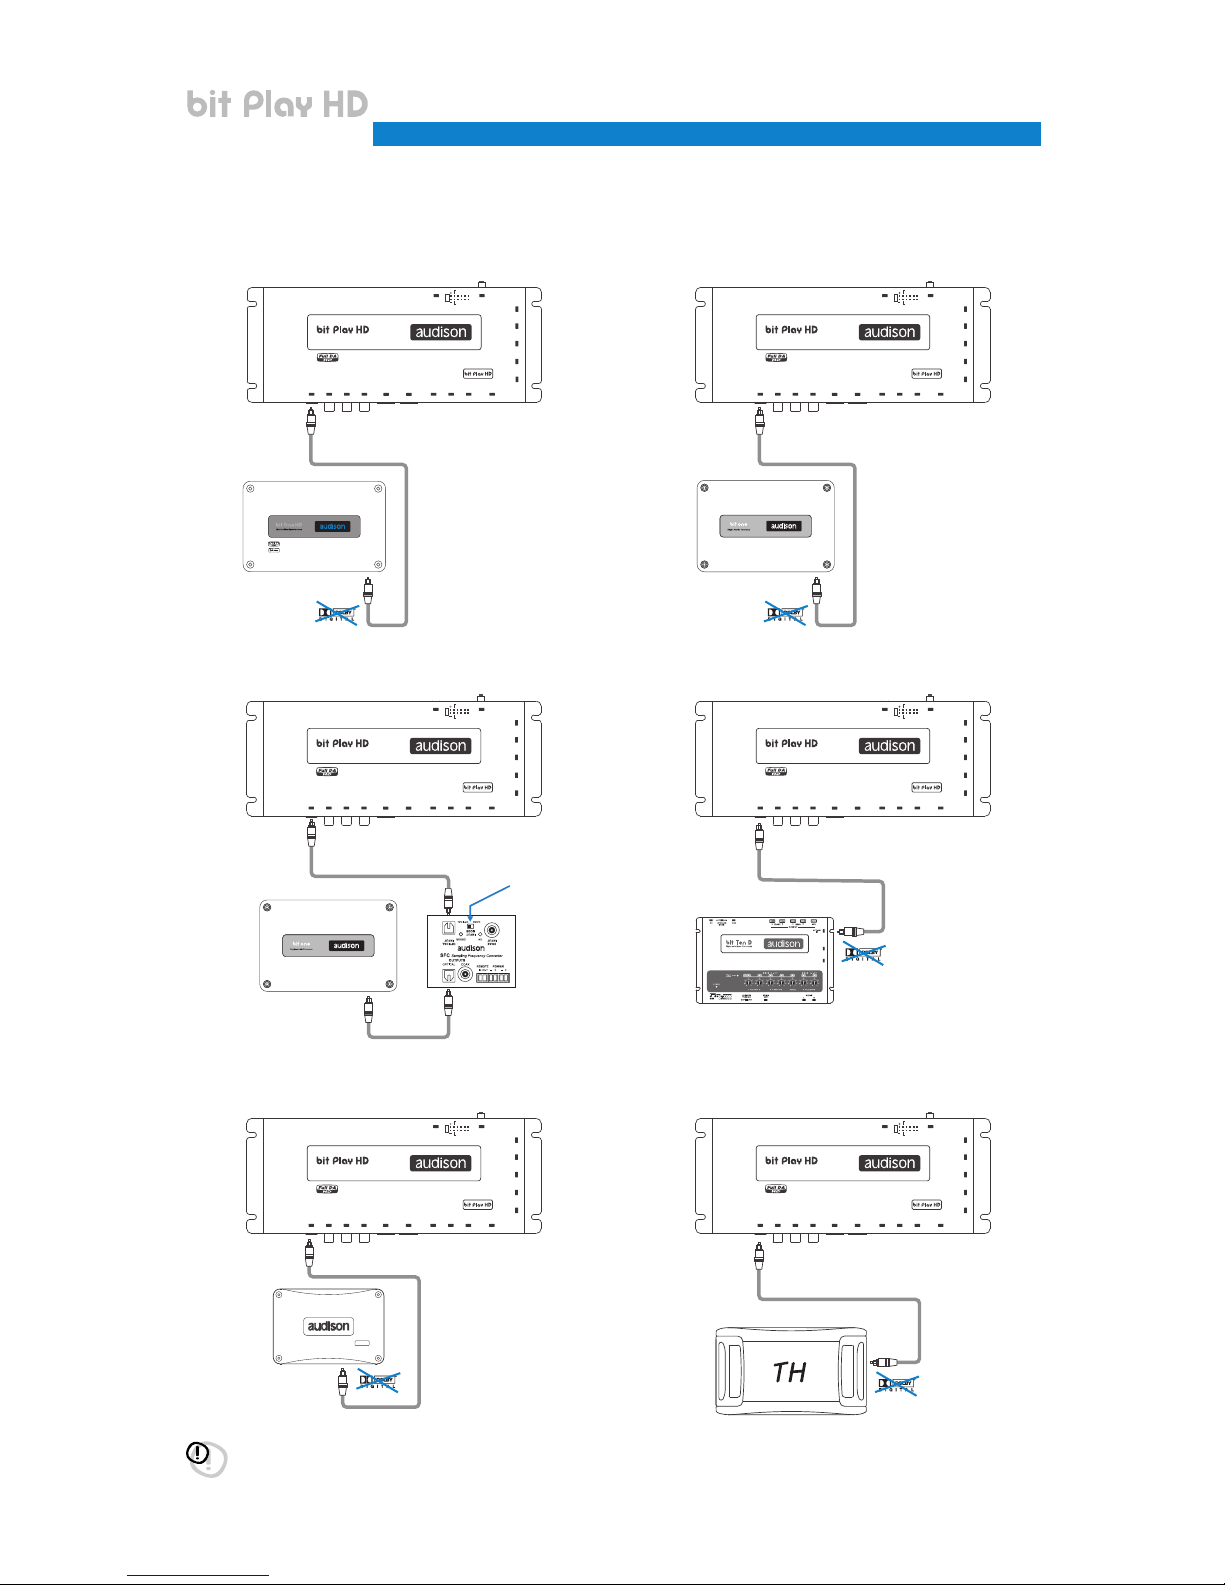
4.2.2 S/PDIF DIGITAL OUTPUT SIGNALS
*
AUDISON
AC-LINK
OEM
INTERFACE
DRC
ON OFF
MODE
SYSTEM UPGRADE
PC
IR REM.
CONTROL
FUSE 3A
OPTICAL VIDEO
AUDIOL
R
HDMI
Mp3 - WAV - FLAC
24 bit / 96 kHz
Multimedia Player
LAN
WI-FI USB
PROVIDED
1
HARD DRIVE USB2.0
2
PEN DRIVE
MEDIA
UPGRADE
5 6 7 8
3
41 2
REM OUT
REM IN
12V
TOSLINK
Connector
TOSLINK
Connector
Optical fiber
set optical INPUT
AUDISON
AC-LINK
OEM
INTERFACE
DRC
ON OFF
MODE
SYSTEM UPGRADE
PC
IR REM.
CONTROL
FUSE 3A
OPTICAL VIDEO
AUDIOL
R
HDMI
Mp3 - WAV - FLAC
24 bit / 96 kHz
Multimedia Player
LAN
WI-FI USB
PROVIDED
1
HARD DRIVE USB2.0
2
PEN DRIVE
MEDIA
UPGRADE
5 6 7 8
3
41 2
REM OUT
REM IN
12V
TOSLINK
Connector
TOSLINK
Connector
Optical fiber
PHONE
REM
IN
REM
OUT
12V
KEY
SW
INPUTS
MUTE IN
FLFR RRRL
AD Link
AC Link
OPTICAL OUT: bit One HD OPTICAL
INPUT, MAX 48KHz / 24 bit
OPTICAL OUT: bit One OPTICAL
INPUT, MAX 48KHz / 24 bit
MAX 48k Hz /24 bit MAX 48k Hz /24 bit
MAX 96k Hz /24 bit
OPTICAL OUT: AP bit Prima OPTICAL
INPUT, MAX 96KHz / 24 bit
OPTICAL OUT: bit One + SFC
OPTICAL INPUT, MAX 96KHz / 24 bit
OPTICAL OUT: bit Ten D OPTICAL
INPUT, MAX 96KHz / 24 bit
OPTICAL OUT: TH AMPLIFIERS
OPTICAL INPUT, MAX 96KHz / 24 bit
MAX 96k Hz /24 bit
MAX 96k Hz /24 bit
MAX 96k Hz /24 bit
*
WARNING: volume is controlled by the bit Play HD
USER’S MANUAL
bit Play HD /
4
Page 15

15
4.2.3 S/PDIF DIGITAL OUTPUT SIGNALS WITH HI-DEFINITION VOLUME CONTROL
OPTICAL OUT: bit One HD OPTICAL
INPUT, MAX 48KHz / 24 bit
OPTICAL OUT: bit One OPTICAL
INPUT, MAX 48KHz / 24 bit
OPTICAL OUT: AP bit Prima OPTICAL
INPUT, MAX 96KHz / 24 bit
OPTICAL OUT: bit One + SFC OPTICAL
INPUT, MAX 96KHz / 24 bit
OPTICAL OUT: bit Ten D OPTICAL
INPUT, MAX 96KHz / 24 bit
OPTICAL OUT: TH AMPLIFIERS OPTICAL
INPUT, MAX 96KHz / 24 bit
MAX 48k Hz/24 bit
AC LINK cable
AC LINK cable
AC LINK cable
AC LINK cable
AC LINK cable
MAX 96k Hz/24 bit
MAX 96k Hz/24 bit
MAX 96k Hz/24 bit
MAX 96k Hz/24 bit
DRC
MAX 96k Hz/24 bit
*
* *
*
*
DRC
*
DRC
*
DRC
*
DRC
*
DRC
*
AUDISON
AC-LINK
OEM
INTERFACE
DRC
ON OFF
MODE
SYSTEM UPGRADE
PC
IR REM.
CONTROL
FUSE 3A
OPTICAL VIDEO
AUDIOL
R
HDMI
Mp3 - WAV - FLAC
24 bit / 96 kHz
Multimedia Player
LAN
WI-FI USB
PROVIDED
1
HARD DRIVE USB2.0
2
PEN DRIVE
MEDIA
UPGRADE
5 6 7 8
3
41 2
REM OUT
REM IN
12V
AUDISON
AC-LINK
OEM
INTERFACE
DRC
ON OFF
MODE
SYSTEM UPGRADE
PC
IR REM.
CONTROL
FUSE 3A
OPTICAL VIDEO
AUDIOL
R
HDMI
Mp3 - WAV - FLAC
24 bit / 96 kHz
Multimedia Player
LAN
WI-FI USB
PROVIDED
1
HARD DRIVE USB2.0
2
PEN DRIVE
MEDIA
UPGRADE
5 6 7 8
3
41 2
REM OUT
REM IN
12V
AUDISON
AC-LINK
OEM
INTERFACE
DRC
ON OFF
MODE
SYSTEM UPGRADE
PC
IR REM.
CONTROL
FUSE 3A
OPTICAL VIDEO
AUDIOL
R
HDMI
Mp3 - WAV - FLAC
24 bit / 96 kHz
Multimedia Player
LAN
WI-FI USB
PROVIDED
1
HARD DRIVE USB2.0
2
PEN DRIVE
MEDIA
UPGRADE
5 6 7 8
3
41 2
REM OUT
REM IN
12V
AUDISON
AC-LINK
OEM
INTERFACE
DRC
ON OFF
MODE
SYSTEM UPGRADE
PC
IR REM.
CONTROL
FUSE 3A
OPTICAL VIDEO
AUDIOL
R
HDMI
Mp3 - WAV - FLAC
24 bit / 96 kHz
Multimedia Player
LAN
WI-FI USB
PROVIDED
1
HARD DRIVE USB2.0
2
PEN DRIVE
MEDIA
UPGRADE
5 6 7 8
3
41 2
REM OUT
REM IN
12V
TOSLINK
Connector
TOSLINK
Connector
Optical fiber
TOSLINK
Connector
TOSLINK
Connector
Optical fiber
PHONE
REM
IN
REM
OUT
12V
KEY
SW
INPUTS
MUTE IN
FLFRRRRL
AD Link
AC Link
TOSLINK
Connector
TOSLINK
Connector
Optical fiber
TOSLINK
Connector
TOSLINK
Connector
Optical fiber
set optical INPUT
AUDISON
AC-LINK
OEM
INTERFACE
DRC
ON OFF
MODE
SYSTEM UPGRADE
PC
IR REM.
CONTROL
FUSE 3A
OPTICAL VIDEO
AUDIOL
R
HDMI
Mp3 - WAV - FLAC
24 bit / 96 kHz
Multimedia Player
LAN
WI-FI USB
PROVIDED
1
HARD DRIVE USB2.0
2
PEN DRIVE
MEDIA
UPGRADE
5 6 7 8
3
41 2
REM OUT
REM IN
12V
TOSLINK
Connector
TOSLINK
Connector
Optical fiber
AUDISON
AC-LINK
OEM
INTERFACE
DRC
ON OFF
MODE
SYSTEM UPGRADE
PC
IR REM.
CONTROL
FUSE 3A
OPTICAL VIDEO
AUDIOL
R
HDMI
Mp3 - WAV - FLAC
24 bit / 96 kHz
Multimedia Player
LAN
WI-FI USB
PROVIDED
1
HARD DRIVE USB2.0
2
PEN DRIVE
MEDIA
UPGRADE
5 6 7 8
3
41 2
REM OUT
REM IN
12V
TOSLINK
Connector
TOSLINK
Connector
Optical fiber
* Set to MAX the bit play HD Volume
*
WARNING: connect the AC-LINK cable to the DRC input.
USER’S MANUAL
bit Play HD /
4
Page 16

16
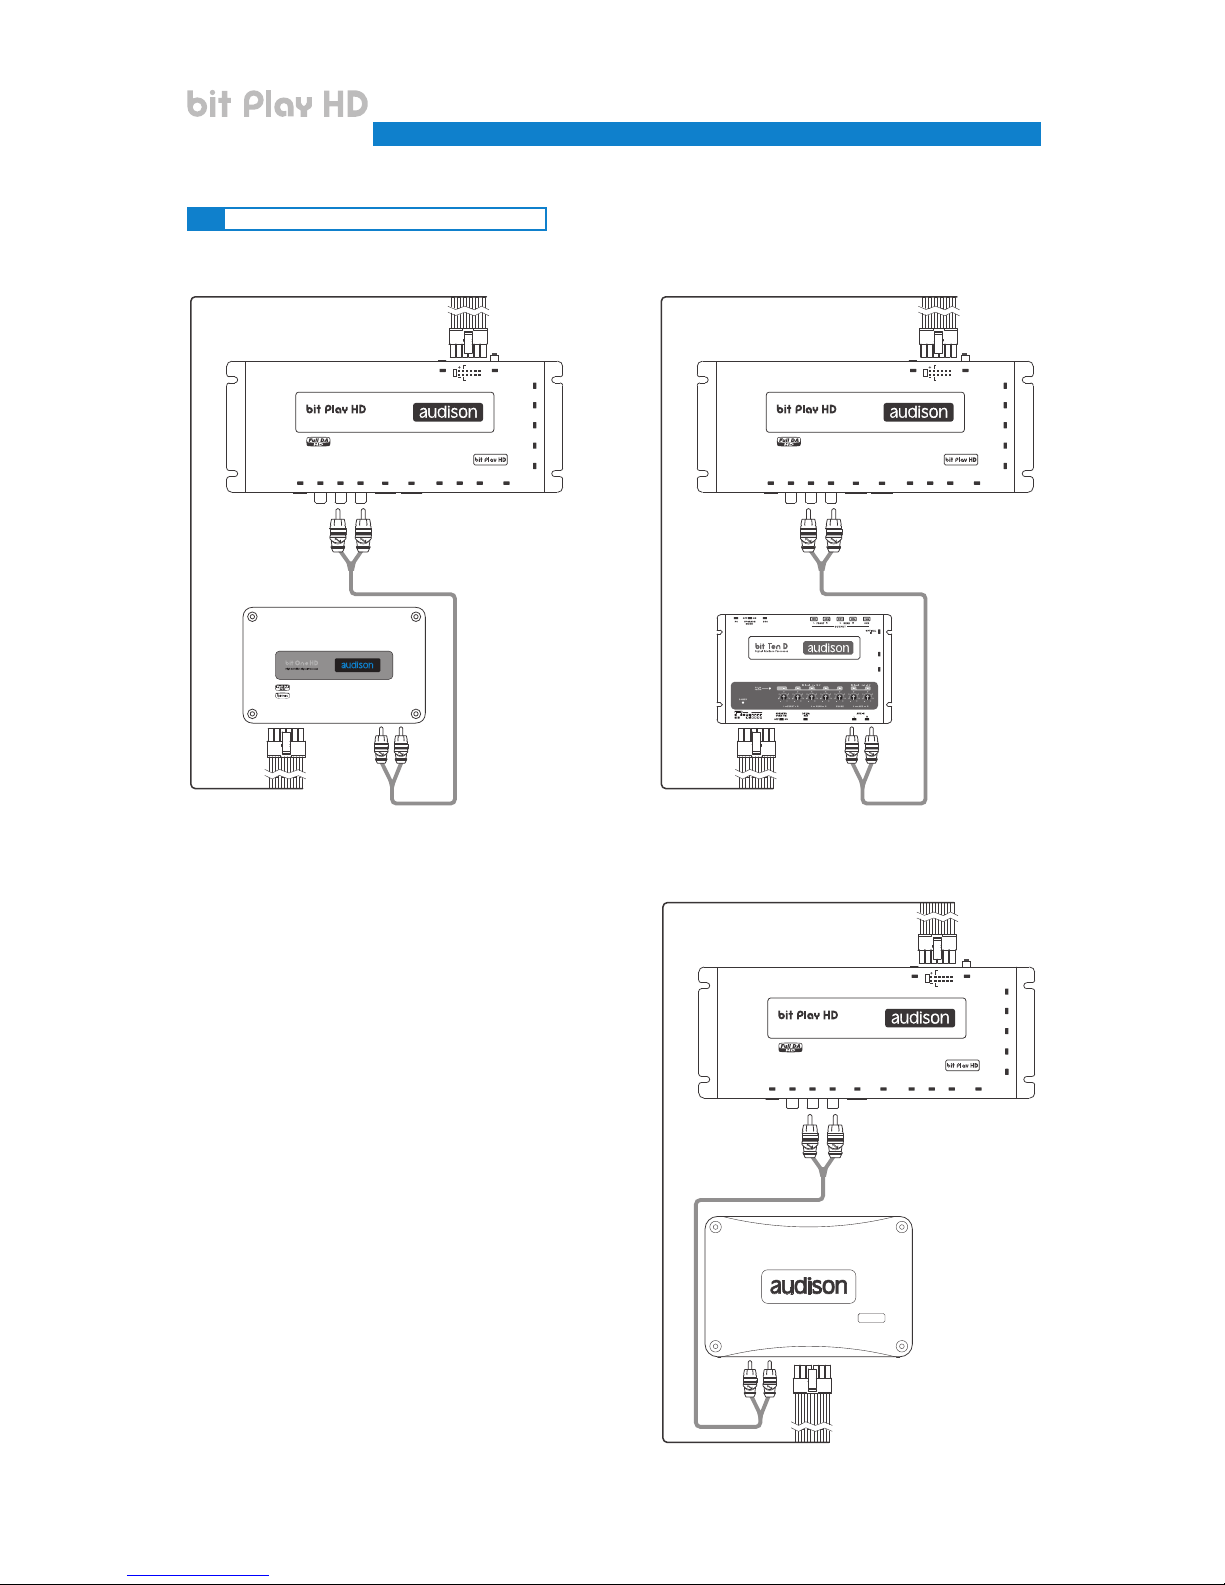
4.2.4 HOW TO CONNECT THE bit Play HD TO THE AUDISON bit DMI
AUDISON
AC-LINK
OEM
INTERFACE
DRC
ON OFF
MODE
SYSTEM UPGRADE
PC
IR REM.
CONTROL
FUSE 3A
OPTICAL VIDEO
AUDIOL
R
HDMI
Mp3 - WAV - FLAC
24 bit / 96 kHz
Multimedia Player
LAN
WI-FI USB
PROVIDED
1
HARD DRIVE USB2.0
2
PEN DRIVE
MEDIA
UPGRADE
5 6 7 8
3
41 2
REM OUT
REM IN
12V
AUDISON
AC-LINK
OEM
INTERFACE
DRC
ON OFF
MODE
SYSTEM UPGRADE
PC
IR REM.
CONTROL
FUSE 3A
OPTICAL VIDEO
AUDIOL
R
HDMI
Mp3 - WAV - FLAC
24 bit / 96 kHz
Multimedia Player
LAN
WI-FI USB
PROVIDED
1
HARD DRIVE USB2.0
2
PEN DRIVE
MEDIA
UPGRADE
5 6 7 8
3
41 2
REM OUT
REM IN
12V
TOSLINK
Connector
OPTICAL INPUT
TOSLINK
Connector
TOSLINK
Connector
AP8.9 bit
AP5.9 bit
AP4.9 bit
AUDISON
AC-LINK
OEM
INTERFACE
DRC
ON OFF
MODE
SYSTEM UPGRADE
PC
IR REM.
CONTROL
FUSE 3A
OPTICAL VIDEO
AUDIOL
R
HDMI
Mp3 - WAV - FLAC
24 bit / 96 kHz
Multimedia Player
LAN
WI-FI USB
PROVIDED
1
HARD DRIVE USB2.0
2
PEN DRIVE
MEDIA
UPGRADE
5 6 7 8
3
41 2
REM OUT
REM IN
12V
TOSLINK
Connector
TOSLINK
Connector
OPTICAL INPUT
OPTICAL INPUT
TOSLINK
Connector
TOSLINK
Connector
COAXIAL
INPUT
COAXIAL
OUTPUT
TO MOST CHAIN
Optical fiber
set optical INPUT
Digital Most Interface
MOSTOPTICAL OUT
POWER
USB
TO MOST CHAIN
Digital Most Interface
MOSTOPTICAL OUT
POWER
USB
TO MOST CHAIN
Digital Most Interface
MOSTOPTICAL OUT
POWER
USB
AUDISON
AC-LINK
OEM
INTERFACE
DRC
ON OFF
MODE
SYSTEM UPGRADE
PC
IR REM.
CONTROL
FUSE 3A
OPTICAL VIDEO
AUDIOL
R
HDMI
Mp3 - WAV - FLAC
24 bit / 96 kHz
Multimedia Player
LAN
WI-FI USB
PROVIDED
1
HARD DRIVE USB2.0
2
PEN DRIVE
MEDIA
UPGRADE
5 6 7 8
3
41 2
REM OUT
REM IN
12V
TOSLINK
Connector
TOSLINK
Connector
OPTICAL INPUT
TOSLINK
Connector
COAXIAL
INPUT
COAXIAL
OUTPUT
TO MOST CHAIN
Optical fiber
set optical INPUT
Digital Most Interface
MOSTOPTICAL OUT
POWER
USB
PHONE
REM
IN
REM
OUT
12V
KEY
SW
INPUTS
MUTE IN
FLFR RRRL
AD Link
AC Link
bit Play HD + BIT DMI WITH
AUDISON BIT ONE HD PROCESSOR
bit Play HD + BIT DMI WITH
AUDISON BIT ONE PROCESSOR
bit Play HD + BIT DMI WITH
AUDISON BIT TEN D PROCESSOR
bit Play HD + BIT DMI WITH
AUDISON AP BIT PROCESSOR
MAX 96k Hz/24 bit MAX 96k Hz/24 bit
STEREO
ANALOG OUTPUT
STEREO
ANALOG OUTPUT
AUX INPUT
AUX INPUT
L
L
L
L
R
R
R
R
USER’S MANUAL
bit Play HD /
4
Page 17
17
4.3 VIDEO OUTPUT SIGNALS
4.3.1 COMPOSITE VIDEO SIGNAL
4.3.2 HDMI VIDEO SIGNAL
AUDISON
AC-LINK
OEM
INTERFACE
DRC
ON OFF
MODE
SYSTEM UPGRADE
PC
IR REM.
CONTROL
FUSE 3A
OPTICAL VIDEO
AUDIOL
R
HDMI
Mp3 - WAV - FLAC
24 bit / 96 kHz
Multimedia Player
LAN
WI-FI USB
PROVIDED
1
HARD DRIVE USB2.0
2
PEN DRIVE
MEDIA
UPGRADE
5 6 7 8
3
41 2
REM OUT
REM IN
12V
ORANGE 1A MONITORGREEN GREEN
Ground
BRAKE
Ground
VIDEO IN 75 Ohm
Coax Cable
75 Ohm
Coax Cable
VIDEO IN
VIDEO ENABLE +12V
+ 12 Volt
- GND
MONITOR
Power Supply
OEM HEAD UNIT
AUDISON
AC-LINK
OEM
INTERFACE
DRC
ON OFF
MODE
SYSTEM UPGRADE
PC
IR REM.
CONTROL
FUSE 3A
OPTICAL VIDEO
AUDIOL
R
HDMI
Mp3 - WAV - FLAC
24 bit / 96 kHz
Multimedia Player
LAN
WI-FI USB
PROVIDED
1
HARD DRIVE USB2.0
2
PEN DRIVE
MEDIA
UPGRADE
5 6 7 8
3
41 2
REM OUT
REM IN
12V
ORANGE 1A MONITOR
Ground
BRAKE
NOT PROVIDED
SD
After Market Monitor
NOT PROVIDED
AUDISON
AC-LINK
OEM
INTERFACE
DRC
ON OFF
MODE
SYSTEM UPGRADE
PC
IR REM.
CONTROL
FUSE 3A
OPTICAL VIDEO
AUDIOL
R
HDMI
Mp3 - WAV - FLAC
24 bit / 96 kHz
Multimedia Player
LAN
WI-FI USB
PROVIDED
1
HARD DRIVE USB2.0
2
PEN DRIVE
MEDIA
UPGRADE
5 6 7 8
3
41 2
REM OUT
REM IN
12V
ORANGE 1A MONITORGREEN GREEN
Ground
BRAKE
Ground
VIDEO IN 75 Ohm
Coax Cable
75 Ohm
Coax Cable
VIDEO IN
VIDEO ENABLE +12V
+ 12 Volt
- GND
MONITOR
Power Supply
OEM HEAD UNIT
AUDISON
AC-LINK
OEM
INTERFACE
DRC
ON OFF
MODE
SYSTEM UPGRADE
PC
IR REM.
CONTROL
FUSE 3A
OPTICAL VIDEO
AUDIOL
R
HDMI
Mp3 - WAV - FLAC
24 bit / 96 kHz
Multimedia Player
LAN
WI-FI USB
PROVIDED
1
HARD DRIVE USB2.0
2
PEN DRIVE
MEDIA
UPGRADE
5 6 7 8
3
41 2
REM OUT
REM IN
12V
ORANGE 1A MONITOR
Ground
BRAKE
NOT PROVIDED
75 Ohm
Coax Cable
GREEN
VIDEO IN
VIDEO ENABLE +12V
AUDISON
AC-LINK
OEM
INTERFACE
DRC
ON OFF
MODE
SYSTEM UPGRADE
PC
IR REM.
CONTROL
FUSE 3A
OPTICAL VIDEO
AUDIOL
R
HDMI
Mp3 - WAV - FLAC
24 bit / 96 kHz
Multimedia Player
LAN
WI-FI USB
PROVIDED
1
HARD DRIVE USB2.0
2
PEN DRIVE
MEDIA
UPGRADE
5 6 7 8
3
41 2
REM OUT
REM IN
12V
ORANGE 1A MONITOR
Ground
BRAKE
AUDISON
AC-LINK
OEM
INTERFACE
DRC
ON OFF
MODE
SYSTEM UPGRADE
PC
IR REM.
CONTROL
FUSE 3A
OPTICAL VIDEO
AUDIOL
R
HDMI
Mp3 - WAV - FLAC
24 bit / 96 kHz
Multimedia Player
LAN
WI-FI USB
PROVIDED
1
HARD DRIVE USB2.0
2
PEN DRIVE
MEDIA
UPGRADE
5 6 7 8
3
41 2
REM OUT
REM IN
12V
ORANGE 1A MONITORGREEN
Ground
BRAKE
Ground
HDMI VIDEO INPUT
+ 12 Volt
- GND
MONITOR
Power Supply
HDMI Cable
SD
After Market Monitor
NOT PROVIDED
After Market Monitor
NOT PROVIDED
After Market Monitor
NOT PROVIDED
USER’S MANUAL
bit Play HD /
4
Page 18
18
4.4 AUX/OPTICAL INPUT AUTO SWITCH
OPTICAL / AUX SEL brown
OPTICAL SEL Pink
Set the terminal with
bit One HD PC software to
activate AUX IN
AUDISON
AC-LINK
OEM
INTERFACE
DRC
ON OFF
MODE
SYSTEM UPGRADE
PC
IR REM.
CONTROL
FUSE 3A
OPTICAL VIDEO
AUDIOL
R
HDMI
Mp3 - WAV - FLAC
24 bit / 96 kHz
Multimedia Player
LAN
WI-FI USB
PROVIDED
1
HARD DRIVE USB2.0
2
PEN DRIVE
MEDIA
UPGRADE
5 6 7 8
3
41 2
REM OUT
REM IN
12V
OPTICAL / AUX SEL brown
MUTE IN brown
Set the terminal with
bit Ten D PC software to
activate AUX IN
PHONE
REM
IN
REM
OUT
12V
KEY
SW
INPUTS
MUTE IN
FLFR RRRL
AD Link
AC Link
AUDISON
AC-LINK
OEM
INTERFACE
DRC
ON OFF
MODE
SYSTEM UPGRADE
PC
IR REM.
CONTROL
FUSE 3A
OPTICAL VIDEO
AUDIOL
R
HDMI
Mp3 - WAV - FLAC
24 bit / 96 kHz
Multimedia Player
LAN
WI-FI USB
PROVIDED
1
HARD DRIVE USB2.0
2
PEN DRIVE
MEDIA
UPGRADE
5 6 7 8
3
41 2
REM OUT
REM IN
12V
OPTICAL / AUX SEL brown
OPTICAL SEL Pink
Set the terminal with
AP Prima PC software to
activate AUX IN
AUDISON
AC-LINK
OEM
INTERFACE
DRC
ON OFF
MODE
SYSTEM UPGRADE
PC
IR REM.
CONTROL
FUSE 3A
OPTICAL VIDEO
AUDIOL
R
HDMI
Mp3 - WAV - FLAC
24 bit / 96 kHz
Multimedia Player
LAN
WI-FI USB
PROVIDED
1
HARD DRIVE USB2.0
2
PEN DRIVE
MEDIA
UPGRADE
5 6 7 8
3
41 2
REM OUT
REM IN
12V
AUX SELECT with bit Bit One HD AUX SELECT with bit Ten D
AUX SELECT with AP bit
STEREO
ANALOG OUTPUT
STEREO
ANALOG OUTPUT
L L
L
L L
L
R R
R
R R
R
AUX AUX
AUX
STEREO
ANALOG OUTPUT
USER’S MANUAL
bit Play HD /
4
Page 19

19
OPTICAL / AUX SEL brown
OPTICAL SEL Pink
Set the terminal with
bit One HD PC software to
activate OPTICAL INPUT
AUDISON
AC-LINK
OEM
INTERFACE
DRC
ON OFF
MODE
SYSTEM UPGRADE
PC
IR REM.
CONTROL
FUSE 3A
OPTICAL VIDEO
AUDIOL
R
HDMI
Mp3 - WAV - FLAC
24 bit / 96 kHz
Multimedia Player
LAN
WI-FI USB
PROVIDED
1
HARD DRIVE USB2.0
2
PEN DRIVE
MEDIA
UPGRADE
5 6 7 8
3
41 2
REM OUT
REM IN
12V
TOSLINK
Connector
TOSLINK
Connector
Optical fiber
OPTICAL / AUX SEL brown
OPTICAL SEL Pink
Set the terminal with
AP Prima PC software to
activate OPTICAL INPUT
AUDISON
AC-LINK
OEM
INTERFACE
DRC
ON OFF
MODE
SYSTEM UPGRADE
PC
IR REM.
CONTROL
FUSE 3A
OPTICAL VIDEO
AUDIOL
R
HDMI
Mp3 - WAV - FLAC
24 bit / 96 kHz
Multimedia Player
LAN
WI-FI USB
PROVIDED
1
HARD DRIVE USB2.0
2
PEN DRIVE
MEDIA
UPGRADE
5 6 7 8
3
41 2
REM OUT
REM IN
12V
TOSLINK
Connector
TOSLINK
Connector
Optical fiber
OPTICAL / AUX SEL brown
MUTE IN brown
Set the terminal with
bit Ten D PC software to
activate OPTICAL INPUT
PHONE
REM
IN
REM
OUT
12V
KEY
SW
INPUTS
MUTE IN
FLFR RRRL
AD Link
AC Link
AUDISON
AC-LINK
OEM
INTERFACE
DRC
ON OFF
MODE
SYSTEM UPGRADE
PC
IR REM.
CONTROL
FUSE 3A
OPTICAL VIDEO
AUDIOL
R
HDMI
Mp3 - WAV - FLAC
24 bit / 96 kHz
Multimedia Player
LAN
WI-FI USB
PROVIDED
1
HARD DRIVE USB2.0
2
PEN DRIVE
MEDIA
UPGRADE
5 6 7 8
3
41 2
REM OUT
REM IN
12V
TOSLINK
Connector
TOSLINK
Connector
Optical fiber
OPTICAL SELECT with bit One HD OPTICAL SELECT with bit Ten D
OPTICAL SELECT with AP bit
USER’S MANUAL
bit Play HD /
4
Page 20

20
4.5 STORAGE DEVICES/EXTERNAL FILE READING
External USB PEN DRIVE
External HARD DISK
External DVD ROM
External SD CARD READER
*
WARNING: compatible File Systems:
FAT32; NTFS; HFS+; EXT 3
*
WARNING: for the USB memory device to work properly, the folders it includes must not contain more than 99 les. Make sure
the music tracks are divided into folders according to their extension (mp3, Wav, Flac), with special attention to not
include les that are not supported by the bit Play HD.
*
*
*
*
USER’S MANUAL
bit Play HD /
AUDISON
AC-LINK
OEM
INTERFACE
DRC
ON OFF
MODE
SYSTEM UPGRADE
PC
IR REM.
CONTROL
FUSE 3A
OPTICAL VIDEO
AUDIOL
R
HDMI
Mp3 - WAV - FLAC
24 bit / 96 kHz
Multimedia Player
LAN
WI-FI USB
PROVIDED
1
HARD DRIVE USB2.0
2
PEN DRIVE
MEDIA
UPGRADE
5 6 7 8
3
41 2
REM OUT
REM IN
12V
NOT PROVIDED
NOT PROVIDED
AUDISON
AC-LINK
OEM
INTERFACE
DRC
ON OFF
MODE
SYSTEM UPGRADE
PC
IR REM.
CONTROL
FUSE 3A
OPTICAL VIDEO
AUDIOL
R
HDMI
Mp3 - WAV - FLAC
24 bit / 96 kHz
Multimedia Player
LAN
WI-FI USB
PROVIDED
1
HARD DRIVE USB2.0
2
PEN DRIVE
MEDIA
UPGRADE
5 6 7 8
3
41 2
REM OUT
REM IN
12V
NOT PROVIDED
AUDISON
AC-LINK
OEM
INTERFACE
DRC
ON OFF
MODE
SYSTEM UPGRADE
PC
IR REM.
CONTROL
FUSE 3A
OPTICAL VIDEO
AUDIOL
R
HDMI
Mp3 - WAV - FLAC
24 bit / 96 kHz
Multimedia Player
LAN
WI-FI USB
PROVIDED
1
HARD DRIVE USB2.0
2
PEN DRIVE
MEDIA
UPGRADE
5 6 7 8
3
41 2
REM OUT
REM IN
12V
NOT PROVIDED
AUDISON
AC-LINK
OEM
INTERFACE
DRC
ON OFF
MODE
SYSTEM UPGRADE
PC
IR REM.
CONTROL
FUSE 3A
OPTICAL VIDEO
AUDIOL
R
HDMI
Mp3 - WAV - FLAC
24 bit / 96 kHz
Multimedia Player
LAN
WI-FI USB
PROVIDED
1
HARD DRIVE USB2.0
2
PEN DRIVE
MEDIA
UPGRADE
5 6 7 8
3
41 2
REM OUT
REM IN
12V
4
Page 21

21
4.6 INFRARED RECEIVER
4.7 WI-FI AND MOBILE DEVICES
(see section 6)
AUDISON
AC-LINK
OEM
INTERFACE
DRC
ON OFF
MODE
SYSTEM UPGRADE
PC
IR REM.
CONTROL
FUSE 3A
OPTICAL VIDEO
AUDIOL
R
HDMI
Mp3 - WAV - FLAC
24 bit / 96 kHz
Multimedia Player
LAN
WI-FI USB
PROVIDED
1
HARD DRIVE USB2.0
2
PEN DRIVE
MEDIA
UPGRADE
5 6 7 8
3
41 2
REM OUT
REM IN
12V
AUDISON
AC-LINK
OEM
INTERFACE
DRC
ON OFF
MODE
SYSTEM UPGRADE
PC
IR REM.
CONTROL
FUSE 3A
OPTICAL VIDEO
AUDIOL
R
HDMI
Mp3 - WAV - FLAC
24 bit / 96 kHz
Multimedia Player
LAN
WI-FI USB
PROVIDED
1
HARD DRIVE USB2.0
2
PEN DRIVE
MEDIA
UPGRADE
5 6 7 8
3
41 2
REM OUT
REM IN
12V
NO
WARNING: if you choose to use the bit Play HD using the APP, the management via remote control may be disabled.
USER’S MANUAL
bit Play HD /
AUDISON
AC-LINK
OEM
INTERFACE
DRC
ON OFF
MODE
SYSTEM UPGRADE
PC
IR REM.
CONTROL
FUSE 3A
OPTICAL VIDEO
AUDIOL
R
HDMI
Mp3 - WAV - FLAC
24 bit / 96 kHz
Multimedia Player
LAN
WI-FI USB
PROVIDED
1
HARD DRIVE USB2.0
2
PEN DRIVE
MEDIA
UPGRADE
5 6 7 8
3
41 2
REM OUT
REM IN
12V
INFRARED RECEIVER
LED STATUS
bit Play HD OPERATE
... WAIT
4
Page 22

22
5. HOW TO USE THE bit Play HD WITH AN EXTERNAL MONITOR
DEVICE INFO: this window indicates whether the Wi-Fi interface is working properly and is initialized.
This window also shows the device rmware version (FW Media).
This window shows the active peripherals connected to the device
A. When this logo is on, audio output is active.
B. When this logo is on, the HDMI port is connected to an external monitor.
C. When this logo is on, the external Wi-Fi USB is turned on.
D. When this logo is on, USB storage devices are connected
to the bit Play HD.
E. When this logo is on, an internal HDD is present.
FILE MANAGER: the File Manager menu allows you to navigate
the storage directory of the device and open, copy, delete, move,
or rename multimedia les.
How to copy your multimedia les in the bit Play HD.
A. Transfer the multimedia (audio/video/photo) les to a USB storage device.
B. Connect the bit Play HD to the USB storage device using the HARD DRIVE USB 2.0 plugs.
C. Select “File Manager” from the main menu of the bit Play HD
then select the USB device containing the multimedia data to transfer.
1
2
3
43 5 6 7
1 2
A B C D E
USER’S MANUAL
bit Play HD /
5
Page 23

23
D. Press the button on the ASR remote control and select:
- “COPY” to copy individual les or folders;
- “MULTIPLE SELECT” to select multiple les or folders.
E. Select the destination folder for the les to be copied on the
Hard Disk Drive (HDD) and press the PLAY key on the USR remote.
F. Wait until the selected les are copied to the
destination folder, and then press OK.
To perform other operations such as deleting, moving and renaming les, select the desired entry from section D.
FILM: By clicking on the Film menu you can navigate the
device storage directory only displaying video les.
It is possible to open, copy, delete, move
or rename them (see point 3)
MUSIC: By clicking on the Music menu you can navigate the
device storage directory only displaying music les.
It is possible to open, copy, delete, move
or rename them (see point 3).
PHOTO: By clicking on the Photo menu you can navigate the
device storage directory only displaying photo les.
It is possible to open, copy, delete, move
or rename them (see point 3).
SETTINGS: By clicking on the Settings menu, you can select
the bit Play HD system settings. The navigation buttons
on the remote allow you to navigate the submenus: Audio;
Video; Network; Advanced; System.
In the default conguration, system settings are optimized for
an ideal installation of the product, but you can
customize settings according to your needs.
4
5
6
7
USER’S MANUAL
bit Play HD /
5
WARNING: do not turn off or disconnect the device while transferring les in order to avoid possibly damaging
them and making them inaccessible.
Page 24

24
6. HOW TO USE THE BIT PLAY HD ON MOBILE DEVICES
The Audison bit Play HD App is an application providing the ability to control the Audison bit Play HD multimedia
player through the Wi-Fi network of your smartphone or tablet.
Once you install the bit Play HD player in your car, this App will allow you to listen to the music stored in your
smartphone or tablet directly through your car audio system.
You can also control the bit Play HD player to listen to music stored inside the SSD or USB mass storage devices
connected to the USB plugs.
Through the Audison bit Play HD App as well as the Apps using the DLNA protocol you can select and start playing
a music track, adjust volume and manage playback controls. Only with the Audison bit Play HD App you can
transfer les between the USB mass storage devices or within the internal SSD.
Compatibility: the App has been tested with:
- Android: version 4.2 or higher
- Smartphones: Samsung Galaxy S5, S6, S7, Y56, HUAWEI P8 / P9
- Tablets: Samsung Galaxy Tab 3 10.1; Galaxy Tab 3 7.0
The App is available for download as freeware, however if you turn on a mobile data connection, costs might be
charged by the mobile network operator. The App supports all Android cell phones and tablets provided that an
Android 4.2 or higher operating system is installed. A list of compatible devices is available in the Play Store.
To install the App, proceed as follows:
1 Launch the Play Store App .
2. Search for the Audison bit Play HD v.2.0 App.
3. Select Install to download and install the App
Otherwise, if the Play Store App is not available for your device, go to the Google Play website with your device,
search for the Audison bit Play HD v.2.0 App and download the App from there.
REMARK: the bit Play HD player, with some limitations, is compatible with Apps using the DLNA protocol (see section 8.3).
Only the Audison bit Play HD App provides the ability to transfer les between the USB mass storage
devices or the internal SSD.
6.1 ANDROID DEVICES
6.1.1 DOWNLOAD THE AUDISON BIT PLAY HD APP FROM PLAY STORE
PRECAUTIONS FOR AN APPROPRIATE USE
- For a proper interface between the APP and the bit Play HD, the battery level of the Android device must be at least 30%.
- We recommend to switch off the phone stand-by mode while using the APP to improve the connection performance.
- Two devices can not be connected simultaneously to the same bit Play HD.
USER’S MANUAL
bit Play HD /
6
Page 25

25
6.1.2.1 Wi-Fi HOT SPOT
This connection mode between the bit Play HD and the Android device enables the access to all contents
stored in the mobile device and in the player through Wi-Fi. When using this mode the access to
navigation through the mobile device is disabled.
By default the pre-set device user name and password are bit Play HD and 00000000. To modify them
connect an external monitor to the bit Play HD and proceed as described below.
REMARK: to stay connected to external networks for the navigation using the mobile device, select the “Wi-Fi Direct”
mode (see section 6.1.2.2).
6.1.2 ANDROID DEVICE SETUP
The bit Play HD features three modes to interface with Android devices: Wi-Fi Client, WI-Fi Direct, Wi-Fi Hotspot, as
described below.
A) bit Play HD “Wi-Fi Hotspot” mode selection.
1) Access the bit Play HD “SETUP” menu by remote control.
2) Select the “Wi-Fi setup” menu.
USER’S MANUAL
bit Play HD /
6
Page 26

26
3) Select “Wi-Fi mode” and then “Hotspot” operating mode.
4) To rename the device, select the “Wi-Fi SSID” menu and enter the name with the keyboard using the remote.
The pre-set default name is bit Play HD.
5) Conrm the entry with the OK button, after moving the pointer to the name box.
6) To rename the device password select the “Password” menu and then enter the desired numerical password.
USER’S MANUAL
bit Play HD /
6
Page 27

27
7) Conrm the entry with the OK button, after moving the pointer to the name box.
8) Select the “Save Change” function and then exit the “SETUP” menu with the remote control <> button and wait
for a few seconds.
1. Before turning the bit Play HD on, check and make sure that the Wi-Fi USB dongle is inserted into the
device “Wi-Fi USB” plug (see section 4.7).
2. Connect the power and turn the bit Play HD on; check and make sure that, once started, a Wi-Fi connection
is available (see section 5.1). If not, restart the device and check if the Wi-Fi USB dongle is correctly inserted.
3. From the Home window of your Android device, select in sequence Menu, Settings, Wireless and Networks.
4. Select Wi-Fi Settings and then Wi-Fi to enable the wireless antenna. Select the Wi-Fi menu, wait for your
mobile device to detect the available Wi-Fi networks and select the network and the password previously set
up in the bit Play HD.
REMARK: if the device user name and password have not been changed the default ones are:
User name: bit Play HD
Password: 00000000
5. The Android mobile device is now correctly set up and ready for use.
B) Android device setup in “Hotspot” mode.
USER’S MANUAL
bit Play HD /
6
WARNING: after the operating mode (HOT SPOT) is enabled and saved, we recommend to reboot the bit Play HD.
Page 28

28
USER’S MANUAL
bit Play HD /
6
6.1.2.2 Wi-Fi Direct
This connection mode between the bit Play HD and the Android device enables the access to all contents
stored in the mobile device and in the Player through Wi-Fi, while keeping the internet connection enabled
through the mobile device.
WARNING: before activating this mode, make sure your mobile device supports the Wi-Fi Direct connection.
A) bit Play HD “Wi-Fi Direct” mode selection.
1) Access the bit Play HD “SETUP” menu by remote control.
2) Select the “Wi-Fi setup” menu.
Page 29

29
USER’S MANUAL
bit Play HD /
6
3) Select the “Wi-Fi mode” menu and then the “Wi-Fi Direct” mode.
4) Select the “Wi-Fi SSID” menu to set up the device name and then enter the name chosen.
5) Conrm the entry with the OK button, after moving the pointer to the name box.
6) To rename the device password select the “Password” menu and then enter the desired numerical password.
Page 30

30
USER’S MANUAL
bit Play HD /
6
7) Conrm the entry with the OK button, after moving the pointer to the name box.
8) Select the “Save Change” function and then exit the “SETUP” menu with the remote control <> button and wait
for a few seconds.
1. Before turning the bit Play HD on, check and make sure that the Wi-Fi USB dongle is inserted into the
device “Wi-Fi USB” plug (see section 4.7).
2. Connect the power and turn the bit Play HD on; check and make sure that, once started, a Wi-Fi connection
is available (see section 5.1). If not, restart the device and check if the Wi-Fi USB dongle is correctly inserted.
3. From the Home window of your Android device, select in sequence Menu, Settings, Wireless and Networks.
4. Select Wi-Fi Settings and then Wi-Fi to enable the wireless antenna. Select the Wi-Fi direct menu, wait for
your mobile device to detect the available Wi-Fi networks and select the network and the password previously
set up in the bit Play HD.
REMARK: if the device user name and password have not been changed the default ones are:
User name: bit Play HD
Password: 11111111
5. The Android mobile device is now correctly set up and ready for use.
B) Android device setup in “Wi-Fi Direct” mode.
WARNING: after the operating mode (Wi Fi Direct) is enabled and saved, we recommend to reboot the bit Play HD.
Page 31

31
USER’S MANUAL
bit Play HD /
6.1.2.3 Wi-Fi Client
This mode enables the connection between the bit Play HD and an existing Wi-Fi network installed in the
vehicle, while keeping the internet connection (when provided by the vehicle) active, to access all the
multimedia contents.
A) bit Play HD “Wi-Fi Client” mode selection.
1) Access the bit Play HD “SETUP” menu by remote control.
2) Select the “Wi-Fi setup” menu.
6
Page 32

32
USER’S MANUAL
bit Play HD /
3) Select the “Wi-Fi mode” menu and then the “Wi-Fi Client” mode.
4) Select the “Network Search” menu to choose the desired network.
5) Select the “Save Change” function and then exit the “SETUP” menu with the remote control <> button and wait
for a few seconds.
1. Before turning the bit Play HD on, check and make sure that the Wi-Fi USB dongle is inserted into the device
“Wi-Fi USB” plug (see section 4.7).
2. Connect the power and turn the bit Play HD on; check and make sure that, once started, a Wi-Fi connection
is available (see section 5.1). If not, restart the device and check if the Wi-Fi USB dongle is correctly inserted.
3. From the Home window of your Android device, select in sequence Menu, Settings, Wireless and Networks.
4. Select Wi-Fi Settings and then Wi-Fi to enable the wireless antenna. Wait for your mobile device to detect
the available Wi-Fi networks and select the network and the password previously set up in the bit Play HD.
5. The Android mobile device is now correctly set up and ready for use.
B) Setup dispositivo Android modalità CLIENT MODE.
6
WARNING: after the operating mode (Wi-Fi Client) is enabled and saved, we recommend to reboot the bit Play HD.
Page 33

33
PRECAUTIONS FOR AN APPROPRIATE USE
- For a proper interface between the APP and the bit Play HD, the battery level of the Android device must be at least 30%.
- We recommend to switch off the phone stand-by mode while using the APP to improve the connection performance.
- Two devices can not be connected simultaneously to the same bit Play HD.
USER’S MANUAL
bit Play HD /
Select the “bit Play HD” application previously installed
from the mobile device Home page.
A. bit Play HD content:
POSSIBLE ERROR MESSAGE
If, when starting the App, the message shown to the right
of this page is displayed, the connection between bit Play HD
and the mobile device needs to be veried.
Select:
- OK to verify the availability of a Wi-Fi network and the
connection with the bit Play HD;
- Cancel to stop the connection.
6.1.3 AUDISON APP FOR ANDROID
WARNING: each time a new storage device is connected to the bit Play HD (for example, a USB PEN DRIVE), the les may not
immediately show in the App menu. Wait the necessary time for the indexing of the les to complete. Time varies according
to the amount of les and levels of sub-folders, and the process may require up to one minute.
Before opening the “Audison bit Play HD” APP we recommend to rst close any unused APPs still active.
1. Select the bit Play HD device 2. Select a folder
APP USER GUIDE.
6
Page 34

34
USER’S MANUAL
bit Play HD /
B. Android device content
3. Select the track to be played.
To go back to the previous
level click on the folder icon
4. Select the menu icon to access the
Player management window
1. Select PHONE 2. Select a folder
5. Reproduction
1. Play track.
2. Pause track.
3. Next track.
4. Previous track.
5. Track progress bar.
6. bit Play HD volume adjustment.
7. Track title.
8. Album or folder cover for the selected track.
9. Repeat.
10. Shuffle.
10
7
6
5
8
4 1/2 3 9
WARNING: to end a track reproduction, close the APP using the specic function in your
Android device called “Kill APP”.
6
Page 35

35
USER’S MANUAL
bit Play HD /
3. Select the track to be played.
To go back to the previous
level click on the folder icon
4. Select the menu icon to access the
Player management window
5. Reproduction
1. Play track.
2. Pause track.
3. Next track.
4. Previous track.
5. Track progress bar.
6. bit Play HD volume adjustment.
7. Track title.
8. Album or folder cover for the selected track.
9. Repeat.
10. Shuffle.
10
7
6
5
8
4 1/2 3 9
WARNING: to end a track reproduction, close the APP using the specic function in your
Android device called “Kill APP”.
*
*
WARNING: the tag of the le being reproduced may sometimes be unavailable.
6
Page 36

36
USER’S MANUAL
bit Play HD /
This “File Manager” allows you to navigate the memory devices of the bit Play HD as well as any connected devices
and copy/move/cancel the stored les.
How to copy multimedia les in the bit Play HD
1. Connect the bit Play HD to the USB storage device using the HARD DRIVE USB 2.0 plugs.
2. From the OPTIONS menu of the App, select the USB storage device where the les to be transferred are stored.
3. Select the les or folders to be copied into the internal HDD of the bit Play HD.
Then press “SELECT” and after “COPY”.
4. Select the HDD destination directory for the les/folders previously selected and then select “COPY”.
5. If the operation is successful, the copied les will be displayed in the HDD directory. Wait for the progress bar to
disappear before starting a new operation.
WARNING: do not turn off or disconnect the device while transferring les in order to avoid possibly damaging them and making
them inaccessible. During the le transfer, performing any other operations is prevented. Wait for this operation to end
before performing others.
C. FILE MANAGER:
WARNING: the COPY function from the APP allows the transfer of Folders/Files of max 1 Gb. If you want to transfer Folders/Files over
1 Gb, use the specic function, using the remote control, or remove the internal HDD from the bit Play HD, and use a PC to transfer
the les more safely.
6
Page 37

37
USER’S MANUAL
bit Play HD /
D. SETTINGS:
E. INFO:
1. Select the menu icon
1. Select the menu icon
2. Select SETTINGS
2. Selec INFO
3. Select the menu to
customize
3. Firmware version
of the APP in use
6
Page 38

38
PRECAUTIONS FOR AN APPROPRIATE USE
- For a proper interface between the APP and the bit Play HD, the battery level of the Apple device must be at least 30%.
- Two devices can not be connected simultaneously to the same bit Play HD.
USER’S MANUAL
bit Play HD /
6.2 APPLE IOS DEVICES
The Audison bit Play HD App is an application providing the ability to control the Audison bit Play HD multimedia
player through the Wi-Fi network of your smartphone or tablet.
Once you install the bit Play HD player in your car, this App will allow you to control bit Play HD to listen to the music
stored in its internal SSD or USB mass storage devices connected to the USB plugs.
Through the Audison bit Play HD App as well as the Apps using the DLNA protocol you can select and start playing a
music track, adjust volume and manage playback controls.
Compatibility.
The Audison bit Plat HD App has been tested with:
- Iphone: IOS 10 or higher.
- Ipad: IOS 10 or higher, it only supports vertical display mode.
The App is available for download as freeware, however if you turn on a mobile data connection, costs
might be charged by the mobile network operator. The App supports all IOS Iphone/Ipad/Ipod devices.
A list of compatible devices is available in the Store App.
To install the App, proceed as follows:
1. Launch the App Store .
2. Search for the Audison bit Play HD App v 2.0
3. Select “Install” to start the download and the automatic installation of the App.
How to connect your IOS mobile device to the bit Play HD.
1. Before turning the bit Play HD on, check and make sure that the Wi-Fi USB dongle is inserted into
the “Wi-Fi USB” plug of the device (see section 5.7).
2. Connect the power and turn the bit Play HD on; check and make sure that, once started, a Wi-Fi
connection is available (see section 5.1). If not, restart the device and check if the Wi-Fi USB dongle is
correctly inserted.
3. From the Home window of your IOS device, select Settings, then select Wi-Fi.
4. Select Wi-Fi to enable the wireless antenna. Wait until your mobile device automatically detects the
available Wi-Fi networks and select the network bit Play HD XXX (see section 5.1).
5. The IOS mobile device is now correctly set up and ready for use.
6.2.1 DOWNLOAD THE AUDISON BIT PLAY HD APP FROM THE APP STORE.
6.2.2 APPLE DEVICE SETUP.
6
WARNING: if you want to use the Air Play function to play the tracks included in your IOS device, the
“bit Play HD 2.0”APP must be shut down and vice versa.
Page 39

39
USER’S MANUAL
bit Play HD /
6.2.2.1 Wi-Fi Hotspot
This connection mode between the bit Play HD and the IOS device enables the access to all contents stored
in the mobile device and in the player through Wi-Fi. When using this mode the access to navigation through
the mobile device is disabled.
By default the pre-set device user name and password are bit Play HD and 00000000. To modify them
connect an external monitor to the bit Play HD and proceed as described below.
A) bit Play HD “Wi-Fi Hotspot” mode selection.
1) Access the bit Play HD “SETUP” menu by remote control.
2) Select the “Wi-Fi setup” menu.
6
Page 40

40
USER’S MANUAL
bit Play HD /
3) Select “Wi-Fi mode” and then “Hotspot” operating mode.
4) To rename the device, select the “Wi-Fi SSID” menu and enter the name with the keyboard using the remote.
The pre-set default name is bit Play HD.
5) Conrm the entry with the OK button, after moving the pointer to the name box.
6) To rename the device password select the “Password” menu and then enter the desired numerical password.
6
Page 41

41
USER’S MANUAL
bit Play HD /
7) Conrm the entry with the OK button, after moving the pointer to the name box.
8) Select the “Save Change” function and then exit the “SETUP” menu with the remote control <> button and wait
for a few seconds.
Connecting your IOS mobile device to the bit Play HD.
1. Before turning the bit Play HD on, check and make sure that the Wi-Fi USB dongle is inserted into the device
“Wi-Fi USB” plug (see section 4.7).
2. Connect the power and turn the bit Play HD on; check and make sure that, once started, a Wi-Fi connection
is available (see section 5.1). If not, restart the device and check if the Wi-Fi USB dongle is correctly inserted.
3. From the Home window of your IOS device, select in sequence Menu, Settings, Wireless and Networks.
4. Select Wi-Fi Settings and then Wi-Fi to enable the wireless antenna. Wait for your mobile device to detect the
available Wi-Fi networks and select the network and the password previously set up in the bit Play HD
REMARK: if the device user name and password have not been changed the default ones are:
User name: bit Play HD
Password: 00000000
5. The IOS mobile device is now correctly set up and ready for use.
A) IOS device setup in “Hotspot” mode
6
WARNING: after the operating mode (HOT SPOT) is enabled and saved, we recommend to reboot the bit Play HD.
Page 42

42
USER’S MANUAL
bit Play HD /
Select the “Audison bit Play HD”
application previously installed
from the mobile device Home page.
If, when starting the App, the message shown to the right
of this page is displayed, the connection between bit Play HD
and the mobile device needs to be veried..
Select:
- OK to verify the availability of a Wi-Fi network and the
connection with the bit Play HD;
- Cancel to stop the connection.
6.2.3 AUDISON APP FOR IOS
POSSIBLE ERROR MESSAGE
WARNING: each time a new storage device is connected to the bit Play HD (for example, a USB PEN DRIVE), the les may not
immediately show in the App menu. Wait the necessary time for the indexing of the les to complete. Time varies
according to the amount of les and levels of sub-folders, and the process may require up to one minute.
Before opening the “Audison bit Play HD” APP we recommend to rst close any unused APPs still active.
A. bit Play HD content:
1. Select the bit Play HD device 2. Select a folder
APP USER GUIDE.
WARNING: if you want to use the “bit Play HD 2.0”APP, the connection through Air Play must be shut down.
6
PRECAUTIONS FOR AN APPROPRIATE USE
- For a proper interface between the APP and the bit Play HD, the battery level
of the Apple device must be at least 30%.
- Two devices can not be connected simultaneously to the same bit Play HD.
Page 43

43
*
WARNING: the tag of the le being reproduced may sometimes be unavailable.
USER’S MANUAL
bit Play HD /
B. IOS device content:
1. Select PHONE 2. Select a folder
3. Select the track to be played.
To go back to the previous
level click on the folder icon
4. Select the menu icon to access the
Player management window
5. Reproduction
1. Play track.
2. Pause track.
3. Next track.
4. Previous track.
5. Track progress bar.
6. bit Play HD volume adjustment.
7. Track title.
8. Album or folder cover for the selected track.
9. Repeat.
10. Shuffle.
10
7
6
5
8
4 1/2 3 9
WARNING: to end a track reproduction, close the APP using the specic function in your
IOS device called “Kill APP”.
*
6
Page 44

44
*
WARNING: the tag of the le being reproduced may sometimes be unavailable.
USER’S MANUAL
bit Play HD /
3. Select the track to be played.
To go back to the previous
level click on the folder icon
4. Select the menu icon to access the
Player management window
5. Reproduction
1. Play track.
2. Pause track.
3. Next track.
4. Previous track.
5. Track progress bar.
6. bit Play HD volume adjustment.
7. Track title.
8. Album or folder cover for the selected track.
9. Repeat.
10. Shuffle.
10
7
6
5
8
4 1/2 3 9
WARNING: to end a track reproduction, close the APP using the specic function in your
IOS device called “Kill APP”.
*
6
Page 45

45
USER’S MANUAL
bit Play HD /
This “File Manager” allows you to navigate the
memory devices of the bit Play HD as well as any connected devices and copy/move/cancel the stored les.
How to copy multimedia les in the bit Play HD.
1. Connect the bit Play HD to the USB storage device using the HARD DRIVE USB 2.0 plugs.
2. From the OPTIONS menu of the App, select the USB storage device where the les to be transferred are stored.
3. Select the les or folders to be copied into the internal HDD of the bit Play HD.
Then press “SELECT” and after “COPY”.
4. Select the HDD destination directory for the les/folders previously selected and then select “COPY”.
5. If the operation is successful, the copied les will be displayed in the HDD directory. Wait for the progress bar to
disappear before starting a new operation.
WARNING: do not turn off or disconnect the device while transferring les in order to avoid possibly damaging
them and making them inaccessible.
C. FILE MANAGER:
WARNING: the COPY function from the APP allows the transfer of Folders/Files of max 1 Gb. If you want to transfer Folders/Files over
1 Gb, use the specic function, using the remote control, or remove the internal HDD from the bit Play HD, and use a PC to transfer
the les more safely.
6
Page 46

46
USER’S MANUAL
bit Play HD /
D. SETTINGS:
E. INFO:
1. Select the menu icon
1. Select the menu icon
2. Select SETTINGS
2. Select INFO
3. Select the menu to customize
3. Firmware version
of the APP in use
6
Page 47

47
USER’S MANUAL
bit Play HD /
6.2.4 AIRPLAY
AirPlay enables the bit Play HD to reproduce musical les in streaming from an iOS mobile device.
Reproduction of the iOS device contents in streaming using AirPlay
1. Connect the iOS device and the device where you would like to reproduce in streaming with AirPlay to the same
Wi-Fi network (see section 6.2.2.1).
2. To open the “Control Panel” on a iOS device, slide the screen from bottom to top. .
3. From the “Control Panel”, slide the screen from right to left to access the “Player” window.
4. Select the bit Play Audison Air Play.
5. Play the tracks stored in the iOS device using iTunes.
REMARK: The bit Play HD, using AirPlay, only reproduces audio les and not video.
WARNING: if you want to use the Air Play function to play the tracks included in your IOS device, the “bit Play HD 2.0”APP must
be shut down and vice versa.
6
Page 48

48
7.1 INTERNAL HDD INSTALLATION
7. MAIN SYSTEM SETTINGS
USER’S MANUAL
bit Play HD /
7
STEP 1
STEP 3
STEP 5
STEP 2
*
*
*
*
* Included in
the package
Max 2TB support
STEP 4
STEP 6
2
1
3
Page 49

49
7.1.1 INTERNAL HDD FORMAT
3. Return to the main screen using the RETURN button on the remote control and then turn off the product.
After installing the hard drive in the bit Play HD (see section 7.1) proceed as follows:
1. Turn on the bit Play HD SSD.
2. Use the remote control to select:
USER’S MANUAL
bit Play HD /
7
SETUP
INTERNAL HD
NEXT
SYSTEM -> FORMAT
OK
OK
1
3
5
2
4
6
Page 50

50
7.2 EXTERNAL MONITOR GRAPHIC RESOLUTION
Procedure by remote control
To change the VIDEO resolution, press the button on the ARC remote, until a suitable resolution for your
monitor is displayed.
It is also possible to select the size of the VIDEO depending on the monitor you are using, via the remote control
button 16:9. Press the button until you get the best possible picture quality.
Procedure using the Settings Menu.
Use the remote control to select:
Select the desired ratio
Select the desired resolution
Conrm the selected resolution
3 4
5
6
SETUP
Video
-
> Aspect Ratio
VIDEO
-
> TV SYSTEM
1
5
2
USER’S MANUAL
bit Play HD /
7
Page 51

51
7.3 SELECT SYSTEM LANGUAGE
7.4 SELECT AUDIO/VIDEO LANGUAGE
Use the remote control to select:
Use the remote control to select:
SETUP
Select the desired
language
Advanced
-
> Choose
the default video
language
Advanced
-
> Choose
the default subtitle
language
1
2
3
3
SETUP
System
-
> Menu’ Language
1
2
USER’S MANUAL
bit Play HD /
7
Page 52

52
7.5 RESTORING FACTORY SETTINGS
Use the remote control to select:
YES
to conrm
SETUP
1
3
System
-
> Factory Default
2
WARNING: each time a new storage device is connected to the bit Play HD (for example, a USB PEN DRIVE), the les may not
immediately show in the App menu. Wait the necessary time for the indexing of the les to complete. Time varies
according to the amount of les and levels of sub-folders, and the process may require up to one minute.
Before opening the “Audison bit Play HD” APP we recommend to rst close any unused APPs still active.
USER’S MANUAL
bit Play HD /
7
Page 53

53
8. TROUBLESHOOTING
8.1 MEDIA FIRMWARE UPGRADE
8.2 CONTROL FIRMWARE UPGRADE
All FIRMWARE updates must be performed in strict accordance with the following procedures.
The FIRMWARE update must be performed with utmost care, following the precautions displayed on the
monitor, to prevent damage to the product.
1 Turn off the bit Play HD.
2. Go to the bit Drive Portal URL: www.bitdrive.it to download the latest rmware version, if available.
3. Download the “install.img” le and copy it to the main directory of a USB flash drive.
4. Connect the USB flash drive to the “Wi-Fi USB” connector.
5. Press the “PEN DRIVE UPGRADE MEDIA” button releasing it about 30 seconds after turning the bit Play HD on.
6. Release the “PEN DRIVE MEDIA UPGRADE” button when the window shown below is displayed.
Wait about 2 minutes for the rmware update.
All FIRMWARE updates must be performed in strict accordance with the following procedures.
The FIRMWARE update must be performed with utmost care, following the precautions displayed on the
monitor, to prevent damage to the product.
1. Turn off the bit Play HD.
2. Go to the bit Drive Portal URL: www.bitdrive.it, and follow the instructions below:
A) Download the “Audison bit Play HD control rmware update” le and copy it to the PC Desktop.
B) Download the “bitPlayHD_v1.1.0.0.hex” le and copy it to the PC Desktop.
3. Connect the PC to bit Play HD “PC” plug, with USB cable.
4. Power and turn On the bit Play HD.
WARNING: do not turn off the bit Play HD or disconnect the USB Flash drive while updating.
7. After the upgrade the product will reboot. Wait for the restart, then shut it down and pull out the USB flash drive
used to update the device.
USER’S MANUAL
bit Play HD /
8
Page 54

54
5. Launch the “Audison bit Play HD control rmware
update” previously downloaded.
6. Select the entry “SEARCH”; the software will ask you to
select the le “bitPlayHD_v1.1.0.0.hex”, that you
previously saved in your PC.
7. Select the entry “UPDATE”; the software will offer
the following warnings:
- close all running applications;
- disable standby and energy saving features;
- disable anti-virus and anti-spyware systems.
Select “Yes” to continue.
8. Once the update has been successfully completed the
window you can see on your right will appear.
Select “OK” to continue.
9. Exit the program, by clicking on X ; then turn the bit Play HD off.
10. Disconnect the USB cable located between the PC and the bit Play HD.
USER’S MANUAL
bit Play HD /
8
Page 55

55
8.3 FAQ
FREQUENTLY ASKED QUESTIONS
BIT PLAY HD INTERNAL MEMORY
How do I install the solid state drive (SSD) in the
bit Play HD?
To install an SSD unit in the bit Play HD proceed as follows:
1. Acquire a 2.5-inch SATA SDD unit.
2. Turn off the power to the bit Play HD.
3. Remove the 4 screws on the lid of the product.
4. Apply the 4 anti-vibration fasteners to the SSD unit
(supplied in the box).
5. Fasten the SSD unit inside the bit Play HD, using the
anti-vibration fasteners previously attached.
6. Attach the SATA connector inside the bit Play HD to the
SSD unit.
7. Put back the bit Play HD lid and screws.
8. Power the bit Play HD and turn it on.
9. Format the SDD from the product menu:
SETUP -> SYSTEM -> FORMAT -> INTERNAL HDD
10. Wait until formatting has completed successfully.
Which solid state drives (SSD) are compatible
with the bit Play HD?
2.5-inch SATA interface SSDs.
Can I install a 3.5-inch SSD unit?
The SSD HDD to be installed inside the bit Play HD must be 2.5
inches. Bigger HDD cases are not compatible.
Can I install a 2.5-inch SATA HDD hard disk
instead of a 2.5-inch SATA SSD?
Both kinds of memory are compatible, but we recommend
using solid state memory (SSD) to prevent damage caused by
vibration while driving the vehicle.
USB EXTERNAL MEMORY
What kind of USB ports are available on the bit
Play HD?
USB 2.0 plugs are available with type A connectors. Compatibility
is also guaranteed for USB 3.0 devices with type A connectors.
How many external USB devices can I connect
to the bit Play HD?
The bit Play HD has 2 USB ports. An external USB HUB can
increase the number of ports but may occasionally result in
errors.
Can I connect an external USB HDD to the bit
Play HD USB plug?
It is possible, but it is not recommended while driving the vehicle
to avoid prolonged vibrations that could damage the HDD.
What is the maximum size of the USB device
that can be installed in the bit Play HD?
Up to 2 TB.
EXTERNAL OPTICAL DRIVES
Can the bit Play HD read FLAC/MP3 formats
from a portable DVD-ROM drive connected
externally via USB?
Yes, but the DVD must use the ISO le.
Can I install an external DVD-ROM drive and an
internal SSD at the same time?
Yes. You can use an external DVD ROM by connecting it to one
of the two USB ports on the bit Play HD.
DRC
Where should the DRC be connected in a system
with an Audison bit processor?
If you wish, it is possible to connect the DRC to the bit Play
HD; however, it won’t be possible for the DRC to control
the bit Play HD in any way. In such case, for the DRC to be
operational and communicate with an Audison bit processor,
the AC-LINK output cable of the bit Play HD has to be
connected to the DRC input of the Audison bit processor.
USER’S MANUAL
bit Play HD /
8
Page 56

56
FILE MANAGER
How do I transfer les within the bit Play HD SSD?
You can transfer les or folders:
•
Through the ARC remote, using a monitor as a video interface:
• Connect the USB device (USB pen drive, USB external HDD, etc.)
containing the les/folders you want to copy to the bit Play HD.
•
From the main menu of the bit Play HD, select the menu
“File Manager”.
•
Select the USB device.
•
Using the “FILE” button on the ARC remote, you can manage
the les/folders (Copy, Delete, Move, Rename, Multi-Select).
(see section 5 of the bit Play HD user’s manual).
•
Through the ofcial Audison bit Play HD Android App, without
the need to connect an external monitor as a video interface:
• Connect the USB device (USB pen drive, USB external HDD, etc.)
containing the les/folders you want to copy to the bit Play HD.
•
Select the “Option” menu in the Audison bit Play HD App.
•
Use the controls for managing les/folders
(Copy, Delete, Move, Rename, Multi-Select).
(see section 6.1.3 of the bit Play HD user’s manual).
APP
Is it possible to use the remote control and the
App simultaneously?
Not if there is a le running.
Does the bit Play HD only work with the ofcial
App or is it possible to use a compatible App?
1. Bubble UPnP. Manages only bit Play HD and
Android device contents.
USER’S MANUAL
bit Play HD /
8
Page 57

57
MALFUNCTION
POWER
The bit Play HD does not turn on.
1. Check the charge level of your car battery. If the power is
low, it is necessary to recharge the battery.
2. Check the integrity of the 3 Amp fuse in the product side panel.
3. Make sure the “+” (red wire) and “-” (black wire) terminals
are connected properly and that there is a 12V nominal
voltage when the car is off.
4. Make sure that the “REM IN” terminal (blue wire) is properly
connected to a power consent terminal of the audio system.
The bit Play HD logo flashes red.
Verify that the “SYSTEM UPGRADE MODE” switch on the
product side panel is in the “OFF” position.
DISPLAY
The monitor connected to the bit Play HD doesn’t
display anything.
• Make sure the monitor is turned on.
• Check that the video cable is properly connected.
• Set a suitable video resolution for the monitor used.
General issues:
- The monitor flashes;
- The image is blurred;
- The image is not scaled to t the screen;
- The image is not displayed on the monitor.
• Check that the video cable is working and is properly connected.
• Set a suitable video resolution for the monitor used.
AUDIO
You cannot hear the audio signal.
• Verify that the volume of the sound system is set correctly.
• If you use the TOSLINK optical connection, the S/PDIF LPCM
setting from the main menu:
SETTING -> AUDIO -> SPDIF OUTPUT must be active.
Noise is heard while playing songs using the bit
One with TOSLINK input.
• Check the integrity of the optical cable and connections.
• If you are using the bit Play HD with bit One, make sure that
you
are playing les with 48KHz 24-bit resolution MAX. In case
you want to play les with higher resolution, place an SRC
(SAMPLE RATE CONVERTER) between the bit Play HD and
the bit One.
(see section 13.1 of the bit One user’s manual v.1.5d)
USB DEVICE
The bit Play HD does not recognize any USB
storage device.
Verify that the system le of your USB device is NTFS, FAT/
FAT32 or HFS+.
REMOTE CONTROL
The multimedia player remote control
does not work.
• Make sure the batteries are properly installed.
• The batteries may be depleted. Replace them with new batteries.
• Press only one button at a time.
• Verify that the line of sight between the remote and the IR
receiver is not obstructed.
• Make sure that the IR receiver is properly connected to the
bit Play HD.
USER’S MANUAL
bit Play HD /
8
Page 58

58
REPRODUCTION OF CONTENTS
The le does not play.
• Check the list of supported multimedia le formats
(refer to section 8).
• Use a multimedia program to convert the le to a suitable
format.
The selected folder does not contain any
supported multimedia les.
• Select another folder that contains multimedia les in the
correct format.
• Disconnect and reconnect the USB device from the bit Play HD.
• Connect the USB device to the computer and verify that the
stored les are supported and not corrupt.
CONNECTIVITY
You cannot establish a connection between
Apps and the bit Play HD.
• Check that the Wi-Fi USB key (Wi-Fi Dongle) is inserted correctly.
• Using the external monitor (if installed), verify that the
bit Play HD has generated the Wi-Fi network, then verify
that “bit Play-HD_xxxx” is displayed on the main screen, on
the lower left.
• Ensure that the Wi-Fi setting on your mobile device is
enabled and detects the “bit Play-HD_xxxx” network;
• Verify that the mobile device is connected to the
“bit Play-HD_xxxx” Wi-Fi network.
• Shut down and restart the application.
The connection between the bit Play HD and the
mobile device is not stable.
• Check that the Wi-Fi USB key (Wi-Fi Dongle) is placed in an
open area of the passenger compartment and as close
as possible to the point of use of the mobile device. Avoid
installing the bit Play HD and the Wi-Fi USB key in close
proximity to metal surfaces, vehicle control units or
possible electromagnetic shields.
•
Use the USB extension cable (included) or a compatible
type A USB extension cable to reposition the Wi-Fi USB key
(Wi-Fi Dongle).
You cannot access the bit Play HD internal SSD
contents through your App.
• Verify that the LED status light is not flashing; wait until it
stays on.
• Close the App and restart the bit Play HD.
• Check that the internal SSD unit is correctly installed.
You cannot play the les stored on the mobile
device.
• Check that the le format is supported by the bit Play HD.
• Use an App able to play the content stored on the mobile device.
USER’S MANUAL
bit Play HD /
8
Page 59

59
9. TECHNICAL SPECIFICATIONS
USER’S MANUAL
bit Play HD /
9
Power Supply
Voltage 8.5 ÷ 14 VDC
Idling current 1.0 A with internal SSD A
Fuse 3 A
Remote IN 7 ÷ 15 VDC (1 mA)
Remote OUT 12 VDC (130 mA)
General Features
User Interface Dual mode:
1) Advanced control on Video out via Remote control
2) Basic control via iOS/Android App
Smartphone Control Dedicated Audison App for Android
and iOS smartphone, to allow:
1) Wi-Fi Streaming of smartphone multimedia
contents to bit Play HD output (Android only).
Alternatively standard DLNA Apps (iOS/Android).
2) Play the bit PlayHD storage multimedia contents.
3) File management of bit Play HD storage contents,
with copy, delete and move functions
Media Storage 1) 240GB SSD 2.5’’ (Included in bit Play HD SSD,
internal, up to 2TB support)
2) External USB HDD/Pendrive/DVD drive
File System - Media Storage FAT32, NTFS, EXT3, HFS+ (Mac OS X)
Wi-Fi 802.11n - Internal Hotspot with
external USB Wi-Fi Dongle (supplied)
Multimedia Format
Audio Formats Hi-Res Uncompressed:
WAV, FLAC (Up to 96kHz/24bit)
Compressed:
OGG, AAC, MPEG Audio (MP1, MP2, MP3, MPA)
Video Formats WMV, DivX, Xvid, MPEG, H264
Subtitle Formats MicroDVD [.sub], SubRip [.srt],
Sub Station Alpha [.ssa], Sami [.smi], Idx+Sub, PGS
Image Formats JPG, BMP, PNG, GIF
Analog Signal stage
Distortion - THD @ 1 kHz, 1 VRMS 0.003%
Bandwidth 20 ÷ 20k Hz
S/N RATIO (A weighted) 100 dBA
Output Level 1 VRMS
Signal Connection
Digital Video Output 1 x HDMI v1.3 (type A receptacle)
Resolution: 480p, 576p, 720p@50Hz/60Hz,
1080i@50Hz/60Hz, 1080p@50Hz/60Hz
Analog Video Ouput 1 x RCA - Composite video
Resolution: 576i (PAL), 480i (NTSC)
Toslink Optical Output 1 x S/P-DIF - PCM 96 kHz/24 bit
Analog Pre Out 2 x RCA, Left / Right
Data Connection
USB Hard Drive / Pen Drive 2 x USB/A (1.1/2.0),
USB extension supplied
LAN 1 x 10/100M Ethernet / RJ45 port for future
upgrade (Car NAS; 3G/LTE router; etc.)
SATA 1 x internal mini SATA 2.0 port for 2.5” SSD Drive
(Available version with SSD 240GB built-in)
Firmware Media Upgrade USB Pen Drive 1.1/2.0 (not supplied)
Infrared Remote Controls (Supplied)
USR User Remote Control - Ultra-Compact 14 keys for audio control
ARC Advanced Remote Control - Compact 40 keys for audio/video
control
Size / Weight & Temperature
W x H x D (mm / in.) 249 x 98 x 41 / 9.80 x 3.85 x 1.61 in.
Weight (kg / lb.) 0,9 Kg /1.98 lb.
Ambient Operating Temperature 0°C to 50°C (32°F to 122°F)
Control Connection
Audison AC Link 1 x RJ12 - To Audison AC link provided devices
Audison DRC 1 x RJ12
OEM Interface 1 x RJ12 - Ready for external interface
Steering Wheel Control Wires - Ready for In / Out control
signal BUS for external interface
IR Remote Control 1x 3.5mm 4 way mini-jack for IR receiver
with status LED (supplied)
Parking Brake Video Inhibition Wires - GND control to the parking
brake; monitor power supply
Optical Receiver Enable Wire - Control to enable optical In
for external devices
Status Led Wire - To external status LED (not supplied)
Page 60

All specications subject to change without notice
PART OF ELETTROMEDIA
62018 Potenza Picena (MC) Italy
T +39 0733 870 870 - F +39 0733 870 880
www.elettromedia.it
 Loading...