

Page 1
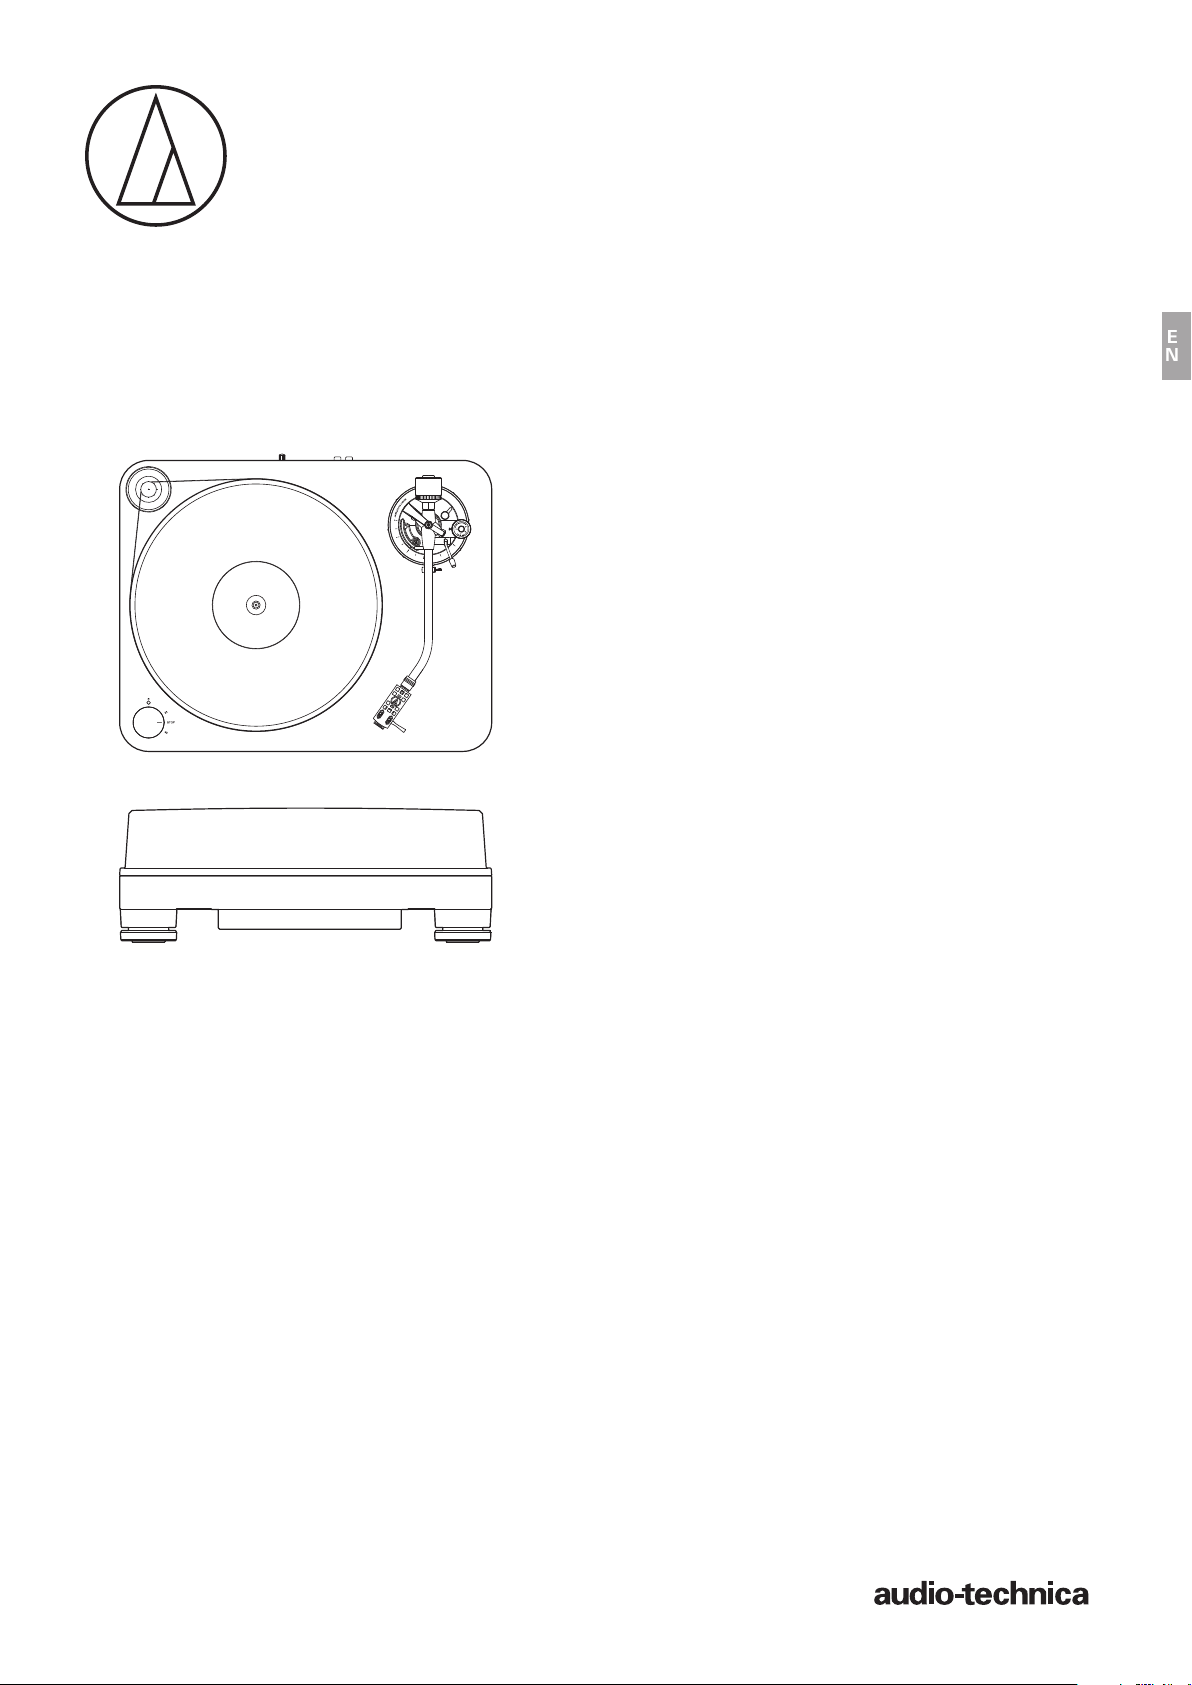
AT-LP
7
User Manual
Belt-Drive Turntable
EN
IMPORTANT:
Turntable belt needs to be attached or turntable will not
operate. See page 5 for instructions.
For assistance, contact our Audio Solutions Department at
330-686-2600 x5000 or audio-solutions@atus.com.
Page 2
Introduction
Thank you for purchasing this Audio-Technica product.
Before using the product, read through this user manual to ensure that you will use the product correctly. Please keep this manual for future
reference.
This product can be used only in the countries where the product is sold. Make sure that the operating voltage and the plug of AC adapter of the
product are correct for the country you live in.
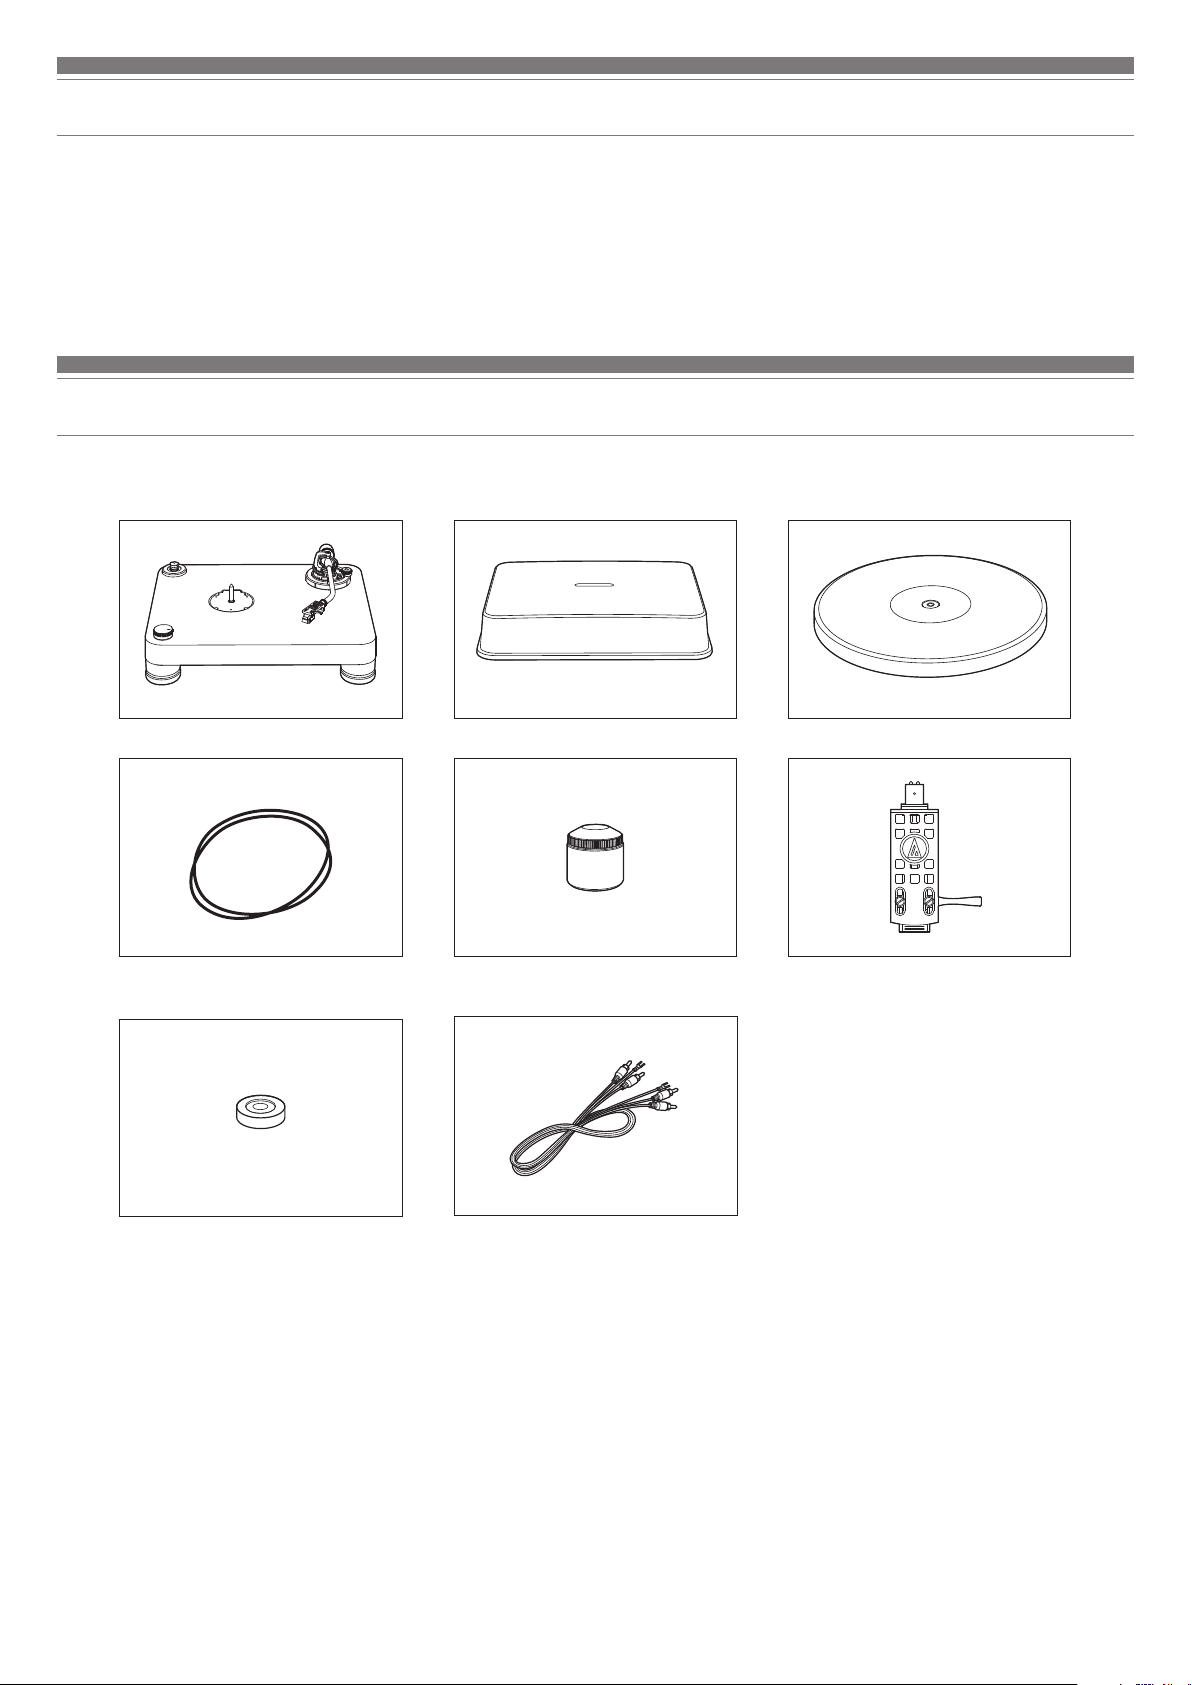
Package contents
Make sure that you have all the included items listed below before using this product.
If some items are missing or damaged, contact your local Audio-Technica dealer.
• Turntable body • Dust cover • Platter
• Drive belt • Counterweight • Headshell (AT-HS10) with VM stereo
cartridge (VM520EB)
• AC adapter (Approx. 1.3 m (4.3'))
• User manual (this document)
• 45 RPM adapter • RCA audio cable (Approx. 1.4 m (4.6'))
After purchase, we suggest that you save all packaging materials for possible future storage, moving, or shipping.
1
Page 3

Safety precautions
Notes on use
Important information
Warning:
To prevent fire or shock hazard, do not expose this apparatus to rain or
moisture.
Caution:
Do not expose this apparatus to drips or splashes.
To avoid electric shock, do not open the cabinet.
Refer servicing to qualified personnel only.
Do not expose this apparatus to excessive heat such as sunshine, fire
or the like.
Do not subject this apparatus to strong impact.
This apparatus should be located close enough to the AC outlet so
that you can easily grasp AC adapter at any time.
In case of emergency, disconnect the AC adapter quickly.
Do not place any objects filled with liquids, such as vases, on this
apparatus.
To prevent fire, do not place any naked flame sources (such as lighted
candles) on this apparatus.
Do not install this apparatus in a confined space such as a bookcase or
similar unit.
To install this apparatus only in the place where ventilation is good.
Turntable body
• Do not set and use the product in locations that are considerably hot
or humid, dirty, or subject to extreme vibrations.
• The product should be positioned on a flat, level surface.
Cartridge
• Lower the protector to protect the stylus when the product is not in
use.
• Do not touch the stylus of the cartridge with your finger.
• Do not allow the cartridge's stylus to bump against the platter or the
edge of the record.
EN
For customers in the USA
FCC Notice
Warning:
This device complies with Part 15 of the FCC Rules. Operation is
subject to the following two conditions: (1) This device may not cause
harmful interference, and (2) this device must accept any interference
received, including interference that may cause undesired operation.
Caution:
You are cautioned that any changes or modifications not expressly
approved in this manual could void your authority to operate this
equipment.
Note: This equipment has been tested and found to comply with
the limits for a Class B digital device, pursuant to part 15 of the FCC
Rules. These limits are designed to provide reasonable protection
against harmful interference in a residential installation. This equipment
generates, uses and can radiate radio frequency energy and, if not
installed and used in accordance with the instructions, may cause
harmful interference to radio communications. However, there is no
guarantee that interference will not occur in a particular installation. If
this equipment does cause harmful interference to radio or television
reception, which can be determined by turning the equipment off and
on, the user is encouraged to try to correct the interference by one or
more of the following measures:
– Reorient or relocate the receiving antenna.
– Increase the separation between the equipment and receiver.
– Connect the equipment into an outlet on a circuit different from that
to which the receiver is connected.
– Consult the dealer or an experienced radio/TV technician for help.
For customers in Canada
IC statement:
CAN ICES-3 (B)/NMB-3(B)
2
Page 4
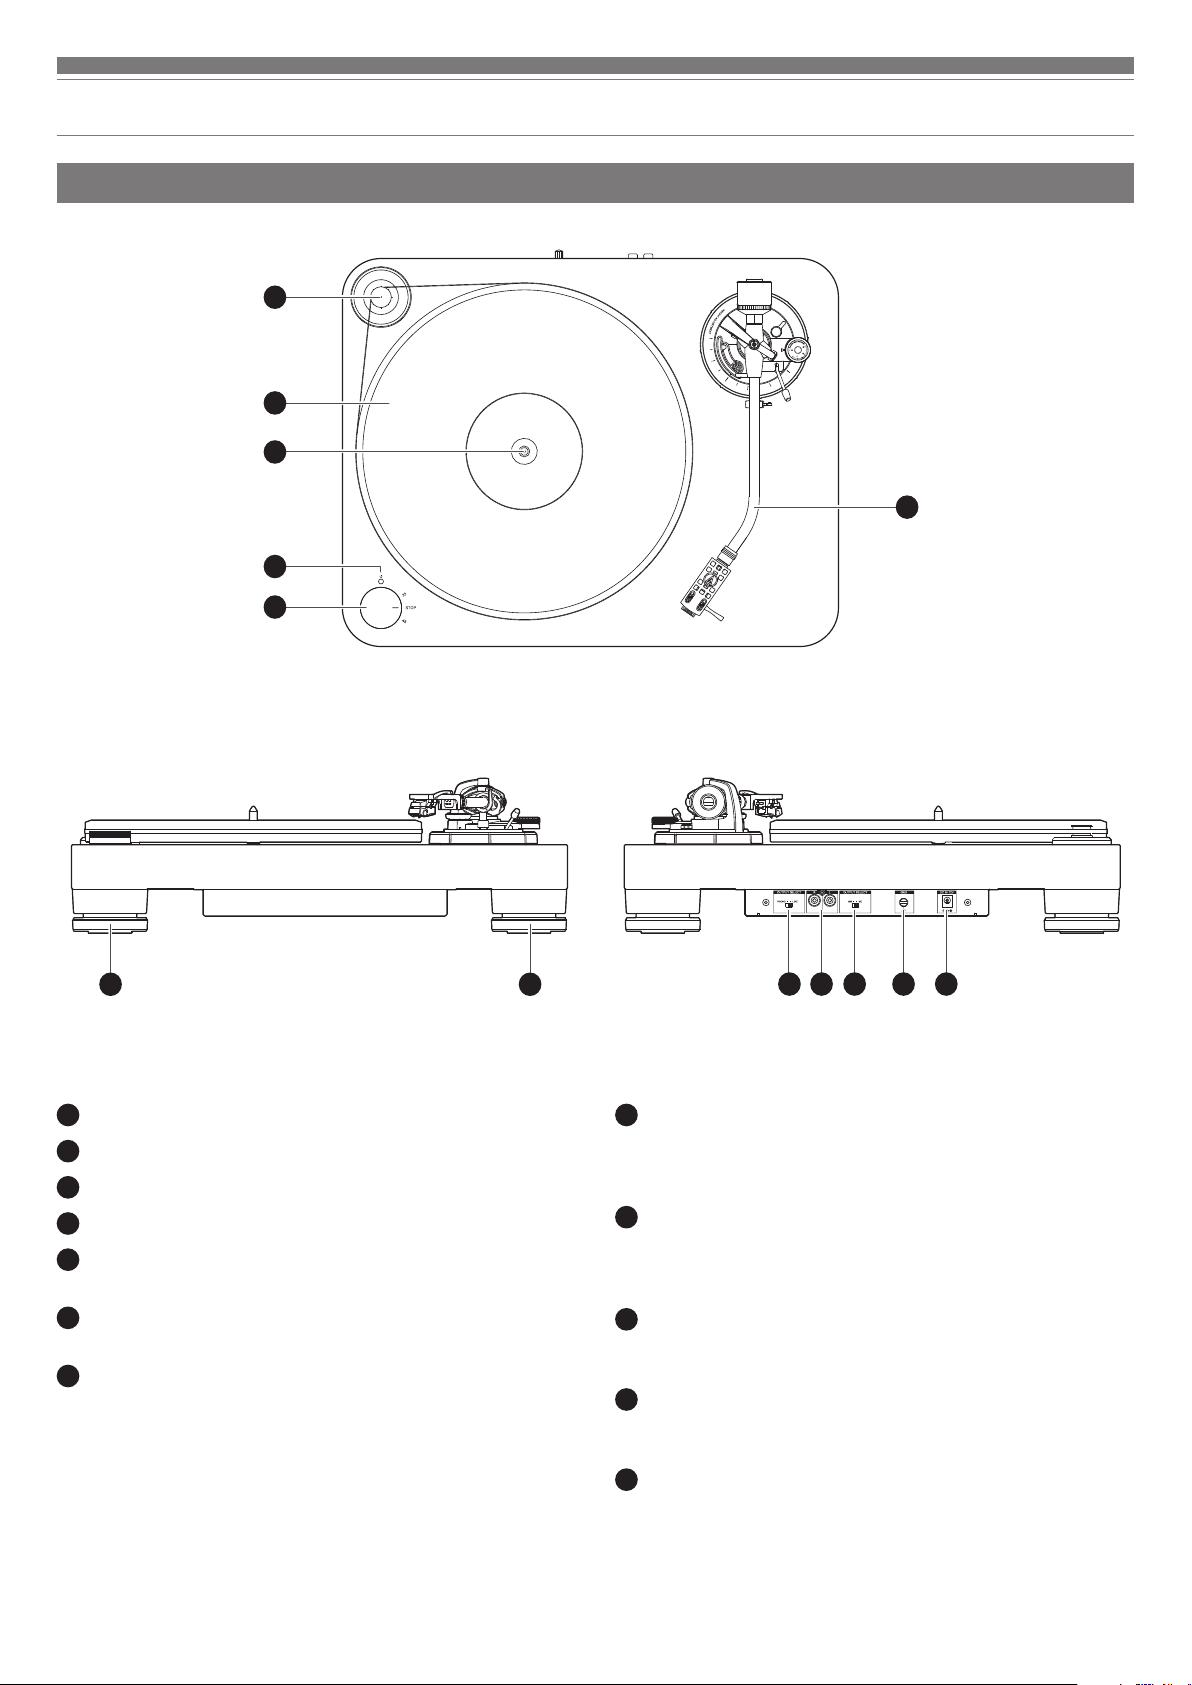
Part names and functions
Overall diagram
1
2
3
4
5
6
7 7
Motor pulley
1
Platter
2
Spindle
3
Power indicator
4
Control knob
5
Use to start and stop, as well as select the platter's speed.
Tonearm
6
For details, refer to “Tonearm” on p. 4.
Feet
7
Adjust the level of the product.
8 9 10 11 12
Pre-amplifier selector switch
8
If connecting to an amplifier's PHONO input jack, set this switch to
the PHONO position. If connecting to the AUX jack of an amplifier,
set this switch to the LINE position.
Stereo output terminals
9
Connect the RCA audio cable. Connect it to either the amplifier's
PHONO input jack or its line input jack. The red terminal is the
right channel and the white terminal is the left channel.
MM (VM)/MC cartridge selector switch
10
If using an MM (VM) cartridge, set this switch to the MM position.
If using an MC cartridge, set this switch to the MC position.
Ground (earth) terminal
11
Connect the amplifier's ground (earth) terminal to this terminal
using the RCA audio cable's ground line.
Power input jack
12
Connect the AC adapter.
3
Page 5

Part names and functions
Tonearm
Counterweight
1
Balances the tonearm and adjusts to provide the proper tracking
force.
Tracking force gauge ring
2
Use to adjust the tracking force.
Tonearm lift
3
Moves the tonearm vertically to and from the face of the record.
Tonearm rest with clamp
4
Use the clamp to secure the tonearm so that it does not move.
Tonearm height setting lever
5
Anti-skate control dial
6
While the record is playing, a force acts on the stylus tip to pull it
inward. This force can be counteracted by setting the same values
for anti-skate and the tracking force.
Tonearm height adjustment dial
7
Use the adjustment dial to adjust the height of the tonearm.
Tonearm lift control lever
8
Operates the tonearm lift.
Tonearm
9
Locking ring
10
Rotate the ring to the left (counterclockwise) to secure the
headshell. To remove the headshell, rotate the ring to the right.
Headshell and cartridge
11
The cartridge (VM520EB) is attached to the headshell (AT-HS10).
1
2
5
3
4
6
7
8
9
10
11
EN
4
Page 6
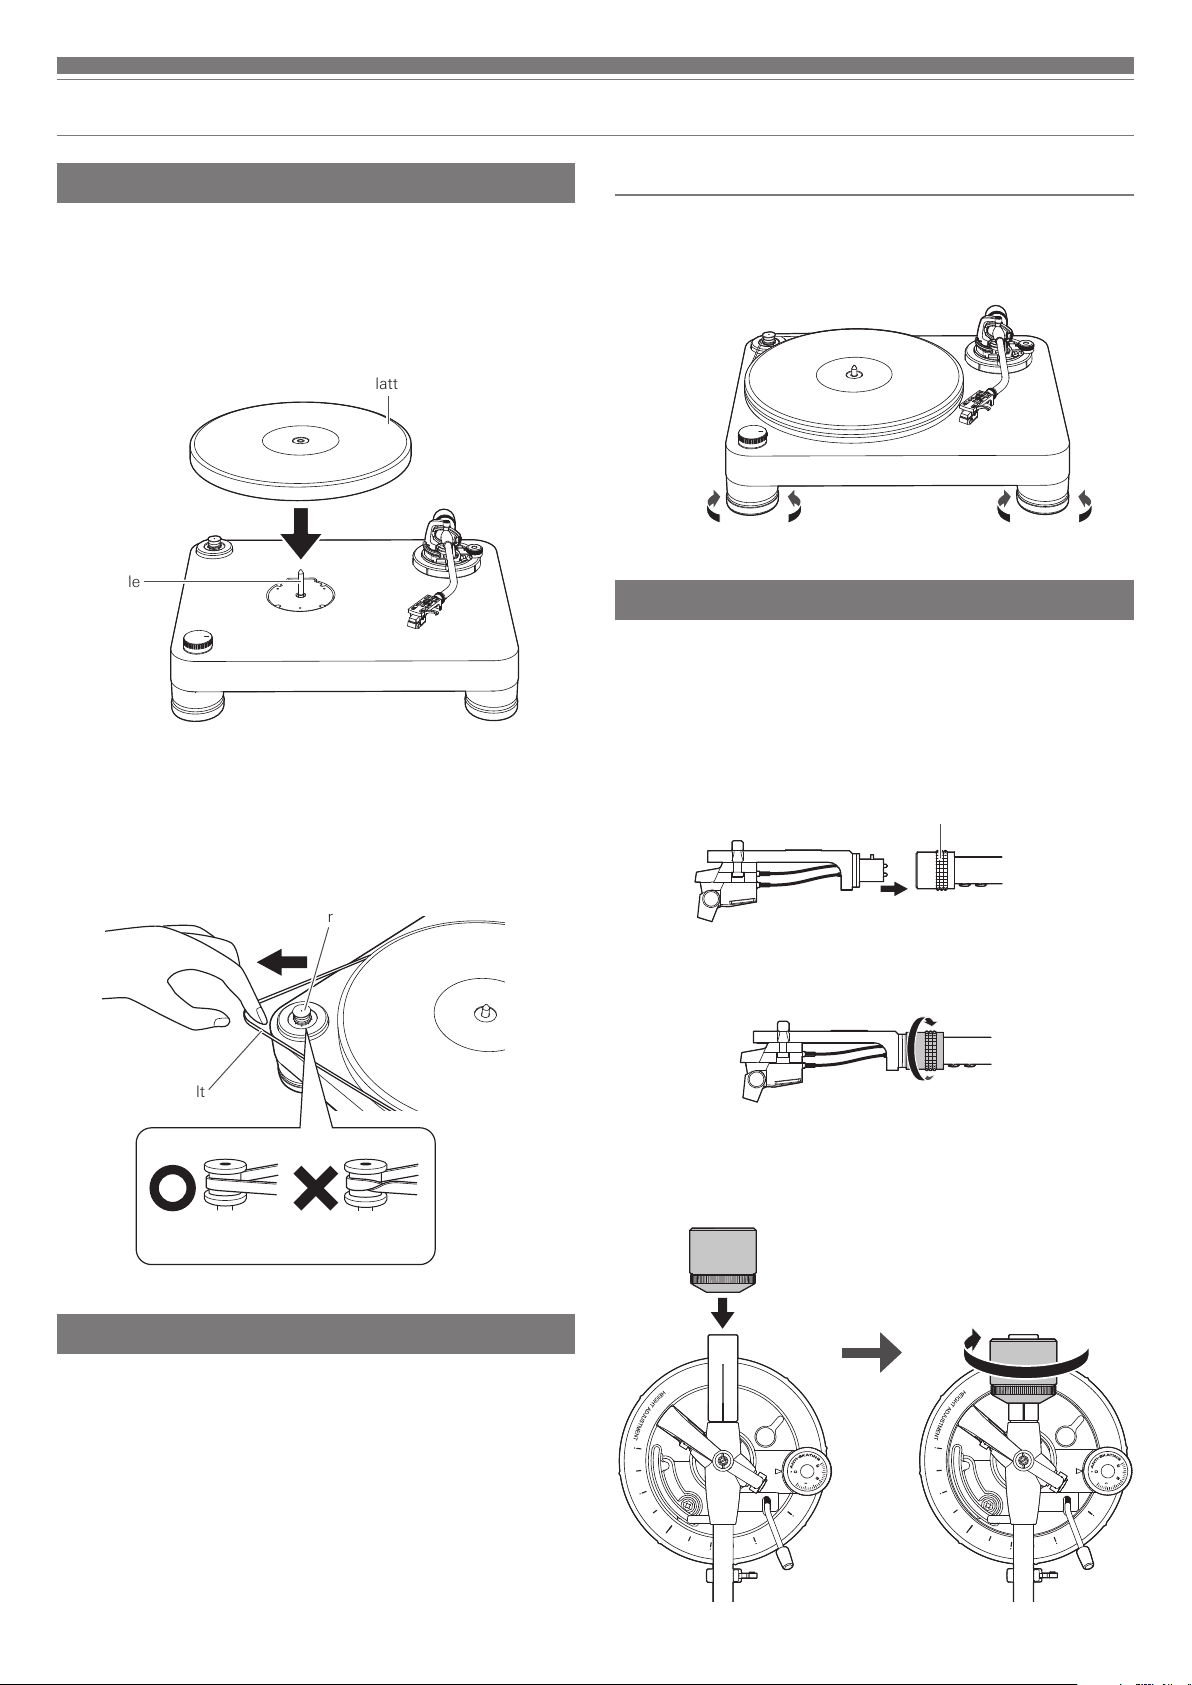
Preparation for use
Placing the platter
This product requires some assembly before using it for the first time.
Do not connect the AC adapter until assembly is complete.
1. Set the platter on the spindle.
• To avoid damaging the spindle when seating the platter, align the positions
of the spindle and the platter's hole, and then slowly seat the platter.
• Make certain that the platter is fully seated on the spindle.
Platter
Spindle
Leveling the turntable
1. After positioning the product where you want to use it, adjust the
feet so that the product is level.
• Use a level (sold separately) as needed to ensure that the product is level.
Assembling the tonearm
1. Remove the cable tie used to secure the tonearm at the time of
delivery.
• Use the clamp to temporarily secure the tonearm to the tonearm rest.
2. Insert the headshell into the tonearm.
• Hold the right and left edges of the headshell so that you do not damage
the stylus or cut the cartridge’s wires.
2. Attach the belt to the platter first, and then attach it to the motor
pulley.
•
Make sure that the belt does not get twisted.
Motor pulley
Belt
Untwisted Twisted
Setting up the turntable
• Position the product on a level surface.
• To avoid the effects of vibrations and acoustic pressure, do not
mount the product next to such items as speakers.
• The product may pick up radio static if placed next to a radio.
Therefore, try to keep the product away from radios.
• If the product is near equipment (cell phone, etc.) that emits strong
radio waves, noise may occur.
Locking ring
3. With the headshell inserted, turn the locking ring
counterclockwise (to the left).
4. With the tracking force gauge ring facing forward, attach the
counterweight to the back of the tonearm, and slowly turn it
counterclockwise (to the left).
5
Page 7

Preparation for use
Tonearm balance and tracking force
In order for the cartridge to pick up sound correctly from the record’s
grooves, the tonearm’s balance and tracking force must be adjusted
to fit the specifications of the cartridge. If the tonearm’s balance and
tracking force are not properly adjusted, the record or the cartridge’s
stylus may become damaged.
• Do not drag the cartridge’s stylus across the record or platter when
adjusting the tonearm’s balance or tracking force. Doing so may
damage the stylus.
Setting tonearm balance
1. While lightly holding the headshell so as not to move the
tonearm, remove the clamp.
• The tonearm is tilted because the balance has yet to be adjusted.
Clamp
Setting tracking force
1. While supporting the counterweight so that it does not move,
turn the tracking force gauge ring so that its “0” position lines up
with the centerline on the back of the tonearm.
• The tracking force is not adjusted simply by turning the tracking force
gauge ring.
Tracking force
gauge ring
Centerline
2. Turn the counterweight and the tracking force gauge ring
together counterclockwise (to the left) until the centerline value
matches the recommended tracking force value for the cartridge
you are using.
• Refer to the cartridge maker’s specifications for the recommended tracking
force value.
• The tracking force value for the cartridge provided with this product is 2.0 g.
EN
2. While still lightly holding the headshell, turn the counterweight to
adjust the tonearm’s balance.
• Adjust the balance so that the tonearm is level when you release the
headshell.
Tonearm Counterweight
Setting the anti-skate adjustment
While the record is playing, a force acts on the stylus tip to pull it
inward. This force can be counteracted by setting the same values for
anti-skate and the tracking force.
1. Adjust the anti-skate control dial to have the same value as the
tracking force value.
• The tracking force value for the cartridge provided with this product is 2.0 g.
Adjust so that tonearm is level
3. Return the tonearm to the tonearm rest.
6
Page 8

Preparation for use
Installing/removing the dust cover
• The dust cover is designed to protect the product's sensitive
components when the product is not in use. It should remain off
while records are playing.
• Using the dust cover during play may result in record damage or
sound degradation.
• Whenever putting on or taking off the dust cover, put it onto or take
it off of the body slowly.
Setting MM (VM)/MC Cartridge Selector Switch
If using a moving magnet (MM or VM) cartridge, set this switch to the
MM position. If using a moving coil (MC) cartridge, set this switch to
the MC position.
• This switch is set to the MM position at the time of purchase.
Because the cartridge (VM520EB) included with the product is a VM
stereo cartridge, keep the switch in the MM position as long as you
continue to use the cartridge.
• The RCA audio cable's red jack is for the right (R) channel, and the
white jack is for the left (L) channel.
With PHONO input*
Connectable
equipment
(amplifier, etc.)
With PHONO input*
Without PHONO input
To outlet
To outlet
Without PHONO input
Setting pre-amplifier selector switch
This product has a built-in phono equalizer function. You can use the
product, even if you do not have a phono amplifier or connectable
equipment with a built-in phono amplifier, by connecting an active
speaker, etc.
Use the pre-amplifier selector switch to set the output, as shown
below.
Connectable
equipment being
used
Device with phono
input
Device without
phono input
PC sound card LINE Sound card's line input
* An audio adapter (sold separately) may be required to connect the
RCA audio cable to the PC sound card's line input jack.
Position of
pre-amplifier
selector switch
PHONO Phono input jack and
LINE AUX or line input jack of
Where to connect the
RCA audio cable
ground (earth) terminal of
connectable equipment
connectable equipment
jack*
Connecting to connectable equipment (active
speakers, amplifiers, etc.)
* Depending on the equipment you are connecting, a ground (earth)
terminal may exist near the phono input jack. If this is the case,
connect to it using the ground line from the RCA audio cable. This
will help prevent a low humming noise that might otherwise be heard
during playback.
Connecting the AC adapter
This product does not have a power switch. A standby current is
always running through the product, even when it is not being used;
disconnect the AC adapter from the outlet when not using the product
for a long period of time.
1. Connect the AC adapter's cord to the AC inlet.
2. Plug the AC adapter into an outlet.
• Make sure that the control knob is in the "STOP" position.
• If you play a record immediately after plugging the AC adapter into an
outlet, the sound that is played may be garbled. Wait a short time (about
30 seconds) after plugging the AC adapter into the outlet before playing a
record.
Align the settings for the pre-amplifier selector switch and connect
the RCA audio cable to an input jack that is compatible with the
connectable equipment you are using (amplifier, receiver, active
speakers, sound card, etc.).
7
Page 9

Playing a record
STOP
Before playing a record
1. Return the cartridge's protector to its original up position.
• If the tonearm is fixed to the tonearm rest, remove the clamp.
Protector
2. Place the record on the platter so that the center hole aligns with
the spindle.
• If playing a 45 RPM record, attach the 45 RPM adapter (see the diagram to
the right below).
At 33-1/3 RPM At 45 RPM
Record
Platter
45-RPM
adapter
• Alternatively, you can skip steps 2 to 4, and use your fingers to lift the
headshell, move the tonearm over the desired location on the record, and
then place the headshell down to begin playing the record.
• Do not subject the product to strong impact during playback.
Pausing the record
EN
1. After lowering the volume of the amplifier, speakers, etc.,
sufficiently, lift the tonearm with the tonearm lift control lever.
Stopping the record
1. Lower the volume of the amplifier, speakers, etc., sufficiently.
2. Lift the tonearm lift control lever, return the tonearm to the
tonearm rest, and fix it with the clamp.
3. Turn the control knob to the "STOP" position.
• The platter slows down and rotation stops.
33
45
4. Remove the record after the platter has come to a complete stop.
Playing a record
Lower the volume of the amplifier, speakers, etc., sufficiently.
1. Use the control knob to select the speed.
• Select “33” for a 33-⁄ RPM record, or “45” for a 45 RPM record.
• The platter begins spinning.
2. Raise the tonearm by lifting the tonearm lift control lever to the
UP position.
Tonearm lift
control lever
3. Position the tonearm over the desired location (groove) on the
record.
• To prevent the record from becoming scratched or warped, remove it
after use.
• Do not use a platter other than the one provided.
• This product is not intended for DJs. Do not touch the record or the
platter while the record is playing.
Care
Turntable body
• When the turntable body is dirty or dusty, first disconnect the power
cable plug, and then wipe off the dirt and dust with a soft, dry cloth.
• Do not use benzenes, thinners, etc.
• When storing the product for a long time, disconnect the power
cable plug from the outlet and wrap the equipment in plastic; do not
allow it to become damp.
Stylus tip
• If dirt and grime are stuck to the stylus tip, clean it with a
commercially sold brush.
• We recommend using a stylus cleaner (sold separately) if the stylus
tip is considerably dirty. Clean the stylus tip by moving the brush
from the rear to the front of the stylus tip.
4. Lower the tonearm by moving the tonearm lift control lever to the
DOWN position. The tonearm descends slowly onto the record
and play begins.
8
Page 10

Replacing the stylus
Replacing a cartridge
Removing the stylus
• In addition to the deterioration of sound quality, records may also be
damaged as the cartridge’s stylus tip wears down.
• As a rule of thumb, replace the stylus after 300 hours of use.
• Be sure to disconnect the product’s power cable plug from the outlet.
1. Release the headshell from the tonearm.
• Fix the tonearm with the clamp and then remove the headshell gently.
2. After lowering the cartridge's protector, remove the stylus by
pulling in the direction of the arrow.
Lower
Pull
Installing a new replacement stylus
1. Mount the new replacement stylus to the cartridge.
Refer to the user manual for the cartridge that you will be using if you
are replacing the cartridge (VM520EB) included with this product with
another, commercially available cartridge. After you replace the old
cartridge with a new one, you must readjust the overhang and the
tonearm’s balance and tracking force.
1. Release the headshell from the tonearm.
• Use the clamp to secure the tonearm and then remove the headshell
gently.
2. Remove the stylus from the cartridge.
• Refer to “Removing the stylus” on p. 9.
3. Remove the lead tips.
• Be careful not to damage the lead tips.
4. Using a commercially sold, non-metallic slotted screwdriver,
remove the installation screws, and then remove the cartridge
from the headshell.
5. Refer to the user manual for the new cartridge for mounting
instructions and connecting to the lead tips.
Nuts
Plastic washers
Align the position of the inner
protrusion.
2. Mount the headshell onto the tonearm.
Installation screws
6. Using a commercially sold, non-metallic slotted screwdriver,
tighten the screws in both places, and then adjust the overhang.
• Refer to "Adjusting the overhang" on p. 11.
• After the adjustments are complete, tighten the screws securely.
7. Attach the headshell to the tone arm.
8. Adjust the tonearm's height.
• Refer to “Adjusting the tonearm's height” on p. 10 while doing the
adjustments.
9. Adjust the tonearm balance and tracking force.
• Refer to “Tonearm balance and tracking force” from p. 6.
9
Page 11

Replacing the belt
Adjusting the tonearm's height
• The belt is a consumable part. Replace the belt if the speed of
playback slows down or irregular rotation occurs. As a rule of thumb,
we suggest replacing the belt once a year.
• Before replacing the belt, be sure to disconnect the product’s power
cable plug from the outlet.
1. Remove the old belt.
2. Attach the new belt to the platter first, and then attach it to the
motor pulley.
• When attaching the belt to the motor pulley, make sure that the belt does
not get twisted.
When installing a cartridge other than the one provided, you must
maintain a suitable distance between the cartridge and the surface of
the record. Place the stylus on the record and confirm that the tonearm
is parallel to the record's surface. If it is not parallel, adjust the height
of the tonearm.
1. Rotate the tonearm's height setting lever to loosen the tonearm's
anchor.
2. Rotate the tonearm's height adjustment dial and adjust the
tonearm's height.
EN
Guideline
3. After the adjustments are complete, rotate the tonearm's height
setting lever to set the tonearm.
10
Page 12

Adjusting the overhang
The position of the cartridge must be accurately determined (adjusting the
overhang) when mounting a cartridge or headshell other than the one provided.
1. Mount the cartridge so it is parallel to the headshell.
Match up the positions of the cartridge and headshell to the figure
•
below and mount the cartridge so it is parallel to the headshell.
Overhang adjustment guide
This illustration represents the actual size.
Place the headshell on the figure below, and then adjust the stylus tip
of the new cartridge along the lines for the "Stylus tip" of the cartridge.
Underside of headshell
Stylus tip
50 mm
2. Mount the cartridge so it is perpendicular to the top of the
headshell.
Front of headshell
When the turntable is moved
Using the product's original packing materials, wrap the turntable in
the reverse order from when you unwrapped it. If you do not have the
packaging materials, take the following measures:
• After unplugging the power cable plug from the outlet, remove the
platter, and then wrap it so that it does not get damaged. If the product
is moved while the platter is still seated, it may damage the spindle.
• Fix the tonearm with the clamp.
• Remove the counterweight.
• Remove the headshell from the tonearm with the cartridge's protector
lowered, and then wrap the entire headshell assembly so that it does
not get damaged.
• Wrap the turntable body with paper or a soft cloth so that it does not
get damaged.
11
Page 13

Troubleshooting
Problem Solution
The platter does not spin. • Is the AC adapter connected to the outlet? Connect AC adapter to the outlet.
• Has the AC adapter's plug come off? Check whether or not the plug is properly attached to the AC adapter.
• Has the belt slipped from the platter? Correctly place the belt on the platter.
• Is the belt placed on the motor pulley? Check that the belt is placed on the motor pulley correctly.
• Has the belt been damaged? Replace it with a new belt.
The platter spins, but there is
no sound or the volume is not
loud enough.
The stylus skips. • Is the tracking force set too light? Adjust the tracking force.
There is howling. • Is the product picking up excessive vibrations from the floor, surfaces of the walls, or nearby speakers?
There is noise when the record
is playing.
The sound when the record is
playing is either too fast or too
slow.
Playing speed slows down or
there is irregular rotation.
Humming is heard during
playback.
• Are the function settings and input for connected equipment (amplifier, etc.) selected correctly? Check
whether the settings for the connected equipment are correct.
• Is the stylus damaged? Check the stylus and replace it, if necessary.
• Is the stylus placed correctly on the body of the cartridge? Check the cartridge and adjust it, if necessary.
• Are the setting positions for the pre-amplifier selector switch correct? Check that the pre-amplifier settings
are correct, noting the following common problems and their causes:
- If there is no sound, or if the volume is not loud enough, the product is set to the “PHONO” position
and connected to the amplifier’s AUX/LINE input.
- If the volume is too loud or is distorted, the product is set to the “LINE” position and connected to the
amplifier's PHONO input.
• Is the tracking force set too heavy? Adjust the tracking force.
• Is the anti-skate set improperly? Verify anti-skate is set for same value as cartridge tracking force.
• Is the record warped? Check the record.
• Is the record scratched? Check the record.
Decrease the vibrations or mount the product on a surface that is not subject to the effects of vibrations.
• Is the product mounted on an unstable surface? Check whether the surface on which the product is
mounted is suitable.
• Is there dust on the cartridge’s stylus tip? If dust is stuck to the stylus tip, clean it with a commercially
sold brush.
• Are the speed settings for the product correct? Use the control knob to select the correct speed for the
type of record being played.
• Is the belt stretched out? Replace it with a new belt.
• Is the ground line connected correctly? Make sure the ground line is properly connected.
• Is the headshell attached to the tonearm firmly? Make sure the locking ring is tight.
EN
Dimensions
352
450
157
(Unit: mm)
12
Page 14

Specifications
Turntable specifications
Type
Motor DC motor
Drive method Belt drive
Speeds 33-1/3 RPM, 45 RPM
Turntable platter POM (polyoxymethylene)
Wow and flutter < 0.08 % WRMS (33 RPM) at 3 kHz
Signal-to-noise ratio > 60 dB
Output levels
“PHONO”
“LINE (MM)”
Phono Pre-amp gain (MM)
Phono Pre-amp gain (MC)
Tonearm specifications
Type
Effective length 247 mm
Overhang 17 mm
Maximum tracking error angle Less than 2.5°
Stylus pressure adjustment
range
Applicable cartridge weight
range (including headshell)
Belt-drive manual turntable
4.5 mV nominal at 1 kHz, 5 cm/sec
280 mV nominal at 1 kHz, 5 cm/sec
36 dB nominal, RIAA equalized
56 dB nominal, RIAA equalized
Static balanced J-shaped tonearm
0 to 2.5 g
15 to 20 g
General specifications
Power supply requirements 100 to 240 V, 50/60 Hz, 0.6 A Max.
Power consumption 5.5 W
AC Adapter 12 V, 2 A
Dimensions 450 mm (17.72") × 352 mm (13.86")
× 157 mm (6.18")
(W × D × H)
Weight 8.3 kg (18.30 lbs) (without dust
cover)
Accessories included Dust cover, Platter, Drive belt,
Counterweight, Headshell (AT-HS10)
with VM stereo cartridge (VM520EB),
45-RPM adapter, RCA audio cable
(Approx. 1.4 m (4.6')), AC adapter
(Approx. 1.3 m (4.3')) (AD-SE1220KZ)
Replacement stylus (sold
separately)
Replacement headshell (sold
separately)
Replacement belt (sold
separately)
Specifications are subject to change without notice due to
improvements.
VMN20EB
AT-HS10
AT-LP7 exclusive belt
Cartridge and headshell specifications
Cartridge Model VM520EB
Cartridge Type VM Dual Magnet
Recommended load
impedance
Output voltage 4.5 mV (mV at 1 kHz, 5 cm/sec)
Stylus 0.3 × 0.7 mil bonded elliptical stylus
Cantilever Aluminum pipe
Tracking force range 1.8 to 2.2 g (standard 2.0 g)
Cartridge weight 6.4 g
Headshell model AT-HS10
Headshell weight 10 g (excluding lead wires)
Headshell overhang
adjustment
47,000 ohms
± 5 mm
13
Page 15

Memo
EN
14
Page 16

Visit our Web Site: www.audio-technica.com
One-Year Limited Warranty
Audio-Technica brand products purchased in the U.S.A. are warranted for one year from date of purchase by AudioTechnica U.S., Inc. (A.T.U.S.) to be free of defects in materials and workmanship. In event of such defect, product will be
repaired promptly without charge or, at our option, replaced with a new product of equal or superior value if delivered
to A.T.U.S. or an Authorized Service Center, prepaid, together with the sales slip or other proof of purchase date. Prior
approval from A.T.U.S. is required for return. This warranty excludes defects due to normal wear, abuse, shipping
damage, or failure to use product in accordance with instructions. This warranty is void in the event of unauthorized repair
or modification, or removal or defacing of the product labeling.
For return approval and shipping information, contact the Service Dept., Audio-Technica U.S., Inc., 1221 Commerce
Drive, Stow, Ohio 44224.
Except to the extent precluded by applicable state law, A.T.U.S. will have no liability for any consequential, incidental, or
special damages; any warranty of merchantability or tness for particular purpose expires when this warranty expires.
This warranty gives you specific legal rights, and you may have other rights which vary from state to state.
Outside the U.S.A., please contact your local dealer for warranty details.
Visitez notre site web : www.audio-technica.com
Garantie limitée de 1 an
Les produits de la marque Audio-Technica achetés aux États-Unis sont garantis pendant un an à compter de la date d’achat
contre tout défaut de matériau et de fabrication par Audio-Technica U.S., Inc. (A.T.U.S.). Dans l’éventualité d’un tel défaut, le
produit sera soit réparé gratuitement et dans les plus brefs délais, soit remplacé à notre convenance par un nouveau produit
d’une valeur égale ou supérieure. Le produit doit être retourné en port payé à A.T.U.S. ou à un centre agréé de service aprèsvente avec un ticket de caisse ou autre preuve de la date d’achat. Le renvoi ne peut avoir lieu sans l’accord préalable
de A.T.U.S. Cette garantie exclut les défauts liés à une usure normale, à un usage abusif, à tout incident survenu lors du
transport ou à une utilisation non conforme au mode d’emploi. Cette garantie n’est pas valable en cas de réparation ou de
modication effectuée par un personnel non agréé ou dans le cas où la marque du produit aurait été enlevée ou abîmée.
Pour obtenir notre accord pour le retour et pour tout renseignement concernant le transport, veuillez prendre contact
avec le département de service après-vente, Audio-Technica U.S., Inc., 1221 Commerce Drive, Stow, Ohio 44224.
A.T.U.S. ne sera pas tenu responsable des dommages indirects, accessoires ou spéciaux à moins que la loi applicable
de l’État n’en dispose autrement ; lorsque cette garantie expire, toute garantie de valeur marchande ou d’aptitude à
un usage particulier expire.
Cette garantie vous confère des droits spéciques ; il se peut par ailleurs que vous ayez d’autres droits qui varient d’un État
à l’autre.
En dehors des États-Unis, veuillez prendre contact avec votre revendeur local pour plus de détails concernant la garantie.
Visite nuestro sitio Web: www.audio-technica.com
Garantía limitada de un año
Audio-Technica U.S., Inc. (A.T.U.S.) ofrece una garantía de un año desde la fecha de compra en lo que se reere a materiales y
fabricación para todos los productos de la marca Audio-Technica adquiridos en Estados Unidos. En caso de que tenga algún
defecto, el producto será reparado inmediatamente sin cargo alguno o, según nuestro criterio, reemplazado por uno nuevo de
valor igual o superior, si se envía a A.T.U.S. o a un Centro de Servicio autorizado, franqueado y junto con el recibo de compra
u otro comprobante de la fecha de compra. Toda devolución requiere la autorización previa de A.T.U.S. Esta garantía
excluye defectos debidos al uso diario, al uso inapropiado, al transporte o a otros problemas que se produzcan por no utilizar
el producto según las instrucciones. Esta garantía no será válida en caso de reparaciones o modicaciones no autorizadas o si
se ha retirado la identificación del producto.
Para aprobación de devoluciones e información de envío, póngase en contacto con el Departamento de Servicio de
Audio-Technica U.S., Inc., 1221 Commerce Drive, Stow, Ohio 44224 (EE. UU.).
En la medida en que lo permita la ley aplicable del estado, A.T.U.S. renuncia a toda responsabilidad por los
daños especiales, incidentales, consecuentes o indirectos comoquiera que se produzcan; toda garantía de
comerciabilidad e idoneidad para un n determinado caduca al hacerlo esta garantía.
Esta garantía le otorga a usted derechos legales específicos y puede tener otros derechos que varían de un estado a otro.
Fuera de Estados Unidos, póngase en contacto con su distribuidor local para conocer los detalles de la garantía.
Page 17

Visite o nosso website: www.audio-technica.com
Garantia limitada de um ano
Produtos da marca Audio-Technica adquiridos nos EUA são garantidos por um ano a partir da compra pela AudioTechnica U.S., Inc. (A.T.U.S.) como livres de defeitos de materiais e mão de obra. No caso de tais defeitos, o produto será
reparado imediatamente, sem despesas, ou segundo a nossa opção, substituído por um produto novo de valor igual ou
superior se entregue para a A.T.U.S. ou para um Centro de Serviço Autorizado, pré-pago, juntamente com o recibo de
venda ou outro comprovante com a data da compra. Antes, a aprovação da A.T.U.S. é exigida para devolução.
Essa garantia exclui defeitos devido ao desgaste normal, abuso, danos devido ao transporte ou falha em usar o produto
de acordo com as instruções. Essa garantia será anulada no caso de reparo ou modificação não autorizados ou remoção
ou deformação do rótulo do produto.
Para aprovação de devolução e informações de envio, entre em contato com o Departamento de Serviço, AudioTechnica U.S., Inc., 1221 Commerce Drive, Stow, Ohio 44224.
Exceto até onde impedido pela lei estadual aplicável, a A .T.U.S. não terá responsabilidade por nenhum dano
consequencial, incidental ou especial; qualquer garantia de comercialização ou aptidão para um propósito
em particular expirará quando esta garantia expirar.
Esta garantia oferece a você direitos legais específicos e você poderá ter outros direitos que variam de estado para estado.
Fora dos EUA, favor entrar em contato com o seu revendedor local para os detalhes da garantia.
Page 18

Audio-Technica Corporation
2-46-1 Nishi-naruse, Machida, Tokyo 194-8666, Japan
©2017 Audio-Technica Corporation
Global Support Contact: www.at-globalsupport.com
162501140-01-01 ver.1 2017.11.01
 Loading...