


FF893
Cordless telephone with digital answering system
This equipment is not designed for making emergency telephone calls when the power fails. Alternative arrangements should be made for access to the emergency services.
User guide
Downloaded from: http://www.guardianalarms.net
AUDIOLINE FF893 |
SAFETY INFORMATION |
|
|
IMPORTANT INFORMATION
Use only AUDIOLINE approved cadmium-free NiMH rechargeable battery pack within the handset. Never use other packs. Your replacement packs are available from DORO Australia and many leading retailers.
Do not use any power supply except the one provided (Approval No. N/12462). Connection of any other adaptor could compromise the compliance with Australian/New Zealand standards.
This is a rechargeable product and it is normal that a certain amount of heat will be generated during the charging process. Whilst this is safe, it is recommended that this product is not placed on sensitive surfaces.
PARTS LIST
In the box you should find the following items:
# Handset |
• |
AC Adaptor |
# Base Unit |
• |
Line cord & adaptor plug |
# NiMH battery pack (3.6V 600mA/H) |
• |
User guide |
# Handset antenna |
• |
Wall mounting bracket |
Please contact your retailer if any item is missing or damaged.
CONTENTS |
AUDIOLINE FF893 |
|
|
LIST OF CONTENTS
Handset functions . . . . . . . . . . . . . . . . |
. . . . . . . . . . . . . . . . . . . . . . . . . . . . . . . . . 2 |
Base Unit functions . . . . . . . . . . . . . . |
. . . . . . . . . . . . . . . . . . . . . . . . . . . . . . . . . 3 |
Installation
Positioning the base unit . . . . . . . . . . . . . . . . . . . . . . . . . . . . . . . . . . . . . . . . . . . 4 Base installation . . . . . . . . . . . . . . . . . . . . . . . . . . . . . . . . . . . . . . . . . . . . . . . . . . . 4 Fitting back-up batteries . . . . . . . . . . . . . . . . . . . . . . . . . . . . . .. . . . . . . . . . . . . . . 4 Handset battery installation. . . . . . . . . . . . . . . . . . . . . . . . . . . . . . . . . . . . . . . . . . 5 Handset battery care. . . . . . . . . . . . . . . . . . . . . . . . . . . . . . . . . . . . . . . . . . . . . . . 5
Using the Telephone
Making a call. . . . . . . . . . . . . . . . . . . . . . . . . . . . . . . . . . . . . . . . . . . . . . . . . . . . . . 6 Receiving a call . . . . . . . . . . . . . . . . . . . . . . . . . . . . . . . . . . . . . . . . . . . . . . . . . . 6 Last number redial . . . . . . . . . . . . . . . . . . . . . . . . . . . . . . . . . . . . . . . . . . . . . . . . 6 Handset volume control . . . . . . . . . . . . . . . . . . . . . . . . . . . . . . . . . . . . . . . . . . . . . 6
Range warning . . . . . . . . . . . . . . . . . . . . . . . . . . . . . . . . . . . . . . . . . . . . . . . . . . . 7
Low battery indicator. . . . . . . . . . . . . . . . . . . . . . . . . . . . . . . . . . . . . . . . . . . . . . . . 7 Page/find handset . . . . . . . . . . . . . . . . . . . . . . . . . . . . . . . . . . . . . . . . . . . . . . . . 7 Incoming call during paging . . . . . . . . . . . . . . . . . . . . . . . . . . . . . . . . . . . . . . . . . 7
Ringer On/Off settings . . . . . . . . . . . . . . . . . . . . . . . . . . . . . . . . . . . . . . . . . . . . . . 7 Storing memory numbers. . . . . . . . . . . . . . . . . . . . . . . . . . . . . . . . . . . . . . . . . . . . 8 Dialling memory numbers . . . . . . . . . . . . . . . . . . . . . . . . . . . . . . . . . . . . . . . . . . . 8 Mute button . . . . . . . . . . . . . . . . . . . . . . . . . . . . . . . . . . . . . . . . . . . . . . . . . . . . . 8
Pause function. . . . . . . . . . . . . . . . . . . . . . . . . . . . 8 Call Waiting . . . . . . . . . . . . . . . . . . . . . . . . . . . . . . . . . . . . . . . . . . . . . . . . . . . . . . 9 Recall button . . . . . . . . . . . . . . . . . . . . . . . . . . . . . . . . . . . . . . . . . . . . . . . . . . . . 9 Scan button . . . . . . . . . . . . . . . . . . . . . . . . . . . . . . . . . . . . . . . . . . . . . . . . . . . . . 9
Using the Answering Machine
Setting the clock . . . . . . . . . . . . . . . . |
. . . . . . . . . . . . . . . . . . . . . . . . . . . . . . . . |
10 |
Answering system on/off . . . . . . . . . . |
. . . . . . . . . . . . . . . . . . . . . . . . . . . . . . . . . |
10 |
The outgoing messages (OGM) . . . . . |
. . . . . . . . . . . . . . . . . . . . . . . . . . . . . . . . . |
11 |
Message playback . . . . . . . . . . . . . . . |
. . . . . . . . . . . . . . . . . . . . . . . . . . . . . . . . . |
12 |
Message counter. . . . . . . . . . . . . . . . . |
. . . . . . . . . . . . . . . . . . . . . . . . . . . . . . . . |
12 |
Volume control . . . . . . . . . . . . . . . . . . . |
. . . . . . . . . . . . . . . . . . . . . . . . . . . . . . . |
12 |
Delete all old message. . . . . . . . . . . . . |
. . . . . . . . . . . . . . . . . . . . . . . . . . . . . . . . |
12 |
Memo recording . . . . . . . . . . . . . . . . . . |
. . . . . . . . . . . . . . . . . . . . . . . . . . . . . . . . |
1 3 |
2 way recording. . . . . . . . . . . . . . . . . |
. . . . . . . . . . . . . . . . . . . . . . . . . . . . . . . . |
13 |
Answering calls. . . . . . . . . . . . . . . . . . . . . . . . . . . . . . . . . . . . . . . . . . . . . . . . . |
13 |
|
Remote access . . . . . . . . . . . . . . . . . . . |
. . . . . . . , |
.14 |
Memory full . . . . . . . . . . . . . . . . . . . |
. . . . . . . . . . . . . . . . . . . . . . . . . . . . . . . . |
15 |
LED indications for the answering system . . . . ... |
15 |
|
Troubleshooting . . . . . . . . . . . . . . . . . . . |
. . . . . . . . . . . . . . . . . . . . . . . . . . . . . . |
16 |
Warning . . . . . . . . . . . . . . . . . . . . . . |
. . . . . . . . . . . . . . . . . . . . . . . . . . . . . . . . |
17 |
REN, Cleaning & Gurantee . . . . . . . |
. . . . . . . .. |
18 |
Wall bracket installation guide. . . . . . . . . |
. . . . . . . . . . . . . . . . . . . . . . . . . . . . . . |
19 |
Notes for Operation in New Zealand . . |
. . . . . . . . . . . . . . . . . . . . . . . . . . . . . . |
20 |
1
AUDIOLINE FF893 |
INSTALLATION |
|
|
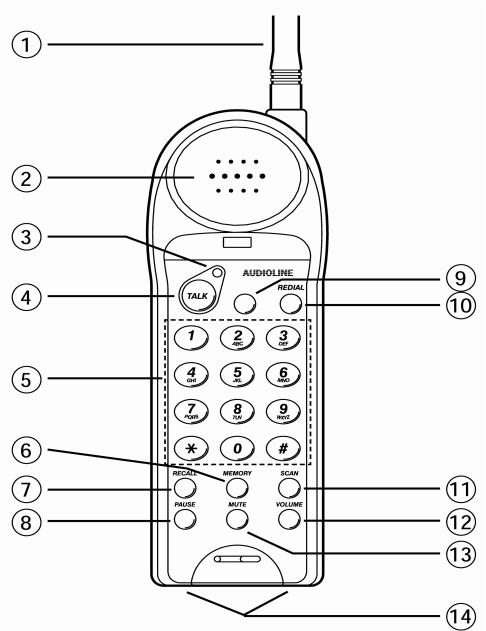
HANDSET FUNCTIONS
1. |
Antenna |
9. |
Call Waiting button |
2. |
Earpiece |
10. |
Redial button |
3. |
Talk LED |
11. |
Scan button |
4. |
Talk Button |
12. |
Volume button |
5. |
Keypad |
13. |
Mute button |
6. |
Memory button |
14. |
Charging contacts |
7.Recall button
8.Pause button
2

INSTALLATION |
AUDIOLINE FF893 |
|
|
BASE UNIT FUNCTIONS
1. |
L |
|
ou |
|
d speaker |
7. |
In use / Charge LED |
2. |
Speaker Volume control |
8. |
Microphone |
3. |
Answer ON/Off, Message LED |
9. |
T/S, 6, 2 ring select |
4. |
Answering machine function keys |
10. |
180/ 60 Incoming message time |
5. |
Page button |
11. |
Ringer On/Off switch |
6. |
Power / Low Battery LED |
12. |
Connect to the FF893 power supply |
|
|
13. |
Connect to the telephone line |
3

AUDIOLINE FF893 |
INSTALLATION |
POSITIONING THE BASE UNIT
It is essential for best performance of the telephone system that the base unit be positioned properly in your home or office.
Place the base unit close to a telephone network socket and a 230/240 volt mains outlet.
If the range of operation between the handset and the base unit is not satisfactory, try repositioning the base unit, but:
#Do not position the unit in direct sunlight, damp or high humidity locations.
#Do not position the unit close to: electrical equipment such as TV’s, computers, fridges, etc., or close to radiators, metal pipes or window frames.
BASE INSTALLATION
Connect the power supply cord to the rear of the base unit and plug into the 230/240 volt mains outlet.
You will hear “Please wait”and the answer ON/OFF and power LEDs will flash for around 25 seconds, then a confirmation tone will be heard.
FITTING BACK-UP BATTERIES IN BASE UNIT
It is essential to fit four “AAA” size 1.5v Alkaline batteries (not rechargeable type) to ensure your messages are not lost during a mains power failure. Note, batteries not included. To install or replace batteries do the following:
#Disconnect the line cord from the telephone.
#Locate battery compartment on underside of base unit.
#Insert blunt instrument into small square hole and prise cover gently open.
#Insert batteries observing correct polarity.
#Replace battery cover.
#Reconnect telephone cord.
NOTE: The POWER/LOW BAT indicator will flash continuously if back-up batteries are not fitted or are discharged.
4

INSTALLATION |
AUDIOLINE FF893 |
|
|
HANDSET BATTERY INSTALLATION
To install or change the battery do the following:
#Remove the battery cover by applying gentle pressure to the rear of the handset and slide downwards.
#Insert the battery (supplied), observing correct polarity (ensure red wire is on left hand side) and replace the battery cover. FIT the aerial to the handset.
#Place handset onto base unit (face up or down) and charge for 14 hours. The telephone should not be used during this time.
#Connect the telephone line cord to the rear of the base unit and plug into the telephone network socket.
#Your FF893 is now ready for use.
HANDSET BATTERY CARE
For maximum life from your battery, do the following:
#After initial charging the base unit must remain connected to the mains power.
#If the telephone is not to be used for a substantial period of time, i.e. holidays, disconnect the mains power adaptor.
#When power is reconnected you must recharge the handset for 14 hours.
#To maintain optimum condition, discharge the batteries fully every 4 months, and then recharge for 14 hours.
#The batteries will need replacing if there are signs of leakage, or the batteries will not hold a charge for more than two hours.
NOTE: From new, the batteries after they have been installed, must be charged for 14 hours without interruption.
Use only AUDIOLINE approved cadmium-free Nickel Metal Hydride (NiMH) rechargeable batteries. The guarantee will be invalid if any problems arise as a result of the use of an incorrectly specified battery.
5
 Loading...