

Page 1
SUB OUT
www.audioengineusa.com
W3
Premium Wireless Audio Adapter
Safety Information
Information for Users on Disposal of Old
Equipment
[European Union]
This symbol indicates that the electrical and
electronic equipment should not be
disposed as general household waste at its
Attention:
This symbol is
only valid in the
European Union.
By disposing of this product correctly, you will help to
conserve natural resources and will help prevent potential
negative effects on the environment and human health that
could otherwise be caused by inappropriate waste handling
of this product. For more information about collection point
and recycling of this product, please contact your local
municipal office, your household waste disposal service or
the shop where you purchased the product.
Introduction
Welcome to the Audioengine family and congratulations on
your purchase of the Audioengine W3 Premium Wireless
Audio Adapter!
The Audioengine team is dedicated to bringing you the
highest-quality listening experience possible and the W3 was
designed with the same attention to detail and operational
end-of-life. Instead, the product should be
handed over to the applicable collection
point for the recycling in accordance with
your national legislation.
1
Setup Guide
V03
Penalties may be applicable for incorrect disposal of this
waste, in accordance with national legislation.
[Other Countries outside the European Union]
If you wish to dispose of this product, please do so in accordance
with applicable national legislation or other rules in your country
for the treatment of old electrical and electronic equipment.
FCC
This device complies with Part 15 of the FCC Rules Operation
that is subject to following two conditions:
(1) This device may not cause harmful interference and,
(2) This device mus t acc ept any interference received ,
including interference that may cause undesired operation.
Warning: Changes or modifications to this unit not
expressly approved by the party responsible for compliance
could void the user authority to operate the equipment.
simplicity as other Audioengine products. Our goal is to get
you to your music as quickly as possible, without all the
“gadget tinkering” that so many other products require.
We wish to thank our customers, distributors, and resellers
for helping us create another quality Audioengine product.
What’s in the box Cleaning
Wireless Audio Sender
Wireless Audio Receiver
(1) Power adapter
(1) RCA adapter “Y” cable
(2) Mini-jack (3.5mm) audio cables
Setup Guide
Your W3 components are not water-resistant, so it's
important that they should be kept free of moisture. You
should clean only with a dry cloth or tissue and no liquid
cleaners or solvents should be used.
Features
Easy setup - connects in seconds
Works with Mac or PC - or without a computer
Plug-n-play - no software or downloads to install
Super-compact size, no batteries required
Plays all music formats from any media player
100 ft (30m) typical range with no signal delay, dropouts, or
interference
CD-quality, 16-bit stereo sound with no added compression
Simultaneously broadcast to up to 4 W3 Receivers
Replaces any RCA or mini-jack (3.5mm) audio cable
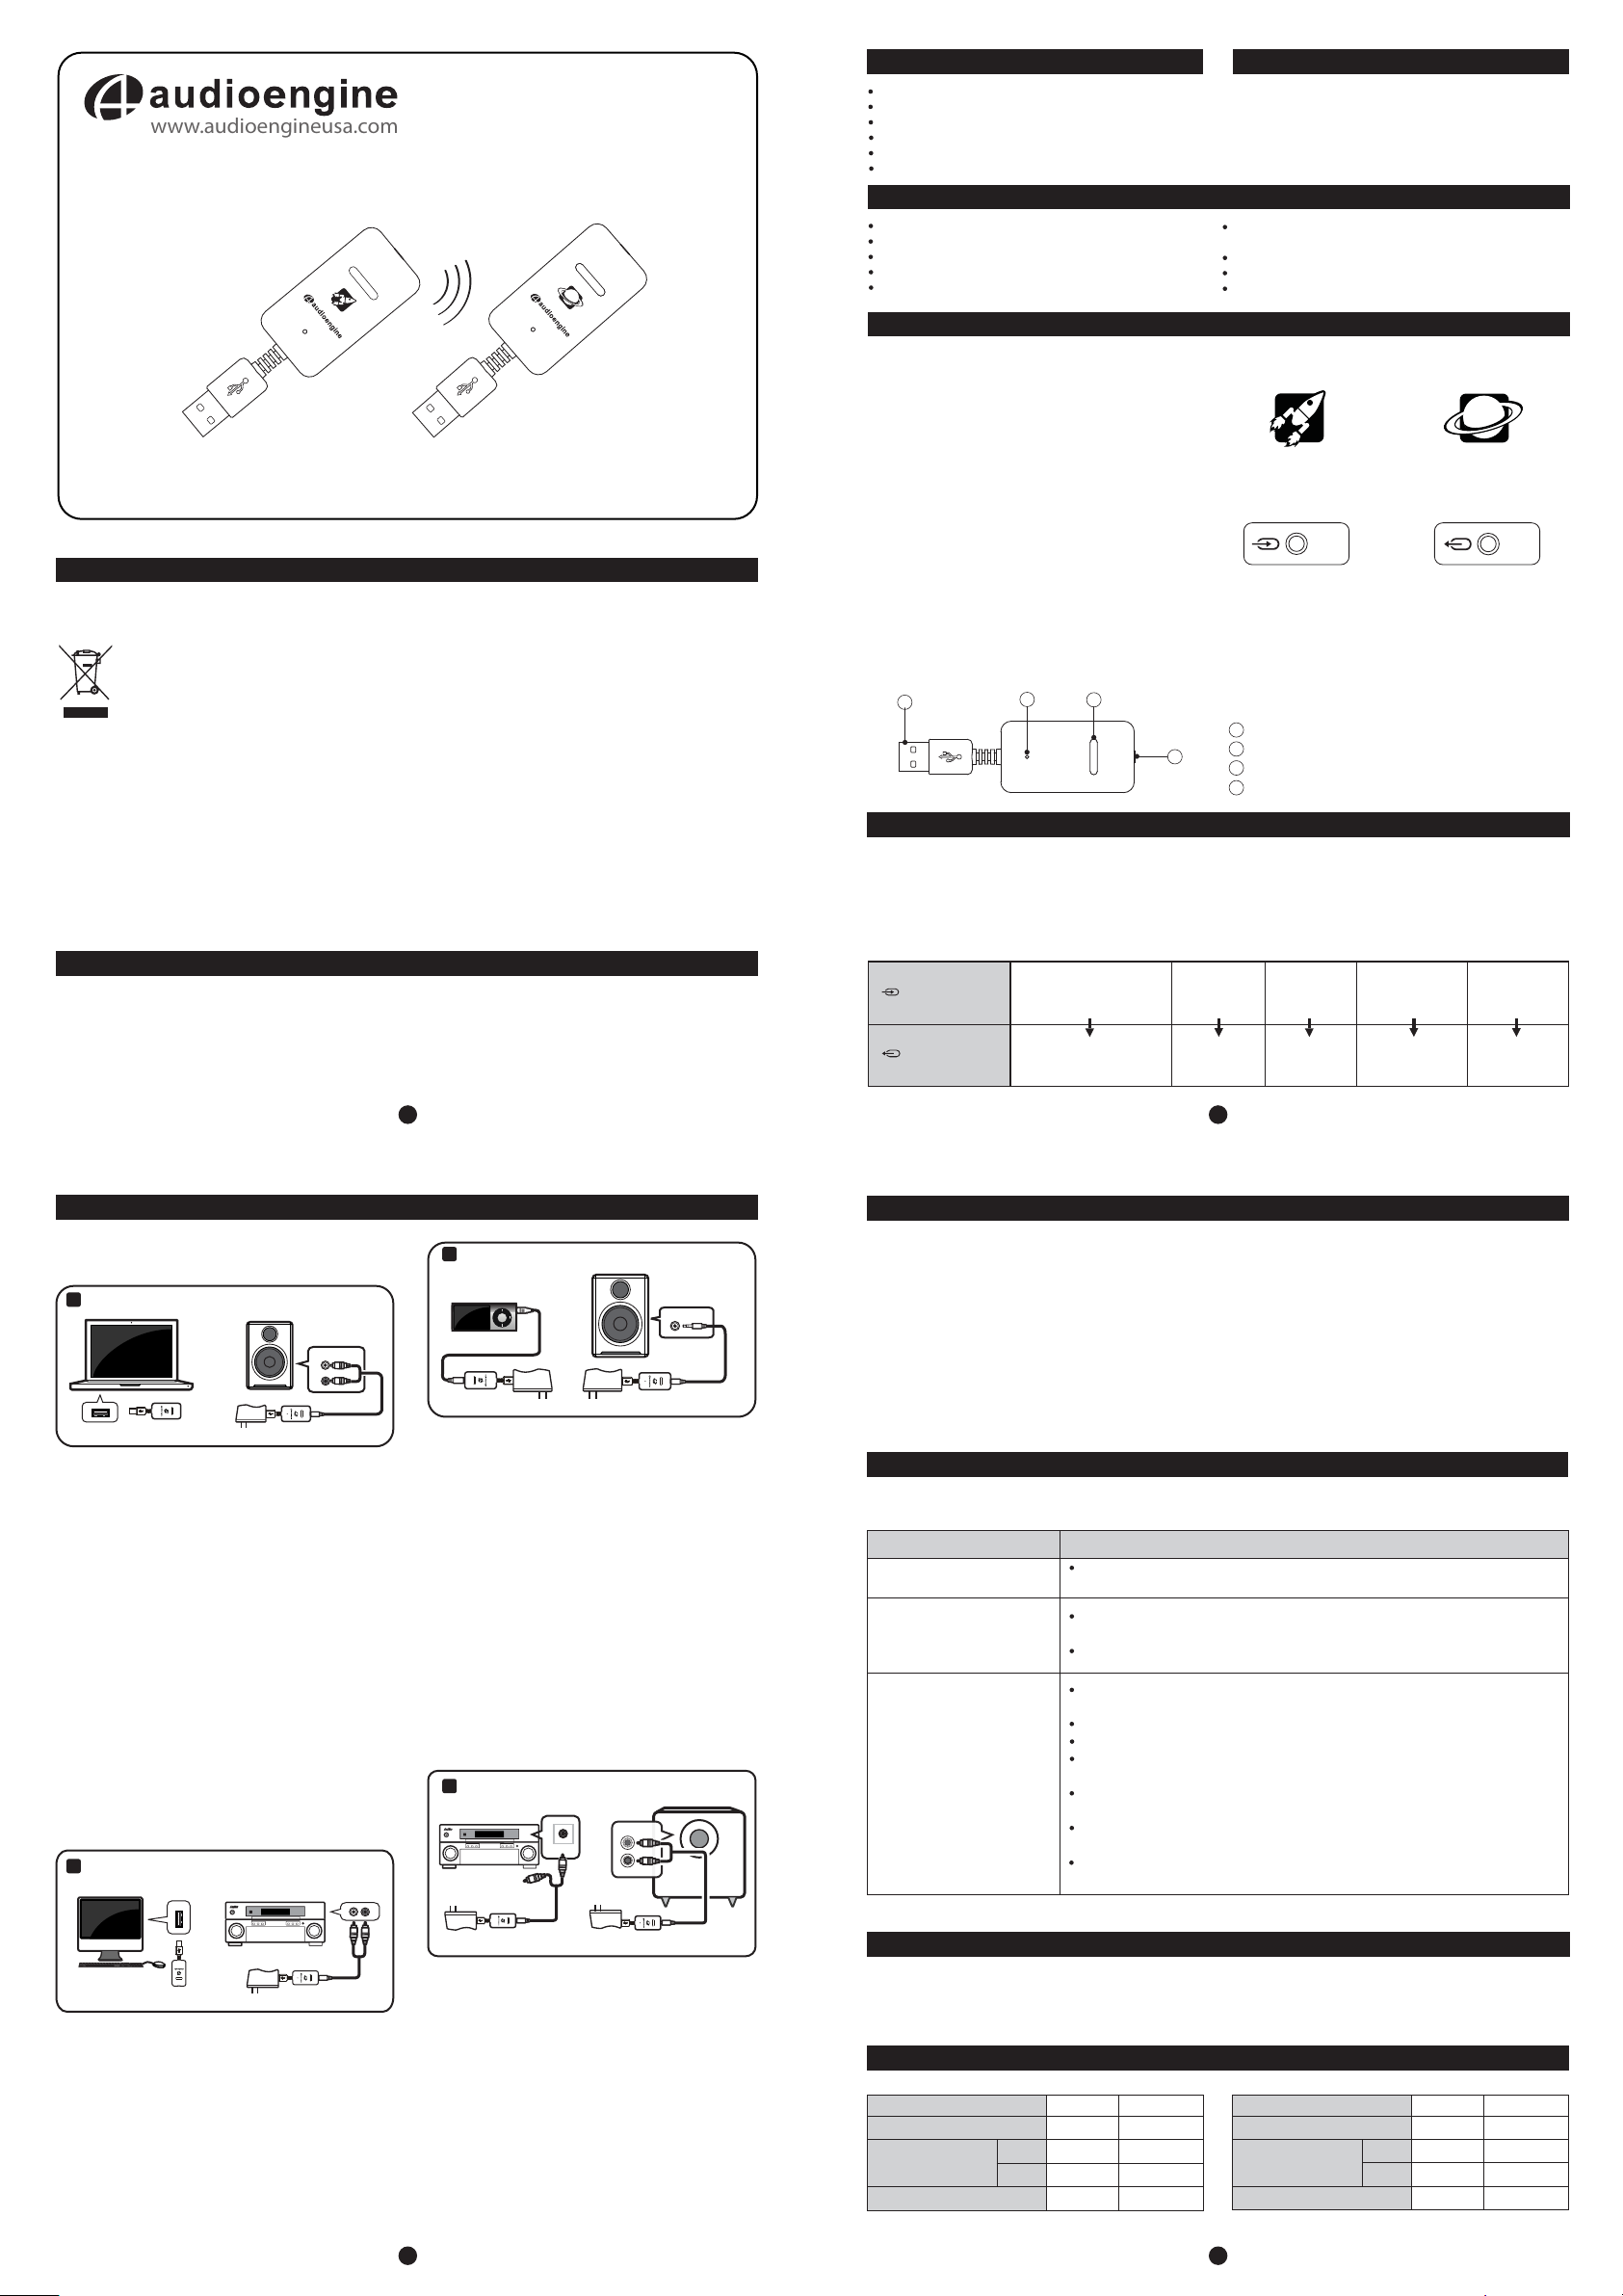
Functional Overview
The W3 set consists of 2 dongles, the Sender and Receiver.
The W3 Sender connects to your computer (or any audio
source) and transmits stereo sound automatically to the
W3 Receiver. The Receiver can be connected to any gear
with an analog audio input, such as powered speakers,
a boombox, stereo system, subwoofer, etc. You can mixand-match different Senders and Receivers, broadcast
to up to four W3 Receivers or "daisy-chain" multiple sets,
which is an inexpensive way to set up a high-quality,
whole-house wireless music system.
Power for the devices is provided from a USB computer
port for the Sender, from the included power adapter,
or any adapter with a USB connector, such as an
iPhone charger, for example. Another power source for
the W3 Receiver is the Audioengine 5+ powered
speaker system which has a built-in USB charge/power port.
Note: The W3 Sender and Receiver each have USB connectors, however only the Sender can accept USB audio from
a computer. The Receiver's USB connector is simply for
powering the device as USB adapters are widely-available.
1
2
3
4
The Sender and Receiver dongles look identical however
you can tell them apart by these markings:
The end of each unit has an audio input or output connector, shown with these symbols:
Sender (End View)
The symbol on the Sender (above left) with the arrow pointing
inward indicates an audio input from a computer, iDevice, CD
player, etc.
The symbol on the Receiver (above right) with the arrow point-
ing out indicates an audio output from the W3 Receiver that
connects to the input of any audio system.
1 USB connector (audio for Sender, power only for Receiver)
2 Power/Pair indicator
3 Pair button
4 Audio jack (input for Sender, output for Receiver)
General Setup
Setup is really simple. The W3 Sender needs power and
an audio input (either USB audio or audio into the
mini-jack input on the end of the Sender). The W3 Receiver
also needs power and a place to send the audio to, such
as Audioengine 5+ powered speakers or any audio system.
Possible configurations:
W3 Sender
W3 Receiver
Computer (Mac or PC)
AV Receiver
There are many ways to use the W3 Premium Wireless
Audio Adapter. Some possible configurations are listed here
and a few specific examples are shown in the Configuration
section. These are by no means all the possible uses - they
are just shown to give ideas for your own setup.
iDevice
Powered
Speakers
Digital music
AV Receiver
2
player
Receiver (End View)
AV Receiver
(rear speakers)
Powered Speakers
(for rear surround)
revieceRredneS
AV Receiver
(subwoofer out)
Powered
Subwoofer
Configurations
Shown here are examples of some common W3 wireless
configurations and setup instructions for each:
1 Computer USB Audio to Powered Speakers
MacBook
Sender
Note: If using Audioengine 5+ (A5+) powered speakers the
A5+ USB power port can be used to power the W3 Receiver.
1) Connect the W3 Sender to your computer's USB port.
2) For PC wait for the USB audio connection to be detected.
For Mac OS, open System Preferences/Sound, select
Output, then select “Audioengine W3”.
3) Connect the W3 Receiver to the included power
adapter and plug the adapter into a power outlet.
4) Connect a mini-jack or RCA audio cable from the W3
Receiver to your powered speaker’s audio input.
5) The status indicators on the Sender and Receiver will
blink briefly and then go solid, indicating that they
are paired.
6) Play your music!
Note: If using W3 for USB computer audio there is no need
to connect an audio cable from the W3 Sender to your
computer's headphone output. Doing so may create a
ground loop resulting in unwanted noise.
2 Computer to any Audio System
USB
Sender
1) Follow steps 1 thru 3 above.
2) Connect the included RCA “Y” adapter interface
cable to the W3 Receiver audio output.
3) Connect an RCA cable (not included) from your
stereo receiver's RCA inputs to the RCA “Y” adapter.
4) The status indicators on the Sender and Receiver will
blink briefly and then go solid, indicating that they
are paired.
5) Play your music!
Receiver
Receiver
How to Pair
3
iDevice to Powered Speakers
Up to four W3 Receivers may be paired with one Sender,
allowing the Sender to simultaneously broadcast audio
to all Receivers, with no degradation of the audio signal.
MENU
INPUT
L
R
Sender
you have Audioengine 5+ powered speakers, you
Note: If
INPUT
Receiver
may use the built-in USB power/charge port on the A5+ to
power the W3 Receiver. Otherwise, you can use an iPhone
W3 Sender and Receiver sets packaged together are
already paired, so if you're only using one set they
will remember each other and no further configuration
is needed.
However, if you wish to add more Receivers, the following
procedure explains how to add additional W3 Receivers to
a Sender (or how to pair a Receiver to another Sender).
Troubleshooting
charger or purchase an extra Audioengine power adapter.
1) Connect the included mini-jack cable from your
Here are some tips to try if your W3 is not performing as it should.
iDevice to the W3 Sender audio input.
2) Connect the W3 Sender to the included power
adapter and plug the adapter into a power outlet.
3) Connect the included mini-jack cable from the W3
Receiver output to the powered speaker’s audio input.
4) Connect the W3 Receiver to another power adapter
(1 power adapter is included, others sold separately).
5) Plug the power adapter into an AC outlet.
6) The status indicators on the Sender and Receiver
will blink briefly and then go solid, indicating that
they are paired.
7) Play your music!
Wireless Rear Speakers and/or Subwoofer
4
Sender and/or Receiver status
indicators are not lit:
Sender and Receiver status
indicators are both blinking:
Sender and Receiver status
indicators are both solidly lit,
but no audio:
Check that the Sender and Receiver are connected to power (from a USB port and/
or power adapter).
If using a computer, verify that the Sender (and not the Receiver) is connected to
the computer’s USB port.
Repeat the Sender/Receiver pairing process (see “How to Pair” above).
Check that the Sender is connected to the desired audio source and the Receiver's
output is connected to the correct audio input.
Check that all cables are properly connected. Unplug and reconnect each to verify.
Check that your desired audio output source (into the Sender) is present.
Check that the Receiver's output is connected to the device which is powered on
and working.
If connected to a computer, verify that USB Audio Device “Audioengine W3” is
selected in your system (see “Configurations” #1).
INPUT
If connected to a computer and using iTunes, verify that “Computer” is selected in
the lower right corner of iTunes.
If using a computer, check that the Sender (not the Receiver) is connected to
the computer’s USB port.
INPUT
L R
Sender
1) Connect the W3 Sender and W3 Receiver to power
adapters and plug each into a power outlet.
2) Connect your surround sound AV receiver’s rear channel
Receiver
Support
If you have any questions or feel you may need service, contact us via email: support@audioengineusa.com
or call toll-free in the United States: (877) 853-4447
(or subwoofer) RCA outputs to the W3 Sender input.
3) Connect the W3 Receiver to your powered rear
channel speakers (or subwoofer).
4) The status indicators on the Sender and Receiver will
blink briefly and then go solid, indicating that they
are paired.
5) Play your music!
Note: To set up wireless rear channel speakers AND a wireless subwoofer from your surround system, simply add
another W3 Sender/Receiver pair and repeat the previous
Technical Specifications
20 Hz
20 kHz
Condition
mV
dB
dB
%
Item
Output level
Frequency Response
(1 kHz = 0 dB)
THD+N
Specification
1.0V
0
-0.4
<0.01
instructions.
3
Pairing a Sender and Receiver:
1) Press and release the pair button on the W3 Sender and
the the status indicator will blink rapidly.
2) Go to the W3 Receiver and press and release the pair
button on the Receiver.
3) Both Sender and Receiver status indicators will turn solid,
indicating they are now paired.
4) Repeat these steps to add additional Receivers.
Once a Sender and Receiver are paired, they will remember
each other.
spiTsmelborP
dB
dB
dB
m
Specification
92
70
70
>30
Item
Signal - Noise Ratio
Channel Separation
Effective Distance (typical)
Condition
L > R
R > L
4
 Loading...