

Page 1
Premium Powered 8" Subwoofer
Setup Guide
Audioengine, Ltd.
www.audioengineusa.com
© 2008 Audioengine Corp. All Rights Reserved.
Copyright Notice
Audioengine and Audioengine Sub 8 are trademarks of Audioengine Ltd.
Page 2
Contents
Basic Safety Instructions
Safety Information Page 1
Basic Information Page 2
Introduction
Unpacking
Box Contents
Cleaning
Placement Page 3
Features Page 4
Controls Pages 4-7
Connections Pages 8-10
Setup Diagrams
Final Adjustments Page 11
Troubleshooting Pages 12-14
Warranty Information Page 8
Specications Page 15
Materials and Construction
Company Information Page 16
Support
Read these instructions for all components before using this
•
product.
• Keep these instructions for future reference.
• Heed all warnings on the product and in the owner's guide.
• Follow all instructions.
• Do not use this apparatus near water or moisture. Do not use
this product near a bathtub, washbowl, kitchen sink, laundry
tub, in a wet basement, near a swimming pool, or anywhere
else that water or moisture are present.
• Clean only with a dry cloth and as directed by the
manufacturer. Unplug this product from the wall outlet
before cleaning.
• Do not block any ventilation openings. Install in accordance
with the manufacturer's instructions. To ensure reliable
operation of the product and to protect it from overheating,
put the product in a position and location that will not
interfere with its proper ventilation. For example, do not
place the product on a bed, sofa, or similar surface that may
block the ventilation openings. Do not put it in a built-in
system, such as a bookcase or a cabinet that may keep air
from owing through its ventilation openings.
• Do not install near any heat sources, such as radiators, heat
registers, stoves or other apparatus that produce heat.
• Do not defeat the safety purpose of the polarized or
grounding-type plug. A polarized plug has two blades with
one wider than the other. A grounding-type plug has two
blades and a third grounding prong. The wider blade or third
prong are provided for your safety. If the provided plug does
not t in your outlet, consult an electrician for replacement of
the obsolete outlet.
• Protect the power cord from being walked on or pinched,
particularly at plugs, convenience receptacles, and the point
where they exit from the apparatus.
• Only use attachments or accessories specied by the
manufacturer.
• Use only with the cart, stand, tripod, bracket or table
specied by the manufacturer or sold with the apparatus.
When a cart is used, use caution when moving the cart/
apparatus combination to avoid injury from tip-over.
• Unplug this apparatus during lightning storms or when
unused for long periods of time to prevent damage to this
product.
• Refer all servicing to qualied service personnel.
• Servicing is required when the apparatus has been damaged
in any way such as power supply cord or plug is damaged,
liquid has been spilled or objects have fallen into the
apparatus, the apparatus has been exposed to rain or
moisture, does not operate normally, or has been dropped.
Do not attempt to service this product yourself. Opening or
removing covers may expose you to dangerous voltages or
other hazards. Please contact the manufacturer to be referred
to an authorized service center near you.
• To prevent risk of re or electric shock, avoid over loading
wall outlets, extension cords, or integral convenience
receptacles .
• Do not let objects or liquids enter the product as they may
touch dangerous voltage points or short out parts that could
result in a re or electric shock.
• See product enclosure bottom for safety related markings.
• Use Proper Power Sources. Plug the product into a proper
power source, as described in the operating instructions or as
marked on the product.
• Avoid power lines– Use extreme care when installing an
outside antenna system to keep from touching power lines or
circuits, as contact with them may be fatal. Do not install
external antennas near overhead power lines or other electric
light or power circuits, nor where an antenna can fall into
such circuits or power lines.
This device complies with part 15 of the FCC Rules.
Operation is subject to the following two conditions: This device
may not cause harmful interference and this device must accept
any interference received, including interference that may cause
undesired operation.
CAUTION
RISK OF ELECTRICAL SHOCK
DO NOT OPEN
CAUTION: TO REDUCE THE RISK OF ELECTRIC SHOCK,
DO NOT REMOVE COVER (OR BACK.)
NO USER-SERVICABLE PARTS INSIDE.
REFER SERVICING TO QUALIFIED PERSONNEL
AVIS
RISQUE DE CHOC ÉLECTRIQUE
NE PAS OUVRIR
ATTENTION: POUR RÉDUIRE LE RISQUE DE DÉCHARGE
ÉLECTIQUE, NE RETIREZ PAS LE COUVERCLE (OU
L’ARRIÈRE.) IL NE SE TROUVE ÀL’INTÉRIEURAUCUNE
PIÉCE POUVANT ÊTRE RÉPARÉE PAR L’USAGER.
S’ADRESSER ÀUN REÉPARATEUR COMÉTENT.
audioengine S8 setup guideaudioengine S8 setup guide 1
Page 3
Introduction
Placement
Welcome to the Audioengine family and congratulations on your purchase
of the Audioengine S8 Premium Powered 8" Subwoofer. The Audioengine
team is dedicated to bringing you the highest quality listening experience
possible and the Audioengine S8 (AS8) is designed with the same attention
to detail and operational simplicity as other Audioengine products. Our
goal is to get you to your music as simply as possible without all the “gadget
tinkering” that other products generally require. As with our other past
eorts, we thank all our customers and resellers for helping us create
another great Audioengine product!
Unpacking
Your Audioengine speakers were carefully tested and inspected before
packaging and shipping. After unpacking please check for any damage. It is
rare that a unit is damaged during shipping, but if this does happen contact
the shipping company immediately. We recommend that you keep the
original carton and packing material for any possible future shipping.
Box Contents
• AS8 Powered Subwoofer
• AC power cable
• 1/8” mini-jack audio cable, 2 meters (~6.5 feet)
• RCA audio cable, 2 meters (~6.5 feet)
• Drawstring cable bag
• Drawstring subwoofer bag
• Setup guide
Cleaning
Your AS8 subwoofer is designed for years of use with no maintenance as
long as you avoid exposure of the AS8 to moisture or high temperatures.
The hand-nished MDF wood cabinets are very durable and are easily
cleaned by wiping down with a soft, dry cloth. We do not recommend
using cleaners or solvents.
We think you’ll nd your AS8 to be forgiving with regards to room placement
and control settings, so if you’re not an audio expert don't be intimidated by
setting up your subwoofer. The most important thing to remember is there
really is no right or wrong room placement for your AS8, but hopefully the
simple tips that follow will be useful.
As subwoofers produce audio in a frequency range below 100Hz, it’s dicult
to hear where these low sounds are coming from, which is why subwoofer
placement is not critical. Room size and construction along with furniture
and oor coverings do make a dierence, however, so try dierent locations
while listening to some of your favorite music to get an idea of how placement aects the sound.
Here are 3 room locations to try out:
1 In a corner– which will usually increase subwoofer loudness. Typically the
front right and left corners sound the most natural, though rear corner
placement is also an option.
2 Along a wall– which tends to give moderate bass performance with
increased audio quality over corner placement.
3 Alongside one of the front speakers– which may blend better with the
overall system, but can also sacrice some subwoofer loudness.
Note: We recommend at least 3 inches of clearance around cabinet with good
air circulation. Never cover the subwoofer or place it where the built-in
amplier could be covered.
audioengine S8 setup guideaudioengine S8 setup guide2
3
Page 4
Audioengine S8 Features
LFE IN
FOR 110–120V: T3.15AL
FOR 220–240V: T2AL
110–120V 2.5A
~AC
220–240V 1.6A 60Hz/50Hz
Replace with
same rating
and type
AS8
120W MAX
AUX OUTLET
Unswitched
110–120VAC 60Hz 1A
220–240VAC 50Hz 0.5A
INPUTS
A
L
R
B
OUTPUT
AC SELECT
• Super-compact size
• 8" custom downring woofer
• Wireless-ready!
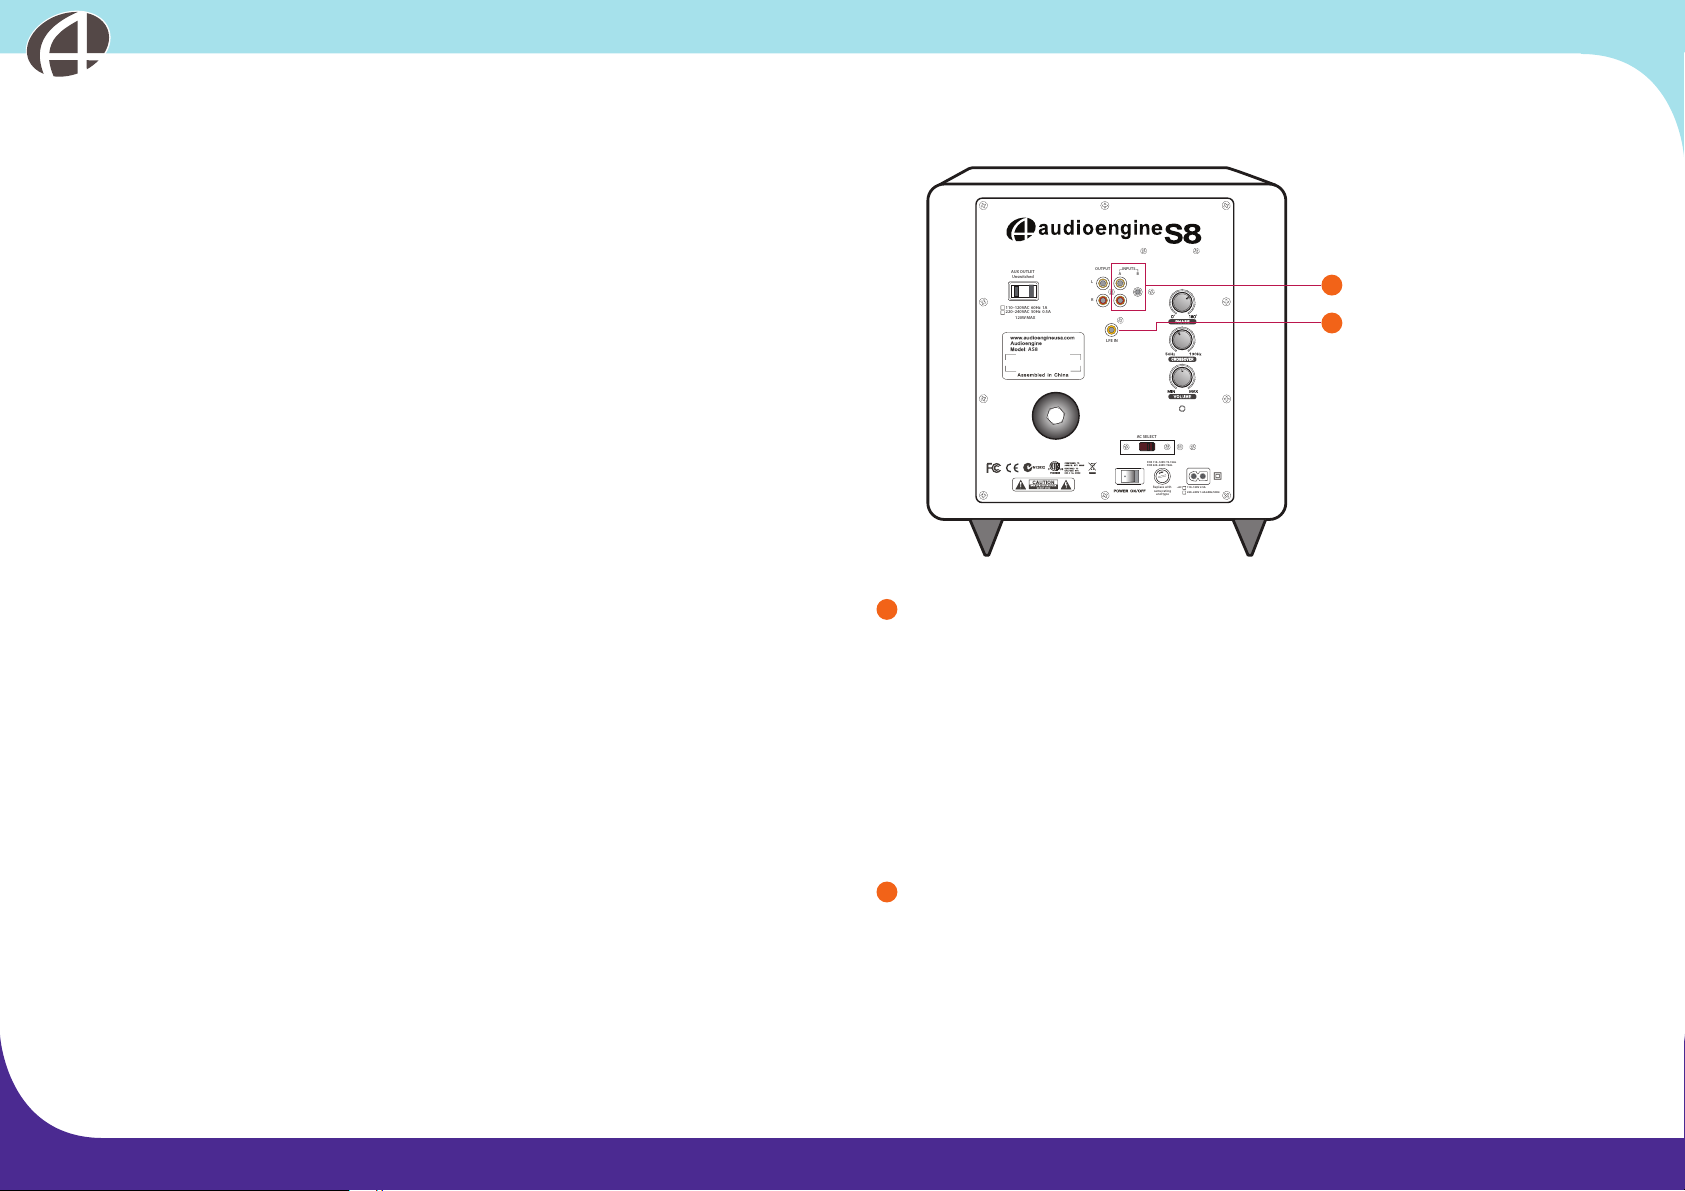
Following is an overview of the subwoofer controls and connections:
• Solid hand-nished, front-ported cabinet
• Auto sleep power saving mode
• Dual line-level inputs (RCA and mini-jack)
• All cables included
• Excellent performance for music, movies, and videogames
• A perfect bass extension for Audioengine powered speakers!
Wireless Ready!
If you decide to place your AS8 away from your powered speakers or
receiver, check out the Audioengine W1 wireless adapters (shameless product plug) or Apple’s Airport Express for high-quality wireless options. The
AS8 has a built-in AC outlet on the rear panel that’s perfect for powering
these wireless products.
Controls
Your AS8 Powered Subwoofer oers simple yet versatile setting options.
After you've become familiar with what these settings do, don’t hesitate to
experiment with them to nd the sound that works best with your system.
When you set up your subwoofer for the rst time, you will probably make
adjustments a few times before you hear what you like. Start with the
volume at 50% and keep in mind that as with subwoofer room placement,
there are really no right or wrong settings.
1
2
115
1 Inputs
The RCA and 3.5mm mini-jack inputs are line-level audio inputs used for
connecting the output of your audio source (receiver, TV, iPod, computer,
etc.) into your AS8 subwoofer. Both inputs are active so no switching is
required if you wish to use inputs from 2 dierent audio sources plugged
in at the same time.
Note: If your receiver has a single (mono) subwoofer output, connect an RCA-
cable from this output to the RIGHT RCA input on the AS8 rear panel.
2 LFE In
If your preamplier or receiver has an LFE (“Low Frequency Eects”) input
or single SUB output connect it to this "LFE In" input connector on the
subwoofer.
Note: Most receivers have a subwoofer preamp mono or stereo output, so
LFE will most-likely remain unconnected.
audioengine S8 setup guideaudioengine S8 setup guide4 5
Page 5
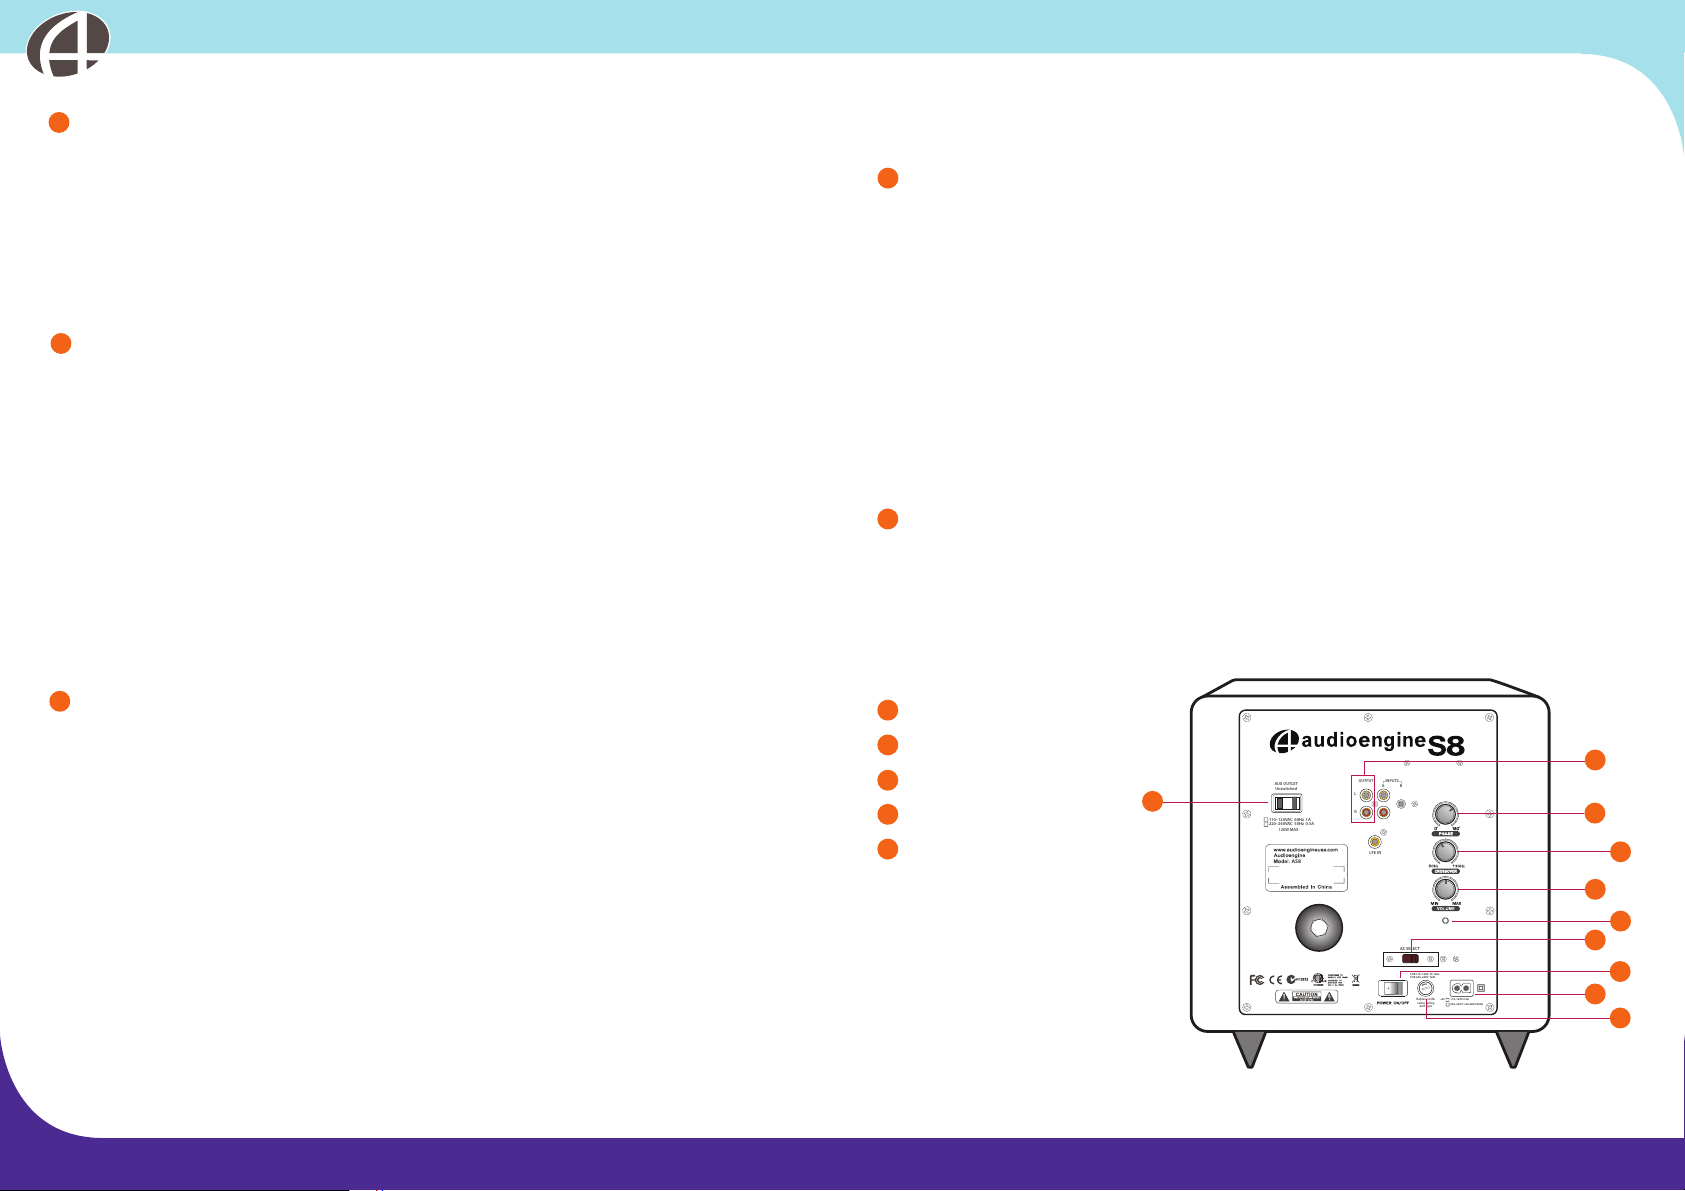
3 Output
LFE IN
FOR 110–120V: T3.15AL
FOR 220–240V: T2AL
110–120V 2.5A
~AC
220–240V 1.6A 60Hz/50Hz
Replace with
same rating
and type
AS8
120W MAX
AUX OUTLET
Unswitched
110–120VAC 60Hz 1A
220–240VAC 50Hz 0.5A
INPUTS
A
L
R
B
OUTPUT
AC SELECT
The Output connectors provide a full-range line-level output to speakers
or another subwoofer. This Output is used whenever a signal is connected
to one of the 2 subwoofer inputs.
Note: The volume level of this Output connection is controlled by the audio
input source, not the volume control on the subwoofer.
4 Phase
The Phase control is used to blend the sound of the subwoofer with the
other speakers in your system. Phase is the degree to which the
subwoofer speaker and other speakers are moving in and out at the same
time. Once you have chosen a location for your subwoofer, try turning
the Phase control in small amounts while you listen for the most bass
from your favorite listening position. Sometimes no dierence will be
heard, which is OK. There is no correct Phase setting and it is not uncommon for the subwoofer to sound similar at every setting, depending on
your room and location of the subwoofer. If you don’t hear a dierence
go ahead and set the Phase knob at the 0 position.
The Crossover control is not active when using the LFE input jack.
6 Volume
The Volume control is for matching the subwoofer speaker volume to the
level of your speakers. Keep the volume low when rst setting up your
system and then adjust to your preferred level using dierent music
and/or video sources. The best advice we can give on matching the
volume is to adjust for the strongest bass without being “boomy”.
Note: The subwoofer Volume controls the AS8 subwoofer level and does not
control the subwoofer output audio level or the input level volume. The
overall system volume (subwoofer + speakers) should be controlled
directly from the audio source (TV, receiver, iPod, etc.).
7 Power On/Standby Indicator
This indicator LED will be GREEN when a input signal is present (music
playing) and RED when no signal is present (power-saving standby
mode). The AS8 subwoofer will automatically enter Standby mode after
15 minutes when no signal is detected.
5 Crossover
The Crossover control is used to set the subwoofer high frequency cuto
point, which is the point at which the subwoofer transitions to your other
speakers. For example, if the Crossover control is set to the 50Hz mark
then the sub will play all frequencies up to 50Hz. All frequencies from
50Hz and higher will then be played by the other speakers. Fine-tune the
Crossover setting by ear for the smoothest blend with your main speakers. The best setting of the Crossover control will depend on speaker
placement, room characteristics, and personal preference. As with the
Phase control, sometimes little or no dierence will be heard, which is OK.
Note: For surround sound setup refer to the manual for your receiver or
processor for correct Crossover settings for your system.
8 Aux AC Outlet
9 AC Select
10
Power Switch
11 Fuse Holder
12 Power Inlet
3
8
4
5
6
7
115
9
10
12
11
audioengine S8 setup guideaudioengine S8 setup guide6 7
Page 6
Connections
FRONT
R L R L
CENTER SURROUND
SPEAKERS
Replace with
same rating
and type
ASUB-8
120W MAX
AUX OUTLET
Unswitched
110–120VAC 60Hz 1A
220–240VAC 50Hz 0.5A
AC SELECT
INPUTS
A
L
R
B
OUTPUT
LFE IN
L
R
B
OUTPUT
LFE IN
FRONT
R L R L
CENTER SURROUND
SPEAKERS
Replace with
same rating
and type
ASUB-8
120W MAX
AUX OUTLET
Unswitched
110–120VAC 60Hz 1A
220–240VAC 50Hz 0.5A
AC SELECT
INPUTS
A
L
R
B
OUTPUT
INPUTS
A
L
R
B
OUTPUT
FOR 110–120V: T3.15AL 250V
FOR 220–250V: T2AL 250V
110–120V 2.5A
~AC
220–250V 1.6A 60Hz/50Hz
Replace with
same rating
and type
ASUB-8
120W MAX
AUX OUTLET
Unswitched
110–120VAC 60Hz 1A
220–240VAC 50Hz 0.5A
AC SELECT
115
LFE IN
A
LFE IN
A
B
Power
• Verify that the power switch on the rear panel is in the OFF position
before making any connections.
• Verify that the voltage selector switch is set to the correct operating
voltage in your area.
• If your receiver has a single (mono) SUB OUT, connect an RCA cable
from this output to the AS8 RCA right (R) input.
• If your receiver has an LFE output, connect an RCA cable from this
output to the AS8 LFE IN.
• Connect the AC power cord to the subwoofer and the other end into a
wall outlet. Do not use the outlet on the back of your Audioengine
powered speakers or receiver.
Note: If using a receiver or surround sound processor always refer to the instruc-
tion manual for specic setup procedures, options, and warnings
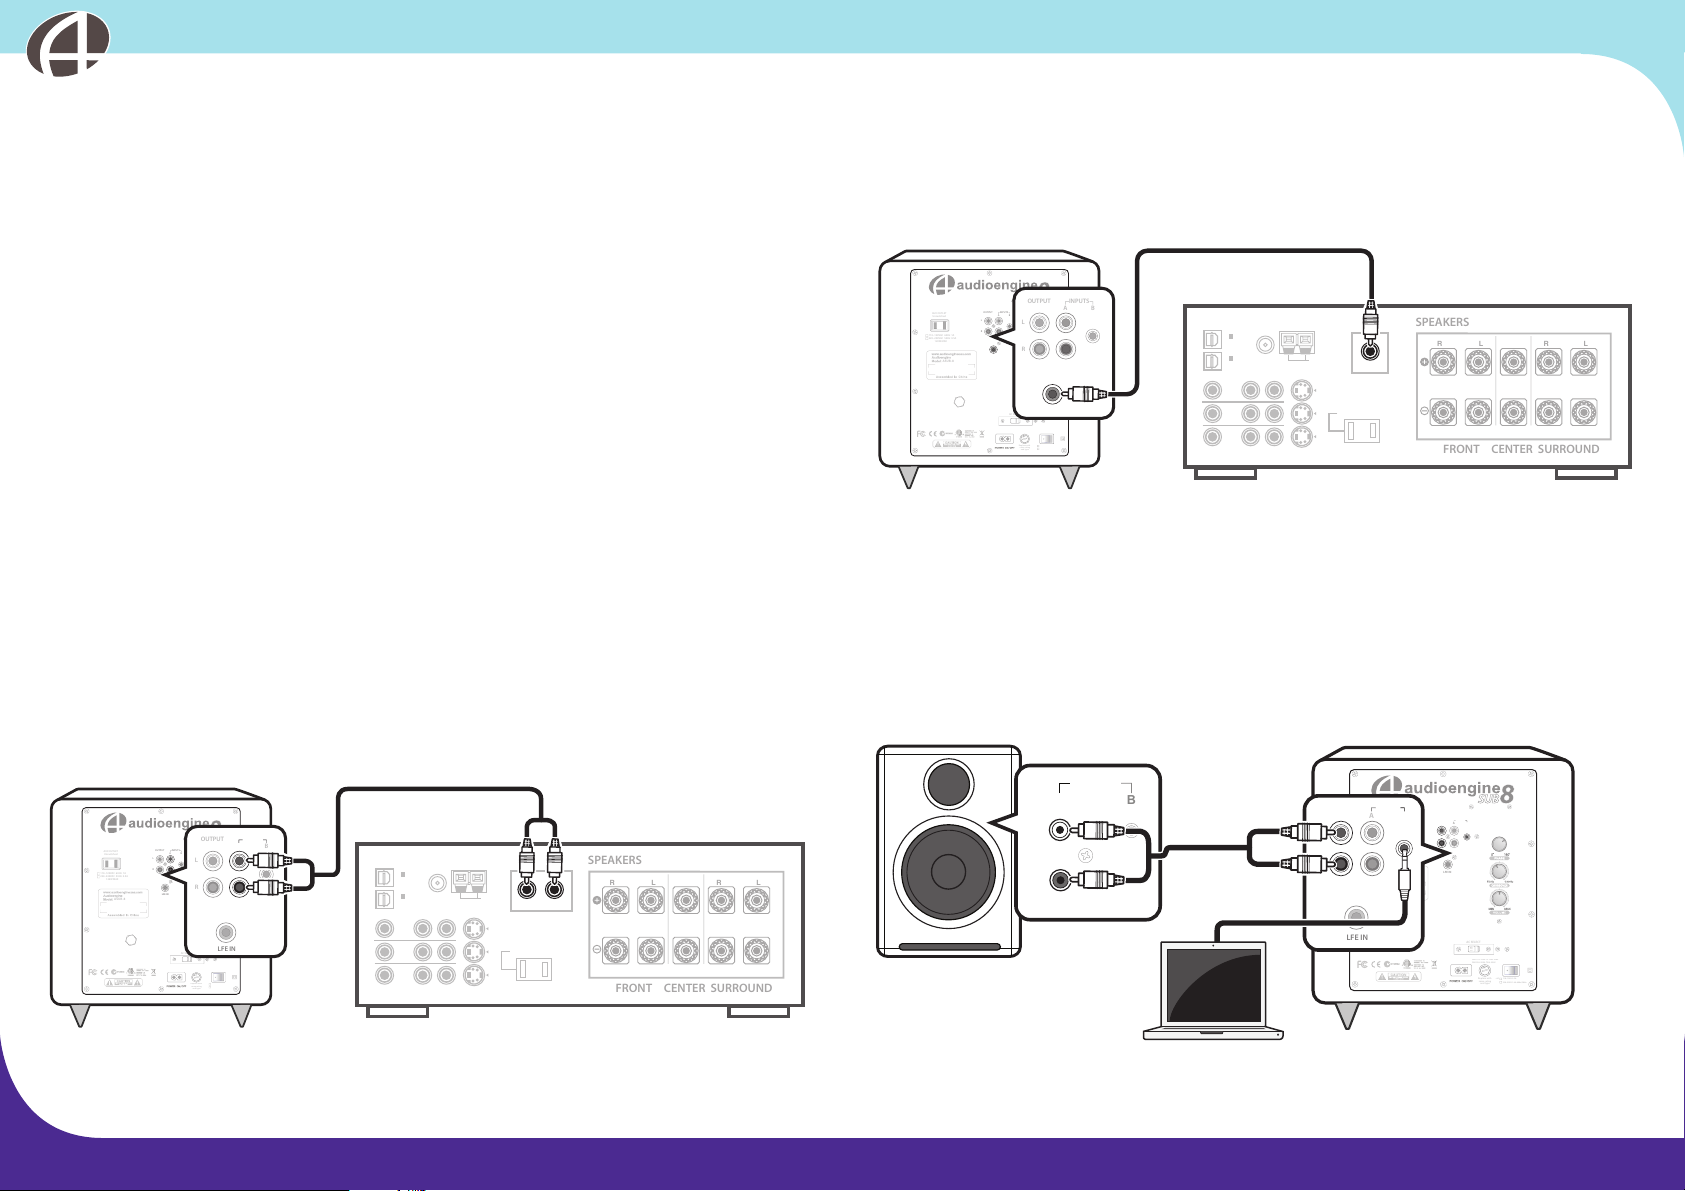
Setup Diagrams
The diagrams that follow show the most common setup and connection
options to connect your AS8 to other audio gear.
Option A
Connect a stereo RCA cable from your receiver's preamp SUB OUTPUT to the
AS8 subwoofer INPUT.
INPUTS
A
1
IN
)
(TV/
SAT
IN
(DVD)
TV/SAT
VIDEO /
GAME 1
DVD/LD
2
IN
IN
IN
FM UNBAL 75 Ω
AM LOOP
SUB PREAMP
L R
OUT
SWITCHED 100 W(0.8 A
1
IN
)
(TV/
LFE IN
LFE IN
AS8
SAT
2
FM UNBAL 75 Ω
IN
(DVD)
TV/SAT
IN
VIDEO /
GAME 1
IN
DVD/LD
IN
Receiver
AM LOOP
SUB LFE
OUTPUT
SWITCHED 100 W(0.8 A
Note: Your receiver’s manual should indicate which subwoofer connection is
most appropriate.
Option B
Connect a mini-jack or RCA cable from any audio product (iPod, computer,
CD player, TV, etc.) to one of the AS8 INPUT connectors.
INPUTS
A
L
R
Audioengine 2 (A2)
Powered Speakers
L
R
OUTPUT
INPUTS
B
OUTPUT
INPUTS
B
L
R
AS8
Receiver
Laptop/ Any Audio Device
AS8
audioengine S8 setup guideaudioengine S8 setup guide8 9
Page 7
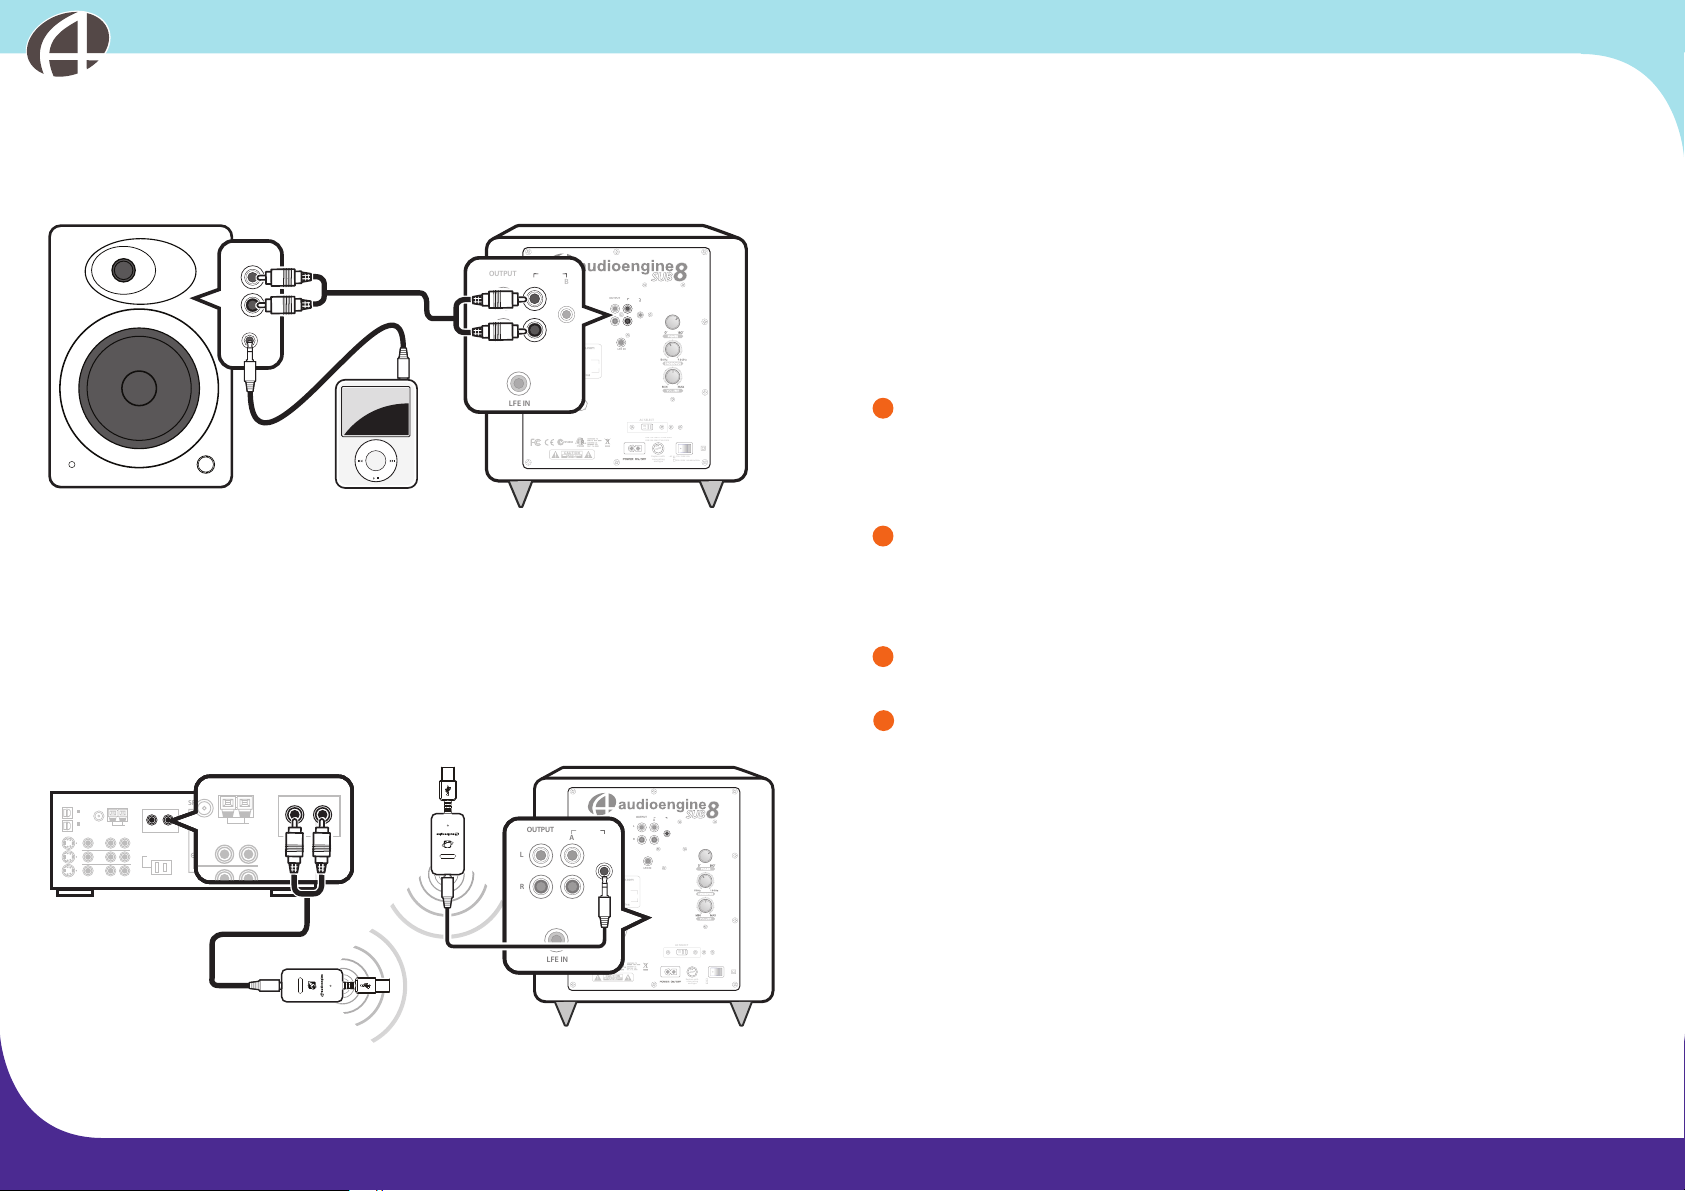
Option C
FRONT
R L R L
CENTER SURROUND
SPEAKERS
Replace with
same rating
and type
ASUB-8
120W MAX
AUX OUTLET
Unswitched
110–120VAC 60Hz 1A
220–240VAC 50Hz 0.5A
AC SELECT
115
LFE IN
A
L
R
OUTPUT
LFE IN
A
L
R
OUTPUT
L R
AUX
VIDEO/
GAME 1
IN
FM UNBAL 75 Ω
AM LOOP
SUB PREAMP
OUT
FOR 110–120V: T3.15AL 250V
FOR 220–250V: T2AL 250V
110–120V 2.5A
~AC
220–250V 1.6A 60Hz/50Hz
Replace with
same rating
and type
ASUB-8
120W MAX
AUX OUTLET
Unswitched
110–120VAC 60Hz 1A
220–240VAC 50Hz 0.5A
AC SELECT
115
B
OUTPUT
LFE IN
LFE IN
B
OUTPUT
Connect a stereo RCA cable from your Audioengine 5 (A5) SUB OUT into the
AS8 subwoofer INPUT
L
R
AUDIO IN
Audioengine 5 (A5)
Powered Speakers
SUB OUT
MENU
MP3 Player/
Any Audio Device
INPUTS
A
L
R
INPUTS
A
L
R
AS8
Option D
Connect a stereo RCA-to-mini “Y” adapter cable from your receiver's SUB
OUTPUT into the Audioengine W1 (AW1) Wireless Sender. Then connect a
mini-jack cable from the AS8 INPUT to the Audioengine W1 Wireless
Receiver.
1
IN
)
(TV/
SAT
2
AM LOOP
FM UNBAL 75 Ω
IN
(DVD)
SUB PREAMP
AUX
IN
VIDEO /
GAME 1
IN
DVD/LD
IN
AV Receiver
L R
OUT
SWITCHED 100 W(0.8 A
INPUTS
INPUTS
B
B
Note: The overall volume for the sub and speakers together is controlled from
the input audio source.
If using the Sub Out feature on Audioengine 5 (A5) power speakers, the overall
system volume (sub + speakers) is controlled directly from the audio source and
not via the A5 front panel volume control.
Final Adjustments
1 After having connected your subwoofer in your preferred conguration,
set the subwoofer volume to about 50% and turn on the power switch.
Note: Refer to the “Controls” section in this Setup Guide for more in-depth
descriptions of the following settings.
2 Adjust the Volume level of your AS8 so that the subwoofer volume
matches the overall volume of your speakers. As mentioned in the previous “Controls” section, adjust the volume for the strongest bass without
being “boomy”.
3 Fine-tune the Crossover setting by ear for the smoothest blend with your
main speakers.
4 Adjust the Phase control for the most bass from your favorite listening
position. As mentioned previously it is not uncommon for the subwoofer
to sound similar at every setting, depending on your room and location of
the subwoofer
There are no right or wrong settings but with these simple steps you should
be up and running within a few minutes. Steps 2, 3 and 4 may require repeating in order to ne-tune to your taste.
AW1 Sender
AS8
audioengine S8 setup guideaudioengine S8 setup guide10 11
Page 8

Basic Troubleshooting
No sound from the subwoofer
If there is no sound from the subwoofer, please try the following:
LED indicator does not light up
• Check that the AC power cord is plugged in securely at both ends and
make sure that the power outlet the subwoofer is connected to is
working.
• Check that the power switch on the rear control panel is on.
LED indicator lights up RED but does not turn GREEN
• Recheck the connections to and from the subwoofer. Verify that the
input and outputs are not accidentally swapped.
• Check that the cables from your audio source to your subwoofer are
properly connected. Sometimes the 1/8” audio cables feel as if they are
inserted all the way, but are not.
• Check that the volume knob on the rear panel is not set to minimum
volume.
• Check that the volume level of your audio source in not set to minimum
or powered o.
• If connected to a receiver or processor check settings in the bass-
management menu.
• If your receiver has a single subwoofer connector that is not labeled LFE,
make sure it connects to the subwoofer’s RIGHT (mono) input connector.
• If the bass is still not enough after checking other tips use an RCA “Y”
cable to connect your preamp or receiver’s single output to the
subwoofer’s RIGHT and LEFT inputs.
• Consult your preamp processor or receiver’s manual and/or on-screen
menus and go through all surround sound setup and bass management
options.
• If playing a movie, check the source material menu to verify that the
desired soundtrack option is selected.
Note: If your subwoofer is connected to a receiver or processor and you've tried
all these tips but are still having problems, remove the AS8 from the
receiver and test using an iPod, computer or other source to verify that
the problem is with the subwoofer and not the receiver setup.
Subwoofer goes into standby
If your subwoofer goes into standby while music is playing, please try the
following:
• Turn the source signal up and the subwoofer volume down.
• If using with a receiver, turn the SUBWOOFER level up in the SPEAKER
SET-UP menu. After you turn the signal up, turn down the volume knob
on the subwoofer to compensate.
LED turns green, but no sound
• Recheck the connections to and from the subwoofer.
Not enough bass from the subwoofer
If the output from the subwoofer is low, please try the following:
• Make sure that the Volume control is turned up.
• Check that the inputs and outputs are connected correctly.
• Experiment with dierent locations for your subwoofer.
Thermal Overload
All Audioengine powered speakers and subwoofers are protected by an
internal thermal sensor. If they run for extended periods beyond their
designated power rating the thermal sensor will engage and shut down the
ampliers. If this occurs, turn o the power switch, lower the volume level,
and wait ve minutes before restarting the system. This is a normal protection feature and does not indicate a malfunction. A good tip in the unlikely
event that a thermal overload occurs is to lower the subwoofer or speaker
output volume and increase the volume of your input source.
audioengine S8 setup guideaudioengine S8 setup guide12
13
Page 9

Troubleshooting continued
Warranty
Hum
Adding a new component such as your subwoofer can bring out hum or
buzz that may not have existed before. Your rst assumption may be that
something is wrong with your subwoofer or other component but this is
usually caused by a “ground-loop” in your system. Consider these tips for
possible solutions:
• First try moving your equipment to the same electrical circuit or AC
outlet.
• If the hum or buzz is still present, turn o the power on all your compo-
nents in your system and remove all connections to and from the
subwoofer. Plug the subwoofer AC cable back in, turn on the power
switch and check for hum. If the hum is still audible then try plugging
the subwoofer power cable into a dierent outlet.
• If the hum goes away when the interconnect cables are disconnected,
the noise is likely coming from another component in your system. Add
each component back one piece at a time and the one that causes the
system to hum is likely the source of your noise.
• A common ground-loop source is cable TV or satellite cables. If the hum
or buzz persists after trying the previous tips, disconnect the coaxial
cable from your cable box, TV, or DVR and if the hum goes away the
cable is the cause. In this case you can get a ground-loop isolator from
Radio Shack or your local electronics store. These are inexpensive and
easy to connect inline with your video cable.
• Sometimes something as simple as a portable heater or dehumidier
will add noise into your wall wiring that could be picked up by your
subwoofer or powered speakers. A dimmer switch on a halogen oor
lamp or a wireless internet router positioned near the subwoofer, for
example, could also be possible culprits.
• The best solutions are to use an AC line lter, plug the unit into a dier-
ent AC circuit, or in the case of a wireless router just physically move it
further away from the subwoofer or powered speakers.
Period
All Audioengine products have a 3-year Limited Warranty on par ts and labor from date of purchase. Your warranty is
automatic, so there is no need to register. This Limited Warranty applies only to Audioengine products purchased in the
Continental United States. For Limited Warranty coverage elsewhere, please contact your Audioengine dealer, reseller, or
distributor.
What is covered
All defective parts or faulty workmanship.
What is not covered
The Audioengine Limited Warranty does not cover damage caused by accident, misuse, abuse, neglect, excessive moisture,
lightning, power surges, other acts of nature, unauthorized product modication or repairs, or failure to follow the
instructions outlined in the Setup Guide.
What we will do
We will repair or replace any defective parts, at our option, within a reasonable amount of time and free of charge any time
during the warranty period. After service, we will be responsible for shipping the product back to you at our expense.
What we ask from you
You will be responsible for shipping or transportation charges directly to Audioengine or to an authorized dealer. We
recommend that you keep the original shipping materials, as it is important that you package the product so that it will not
be damaged during shipping. Audioengine cannot be responsible for any damages incurred during shipping due to poor
packing, so please pack well and make sure to insure your shipment.
How to obtain Audioengine Warranty service
If you have any questions about your warranty coverage or you think you may need service, email the Audioengine
Authorized Service Center at: [email protected] or ca ll toll -free i n the United St ates at: (877) 853 -4447. We wi ll
do everything we can to answer your questions and resolve any issues as quickly as possible.
Exclusive Remedy
This Limited Warranty is fully transferable provided that the current owner furnishes the original proof of purchase and that
furnishes the original proof of purchase and that the serial number on the product is intact. THE MAXIMUM LIABILITY OF
AUDIOENGINE SHALL NOT EXCEED THE ACTUAL PURCHASE PRICE PAID BY YOU FOR THE PRODUCT. IN NO EVENT SHALL
AUDIOENGINE BE LIABLE FOR SPECIAL, INCIDENTAL, CONSEQUENTIAL OR INDIRECT DAMAGES.
Product Returns and Refunds
Your satisfaction is guaranteed! Should you have a problem or are not satised with any Audioengine product, send us an
email at: [email protected] or call toll-free in the United States at: (877) 853-4447.
audioengine S8 setup guideaudioengine S8 setup guide14
15
Page 10
Audioengine S8 Premium Powered Subwoofer
General Specications
Type: Powered subwoofer
Power output: 250W peak power total (125W RMS), AES
Amplier type: Dual Class AB monolithic
Inputs: ⁄” (3.5mm) stereo mini-jack and RCA L/R
Outputs: RCA L/R full-range
Voltages: 110-240V, 50/60Hz
Drivers: 8” (25.4cm) long-throw woofer, downring design
Ports: Single, front
Signal-to-noise: >95dB (typical A-weighted)
THD: <0.05% at all power settings
Frequency response: 27Hz-180Hz ±1.5dB
Sensitivity: 88db SPL (1w@1m)
Input impedance: 10K ohms unbalanced
Crossover Freq: 50Hz - 130Hz
Phase: 0 - 180°
Standby power: 8W
Protection: Output current limiting, thermal over-temperature, power
on/o transient protection
Dimensions: 11.25”(H) x 11.25”(W) x 11.25”(D)
Weight: 28 lbs (12.7 kg)
Shipping weight: 30lbs (13.6 kg)
Shipping box dims: 17” (H) x 17” (L) x 17” (W)
About Audioengine
Audioengine designs and builds innovative audio products with all your
music in mind. Great sound, simple but elegant designs, high-quality materials, and truly useful features are what Audioengine is all about. We sincerely
hope you get as much enjoyment from our products as we've had creating
them! For information about our other products go to:
www.audioengineusa.com
Support
If you have any questions or feel you may need service contact the reseller
where you purchased you subwoofer or feel free to email us directly at
[email protected]
or call toll-free in the United States: (877) 853-4447
Materials and Construction
1” thick MDF cabinets
8” custom woofer with advanced voice coil
Toroidal power transformer
audioengine S8 setup guideaudioengine S8 setup guide16
17
 Loading...