

Page 1
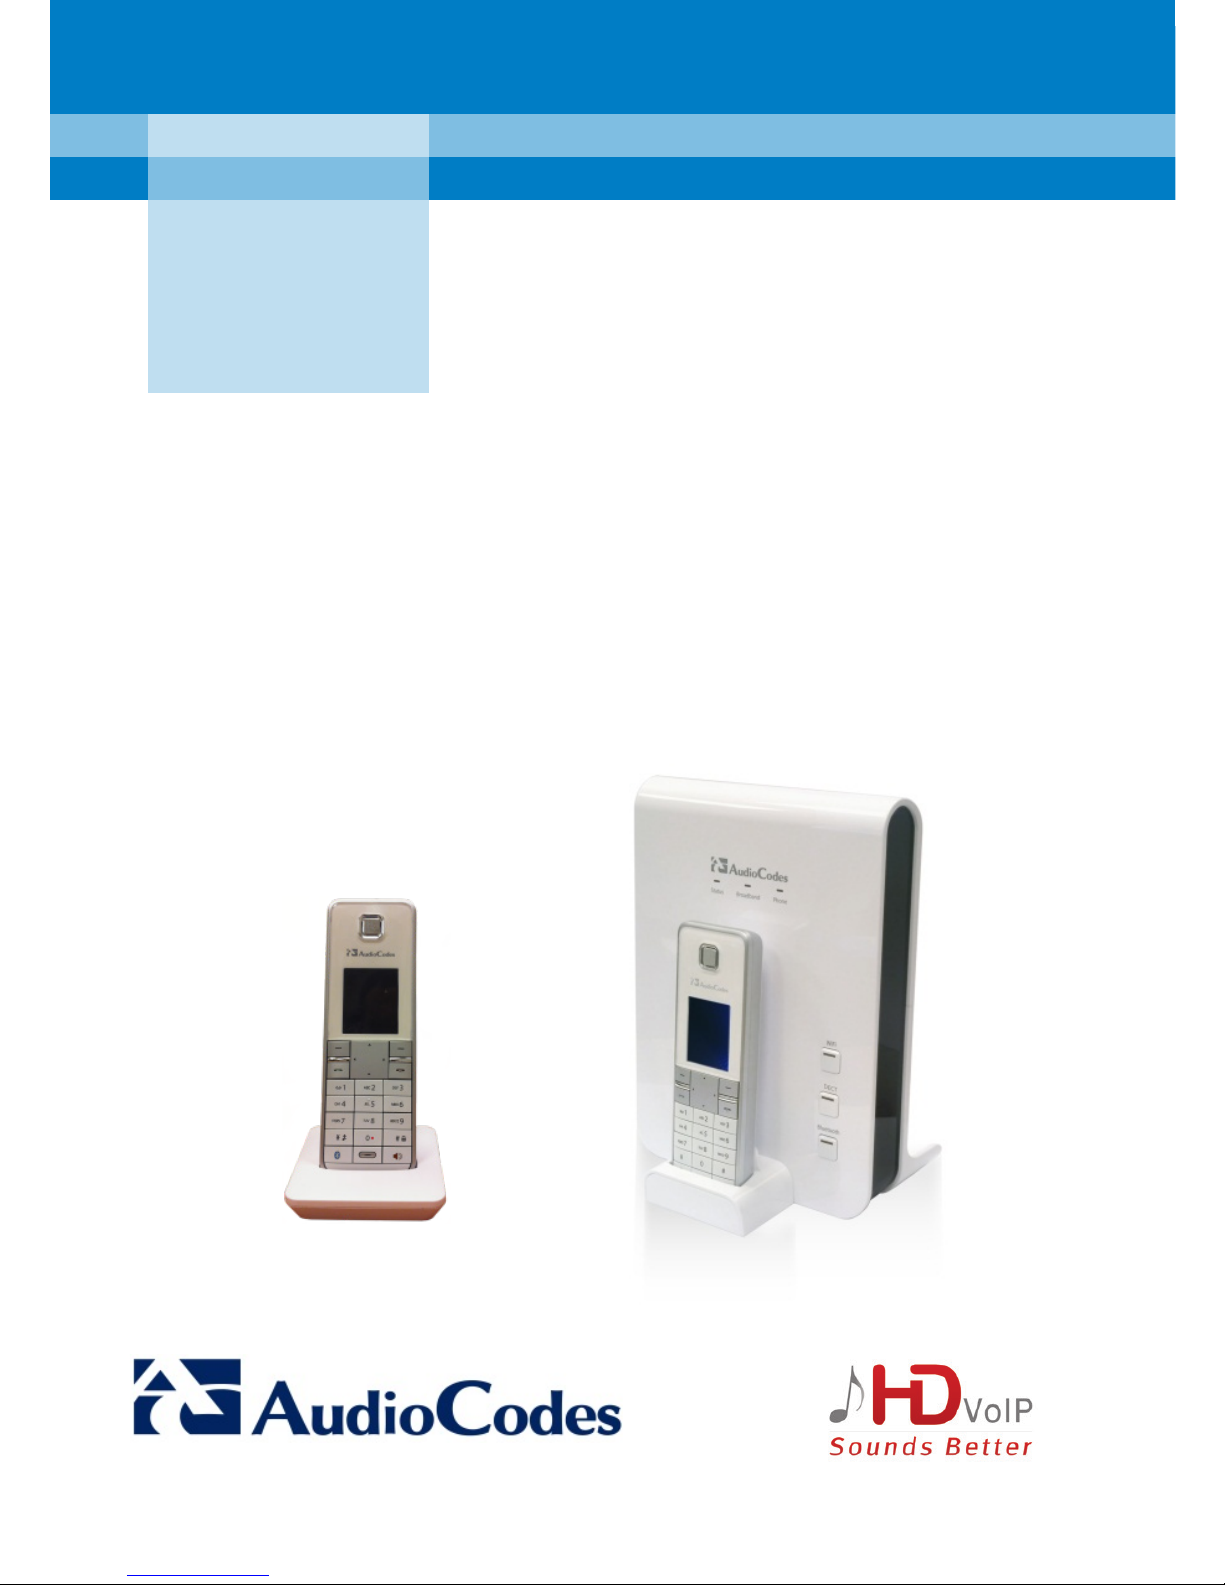
MP-252-WDNB
MP-263-DB
MP-264-DB
MP-272-DB
Multimedia Home Gateways
Quick Guide
AudioCodes® MediaPack™ Series
DECT Handset
Page 2

2
Notice
This Quick Guide describes the operation of AudioCodes’
MediaPack™ series MP-252-WDNB, MP-264-DB, MP-263-DB,
and MP-272-DB Cordless Digital Enhanced Cordless
Telecommunications (DECT) Voice-over-IP (VoIP) phones.
Information contained in this document is believed to be
accurate and reliable at the time of printing. However, due to
ongoing product improvements and revisions, AudioCodes
cannot guarantee accuracy of printed material after the Date
Published nor can it accept responsibility for errors or
omissions. This document is subject to change without notice.
Refer to the current Release Notes that may be included with
your documentation or hardware delivery. Updates to this
document as well as software files can be viewed by
registered customers at www.audiocodes.com/downloads
.
© Copyright 2013 AudioCodes Ltd. All rights reserved.
Date Published: April-24-2013
Page 3

3
Table of Contents
Safety Instructions ........................................................ 6
Initial Installation of DECT Handset ............................... 8
Registering the DECT Handset to the Base Unit ...... 10
Charging the Handset .............................................. 11
Checking the Battery Level ...................................... 11
Replacing the Batteries ........................................... 12
Setting the Display Language .................................. 14
Overview ..................................................................... 15
General Screen Description ..................................... 17
Screen Description during a Call ............................. 17
Main Menu Description .......................................... 18
Using the Phone .......................................................... 19
Making an External Call ........................................... 19
Pre-Dialing ........................................................... 19
Direct Dialing ....................................................... 19
Calling from your Phonebook .............................. 20
Calling from the Call List ...................................... 20
Establishing a Second Call ................................... 21
Page 4

4
Redialing a Number ............................................. 22
Answering a Call ...................................................... 22
Answering or Rejecting a Second Call ..................... 23
Ending a Call ............................................................ 23
Adjusting the Volume during a Call ......................... 24
Muting a Call ........................................................... 24
Turning Off the Ringer ............................................. 25
Activating the Speakerphone .................................. 25
Locking / Unlocking the Keypad .............................. 25
Paging your Handset ............................................... 26
Redial List ................................................................ 26
Saving a Redial Number to the Phonebook ........ 27
Deleting a Number from the Redial List .............. 27
Deleting the Entire Redial List ............................. 28
Call Handling for Multiple Handsets ....................... 28
Calling (Intercom) another Handset .................... 29
Transferring an External Call to another Handset 29
Three-Way Conference Calls ................................... 30
Making a Three-Way Conference Call with another
Handset and an External Party ............................ 30
Page 5

5
Making a Three-Way Conference Call with your
Handset and two External Calls ........................... 31
Adding a Contact to the Phonebook ....................... 31
Page 6

6
Safety Instructions
CAUTION:
RISK OF EXPLOSION IF BATTERY IS REPLACED
BY AN INCORRECT TYPE
Before using your DECT phone, read the following
safety instructions:
1. Read and understand all the instructions.
2. Follow all warnings and instructions marked on the
product.
3. Unplug this product from the wall outlet before
cleaning. Do not use liquid cleaners or aerosol
cleaners. Use a damp cloth for cleaning.
4. Do not use this product near water (for example,
near a bath tub, kitchen sink, swimming pool).
5. Do not overload wall outlets and extension cords
as this can result in the risk of fire or electric shock.
6. Unplug this product from the wall outlet and refer
servicing to AudioCodes under the following
conditions:
• When the power supply cord or plug is
damaged or frayed.
• If the product does not operate normally by
following the operating instructions.
• If the product has been dropped and the
cabinet has been damaged.
Page 7

7
• If the product exhibits a distinct change in
performance.
7. Avoid using a telephone (other than a cordless
type) during an electrical storm. There may be a
remote risk of electric shock from lightning.
8. Do not use the telephone to report a gas leak in
the vicinity of the leak.
9. Use only the supplied nickel-metal hydride cell
(NiMH) rechargeable batteries! The operation
periods for the handsets are only applicable with
the default battery capacities.
10. Use only the supplied 12VDC +/-10%, 2A, limited
power source wall mount Class II power supply
adapter. Before connecting the MediaPack to
power, ensure that the VAC ratings match.
11. The use of other battery types or non-rechargeable
batteries/primary cells can be dangerous. These
may cause interference and/or unit damage. The
manufacturer will not be held liable for damage
arising from such non-compliance.
12. Do not use third-party charging bays. The batteries
may be damaged.
13. Please note the correct polarity while inserting the
batteries.
14. Do not immerse batteries in water; do not place in
fire.
Page 8

8
Initial Installation of DECT Handset
The handset is shipped with rechargeable batteries
already installed in the battery compartment. However,
a plastic sheath separates the batteries from the
handset’s electrical circuit. Before you can charge the
handset, you need to remove this plastic sheath. On
the handset, pull out the plastic tab jutting out from
the battery compartment. This closes the battery
circuit and provides power to the handset.
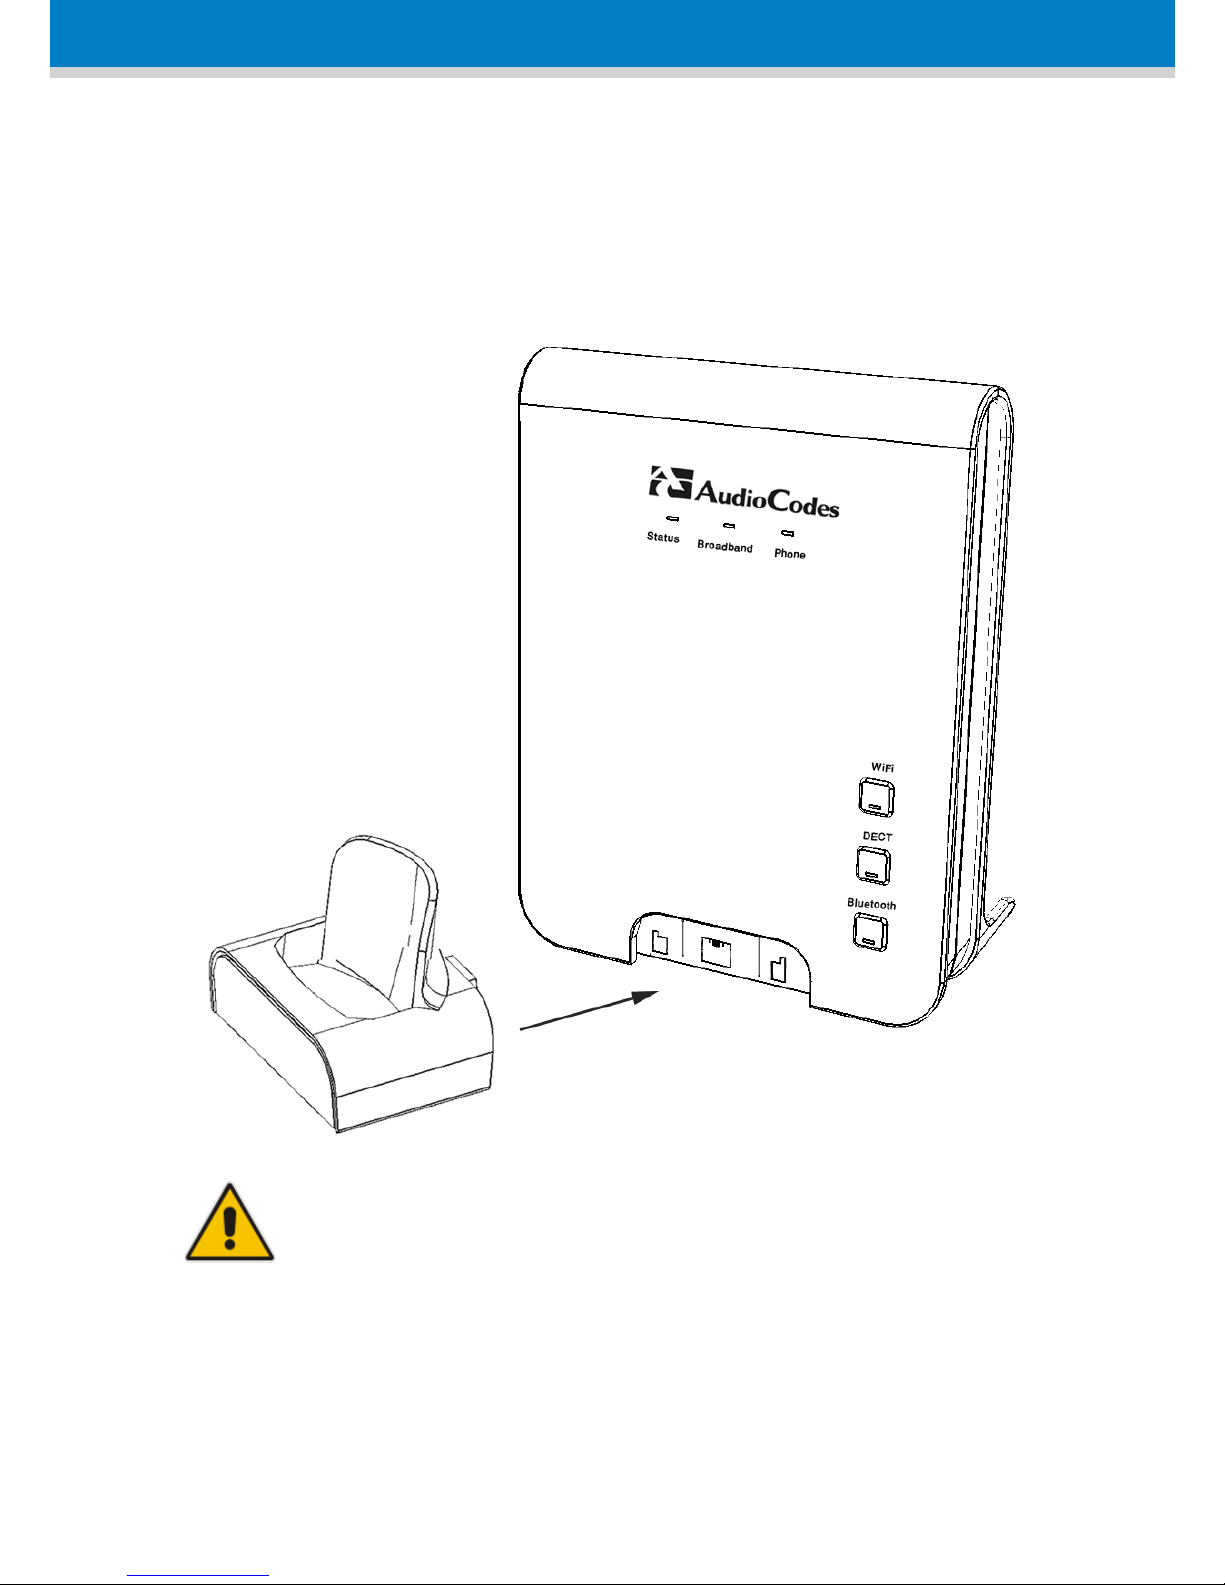
1. On the lower part of the MediaPack front panel,
remove the cover protecting the connector for the
handset cradle.
Page 9
9
2. Attach the handset cradle to the unit by inserting it
into the exposed groove and then pushing it up so
that it clicks on to the connector. Attach the
removed cover to the front of the cradle.
Note: Charge the batteries for at least 16
hours before initial use.
Page 10
10
Registering the DECT Handset to the Base Unit
Before you can make or receive calls, you need to
register the DECT handset to the MediaPack base unit.
Note: Applicable for purchased stand-alone
handset.
1. Press the Menu softkey, and then select the
Registration icon.
2. Press (for 2-5 seconds) the DECT LED button until it
starts flashing green; the base unit enters
registration mode.
3. On the handset, select base unit "Base 1" to which
the handset must register; the registration process
begins and "Registering - Waiting" is displayed on
the handset screen. When the handset identifies
the base unit, it displays its radio frequency
identification (RF ID).
4. Click the Accept softkey to confirm registration.
Page 11

11
Charging the Handset
Ensure that the MediaPack is connected to power.
Place the handset in the charging cradle of the base
unit so that the bottom of the phone sits in the base
cradle. When correctly inserted in the cradle, the
phone begins charging, indicated by the display of the
charging levels of the battery icon on the phone's
screen.
Checking the Battery Level
The battery icon located in the main screen, displays
the current battery level, as shown below:
Handset battery is fully charged
Handset battery is two-thirds charged
Handset battery is one-third charged
Handset battery is empty and needs charging
(this icon flashes)
Page 12

12
Replacing the Batteries
The handset is shipped with rechargeable batteries.
However, if you need to replace them, do the
following:
1. Remove the battery compartment cover, by sliding
the cover out from the base of the phone toward
the top end (in the direction of the arrow label
printed on the cover). You can use your thumb to
push at the base of the cover.
2. Remove the old batteries (if any) and then place
the two batteries (supplied) into the battery
compartment, as indicated.
3. Slide the battery compartment cover back into
place.
Page 13

13
Warnings:
• Risk of explosion if battery is replaced by an
incorrect battery type; use only the nickel-metal
hydride cell (NiMH) rechargeable batteries as
provided with your phone. The manufacturer will
not be held liable for damage arising from such
non-compliance.
• Verify correct polarity of batteries when
inserting the batteries. Incorrect polarity may
damage the product.
• The operation periods for the handset are only
applicable with the default battery capacities.
• Do not use third-party charging bays to charge
the batteries.
• Do not immerse batteries in water and do not
place in fire.
• Do not mix old and new batteries.
• Do not open or mutilate the batteries. Released
electrolyte from the batteries is corrosive and
may cause burns or injury to the eyes or skin.
The electrolyte is toxic and may be harmful if
swallowed.
• Do not allow conductive materials such as rings,
bracelets, or keys to touch the batteries,
otherwise a short circuit may cause the batteries
and/or the conductive material to overheat and
cause burns.
• Avoid touching the battery ends (+, -) or the base
unit contacts.
Page 14

14
Setting the Display Language
You can change the display language of your handset.
1. In idle state, press the Menu softkey.
2. Press the navigation keys to scroll to the
HS Settings icon, and then press the Select
softkey.
3. Press the navigation keys to choose the
Language option, and then press the Select
softkey.
4. Press the navigation keys to choose the desired
language, and then press the Select softkey; the
saved message is displayed in the chosen language
and the display is changed accordingly.
Page 15

15
Overview
Item Name Description
1 Right Soft Key Key action is according to the text
on the handset screen.
2 Left Soft Key Key action is according to the text
on the handset screen.
1
4
6
7
2
5
8
3
Page 16

16
Item Name Description
3 Navigation Key For up, down, left, and right
navigation in LCD screen.
4 End Call Key During a call: press to end a call
and go back to idle screen.
Off Key Press and hold to power off the
handset.
On Key When the handset is powered
off: press and hold to power on
the handset.
5 Talk On After entering a number or
selecting a number from the
phone book, press to make the
call.
During ringing: press
to answer a
call.
6 Alphanumeric
Keypad
Dials and edits numbers and
text.
7 Speakerphone During a call: press to turn
on/off the speakerphone.
During
ringing: press to answer a
call with speakerphone.
8 Bluetooth
This button will be supported in the
next applicable release.
Page 17

17
General Screen Description
Icon Description
Steady when the handset is in range of the base.
Additional bars (red, orange, and blue) are
displayed as the signal strength increases.
Flashes when the handset is not registered to
the base or out of range of the base. When the
handset is out of range, the LCD displays "Out of
Range" message.
For up, down, left, and right navigation in LCD
screen.
The alarm is set. When the alarm time is
reached, this icon flashes. This icon disappears
when the alarm is off.
Screen Description during a Call
Icon Description
Phone is ringing (i.e., incoming call)
Call is in progress
Intercom is in progress
Hands-free is in use
Page 18

18
Icon Description
Ringer is switched off
Keypad is locked
Main Menu Description
Unselected Icon Selected Icon Description
Phonebook
Alarm clock
Base setting
Phonebook
Handset setting
Registration
Page 19

19
Using the Phone
Making an External Call
Pre-Dialing
Preparatory dialing is when you first enter the phone
number and only then dial it. This therefore, allows you
to make changes to the number before making the call.
1. Enter the phone number; the number is displayed
on the screen. You can make changes to the
number before dialing. Press the Clear softkey to
delete digits to the left of the cursor.
2. Press or to dial the number.
Direct Dialing
Direct dialing is when you activate dialing and only then
enter the phone number.
1. Press or to take the line.
2. Enter the phone number; the phone waits a few
seconds and then dials the number.
Page 20

20
Calling from your Phonebook
If you have added any contacts to your phonebook, you
can dial from the phonebook.
1. Press the PB softkey to access the phonebook.
2. Press the navigation keys to choose the desired
phonebook entry, and then press the Select
softkey.
3. Press or to dial the selected
phonebook entry.
Calling from the Call List
You can dial numbers from previously received or
missed calls, which are stored in the Call List:
1. Press the navigation key to access the Call List.
2. Press the navigation keys to select the desired
entry, and then press the Select softkey.
3. Press or to dial the selected entry.
Page 21

21
Establishing a Second Call
While you are in an active call, you can establish a
second call. When you establish a second call, the first
call is put on hold. You can toggle between the calls by
placing one call on hold while speaking to the other call
To establish a second call, do one of the following:
Making a second call directly:
1. Press ; the Predialing screen appears.
2. Dial the desired number, and then press .
Making a second call to a contact in your phonebook:
1. Press the Menu softkey, and then choose
Phonebook.
2. Select a number from the phonebook, and then
press .
Manually placing the first call on hold before making a
second call:
1. Press the Menu softkey and choose Hold to place
the current call on hold.
2. Establish a second call by doing one of the
previously mentioned methods.
Page 22

22
Redialing a Number
You can dial numbers that were previously dialed,
which are stored in the Redial List.
1. Press the navigation key to access the Redial
List.
2. Press the navigation keys to select the desired
number, and then press the Select softkey.
3. Press or to dial the selected entry.
Answering a Call
When you receive a call, your phone rings and
"Incoming Call" and the calling number are displayed
on your screen. To answer a call, do one of the
following:
If the handset is not on the base: When the phone
rings, press or .
If the handset is on the base and when Auto
Answer is set to On: When the phone rings, pick
up the handset.
Page 23

23
Answering or Rejecting a Second Call
While you are talking on the phone, you can receive a
second call. When there is a second incoming call, the
phone beeps and "Call Waiting" is displayed on the
screen with the calling party's name and number.
To answer a second call: Press ; the call
with the second call party is established and the
first call is put on hold.
To reject a second call: Press.
Once you have answered the second call, you can
toggle between the calls by placing one call on hold and
speaking to the other.
Ending a Call
To end call, do one of the following:
Press
Place the handset on the cradle charger
When you end a call, the screen displays
"Disconnected".
Page 24

24
Adjusting the Volume during a Call
During a call, you can adjust the volume of the handset
earpiece, and hands-free to one of five levels.
During a call, press the navigation keys to increase
or decrease the volume level, respectively; the screen
displays the current volume setting.
Muting a Call
You can talk to someone nearby without letting the
caller hear you during a call. This is done by muting the
microphone of the handset.
To mute the call:
1. During a call, press the Menu softkey.
2. Press the navigation keys to select the Mute
option, and then press the Select softkey; the
microphone is muted and "Call Muted" is displayed
on the screen.
To unmute the call:
1. Press the Menu softkey.
2. Press the navigation keys to select the Unmute
option, and then press the Select softkey; the
microphone is unmuted and you can now converse
with the caller.
Page 25

25
Turning Off the Ringer
You can turn off the ringer of the handset that audibly
notifies of incoming calls.
To turn off the ringer: In idle mode, press and hold
(shares the * key) key to turn off the ringer. The
icon is displayed on the screen.
To turn on the ringer: Press and hold the key to
turn on the ringer. The icon disappears.
Activating the Speakerphone
During a call, you can switch from the earpiece to the
built-in speaker. This allows hands-free conversations.
To activate the speakerphone: While in a call,
press the key.
To turn off the speaker and return to the
earpiece: Press the key.
Locking / Unlocking the Keypad
You can lock the keypad to prevent accidental presses
on the handset.
To lock the keypad: In idle mode, press and hold
the key (shares the # key); the icon is
displayed.
To unlock the keypad: In idle mode, press and hold
the key, the icon disappears.
Page 26

26
Paging your Handset
You can locate the handset by paging the handset from
the base.
To page the handset: On the base unit, press on
(less than two seconds) the DECT button; the LED
changes to orange and all handsets registered to
the base ring for up to 60 seconds and "Incoming
Call HS LOCATOR" is displayed on the LCD.
To stop the paging: Press any key on the handset,
except the Silent softkey.
Redial List
The Redial List displays up to a 100 of the last dialed
numbers. If the number that you called also appears in
the phonebook, then the contact name is displayed
instead of the number.
The Redial List allows you to do the following:
Redial a listed number
Add a listed number to the phonebook
Delete a listed number
Delete all entries in the Redial List
Page 27

27
Saving a Redial Number to the Phonebook
You can save a number listed in the Redial List to the
phonebook.
1. Press the navigation key to access the Redial
List.
2. Press the navigation keys to select the desired
number, and then press the Select softkey.
3. Press the Menu softkey.
4. Press the navigation keys to choose the Add to
PB option, and then press the Select softkey; the
phonebook is accessed with the number already
appearing in the Number field.
5. Enter the details (i.e., name) of the contact in the
phonebook.
Deleting a Number from the Redial List
You can delete a number from the Redial List.
1. Press the navigation key to access the Redial
List.
2. Press the navigation keys to select the desired
number, and then press the Select softkey.
3. Press the Menu softkey.
Page 28

28
4. Press the navigation keys to choose the Delete
option, and then press the Select softkey; the
"Delete Confirm" message is displayed.
5. Press the OK softkey to confirm deletion.
Deleting the Entire Redial List
You can delete all the entries in the Redial List.
1. Press the navigation key to access the Redial
List.
2. Press the Select softkey
3. Press the Menu softkey.
4. Press the navigation keys to choose the Delete
All option, and then press the Select softkey; the
"Delete Confirm" message is displayed.
5. Press the OK softkey to confirm deletion.
Call Handling for Multiple Handsets
This section describes procedures for call handling
between multiple registered handsets. This includes
making internal calls, transferring external calls from
one handset to another handset, and making
conference calls.
Page 29

29
Calling (Intercom) another Handset
An intercom call is a call from one handset to another
handset, registered to the MediaPack base unit. Note
that these internal calls are in High Definition (HD)
quality.
1. Press the navigation key; the screen displays a
list of the registered handsets.
2. Press the navigation keys to select the handset
to which you want to make a call.
3. Press the Select softkey; the called handset rings.
4. On the called handset, press to establish
the internal call.
Transferring an External Call to another Handset
You can transfer an external call (i.e., not a call from
another handset) received on your handset, to another
handset.
1. During the call with the external call, press the
Transfer softkey
2. Press the navigation keys to select the handset
to where you want to transfer the call.
3. Press the Select softkey; the external call is put on
hold and the called handset rings.
4. On the called handset, press or to
receive the transferred call.
Page 30

30
Three-Way Conference Calls
You make three-way conference calls composed of the
following call party types:
Two handsets and an external party
Your handset and two external calls
Making a Three-Way Conference Call with another
Handset and an External Party
The conference call feature allows one external call to
be shared with two handsets (in intercom). The three
parties can share the conversation and no network
subscription is required.
1. During the call with the external call, press the
navigation key; the screen displays a list of the
registered handsets.
2. Press the navigation keys to select the handset
with which you want to establish a three-way
conference call.
3. Press the Select softkey; the external call is put on
hold and the called handset rings.
4. On the called handset, press or to
establish the internal call.
5. On the calling handset, press and hold the
navigation key for three seconds to establish the
three-way conference call.
Page 31

31
Making a Three-Way Conference Call with your
Handset and two External Calls
You can make a three-way conference call between
your handset and two external calls. This can be done
when you have two external calls, where you are
talking with one and the other call is waiting (on hold).
1. Press the Menu softkey, and then choose the
Conference option.
2. Press the OK softkey to confirm the conference;
the two external calls parties are included in your
conference call.
Adding a Contact to the Phonebook
Follow the procedure below for adding a new contact
to your phonebook.
1. In idle state, press the Menu softkey.
2. Press the navigation keys to scroll to the
Phonebook icon.
3. Press the Select softkey to access the Phonebook.
4. Press the navigation keys to choose the Add
option, and then press the Select softkey.
5. Enter the contact details, using the navigation
keys to move from one field to the next.
6. Press the OK softkey to save the phonebook entry.
Page 32

MP-252-WDNB
MP-264-DB
MP-263-DB
MP-272-DB
32
For additional information, go to:
AudioCodes Web site at www.audiocodes.com
Trademarks
AudioCodes, AC, AudioCoded, Ardito, CTI2, CTI², CTI Squared, HD VoIP, HD VoIP Sounds Better,
InTouch, IPmedia, Mediant, MediaPack, NetCoder, Netrake, Nuera, Open Solutions Network, OSN,
Stretto, TrunkPack, VMAS, VoicePacketizer, VoIPerfect, VoIPerfectHD, What’s Inside Matters, Your
Gateway To VoIP and 3GX are trademarks or registered trademarks of AudioCodes Limited. All other
products or trademarks are property of their respective owners. Product specifications are subject
to change without notice.
Document #: LTRT-18634
 Loading...