

Page 1

Mediant 500L Gateway and E-SBC
Quick Setup Guide
Welcome
Congratulations on purchasing your AudioCodes Mediant 500L Gateway and Enterprise Session Border
Controller (hereafter, referred to as device)!
This document is only intended to provide basic setup instructions for initial access to the device and
connecting it to your network. For advanced configuration and cabling, refer to the User's Manual and
Hardware Manual respectively, which can be downloaded from AudioCodes Website at
https://www.audiocodes.com/library/technical-documents.
Pour consulter le guide rapide de l’équipement en français, consultez le site web AudioCodes suivant :
https://www.audiocodes.com/library/technical-documents?productFamilyGroup=1637&productGroup=1639.
Before you begin, please read the Safety Precautions on page 7.
Package Contents
Make sure that the following items (in addition to any separate-orderable items that you may have purchased)
are included with your shipped device:
4 x anti-slide bumpers for desktop mounting
1 x AC/DC power adapter
Regulatory Information document
This document
1 | Page
Page 2

1
POWER
AC power plug entry
Power LED (located on the front panel):
Green On
Power received by device
Off
No power
Status LED (located on the front panel):
Green On
Device is operational
Green Flashing
Initial rebooting stage or software upgrade (.cmp
file) in process
Red On
Boot failure
Off
Advanced rebooting stage
2
ON / OFF
Power button to switch on the device (when pressed in) and to switch off the
3
CONSOLE
RS-232 serial interface port (RJ-45).
4 USB port, which you can use for various functionalities such as storing the
5
//
Reset pinhole button for resetting the device or restoring it to factory defaults. To
6
S1 GE LAN
Up to four Gigabit Ethernet (10/100/1000Base-T) ports (RJ-45) for connecting IP
through or crossover cable detection.
Green On
Ethernet link established
Green Flashing
Data is being received or transmitted
Off
No Ethernet link
1 2 3
4
5
6
Physical Description
[The number and type of port interfaces depend on the ordered hardware configuration.]
device (when pressed out).
configuration file on an external USB hard drive.
restore the device to factory defaults: with a paper clip or any other similar
pointed object, press and hold down the button for at least 15 seconds (but no
more than 25 seconds).
phones, computers, or switches. The ports support 1+1 Ethernet port redundancy
(active-standby), half- and full-duplex modes, auto-negotiation, and straight-
2 | Page
Page 3
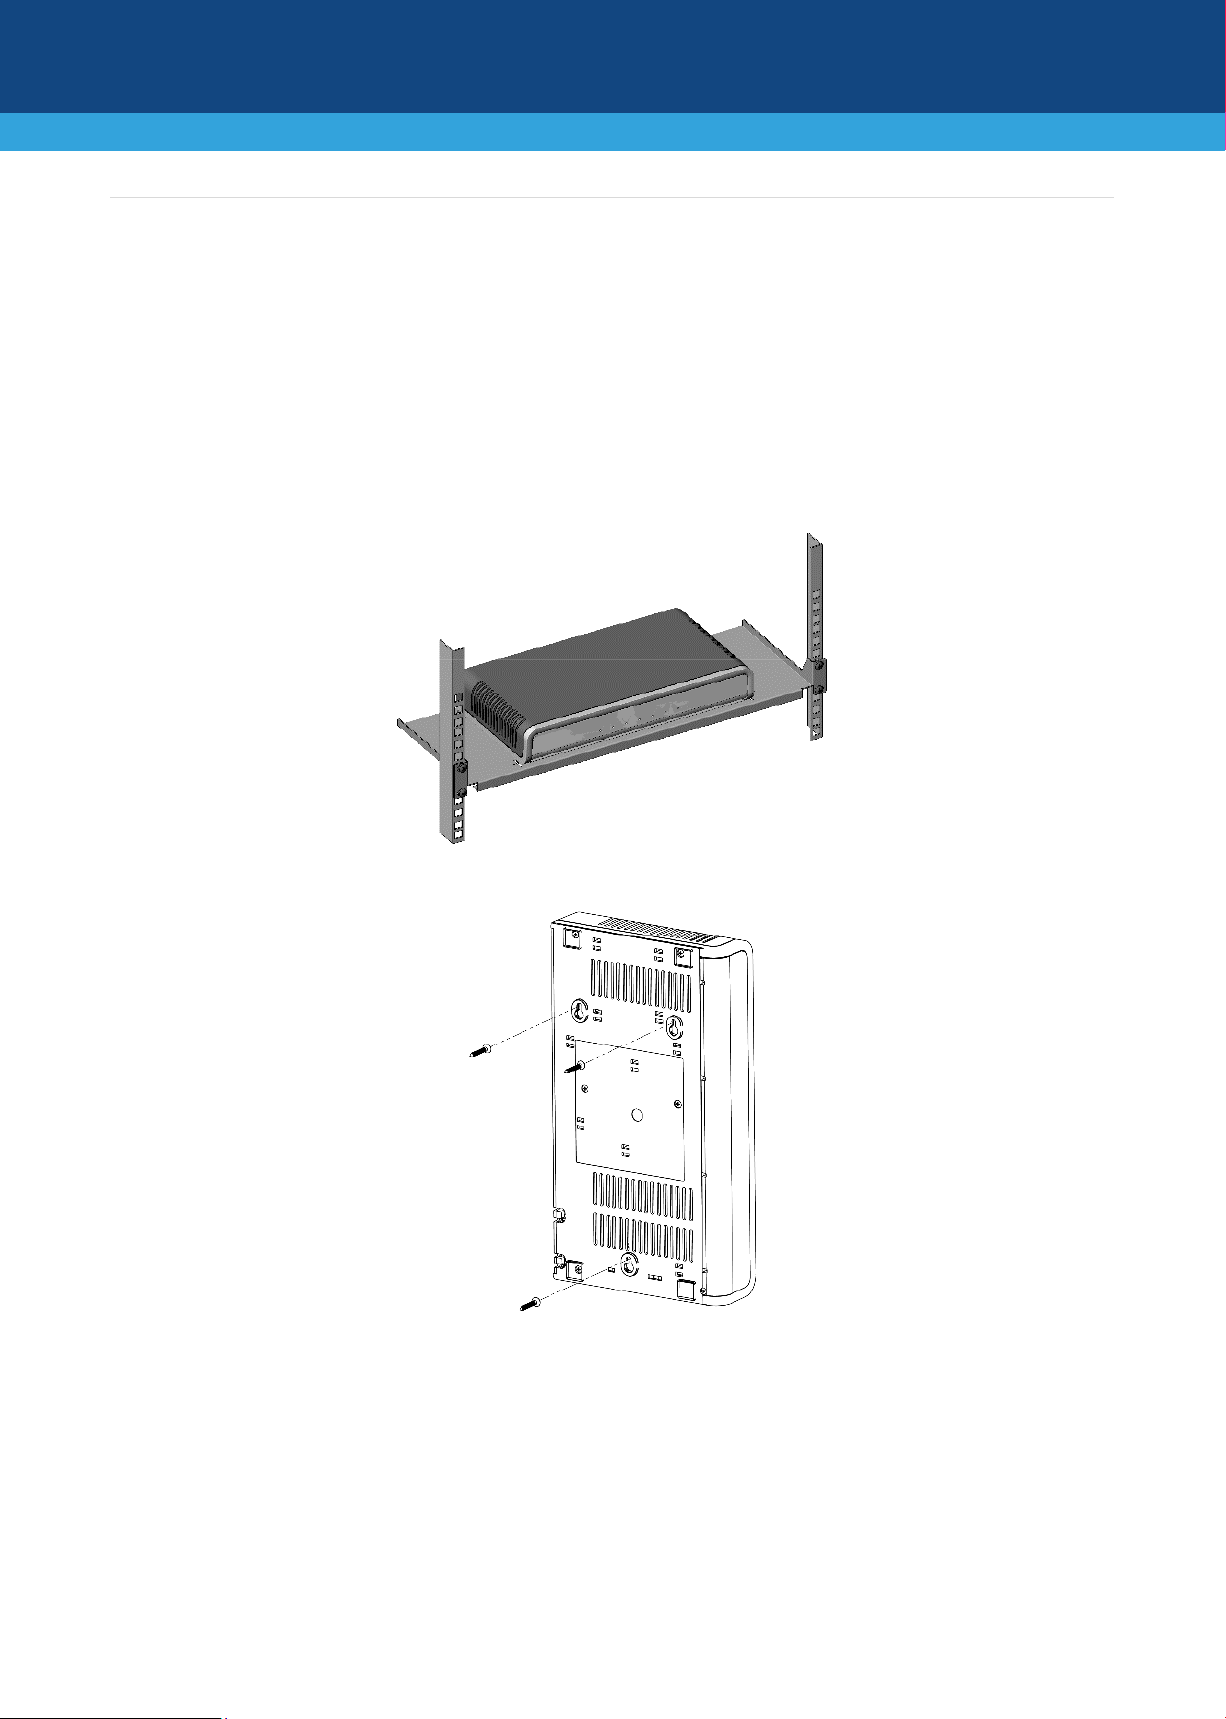
Mounting the Device
You can mount the device in several ways:
Placing it on a desktop using the four anti-slide bumpers (supplied), which you need to stick on the
grooves located on the underside of the device.
Mounting it in a standard 19-inch rack by placing it on AudioCodes 1U 19-inch rack mount shelf
(separate orderable item). The procedure includes attaching the shelf to the rack's front posts, and
then placing the device on the shelf where it is securely held in position by the device's anti-slide
bumpers which fit into the shelf's four square-openings.
Mounting it on a wall, using the integral mounting keyholes located on its underside.
For detailed instructions on mounting, refer to the Hardware Manual.
3 | Page
Page 4

Cabling the Device
The device is powered by an external 12V/3A AC/DC power adapter (supplied), connected to a standard
alternating current (AC) electrical wall outlet.
1. The AC/DC power adapter (supplied) supports interchangeable plugs to suit the type of electrical wall
outlet of the country in which you are installing the device. To attach the required plug to the adapter,
insert the top part of the plug into the upper part of the adapter's housing slot, and then press down
on the bottom part of the plug until you hear a "click" sound, indicating that the plug is securely
inserted into the slot. (To remove the plug, push and slide down the adapter's OPEN plug release
lever.)
2. Insert the DC plug that is located at the end of the power cord of the power adapter into the device's
power socket located on the rear panel and labeled POWER.
3. Plug the power adapter directly into a standard electrical wall outlet.
4. Switch on the device by pressing-in the power button located on the rear panel. When the device
receives power, the Power LED turns on (green).
4 | Page
Page 5

Assigning an IP Address to the Device
Use the device's factory default IP address (192.168.0.2/24 and Default Gateway 0.0.0.0) to initially access the
device's Web-based management interface and then change it to suit your networking addressing scheme for
subsequent connectivity.
1. Using a CAT-5e/6 straight-through RJ-45 Ethernet cable, connect the device's Ethernet port GE LAN #1
(front panel) to the LAN port of your computer.
2. Change the IP settings of your computer to correspond with the device's default IP address and subnet
mask.
3. On your computer, open a standard Web browser (for example, Google Chrome), and then in the URL
field, enter the device's default IP address; the Web Login screen appears:
4. Type in the default username (Admin) and password (Admin), and then click Log In.
5. Open the IP Interfaces table (Setup menu > IP Network tab > Core Entities folder > IP Interfaces).
5 | Page
Page 6

6. Select the OAMP interface ('Application Type' with OAMP + Media + Control), click Edit, and then in
the dialog box, modify the device's OAMP interface.
7. Click Apply to submit your changes; your connection with the device becomes unavailable at the
default IP address (due to the new IP address).
8. Change the IP settings of your computer to correspond with the new OAMP IP addresses and subnet of
the device.
9. Access the device again, but at its' new IP address, and then on the Web interface's toolbar, click the
Save button; the new IP address is now saved to the device's flash memory.
10. Re-cable the device to the required network. You can now access the device's management interfaces
remotely, using the new IP address.
6 | Page
Page 7

Safety Precautions
This device is an indoor unit and therefore, must not be installed outdoors.
Ethernet cabling must be routed only indoors and must not exit the building.
The device must be installed and serviced only by qualified service personnel.
Do not open or dismantle the device.
Do not expose the device to water or moisture.
Make sure the device is installed in a well-ventilated location to avoid over heating of internal
components and subsequent damage.
Do not place any object on top of the device and make sure that sufficient clearance from the top and
sides are maintained to ensure proper airflow to avoid over heating of internal components.
Operate the device in an ambient temperature (Tma) that does not exceed 40°C (104°F).
The device must be installed only in restricted access locations.
Use only the supplied AC/DC power adapter for connection to the power source.
In case of a malfunction, do not attempt to fix the power adapter and do not use any other type of
power adapter. Contact AudioCodes for further assistance.
Operate the device only from the type of power source indicated on the chassis.
Installation of the device must be in accordance with national electrical codes and conform to local
regulations.
Use minimum 26-AWG wiring for FXO ports.
7 | Page
Page 8

International Headquarters
AudioCodes Inc.
About AudioCodes
AudioCodes Ltd. (NASDAQ, TASE: AUDC) is a leading vendor of advanced communications software, products
and productivity solutions for the digital workplace. AudioCodes enables enterprises and service providers to
build and operate all-IP voice networks for unified communications, contact centers, and hosted business
services. AudioCodes offers a broad range of innovative products, solutions and services that are used by large
multi-national enterprises and leading tier-1 operators around the world.
1 Hayarden Street,
Airport City
Lod 7019900, Israel
Tel: +972-3-976-4000
Fax: +972-3-976-4040
200 Cottontail Lane,
Suite A101E,
Somerset, NJ 08873
Tel: +1-732-469-0880
Fax: +1-732-469-2298
Contact us: https://www.audiocodes.com/corporate/offices-worldwide
Website: https://www.audiocodes.com/
©2020 AudioCodes Ltd. All rights reserved. AudioCodes, AC, HD VoIP, HD VoIP Sounds Better, IPmedia, Mediant,
MediaPack, What’s Inside Matters, OSN, SmartTAP, User Management Pack, VMAS, VoIPerfect, VoIPerfectHD, Your
Gateway To VoIP, 3GX, VocaNom, AudioCodes One Voice, AudioCodes Meeting Insights, AudioCodes Room Experience
and CloudBond are trademarks or registered trademarks of AudioCodes Limited. All other products or trademarks are
property of their respective owners. Product specifications are subject to change without notice.
Document #: LTRT-10706
Date Published: 20/08/2020
8 | Page
 Loading...