

Page 1

e
Audi Navigation Syst
Operating Instr
Audi Navigation System plus (RNS-E) 11.04
Page 2

© 2004 AUDI AG
y
e
It has always been Audi’s policy to continuously improve its products. Audi, therefore, reserves the right to make changes in design
and specifications, and to make additions or improvements in its
products, without incurring any obligation to install them on products previously manufactured.
Text, illustrations and specifications in this book are based on the
most up-to-date information available at the time of printing.
All rights reserved. May not be reproduced or translated in whole or
in part without the written consent of AUDI AG. Specifications are
subject to change without notice.
“BOSE” is a registered trademark of Bose Corporation.
Editorial deadline: 08/20/20
Tips
This owner's manual is onl
manual for your vehicle.
For the sake of the
Printed on environmentally
rine, recyclable).
Printed in Germany
© 2004 AUDI AG
Page 3

Introduction
You have decided on the Audi Navigation System plus - thank you very much
for your confidence in us.
With this equipment, you are acquiring a highly developed technical system which offers various
choices for entertainment and communication in addition to navigation. All the settings can be
made centrally, using an easy-to-follow menu guide.
We re co mmend that you rea d t his owner's manual carefully so that you qu ick ly become completely
familiar with all of the functions and possibilities of the system and are able to make full use of
them while driving.
Should you have any further questions about the Audi Navigation System plus in your vehicle,
please direct them to your Audi Dealer.
We hope you enjoy driving your car!
AUDI AG
Page 4

Table of contents2
Table of contents
About this book . . . . . . . . . .
General operation . . . . . . . .
Overview . . . . . . . . . . . . . . . . . . . . . . .
Control unit with screen . . . . . . . . .
Important Notes . . . . . . . . . . . . . . . .
Switching on and off . . . . . . . . . . . .
Opening and closing display . . . . .
Anti-theft coding . . . . . . . . . . . . . . . .
General system operation . . . . . .
Controls . . . . . . . . . . . . . . . . . . . . . . .
Multi-function steering wheel . . . .
Display . . . . . . . . . . . . . . . . . . . . . . . . .
Orientation . . . . . . . . . . . . . . . . . . . . .
Orientation symbols . . . . . . . . . . . . .
Operating the speller . . . . . . . . . . . .
Control wheel . . . . . . . . . . . . . . . . . .
Drives . . . . . . . . . . . . . . . . . . . . . . . . . .
Introduction . . . . . . . . . . . . . . . . . . . .
CD changer . . . . . . . . . . . . . . . . . . . .
DVD navigation drive . . . . . . . . . . . .
MP3 player . . . . . . . . . . . . . . . . . . . . .
CD changer . . . . . . . . . . . . . . . . . . . .
Tips . . . . . . . . . . . . . . . . . . . . . . . . . . .
4
RADIO, CD . . . . . . . . . . . . . . . . . .
RADIO . . . . . . . . . . . . . . . . . . . . . . . . . .
Introduction . . . . . . . . . . . . . . . . . . .
7
Band control button (frequency) .
9
Main radio menu . . . . . . . . . . . . . . .
9
Memory control button . . . . . . . . .
9
Sound control button . . . . . . . . . . .
11
Tuning control button . . . . . . . . . .
12
Setup Radio (FM/AM range) . . . . . .
13
Satellite Digital Audio Radio
Service . . . . . . . . . . . . . . . . . . . . . . . .
15
Setup Satellite radio . . . . . . . . . . . .
15
System information . . . . . . . . . . . .
21
CD/SD . . . . . . . . . . . . . . . . . . . . . . . . . .
27
Introduction . . . . . . . . . . . . . . . . . . .
27
Source control button . . . . . . . . . .
29
Main CD menu . . . . . . . . . . . . . . . . .
30
CD list control button . . . . . . . . . . .
33
Sound control button . . . . . . . . . . .
34
CD control button . . . . . . . . . . . . . .
34
Setup CD . . . . . . . . . . . . . . . . . . . . . .
35
Main MP3 menu . . . . . . . . . . . . . . .
35
MP3 list control button . . . . . . . . .
37
Sound control button . . . . . . . . . . .
43
MP3 ctrl control button . . . . . . . . .
48
Setup MP3 . . . . . . . . . . . . . . . . . . . .
Adjusting sound settings . . . . . .
Setting basic s ound characteristics
DSP (Digital Signal Processing) . . .
Dynamic noise compensation . . . .
Volume settings . . . . . . . . . . . . . . . .
55
56
56
57
58
61
NAME, TEL . . . . . . . . . . . . . . . . . .
62
62
NAME (directory) . . . . . . . . . . . . . . .
65
General safety precautions . . . . . .
Introduction . . . . . . . . . . . . . . . . . . .
67
Main directory menu . . . . . . . . . . . .
70
Telep ho n e . . . . . . . . . . . . . . . . . . . . . .
73
General . . . . . . . . . . . . . . . . . . . . . . . .
74
74
77
78
79
79
80
82
83
84
84
85
88
92
92
93
94
94
97
98
98
98
99
105
105
Page 5
Table of contents 3
NAV, INFO . . . . . . . . . . . . . . . . . .
Navigation (NAV) . . . . . . . . . . . . . . .
General safety precautions . . . . . .
Introduction . . . . . . . . . . . . . . . . . . .
Main navigation menu . . . . . . . . . .
Memory control button . . . . . . . . .
Route control button . . . . . . . . . . .
Map control button . . . . . . . . . . . . .
Nav-Info control button . . . . . . . . .
Setup Navigation . . . . . . . . . . . . . . .
Information (INFO) . . . . . . . . . . . . .
Introduction . . . . . . . . . . . . . . . . . . .
Main information menu . . . . . . . . .
CAR, SETUP . . . . . . . . . . . . . . . .
CAR . . . . . . . . . . . . . . . . . . . . . . . . . . . .
Introduction . . . . . . . . . . . . . . . . . . .
SETUP . . . . . . . . . . . . . . . . . . . . . . . . . .
Introduction . . . . . . . . . . . . . . . . . . .
Settings control button . . . . . . . . .
Sound control button . . . . . . . . . . .
Display control button . . . . . . . . . .
Frequently Asked Questions
. . . . . . . . . . . . . . . . . . . . . . . . . . .
(FAQ)
Self-help . . . . . . . . . . . . . . . . . . . . . . .
Warranty . . . . . . . . . . . . . . . . . . . . . .
107
108
108
109
117
134
139
Alphabetical index . . . . . .
142
150
151
163
163
163
167
168
168
169
169
170
173
173
175
175
176
179
General operation RADIO, CD NAME, TEL NAV, INFO CAR, SETUP
Page 6

About this book4
About this book
Equipment and illustrations
This boo k de scr ibes the equipment range specified for this model at
the editorial deadline date as indicated on the inside of the back
cover. Individual items of equipment may not yet be available at the
time of printing or may only be offered in certain countries.
The illustrations are designed as schematic images. Some of the
details on your vehicle may therefore look slightly different than
illustrated in this manual.
Structure of the book
The contents are systematically structured in a color-coded layout
to make it easier to locate specific topics and understand them.
Chapters, Table of Contents and Index
The contents of the book are divided into relatively small sections
that are summarized in clearly arranged chapters (e.g. “System
Operation”). To make it easier to use the book, we have identified
the individual chapters with the color codes from the Audi Navigation System. Each color code is shown in the bottom margin of the
chapter as well as in the headings and illustrations.
In front of each chapter, icons shaded with the background color
code of that specific section help to make the book more attractive
and also serve to differentiate the fonts and facilitate navigation.
The Table of Contents, organized into chapters, and the detailed
Index at the end of the b ook hel p you to quickly find the information
you need.
Sections
The information in most sections apply to all vehicles. However,
since the equipment level is not the same on all vehicles, this book
also contains sections which may not apply to your particular
vehicle. When this is the case, the section will be identified, for
example: “Applies to vehicles: with Audi cd changer”. This way, you
only have to read the sections which are applicable to your vehicle.
Although the information has been grouped into the appropriate
sections, there are many possible equipment combinations which
may be described in this book, but not installed on your vehicle.
These are listed as optional equip ment and marked with an asterisk
“*”.
® Registered trademarks are marked with ®. The absence of this
symbol does not warrant unrestricted use of a term.
£ The paragraph continues on the next page.
Ð The square marks the end of a paragraph.
Heading summaries and step-by-step
instructions
Each section has its own heading.
Then follows a summary (in large, italic print), which tells you the
subject matter of the section.
Under an illustration you will find step-by-step instructions (in rela-
tively large print), which tell you what you must do. Each instruction
is identified with a dash.
A descriptive section offering important and continuing information for each topic follows.
Special symbols in this book
Several symbols are used in this book. These symbols draw your
attention to important information about a number of special
subjects. Please familiarize yourself with the symbols and what they
mean.
Page 7
WARNING
Text with this symbol contains information about safety and how
to reduce the risk of serious personal injury or death.
Warning texts are the most important. Throughout this book you
will find a double arrow followed by a warning symbol. This will
refer you to a warning at the end of the section. You should pay
particular attention to this warning.
Note
Text with this symbol contains information about avoiding damage
to your vehicle.
A note lets you know that something may cause damage to your
ve hic le or equ ipm ent (fo r e xam ple , da mage to t he CD p lay er) or th at
something could cause an accident (for example, a street could be
slippery even if the temperature is around 40° F (5° C).
For the sake of the environment
Text with this symbol contains important notes about the environment and how you can help protect it.
For the sake of the environment lets you know what you can do to
he lp pr ote ct t he e nvi ron men t (f or e xamp le, h ow y ou c an re duc e fu el
consumption).
About this book 5
Tips
Text with this symbol contains special tips and other information
about getting the most out of your vehicle and its features.
A tip makes you aware of important information which you may find
useful.
General operation RADIO, CD NAME, TEL NAV, INFO CAR, SETUP
Page 8
6
Page 9
7General operation
Page 10
Overview8
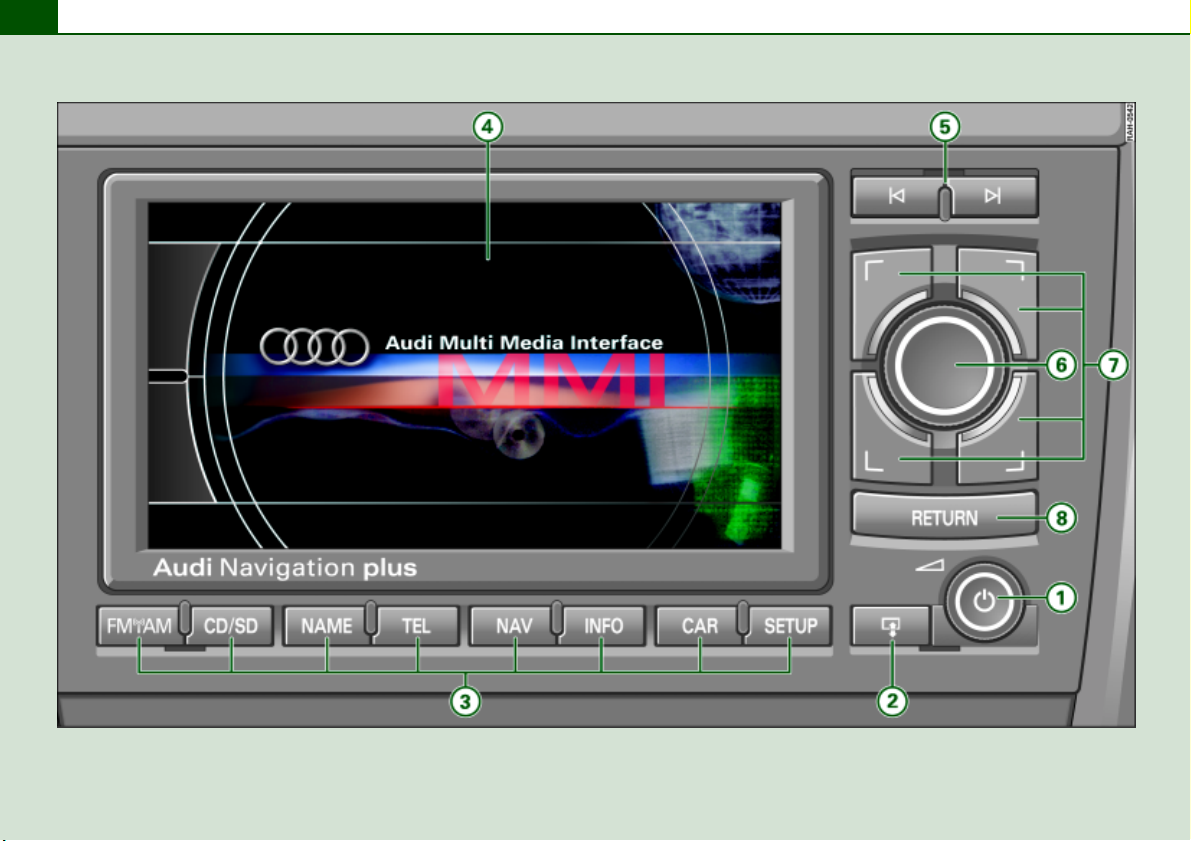
Fig. 1 Navigation System plus control unit
Page 11
Overview
Overview 9
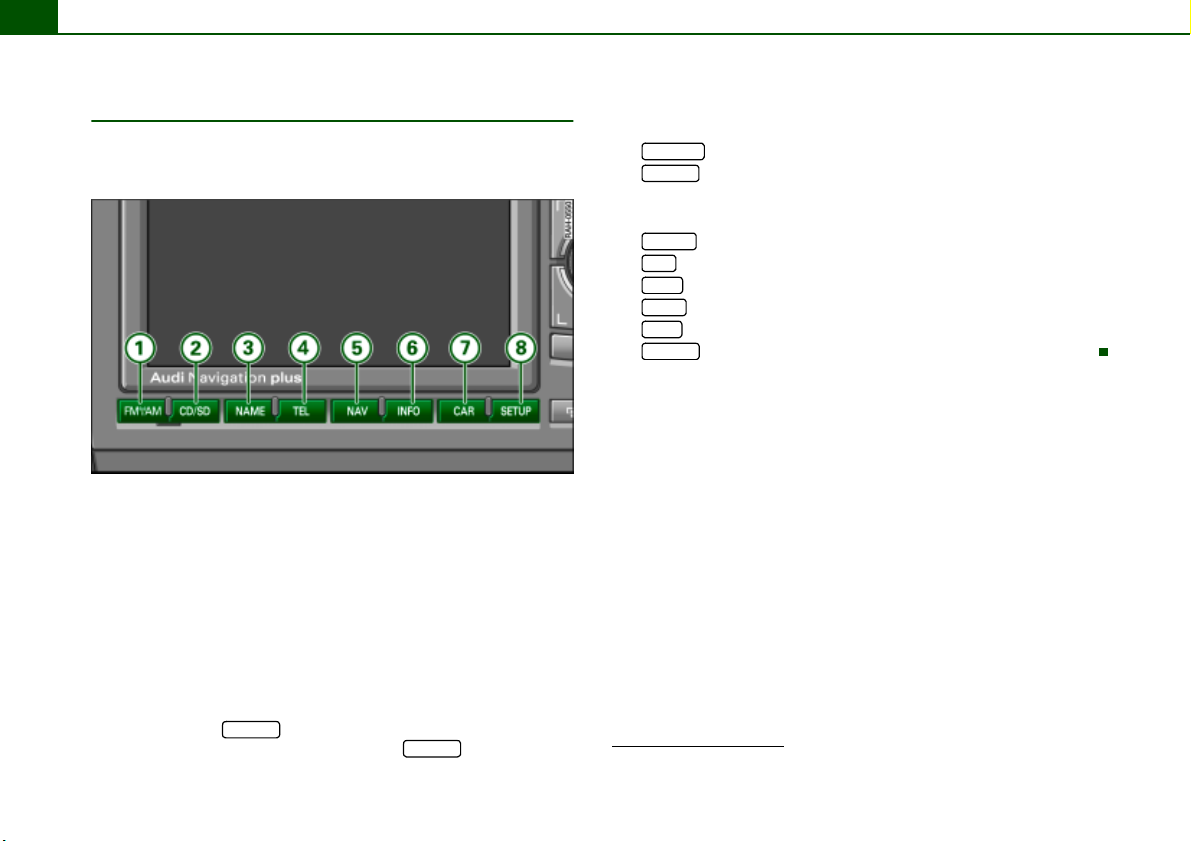
Control unit with screen
This overview is to assist you in familiarizing yourself
with the controls and their functions.
1
On/Off knob
A
- Switching on and off . . . . . . . . . . . . . . . . . . . . . . . . . . .
- Volume adjustment . . . . . . . . . . . . . . . . . . . . . . . . . . . .
2
A
3
A
4
A
5
A
6
A
7
A
8 RETURN
A
î) for opening and closing the Display . . . . . .
Button (
Function buttons . . . . . . . . . . . . . . . . . . . . . . . . . . . . . . . .
Display . . . . . . . . . . . . . . . . . . . . . . . . . . . . . . . . . . . . . . . .
Forward/reverse buttons . . . . . . . . . . . . . . . . . . . . . . . . .
Control knob . . . . . . . . . . . . . . . . . . . . . . . . . . . . . . . . . . .
Control buttons . . . . . . . . . . . . . . . . . . . . . . . . . . . . . . . . .
button . . . . . . . . . . . . . . . . . . . . . . . . . . . . . . . .
Tips
· Please note that this Operator's Manual describes only the Audi
Navigation System plus and its components. You can find additional information on vehicle operation in your Owner's Manual.
· Some the equipment shown is found only in certain model
versions or is optional equipment
11
19
12
16
27
18
17
17
18
Important Notes
Notes on Traffic Safety
To ensure driving safety, settings in the Navigation
System must only be performed when the vehicle is
parked.
The broad range of equipment in the Audio Navigation System
provides a wealth of potential entertainment and a wide variety of
information in addition to navigation.
Carry out your settings in the Navigation System only when the
vehicle is stationary. Avoid using the Navigation System while you
are driving so that you can devote your full attention to traffic. Use
the controls on the multi-function steering wheel*
you are driving.
WARNING
· Pay attention first and foremost to your driving! As the driver
of the vehicle, you have total responsibility for operating the
vehicle safely. Therefore, when using the Navigation System functions, make c ertain that y ou al ways ha ve complete control of your
vehicle!
· Traffic today requires your full and continuous concentration.
As the driver, you bear complete respo nsibility for safety in traffic.
Therefore, to ensure driving safety, settings in the Navigation
System must be performed only when the vehicle is parked.
Þ page 21 while
General operation RADIO, CD NAME, TEL NAV, INFO CAR, SETUP
Page 12
Overview10
WARNING (continued)
· The volume controls on the audio system should be selected to
ensure that outside signals, such as police and fire truck sirens
can always be heard - danger of accident!
General information
Settings in the Navigation System should not be
performed while you are driving the vehicle.
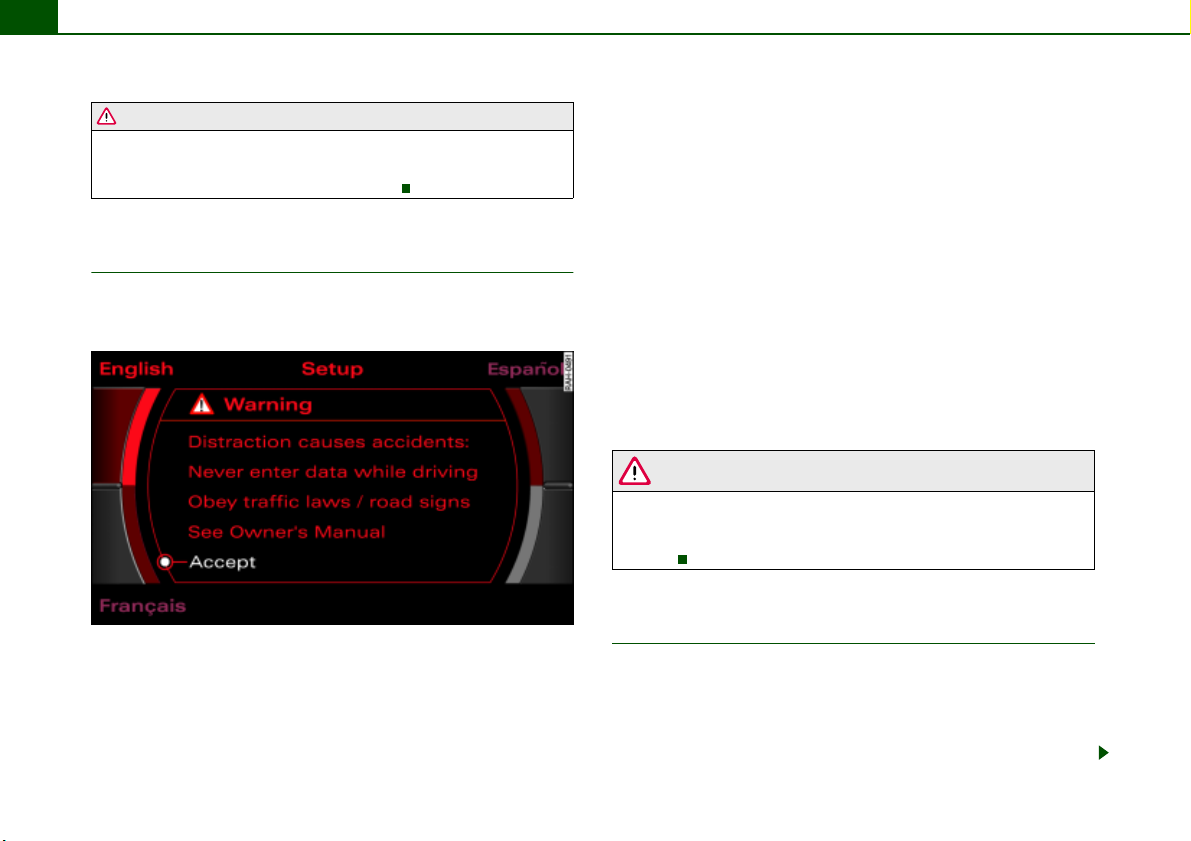
Fig. 2 Display: Warning
After the Navigation System has been switched on
Þ page 11, a warning message is displayed Þ fig. 2.
– Press the ap propriate con trol butto n Þ page 17 for ei th er
English, Español or Français, in case the display does not
appear in the desired language Þ fig. 2.
– Please read the warning message carefully and follow
the instructions.
– Select Accept by pressing the control knob once you
have read the warning message.
Always observe this message to avo id je opardizing your ow n safet y
and that of others.
Perform settings only when the vehicle is parked in order to devote
your full attention to driving safety.
Once you have confirmed the warning message, you may continue
to adjust the Navigation System.
WARNING
Traffic today requires your full and continuous concentration. As
the driver, you bear complete responsibility for safety in traffic. To
avoid accidents, never operate the Navigation System while
driving!
Instructions for care
The Navigation System requires regular attention.
Cleaning the display
– Clean the Navigation System Display with a soft clean
cloth and a LCD cleaner.
Page 13
Overview 11
Cleaning the controls
– First clean the controls with a brush to remove dust.
– Then wipe the controls with a clean, soft, slightly damp
cloth.
Display
The Display can be cleaned with a professionally available “LCD
cleaner”. The cloth should be slightly dampened with the cleaning
fluid to clean the display.
Controls
The controls should be cleaned with a brush first so that no dirt is
trapped between the buttons and the housing. We recommend
giving the controls a final wipe with a cloth moistened with water
and dish washing detergent.
Note
Treat the display with care. Pushing on it with your finger or
touching it with sharp objects can cause dents or scratches.
Switching on and off
Automatic switching on and off
The Navigation System switches on automatically after you turn on
the ignition. When you remove your key from the ignition lock, the
Navigation System will automatically switch off.
What happens when it is switched on?
When the system is switched on, the start screen appears. The
ou t put menu of the last sel e cted main functi o n is displayed . The last
selected audio source is switched on automatically.
What happens when it is switched off?
When the equipment is switched off, the display darkens and the
audio source is silenced. Settings that have already been made do
not change.
Tips
The display can be switched off in the Setup menu Þ page 173, the
operating mode selected remains active.
Switching on/off manually
The Navigation System can also be turned on and off
manually if necessary.
Fig. 3 Navigationssystem: ON/OFF knob
General operation RADIO, CD NAME, TEL NAV, INFO CAR, SETUP
Page 14
Overview12
– Push the On/Off knob to switch it on and off Þ fig. 3.
The Navigation System can also be switched on and off manually if
necessary. If the Navigation System was switched off in this way
with the ignition key removed, it is still available for about 30
minutes.
If the Navigation System was switched off manually, it is not
switched on automatically the next time the ignition is turned on.
Note
To avoid discharging the battery, the Navigation System should not
be switched on for an unnecessarily long time with the engine off.
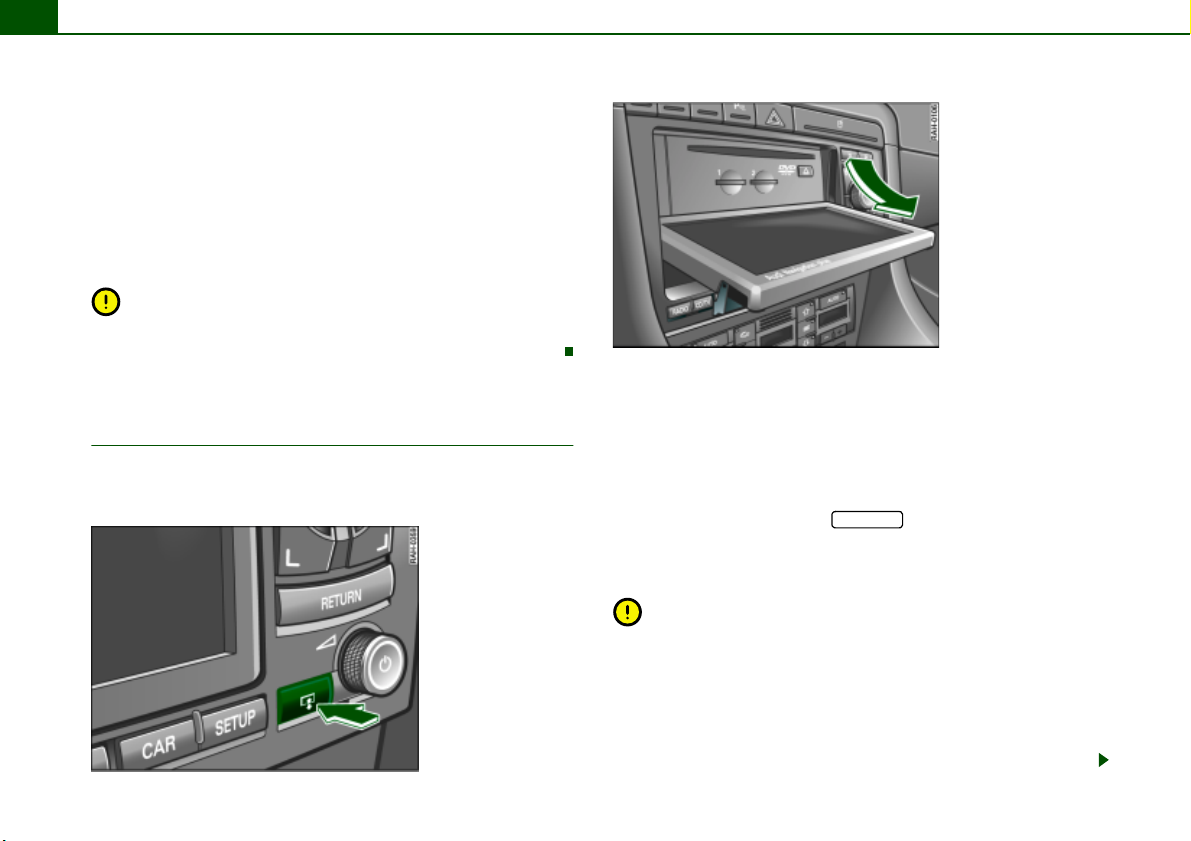
Opening and closing display
The display must be opened to access the drives
located behind it.
Fig. 5 Display open:
Access to the DVD
drive and the MP3 card
reader
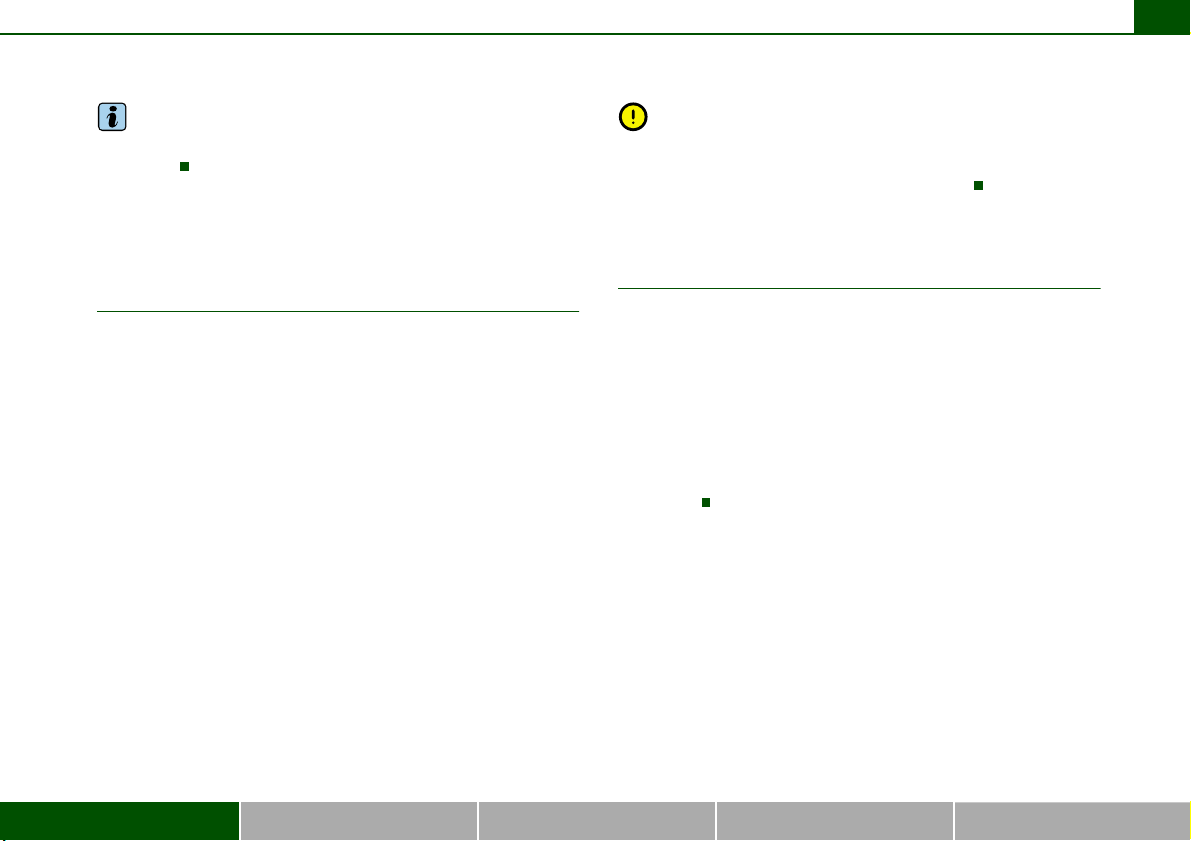
–Press the î button Þ fig. 4 to open or close the display
Þ fig. 5.
Opening the display provides access to the DVD navigation drive
and the two card readers for SD/MMC memory cards
The display can also be closed using the function button, control
buttons, the control knob, the button or the
Forward/Reverse button
The open display is automatically closed after about one minute.
RETURN
Þ page 9.
Þ fig. 5.
Fig. 4 Navigation
System: Button for
opening and closing
the display
Note
· If the display cannot be closed, it is possible that objects in the
vicinity of the display or an incorrectly inserted SD/MMC memory
card is preventing it from being closed. Do not try to force the
display closed.
· To prevent damage to the Navigation System, no foreign bodies
should be introduced into the DVD navigation drive or into the MP3
card reader.
Page 15
Overview 13
Tips
You can find information about the different drives starting on
Þ page 34.
Anti-theft coding
General
Effective safety measures in conjunction with the PIN
prevent misuse of the equipment by unauthorized
parties.
The electronic lock-up is operational, if:
· the Navigation System is removed from the vehicle,
· the Navigation System is disconnected from the vehicle current
supply,
· the battery is disconnected or
· the electric fuse for the Navigation System is blown.
If the anti-theft coding has locked up the Navigation Syst em for one
of the reasons given, the speller display for entering the PIN
Þ page 14, fig. 6 appears after the Navigation System is switched
on.
After that, the Navigation System can only be operated again only
by entering the correct PIN.
This PIN is attached to the equipment card along with the equip-
ment number.
The PIN can be used for your equipment alone and cannot be
changed.
Note
The “equipment card” should be removed and kept in a safe place under no circumstances should it be kept in the vehicle. This makes
the Audi Navigation System unusable by thieves.
Applies to vehicles: with convenience coding
User-friendly radio coding
After the PIN is entered the first time, t he Navigatio n System gets to
know its vehicle.
If the power supply was interrupted, the Navigation System checks
to see whether it is still its vehicle. If it is, the Navigation System is
ready for use again after a few seconds.
It is no longer necessary to manually disable the electronic lock!
However, if the Navigation System is installed in another vehicle,
the electronic lock must be cancelled by entering the PIN
Þ page 14.
General operation RADIO, CD NAME, TEL NAV, INFO CAR, SETUP
Page 16
Overview14
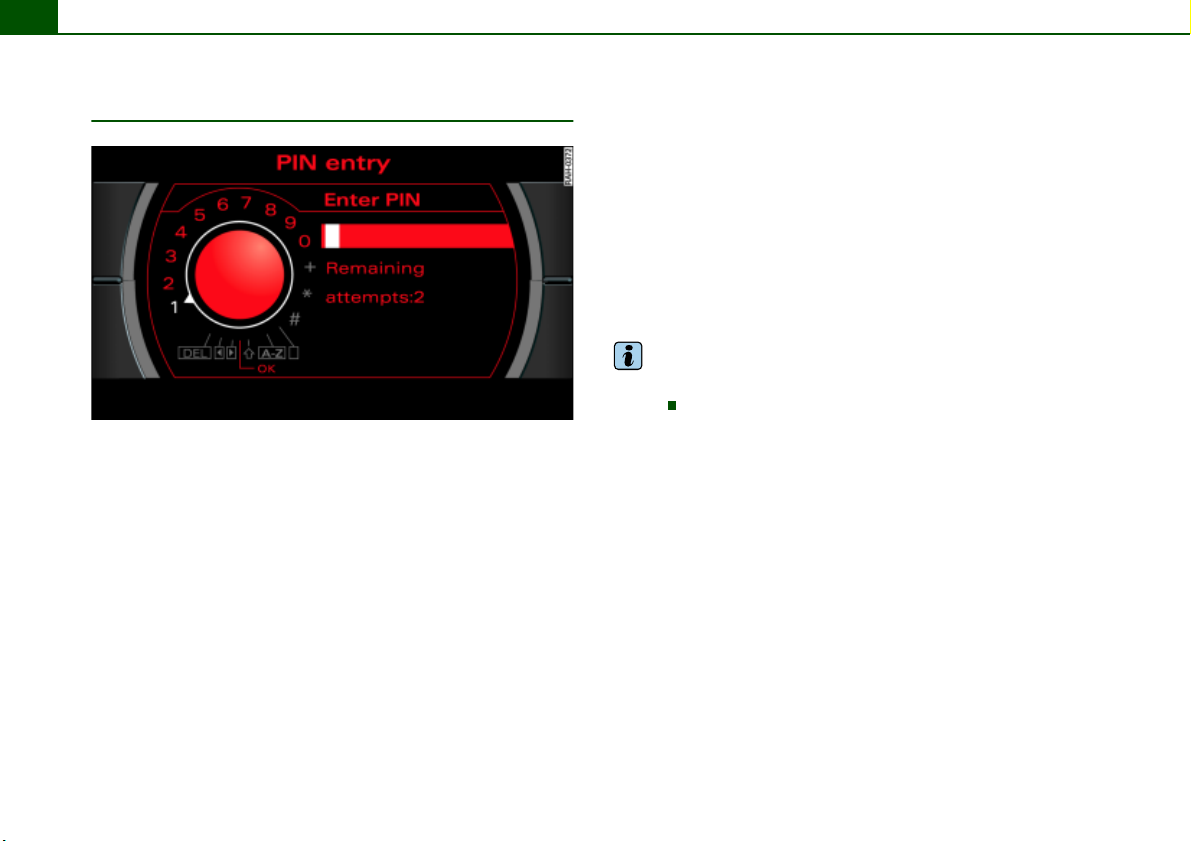
Entering PIN
Fig. 6 Speller display: Entering PIN
– Switch the ignition on.
– Switch the Navigation System on if it is not switched on
automatically Þ page 11.
– Enter the PIN using the speller Þ fig. 6.
– Confirm your entry with OK. The electronic lock is
cancelled.
Yo u ha ve two attempts to enter the correct PIN. The number of
attempts is shown in the display. If you enter the incorrect PIN twice
in succession, the message System is locked appears in the display.
Unlocking the system (unlocking procedure)
Before you can enter the PIN again, the electronic lock must be
cancelled. This happens automatically wh en t he Na vig ati on S yste m
has been switched on for about 60 minutes. If you do not insert the
ignition key into the lock, the Navigation System switches off automatically after 30 minutes. When the Navigation System switches
off automatically or is switched off, the unlocking process is
cancelled and has to be started over.
When the unlocking process is complete, you have two more
attempts to enter the correct PIN. If you enter the incorrect PIN
again twice in succession, the procedure must be repeated.
Tips
If you lose your PIN, contact an Audi dealership or authorized
facility.
Page 17
General system operation
A
A
A
General system operation 15
Controls
Basic operating functions
All the functions of the Navigation System can be operated with four basic rules.
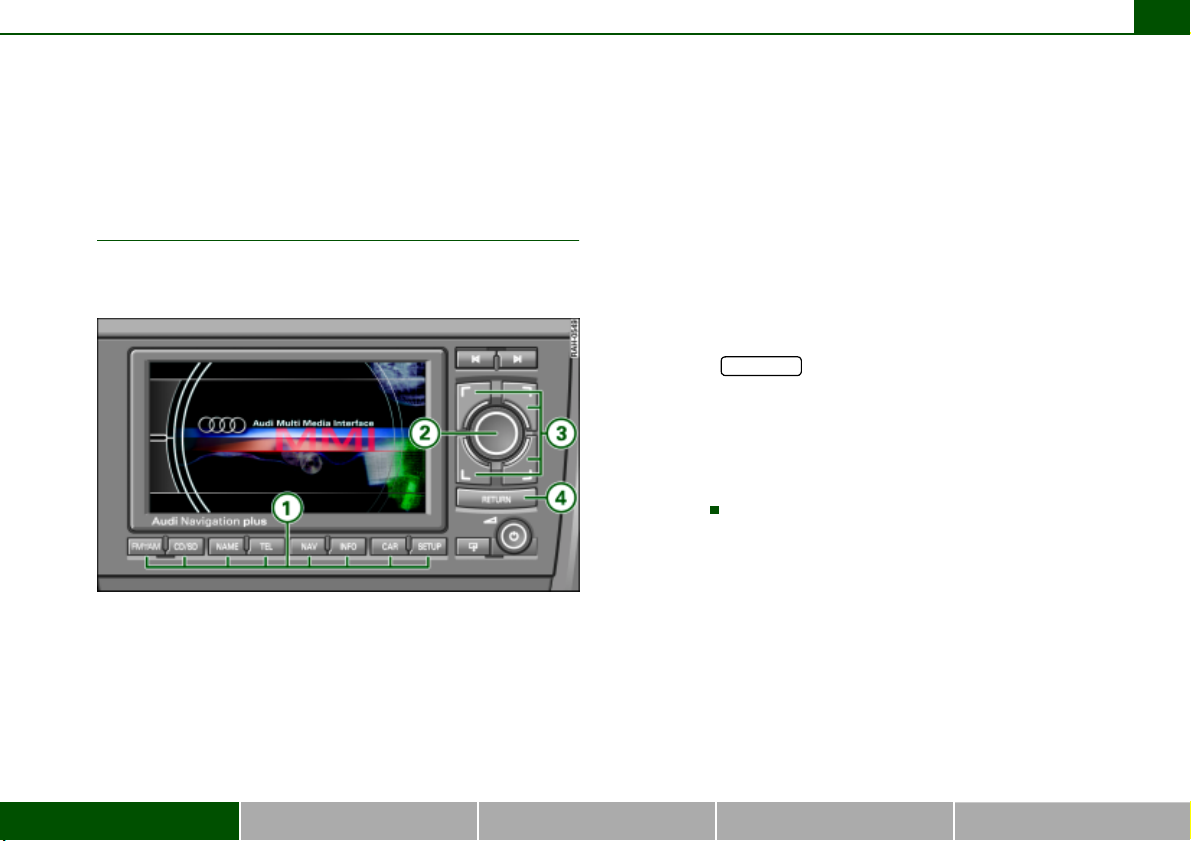
Fig. 7 Navigation System Controls
The buttons on the operating unit have been assigned the
following four basic functions:
1. Press one of the function keys Þ fig. 7 (Þ page 16) to
reach the desired main function (e.g. radio operation,
navigation).
1
2. Rotate and press the control knob Þ fig. 7
(Þ page 17) to make a selection in the Display.
3. Press one of the control buttons Þ fig. 7 (Þ page 17)
to open one of the submenus in the particular main function. You can find the current submenus in the four
corners of the display. The four corners of the display
correspond to the four control buttons that are positioned around the control knob.
4. Press the button Þ fig. 7 (Þ page 18) to
cancel a selection not yet confirmed or to return to the
next higher level.
In principle you only need to take note of the buttons described,
along with their main functions. You will be led through the operating procedures with the help of the menus, which are mostly selfexplanatory.
RETURN
2
A
3
4
General operation RADIO, CD NAME, TEL NAV, INFO CAR, SETUP
Page 18
General system operation16
A
A
A
A
A
A
A
A
Function buttons
The function buttons determine which main functions
are shown in the display.
Fig. 8 Navigation System: Function buttons
– Pr es s a fun ct io n b ut to n Þ fig . 8 to reach the d e sired main
function.
If the Navigation System is switched on, all main functions are
active.
The main menu or a submenu assigned to this main function is
sh own in t he d isp lay
the function button again, you usually go the particular main menu
Þ page 20, “Home function”.
If you pressed the button in one of the main functions, you
can leave that Setup menu by pressing the button
again
Þ page 169. The Setup function works in conjunction with an
Þ page 20, “History function”. When you press
SETUP
SETUP
already activated function button. This opens special settings
belonging to the main function just selected.
1 FM-AM
2 CD/SD
- Running the CD drives . . . . . . . . . . . . . . . . . . . . . . . . .
- Running the MP3 player . . . . . . . . . . . . . . . . . . . . . . . .
3 NAME
4 TEL
5 NAV
6 INFO
7 CAR
8 SETUP
1)
Telephone is not installed.
button . . . . . . . . . . . . . . . . . . . . . . . . . . . . . . . . .
button
button . . . . . . . . . . . . . . . . . . . . . . . . . . . . . . . . . .
1)
button
button . . . . . . . . . . . . . . . . . . . . . . . . . . . . . . . . . . .
button . . . . . . . . . . . . . . . . . . . . . . . . . . . . . . . . . . .
button . . . . . . . . . . . . . . . . . . . . . . . . . . . . . . . . . . .
. . . . . . . . . . . . . . . . . . . . . . . . . . . . . . . . . . .
button . . . . . . . . . . . . . . . . . . . . . . . . . . . . . . . . .
56
78
83
98
105
108
163
168
169
Page 19
General system operation 17
A
Control knob
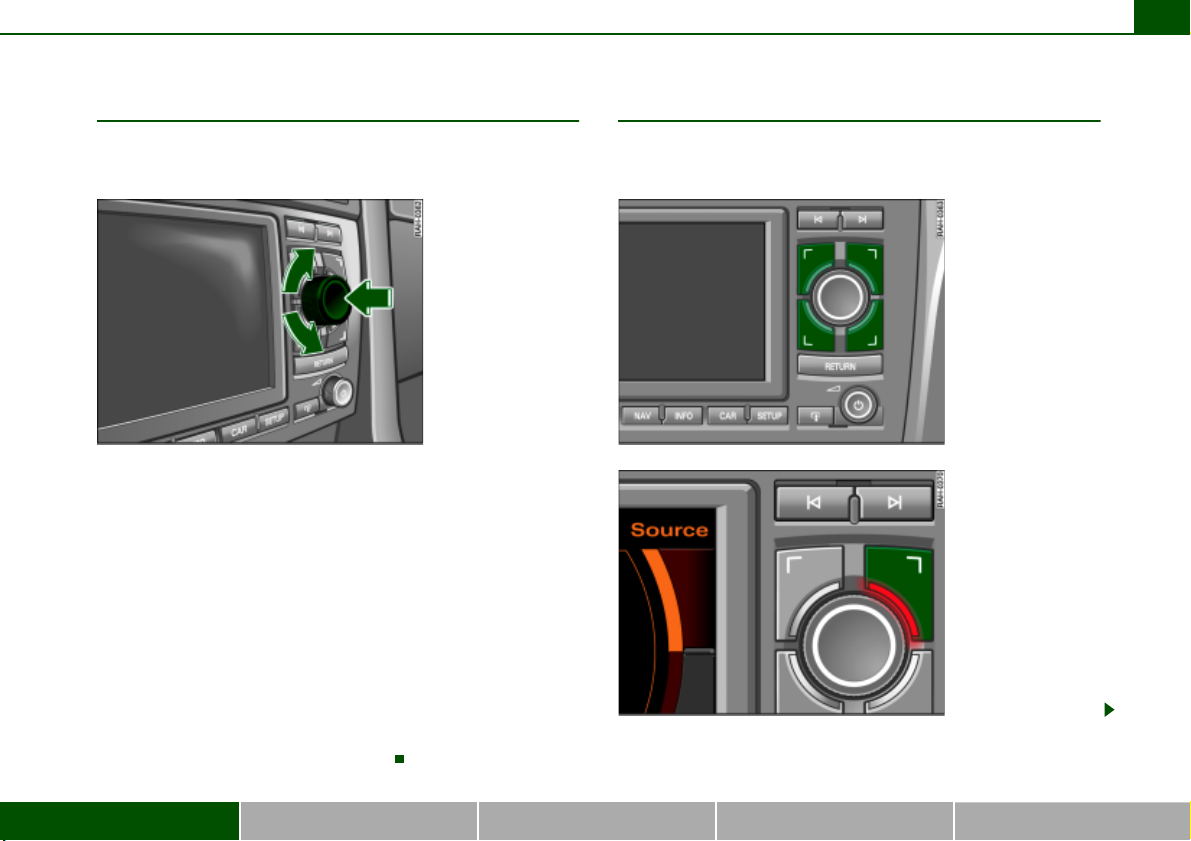
You can make a selec tion in t he Dis play by turning a nd
pressing the control knob.
Fig. 9 Navigation
System: Control knob
Rotation function
– Rotate the control knob Þ fig. 9 to select a menu item in
the Display.
– Rotate the control knob clockwise or counter-clockwise
to move the cursor up or down.
Pressing function
– Press the control knob Þ fig. 9 to confirm the selection
or entry.
If an arrow Þ page 29, fig. 23 is visible in the lower or upper
Display corner, additional menu items can be called up by
continuing to rotate the knob
2
Þ page 29.
Control buttons
The control buttons are logically assigned to the
corners of the screen.
Fig. 10 Navigation
System: Control
buttons
Fig. 11 Navigation
System: Assignment of
control buttons and
button symbols to the
screen corners.
General operation RADIO, CD NAME, TEL NAV, INFO CAR, SETUP
Page 20
General system operation18
A
A
The four control buttons organized around the control
Þ page 17, fig. 10 are arranged to correspond to the bar-
knob
shaped switch symbols in the screen corners: the top right screen
corner corresponds to the top right control button
Þ page 17,
fig. 11.
When you press a control button, a new menu group is displayed
which is assigned thematically to the particular main function.
To make orientation easier, the activated control button is illumi-
nated and the corresponding corner of the screen is highlighted in
color.
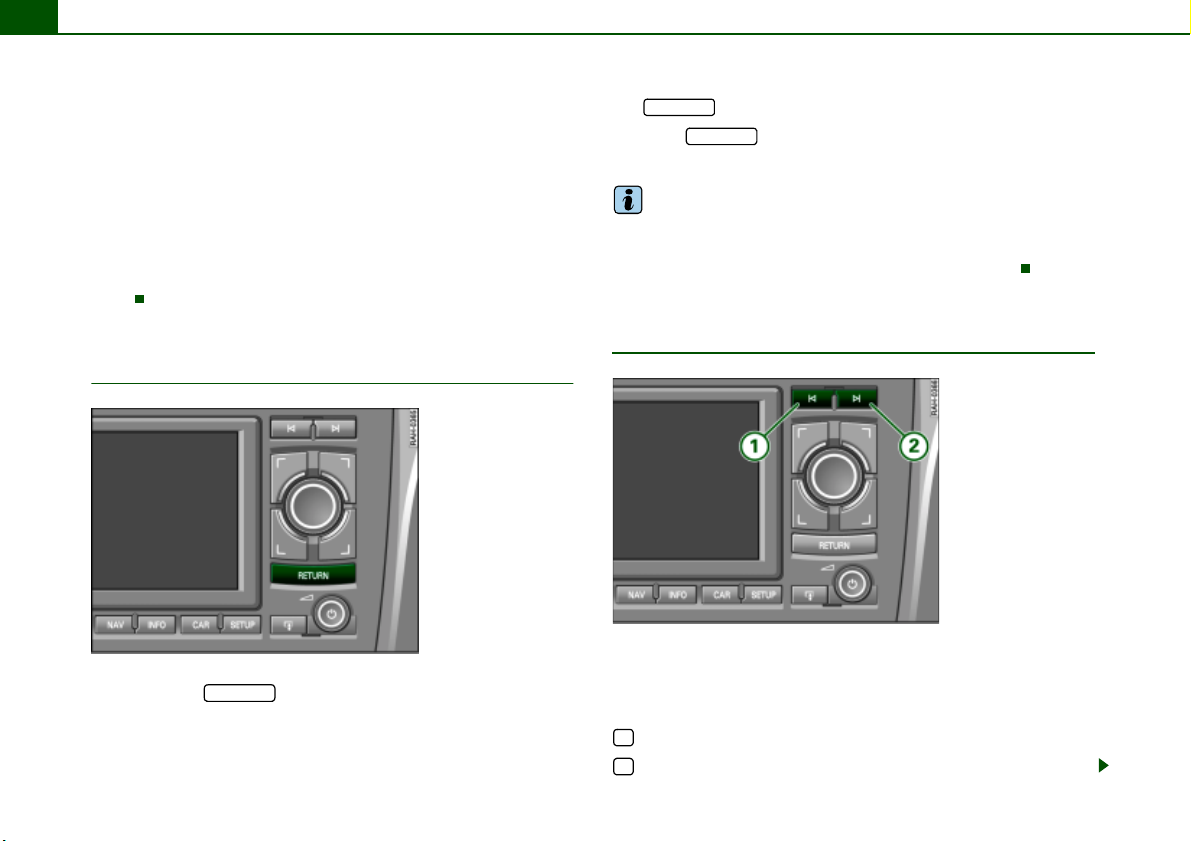
Return button
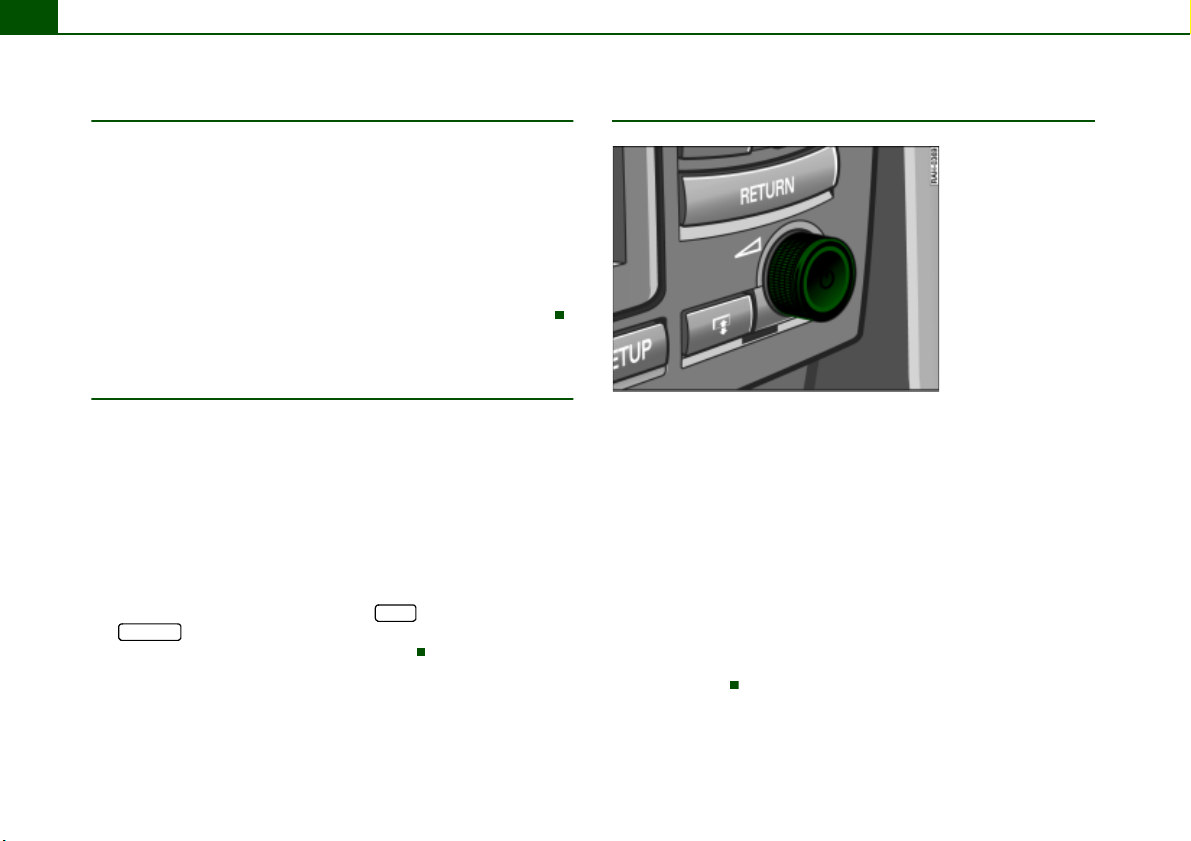
Fig. 12 Navigation
System: Return button
By pre ssi ng t he b utto n yo u wi ll j ump b ack one lev el i n the
menu hierarchy within a main function.
A selection that has not been confirmed by pressing the control
knob will be cancelled.
RETURN
RETURN
The button is available in every menu application.
Using the button, you can also deactivate the active side
menu in the navigation map display
RETURN
Þ page 144.
Tips
If you activate the function button Þ page 16 within a main function, the system will automatically jump to the main menu of that
main function. Please note
Þ page 20, “Home function”.
Forward/Reverse button
Fig. 13 Navigation
System
Forward/reverse
button
Depending on the operating mode, the following functions are
carried out with these buttons:
Main radio function is active
Í|
2
go to next station on the radio station list
|Ì
1
go to previous station on the radio station list
Page 21
General system operation 19
A
A
A
If you would like to scroll in an active radio station list using the
Forward/Reverse button, it is not necessary to show the station list
in the Navigation System display.
If the radio memory list
Þ page 61 is shown in the Navigation
System display, you can select a a station from the memory list by
pressing the Forward/Reverse button.
Main CD function is active
Pressing the button calls up the next CD track. If the button is
Í|
2
held down, fast forward is activated.
You can jump back to the previous track by pressing the button
1
within the first 10 seconds of play time for a track. After 10
A
|Ì
seconds it jumps to the start of the track. If the button is held down,
reverse is activated.
If you would like to scroll in an active CD track list using the
Forward/Reverse button or activate forward/reverse it is not necessary to show the CD operating menu in the Navigation System
display.
Main MP3 function is active
Pressing the button calls up the next in the MP3 player. If the
Í|
2
button is held down, fast forward is activated.
You can jump back to the previous track by pressing the button
1
within the first 10 seconds of play time for a track. After 10
|Ì
seconds it jumps to the start of the track. If the button is held down,
reverse is activated.
If you would like to scroll in an active MP3 track list using the
Forward/Reverse button or activate forward/reverse it is not necessary to show the MP3 operating menu in the Navigation System
display.
Adjusting volume
Fig. 14 Navigation
System ON/OFF knob adjusting volume
Volume can be adjusted by turning the ON/OFF button. The volume
setting will be stored automatically.
If the volume is too high when the radio is turned on, it will be
reduced automatically to a level set by the factory. If the volume is
too low when the radio is turned on, it will be increased automatically to a level set by the factory.
Tips
Volume can also be adjusted using the buttons on the multi-function steering wheel*
Þ page 21.
General operation RADIO, CD NAME, TEL NAV, INFO CAR, SETUP
Page 22
General system operation20
Home function
If you activate the function button within a main function, the
system will automatically jump to the main menu of that main function.
In Navigation “Home function” depends on the route guidance
selected: If you have activated route guidance with stopovers, you
go to the menu for route planning by pressing the function button
Þ page 139, fig. 146. If you have activated route guidance
again
without stopovers
(singe destination mode) by pressing the function button again.
Þ page 139, yo u go to th e mai n nav iga tio n men u
History function
The system recalls the previous settings.
When a function button is pressed, the system will switch to the
most recently accessed menu level for the specific main function.
This includes any sublevels that were opened. This excludes Setup
menus.
The history memory is erased when the system moves into standby
mode.
An example: You are currently on the Tuning radio menu and switch
to the navigation menu by pushing the button. If you press
FM-AM
the button at this time, you will not jump to the main radio
menu, but directly to the Tuning radio menu.
NAV
Start Navigation System Reset
Fig. 15 Navigation
System ON/OFF knob
The following process will restart your Audi Navigation
System and will allow complete functionality sytem to be
restored.
– Press the ON/OFF knob to switch the Navigation System
off.
– Press and hold the ON/OFF knob until the display reap-
pears and turns black.
– Release the ON/OFF knob as soon as the display has
turned black. After a few seco n d s , th e Navigation System
begins its restart, or you can switch it on manually
Þ page 11.
Page 23
General system operation 21
Multi-function steering wheel
Applies to vehicles: with multi-function steering wheel
General
The multi-function steering wheel enables quick and
easy operation of selected systems on the Navigation
System.
To minimize driver distraction when operating the Navigation
System and its components, buttons for controlling basic audio
functions are placed on the multi-function steering wheel. However,
this applies only if your vehicle equipment was installed at the
factory.
Depending on the multi-function steering wheel in your vehicle, you
can use audio functions.
You use the buttons to operate the function that is active at the time.
For example, if you are listening to the radio, you can select the
last/next station from the station list using the or button on
the multi-function steering wheel with audio controls*.
The volume can be adjusted in each active function.
Of course, you can continue to use the audio functions from the
Navigation System.
Tips
If systems have not been installed in the vehicle, the button on the
multi-function steering wheel* assigned to that system is
inoperative.
b c
Applies to vehicles: with multi-function steering wheel with audio operation
Multi-function steering wheel with audio
operation
Fig. 16 Multi-function
steering wheel with
audio operation
You can perform the following functions with this
multi-function steering wheel:
Button
A
A
A
A
Function
description
Press the
b
button
Press and hold
b
the button
Operating
mode
Radio
CD or MP3
CD or MP3 Reverse
Application
Select the previous
station on the radio
station list
Select the previous
track for the audio
source you are listening to.
a)
.
General operation RADIO, CD NAME, TEL NAV, INFO CAR, SETUP
Page 24
General system operation22
A
Button
Function
description
Operating
mode
Application
Select the next station
on the radio station
a)
.
list
Select the next track
for the audio source
A
B
Press the
c
button
Radio
CD or MP3
you are listening to.
A
A
B
C
D
Press and hold
c
the button
Press the
^
button
Press the
_
button
CD or MP3 Fast forward
Radio, CD or
MP3
Radio, CD or
MP3
Increase volume
Reduce volume
Radio Frequency scan
Load the previous CD
A
E
Press the
`
button
CD
MP3
if CD changer* is
installed
Switch to previous
available MP3 drive
Radio Frequency scan
Load the next CD if CD
changer* is installed
Switch to next available MP3 drive
A
F
Press the
a
button
CD
MP3
a)
If the radio memory list is shown in the Navigation System display, a radio
station can be selected from the list using the left menu thumbwheel.
Applies to vehicles: with multi-function steering wheel with audio operation - version A
Multi-function steering wheel with audio
operation - version A
Fig. 17 Multi-function
steering wheel with
audio operation
(version A)
Page 25
General system operation 23
A
A
A
A
A
You can perform the following functions with this
multi-function steering wheel:
Button
Function
description
Operating
mode
Application
Select the previous
station on the radio
a)
station list
.
Select the previous
track for the audio
source you are listen-
A
Press the
b
button
Radio
CD or MP3
ing to.
Press and
A
hold
b
the button
CD or MP3 Reverse
Select the next station
on the radio station
a)
.
list
Select the next track
for the audio source
B
Press the
c
button
Radio
CD or MP3
you are listening to.
Press and
B
E
hold
c
the button
d
button not applicable.
CD or MP3 Fast forward
Button
a)
If the radio memory list is shown in the Navigation System display, a radio
station can be selected from the list using the left menu thumbwheel.
Applies to vehicles: with multi-function steering wheel with audio operation - version B
Function
description
Press the
C
A
^
button
Press the
D
A
_
button
F
Talk Button ( ) not applicable.
A
Operating
mode
Radio, CD or
MP3
Radio, CD or
MP3
g
Application
Increase volume
Reduce volume
Multi-function steering wheel with audio
operation - version B
Fig. 18 with multifunction steering
wheel with audio operation (version B)
General operation RADIO, CD NAME, TEL NAV, INFO CAR, SETUP
Page 26
General system operation24
A
A
A
A
You can perform the following functions with this
multi-function steering wheel:
Button
Function
description
Operating
mode
Application
Select the previous/next station on the
radio station list
a)
Select the previous/next track for the
audio source you are
A
Roll the left
menu thumbwheel
up/down
Radio
CD or MP3
listening to.
A
A
First press on
left menu
thumbwheel
Second press
on left menu
thumbwheel
Radio
Radio
Start station frequency
scan forward
Stop station frequency scan
Press and hold
A
A
left menu
CD or MP3 Fast forward
thumbwheel
MODE
A
B
button not applicable.
Button
C
Function
description
Talk Button ( ) not applicable.
Operating
mode
f
Application
Roll right
menu thumb-
D
.
wheel up
or down
^
_
Radio, CD or
MP3
Increase or reduce volume
Repeat the last naviga-
D
Press the right
thumbwheel
Radio, CD or
MP3
tion* announcement
with active route guidance
a)
If the radio memory list is shown in the Navigation System display, a radio
station can be selected from the list using the left menu thumbwheel.
The menu thumbwheel functions apply to the equipment which is
active at the time.
If you roll the left menu thumbwheel past several detents in CD
operation, several tracks are jumped.
Page 27
General system operation 25
A
A
A
A
A
Applies to vehicles: with multi-function steering wheel with audio operation - version C
Multi-function steering wheel with audio
operation - version C
Fig. 19 Multi-function
steering wheel with
audio operation version C
You can perform the following functions with this
multi-function steering wheel:
Button
Function
description
Operating
mode
Application
Select the previous
station on the radio
a)
station list
.
Select the previous
track for the audio
source you are listen-
A
Press the
b
button
Radio
CD or MP3
ing to.
Press and hold
the
A
b
button
CD or MP3 Reverse
Select the next station
on the radio station
a)
.
list
Select the next track
for the audio source
B
Press the
c
button
Radio
CD or MP3
you are listening to.
Press und
B
E
halten der
c
button
d
button not applicable.
CD or MP3 Fast forward
General operation RADIO, CD NAME, TEL NAV, INFO CAR, SETUP
Page 28

General system operation26
A
A
A
C
D
F
Function
description
Press the
^
button
Press the
_
button
e
button not applicable.
Button
a)
If the radio memory list is shown in the Navigation System display, a radio
station can be selected from the list using the left menu thumbwheel.
Operating
mode
Radio, CD, or
MP3
Radio, CD, or
MP3
Application
Increase volume
Reduce volume
Page 29
Display
Orientation
Main menu
The main menu or the previously active function menu
appears in the display when a function button is
pressed.
Display 27
Fig. 21 Display overview: Setup main navigation menu
When you press a function button, the main menu or a submenu
assigned to this main function is displayed
If you then press the button, the appropriate main Setup
menu is displayed
You can open the main Setup menu from a main menu or a
submenu. For example, if you press the button in the main
Fig. 20 Display overview: Main navigation menu
General operation RADIO, CD NAME, TEL NAV, INFO CAR, SETUP
navigation menu
fig. 22, you are shown the main Setup navigation menu
The functions in that menu which can be performed are shown in
the center of the display. If your vehicle is not equipped with a
particular function, no functions are offered in the main menu. You
are shown an appropriate Note instead.
SETUP
Þ fig. 21.
Þ fig. 20 or in a navigation submenu Þ page 28,
Þ page 16.
SETUP
Þ fig. 21.
Page 30
Display28
A1A
A
A4A
A
A
The display comprises the following areas identified in the illustra-
Þ page 27, fig. 20 and Þ page 27, fig. 21:
tions
Title line
The title line shows the main function that you are currently in, e.g.
Navigation
as well, you are in a Setup menu
Switching between the individual main functions is carried out
through the function keys
2
Corners of the display
These functions depend on the menu you are currently in and are
operated using the control buttons. The control buttons are logically assigned to the corners of the screen. The top right corner of
the screen corresponds to the top right control button
3
Display center
Radio station or track lists are displayed in the center of the display
in radio, CD and MP3 operation. In Navigation, the individual destination mode is displayed. In the main Setup menus, a list of available functions is displayed.
Orientation symbols
The different symbols in the display are used to select various additional functions
Þ page 27, fig. 20. If Setup is displayed on the title line
Þ page 27, fig. 21.
Þ page 16.
Þ page 17.
Þ page 29.
Submenu
Fig. 22 Display: Navigation submenu
The submenu generally comprises the following areas identified in
the illustration
1
Title line
You are also shown the title line in the submenus that were opened
for the individual main functions. This orients you as to which main
function you are in.
2
Submenu
The subtitle shows detailed information about the selected
submenu option, such as Destination.
3
Display center
In the center of the display, the available options in the particular
submenu are listed or notes are displayed.
Þ fig. 22:
Page 31

Display 29
Orientation symbols
Cursor and arrows
Cursor and arrows provide orientation when navigating through the different menus.
Fig. 23 Section of
display: Orientation
symbols
1
This cursor designates a chosen line in a menu.
A
2
A
The arrows pointing up or down point to other menu points
(scrolling up/down).
3
After a selection is made, this arrow points to other available
A
selections or possible settings.
Selected text
Fig. 24 Section of
display: Example of
highlighted line
Your choice will be highlighted in white text Þ fig. 24.
General operation RADIO, CD NAME, TEL NAV, INFO CAR, SETUP
Page 32

Display30
A
Operating the speller
Overview
Fig. 25 Display: Number entry in the speller, e.g. entering special destination
using telephone number
Fig. 26 Display: Letter entry in the speller, e.g. Navigation destination entry
If re qu ire d b y t he sy stem , t he sp elle r w il l a uto ma ti ca ll y appe ar in th e
display. Then the system offers, independent of operating mode,
either the option of entering numbers
If necessary, you can manually change from numbers to letters
or from letters to numbers .
The illustrations
corresponding actions are listed in the following table.
Þ fig. 25 and designated Þ fig. 26 symbols with
11
A
Þ fig. 25 or letters Þ fig. 26.
6
Page 33

Display 31
A1A2A
A
A5A6A
A
A9A10A
A
Legend
3
4
7
8
11
Symbol/
Description
Selection arrow
DEL
ÌÍ
3
OK Confirms an entry
A..Z
LIST
0..9
Action
The selected element has a
white background and is shown
larger in the entry ring.
The symbol to the left of the
cursor with the white fill is
deleted.
Cursor movement in entry field
forward/back.
Switch between caps/no caps
Switches from number to letter
entry.
Entry cursor
Entry field
Large image of the selected
character/function.
Selecting a suggestion from the
list.
Switches from letter to number
entry.
Legend
12
A
13
A
14
Symbol/
Description
Ï
Action
Space
Reference to list elements
which match the current entries
in the entry field, showing number of list elements
Sorted list of entries
General operation RADIO, CD NAME, TEL NAV, INFO CAR, SETUP
Page 34

Display32
A2A
Making entries with the speller
Fig. 27 Display: Entering letters in the speller
Entering digits, letters and characters
– Select the desired letters, numbers or characters in the
speller display using the selector arrow by rotating
A
1
the control knob.
– To confirm the entry, press the control knob after each
selection of a letter, number or character.
– Select OK to close out the entry.
Deleting numbers, letters and characters
– With the selection arrow, select DEL by rotating the
3
control knob.
– Press the control knob, and the last entry in the entry
field will be deleted.
In some cases, such as in navigation, the selection of letters is
limited by logical exclusion.
For example, if you have entered part of a city in the speller display
and you already recognize the desired city in the speller display list,
you can shift directly to the city list by keeping pressure on the
control knob.
Fig. 28 Display: Entering numbers in the speller
Page 35

Display 33
Control wheel
Operation
The “controlwheel” shown in the display, together
with the “controlknob”, allows easy operation of the
basic functions when playing the CD, radio and MP3.
Fig. 29 Display: Control wheel (example shows MP3 operation)
– Press the corresponding function button, e.g. .
– Press the control button with the Source function.
–Select MP3.
CD/SD
– Rotate the control knob to select a function on the
control wheel Þ fig. 29.
A
1
– Confirm your selection by pressing the control knob.
The control wheel is divided into different segments. The function of the segment depends on the current menu.
A
1
Tips
You can fin d th e des cri pti on o f the dif ferent con tro l whe el f unc tio ns
during radio operation starting on
starting on
Þ page 85.
Þ page 80 and during MP3 operation starting on
Þ page 62, during CD operation
– Press the control button with the MP3 ctrl function.
General operation RADIO, CD NAME, TEL NAV, INFO CAR, SETUP
Page 36

Drives34
A1A
Drives
Introduction
System drives
The navigation DVD, audio CDs or MP3 CDs compatible
with the equipment can be loaded into the DVD navigation drive.
Fig. 30 Display open:
DVD drive and MP3
card reader
–Press the button Þ page 12, fig. 4 to open or close the
display. The drives are located behind the display
Þ fig. 30.
The following drives are integrated in the Navigation System.
DVD navigation drive
2
Two MP3 card readers for SD or MMC memory cards
î
Þ page 35
Þ page 40
Tips
An MP3 CD is a CD ROM on which MP3 files are stored.
Page 37

Drives 35
Applies to vehicles: with CD changer
CD changer
Fig. 31 Audi cd
changer in glove
compartment
Fig. 32 CD changer
with cartridge in trunk
For technical reasons there are two different CD changers which are
not available for all models.
· Audi cd changer* in glove compartment Þ fig. 31
· CD changer with cartridge* in trunk Þ fig. 32
The differences in operation of the external CD changer are limited
to the different procedure when loading the CDs into the changer.
Tips
The CD changers are available as factory equipment.
DVD navigation drive
General
The DVD navigation drive Þ page 36, fig. 33 can read and play the
navigation DVD, audi o CDs (CD-A) and MP3 C Ds compatibl e with t he
equipment.
An audi o CD (CD-A) inser ted i n the drive is played using the CD func-
Þ page 78. An MP3 CD inserted in the drive is played using the
tion
MP3 function
Important tips for handling the different data carriers can be found
starting on
Tips
Navigation DVDs can be purchased from an Audi dealer. The dealer
can also provide you with information about navigation DVD
updates.
Þ page 83.
Þ page 48.
General operation RADIO, CD NAME, TEL NAV, INFO CAR, SETUP
Page 38

Drives36
A
Loading navigation DVD
Fig. 33 Display open:
DVD navigation drive
Fig. 34 Display open:
Inserting navigation
DVD into the drive
– Guide the navigation DVD straight (label side up) into the
1
drive . The navigation DVD is pulled in automatically.
A
Before inserting the navigation DVD, check to make sure there is no
DVD/CD already in the drive. If there is a DVD/CD in the drive, push
the Eject button and remove the DVD/CD
The navigation DVD should never be forced into the drive. The navigation DVD is pulled in automatically.
If you are shown the message Please check navigation DVD in the
display, you cannot use the Navigation function. Possible reasons
are described starting on
If you are shown the message Navigation is being initialized in the
display, navigation is in the start phase. As soon as this message
disappears and a navigation menu is displayed, you can use the
navigation feature.
Þ page 51.
Þ page 37.
Tips
To ensure problem-free operation, you should use only a clean,
unscratched and undamaged navigation DVD. You can find additional hints starting on
Þ page 48.
– Press the button to open the display.
î
2
– Hold the navigation DVD by the hole in the center and the
outer edge Þ page 51, fig. 52.
Page 39

Drives 37
A
Ejecting navigation DVD
Fig. 35 Display open:
Ejecting navigation
DVD
– Press the button to open the display.
î
– When the display is fully open, press the Eject button .
The navigation DVD will be ejected.
Note
Always keep the navigation DVD in a suitable jewel case (e.g. CD
case) to protect it from dirt, dust particles, scratches and other
damage. You can find additional hints starting on
A
2
1
Þ page 48.
MP3 player
General
The MP3 player recognizes MP3 music files on different
data carriers.
MP3 music are normally subject to copyright law in accordance with
the applicable international and national regulations. Without the
pr io r c on sent o f t he co py rig ht ho ld er, du plic at io ns ma y not be ma de
in some countries, not even for personal use.
Please find out about and follow applicable copyright regulations.
As long as you yourself hold these rights, for example, to your own
compositions and recordings or they were granted by the beneficiary, these restrictions naturally do not apply.
Storage medium “MP3 CD”
CDs with stored MP3 files c an be playe d on the i ntegral
MP3 player.
Only MP3 compositions which were stored on a CD in accordance
with the ISO9660 file system (single session and multisession) can
be played. MP3 CDs with a capacity of 650 and 700 MB can be used.
The maximum length for the file names is 8+3 characters.
The maximum number per medium is limited to 400 files.
MPEG-1 layer 3 format is supported by the MP3 player. Fixed bit
rates of 32-320 kbits/s are supported.
General operation RADIO, CD NAME, TEL NAV, INFO CAR, SETUP
Page 40

Drives38
For compressing MP3 files we recommend a bit rate of at least 160
kbit/s.
In the case of MP3 files with a variable bit rate, there may be a
discrepancy between play time displayed and the real time.
If various types of information (artist, album, track name, and so on)
are to be displayed, an ID3 tag must be attached to the MP3 file. The
MP3 player supports Versions 1 and 2 of ID3 tags. The display of
artist and track name is limited to a total of 64 characters maximum.
The Navigation System recognizes playlists and can play MP3 files
in the sequence established there. The structure of the playlists
must conform to m3u format. The file names must have the extension “.m3u”.
Tips
Because of the diversity of CD-R/CD-RW blanks and their different
storage capacities, function may be limited with individual storage
media.
Loading CD
MP3 CDs and audio CDs can also be played in the DVD
navigation drive.
Fig. 36 Display open:
DVD navigation drive
Fig. 37 Display open:
Inserting CD into the
drive
Page 41

Drives38
For compressing MP3 files we recommend a bit rate of at least 160
kbit/s.
In the case of MP3 files with a variable bit rate, there may be a
discrepancy between play time displayed and the real time.
If various types of information (artist, album, track name, and so on)
are to be displayed, an ID3 tag must be attached to the MP3 file. The
MP3 player supports Versions 1 and 2 of ID3 tags. The display of
artist and track name is limited to a total of 64 characters maximum.
The Navigation System recognizes playlists and can play MP3 files
in the sequence established there. The structure of the playlists
must conform to m3u format. The file names must have the extension “.m3u”.
Tips
Because of the diversity of CD-R/CD-RW blanks and their different
storage capacities, function may be limited with individual storage
media.
Loading CD
MP3 CDs and audio CDs can also be played in the DVD
navigation drive.
Fig. 36 Display open:
DVD navigation drive
Fig. 37 Display open:
Inserting CD into the
drive
Page 42

Drives 39
A
– Press the button to open the display Þ page 38,
î
A
2
fig. 36.
– Hold the MP3 CD or audio CD by the hole in the center
and the outer edge Þ page 38, fig. 37.
– Guide the MP3 CD or audio CD straight (label side up)
into the drive . The CD is pulled in automatically.
Before inserting the CD, check to make sure there is no CD already
in the drive. If there is a CD in the drive, push the Eject button and
remove the CD
A CD should never be forced into the drive. The CD is pulled in automatically. If the CD is inserted wrong side up, you will be alerted by
a message in the open display.
If an MP3 CD has been inserted and not played, the data from the
ID3 tag are read in in the background. If you start playback of an
MP3 CD immediately, the ID3 tag data are displayed for the track
being played.
An audio CD (CD-A) inserted in the DVD navigation drive is played
using the CD function
navigation drive is played using the MP3 function
1
A
Þ page 37.
Þ page 78. An MP3 CD inserted in the DVD
Þ page 83.
Note
· Always keep the navigation DVD that you removed in a suitable
jewel case (e.g. CD case) to protect the DVD from dirt, dust particles,
scratches and other damage
Þ page 48.
· Do not attach labels to the CDs. Heat can cause the label to
become detached in the drive, jam the CD and cause a malfunction.
Use a permanent marker to label CDs you have burned yourself.
· Never expose the navigation DVD to direct sunlight.
Tips
· Standard 12-cm diameter CDs can be used. Mini CDs with a
diameter of 8 cm (3 inches) or non-circular CDs, known as shape
CDs, must not be used.
· The use of cleaning CDs can lead to mechanical damage to the
drive.
· Because of the diversity of CD-R/CD-RW blanks and their
different storage capacities, function may be limited with individual
storage media.
· If you have not inserted a navigation DVD into the drive, you
cannot use the Navigation and Directory functions.
Ejecting a CD
Fig. 38 Display open:
Ejecting a CD
– Press the button to open the display.
î
2
General operation RADIO, CD NAME, TEL NAV, INFO CAR, SETUP
Page 43

Drives40
– Push the Eject button to eject the MP3 CD or the audio
A
1
CD.
On ly u se cl ean CDs wit hout scr atches or d amag e to ens ure pro ble mfree, high-quality music playback.
Note
· Alwa ys keep the MP3 CD s/au dio CDs in a suitable jewel case (e .g.
CD case) to protect them from dirt, dust particles, scratches and
other damage.
· Never expose MP3 CDs/audio CDs to direct sunlight.
SD or MMC memory cards
Both SD and MMC cards can be used as memory
cards.
SD or MMC cards with a storage capacity of 32 MB, 64 MB, 128 MB
and 256 MB can be used.
The two MP3 card readers were tested with most of the products
available on the market. However, in isolated cases, it is possible
that individual memory cards may not be recognized.
Memory cards must be formatted using the FAT or FAT32 methods.
The file/folder name must not exceed a maximum of 64 characters
in length. Files with longer file/folder names are not played. The file
names for the MP3 files must have the extension “.mp3”.
MPEG-1 layer 3 format is supported by the MP3 player. For
compressing MP3 files, we recommend a bit rate of at least 160
kbits/s. Fixed bit rates of 32-320 kbits/s are supported.
In the case of MP3 files with a variable bit rate, there may be a
discrepancy between play time displayed and the real time.
The maximum number per medium is limited to 400 files and 256
file folders.
If variou s types of information (arti st, album, track nam e, and s o on)
are to be displayed, an ID3 tag must be attached to the MP3 file. The
MP3 player supports Versions 1 and 2 of ID3 tags. The display of
arti st an d track name is lim ited to a t otal of 64 characters ma ximum.
The Navigation System recognizes playlists and can play MP3 files
in the sequence established there. The structure of the playlists
must conform to m3u format. The file names must have the extension “.m3u”.
Tips
Individual types of memory cards may have limited functions.
Page 44

Drives 41
A
Loading a memory card
The Navigation System contains two MP3 card
readers.
Fig. 39 Display open:
Inserting a memory
card.
Fig. 40 Display open:
Position of the
SD/MMC card during
loading
– Press the button to open the display Þ page 39,
î
2
fig. 38.
– Insert the memory card with the label side up (contact
surface down) into the card reader slot Þ fig. 39. The
missing corner of the memory card must point to the
front right as seen in the direction of travel Þ fig. 40.
– Then push the memory card into the slot until you feel it
click into place. The memory card is flush with the area
around it.
If the mem ory car d ha s be en l oad ed c orrec tly, the for mat ted sto rag e
capacity of the card is displayed in the open display. In addition, the
file format “MP3”, or possibly the date carrier name, is displayed if
MP3 audio files have been stored on the card and they can be read
by the MP3 player.
As long as the message “Reading card...Please do not remove”
appears in the display, the memory card must not be removed from
the drive. If the memory card is removed from the drive, there is a
possibility that the data will be destroyed. In this case, the memory
card can no longer be read and must be formatted.
If a memory card has been inserted and not played, the data from
the ID3 tags are read in the background. If you start playback of the
memory card immediately, the ID3 tag data are displayed for the
track being played.
Note
Use only single-piece SD/MMC memory cards. If you use SD/MMC
adapter cards (multi-piece memory cards), the memory card can
become detached from the adapter as the result of vibration while
driving. There is a possibility that individual pieces may become
stuck in the drive.
General operation RADIO, CD NAME, TEL NAV, INFO CAR, SETUP
Page 45

Drives42
A
Tips
· The MP3 player is operated through the main CD/SD function
Þ page 83.
· The storage capacity displayed equals the formatted storage
capacity of the SD or MMC card being used and may vary from the
capacity printed on the label.
Removing a memory card
Fig. 41 Display open:
Removing a memory
card.
– Press the button to open the display Þ page 39,
î
fig. 38.
– Give a short push on the memory card Þ fig. 41. The card
is released from the slot.
2
Once the memory card has been removed, the open display shows
Empty.
As long as the message “Reading card...Please do not remove”
appears in the display, the memory card must not be removed from
the drive. If the memory card is removed from the drive, there is a
possibility that the data will be destroyed. In this case, the memory
card can no longer be read and must be formatted.
Tips
· A lw ay s kee p t he me mo ry ca rd i n a su it ab le ca se to prot ec t i t f rom
dirt, dust particles, scratches and other damage
Þ page 48.
· Never expose the memory cards to direct sunlight.
– Remove the memory card.
Page 46

Drives 43
A2A1A
A
A2A
A
A2A
CD changer
Applies to vehicles: with Audi cd changer
Loading your CDs into the CD changer
Fig. 42 Audi cd
changer: Loading CDs
Loading just one CD
– Press the button . As soon as the CD changer
is ready for you to load a CD, the red LEDs on the inside
sides of the CD tray (not shown in the illustration)
start to blink.
– Insert the CD (printed side up and straight) into the CD
tray . The CD automatically loads into the next free slot
in the CD changer. The LED in the button will stop
blinking.
LOAD
1
3
A
Loading all CDs
– Press and hold the button for longer than 2
LOAD
A
2
seconds.
– Wait until the red LEDs on the inside sides of the CD tray
1
(not shown in the illustration) start to blink.
A
– Now insert your other CDs (printed side up and straight)
one at a time into the CD tray . The LEDs in each button
3
will stop blinking once a CD has been loaded into the
A
1
slot.
Loading the CD into a specific empty slot
– Press the button . The LED in the button of
LOAD
3
any empty slot will start to blink.
– If you want to load a CD into a specific slot, you can also
press a butto n , where the LE D is not lit an d in ser t yo ur
A
3
CD.
– Wait until the red LEDs on the inside sides of the CD tray
1
(not shown in the illustration) start to blink.
A
– Now insert your CDs (printed side up and straight) into
the CD tray .
1
Loading the CD into a specific slot
– Press the button . The LEDs in the buttons
LOAD
3
for the slots that already have CDs loaded blink.
– If you press an illuminated button that is not blinking
A
3
then that CD will be ejected.
– Remove the ejected CD from the CD tray .
General operation RADIO, CD NAME, TEL NAV, INFO CAR, SETUP
A
1
Page 47

Drives44
– Insert a CD that you want to load, label up, into the CD
1
tray .
A
If you press the button again while you are loading all CDs,
the loading process will be interrupted.
Make sure you load your CDs label side up and straight
Þ page 43, fig. 42.
The CDs should never be forced into the slot. The CD will be pulled
into the CD changer automatically.
After a CD has been lo aded in to th e CD change r, you shou ld wait for
a moment until the red LED on the inside side of the tray blinks. The
CD tray is then ready to be loaded with the next CD.
If you choose a slot which already has a CD loaded in it, the CD will
be ejected. Remove the CD, and insert the new CD you want to have
in this slot.
If you w ait longer than 3 0 seconds withou t remov ing the CD, the CD
will be pulled back into the CD changer automatically.
LOAD
A
1
Tips
· The CD is played through the main CD/SD function Þ page 78.
· If you have accidently inserted a CD upside down (with the label
side facing down), the Display will show a read-error-message.
· Never force the CDs into the CD tray. The CD will be pulled into
the CD changer automatically.
· Do not use any non circular CDs (for example, Shape CDs)
Þ page 49.
Applies to vehicles: with Audi cd changer
Ejecting CDs
Fig. 43 Audi cd
changer: Ejecting CDs
Ejecting a CD
1
A
A
2
A
2
A
1
– Press the CD EJECT button Þ fig. 43.
– Press the button (LED on) to eject an individual CD, or
– Press the CD EJECT button again to eject the CD you
are playing.
Ejecting all CDs
– Hold down the button for more than two seconds. All
CDs that are currently in the CD changer will be ejected.
Note
· Always keep your CDs in their original cases to protect them
from dirt, dust, scratches or other damage.
Page 48

· Never expose CDs to direct sunlight.
A1A2A3A1A
Tips
If yo u wait long er than 30 s econds wit hout removin g the CD, the CD
will be pulled back into the CD changer automatically.
Applies to vehicles: with CD changer with magazine
CD changer with magazine
Fig. 44 CD changer
with magazine
Drives 45
Fig. 45 CD magazine
CD changer with magazine: Þ fig. 44
Sliding door to close the CD slot
CD magazine slot
Cartridge eject button
CD Changer Magazine
Upper side of the magazine
2
Lower side of the magazine
As a rul e, the CD ch anger a nd magazin e are inst alled i n the luggage
compartment of most vehicles. In other models, they may be
installed in a c ompa rtment in the rear side tr im or behin d the driv er
seat. Please refer to your Owner's Manual for the exact location.
Þ fig. 45
Note
The CD changer is intended for use with 12 cm (4.7 inch) discs
only.
General operation RADIO, CD NAME, TEL NAV, INFO CAR, SETUP
Page 49

Drives46
A
Removing and inserting the magazine
Fig. 46 CD changer
with magazine
You can load and remove the CD magazine with the Navigation System switched on or off.
Removing the magazine from the CD changer
A
A
3
1
2
A
1
– Slide the changer door open Þ fig. 46.
– Press the cartridge eject button Þ fig. 46. The maga-
zine automatically comes out.
– Remove the magazine .
Inserting the magazine in the CD changer
– Open the sliding door of the CD slot Þ fig. 46.
– Close the changer door .
After inserting the magazine, you will hear a “working noise” from
the CD changer. The device is simply counting how many CDs are in
the changer.
If there is no magazine in the CD changer, a read error is shown in
the display.
A
1
– Slide the magazine all the way in with the inscription
“disc” on top. While doing this, the arrow on the magazine must point towards the magazine slot Þ fig. 46.
Page 50

Drives 47
A
Loading the magazine with CDs
Fig. 47 Side of magazine marked "disc"
Fig. 48 Inserting the
CD in the magazine
– Insert the CDs one at a time (printed side facing up) into
the magazine until they “click” into place Þ fig. 48.
Always insert the CDs straight in the CD slot with the printed side
facing up.
Make su re you pay att ention to the C D seque nce o n the righ t sid e of
the magazine.
If you have not fill ed C D slo ts i n the mag azin e, Empty appears in the
display when you select the Changer control button in the CD function.
Tips
Always close the sliding cover after inserting the magazine to
protect your CD changer from dirt and dust
helps to prevent malfunctions.
1
Þ page 46, fig. 46. This
– Hold the CD with the printed side facing up and grasping
it by the hole and outer edge Þ page 51, fig. 52.
– Hold the magazine with “disc” facing upwards Þ fig. 47.
General operation RADIO, CD NAME, TEL NAV, INFO CAR, SETUP
Page 51

Drives48
Removing CDs from the magazine
Fig. 49 Removing CDs
from the magazine
– Turn the magazine over and hold it with the CD release
lever up Þ fig. 49.
– Hold the release lever against the spring force.
– Press the CDs out through the opening in the back of the
magazine Þ fig. 49.
– Take the CDs out of the magazine.
Note
· Always keep your CDs in their original cases to protect them
from dirt, dust, scratches or other damage.
· Never expose CDs to direct sunlight.
Tips
Do not let the CDs drop!
Tips
Precautions with laser devices
Laser devices are categorized according to DIN IEC 76 (CO) 6/VDE
0837 into safety classes 1 - 4.
The laser devices in your Audi conform to safety class 1.
The laser used in Class 1 is so low and so well shielded, no danger
exists with proper usage.
Tips
Do not open the cabinet. The unit does not contain any components
that can be maintained by the user.
Page 52

Drives 49
AAA
Compact Disc (CD)
Fig. 50 Compact Disc
Label
Tips
It is possible that you may not be able to play CDs which are copyprotected or CDs with CD ROM in your player. Only those CDs with
the logo “Compact Disc Digital Audio” on the CD itself can be
played.
Tips on taking care of your CDs
Fig. 51 Do not use the
following CDs!
To assure high-quality performance, make sure your CDs are clean.
The following tips are also important:
Never use CDs which are damaged or defective.
Do not play CDs which are scratched or damaged. Never leave your
CD in direct sunlight. They could warp. Store them in their original
cases.
B
Never play CD singles or CDs which are not round
(shape CDs).
Your CD player and CD changer can play and holdstandard CDs. Do
not play 3 inch single CDs.CDs which are not round, (shape CDs)
must not be played. They can jam up the player and cause it to
malfunction.
General operation RADIO, CD NAME, TEL NAV, INFO CAR, SETUP
Page 53

Drives50
ACA
Do not place an adhesive label on a CD.
Do not place an adhesive label on your CDs. Due to heat build-up
inside the CD player, the label could come loose and jam up the CD
player or CD changer.
D
Do not use protective rings.
Do not use commerically available protective rings. They could jam
up the player.
Cleaning your CDs
Use a soft, lint-free cloth to clean your CDs. Wipe the disc starting
from the center and working yo ur way out. You can purchase special
cleaners to remove stubborn stains from your CD.
Never use CD cleaners which contain benzine or other corrosive
properties. They could damage your CD!
Note
· Never place an adhesive label on your CDs.
· To prevent the CD player from malfunctioning, never use CD
protectors or stabilizers (available in most stores).
· Never insert an out-of-round CD (shape CDs) in the CD slot.
· Never leave your CDs exposed to direct sunlight.
· The use of cleaning CDs can lead to mechanical damage to the
drive.
Tips on handling navigation DVDs
To ensure perfect, high-quality navigation DVD playback, only clean
navigation DVDs should be used. In addition, observe the following:
Do not use a damaged navigation DVD
You should not use a scratched or damaged navigation DVD. To
avoid damage, never expose the navigation DVD to direct sunlight.
Always keep the navigation DVD in a suitable jewel case (e.g. CD
case).
Do not attach labels
Do not attach labels to the navigation DVD. Attaching labels can
cause an imbalance. If the labels are exposed to heat, they can
become detached and cause damage to the navigation DVD drive.
Do not use protective rings
Commercially available protective rings must not be used. They can
jam in the navigation DVD drive and damage the drive mechanism.
Cleaning the navigation DVD
Use only a soft, lint-free cloth to clean the navigation DVD. Wipe the
DVD in a straight line from the center outwards. Heavy soiling can
be removed with a commercial CD cleaner or isopropyl alcohol.
Please never use fluids such as gasoline, paint thinner or vinyl
record cleaner or the surface of the DVD could be damaged!
Note
· Never place an adhesive label on your Navigation DVD.
· To avoid damage to the DVD drive, never use a CD protecti ve film
or stabilizer (available in stores as a CD accessory).
· Always keep the navigation DVD in a suitable jewel case (e.g. CD
case) to protect it from dirt, dust particles, scratches and other
damage.
· Never expose the navigation DVD to direct sunlight.
· The use of cleaning CDs can lead to mechanical damage to the
drive.
Page 54

Drives 51
Tips
If outside temperatures are unusually high or low, the navigation
DVD function may be temporarily unavailable. A thermal switch has
been installed to protect the navigation DVD and the laser
scanner.
Handling the navigation DVD or CD
Correct handling of the data carrier being used helps
to extend its life.
Fig. 52 Holding your
Navigation DVD or CD
Always hold a Navigation DVD or CD either by the hole in the center
or by the outer edge
The CDs should never be forced into the slot. The CD will be pulled
into the CD changer automatically.
When inserting a CD into the drive, insert it with the printed side
facing up and straight.
Þ fig. 52.
Error messages
The following may be the reason for a read error in the display:
· The navigation DVD, audio CD or MP3 CD is contaminated.
· The navigation DVD, audio CD or MP3 CD was inserted upside
down (with the printed side down).
· The navigation DVD, audio CD or MP3 CD is scratched.
· There is condensation on the navigation DVD, audio CD or MP3
CD.
· The mechanism for the CD changer, the navigation DVD drive or
the MP3 card reader is malfunctioning.
Check the navigation DVD, audio CD, MP3 CD or SD/MMC memory
card for damage.
Clean the navigation DVD, a udio CD or MP3 CD by wip ing it f rom t he
center toward the outside with a soft, lint-free cloth.
In cold weather and in rain showers, moisture (condensation) can
collect in the housing or on the data carriers. This can cause skips
or make playback impossible. When moisture is no longer present,
it should be possible to play them.
If the mechanism for the CD changer with magazine malfunctions,
remove the magazine from the changer
CDs for damage and for correct positioning in the magazine
Þ page 48.
If th e m ec hani sm fo r the A ud i c d chan ge r m al fu nct io ns , p ush th e C D
Eject button and the corresponding illuminated button to eject the
CD
Þ page 44. Inspect the CD for damage.
Try to resume DVD/CD operation. If the malfunction persists, please
consult a qualified dealership.
Þ page 46 and inspect the
General operation RADIO, CD NAME, TEL NAV, INFO CAR, SETUP
Page 55

Drives52
Tips
If outside temperatures are unusually high or low, navigation
DVD/CD playback may be temporarily unavailable. A thermal switch
has been installed to protect the navigation DVD/CDs and the laser
scanner.
Page 56

Drives 53
General operation RADIO, CD NAME, TEL NAV, INFO CAR, SETUP
Page 57

54
Page 58

55RADIO, CD
Page 59

RADIO56
A1A
A1A
A
A
RADIO
Introduction
Selecting radio function
The radio settings can be selected via the
function button.
Fig. 53 Display: Main radio menu
– Press the function button Þ page 16. The main
radio menu (station list) Þ fig. 53 or the previous active
radio function menu appears in the display.
– Press one of the control buttons Þ page 17 to move to
the appropriate submenus to Þ fig. 53.
FM-AM
4
FM-AM
The following submenus are available in the radio
function:
Control button
functions
Þ fig. 53
Memory
2
Band
3
Sound
4
Tuning
(FM/AM range)
a)
Digital Signal Processing
b)
Vehicles with a BOSE® sound system in conjunction with an AudioPilot do
not hav e a DSP func ti on . In this case your vehicle is equipped wit h dyna mi c
noise compensation Þ page 94.
Radio submenus
Memory list
FM
AM
Satellite Radio
(XM Radio* or Sirius Radio*)
Balance
Fader
Trebl e
Bass
a)b)
DSP
Volume settings (Navigation info)
Tun e up
Tune down
Seek up
Seek down
Store station
Scan
Page 60

RADIO 57
The following submenus are available in the radio
Setup function:
Radio Setup submenus
Press the
function button in
the radio function
(FM/AM range)
Þ page 65
Press the
function button in
the satellite radio function
(XM* or Sirius*)
Þ page 70
SETUP
SETUP
Station reception
Station display
Delete stored stations
Sort station by
Station info
Category filter
Receiver serial number
Delete stored stations
Band control button (frequency)
Selecting frequency band
The frequency band selection determines which radio
stations are received.
Fig. 54 Radio: Available frequency band
Band control button
–Press the Band control button in the radio menu.
– Select your desired frequency band Þ fig. 54 by rotating
the control knob.
– Press the control knob to confirm your selection.
General operation RADIO, CD NAME, TEL NAV, INFO CAR, SETUP
Page 61

RADIO58
FM-AM
– Press the function button in the radio menu.
function button
FM-AM
Each time the button is pressed, the frequency
FM-AM
band changes.
The following frequency bands are available:
Frequency band Abbreviation
Frequency modulation FM
Amplitude modulation AM
Satellite Radio XM* Radio or
Sirius*
Main radio menu
General
The radio station list for the selected frequency band is
displayed in the main radio menu.
The station lists for the FM and AM range differ in their behavior.
The FM station list
and the AM station list
ally (statically).
The station list in the XM Satellite Radio*
Satellite Radio* main menu is updated dynamically.
The title line of the Display shows you whether the radio station is
operating in FM, AM, XM* or Sirius*. The frequency band can be
selected with Band control button
Þ fig. 55 is adapted automatically (dynamically)
Þ page 59, fig. 56 has to be updated manu-
Þ page 60, fig. 57 or Sirius
Þ page 57.
Tips
The radio station currently set and the frequency band is shown in
the instrument cluster display.
Radio station list on the FM band
The FM station list is dynamic and adapts automatically to the current reception status.
Fig. 55 Radio: Station list in main FM menu
– Press the function button if another menu is
currently being displayed.
– Select the desired radio station in the main FM radio
menu with the control knob.
FM-AM
Page 62

RADIO58
FM-AM
– Press the function button in the radio menu.
function button
FM-AM
Each time the button is pressed, the frequency
FM-AM
band changes.
The following frequency bands are available:
Frequency band Abbreviation
Frequency modulation FM
Amplitude modulation AM
Satellite Radio XM* Radio or
Sirius*
Main radio menu
General
The radio station list for the selected frequency band is
displayed in the main radio menu.
The station lists for the FM and AM range differ in their behavior.
The FM station list
and the AM station list
ally (statically).
The station list in the XM Satellite Radio*
Satellite Radio* main menu is updated dynamically.
The title line of the Display shows you whether the radio station is
operating in FM, AM, XM* or Sirius*. The frequency band can be
selected with Band control button
Þ fig. 55 is adapted automatically (dynamically)
Þ page 59, fig. 56 has to be updated manu-
Þ page 60, fig. 57 or Sirius
Þ page 57.
Tips
The radio station currently set and the frequency band is shown in
the instrument cluster display.
Radio station list on the FM band
The FM station list is dynamic and adapts automatically to the current reception status.
Fig. 55 Radio: Station list in main FM menu
– Press the function button if another menu is
currently being displayed.
– Select the desired radio station in the main FM radio
menu with the control knob.
FM-AM
Page 63

RADIO 59
All the FM stations that can be received are on this list. The list is
limited to a maximum of 30 stations.
If the main FM radio menu does not appear after pressing the function button, you can change the frequency band by pressing the
Band control button
FM-AM
function button
Þ page 57 or by repeatedly pressing the
Þ page 16.
Radio station list on the AM band
The AM band radio station list is static and has to be
changed manually.
Fig. 56 Radio: AM station list (main menu)
– In the main AM radio menu select Update station list
with the control knob to update the list of radio stations.
– Select the desired radio station.
All the AM stations that can be received are included at this time in
the station list in this manually activated search. The list is limited
to a maximum of 30 stations.
If you a re outside the t rans miss ion ran ge for y our s tation, it will still
be displayed but there will be interference in the signal. In that case
update your list of stations
If the main AM menu does not appear after pressing the function
button, you can change the frequency band by pressing the Band
control button
function button
Þ page 57 or by repeatedly pressing the
Þ page 16.
Þ fig. 56.
FM-AM
– Press the function button if another menu is
FM-AM
currently being displayed.
General operation RADIO, CD NAME, TEL NAV, INFO CAR, SETUP
Page 64

RADIO60
Applies to vehicles: with Satellite Digital Audio Radio Service
Radio station list in satellite mode
The available radio stations are listed in the satellite
radio main menu.
Fig. 57 Radio: XM station list
– Press the function button if another menu is
currently being displayed.
– Select the desired radio station in the main XM or Sirius
radio menu with the control knob.
If you are not in the main satellite radio menu (XM or Sirius Radio)
after pressing the function button, you can change the frequency
band by pressing the Band control button
edly pressing the function button
FM-AM
FM-AM
Þ page 57 or by repeat-
Þ page 16.
The ID number of the XM* or Sirius* satellite tune r can be displ ayed
using the Setup function
If you have an XM tuner, you may also display the ID number using
the 000 Radio ID
Þ fig. 57 option in the main menu.
Þ page 68.
Tips
· To use the satellite program, you must have an additional tuner
in the vehicle and a contract with a service provider (XM* or Siri us*) .
Activating the satellite radio service is described starting
Þ page 68.
· The description of the Setup function starts at section
Þ page 70.
Page 65

RADIO 61
Memory control button
Using the memory list
Up to 30 stations from all available frequency bands
can be saved in the memory list.
Fig. 58 Radio: Memory list
Saving a new station in the memory list
– Select the desired radio station in the main radio menu
with the control knob.
–Press the Memory control button.
– By rotating and pressing the control knob, select Store
station station-ID Þ fig. 58.
– Select your desired memory location by rotating the
control knob.
– Press the control knob to save the station.
Selecting a station from the memory list
–Press the Memory control button in the radio menu.
– By rotating and pressing the control knob, select a
station from the memory list.
In addition to the lists of available radio stations (Þ page 58), the
radio function gives you the option of collecting the radio stations
that you want in a memory list.
The frequency band
of the station name
When you save a new station, an empty memory location will be
offered automatically. You may also select any other memory location or you can replace one that is already taken. If a station is
already stored there, it is overwritten.
If the current station is already saved in the memory, you are not
given the option Store station station-ID.
When you have selected the station you want in a radio station list
Þ page 59, fig. 56, you can switch to the memory list by pressing
and holding the control knob to save this station.
In Se tu p r adi o, yo u c an de let e s av ed radi o s ta ti ons f ro m t he me mor y
list using the Delete stored stations function
Starting on
stations manually.
Þ page 57 is indicated in each case to the right
Þ fig. 58.
Þ page 67.
Þ page 62 you can find how to set and save radio
General operation RADIO, CD NAME, TEL NAV, INFO CAR, SETUP
Page 66

RADIO62
Sound control button
Sound settings
Starting on Þ page 92, you can read how to select the sound
settings for the radio function.
Tuning control button
Manual station selection
With the manual settings option, even weak stations
can be set and saved.
–Press the Tuning control button in the FM/AM radio
menu.
– Select >> (“Tune up”) Þ fig. 59 or << (“Tune down”) in the
Display by rotating the control knob.
– Press the control knob to set the desired station
frequency.
Briefly pressing the control knob will change the frequency in small
steps. If you hold the control knob down, the frequency changes
more rapidly. When you release the control knob, the frequency
adjustment stops.
Whe n y ou ha ve se lect ed a r ad io stat io n m an ua lly, you ar e s ho wn the
station even after switching to the main Radio menu.
If you have selected a weak station in the FM band, it does not
continue to appear on the station list as a selection after changing
radio stations.
The control wheel functions always refer to the frequency band that
is currently set.
Fig. 59 Radio: Manual tuning (forward)
Page 67

RADIO 63
Automatic seek mode
Fig. 60 Radio: Automatic seek mode forward
–Press the Tuning control button in the FM/AM radio
menu.
–Select >| (“Seek up”) Þ fig. 60 or |< (“Seek down”) in the
Display by rotating the control knob.
– Press the control knob to begin automatic frequency
search.
By br ie fl y pr es si ng th e co nt ro l kno b, yo u s ta rt auto ma ti c seek, wh ic h
stops at the next receivable frequency. Since a station often broadcasts on different frequencies (e.g. “Bayern 3”), the seek stops at
each of the receivable frequencies. So “Bayern 3” is found several
times.
Saving stations (STORE)
Fig. 61 Radio: Store station
Fig. 62 Radio: Saving stations in the memory list
General operation RADIO, CD NAME, TEL NAV, INFO CAR, SETUP
Page 68

RADIO64
–Press the Tuning control button in the FM/AM radio
menu.
– Using “Manual station search” Þ page 62 or “Automatic
seek” Þ page 63, select the station (or frequency) that
you wish to save.
– By rotating and pressing the control knob, select STORE
(“Store station”) Þ page 63, fig. 61.
– Select your desired memory location by rotating the
control knob.
– Press the control knob to save the station.
Using the control wheel, you can also save manually set radio
stations
When you save a new station, an empty memory location will be
offered automatically. You can also choose any other memory location.
You can find additional information about radio stations starting on
Þ page 61. In Setup radio you can delete saved radio stations from
the memory list
Þ page 62.
Þ page 67.
Automatic station scan (SCAN)
Fig. 63 Radio: SCAN function
–Press the Tuning control button in the FM/AM radio
menu.
– By rotating the control knob, select SCAN Þ fig. 63.
– Press the control knob to begin scan. The receivable
stations are played for a few seconds.
To select the station that is currently being played, press the co ntro l
knob again.
Page 69

RADIO 65
Setup Radio (FM/AM range)
Opening and closing Setup
Fig. 64 Setup Radio: Main menu
– In a Radio menu, press the button to open the
main Setup menu for the radio function Þ fig. 64.
– Press the button again to close the main Setup
SETUP
menu again.
The following settings are possible in Setup Radio:
· Station reception Þ page 65
· Station display Þ page 66
· Delete stored stations Þ page 67
SETUP
The sound and tuning settings and the brightness of the display can
be entered using the control buttons
Þ page 169.
Tips
We recommend that you enter these settings when the vehicle is
stationary. In this way, you can be sure that you are not unnecessarily distracted from traffic when performing the procedures that
follow. Please note
Þ page 9, “Notes on Traffic Safety”.
Station reception (FM/AM range)
The selectivity for the automatic seek function can also
be adjusted.
Fig. 65 Setup Radio: Station reception
General operation RADIO, CD NAME, TEL NAV, INFO CAR, SETUP
Page 70

RADIO66
– Press the function button in the FM/AM radio
SETUP
menu.
– Select Station reception Þ page 65, fig. 65.
Local station reception
Automatic seek
strong reception.
Distant station reception
Automatic seek
frequencies.
Þ page 63 s top s o nl y a t stat io ns or fre qu en cies wi th
Þ page 63 also stops at distant, weaker stations or
Station display (FM/AM range)
Ticker texts broadcast by radio stations can be
stopped.
Fig. 66 Setup Radio: Station display
– Press the function button in the FM/AM radio
menu.
– Select Station display.
–Under Station display, select on. The texts/names broad-
cast for the radio station currently selected are shown, or
–Under Station display, select off. The texts/names broad-
cast for the radio station currently selected are not
shown.
SETUP
Page 71

RADIO 67
Delete stored stations (FM/AM range)
Fig. 67 Setup Radio: Delete stored stations
Delete individual stations
– Press the function button in the FM/AM radio
menu.
–Select Delete stored stations Þ page 66, fig. 66.
–Select Delete individually Þ fig. 67.
– Rotate and press the control knob to delete individual
stations from the memory list.
Delete all stations
– Press the function button in the FM/AM radio
menu.
SETUP
SETUP
– Select Delete stored stations Þ page 66, fig. 66.
– Select Delete all Þ fig. 67. All entries on the memory list
are deleted.
Satellite Digital Audio Radio
Service
Applies to vehicles: with Satellite Digital Audio Radio Service
Technical requirements
In addition to the radio in your vehicle, a tuner module has to be
installed in order to be able to receive satellite programs. At the
pr es en t t ime, tu ne rs are a va il ab le fro m t he se pro vi de rs : XM Satellite
radio and Sirius Satellite radio. If you would like to retrofit a tuner,
please consult your Audi dealer.
You can select Radio Satellite mode (XM or Sirius Radio) by operating the Band control button
FM-AM
the function button
installed a tuner in your vehicle, the Band function will display the
Satellite radio option.
The Memory control button functions the same for all bands (FM,
AM, XM or Sirius)
Þ page 61.
Tips
· Only one tuner module can be installed in a vehicle at a time.
· XM and its corresponding logos are trademarks of XM Satellite
Radio Inc.
Þ page 57 or by repeatedly pressing
Þ page 16. If you have not yet
General operation RADIO, CD NAME, TEL NAV, INFO CAR, SETUP
Page 72

RADIO68
· Sirius and related marks are trademarks of Sirius Satellite Radio
Inc.
Applies to vehicles: with Satellite Digital Audio Radio Service
Activate your Satellite Radio Service
In order to be able to receive satellite programs, this
service must be enabled.
Fig. 68 Setup Radio: Example for Receiver serial number
In order to have the service enabled at your provider, you
need the ID number of the tuner. To show the ID number in
the display:
– Select Receiver serial number Þ page 70, fig. 71 by
rotating the control knob.
– Press the control knob. The ID number will appear on the
Display Þ fig. 68.
XM ID number
This number is an 8 character alphanumeric number.
The XM ID number can be called up in the XM main menu using the
000 Radio ID
Sirius ID number
This number is a 12 character alphanumeric number.
Þ page 60, fig. 57 option.
– Press the function button in the satellite radio
SETUP
menu.
Page 73

RADIO 69
Applies to vehicles: with Satellite Digital Audio Radio Service
Satellite station list
The available stations are listed in the satellite main
menu.
Fig. 69 Radio: Sirius Satellite Radio station list
– Press the function button if another menu is
currently being displayed.
– Select the desired radio station in the main XM or Sirius
radio menu with the control knob.
If you are not in the main satellite radio menu (XM or Sirius Radio)
after pressing the function button, you can change the frequency
band by pressing the Band control button
edly pressing the function button
FM-AM
FM-AM
Þ page 57 or by repeat-
Þ page 16.
Operating the Memory control button displays the memory list. You
ma y s to re sta ti on s f rom th e F M, AM an d Sa te ll it e rad io (X M o r Sir iu s)
Þ page 61.
bands
The explanations for the sound settings start with section
Þ page 92.
Tips
· The stations that are displayed in the station list can be filtered
accord ing to your per sona l desires as to type of pro gram
· If you operate the button in a submenu, the Satellite
radio main menu will be displayed.
RETURN
Þ page 72.
· The control button with the Tunin g function cannot be
selected.
General operation RADIO, CD NAME, TEL NAV, INFO CAR, SETUP
Page 74

RADIO70
Setup Satellite radio
Opening and closing Setup
Fig. 70 Setup Radio XM: Main menu
– In a radio menu, press the button to open the
main Setup menu for satellite radio Þ page 65, fig. 64.
– Press the button again to close the main Setup
menu again.
The following settings are possible in Setup Radio:
SETUP
· Sorting stations Þ page 70
· Station info Þ page 71
· Category filter Þ page 72
· Receiver serial number Þ page 68
SETUP
· Delete stored entries Þ page 73
The sound and tuning settings and the brightness of the display can
be entered using the control buttons
Tips
We recommend that you enter these settings when the vehicle is
stationary. In this way, you can be sure that you are not unnecessarily distracted from traffic when performing the procedures that
follow. Please note
Applies to vehicles: with Satellite Digital Audio Radio Service
Þ page 9, “Notes on Traffic Safety”.
Sorting stations
Stations can be sorted by category or channel number.
Fig. 71 Setup Radio XM: Sort station by
Þ page 169.
Page 75

RADIO 71
– Press the function button in the satellite radio
SETUP
menu.
–Select Sort station by Þ page 70, fig. 71.
–Select Category or Channel no. Þ page 70, fig. 71.
If you select “Sort station by” Category, the station categories are
listed in the main menu in alphabetical order. Within the individual
categories the stations are listed by channel number in ascending
order.
If you select “Sort station by” Channel no., the stations are listed by
channel number in ascending order.
Tips
The stations that are displayed in the station list can be filtered
according to your personal desires as to type of program
Þ page 72.
Applies to vehicles: with Satellite Digital Audio Radio Service
Station info
The two-part informational text in the Display can be
switched on and off.
Fig. 72 Setup Radio: Station info
– Press the function button in the satellite radio
menu.
– Select Station info.
– Select on or off Þ fig. 72.
If you have switched on Station info, two-part information is
displayed in the satellite radio main menu. For example, the names
of the artist and song are displayed
SETUP
Þ page 69, fig. 69.
General operation RADIO, CD NAME, TEL NAV, INFO CAR, SETUP
Page 76

RADIO72
Applies to vehicles: with Satellite Digital Audio Radio Service
Category filter
You can make a preselection in the program categories.
Fig. 73 Setup Radio: Category filter
Turning on filter option
– Press the function button in the satellite radio
menu.
– Select Category filter.
–Under Category filter select the desired filter option and
press the control knob. A check
filter option, or
SETUP
¥ will appear after the
– Select the filter option All categories and press the
control knob so that a check
categories.
Turning off individual filter options
– Press the function button in the satellite radio
menu.
– Select Category filter.
–Under Category filter select individual filter options that
are not to be active any longer and press the control
knob. The check ¥ after the filter option disappears.
Turning off all filters
– Press the function button in the satellite radio
menu.
– First select the filter option All categories and press the
control knob so that a check
categories. At the same time, a check
each filter option.
– If you press the control knob again afterwards, the
checks
The stations that are displayed in the station list can be filtered
according to your personal desires as to type of program. The selection of program categories depends on what your provider offers.
SETUP
SETUP
¥ after all of the filter options disappear.
¥ appears after All
¥ appears after All
¥ will appear after
Page 77

RADIO 73
Applies to vehicles: with Satellite Digital Audio Radio Service
Delete stored stations
Delete individual stations
– Press the function button in the satellite radio
SETUP
menu.
–Select Delete stored stations Þ page 71, fig. 72.
–Select Delete individually.
– Rotate and press the control knob to delete individual
stations from the memory list.
Delete all stations
– Press the function button in the satellite radio
SETUP
menu.
–Select Delete stored stations.
–Select Delete all. All entries on the memory list are
deleted.
Applies to vehicles: with Satellite Digital Audio Radio Service
System information
The following system messages can be displayed:
XM Satellite Radio
System messages
ANTENNA No antenna is connected to the tuner, or
UPDATING Your system is being updating.
NO SIGNAL The tuner is presently not receiving any
LOADING Your prov ider is send ing i nformation which
OFF AIR The station selected has shut down its pro-
INVALID The channel is invalid or not used.
Sirius Satellite Radio
System messages
LINKING The tuner is presently not receiving any
CALL 888-539-SIRIUS
TO SUBSCRIBE
Meaning
there are loose plug contacts on the
antenna cable.
satellite signal.
the system is currently storing.
gram (e.g. children's channel at night)
Meaning
satellite signal.
First possibility: the tuner has not been
enabled yet. Second possibility: the station
selected is not enabled, for example
because the station requires a subscription.
General operation RADIO, CD NAME, TEL NAV, INFO CAR, SETUP
Page 78

CD/SD74
A
CD/SD
Introduction
General
CD and MP3 operatio n is selected by us ing the
function button.
Depending on the equipment in your vehicle, you can use the
CD/SD
function to play an audio CD in the DVD navigation drive,
use a CD changer*
Navigation System
You switch between the CD and MP3 function by using the control
button with the Source function
Þ page 79 or the MP3 player integrated into the
Þ page 83.
Þ page 77.
CD/SD
Selecting CD function
Fig. 74 Display: Main CD menu (example of a list of tracks)
– Insert an audio CD into a drive Þ page 34
– Press the function button Þ page 16. A main
audio menu Þ fig. 74 or the previously active function
menu appears in the display.
– If necessary, press the control button with the Source
function and select CD Þ page 77.
– Press one of the control buttons Þ page 17 to move to
the appropriate submenus to Þ fig. 74.
CD/SD
1
4
A
Page 79

CD/SD 75
A
The following submenus are available in the CD
function:
Control button
functions
Þ page 74,
CD submenus
fig. 74
Audio CD
1
CD list*
Empty
CD ROM
CD unreadable
2
A
Source
CD
MP3
Balance
Fader
3
A
Sound
Trebl e
Bass
a)b)
DSP
Volume settings (Navigation info)
Forward
Reverse
4
A
CD control
Next
Previous
Random
Scan
a)
Digital Signal Processing
b)
Vehicles with a BOSE® sound system in conjunction with an AudioPilot do
no t hav e a DSP f unc tio n. In t his case your v ehicle is equ ipp ed wi th Dy nam ic
Noise Compensation Þ page 94.
The following submenus are available in the CD Setup
function:
CD Setup submenu
Press the
SETUP
Repeat CD
function button in
the CD function
Þ page 82
Selecting MP3 function
Fig. 75 Display: Main MP3 menu (example of a list of tracks)
– Insert an MP3 card or an MP3 CD into the appropriate
drive Þ page 37.
General operation RADIO, CD NAME, TEL NAV, INFO CAR, SETUP
Page 80

CD/SD76
A1A
A1A2A3A
– Press the function button Þ page 16. A main
CD/SD
audio menu Þ page 74, fig. 74 or the previously active
function menu appears in the display.
– If necessary, press the control button with the Source
function and select MP3 Þ page 77.
– Press one of the control buttons Þ page 17 to move to
the appropriate submenus to Þ page 75, fig. 75.
4
The following submenus are available in the MP3
function:
Control button
functions
Þ page 74,
fig. 74
MP3 list
Source
Sound
4
MP3 ctrl
a)
Digital Signal Processing
MP3 submenus
CD
Card 1
Card 2
Navigation DVD
Empty
Audio
CD ROM
Unreadable
CD
MP3
Balance
Fader
Trebl e
Bass
a)b)
DSP
Volume settings (Navigation info)
Forward
Reverse
Next
Previous
Random
Scan
Name (Details)
Page 81

b)
Vehicles with a BOSE® sound system in conjunction with an AudioPilot do
no t hav e a DSP f unc tio n. In t his case your v ehicle is equ ipp ed wi th Dy nam ic
Noise Compensation Þ page 94.
The following submenus are available in the MP3
Setup function:
MP3 Setup submenus
Press the
function button in
the MP3 function
SETUP
Þ page 88
Repeat
With subdirectories
Tra ck di spl ay
Categ. display
CD/SD 77
Source control button
Selecting audio source
Fig. 76 CD/SD: List of available audio sources
–Press the Source control button in the CD or MP3 menu.
– Select the desired equipment by rotating and pressing
the control knob.
Depending on vehicle equipment, the following choices are available:
· CD
· MP3
Various submenus are available, depending on the equipment
selected.
General operation RADIO, CD NAME, TEL NAV, INFO CAR, SETUP
Page 82

CD/SD78
Tips
· Sound controls can be adjusted individually for each piece of
equipment
Þ page 92.
· The audio source selected is shown in the title line of the
display.
Main CD menu
Selecting a CD track
Fig. 77 CD: Track selection (main menu)
– In the main CD menu Þ fig. 77, select the desired track
on the active CD with the control knob.
The playing time of the track will be displayed after the track name.
If the vehicle has a CD changer*, you can select a CD using the CD
list control button
An audio CD inserted into the DVD Navigation drive
shown as CD 1 in the title line. If your vehicle is equipped with a CD
changer*, an audio CD inserted into the DVD Navigation drive can
be selected with the CD list control button via location CD 7.
Þ page 79
Þ page 35 is
–Press the Source control button from a CD/SD menu.
– Select CD Þ page 77.
Page 83

CD/SD 79
CD list control button
Applies to vehicles: with CD changer
CD selection
Fig. 78 CD: Selecting CDs from the changer
–Press the CD list control button in the CD menu.
– Select the desired CD Þ fig. 78. The CD title list is
displayed.
– Select your track as necessary.
Audio CDs (CD-A) can also be played in the DVD Navigation drive. If
there is a CD changer* in the vehicle, an audio CD inserted in the
DVD Navigation drive can be played over CD 7.
Sound control button
Sound settings
Starting at Þ page 92, you can read how to select the sound
settings for the CD function.
The selected CD location appears in the title line.
If there is no CD in one of the slots in the changer, “Empty” is
displayed in the CD list.
General operation RADIO, CD NAME, TEL NAV, INFO CAR, SETUP
Page 84

CD/SD80
CD control button
Forward/reverse within the CD track
Fig. 79 CD: Forward within a track
–Press the CD control button in the CD menu.
– Select >> (“Forward”) Þ fig. 79 or << (“Reverse”) by
rotating the control knob.
– Hold down the control knob.
The track advances or reverses for as long as you hold the control
knob down.
CD track next/previous
Fig. 80 CD: Track next
–Press the CD control button in the CD menu.
– Select >| (“Next”) Þ page 85, fig. 87 or |< (“Previous”) by
rotating the control knob.
– Press the control knob.
The next or previous track will be played.
Page 85

CD/SD 81
CD Random play
CD tracks can also be played in random order.
Fig. 81 CD: Random
–Press the CD control button in the CD menu.
– By rotating the control knob, select MIX (“Random”)
Þ fig. 81.
– Press the control knob.
The possibilities for Random play depend on the different settings
available for Repeat in the Setup CD menu
If yo u have switched the Repeat function off in Setup CD, the CDs in
a CD changer* are played one after the other in random order. The
tracks on the current CD are first played in random order. After all
the tracks have been played, the next CD is loaded.
Þ page 82.
If you s et Repeat in Setup CD for only a single CD, only the tracks on
the current CD will be played in random order.
If you have set Repeat for a single Tra ck in Setup CD, you cannot use
random play. The Scan function also cannot be used
Þ page 81.
Scan CD tracks
Fig. 82 CD: Scanning a track
–Press the CD control button in the CD menu.
– By rotating and pressing the control knob, select SCAN
Þ fig. 82.
Pressing the control knob activates automatic track scan. Each track
on the CD will be played for a few seconds.
General operation RADIO, CD NAME, TEL NAV, INFO CAR, SETUP
Page 86

CD/SD82
When the button is pressed again, the scanning stops and the title
currently being played will continue to play.
Tips
If you have set Repeat for a single Tra ck in Setup CD, you cannot use
the Scan function
Þ page 82.
Setup CD
Opening and closing Setup
Fig. 83 Setup CD Repeat CD (main Setup menu)
– In a CD m enu , press t he button to ope n th e ma in
Setup menu for the CD function Þ fig. 83.
SETUP
– Press the button again to close the main Setup
SETUP
menu again.
The Repeat options Þ page 82 can be set in Setup CD.
The sound and tuning settings and the brightness of the display can
be entered using the control buttons
Þ page 169.
Tips
We recommend that you enter these settings when the vehicle is
stationary. In this way, you can be sure that you are not unnecessarily distracted from traffic when performing the procedures that
follow. Please note
Þ page 9, “Notes on Traffic Safety”.
Repeating CD
–Press the function button Þ page 16 in the CD
menu.
– Select Repeat Þ fig. 83.
– Select CD, off or Track .
SETUP
· Function CD: The current CD tracks are repeated.
· Function off: The Repeat function is switched off.
· Function Tra ck : The CD track currently entered is repeated.
Tips
The Repeat options can be combined with the Random function.
You can find more information in the description of the Random
function
Þ page 81.
Page 87

CD/SD 83
Main MP3 menu
Selecting a MP3 track
The list of tracks on the activated, readable storage
medium inserted are displayed in the main MP3 menu.
Fig. 84 MP3: List of tracks (main menu)
–Press the Source control button from a CD/SD menu.
–Select MP3 Þ page 77.
– In the main MP3 menu Þ fig. 84, select the desired track
on the active MP3 data carrier with the control knob.
You can select an MP3 data carrier using the MP3 list control button
Þ page 84.
Tips
· If you open the disp lay, M P3 play back of the acti ve data carri er is
stopped.
· The MP3 player can also stop when playing back individual MP3
tracks from a data carrier if they cannot be read. In this case, select
another readable MP3 track on this data carrier and playback
continues.
· Because there are different methods of generating MP3 files, it
is possible that MP3 files cannot be played or information cannot be
read. You can find additional hints starting on
Þ page 37.
The playing time of the track will be displayed after the track name.
General operation RADIO, CD NAME, TEL NAV, INFO CAR, SETUP
Page 88

CD/SD84
MP3 list control button
Selecting MP3 drive
Fig. 85 MP3: List of MP3 drives
–Press the MP3 list control button in the MP3 menu.
– Select the desired drive Þ fig. 85.
– Select your track as necessary.
Drives are shown greyed out in the list if there is no data carrier in
this drive or if the data carrier cannot be read. MP3 CDs can be used
as data carriers in the DVD Navigation drive, and SD/MCC memory
cards can be used in the MP3 card reader.
The active drive appears in the title line.
Tips
Not all MP3 CDs can be played. For example, it is possible that the
MP3 files cannot be read by the MP3 player
Þ page 37.
Sound control button
Sound settings
Starting on Þ page 92, you can read how to select the sound
settings for the MP3 function.
Page 89

CD/SD 85
MP3 ctrl control button
Forward/reverse within the track
Fig. 86 MP3: Forward within a track
–Press the MP3 ctrl control button in the MP3 menu.
–Select >> (“Forward”) Þ fig. 86 or << (“Rewind”) by
rotating the control knob..
– Hold down the control knob.
The track advances or reverses for as long as you hold the control
knob down.
MP3 track next/previous
Fig. 87 MP3: Track next
–Press the MP3 ctrl control button in the MP3 menu.
– Select >| (“Next”) Þ fig. 87 or |< (“Previous”) by rotating
the control knob.
– Press the control knob.
The next or previous track will be played.
General operation RADIO, CD NAME, TEL NAV, INFO CAR, SETUP
Page 90

CD/SD86
MP3 Random
Fig. 88 MP3: Random
–Press the MP3 ctrl control button in the MP3 menu.
– By rotating the control knob, select MIX (“Random”)
Þ fig. 88.
– Press the control knob.
The possibilities for Random play depend on the different settings
available for Repeat in the Setup MP3 menu
If you have selected Repeat function off in Setup MP3, all the MP3
tracks on the current data carrier are played randomly. But if a playlist was activated previously, the tracks from this playlist are played
first in random order, and then the entire directory.
If you have entered Repeat in Set up M P3 for a Playlist/Dir., the tracks
on the current pla ylist or th e current dire ctory a re pl ayed in rando m
Þ page 82.
order If With subdirectories is activated, they are included in
random play.
If you have entered Repeat of All playlists in Setup MP3, the tracks
for all existing playlists for all data carriers are played. SD or MMC
memory cards can be used for playlists
If you have entered Repeat for a single Tra ck in Setup MP3, you
cannot use random play. The Scan function also cannot not be used
Þ page 87.
Þ page 40.
MP3 Details (NAME)
Fig. 89 MP3: NAME (Details)
–Press the MP3 ctrl control button in the MP3 menu.
Page 91

CD/SD 87
– By rotating and pressing the control knob, select NAME
(“Details”) to open more detailed information about the
current track Þ page 86, fig. 89.
If information about the current track, performer, album, year of
issue, specific comments and the category has been stored in the
MP3 file, you can bring up this information using NAME (“Details”).
Tips
Because there are different methods of generating MP3 files, it is
possible that MP3 files cannot be played or information cannot be
read. You can find additional hints starting on
Þ page 37.
Scan MP3 track (SCAN)
–Press the MP3 ctrl control button in the MP3 menu.
– By rotating and pressing the control knob, select SCAN
Þ fig. 90.
Pressing the control knob activates automatic track scan. Each track
on the MP3 data carrier will be played for a few seconds.
When the button is pressed again, the scanning stops and the title
currently being played will continue to play.
Tips
Because there are different methods of generating MP3 files, it is
possible that MP3 files cannot be played or information cannot be
read. You can find additional hints starting on
Þ page 37.
Fig. 90 MP3: Scanning tracks on a MP3
General operation RADIO, CD NAME, TEL NAV, INFO CAR, SETUP
Page 92

CD/SD88
Setup MP3
Opening and closing Setup
Fig. 91 Setup MP3: main menu
– In an MP3 menu, press the button to open the
main Setup menu for the MP3 function Þ page 82,
fig. 83.
– Press the button again to close the main Setup
SETUP
menu again.
The following settings are possible in Setup MP3:
· Repeat options Þ page 88
· With subdirectories Þ page 89
· Track d isp lay Þ page 90
SETUP
· Categ. display Þ page 90
The sound and tuning settings and the brightness of the display can
be entered using the control buttons
Tips
We recommend that you enter these settings when the vehicle is
stationary. In this way, you can be sure that you are not unnecessarily distracted from traffic when performing the procedures that
follow. Please note
Þ page 9, “Notes on Traffic Safety”.
Repeating MP3
Fig. 92 Setup MP3: Repeating MP3 data carrier
– Press the function button Þ page 16 in the MP3
menu.
SETUP
Þ page 169.
Page 93

CD/SD88
Setup MP3
Opening and closing Setup
Fig. 91 Setup MP3: main menu
– In an MP3 menu, press the button to open the
main Setup menu for the MP3 function Þ page 82,
fig. 83.
– Press the button again to close the main Setup
SETUP
menu again.
The following settings are possible in Setup MP3:
· Repeat options Þ page 88
· With subdirectories Þ page 89
· Track d isp lay Þ page 90
SETUP
· Categ. display Þ page 90
The sound and tuning settings and the brightness of the display can
be entered using the control buttons
Tips
We recommend that you enter these settings when the vehicle is
stationary. In this way, you can be sure that you are not unnecessarily distracted from traffic when performing the procedures that
follow. Please note
Þ page 9, “Notes on Traffic Safety”.
Repeating MP3
Fig. 92 Setup MP3: Repeating MP3 data carrier
– Press the function button Þ page 16 in the MP3
menu.
SETUP
Þ page 169.
Page 94

CD/SD 89
–Select Repeat.
–Select Off, Playlist/Dir., All playlists or Track Þ page 88,
fig. 92.
The tracks from an available MP3 data carrier can be repeated.
· Function Off: The Repeat function is switched off.
· Function Playlist/Dir.: The MP3 tracks from the current Playliste
or of the current Directory are repeated.
· Function All playlists: The MP3 tracks from all available Playlists
or of all Directories are repeated.
· Function Tr ac k: The MP3 track currently selected is repeated.
Tips
The Repeat options can be combined with the Repeat and Random
functions. You can find more information in the description of the
Random function
Þ page 86.
Subdirectories
Fig. 93 Setup MP3: Subdirectories activated
– Press the function button Þ page 16 in the MP3
menu.
– Select Repeat Þ page 88, fig. 92.
– Select Playlist/Dir.
– Select With subdirectories and press the control knob so
that a check mark
Þ fig. 93.
SETUP
¥ is displayed behind this function
The function With subdirectories is available for the Repeat
Playlist/Dir. function. In this way, all subdirectories in a directory are
played as well.
General operation RADIO, CD NAME, TEL NAV, INFO CAR, SETUP
Page 95

CD/SD90
Track display
Fig. 94 Setup MP3: Select track display
– Press the function button Þ page 16 in the MP3
menu.
– Select Track d ispl ay.
– Select Track na me or File name Þ fig. 94.
Tra ck name
Information about the tracks (e.g. artist, album, etc.) can be read
from a previously stored ID3 tag.
The different information has to be stored first in the ID3 tag, otherwise no information is available.
If an MP3 data carrier has been inserted and not played, the data
from the ID3 tag are read in in the background. If you start playback
SETUP
of an MP3 data carrier immediately, the ID3 tag data are displayed
for the track being played.
If the re a re n o ID 3 ta gs, or i f th ey h ave not bee n re ad, no i nfo rma tio n
about the tracks is displayed.
File name
No information about the tracks is displayed.
Category display
If the display “Track name” was selected, the category
display can be used.
Fig. 95 Setup MP3: Category display switched on
– Press the function button Þ page 16 in the MP3
menu.
SETUP
Page 96

–Select Track di splay Þ page 90, fig. 94.
–Select Track nam e.
–Select Categ. display on Þ page 90, fig. 95.
Information about the category of an MP3 track can be read from a
previously stored ID3 tag. In order for this function to be available,
Tra ck n ame must be selected
Þ page 90.
CD/SD 91
General operation RADIO, CD NAME, TEL NAV, INFO CAR, SETUP
Page 97

Adjusting sound settings92
Adjusting sound settings
Setting basic sound
characteristics
Fig. 96 Sound: Setting the balance (example radio menu)
Fig. 97 Sound: Balance adjustment (example radio menu)
– Press the control button for the Sound function from an
audio or Setup menu.
– Select the desired sound setting (e.g. Balance) Þ fig. 96
with the control knob.
– Rotat e the spec ific con trol kno b in the sou nd a dju stm ent
menu (e.g. Balance) Þ fig. 97 to set the sound character-
istic to your liking.
– By pressing the con trol knob or the butto n, the
setting is imported and you leave the settings menu.
The Display Þ fig. 97 shows the degree of adjustment.
RETURN
Page 98

Adjusting sound settings 93
The following sound adjustments are possible:
· Balance (left/right volume relationship)
· Fader (front/rear sound relationship)
· Treb le
· Bass
· DSP (Digital Signal Processing) Þ page 93
· Volume settings (Navigation info) Þ page 94
The sound setting for the Tre bl e and Bass (lows) can be adjusted
separately for radio, CD and MP3 operation.
The settings that you enter apply to the operating mode that is
currently active in the Navigation System. If you change the bass
setting, for example, when playing a CD, it will not affect radio or
MP3 operation.
DSP (Digital Signal Processing)
Fig. 98 DSP: GALA settings
– Press the control button for the Sound function from an
audio or Setup menu.
– Select DSP.
– Select GALA.
– Select one of the five levels, or
– Select off to switch the function off.
The GALA function matches the volume to the speed to compensate
for road and wind noise.
If you set level 1, the volume is increased less as speed increases. If
you set level 5, the volume is increased more as speed increases.
General operation RADIO, CD NAME, TEL NAV, INFO CAR, SETUP
Page 99

Adjusting sound settings94
Tips
Vehicles with a BOSE sound system in conjunction with
an AudioPilot do not have a DSP function. In this case your vehicle
is equipped with dynamic noise compensation
Applies to vehicles: with BOSE sound system in conjunction with AudioPilot
Þ page 94.
Dynamic noise compensation
Vehicles with a BOSE sound system in conjunction with AudioPilot
are equipped with dynamic noise compensation.
Dynamic noise compensation automatically adjust music playback
so that the music is not drowned out by noise. No matter what kind
of ambient noise you have in the vehicle, the music playback level
remains the same.
Dynamic noise compensation takes account of both temporary and
permanent ambient noise.
How does dynamic noise compensation work?
A microphone in the vehicle interior detects both the noise level of
the music playback and intrusive noises. The intrusive noises are
digitally analyzed and evaluated. The system simultaneously
ensures that the music playback level is increased by the frequencies affected by intrusive noise so that music playback remains at a
constant level for good listening.
Tips
In the event of a malfunction in the AudioPilot system, a gong signal
sounds three times to alert you after the Navigation System is
turned on. Have the AudioPilot system inspected by a qualified
dealership.
Volume settings
Fig. 99 Display: Volume settings
– Press the control button for the Sound function from an
audio or Setup menu.
– Select Volume settings.
– Select Navigation info.
– Rotate and press the control knob to set the desired
volume.
When you adjust the volume for Navigation prompts, a test
announcement is made automatically. This test announcement is
made only if the navigation DVD is in the DVD navigation drive
Þ page 35.
Page 100

Tips
If the volume is too high when the radio is turned on, it will be
reduced automatically to a level set at the factory. If the volume is
too low when the radio is turned on, it will be increased automatically to a level set at the factory.
Adjusting sound settings 95
General operation RADIO, CD NAME, TEL NAV, INFO CAR, SETUP
 Loading...