

Page 1
Contents/Ready
Basic
Manual
Phone
Address Book /
Pair Function
Mail
Camera
EZweb
EZ Navi
EZ・FM
EZ FeliCa
PC site viewer
Teens Mode
Smart Mode
Inputting
Characters
Other Functions
Troubleshooting/
Remote Auto Lock
Index
Page 2
Introduction
Thank you for purchasing the W32H.
Before using it for the first time, be sure to read the W32H Ba
so you know how to use it correctly. After you finish reading t
printed materials that come with the phone in a safe place f
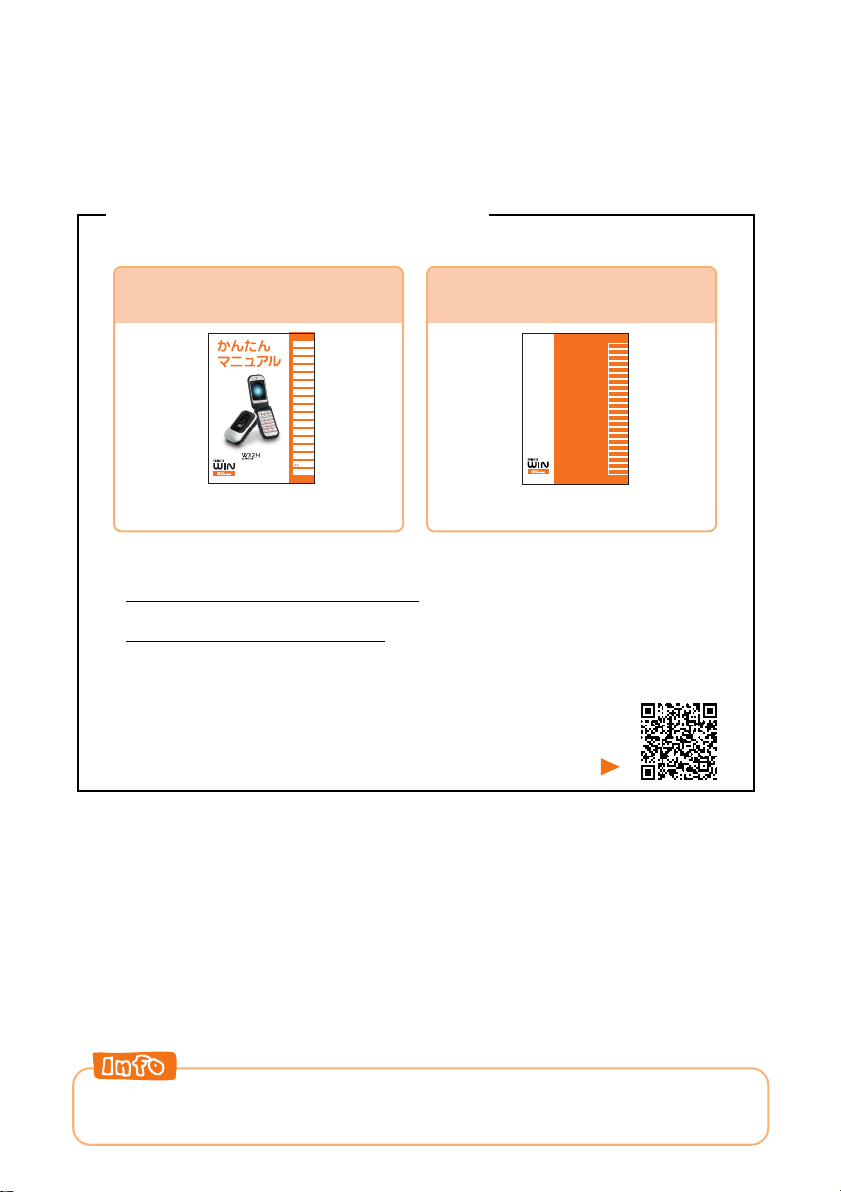
Printed Manuals for the W32H (Japanese)
The W32H comes with a Basic Manual and an Instruction Man
sic Manual (this PDF manual)
his manual, store it and the
or future reference.
ual.
For information about basic
operation
目次/準備
電話
ア
ドレス帳/
ペア機能
メール
カメラ
EZweb
EZナビ
EZ・FM
EZFeliCa
ー
PCサイ
トビューア
モード
ティーンズ
ード
スマートモ
文字入力
その他機能
は/
困ったとき
トロック
遠隔オー
/
English
(英語)
)
(中国語
索引
W32H Basic Manual
Equivalent to this English PDF manual.
The following information is also available on the au w
• To download the Basic Manual or Instruction Manual
(http://au-pro.kddi.com/phone/torisetu/index.html)
• To access a keyword searchable au online manual
(http://www.au.kddi.com/manual/index.html)
You can also access the au online manual using EZw
EZweb Access
EZトップメニュー(
→料金・申込・インフォ(
→auオンラインマニュアル(
EZ Top Menu
)
Charges, Applications, and Info
au Online Manual
You can also read the barcode (QR code) sho
here and use it to access the au Online Man
W32H Instruction Manual
English version not available.
)
For detailed information
about each function
目次
ご利用いただく前に
auICカード
基本操作
カメラ
データフォルダ
W32H
TM
miniSD
by HITACHI
メモリカード
ミュージックプレイヤー
エンジョイツール
取扱説明書
メール
EZweb
TM
「着うたフル
EZ
」
EZFeliCa
EZチャンネル
EZナビ
M
EZ・F
EZムービー
®
(BREW
EZアプリ
)
バーコードリーダー
PCサイトビューアー
PCドキュメント
ビューアー
ー
(M)
メニュ
機能
便利な機能
auのネットワーク
サービス
付録/索引
クイックガイド
ebsite.
eb.
)
wn
ual.
The typeface, fonts, and colors of the text on the example scr
from the screens that actually appear on the display of the pho
scroll bars are not included on sample screens.
eens in this manual may differ
ne. Also, certain icons and the
Page 3
Cellphone Etiquette
Mind your manners!
A cellphone always emits weak radio waves while it is turned on.
Enjoy operation of your cellphone without forgetting to be considerate
of those around you.
Some locations do not allow the use of
cellphones.
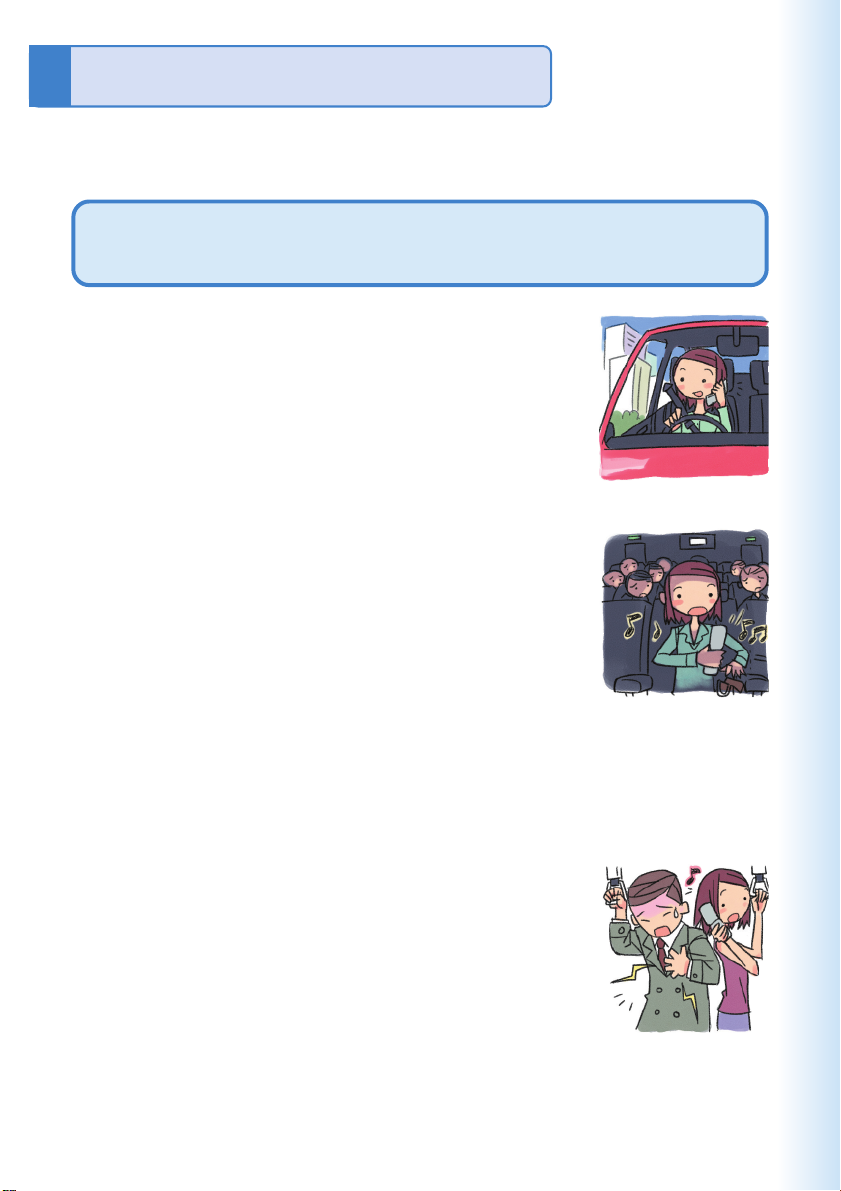
■ Using a cellphone while driving is both dangerous
and prohibited by Japanese law.
■ Using a cellphone inside of an aircraft is prohibited
by law. Be sure to turn off your cellphone before
takeoff.
Watch out where you use your cellphone, and
keep your voice down.
■ Do not make calls from cinemas, theaters,
museums, libraries, or other similar locations. Turn
off the cellphone or use Manner Mode to ensure
that the ring tone does not disturb others.
■ When in public, move to a location where you will
not be blocking traffic.
■ On the Shinkansen, in a hotel lobby, or in other similar locations, move
to a location where you will not disturb others.
■ Take care to avoid talking on the phone in a loud voice.
■ Before taking the picture of others, be sure to obtain their permission first.
Cellphone radio waves may interfere with
electrical medical equipment.
■ On a train or in other crowded locations, there is
always the possibility that someone nearby may be
wearing a pacemaker. Turn off your cellphone when
you are in a crowded area.
■ Follow the rules of hospitals and other medical
facilities concerning the use or possession of
cellphones.
1
Page 4
Cellphone Basics
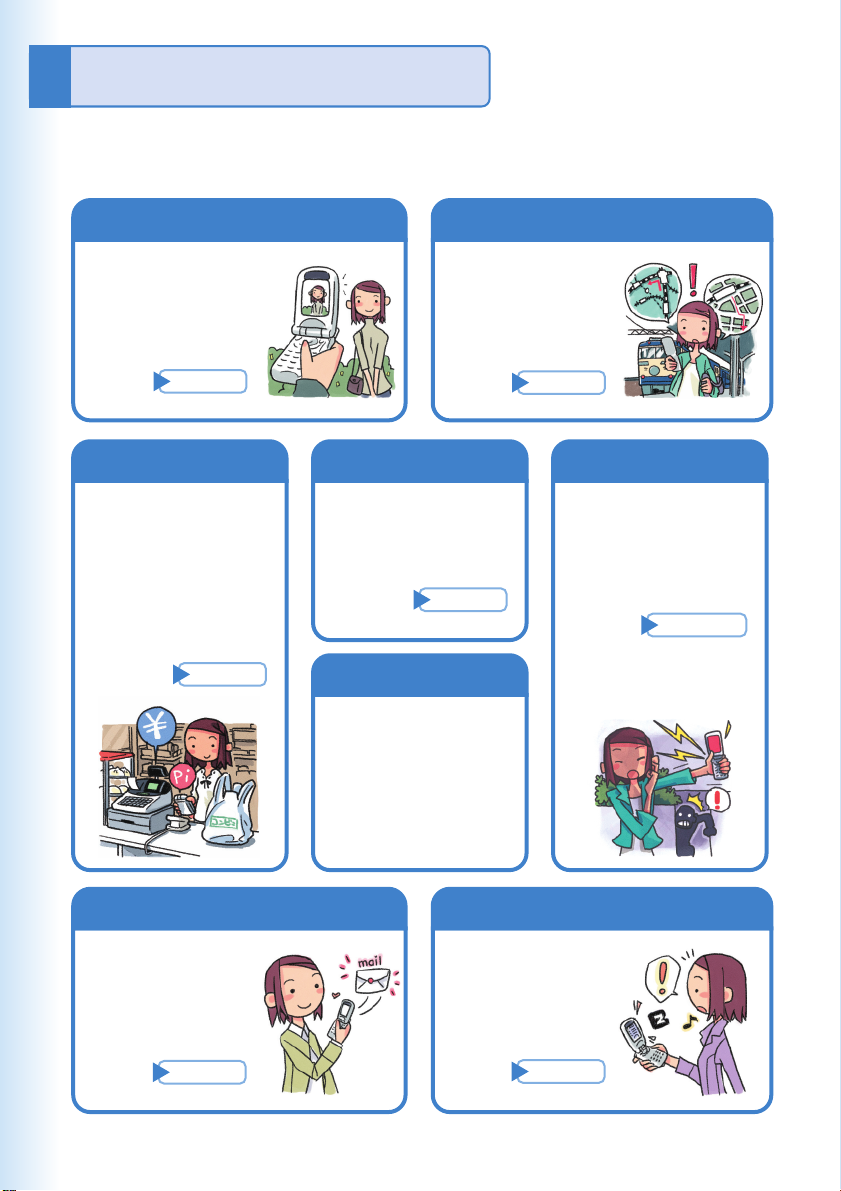
Features
Camera
Shoot photos and
record movies,
and send them by
e-mail.
Page
54
EZ FeliCa
Use the cellphone
for shopping by
using e-money, or
use it as member’s
cards, point cards,
and so on.
Page
82
EZ Navi
EZ Navi Walk,
Position Search,
and Area Message
are all built-in.
Page
74
PC site viewer
View WEB sites
created for viewing
with PCs.
Page
86
Hot Key
Select either
“Hot Dial” or “Hot
Buzzer” as the Hot
Key function.
PC document viewer
Display Word files,
Excel files or PDF
files, and so on.
Page
110
Send mail
messages to other
cellphones or to
PCs.
Page
2
Mail
44
EZweb
Download
“Chaku-Uta®”,
wallpaper, and
other data.
Page
66
Page 5
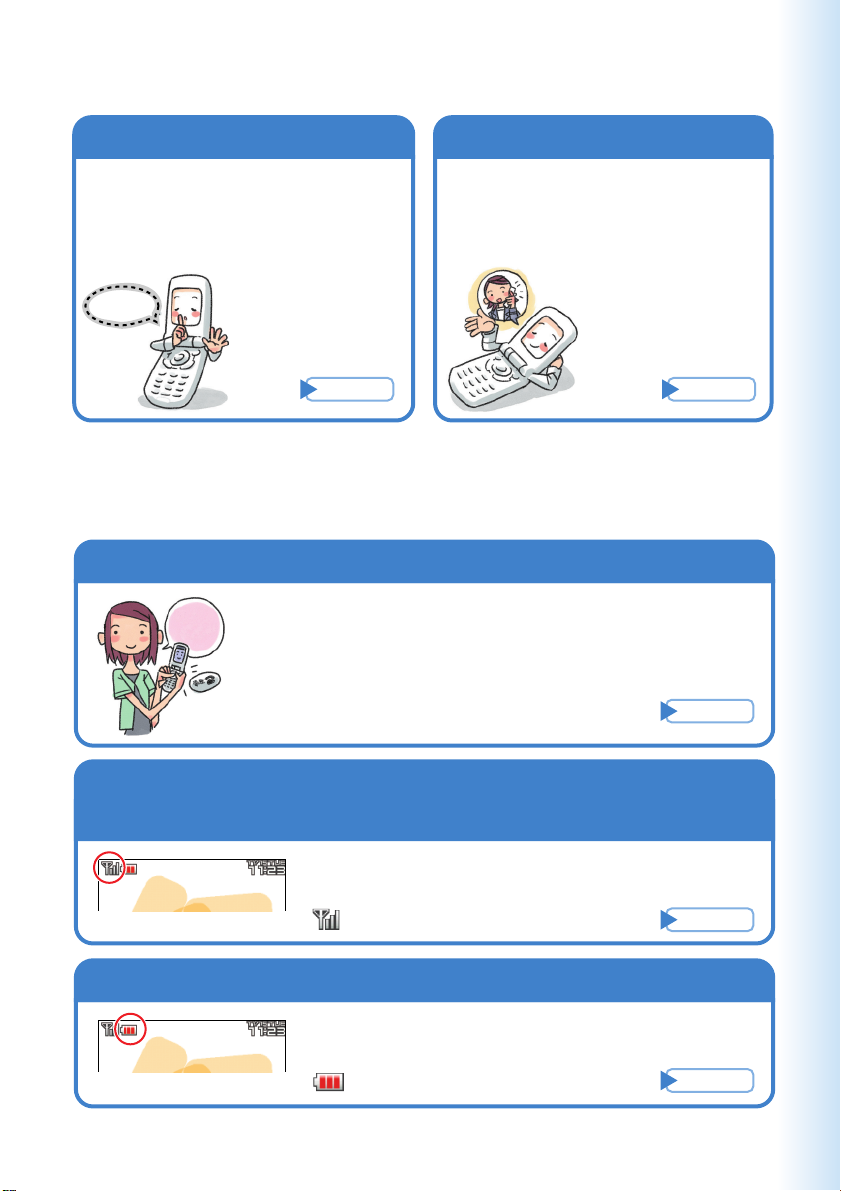
Manner Mode and Easy Voice Memo
Manner Mode
Use Manner Mode to turn off the
ring tone so you do not bother
others around you.
While the standby
Shhhhhhh!
screen is displayed,
hold down ( for
about one second.
Page
33
Easy Voice Memo
If you cannot answer a call, Easy
Voice Memo plays an answering
message and records the caller’s
message.
While the standby
screen is displayed,
hold down
about one second.
Checking Power, Signal Strength, and Battery Level
Normally leave the phone turned on.
Power
The phone needs to be turned on to make and receive
calls.
on
Hold down F for at least 1.5 seconds to turn on the phone.
C
Page
Page
for
34
14
You cannot talk on the phone
if it is unable to receive a signal.
Signal strength is low in some areas, even if
they are within the service area.
indicates the current signal strength.
Keep an eye on the battery level.
The phone may not function properly if battery
power is low.
indicates the current battery level.
Page
Page
14
14
3
Page 6
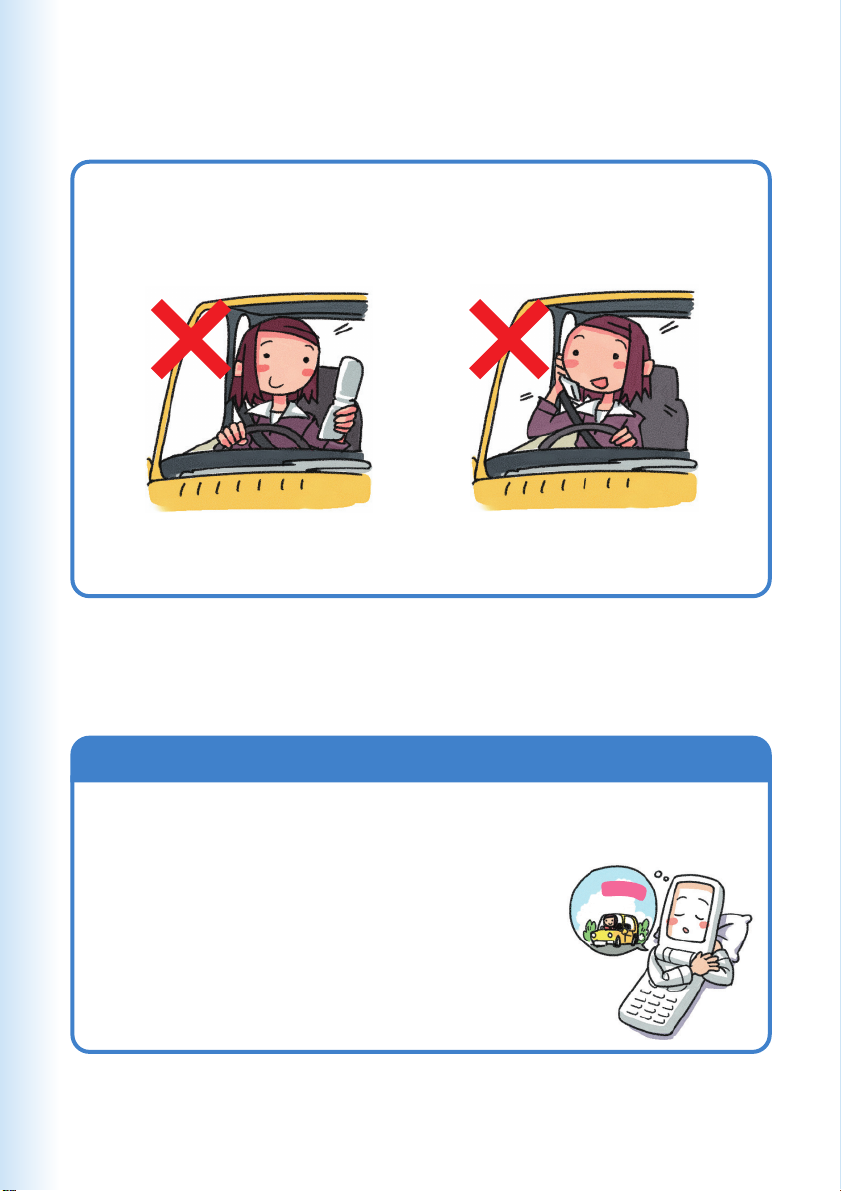
Never use your cellphone while driving!
Holding a cellphone in your hand, talking on a cellphone, or
looking at a cellphone display to send mail or to perform any
other operation while driving is prohibited by Japanese law.
(Revised Traffic Control Law, effective November 1, 2004)
×
Reading mail or looking
at the display.
×
Holding a cellphone in
your hand to talk.
Turn off your cellphone or enter Drive Mode while driving.
Drive Mode
In Drive Mode, the phone will play the messageただいま車を運転
しています。・・・(I am driving right now...), and then ask the caller
to leave a message using Easy Voice Memo.
v
i
r
i
n
d
g
m
’
I
o
n
w
t
h
.
g
.
i
r
While the standby screen is on the display, press (,
and then press 1 (ON). Next, press 2 (Drive
Mode) to enter Drive Mode.
4
.
Page 7
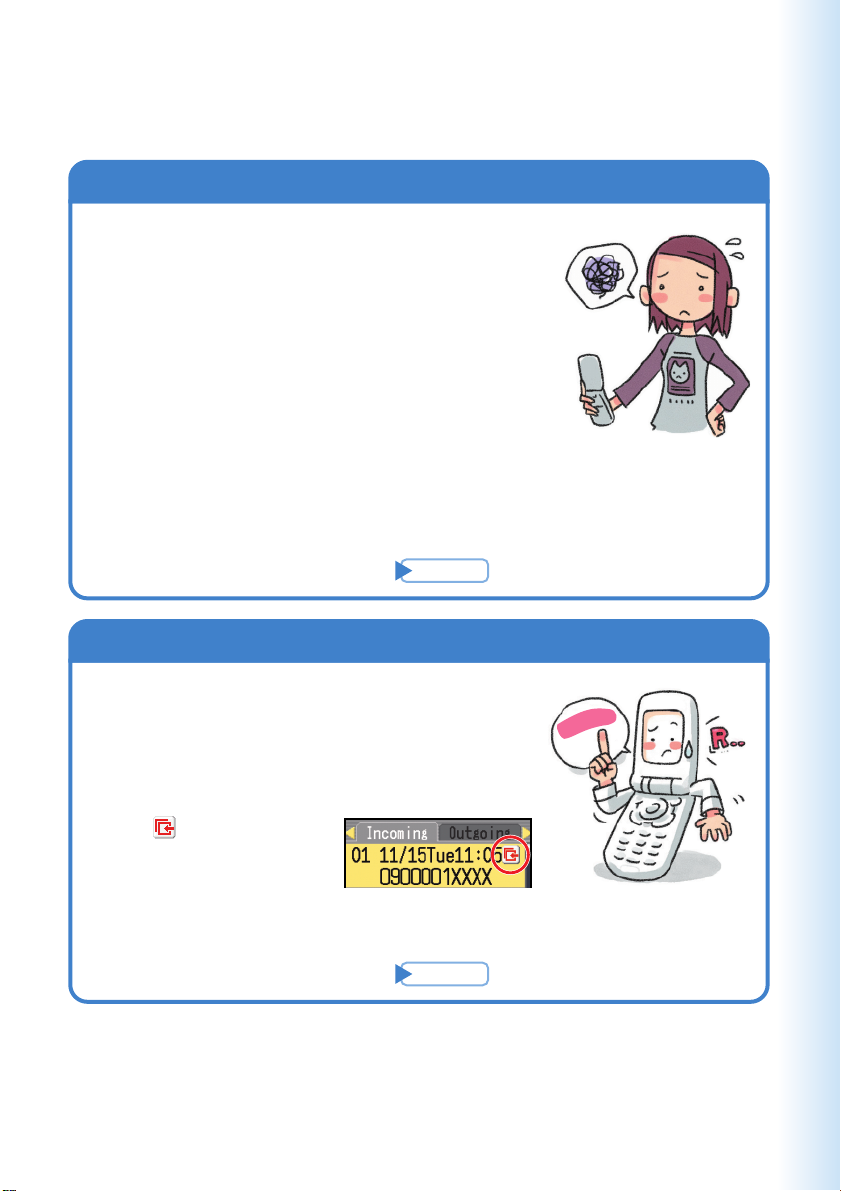
Beware of spam and one-ring calls!
How to Combat Spam
You can set up mail filters to block specific
mail or mail identified as “未承諾広告※”
(unsolicited advertisement), which often
includes a lot of spam.
Your cellphone has the following filters for
blocking spam.
・未承諾広告フィルター
(unsolicited advertisement filter)
・アドレスフィルター
−指定拒否設定
−指定受信設定
(address filters)
(blocks specific mail)
(receives specific mail)
Beware of one-ring calls!
Page
51
A “one-ring call” (wan-giri in Japanese)
rings your phone only once, in an attempt
to make you call back to a service that
automatically bills you very high charges.
The icon at the head
of an incoming record
indicates that the call
rang for only four seconds or less.
This indicates a possible “one-ring call.”
Page
29
g
n
i
r
-
e
n
O
!
l
l
a
c
5
Page 8
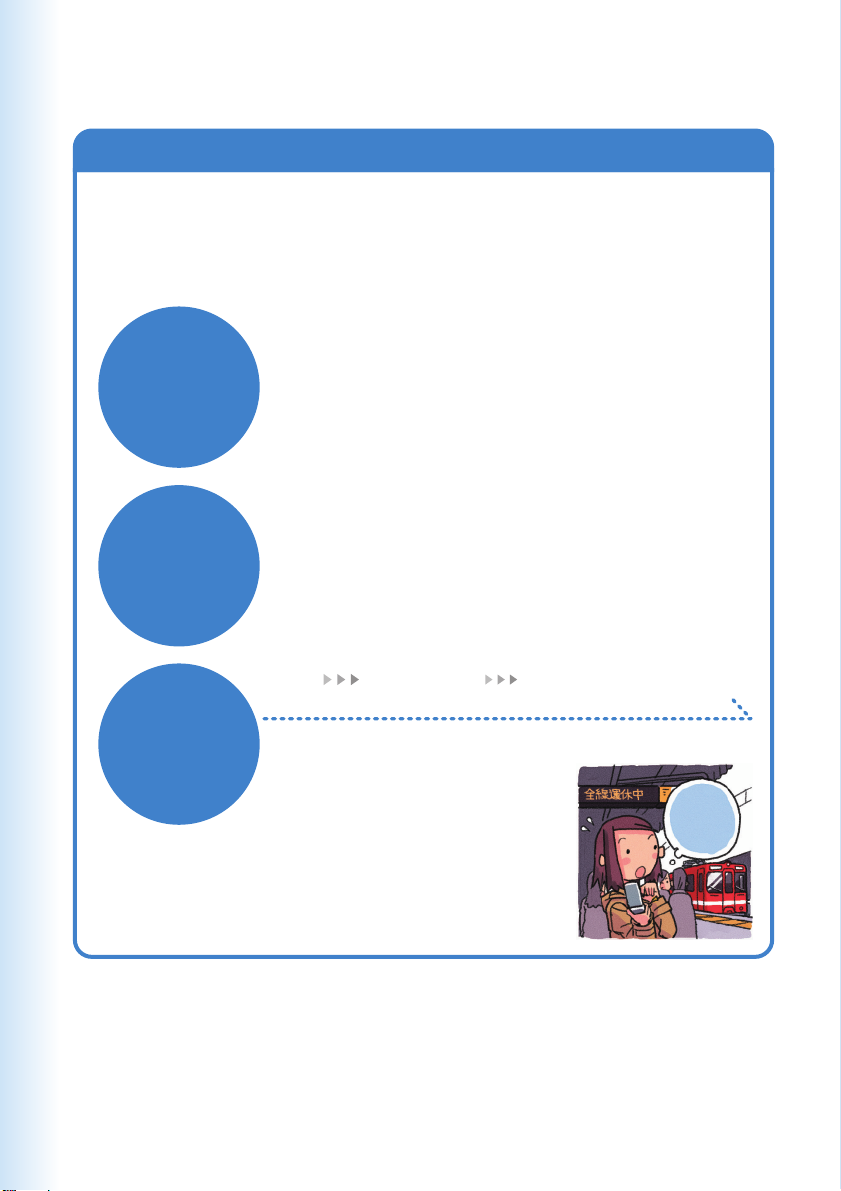
Disaster Message Board Service
Disaster Message Board
The Disaster Message Board lets you use EZweb to register
information about your well-being in case of a major disaster. The
information you register can be accessed from anywhere in Japan
over EZweb or the Internet.
◆ When a major disaster strikes, you can use your au
Registering
the safety
information
Checking
the safety
information
cellphone to access the “
Board) on EZweb and register your current condition,
comments, and other information about your well-being.
◆ After you register information, it can be sent by mail to
family, friends, and other individuals you have registered
as a recipient of your Disaster Message Board information.
◆ Disaster Message Board information can be accessed by
inputting the phone number of an individual over EZweb or
the Internet.
※Disaster Message Board information can be accessed
from another type of cellphone (excluding TU-KA), PHS,
or PC at http://dengon.ezweb.ne.jp/.
※
災害用伝言板
” (Disaster Message
R Top Menu 災害用伝言板
(Disaster Message Board)
Access
method
http://dengon.ezweb.ne.jp/
m
’
I
.
K
O
6
Page 9
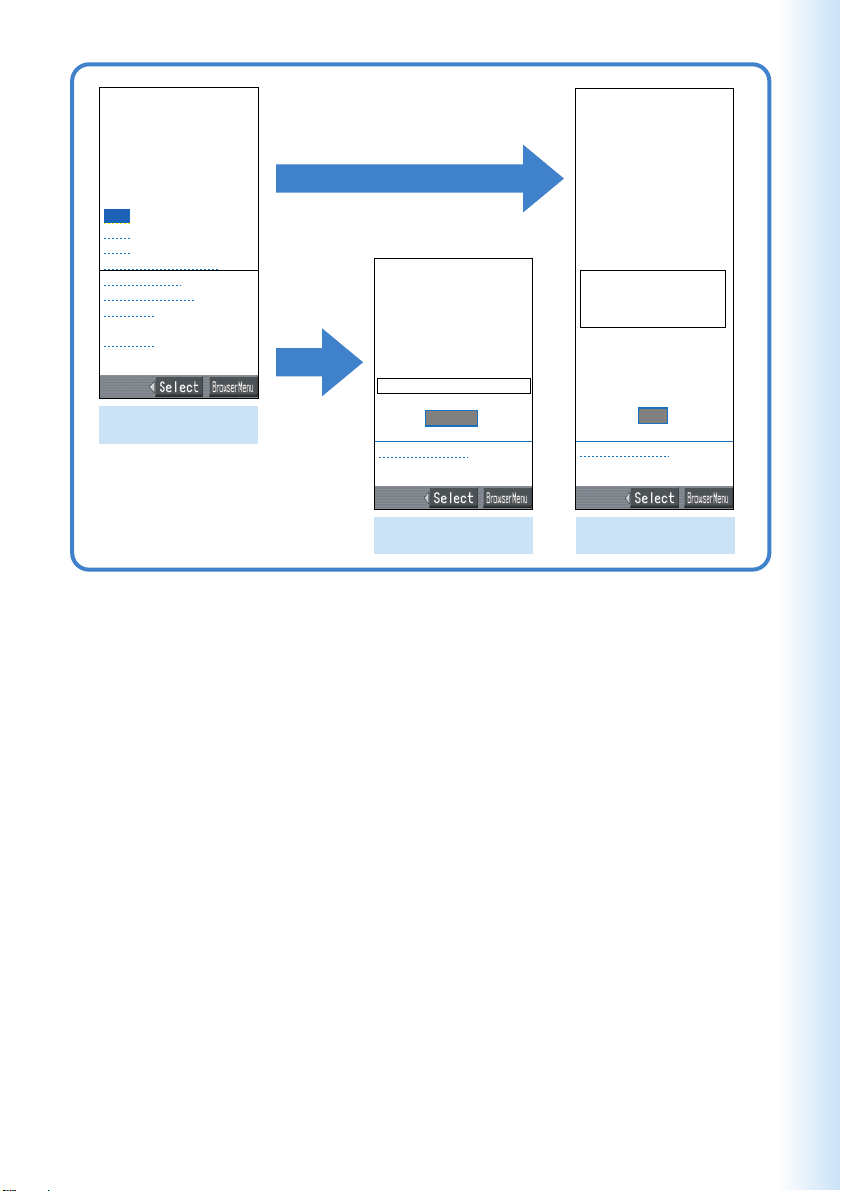
災害用伝言板
伝言板トップ
〜サービス提供中〜
安否情報の登録・確認が
できます。
登録
確認
削除
お知らせメール設定
サービス概要
ご利用地域情報
お問合せ
English
(C)KDDI/TU-KAGroup
Access
Disaster Message
Board top screen
Registration
災害用伝言板
〜確認〜
安否情報を確認したい相
手のau/ツーカー携帯電話
番号を入力して下さい。
090
ЧЧЧЧЧЧЧЧ
検索する
伝言板トップへ
(C)KDDI/TU-KAGroup
災害用伝言板
〜登録〜
被災状況
□
無事です。
□
被害があります。
□
自宅に居ます。
□
避難所に居ます。
□
コメント見て
コメント入力(全角100文
字まで)
※登録内容確認画面にて
、お客様の携帯電話番号
および登録日時が表示さ
れます。
登録
伝言板トップへ
(C)KDDI/TU-KAGroup
Information screen
Information registration
screen
※Registration contents are retained for up to 72 hours.
※You can register up to 10 entries per phone number. Registering a new entry while there are already 10
registered overwrites the oldest current entry with the new one.
※You can view a Disaster Message Board demonstration at:
R
→Top Menu→ 料金・申込・インフォ → 災 害 用 伝 言 板(デモ版)
(Charges, Applications, and Info) (Disaster Message Board (Demo))
※To view the Disaster Message Board in English, select the “English” option on the Disaster Message Board top
screen.
7
Page 10
Contents
Cellphone Etiquette ................................................................. 1
Mind your manners! .......................................................................................................... 1
Cellphone Basics ..................................................................... 2
Features ........................................................................................................................... 2
Manner Mode and Easy Voice Memo ............................................................................... 3
Checking Power, Signal Strength, and Battery Level ....................................................... 3
Never use your cellphone while driving! ........................................................................... 4
Turn off your cellphone or enter Drive Mode while driving. .............................................. 4
Beware of spam and one-ring calls! ................................................................................. 5
Disaster Message Board Service ..................................................................................... 6
Contents ................................................................................... 8
Ready ..................................................................................... 10
Checking the contents of the package ........................................................................... 10
Names of Parts ............................................................................................................... 11
Charging the Battery Pack ............................................................................................. 12
Turning On Power ........................................................................................................... 14
Turning Off Power ........................................................................................................... 14
Initial Settings ................................................................................................................. 15
Selecting English as the Display Language ................................................................... 15
Operation Basics ............................................................................................................ 16
Display Indicators ........................................................................................................... 17
Main Menu ......................................................................................................................18
Initializing E-mail and EZweb ......................................................................................... 20
Looking Up Your Current Phone Number and E-mail Address ....................................... 21
Changing Your E-mail Address ....................................................................................... 22
Changing the Display Character Size ............................................................................ 24
Personal Identification Numbers and Passwords ........................................................... 25
Phone ..................................................................................... 26
Making a Call ................................................................................................................. 26
Answering a Call ............................................................................................................ 27
Redialing (Outgoing Records/Incoming Records) .......................................................... 28
One-ring Calls ................................................................................................................ 29
Changing the Ring Tone ................................................................................................. 30
Adjusting the Ring Tone Volume ..................................................................................... 32
Adjusting the Earpiece Volume during a Call ................................................................. 33
Turning On Manner Mode .............................................................................................. 33
Turning On Easy Voice Memo ........................................................................................ 34
Playing an Easy Voice Memo ......................................................................................... 35
Address Book ......................................................................... 36
Registering an Address Book ......................................................................................... 36
Editing an Address Book Record ................................................................................... 38
Adding Outgoing or Incoming Record Data to the Address Book .................................. 40
Dialing from the Address Book ....................................................................................... 41
Pair Function .......................................................................... 42
Registering a Pair Partner .............................................................................................. 42
Making a Phone Call or Sending Mail to a Pair Partner ................................................. 43
Mail ......................................................................................... 44
Using E-mail ...................................................................................................................44
Using C-mail ...................................................................................................................45
About C-mail safe block function ............................................................................... 45
Creating and Sending E-mail Messages ........................................................................ 46
Reading Received E-mail Messages ............................................................................. 48
Reading an E-mail Message with an Attached Photo or Movie ..................................... 49
Replying to a Received E-mail Message ........................................................................ 50
Avoiding Spam ............................................................................................................... 51
8
Creating and Sending C-mail Messages ........................................................................ 52
Page 11
Reading Received C-mail Messages ............................................................................. 53
Camera Features ................................................................... 54
Camera ................................................................................... 56
Shooting a Photo ............................................................................................................ 56
Viewing Photos ............................................................................................................... 58
Recording a Movie ......................................................................................................... 60
Viewing Movies .............................................................................................................. 62
Attaching a Photo or Movie to an E-mail Message ........................................................ 64
Using Photo Mail ............................................................................................................ 65
EZweb .................................................................................... 66
Using EZweb .................................................................................................................. 66
Displaying the EZ Top Menu ........................................................................................... 67
Bookmarking Sites You Frequently Access .................................................................... 68
Viewing a Bookmarked Site ........................................................................................... 69
Downloading Chaku-Uta®............................................................................................... 70
Downloading Chaku-Uta-FullTM...................................................................................... 71
Checking Charges .......................................................................................................... 72
EZ Channel .................................................................................................................... 73
EZ Navi Features ................................................................... 74
Security Navi Features .......................................................... 76
EZ•FM ..................................................................................... 78
Before using EZ•FM ....................................................................................................... 78
Listening to the EZ•FM ................................................................................................... 79
Suspending/Stopping the EZ•FM ................................................................................... 81
EZ FeliCa ................................................................................ 82
Communicating with reader/writer .................................................................................. 83
Setting FeliCa lock ......................................................................................................... 84
Using FeliCa-supported EZ apps ................................................................................... 85
PC site viewer Features ........................................................ 86
PC site viewer ........................................................................ 87
Mastering Operation Basics ........................................................................................... 87
Using Standby Assignment ............................................................................................ 88
Teens Mode ............................................................................ 90
Using Teens Mode .......................................................................................................... 90
Turning on Teens Mode .................................................................................................. 91
Smart Mode ............................................................................ 92
Entering Smart Mode ..................................................................................................... 92
Exiting Smart Mode ........................................................................................................ 93
Using the Smart Mode Main Menu ................................................................................. 94
Adding Data to the Address Book in Smart Mode .......................................................... 96
Using the Address Book in Smart Mode ........................................................................ 99
Creating and Sending E-mail Messages in Smart Mode ............................................. 100
Shooting a Photo in Smart Mode ................................................................................. 103
Viewing Photos in Smart Mode .................................................................................... 104
Inputting Characters ........................................................... 106
Inputting an E-mail Address ......................................................................................... 107
Inputting Pictographs and Useful Sentences ............................................................... 108
Other Functions ................................................................... 110
Hot Key Features .......................................................................................................... 110
Extension Mode ........................................................................................................... 111
Troubleshooting ................................................................... 113
If you lose your W32H .................................................................................................. 114
Index .................................................................................... 116
Contents
9
Page 12
Ready
All
Before using the W32H for the first check the
contents of the package it comes in.
You should also familiarize yourself with
basic operations, like how to charge the
battery, how to turn on power, etc.
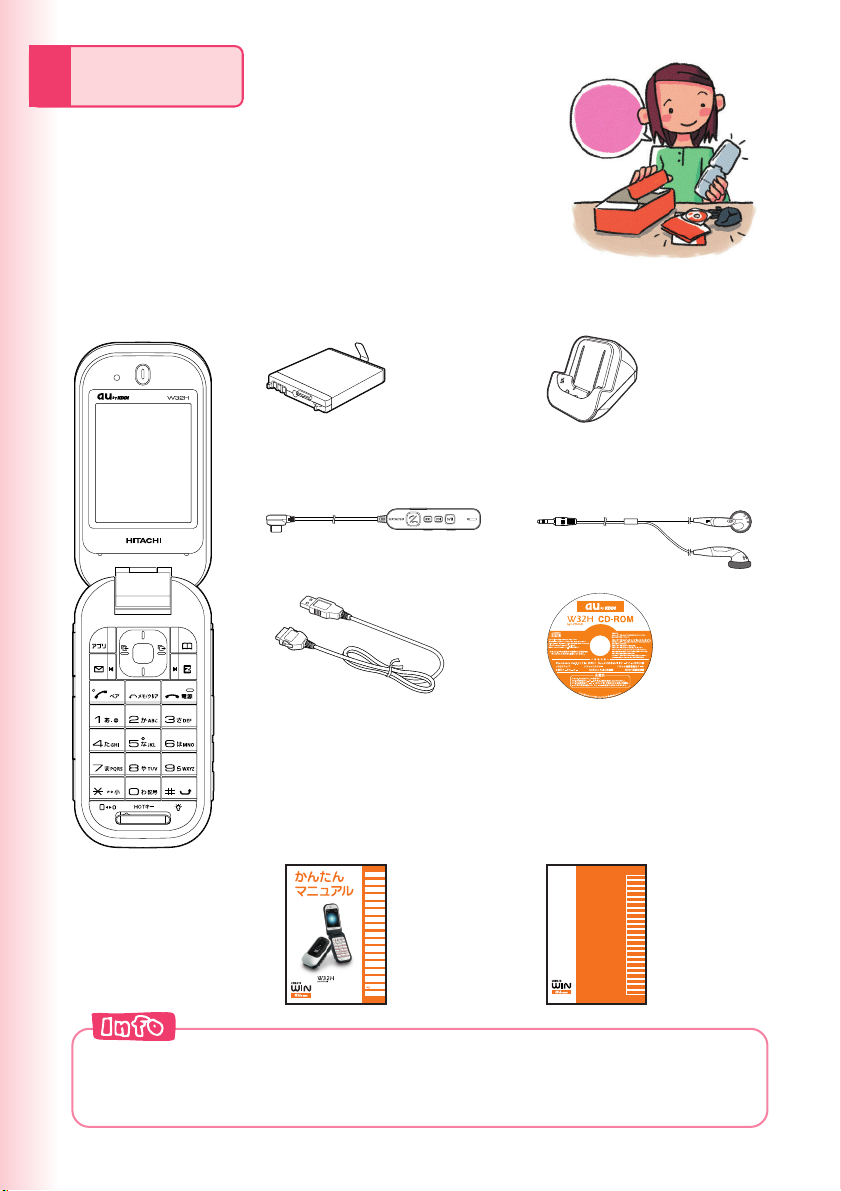
Checking the contents of the package
● W32H
●
Battery pack (32HIUAA)
set?
●
Desktop holder (32HIPUA)
● Hitachi remote controller
with microphone 01
● Stereo earphones
(sample)
(32HIQFA)
● USB cable (sample) ● CD-ROM
● Extracted contract
clauses (Japanese)
● Warranty (Japanese)
● Operating Precautions
● EZ FeliCa Introduction
Guide (Japanese)
● Global Expert User’s
Guide (Japanese)
(Japanese)
●
Basic Manual (Japanese)
目次/準備
電話
アドレス帳/
ペア機能
メール
カメラ
EZweb
EZナビ
EZ・FM
EZFeliCa
PCサイトビューアー
ティーンズモード
スマートモード
文字入力
その他機能
困ったときは/
遠隔オートロック
English(英語)/
(中国語)
索引
●
Instruction Manual (Japanese)
W32H
by HITACHI
取扱説明書
目次
ご利用いただく前に
auICカード
基本操作
カメラ
データフォルダ
miniSD
メモリカード
ミュージックプレイヤー
エンジョイツール
メール
EZweb
EZ「着うたフルTM」
EZFeliCa
EZチャンネル
EZナビ
EZ・FM
EZムービー
EZアプリ(BREW®)
バーコードリーダー
PCサイトビューアー
PCドキュメント
ビューアー
メニュー(M)
機能
便利な機能
auのネットワーク
サービス
付録/索引
クイックガイド
TM
◎The miniSD memory card is not included.
◎An AC adaptor is not included. It is up to you to purchase a common AC
adaptor 01 (option).
10
Page 13
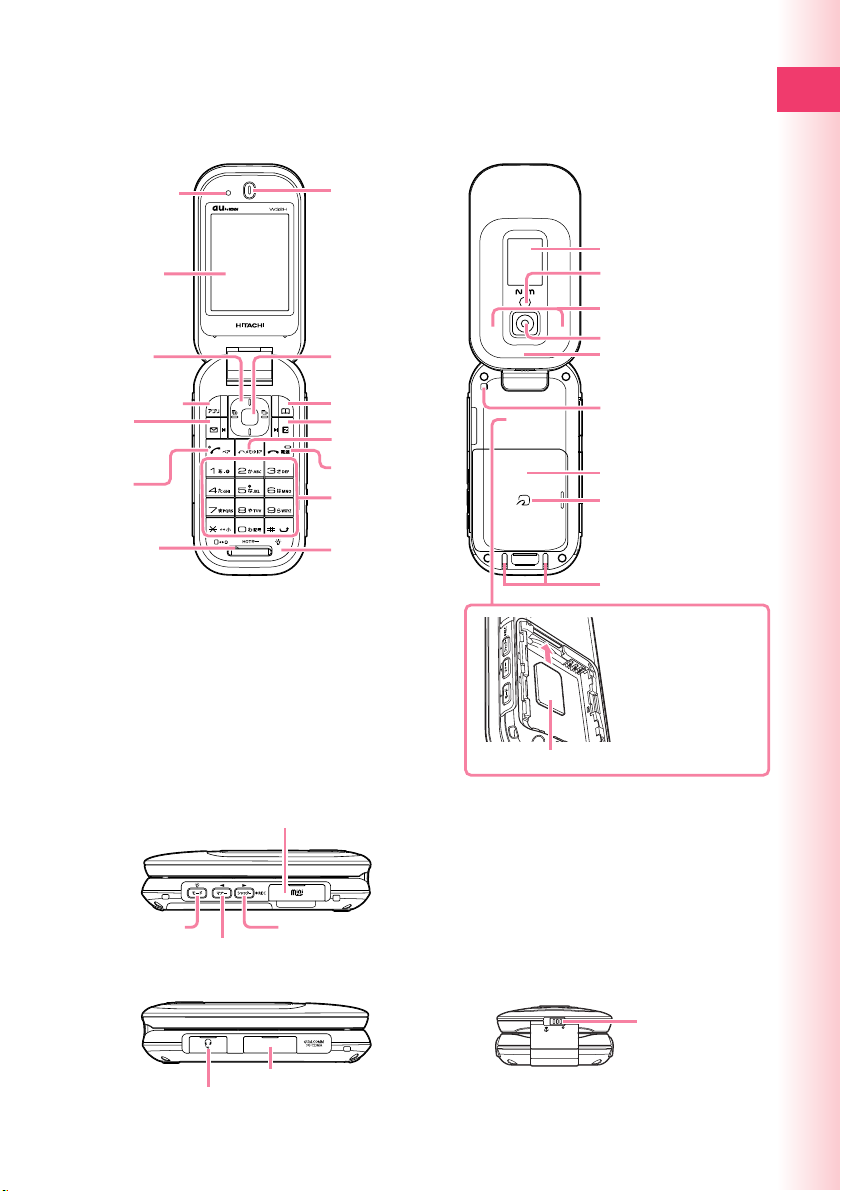
Names of Parts
Macro switch
■ Front ■ Back
Ready
Optical sensor
Main display
Cursor key
Application key
Mail key
Answer/
Pair key
Microphone
※Take care to avoid covering the built-in antenna
with your hand when using the phone, using
EZweb, and when accessing GPS information.
Earpiece
Center key
Address book key
EZ key
Memo/Clear key
Power/End key
Number keys
Built-in antenna
■ Side
miniSD memory card slot
※
au IC card
Sub display
Photo light/
Standby light
Stereo speaker
Camera lens
Indicator (LED)
Strap eyelet
Battery pack /Cover
FeliCa mark
Charging terminals
※Do not take out
this card if not
necessary as your
number is
recorded on it.
※
Mode key Shutter key
Manner key
External connection jack
Flat-type stereo earphone-microphone jack
11
Page 14
Charging the Battery Pack
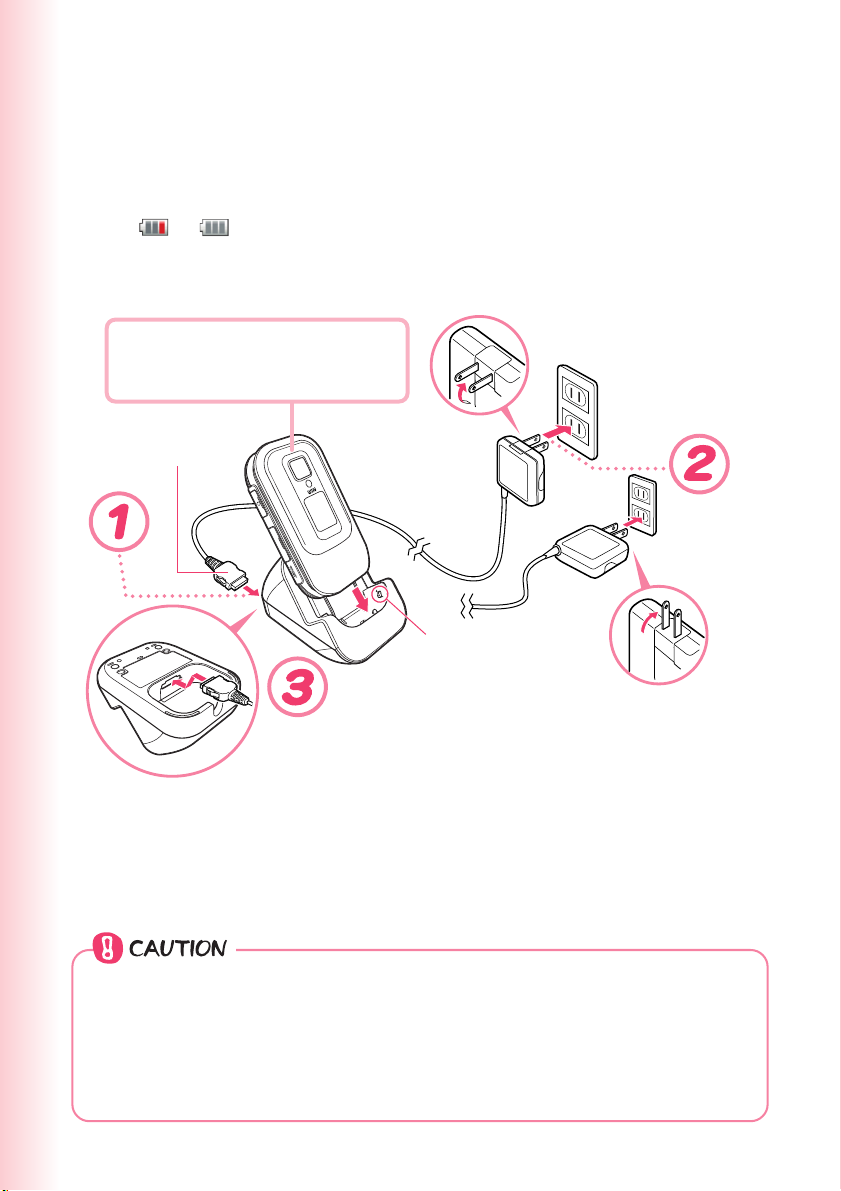
The battery pack that comes with the phone is not charged when you
purchase it. Be sure to charge the battery pack before using the W32H
for the first time. Charging takes about 130 minutes.
You should recharge the battery pack whenever the battery level icon
shows
or .
:
•Charging
•Charging complete
Connector
LED indicator is lit red.
: LED indicator
goes out.
Locking tab
You can also use the plug
by extending the prongs
like this.
Check the shape of the
connectors to ensure they
are aligned correctly when
you connect them.
◎You must purchase a common AC adaptor 01 (option) for charging. Note
that the configuration of the AC adaptor may be different from that shown
in the illustration above.
◎Orient the connector of the common AC adaptor 01 (option) so it is
parallel to the W32H or the desktop holder connector terminal when you
connect them.
12
Page 15
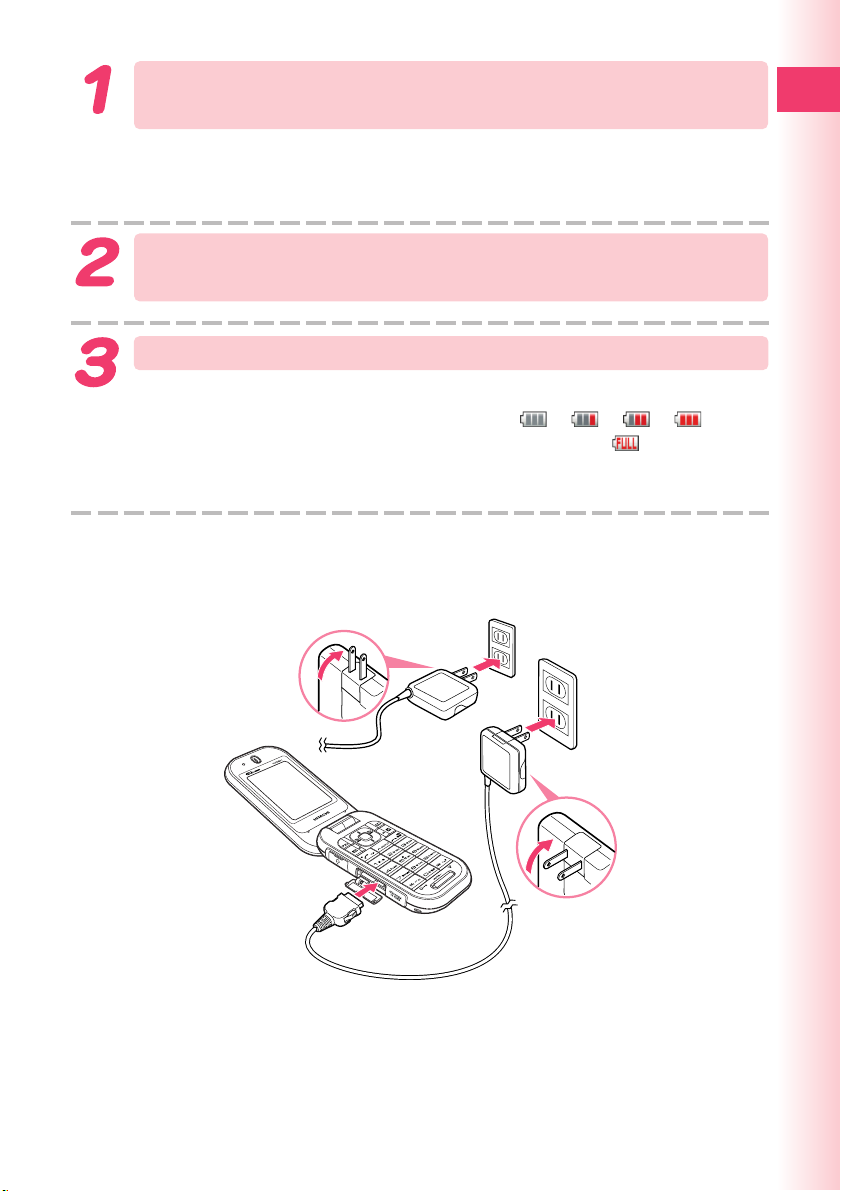
Connect the common AC adaptor 01 (option) to the
desktop holder.
Check the shape of the connectors to ensure they are aligned correctly before
you connect.
Trying to force a connection may damage the connectors.
Fold out the power plug of the common AC adaptor 01
(option), and then plug it into a 100V AC power outlet.
Insert the W32H into the desktop holder.
This will cause the W32H charge LED indicator to light red, and the battery
level icon to cycle through the following pattern:
When charging is complete, the battery level icon will show
indicator will go out.
To remove the W32H from the desktop holder, lift it straight up.
※You can connect the common AC adaptor 01 (option) to the W32H to charge the
battery pack.
➔ ➔ ➔ .
and the LED
Ready
Check the shape of the connectors to ensure
they are aligned correctly when you connect.
13
Page 16
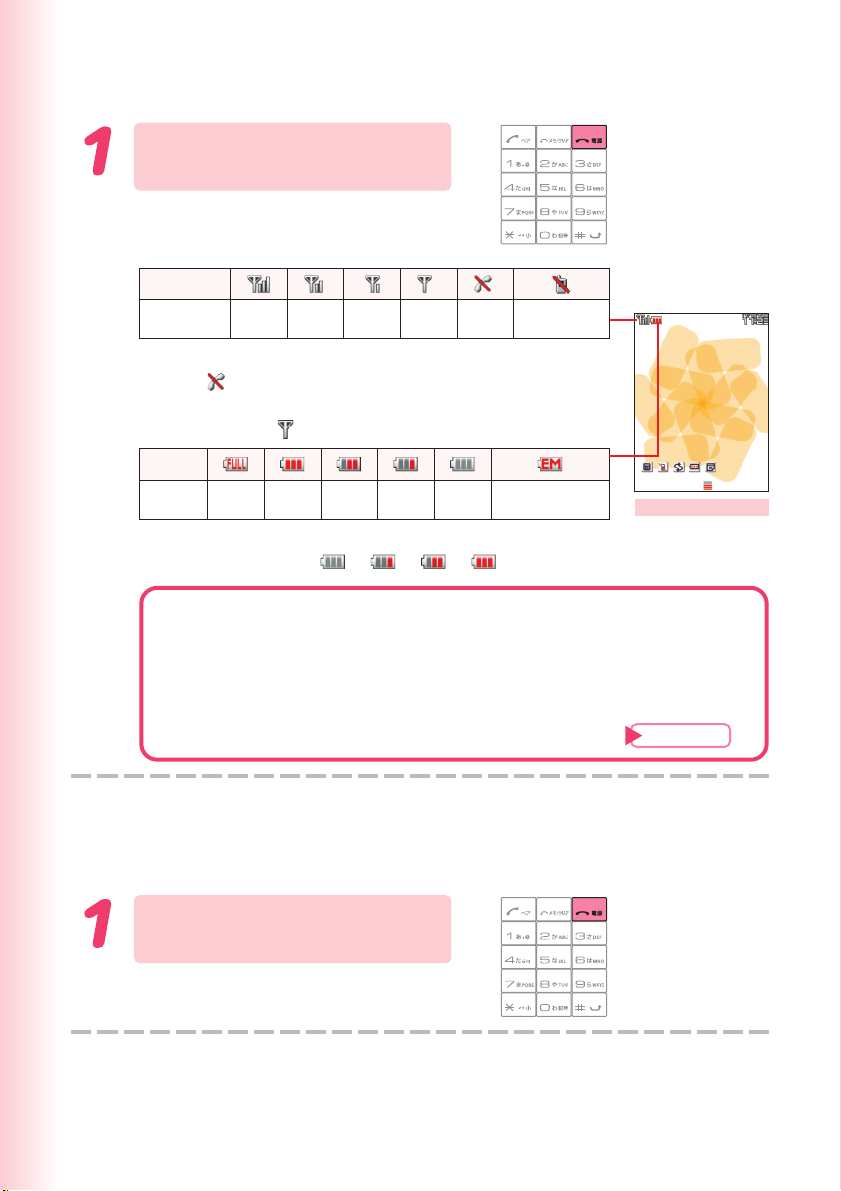
Turning On Power
Hold down F for at least
1.5 seconds.
The standby screen appears.
icon
Signal
Strength
Strong
Medium
• Communication is not possible while the signal strength
icon is
(Out of Range).
• Communication may not be possible while the signal
strength icon is
icon
Battery
Level
Fully
Charged
(Very Weak).
High Low
Medium
• During charging, the battery level icon will cycle through
the following pattern:
➔ ➔ ➔ .
※ Using Extension Mode
Using the Extension Mode, W32H automatically shuts down the
radio wave after issuing the Low Battery Alert. This is quite a useful
function for the case, although available functions are limited, that
you can still check Outgoing/Incoming Records, Content of e-mail,
Address Book, Schedule and so on.
Weak
Ver y
Weak
Fully
Discharged
Out of
Range
Extension Mode
Emission
OFF Mode
※
Standby screen
Page
111
Turning Off Power
Hold down F for about
one second.
14
Page 17
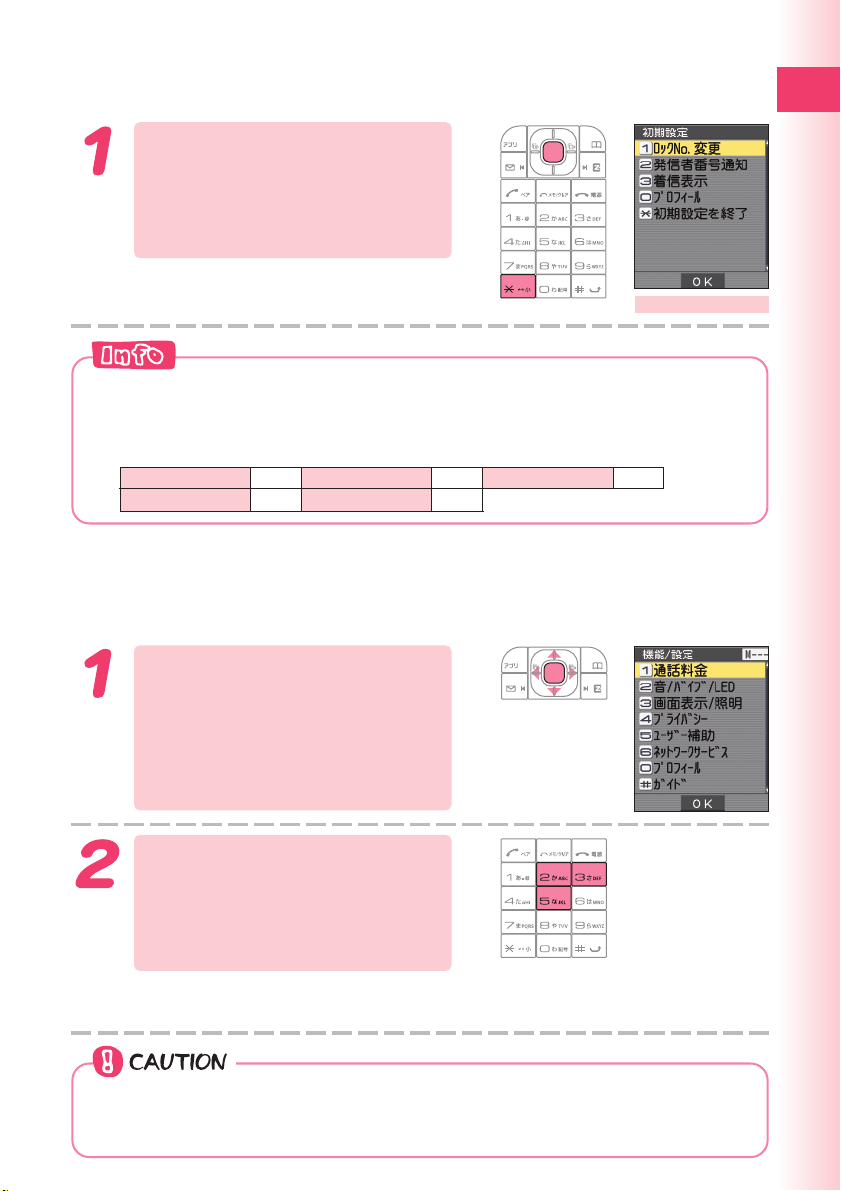
Initial Settings
While the standby screen
is displayed, press c, and
then press * (初期設定
を終了) (Quit Initialization).
The main menu appears (page 18).
Initial Settings screen
◎Although you do not make the initial settings, you can make/receive calls.
◎The table below shows the initial factory default setup of the W32H.
Quitting initialization as shown in the above procedure will configure the
setting shown below.
Lock No. 1234 Caller ID On Profile Blank
Teens Lock No. 1234 Incoming Display On
Selecting English as the Display Language
Ready
While the standby screen
is displayed, press c, use
a to select “ 機能設定 ”
(SET TINGS), and then
press c (OK).
Press
3
( 画面表示/照明 )
(Screen/Light),
(Set Language), and
5
then
This selects English as the display
language.
Even if English is selected as the display language, schedule and other
dates are displayed in the format year/month/day. Folder names inside of
the Data Folder are also displayed in year/month/day sequence.
(English).
2
15
Page 18
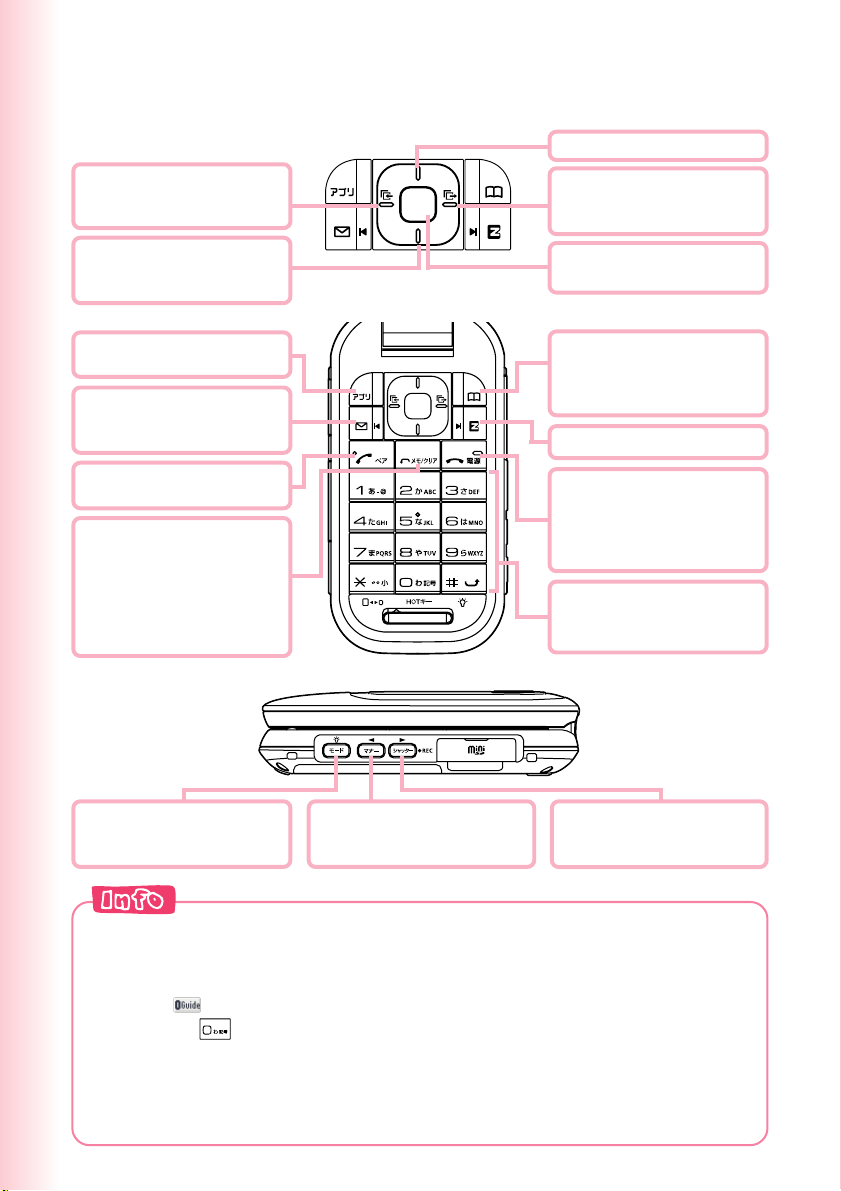
Operation Basics
■ Key functions
•
Displays incoming records.
l
•
Returns to the previous
menu screen.
•
Displays the standby
d
shortcut icon.
•
Selects an item.
•
Selects an item.
u
•
Displays outgoing records.
r
•
Scrolls forward one menu
screen.
•
Displays the main menu.
c
•
Applies an item.
•
Displays the EZ apps
%
menu.
•
E-mail
L
•
C-mail (hold down for
about one second).
•
Dials/answers a phone call.
N
•
Displays the Pair function.
•
Memo
C
•
Toggles Easy Voice Memo
on and off (hold down for
about one second).
•
Deletes a character.
•
Returns to the previous
menu screen.
•
+
Turns on the light
(hold down for about one
second).
•
(
Toggles Manner Mode on
and off (hold down for
about one second).
•
Displays the address book.
&
•
Creates a new address
book (hold down for about
one second).
•
Displays the EZ menu.
R
•
Toggles power on and off.
F
•
Hangs up.
•
Terminates a function.
•
Returns to the standby
screen.
0 〜 9*#
•
Inputs phone number.
•
Inputs text character.
•
)
Shutter release
•
Shoots a photo (hold down
for about one second).
◎If you lose track of where you are or if you make a mistake
Press C to scroll back to the previous screen.
Press F to return to the standby screen.
◎When is in the lower right corner of the photo or movie screen,
pressing
will display key help.
◎Holding down c for about one second toggles side key’s disabling
feature on and off while the cellphone is folded.
To cancel the side key’s disabling feature, follow the above procedure
with the phone unfolded.
16
Page 19
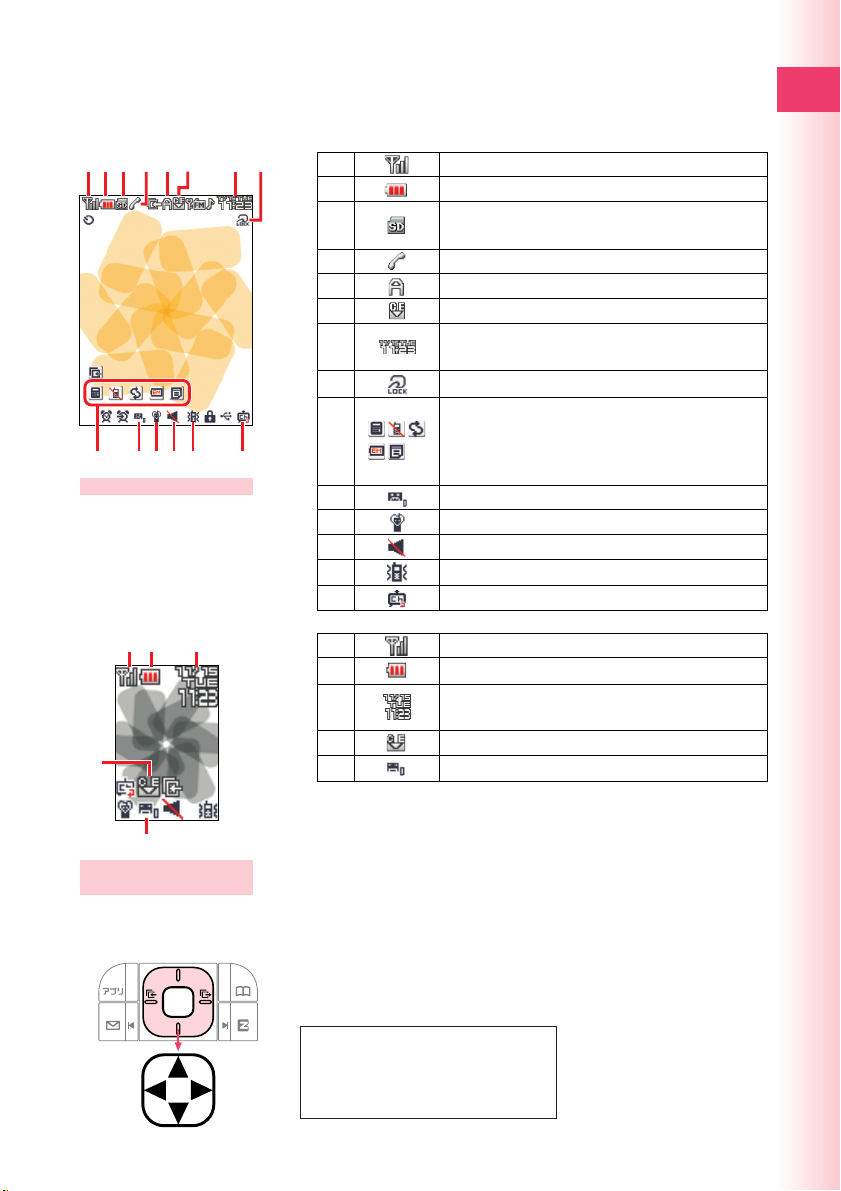
Display Indicators
The following explains the main icons that appear on the standby screen.
Ready
123 4 8
9 !
4
5 6 7
"#$ %
Main display
2 3
1
1
2
3
4
5
6
7
8
9
!
"
#
$
%
1
2
3
4
5
Signal strength
Battery level
The miniSD memory card (commercial item)
is inserted into the cellphone.
During a call
EZ apps (BREW®) on
Unread mail
Current time
The date and time are set automatically.
FeliCa lock on
Selection of calculator, Emission Off Mode,
mode setting, Extension Mode, Note Pad 01,
or other user icons by pressing d and
then s
Easy Voice Memo on
Manner Mode on
Ring tone off
Vibrator on
EZ Channel is in use.
Signal strength
Battery level
Current time
The date and time are set automatically.
Unread mail
Easy Voice Memo on
5
Sub display
(When phone is folded)
■ Key symbols used in this manual
The cursor key is represented in this manual using the
key symbols described below.
u or d key: j
l
or r key: s
, d, l or r key: a
u
17
Page 20
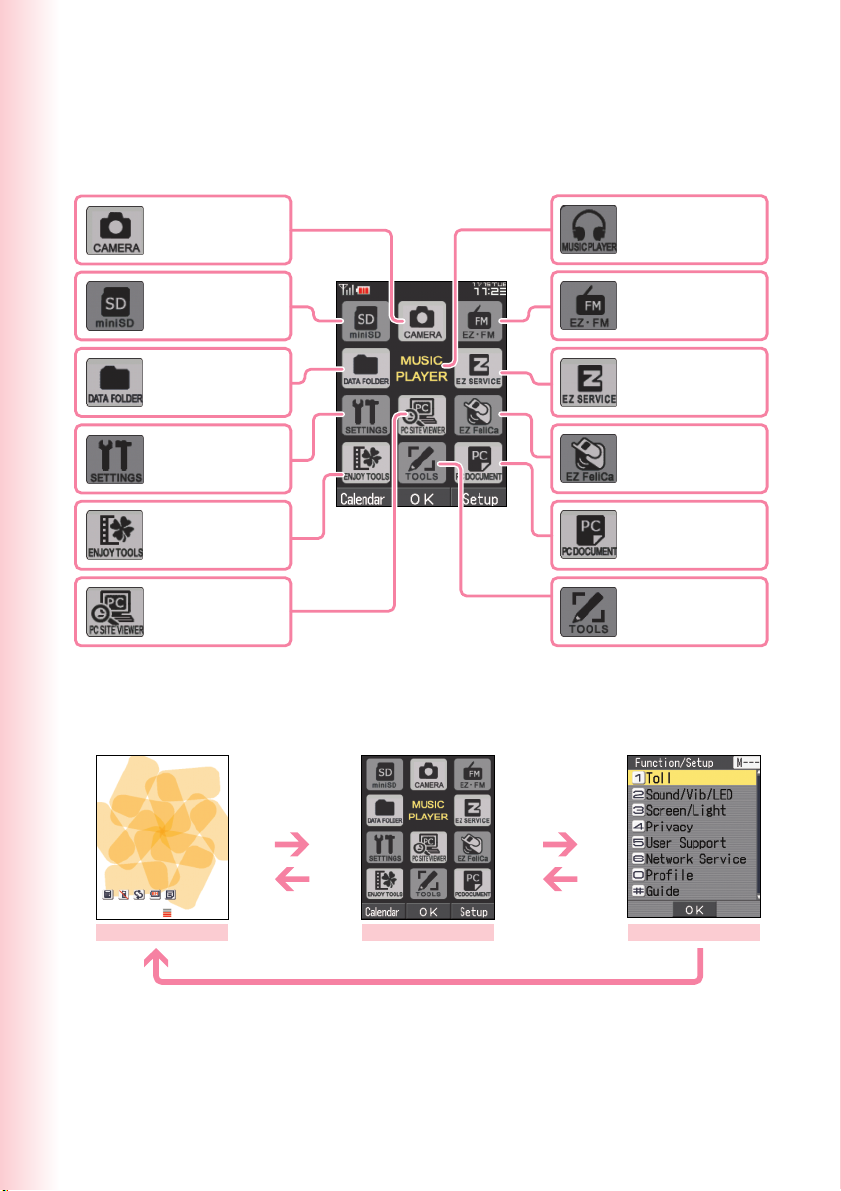
Main Menu
Pressing c while the standby screen is displayed displays the main menu.
Use a to select the icon you want, and then press c (OK) to access
the function associated with the icon.
Camera
miniSD Menu
Data Folder
Function/Setup
Enjoy Tools
PC site viewer
Menu
■ Using the Main Menu
Example: To display the setting screen from the main menu.
Press a to select
“SETTINGS”, and
c
then press
c
(OK).
Music Player
•
EZ
FM
EZ Service Menu
EZ FeliCa Menu
PC Document
Viewer
Tools
18
Standby screen
C returns to the
previous screen.
F returns to the standby screen.
Main menu
C returns to the
previous screen.
Setting screen
Page 21
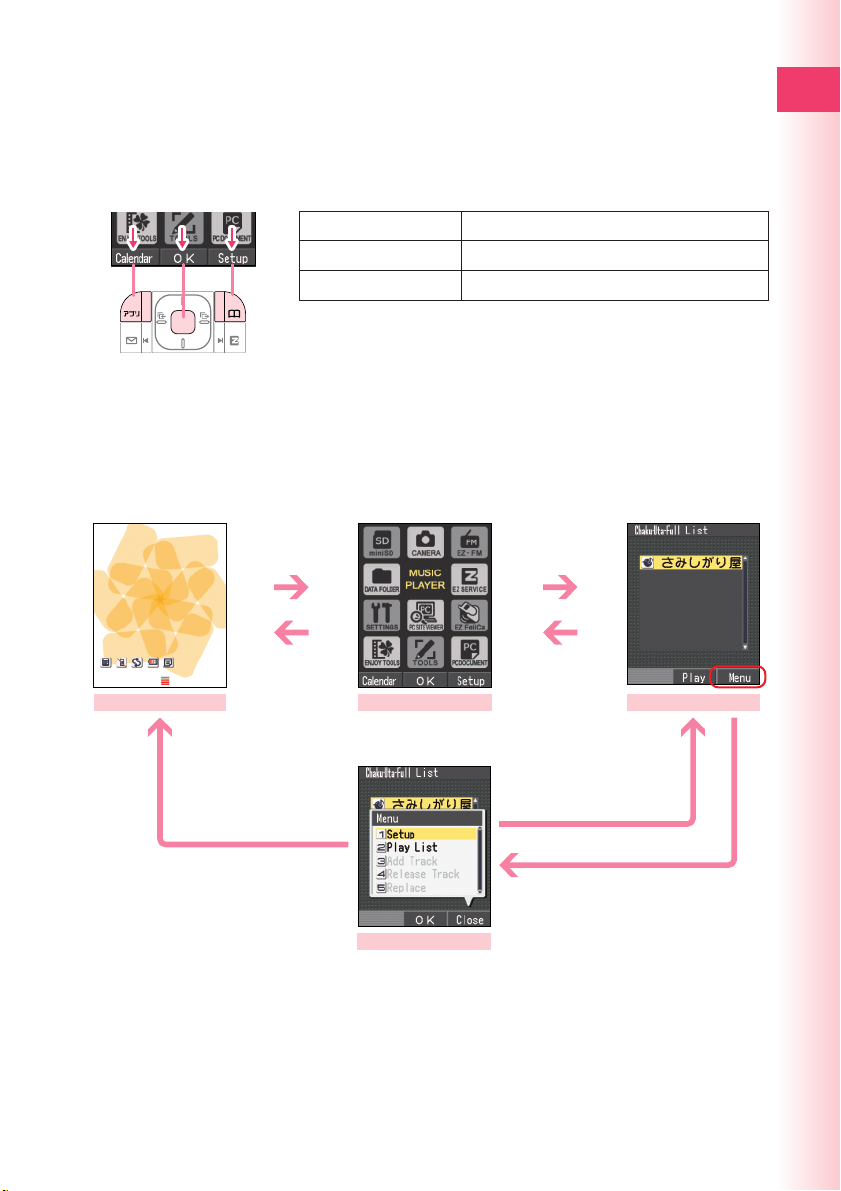
■ Using Soft Keys
Left
Center
Right
Soft keys are the keys you use to execute the functions along the bottom of
the screen. The table below explains the relationship between the soft keys
and the on-screen functions. Note that the function of each soft key depends
on the currently displayed screen.
Left
Center
Left Center Right
Right
Left soft key %
Center soft key c
Right soft key &
Executes the function on the left.
Executes the function in the center.
Executes the function on the right.
■ Using Menus
Pressing the soft key that corresponds to the “Menu” at the bottom of the
display will display a menu of various operations related to the function you
are currently using.
Example: To display the music player menu from the music player screen.
Ready
Standby screen
c
C returns to the
previous screen.
F returns to the
standby screen.
Main menu
Music player menu
c
(OK)
C returns to the
previous screen.
C returns to the previous
screen. Or, & (Close).
Music player screen
& (Menu)
19
Page 22
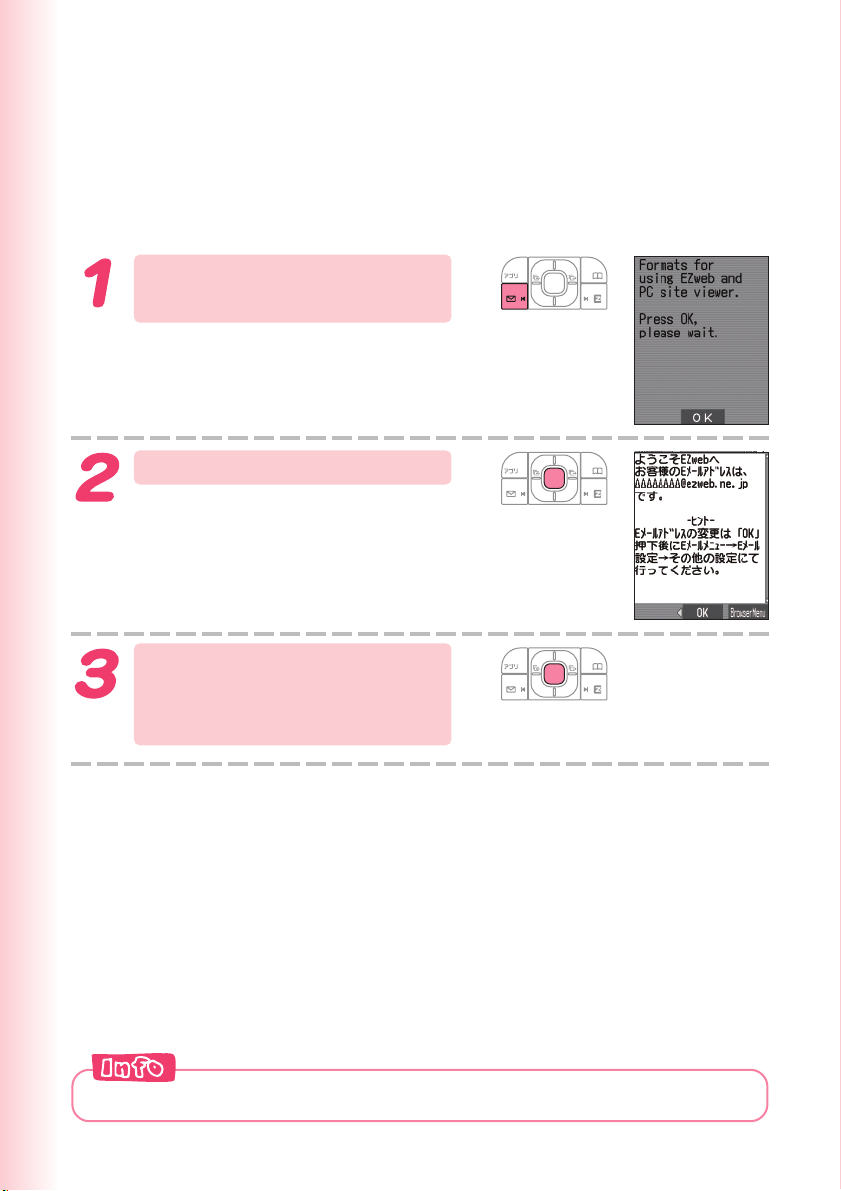
Initializing E-mail and EZweb
An EZweb subscription is required to use e-mail and EZweb. If you did
not apply when you purchased your phone, contact your nearest au
shop or the au Customer Service Center.
※You will be assigned an e-mail address automatically when you perform the
EZweb initialization procedure.
While the standby screen
is displayed, press L.
Press c (OK).
Wait until the phone connects to the
server for initialization.
After your automatically
assigned e-mail address
appears, press c (OK).
Pressing R/% also allows you to make initial settings.
20
Page 23
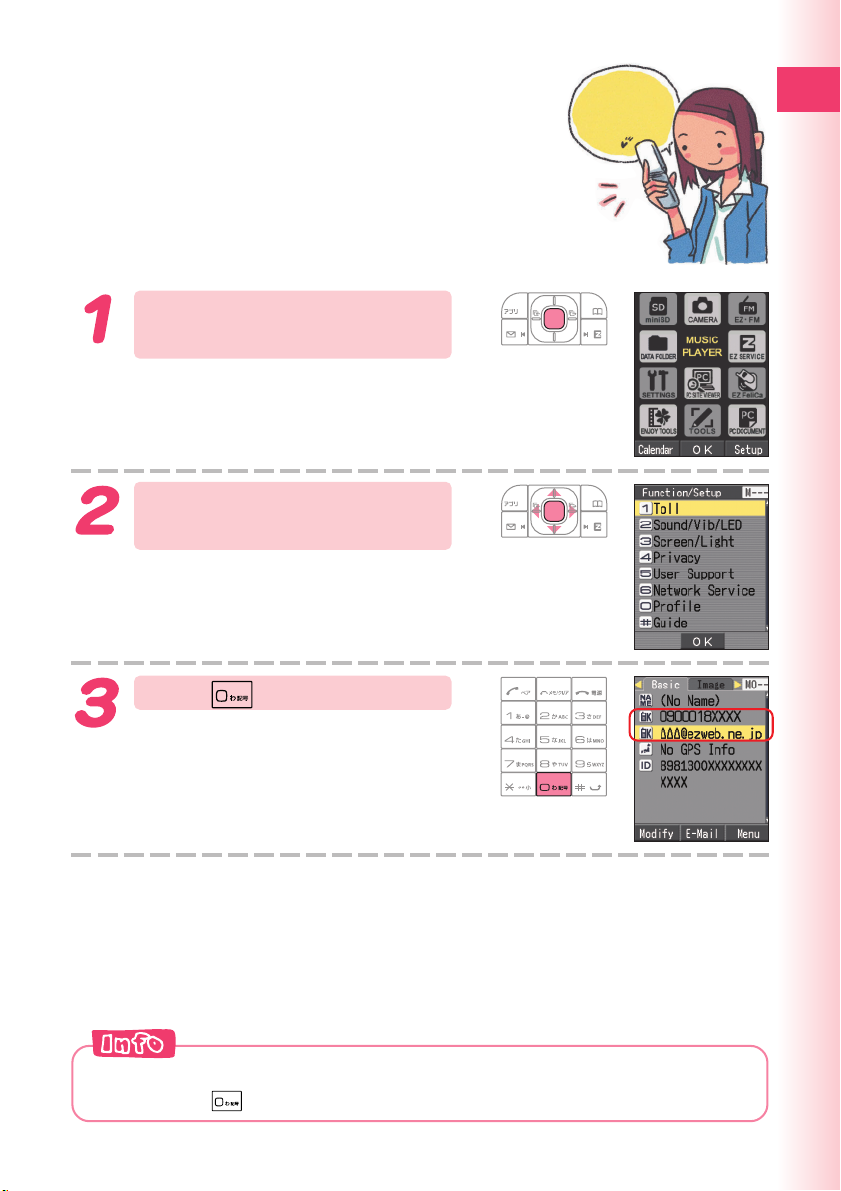
Looking Up Your Current Phone Number and E-mail Address
While the standby screen
is displayed, press c.
Use a to select “SETTINGS,”
and then press c (OK).
My phone
number and
mail address
Ready
Press (Profile).
Your current phone number and e-mail
address appear.
You can also look up your phone number and e-mail address by pressing
c and then
while the standby screen is displayed.
21
Page 24
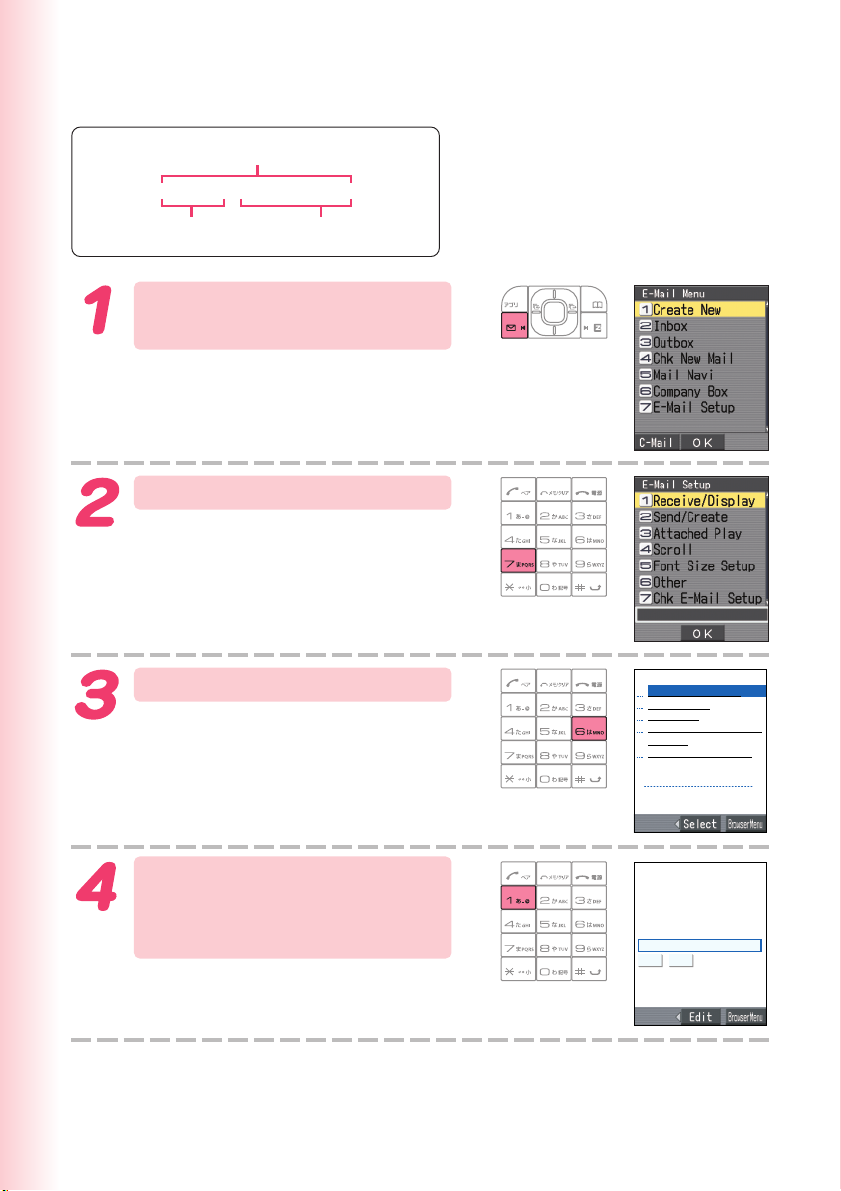
Changing Your E-mail Address
E-mail address
@ezweb.ne.jp
△△△
Part you can change Domain name
While the standby screen
is displayed, press L.
Press 7 (E-Mail Setup).
22
Press 6 (Other).
When the EZweb connection
confirmation screen appears, press
1 (Yes).
Press 1 (E メールアドレ
スの変更 ) (Change E-mail
Address).
その他の設定
1 Eメールアト゛レス
2
3 メールフィルター
4 Eメールヘッタ゛
5
au
(
※auの公式
お客様の暗証番号を入力
してください。下記の対
象サービスで
違えると、翌日までご利
用できなくなりますので
ご注意ください。
送信
<対象サービス>
•
• 各種申込サービス
• 「
の変更
自動転送先
情報表示(通信
料有料
)
その他の設定の確認
*ー*ー*ー*ー*ー*ー*ー*
の
メルマカ゛サーヒ゛ス
メルマカ゛
の登録・設定変更
リセット
au
オンラインカスタマーサービス
メール設定」の「その
E
設定
メルマカ゛
です。ぜ
1
日に合計3回間
)
Page 25
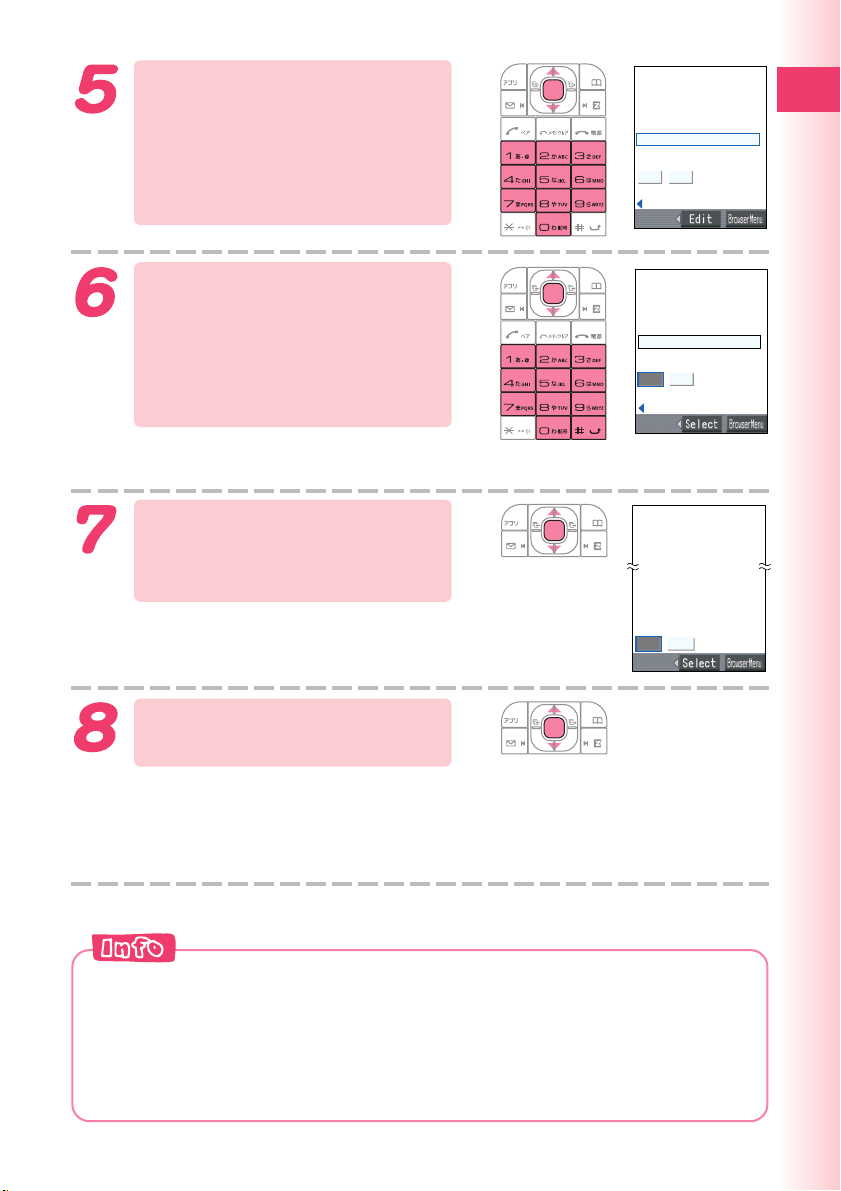
Enter your PIN, press c (OK),
こ
能です。「.」は連続して利
こ
能です。
「.」
は連続して利
use j to select “ 送信 ” (Send),
and then press c (Select). Use
j
to select “ 承諾する ” (Accept),
and then press c (Select).
Use j to select the text
box, and then press
c
(Edit). Enter the e-mail
address you want, and
then press c (OK).
To input an e-mail address
→ “Inputting an E-mail Address” (page 107)
Use j to select “ 送信 ”
(Send), and then press
(Select).
c
The e-mail address confirmation screen
appears.
用したり、最初と最後に
は利用できません。最初
に数字の
「0」
とはできません。
@ezweb.ne.jp
新しい
△△△□□□□△△△□□□@ezweb.ne.
jp
***
アト゛レス
更前の
ることはできません。
を使用する
送信
リセット
前のページへ
オフィシャる?au
用したり、最初と最後に
は利用できません。最初
に数字の
「0」
を使用する
オフィシャる?au
とはできません。
△△△□□□□△△△□□□
@ezweb.ne.jp
送信
リセット
前のページへ
E
メールアドレスは
オフィシャる?au
ご注意
***
を変更した場合は変
アト゛レス
を再度利用す
OK キャンセル
Ready
◎Your PIN is the 4-digit number you entered on your subscription contract.
◎If your e-mail address won’t change in step 7:
Press j to select “OK,”
and then press c (Select).
The message “ 正常に変更されました。”
(Update is complete.) appears to indicate
that your e-mail address has been
changed.
If the wrong PIN is entered three times in one day, the setting operation
will be disabled until the following day.
The new e-mail address you entered may be registered by someone else
already. Try entering a different address.
23
Page 26
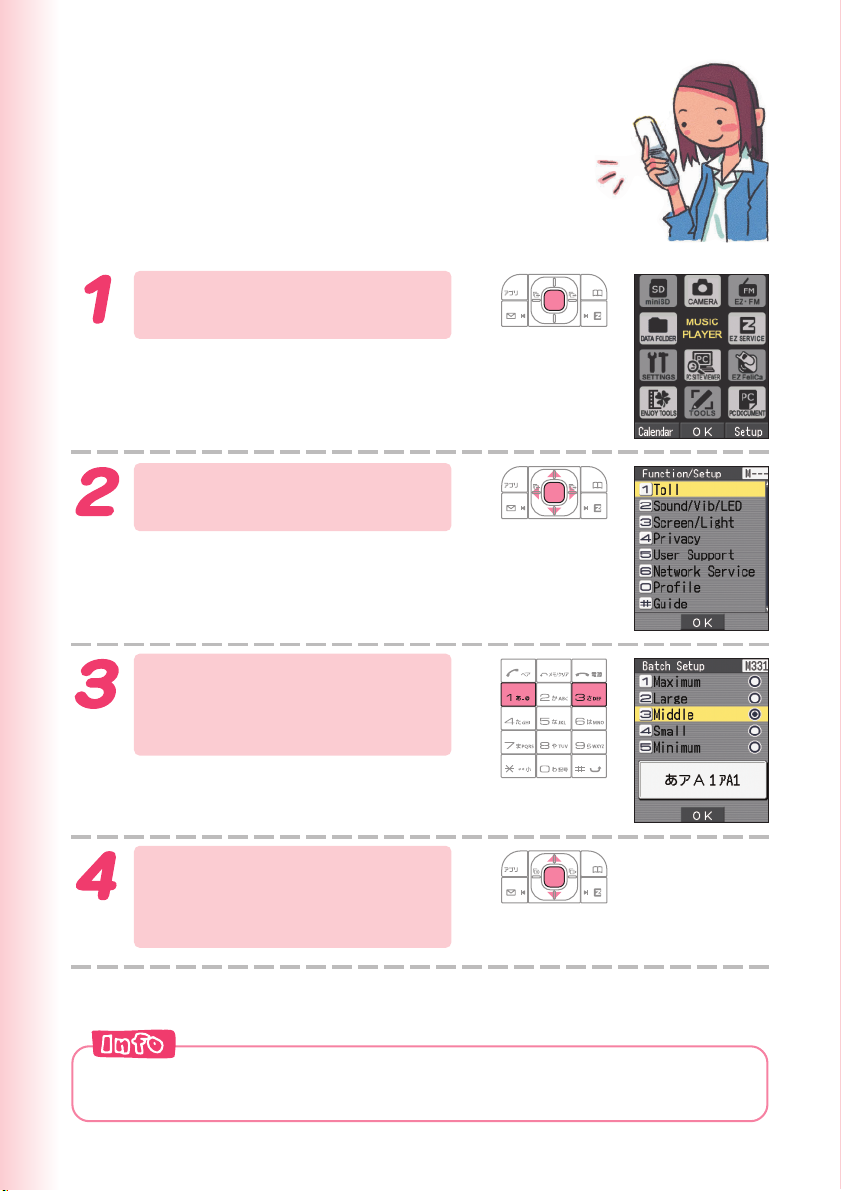
Changing the Display Character Size
While the standby screen
is displayed, press c.
Use a to select “SETTINGS,”
and then press c (OK).
Press 3 (Screen/Light),
3 (Font Size), and then
1 (Batch Setup).
Use j to select the
character size you want,
and then press c (OK).
◎The initial setting is “Middle.”
◎You can specify a character size for each function.
24
Page 27
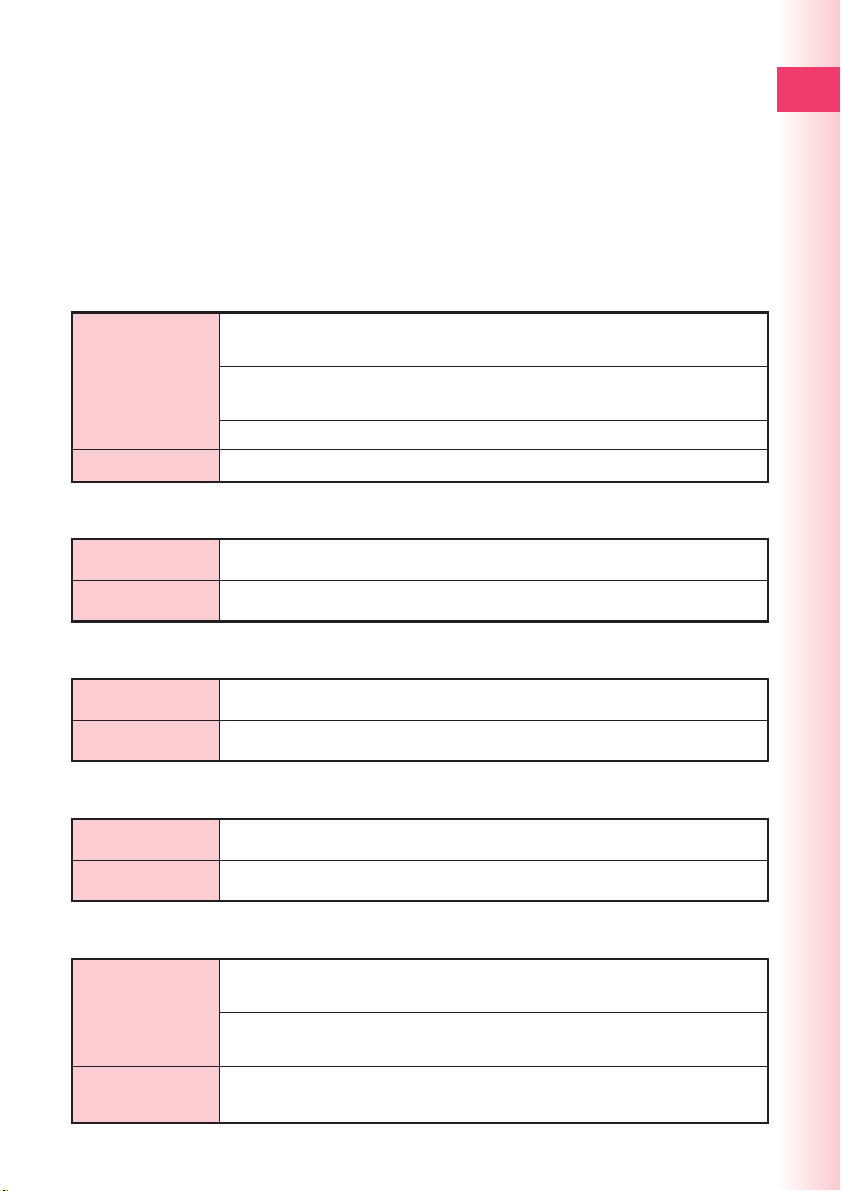
Personal Identification Numbers and Passwords
The W32H lets you use the numbers and passwords described below.
Be sure to take steps so you do not forget your numbers and passwords,
because you will need them to perform various operations and to access
subscription services.
Personal Identification Number (PIN)
① For remote operation of the Voice Mail and Call Transfer from a
standard phone
Usage Examples
Initial Default
Lock No.
② For inquiries, applications, and service modifications using au
Customer Service Center voice guidance, au website, and EZweb
③ For changing e-mail settings
4-digit number you entered on your subscription contract
Ready
Usage Examples
Initial Default
For modifying various phone settings
1234 (4-digit number)
Teens Lock No.
Usage Examples
Initial Default
For modifying various phone settings in Teens Mode
1234 (4-digit number)
EZ Password
Usage Examples
Initial Default
For entering and canceling subscriptions for EZweb fee-based content
4-digit number you registered for your first fee-based content subscription
Premium EZ Password
①
For entering and canceling subscriptions for EZweb fee-based contents
Usage Examples
Initial Default
paid for using “
②
For purchasing products from EZweb sites that use “
(combined au payment service)
4 to 8-digit number you registered for your first “まとめてau支払い ”
(combined au payment service) payment
まとめてau支払い
” (combined au payment service)
まとめてau支払い
”
25
Page 28
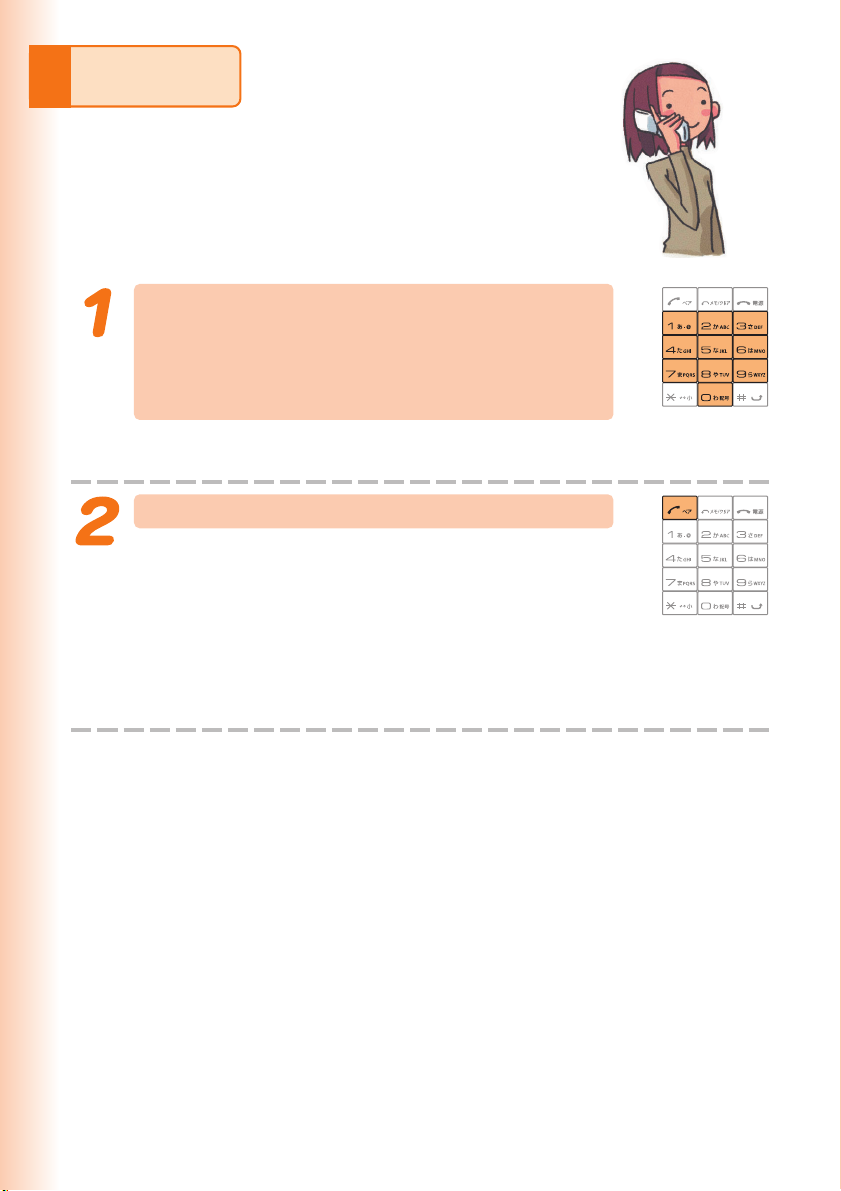
Phone
Making a Call
While the standby screen is displayed,
use the number keys (0 to 9) of the
keypad to enter the phone number you
want to call.
When calling a standard phone, you also need to enter the
area code.
Press N.
After you finish a call, press F to hang up.
Send Methods
Call : Your phone number is provided to the party you are calling in
accordance with the caller ID setting of your phone.
184 Add : Your phone number is not provided to the party you are calling.
186 Add : Your phone number is provided to the party you are calling.
R
R
R
R
R
i
i
i
i
i
n
n
n
n
n
g
g
g
g
g
.
.
.
.
.
.
.
.
.
.
.
.
.
.
.
26
Page 29
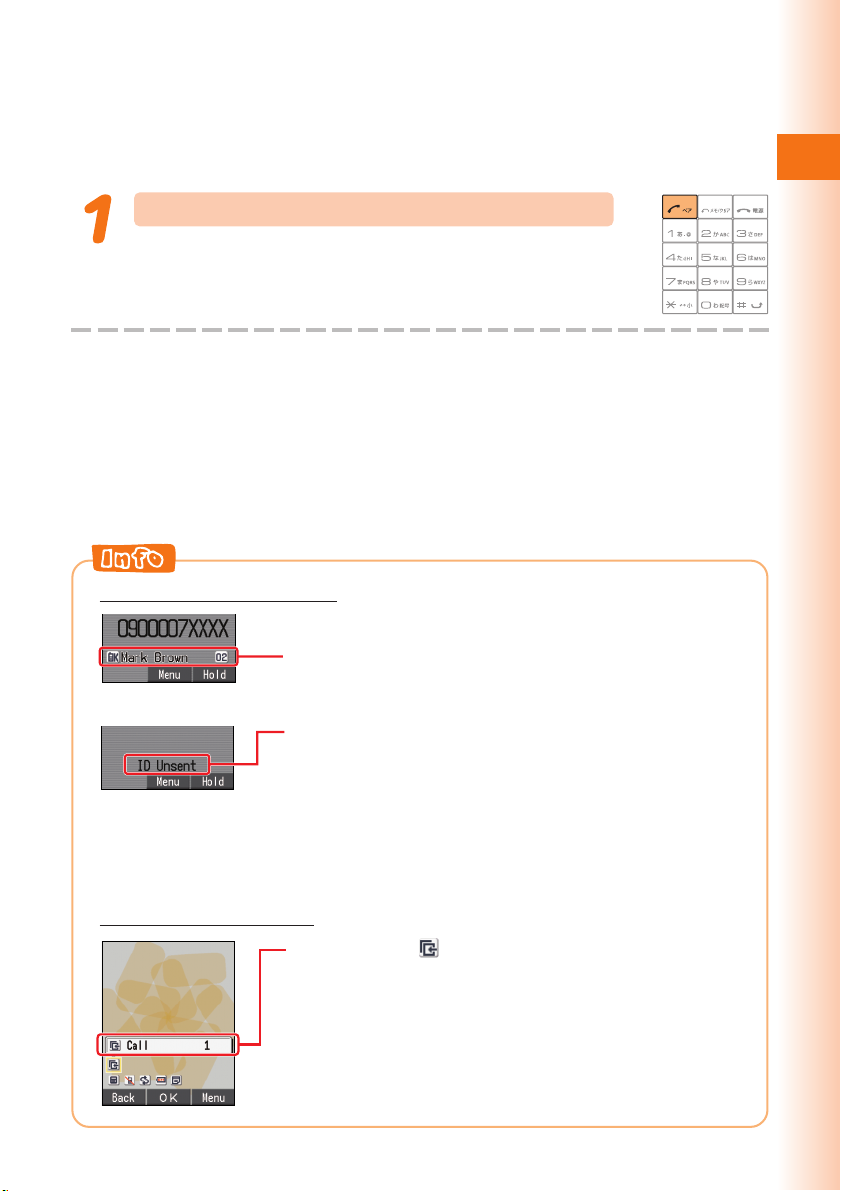
Answering a Call
Press N to answer an incoming call.
After you finish a call, press F to hang up.
Display for Incoming Calls
If the caller’s name is in your address book, it appears
on the display.
If not, only the caller’s phone number is displayed.
A message like this appears when the phone number
of the caller is not provided for some reason.
Phone
ID Unsent : The caller’s phone refused to send its
Pay Phone : The call is from a pay phone.
Not Support : The call is from a phone that does not
Missed Call Notification
The message “
did not answer one or more calls.
Press c (OK) to check incoming records (caller phone
number, etc.)
To redial a number
→“Redialing (Outgoing Records/Incoming Records)”
phone number.
support caller ID.
Call X” will be on the display if you
(page 28)
27
Page 30
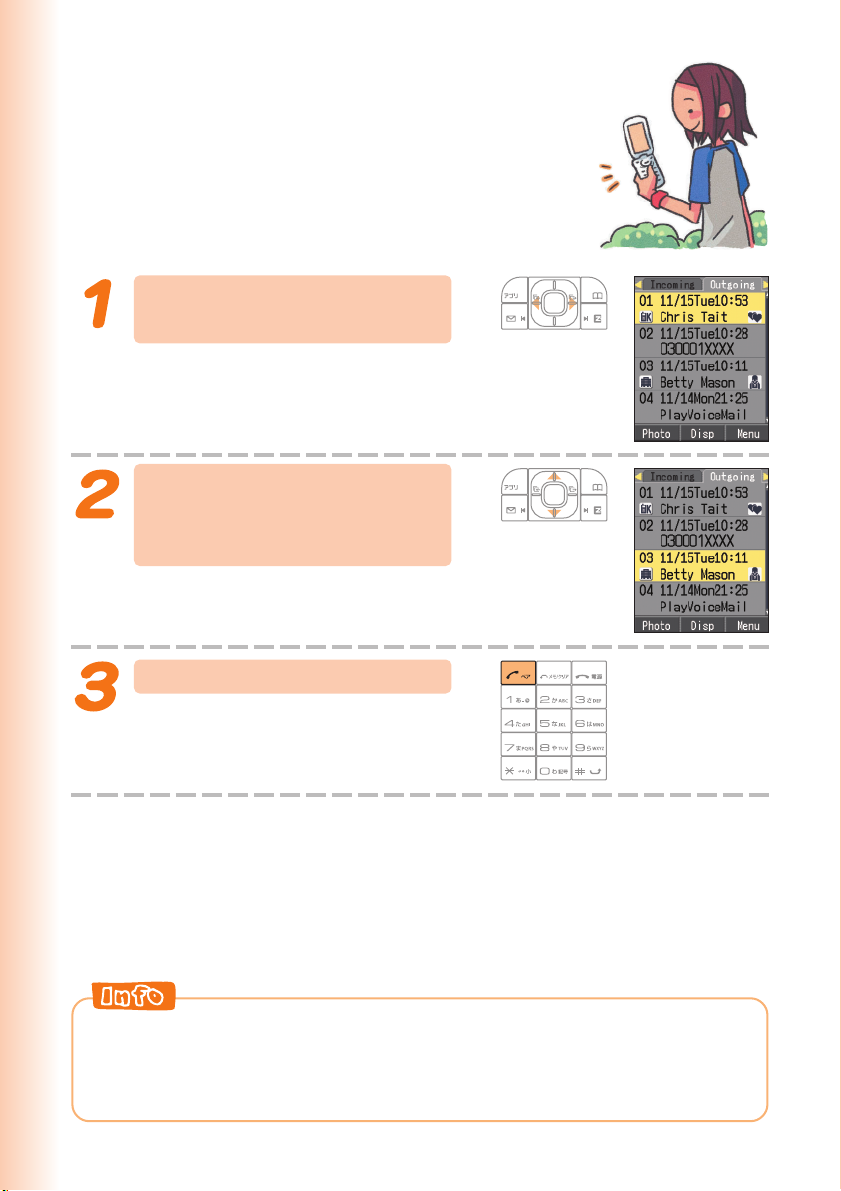
Redialing (Outgoing Records/ Incoming Records)
While the standby screen
is displayed, press s.
r: Displays outgoing records.
l: Displays incoming records.
Use j to select the
record whose number you
want to dial.
Press N.
The phone stores up to 50 records each for the outgoing records and
incoming records. When a record is created while there are already 50
records in memory, the oldest current record is deleted automatically to
make room for the new one.
28
Page 31
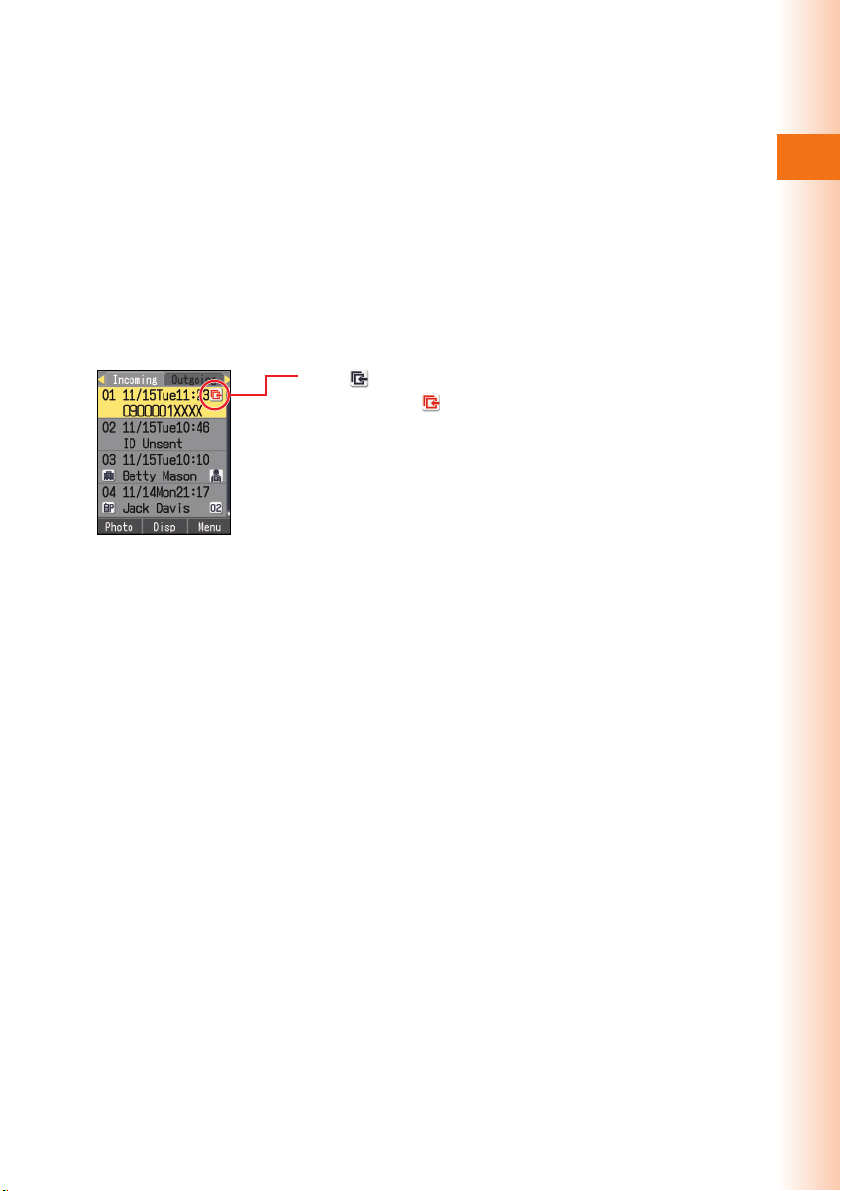
One-ring Calls
■ What is a “one-ring call”?
A “one-ring call” is an incoming call that rings your phone only once, which
causes it to be stored in your incoming records. If you redial the number
shown in your incoming records, often you are connected to a dating
service or some other service that may bills you very high charges. Always
keep in mind that it is a good idea to avoid calling back unfamiliar numbers.
■ One-ring call indicator
The icon indicates an incoming call you did not
answer. The icon indicates an incoming call that
rang for four seconds or less.
There is a good chance that such a call is a one-ring
call.
Phone
29
Page 32
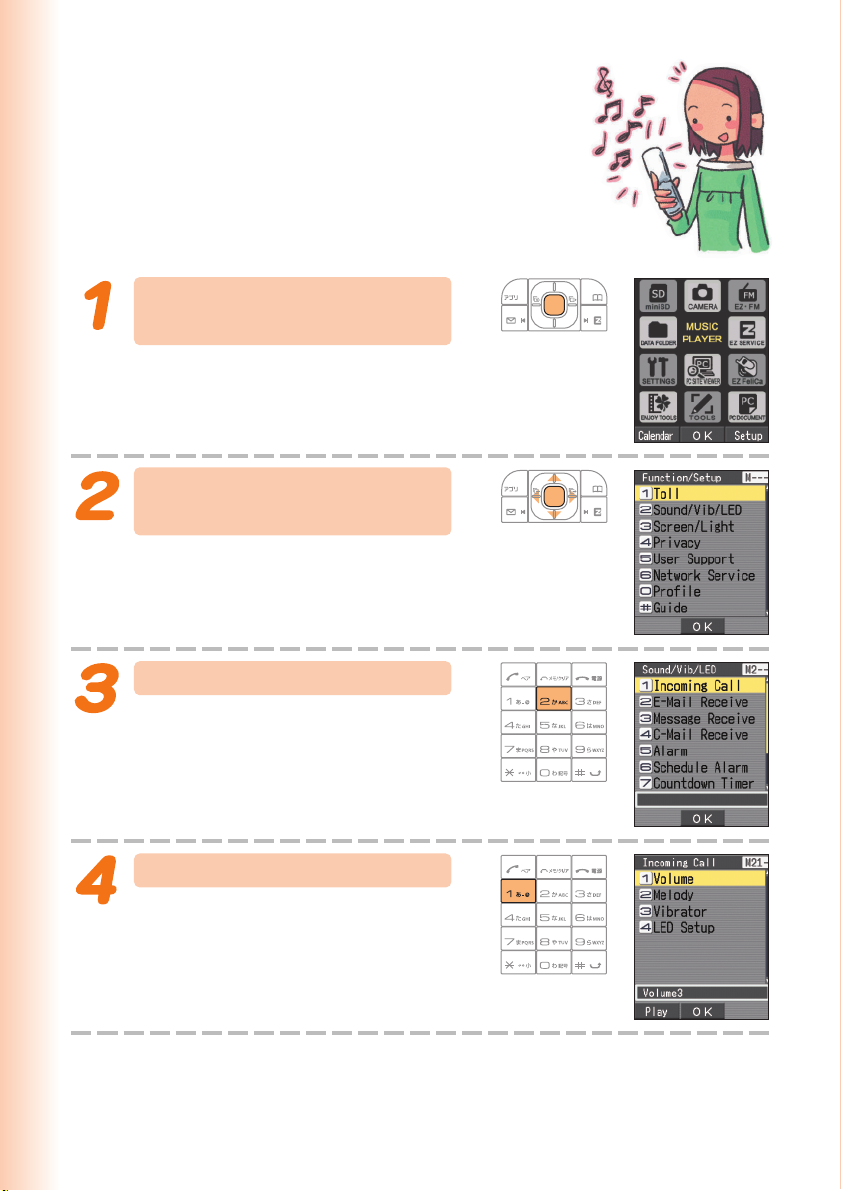
Changing the Ring Tone
While the standby screen
is displayed, press c.
Use a to select “SETTINGS,”
and then press c (OK).
30
Press
Press 1 (Incoming Call).
2
(Sound/Vib/LED).
Page 33
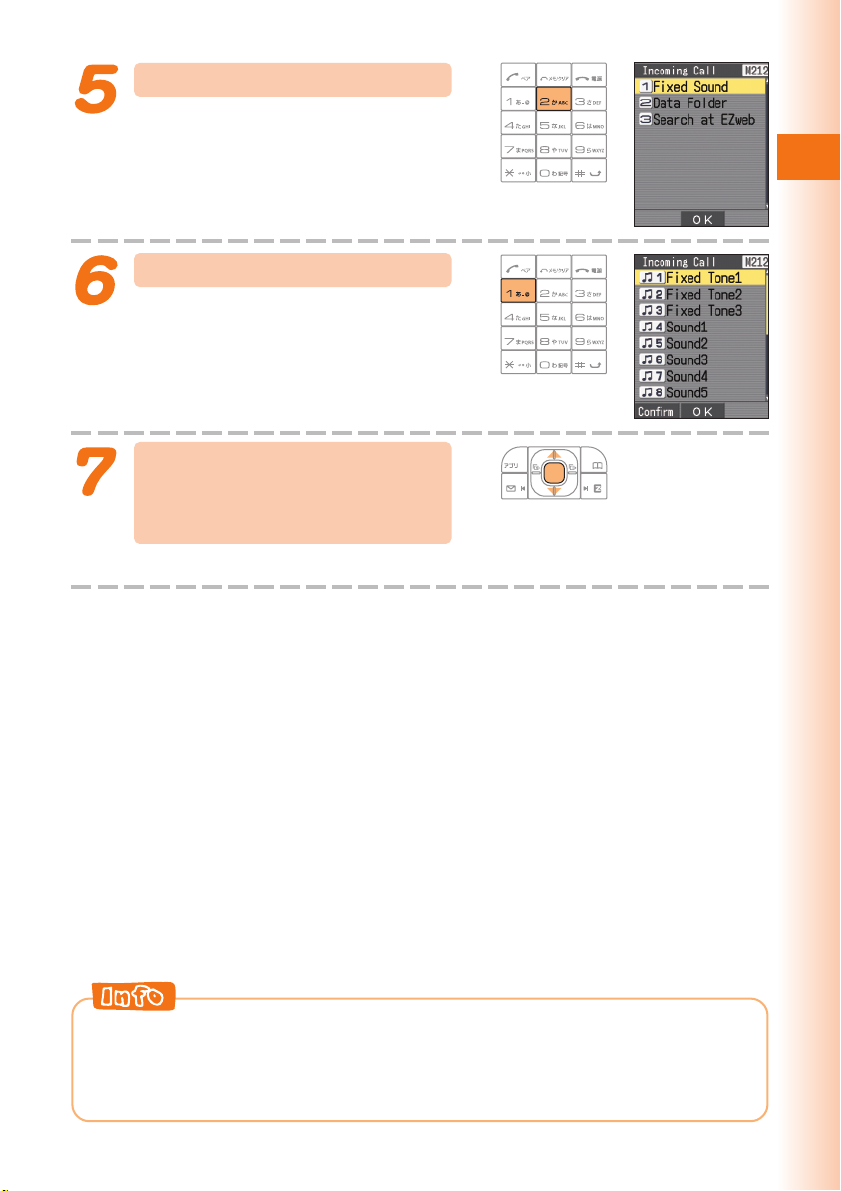
Press 2 (Melody).
Press 1 (Fixed Sound).
To hear the currently selected ring tone,
press % (Confirm).
Use j to select the ring
tone you want, and then
press c (OK).
The ring tone is set.
Phone
◎The initial setting is “Fixed Tone1”.
◎You can also download a “Chaku-Uta
your ring tone.
→ “Downloading Chaku-Uta
®
” (page 70)
®
” from the Internet and use it for
31
Page 34
Beep,
beep
...
Adjusting the Ring Tone Volume
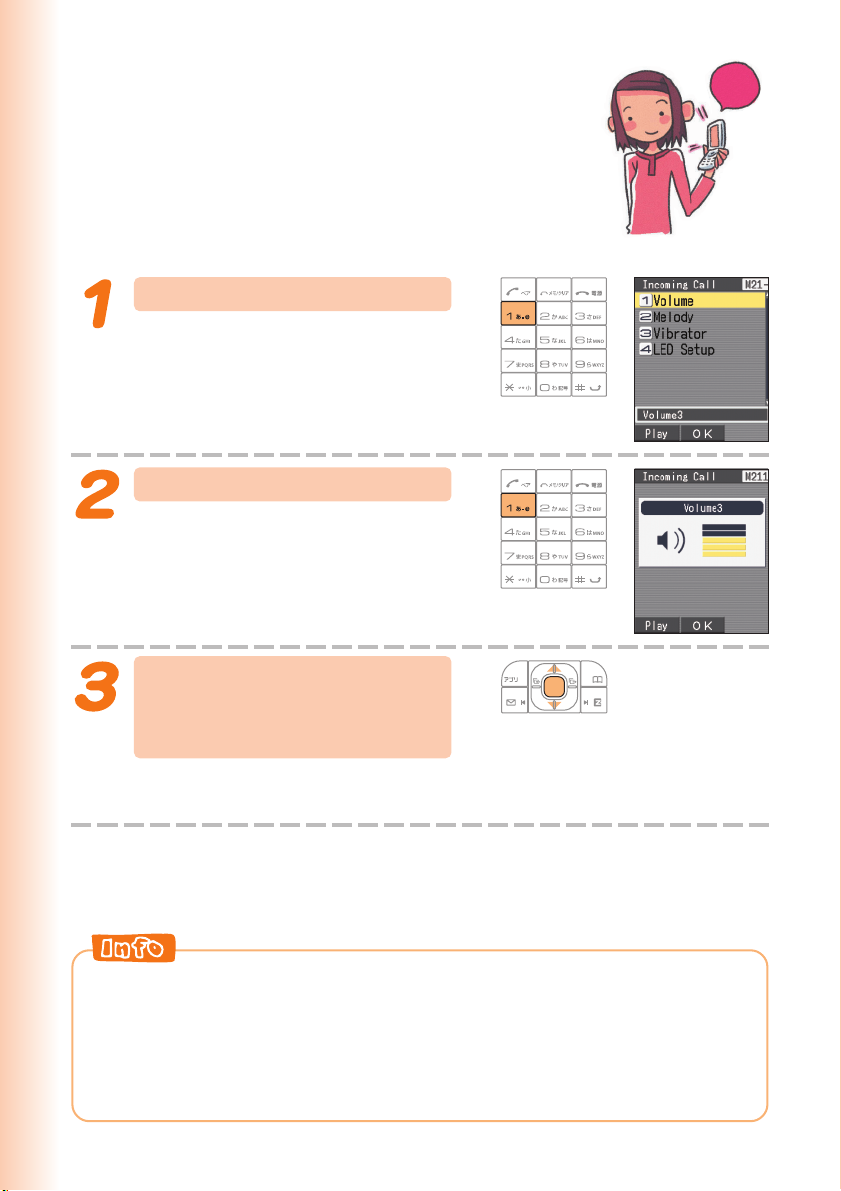
To adjust the ring tone volume, perform steps 1
through 3 under “Changing the Ring Tone” (page 30),
and then continue with the following steps.
Press 1 (Incoming Call).
Press 1 (Volume).
To hear the ring tone at the current
volume setting, press % (Play).
e
e
e
e
B
B
beep
beep
,
,
p
p
.
.
.
.
.
.
Use j to adjust the ring
tone volume, and then
press c (OK).
u: Increases volume.
d: Decreases volume.
Step-up : Ring tone gradually increases in volume.
Step-down: Ring tone gradually decreases in volume.
Mute : Ring tone does not sound.
To display the “Step-up” and “Step-down” settings, select volume level 5
and then press u.
To display the “Mute” setting, select volume level 1 and then press d.
32
Page 35
Hello
Adjusting the Earpiece Volume during a Call
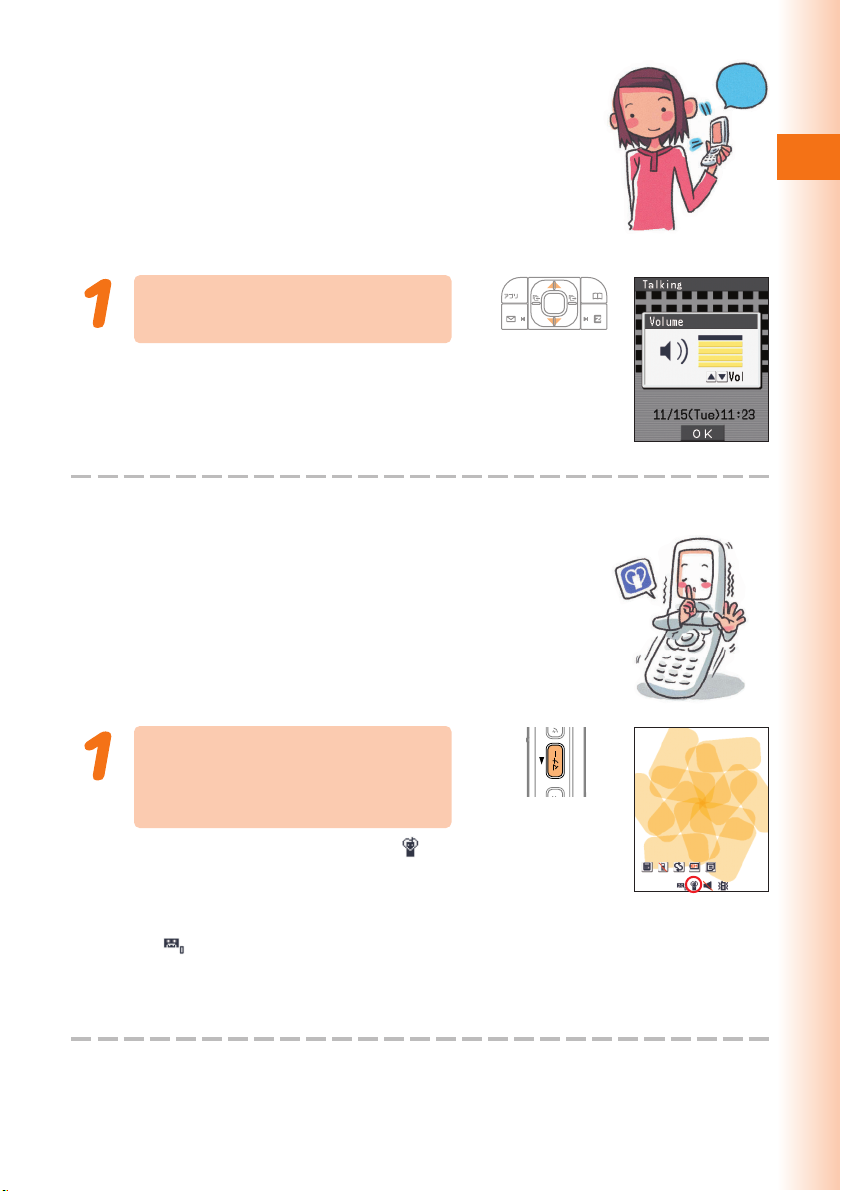
During a call, use j to
adjust the volume.
u: Increases volume.
d: Decreases volume.
There are five volume levels for the
earpiece volume.
Turning On Manner Mode
While Manner Mode is set to on, the phone alerts you
to incoming calls by vibrating.
?
?
o
o
l
l
l
l
e
e
H
H
Phone
While the standby screen
is displayed, hold down
( for about one second.
This turns on Manner Mode, the icon is on the display
while Manner Mode is turned on.
Turning on Manner Mode also turns on Easy Voice Memo, which is indicated
by
on the display.
While Manner Mode is set to on, the phone vibrates without sounding its ring tone.
To turn off Manner Mode, hold down ( for about one second again.
33
Page 36
Turning On Easy Voice Memo
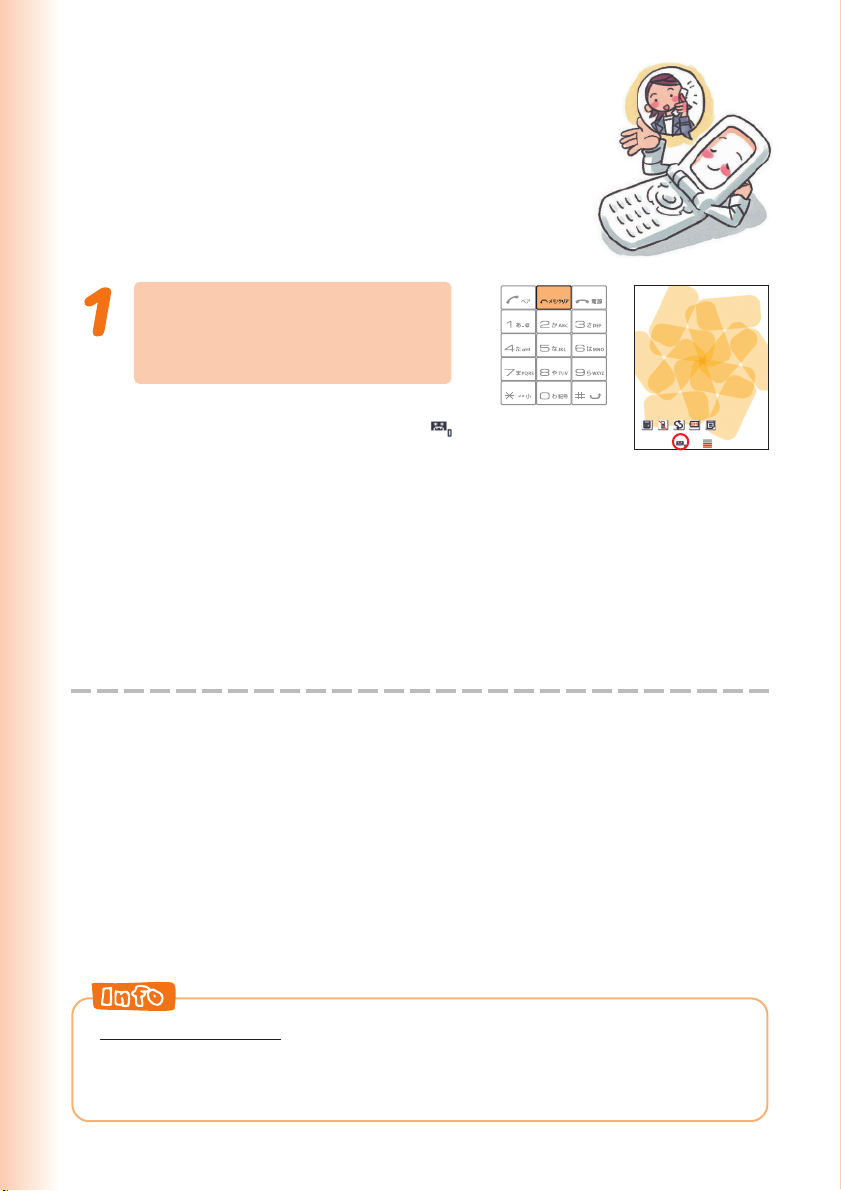
While the standby screen
is displayed, hold down
C for about one second.
This turns on Easy Voice Memo, the icon is on the
display while Easy Voice Memo is turned on.
The phone can have up to four Easy Voice Memos recorded, and each memo
can be up to 15 seconds long.
If a new Easy Voice Memo is recorded when there are already four in memory,
the oldest, unprotected memo that has already been played back is deleted
automatically to make room for the new one. Protected Easy Voice Memos are
not deleted.
To turn off Easy Voice Memo, hold down C for about one second again.
Using the Voice Mail
The Voice Mail can be used to answer the phone and take messages when
the phone is turned off, or when you are in a location where signal
reception is not possible.
34
Page 37
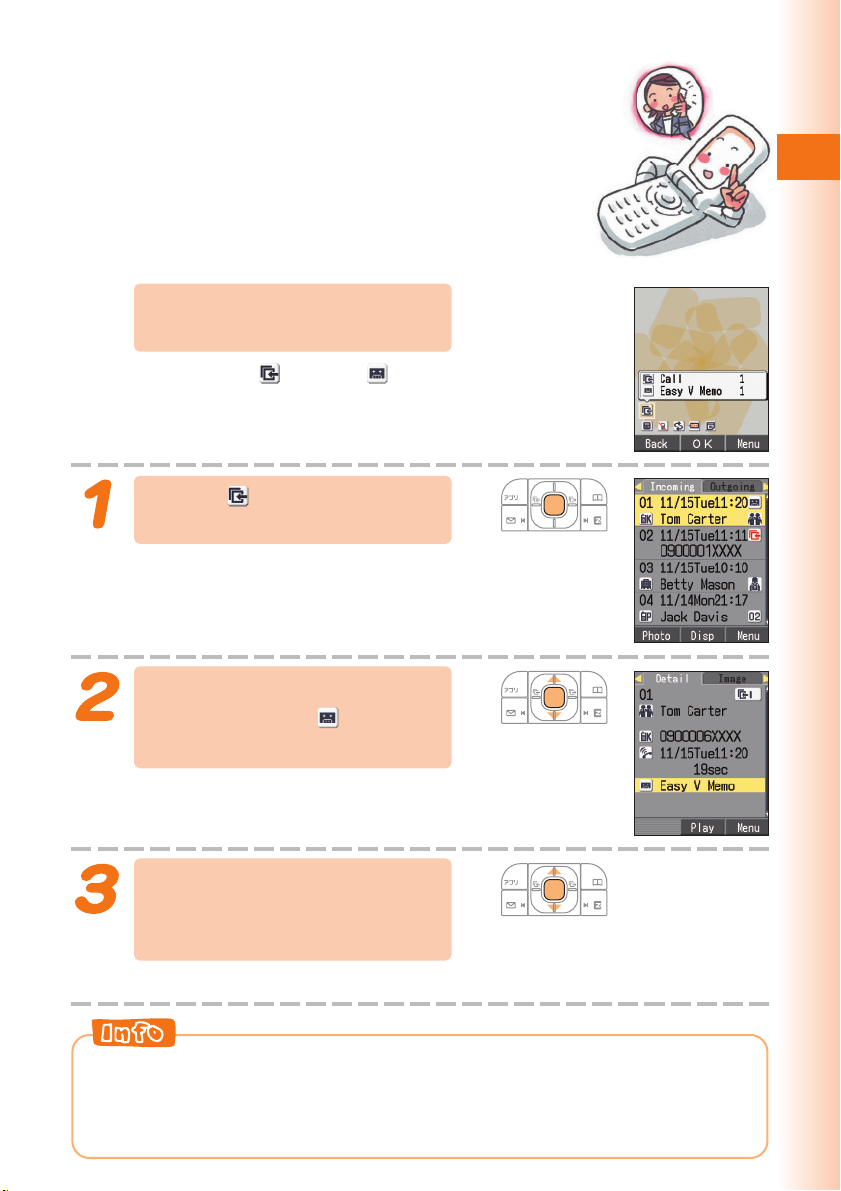
Playing an Easy Voice Memo
When there is one or more
Easy Voice Memos recorded
The message “ Call” and “ Easy V
Memo” appear on the standby screen.
Select “ Call,” and then
press c (OK).
The incoming records list appears.
Phone
Use j to select the
record with the icon,
and then press c (Disp).
The incoming record detail screen
appears.
Use j to select “Easy V
Memo” and then press
c (Play).
The easy voice memo plays back.
To delete an Easy Voice Memo, press C42 while the standby
screen is displayed. Select the Easy Voice Memo you want to delete, press
& (Menu) and then 1 (Delete). Next press 1 (Delete One), and then
press 1 (Yes).
35
Page 38
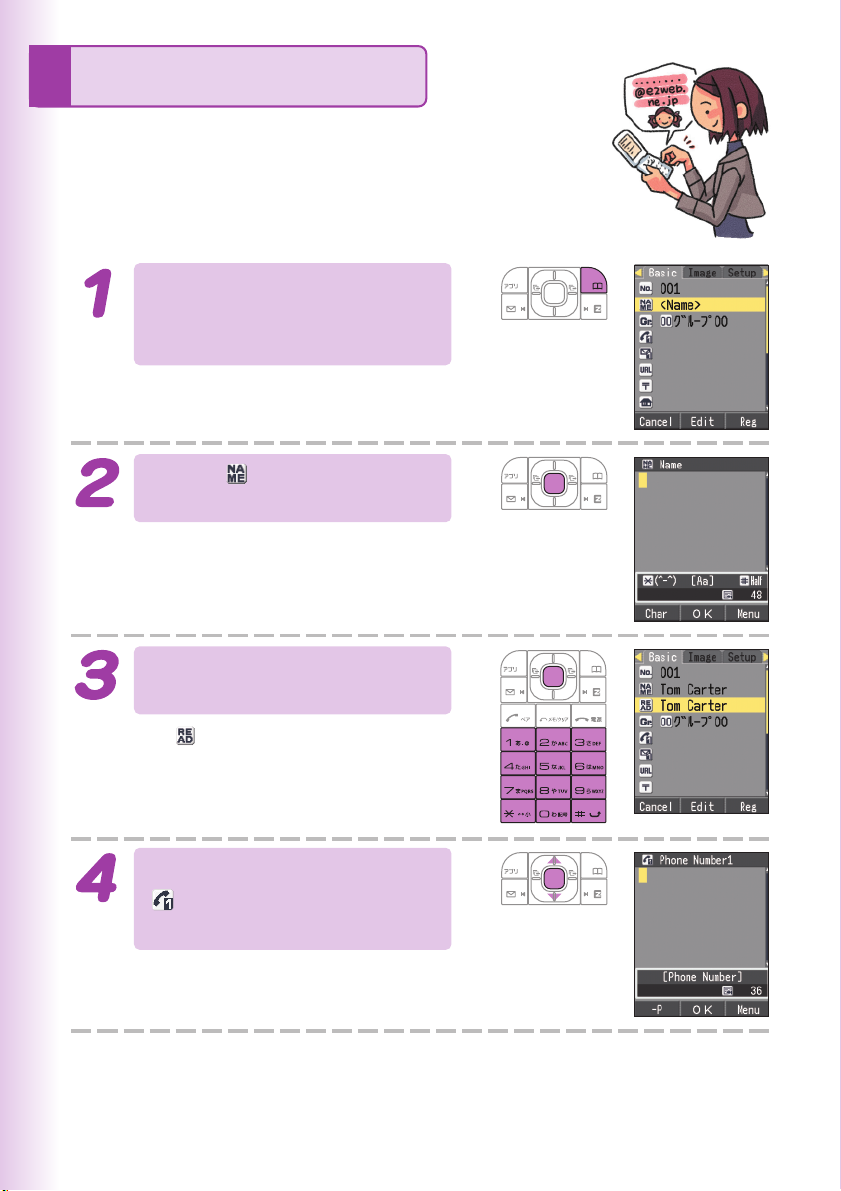
Address Book
Registering an Address Book
While the standby screen
is displayed, hold down
& for about one second.
Select “ <Name>,” and
then press c (Edit).
36
Enter the name and then
press c (OK).
The <Reading> is generated
automatically when you enter a name.
To input text
→ “Inputting Characters” (page 106)
Use j to select
“ <Phone Number1>,”
and then press c (Edit).
Page 39
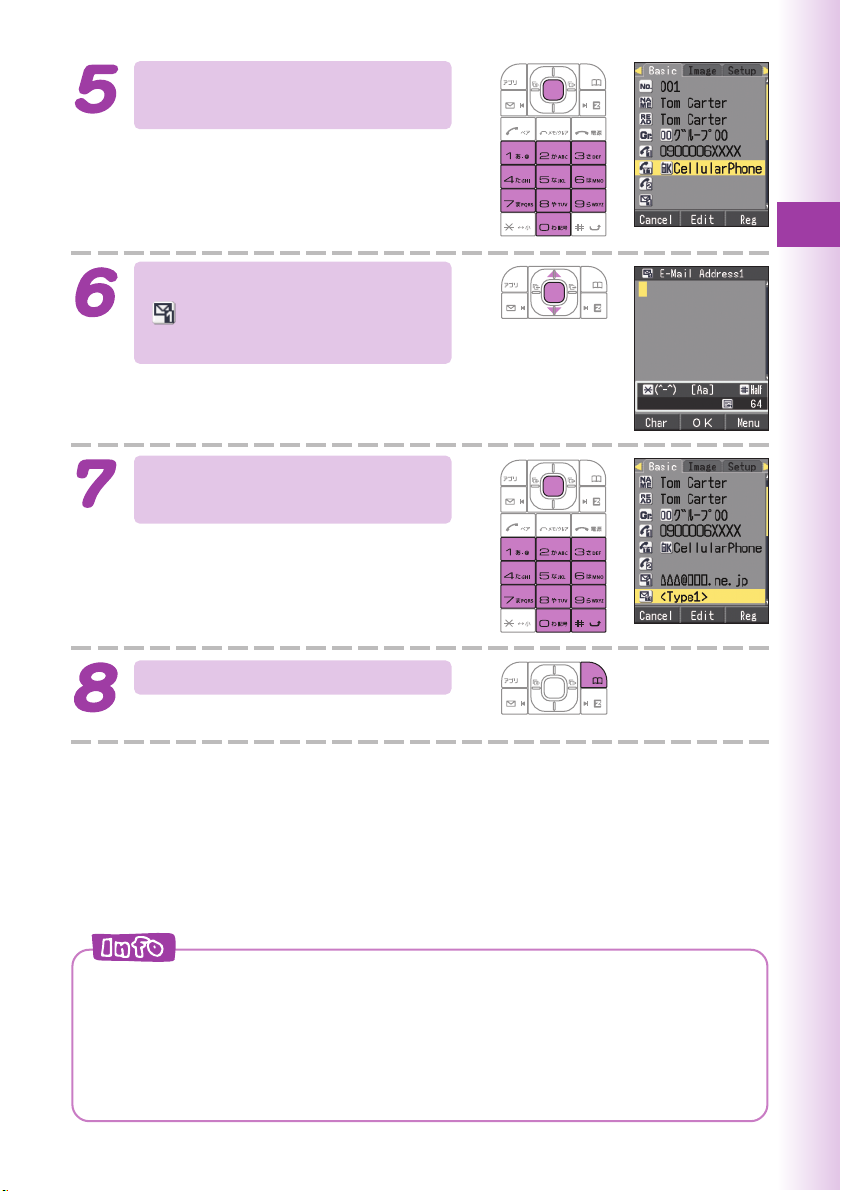
Enter the phone number,
and then press c (OK).
When entering the number of a standard
phone, be sure to include the area code.
Use j to select
“ <E-Mail Adrs1>,” and
then press c (Edit).
If you do not want to enter an e-mail
address, jump to step 8.
Enter the e-mail address,
and then press c (OK).
To input an e-mail address
→ “Inputting an E-mail Address”
(page 107)
Address Book
Press & (Reg).
◎The address book can contain up to 700 records.
◎Address book records are numbered from 000 through 699. Registering
a new record automatically assigns it the lowest available unused record
number.
◎An address book record can also contain a website URL, street address,
birthday, and other personal information.
37
Page 40
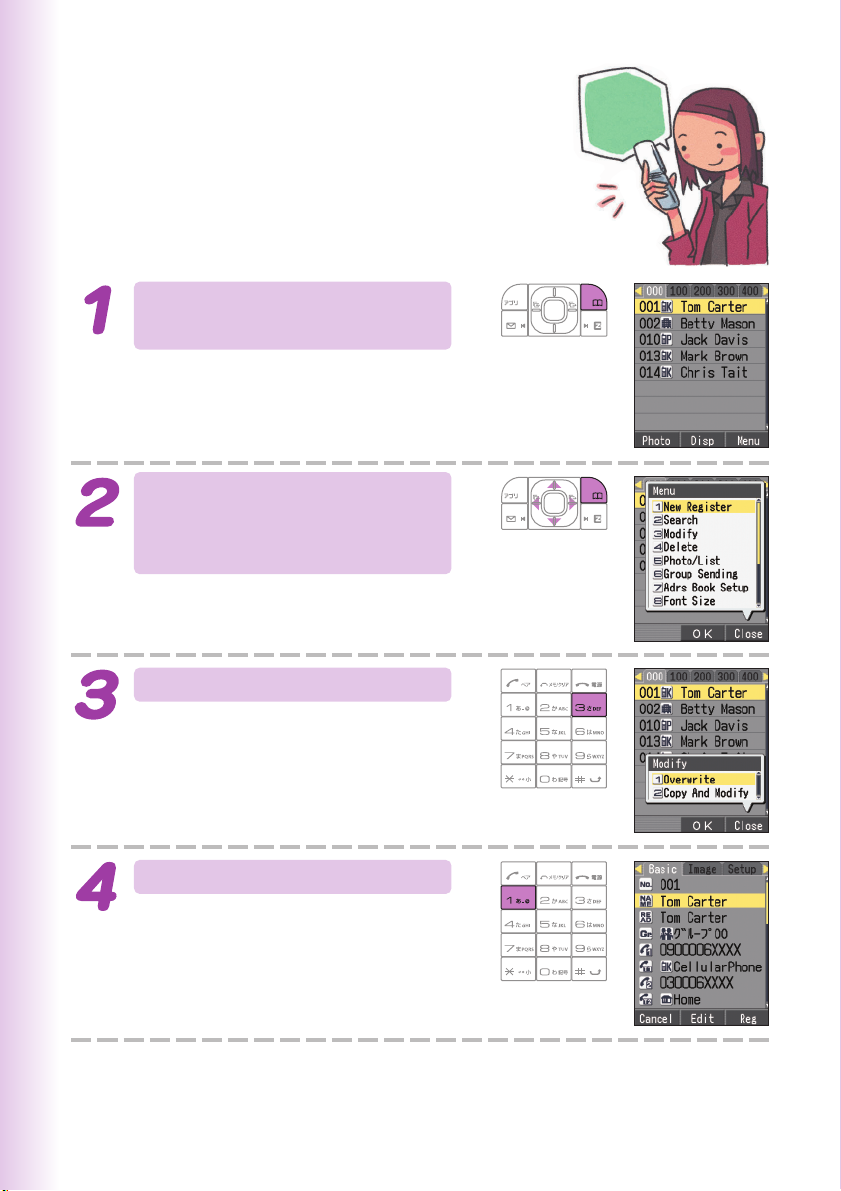
Editing an Address
Address
Birthday
Book Record
Example: To edit the phone number of “Tom Carter”
While the standby screen
is displayed, press &.
Use a to select the
record you want to edit,
and then press & (Menu).
Group
...
...
...
38
Press 3 (Modify).
Press 1 (Overwrite).
Page 41
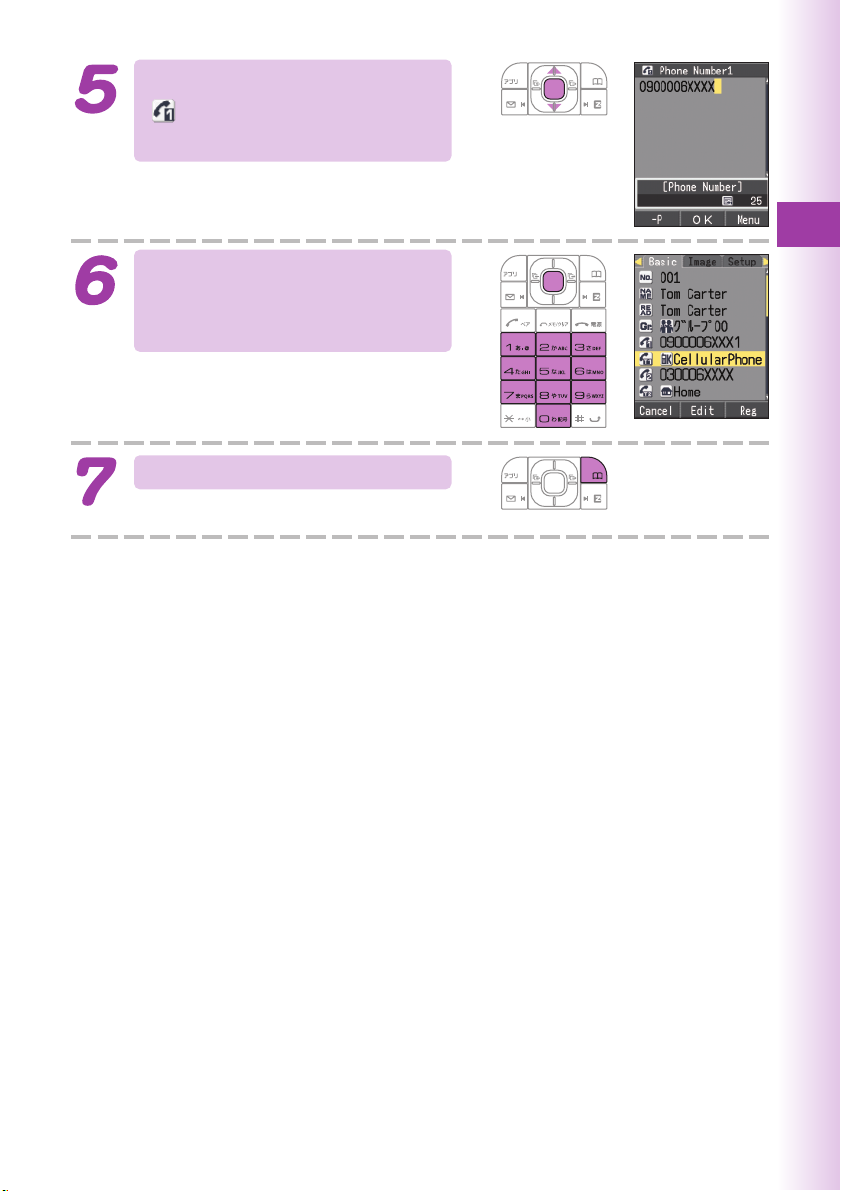
Use j to select
“ 0900006XXXX”, and
then press c (Edit).
Make the changes you
want, and then press
c (OK).
To delete characters, press C.
Press & (Reg).
Address Book
39
Page 42
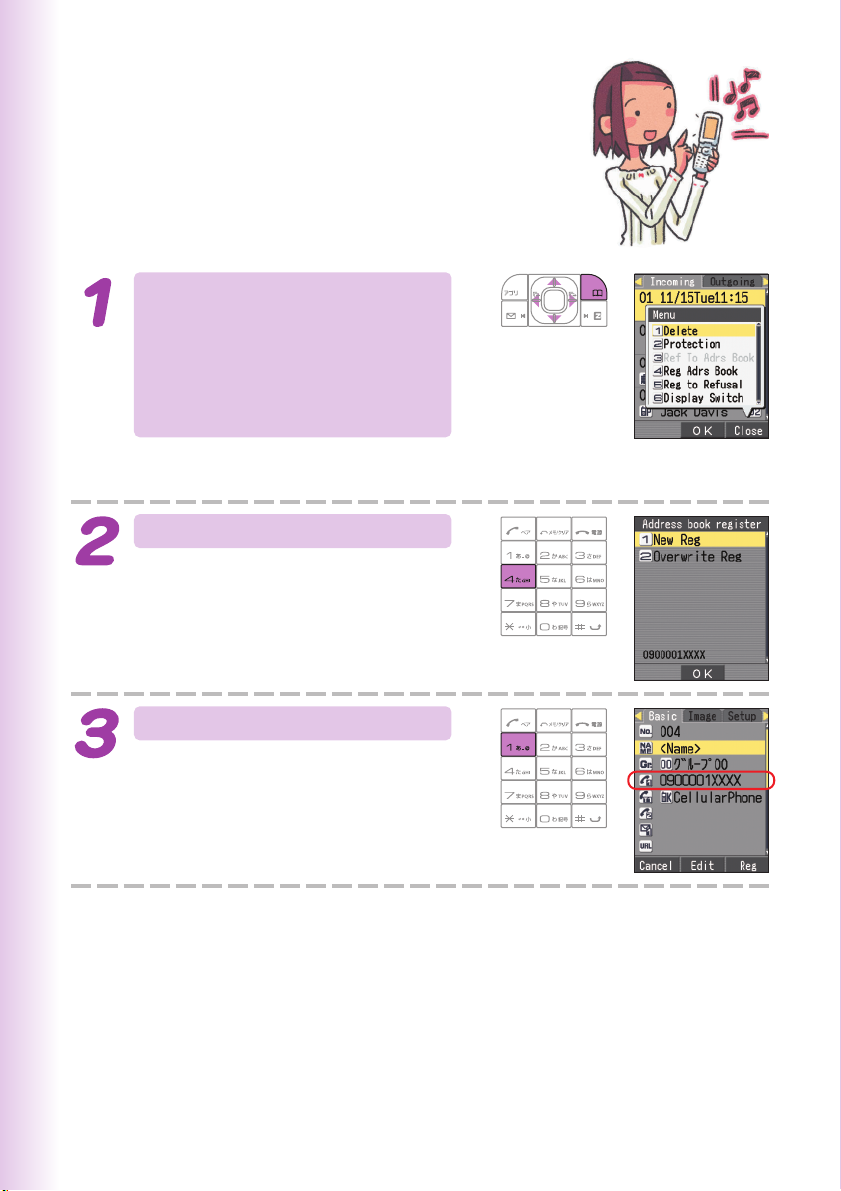
Adding Outgoing or Incoming Record Data to the Address Book
While the standby screen is
displayed, press s, use
j
to select the phone
number you want to save,
and then press & (Menu).
r: Displays outgoing records.
l: Displays incoming records.
Press
Press 1 (New Reg).
To enter the name, use the procedure
starting from step 2 under “Registering
an Address Book” (page 36).
4
(Reg Adrs Book).
40
Page 43
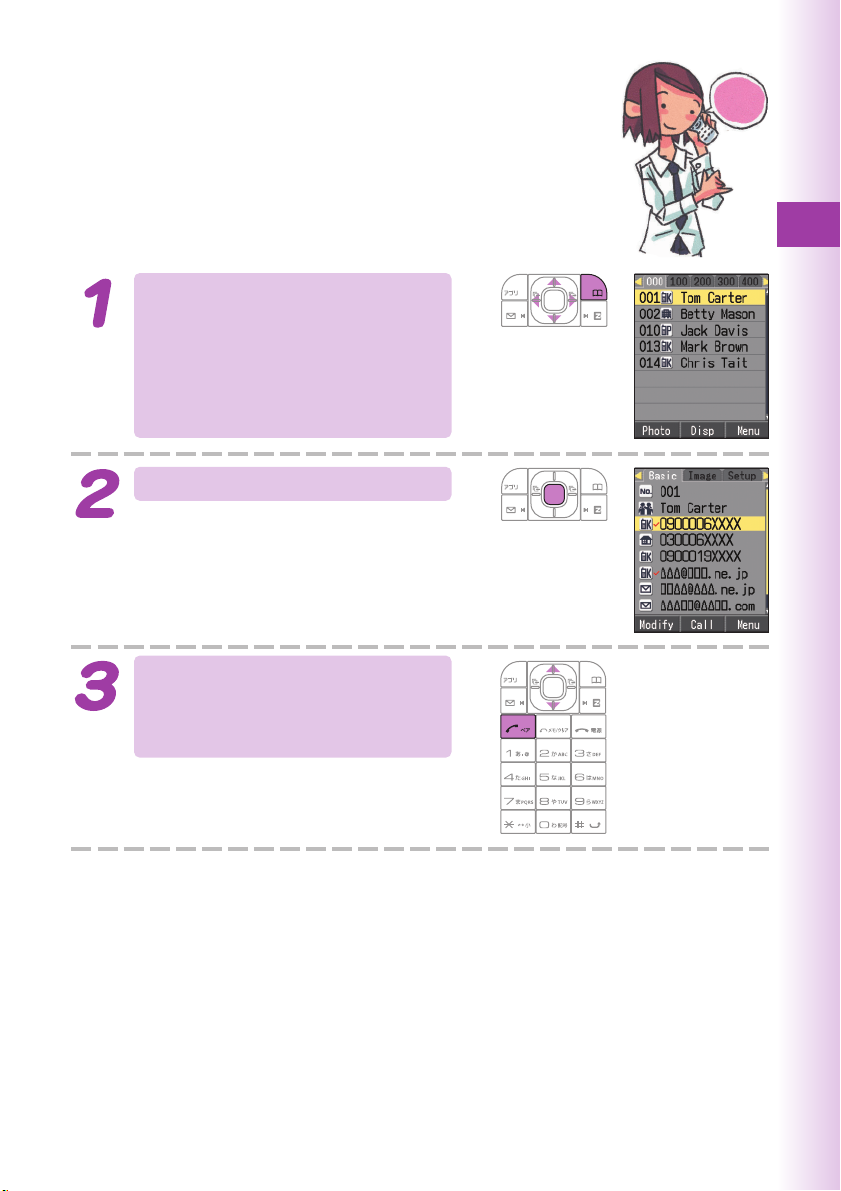
Dialing from the Address Book
While the standby screen is
displayed, press & and
then use a to select the
record whose phone
number you want to dial.
Press c (Disp).
The details screen of the record
appears.
?
llo
e
H
Address Book
Use j to select the
phone number, and then
press N.
41
Page 44
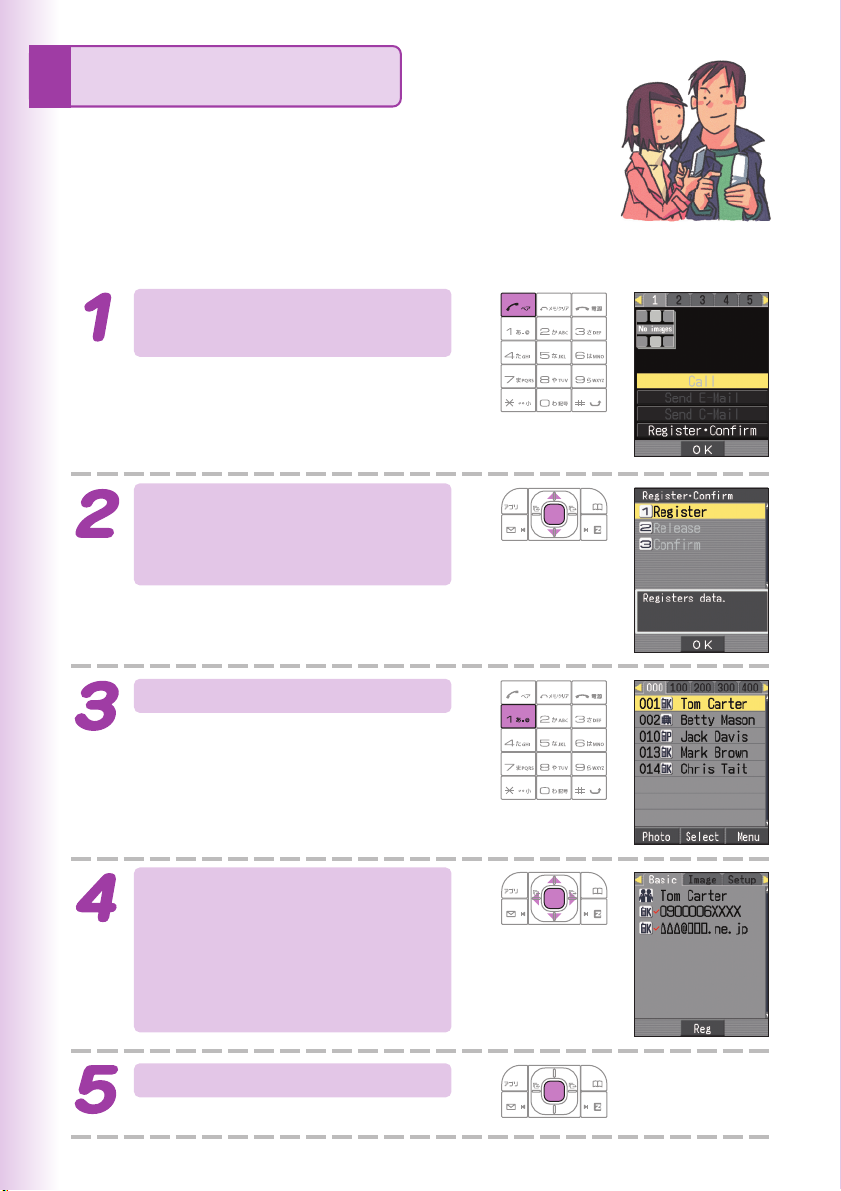
Pair Function
Once you register a person as a “Pair partner,”
you can make a call to that person or send that
person e-mail using a simplified operation. Up to
five persons can be registered as Pair partners.
Registering a Pair Partner
While the standby screen
is displayed, press N.
If the pair partner is not registered, the
confirmation screen appears. Press
Use s to select the 1 through 5 tab
where you want to register the Pair partner.
c
(OK).
Use j to select “Register
Confirm,” and then press
c
(OK).
Press 1 (Register).
Use a to select the
address book record for
the person you want to
register as a Pair partner,
and then press c (Select).
Press c (Reg).
•
42
Page 45
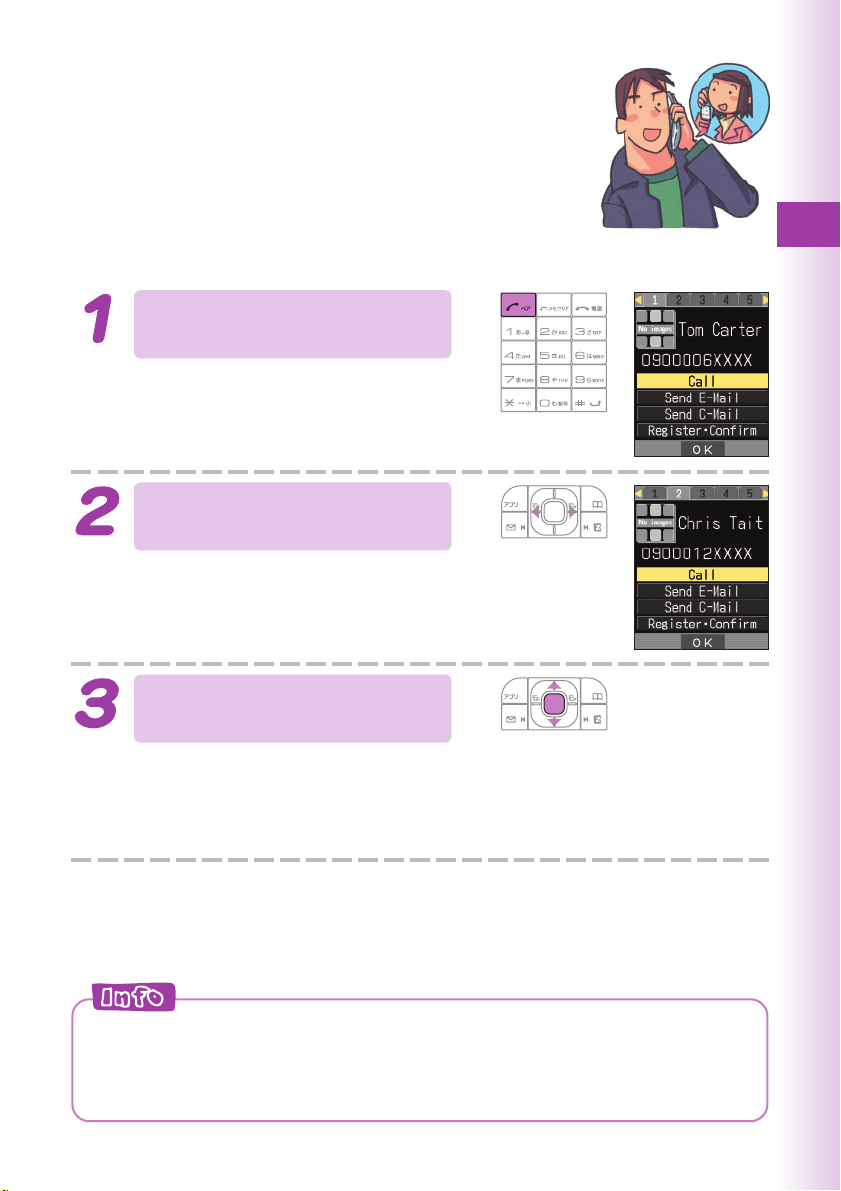
Making a Phone Call or Sending Mail to a Pair Partner
While the standby screen
is displayed, press N.
Use s to select the Pair
partner.
Use j to select “Call”,
and then press c (OK).
Pair Function
Selecting “Send E-Mail”/“Send C-Mail”, and then pressing c (OK) will display
a screen for composing and sending an e-mail/a C-mail message. Next,
continue from step 5 of the procedure under “Creating and Sending E-mail
Messages” (page 46)/“Creating and Sending C-mail Messages” (page 52).
In order to register a person as a Pair partner, that person’s name, phone
number, and other information need to be in the address book beforehand.
Use the procedure under “Registering an Address Book” (page 36) to create
the required record before trying to register a person as a Pair partner.
43
Page 46
△△△
EZweb subscription required
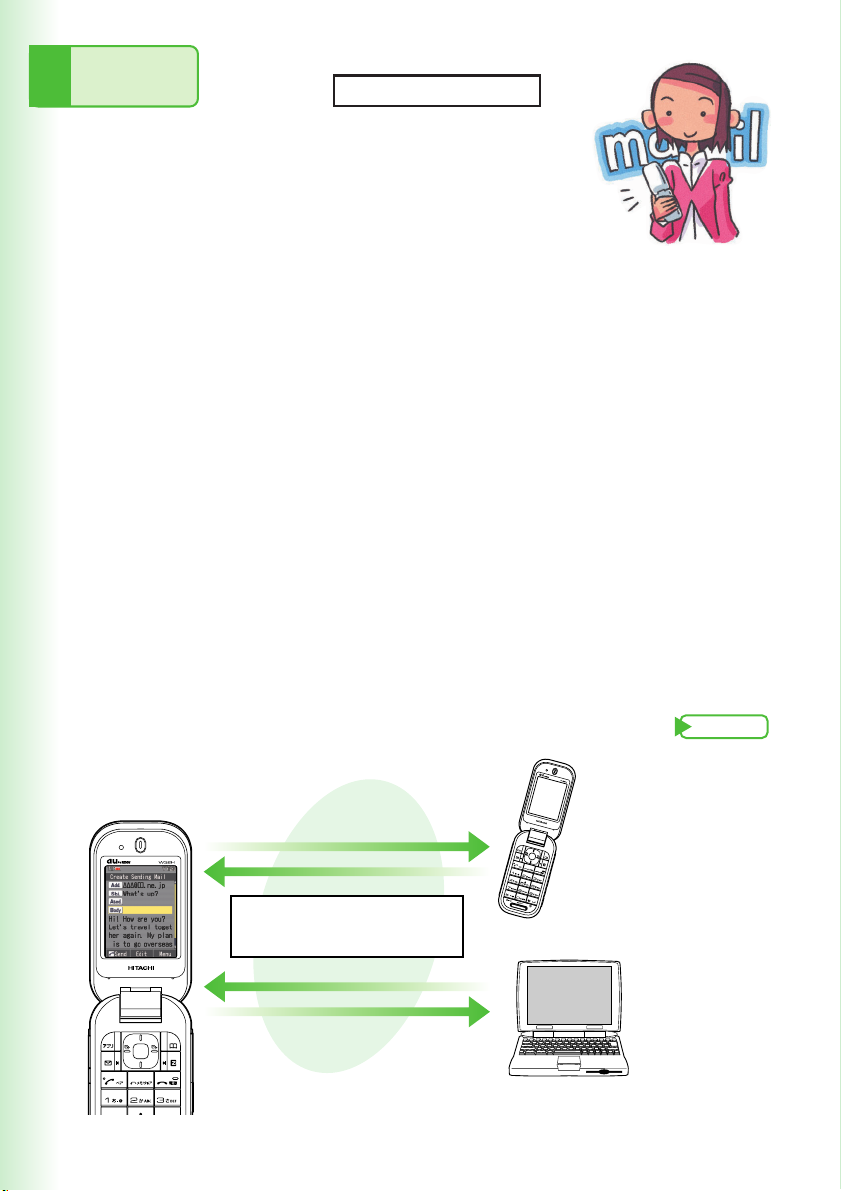
Your W32H supports two types of mail:
e-mail and C-mail.
Using E-mail
To use e-mail, you need to apply for an EZweb subscription. If you did
not apply when you purchased your phone, contact your nearest au
shop or the au Customer Service Center.
In addition to an EZweb subscription, you also need to perform an
initialization procedure before you can use e-mail. If you have not
performed initialization yet, refer to “Initializing E-mail and EZweb”
(page 20).
E-mail makes you possible to exchange mails with a PC and with
another cellphone that supports e-mail function. You can send mail
messages that contain up to 5,000 double-byte characters, and you can
attach photos and movies to e-mail messages.
※You can send an e-mail to up to five addressees.
※You can send up to 1,000 e-mail messages (each addressee counts as a
separate message) per day.
※The sending and receiving operations may take longer when a mail message
has data attached.
Page
46
44
InternetInternet
Sent using an e-mail address.
Example:
@ezweb.ne.jp
△△△
E-mail can be sent to
another au cellphone or
cellphone of other
manufacturer’s.
E-mail can be sent to a PC.
Page 47
Using C-mail
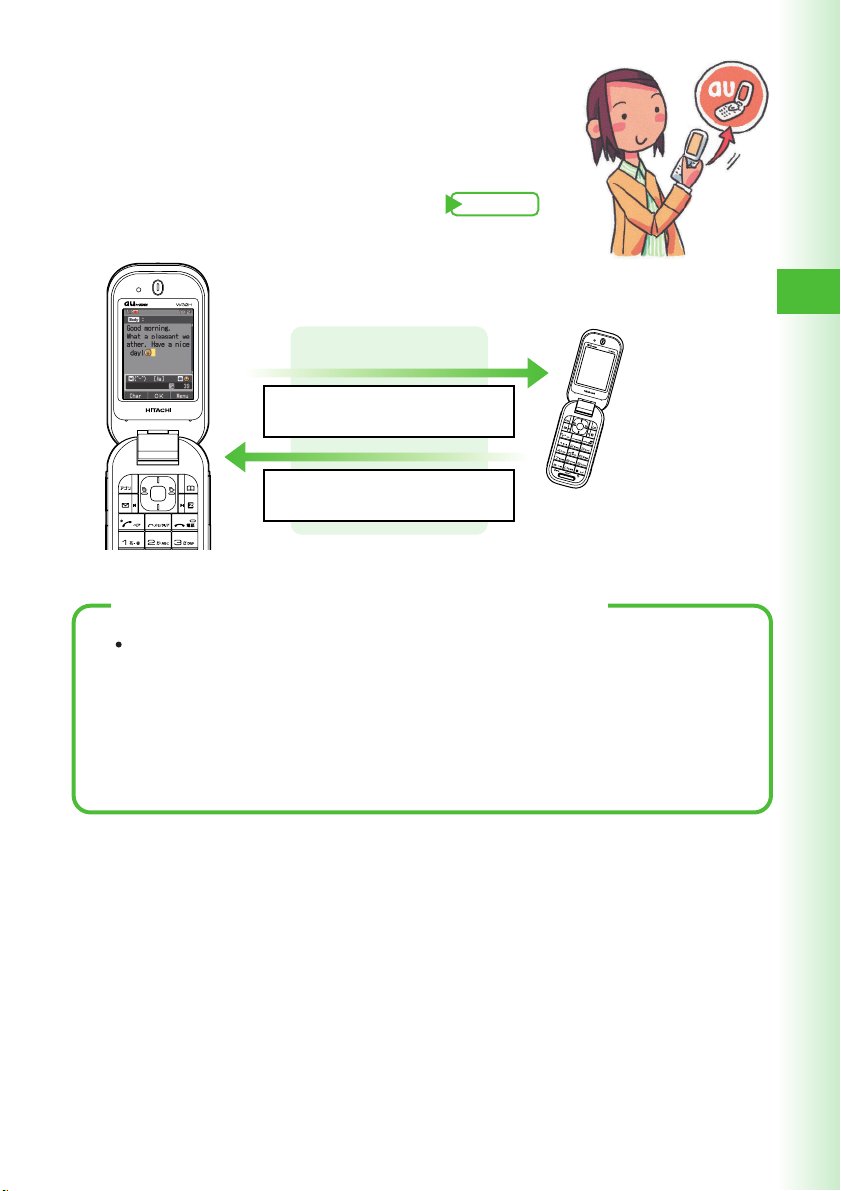
C-mail lets you exchange text messages that
contain up to 50 double-byte characters with
another au cellphone that supports C-mail.
Page
C-mail CenterC-mail Center
Sent using a phone number.
Example: 090-0001-XXXX
52
Mail
Received using a phone number.
Example: 090-0002-XXXX
C-mail can be sent to
another au cellphone.
About C-mail safe block function
・C-mail safe block function blocks C-mails that contain accessing
URLs (http://
C-mail safe block function is set to on by default. If you want to
receive C-mails that contain accessing URLs or phone numbers
in their body texts, you can disable this function to receive such
C-mails.
△△△
, https://
△△△
) or phone numbers in its body text.
45
Page 48
Creating and Sending E-mail Messages
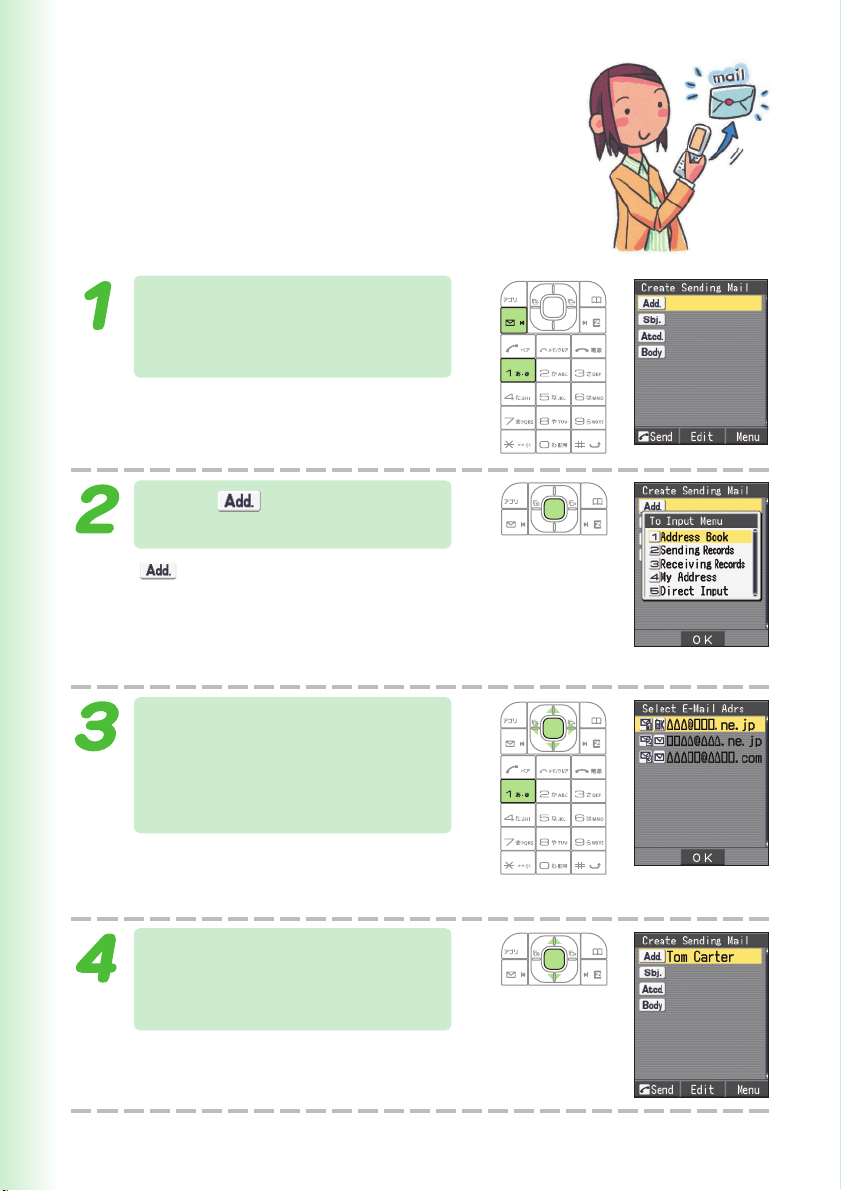
While the standby screen is
displayed, press L, and
then press
Select , and then press
c (Edit).
: Address to which the e-mail will
be sent.
You can send an e-mail to up to five
addressees.
1
(Create New).
46
Press 1 (Address Book),
use a to select an
addressee, and then press
c (Select).
You can select an addressee from
sending records, receiving records, or My
Address, or you can enter an address.
Use j to select the e-mail
address you want to enter,
and then press c (OK).
Page 49
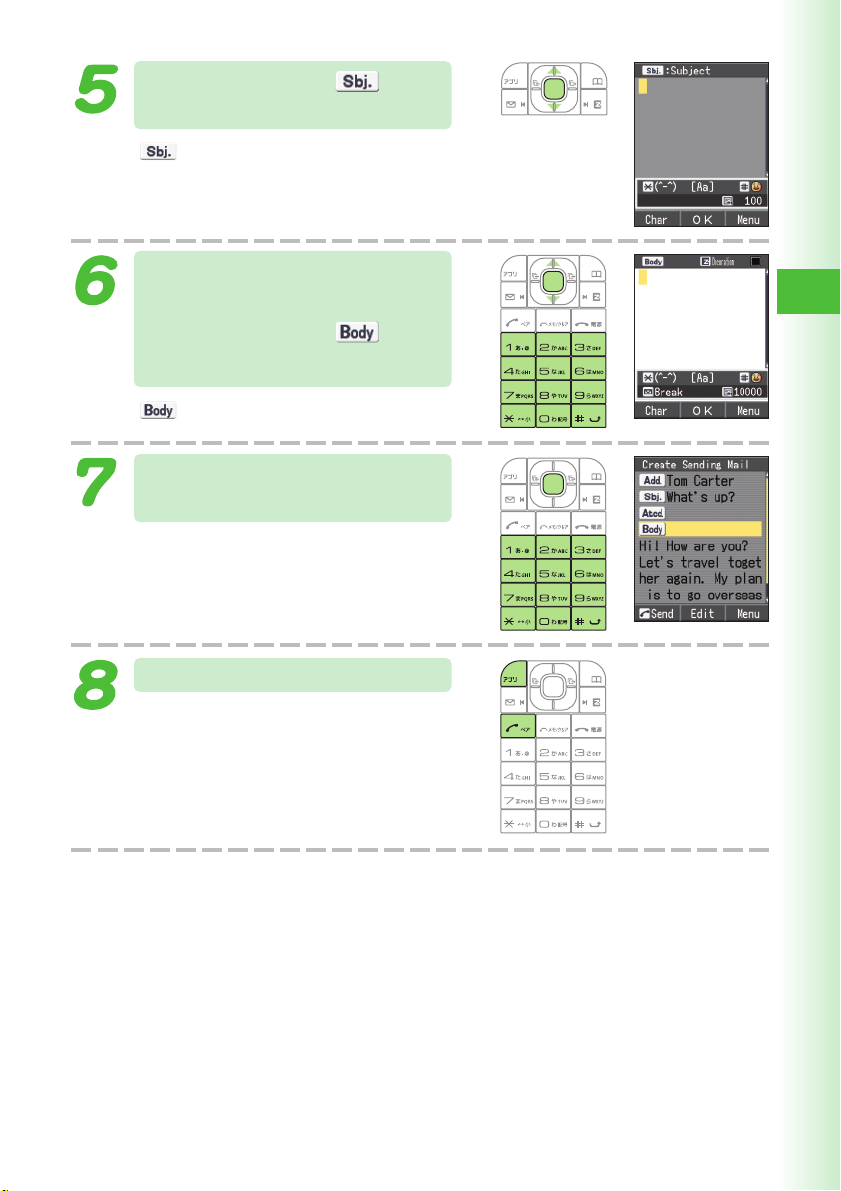
Use j to select , and
then press c (Edit).
: Subject of the e-mail message.
Enter the subject and then
press c (OK).
Use j to select , and
then press c (Edit).
: Body of the e-mail message.
Enter the body text and
then press c (OK).
Mail
Press % (Send) or
The message “Sent” appears on the
display after the e-mail message is sent.
N
.
47
Page 50
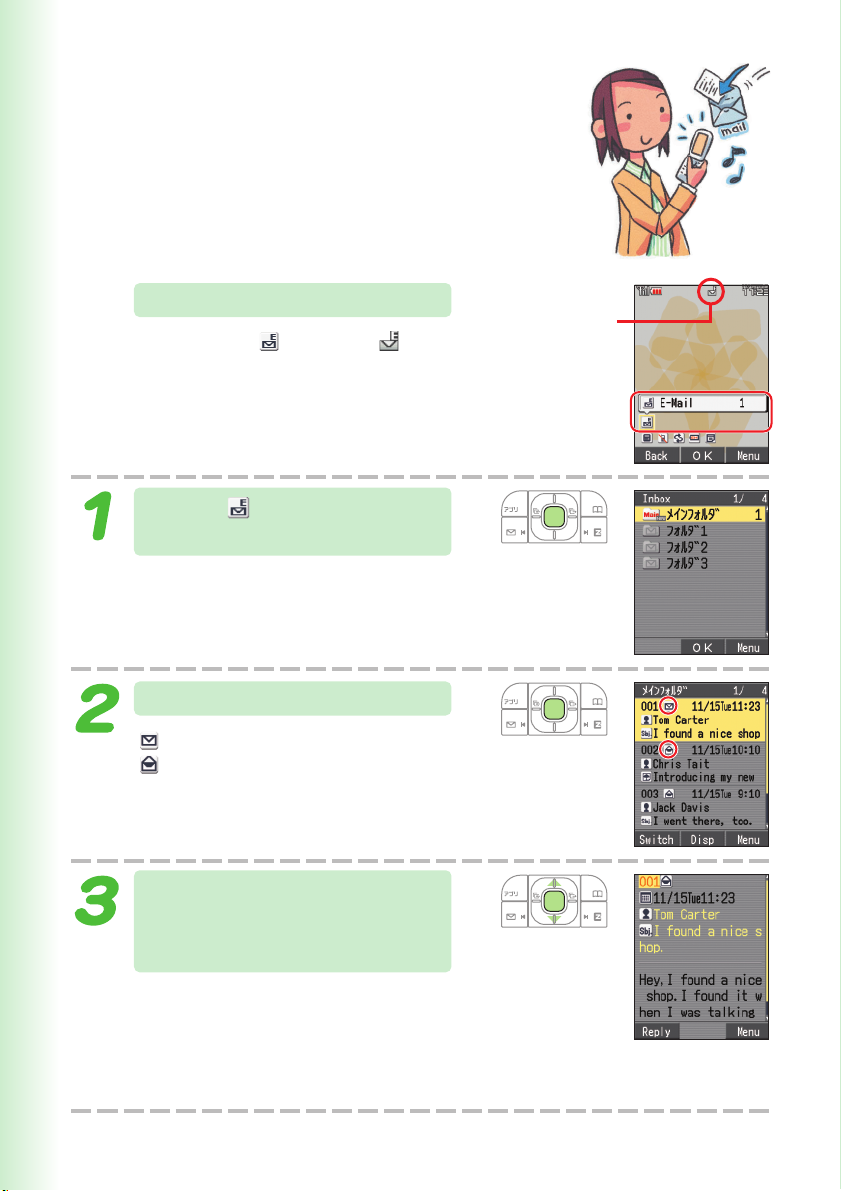
Reading Received E-mail Messages
When you receive an e-mail
The message “ E-Mail” and
appear on the standby screen.
Select “ E-Mail,” and
then press c (OK).
Press c (OK).
:
Indicates an unread message.
:
Indicates an already read message.
Received
e-mail icon
48
Use j to select the unread
e-mail you want to view, and
then press c (Disp).
The received e-mail message appears.
If all of the message cannot fit, press
d to scroll.
Use L and R to scroll between messages.
Press C to return to the e-mail message list.
Page 51
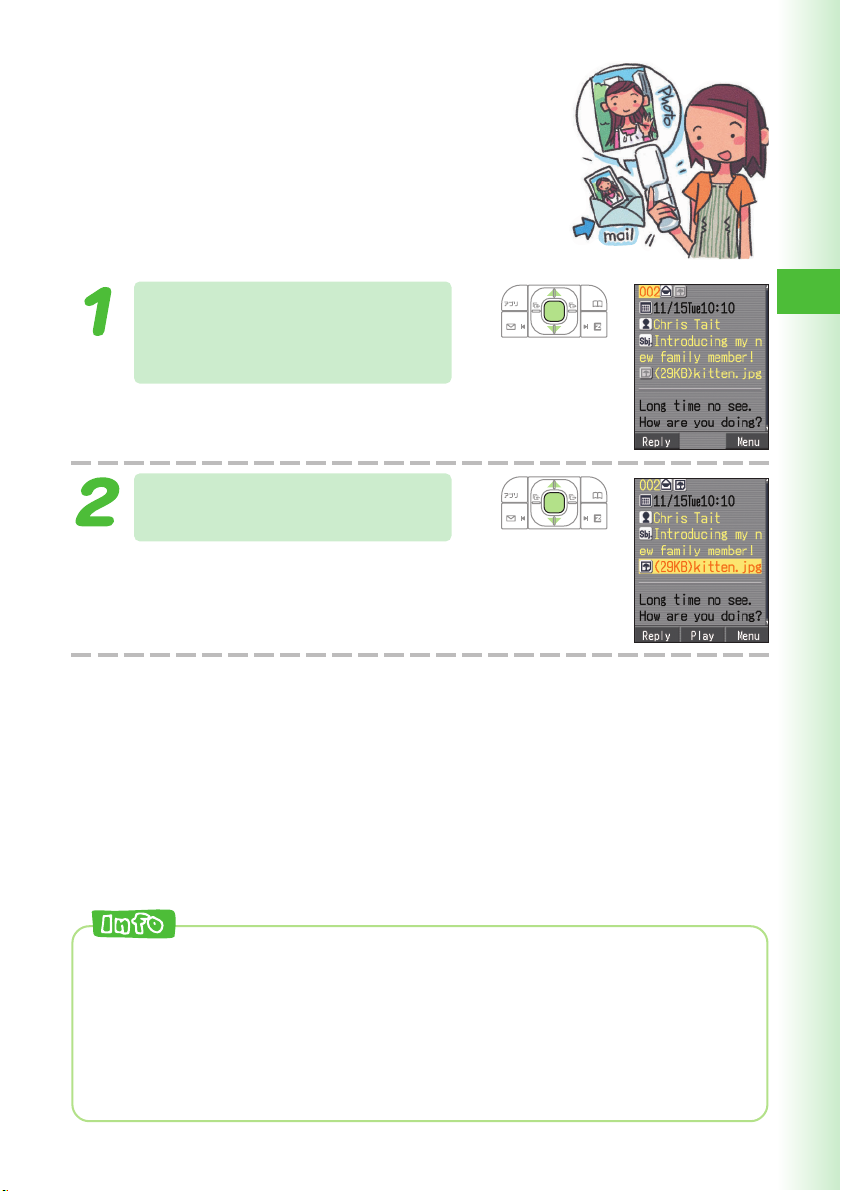
Reading an E-mail Message with an Attached Photo or Movie
Example: To see a photo attached to an e-mail.
Use j to select the e-mail
message, and then press
c (Disp).
Use j to select a file name,
and then press c (Rcv).
Mail
◎Photos or movies may be displayed within mails or may require the
recipients of the mails to select file names and press c (Play) to display
those files, depending on the file sizes of the attached photos or movies.
◎The sending and receiving operations may take longer when a mail
message has data attached.
◎Certain signal conditions may also cause e-mail sending and receiving to
take longer than normal.
49
Page 52
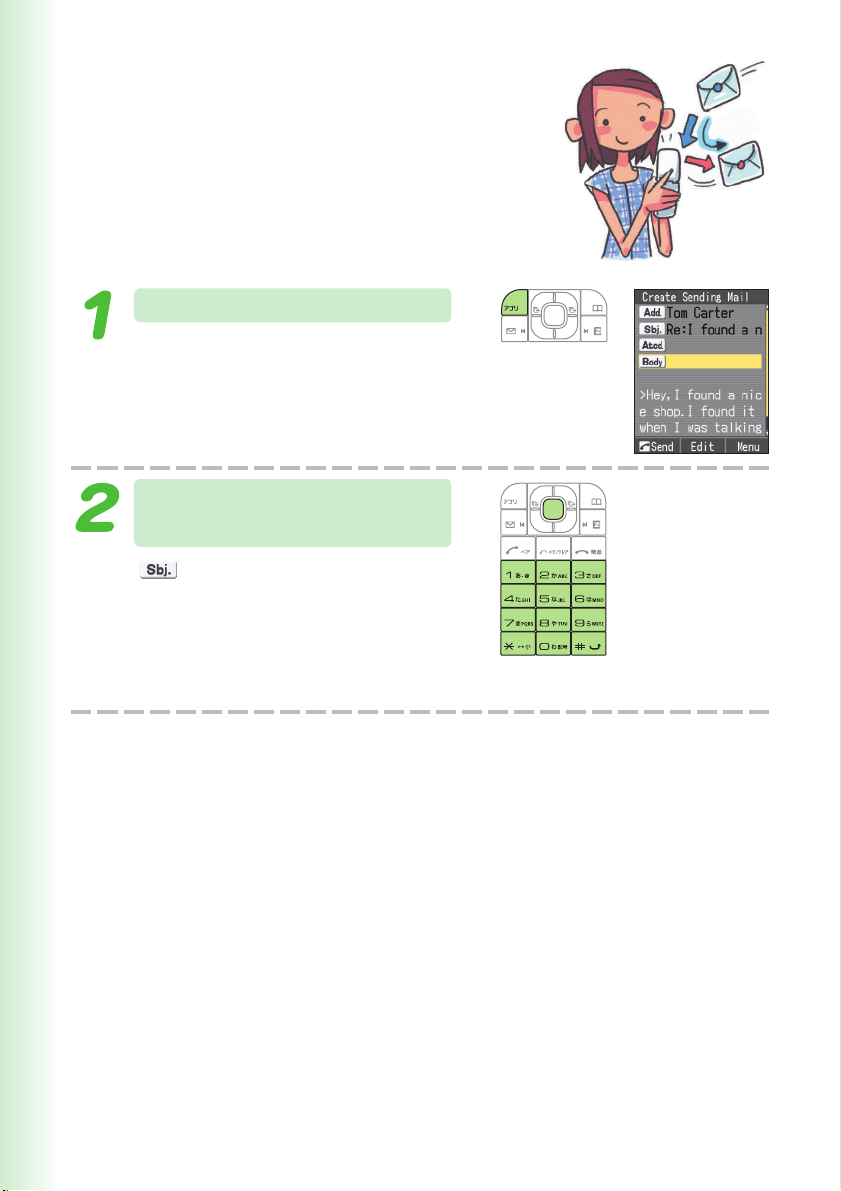
Reply
Replying to a Received E-mail Message
To reply to an e-mail message, perform steps 1
through 3 under “Reading Received E-mail
Messages” (page 48), and then perform the
following steps.
Press % (Reply).
You can also display the e-mail
composition screen by pressing
& (Menu) and then 1 (Reply).
Press c (Edit), and then
enter the body text.
is prefixed with “Re:,” and the body
text of the e-mail is quoted.
For the remainder of this procedure
→Perform the procedure starting from
step 7 under “Creating and Sending
E-mail Messages” (page 46).
Reply
Reply
50
Page 53
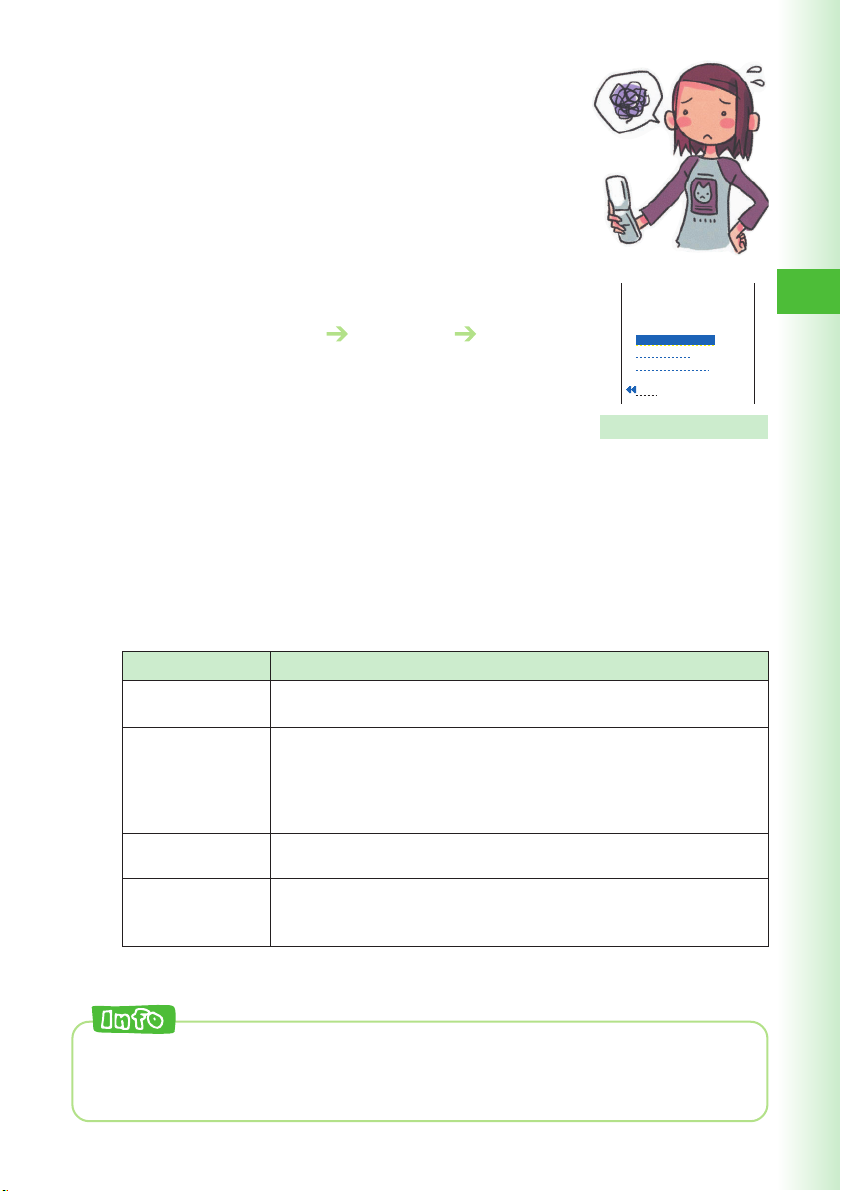
Avoiding Spam
You can use mail filters to block spam, to
receive e-mail from specific sources only, etc.
You can also block any e-mail that includes
“
未承諾広告※ ” (unsolicited advertisement) in
the subject.
■ Configuring Mail Filter Settings
① While the standby screen is displayed, press L.
② Press 7 (E-Mail Setup)
③ Press 3 (メー ルフィル ター /Mail Filters).
④ Enter your PIN, press c (OK), use j to select
“送信” (Send), and then press c (Select).
Your PIN is the 4-digit number you entered on your
subscription contract.
6 (Other) 1 (Yes).
自動的に変更されますの
で変更する必要はありま
せん。
1
未承諾広告
2 アト゛レスフィルター
3
設定にあたって
戻る
Mail filter setting screen
■ Unsolicited Advertisement Filter and Address Filters
● 未承諾広告フィルター(Unsolicited Advertisement Filter)
Blocks any e-mail that includes “ 未承諾広告※ ” (unsolicited advertisement)
in the subject.
●アドレスフィルター(Address Filters)
Item
全受信
(Receive all)
指定受信設定
(
Receive specific
指定拒否設定
(Block specific)
なりすまし規制
(Block imposters)
※You can configure your list of individual e-mail addresses to be blocked any time after
turning on “ 指定受信設定 ” (Receive specific).
Allows receipt of all e-mail.
Allows receipt of e-mail from specified sources only. You can
configure Internet and cellphone domain options (
)
batch settings), and specify individual (
settings) e-mail addresses, domains, and account names (the
part of the address to the left of “@”).
Blocks individually specified e-mail addresses, domains, and
account names (the part of the address to the left of “@”).
Turning on “
(Receive all) will block only e-mail that is configured to look like
it came from a cellphone or PHS phone.
規制する ” (Imposter block) along with “ 全受信 ”
Description
一括指定先 /
個別指定 /individual
フィルター
Mail
You can prevent spam by changing your e-mail address. See “Changing
Your E-mail Address” (page 22) for information about how to change your
e-mail address.
51
Page 54
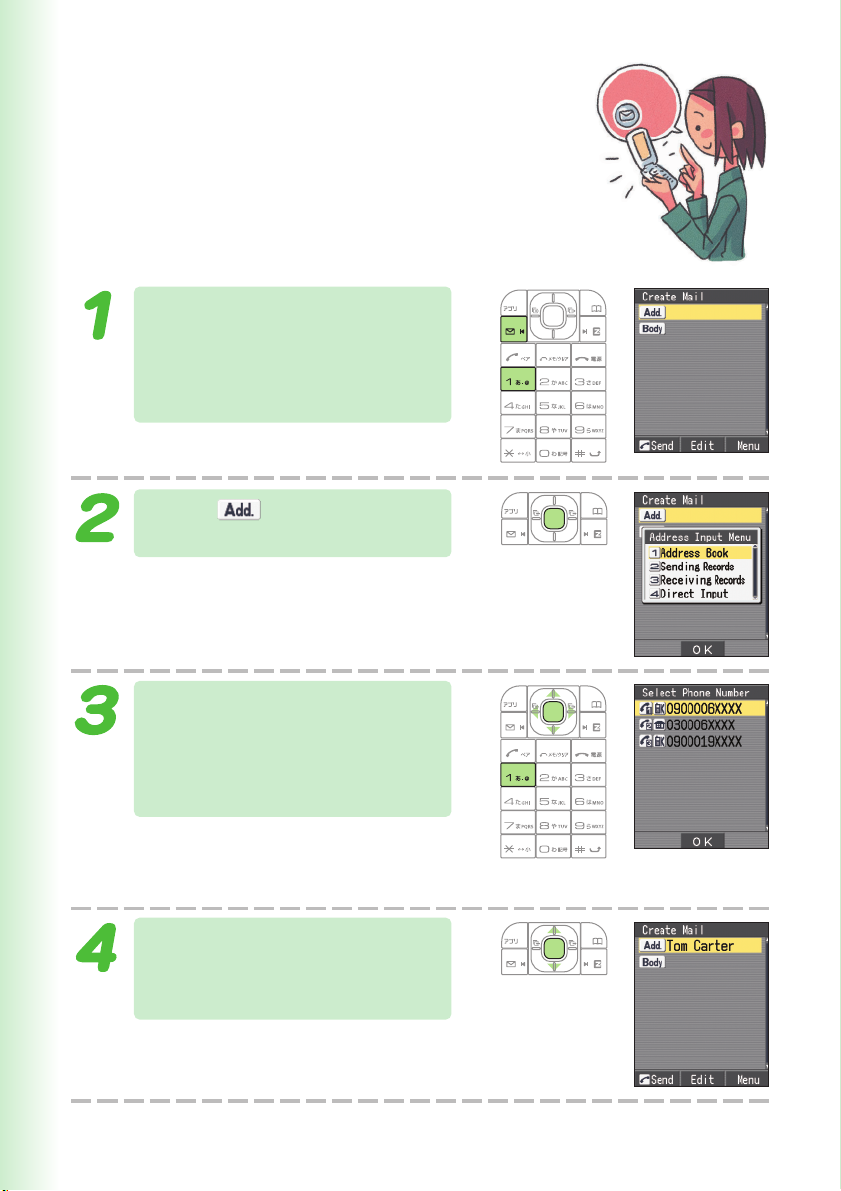
Creating and Sending C-mail Messages
While the standby screen is
displayed, hold down L for
about one second, and then
press
Select , and then press
c (Edit).
1
(Create New).
Hold down
...
52
Press 1 (Address
Book), use a to select an
addressee, and then press
c (Select).
You can also select a phone number
from sending records or receiving
records, or you can enter an address.
Use j to select the phone
number you want to enter,
and then press c (OK).
Page 55
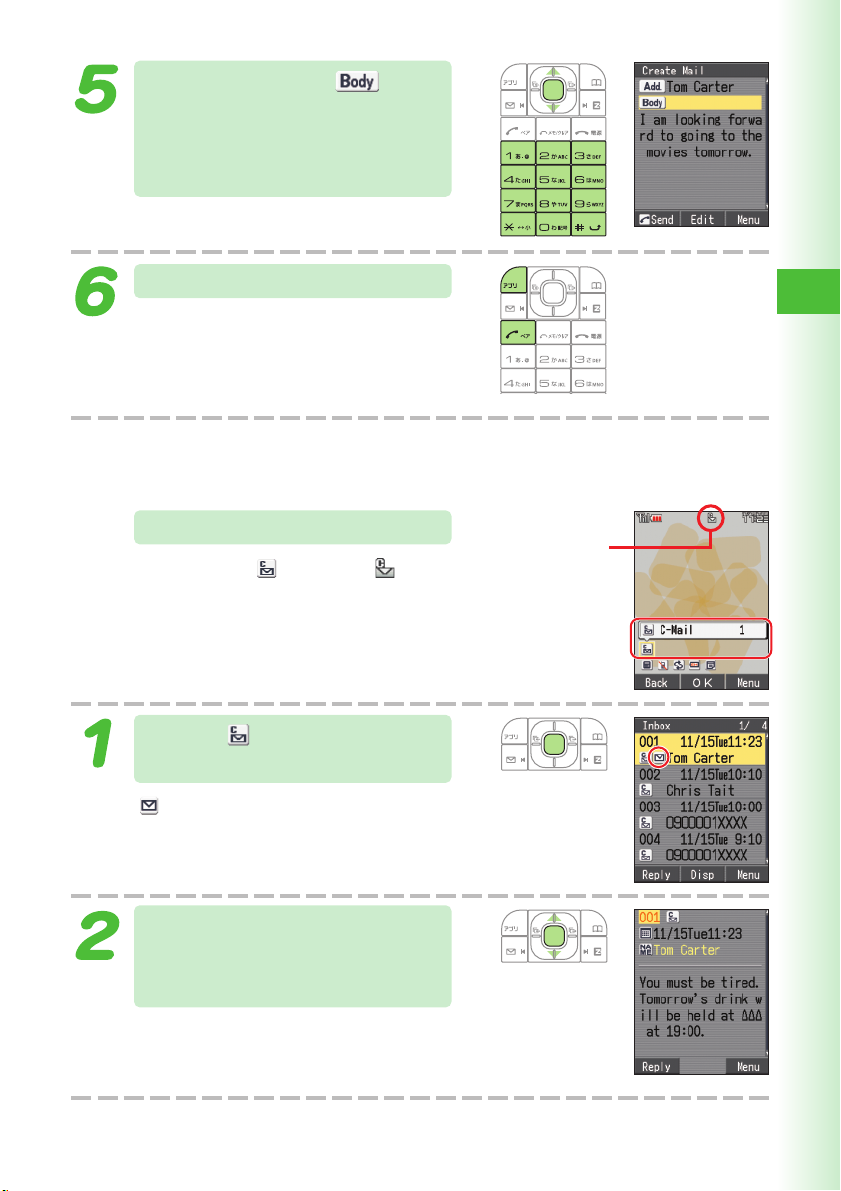
Use j to select , and
then press c (Edit).
Enter the body text, and
then press c (OK).
Press % (Send) or
When the C-mail reaches the other
party, the message “Completed”
appears, and the message is stored in
your sending records.
N
.
Mail
Reading Received C-mail Messages
When you receive a C-mail
The message “ C-Mail” and appear
on the standby screen.
Select “ C-Mail,” and
then press c (OK).
: Indicates an unread message.
Received
C-mail icon
Use j to select the unread
C-mail you want to view, and
then press c (Disp).
The received C-mail message appears.
Use L and R to scroll between messages.
Press C to return to the C-mail message list.
53
Page 56
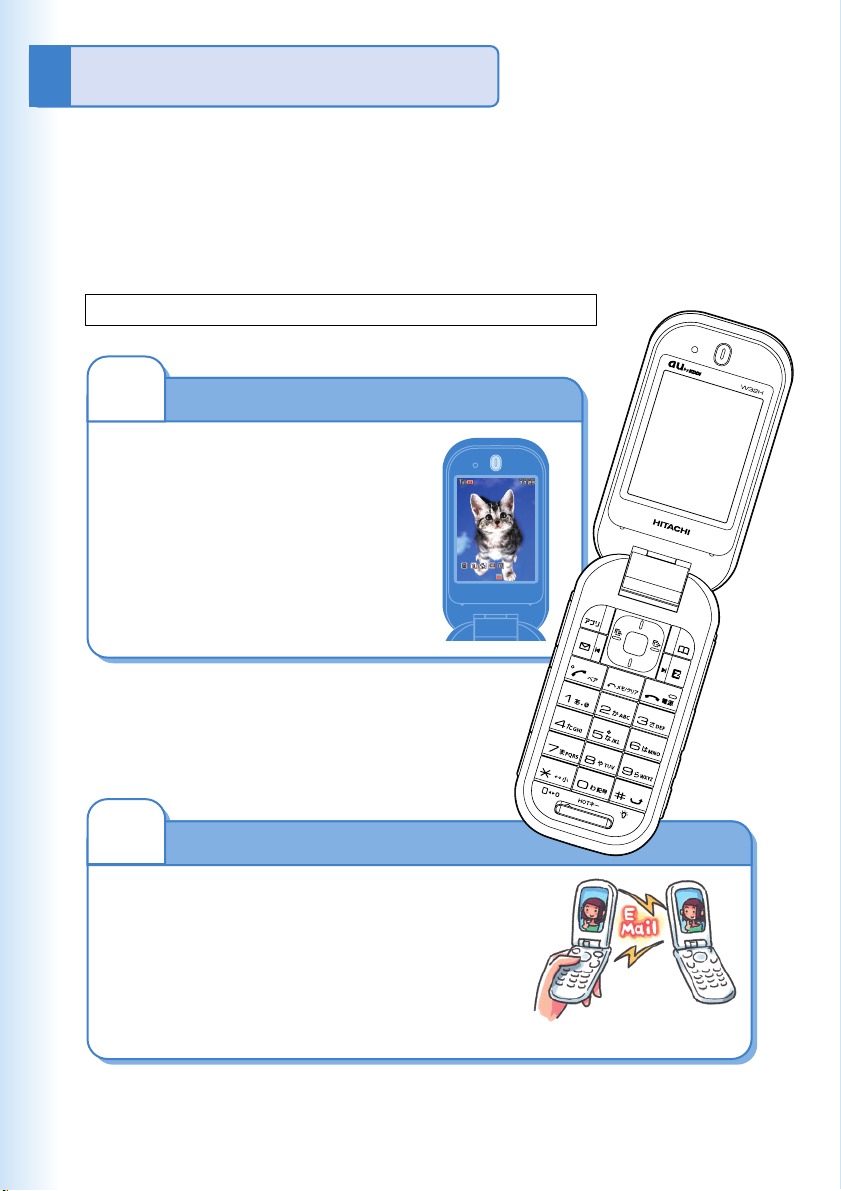
Camera Features
Your W32H comes with a built-in 1.28-million effective pixel
camera that you can use to shoot photos and record movies.
You can attach the photos and movies that you shot/recorded to
e-mail messages.
Using the Camera
Shooting a Photo (page 56) Recording a Movie (page 60)
1
You can use photos you shot for
the standby screen, for the
image that appears while the
ring tone is sounding, and even
in your address book.
2
You can send a photo or a movie (excluding
those recorded in Video Mode) whose data
is up to 500KB
Use your images for W32H functions!
Send images by e-mail!
※
as an e-mail attachment.
54
※
Certain signal conditions may cause e-mail
send and receive to take longer than
normal.
Page 57
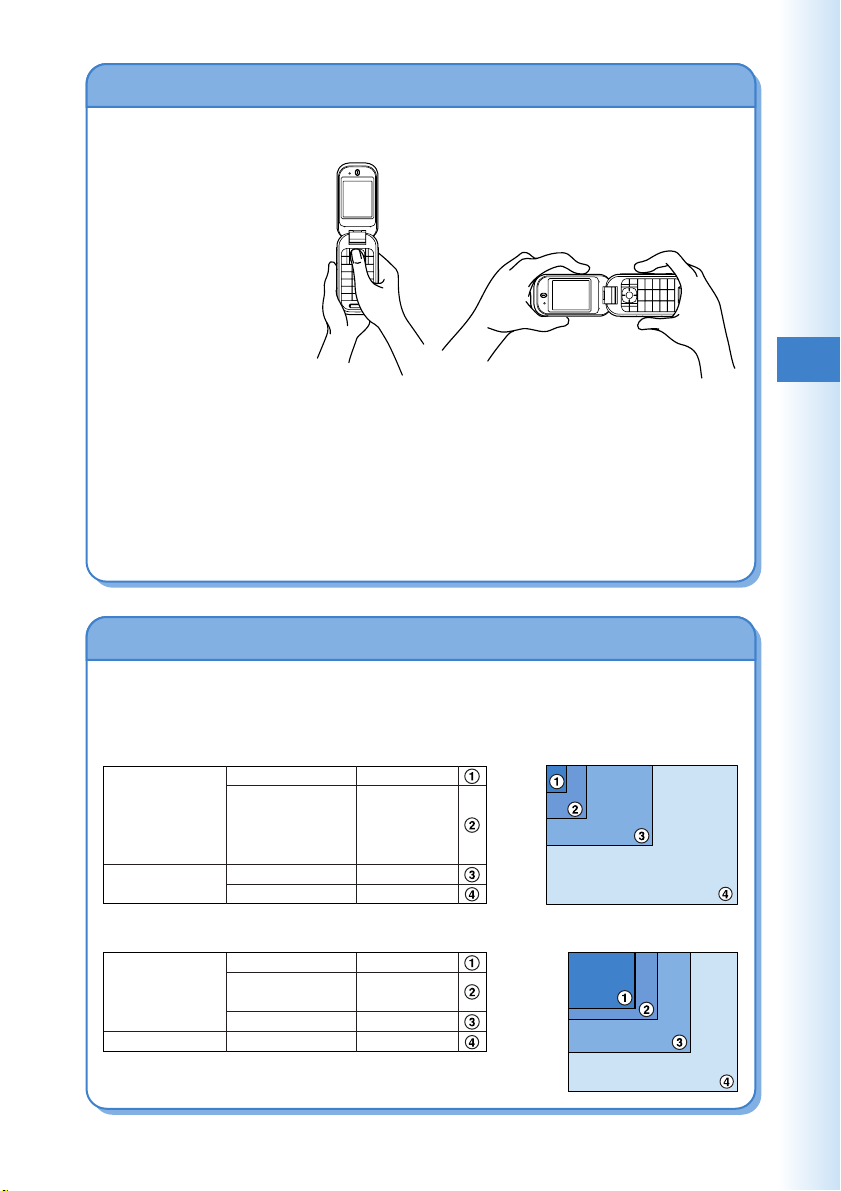
Tips for Better Photos
Shooting in Phone Mode
Taking care to avoid
blocking the lens with your
fingers, hold the camera
securely with both hands.
Use your thumb to press
c (Shutter) to release the
shutter.
Shooting in PC Mode
Taking care to avoid blocking the lens with
your fingers, hold the camera securely with
both hands.
Use the index finger of your right hand to
press ).
Tips for Avoiding Hand Movement
●
Remain steady by keeping your arms lightly against your sides and standing with your feet about
shoulder width apart. Having your arms away from your side or extended in front of you can
cause blurred images.
●
When you press the shutter button, remain still until your shutter tone finishes sounding. This is
especially important when shooting where lighting is dim.
●
A self-timer is also provided for shooting photos. With the self-timer, you do not need to press the
shutter button to shoot a photo, so there is less chance of a blurred image caused by accidental
movement of the phone.
Photo and Movie Sizes
The following shows the sizes of the photos and movies that can
be recorded with your W32H.
Camera
Photo Sizes
Phone Mode
PC Mode
Movie Sizes
Mail Mode
Video Mode
Phone
Wallpaper
Coupling Shot
Updown Shot
Serial Shot
VGA
SXGA
Standard S
Standard M
High Quality M
High Quality L
QVGA
120×160
240×320
640×480
1280×960
96×80
128×96
176×144
320×240
55
Page 58
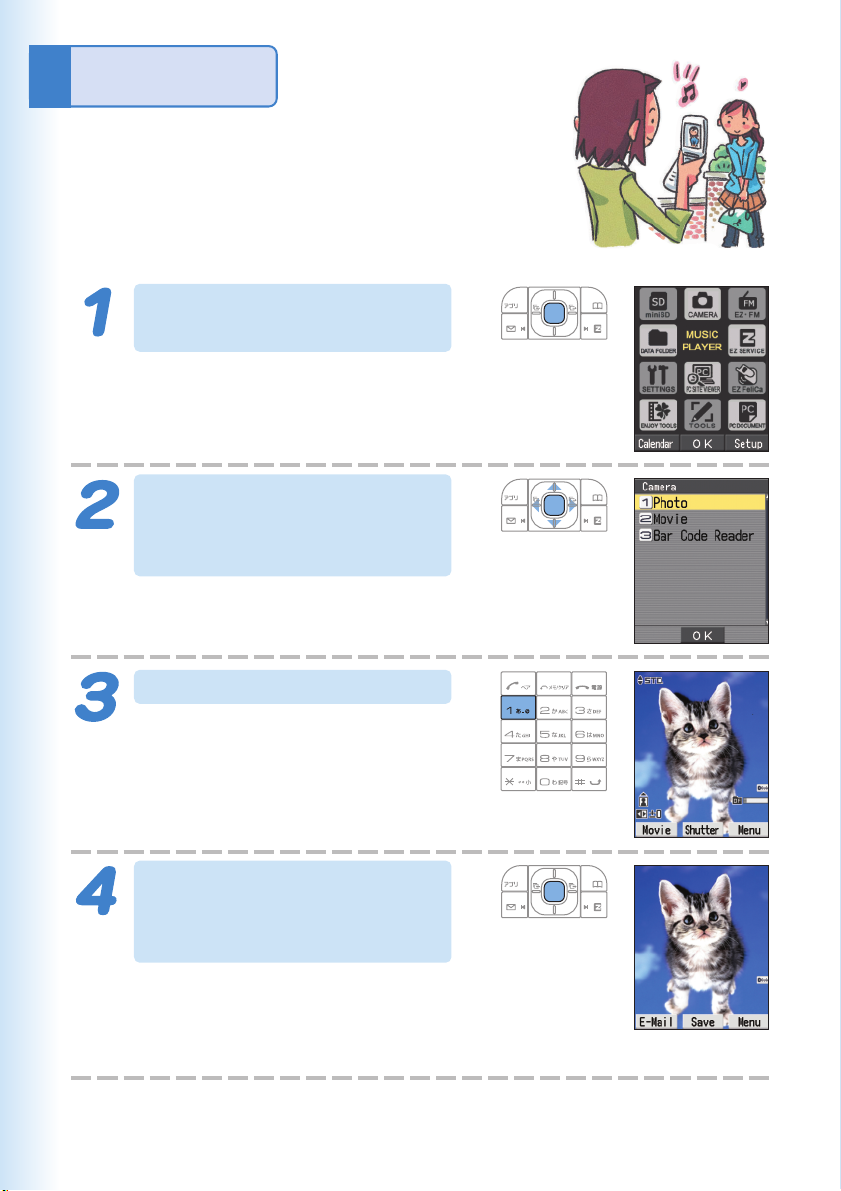
Camera
Shooting a Photo
While the standby screen
is displayed, press c.
Use a to select
“CAMERA,” and then press
c (OK).
56
Press 1 (Photo).
Point the lens at the
subject, and then press
c (Shutter).
The phone emits a shutter sound.
You can also press ) in place of c.
Note that the phone emits the shutter
sound even if it is in Manner Mode.
Page 59
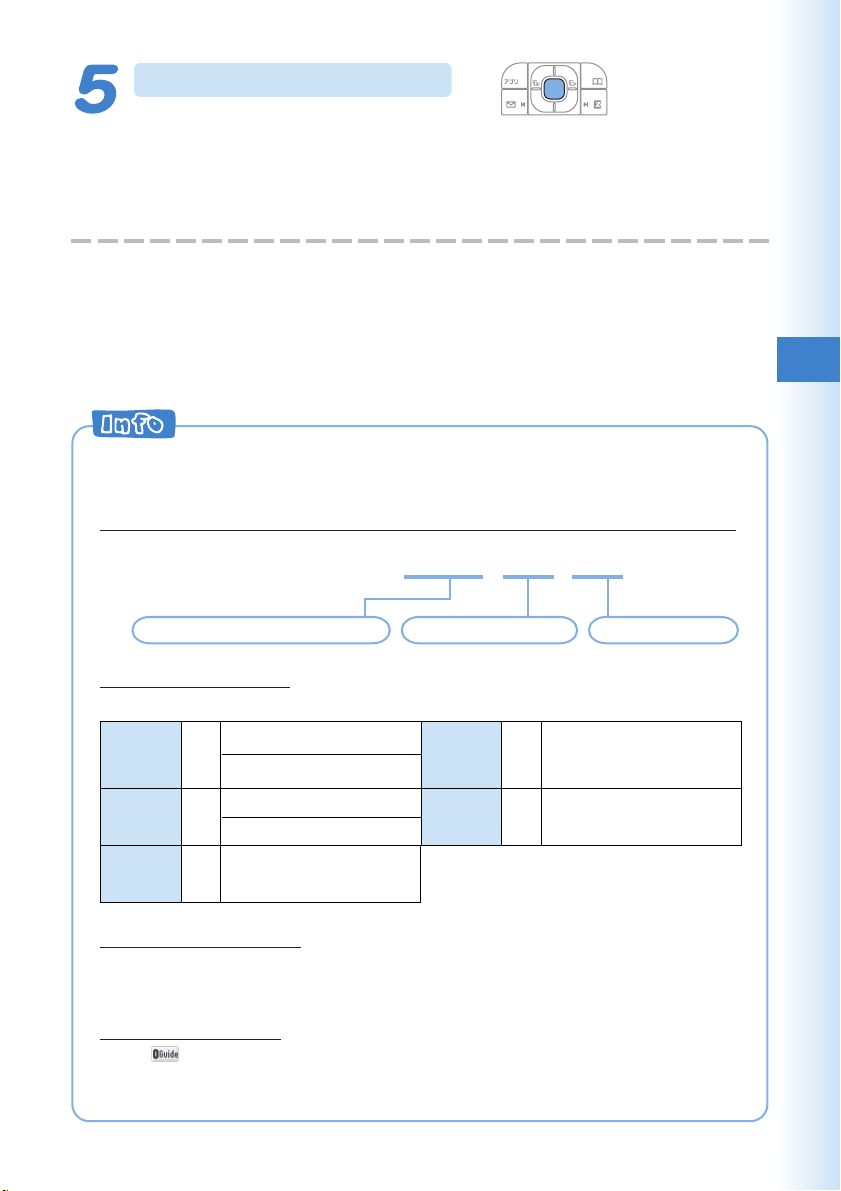
Press c (Save).
The display shows the message “Saved
to data folder (Phone).”, and then
returns to the photo monitor screen.
Photos you shot are saved to the “Photo
Folder,” which is in the Data Folder.
The initial photo mode setting when you purchase your W32H is “Phone
Mode (Wallpaper 240
Meanings of the Photo Titles in the “Photo Folder”, which is in the Data Folder.
Example of a Photo Title
×320)”.
051115_1123
〜
0001
Camera
Date: November 15, 2005
Time: 11:23 a.m.
Serial number
Shooting Techniques
The following useful functions can be used when shooting photos.
Zoom/Wide
Brightness
Shot Light
Press u to zoom in.
j
Press
d to zoom out.
Press l to make the image darker.
s
#
+
r
to make the image brighter.
Press
Use this light when available
lighting is dim.
(Auto→ON→OFF)
Photo Size
Self-timer
Press 1 to cycle through
1
the photo sizes.
Press 5 to toggle the
5
self-timer on and off.
When Shot Mistakenly
If the photo is not what you want, press C or l in place of
c (Save) in step 5 of the above procedure. Next, repeat step 4 to reshoot.
Displaying Key Help
While
(key help icon) is displayed in the lower right corner of the
screen, press 0 to display key help.
Press 0 again to exit key help.
57
Page 60
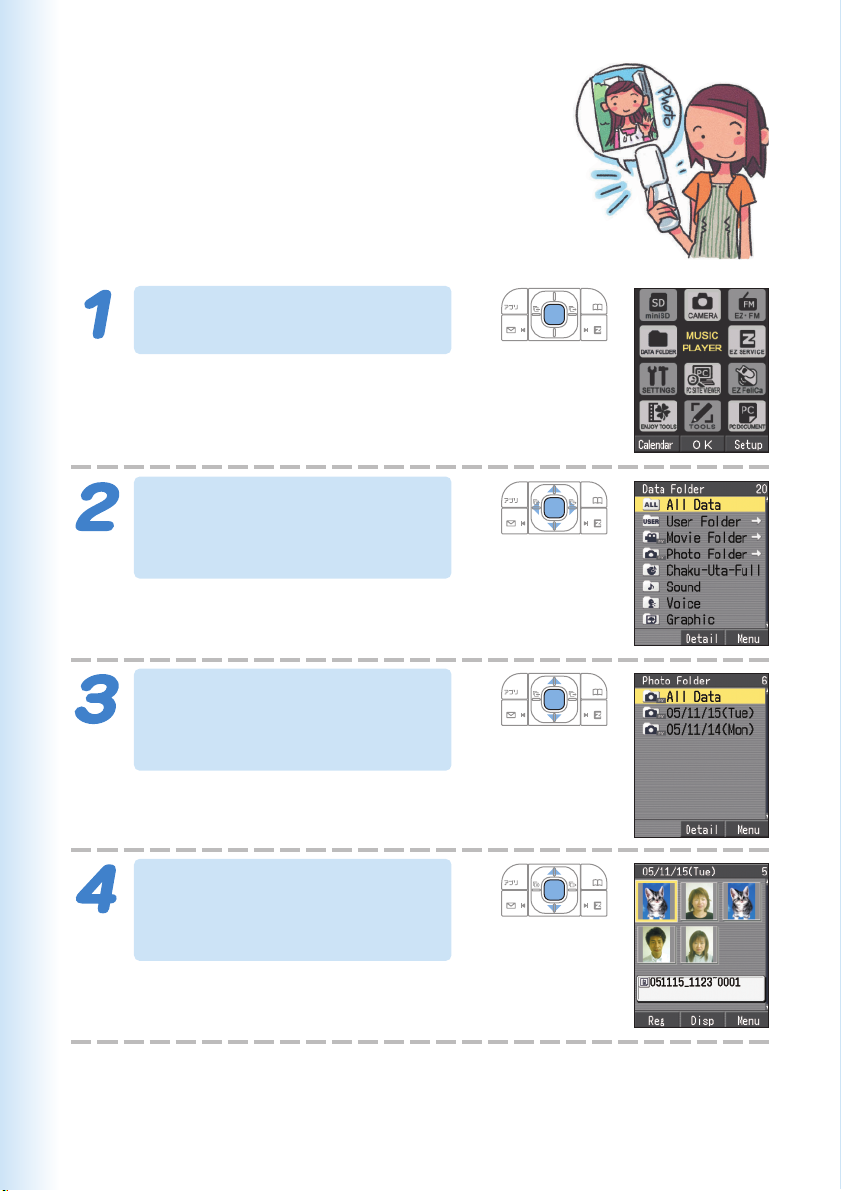
Viewing Photos
While the standby screen
is displayed, press c.
Use a to select “DATA
FOLDER,” and then press
c (OK).
58
Use j to select “Photo
Folder,” and then press
c (Detail).
Selecting “All Data” displays a list of all
photos in the Photo Folder.
Use j to select the dated
(by photos-shot date) folder,
and then press c (Detail).
A list of all photos that were shot on
that day are displayed.
Page 61
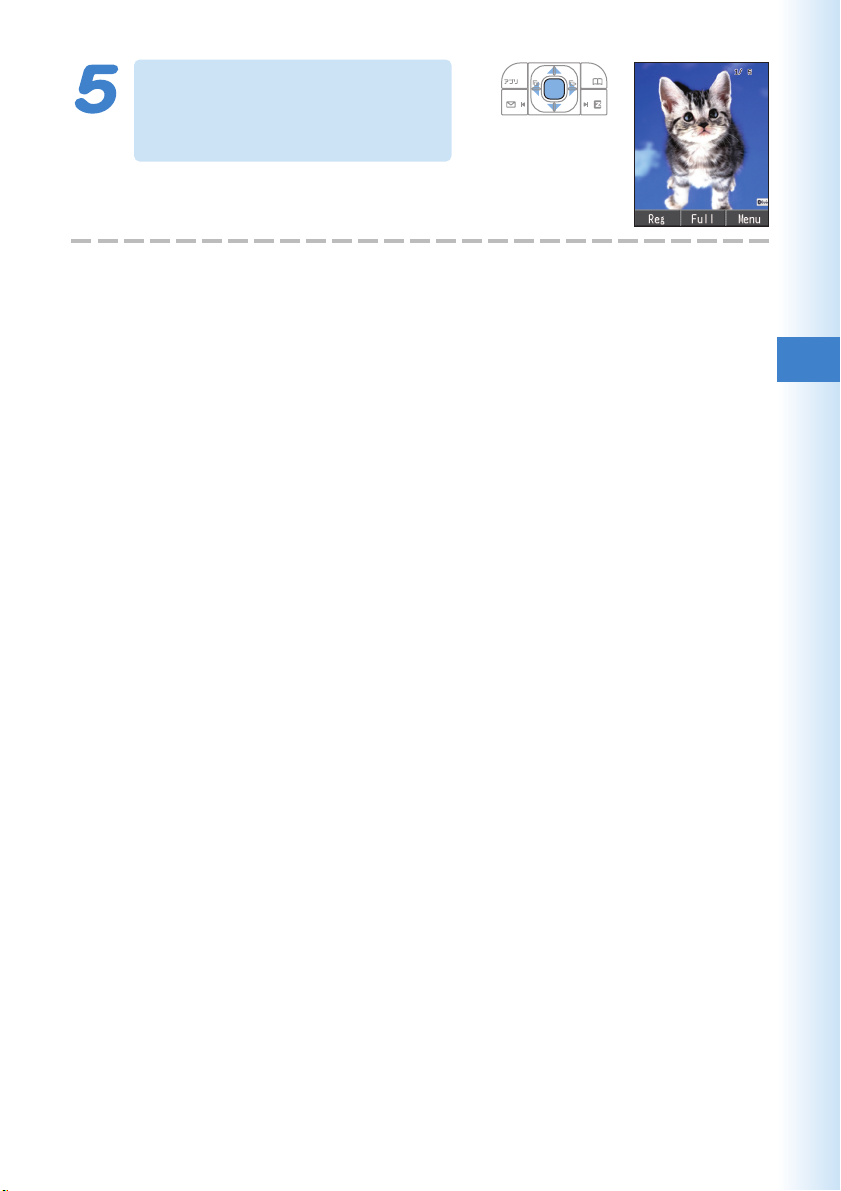
Use a to select the photo
you want to view, and then
press c (Disp).
The photo appears.
Camera
59
Page 62
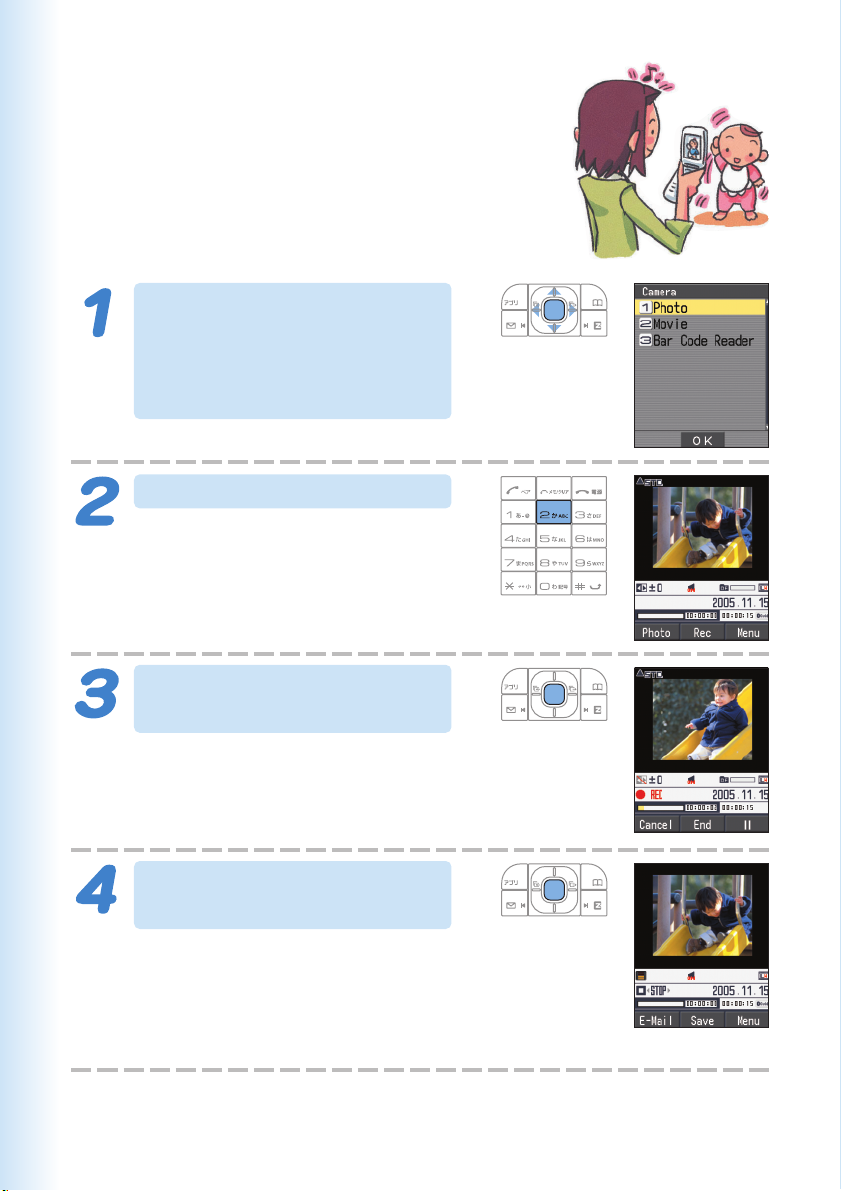
Recording a Movie
While the standby screen
is displayed, press c. Use
a to select “CAMERA,”
and then press c (OK).
Press 2 (Movie).
60
Point the lens at the subject,
and then press c (Rec).
The phone emits a shutter sound to
signal the start of recording.
You can also start recording by
pressing ).
To stop recording, press
c (End).
Even if you do not press c (End),
recording will stop automatically after
about 15 seconds.
The phone emits a shutter sound when
recording stops.
Page 63
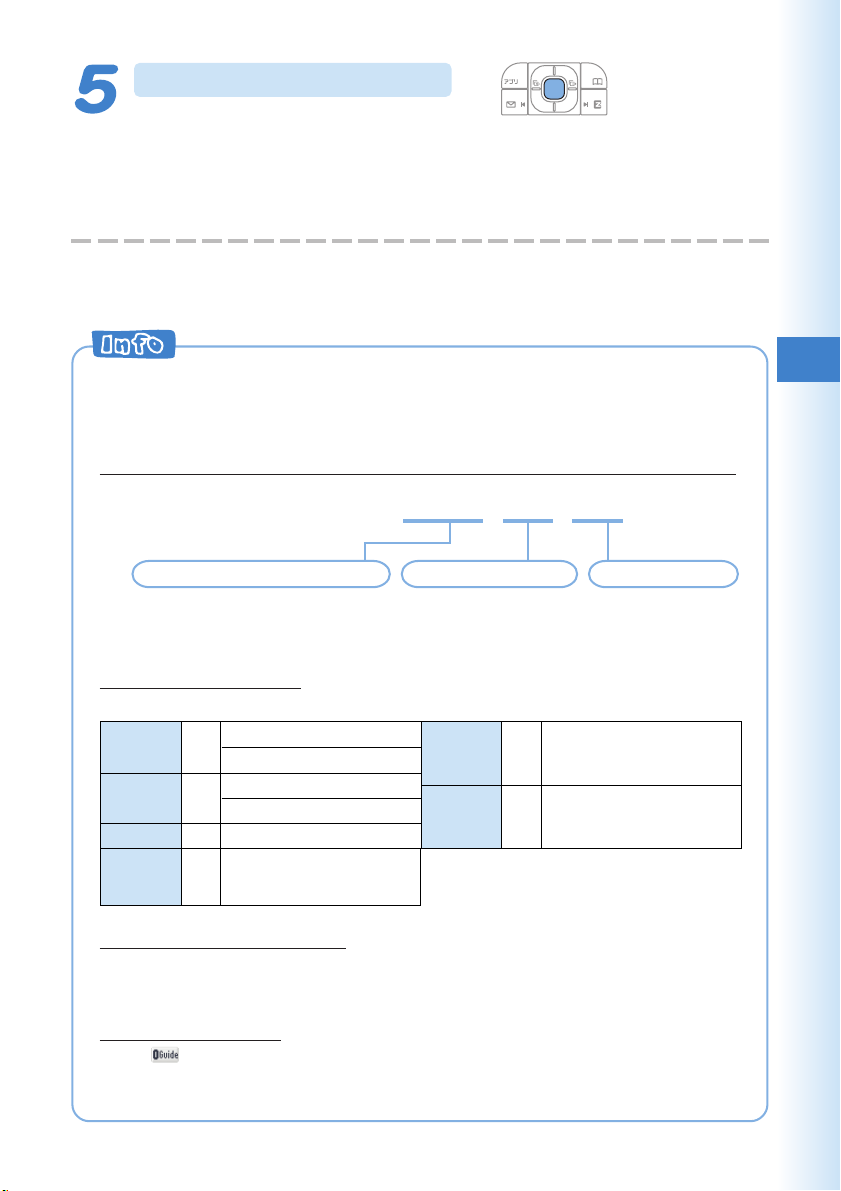
Press c (Save).
The display shows the message “Saved
to data folder (Phone).”, and then
returns to the movie monitor screen.
Movies you recorded are saved to the
“Movie Folder,” which is in the Data Folder.
The initial movie mode setting when you purchase your W32H is “Mail
Mode (High Quality L 176
×144)”. The maximum recording time in “Mail
Mode” is 15 seconds.
Meanings of the Movie Titles in the “Movie Folder”, which is in the Data Folder.
Example of a Movie Title
051115_1123
〜
0001
Time: 11:23 a.m.Date: November 15, 2005 Serial number
※ “S_” is added to the beginning of the movie title when the movie size is
“Standard S”.
Recording Techniques
The following useful functions can be used when recording movies.
Zoom
Brightness
Pause
Shot Light
Press u to zoom in.
j
s
&
#
+
d to zoom out.
Press
Press l to make the image darker.
Press r to make the image brighter.
Press to pause recording.
Use this light when available
lighting is dim.
(Auto→ON→OFF)
Movie Size
Self-timer
Press 1 to cycle through
1
the movie sizes.
Press 5 to toggle the
5
self-timer on and off.
When Recorded Mistakenly
If the movie is not what you want, press C or l and then 1 (Cancel) in
step 5 of the above procedure. Next, repeat step 3 to rerecord.
Camera
Displaying Key Help
While
(key help icon) is displayed in the lower right corner of the
screen, press 0 to display key help.
Press 0 again to exit key help.
61
Page 64
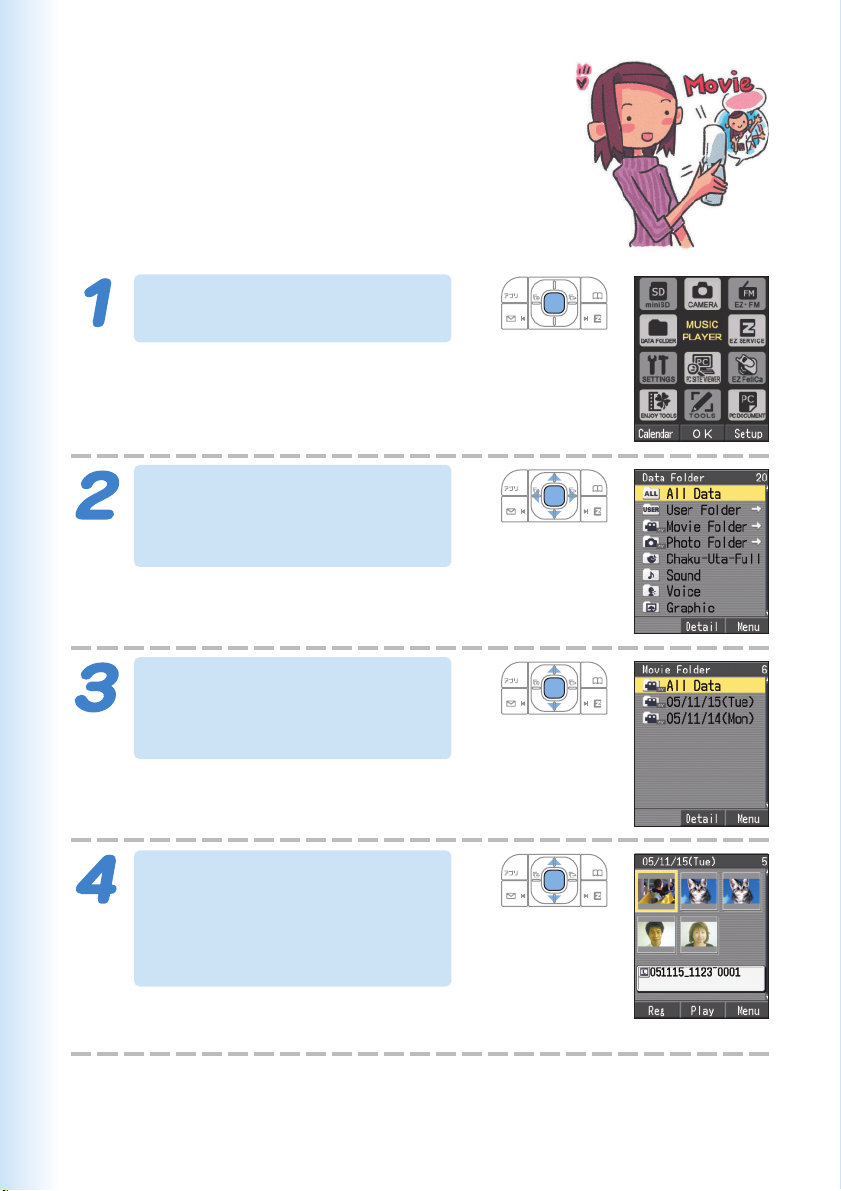
Viewing Movies
While the standby screen
is displayed, press c.
Use a to select “DATA
FOLDER,” and then press
c (OK).
!
i
H
62
Use j to select “Movie
Folder,” and then press
c (Detail).
Selecting “All Data” displays a list of all
movies in the Movie Folder.
Use j to select the dated
(by movies-recorded date)
folder, and then press
(Detail).
c
A list of all movies that were recorded
on that day are displayed.
Page 65
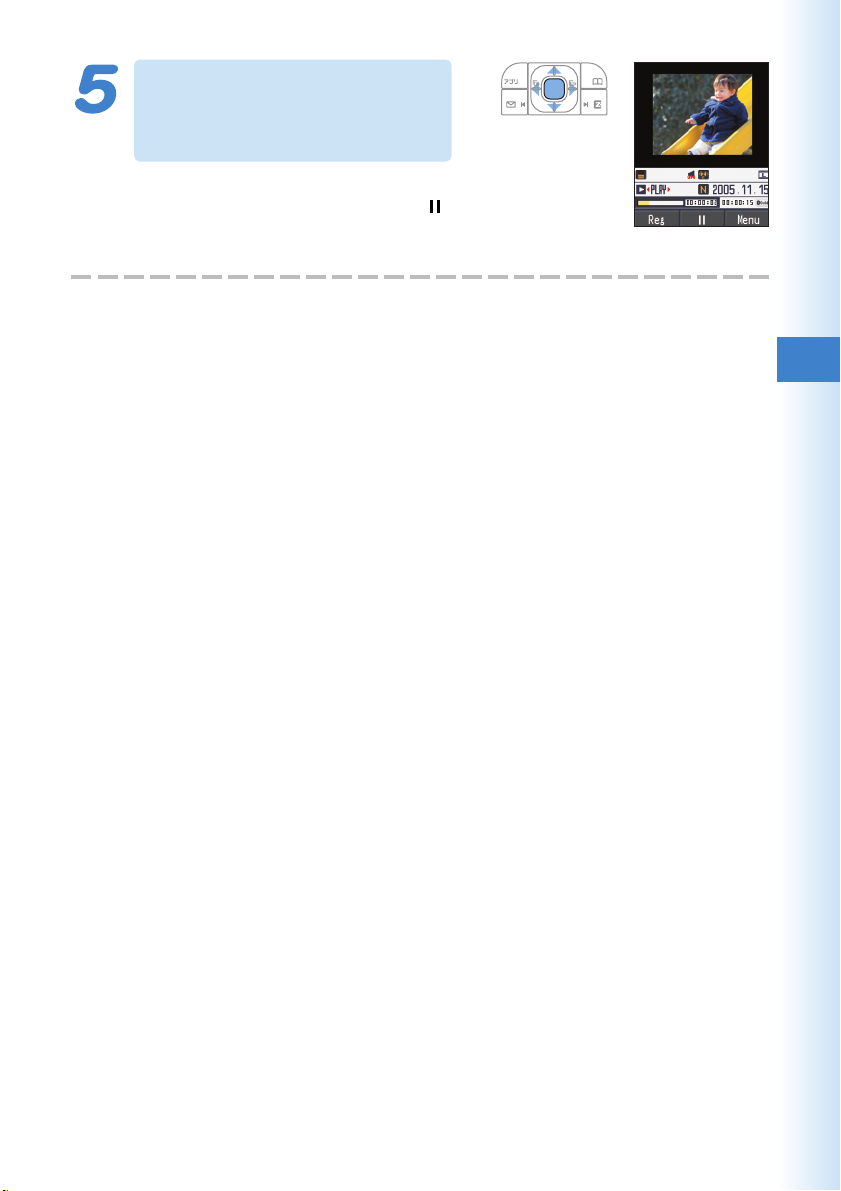
Use a to select the
movie you want to play,
and then press c (Play).
The movie plays.
To pause movie playback, press c (
Playback will stop automatically when
the movie ends.
).
Camera
63
Page 66
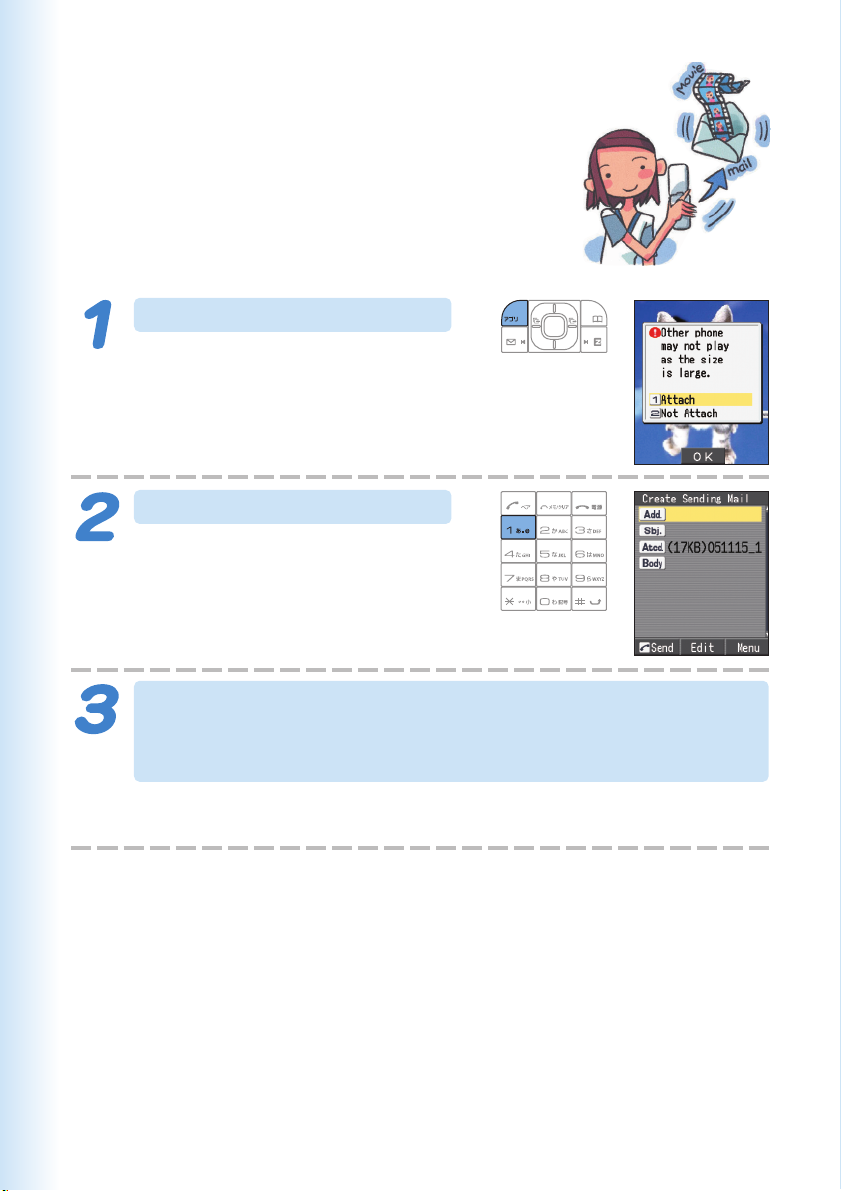
Attaching a Photo or Movie to an E-mail Message
Perform the procedure from step 1 to 4 under
“Shooting a Photo” (page 56) or “Recording a
Movie” (page 60), and then perform the
following steps.
Press % (E-Mail).
Press 1 (Attach).
Photos you shot are stored in the Photo
Folder and movies are stored in the
Movie Folder, which are in the Data
Folder.
64
Perform the procedure starting from step 2 under
“Creating and Sending E-mail Messages” (page 46) to
create an e-mail message.
※ A movie attached to an e-mail can be played on the cellphone that supports
movie playback or on a PC.
Page 67
Using Photo Mail
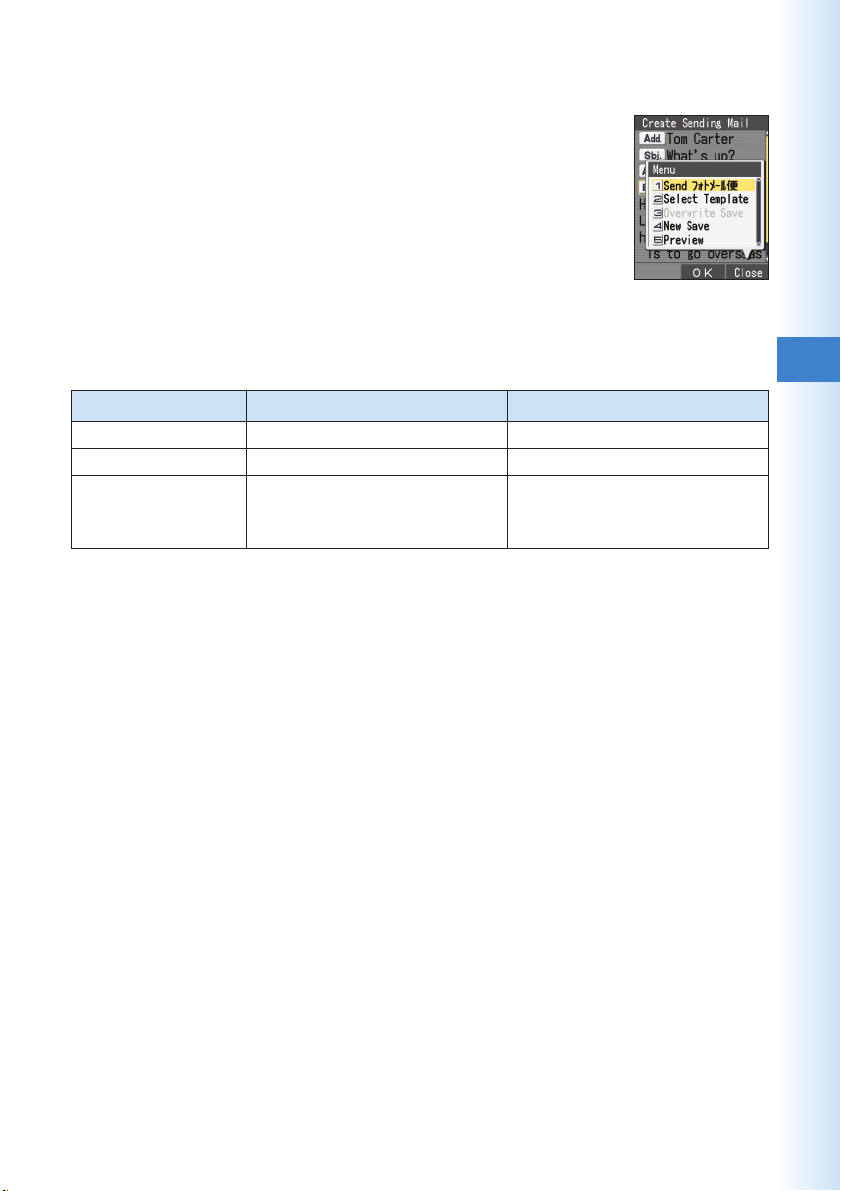
Photo Mail automatically converts images so they can
be viewed correctly on a non-au cellphone. In order to
use Photo Mail, you need to change the receiver’s
e-mail address to a special Photo Mail address.
When you send an e-mail using the auto address
converter, the e-mail address will be converted
automatically as shown below. To use the auto
address converter, press & (Menu) on the e-mail
composition screen, and then press 1 (Send
フォトメール便 ).
Addressee Service
DoCoMo
Vodafone
TU-KA and
au phone without
movie mail support
□ varies depending on subscription region.
E-mail Address
△△△ @docomo.ne.jp
△△△ @ □ .vodafone.ne.jp
△△△ @ezweb.ne.jp
Converted Address
△△△ @d.nepm.jp
△△△ @ □ .vodafone.nepm.jp
△△△ @ezweb.nepm.jp
Camera
65
Page 68
Internet
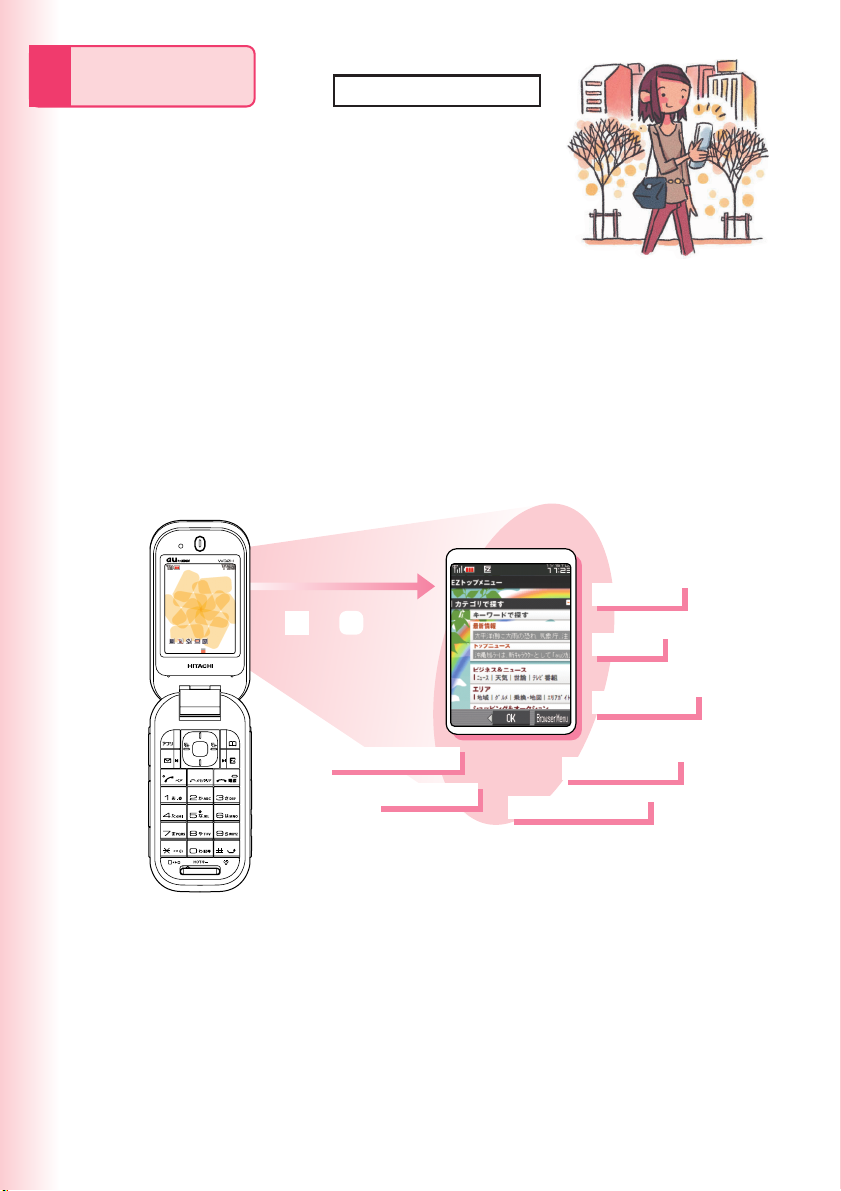
EZweb
EZweb subscription required
Using EZweb
To use EZweb, you need to apply for an EZweb
subscription. If you did not apply when you
purchased your phone, contact your nearest au
shop or the au Customer Service Center.
In addition to an EZweb subscription, you also need to perform an
initialization procedure before you can use EZweb. If you have not
performed initialization yet, refer to “Initializing E-mail and EZweb”
(page 20).
EZweb provides you with access to Chaku-Uta
other web-based contents.
While the standby
screen is displayed
R
➔
c
(OK)
®
, the latest news, and
Internet
Internet
Wallpaper
Games
66
Weather reports
Chaku-Uta
®
Latest news
Traffic reports
Chaku-Uta-Full
TM
Page 69
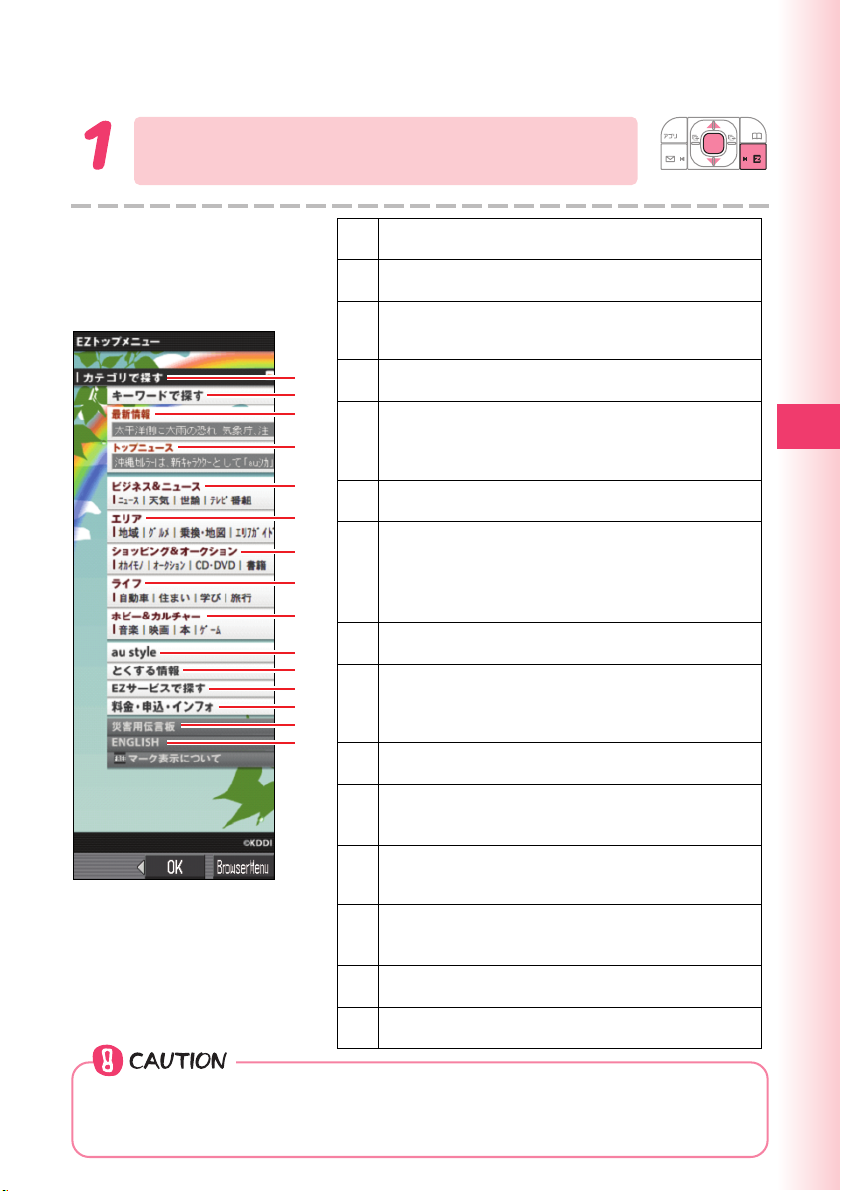
Displaying the EZ Top Menu
While the standby screen is displayed, press R, use
j
to select “Top Menu,” and then press c (OK).
1
2
3
4
5
6
7
8
9
!
"
#
$
%
&
カテゴリで探す
1
Searches for a site by category
キーワードで探す
2
Searches for a site with a keyword
最新情報
3
Introduces the list of new special features or
contents started at EZweb
トップニュース
4
Provides the automatically-updated latest top news
ビジネス&ニュース
Provides the latest information such as news,
5
weather, share prices, and other information
beneficial for business
エリア
6
Provides information such as weather or map by districts
ショッピング&オークション
Provides information about shopping malls where
you can purchase goods with your cellphone and
7
the information about the auction where you can
put up or go for easily
ライフ
8
Provides information beneficial for daily life
ホビー&カルチャー
Provides the latest information about games,
9
fortune-telling, music, e-books, and information
about hobby and entertainment trends
austyle
!
Introduces au-recommended information and sites
とくする情報
"
Provides presents and beneficial information
exclusively for EZweb service subscribers for free
EZサービスで探す
#
Introduces useful and amusing recommended
services special to EZweb
料金・申込・インフォ
$
Provides phone bills, procedures, au information,
and au on-line manuals
災害用伝言板
%
Registers/checks the safety information in disasters
ENGLISH
&
Introduces English sites
(Search by category)
(Search by keyword)
(Latest Information)
(Top News)
(Business & News)
(Area)
(Shopping & Auctions)
(Daily life)
(Hobbies & Culture)
(Valuable Information)
(Search by useful EZ services)
(Charges, Applications, and Info)
(Disaster Message Board)
EZweb
◎The layout and contents of the EZweb screens are example. These are
subject to change.
◎Some sites charge for content in addition to call charges.
67
Page 70
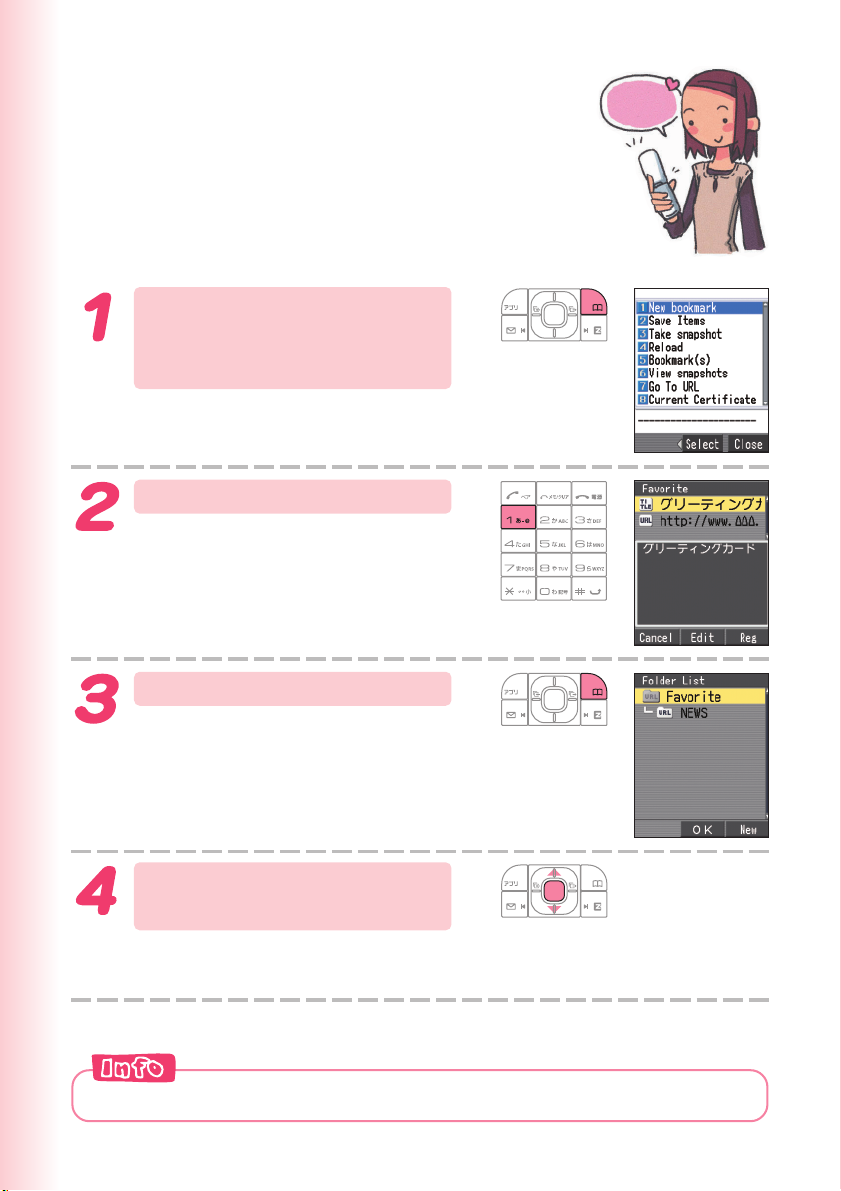
Bookmarking Sites You Frequently Access
Display the site you want to
bookmark, and press
&
(BrowserMenu).
Bookmark
!
it
Press
※ You may not be able to bookmark
1
some sites.
(New bookmark).
Press & (Reg).
Use j to select a folder,
and then press c (OK).
The message “Registered” appears
when completed.
You can have up to 100 sites bookmarked in the Favorite Site list.
68
Page 71
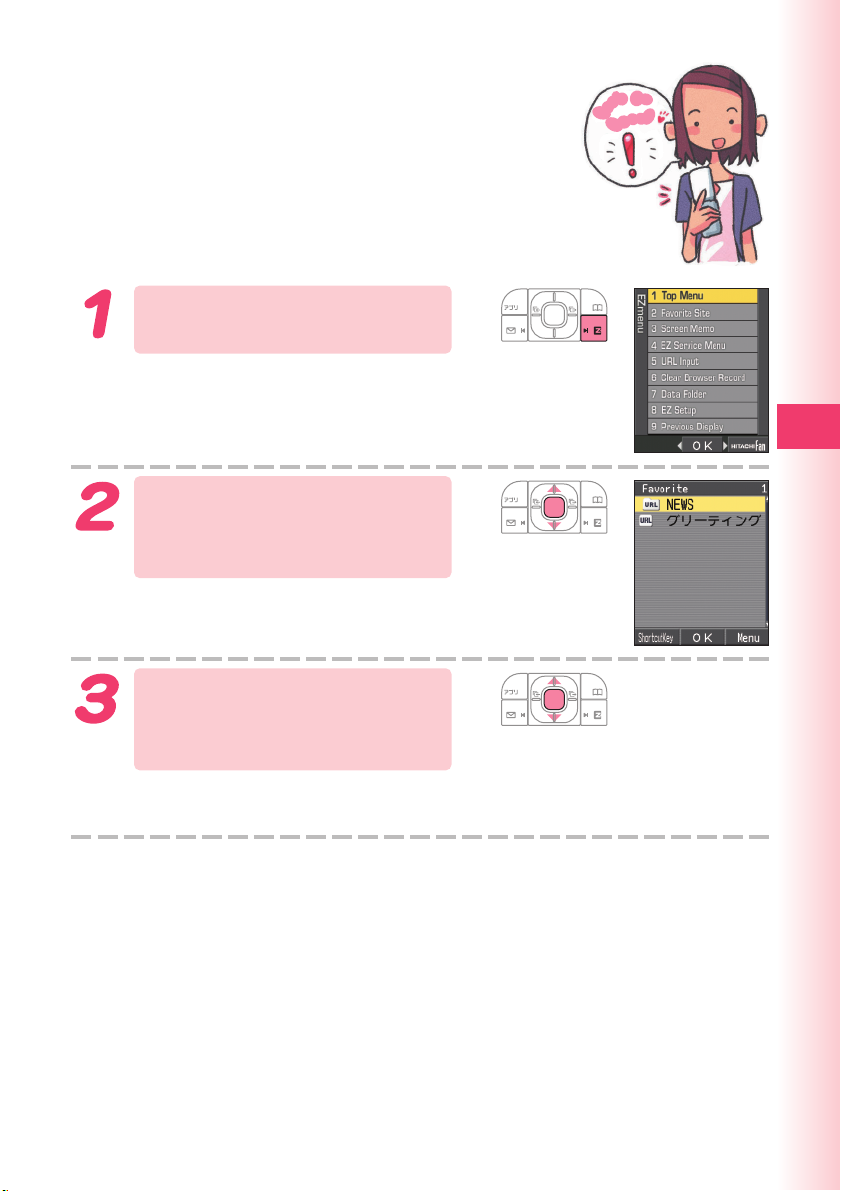
Viewing a Bookmarked Site
While the standby screen
is displayed, press R.
Use j to select “Favorite
Site,” and then press
c (OK).
g
o
s
’
t
e
L
!
e
r
e
h
EZweb
Use j to select a site or
folder, and then press
c (OK).
If you selected a folder, use j to
select a site and then press c (OK).
69
Page 72
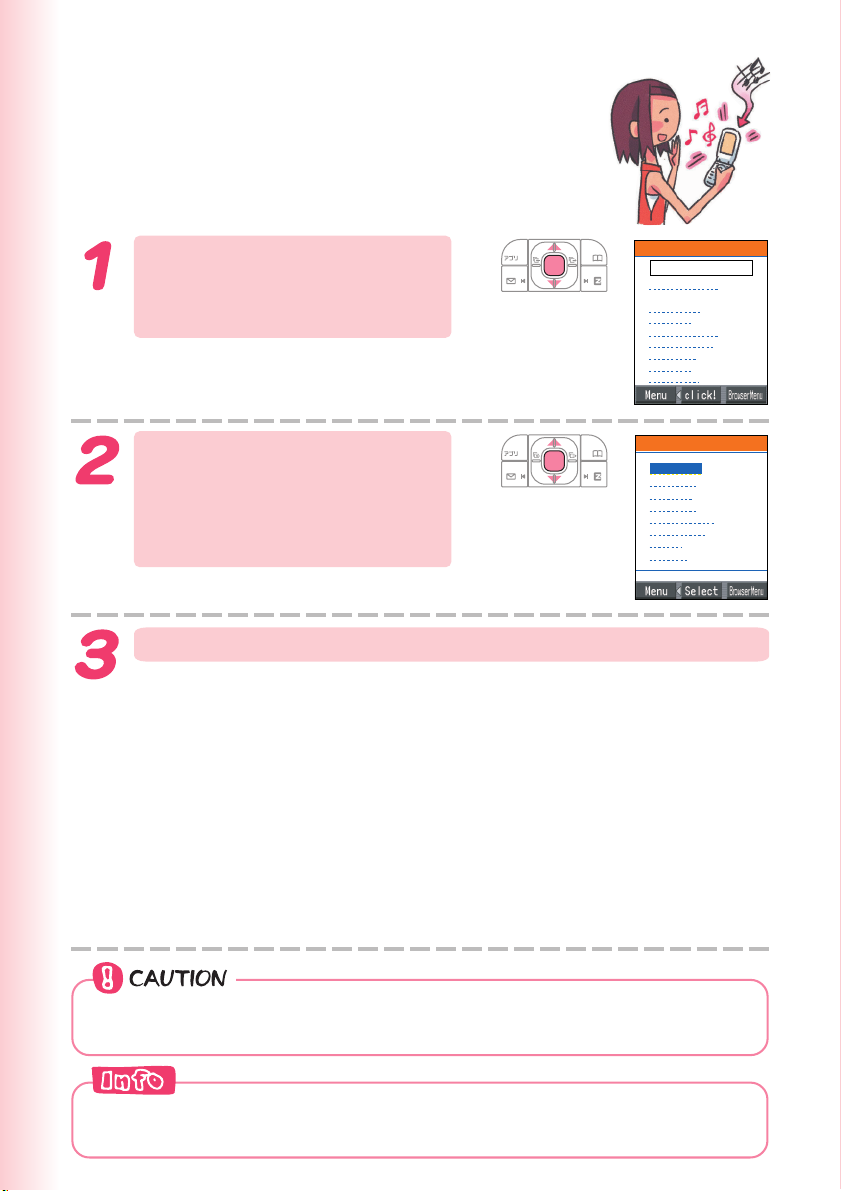
Downloading Chaku-Uta
®
To download a Chaku-Uta®, perform step 1
under “Displaying the EZ Top Menu” (page 67),
and then perform the following steps.
Use j to select “
探す
” (Search by Category),
カテゴリで
and then press c (OK).
Use j to select “ 着うた・
着ムービー
” (Chaku-Uta®/
Chaku-Movie), and then
press c (Select).
Select the content (site) you want to use, and then download it.
カテコ゛リ
で探す
EZサービス
で探す
┗
au
のおすすめ
サービス
フル
ムーヒ゛ー
1
)
はこ
ム−ヒ゛−
128
)
)
)
)
ニュース
・天気
着うた
着うた・着
着Flash(アニメ)
メロテ゛ィ
着信
待ちうた
カラオケ・ホ゛イス
画像・
キャラクター
着うた・着
J-POP
・総合(
・
ケ゛ーム(26
アニメ
TV
・映画(34)
ロック
・洋楽(30)
クラフ゛・インテ゛ィース゛(36
クラシック・シ゛ャス゛(26
着
ムービー
(93)
着実況!(
カテコ゛リ
別へ
In order to use fee-based contents, you need to enter your EZ password or
premium EZ password.
EZ Password:
This is the 4-digit number you specified when you originally subscribed to the
fee-based contents.
Premium EZ Password:
This is the 4 to 8-digit number you registered for your first “
い
” (combined au payment service) payment.
Input the required password in accordance with the instructions that appear on
the display. The first time you use a site, register the password you want to use.
To download information, follow the instructions that appear on the display.
Downloaded data is stored in the Data Folder.
In addition to call charges, you will be charged in accordance with the pricing policy
®
of each site to download Chaku-Uta
and other contents from a fee-based site.
Perform the same procedure to download wallpaper and use it for the
standby screen background.
70
まとめて au 支払
Page 73
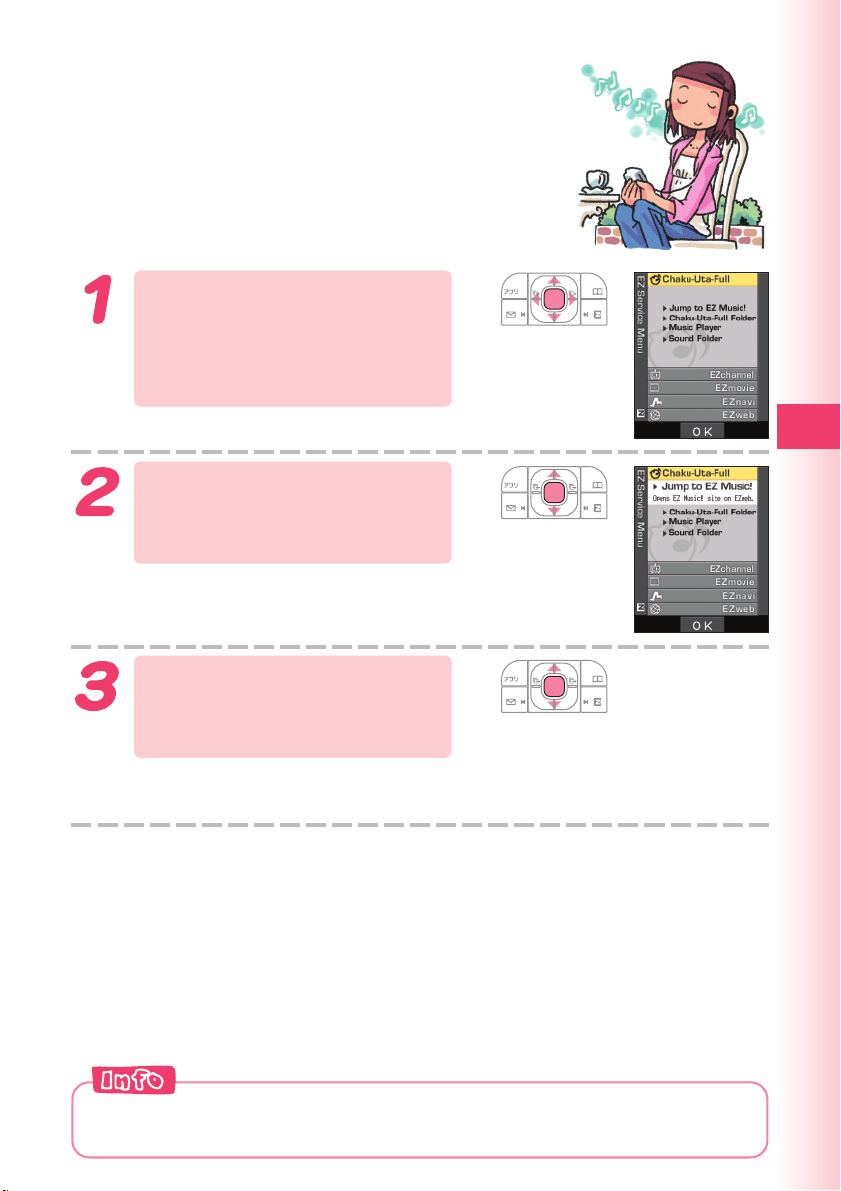
Downloading Chaku-Uta-Full
While the standby screen is
displayed, press c, use
a
to select “EZ SERVICE,
and then press c (OK).
Use j to select “Chaku-
Uta-Full,” and then press
c (OK).
TM
”
EZweb
Use j to select “Jump to
EZ Music!,” and then press
c (OK).
This operation connects the phone to “EZ Music!”. For the operations after
connecting, follow the instructions displayed on the screen.
You can also download Chaku-Uta-FullTM by selecting “着うたフル” (ChakuUta-Full
TM
) performing step 2 under “Downloading Chaku-Uta®” (page 70).
71
Page 74
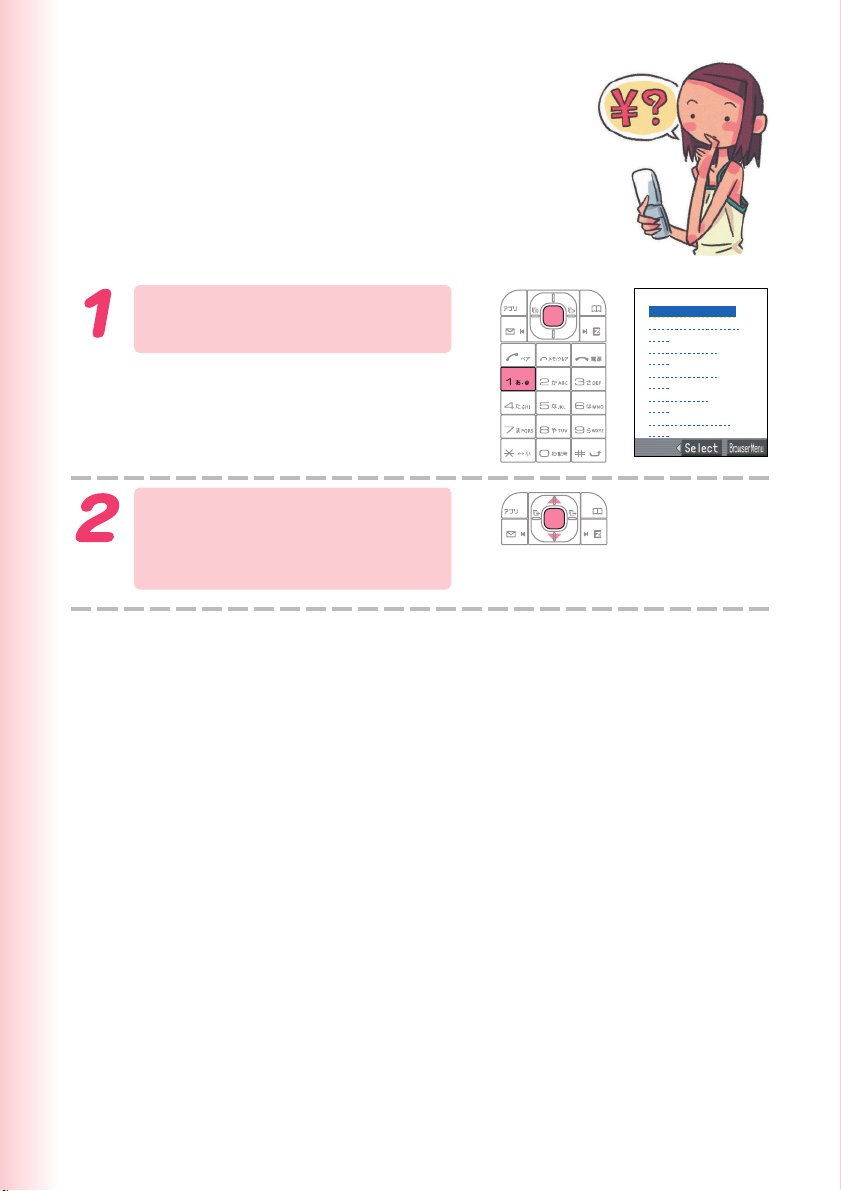
Checking Charges
You can check call and transmission charges.
While the standby screen is
displayed, press
c11
Use j to select the item
you want to check, and
then press c (Select).
■料金照会■
料金お知らせ
1
.
2
3
ご請求金額照会
説明
4
5
6
サーヒ゛ス
通話料・通信料照会
説明
未払い料金照会
説明
料金のお支払
説明
累計ポイント照会
説明
72
Page 75
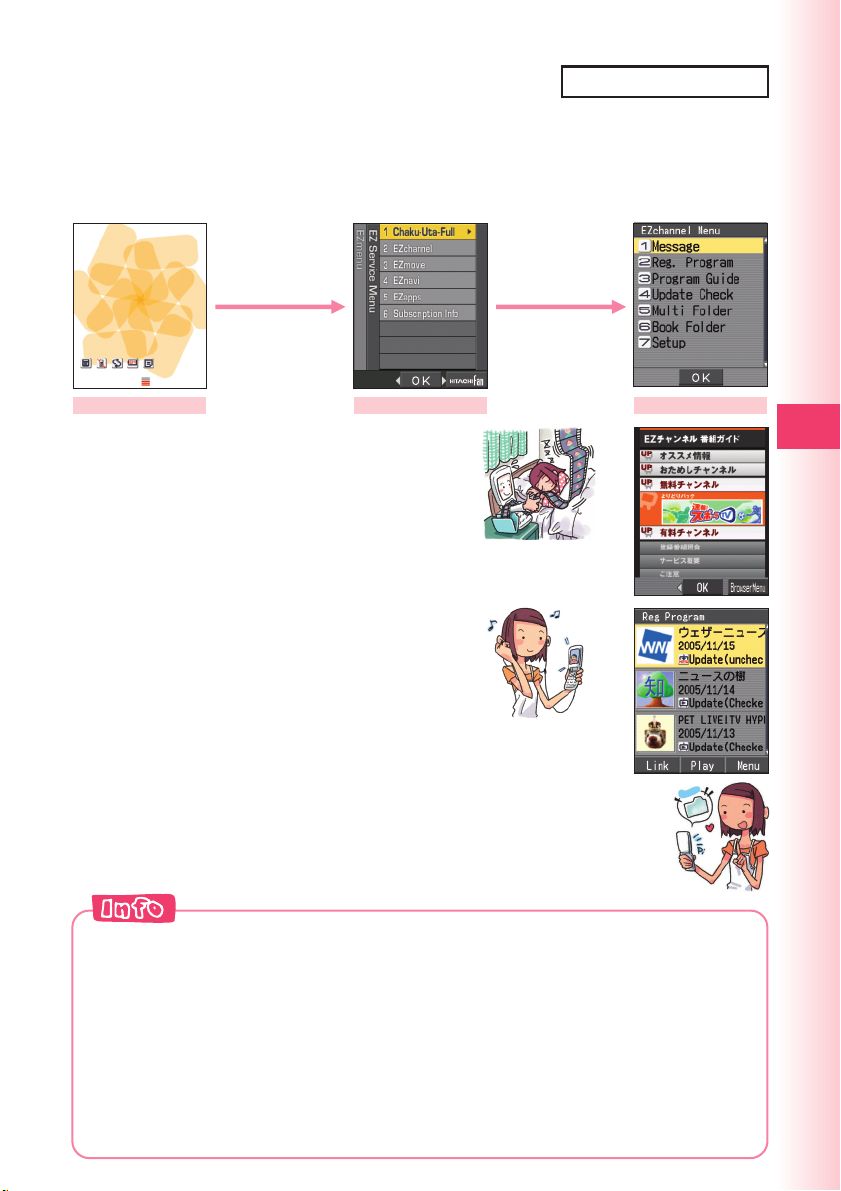
EZ Channel
EZweb subscription required
EZ Channel is au’s unique mobile program delivery service that latest
contents are automatically delivered to you to enjoy just like TV programs
or magazines simply by registering your favorite programs on W32H.
■ Displaying EZ Channel Menu
R→Use j to
select “EZ Service
Menu” and then
press c (OK).
EZ Service MenuStandby screen EZ Channel Menu
Use j to
select “EZchannel”
and then press
c (OK).
■ Enjoying EZ Channel
①
Register the programs you are interested in.
You can register up to 3 programs from “Program
Guide”.
They are downloaded automatically since late
night to early morning, and then saved in “Reg.
Program”.
② Playback the program.
You can watch the program saved to “Reg.
Program” whenever you want.
③ Save the program.
When a registered program is updated, the program is overwritten with new one.
You should save the programs you do not want to delete in “Multi Folder” etc.
※In some cases, you may not be able to move a program because of
copyright protection.
© ナノ・メディア
スポーツ・アイネットワーク
©
© 伊藤忠商事
weathernews
©
時事通信/アクセス・パブリッシング
©
© SCN
EZweb (EZ Channel)
e
v
a
S
◎You need to perform an initialization procedure before you use
EZ Channel. If you have not performed initialization yet, refer to
“Initializing E-mail and EZweb” (page 20).
◎With EZ Channel service, you will get a relatively large-sized data by
each program (maximum of about 3MB). To cost less, you may want to
subscribe to Packet Communication Discount Service before use.
◎When the scheduled delivery time comes, the programs are
automatically downloaded. Turn on the cellphone with its battery pack
full, and put it in the area where reception condition is good.
◎
The display layout and contents are examples. These are subject to change.
73
Page 76
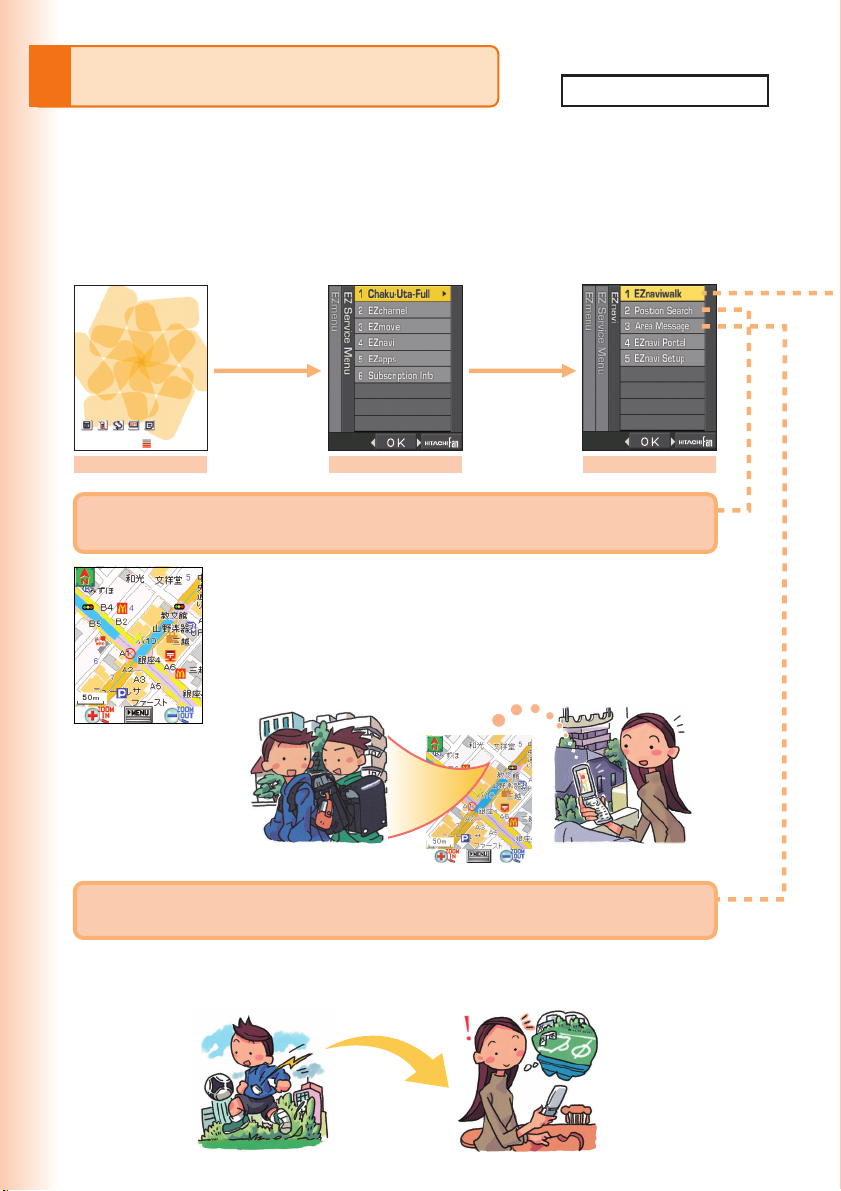
EZ Navi Features
EZweb subscription required
EZ Navi uses global positioning system (GPS) information to
provide you with a wealth of useful information.
You can use “EZ Navi Walk” that navigates you to your destination,
“Position Search” that allows you to check where your child is,
and “Area Message” that lets you know when your child is coming
close to destination.
R
→Use j to
select “EZ Service
Menu” and then
press
c
(OK).
Standby screen EZ Service Menu
Use j to
select “EZnavi”
and then press
c (OK).
When you wonder where your child is: “
(Position Search)
This is a service that you can check the position of an au cellphone
supporting “Position Search” by the operation on W32H. There are
two kinds of services: “
that sets a specified cellphone to let you know where it is, and “
も位置確認
search the location of a specified au cellphone with no operation on it.
” (Auto Position Search) (fee-based) that allows you to
位置確認メール
EZnavi menu
安心ナビ位置確認
” (Position Search Mail) (free)
”
いつで
When you want to be notified of a specified period of time
or area: “
You can set other cellphones as specified number and specified area to let you know
when his/her arrival/leaving information. You can also set this information automatically
send to another au cellphone.
安心ナビエリア通知
” (Area Message)
74
Page 77
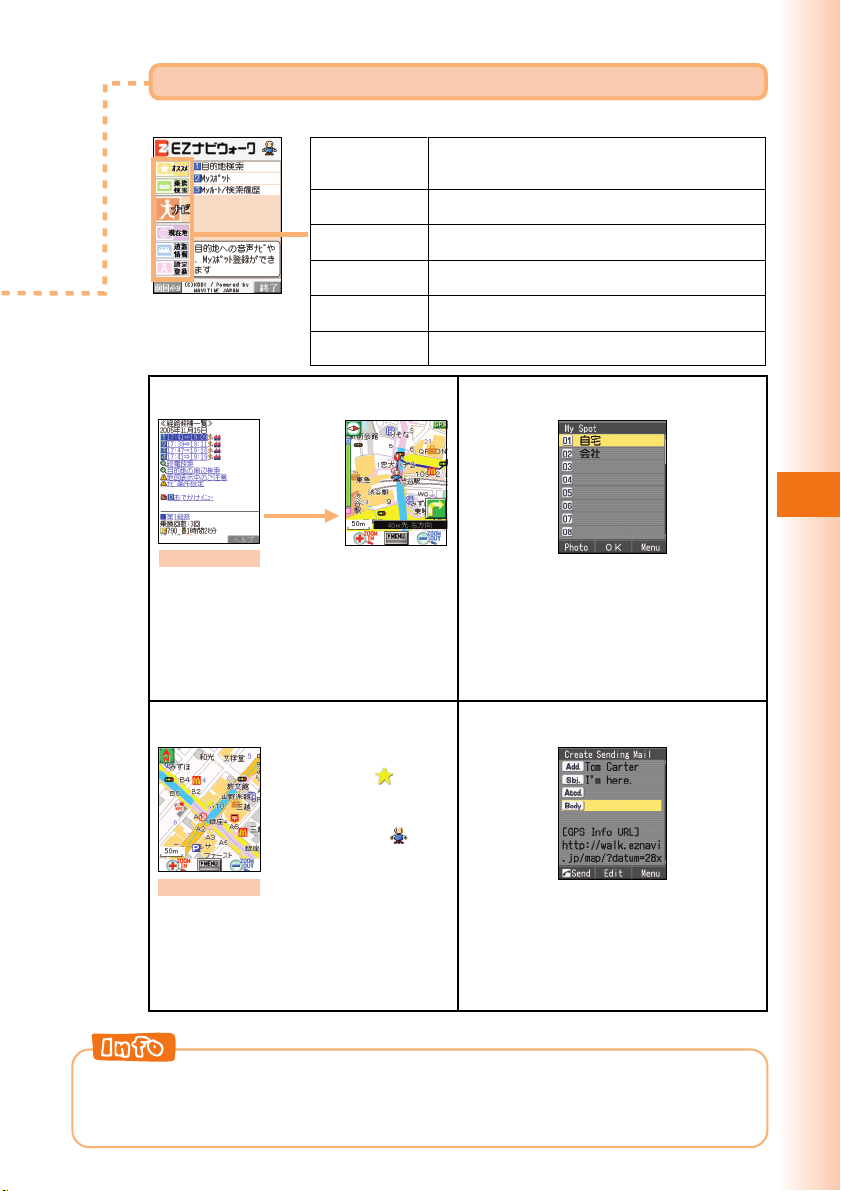
“Going-out Menu”
A menu of useful options you can use while you are out.
オススメ(New)
乗換検索
(
Transfer Search
(Navigation)
ナビ
現在地
(
Current Location
道路情報
(
Traffic Information
設定登録
(
Setups and Registrations
The latest news and featured information
※“おためしナビ” (Navi Demo) provides a sample of
voice navigation.
Searchable source of train transfer and timetable
)
information
Voice navigation to a specific destination, and “ My Spot ”
registration
Searchable source of maps, shops, and other information
)
about your current location
Searchable source of real-time Japan-wide traffic
)
information
Setups, membership registration, etc.
)
“Return Home”“My Spot”
Select “ルート
案内開始”
(Start Route
Guidance)
→“はい” (OK)
Search result screen
Simply preset the location of your
home for easy navigation back there
from any other location. Useful
information includes train transfers
and estimated time of arrival.
Just register destinations you often
visit, your home location, and your
favorite destinations (place of work,
friend’s house, shops, etc.) for quick
and simple navigation when you
need it.
EZ Navi
“View My Map”
“E-Mail My Map”
Your initial location is
indicated by .
Changes in your
location are indicated
in real time by .
Map screen
When you are in an area that is
unfamiliar to you or if you lose your
way, simply select “View My Map. ”
This will display a map showing your
You can e-mail a map of your current
location to another phone, which can
then use the map to navigate to your
location.
current location in real time.
◎In addition to packet communication fee, you may be charged some
other fees for using EZ Navi.
◎
The display layout and contents are examples. These are subject to change.
75
Page 78
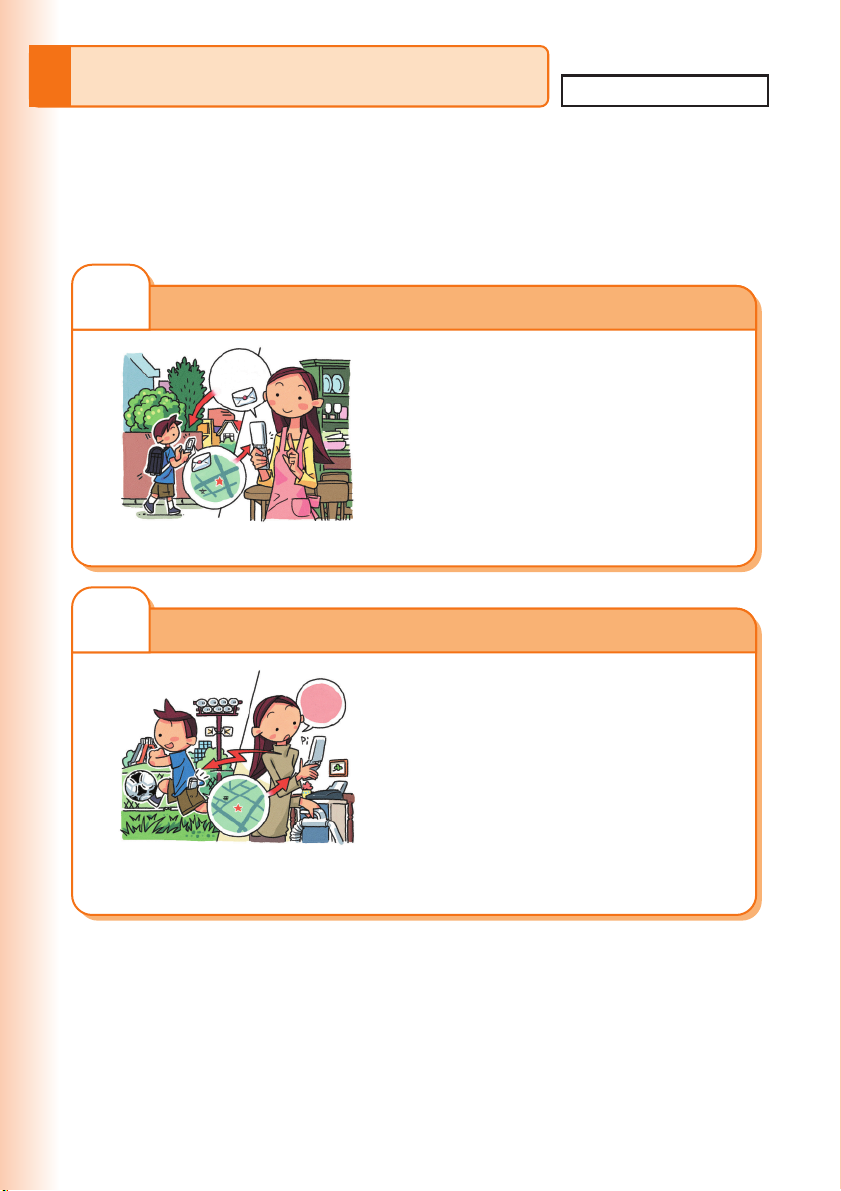
Security Navi Features
EZweb subscription required
Position Search Features
When your child does not come home early and you are anxious if your child may
be lost, you can check the current position of your child by a map with a simple
operation. There are two kinds of services of “Position Search”: “Position Search
Mail” and “Auto Position Search”.
1
“
位置確認メール
u
o
y
d
i
?
l
D
o
o
h
c
s
h
s
i
n
i
f
” (Position Search Mail)
Features
・The mother can send a mail with a
message to her child.
・The child can check the message
from his/her mother and inform her
where he/she is now.
Example: When the mother sent a mail to her child:
2
“
いつでも位置確認
s
i
e
r
e
h
W
?
y
o
b
y
m
” (Auto Position Search)
Feature
・When the mother searches where
her child is, she can be notified
where her child is, although her
child does not make any operation.
ParkParkPark
This service is recommended to
little children who are not
accustomed to cellphone
Example: When the mother sent a mail
to her child:
operations.
Notice: The monthly fee is charged separately.
76
Page 79
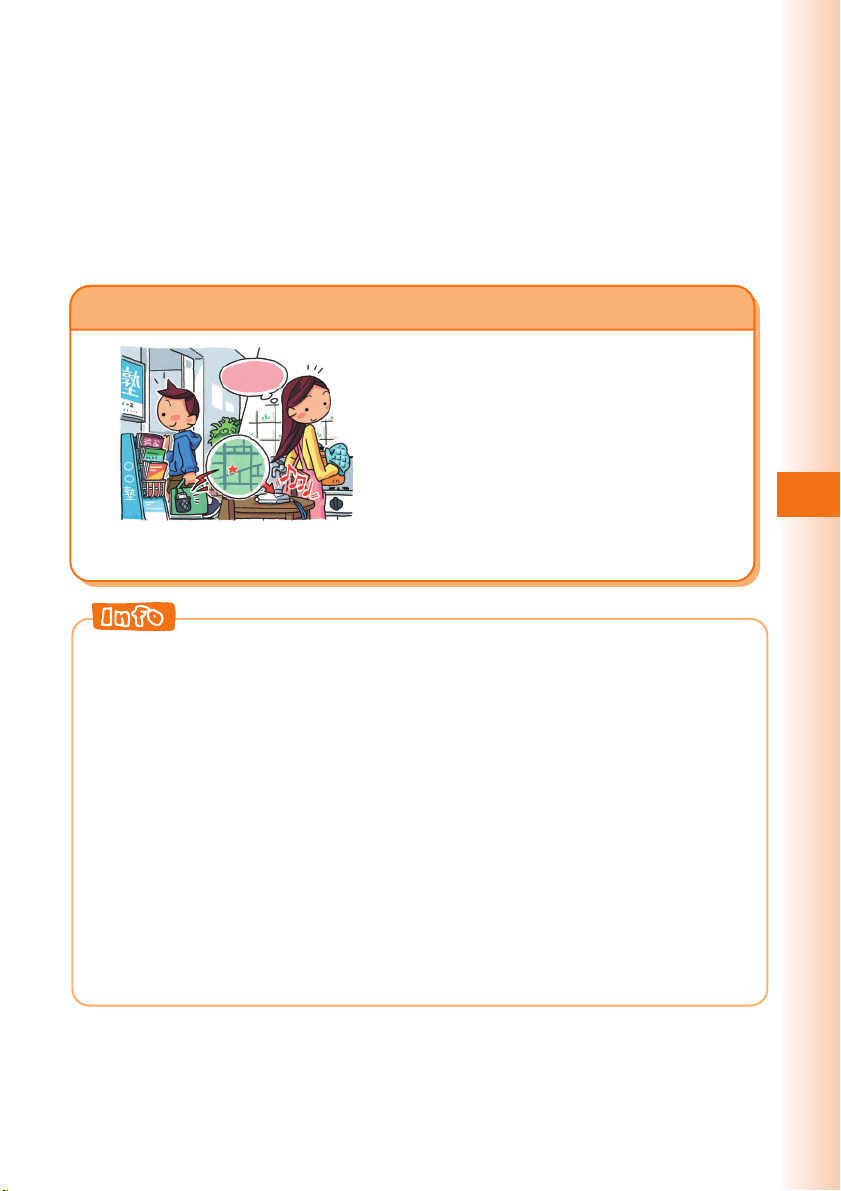
Cram School
Area Message Features
When the child approaches a specified area at a specified period of time that the
mother has set beforehand, her cellphone receives a notification of it automatically
from her child’s cellphone.
“
安心ナビエリア通知
” (
Area Message)
d
e
v
i
r
r
a
s
’
e
H
.
l
o
o
h
c
s
m
a
r
c
t
a
Feature
・This feature makes it quite safe and
secure when your child goes to
Juku (cram school) or culture
Cram School
Cram School
lesson and you are anxious of your
child’s way home. The child’s
cellphone automatically informs the
mother’s cellphone that the child
Example: When the mother checks the
area her child is in:
◎Security Navi services are available only among the cellphones
has passed the usual route.
supporting that feature.
◎The packet communication fee is charged separately for obtaining
information or displaying map.
◎
Confirm the terms of service and agree to it before you use Security Navi.
※The other side also needs to agree to the terms of service before using
the service.
◎You must set the navi password before you use Security Navi.
◎When the other side is out of range, set to “reject”, no application,
operating, or using a cellphone not supporting the service, you cannot
check the position.
◎The screen is an image, and may differ from the real display.
◎If you disable C-mail, you cannot use Security Navi features.
◎The toll pay for the mails for this service are not applied to Family C-mail or
Packet Communication Discount Service.
EZ Navi
77
Page 80
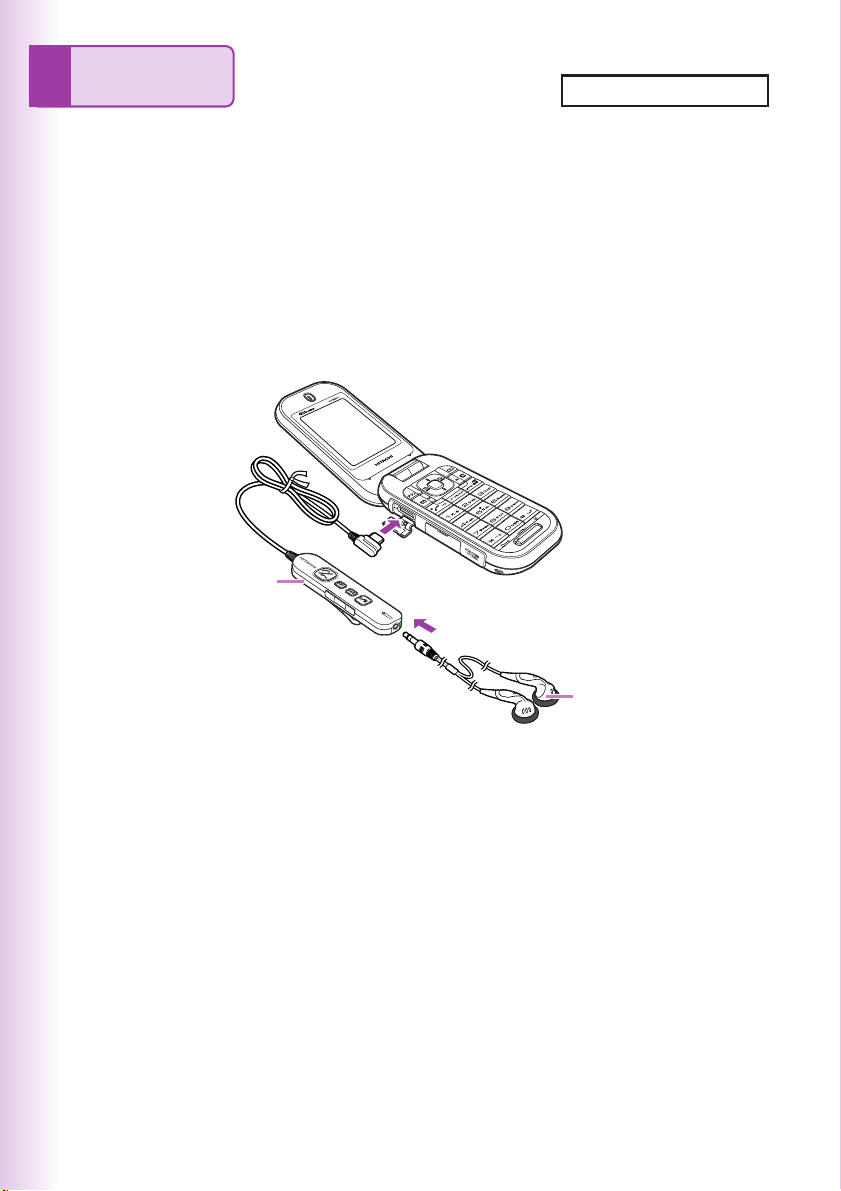
EZ•FM
EZweb subscription required
The W32H allows you to listen to the FM radio.
Before using EZ•FM
■ Connecting Hitachi remote controller with microphone 01
and stereo earphones (sample)
① Connect Hitachi remote controller with microphone 01 to stereo earphones (sample).
② Open the cap of the flat-type earphone-microphone jack of W32H, and then
connect Hitachi remote controller with microphone 01.
②
Hitachi remote controller
with microphone 01
①
Stereo earphones (sample)
■ To listen to the EZ•FM clearly
In places like a room where reception condition is not good, you may not be able to
listen to the EZ
● The cable of Hitachi remote controller with microphone 01 works as an antenna.
Connect Hitachi remote controller with microphone 01 and stereo earphones
(sample) to W32H, extend the cable as much as possible, and then try to search
for the best direction for listening to the EZ
● Radio wave comes from outside, so try to listen to the EZ
possible to the window.
•
FM. In such case, try the measures below.
•
FM.
•
FM as close as
78
Page 81
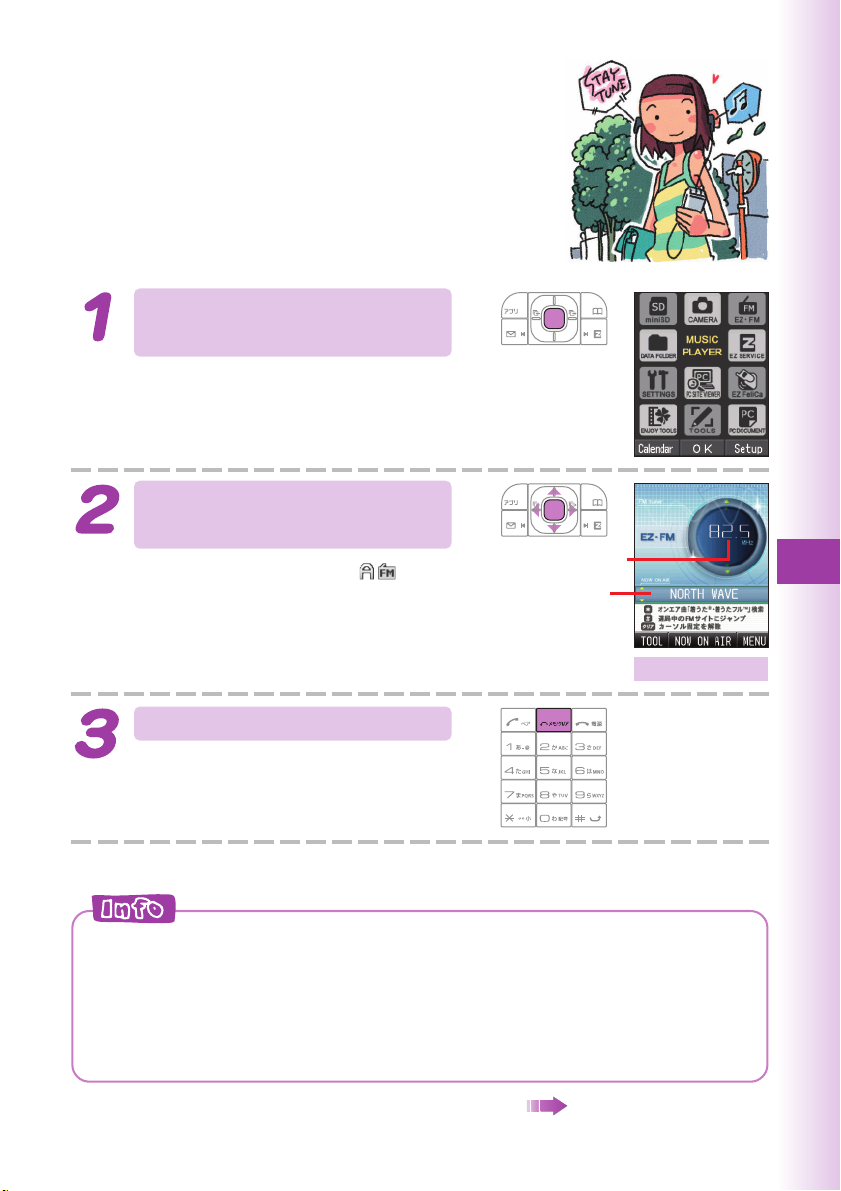
Listening to the EZ•FM
While the standby screen
is displayed, press c.
Use a to select “EZ
•
FM,”
and then press c (OK).
The EZ•FM is received and
appears.
Frequency area
NOW ON AIR
display area
Press C.
You will be able to use j to select
area. Select the area you are in, and
then press c to operate.
◎When you use EZ
Read the precautions, and if you select “
hereafter), they will not be displayed from next time on.
◎When you use EZ
appears. Select an area where you use the EZ
◎The specification is subject to change without notice.
•
FM for the first time, the precautions will be displayed.
以降確認なし” (No confirmation
•
FM for the first time, the display to select an area
•
FM.
EZ•FM screen
EZ
•
FM
Continued on the next page
79
Page 82
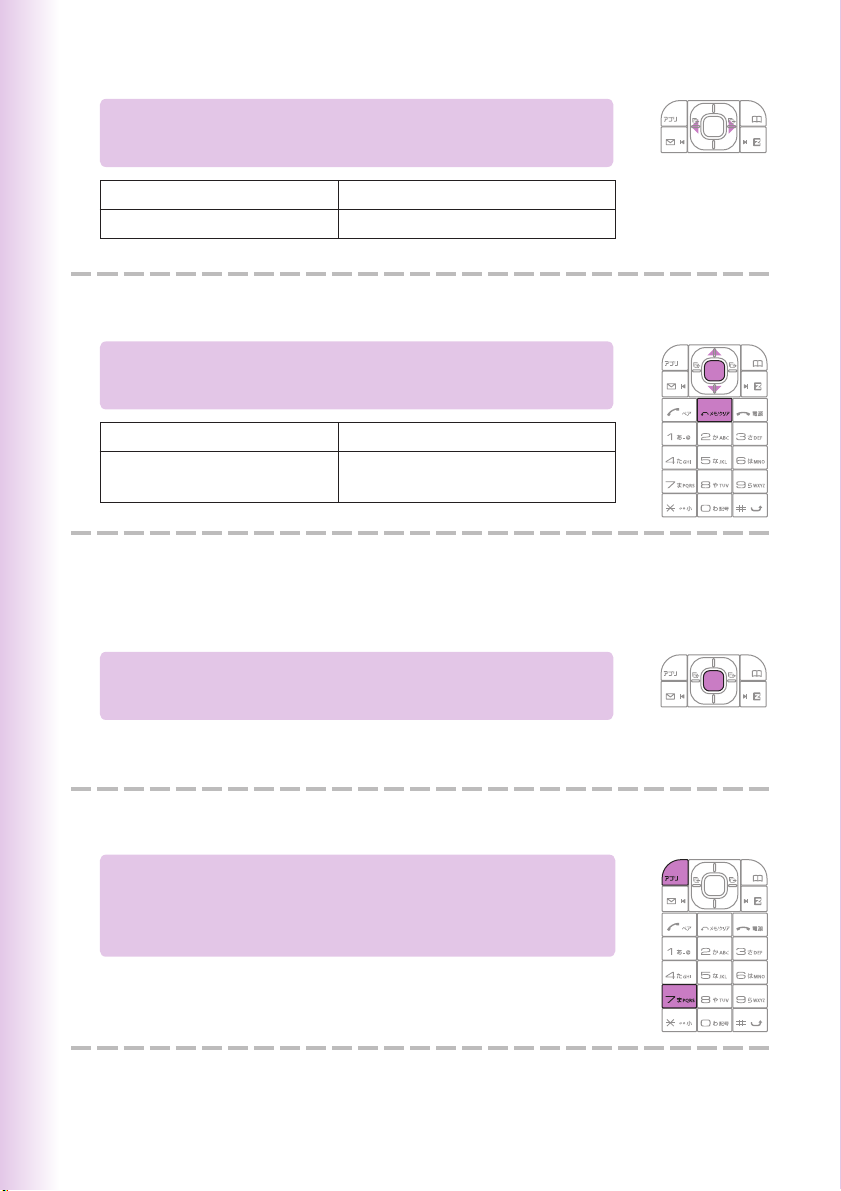
■ Adjusting the volume
Press s on the EZ
•
FM screen to adjust the
volume.
l
r
※ There are ten levels for the volume.
Decreases volume.
Increases volume.
■ Tuning the radio frequency
Press
j
j
j
C
on the EZ•FM screen, and then use
to select the frequency area and press c.
By 0.1MHz tuning
(hold down for about one
second)
Automatic tuning
■ Displaying “NOW ON AIR” information
You can obtain the information such as the name of the tune, the
artist and the broadcasting station of the currently air-played tune.
Press c (NOW ON AIR) on the EZ
•
FM
screen.
The name of the tune, the artist, etc, will be scroll-displayed. This
information may not be displayed depending on the program.
■ Switching the speakers
Press % (TOOL) on the EZ
then press 7(
スピーカー切り替え
•
FM screen, and
(Switch the Speakers).
You can set to “イヤホン” (Earphone) or “スピーカー” (Speaker).
80
)
Page 83
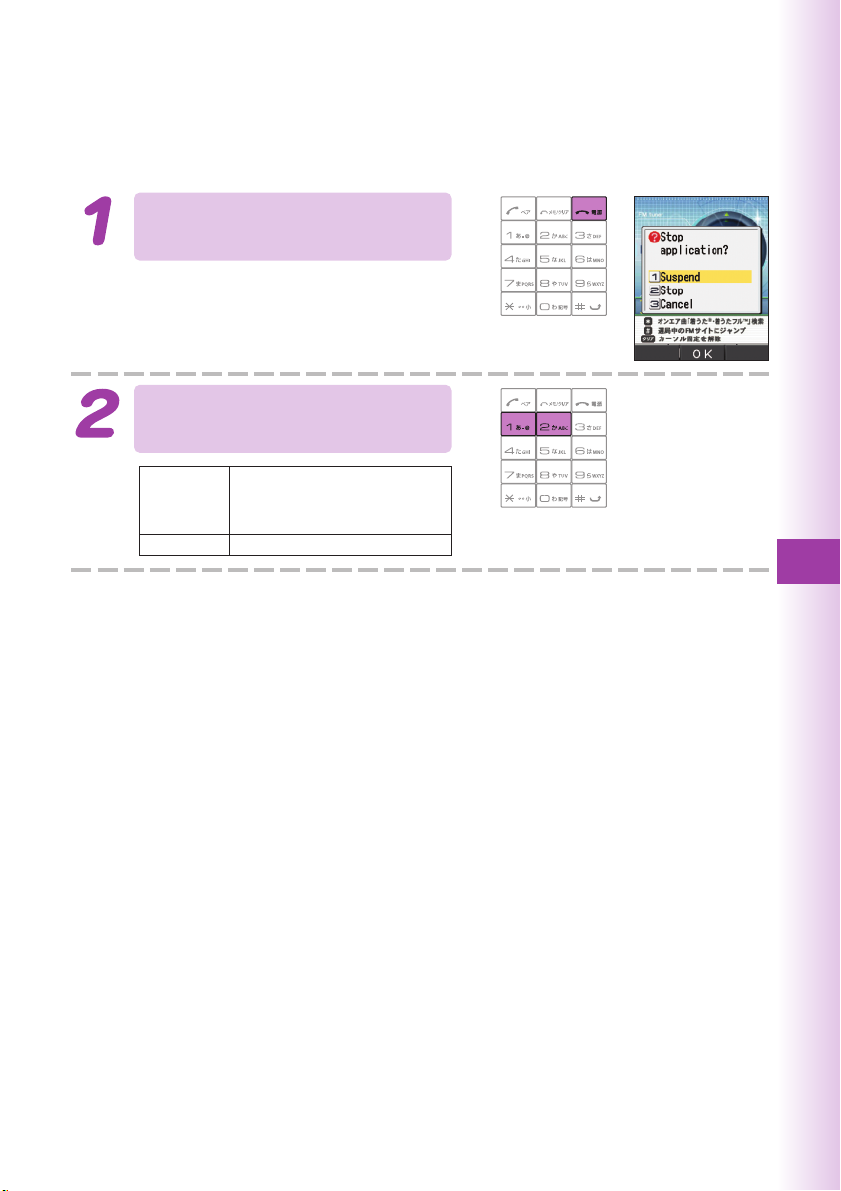
Suspending/Stopping the EZ•FM
Suspends/stops the EZ•FM apps. Even after suspending the EZ•FM
apps, you can listen to the EZ
•
FM as a BGM.
Press F on the EZ
•
FM
screen.
Press 1 (Suspend) or
2 (Stop).
Suspend
Stop
Suspends the EZ•FM apps.
However, you can continue
•
listening to the EZ
Stops the EZ•FM.
FM.
EZ
•
FM
81
Page 84
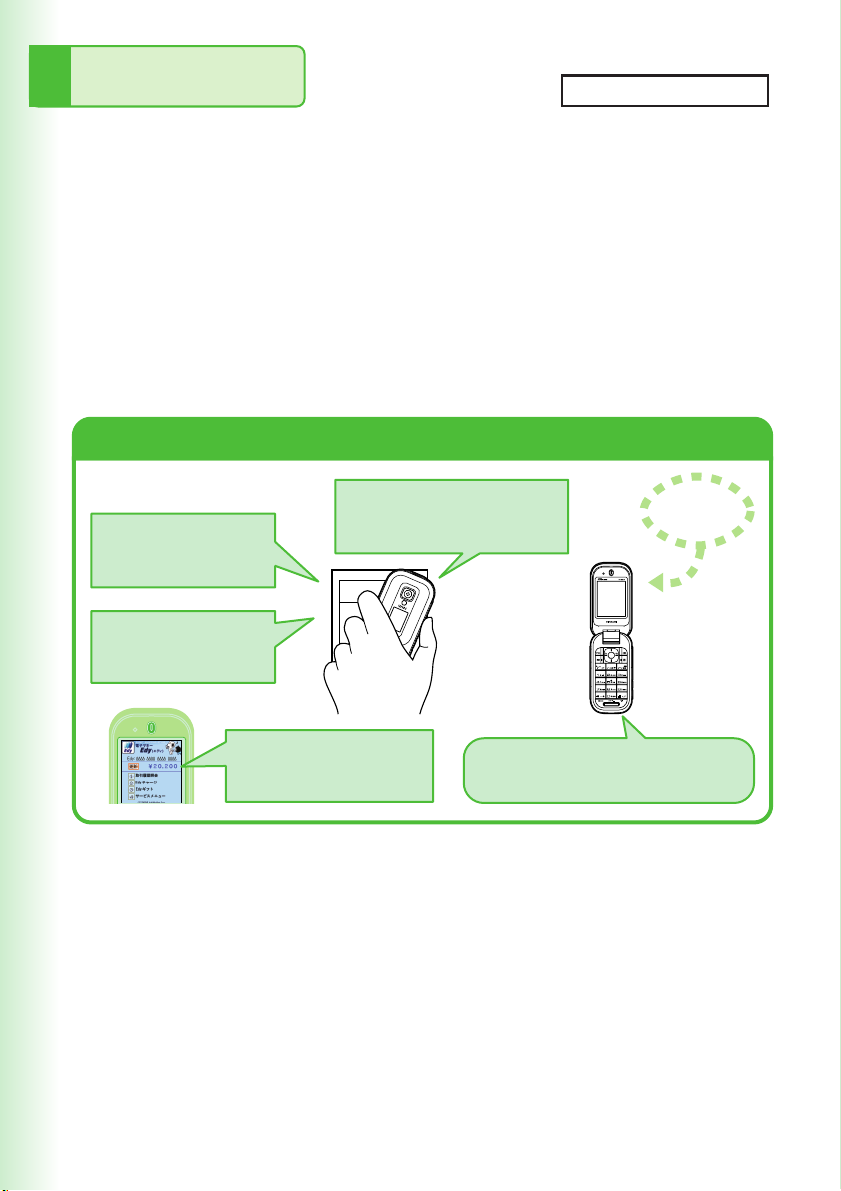
EZ FeliCa
EZweb subscription required
EZ FeliCa is a service available for the cellphones loading the
technology of contact-free IC cards called FeliCa. Simply by
holding W32H over reader/writer (external device)
※
, you can use
W32H for shopping by using e-money or use it as member’s cards,
point cards, and so on.
When you use EZ FeliCa, you need to download the applications
of the provider of the service you want to use.
“電子マネー「Edy」” (“Edy”, the e-money) is prepared at the time of
purchasing.
→ “Using FeliCa-supported EZ apps” (page 85).
※Devices equipped on the electronic cash registers of stores, etc, that exchange
data for FeliCa chips.
EZ FeliCa Features
Member’s Card
Available as member’s cards
or point cards.
Transportation Ticket
You can check in simply with
your cellphone.
You can check the history
of use or the balance on the
display of the cellphone.
You can shop using the e-money or
Shopping
credit card functions of your cellphone.
You can make online charge or
perform various procedures
anytime, anywhere.
au network
■ Notes on Using EZ FeliCa
● Keep your W32H cellphone safe from loss. In case your cellphone is lost, please
contact the service company for details about EZ FeliCa-supported service.
● We recommend that you set FeliCa lock or remote lock in case of loss or theft.
● We accept no responsibility for loss or damage of your data caused by theft, loss
or malfunction of your W32H cellphone.
● Your security codes and passwords are to be highly confidential and protected.
● Contact the service company for further details about FeliCa-supported EZ apps.
● Some of the EZ FeliCa service are subscription dependant.
82
Page 85
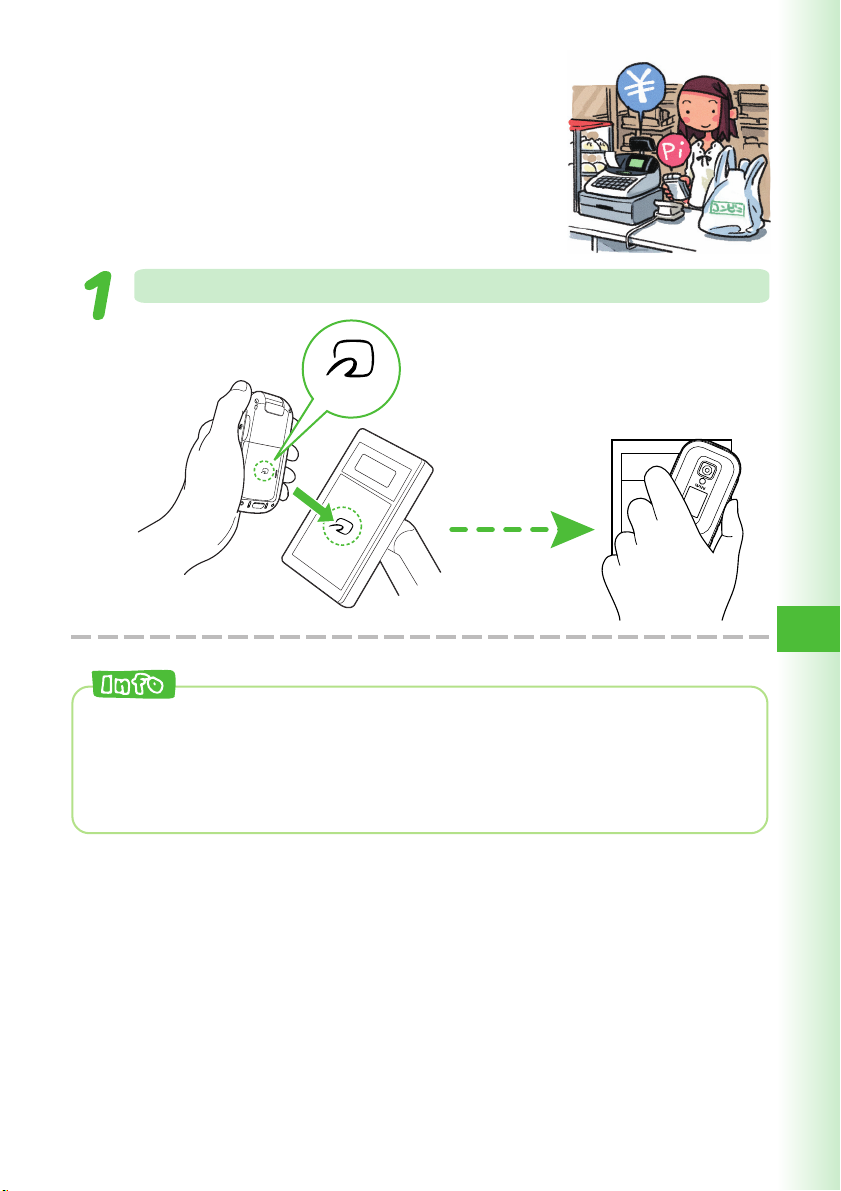
Communicating with reader/writer
You can use EZ FeliCa simply by holding the
FeliCa mark over reader/writer.
Hold the FeliCa mark of W32H over reader/writer.
FeliCa
mark
EZ FeliCa
◎You can use EZ FeliCa without starting FeliCa-supported EZ apps.
◎EZ FeliCa is available even when the power is turned off. However, when
the battery level is very low, you may not be able to use EZ FeliCa.
◎Be careful not to bump the FeliCa mark against reader/writer when
holding it.
83
Page 86
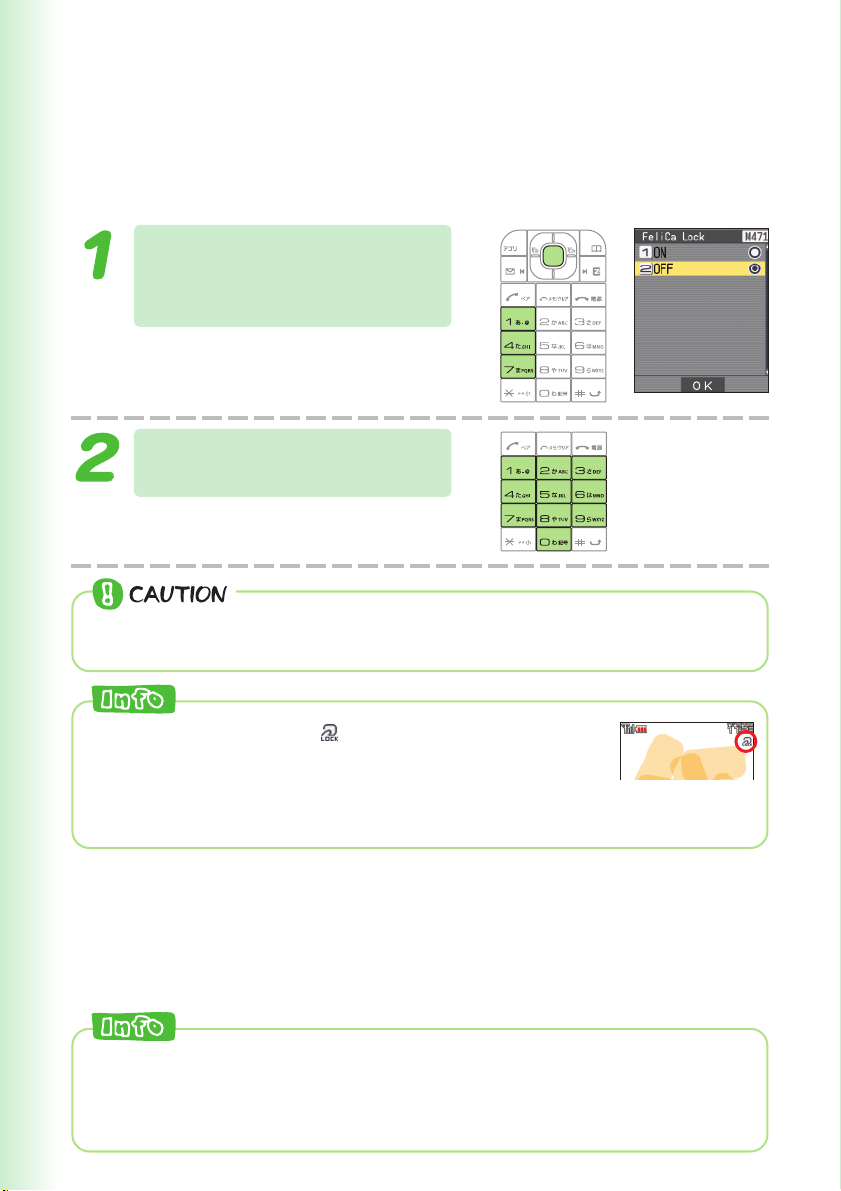
Setting FeliCa lock
You can restrict the use of EZ FeliCa by setting FeliCa lock. Incidentally,
you can temporarily release the FeliCa lock and use EZ FeliCa for a
certain period of time by holding down
standby screen is displayed and entering the lock number (quick release).
While the standby
screen is displayed,
press c471.
Press 1 (ON), and then
enter the lock number.
The FeliCa lock is set.
If the battery exhausts while the FeliCa lock is on, you will be unable to
release the FeliCa lock. Be careful of the battery level.
r
for about one second while the
◎
When FeliCa lock is set, appears on the standby screen.
◎In case you lost W32H, you can set the FeliCa lock by
setting remote lock. Incidentally, remote lock requires the
initial setup beforehand.
◎Even if you set auto lock, the FeliCa lock will not be set.
■ Releasing FeliCa lock temporarily (quick release)
① When the FeliCa lock is on, hold down r for about one second while the standby
screen is displayed, and then enter the lock number.
The vibrator works, “FeliCa Lock Quick Releasing” is displayed and the FeliCa
lock is temporarily released.
◎If you press F or when “MomentaryRelease” (300 seconds is set at the
time of purchasing) elapses, W32H returns to FeliCa lock status.
◎You cannot start FeliCa-supported EZ apps while FeliCa lock is
temporarily released.
84
Page 87
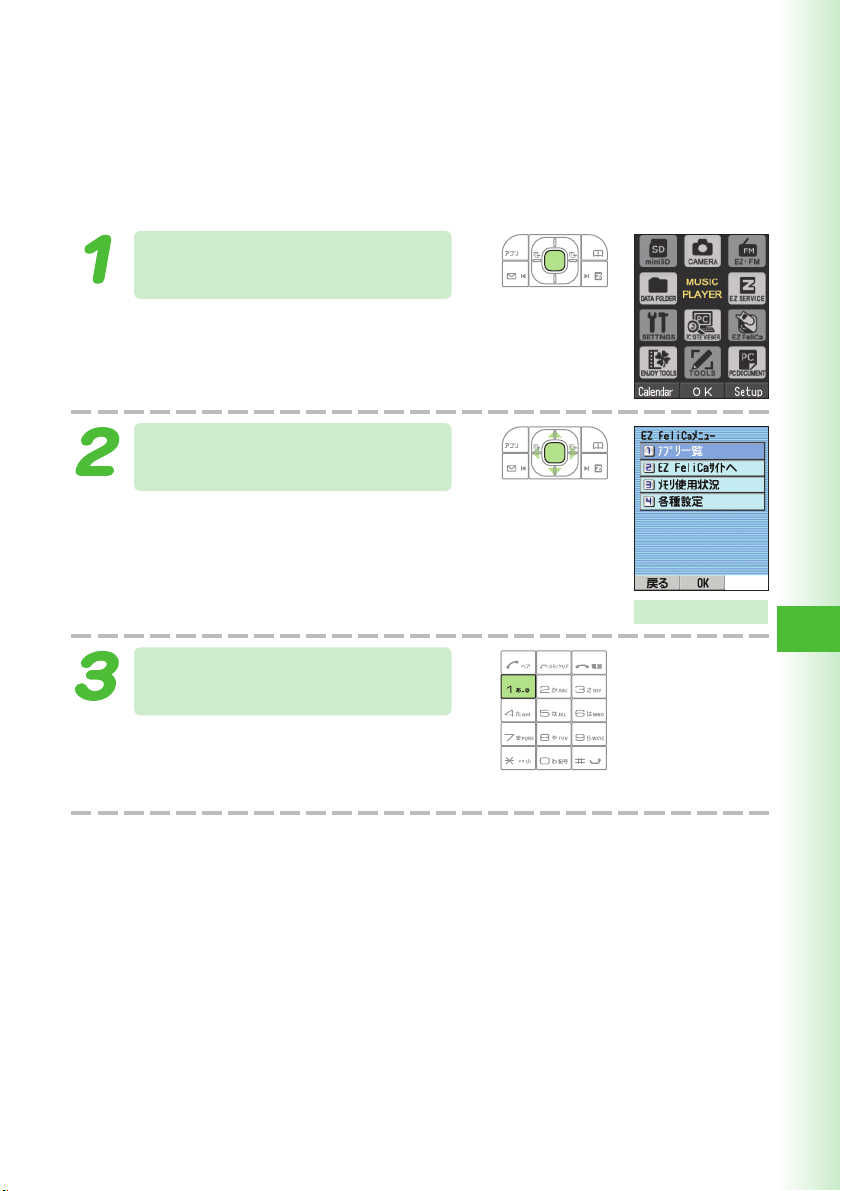
Using FeliCa-supported EZ apps
“
電子マネー「Edy」
EZ apps in W32H at the time of purchasing.
■ Starting FeliCa-supported EZ apps
While the standby screen
is displayed, press c.
” (“Edy”, the e-money) is prepared as FeliCa-supported
Use a to select “EZ FeliCa,
and then press c (OK).
EZ FeliCa menu appears.
Press 1 ( アプリ一覧 )
(EZ apps List).
The list of the FeliCa-supported EZ
apps saved in W32H is displayed.
Select the EZ apps you want to start.
”
EZ FeliCa menu
EZ FeliCa
85
Page 88
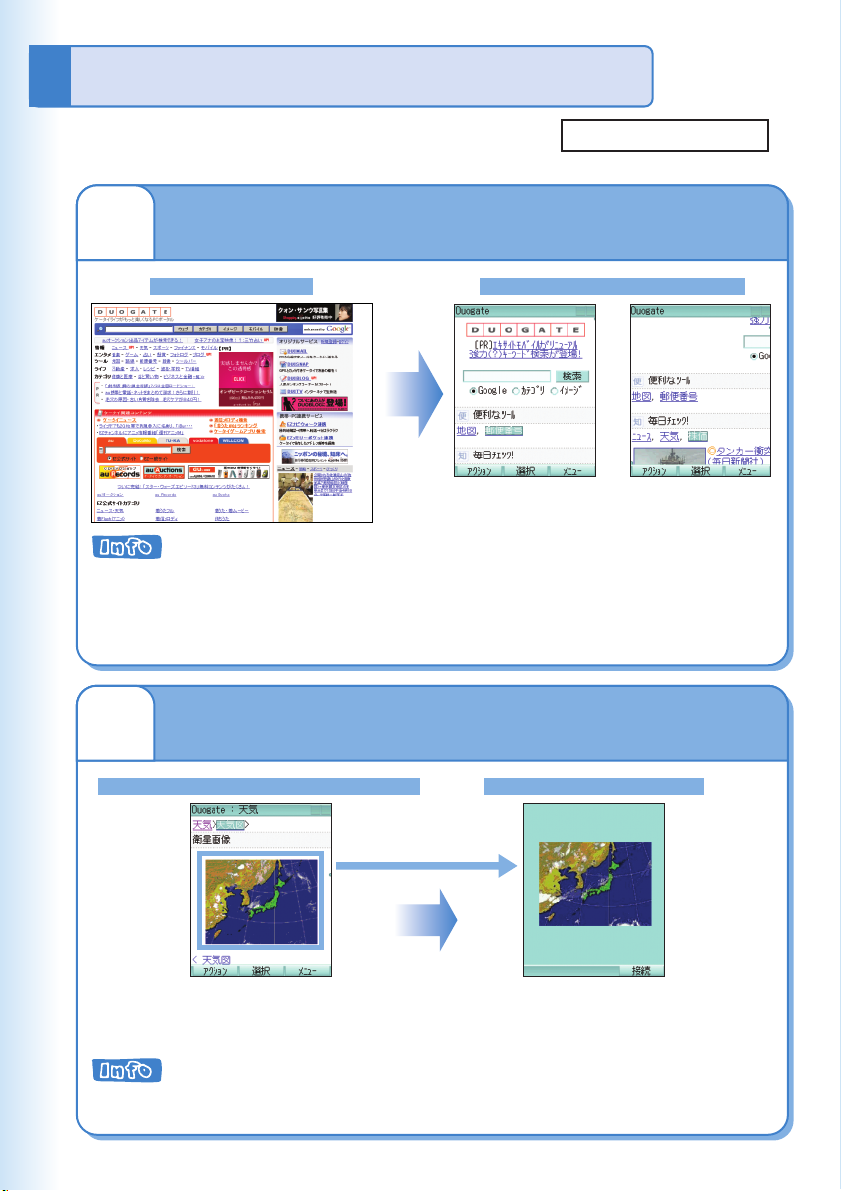
PC site viewer Features
EZweb subscription required
1
The content displayed is an example, and it
may differ from the contents that actually
appear on the display of your phone.
You can view WEB sites for PC with W32H
A WEB site for PC
You can display/automatically-update a portion of
2
WEB site information.
Registering to “
待受指定
” (Standby Assignment)
Viewing a site with PC site viewer
If you set the “
ド
” (Display Mode) to
“
スモールスクリーン
(Small Screen), a
WEB site is displayed
adjusted to the size of
W32H screen, and you
can view the site with
simple j operations.
表示モー
”
If you set the “
ド
” (Display Mode) to
“
PCスクリーン
Screen), the portion
of the page laid out by
PC screen is
displayed, and you
can view the site with
operations.
a
表示モー
” (PC
“Using Standby Assignment” (page 88)
Displaying as “Standby screen”
Select a portion of a WEB site page
beforehand, and then register it to
“
待受指定
If you press & (接続) (Connect) while “
top of the page with a full-screen and operate the PC site viewer in the same way as the usual browsing.
” (Standby Assignment).
待受指定
” (Standby Assignment) is displayed, you can display from the
Display a portion of a WEB site page, and
you can automatically-update it at specified
intervals.
86
Page 89
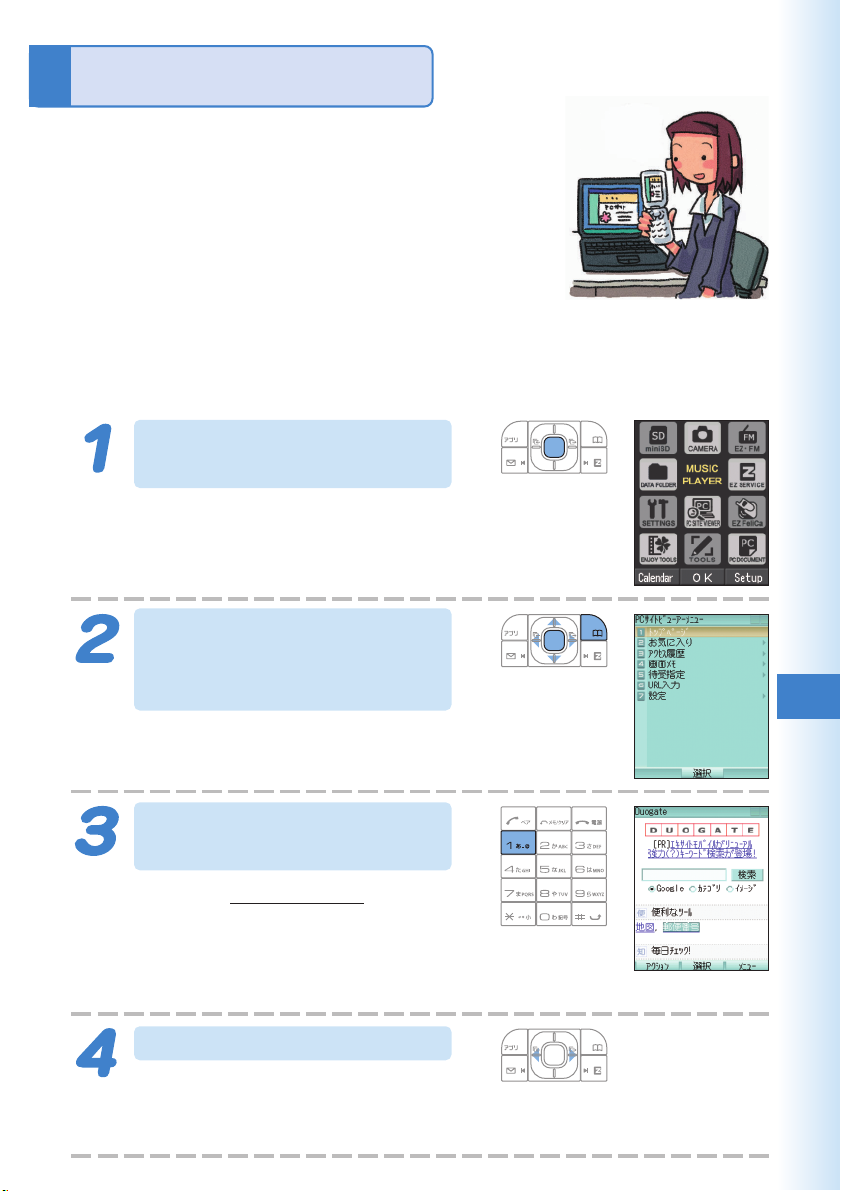
PC site viewer
To use the PC site viewer, an EZ WIN course
subscription is required. If you did not apply
when you purchased your cellphone, contact
your nearest au shop or the au Customer
Service Center.
Using the PC site viewer, you can comfortably
view the WEB sites that you usually view with
your PC, by high speed packet communication of
2.4 Mbps down at maximum.
Mastering Operation Basics
While the standby screen
is displayed, press c.
Use a to select “PC SITE
VIEWER,” press c (OK),
and then press & (OK).
Warning message on packet
communication appears.
PC site viewer
Press 1 (トップペ ー ジ)
(Top Page).
“Duogate” (http://duogate.jp/) is set.
※
The contents displayed on the top page
on the right is an example, and it may
differ from the contents that actually
appear on the display of your phone.
Press s.
The display scrolls.
Use j to select the links on the screen.
If you select a link and press c (
選択 ) (Select), the linked page appears.
87
Page 90
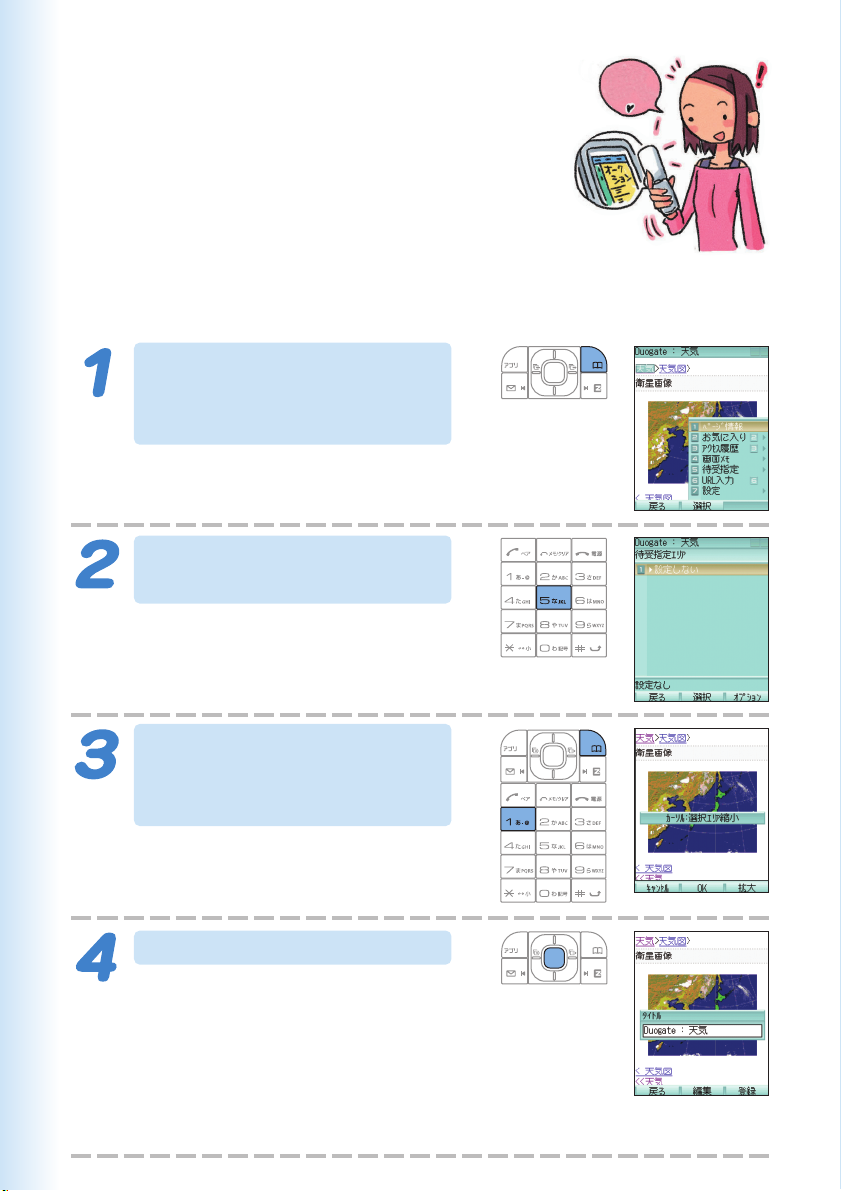
ItIt’s
s
updated.
Using Standby Assignment
It’s
updated.
updated.
You can set a portion of a WEB site as the standby
screen. You can set it to be automatically-updated
at specified intervals.
When a specified time elapses on the standby
screen, the WEB site selected by “
待受指定 ”
(Standby Assignment) is displayed.
To use “
待受指定 ” (Standby Assignment), perform steps 1 through 4
under “Mastering Operation Basics” (page 87), and then perform the
following steps.
Display your favorite page,
and then press & (
メニュー
)
(Menu).
88
Press 5
(
待受指定
)
(Standby Assignment).
Press &
(Option)
(
1
(
オプション
, and then press
新規作成
) (Create New).
)
Press c (OK) twice.
If you press a, you can shrink the area
displayed by “
Assignment).
If you press & (拡大) (Widen) and press
a
, you can enlarge the display area.
※
If you press & (縮小) (Narrow) again,
you can shrink the display area.
待受指定 ” (Standby
Page 91
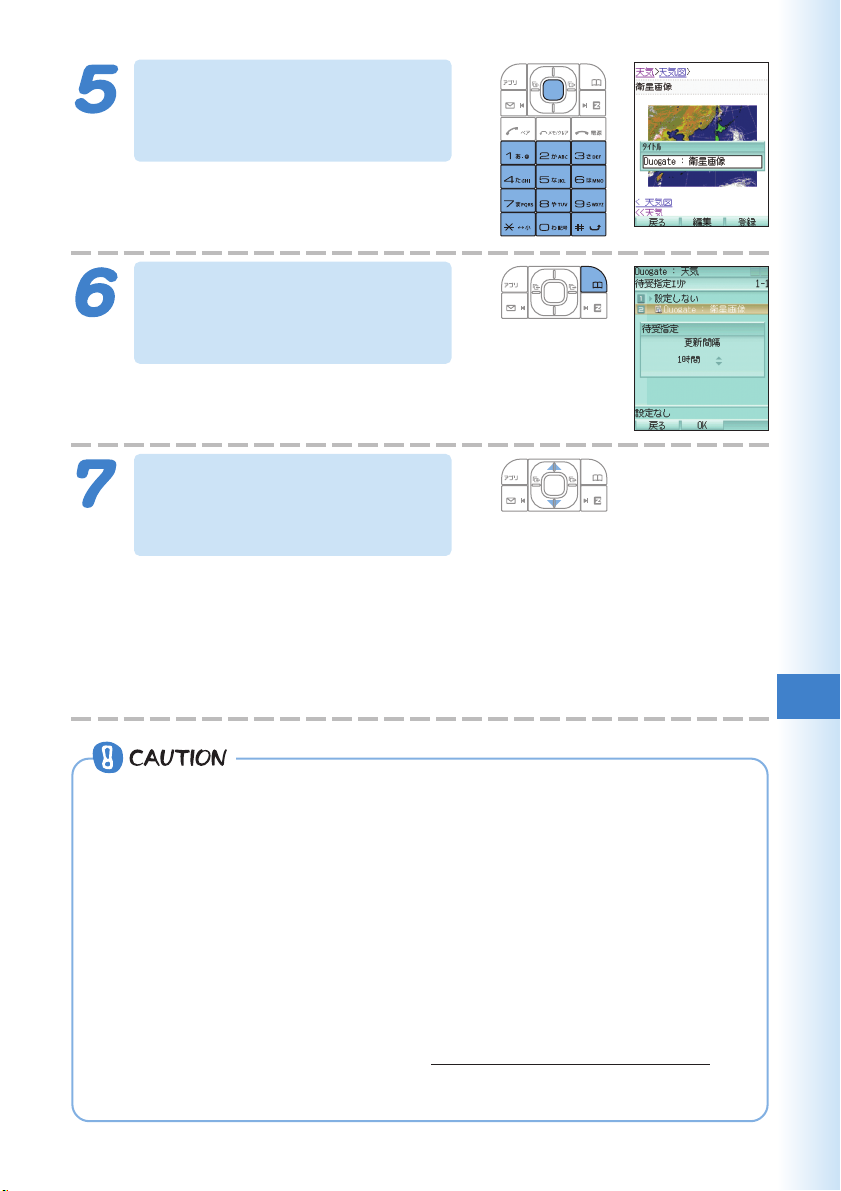
Press c (編集) (Edit),
enter the title, and then
press c (OK).
Press & (登録) (Register),
and then press & (設定)
(Setting).
Use j to select the
interval to update the
standby screen.
If you select the interval to automatically-update the page displayed as the
standby screen from among “
更新しない
update), and press c (OK), then “
Warning Display) appears.
Press & (OK), and then press c (OK) to complete the setting.
” (24 hours/12 hours/8 hours/4 hours/2 hours/1 hour/30 minutes/no
24時間/12時間/8時間/4時間/2時間/1時間/30分/
待受指定警告表示 ” (Standby Assignment
PC site viewer
◎Precautions for using packet communication for PC site viewer
We recommend you apply for Packet Communication Discount Service
subscription as the communication fee may be quite high by performing
a large-size communication such as viewing homepages that include
large images.
Also, be careful that packet communication fee will be charged for each
updating if you set automatic-update by “
◎Checking your packet communication fee
You can use Charge Reference Service (This service estimates this
month’s packet communication fee with no discount. The rough number
was billed 1 or 2 days ago.).
PC ⇒ au Online Customer Service (https://au-cs0.kddi.com/AuHome)
au phone ⇒ R → “Top Menu” → “
Applications, and Info)
待受指定” (Standby Assignment).
料金・申込・インフォ” (Charges,
89
Page 92
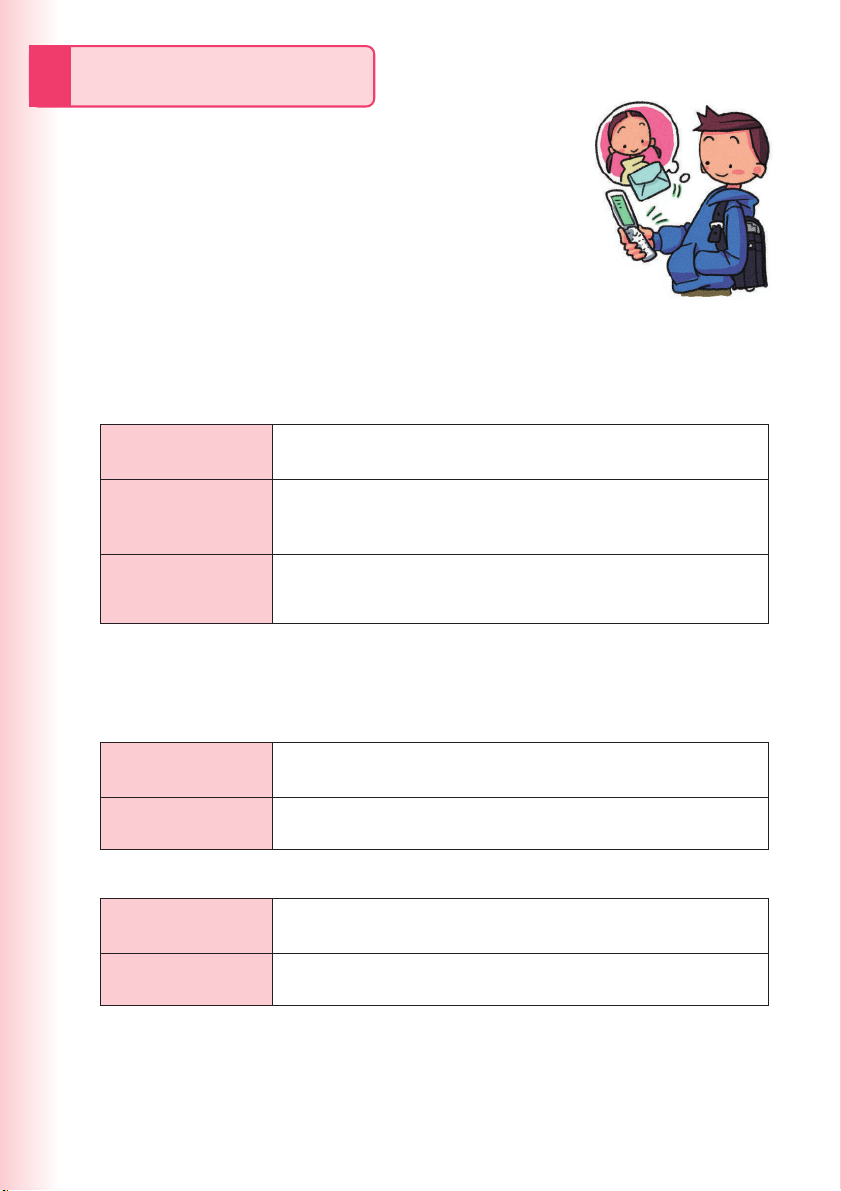
Teens Mode
Teens Mode can be used to block spam, and
to block inadvertent access to phone
numbers and URLs included inside of mail
messages. Teens Mode can also be used to
restrict call time and the number of mail
sendings.
Using Teens Mode
■ Teens Mode can be used to restrict mail reception and
display contents.
When the sender is
a Pair partner
When the sender is
included in the
address book
When the sender is
neither of the above
■
Turning on “Teens Restrict (M44#)” and Teens Mode makes it
possible to restrict call time and the number of mail sends.
●Making a Call
To someone who is
a Pair partner
To someone who is
not a Pair partner
Receipt is allowed.
Receipt is allowed. However, none of the phone numbers, e-mail
addresses or URLs contained in the body of the mail message can
be used.
E-mail: Only the sender’s name and subject are received.
Body text and attached data are not received.
C-mail: Not received.
No restriction
Call time is restricted. Further calling is not possible if the call time
exceeds the “Teens Restrict (M44#)” setting.
●Sending a Mail
To someone who is
a Pair partner
To someone who is
not a Pair partner
90
No restriction
The number of sendings is restricted. Further mailing is not possible if
the number of sendings exceeds the “Teens Restrict (M44#)” setting.
Page 93
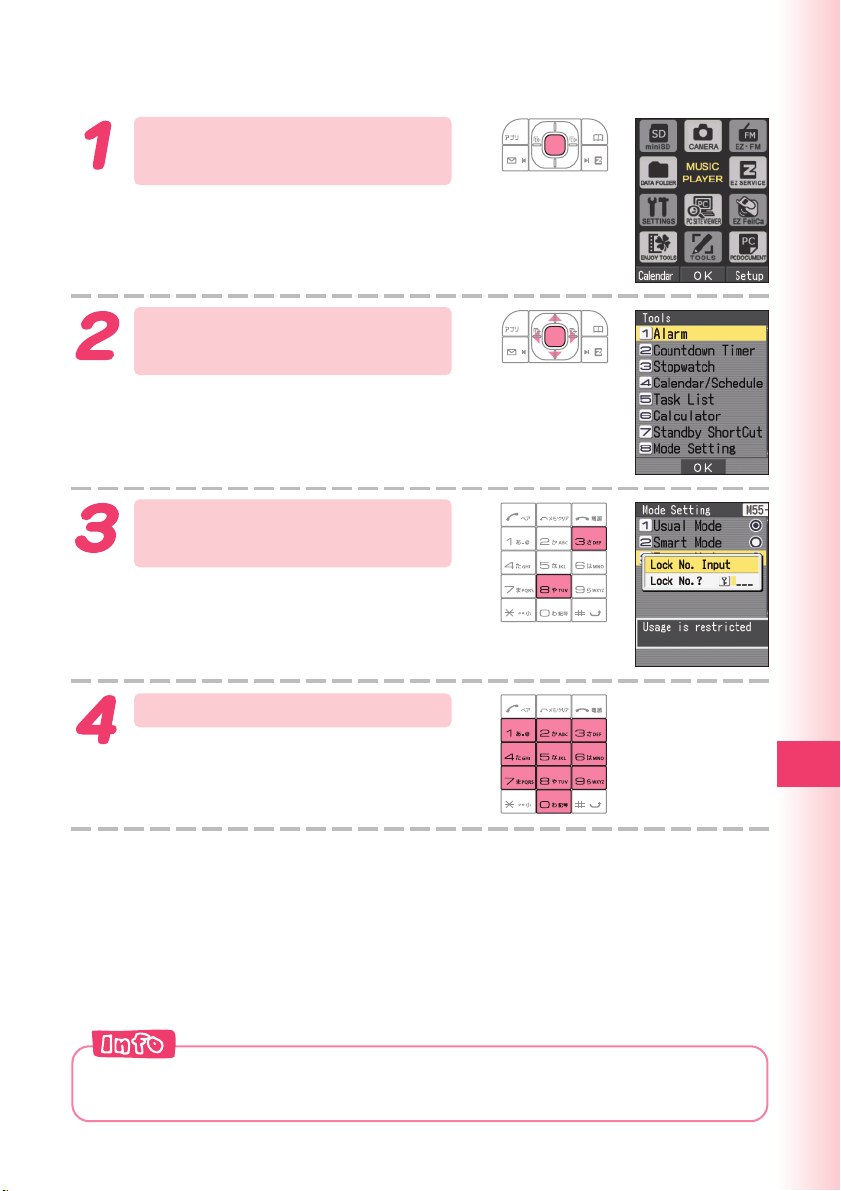
Turning on Teens Mode
While the standby screen
is displayed, press c.
Use a to select “TOOLS,”
and then press c (OK).
Press
and then
Enter the lock number.
The lock number is required when changing from Teens Mode to Usual
Mode or Smart Mode.
8
(Mode Setting),
3
(Teens Mode).
Teens Mode
91
Page 94
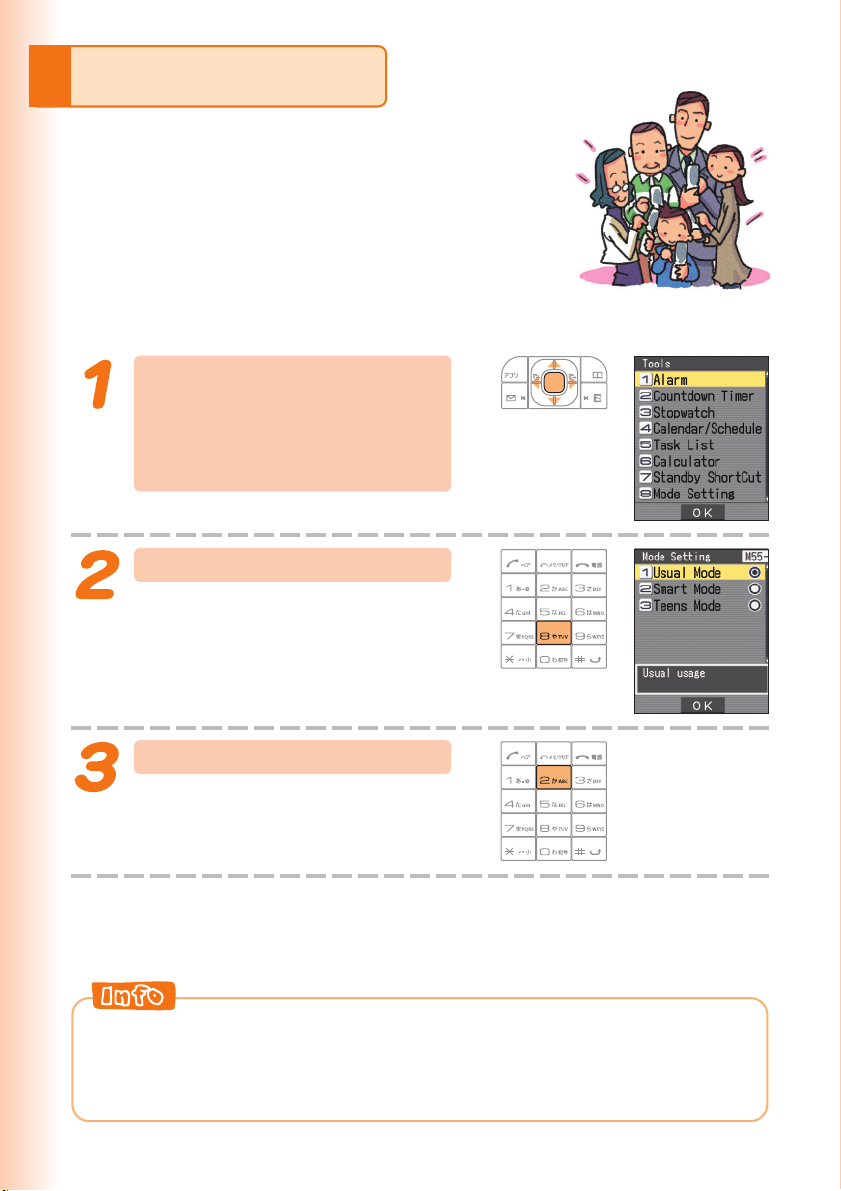
Smart Mode
Smart Mode lets you limit operations to the
telephone function, address book, camera,
e-mail, C-mail, EZweb, and other frequently
used functions, which simplifies operation.
Entering Smart Mode
While the standby screen
is displayed, press c,
use a to select “TOOLS,”
and then press c (OK).
Press 8 (Mode Setting).
B
B
e
e
e
e
p
p
!
!
!
!
Press 2 (Smart Mode).
◎The lock number is required when changing from Teens Mode to Smart
Mode.
◎
When you enter Smart Mode, Smart Mode settings are automatically
changed to those configured on the phone before you entered Smart Mode.
92
Page 95
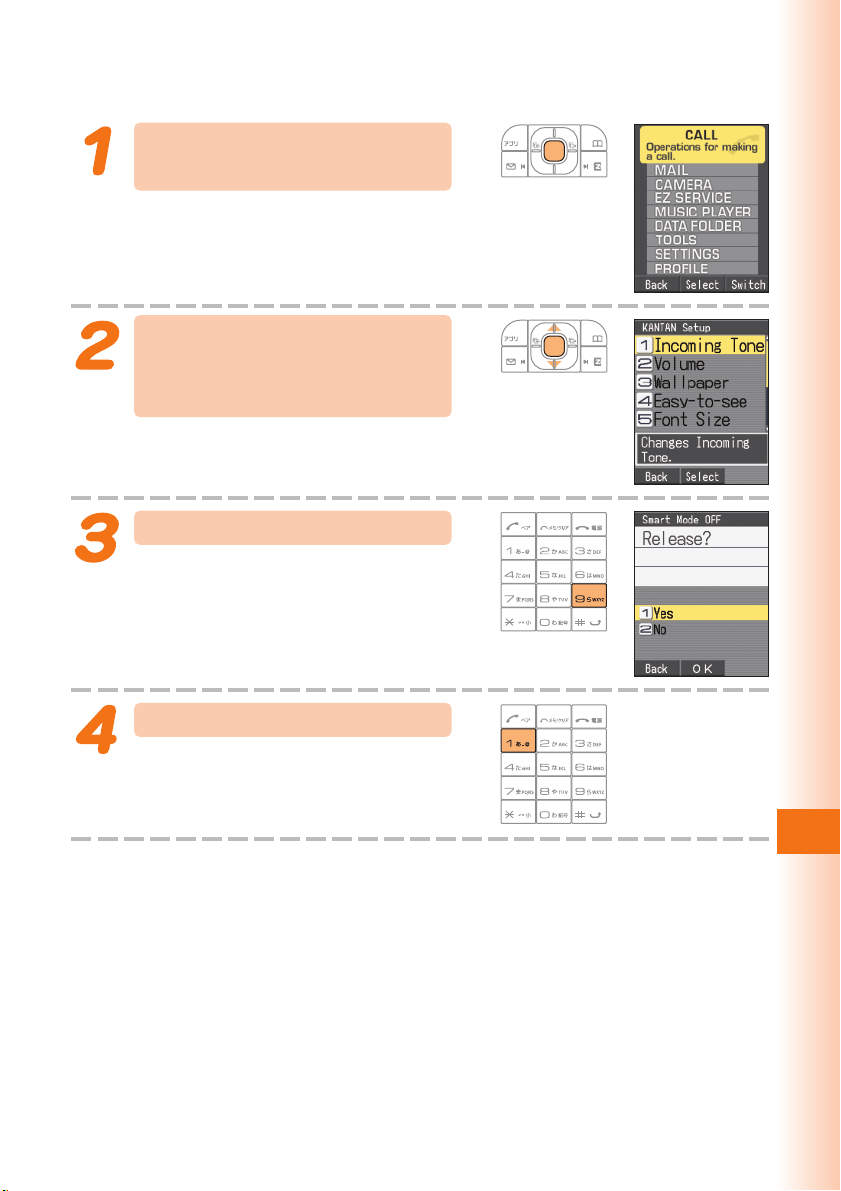
Exiting Smart Mode
While the standby screen
is displayed, press c.
Use j to select
“SETTINGS,” and then
press c (Select).
Press
Press 1 (Yes).
This returns to Usual Mode.
9
(SmartMode OFF).
Smart Mode
93
Page 96
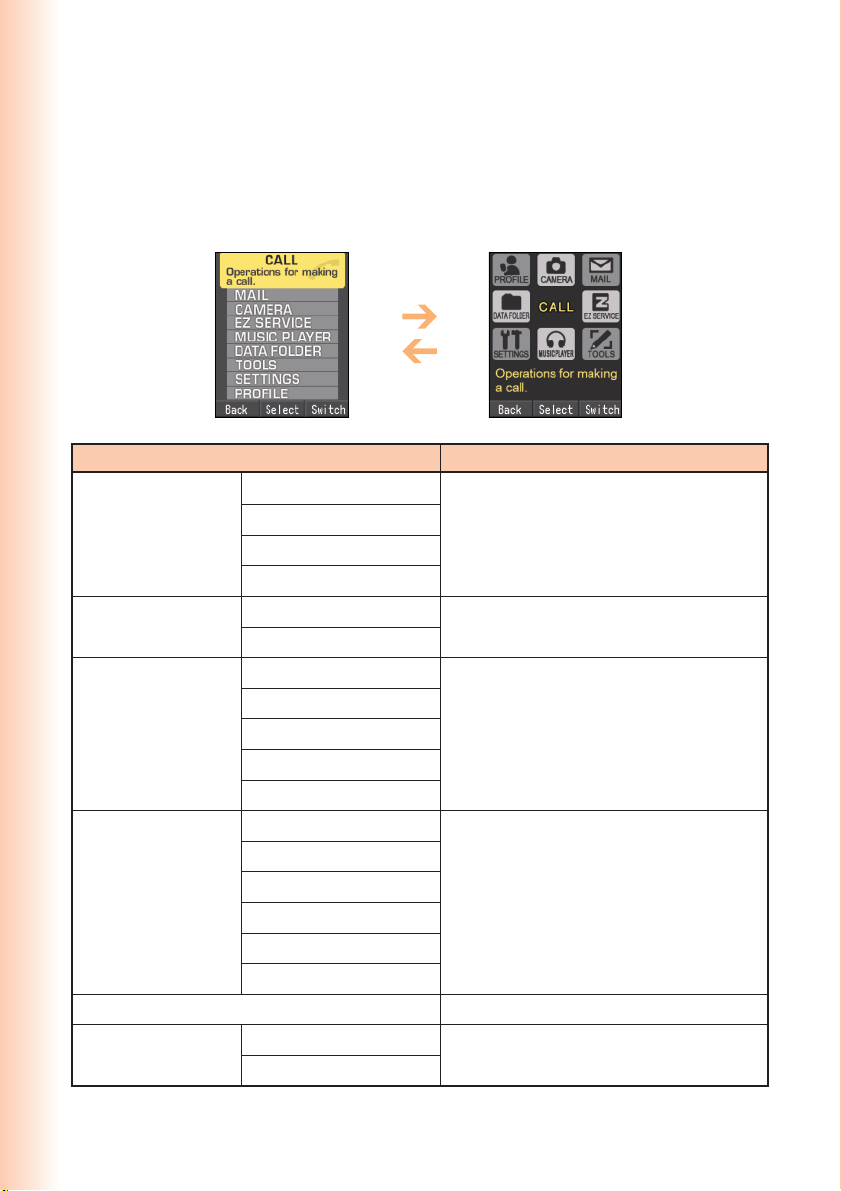
Using the Smart Mode Main Menu
Smart Mode has its own main menu.
You can switch between the two available Smart Mode main menu styles
by pressing & (Switch).
&(Switch)
&(Switch)
Menu Description
Address Book
CALL
MAIL
CAMERA Movie1
EZ SERVICE
MUSIC PLAYER
DATA FOLDER
Outgoing Records
Incoming Records
AdrBookReg
E-Mail
C-Mail
Photo1
Photo2
Movie2
Correction
Chaku-Uta-Full
EZchannel
EZmovie
EZnavi
EZapps
EZweb
Data Folder
miniSD
For using the address book, outgoing
records and incoming records, and for
registering data in the address book
For composing and reading E-mail and C-mail
messages, and for changing E-mail addresses
For selecting the photo or movie recording,
and the correction method
For using EZ services
For using Music Player
For viewing and deleting data in the Data
Folder or miniSD memory card
94
Page 97
Menu Description
Calendar
Calculator
Alarm Clock
TOOLS
SETTINGS Font Size
Countdown Timer
Stopwatch
PC site viewer
PC document
EZ FeliCa
Incoming Tone
Vol ume
Wallpaper
Easy-to-see
Voice Mail
Manner Mode
Toll/Inquiry
SmartMode OFF
For using the calendar, calculator, and
other tools
For changing the incoming tone, wallpaper,
and character size, for turning Manner
Mode on and off, and for turning Smart
Mode off
PROFILE
For displaying your current phone number
and e-mail address
Smart Mode
95
Page 98
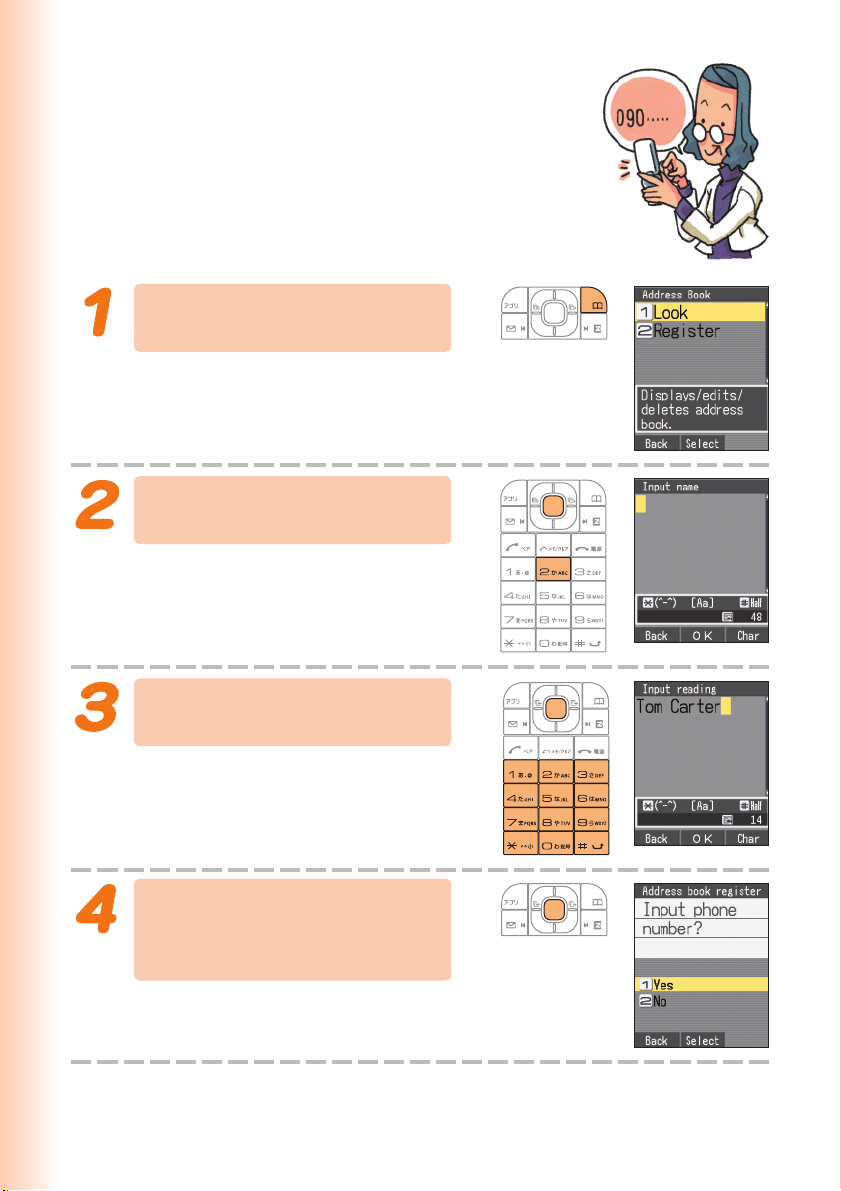
Adding Data to the Address Book in Smart Mode
While the standby screen
is displayed, press &.
Press 2 (Register), and
then press c (Fix).
To m
96
Enter the name, and then
press c (OK).
To input text
→ “Inputting Characters” (page 106)
Check the reading of the
name you inputted, and
then press c (OK).
Page 99
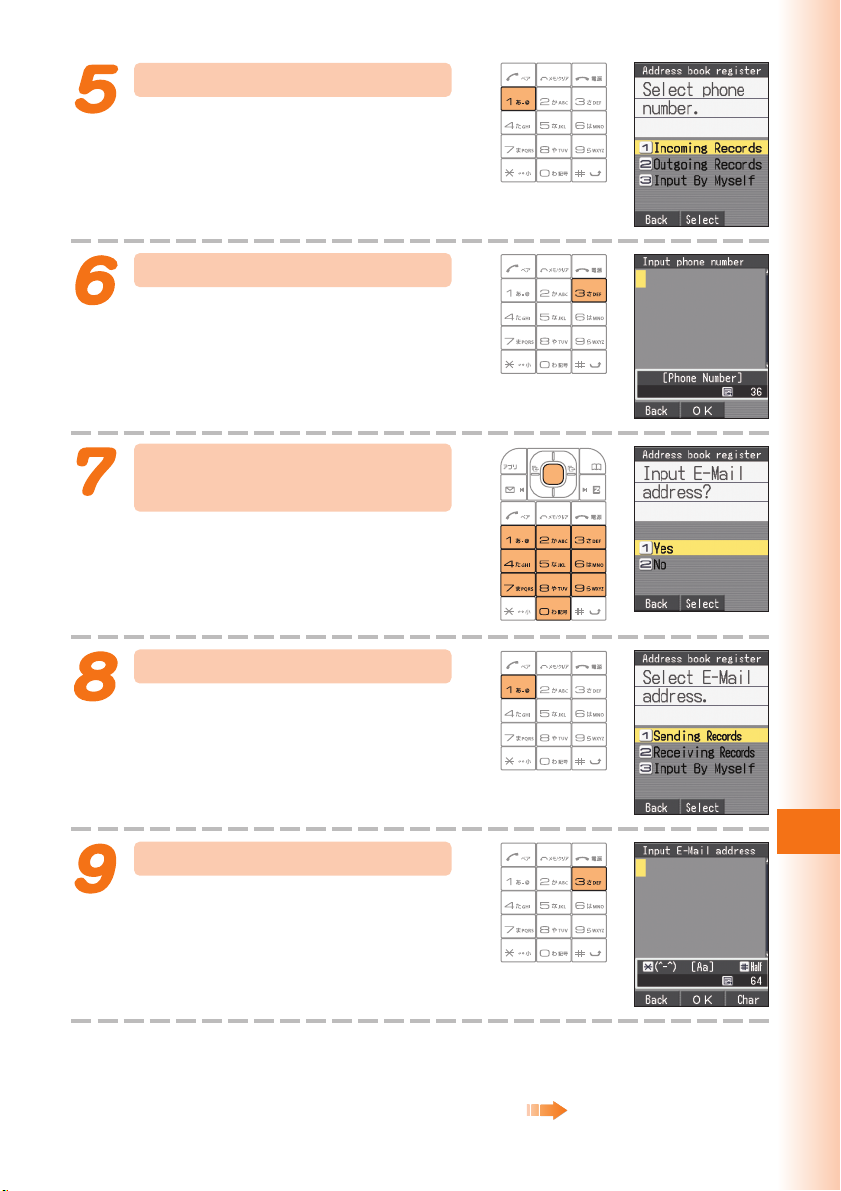
Press 1 (Yes).
Press
You can also select data in incoming
records or outgoing records.
3
(Input By Myself).
Enter the phone number,
and then press c (OK).
When entering the number of a
standard phone, be sure to start with
the area code.
Press 1 (Yes).
If you do not want to input an e-mail
address, press 2 (No), and then
advance to step 11.
Press
You can also select data in sending
records or receiving records.
3
(Input By Myself).
Smart Mode
Continued on the next page
97
Page 100
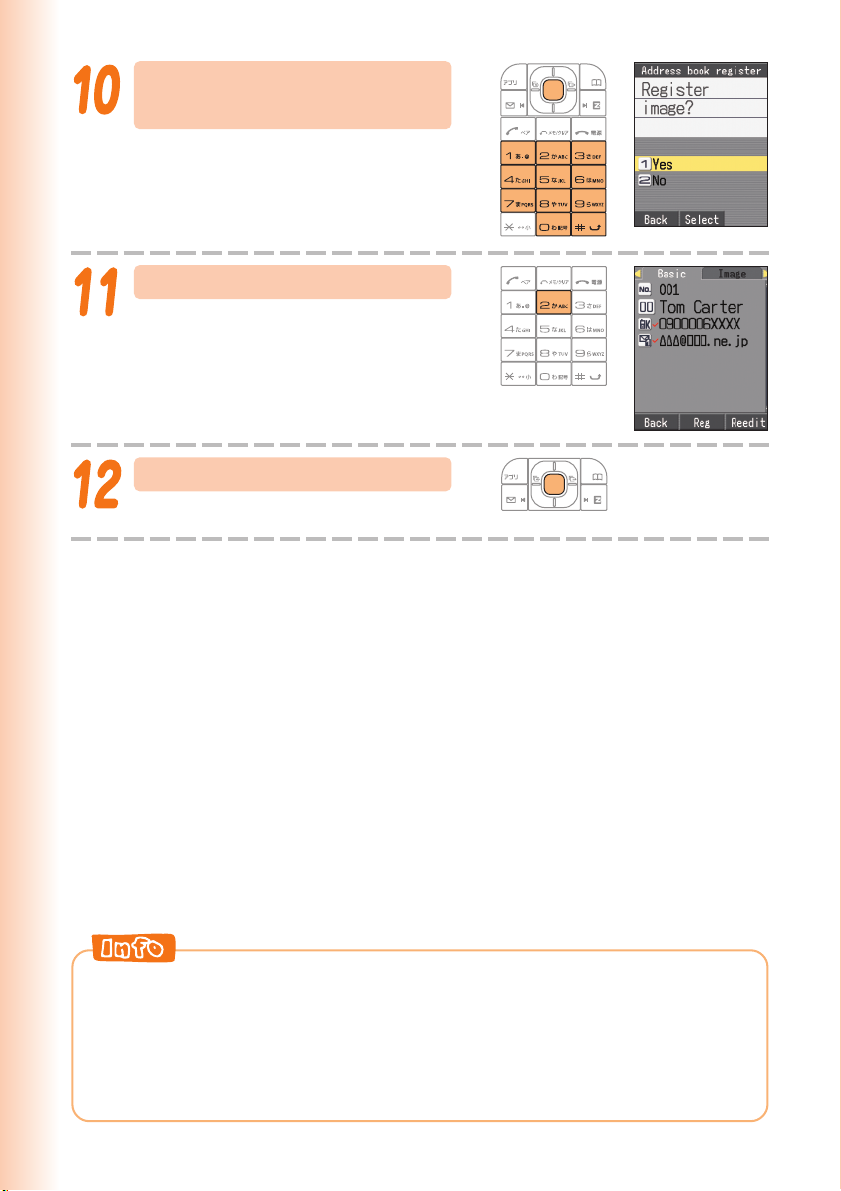
Enter the e-mail address,
and then press c (OK).
To input an e-mail address
→ “Inputting an E-mail Address”
(page 107)
Press 2 (No).
Press c (Reg).
◎In Smart Mode, you can input “Name,” “Reading,” “Phone Number1,”
“E-mail Address1,” and “Image” data only into an address book record.
◎You can press 1 (Yes) in step 11 to select a photo in the Data Folder
and assign it to the address book record.
◎Pressing & (Reedit) in step 12 and then pressing 1 (Yes) returns to
step 3 from which you can edit the contents of the record.
98
 Loading...