

Page 1
BasicManual
Introduction
Contents
GettingReady
LearningtheBasics
CharacterInput
Phone
Contacts
Mail
Internet
Multimedia
Applications
SettingsofIS11CA
OverseasUsage
Appendix/Index
Page 2
Preface
Thank you for purchasing the IS11CA.
Before using your IS11CA, be sure to read the Basic Manual (this
PDF manual) to ensure correct usage. After you have finished
reading this manual, store this PDF manual and the printed
manuals in safe places so you can retrieve them whenever you
need them.
Basic Manual (this PDF manual) describes basic operations of
major functions of the IS11CA.
For detailed descriptions on various functions, refer to the
Instruction Manual (Japanese).
Downloading Manuals
You can download the Basic Manual (this manual) and the
Instruction Manual (Japanese) in PDF format from the au
homepage.
http://www.au.kddi.com/torisetsu/index.html
•
To display the Basic Manual (this manual) and the Instruction
Manual (Japanese) in PDF format on the IS11CA, use Quickoffice.
Online Manual
Online manuals are also provided on the au homepage, which
contents are from the Instruction Manual (Japanese) and are
reorganized in a searchable format.
http://www.au.kddi.com/manual/index.html
Safety Precautions
Be sure to read the Safety Precautions “安全上のご注意” in the
Instruction Manual (Japanese) to ensure proper usage of the
IS11CA.
For troubleshooting, check the symptom of your IS11CA in
auお客さまサポート (au Customer Support) on the au homepage.
http://www.kddi.com/customer/service/au/trouble/kosho/index.html
ii
Before Using an au Phone
You cannot receive or make calls in a location where the signal
•
cannot be received, even within the service area. Calling may
not be available in a location where the signal is weak. If you
move to a location where the signal is weak during a call, the
call may be interrupted.
The au phone is a digital cell phone and can maintain a
•
high call quality until the signal weakness reaches its limit.
Therefore, once the limit has been reached, the call may be
disconnected suddenly.
Note that the au phone uses signals which may be intercepted
•
by a third party. (However, the CDMA/GSM system enables
highly confidential call communications.)
The au phone is a wireless station which is compliant with the
•
Radio Act, and may be subject to inspections regulated by the
Radio Act.
When you insert the au IC-Card, the product number
•
information of your au phone is sent to the au server for the
security and operation status notification of the au phone.
Always be considerate of others around you when using your
•
au phone in public places.
For a child’s use, read the Basic Manual and give your child
•
instructions on proper use.
The IS11CA is a cell phone compatible with the international
•
roaming service. Each network service which is described in
the Basic Manual varies depending on the area or service. For
details, refer to the supplied Global Passport Owner’s Guide
(Japanese).
Page 3
Introduction
Cell Phone Etiquette
Cell phones always emit weak radio waves when power is on.
Use cell phones in an enjoyable and safe manner without
forgetting to be considerate of others around you.
Use of cell phones is not allowed in some
■
places.
Using a cell phone while driving a car/motorcycle is dangerous
•
and is prohibited by law. Also, using a cell phone while riding a
bicycle may be punished by law.
Using a cell phone in an aircraft is prohibited by law.
•
Be considerate of where you use the cell phone
■
and how loudly you talk.
Do not make calls in theaters, museums, libraries, and other
similar places. Turn power off or turn on silent mode so as not to
disturb others around you by ringtones.
Do not use the cell phone on a street where you might interrupt
•
the flow of pedestrians.
Move to areas where you will not inconvenience others on
•
trains or in hotel lobbies.
Refrain from talking in a loud voice.
•
Obtain the permission of other people before you take their
•
photos with the cell phone’s camera.
Be considerate of people around you.
■
Some people close to you in crowded places such as packed
•
trains may be using a cardiac pacemaker. Turn the cell phone
off in such places.
Abide by the rules of hospitals and other medical institutions
•
where it is forbidden to use or carry cell phones.
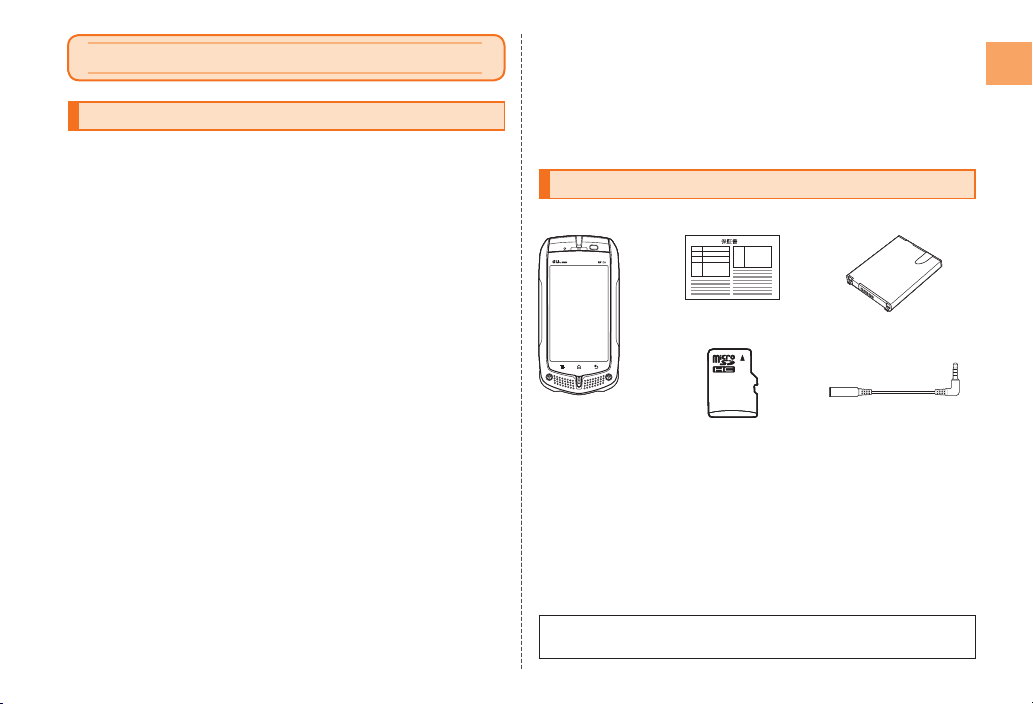
Accessories
Check all the contents are included.
Warranty
(Japane se)
IS11CA
microSDHC memory
card (Sample)
Instruction Manual (Japanese)
•
Safety Precautions (Japanese)
•
Setting Guide (Japanese)
•
JIBUN BANK Launcher Operation Guide (Japanese)
•
Global Passport Owner’s Guide (Japanese)
•
au International Call Guide (Japanese)
•
The following items are not included.
AC adapter
• microUSB-USB conversion cable•
Earphone•
Battery pack
(CAI11UAA)
ø3.5 earphone extension
cable (Sample)
Introduction
1
Page 4
Purchase a specified charger (sold separately).
•
The illustrations in this manual may look different from the
•
actual product.
Introduction
The ø3.5 earphone extension cable (sample) and microSDHC
•
memory card (sample) are not covered by the warranty.
Illustrations and Descriptions in This Manual
Note on Key Illustrations
■
In this manual, the key illustrations are simplified as shown
below.
Security Code and PIN Code
Security Code and Passwords
You have to use each security code for using the IS11CA. You
can use a security code and other passwords described below.
Take care not to forget your security code and passwords,
because they are required for performing various operations and
using subscription services.
● Security Code
Usage
example
Initial
value
① Using the Answering Service (Voice Mail) and Call
Transfer remotely from a fixed-line phone
② Making inquiries, applications, and changes while
using Customer Center voice guidance, and au
homepage
The four-digit number you wrote on your subscription
form
MHB
MHB
< > ,P
< > ,P
■
Note on Screenshots
The screenshots in this manual are simplified and may look
different from the actual screens.
2
● Lock No.
● Lock No.
Usage
Usage
example
example
Initial
Initial
value
value
Setting/Canceling
Setting/Canceling
Screen Lock, etc.
Screen Lock, etc.
1234
1234
● PIN Code
● PIN Code
Usage
Usage
example
example
Initial
Initial
value
value
Preventing
Preventing
unauthorized use
unauthorized use
of the au IC-Card
of the au IC-Card
by a third party
by a third party
1234
1234
PIN Code
If the PIN code is incorrectly entered three times consecutively,
the PIN code will be locked. Use the PUK code to unlock the PIN
code.
Page 5
PIN Code
■
You can set the IS11CA to require PIN code entry every time the
power is turned on, to prevent unauthorized use of the au ICCard by a third party.
At the time of purchase, the PIN code is not to be required to
•
use phone. You can select “Lock UIM Card” and set the PIN
code to be required.
It is also required when setting “Lock UIM Card”.
The initial value of the PIN code is “1234”. You can change the
•
PIN code to a four- to eight-digit number by selecting “Change
UIM PIN”.
PUK Code
■
When the PIN code is locked, enter the PUK code and set the
new PIN code.
PUK code is an eight-digit number given at the time of
•
purchase, and is printed on the back side of the plastic card
where your au IC-Card is attached.
If the PUK code is incorrectly entered ten times consecutively,
•
contact an au shop, PiPit or the Customer Center.
When the PIN code is locked, the IS11CA may be restarted for
•
the security reasons.
•
The PIN code is not reset even if you perform a reset with
“Factory data reset”.
Feature Overview
Water Resistance
■
The IS11CA complies with IPX5*1 and IPX8*2 water protection
standards (JIS C 0920).
*1 IPX5 compliant means that this cell phone continues to
function as a phone after being subjected to a water jet
(approximately 12.5 liters/min.) discharged from a nozzle
(inner diameter: 6.3 mm), from all directions (approximately
three meters from the cell phone) for three minutes or more.
*2 IPX8 compliant means that this cell phone continues
to function as a phone and no water seeps inside after
being gently lowered into a tank filled with still tap water
(at normal temperature) to the depth of 1.5 meter, and
immersed at the bottom for approximately 30 minutes.
The IS11CA is resistant to fresh or tap water at normal
•
temperature (5℃ - 35℃) only.
The IS11CA is resistant to water when the external connection
•
jack cover and battery pack cover are closed firmly.
Malfunction resulting from misuse is not covered by the
•
warranty.
Dust Resistance
■
The IS11CA complies with IP5X* dust protection standards
(JIS C 0920).
* IP5X compliant means that this cell phone continues to
function as a phone and continues to be safe to use after
being placed in a chamber containing dust particles with
a diameter of 75 µm or less and left for 8 hours while the
contents of the chamber are subjected to agitation.
Introduction
3
Page 6

Shock Resistance
■
The IS11CA has shock resistance performance (compliant with
MIL standards*) to withstand hard day-to-day use.
Introduction
* Tests were performed under independent standards
compliant to MIL-STD-810G Method 516.6-Shock
established by the United States Department of Defense,
where the product is dropped closed from 1.22 m onto
plywood (lauan wood) in 26 directions.
Note that this assumes shock resistance in day-to-day use.
•
Applying excessive shock such as throwing or intentionally
dropping may lead to breakage. Also, the cell phone may
suffer damage from drop impact even if it continues to function
normally.
4
Page 7
Contents
Preface ......................................................ii
Safety Precautions ....................................ii
Before Using an au Phone ........................ii
Introduction ................................1
Cell Phone Etiquette .......................................1
Accessories ....................................................1
Illustrations and Descriptions in This
Manual ............................................................2
Security Code and PIN Code .........................2
Security Code and Passwords ...................2
PIN Code ....................................................2
Feature Overview ...........................................3
Contents ......................................5
Getting Ready .............................7
Names and Functions of Parts .......................7
Charging the Battery Pack ..............................9
Turning the Power On/Off .............................10
Turning the Power On ..............................10
Turning the Power Off...............................10
Sleep Mode ..............................................10
Switching the Display Language to
English ..........................................................10
Initial Settings ...............................................11
Setting Up a Google™ Account ...............11
Removing/Attaching the Battery Pack ..........12
Removing the Battery Pack......................12
Attaching the Battery Pack ......................13
au IC-Card ....................................................13
Removing au IC-Card ..............................14
Inserting au IC-Card ................................14
Using microSD Memory Card .......................14
Inserting microSD Memory Card .............15
Removing microSD Memory Card ...........15
Learning the Basics .................17
Operating the Touch Panel ...........................17
Operation While Using Functions .................18
Selecting an Item .....................................18
Displaying the Menu ................................18
Viewing the Home Screen ............................19
Using Status Bar ......................................19
Using Notification Panel ...........................21
Using the Home Screen ...............................21
Switching the Home Screen .....................21
Moving Icons on the Home Screen ..........22
Using Shortcuts/Widgets/Folders ............22
Changing the Wallpaper ..........................23
Using the Launcher ......................................23
Switching Orientation....................................25
Character Input .........................26
Entering Text .................................................26
Keyboard and Panel Types ......................26
Switching to English Input Mode ..................26
Using the Number Keyboard ........................27
Switching Input Modes of the Number
Keyboard .................................................27
Inputting with the Number Keyboard .......27
Inputting with the QWERTY Keyboard .........28
Inputting with the Pictogram/Face Mark/
Symbol Panel................................................29
Inputting with the Common Phrase/Text
Code Panel ...................................................29
Phone ........................................30
Making a Call ................................................30
Making an International Call .........................31
001 International Call Service ..................31
Answering a Call ...........................................31
Returning a Call (Call Log) ...........................31
Contacts ....................................32
Adding a New Contact ..................................32
Editing My Profile .....................................33
Checking Contact Details .............................33
Mail ............................................34
About Mail .....................................................34
Using E-mail .................................................34
Creating and Sending E-mail ...................34
Receiving E-mail ......................................35
Checking Sent and Received E-mail .......35
Using E-mail Contacts .............................36
Changing Your E-mail Address ................37
Setting Mail Filters ....................................38
Using C-mail .................................................39
Creating and Sending C-mail ..................39
Receiving C-mail ......................................40
Checking Sent and Received C-mail .......40
Contents
5
Page 8

C-mail Safety Block Setting ......................40
Setting C-mail ...........................................41
Using PC-mail ...............................................41
Registering a PC-mail Account ................41
Creating and Sending PC-mail ...............42
Contents
Receiving PC-mail ....................................42
Using Gmail™ ..............................................43
Creating and Sending Gmail ...................43
Receiving Gmail .......................................43
Internet ......................................44
Viewing Sites with Browser...........................44
Using Bookmarks/History .............................44
Bookmarking a Web Page .......................44
Multimedia .................................45
Using the Camera .........................................45
Cautions for Using the Camera ................45
Taking a Photo ..............................................45
Recording a Movie ........................................45
Using Gallery ................................................46
Applications ..............................47
Using Android Market™ ...............................47
Using au one Market ....................................47
Managing Applications .................................48
Settings of IS11CA ...................49
Turning On Silent Mode ................................49
Changing the Incoming Ringtone .................49
Setting the Screen Lock ...............................49
Initializing microSD Memory Card ................49
6
Overseas Usage .......................50
Using Global Passport CDMA/GSM .............50
For Overseas Use without Anxiety ...........50
Configuring the Overseas Settings ..........50
Making a Call at Your Travel
Destination ...............................................51
Receiving a Call at Your Travel
Destination ...............................................53
Appendix/Index .........................54
Troubleshooting ............................................54
Trademarks/Others .......................................56
Index .............................................................58
Page 9
Getting Ready
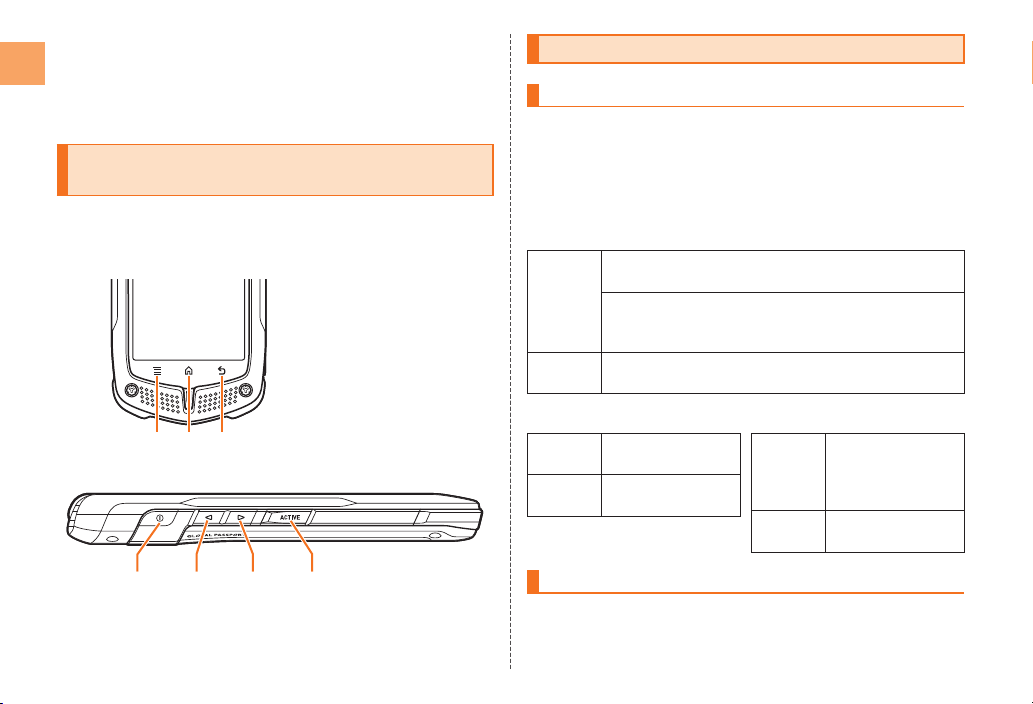
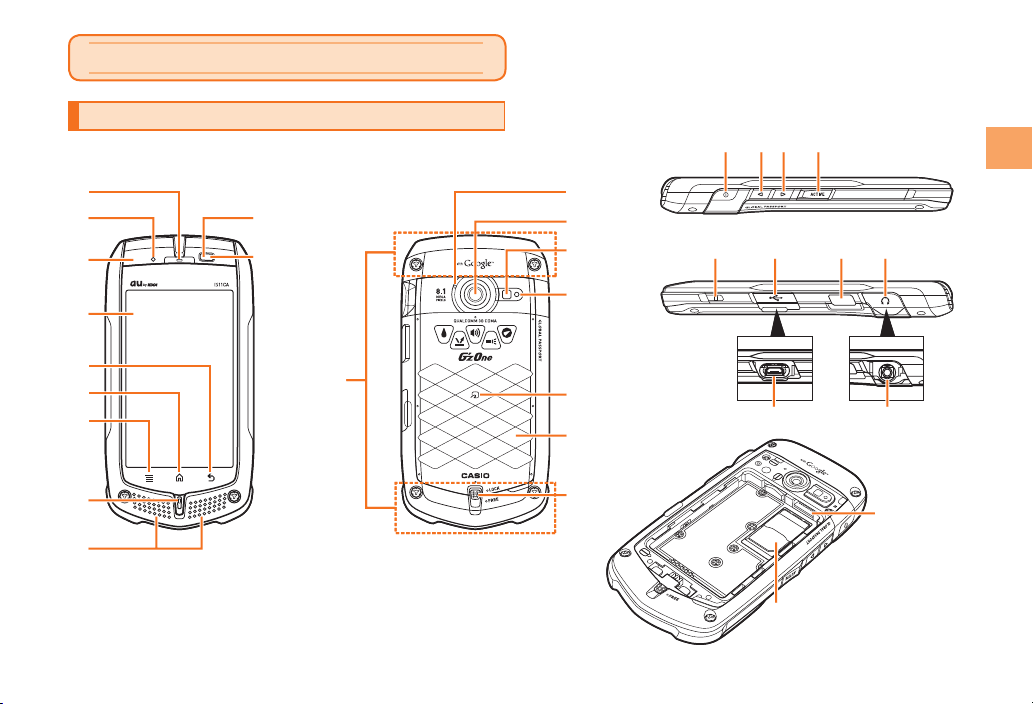
Names and Functions of Parts
①
①
②
②
③
③
④
④
⑤
⑤
⑥
⑥
⑦
⑦
⑧
⑧
⑨
⑨
⑩
⑩
⑪
⑪
⑫
⑫
㉕
㉒㉓㉔
㉒㉓㉔
㉕
Getting Ready
⑬
⑬
⑭
⑭
㉘
㉖
㉖
㉗
⑮
⑮
⑯
⑯
⑰
⑰
⑱
⑱
⑲
⑲
㉗
㉚㉛
㉚㉛
㉑
㉑
㉘
㉙
㉙
⑳
⑳
7
Page 10

① Earpiece (Receiver)
Emits voice of other party during a call.
② Temperature sensor
③ LED indicator
Lights in red while charging.
Blinks according to the settings when receiving a call or mail
message.
Getting Ready
④ Display
⑤ BBack key
Returns to the previous page.
⑥ HHome key
Use it to display the home screen etc.
⑦ MMenu key
Displays the option menu.
⑧ Microphone (Mouthpiece)
Transmits your voice during a call. It is also used for
recording sounds.
⑨ Speaker
Emits ringtones, alarm tones, etc.
⑩ Light sensor
Light sensor detects the ambient brightness and adjusts the
brightness of display.
⑪ Proximity sensor
Proximity sensor prevents operating the touch panel
incorrectly during a call.
⑫ Built-in antenna
Do not cover the built-in antennas when you call, use the
Internet, Wi-Fi, Bluetooth
®
, or retrieve GPS information.
⑬ Back microphone
Transmits your voice during a call using hands-free.
8
⑭ Camera lens
⑮ Photo light/Flashlight
⑯ Camera start indicator
⑰ FeliCa mark
Hold it over a reader/writer when using Osaifu-Keitai
®
The FeliCa antenna is built into the battery pack. Be sure to
use the battery pack designed specifically for the IS11CA.
⑱ Battery pack/cover
For removing or attaching the battery pack, refer to
“Removing/Attaching the Battery Pack”.
⑲ Battery lock
⑳ microSD memory card slot
㉑ au IC-Card
For details on handling the au IC-card, see “au IC-Card”.
㉒ PPower key
Turns on/off the power, and sets/cancels sleep mode.
㉓ <Volume Up key
㉔ >Volume Down key
㉕ ,ACTIVE key
㉖ Strap eyelet
㉗ External connection jack cover
㉘ Infrared port
Sends and receives data via infrared communication.
㉙ Earphone jack cover
㉚ External connection jack
Use it to connect the IS11CA to the microUSB cable 01 (sold
separately), the 18-pin microUSB conversion adapter 01
(sold separately), etc.
㉛ Earphone jack
Use it to connect an earphone.
.
Page 11
Charging the Battery Pack
The battery pack is not fully charged at the time of purchase.
Charge the battery pack when you use the IS11CA for the first
time or the battery level becomes low. Charging is finished when
the red LED indicator goes out.
The common AC adapter 02/03 (sold separately) supports a
•
voltage of 100 V to 240 V AC. Be sure to use the common AC
adapter 02/03 (sold separately) when charging overseas.
The common AC adapter 01 (sold separately) is only for
domestic use with a 100 V AC power outlet.
•
Be sure to close the external connection jack cover and
earphone jack cover, and do not pull or twist them forcefully.
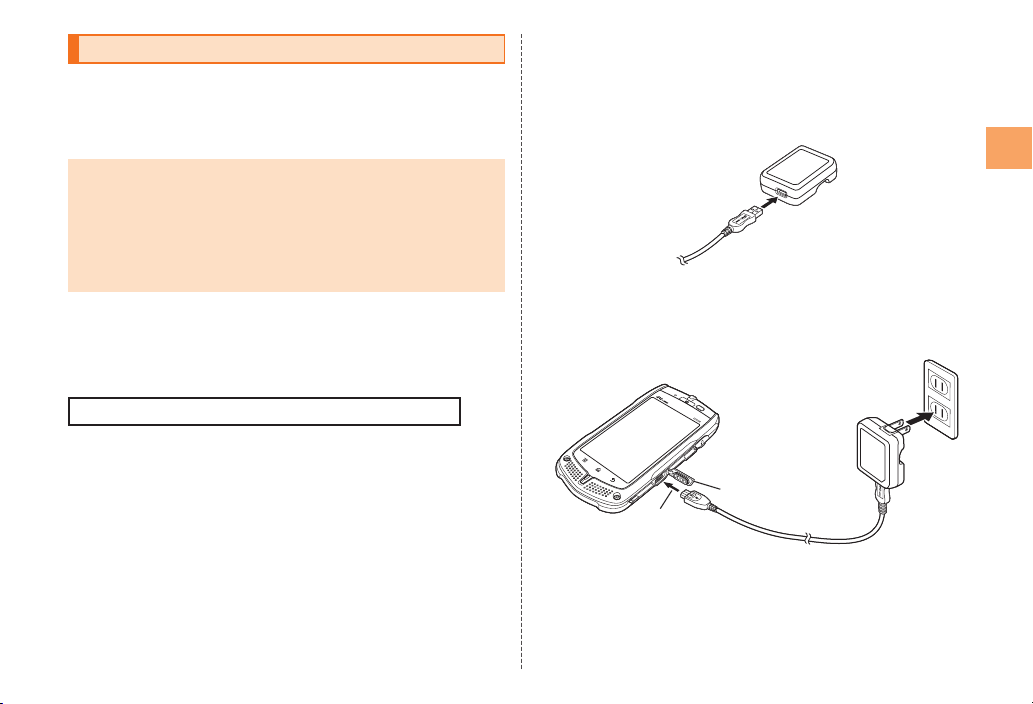
Charging the Battery Pack with the Specified
■
AC Adapter (sold separately)
The common AC adapter 03 (sold separately) and the microUSB
cable 01 supplied with the common AC adapter 03 are required.
Chargingtimetakesapproximately140minutes.
Connect the microUSB cable 01 supplied with
the common AC adapter 03 (sold separately) to
the common AC adapter 03
Confirm the orientation of the USB plug and then insert it
while keeping it straight in relation to the jack.
Connect the microUSB cable 01 to the IS11CA
Open the cap (-1) of the external connection jack and
confirm the orientation of the microUSB plug and then insert
it while keeping it straight in relation to the jack (-2).
-1
-1
-2
-2
Insert the power plug of the common AC
adapter 03 (sold separately) into a power outlet
The LED indicator of the IS11CA lights red and the charge
indicator is displayed. The LED indicator turns off when
charging is complete.
Getting Ready
9
Page 12
Charging is available by connecting the IS11CA to a PC with the
•
microUSB cable 01.
Turning the Power On/Off
Turning the Power On
Getting Ready
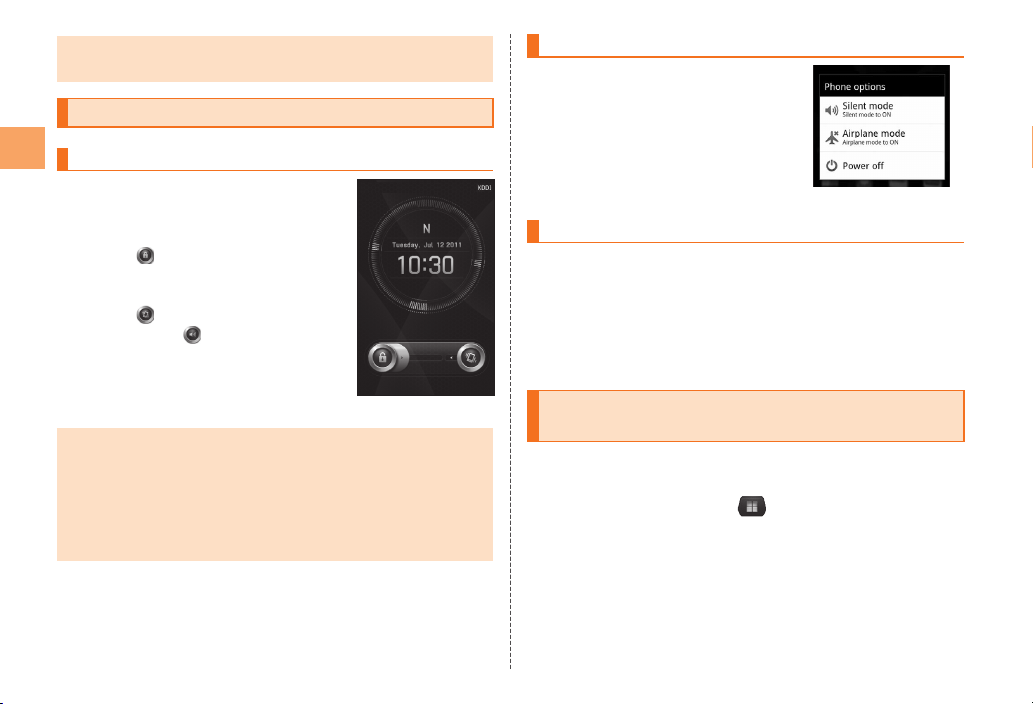
Hold down P for at least
two seconds
The unlock screen is displayed.
Drag
•
•
to the right to unlock. If
Screen Lock is set, the Lock No.
entry screen is displayed.
Drag
to the left to enable Silent
mode. Drag
Silent mode.
to the left to disable
Turning the Power Off
Hold down P for at
least two seconds
The Phone options screen is
displayed.
[Power off] → [OK]
《Phone options screen》
Sleep Mode
If you press P or no operation is made for a while, the screen
is turned off temporarily, and then sleep mode is set.
■
Canceling Sleep Mode
While sleep mode is set, press P
The unlock screen is displayed.
The initial setting of the touch panel is executed while the logo
•
“Android™ au with Google™” is displayed. Do not touch the
screen, otherwise touch panel operations may not be performed
properly.
•
After you purchase the IS11CA, the Initial Settings screen is
displayed automatically when turning on the power for the first
time.
10
《Unlock screen》
Switching the Display Language to English
You can switch the display language for function names and
other items to English.
On the home screen, → [設定](Settings)
→ [言語とキーボード](Language & keyboard)
[言語を選択](Select language) → [English]
Page 13
Initial Settings
The Initial Settings screen is displayed automatically when first
turning on the power after purchasing the IS11CA, or restarting
after initializing the IS11CA.
For detailed operations on the initial settings, refer to the
supplied Setting Guide (Japanese).
Hold down P for at least two seconds to
turn on the power
The Initial Settings screen is displayed.
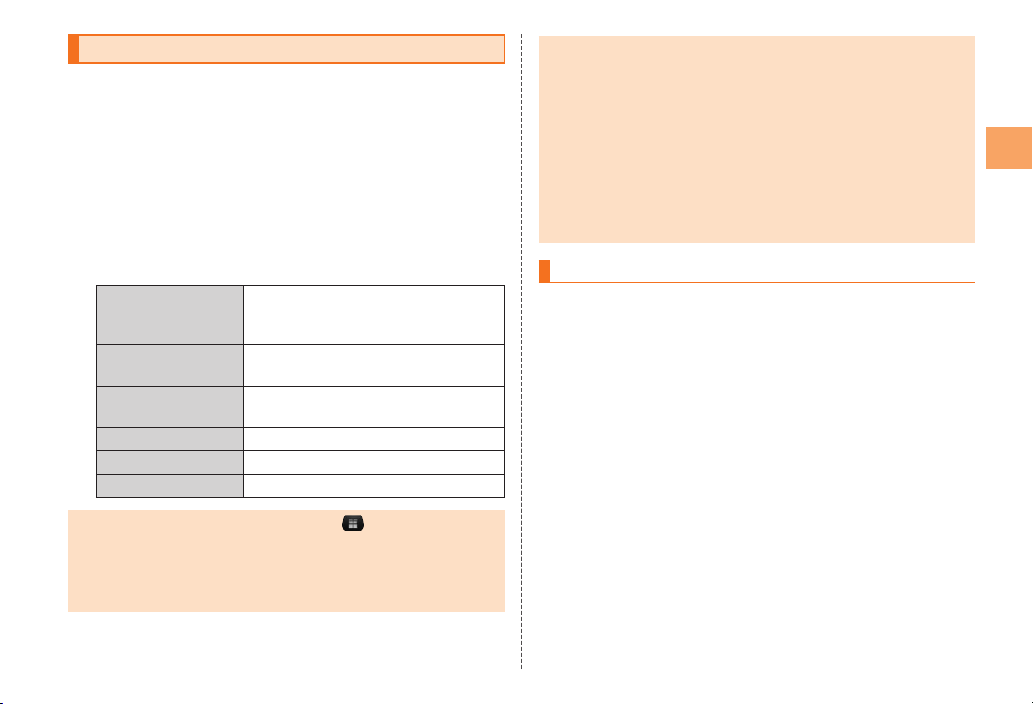
Configure the following initial settings as described in the
instructions on the screen.
Language Set the language to use.
Date & Time Set the display format for the date
E-mail Settings Do the initial settings for au mobile e-
au one-ID Settings Set up au one-ID.
Wi-Fi Settings Set up Wi-Fi access point.
Google Sign-up Set up your Google account.
•
Alternatively, from the home screen, tap
to set up.
About the E-mail initial settings
You need to apply to use E-mail. If you did not apply at the time
•
of purchase, contact an au shop or Customer Center.
•
You can select 日本語 (Japanese)
or English.
and time.
mail (@ezweb.ne.jp).
→ [Setup Wizard]
When configuring the initial settings, select “Japan” for the
•
“Area Settings” and then configure the settings in a location in
Japan where the signal reception is good. The settings may not
be configured correctly if you are in a location where the signal
reception is poor or if you are moving.
•
Depending on the time of day, it may take from about 30
seconds to 3 minutes to configure the initial settings. Continue
waiting as long as the message “Configuring mail settings.
Please wait.” is displayed on the screen.
•
For the procedure to change the e-mail address in the initial
settings, refer to “Changing Your E-mail Address”.
Setting Up a Google™ Account
If you set up a Google account on your IS11CA, you will be able
to use the online services provided by Google.
The Google account setup screen is displayed when, for
example, you configure the initial settings, first start an
application that requires a Google account, or first configure
“Accounts & sync”.
On the Google account setup screen, tap
[Settings]
The Google account setup screen is displayed.
[Next] → [Create]/[Sign in]
If you already have a Google account, tap “Sign in” and
enter your username and password, and then tap “Sign in”.
If you do not have a Google account, tap “Create” and
register for an account as described in the instructions on
the screen.
Getting Ready
11
Page 14
To reset your Google password
■
On the home screen, tap → Tap the URL
display field → Enter “http://www.google.co.jp/”
→ Tap
Tap [ログイン] (Sign in)
The Google account screen is displayed.
Getting Ready
Tap [
アカウントにアクセスできない場合
access your account?)
The screen for resetting your account password is
displayed.
Follow the instructions on the screen
Removing/Attaching the Battery Pack
Use only the battery pack for the IS11CA, and be sure to install
it correctly.
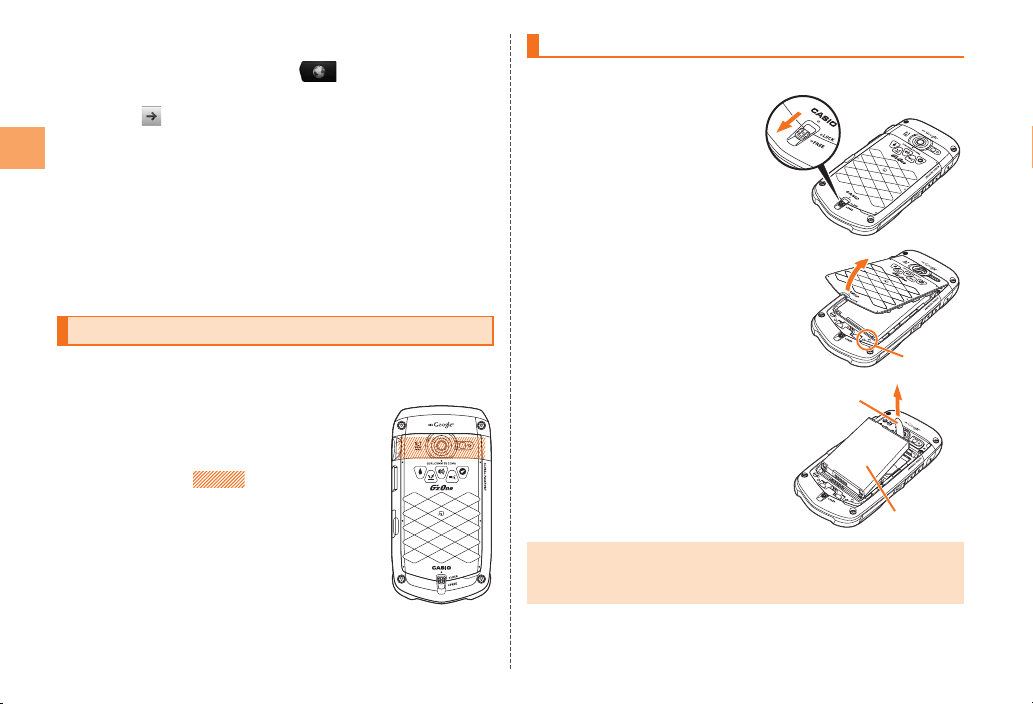
Note on Removing the Battery
■
Pack Cover
Do not pull up on the battery pack cover by
forcibly pushing the
camera lens) of the cover with fingers, as
illustrated on the right. If the cover becomes
extremely bent, the battery pack cover is
damaged, which may cause injury.
part (around the
] (Can’t
Removing the Battery Pack
Before removing the battery pack, turn off the IS11CA.
Slide the battery lock
to the “FREE” position
Pull the battery pack cover
upward in the direction of
the arrow from the concave
portion in the IS11CA
Remove the battery pack
by pulling up on the PULL
tab in the direction of the
arrow
When removing the battery pack, always pull up on the PULL
•
tab. Doing otherwise may result in damage to the contacts on
the IS11CA.
PULL tab
Concave
portion
Battery pack
12
Page 15
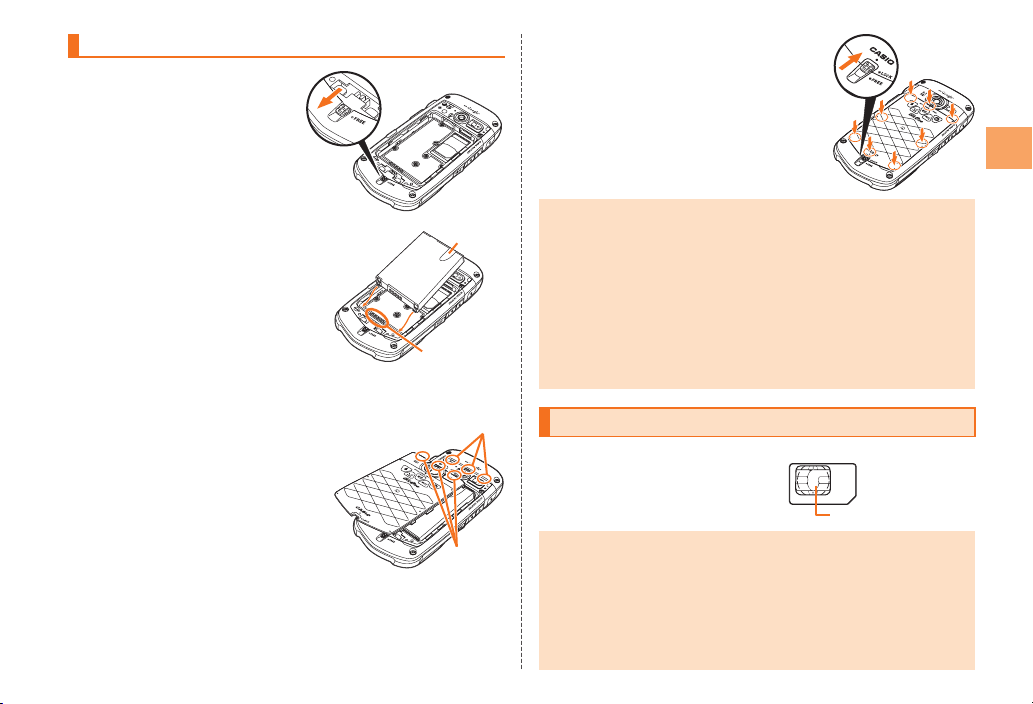
Attaching the Battery Pack
Make sure that the
battery lock is set to
the “FREE” position
Make sure that the PULL
tab of the battery pack is
securely attached within
the dashed line, confirm
the position of the
contacts on the IS11CA,
and then firmly insert the
battery pack
Hold the battery pack
cover so that the three
tabs on the top edge are at
an angle, and then insert
them into the holes in
the IS11CA and close the
battery pack cover
PULL tab
Contacts on
IS11CA
Holes
Tabs
Firmly press the battery pack
cover at the eight places
shown in the figure, make sure
that the entire battery pack
cover is firmly seated in place,
and then slide the battery lock
to the “LOCK” position
Before attaching the battery pack, make sure that the microSD
•
memory card and au IC-Card are inserted securely. If the card
is not completely inserted, that may lead to microSD memory
card, au IC-Card, or battery pack damage.
•
Failure to follow the correct procedures when attaching the
battery pack may result in damage to the battery pack or
battery pack cover.
•
If the battery pack cover is forcibly pushed with fingers with the
tabs of the battery pack cover attached on the battery pack, the
tabs may be damaged.
au IC-Card
An au IC-Card records your
personal information such as
phone numbers, etc.
Note the following not to cause malfunction or damage when
•
you insert or remove the au IC-Card.
•
Do not touch the IC (metal surface) part of the au IC-Card or
the IC card slot part of the IS11CA.
•
Confirm the correct direction when you insert the au IC-Card.
•
Do not insert or remove the au IC-Card forcefully.
Take care not to lose your au IC-Card when you remove it.
•
au IC-Card
IC (metal surface) part
Getting Ready
13
Page 16
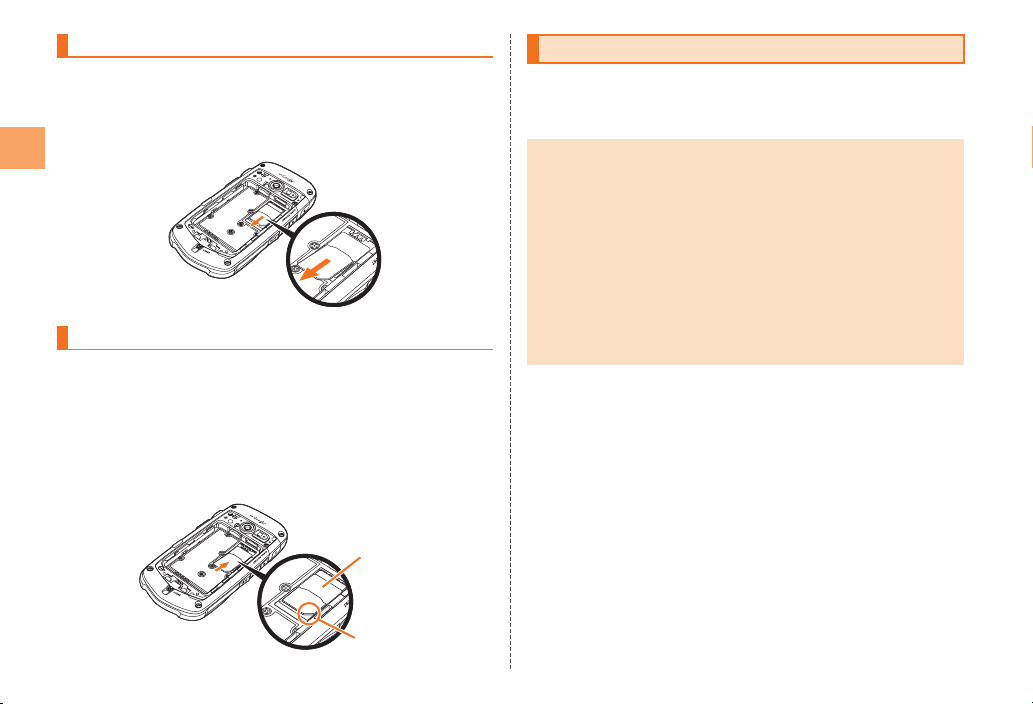
Removing au IC-Card
Turn off the power and remove the battery pack before removing
the au IC-Card.
Slide out the au IC-Card in the direction of the
arrow in the figure while keeping it straight
Getting Ready
Inserting au IC-Card
Turn off the power and remove the battery pack before inserting
the au IC-Card.
Insert the au IC-Card beneath the guide in
the direction of the arrow with its au IC-Card
surface face down and then push it to slide it
all the way in while gently pressing from above
Guide
Guide
Cutout
Cutout
14
Using microSD Memory Card
You can set microSD memory card (including microSDHC
memory card) to the IS11CA, and save data. And also you can
keep mail messages, bookmarks, etc. in microSD memory card.
Some applications may not be available when a microSD
•
memory card is not inserted.
•
The maximum file size available on a microSD memory card is
4 GB per file when saving data to microSD memory card on the
IS11CA.
•
A microSD memory card initialized on other devices may not
be used on the IS11CA properly. Initialize it on the IS11CA.
For operations to initialize the microSD memory card, refer to
“Initializing microSD Memory Card”.
•
Some files such as copyright protected data may not be played
on IS11CA even if they are moved/copied from the PCs to a
microSD memory card successfully.
Handling Precautions
■
Do not remove the battery pack and do not turn off the IS11CA
•
and other equipment while reading, writing, playing, saving or
moving/copying data.
It may result in damage to data in the IS11CA or microSD
memory card, or data loss.
Do not drop or subject the IS11CA to impact with a microSD
•
memory card inserted. It may result in damage to recorded
data, or data loss.
Do not insert objects other than microSD memory card such
•
as liquid, metals or flammable items into the microSD memory
card slot of the IS11CA. It may result in a fire, electric shock or
malfunction.
Page 17
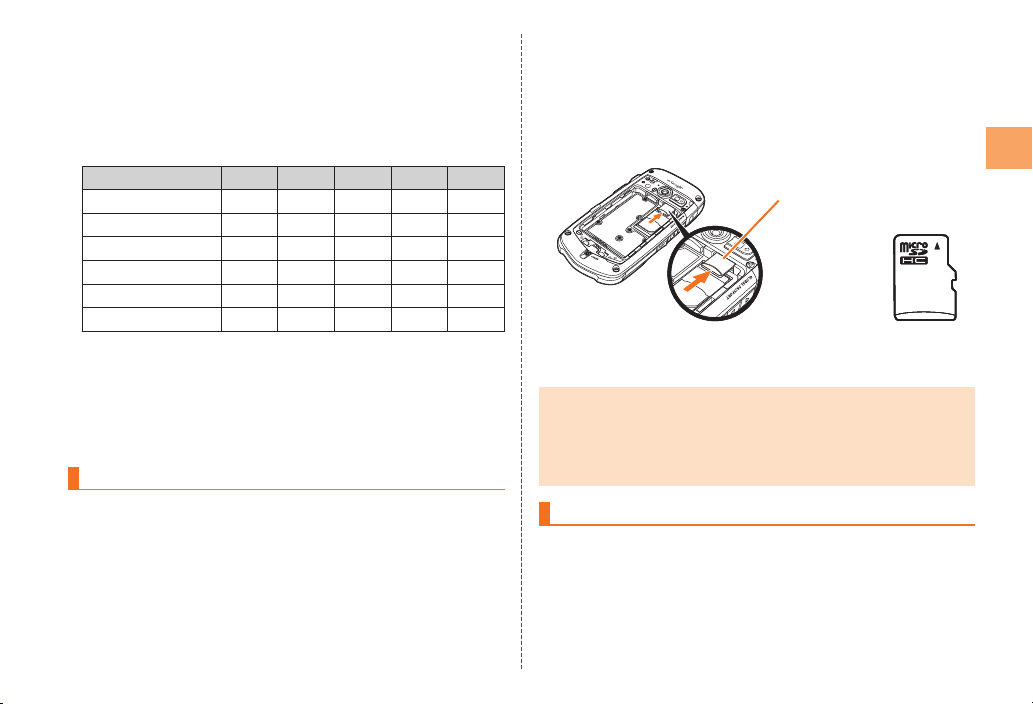
The following microSD memory cards have been confirmed
•
for operation based on the criteria by au. For operation
confirmation results of other microSD memory cards, contact
each microSD memory card manufacturer.
<microSD/microSDHC Memory Card>
* 4GB or mo re are for micro SDH C memor y card.
Manufacturer 2GB 4GB 8GB 16GB 32GB
Toshiba
Panasonic
SanDisk
ADTEC
Buffalo
Sony
○: Confirmed operation
ー: Unconfirmed operation or not for sale
As of April 2011
* Operatio n is confirmed for micro SD mem ory cards t hat are sold as of
April 2011. For the late st informat ion on operation confirmation, visit the au
homepage o r contact t he Custome r Center.
○○○○○
○○○○ー
○○○○○
○○○○ー
○○○○ー
○○○ーー
Inserting microSD Memory Card
Confirm the direction of the microSD memory
card and slowly insert it into the slot until it
clicks
Insert a microSD memory card until you hear a click and
confirm it is locked. Releasing the microSD memory card
before it is locked may cause it to pop-out.
microSD memory
microSD memory
card slot
card slot
Insert this card
Insert this card
with the microSD
with the microSD
logo side up
logo side up
Attach the battery pack, and attach the battery
pack cover
Insert a microSD memory card with the right side up in the
•
appropriate direction.
Inserting a microSD memory card forcefully into the slot could
result in failure to remove the microSD memory card, or damage
to the microSD memory card or the IS11CA.
Getting Ready
Turn off the IS11CA and remove the battery
pack cover and battery pack
Removing microSD Memory Card
Turn off the IS11CA and remove the battery
pack cover and battery pack
15
Page 18
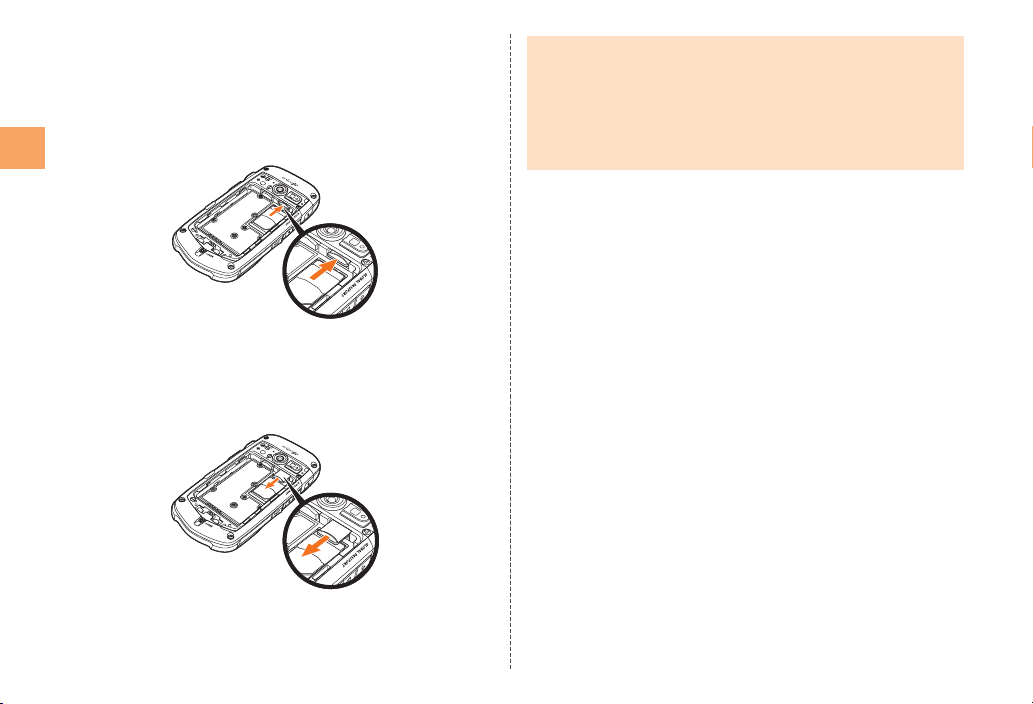
Slowly push the microSD memory card toward
the slot until it clicks
After it clicks, pull back your finger and keep putting it on the
microSD memory card until it comes out a little. Releasing
the microSD memory card when it is pushed toward the slot
may cause ejection of the microSD memory card.
Getting Ready
Slowly remove the microSD memory card
Slowly remove the microSD memory card.
Some microSD memory cards cannot be unlocked and do
not come out smoothly. In such case, pull it out with your
finger.
Attach the battery pack, and attach the battery
pack cover
Some applications may not be available when a microSD
•
memory card is not inserted.
•
Do not remove the microSD memory card forcefully. It may result
in damage to the microSD memory card or the IS11CA, or data
loss.
•
The microSD memory card may be warm after a long time use.
It is normal.
16
Page 19
Learning the Basics
Operating the Touch Panel
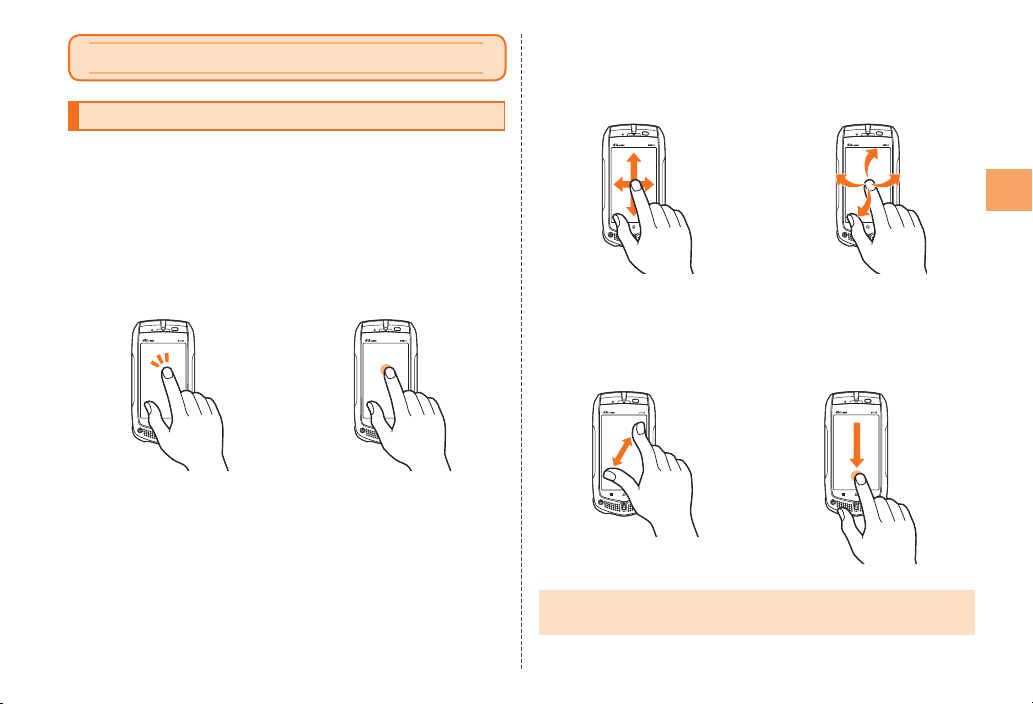
The display of the IS11CA is a touch panel. You can operate the
IS11CA by directly touching the screen.
Tap /Doub l e -tap
■ Touch and Hold
Tap: Gently touch a screen and
then immediately release your
finger.
Double-tap: Tap the same
position twice.
■
Keep touching an item or key.
Slide
■ Flick
While your finger is gently
touching the screen, trace it to
the desired direction.
Pinch
■ Drag
While two of your fingers are
touching the screen, move
the fingers apart or closer
together.
When performing flick operations, move your finger slowly and
•
then flick it gently.
■
Operate the screen by quickly
moving (flicking) your finger
up, down, right, or left.
■
While your finger is gently
touching the screen, trace it to
the desired position.
Learning the Basics
17
Page 20
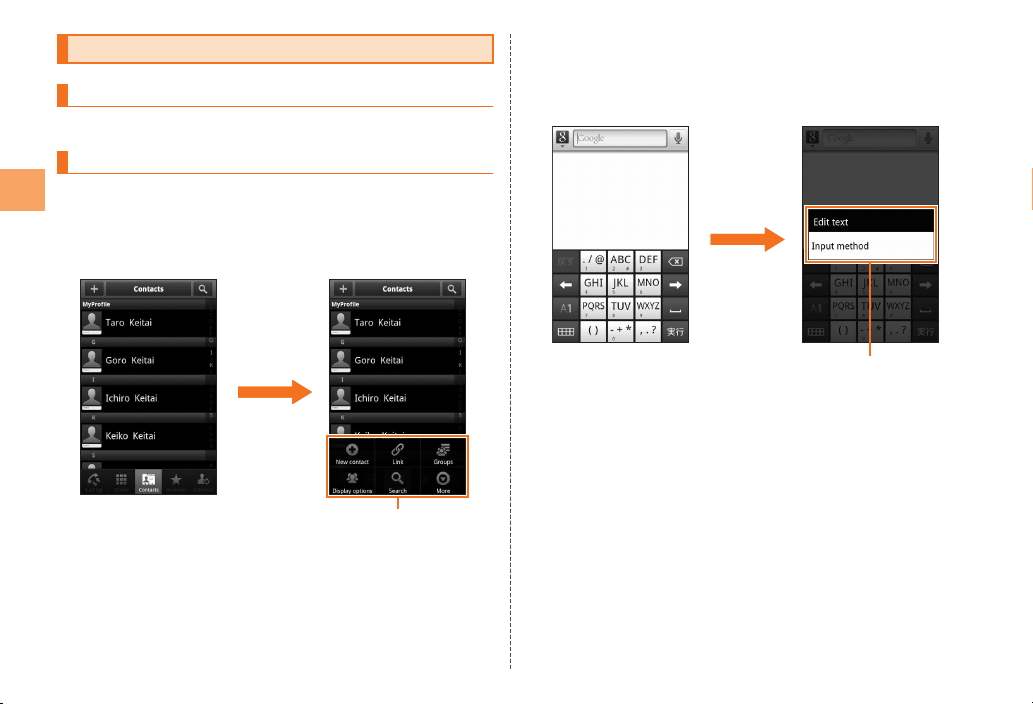
Operation While Using Functions
Selecting an Item
Select a displayed item or icon by tapping the screen directly.
Displaying the Menu
Option Menu
■
Learning the Basics
The option menu is displayed by tapping M on the screen
where the menu is available.
Example: In the Contacts list screen
Tap
Tap
M
M
Option menu
Option menu
Context Menu
■
The context menu is displayed by touching and holding an item
or a display where the menu is available.
Example: In the character entry screen
Touch and hold
Touch and hold
the character
the character
entry area
entry area
Context menu
Context menu
18
Page 21
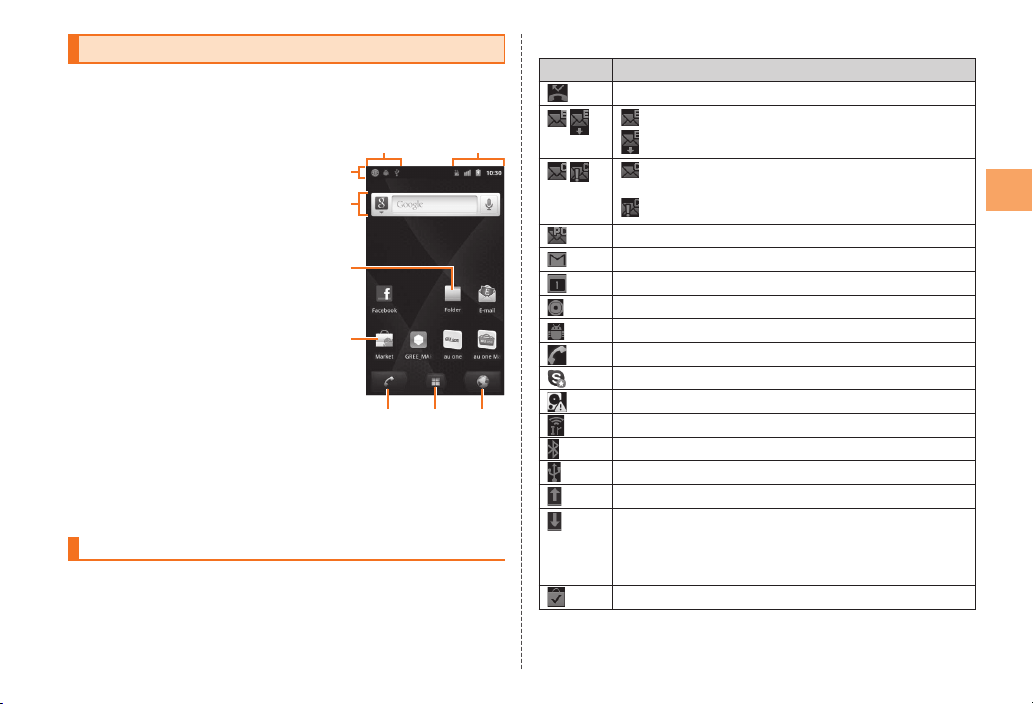
Viewing the Home Screen
On the home screen, you can check the status and current
settings of the IS11CA, start an application from a shortcut icon,
etc. You can also place and use your favorite widgets.
②
① Status bar
Displays notification indicators
such as missed call or status
indicators to check the status of
②
①
①
④
④
the IS11CA.
② Notification indicator
③ Status indicator
⑤
⑤
④ Widgets
⑤ Folder
⑥ Shortcuts
⑦ Phone button
⑥
⑥
Tap this button to display the
most recently displayed screen
out of the phone number entry
screen, call log screen, contacts
list screen, favorites screen, and
activities screen.
⑧ Launcher button
⑨ Browser button
⑦⑨⑧
⑦⑨⑧
《Home screen》
* This screen is for the
explanation of each function,
so it is different from the
default stat us.
Using Status Bar
The status bar is on the top of the screen of the IS11CA. The
notification indicators to notify you of a missed call, a new mail
message, or a running operation are displayed on the left side
of the status bar, while the status indicators to show the status of
the IS11CA are on the right side.
③
③
Examples of Notification Indicator
■
Indicator Description
Missed call
New mail message (E-mail)
Unreceived mail message (E-mail)
New mail message (C-mail)/Answering Service
message notification
Sending failed (C-mail)
New mail message (PC-mail)
New mail message (Gmail)
Schedule notification of the calendar
Playing music
USB debug connecting
Dialing/Calling
New event of Skype™
Few space available in the IS11CA
Infrared communication in progress
Receiving Bluetooth® pair setting request
USB connecting
Uploading data
Downloading/Finished downloading/Installing data or
application
•
The downloading indicator is displayed as an
animation.
Finished installing
Learning the Basics
19
Page 22
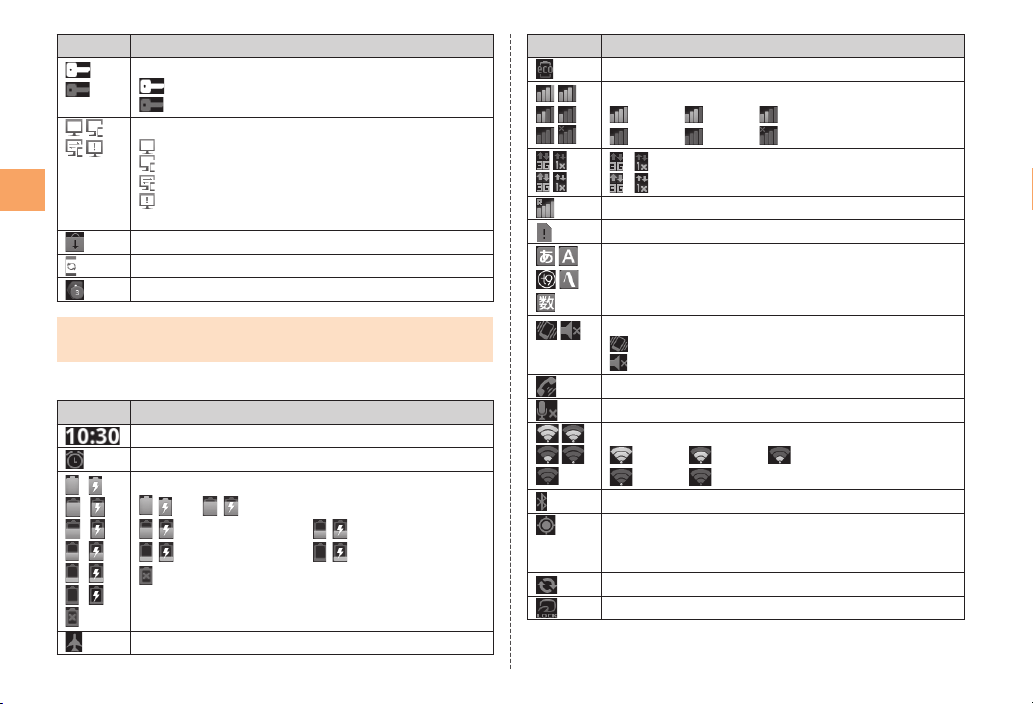
Indicator Description
VPN connection
Connected to VPN
Unconnected to VPN
PC Link
Learning the Basics
PC Link running
PC Link connected
PC Link accessing
User registration notification/Host rename
notification
Update available
Major update (OS Update) available
Indicators collected
Indicator Description
eco mode set
*
Signal strength
*
Level 4/ Level 3/ Level 2/
Level 1/ Level 0/ Out of service area
*
Data communication available
/
/ Data communication in use
In roaming
au IC-Card not inserted
Character type
When the same type of notifications exist, the number of them is
•
displayed on the lower right of the indicator.
Examples of Status Indicator
■
Indicator Description
Time
Alarm set
Battery level (While charging)
)
(
(
(
(
(
(
( ) Full/ ( ) Approx. 80 % remaining/
)
)
( ) Approx. 60 % remaining / ( ) Approx. 40 % remaining/
)
( ) Approx. 20 % remaining / ( ) Approx. 10 % remaining/
)
Battery level 0 %
)
The charge indicator is displayed as an animation.•
Airplane mode set
20
Silent mode status
* If you have set up a G oogle acc ount, the network service indicator turns
green when the IS11CA connects to Google services to synchronize Gmail,
calendar, contact, and other data and ba ck up setti ngs.
Silent mode on (with vibration)
Silent mode on (without vibration)
During a call using hands-free
Microphone set to off during a call
*
Wi-Fi signal strength
Level 4/ Level 3/ Level 2/
Level 1/ Level 0
Bluetooth® waiting/connecting/in use
GPS in use
•
The GPS information acquisition indicator is
displayed as an animation.
Data synchronizing
Osaifu-Keitai® lock setting in use
Page 23
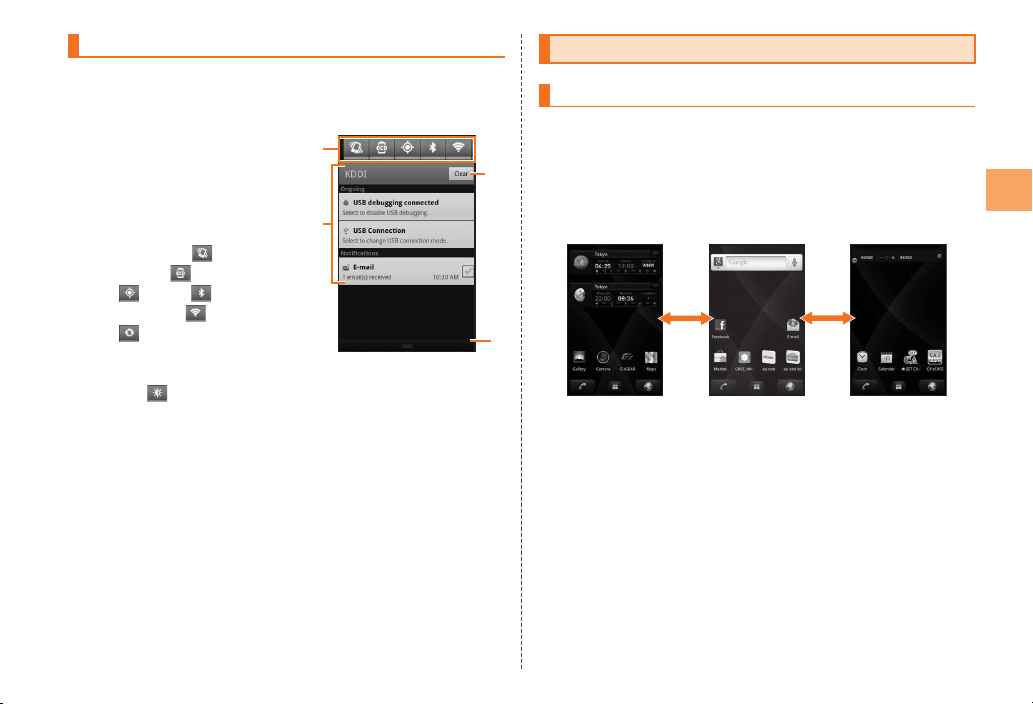
Using Notification Panel
In the notification panel, you can check the details on notification
indicators and status indicators or activate an application
corresponding to the indicator.
Flick/drag the status
bar downward
The notification panel
appears.
① Function Switches
Tap any of
mode),
(GPS), (Bluetooth®
function),
(Auto Sync) to turn the
corresponding function
ON/OFF.
Tap
brightness) to adjust the
screen brightness.
② Notification area
You can view the status of the IS11CA and contents of
notifications. You can tap to activate a corresponding
application depending on the notification.
③ Clear button
Tap the “Clear” button to clear any notification with a
checkmark in the checkbox.
For any notification you do not want clear, tap the
checkbox to remove the checkmark.
④ Close tab
Flick or drag upward to close the notification panel.
(Silent
(eco mode),
(Wi-Fi), and
(screen
①
①
②
②
《Notification panel》
③
③
Using the Home Screen
Switching the Home Screen
You can switch the home screen by sliding or flicking it to the
right and left.
A total of seven home screens, three for each side, are set by
default.
You can register shortcuts, widgets and folders on each home
screen.
④
④
《Swiching home screens》
Learning the Basics
21
Page 24
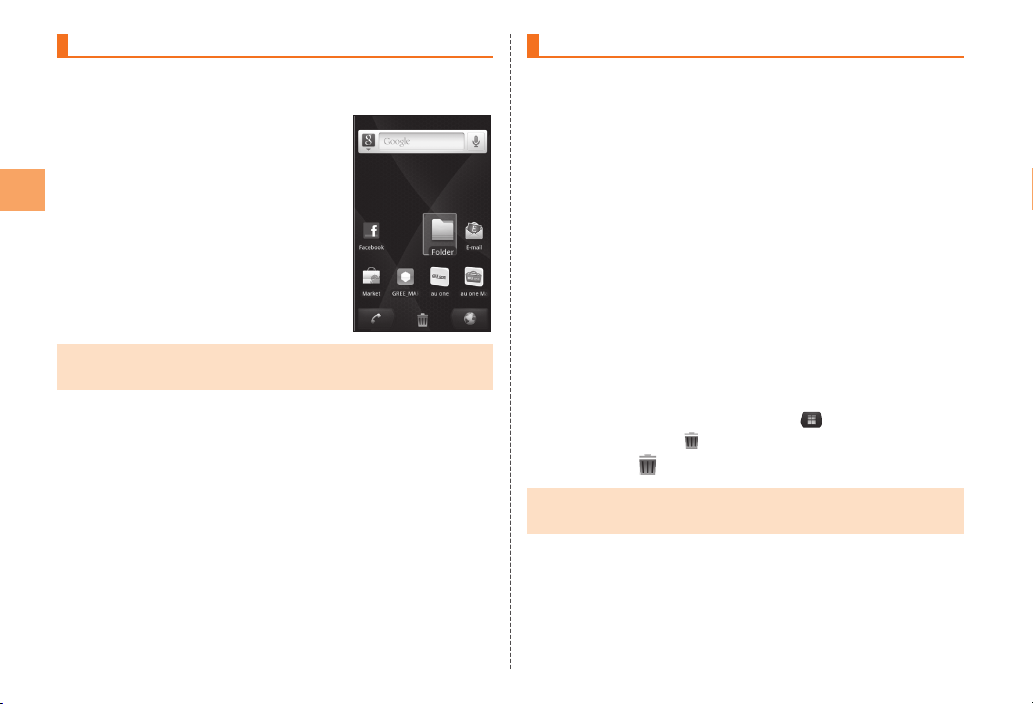
Moving Icons on the Home Screen
By touching and holding an icon of a shortcut, a widget, or a
folder, you can move or rearrange it.
On the home screen, touch
and hold an icon to be moved
The icon becomes enlarged.
Drag the icon to the desired
Learning the Basics
position and release your
finger
You can switch the home screens by dragging an icon to the
•
right or left edge of the screen.
Using Shortcuts/Widgets/Folders
You can create a folder or add a shortcut of an application etc.
or a widget on the home screen.
A widget is an application which can be registered on the home
screen.
Adding Shortcuts/Widgets/Folders
■
On the home screen, M → [Add]
→ [Shortcuts]/[Widgets]/[Folders]
Tap an item
The selection screen or the setting screen of an application,
an account, or data being added may be displayed.
Operate according to the instructions on the screen.
■
Removing Shortcuts/Widgets/Folders
Touch and hold the shortcut/widget/folder icon
to remove on the home screen
The icon is displayed enlarged, and at the bottom of the
screen changes to
.
Drag it to and release your finger
Shortcuts, widgets, and folders cannot be added in such a case
•
as that the displayed home screen has no available space.
22
Page 25
Changing the Wallpaper
Change the wallpaper displayed for the background of the home
screen.
On the home screen, M → [Wallpaper]
→ [Gallery]/[Live wallpapers]/[Wallpapers]
When you tap “Gallery”, you can select the image from the
•
microSD memory card.
When you tap “Live wallpapers” or “Wallpapers”, you can
•
select the image from the preset wallpapers.
Tap the image → [Set wallpaper]
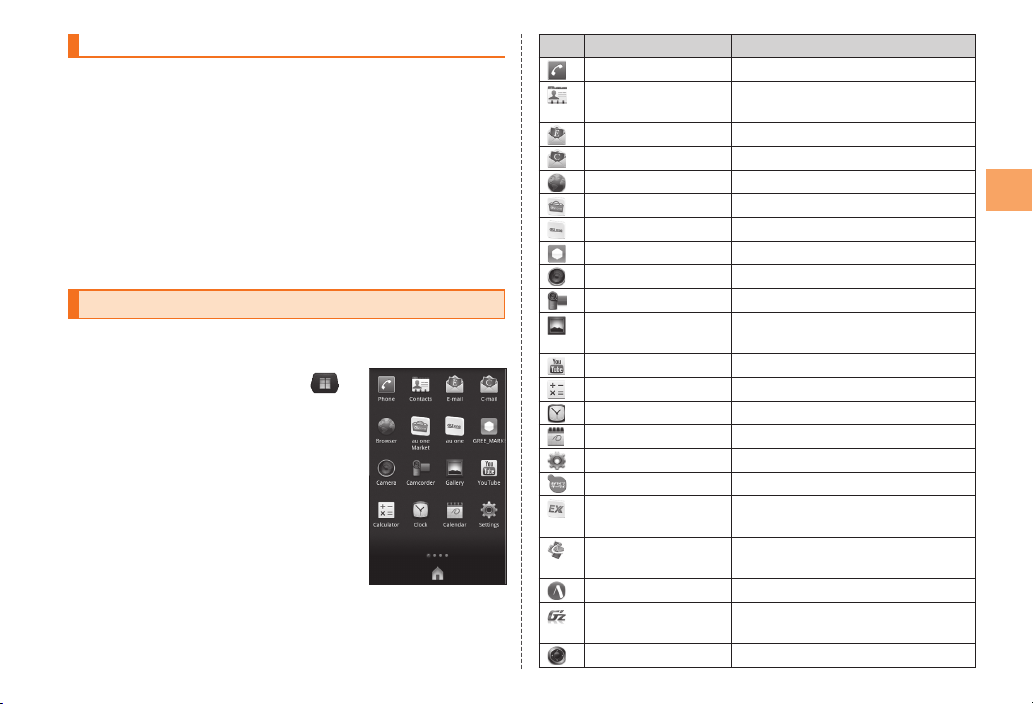
Using the Launcher
Installed applications are displayed as icons. You can tap an
icon to activate the application.
On the home screen, tap
The Launcher is displayed.
You can switch the Launcher by
sliding/flicking it to the right and left.
《Launcher》
Icon Application Description
Phone Make a call.
Contacts Manage phone numbers or mail
E-mail Use E-mail.
C-mail Use C-mail.
Browser Browse web sites on the Internet.
au one Market Use au one Market.
au one au one homepage is displayed.
GREE_MARKET Use GREE Market.
Camera Take photos (still images).
Camcorder Record movies.
Gallery Display images and movies as a
YouTube Use YouTube™.
Calculator Use calculator.
Clock Use alarm.
Calendar Save and manage schedules.
Settings Set various items.
Osaifu-Keitai Use Osaifu-Keitai®.
ニュースEX
(News EX)
Quickoffice You can view and edit documents that
ATOK Input method
G’zGEAR G’zGEAR® is a collection of multiple
Active Slot You can start applications quickly.
addresses.
list.
Downloaded easily from au one
Market. Requires download to use.
have been saved on a microSD card.
tools developed for G’zOne.
Learning the Basics
23
Page 26
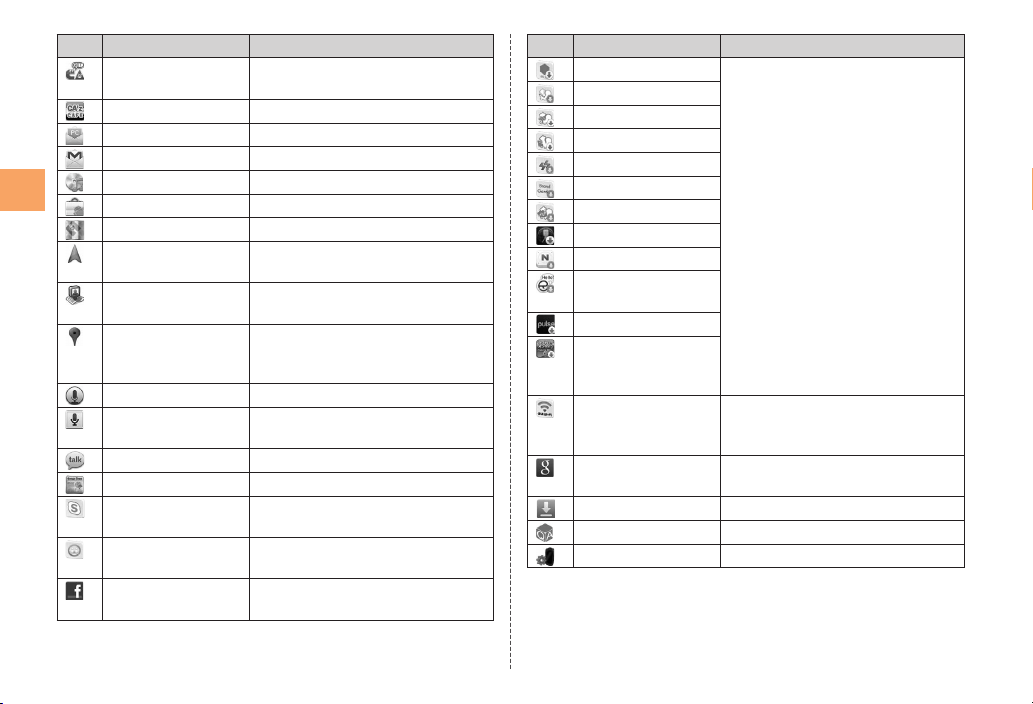
Icon Application Description
★GET CA★
by CASIO
CA’zCAFE Casio site
PC-mail Use PC-mail.
Gmail Use Gmail.
Music Play music.
Learning the Basics
Market Use Android Market.
Maps Use Google Maps™.
Navigation Search for routes to the destination
Latitude Use Google Maps to check the
Places Search for facilities around your
Sound Recorder Record a voice.
Voice Search Enter a keyword for Google
Talk Use Google Talk™.
News & Weather Display news and weather.
Skype™ Make a call or send and receive
jibe Address Book Use multiple social networking
Facebook For details, refer to the Facebook
Casio site
on Google Maps.
location of your friends.
current location and display them
on the Google Maps.
search™ with your voice.
messages using Skype™.
services in one application.
homepage.
Icon Application Description
GREE Downloaded easily from au one
LISMO
LISMO WAVE
LISMO Book Store
Run&Walk
BrandGarden
unlimited
Sfera Android
Nドライブ (N Drive)
レアジョブ
(Rarejob)
Pulse
ラグナロク Mobile
Story (Ragnarok
Mobile Story)
au Wi-Fi接続ツール
(au Wi-Fi Connection
Tool)
Google Search Search for information in the IS11CA
Downloads Display a list of downloaded files.
Q&A Check Q&A.
Setup Wizard Do the initial settings.
Market. Requires download to use.
For details, refer to the au
homepage.
or on web sites.
24
Page 27
When you use applications, packet communication charges
•
may apply depending on the application.
If you have not subscribed to IS NET, au.NET charges (525 yen
for the used month) and communication charges apply.
•
Icon designs may be changed without prior notice.
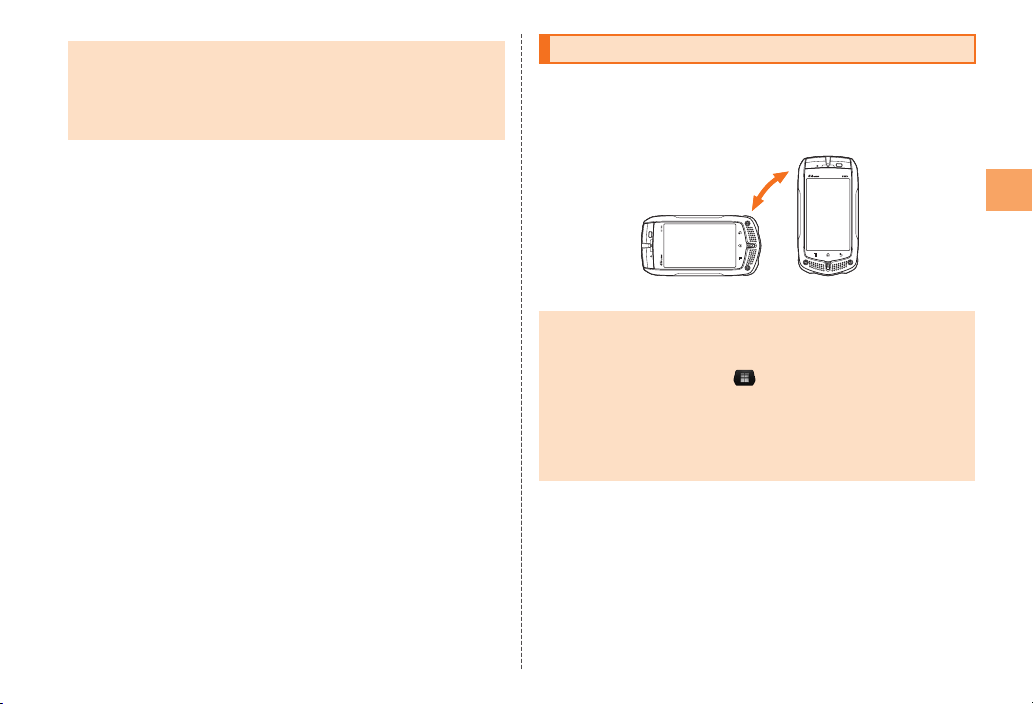
Switching Orientation
Portrait and landscape displays are switched according to the
orientation of the IS11CA.
Example: When rotating the IS11CA 90° from Portrait
(Landscape) display to the left (right)
Landscape display》《Portrait display
Landscape display》《Portrait display
《
Operate the IS11CA in the upright position. The screen display
•
may not be changed if the IS11CA is laid in parallel to the
ground.
•
From the home screen, tap
→ [Auto-rotate screen] to set whether to switch portrait display
and landscape display.
•
In some applications such as Camcorder, the screen display
is not switched regardless of the orientation or setting of the
IS11CA.
→ [Settings] → [Display]
》《
》
Learning the Basics
25
Page 28
Character Input
Entering Text
The IS11CA uses the ATOK keyboard for inputting text.
You can display the keyboard on the screen by tapping the
character entry field and hide it by touching and holding M.
Keyboard and Panel Types
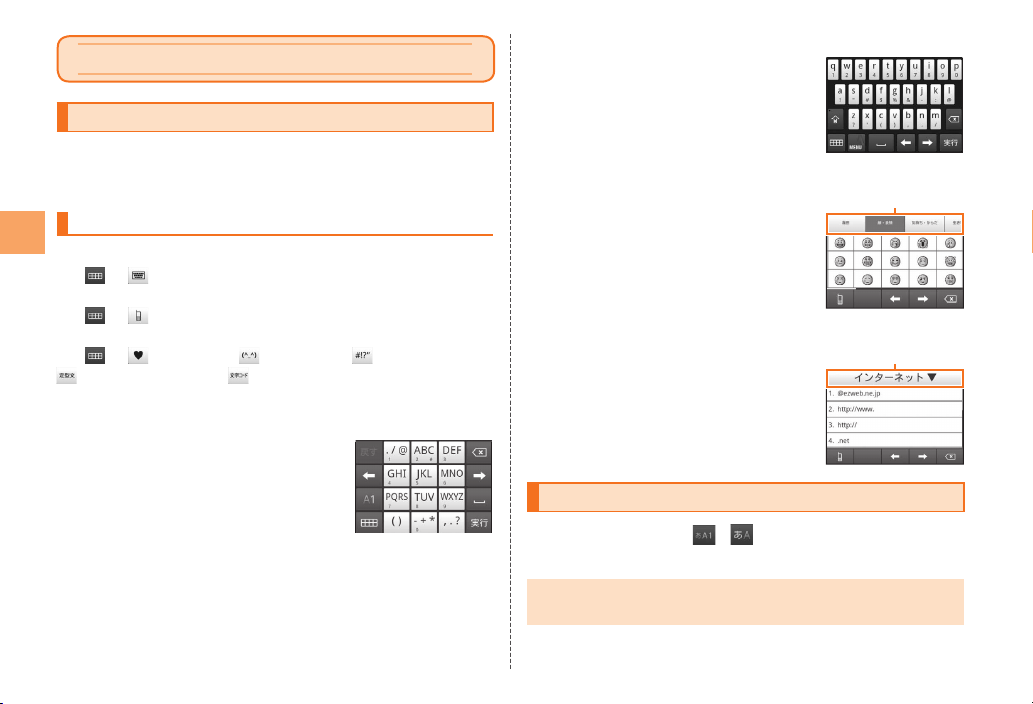
ATOK has two types of keyboard and five types of panel.
Character Input
Tap
→ while the number keyboard is displayed to switch
to the QWERTY keyboard.
Tap
→ while the QWERTY keyboard is displayed to switch
to the number keyboard.
Tap
→ (Pictogram), (Face mark), (Symbol),
(Common phrase), or (Text code) to switch to the
corresponding panel.
Number Keyboard
■
Characters are arranged the same as the
keyboard on a conventional cell phone.
You can use four input modes on this
keyboard: Numeric keypad input, Gesture
input, Flick input and T9 input.
For input mode settings, refer to “Using
the Number Keyboard”.
QWERTY Keyboard
■
Characters are arranged on the keyboard
the same as on a conventional computer.
Pictogram/ Face Mark/Symbol Panel
■
This is the panel for inputting pictograms,
face marks, and symbols.
Slide or flick the categories and
characters to the left or right to scroll
them.
Common Phrase/Text Code Panel
■
This panel is the panel for selecting and
inputting common phrases from the
common phrase list and text from the text
code table. Tap a category to change it.
Slide or flick up/down the list to scroll it.
Categories
Categories
Switching to English Input Mode
Touch and hold / on the keyboard
→ Tap [English Input Mode]
The following explanations on character input are for character
•
input in English input mode.
26
Page 29
Using the Number Keyboard
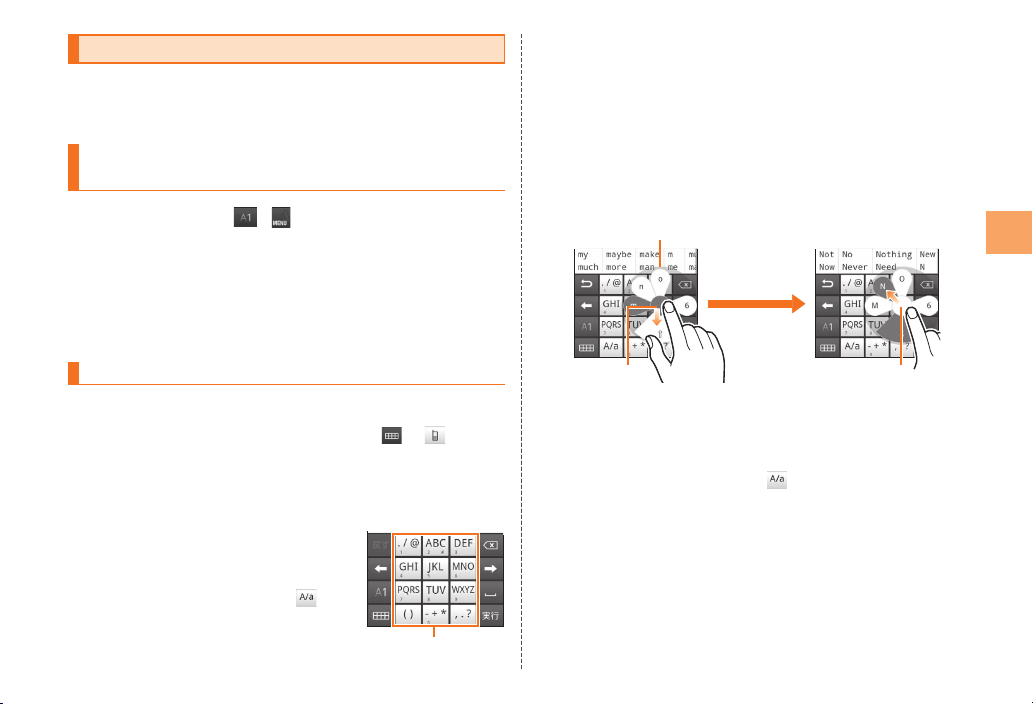
You can use any of the four input modes with the number
keyboard: Numeric keypad input, Gesture input, Flick input, and
T9 input.
Switching Input Modes of the Number
Keyboard
Touch and hold / on the keyboard
→ Tap [ATOK Settings]
The ATOK Settings screen is displayed.
[Software keyboard] → [Input mode]
→ [Numeric keypad input]/[Gesture input]/[Flick
input]/[T9 input]
Inputting with the Number Keyboard
Tap a text input field
If the QWERTY keyboard is displayed, tap → to
switch to the number keyboard.
Input text
Numeric Keypad Input
■
Continuously tap the key assigned to
the character you want to enter until the
desired character is displayed.
After inputting text, you can tap
•
to switch between uppercase and
lowercase.
Continuously tap
You can input text with gesture input and flick input in the same
•
way as with numeric keypad input.
Gesture Input
■
Touch and hold the key assigned to the character you want to
input to display a gesture guide around the key. Without lifting
your finger from the display, move it to the desired character and
lift it to input that character.
Example: To enter “N”
Gesture guide
Gesture guide
②
①
①
① Without lifting your finger, move it down to display the
uppercase characters.
② Without lifting your finger, move it to the “N” and lift it to input
the character.
After inputting text, you can tap
•
uppercase and lowercase.
to switch between
②
Character Input
27
Page 30
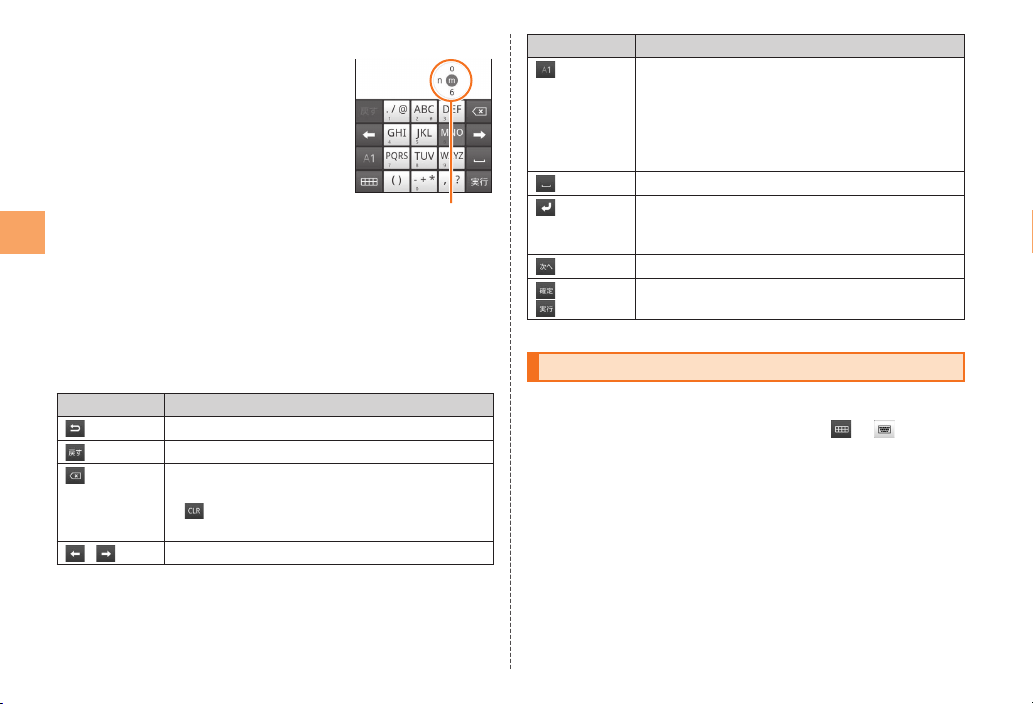
Flick Input
■
Touch and hold the key assigned to the
character you want to input to display a
flick guide. Without lifting your finger from
the display, flick your finger in the direction
indicated by the flick guide to input that
character.
If you did not flick, the characters at the
•
center are input.
■
Predictive Conversion
Character Input
Predictive conversion candidates are displayed above the
keyboard each time you input a character.
Tap a predictive conversion candidate to input that candidate.
•
Slide or flick predictive conversion candidates left or right to
•
scroll.
Other Key Operations
■
Key Description
Display the characters in the opposite order.
(Undo)
/
Undo the last input operation.
Delete the character on the left of the cursor.
•
If “Character delete key” is set to “[CLR]Clear”,
is displayed. Tap to delete the character on
the right of the cursor.
Move the cursor.
Flick guide
Key Description
Switches the character type between alphabet
input and number input.
•
Touch and hold to select “ATOK Settings”,
“Register Words”, or “Japanese Input Mode”. In
Japanese input mode, you can select “English
Input Mode”.
Input a space.
Insert a line feed (only when possible). If there
are unconfirmed characters, the characters are
confirmed.
(Next)
(Confirm) /
(Execute)
* Some keys may n ot be displayed depending on the input ite m or input state.
Move to the next input item.
Confirm or execute the operation for the input
content.
Inputting with the QWERTY Keyboard
Tap a text input field
If the number keyboard is displayed, tap → to switch
to the QWERTY keyboard.
Input text
If the number keys are set not to be displayed, you can
•
flick a key downward to input the number or symbol
displayed at the bottom of the key. You can flick a key
upward to input the uppercase or lowercase character.
For details on predictive conversion, refer to “Predictive
•
Conversion”.
28
Page 31
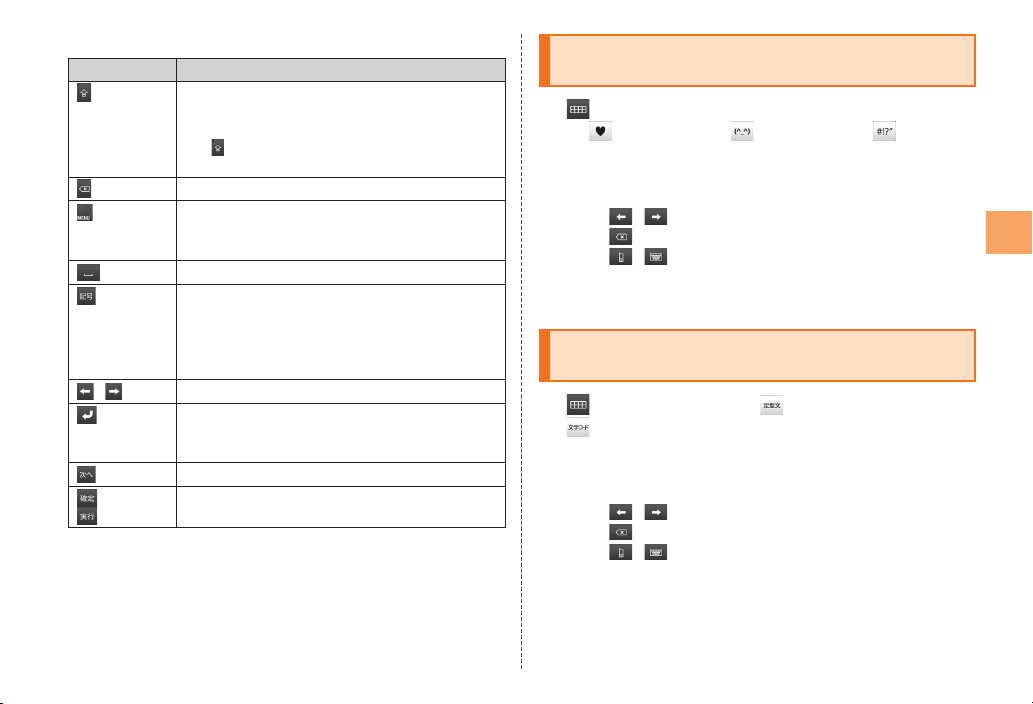
■
Key Operations
Key Description
Each tap switches key input in the order of
Uppercase → Uppercase (Lock) → Lowercase.
•
When input is Uppercase (Lock), the top left
lights. This allows you to input uppercase
of
and symbols continuously.
Delete the character on the left of the cursor.
You can select “ATOK Settings”, “Register Words”,
or “Japanese Input Mode”. In Japanese input
mode, you can select “English Input Mode”.
Input a space.
(Symbol)
/
(Next)
(Confirm) /
(Execute)
* Some keys may n ot be displayed depending on the input ite m or input state.
Switch the keyboard to symbol only input. Tap
again to return to the normal QWERTY keyboard.
•
This is not displayed when the QWERTY
keyboard is displayed in landscape display
mode.
Move the cursor.
Insert a line feed (only when possible). If there
are unconfirmed characters, the characters are
confirmed.
Move to the next input item.
Confirm or execute the operation for the input
content.
Inputting with the Pictogram/Face Mark/Symbol Panel
on the keyboard
→
(Pictogram) / (Face mark) / (Symbol)
The pictogram/face mark/symbol panel is displayed.
Slide or flick the categories or list left or right to scroll.
•
Tap a category to display the list for that category.
•
Tap
•
•
•
/ to move the cursor left or right.
Tap
to delete the character to the left of the cursor.
Tap
/ to return to the number keyboard or QWERTY
keyboard.
Tap a pictogram/face mark/symbol in the list
Inputting with the Common Phrase / Text Code Panel
on the keyboard → (Common phrase) /
(Text code)
The common phrase/text code panel is displayed.
Tap a category to select a category from a list.
•
Slide or flick up or down in a list to scroll.
•
Tap
•
•
•
Tap a common phrase/character in the list.
/ to move the cursor left or right.
Tap
to delete the character on the left of the cursor.
Tap
/ to return to the number keyboard or QWERTY
keyboard.
Character Input
29
Page 32
Phone
Making a Call
On the home screen, tap
The phone number entry screen is displayed.
Enter a phone number
When calling to a fixed-line phone, enter the phone number
starting with the area code even if you are in the same area.
Tap → Talk → Tap [End]
Phone
Press < or > during a call to adjust the other party’s
voice.
After the call is disconnected, the approximate call duration
appears.
•
If the screen is covered with, for example, your face during
dialing or a call, the keys on the screen will be hidden to prevent
unintentional operation.
•
Note that even if you cover microphone not to be heard, the
sound can be conveyed to the other party.
Dial services available from au phones
•
Call with fixed-line phones all over Japan
•
Call with cell phones, PHS, and car phones all over Japan
•
001 (001 international call service: Subscription is
unnecessary)
•
171 (Voice mail for countermeasures against disaster)
•
177 (Weather forecast: The area code is necessary)
•
117 (Time signal)
•
104 (Directory assistance)
•
115 (Sending telegram)
•
110 (Emergency call to Police)★
•
119 (Emergency call to Fire and Ambulance)★
•
118 (Emergency call to Regional Coast Guard
Headquarters)★
•
157 (Customer Center)
•
Maritime telephone
* The numbers added ★ are emergency call numbers.
IS11CA notifies your present location to the emergency call
destination with a signal from a base station when you call
to Police, Fire and Ambulance, or Regional Coast Guard
Headquarters.
* The following NTT services are unavailable.
Collect call, message service, dial Q2, 116 (NTT business
information)
30
Page 33
Making an International Call
Answering a Call
001 International Call Service
You can make international calls without any special procedure
from your IS11CA.
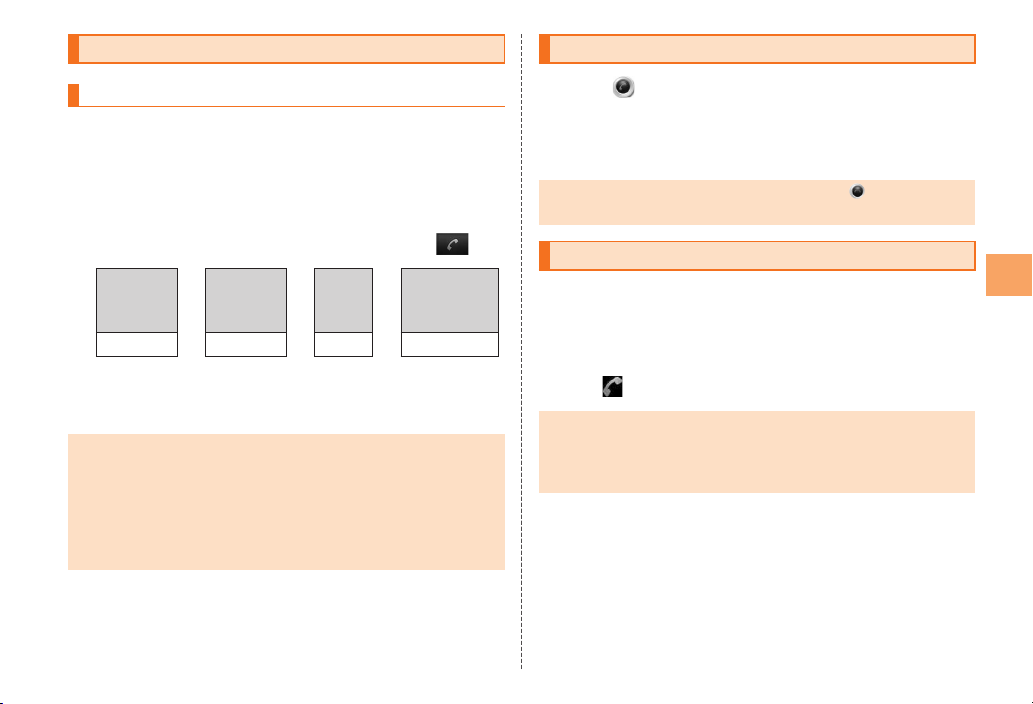
Example: To call 212-123-△△△△ in the USA
On the phone number entry screen, enter the
access code, country code, area code, and the
phone number of the other party → Tap
International
access
1
code*
001010 1 212 123XXXX
*1 Touch a nd hold the “ 0” to enter “+” and the international acce ss code
of your travel des tination is automatically added when calling.
*2 If th e area code st arts wit h “0”, dial it with out includ ing the “0 ”.
However, include the “0” in so me countries or regio ns such as Ita ly.
International call charges are billed together with monthly local
•
call charges.
•
For more information on 001 International Call Service, dial
either of the following numbers:
From au phones (toll-free): 157 (area code not required)
From fixed-line phones (toll-free): 0077-7-111
(Open 9:00 to 20:00 everyday)
code (USA)
➡
Country
➡
Area
code*
Phone number of
2
the other party
➡
Drag to the right during an incoming call
Talk → Tap [End]
After the call is disconnected, the approximate call duration
appears.
When you get an incoming call, you can drag in the left
•
direction to reject that call.
Returning a Call (Call Log)
You can make a call using Call log.
On the phone number entry screen, tap [Call
log]
The call log screen is displayed.
Tap for the entry you want to call
Up to 100 entries can be stored in the call log. If 100 entries will
•
be exceeded, entries will be automatically deleted in order from
the oldest. The number of the entries that can be stored may be
less depending on the amount of free space.
Phone
31
Page 34
Contacts
Phone numbers and names saved in the Contacts may be lost
•
due to an accident or malfunction. It is recommended that you
take a copy of important phone numbers etc. We shall not be
liable for the damage and lost profit in the case that the Contacts
is changed or lost because of an accident or malfunction.
•
From the home screen, tap
sync] → Set the synchronization to synchronize the contacts
saved in the server to use in Google with the Contacts of
IS11CA. (Even when you synchronize an account other than
Google, register your Google account first.)
•
If an SNS account or ID is registered for the Contacts,
communication will be performed to obtain the SNS information.
Contacts
Adding a New Contact
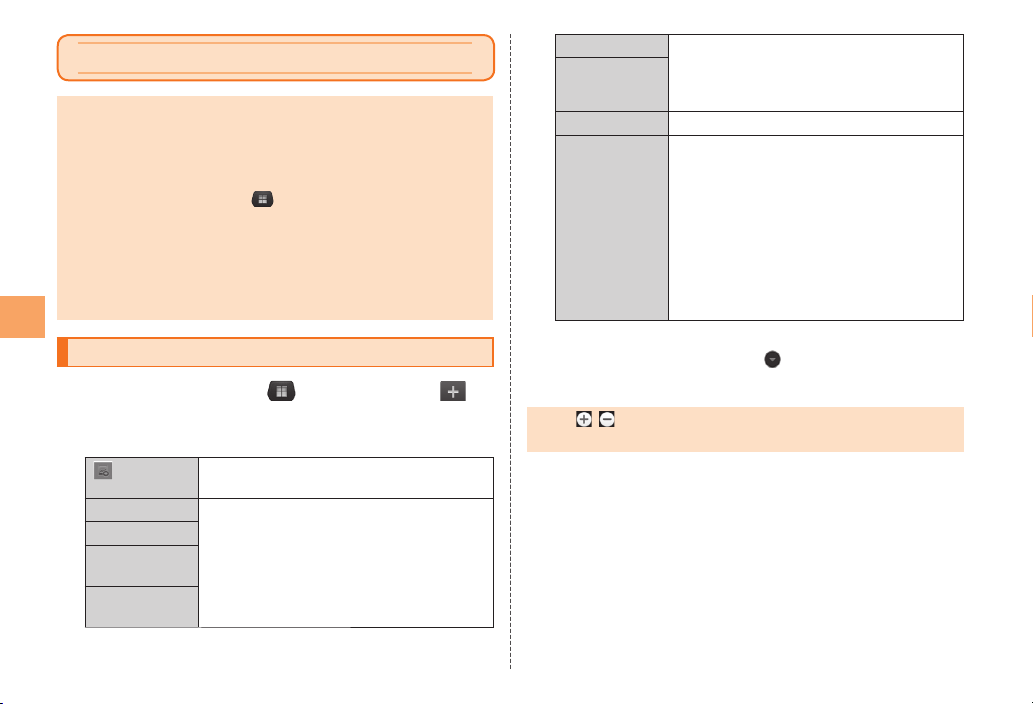
On the home screen, → [Contacts] →
The Add new contact screen is displayed.
Input the required items
Take a photo or select an image in Gallery
and then register it.
First name Input the name and phonetic name.
Last name
Phonetic given
name
Phonetic family
name
→ [Settings] → [Accounts &
Phone number Input the phone number and mail address.
Mail
Groups Select a group.
SNS
To display and edit hidden items such as “Postal address”,
•
“GPS information”, etc., tap “
•
If the phone number to be registered is for
a landline phone, input the phone number
from the area code.
When newly registering or editing a contact
Add the ID of the SNS (Twitter, mixi,
Facebook, or GREE) to associate with the
contact.
•
To add the ID of an SNS, the SNS account
needs to have been added to “SNS” in
My Profile beforehand. For details, refer to
“Editing My Profile”.
When editing My Profile
Register an SNS account.
More”.
Tap [Save]
•
Tap / to add or delete the item in the Add new contact
screen.
32
Page 35
Editing My Profile
You can register additional information such as your name and
address to My Profile.
On the home screen, → [Contacts]
→ [MyProfile]
The MyProfile screen is displayed.
Tap
The Edit my profile screen is displayed.
Edit the items
To display and edit hidden items such as “Postal address”,
“GPS information”, etc., tap “
More”.
[Save]
The first phone number of My Profile is the phone number of
•
your IS11CA. It cannot be edited or deleted.
•
On the MyProfile screen, you can tap M → [Share] and
then send My Profile with the infrared, Bluetooth
communication functions. If you tap “Select data”, you can
select the item of My Profile to send.
®
and other
Checking Contact Details
On the home screen, → [Contacts]
The contact list is displayed.
Tap the contact you want to check
The Profile screen is displayed.
You can tap a registered item to start the application
corresponding to the registered item, make a call, or
compose mail.
Contacts
33
Page 36
About Mail
You can use the following types of mail on the IS11CA.
■
E-mail
This au service allows you to exchange mail with computers and
cell phones that support e-mail. You can send text, photos, and
video data.
The e-mail address domain name (the part to the right of the @
mark) is “@ezweb.ne.jp”.
C-mail
■
This service allows you to exchange mail with cell phones by
using the phone number as the address.
Mail
■
PC-mail
You can set up the IS11CA with the mail account of that you
normally use on your computer so you can send and receive
mail from your IS11CA the same as the computer.
■
Gmail
Gmail is Google’s mail service. You can use Gmail by setting up
a Google account on your IS11CA. You can also check Gmail
you have sent or received on your IS11CA from a browser on a
computer. Also, the Gmail operations you do in a browser on a
computer are reflected in the Gmail on your IS11CA.
Using E-mail
To use e-mail, a packet communications connection is
•
required. It is also necessary to initialize settings in advance.
For details, refer to “Initial Settings”.
To use e-mail functions, subscription to IS NET is necessary.
•
If you have not subscribed at the time of purchase, contact an
au shop or Customer Center.
You can use e-mail overseas also.
•
•
The cost of transmitting packets varies depending on the
volume of the data when sending or receiving e-mail. The
transmission cost may be expensive when using the service
overseas. For details, refer to the au catalog and the au
homepage.
•
Sending and receiving e-mail may take some time depending
on if there is an attachment and the status of the connectivity in
the service area.
Creating and Sending E-mail
On the home screen, → [E-mail] → [New]
A new message screen is displayed.
Enter the body text
You can change the text and background color, and insert
decoration pictograms to create decorated mails by tapping
“Decorate” on the new message screen.
Tap [Recipient]
34
Page 37
A contact from
Contacts
Contact group Select a group in the E-mail Contacts
Outgoing call logs Select a mail address in Outgoing
Incoming call logs Select a mail address in Incoming
Direct input Directly input a mail address.
My E-mail address Input your own address as an
Cancel Cancel address input.
Select a mail address in the E-mail
Contacts to input it.
to input it.
call logs to input it or delete call logs.
call logs to input it or delete call logs.
addressee.
Tap [Subject] → Enter the subject
→ Tap [Return to edit body]
To attach data, tap [Attac...] → [Add attachments].
Tap [Send]
Receiving E-mail
A mail message is received
When a mail message is received, appears in the status
bar and the notification ringtone plays.
Flick/drag the status bar downwards
The notification panel is displayed.
Tap [E-mail]
The E-mail screen is displayed.
At the time of purchase, received e-mail is saved to the
inbox.
Tap the folder where the mail message you
want to read is stored → Tap the mail message
The contents of the mail are displayed.
E-mail cannot be received if the IS11CA does not have enough
•
available memory. Delete saved mail or something to increase
the amount of memory available in the phone.
Checking Sent and Received E-mail
On the home screen,
→ [E-mail]
The E-mail screen is displayed.
《
E-mail screen
Tap the folder
The e-mail stored in a folder can be displayed in List view or
Full view.
Mail
》
35
Page 38
List This option splits the screen into a top pane
Full The content of the selected e-mail fills the
Tap “List” or “Full” at the bottom of the screen to switch
•
and bottom pane. The top pane shows a list
of e-mail, and the bottom pane shows the
body text of selected e-mail.
•
If “Two-pane layout” is enabled in the email settings, the screen is displayed split
into two panes.
entire screen.
the view.
Tap the e-mail you want to check
•
To open an attachment file, tap [Show detail] → [Open]. To
save an attachment file without opening it, tap [Save].
To reply to the displayed mail, tap [Reply].
•
Deleting E-mail
■
Mail
On the mail list screen, [etc.] → [Select]
Tap the mail message you want to delete so the check box
next to it is selected.
Tap [Delete]
Deleting a mail message move it to the “Trash” folder. To
•
permanently delete the mail message, delete it from the “Trash”
folder.
•
On the E-mail screen, tap M → [Delete all] → [OK] to delete all
of the e-mail in the “Trash” folder.
Using E-mail Contacts
You can register an e-mail address to the E-mail Contacts. You
can also copy Contacts information to the E-mail Contacts.
Registering an E-mail Contact
■
On the E-mail screen, M → [E-mail Contacts]
The E-mail Contacts list is displayed.
If not even one e-mail contact is registered, a message
•
for selecting whether or not to import the contact of the
IS11CA appears.
You can add an e-mail contact by tapping “Add”.
•
Tap an e-mail contact
The group list is displayed.
You can add a group by tapping “Add”.
•
Tap a group
The contact list appears.
Tap [Add]
The contact data edit screen appears.
Configure the required items
Picture You can register an image.
The name of a
person
Phonetic
name
Group contact You can select a group.
You can register a name.
You can register a phonetic name.
•
Select a group you added in step , above.
36
Page 39
receive all Tapping this check box causes mail to be
Nickname You can register a nickname.
Ringtone You can set a ringtone.
Phone number You can register the phone number.
Mail address You can register a mail address.
Note You can register optional text.
received when “Receive all mails saved in
contacts” is selected for “Receive Order”.
Tap [OK]
Tap “More item” in step to register the Mail address, Phone,
•
Event, and Address items.
•
If you change the Contacts after you copy contacts to the E-mail
Contacts, the change will not be reflected in the E-mail Contacts
until you re-import.
•
Tapping M → [Checking Contacts] on the E-mail Contacts list
will copy the contact information into the E-mail Contacts.
Checking Data in an E-mail Contact
■
On the E-mail Contacts list, tap an e-mail
contact
The group list appears.
Tap a group
The contact list appears.
Tap the individual data you want to check
The contact data edit screen appears and you can edit the
data.
Changing Your E-mail Address
The e-mail address is automatically set when the E-mail is
initialized, but you can change the e-mail address after the initial
settings.
On the E-mail screen, M → [Setting]
→ [E-mail settings] → [Other settings] → [OK]
Tap [Eメールアドレスの変更](Change e-mail
address) → Tap the security code input field
→ Input the security code (4 digits)
→ Tap [送信](Send)
Tap [承諾する](Accept)
Tap the e-mail address input field → Enter the
part of the address to the left of “@” (variable
part) → Tap [送信](Send) → [OK]
You can input up to 30-byte alphanumeric characters, including
•
“-”, “.”, and “_” for the part of the e-mail address that can be
changed. However, you can not use consecutive “.” or use them
for the first or last character. Also, you cannot use “0” as the first
character.
•
Note that immediately after changing your e-mail address, you
may be not be able to receive e-mails for a short time.
•
If the e-mail address that you input is already being used, a
message appears requesting that you input a different e-mail
address. Input a new address.
•
It is possible to change your e-mail address three times within
a single day.
Mail
37
Page 40
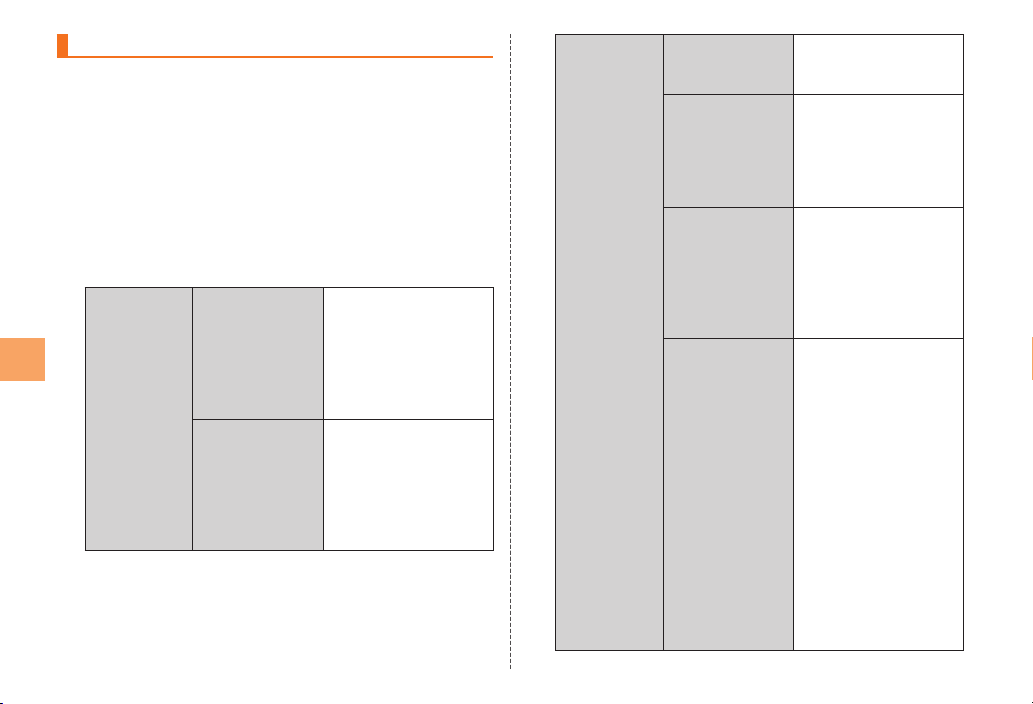
Setting Mail Filters
Mail filters have functions to receive and reject specific e-mail
messages and to reject e-mail messages spoofing cell phones
or PHSs.
On the E-mail screen, M → [Setting]
→ [E-mail settings] → [Other settings] → [OK]
Tap [迷惑メールフィルター](Mail Filter)
→ Tap the security code input field
→ Input the security code (4 digits)
→ Tap [送信](Send)
Reject spoofing or
auto-forwarded mail
messages, and receive
mail messages from cell
phones, PHSs or PCs.
Reject mail messages
from PCs, spoofing
mail messages or
auto-forwarded mail
messages, and receive
mail messages from cell
phones or PHSs.
Mail
カンタン設定
(Simple
Settings)
1.「携帯」「PHS」
「PC」メールを
受信
(1. Receive Mail
Messages from
Cell Phone, PHS
or PC)
2.「携帯」「PHS」
メールのみを受信
(2. Receive only
Mail Messages
from Cell Phone
or PHS)
38
詳細設定
(Advanced
Settings)
一括指定受信
(Collective
Receive Setting)
なりすまし規制
(Spoof
Restriction)
指定拒否リスト
設定
(Reject Mail
Address List
Setting)
指定受信リスト
設定
(Allowed Address
List Setting)
Receive or reject all
mail messages from the
Internet or cell phones.
Reject mail messages
sent with an alleged
sender address. You
can set the following
levels: 高 (High), 中
(Medium), 低 (Low).
Reject mail messages
from certain e-mail
addresses, domains
or parts of addresses
to the left of “@” that
are contained in the
specified address list.
Prioritize reception
of mail messages
from certain e-mail
addresses, domains
or parts of addresses
to the left of “@” that
are contained in the
specified address list.
•
To block e-mail
messages from
addresses other than
the specified ones,
unmark all items in
“一括指定受信”
(Collective Receive
Setting) to set to off (to
reject receiving).
Page 41
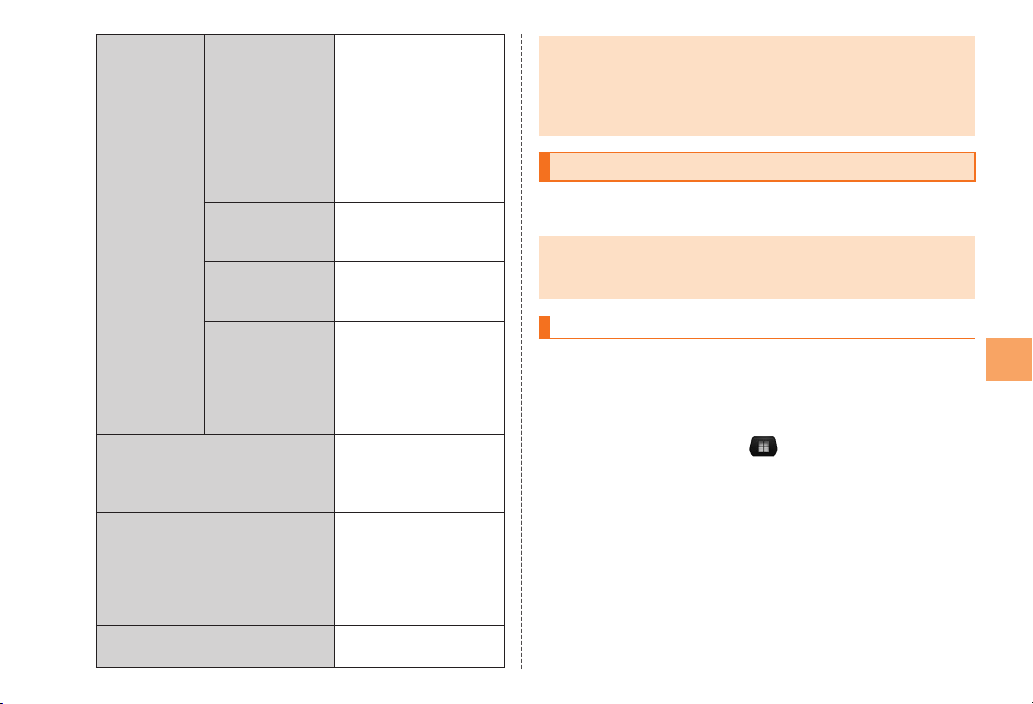
詳細設定
(Advanced
Settings)
設定確認/設定解除
(Check Settings/Release Settings)
PC設定用ワンタイムパスワード
発行
(Issue One Time Password for PC
Setting)
設定にあたって
(Notes on Setting Mail Filter)
指定受信リスト
設定(なりすま
し・転送メール
許可)
(Allowed Address
List Setting
(Spoofing or
Forwarded Mail
Messages))
HTMLメール規制
(HTML Mail
Restriction)
URLリンク規制
(URL Link
Restriction)
拒否通知メール返
信設定
(Block Mail
Notification
Setting)
Avoid the mail block
due to “なりすまし規
制” (Spoof Restriction)
setting, and receive
auto-forwarded mail
messages.
Reject e-mail messages
in HTML format.
Reject e-mail messages
that include a URL.
Sets whether to
send a receiver error
(address unknown) mail
message to the sender
of the rejected e-mail
message.
Check the setting status
of the mail filters and
release all the settings
at one time.
Issue a one time
password to set the mail
filter on your PC. The
password is available
within 15 minutes after
issuance.
Display the explanation
for setting mail filters.
If the security code is incorrectly entered three times
•
consecutively during a single day, the mail filter setting
operation will be disabled until the next day.
•
Note that you cannot receive e-mail messages once rejected by
mail filters. Be careful when you set mail filters.
Using C-mail
This service allows you to exchange mail with cell phones by
using the phone number as the address.
The functionality of C-mail is scheduled to be enhanced. The
•
details and dates of function enhancement will be announced
on the au website.
Creating and Sending C-mail
You can send a message (text of mail) using kanji, hiragana,
katakana, alphanumerics, symbols, pictograms, and face marks.
When sending is complete, you know that the C-mail has
reached the other party.
On the home screen, → [C-mail]
→ [New message]
A new message screen is displayed.
Input the other party’s phone number in the
“To” field
To send C-mail to a party whose phone number is registered
in “Mobile” in Contacts, their phone number appears if you
input the name that is registered in Contacts.
Mail
39
Page 42
Tap the “Type to compose” field → Input text
Tap [Send]
When the other party receives the mail, a message appears
indicating that the other party has received the mail.
If you tap “CONTACT” in step , a list of contacts with phone
•
numbers registered is displayed and you can tap a contact to
input the phone number to the “To” field.
•
Pressing B in step saves the C-mail as a draft without
sending it.
Receiving C-mail
A mail message is received
When a mail message is received, appears in the status
bar and the notification ringtone plays.
Flick/drag the status bar downwards
Mail
The notification panel is displayed.
Tap the incoming C-mail notification
The thread containing the received C-mail is displayed.
If you have received C-mail from multiple people, a list of
•
threads is displayed. Tap the thread you want to read.
•
C-mail cannot be received if the IS11CA does not have enough
available memory. Delete saved mail or something to increase
the amount of memory available in the phone.
•
If a C-mail arrives from a phone number that is registered in
Contacts, the name registered in Contacts appears on the C-mail.
There is no charge for receiving C-mail.
•
•
You can check the telephone number of the sender.
•
Only C-mail from au phones that support C-mail and short
messages from other carriers’ cell phones (Short Message
Service compatible models) can be received as C-mail.
•
Depending on their content, some mail may not be displayed
correctly.
Checking Sent and Received C-mail
C-mail exchanged with the same phone number is organized
and displayed in one thread.
On the home screen, → [C-mail]
The thread list display screen appears.
Tap a thread
The C-mail list display screen appears.
C-mail Safety Block Setting
The C-mail safety block setting blocks reception of C-mails that
contain URLs or phone numbers in the main text.
•
The C-mail safety block setting is enabled from your initial use.
•
If you change models, the settings of the previous model remain
enabled.
•
C-mail that can be blocked are normal C-mail (including
prepaid transmissions). Voice mail service (message notification
and incoming notification) is excluded.
40
Page 43
C-mail Safety Block Setting Procedure
■
Setting the C-mail safety block setting is done by sending C-mail
to a specified phone number.
Release the
setting
Enable the
setting
Confirm the
setting
* There is no charge for sending the C- mail for thi s setting.
* A C-mai l report th at settings are comple te arrives fro m “09 044 440 012”.
When Reception Is Blocked by the C-mail
■
Input “Release” in the main text and send the
C-mail to 09044440010.
Input “Enable” in the main text and send the
C-mail to 09044440011.
Input “Confirm” in the main text and send the
C-mail to 09044440012.
Safety Block Setting
When a C-mail is blocked by the C-mail safety block setting, an
error C-mail is returned from “09044440019” indicating a failure
to arrive.
Communication charges apply even if a C-mail is blocked.
•
Setting C-mail
On the thread list display screen, M
→ [Settings]
Delete old messages Set whether to automatically delete
Text message limit Set the number of C-mail messages
Signature Set the signature pre-entered in
old C-mail messages.
that can be saved in each thread.
the body text when a new C-mail
message is created.
Store Function Set whether to automatically store
Notifications Set whether to display a notification
Select ringtone Set the ringtone for notifying you of
Vibrate Set whether to notify you by vibration
C-mails that failed to be sent in the
C-mail center.
Select-Store: Select whether to store
each time it happens.
Auto-Store: Store automatically in the
C-mail center.
icon in the status bar when a new Cmail is received.
new C-mails.
when a new C-mail is received.
Using PC-mail
If you set up the mail account you normally use with your PC
or other device, you will be able to exchange mail from your
IS11CA in the same way as with a PC.
To use PC-mail, a packet communications connection or
•
wireless LAN connection is required.
Registering a PC-mail Account
To use PC-mail to exchange mail, you need to set up a mail
account.
On the home screen, → [PC-mail]
When you use PC-mail for the first time, the mail account
setup screen is displayed.
Input your address in the “Email address” field
Mail
41
Page 44
Tap the “Password” field → Input the password
→ Tap [Next]
The mail server is set automatically.
If the mail server is not set automatically or you tapped
“Manual setup”, the user name and mail server need to be
set.
Input the account name in the “Give this
account a name” field
If you skip this step, the mail address becomes the account
name.
Tap the “Your name” field → Input your name
→ Tap [Done]
If the mail server is not set automatically or you want to manually
•
set up the mail account, obtain the information required for the
settings from your service provider and then set the mail server
information.
Mail
Creating and Sending PC-mail
If multiple mail accounts are registered, display the inbox of
•
the mail account you want to use for sending mail before you
perform this operation.
On the home screen, → [PC-mail] → M
→ [Compose]
The mail composition screen is displayed.
Input the other party’s mail address in the “To”
field
42
To add Cc or Bcc, tap M → [Add Cc/Bcc].
Tap the “Subject” field → Input the subject
Tap the “Compose Mail” field → Input a
message
To attach a file, tap M → [Add attachment] and then select
the file.
Tap [Send]
The sent mail is handled as mail from a PC. It will not be
•
delivered if the recipient’s device is set to reject mail from PCs.
Receiving PC-mail
PC-mail is received
When PC-mail is received, appears in the status bar, and
the mail ringtone sounds.
Flick/drag the status bar downwards
The notification panel is displayed.
Tap [New email]
The inbox screen is displayed.
Tap the mail you want to read
The mail message screen is displayed.
Page 45
Using Gmail™
Gmail is a mail service provided by Google. You can send and
receive Gmail with IS11CA.
Google account is required to use Gmail. For details on
•
Google account, refer to “Setting Up a Google™ Account”.
Gmail contacts are synchronized with the contacts of the
•
IS11CA.
For details on how to use Gmail, refer to the Google website.
•
On the home screen, → [Gmail]
The Gmail inbox screen is displayed.
With Gmail, the first reply to a message is organized and
displayed with the message in one thread. Tapping a thread
allows you to view the exchanged messages. However, if
the subject of a message is changed, that message will be
displayed in a new thread.
Creating and Sending Gmail
On the inbox screen, M → [Compose]
The mail composition screen is displayed.
Input the other party’s mail address in the “To”
field
Tap the “Subject” field → Input the subject
Tap the “Compose Mail” field → Input a
message
Tap
Receiving Gmail
A mail message is received
When a mail message is received, appears in the status
bar and the notification ringtone plays.
Flick/drag the status bar downwards
The notification panel is displayed.
Tap mail information
The inbox screen is displayed.
Tap the mail you want to read
The mail message screen is displayed.
Mail
43
Page 46
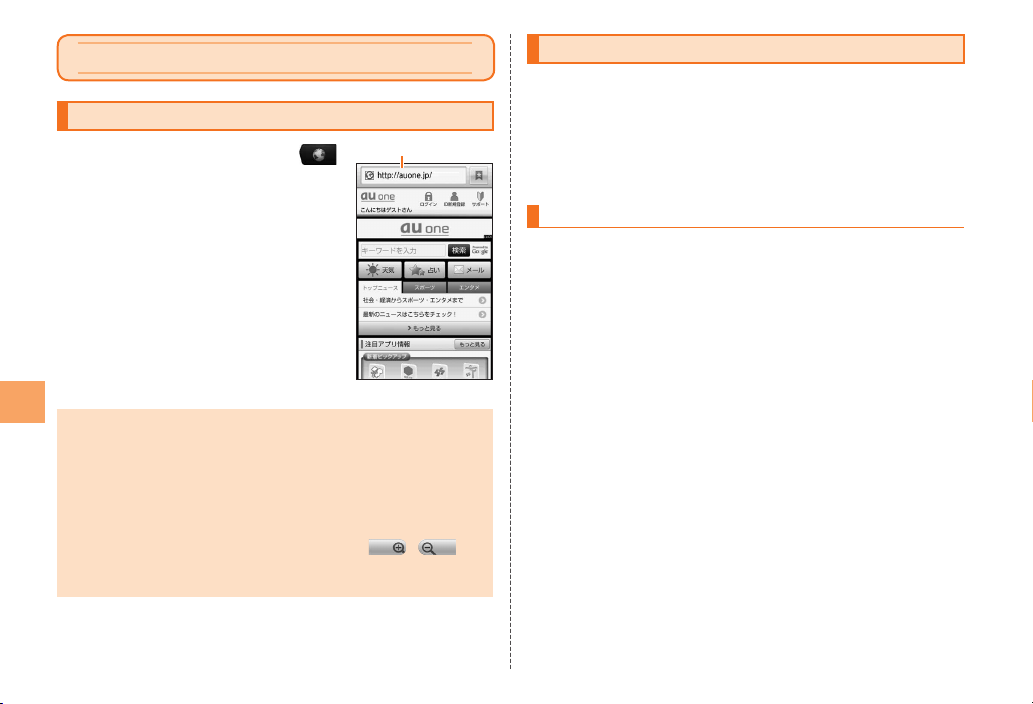
Internet
Viewing Sites with Browser
On the home screen, tap
The au one homepage for Android
is displayed by default. Also, on the
Launcher, tap “au one” to display the
au one homepage for Android always.
•
When browsing a web page with a large amount of data, the
Internet
application may be terminated automatically.
Basic operations in the browser screen
•
The following operations are available.
•
Tap: Selects or activates a link or a key.
•
Slide/Flick: Scrolls a screen.
•
Pinch out/in:
Zooms in/out on a screen. (Alternatively, tap
•
Double-tap: Zooms in/out on a tapped point.
* The operat ions may not be available depending on th e web page.
URL address
《Browser screen》
/ )
Using Bookmarks/History
On the browser screen, M → [Bookmarks]
The bookmarks screen is displayed.
The history screen is displayed by tapping “Most visited” or
“History” tab.
Tap a bookmark/history
Bookmarking a Web Page
Bookmark the displayed site.
On the browser screen, M → [Bookmarks]
Tap [Add]/[Add bookmark...]
The bookmark registration screen is displayed.
Tap [OK]
44
Page 47
Multimedia
Using the Camera
Insert a microSD memory card before using camera. All the
photos and movies taken with IS11CA are saved in a microSD
memory card. For the way to insert a microSD memory card,
refer to “Inserting microSD Memory Card”.
Cautions for Using the Camera
Do not position the photo light close to your eyes. Do not look
•
at the photo light directly while it is on. Do not point on the
photo light toward the eyes of others. It may harm eyesight.
The IS11CA may be warm after displaying the photo monitor
•
screen or operating repeated movie recordings for a long time.
Be careful of touching for a long time which may result in a low
temperature burn. Also, if the IS11CA becomes warm during
use of the camera function, the application may end.
When the battery level is low, camera cannot be activated.
•
If you use the IS11CA camera in a wrongful manner, you may
•
be subject to punishment according to laws of the national and
local governments.
Taking a Photo
IS11CA is equipped with a CMOS camera with approximately
8.08 effective megapixels to enable you to take up to 8M (3,264
× 2,448 dots) photos. The photos you take can be saved to a
microSD memory card and then viewed in an application such
as Gallery.
On the home screen, → [Camera]
The camera monitor screen is displayed.
Tap
The shutter sounds and the captured photo is automatically
saved to the microSD memory card.
Tap the thumbnail on the top right of the camera monitor
screen to display the captured photo.
About the auto focus lock
•
Touching and holding
adjusted focus state. When the subject becomes in focus and
the focus locks, the auto focus frame turns green and the lock
tone sounds, and when you release your finger, a photo is taken.
•
If the focus is locked while the subject is still not in focus, the
auto focus frame will be displayed in red.
•
If “Auto Focus” is set to “OFF”, the focus lock cannot be used.
allows you to fix the focus to a pre-
Recording a Movie
You can record an HD movie of up to 1,280 (W) × 720 (H) dots.
Recorded movies are saved to the microSD memory card and
can be played in an application such as Gallery.
On the home screen, → [Camcorder]
The camcorder monitor screen is displayed.
Tap
The recording start tone sounds and recording starts.
Multimedia
45
Page 48
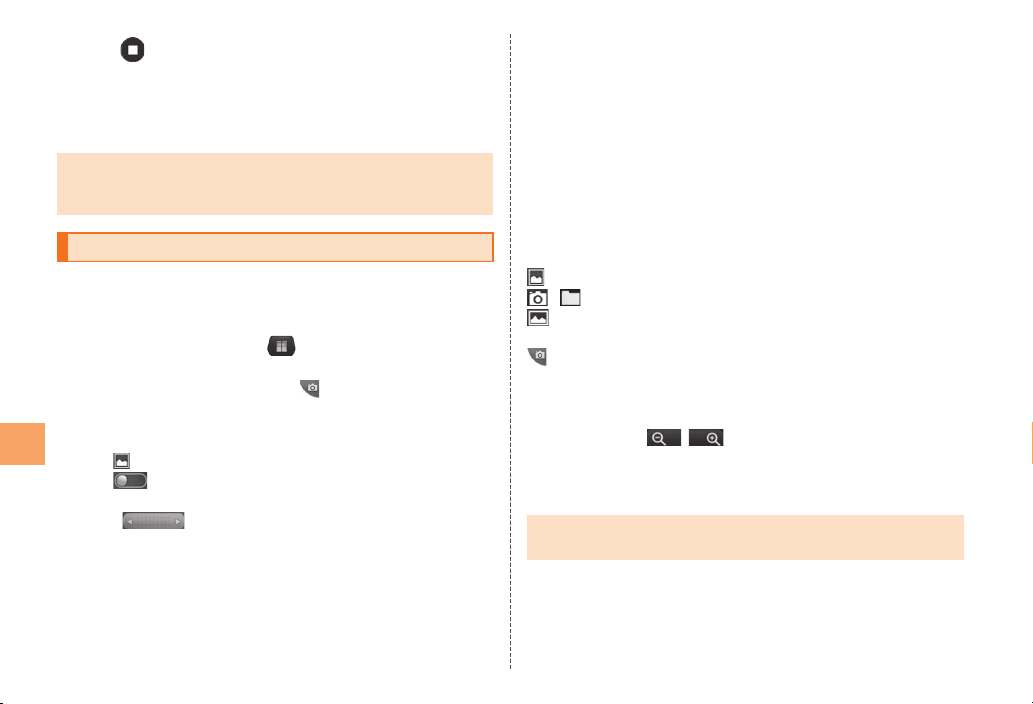
Tap or the possible recording time elapses
The recording end tone sounds and the recorded movie is
automatically saved to the microSD memory card.
Tap the thumbnail on the top right of the camcorder monitor
screen to play the recorded movie.
If recording is stopped by an incoming call, alarm, or other
•
interruption, the movie recorded up until the interruption is
saved to the microSD memory card.
Using Gallery
In the Gallery, you can share the images and the movies saved
in the microSD memory card, display them as a list, or edit the
images.
On the home screen, → [Gallery]
The album selection screen is displayed.
Camera is activated by tapping
Tap an album
The thumbnail display screen is displayed.
Tap
Multimedia
to return to the album selection screen.
Tap
display of the images.
Slide
to switch the date display and the thumbnail
to the left/right to slide the thumbnails.
.
Tap an image or a movie to be displayed
When you tap an image, the one image display screen is
displayed.
When you tap a movie, an application corresponding to its
data type is activated and the data is played or displayed.
When there are two or more applications to play or display
data, the application selection screen is displayed when you
tap a data. It is played or displayed after an application is
tapped.
Tap B to return to the thumbnail display screen.
Operations in the one image display screen
■
: Returns to the album selection screen.
/ : Returns to the thumbnail display screen.
: Switch the number display and the file name display of the
image.
: Activate Camera.
Flick/slide the image to the left/right: Switch to the previous/next
image.
Double-tap or pinch out/in the image: Zooms in/out.
(Alternatively, tap
Slide the image vertically and horizontally: Moves vertically and
horizontally (when the image is zoomed in).
Tap the image: Displays/hides icons, “Slideshow” and “Menu”.
If the shot images or movies are not displayed in the Gallery,
•
restart the Gallery.
/ .)
46
Page 49
Applications
Using Android Market™
You can download and install various applications such as useful
tools or games to the IS11CA from Android Market offered by
Google.
Google account is required to use Android Market. For details
•
on Google account, refer to the supplied Setting Guide
(Japanese) and the site (http://www.google.com/support/
accounts/).
For details, refer to Android Market Help by tapping M and
•
“Help” on the Android Market screen.
On the home screen, →[Market]
The Android Market screen is displayed.
When you activate Android Market for the first time, the
terms of service are displayed, so tap “Accept”.
Some applications may not be available when a microSD
•
memory card is not inserted.
•
Some applications make the display keep turned on, or
continue in the background and weaken battery.
•
You can uninstall the unnecessary application.
Using au one Market
You can download and install applications from au one Market.
You can search the desired applications by categories,
keywords, or ranking.
au one-ID is required to use some functions. Refer to the
•
supplied Setting Guide (Japanese) to set au one-ID.
On the home screen, →[au one Market]
The au one Market screen is displayed.
When you activate au one Market for the first time, the terms
of service are displayed, so tap “同意”(Agree).
Follow the terms of service to use au one Market. Procedures
•
on downloading applications and making payment for feebased applications differ depending on the distributor of au one
Market.
•
Some applications may not be available when a microSD
memory card is not inserted.
•
You can uninstall the unnecessary application.
Applications
47
Page 50
Managing Applications
You can delete data, clear cache, or stop installed applications
forcefully.
On the home screen, →[Settings]
→[Applications]
The application settings screen is displayed.
Tap [Manage applications]
The installed applications list is displayed.
The Manage applications screen contains the “Downloaded”,
“All”, “On SD card” and “Running” tabs.
Tap an application
The detailed application information is displayed.
Tap the operation to perform
Follow the on-screen instructions to perform it.
When you select an installed application, “Uninstall” is
•
displayed. Tap it to remove the application.
•
To use the uninstalled application, you need to download and
install again.
Applications
48
Page 51
Settings of IS11CA
Turning On Silent Mode
Just enable Silent mode to turn off the ringtone and other
sounds.
On the home screen, →[Settings]
→ [Sound] → [Silent mode]
Hold down P and tap “Silent mode” to enable or disable
•
Silent mode.
•
Even in Silent mode, music, video media, alarms, dial pad
operation sound, camera shutter tone and recording start/end
tone can still be heard.
•
When the content of function settings is played in Silent mode,
the data will be played without sound. The volume can be
adjusted for some functions by pressing </> during
playback.
•
To set the vibrator operation for when in Silent mode, from the
home screen, tap
Changing the Incoming Ringtone
On the home screen, →[Settings]
→ [Sound] → [Phone ringtone]
Tap the data
To set a music file saved to the microSD memory card as the
•
ringtone, tap “External” in the ringtone list.
→ [Settings] → [Sound] → [Vibrator].
Setting the Screen Lock
Set the screen to be locked when entering sleep mode.
On the home screen, →[Settings]
→ [Location & security]
Tap [Screen Lock]
The lock number needs to be entered to cancel the screen lock.
•
•
When the screen lock is set, you can call 110 (Police), 119 (Fire
and Ambulance), 118 (Regional Coast Guard Headquarters)
and 157 (Customer Center) without even having to cancel the
lock if you tap “Emergency call”.
Initializing microSD Memory Card
When initializing a microSD memory card, all data saved on the
microSD memory card is deleted.
On the home screen, →[Settings]
→ [Storage] → [Unmount SD card] → [OK]
Tap [Erase SD card]
Tap [Erase SD card] → Enter Lock No.
→ Tap [OK] → [Erase everything]
•
Initialize a microSD memory card while charging or with the
battery fully charged.
•
To have the microSD memory card recognized after having
unmounted it, tap “Mount SD card”.
•
While saving data on a microSD memory card, you cannot
unmount the microSD memory card.
Settings of IS11CA
49
Page 52
Overseas Usage
Using Global Passport CDMA/GSM
For Overseas Use without Anxiety
The overseas network condition is available on the au
homepage.
Make sure to check the condition before leaving Japan.
http://www.au.kddi.com/service/kokusai/tokomae/
When the IS11CA is Stolen or Lost
■
If the IS11CA is lost or stolen while overseas, please contact
•
an au shop or Customer Center immediately to suspend phone
service. Please be aware that any calling charges and packet
communication charges incurred after theft or loss of a phone
Overseas Usage
are the responsibility of the customer.
If the au IC-Card inserted into the IS11CA is stolen or lost,
•
the card may be inserted into another cell phone (including
GSM cell phone for overseas use) by a third party. So, it is
recommended to set the PIN code to protect from improper
use by a third party.
Using the IS11CA Properly by Knowing About
■
Calling and Communication Services Overseas
Calling charges differ depending on the country/region.
•
Discount services do not apply to calling charges incurred
•
while overseas.
Calling charges are also incurred when receiving calls
•
overseas.
50
Depending on the country/region, calling charges may be
•
incurred from the time that you tap
If you do not want to use packet communication, disable data
•
communication from the home screen by tapping
→ [Settings] → [Wireless & networks] → [Mobile networks]
→ [Data enabled].
.
Configuring the Overseas Settings
To use the IS11CA overseas, you are required to change to the
telecommunications carrier’s networks that you connect to at
your travel destination.
Please obtain the latest PRL before traveling.
Obtaining the PRL (Roaming Area Information)
■
The PRL (roaming area information) contains information on
roaming areas of overseas partner providers who have signed
an international roaming contract with KDDI (au).
On the home screen, →[Settings]
→ [Wireless & networks] → [Mobile networks]
→ [Roaming Settings] → [PRL Settings]
Tap [Update PRL version]
The PRL is obtained. Download the PRL data by following
the on-screen instructions.
When you download the PRL data, packet communication
•
charges apply.
•
Be aware that service may be unavailable in some areas if you
do not update the PRL.
Page 53
Setting the Area
■
You can set the area where you use the IS11CA.
On the home screen, →[Settings]
→ [Wireless & networks] → [Mobile networks]
→ [Roaming Settings] → [Area Settings]
Japan Select this for use within Japan.
Abroad(Auto) Select this to use a CDMA
Abroad(CDMA) Select this to use a CDMA
Abroad
(GSM)
•
The country selection screen may be displayed if “Area
Settings” is set to “Abroad(Auto)” or “Abroad(CDMA)”. Select
the travel country.
•
If packet communication is unavailable, you may be able to
use packet communication by tapping “Search networks” in
“Abroad(GSM)” and then changing the network (carrier).
Search
networks
Select
automatically
network and GSM network
abroad.
•
The network to connect to is
selected automatically.
network abroad.
Search for all available GSM
networks.
Select the most suitable GSM
network automatically.
Setting the data roaming
■
You can use the packet communication during roaming.
On the home screen, →[Settings]
→ [Wireless & networks] → [Mobile networks]
→ [Data roaming]
Tap “OK” to enable the data roaming.
To enable the data roaming, set “Area Settings” to the setting
•
other than “Japan” in advance.
•
If you have not subscribed to IS NET, au.NET charges (525 yen
for the used month) and communication charges apply.
•
In some regions, packet communication may still be possible
even if data roaming is disabled. If you do not want to use
packet communication, disable the settings for both “Data
roaming” and “Data enabled”.
Making a Call at Your Travel Destination
Making a Call to Another Country (Including
■
Japan) from Your Travel Destination
You can make a call to Japan or another country from your travel
destination.
Example: To call “212-123-XXXX” in the U.S. from South Korea
On the home screen, tap
The phone number entry screen is displayed.
Overseas Usage
51
Page 54
Enter an international access code, country
code, area code and recipient’s phone number
→ Tap
International
access code
(South Korea)*
002 1 212 123XXXX
*1 Touch a nd hold the “ 0” to enter “+” and the internat ional acce ss code
of your travel destination is automatically added when calling.
*2 If the area code starts with “0”, dial it without including the “0”.
However, include the “0” in so me countries or regio ns such as Ita ly.
If the person you are dialing is using Global Passport, enter
•
the country code “81” (Japan) regardless of his/her travel
destination.
Making a Call within the Same Country While
■
Overseas
Overseas Usage
You can call to general fixed-line phones or cell phones with the
same method as when calling in Japan.
Country
code
1
➡
(U.S.)
➡
Area
code*
2
➡
On the home screen, tap
The phone number entry screen is displayed.
When Using a CDMA Network
■
Enter a phone number → Tap
With CDMA networks, the number to dial differs depending
on your travel destination.
Recipient’s
phone
number
Travel destination Number
U.S. Mainland, Hawaii, Saipan “1”+ Area code +
New Zealand, South Korea, China,
Hong Kong, Macau, Thailand,
Taiwan, Indonesia, Vietnam, Israel,
India, Peru, Bermuda Islands,
Bangladesh, Bahamas, Venezuela
Mexico
When Using a GSM Network
■
Recipient’s phone
number
Area code + Recipient’s
phone number
■ For local call
Recipient’s phone
number
■ For long distance call
“01”+ Area code +
Recipient’s phone
number
Enter an area code and recipient’s phone
number → Tap
If “Area Settings” is set to “Abroad(Auto)”, confirm the type of
•
network you are connected to before making a call.
From the home screen, tap
→ [Status] and then confirm the type of network under “Mobile
network type” on the screen that appears.
→ [Settings] → [About phone]
52
Page 55
Receiving a Call at Your Travel Destination
You can receive calls with the same method as when receiving
calls in Japan.
If you receive a call while overseas, the call is forwarded from
•
Japan no matter where the call is made from. Call charges to
Japan are incurred by the caller and receiving charges by the
receiver.
Having Calls Made to Your Travel Destination
■
from Japan
People calling you can use the same method as when calling
you from Japan.
Having Calls Made to Your Travel Destination
■
from Countries Other Than Japan
International access code and “81” (Japan) have to be dialed
regardless of the travel destination since the call is made through
Japan.
Example: To have a call made to your au phone in Japan
“090-1234-XXXX” from the U.S.
Enter an international access code, Japan
country code and phone number of au phone
→ Tap
International
access code
(U.S.)
011 81 901234XXXX
➡
Country
code
(Japan)
Phone number of
➡
(Omit the first 0)
au phone
Overseas Usage
53
Page 56
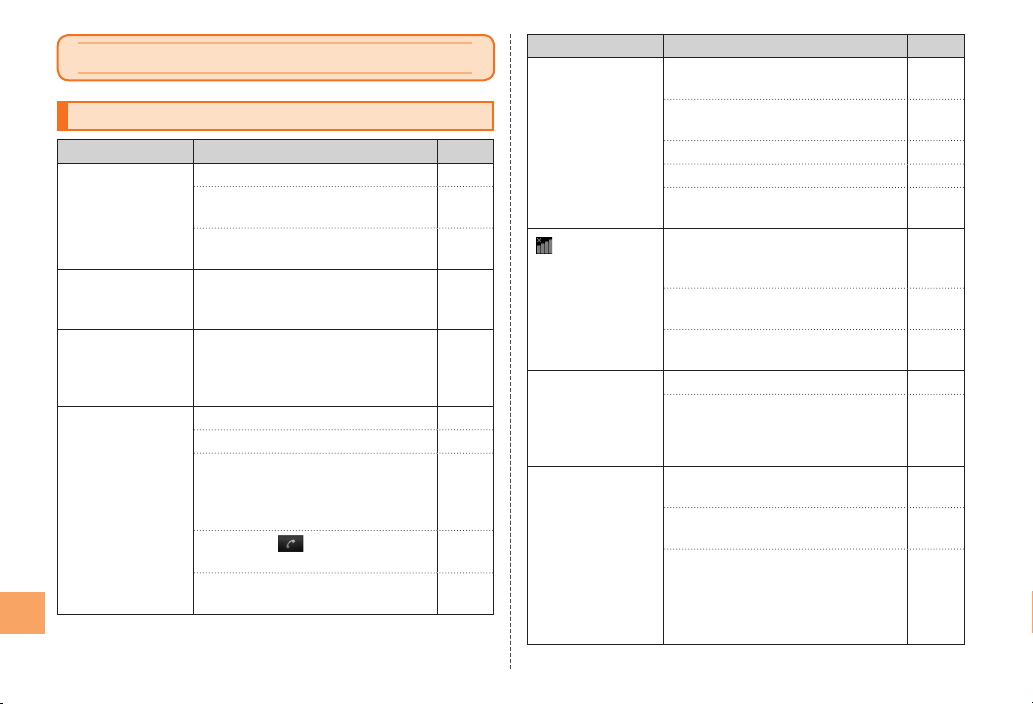
Trouble s ho oti n g
Symptom What you should check Page
Cannot turn on
power by pressing
P.
The power
is turned off
automatically.
The power is
turned off while the
wake-up animation
is displayed.
Cannot make
calls.
Appendix/Index
54
Appendix/Index
Is the battery pack charged? P.9
Is the battery pack installed
correctly?
Did you hold down P for at
least two seconds.
Is there enough power left in the
battery pack?
Is there enough power left in the
battery pack?
Is power turned on? P.10
Is an au IC-Card inserted? P.14
Did you enter the correct phone
number? (Did you enter the phone
number starting with the area
code?)
Did you tap
phone number?
Did you set the correct setting in
“Area Settings”?
after entering a
P. 1 3
P. 1 0
P. 9
P. 9
P. 3 0
P. 3 0
P. 5 1
Symptom What you should check Page
Cannot receive
calls.
(out of service
area) appears.
Display and LED
indicator lights
or blinks, but
ringtone does not
sound.
Cannot charge the
battery pack.
Does the IS11CA receive an
adequate signal?
Is the IS11CA out of the service
area?
Is power turned on? P.10
Is an au IC-Card inserted? P.14
Did you set the correct setting in
“Area Settings”?
Is the IS11CA out of the service
area or in a location where the
signal is weak?
Is your finger covering the area
around the built-in antenna?
Did you set the correct setting in
“Area Settings”?
Is the ringtone volume too low? —
Is Silent mode set? P.49
Are the charging devices
connected properly?
Is the battery pack installed
correctly?
Did you set the recording size to
“HD” and then start a movie?
To charge the battery pack, end the
movie or set the recording size to
other than “HD”.
P.20
P.20
P.51
P.20
P. 8
P.51
P. 9
P.13
—
Page 57
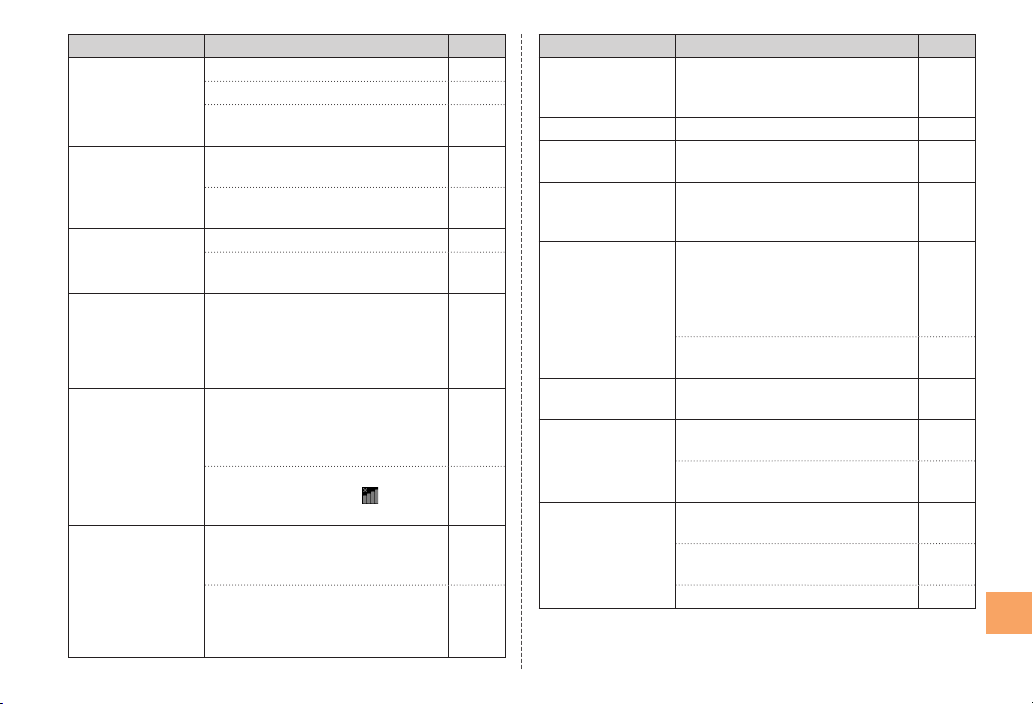
Symptom What you should check Page
Cannot operate
key/touch panel.
Cannot operate
touch panel as
intended.
An au IC-Card
(UIM) error is
displayed.
A message
indicating
that charging
is necessary
appears.
Battery usage time
is short.
When making a
call, a beeping
sound is heard
from the earpiece
and a connection
cannot be
established.
Is power turned on? P.10
Is the screen lock set? P.49
Turn off the power and then turn it
on again.
Check the proper operation of touch
panel.
Turn off the power and then turn it
on again.
Is the au IC-Card inserted? P.14
Did you insert a different au ICCard?
The battery pack is almost empty. P.9
Is the battery pack charged
enough?
* Charge the battery pack until the
red LED indicator is turned off.
Is the battery pack left in the place
for a long period where
service area) appears?
Are you out of the service area or
in a location where the signal is too
weak?
The wireless line is busy or the
phone you are calling is on another
line. Try again later.
(out of
P.10
P.17
P.10
P.13
P. 9
P.20
P.20
Symptom What you should check Page
The light of the
display is turned
off.
Display is dark. Is “Brightness” set to dark? —
Cannot hear the
other party.
Cannot operate
any key and the
screen is frozen.
Cannot operate
the respective
profile settings in
the Contacts.
Cannot create PC
mail.
Cannot recognize
a microSD
memory card.
Cannot operate
the camera.
—
For more detailed information, visit the following au troubleshooting
sites on the au homepage.
http://www.kddi.com/customer/service/au/trouble/kosho/index.html
Is “Screen timeout” set short?
Is the earpiece volume too low? P.30
Turn off the power and then turn it
on again.
Is the other party’s phone number
notified? If there is no notification,
the setting for individual incoming
image of the contact and the
ringtone setting are not enabled.
Is more than one same phone
number saved in the Contacts?
Did you add a PC mail account? P.41
Is a microSD memory card inserted
properly?
Is the microSD memory card
unmounted?
Is a microSD memory card
inserted?
Is there enough power left in the
battery pack?
Has the IS11CA become too warm? P.45
P. 1 0
P. 3 2
P. 1 5
P. 4 9
P. 1 5
P. 9
P. 4 5
—
—
Appendix/Index
55
Page 58
Trademarks/ O thers
The microS DHC logo is a trademark of SD- 3C, LLC.
®
Contains Adobe
Adobe Flash Player Copyright © 1996-2011 Adobe Systems
Incorporated. All rights reser ved.
Adobe, Flash and Flash logo are registered trademarks or
trademarks of Adobe Systems Incorporated in the United States
and/or other countries.
Google, the Google logo, Android, Android Market, the Android
Market logo, Gmail, the Gmail logo, YouTube, the YouTube logo,
Google Maps, the Google Maps logo, Google Maps Navigation, the
Google Maps Navigation logo, Google Voice Search, the Google
Voice Search logo, Google Latitude, the Google Latitude logo,
Google Places, the Google Places logo, Google Talk, the Google
Appendix/Index
Talk logo, Picasa are trademarks or registered trademarks of Google
Inc.
FeliCa is a contactless IC card technology developed by Sony
Corporation.
FeliCa is a registered trademark of Sony Corporation.
is a registered trademark of FeliCa Net works, Inc.
“Osaifu-Keitai” is a registered trademark of NTT DOCOMO, INC.
56
Flash® Player by Adobe Systems Incorporated.
The Bluetooth word mark and logos are owned by the Bluetooth
SIG, INC. and any use of such marks by NEC CASIO Mobile
Communications, Ltd. is under license.
®
is a registered trademark of Wi-Fi Alliance.
Wi-Fi
“jibe” is a social service related application produced by Jibe Mobile
K.K.
“Jibe Mobile” is a registered trademark of Jibe Mobile K.K.
Skype, associated trademarks and logos and the "S" symbol are
trademarks of Skype Limited.
“Twitter” is a registered trademark of Twitter, Inc.
“mixi” is a registered trademark of mixi, Inc.
®
Facebook
is a registered trademark of Facebook, Inc.
GREE and the GREE logo are registered trademarks of GREE, Inc.
in Japan. All other trademarks are the property of their respective
owners.
This product is licensed in compliance with the MPEG-4 Visual
Patent Portfolio License. You are allowed to use it for private
nonprofit purposes and only when:
•
Recording moving pictures that are compliant with the standard of
MPEG-4 Visual (hereinafter referred to as MPEG-4 Video)
•
Playing MPEG-4 Videos recorded personally by consumers not
engaged in profit activities
•
Playing MPEG -4 Video supplied from a provider licensed by
MPEG-LA
When using the product for any other purpose, such as commercial
promotion, internal use or profit, contact M PEG LA, LLC of the U.S.
Page 59
Using Adobe® Flash® Player
®
•
Flash® Player embedded in this product ("Software") is
Adobe
protected by copyright laws. Be sure to obser ve the following rules
when using the Software.
① You shall not copy or distribute the Software.
② You shall not modify, adapt, translate or create derivative works
based upon the Software.
③ You shall not reverse engineer, decompile, disassemble, or
otherwise attempt to discover the source code of the Sof tware.
④ You shall not make a claim for any consequential, indirect,
incidental, special damages, or any lost profits by using the
Software.
This product contains software licensed complying with GNU
General Public License (GPL) or GNU Lesser General Public
License (LGPL). You can obtain the source code for the software
and reproduce, redistribute, or modify the soft ware in accordance
with the GPL or LGPL.
For information on GPL and LGPL, from the Home screen,
▶
“Settings” ▶ “Ab ou t ph on e” ▶ “Legal information” ▶ “Open source
licenses”
“ATOK” is a registered trademark of JustSystems Corporation.
“ATOK” is a copyrighted material of JustSystems Corporation, and all
rights are reserved by JustSystems Corporation and other individual
right holders.
®
is a trademark or registered trademark of Nuance Communications,
T9
Inc. and corporate owners of Nuance in the United States and/or other
countries.
Powered by emblend™ Copyright 20 09 -2011 Aplix and/or its
affiliates. All rights reserved.
emblend is a trademark of Aplix and/or its affiliates in Japan and
other countries.
G’zOne is a trademark of Casio Computer Co., Ltd.
Other company names or product names are registered trademarks
or trademarks of those companies.
Appendix/Index
57
Page 60

Index
A
Accessories …………………………………… 1
ACTIVE key …………………………………… 8
Android Market……………………………… 47
Applications ………………………………… 47
Managing ………………………………… 48
au IC-Card…………………………………… 13
Inserting…………………………………… 14
Removing ………………………………… 14
au one Market ……………………………… 47
B
Back key………………………………………… 8
Back microphone……………………………… 8
Basic operations
Displaying the menu……………………… 18
Selecting an item ………………………… 18
Battery level ………………………………… 20
Battery lock …………………………………… 8
Appendix/Index
Battery pack…………………………………… 9
Attaching ………………………………… 13
Removing ………………………………… 12
Battery pack cover ………………………… 8
Browser……………………………………… 44
Bookmarks………………………………… 44
History……………………………………… 44
Built-in antenna……………………………… 8
C
Camcorder…………………………………… 45
Camera……………………………………… 45
58
Auto focus lock…………………………… 45
Camera lens………………………………… 8
Camera start indicator……………………… 8
Cell phone etiquette…………………………… 1
Character input……………………………… 26
Common phrase ………………………… 29
Face mark ………………………………… 29
Flick input ………………………………… 28
Gesture input……………………………… 27
Input mode………………………………… 27
Number keyboard………………………… 27
Numeric keypad input…………………… 27
Pictogram ………………………………… 29
QWERTY keyboard ……………………… 28
Symbol …………………………………… 29
Text code ………………………………… 29
Charging the battery pack …………………… 9
C-mail………………………………………… 39
Checking sent and received mail ……… 40
C-mail safety block setting……………… 40
Creating and sending …………………… 39
Receiving ………………………………… 40
Settings …………………………………… 41
Contacts……………………………………… 32
Adding …………………………………… 32
Checking ………………………………… 33
My Profile ………………………………… 33
D
Display ………………………………………… 8
Dust resistance………………………………… 3
E
Earphone jack ………………………………… 8
Earphone jack cover ………………………… 8
Earpiece………………………………………… 8
Earpiece volume …………………………… 30
E-mail………………………………………… 34
Changing e-mail address ……………… 37
Checking sent and received mail ……… 35
Creating and sending …………………… 34
Deleting …………………………………… 36
E-mail Contacts…………………………… 36
Mail filter…………………………………… 38
Receiving ………………………………… 35
External connection jack……………………… 8
External connection jack cover……………… 8
F
FeliCa mark …………………………………… 8
Flashlight ……………………………………… 8
G
Gallery ……………………………………… 46
Global Passport CDMA/GSM……………… 50
Configuring the overseas settings……… 50
Making a call……………………………… 51
Receiving a call…………………………… 53
Gmail………………………………………… 43
Creating and sending …………………… 43
Receiving ………………………………… 43
Google account……………………………… 11
H
Home key ……………………………………… 8
Home screen………………………………19, 21
Folders …………………………………… 22
Moving icons……………………………… 22
Shortcuts ………………………………… 22
Status bar ………………………………… 19
Page 61

Switching ………………………………… 21
Wallpaper ………………………………… 23
Widgets …………………………………… 22
I
Illustrations and descriptions………………… 2
Infrared port …………………………………… 8
Initial settings ……………………………… 11
Internet ……………………………………… 44
L
Language …………………………………… 10
Launcher …………………………………… 23
LED indicator…………………………………… 8
Light sensor …………………………………… 8
Lock No.………………………………………… 2
M
Market ……………………………………… 47
Menu key ……………………………………… 8
Microphone …………………………………… 8
microSD memory card……………………… 14
Initializing ………………………………… 49
Inserting…………………………………… 15
Removing ………………………………… 15
microSD memory card slot…………………… 8
Mobile networks
Area settings……………………………… 51
PRL settings ……………………………… 50
Roaming settings………………………… 50
Mouthpiece …………………………………… 8
Movie………………………………………… 45
N
Names and functions of parts ……………… 7
P
PC-mail……………………………………… 41
Account …………………………………… 41
Creating and sending …………………… 42
Receiving ………………………………… 42
Phone………………………………………… 30
001 International Call Service…………… 31
Answering ………………………………… 31
Call log …………………………………… 31
Incoming ringtone………………………… 49
International call ………………………… 31
Making a call……………………………… 30
Returning ………………………………… 31
Photo………………………………………… 45
Photo light……………………………………… 8
PIN code ……………………………………… 2
Power key……………………………………… 8
Proximity sensor ……………………………… 8
PUK code ……………………………………… 3
R
Receiver………………………………………… 8
Ringtone……………………………………… 49
S
Screen lock ………………………………… 49
Security code ………………………………… 2
Settings……………………………………… 49
Shock resistance……………………………… 4
Shortcuts …………………………………… 22
Silent mode ………………………………… 49
Sleep mode ………………………………… 10
Sound
Ringtone…………………………………… 49
Silent mode ……………………………… 49
Speaker………………………………………… 8
Status bar…………………………………… 19
Notification indicator……………………… 19
Notification panel………………………… 21
Status indicator…………………………… 20
Strap eyelet …………………………………… 8
Switching orientation ……………………… 25
Switching to English………………………… 10
T
Temperature sensor…………………………… 8
Touch panel operation……………………… 17
Trademarks ………………………………… 56
Troubleshooting …………………………… 54
Turning the power on/off…………………… 10
V
Volume down key……………………………… 8
Volume up key ………………………………… 8
W
Wallpaper …………………………………… 23
Water resistance ……………………………… 3
Widgets……………………………………… 22
Appendix/Index
59
Page 62
Forinquiries,call:CustomerCenter
Forgeneralinformationandcharges
(tollfre e)
Fromfixed -lineph ones: Fromaucellp hones:
PRESSINGZEROWILLCONNECTYOUTOANOPERATOR
AFTERCALLING157ONYOURauCELLPHONE.
Forloss,theftordamageandoperation
0120‑9
0120‑9
(tollfre e)
‑
033
‑
699
information
Fromfixed -lineph ones:
Incaseabovenumbersarenotavailable,
areacodenotrequired
Fromaucellp hones:
areacodenotrequired
(exceptOkin awa)
(Okinawa)
Cellphonean dPHSoperato rscollectan drecycleunuse d
telephones,batteriesandbatterychargersatstores
bearingthelogoregardle ssofbrandandma nufacturer
toprotecttheenvironmentandreusevaluableresources.
July2011,1stEdition
Sales:KDDICORPORATION
OKINAWACELL ULARTE LEPHON ECOMPANY
Manufa cture dby:CASIOCO MPUTERC O.,LTD.
•
 Loading...