

Page 1
Basic Manual
Contents
Safety Precautions
Getting Ready
Basic Operation
Phone
Tool/Applications
File Management
Settings
Appendix/Index
Page 2
Preface
Thank you for purchasing "DIGNOS" (called the product from here
on).
Before using the product, be sure to read the "Basic Manual" (this
manual) to ensure correct use.
After you have finished reading this PDF and the printed manuals,
be sure to store them in safe places so that you can retrieve them
whenever needed.
About Operating Instructions
■"Setting Guide"/"Basic Manual" (This manual)
Handles only basic operations for main features.
For detailed descriptions on various functions, refer to the "Instruction
Manual" application (Japanese) installed on the product or "取扱説
明書詳細版 (Full Instruction Manual) (Japanese)" available on the au
homepage.
http://www.au.kddi.com/torisetsu/index.html
Company names and product names referred to in this manual are
•
trademarks or registered trademarks of respective companies.
■"Instruction Manual" application (Japanese)
You can use the "Instruction Manual" application (Japanese) on the
product to confirm detailed operational procedures. Certain functions
can be directly activated from the application screens on which their
operations are described.
From the Home screen, [
DIGNO S]
• When you activate for the first time, follow the onscreen instructions
to download and install application.
] →[Apps]→[Instruction Manual
■ Downloading Manuals
You can download the "Basic Manual" (this PDF manual), the "取扱説
明書 (Instruction Manual)" (Accessory) (Japanese) and "取扱説明書詳
細版 (Full Instruction Manual)" (Japanese) in PDF format from the au
homepage.
Download URL:
http://www.au.kddi.com/torisetsu/index.html
Safety precautions
Before you start using the product, make sure to read the "Safety
precautions" to ensure correct use.
Before you assume that the product is malfunctioning, check for
possible remedies in the following au Customer Support site of au
homepage:
http://cs.kddi.com/support/komatta/kosho/index.html
When using the product
• Communication is not possible even inside the service area
in places where the signal does not reach (e.g. tunnels and
basements). Also, communication is sometimes not possible in poor
reception areas. Communication is sometimes interrupted if you
move into a poor reception areas during communications.
• Since this product uses radio waves, the possibility of
communication intercepts by third parties cannot be eliminated.
(Though LTE/CDMA/GSM/UMTS system has highly secure
confidential communication features.)
ii
Page 3
• This product is compatible with the international roaming service.
Each network service described in this manual varies depending on
the area and service content.
• Since this product is a radio station under the Radio Law, you
may be asked to temporarily submit the product for inspection in
accordance with the Radio Law.
• The product number of your cell phone is automatically sent to
KDDI CORPORATION for maintenance and monitoring operational
status of your cell phone.
• Take care not to inconvenience people around you when you use
the product in a public place.
• When the product is used by a child, parents or guardians should
thoroughly read the "Basic Manual" (this manual) and teach the
child how to use it.
• To use the product overseas, check the condition such as
regulations of the country/region.
■ Use of the product is not allowed in the following
places!
• Do not use a cell phone while driving a car or riding a motorbike or
bicycle. It might cause a traffic accident. Use of a cell phone while
driving a car or motorbike is prohibited by law. Use of a cell phone
while riding a bicycle may be punishable by some regulations.
• Do not use this product while you are aboard an airplane. Use of
electric devices transmitting radio waves in airplane is prohibited
by law. Some airline companies, however, allow their passengers to
use cell phones. For details, contact the airline company you use.
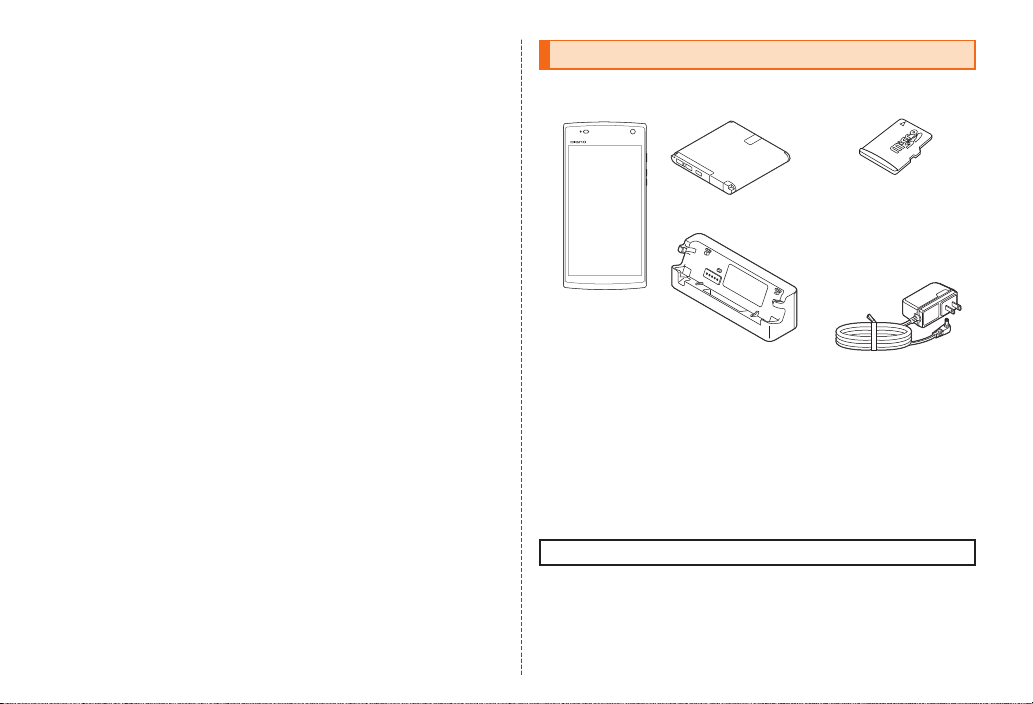
List of Packaged Items
Before your start using the product, make sure that you have all the
following packaged with the product.
microSD memory
Battery Pack (KLY21UAA)
Main unit
Quick Charge Desktop
Holder (KYL21PUA)
● 取扱説明書 (Instruction Manual) (Japanese)
● 設定ガイド (Setting Guide) (Japanese)
● Warranty for Main unit
● Warranty for Quick Charge Desktop Holder
● Warranty for AC Adapter for Desktop Holder
● ご使用上の注意 (Notes on usage) (Japanese)
The following items are not included in the package.
・microUSB cable ・Earphones
card
(sample)
When you purchase the
product, it is attached to
the main unit.
AC Adapter for
Desktop Holder
(KYL21PQA)
1
Page 4
Contents
Preface ............................................................ ii
About Operating Instructions ....................... ii
Safety precautions ......................................... ii
When using the product ................................ ii
Contents
List of Packaged Items .................................. 1
Contents ...................................... 2
Contents ................................................... 2
Safety Precautions ..................... 4
Regarding notations used
in this document ............................................4
Exemptions .................................................... 5
Safety Precautions (Observe Strictly) ..........6
Handling precautions .................................. 14
Available Security Codes............................... 18
PIN code ........................................................ 18
Notes on waterproof and dustproof ........... 20
Notes on using Bluetooth
®
) functions ......................................... 25
(Wi-Fi
®
Bluetooth
Cautions on using 2.4 GHz band ..................25
Cautions on using 5 GHz band .....................26
Notes on packet communication charge ... 26
Notes on Google Play/au Market/
applications .................................................. 27
/Wireless LAN (Wi-Fi®) function ..... 25
2
®
/Wireless LAN
Getting Ready ............................ 28
Names and functions of parts ....................28
About Smart Sonic Receiver .......................... 30
Attaching/Removing the battery pack ........ 30
Attaching the battery pack ............................30
Removing the battery pack ........................... 31
au Micro IC Card (LTE)................................. 31
Attaching the au Micro IC Card (LTE) ............ 32
Removing au Micro IC Card (LTE) ................. 33
Charging ....................................................... 34
Turning the power on/off ............................. 37
Turning the power on ..................................... 37
Turning the power off ..................................... 38
Sleep mode ................................................... 38
Switching to English display ......................... 38
Setting au ID ..................................................38
Setting up Google account ............................ 39
Basic Operation ........................ 40
Basic Operation ..................................... 40
Using the Touch panel .................................40
Using the Navigation bar............................. 41
Switching Orientation .................................. 41
Using Home screen .....................................41
Adding shortcuts/widgets/folders to the Home
screen ............................................................ 42
Using 便利ツール (Convenient tools)/
My Selection ..................................................43
Using the Applications list .......................... 44
Using the menu of Applications list ............... 46
Moving an icon on the Applications list ......... 46
Using Quick launch area ...............................46
Using the Simple menu ................................. 46
Checking the status of the product ............47
Icons .............................................................. 47
Notification/Status Panel ................................ 48
Displaying available menu .......................... 48
Character entry ...................................... 49
Entering characters .....................................49
Switching keyboards .....................................49
Inputting text with the 10-key/QWERTY ......... 50
Entering by handwriting ................................. 52
Using convenient functions for character
entry .............................................................. 54
Entering Emoji/Symbol/Facemark .................. 54
Cutting/Copying characters and pasting ...... 54
Using Mushroom applications ....................... 54
Setting iWinn IME .........................................54
Registering to the user dictionary .................. 55
Phone ......................................... 56
Making a call ................................................56
Using history to make a call ......................... 57
Calling overseas (au International Call Service)
....................................................................... 58
Receiving a call ............................................ 58
Tool/Applications ...................... 60
Using E-saving mode ............................ 60
Managing running applications ..................... 60
Using au災害対策 (au Disaster
Countermeasure) ................................... 61
Page 5
Using Disaster Message Board ..................... 61
Using emergency early warning mail ............ 61
Using 災害用音声お届けサービス
(Disaster voice message service) .................63
File Management ....................... 64
Using microSD memory card ............... 64
Attaching/Removing microSD memory card
....................................................................... 64
Attaching microSD memory card ..................64
Removing microSD memory card.................. 65
Settings ...................................... 66
Settings .................................................. 66
Opening settings screen ............................. 66
Setting Airplane mode ...................................67
Setting the Silent Mode .................................. 67
Appendix/Index ......................... 68
Appendix ................................................ 68
Introduction of related accessories ........... 68
Troubleshooting ........................................... 69
Using earphones .......................................... 70
Updating Software or OS.............................70
Downloading and updating software or OS
....................................................................... 71
Connecting to a PC for updating software ....71
After-sales service ....................................... 71
Available data ............................................... 73
Main speci cations ......................................73
Speci c Absorption Rate of Mobile Phone
....................................................................... 74
Index ....................................................... 76
Intellectual property rights ..........................78
Gracenote
...................................................................... 80
OpenSSL License ........................................81
FCC Notice ................................................... 82
European RF Exposure Information ........... 83
Declaration of Conformity for KYL21 ......... 83
®
End User License Agreement
Contents
3
Page 6
Regarding notations used in this document
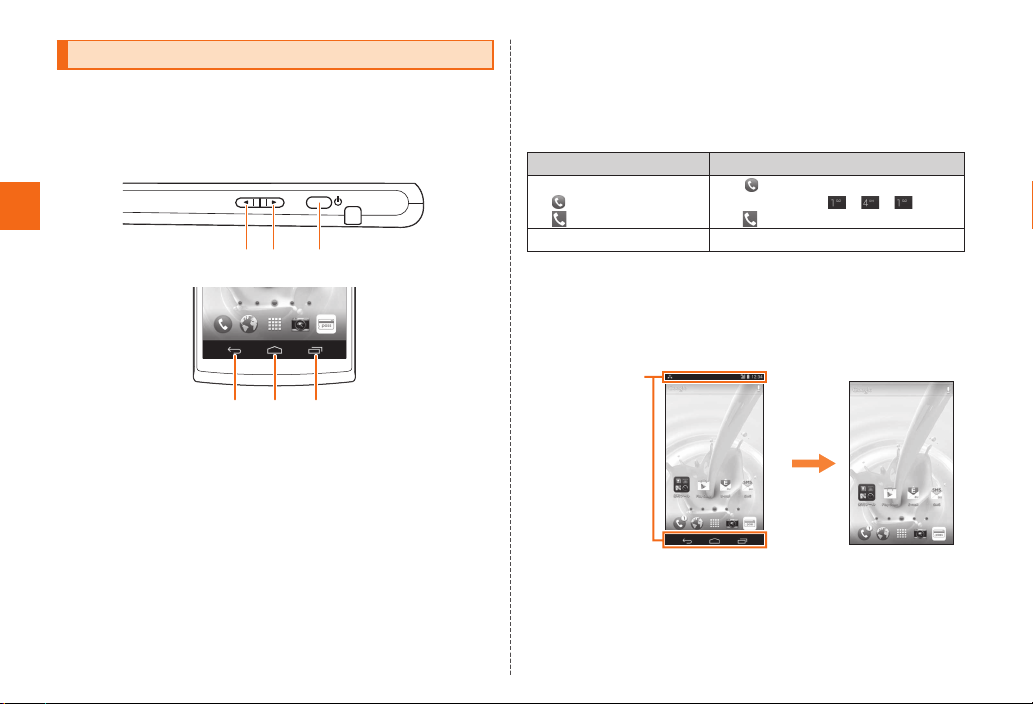
■ Key indications used in this manual
In this manual, keys are represented by simplified illustrations as
shown below.
Safety Precautions
lr F
CHN
■ Indications used for the operation of selecting
items/icons/buttons, etc.
Notations used for operation procedures in this manual are as follows.
Tapping is to select a button or icon displayed on the screen by lightly
tapping it with your finger (▶P. 40).
Description Explanation
From the Home screen
→[
(Phone)]→[1][4][1]
]
→[
In sleep mode, F In sleep mode, press F.
" at the bottom of the Home
Tap "
screen. Then tap "
".
tap "
", " ", " " and
■ Illustrations/screen displayed used in this manual
Screen illustrations shown in this manual may look different from the
actual screens. In some cases, minor details or a part of a screen
may be omitted.
In this manual, some
icons on a screen are
omitted.
Actual screen
Notations used in this
manual
4
Page 7
◎ Operations from the vertical display are mainly described. Menu items/
icons/keys on a screen may be different from the ones in the horizontal
display.
◎ Menu items/layers/icons may be different depending on functions,
conditions, etc.
◎ In this manual, "microSD™ memory card", "microSDHC™ memory card"
and "microSDXC™ memory card" are abbreviated as "microSD memory
card" or "microSD".
Exemptions
◎ The Company is not liable for any damages arising from earthquakes,
lightning, storms, floods or other natural disasters, as well as fires, actions
by third parties, other accidents, intentional or mistaken misoperation by the
customer, or use under other unusual conditions outside the responsibility of
the Company.
◎ The Company is not liable for any incidental damages (change/disappearance
of described content, loss of business income, disruption of business, etc.)
arising from use of or inability to use the product.
◎ The Company is not liable for any damages arising from failure to observe the
described content of this manual.
◎ The Company is not liable for any damages arising, for example, from
malfunction caused by combination with connected devices or software not
related to the Company.
◎ Captured image data or downloaded data may sometimes be altered or lost
due to faults, repair or other handling of the product. The Company is not liable
for any damage or lost income resulting from recovery of these data.
◎ It is recommended you keep a copy of important data in your PC's hard disk,
etc. Whatever the cause of fault or malfunction may be, the Company assumes
no responsibility for alteration or loss of saved information.
* "The Company" as appears in this manual refers to the following companies:
Sold by: KDDI CORPORATION, OKINAWA CELLULAR TELEPHONE COMPANY
Manufactured by: KYOCERA Corporation
■ Information
• Reproduction of the content of this manual in part or in whole is prohibited.
• The content of this manual is subject to change without notice.
• Every effort has been made in the preparation of this manual. Should you
notice any unclear points, omissions, etc., feel free to contact us.
• Wrong page order or missing pages will be replaced.
Safety Precautions
5
Page 8
Safety Precautions (Observe Strictly)
■ Before using this product, thoroughly read these safety
precautions for proper use. After reading, store the precautions
in a safe place.
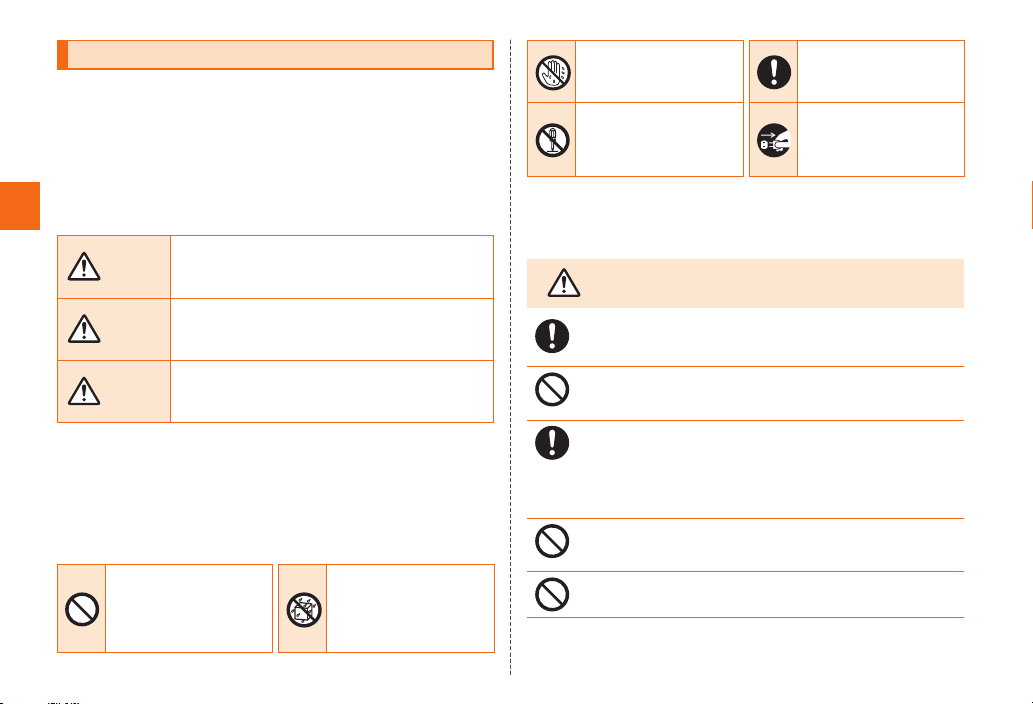
● These "Safety Precautions" describe instructions that should be
observed to prevent damage to property or injury to the customer
or others using the product.
● These instructions are divided into the following categories.
■ Explanation of indications used in this manual
Safety Precautions
%"/(&3
8"3/*/(
$"65*0/
*1 Serious injury: This refers to loss of sight, injury, burns (high- and low-temperature), electric
*2 Injury: This refers to injuries, burns (high- and low-temperature), electric shock, etc. that do
not require hospital admission for treatment or long-term hospital attendance as an
outpatient.
*3 Physical damage: This refers to extended damage to buildings, furniture, livestock, or pets.
This symbol indicates the potential and imminent
danger of death or serious injury
This symbol indicates the possibility of death or
serious injury
This symbol indicates the possibility of personal
injury
shock, broken bones, injuries with residual aftereffects from poisoning, etc.,
and injuries requiring hospital admission for treatment or long term hospital
attendance as an outpatient.
(*1)
to a person.
(*2)
to a person or physical damage
■ Explanation of graphic symbols used in this manual
Indicates an action that
is not allowed.
6
(*1)
to a person.
Indicates that use in a
place where the product
is likely to get wet or
allowing the product to
get wet is not allowed.
Indicates that handling
with wet hands is not
allowed.
Indicates that
disassembly is not
allowed.
Indicates an action that
must be done.
Indicates that the
power plug must be
disconnected from the
power outlet.
■ Precautions common to the main unit, battery
pack, charging equipment, au Micro IC Card (LTE),
peripheral devices
%"/(&3
Be sure to use only the specified peripheral devices. Use of other
peripheral devices might cause overheating, fire, rupture, fault, or
leakage of liquid.
Do not use, store or leave the product in hot places (e.g. by the fire,
(*3)
.
near a heater, under a kotatsu, in direct sunlight, in a car in the hot
sun). Doing so might cause ignition, rupture, fault, fire or injury.
Before entering an area where flammable gas is generated such as a
gas station, be sure to turn off the product. Do not charge the battery.
Failure to observe these precautions might cause the gas to catch fire.
In addition, when using the payment function of NFC/Osaifu-Keitai® at
a gas station, be sure to turn off the power in advance. (If NFC/OsaifuKeitai® lock has been set, cancel the lock before turning off the power.)
Do not put the product in a cooking apparatus such as microwave oven
or a pressure vessel. Doing so might cause ignition, rupture, fault, fire
or injury.
Do not throw the product into a fire or heat it. Doing so might cause fire,
rupture or fire.
Be sure to read the following hazards
before use.
Page 9
Do not short-circuit the connection terminals or the earphone
microphone terminal. Do not allow conductive foreign objects (metal
fragments, pencil leads, etc.) to come into contact with or get inside
the connection terminals or the earphone microphone terminal. Doing
so might cause fire or a fault.
In the case of using metal accessories, etc., take sure not to allow the
metal part come in contact with the connection terminals, the earphone
microphone terminal or the power outlet when charging. Doing so
might cause electric shock, fire, injury or a fault.
Do not expose the camera lens to direct sunlight for an extended
period. Doing so might cause ignition, rupture or fire by the lightcollecting mechanism of the lens.
The customer is not allowed to disassemble, modify or repair the
product. Doing so might cause a fault, fire, electric shock, or injury. The
Company is not liable even in the event of any nonconformities arising
on the product or peripheral devices as a result of modification, etc.
Modification of the product is in violation of the Wireless Telegraphy
Act.
8"3/*/(
Do not drop or subject to strong impact, such as throwing. Doing so
might cause rupture, overheating, fire, or a fault.
Do not use outside when you can hear thunder. Doing so might risk
lightning strikes and electric shock.
Do not let your hands, fingers and other parts of the body touch the
connection terminals. Doing so might cause electric shock, injury or a
fault.
If the product is damaged because it is dropped or something, and
its display is cracked or internal parts are exposed, do not touch the
cracked display or exposed parts with your hands. Doing so might
cause electric shock or injury from damaged parts. Contact an au shop
or Secure cell phone support center.
Be sure to read the following warnings
before use.
Although this product model has waterproof property, stop use if liquid
such as water gets inside the main unit from the external connection
terminal cover, the earphone microphone terminal or the battery cover.
Continued use of the product in this state might cause overheating, fire
or a fault.
When removing the battery cover, do not exert more than necessary
force. The battery pack might jump out, for example, and cause injury
or a fault.
Do not operate the product while driving an automobile or motorized
bicycle, riding a bicycle or walking. Doing so may compromise traffic
safety and cause an accident.
If charging is not completed after the specified charging time, stop
charging. Failure to do so might cause leakage of liquid, overheating,
rupture or fire.
Do not leave in places within the reach of small children. Small children
might swallow small parts, etc. by mistake and choke on them, or might
drop them by mistake and cause accidents or injury.
$"65*0/
Do not store the product in places subject to direct sunlight (e.g. in
automobiles), places that get hot, places that get extremely cold, and
in humid or dusty places. Doing so might cause overheating, fire,
deformation or a fault.
Do not leave on unstable places such as rocky stands or tilting
surfaces especially while the vibration mode set. Dropping the product
may cause injury or damage. Also, pay sufficient attention to impact,
etc.
Do not cover or wrap the product with bedding, etc. while using or
charging the product. Doing so might cause fire, fault or injury.
Do not touch the main unit or the specified charging equipment for a
long time while power is being supplied from an external source. Doing
so might cause low-temperature burns.
Be sure to read the following cautions
before use.
Safety Precautions
7
Page 10
Safety Precautions
8
The product may become hot by prolonged use especially in hightemperature environment. Be careful when using the product touching
your skin for a long time, as it might cause low-temperature burns.
Do not use power outlets or wiring apparatus beyond its rating. Also,
exceeding rating, for example, by connecting multiple devices to a
single power strip might cause overheating and fire.
Do not use the product with the battery cover removed.
Do not place near corrosive chemicals or in places where corrosive
gas is generated. Doing so might cause a fault or loss of internal data.
Do not leave or store with the battery cover or battery pack removed
from the main unit. Doing so might allow dust or other foreign objects
to get inside and cause a fault.
Do not use if there is smoke, abnormal odor or noise, excessive
overheating, or other abnormalities. If an abnormality occurs,
disconnect the specified charging equipment from the power outlet,
make sure that the product is not overheating before turning the power
off or removing the battery off, and contact an au shop or Secure cell
phone support center. Also, if you have dropped or damaged the
product, do not continue to use it in that state, and contact an au shop
or Secure cell phone support center.
When inserting an earphone, etc. into the product, adjust the volume
to the proper level. Setting too loud a volume or using the earphone
continuously for a long period of time might adversely affect your
ears. Also, raising the volume too high might prevent you from hearing
sounds around you, which might in turn lead to a traffic accident at a
railroad crossing or pedestrian crossing.
When adjusting the volume with an earphone, etc. inserted into the
product, raise the volume a little at a time. If you raise the volume too
much from the outset, sudden loud noise from the earphone, etc. might
adversely affect your ears.
When using a specified charging equipment or external device, insert/
remove the connector straight to/from the terminal. Make sure the
orientation of the connector is correct. Failure to do so might cause
damage or a fault.
■ Main unit
8"3/*/(
Do not use a cell phone while driving a car or riding a motorbike or
bicycle. It may cause a traffic accident. Use of a cell phone while
driving a car or motorbike is prohibited by law. Use of a cell phone
while riding a bicycle may be punishable by some regulations.
Do not use this product while you are aboard an airplane. Use of
electric devices transmitting radio waves in airplane is prohibited by
law. Some airline companies, however, allow their passengers to use
cell phones. For details, contact the airline company you use.
The product sometimes affects high-precision electronic devices. So,
turn it off near such devices. (Examples of electronic devices that
might be affected by the product include cardiac pacemakers, hearing
aids, other electronic medical devices, fire alarms, and automatic
doors. If you are using an electronic medical device, contact the
device manufacturer or retailer for information about the possible affect
of radio waves.)
Be sure to read the following warnings
before use.
Page 11
When using the product near an implanted pacemaker, implanted
cardioverter-defibrillator or other electronic medical device, radio
waves might affect these units and devices. So, please observe the
following.
1. Those with an implanted pacemaker or implanted cardioverterdefibrillator should carry or use the product at least 22 cm away
from the pacemaker or cardioverter-defibrillator.
2. Tur n the product off in crowded trains or other crowded places,
since there may be people with a cardiac pacemaker or implanted
cardioverter-defibrillator nearby.
3. Pay attention to the following points when using the product inside
medical institutions.
・ Do not bring the product into operating theaters, intensive-care
units (ICU) and coronary care units (CCU).
・ Turn the product off in hospital wards.
・ Even if you are in a lobby, etc., be sure to turn the product off
when there are electronic medical devices nearby.
・ When a medical institution has laid down designated areas
where use of the product is prohibited or is not allowed to be
brought in, abide by the instructions of that medical institution.
4. When using electronic medical devices other than an implanted
pacemaker and implanted cardioverter-defibrillator outside
a medical institution (e.g. home medical treatment), check
individually with the manufacturer of the electronic medical device
regarding the influence of radio waves.
Stay alert to your surroundings when calling, messaging, browsing
the Internet, shooting photos, playing games, watching TV (1Seg) or
listening to music. Failure to do so might cause a fall or traffic accident.
Do not send data by infrared communication with the infrared port
pointing toward eyes. Doing so might affect eyes. Also, sending data
with the infrared port pointing toward some other infrared device might
cause false operation, etc.
Do not light the photo light in front of a person's eyes. Do not gaze at
the light emitting part when the photo light is lighted. Doing so might
cause impairment of eyesight, etc. Be especially careful not to shoot
small children from a very close distance.
Do not light the photo light toward a driver of a car, motorbike or
bicycle. If dazzled by the light, the driver might become unable to
drive and cause an accident.
Sometimes, very rarely some people demonstrate symptoms such as
temporary muscle spasms, loss of consciousness, etc. by watching
repeatedly flickering screens. Those with a past history of this should
consult with a physician beforehand.
Hardened glass is used for the display of the product. In case it is
broken, do not touch the broken part. Doing so might cause injury by
the broken part. Contact au shop or Secure cell phone support center.
$"65*0/
Use of the main unit in an automobile might sometimes affect onvehicle electronic devices, though this rarely happens. If this happens,
stop use since this may impair safe travel.
If you feel any abnormality with your skin, immediately consult a
dermatologist. Itching, rashes, eczema, etc. sometimes occurs
depending on your physical constitution and condition.
Be sure to read the following cautions
before use.
The materials of parts used on the product are as follows.
Part Material Surface treatment
Exterior case
(Display side)
Exterior case
(Lateral side)
Display Chemical hardened
Battery cover PC resin Acrylic UV hard coating
External
connection
terminal cover
F key Aluminum Alumite treatment
lr key PC resin Acrylic UV hard coating
PA resin Acrylic UV hard coating
PC resin
glass
PC resin Acrylic UV hard coating
(White/Pink)
Urethane thermal hardening
coating (Black)
Acrylic UV hard coating
Antifouling treatment
(White/Pink)
Urethane thermal hardening
coating (Black)
Safety Precautions
9
Page 12
Part Material Surface treatment
Camera lens,
Infrared data port
Mobile light PC resin −
Antenna top PC resin Acrylic UV hard coating
Antenna shaft SUS −
Charging terminal PPS resin (resin
Safety Precautions
Earphone
microphone
terminal
Do not bring the product close to magnetized objects such as cash
cards, floppy disks, credit cards, and prepaid cards. Doing so might
result in loss of recorded information.
Do not allow liquids, metal objects, burnable items, and other foreign
matter to get inside the earphone microphone terminal or the microSD
memory card slot. Failure to do so might cause fire, electric shock or a
fault.
Do not swing the product around by holding the hand strap, the
earphone (commercially available), etc. Doing so might cause an
accident or damage.
Use the product with the covers of external connection terminal, etc.
closed. If the covers are open, dirt or water may get inside causing a
fault.
Stow the 1Seg antenna when not watching TV (1Seg). If you operate
the product for calling, etc. with the 1Seg antenna extended, it might
cause unexpected injury by hitting your face, etc.
If you have a weak heart, be careful when setting the incoming
vibration and ringtone volume to prevent adverse effects on your heart.
PMMA resin Hard coating
(White/Pink)
Urethane thermal hardening
coating (Black)
surrounding SUS)
SUS
PA resin −
−
Gold plating (first nickel
plating)
Do not put the product directly on sand at a beach, etc. Sand or other
small particles might get inside the earpiece, microphone or speaker,
causing the volume to drop. If sand gets inside the product's main
unit, it might cause overheating or a fault.
When using the product for calling or data communication, be careful
not to keep the product in direct contact with your skin for a prolonged
period, or not to cover the product with paper, cloth, bedding, etc. The
main unit might get hot, causing fire, burns or a fault.
■ Battery pack
(The battery pack of this product is a lithium-ion
battery.)
The battery pack is not fully charged at the time of
purchase. Charge the battery before using the product.
%"/(&3
Do not short-circuit the positive (+) and negative (-) terminals of the
battery pack.
Connect the battery pack to this product in the correct orientation.
Connecting in an incorrect orientation might cause rupture, fire or
overheating. Do not try to forcibly connect the battery pack, instead
thoroughly check the connection terminals carefully before connection.
Do not puncture the battery pack with a nail, hit it with a hammer or
step on it. Doing so might cause fire or damage.
Do not allow metal objects (such as necklaces and hairpins) to come
in contact with the connection terminals or the earphone microphone
terminal when carrying or storing the battery pack. Doing so might
cause fire or a fault due to a short circuit.
Do not disassemble, modify or directly solder the battery pack. Doing
so might cause spilling of the battery liquid resulting in an accident
such as loss of eyesight if it gets into eyes, or cause overheating, fire
or rupture.
Be sure to read the following hazards
before use.
10
Page 13
Do not use a battery pack that has been dropped, stepped on,
damaged, or leaking battery liquid. Immediately move the battery pack
away from fire if you notice leakage of liquid or unusual odor. Failure
to do so might cause the leaked liquid to catch fire resulting in fire or
rupture.
Do not wet the battery pack with water, seawater, pet urine, etc. A wet
battery pack might cause overheating, rupture or fire. If you drop the
product into water by mistake, immediately turn off the power, remove
the battery pack, and contact an au shop or Secure cell phone support
center. Never charge the wet battery pack.
If the leaked liquid gets on your skin or clothes, immediately rinse it
off with water to avoid injury. If the liquid gets into your eyes, do not
rub but wash your eyes with water, and immediately consult a doctor
to avoid the risk of losing your eyesight. If the liquid gets on a device,
wipe it off without touching it.
The battery pack is a consumable item. If the performance of a battery
pack does not recover (e.g. the usable time after each charge has
become extremely short), the battery pack is at the end of service life,
so stop use and buy a new one of the specified type. Failure to do so
might cause overheating, fire, rupture or leakage. Note that the length
of service life varies depending on the usage condition, etc.
Be careful not to have the battery pack bitten by your pet. It might
cause leakage, overheating, rupture or ignition of the battery pack.
■ Charging equipment
8"3/*/(
Do not use at other voltages than the specified power supply voltage.
Doing so might cause fire, overheating or electric shock.
・ Quick Charge Desktop Holder (KYL21PUA): 5.0 VDC
・ AC Adapter for Desktop Holder (KYL21PQA): 100 VAC to 240 VAC
・ AC adapter (sold separately) that can be charged overseas except
above:
・ Common DC adapter 03 (sold separately): 12/24 VDC (for negative
grounded vehicles only)
Firmly insert the plug of the specified charging equipment into the
power outlet down to the base of its pins. Incomplete insertion of the
power plug might result in electric shock or fire caused by overheating
and fire. Do not use damaged adapters or loose power outlets.
If the fuse in the common DC adapter 03 (sold separately) blows,
replace it with a fuse of the specified type (250 V, 1 A). Replacing with
a different type of fuse might cause overheating or fire. (For information
about fuse replacement, carefully read the manual for the common DC
adapter 03 (sold separately).)
Do not damage, modify, twist, pull or place a heavy object on the
power cord of the specified charging equipment. Do not use a
damaged cord. Doing so might cause an electric shock, short circuit
or fire.
Do not let your hands, fingers and other parts of the body touch the
connection terminals or the earphone microphone terminal. Doing so
might cause electric shock, injury or a fault.
If you hear thunder, do not touch the power plug. Doing so might
cause an electric shock as a result of a lightning strike.
Before cleaning the specified charging equipment, unplug its power
plug from the outlet or cigarette lighter socket. If the plug remains
plugged in when you clean the equipment, it might cause an electric
shock or short circuit. Also, wipe off dust on the charging equipment's
power plug. If the plug is left covered with dust, it might cause fire.
Be sure to read the following warnings
before use.
100 VAC to 240 VAC
Safety Precautions
11
Page 14
Safety Precautions
12
Wipe off dust on the power plug. Failure to do so might cause fire,
burns or electric shock.
Install and position in-car devices where they do not hinder driving
or safety equipment such as airbags. Failure to do so might cause a
traffic accident. Install in-car devices following the instructions of their
manuals.
When the specified charging equipment is not to be used for a long
time, disconnect the specified charging equipment's power plug from
the power outlet. Failure to do so might cause electric shock, fire or a
fault.
Do not use in places subject to direct splashing with water, pet urine or
other liquids. Doing so might result in faults resulting from overheating,
fire, electric shock, or short-circuiting of electronic circuits. In the event
that the product is splashed with liquid, immediately disconnect the
specified charging equipment's power plug.
$"65*0/
Do not use in humid places such as bath areas, or connect/disconnect
the specified charging equipment with wet hands. Doing so might
cause electric shock or a fault.
Charge the battery in a stable place especially while the vibration
mode set. If placed on an inclined surface or wobbly stand, the
product might fall causing injury or damage. In addition, do not cover
or wrap the product with a cloth or bedding. Doing so might cause fire
or a fault.
When unplugging the plug of the specified charging equipment from
the power outlet, hold and pull the power plug. If you pull the cord, the
cord might be damaged.
Do not use the common DC adapter 03 (sold separately) with the car
engine stopped. Doing so might result in draining of the car battery.
Do not leave the specified charging equipment connected to the
main unit with the battery pack removed. Doing so might cause fire or
electric shock.
Be sure to read the following hazards
before use.
If you feel any abnormality with your skin, immediately consult a
dermatologist. Itching, rashes, eczema, etc. sometimes occurs
depending on your physical constitution and condition.
The materials of parts used on the Quick Charge Desktop Holder
(KYL21PUA) and AC Adapter for Desktop Holder (KYL21PQA) are as
follows.
■ Quick Charge Desktop Holder (KYL21PUA)
Part Material Surface treatment
Exterior case ABS resin Lever, Knob POM resin Charging terminal Brass Gold plating (first nickel
plating)
■ AC Adapter for Desktop Holder (KYL21PQA)
Part Material (metal) Material (resin)
Exterior case Copper, zinc, nickel PC resin
Cord - TPE
Connector Iron, copper, zinc, nickel,
gold
PBT
Page 15
■ au Micro IC Card (LTE)
Be sure to read the following warnings before use.
8"3/*/(
Do not put the au Micro IC Card (LTE) in a cooking apparatus such as
a microwave oven or a pressure vessel. Doing so might cause melting,
overheating, fuming, loss of data or a fault.
$"65*0/
Be careful not to injure your hand or finger when attaching/removing
the au Micro IC Card (LTE).
Use only the devices specified by the Company to insert the au Micro
IC Card (LTE) in. Using a device not specified by the Company might
cause loss of data or a fault.
For the specified devices, contact an au shop or Customer Service
Center.
Do not disassemble or modify the au Micro IC Card (LTE). Doing so
might cause loss of data or a fault.
Do not use or leave the au Micro IC Card (LTE) in hot places such as
by the fire or a heater. Doing so might cause melting, overheating,
fuming, loss of data or a fault.
Do not throw the au Micro IC Card (LTE) into a fire or heat it. Doing so
might cause melting, overheating, fuming, loss of data or a fault.
Do not touch the IC (metal) part of the au Micro IC Card (LTE) or shortcircuit it. Doing so might cause loss of data or a fault.
Do not drop the au Micro IC Card (LTE) or subject it to strong impact.
Doing so might cause a fault.
Do not fold, bend or place a heavy object on the au Micro IC Card (LTE).
Doing so might cause a fault.
Be sure to read the following warnings
before use.
Be sure to read the following warnings
before use.
Do not wet the au Micro IC Card (LTE). Doing so might cause a fault.
Do not scratch the IC (metal) part of the au Micro IC Card (LTE). Doing
so might cause a fault.
Do not store the au Micro IC Card (LTE) in dusty places. Doing so
might cause a fault.
Do not store the au Micro IC Card (LTE) in places exposed to direct
sunlight or hot and humid places. Doing so might cause a fault.
Store the au Micro IC Card (LTE) out of reach of small children. Failure
to do so might cause injury or asphyxiation, etc. if they accidentally
swallow and choke on it.
Safety Precautions
13
Page 16
Handling precautions
These precautions are provided to ensure that performance can be
fully demonstrated. Thoroughly read these precautions to ensure
correct use.
■ Precautions common to the main unit, battery pack, charging
equipment, au Micro IC Card (LTE), peripheral devices
● Do not apply excessive force to the product during use. Be sure not to put the
product into a tightly packed bag or place a heavy object on the product in a
bag. Sitting on the product in your pocket might damage the display or internal
circuit board resulting in a malfunction. Keeping an external device connected
Safety Precautions
to the external connection terminal or earphone terminal might damage the
connector resulting in a malfunction. Such damage and malfunction are not
covered by the warranty, even if there is no external damage.
● To ensure waterproof property (equivalent to IPX5 and IPX7) of this product,
use the product with the battery cover and external connection terminal cover
tightly closed.
Note that the waterproof property is not guaranteed in every usage condition.
Do not allow water to get inside the product or splash water on the battery
pack, charging equipment or optional accessories. Do not attach/remove the
battery cover or open/close the external connection terminal cover in the rain
or with waterdrops on the surface of the product. Doing so might cause water
intrusion resulting in internal corrosion.
Malfunctions determined to be caused by water intrusion are not covered by
the warranty.
● Do not use the product in extremely hot, cold or humid places. (Use within an
ambient temperature range of 5℃ to 35℃ and humidity range of 35% to 85%.)
- Charging equipment
- Peripheral devices
● Do not use the product in extremely hot, cold or humid places. (Use within an
ambient temperature range of 5℃ to 35℃ and humidity range of 35% to 90%.
Temporary use at 36℃ to 40℃ is allowed.)
- main unit
- Battery pack, au Micro IC Card (LTE) (attached to the main unit)
● Do not use in places subject to lots of dust or vibration.
14
● Clean the connection terminals and the earphone microphone terminal with
dry cotton swabs, etc. every now and then. Soiled terminals might cause poor
connection. Do not exert a strong force to clean the connection terminals or
the earphone microphone terminal to prevent deformation.
● Clean the product with a soft dry cloth (such as the type used for eyeglasses).
Forceful rubbing with a dry cloth may scratch the display. The display may be
stained if splash or smear is left attached to the surface. Wiping the product
using alcohol, thinner, benzene, detergent, etc. might erase the printing on the
outer casing or cause discoloration.
● Use as far away as possible from land-line phones, TVs and radios. Use
nearby might affect them.
● The product may become warm while charging or during other operations,
depending on the situation, but this is not abnormal.
● When the product is used by a child, parents or guardians should thoroughly
read the "Basic Manual" (this manual) and teach the child how to use it.
● Turn off the power before removing the battery pack. If you remove the battery
pack with the power on, saved data might be altered or lost.
● Do not put stickers on the product main unit. Sound may not be emitted or
voice sound may not be delivered to the party.
■Main unit
● Do not forcefully press, tap or intentionally subject the display to strong
impact. Doing so might cause scratching or damage.
● Do not forcefully press your fingernails, sharp objects or hard objects against
keys or display surface. Doing so might cause scratching or damage. The
touch panel is designed to be lightly touched by fingers. Do not apply strong
pressure with your fingers or sharp-pointed objects (such as fingernails,
ballpoint pens and pins) on the touch panel.
In the following cases, the product may not respond to touching the touch
panel, or errors in operation may occur.
・ Operation with gloved hands
・ Operation with fingernails
・ Operation with a foreign object placed on the touch panel
・ Operation with a protective sheet or sticker on the touch panel
・ Operation when the display is wet or fogged.
・ Operation with wet or sweaty fingers
・ Operation under water
Page 17
● The product uses printed antenna. If you scratch it with your fingernail or a
sharp object, the pattern is cut and the performance is degraded.
● If you peel off the FeliCa antenna, the contact part also peels off, disabling
the function. Do not peel the FeliCa antenna. And, if you scratch it with
your fingernail or a sharp object, the pattern is cut and the performance is
degraded. Do not scratch it.
● Do not remove the stickers printed with the IMEI that can be seen when the
battery cover is removed. These stickers prove that the product and the
communication module you are using comply with the Wireless Telegraphy
Act and Telecommunications Operations Act.
● Never use modified au cell phones. Use of a modified device violates the
Radio Law.
This product has acquired the certification of conformity with technical
regulations for the specified radio station based on the Radio Law, and the
""Technical Conformity Mark "" is printed on the nameplate of the product as
a certificate.
If the screws of the product are removed and modifications are made to the
internal components, the certification of conformity with technical regulations
will become invalid. Never use the product without the valid certification.
Doing so violates the Radio Law.
● To prevent unlawful modification, the product has been designed so that it
cannot be easily disassembled. Modifying the product is prohibited by the
Radio Law.
● Contents saved in this product, such as contacts, mails and favorites, might
be altered or lost by an accident, fault, repair or mishandling. Be sure to
keep a copy of important contents. Note that The Company assume no
responsibility for any damages or lost profits resulting from altered or lost
contents.
● Note that content data (both charged or free content) saved on the product
cannot be returned to the customer when the product is replaced for repair of
a fault, for example.
● This product uses liquid crystal for its display. The display response speed
may become slow when the ambient temperature is low, which is due to the
property of liquid crystal and not a malfunction. The display response speed
will return to normal at room temperature.
● Although the display used on the product is made using high-precision
technology, some pixels (dots) might be lit or out at all times. This is not a
malfunction.
● Take care not to inconvenience people around you when you use the product
in a public place.
● You are recommended to store copies of individual data such as photos you
took, videos and music in your PC by sending each file as mail attachment,
etc. Note, however, that you may not be able to make copies of some
copyrighted data even by the above-mentioned means.
● Take care not to place magnetized items such as magnetic cards, speakers
and TV sets near the product, as it might cause malfunction.
Putting strong magnetism close to the product might cause false operation.
● Although the earphone microphone terminal is waterproof, you may not use it
by inserting a plug when water remains. Swing the product to remove water
so that water does not remain in the earphone microphone terminal, then dry it
before using.
● When you put the product in your pocket or bag, take care so that the display
does not come in contact with metal objects or other hard objects, as it might
cause scratching or damage. Also, be careful not to scratch or damage the
display by using a strap whose metal or other hard part comes in contact with
the display.
● When suddenly brought into a warm place from a cold place, or when in a
humid location, or when used where temperature suddenly changes (e.g. near
the air discharge port of an air conditioner), water droplets (i.e. condensation)
sometimes are formed inside the product. Note that when used under
conditions such as this, humidity might cause corrosion or a fault.
● When wiping the display, wipe with a soft, dry cloth. Use of a moistened cloth,
glass cleaner or other similar liquid might cause a fault.
● When connecting/disconnecting the external device to/from the external
connection terminal or the earphone microphone terminal, make sure that the
connector or plug of external device is straight with the external connection
terminal.
● Note that applying unnecessary force with the external connection ter minal
or the earphone microphone terminal connected to the external device might
cause damage.
Safety Precautions
15
Page 18
● Do not discard the product together with regular trash. Please cooperate
in the collection of the product when it is no longer needed to protect the
environment and effectively use resources. Old products are collected at au
shops and other places.
● Insert only a microSD memory card into the microSD memory card slot on the
product.
● Do not exert excessive force when attaching/removing a microSD memory
card. Doing so might injure your hands or fingers.
● While writing/reading data to/from a microSD memory card, do not subject the
product to vibration or impact, remove the battery pack or turn off the power.
Doing so might cause loss of data or a fault.
Safety Precautions
● Take care not to cover the microphone with your fingers during a call. The
other party may not be heard your voice clearly.
● When using handsfree call, take care to keep the speaker at a safe distance
from your ears, as the speaker volume may be too loud.
● Do not cover the light sensor with your finger or put a sticker on it. Doing
so may hinder the light sensor from detecting the ambient brightness and
functioning correctly.
● Do not put a sticker, etc. on the proximity sensor. Doing so may cause the
sensor to malfunction and make the display always turned off while receiving
a call or during a call.
■ Touch Panel
● Use your finger to operate the touch panel. Do not use ballpoint pens, pencils
or other sharp-pointed objects. Using such objects does not only hinder
correct operation of the touch panel, but also might cause scratching or
damage to the display.
● Do not put stickers or sheets (e.g. commercially available protective films,
peep prevention sheets) on the display. Doing so might hinder correct
operation of the touch panel.
● Do not operate the touch panel with fingernails. Doing so might result in split
nails or jammed fingers.
● If the display surface is dir ty or wet with sweat or water, it may not function
correctly. In such case, wipe the display surface with a dry, soft cloth.
16
● When carrying the product in your pocket or bag, take care not to put the
touch panel close to metals or other conductive materials, as it might cause
false operation of the touch panel.
■ Battery pack
● Use in very hot or cold environments, for example, when left in an automobile
with the windows closed in summer, will cause the battery capacity to drop
and shorten the available battery usage time. This will also shorten the battery
pack's service life. Try to use the battery pack as far as possible at room
temperature.
● When the battery pack is not to be used for a long time, remove the battery
cover and remove the battery pack from the main unit, and store it away from
hot and humid places.
● Charge the battery before using the product for the first time after purchase,
or if you have not used the product for a long time.
● The battery pack is a consumable item. If the per formance of a battery pack
does not recover after charge, the battery pack is at the end of service life, so
buy a new one of the specified type. Note that the length of service life varies
depending on the usage condition, etc.
● Do not discard battery packs together with regular trash. Please cooperate in
the collection of used battery packs to protect the environment and effectively
use resources. au shops and other retailers collect used battery packs.
● Battery packs sometimes swell up as they approach the end of their service
life. This is due to the properties of lithium-ion batteries, and is not a problem
in terms of safety.
■ Speci ed charger
● When the charging equipment is not to be used, unplug the power plug of the
specified charger from the outlet or cigarette lighter socket.
● Do not wrap the power cord of specified charger around the power plug or
the Quick Charge Desktop Holder (KYL21PUA). Doing so might cause electric
shock, overheating or fire.
● Do not forcibly bend the charging equipment's plug or the connection
between the connector and power cord. Doing so might cause electric shock,
overheating or fire.
Page 19
● AC Adapter for Desktop Holder (KYL21PQA) is compatible with 100 VAC to
240 VAC. The AC adapter plug shape is designed for 100 VAC (domestic
specification). For using overseas, prepare a conversion adapter for your
destination. Do not charge using a transformer for international travel.
■ au Micro IC Card (LTE)
● The au Micro IC Card (LTE) is lent to you by au. In case of loss or damage, the
card will be replaced at your expense. When malfunction is suspected, or in
case of theft or loss, contact an au shop or PiPit.
● Do not forcibly remove or insert the au Micro IC Card (LTE). Be careful not to
exert excessive force when inserting the card into your au cell phone.
● You are responsible for any damage caused by inserting your au Micro IC
Card (LTE) into some other IC card reader/writer, etc.
● Keep the IC (metal) part of your au Micro IC Card (LTE) clean. Wipe the card
with a dry, soft cloth (such as for cleaning eyeglasses) for cleaning.
● Do not put stickers, etc. on the au Micro IC Card (LTE).
● Do not use au Micro IC Card (LTE) with the card adapter. Doing so might
cause a fault.
■ Camera
● When using the camera, follow common rules of etiquette regarding camera
use.
● Image data might be altered or lost due to malfunction, repair or mishandling
of this product. The Company takes no responsibility for recovery of altered or
lost data, damages resulting from altered or lost data, and lost profits.
● When photographing important occasions (such as a wedding), take a trial
shot and check the shot image to make sure it is correctly shot.
● Do not use the camera for recording commercially available books or
information of which photographing is not allowed.
● Do not leave the camera lens exposed to direct sunlight. Imaging elements
might be discolored or burnt.
■ Music, videos and TV (1Seg)
● Do not listen to music or watch videos or TV (1Seg) while driving a car or
motorbike, or riding a bicycle. Use of cell phones while driving a car or
motorbike is prohibited by law. (Use of cell phones while riding a bicycle
may also be punishable by law.) In addition, stay alert to the traffic around
you even when walking. Surrounding sounds may not be heard clearly, and
gazing at the screen might distract your attention causing a traffic accident.
Be especially careful at railroad crossings, station platform and pedestrian
crossings.
● Take care not to listen at ear-splitting volume for a long time, as it might affect
hearing.
● Be careful of sound leakage from earphones in trains or other places with
many people around you.
■ Copyrights and rights of portrait
● You are not allowed to copy, distribute, publish, modify or edit the data you
shot, recorded or downloaded using this product without consent of the
copyright holder, except for personal use, under the copyright law. In addition,
do not use or modify portraits or names of other individuals without their
consent, as it might infringe on rights of portrait.
Note that shooting and recording may be restricted at some live performances,
shows and exhibitions even for personal use.
● Be careful about the copyright and portrait right when posting photos you
shot, etc. on Internet homepages.
■ Backup content on the product
● Please back up important content recorded or downloaded to the product to
an outside source. Content recorded to memory on the product sometimes
disappears or is altered by unexpected factors, such as static electricity or a
fault, repair, mishandling, etc.
* How to make backups: Store important data such as phonebook data,
music, shot photos and videos on microSD memory cards. You can also
send files as mail attachment or transfer to your PC. Note, however, that
there are some data that cannot be copied by using these means.
Safety Precautions
17
Page 20
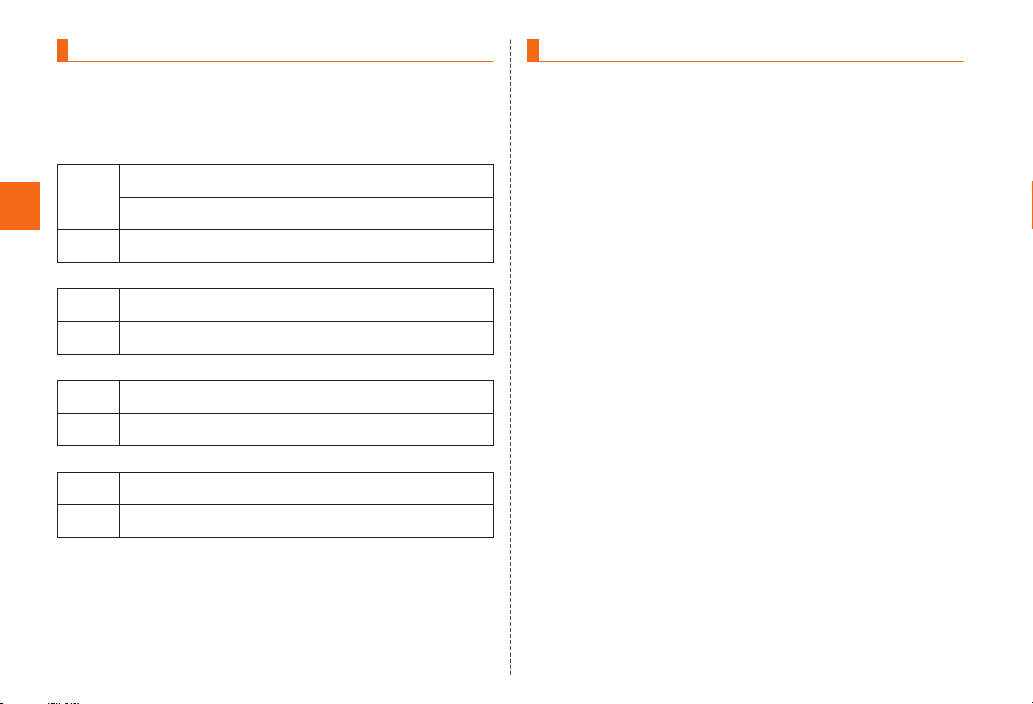
Available Security Codes
The product has various security codes that you can use. The
available security codes are as follows. Do not forget the various
security codes that are set as they are necessary for various
operations and contracts.
● Security code
Example
of usage
Safety Precautions
Initial
value
● Setting screen lock
Example
of usage
Initial
value
● PIN code
Example
of usage
Initial
value
● Lock No ("NFC/Osaifu-Keitai lock setting")
Example
of usage
Initial
value
① To do remote operation of voice mail and call forwarding services
from a landline phone
② To use Customer Service Center and to do various inquiries,
applications, and modifications on the au homepage
A four digit number chosen by the customer and noted on the
application form
To set and release the screen lock
Touch
To prevent unauthorized use of the au Micro IC Card (LTE) by third
parties
1234
To use the "NFC/Osaifu-Keitai lock setting"
1234
PIN code
■ PIN code
To prevent unauthorized use of the au Micro IC Card (LTE) by a third
party, you can set the product to require PIN code entry each time
the power is turned on. You also need to enter PIN code when setting
whether PIN code entry is required. If PIN code is incorrectly entered
three times consecutively, the PIN code will be locked. You can
unlock the PIN code using PUK code.
• PIN code is "1234" and PIN code entry is set to not be required
at the time of purchase. You can change PIN code to any fourto eight-digit number, and set PIN code entry to be required as
necessary.
■ PUK code
In case PIN code is locked, you can unlock it by entering PUK code.
• PUK code is an eight-digit number given at the time of purchase,
which is printed on the back side of the plastic card on which your
au Micro IC Card (LTE) is attached.
• After entering PUK code, you need to set a new PIN code.
• If PUK code is incorrectly entered ten times consecutively, contact
an au shop, PiPit or Customer Service Center.
• PIN code is not reset by initializing the product.
18
Page 21
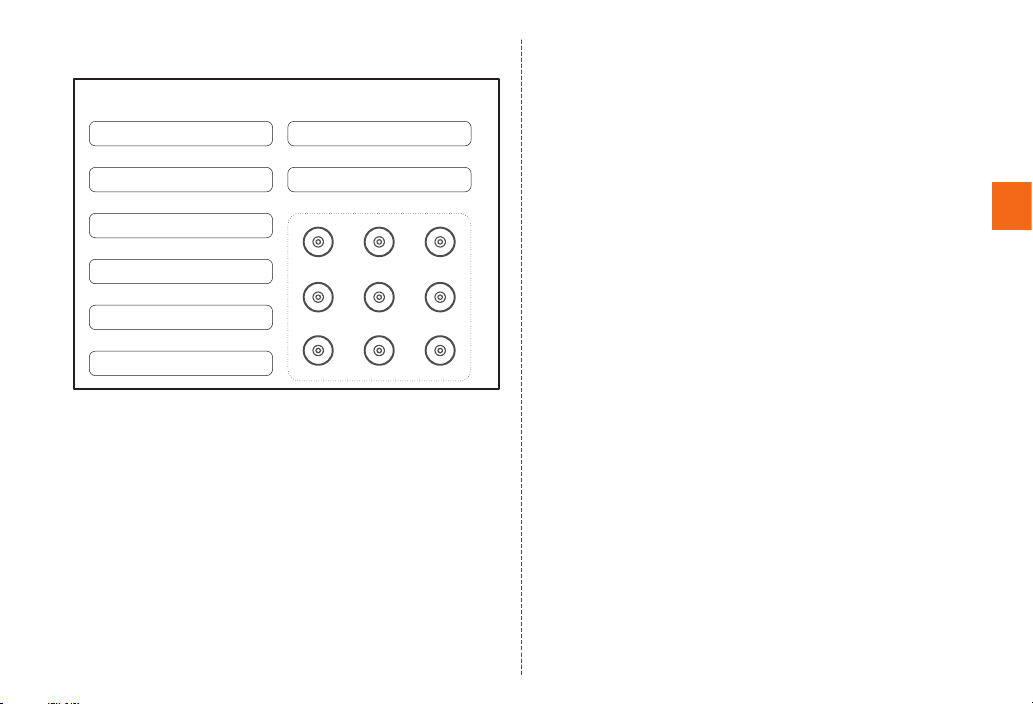
<Please copy this section and use>
【Password entry field】
Google account ID
@gmail.com
Google account password
au ID account ID Screen Lock: Pattern
au ID account password
Facebook account ID
Facebook account password
Screen Lock: PIN
Screen Lock: Password
Safety Precautions
19
Page 22
Notes on waterproof and dustproof
This product has a waterproof property equivalent to IPX5*1 and
2
, as well as a dustproof property equivalent to IP5X*3 on the
IPX7*
condition that the external connection terminal cover and battery
cover are securely attached (based on in-house testing).
Specifically, you can make calls holding the product with wet hands
in the rain (less than 20 mm per hour) without umbrella, as well as use
the product in a place with water such as a bathroom or kitchen.
Before using the product, thoroughly read "Important items to
Safety Precautions
remember before use" and "Tips for comfortable use" to ensure
correct use. Failure to follow the contents described in these sections
may cause intrusion of water, sand or other foreign material, resulting
in overheating, fire, electric shock, injury or a fault.
*1 IPX5 equivalent means that the product will maintain its operability as a phone even if it is
sprayed with water from a 6.3 mm diameter nozzle at a distance of about 3 meters for more
than 3 minutes at a rate of about 12.5 liters per minute from any direction.
*2 IPX7 equivalent means that the product will maintain its operability as a phone with no water
getting inside the main unit even if it is gently submerged in a tank of still tap water at room
temperature to a depth of 1 meter for about 30 minutes.
*3 IP5X equivalent means that the product will securely maintain its operability as a phone even
after it has been placed in an apparatus with grit and dust of diameters of 75 μm or less and
shaken for 8 hours.
Since operation of the product on each usage scene was confirmed
based on the above assumption, proper operation of the product
in every possible condition during actual use is not guaranteed.
Malfunctions determined to be caused by mishandling by the
customer are not covered by the warranty.
Important items to remember before use
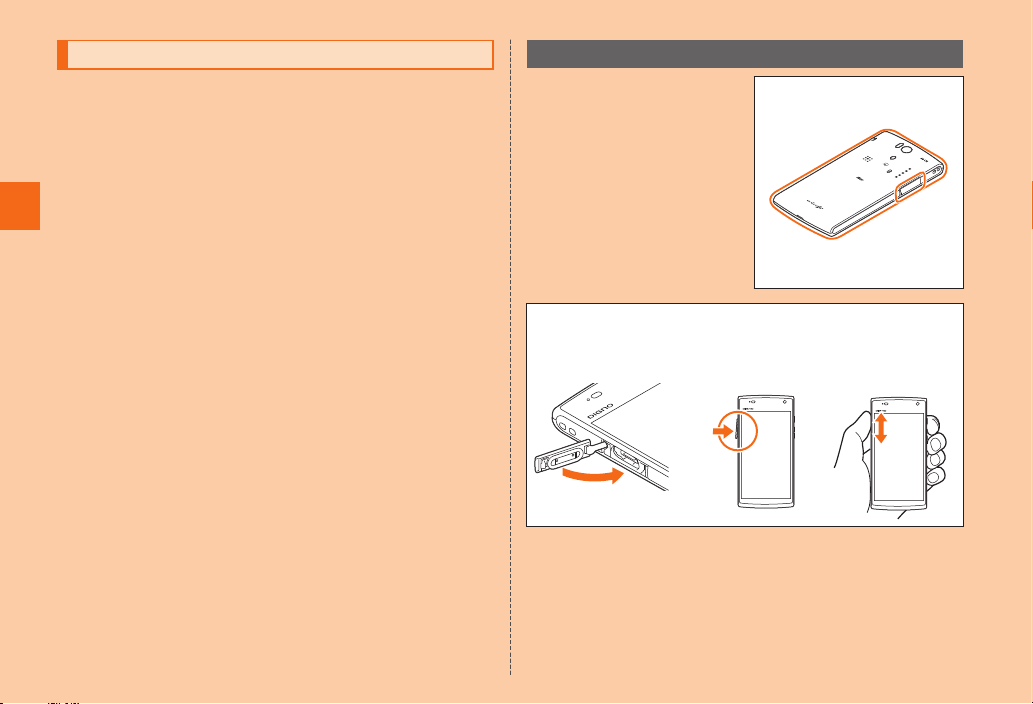
●Make sure that the external
connection terminal cover is firmly
closed, and the battery cover is
securely attached.
• Waterproofness is only effective when the
covers are securely closed.
• Just a small particle (a hair, a grain of
sand, etc.) on the seals can cause water
leaks.
• Do not open/close the external connection
terminal cover or battery cover if the main
unit or your hands are wet. When water
remains in the earphone microphone
terminal, do not insert an earphone
(commercially available).
How to close the external connection terminal cover
After stowing the cover hinge, press on the cover ① evenly with the flat part of
your finger. Rub your finger over the cover in the direction of arrow ② to ensure
that the cover is not partially open.
① ②
20
Page 23
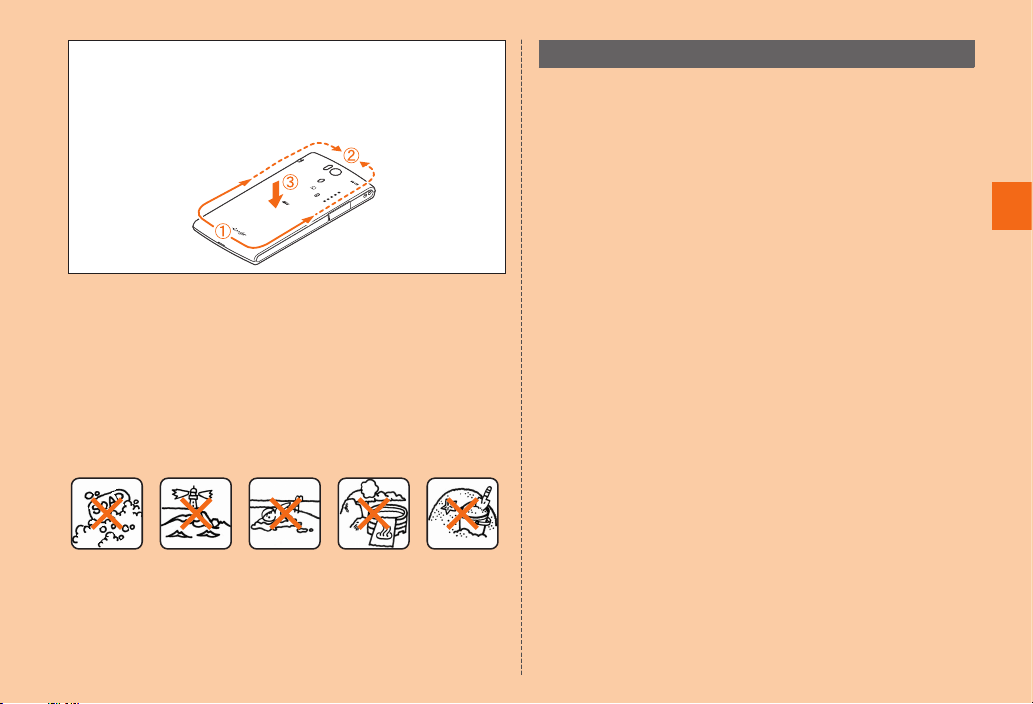
Attaching the battery cover
Attach the battery cover with the main unit, trace in the direction from ① to
② according to the arrow mark not to come off the cover, and then push the
center part ③ firmly.
●Do not immerse the product in water with soap, detergent or bath salts in it.
●Do not immerse the product in seawater, a swimming pool or hot spring.
●Do not immerse the product in any liquid (alcohol, etc.) other than water.
●Do not place the product directly on sand at a beach, etc. Grains of sand
or other small particles might get into the earpiece, microphone or speaker
causing the volume to drop. And if sand gets inside the main unit, it might
cause overheating or a fault.
●Do not use the product underwater.
●Do not leave the product in a humid place such as a bathroom or kitchen for an
extended period of time.
Soap/detergent/
bath salts
Seawater Swimming pool Hot spring Sand/mud
Tips for comfortable use
●Once the product gets wet, water may remain in gaps of the main unit.
Shake the product well to drain water. Especially make sure to drain water
remaining in the battery cover and key parts.
●Even after water is drained, the inner parts might be still wet. Although you can
use the product, do not place it near things that must not get wet. Take care not
to wet your clothes, bag or contents of the bag.
●Drain water if it becomes temporarily hard to hear the sound due to water
remaining in the microphone or earpiece.
■ Notes on various usage scenes
<In the rain>
You can make calls holding the product with wet hands in the rain without
umbrella.
• The rain in this case means a moderately-heavy rain (less than 20 mm per
hour).
• Water drops on the display might cause errors in the touch panel operation.
• Never open/close the external connection terminal cover or battery cover if the
product is exposed to rain, or your hands are wet.
< In the shower >
You can make calls holding the product with wet hands while taking a shower.
• Avoid spraying the product with high-pressure water, as the product is not
designed to withstand high water pressure.
<Washing>
You can wash the product under a mild flow (up to 6 liters per minute) of tap
water at room temperature (5℃ to 35℃ ) at a distance of about 10 cm from the
faucet or showerhead.
• Do not spray the product with high-pressure water or submerge it in water for
extended periods of time, as the product is not designed to withstand high
water pressure.
• Make sure that the battery cover is tightly closed, and holding the external
connection terminal cover so that it does not open, wash the product with your
hands. Do not use a brush or sponge.
• Do not wash the product in a washing machine or ultrasound bath.
Safety Precautions
21
Page 24

• Do not splash the product with or immerse it in soap water, detergent water,
etc. other than tap water.
<In the bath>
You can use the product in a bathroom.
• Although you can make calls with wet hands, do not immerse the product into
a bathtub. The product is not resistant to high temperatures.
• Do not use the product in a bathroom for an extended period of time. The
product is not moistureproof.
• Do not immerse the product in hot spring water, soap water, detergent water,
or water with bath salts in it. Also, do not use the product underwater. Doing so
may cause a fault.
Safety Precautions
• Extreme changes in temperature cause condensation. Wait until the main unit
reaches room temperature before you bring the product from a cold place into
a warm bathroom.
• If condensation occurs inside the display, leave the product at room
temperature for a while until condensation is cleared.
• When viewing 1Seg, place the product on a stable surface.
• Do not splash the product with hot water. The product is not resistant to high
temperatures.
• Do not bring the Quick Charge Desktop Holder (KYL21PUA) or AC Adapter for
Desktop Holder (KYL21PQA) into a bathroom.
<At a poolside>
• Do not immerse or drop the product in pool water. Also, do not use the product
underwater.
• If the product gets splashed with pool water, immediately rinse it off with
tap water* in room temperature, because pool water contains chlorine for
disinfection. To wash the product, do not a brush, etc.
* Mild flow (6 liters per minute or less)
<In the kitchen>
You can use the product in the kitchen and other places where water is used.
• Do not splash the product with or immerse it in soap water, detergent water,
seasonings, juices, etc. other than tap water.
• Do not immerse the product in or splash it with boiling water. The product is not
resistant to hot temperatures.
22
• Do not place the product where it gets extremely hot or cold such as near a
stove or in a refrigerator.
• When viewing 1Seg, place the product on a stable surface.
■ Common precautions
External connection terminal cover, battery cover
Make sure that the external connection terminal cover is firmly closed, and the
battery cover is securely attached. Just a small particle (a hair, a grain of sand,
etc.) on the seals can cause water leaks.
Do not open/close the external connection terminal cover or attach/remove the
battery cover with gloved hands. Just a small particle (a hair, a grain of sand,
etc.) on the seals can cause water leaks. Wipe off any minuscule droplets of
water or dirt with a clean dry cloth before closing the covers.
If the external connection terminal cover or battery cover is deteriorated or
damaged, the waterproof property becomes ineffective. In such case, contact an
au shop near you.
If any liquid other than plain water gets on the product
If any liquid other than plain water (e.g. seawater, detergent, alcohol) gets on the
product, immediately rinse it with plain water.
You can wash the product under a mild flow (up to 6 liters per minute) of tap
water at room temperature (5℃ to 35℃ ) at a distance of about 10 cm from the
faucet or showerhead.
If the product gets dirty, wash it with your hands holding the battery cover and
external connection terminal cover so that they do not open. Do not use a brush
or sponge.
After the product gets wet
After the product gets wet, drain water, and wipe the main unit and the battery
cover with a clean dry cloth without removing the battery cover.
In cold climates, water on the main unit may turn to frost. Using the product with
frost may cause a fault. Do not leave the product without wiping off water. (No
special measures against condensation have been implemented in this product.)
Page 25
Rubber seals
The rubber seals on the inner edges of the external connection terminal cover
and battery cover are important to maintain waterproof property. Do not damage
or remove the rubber seals.
When closing the external connection terminal cover or battery cover, take care
not to get the rubber seals caught. Forcibly closing the cover with the rubber
seals caught may damage them resulting in loss of waterproof property. Just a
small particle (a hair, a grain of sand, etc.) on the seals can cause water leak.
If any liquid other than plain water (e.g. alcohol) gets on the rubber seals, it may
cause deterioration in durability.
Do not insert sharp objects into gaps around the external connection terminal
cover and battery cover. Doing so might damage or deform the product or
damage the rubber seals, causing water leak.
It is recommended to replace the parts for maintaining waterproof property once
every 2 years regardless of whether any abnormality is present. For information
on part replacement, contact an au shop near you.
Charging
Never charge the battery if the main unit is wet.
The supplied and optional accessories are not waterproof.
Waterproof property
Do not use the product in places where it may be sprayed with high-pressure
water (e.g. near a faucet or showerhead) or submerge it in water for extended
periods of time, as the product is not designed to withstand high water pressure.
Also, do not expose the product to a water flow stronger than the specified flow
rate (i.e. 6 liters per minute from a faucet or showerhead, at which you might even
feel pain in the skin). Doing so might cause a fault, even though the product has
a waterproof property equivalent to IPX5. Do not wash the product in a washing
machine or ultrasound bath.
This product does not float on water.
Heat resistance
Do not use the product in places where boiling water may splash on it, in saunas
or near hot air (e.g. hairdryer). The product is not resistant to high temperatures.
Shock
This product is not resistant to shock. Do not drop the product or subject it to
shock. Also, do not jab the earpiece, microphone or speaker with a cotton swab
or any sharp object. Doing so might damage or deform the main unit causing
water leak.
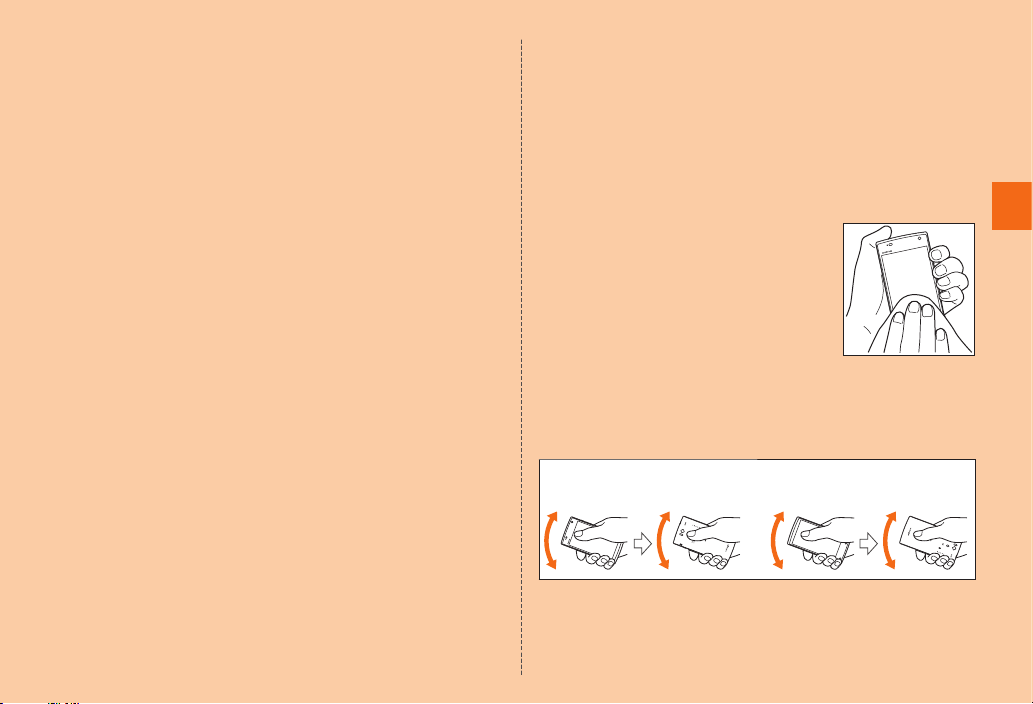
■ Draining water after wetting the product
As some parts of this product are not watertight, if you use the product after it gets
wet, water remaining in those parts might wet your clothes or bag, or the sound might
become hard to hear. Follow the steps below to drain water.
Wipe water thoroughly on the
surface of the product with a
clean dry cloth without waste
textiles
Shake the product
① Hold the product firmly and shake it in the direction of arrows until water
does not come out.
* When shaking the product, stay alert to your surroundings.
Be careful not to have the product pop out, and hold it firmly to drain water.
*
Speaker side/Earphone
microphone terminal side:
20 times or more respectively
② Wipe drained water.
The microphone, the speaker and the earphone microphone terminal are
*
particularly hard to drain water. Face those parts down and press to wipe off.
③ Place the product on a dry towel or cloth and leave it at room
temperature.
Microphone side: 20 times or more
respectively
Safety Precautions
23
Page 26
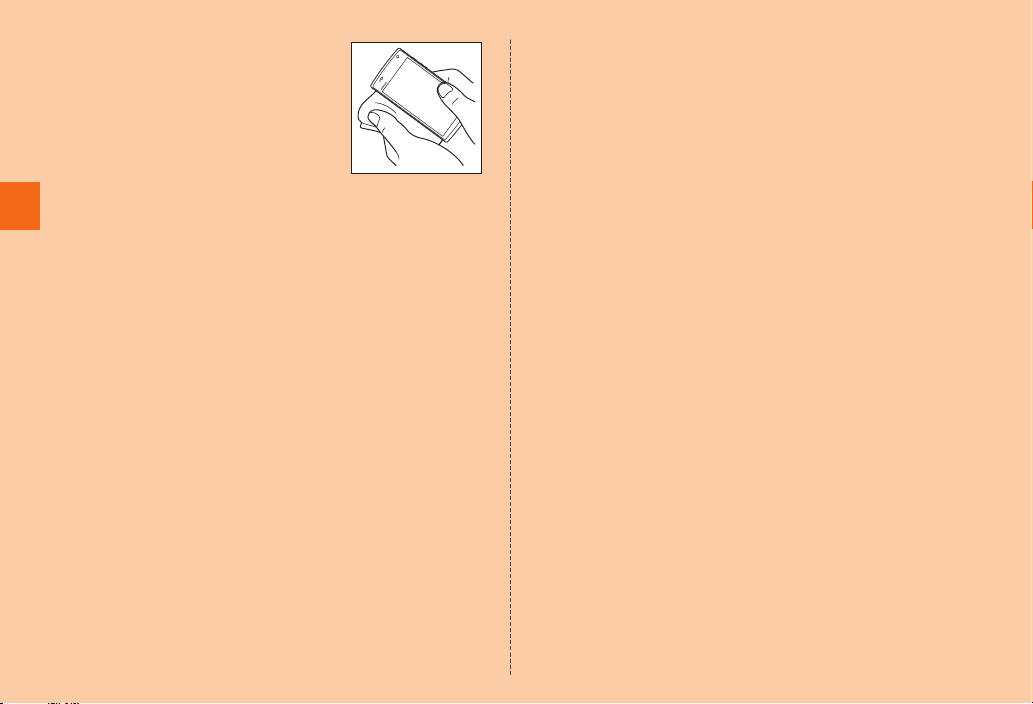
Press the product gently to
clean dry cloth without waste
textiles, and wipe off water
remained in the gaps in the
microphone, speaker, external
connection terminal, earphone
microphone terminal, etc.
Leave the product for one hour or more at room
Safety Precautions
temperature to dry after removing drained water
thoroughly
Even after you take these procedures, water may remain on the product. Do not
place the product near things that you do not want to wet.
Also, take care not to wet your clothes, bag, etc.
■ Charging
The supplied and optional accessories are not waterproof/dustproof. Be sure to
check the following points before and after charging.
• Never charge the battery if the main unit is wet. Doing so might cause electric
shock or short circuit resulting in fire or a fault.
• Check that the main unit is not wet. If you are charging the battery just after the
product gets wet, drain water well and wipe remaining water off with a clean
dry cloth before placing it in the Quick Charge Desktop Holder (KYL21PUA) or
opening the external connection terminal cover.
• If you charge the battery with the external connection terminal cover open, be
sure to tightly close the cover when charging is finished. We recommend using
the Quick Charge Desktop Holder (KYL21PUA) and AC Adapter for Desktop
Holder (KYL21PQA) to charge the battery to prevent water from entering from
the external connection terminal.
• Do not touch the specified charging equipment with wet hands. Doing so might
cause electric shock.
• Do not splash water over the specified charging equipment when using them.
Do not use them near water such as in a bathroom, shower room, kitchen or
24
washroom. Doing so might cause fire, electric shock or a fault. Do not bring
them into a bathroom, etc. even when you are not charging with them.
Page 27
Notes on using Bluetooth®/Wireless LAN (Wi-Fi®) functions
Bluetooth®/Wireless LAN ( Wi-Fi®) function
• The Bluetooth® function of this product conforms to domestic, FCC
standards, and EC Declaration, and has been certified.
• The wireless LAN function of this product conforms to domestic,
FCC standards, and EC Declaration, and has been certified.
• The 2.4 GHz band used by wireless LAN and Bluetooth
operated by various other devices. The communication speed and
connectable range may be decreased, or disconnection may occur,
due to interference by other devices.
• Do not use this product in places where electromagnetic waves are
generated or near electric products, AV and OA equipment, or other
magnetized devices.
• Subjecting this product to magnetic or electrical noise might
increase noise and prevent it from performing communications.
(This product is particularly susceptible to noise when it used near
a microwave oven.)
• Using this product near a TV, radio or similar appliance might cause
reception interference and disrupt TV images.
• Searching might not be successful if there are multiple wireless LAN
access points near to the product or the same channel is being
used.
• The wireless LAN function cannot be used in airplane. Be sure to
turn off the power even in a Wi-Fi compliant airplane. Some airline
companies, however, allow their passengers to use cell phones. For
details, contact the airline company you use.
• The communication speed and connectable range vary depending
on the distance between communication devices, obstacles and
the devices used.
®
devices is
Cautions on using 2.4 GHz band
Bluetooth® and wireless LAN functions of this product use the 2.4 GHz
band. In this frequency band, other similar wireless stations, in-plant
wireless stations for mobile unit identification that require a license for
use, such as factory production lines, specific smallpower wireless
stations that do not require licenses, amateur wireless stations
(collectively called "other wireless stations" from here on) are operated
in addition to home electrical appliances such as microwave ovens,
devices for industrial, scientific and medical devices.
1. Before using this product, make sure that "other wireless stations"
are not in operation nearby.
2. In the event that instances of radio wave interference have
occurred between this product and "other wireless stations",
immediately either relocate this product or stop operation of the
device (stop emission of radio waves).
3. If you are unclear on any points or are troubled by anything,
contact an au shop or Customer Service Center.
• Connections between this product and all other Bluetooth
wireless LAN devices have not been confirmed. Therefore,
connections with all Bluetooth
®
and wireless LAN devices are not
guaranteed.
• This product supports security features for wireless communications
that are compliant with the Bluetooth
®
and wireless LAN standard
specifications, but the security may not be sufficient depending on the
usage environment and configuration. Be careful when making data
communication using Bluetooth
®
or wireless LAN function.
®
and
Safety Precautions
25
Page 28
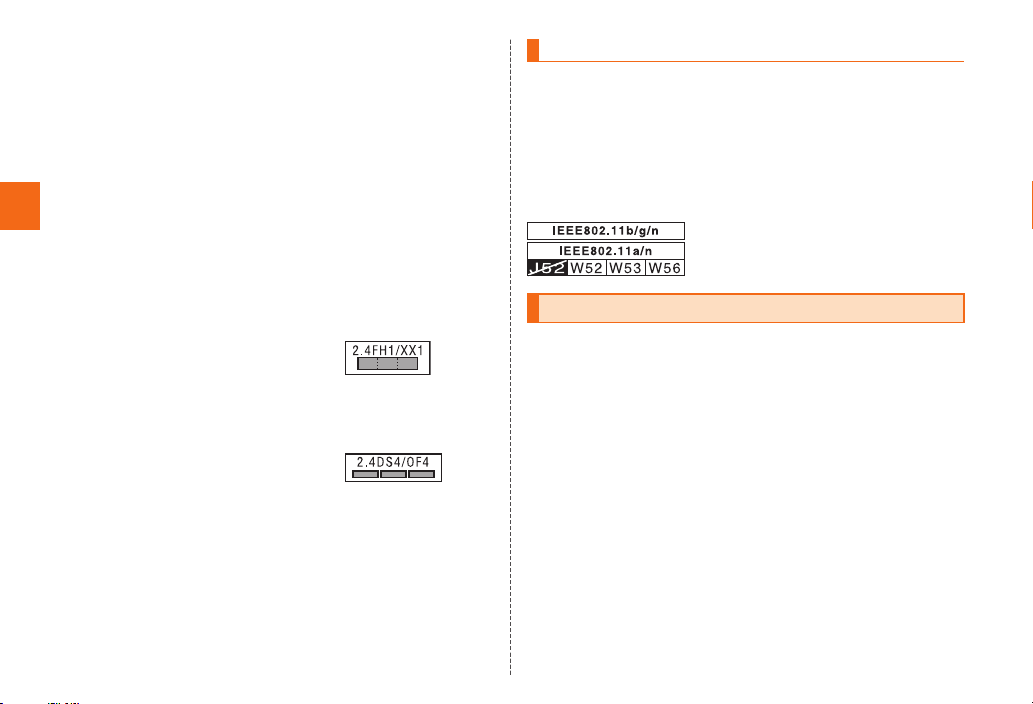
• Wireless LAN has the advantage that it can be freely connected
anywhere within the radio wave range, as it uses radio waves for
exchanging information. At the same time, there is a risk that a
malicious third party may obtain unauthorized access if security
settings have not been configured. You are recommended to
configure security settings before using wireless LAN at your direction
and responsibility.
• The Company assumes no responsibility for leakage of data
or information that may occur during Bluetooth
communication.
• Since Bluetooth
Safety Precautions
®
and wireless LAN functions use the same frequency
®
/wireless LAN
band, using the both functions at the same may cause radio wave
interference resulting in decreased communication speed or
disconnection from the network. If connection fails, stop using either of
the Bluetooth
Bluetooth
in the 2.4 GHz band.
● Bluetooth
®
and wireless LAN functions.
®
and wireless LAN functions of this product use frequencies
®
function: 2.4FH1/XX1
2.4FH1/XX1
This product uses the 2.4 GHz band. FH-SS etc. is used as the
modulation scheme. The interference distance is about 10 m or
less.
Bands of mobile unit identification devices cannot be avoided.
● Wireless LAN function: 2.4DS/OF4
This product uses the 2.4 GHz band. DS-SS and OFDM are used
as the modulation schemes. The interference distance is about 40
m or less.
This means that all bandwidths are used, and that bands of mobile
unit identification devices can be avoided.
Available channels vary depending on countries.
For use in airplane, check with the airline company in advance.
Cautions on using 5 GHz band
Wireless LAN functions of this product use the 5 GHz band. Using the
5.2 GHz band and 5.3 GHz band outside is prohibited by the Radio
Law.
The channels used on the product are as follows.
W52 (5.2 GHz band/36, 38, 40, 44, 46, 48 ch)
W53 (5.3 GHz band/52, 54, 56, 60, 62, 64 ch)
W56 (5.6 GHz band/100, 102, 104, 108, 110, 112, 116, 118, 120, 124,
126, 128, 132, 134, 136, 140 ch)
Notes on packet communication charge
◎ Since constant Internet connection is possible with this product, packet
communication may be performed automatically by some applications,
resulting in high packet communication charges. Therefore, subscription to a
packet communication charge Teigaku/Discount service is recommended.
◎ To browse homepages, download applications, communicate using
applications, send/receive e-mails and configure various settings, connection
to the Internet is required, to which packet communication charge applies.
(For receiving e-mails such as "auからの重要なお知らせメール (Notes from
au)" and "WEB de 請求書お知らせメール (Notification of WEB de Seikyu-sho)",
charge is applied.)
* Packet communication charge does not apply to Wi-Fi® connection.
26
Page 29
Notes on Google Play/au Market/applications
◎ Be sure to check the security of the application, then install it at your own risk.
Some applications might cause virus infection, damage various data, and send
out your location information, usage history or personal information stored in
your cell phone via the Internet.
◎ The Company assumes no responsibility for any failures that might be caused
by applications you have installed. Repair costs in this case may be charged
even during the warranty period.
◎ The Company assumes no responsibility for any disadvantage brought to you
or any third party by applications you have installed.
◎ Insertion of a microSD memory card is necessary to use some applications.
◎ Some applications prohibit the product from entering sleep mode while they
are active, or rapidly drain the battery while running in the background.
◎ Operation procedures and screen appearances of the applications preinstalled
in this product and those installed by you are subject to change without notice
as a result of version upgrade. In addition, operation procedures described in
this manual may differ from the actual procedures.
◎ Some applications are installed into a microSD memory card and some other
applications are installed into the phone memory.
Safety Precautions
27
Page 30
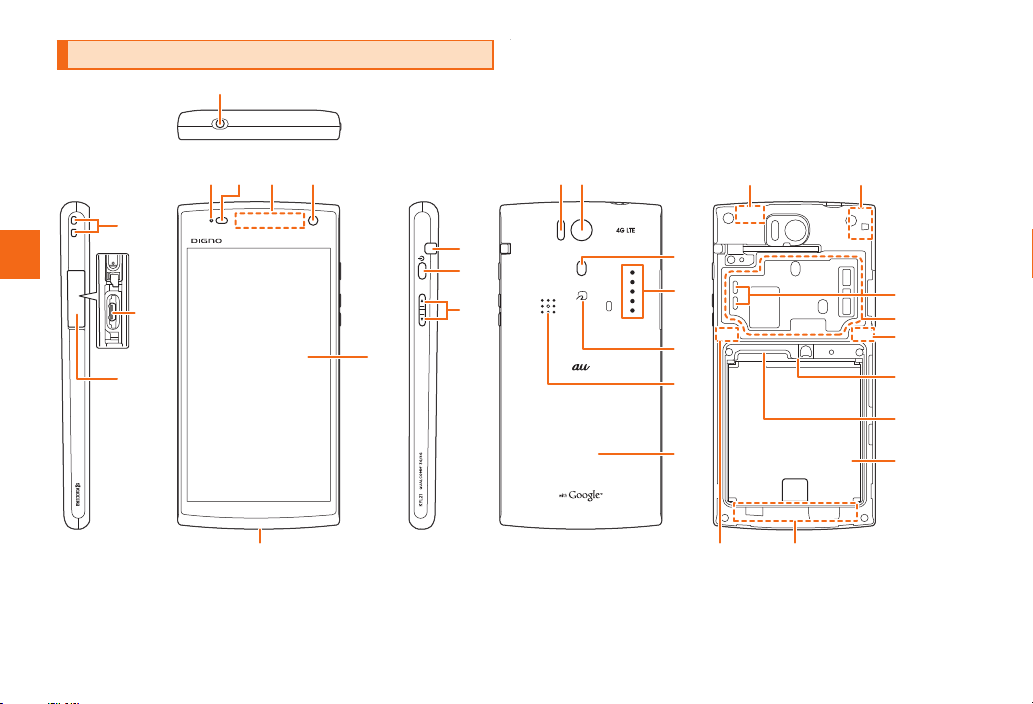
Names and functions of parts
④
⑤
⑥
①
Getting Ready
②
③
⑦
⑧
⑨
⑪
⑫
⑬
⑭
⑮
⑯
⑰
⑱
⑲
㉑㉒
Air vent*
㉓
㉔
㉕
㉖
28
⑩
⑳
㉗
㉔㉔
* Since the product is waterproof and hermetically-sealed, an
air vent (hole for removal of air) is provided.
• Air vent does not affect the waterproofness.
• Do not cover the air vent with sticker etc.
Page 31
① Strap eyelet
② External connection terminal
Used for connecting Common AC adapter 04 (sold separately),
microUSB Cable 01 (sold separately), etc.
③ External connection terminal cover
④ Earphone microphone terminal
⑤ Incoming (Charging) light
Lights in red while charging.
Lights according to the settings for incoming call/mail.
⑥ Proximity sensor/ Light sensor
Proximity sensor prevents from erroneous operation of touch panel
during a call.
Light sensor detects the ambient brightness to adjust the display
brightness.
⑦ Earpiece (receiver)
With the smart sonic receiver, hear the other party's voice on call,
play sound of answer memo, etc.
For details, refer to "About Smart Sonic Receiver" (▶P. 30).
⑧ In camera (lens)
⑨ Display
⑩ Microphone
Transmits your voice to the other party during a call. Or used for
recording the voice sound. Take care not to cover the microphone
with your fingers during a call or recording a video.
⑪ TV antenna
Extend to watch TV (1Seg). Even when the antenna is extended
during a call or while using the browser, calling or data
communication is not affected.
⑫ F Power key
Power ON/OFF or activate/deactivate Sleep mode, etc.
⑬ lr Volume DOWN/UP key
Adjusts sound volume.
Press and hold r during sleep mode to activate "Talk now".
⑭ Infrared data port
Send or receive data via infrared communication.
⑮ Out camera (lens)
⑯ Photo light/ Simple light
⑰ Charging terminal
It is a terminal for using the Quick Charge Desktop Holder
(KYL21PUA) when charging.
⑱ FeliCa mark
Hold the mark over the reader/writer when using NFC/Osaifu-
®
.
Keitai
Send or receive data via IC transmission.
⑲ Speaker
Ringtone or alarm sound can be heard from here.
⑳ Battery cover
®
antenna*
㉑ Wi-Fi
㉒GPS/Bluetooth
®
/Wi-Fi® antenna*
㉓FeliCa antenna
㉔Main/Sub antenna*
㉕au Micro IC Card (LTE) slot
㉖ microSD memory card slot
㉗ Battery pack
* Do not cover antennas with your hand or put stickers etc. It might affect communication quality.
If you scratch the antenna with your fingernail or a sharp object, the pattern is cut and the
performance is degraded. And, if you peel off the FeliCa antenna, the contact part also peels
off, disabling the function. Do not scratch or peel off antennas.
Getting Ready
29
Page 32
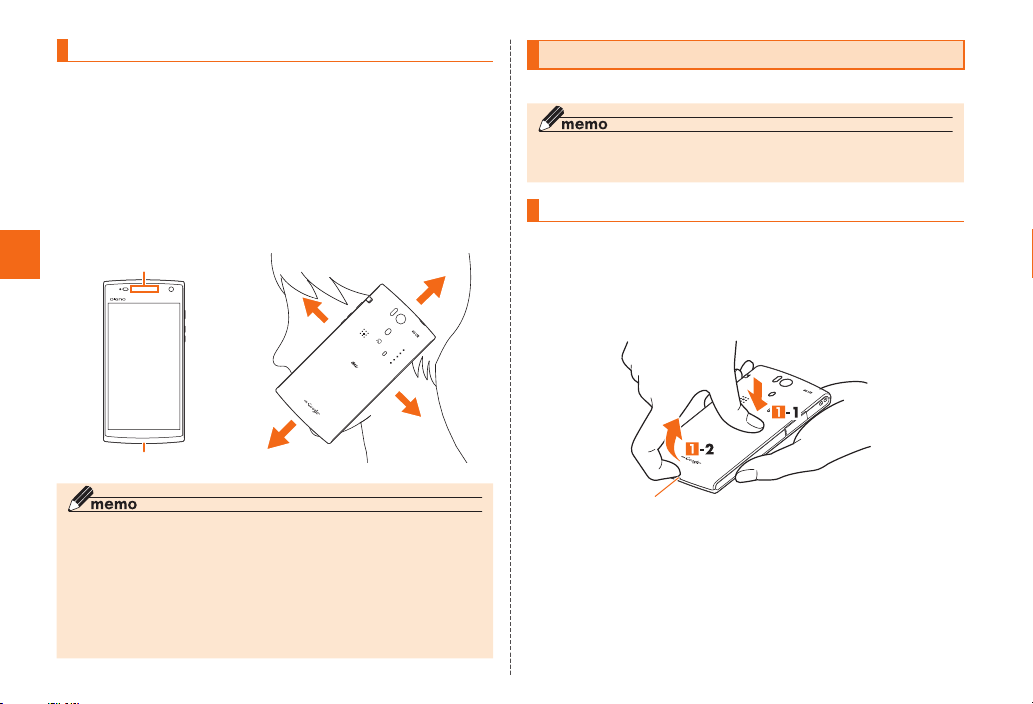
About Smart Sonic Receiver
The product is equipped with Smart Sonic Receiver which transmits
sound by vibrating the display. Although there is not earpiece hole,
you can use as usual.
■ Touching to your ear
Touch earpiece part of the product to your ear as shown below. By
covering your ear to interrupt surrounding noise, voice sound will
be heard more easily. Move position of the product up/down/left/
right to adjust according to your hearing condition or an immediate
environment.
Getting Ready
30
Earpiece (receiver)
Microphone
◎ Take care not to cover the microphone with your fingers etc. during a call.
◎ When the earphones (commercially available) are connected, voice sound
can be switched to the one via earphones not using the smart sonic
receiver.
◎ Do not put stickers, etc. on the display. May make earpiece sound to be
heard hard.
◎ There may be differences in the hearing easiness among individuals.
◎ Depending on environment, the hearing effect differs.
Attaching/Removing the battery pack
Use a dedicated battery pack and attach it properly.
◎ Before attaching/removing the battery pack and battery cover, turn the
power off.
Attaching the battery pack
Remove the battery cover of the back side of the
product
Lightly push the center part of the battery cover (-1), hook the
concave part of the battery cover with your fingernail etc., and then lift
the battery pack up in the arrow direction to remove (
Concave part
-2).
Page 33
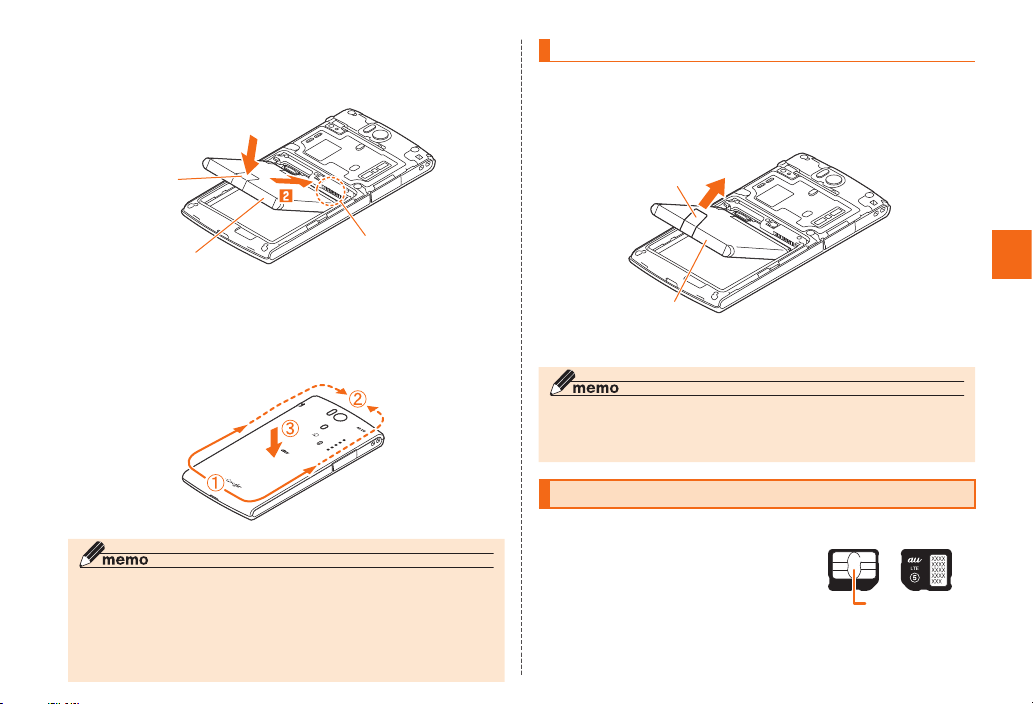
Check the position of connection part and slide the
battery pack to push in certainly
Check that the lift tab is on the battery.
Removing the battery pack
Remove the battery cover of the back side of the
product (▶P. 30)
Pull the lift tab to remove the battery pack
Lift tab
Battery pack
Attach the battery cover with the main unit, trace in
Connection part
the direction from ① to ② according to the arrow
mark not to come off the cover, and then push the
center part ③ rmly
◎ Be sure to check the au Micro IC Card (LTE) is certainly attached and then
attach the battery pack.
◎ Attaching incorrectly might cause damage of the battery pack or battery
cover.
◎ When attaching the battery cover, be careful not to get the lift tab of the
battery caught.
Lift tab
Battery pack
Attach the battery pack cover (▶P. 31)
◎ To remove the battery pack, pull the lift tab upward. Lifting up using other
than the lift tab might cause damage the main unit or connection part of
the battery pack.
au Micro IC Card (LTE)
Your phone number etc. is recorded in the au
Micro IC Card (LTE).
The product supports only with au Micro IC
Card (LTE). You cannot use the product with
an au IC-card or a micro au IC-card switched
from an au cell phone or au smartphone.
au Micro IC Card(LTE )
IC (metal) part
Getting Ready
31
Page 34
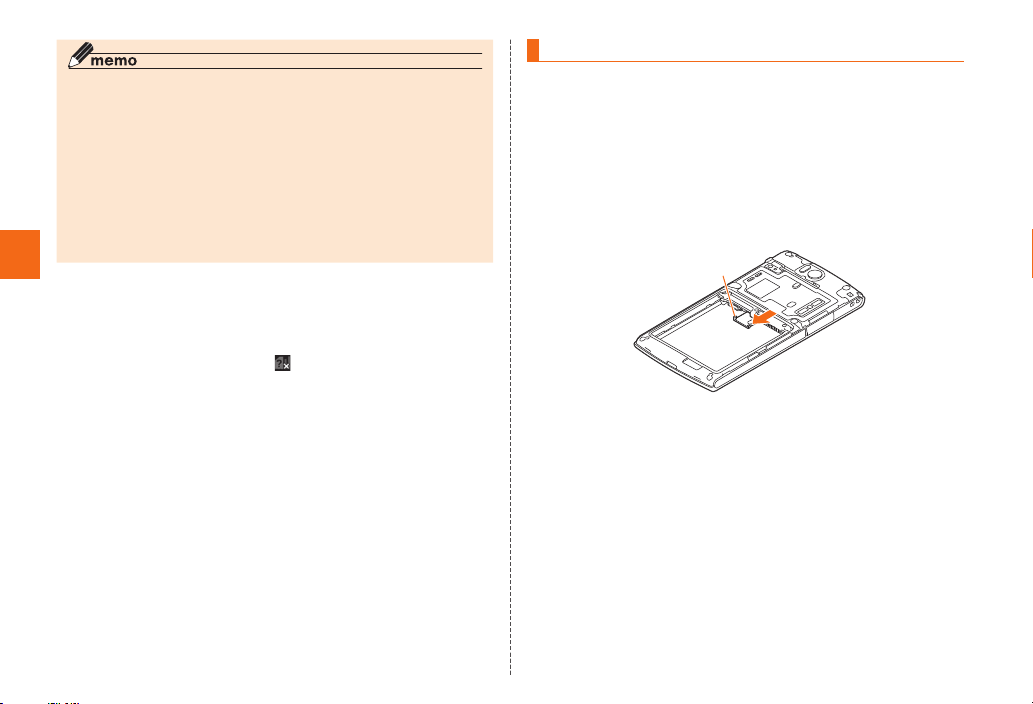
◎ Note the following points, otherwise handling the au Micro IC Card (LTE)
may cause malfunction or damage.
• Do not touch the IC (metal) part of the au Micro IC Card (LTE) or the IC
card terminal inside the product.
• Insert in the correct direction.
• Do not use force to attach or remove.
◎ Before removing au Micro IC Card (LTE), be sure to remove a power plug
of specified AC adapter etc. from the product.
◎ When au Micro IC Card (LTE) is not attached properly or au Micro IC Card
(LTE) is abnormal, an error message appears.
◎ Do not lose the au Micro IC Card (LTE) after it has been removed.
Getting Ready
■ What if your au Micro IC Card (LTE) is not inserted?
You cannot use the product inserting other than au Micro IC Card
(LTE).
If you turn the power on without au Micro IC Card (LTE), the following
operations
• Making
*1
cannot be performed. appears on the status bar.
*2
/Receiving a call
• Sending/Receiving SMS
• Making initial settings for E-mail (@ezweb.ne.jp), sending and
receiving Emails
• Setting up UIM card lock
• Checking My phone number/Email address
*1 Besides the operations mentioned above, the operations which need your phone number etc.
may not be available.
*2 Emergency calls to 110 (Police), 119 (Fire and Ambulance) or 118 (Regional Coast Guard
Headquarters) cannot be made.
■ Restriction setting by PIN code
For using au Micro IC Card (LTE), changing PIN code or UIM card
lock can restrict use by others in the purpose of protecting personal
information. (▶P. 18 "PIN code")
Attaching the au Micro IC Card (LTE)
Before attaching the au Micro IC Card (LTE), make sure to turn the
power off and remove the battery pack.
Turn the power off and remove the battery pack
(▶P. 31 "Removing the battery pack")
Hook the tab with your nger to pull the tray straight
out
The tray can be pulled out to the arrow position. If you pull the tray
forcibly, the tray may be damaged.
Tab
32
Page 35
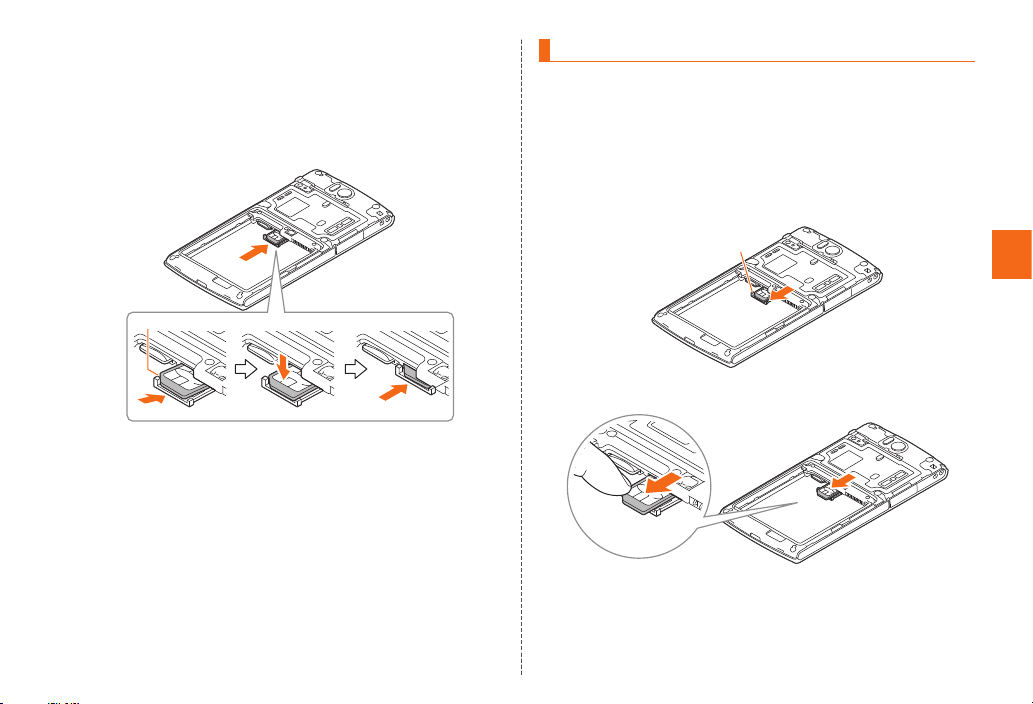
With the IC side of the au Micro IC Card (LTE) facing
up, put it on the tray and insert the tray with the au
Micro IC Card (LTE) all the way into the slot
Check the orientation of the notch. The proper position when the tray
is pushed into the end is where the edge of au Micro IC Card (LTE) is
shown a little.
Notch
Attach the battery pack and the battery cover (▶P. 31)
Removing au Micro IC Card (LTE)
Before removing the au Micro IC Card (LTE), make sure to turn the
power off and remove the battery pack.
Turn the power off and remove the battery pack
(▶P. 31 "Removing the battery pack")
Hook the tab with your nger to pull the tray straight out
The tray can be pulled out to the arrow position. If you pull the tray
forcibly, the tray may be damaged.
Tab
Slide the au Micro IC Card (LTE) to remove
Attach the battery pack and the battery cover (▶P. 31)
Getting Ready
33
Page 36
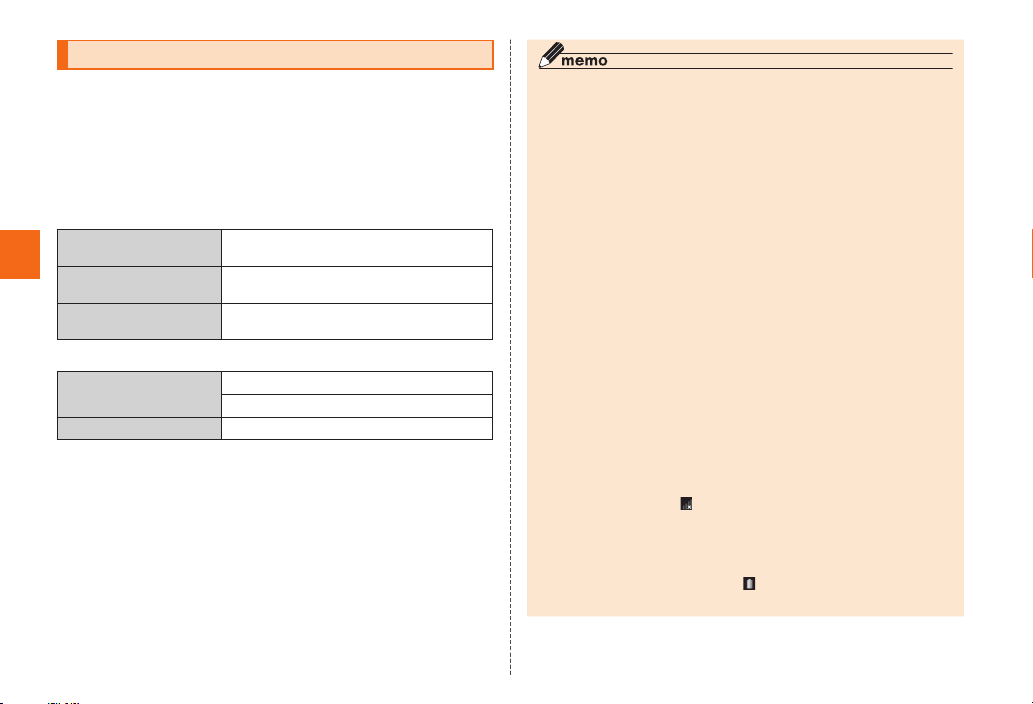
Charging
When you purchase your product, the battery pack is not fully
charged. Make sure to charge the battery pack before use. When the
charging light in red turns off, charging is complete. Charging times
and available operation time are as follows.
■ Charging times (estimate)
These times are to fully recharge the battery pack while the product
is turned off. The charging times increase if the power is on or the
temperature is low during charging.
Quick Charge Desktop
Holder (KYL21PUA)
Common AC adapter 04
Getting Ready
(sold separately)
Common DC adapter 03
(sold separately)
■ Available operation time
Continuous stand-by
time*
Continuous call time* Approx. 1110 minutes
* Above is time for using the product in Japan. For using overseas, see "Main specifications"
(▶P. 73).
Approx. 120 minutes
Approx. 160 minutes
Approx. 380 minutes
Approx. 580 hours (LTE area)
Approx. 720 hours (3G area)
◎ The product may become warm while charging or during other operations,
depending on the situation, but this is not abnormal.
◎ Charging while using camera may take longer.
◎ For handling the battery pack, thoroughly read "Safety Precautions" (▶P. 6)
for proper use.
◎ When you operate the product with the specified charger connected, the
product may repeat short-time charging/discharging resulting in short battery
life.
◎ When temperature of environment or the product becomes extremely high or
low, charging may be stopped. Try to charge the battery as far as possible at
room temperature.
◎ If the charging light blinks in red, check if the battery pack is correctly
attached or connected. If the light keeps blinking, stop charging and then
contact au shop or Secure cell phone support center.
◎ Clean the power terminal/charging terminal with dry cotton swabs, etc. with
care not to deform the terminals every now and then. When they are dirty,
the battery may not be charged normally.
◎ Firmly close the external connection terminal cover after charging to
prevent water or dust from getting in. And do not pull strongly or twist the
cover.
◎ The continuous standby time and continuous talk time are the average
available time estimated combining with moving status and staying status
where the radio waves can be received correctly. They may drop to less
than half in the following cases depending on the battery charging status,
usage environment such as temperature, reception condition at the
location where the product is used, and the function settings.
• Use in a place where
• Use of Wi-Fi
• When the product is set not to be in sleep mode by application
• Use of application that operates in background
◎ If charging is stopped while the charging light is still turned on, the battery
may not be fully charged even with
available time will be short.
®
(out of range) appears for a long period
, mail, camera, TV (1Seg), location information, etc.
(Full) displayed. In that case,
34
Page 37
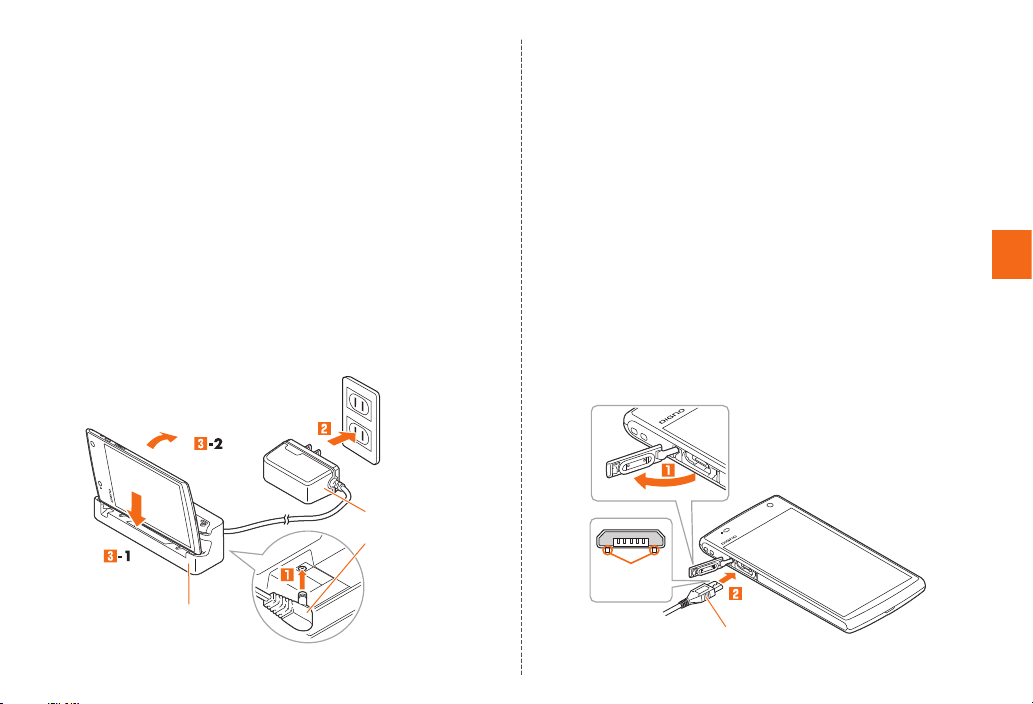
■ Charging with the Quick Charge Desktop Holder
(KYL21PUA)
Using supplied Quick Charge Desktop Holder (KYL21PUA) and AC
Adapter for Desktop Holder (KYL21PQA) enables quick charge,
shorter charging time than usual.
• Connect AC Adapter for Desktop Holder (KYL21PQA) with Quick
Charge Desktop Holder (KYL21PUA).
Insert the plug of AC Adapter for Desktop Holder
(KYL21PQA) into the external connection terminal of
Quick Charge Desktop Holder (KYL21PUA)
Insert the power plug of AC Adapter for Desktop Holder
(KYL21PQA) into an outlet (100 VAC to 240 VAC)
Place the product on Quick Charge Desktop Holder
(KYL21PUA) in order of -1 to -2
The charging light lights in red.
When charging ends, the charging light turns off.
AC Adapter for Desktop
Holder (KYL21PQA)
Quick Charge Desktop
Holder (KYL21PUA)
When charging is nished, remove the product from
Quick Charge Desktop Holder (KYL21PUA) by tilting
the product forward
■ Charging with the speci ed AC adapter (sold
separately)/DC adapter (sold separately)
Charging with Common AC adapter 04 (sold separately)/Common
DC adapter 03 (sold separately) is explained. For information on the
specified AC adapter (sold separately)/DC adapter (sold separately),
see "Introduction of related accessories" (▶P. 68).
Open the external connection terminal cover of the
product
Check the orientation of the microUSB plug of
Common AC adapter 04 (sold separately)/Common
DC adapter 03 (sold separately) and insert it straight
into the external connection terminal
Projections
down
Common AC adapter 04 (sold separately)/
Common DC adapter 03 (sold separately)
Getting Ready
35
Page 38
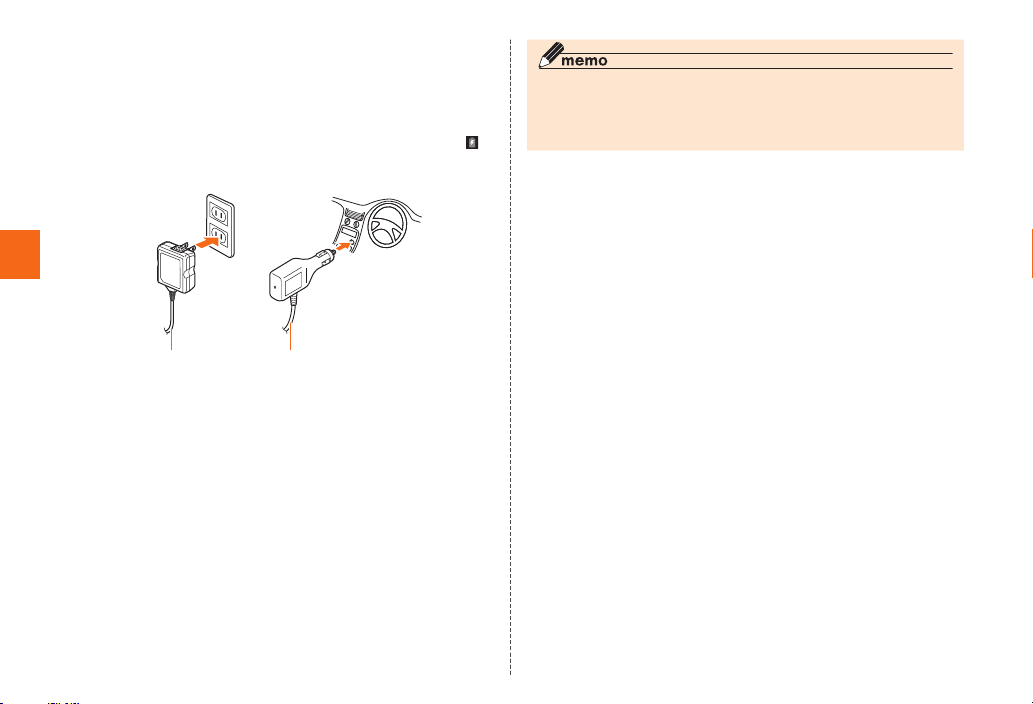
Insert the power plug of Common AC adapter 04 (sold
separately) into an outlet (100 VAC to 240 VAC)/Insert
the plug of Common DC adapter 03 (sold separately)
into a cigarette lighter socket
The charging light lights in red. When the battery power turns on,
appears on the status bar.
When charging ends, the charging light turns off.
Getting Ready
Common AC adapter 04
(sold separately)
When charging ends, pull out the microUSB plug of
Common DC adapter 03
(sold separately)
Common AC adapter 04 (sold separately)/Common
DC adapter 03 (sold separately) straight from the
external connection terminal
Close the external connection terminal cover
Pull out the power plug of Common AC adapter 04
(sold separately) from the outlet/Pull out the plug of
Common DC adapter 03 (sold separately) from the
cigarette lighter socket
◎ Note that applying unnecessary force with the external connection terminal
connected to the external device might cause damage.
◎ When charging starts with the battery empty, the charging light may not
light immediately. But charging has started.
■ Charging with a PC
Charging the battery by connecting to chargeable USB port on a PC
using microUSB cable 01 (sold separately) is explained.
Connect the microUSB cable 01 (sold separately) to a
USB port on a PC that is activated completely
Open the external connection terminal cover of the
product
Check the orientation of microUSB plug of microUSB
cable 01 (sold separately) and insert it straight into
the external connection terminal
The charging light lights in red.
When charging ends, the charging light turns off.
• When a screen for new hardware detection etc. appears on the PC,
select "Cancel".
36
Page 39
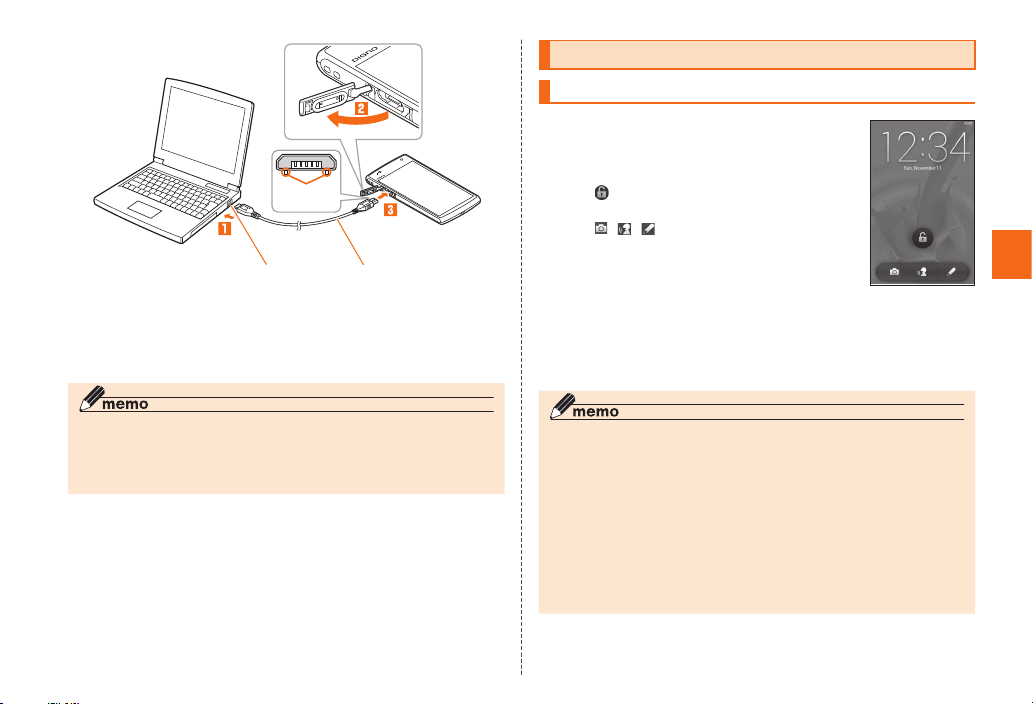
Projections
down
USB port of PC microUSB Cable 01
When charging ends, remove the microUSB cable
(sold separately)
01 (sold separately) from the external connection
terminal and the PC
Turning the power on/off
Turning the power on
Press and hold F until the
incoming light turns on
The unlock screen appears after a while.
" (▶P. 40) to unlock the screen and display
Tap "
the Home screen (▶P. 41).
"/" "/" " to unlock. Then Camera/Talk now/
Tap "
Write now activates.
• The first time the product turns ON, "auかんた
ん設定 (au Easy Setting)" which allows you to
make au ID settings etc. activates. See Step
in "Setting au ID" (▶P. 38) and make the settings
as required.
Also an explanation screen for the Home screen appears, then read
and tap "OK".
《Unlock screen》
Getting Ready
◎ When charging starts with the battery empty, the charging light may not
light immediately. But charging has started.
◎ Charging may take longer than with the specified AC adapter. Also,
charging time varies depending on your PC.
◎ While some logos are displayed after the power is on, initial settings for
touch panel are in process. Do not touch the screen. The touch panel may
not work properly.
◎ If missed calls or new arrival mails exist, application icons appear on
the unlock screen. Tap to unlock the screen and then corresponding
application can be activated.
◎ "auかんたん設定 (au Easy Setting)" can be set up later even though it is
skipped. (▶P. 38)
◎ If the charging light blinks in yellow when you turn the power on, the
remaining battery is not sufficient for activating the product. Charge the
battery before using the product.
37
Page 40
Turning the power off
F(hold down for at least one second)
[Power off]→[OK]
Sleep mode
When F is pressed or no operation has been made for a certain
period, the screen turns off temporarily to transition to sleep mode. To
cancel sleep mode, operate the following.
In sleep mode, F
The unlock screen appears.
Getting Ready
◎ When you display the screen by pressing F in sleep mode, do not
touch the screen. The touch panel may not work properly.
Switching to English display
The first time the product turns ON, "auかんたん設定 (au Easy
Setting)" screen appears. Press C to display the Home screen. You
can change display language.
From the Home screen→[ ] →[設定 (Settings)]
[言語と入力 (Language & input)]→[言語
(Language)]→"English"
Setting au ID
By setting au ID, you can use various services provided by au
such as "au Simple Payment Service" which allows you to purchase
applications from the au Market or Google Play.
Using "au Easy Setting", you can make au ID settings, etc.
From the Home screen→[ ] →[au Easy Setting]
[Next]→[Registration]→[OK]→[au IDの 設 定・保 存 (Set
and save au ID)]
Authentication starts.
Follow the onscreen instructions to set au ID
If you already have au ID, set your au ID.
If you do not have any au ID, newly register one.
Continue to follow the onscreen instructions.
◎ If you set au ID only, you can use "au ID Setting".
38
Page 41
Setting up Google account
Set up a Google account to use online services provided by Google.
If Google account is not set up, when you activate an application or
function that requires Google account, a setup screen appears.
Setup screen of Google account
■ If you have a Google account
[Existing]→Enter mail address and password
→"Sign in"
Follow the onscreen instructions
■ If you do not have a Google account
[New]→Follow the onscreen instructions to register
Google account
■ If you cannot log in
Form the Home screen→[ (Browser)]→Select
URL eld→Enter "http://www.google.com/accounts/
recovery/"→[Go]
Select a reason why you cannot log in→Enter a mail
address if required→[Continue]
Follow the onscreen instructions
Getting Ready
39
Page 42
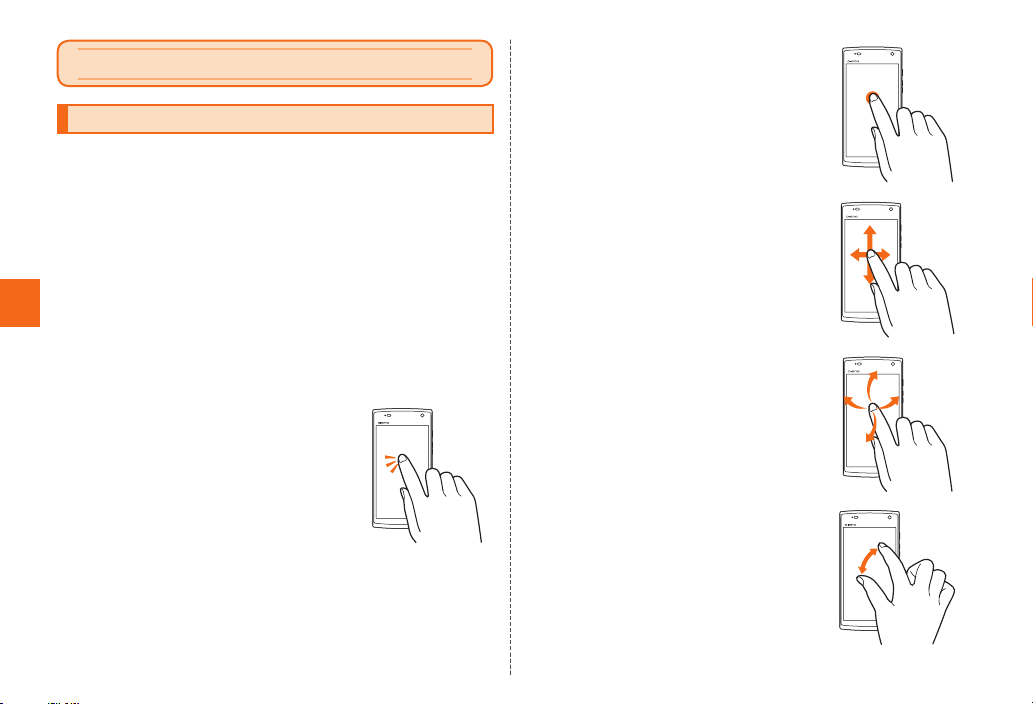
Basic Operation
Using the Touch panel
The display on the product is a touch panel operated by touching it
with your finger.
• The touch panel is designed to be lightly touched by fingers. Do
not push it forcibly with a finger or press it with sharp objects (nail,
ballpoint pen, pin, etc.).
• In the following cases, the product may not respond to touching the
touch panel, or errors in operation may occur.
- Operation with gloved hands
- Operation with tip of fingernail
- Operation with a foreign object on the display
Basic Operation
- Operation with protective sheet or seal on the display
- Operation when the display is wet or fogged
- Operation with wet or sweaty fingers
- Operation under water
■ Tap/ Double-tap
Tap: Gently touch a screen and then immediately
release your finger.
Double tap: Tap the same position twice.
■ Long-touch
Keep touching an item with your finger.
■ Slide
While your finger is gently touching the screen,
trace it to the desired direction to move over.
■ Flick
Operate the screen by quickly moving (flicking)
your finger up, down, right, or left.
■ Widen/Narrow with ngers
Touch the screen with two fingers and widen or
narrow the fingers' distance.
40
Page 43
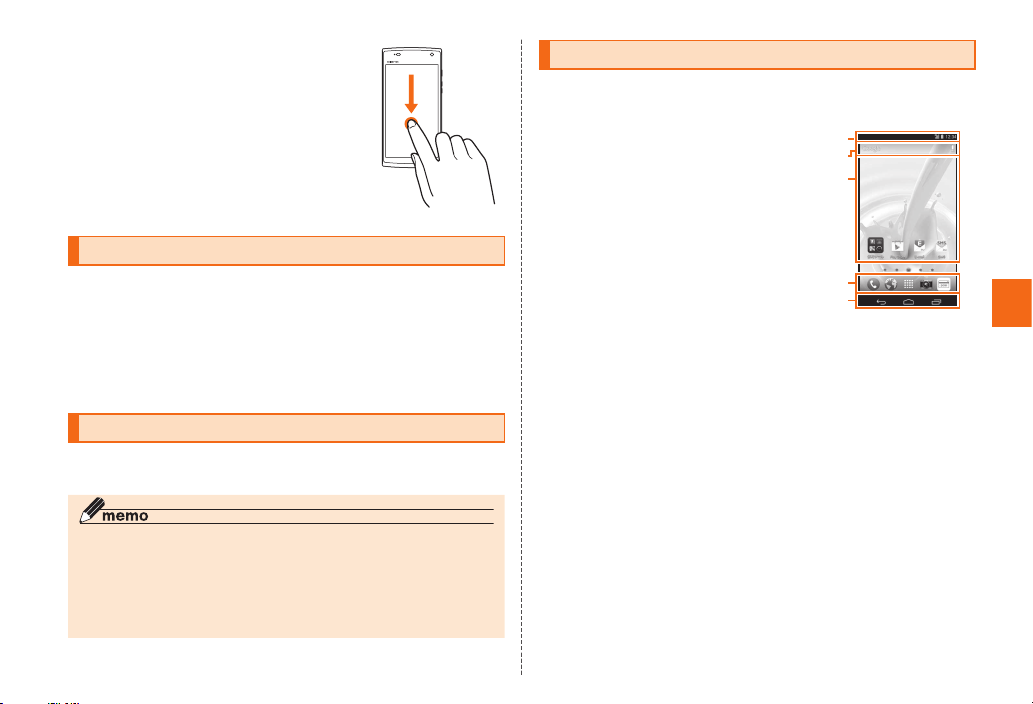
■ Drag
Keep touching an item or icon, trace it to the
desired direction to move.
Using the Navigation bar
The following keys appear on the Navigation bar at the bottom of the
screen.
C:Return to the previous screen.
H:Display a home screen.
N:Display a list of recently used applications.
Keys other than shown above may be displayed depending on the
screen.
Switching Orientation
Switch portrait or landscape display automatically according to the
orientation of the product.
◎ Operate the product in the upright position. The screen display may not be
changed if the product is laid in parallel to the ground.
◎ You can set whether to switch portrait display and landscape display in
"Auto-rotate screen".
◎ In some applications, the screen display may not be switched regardless
of the orientation or settings of the product.
Using Home screen
On the Home screen, shortcuts, widgets, folders can be added. Tap
"H" to go to the Home screen any time.
① Status bar
② Quick search box
③ Shortcuts/ Widgets/ Folders
便利ツール (Convenient tools) etc. are
displayed by default.
④ Quick launch area
⑤ Navigation bar
①
②
③
④
⑤
《Home screen》
Basic Operation
41
Page 44
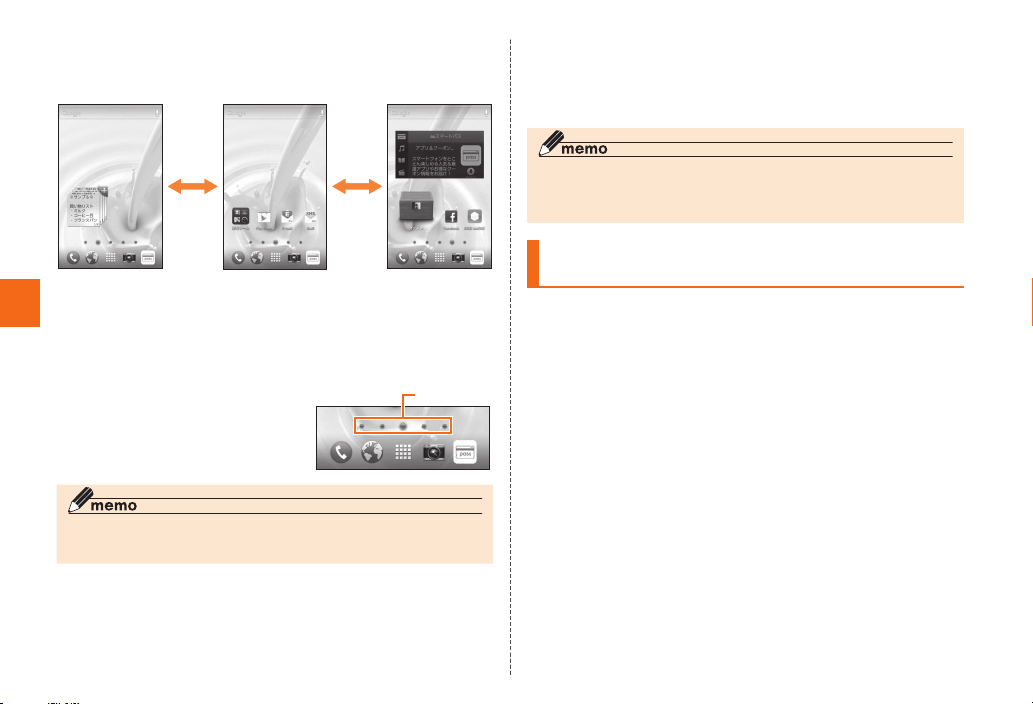
■ Switching home screens
The home screen is configured of multiple screens that can be
switched by flicking left or right.
《When switching Home screen》
• When you switch home screens for the first time, an explanation
screen appears.
Basic Operation
• An indicator of current position appears at the bottom of the home
screen.
Tap the indicator to switch the home screens.
◎ Besides of the center Home screen, two screens on the left and right, in
total five home screens are set by default.
Indicator
■ Editing Home screen
Narrow with fingers on the home screen to display thumbnail so that
you can add, delete, sort home screens, etc. Up to 9 home screens
can be set.
◎ Home screen→Long-touch an empty space→[Wallpaper] to change a
wallpaper on the home screen. While Live wallpaper is set, the battery
consumption increases.
Adding shortcuts/ widgets/ folders to the
Home screen
Add shortcuts of application, widgets or folders to the Home screen.
■ Adding shortcuts/widgets
Home screen→Long-touch an empty space→[Add
widgets]/[Add shortcuts]
Tap a widget/application
An item will be added automatically in an empty space on the home
screen.
■ Creating a folder
Drag a shortcut to overlap the other shortcut to create folder where
you can store multiple icons.
42
Page 45
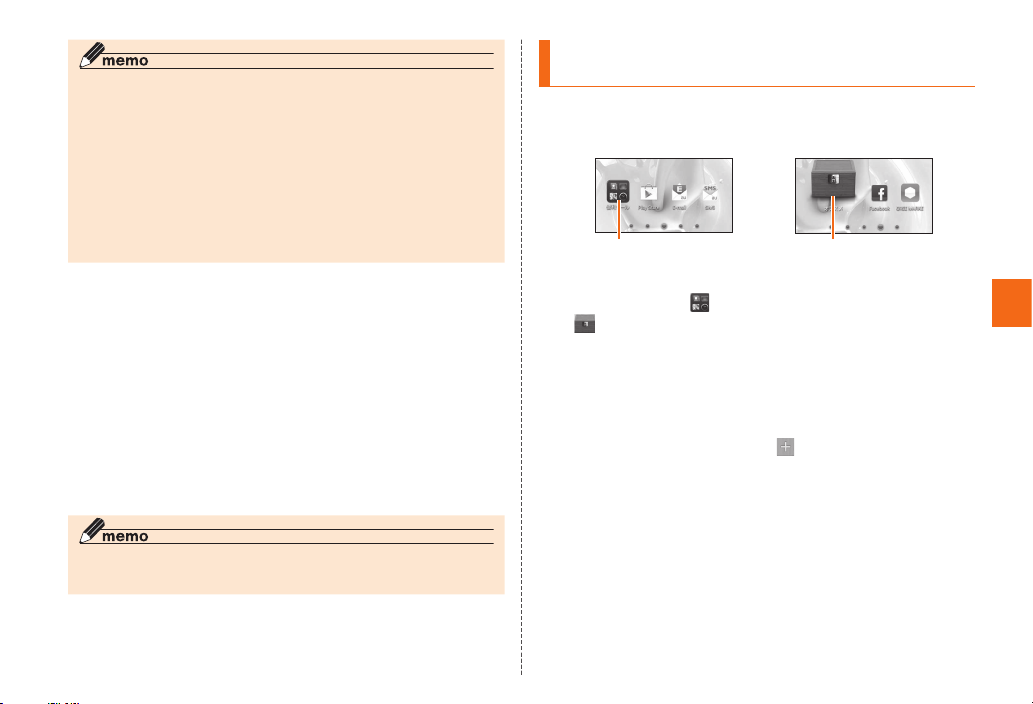
◎ In step , if you long-touch a widget/ application, the home screen
thumbnail appears. Drag an item to desired position and then release your
finger to add.
◎ You cannot add an item when there is no space in a displayed home
screen.
Folders
◎ To rename the folder, select a folder→Tap a folder name at the bottom of
the folder→Enter a folder name→[OK].
◎ A shortcut displayed by tapping a folder can be removed from the folder
by dragging the shortcut out from the folder.
◎ When these is only one shortcut, folder display can be canceled.
■ Moving/Deleting a widget/shortcut/folder
Long-touch a widget/shortcut/folder you want to
move/delete
■ Moving
Drag an item to desired position and then release
your nger
■ Deleting
Drag an item to "Remove" on the upper screen and
then release your nger
◎ To move the item to the desired position, drag it to the left end or right end
of the home screen to display the home screen thumbnail.
Using 便利ツール ( Convenient tools)/
My Selection
便利ツール (Convenient tools)/My Selection is a folder/widget which
allows you to locate shortcuts of frequently-used applications on the
Home screen.
便利ツール
(Convenient tools) (folder)
Home screen→[ (便利ツール (Convenient tools))]/
[
(My Selection)]
Tap a shortcut to activate an application
Application is activated.
■ Editing 便利ツール (Convenient tools)/My Selection
Long-touch a shortcut to change or delete in 便利ツール (Convenient
tools)/My Selection. In My Selection, [
add a shortcut.
My Selection (widget)
] → Select an application to
Basic Operation
43
Page 46
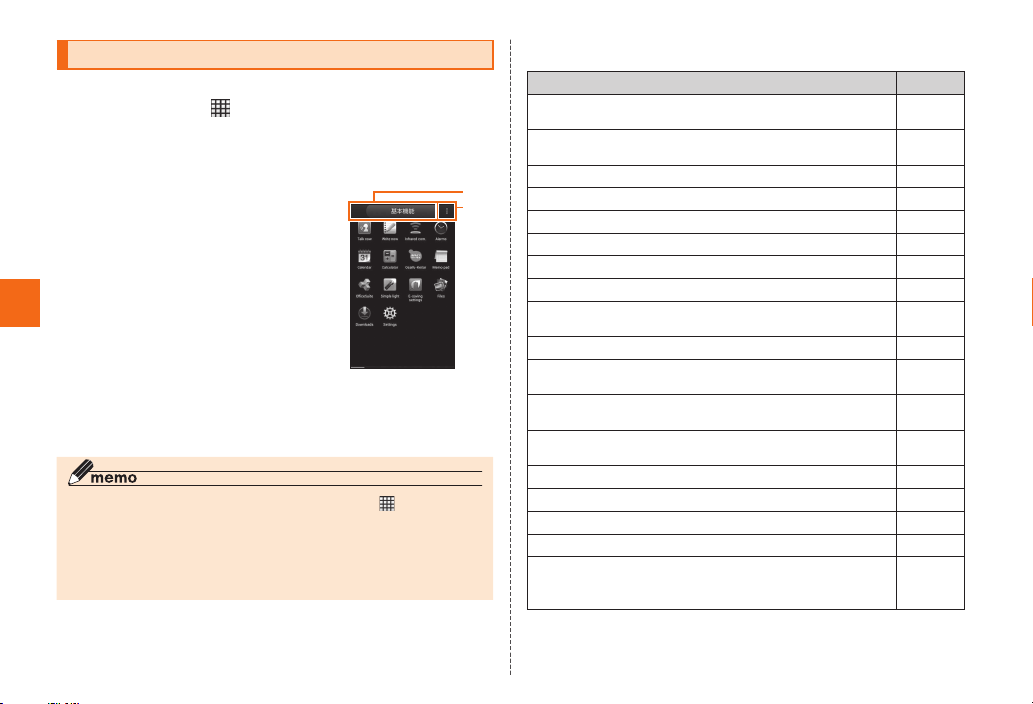
Using the Applications list
A list of installed applications is displayed.
Home screen→[ ]
The Applications list appears.
When you activate for the first time, an explanation for selecting
application appears. Confirm and tap "OK".
① Category title
Tap to display the title list.
Long-touch to change title.
② Menu icon
Display the menu of Applications
list.
Basic Operation
《Applications list
(Categorized order)》
Tap an application to activate
Application is activated.
◎ When "Simple menu setting" (▶P. 46) is set to ON, tap " " on the Home
screen to display the Simple menu list (▶P. 46).
◎ Downloaded applications are allocated to "ダウンロードしたアプリ
(Downloaded application)" page in the application list.
◎ When you use functions from the application, communication fees may be
charged depending on the function.
■ Main applications
Icon name Page
Talk now
Voice input activates applications.
Write now
Entering characters activates the application.
①
②
Infrared com. ―
Alarms
Calendar ―
Calculator ―
Osaifu-Keitai
Memo pad ―
OfficeSuite
View files of Word, Excel, etc.
Simple light
E-saving settings
Set battery use to be kept at a minimum.
Files
Show a list of data in the microSD memory card to play.
Downloads
Manage downloaded data.
Settings P. 66
Phone P. 56
Browser ―
Camera ―
au Market
You can install Android-based applications offered with
au Smart Pass service.
―
―
―
―
―
―
P. 60
―
―
―
44
Page 47
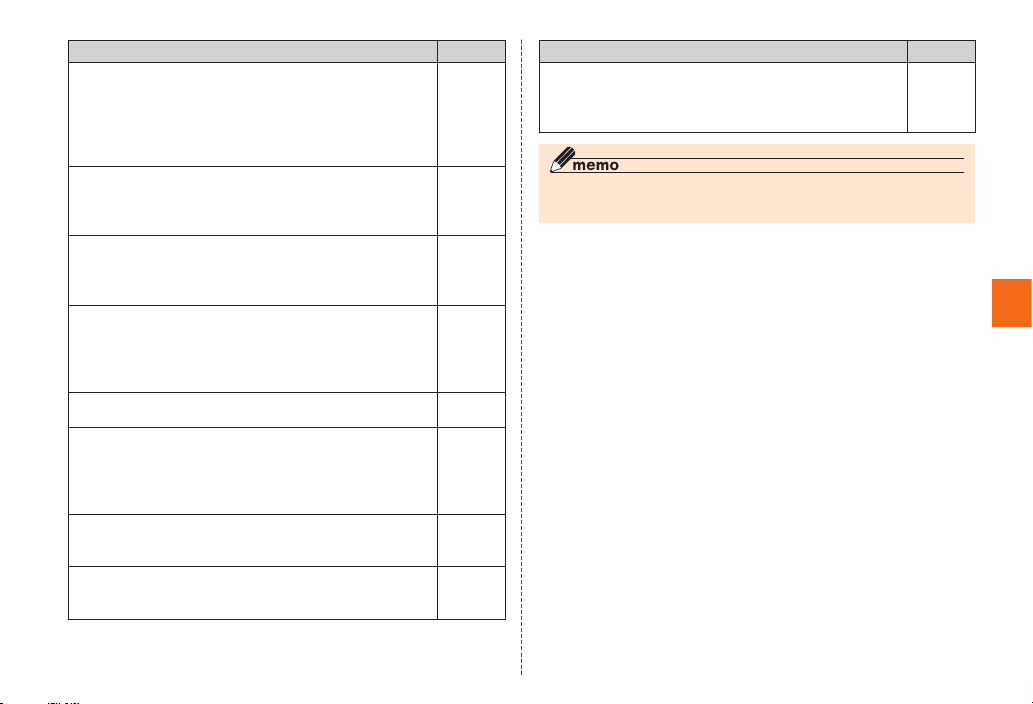
Icon name Page
auスマートパス (au Smart Pass)
You can enjoy as many applications as you want from
among over 500 apps by ¥390 (including tax) per month!
Also coupons, presents, photo storage and security apps
are available. Please enjoy your safety and comfortable
smartphone life!
LISMO Player
Plays music or checks information on the music using
the LISMO Player. Moreover, try listening it and purchase
the investigated music.
Friends Note
"Friends Note" can manage Native Address Book of your
phone and multiple social networking services in just one
application.
GREE Market
This application allows you to browse games and other
content provided by GREE.
You do not need a GREE account in order to use this
application.
Facebook
Access Facebook.
auお客さまサポート (au Customer Support)
You can check the subscription contents or monthly
usage of your au phones etc. with this application. You
can change your rate plan, apply for optional services
and so on at au Customer Support website.
auテレビ.Gガイド (au TV.G-GUIDE program table)
View TV program table or search programs. Functions
using 1Seg or remote timer recording can be used.
NFC Menu
Shows compatible applications list with the NFC service,
sets NFC lock, or makes NFC settings.
Icon name Page
リモートサポート (Remote Support)
Call for technical supports on the phone operations
―
―
by sharing the screen that you are watching with au
operators.
◎ More applications are preinstalled. For details, refer to "取扱説明書詳細版
(Full Instruction Manual)" (Japanese).
―
―
Basic Operation
―
―
―
―
―
45
Page 48
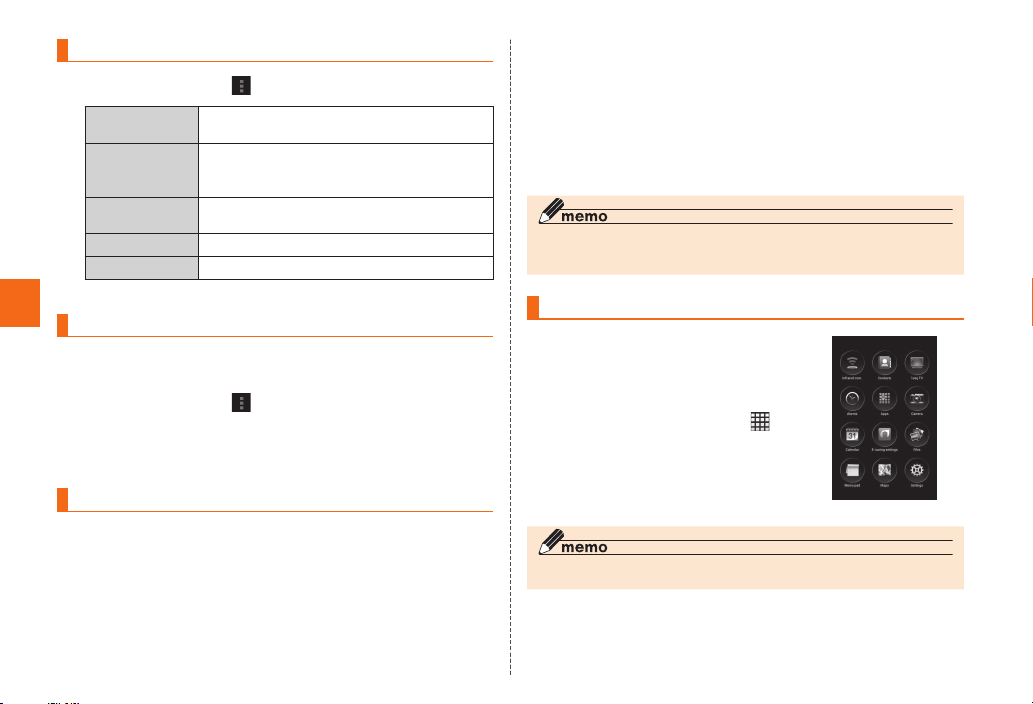
Using the menu of Applications list
Applications list→[
Simple menu
setting
Apps order Switch Applications list to "Alphabetical
Sort apps ▶ P. 46 "Moving an icon on the Applications
Manage apps
Phone settings ▶P. 66 "Settings"
* Items displayed in a menu depend on the screen.
Basic Operation
Moving an icon on the Applications list
When "Categorized order" is selected in Apps order, you can move an
icon of application to another position in the Application list.
Applications list→[
Long-touch an icon→Drag an icon to a desired
position and then release your nger→[DONE]
]
Switch ON/OFF of Simple menu.
order", "Downloaded order", "Categorized
order".
list"
Display the application managing screen.
]→[Sort apps]
Applications list→Long-touch an icon→Drag an icon
to the thumbnail on the home screen and release
your nger
Long-touch the icon moved to the Home screen →
Drag the icon to the Quick launch area and then
release your nger
◎ When there is not available space in the Quick launch area, create a folder
by overlapping an icon you want to add to an existing icon.
Using the Simple menu
You can display "Simple menu", which
places basic functions, by setting "Simple
menu setting" (▶P. 46) to ON. Select an
icon to activate the application.
From the Home screen→[
An explanation of Simple menu appears.
]
Using Quick launch area
Locate frequent-used applications in the Quick launch area in the
Home screen.
Quick launch area can be fixed and displayed in any screen of the
home screens. By default, Phone, Browser, Camera and auスマート
パス (au Smart Pass) are already registered.
46
《Simple menu》
◎ It is not possible to change applications on the Simple menu.
Page 49
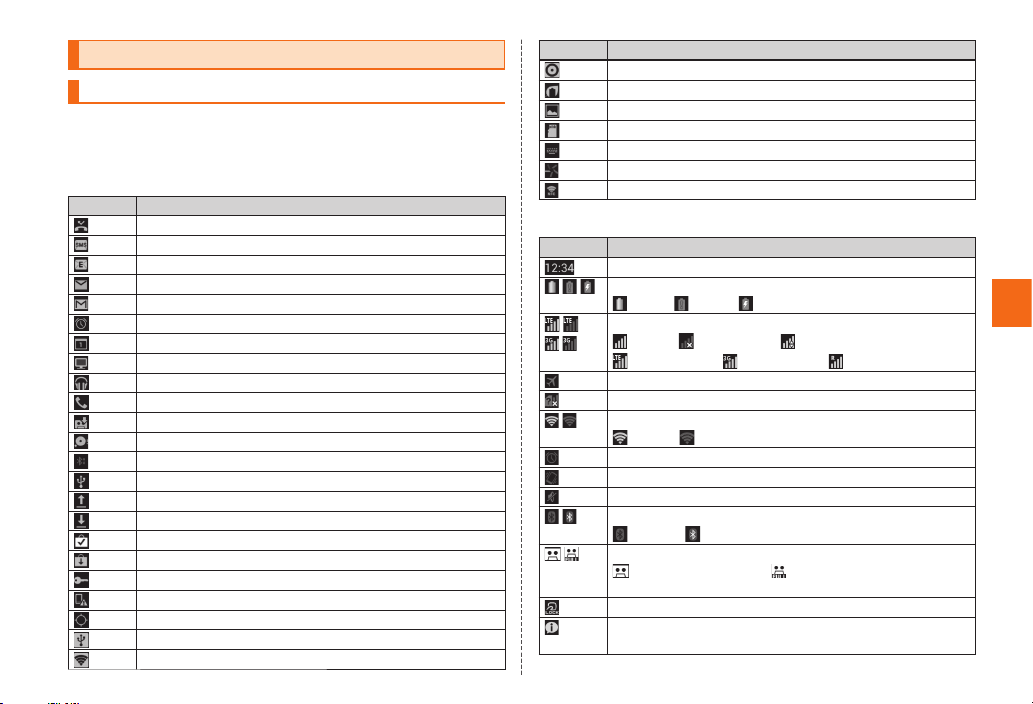
Checking the status of the product
Icons
Notification icons which inform missed calls, new mail, operations in
progress, etc. appear on the left of the status bar, and status icons
which indicate the status of the product appear on the right.
■ Examples of noti cation icon
Icon Description
Missed call
New mail message (SMS)
New mail message (E-Mail)
New mail message (PC-mail)
New mail message (Gmail)
Alarm is snoozing or alarm ends but is not canceled yet
Schedule notification of the calendar
TV (1Seg) is active
Playing music
Dialing, calling or receiving an incoming call
Answering memo
Few spaces available in the product
Bluetooth® file receiving request
USB connecting
Sending/Uploading data
Receiving/Downloading data
Finished installing
Update notification for installed applications
Connected, Unconnected to VPN
Major Update (OS Update)/Software Update available
GPS in use
USB tethering is on
Wi-Fi tethering is on
Icon Description
USB tethering and Wi-Fi tethering are enabled
Energy save mode is enabled
Screen shot is taken
microSD memory card is unmounted
Keyboard is shown
MHL connecting
NFC R/W P2P function activated
■ Examples of status icon
Icon Description
Time
Battery level
Wi-Fi® signal strength
Bluetooth® in use
Answering memo set
100%/ empty/ charging
Signal strength/Signal condition (3G/CDMA 1x)
level 4/ out of range/ in communication
LTE Available/ 3G Available/ In roaming
Airplane mode is activated.
au Micro IC Card (LTE) not inserted
level 4/ level 0
Alarm set
Silent mode (Vibrate) set
Silent mode (Mute) set
Waiting/ Connecting
Answering memo set/ All answering memo items
recorded
"NFC/Osaifu-Keitai®" lock set
Talk now "着信時に自動起動 (Auto activation for
incoming)" set
Basic Operation
47
Page 50
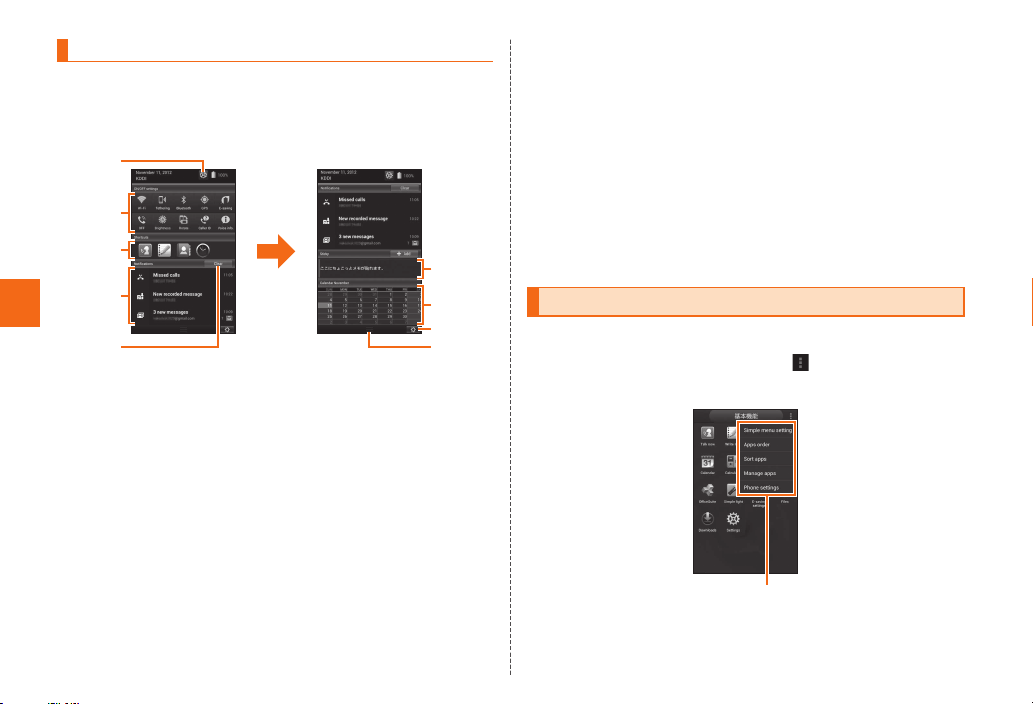
Noti cation/Status Panel
Slide down the status bar to display the notification/status panel.
You can check details of notification icons or start corresponding
applications. Also, you can set frequent-used functions or activate
applications from shortcuts.
①
②
③
Slide up
④
Basic Operation
⑤
① Settings icon
Opening settings screen (▶P. 66)
② Function icon
Enable/Disable frequently-used functions.
By default, functions for "Wi-Fi", "Tethering" (Wi-Fi tethering),
"Bluetooth", "GPS", "E-saving", "Vibrate", "Brightness", "Rotate",
"Caller ID" and "Voice info" ("着信時に自動起動(Auto activation for
incoming)" in Talk now) are registered.
③ Apps shortcuts
Activate frequently-used application.
By default, shortcuts for "Talk now", "Wright now", "Contacts" and
"Alarms" are set.
④ Noti cation area
You can check the status of the product or details of notification.
For some information, tap to activate the corresponding
application.
48
⑤ Clear noti cation
Tap to clear all notifications.
⑥ Sticky
Paste memos.
⑦ Monthly calendar
Tap to activate the calendar application.
⑧ Edit icon
Tap to display the edit screen for notification/status panel. Long-
touch an item to drag to the desired position to move or drag
to "Remove". Tap "Add items" to add an item. Tap "DONE" after
editing.
⑨ Close tab
⑥
⑦
⑧
⑨
Slide upward to hide the notification/status panel.
Displaying available menu
■ Option menu
The option menu is displayed by tapping " " on the screen where
the menu is available.
Example: In the application list
Option menu
Page 51
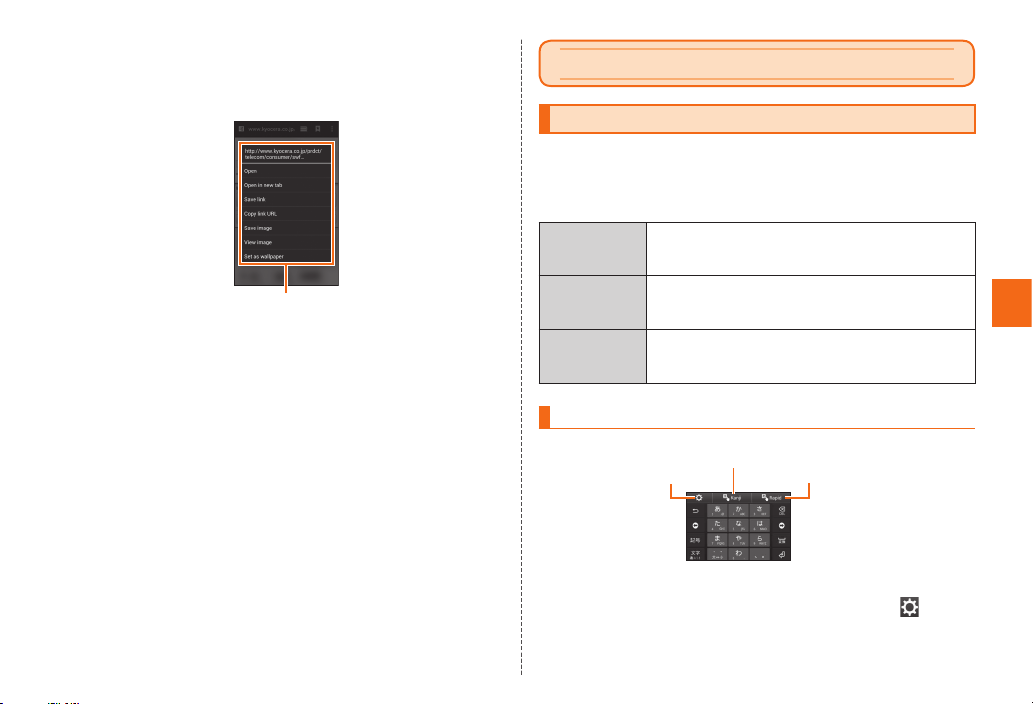
■ Context menu
The context menu is a menu displayed by long-touching the screen
or items.
Example: In the browser screen
Context menu
Character entry
Entering characters
Use software keyboard to enter characters.
The software keyboard appears when you tap the entry field
displayed for registering a contact or composing a mail.
The following software keyboards are available for the product.
iWnn IME Mainly used for entering Hiragana/Kanji/Katakana.
Kanji
Handwriting
( LaLaStroke)
Rapid
Handwriting
(LaLaStroke)
Switching keyboards
■ Switching 10-key/QWERTY
Character entry screen (10-key/QWERTY)→[ ]
→[10-key⇔QWERTY]
There are two types: 10-key and QWERTY
keyboards.
Select a character type to input and write
characters in the handwriting field to input. Multiple
characters including Kanji can be input in one line.
Select a character type to input and write
characters in handwriting field to input. Character
is recognized per one stroke.
Kanji Handwriting
(LaLaStroke)
Settings
Rapid Handwriting
(LaLaStroke)
Basic Operation
49
Page 52
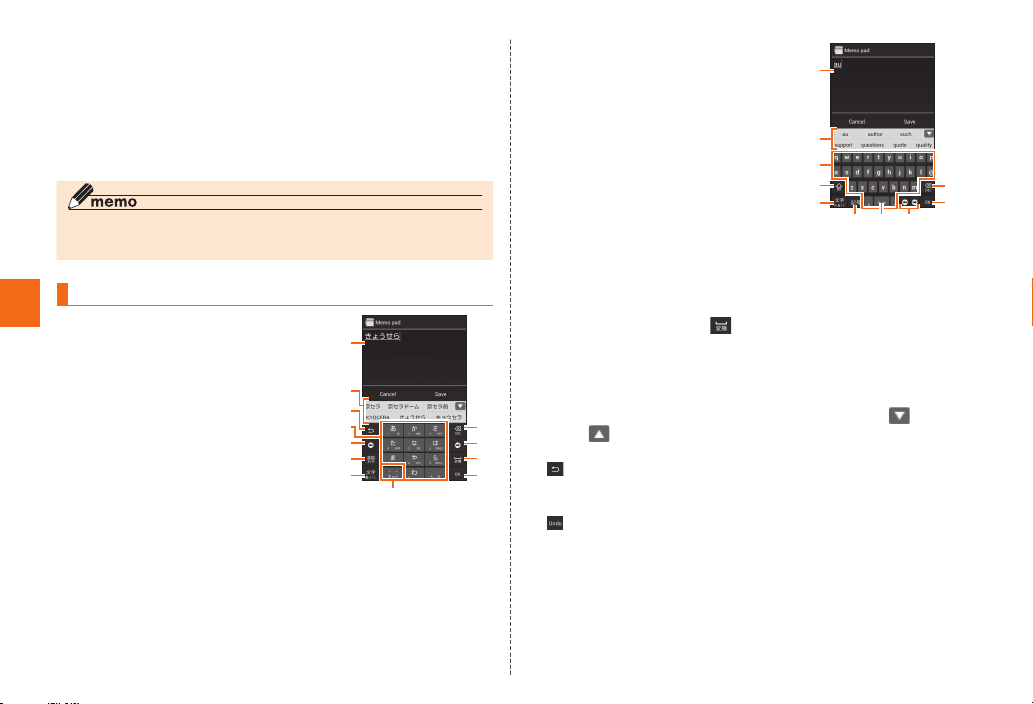
■ Switching 10-key/QWERTY to Handwriting
(LaLaStroke)
Character entry screen (10-key/QWERTY)
→[Kanji]/[Rapid]
Tap "Keyboard" on the handwriting (LaLaStroke) screen to return to the
keyboard used before switching to handwriting input.
◎ You can install an input application to use. Enable the installed application
in "Language & input".
Inputting text with the 10-key/QWERTY
■ Character entry screen (10-key)
Basic Operation
It is a keyboard with characters allocated
in the same order as general cell phones.
Every time you tap the character entry key,
a character is switched.
Or you can use "Flick input". For details,
see "Flick input" (▶P. 52).
①
②
③
④
⑤
⑥
⑦
⑪
《Character entry screen
(10-key)》
■ Character entry screen
(QWERTY)
It is a keyboard with characters allocated
in the same order as general PC. Tap
character input key to enter character
on the key. Enter Japanese in "Roman
character".
①
②
④
⑫
⑦
《Character entry screen
① Character entry area
② Input Word Learning/Word Prediction
Enter characters and tap "
candidates list. If "Word Prediction" is enabled, the prediction
candidates list is displayed when characters are entered and
then candidates which come next are displayed when the entry is
confirmed.
⑧
⑤
⑨
⑩
• You can enlarge the candidates list area by tapping "
③ Back key/Undo key
④ Software keyboard
You can enter a character assigned to each key.
⑤ Cursor key
Moves the cursor to the left and right. Change the range of the
characters for character entry/conversion.
" to return it to the original display.
Tap "
: Display the characters assigned to the same key in the reverse
rotation.
• Back function cannot be used in "Flick input".
: Cancel the last operation such as returning the determined
characters to the undermined state by tapping the key.
" to display the normal conversion
⑧
⑩
⑥⑨⑤
(QWERTY)》
".
50
Page 53
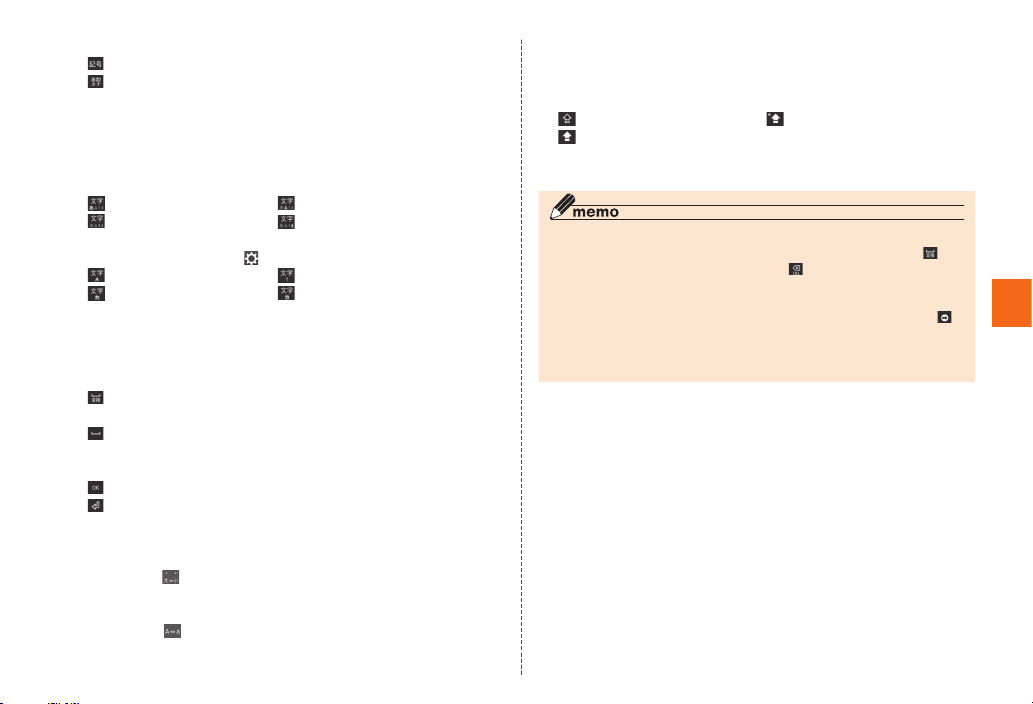
⑥ Emoji, Symbol, Facemark/Alphanumeric, Kana key*
:Displays the list of Emoji/Symbol/Facemark.
: Displays hiragana, katakana, alphabet, number and predicted
date and time assigned to the entered key as conversion
candidates.
* Depending on operating screen or application, some character types may not be entered.
⑦ Character entry mode switch key*
Switches character type to enter.
The display changes as follows each time you tap it.
:Hiragana-Kanji :Half-width Alphabet
:Half-width Numeric :Voice Input
You can switch to the another character type such as katakana or
full-width characters by [
:Full-width Alphabet :Full-width Numeric
:Full-width Katakana :Half-width Katakana
* Depending on operating screen or application, some character types may not be entered.
] →[Input Mode].
⑧ DEL key
Deletes the selected character or the character on the left of the
cursor.
⑨ Conversion key/Space key
:Displays the normal conversion candidates list.
• Appears in hiragana entry.
:Enters the space.
• Appears in numeric/one-byte alphabet entry etc.
⑩ OK key/Enter key
:Determines the entering characters.
:Inserts a line feed at the cursor position.
• The display is changed depending on the application or
entering item.
⑪ Uppercase/Lowercase switch key
By tapping "
" in hiragana or katakana entry, you can switch the
entered character to the uppercase/lowercase one or add dakuten/
handakuten to the character.
By tapping "
" in alphabet entry mode, you can switch the
entered character to the uppercase/lowercase one.
⑫ Shift key
By tapping the shift key, you can switch uppercase characters
entry and lowercase characters entry.
The display changes as follows each time you tap it.
:Lowercase character entry :Uppercase entry mode
:Uppercase character entry
You can switch the symbols to enter by tapping the keys in two-
byte numeric or one-byte numeric entry.
Prediction conversion
◎ You can switch to the normal conversion candidate list by tapping "
while you enter hiragana characters. Tap "
conversion candidate list again.
◎ When "Wildcard Prediction" (▶P. 55) is set, you can conver t word by
specifying number of characters. "○" is displayed each time you tap "
when the cursor is at right of the text end. "○" is counted as one character,
candidates in more than entered number of characters are displayed in
the conversion candidates.
" to switch to the prediction
"
"
Basic Operation
51
Page 54
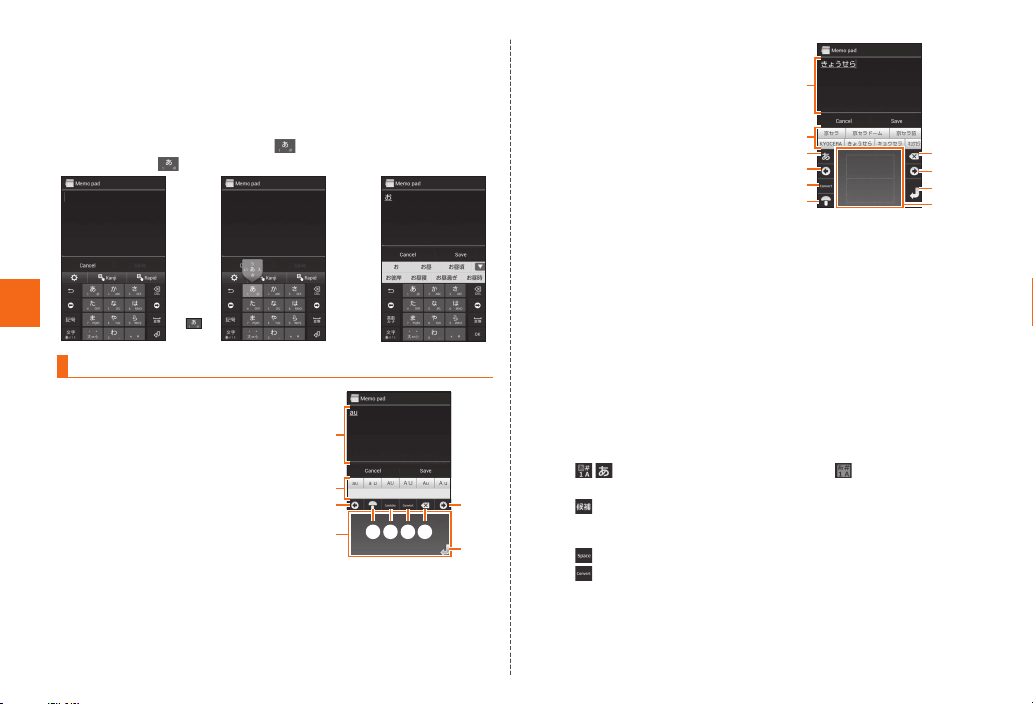
■ Flick input
For software keyboard "10-key", you can enter characters by flicking
key up/down/left/right without tapping the key repeatedly.
Long-touch a key to display input candidates for flick input. Flick to
the direction of character to enter in the character entry area. For
entering "あ" for example, just tap "
touch and flick "
" down.
➡
Longtouch
"
Basic Operation
"
" and for entering "お", long-
➡
Flick
down
Entering by handwriting
■ Handwriting (LaLaStroke)
screen (Kanji handwriting)
Enter hiragana/katakana/alphabet/
symbol/number by handwriting. You
can also input kanji directly.
①
②
③
⑤⑥⑦⑧
④
《Handwriting screen
(Kanji handwriting)》
■ Handwriting (LaLaStroke)
screen (Rapid Handwriting)
Recognize characters of hiragana/
katakana/alphabet/symbol/number*
per one handwriting stroke and
convert them in written order.
You can select a kanji from the
conversion candidates displayed
when entering hiragana to enter.
* For each character entry, switch character types by
character entry mode switch key and then enter.
Character entry screen (10-key/Full-key)
①
②
⑥
③
⑦
⑤
《Handwriting screen
(Rapid Handwriting)》
⑧
③
⑨
④
→[Kanji]/[Rapid]
Handwriting screen (Kanji Handwriting/Rapid Handwriting) appears.
① Character entry area
② Conversion candidate eld
③ Cursor key
④ Handwriting input eld
⑤ Mushroom key
Use Mushroom applications.
(▶P. 54 "Setting up Mushroom applications")
⑥ Character switch key/Candidate key*
/ : Switches character type to enter. For , character type is
③
⑨
⑦ Space key/Conversion key
⑧ DEL key
⑨ Enter key
Inserts a line feed at the cursor position.
determined automatically.
:Candidates of recognized characters are displayed.
* Displayed only in the case of "Kanji Handwriting".
:Enter a space.
:Display candidates of recognized characters.
52
Page 55
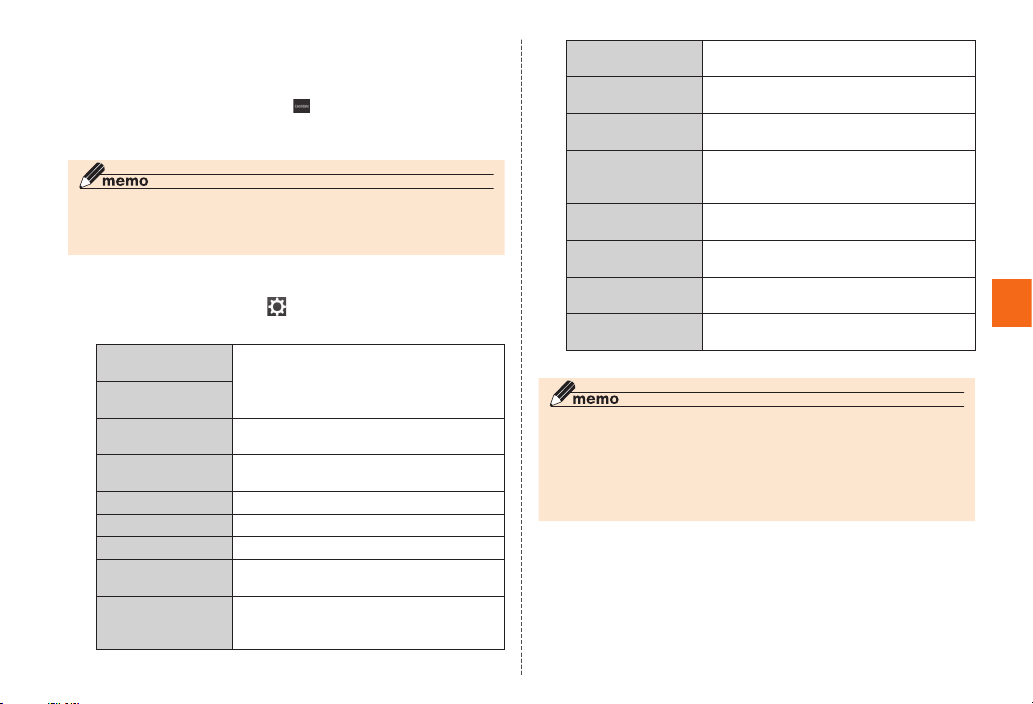
Handwrite a character in the handwriting input eld
Characters are entered when handwritten characters are recognized.
In the case of "Kanji Handwriting", when the handwritten character
•
is not recognized properly, tap "
Alternatively, tap a candidate in the conversion candidate field to
enter.
◎ For "Kanji Handwriting" entry, characters may not be recognized when
handwriting input is too fast or spaces between characters are wide.
Slowly and exactly enter characters.
" to select a right character.
■ Set handwriting input
Handwriting screen→[ ]
The handwriting setting menu appears.
Kanji Handwriting
(LaLaStroke) help
Rapid Handwriting
(LaLaStroke) help
interval for auto-
recognition
guidelines on font size
scrolling time Set a time for scrolling characters.
brushstroke Set a width of writing.
guide message Set whether to display guide messages.
guideline for
alphabet
display borderline Set whether to display a border line
Display operation method.
Set time for recognizing characters
automatically after entry.
Set whether to display a guide line for
character size.
Set whether to display a guide line for
alphabet.
of uppercase and lowercase in the
handwriting input field.
Katakana to 1-byte Set whether to enter katakana in one-byte
character.
other characters to
1-byte
Set whether to enter symbol/number/
alphabet in one-byte character.
number recognition Set whether to recognize number when
entering hiragana.
Set whether to enable finalize gesture by
finalize gesture
flicking diagonally downward to the left in
handwriting input field.
space gesture
Set whether to enable space gesture by
flicking right in handwriting input field.
delete gesture Set whether to enable delete gesture by
flicking left in handwriting input field.
help gesture Set whether to enable help gesture by
flicking upward in handwriting input field.
narrow down
character options
* Items displayed in a menu depend on the screen.
◎ In the handwriting input setting menu, memorize function, predictive
conversion, Japanese user-dictionary, English user-dictionary, reset your
custom dictionary (▶P. 54) can also be set.
◎ To display the detailed explanation on gesture, in Step
Handwriting (LaLaStroke) help]/[Rapid Handwriting (LaLaStroke)
help]→[About gesture].
Set whether to narrow down character
type when entering Kana.
, [Kanji
Basic Operation
53
Page 56
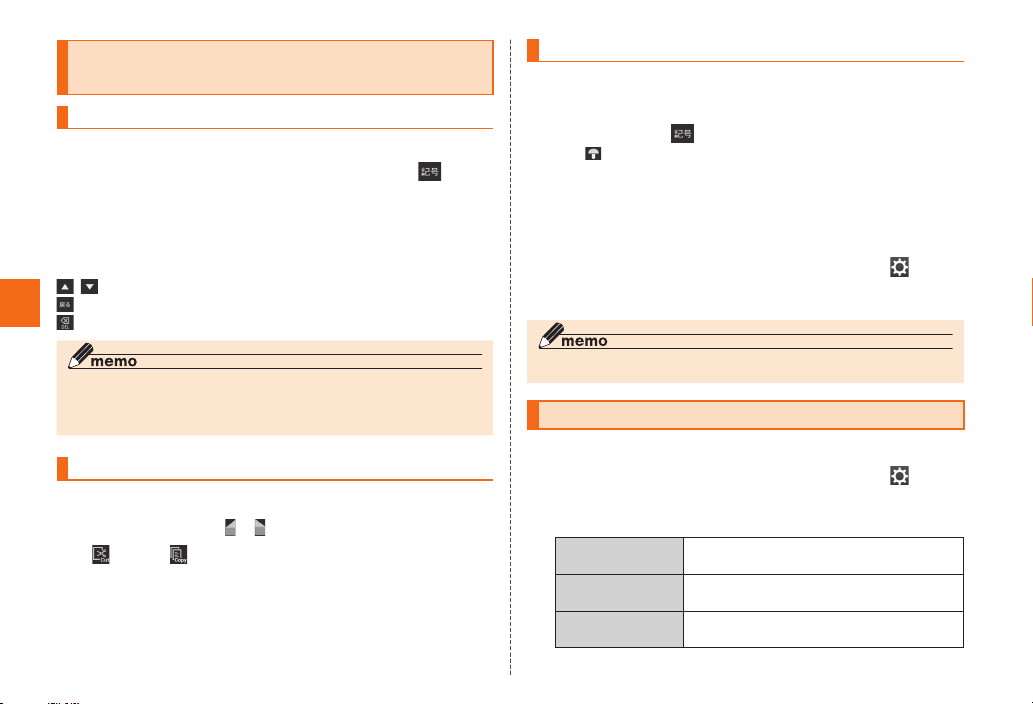
Using convenient functions for character entry
Entering Emoji/Symbol/Facemark
You can use Emoji/Symbol/Facemark with 10-key or QWERTY.
Character entry screen (10-key/QWERTY)→[ ]
Displays the list of Emoji/Symbol/Facemark.
No conversion target is displayed in character entry screen.
Select Emoji/Symbol/Facemark you want to enter
■ Operations in the list of Emoji/Symbol/Facemark
/ :Display the previous/next category or page
:Returns to the character entry screen
:Delete a character at the left of cursor or selected character
Basic Operation
◎ Some list screen displays may be different or some Emoji/Symbol/
Facemark options may not be displayed or entered depending on
operating applications or screens.
Cutting/Copying characters and pasting
Character entry screen→Long-touch the character
entry area→Drag "
[ ] (Cut)/[ ] (Copy)
Tap a position to paste for moving the cursor→Long-
touch the cursor→[Paste]
A list of paste item appears.
Select a word to paste
54
"/" " to select range
Using Mushroom applications
You can use various character input applications using Mushroom.
Character entry screen (10-key/QWERTY)
→Long-touch "
Tap " " on the handwriting input screen.
Select an application
"
■ Setting up Mushroom applications
Make Mushroom settings before using Mushroom.
Character entry screen (10-key/QWERTY)→[ ]
[Change Settings]→[Mushroom]→[Use]→[OK]
◎ You cannot use Mushroom application without installing the application.
Setting iWinn IME
Set an operation sound or vibration for key operation in iWnn IME.
Character entry screen (10-key/QWERTY)→[ ]
→[Change settings]
An iWnn IME setting screen appears.
Sound on Key
Press
Vibrate on Key
Press
Key Preview Set whether to enlarge tapped key or
Set whether to sound key operation sound
when tapping a key.
Set whether to enable vibrator when
tapping a key.
whether to display the guide of flick input.
Page 57
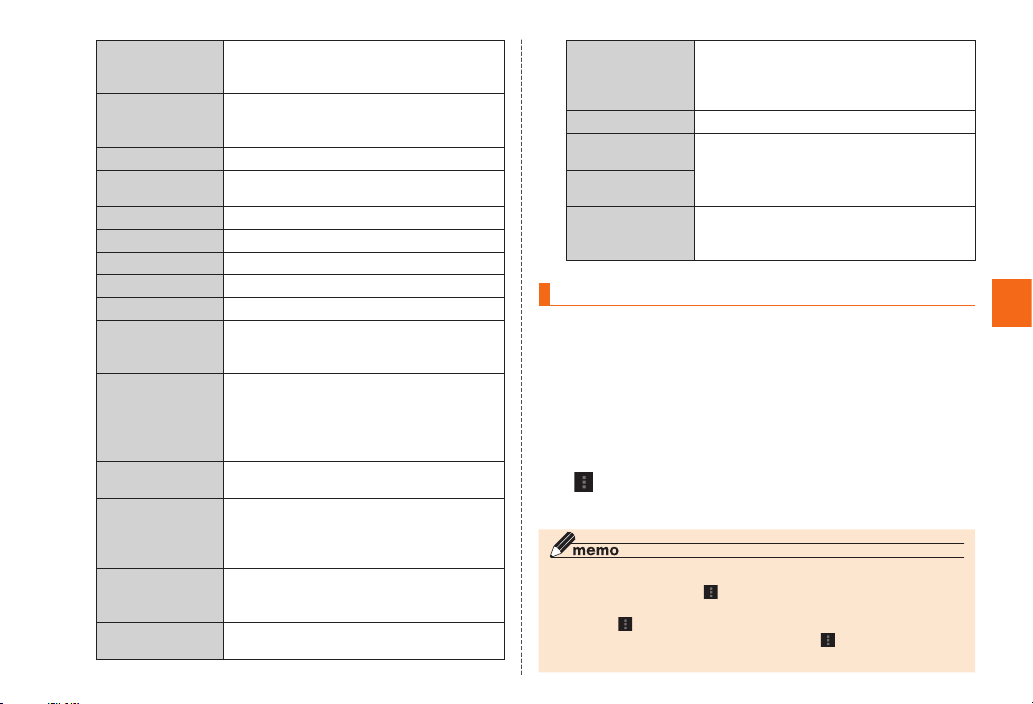
Auto
Capitalization
Auto Space Input Set whether to enter a space automatically
Keyboard Type Change a type of software keyboard.
Key Size Set height of keyboard per display
Keyboard Image Change the image of software keyboard.
Voice Input Set whether to use voice input.
Fullscreen Mode Set whether to enable full-screen mode.
Flick Input Set whether to use flick input (▶P. 52).
Flick Sensitivity Set flick sensitivity for flick input.
Toggle Input Set whether to switch characters by
Auto Cursor
Movement
Input Word
Learning
Word Prediction Set whether to display predictive
Typing Error
Correction
Wildcard
Prediction
Set whether to convert capitalize
automatically when entering one-byte
alphabet.
when conversion candidate word is
selected when entering one-byte alphabet.
orientation.
tapping a key repeatedly when the flick
input is enabled.
Set a time for moving the cursor
automatically after character is entered.
• Even when the cursor is moved, adding
゛ (dakuten)/゜ (handakuten) or changing
uppercase/lowercase can be performed.
Learn confirmed characters from the
conversion candidate list.
conversion candidates when a frequently
used word or paragraph converted/
confirmed in the past is entered halfway.
Set whether to display correction
candidates for inputting error when
entering one-byte alphabet with QWERTY.
Set whether to use Wildcard prediction
(▶P. 51).
Lines of Candidate
Area
Mushroom Set whether to use Mushroom add-ons.
Japanese User
Dictionary
English User
Dictionary
Clear Learning
Dictionary
Change a number of lines for displaying
conversion candidate list such as
prediction conversion when entering
characters with software keyboard.
▶P. 55 "Registering to the user dictionary"
Delete all saved contents in the dictionary.
• A history of entering Emoji/Symbol/
Facemark will be also deleted.
Registering to the user dictionary
You can register a word and the reading of frequently-used word
etc. in Japanese and English up to 500 items respectively. When you
enter the reading of word etc. registered when entering characters, it
is displayed in the conversion candidate list.
iWnn IME setting screen→[Japanese User Dictionary]/
[English User Dictionary]
Displays the words list of Japanese/English user dictionary.
[ ] →[Add]
Enter Reading/Word→[Save]
◎ To edit registered words, select a word to edit on the word list of Japanese/
English user dictionary→[
◎ On the word list of Japanese/English user dictionary, select a word to
delete→ [
word list of Japanese/English user dictionary→[
delete the selected word or all words.
]→[Delete]→[OK] to delete the selected word. And, on the
]→[Edit].
]→[Initialize]→[OK] to
Basic Operation
55
Page 58
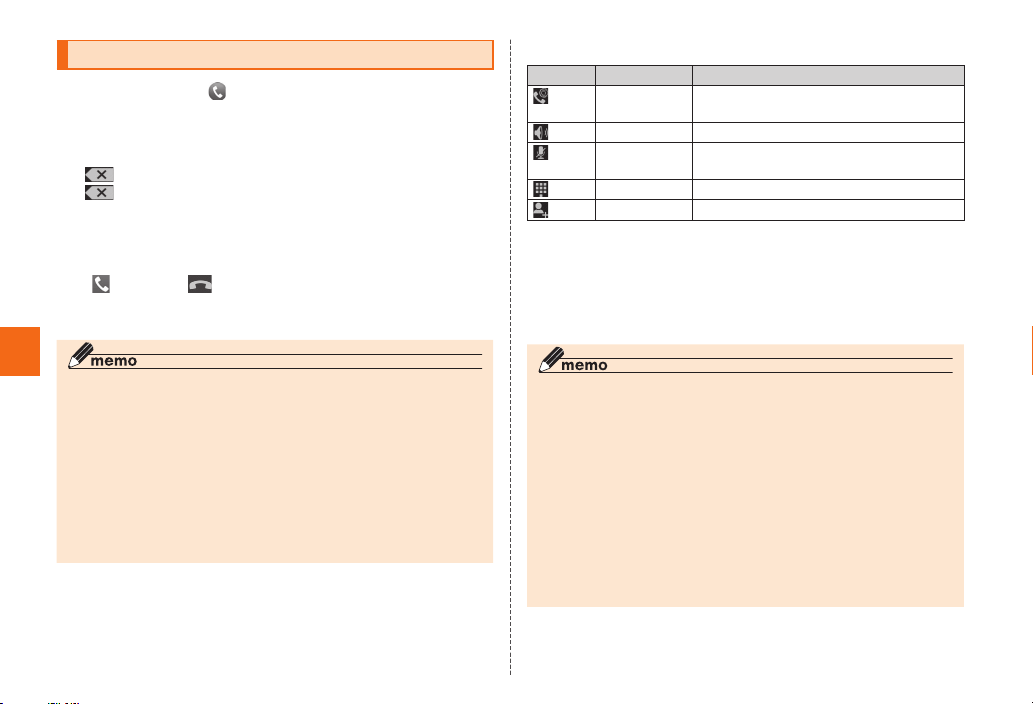
Making a call
Home screen→[ (Phone)]
Enter a phone number
When calling to a fixed-line phone, enter the phone number starting
with the area code even if you are in the same area.
: Delete a number that is entered
(Long-touch): Delete all numbers
Contacts: Activate Contacts
Long-touch "1"→[OK] to connect to the Answering Service Center to
listen to messages.*
* Answering Service EX is a charged optional service.
]→Call→[ ] (End call)
[
Press l r during a call to adjust volume of the other party's
voice.
Phone
◎ Applications list→[Settings]→[About phone]→[Status]→Check your
number in [My phone number]. Also, you can check your own phone
number by activating Contacts.
◎ If you cover the screen by your face etc. while dialing/calling, the display
turns off for preventing false operation.
◎ Call charges when adding "1401" are deducted from the money registered
in your au prepaid card.
◎ Note that even if you cover the microphone, the sound can be conveyed
to the other party.
◎ Even when Airplane Mode is set to on, you can make calls to emergency
services (110, 119, 118).
■ Available operations during a call
Icon Operation Description
Enhanced
call
Switch to Enhanced call.
Speaker Switch to a handsfree call.
Mute Make your voice not to be heard by the
other party.
Number Send push tone signals.
Add a call Call to another party.
■ Emergency call location noti cation
This product supports "Emergency call location notification" so that
if you make an emergency call to the police, fire station or Regional
Coast Guard Headquarters, your current location (GPS information)
will be transmitted to the agency receiving the emergency call.
◎ In this section, the police (110), fire station (119) and Regional Coast
Guard Headquarters (118) are collectively referred to as the emergency
call receiving agency.
◎ This feature may not yet be available at some emergency call receiving
agencies.
◎ If you add "184" before the emergency call number 110/119/118, the
emergency call receiving agency will not be notified of your location and
phone number.
◎ In places where signal reception from GPS satellites or a base station is
relatively poor, such as in an underground mall, inside a building or behind
a tall building, the emergency call receiving agency may be notified of
some other place different from your actual location.
◎ When GPS cannot be used to notify of your location, base station signal is
used instead.
56
Page 59
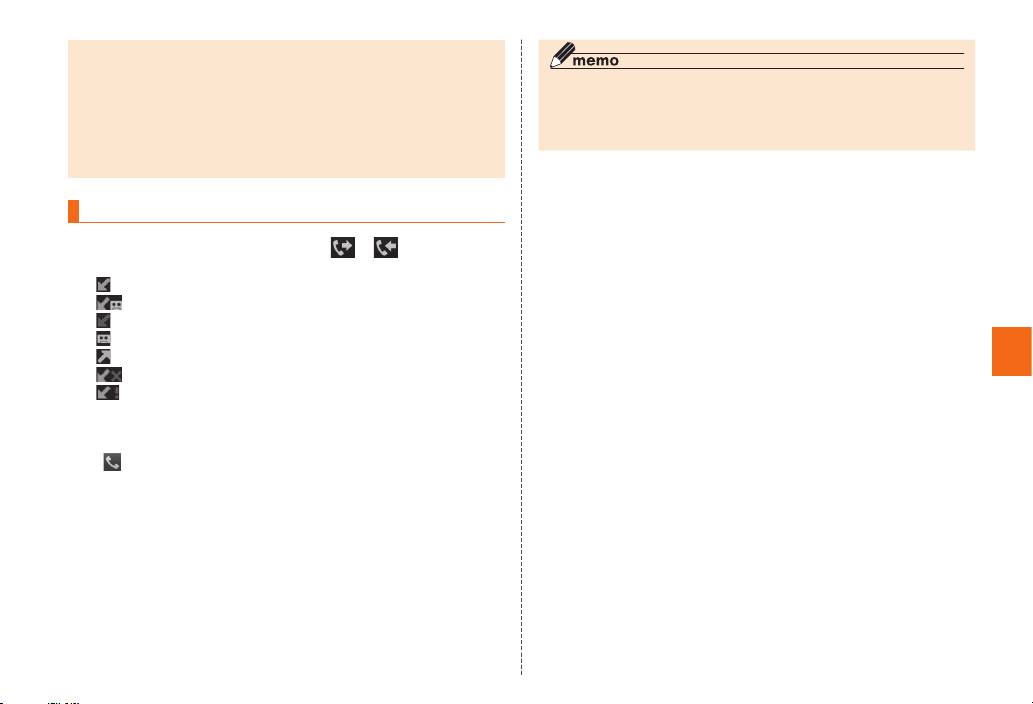
◎ When making an emergency call to the police, fire station or Regional
Coast Guard Headquarters, always confirm where you are, and tell them
your exact location on the phone. Note that depending on the area where
you are calling, your call may not be connected to the agency having
jurisdiction over that area.
◎ If the emergency call receiving agency determines that human lives and
health are in danger, they will be able to acquire the caller's location
information during the call or within a certain period of time after the call.
Using history to make a call
Phone number input screen→[ ]/[ ]
A call history list screen appears.
: Incoming call
: Incoming call (with answer memo)
: Missed call (red)
: Missed call (with answer memo)
: Call
: Rejecting a call
: Missed call (one-ring phone scam*)
* A missed call hanged up within approximately 3 seconds is regarded as one-ring phone
scam. Be careful because it might have you connected to a malicious charged program
if you call back.
[ ] in the call history to call
A call to a selected part is made.
• Tap a history entry on the outgoing/incoming history list screen
to display an entry detail screen. You can play answering memo,
compose SMS, register to the Contacts or call rejection other than
make a voice call.
◎ The product can store up to 50 entries in each of the outgoing and
incoming histories. If the history exceeds 50 entries, it is automatically
deleted from the oldest entry. The number of the saved entries may be
reduced depending on amount of free space.
■ Incoming noti cation service
"着信お知らせサービス (Incoming notification service)" is a service
that notifies you via SMS of incoming call to the voice mail while au
phone is turned off, in Airplane mode or out of service area.
When the other party hanged up the phone without leaving a
message, you are notified of a received time and the other partys
phone number.
Phone
57
Page 60
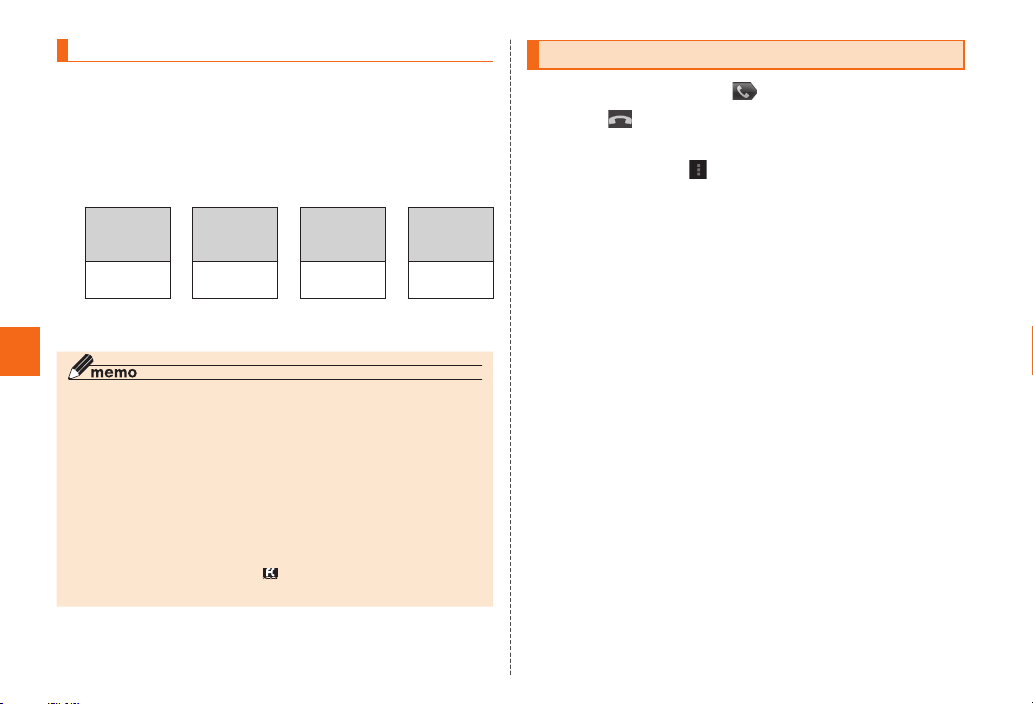
Calling overseas ( au International Call Service)
You can make international calls without any special procedure from
the product.
Example: To call "212-123-XXXX" in the USA from the product
On the phone number entry screen→Enter an access
code, country code, area code, and the phone number
of the other party→[Call]
International
access
1
code*
001010 or
010
*1 Long-touch "0" to enter "+" and the access code "001010" is automatically added.
*2 If the area code starts with "0", dial it without including the "0". (There are some exceptions
such as fixed-line phones in some countries or regions including Italy and Moscow).
Phone
◎ A monthly charge limit is set for au International Call Service. You cannot
use au International Call Service in the period from the time that au finds
exceeding the charge limit to the last day of the same month.
◎ If using the product is stopped because of exceeding the charge limit, you
can restart using from the 1st day of next month. Also, even if in the period
that using the product is stopped, domestic calls are available as usual.
◎ International call charges are billed together with monthly local call
charges.
◎ For more information on au International Call Service, dial either of the
following numbers:
From au cell phones (toll-free): 157 (area code not required)
From fixed-line phones (toll-free):
(Open 9:00 to 20:00 everyday)
code (USA)
➡
Country
Area code*
➡
1 212 123XXXX
0077-7-111
2
➡
Phone
number of
the party
Receiving a call
While incoming, slide " " to the right
Call→[ ] (End call)
■ To reject incoming call
While incoming, [ ] →[Decline]
Ringtone stops and the call ends. The caller is notified by the voice
guidance.
■ Display of incoming call
When there is an incoming call, the following contents are displayed
by default.
• When a phone number is notified from the caller, the phone number
appears on the display. Information such as name, image, etc.
saved in the Contacts is also displayed.
• When a phone number is not notified from the caller, a reason is
displayed on the display.
"ID Unsent", "Payphone", "Not Support*"
* Calling from a telephone that cannot notify you of the phone number.
You can set not to display the phone number, name, image, etc. of
the other party when there is an incoming call.
58
Page 61
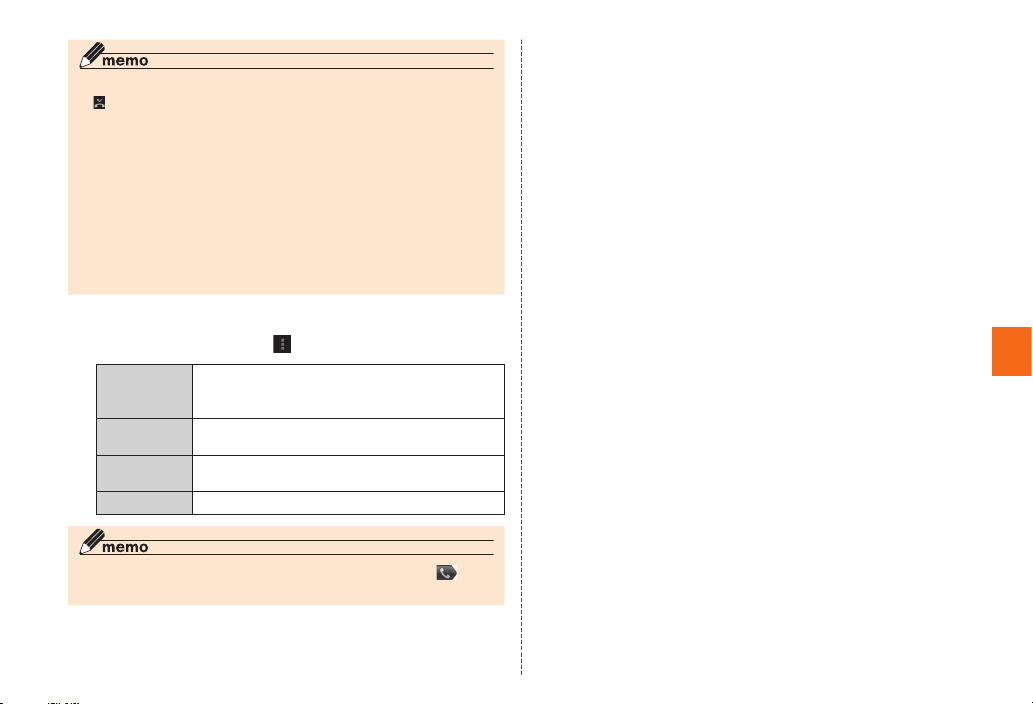
When you do not answer the incoming call
◎
appears on the status bar. Slide the status bar down to open the
notification/status panel, a received time and phone number or name
registered in the Contacts are displayed.
To disable ringtone or vibrator for incoming call
◎ Press lr while call is incoming to disable ringtone or vibrator.
When there is an incoming call while you use another function
◎ If a call received while you are using the Contacts or mail, the call takes
precedence. After the call ends, the function can be used again.
◎ If you are recording a video, recording stops and the screen after
recording appears.
◎ If you record voice with a voice recorder etc., recording stops and
recorded data is saved.
■ Using menu during an incoming call
While receiving a call, [ ]
Replay with
SMS
Reply Auto
answering
Forwarding Without answering an incoming call, forward to
Decline Reject an incoming call.
◎ To answer the call while an answering memo is recorded, slide " " to
the right.
Reject call and answer by SMS message.
• You can send an SMS by selecting a phrase
or composing yourself.
Answer by the answering memo message and
record a message of the other party.
the forwarding phone number.
Phone
59
Page 62
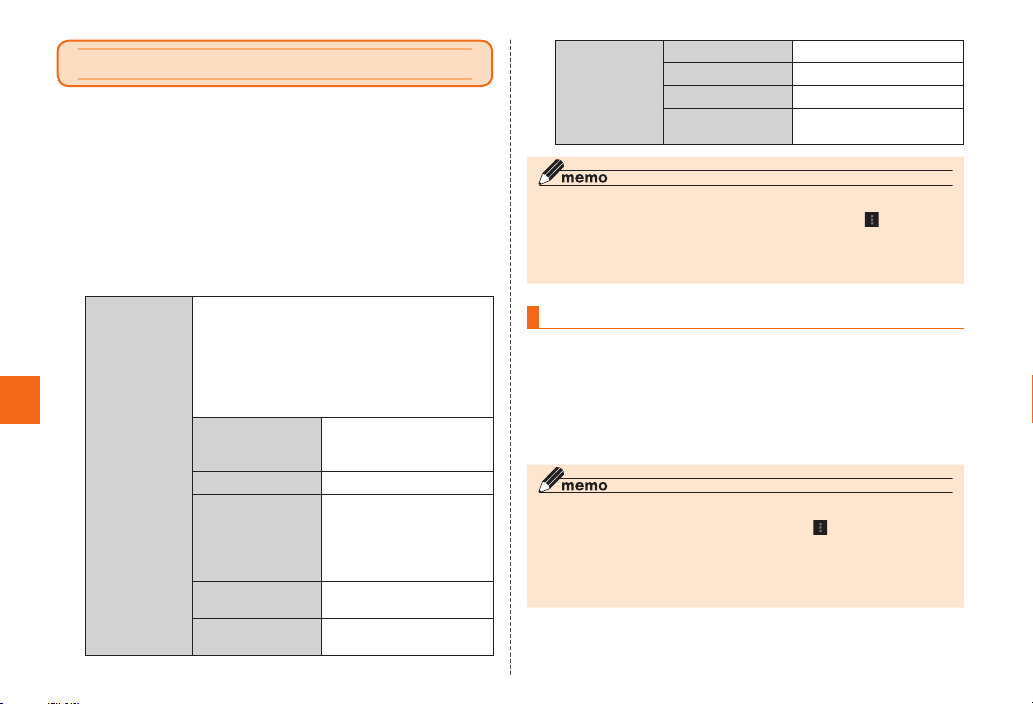
Using E-saving mode
By setting backlight timeout or screen brightness at the minimum
value, or setting Wi-Fi
battery power.
Applications list→[E-saving settings]
A description screen of the E-saving mode appears.
• Select "Understood" not to show the description screen after that
time.
[OK]
The E-saving settings screen appears.
E-saving mode
switch
Tool/Applications
60
®
, Bluetooth®, etc. to OFF, you can save the
Select E-saving to Invalidate all items for
power saving at once or set to the minimum
value. Eco level and Standby time for each
mode are displayed.
OFF: Return to previous settings.
My e-saving: Set following items individually.
E-saving: Set All data communication only.
Screen timeout Select time for the
Brightness Set backlight brightness.
Auto-rotate screen Set whether to switch
Wi-Fi Set whether to enable Wi-
Bluetooth Set whether to enable
backlight to be turned off
automatically.
portrait/landscape
display automatically
according to orientation
of the product.
®
Fi
function.
®
Bluetooth
function.
E-saving mode
switch
◎ To set E-saving automatically when remaining battery level becomes
the set value (%) or less, in the E-saving settings screen, [
settings]→Select "E-saving settings". When the remaining battery becomes
higher than the set value (%), the power saving mode is automatically
deactivated.
Use GPS satellites Set GPS function.
Live wallpaper Set Live wallpaper.
NFC R/W P2P Set NFC function.
All data
communication
Set data communication.
] →[Other
Managing running applications
On the power saving setting screen→Tap "MANAGE
APPLICATIONS"
An application managing screen appears.
Tap "Exit" for the application you want to quit
Tap "Exit all" to quit all running applications.
◎ You can set up applications that will not quit even if "Exit all" is tapped,
operate from the application managing screen, [
settings]→Tap an application to be always run→[OK].
◎ You are recommended to set some applications to "Always run settings"
because the product may not operates properly if they are quitted.
◎ Some applications cannot be quitted even if "Exit" is tapped.
] →[Always run
Page 63
Using au災害対策 (au Disaster
Countermeasure)
au災害対策 (au Disaster Countermeasure) is an application in
which you can use Disaster Message Board or Early warning mail
(earthquake early warnings and disaster/evacuation information,
tsunami warning), 災害用音声お届けサービス (Disaster voice
message service).
Applications list→
[au災害対策(au Disaster Countermeasure)]
au災害対策 (au Disaster Countermeasure) menu appears.
Using Disaster Message Board
Disaster Message Board service enables you to register information
of well-being from an area of distress via LTE NET in case of largescale disaster such as earthquake with a seismic intensity of over 6
lower. Registered information can be viewed on any cell phones and
PCs besides by au cell phone users.
For details, refer to "Disaster Message Board" of au homepage.
au災害対策 (au Disaster Countermeasure) menu
→[災害用伝言板 (Disaster message board)]
Follow the onscreen instructions to register/confirm.
◎ To register information of well-being, E-mail address (ezweb.ne.jp) is
required. Set up E-mail address beforehand.
◎ Deleting or changing the setting for information of well-being is unavailable
during Wireless LAN (Wi-Fi
◎ The Company makes no guarantees about the quality of this service.
The Company is not liable in the event of any nonconformities about
registration of well-being information or damages by loss of well-being
information arising from intense access to this service or equipment failure
or damages caused by registered well-being information.
®
) connection.
Using emergency early warning mail
The emergency early warning mail is a service that distributes
emergency earthquake information or tsunami warning delivered
from the meteorological bureau or disaster evacuation information
delivered from the government or local public organization to all au
cell phones in specified areas simultaneously.
When you purchased the product, "受信設定 (Reception setting)"
of the emergency early warning mail is set to "受信する (Receive)".
Reception setting of tsunami warning is available in the settings of
disaster/evacuation information.
When you receive emergency earthquake information, ensure your
safety and take proper action according to the situation around you.
When you receive a tsunami warning, draw away from sea coast
immediately and evacuate to safe place such as upland or well-built
high building.
au災害対策 (au Disaster Countermeasure) menu
→[緊急速報メール (emergency early warning mail)]
Inbox appears.
Select a mail you want to view to check the detail.
Tool/Applications
61
Page 64
削除 (Delete) Delete the received mail.
設定(Setting) 緊急地震速報 (Emergency earthquake
Tool/Applications
information): Set whether to receive
emergency earthquake information.
災害・避難情報 (Disaster evacuation
information): Set whether to receive disaster
evacuation information.
音量 (Volume): Set ring tone volume.
バイブ (Vibrate):Set whether to operate
vibrator when receiving.
マナー時の鳴動 (Action in Silent mode):
Set whether to notify according to the silent
mode setting in Silent Mode.
緊急地震速報 (Emergency earthquake
information): Check ringtone or operation of
vibrator for emergency early warning mail.
災害・避難情報 (Disaster evacuation
information): Check the ring tone and vibrator
settings for disaster evacuation information
and tsunami warning.
◎ The service is available only in Japan (it cannot be used overseas).
◎ No information fee or communication charge is required for receiving
emergency early warning mail.
◎ You cannot receive emergency early warning mail when your cell phone is
turned off or during a call.
◎ Emergency early warning mail may not be received when your cell phone
is communicating such as while sending/receiving SMS/e-mail or using
the browser, or if you are in a place where signal does not reach even
in the service area (e.g. in a tunnel, basement) or in a place with a poor
reception.
◎ You cannot receive the emergency early warning mail that the reception is
failed.
◎ Reception of emergency early warning mail is notified by a special
warning tone. It is not possible to change the warning tone.
◎ Information from someplace other than your current location may be
received.
◎ KDDI is not liable for damages suffered by customers resulting from
the service's information, lack or delay in the information caused by
transmission or system breakdowns, or other events that are outside the
responsibility of KDDI.
◎ Refer to the Japan Meteorological Agency web page for details about
distribution of emergency earthquake information.
http://www.jma.go.jp/
Emergency earthquake information
◎ Emergency earthquake information is sent to areas where strong quakes
(over 4 degrees) are expected when the earthquake whose the maximum
seismic intensity 5 lower is anticipated occurs.
◎ Immediately after an earthquake occurs, quakes (P waves and initial
tremors) near the epicenter are detected and position, scale, and
expected strength are automatically calculated and notification is sent
as soon as possible within a few seconds to tens of seconds before the
strong quakes (S waves and major tremors) caused by the earthquake
start.
◎ Emergency earthquake information may not arrive before strong tremors in
areas near the epicenter.
62
Page 65
◎ This delivery system is different from emergency earthquake information
provided through TV, radio, or other communication procedures, which
means that the time the emergency earthquake information arrives may
vary.
Tsunami warning
◎ Tsunami warning is a notification delivered from the meteorological bureau
(major tidal wave, seismic sea wave) to the area including target coast.
Disaster evacuation information
◎ Disaster evacuation information is a service that distributes bulletins
concerning residents' safety including evacuation advisories, evacuation
orders and other warnings issued by the national and local governments.
Using 災害用音声お届けサービス
(Disaster voice message service)
Disaster voice message service is a service which allows you to
record your voice and send someone you want to inform your wellbeing in case of a large-scale disaster.
au災害対策 (au Disaster Countermeasure) menu
→[災害用音声お届けサービス (Disaster voice message
service)]
Follow the onscreen instructions to register.
◎ Sending/Receiving voice messages is available via LTE/3G network. Turn
off wireless LAN (Wi-Fi®) function and then use it.
◎ Voice message can be recorded for up to 30 seconds.
◎ Voice messages can be sent and received to or from au cell phones
(exchanging voice messages with cell phones of other telecommunication
carriers is scheduled in spring 2013 or later).
◎ Voice message may be difficult to hear if the media volume is low or Silent
mode is set.
◎ Voice messages cannot be saved or played if the main unit (memory)
does not have available memory.
◎ Some cell phones do not support receiving voice messages. For details,
refer to au homepage.
Tool/Applications
63
Page 66
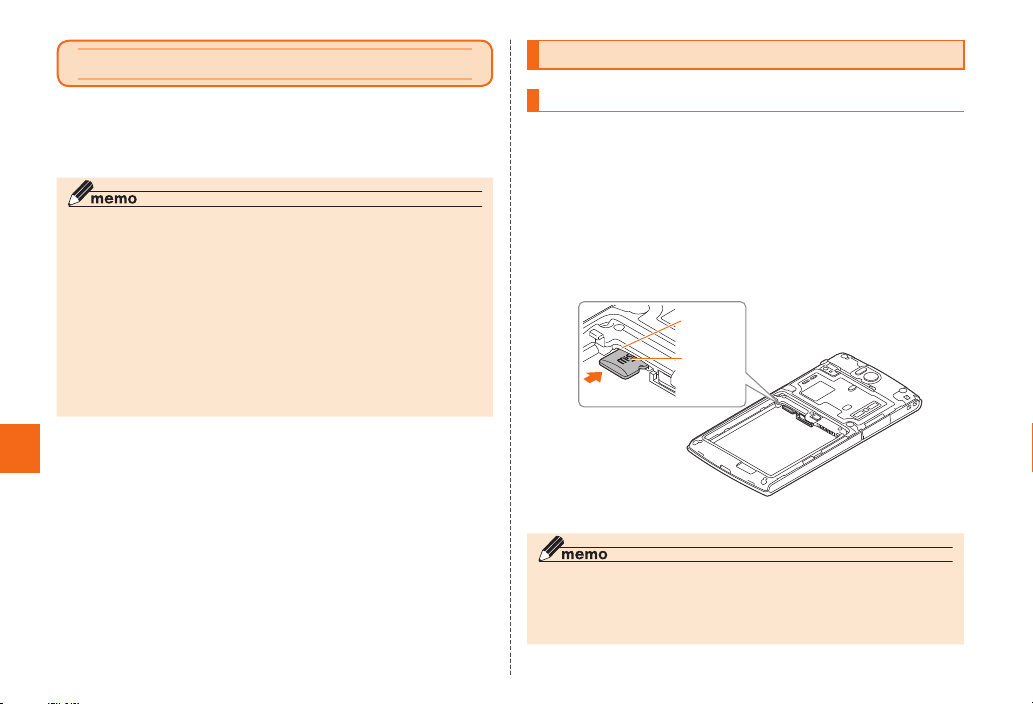
Using microSD memory card
You can set microSD memory card (including microSDHC memory
card, microSDXC memory card) to the product to save, move and
copy data. And also you can save contacts, mail messages, etc. in
microSD memory card.
◎ A microSD memory card initialized on other devices may not be used on
the product properly. Initialize it on the product.
◎ Some files such as copyright protected data may not be played on the
product even if they are moved/copied from a PC etc. to a microSD
memory card successfully.
◎ Use specified microSDXC memory card. If you insert a microSDXC
memory card into a device that does not support SDXC, a message may
appear asking to format. Do not format the card. If you format microSDXC
memory card with a device that does not support SDXC, data is lost and
the microSDXC memory card is overwritten to a different file system.
Besides, you may not be able to use microSDXC memory card with
original memory capacity.
■ Handling Precautions
• Do not turn off the product or subject it to shocks while accessing
File Management
data on a microSD memory card. It may result in damage to data.
• Do not drop or subject the product with a microSD memory card
inserted to shakes or shocks. It may result in damage to recorded
data or data loss.
• Do not insert objects other than microSD memory card such as
liquid, metals or flammable items into the microSD memory card
slot. It may result in a fire, electric shock or malfunction.
• This product supports microSD/microSDHC/microSDXC memory
card. For supported microSD/microSDHC/microSDXC memory
cards, contact each microSD memory card manufacturer or refer to
the au homepage.
64
Attaching/Removing microSD memory card
Attaching microSD memory card
Turn off the product and remove the battery pack
cover and the battery pack (▶P. 31)
Con rm the direction of the microSD memory card
and slowly insert it into the slot until it clicks
Insert a microSD memory card until you hear a click and confirm it is
locked.
Releasing the microSD memory card before it is locked may cause it
to pop-out.
Memory
card slot
microSD
logo side
up
Attach the battery pack and the battery cover
◎ Insert a microSD memory card with the right side up in the appropriate
direction. Inserting a microSD memory card forcefully into the slot could
result in failure to remove the microSD memory card or damage to the
microSD memory card or the product.
Page 67
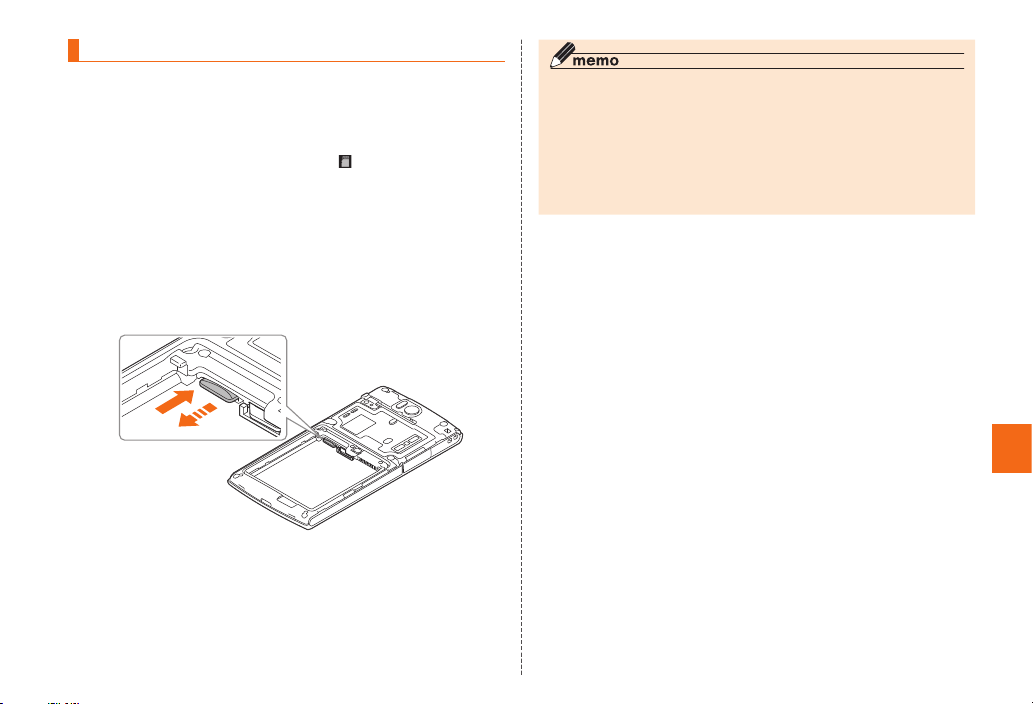
Removing microSD memory card
Make sure to unmount a microSD memory card before removing.
Applications list→[Settings]→[Storage]
[Unmount SD card]→[OK]
microSD memory card is unmounted and appears in the status bar.
Turn off the product and remove the battery cover and
the battery pack
Slowly push the microSD memory card toward the
slot until it clicks
After it clicks, pull back your finger and keep putting it on the microSD
memory card until it comes out a little. Releasing the microSD memory
card when it is pushed toward the slot may cause it to pop-out.
Slowly remove the microSD memory card
Slowly pull the microSD memory card straight out.
Some microSD memory cards cannot be unlocked and do not come
out smoothly. In such case, pull it out with your finger.
Attach the battery pack and the battery cover
◎ Do not touch the terminal part of microSD memory card.
◎ Do not remove the microSD memory card forcefully. It may result in
damage to the microSD memory card or the product or data loss.
◎ Application installed to microSD memory card cannot be used once you
removed microSD memory card.
◎ The microSD memory card may be warm after a long time use. It is normal.
◎ Do not unmount a microSD memory card during saving. Data may be
damaged (erased).
File Management
65
Page 68
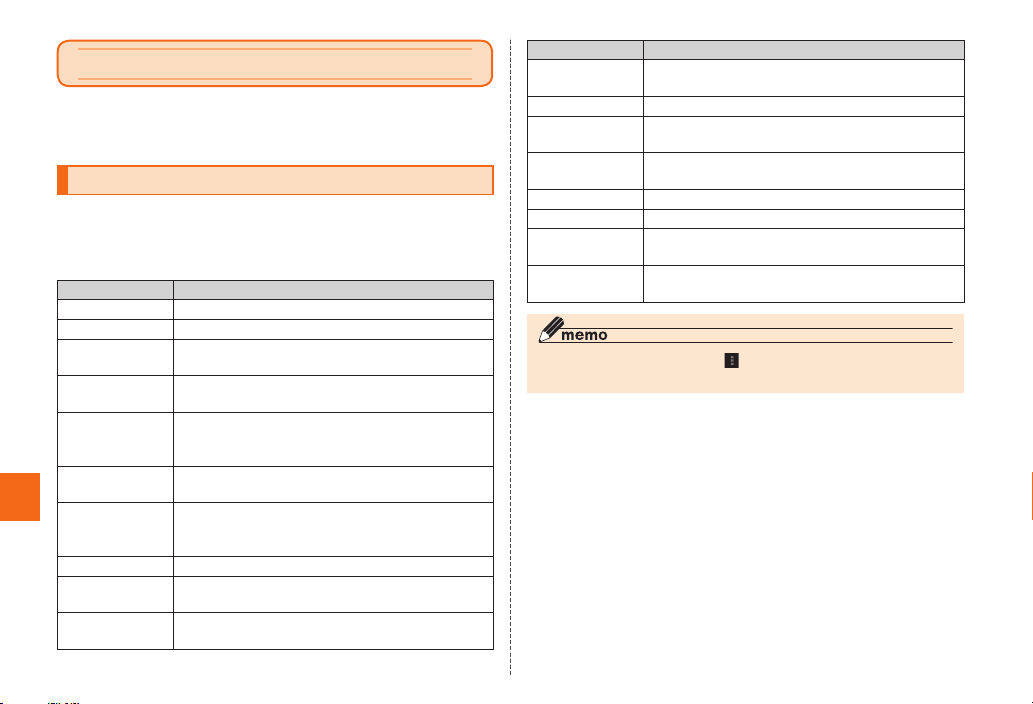
Settings
You can access the setting menu to set and manage functions of the
product. You can customize wallpaper and ringtones, set security,
initialize data, etc.
Opening settings screen
Applications list→[Settings]
Settings screen appears.
■ Setting menu
Item Description
Wi-Fi Set Wireless LAN (Wi-Fi®) function.
Bluetooth Set Bluetooth® function.
Data usage Show amount of data communication or set
More... Make communication settings such as airplane
Sound Make sound settings such as Silent mode,
Display Make display settings such as display font,
Storage Check memory capacity of the internal storage
Settings
Battery Show battery level and battery usage.
Apps Check downloaded applications and make
Accounts & sync Manage online service account and make basic
66
upper limit of data communication.
mode, VPN, MHL or tethering.
vibrate, ringtone, notification ringtone, touch tone,
etc.
wallpaper, brightness, orientation of screen.
of the product or a microSD memory card or
initialize a microSD memory card.
settings for running applications.
settings on data synchronization.
Item Description
Location
services
Security Make security settings such as screen lock.
Language &
input
Factory data
reset
Date & time Set date and time, date & hour format etc.
Accessibility Set call end operation and user support service.
Developer
options
About phone Check your own phone number, battery level,
◎ Alternatively, applications list→[ ] →[Phone settings] to display the
settings menu.
Make location settings using wireless LAN (Wi-Fi
or GPS functions.
Set display language or make text input settings.
Reset the product.
Make developer settings such as USB debag,
virtual location.
etc. Perform software update.
®
)
Page 69
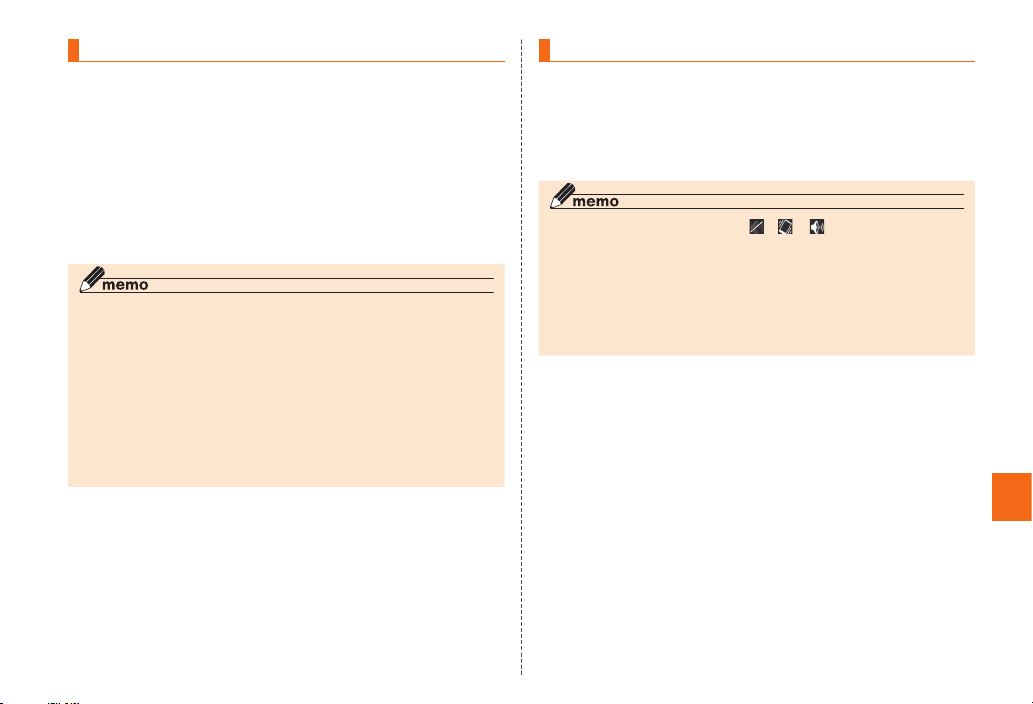
Setting Airplane mode
When Airplane mode is set, all wireless functions (phone, packet
communication, wireless LAN (Wi-Fi
are turned off.
Settings screen→[More...]
Select "Airplane mode"
You can enable Wireless LAN (Wi-Fi®)/Bluetooth® function even though
Airplane mode is ON. Do not use wireless LAN (Wi-Fi
function in a place where the use of radio waves is prohibited such as
in airplane or hospital.
◎ Turn the power OFF in areas where use of cell phones is prohibited, such
as in airplanes and hospitals.
◎ When Airplane mode is set, you cannot make calls. However, calling 110
(Police), 119 (Fire/Ambulance), 118 (Maritime rescue), 157 (Customer
Service Center) is available. After calling emergency number, Airplane
mode is disabled.
◎ When Airplane mode is set, you cannot receive calls. Besides, sending/
receiving mail, communication via wireless LAN (Wi-Fi
®
Bluetooth
◎ Alternatively, F (over 1 sec.)→[Airplane mode] to switch the airplane
function are disabled.
mode on or off.
®
) function, Bluetooth® function)
®
)/Bluetooth®
®
) function/
Setting the Silent Mode
Set Silent mode not to inconvenience people around you in a public
space.
Setting screens→[Sound]→[Silent mode]
[Off]/[Vibrate]/[Mute]
◎ Alternatively, F (over 1 sec.)→[ ]/[ ]/ [ ] to switch Mute/Vibrate/
OFF.
◎ Press l to turn the ringtone down by one level. Decreasing the ringtone
volume sets Vibrate/Mute.
◎ Shutter sound, start/end recording sound of camera are emitted even in
the Silent mode.
◎ If you play to check the settings in the Silent mode, data is played without
sound. For some functions, pressing l r adjusts the volume.
Settings
67
Page 70
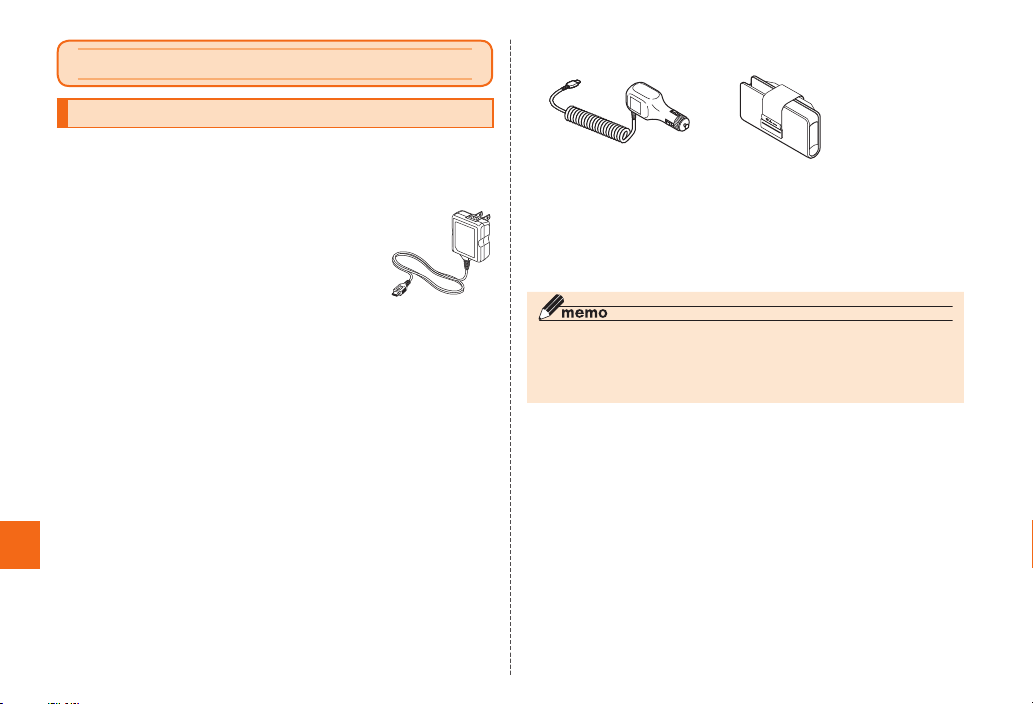
Appendix
Introduction of related accessories
■ Battery Pack (KYL21UAA)
■ Quick Charge Desktop Holder (KYL21PUA)
■ AC Adapter for Desktop Holder (KYL21PQA)
■ Common AC Adapter 04 (0401PWA) (sold separately)
■
Common AC Adapter 03 (0301PQA) (sold separately)
■ Common AC Adapter 03 Navy (0301PBA)
(sold separately)
■ Common AC Adapter 03 Green (0301PGA)
(sold separately)
■ Common AC Adapter 03 Pink (0301PPA) (sold
separately)
■ Common AC Adapter 03 Blue (0301PLA) (sold
separately)
■ AC Adapter JUPITRIS (White) (L02P001W) (sold separately)
■ AC Adapter JUPITRIS (Red) (L02P001R) (sold separately)
■ AC Adapter JUPITRIS (Blue) (L02P001L) (sold separately)
■ AC Adapter JUPITRIS (Pink) (L02P001P) (sold separately)
Appendix/Index
■ AC Adapter JUPITRIS (Champagne) (L02P001N) (sold separately)
Common AC
Adapter 04
■
Common DC adapter 03
(0301PEA) (sold separately)
■ au Carrying Case F Black
(0105FCA) (sold separately)
■ Portable charger 02 (0301PFA) (sold separately)
■ microUSB cable 01 (0301HVA) (sold separately)
■ microUSB cable 01 Navy (0301HBA) (sold separately)
■ microUSB cable 01 Green (0301HGA) (sold separately)
■ microUSB cable 01 Pink (0301HPA) (sold separately)
■ microUSB cable 01 Blue (0301HLA) (sold separately)
* Note that your AC adapter may be different from this illustration.
◎ For the latest information on accessories, visit the au homepage (http://
www.au.kddi.com/) or contact the Customer Service Center.
◎ Accessories described on this page can be purchased from the au Online
Shop. http://auonlineshop.kddi.com/
68
Page 71
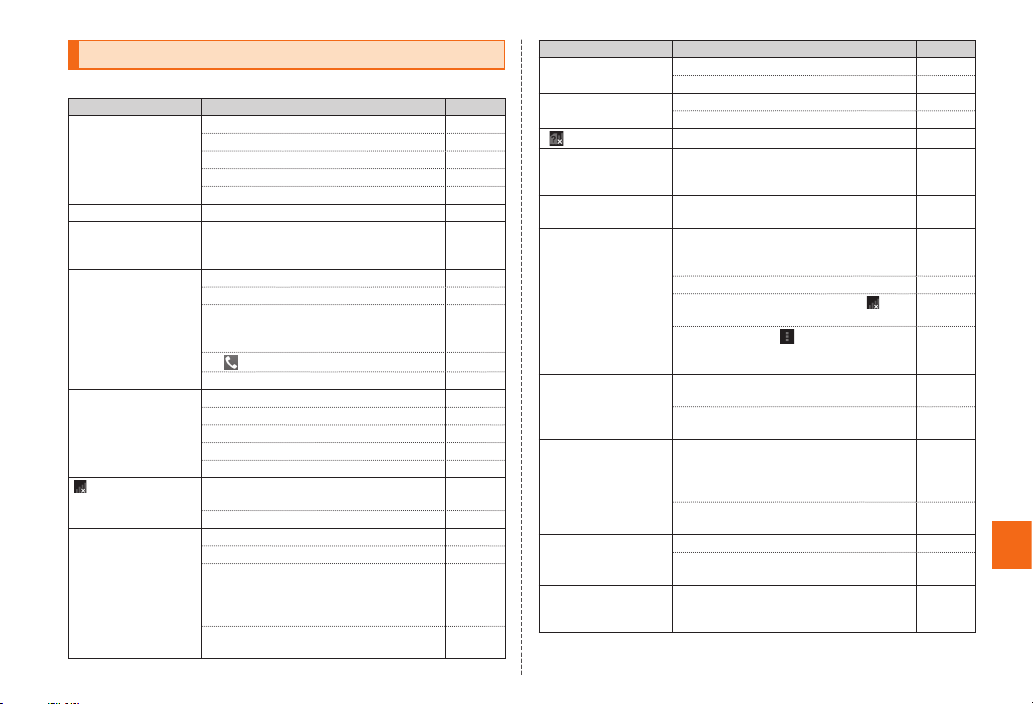
Troubleshooting
Before you assume that the product is malfunctioning, check the following:
Symptom What you should check Page
Power is not turned on. Is the battery pack charged? P. 34
The power goes off. Is the battery pack fully charged? P. 34
The power is going
off while the activation
logo is displaying.
Cannot make calls. Is the power turned on? P. 37
Cannot receive calls. Is signal strong enough? P. 47
(out of range)
appears.
Cannot charge the
battery pack.
Is the battery pack attached properly?
Are the terminals of the battery pack durty? P. 34
Is F pressed and hold? P. 37
Is the charging lump blinking yellow? P. 37
Is the battery pack fully charged? P. 34
Is your au Micro IC Card (LTE) inserted? P. 32
Did you enter the correct phone number?
(Did you enter the phone number starting
with the area code?)
Is " " tapped after entering phone number?
Is "Airplane mode" set? P. 67
Is the product out of the service area? P. 47
Is the power turned on? P. 37
Is your au Micro IC Card (LTE) inserted? P. 32
Is "Airplane mode" set? P. 67
Is the product out of the service area or in
an area where the signal is weak?
Is the built-in antenna covered with finger etc.?
Is the charger connected correctly? P. 35
Is the battery pack attached properly? P. 30
Is the temperature of the product or battery
pack high or low? Charging may stop due
to the temperature of the product or battery
pack.
Are the specified accessories (adapter,
etc.) used to charge?
P. 30
P. 56
P. 56
P. 47
P. 29
P. 34
P. 35
Symptom What you should check Page
Cannot operate key/
touch panel.
Cannot operate touch
panel as intended.
"
" appears.
A message such as
charge the battery
appears.
The phone answers
automatically.
Battery usage time is
short.
Cannot connect to the
party and the phone
beeps even though a
call is made.
Display is dark. Is the temperature of the product or battery
Cannot hear/Hard to
hear the other party.
The screen cannot be
operated by tapping
any keys.
Is the power turned on? P. 37
Turn off the power and then turn it on again. P. 37
Do you operate the touch panel properly? P. 40
Turn off the power and then turn it on again. P. 37
Is your au Micro IC Card (LTE) inserted? P. 32
The battery is almost dead. P. 34
Is "Phone meno" set? P. 59
Is the battery pack fully charged?
• Charge the battery pack until the red
charging light goes off.
Is the battery pack end-of-life? P. 16
Is the product left in a place where
of range) appears for a long period?
Applications list→[
→[RUNNING]→Tap application or function
not used to end/stop.
Is the product out of the service area or in
an area where the signal is weak?
The line is extremely busy or the party is
calling. Retry later.
pack high? The display may become
dark according to the temperature of the
product.
Display brightness is set to "Low" when the
e-saving mode is set.
Is the earpiece volume too low? P. 56
Place your ear hole to the earpiece. P. 29 ,
Turn off the power and then turn it on again. P. 37
] →[Manage apps]
(out
P. 34
P. 47
−
P. 47
−
−
P. 60
P. 30
Appendix/Index
69
Page 72
Symptom What you should check Page
Settings made for
specified contacts do
not work.
Cannot recognize a
memory card.
Is the caller ID notified? Incoming picture,
ring tone settings are not effective if the
caller does not notify the caller ID. Group
ring tone settings in Contacts is not
effective, either.
Is a microSD memory card inserted
properly?
Is the microSD memory card unmounted? P. 65
For more details, visit au Customer Support site of au homepage.
http://cs.kddi.com/support/komatta/kosho/index.html
Using earphones
Connect an earphone (commercially available), an earphone
microphone (commercially available) or a stereo earphone
microphone (commercially available) to use.
Connect an earphone to the earphone microphone
terminal of the product
Appendix/Index
◎ Some earphone microphones may not be used.
70
−
P. 64
Updating Software or OS
You can update the product to the most recent software for optimal
performance and to get the latest enhancements.
There are several methods to update software.
• Downloading software into the product to update
• Downloading software via Wi-Fi
• Connecting the product to a PC to transfer software downloaded
into the PC and update
■ Notes
• When au Micro IC Card (LTE) is not inserted, software cannot be
updated.
• You are charged for data communication when connecting to the
Internet from the product using packet communication.
• When software update is necessary, you will be informed on au
homepage, etc. For details, contact an au shop or Customer
Service Center (call toll-free 157). In addition, users of the product
will receive a notice from au, when software update is necessary to
improve the functionality of the product.
• You are recommended to back up your data before updating
software.
• Fully charge before update. If the update is started with the battery
power low or battery power becomes low during update, software
update cannot be done.
• Check the radio wave condition. Software update may fail in poor
reception area.
• Any operations are not available during software update. Calling
110 (Police), 119 (Fire/Ambulance), 118 (Maritime rescue) is not
available. Alarm does not work, either.
• If software update has failed or stopped, perform the same
procedure again.
Update is unavailable during international roaming.
•
®
into the product to update
Page 73
• If you fail to update software, it may become impossible to operate
the product. If this happens, bring it to an au shop or PiPit (not
accepted by some shops).
Downloading and updating software or OS
Update files can be downloaded from the Internet web site into the
product directly.
Selecting "Start major update" downloads Android OS for the product.
Applications list→[Settings]→[About phone]→
[Software update]
[Start updating software]/[Start major update]
From here on, follow the onscreen instructions.
◎ Note that charges may be applied depending on your service subscription
since the product automatically searches available network.
◎ Updated software/Android OS cannot be reverted back to the older
version.
Connecting to a PC for updating software
In case of major update of OS, using "京セラAndroid端末アップデー
トツール (KYOCERA Android phone update tool)" to be installed into
a PC, you can transfer software to the product. Connecting to the
Internet is required for a PC to be installed "京セラAndroid端末アップ
デートツール (KYOCERA Android phone update tool)".
Install USB driver to the PC before connecting the product to the PC.
For information on the USB driver and Installation manual, visit the
websites as follows;
● au homepage:
http://www.au.kddi.com/seihin/ichiran/shuhenkiki/usb_cable_win/
usb_driver.html
For details on "京セラAndroid端末アップデートツール (KYOCERA
Android phone update tool)", visit the website as follows;
● Kyocera homepage:
http://www.kyocera.co.jp/prdct/telecom/consumer/kyl21/
◎ "京セラAndroid端末アップデートツール (KYOCERA Android phone
update tool)" is released when major update is announced.
After-sales service
■ When asking for repair
For repair, contact Secure cell phone support center.
During the
warranty
period
Outside the
warranty
period
◎ Before handing in the product for repair, make a backup of the contents of
memory since they may disappear during repair. Note that the Company
shall not be liable for any damages and loss of income should the contents
of memory be altered or lost.
◎ Recycled parts that meet the Company's quality standards are sometimes
used for repair.
◎ Collected au cell phones by Replacement cell phone delivery service
which you used before are recycled to cell phones for replacement after
repairs. Also replaced parts by au after-sales service are collected and
recycled by KDDI.
They are not returned to customers.
Repairs will be done based on the terms of services of the
free-of-charge repair warranty described on the warranty card.
We shall repair the product for a charge as requested by the
customer if repair renders it usable.
Appendix/Index
71
Page 74
■ Performance parts for repair
The Company retains performance parts for repair of the DIGNOS
main unit and its peripherals for six years after discontinuation of
production. "Performance parts for repair" refers to parts required for
maintaining the functions of the product.
■ Warranty card
At the store of purchase, thoroughly check and read the name of the
retailer, date of purchase and other necessary details filled in on the
warranty card, and be sure to keep it in a safe place.
■ Secure cell phone support plus
An after-sales service membership program on a monthly basis called
"Secure cell phone support plus" (monthly fee: 399 yen including
tax) is available for using your au cell phone for a long time without
worries. This service expands coverage for many troubles including
malfunction, theft and loss. For details of this service, refer to au
homepage or contact Secure cell phone support center.
◎ You can apply for membership only at the time of purchasing your au cell
Appendix/Index
phone.
◎ Once you cancel the membership, you cannot reapply for it until you
purchase an au cell phone next time.
◎ Note that when changing the model or purchasing an extra cell phone, this
service only covers the most recently purchased au cell phone.
◎ When an au cell phone is handed over to you or someone else, the Secure
cell phone support plus membership is also handed over to the successor
of the cell phone.
◎ When you get a new au cell phone by changing the model or purchasing
an extra cell phone, the "Secure cell phone support plus" membership for
the old au cell phone is automatically canceled.
◎ Service contents are subject to change without notice.
■ au Micro IC Card (LTE)
The au Micro IC Card (LTE) is lent to you by au. In case of loss or
damage, the card will be replaced at your expense. When malfunction
is suspected, or in case of theft or loss, contact an au shop or PiPit.
■ After-sales service
If you are unsure about anything regarding after-sales service, contact
the following service contact.
Customer Service Center (for loss, theft or damage and operation
information)
From a land-line phone,
0 077-7-113 (toll-free)
From an au cell phone, 113 without area code (toll free)
Secure cell phone support center (for loss, theft, damage)
From a land-line phone/an au cell phone,
0120-925-919 (toll free)
(Open 9:00 to 21:00 everyday)
■ au after-sales service information
Secure cell phone support plus
Members Others
Customer
charge
1st: 5,250 yen
2nd: 8,400 yen
No recompense
Replacement
cell phone
delivery
service
Service
Spontaneous
failure
Partially damage,
water soak, irreparable
damage, theft or loss
1st year Free of charge
2nd year
or later
72
Page 75
Service
Spontaneous
failure
Holding over
and repair
* Charge amounts are all tax-included.
Partially damage
Water soak, irreparable
damage, loss, theft
Secure cell phone support plus
1st year Free of charge Free of charge
2nd year
or later
Members Others
Free of charge
(three-year
warranty)
Customer
charge
Upper limit:
5,250 yen
No recompense
No recompense
(model change)
Actual cost
Available data
The following file formats are supported.
Type File format
Sound .3gp, .mp4, .m4a, .3g2, .flac, .mp3, .mid, .xmf,
Photo .jpg, .png, .bmp, .gif, .webp
Video .3gp, .mp4, .3g2, .ts, .webm, .mkv
◎ Extremely large or small files may not be played.
◎ Some copyrighted data cannot be played.
.mxmf, .rtttl, .rtx, .ota, .imy, .ogg, .mkv, .ts, .wav,
.aac, .amr
Replacement cell phone delivery service
◎ When you have trouble with your au cell phone, replacement cell phone
(same model, same color, including new battery) is delivered by calling
to. Return your damaged cell phone within 14 days after replacement cell
phone is delivered.
◎ Available up to twice in a year from the day you use this service as a start
day. If you do not use this service in the past year at the subscription to
this service, it will be 1st and if you use, it will be 2nd.
* For details, refer to au homepage.
Holding over and repair
◎ Repairs due to water soak and irreparable damage are not covered by this
service.
◎ Damages and malfunctions intentionally caused by the customer as well
as those due to modification (e.g. disassembly, change of parts, painting,
etc.) by the customer are not covered by this service.
◎ You cannot receive a refund for replacement of the outer casing due to
stains, scratches, paint removal, etc. on the outer casing.
Main speci cations
Display Approx. 4.7 inches TFT 16,770,000 colors
Weight Approx. 157g (with battery pack)
Continuous
call time
Continuous
stand-by time
720×1280 dots (HD720)
In Japan Approx. 1110 minutes:
Overseas
(GSM)
Overseas
(CDMA)
In Japan Approx. 580 hours (LTE area)
Overseas
(GSM)
Overseas
(CDMA)
Approx. 730 minutes:
Approx. 1220 minutes:
U.S. mainland/Hawaii/Chinese mainland
• As of September 2012
Approx. 720 hours (3G area)
Approx. 660 hours
Approx. 570 hours:
U.S. mainland/Chinese mainland
Approx. 710 hours:
Hawaii
• As of September 2012
Appendix/Index
73
Page 76
Continuous tethering time Approx. 560 minutes (WAN 3G)
Approx. 450 minutes (WAN LTE)
Dimension
(W x H x D)
Storage space*
Number of effective pixels:
Out-camera
Number of effective pixels:
In-camera
Wireless LAN (Wi-Fi
Bluetooth
function
Approx. 66mm×134mm×10.8mm (thickest part 11.6mm)
1
Approx. 10GB
Approx. 8.08 million pixels
Approx. 1.2 million pixels
®
®
) function IEEE802.11a/b/g/n compatible
Compatible
version
Bluetooth® standards Ver. 4.0 EDR*
2
Output Bluetooth® standard Class 1
Communication
range
Supported
Bluetooth
profile*
Appendix/Index
Frequency
*1 Since the storage is shared by data and applications, storage space may be reduced
according to the usage of applications.
*2 It is confirmed that the product and all Bluetooth® devices are compliant with Bluetooth®
standards designated by Bluetooth® SIG, and they are authenticated. However, procedures
may differ or data transfer may not be possible depending on the device's characteristics or
specifications.
*3 May vary by the signal status and/or whether there is an interference between
communications devices.
*4 Bluetooth® standards for Bluetooth® device connection procedure according to the product's
applications.
*5 To use this profile, "カーナビデータ通信設定 (Car Navigation Data Communication Setting)"
application is required. Download this application from "auポータル (au portal)"→"メニューリ
スト(Menu list)". The profile supports part of car navigation systems. For details, refer to the
au catalog and the au homepage.
74
bands
Within 10 m with no obstacles in the range
3
*
SPP (Serial Port Profile)
A2DP (Advanced Audio Distribution Profile)
4
AVRCP (Audio/Video Remote Control Profile) Ver.1.3
HSP (Headset Profile)
HFP (Hands-Free Profile)
OPP (Object Push Profile)
PBAP (Phone Book Access Profile)
HID (Human Interface Device Profile)
PXP (Proximity Profile)
DUN (Dial-Up Networking Profile) *
2.4GHz band (2.402GHz to 2.480GHz)
5
◎ The continuous talk time and continuous standby time may drop to less
than half depending on the battery charging status, usage environment
such as temperature, reception condition at the location where the product
is used, and the function settings.
Speci c Absorption Rate of Mobile Phone
This model DIGNOS mobile phone complies with Japanese
technical regulations and international guidelines regarding exposure
to radio waves. This mobile phone has been designed in observance
of the Japanese technical regulations regarding exposure to radio
waves (*1) and limits to exposure to radio waves recommended by
equivalent international guidelines.
These international guidelines were set out by the International
Commission on Non-Ionizing Radiation Protection (ICNIRP), which
is in collaboration with the World Health Organization (WHO), and
the permissible limits include a substantial safety margin designed
to assure the safety of all persons, regardless of age and health
condition. The SAR limit for mobile phones is 2.0 W/kg. The highest
SAR value for this mobile phone when tested for use at the ear is
0.762 W/kg. There may be slight differences in SAR levels among
individual products, but they all satisfy the limit. The actual SAR of
this mobile phone while talking on the phone can be well below that
indicated above. This is due to automatic changes in the power level
of the mobile phone to ensure it only outputs the minimum power
required to communicate with a base station. Therefore in general,
the closer you are to a base station, the lower the power output of
the mobile phone. This mobile phone can be used in positions other
than against your ear. This mobile phone satisfies the international
guidelines when used with au Carrying Case F Black (0105FCA) (sold
separately) recommended by KDDI (*2). In case you are not using the
au Carrying Case F Black (0105FCA) (sold separately), use a product
that contains no metal parts, and one that can hold the mobile phone
Page 77

at least 1.5 cm away from your body. The World Health Organization
has stated that present scientific information does not indicate the
use of mobile devices has nay harmful effects on the human body.
They recommend that if you are still worried about your exposure then
you can limit your talk time or use a handsfree kit to keep the mobile
phone away from your head and body. If you would like to know more
detailed information, please refer to the WHO website.(http://www.
who.int/docstore/peh-emf/publications/facts_press/fact_japanese.
htm)
Please refer to the websites listed below if you would like to know
more detailed information regarding SAR.
○ Ministry of Internal Affairs and Communications website:
http://www.tele.soumu.go.jp/j/sys/ele/index.htm
○ Association of Radio Industries and Businesses website:
http://www.arib-emf.org/index02.html
○ au homepage:
http://www.au.kddi.com/
*1 Technical regulations are defined by the Ministerial Ordinance Related to Radio Law (Article
14-2 of Radio Equipment Regulations).
*2 Regarding the method of measuring SAR when using mobile phones in positions other than
against the ear, the international standard IEC62209-2 was set in March 2010. On the other
hand, Japanese technical regulation is currently under deliberation by the Committee for
Radio Wave Utilization Environment set up in the Information and Communication Technology
Group of the Advisory Committee on Information and Communications. (As of October 2011)
Appendix/Index
75
Page 78
A
AC Adapter for Desktop Holder ..... 1
Accessories .................................. 68
After-sales service ........................ 71
Airplane mode .............................. 67
au Disaster Countermeasure ........ 61
au Easy Setting ............................. 38
au ID ............................................. 38
au International Call Service......... 58
au Micro IC Card (LTE) ........... 29,31
Auto-rotate screen ........................ 41
B
Basic operation ............................ 40
Battery cover ................................ 29
Battery pack ............................. 1,29
®
Bluetooth
Appendix/Index
function ....................... 25
C
Call history .................................... 57
Character entry............................. 49
Charging ....................................... 34
Charging light ............................... 29
Charging terminal ......................... 29
Context menu ............................... 49
Convenient tools ........................... 43
D
Disaster Message Board .............. 61
Display .......................................... 29
Double-tap .................................... 40
76
Index
Drag .............................................. 41
E
Earphone microphone terminal .... 29
Earphones .................................... 70
Earpiece (receiver) ....................... 29
English display ............................. 38
E-saving mode ............................. 60
Exemptions ..................................... 5
External connection terminal ........ 29
External connection terminal cover
...................................................... 29
F
FeliCa antenna ............................. 29
FeliCa mark .................................. 29
Flick .............................................. 40
Folders .................................... 41,42
G
Google account ............................ 39
GPS/Bluetooth
H
Handling precautions ................... 14
Handwriting input ......................... 52
Home screen ................................ 41
I
In camera ..................................... 29
Incoming call history .................... 57
®
/Wi-Fi® antenna .... 29
Incoming light ............................... 29
Infrared data port ......................... 29
iWnn IME ................................ 49,54
L
LaLaStroke ................................... 49
Light sensor .................................. 29
Long-touch ................................... 40
M
Main specifications ....................... 73
Main/Sub antenna ........................ 29
Major update ................................ 71
Menu during an incoming call ...... 59
Microphone .................................. 29
microSD memory card ............. 1,64
microSD memory card slot ........... 29
Moving icon .................................. 46
Mushroom ..................................... 54
My Selection ................................. 43
N
Names and functions of parts ...... 28
Navigation bar .............................. 41
Notations ........................................ 4
Notes on packet communication
charge .......................................... 26
Notification icons .......................... 47
Notification/Status panel ............... 48
O
Option menu ................................. 48
OS update .................................... 70
Out camera ................................... 29
P
Phone ........................................... 56
Photo light ..................................... 29
PIN code ....................................... 18
Power key ..................................... 29
Proximity sensor ........................... 29
PUK code ..................................... 18
Q
Quick Charge Desktop Holder
.................................................. 1,35
Quick launch area .................. 41,46
Quick search box ......................... 41
R
Rejecting a call ............................. 58
S
SAR ............................................... 74
Secure cell phone support plus ... 72
Security code ............................... 18
Shortcuts ................................ 41,42
Silent Mode ................................... 67
Simple light ................................... 29
Simple menu ................................. 46
Sleep mode .................................. 38
Slide .............................................. 40
Smart Sonic Receiver ................... 30
Speaker ........................................ 29
Specific Absorption Rate of Mobile
Phone ........................................... 74
Status bar ..................................... 41
Status icons .................................. 47
Strap eyelet .................................. 29
Page 79
T
Tap ................................................ 40
Troubleshooting ............................ 69
Turning the power off .................... 38
Turning the power on .................... 37
TV antenna ................................... 29
V
Volume DOWN/UP key ................. 29
W
Widen/Narrow with fingers ........... 40
Widgets .................................. 41,42
®
Wi-Fi
............................................ 25
®
Wi-Fi
antenna .............................. 29
Wildcard Prediction ...................... 55
Word Prediction ............................ 55
Appendix/Index
77
Page 80
Intellectual property rights
■ Trademarks
Company names and product names referred to in this manual are
trademarks or registered trademarks of respective companies.
Google and Google logo, Android and Android logo, Google Play, Google Play logo, Play
Music, Play Music logo, Play Movies, Play Movies logo, Gmail and Gmail logo, Google
Maps and Google Maps logo, Google Talk and Google Talk logo, Google Latitude and
Google Latitude logo, Google Maps Navigation and Google Maps Navigation logo,
Google+ Local, Google+ Local logo, Voice Search and Voice Search logo, and YouTube
Appendix/Index
and YouTube logo are trademarks or registered trademarks of Google, Inc.
®
Microsoft
, Windows® and Windows® XP/Windows Vista®/Windows® 7 are registered
trademarks of Microsoft Corporation in the United States and other countries.
The official name for Microsoft® Windows® is Microsoft® Windows® Operating System.
®
, Microsoft® Excel®, Microsoft® PowerPoint®, Windows Media®, and Exchange®
Microsoft
are trademarks or registered trademarks of Microsoft Corporation in the United States and
other countries.
®
Microsoft
Word and Microsoft® Office are product name of Microsoft Corporation in the
United States.
QR code is a trademark of DENSO WAVE INCORPORATED.
Rovi, G-GUIDE, G-GUIDE MOBILE and G-Guide related logos are trademarks or
registered trademarks of Rovi Corporation and/or its subsidiaries in Japan.
microSD, microSDHC and microSDXC logos are trademarks of SD-3C, LLC.
78
®
and Bluetooth® logo are registered trademarks owned by the Bluetooth SIG,
Bluetooth
Inc., and KYOCERA Corporation is licensed to use those trademarks.
AirStation™ and AOSS™ are trademarks of BUFFALO INC.
®
, WPA®, Wi-Fi CERTIFIED logo and Wi-Fi Protected Setup logo are registered
Wi-Fi
trademarks of Wi-Fi Alliance
®
.
Wi-Fi CERTIFIED™ and Wi-Fi Protected Setup are trademarks of Wi-Fi Alliance.
FeliCa is a contactless IC card technology developed by Sony Corporation.
FeliCa is a registered trademark of Sony Corporation.
is a registered trademark of FeliCa Networks, Inc.
"Osaifu-Keitai®"
is a registered trademark of NTT DOCOMO, INC.
© 2012 NBGI
"jibe" is a trademark of Jibe Mobile K.K.
Skype, associated trademarks and logos and the "S" symbol are trademarks of Skype
Limited.
Facebook and Facebook logo are trademarks or registered trademarks of Facebook, Inc.
GREE and the GREE logo are registered trademarks of GREE, Inc. in Japan. All other
trademarks are the property of their respective owners.
TRENDMICRO, VirusBuster are trademarks of Trend Micro Inc.
Copyright © 2010- Three Laws of Mobility. All Rights Reserved.
The product is equipped with "airCube for Android", 1Seg total solution, developed by
System Engineering Consultants Co., LTD. "airCube" is a registered trademark of System
Engineering Consultants Co., LTD.
"NAVITIME" is a registered trade mark of NAVITIME JAPAN Co., Ltd..
Music recognition technology and related data are provided by Gracenote
Gracenote is a business standard for music recognition technology and related
contents delivery.
For details, refer to the following web page: www.gracenote.com
CD and music data provided by Gracenote:
Copyright ©2000 - present Gracenote.
Gracenote Software: Copyright 2000 - present Gracenote.
This product and services may include one or several of the following US Patent.
#5,987,525, #6,061,680, #6,154,773, #6,161,132, #6,230,192, #6,230,207,
#6,240,459, #6,330,593, and other granted or applied patents.
®
.
Page 81
Part of services are provided by Open Globe, Inc. for US patent (#6,304,523) under
license.
Gracenote and CDDB are registered trademarks of Gracenote, Inc.
Logo and logo type of Gracenote and "Powered by Gracenote" logo are either
registered trademarks or trademarks of Gracenote, Inc.
For information on the use of Gracenote services, refer to the following web page:
www.gracenote.com/corporate
iWnn of OMRON SOFTWARE Co., Ltd. is used for conversion methods for
Japanese language, and for phrase prediction methods for English.
iWnn IME
©
OMRON SOFTWARE Co., Ltd. 2009-2012 All Rights Reserved.
THIS PRODUCT IS LICENSED UNDER THE MPEG-4 VISUAL PATENT PORTFOLIO
LICENSE FOR THE PERSONA L AND NON-COMMERCIAL USE OF A CONSUMER
FOR (i) ENCODING VIDEO IN COMPLIANCE WITH THE MPEG-4 VISUAL STANDARD
("MPEG-4 VIDEO") AND/OR (ii) DECODING MPEG-4 VIDEO THAT WAS ENCODED BY
A CONSUMER ENGAGED IN A PERSONAL AND NONCOMMERCIAL ACTIVITY AND/
OR WAS OBTAINED FROM A VIDEO PROVIDER LICENSED BY MPEG LA TO PROVIDE
MPEG-4 VIDEO. NO LICENSE IS GRANTED OR SHALL BE IMPLIED FOR ANY OTHER
USE. ADDITIONAL INFORMATION INCLUDING THAT RELATING TO PROMOTIONAL,
INTERNAL AND COMMERCIAL USES AND LICENSING MAY BE OBTAINED FROM
MPEG LA, LLC. SEE HTTP://WWW.MPEGLA.COM.
(1) ACCESS, the ACCESS logo, and NetFront are registered trademarks or
trademarks of ACCESS CO., LTD. in the United States, Japan and/or other
countries.
(2) This software is based in part on the work of the Independent JPEG Group.
"すぐ文字" and "DIGNO" are registered trademarks of KYOCERA Corporation.
絵文字ソリューションパッケージ © OMRON SOFTWARE Co., Ltd. 2011 All
Rights Reserved.
The product utilizes handwritten script recognition, LaLaStroke provided by
TOSHIBA Corpration.
LaLaStroke is a trademark of TOSHIBA Corporation.
"もじチェン" by LIM Corporation LTD. is used for switching font. "もじチェン" is a
registered trademark of LIM Corporation LTD.
The product contains fonts provided by LIM Corporation LTD.
The product contains fonts provided by Morisawa Inc.
MHL Logo, MHL and Mobile High-Definition Link are trademarks of MHL LLC.
Copyright
©
2012 DigiOn, Inc. All rights reserved.
DigiOn and DiXiM are registered trademarks of DigiOn, Inc.
DLNA®, DLNA logo and DLNA CERTIFIED™ are trademarks of the Digital Living
Network Alliance.
DLNA®, the DLNA Logo and DLNA CERTIFIED™ are trademarks, service marks,
or certification marks of the Digital Living Network Alliance.
DLNA Certifications of the this product are obtained by KYOCERA Corporation.
The product includes pictograms that KYOCERA Corporation is licensed by NTT
DOCOMO, INC.
The product is equipped with DeepCore
Corporation as infrared communication function. Copyright© 2012 E-Globaledge
Corp. All Rights Reserved.
"PhotoSolid
Inc. "PhotoSolid
"MovieSolid
"MovieSolid
"TrackSolid
"TrackSolid
"QuickPanorama
product of Morpho, Inc. "QuickPanorama
®
", the function to avoid blurring still images, is a product of Morpho,
®
" is a registered trade mark of Morpho, Inc.
®
", the function to avoid blurring videos, is a product of Morpho, Inc.
®
" is a registered trade mark of Morpho, Inc.
®
", the automatic tracking technology, is a product of Morpho, Inc.
®
" is a registered trade mark of Morpho, Inc.
®
", the panoramic image generation technology product, is a
Inc.
"Morpho Effect Library", the image effect technology, is a product of Morpho, Inc.
"Morpho Effect Library" is a trade mark of Morpho, Inc. Morpho HDR is adopted
for HDR (High Dynamic Range) technology. "Morpho HDR" is a trade mark of
Morpho, Inc.
All other company names and product names are trademarks or registered
trademarks of respective companies referred to in this manual.
Users of the product are authorized to use software installed into the mobile
phone described in this instruction manual. Pay attention to the following points
when using the software.
(a) The software installed on this product or part of it may not be altered,
delivered, modified, analyzed, reverse-engineered, derived, and any such
actions are prohibited.
(b) Illegally importing the software or a part of it is prohibited.
®
3.0Plus for Android by E-Globaledge
®
" is a registered trademark of Morpho,
Appendix/Index
79
Page 82
(c) This Software is provided without implied warranties of merchantability,
fitness for a particular purpose and noninfringement of third party rights.
Note that the existing license agreement takes priority for usage of GNU General
Public License (GPL), GNU Library/Lesser General Public License (LGPL)
included in software, software based on other open source software license and
software that KYOCERA Corporation is licensed.
For information on the Open source software, refer to "Open source software" as
follows;
■ About Open Source Software
This product includes software originating from third parties that is subject to the GNU
General Public License (GPL), GNU Library/Lesser General Public License (LGPL) and
different and/or additional copyright licenses, disclaimers and notices. The exact terms
of GPL, LGPL and some other licenses, disclaimers and notices are reproduced in
"About phone" in this product. For details, refer to Kyocera homepage.
This product includes software copyrighted by Kyocera Corporation and licensed software.
Copyright of the software designed and developed complying with the open source
software standard belongs to Kyocera Corporation or the third parties, distribution,
reproduction, transformation and transmission over public lines without consent of Ky ocera
Corporation are prohibited, unless you are authorized or permitted by Copyright La w.
■ Export Administration Regulations
This product and its accessories may be subject to the Japan Export Administration
Regulations ("Foreign Exchange and Foreign Trade Law" and its related laws).
In addition, U.S. Re-export Regulations (Export Administration Regulations and
the related laws and regulations), regulations in other countries may apply to
Appendix/Index
this product and its accessories. To export and re-export this product and its
accessories, directly or indirectly, take the required measures on your responsibility
and at your expenses. For details on the procedures, contact the Ministry of
Economy, Trade and Industr y, the U.S. Department of Commerce, or authority
concerned.
Gracenote® End User License Agreement
This application or device contains software from Gracenote, Inc. of Emeryville,
California ("Gracenote"). The software from Gracenote (the "Gracenote Software")
enables this application to perform disc and/or file identification and obtain music-
related information, including name, artist, track, and title information ("Gracenote
Data") from online servers or embedded databases (collectively, "Gracenote
Servers") and to perform other functions. You may use Gracenote Data only by
80
means of the intended End-User functions of this application or device.
You agree that you will use Gracenote Data, the Gracenote Software, and
Gracenote Servers for your own personal non-commercial use only. You agree
not to assign, copy, transfer or transmit the Gracenote Software or any Gracenote
Data to any third party. YOU AGREE NOT TO USE OR EXPLOIT GRACENOTE
DATA, THE GRACENOTE SOFTWARE, OR GRACENOTE SERVERS, EXCEPT
AS EXPRESSLY PERMITTED HEREIN.
You agree that your non-exclusive license to use the Gracenote Data, the
Gracenote Software, and Gracenote Servers will terminate if you violate these
restrictions. If your license terminates, you agree to cease any and all use of the
Gracenote Data, the Gracenote Software, and Gracenote Servers.
Gracenote reserves all rights in Gracenote Data, the Gracenote Software, and
the Gracenote Servers, including all ownership rights Under no circumstances
will Gracenote become liable for any payment to you for any information that
you provide. You agree that Gracenote, Inc. may enforce its rights under this
Agreement against you directly in its own name.
The Gracenote service uses a unique identifier to track queries for statistical
purposes. The purpose of a randomly assigned numeric identifier is to allow the
Gracenote service to count queries without knowing anything about who you are.
For more information, see the web page for the Gracenote Privacy Policy for the
Gracenote service.
The Gracenote Software and each item of Gracenote Data are licensed to you
"AS IS". Gracenote makes no representations or warranties, express or implied,
regarding the accuracy of any Gracenote Data from in the Gracenote Servers.
Gracenote reserves the right to delete data from the Gracenote Servers or to
change data categories for any cause that Gracenote deems sufficient. No
warranty is made that the Gracenote Software or Gracenote Servers are errorfree or that functioning of Gracenote Software or Gracenote Servers will be
uninterrupted. Gracenote is not obligated to provide you with new enhanced or
additional data types or categories that Gracenote may provide in the future and
is free to discontinue its services at any time.
GRACENOTE DISCLAIMS ALL WARRANTIES EXPRESS OR IMPLIED,
INCLUDING, BUT NOT LIMITED TO, IMPLIED WARRANTIES OF
MERCHANTABILITY, FITNESS FOR A PARTICULAR PURPOSE, TITLE,
AND NON-INFRINGEMENT. GRACENOTE DOES NOT WARRANT THE
RESULTS THAT WILL BE OBTAINED BY YOUR USE OF THE GRACENOTE
SOFTWARE OR ANY GRACENOTE SERVER. IN NO CASE WILL
GRACENOTE BE LIABLE FOR ANY CONSEQUENTIAL OR INCIDENTAL
DAMAGES OR FOR ANY LOST PROFITS OR LOST REVENUES.
© Gracenote, Inc. 2000-present
Page 83
OpenSSL License
OpenSSL License
【
Copyright © 1998-2007 The OpenSSL Project. All rights reserved.
This product includes software developed by the OpenSSL Project for use in
the OpenSSL Toolkit. (http://www.openssl.org/)
THIS SOFTWARE IS PROVIDED BY THE OpenSSL PROJECT ''AS IS''
AND ANY EXPRESSED OR IMPLIED WARRANTIES, INCLUDING, BUT
NOT LIMITED TO, THE IMPLIED WARRANTIES OF MERCHANTABILITY
AND FITNESS FOR A PARTICULAR PURPOSE ARE DISCLAIMED. IN
NO EVENT SHALL THE OpenSSL PROJECT OR ITS CONTRIBUTORS
BE LIABLE FOR ANY DIRECT, INDIRECT, INCIDENTAL, SPECIAL,
EXEMPLARY, OR CONSEQUENTIAL DAMAGES (INCLUDING, BUT NOT
LIMITED TO, PROCUREMENT OF SUBSTITUTE GOODS OR SERVICES;
LOSS OF USE, DATA, OR PROFITS; OR BUSINESS INTERRUPTION)
HOWEVER CAUSED AND ON ANY THEORY OF LIABILITY, WHETHER
IN CONTRACT, STRICT LIABILITY, OR TORT (INCLUDING NEGLIGENCE
OR OTHERWISE) ARISING IN ANY WAY OUT OF THE USE OF THIS
SOFTWARE, EVEN IF ADVISED OF THE POSSIBILITY OF SUCH
DAMAGE.
】
Original SSLeay License
【
Copyright © 1995-1998 Eric Young ([email protected]) All rights reserved.
This product includes cryptographic software written by Eric Young
([email protected])
THIS SOFTWARE IS PROVIDED BY ERIC YOUNG ''AS IS'' AND ANY
EXPRESS OR IMPLIED WARRANTIES, INCLUDING, BUT NOT LIMITED
TO, THE IMPLIED WARRANTIES OF MERCHANTABILITY AND FITNESS
FOR A PARTICULAR PURPOSE ARE DISCLAIMED. IN NO EVENT SHALL
THE AUTHOR OR CONTRIBUTORS BE LIABLE FOR ANY DIRECT,
INDIRECT, INCIDENTAL, SPECIAL, EXEMPLARY, OR CONSEQUENTIAL
DAMAGES (INCLUDING, BUT NOT LIMITED TO, PROCUREMENT
OF SUBSTITUTE GOODS OR SERVICES; LOSS OF USE, DATA, OR
PROFITS; OR BUSINESS INTERRUPTION)
HOWEVER CAUSED AND ON ANY THEORY OF LIABILITY, WHETHER
IN CONTRACT, STRICT LIABILITY, OR TORT (INCLUDING NEGLIGENCE
OR OTHERWISE) ARISING IN ANY WAY OUT OF THE USE OF THIS
SOFTWARE, EVEN IF ADVISED OF THE POSSIBILITY OF SUCH
DAMAGE.
】
Appendix/Index
81
Page 84
FCC Notice
This device complies with part 15 of the FCC Rules. Operation is subject
to the following two conditions: (1) This device may not cause harmful
interference, and (2) this device must accept any interference received,
including interference that may cause undesired operation.
Note:
This equipment has been tested and found to comply with the limits for a
Class B digital device, pursuant to part 15 of the FCC Rules. These limits
are designed to provide reasonable protection against harmful interference
in a residential installation. This equipment generates, uses, and can radiate
radio frequency energy and, if not installed and used in accordance with the
instructions, may cause harmful interference to radio communications.
However, there is no guarantee that interference will not occur in a particular
installation. If this equipment does cause harmful interference to radio or
television reception, which can be determined by turning the equipment off
and on, the user is encouraged to try to correct the interference by one or
more of the following measures:
- Reorient or relocate the receiving antenna.
- Increase the separation between the equipment and receiver.
- Connect the equipment into an outlet on circuit different from that to which
the receiver is connected.
- Consult the dealer or an experienced radio/TV technician for help and for
Appendix/Index
additional suggestions.
Warning
The user is cautioned that changes or modi cations not expressly
approved by the manufacturer could void the user's authority to operate the
equipment.
Warning! Read this information before using your phone.
FCC RF EXPOSURE INFORMATION
Warning! Read this information before using your phone. In August 1996,
the Federal Communications Commission (FCC) of the United States, with
its action in Report and Order FCC 96-326, adopted an updated safety
standard for human exposure to radio frequency electromagnetic energy
emitted by FCC regulated transmitters. Those guidelines are consistent with
the safety standard previously set by both U.S. and international standards
bodies. The design of this phone complies with the FCC guidelines and
these international standards.
Body-worn Operation
This device was tested for typical body-worn operations with the back of
the phone kept 0.39 inches (1.0 cm) from the body. To comply with FCC
RF exposure requirements, a minimum separation distance of 0.39 inches
(1.0 cm) must be maintained between the user's body and the back of the
phone, including the antenna. All beltclips, holsters and similar accessories
used by this device must not contain any metallic components. Body-worn
accessories that do not meet these requirements may not comply with FCC
RF exposure limits and should be avoided.
Turn off your phone before ying
You should turn off your phone when boarding any aircraft. To prevent
possible interference with aircraft systems, U.S. Federal Aviation
Administration (FAA) regulations require you to have permission from a crew
member to use your phone while the plane is on the ground. To prevent any
risk of interference, FCC regulations prohibit using your phone while the
plane is in the air.
82
Page 85
European RF Exposure Information
Your mobile device is both a radio transmitter and receiver, and is designed
not to exceed limits for exposure to radio waves recommended by international
guidelines. These guidelines were produced by independent scientific
organization, ICNIRP, and include safety margins designed to protect all persons,
regardless of age and condition of health.
The guidelines apply a unit of measurement known as the Specific Absorption
Rate (SAR). The SAR limit for mobile devices is 2W/kg and the highest SAR value
for this device was 0.640 W/kg*.
As testing measures SAR at the highest transmitting power of a device, actual
SAR tends to be lower during ordinary operation. Lower SAR levels are typical
during ordinary operation as automatic changes are made within the device to
ensure the network can be reached with minimal power.
The World Health Organization (WHO) has stated that present scientific
information does not indicate the need for any special precautions to be adopted
when using mobile devices. WHO also notes that those wishing to reduce
exposure may do so by limiting call length and by using a 'hands-free' device to
distance the phone from the head and body. For further information, please see
the WHO website: http://www.who.int/emf.
* Note that tests are also carried out in accordance with international testing
guidelines.
Declaration of Conformity for KYL21
The product 'KYL21' is declared to conform with the essential requirements of
European Union Directive 1999/5/EC Radio and Telecommunications Terminal
Equipment Directive 3.1 (a), 3.1 (b) and 3.2. The Declaration of Conformity can
be found on http://www.kyocera.co.jp/prdct/telecom/consumer/ (Japanese
only).
-NoteBelow frequency bands are restricted for indoor use only.
5150 - 5250MHz(802.11a/n) in US
5150 - 5350MHz(802.11a/n) in EU
Appendix/Index
83
Page 86
For inquiries, call: Customer Service Center
For general information and charges (tol l free)
From fixed-lin e phones:
0077-7-111 157
PRESSING ZE RO WILL CONNECT YO U TO AN OPERATOR
AFTER CALL ING 157 ON YOUR au CELL PH ONE
For loss, theft or damage and operation information
(toll free)
From fixed-lin e phones: From au cell phones:
-7-
0077
In case above numbe rs are not available,
0120-977-033
-
0120
977-699
From au cell phone s:
113 113
(excep t Okina wa)
(Okinaw a)
area code not req uired
area code not req uired
Secure cell phone support center
For loss, theft or damage (toll free)
From fixed-li ne phones/au cell phone s,
0120-925-919
Business hou rs 9:00 – 21:00 (7 days a week)
Cell phone and PHS o perators collect and recycle un used
telephones, batteries and battery chargers at stores
bearing the logo regardless of brand and manufacturer
to protect the environment and reuse valuable resources.
October20121stEdition
Sales:KDDICORPORATION•OKINAWACELLULARTELEPHONECOMPANY
Manufacturedby:KYOCERACorporation
 Loading...