

Page 1

Illustrations and
Screenshots
in This Manual
Notes on
Cell Phone Use
Contents
E10K
Basic Manual
Getting Ready
Making and
Answering Calls
Character Input
Phone Book
Pair Function
Mail
Camera
EZweb
EZ News Flash
EZ Navi
In Case of
Loss of Your E10K
Troubleshooting
Index
Page 2
Introduction
Thank you for purchasing the E10K. Before using your E10K, be sure to read the E10K Basic Manual (this PDF manual) to
ensure correct usage. After you have finished reading this manual, store this PDF manual and the printed manuals in safe
places so you can retrieve them whenever you need them.
Manuals for the E10K
There are three manuals for the E10K: The Basic Manual, printed Basic Manual (Japanese) and full Instruction Manual
(Japanese).
● For learning the basics:
Read the E10K Basic Manual (this manual).
● For learning details on using each function:
The full Instruction Manual (Japanese) gives detailed instructions on using each function and can be downloaded from
the au homepage: http://www.au.kddi.com/torisetsu/index.html
The keyword searchable au Online Manual is also available on the au homepage:
http://www.au.kddi.com/manual/index.html
To access from EZweb (free of packet communication charge): •
R⇒ T
op Menu/Search ⇒
Scan this QR code to access the au Online Manual. ▶
auお客さまサポート
(au Customer Support) ⇒
オンラインマニュアル
(Online Manual)
Page 3
Illustrations and Screenshots in This Manual
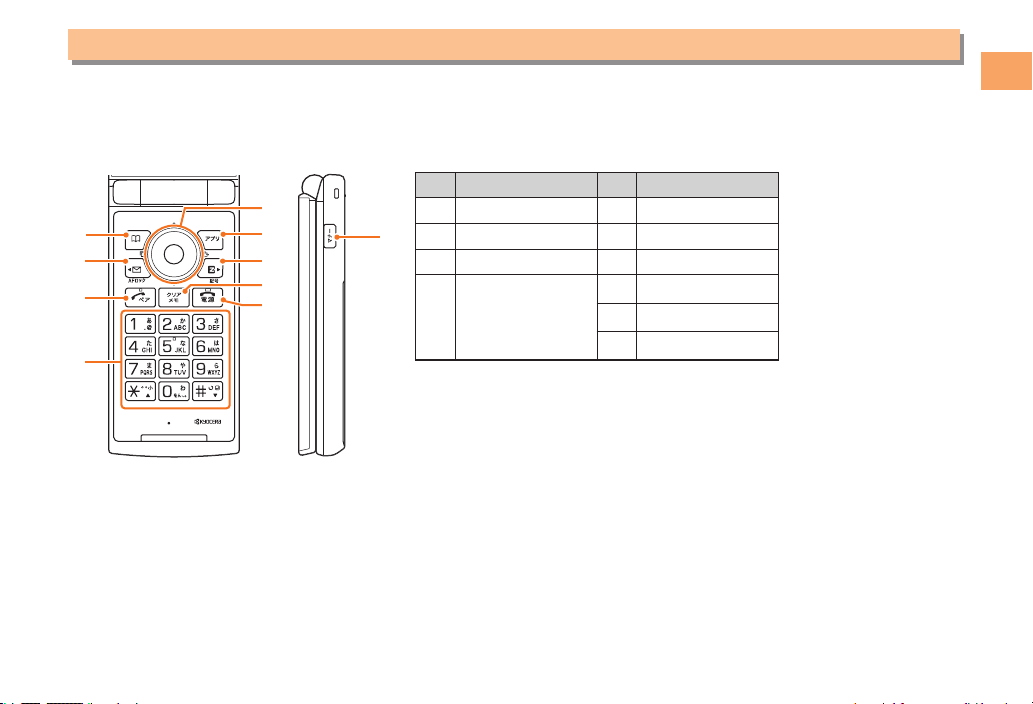
Note on Illustrations ■
The illustrations in this manual may look different from the actual cell phone in shape, color and typeface. The key
illustrations are also simplified as shown below.
Key Illustration Key Illustration
⑤
①
②
③
④
⑥
⑦
⑧
⑨
① & ⑤ cjs
⑩
② L ⑥ %
③ N ⑦ R
123
456
④
789
*0#
⑧ C
⑨ F
⑩ (
Note on Screenshots ■
The screenshots in this manual are simplified and may look different from the actual cell phone screens.
Illustrations and Screenshots in This Manual
1
Page 4
Notes on Cell Phone Use
Cell Phone Etiquette
The cell phone always emits weak radio waves when power
Notes on Cell Phone Use
is on.
Use the cell phone in an enjoyable and safe manner without
forgetting to be considerate of others around you.
Use of cell phones is not allowed in some places. ●
Do not use the cell phone while you are driving. Doing •
so is both dangerous and prohibited by law.
Using a cell phone in an aircraft is prohibited by law. •
Be sure to turn the cell phone power off.
Radio waves from cell phones may interfere with ●
medical electrical equipment.
Some people close to you in crowded places such •
as packed trains may be using a cardiac pacemaker.
Turn the cell phone off in such places.
Abide by the rules of hospitals and other medical •
institutions where it is forbidden to use or carry cell phones.
Be considerate of where you use the cell phone and ●
how loudly you talk.
Do not make calls in theaters, museums, libraries, and •
other similar places. Turn power off or turn on manner
mode not to disturb others around you by ring tones.
Do not use the cell phone on a street where you might •
interrupt the flow of pedestrians.
Move to areas where you will not inconvenience others •
on trains or in hotel lobbies.
Refrain from talking in a loud voice.•
Obtain the permission of other people before you take •
their photos with the cell phone's camera.
Do not record information with the cell phone's camera •
in bookstores and other locations where taking photos
is not permitted.
Do Not Use the Cell Phone While Driving!
Turn off your cell phone or put it in Drive Mode while
driving.
Do not use the cell phone while driving a car/motorcycle
or riding a bicycle. It may result in a traffic accident. Using
a cell phone while driving is prohibited by law. Using a
cell phone while riding a bicycle may also be punishable
by law.
Prohibited!
Looking at a cell phone display•
Talking on a cell phone while holding it•
Drive Mode
In Drive Mode, a Japanese message meaning "I'm
driving now, so I can't answer your call." is played
when a call is received, and asks the caller to leave a
message on the answer memo.
When the standby screen is displayed, press )(,
Use ➡ Dj to select Drive Mode and then pr
ess Dc (OK).
2
Page 5
Disaster Message Board Service
When a large scale disaster occurs, you can register
your safety information from EZweb. The registered
information can be referred from anywhere in Japan from
EZweb or Internet.
Registering
safety
information
Inquiring
for safety
information
Access
When a large scale disaster occurs, •
from an au phone, you can register your
safety information (i.e. your condition
and comments) to the 災害用伝言板
(Disaster Message Board) created on
the EZweb.
After registration of your safety •
information, e-mail is sent to your family
or acquaintances you have previously
designated to notify that your safety
information has been uploaded to
the 災害用伝言板 (Disaster Message
Board).
You can inquire for safety information •
of a person by entering his/her phone
number from EZweb or Internet.*
* To inquire from other carriers' cell
phone, a PHS or PC, access
"http://dengon.ezweb.ne.jp/".
R ⇒ T
(Disaster Message Board)
http://dengon.ezweb.ne.jp/
op Menu/Search ⇒
災害用伝言板
Registered information is stored until the service set •
up for the disaster ends.
The maximum available number of registrations is 10 •
per phone number. When the number of registrations
exceeds 10, the oldest one is overwritten.
The demonstration of this service can be referred to •
anytime by pressing $R ⇒ T
auお客さまサポート
災害用伝言板(デモ版)
(Demo Version)).
To view the Disaster Message Board in English, select •
English from the top menu of the Disaster Message
Board.
op Menu/Search ⇒
(au Customer Support) ⇒
(Disaster Message Board
Notes on Cell Phone Use
3
Page 6
Contents
Introduction
Illustrations and Screenshots in This Manual
Notes on Cell Phone Use 2
Contents
Cell Phone Etiquette …………………………………… 2
Do Not Use the Cell Phone While Driving! …………… 2
Disaster Message Board Service …………………… 3
Contents 4
Getting Ready 6
Checking the Contents of the Box …………………… 6
Names of Parts ………………………………………… 7
Charging the Battery Pack …………………………… 8
Learning the Basics …………………………………… 9
Turning On Power ……………………………………… 10
Switching the Display Language to English ………… 10
Initial Setup of E-mail and EZweb …………………… 11
Checking Your Phone Number and E-mail Address … 11
Display Indicators ……………………………………… 12
Using Main Menu ……………………………………… 13
Changing Your E-mail Address ………………………… 13
Security Code and Passwords ………………………… 14
Making and Answering Calls 16
Making a Call …………………………………………… 16
Making an International Call …………………………… 16
1
Answering a Call ………………………………………… 17
Returning a Call (Outgoing History/Incoming History)
One-ring Calls …………………………………………… 17
Adjusting the Earpiece Volume during a Call ………… 18
Turning On Manner Mode ……………………………… 18
Changing the Incoming Ring Tone …………………… 18
Adjusting the Incoming Ring Tone Volume …………… 19
Turning On the Answer Memo ………………………… 19
Character Input 21
Character Entry Modes ………………………………… 21
Entering Alphanumeric Characters …………………… 21
Entering E-mail Addresses …………………………… 22
Entering Pictograms …………………………………… 23
Phone Book 24
Saving a Phone Book Entry …………………………… 24
Dialing from the Phone Book ………………………… 24
Editing Phone Book Entries …………………………… 24
Saving a Phone Number from the Incoming
or Outgoing History …………………………………… 25
Pair Function 26
Registering a Pair Partner ……………………………… 26
Making a Call to a Pair Partner ……………………… 26
Sending Mail to a Pair Partner ………………………… 26
…17
4
Page 7

Mail 27
Using E-mail …………………………………………… 27
Creating and Sending E-mail Messages …………… 27
Reading Received E-mail Messages ………………… 28
Reading an E-mail Message
with an Attached Photo or Movie ……………………… 28
Replying to Received E-mail Messages ……………… 28
Rejecting Spam ………………………………………… 29
Using C-mail …………………………………………… 29
Creating and Sending C-mail Messages …………… 29
Reading Received C-mail Messages ………………… 30
Camera 31
Photo Taking Tips ……………………………………… 31
About Photo Modes …………………………………… 31
Taking a Photo ………………………………………… 31
Viewing Photos ………………………………………… 32
EZweb 33
Accessing Sites ………………………………………… 34
Bookmarking Frequently Accessed Pages …………… 35
Viewing Bookmarked Pages …………………………… 35
Checking Charges ……………………………………… 36
EZ News Flash 37
Basic Operations ……………………………………… 37
Setting EZ News Flash ………………………………… 37
EZ Navi 39
Passenger Seat Navi for People
in the Passenger Seat to Check the Route ………… 39
Security Navi to Check Where Your Kids Are ………… 39
EZ Navi Walk for When You Go Out ………………… 40
Evacuate Navi to Guide You Home or to Nearby
Evacuation Areas during Disasters …………………… 41
In Case of Loss of Your E10K 42
Setting Conditions for Activating the Remote Ctrl Lock
Remotely Activating the Remote Ctrl Lock
on Your E10K …………………………………………… 43
Activating the Remote Ctrl Lock by the
Security Lock Service ………………………………… 43
…42
Troubleshooting 44
Index 46
Contents
5
Page 8
Getting Ready
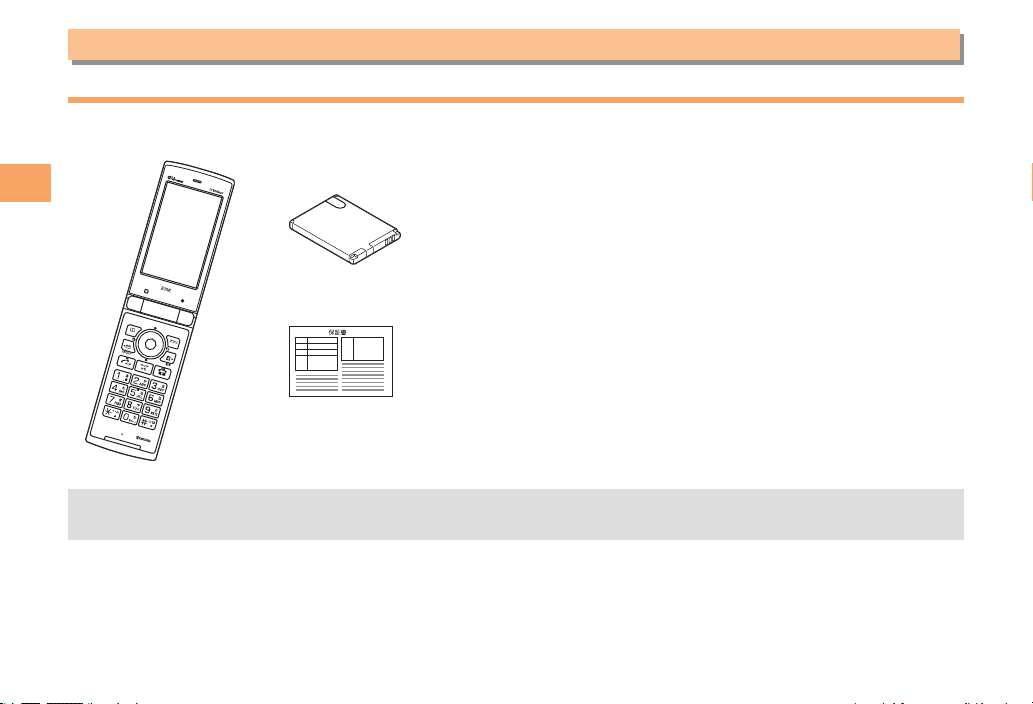
Checking the Contents of the Box
The box contains the cell phone and accessories.
Cell phone• • Battery pack Basic Manual (Japanese)•
Getting Ready
Warranty (Japanese)•
An AC adapter and microSD memory card are not included. Purchase a specified AC adapter (sold separately) and a •
commercially available microSD memory card.
Safety Precautions (Japanese)•
Global Passport mobile rental service Owner's Guide •
(Japanese)
au International Call Guide (Japanese)•
Corporate Applications Guide (Japanese)•
6
Page 9
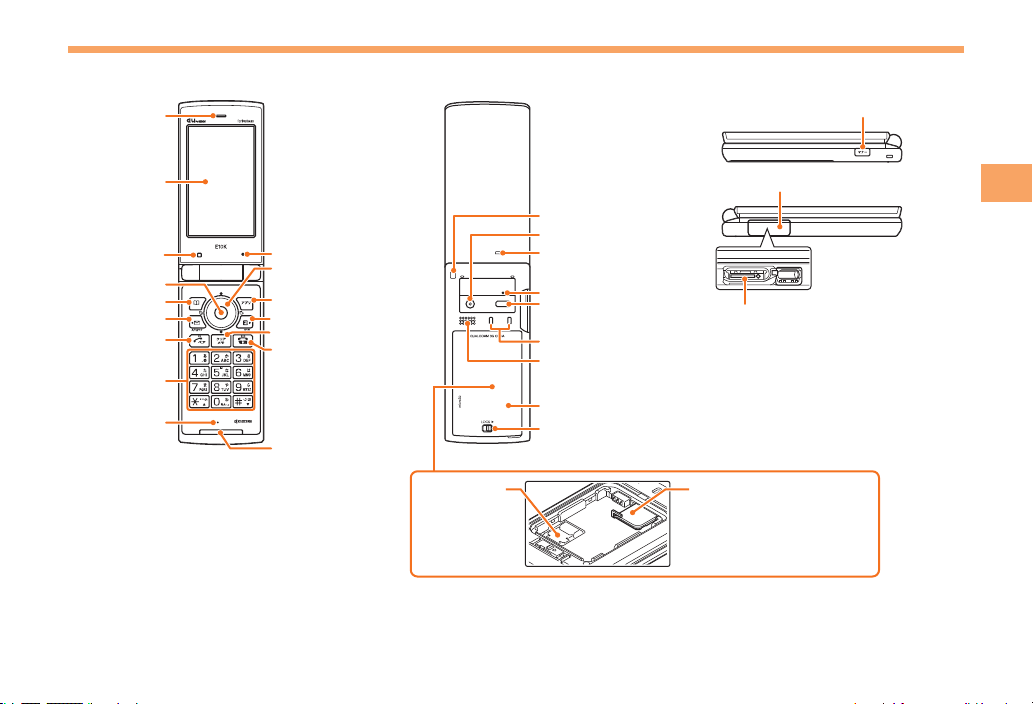
Names of Parts
Microphone
Power/End key
Mail key
Address book key
Appli key
Air vent
EZ key
Answer/Pair key
Clear/Memo key
Number keys
Front jog key
Display
Optical Sensor
Center key
Earpiece
Built-in antenna
*
* Do not hold the built-in antenna portion
when talking on the phone, using EZweb,
receiving the GPS information.
From the Front ■
From the Back ■
Strap mount
Camera lens
Incoming (charging)
indicator
Air vent
Infrared port
Charging terminals
Speaker
Battery pack/cover
Lock switch
microSD
memory card
slot
From the Sides ■
Manner key
External connection cover
Getting Ready
External connection jack
au IC Card*
* Do not remove this card
unnecessarily as your phone
number is recorded on it.
7
Page 10
Charging the Battery Pack
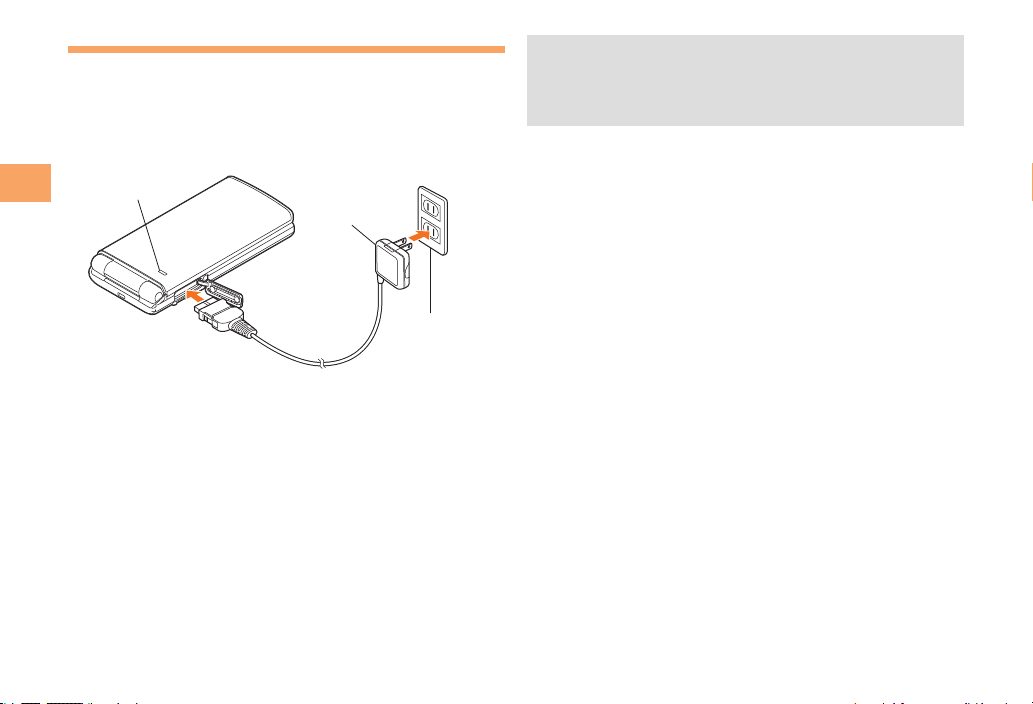
The battery pack is not fully charged at the time of purchase.
Be sure to charge the battery pack before using the cell
phone for the first time.
An AC adapter is not included. Purchase a specified AC •
adapter (sold separately).
Charge indicator
3
Getting Ready
AC adapter
2
Be sure to close the cover of the external connection •
jack when charging is finished.
Do not pull or twist the cover of the external •
connection jack forcibly.
1
Connect a speci ed AC adapter to the cell ➡
phone with the battery pack attached.
Open the cover of the external connection jack. Check •
the shape of the connector of the AC adapter, and
plug it straight into the external connection jack.
Unfold the power plug of the AC adapter and ➡
plug it into a 100V AC power outlet.
Con rm that the charge indicator lights. ➡
Charging: The charge indicator lights.•
Charging finished: The charge indicator goes out.•
8
100V AC
power outlet
Page 11
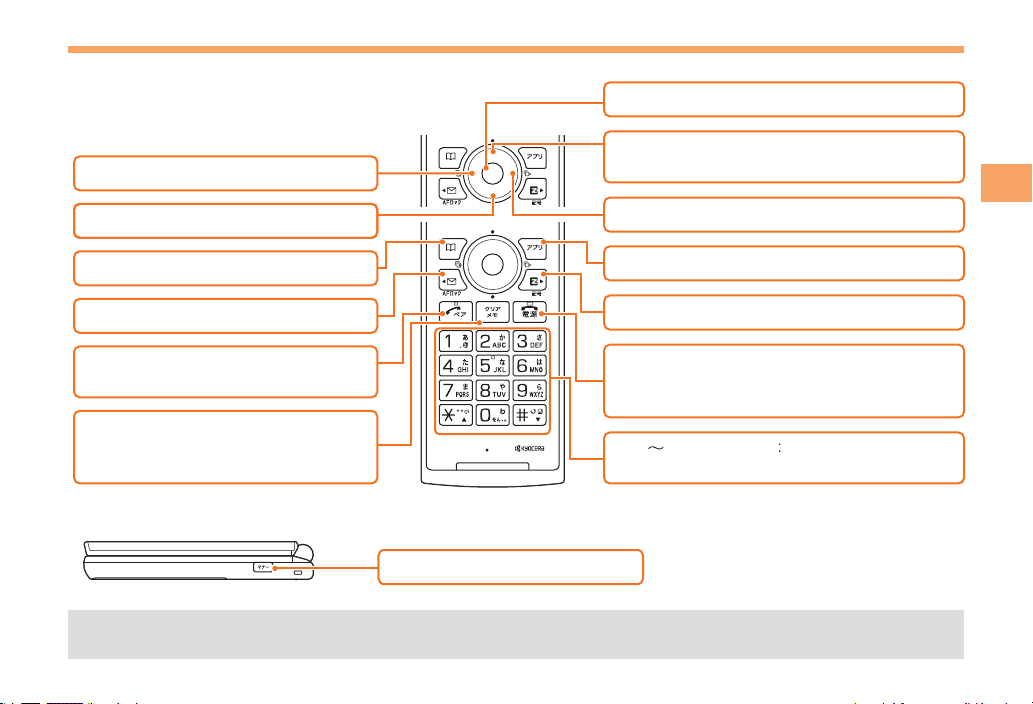
Learning the Basics
: Display Incoming History.
: Display EZ Service menu.
: Turn power on/off.
End call/communication.
Cancel operation.
: Display Outgoing History.
: Display EZapps menu.
l
: Display PetaMemo icon.
d
: Display the ticker field/info pane.
Activate Camera.
u
: Use Phone Book.
&
: Display Main menu.
c
: Display E-mail/C-mail menu.
L
: Make/answer calls.
Use the Pair function.
N
: Set/cancel Answer memo.
Delete characters.
Cancel operation.
C
r
%
R
F
Input phone numbers and characters.
0 9*#
■Key Assignments
■
Side Key Assignments
If you lose track of where you are or if you make a mistake, press • MC to return to the previous screen. Press MF
and return to the standby screen.
: Set/cancel manner mode.
(
Getting Ready
9
Page 12
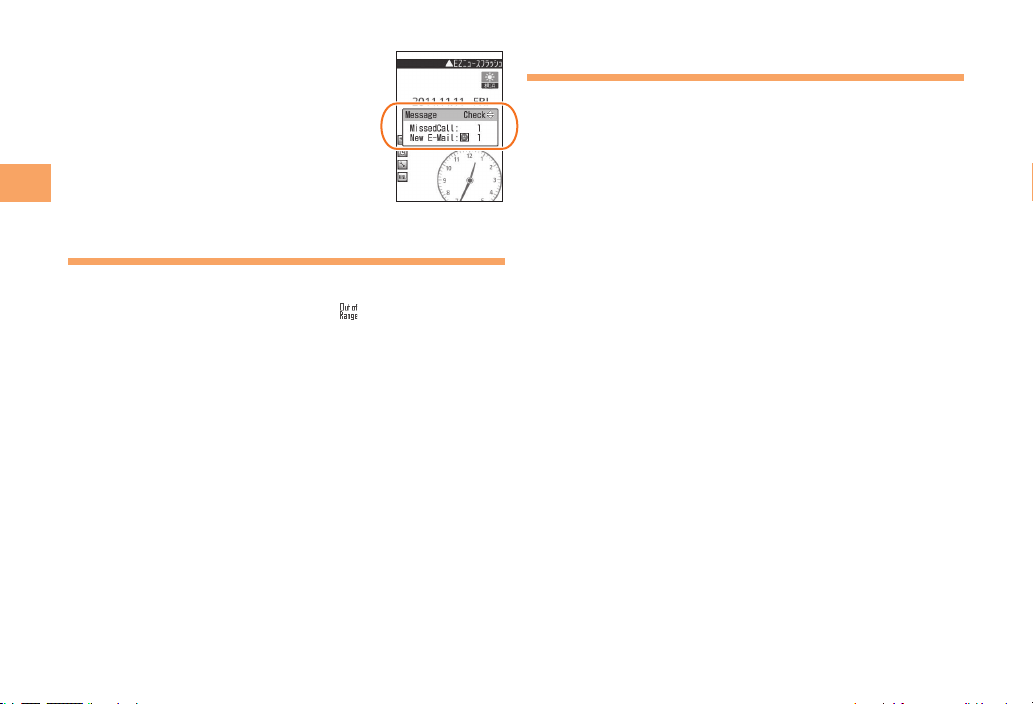
Hiding/Redisplaying the ■
Message menu
Message Menu
When the message menu is displayed on
the standby screen, you can temporarily
hide it by pressing F and then display
the Main menu by pressing c.
To redisplay the hidden message menu,
press F when the standby screen is
Getting Ready
displayed.
Turning On Power
Hold down F for at least one second.
You cannot receive or make calls if • (out of range
indicator) is displayed.
Turning Off Power ■
When the standby screen is displayed, hold down F for
at least two seconds.
Switching the Display Language to English
You can switch the display language for function names
and other items to English.
When the standby screen is displayed, press c.
Use ➡ a to select
then press c (選択 [Select]).
Use ➡ j to select
then press c (選択 [Select]).
Use ➡ j to select Set Language and then press
c (選択 [Select]).
Use ➡ j to select English and then press
c (OK).
Use ➡ j to select Alphabet and then press
c (OK).
機能設定
画面表示
(Set Functions) and
(Screen Setup) and
10
Page 13

Initial Setup of E-mail and EZweb
To use e-mail and EZweb, you need to apply for an EZweb
subscription. If you did not apply for an EZweb subscription
at the time of purchase, contact an au shop or the
Customer Service Center.
Also, before use, you need to configure initial settings. Your
e-mail address is assigned automatically in the initial setup.
When the standby screen is displayed, press %.
Press ➡ c (OK).
After a short while, your e-mail address is displayed.
Press ➡ c (OK).
The initial settings are complete.
You can also configure initial settings by pressing • $L
or $R.
Checking Your Phone Number and E-mail Address
When the standby screen is displayed, press c
and then 0/&(Pro le).
Getting Ready
11
Page 14
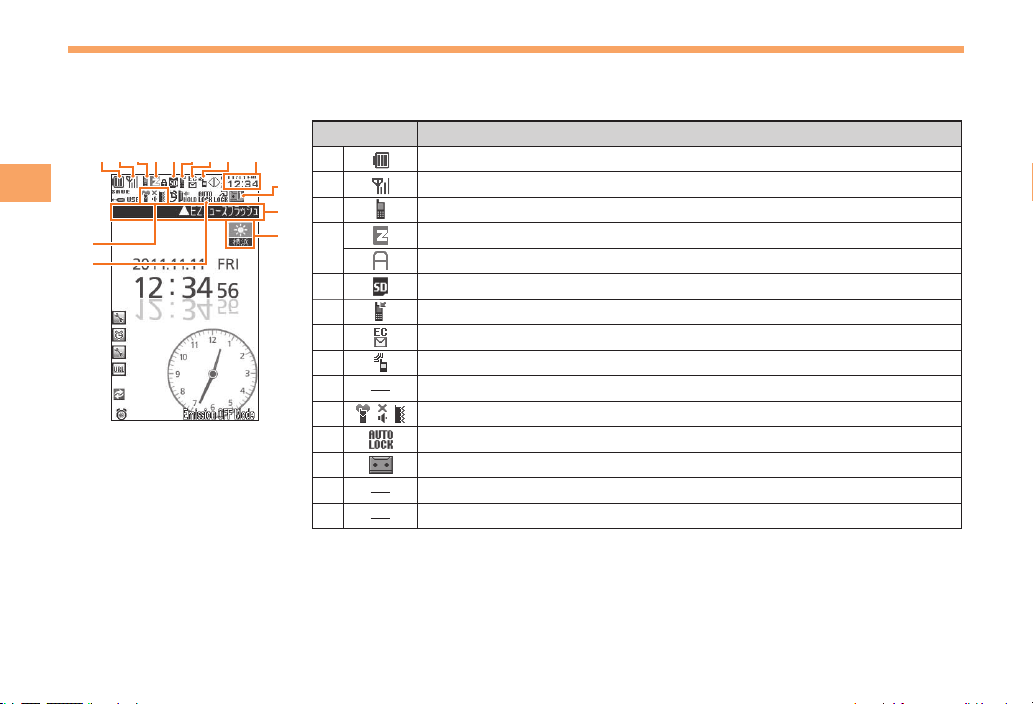
Display Indicators
⑭
⑬
①⑩②③④⑤⑥⑫⑦⑧
⑨
⑪
Display indicators inform you of mail arrival, current settings, etc.
■Display
Getting Ready
Indicator Description
①
②
③
④
⑤
⑥
⑦
⑧
⑨
⑩
⑪
⑫
⑬
⑭
Battery level
Signal strength
During a call
Connecting to EZweb
EZapps activated
A microSD memory card (commercially available) inserted
Missed calls
New or unread e-mail/C-mail
Receiving EZ News Flash information
Current date and time
Manner mode set
Auto Lock activated
Answer memo set
Ticker field
Info pane
12
Page 15
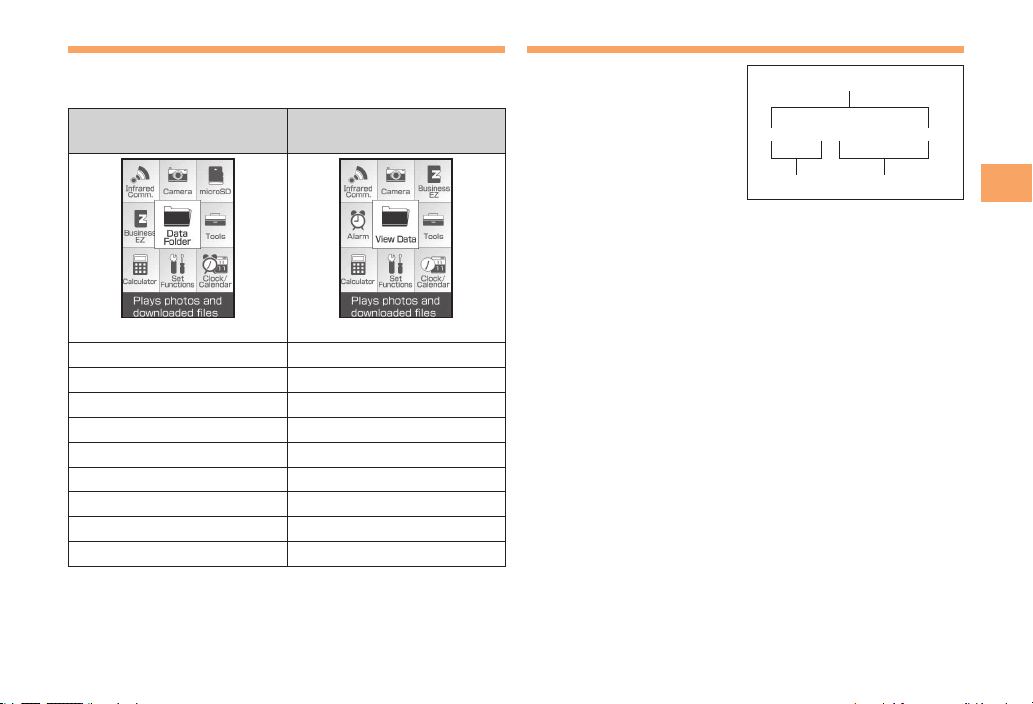
Using Main Menu
You can access various functions from the Main menu.
Each Menu pattern has a different set of items.
Normal Mode
(Standard, Metal)
(Screen for Standard)
Infrared Comm. Infrared Comm.
Camera Camera
microSD Business EZ
Business EZ Alarm
Data Folder View Data
Tools Tools
Calculator Calculator
Set Functions Set Functions
Clock/Calendar Clock/Calendar
Simple Mode
(Standard)
Changing Your E-mail Address
You can change the account
name of your e-mail address.
When the standby screen is displayed, press L.
Use ➡ j to select E-Mail Setup and then press
c (Select).
Use ➡ j to select Change Adr / Other and then
press c (Select).
The cell phone connects to the server.
Use ➡ j to select
Eメールアドレスの変更
E-mail Address) and then press c (Select).
Use ➡ j to select the entry box, press c (Edit),
enter your security code, and then press c (OK).
Your security code is the four-digit number you wrote •
on your subscription form.
If the security code is incorrectly entered three times •
consecutively during a single day, the e-mail address
change operation will be disabled until the next day.
Use ➡ j to select 送信 (Send) and then press
c (Select).
E-mail address
△△△@ezweb.ne.jp
Account name Domain name
(Change
Getting Ready
13
Page 16
Getting Ready
Use ➡ j to select
承諾する
(Accept) and then
press c (Select).
Use ➡ j to select the entry box, press c (Edit),
enter an e-mail address using single-byte
alphanumeric characters, and then press
c (OK).
For details on entering e-mail addresses, see page 22.•
Use ➡ j to select 送信 (Send) and then press
c (Select).
Use ➡ j to select OK, press c (Select) and then
c (OK).
Check that the e-mail address has been updated •
before pressing c (OK).
Your e-mail address cannot be changed if the new •
address you enter in the above procedure is already
being used. In this case, enter a different e-mail
address.
Security Code and Passwords
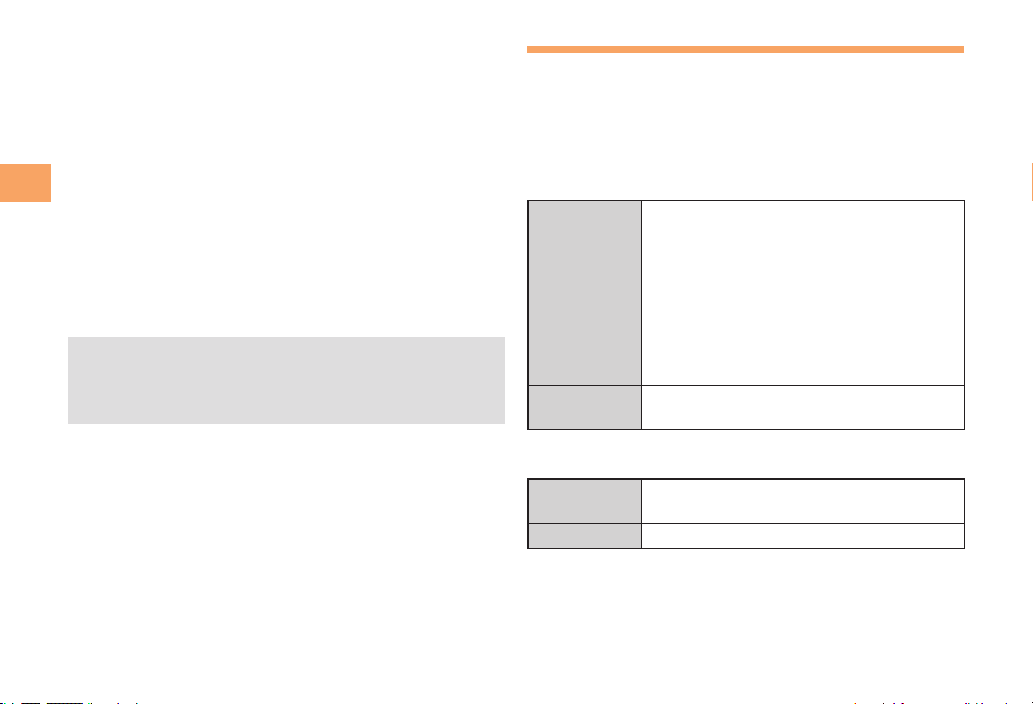
You can use a security code and other passwords
described below.
Take care not to forget your security code and passwords,
because they are required for performing various
operations and using subscription services.
■Security Code
①Using the Answering Service (Voice
Mail) and Call Transfer remotely from a
fixed-line phone
Usage
Example
Initial Setting
■Lock No.
Usage
Example
Initial Setting 1234
②Making inquiries, applications, and
changes while using Customer Service
Center voice guidance, au web pages,
and EZweb
③Changing the settings of Spam Filter or
Change Adr / Other under E-mail Setup
The four-digit number you wrote on your
subscription form
Changing various settings of the cell
phone
14
Page 17
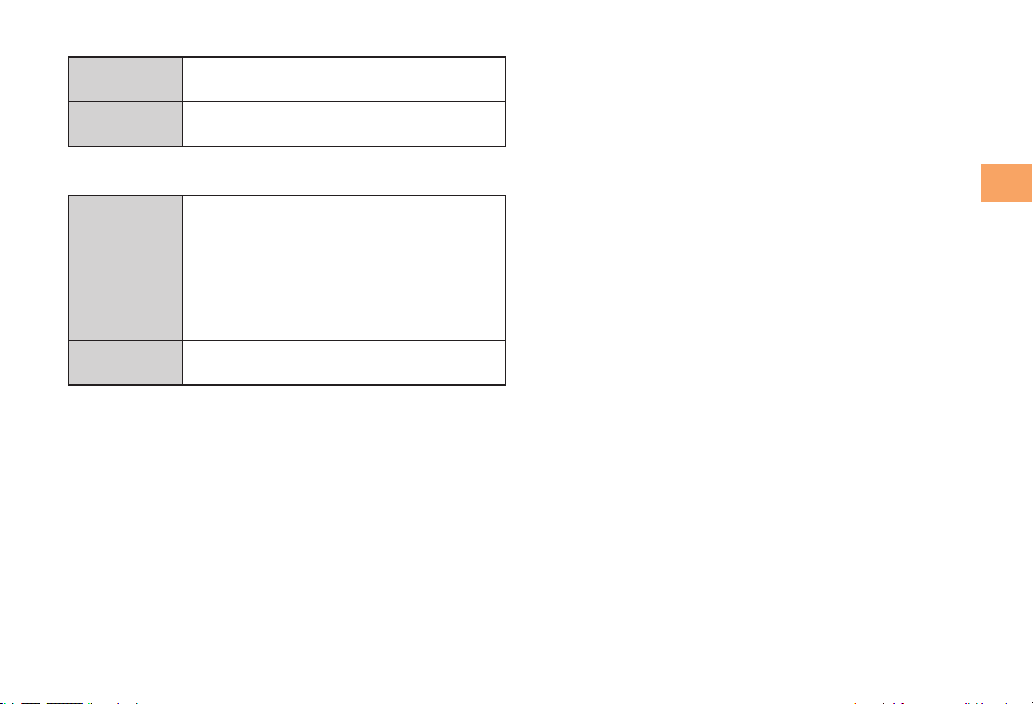
■EZ Password
Usage
Example
Initial Setting
Subscribing or canceling subscriptions to
EZweb fee-based contents
The four-digit number you wrote on your
subscription form
■Premium EZ Password
①Subscribing or canceling subscriptions
to EZweb fee-based contents paid
by
Usage
Example
Initial Setting
まとめて
Payment Service)
②Purchasing products from EZweb sites
using
まとめて
Payment Service)
The four-digit number you wrote on your
subscription form
au
支払い
au
支払い
Getting Ready
(au Collective
(au Collective
15
Page 18
Making and Answering Calls
Making a Call
When the standby screen is displayed, use 0
to 9 to enter a phone number.
When calling to a fixed-line phone, you also need to enter •
the area code.
Press ➡ N.
Making and Answering Calls
To end the call, press • F.
After you enter a phone number, you can add 184 or •
186 to the phone number as follows:
Press ➡ Dc (Call).
Use ➡ Dj to select Call 184 or Call 186 and then pr
Dc (Call).
184: When you do not want to infor
your phone number.
186: When you want to inform the other party of your
phone number.
m the other party of
ess
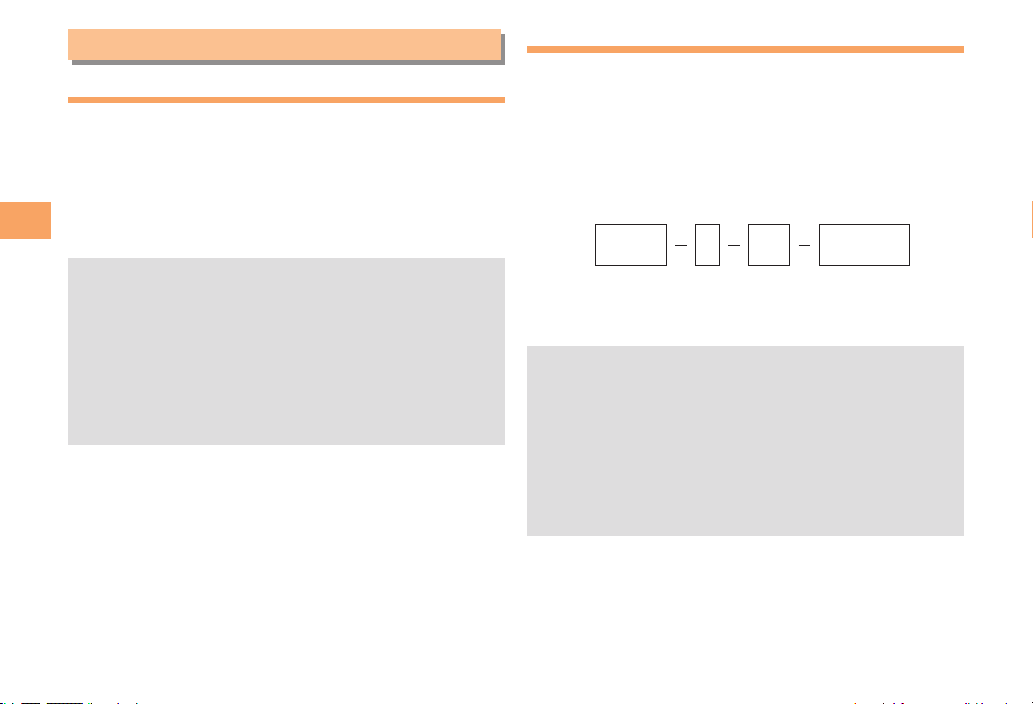
Making an International Call
au International Call Service ■
Available without any additional application
Example: To call 212-123-△△△△ in the USA
Enter the International access code, a country
code, area code and phone number, and then
press N.
001010
or010
↑
KDDIInternational
accesscode
International call charges are billed together with •
monthly local call charges.
For more information on au International Call Service, •
dial either of the following numbers:
From au cell phones (toll-free):
157 (area code not required)
From fixed-line phones (toll-free):
0077-7-111
(Open 9:00 to 20:00 everyday)
Country
(USA)
212 123-XXXX1
↑
code
↑
Areacode↑Phonenumber
16
Page 19
Answering a Call
To answer a call, press N.
To end the call, press • F.
Display When a Call is Received ■
The phone number of the caller appears.
If the caller's phone number and name are in the phone
book, the name is also displayed.
When the phone number of the caller is not displayed, one
of the following indicators may appear.
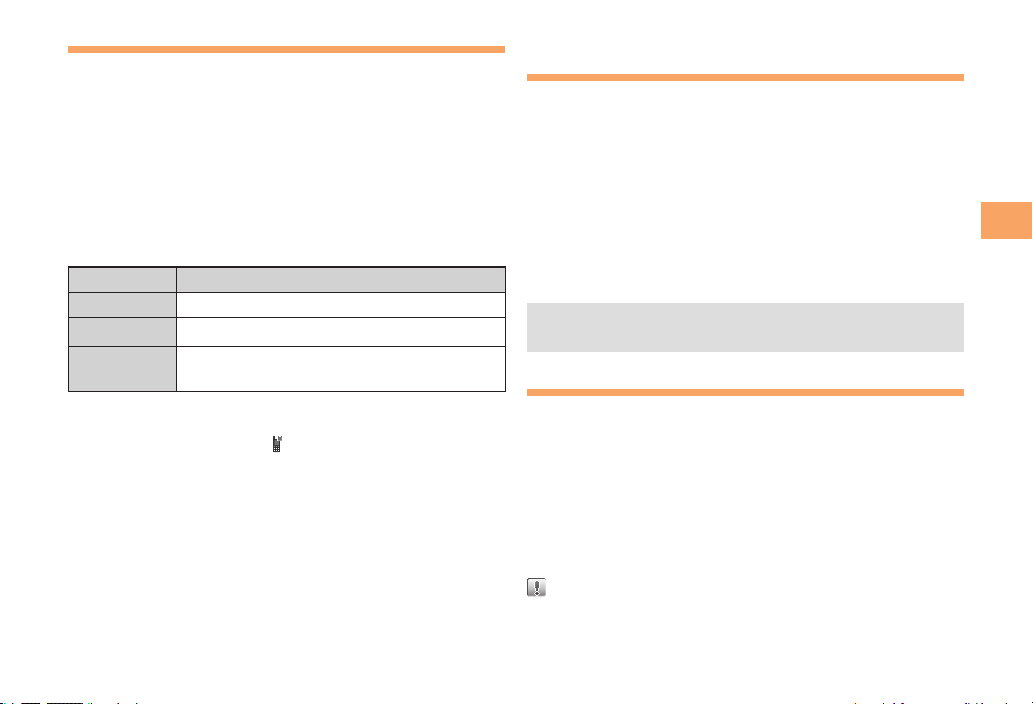
Indicator Meaning
ID Unsent
Payphone
Not Support
Missed Call Noti cation ■
If you did not answer a call, and MissedCall are displayed
to let you know that you missed a call.
To check the caller's phone number, use j to select
MissedCall and then press c (Check). You can then return
the call (see the procedure on the right).
The caller did not send a Caller ID.
The call is from a pay phone.
The call is from a phone that does not
support Caller ID.
Returning a Call ( Outgoing History/ Incoming History)
Example: Returning a call to a phone number in the
incoming history
When the standby screen is displayed, press l.
Press • r while the standby screen is displayed to
display the Outgoing History screen.
Use ➡ j to select the phone number you want
to call and then press c (Detail).
Press • r to display the Outgoing History screen.
Press ➡ N.
The cell phone can store up to 50 phone numbers in •
each of the incoming and outgoing history.
One-ring Calls
What is a One-ring Call? ■
A one-ring call is a call from an unknown caller that only
rings once, causing it to be stored in the incoming history.
One-ring calls are often used to get you to return the call,
which will connect you to a dating service or some other
service that charges you at high rates.
One-ring Indicator ■
indicator on the Incoming History screen indicates you
have received a one-ring call (a call rang for three seconds
or shorter). Be careful when you return a call to an unknown
caller.
Making and Answering Calls
17
Page 20
Adjusting the Earpiece Volume during a Call
During a call, use j.
u• : Increases the volume.
d• : Decreases the volume.
Turning On Manner Mode
When the standby screen is displayed, hold down
Making and Answering Calls
( for at least one second.
This turns on manner mode, and displays , and on the
standby screen. This also turns on Answer memo, which is
indicated by
Turning Off Manner Mode ■
When the standby screen is displayed, hold down ( for
at least one second.
Turning off manner mode causes
from the standby screen. Answer memo is also turned off,
which is indicated by
screen.
Even in manner mode, the cell phone still emits a •
sound when autofocusing, a shutter sound when you
take a photo.
on the standby screen.
, and to disappear
disappearing from the standby
Changing the Incoming Ring Tone
When the standby screen is displayed, press c.
Use ➡ a to select Set Functions and then press
c (Select).
Use ➡ j to select Tone/Vib/Lamp and then press
c (Select).
Use ➡ j to select Incoming Setup and then press
c (Select).
Use ➡ j to select Incoming Call and then press
c (Select).
Use ➡ j to select Melody and then press
c (Select).
Use ➡ j to select Fixed RingTone and then press
c (Select).
Use ➡ j to select Preset Data and then press
c (Select).
Use ➡ j to select the ring tone and then press
c (OK).
The incoming ring tone is set.
If you press • % (Play), the tone plays.
18
Page 21
Adjusting the Incoming Ring Tone Volume
When the standby screen is displayed, press c.
Use ➡ a to select Set Functions and then press
c (Select).
Use ➡ j to select Tone/Vib/Lamp and then press
c (Select).
Use ➡ j to select Incoming Setup and then press
c (Select).
Use ➡ j to select Incoming Call and then press
c (Select).
Use ➡ j to select Volume and then press
c (Select).
Use ➡ j to adjust the volume and then press
c (OK).
Each press of • j changes the volume one step.
STEP UP
5 (Deka)
(loud)
1 (sof
OFF
The ring tone volume gradually increases.
The ring tone sounds at the set volume.
t)
The ring tone does not sound.
Turning On the Answer Memo
When the standby screen is displayed, hold down
C for at least one second.
is displayed on the standby screen.
■Turning Off the Answer Memo
When the standby screen is displayed, hold down C for
at least one second. The answer memo is turned off and
disappears from the standby screen.
The cell phone can record a maximum of ten •
messages, each up to 60 seconds long.
Answer memo is a function that automatically answers •
calls and allows callers to record messages. Use the
Answering Service (Voice Mail) when your phone is
turned off or when you are in a location where a signal
cannot be received.
■Playing a Message
If a message is recorded, AnswerMemo appears on
the standby screen.
Use ➡ j to select AnswerMemo and then press
c (Check).
Use ➡ j to select Play Memo and then press
c (Select).
Use ➡ j to select the message you want to play
and then press c (Play).
To stop playing the message, press • c (Stop).
Making and Answering Calls
19
Page 22

Deleting a Message ■
When the standby screen is displayed, press C.
Use ➡ j to select Answer Memo and then press
c (Select).
Use ➡ j to select Play Memo and then press
c (Select).
Use ➡ j to select the message you want to
Making and Answering Calls
delete and then press % (Menu).
Use ➡ j to select Delete and then press
c (Select).
Use ➡ j to select Delete One and then press
c (Select).
Use ➡ j to select YES and then press c (OK).
20
Page 23
Character Input
Character Entry Modes
When a character entry screen is displayed, you can select
a character entry mode if you press & (ChrTyp).
Menu Items ■
漢あ : Kanji/hiragana mode
カナ : Double-byte katakana mode
Aa : Double-byte alphanumeric mode
12 : Double-byte number mode
?& : Double-byte symbol mode
カナ
: Single-byte katakana mode
Aa
: Single-byte alphanumeric mode
12
: Single-byte number mode
?&
: Single-byte symbol mode
Use a to select a character entry mode and then
press c (Select).
Entering Alphanumeric Characters
You can use the keys 1 to 0 to enter characters.
More than one character is assigned to each key.
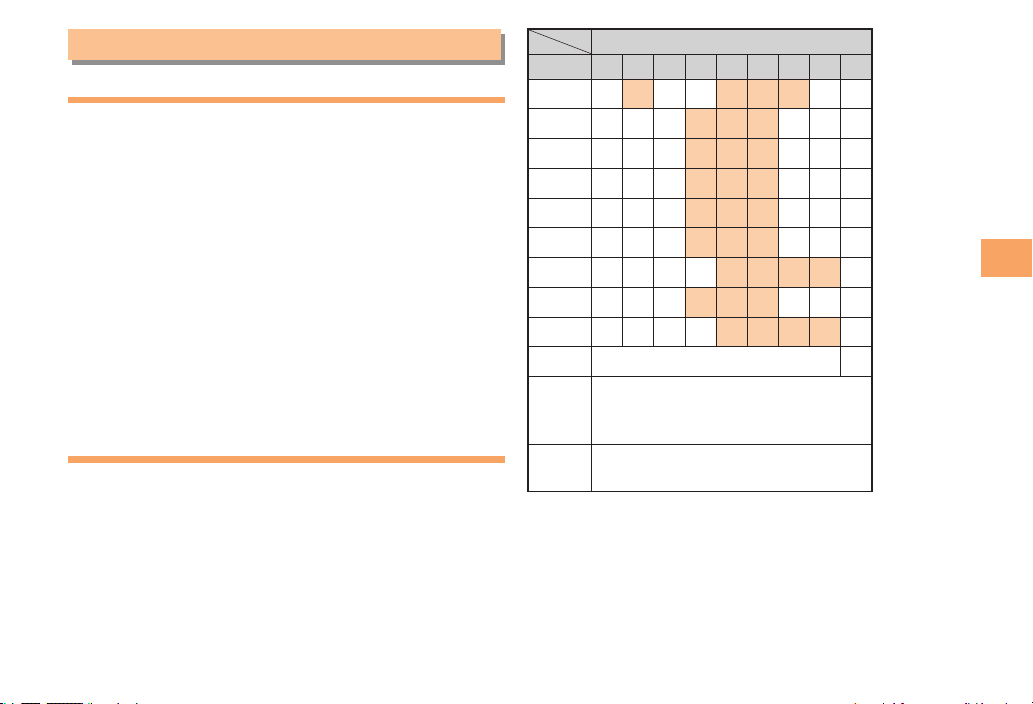
The following table shows the key assignment for entering
characters.
Number of Times to Press the Key
Key 123456789
.
1
2 abc A B
3 def D E
4 ghi G H
5 jkl J K
6 mnoM N
7 pqrs P
8 tuv T U
9 wxyzW
0
*
#
When you change your e-mail address, you cannot use
the characters in
address to the left of @).
@- / :
Inputs symbols
Inputs symbols (switches an
unconfirmed character between
uppercase and lowercase).
Adds a line break and displays
characters in the opposite order.
■
for the account name (part of the
~
1
C2
F3
I4
L5
O6
QRS7
V8
XYZ9
0
Character Input
21
Page 24

■Entering Two or More Characters
Assigned to the Same Key
After you enter the first character, press r and then enter
the next character.
■Deleting Characters
To delete one character at a time, move the cursor to the
character you want to delete and then press C. To
delete all characters to the right of the cursor, hold down
C for at least one second. If there are no characters to
the right of the cursor, holding down C will delete all the
Character Input
characters.
■Starting a New Line
Press #.
Certain functions such as C-mail do not support •
entering new lines.
22
Entering E-mail Addresses
E-mail Address Compatible Characters ■
Before you enter an e-mail address, switch to the single-•
byte alphanumeric mode.
When changing your e-mail address, you can enter up •
to 30 single-byte alphanumeric and symbol characters
for the account name (part to the left of @). Note the
following:
- Uppercase characters cannot be used.
- Period (.) or zero (0) cannot be used as the first
character.
How to Enter E-mail Addresses ■
Example: Entering "[email protected]"
Enter "taro.23".
t : Press 8 once.
a : Press 2 once.
r : Press 7 three times.
o : Press 6 three times.
. : Press 1 once.
2 : Press 2 once and then #.
3 : Press 3 once and then #.
Enter "@". ➡
@: Press 1 twice.
Enter "kddi". ➡
k : Press 5 twice.
d : Press 3 once and then r.
d : Press 3 once.
i : Press 4 three times.
Page 25

Press ➡ % (Menu).
Use ➡ j to select Get and then press
c (Select).
Use ➡ j to select UsefulSentence and then press
c (Select).
Use ➡ j to select Internet and then press
c (Select).
Use ➡ j to select .co.jp and then press c (OK).
".co.jp" is entered.
Entering Pictograms
When a character entry screen is displayed, press
& (ChrTyp).
Use ➡ a to select
c (Select).
Use ➡ a to select the pictogram you want to
enter and then press c (OK).
You can enter pictograms consecutively if you press •
% (Continue) instead of c (OK).
and then press
Character Input
23
Page 26
Phone Book
Saving a Phone Book Entry
When the standby screen is displayed, hold down
& for at least one second.
Use ➡ j to select
c (Edit).
Enter a name and then press ➡ c (OK).
The [Reading] for the name is entered automatically.
Use ➡ j to select [Phone No.1] and then
Phone Book
press c (Edit).
Enter a phone number and then press ➡ c (OK).
If the phone number is for a fixed-line phone, enter the •
phone number starting with the area code.
Use ➡ j to select a phone number type and
then press c (OK).
Follow the next step to enter an e-mail address. If •
you do not want to enter an e-mail address, press
& (Comp).
Use ➡ j to select [E-Mail Address1] and then
press c (Edit).
Enter an e-mail address and then press ➡
c (OK).
Use ➡ j to select an e-mail address type and
then press c (OK).
Press ➡ & (Comp).
24
[Name] and then press
The phone book can store up to 1,000 entries. •
The cell phone automatically saves an entry to the •
lowest available memory number from 000 to 999.
You can save three phone numbers and three e-mail •
addresses for each phone book entry.
You can also assign a group No., and enter birthday, •
address, and other information.
Dialing from the Phone Book
When the standby screen is displayed, press &.
Use ➡ a to select the entry containing the
phone number you want to dial and then press
c (Detail).
Use ➡ j to select the phone number and then
press c (Select).
Use ➡ j to select Call and then press c (Call).
Editing Phone Book Entries
When the standby screen is displayed, press &.
Select an entry and press ➡ c (Detail).
Press ➡ & (Edit).
Edit the contents and then press ➡ & (Comp).
Use ➡ j to select YES and then press c (OK).
Page 27

Saving a Phone Number from the Incoming or Outgoing History
Example: Saving a phone number from the incoming history
to the phone book
When the standby screen is displayed, press l
and use j to select the phone number you want
to save.
Press ➡ % (Menu).
Use ➡ j to select Add to Adr Bk and then press
c (Select).
Use ➡ j to select New and then press c (Select).
Use ➡ j to select a phone number type and
then press c (OK).
For details on saving a phone book entry, see page •
24.
Phone Book
25
Page 28
Pair Function
You can register a maximum of three pair partners you
contact often to easily call or send mail.
Registering a Pair Partner
When the standby screen is displayed, press N.
Use ➡ s to select the pair No. for registeration.
Use ➡ j to select YES and then press c (OK).
Use ➡ a to select a pair partner, press % (Detail)
and then c (OK).
When registering a phone book entry with multiple •
phone numbers and e-mail addresses as pair partner,
Pair Function
select the phone number and e-mail address to use
with the Pair function.
When you delete a phone book entry registered in the •
pair partner, the phone book entry is also deleted from
the Pair function.
Making a Call to a Pair Partner
When the standby screen is displayed, press N.
Use ➡ s to select the pair partner among three
tabs.
Press ➡ N.
Sending Mail to a Pair Partner
When the standby screen is displayed, press N.
Use ➡ s to select the pair partner among three
tabs.
Use ➡ j to select Send E-Mail or Send C-Mail and
then press c (Select).
To create an e-mail message, see "Creating and •
Sending E-mail Messages" on page 27. To create a
C-mail message, see "Creating and Sending C-mail
Messages" on page 29.
26
Page 29
Using E-mail
To use e-mail, you need to apply for an EZweb subscription.
If you did not apply for an EZweb subscription at the time
of purchase, contact an au shop or the Customer Service
Center. Also, before use, you need to configure initial
settings.
You can send and receive e-mail with other cell phones
that support e-mail, and with PCs. In addition to text
messages of up to 5,000 double-byte (or 10,000 singlebyte) characters, you can also send photos and movies by
e-mail.
The packet communication charge for sending and •
receiving e-mail applies to the amount of data sent
and received.
You can send an e-mail message to up to 30 different •
addresses at one time.
You can send up to 1,000 e-mail messages per day (a •
message with multiple recipients is counted as more
than one message).
Sending and receiving e-mail messages that include •
attachment data may take a while.
Creating and Sending E-mail Messages
When the standby screen is displayed, press L.
Use ➡ j to select Create New E-Mail and then
press c (Select).
Use ➡ j to select [Destination] and then press
c (Edit).
Use ➡ j to select [Get Adr Bk (1)] and then press
c (Select).
Use ➡ a to select a phone book entry and then
press c (OK).
Use ➡ j to select an address and then press
c (OK).
Use ➡ j to select [Subject] and then press
c (Edit).
Enter a subject and then press ➡ c (OK).
You cannot enter single-byte katakana characters or a •
new line in a subject.
Use ➡ j to select [Body] and then press
c (Edit).
Enter text and then press ➡ c (OK).
You cannot enter single-byte katakana characters.•
Press ➡ & (Send).
Mail
27
Page 30
Reading Received E-mail Messages
When you receive an e-mail message, New E-Mail
appears on the standby screen.
Use ➡ j to select New E-Mail and then press
c (Check).
Use ➡ j to select the folder and then press
c (Select).
• : Indicates a read message.
• : Indicates an unread message.
Use ➡ j to select the new message and then
press c (View).
Reading an E-mail Message from the E-mail Menu
■
When the standby screen is displayed, press L to display
the E-mail menu, use j to select Inbox and then press
Mail
c (Select).
For subsequent operations, see "Reading Received E-mail
Messages" above.
Reading an E-mail Message with an Attached Photo or Movie
Example: Viewing an attached photo
Display the e-mail message that has an attached
photo.
Use ➡ j to select the le name and then press
c (Select).
28
Use ➡ j to select the le name and then press
c (Receive).
Press ➡ c (Play).
Selecting the file name or pressing•
may be unnecessar
depending on the file size.
y for some files to be displayed,
(Receive)
Dc
Replying to Received E-mail Messages
When the standby screen is displayed, press L.
Use ➡ j to select Inbox and then press
c (Select).
Use ➡ j to select the folder and then press
c (Select).
Use ➡ j to select the message you want to
reply to and then press c (View).
Press ➡ & (Reply).
"Re:" is prefixed to the subject, and the text of the
message is quoted.
Refer to "Creating and Sending E-mail ➡
Messages" (page 27) for subsequent
operations.
Page 31
Rejecting Spam
Setting spam filters to reject spam is recommended.
The オススメ設定 (Recommended Settings) helps you to
set spam filters easily.
Spam mail is planned to enhance the function. Details on
enhancement function and the start date will be announced
in au homepage.
Using C-mail
C-mail is a service that uses phone numbers as addresses
to exchange messages between cell phones. A C-mail
message can contain up to 50 double-byte (or 100 singlebyte) characters.
The C-mail send charge applies when sending C-mail.•
■Recommended Settings
Spam filter is set to reject spoofing mail, auto-forwarding
mail and to receive mail sent from a cell phone, PHS, or PC.
When the standby screen is displayed, press L.
Use ➡ j to select Spam Filter and then press
c (Select).
Use ➡ j to select
(Recommended Settings) and then press
c (Select).
Use ➡ j to select
press c (Select).
You can also prevent spam by changing your e-mail •
address. For details on changing your e-mail address,
see page 13.
オススメの設定をする
登録
(Registration) and then
■C-mail Safety Block
C-mail safety block is a function that allows you to reject
C-mails that include URLs (http://△△△, https://△△△) or
phone numbers in the C-mail message text.
C-mail safety block is valid by default. Cancel the setting if
you want to receive C-mails that include URLs and phone
numbers in the message text.
Creating and Sending C-mail Messages
When the standby screen is displayed, hold down
L for at least one second.
Use ➡ j to select Create New C-Mail and then
press c (Select).
Use ➡ j to select
[Destination] and then press
c (Edit).
Use ➡ j to select Get AddressBook and then
press c (Select).
Use ➡ a to select a phone book entry and then
press c (OK).
Mail
29
Page 32
Use ➡ j to select a phone number and then
press c (OK).
Use ➡ j to select
[Body] and then press
c (Edit).
Enter text and then press ➡ c (OK).
Press ➡ & (Send).
Reading Received C-mail Messages
When you receive a C-mail message, New C-Mail
appears on the standby screen.
Use ➡ j to select New C-Mail and then press
c (Check).
• : Indicates a read message.
• : Indicates an unread message.
Mail
Use ➡ j to select the new message and then
press c (View).
Reading a C-mail Message from the C-mail Menu
■
When the standby screen is displayed, hold down L for
at least one second to display the C-mail menu, use j to
select Inbox and then press
For subsequent operations, see "Reading Received C-mail
Messages" above.
(Select).
c
30
Page 33
Camera
Your cell phone has a CMOS camera with 3.31 effective
megapixels for shooting photos and movies. You can use
the self-timer and autofocus.
Shot images can be used for the standby screen, and
attached to e-mail messages.
Photo Taking Tips
When taking photos, position the cell phone so that is
not displayed upside down or inclined. Frame the subject
within the display and hold the cell phone steady with both
hands to avoid shaking.
Camera (lens)
About Photo Modes
The following modes are available for taking photos.
Mode Photo Size Storage Location
Wallpaper
Camera
* When a microSD memory card (commercially available) is
not inserted, the files are saved to the Data Folder of the
cell phone.
Take care not to cover the lens with a strap or finger.•
Wallpaper
Wallpaper (Wide)
0.3M
1M
2M
3M
The Photo Folder in the Data
Folder of the cell phone
The Camera Folder in the
Data Folder of a microSD
memory card*
Taking a Photo
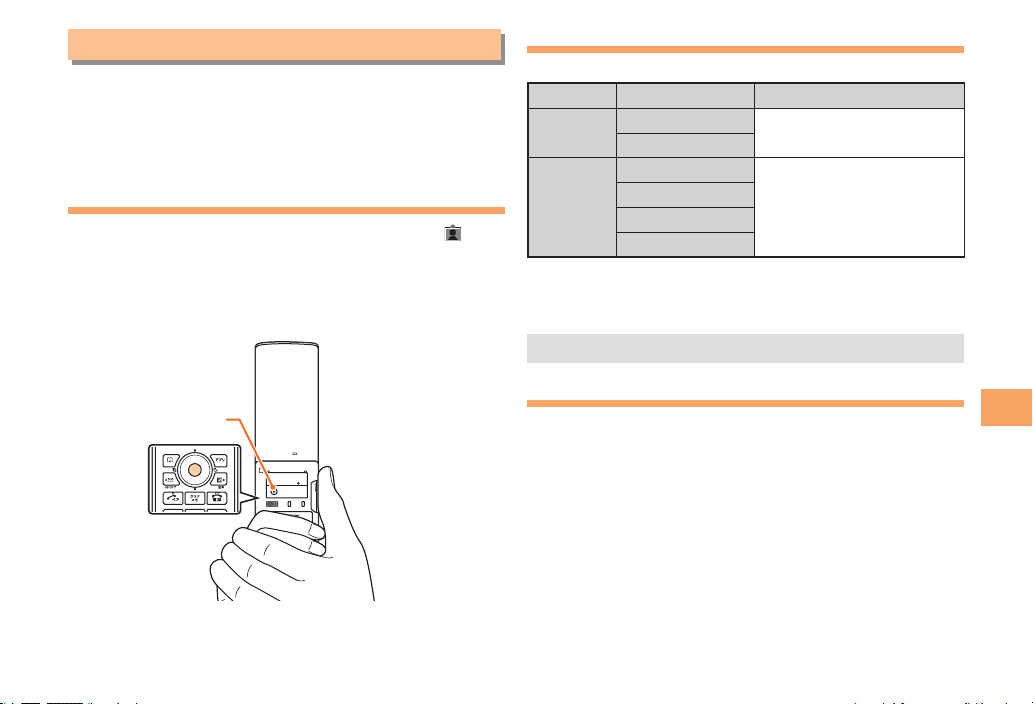
When the standby screen is displayed, hold down
u for at least one second.
The monitor screen appears.
Point the AF frame at the subject and then ➡
press c (Shoot).
The camera focuses automatically and the shutter clicks.
The preview screen is displayed.
Camera
31
Page 34
Saving a Photo ■
Press c (Save) on the preview screen.
If you do not want to save the photo, press • MC in the
pr
eview screen.
Viewing Photos
When the standby screen is displayed, press c.
Use ➡ a to select Data Folder and then press
c (Select).
Use ➡ j to select Photo Folder and then press
c (Select).
Use ➡ j to select a folder and then press
c (Select).
Use ➡ a to select the photo you want to view
and then press c (Play).
Camera
32
Page 35
EZweb
&;XFC4VCTDSJQUJPO3FRVJSFE
EZweb is an information service that allows you to enjoy
browsing the Internet on your cell phone. You can also
download news and other contents from web pages.
To use EZweb, you need to apply for an EZweb
subscription. If you did not apply for an EZweb subscription
at the time of purchase, contact an au shop or the
Customer Service Center. Also, before use, you need to
configure initial settings.
The packet communication charge for EZweb •
connection applies to the amount of data sent and
received, not to the length of time connected.
In addition to communication charges, some sites •
charge for providing information.
EZweb
33
Page 36
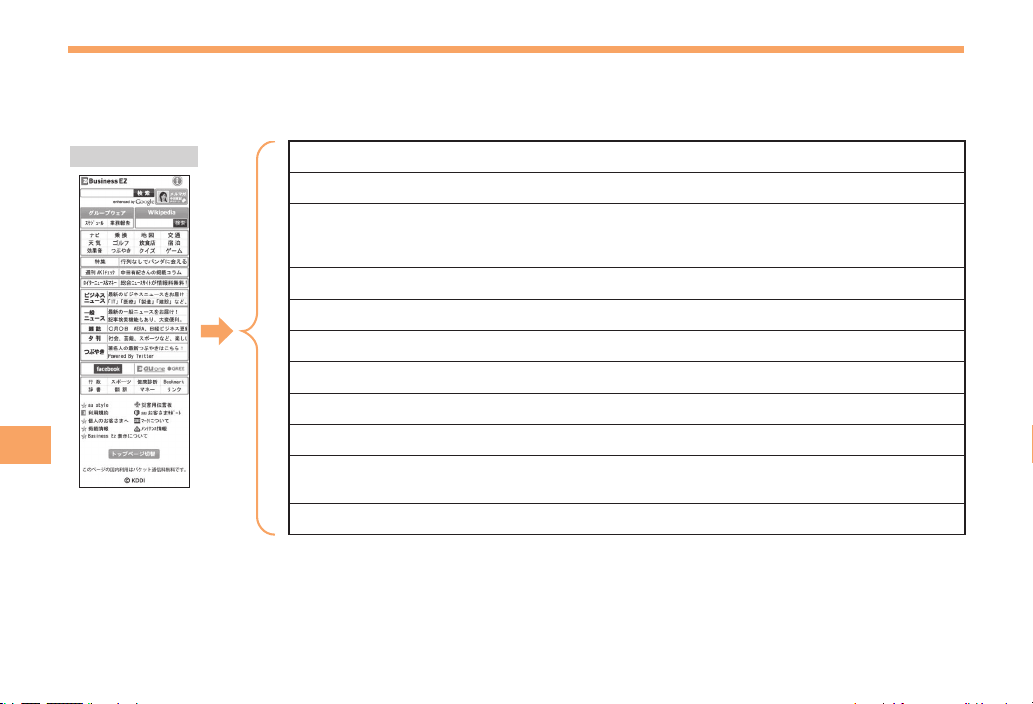
Accessing Sites
Viewing the ■ Business EZ Top
You can access EZweb from the Business EZ Top. A variety of useful and fun sites are available on EZweb.
When the standby screen is displayed, press R, use j to select Top Menu/Search and then press c (Select).
Business EZ Top
EZweb
34
グループウェア(Groupware)
Wikipedia
ナビ/乗換/地図/交通/天気/ゴルフ/飲食店/宿泊/効果音/つぶやき/クイズ/ゲーム
(Navigation/Connection/Map/Transportation/Weather/Golf/Restaurant/Lodging/Sound effect/
Tweets/Quiz/Game)
ロイターニュース&マネー(Reuters News & Money)
ビジネスニュース(Business news)
一般ニュース(General News)
雑誌(Magazine)
夕刊(Evening paper)
つぶやき(Tweets)
行政/スポーツ/健康診断/Bookmark/辞書/翻訳/マネー/リンク
(Government/Sport/Checkup/Bookmark/Dictionary/Translation/Money/Link)
トップページ切替(Switch Top Page)
※ The above information as of September, 2011. Information in this document is subject to
change without notice.
Page 37
■Basic Operations
Use j to select the site you want to access and then
press c (Select).
Press C to return to the previous screen. Hold down
C for at least one second to return to the Business EZ
Top.
The following describes the basic operations that are
available while accessing sites.
Key
Operation
F
j
L/R
C
Exits EZweb.
Moves the cursor up and down.
When there is data available above or below
the current screen, scrolls up and down the
screen one line at a time.
When there is data available above or below
the current screen, scrolls the screen page
by page.
L:Scrolls one page up.
R:Scrolls one page down.
Returns to the previous screen.
Description
Bookmarking Frequently Accessed Pages
When the page you want to bookmark is
displayed, press % (Brow. Menu).
Use ➡ j to select New bookmark and then press
c (Select).
Some pages cannot be bookmarked. •
Press ➡ % (Store).
The displayed page is bookmarked, and its title and
URL are added to the Bookmark.
The Bookmark can contain up to 100 titles and URLs.•
Viewing Bookmarked Pages
When the standby screen is displayed, press R
and then use s to select EZweb.
Use ➡ j to select Bookmark and then press
c (Select).
Use ➡ j to select the bookmark for the page
you want to view and then press c (Select).
The cell phone connects to the site.
EZweb
35
Page 38

Checking Charges
When the standby screen is displayed, press c.
Use ➡ a to select Set Functions and then press
c (Select).
Use ➡ j to select Time/Toll/Subs and then press
c (Select).
Use ➡ j to select Inquiry Toll and then press
c (Connect).
Press ➡ c (OK).
Select the item you want to check and then follow the •
on-screen instructions.
EZweb
36
Page 39
EZ News Flash
&;XFC4VCTDSJQUJPO3FRVJSFE
Use the EZ News Flash to display flash news on the
standby screen. You can check the news details and other
information by selecting the ticker field.
You can use the EZ News Flash by making a few simple
settings following the EZweb initial setup.
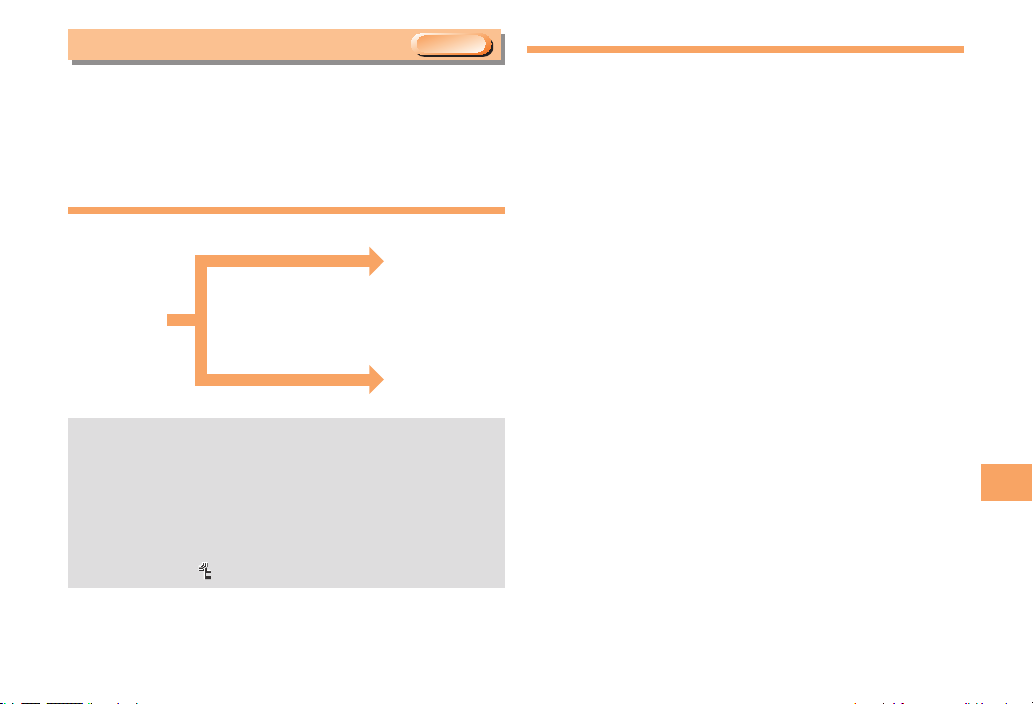
Basic Operations
Select the ticker field.
Check the news.
Press u on
the standby
screen.
The EZ News Flash information is automatically •
received at no charge. Note, however, that packet
communication charges may be incurred for manual
updates and connecting to EZweb sites. In this case,
a confirmation screen for network connection is
displayed.
The EZ News Flash information is updated at regular •
time intervals.
Select the info pane.
appears while receiving information.
Check the
weather forecast.
Setting EZ News Flash
The EZ News Flash is available free of charge. You have
only to make a few simple settings. After following the
procedure in “Initial Setup of E-mail and EZweb” on page
11, configure EZ News Flash settings. If you did not
configure the EZ News Flash settings at the time of the
initial setup, follow the steps below.
When the standby screen is displayed, press
u and select the ticker eld and then press
c (OK).
Follow the on-screen instructions. ➡
The setup procedure is completed.
When the standby screen returns, a message asking •
you to wait for a while until the next update takes place
appears in the ticker field.
EZ News Flash
37
Page 40

■Canceling EZ News Flash
When the standby screen is displayed, press u
and select the ticker eld and then press c (OK).
Press ➡ % (メニュー[Menu]), use j to select
サービス設定解除
then press c (選択[Select]).
Follow the on-screen instructions. ➡
(Service Cancellation) and
■Changing the Reception Settings for
EZ News Flash Information
You can change the ring tone, vibrator and indicator
settings under M215 NewsFlash Rcv for reception of EZ
EZ News Flash
News Flash information.
If you do not want the ring tone to sound when receiving EZ
News Flash information, set the volume to OFF.
38
Page 41
EZ Navi
&;XFC4VCTDSJQUJPO3FRVJSFE
Using GPS (Global Positioning System), EZ Navi provides
useful positional information services.
When the standby screen is displayed, press R
and then use s to select the EZnavi.
The packet communication charges for using EZ Navi •
services apply to the amount of data sent and
received. Some services may require a separate
information fee.
Before using EZ Navi, you must configure initial •
settings of EZweb (page 11).
Passenger Seat Navi for People in the Passenger Seat to Check the Route
Passenger Seat Navi guides the passengers to the
destination with the best route using voice and map.
Drivers are not allowed to use Passenger Seat Navi.
Security Navi to Check Where Your Kids Are
The Security Navi application is made up of the following
three functions:
いつでも位置確認 (Auto Position Search [monthly charge]),
エリア通知 (Area Message [no monthly charge]),
位置確認メール (Position Search Mail [no monthly charge])
Using these functions, you can check the position of an au
cell phone that supports Security Navi; and automatically
receive a notification from the specified au cell phones
when your kids enter (or are in) or leave (or are no longer
in) the set area within a predetermined period of time.
EZ Navi
39
Page 42
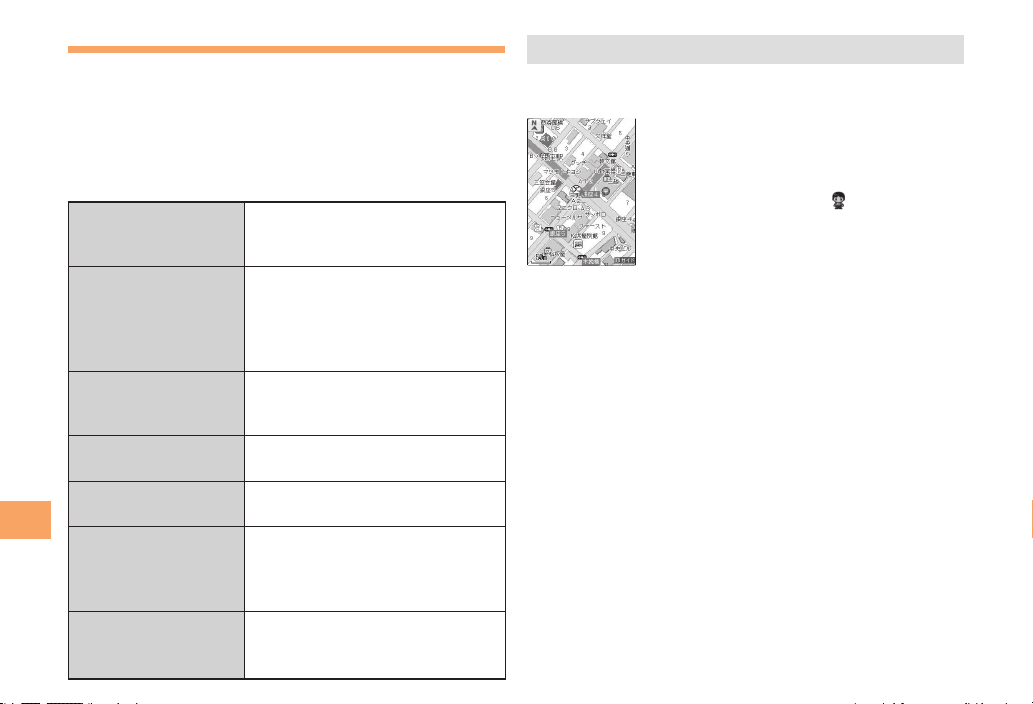
EZ Navi Walk for When You Go Out
Displays various useful menu items for when you are out.
There are two menu modes: the Full Mode menu for those
who want to use all the convenient functions including the
latest features, and the Simple Mode menu with limited
functions allowing you to use the service with simple
operation.
The following table describes the Full Mode menu.
フリーワード検索
(Free Word Search)
トータルナビ/地図
(Total Navigation/Map)
乗換/時刻表
(Connection/Timetable)
EZ Navi
お店/施設/イベント
(Shop/Facility/Event)
ドライブ/渋滞情報
(Road/Traffic Information)
オススメ便利メニュー
(Useful Menu)
設定/会員登録/インフォ
(Setting/Membership
Registration/Information)
40
Search by entering names of
facilities and stores, or key words
ofstations and addresses.
Find the most preferable
combination of transportation
(trains, airplanes, buses and taxis),
and check out maps of your current
location and places you like to go.
Search for train connections,
timetables and other public
transportation information.
Search for local stores, facilities
or events.
Check out road traffic information
in real time.
View information on services that
are available on PCs, and use
advanced functions of EZ Navi
Walk that you can enjoy.
Configure various settings, sign
up as a member or check out
various useful information.
Some of the menu options require a monthly charge.•
View Your Current Location ■
★ represents your initial location. As you
start moving, changes of your location are
tracked by continuous positioning and
indicated in real time by
現在地の地図
The
displays the current map in real time.
(View Your Current Location) option
.
3D Navi ■
Shows a 3D view at guidance points and around the
destination area.
Page 43

Evacuate Navi to Guide You Home or to Nearby Evacuation Areas during Disasters
Nearby public evacuation areas or the direction to your
home can be determined using the map data pre-installed
on the E10K (
Other useful contents can be downloaded from the
ナビ
(Evacuate Navi) section of the EZweb site.
Some contents require a monthly charge. •
Use the information on the screen as a reference and •
always follow the instructions of police, fire and other
municipal authorities.
避難所マップ
[Evacuate Area Map] ).
災害時
EZ Navi
41
Page 44
In Case of Loss of Your E10K
The Remote Ctrl Lock allows you to remotely activate the
Auto Lock, and Address Book Lock, preventing others from
using your cell phone.
Setting Conditions for Activating the Remote Ctrl Lock
You can activate the Remote Ctrl Lock by calling your E10K
a set number of times from a registered phone number
within a specified period of time.
In Case of Loss of Your E10K
When the standby screen is displayed, press c.
Use ➡ a to select Set Functions and then press
c (Select).
Use ➡ j to select Priv/Restrict and then press
c (Select).
Use ➡ j to select Security Lock and then press
c (Select).
Use ➡ j to select Remote Lock and then press
c (Select).
Enter Lock No., and then press ➡ c (OK).
Use ➡ j to select ON/OFF Setup and then press
c (Select).
Use ➡ j to select ON and then press c (OK).
Use ➡ j to select Caller No.List and then press
c (Select).
42
Use ➡ j to select 00 and then press c (Edit).
Use ➡ j to select Input Phone No., press
c (Select), enter a phone number, and then
press c (OK).
Press ➡ & (Back).
Use ➡ j to select Set T
ime and then press
c (Select).
Enter a time and then press ➡ c (OK).
This sets the time limit for receiving the set number of •
calls after the first call is received.
You can set a time from one to ten minutes.•
Use ➡ j to select No. of Calls, and then press
c (Select).
Enter a number of calls, and then press ➡
c (OK).
This sets the number of calls to receive to activate the •
Remote Ctrl Lock.
You can set a number of calls from five to ten.•
Page 45
Remotely Activating the Remote Ctrl Lock on Your E10K
Call the E10K from the registered phone number
repeatedly within the set time limit.
When the specified number of calls are received, the •
Remote Ctrl Lock is activated and a message plays
telling you that the cell phone is locked.
Activating the Remote Ctrl Lock by the Security Lock Service
Even if the Remote Ctrl Lock is not set in advance, the
Remote Ctrl Lock can be activated by calling Customer
Service Center or completing the application process on au
Customer Support from a PC.
The Security Lock Service is available free of charge.
Calling Customer Service Center for ■
Activating/Canceling the Remote Ctrl
Lock
From an au cell phone: 113 without a prefix (toll free)
From any other cell phone or fixed-line phone:
0077-7-113 (toll free)
Open 24 hours
Follow the voice guidance to complete the application
process.
Activating/Canceling the Remote Ctrl ■
Lock from a PC
Login to au Customer Support (https://cs.kddi.com/) and
complete the application process by following the onscreen instructions.
The Remote Ctrl Lock cannot be activated when •
the E10K is turned off or out of the service area, or
Emission OFF is set.
You must fill out an application to use au Customer •
Support (the application can be filled out even after
your cell phone is lost).
In Case of Loss of Your E10K
43
Page 46
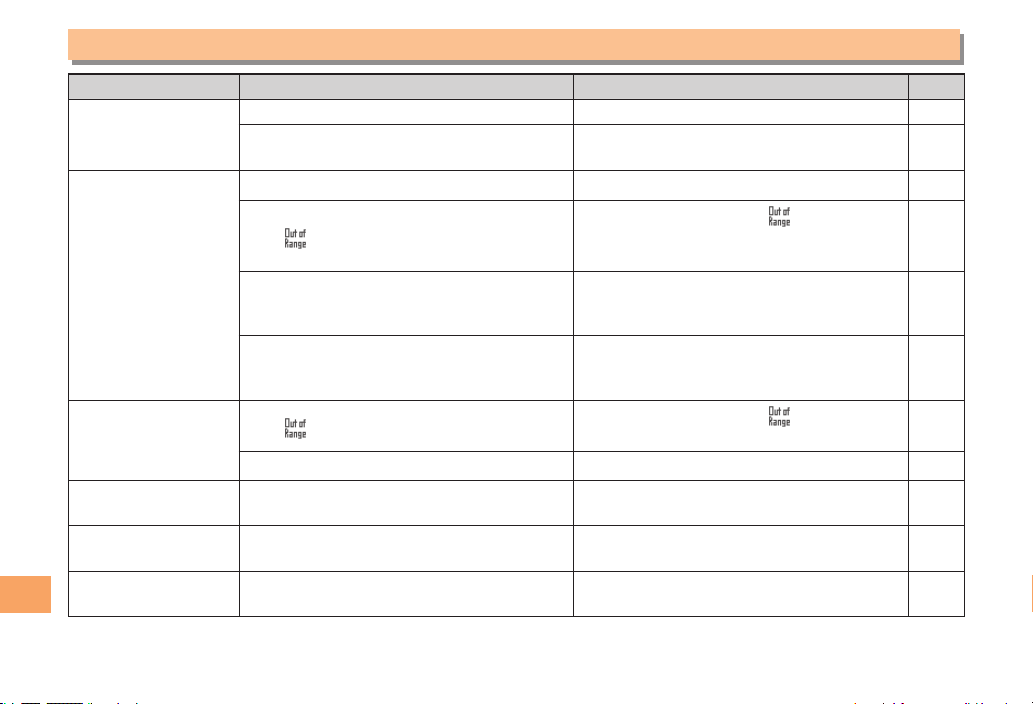
Troubleshooting
Symptom Possible Cause Remedy Page
Cannot turn on
power.
Cannot make calls.
Troubleshooting
Cannot receive calls.
No response when a
k
ey is pressed.
A warning tone sounds
and po
wer turns off.
Calls are answered
aut
omatically.
●Is the battery pack charged?
● Did you hold down F for at least one
second?
●Is power tur
●Is
●Is your hand or a metal object covering
the area around the built-in antenna?
● Did you enter the phone number starting
with the area code?
●Is
●Is power turned on? Hold down F for at least one second.
●Is power tur
●Is ther
pack?
●Is Answer memo tur
ned on? Hold down F for at least one second.
(out of range indicator) displayed?
(out of range indicator) displayed?
ned on? Hold down F for at least one second.
e enough power left in the battery
ned on?
Charge the battery pack. 8
Hold down F for at least one second.
Move to a location where
indicator) is no longer displayed, and try
again.
Make sure your hand or any other metal
object is not covering the area around the
built-in antenna.
When making a call to a phone other than
a cell phone, you need to enter the area
code even if you are inside the same area.
Move to a location where
indicator) is no longer displayed.
Charge the battery pack. 8
Hold down C for at least one second to
turn off Answer memo.
(out of range
(out of range
10
10
10
7
16
10
10
10
19
44
Page 47
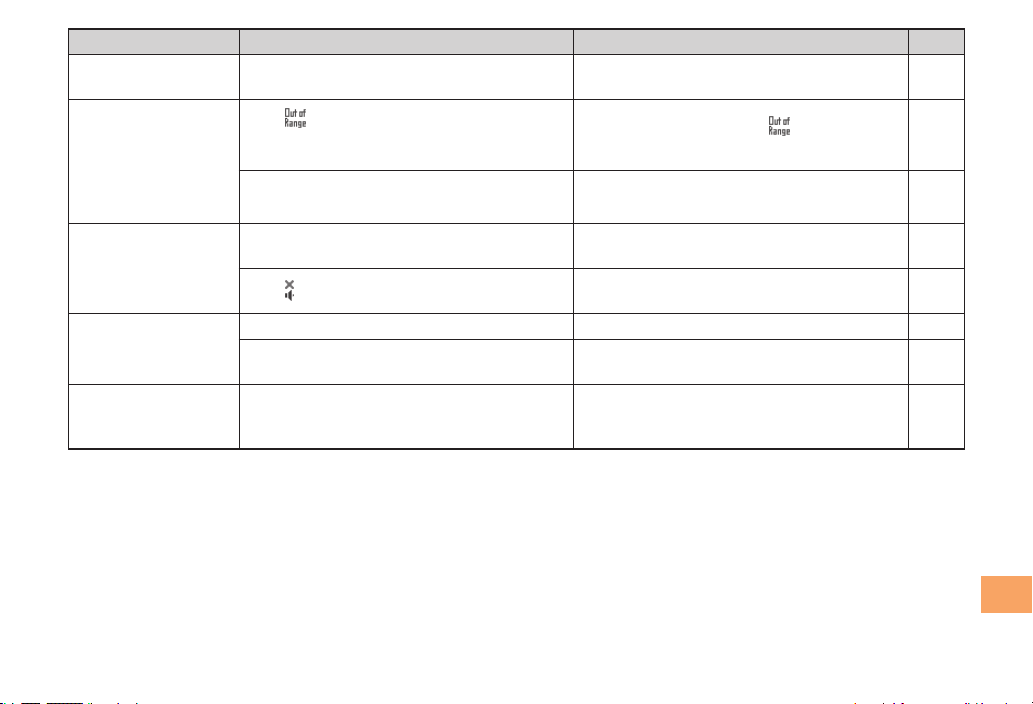
Symptom Possible Cause Remedy Page
Cannot hear the
other par
When making a call,
a beeping sound
is hear
earpiece and a
connection cannot be
established.
The incoming
indicat
the ring tone does
not play.
Cannot charge the
bat
When the camera is
activ
is displayed.
ty.
d from the
or ashes but
tery pack.
ated, no subject
For more detailed information, visit the following au troubleshooting sites:•
- From an au cell phone: R ⇒ Top Menu/Search ⇒
オンラインマニュアル
- From a PC: http://www.kddi.com/customer/service/au/trouble/kosho/index.html
●Is the earpiece volume too low?
●Is
●Is the wireless line busy or is the phone
●Is manner mode tur
●Is
●Is the batter
●Are the plug and connector of the AC
●Is a finger or other object covering the
(out of range indicator) displayed?
Or are you in a location where the signal
is too weak?
you are calling on another line?
ned on?
(ring tone off indicator) displayed?
y pack installed properly?
adapter inserted properly?
camera (lens)?
auお客さまサポート
(Online Manual) ⇒
故障診断Q&A
(Troubleshooting FAQ)
Pr
ess u during a call to increase the
earpiece volume.
Move to a location where
indicator) is no longer displayed.
End the call and try again later. 16
Hold down ( for at least one second to
turn off manner mode.
Increase the volume of the incoming call
ring tone.
Install the battery pack properly. 8
Insert the plug and connector firmly. 8
Check the position of the camera (lens)
and r
emove the obstacle.
(au Customer Support) ⇒
(out of range
18
10
18
19
31
Troubleshooting
45
Page 48
Index
A
Accessories …………………………………………………… 6
Answer memo ……………………………………………… 19
Playback…………………………………………………… 19
Turning off ………………………………………………… 19
Turning on ………………………………………………… 19
B
Battery level ………………………………………………… 12
Battery pack…………………………………………………6, 8
Battery pack cover …………………………………………… 7
C
Camera……………………………………………………… 31
Photo taking tips ………………………………………… 31
Taking a photo …………………………………………… 31
Cell phone etiquette…………………………………………… 2
Character input……………………………………………… 21
Character entry modes…………………………………… 21
Deleting characters ……………………………………… 22
Entering characters from the same key………………… 22
Starting a new line………………………………………… 22
Index
Charging the battery pack …………………………………… 8
Checking charges…………………………………………… 36
C-mail………………………………………………………… 29
C-mail safety block ……………………………………… 29
Creating and sending …………………………………… 29
Reading Received mail ………………………………… 30
Contents………………………………………………………… 4
D
Disaster Message Board Service…………………………… 3
Display …………………………………………………… 7, 1 2
Domain ……………………………………………………… 13
E
Earpiece volume …………………………………………… 18
E-mail………………………………………………………… 27
Creating and sending …………………………………… 27
Initial settings……………………………………………… 11
Reading Received mail ………………………………… 28
Replying…………………………………………………… 28
Viewing attached images………………………………… 28
E-mail address……………………………………………… 11
Available characters……………………………………… 21
Changing ………………………………………………… 13
Entering …………………………………………………… 22
Entering pictograms………………………………………… 23
Evacuate Navi ……………………………………………… 41
EZ Navi……………………………………………………… 39
EZ Navi Walk………………………………………………… 40
46
Page 49

EZ News Flash……………………………………………… 37
Canceling ………………………………………………… 38
Changing the Reception Settings ……………………… 38
Info pane…………………………………………………… 37
Setting……………………………………………………… 37
Ticker field………………………………………………… 37
EZ password………………………………………………… 15
EZweb ……………………………………………………… 33
Accessing sites…………………………………………… 34
Basic operations ………………………………………… 35
Business EZ Top ………………………………………… 34
Initial settings……………………………………………… 11
I
Incoming history …………………………………………… 17
Indicators …………………………………………………… 12
Initial settings ……………………………………………… 11
E-mail ∙ EZweb …………………………………………… 11
International Call …………………………………………… 16
Internet ……………………………………………………… 33
Sites………………………………………………………34, 35
K
Key assignments……………………………………………… 9
L
Language …………………………………………………… 10
Learning the basics…………………………………………… 9
Lock No.……………………………………………………… 14
M
Mail…………………………………………………………… 27
C-mail……………………………………………………… 29
E-mail ……………………………………………………… 27
Main menu…………………………………………………… 13
Manner mode ……………………………………………… 18
Message Menu……………………………………………… 10
N
Names of parts………………………………………………… 7
O
One-ring calls ……………………………………………… 17
Outgoing history …………………………………………… 17
P
Pair Function………………………………………………… 26
Making a call to a pair partner ………………………… 26
Registering a pair partner ……………………………… 26
Sending mail to a pair partner…………………………… 26
Passenger Seat Navi ……………………………………… 39
Passwords…………………………………………………… 14
Phone (call) ………………………………………………… 16
184/186 …………………………………………………… 16
Answering ………………………………………………… 17
International Call ………………………………………… 16
Making……………………………………………………… 16
Returning ………………………………………………… 17
Index
47
Page 50

Phone book ………………………………………………… 24
Dialing……………………………………………………… 24
Editing……………………………………………………… 24
Saving……………………………………………………… 24
Saving a phone number from the incoming or outgoing history
Phone number……………………………………………… 11
Photos ……………………………………………………… 31
Photo modes……………………………………………… 31
Taking……………………………………………………… 31
Viewing …………………………………………………… 32
Playback
Answer memo …………………………………………… 19
Premium EZ password……………………………………… 15
R
Remote Ctrl Lock…………………………………………… 42
Ring tones
Changing the type………………………………………… 18
Changing the volume …………………………………… 19
S
Security code ……………………………………………… 14
Security Lock Service……………………………………… 43
Security Navi………………………………………………… 39
Signal strength……………………………………………… 12
Sites ………………………………………………………… 34
Index
Bookmarking……………………………………………… 35
Viewing from bookmarks………………………………… 35
Spam………………………………………………………… 29
Spam lters ………………………………………………… 29
Recommended settings ………………………………… 29
48
… 25
T
Troubleshooting …………………………………………… 44
Turning on/off power ……………………………………… 10
V
Viewing
Photos……………………………………………………… 32
Page 51
For inquiries, call: Customer Service Center
For general information and charges (toll free)
From fixed-lin e phones:
0077-7-111 157
PRESSING ZE RO WILL CONNECT YO U TO AN OPERATOR
AFTER CALL ING 157 ON YOUR au CELL PH ONE
For loss, theft or damage and operation information
(toll free)
From fixed-lin e phones: From au cell ph ones:
-7-
0077
In case above numbers are not available,
0120-977-033
-
0120
977-699
From EZweb:
Access Method
From au cell phone s:
area code not req uired
113 113
EZ▶Top Menu/Search▶auお客さまサポート
▶お問い合わせ
・ Menus are subject to change without prior notice.
area code not req uired
(excep t Okina wa)
(Okinaw a)
(Inquiries)
(au Customer Support)
Cell phone and PHS o perators collect and recycle un used
telephones, batteries and battery chargers at stores
bearing the logo regardless of brand and manufacturer
to protect the environment and reuse valuable resources.
なるほど ! au
みんなでつくる、au Q&Aサイト
Access Method
Read this code for an easy
access to なるほど! au
(au User’s Forum).
・The packet communication
charge applies.
EZ▶Top Menu/Search▶auお客さまサポート
▶みんなでQ&A「なるほど! au」
▶
(au User’s Forum)
(au Customer Support)
Read this code for an easy
access to au Online Manual.
(Packet communicatio n charges
do not apply.)
September 2011 1st Edition
Sales: KDDI CORPORATION
OKINAWA CELLULAR TELEPHONE COMPANY
Manufacture d by: KYOCERA C orporation
t
 Loading...