

Page 1
Page 2
Preface
Thank you for purchasing the IS12SH.
Before using your IS12SH, be sure to read the Basic Manual (this PDF
manual) to ensure correct usage. After you have finished reading this
manual, store this PDF manual and the printed manuals in safe places
so you can retrieve them whenever you need them. If the printed
manuals are lost, please contact an au shop or Customer Service
Center.
Basic Manual (this PDF manual) describes basic operations of major functions
of the IS12SH.
For detailed descriptions on various functions, refer to the Instruction Manual
(Japanese).
Downloading Manuals
You can download the Basic Manual (this manual) and the Instruction Manual
(Japanese) in PDF format from the au homepage.
http://www.au.kddi.com/torisetsu/index.html
• To display the Basic Manual (this manual) and the Instruction Manual
(Japanese) in PDF format on the IS12SH, purchase the full version of
Documents To Go or install an application which allows you to display PDF
files.
Online Manual
Online manuals are also provided on the au homepage, which are from the
Instruction Manual (Japanese) and are reorganized in a searchable format.
http://www.au.kddi.com/manual/index.html
Safety Precautions
Be sure to read the Safety Precautions “安全上のご注意” in the
Instruction Manual (Japanese) to ensure proper usage of the IS12SH.
For troubleshooting, check the symptom of your IS12SH in
auお客さまサポート(au Customer Support) on the au homepage.
http://www.kddi.com/customer/service/au/trouble/kosho/
index.html
Before Using an au Phone
• You cannot receive or make calls in a location where the signal
cannot be received, even within the service area. Calling may not be
available in a location where the signal is weak. If you move to a
location where the signal is weak during a call, the call may be
interrupted.
• The au phone is a digital cell phone and can maintain a high call
quality until the signal weakness reaches its limit. Therefore, once
the limit has been reached, the call may be disconnected suddenly.
• Note that the au phone uses signals which may be intercepted by a
third party. (However, the CDMA system enables highly confidential
call communications.)
• The au phone is a wireless station which is compliant with the Radio
Act, and may be subject to inspections regulated by the Radio Act.
• When you insert the au IC-Card, the product number information of
your au phone is sent to the au server for the security and operation
status notification of the au phone.
• Always be considerate of others around you when using your au
phone in public places.
• For a child’s use, read the Basic Manual and give your child
instructions on proper use.
• The IS12SH is a cell phone compatible with the international
roaming service. Each network service which is described in the
Basic Manual varies depending on the area or service. For details,
refer to supplied Global Passport Owner’s Guide (Japanese).
ii
Page 3
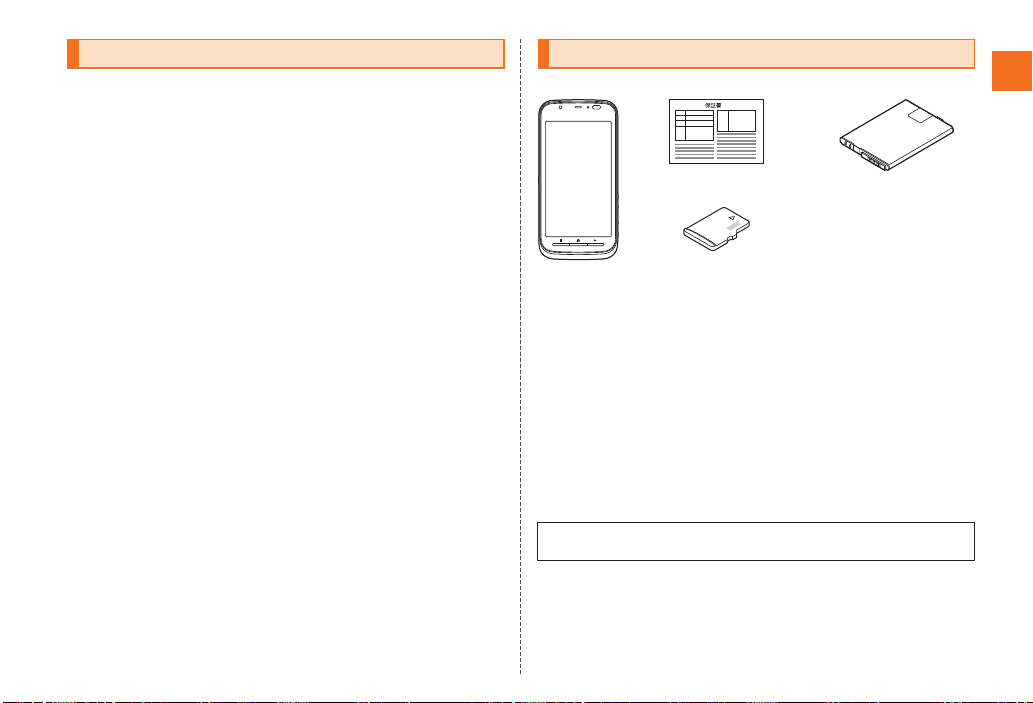
Cell Phone Etiquette Accessories
IS12SH
Warranty
(Japanese)
Battery pack
(SHI12UAA)
microSD memory card
(2 GB) (Sample)
* This is inser ted in the
IS12SH at the time of
purchase.
Cell phones always emit weak radio waves when power is on. Use cell
phones in an enjoyable and safe manner without forgetting to be
considerate of others around you.
■ Use of cell phones is not allowed in some places.
• Using a cell phone while driving a car/motorcycle is dangerous and
is prohibited by law. Also, using a cell phone while riding a bicycle
may be punished by law.
• Using a cell phone in an aircraft is prohibited.
■ Be considerate of where you use the cell phone and
how loudly you talk.
Do not make calls in theaters, museums, libraries, and other similar
places. Turn power off or turn on manner mode so as not to disturb
others around you by ring tones.
• Do not use the cell phone on a street where you might interrupt the
flow of pedestrians.
• Move to areas where you will not inconvenience others on trains or in
hotel lobbies.
• Refrain from talking in a loud voice.
• Obtain the permission of other people before you take their photos
with the cell phone’s camera.
■ Be considerate of people around you.
• Some people close to you in crowded places such as packed trains
may be using a cardiac pacemaker. Turn the cell phone off in such
places.
• Abide by the rules of hospitals and other medical institutions where
it is forbidden to use or carry cell phones.
Check all the contents are included.
● Instruction Manual (Japanese)
● Safety Precautions (Japanese)
● Notice Sheet (Japanese)
● Setting Guide (Japanese)
● JIBUN BANK Service Guide (Japanese)
● Global Passport Owner’s Guide (Japanese)
● au International Call Guide (Japanese)
The following items are not included.
• AC adapter
• Earphone
• microUSB cable
• HDMI cable
• Purchase a specified charger (sold separately).
• The illustrations in this manual may look different from the actual
product.
Introduction
1
Page 4
Illustrations and Descriptions in This Manual
Introduction
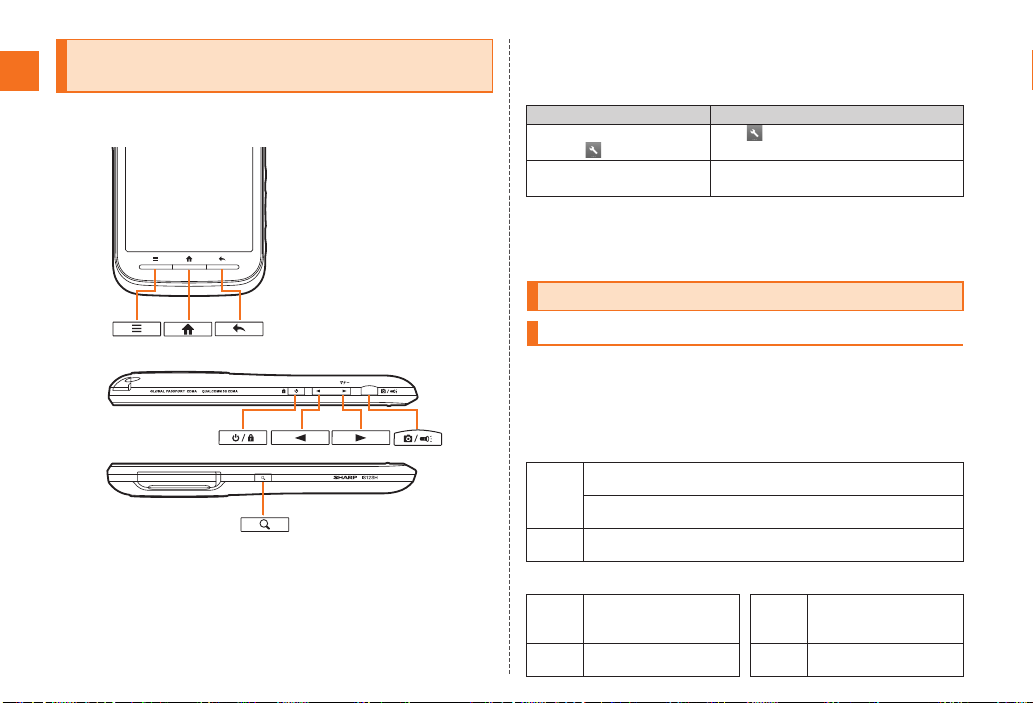
■ Note on Key Illustrations
In this manual, the key illustrations are simplified as shown below.
2
■ Description of Operations for Selecting Item/Icon/
Key etc.
In this manual, operation steps are described as below.
Description Explanation
On the character entry
screen, [Input mode.
On the home screen,
e [Add.
Tap on the character entry screen.
Then tap Input mode.
Press e on the home screen.
Then tap Add.
■ Note on Screenshots
The screenshots in this manual are simplified and may look different
from the actual screens.
Security Code and PIN Code
Security Code and Passwords
You have to use each security code for using the IS12SH.
You can use a security code and other passwords described below.
Take care not to forget your security code and passwords because
they are required for performing various operations and using
subscription services.
● Security Code
Usage
A Using the Answering Service (Voice Mail) and Call Transfer
Example
Initial
Setting
● Lock No. ● PIN Code
Usage
Example
Initial
Setting
remotely from a fixed-line phone
B Making inquiries, applications, and changes while using
Customer Service Center voice guidance, and au homepage
The four-digit number you wrote on your subscription form
Setting/Canceling Screen
lock, Remote lock, Restrict
address book, etc.
1234 Initial
Usage
Preventing unauthorized
Example
use of the au IC-Card by a
third party
1234
Setting
Page 5
PIN Code
If the PIN code is incorrectly entered three times consecutively, the
PIN code will be locked. Use the PUK code to unlock the PIN code.
■ PIN Code
You can set the IS12SH to require PIN code entry every time the
power is turned on, to prevent unauthorized use of the au IC-Card by
a third party.
• At the time of purchase, the PIN code is not to be required to use
phone. From the Main Menu, tap Settings [Location & security
[Set up UIM card lock [Mark Lock UIM card to set the PIN code to
be required.
The PIN code is also required when setting Lock UIM card.
• The initial setting of the PIN code is “1234”. From the Main Menu, tap
Settings [Location & security [Set up UIM card lock [Change UIM
PIN to change the PIN code to a four- to eight- digit number.
■ PUK Code
Enter the PUK code when the PIN code is locked.
• PUK code is an eight-digit number given at the time of purchase,
and is printed on the back side of the plastic card where your au
IC-Card is attached.
• When you enter the PUK code, set the new PIN code with Change
UIM PIN.
• If the PUK code is incorrectly entered ten times consecutively,
contact an au shop, PiPit or the Customer Service Center.
• When the PIN code is locked, the IS12SH may be restarted for the security
reasons.
Precautions for Shooting/Viewing 3D Images
■ Cautions
• When you shoot 3D images, do not shoot in the distance shorter
than the shortest shooting distance. 3D effect may become large
and may cause a trouble such as fatigue or discomfort.
・ The shortest shooting distance is approximately 80 cm for 3D
shooting.
• Do not shoot or view 3D images if you have had photosensitivity
diseases or have heart diseases or if you are in bad shape,
sleep-deprived, tired or under the influence of drink. May cause an
increase in symptoms.
• When you see a double image or have difficulty in feeling
stereoscopic effect while shooting or viewing 3D images, stop
shooting or viewing 3D images. May cause eyestrain.
• When you feel trouble such as fatigue or discomfort (sickness that is
similar to carsickness) while shooting or viewing 3D images, stop
shooting or viewing 3D images. May cause sick feelings. Take a rest
properly. Be extra careful to use in the environment that tends to
shake the screen such as a train or a vehicle.
• Shooting or viewing 3D images is intended for use by 7 years or
older. When a child shoots or views 3D images, he/she may get sick
suddenly, since it is difficult to notice the reaction for fatigue or
discomfort. When a child shoots or views 3D images, his/her parents
supervise and take care whether he/she feels eyestrain.
• When shooting or viewing 3D images, take a break every 30
minutes. Shooting or viewing for a long time may cause eyestrain.
• When shooting or viewing 3D images, shoot or view the full screen.
May cause eyestrain.
Introduction
3
Page 6
■ Notes
• Note the following when shooting to view 3D images safely.
・ Keep the twin-lens camera in a horizontal position when shooting.
Introduction
・ Do not approach the subject excessively (Keep the camera at
least approximately 80 cm away from the subject).
・ Move slowly when moving the IS12SH while shooting.
• Hold the IS12SH in horizontal display when shooting 3D images.
Shooting in vertical display makes 3D effect difficult to appear.
• Keep a display parallel to your eyes when watching 3D images.
• When shooting or viewing 3D images, hold the IS12SH in front of
your face and keep it approximately 30 cm away. The floating image
or image which has depth appears.
• There are differences in vision of a 3D image among individuals.
• Some 3D capable applications enable you to switch 2D/3D display.
When you convert an image whose copyright is owned by another
person, such as recorded one with the IS12SH or acquired from
another media, enjoy it by yourself and use it only within the range of
your private purpose. Note that the use of it over the range can be
violation of the copyright.
• For the precautions etc. for safely shooting or viewing 3D images, refer to
“3DC安全ガイドライン” (Japanese) on the homepage of 3D Consortium.
http://www.3dc.gr.jp/
4
Page 7
Contents
Preface............................................................ ii
Safety Precautions .......................................... ii
Before Using an au Phone .............................. ii
Introduction
Cell Phone Etiquette............................................... 1
Accessories ............................................................ 1
Illustrations and Descriptions in This Manual ......... 2
Security Code and PIN Code..................................2
Security Code and Passwords ............................... 2
PIN Code ................................................................3
Precautions for Shooting/Viewing 3D Images ........ 3
Getting Ready
Names and Functions of Parts ............................... 7
Charging the Battery Pack...................................... 9
Turning the Power On/Off..................................... 10
Turning the Power On........................................... 10
Turning the Power Off........................................... 10
Restarting the IS12SH .......................................... 11
Sleep Mode .......................................................... 11
Switching the Display Language to English.......... 11
Initial Setup ...........................................................11
Removing/Attaching the Battery Pack .................. 12
Removing the Battery Pack .................................. 12
Attaching the Battery Pack................................... 12
au IC-Card ............................................................13
Removing au IC-Card........................................... 13
Inserting au IC-Card .............................................13
Using microSD Memory Card ............................... 14
Removing microSD Memory Card........................ 15
Inserting microSD Memory Card .......................... 15
Learning the Basics
Operating the Touch Panel ...................................16
Viewing the Home Screen.....................................17
Using Status Bar ...................................................17
Using the Home Screen ........................................20
Moving/Removing Shortcuts/Widgets/Folders ......20
Adding Shortcuts/Widgets/Folders .......................20
Switching the Home Screen..................................20
Using Main Menu ..................................................20
Switching Orientation ............................................23
Displaying Available Menu ....................................23
Character Input......................................................25
Switching Software Keyboards .............................25
Viewing the Character Entry Screen .....................25
Switching Character Entry Modes.........................27
Entering Emoji/D-Emoji/Symbol/Facemark............27
Switching Input Software.......................................27
Phone
Making a Call.........................................................28
Making an International Call (001 International Call
Service) .................................................................29
Answering a Call ...................................................29
Putting the Call on Hold ........................................29
Answering with the Message of Answering Memo
..............................................................................29
Returning a Call (Outgoing History/Incoming
History) ..................................................................30
Turning On Manner Mode .....................................30
Turning On the Answering Memo..........................31
Playing a Message in Answering Memo ...............31
Address Book
Adding an Address Book Entry .............................32
Using an Address Book.........................................32
Using Phone Number............................................32
Using Mail Address...............................................33
Mail
Using E-mail/C-mail ..............................................34
Sending E-mail Messages ....................................34
Sending C-mail Messages ....................................34
Receiving E-mail/C-mail Messages ......................35
Reading E-mail/C-mail Messages.........................35
Setting Mail Filters ................................................36
Rejecting Spam C-mail Messages........................ 37
Using PC-mail .......................................................38
Registering Another PC-mail Account...................38
Sending PC-mail Messages..................................39
Receiving PC-mail Messages ...............................39
Using Gmail ..........................................................39
Sending Gmail ......................................................40
Receiving Gmail....................................................40
Replying/Forwarding Gmail ..................................40
Internet
Viewing Sites with Browser................................... 41
Using Bookmarks/History......................................41
Bookmarking a Web Page ....................................41
Multimedia
Using the Camera .................................................42
Cautions for Using the Camera.............................42
Taking Photos .......................................................42
Recording Movies .................................................43
Using Gallery ........................................................43
Using Contents Manager ......................................44
Playing/Displaying Data........................................44
Using Menu in the Contents Screen..................... 44
TV (1Seg)
Cautions for Using TV (1Seg)............................... 45
Initial Setup of TV (1Seg)......................................45
Watching TV (1Seg)..............................................45
Operations on the 1Seg screen............................46
Contents
5
Page 8
Applications
Using Android Market............................................47
Using au one Market .............................................47
Using GREE Market..............................................48
Managing Applications..........................................48
Contents
Settings of IS12SH
Checking Your Profile ...........................................49
Changing the Incoming Ring Tone........................49
Changing the Wallpaper........................................49
Initializing microSD Memory Card.........................49
Global Function
Using Global Passport CDMA...............................50
For overseas use without anxiety..........................50
Configuring the Overseas Settings....................... 50
Making a Call at Your Travel Destination.............. 51
Receiving a Call at Your Travel Destination..........52
In Case of Loss of Your IS12SH
Setting Conditions for Activating the Remote Lock
..............................................................................53
Appendix/Index
Troubleshooting ....................................................54
Index .....................................................................56
6
Page 9
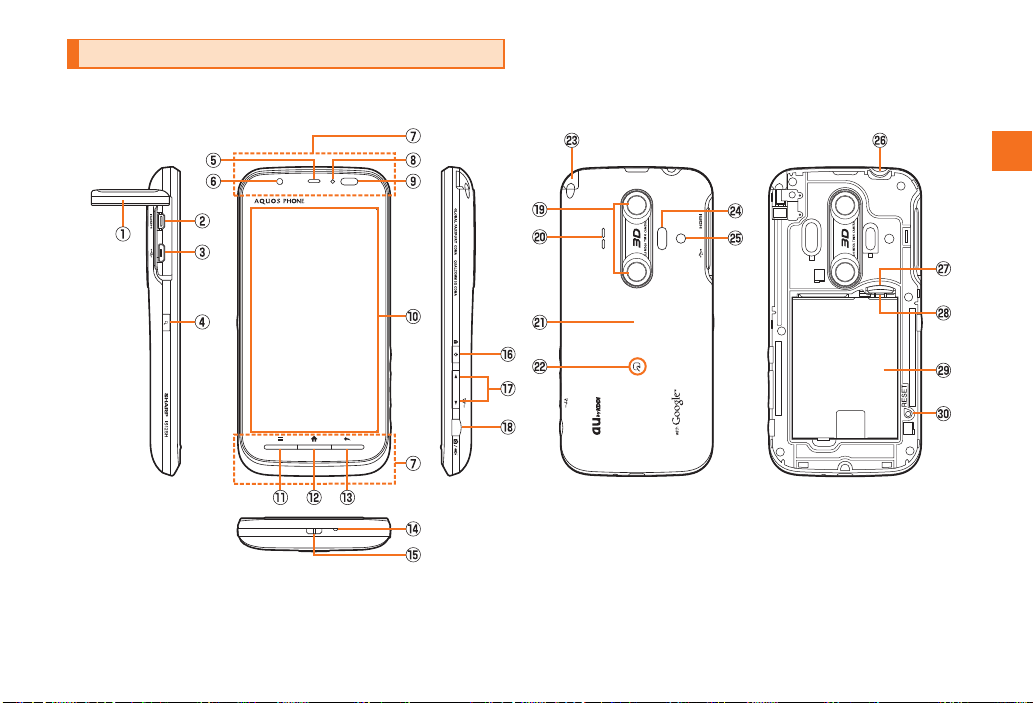
Names and Functions of Parts
Getting Ready
7
Page 10

A External connection jack/HDMI jack cover
B HDMI jack
Use it to connect the HDMI cable (sold commercially).
C External connection jack
Use it to connect the IS12SH to the common AC adapter 03 (sold
separately), the microUSB cable 01 (sold separately), the 18
pin-microUSB conversion adapter 01 (sold separately), etc.
Getting Ready
D m Search key
Use it to display the Quick Search Box etc.
E Earpiece (Receiver)
Emits voice of other party during a call, messages in Answering
memo, etc.
F In camera lens
G Internal antennas
Do not cover the internal antennas with your hand when you call,
use the Internet, Wi-Fi or Bluetooth
®
or retrieve GPS information.
H Charging/Incoming indicator
Illuminates in red while charging.
Flashes according to the settings when receiving a call or mail
message.
I Proximity sensor/Light sensor
Proximity sensor prevents operating the touch panel incorrectly
during a call.
Light sensor detects the ambient brightness and adjusts the
brightness of display.
J Display
K e Menu key
Displays the option menu.
L # Home key
Use it to display the home screen and disable sleep mode.
M ^ Back key
Returns to the previous screen.
8
N Mouthpiece (Microphone)
Transmits your voice to the other party during a call. It is also used
for recording sounds. Take care not to cover the microphone with
your fingers etc.
O Strap eyelet
P f Power key
Turns on/off the power, and sets/disables sleep mode.
Q ud Volume up/down key
Adjusts volume.
Hold d down on the unlock screen, home screen or Main
menu to enable/disable manner mode.
R b Shutter key
Use it to take photos or movies.
Hold it down on the home screen to activate Camera.
Hold it down on the unlock screen to turn on the mobile light.
S Out camera lens
T Speaker
Emits ring tones, alarm tones, etc.
U Battery pack cover
V FeliCa mark
Hold it over a reader/writer when using Osaifu-Keitai
®
.
Sends and receives data via IC communication.
W TV antenna
Extend and use it to watch TV (1Seg). It has no influence on calls or
data communication if you extend the TV antenna when calling or
using browser.
X Infrared port
Sends and receives data via infrared communication.
Y Mobile light
Z Earphone jack
a microSD memory card slot
b au IC-Card
Page 11
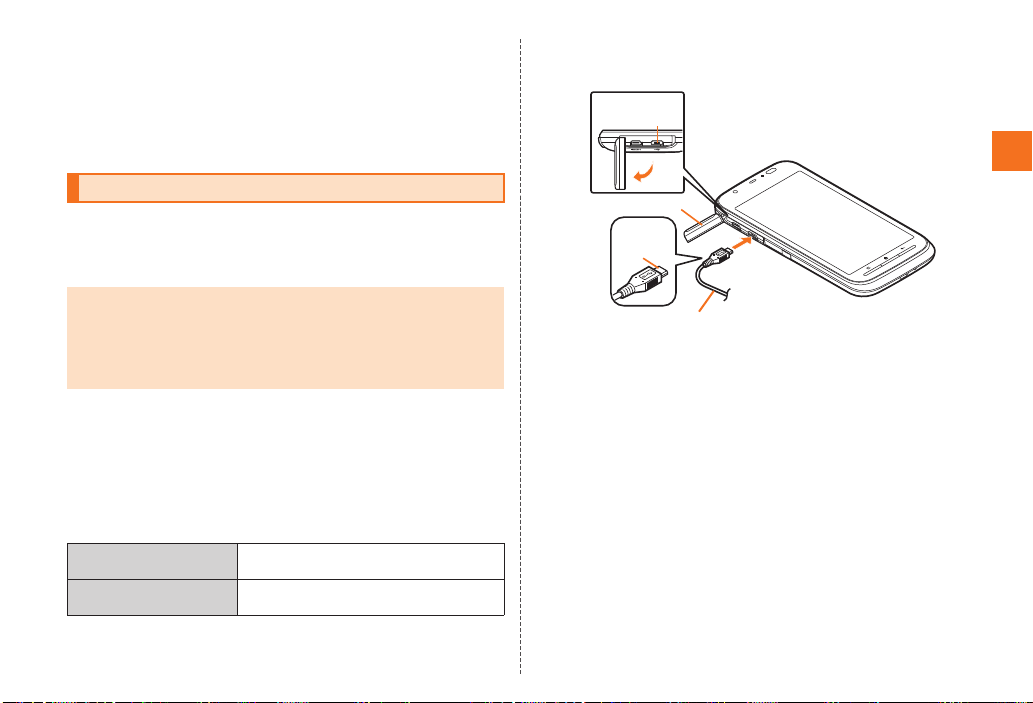
c Battery pack
A
B
Check the
orientation
External
connection jack
Common AC adapter 03 (sold separately)/
Common DC adapter 03 (sold separately)
d Reset button
If operations become unstable or unavailable, press the reset
button with a pointed end of an object for at least two seconds to
restart the IS12SH. Restarting with the reset button does not delete
any saved data or application.
Charging the Battery Pack
The battery pack is not fully charged at the time of purchase. Charge
the battery pack when you use the IS12SH for the first time or the
battery level becomes low. Charging is finished when the red
charging/incoming indicator goes out.
• When the battery pack has less than approximately 15 percent of the
battery level, the message Please connect charger appears on the screen.
Charge the battery pack after tapping OK, or exchange it for another one
fully charged.
• Be sure to close the external connection jack/HDMI jack cover securely,
and do not pull or twist it forcefully.
■ Charging the Battery Pack with the Specified AC
Adapter (sold separately)/DC Adapter (sold
separately)
The followings are the explanation of how to connect the common AC
adapter 03 (sold separately)/the common DC adapter 03 (sold
separately) to charge.
Charging time is as shown below.
* These times are based on the case when you use the common AC adapter 03 (sold separately)/
Specified AC adapter
(sold separately)
Specified DC adapter
(sold separately)
the common DC adapter 03 (sold separately).
Approx. 190 min
Approx. 240 min
A Open the external connection jack/HDMI jack cover of
the IS12SH.
Getting Ready
B Insert the microUSB plug of the common AC adapter
03 (sold separately)/the common DC adapter 03 (sold
separately) to the external connection jack of the
IS12SH.
9
Page 12
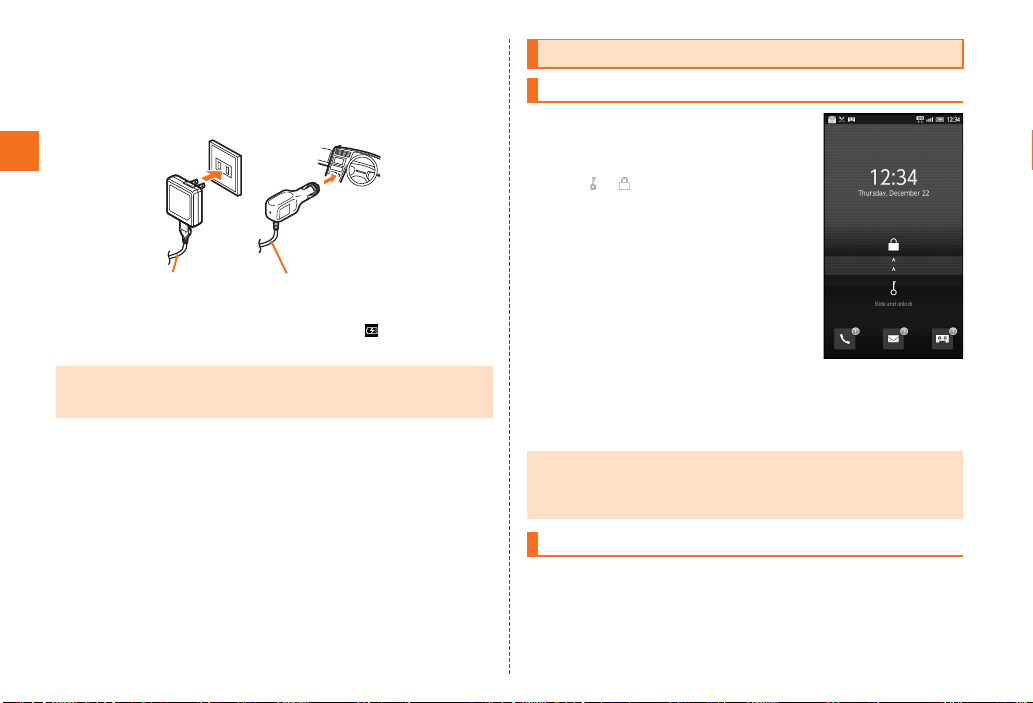
C Plug the common AC adapter 03 (sold separately)
Common AC adapter 03
(sold separately)
Common DC adapter 03
(sold separately)
《Unlock screen (When a
call is missed, a new
mail is received,
Answering memo is
recorded)》
power plug into a 100 V AC power outlet/Plug the
common DC adapter 03 (sold separately) plug into a
cigarette lighter socket.
Getting Ready
Charging/Incoming indicator illuminates in red, and appears. When
charging is finished, the charging/incoming indicator goes out.
• Charging is available by connecting the IS12SH to a PC with the microUSB
cable 01 (sold separately). From the Main Menu, tap Settings [USB
connection [Mark USB battery charge to enable the setting.
10
Turning the Power On/Off
Turning the Power On
A Hold down f for at least two
seconds.
The unlock screen is displayed.
Slide to to unlock.
Icons appear on the unlock screen when a
call is missed, a new mail is received or
Answering memo is recorded.
After tapping an icon, unlock to activate the
corresponding application.
• The initial setting of the touch panel is executed while the logo
Android™ au with Google™ is displayed after the power is turned on. Do not
touch the screen, otherwise touch panel operations may not be performed
properly.
Turning the Power Off
A Hold down f for at least two seconds.
The phone options screen is displayed.
If you hold down f on the unlock screen, the power is turned off
without the phone options screen being displayed.
B Power off [OK.
Page 13
Restarting the IS12SH
言語とキーボード
Turn off the IS12SH once and restart.
A Hold down f for at least two seconds.
The phone options screen is displayed.
B Reboot [OK.
Sleep Mode
If you press f or no operation is made for a while, the screen is
turned off temporarily, and then sleep mode is set. You can disable
sleep mode if you execute the following operation.
A #/f while sleep mode is set.
The unlock screen is displayed.
• Do not touch the screen when you display the screen by pressing the power
key during sleep mode. Otherwise touch panel operations may not be
performed properly.
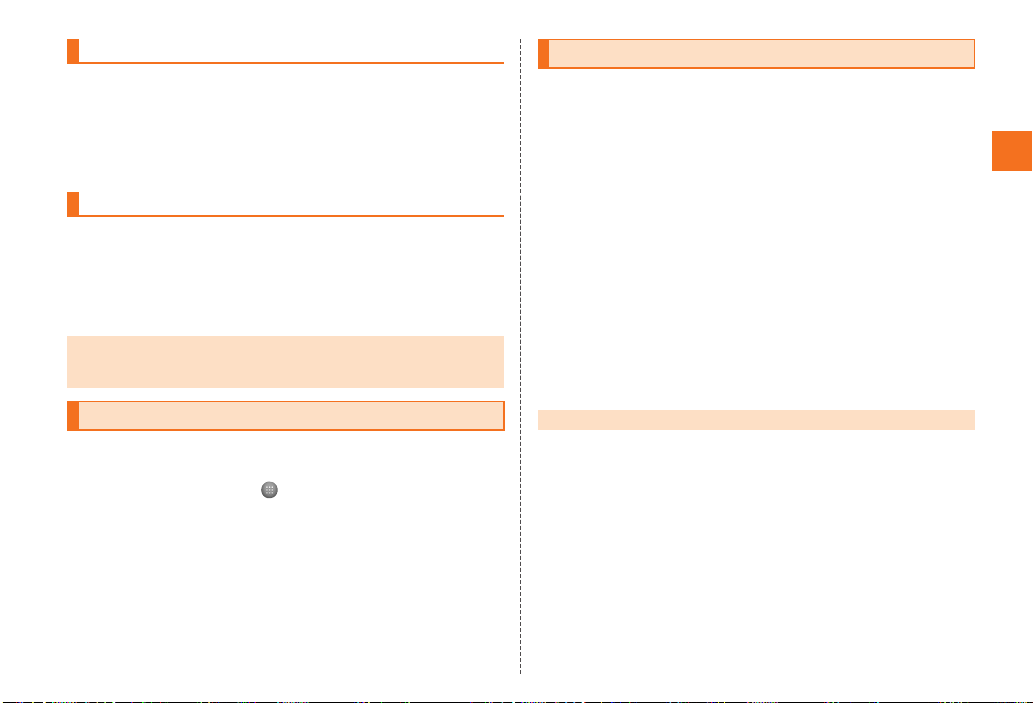
Switching the Display Language to English
You can switch the display language for function names and other
items to English.
A On the home screen, .
B (Settings).
設定
C (Language & keyboard).
D (Select language).
言語(Language)を選択
E English.
Initial Setup
After you purchase the IS12SH, the initial setup screen is displayed
automatically when turning on the power or inserting another’s au
IC-Card.
For detailed operations on the initial setup, refer to the supplied
Setting Guide (Japanese).
A Set Date & time [Next.
B Set Location [Next.
C Set Other.
Set Wi-Fi settings, au one-ID setting, Google account, Text font or Profile
settings.
D Done.
E Yes/No.
If you tap No, the initial setup screen is not displayed from the next
startup.
• Alternatively, from the Main Menu, tap Settings [Default settings to set up.
Getting Ready
11
Page 14
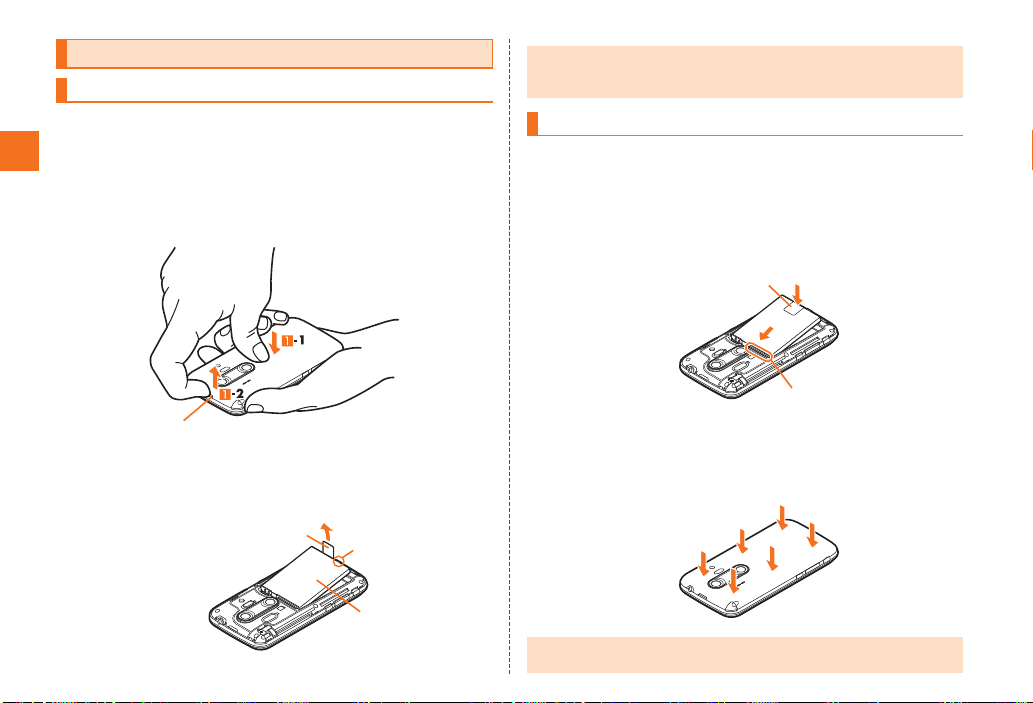
Removing/Attaching the Battery Pack
Concave portion
PULL tab
Protruding edge
Battery pack
PULL tab
Contacts on IS12SH
Removing the Battery Pack
When removing the battery pack, turn off the IS12SH.
A Remove the battery pack cover on the back of the
Getting Ready
IS12SH.
Hook a fingertip (nail) on the concave portion with the center of the
battery pack cover pressed (A-1), and then remove the battery pack
cover by pulling up in the direction of the arrow (A-2).
B Remove the battery pack.
Remove the battery pack by pulling up on the PULL tab in the direction
of the arrow.
• When removing the battery pack, always pull up on the PULL tab.
Or use the protruding edge of the battery pack. Doing otherwise may result
in damage to the IS12SH or the battery contacts.
Attaching the Battery Pack
Use the specified battery pack for the IS12SH and attach it properly.
A After making sure that the PULL tab is closely
attached to the battery pack, align the contacts on the
battery pack with those of the IS12SH and then insert
the battery pack securely.
B After attaching the battery pack cover, press the
battery pack cover securely, and make sure that it is
closed properly.
12
• Before attaching the battery pack, make sure that the au IC-Card is inserted
properly.
Page 15
• Failure to follow the correct procedure when attaching the battery pack may
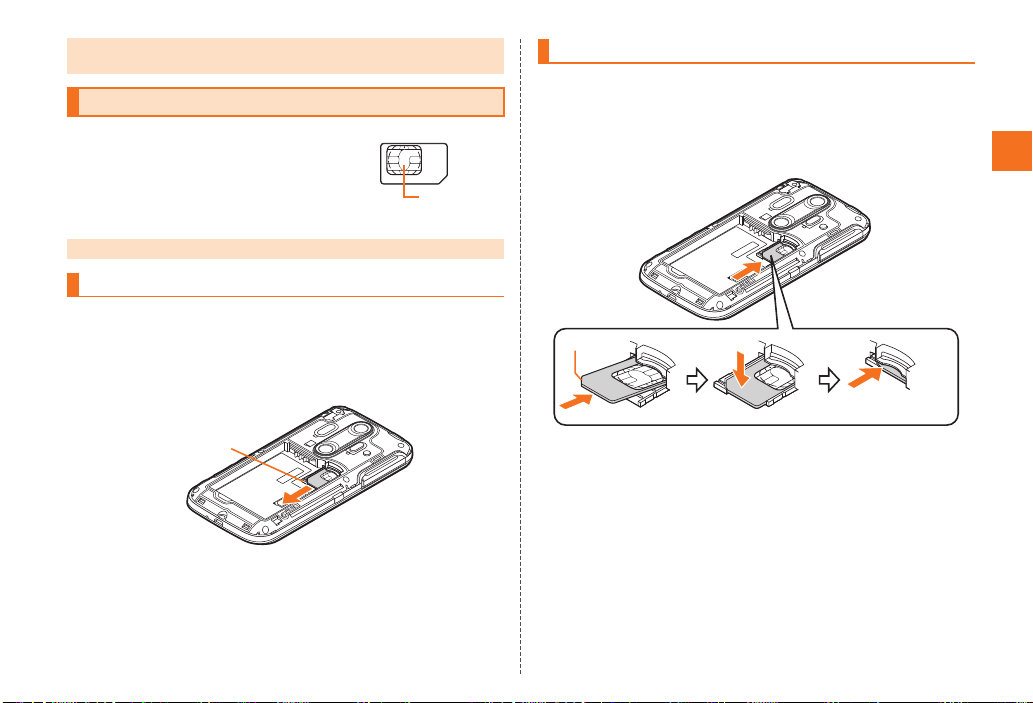
au IC-Card
IC (metal
surface) part
Tab
Cutout
result in damage to the battery pack or the battery pack cover.
au IC-Card
An au IC-Card records your personal information
such as phone numbers.
• Confirm the correct direction when you insert the au IC-Card.
Removing au IC-Card
Turn off the power and remove the battery pack before removing or
inserting the au IC-Card.
A Pull the tab of the tray straight out and remove the au
IC-Card.
Inserting au IC-Card
A Pull the tab of the tray straight out.
B Place the au IC-Card on the tray with the IC (metal
surface) side up and insert it securely.
Insert the au IC-Card according to the orientation of its cutout.
Getting Ready
13
Page 16
Using microSD Memory Card
You can set microSD memory card (including microSDHC memory
card) to the IS12SH, and save data. And also you can save address
book, mail messages, bookmarks, etc. in microSD memory card.
• Some applications may not be available when a microSD memory card is
not inserted.
Getting Ready
• The maximum file size available on a microSD memory card is 2 GB per file
when saving data to microSD memory card.
• A microSD memory card initialized on other devices may not be used on the
IS12SH properly. Initialize it on the IS12SH. For operations to initialize the
microSD memory card, refer to “Initializing microSD Memory Card”.
• For operations to play/display data in the microSD memory card, refer to
“Playing/Displaying Data” and “Using Menu in the Contents Screen”.
• Some files such as copyright protected data may not be played on the
IS12SH even if they are moved/copied from the PC etc. to a microSD
memory card successfully.
■ Handling Precautions
• Do not remove the battery pack and do not turn off the IS12SH and
other equipment while reading, writing, playing, saving or moving/
copying data. It may result in damage to data in the IS12SH or
microSD memory card or data loss.
• Do not drop or subject the IS12SH to vibration or impact with a
microSD memory card inserted. It may result in damage to recorded
data or data loss.
• Do not insert objects other than microSD memory card such as
liquid, metals or flammable items into the microSD memory card
slot. It may result in a fire, electric shock or malfunction.
• The following microSD memory cards have been confirmed for
operation based on the criteria by au. For operation confirmation
results of other microSD memory cards, contact each microSD
memory card manufacturer.
14
<microSD/microSDHCMemoryCard>
Manufacturer 2 GB 4 GB 8 GB 16 GB 32 GB
Toshiba
Panasonic
SanDisk
ADTEC
Buffalo
Sony
○ ○ ○ ○ ○
○ ○ ○ ○ −
○ ○ ○ ○ ○
○ ○ ○ − −
○ ○ ○ ○ −
○ ○ ○ − −
○: Confirmed operation
−: Unconfirmed operation or not for sale
As of May 2011
* 4 GB or more are for microSDHC memory card.
* Operation is co nfirmed for microSD memory cards that are sold as of May 2011. For the
latest information on operation confirmation, visit the a u homepage or contact the Customer
Service Center.
Page 17
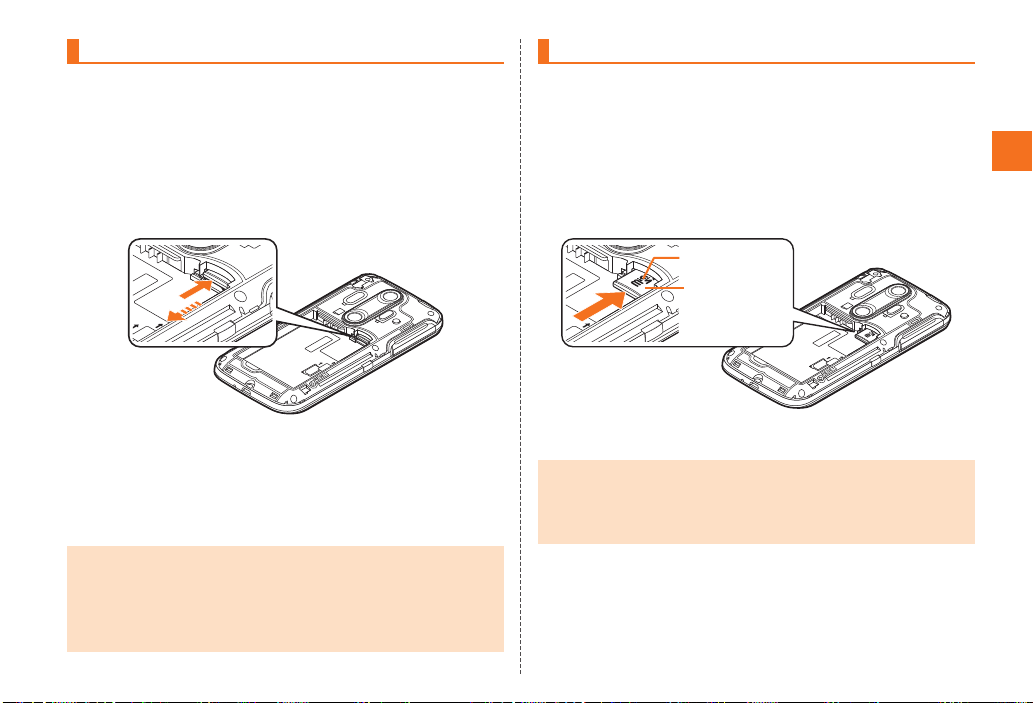
Removing microSD Memory Card
B
C
microSD memory
card slot
Insert this card with
the microSD logo
side up
A Turn off the IS12SH and remove the battery pack
cover and the battery pack.
B Slowly push the microSD memory card toward the
slot until it clicks.
After it clicks, pull back your finger and keep putting it on the microSD
memory card until it comes out a little. Releasing the microSD memory
card when it is pushed toward the slot may cause it to pop-out.
Inserting microSD Memory Card
A Turn off the IS12SH and remove the battery pack
cover and the battery pack.
B Confirm the direction of the microSD memory card
and slowly insert it into the slot until it clicks.
Insert a microSD memory card until you hear a click and confirm it is
locked. Releasing the microSD memory card before it is locked may
cause it to pop-out.
Getting Ready
C Slowly remove the microSD memory card.
Slowly pull the microSD memory card straight out.
Some microSD memory cards cannot be unlocked and do not come
out smoothly. In such case, pull it out with your finger.
D Attach the battery pack and the battery pack cover.
• Do not touch the terminal part of microSD memory card.
• Do not remove the microSD memory card forcefully. It may result in damage
• Application installed to microSD memory card cannot be used once you
• The microSD memory card may be warm after a long time use. It is normal.
to the microSD memory card or the IS12SH or data loss.
removed microSD memory card.
C Attach the battery pack and the battery pack cover.
• Insert a microSD memory card with the right side up in the appropriate
direction.
Inserting a microSD memory card forcefully into the slot could result in
failure to remove the microSD memory card or damage to the microSD
memory card or the IS12SH.
15
Page 18
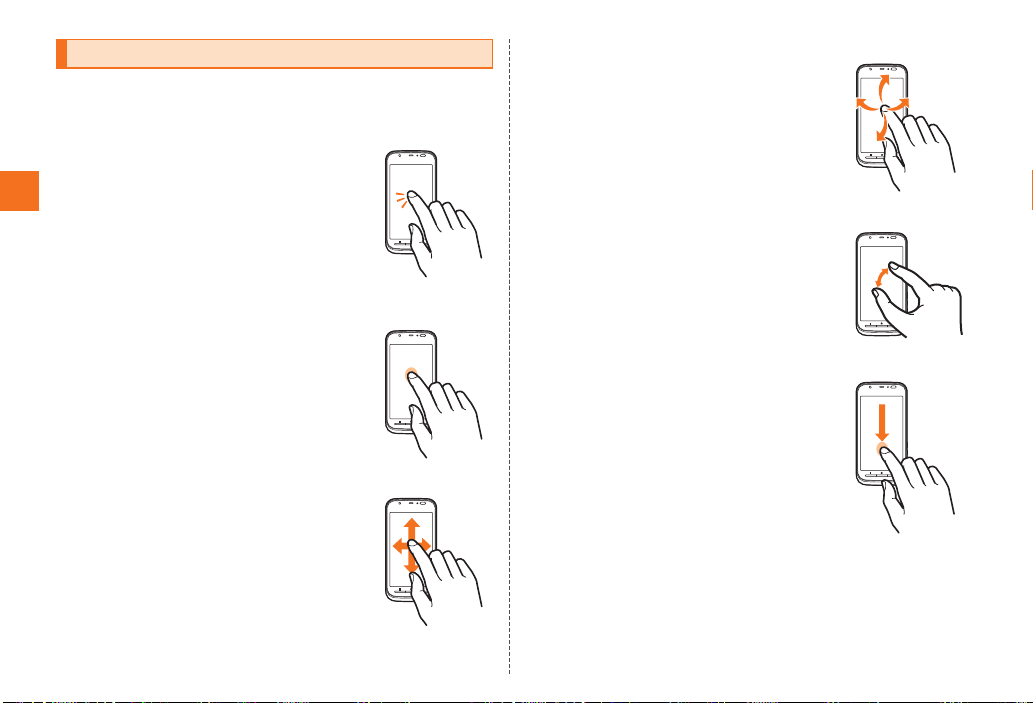
Operating the Touch Panel
The display of the IS12SH is a touch panel. You can operate the
IS12SH by directly touching the screen.
■ Tap/Double-Tap
Tap: Gently touch a screen and then immediately
release your finger.
Double-tap: Tap quickly twice on the same
Learning the Basics
■ Main purpose of this operation
Select an item or icon displayed on the screen.
Double-tap to enlarge/reduce the screen.
■ Long-Touch
Keep touching an item or key.
■ Main purpose of this operation
Display context menu etc.
■ Slide
Gently touch a screen and then trace it to the
desired direction.
■ Main purpose of this operation
Scroll screen or switch pages.
In addition, operate gauge and bar when adjusting
volume and brightness.
position.
■ Flick
Touch a screen and then quickly flick your finger
up, down, left or right.
■ Main purpose of this operation
Switch pages or enter characters by flick input.
■ Pinch
Touch a screen with two of your fingers and then
move them apart or closer together.
■ Main purpose of this operation
Enlarge/Reduce the screen.
■ Drag
Gently touch a screen and then trace it to the
desired position.
■ Main purpose of this operation
Move an icon on the screen to the desired position.
16
Page 19
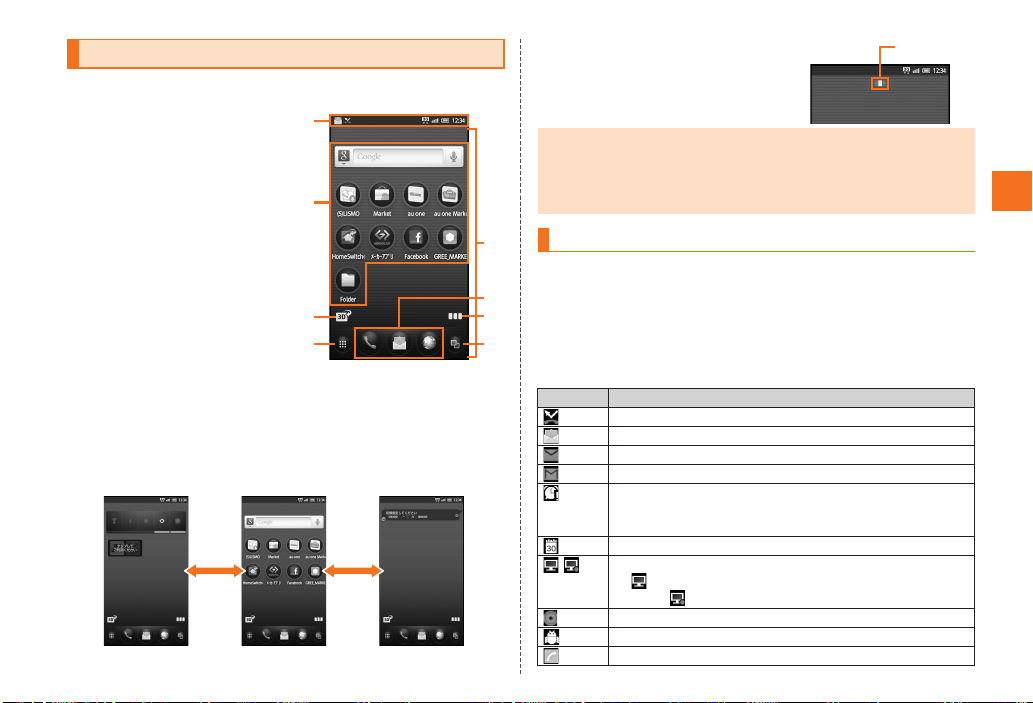
《Home screen》
A
F
B
HD
E
C
G
《Switching desktop screens》
Indicator
Viewing the Home Screen
The home screen consists of multiple desktops, and you can register
shortcuts, widgets and folders on each desktop screen.
A Status bar
B Shortcuts/Widgets/Folders
C Switch 2D/3D display
Tap to switch 2D/3D display.
D Main Menu
E Desktop
F Quick Menu
G List desktop
Tap to display the desktops as
a list. Tap the thumbnail to
move the page.
H Running application
Displays the running
applications as a list to switch
or exit running applications.
■ Switching the Desktop
You can switch the desktop by sliding or flicking the home screen to
the left and right.
• The indicator displayed on the top of
the screen shows the current display
position.
• A total of three desktop screens, one for each side, are set by default.
• Power Control widget is displayed by sliding the home screen to the right by
default. By setting each function of Wi-Fi, Bluetooth®, GPS, auto-sync, and
brightness of screen frequently with the Power Control widget, you can
reduce battery consumption.
Using Status Bar
The notification indicators to notify you of a missed call, a new mail
message or a running operation are displayed on the left side of the
status bar, while the status indicators to show the status of the IS12SH
are on the right side.
Also, tap the status bar to display the notification/status panel.
■ Examples of notification indicator
Indicator Description
Missed call
New mail message (Mail)
New mail message (PC-mail)
New mail message (Gmail)
Alarm terminated
• Appears when the alarm is terminated without the
operation for terminating the alarm.
Schedule notification of the calendar
1Seg information
Watching information, Playing TV (1Seg) sounds as
BGM/ Recording information
Playing music
USB debug connecting
Dialing, Calling
Learning the Basics
17
Page 20
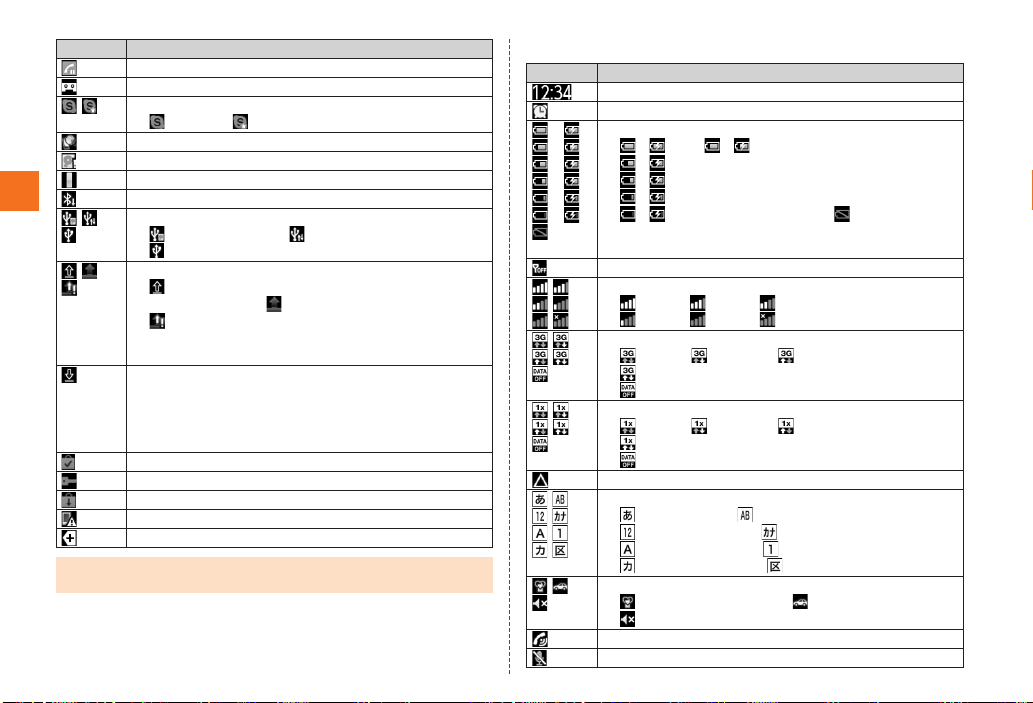
Indicator Description
Putting a call on hold
Answering memo
Skype™ status
Signed in/ New event
Activating Yubisaki dictionary
Few space available in the IS12SH
Shooting notification of a 3D movie
Learning the Basics
Bluetooth® file receiving request
USB connecting
Card reader mode/ Fast transfer mode/
USB connecting (in Card reader mode connecting)
Data upload, File sending
Uploading data, Sending file, Finished sending file,
Failed to send file/ Finished uploading data/
Waiting to upload data
• The Uploading data indicator and Sending file
indicator are displayed as animations.
Downloading, Finished downloading, Installing data or
application, Receiving, Finished receiving file, Failed to
receive file
• The Downloading indicator and Receiving file indicator
are displayed as animations.
Finished installing
Connected, Unconnected to VPN
Update available
Major Update (OS Update) available
Indicators collected
• When multiple notifications of the same type exist, the number of them is
displayed on the lower right of the indicator.
18
■ Examples of status indicator
Indicator Description
Time
Alarm set
Battery level (While charging)
()
()
()
()
()
()
( ) Full/ ( ) Approx. 80 % remaining/
( ) Approx. 60 % remaining/
( ) Approx. 40 % remaining/
( ) Approx. 20 % remaining/
( ) Approx. 10 % remaining/ Battery level 0 %
• The charge indicator other than “Full” is displayed as
an animation.
Offline mode set
Signal strength (Receiving electric field)
Level 4/ Level 3/ Level 2/
Level 1/ Level 0/ Out of service area
3G data communication status
Waiting/ Receiving/ Sending/
Sending and Receiving/
Data communication off setting
CDMA 1X data communication status
Waiting/ Receiving/ Sending/
Sending and Receiving/
Data communication off setting
In roaming
Character type
Hiragana-Kanji/ Half-width alphabet/
Half-width numeric/ Half-width Katakana/
Full-width alphabet/ Full-width numeric/
Full-width Katakana/ Character code
Manner mode status
Standard manner mode/ Drive manner mode/
Silent manner mode
During a call using hands-free
Microphone set to off during a call
*
*
*
Page 21
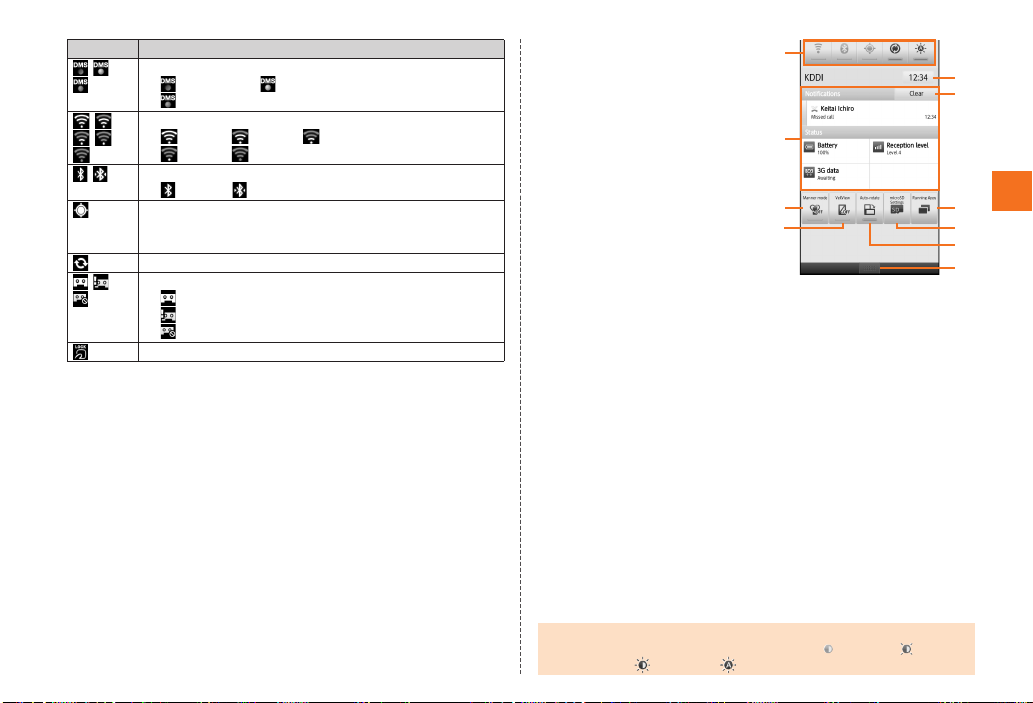
Indicator Description
《Notification/Status panel》
B
E
G
C
F
I
D
J
H
A
* Displayed in g reen when you login using your Google ac count.
■ Using Notification/Status Panel
In the notification/status panel, you can check the details on
notification indicators and status indicators or activate an application
corresponding to the indicator.
You can also set manner mode, VeilView, etc.
Home Network status
Suspending/ (Green) Preparing/
(Blue) Running
Wi-Fi signal strength
*
Level 4/ Level 3/ Level 2/
Level 1/ Level 0
Bluetooth® in use
Waiting/ Connecting
GPS in use
• The GPS positioning indicator is displayed as an
animation.
Data synchronizing
Answering memo set
No Answering memo/
Answering memo (one to nine entries)/
Answering memo (ten entries)
Osaifu-Keitai® lock setting in use
A Power control
You can set Wi-Fi, Bluetooth
®
,
GPS, auto-sync, and
brightness of screen.
You can save power by
switching the settings
frequently when you do not use
functions.
B Notification area
You can check the status of the
IS12SH and contents of
notifications. You can tap to
activate a corresponding
application depending on the
information.
C Manner mode
You can set manner mode.
D VeilView
You can set VeilView.
E Time
Displays the current time. You can tap to set the date and time.
F Clear
You can clear all the notifications by tapping the key.
G Running Apps
Displays the running applications list screen.
H microSD Settings
You can set the microSD memory card and phone space.
I Auto-rotate
You can set the automatic rotation of the display.
J Close tab
You can hide the notification/status panel by tapping the tab.
Power control
• The brightness of screen is switched in order of (dark) [
(medium) [ (bright) [ (auto) every time the icon is tapped.
Learning the Basics
19
Page 22
Using the Home Screen
《Main Menu》
Main Menu
Moving/Removing Shortcuts/Widgets/Folders
A
Long-touch the shortcut/widget/folder to move/remove.
The desktop display becomes reduced.
■ When moving the shortcut/widget/folder
B
Drag it to the position to move to and release your finger.
Learning the Basics
■ When removing the shortcut/widget/folder
B Drag it to Remove Shortcut/Remove Widget/Remove Folder
at the bottom of the screen and release your finger.
• You can switch the desktop by dragging an icon to the left or right edge of
the desktop. If you drag it to at the either side of the left or right edge
desktop, a new desktop is added.
Adding Shortcuts/Widgets/Folders
A On the home screen, e [Add
[Shortcuts/Widgets/Folders.
B Select an item.
• Shortcuts, widgets, and folders cannot be added in such a case as that the
displayed desktop has no available space.
Shortcut
• You can long-touch and drag a shortcut to a folder to store it in the folder.
Widget
• The IS12SH is compatible with the Droidget in addition to the Android
standard widget.
* Droidget is a program for widgets.
• Widgets for which is displayed on the widget list screen are compatible
with the Droidget. appears for widgets added to the desktop.
20
Folder
• Select a folder [Long-touch the folder name on the top of the folder
[Enter a new folder name [OK to change the folder name.
Switching the Home Screen
You can switch a home application to use.
A On the home screen, [HomeSwitcher.
B Select a home application to use.
Using Main Menu
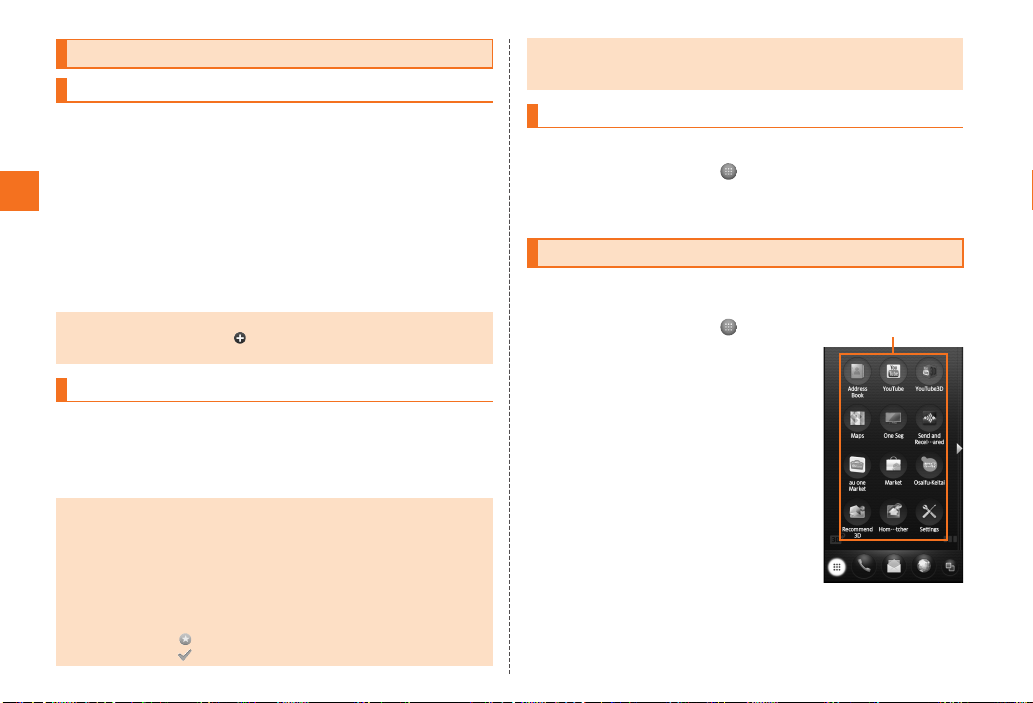
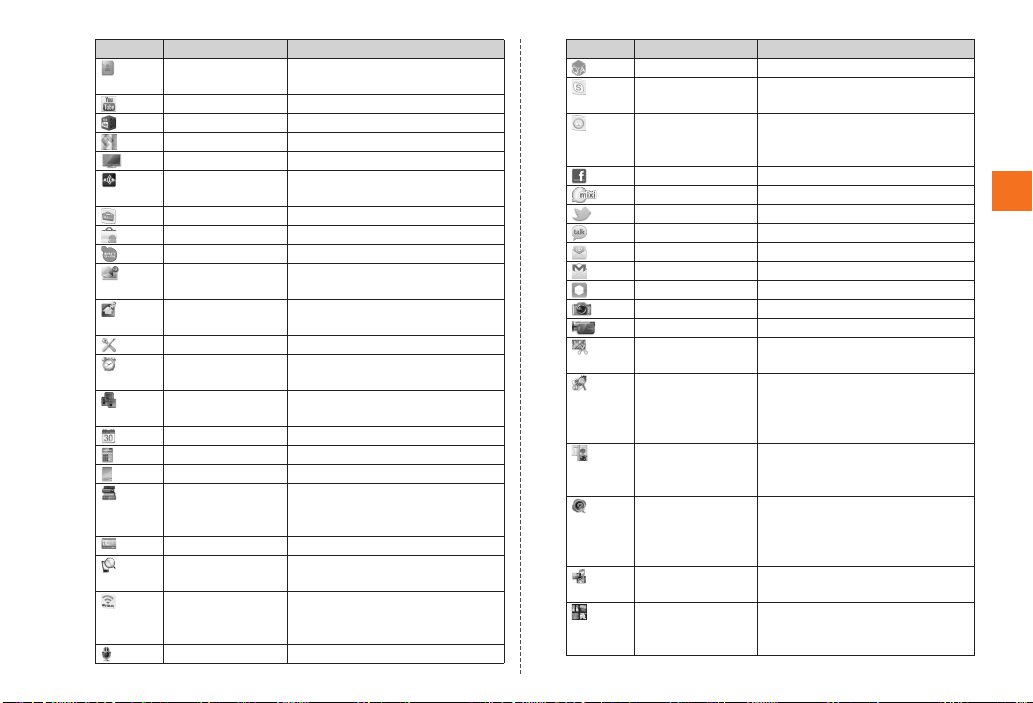
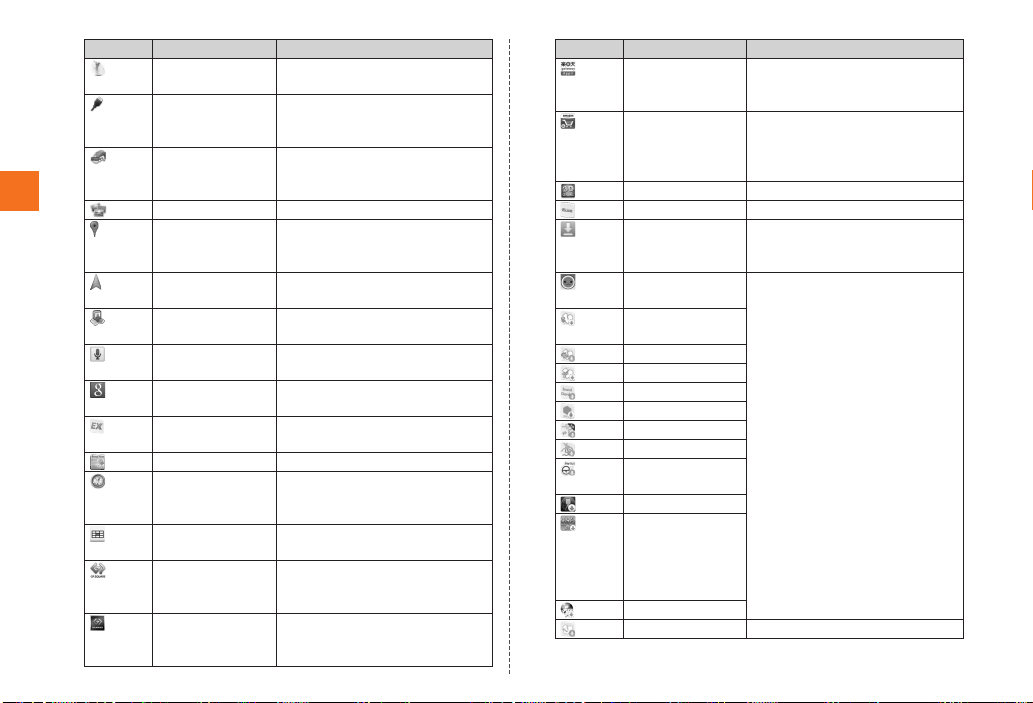
Installed applications are displayed as icons. You can tap an icon to
activate the application.
A On the home screen, .
The Main Menu is displayed.
Page 23
Icon Application Description
Address Book Manage phone numbers or mail
addresses.
YouTube Use YouTube.
YouTube3D Use YouTube3D.
Maps Use Google Maps.
One Seg Watch TV (1Seg).
Send and Receive
by Infrared
Send and receive data via
infrared communication.
au one Market Use au one Market.
Market Use Android Market.
Osaifu-Keitai
®
Use Osaifu-Keitai®.
Recommend 3D Use 3D contents in the microSD
memory card (Sample).
HomeSwitcher Switch a home application to
use.
Settings Check settings or information.
Clock Use world clock, alarm,
stopwatch, and timer.
Documents To GoDisplay Microsoft Office
documents.
Calendar Save and manage schedules.
Calculator Use calculator.
Notepad Create memos.
Dictionary Search for information in the
built-in dictionary of the IS12SH
or dictionaries on the Internet.
Pedometer Use pedometer.
Yubisaki
dictionary
au Wi-Fi接続ツー
ル (au Wi-Fi
Look up the characters displayed
on the screen in dictionaries.
Requires download and
installation to use.
connection tool)
Voice Recorder Record a voice.
Icon Application Description
Q&A Check Q&A.
Skype Make a call or send and receive
messages using Skype
jibe Address
Book
Use multiple social networking
services such as Twitter or mixi
in one application.
Facebook Use Facebook.
mixiSH Use mixi.
Twitter Use Twitter.
Talk Use Google Talk.
PC-mail Use PC-mail.
Gmail Use Gmail.
GREE_MARKET Use GREE Market.
Camera Take photos (still images).
Video Camera Record movies.
Movie Edit Clip images shot with IS12SH in
the specified range and save.
Camera Reader Switch Barcode reader,
Business card reader, Kanji/
English grabber, Text reader,
Information reader to use.
Household
account Photo
money
Scan prices etc. on a receipt
and register them to the
household account.
mosimo camera 3DDetect the movement of object
and face automatically and add
effects such as musical note and
glitter.
Contents
Manager
Picture
(3D-capable)
Display and manage data on a
microSD memory card.
Sort images and movies by
people, event and location and
use them.
™
|au.
Learning the Basics
21
Page 24
Learning the Basics
22
Icon Application Description
Golf Swing
Camera
Record golf swing and check it
in various display method.
HDMI Use HDMI connection to display
images and movies on TV, which
are in the microSD.
Smart Familink Play data released by DLNA
compatible devices on the
IS12SH using Wi-Fi.
Gallery
Display images and movies as a list.
Places Search for facilities around your
current location and display
them on the Google Maps.
Navigation Search for routes to the
destination on Google Maps.
Latitude Google Maps to check the
location of your friends.
Voice Search Enter a keyword for Google
search with your voice.
Google Search Search for information in the
IS12SH or on web sites.
ニュースEX
Requires installation to use.
(News EX)
News & Weather Display news and weather.
Compass Display the compass and your
current location on the Google
Maps.
Gガイド番組表
Display
auoneテレビ.Gガイド
(G-Guide EPG)
メーカーアプリ
(GALAPAGOS
SQUARE)
GALAPAGOS
App for
Smartphone
Use various services such as
downloading and viewing
applications.
Purchase and view e-books
such as newspapers, magazines
and books.
Icon Application Description
楽天gateway
(Rakuten
Gateway)
Use various services such as
Rakuten Auction and Rakuten
Ichiba.
Amazon JP Connect to Amazon web site
and purchase various products
such as books and home
electric appliances.
3D Gamelink Connect to 3D game sites.
au one Display au one homepage.
Download Display the list of data
downloaded from the browser
and manage them.
taiko no tatsujin ARRequires download and
installation to use.
LISMO Book
Store
unlimited
LISMO WAVE
BrandGarden
GREE
au Fitness
てのりん (tenorin)
レアジョブ
(RareJob)
Sfera Android
.
ラグナロク
Mobile Story
(RAGNAROK
ONLINE Mobile
Story)
TEIBAN GAME
*
LISMO Play music using LISMO.
Page 25
Icon Application Description
《Landscape display》
《Portrait display》
Option menu
*
Phone Make a call and use outgoing
history/incoming history.
*
Mail Use C-mail or e-mail.
*
Browser Browse web sites on the
Internet.
* Registered to the Quick Menu by default.
• When you use functions from a menu, packet communication charges may
apply depending on the function.
If you have not subscribed to IS NET, au.NET charges (525 yen for the used
month) and communication charges apply.
• Icon designs may be changed without prior notice.
Switching Orientation
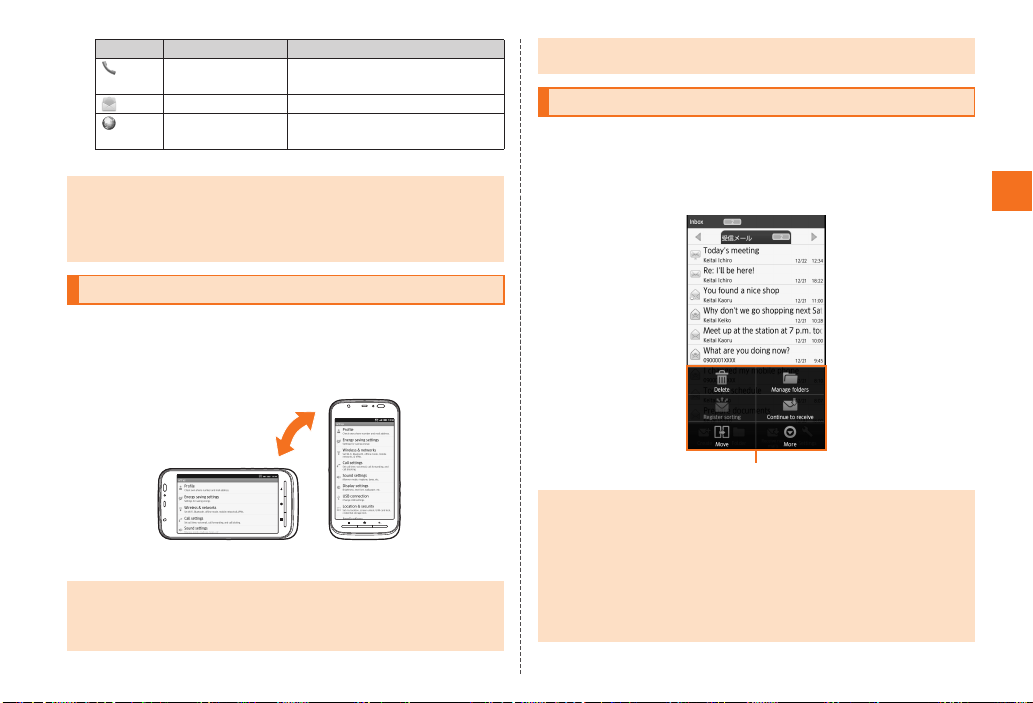
Portrait and landscape display are switched according to the
orientation of the IS12SH.
Example: When rotating the IS12SH 90° from Portrait (Landscape)
display to the left (right).
• Operate the IS12SH in the upright position. The screen display may not be
changed if the IS12SH is laid in parallel to the ground.
• From the Main Menu, tap Settings [Display settings [Auto-rotate screen to
set whether to switch portrait display and landscape display.
• In some applications such as Video Camera, the screen display may not be
switched regardless of the orientation or setting of the IS12SH.
Displaying Available Menu
■ Option Menu
The option menu is displayed by pressing e on the screen where
the menu is available.
Example: In the inbox screen
More
• When the number of available option menus exceeds the number that can
be displayed on the screen as icon, More is displayed. Option menus that
cannot be displayed as icon are collected into More, and tap More to
display them.
• Even on the same screen, the number of items collected into More differs
depending on the setting and condition since the number of option menus
displayed differs depending on the setting and condition.
• In this manual, operation to tap More is not described for option menu.
Learning the Basics
23
Page 26
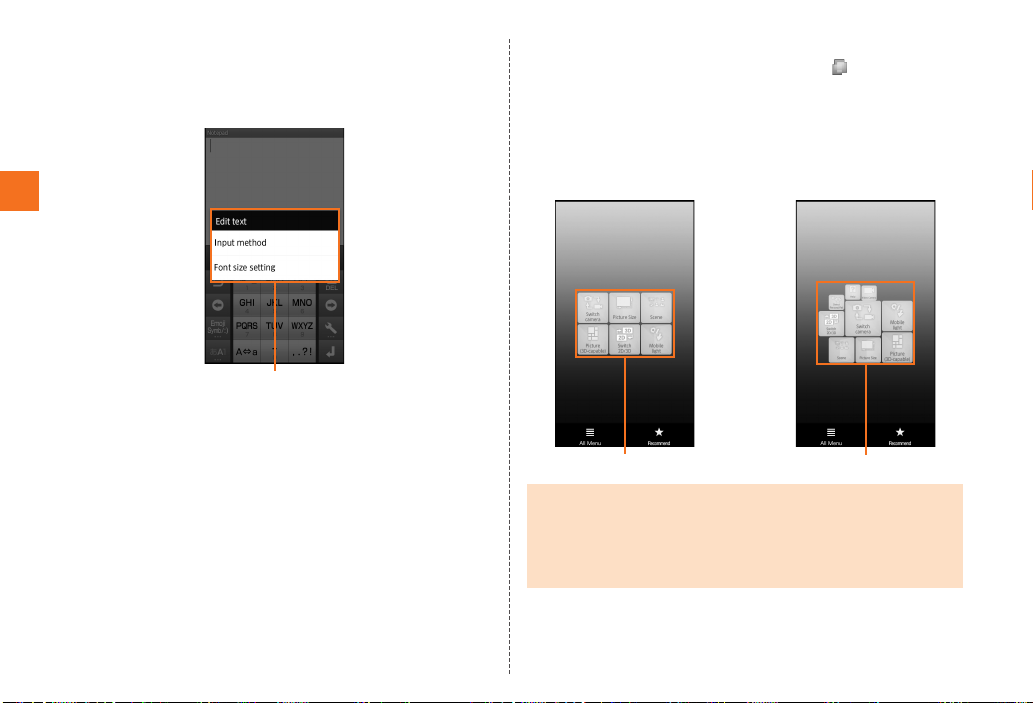
■ Context Menu
Context menu
TapFlow UI TapFlow UI
• At the time of purchase • After the operation of each
function
The context menu is displayed by long-touching an item or a display
where the menu is available.
Example: In the character entry screen
Learning the Basics
■ TapFlow UI
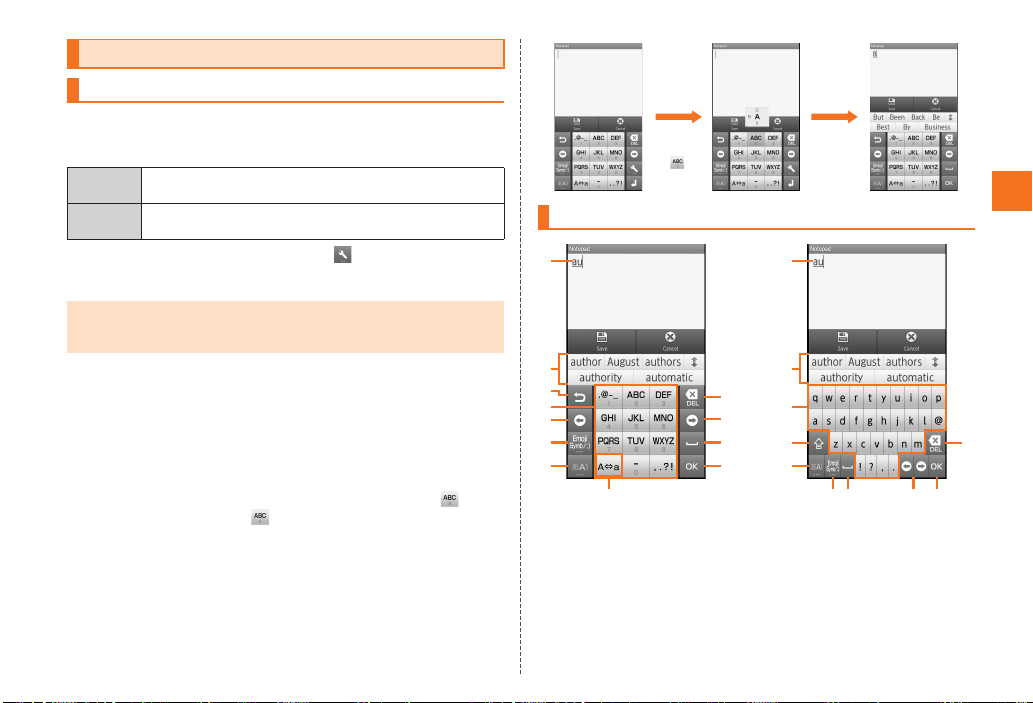
The TapFlow UI is a menu displayed by tapping when using
Address Book, Camera, Video Camera or Picture (3D-capable).
The type, position and size of menu icons displayed on the TapFlow
UI vary depending on how frequently you use them.
Example: In the photo monitor screen
24
• While displaying the TapFlow UI, tap All Menu to display all the available
menu.
• While displaying the TapFlow UI, tap All Menu [Reset usage history [Yes
to reset the TapFlow UI.
• While displaying the TapFlow UI, tap Recommend to display the
recommended menu corresponding to applications.
Page 27
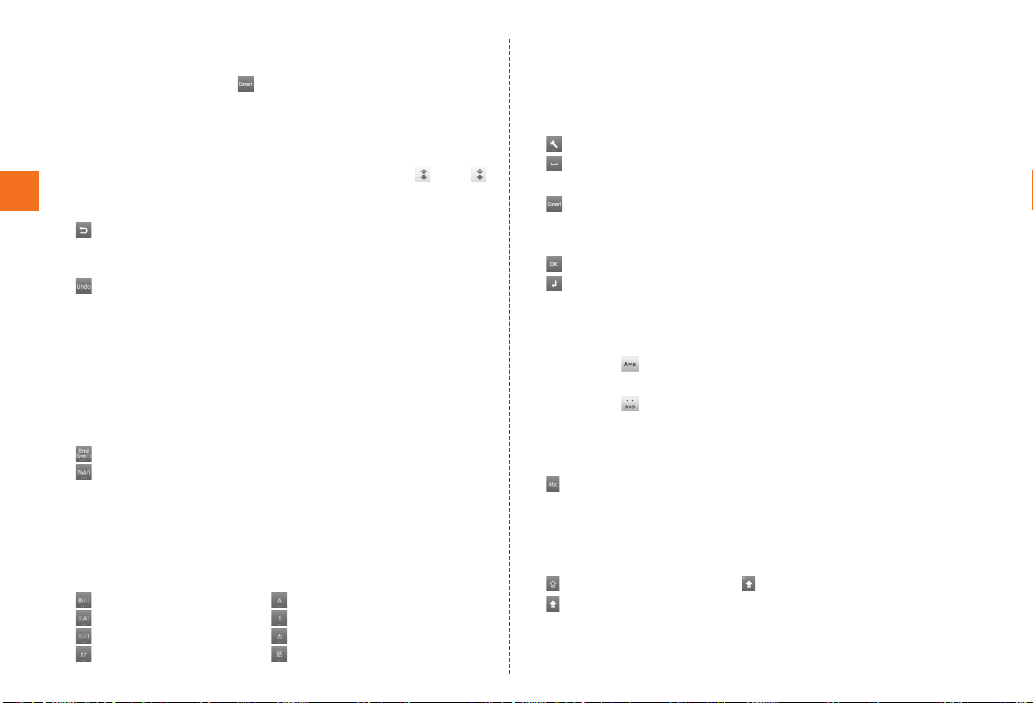
Character Input
Longtouch
Flick left
《Character entry screen
(12 Key)》
《Character entry screen
(QWERTY)》
AA
B
D
E
D
I
JG
H
G
F
E
C
H
L
KIFJE
B
Switching Software Keyboards
Tap the character entry field to display software keyboard and enter
characters by tapping keys on the screen.
The following software keyboards are available for the IS12SH.
QWERTY You can enter a displayed character by tapping the
12Key Characters are switched and entered every time the
A On the character entry screen,
[Change keyboard(Portrait).
• At the time of purchase, “iWnn IME - SH edition” and “Android keyboard”
are installed as input software. The operations of “iWnn IME - SH edition”
are described in this manual.
■ Flick input
When the software keyboard is “12 Key”, you can enter a desired
character by flicking the key up, down, left or right without tapping the
key repeatedly.
By long-touching a key, the candidates that can be entered by flicking
entry are displayed. By flicking the key in the direction of a desired
character being displayed, the character is entered in the character
entry area. For example, you can enter “A” by only tapping , and
you can enter “B” by flicking left.
character entry key. Use romaji for entry.
character entry key is tapped.
Viewing the Character Entry Screen
A Character entry area
Learning the Basics
25
Page 28
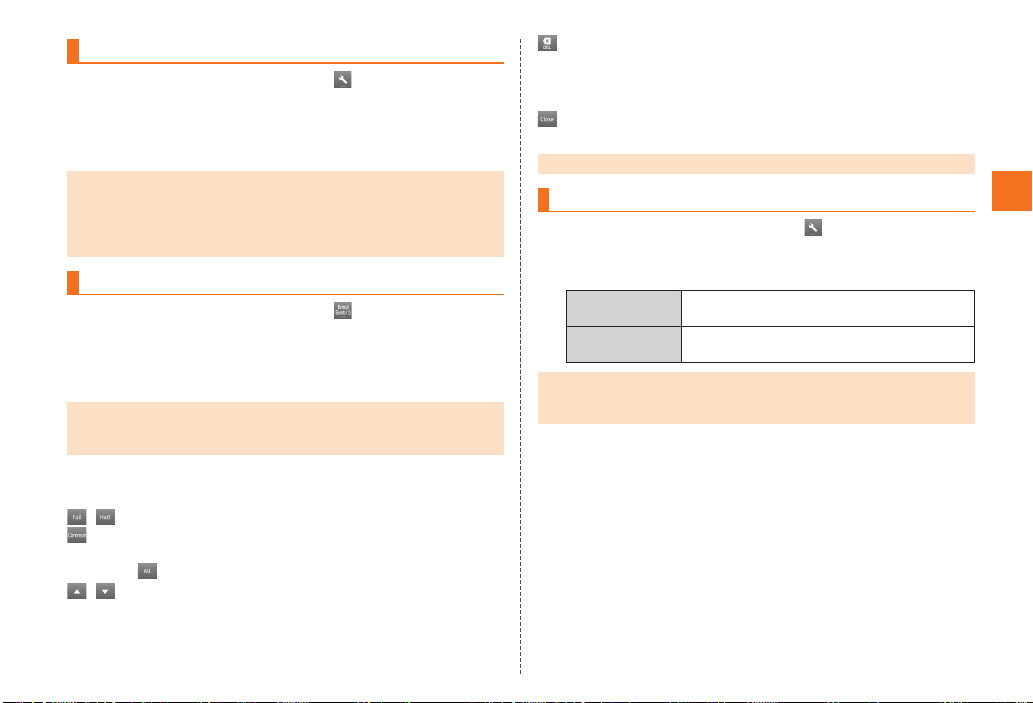
B Prediction candidates list/Relational prediction candidates list/
Normal conversion candidates list
Enter characters and tap to display the normal conversion
candidates list. If the word prediction function is enabled, the
prediction candidates list is displayed when characters are
entered. The relational prediction candidates list is displayed when
an entry is selected from the prediction candidates list.
• You can enlarge the candidates list area by tapping . Tap
to return it to the original display.
Learning the Basics
C Back key/Undo key
: Displays the characters assigned to the same key in the
reverse rotation.
・ Back function cannot be used in flick input.
: You can cancel the last operation such as returning the
determined characters to the undetermined state by tapping
the key.
D Software keyboard
You can enter a character assigned to each key.
E Cursor key
Moves the cursor to the left and right. Change the range of the
characters for character input and conversion.
F Emoji, Symbol, and Facemark key/Kana, Alphanumeric key
: Displays the list of Emoji/D-Emoji/Symbol/Facemark.
: Displays hiragana, katakana, alphabet, number and predicted
date and time assigned to the entered key as conversion
candidates.
G Character entry mode switch key
Switches the character types to enter.
When you switch the character types, the display changes as
follows.
: Hiragana-Kanji : Full-width alphabet
: Half-width alphabet : Full-width numeric
: Half-width numeric : Full-width Katakana
26
: Half-width Katakana : Character code
H DEL key
Deletes the selected character or the character on the left of the
cursor. When the cursor is at the beginning, the character on the
right of the cursor is deleted.
I Settings key/Space key/Conversion key
: Displays iWnn IME menu.
: Enters the space.
・ Appears in numeric/half-width alphabet entry etc.
: Displays the normal conversion candidates list.
・ Appears in hiragana entry.
J OK key/Enter key
: Determines the entering characters.
: Inserts a line feed at the cursor position.
• The display is changed depending on the application or entering
item.
K Uppercase/Lowercase characters switch key
By tapping in alphabet entry, you can switch the entered
character to the uppercase/lowercase one.
By tapping in hiragana or katakana entry, you can switch the
entered character to the uppercase/lowercase one or add
dakuten/handakuten to the character.
L Alphabet entry key/Shift key
: Switches the entering characters to the alphabet.
・ Appears in hiragana/kanji entry.
By tapping the shift key, you can switch uppercase characters
entry and lowercase characters entry. The display changes as
follows each time you tap it.
: Lowercase character entry : Uppercase character entry lock
: Uppercase character entry
You can switch the symbols to enter by tapping the keys in
full-width numeric or half-width numeric entry.
Page 29
Switching Character Entry Modes
A On the character entry screen, [Input mode.
Alternatively, on the character entry screen, long-touch the character
entry mode switch key to switch character entry modes.
B Select the character type.
• The character type is switched in order of Half-width alphabet [Half-width
numeric [Hiragana-Kanji each time you tap the character entry mode
switch key.
• Some character types cannot be used depending on the screen or the
application.
Entering Emoji/D-Emoji/Symbol/Facemark
A On the character entry screen, .
The Emoji/D-Emoji/Symbol/Facemark list screen is displayed.
Tap when there is no conversion target on the character entry screen.
B Select Emoji/D-Emoji/Symbol/Facemark.
• There are some lists that cannot be displayed and some Emoji/D-Emoji/
symbols/facemarks that cannot be entered depending on the screen you
operate.
■ Operations on the Emoji/D-Emoji/Symbol/Facemark
list screen
/ : Displays the list of full-width symbols/half-width symbols.
: Displays the list of Emoji converted automatically when sent to a
cell phone of other carrier.
・ Tap to return to the normal Emoji list.
/ : Displays the previous/next category or page.
: Deletes the selected character or the character on the left of the
cursor.
・ When the cursor is at the beginning, the character on the right
of the cursor is deleted.
: Returns to character entry screen.
Long-touch the facemark: Edits the facemark.
• Facemarks in History cannot be edited.
Switching Input Software
A On the character entry screen, [Input method.
Alternatively, long-touch the character entry area [Input method to
switch input software.
Android
B
keyboard
iWnn IME -
SH edition
• To switch input software, install an application and enable it in Language &
keyboard in advance. Refer to “Using Android Market” to install an
application.
Select mainly to enter alphanumeric.
• Japanese entry is impossible.
Select mainly to enter hiragana, kanji or
katakana.
Learning the Basics
27
Page 30
Making a Call
A On the home screen, (Phone).
The phone number entry screen is displayed.
B Enter a phone number.
When calling to a fixed-line phone, enter the phone number starting
with the area code even if you are in the same area.
C Call [Talk.
The calling screen is displayed.
Press u or d during a call to adjust the other party’s voice.
Phone
D End call.
When you end the call to/from an unregistered phone number, the
confirmation screen asking whether to register the phone number to
the address book is displayed.
• If you cover the screen while dialing or calling, it may be turned off
depending on the orientation of the IS12SH.
• Note that even if you cover microphone, the sound can be conveyed to the
other party.
Dial services available from au phones
• The following dial services are available.
• Call with fixed-line phones all over Japan
• Call with cell phones, PHS, and car phones all over Japan
• 001 (001 international call service: Subscription is unnecessary)
• 171 (Disaster emergency message dial)
• 177 (Weather forecast: The area code is necessary)
• 117 (Time signal)
• 104 (Directory assistance)
• 115 (Sending telegram)
• 110 (Emergency call to Police)
• 119 (Emergency call to Fire and Ambulance)
• 118 (Emergency call to Regional Coast Guard)
• 157 (Customer Service Center)
• Maritime telephone
* The numbers are emer gency call numbers. The IS12SH notifies your present location to
the emergency call destination with a signal from a bas e station when you call to the
agency that received the emergency call.
• The following NTT services are unavailable.
• Collect call
• Message service
• Dial Q2
• 116 (NTT business information)
*
*
*
28
Page 31
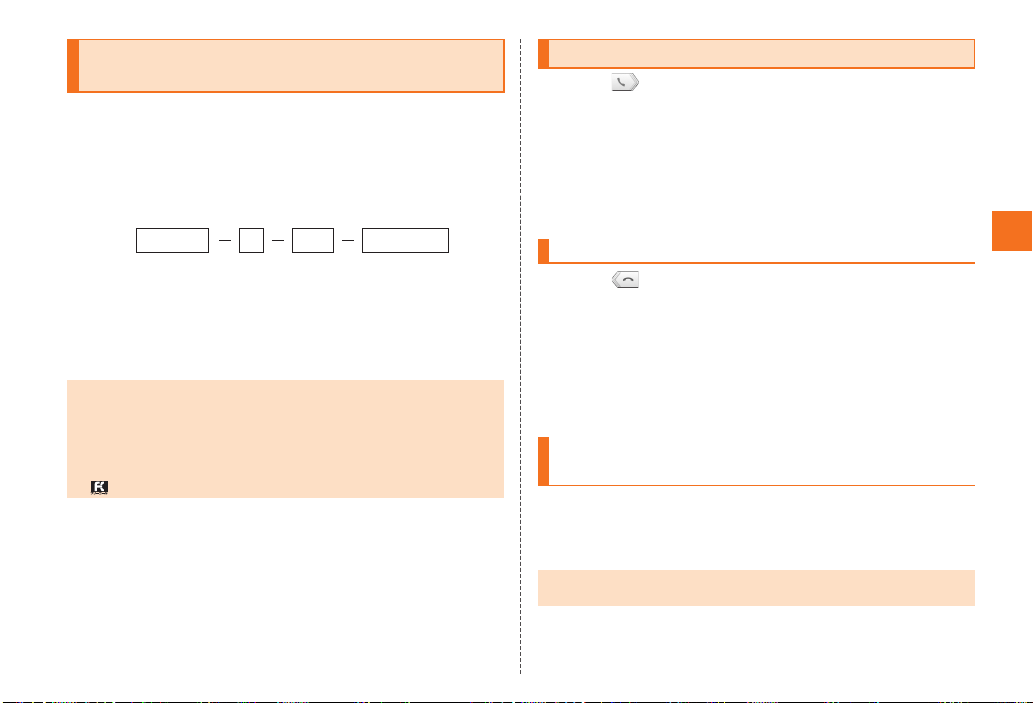
Making an International Call (001 International Call Service)
Available without any additional application.
Example: To call 212-123-XXXX in the USA
A On the phone number entry screen, enter the access
code, a country code, area code and phone number
[Call.
001010 212 123XXXX1
↑
KDDIInternational
accesscode
*1 Long-touch the “0” to enter “+” and “001010” is automatically added wh en calling.
*2 If the area code starts with “0”, dial it without including the “0” (There are s ome
exceptions such as fixed-line phones in some countries or regions including Italy and
Moscow).
• International call charges are billed together with monthly local call charges.
• For more information on 001 International Call Service, dial either of the
following numbers:
From au phones (toll free):
157 (area code not required)
From fixed-line phones (toll free):
0077-7-111 (Open 9:00 to 20:00 everyday)
*1
↑
Country
code
(USA)
↑
Areacode
*2
Phonenumber
↑
Answering a Call
A Slide to the right during an incoming call.
When you get an incoming call, tap Answer while the backlight
illuminates (except when the unlock screen is displayed).
B Talk [End call.
When you end the call to/from an unregistered phone number, the
confirmation screen asking whether to register the phone number to
the address book is displayed.
Putting the Call on Hold
A Slide to the left during an incoming call.
When you get an incoming call, tap Answer Holding while the backlight
illuminates (except when the unlock screen is displayed).
The call is put on hold. The other party hears voice guidance indicating
that the call is put on hold.
B Answer while the call is on hold.
The hold state is released and the call is connected.
Answering with the Message of Answering
Memo
You can answer a call with the message of the Answering memo and
record the other party’s message.
A e [Absence Memo during an incoming call.
• Press e [Rcv. ON to hear the other party’s voice while recording
Answering memo. Press e [Rcv. OFF to turn off the voice.
Phone
29
Page 32
Returning a Call (Outgoing History/ Incoming History)
A On the phone number entry screen,
Outgoing History/Incoming History.
The outgoing history/incoming history screen is displayed.
B Select the entry you want to call.
The outgoing history/incoming history detail screen is displayed.
C Call.
Phone
You can tap Message to create C-mail.
• The IS12SH can store up to 100 entries in each of the outgoing and
incoming histories. If the history exceeds 100 entries, it is automatically
deleted from the oldest entry. The number of the saved entries may be
reduced depending on the amount of free space.
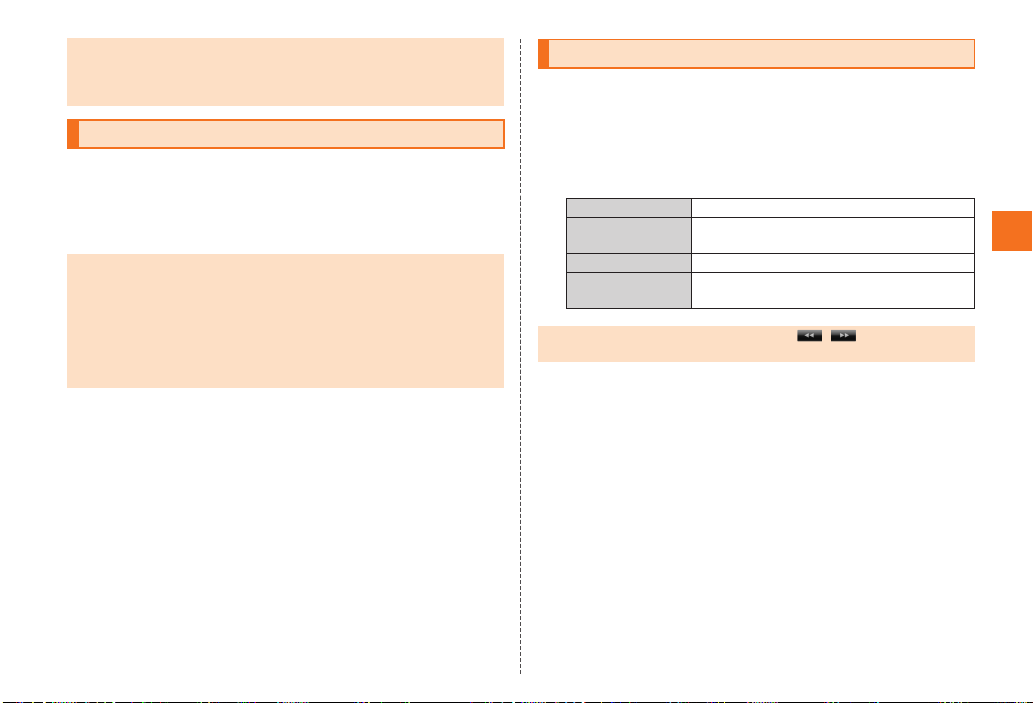
Turning On Manner Mode
Just by selecting Manner mode, you can set not to disturb others
around you in public places. Also, you can set the ring tone or the
vibrator to off while driving.
A From the Main Menu, Settings [Sound settings
[Manner mode.
B Select Manner mode.
Volume of call
ring tone/mail
Standard
manner
mode
Drive
manner
*
mode
Silent
manner
mode
* The answerin g message is fixed to Drive, the answering time is fixed to 3secs, and the
Answering memo is fixed to ON.
• The use of cell phones while driving a car/motorcycle is dangerous and is
prohibited by law. Set manner mode to Drive manner mode while driving or
riding.
• Hold down f for at least two seconds [Manner mode or hold down
d on the unlock screen, home screen or Main menu to enable/disable
manner mode.
• Even in manner mode, the IS12SH still emits a shutter sound, start/end tone
when you record a movie with Camera or recording start/stop tone of Voice
Recorder.
ring tone
OFF ON OFF
OFF OFF OFF
OFF OFF OFF
Vibrator when
receiving call/
mail
Volume of
operation
sound
30
Page 33
• When playing the data in Contents Manager or checking the function setting
by playing the data in manner mode, the data is played on mute.
Depending on the function, you can adjust the volume by pressing u/
d while playing the data.
Turning On the Answering Memo
When you cannot answer calls, this function automatically plays a
message and allows callers to record messages.
A From the Main Menu, Settings [Call settings
[Call/Ans Memo [Answering memo setting.
• When you set the same length of answering time for Answering memo and
Auto Answer, Answering memo takes priority.
• The IS12SH can record a maximum of ten messages of up to approximately
60 seconds per message. When ten messages have already been
recorded, the messages that are already played but not protected are
deleted from the oldest one. When ten messages are recorded and all of
them have not been played or are protected, the Answering memo does not
answer the call.
Playing a Message in Answering Memo
A From the Main Menu, Settings [Call settings
[Call/Ans Memo [Answering Memo List.
The answering memo list screen is displayed.
B Select the message to be played.
The message is played.
Stop Stop playing the message.
On/Off Protect/Unprotect the message not to be
Delete Delete the playing message.
Speaker on/
Speaker off
• When multiple messages are recorded, tap / while playing a
message to play the previous/next message.
automatically deleted.
The message can be heard on the speaker/
earpiece.
Phone
31
Page 34
Adding an Address Book Entry
A From the Main Menu, Address Book.
The address book list screen is displayed.
B e [Add new entry.
The address book edit screen is displayed.
When you register an account, the screen to select a register
destination is displayed. Select a register destination.
C Select and edit an item.
D Save [Yes.
• Tap to display the entry items which are not displayed.
Address Book
• On the address book edit screen, tap / to add/delete the item.
• If the phone number is for a fixed-line phone, enter the phone number
starting with the area code.
• If you save multiple phone numbers/mail addresses, on the address book
edit screen, tap to change it to so that you can set a phone number/
mail address for usual use.
• Depending on an item, you can change its type. Tap the icon displayed on
the left of the item and select a type. By tapping Custom when you change
the type, you can save the entered string as a type.
• For the chat address type, set the application which is activated when the
operation (on the address book detail screen, tap ) is executed.
• If you save the name in the following characters, it is displayed in order of
name, and family name on the address book.
• Half-width alphanumeric including alphabet only for name and family
name
• Half-width alphanumeric including alphabet only for family name/Kanji or
half-width alphanumeric including Kanji only for name
• To save GPS information, enable Use wireless networks/Use GPS satellites in
advance. From the Main Menu, tap Settings [Location & security [Check
Use wireless networks/Use GPS satellites to enable it.
• If the other party’s phone number is not notified, Ring Set is not enabled.
32
Using an Address Book
You can use address book entries to make a call or send a mail
message easily.
A On the address book list screen, select the contact.
Tap image (face) on the address book list screen (newly arrived
order).
The address book detail screen is displayed.
Using Phone Number
■ When calling/sending to a phone number
A Select the desired phone number on the address
book detail screen.
B
Call
Edit and call Display the selected phone number in the
Send push tone Send Dual Tone Multi Frequency to the
Create mail Create a C-mail message using the selected
Call added
special number
Call to the selected phone number.
phone number entry screen to make a call.
receiver.
phone number as an address.
Add the specific number to the selected
phone number.
Page 35
■ When setting a phone number
A Long-touch the desired phone number on the
address book detail screen.
B
Set main phone
number
Create shortcut
Set the phone number for usual use.
Direct call Create a shortcut to call to
Send
message
directly
the selected phone number
or to activate C-mail
message using the selected
phone number as an
address.
Using Mail Address
■ When sending a mail message to a mail address
A Select the desired mail address on the address book
detail screen.
■ When setting a mail address
A Long-touch the desired mail address on the address
book detail screen.
Set main mail
B
address
Create shortcut Create a shortcut to activate mail message
Set the mail address for usual use.
using the selected mail address as an
address.
Address Book
33
Page 36
Using E-mail/C-mail
E-mail ([email protected]) is a service that you can exchange e-mail
with other cell phones that support e-mail, and with PCs. In addition to
text messages, you can also send photos and movies by e-mail.
For the way to acquire an e-mail address, refer to the supplied Setting
Guide (Japanese).
C-mail is a service that uses phone numbers as addresses to
exchange messages between cell phones.
• For using e-mail/C-mail overseas, refer to supplied Global Passport Owner’s
Guide (Japanese).
• The packet communication charge for sending and receiving e-mail varies
according to the amount of data sent and received. For using overseas,
high charges can be incurred. For details, refer to the au comprehensive
catalogue or au homepage.
• The function of C-mail is to be expanded. The contents of the expanded
function and time for the function expansion are to be released on the au
homepage.
• Charges do not apply when receiving C-mail.
A On the home screen, (Mail).
The inbox screen is displayed.
Sending E-mail Messages
A On the inbox screen/the outbox screen/the folder list
screen, Create.
The e-mail creation screen is displayed.
B .
You can also enter an address directly by tapping the enter destination
field.
If you have already entered destinations, the destination list screen is
displayed.
34
C Select/Set the address.
Address
Book
Send/
Receive
history
Mail Group Enter a mail address by selecting a mail group.
Profile Enter a mail address registered in the Profile.
Secrecy Disable secrecy setting temporarily when it is
Enter a mail address by selecting an entry from
the address book.
Enter a mail address by selecting an entry from
the send/receive history.
• On the send/receive history selecting screen,
press e [Set secrecy not to display Send/
Receive history when selecting destinations etc.
set on send/receive history.
D Tap the subject entry field [Enter a subject.
E Tap the message entry field [Enter a message.
F Send.
• On the e-mail creation screen, press e [Save [Save to unsent box
[Save as New/Overwrite. After that, the mail message is saved to the
Unsent box without being sent.
•
If you enter a destination or a name in the destination entry field, the destination
candidates are searched for automatically from the send/receive history or the
address book and displayed. Select one of them to be set as the destination.
After setting, you can enter and add another destination successively.
Sending C-mail Messages
You can send a message consisting of kanji/hiragana/katakana/
alphanumeric/symbols/pictograms/face marks. After sending, you can
know whether the message has been sent to the other party.
A On the e-mail creation screen, Cmail.
The C-mail creation screen is displayed.
Page 37
B .
You can also enter a phone number directly by tapping the enter
destination field.
If you have already entered destinations, the destination list screen is
displayed.
C Select/Set the phone number.
Address
Book
Send/
Receive
history
Profile Enter a phone number registered in the Profile.
Secrecy Disable secrecy setting temporarily when it is
Enter a phone number by selecting an entry
from the address book.
Enter a phone number by selecting an entry
from the send/receive history.
• On the send/receive history selecting screen,
press e [Set secrecy not to display Send/
Receive history when selecting destinations etc.
set on send/receive history.
D Tap the message entry field [Enter a message.
E Send.
• On the C-mail creation screen, tap Save. After that, the mail message is
saved to the Unsent box without being sent.
• On the C-mail creation screen, tap Email to switch C-mail in process of
creation to e-mail. When switched, half-width katakana will be converted to
full-width one.
• If you enter the name in the destination entry field, the destination
candidates are searched for automatically from the send/receive history or
the address book and displayed. Select one of them to set as the
destination.
• If you send pictograms to cell phones of different models, some pictograms
may not be displayed properly.
• Even when a C-mail is successfully sent, a message indicating that sending
the mail failed may appear infrequently.
Receiving E-mail/C-mail Messages
A A mail message is received.
When a mail message is received, appears on the status bar, and
the mail ring tone sounds.
B Tap the status bar.
C Select mail information.
The inbox screen is displayed.
D Select the received mail.
The received mail message screen is displayed.
Reading E-mail/C-mail Messages
You can read mail messages sent, received or saved in each mail box
screen.
A On the inbox screen/the outbox screen, Folder.
The folder list screen is displayed.
B Select a folder.
C Select a mail message.
When you select an unsent mail message in the Unsent box, the
e-mail/C-mail creation screen is displayed.
Mail
35
Page 38
Setting Mail Filters
登録
Mail filters have functions to receive and reject specific e-mail
messages and to reject e-mail messages spoofing cell phones or PHSs.
A On the inbox screen/the outbox screen/the folder list
screen, Settings [E-mail settings [Other settings
[OK.
■ Setting the mail filter as recommended
B (See Recommended Settings)
オススメの設定はこちら
[ (Register).
Set the mail filter that enables to reject spoofing or auto-forwarded mail
messages, and to receive mail messages from cell phones, PHSs or PCs.
Mail
■ Setting details of the mail filter
B (Mail Filter)
迷惑メールフィルター
[Tap (Entry field) [Enter your security code
[ (Send).
送信
The mail filter screen is displayed.
C
カンタン設定
(Simple Settings)
詳細設定
(Advanced
Settings)
1.
「携帯」「PHS」
「PC」メールを受信
(1. Receive Mail
Messages from
Cell Phone, PHS
or PC)
2. 「携帯」「PHS」
メールのみを受信
(2. Receive only
Mail Messages
from Cell Phone
or PHS)
一括指定受信
(Collective
Receive Setting)
なりすまし規制
(Spoof
Restriction)
指定拒否リスト設定
(Reject Mail
Address List
Setting)
Reject spoofing or
auto-forwarded mail
messages, and receive
mail messages from cell
phones, PHSs or PCs.
Reject mail messages
from PCs, spoofing mail
messages or
auto-forwarded mail
messages, and receive
mail messages from cell
phones or PHSs.
Receive or reject all mail
messages from the
Internet or cell phones.
Reject mail messages
sent with an alleged
sender address. You
can set the following
levels; 高 (High), 中
(Medium), 低 (Low).
Reject mail messages
from certain e-mail
addresses, domains or
parts of addresses to
the left of “@” that are
contained in the
specified address list.
36
Page 39
詳細設定
(Advanced
Settings)
指定受信リスト設定
(Allowed Address
List Setting)
指定受信リスト設
定(なりすまし・転
送メール許可)
(Allowed Address
List Setting
(Spoofing or
Forwarded Mail
Messages))
HTMLメール規制
(HTML Mail
Restriction)
URLリンク規制
(URL Link
Restriction)
Prioritize reception of
mail messages from
certain e-mail
addresses, domains or
parts of addresses to
the left of “@” that are
contained in the
specified address list.
• To block e-mail
messages from
addresses other than
the specified ones,
unmark all items in
一括指定受信
(Collective Receive
Setting) to set to off (to
reject receiving).
Avoid the mail block due
to
なりすまし規制
(Spoof Restriction)
setting, and receive
auto-forwarded mail
messages.
Reject e-mail messages
in HTML format.
Reject e-mail messages
that include a URL.
• If the security code is incorrectly entered three times consecutively during a
• Note that you cannot receive e-mail messages once rejected by mail filters.
You can register the phone numbers to reject C-mail messages. You
can also set to reject C-mail messages sent from the phone numbers
not registered in the address book.
A On the inbox screen/the outbox screen/the folder list
詳細設定
(Advanced
Settings)
設定確認/設定
解除
(Check Settings/
Release
Settings)
PC設定用ワンタ
イムパスワード
発行
(Issue One Time
Password for PC
Setting)
設定にあたって
(Notes on Setting
Mail Filter)
single day, the mail filter setting operation will be disabled until the next day.
Be careful when you set mail filters.
拒否通知メール返
信設定
(Block Mail
Notification
Setting)
Check the setting status of the mail filters
and release all the settings at one time.
Issue a one time password to set the mail
filter on your PC. The password is available
within 15 minutes after issuance.
Display the explanation for setting mail
filters.
Sets whether to send a
receiver error (address
unknown) mail message
to the sender of the
rejected e-mail
message.
Rejecting Spam C-mail Messages
screen, Settings [C-mail settings [Receiving filter
[Enter Lock No. [OK.
Mail
37
Page 40
B
Block
specified
numbers
Mail
Not in
address
book
E-mail
notifications
38
Set
Specified
Numbers
Specified
Number
List
Set whether to block C-mail from any phone number
not saved in the address book.
Set whether to block e-mail notifications.
Set whether to enable the Block
specified numbers.
If no phone number to be blocked is
specified in Specified Number List, the
specified number screen is displayed.
Tap Add new and register the phone
number.
Specify the phone number to be
blocked.
• Tap Add new to register a phone
number to be blocked. Select the
registered phone number [Secrecy
[Enter Lock No. [OK to disable
secrecy setting on send/receive history
temporarily.
•
Press
e [
selection
numbers to be deleted or to delete all
the phone numbers.
• Long-touch the registered phone
number [Change to change the
phone number.
• Long-touch the registered phone
number [Delete to delete the phone
number.
• Up to ten phone numbers can be
registered.
• Even when you reject receiving by
receiving filter, the sender is supposed
to send the mail message correctly,
and the charge applies.
/
Delete all
Delete [
Delete
to select the phone
Using PC-mail
You can use PC-mail setting an account of au one mail etc.
• To use au one mail in PC-mail, acquiring au one mail account,
enabling IMAP setting, setting mail password are required in
advance. From the Main Menu, tap au one [ (Support)
[ (au one mail help) and set after
auoneメールヘルプ
confirming the contents of the help.
サポート
A From the Main Menu, PC-mail.
The inbox screen is displayed.
If multiple mail accounts are registered, the PC-mail main screen is
displayed.
When you use PC-mail for the first time, the mail account setup screen
is displayed, and then register a mail account. For operation on
registering a mail account, refer to “Registering Another PC-mail
Account”.
Registering Another PC-mail Account
A On the inbox screen, e [Accounts.
The PC-mail main screen is displayed.
B e [Add account.
The mail account setup screen is displayed.
When you register the second or later account, you can register it as a
prioritized account by tapping Send email from this account by default.
C Email address [Enter mail address.
D Password [Enter password [Next.
The mail server is set automatically.
E Tap the account name entry field
[Enter account name.
Page 41
F Tap the your name entry field [Enteryourname
[Done.
Sending PC-mail Messages
A On the inbox screen, e [Compose.
The PC-mail composition screen is displayed.
B Tap the destination entry field
[Enter the destination.
If you enter a name or a mail address saved in the address book, the
address book is searched and the destination is displayed below the
destination entry field. You can select the displayed destination.
C Tap the subject entry field [Enter the subject.
D Tap the message entry field [Enter the message.
E Send.
If you tap Sava as draft, PC-mail is saved to draft without sending it.
If you tap Discard, PC-mail in process of composition is discarded.
Receiving PC-mail Messages
A PC-mail is received.
If PC-mail is received, appears on the status bar, and the mail ring
tone sounds.
B Tap the status bar.
C Select PC-mail information.
The inbox screen is displayed.
D Select the received PC-mail.
The received PC-mail message screen is displayed.
Using Gmail
Gmail is a mail service provided by Google. You can send and receive
Gmail with the IS12SH.
• Google account is required to use Gmail. For details on Google
account, refer to the supplied Setting Guide (Japanese) and the site
(http://www.google.com/support/accounts/).
• From the Main Menu, tap Settings [Accounts & sync to synchronize
Gmail saved in the server with one saved in the IS12SH.
• For using Gmail, refer to Google homepage.
A From the Main Menu, Gmail.
The Gmail inbox screen is displayed.
Mail
39
Page 42
Sending Gmail
A On the inbox screen, e [Compose.
B Tap the destination entry field
[Enter the destination.
C Tap the subject entry field [Enter the subject.
D Tap the message entry field [Enter the message.
E .
Receiving Gmail
A Gmail is received.
Mail
When Gmail is received, appears on the status bar, and the mail
ring tone sounds.
B Tap the status bar.
C Select mail information.
The inbox screen is displayed.
D Select the received mail.
The received mail message screen is displayed.
Replying/Forwarding Gmail
A On the received mail message screen,
[Reply/Reply all/Forward.
40
Page 43
Viewing Sites with Browser
A On the home screen, (Browser).
The browser screen is displayed.
From the Main Menu, tap au one to always display the au one
homepage for Android.
• When browsing a web page with a large amount of data, the application
may be terminated automatically.
Filtering function
• The filtering function blocks inappropriate web pages for young people.
From the Main Menu, tap Settings [Wireless & networks [Filtering settings
[Yes [Enter a password [OK [Enter a password again [OK.
• The filtering function is disabled during Wi-Fi connection.
• The password used when enabling the filtering function is necessary
when disabling the setting. Be sure to keep the password.
Using Bookmarks/History
A On the browser screen, e [Bookmarks/History.
The bookmarks screen/history screen is displayed.
B Select a bookmark/history.
• On the history screen, tap / to bookmark/delete the selected history.
Bookmarking a Web Page
Bookmark the displayed site.
A On the browser screen, e [Bookmarks [Add.
The bookmark registration screen is displayed.
B OK.
• On the bookmarks/history screen, long-touch the bookmark/history
[Delete bookmark/Delete from bookmarks to delete the bookmark.
Internet
41
Page 44
Using the Camera
IS12SH has a CMOS out camera with approximately 8.05 effective
megapixels and a CMOS in camera with approximately 0.31 effective
megapixels for shooting 2D/3D photos and movies.
When the battery level is (approximately 20 %) or lower, camera
cannot be activated.
Insert a microSD memory card before using camera. All the photos
and movies taken are saved in a microSD memory card.
• The mobile light flashes in red while each camera mode (excluding
“mosimo camera 3D”) is activated.
Cautions for Using the Camera
• Do not position the mobile light close to your eyes. Do not look at the
mobile light directly while it is on. Do not point on the mobile light
toward the eyes of others. It may harm eyesight.
• The IS12SH may be warm after displaying the photo monitor screen
or operating repeated movie recordings for a long time. Be careful
of touching for a long time which may result in a low temperature
Multimedia
burn.
• If you use the IS12SH camera in a wrongful manner, you may be
subject to punishment according to laws of the national and local
governments.
Taking Photos
A From the Main Menu, Camera.
The photo monitor screen is displayed.
Alternatively, hold down b while the home screen is displayed to
activate Camera.
Tap / to switch 2D/3D shooting.
B at the bottom of the screen/b.
The shutter sounds and the shot image is automatically saved.
On the photo monitor screen, press e [Save settings [Auto
Save to set to OFF. After that, the photo preview screen is displayed
after shooting. You can save the shot data etc.
• 3D shooting supports only landscape display.
• If you operate nothing in the photo monitor screen for approximately three
minutes, Camera is terminated.
• If the mobile light is set to ON, the mobile light is turned on and it is
automatically turned off in approximately three minutes.
AF lock
• By tapping the section on which you want to set the focus in the photo
monitor screen, you can hold it in the state that it focuses on the tapped
section. When the focusing is locked, the AF frame is displayed and focus
lock tone sounds. If the focusing is failed, the AF frame is displayed in red.
• On the photo monitor screen, press e [Focus settings [Chase Focus
to set to ON. After that, if you move the AF frame to detect the subject, the
AF frame chases the subject even if the subject is moving.
• On the photo monitor screen, press e [Focus settings to set to Macro
Fixed or Infinity Fixed. After that, you cannot use the AF lock.
• You can take a photo by tapping the AF frame.
42
Page 45
Recording Movies
A From the Main Menu, Video Camera.
The movie monitor screen is displayed.
Tap / to switch 2D/3D shooting.
B at the bottom of the screen/b.
Recording starts.
C /b.
The recorded data is automatically saved.
On the movie monitor screen, press e [Auto Save to set to OFF.
After that, the movie preview screen is displayed after stopping
recording. You can play or save the recorded data etc.
• 3D shooting supports only landscape display.
• If the battery level becomes (approximately 20 %) or lower while
recording, recording is terminated and saved automatically.
• When you get an incoming call while recording, the recording is terminated
and saved, and then the incoming call screen is displayed. If Auto Save is set
to OFF, the recording is terminated, and then the incoming call screen is
displayed. After the incoming or the call, the movie preview screen is
displayed.
• If you operate nothing in the movie monitor screen for approximately three
minutes, Video Camera is terminated.
• If the mobile light is set to ON, the mobile light is turned on and it is
automatically turned off in approximately three minutes.
Using Gallery
In the Gallery, you can share the images and the movies saved in the
microSD memory card, display them as a list or edit the images.
A From the Main Menu, Gallery.
The album selection screen is displayed.
Camera is activated by tapping .
B Select an album.
The thumbnail display screen is displayed.
Tap to return to the album selection screen.
Tap to switch the date display and the thumbnail display of the
images.
Slide to the left/right to slide the thumbnails.
C Select an image or a movie.
When you select an image, the one image display screen is displayed.
When you select a movie, an application corresponding to its data
type is activated and played. If there are multiple applications to play,
the application selection screen may be displayed. Select an
application to play a movie.
■ Operations in the one image display screen
: The thumbnail display screen is displayed.
Tap the image: Displays/Hides icons, Slideshow, Menu.
Multimedia
43
Page 46
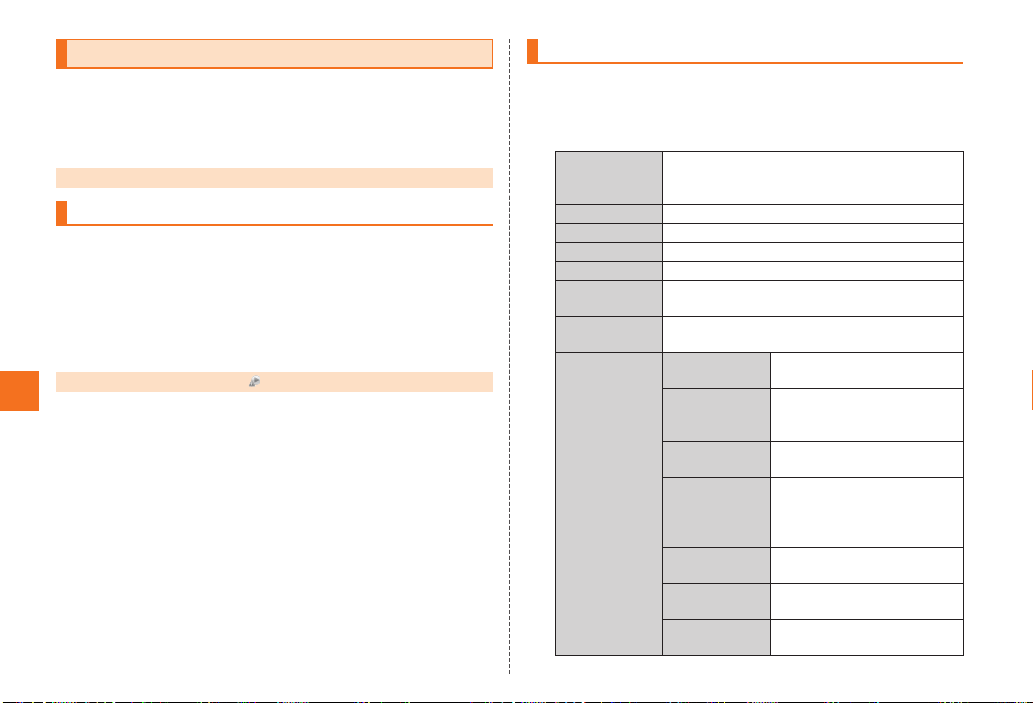
Using Contents Manager
You can categorize and list, play/display, check, and manage data on
a microSD memory card, using Contents Manager.
A From the Main Menu, Contents Manager.
The contents screen is displayed.
• Some data displayed in Contents Manager cannot be played/displayed.
Playing/Displaying Data
A On the contents screen, select data.
The application is automatically activated according to the data type
and the data is played/displayed.
Regardless of playing/displaying the data from the contents screen, if
there are multiple applications to play/display, the application
selection screen may be displayed. Select an application to play/
display the data.
• You cannot play data on which is displayed.
Multimedia
44
Using Menu in the Contents Screen
You can send, upload, edit, delete data, etc. on the Contents
Manager.
A On the contents screen, e.
B
Delete
selected
List Players Display applications related to file format.
Switch grid/list Switch grid display and list display.
Sort Sort saved data.
Slideshow Display the taken pictures by slideshow.
microSD/
phone space
App setting Set effective range of search criteria etc. on
Slideshow
settings
Delete data.
Select data [Enter [Yes.
• Tap Check all/Uncheck all to select/cancel all.
Check the space of the microSD memory
card, back up the data, etc.
the contents screen.
Slideshow
interval
Slideshow
transition
3D view setting Set whether to display the
Effect image
settings
Photo block
settings
Repeat setting Set whether to repeat the
Shuffle setting Set whether to display the
Set the interval of switching
images of slideshow.
Set the operation when
switching images of
slideshow.
slideshow in 3D.
Set the face images of
characters which appear
when switching the set
image.
Set the size and color of
block for photo block.
slideshow display.
slideshow in random order.
Page 47
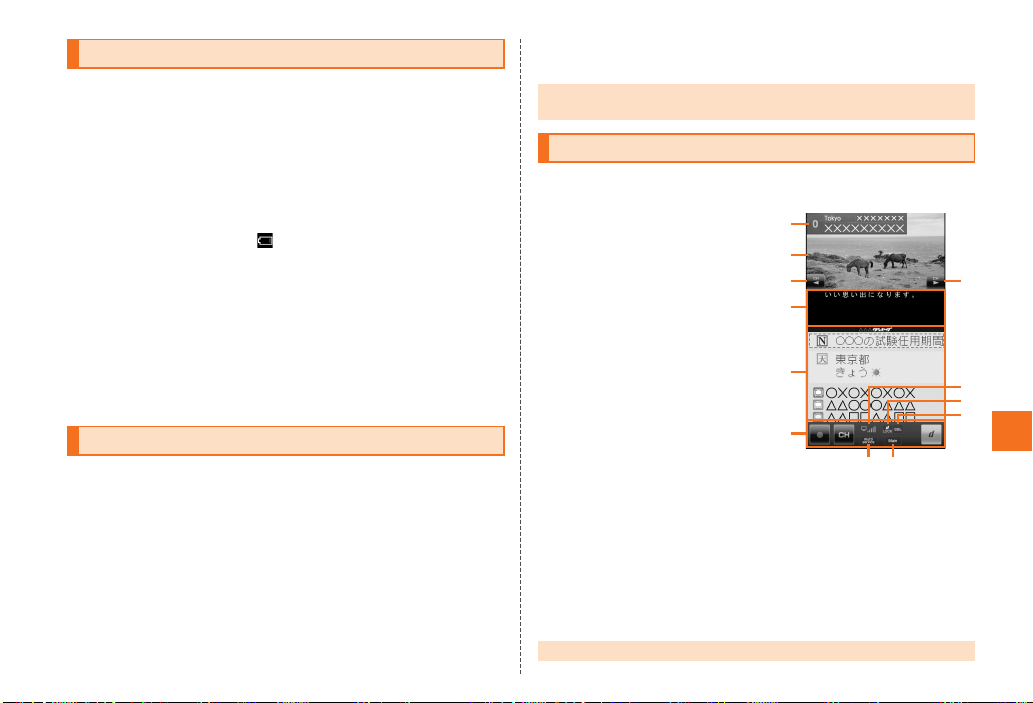
Cautions for Using TV (1Seg)
《1Seg screen》
B
F
D
E
A
C C
J
G
H
I
K
■ Cautions for using TV (1Seg)
• No communication charges apply for watching TV (1Seg). However,
when you use an additional service using packet communication on
a data broadcast etc., packet communication charges apply.
• Be careful not to watch TV (1Seg) for a long time at a loud volume. It
may harm your hearing.
■ Behavior by Battery Level
• If the battery level becomes (approximately 10 %) or lower while
activating TV (1Seg), it is terminated automatically. If the battery
level becomes so while recording TV programs, the recorded
content is saved and TV (1Seg) ends.
■ TV antenna
• When watching TV (1Seg), extend the TV antenna to ensure you can
receive an adequate signal.
• Sufficiently pull out the TV antenna until it is fixed into position.
Initial Setup of TV (1Seg)
Set the watching area when you activate TV (1Seg) for the first time.
After you have finished to set, you can watch TV (1Seg).
A From the Main Menu, One Seg [Yes.
B Select a region.
C Select a prefecture.
D Select a locality.
Searching for local channels begins.
E OK.
The 1Seg menu screen is displayed.
• On the 1Seg screen, press e [Channel setting [Switch area to
change the area.
Watching TV (1Seg)
A From the Main Menu, One Seg [One Seg TV.
The 1Seg screen is displayed.
A Program information
B Video image
C Operation key
D Subtitle
E Data broadcast
F 1Seg operation panel/Data
broadcast operation panel
G Signal strength
H Data broadcast lock
indicator
Indicates that the Data
broadcast lock content is
displayed on a data
broadcast.
I SSL indicator
Indicates that the page protected by the advanced security is
displayed on a data broadcast.
J Multiple services indicator
Indicates that a service (program) broadcasts in another
channel being received.
K Language
• Camera is not available while activating TV (1Seg).
TV (1Seg)
45
Page 48
Operations on the 1Seg screen
■ Operation on the portrait display
Slide/Flick the video image to the left/right: Switches channels.
Tap the video image: Shows/Hides the program information and
operation key.
Double-tap the video image: Switches image sizes.
Long-touch the video image: Displays the channel list.
Tap the program information: Displays the program name.
Operation key
/ : Switches channels or searches for a channel by long-touch.
1Seg Operation Panel
/ : Starts/Stops recording.
: Displays the channel list.
: Displays the data broadcast operation panel.
Data Broadcast Operation Panel
/ : Moves the cursor.
: Selects an item.
: Returns to the previous screen.
: Displays the 1Seg operation panel.
■ Operation on the landscape display
TV (1Seg)
Slide/Flick the video image to the left/right: Switches channels.
Tap the video image: Shows/Hides the program information, operation
key and operation panel.
Long-touch the video image: Displays the channel list.
Tap the program information: Displays the program name.
Operation key
/ : Switches 2D/3D display.
1Seg Operation Panel
/ : Switches channels and searches for a channel by long-touch.
/ : Starts/Stops recording.
: Displays the program guide.
: Displays the channel list.
46
■ Operations while displaying Channel List
Select the broadcast station name: Switches to the selected
broadcast station.
Long-touch the broadcast station [Channel overwrite registration
[Yes: Assigns the broadcast station being watched to the selected
remote control number.
Long-touch the broadcast station [Delete channel [Yes: Deletes the
broadcast station from the selected remote control number.
Long-touch the unset remote control number: Assigns the broadcast
station being watched to the selected remote control number.
Page 49
Using Android Market
同意
You can download and install various applications such as useful
tools or games from Android Market offered by Google.
• Google account is required to use Android Market. For details on
Google account, refer to the supplied Setting Guide (Japanese) and
the site (http://www.google.com/support/accounts/).
• For details, on the Android Market screen, press e [Help to
refer to Android Market Help.
A From the Main Menu, Market.
The Android Market screen is displayed.
When you activate Android Market for the first time, the terms of
service are displayed, so tap Accept after confirming the contents.
• Some applications may not be available when a microSD memory card is
not inserted.
• Some applications make the display keep turned on or continue in the
background and weaken battery.
Using au one Market
You can download and install applications from au one Market. You
can search the desired applications by categories, keywords or
ranking.
• au one-ID is required to use some functions. Refer to the supplied
Setting Guide (Japanese) to set au one-ID.
A From the Main Menu, au one Market.
The au one Market screen is displayed.
When you activate au one Market for the first time, the terms of service
and cautions for using au one Market are displayed, so tap
(Agree) [OK after confirming the contents.
• Follow the terms of service to use au one Market. Procedures on
downloading applications and making payment for fee-based applications
differ depending on the distributor of au one Market.
• Some applications may not be available when a microSD memory card is
not inserted.
Applications
47
Page 50
Using GREE Market
You can search for free games etc. of au one GREE easily.
A From the Main Menu, GREE_MARKET.
The GREE Market screen is displayed.
You can search for games etc. you want to use from the section on the
screen.
• To use games searched from GREE Market, registering as an au one GREE
member may be required.
Managing Applications
You can delete data, clear cache or stop installed applications
forcefully.
A From the Main Menu, Settings [Applications
[Manage applications.
The installed applications list is displayed.
B Select an application.
The detailed application information is displayed.
C Select the operation to perform.
Follow the on-screen instructions to perform it.
Applications
• When you select an installed application, Uninstall is displayed. Tap it to
remove the application.
48
Page 51
Checking Your Profile
You can save additional information such as name or residence
besides phone number etc. saved in advance and use it for attaching
to a mail etc.
A From the Main Menu, Settings [Profile.
The profile screen is displayed.
• If au IC-Card is not inserted or different au IC-Card is inserted, auIC
Card(UIM) error. appears for checking your profile. Tap OK to display the
profile screen. However, information such as Own phone number, Own mail
address or ICCID is not displayed. Also, some operations, such as
attaching the profile to mail, may not be carried out. Insert your au IC-Card
and turn on power again.
Changing the Incoming Ring Tone
You can select and set data for the incoming ring tone.
A From the Main Menu, Settings [Sound settings
[Melody.
B Select the data.
Changing the Wallpaper
You can select and set an image to display as the wallpaper.
A From the Main Menu, Settings [Display settings
[Wallpaper.
B Select the application.
C Select the data [Save/Set wallpaper/Set to wallpaper.
You can also set a 2D wallpaper just by selecting the data when
choosing one from Wallpaper gallery.
Initializing microSD Memory Card
When initializing a microSD memory card, all data (including
applications) saved on the microSD memory card is deleted.
A
From the Main Menu,
[
microSD & phone storage [
Settings
Unmount microSD [OK.
B Erase microSD.
C Erase microSD [Enter Lock No. [OK
[Erase everything.
• Initialize a microSD memory card while charging or with the battery fully
charged.
• To have the microSD memory card recognized after having unmounted it,
tap Mount microSD.
• Do not unmount the microSD memory card while saving data on it since it
may result in damage to data on the microSD memory card or data loss.
Settings of IS12SH
49
Page 52
Using Global Passport CDMA
For overseas use without anxiety
The overseas network condition is available on the au homepage.
Make sure to check the condition before leaving Japan.
http://www.au.kddi.com/service/kokusai/tokomae/
■ When the IS12SH is Stolen or Lost
• If the IS12SH is lost or stolen while overseas, please contact
Customer Service Center immediately to suspend phone service.
Please be aware that any calling charges and packet
communication charges incurred after theft or loss of a phone are
the responsibility of the customer.
• If the au IC-Card inserted into the IS12SH is stolen or lost, the card
may be inserted into another mobile phone (including GSM mobile
phone for overseas use) by a third party. So, it is recommended to
set the PIN code to protect from improper use by a third party.
■ Using the IS12SH Properly by Knowing About
Calling and Communication Services Overseas
Global Function
• Calling charges differ depending on the country/region.
• Discount services do not apply to calling charges incurred while
overseas.
• Calling charges are also incurred when receiving calls overseas.
• Depending on the country/region, calling charges may be incurred
from the time that you tap Call.
Configuring the Overseas Settings
To use the IS12SH overseas, you are required to change to the
telecommunications carrier’s networks that you connect to at your
travel destination.
Please obtain the latest PRL before traveling.
■ Obtaining the PRL (Roaming Area Information)
The PRL (roaming area information) contains information on roaming
areas of overseas partner providers who have signed an international
roaming contract with KDDI (au).
A From the Main Menu, Settings [Wireless & networks
[Mobile networks [Roaming settings [PRL settings
[Update PRL version.
The PRL is obtained. Download the PRL data by following the
on-screen instructions.
• When you download the PRL data, packet communication charges apply.
• Be aware that service may be unavailable in some areas if you do not
update the PRL.
50
Page 53
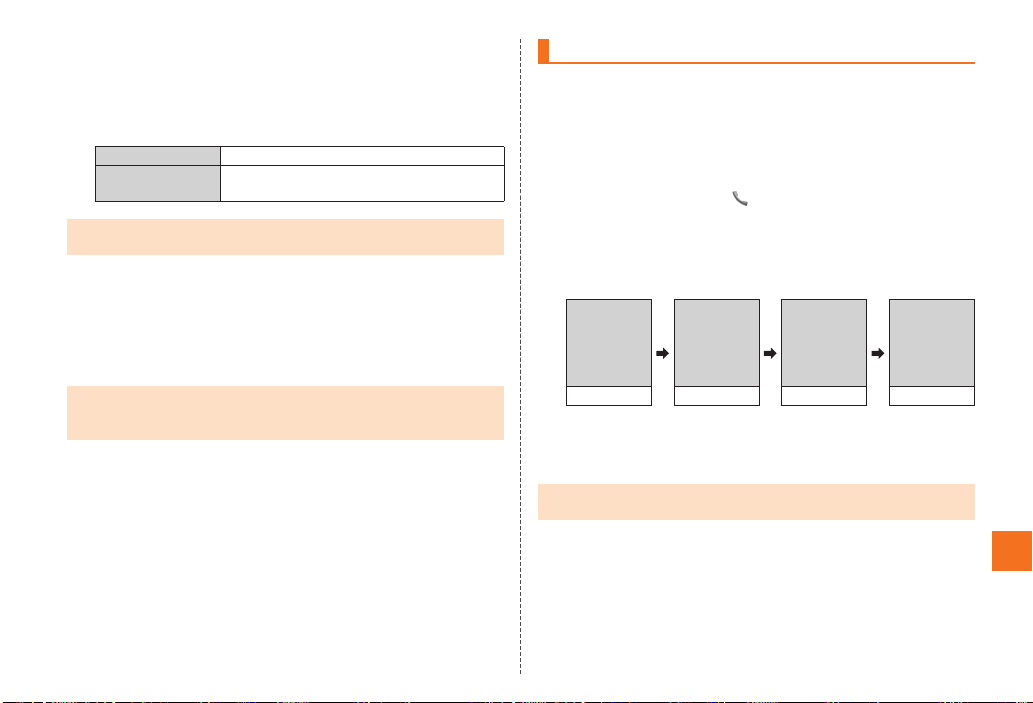
■ Setting the Area
You can set the area where you use the IS12SH.
A From the Main Menu, Settings [Wireless & networks
[Mobile networks [Roaming settings [Area settings.
B
Japan Set for using within Japan.
Roaming Set for using overseas (Automatic setting in
• The country selection screen may be displayed if Area settings is set to
Roaming. Select the travel country.
accordance with the PRL).
■ Setting the data roaming
You can use the packet communication during roaming.
A From the Main Menu, Settings [Wireless & networks
[Mobile networks [Data roaming.
Tap OK to enable the data roaming.
• To enable the data roaming, set Area settings to Roaming in advance.
• If you have not subscribed to IS NET, au.NET charges (525 yen for the used
month) and communication charges apply.
Making a Call at Your Travel Destination
■ Making a Call to Another Country (Including Japan)
from Your Travel Destination
You can make a call to Japan or another country from your travel
destination.
Example: To call “212-123-XXXX” in the USA from South Korea
A On the home screen, (Phone).
B Enter an international access code, country code,
area code and the other party’s phone number
[Call.
International
access
code
(South
*1
Korea)
002 1 212 123XXXX
*1 Long-touch the “0” to enter “+” and the international access code of your travel
destination is automatically added when calli ng.
*2 If the area code starts with “0”, dial it without including the “0” (There are som e
exceptions such as fixed-line phones in som e countries or regions including Italy and
Moscow).
• If the person you are dialing is using Global Passport, enter the country
code “81” (Japan) regardless of his/her travel destination.
Country
code
(USA)
Area
code
*2
Other
party’s
phone
number
Global Function
51
Page 54
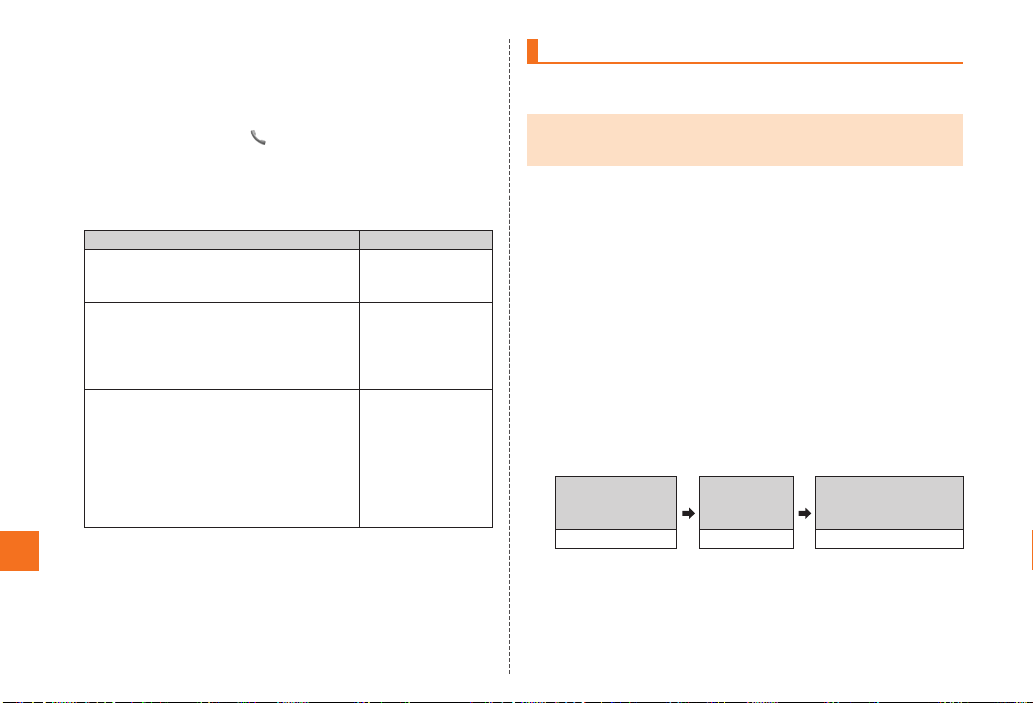
■ Making a Call within the Same Country While
Overseas
You can call to general fixed-line phones or mobile phones with the
same method as when calling in Japan.
A On the home screen, (Phone).
B Enter a phone number.
The method for making calls varies depending on where you are
calling.
U.S. Mainland, Hawaii, Saipan
New Zealand, South Korea, China, Hong
Kong, Macau, Thailand, Taiwan,
Indonesia, Vietnam, Israel, India, Peru,
Bermuda Islands, Bangladesh, Bahamas,
Venezuela
Mexico
Global Function
Travel destination Number
“1” + Area code +
Other party’s
phone number
Area code + Other
party’s phone
number
■ For local call
Other party’s
phone number
■ For long
distance call
“01” + Area code +
Other party’s
phone number
C Call.
Receiving a Call at Your Travel Destination
You can receive calls with the same method as when receiving calls in
Japan.
• If you receive a call while overseas, the call is forwarded from Japan no
matter where the call is made from. Call charges to Japan are incurred by
the caller and receiving charges by the receiver.
■ Having Calls Made to Your Travel Destination from
Japan
People calling you can use the same method as when calling you from
Japan.
■ Having Calls Made to Your Travel Destination from
Countries Other Than Japan
International access code and “81” (Japan) have to be dialed
regardless of the travel destination since the call is made through
Japan.
Example: To have a call made to your au phone in Japan
“090-1234-XXXX” from the USA
A Enter an international access code, Japan country
code and phone number of au phone [Call.
International
access code
(USA)
011 81 901234XXXX
Country
code
(Japan)
Phone number of
au phone
(omit the first 0)
52
Page 55
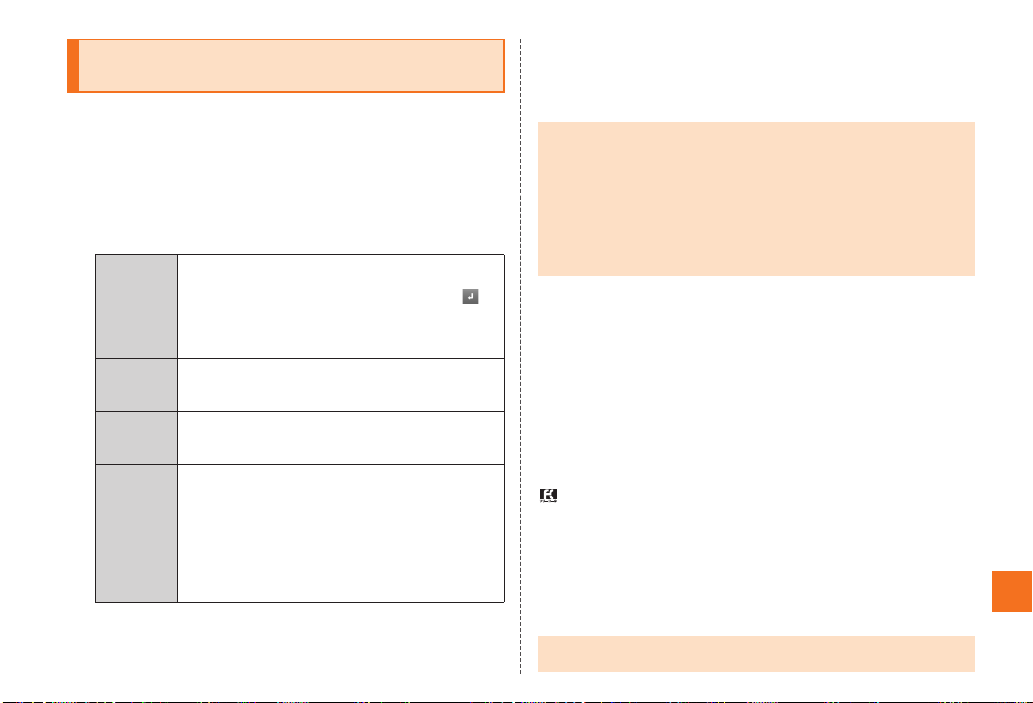
Setting Conditions for Activating the Remote Lock
In the case of loss of your IS12SH, calling the IS12SH from a specified
phone number repeatedly allows you to remotely prevent others from
using the IS12SH.
A From the Main Menu, Settings [Location & security
[Lock Setting [Remote lock.
B Enter Lock No. [OK.
C
Valid
number list
Specified
period
Number of
calls
arrived
Remove
phone lock
Register up to three phone numbers.
1. Add new.
2. Direct entry [Enter a phone number [ .
You can select a phone number from Use
address book or Use profile. Also you can select
Payphone.
Specify the time limit for receiving the number of
calls you have set for Number of calls arrived after
the first call is received.
Set the number of calls to receive to activate the
Remote lock.
Allow you to cancel the Remote lock by operating
the IS12SH.
• If you enable the setting, canceling the Remote
lock is available by operating the IS12SH or
performing remote operation.
• If you disable the setting, canceling the Remote
lock is available only by performing remote
operation.
■ Activating the Remote Lock from a specified phone
number
Call the IS12SH from a phone number registered to the valid number
list with the set conditions (specified period/number of calls arrived).
• To activate the Remote lock, notify the caller’s phone number.
•
The Remote lock cannot be activated when the IS12SH is turned off or out of
service area or
adequate signal cannot be received, the Remote lock may not be activated.
• To cancel the Remote lock, call the IS12SH from a phone number registered
to the valid number list with the set conditions (specified period/number of
calls arrived).
• The Remote lock cannot be activated or canceled when your au IC-Card is
not inserted or another’s au IC-Card is inserted.
Offline mode
is set. If your IS12SH is in a location where an
■ Activating the Remote Lock with the Security Lock
Service
Even if the Remote lock is not set in advance, the Remote lock can be
activated by calling Customer Service Center or completing the
application process on au Customer Support from a PC.
The Security Lock Service is available free of charge.
■ Calling Customer Service Center for Activating/Canceling the
Remote lock
From an au phone: 113 without a prefix (toll free)
From any other cell phone or fixed-line phone:
0077-7-113 (toll free)
• Open 24 hours
• Follow the voice guidance to complete the application process.
■ Activating/Canceling the Remote lock with au Customer Support
Login to au Customer Support (https://cs.kddi.com/) and
complete the application process by following the on-screen
instructions.
• You must fill out an application to use the Security Lock Service (the
application can be filled out even after your cell phone is lost).
In Case of Loss of Your IS12SH
53
Page 56
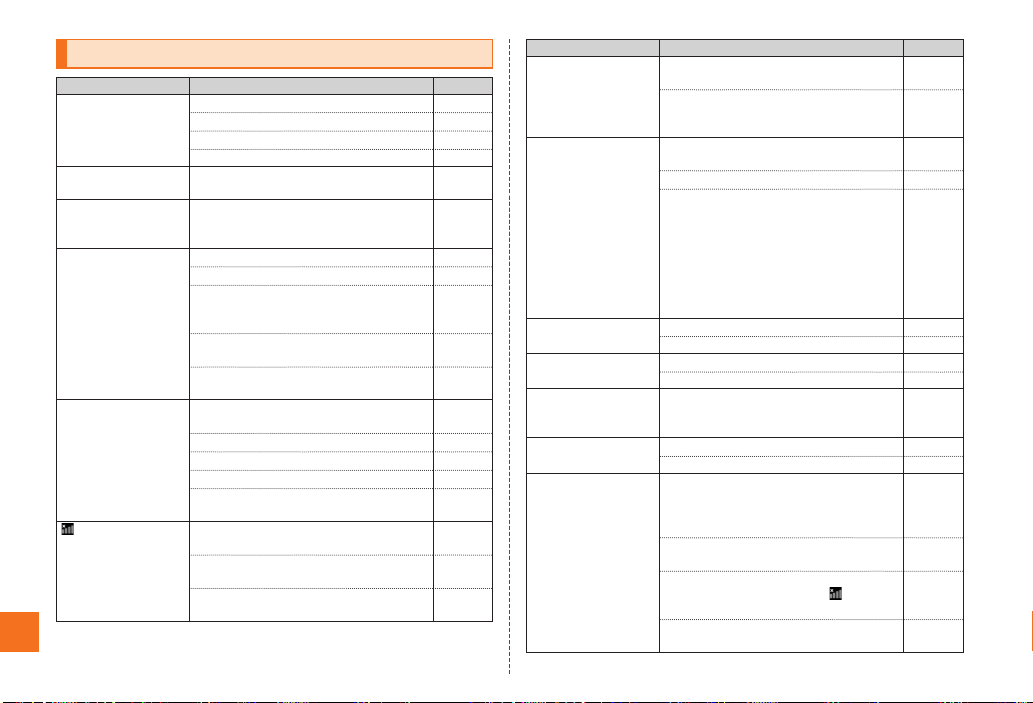
Troubleshooting
Trouble Detail Page
Cannot turn on the
power by pressing
f.
The power is turned off
automatically.
The power is turned off
while the wake-up logo
is displayed.
Cannot make calls. Is the power turned on?
Cannot receive calls. Does the IS12SH receive an adequate
Appendix/Index
(out of service area
indicator) appears.
54
Is the battery pack charged?
Is the battery pack attached properly?
Is the jack of the battery pack clean?
Did you hold down f?
Is there enough power left in the battery
pack?
Is there enough power left in the battery
pack?
Is an au IC-Card inserted?
Did you enter the correct phone number?
(Did you enter the phone number starting
with the area code?)
Did you tap Call after entering a phone
number?
Did you set the correct setting in Area
settings?
signal?
Is the IS12SH within the service area?
Is the power turned on?
Is an au IC-Card inserted?
Did you set the correct setting in Area
settings?
Is the IS12SH within the service area or in a
location where the signal is strong?
Is your finger off the area around the
internal antenna?
Did you set the correct setting in Area
settings?
P.9
P.12
P.10
P.9
P.9
P.10
P.13
P.28
P.28
P.51
P.18
P.18
P.10
P.13
P.51
P.18
P.7
P.51
Trouble Detail Page
Display and charging/
incoming indicator
illuminates or flashes,
but ring tone does not
–
sound.
Cannot charge the
battery pack.
Cannot operate key/
touch panel.
Cannot operate touch
panel as intended.
A message indicating
that charging is
necessary appears.
Calls are answered
automatically.
Battery usage time is
short.
Is the ring tone volume set to other than
minimum?
Is manner mode disabled?
Are the charging devices connected
properly?
Is the battery pack attached properly?
Is USB battery charge enabled?
• If a microSD memory card is not inserted,
the installation of a USB driver to the PC
may be necessary. For the USB driver
and install manual, refer to the Support
page in シャープケータイdaSH (SHARP
Keitai daSH) (http://k-tai.sharp.co.jp/
support/
).
Is the power turned on?
Turn off the power and then turn it on again.
Check the proper operation of touch panel.
Turn off the power and then turn it on again.
The battery pack is almost empty. P. 9
Is Answering memo disabled?
Is manner mode disabled?
Is the battery pack charged enough?
• Charge the battery pack until the red
Charging/Incoming indicator is turned
off.
Make sure the battery does not approach
the end of its service life.
Make sure the IS12SH is not left in the
place for a long period where (out of
service area indicator) appears.
Finish or suspend the applications or
functions not being used.
P.30
P.9
P.12
P.10
P.10
P.10
P.16
P.10
P.31
P.30
P.9
P.18
P.19
–
–
Page 57
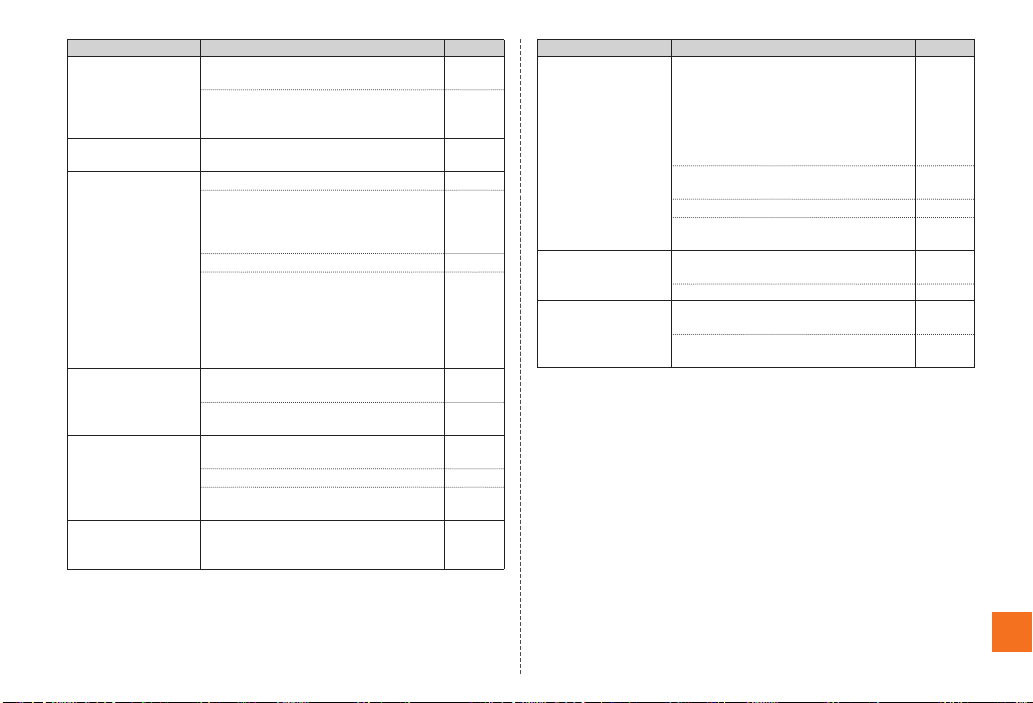
Trouble Detail Page
When making a call, a
beeping sound is heard
from the earpiece and a
connection cannot be
established.
The light of the display
is turned off.
Display is dark. Is Brightness set to be bright enough?
Cannot hear the other
party.
Cannot watch TV
(1Seg), images or
sounds are interrupted
or noise occurs.
Cannot operate any key
and the screen is
frozen.
Are you within the service area or in a
location where the signal is strong?
The wireless line is busy or the other party’s
you are calling is on another line. Try again
later.
Is Screen timeout set to be long enough?
Are you operating the IS12SH in the area
other than bright places?
The backlight does not illuminate in the
bright surroundings.
Is VeilView disabled?
Make sure you are not shooting/viewing 3D
video images.
• If the IS12SH is warm while shooting/
viewing 3D video images, the backlight
of display automatically becomes dark to
prevent heat generation of the IS12SH.
Is the earpiece volume set to other than
minimum?
Make sure your ear is not covering the
earpiece. Put your ear on the earpiece.
Does the IS12SH receive an adequate
digital broadcasting signal?
Is TV antenna extended?
Is the selected area for the area where you
use the IS12SH?
Press the reset button with a pointed end of
an object for at least two seconds.
The IS12SH restarts.
P.18
P.19
P.28
P.7
P.9
Trouble Detail Page
Cannot operate the
respective address
–
–
–
–
–
book settings.
Cannot recognize a
microSD memory card.
Cannot operate the
camera.
Is the other party’s phone number notified?
If there is no notification, the setting for
individual incoming image of the address
book and the ring tone setting are not
enabled. Also, the setting for incoming
voice call of the group setting in the
address book is not enabled.
Make sure more than one same phone
number is not saved in the address book.
Is Remote lock disabled?
Is the folder set to other than Register
sorting set to Folder secrecy?
Is a microSD memory card inserted
properly?
Is the microSD memory card mounted?
Is there enough power left in the battery
pack?
Make sure the IS12SH does not become too
warm.
P.32
P.53
P.15
P.49
P.9,
P.42
P.43
–
–
For more detailed information, visit the following au troubleshooting
sites on the au homepage.
http://www.kddi.com/customer/service/au/trouble/kosho/
–
–
–
index.html
Appendix/Index
55
Page 58
Numeric
001 international call service.......29
A
Absence Memo .............................29
Accessories ....................................1
Add
Bookmarking a web page...........41
Shortcuts/Widgets/Folders..........20
Add account..................................38
Address Book
Address Book .............................32
Cmail...........................................35
Create .........................................34
Advanced Settings .......................36
Answer...........................................29
Answer Holding ............................29
Answering memo..........................31
Answering Memo List ..................31
App setting....................................44
Area settings.................................51
Appendix/Index
Attaching the battery pack ..........12
au IC-Card
au IC-Card ..................................13
Names and functions of parts.......8
au one Market ...............................47
56
Index
B
Back key ......................................... 8
Battery pack ................................... 9
Battery pack cover......................... 8
Block specified numbers ............ 38
Bookmarking a web page............ 41
Bookmarks ................................... 41
Browser......................................... 41
C
Call ................................................ 32
Call added special number ......... 32
Camera.......................................... 42
Cautions for using the camera ... 42
Cautions for using TV (1Seg)...... 45
Cell phone etiquette....................... 1
Character entry screen................ 25
Character input ............................ 25
Charging
Battery pack ................................. 9
Charging with the AC adapter...... 9
Charging with the DC adapter ..... 9
Charging/Incoming indicator ........ 8
Check Settings/Release Settings
.................................................... 37
C-mail
C-mail ......................................... 34
Cmail .......................................... 34
Compose
Gmail .......................................... 40
PC-mail messages...................... 39
Configuring the overseas settings
....................................................50
Contents Manager ........................44
Context menu ...............................24
Create ............................................34
Create mail ....................................32
Create shortcut
Mail address ...............................33
Phone number ............................ 33
D
Data roaming ................................ 51
Delete.............................................31
Delete selected .............................44
D-Emoji.......................................... 27
Display.............................................8
Displaying data............................. 44
Displaying menu........................... 23
Double-tap.....................................16
Drag ...............................................16
Drive manner mode...................... 30
E
Earphone jack................................. 8
Earpiece ..........................................8
Edit and call ..................................32
E-mail.............................................34
E-mail notifications ......................38
Emoji..............................................27
Erase microSD.............................. 49
External connection jack ...............8
External connection jack/HDMI jack
cover ............................................8
F
Facemark .......................................27
FeliCa mark .....................................8
Flick................................................16
Folder.............................................35
For overseas use without anxiety
....................................................50
Forward..........................................40
G
Gallery............................................43
Global passport CDMA.................50
Gmail..............................................39
GREE_MARKET ............................48
H
HDMI jack.........................................8
History ...........................................41
Home key.........................................8
Home screen .................................17
HomeSwitcher...............................20
I
Illustrations and descriptions........2
In camera lens.................................8
Incoming History ..........................30
Incoming ring tone .......................49
Infrared port ....................................8
Initial setup
Initial setup..................................11
Initial setup of TV (1Seg).............45
Input method .................................27
Page 59
Input mode.................................... 27
Inserting au IC-Card..................... 13
Inserting microSD Memory Card
....................................................15
Internal antennas ........................... 8
Issue One Time Password for PC
Setting........................................37
J
Japan............................................. 51
L
List Players ................................... 44
Long-touch ...................................16
M
Mail address ................................. 33
Mail Group .................................... 34
Main menu .................................... 20
Making a call at your travel
destination................................. 51
Making a call to another country
from your travel destination .... 51
Making a call within the same
country while overseas............ 52
Manage applications.................... 48
Manner mode................................ 30
Market............................................ 47
Melody........................................... 49
Menu in the contents screen....... 44
Menu key......................................... 8
Microphone..................................... 8
microSD memory card................. 14
microSD memory card slot............8
microSD/phone space..................44
Mobile light......................................8
Mouthpiece......................................8
Moving folders ..............................20
Moving shortcuts..........................20
Moving widgets.............................20
N
Names and functions of parts ....... 7
Not in address book .....................38
Notes on Setting Mail Filter .........37
Notification indicator....................17
Notification/Status panel .............19
Number of calls arrived................53
O
Off ..................................................31
On...................................................31
One Seg TV ...................................45
Operating the touch panel ...........16
Operations on the 1Seg screen
....................................................46
Option menu .................................23
Out camera lens..............................8
Outgoing History ..........................30
P
PC-mail ..........................................38
Phone.............................................28
Phone number ..............................32
PIN code ..........................................2
Pinch..............................................16
Playing .......................................... 44
Playing data.................................. 44
Power key ....................................... 8
Precautions for Shooting 3D
images ......................................... 3
Precautions for Viewing 3D images
...................................................... 3
PRL settings ................................. 50
Profile
Cmail .......................................... 35
Create......................................... 34
Profile.......................................... 49
Proximity sensor/Light sensor ..... 8
R
Reboot........................................... 11
Receiver .......................................... 8
Receiving a call at your travel
destination ................................ 52
Receiving calls from countries
other than Japan....................... 52
Receiving filter ............................. 37
Receiving Gmail........................... 40
Receiving mail.............................. 35
Receiving PC-mail........................ 39
Remote lock.................................. 53
Remove Folder ............................. 20
Remove phone lock..................... 53
Remove Shortcut ......................... 20
Remove Widget ............................ 20
Removing au IC-Card .................. 13
Removing microSD Memory Card
.................................................... 15
Removing the battery pack......... 12
Reply ............................................. 40
Reply all.........................................40
Reset button ...................................9
Roaming ........................................51
S
Search key ......................................8
Secrecy
Cmail...........................................35
Create .........................................34
Security code..................................2
Select language ............................11
Send push tone ............................32
Send/Receive history
Cmail...........................................35
Create .........................................34
Set main mail address .................33
Set main phone number ..............33
Setting mail filter ..........................36
Shutter key ......................................8
Silent manner mode .....................30
Simple Settings ............................36
Sleep mode ...................................11
Slide...............................................16
Slideshow......................................44
Slideshow settings....................... 44
Sort ................................................44
Speaker ...........................................8
Speaker off ....................................31
Speaker on ....................................31
Specified period ...........................53
Standard manner mode ............... 30
Status bar...................................... 17
Status indicator ............................18
Stop ...............................................31
Strap eyelet..................................... 8
Appendix/Index
57
Page 60

Switch grid/list..............................44
Switching orientation ...................23
Switching software keyboards....25
Switching the desktop .................17
Symbol...........................................27
T
Taking photos ...............................42
Tap .................................................16
TapFlow UI ....................................24
Troubleshooting ...........................54
Turning the power off...................10
Turning the power on...................10
Turning the power on/off .............10
TV antenna ......................................8
U
Unmount microSD ........................49
Using an address book................32
V
Valid number list...........................53
Video Camera................................43
Volume up/down key......................8
Appendix/Index
W
Wallpaper ......................................49
58
Page 61
June2011Edition
 Loading...