

Page 1
Page 2
Preface
Thank you for buying the “AQUOS PHONE CL IS17SH” (simply called
the “IS17SH” or the “product” from here on).
Before using the product, be sure to read the “Basic Manual” (this
PDF manual) on the au homepage to ensure correct use. After you
have finished reading this PDF manual, be sure to store it and the
printed manuals (Accessories) in safe places so that you can retrieve
them whenever you need them. If you lose the printed manuals
(Accessories), contact an au shop or Customer Service Center.
Operating Instructions
■ “Basic Manual” (This PDF Manual)
This manual describes basic operations of major functions.
For detailed descriptions of various functions, refer to the “Instruction
Manual application” (Japanese) that can be used on the product or
“Full Instruction Manual” (Japanese) on the au homepage:
(http://www.au.kddi.com/torisetsu/index.html)
■ “Instruction Manual Application” (Japanese)
You can use the “Instruction Manual application” on the product to
check detailed operational procedures.
Also, you can activate intended functions from an explanation screen
depending on the functions.
On the home screen, tap [APPS] [[Instruction Manual].
• To use the application for the first time, you need to download and
install it by following on-screen instructions.
■ Downloading Manuals
You can download the “Basic Manual” (this PDF manual) and the
“Instruction Manual” (Accessory) (Japanese) or “Full Instruction
Manual” (Japanese) in PDF format from the au homepage.
Safety Precautions
Before you start using the product, be sure to read the “Safety
Precautions” to ensure correct use.
Before you assume that the product is malfunctioning, check for
possible remedies in the following au Customer Support site of au
homepage:
(http://cs.kddi.com/support/komatta/kosho/index.html)
ii
Page 3
When Using the Product Cell Phone Etiquette
• Communication is not possible even inside the service area in
places where the signal does not reach (e.g. tunnels and
basements). Also, communication may not be possible in poor
reception areas. Communication may be interrupted if you move into
a poor reception areas during communications.
• A feature of digital communication used on the product is that
consistent, high communications quality continues to be maintained
down to a weak signal limit. Accordingly, communication may be
interrupted if this limit has been reached during a communication.
• Since this product uses radio waves, the possibility of
communication intercepts by third parties cannot be eliminated.
(Though the CDMA system has highly secure confidential
communication features.)
• The product is compatible with the international roaming service.
Each network service described in this manual varies depending on
the area and service content.
For details, refer to “Global Passport Owner’s Guide”.
• Since the product is a radio station under the Radio Law, you may
be asked to temporarily submit the product for inspection in
accordance with the Radio Law.
• When the au IC-Card is inserted in your cell phone, the product
number information of your cell phone is automatically sent to KDDI
CORPORATION for maintenance and monitoring operational status
of your cell phone.
• Take care not to inconvenience people around you when you use
the product in a public place.
• When the product is used by a child, parents or guardians should
thoroughly read this PDF manual and teach the child how to use it.
Cell phones always emit weak radio waves when power is on. Use cell
phones in an enjoyable and safe manner without forgetting to be
considerate of others around you.
■ Use of cell phones is not allowed in the following
places!
• Do not use a cell phone while driving a car or riding a motorbike or
bicycle. It may cause a traffic accident. Use of a cell phone while
driving a car or motorbike is prohibited by law. Use of a cell phone
while riding a bicycle may be punishable by some regulations.
• Be sure to turn off the product while you are aboard an airplane.
Otherwise, safety of your flight may be compromised.
■ Be considerate of where you use the cell phone and
how loudly you talk!
Do not make calls in theaters, museums, libraries, and other similar
places. Turn power off or turn on the manner mode so as not to disturb
others around you by ringtones.
• Do not use the cell phone on a street where you might interrupt the
flow of pedestrians.
• Move to areas where you will not inconvenience others on trains, in
hotel lobbies, etc.
• Refrain from talking in a loud voice.
• Obtain the permission of other people before you take their photos
with the cell phone’s camera.
■ Be considerate of people around you!
• Some people close to you in crowded places such as packed trains
may be using a cardiac pacemaker. Turn the cell phone off in such
places.
• Abide by the rules of hospitals and other medical institutions where
it is forbidden to use or carry cell phones.
1
Page 4
List of Packaged Items
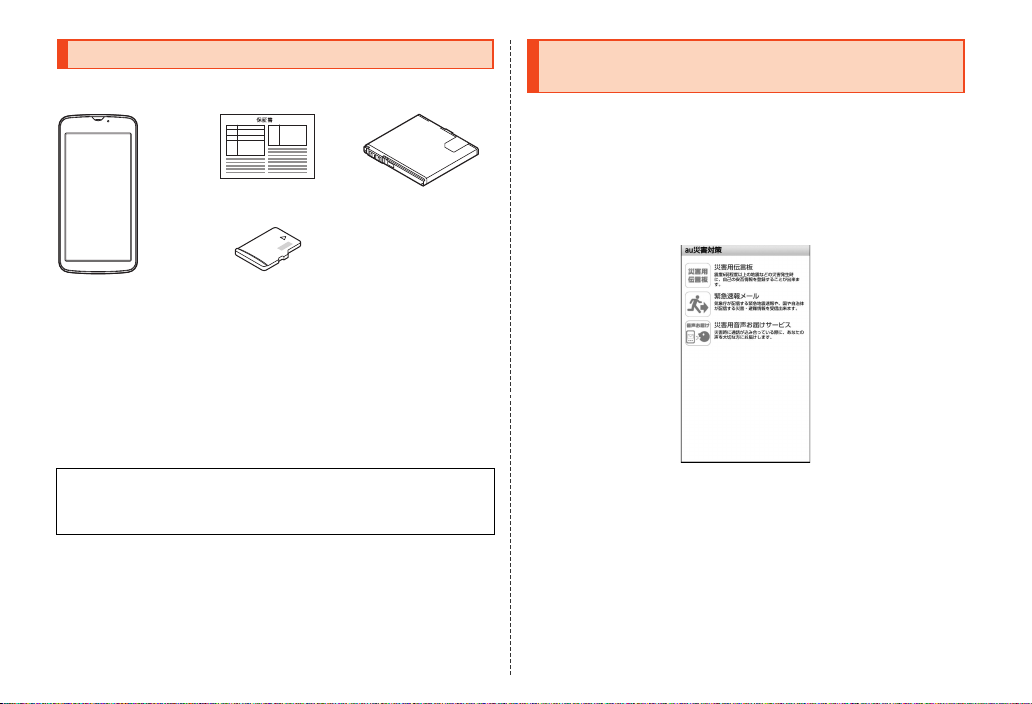
Before you start using the product, make sure that you have all the
following packaged items with the product.
Warranty
(Japanese)
Battery pack (SHI13UAA)
Using au Disaster Countermeasure Application
au Disaster Countermeasure is an application in which you can use
Disaster Message Board, Early warning mail (earthquake early
warnings, disaster/evacuation information and tsunami warnings) and
Disaster Voice Delivery Service.
A On the home screen, [APPS]
[[au災害対策] (au Disaster Countermeasure).
The au disaster countermeasure menu is displayed.
IS17SH
● Instruction Manual (Japanese)
● Setting Guide (Japanese)
● Before Using the Product (Japanese)
● Global Passport Owner’s Guide (Japanese)
The following items are not included in the package.
● AC adapter
● Earphone
● microUSB cable
• Purchase a specified charger (sold separately).
• Illustrations of cell phones in this manual are only for reference. They
may look different from the actual product.
2
microSD memory card
(2 GB) (Sample)
• This is inserted in the IS17SH
at the time of purchase.
《au disaster countermeasure menu》
■ Using Disaster Message Board
Disaster Message Board is a service to enable customers in disaster
areas to register their safety information via IS NET when large-scale
disasters, such as an earthquake whose Japan seismic scale is
approximately 6-lower or more, occur. The registered safety
information can be checked by customers using au phones, and also
from other carriers’ cell phones, PCs, etc.
For details, refer to “Disaster Message Board Service” on the au
homepage.
Page 5
memo
memo
A From the au disaster countermeasure menu, [災害用
伝言板] (Disaster Message Board).
Follow the on-screen instructions for registration/confirmation.
◎ To register the safety information, an e-mail address (~ezweb.ne.jp) is
required. Set the mail address in advance.
◎ It is unavailable while connecting via Wi-Fi®.
◎
The Company does not guarantee the quality of this service. The Company,
regardless of the cause, shall not be liable for any problems related to
registration of safety information due to the concentration of access to this
service or equipment errors, any loss due to the damage, ruination, etc. of
safety information or any loss arising from registered safety information.
■ Using Early Warning Mail
Early warning mail is a service to collectively deliver earthquake early
warnings and tsunami warnings provided by the Japan Meteorological
Agency and disaster/evacuation information provided by the national
government or the local governments to au phones in the specified
areas.
At the time of purchase, receiving setting of early warning mail
(earthquake early warnings and disaster/evacuation information) is set
to “受信する” (Receive). You can receive tsunami warnings by setting
災害・避難情報 (Disaster/Evacuation information).
When receiving an earthquake early warning, secure your safety and
act composedly according to the surrounding situations.
When receiving a tsunami warning, leave sea coasts immediately and
evacuate to safe places such as hills and strongly-built tall buildings.
A From the au disaster countermeasure menu, [緊急速報
メール
] (Early warning mail).
The inbox is displayed.
Select a mail to check to display the details of the mail.
削除
(Delete)
Delete received mails.
設定
(Settings)
緊急地震速報 (Earthquake early warning)
Set whether to receive earthquake early warnings.
• Tap [受信する] (Receive)/[受信しない] (Not
receive) [[OK].
災害・避難情報 (Disaster/Evacuation information)
Set whether to receive disaster/evacuation
information and tsunami warnings.
• Tap [受信する] (Receive)/[受信しない] (Not
receive) [[OK].
音量 (Volume)
Set the volume of the receiving sound.
バイブ (Vibrator)
Set whether to activate the vibrator at the time of
reception.
マナー時の鳴動 (Linkage to the manner mode)
Set whether to notify you with the manner mode
settings applied in the manner mode.
緊急地震速報 (Earthquake early warning)
Check the operations of the receiving sound and
vibrator for earthquake early warnings.
災害・避難情報 (Disaster/Evacuation information)
Check the operations of the receiving sound and
vibrator for disaster/evacuation information and
tsunami warnings.
◎ This service is available only in Japan (Not available overseas).
◎ Early warning mail is free of both information charges and communication
charges.
◎ Early warning mails cannot be received while the power is turned off or
during a call.
◎
Early warning mails may not be received during communication such as
while sending and receiving SMSs (C-mails)/e-mails and while using the
browser or when you are in a place where the signal cannot be received (e.g.
tunnels and basements) or the signal is weak, even within the service area.
◎ Early warning mails which failed to be received will not be able to be
received again.
◎ When you receive an early warning mail, the dedicated alarm tone rings.
The alarm tone cannot be changed.
3
Page 6

◎ Information intended for the areas of other than your present location may
memo
be received.
◎
As for this service, the Company shall not be liable for any damage incurred
on the users resulted from failure or delay of information delivery due to
communication disturbance or system failure, contents of the information or
other problems that are not supposed to be blamed on the Company.
◎ For details on earthquake early warnings and tsunami warnings provided
by the Japan Meteorological Agency, refer to the agency’s homepage.
(http://www.jma.go.jp/)
Earthquake early warning
◎
Earthquake early warning notifies areas where a strong shaking (Japan
seismic scale 4 or more) is expected when an earthquake whose maximum
Japan seismic scale is predicted of 5-lower or more has been detected.
◎ This service detects an earthquake (P-wave, preliminary tremors) near the
seismic center immediately after the earthquake occurs and automatically
calculates its location, scale and predicted strength of the shaking. After
that, you will be notified of the earthquake as soon as possible within a few
seconds to dozens of seconds before a strong shaking from the
earthquake (S-wave, principal shock) occurs.
◎ In the vicinity of the seismic center, a strong shaking may reach you before
an earthquake early warning.
◎ The earthquake early warning distribution system provided by this service
is different from that provided by TV, radio and other communication media
and thus the arriving time of earthquake early warnings may be different
among those media.
Tsunami warning
◎ Tsunami warning notifies areas including target sea coasts of tsunami
warnings (major tsunami and tsunami) provided by the Japan
Meteorological Agency.
Disaster/Evacuation information
◎ Disaster/Evacuation information notifies information related to the safety of
citizens, such as evacuation advisories, evacuation orders or various
alarms delivered by the national government or the local governments.
■ Using Disaster Voice Delivery Service
Disaster Voice Delivery Service is a service to record voices with a
smartphone and deliver them as a voice message to people to whom
you want to deliver the information that you are safe when large-scale
disasters occur.
A From the au disaster countermeasure menu, [災害用
音声お届けサービス] (Disaster Voice Delivery Service).
■ Sending voices (Send)
Tap “声をお届け” (Send voices) and operate in order of “①お届け先を
*
選択
” (Select to whom to send) [“②お届けしたい声を録音”
(Record voices to send).
* You can als o select to whom to send your voices from the address book.
■ Receiving voices (Receive)
You will be notified via a pop-up screen or an SMS (C-mail) that a
voice message has been received. You can listen to the message by
receiving (downloading) and playing the voice message.
• If the receivers are using a smartphone on which an au Disaster
Countermeasure application supporting Disaster Voice Delivery
Service is not enabled or using an au cell phone, they will be notified
via an SMS (C-mail).
• If the receivers are notified via an SMS (C-mail), the information will
not be saved in the au Disaster Countermeasure application.
◎
Sending and receiving voice messages are available only when you are using
3G network. Disable wireless LAN (Wi-Fi®) communication etc. before use.
◎ Voice messages can be recorded for up to 30 seconds.
◎ Voice messages can be exchanged only among au cell phones
(interoperation with other carriers’ cell phones will be available from the
spring of 2013).
◎ Voices may not be heard when the media sound volume is set to low or the
manner mode is set.
◎ When a microSD memory card is not inserted or no free space is left on the
microSD memory card, voice messages may not be saved or played.
◎ Some cell phones cannot receive voice messages. For details, refer to the
au homepage.
4
Page 7
Contents
Preface ........................................................... ii
Operating Instructions ................................. ii
Safety Precautions........................................ ii
When Using the Product .............................. 1
Cell Phone Etiquette .....................................1
List of Packaged Items.................................2
Using au Disaster Countermeasure
Application .................................................... 2
Contents ........................................................ 5
Safety Precautions
Illustrations and Descriptions in This Manual ...7
Exemptions ........................................................... 8
Safety Precautions (Observe Strictly) ................ 8
Handling Precautions......................................... 16
Available Security Codes................................... 20
Security Codes .....................................................20
Functions to Protect Your Privacy......................... 21
PIN Code ..............................................................21
Notes on Waterproof and Dustproof Properties
.............................................................................. 22
Notes on Using Bluetooth®/Wireless LAN
(Wi-Fi®) Functions .............................................. 26
Frequency Band...................................................26
Precautions about Bluetooth®.............................. 26
Precautions about Wireless LAN (Wi-Fi®)............. 27
Notes on Packet Communication Charge ........28
Notes on Google Play/au Market/Applications
.............................................................................. 28
Getting Ready
Names and Functions of Parts...........................29
Attaching/Removing the Battery Pack ..............31
Attaching the Battery Pack....................................31
Removing the Battery Pack...................................32
Using the au IC-Card...........................................33
au IC-Card.............................................................33
Attaching the au IC-Card ......................................33
Removing the au IC-Card .....................................34
Using a microSD Memory Card..........................35
microSD Memory Card..........................................35
Attaching a microSD Memory Card ......................36
Removing the microSD Memory Card ..................36
Charging...............................................................37
Charging ...............................................................37
Charging with the Specified AC Adapter (Sold
Separately)/Specified DC Adapter (Sold
Separately) ............................................................37
Charging with a PC ...............................................39
Turning the Power On/Off...................................39
Turning the Power On ...........................................39
Turning the Power Off ...........................................39
Restarting the Product ..........................................39
Sleep Mode ..........................................................39
Welcome Sheet(Lock Screen) ............................40
Switching the Display Language to English.....40
Basic Operations
Using the Touch Panel........................................41
Using the Touch Keys.........................................42
Using the 3-Line Home .......................................42
Viewing the 3-Line Home ......................................42
Using Menu on the Home Screen.........................43
Main Application List.............................................44
Using the Status Bar ...........................................45
Icons......................................................................45
Using the Notification/Status Panel.......................47
Viewing the Display (Sub Area) .........................48
Character Input
Switching Software Keyboards .........................49
Viewing the Character Input Screen..................49
Character Input Method......................................51
Entering Characters..............................................51
Switching Character Input Modes ........................51
Entering Emoji/Symbol/Facemark......................... 52
Phone
Making Calls ........................................................53
Entering a Phone Number and Making a Call ...... 53
Using Menu on the Phone Number Entry Screen
..............................................................................55
Using Menu on the Call Screen ............................55
Calling Overseas from au Phones (au International
Call Service)..........................................................55
Receiving Calls ...................................................56
Answering an Incoming Call................................. 56
Putting a Call on Hold ...........................................57
Sending SMS (C-mail) to an Incoming Call ..........57
Using Menu While Receiving a Call......................57
Checking Your Phone Number ..........................58
Checking Your Profile ...........................................58
Settings
Displaying Setting Menu ....................................59
Contents
5
Page 8

Appendix/Index
Appendix...................................................... 60
Introduction of Peripheral Devices....................60
Using Earphones.................................................61
Contents
Using an Earphone/Microphone with Switch or
Earphone/Microphone ........................................61
Troubleshooting..................................................62
Updating Software or OS....................................63
Software Update ...................................................63
Major Update (OS Update)...................................65
After-Sales Service .............................................65
Available Data Formats ......................................67
Main Specifications.............................................68
Specific Absorption Rate (SAR) of Cell Phones
..............................................................................70
CE Declaration of Conformity ............................71
FCC Notice...........................................................72
Export Administration Regulations................... 73
Intellectual Property Rights ...............................73
Index............................................................. 78
6
Page 9
Illustrations and Descriptions in This
memo
Manual
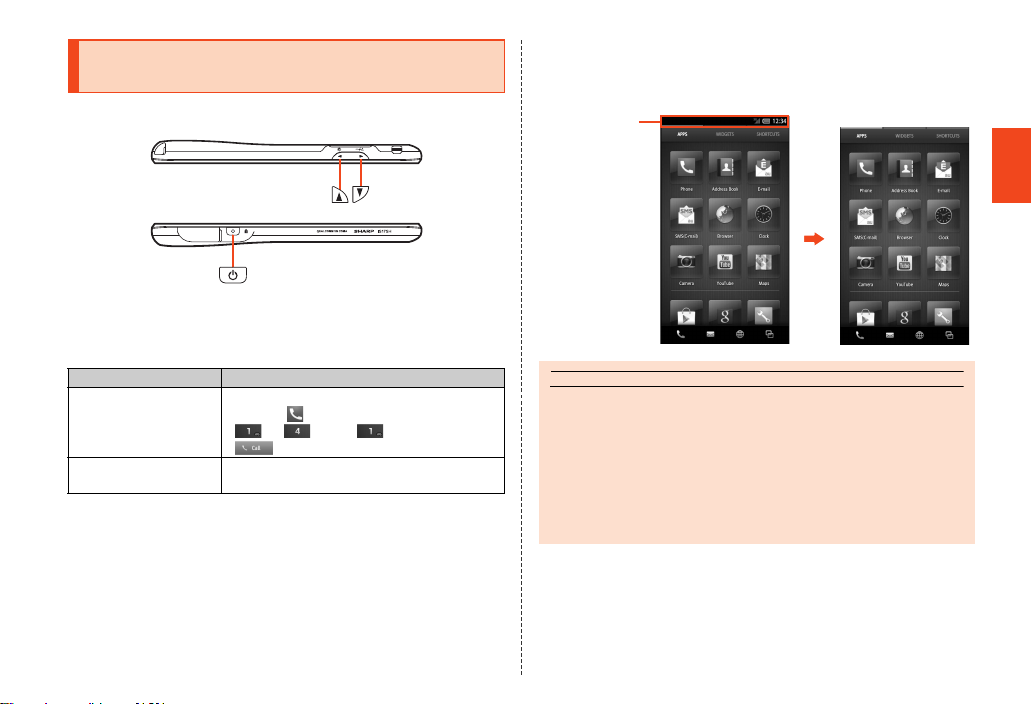
■ Note on Key Illustrations
In this manual, the key illustrations are simplified as shown below.
■ Description of Operations for Selecting Item/Icon/
Key etc.
In this manual, operation procedures are described as below.
Description Explanation
On the home screen,
[APPS] [[Phone]
[Enter “141”
[[Call].
f (hold down for at
least 2 seconds)
* Tapping is to select a key or icon displayed on the screen by lightly tapping it with your finger.
Tap [APPS] at the top of the home screen
and tap [ Phone]. Then tap in order of
[], [] and []. Lastly, tap
[].
Hold f down for at least 2 seconds.
■ Notes on Illustrations/Screenshots
The screenshots in this manual are simplified and may look different
from the actual screens. Also, part of the screen may be omitted.
In this manual,
part of the screen
such as icons are
omitted.
◎ Explanations of this manual are based on the case when the color of the
main unit is “Pure White” as an example.
◎ Explanations of this manual are based on the case when the product is
held vertically. If you hold it horizontally, menu items/icons/on-screen keys
etc. may be different.
◎ Menu items, layers and icons described in this manual may be different
according to functions being used and cond itions.
◎ “microSD™ memory card” and “microSDHC™ memory card” are
abbreviated as “microSD memory card” or “microSD”.
Actual screen
In this manual
Safety Precautions
7
Page 10
Exemptions
memo
Prohibited
• The Company is not liable for any damages arising from
earthquakes, lightning, storms, floods or other natural disasters, as
well as fires, actions by third parties, other accidents, intentional or
mistaken operation by the customer, or use under other unusual
conditions outside the responsibility of the Company.
• The Company is not liable for any incidental damages (change/
disappearance of saved content, loss of business income,
Safety Precautions
disruption of business, etc.) arising from use of or inability to use the
product.
It is recommended that you keep a copy of important phone
numbers etc.
• The Company is not liable for any damages arising from failure to
observe the described content of this manual.
• The Company is not liable for any damages arising, for example,
from malfunction caused by combination with connected devices or
software not related to the Company.
• Captured image data or downloaded data may sometimes be
altered or lost due to faults, repair or other handling of the product.
The Company is not liable for any damage or lost income resulting
from recovery of these data.
• It is recommended you keep a copy of important data in your PC’s
hard disk, etc. Whatever the cause of fault or malfunction may be,
the Company assumes no responsibility for alteration or loss of
saved information.
* “The Company” as appears on the product refers to the following co mpanies:
Sold by: KDDI CORPORATION, Okinawa Cellular Telepho ne Company
Manufactured by: SHARP CORPORATION
◎ Reproduction of the content of this manual in part or in whole is prohibited.
◎ The content of this manual is subject to change without notice.
◎ Every effort has been made in the preparation of this manual . Should you
notice any unclear points, omissions, etc., feel free to contact us.
8
Safety Precautions (Observe Strictly)
■ Before using the product, thoroughly read these safety
precautions for proper use. After reading, store the precautions
in a safe place.
These “Safety Precautions” describe instructions that should be
observed to prevent damage to property or injury to the customer or
others using the product.
These instructions are divided into the following categories.
■ Explanation of Indications Used in This Manual
This symbol indicates the potential and
DANGER
WARNING
CAUTION
*1 Seri ous injury: This refers to loss of sight, injury, burns (high- and low-temperature), electric
*2 Injury : This refers to injuries, burns (high- and low-temperature), electric shock, etc. that do not
*3 Physica l damage: This refers to extended damage to buildings, furniture, livestock or pets.
■ Explanation of Graphic Symbols Used in This
Manual
shock, broken bones, injuries with residual af tereffects from poisoning, etc., or
injuries requiring hospital admission for tr eatment or long-term hospital
attendance as an outpatient.
require hospital admission for treatment or l ong-term hospital attendance as an
outpatient.
Indicates an action that is not allowed.
imminent danger of death or serious injury*1
to a person.
This symbol indicates the possibility of
death or serious injury*1 to a person.
This symbol indicates the possibility of
personal injury*2 to a person or physical
damage*3.
Page 11
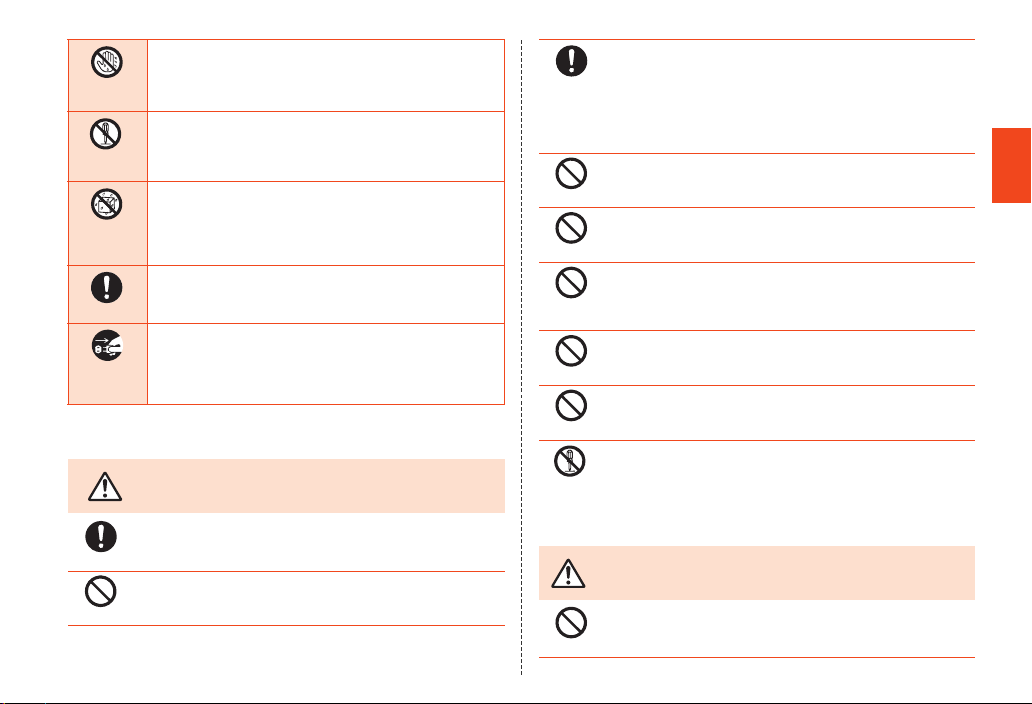
Disconnect
plug from
power outlet
Prohibited
Prohibited
Prohibited
Prohibited
Prohibited
Prohibited
Prohibited
Wet hands
prohibited
Disassembly
prohibited
Wetting
with water
prohibited
Instruction
Indicates that handling with wet hands is not allowed.
Indicates that disassembly is not allowed.
Indicates that use in a place where the product is likely to get
wet or allowing the product to get wet is not allowed.
Indicates an action that must be done.
Indicates that the power plug must be disconnected from the
power outlet.
■ Precautions Common to the Main Unit, Battery
Pack, Charger, au IC-Card, Peripheral Devices
Be sure to read the following
hazards before use.
Instruction
DANGER
Be sure to use only the specified peripheral devices. Use of other
peripheral devices might cause overheating, ignition, rupture, fault,
or leakage of liquid.
Do not use, store or leave the product in hot places (e.g. by the fire,
near a heater, under a kotatsu, in direct sunlight, in a car in the hot
sun). Doing so might cause ignition, rupture, fault, fire or injury.
Before entering an area where flammable gas is generated such as
a gas station, be sure to turn off the product. Do not charge the
Instruction
Disassembly
prohibited
battery. Failure to observe these precautions might cause the gas to
catch fire. In addition, when using Osaifu-Keitai® payment function
at a gas station, be sure to turn off the power in advance. (If
Osaifu-Keitai® has been locked, cancel the lock before turning off
the power.)
Do not put the product in a cooking apparatus such as microwave
oven or a pressure vessel. Doing so might cause leakage of liquid,
ignition, rupture, fault, fire or injury.
Do not throw the product into a fire or heat it. Doing so might cause
ignition, rupture or fire.
Do not short-circuit the external connection jack or the earphone/
microphone jack. Do not allow conductive foreign objects (metal
fragments, pencil leads, etc.) to come into contact with or get inside
a jack. Doing so might cause fire or a fault.
When using a metal accessory, do not allow the metal part come in
contact with the connection jack or power outlet. Doing so might
cause electric shock, ignition, injury or a fault.
Do not expose the camera lens to direct sunlight for an extended
period. Doing so might cause ignition, rupture or fire by the
light-collecting mechanism of the lens.
The customer is not allowed to disassemble, modify or repair the
product. Doing so might cause a fault, ignition, electric shock, or
injury. The Company is not liable even in the event of any
nonconformities arising on the product or peripheral devices as a
result of modification, etc. Modification of the product is in violation
of the Radio Law.
WARNING
Do not drop or subject to strong impact, such as throwing. Doing so
might cause rupture, overheating, ignition or a fault.
Safety Precautions
Be sure to read the following
warnings before use.
9
Page 12
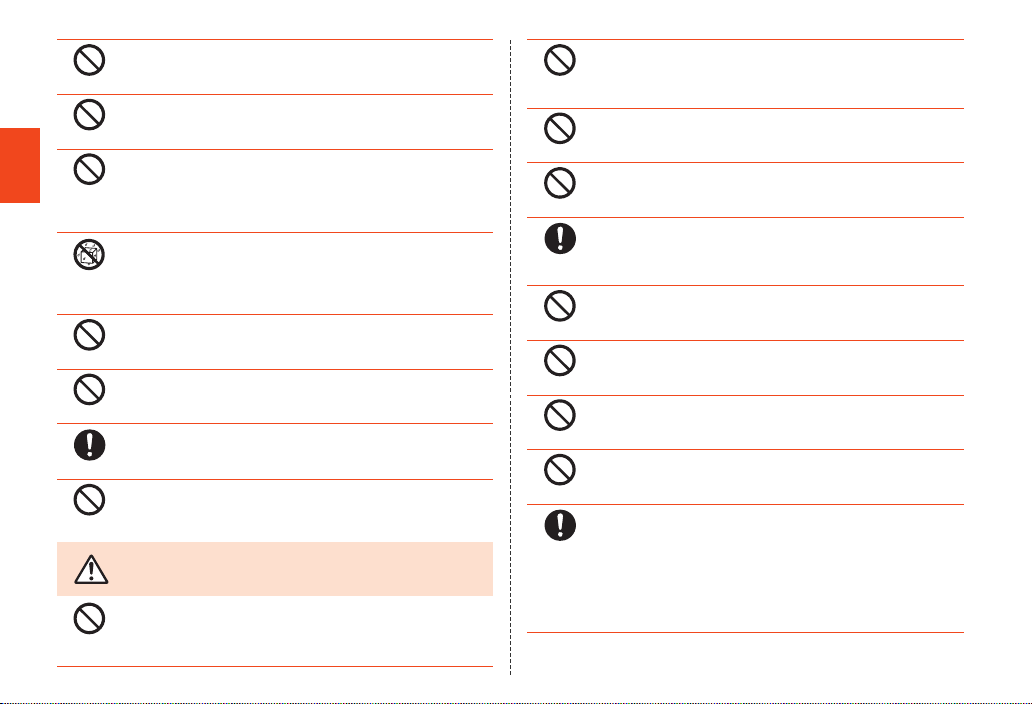
Safety Precautions
Prohibited
Prohibited
Prohibited
Prohibited
Prohibited
Prohibited
Prohibited
Prohibited
Prohibited
Prohibited
Prohibited
Prohibited
Prohibited
Prohibited
10
Wetting
with water
prohibited
Instruction
CAUTION
Do not use outside when you can hear thunder. Doing so might risk
lightning strikes and electric shock.
Do not let your hands, fingers and other parts of the body touch the
external connection jack or earphone/microphone jack. Doing so
might cause electric shock, injury or a fault.
If the product is damaged because it is dropped or something, and
its display is cracked or internal parts are exposed, do not touch the
cracked display or exposed parts with your hands. Doing so might
cause electric shock or injury from dam aged parts. Contact an au
shop or Secure cell phone support center.
Although the product model has waterproof property, stop use if
liquid such as water gets inside the main unit from the external
connection jack cover or the battery cover. Continued use of the
product in this state might cause overheating, ignition or a fault.
When removing the battery cover, do not exert more than necessary
force. The battery pack might jump out, for example, and cause
injury or a fault.
Do not operate the product while driving an automobile or motorized
bicycle, riding a bicycle or walking. Doing so may compromise
traffic safety and cause an accident.
If charging is not completed after the specified charging time, stop
charging. Failure to do so might cause leakage of liquid,
overheating, rupture or ignition.
Do not leave in places within the reach of small children. Small
children might swallow part of the equipment by mistake and choke on
them, or might drop them by mistake and cause accidents or injury.
Be sure to read the following
cautions before use.
Do not store the product in places subject to direct sunlight (e.g. in
automobiles), places that get hot, places that get extremely cold,
and in humid or dusty places. Doing so might cause overheating,
ignition, deformation or a fault.
Instruction
Instruction
Do not leave on unstable places such as rocky stands or tilting
surfaces. Dropping the product may cause injury or damage. Be
especially careful while the vibration is set. Also, pay sufficient
attention to impact, etc.
Do not cover or wrap the product with bedding, etc. while using or
charging the product. Doing so might cause fire, fault or injury.
Do not touch the main unit, the battery pack or specified chargers
(sold separately) for a long time while power is being supplied from
an external source. Doing so might cause low-temperature burns.
The product may become hot by prolonged use especially in
high-temperature environment. Be careful when using the product
touching your skin for a long time, as it might cause low-temperature
burns.
Do not use power outlets or wiring apparatus beyond its rating. Also,
exceeding rating, for example, by connecting multiple devices to a
single power strip might cause overheating and fire.
Do not use the product with the battery cover removed.
Do not place near corrosive chemicals or in places where corrosive
gas is generated. Doing so might cause a fault or loss of internal
data.
Do not leave or store with the battery cover removed from the main
unit. Doing so might allow dust or other foreign objects to get inside
and cause a fault.
Stop use if there is smoke, abnormal odor or noise, excessive
overheating, or other abnormalities. During charging, disconnect the
specified charger (sold separately) from the power outlet or the
socket, make sure that the product is not overheating before turning
the power off, remove the battery pack and contact an au shop or
Secure cell phone support center. Also , if you have dropped or
damaged the product, do not continue to use it in that state, and
contact an au shop or Secure cell phone support center.
Page 13
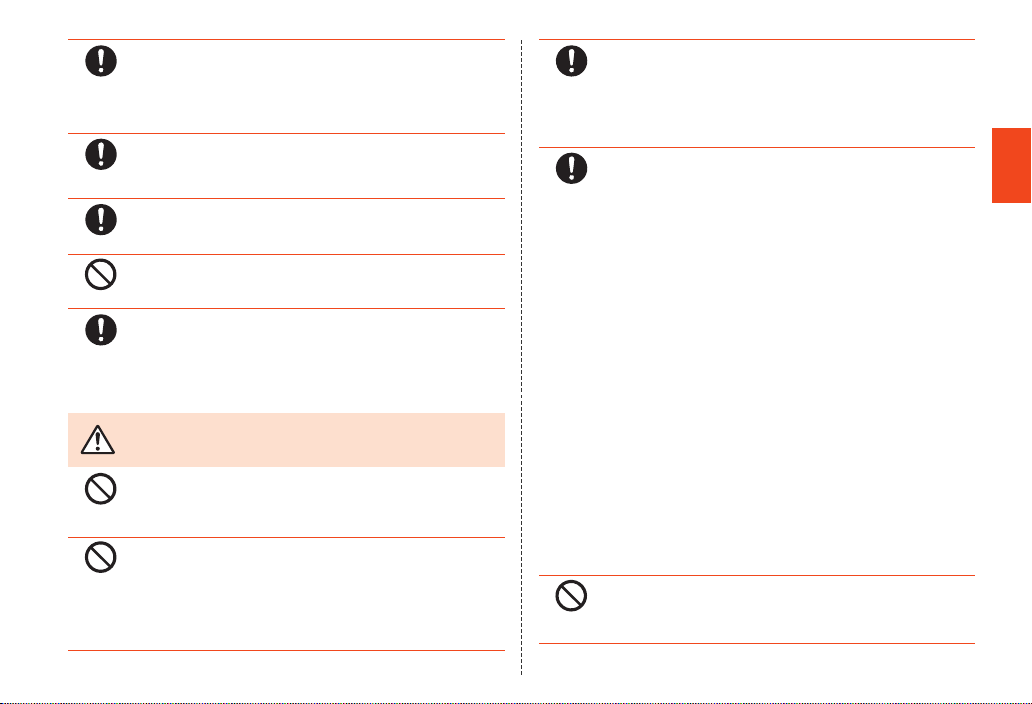
Prohibited
Prohibited
Prohibited
Prohibited
When inserting an earphone, etc. into the product, adjust the volume
to the proper level. Setting too loud a volume or using the earphone
Instruction
Instruction
Instruction
Instruction
continuously for a long period of time might adversely affect your
ears. Also, raising the volume too high might prevent you from
hearing sounds around you, which might in turn lead to a traffic
accident at a railroad crossing or pedestrian crossing.
When adjusting the volume with an earphone, etc. inserted into the
product, raise the volume a little at a time. If you raise the volume too
much from the outset, sudden loud noise from the earphone, etc.
might adversely affect your ears.
When using a charger or external device, insert/remove the connector
straight to/from the jack. Make sure the orientation of the connector is
correct. Failure to do so might cause damage or a fault.
When removing the battery cover, do not insert a sharp tipped
object. Doing so may damage or deform the battery cover, resulting
in fault because of water intrusion.
When small children use the equipment, have the guardian teach them
the proper handling procedures so as to avoid potential dangerous
situations. In addition, check that they are using the equipment as
directed during use. Failure to do so might cause injury etc.
■ Main Unit
WARNING
Do not use a cell phone while driving a car or riding a motorbike or
bicycle. It may cause a traffic accident. Use of a cell phone while
driving a car or motorbike is prohibited by law. Use of a cell phone
while riding a bicycle may be punishable by some regulations.
Turn off the product while you are aboard an airplane. Otherwise, the
product may affect electronic devices and safety of your flight may be
compromised. If your cell phone is permitted to be used on an airplane,
use it appropriately by following instructions from the airline company.
Do not connect the product with a PC aboard an airplane using the
microUSB cable 01 (sold separately), since the product is automatically
turned on.
Be sure to read the following
warnings before use.
Instruction
Instruction
The product sometimes affects high-precision electronic devices.
So, turn it off near such devices. (Examples of electronic devices
that might be affected by the product include cardiac pacemakers,
hearing aids, other electronic medical devices, fire alarms, and
automatic doors. If you are using an electronic medical device,
contact the device manufacturer or retailer for information about the
possible effects of radio waves.)
When using the product near an implanted pacemaker, implanted
cardioverter-defibrillator or other electronic medical device, radio
waves might affect these units and devices. So, please observe the
following.
1. Those with an implanted pacemaker or implanted
cardioverter-defibrillator should carry or use the product at least
22 cm away from the pacemaker or cardioverter-defibrillator.
2. Turn the product off in crowded trains or other crowded places,
since there may be people with a cardiac pacemaker or
implanted cardioverter-defibrillator nearby.
3. Pay attention to the following points when using the product
inside medical institutions.
• Do not bring the product into operating theaters, intensive-care
units (ICU) and coronary care units (CCU).
• Turn the product off in hospital wards. Do not connect the
product with a PC in hospital wards using the microUSB cable
01 (sold separately), since the product is automatically turned
on.
• Even if you are in a lobby, etc., be sure to turn the product off
when there are electronic medical devices nearby.
• When a medical institution has laid down designated areas
where use of the product is prohibited or is not allowed to be
brought in, abide by the instructions of that medical institution.
4. When using electronic medical devices other than an implanted
pacemaker and implanted cardioverter-defibrillator outside a
medical institution (e.g. home medical treatment), check
individually with the manufacturer of the electronic medical
device regarding the influence of radio waves.
Do not forget to stay alert to your surroundings when calling,
messaging, browsing the Internet, shooting photos, playing games,
watching TV (1Seg) or listening to music. Failure to do so might
cause a fall or traffic accident.
Safety Precautions
11
Page 14
Safety Precautions
Prohibited
Prohibited
Prohibited
Instruction
Do not send data by infrared communication with the infrared port
pointing toward eyes. Doing so might affect eyes. Also, sending
data with the infrared port pointing toward some other infrared
device might cause false operatio n, etc.
Do not point the illuminated light directly at someone’s eyes. Be
especially careful not to shoot small children from a very close
distance. Do not use Mobile light near people’s faces.
Eyesight may be temporarily affected leading to accidents.
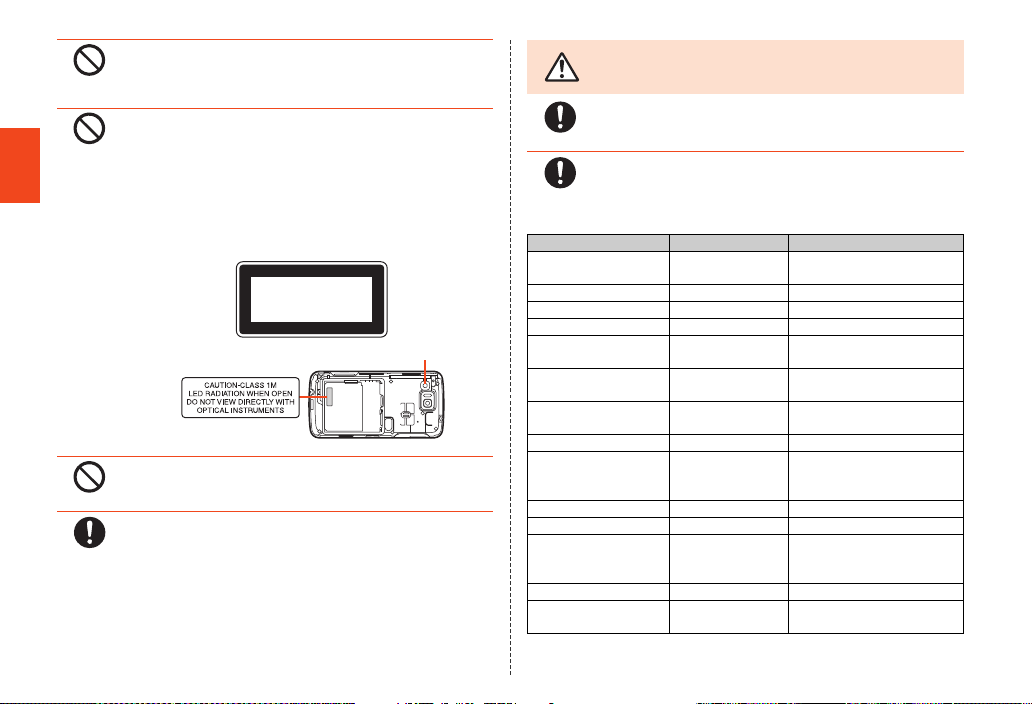
Precautions:
The mobile light source used for the product may emit the light over
the safety level for eyes when operations such as undirected
adjustments are intentionally made. Therefore, do not disassemble
the product.
EN60825-1:1994 A1:2002 & A2:2001
CLASS1
LED Product
Mobile light
Do not light the mobile light toward a driver of a car, motorbike or
bicycle. If dazzled by the light, the driver might become unable to
drive and cause an accident.
Sometimes, very rarely some people demonstrate symptoms such
as temporary muscle spasms, loss of consciousness, etc. by
watching repeatedly flickering screens. Those with a past history of
this should consult with a physician beforehand.
CAUTION
Use of the main unit in an automobile sometimes affects on-vehicle
electronic devices, though this rarely happens. If this happens, stop
Instruction
Instruction
The materials of parts used on the product are as follows.
Outer case (display
frame part)
Earpiece Acrylic resin Hard coating
Outer case (side) PA resin Acrylic UV cured coating
Battery cover PC resin Acrylic UV cured coating
External connection
jack cover
Earphone/Microphone
jack
Earphone/Microphone
jack decoration
Strap eyelet SUS Nickel plating
TV antenna PA resin
Power key PC resin Acrylic UV cured coating
Volume up/down key PC resin Acrylic UV cured coating
Display Hardened glass
Mobile light lens ABS resin None
Camera lens/Infrared
port cover
use since this may impair safe travel.
If you feel any abnormality with your skin, immediately consult a
dermatologist. Itching, rashes, eczema, etc. sometimes occurs
depending on your physical constitution and condition.
Part Material Surface treatment
Be sure to read the following
cautions before use.
PA resin Acrylic UV cured coating
PC resin
Elastomer resin
PA resin None
PC resin Acrylic UV cured coating
SUS
Nickel-titanium alloy
(Shatterproof sheet
of surface: PET)
Acrylic resin Hard coating
Acrylic UV cured coating
None
Acrylic hard coating
12
Page 15
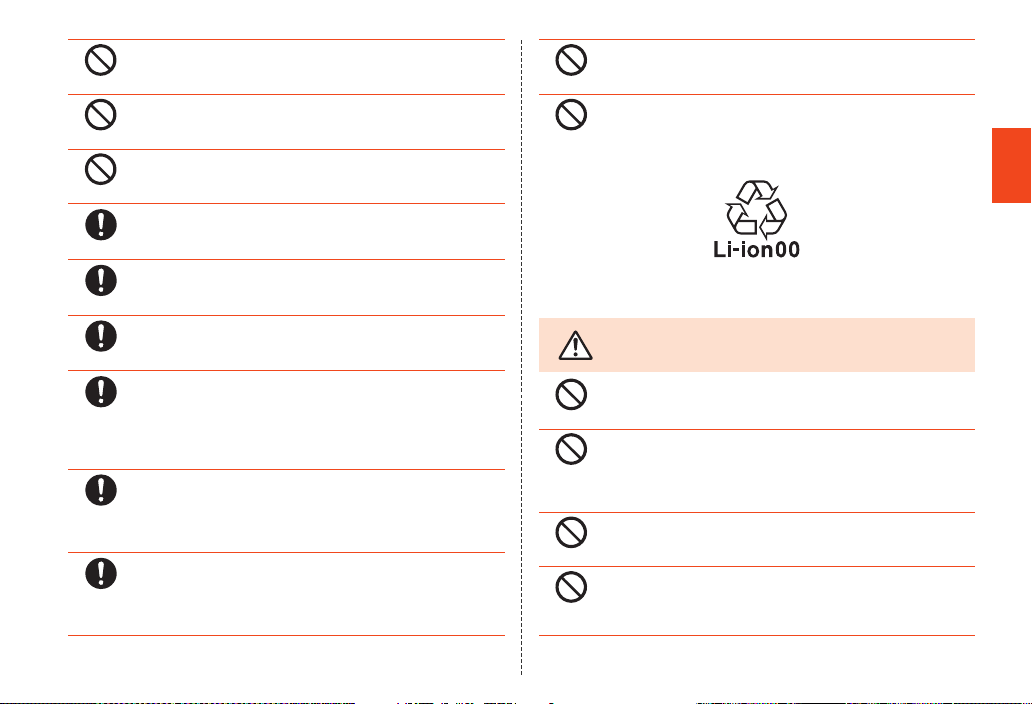
Prohibited
Prohibited
Prohibited
Instruction
Prohibited
Prohibited
Prohibited
Prohibited
Prohibited
Prohibited
Instruction
Instruction
Instruction
Instruction
Instruction
Do not bring the product close to magnetized objects such as cash
cards, floppy disks, credit cards, and prepaid cards. Doing so might
result in loss of recorded information.
Do not allow liquids, metal objects, burnable items, and other foreign
matter to get inside the microSD memory card slot. Doing so might
cause fire, electric shock or a fault.
Do not swing the product around by holding the strap, TV antenna,
etc. Doing so might cause an accident or damage.
Use the product with the covers of external connection jack, etc.
closed. If the covers are open, dirt or water may get inside causing a
fault.
Stow the TV antenna when not watching TV (1Seg). If you operate
the product for calling, etc. with the TV antenna extended, it might
cause unexpected injury by hitting your face, etc.
If you have a weak heart, be careful when setting the incoming
vibration and ringtone volume to prevent adverse effects on your
heart.
Pay attention to items becoming stuck to the main unit. The speaker
uses magnets, and so thumbtacks and pins, craft knife blades,
staples, and other metal objects sometimes become stuck to the
main unit, and cause unexpected injury. Before using the product,
be sure to check that there are no foreign objects on the speaker or
other parts.
Be careful not to put the product directly on sand at a beach, etc.
Sand or other small particles might get inside the earpiece,
mouthpiece, speaker or earphone/microphone jack causing the
volume to drop. If sand gets inside the product’s main unit, it might
cause overheating or a fault.
When using the product for calling or data communication, be
careful not to keep the product in direct co ntact with your skin for a
prolonged period, or not to cover the product with paper, cloth,
bedding, etc. The main unit might get hot, causing fire, burns or a
fault.
Do not use the product in a crowded place. Doing so may cause
others to be hit by the cell phone, resulting in an unexpected injury.
Do not swing the product with the TV antenna pulled out. Doing so
may cause injury or deform or damage the TV antenna.
■ Battery Pack
(The battery pack of the product is a lithium-ion battery.)
The battery pack is not fully charged at the time of purchase. Charge the battery
before using the product.
DANGER
Do not short-circuit the contact terminal of the battery pack.
Do not fail to connect the battery pack to the product in the correct
orientation. Connecting in an incorrect orientation might cause
rupture, fire or overheating. Do not try to forcibly connect the battery
pack, instead thoroughly check the contact terminal before
connection.
Do not puncture the battery pack with a nail, hit it with a hammer or
step on it. Doing so might cause leakage of liquid, overheating,
rupture or ignition.
Do not allow metal objects (such as necklaces and hairpins) to come
in contact with the contact terminal when carrying or storing the
battery pack. Doing so might cause fire or a fault due to a short
circuit.
Be sure to read the following
hazards before use.
Safety Precautions
13
Page 16
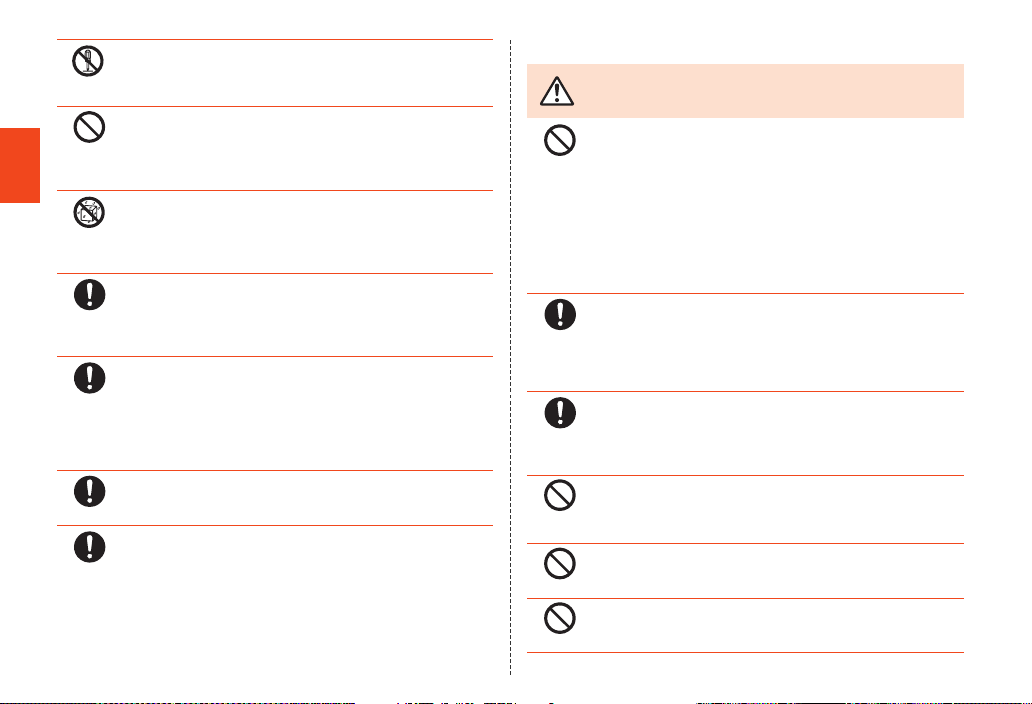
Safety Precautions
Prohibited
Prohibited
Prohibited
Prohibited
Prohibited
Disassembly
prohibited
Wetting
with water
prohibited
Instruction
Instruction
Instruction
Instruction
Do not disassemble, modify or directly solder the battery pack.
Doing so might cause overheating, ignition or rupture.
Do not use a battery pack that has been dropped, stepped on,
damaged, or leaking battery liquid. Immediately move the battery
pack away from fire if you notice leakage of liquid or unusual odor.
Failure to do so might cause the leaked liquid to catch fire resulting
in ignition or rupture.
Do not wet the battery pack with water, seawater, pet urine, etc. A
wet battery pack might cause overheating, rupture or ignition. If you
drop the product into water by mistake, immediately turn off the
power, remove the battery pack, and contact an au shop or Secure
cell phone support center. Never charge the wet battery pack.
If the liquid leaking from inside gets on your skin or clothes,
immediately rinse it off with water to avoid injury. If the liquid gets
into your eyes, do not rub but wash your eyes with water, and
immediately consult a doctor to avoid the risk of losing your
eyesight.
The battery pack is a consumable item. If the performance of a
battery pack does not recover (e.g. the usable time after each
charge has become extremely short), the battery pack is at the end
of service life, so stop use and buy a new one of the specified type.
Failure to do so might cause overheating, ignition, rupture or
leakage. Note that the length of service life varies depending on the
usage condition, etc.
Be careful not to have the battery pack bitten by your pet.
It might cause leakage, overheating, rupture or ignition.
When removing the battery pack from the product, always hold the
PULL tab or protruding edge and pull it upward. Attempting to
remove the battery pack by inserting a sharp tipped object such as
a pen may cause ignition or damage.
■ Charger
WARNING
Instruction
Instruction
Be sure to read the following
warnings before use.
Do not use at other voltages than the specified power supply
voltage. Doing so might cause ignition, fire, overheating, or electric
shock.
• Common AC adapter 01 (sold separately): 100 V AC (for domestic
use in Japan)
Do not charge with single-phase 200 V or voltage converters for
overseas travel.
• AC adapter available overseas other than the adapters above: 100
V AC to 240 V AC
• DC adapter (sold separately): 12/24 V DC (for negative grounded
vehicles only)
Firmly insert the power plug of the specified charger (sold
separately) into the power outlet or cigarette lighter socket down to
the base of its pins. Incomplete insertion of the power plug might
result in electric shock or fire caused by overheating and ignition. Do
not use damaged specified charger (sold separately) or loose power
outlets or cigarette lighter sockets.
If the fuse in the common DC adapter 01/03 (sold separately) blows,
replace it with a fuse of the specified type (250 V, 1 A). Replacing
with a different type of fuse might cause overheating or ignition. (For
information about fuse replacement, carefully read the manual for
the common DC adapter 01/03 (sold separately).)
Do not damage, modify, twist, pull or place a heavy object on the
cable of the specified charger (sold separ ately). Do not use a
damaged cable. Doing so might cause an electric shock, short
circuit or fire.
Do not let your hands, fingers and other parts of the body touch the
charger terminal. Doing so might cause electric shock, injury or a
fault.
If you hear thunder, do not touch the power plug. Doing so might
cause an electric shock as a result of a lightning strike.
14
Page 17
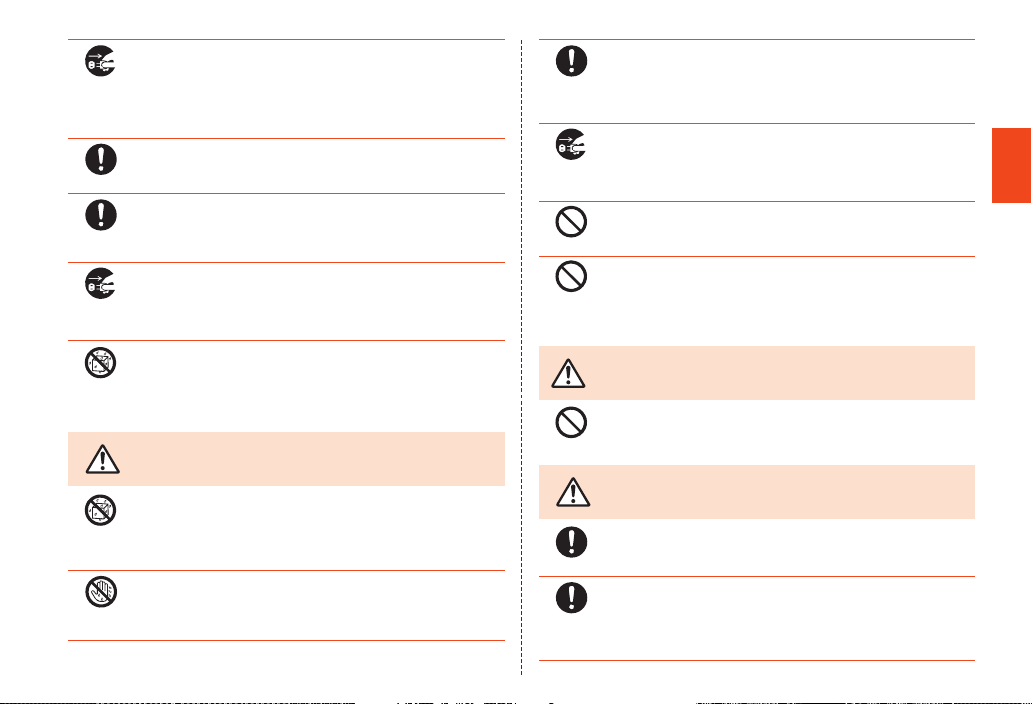
Prohibited
Prohibited
Prohibited
Disconnect
plug from
power outlet
Instruction
Instruction
Disconnect
plug from
power outlet
Wetting
with water
prohibited
CAUTION
Wetting
with water
prohibited
Wet hands
prohibited
Before cleaning the specified charger (sold separately), unplug its
power plug from the outlet or cigarette lighter socket. If the plug
remains plugged in when you clean the charger, it might cause an
electric shock or short circuit. Also, wipe off dust on the power plug
of the specified charger (sold separately). If the plug is left covered
with dust, it might cause fire.
Wipe off dust on the power plug. Failure to do so might cause fire,
burns or electric shock.
Install and position in-car devices where they do not hinder driving
or safety equipment such as airbags. Failure to do so might cause a
traffic accident. Install in-car devices following the instructions of
their manuals.
When the charger is not to be used for a long time, disconnect the
charger’s power plug from the power outlet or cigarette lighter
socket. Failure to do so might cause electric shock, fire or a fault.
The specified charger (sold separately) is not waterproof. Never use
in places subject to direct splashing with water, pet urine, etc. or in
humid places such as a bathroom. Doing so might cause
overheating, fire or electric shock. In the event that a char ger is
splashed with liquid, immediately disconnect its power plug.
Be sure to read the following
cautions before use.
Do not use in humid places such as bath areas. Doing so might
cause electric shock or a fault.
Do not plug or unplug the specified charger (sold separately) with
wet hands. Doing so may cause electric shock or fault.
Charge the battery in a stable place. If placed on an inclined surface
or wobbly stand, the product might fall causing injury or damage. Be
Instruction
Disconnect
plug from
power outlet
especially careful while the vibration is set. In addition, do not cover
or wrap a charger with a cloth or bedding. Doing so might cause fire
or a fault.
When unplugging the power plug of the specified charger (sold
separately) from the outlet or cigarette lighter socket, hold the
charger to do so. If you pull the cable, it might be damaged, causing
overheating, ignition or electric shock.
Do not use the common DC adapter 01/03 (sold separately) with the
car engine stopped. Doing so might result in draining of the car
battery.
Do not leave the specified charger (sold separately) connected to
the main unit with the battery pack removed. Doing so might cause
ignition or electric shock.
■ au IC-Card
WARNING
Do not put the au IC-Card in a cooking apparatus such as a
microwave oven or a pressure vessel. Doing so might cause
melting, overheating, fuming, loss of data or a fault.
CAUTION
Be careful not to injure your hand or finger when attaching/removing
Instruction
Instruction
the au IC-Card.
Use only the devices specified by the Company to insert the au
IC-Card in. Using a device not specified by the Company might
cause loss of data or a fault.
For the specified devices, contact an au shop or Customer Service
Center.
Safety Precautions
Be sure to read the following
warnings before use.
Be sure to read the following
cautions before use.
15
Page 18
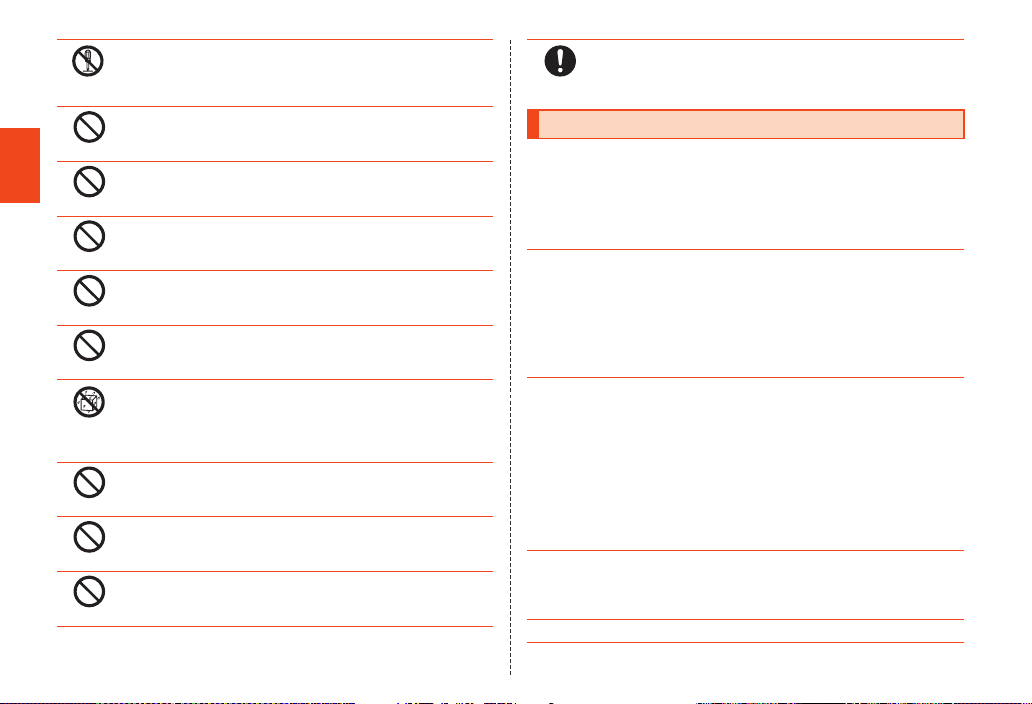
Safety Precautions
Prohibited
Prohibited
Prohibited
Prohibited
Prohibited
Prohibited
Prohibited
Prohibited
Disassembly
prohibited
Wetting
with water
prohibited
Do not disassemble or modify the au IC-Card. Doing so might cause
loss of data or a fault.
Do not use or leave the au IC-Card in hot places such as by a fire or
a heater. Doing so might cause melting, overheating, fuming, loss of
data or a fault.
Do not throw the au IC-Card into a fire or heat it. Doing so might
cause melting, overheating, fuming, loss of data or a fault.
Do not touch the IC (metal) part of the au IC-Card or short-circuit it.
Doing so might cause loss of data or a fault.
Do not drop the au IC-Card or subject it to strong impact. Doing so
might cause a fault.
Do not fold, bend or place a heavy object on the au IC-Card. Doing
so might cause a fault.
Do not wet the au IC-Card. Doing so might cause a fault.
Do not scratch the IC (metal) part of the au IC-Card. Doing so might
cause a fault.
Do not store the au IC-Card in dusty places. Doing so might cause a
fault.
Do not store the au IC-Card in places exposed to direct sunlight or
hot and humid places. Doing so might cause a fault.
Store the au IC-Card out of reach of small children. Accidental
Instruction
swallow might cause suffocation, injury, etc.
Handling Precautions
These precautions are provided to ensure that performance can be
fully demonstrated.
Thoroughly read these precautions to ensure correct use.
■ Precautions common to the main unit, battery pack, charger,
au IC-Card, peripheral devices
● Do not apply excessive force to the product during use. Be sure not to put the
product into a tightly packed bag or place a heavy object on the product in a
bag. Sitting on the product in your pocket might damage the display or
internal circuit board resulting in a malfunction.
Keeping an external device connected to the external connection jack might
damage the connector resulting in a malfunction. Such damage and
malfunction are not covered by the warranty, even if there is no external
damage.
● To ensure waterproof property (equivalent to IPX5 and IPX7) of the product,
use the product with the battery cover and external connection jack cover
tightly closed.
Note that the waterproof property is not guaranteed in every usage condition.
Do not allow water to get inside the product or splash water on the battery
pack, charger or optional accessories. Do not attach/remove the battery cover
or open/close the external connection jack cover in the rain or with water
drops on the surface of the product. Doing so might cause water intrusion
resulting in internal corrosion.
Malfunctions determined to be caused by water intrusion are not covered by
the warranty.
● Do not use the product in extremely hot, cold or humid places.
(Use within an ambient temperature range of 5°C to 35°C and humidity range
of 35% to 85%. Using at a temperature of 36°C to 40°C is allowed only when
you use in a bathroom etc. temporarily.)
● Do not use in places subject to lots of dust or vibration.
16
Page 19
● Clean the external connection jack and earphone/microphone jack with dry
cotton swabs, etc. every now and then. A soiled jack might cause poor
connection. When cleaning it, do not exert a strong force to clean it to prevent
deformation.
● Clean the product with a soft dry cloth (such as the type used for eyeglasses).
Forceful rubbing with a dry cloth may scratch the display. The display may be
stained if splash or smear is left attached to the surface. Wiping the product
using alcohol, thinner, benzene, detergent, etc. might erase the printing on
the outer casing or cause discoloration.
● Use as far away as possible from fixed-line phones, TVs and radios. Use
nearby might affect them.
● The product may become warm while charging or during other operations,
depending on the situation, but this is not abnormal.
● Turn off the power of the main unit before removing the battery pack. If you
remove the battery pack with the power on, saved data might be altered or
lost.
● When the temperature of the product gets high during use, the product may
temporarily lower the screen brightness or may stop part of its functions to
protect the main unit.
■ Main unit
● Do not forcefully press, tap or intentionally subject the display to strong
impact. Doing so might cause scratching or damage.
● Do not forcefully press your fingernails, sharp objects or hard objects against
keys or display surface. Doing so might cause scratching or damage.
The touch panel is designed to be lightly touched by fingers. Do not apply
strong pressure with your fingers or sharp-pointed objects (such as
fingernails, ballpoint pens and pins) on the touch panel.
In the following cases, the product may not respond to touching the touch
panel, or errors in operation may occur.
• Operation with gloved hands
• Operation with fingernails
• Operation with a foreign object placed on the touch panel
• Operation with a protective sheet or sticker on the touch panel
• Operation with water drops left or frozen on the surface
• Operation with wet or sweaty fingers
• Operation under water
● Do not remove the stickers printed with the serial numbers on the back of the
battery pack that can be seen when it is removed. These stickers prove that
the product and the communication mod ule you are using comply with the
Radio Law and Telecommunications Business Law.
● Never use modified au cell phones. Use of a modified device violates the
Radio Law.
The product has acquired the certification of conformity with technical
regulations for the specified radio station based on the Radio Law, and the
“Technical Conformity Mark ” is printed on the nameplate of the product as
a certificate.
If the screws of the product are removed and modifications are made to the
internal components, the certification of conformity with technical regulations
will become invalid. Never use the product without the valid certification.
Doing so violates the Radio Law.
● To prevent unlawful modification, the product has been designed so that it
cannot be easily disassembled. Modifying the product is prohibited by the
Radio Law.
● Contents saved in the product, such as contacts, mails and bookmarks might
be altered or lost by an accident, fault, repair or mishandling. Be sure to keep
a copy of important contents. Note that the Company assumes no
responsibility for any damages or lost profits resulting from altered or lost
contents.
● Note that content data (both charged or free content) saved on the product
cannot be returned to the customer when the product is replaced for repair of
a fault, for example.
● The product uses liquid crystal for its display. The display response speed
may become slow when the ambient temperature is low, which is due to the
property of liquid crystal and not a malfunction. The display response speed
will return to normal at room temperature.
● Although the display used on the product is made using high-precision
technology, some pixels (dots) might be lit or out at all times. This is not a
malfunction.
● Take care not to inconvenience people around you when you use the product
in a public place.
Safety Precautions
17
Page 20
● You are recommended to store copies of individual data such as still pictures
you took, videos and music in your PC by sending each file as mail
attachment, etc. Note, however, that you may not be able to make copies of
some copyrighted data even by the above-mentioned means.
● Take care not to place magnetized items such as ma gnetic cards, speakers
and TV sets near the product, as it might cause malfunction.
Putting strong magnetism close to the product might cause false operation.
● When you put the product in your pocket or bag, take care so that the display
does not come in contact with metal objects or other hard objects, as it might
Safety Precautions
cause scratching or damage. Also, be careful not to scratch or damage the
display by using a strap whose metal or other hard part comes in contact with
the display.
● When suddenly brought into a warm place from a cold place, or when in a
humid location, or when used where temperature suddenly changes (e.g.
near the air discharge port of an air conditioner), water drops (i.e.
condensation) sometimes are formed inside the product. Note that when used
under conditions such as this, humidity might cause corrosion or a fault.
● When wiping the display, wipe with a soft, dry cloth. Use of a moistened cloth,
glass cleaner or other similar liquid might cause a fault.
● When connecting/disconnecting an external device to/from the external
connection jack or earphone/microphone jack, make sure to insert/remove the
connector or earphone plug of the external device straight to/from the jack.
●
Note that applying unnecessary force with an external device connected to the
external connection jack or earphone/microphone jack may cause damage.
● Do not discard the product together with regular trash. Please cooperate in
the collection of the product when it is no longer needed to protect the
environment and effectively use resources. Old products are collected at au
shops and other places.
● Insert only a microSD memory card into the microSD memory card slot on the
product.
● Do not exert excessive force when attaching/removing a microSD memory
card. Doing so might injure your hands or fingers.
● While writing/reading data to/from a microSD memory card, do not subject the
product to vibration or impact, remove the battery pack or turn off the power.
Doing so might cause loss of data or a fault.
18
● When hearing the other party’s voice, make sure that the earpiece is placed at
the center of your ear. If the earpiece (audio output port) is closed by the ear
lobe, it may be hard to hear the voice.
● Even if you cover the mouthpiece to make your voice inaudible to the other
party, the other party can hear your voice.
● When using handsfree call, take care to keep the speaker at a safe distance
from your ears, as the speaker volume may be too loud.
● Attach the battery cover securely. FeliCa function may not work properly. Also,
if you deform the battery cover, forcefully press the inside of the battery cover
on which the sheet is pasted or remove the sheet, FeliCa communications
may be hindered.
● Do not cover the light sensor with your finger or put a sticker on it. Doing so
may hinder the light sensor from detecting the ambient brightness and
functioning correctly.
● If the display gets damaged, immediately stop use and contact an au shop or
Secure cell phone support center. Keeping using it may cause injury.
● Putting a sticker, etc. on the display or a key may cause malfunction or
shortened usage time. Also, doing so may damage the product.
● When answering a call while the TV antenna is pulled out or it is kept standing
(e.g. while you are watching TV (1Seg)), take lots of care especially to the tip
of the TV antenna so that it will not do any harm on surrounding people nor
touch your own eye.
● If you put magnetized objects, metal straps, etc. close to the product, the
speaker section sometimes emits sounds. This is not a fault.
● Note that if you forcefully pull external connection jack cover or apply
excessive force on it, it may be damaged.
● When you put the product in your pocket or bag, do not forget to replace the
TV antenna to its original position. Also, do not forcefully pull out or bend the
TV antenna intentionally. Doing so may cause injury or damage.
● Bright places such as under the direct sunlight sometimes make it hard to see
the display. This is not a fault.
Page 21
■ Touch panel
● Use your finger to operate the touch panel. Do not use ballpoint pens, pencils
or other sharp-pointed objects. Using such objects does not only hinder
correct operation of the touch panel, but also might cause scratching or
damage to the display.
● Do not put stickers or sheets (e.g. commercially available protective films,
peep prevention sheets) on the display. Doing so might hinder correct
operation of the touch panel.
● Do not operate the touch panel with fingernails. Doing so might result in split
nails or jammed fingers.
● If the display surface is dirty or wet with sweat or water, it may not function
correctly. In such case, wipe the display surface with a dry, soft cloth.
● When carrying the product in your pocket or bag, take care not to put the
touch panel close to metals or other conductive materials, as it might cause
false operation of the touch panel.
■ Battery pack
● Make sure not to touch the contact terminal with a cotton swab or sharp tipped
object. Inserting an object other than a terminal metal into it sometimes makes
it deformed and makes the battery pack unable to be properly used since the
contact terminal is groove-shaped metal springs.
● Use in very hot or cold environments, for example, when left in an automobile
with the windows closed in summer, will cause the battery capacity to drop
and shorten the available battery usage time. This will also shorten the battery
pack’s service life. Try to use the battery pack as much as possible at room
temperature.
● When the battery pack is not to be used for a long time, remove the battery
cover and remove the battery pack from the main unit, and store it away from
hot and humid places.
● Charge the battery before using the product for the first time after purchase,
or if you have not used the product for a long time.
● The battery pack is a consumable item. If the performance of a battery pack
does not recover after charge, the battery pack is at the end of service life, so
buy a new one of the specified type. Note that the length of service life varies
depending on the usage condition, etc.
● Do not discard battery packs together with regular trash. Please cooperate in
the collection of used battery packs to protect the environment and effectively
use resources. au shops and other retailers collect used battery packs.
● Battery packs sometimes swell up as they approach the end of their service
life.
This is due to the properties of lithium-ion batteries, and is not a problem in
terms of safety.
■ Charger
● When not using the specified charger (sold separately), remove its power
plug from the power outlet or the cigarette lighter socket.
● Do not wrap the power cord of the specified charger (sold separately) around
the power plug. Doing so might cause electric shock, overheating or fire.
● Do not forcibly bend the charger’s plug or the connection between the
connector and power cord. Doing so might cause electric shock, overheating
or fire.
■ au IC-Card
● The au IC-Card is lent to you by au. In case of loss or damage, the card will be
replaced at your expense. When malfunction is suspected, or in case of theft
or loss, contact an au shop or PiPit.
● Do not forcibly remove or insert the au IC-Card. Be careful not to exert
excessive force when inserting the card into your au cell phone.
● You are responsible for any damage caused by inserting your au IC-Card into
some other IC card reader/writer, etc.
● The au IC-Card may become warm during use, but this is not a malfunction
and you can continue to use the card.
● Keep the IC (metal) part of your au IC-Card clean. Wipe the card with a dry,
soft cloth (such as for cleaning eyeglasses) for cleaning.
● Do not put stickers, etc. on the au IC-Card.
● Do not touch the IC (metal) part of the au IC-Card when inserting or removing
it.
Safety Precautions
19
Page 22
■ Camera
● When using the camera, follow common rules of etiquette regarding camera
use.
● Image data might be altered or lost due to malfunction, repair or mishandling
of the product. The Company takes no responsibility for recovery of altered or
lost data, damages resulting from altered or lost data, and lost profits.
● When photographing important occasions (such as a wedding), take a trial
shot and check the shot image to make sure it is correctly shot.
● Do not use the camera for recording commercially available books or
Safety Precautions
information of which photographing is not allowed.
● Do not leave the camera lens exposed to direct sunlight. Imaging elements
might be discolored or burnt.
■ Music, videos and TV (1Seg)
● Do not listen to music, watch videos or TV (1Seg) while driving a car or
motorbike, or riding a bicycle. Use of cell phones while driving a car or
motorbike is prohibited by law. (Use of cell phones while riding a bicycle may
also be punishable by law.) In addition, stay alert to the traffic around you
even when walking. Surrounding sounds might not be heard clearly, and
gazing at the screen may distract your attention causing a traffic accident. Be
especially careful at railroad crossings, platforms and pedestrian crossings.
● Take care not to listen at ear-splitting volume for a long time, as it might affect
hearing.
● Be careful of sound leakage from earphones in trains or other places with
many people around you.
■ Copyrights and rights of portrait
● If the data you shot or recorded using the product or part or whole of the data
you downloaded from the Internet etc. is protected by the third party’s
copyright, you are not allowed to copy, distribute, publicly send, modify the
data without consent of the copyright holder, except for personal use, under
the copyright law.
In addition, do not use or modify portraits or names of other individuals without
their consent, as it may infringe on rights of portrait.
Note that shooting and recording might be restricted at some live
performances, shows and exhibitions even for personal use.
20
● Be careful about the copyright and portrait right when posting still pictures you
shot, etc. on Internet homepages.
■ Backup content on the product
● Please back up important content recorded or downloaded to the product to
an outside source. Content recorded to memory on the product sometimes
disappears or is altered by unexpected factors, such as static electricity or a
fault, repair, mishandling, etc.
* How to make back ups: Store important data such as phonebook data, m usic, shot still
pictures and videos on microSD memory cards . You can also send files as mail attachment
or transfer to your PC. Note, however, that there are s ome data that cannot be copied by
using these means.
Available Security Codes
Security Codes
The product has various security codes that you can use.
The available security codes are as follows. Do not forget the various
security codes that are set as they are necessary for various
operations and contracts.
■ Security code
Example of
usage
Initial value A four digit number chosen by the customer and noted on the
■ Security key
Example of
usage
Initial value 1234
A To do remote operation of voice mail and call forwarding
services from a landline phone
B To use Customer Service Center and to do various inquiries,
applications, and modifications on the au homepage
application form
To set and release Restrict address book etc.
Page 23
■ PIN Code
memo
Example of
usage
Initial value 1234
To prevent unauthorized use of the au IC-Card by third parties
Functions to Protect Your Privacy
The product has the following functions to protect the privacy of saved
data.
• Lock folder
• Osaifu-Keitai
• Screen lock
• Restrict address book
®
lock setting
PIN Code
■ PIN1 Code
To prevent unauthorized use of the au IC-Card by a third party, you
can set the product to require PIN1 code entry every time the power is
turned on. You also need to enter PIN1 code when setting whether
PIN1 code entry is required.
If PIN code is incorrectly entered three times consecutively, the PIN
code will be locked. You can unlock the PIN code using PUK code.
• PIN1 code is “1234” and PIN1 code entry is set to not be required at
the time of purchase. You can change PIN1 code to any four- to
eight-digit number, and set PIN1 code entry to be required as
necessary.
■ PUK Code
In case PIN1 code is locked, you can unlock it by entering PUK code.
• PUK code is an eight-digit number given at the time of purchase,
which is printed on the back side of the plastic card on which your
au IC-Card is attached.
• After entering PUK code, you need to set a new PIN1 code.
• If PUK code is incorrectly entered ten times consecutively, contact
an au shop, PiPit or Customer Service Center.
• “PIN1 code” is not reset by initializing the product.
◎ When the PIN code is locked, the product may be restarted for the security
reasons.
Safety Precautions
21
Page 24
Notes on Waterproof and Dustproof Properties
Before using the product, thoroughly read the contents of “Notes on
Waterproof and Dustproof Properties” to ensure correct use. Failure to
follow the contents described in these sections may cause intrusion of
water, sand or other foreign material, resulting in overheating, ignition,
electric shock, injury or fault.
Proper operations of the product are not guaranteed in every possible
Safety Precautions
condition during actual use. Faults determined, after an inspection, to
be caused by mishandling by the customer such as by using the
product without following the contents written on “Notes on Waterproof
and Dustproof Properties” are not covered by the warranty.
■ Waterproof and Dustproof Properties of the
Product
The product has a protection rating (JIS C 0920) for waterproof
property equivalent to IPX5
equivalent to IP5X
cover is securely closed as well as the battery cover is securely
attached (Based on the experiments by the Company).
*1 IPX5 me ans that the cell phone continues to function as a pho ne after being subjected to a
water jet (approximately 12.5 liters/min) disch arged from a water pouring nozzle (inner
diameter: 6.3 mm), from all directions and approximately 3 meter s away from the cell phone for
at least 3 minutes.
*2 IPX7 me ans that the cell phone continues to function as a p hone after being gently lowered
into a tank filled with still tap water (at room temperature) to the depth of 1 meter , immersed at
the bottom for approximately 30 minutes and then taken o ut of the tank.
*3 IP5X me ans the level of dust protection. The cell phone con tinues to function as a phone in
safety after it is left in a device containing dust (di ameter: 75 μm or smaller) for 8 hours,
agitated and then taken out.
■ Waterproof and dustproof properties of the product enable you
• To use the product in the rain without an umbrella. (with a
precipitation of 20 mm/hour or smaller)
• To use the product in places with water such as in bathrooms,
lavatories, kitchens or at the poolside. However, do not submerge it
in the bathtub or swimming pool or get it wet with water other than
tap water.
22
*1
*3
and IPX7*2 and for dustproof property
on the condition that the external connection jack
• To wash the product with the low-pressure water flow of a tap water
(6 liters/min or lower) at the room temperature (5°C to 35°C).
■ Handling the product
• Attach the battery cover and close the external connection jack
cover securely. Even a fine obstacle (one hair, one grain of sand,
tiny fiber, etc.) put between contact surfaces may cause intrusion of
water or dust.
• If liquid such as water is splashed onto the product with the battery
cover removed or the external connection jack cover opened, the
liquid may seep inside and cause electric shock or fault. Stop using
it, turn off the power, remove the battery pack and then contact an
au shop near you or Secure cell phone support center.
• When the product is wet, wipe it with a dry and clean cloth.
• When your hand or the product is wet, never attach/remove the
battery cover or open/close the external connection jack cover.
• The product is resistant to fresh and tap water at room temperature
(5°C to 35°C) only.
• Do not use the earphone when any jack is wet or sand or dust is
attached to it. Doing so may cause fault such as impairment of the
waterproof/dustproof property.
■ Dustproof property of the product
• The dustproof property of the product only guarantees a protection
rating equivalent to IP5X and does not guarantee its performance
under other using conditions such as when the product is directly
put on sand such as a beach.
• If dust is attached to the product, immediately wash it away with
water or otherwise clear it completely before use.
■ Notes on Using the Product
• Do not let the product get wet with or submerged into the following
liquids.
・ Water containing soap, detergent or bath powder
・ Seawater or water from a swimming pool
・ Hot spring, hot water, etc.
Page 25

• If the product gets wet with seawater, water from a swimming pool,
soft drink, etc. or dust, sand, mud, etc. is attached on the product,
immediately wash it away. When it gets dry and coagulated on the
product, the stains get hard to get rid of and may cause fault.
• Using the product without completely washing sand or mud away
may cause fault such as scratches and damages on the main unit.
• Do not immerse the product in a bathtub or swimming pool. Also, do
not use it under water. (including key operations.)
• The product is not designed to withstand high water pressure. Do
not expose the product to a strong water flow with tap water,
shower, etc. (6 liters/min or more) or submerge it under water.
• Do not leave the product in a humid place such as a bathroom for an
extended period of time. Also, do not use the product in a bathroom
for an extended period of time.
• To prevent condensation, wait until the product reaches room
temperature before you bring it from a cold place into a bathroom
etc. If condensation occurs, leave it in room temperature until the
condensation is removed.
• Do not get the product wet with hot water, use it in saunas or expose
it to hot air from hair dryer etc.
• Do not place the product where it gets extremely hot or cold such as
near a stove or in a refrigerator.
• Volumes may temporarily become lower due to water entering in the
mouthpiece, earpiece, and speaker. Drain water and dry the
product well before use.
• When water drops are attached on the touch panel or you perform
touch operations with your hand wet, the product may not properly
function.
• The product does not float on water.
• Do not use the product in heavy rain.
• Do not leave the product wet. Doing so may let the liquids freeze on
the product in cold places or otherwise cause fault.
• Do not drop or otherwise subject the product to strong impact or jab
the mouthpiece, earpiece, speaker, etc. with a cotton swab or any
sharp object. Doing so may cause scratching, deformation, etc. on/
of the product, resulting in impairment of waterproof/dustproof
property.
• Do not place the product directly on sand at a sandbox, beach, etc.
or on mud. Grains of sand may get into the earpiece, speaker, etc.,
causing the volume to drop.
• Packaged items (battery pack) or optional accessories are not
waterproof/dustproof.
• If the battery cover or external connection jack cover degrades or is
damaged, the waterproof and dustproof properties cannot be
maintained. In such case, contact an au shop near you or Secure
cell phone support center.
■ Maintaining the Waterproof and Dustproof
Properties
■ Rubber seals
The rubber seals on the external connection jack cover and battery
cover are important to maintain the waterproof property. Be sure to
observe the following items.
• Do not remove or scratch them.
• When closing the external connection jack cover and battery cover,
do not get the rubber seals caught. Also, do not insert sharp objects
into gaps around the external connection jack cover and battery
cover or the earphone/microphone jack section.
Doing so may damage the rubber seals and cause intrusion of water
or dust.
• It is recommended to replace the parts for maintaining the
waterproof and dustproof properties (pay service) once every two
years regardless of whether any abnormality is present. For
information on part replacement, contact an au shop near you or
Secure cell phone support center.
■ Precautions on Charging
The battery pack, specified charger (sold separately) and optional
accessories are not waterproof/dustproof. Be sure to check the
following items before and after charging.
• Check that the product is not wet. If it is wet or after it gets wet, drain
water well and wipe remaining water off with a clean dry cloth etc.
before opening the external connection jack cover.
Safety Precautions
23
Page 26
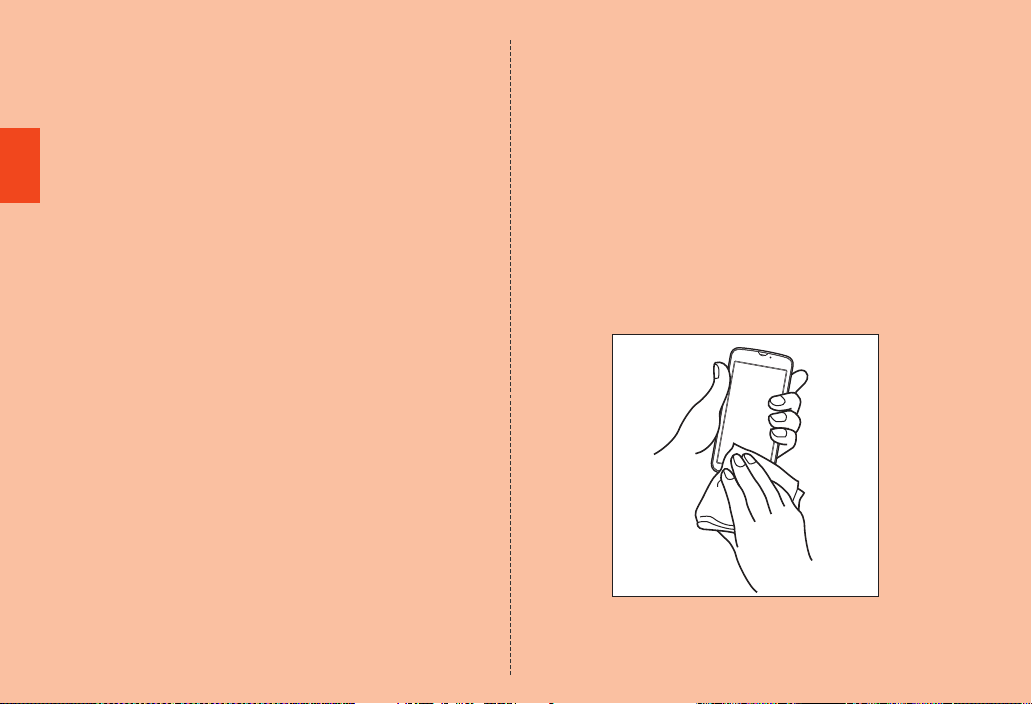
• If you charge the battery with the external connection jack cover
open, be sure to tightly close the cover when charging is finished.
• Never charge the battery if the product is wet. Doing so may cause
electric shock, short circuit, etc., resulting in fire or fault.
• Do not touch the specified charger (sold separately) with wet hands.
Doing so may cause electric shock.
• Do not splash water onto the specified charger (sold separately) or
optional accessories when using the equipment. Do not use the
equipment in places where water is regularly used such as a
bathroom, shower room, kitchen and lavatory. Doing so may cause
Safety Precautions
fire or electric shock.
■ Washing the Product
If any stain, dust, sand, soft drink, etc. is attached to the surface of the
product, gently wipe it off with a cloth and wash the product under a
mild water flow (up to 6 liters/min) of tap water at room temperature (5
℃ to 35℃) approximately 10 cm away from the faucet or shower
head.
Make sure that the battery cover is attached, holding the external
connection jack cover so that it does not open, and wash the product
with your hands without using a brush or sponge. After washing the
product, drain water off and then use the product.
• Make sure that the battery cover and external connection jack cover
are securely closed before washing the product.
• Do not wash the product with a washing machine or an ultrasound
bath.
• The earphone/microphone jack section is especially subject to stain
such as dust or sand adhesion. Wash away stain carefully so as not
to keep it remaining in the section. Also, after washing it away, make
sure the section gets sufficiently dried off before using the product.
Using the product with sand or water drops remaining in the jack
sections may cause fault.
• When cleaning the earphone/microphone jack section, do not use
tools such as a cotton swab or jam a cloth into the jack section.
Doing so may cause fault such as impairment of waterproof/
dustproof property.
24
• Never put the product in a microwave oven for drying it. Doing so
may cause the battery pack to leak liquid, overheat, rupture or
ignite. Also, doing so may cause the product to overheat, emit
smoke, ignite or cause destruction of circuit components.
• Do not expose the product to hot air from a hair dryer or leave it in a
high temperature environment for drying it. Doing so may cause the
product to deform, discolor, get out of order, etc.
■ Draining Water
If the product gets wet, make sure to drain water remaining in the
“earphone/microphone jack section”, “earpiece (receiver) section”,
“mouthpiece (microphone) section”, “speaker section”, “camera lens
section”, “key section”, etc.
A Wipe off water on the surface of the product carefully
with a dry and clean cloth etc.
• If a strap is attached, dry it sufficiently as well.
Page 27
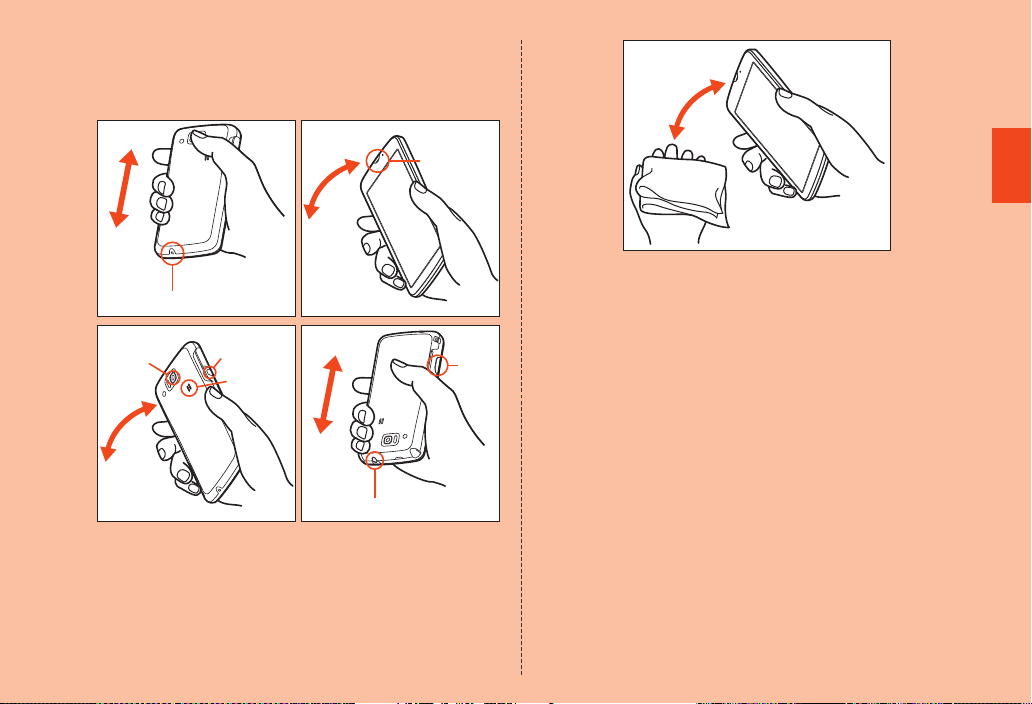
B Hold the product securely and shake it approximately
20 times until there is no more water splashing.
• Make sure of the safety around you and shake the product while
holding it securely not to let it drop.
Earpiece
(Receiver)
section
Mouthpiece (Microphone) section
Camera lens
section
Key section
Speaker
section
Key
section
Earphone/Microphone jack section
C Wipe off water remaining in the grooves of each
section by gently putting the product against a dry
and clean cloth etc.
• Since water is sometimes left in the grooves of each section, clear
them of water by putting a cloth against their openings and gently
patting them. Make sure that there is no more water or foreign
objects remaining in them.
Safety Precautions
D Lay out a dry cloth etc. beneath and leave the product
on the cloth at room temperature for approximately 2
to 3 hours to dry it.
• Water, if any, remaining in the main body may ooze up after wiping
off.
• Do not wipe off water remaining in the grooves directly by a cotton
swab etc.
■ Precautions to be taken after water draining
Do not use the product with water drops still left on it.
• Doing so may cause call disruption or cause clothes or bags to get
wet.
• Doing so may cause short circuit of a jack section of the earphone
etc.
• Doing so may cause fault due to the water drops frozen in a cold
place.
25
Page 28
Notes on Using Bluetooth®/Wireless LAN
®
(Wi-Fi
) Functions
Frequency Band
Bluetooth® and wireless LAN (Wi-Fi®) functions (2.4 GHz band) of the
product use frequencies in the 2.4 GHz band ranging from 2.402 GHz
to 2.480 GHz.
• Bluetooth
Safety Precautions
• Wireless LAN (Wi-Fi
26
®
function: 2.4FH1
The product uses the 2.4 GHz band.
FH-SS is used as the modulation scheme. The interference distance
is about 10 m or less.
Bands of mobile unit identification devices cannot be avoided.
®
) function: 2.4DS/OF4
The product uses the 2.4 GHz band.
DS-SS and OFDM are used as the modulation schemes. The
interference distance is about 40 m or less.
Bands of mobile unit identification devices can be avoided.
Channels available with the 2.4 GHz band wireless LAN (Wi-Fi
the product are between 1 to 13.
Available channels differ depending on the country.
For use in airplane, check with the airline company in advance.
Precautions about Bluetooth
• The Bluetooth
standards of Japan and FCC standards and EC directives, and has
been certified. Use of the Bluetooth
some countries/regions. If you are using the Bluetooth
®
function of the product conforms to the domestic
®
®
function may be restricted in
®
function
overseas, check the relevant laws and regulations of the country/
region you visit.
• The 2.4 GHz band used by wireless LAN (Wi-Fi
devices is shared by various other devices. For this reason,
®
Bluetooth
device use technologies for minimizing effects from other
®
) and Bluetooth®
devices using the same radio frequency band. In some cases,
however, the communication speed and connectable range may be
decreased, or disconnection may occur, due to interference by
other devices.
• The communication speed and connectable range vary depending
on the distance between communication devices, obstacles and the
®
Bluetooth
■ Bluetooth
The frequencies used by the Bluetooth
devices used.
®
function precautions
®
function of the product are in
the 2.4 GHz band. In this frequency band, other similar wireless
stations, in-plant wireless stations for mobile unit identification that
®
) of
require a license for use, such as factory production lines, specific
small power wireless stations that do not require licenses, amateur
wireless stations (collectively called “other wireless stations” from here
on) are operated in addition to home electrical appliances such as
microwave ovens, devices for industrial, scientific and medical
devices.
1. Before using the product, make sure that “other wireless stations”
are not in operation nearby.
2. In the event that instances of radio wave interference have
occurred between the product and “other wireless stations”,
immediately either relocate the product or stop operation of the
device (stop emission of radio waves).
Page 29
memo
3. If you are unclear on any points or are troubled by anything, contact
an au shop or Customer Service Center.
Precautions about Wireless LAN (Wi-Fi®)
®
• The 2.4 GHz band wireless LAN (Wi-Fi
conforms to the domestic standards of Japan, FCC standards and
EC directives, and has been certified. Use of the 2.4 GHz band
wireless LAN (Wi-Fi
®
) function is restricted in some countries/
regions such as France.
If you are using the wireless LAN (Wi-Fi
the relevant laws and regulations of the country/region you visit.
• Do not use the product in places where electromagnetic waves are
generated or near electric products, AV and OA equipment, or other
magnetized devices.
• Subjecting the product to magnetic or electrical noise might
increase noise and prevent it from performing communications. (The
product is particularly susceptible to noise when it used near a
microwave oven.)
• Using the product near a TV, radio or similar appliance might cause
reception interference and disrupt TV images.
• Searching might not be successful if there are multiple wireless LAN
®
(Wi-Fi
) access points near the product or the same channel is
being used.
) function of the product
®
) function overseas, check
®
■ 2.4 GHz band wireless LAN (Wi-Fi
The frequencies used by the wireless LAN (Wi-Fi
) precautions
®
) function of the
product are in the 2.4 GHz band. In the 2.4 GHz frequency band,
other similar wireless stations, in-plant wireless stations for mobile unit
identification that require a license for use, such as factory production
lines, specific small power wireless stations that do not require
licenses, amateur wireless stations (collectively called “other wireless
stations” from here on) are operated in addition to home electrical
appliances such as microwave ovens, devices for industrial, scientific
and medical devices.
1. Before using the product, make sure that “other wireless stations”
are not in operation nearby.
2. In the event that instances of radio wave interference have
occurred between the product and “other wireless stations”,
immediately either relocate the product or stop operation of the
device (stop emission of radio waves).
3. If you are unclear on any points or are troubled by anything, contact
an au shop or Customer Service Center.
◎ Connections between the product and all other Bluetooth® and wireless
LAN (Wi-Fi®) devices have not been confirmed. Therefore, connections
with all Bluetooth® and wireless LAN (Wi-Fi®) devices are not guaranteed.
◎ The product supports security features for wireless communications that
are compliant with the Bluetooth® and wireless LAN (Wi-Fi®) standard
specifications, but the security may not be sufficient depending on the
usage environment and configuration. Be careful when making data
communication using Bluetooth® or wireless LAN (Wi-Fi®) function.
◎ Wireless LAN (Wi-Fi®) has the advantage that it can be freely connected
anywhere within the radio wave range, as it uses radio waves for
exchanging information. At the same time, there is a risk that a malicious
third party may obtain unauthorized access if security settings have not
been configured. You are recommended to configure security settings
before using wireless LAN (Wi-Fi®) at your decision and responsibility.
◎ The Company assumes no responsibility for leakage of data or information
that may occur during Bluetooth®/wireless LAN (Wi-Fi®) communication.
Safety Precautions
27
Page 30
◎ Since Bluetooth® and wireless LAN (Wi-Fi®) functions use the same
frequency band, using the both functions at the same time may cause
radio wave interference resulting in decreased communication speed or
disconnection from the network. If connection fails, stop using either of the
Bluetooth® and wireless LAN (Wi-Fi®) functions.
Notes on Packet Communication Charge
• Since constant Internet connection is possible with the product,
Safety Precautions
packet communication may be performed automatically by some
applications, resulting in high packet communication charges.
Therefore, subscription to the flat-rate/discount service for packet
communication charges is recommended.
• To browse homepages, download applications, communicate using
applications, send/receive e-mails and configure various settings,
connection to the Internet is required, to which packet
communication charge applies.
* Packet commun ication charge does not apply to Wi-Fi® connection.
Notes on Google Play/au Market/ Applications
• Be sure to check the security of the application, then install it at your
own risk. Some applications might cause virus infection, damage
various data, and send out your location information, usage history
or personal information stored in your cell phone via the Internet.
• The Company assumes no responsibility for any problems that
might be caused by applications you have installed. In such case,
you may be charged a repair fee even during the warranty period.
• The Company assumes no responsibility for any disadvantage
brought to you or any third party by applications you have installed.
• Insertion of a microSD memory card is necessary to use some
applications.
• Some applications prohibit the product from entering sleep mode
while they are active, or rapidly drain the battery while running in the
background.
• Operation procedures and screen appearances of the applications
preinstalled in the product and those installed by you are subject to
change without notice as a result of version upgrade. In addition,
operation procedures described in this manual may differ from the
actual procedures.
28
Page 31
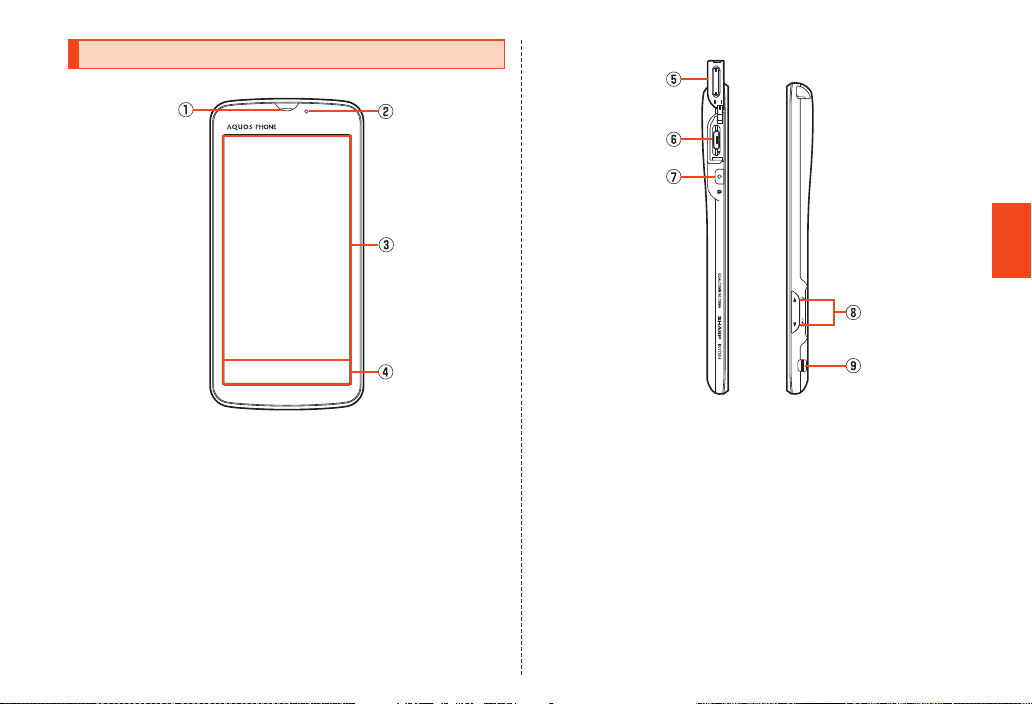
Names and Functions of Parts
■ Front
■ Left Side/Right Side
Getting Ready
A Earpiece (Receiver)
Emits voice of the other party during a call, messages in Answering
memo, etc.
B Light sensor
Detects the ambient brightness and adjusts the brightness of
display (main area).
C Display (Main area)/Touch panel
D Display (Sub area)/Touch panel
The touch keys are displayed.
Battery level, the date and time, etc. are displayed while the sleep
mode is set.
E External connection jack cover
F External connection jack
Use it to connect the product to the common AC adapter 03 (sold
separately), the microUSB cable 01 (sold separately), SHARP
microUSB-18-pin (charger) conversion cable 01 (sold separately),
etc.
G f Power key
Sets sleep mode.
Hold it down to turn on/off the power, set the manner mode, etc.
29
Page 32
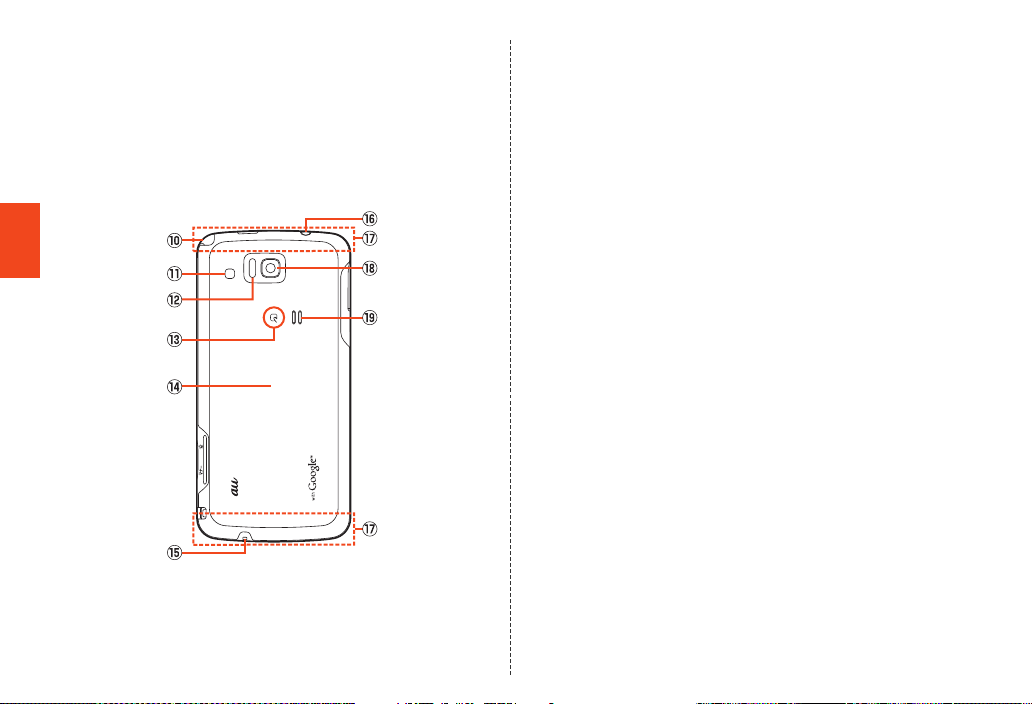
H ud Volume up/down key
Adjusts the volume.
Hold u down on the Welcome Sheet(Lock Screen) to turn on the
mobile light.
Hold d down on the home screen or Welcome Sheet(Lock
Screen) to enable/disable the manner mode.
I Strap eyelet
■ Back
Getting Ready
J TV antenna
Extend and use it to watch 1Seg. It has no influence on calls or
data communications if you extend the TV antenna when talking on
the product, using browser, etc.
K Mobile light/Charging indicator
Flashes in red while activating the camera.
Illuminates in red while charging.
L Infrared port
Sends and receives data via infrared communication.
M FeliCa mark
Hold it over a reader/writer when using Osaifu-Keitai
®
.
Sends and receives data via IC communication.
N Battery cover
O Mouthpiece (Microphone)
Transmits your voice to the other party during a call. It is also used
for recording sounds. Take care not to cover the microphone with
your fingers etc. when using it.
P Earphone/Microphone jack
Q Internal antennas area
Do not cover the internal antennas area with your hand when you
talk on the product, use the Internet, Wi-Fi
or retrieve GPS information (only the upper part on the back of the
main unit affects the Wi-Fi
®
, Bluetooth® and GPS functions). Also,
®
or Bluetooth® function
do not paste stickers etc. around the internal antennas area. Doing
so may make the quality of calls/communications deteriorate.
R Camera lens
S Speaker
Emits ringtones, alarm tones, etc.
30
Page 33
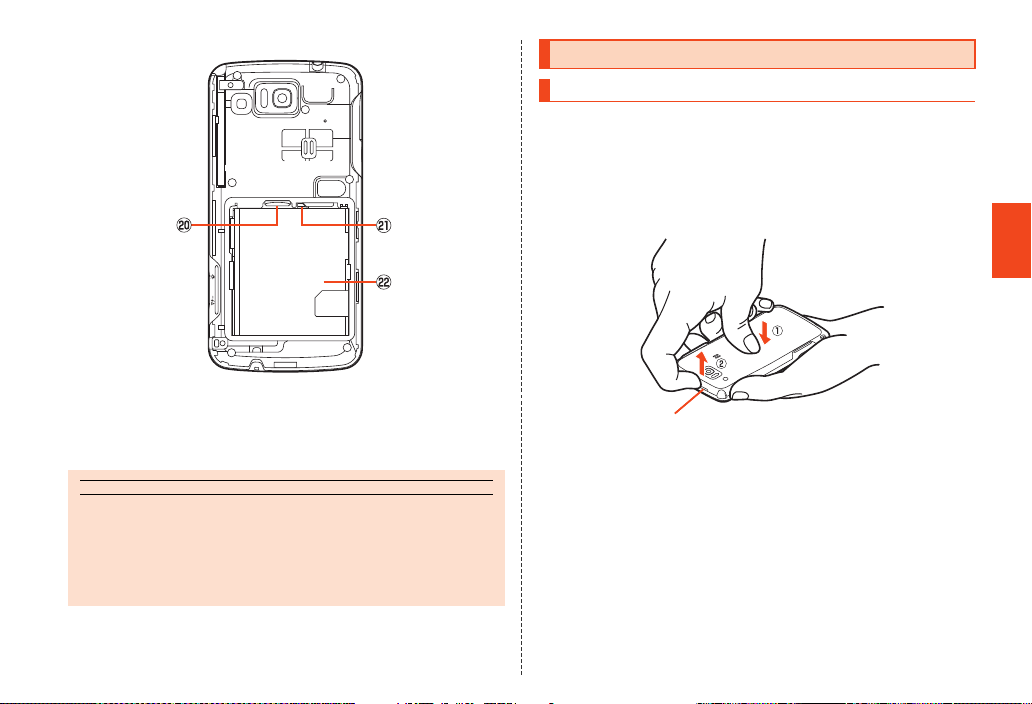
■ Back (Inside the Battery Cover)
memo
Concave portion
T microSD memory card slot
U Tray
Use it when you insert the au IC-Card.
V Battery pack
◎ Do not remove the cover etc. put inside the battery cover.
◎ When you connect the common AC adapter 03 (sold separately), the
microUSB cable 01 (sold separately), etc . to the product, some
applications may not function properly since the geomagnetic sensor is
affected by the magnetism of connected devices. Use the product after
removing cables.
Attaching/Removing the Battery Pack
Attaching the Battery Pack
Use only the battery pack for the product.
A Remove the battery cover on the back of the main
unit.
Hook a fingertip (nail) on the concave portion of the battery cover with
the center of the battery cover pressed (A), and then remove the
battery cover by pulling up in the direction of the arrow (B).
Getting Ready
31
Page 34
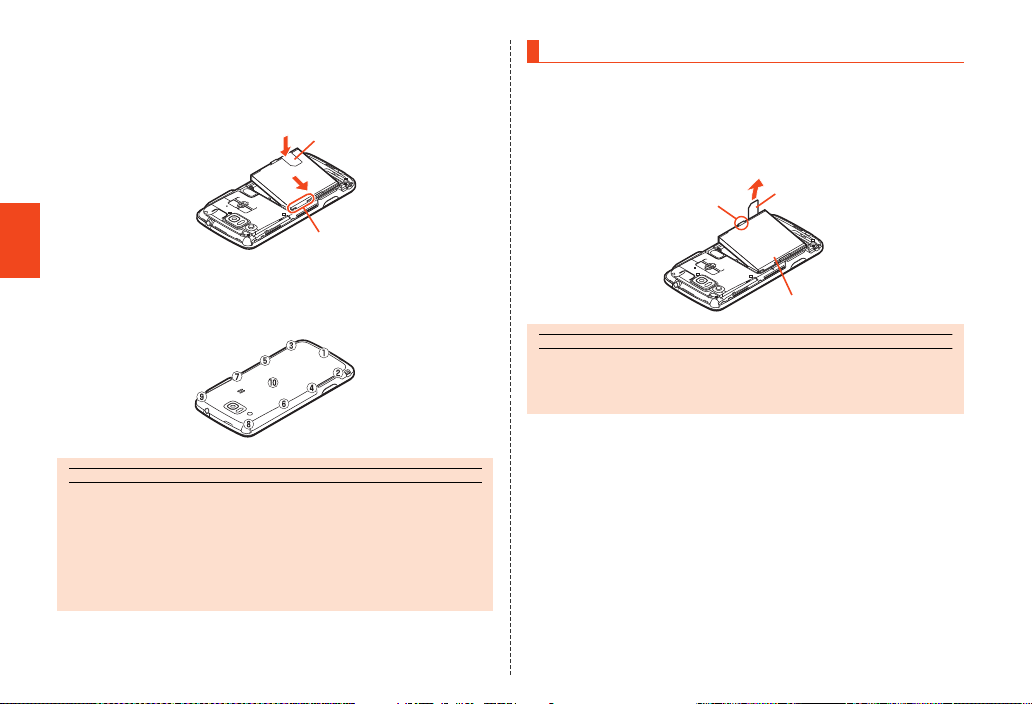
B After making sure that the PULL tab is closely
memo
memo
attached to the battery pack, align the contacts on the
battery pack with those of the product and then insert
the battery pack securely.
PULL tab
Contacts on the product
Getting Ready
C After attaching the battery cover, press the battery
cover securely from A to J in order, and make sure
that there is no gap.
◎ When removing the battery cover, do not warp it too much.
◎ Before attaching the battery pack, make sure that the au IC-Card is
inserted properly.
◎ Make sure to close the battery cover securely with no gap left in order to
maintain the waterproof property.
◎ Failure to follow the correct procedure when attaching the battery pack
may result in damage to the battery pack or the battery cover.
Removing the Battery Pack
Before removing the battery pack, turn the product off and remove the
battery cover.
A Remove the battery pack.
Remove the battery pack by pulling up the PULL tab in the direction of
the arrow.
Protruding edge
◎ When removing the battery pack, pull the PULL tab up.
Or use the protruding edge to remove it. Doing otherwise may result in
damage to the main unit or the battery connections.
PULL tab
Battery pack
32
Page 35
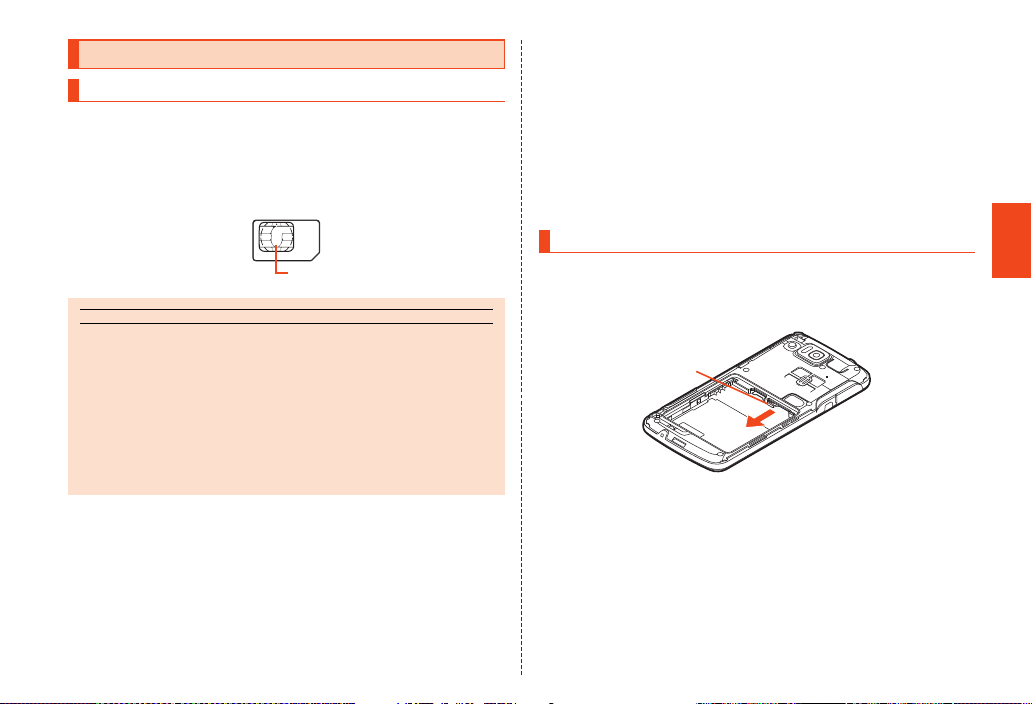
memo
au IC-Card
IC (metal) part
Using the au IC-Card
au IC-Card
The au IC-Card records your personal information such as phone
numbers.
The product is compatible with au IC-Card only. You cannot use the
product by inserting the micro au IC-Card for au phones and
smartphones instead.
◎ Note the following points, which may cause malfunction or damage, when
handling the au IC-Card.
• Do not touch the IC (metal) part of the au IC-Card or the IC card terminal
inside the product.
• Insert the au IC-Card in the correct direction.
• Do not use force to attach or remove the au IC-Card.
◎ Do not lose the au IC-Card after it has been removed.
◎ Make sure to unplug the microUSB plug of the common AC adapter 03
(sold separately) etc. from the product when attaching or removing the au
IC-Card.
■ When the au IC-Card is not inserted
If the au IC-Card is not inserted, the following operations are
unavailable.
*
• Making
• Sending/Receiving mails
• Confirming your own phone number/own mail address
• Setting UIM card lock
* Making an emerg ency call to 110 (Police), 119 (Fire and Ambulan ce) and 118 (Regional Coast
/Receiving a call
Guard) and making a call to 157 (Customer Ser vice Center) are also unavailable.
Besides the above, functions which requires your phone number etc.
may not be available.
Also, you cannot use the product with a card other than an au IC-Card
inserted.
■ Restriction Settings with PIN Code
You can set the product to restrict the use of the product by others
through changing the PIN code or locking the UIM card in order to
protect your important private information while you are using your au
IC-Card.
Attaching the au IC-Card
Before attaching the au IC-Card, turn the product off and remove the
battery pack.
A Pull the tab of the tray in the direction of the arrow.
Tab
Getting Ready
33
Page 36
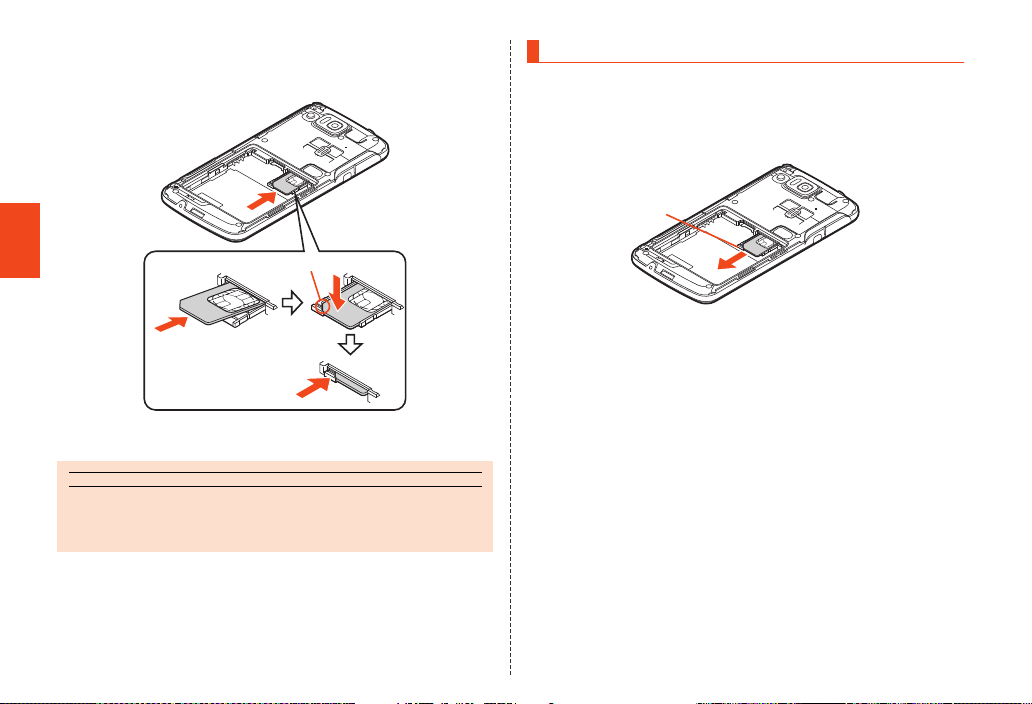
B Place the au IC-Card on the tray with the IC (metal)
memo
side up and insert it securely.
Insert the au IC-Card according to the orientation of its cutout.
Removing the au IC-Card
Before removing the au IC-Card, turn the product off and remove the
battery pack.
A Pull the tab of the tray in the direction of the arrow
and remove the au IC-Card.
Tab
Getting Ready
Cutout
C Attach the battery pack and the battery cover.
◎ Inserting the tray not deeply enough may prevent the product from
functioning properly.
◎ When the tray comes off, insert the tray straightly.
34
B After inserting the tray securely, attach the battery
pack and battery cover.
Page 37
Using a microSD Memory Card
memo
microSD Memory Card
You can save, move and copy data by attaching one of microSD
memory cards (including microSDHC memory cards) in the product.
◎ The maximum file size available on a microSD memory card is 2 GB per file
when saving data to a microSD memory card.
◎ A microSD memory card initialized on other devices may not work on the
product properly. On the home screen, tap [APPS] [[Settings]
[[microSD & phone storage] [[Erase microSD] [[Erase SD card]
[Unlock [[Erase everything] to i nitialize the microSD memory card.
◎ To play/display data on the microSD memory card, on the home screen,
tap [APPS] [[Contents Manager] and use Contents Manager.
◎ Some copyright protected data may not be played on the product even if
they can be moved/copied from a PC etc. to a microSD memory card
successfully.
■ Handling Precautions
• Do not turn off the product or subject it to impact while microSD
memory card data is being accessed. Doing so creates the risk of
data corruption.
• The following microSD memory cards have been confirmed for
operation based on the criteria by the Company. For operation
confirmation results of other microSD memory cards, contact each
microSD memory card manufacturer.
* Note that the p rovided information is the information check ed for operation. The Company
shall not guarantee all operations to you.
<microSD/microSDHC Memory Card>
Manufacturer 2 GB 4 GB 8 GB 16 GB 32 GB
Toshiba
Panasonic
SanDisk
ADTEC
Buffalo
Sony
○: Confirmed operation
−: Unconfirmed operation or not for sale
As of June 2012
* 4 GB or more are for microSDHC mem ory card.
* Operatio n is confirmed for microSD memory cards that are so ld as of June 2012. For the
latest information on operation confirmation, visit the a u homepage or contact Customer
Service Center.
○ ○ ○ ○ ○
○ ○ ○ ○ ○
○ ○ ○ ○ ○
○ ○ ○ ○ ○
○ ○ ○ ○ ○
○ ○ ○ ○ ○
Getting Ready
35
Page 38
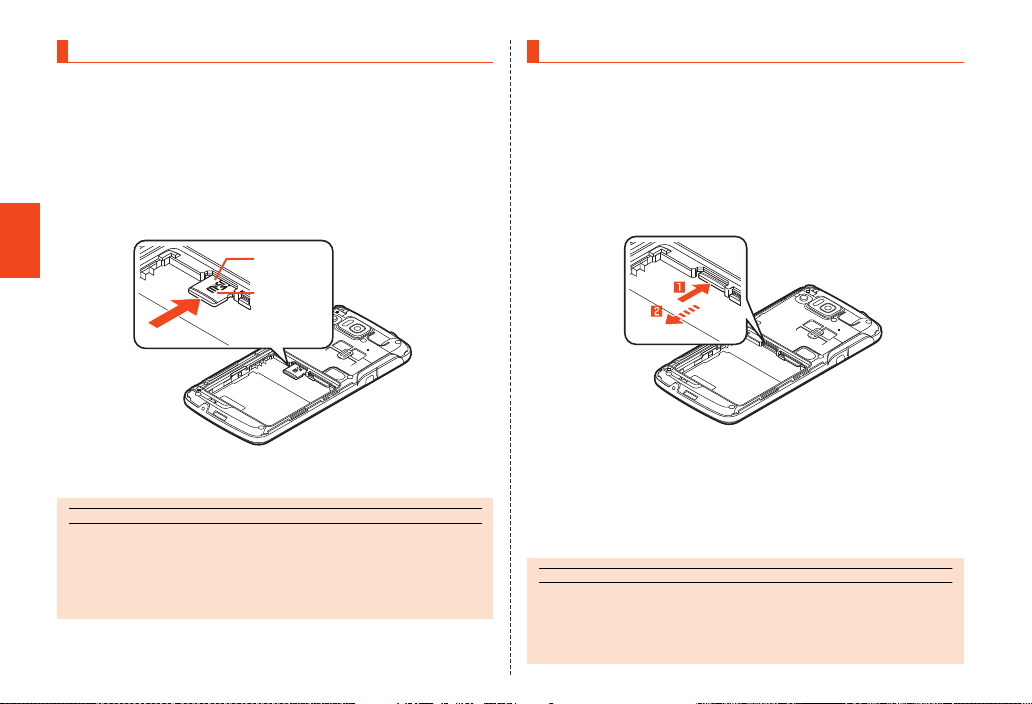
Attaching a microSD Memory Card
memo
memo
Before attaching a microSD memory card, turn the product off and
remove the battery pack.
A Confirm the direction of the microSD memory card
and insert it slowly in the direction of the arrow until it
clicks.
Insert a microSD memory card until you hear a click and confirm it is
locked. Releasing the microSD memory card before it is locked may
cause it to pop out.
microSD
memory card
Getting Ready
slot
microSD logo
side up
B Attach the battery pack and the battery cover.
◎ Make sure that the top and bottom of the microSD memory card are facing
correctly.
Trying to force a wrongly oriented card into the slot could make it
impossible to remove the card and result in damage.
◎ Do not touch the terminal part of a microSD memory card.
36
Removing the microSD Memory Card
Before removing the microSD memory card, turn the product off and
remove the battery pack.
A Push slowly the microSD memory card into the slot
until it clicks.
After it clicks, pull back your finger without releasing it from the
microSD memory card until it comes out a little. Releasing your finger
from the microSD memory card when it is pushed deeply into the slot
may cause it to pop out.
B Remove slowly the microSD memory card.
Pull slowly the microSD memory card straight out.
Some microSD memory cards cannot be unlocked and do not come
out smoothly. In such case, pull it out lightly with your finger.
C Attach the battery pack and the battery cover.
◎ Do not remove the micr oSD memory card forcefully. Doing so may result in
damage to the microSD memory card or the product or data loss.
◎ Applications installed to a microSD memory card cannot be used once you
removed the microSD memory card.
Page 39
◎ The microSD memory card may become warm after a long time use, but
memo
this is not a fault.
Charging
Charging
When you purchase the product, the battery pack is not fully charged.
Be sure to charge the battery pack before use.
The usage times are as follows.
Continuous
standby time
Continuous talk
time
* These times are based on the case when the product is used in Japan. For details on the usage
time overseas, refer to “Main Specifications” (z P. 68).
◎ The product and the battery pack may become warm during charging, but
this is not a fault.
◎ Charging the battery pack while using the camera function etc. may
lengthen the charging time.
◎ If you perform various operations with a specified charger (sold separately)
connected to the product, charging/electric discharge may take place
repeatedly in a short time. Frequently charging the battery pack shortens
its service life.
◎ If the charging indicator flashes in red, check whether the battery pack is
properly attached, an external device is properly connected to the
product, etc. If the indicator flashes even after you have checked that, stop
charging the battery pack and contact an au shop or Secure cell phone
support center.
◎ Properly close the external connection jack cover. Also, do not pull it
forcibly or twist it.
Approx. 470 hours (while 3G is used)
Approx. 240 hours (while 3G and Wi-Fi
Approx. 590 min
®
are used)
◎ The continuous talk time and continuous standby time are average usage
times combining the time during which a cell phone is carried around by a
user and properly receives radio waves plus the time during which a cell
phone is stationary and properly receives radio waves. According to usage
conditions such as battery level status and temperature, the signal
strength in a place where the cell phone is used, settings of functions, etc.,
the usage times may be reduced to less than half under the following
cases.
• A cell phone is frequently used in a place where (out of service area
indicator) appears on it.
• The Wi-Fi® function, Bluetooth® function, mail function, camera function,
1Seg function, location information, etc. is used.
• A cell phone is set not to enable sleep mode because of an application
etc.
• Applications which remain activated in the background are used.
◎ If you stop charging while the charging indicator still illuminates during
charging, the cell phone may be left not fully charged even if appears
on it. In such case, the average usage times shorten.
Charging with the Specified AC Adapter (Sold
Separately)/Specified DC Adapter (Sold
Separately)
The followings are the explanation of how to connect the common AC
adapter 03 (sold separately)/the common DC adapter 03 (sold
separately) to charge. For details on the specified AC adapter (sold
separately)/DC adapter (sold separately), refer to “Introduction of
Peripheral Devices” (zP. 60).
Charging time is as shown below.
Common AC adapter 03
(sold separately)
Common DC adapter 03
(sold separately)
Approx. 210 min
Approx. 270 min
Getting Ready
37
Page 40
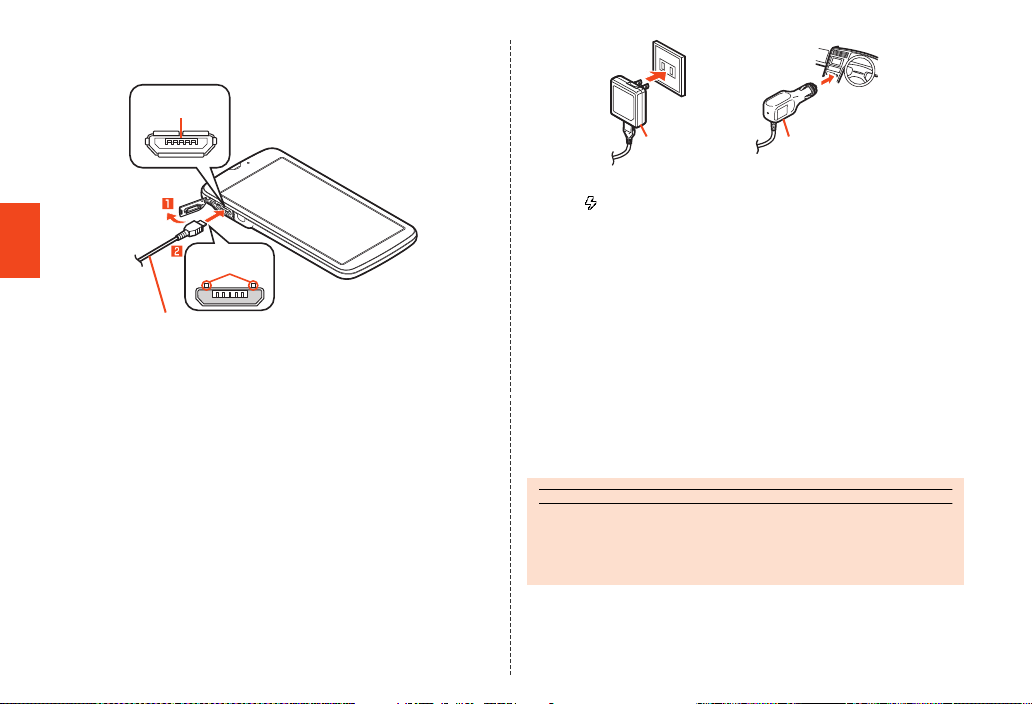
A Open the external connection jack cover of the
memo
product.
External
connection jack
Protruding
Getting Ready
Common AC adapter 03 (sold separately)/
Common DC adapter 03 (sold separately)
edges
B Confirm the direction of the microUSB plug of the
common AC adapter 03 (sold separately)/the common
DC adapter 03 (sold separately) and insert it in the
direction of the arrow to the external connection jack
of the product.
C Plug the common AC adapter 03 (sold separately)
power plug into a 100 V AC power outlet/Plug the
common DC adapter 03 (sold separately) plug into a
cigarette lighter socket.
38
Common AC adapter
03 (sold separately)
The charging indicator illuminates in red, and the battery icon appears
with superimposed. When charging is finished, the charging
indicator goes out.
Common DC adapter
03 (sold separately)
D When charging is finished, pull the microUSB plug of
the common AC adapter 03 (sold separately)/common
DC adapter 03 (sold separately) straight out from the
external connection jack of the product.
E Close the external connection jack cover of the
product.
F Unplug the common AC adapter 03 (sold separately)
power plug from the power outlet/Unplug the
common DC adapter 03 (sold separately) plug from
the cigarette lighter socket.
◎ Although you can charge the battery pack while the power is turned on,
charging time lengthens.
◎ If you charge the battery pack when the battery has run out, the charging
indicator may not illuminate soon. However, charging is in progress.
Page 41
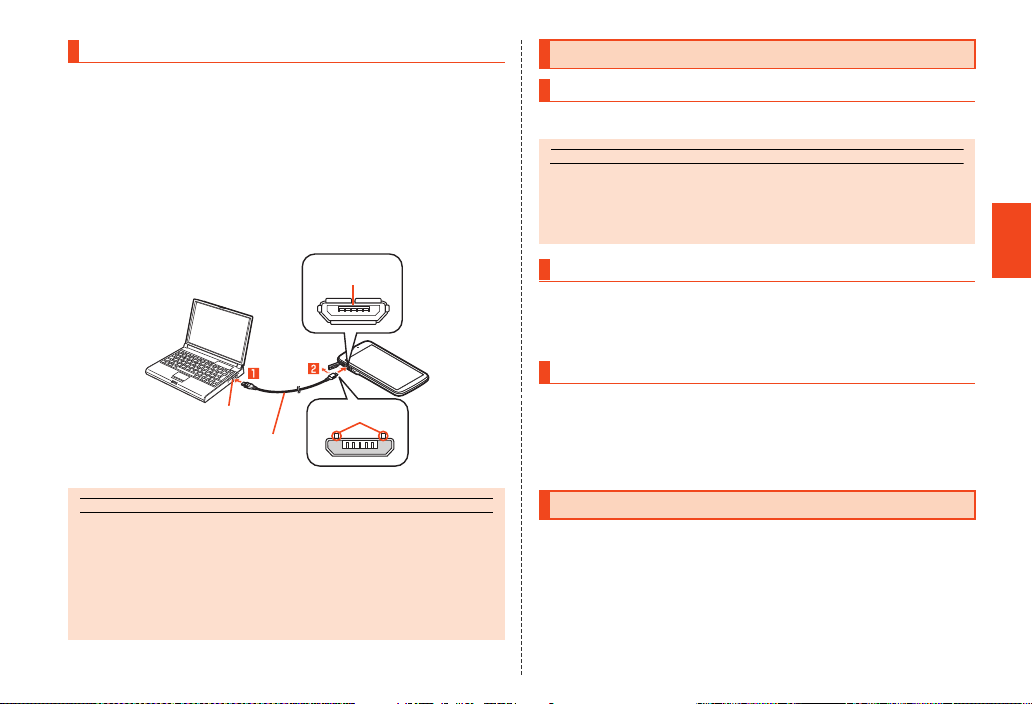
Charging with a PC
memo
memo
When you connect the product to a USB port of a PC through which
the battery pack can be charged, the charging indicator illuminates in
red and charging starts. When charging is finished, the charging
indicator goes out.
A Connect the microUSB cable 01 (sold separately) to a
USB port of a PC after the PC is activated completely.
B Connect the microUSB cable 01 (sold separately) to
the product after the product is activated completely.
External
connection jack
USB port of a PC
microUSB cable 01
(sold separately)
◎ If you use the microUSB cable to charge the battery pack, it may take the
battery pack longer to be fully charged than if you use the specified AC
adapter (sold separately).
◎ The product is turned on when it is connected while the power is turned off.
◎ If you charge the battery pack when the battery has run out, the charging
indicator may not illuminate. In such case, use the specified AC adapter
(sold separately) for charging.
Protruding edges
Turning the Power On/Off
Turning the Power On
A f (hold down for at least 2 seconds).
◎ The initial setting of the touch panel will be executed until “AQUOS
PHONE” disappears from the screen after the power is turned on. Do not
touch the screen, otherwise touch panel operations may not be performed
properly.
Turning the Power Off
A f (hold down for at least 2 seconds).
B [Power off] [[OK].
Restarting the Product
Turn off the product once and restart.
A f (hold down for at least 2 seconds).
B [Reboot] [[OK].
Sleep Mode
If you press f or no operation is made for a specified time, the
screen is turned off temporarily, and then sleep mode is set.
■ Disabling Sleep Mode
A f while sleep mode is set.
Getting Ready
39
Page 42
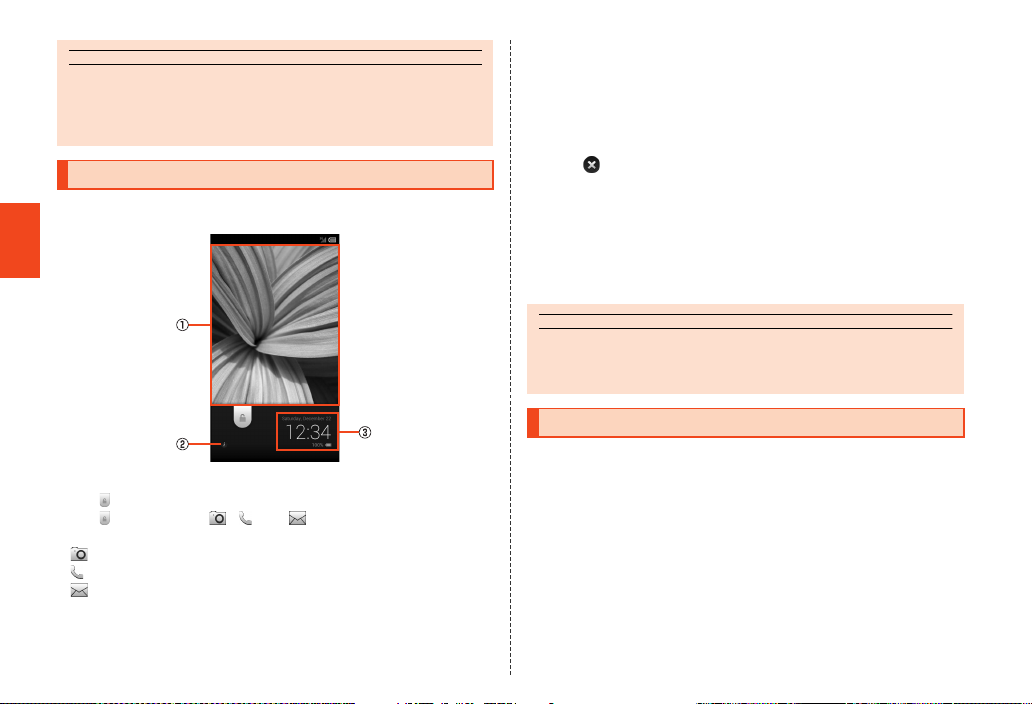
memo
◎ In some applications in use, the screen which was displayed before sleep
memo
mode is set may be displayed when sleep mode is disabled.
◎ Do not touch the screen when you disable sleep mode. Otherwise touch
panel operations may not be performed properly.
Welcome Sheet(Lock Screen)
The Welcome Sheet(Lock Screen) is displayed if you disable sleep
mode.
Getting Ready
《Welcome Sheet(Lock Screen)》
Slide “ ” down to unlock.
Slide “ ” up to display , and . Tap them to activate the
following applications.
• : Camera
• : Phone
• : E-mail
When you receive a missed call/new e-mail/new SMS (C-mail), the
notification bar is displayed. Slide the notification bar down to display
the corresponding screen.
40
A Wallpaper
If multiple images are set in “Welcome sheet (lock screen)” in
advance, flick to the left/right to switch the wallpapers.
B Owner info key
Displayed when “Owner info” in “Lock & Security” is set. Tap it to
display the owner info in the Info Area.
Tap “ ” to hide it.
C Info Area
Flick to the left/right to switch the weather, stock prices information,
music operation keys and date and time.
• The music operation keys are displayed only while an application
for music playback is being activated. They may not be
displayed depending on the application.
◎ When the Welcome Sheet(Lock Screen) is displayed for the first time, its
tutorial is displayed. Confirm the contents and follow the on-screen
instructions.
Switching the Display Language to English
You can switch the display language for function names and other
items to English.
A On the home screen, [アプリ] (APPS).
B [設定] (Settings).
C [言語と文字入力] (Language & input).
D [言語(Language)を選択] (Select language).
E [English].
Page 43
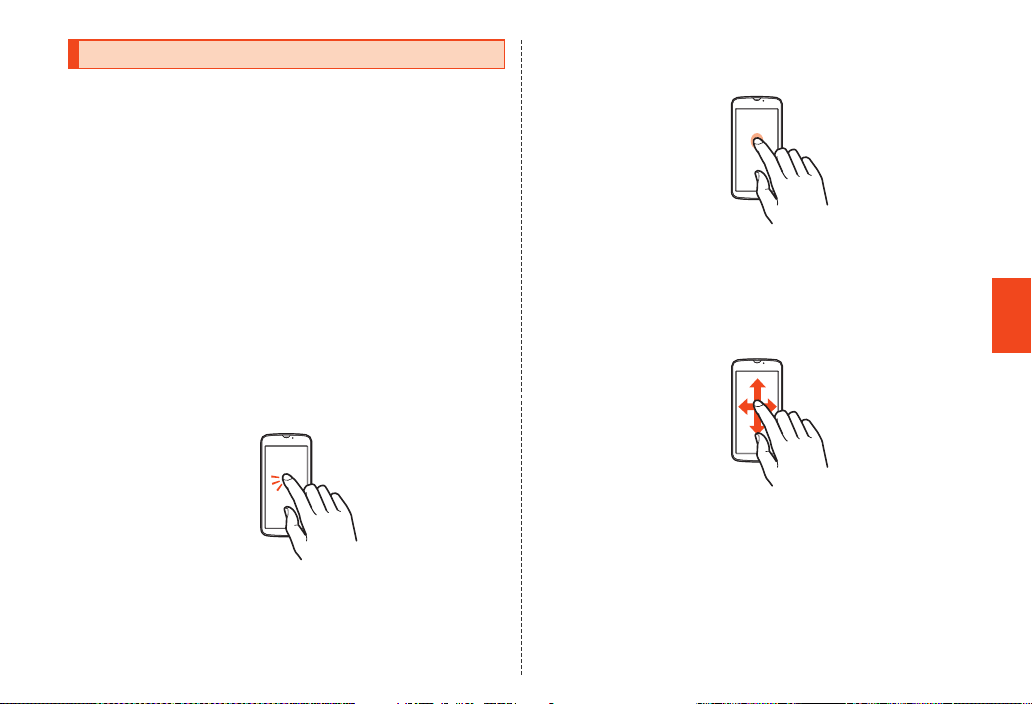
Using the Touch Panel
The display (main area) on the product is a touch panel operated by
touching it with your finger.
• The touch panel is designed to be touched lightly by your finger. Do
not exert too much pressure with your finger or press sharp-pointed
objects (fingernails, ballpoint pens, pins, etc.) against it.
• In the following cases, the touch panel may not work even if you
touch it. It may also cause a malfunction.
・ Operation with a gloved finger
・ Operation with your fingernails
・ Operation with foreign objects placed on the operation pad
・ Operation with protective sheets or stickers on the touch panel
・ Operation when the display is wet or fogged
・ Operation with wet or sweaty fingers
・ Operation under water
■ Tap/Double Tap
Tap: Gently touch a screen and then immediately release your finger.
Double tap: Tap the same position twice.
• Select an item or icon displayed on the screen. Double tap on the
browser etc. to enlarge/reduce the screen.
■ Long Touch
Keep touching an item with your finger.
• Display context menu etc.
■ Slide
While your finger is gently touching the screen, trace it to the desired
direction to move over when all items cannot be displayed within the
screen.
• Scroll screen or switch pages. In addition, operate gauge and bar
when adjusting volume and brightness.
Basic Operations
41
Page 44
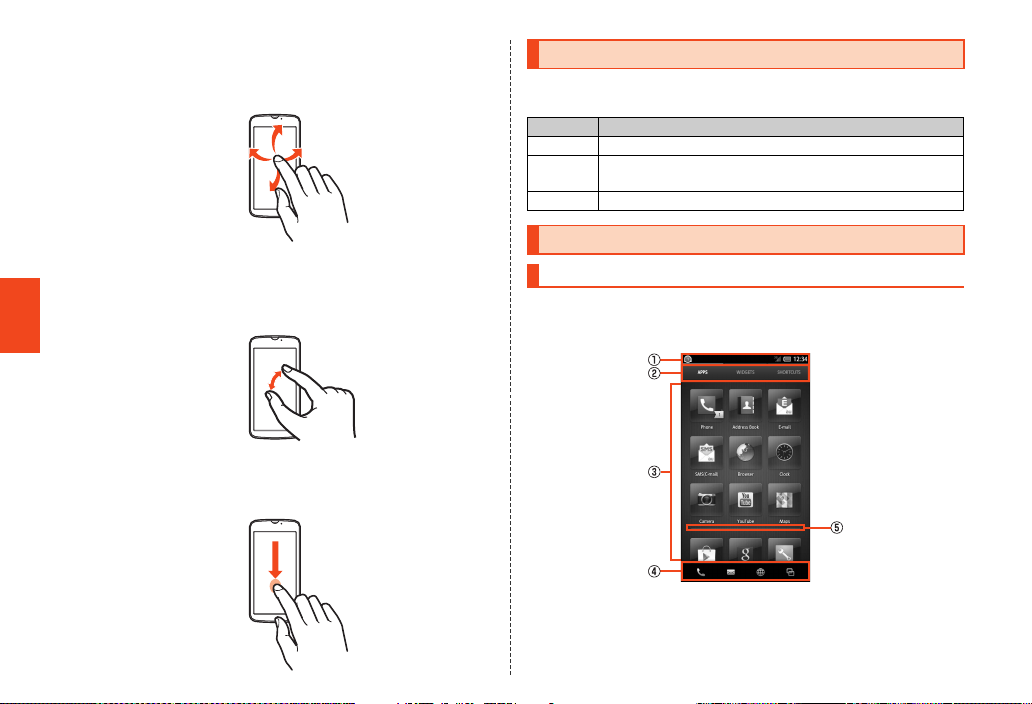
■ Flick
Operate the screen by quickly moving (flicking) your finger up, down,
right, or left.
• Switch pages, enter characters by flick input, etc.
■ Pinch
Touch the screen with two fingers and widen (pinch-out) or narrow
(pinch-in) the fingers’ distance.
• Enlarge/Reduce the screen of the browser etc.
Basic Operations
■ Drag
While your finger is gently touching an item or icon, trace it to the
desired position to move or perform other operations.
Using the Touch Keys
While the display (main area) illuminates, the following icons appear
on the display (sub area) all the time and can be used as touch keys.
Icon Description
^
#
e
Returns to a previous screen.
Displays the home screen.
Long touch it to display recent applications.
Displays an option menu.
Using the 3-Line Home
Viewing the 3-Line Home
The 3-Line Home is a home screen which consists of the Apps Sheet,
the Widget Sheet and the Shortcut Sheet. You can use the function by
tapping an icon/a widget/shortcut on each sheet.
42
Page 45
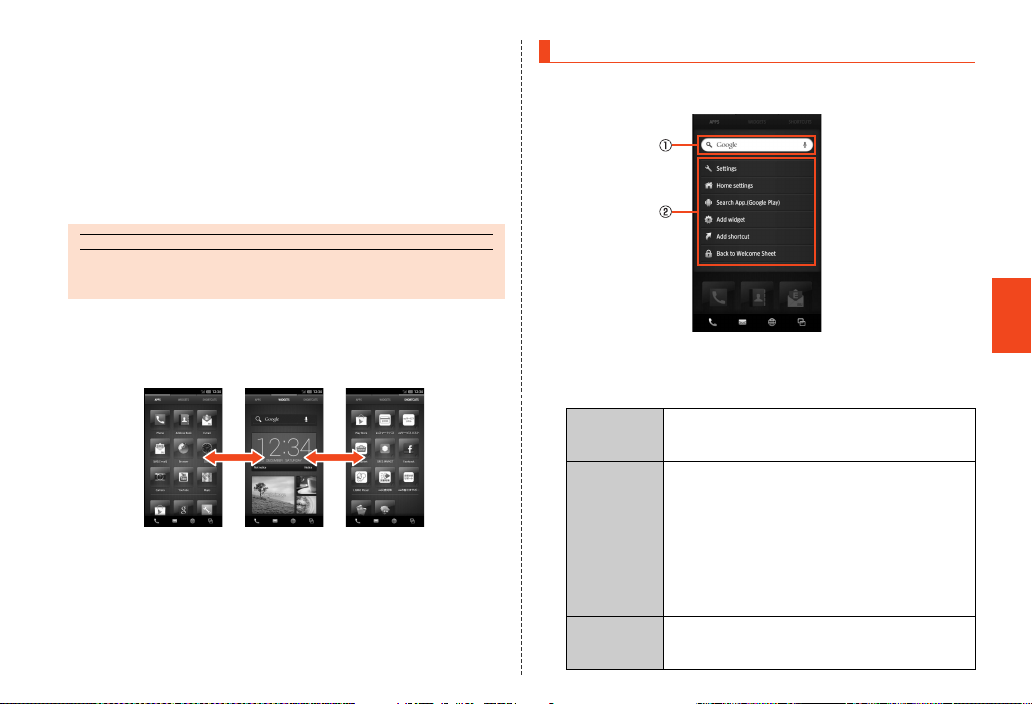
memo
A Status bar
B Sheet Switcher
Tap it to switch the Apps Sheet, the Widget Sheet and the Shortcut
Sheet.
C Apps Sheet/Widget Sheet/Shortcut Sheet
D Navigation Bar
E Separator
Pinch out vertically on the home screen to add the separator. To
delete the separator, pinch it in vertically.
◎ When the 3-Line Home is displayed for the first time, its operation guide is
displayed. Confirm the contents and follow the on-screen instructions.
■ Switching Sheets
On the Sheet Switcher, tap “APPS”, “WIDGETS” or “SHORTCUTS”, or
slide/flick the home screen to the left/right to switch each sheet.
《Apps Sheet》《Widget Sheet》《Shortcut Sheet》
Switching sheets
Using Menu on the Home Screen
A Slide down at the top of each sheet.
Alternatively, tap “e” at the top of each sheet to display menu.
《Menu》
A Quick search box
B Menu
Settings Makes various settings for the product.
B
Home
settings
Search
App.(Google
Play)
• For details, refer to “Displaying Setting Menu”
(zP. 59).
About home
Tap “View tutorial” to display the operation
guide for the 3-Line Home.
Layout
Sets the layout of the 3-Line Home.
Scroll setting
Sets the scroll type for the 3-Line Home.
Theme
Sets the theme of the 3-Line Home.
Use Google Play.
Basic Operations
43
Page 46
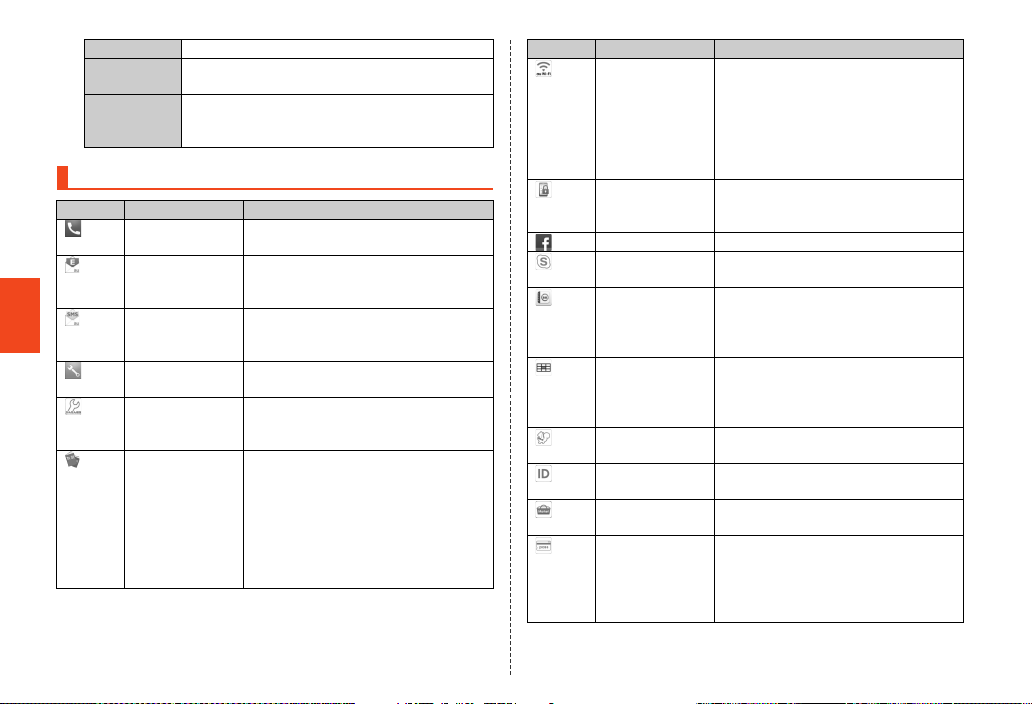
Add widget Pastes the selected widget on the Widget Sheet.
Add shortcut Pastes the selected shortcut on the Shortcut
Sheet.
Back to
Displays the Welcome Sheet(Lock Screen).
Welcome
Sheet
Main Application List
Icon Name of icon Description
Basic Operations
Phone Make a call and confirm histories.
E-mail Sends and receives mails using an
SMS(C-mail) Exchange mails between cell phones
Settings From Settings, set up and manage
au Easy Setting “au Easy Setting” assists you to set up
*
Instruction
Manual
(zP. 53)
address (ezweb.ne.jp). Emoji and
Decoration Mail are supported.
by using phone numbers as the
destination.
functions. (zP. 59)
au services and functions.
For details, refer to “Setting Guide”.
Check the contents written in “Full
Instruction Manual” (Japanese). You
can search explanations of a function
that you want to use by using the table
of contents, index and search engine.
Also, you can easily search
explanations often confirmed by
putting bookmarks on them.
Icon Name of icon Description
au Wi-Fi接続ツー
ル (au Wi-Fi
connection tool)
Connects to a Wi-Fi network easily in
an area where au Wi-Fi SPOT is
available.
Also, you can set Wi-Fi
wireless LAN (Wi-Fi
®
) access point on
which “Simple connection” is
available.
安心アプリ制限
(Restrict
Restrict applications or functions that
you do not want your children to use.
Applications)
Facebook Use Facebook.
Skype Makes a call or exchanges instant
messages (chat).
Friends Note “Friends Note” can manage Native
Address Book of your phone and
multiple social networking services in
just one application.
auテレビ.Gガイ
ド (au TV.
G-GUIDE
View TV program table or search
programs. Functions using 1Seg or
remote timer recording can be used.
program table)
LISMO Player Plays music or checks information
about the playing music.
au ID Setting Set au ID.
For details, refer to “Setting Guide”.
au Market Allows you to install Android
applications recommended by au.
auスマートパス
(au Smart Pass)
You can enjoy over 500 apps by ¥390
per month! Also coupon, present,
photo storage and security apps are
available! Please enjoy your safety
and comfortable smartphone life!
®
easily with a
44
Page 47
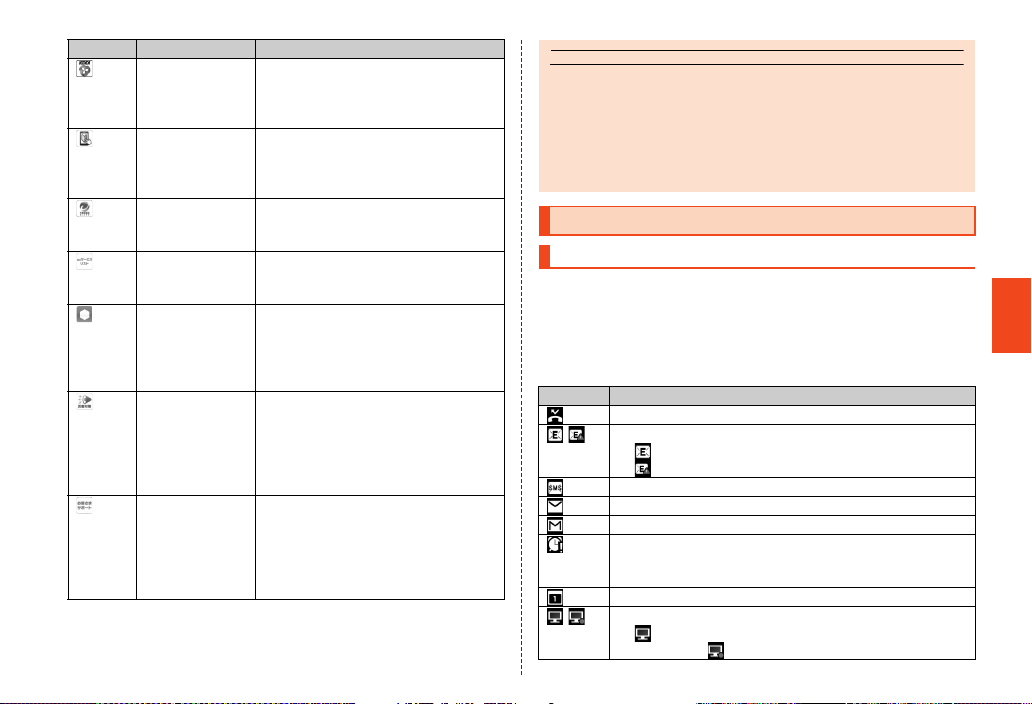
memo
Icon Name of icon Description
3LM Delete data in the IS17SH and
microSD memory card or lock its
operations in case of loss of your
IS17SH.
リモートサポー
ト (Remote
Support)
Call for technical supports on the
phone operations by sharing the
screen that you are watching with au
operators.
ウイルスバス
ター
Blocks improper applications and
sites in order to protect young people.
(VirusBuster)
auサービスリス
ト(au service
Use services and applications of au/
KDDI easily from lists.
list)
GREE MARKET
(GREE Market)
This application allows you to browse
games and other content provided by
GREE.
You do not need a GREE account in
order to use this application.
au
災害対策
(au
Disaster
Countermeasure)
This is an application in which you can
use Disaster Message Board, Early
warning mail (earthquake early
warnings and disaster/evacuation
information) and Disaster Voice
Delivery Service. (zP. 2)
auお客さまサ
ポート (au
Customer
Support)
You can check the subscription
contents or monthly usage of your au
phones etc. with this application. You
can change your rate plan, apply for
optional services and so on at au
Customer Support website.
* Requires download and installation to use.
◎ When you tap an icon to use the corresponding function, communication
charges may be incurred depending on the function.
If you have not subscribed to IS NET, au.NET charges (525 yen including
tax for the used month) and communication charges are incurred.
◎ The design of icons etc. may be changed without prior notice.
◎ Besides the above, some applications are installed on the product. For
details, refer to “Instruction Manual application” (Japanese).
Using the Status Bar
Icons
The notification icons to notify you of a missed call, a new mail
message or a running operation are displayed on the left side of the
status bar, while the status icons to show the status of the product are
on the right side.
■ Examples of Notification Icon
Icon Description
Missed call
E-mail information
: New e-mail message
: E-mail message failed to be sent
New mail message (SMS (C-mail))
New mail message (PC-mail)
New mail message (Gmail)
Alarm terminated
• Appears when the alarm is terminated without the
operation for terminating the alarm.
Schedule notification of the calendar
1Seg information
: Watching information, Recording reservation
information : Recording information
Basic Operations
45
Page 48
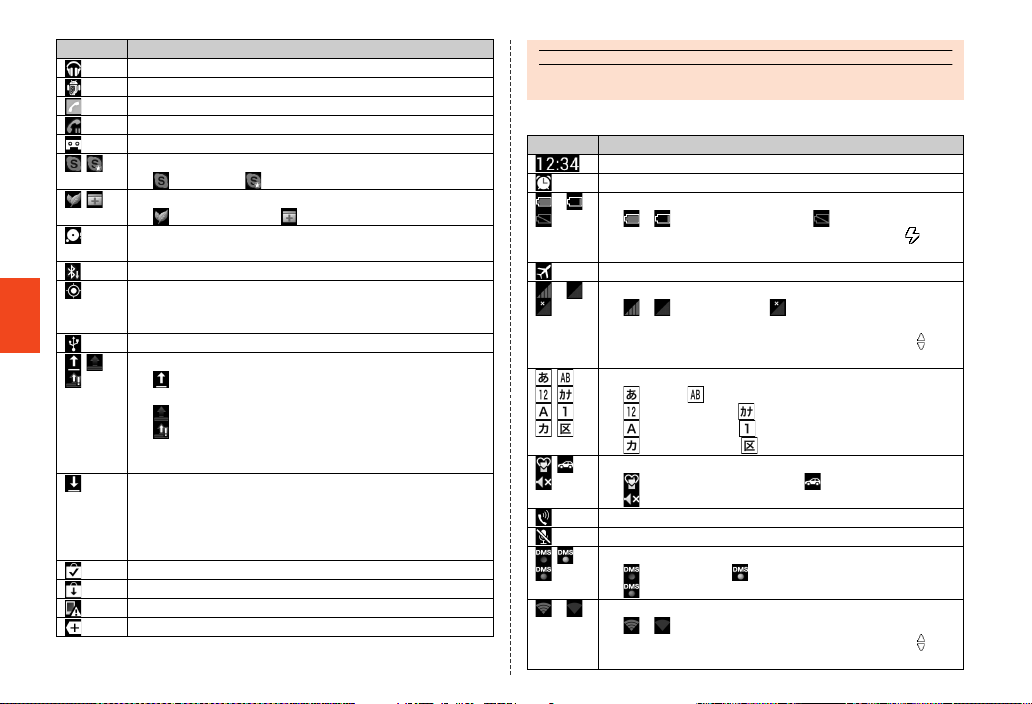
Basic Operations
memo
46
Icon Description
Playing music
USB debug connecting
Making a call, talking, receiving a call
Putting a call on hold
Answering memo
Skype™|au status
: Signed in : New event
Energy saving setting
: Waza-ari mode : Emergency mode
Space on the main unit available less than approx. 500
MB
Bluetooth® file receiving request
GPS in use
• The GPS information positioning icon is displayed as
an animation.
USB connecting
Data upload, File sending
: Uploading data, Sending file, Finished sending
file, Failed to send file
: Finished uploading data
: Waiting to upload data
• The uploading data icon and the sending file icon are
displayed as animations.
Downloading, Finished downloading, Installing data or
application, Receiving, Finished receiving file, Failed to
receive file
• The installing icon and the receiving file icon are
displayed as animations.
Finished installing
Update available
Major Update (OS Update) available
Icons collected
◎ Some icons appear with their number superimposed on them.
■ Examples of Status Icon
Icon Description
Time
Alarm set
~ Battery level
~ : Battery level display : No battery
• While charging, the battery icon appears with
superimposed.
Airplane mode set
~ Signal strength (Receiving electric field)
~ : Level display : Out of service area
• The icon indicating network appears at the upper left.
• During a communication, the icon appears with
superimposed.
Character type
: Kanji : Half Alphabet
: Half Numeric : Half Katakana
: Full Alphabet : Full Numeric
: Full Katakana : Character Code
Manner mode status
: Standard manner mode : Drive manner mode
: Silent manner mode
During a call using hands-free
Microphone set to “Mute” during a call
Home Network status
: Suspending (Green): Preparing
(Blue): Running
~ Wi-Fi® signal strength
~ : Level display
• During a communication, the icon appears with
superimposed.
Page 49
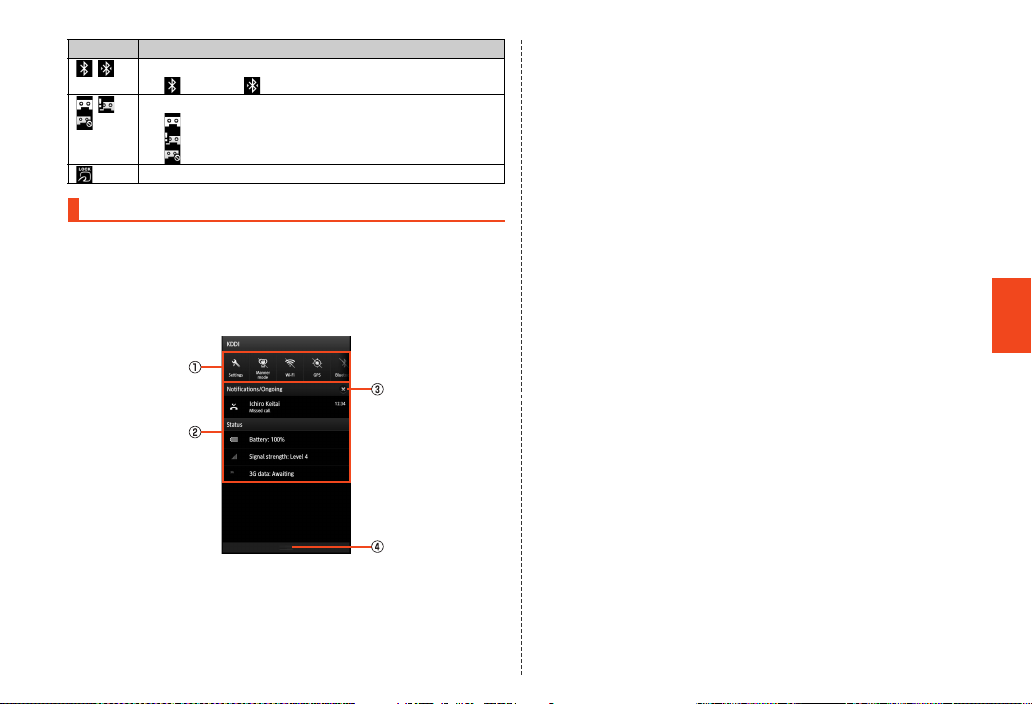
Icon Description
Bluetooth® in use
: Waiting : Connecting
Answering memo set
: No Answering memo
: Answering memo (one to nine entries)
: Answering memo (ten entries)
Osaifu-Keitai® function locked
Using the Notification/Status Panel
In the notification/status panel, you can check the details on
notification icons and status icons or activate an application
corresponding to the icon.
You can also set the manner mode, VeilView, etc.
A Slide the status bar down.
《Notification/Status panel》
A Function key
You can switch settings of the frequently used function by one
touch.
Tap “Settings” to make various settings for the product.
• For details, refer to “Displaying Setting Menu” (zP.59).
B Notification area
You can check the status of the product and contents of
notifications. You can tap to activate a corresponding
application depending on the information.
C Clear
You can clear all the notifications by tapping the key.
D Close bar
You can hide the notification/status panel by sliding it up.
Basic Operations
47
Page 50
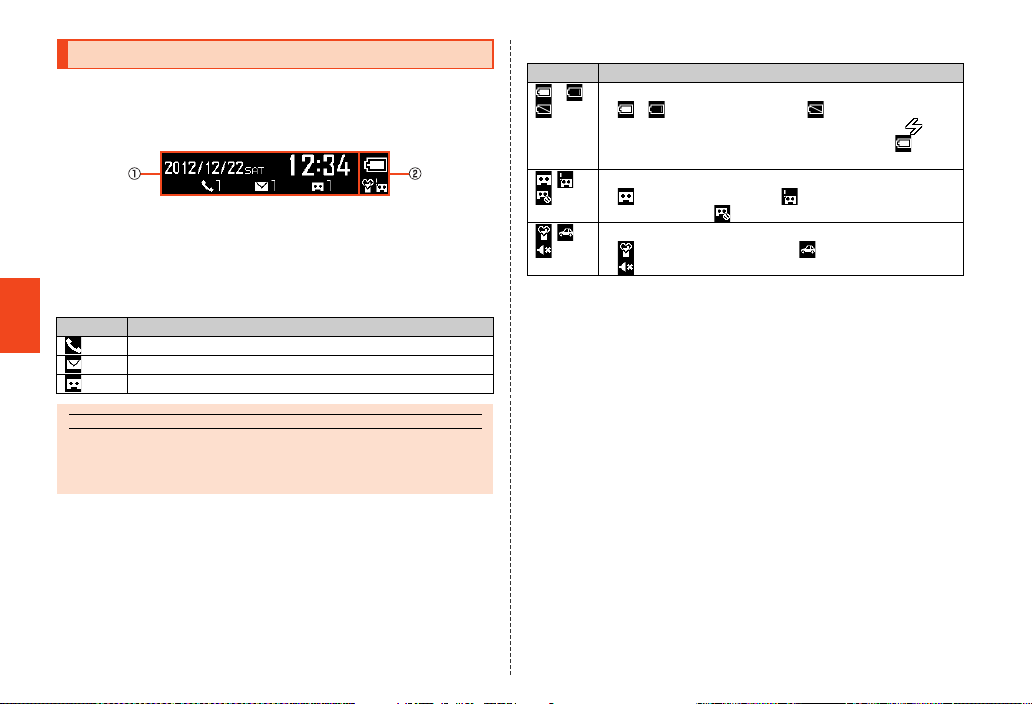
Viewing the Display (Sub Area)
memo
You can check various information such as date & time, received
mails, music, BGM and pedometer on the display (sub area) during
sleep mode. Also, notification icons and status icons are displayed.
You can switch the displays by pressing u/d.
《Date & time display (When a call is missed, a new
mail is received, Answering memo is recorded》
A Information/Notification icon display area
B Status icon display area
■ Notification Icon
Icon Description
Basic Operations
◎ The number of notifications is displayed on the right of the icon. For new
Missed call
New e-mail/SMS (C-mail) message
Answering memo
e-mail/SMS (C-mail) messages, the total numbe r of unopened mails is
displayed.
■ Status Icon
Icon Description
~ Battery level
~ : Battery level display : No battery
• While charging, the battery icon appears with
superimposed. The charge icons other than are
displayed as animations.
Answering memo set
: No Answering memo : Answering memo (one
to nine entries) : Answering memo (ten entries)
Manner mode status
: Standard manner mode : Drive manner mode
: Silent manner mode
48
Page 51
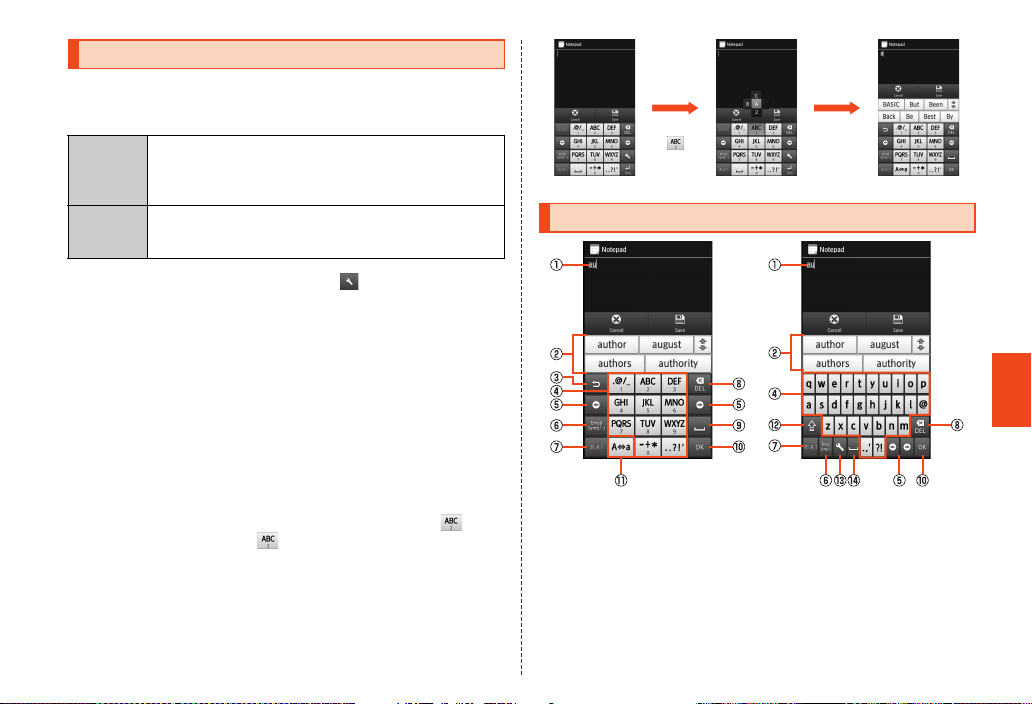
Switching Software Keyboards
Touch
“ ”
Flick left
To display the software keyboard, tap a character input field in the
character entry screen for adding contacts, creating a message, etc.
The following software keyboards are available for the product.
12Key Characters are arranged in the same order as of the
QWERTY Characters are arranged in the same order as of the
keyboard on a conventional cell phone. You can enter a
character, changing characters by repeatedly tapping
the character entry key.
keyboard on a conventional PC. You can enter a
displayed character by tapping the character entry key.
A On the character entry screen, [ ]
[[Change input UI]
[[Set QWERTY keyboard]/[Set 12 keyboard].
The hint screen for switching keyboards is displayed. Follow the
on-screen instructions.
■ Flick Input
When the software keyboard is “12 Key”, you can enter a desired
character by flicking the key up, down, left or right without tapping the
key repeatedly.
When you touch a key, the candidates that can be entered by flick
input are displayed. By flicking the key in the direction of a desired
character being displayed, the character is entered in the character
entry area. For example, you can enter “A” by only tapping “ ”, and
you can enter “B” by flicking “ ” left.
Viewing the Character Input Screen
《Character entry screen (12 Key)》
A Character entry area
B Prediction candidates list/Relational prediction candidates list/
Normal conversion candidates list
If the predictive conversion is enabled, the prediction candidates
list is displayed when characters are entered. If the relational
prediction is enabled, the relational prediction candidates list is
displayed when you select a candidate.
《Character entry screen (QWERTY)》
Character Input
49
Page 52
Enter characters and tap “ ” to display the normal conversion
candidates list.
• You can enlarge the candidates list area by tapping “ ”. Tap
“ ” to return it to the original display.
C Reverse toggle key/Undo key
: Displays the characters assigned to the same key in the
reverse rotation.
: Cancels the last operation such as returning the determined
characters to the undetermined state by tapping the key.
D Character entry key
You can enter a character assigned to each key.
Character Input
E Cursor key
Moves the cursor to the left and right. Enters a space by moving
the cursor to the right at the end of a text. Change the range of the
characters for character input and conversion.
F Emoji, Symbol and Facemark key/Kana and Alphanumeric key
: Displays the emoji/symbol/facemark list.
: Displays katakana, alphabet, number and predicted date and
time assigned to the entered characters as conversion
candidates.
・ Tap “ ” to return to the previous display.
Flick Emoji, Symbol and Facemark key/Kana and Alphanumeric
key to the right to display Quote apps list. Select an application to
activate.
G Input mode key
When you switch the input modes, the display changes as follows.
:Kanji
: Half Alphabet
: Half Numeric
: Half Katakana
: Full Alphabet
50
: Full Numeric
: Full Katakana
: Character Code
H Delete key
Deletes the selected character or the character on the left of the
cursor. When the cursor is at the beginning, the character on the
right of the cursor is deleted.
I Settings key/Space key/Conversion key
: Displays the iWnn IME menu.
: Enters a space.
・ Appears in alphabet and katakana entry.
: Displays the normal conversion candidates list.
J OK key/Line feed key
: Determines the characters being entered.
: Inserts a line feed at the cursor position.
• The display is changed depending on the application or entering
item.
K Space key/Uppercase and Lowercase characters switch key
:Enters a space.
:Switches the entered alphabet to the uppercase/lowercase
one.
:Switches the entered character to the uppercase/lowercase
one or add dakuten/handakuten to the character.
L Shift key
You can switch uppercase character entry and lowercase
character entry by tapping the shift key. The display changes as
follows each time you tap it.
: Lowercase character entry
: Uppercase character entry
: Uppercase character entry lock
You can switch the symbols to enter by tapping the key in numeric
entry.
Page 53
M Setting key
memo
memo
memo
Displays the iWnn IME menu.
N Space key/Conversion key
: Enters a space.
: Displays the normal conversion candidates list.
◎ While the prediction candidates list/relational prediction candidates list/
normal conversion candidates list is not displayed, tap “^” to hide the
keyboard.
◎ Perform the following operations with a software keyboard to switch input
methods.
• Flick from the right edge to the left edge or from the left edge to the right
edge: QWERTY keyboard/12 keyboard input
• Flick from the bottom edge to the top edge: Handwriting input
• Flick from the top edge to the bottom edge: Voice input
Character Input Method
◎ In the prediction candidates list, long touch a registered conversion
candidate [[Delete learning] to delete the conversion candidate.
◎ For Hiragana input, tap “ ” to switch to the normal conversion
candidates list. Tap “ ” to display the prediction candidates list
again.
■ Using Wildcard Prediction
Conversion candidates predicted from the number of the entered
characters are displayed and can be entered.
Example: When entering “Call”
A On the character entry screen, enter “C”.
B [] [[] [[].
Each time you tap “ ”, “*” is entered and conversion candidates
predicted from the number of characters appear in the prediction
candidates list.
C Select “Call” from conversion candidates.
Character Input
Entering Characters
You can enter characters with the software keyboards. The wildcard
prediction, predictive conversion and relational prediction functions
are also available for character input.
Example: When entering “大阪”
A On the character entry screen, enter “おおさか”.
B Select “大阪” from conversion candidates.
Predictive conversion
◎ In the prediction candidates list, tap “ ” to predict input errors and
display words similar to the entered characters in the prediction
candidates list.
Switching Character Input Modes
A On the character entry screen, [ ]
[[Change input mode].
B Select the input mode.
◎ The input mode is switched in order of “Half Alphabet” [“Half Numeric”
[“Kanji” each time you tap the input mode key. Also, slide the input
mode key to the left/right to switch “Kanji”/“Half Alphabet”/“Half Numeric”.
◎ Some input modes cannot be used depending on the screen or the
application.
51
Page 54
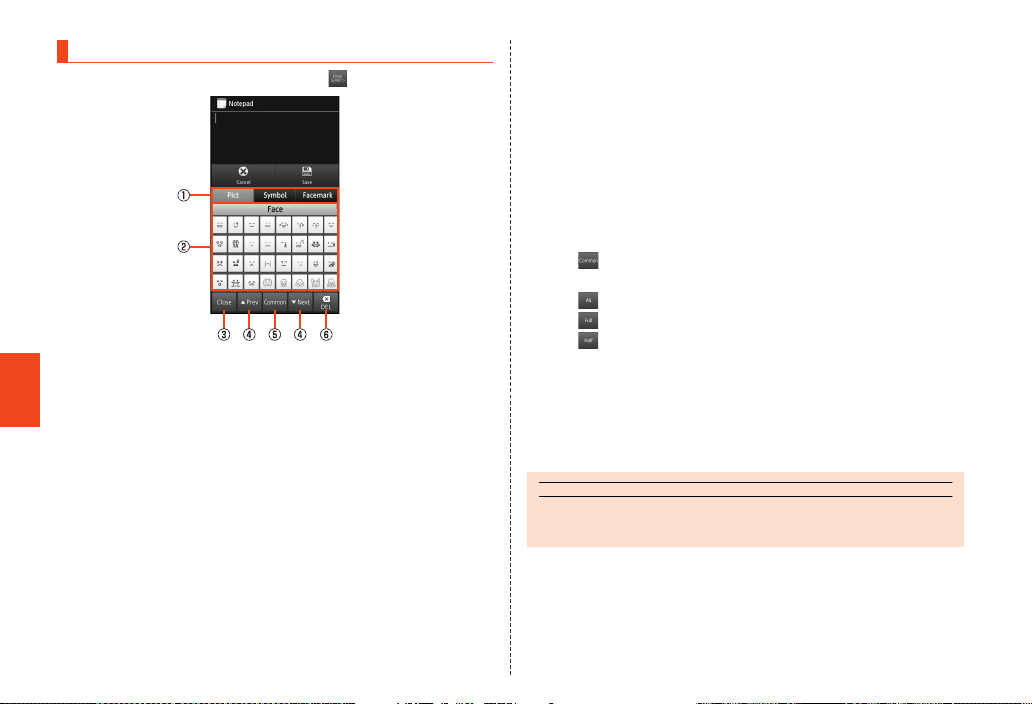
Entering Emoji/Symbol/Facemark
memo
A On the character entry screen, [ ].
Character Input
《Emoji/Symbol/Facemark list screen》
A Character switching tab
Switches the emoji/symbol/facemark.
B Emoji/Symbol/Facemark list
Displays the emoji/symbol/facemark list for each category.
• Long touch a facemark to edit it. However, facemarks in the
“History” field cannot be edited.
C Close key
Returns to the character entry screen.
D Page switching key
Displays the previous/next categories or pages.
E Character switching key
: Displays emojis converted automatically when sent to a
cell phone of another carrier.
: Displays normal emojis.
: Displays full-width symbols.
: Displays half-width symbols.
F Delete key
Deletes the selected character or the character on the left of
the cursor. When the cursor is at the beginning, the character
on the right of the cursor is deleted.
B Select an emoji/a symbol/facemark.
◎ Some lists cannot be displayed and some emojis/symbols/facemarks
cannot be entered depending on the screen you operate.
52
Page 55
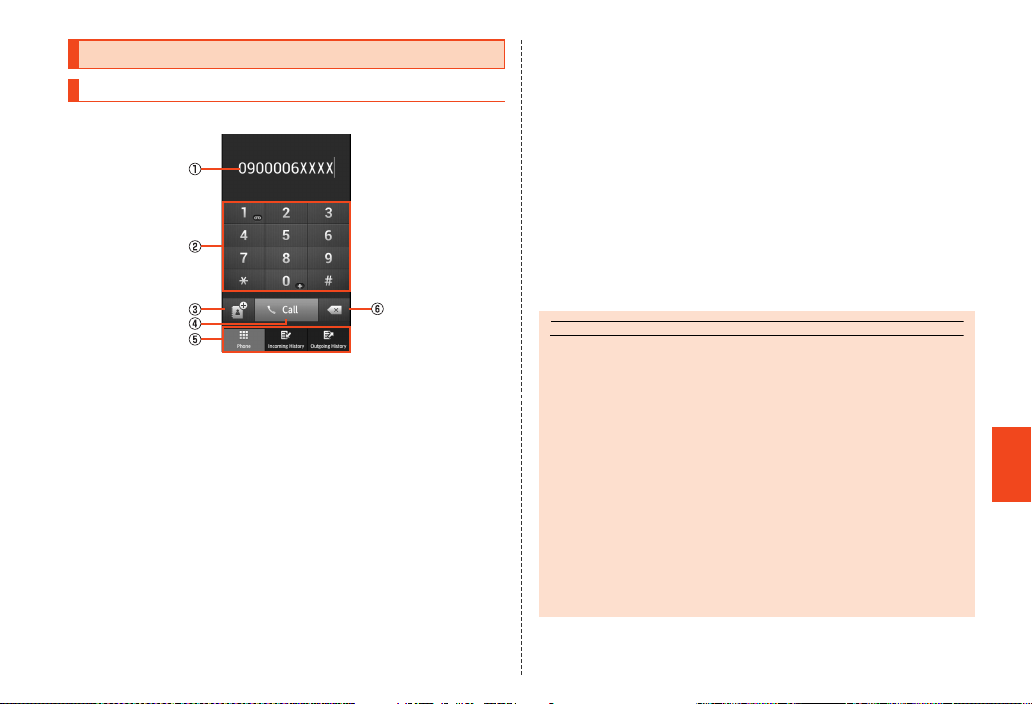
Making Calls
memo
Entering a Phone Number and Making a Call
A On the home screen, [APPS] [[Phone].
F Delete key
Deletes one digit on the left of the cursor. If you long touch the
key, all the numbers on the left of the cursor are deleted and
all the numbers are deleted when there is no number on the
left of the cursor.
B Enter a phone number.
When calling to a fixed-line phone, enter the phone number starting
with the area code even if you are in the same area.
C [Call] [Talk.
Press u/d during a call to adjust the earpiece volume (the other
party’s voice).
D Slide “End call” down.
《Phone number entry screen》
A Phone number entry field
Enter numbers of up to 32-digit.
B Dial key
C Address book key
Make a call by selecting a contact information from the
address book. Or you can register the entered phone number
to the address book.
D Call key
Make a call. Also, if there is an outgoing history, the latest
outgoing history is entered by tapping the key when the phone
number has not been entered.
E Screen switching tab
Switches the phone number entry screen/incoming history list
screen/outgoing history list screen.
◎ If you touch the wide range of the screen while making a call/talking, it is
turned off. Press f or tap the screen to turn it on.
◎ If the screen is turned off while a screen other than the making-call/call
screen is displayed, you cannot turn the screen on by tapping it. Also,
when “Power key ends call” is enabled, you need to end the call to turn the
screen on.
◎ The call fees when calling with “1401” will be subtracted from the balance
registered at the time of purchase of an au prepaid card.
◎ You can play the answering/voice mail saved by Answering Service by
long touching “1” without entering the phone number on the phone number
entry screen.
◎ Note that even if you cover the mouthpiece, the sound can be conveyed to
the other party.
◎ Even if “Airplane mode” is set, you can call to the emergency number (110,
119, 118) and Customer Service Center (157).
◎ Tap “Dial Pad” while talking on the product to display dial keys.
A touch-tone signal of the tapped number can be sent.
Phone
53
Page 56
Phone
memo
54
◎ Execute the following operations to return to the call screen after activating
another application during a call.
• Tap “#” to return to the home screen, activate “Phone” and tap “Return
to call in progress”.
• Slide the status bar down and tap “Current call”.
Dial services available from au phones
◎ The following dial services are available.
• Call with fixed-line phones throughout Japan
• Call with cell phones, PHS and car phones throughout Japan
• 010 (au International Call Service: Subscription is unnecessary)
• 171 (Disaster emergency message dial)
• 177 (Weather forecast: The area code is necessary)
• 117 (Time signal)
• 104 (Directory assistance)
• 115 (Sending telegrams)
• 110 (Emergency call to Police)
• 119 (Emergency call to Fire and Ambulance)
• 118 (Emergency call to Regional Coast Guard Headquarters)
• 157 (Customer Service Center)
• Maritime telephone
* The numbers a re emergency call numbers.
◎ The following NTT services are unavailable.
• Collect call
• Message service
• Dial Q2
• 116 (NTT business information)
*
*
*
■ Emergency Call Location Notification
The product supports “Emergency call location notification” so that if
you make an emergency call to Police, Fire and Ambulance or
Regional Coast Guard Headquarters, your current location (GPS
information) will be transmitted to the agency receiving the emergency
call.
◎ In this section, Police (110), Fire and Ambulance (119) and Regional Coast
Guard Headquarters (118) are collectively referred to as the emergency
call receiving agency.
◎ This feature may not yet be available at some emergency call receiving
agencies.
◎ If you add “184” before the emergency call number 110/119/118, the
emergency call receiving agency will not be notified of your location and
phone number.
◎ In places where signal reception from GPS satellites or a base station is
relatively poor, such as in an underground mall, inside a building or behind
a tall building, the emergency call receiving agency may be notified of
some other place different from your actual location.
◎ When GPS cannot be used to notify of your location, base station signal is
used instead.
◎ When making an emergency call to Police, Fire and Ambulance or
Regional Coast Guard Headquarters, always confirm where you are, and
tell them your exact location on the phone. Note that depending on the
area where you are calling, your call may not be connected to the agency
having jurisdiction over that area.
◎ If the emergency call receiving agency determines that human lives and
health are in danger, they will be able to acquire the caller’s location
information during the call or within a certain period of time after the call.
■ Using P (Pause) Dial
If you have entered a touch-tone signal to send in advance, you can
send the touch-tone signal by tapping “Yes” during a call. It is
convenient for using various information services and automated
reservation services.
Example: To call “03-0001-XXXX (bank’s phone number)” and send a
branch code “22X” and an account number “123XX”
Page 57
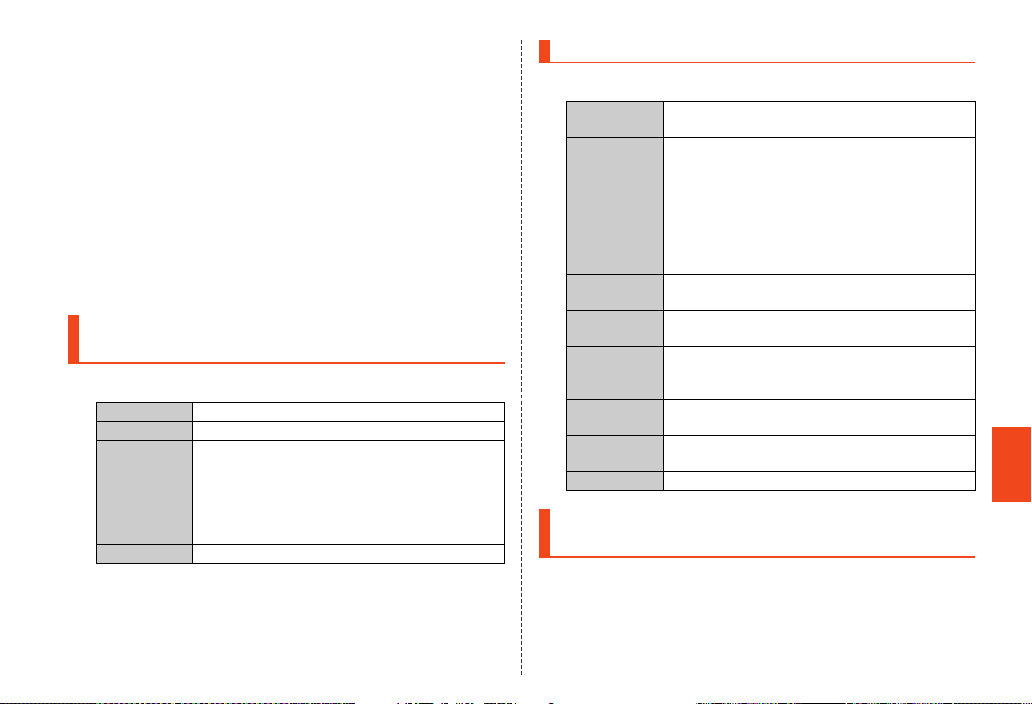
A On the phone number entry screen, enter a bank’s
phone number “030001XXXX”.
B [e] [[Add Prefix] [[Add P] [Enter a branch
code “22X”.
C [e] [[Add Prefix] [[Add P] [Enter an account
number “123XX”.
You can enter multiple touch-tone signals at the same time by entering
P (pause) between touch-tone signals.
D [Call] [[Yes] [[Yes].
If you make a call, the confirmation screen is displayed. Make sure that
the receiver receives the call, and tap “Yes”. Each time you tap “Yes”,
a touch-tone signal is sent.
Using Menu on the Phone Number Entry
Screen
A On the home screen, [APPS] [[Phone] [[e].
Create SMS Create an SMS (C-mail).
B
Add Prefix Add a prefix to the phone number.
Restrict Calls
Setting
Settings Perform call settings.
Set whether to restrict making a call.
• Even while Restrict Calls Setting is set to ON,
you can make a call to emergency call
numbers and 157 (Customer Service Center).
Even in roaming, you can make a call to
emergency call numbers.
Using Menu on the Call Screen
A
During a call, [e].
Mute/Mute
B
OFF
Voice Memo Record the other party’s voice and your voice
SpeakerON/
SpeakerOFF
Address
Book
Bluetooth
ON/Bluetooth
OFF
Quote to Call
log
Quote from
profile
Add Call You can add a call.
Set whether to convey your voice to the other
party.
during a call.
• You can record up to 10 memos with the
recording time per memo up to approximately
60 seconds. If the number of memos exceeds
10, memos are deleted from the oldest one. If
all voice memos are protected, you cannot
record new one.
Set whether to call using hands-free.
Display the address book.
Connect to/Disconnect from a Bluetooth®
headset sold separately.
Display the outgoing history/incoming history list
screen.
Display the profile screen.
Calling Overseas from au Phones
(au International Call Service)
You can make international calls without any special procedure from
the product.
Example: To call “212-123-XXXX” in the USA from the product
A On the home screen, [APPS] [[Phone].
Phone
55
Page 58
B Enter the international access code “001010” or
memo
memo
“010”.
Long touch “0” to enter “+” and “001010” is automatically added when
calling.
C Enter the country code of the USA “1”.
D Enter the area code “212”.
If the area code starts with “0”, dial it without including the “0” (There
are some exceptions such as fixed-line phones in some countries or
regions including Italy and Moscow).
E Enter the phone number of the other party “123XXXX”
[[Call].
◎ The monthly limit fee is set for the au International Call Service. The au
International Call Service is unavailable from when the limit fee is confirmed
to be exceeded until the end of the same month.
◎ Even if you cannot use the service by exceeding the limit fee, you can use
Phone
from the first day of the next month. Also, you can use the domestic call as
usual while the service is stopped.
◎
International call charges are billed together with monthly local call charges.
◎ If you do not wish to use the service, you can set not to use the au
International Call Service.
For au International Call Service:
From au phones 157 (area code not required) (toll free)
From fixed-line phones 0077-7-111 (toll free)
Open 9:00 to 20:00 (everyday)
Receiving Calls
Answering an Incoming Call
A Slide “Answer” down during an incoming call.
When you receive a call while the backlight illuminates (except for
when the Welcome Sheet(Lock Screen) is displayed), tap “Answer”.
B Talk [Slide “End call” down.
■ Display During an Incoming Call
The following contents are displayed during an incoming call.
• The other party’s phone number is displayed on your screen if he/
she notifies you of the phone number. Information such as name is
also displayed if his/her phone number and name are registered to
the address book. Set face image/body image is displayed on your
screen if face image/body image is set.
• If the other party does not notify you of his/her phone number, the
reason is displayed on your screen.
“ID Unsent”“Pay Phone”“Not Support
* Appears when the other party makes a call using a phone which can not send any phone
number.
To mute the ringtone when receiving a call
◎ If you press d during an incoming call, you can silence the ringtone and
stop vibrator.
When receiving a call while using another function
◎ When you receive a call while using the address book, mail, etc., the
incoming call is prioritized. The function which you have used will be
available after the call ends.
◎ When you receive a call while recording with the voice recorder etc.,
recording is interrupted and the recorded data is saved.
*
”
56
Page 59
Putting a Call on Hold
memo
memo
memo
A Slide “Answer Holding” down during an incoming
call.
When you receive a call while the backlight illuminates (except for
when the Welcome Sheet(Lock Screen) is displayed), tap “Answer
Holding”.
The call is put on hold. The other party will hear voice guidance
indicating that the call is put on hold.
B Slide “Answer” down while the call is put on hold.
The hold state is released.
◎ The call charges are charged on the other party who has made a call to
you while the call is put on hold as well.
◎ If you disable the hold state once, you cannot put the call on hold again.
◎ You can put the call on hold only when the product is used in Japan.
Sending SMS (C-mail) to an Incoming Call
A Slide “Quick reply” down during an incoming call.
When you receive a call while the backlight illuminates (except for when
the Welcome Sheet(Lock Screen) is displayed), tap “Quick reply”.
B Select a message to send.
You can create and send an SMS (C-mail) by tapping “Custom
message...”.
The incoming call is disconnected. The other party will hear voice
guidance stating that “こちらはauです。おかけになった電話をお呼び
しましたが、お出になりません。” (This is au. We called the number you
have dialed, but no response).
◎ If the other party’s phone number is not notified, quick responses are not
available. Also, quick responses may not be available depending on the
communication condition.
Using Menu While Receiving a Call
A [e] during an incoming call.
Absence
B
Memo
Reject Disconnect an incoming call. The other party will
Forwarding Forward an incoming call to the specified phone
Silent Silence the ringtone and stop vibrator.
◎ When forwarding an incoming call without specifying a phone number, the
call is forwarded to Answering Service if you have activated the service.
Also, when Answering Service is suspended, you cannot forward calls.
Answer a call with the message of the Answering
memo and record the other party’s message.
• While recording an Answering memo, tap [e]
[[Rcv. ON]/[Rcv. OFF] to turn on/off the other
party’s voice.
hear voice guidance stating that “こちらはauで
す。おかけになった電話をお呼びしましたが、お出
になりません。” (This is au. We called the number
you have dialed, but no response).
number without answering it.
Phone
57
Page 60
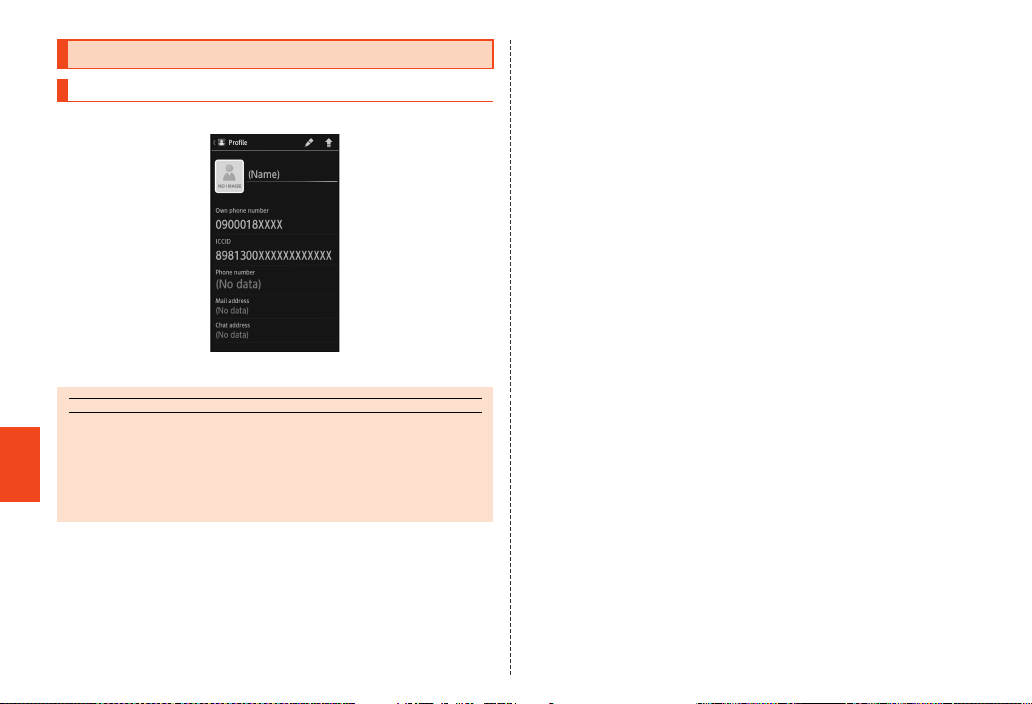
Checking Your Phone Number
memo
Checking Your Profile
A
On the home screen, [APPS] [[Settings] [[Profile].
Phone
58
《Profile screen》
◎ If an au IC-Card is not inserted, “auIC Card(UIM) error. Please insert card”
appears when checking your profile. Tap “OK” to display the profile
screen. However, information such as Own phone number or ICCID is not
displayed. Also, some operations, such as attaching the contents of the
profile to mail, may not be carried out. Insert an au IC-Card and turn on
power again.
Page 61
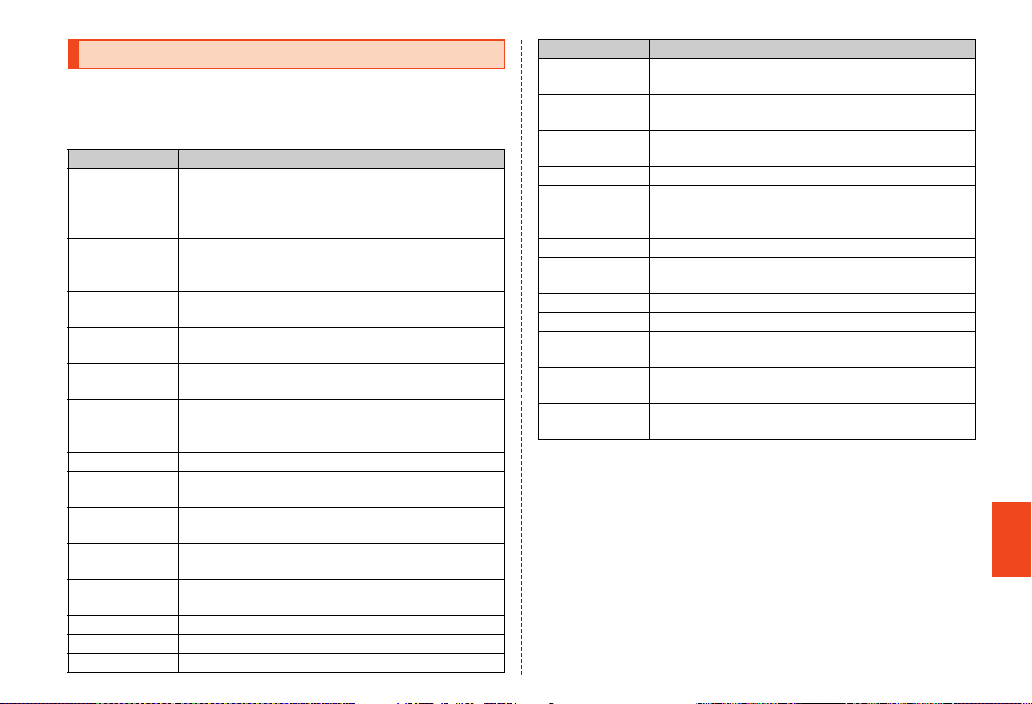
Displaying Setting Menu
From Settings, set up and manage functions. You can personalize the
wallpaper or ringtone, set up security, initialize data, etc.
A On the home screen, [APPS] [[Settings].
Item Description
Profile Information such as name or residence can be
Sound settings Set the manner mode, adjust the call ringtone
Wallpaper &
display
Energy saving
settings
au ID setting Set au ID.
microSD &
phone storage
Battery Display battery usage for functions in use per item.
Call Check talk time and make call settings such as
Home
applications
Pedometer
setting
Application Uninstall and forcibly stop installed applications,
Wi-Fi Make Wi-Fi® settings.
Bluetooth Make Bluetooth® settings.
Data usage Display the data traffic record.
registered, as well as phone number etc.
registered in advance. Also, you can attach the
information to a mail etc.
volume, key touch tone volume, vibration,
playback volume, etc.
Make settings for displays such as brightness of
the screen and switching text fonts.
Activate Energy save.
• For details, refer to “Setting Guide”.
Check memory space of microSD memory card
and the product, initialize microSD memory card,
etc.
Answering Service (Voice Mail).
Switch home applications to use.
Make pedometer settings.
clear cache, etc.
Item Description
Network
settings
Accounts &
sync
Location
services
Lock & Security Make Screen lock or security settings.
Language &
input
Reset all Restore the default settings.
External
connection
Date & time Set the display format etc. of the date and time.
Accessibility Set user support services.
Developer
options
Device info Check your own phone number, signal level, etc.
Initial setting Make initial settings.
Make network settings such as Airplane mode and
Home network settings.
Make basic settings for managing online service
accounts or synchronizing data.
Make settings of location information.
Set the language to be displayed and make
character input settings. Make Google voice input
settings and Text-to-speech settings.
Set earphone type to use, and make USB
connection settings.
Set tools etc. for developing applications.
Perform software update.
• For details, refer to “Setting Guide”.
Settings
59
Page 62
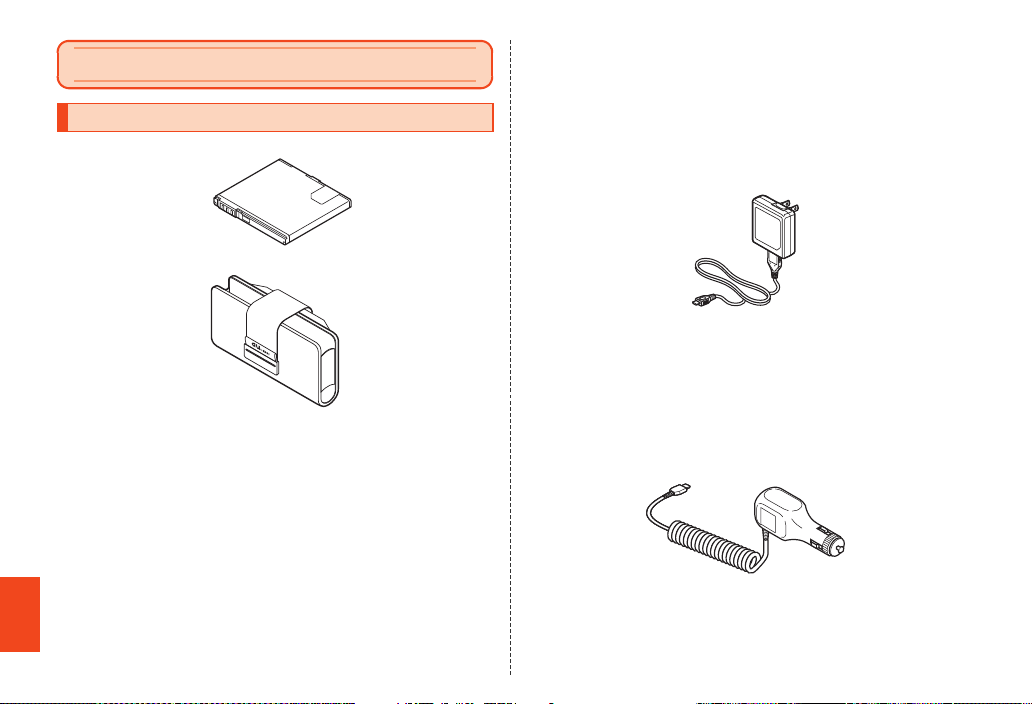
Appendix
Common AC adapter 03
Introduction of Peripheral Devices
■ Battery Pack (SHI13UAA)
■ au Carrying Case F Black (0105FCA) (sold separately)
■ Common AC Adapter 01 (0202PQA) (sold separately)
Common AC Adapter 02 (0203PQA) (sold separately)
Common AC Adapter 03 (0301PQA) (sold separately)
Appendix/Index
Common AC Adapter 03 Navy (0301PBA) (sold separately)
Common AC Adapter 03 Green (0301PGA) (sold separately)
Common AC Adapter 03 Pink (0301PPA) (sold separately)
Common AC Adapter 03 Blue (0301PLA) (sold separately)
AC Adapter MIDORI (0205PGA) (sold separately)
AC Adapter AO (0204PLA) (sold separately)
AC Adapter SHIRO (0204PWA) (sold separately)
AC Adapter MOMO (0204PPA) (sold separately)
AC Adapter CHA (0204PTA) (sold separately)
AC Adapter REST (LS1P002A) (sold separately)
AC Adapter RANGERS (LS1P003A) (sold separately)
60
AC Adapter CHARGY (LS1P001A) (sold separately)
AC Adapter WORLD OF ALICE (LS1P004A) (sold separately)
AC Adapter KiiRoll (L01P005A) (sold separately)
*
*
*
AC Adapter JUPITRIS (White) (L02P001W) (sold separately)
AC Adapter JUPITRIS (Red) (L02P001R) (sold separately)
AC Adapter JUPITRIS (Blue) (L02P001L) (sold separately)
AC Adapter JUPITRIS (Pink) (L02P001P) (sold separately)
AC Adapter JUPITRIS (Champagne) (L02P001N) (sold
separately)
• Illustrations and forms may not match depending on the AC
adapter you use.
• Common AC adapter 01 can only be used in Japan. When you
use an AC adapter overseas, choose available one from among
*
*
the above-mentioned models (except for Common AC adapter
01) to use.
■ Common DC adapter 01 (0201PEA) (sold separately)
*
Common DC adapter 03 (0301PEA) (sold separately)
*
*
*
*
*
*
*
Common DC adapter 03
Page 63
■ Portable charger 01 (0201PDA) (sold separately)
memo
memo
■ Portable charger 02 (0301PFA) (sold separately)
■ microUSB cable 01 (0301HVA) (sold separately)
■ microUSB cable 01 Navy (0301HBA) (sold separately)
■ microUSB cable 01 Green (0301HGA) (sold separately)
■ microUSB cable 01 Pink (0301HPA) (sold separately)
■ microUSB cable 01 Blue (0301HLA) (sold separately)
■ SHARP microUSB-18-pin (charger) conversion cable 01
(SHI01HVA) (sold separately)
■ 18 pin-microUSB conversion adapter 01 (0301QYA) (sold
separately)
* When using this with the product, you need to connect it to SHARP mi croUSB-18-pin (charger)
conversion cable 01 (sold separately) or 18 pin-microUSB conversion adapter 01 (sol d
separately).
◎ For the latest information about available peripheral devices, check the au
homepage (http://www.au.kddi.com/) or contact Customer Service
Center.
◎ The product does not support ASYNC/Fax transmission.
◎ The above-mentioned peripheral devices can be purchase d from au
Online Shop.
(http://auonlineshop.kddi.com/)
*
Using Earphones
Connect an earphone (commercially available) to use.
A On the home screen, [APPS] [[Settings]
[[External connection] [[Earphone type]
[[Without microphone].
B Insert an earphone (commercially available) into the
earphone/microphone jack of the product.
Using an Earphone/Microphone with Switch or Earphone/Microphone
A On the home screen, [APPS] [[Settings]
[[External connection] [[Earphone type]
[[With microphone].
B Insert an earphone/microphone with switch
(commercially available) or earphone/microphone
into the earphone/microphone jack of the product.
◎ Some earphones/microphones with switch or earphones/microphones are
not available depending on their types.
◎ For the earphone/microphone with switch (commercially available) with
3.5φ plug whose operation has been confirmed, refer to the Support page
in SH DASH.
(http://k-tai.sharp.co.jp/support/a/is17sh/)
■ Answering Calls
A Press the switch of the earphone/microphone with
switch during an incoming call.
B Press the switch of the earphone/microphone with
switch to end the call.
Appendix/Index
61
Page 64
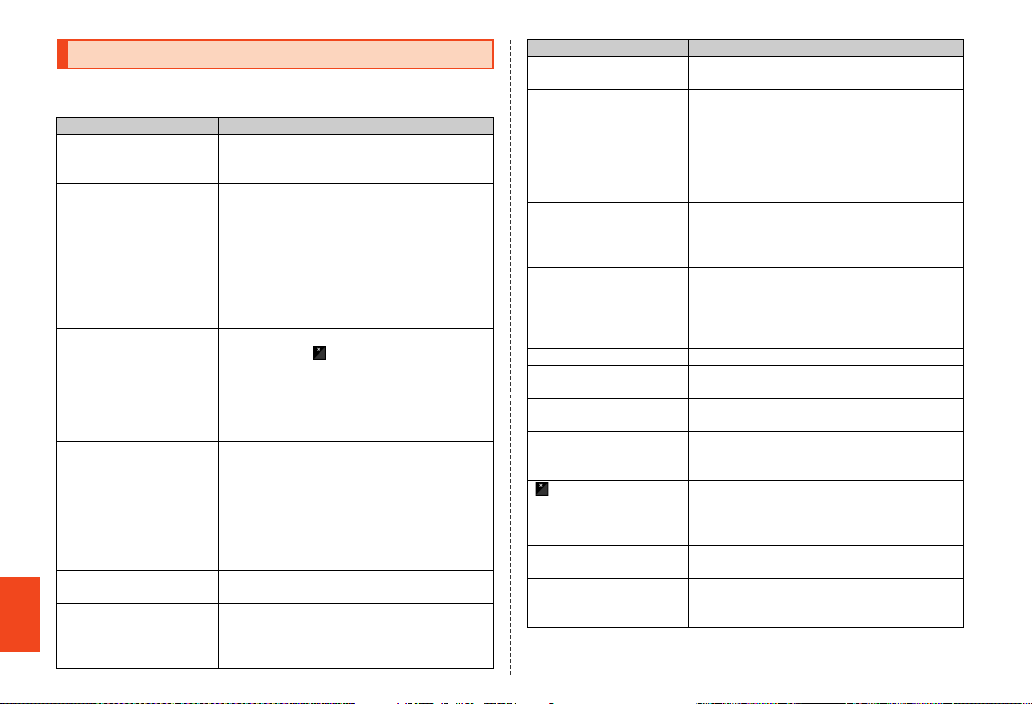
Troubleshooting
Before you assume that the product is malfunctioning, check the
following:
Trouble Detail
Cannot turn on the power. • Is the battery pack charged? (zP.37)
Cannot charge the battery. • Is the battery pack attached properly? (zP. 31)
Battery usage time is short. • Make sure you do not often use the product in
Cannot operate the touch
panel as intended.
Appendix/Index
Cannot operate the keys/
touch panel.
Screen response is slow
when you tap on the
screen/press the keys.
62
• Is the battery pack attached properly? (zP. 31)
• Did you hold f down? (zP.39 )
• Is the power plug of the specified charger (sold
separately) securely plugged into an outlet or a
cigarette lighter socket? (z P. 37)
• If you use Fast transfer mode, make sure the
USB driver is installed to the PC.
For the USB driver and install manual, refer to
the Support page in SH DASH (http://
k-tai.sharp.co.jp/support/a/is17sh/).
places where (out of service area) is
displayed. (zP. 46)
• Make sure the battery does not approach the
end of its service life. (zP. 13)
• Is the battery pack charged enough? (z P. 37)
• Suspend the functions not being used. (zP. 47)
• Make sure you are not operating with hands
wearing gloves etc.
• Make sure you are not operating with the tip of
a fingernail or with foreign object between the
screen and your fingers.
• Check the proper operation of touch panel.
(zP. 41)
• Restart the product. (zP. 39)
• Turn off the power and then turn it on again.
• Is the power turned on? (zP. 39)
• Screen response may be slowed down when a
large amount of data is stored in the product or
being transmitted between the main unit and a
microSD memory card.
Trouble Detail
auIC card(UIM) error. is
displayed.
Cannot make calls. • Is an au IC-Card inserted? (zP.33)
Cannot receive calls. • Is reception good enough? (z P.46)
Cannot hear the other party. • Is the earpiece volume set to other than
Cannot use Osaifu-Keitai®. • Make sure the battery has not run out. (zP.37)
Cannot recognize a
microSD memory card.
The power is turned off
automatically.
The power is turned off
while the wake-up logo is
displayed.
(out of service area
indicator) appears.
Wi-Fi® cannot be
connected.
A message indicating that
charging is necessary
appears.
• Is an au IC-Card inserted? (zP.33)
• Did you enter the correct phone number? (Did
you enter the phone number starting with the
area code?) (zP.53)
• Is the power turned on? (zP. 39)
• Did you tap “Call” after entering a phone
number? (zP. 53)
• Is the product within the service area? (z P.46)
• Is the power turned on? (zP. 39)
• Is an au IC-Card inserted? (zP.33)
minimum? (zP. 53)
• Make sure you are not covering the earpiece
with your ear.
Place the earpiece over your earhole.
• Is a microSD memory card inserted properl y?
(zP. 36)
• Make sure the battery has not run out. (zP. 37)
• Make sure the battery has not run out. (zP. 37)
• Is reception good enough? (zP.46)
• Is the product within the service area? (z P.46)
• Is your finger etc. off the area around the
internal antenna? (zP.30)
• Is reception for Wi-Fi® good enough? (zP.46)
• The battery pack is almost empty. (zP. 37)
Page 65
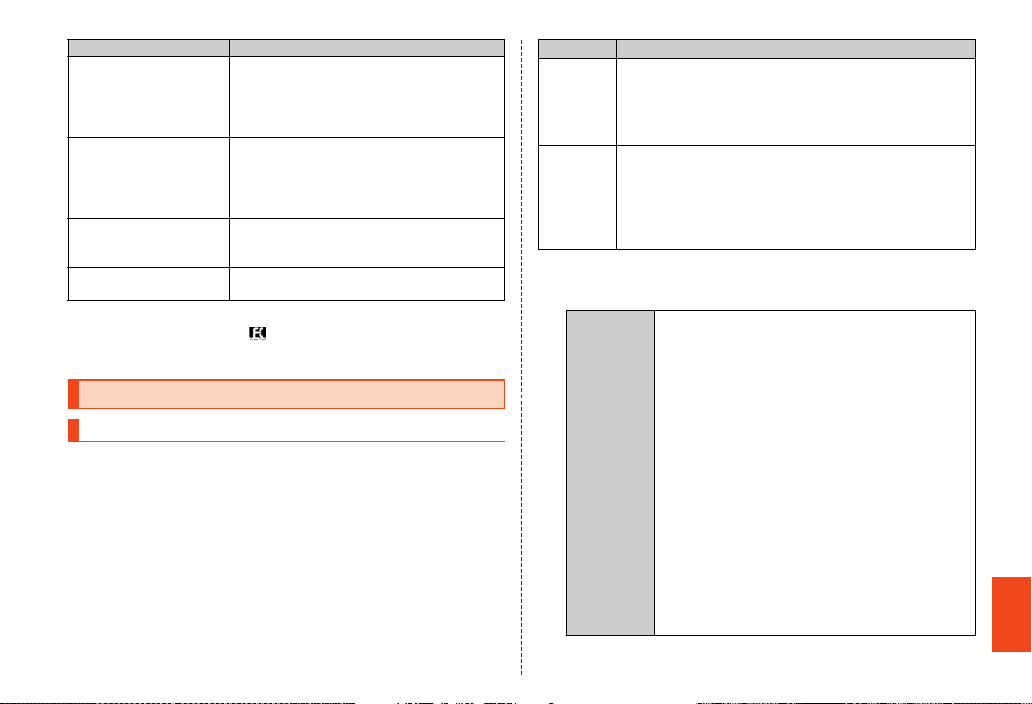
Trouble Detail
When making a call, a
beeping sound is heard
from the earpiece and a
connection cannot be
established.
Cannot use the microphone
of earphone/microphone.
Cannot operate the
respective address book
settings.
Cannot operate the camera. • Is there enough power left in the battery pack?
• Is reception good enough? (zP. 46)
• Is the product within the service area? (zP.46)
• The wireless line is busy or the other party is on
another line. Try again later.
• Make sure “Without microphone” is not set for
“Earphone type”. (z P.61)
• Is the connector of the microphone inserted
properly?
Insert the connector securely.
• Is the other party’s phone number notified?
If there is no notification, the settings of the
address book are not enabled.
(zP. 37)
For more details, contact Customer Service Center.
From a fixed-line phone, 0077-7-111
From an au cell phone, 157 without area code
Updating Software or OS
Software Update
The product supports the software update. The software update is a
function to update software of the product.
The methods for updating software of the product available by the
software update are described as follows. Restarting the product
before and after software update is required regardless of the
updating method. When the automatic updating style is set, the
product will automatically restart.
Method Detail
Manual
update
Check whether software update is necessary or not by
connecting the product to the network.
• When it is necessary, you can choose whether to
update immediately or to update later (update
reservation).
Automatic
update
Update software when receiving a software update
notification from au.
• You can also choose whether to automatically update
(automatic updating style) or to display the
confirmation screen (user approval style) after
receiving the notification.
A On the home screen, [APPS] [[Settings]
[[Device info] [[Software update].
Update Check whether software update is necessary or
B
not (manual update). The confirmation starts
when you tap “Execute”. When it is necessary,
you can choose whether to update immediately
or to update later (update reservation).
• If you want to update immediately, tap
“Execute” to start the download of data needed
for software update. When the download has
completed and the product has restarted,
software will be updated.
• If you want to update later (update reservation),
tap “Reserve” to start the download of data
needed for software update. When the
download has completed, the screen for setting
the date and time to start software update will
be displayed. If you set the date and time
[tap [Reserve], the product will automatically
restart at the set time of the day for the update
and software will be updated.
Appendix/Index
63
Page 66
Auto Setup Set whether to automatically start the download of
memo
memo
data needed for software update and to update
software when receiving a notification for the
update in automatic updating style.
Reserve
Time
Change the set date and time to start software
update.
• If you tap “Cancel”, you can cancel the update
reservation.
Reminder Set whether to display a notification for the
update repeatedly.
◎ If you enable “Automatic date & time” or change the settings of “Set date”
and “Set time” after setting the date and time to start software update, the
update reservation will be canceled.
◎ If you cancel the update reservation, carry out “Update” once again to
update software. When you carry out “Update” after canceling the update
reservation, restart the product by following the screen.
■ Notes on Software Update
• You are charged for data communication when connecting to the
Internet from the product by using packet communication.
• When software update is necessary, you will be informed on au
homepage, etc. For details, contact an au shop or Customer Service
Center (call toll-free 157). In addition, users of the IS17SH will
Appendix/Index
receive a notice from au, when software update is necessary to
improve the functionality of the IS17SH.
• It is recommended to back up your data before updating software.
• If the software update has failed or stopped, perform the same
procedures again.
• If the software update fails, it may become impossible to operate the
product. If this happens, bring it to an au shop or PiPit (not accepted
by some shops).
64
• Charge the battery sufficiently before starting update. If the battery
level is insufficient or the battery runs out during the update, the
software update will fail.
• Check out the signal reception status. The software update may fail
if the product is in a place with bad signal reception status.
• Various data registered on the product (address books, mails, still
pictures, music data, etc.) and information of settings will not be
changed even after software is updated. However, note that data
may not be protected depending on the state of the product (fault,
damage, getting wet with water, etc.).
• After software is updated, the download of next update software
may automatically start (consecutive update).
• The software update is not available when using overseas network.
Do not conduct the following operations during the software update
• Do not remove the battery pack during software update. Doing so
may cause the software update failure.
• Do not move during software update.
The following operations are not available during the software
update
• Operations are not available during software update. Making a call
to 110 (Police), 119 (Fire and Ambulance), 118 (Regional Coast
Guard Headquarters) or 157 (Customer Service Center) is not
available either. Also, the alarm etc. does not function.
■ When an Update Notification (Automatic Updating
Style) is Received
When a “software update notification” in automatic updating style is
received, the download of data needed for software update will
automatically start. When the download has completed, software will
be updated.
◎ When you set “Auto Setup” to “OFF”, the confirmation screen is displayed
in the same way as in user approval style.
Page 67
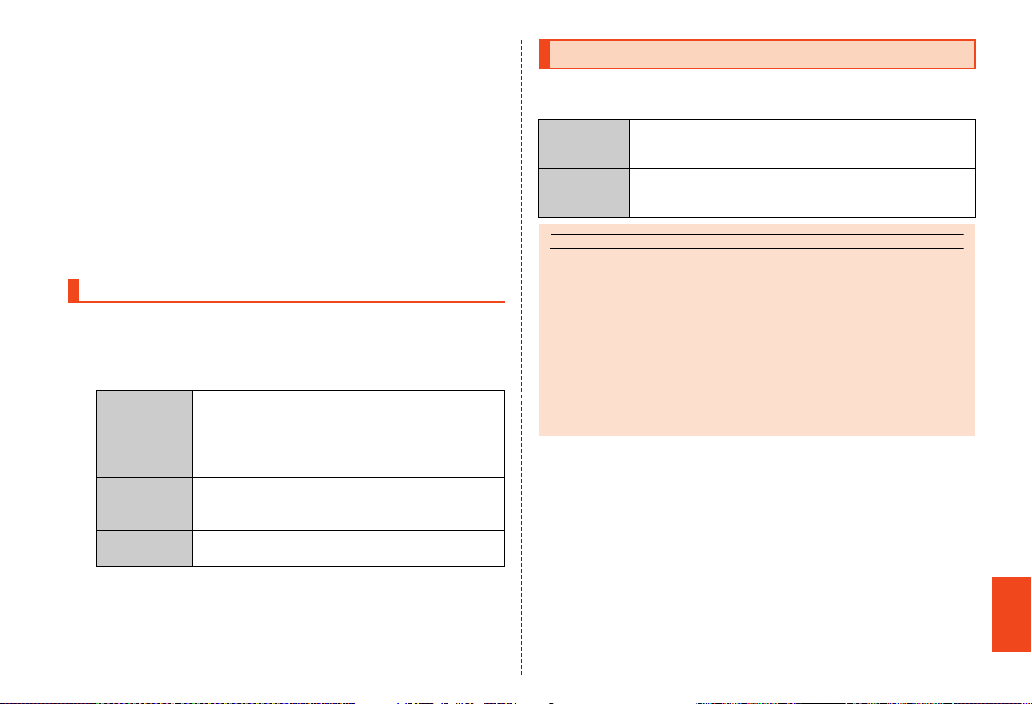
■ When an Update Notification (User Approval Style)
memo
is Received
When a software update notification in user approval style is received,
the confirmation screen is displayed.
■ When you want to update immediately
Tap “Execute” to start the download of data needed for software
update. When the download has completed and the product has
restarted, software will be updated.
■ When you want to update later
Tap “^” to stop the update. Carry out the software update again with
“Update”.
Major Update (OS Update)
Major update is a function to update the OS of the product.
A On the home screen, [APPS] [[Settings]
[[Device info] [[Major Update].
Confirm
B
update
Start update Carry out OS update via Wi-Fi®.
Check for
updates
Check manually whether update is available.
• When a message indicating that a new version
has been released appears, tap “OK” to
activate the browser and display methods for
the major update. Confirm the details.
• Data for the update are save on microSD
memory cards. Insert one in advance.
Set whether to regularly and automatically
check the presence of new update available.
After-Sales Service
■ When Asking for Repair
For repair, contact Secure cell phone support center.
During the
warranty
period
Outside the
warranty
period
◎ Before handing in the product for repair, make a backup of the contents of
memory since they may disappear during repair. Note that the Company
shall not be liable for any damages and loss of income should the contents
of memory be altered or lost.
◎ Recycled parts that meet the Company’s quality standards are sometimes
used for repair.
◎ Old au phones collected via Replacement cell phone delivery service will
be reused as cell phones for replacement after they are recovered and
repaired. Also, old mechanical parts replaced via the au after-sales service
will be collected and recycled by the Company and cannot be returned to
the customer.
■ Performance Parts for Repair
The Company retains performance parts for repair of the IS17SH main
unit and its peripheral devices for 6 years after discontinuation of
production. “Performance parts for repair” refers to parts required for
maintaining the functions of the product.
■ Warranty Card
At the store of purchase, thoroughly check and read the name of the
retailer, date of purchase and other necessary details filled in on the
warranty card, and be sure to keep it in a safe place.
Repairs will be done based on the <terms of services of the
free-of-charge repair warranty> described on the warranty
card.
We shall repair the product for a charge as requested by the
customer if repair renders it usable.
Appendix/Index
65
Page 68
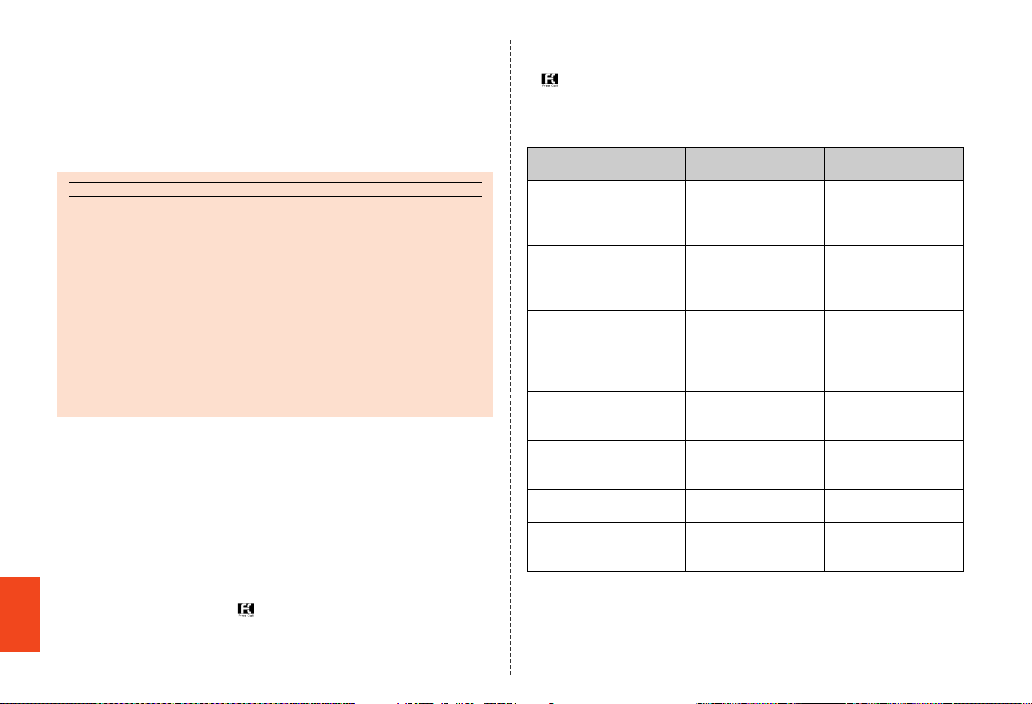
■ Secure cell phone support plus
memo
An after-sales service membership program on a monthly basis called
“Secure cell phone support plus” (monthly fee: 399 yen including tax)
is available for using your au cell phone for a long time without
worries. This service expands coverage for many troubles including
malfunction, theft and loss. For details of this service, check on the au
homepage or contact Secure cell phone support center.
◎ You can apply for membership only at the time of purchasing your au cell
phone.
◎ Once you cancel the membership, you cannot reapply for it until you
purchase an au cell phone next time.
◎ Note that when changing the model or purchasing an extra cell phone, this
service only covers the most recently purchased au cell phone.
◎ When an au cell phone is handed over to you or someone else, the Secure
cell phone support plus membership is also handed over to the successor
of the cell phone.
◎ When you get a new au cell phone by changing the model, purchasing an
extra cell phone, etc., the Secure cell phone support plus membership for
the old au cell phone is automatically canceled.
◎ Service contents are subject to change without notice.
■ au IC-Card
The au IC-Card is lent to you by au. In case of loss or damage, the
card will be replaced at your expense. When malfunction is
Appendix/Index
suspected, or in case of theft or loss, contact an au shop or PiPit.
■ After-Sales Service
If you are unsure about anything regarding after-sales service, contact
the following service counter.
Customer Service Center (for service canceling procedure or
operation in case of loss or theft)
From a fixed-line phone, 0077-7-113 (toll free)
From an au cell phone, 113 without area code (toll free)
Secure cell phone support center (for loss, theft or damage)
From a fixed-line phone/an au cell phone,
0120-925-919 (toll free)
Business hours 9:00 to 21:00 (7 days a week)
■ au After-Sales Service Information
Service contents
Replacement cell phone
delivery service
(spontaneous failure: 1st
year)
Replacement cell phone
delivery service
(spontaneous failure: 2nd
year and later)
Replacement cell phone
delivery service
(partial damage, water
soak, irreparable damage,
theft and loss)
Holding over and repair
(spontaneous failure: 1st
year)
Holding over and repair
(spontaneous failure: 2nd
year and later)
Holding over and repair
(partial damage)
Holding over and repair
(water soak, irreparable
damage, theft and loss)
* All the pr ices written above include tax.
Secure cell phone
support plus member
Free N/A
Customer charge
1st: 5,250 yen
2nd: 8,400 yen
Customer charge
1st: 5,250 yen
2nd: 8,400 yen
Free Free
Free (three-year
warranty)
Customer charge
Upper limit: 5,250 yen
N/A
Free member
N/A
N/A
Actual cost
Actual cost
N/A
(model change)
66
Page 69
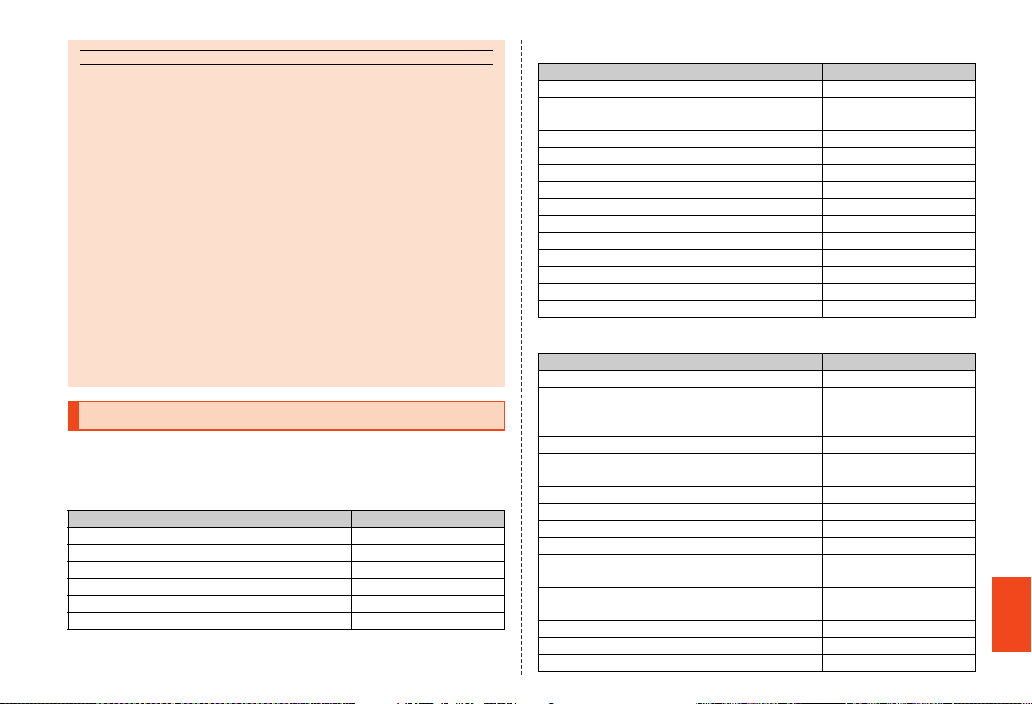
memo
Replacement cell phone delivery service
◎ When you have trouble with your au phone, you can have a cell phone for
replacement (same model and color as your old one with new battery
included) delivered to any destination that you specify. Please return your
old au phone got out of order within 14 days after the cell phone for
replacement is delivered to you.
◎ You can use this service up to twice within one year starting from the day
when you first use this service. If you have not used this service o ver the
past one year at the time of your application for this service, the application
will be regarded as your first time. If you have, the application will be
regarded as your second time.
* For details, ch eck on the au homepage.
Holding over and repair
◎ Repairs due to water soak and irreparable damage are not covered by this
service.
◎ Damages and malfunctions intentionally caused by the customer as well
as those due to modification (e.g. disassembly, change of parts, painting,
etc.) by the customer are not covered by this service.
◎ You cannot receive a refund for replacement of the outer casing due to
stains, scratches, paint removal, etc. on the outer casing.
Available Data Formats
Formats of image, video and audio available on the product are as
follows.
■ Image
JPEG image, decoration-emoji (JPG) .jpg, .jpeg
GIF, GIF animation, decoration-emoji (GIF) .gif
Image: PNG .png
Image: BMP .bmp
Image: WBMP .wbmp
Image: WEBP .webp
Data format Extension
■ Video
Video: 3GPP (MPEG-4 SP) .3gpp
Video: 3GP (MPEG-4 SP), Video: H.263, Video:
H.264 AVC, videos recorded with the camera
EZ movie (H.264), EZ movie (MEPG4) .3g2
Video: 3GPP2 .3gpp2
Video: H.264 AVC .mp4
Video: MP4 .m4v
Video: WMV .wmv
Advanced Streaming Format .asf
PlayReady movie: PYV .pyv
PlayReady movie: ISMV .ismv
Video: WEBM .webm
Video: MKV .mkv
Video: TS .ts
Data format Extension
.3gp
■ Audio
Audio: AMR-Narrow band .amr
Audio: 3GPP (AAC LC/LTP, HE-AACv1 (AAC+),
HE-AACv2 (enhanced AAC+)), Chaku-uta® (AAC,
HE AAC), Voice (only AMR)
Voice (AMR), Chaku-uta® (AAC, HE AAC) .3g2
Audio: MPEG4 (AAC LC/LTP, HE-AACv1 (AAC+),
HE-AACv2 (enhanced AAC+))
Audio: MP3 (8 to 320 kbps CBR or VBR) .mp3
Audio: WMA .wma
PlayReady music: PYA .pya
PlayReady music: ISMA .isma
Audio: MIDI .mid, .midi, .xmf, .rtttl, .rtx,
Audio: Adjustable audio file format developed by
Xiph.Org
Audio: iMelody (unique to Ericsson/SonyEricsson) .imy
Audio: PCM/WAVE .wav
Audio: SMF .smf
Data format Extension
.3gp
.m4a, .mp4
.ota
.ogg, .oga
Appendix/Index
67
Page 70
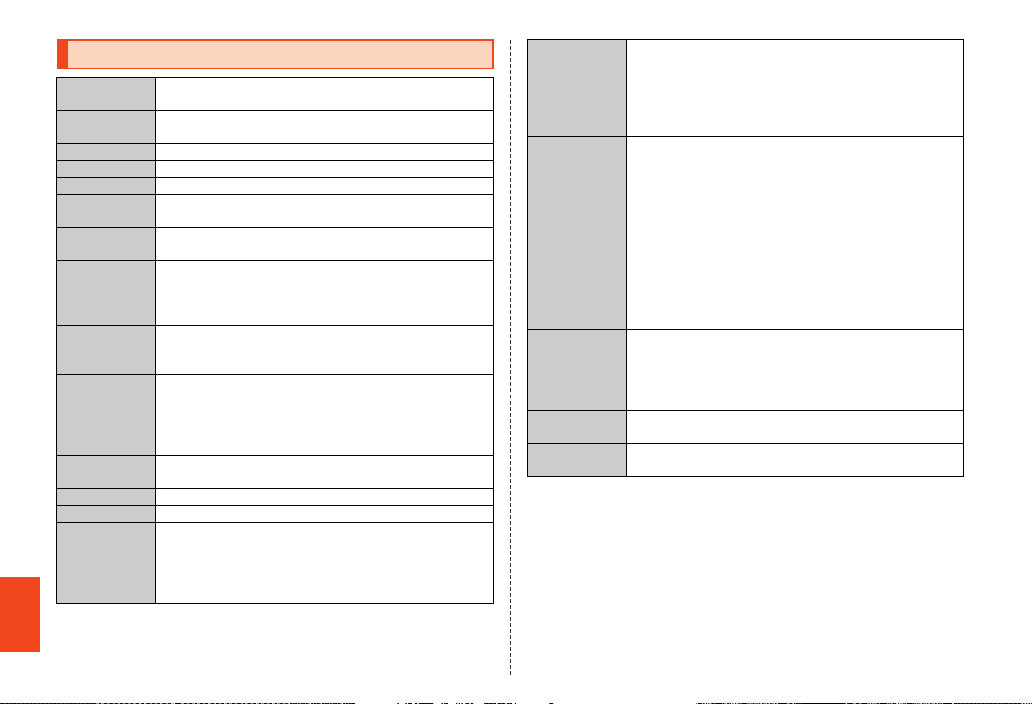
Main Specifications
Display (main
area)
Display (sub
area)
Weight Approx. 132 g (including the battery pack)
Size (W×H×D) Approx. 65 mm×132 mm×8.9 mm (thickest part 10.9 mm)
CPU MSM8655 1.4 GHz
Memory (built-in
*1
(ROM))
Continuous talk
time (in Japan)
Continuous talk
time
(overseas)
Continuous
standby time (in
Japan)
Continuous
standby time
(overseas)
Charging time Common AC adapter 03 (sold separately): Approx. 210 min
Appendix/Index
Camera device CMOS image sensor
Effective pixels Approx. 8.04 million pixels
Picture size of
still picture/
Magnification
and its steps
68
Approx. 4.2 inches, approx. 0.26 million colors, New Mobile
ASV LCD, 960×540 (QHD)
Approx. 2.1 inches, one color, memory LCD, 56×304
Approx. 5.6 GB
Approx. 590 min
Approx. 670 min (U.S./Mexico/Saipan/Chinese mainland/
Hawaii/South Korea/Taiwan/Indonesia/Israel/India/Vietnam/
*2
New Zealand*3/Macau/Bangladesh/Bermuda Islands/
Bahamas/Venezuela/Hong Kong)
Approx. 470 hours (while 3G is used)
Approx. 240 hours (while 3G and Wi-Fi® are used)
Approx. 420 hours (U.S./Mexico/Saipan/Chinese mainland)
Approx. 570 hours (Hawaii/South Korea/Taiwan/Indonesia/
*2
Israel/India/Vietnam/Bangladesh/Bahamas/Hong Kong)
Approx. 680 hours (New Zealand*3/Macau/Bermuda Islands/
Venezuela)
Common DC adapter 03 (sold separately): Approx. 270 min
VGA: 480×640/2.28-fold and 8 steps
QHD: 540×960/1.61-fold and 5 steps
2M: 1,200×1,600/2.04-fold and 7 steps
FULL HD: 1,080×1,920/1.61-fold and 5 steps
8M: 2,448×3,264/2.28-fold and 8 steps
*4
Picture size of
video/
Magnification
and its steps/
Recording
*5
time
Bluetooth®
Function
Mobile light
source LED
characteristics
Network
environment
Interface microUSB jack, 3.5φ (quadrupoles) earphone/microphone
*1 Since d ata and applications share the saving space, available memory capacity on the main
unit decreases depending on how much spac e the applications in use are taking up.
*2 Informati on on the intended countries is valid as of June 201 2.
*3 The s ervice provision will end on July 31, 2012.
*4 If yo u use zoom, the suitable picture size is automatically selected.
*5 The reco rding time is based on the case when a microSD mem ory card (2 GB to 32 GB) is
attached. However, it varies depending on the capac ity on the microSD memory card,
recording condition, memory space of other save d data, etc. Also, the recording time
decreases depending on the temperature a t the location where the product is used and using
condition.
*6 Chang es according to objects obstructing device s and signal reception.
*7 Speci fications provided in Bluetooth standards for making communication between
Bluetooth-compatible devices in accordance with the ir intended use.
QVGA: 320×240/3.50-fold and 12 steps/Max. approx 90 min
VGA: 640×480/2.28-fold and 8 steps/Max. approx 90 min
HD: 1,280×720/1.26-fold and 3 steps/Max. approx 45 min
Communication method: Bluetooth® Standard Ver.3.0
Output: Bluetooth® Standard Power Class 2
Communication distance*6: Within 10 m with no obstacles in
the range
Compatible Bluetooth® profile*7: HSP (Headset Profile), HFP
(Hands-Free Profile), A2DP (Advanced Audio Distribution
Profile), AVRCP (Audio/Video Remote Control Profile) Ver.1.3,
OPP (Object Push Profile), SPP (Serial Port Profile), PBAP
(Phone Book Access Profile)*8, DUN (Dial-up Networking
Profile), HID (Human Interface Device Profile), HDP (Health
Device Profile), PAN (Personal Area Networking Profile)
Frequency bands: 2.4 GHz band (2.402 GHz to 2.480 GHz)
a) Continuous illumination
b) Wavelength
White: 400-700 nm
c) Maximum output
White: 910 μW (inside cell phone 1.57 mW)
Wireless LAN (Wi-Fi®) function: IEEE802.11b/g/n (2.4 GHz)
Standard
jack
Page 71
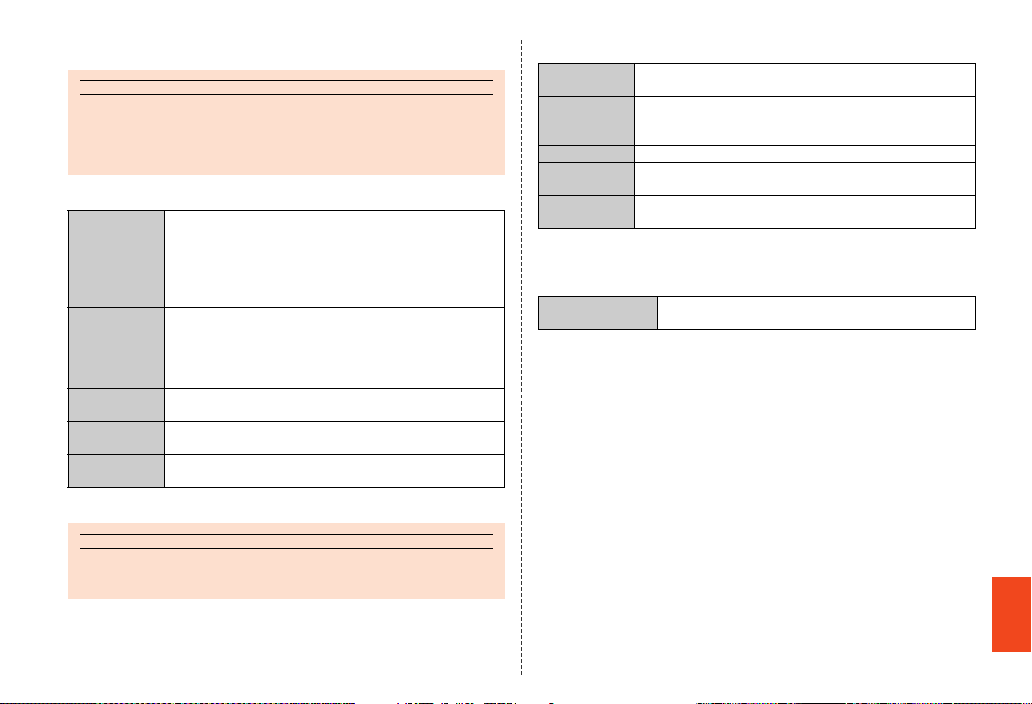
*8 Some content s of address books data may not be properly displayed on the device of the
memo
memo
other party.
◎ The continuous talk time and continuous standby time may drop to less
than half depending on the battery charging status, usage environment
such as temperature, reception condition at the location where the product
is used, and the function settings.
■ E-mail
Newly
compose
Receive Subject: 50 full-width/100 half-width characters
Server Saving capacity: 12 MB or Max. 500 e-mails
Inbox Number of savable e-mails: Max. 2,000 e-mails
Outbox Number of savable e-mails: Max. 1,000 e-mails
* The number of e-ma ils which can actually be saved may decrease depending on the free space
on the main unit.
◎ The number of e-mails which can be sent per day is up to 1,000 (including
the number of carbon copies).
Destination: 30 (including To/Cc/Bcc)
Subject: 50 full-width/100 half-width characters
Message: Approx 5,000 full-width/10,000 half-width
characters
Attached data: Up to 5 files can be attached. Max. 2 MB
when all 5 files put together
Message: Approx 5,000 full-width/10,000 half-width
characters
Attached data: Up to 25 files can be received. Max. 2 MB per
file. Max. 3 MB per e-mail
Saving duration: 30 days
Protected e-mails capacity: Max. 1,000 e-mails
*
*
Protected e-mails capacity: Max. 500 e-mails
■ SMS (C-mail)
Newly
compose
SMS (C-mail)
center
Mail Filters Number of SMSs (C-mails) which you can specified: 10
Inbox Number of savable SMSs (C-mails): Max. 1,000
Outbox Number of savable SMSs (C-mails): Max. 1,000
* The number of SM Ss (C-mails) which can actually be saved ma y decrease depending on the
free space on the main unit.
Message: 70 full-width/140 half-width characters
Number of savable SMSs (C-mails): No limit
Saving duration: Up to 72 hours after the SMS (C-mail) is
stored to the SMS (C-mail) center
Protected SMSs (C-mails) capacity: Max. 500
*
*
Protected SMSs (C-mails) capacity: Max. 500
■ 1Seg
Time you can watch
continuously
* The time you can watch continuously varies depending on the us ing condition.
Approx. 5 hours and 30 min
Appendix/Index
69
Page 72
Specific Absorption Rate (SAR) of Cell Phones
This model 【IS17SH】 mobile phone complies with Japanese technical
regulations and international guidelines regarding exposure to radio
waves. This mobile phone has been designed in observance of the
Japanese technical regulations regarding exposure to radio waves
(*1) and limits to exposure to radio waves recommended by
equivalent international guidelines.
These international guidelines were set out by the International
Commission on Non-Ionizing Radiation Protection (ICNIRP), which is
in collaboration with the World Health Organization (WHO), and the
permissible limits include a substantial safety margin designed to
assure the safety of all persons, regardless of age and health
condition. The Japanese technical regulations and international
guidelines define the limits using a unit of measurement known as the
Specific Absorption Rate (SAR), which represents the average
amount of radio frequency energy absorbed by the human head. The
SAR limit for mobile phones is 2.0 W/kg. The highest SAR value for this
mobile phone when tested for use at the ear is 0.460 W/kg. There may
be slight differences in SAR levels among individual products, but
they all satisfy the limit. The actual SAR of this mobile phone while
talking on the phone can be well below that indicated above. This is
due to automatic changes in the power level of the mobile phone to
Appendix/Index
ensure it only outputs the minimum power required to communicate
with a base station. Therefore in general, the closer you are to a base
station, the lower the power output of the mobile phone.
This mobile phone can be used in positions other than against your
ear. This mobile phone satisfies the international guidelines when
used with au Carrying Case F Black (0105FCA) (sold separately)
recommended by KDDI (*2).
In case you are not using the au Carrying Case F Black (0105FCA)
(sold separately), use a product that contains no metal parts, and one
that can hold the mobile phone at least 1.5 cm away from your body.
70
The World Health Organization has stated that “a large number of
studies have been performed over the last two decades to assess
whether mobile phones pose a potential health risk. To date, no
adverse health effects have been established as being caused by
mobile phone use.” If you would like to know more detailed
information, please refer to the WHO website.
(http://www.who.int/docstore/peh-emf/publications/facts_press/
fact_english.htm)
Please refer to the websites listed below if you would like to know
more detailed information regarding SAR.
○ Ministry of Internal Affairs and Communications website:
(http://www.tele.soumu.go.jp/e/sys/ele/index.htm)
○ Association of Radio Industries and Businesses website:
(http://www.arib-emf.org/index02.html)
○ au homepage:
(http://www.au.kddi.com/)
○ SHARP homepage:
(http://www.sharp.co.jp/products/menu/phone/cellular/sar/
index.html)
*1 Techn ical regulations are defined by the Ministeri al Ordinance Related to the Radio Law
(Article 14-2 of Radio Equipment Regulatio ns).
*2 Regar ding the method of measuring SAR when using mobile phones in positions other than
against the ear, international standards (IEC62209 -2) were set in March of 2010. On the other
hand, technical regulation is currently being deliberated on by national council (As of October,
2011).
Page 73
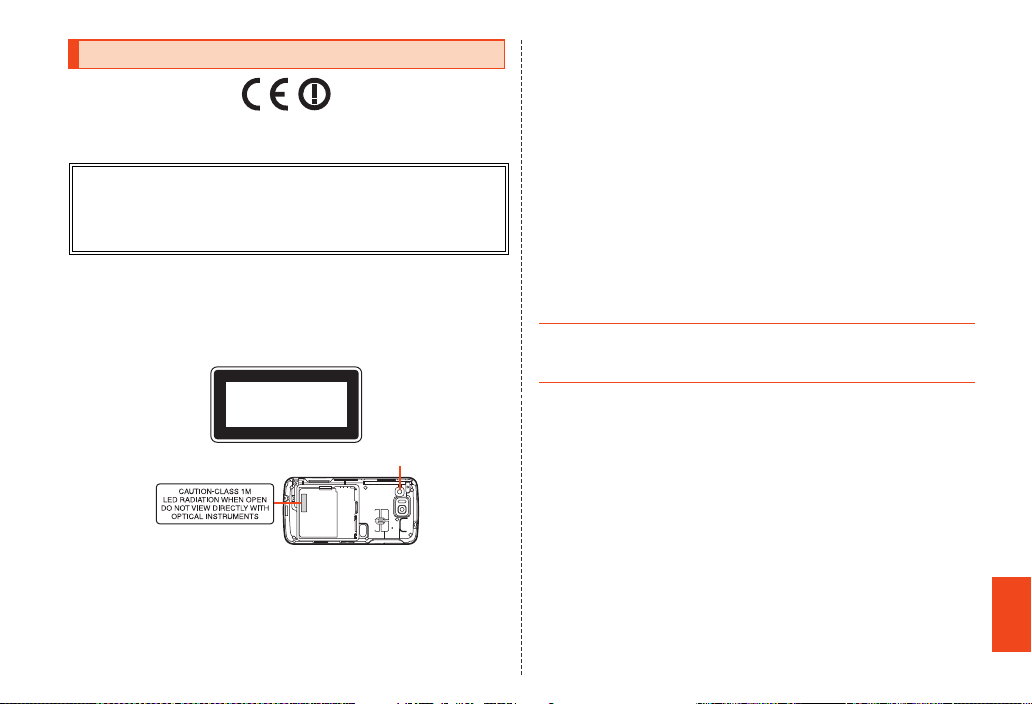
CE Declaration of Conformity
In some countries/regions, such as France, there are restrictions on the use of
®
. If you intend to use Wi-Fi® on the handset abroad, check the local laws and
Wi-Fi
regulations beforehand.
Hereby, Sharp Telecommunications of Europe Ltd, declares that this IS17SH is in
compliance with the essential requirements and other relev ant provisions of Directive
1999/5/EC.
A copy of the original declaration of conformity can be found at the following Internet
address:
(http://www.sharp.co.jp/k-tai/)
■ Mobile Light
Do not point the illuminated light directly at someone’s eyes.
Be especially careful not to shoot small children from a very close distance.
Do not use Mobile light near people’s faces. Eyesight may be temporarily affected
leading to accidents.
CAUTION:
Use of controls, adjustments or performance of procedure other than those
specified herein may result in hazardous radiation exposure. As the emission level
from Mobile light LED used in this product is harmful to the eyes, do not attempt to
disassemble the cabinet. Servicing is limited to qualified servicing station only.
EN60825-1:1994 A1:2002 & A2:2001
CLASS1
LED Product
Mobile light
Mobile light source LED characteristics
a) Continuous illumination
b) Wavelength
White: 400-700 nm
c) Maximum output
White: 910 μW (inside cell phone 1.57 mW)
■ AC Adapter
Any AC adapter used with this handset must be suitably approved with a 5Vdc
SELV output which meets limited power source requirements as specified in EN/
IEC 60950-1 clause 2.5.
■ Battery - CAUTION
Use specified battery or Charger only.
Non-specified equipment use may cause malfunctions, electric shock or fire due
to battery leakage, overheating or bursting.
Do not dispose of an exhausted battery with ordinary refuse; always tape over
battery terminals before disposal. Take battery to an au Shop, or follow the local
disposal regulations.
Charge battery in ambient temperatures between 5°C and 35°C; outside this
range, battery may leak/overheat and performance may deteriorate.
■ Loudness Warning
Excessive sound pressure from earphones and headphones can cause hearing
loss.
■ Headphone Signal Level
The maximum output voltage for the music player function, measured in
accordance with EN 50332-2, is 56 mV.
Appendix/Index
71
Page 74
■ European RF Exposure Information
Your mobile device is a radio transmitter and receiver. It is designed not to
exceed the limits for exposure to radio waves recommended by international
guidelines. These guidelines were developed by the independent scientific
organization ICNIRP and include safety margins designed to assure the
protection of all persons, regardless of age and health.
The guidelines use a unit of measurement known as the Specific Absorption Rate,
or SAR. The SAR limit for mobile devices is 2 W/kg and the highest SAR value for
this device when tested at the ear was 0.141 W/kg*.
As SAR is measured utilizing the devices highest transmitting power the actual
SAR of this device while operating is typically below that indicated above. This is
due to automatic changes to the power level of the device to ensure it only uses
the minimum level required to reach the network.
The World Health Organization has stated that present scientific information does
not indicate the need for any special precautions for the use of mobile devices.
They note that if you want to reduce your exposure then you can do so by limiting
the length of calls or using a hands-free device to keep the mobile phone away
from the head.
* The tests a re carried out in accordance with international gui delines for testing.
FCC Notice
- This device complies with part 15 of the FCC Rules. Operation is subject to the
Appendix/Index
following two conditions:
(1) This device may not cause harmful interference, and (2) this device must
accept any interference received, including interference that may cause
undesired operation.
- Changes or modifications not expressly approved by the manufacturer
responsible for compliance could void the user’s authority to operate the
equipment.
72
■ Information to User
This equipment has been tested and found to comply with the limits of a Class B
digital device, pursuant to Part 15 of the FCC Rules. These limits are designed to
provide reasonable protection against harmful interference in a residential
installation. This equipment generates, uses and can radiate radio frequency
energy and, if not installed and used in accordance with the instructions, may
cause harmful interference to radio communications.
However, there is no guarantee that interference will not occur in a particular
installation; if this equipment does cause harmful interference to radio or television
reception, which can be determined by turning the equipment off and on, the user
is encouraged to try to correct the interference by one or more of the following
measures:
1. Reorient/relocate the receiving antenna.
2. Increase the separation between the equipment and receiver.
3. Connect the equipment into an outlet on a circuit different from that to which
the receiver is connected.
4. Consult the dealer or an experienced radio/TV technician for help.
■ FCC RF Exposure Information
Your handset is a radio transmitter and receiver. It is designed and manufactured
not to exceed the emission limits for exposure to radio frequency (RF) energy set
by the Federal Communications Commission of the U.S. Government.
The guidelines are based on standards that were developed by independent
scientific organizations through periodic and thorough evaluation of scientific
studies. The standards include a substantial safety margin designed to assure the
safety of all persons, regardless of age and health.
The exposure standard for wireless handsets employs a unit of measurement
known as the Specific Absorption Rate, or SAR. The SAR limit set by the FCC is
1.6 W/kg.
Highest SAR value:
Model CDMA SHI17
FCC ID APYHRO00158
At the Ear 0.357 W/kg
On the Body 0.120 W/kg
Page 75
This device was tested for typical body-worn operations with the back of the
handset kept 1.5 cm from the body. To maintain compliance with FCC RF
exposure requirements, use accessories that maintain a 1.5 cm separation
distance between the user’s body and the back of the handset. The use of belt
clips, holsters and similar accessories should not contain metallic components in
its assembly.
The use of accessories that do not satisfy these requirements may not comply
with FCC RF exposure requirements, and should be avoided.
The FCC has granted an Equipment Authorization for this model handset with all
reported SAR levels evaluated as in compliance with the FCC RF emission
guidelines. SAR information on this model handset is on file with the FCC and can
be found at (http://www.fcc.gov/oet/fccid/) under the Display Grant section after
searching on the corresponding FCC ID (see table above).
Additional information on Specific Absorption Rates (SAR) can be found on the
Cellular Telecommunications & Internet Association (CTIA)
Website at (http://www.phonefacts.net).
Export Administration Regulations
The product and its accessories may be subject to the Japan Export
Administration Regulations (“Foreign Exchange and Foreign Trade Law” and its
related laws). In addition, U.S. Re-export Regulations (Export Administration
Regulations) may apply to the product and its accessories. To export and
re-export the product and its accessories, take the required measures on your
responsibility and at your expenses. For details on the procedures, contact the
Ministry of Economy, Trade and Industry or the U.S. Department of Commerce.
Intellectual Property Rights
■ Trademarks
The company names and product names appearing in this manual are
trademarks or registered trademarks of their respective holders.
• The microSD logo and microSDHC logo are trademarks of SD-3C and LLC.
• The Bluetooth® word mark and logo are registered trademarks owned by the
Bluetooth SIG, Inc., and SHARP CORPORATION is licensed to use these
trademarks.
• Wi-Fi® is a registered trademark of Wi-Fi Alliance®.
• Wi-Fi Protected Setup™ and Wi-Fi Protected Setup logo are trademarks of Wi-Fi
Alliance®.
The Wi-Fi Protected Setup Mark is a mark of the Wi-Fi Alliance.
Appendix/Index
• “ ” is a trademark of BUFFALO INC.
• The official name for Microsoft® Windows® is Microsoft® Windows® Operating
System.
73
Page 76
• Microsoft® Windows®, Windows Vista®, Microsoft® Excel®, Microsoft®
PowerPoint®, Windows Media® and Exchange® are trademarks or registered
trademarks of Microsoft Corporation in the U.S.A. and other countries.
• Microsoft® Word and Microsoft® Office are product names of Microsoft
Corporation in the U.S.A.
• Music recognition technology and related data are provided by Gracenote®.
Gracenote is a business standard for music recognition technology and related
contents delivery.
For details, refer to the following web page: (www.gracenote.com)
CD and music data provided by Gracenote: Copyright © 2000 - present
Gracenote.
Gracenote Software: Copyright 2000 - present Gracenote.
This product and services may include one or several of the following US
Patent. #5,987,525, #6,061,680, #6,154,773, #6,161,132, #6,230,192,
#6,230,207, #6,240,459, #6,330,593, and other granted or applied patents.
Part of services are provided by Open Globe, Inc. for US patent (#6,304,523)
under license.
Gracenote and CDDB are registered trademarks of Gracenote, Inc.
Logo and logo type of Gracenote and “Powered by Gracenote” logo are
trademarks of Gracenote, Inc.
For information on the use of Gracenote services, refer to the following web
page: (www.gracenote.com/corporate)
Appendix/Index
• QR code is a register ed trademark of DENSO WAVE INCORPORATED.
• Osaifu-Keitai is a registered trademark of NTT DOCOMO, INC.
• FeliCa is a contactless IC card technology developed by Sony Corporation.
FeliCa is a registered trademark of Sony Corporation.
• is a registered trademark of FeliCa Networks, Inc.
• Twitter and Twitter logo are trademarks or registered trademarks of Twitter, Inc.
• Facebook® is a registered trademark of Facebook, Inc.
• “mixi” and “mymixi” are trademark and/or registered trademark of mixi, Inc.
• Google, Google logo, Android, Android logo, Google Play™, Google Play logo,
Google+, Google+ logo, Gmail™, Gmail logo, Calendar logo, Google Maps™,
Google Maps logo, Google Talk™, Google Talk logo, Google Voice Search™
logo, Picasa™, Picasa logo, YouTube and YouTube logo are trademarks or
registered trademarks of Google Inc.
• Skype, associated trademarks and logos and the “S” symbol are trademarks of
Skype Limited.
• “Jibe” is a trademark of Jibe Mobile K.K.
• GREE and the GREE logo are registered trademarks of GREE, Inc. in Japan. All
other trademarks are the property of their respective owners.
• Rovi, G-GUIDE, G-GUIDE MOBILE and G-Guide related logos are trademarks
or registered trademarks of Rovi Corporation and/or its subsidiaries in Japan.
• TRENDMICRO, VirusBuster are trademarks of Trend Micro Inc.
• Copyright (C) 2010 - Three Laws of Mobility. All Rights Reserved.
• The “RSA Secure” AND “Genuine RSA” logos are trademarks of RSA Data
Security, Inc.
• DLNA®, the DLNA Logo and DLNA CERTIFIED™ are trademarks, service
marks, or certification marks of the Digital Living Network Alliance.
Sharp Corporation has acquired DLNA certification for the device.
• IrSimple™ and IrSS™ are trademarks of Infrared Data Association®.
74
Page 77
• Oracle and Java are registered trademarks of Oracle and/or its affiliates. Other
names may be trademarks of their respective owners.
• “Chaku-uta”, “Chaku-uta full” and “Chaku-uta full plus” are registered
trademarks of the Sony Music Entertainment (Japan) Inc.
• “VeilView”, “Best select photo”, “Chase focus”, “Egao focus shutter”, “Furimuki
shutter”, “AQUOS”, “AQUOS PHONE”, “ファミリンク”, “FAMILINK”, the “エコ
技” symbol and “エコ技”, “OneTouch Shutter”, “GALAPAGOS”, “SH SHOW”,
“ASV”, “LCフォント”, “LCFONT” and the LC logo symbol are registered
trademarks or trademarks of Sharp Corporation.
• Included Document Viewer is Documents To Go provided by DataViz,Inc.
© 2011 DataViz, Inc. and its licensors. All rights reserved.
DataViz, Documents To Go and InTact Technology are trademarks or
registered trademarks of DataViz, Inc.
• PhotoScouter® and TrackSolid® are registered trademarks or trademarks of
Morpho, Inc.
• MyScript® Stylus Mobile is a trademark of VISION OBJECTS.
• CP8 PATENT
• Content owners use Microsoft PlayReady™ content access technology to
protect their intellectual property, including copyrighted content. This device
uses PlayReady technology to access PlayReady-protected content and/or
WMDRM-protected content. If the device fails to properly enforce restrictions on
content usage, content owners may require Microsoft to revoke the device’s
ability to consume PlayReady-protected content. Revocation should not affect
unprotected content or content protected by other content access
technologies. Content owners may require you to upgrade PlayReady to access
their content. If you decline an upgrade, you will not be able to access content
that requires the upgrade.
• iWnn of OMRON SOFTWARE Co., Ltd. is used for conversion methods for
Japanese language, and for phrase prediction methods for English.
iWnn © OMRON SOFTWARE Co., Ltd. 2008-2012 All Rights Reserved.
iWnn IME © OMRON SOFTWARE Co., Ltd. 2009-2012 All Rights Reserved.
• The font type pre-installed in this product, Shin Go M, is licensed by Morisawa
Inc. solely for the use with this product.
“Morisawa” and “Shin Go” are registered trademarks or trademarks of Morisawa
Inc.
• Portions Copyright ©2004 Intel Corporation
• aptX is a registered trademark of CSR plc.
• The product includes pictograms that SHARP CORPORATION is licensed by
NTT DOCOMO, INC.
■ Open Source Software
• The product includes software based on GNU General Public License (GPL),
GNU Lesser General Public License (LGPL) and other licenses.
For details on licenses of related software, on the home screen, tap [APPS]
[[Settings] [[Device info] [[Legal information] [[Open source
licenses].
• Source codes of software based on GPL, LGPL and Mozilla Public License
(MPL) can be referred to on the following site for free. For details, refer to the
following site.
(https://sh-dev.sharp.co.jp/android/modules/oss/)
■ OpenSSL License
【OpenSSL License】
Copyright © 1998-2009 The OpenSSL Project. All rights reserved.
This product includes software developed by the OpenSSL Project for use in the
OpenSSL Toolkit. (http://www.openssl.org/)
Appendix/Index
75
Page 78
THIS SOFTWARE IS PROVIDED BY THE OpenSSL PROJECT “AS IS” AND ANY
EXPRESSED OR IMPLIED WARRANTIES, INCLUDING, BUT NOT LIMITED TO,
THE IMPLIED WARRANTIES OF MERCHANTABILITY AND FITNESS FOR A
PARTICULAR PURPOSE ARE DISCLAIMED. IN NO EVENT SHALL THE OpenSSL
PROJECT OR ITS CONTRIBUTORS BE LIABLE FOR ANY DIRECT, INDIRECT,
INCIDENTAL, SPECIAL, EXEMPLARY, OR CONSEQUENTIAL DAMAGES
(INCLUDING, BUT NOT LIMITED TO, PROCUREMENT OF SUBSTITUTE GOODS
OR SERVICES; LOSS OF USE, DATA, OR PROFITS; OR BUSINESS
INTERRUPTION) HOWEVER CAUSED AND ON ANY THEORY OF LIABILITY,
WHETHER IN CONTRACT, STRICT LIABILITY, OR TORT (INCLUDING
NEGLIGENCE OR OTHERWISE) ARISING IN ANY WAY OUT OF THE USE OF
THIS SOFTWARE, EVEN IF ADVISED OF THE POSSIBILITY OF SUCH DAMAGE.
【Original SSLeay License】
Copyright © 1995-1998 Eric Young ([email protected]) All rights reserved.
This product includes cryptographic software written by Eric Young
THIS SOFTWARE IS PROVIDED BY ERIC YOUNG “AS IS” AND ANY EXPRESS OR
IMPLIED WARRANTIES, INCLUDING, BUT NOT LIMITED TO, THE IMPLIED
WARRANTIES OF MERCHANTABILITY AND FITNESS FOR A PARTICULAR
PURPOSE ARE DISCLAIMED. IN NO EVENT SHALL THE AUTHOR OR
CONTRIBUTORS BE LIABLE FOR ANY DIRECT, INDIRECT, INCIDENTAL,
SPECIAL, EXEMPLARY, OR CONSEQUENTIAL DAMAGES (INCLUDING, BUT
NOT LIMITED TO, PROCUREMENT OF SUBSTITUTE GOODS OR SERVICES;
LOSS OF USE, DATA, OR PROFITS; OR BUSINESS INTERRUPTION) HOWEVER
CAUSED AND ON ANY THEORY OF LIABILITY, WHETHER IN CONTRACT,
Appendix/Index
STRICT LIABILITY, OR TORT (INCLUDING NEGLIGENCE OR OTHERWISE)
ARISING IN ANY WAY OUT OF THE USE OF THIS SOFTWARE, EVEN IF ADVISED
OF THE POSSIBILITY OF SUCH DAMAGE.
■ Windows Notations
The names of operating systems (Japanese versions) used in this manual are as
follows.
• Windows 7 is the abbreviation for Microsoft® Windows® 7 (Starter, Home Basic,
Home Premium, Professional, Enterprise, Ultimate).
76
• Windows Vista is the abbreviation for Microsoft® Windows Vista® (Home Basic,
Home Premium, Business, Enterprise, Ul timate).
• Windows XP is the abbreviation for Microsoft® Windows® XP Professional
operating system and Microsoft® Windows® XP Home Edition operating
system.
■ Gracenote® End User License Agreement
This application or device contains software from Gracenote, Inc. of Emeryville,
California (“Gracenote”). The software from Gracenote (the “Gracenote Software”)
enables this application to perform disc and/or file identification and obtain
music-related information, including name, artist, track, and title information
(“Gracenote Data”) from online servers or embedded databases (collectively,
“Gracenote Servers”) and to perform other functions. You may use Gracenote
Data only by means of the intended End-User functions of this application or
device.
You agree that you will use Gracenote Data, the Gracenote Software, and
Gracenote Servers for your own personal non-commercial use only. You agree not
to assign, copy, transfer or transmit the Gracenote Software or any Gracenote
Data to any third party. YOU AGREE NOT TO USE OR EXPLOIT GRACENOTE
DATA, THE GRACENOTE SOFTWARE, OR GRACENOTE SERVERS, EXCEPT
AS EXPRESSLY PERMITTED HEREIN.
You agree that your non-exclusive license to use the Gracenote Data, the
Gracenote Software, and Gracenote Servers will terminate if you violate these
restrictions. If your license terminates, you agree to cease any and all use of the
Gracenote Data, the Gracenote Software, and Gracenote Servers.
Gracenote reserves all rights in Gracenote Data, the Gracenote Software, and the
Gracenote Servers, including all ownership rights. Under no circumstances will
Gracenote become liable for any payment to you for any information that you
provide. You agree that Gracenote, Inc. may enforce its rights under this
Agreement against you directly in its own name.
The Gracenote service uses a unique identifier to track queries for statistical
purposes. The purpose of a randomly assigned numeric identifier is to allow the
Gracenote service to count queries without knowing anything about who you are.
For more information, see the web page for the Gracenote Privacy Policy for the
Gracenote service.
Page 79
The Gracenote Software and each item of Gracenote Data are licensed to you “AS
IS.” Gracenote makes no representations or warranties, express or implied,
regarding the accuracy of any Gracenote Data from in the Gracenote Servers.
Gracenote reserves the right to delete data from the Gracenote Servers or to
change data categories for any cause that Gracenote deems sufficient. No
warranty is made that the Gracenote Software or Gracenote Servers are error-free
or that functioning of Gracenote Software or Gracenote Servers will be
uninterrupted. Gracenote is not obligated to provide you with new enhanced or
additional data types or categories that Gracenote may provide in the future and
is free to discontinue its servic es at any time.
• GRACENOTE DISCLAIMS ALL WARRANTIES EXPRESS OR IMPLIED,
INCLUDING, BUT NOT LIMITED TO, IMPLIED WARRANTIES OF
MERCHANTABILITY, FITNESS FOR A PARTICULAR PURPOSE, TITLE,
AND NON-INFRINGEMENT. GRACENOTE DOES NOT WARRANT THE
RESULTS THAT WILL BE OBTAINED BY YOUR USE OF THE GRACENOTE
SOFTWARE OR ANY GRACENOTE SERVER. IN NO CASE WILL
GRACENOTE BE LIABLE FOR ANY CONSEQUENTIAL OR INCIDENTAL
DAMAGES OR FOR ANY LOST PROFITS OR LOST REVENUES.
© Gracenote, Inc. 2000-present
■ More
The software installed on this product or part of it may not be altered, translated/
adapted, reverse-engineered, decompiled or reverse-assembled and any such
actions are prohibited.
Under the MPEG-4 Visual Patent Portfolio Lice nse, customers have licensed
permission for the following use of this product to engage in non-profit per sonal
use. Other uses are not permitted.
• Recording MPEG-4 Visual standard video (henceforth referred to as MPEG-4
Video)
• Playing back MPEG-4 Video that a customer engaged in personal and
non-profit activities has recorded
• Playing back MPEG-4 Video obtained from a provider licensed by MPEG-LA
When using for promotion, in-house use, profit use, and other intended uses,
contact MPEG LA. LLC.
• This product is licensed under the AVC patent portfolio license for the personal
and noncommercial use of a consumer to (i) encode video in compliance with
the AVC standard (henceforth referred to as AVC video) and/or (ii) decode AVC
video that was encoded by a consumer engaged in a personal and
noncommercial activity and/or was obtained from a video provider licensed to
provide AVC video. No license is granted or shall be implied for any other use.
Additional information may be obtained from MPEG LA, L.L.C.
See (http://www.mpegla.com)
• This product is l icensed under the VC-1 Patent Portfolio License for the
personal and noncommercial use of a consumer to (i) encode video in
compliance with the VC-1 standard (henceforth referred to as VC-1 video) and/
or (ii) decode VC-1 video that was encoded by a consumer engaged in a
personal and noncommercial activity and/or was obtained from a video
provider licensed to provide VC-1 video. No license is granted or shall be
implied for any other use. Additional information may be obtained from MPEG
LA, L.L.C.
See (http://www.mpegla.com)
This product is licensed under the MPEG-4 Visual Patent Portfolio License for the
personal and non-commercial use of a con sumer to (i) encode video in
compliance with the MPEG-4 Video Standard (“MPEG-4 Video”) and/or (ii)
decode MPEG-4 Video that was encoded by a consumer engaged in a personal
and non-commercial activity and/or was obtained from a licensed video provider .
No license is granted or implied for any other use. Additional information may be
obtained from MPEG LA. See (http://www.mpegla.com).
This product is licensed under the MPEG-4 Systems Patent Portfolio License for
encoding in compliance with the MPEG-4 Systems Standard, except that an
additional license and payment of royalties are necessary for encoding in
connection with (i) data stored or replicated in physical media which is paid for on
a title by title basis and/or (ii) data which is paid for on a title by title basis and is
transmitted to an end user for permanent storage and/or use. Such additional
license may be obtained from MPEG LA, LLC. See (http://www.mpegla.com) for
additional details.
Appendix/Index
77
Page 80
A
Absence Memo .............................57
Add Call .........................................55
Add P .............................................54
Add Prefix......................................55
Add shortcut .................................44
Add widget ....................................44
Address Book ...............................55
Answer...........................................56
Answer Holding ............................57
au Disaster Countermeasure.........2
au IC-Card .....................................33
au International Call Service ....... 55
Auto Setup ....................................64
B
Back to Welcome Sheet............... 44
Battery cover.................................30
Battery pack..................................31
Bluetooth OFF...............................55
Bluetooth ON ................................55
C
Appendix/Index
Camera ..........................................30
Change input mode......................51
Charging indicator........................30
Check for updates ........................65
Confirm update.............................65
Create SMS....................................55
D
Delete...............................................3
Disaster Message Board................2
Disaster Voice Delivery Service....4
Display...........................................29
Double tap .....................................41
78
Index
Drag............................................... 42
E
Early warning mail ......................... 3
Earphone ...................................... 61
Earphone/Microphone ................. 61
Earphone/Microphone jack ......... 30
Earphone/Microphone with switch
.................................................... 61
Earpiece........................................ 29
Emoji ............................................. 52
External connection jack............. 29
External connection jack cover
.................................................... 29
F
Facemark ...................................... 52
FCC Notice.................................... 72
FeliCa mark................................... 30
Flick............................................... 42
Forwarding ................................... 57
H
Home settings .............................. 43
I
Icons.............................................. 45
Infrared port.................................. 30
Internal antennas area ................. 30
L
Lens............................................... 30
Light sensor ................................. 29
Long touch ................................... 41
M
Main area....................................... 29
Major Update.................................65
Microphone ...................................30
microSD memory card .................35
microSD memory card slot..........31
Mobile light ................................... 30
Mouthpiece ...................................30
Mute ...............................................55
Mute OFF....................................... 55
P
Phone ............................................ 53
PIN code ........................................21
Pinch..............................................42
Power key...................................... 29
Power off .......................................39
Profile ............................................ 58
Q
Quick reply ....................................57
Quote from profile ........................ 55
Quote to Call log........................... 55
R
Reboot ...........................................39
Receiver ........................................29
Reject.............................................57
Reminder....................................... 64
Reserve Time................................64
Restrict Calls Setting ...................55
S
Search App.(Google Play) ...........43
Security codes ..............................20
Set 12 keyboard............................ 49
Set QWERTY keyboard ................ 49
Settings
Display setting menu ..................59
Early Warning Mail ........................3
Menu on the home screen ..........43
Menu on the phone number entry
screen ......................................55
Silent ..............................................57
Slide ...............................................41
Software update............................63
Speaker..........................................30
SpeakerOFF...................................55
SpeakerON ....................................55
Start update...................................65
Strap eyelet ...................................30
Sub area.........................................29
Symbol...........................................52
T
Tap .................................................41
Touch panel...................................29
Tray ................................................31
TV antenna ....................................30
U
Update............................................63
V
Voice Memo...................................55
Volume up/down key ....................30
Page 81
July2012,1stEdition
 Loading...