

Page 1
Quick start guide
TL86103
DECT 6.0 2-line
corded/cordless telephone/
answering system with
BLUETOOTH® wireless technology
Page 2
Congratulations
on your purchase of this AT&T product. Before using this AT&T product, please read
the Important safety information section on pages 1-3 of this manual.
Both the model and serial numbers of your AT&T product can be found on the
bottom of the telephone base. Save your sales receipt and original packaging in
case it is necessary to return your telephone for warranty service.
For customer service, please visit our website at https://telephones.att.com
or call 1 (800) 222-3111. In Canada, dial 1 (866) 288-4268.
Please refer to the online TL86103 DECT 6.0 2-line corded/cordless
telephone/answering system with BLUETOOTH® wireless technology
Complete user’s manual for a full set of installation and operation
instructions at https://telephones.att.com/manuals.
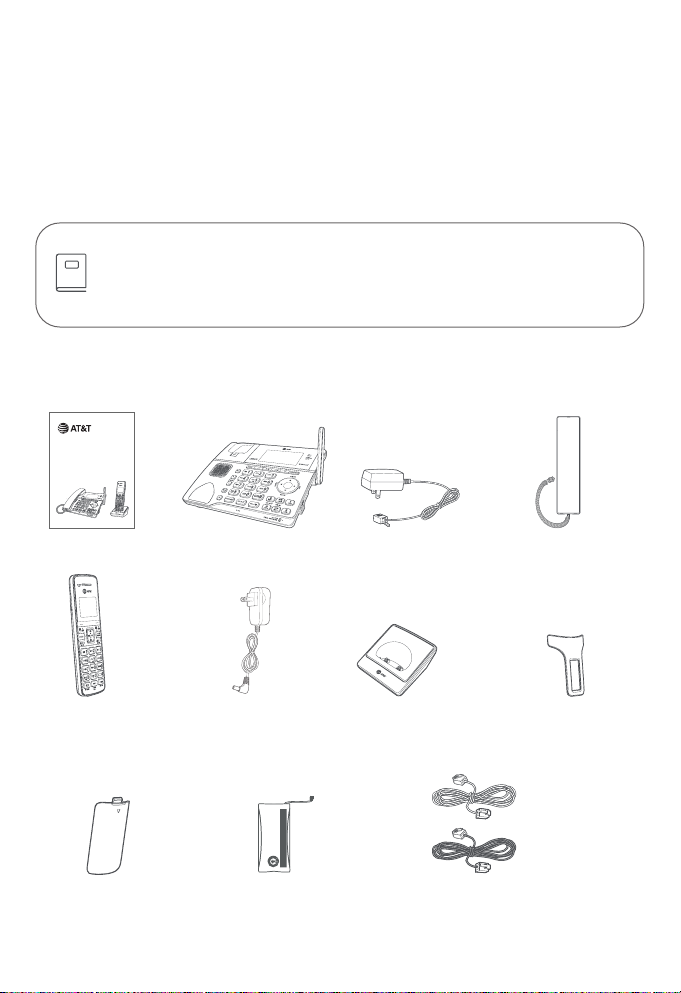
Parts checklist
Your telephone package contains the following items.
Quick start guide
TL86103
DECT 6.0 2-line
corded/cordless telephone/
answering system with
BLUETOOTH® wireless technology
Cordless handset
Battery compartment
cover
Telephone baseQuick start guide
Power adapter for
handset charger
Battery Pack / Bloc-piles :
BT183342/BT283342 (2.4V 400mAh Ni-MH)
WARNING / AVERTISSEMENT :
DO NOT BURN OR PUNCTURE BATTERIES.
NE PAS INCINÉRER OU PERCER LES PILES.
Made in China / Fabriqué en chine CR1349
THIS SIDE UP / CE CÔTÉ VERS LE HAUT
Battery for cordless
handset
Power adapter for
telephone base
Charger for cordless
handset
Telephone line cords
(one black and one clear)
Corded handset with
coiled handset cord
attached
Belt clip for
cordless handset
Page 3

Important safety information
This symbol is to alert you to important operating or servicing instructions
that may appear in this user’s manual. Always follow basic safety precautions
when using this product to reduce the risk of injury, re, or electric shock.
Safety information
f Read and understand all instructions in the user’s manual. Observe all markings on
the product.
f Avoid using a telephone during a thunderstorm. There may be a slight chance of
electric shock from lightning.
f Do not use a telephone in the vicinity of a gas leak. Under certain circumstances,
a spark may be created when the adapter is plugged into the power outlet, or
when the handset is replaced in its cradle. This is a common event associated with
the closing of any electrical circuit. In an inadequately ventilated environment,
the user should not plug the phone into a power outlet, nor put a charged
handset into the cradle where there are concentrations of ammable or amesupporting gases. A spark in such an environment could create a re or explosion.
Such environments might include: medical use of oxygen without adequate
ventilation; industrial gases (cleaning solvents; gasoline vapors; etc.); a leak of natural
gas; etc.
f Do not use this product near water or when you are wet. For example, do not use
it in a wet basement or shower, nor next to a swimming pool, bathtub, kitchen sink
and laundry tub. Do not use liquids or aerosol sprays for cleaning. If the product
comes in contact with any liquid, unplug any line or power cord immediately. Do not
plug the product back in until it has dried thoroughly.
f Install this product in a protected location where no one can trip over any line or
power cords. Protect cords from damage or abrasion.
f If this product does not operate normally, see the Troubleshooting section of the
online Complete user’s manual. If you cannot solve the problem, or if the product
is damaged, refer to the Limited warranty section (pages 36 - 38). Do not
open this product except as directed in your user’s manual. Opening the product or
reassembling it incorrectly may expose you to hazardous voltages or other risks.
f Replace batteries, only as described in your user’s manual (Page 6). Do not burn
or puncture batteries — they contain caustic chemicals.
f This power adapter is intended to be correctly oriented in a vertical or oor mount
position. The prongs are not designed to hold the plug in place if it is plugged into a
ceiling or an under-the-table/cabinet outlet.
f For pluggable equipment, the socket-outlet shall be installed near the equipment
and shall be easily accessible.
1
Page 4

Important safety information
i
CAUTIONS:
f Use only the power adapter provided with this product. To obtain a replacement,
visit our website at https://telephones.att.com or call
1 (800) 222-3111. In Canada, dial 1 (866) 288-4268.
f U
se only the supplied rechargeable battery or replacement battery (model
BT283342).
To order, visit our website at
https://telephones.att.com, or call 1 (800) 222-3111. In
Canada, dial 1 (866) 288-4268.
CAUTION: To prevent risk of re or battery explosion, replace with
the correct battery type. Dispose of used batteries according to the
instructions.
Especially about cordless telephones
f Privacy: The same features that make a cordless telephone convenient create
some limitations. Telephone calls are transmitted between the telephone base
and the handset by radio waves, so there is a possibility that your cordless
telephone conversations could be intercepted by radio receiving equipment within
range of the cordless handset. For this reason, you should not think of cordless
telephone conversations as being as private as those on corded telephones.
f Electrical power: The telephone base of this cordless telephone must be
connected to a working electrical outlet which is not controlled by a wall switch.
Calls cannot be made from the handset if the telephone base is unplugged,
switched o or if the electrical power is interrupted.
f Potential TV interference: Some cordless telephones operate at frequencies
that may cause interference to TVs and VCRs. To minimize or prevent such
interference, do not place the telephone base of the cordless telephone near
or on top of a TV or VCR. If interference is experienced, moving the cordless
telephone farther away from the TV or VCR will oen reduce or eliminate the
interference.
f Rechargeable batteries: This product contains nickel-metal hydride rechargeable
batteries. Exercise care in handling batteries in order not to create a short
circuit with conductive material such as rings, bracelets, and keys. The battery or
conductor may overheat and cause harm. Observe proper polarity between the
battery and the battery charger.
f Nickel-metal hydride rechargeable batteries: Dispose of these batteries in a safe
manner. Do not burn or puncture. Like other batteries of this type, if burned or
punctured, they could release caustic material which could cause injury.
BT183342/
2
Page 5

Important safety information
The RBRC Seal means that the manufacturer is voluntarily
participating in an industry program to collect and recycle nickelmetal hydride rechargeable batteries when taken out of service
within the United States. These batteries may be taken to a
participating local retailer of replacement batteries or recycling
center. You may call 1-800-8-BATTERY® for locations accepting
spent Ni-MH batteries.
The RBRC Seal and 1-800-8-BATTERY® are registered trademarks of
Call2recycle, Inc.
Precautions for users of implanted cardiac pacemakers
Cardiac pacemakers (applies only to digital cordless telephones):
Wireless Technology Research, LLC (WTR), an independent research entity, led
a multidisciplinary evaluation of the interference between portable wireless
telephones and implanted cardiac pacemakers. Supported by the U.S. Food and
Drug Administration, WTR recommends to physicians that:
Pacemaker patients:
f Should keep wireless telephones at least six inches from the pacemaker.
f Should NOT place wireless telephones directly over the pacemaker, such as in a
breast pocket, when it is turned ON.
f Should use the wireless telephone at the ear opposite the pacemaker.
WTR’s evaluation did not identify any risk to bystanders with pacemakers from
other persons using wireless telephones.
ECO mode
This power conserving technology reduces power consumption for optimal battery
performance. The ECO mode activates automatically whenever the handset is
synchronized with the telephone base.
Especially about telephone answering systems
Two-way recording: This unit does not sound warning beeps to inform the other
party that the call is being recorded. To ensure that you are in compliance with any
federal or state regulations regarding recording a telephone call, you should start
the recording process and then inform the other party that you are recording the
conversation.
SAVE THESE INSTRUCTIONS
3
Page 6
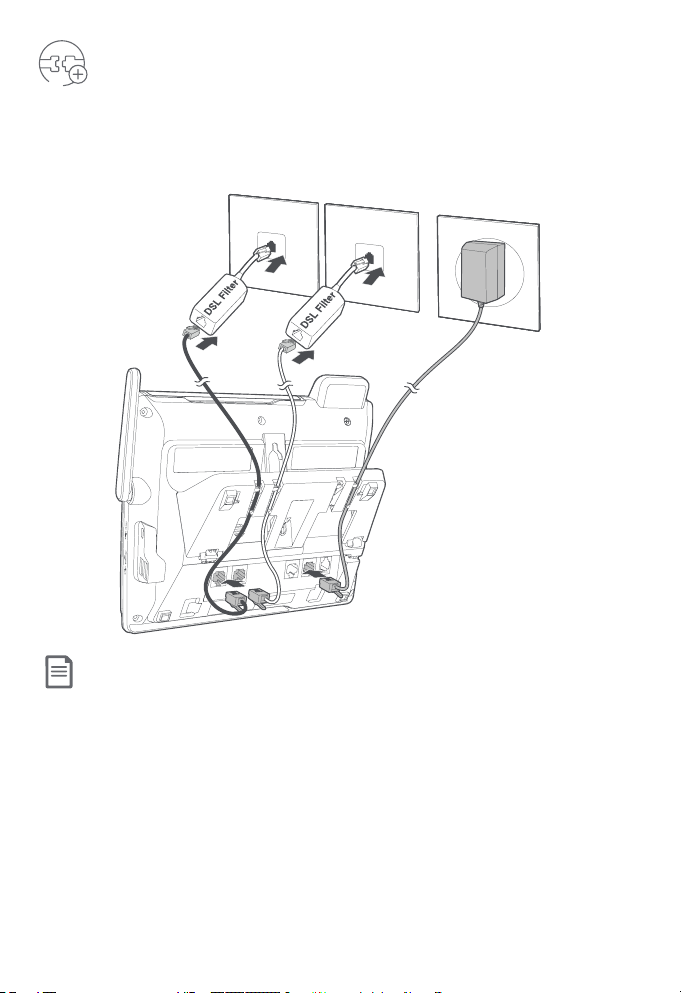
Install
Telephone base
Option 1: If you have separate wall jacks for each line, plug the telephone lines, as
shown below.
Notes:
f Plug one end of the telephone line cord into a telephone jack or a DSL lter.
f If you have DSL high-speed Internet service, a DSL lter (not included) is required.
4
Page 7
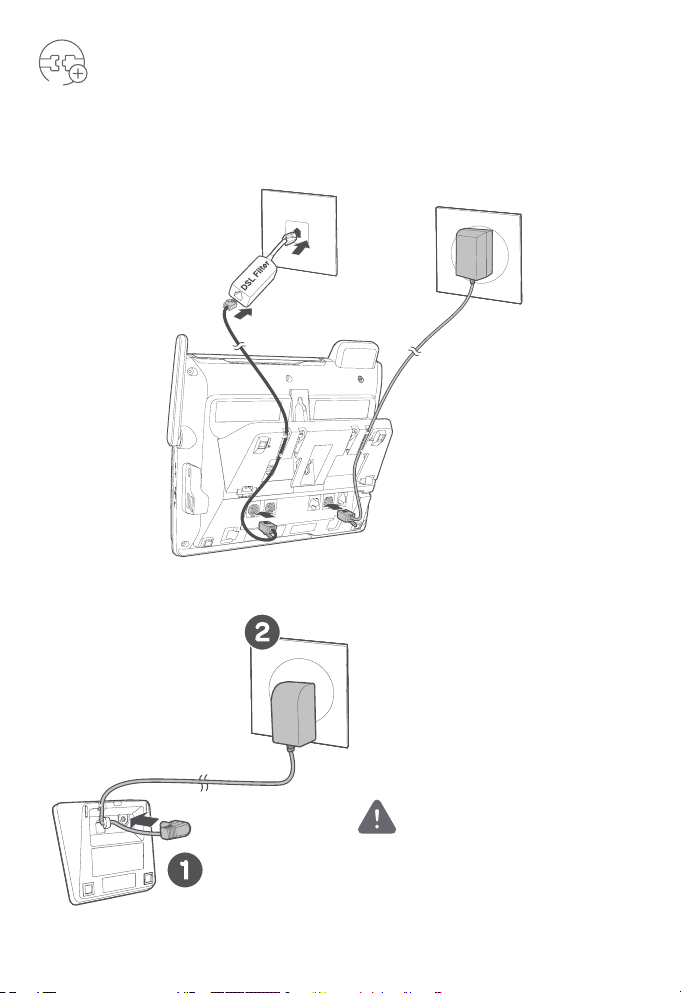
Install
Telephone base
Option 2: If you have a 2-line wall jack, plug the 4-conductor black telephone line,
as shown below.
Charger
Caution: Use only the power adapter(s)
provided with this product. To obtain a
replacement, visit our website at
https://telephones.att.com
or call 1 (800) 222-3111. In Canada,
dial 1 (866) 288-4268.
5
Page 8
Install
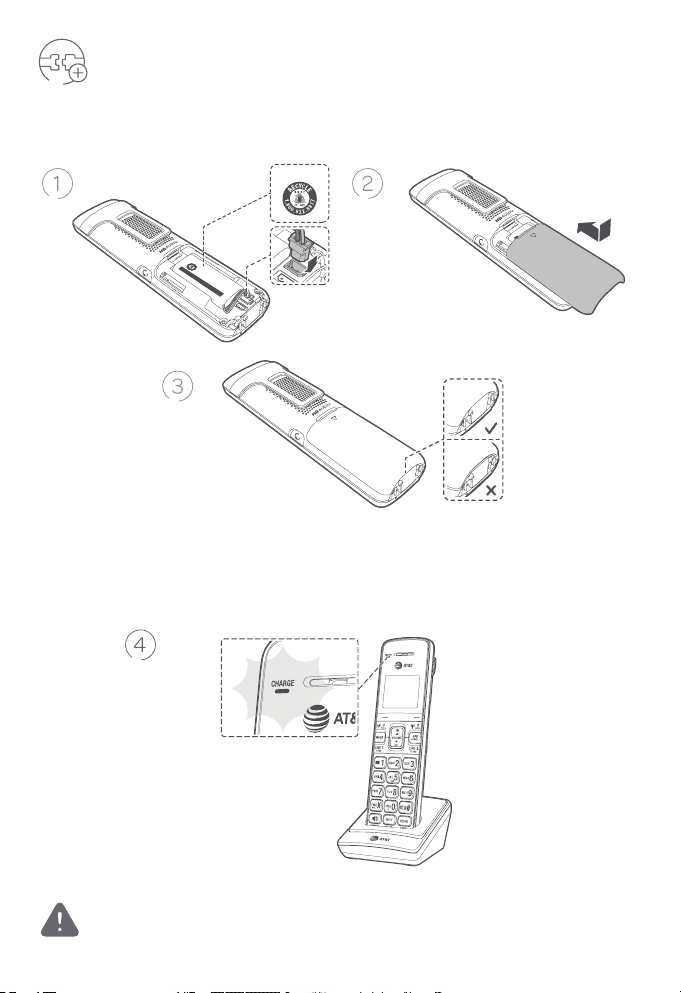
Battery
Install the battery, as shown below.
THIS SIDE UP
CR1349
ES.
UT
S INCINÉRER OU PERCER LES PILES.
AVERTISSEMENT :
WARNING /
CR1349
TTERIES.
Made in China / Fabriqué en chine
NE PAS INCINÉRER OU PERCER LES PILES.
DO NOT BURN OR PUNCTURE BA
WARNING / AVERTISSEMENT :
BT183342/BT283342 (2.4V 400mAh Ni-MH)
THIS SIDE UP / CE CÔTÉ VERS LE HAUT
Battery Pack / Bloc-piles :
Charge the cordless handset by placing it face forward in the charger. The
CHARGE light on the top of the handset is on during charging. Charge your
handset(s) before initial use. The battery is fully charged aer 11 hours of
continuous charging.
BT183342/BT283342 (2.4V 400mAh Ni-MH)
THIS SIDE UP / CE CÔTÉ VERS LE HA
Battery Pack / Bloc-piles :
Made in China / Fabriqué en chine
NE PA
DO NOT BURN OR PUNCTURE BATTERI
Caution: Use only the supplied rechargeable battery or replacement battery
(model BT183342/BT283342).
6
Page 9
Install
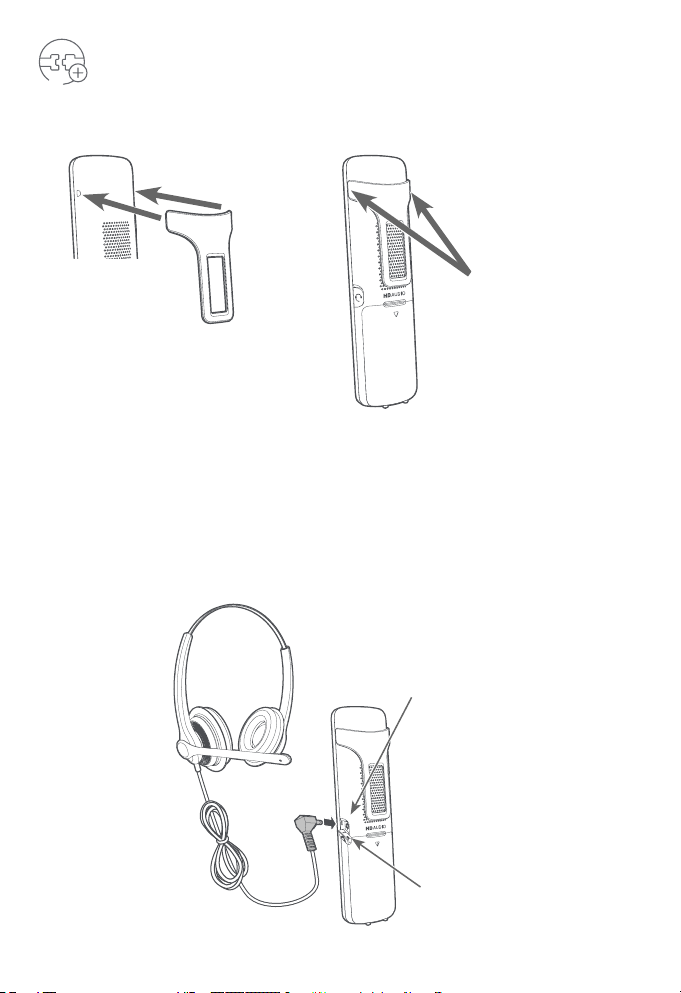
Belt clip & optional cordless handset
To remove the belt clip:
To attach the belt clip:
Snap the belt clip into the
slots on both sides of the
cordless handset.
For handsfree telephone conversations, you can use any industry standard 2.5 mm
headset (purchased separately). For best results, use an AT&T 2.5 mm headset. To
purchase a headset, visit our website at https://telephones.att.com
or call 1 (800) 222-3111. In Canada, dial 1 (866) 288-4268.
Gently li either of the
belt clip tabs outwards to
remove the belt clip from
the handset.
Plug a 2.5 mm headset
(not included) into the jack
on the side of handset
(beneath the small plastic
cover).
Li the plastic
cover here.
7
Page 10
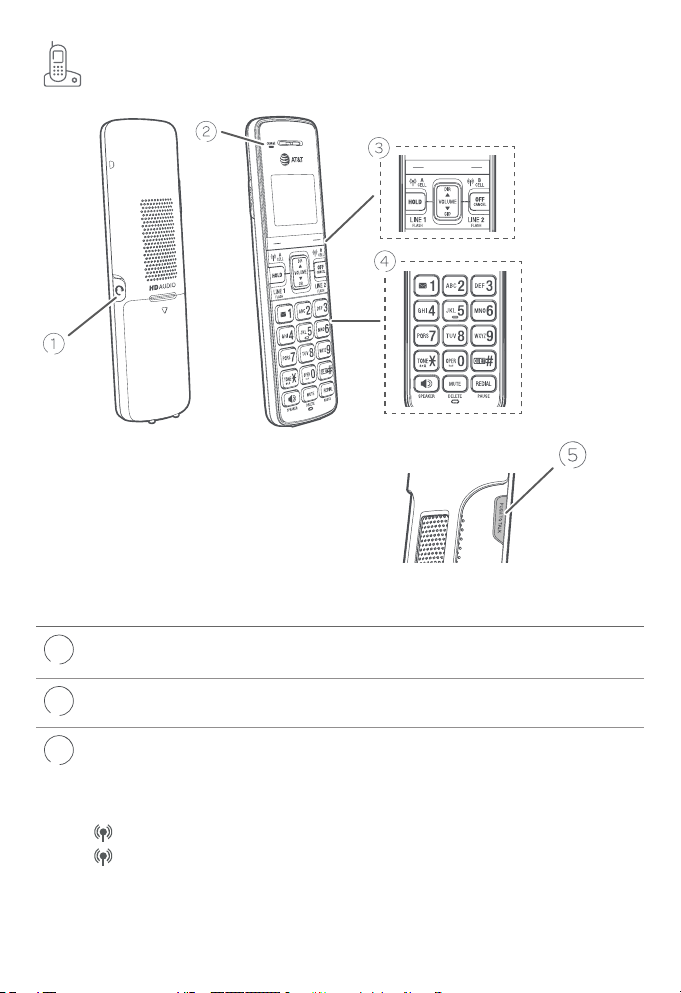
Handset overview
1
Handset
Headset jack Ì Plug a 2.5 mm headset (not included) into the jack for
CHARGE light Ì Steadily on when the handset is charging in the
2
Sokeys (2) Ì Press to select the menu item displayed above the
3
A CELL/
B CELL
HOLD
handsfree telephone conversations.
charger.
key).
Ì While in a menu, press to select an item or save an
entry or setting.
Ì Press to make or answer a cell call.
Ì During a cell call, press to answer an incoming cell A or
cell B line call when you receive a call waiting alert.
Ì During a call, press to put the current call on hold.
8
Page 11
4
Handset overview
Handset
DIR/
3
VOLUME
CID/
VOLUME
OFF/CANCEL Ì During a call, press to hang up.
LINE 1/
FLASH/LINE
2/FLASH
Ì Press to show directory entries when the telephone is
not in use.
Ì Press to scroll up while in menus.
Ì While entering names or numbers in the directory,
press to move the cursor to the right.
Ì Press to increase the listening volume when on a call,
or to increase the message playback volume.
Ì Press to show the caller ID log when the telephone is
not in use.
Ì Press to scroll down while in menus.
Ì While entering names or numbers in the directory,
press to move the cursor to the le.
Ì Press to decrease the listening volume when on a call,
or to decrease the message playback volume.
Ì While in a menu, press to cancel an operation, return to
the previous menu, or exit the menu display. You can
also press and hold this button to return to idle mode.
Ì When the handset is ringing, press to mute the ringer
temporarily.
Ì Press and hold while the telephone is not in use to
erase the missed call indicator.
Ì Press LINE 1/FLASH to make or answer a call on line 1.
During a call, press to answer an incoming call on line 1
when you receive a call waiting alert.
Ì Press LINE 2/FLASH to make or answer a call on line 2.
During a call, press to answer an incoming call on line 2
when you receive a call waiting alert.
1
Ì While reviewing a caller ID log entry, press repeatedly
to add or remove 1 in front of the telephone number
before dialing or saving it in the directory.
Ì Press and hold to set or dial your voicemail number.
9
Page 12
Handset overview
Handset
4
5
TONE /a>A
QUIET #
(pound key)
/SPEAKER
MUTE/
DELETE
REDIAL/
PAUSE
PUSH TO
TALK
Ì Press to switch to tone dialing temporarily during a call
if you have pulse service.
Ì Press to switch between upper case and lower case
while entering characters.
Ì Press repeatedly to display other dialing options when
reviewing a caller ID log entry.
Ì Press and hold to enter the QUIET mode setting
screen, or to deactivate QUIET mode.
Ì Press to toggle the name order when saving a caller ID
log entry into directory.
Ì Press to make a call on line 1 or line 2 using the
handset speakerphone.
Ì Press to answer a call on line 1 or line 2, cell A, or cell B
line using the handset speakerphone.
Ì Press to switch between the handset speakerphone
and the normal cordless handset use during a call.
Ì During a call, press to mute the microphone.
Ì While the telephone base is ringing, press to mute the
ringer temporarily.
Ì While reviewing the redial list, directory, or caller ID log,
press to delete an individual entry.
Ì While predialing, press to delete digits.
Ì While entering or editing a directory entry, press to
erase a digit or character; or press and hold to erase all
digits or characters.
Ì Press repeatedly to view the last 10 numbers dialed.
Ì While entering numbers, press and hold to insert a
dialing pause.
Ì Press to initiate a one-to-one or one-to-group
broadcast.
Ì Press and hold to broadcast to a group of system
devices.
10
Page 13
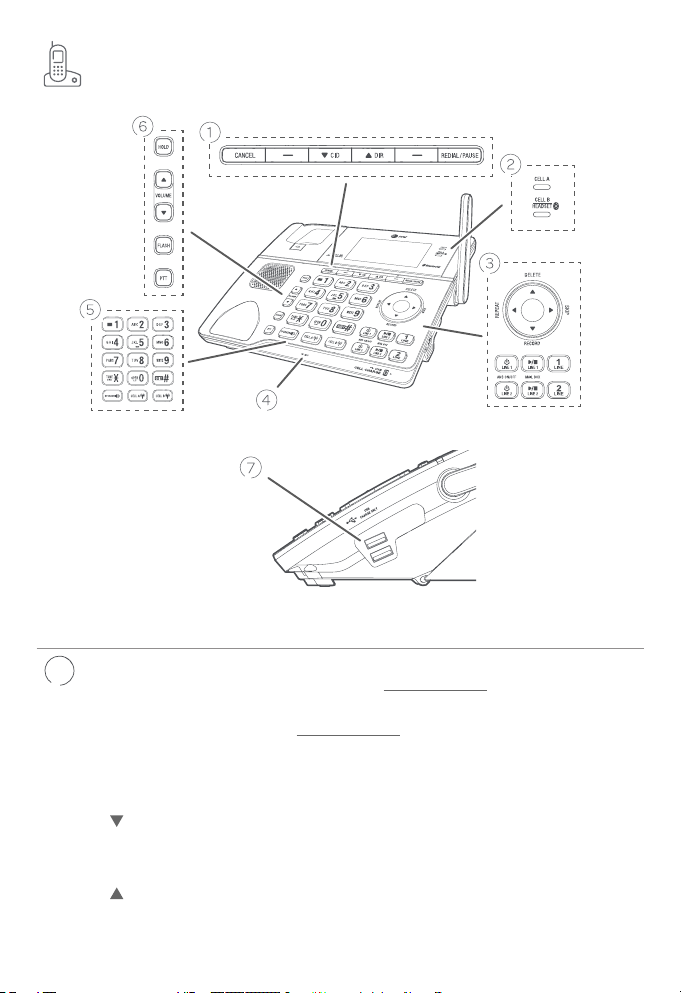
Telephone base overview
Telephone base
CANCEL
1
Sokeys (2)
CID
DIR
Ì While in a menu, press to exit without making
changes; or press and hold to return to idle
mode.
Ì Press and hold while the telephone is not in
use to erase the missed call indicator.
Ì Press to select the menu item displayed above
the key.
Ì Press to scroll down while in a menu.
Ì Press to review the caller ID log when the
telephone is not in use.
Ì Press to scroll up while in a menu.
Ì Press to show directory entries when the
telephone is not in use.
11
Page 14

2
Telephone base overview
Telephone base
1
3
REDIAL/PAUSE
CELL A light
CELL B/
HEADSET light
/REPEAT
/DELETE
/SKIP
/RECORD
/LINE 1
ANS ON/OFF
/LINE 2
ANS ON/OFF
Ì Press repeatedly to view the last 10 numbers
dialed.
Ì While entering numbers, press and hold to
insert a dialing pause.
Ì Steadily on when the telephone base is paired
and connected with a Bluetooth device on Cell
A line.
Ì Flash alternately while pairing a Bluetooth
device.
Ì Steadily on when the telephone base is paired
and connected with a Bluetooth device on Cell
B line.
Ì Flash alternately while pairing a Bluetooth
device.
Ì Press to repeat a message.
Ì Press twice to play the previous message.
Ì While editing names or numbers, press to
move the cursor to the le.
Ì Press to delete the message currently playing.
Ì When the phone is not in use, press to access
the DELETE OLD MSGS menu.
Ì While entering names or numbers, press to
delete a digit or a character.
Ì While predialing, press to delete a digit.
Ì Press to scroll up while in a menu.
Ì During message playback, press to skip to the
next message.
Ì While editing names or numbers, press to
move the cursor to the right.
Ì Press to record an announcement or a memo.
Ì Press to scroll down while in a menu.
Ì Press to turn the answering systems of line 1
or line 2 on or o.
12
Page 15

Telephone base overview
Telephone base
3
4
/LINE 1
MAILBOX
/LINE 2
MAILBOX
1 LINE/2 LINE
Microphone
Ì Press to play line 1 or line 2 messages.
Ì Press to stop playing line 1 or line 2 messages.
Ì Press to make or answer a call on line 1 or line 2.
Ì Flashes slowly when a call on line 1 or line 2 is
on hold.
5
TONE /a>A
QUIET #
(pound key)
SPEAKER
CELL A /CELL
B
1
Ì While reviewing a caller ID log entry, press
repeatedly to add or remove 1 in front of the
telephone number before dialing or saving it in
the directory.
Ì Press and hold to set or dial your voicemail
number.
Ì Press to switch to tone dialing temporarily
during a call if you have pulse service.
Ì Switch between upper case and lower case
while entering characters.
Ì Press repeatedly to display other dialing
options when reviewing a caller ID log entry.
Ì Press and hold to enter the QUIET mode
setting screen, or to deactivate QUIET mode.
Ì Press to make a call on line 1 or line 2 using the
speakerphone.
Ì Press to answer a call on line 1, line 2, cell A, or
cell B line using the speakerphone.
Ì Press to switch between the corded handset
and speakerphone.
Ì Press to make or answer a cell call.
Ì During a cell call, press to answer an incoming
call when you receive a call waiting alert.
Ì Flashes quickly when there is an incoming cell
call.
Ì Flashes slowly when a cell call is on hold.
13
Page 16

Telephone base overview
Telephone base
HOLD
6
/VOLUME/
FLASH Ì During a call on line 1 or line 2, press to answer
PTT Ì Press to initiate a one-to-one or one-to-group
USB charging
7
ports
Ì During a call, press to put the current call on
hold.
Ì Press to adjust the volume during message
playback.
Ì Press to adjust the listening volume during a
call.
Ì When the phone is not in use, press to adjust
the telephone base ringer volume for all lines.
an incoming call on the other line when you
receive a call waiting alert.
broadcast.
Ì Press and hold to broadcast to a group of
system devices.
Ì Two standard size USB ports in the telephone
base for charging your cell phones.
14
Page 17

Initial basic settings
Line power mode (no AC power)
This telephone provides minimal functionality during a power failure. When AC
power is not available, the screen is blank and many telephone features do not
function. Only touch-tone dialing and corded handset volume adjustment are
supported. The telephone uses power from the telephone line to enable you to
make and answer calls on Line 1 only using the corded handset and dialing keys.
Aer you install your telephone or the power returns following a power outage, the
telephone base or cordless handset will prompt you to set the date and time. To
skip setting the date and time, press CANCEL or BACK on the telephone base, or
press OFF/CANCEL or BACK on the corded handset.
We recommend you program your telephone system before use. The following
are a few examples of common features to set before using the telephone. Refer to
the Handset and telephone base settings and Answering system settings in the
Complete user’s manual for detailed instructions on setting all telephone features.
Date and time
Note: Set the date/time before using the answering system.
Using a cordless handset or the telephone base:
1. Press MENU -> Press q/p to Set date/time -> Press SELECT.
2. Enter the month (MM), day (DD) and year (YY) -> Press NEXT.
3. Enter the hour (HH) and minute (MM).
4. Press q/p to choose AM or PM -> Press SAVE.
15
Page 18

Initial basic settings
Add a Bluetooth® cell phone/headset
Note: Your TL86103 is compatible with Bluetooth version 2.0 or above devices.
To use a Bluetooth enabled cellular phone or headset with your telephone, you
must rst pair and connect your Bluetooth cellular phone or headset with the
telephone base.
Bluetooth wireless technology operates within a short range (up to 30 feet). Keep
the connected device within 15 feet of the telephone base for optimal performance.
To pair and connect a cell phone using the telephone base:
1. Press MENU -> Press q/p to Bluetooth -> Press SELECT.
2. Press SELECT to select Add device.
3. Press SELECT to select Add cellular.
4. Disconnect the cell phone from any Bluetooth device -> Press NEXT.
5. Place the cell phone next to the telephone base.
6. Press NEXT to turn on the telephone base discoverable mode.
7. Turn on the Bluetooth feature of your cell phone and search for or
add new devices. Once your cell phone nds your AT&T phone
(AT&T DECT 6.0), press the appropriate key on your cell phone to
continue the pairing process.
f Enter the cell phone passcode (typically 0000), if required -> SET.
f Enter the PIN (default PIN: 0000) of the telephone base into your
cell phone, if required.
To pair and connect a headset using the telephone base:
1. Press MENU -> Press q/p to Bluetooth -> Press SELECT.
2. Press SELECT to select Add device.
3. Press q/p to Add headset -> Press SELECT.
4. Disconnect your headset from any Bluetooth device -> Press NEXT.
5. Set your headset to discoverable mode -> Press NEXT.
6. Press q/p to choose your headset, if required -> Press SELECT.
f Enter the PIN (typically 0000) of your headset, if required, and
press NEXT.
16
Page 19

Initial basic settings
Record your own announcement
Your outgoing announcement plays when calls are answered by the answering
system. You can use the preset announcement to answer calls, or replace it with
your own recorded announcement.
Using the telephone base:
1. Press MENU -> Press SELECT to select Answering system.
2. Press q/p to highlight Mailbox 1 or Mailbox 2 -> Press SELECT.
3. Press SELECT to select Announcement.
4. Press SELECT to select Record annc.
5. Speak towards the microphone of the telephone base to record your
announcement and press STOP to end recording.
Number of rings
You can set the answering system to answer an incoming call aer a number of
rings. You can also select toll saver to answer a call aer two rings when you have
new messages, or four rings when you have no new messages. This feature allows
you to check for new messages and avoid paying long distance charges when
calling from out of your local area. By default, the answering system answers an
incoming call aer four rings.
Using the telephone base:
1. Press MENU -> Press SELECT to select Answering system.
2. Press q/p to highlight Mailbox 1 or Mailbox 2 -> Press SELECT.
3. Press q/p to Ans system setup -> Press SELECT.
4. Press q/p to # of rings -> Press SELECT.
5. Press q/p to
choose among 6, 5, 4, 3, 2, or Toll saver -> Press SELECT.
To use voicemail (requires service subscription)
You can save the voicemail number to 1 for easy access. Contact your telephone
service provider for more information and assistance about using your voicemail
service.
To set voicemail number:
Using a cordless handset or the telephone base:
1. Press MENU -> Press SELECT to select Settings.
2. Press q/p to highlight Voicemail # -> Press SELECT.
17
Page 20

Initial basic settings
3. Press q/p to highlight Line 1 or Line 2 -> Press SELECT.
4. Enter the voicemail number -> Press SAVE.
To retrieve voicemail messages:
1. Press and hold 1.
2. Press q/p to highlight Line 1 or Line 2 -> Press SELECT.
Ringer volume
You can set the ringer volume level to one of the six levels or turn the ringer o.
Using a cordless handset or the telephone base:
1. Press MENU -> Press q/p to Ringers -> Press SELECT.
2. Press SELECT to select Ringer volume.
3. Press q/p to highlight All lines, Line 1, Line 2, Cell A, Cell B,
or PC call, and then press SELECT .
4. Press q/p to choose the desired level -> Press SET.
LCD language
Using a cordless handset or the telephone base:
1. Press MENU -> Press q/p to Settings -> Press SELECT .
2. Press SELECT to choose LCD language.
3. Press q/p to highlight English, Français or Español -> Press SELECT . The
screen prompts Set English/Français/Español as LCD language?.
4. Press YES to conrm, or press NO to cancel the operation.
Note: If you accidentally changed the LCD language to French or Spanish, you can reset it back
to English without going through the French or Spanish menus.
f Press MENU on the cordless handset or telephone base in idle mode, and then enter
364#.
f To reset the LCD language back to English during a call, press OPTION on the cordless
handset or telephone base, and then enter 364#.
18
Page 21

Operate
The TL86103 telephone base can be used to make or answer calls on up to two
individual landlines, or on the cell lines. You can connect a maximum of 2 Bluetooth
enabled cell devices to the telephone base. Both cell devices can be used on two cell
lines at the same time.
Operation Steps
Make a call on line
1 or line 2
Using a cordless handset:
f Press LINE 1/FLASH, LINE 2/FLASH, or /SPEAKER,
and then enter the telephone number.
Using the telephone base:
f Press 1 LINE, 2 LINE, or SPEAKER , and then enter the
telephone number.
-OR-
f Li the corded handset, and then enter the telephone
number.
To predial a call on
line 1 or line 2
To answer a call
on line 1 or line 2
Using a cordless handset:
f Enter the telephone number, and then press
LINE 1/FLASH, LINE 2/FLASH, or /SPEAKER.
Using the telephone base:
f Enter the telephone number, and then press 1 LINE,
2 LINE, or SPEAKER .
Using a cordless handset:
f Press LINE 1/FLASH, LINE 2/FLASH, /SPEAKER, or
any dialing key (0-9 or TONE )
.
Using the telephone base:
f Press 1 LINE, 2 LINE, SPEAKER , or any dialing key
(0-9 or TONE ).
-OR-
f Li the corded handset.
19
Page 22

Operate
Operation Steps
To end a call on
line 1 or line 2
To make a cell call Using a cordless handset:
Using a cordless handset:
f Press OFF/CANCEL, or place the cordless handset into the
charger.
Using the telephone base:
f Press the corresponding line button, 1 LINE or 2 LINE.
-OR-
f Press SPEAKER or return the corded handset to the
telephone base.
1. Press A CELL or B CELL, and then enter the
telephone number.
2. Press DIAL , /SPEAKER, A CELL, or B CELL to
dial.
Using the telephone base:
1. Press CELL A or CELL B , and then enter the
telephone number.
2. Press DIAL or SPEAKER .
To predial a cell
call
To answer a cell
call
Using a cordless handset:
f Enter the telephone number, and then press A CELL
or B CELL.
Using a cordless handset:
f Press /SPEAKER, A CELL, or B CELL.
Using the telephone base:
f Press SPEAKER , CELL A , or CELL B .
-OR-
f Li the corded handset.
20
Page 23

Operate
Operation Steps
To end a cell call Using a cordless handset:
f Press OFF/CANCEL, or place the cordless handset into
the charger.
Using the telephone base:
f Press the corresponding cell button, CELL A or
CELL B .
-OR-
f Press SPEAKER or return the corded handset to the
telephone base.
Handset
speakerphone
Redial Using a cordless handset:
Volume control To adjust the listening volume of a cordless handset:
During a call, press /SPEAKER to switch between
handsfree speakerphone and normal handset use.
1. Press REDIAL/PAUSE in idle mode.
2. Press
CID, DIR, or REDIAL/PAUSE
repeatedly to
browse until the desired number displays. The handset
beeps twice at the end of the list.
3. Press LINE 1/FLASH, LINE 2/FLASH, or
dial using line 1 or line 2,
or press A CELL or B CELL
/SPEAKER to
to dial using the cell line.
Using the telephone base:
1. Press REDIAL/PAUSE in idle mode.
2. Press
CID, DIR, /RECORD, or /DELETE
to browse
until the desired number displays. The telephone base
beeps twice at the end of the list.
3. Press LINE 1, LINE 2, or SPEAKER
or line 2,
or press Cell A or CELL B to dial using the
to dial using line 1
cell line.
f Press q/p while on a call.
To adjust the listening volume of the telephone base:
f Press /VOLUME/ while on a call.
21
Page 24

Operate
Operation Steps
Call waiting
(Requires
subscription from
telephone)
Call waiting on line 1 or line 2
Using a cordless handset or the telephone base:
f Press the corresponding line button, LINE 1/FLASH
or LINE 2/FLASH on the handset, or FLASH on the
telephone base to put your current call on hold and take
the new call.
f Press the same key at any time to switch back and forth
between calls.
Call waiting on the cell line
To answer the incoming call from the same cell line:
Using a cordless handset:
f Press SWAP , A CELL or B CELL on the handset. The
original call is put on hold and you take the new call.
f Press OPTION on the handset. Press CID or DIR to
highlight Swap cell X (X represents the cell line slot).
Press SELECT to resume the original call. The other
incoming cell call is put on hold.
Using the telephone base:
f Press SWAP , CELL A or CELL B on the telephone
base. The original call is put on hold and you take the new
call.
f Press OPTION on the telephone base. Press CID, DIR,
/RECORD, or /DELETE to highlight Swap cell X (X
represents the cell line slot). Press SELECT to resume the
original call. The other incoming cell call is put on hold.
22
Page 25

Directory
The home directory stores up to 200 entries.
Operation Steps
To add an entry in
the home directory
Using a cordless handset or the telephone base:
1. Press MENU -> Press q/p to Directory -> SELECT.
2. Press OPTION to select Home.
3. Press SELECT to select Add contact.
4. Enter a telephone number -> Press NEXT.
5. Press q/p to select Home, Cell, Work, or Other ->
Press NEXT.
6. Enter a name -> Press SAVE.
Searching/dialing an
entry
Using a cordless handset or the telephone base:
1. Press DIR on the handset or the telephone base
in idle mode -> Press q/p to select the desired
directory -> Press REVIEW.
2. Press q/p to browse through the directory, or press
the dialing keys to start a name search.
3. Press
-OR-
LINE 1/FLASH, LINE 2/FLASH,
on the handset, or press 1 LINE or 2 LINE on the
telephone base, or lift the corded handset to dial with
line 1 or line 2.
Press
press
base
A CELL
or
B CELL
CELL A or CELL B on the telephone
call using the cell line.
or
/SPEAKER
on the handset, or
23
Page 26

®
Directory
Download a cell phone directory
To download a cell phone directory using the telephone base:
Before downloading a directory, make sure the cell phone is paired, active, and
connected to your TL86103.
For certain cell phones, you may need to press a key to conrm the directory
download.
1. Press MENU -> Press q/p to Bluetooth -> Press SELECT.
2. Press q/p to Download dir -> Press SELECT.
3. Press q/p to choose among Phone memory, SIM card only, or Phone and SIM
-> Press SELECT.
4. Press NEXT to start downloading.
f Enter the cell phone passcode, if necessary, and then press SET.
f Press a key on your cell phone to conrm the directory download.
5. Press OK to exit.
Bluetooth
Connect to CellTM app
If you are using Bluetooth-enabled cell phones with Android® OS 2.3
or above, you may also download the Connect to Cell™ application
(consists of Caller ID manager and Alerts manager) using the Google
Play® Store app to extend the exibility of your TL86103. Scan the QR
code on the right to download the application.
Android® and Google Play® are registered trademarks of Google Inc.
Connect to Cell
TM
is a trademark of Advanced American Telephones.
24
Page 27

Caller ID
This product supports caller ID services oered by most telephone service
providers. The telephone stores caller ID information of the last 50 incoming calls in
the telephone base. This information is common to all devices.
Caller ID announce
When this feature is on and you have an incoming call, the handset and the telephone
base speaks “Call from...” and the name of the caller based on the directory or caller ID
information. The default setting of caller ID announce feature is On. You can turn this
feature o.
Using the telephone base:
1. Press MENU in idle mode to enter the main menu.
2. Press CID, DIR, /RECORD, or /DELETE to highlight Caller ID Annc, and
then press SELECT .
3. Press CID, DIR, /RECORD, or /DELETE to choose On or O, and then
press SELECT . You hear a conrmation tone and the screen shows
CID Annc ON/OFF on all HS & BS briey before returning to the previous menu.
Review and dial a number in the call log
Using a cordless handset or the telephone base:
1. Press qCID on the handset or the telephone base in idle mode -> Press q/p to
scroll through the list.
2. Press
-OR-
LINE 1/FLASH, LINE 2/FLASH,
1 LINE or 2 LINE on the telephone base, or lift the corded handset to dial with line
1 or line 2.
Press
A CELL
or
B CELL
or
/SPEAKER
on the handset, or press
on the handset, or press
CELL A or
CELL B on the telephone base to dial with the cell line.
Erase missed calls indicator in the call log
Using a cordless handset or the telephone base:
When you have incoming calls that have not been answered, the handset screen
displays XX missed calls, and the telephone base screen displays XX. When you
have reviewed all the missed calls, the missed call indicator is erased.
If you want to erase the missed call indicator without reviewing the caller ID log,
press and hold OFF/CANCEL on a handset, or CANCEL on the telephone base.
25
Page 28

Answering system
About answering system and voicemail
Your telephone has separate indicators for two dierent types of voice messages:
those le on the built-in answering system and those le at your telephone service
provider’s voicemail. To listen to messages recorded on the built-in answering
system, refer to the Message playback section; to listen to voicemail, contact your
telephone service provider for more information.
Built-in answering system Voicemail service
Supported by
Subscription
Fees
Answer
incoming calls
Storage
Display new
messages
Retrieve
messages
Telephone system Telephone service provider
No Yes
No May apply
f Aer 4 rings by default.
f It can be changed in the
handset or the telephone
base menu.
f Usually aer 2 rings.
f It can be changed by
contacting your telephone
service provider.
Telephone base Server or System
f Handset and telephone base
- XX New msgs
f Press on the telephone
base; OR
f Press MENU, and then
select Play messages on
the handset; OR
f Access remotely with an
f Handset and telephone base
- and Voicemail
f Press on the dialpad, and
enter an access number
from your telephone
service provider.
access code.
26
Page 29

Answering system
Turn answering system on or o
The answering system must be turned on to answer and record messages.
Using the telephone base:
f Press /LINE 1 ANS ON/OFF or /LINE 2 ANS ON/OFF to turn the
corresponding answering system on or o. If the answering system is turned
on, it announces, “Calls will be answered.” If the answering system is turned o, it
announces, “Calls will not be answered.”
-OR-
1. When the telephone base is in idle mode, press MENU to enter the main menu.
2. Press SELECT to select Answering system.
3. Press CID, DIR, /RECORD, or /DELETE to highlight Mailbox 1 or Mailbox
2, and then press SELECT .
4. Press CID, DIR, /RECORD, or /DELETE to highlight Answer ON/OFF, and
then press SELECT .
5. Press CID, DIR, /RECORD, or /DELETE to highlight On or O, and then
press SELECT to save the setting. You hear a conrmation tone.
Message alert tone
When this feature is on, and there is at least one new message, the telephone base
beeps every 10 seconds.
Using the telephone base:
1. When the telephone base is in idle mode, press MENU to enter the main menu.
2. Press SELECT to select Answering system.
3. Press CID, DIR, /RECORD, or /DELETE to highlight Mailbox 1 or
Mailbox 2, and then press SELECT .
4. Press CID, DIR, /RECORD, or /DELETE to highlight Ans system setup,
and then press SELECT .
5. Press CID, DIR, /RECORD, or /DELETE to highlight Msg alert tone, and
then press SELECT .
6. Press CID, DIR, /RECORD, or /DELETE to choose On or O.
7. Press SELECT to save the setting. You hear a conrmation tone.
27
Page 30

Answering system
Call screening
Use this feature to choose whether incoming messages can be heard over the
speaker when they are being recorded. If you turn call screening on, you hear the
incoming message. While monitoring an incoming message, you can answer the call
by pressing LINE 1/FLASH, LINE 2/FLASH, or /SPEAKER on a cordless handset,
or pressing 1 LINE, 2 LINE, or SPEAKER on the telephone base. You can also li
the corded handset to answer the incoming call.
Using the telephone base:
1. When the telephone base is in idle mode, press MENU to enter the main menu.
2. Press SELECT to select Answering system.
3. Press CID, DIR, /RECORD, or /DELETE to highlight Mailbox 1 or
Mailbox 2, and then press SELECT .
4. Press CID, DIR, /RECORD, or /DELETE to highlight Ans system setup,
and then press SELECT .
5. Press SELECT to select Call screening.
6. Press CID, DIR, /RECORD, or /DELETE to choose On or O.
7. Press SELECT to save the setting. You hear a conrmation tone.
28
Page 31

Answering system
Message playback
Using the telephone base:
f Press /LINE 1 MAIL BOX or /LINE 2 MAIL BOX on the telephone base to
listen to the messages.
f If there are new and old messages, press CID, DIR, /RECORD, or
/DELETE to select Play new msgs or Play old msgs, and then
press SELECT .
Using a cordless handset:
1. When the handset is in idle mode, press MENU to enter the main menu.
2. Press SELECT to select Play messages.
3. Press q/p to highlight Mailbox 1 or Mailbox 2 -> SELECT .
f If there are new and old messages, press q/p to select Play new msgs or
Play old msgs -> SELECT .
Options during playback
Feature On the telephone base On a handset
Adjust playback to
volume
Stop playback
Skip to the next
message
Repeat the message
Play the previous
message
Delete the message
Press VOLUME
Press /LINE 1 MAIL BOX,
/LINE 2 MAIL BOX, or
CANCEL
Press /SKIP or SKIP
Press /REPEAT or REPEAT
Press /REPEAT or REPEAT
twice
Press /DELETE
Press CID/VOLUME or
DIR/VOLUME
Press OFF/CANCEL
Press SKIP
Press REPEAT
Press REPEAT twice
Press MUTE/DELETE
29
Page 32

For C-UL compliance
In compliance with the bilingual requirements for safety, caution, and warning
markings of Canadian Federal and Provincial/Territorial statutes and regulations,
the French version of Important safety information is included.
Mesures de sécurité importantes
Ce symbole vous alertera d’informations importantes ou d’instructions
d’entretien pouvant apparaître dans ce guide d’utilisation. Respectez
toujours les mesures de sécurité et de sécurité de base lorsque vous utilisez
ce produit, an de réduire les risques de blessures, d’incendie, ou
d’électrocution.
Information relative à la sécurité
f Veuillez lire et comprendre toutes les instructions de ce guide d’utilisation.
Relectez toutes les inscriptions apparaissant sur le produit.
f Évitez d’utiliser le téléphone pendant un orage. Il pourrait y avoir un faible risque
d’électrocution.
f N’utilisez pas un téléphone près d’une fuite de gaz. Dans certaines circonstances,
une ammèche pourrait se produire lorsque l’adaptateur est branché à une
prise de courant, ou lorsque le combiné est déposé sur son chargeur. Ceci
est un événement fréquent associé avec la fermeture d’un circuit électrique.
L’utilisateur ne devrait pas brancher un téléphone dans une prise de courant,
et ne devrait pas déposer un combiné chargé dans le chargeur, si le téléphone
se trouve dans un environnement comportant une concentration de gaz
inammables ou ignifuges, à moins de se trouver dans un endroit où la
ventilation est adéquate. Une ammèche dans de tels environnements pourrait
provoquer une explosion. De tels environnements peuvent comprendre :
les endroits où de l’oxygène à des ns médicales est utilisé sans ventilation
adéquate; des endroits où se trouvent des gaz industriels (dissolvants de
nettoyage, des vapeurs de gazoline, etc.), une fuite de gaz naturel, etc.
f N’utilisez pas ce produit près de l’eau ou lorsque vous êtes mouillés. Par
exemple, ne l’utilisez pas dans des sous-sols humides ou sous la douche, ou
près d’une piscine, d’un bain, d’un évier de cuisine, ou d’une cuve de lavage.
N’utilisez pas de liquides, ou de vaporisateurs aérosol de nettoyage. Si le
produit entre en contact avec du liquide, débranchez immédiatement le l
téléphonique ou le cordon d’alimentation. Ne rebranchez pas le produit avant
qu’il soit complètement sec.
f Installez cet appareil dans un endroit protégé où personne ne peut trébucher sur
les cordons d’alimentation ou la ligne téléphonique. Protégez les câbles contre
les dommages ou l’abrasion.
30
Page 33

For C-UL compliance
f Si le produit ne fonctionne pas correctement, consultez la section Dépannage
(Troubleshooting) du guide d’utilisation. Si vous ne pouvez pas régler le
problème, ou si le produit est endommagé, consultez la section Garantie limitée
(Limited warranty) des pages 36-38. N’ouvrez pas ce produit, sauf tel
qu’indiqué dans le guide d’utilisation. L’ouverture du produit ou le remontage
inadéquat pourrait vous exposer à des tensions dangereuses ou autres dangers.
f Remplacez les piles uniquement tel que décrit dans votre guide d’utilisation
(Page 6). N’incinérez pas et ne percez pas les piles — elles contiennent des
produits chimiques caustiques.
f L’adaptateur de courant est conçu pour être orienté verticalement ou installé
sur le plancher. Les broches ne sont pas conçues pour se maintenir en place si la
che est branchée dans une prise de courant au plafond, sous la table ou sous
une armoire.
f Pour les produits à brancher à une prise de courant, la prise de courant doit être
installée près du produit, an d’assurer une accessibilité sécuritaire à la prise de
courant.
MISES EN GARDE:
f N’utilisez seulement l’adaptateur inclus avec ce produit. Pour obtenir une pièce
de rechange, visitez notre site Web au
https://telephones.att.com ou composez le
1-800-222-3111. Au Canada, composez le 1-866-288-4268.
f N’utilisez que la pile de rechargeable incluse ou une pile de rechange (modèle
BT183342/BT283342). Pour commander, visitez notre site Web
https://telephones.att.com ou composez le
1-800-222-3111. Au Canada, composez le 1-866-288-4268.
ATTENTION:
i
pile, replacez la pile avec une pile du même type. Jetez les piles épuisées en
respectant les instructions.
An de prévenir les risques d’incendie ou d’explosion de la
31
Page 34

For C-UL compliance
Spéciquement en rapport avec les téléphones sans l
f Condentialité : Les mêmes caractéristiques qui rendent les téléphones sans l
si pratiques créent également des restrictions. Les appels téléphoniques sont
transmis entre le socle du téléphone et le combiné par le biais d’ondes radio, et
il se peut que vos conversations téléphoniques soient interceptées par d’autres
équipements de réception d’ondes radio au sein de la portée du téléphone sans
l. Pour cette raison, vous ne devez pas considérer les conversations sur un
téléphone sans l comme étant aussi condentielles que celles d’un téléphone à
cordon.
f Alimentation électrique : La base de ce téléphone sans l doit être branchée à
une prise de courant électrique fonctionnelle. La prise électrique ne doit pas être
contrôlée par un interrupteur mural. Les appels ne peuvent pas être eectués à
partir du combiné si la base n’est pas branchée, si elle est hors fonction ou si le
courant électrique est coupé.
f Interférences potentielles aux téléviseurs : Certains téléphones sans l
fonctionnent sur des fréquences pouvant causer des interférences aux
téléviseurs et magnétoscopes. Pour réduire ou prévenir de tels parasites,
ne pas déposer la base du téléphone sans l à proximité d’un téléviseur ou
magnétoscope, ni directement sur celui-ci. Si votre téléviseur ache des
interférences, éloignez le téléphone sans l de celui-ci an de réduire les
parasites.
f Piles rechargeables : Ce produit comporte des piles rechargeables à l’hydrure
métallique de nickel. Usez de prudence lorsque vous manipulez de telles piles et
veillez à ne pas les court-circuiter avec des matériaux conducteurs, tels que des
bagues, bracelets et clés. La pile ou le conducteur peut surchauer et vous brûler.
Respectez la polarité adéquate entre les piles et le chargeur de piles.
f Piles rechargeables à l’hydrure métallique de nickel : Jetez ces piles de manière
sécuritaire. N’incinérez pas et ne peercez pas les piles. Comme pour les autres
piles du même type, si elles sont brûlées ou percées, des matières corrosives
peuvent s’en échapper, ce qui risque de causer des brûlures ou autres blessures
corporelles.
Le sceau de l’organisme de recyclage RBRC sur les piles à l’hydrure
métallique de nickel signie que le fabricant de cet appareil participe
volontairement au programme industriel visant à reprendre et
recycler ce type de piles lorsqu’elles ne servent plus, au sein du
territoire des États-Unis et du Canada. Vous devez apporter ces piles
chez un détaillant participant ou le centre de recyclage le plus près de
chez vous. Ou vous pouvez composer le 1-800-8-BATTERYMD an de
connaître les endroits qui acceptent les piles à l’hydrure métallique de
nickel mortes.
RBRC Seal et 1-800-8-BATTERYMD sont des marques déposées de
Call2recycle, Inc.
32
Page 35

For C-UL compliance
Mesures préventives pour les utilisateurs de stimulateurs cardiaques implantés
dans l’organisme
Stimulateurs cardiaques (ne s’applique qu’aux téléphones sans l numériques) :
L’organisme ‘Wireless Technology Research, LLC (WTR)’, une rme de recherche
indépendante, a mené une évaluation pluridisciplinaire des interférences entre
les téléphones sans l portatifs et les stimulateurs cardiaques implantés dans
l’organisme. Appuyée par l’Administration des aliments et drogues (FDA) des États-
unis, la rme WTR recommande aux médecins :
Avis aux détenteurs de stimulateurs cardiaques:
f Ils doivent tenir le téléphone sans l à une distance d’au moins six pouces du
stimulateur cardiaque.
f Ils ne doivent PAS placer le téléphone sans l directement sur le stimulateur
cardiaque, tel que dans une poche de chemise, lorsque celui-ci est en fonction.
f Ils doivent utiliser le téléphone sans l en l’appuyant sur l’oreille qui se trouve
dans la direction opposée au stimulateur cardiaque.
L’étude eectuée par l’organisme WRS n’a pas identié de risque pour les
détenteurs de simulateurs cardiaques causé par les gens qui utilisent un téléphone
sans l à proximité de ceux-ci.
Mode ECO
Lorsque le socle communique avec le combiné, le mode ECO sera activé
automatiquement. Ceci réduit la consommation d’énergie selon la distance entre le
socle du téléphone et le combiné.
Spéciquement en rapport avec les répondeurs téléphoniques
Enregistrement deux voies : Cet appareil n’émet pas de bips d’avertissement qui
permettent de prévenir l’autre partie que vous enregistrez la conversation. Pour
assurer votre conformité aux
règlements fédéraux ou provinciaux en rapport avec les enregistrements des
conversations téléphoniques, vous devriez informer l’autre partie lorsque vous
activez l’enregistrement.
CONSERVEZ CES INSTRUCTIONS
33
Page 36

FCC Part 68 and ACTA
This equipment complies with Part 68 of the FCC rules and with technical requirements
adopted by the Administrative Council for Terminal Attachments (ACTA). The label
on the back or bottom of this equipment contains, among other things, a product
identier in the format US:AAAEQ##TXXXX. This identier must be provided to your
telephone service provider upon request.
The plug and jack used to connect this equipment to premises wiring and the telephone
network must comply with the applicable Part 68 rules and technical requirements
adopted by ACTA. A compliant telephone cord and modular plug is provided with
this product. It is designed to be connected to a compatible modular jack that is also
compliant. An RJ11 jack should normally be used for connecting to a single line and an
RJ14 jack for two lines. See the installation instructions in the user’s manual.
The Ringer Equivalence Number (REN) is used to determine how many devices you may
connect to your telephone line and still have them ring when you are called. The REN for
this product is encoded as the 6th and 7th characters following the US: in the product
identier (e.g., if ## is 03, the REN is 0.3). In most, but not all areas, the sum of all RENs
should be ve (5.0) or less. For more information, please contact your telephone service
provider.
This equipment must not be used with Party Lines. If you have specially wired alarm
dialing equipment connected to your telephone line, ensure the connection of this
equipment does not disable your alarm equipment. If you have questions about what
will disable the alarm equipment, consult your telephone service provider or a qualied
installer.
If this equipment is malfunctioning, it must be unplugged from the modular jack until
the problem has been corrected. Repairs to this telephone equipment can only be
made by the manufacturer or its authorized agents. For repair procedures, follow the
instructions outlined under the Limited warranty.
If this equipment is causing harm to the telephone network, the telephone service
provider may temporarily discontinue your telephone service. The telephone service
provider is required to notify you before interrupting service. If advance notice is not
practical, you will be notied as soon as possible. You will be given the opportunity to
correct the problem and the telephone service provider is required to inform you of
your right to le a complaint with the FCC. Your telephone service provider may make
changes in its facilities, equipment, operation, or procedures that could aect the
proper functioning of this product. The telephone service provider is required to notify
you if such changes are planned.
If this product is equipped with a corded or cordless handset, it is hearing aid
compatible.
If this product has memory dialing locations, you may choose to store emergency
telephone numbers (e.g., police, re, medical) in these locations. If you do store or test
emergency numbers, please:
f Remain on the line and briey explain the reason for the call before hanging up.
f Perform such activities in o-peak hours, such as early morning or late evening.
34
Page 37

Industry Canada
This device contains licence-exempt transmitter(s)/receiver(s) that comply with
Innovation, Science and Economic Development Canada’s licence-exempt RSS(s).
Operation is subject to the following two conditions:
(1) This device may not cause interference.
(2) This device must accept any interference, including interference that may cause
undesired operation of the device.
Privacy of communications may not be ensured when using this telephone.
The term ‘’IC:‘’ before the certication/registration number only signies that the
Industry Canada technical specications were met.
The Ringer Equivalence Number (REN) for this terminal equipment is 1.0. The REN
indicates the maximum number of devices allowed to be connected to a telephone
interface. The termination of an interface may consist of any combination of
devices subject only to the requirement that the sum of the RENs of all the devices
not exceed ve.
This product meets the applicable Innovation, Science and Economic Development
Canada technical specications.
FCC Part 15
NOTE: This equipment has been tested and found to comply with the requirements
for a Class B digital device under Part 15 of the Federal Communications
Commission (FCC) rules. These requirements are intended to provide reasonable
protection against harmful interference in a residential installation. This equipment
generates, uses and can radiate radio frequency energy and, if not installed and
used in accordance with the instructions, may cause harmful interference to radio
communications. However, there is no guarantee that interference will not occur in
a particular installation. If this equipment does cause harmful interference to radio
or television reception, which can be determined by turning the equipment o and
on, the user is encouraged to try to correct the interference by one or more of the
following measures:
f Reorient or relocate the receiving antenna.
f Increase the separation between the equipment and receiver.
f Connect the equipment into an outlet on a circuit dierent from that to which
the receiver is connected.
f Consult the dealer or an experienced radio/TV technician for help.
WARNING: Changes or modications to this equipment not expressly approved by
the party responsible for compliance could void the user’s authority to operate the
equipment.
35
Page 38

This device complies with Part 15 of the FCC Rules. Operation is subject to the
following two conditions: (1) this device may not cause harmful interference,
and (2) this device must accept any interference received, including interference
that may cause undesired operation. Privacy of communications may not be
ensured when using this telephone.
To ensure safety of users, the FCC has established criteria for the amount of radio
frequency energy that can be safely absorbed by a user or bystander according
to the intended usage of the product. This product has been tested and found to
comply with the FCC criteria. The handset may be safely held against the ear of the
user. The telephone base shall be installed and used such that parts of the user’s
body other than the hands are maintained at a distance of approximately
20 cm (8 inches) or more.
This Class B digital apparatus complies with Canadian requirement:
CAN ICES-3 (B)/NMB-3(B)
Limited warranty
The AT&T brand is used under license - any repair, replacement or warranty service,
and all questions about this product should be directed to our website at
https://telephones.att.com or call 1 (800) 222-3111. In
Canada, dial 1 (866) 288-4268.
1. What does this limited warranty cover?
The manufacturer of this AT&T branded product warrants to the holder of a valid
proof of purchase (“CONSUMER” or “you”) that the product and all accessories
provided in the sales package (“PRODUCT”) are free from defects in material and
workmanship, pursuant to the following terms and conditions, when installed
and used normally and in accordance with the PRODUCT operating instructions.
This limited warranty extends only to the CONSUMER for products purchased
and used in the United States of America and Canada.
2. What will be done if the PRODUCT is not free from defects in materials and
workmanship during the limited warranty period (“materially defective
PRODUCT”)?
During the limited warranty period, the manufacturer’s authorized service
representative will repair or replace at the manufacturer’s option, without charge,
a materially defective PRODUCT. If the manufacturer repairs the PRODUCT, they
may use new or refurbished replacement parts. If the manufacturer chooses to
replace the PRODUCT, they may replace it with a new or refurbished PRODUCT of
the same or similar design. The manufacturer will retain defective parts, modules,
or equipment. Repair or replacement of the PRODUCT, at the manufacturer’s
option, is your exclusive remedy. The manufacturer will return repaired or
replacement products to you in working condition. You should expect the repair
or replacement to take approximately 30 days.
36
Page 39

3. How long is the limited warranty period?
The limited warranty period for the PRODUCT extends for ONE (1) YEAR from the
date of purchase. If the manufacturer repairs or replaces a materially defective
PRODUCT under the terms of this limited warranty, this limited warranty also
applies to repaired or replacement PRODUCT for a period of either (a) 90 days
from the date the repaired or replacement PRODUCT is shipped to you or (b) the
time remaining on the original one-year limited warranty; whichever is longer.
4. What is not covered by this limited warranty?
This limited warranty does not cover:
f PRODUCT that has been subjected to misuse, accident, shipping or other
physical damage, improper installation, abnormal operation or handling,
neglect, inundation, re, water, or other liquid intrusion; or
f PRODUCT that has been damaged due to repair, alteration, or modication by
anyone other than an authorized service representative of the manufacturer;
or
f PRODUCT to the extent that the problem experienced is caused by signal
conditions, network reliability or cable or antenna systems; or
f PRODUCT to the extent that the problem is caused by use with non-AT&T
accessories; or
f PRODUCT whose warranty/quality stickers, PRODUCT serial number plates or
electronic serial numbers have been removed, altered or rendered illegible; or
f PRODUCT purchased, used, serviced, or shipped for repair from outside the
United States of America or Canada, or used for commercial or institutional
purposes (including but not limited to products used for rental purposes); or
f PRODUCT returned without valid proof of purchase (see item 6); or
f Charges for installation or setup, adjustment of customer controls, and
installation or repair of systems outside the unit.
5. How do you get warranty service?
To obtain warranty service, visit https://telephones.att.com or
call 1 (800) 222-3111. In Canada, dial 1 (866) 288-4268.
Note: Before calling for service, please review the user’s manual; a check of the
PRODUCT’s controls and features may save you a service call.
Except as provided by applicable law, you assume the risk of loss or damage
during transit and transportation and are responsible for delivery or handling
charges incurred in the transport of the PRODUCT(s) to the service location.
The manufacturer will return repaired or replaced PRODUCT under this limited
warranty to you. Transportation, delivery or handling charges are prepaid. The
manufacturer assumes no risk for damage or loss of the PRODUCT in transit.
If the PRODUCT failure is not covered by this limited warranty, or proof of
purchase does not meet the terms of this limited warranty, the manufacturer
37
Page 40

will notify you and will request that you authorize the cost of repair prior to any
further repair activity. You must pay for the cost of repair and return shipping
costs for the repair of products that are not covered by this limited warranty.
6. What must you return with the PRODUCT to get warranty service?
You must:
a. Return the entire original package and contents including the PRODUCT to
the service location along with a description of the malfunction or diculty;
and
b. Include “valid proof of purchase” (sales receipt) identifying the PRODUCT
purchased (PRODUCT model) and the date of purchase or receipt; and
c. Provide your name, complete and correct mailing address, and telephone
number.
7. Other limitations
This warranty is the complete and exclusive agreement between you and the
manufacturer of this AT&T branded PRODUCT. It supersedes all other written
or oral communications related to this PRODUCT. The manufacturer provides
no other warranties for this PRODUCT. The warranty exclusively describes all of
the manufacturer’s responsibilities regarding the PRODUCT. There are no other
express warranties. No one is authorized to make modications to this limited
warranty and you should not rely on any such modication.
State/Provincial Law rights: This warranty gives you specic legal rights, and
you may also have other rights which vary from state to state or province
to province.
Limitations: Implied warranties, including those of tness for a particular
purpose and merchantability (an unwritten warranty that the PRODUCT is t
for ordinary use) are limited to one year from date of purchase. Some states/
provinces do not allow limitations on how long an implied warranty lasts, so
the limitation mentioned above may not apply to you. In no event shall the
manufacturer be liable for any indirect, special, incidental, consequential, or
similar damages (including, but not limited to lost prots or revenue, inability
to use the PRODUCT or other associated equipment, the cost of substitute
equipment, and claims by third parties) resulting from the use of this PRODUCT.
Some states/provinces do not allow the exclusion or limitation of incidental or
consequential damages, so the limitation or exclusion mentioned above may not
apply to you.
Please retain your original sales receipt as proof of purchase.
38
Page 41

Technical specications
RF frequency band DECT frequency: 1921.536 - 1928.448 MHz
Bluetooth frequency: 2402.000 - 2480.000 MHz
Channels DECT channel: 5
Bluetooth channel: 79
Handset battery 2.4VDC 400mAh, AAAx2, Ni-MH battery pack
Telephone base voltage
(AC adapter output)
Charger voltage
6VDC @ 600mA
5.1VDC @1000mA
6VAC @300mA
(AC adapter output)
USB port output current
500mA per port
(Type A)
Operating times* Talk time (cordless handset): up to 7 hours
Standby: up to 7 days
* Operating times vary depending on your actual use and the age of the battery.
Company: Advanced American Telephones
Address: 9020 SW Washington Square Road - Ste 555 Tigard, OR 97223, United States.
Phone: 1 (800) 222-3111 in the U.S. or 1 (866) 288-4268 in Canada
Telephones identied with this logo have reduced noise and
interference when used with most T-coil equipped hearing aids and
cochlear implants. The TIA-1083 Compliant Logo is a trademark of the
Telecommunications Industry Association. Used under license.
The Bluetooth® word mark and logos are owned by Bluetooth SIG, Inc. and any use of such
marks by Advanced American Telephones and its parent, VTech Holdings Limited, is under
license. VTech Holdings Limited is a member of Bluetooth SIG, Inc. Other trademarks and trade
©2013-2020 Advanced American Telephones. All Rights Reserved.
AT&T and the AT&T logo are trademarks of AT&T Intellectual Property licensed to
Connect to Cell
The RBRC Seal and 1-800-8-BATTERY® are registered trademarks of Call2recycle, Inc.
names are those of their respective owners.
Advanced American Telephones, San Antonio, TX 78219.
Android® is a registered trademark of Google Inc.
TM
is a trademark of Advanced American Telephones.
Printed in China. Issue 10.0 AT&T 12/20.
 Loading...