

AT&T TL7812, TL7912 Quick Start Manual
Quick start guide
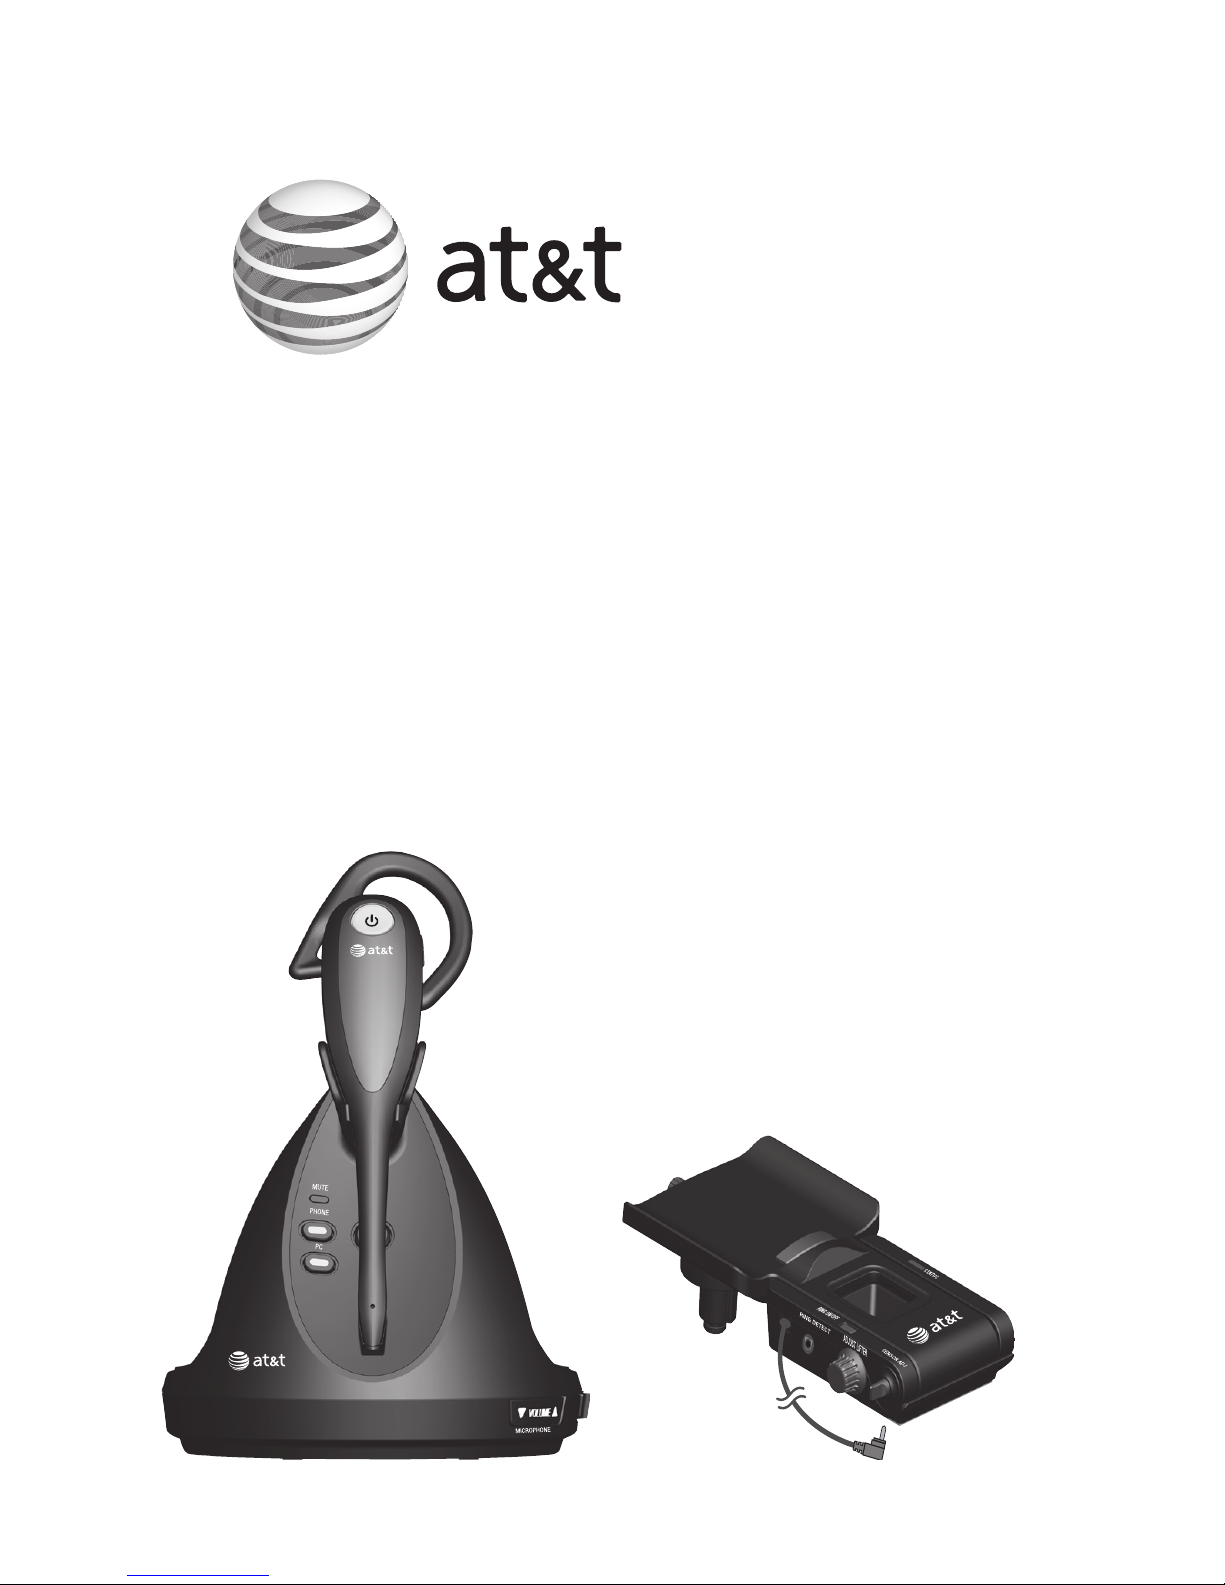
TL7812
DECT 6.0 cordless headset
and handset lifter

1
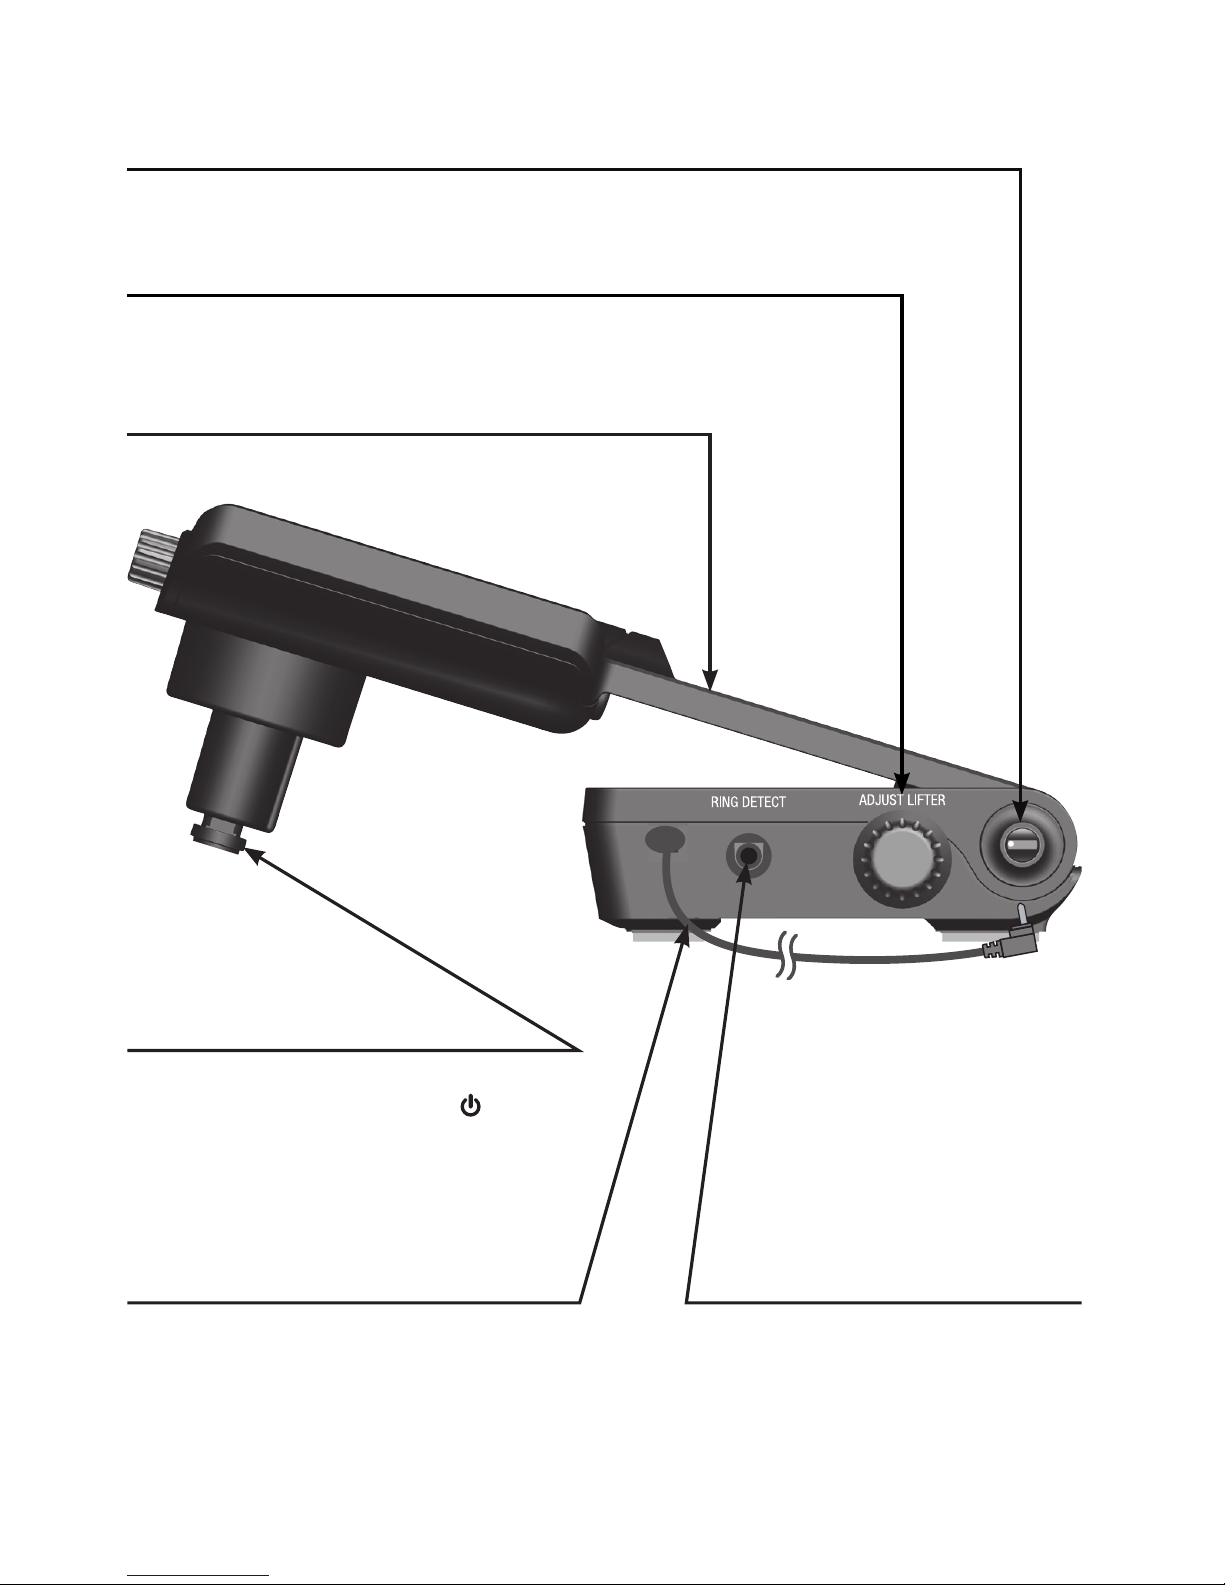
Introduction
The TL7812 is a cordless headset and base that allows you to
have handsfree phone conversations. The package also comes
with the TL7100 handset lifter, making it convenient to answer
and end calls right from the headset. It can be used in different
ways depending on your needs. Choose from the following three
options. Connect your TL7812:
To a traditional corded telephone (pages 11-12). Connect the
headset base to a corded telephone and install the lifter on
your corded telephone. You can use the headset to remotely
control the lifter for answering or hanging up a call.
To both a corded phone and computer (pages 13-15).
Connect the headset base to a corded telephone and install
the lifter on your corded telephone. Use the USB cable to
connect the headset base and your PC. You can make and
answer VoIP calls through SkypeTM and Microsoft Lync , or
landline calls using the AT&T Softphone Call Manager.
Visit www.smbtelephones.att.com/downloads
to download the AT&T Softphone Call Manager. For
installation and operation instructions of the software, refer
to the Installation and Operation Guide which can also be
downloaded at
www.smbtelephones.att.com/downloads.
To a telephone line only (page 16). If you do not want to
install the lifter on the corded handset, you can simply connect
the headset to a telephone wall jack through the line splitter
provided. Use the telephones on the same telephone line to
make or answer calls. The headset is a supplementary device
that can join the calls.
•
•
•
The Skype name is a trademark of Skype.
Microsoft Lync is a registered trademark of Microsoft Corporation.

2
Introduction
This quick start guide provides you with the basic installation and
setup instructions.
You may refer to the user's manual provided in the product
package for complete installation and operation instructions,
or you can visit www.smbtelephones.att.com/smb to
download the manual from the Product Support page.
For customer service or product information, visit our website at
www.telephones.att.com/smb or call
1 (800) 222-3111. In Canada, dial 1 (866) 288-4268.
3
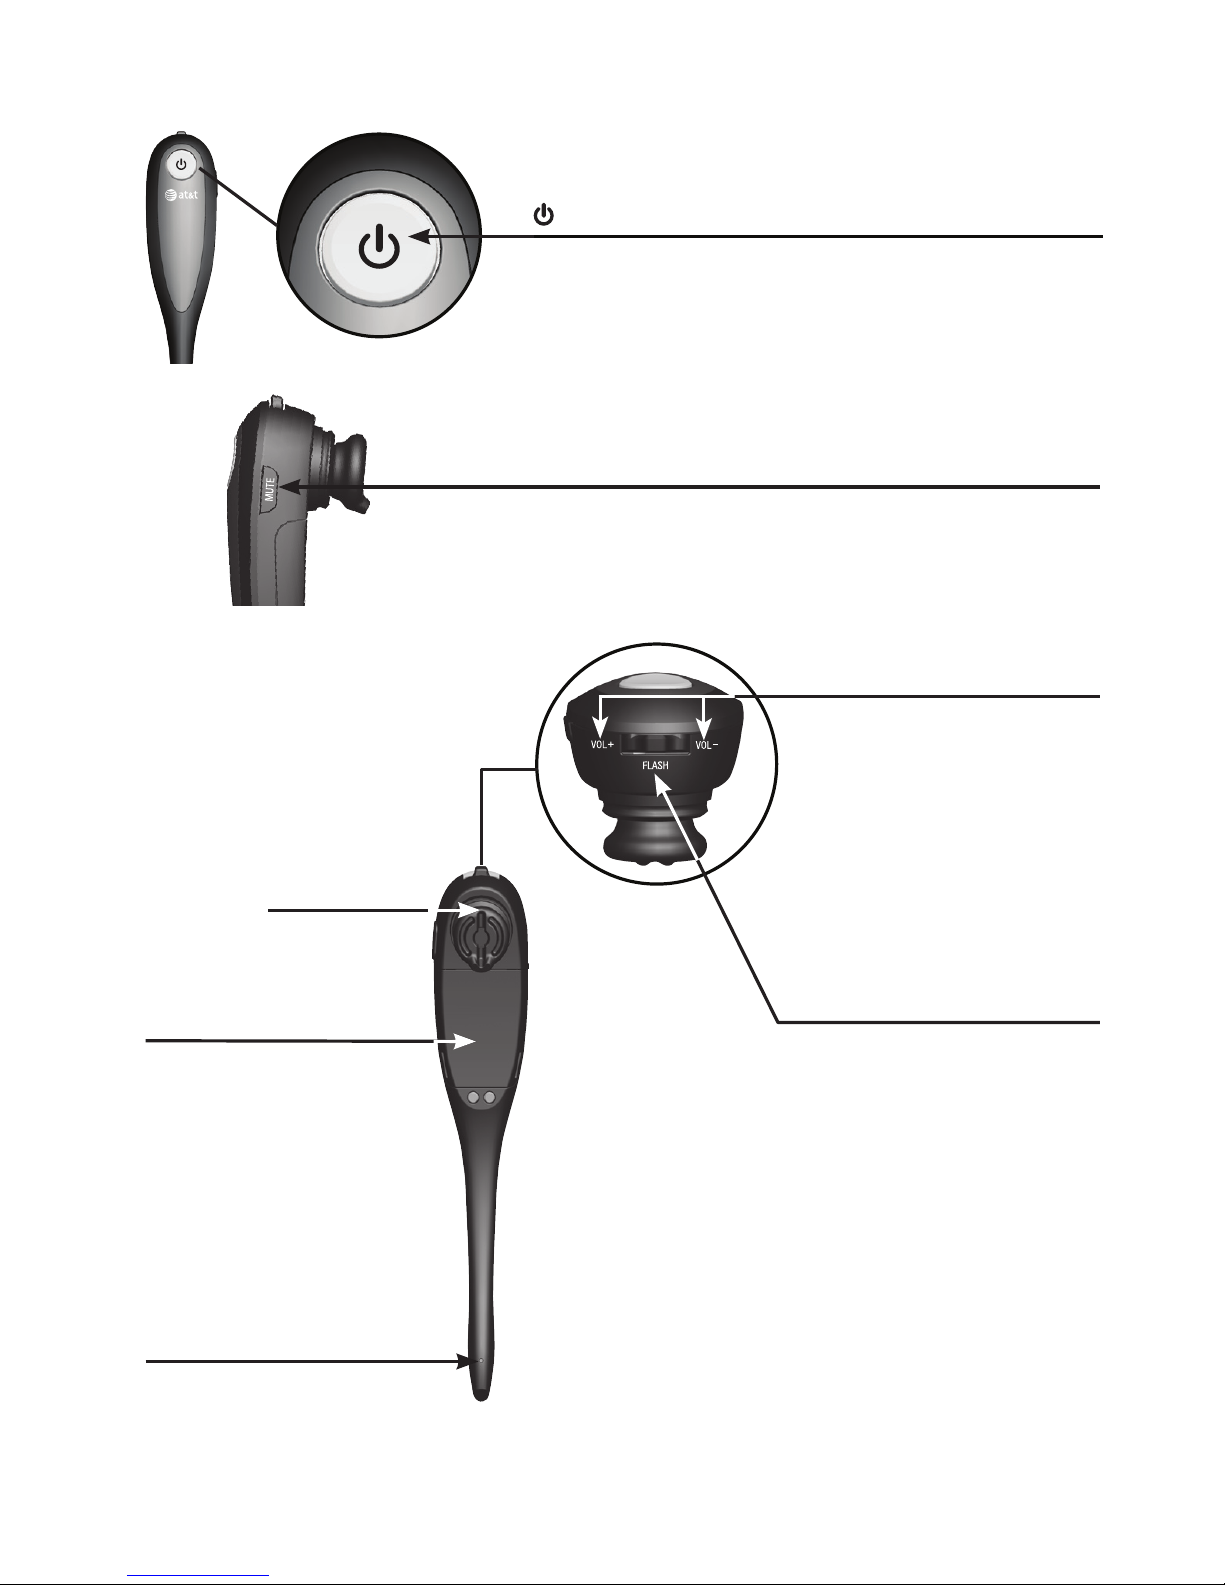
Quick reference guide - headset
(On/off button and light)
Press to make, answer or end a call.
VOL+/VOL-
Slide the volume switch
to the right or left to
adjust the headset
ringer volume while
in idle mode, or the
listening volume while
on a call.
Earpiece
Microphone
The microphone
incorporates noise
canceling technology
for clearer calls.
FLASH
Press to answer an
incoming call when you
receive a call waiting alert
during a call.
Battery with cover
attached
Remove to replace the
battery.
MUTE
Press to mute the microphone during a call.
Press to mute the ringer in the earpiece
when there is an incoming call.
4
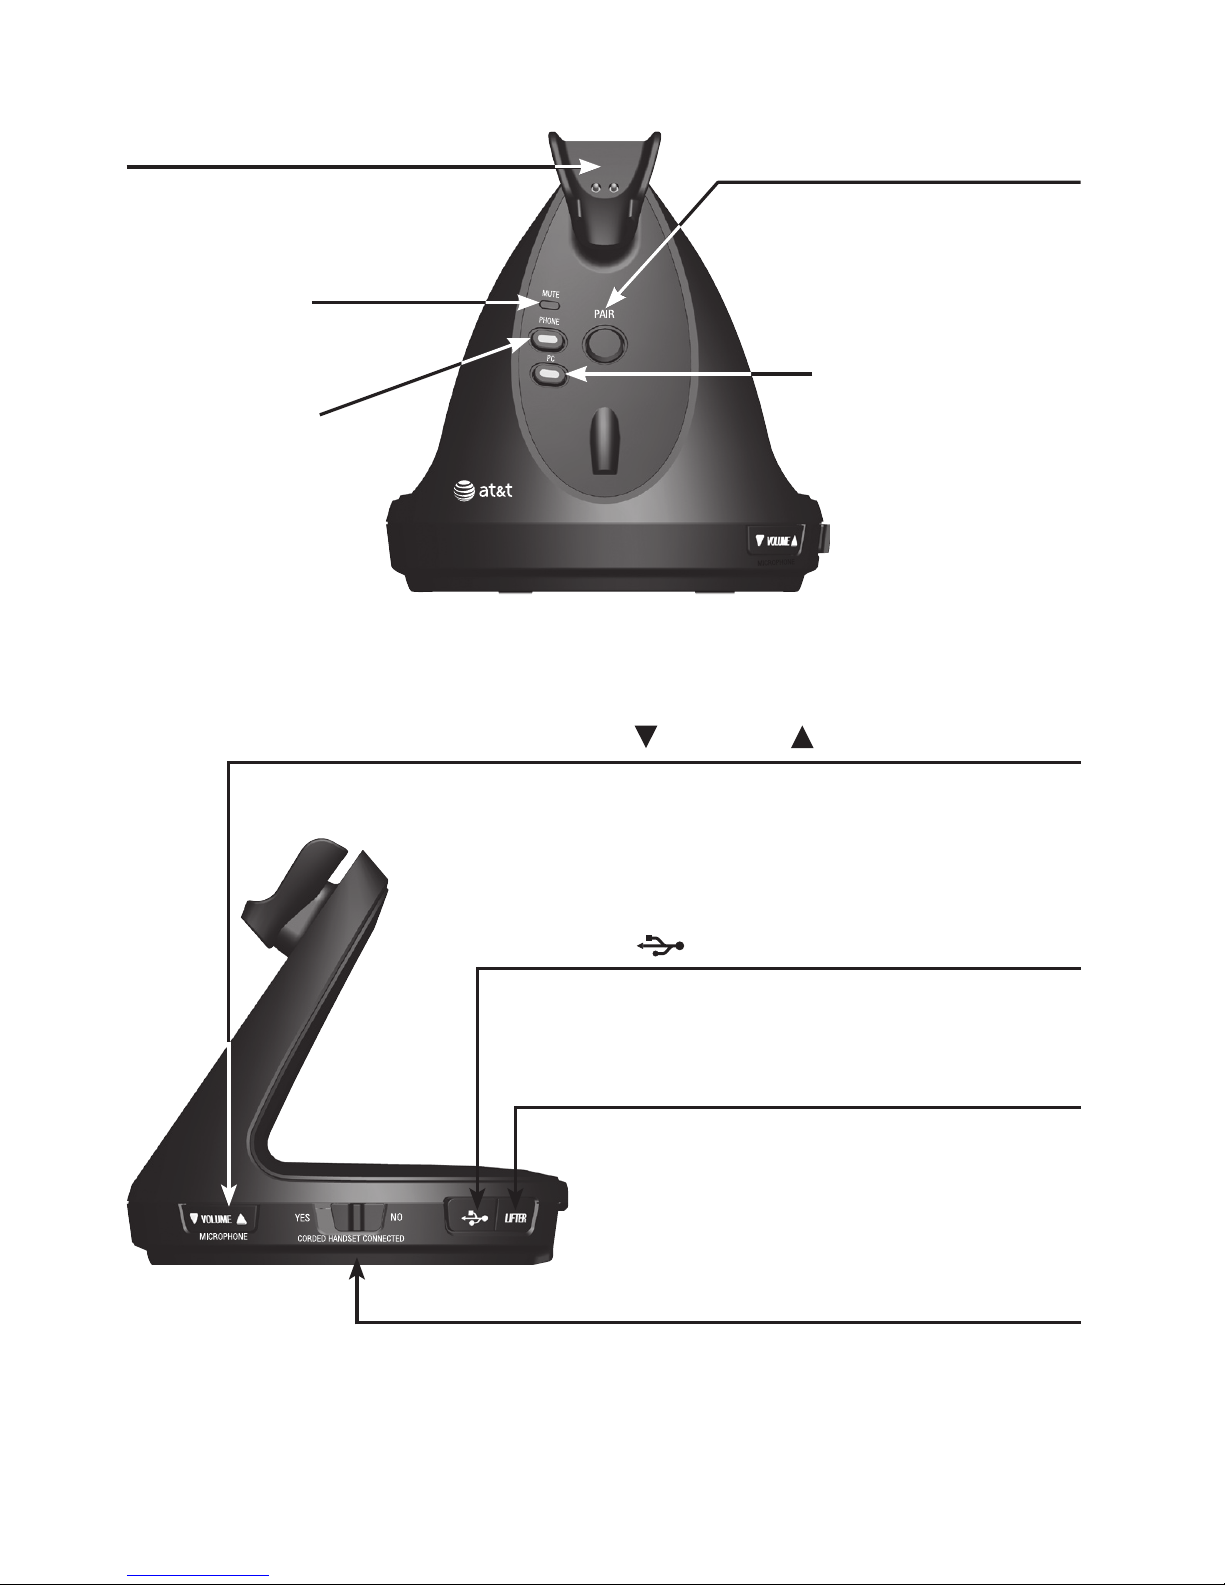
Quick reference guide - headset base
Magnetic charging mount
Place the headset here
for charging.
MUTE (light)
PAIR
Use to initiate headset
registration or deregistration.
PHONE (mode
button and light)
PC (mode button
and light)
VOLUME /MICROPHONE
Press the volume keys on the side
of the headset base to adjust the
speaking volume when on a call.
CORDED HANDSET CONNECTED/
YES/NO
Choose the setting based on whether
you have connected to a corded
handset.
LIFTER
This jack is only used to connect an
AT&T handset lifter (model TL7100,
purchased separately).
(USB port)
Open the port cover to plug in the
USB cable for use with PC mode.
5
Quick reference guide - headset base
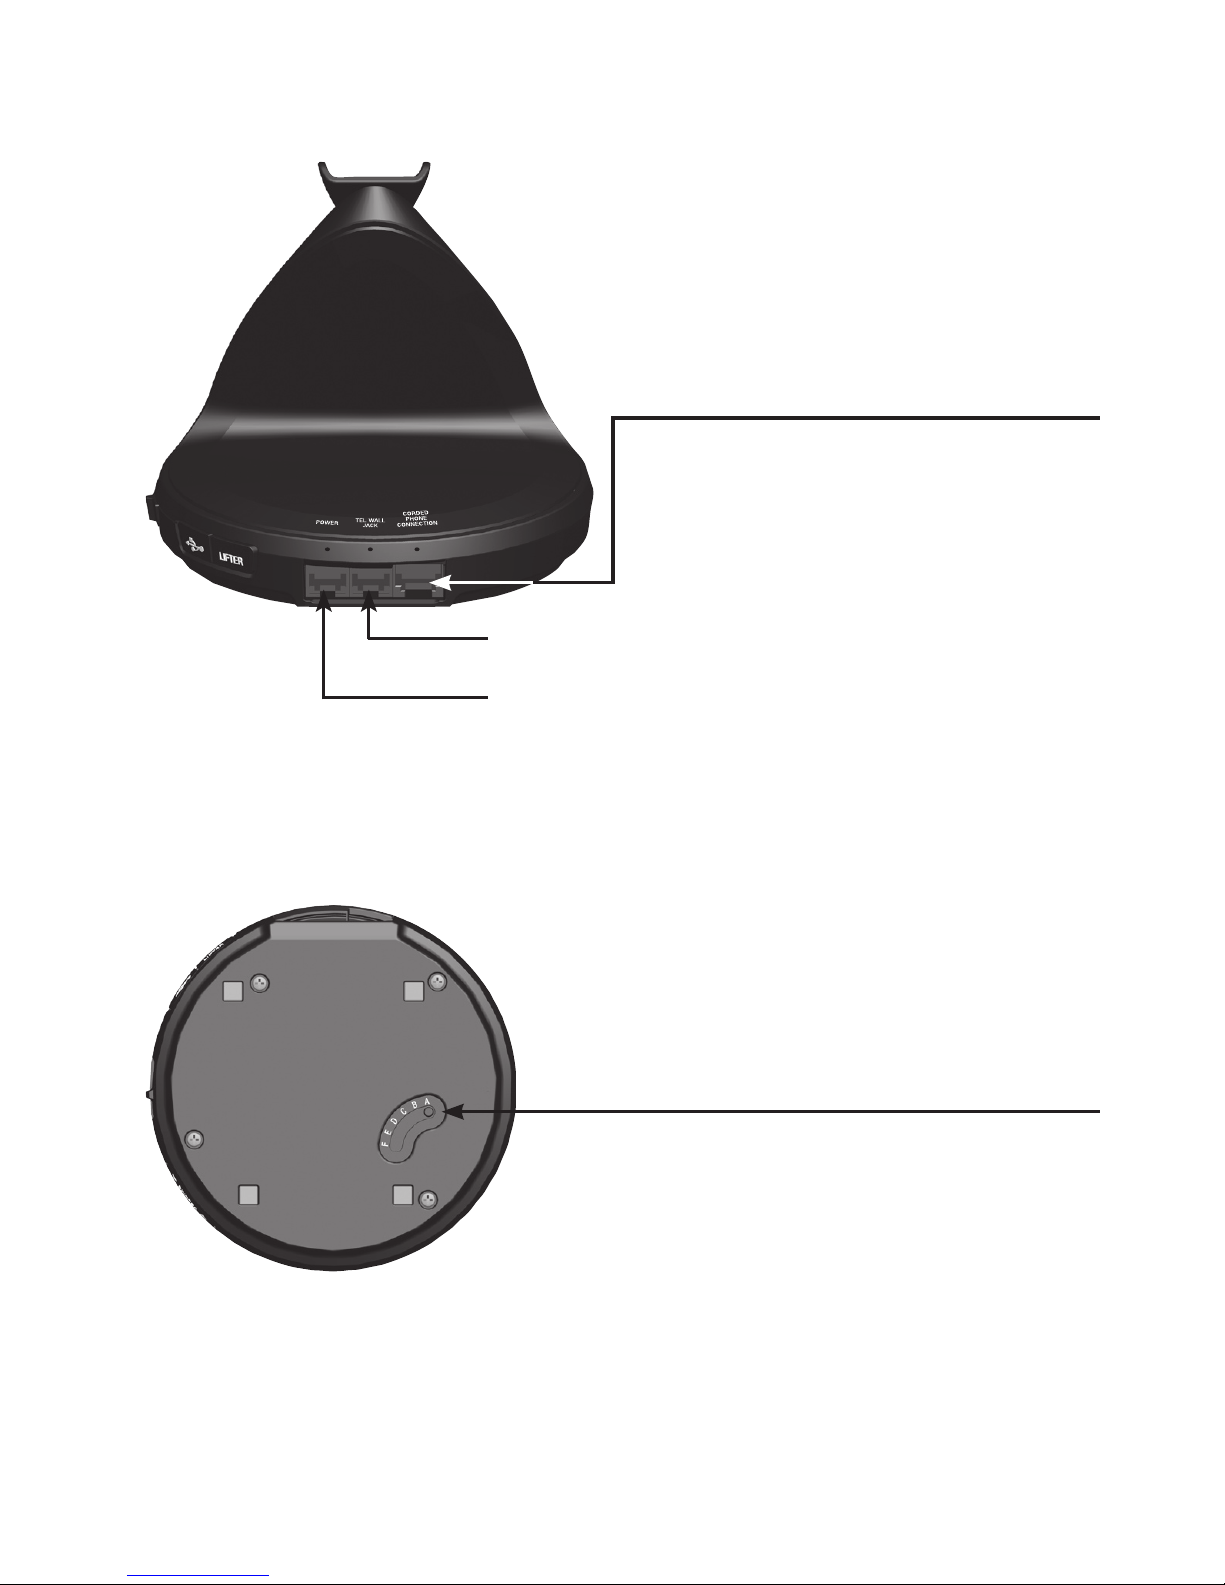
TEL WALL JACK (red dot)
POWER jack (green dot)
CORDED PHONE CONNECTION
jack (blue dot)
This jack is only used to connect
the corded phone connection cable.
Corded handset audio adjust switch
Use this switch to adjust the corded
handset audio when you have connected
the headset base to a corded telephone.
6
Switch hook presser
When the CORDED HANDSET CONNECTED
switch is set to YES, pressing on the
headset raises or lowers the switch
hook presser.
Lifter control cable
Plug this cable into the LIFTER jack on
the headset base.
RING DETECT jack
Plug in the auxiliary ring
detector.
ADJUST LIFTER knob
Adjusts the height of the lifter arm.
Lifter arm
Holds the corded telephone handset.
Quick reference guide - handset lifter
SENSOR ADJ knob
Adjusts the sensitivity of the ring detector.
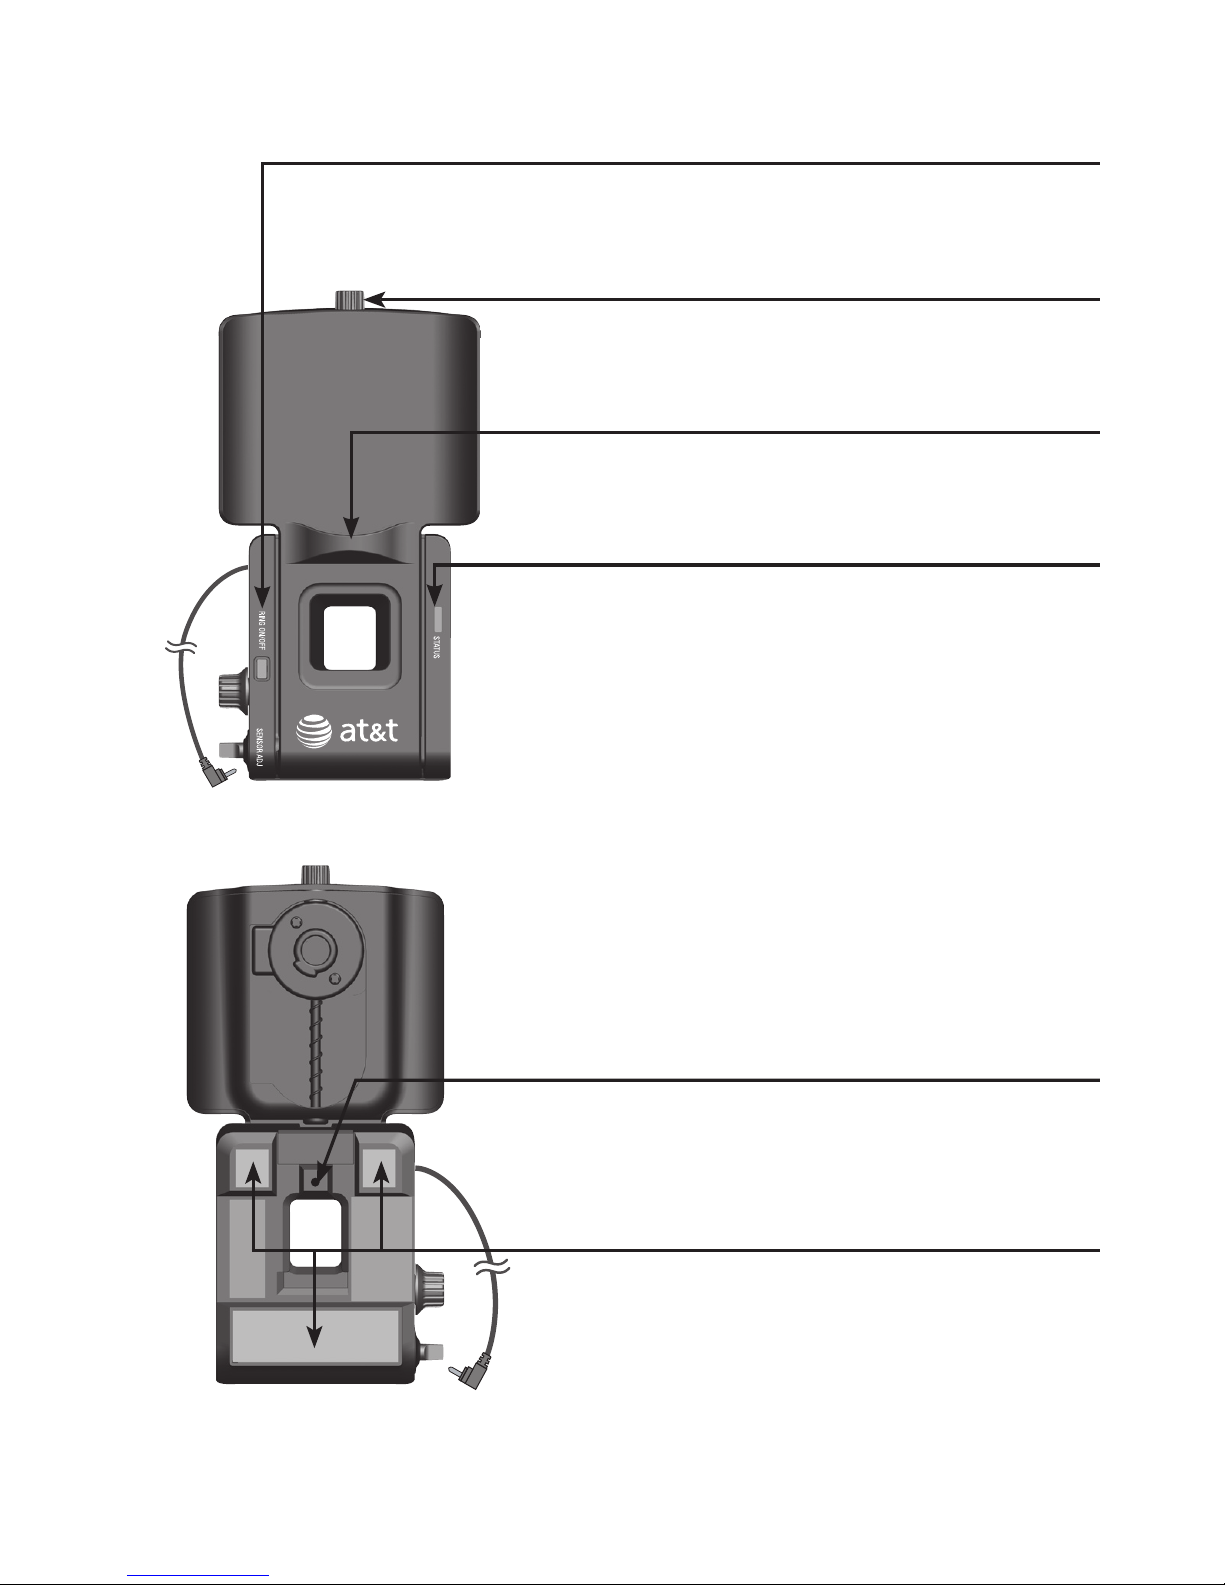
7
Small lifter pad
Holds the earpiece of the corded telephone
handset.
Adhesive tape
Remove the protective strips before
attaching the lifter to the telephone base.
STATUS light
On in red when the ring detector is off.
On in blue when the ring detector is on and
the headset is not in use.
Flashes in blue four times every three seconds
when the ring detector detects an incoming
call.
Flashes in blue slowly when the switch hook
presser is raised and you are on a call.
Quick reference guide - handset lifter
Internal ring detector
Detects the telephone ringer and sends a
ring tone to the headset earpiece.
RING ON/OFF
Press to turn the ring detector on or off. When the ring detector is
off, the cordless headset does not ring.
Switch hook presser adjustment knob
Adjusts the position of the switch hook presser.
Front view
Back view
8
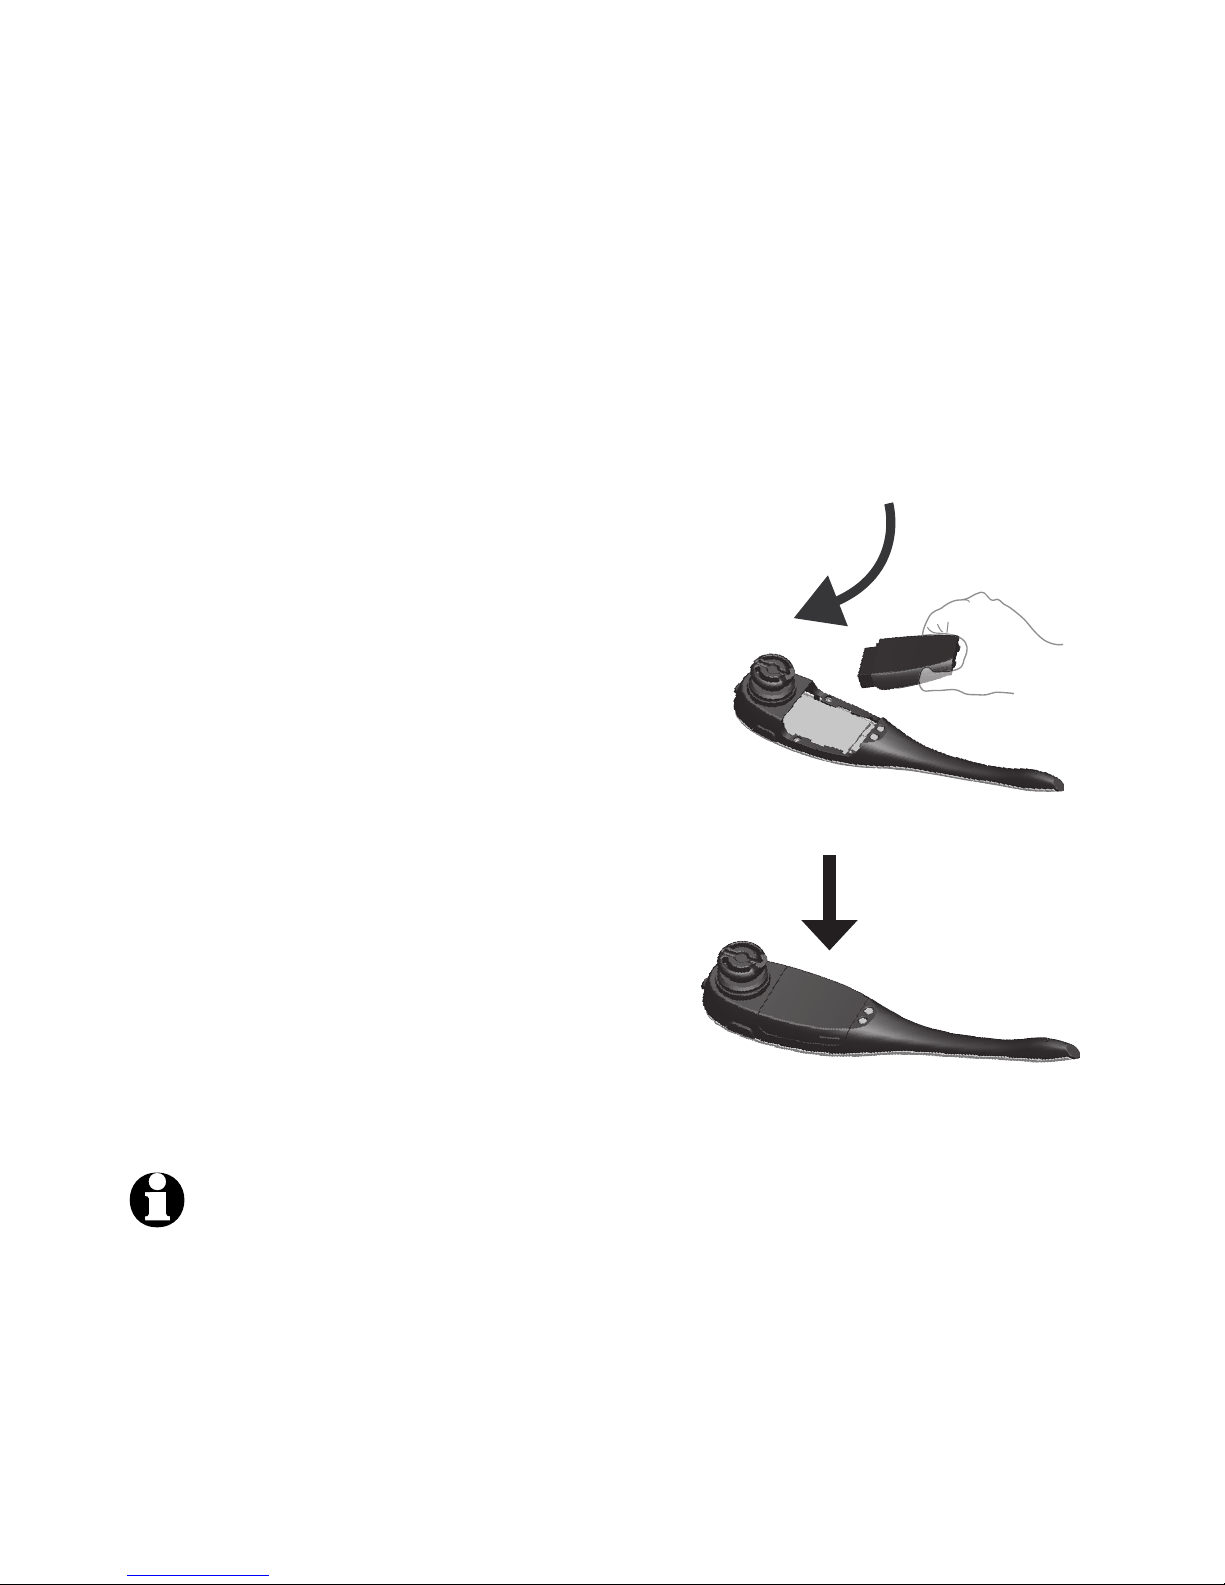
Battery installation
The battery is permanently attached to the battery compartment
cover. Do not try to separate them from each other. After
installing the battery pack, charge it for at least 15 minutes.
You may be able to make and receive short calls. For optimal
performance, charge the headset battery for at least three hours
before use. When fully charged, the headset battery provides
approximately 12 hours of talk time or 5 days of standby time.
When the headset is not in use, recharge by returning it to the
headset base.
NOTES:
Remove any headset attachment (earbud excluded) before battery replacement.
To order a replacement battery pack (model BT191665), visit our website at
www.telephones.att.com/smb or call
1 (800) 222-3111. In Canada, dial 1 (866) 288-4268.
•
•
1. Insert the battery pack into the
battery compartment.
2. Press down on the battery pack
until it clicks into place.
9
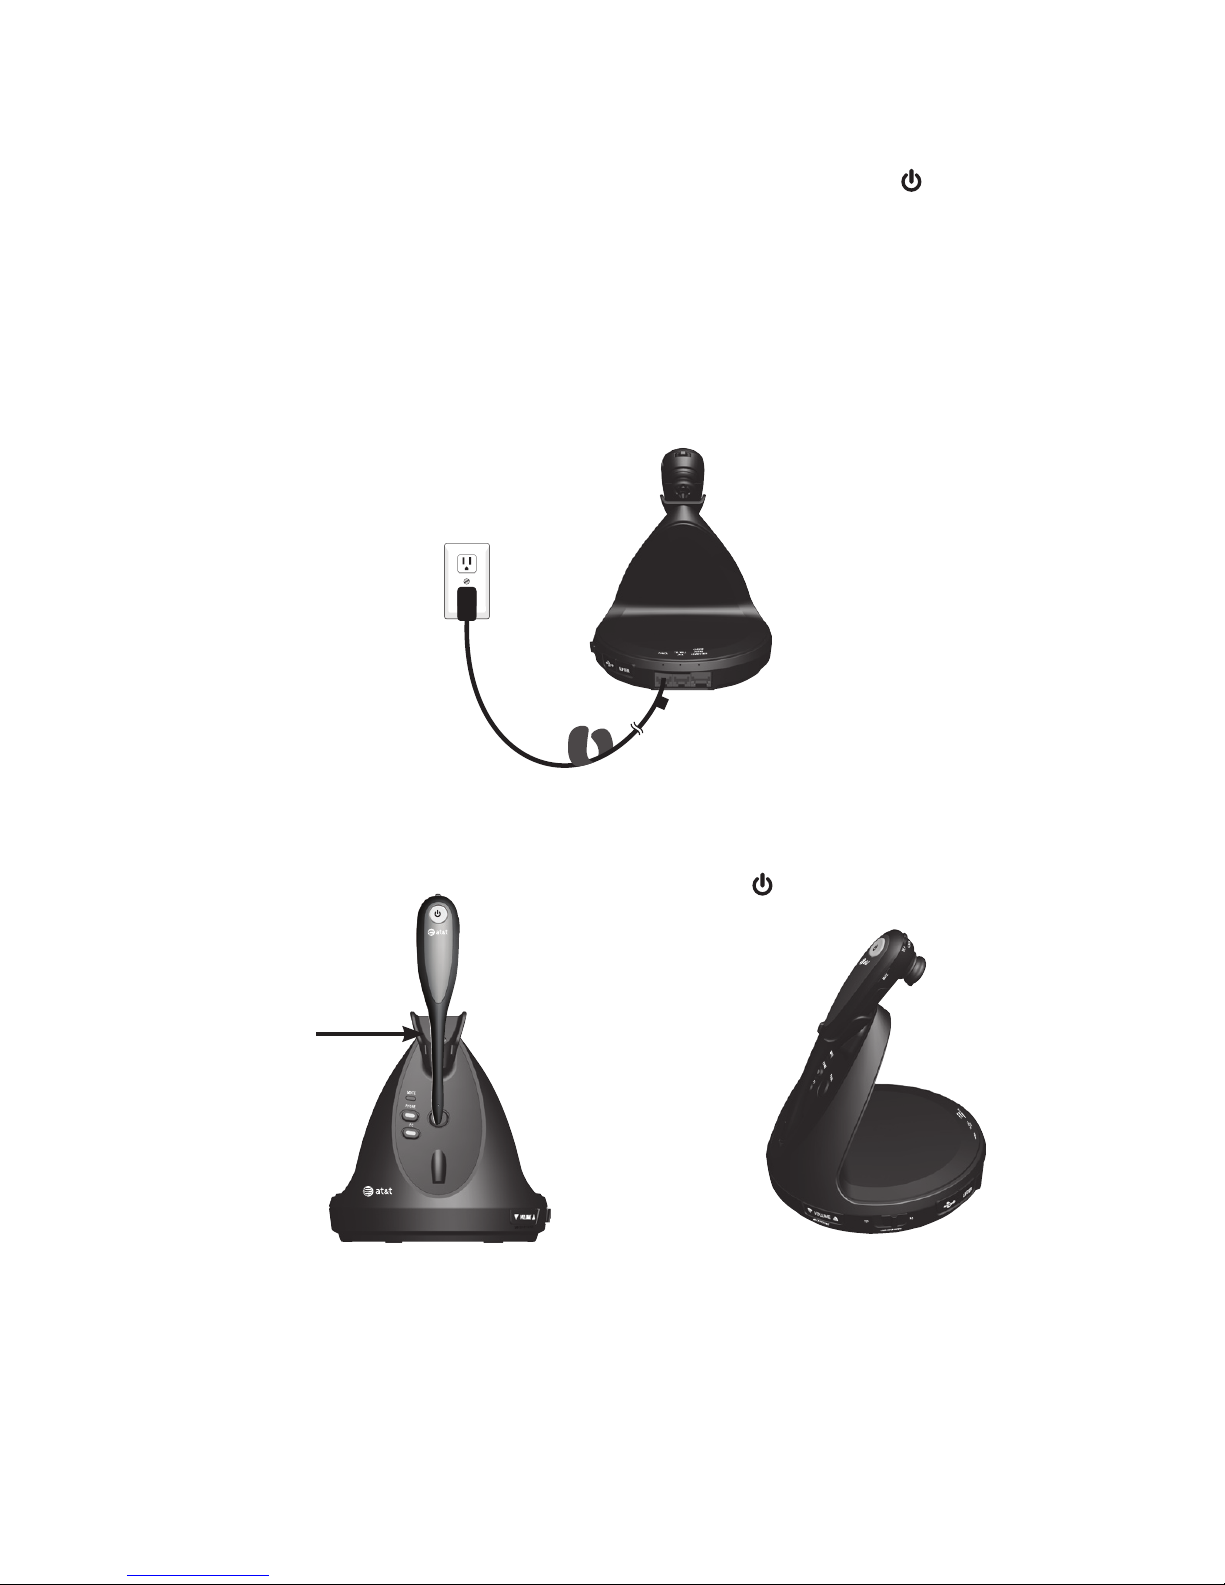
Headset base installation and battery charging
After installing the battery, charge the headset by placing it in
the magnetic charging mount as shown below. The light turns
on when the headset is charging.
IMPORTANT INFORMATION
Use only the supplied rechargeable battery pack or replacement
battery pack (model BT191665). To order, visit our website at
www.telephones.att.com/smb or call
1 (800) 222-3111. In Canada, dial 1 (866) 288-4268.
Plug the small end of the headset base power adapter into
the POWER jack (green dot) at the back of the headset base.
Plug the large end into an electrical outlet not controlled by a
wall switch.
1.
The magnet holds the top
of the headset in place.
The light turns on.
3.
Magnetic
charging
mount
Insert the headset into the
magnetic charging mount.
2.
 Loading...