

Page 1

AT&T Maestro™
User Guide
DOC20190703
1
Page 2

Table of Contents
Getting started ................................................................................................
Introduction .......................................................................................................
About this user guide ......................................................................................................
Set up your phone .............................................................................................
Parts and functions...........................................................................................................
Battery use .......................................................................................................................
SIM Card and microSD Card ..........................................................................................
Turn your phone on and off ............................................................................................
Use the touchscreen .......................................................................................................
Complete the setup screens ..........................................................................................
Basic operations ...............................................................................................
Home screen and applications (Apps) list ....................................................................
Phone settings menu .......................................................................................................
Capture screenshots .......................................................................................................
Applications .....................................................................................................................
Phone number .................................................................................................................
Airplane mode .................................................................................................................
9
10
10
11
11
14
18
21
21
23
24
24
26
28
28
36
37
2
Page 3

Google Account ..............................................................................................................
Lock and unlock your screen..........................................................................................
Your phone’s Home screen .............................................................................
Home screen basics .......................................................................................................
Status bar and notification panel..................................................................................
Notification panel ...........................................................................................................
Customize the home screen ...........................................................................................
Making connections .....................................................................................
Phone ................................................................................................................
Making a call ...................................................................................................................
Making a call when Wi-Fi calling is enabled .................................................................
Receiving a call ...............................................................................................................
Contacts ............................................................................................................
Add a contact .................................................................................................................
Save a phone number .....................................................................................
Messages .........................................................................................................
Text and multimedia messages .....................................................................................
Gmail ...............................................................................................................................
Internet and social networking ........................................................................
Chrome browser ..............................................................................................................
38
41
42
42
46
48
50
55
56
56
57
58
61
61
63
64
64
68
72
72
3
Page 4

Connectivity ......................................................................................................
Transfer files between your phone and a computer .....................................................
Wi-Fi ...................................................................................................................................
Bluetooth ..........................................................................................................................
Apps and entertainment ..............................................................................
Camera and video ..........................................................................................
Camera overview ...........................................................................................................
Take pictures and record videos ....................................................................................
View pictures and videos using Photos .........................................................................
Camera settings .............................................................................................................
Productivity ........................................................................................................
Calendar ..........................................................................................................................
Navigation apps .............................................................................................................
Google Search ...............................................................................................................
Calculator ......................................................................................................................
Clock ..............................................................................................................................
Entertainment and activities
Google Play Music app .................................................................................................
YouTube ...........................................................................................................................
......................................................
Settings .........................................................................................................
73
73
75
77
85
86
86
87
89
90
92
92
96
98
100
102
112
112
115
118
4
Page 5

Basic settings ...................................................................................................
Network & Internet ..........................................................................................
Wi-Fi .................................................................................................................................
Wi-Fi Calling ....................................................................................................................
Mobile network ..............................................................................................................
Data usage ....................................................................................................................
Mobile data ...................................................................................................................
Wi-Fi data ........................................................................................................................
Hotspot & tethering .......................................................................................................
Airplane mode ...............................................................................................................
VPN (Virtual Private Networks) ......................................................................................
Private DNS ......................................................................................................................
Connected devices ........................................................................................
USB ..................................................................................................................................
Connection preferences ...............................................................................................
Apps & notifications........................................................................................
Recently opened apps .................................................................................................
Notifications ...................................................................................................................
Default apps ..................................................................................................................
App permissions ............................................................................................................
119
120
120
126
126
127
127
128
128
130
130
131
132
132
133
138
138
139
139
140
5
Page 6

Special app access ......................................................................................................
Battery...............................................................................................................
Display ............................................................................................................
Sound ..............................................................................................................
Storage ............................................................................................................
Security & location ..........................................................................................
Security status ................................................................................................................
Device security ...............................................................................................................
Privacy ............................................................................................................................
Accounts .........................................................................................................
Add account .................................................................................................................
Automatically sync data ...............................................................................................
Accessibility .....................................................................................................
Volume key shortcut ......................................................................................................
Real-Time Text call ..........................................................................................................
Downloaded services ....................................................................................................
Screen readers ...............................................................................................................
Display ............................................................................................................................
Interaction controls ........................................................................................................
Audio & on-screen text ..................................................................................................
140
141
143
144
146
148
148
150
153
156
156
156
156
157
157
158
158
160
162
163
6
Page 7

Experimental options .....................................................................................................
Google ...........................................................................................................
System .............................................................................................................
Languages & input ........................................................................................................
Gestures .........................................................................................................................
Date & time ....................................................................................................................
Backup ...........................................................................................................................
Reset options .................................................................................................................
About phone .................................................................................................................
Software Update ..............................................................................................
Getting help .................................................................................................
For assistance .................................................................................................
Troubleshooting .............................................................................................................
Specifications .................................................................................................................
Licenses ..........................................................................................................................
Copyright information ...................................................................................................
Safety and use .............................................................................................
Please read before proceeding .....................................................................
Important health information and safety precautions .................................
Electrical safety ..............................................................................................................
163
164
164
164
167
167
168
168
169
171
172
173
173
175
177
177
178
179
179
179
7
Page 8

Safety precautions for proper grounding installation..................................................
Safety precautions for power supply unit .....................................................................
FCC Regulations ............................................................................................
RF Exposure Information (SAR) ......................................................................................
Hearing Aid Compatibility (HAC) for Wireless Telecommunication Devices ..............
Warranty ..........................................................................................................
Warranty duration ..........................................................................................................
Implementation of the Warranty ...................................................................................
Warranty exclusions .......................................................................................................
Available applications and services are subject to change at any time.
179
180
190
191
192
193
193
194
194
8
Page 9

Getting started
The topics in this section will introduce you to your phone, help you get set up
with service, provide an overview of the phone screen, and get you started
with basic phone operations.
9
Page 10

Introduction
The following topics describe the basics of using this guide and your new
phone.
About this user guide
Thank you for purchasing your new AT&T Maestro™. The following topics explain how best to use this guide to get the most out of your phone.
Before using your phone
Read the Let’s get started and Safety Information Guide that came with your
device thoroughly for proper usage.
Accessible services may be limited by subscription contract conditions.
Descriptions in this user guide
Note that most descriptions in this guide are based on your phone's setup
at the time of purchase. Unless otherwise noted, instructions begin from the
phone's home screen, which is displayed by pressing the Home button .
Some operation descriptions may be simplified.
Screenshots and key labels
Screenshots and other illustrations in this user guide may appear differently
on your phone. Key labels are simplified for description purposes and differ
from your phone's display.
Other notations
In this user guide, the phone may be referred to either as "phone," "device,"
or "handset." A microSD™ or microSDXC™ card is referred to as an "SD card"
or a "memory card."
10
Page 11

Set up your phone
The following topics give you all the information you need to set up your
phone and wireless service for the first time.
Parts and functions
These topics illustrate your phone’s primary parts and key functions.
Note: Your phone's screens and app layouts are subject to change. This user
guide uses sample images only.
11
Page 12
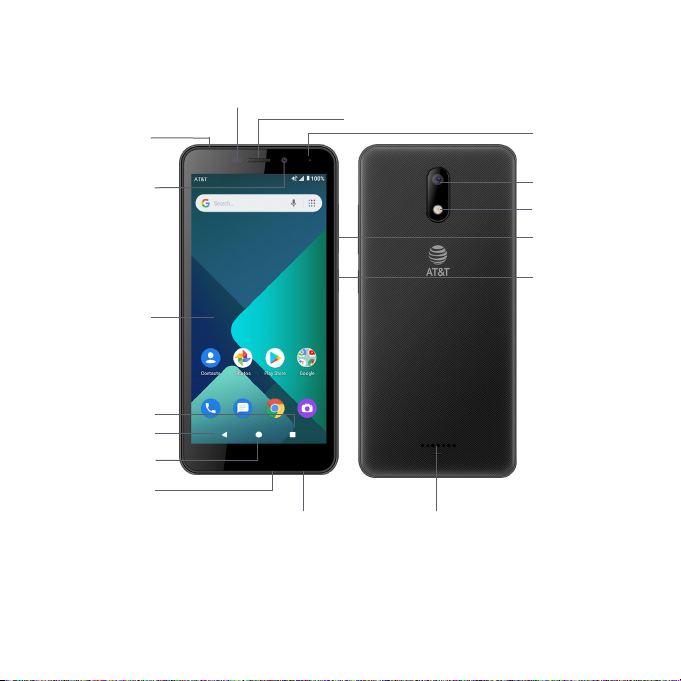
Phone Layout
Proximity and light sensor
Headset port
Receiver
LED indicator
Front camera
Touch screen
Recent app
Microphone
key
Back key
Home key
MicroUSB charging
port
Rear camera
Flash
Volume keys
Power key
Loudspeaker
12
Page 13
Part Description
Front camera • Take selfies and record videos while facing the
Receiver Hear the caller and automated prompts.
Touchscreen • Display all the information needed to operate your
Power key • Press to turn the screen on or off.
MicroUSB charging
port/Accessory
jack
Volume keys Adjust the volume for ringtones, media, notifications,
Headset port Plug in a headset (sold separately) for convenient,
Microphone Used for transmitting your voice electronically for a call,
Proximity sensor To detect nearby objects without any physical contact.
screen.
• Allows you to have video calls and participate in
video conferencing.
phone, such as the call status, the Contacts list, and
the date and time.
• Provides one-tap access to all of your features and
applications.
• Press and hold to turn the phone on or off, to restart it,
or to take a screenshot on the current screen.
Connect the USB cable (included) for charging or
connect other accessories.
and system sounds.
hands-free conversations.
voice recording, video recording, or Google Assistant.
Detects light levels to automatically brighten or dim the
screen and save battery during a call.
13
Page 14
Part Description
LED indicator • Pulsing green light: new notification
CAUTION! Inserting an accessory into the incorrect jack may damage the
phone.
• Solid green light: charging and battery percentage >=
98%
• Pulsing red light: charging and battery percentage <
15%
• Solid red light: charging battery percentage < 98%
Note: new notifications have priority over the charging
indicator.
Battery use
The following topics explain how to insert and remove your phone’s battery.
Battery cautions
• Storage: Avoid storing or leaving the battery with no charge remaining.
Saved information and settings may become lost or changed, or the
battery may become unusable. Charge once every six months if storing
or leaving unused for a long period.
• Bulges: Depending on use, bulges may appear near the end of battery
life. This does not affect safety.
• Replacement: The battery is a consumable item. It needs to be replaced
if operating time shortens noticeably.
• Cleaning: Clean soiled terminals between the battery and phone with a
clean, dry cotton swab. Soiled terminals can result in a poor connection
and prevent charging, etc.
14
Page 15
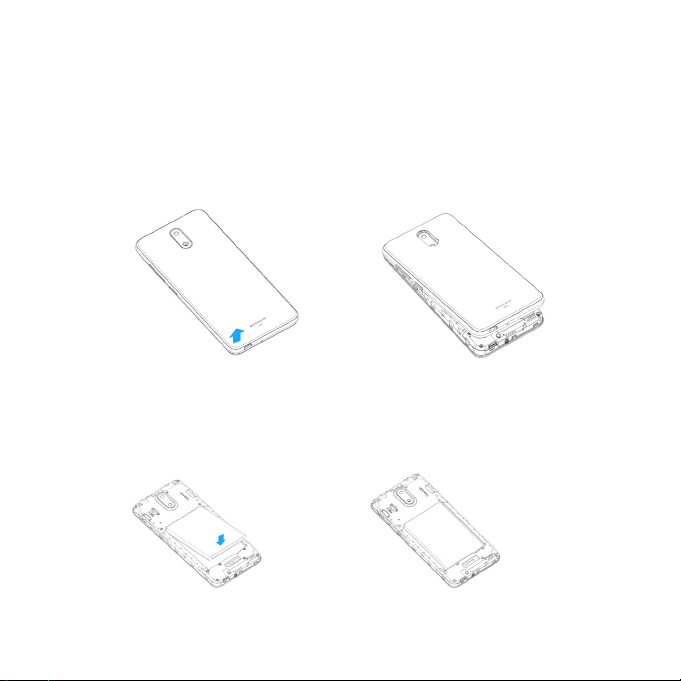
Insert the battery
Follow these instructions to insert your phone’s battery safely and properly.
1. Remove the battery cover by gently lifting up in the direction shown. There
is a notch located on the bottom left hand corner of the phone to help lift
the back cover up.
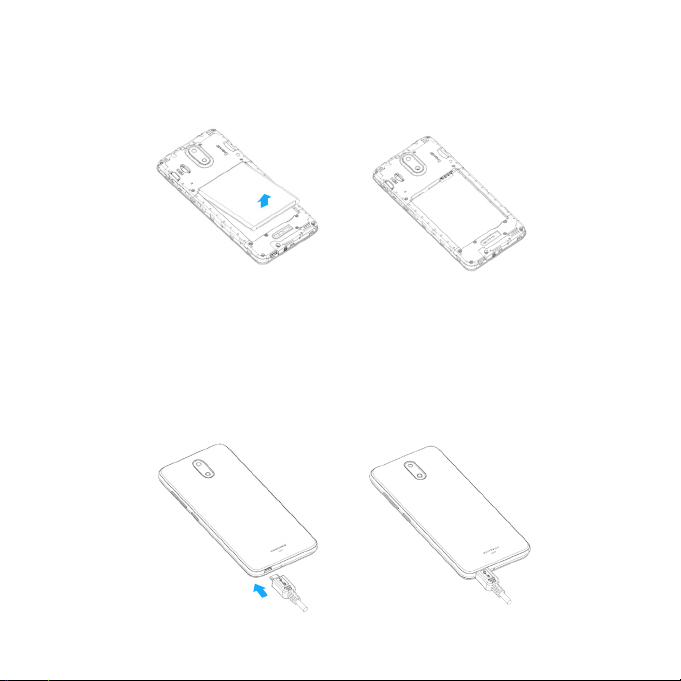
2. Insert the battery by aligning the gold contacts of the battery with the con-
tacts in the phone, and gently press the battery down into place.
15
Page 16
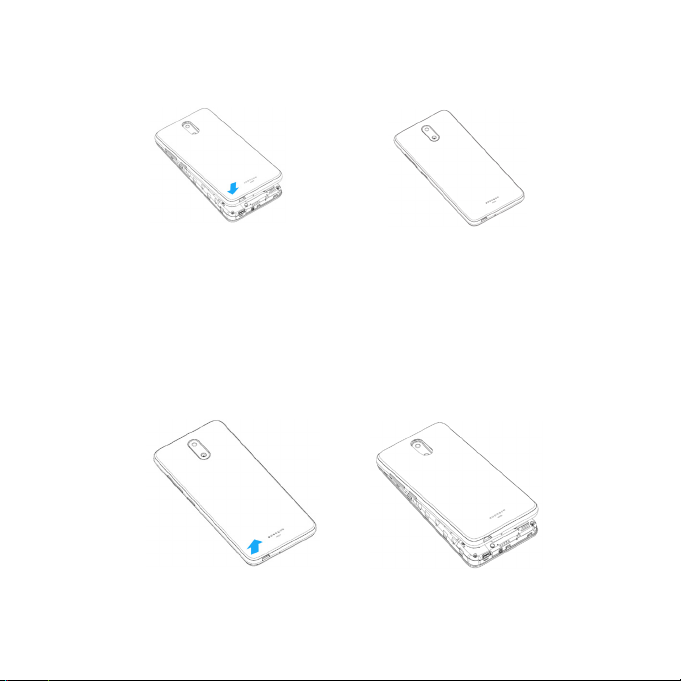
3. Attach the battery cover. Make sure that all the tabs are secure and there
are no gaps around the cover.
Remove the battery
Follow these instructions to remove your phone’s battery. Always power the
phone off before removing the battery.
1. Gently remove the battery cover via the notch at the bottom left corner.
16
Page 17
2. Remove the battery via the notch under the right bottom edge of the bat-
te r y.
3. Lift upward gently as shown.
Charge the battery
1. Connect one end of the data cable to the USB port. This is located on the
lower left side of your phone.
17
Page 18

2. Connect the other end to the power adapter.
3. Connect the power adapter to an electrical outlet to fully charge your
phone.
• Use the power adapter that comes with your phone; using other adapters may damage your phone.
• Charging your phone through a USB cable that is attached to a laptop
takes more time than charging it with the power adapter.
• The phone will power off automatically when the battery is too low.
Charge the battery if this happens. When the battery is critically low, the
charging status may not be displayed immediately (i.e. you must wait
before it is displayed). Using the phone to play games or perform other
activities during the charging process may cause the phone to power
off due to low battery.
• The battery will gradually discharge if it is left unused for a long period
of time. Before using the battery again, you must recharge it in order to
power on and use your phone normally.
SIM Card and microSD Card
Installation of the SIM Card/SD Card
Replace a SIM and install a microSD card.
1. Gently remove the battery cover via the notch at the bottom left corner.
2. Remove the original SIM card from the SIM slot.
3. Hold the new SIM card with metal contacts facing downward and the cut
corner at the upper left. Slide the card into the SIM slot.
4. Hold the microSD card (sold separately) with metal contacts facing downward and the cut side on the right. Slide the card into the microSD slot.
18
Page 19
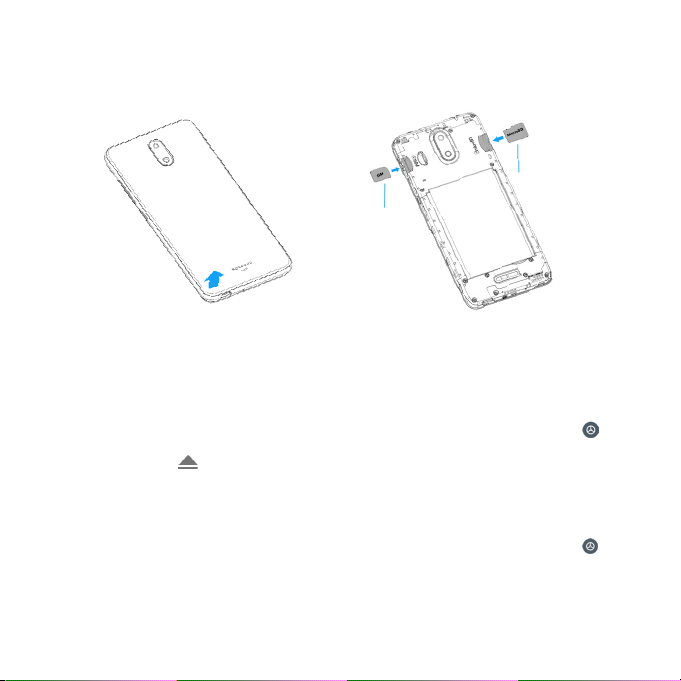
5. Replace the cover on the back of the phone.
6. Press and hold the Power/Lock key until the device turns on.
microSD card
SIM card
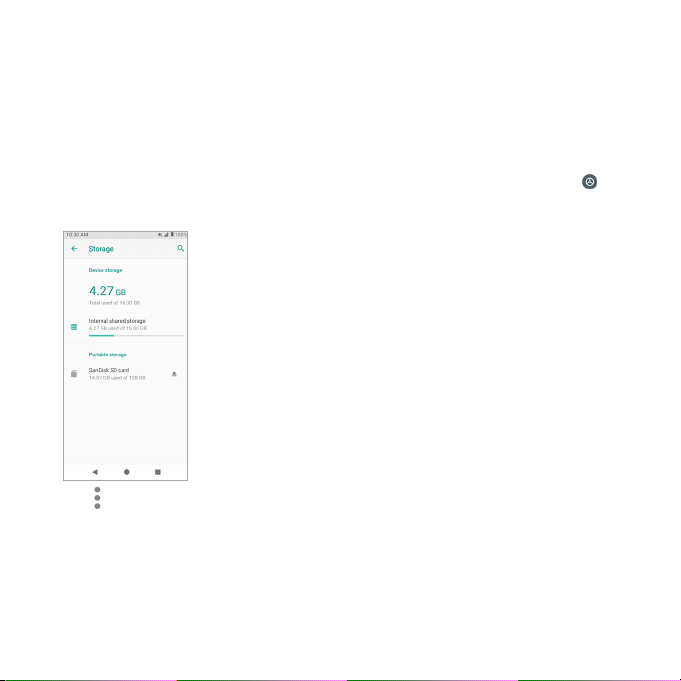
Unmount an SD card
Always unmount an SD card before removing it from your phone to avoid
corrupting or damaging the files in the storage card.
1. From the Home screen, swipe up to access Apps, and tap Settings .
2. Tap Storage > .
Your SD card is now safely ejected. To use this SD card again, you will need to
mount it first by following these steps:
1. From the Home screen, swipe up to access Apps, and tap Settings .
2. Tap Storage > SD card.
3. Tap MOUNT on the prompted screen.
19
Page 20
Format an SD card
When you insert an optional SD card for the first time, it is recommended that
you format it on your phone. When formatting an SD card, you should back
up your music and photo files that are stored on the card as formatting the
SD card deletes all the stored data.
1. From the Home screen, swipe up to access Apps, and tap Settings .
2. Tap Storage > SD card.
3. Tap to access the options menu, and tap Storage settings.
4. Select Format or Format as internal, and then tap FORMAT SD CARD to
confirm.
20
Page 21

All data on the SD card is erased, and the card is formatted for use on your
phone.
Turn your phone on and off
Turn your phone on
Press and hold the Power key until the device turns on.
Turn your phone off
1. Press and hold the Power key.
2. Tap Power off.
Use the touchscreen
Your phone’s touchscreen lets you control actions through a variety of touch
gestures.
21
Page 22
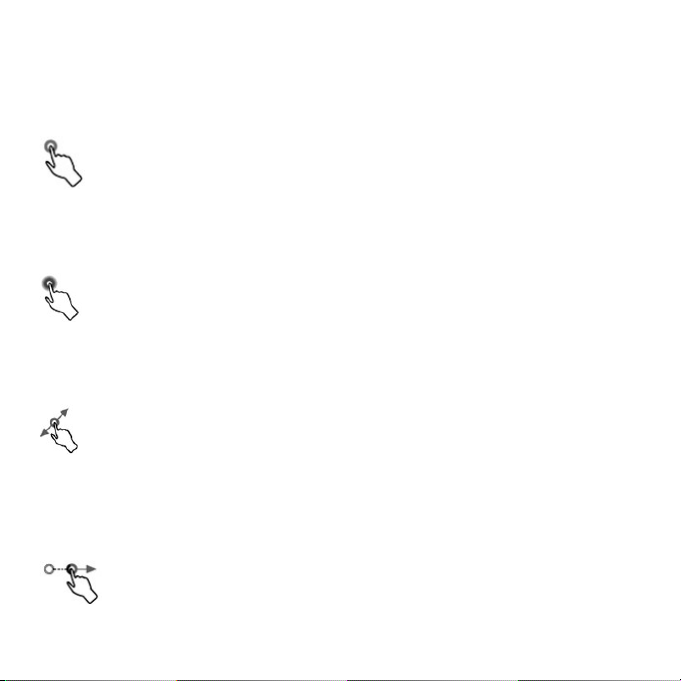
Tap or touch
When you want to type using the onscreen keyboard, select items onscreen
such as application or settings icons, or press onscreen buttons, simply tap or
touch them with your finger.
Touch and hold
To open the available options for an item (for example, a contact or link to a
web page), touch and hold the item.
Swipe or slide
To swipe or slide means to quickly drag your finger vertically or horizontally
across the screen.
Drag
To drag, press and hold your finger with some pressure before you start to
move your finger. While dragging, do not release your finger until you have
reached the target position.
Flick
22
Page 23
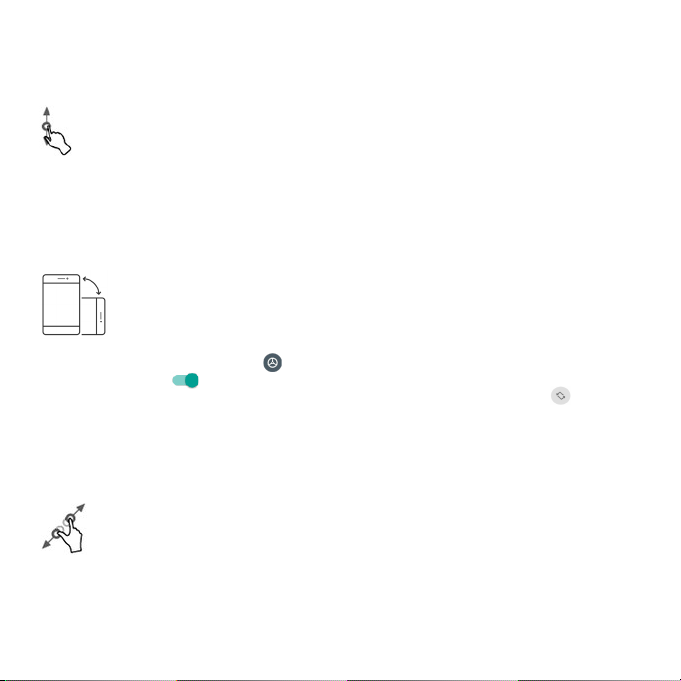
Flicking the screen is similar to swiping, except that you need to swipe your
finger in light, quick strokes. This finger gesture is always in a vertical direction,
such as when scrolling through the contacts or message list.
Rotate
For most screens, you can automatically change the screen orientation from
portrait to landscape by turning the phone sideways. When entering text,
you can turn the phone sideways to bring up a bigger keyboard. See Touchscreen keyboards for more details.
Note: To activate auto-rotate mode, swipe up from the Home screen to access Apps, and tap Settings > Display > Auto-rotate screen, and slide the
switch to the On position. You can also activate it by dragging down
from the status bar to access Quick Settings and tap Auto-rotate .
Pinch and spread
“Pinch” the screen using your thumb and forefinger to zoom out or “spread”
the screen to zoom in when viewing a picture or a web page. (Move fingers
inward to zoom out and outward to zoom in.)
Complete the setup screens
The Setup Wizard will appear to guide you through the basic settings on your
device.
23
Page 24
Select a default language you want to use, select your Internet connection,
set screen lock method, sign in to your Google™ Account, select location services, and more.
Follow the remaining instructions to finish your phone setup.
Basic operations
The following topics outline basic features and operations of your phone.
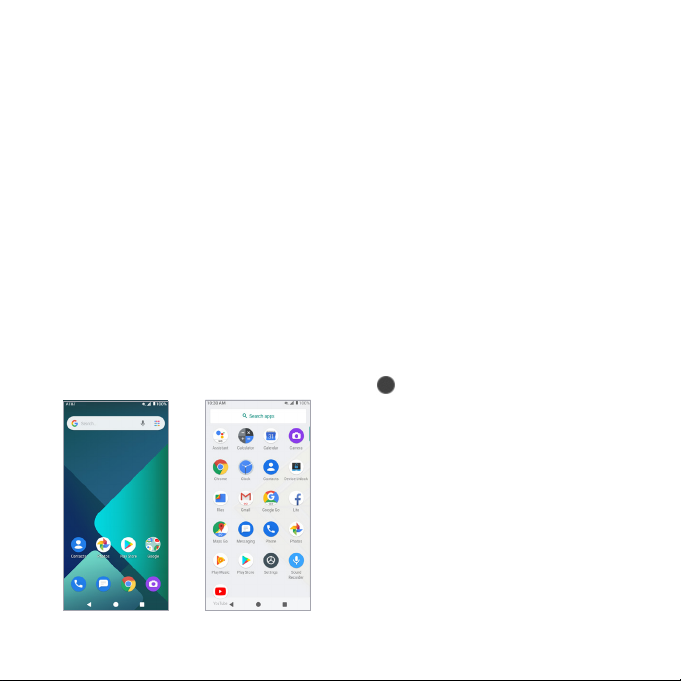
Home screen and applications (Apps) list
Most of your phone’s operations originate from the Home screen or the apps
list.
1. From any screen press the Home button to display the Home screen.
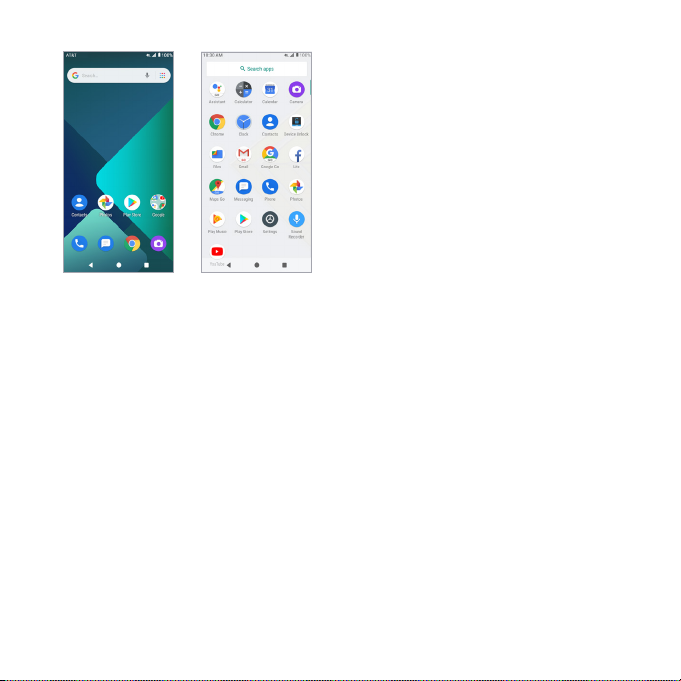
24
Page 25
2. From the Home screen, swipe up to access Apps.
For information about using the Home screen, see “Home screen basics”.
Select options and navigate screens
Tap icons, onscreen buttons, and other items to open or activate the assigned function.
• Tap Back button to return to the previous screen.
Recent applications
You can display a list of recently used applications using the Recent Apps
button .
• Tap Recent Apps button to view a list of recently used applications.
For more information, see Switch between recently opened apps.
25
Page 26
Phone settings menu
You can customize your phone’s settings and options through the Settings
menu.
1. From the Home screen, swipe up to access Apps, and tap Settings .
2. Or you can also drag the status bar down twice and tap Settings .
For more information, see Basic settings.
26
Page 27
Portrait and landscape screen orientation
The default orientation for your phone’s screen is portrait (vertical), but many
apps will change to landscape orientation (wide screen) when you rotate
the phone sideways.
Note: Not all screens will adjust for landscape orientation.
Turn screen rotation on or off
1. Drag the status bar down. Tap Auto-rotation to turn the option on or off.
2. You can also set the rotation option from the Settings menu.
• From the Home screen, swipe up to access Apps, tap Settings , and
tap Display > Auto-rotate screen
• Slide the switch to the On or Off position to activate or deactivate it.
27
Page 28

Capture screenshots
To capture a screenshot, you can follow either of the following two ways:
• Press and hold the Power key and Volume down key at the same time
to capture a screenshot of the current screen.
• Touch and hold the Power key from the screen you want to capture,
and tap Screenshot in the popup option menu.
The screenshots you’ve taken will be stored in the Screenshots album in the
phone’s Photos app. From Home screen, swipe up to access Apps, and tap
Photos .
Applications
The following topics describe how to access the applications (apps) list and
launch apps on your phone.
Launch applications
All installed apps can be accessed and launched from the apps list.
1. From the Home screen, swipe up to access Apps.
2. Tap an app icon to launch the corresponding application.
28
Page 29
Working with apps
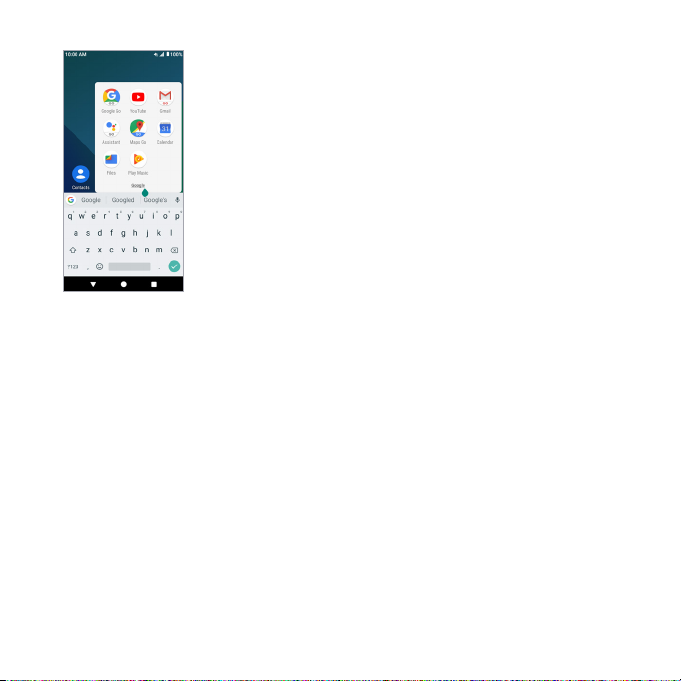
Group apps into a folder
1. Touch and hold an app and drag it over to another app to create a folder
automatically.
2. To add more apps to the folder, drag each app over to the folder.
3. To name or rename the folder, open the folder, tap the title bar, and then
enter a folder name.
29
Page 30
Remove apps from a folder
1. Tap the folder to open it.
2. Touch and hold an app in the folder and drag it out to the Home screen.
App shortcuts
Touch and hold an app icon on the Home screen or the Apps screen to display a menu that lets you quickly access common app functions.
30
Page 31

Note: Not all apps support the app shortcuts feature.
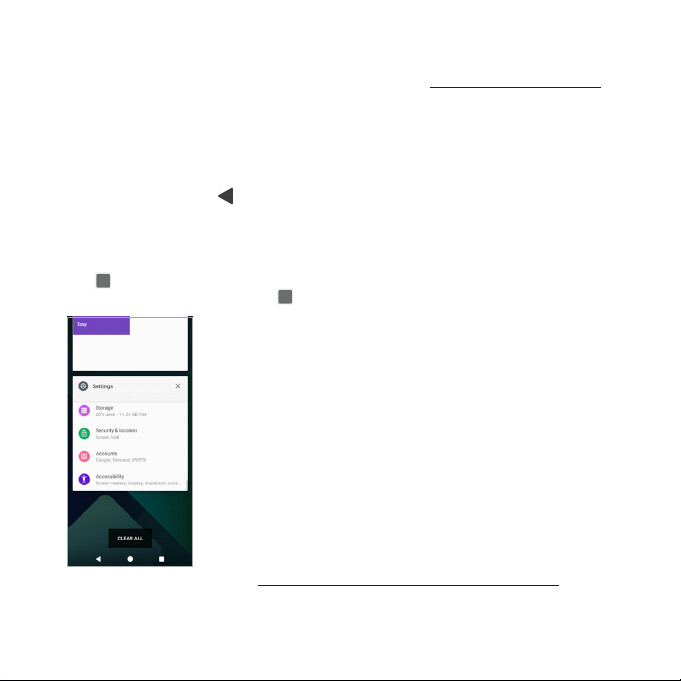
Switch between recently opened apps
You can easily switch between the apps you've recently opened.
1. Tap Recent Apps button to see your recently-opened apps.
31
Page 32

2. To locate an app, swipe up or down through the cards to find the app and
tap it.
3. To remove an app, slide it left or right.
4. To remove all of the apps, slide the screen to the left side and tap CLEAR
ALL.
You can tap the Recent Apps button twice to quickly switch between two
most recently used apps.
Control app permissions
The first time you open an app, you’ll be asked to grant permissions to access
certain data or features. This makes sure that you have full control of which
apps have authorized access.
If you don’t want to grant access for one app, you can choose Deny. If you
choose Deny in a trusted app, you may not be able to use the app or access all the functions. To modify permission settings, you can follow the below
steps:
1. From the Home screen, swipe up to access Apps, and tap Settings .
2. Tap Apps & notifications > App permissions.
3. Tap the app you want to modify, and slide the switch to the On or Off
position to adjust the permission settings.
4. You can also access permission settings by touching and holding the app
on the Home screen or Apps screen. Tap to access the App info screen,
and tap Permissions.
Set default apps
You can choose default apps for web browsing, text messaging, and more.
32
Page 33

1. From the Home screen, swipe up to access Apps, and tap Settings .
2. Tap Apps & notifications > Default apps.
3. Choose your default web browser, phone, messaging app, and more.
Set up app links
When you tap a link, there may be more than one app that can open it, and
you’ll need to choose the app you want to use on the prompted screen. You
can also tap Always on the prompt screen to set that app as the default.
You can also set different apps as default in the Settings menu.
1. From the Home screen, swipe up to access Apps, and tap Settings .
2. Tap Apps & notifications > Default apps > Opening links.
3. Tap the app you want to set and tap Open supported links.
4. Choose Open in this app to set this app as the default one to open when
you tap a link. You can also choose Ask every time or Don’t open in this
app according to your preference.
Disable an app
You can disable some default apps which can’t be uninstalled to avoid them
running in the background and downloading data.
1. From the Home screen, swipe up to access Apps, and tap Settings .
2. Tap Apps & notifications.
3. Tap the app you want to disable to access the App info screen.
4. Tap Disable.
Tip: You can also touch and hold an app on the Home screen or Apps
screen, tap to access the App info screen, and tap Disable.
33
Page 34

Apps list
The apps list expands to include any apps you download and install on your
phone. The following table outlines the primary apps that have been preinstalled on your phone.
App
Google Assistant Go
Calculator
Calendar
Camera
Chrome
Clock
Contacts
Function/Service
You can find answers and get tasks done with
Google Assistant Go, all with your voice.
Perform basic and advanced mathematical
calculations.
Create and manage events, meetings, and
appointments, organize your time and remind
yourself of important events.
Take and share pictures and videos.
A browser you can use to surf the Internet.
Set alarms, view time in time zones around the
world, use a stopwatch, set a timer, and use
your phone as a desk clock.
Manage your contacts from a variety of sources.
34
Page 35
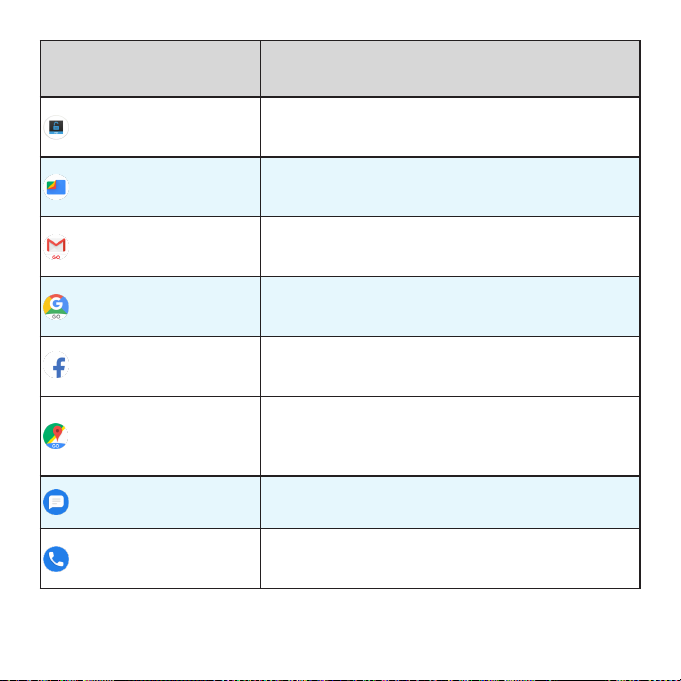
App
Function/Service
Device Unlock
Files
Gmail Go
Google Go
Facebook Lite
Maps Go
Messaging
Phone
Unlock your device if your device meets
eligibility requirements.
Manage files, lets you copy, move, delete, or
rename files.
Send, receive, and manage your email
messages.
Search information saved on the phone and in
phone applications as well as on the Internet.
Connect with friends, family, and other people
you know. Share photos and videos, send
messages, and get updates.
Determine your location, find directions, browse
local businesses and attractions, rate and
review places, navigate to your destination,and
more.
Send and receive text messages.
Place and receive calls, use voicemail, set up
and manage contacts, and more.
35
Page 36

App
Function/Service
Photos
Play Music
Play Store
Settings
Sound Recorder
YouTube
Manage your photos, back them up, or search.
Browse, shop, and play music and podcasts
downloaded from Google Play. You can also
play music from your own personal music and
podcast library.
Browse and download new Android apps,
books, movies, and music for your phone.
Provides an overview of items you can change
through Settings.
Record sounds and play them back.
Share and watch videos, etc.
Phone number
Follow the instructions below to display your phone’s wireless phone number.
1. From the Home screen, swipe up to access Apps, and tap Settings .
2. Tap System > About phone > SIM status.
36
Page 37

3. You will see the phone number listed under Phone number on SIM.
Airplane mode
Airplane mode turns off all functions that emit or receive signals, while leaving your phone on so you can use apps that don’t require a signal or data.
To turn on airplane mode
1. From the Home screen, swipe up to access Apps, and tap Settings .
2. Tap Network & Internet > Airplane mode.
3. Slide the switch to the On position to activate airplane mode.
You will see the airplane mode icon on the status bar while it’s active.
To turn off airplane mode
1. From the Home screen, swipe up to access Apps, and tap Settings .
2. Tap Network & Internet > Airplane mode.
3. Slide the switch to the Off position to deactivate airplane mode.
Your phone’s wireless connection features are now restored.
Tip: You can also access airplane mode through the status bar menu. Drag
the status bar down twice to access the Quick Settings Panel and tap Air-
plane mode to have it enabled or disabled.
Note: Airplane mode may not be displayed on the first screen of the Quick
Settings Panel. You may need to slide right to the next screen to locate it.
37
Page 38

Google Account
You will need a Google Account to access several phone features such as
Gmail, Google Maps, and the Google Play applications. Before you are able
to access Google applications, you must enter your account information.
These applications sync between your phone and your online Google Account.
Google Account cautions
Be sure not to forget your Google Account ID or password.
Create a Google Account
If you do not already have a Google Account, you can create one online or
by using your phone.
Note: You can also create and sign into your Google/Gmail account through
your phone’s Settings application.
Create a Google Account online
1. From a computer, launch a Web browser and navigate to google.com.
2. On the main page, click Sign-in > Create an account.
3. Follow the onscreen prompts to create your free account.
4. Look for an email from Google in the email box you provided and respond
to the email to confirm and activate your new account.
Create a Google Account using your phone
1. From the Home screen, swipe up to access Apps, and tap Settings .
38
Page 39

2. Tap Accounts > Add account.
3. Tap Google and then tap Or create a new account.
4. Follow the prompts to set up your account. Tap Next to proceed between
steps, which may include:
• Enter your First name and Last name.
• Enter a desired Username.
• Enter and reenter a password.
• Create a security question and answer, and enter a secondary email
address to help you recover your password if you ever lose it.
• On the Finish account screen, select your Web history and additional
Google Play options.
• Enter the letters from the Authenticating screen.
• After your phone connects with the Google servers, select the items you
would like to sync with your phone and then tap Sync now.
39
Page 40

5. Tap Finish setup.
Note: When setting up a new Google Account, either on your phone or online, you will be prompted to add a secondary email address. Enter a second
Gmail address or any other email address from which you currently send and
receive email. This address is used to authenticate your account should you
ever encounter problems or forget your password. It is strongly encouraged
for Android users so you can regain access to Google services and purchases on your phone.
Sign in to your Google Account
If you have a Google Account but have not yet signed in with your phone,
follow these instructions to sign in to your Google Account.
1. From the Home screen, swipe up to access Apps, and tap Settings .
2. Tap Accounts > Add account.
3. Tap Google, and then tap Enter your email.
4. Enter your Gmail address and password, and then tap Next.
40
Page 41

5. After your phone connects with the Google servers, select the items you
would like to sync with your phone and then tap Sync now.
6. Tap Finish setup.
Lock and unlock your screen
Your phone allows you to quickly turn the screen off when not in use and to
turn it back on and unlock it when you need it.
Turn the screen off when not in use
To quickly turn the screen off, press the Power key. Pressing the Power key
again or receiving an incoming call will turn on your phone screen and show
the lock screen.
To save battery power, the phone automatically turns off the screen after a
certain period of time when you leave it idle. You will still be able to receive
messages and calls while the phone’s screen is off.
41
Page 42

Note: For information on how to adjust the time before the screen turns off,
see Display settings.
Your phone’s Home screen
The following topics describe how to use and customize your phone’s Home
screen, understand the status bar, and use the notification panel.
Home screen basics
The Home screen is the starting point for your phone’s applications, functions,
and menus. You can customize your Home screen by adding application
icons, shortcuts, and folders.
42
Page 43

Home screen layout
Your Home screen extends beyond the initial screen. Slide the screen left or
right to display additional screens.
Status bar
Notification area
Application icons/
Primary shortcuts
Back button Recent apps button
Home button
43
Page 44

Item Description
Status bar
Notification area
Status area
Application icons
Primary shortcuts
Recent Apps button
Displays icons to notify you of your phone’s
status (on the right side) and notifications (on
the left side).
Displays time, notifications for incoming
messages, missed calls, application updates,
and more. Drag the status bar down to display
the notification panel.
Displays phone and service status information
such as signal strength, battery status, Wi-Fi and
data connectivity, ringer status, and more.
Application icons are shortcuts to favorite
applications. You can add and remove these
shortcuts as you wish.
Primary shortcuts are application shortcuts
that appear in the same location on all of your
phone’s home screens. These are customizable
except for the Applications (Apps) shortcut,
which remains static.
Tap to display a list of recently used
applications.
Home button
Back button
Tap to display the main Home screen.
Tap to return to the previous screen.
44
Page 45
Extended home screens
In addition to the main Home screen, your phone features extended home
screens to provide more space for adding icons and more. Press the Home
button to display the main Home screen and then slide the screen right to
move from the main screen to an extended screen.
To add a new extended home screen, drag an app or a widget icon to the
right edge of the main screen, and hold the icon until a new home screen is
displayed.
• While on an extended screen, press the Home button to return to the
main Home screen.
45
Page 46
Status bar and notification panel
Your phone’s status and notifications are available at a glance at the top of
the screen.
Status bar
The status bar at the top of the Home screen provides phone and service
status information on the right side and notification alerts on the left. To view
the notification panel or access the Quick Settings menu, drag the status
bar down from the top of the screen.
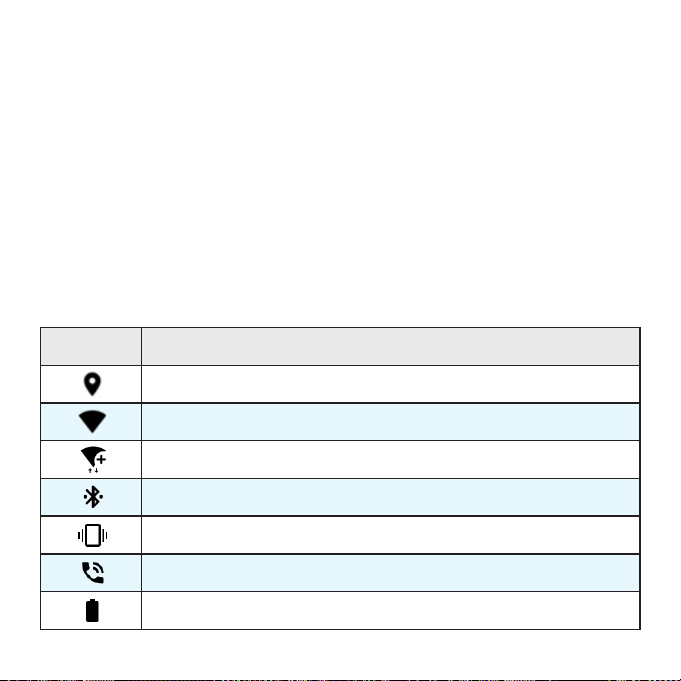
Main status icons
Icon Status
GPS active
Wi-Fi® active
Wi-Fi calling enabled
Bluetooth® connected
Vibrate
Speakerphone active
Battery (full charge)
46
Page 47
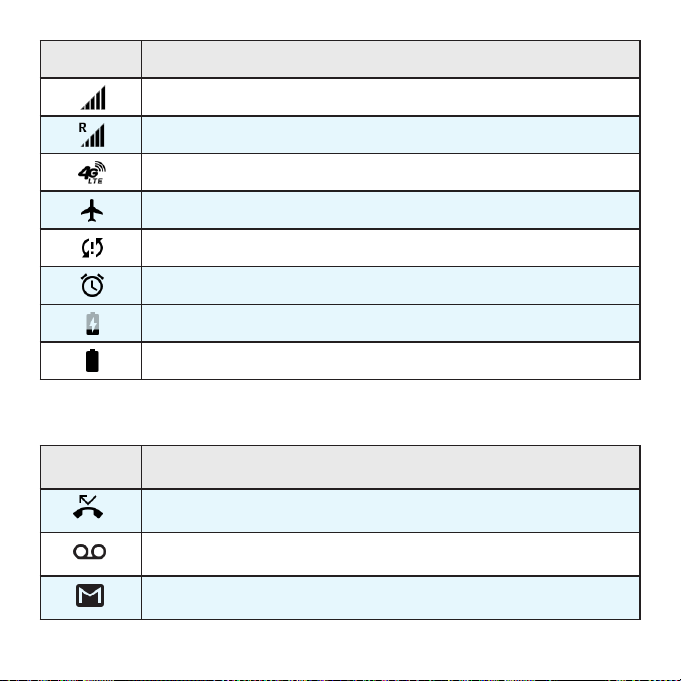
Icon Status
Network (full signal)
Network (roaming)
4G LTE data service
Airplane mode
Sync active
Alarm set
Battery (charging)
Battery (full charge)
Main notification icons
Icon Notification
Missed call
New voicemail
New Email
47
Page 48

Icon Notification
Note: Additional notification icons may appear. All notifications may be ac-
cessed through the notification panel.
Missed call
New text or MMS message
Event
Wi-Fi calling notification
Alarm
Warning
Update available
Downloading
Update successful
Keyboard active
Notification panel
Your phone’s notifications appear at the left side of the status bar, and you
48
Page 49

can access the full notification panel by dragging down the status bar. From
there, you can check notifications, download updates, open messaging
apps, use the Quick Settings menu, and more.
Open the notification panel
• Drag down from the status bar.
The notification panel opens. To check notifications, tap an item in the list.
Close the notification panel
• Swipe up the notification panel to close the notification panel.
• Or you can also tap the Back button to close it.
49
Page 50

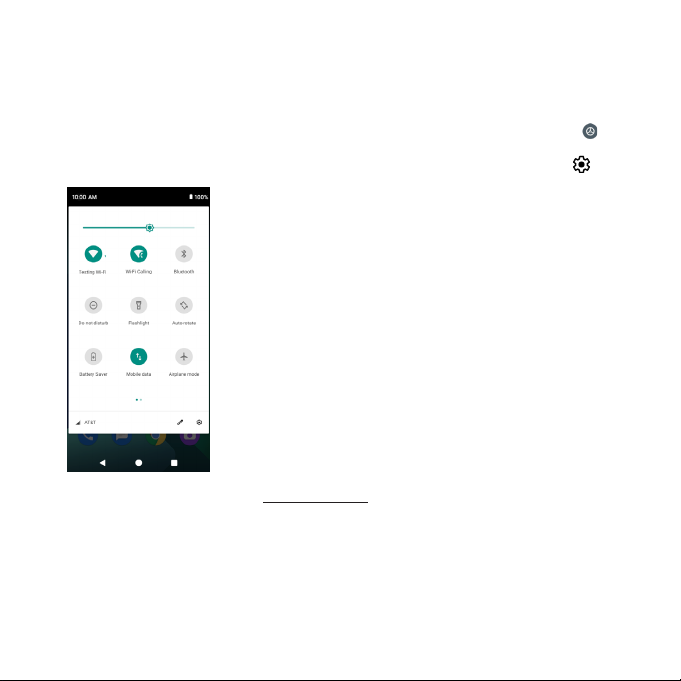
Notification panel layout
The notification panel gives you access to both notifications and the Quick
Settings menu.
To access the Quick Settings menu:
1. Drag the Status bar down to display the notification Panel.
2. Drag the Status bar down again to access full Quick Settings menu.
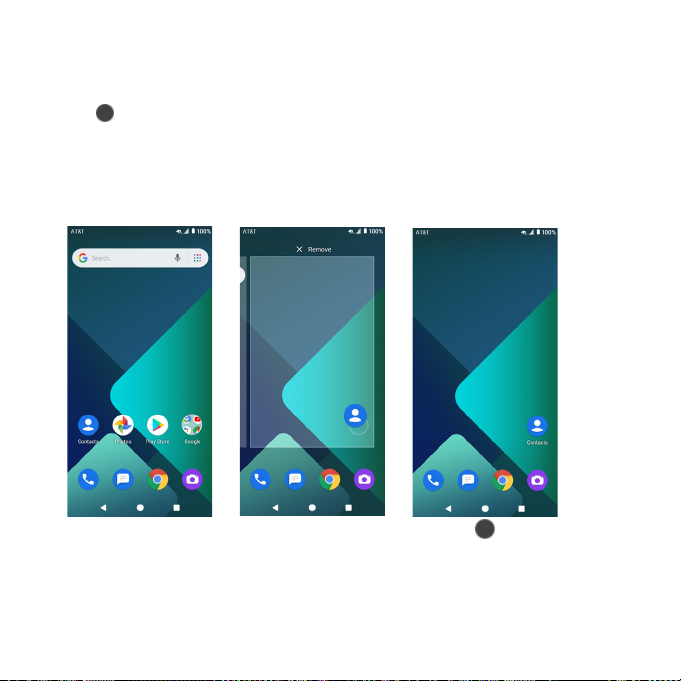
Customize the home screen
Learn how to set the wallpaper and add, move, or remove shortcuts, and
folders from the Home screen.
Operations for rearranging the home screen
50
Page 51

•
Moving icons and folders:
From the Home screen, touch and hold an item and then drag it to the
desired location.
•
Deleting icons and folders:
From the Home screen, touch and hold an item and then drag it up to
Remove .
•
Displaying the home screen menu:
From the Home screen, touch and hold an empty space to display the
home screen menu. It includes Wallpapers, shortcuts, and Home settings.
Change the wallpaper
Select and assign your phone’s background wallpaper.
51
Page 52

1. From the Home screen, touch and hold an empty space, and tap Wallpa-
pers.
• You can also access the wallpaper menu through Settings. From the Home
screen, swipe up to access Apps, and tap Settings > Display > Wallpaper.
2. Tap a location to select the wallpaper from.
3. Select a picture and tap Set wallpaper.
4. You can set this picture as the wallpaper of the Home screen, Lock screen,
or both the Home screen and Lock screen.
Add app shortcuts to the home screen
You can add shortcuts for quick access to favorite apps from the home
screen.
52
Page 53

1. From the Home screen, swipe up to access Apps.
2. Touch and hold an app icon and drag to move it. The icon will disengage,
and you will see thumbnails of your home screens.
• Drag the icon to an empty location on one of the home screens. The
shortcut is added to the home screen.
• Drag the icon to an empty location on one of the home screens. The
widget is added to the home screen.
Add folders to the home screen
You can group home screen app shortcuts into folders for convenient access.
1. Drag an app and release it over another app on the home screen to create a folder.
2. Type a name for the folder, and then tap .
53
Page 54

3. To add more app shortcuts to the folder, touch and hold a shortcut and
drag it on top of the new folder.
Change folder names
Once you have added folders, you can change the name easily from the
folder display.
1. From the Home screen, tap the folder to open it, and then tap the folder
name.
2. Type a new name and then tap .
54
Page 55

Making connections
The topics in this section will cover your phone’s ability to help you make
connections, from phone calls and maintaining contacts, to text messages,
email, Internet, and international services.
55
Page 56

Phone
Making a call
On the Home screen, tap on to enter the Phone screen.
1. If the keypad does not appear on the screen, tap to open it. Enter a
phone number in the keypad to make a call.
2. You can choose someone to call from your contacts list. After choosing the
contact,
3. Tap to make the call.
4. To view recent calls, tap the Call History tab.
5. During a call, you can tap at the bottom of the screen to hang up.
56
Page 57

6. Calls can also be made from other apps that contain your contact infor-
mation by simply tapping the phone number.
Making a call when Wi-Fi calling is enabled
On the Home screen, tap to enter the Phone screen.
1. If the keypad does not appear on the screen, tap to open it. Enter a
phone number in the keypad to make a call.
57
Page 58

2. You can also choose someone to call from your contacts list. After choos-
ing the contact or entering a number to call,
3. Tap to make the call.
4. To view recent calls, tap the Call History tab.
5. During a call, you can tap at the bottom of the screen to hang up.
6. Calls can also be made from other apps that contain your contact infor-
mation by simply tapping the phone number.
Note: You must have an active Wi-Fi connection to send or receive calls and
messages with Wi-Fi Calling.
Receiving a call
• The Incoming Call screen pops up when a call comes in, along with the
caller’s number and other information you’ve entered into your contacts. To
answer a call, slide up to answer
58
Page 59

• To reject a call, slide down to reject
• Press the Volume down key on the left side of your phone to mute the ring-
er.
• Any missed calls are logged in Call History , along with a notification.
Item Description
Route the phone’s audio through the speaker
(On) or through the earpiece (Off).
• Activate Speaker to route the phone’s audio
through the speaker.
Speaker
• Deactivate Speaker to use the phone’s ear-
piece.
Warning: Because of higher volume levels, do
not place the phone near your ear during
speakerphone use.
Mute
On hold
Add call
End call
Merge
Mute the microphone during an active call. Tap
again to unmute the microphone.
Tap to hold the current call.
Tap to initiate a conference call (3-way call).
End the current call.
Join two currently active calls (conference).
59
Page 60

Item Description
Swap
Keypad/Hide
Bluetooth
Swap the calls.
Toggle the appearance of the onscreen keypad.
Show the keypad to enter additional numbers,
for example, an extension or access code.
Route the phone’s audio through a connected
Bluetooth headset (On) or through the speaker
(Off).
• When the call is routed to a Bluetooth headset, the current call area shows the Bluetooth
call icon ( ).
Note: The Headset button is activated to show
the current call is routed to the connected
Bluetooth headset.
• To route the current call back to the phone,
tap Headset to temporarily use the phone.
Tap it again to route the call back to the connected Bluetooth headset.
• When Bluetooth or the Bluetooth headset is
turned off, the call is routed through either the
earpiece or speaker and shows ( ).
60
Page 61
Contacts
Add a contact
You can add contacts from your phone’s Phone application. Enter details
such as name, phone numbers, email addresses, mailing addresses, and
more.
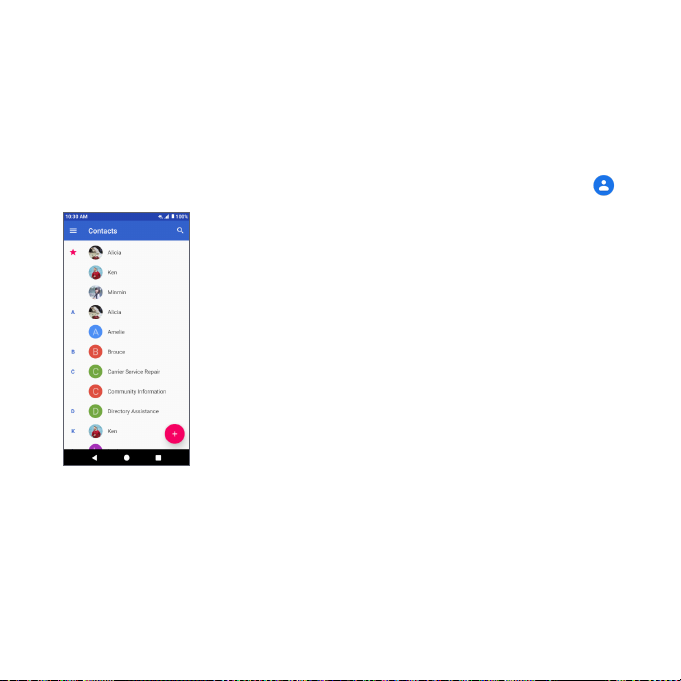
1. From the Home screen, swipe up to access Apps, and tap Contacts .
61
Page 62

2. Tap to add a contact.
3. If you have multiple account types associated with your phone, select a
contact type.
• Select Google if you want to save contacts to your Google Account;
these will be synced automatically with your Google Account online.
• Select Phone contact as the sync account if you want your contacts
on your phone only; they will not be synced with your Google Account.
• Select USIM if you want your contacts on your SIM card only; they will
not be synced with your Google Account.
4. Use the keyboard to enter as much information as you want.
• Photo: Tap the photo icon to assign a picture to the contact.
• Name
62
Page 63

• Phone
• Email
• Add another field: Tap More fields to include additional information
such as Address, IM, Notes, Nickname, Website, etc.
Note: To select a type (label) for a phone number, email address or postal
address (such as Mobile, Home, Work, etc.), tap the type to the left of the field
and select the appropriate type.
5. When you have finished adding information, tap SAVE.
Save a phone number
You can save a phone number to Contacts directly from the phone keypad.
1. From the Home screen, tap Phone > Keypad .
2. Enter a phone number and tap Create new contact to add a new con-
tact or tap Add to a contact to add the number to an existing contact.
63
Page 64

3. To add the number to an existing contact, tap the target contact you want
to update, and select a number type for the new number. To add a new
contact, enter the name and any additional information.
4. Tap SAVE.
Messages
With wireless service and your phone’s messaging capabilities, you can share
information through many different channels and accounts, including Gmail
(Google), personal and corporate email, and text and multimedia messaging.
Text and multimedia messages
With text messaging (SMS), you can send and receive instant text messages
between your wireless phone and another messaging-ready phone.
Multimedia messages, or MMS, can contain text and pictures, recorded voice,
audio or video files, picture slideshows, contact cards (vCard).
See your service plan for applicable charges for messaging.
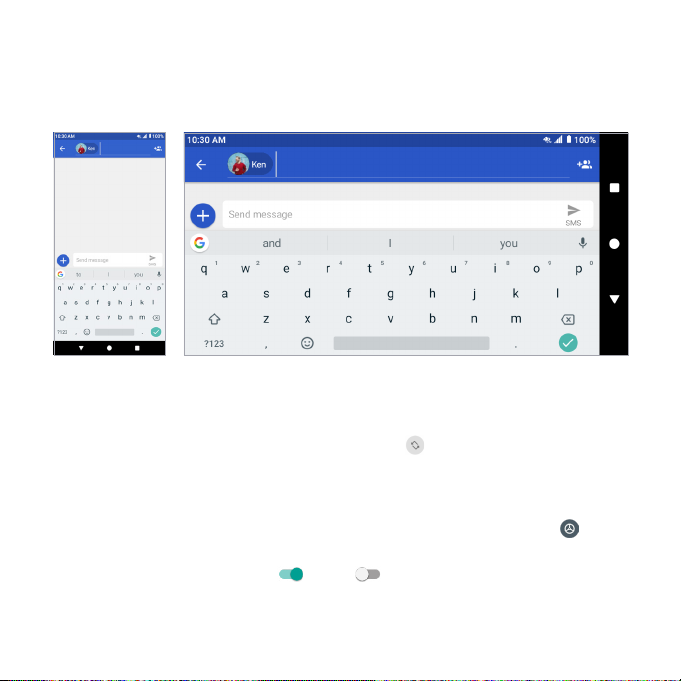
Send a text message
Quickly compose and send text messages on your phone.
1. From the Home screen, swipe up to access Apps, and tap Messaging .
2. Tap Compose .
3. Enter a contact name or mobile number in the To field.
• Enter phone numbers directly in the To field. If you’re sending the mes-
sage to several phone numbers, separate the phone numbers with a
64
Page 65

comma. As you enter information, any matching phone numbers from
your contacts list are displayed. Tap a match to enter that number or
address directly.
• Scroll the screen down to find and select the contacts to whom you
want to send the message. You can also select contact groups as
recipients.
4. Tap the “Text message” box and then start composing your message.
Note: A counter appears above Send to tell you how many characters
you have entered and how many characters are left. If you exceed the limit,
your text message will be delivered as one but will be charged as more than
one message.
5. When done, tap Send to send the text message.
Note: Your text message automatically becomes a multimedia message if
you enter an email address as the recipient, attach an item, or compose a
very long message.
Send a multimedia message (MMS)
When you need to add a little more to a text message, you can send a mul-
65
Page 66

timedia message (MMS) with pictures, voice recordings, audio or video files,
contact cards (vCard).
1. From the Home screen, swipe up to access Apps, and tap Messaging .
2. Tap Compose . The Compose screen opens.
3. Fill in one or more recipients. You can:
• Enter phone numbers directly in the To field. If you’re sending the mes-
sage to several phone numbers, separate the phone numbers with a
comma. As you enter information, any matching phone numbers from
your contacts list are displayed. Tap a match to enter that number or
address directly.
• Scroll the screen down to find and select the contacts to whom you
want to send the message. You can also select contact groups as
recipients.
• Enter an email address.
4. Tap the “Send message” box, and then start composing your message.
5. Tap Add to the left side of the enter text bar.
6. Select one item to add.
• Camera : Select to take a picture or record a video to attach.
• Picture : Select a stored picture to attach.
• Audio : Select Record audio to make a voice recording and attach
it or select a stored audio to attach.
Depending on different conditions, there may be more options to select
from.
66
Page 67

7. After adding an attachment, tap it to view. You can also tap to delete
the attachment.
8. Tap Send to send the MMS message.
Text and MMS options
The messages settings menu lets you control options for your text and MMS
messages including message limits, size settings, and notifications.
1. From the Home screen, swipe up to access Apps, and tap Messaging .
2. Tap Menu > Settings. You can set the following:
• Default SMS app: Tap to set the default SMS app.
• Outgoing message sounds: Slide the switch to the On position to
activate.
• Notifications: Tap to enable or disable notifications
• Sound: Tap to select ringtone used for message notification.
• Vibrate: Tap to enable or disable vibrate.
• Advanced:
• Group messaging: Tap to send an SMS reply to all recipients and get
individual replies (mass text), or send an MMS reply to all recipients
(group MMS).
• Your phone number: View your phone number.
• Auto-retrieve: Slide the switch to the On or Off position to en-
able or disable MMS downloading automatically. When enabled, the
multimedia message header plus the message body and attach-
.
67
Page 68
ments will automatically download to your phone. If disabled, only
the multimedia message header will be retrieved and shown in your
Messaging screen.
• Wireless Emergency Alerts: View wireless emergency alerts.
• Delete old messages: Slide the switch to the On or Off posi-
tion to enable or disable automatically deleting old messages. When
enabled, any messages older than the delete period will be deleted
automatically.
• Set delete period: Choose how many days messages will be kept. By
default the value is 90 days.
Gmail
Use Google’s Gmail service and your Google Account or other email accounts to send, receive, and manage your email messages. Before using
Gmail with Google account, you must register a Google (Gmail) Account on
your phone. See Google Account for details.
Create and send a Gmail message
Use your phone to create and send Gmail messages.
1. From the Home screen, swipe up to access Apps, and tap Gmail .
2. From the inbox, tap to compose a new Gmail message.
3. Enter the message recipient(s), subject, and message, and then tap Send
.
68
Page 69

Gmail composition options
• Adding Cc/Bcc: In the mail composition window, tap near the To
bar, and then add recipients.
• Attaching pictures or videos: In the mail composition window, tap
> Attach file. Locate and then tap the picture or video you want to
attach.
• Save as a draft (Send later): While composing your message, tap
Menu > Save draft, or press the Back button to save as a draft.
• Delete mail being composed: In the mail composition window, tap
Menu > Discard.
69
Page 70

Note: To view your draft email messages, in the inbox, tap > Drafts. To view
your sent messages, in the inbox, tap > Sent.
Check received Gmail messages
Your phone allows you to access, read, and reply to all your Gmail messages.
Open Gmail messages from notifications
When new Gmail arrives, you will see in the status bar.
1. Drag the status bar down to display the notification panel.
2. Tap the new message from the notification panel.
If you have two or more new Gmail messages, tapping the notification opens
the Gmail inbox.
70
Page 71

Gmail settings
You can access settings for the Gmail app and for your individual Gmail
accounts from the Gmail Settings menu.
1. From the Home screen, swipe up to access Apps, and tap Gmail .
2. Tap Menu > Settings.
3. Tap General settings to access settings for all accounts or tap an account
name to configure settings for a specific Gmail account.
• General settings: Gmail default action, Manage notifications, Conversa-
tion view, Swipe actions, Sender image, Default reply action, Open web
links in Gmail, Auto-fit messages, Confirm before deleting, Confirm before
archiving, and Confirm before sending.
• Account settings: Inbox type, Inbox categories, Notifications, Inbox
notifications, Manage labels, Manage notifications, Default reply action,
Mobile Signature, Smart Reply, Vacation responder, Sync Gmail, Days of
71
Page 72
mail to sync, Download attachments, and Images.
Note: Available settings are subject to change.
Internet and social networking
The following topics describe how to connect to and use the Internet on your
phone.
Chrome browser
On the Home screen, tap to browse the Internet, search for information,
and bookmark your favorite webpages to access them conveniently.
Browsing web pages
1. Tap the address field.
2. Enter the web address or a keyword to browse the web page.
Adding a bookmark
1. Open the web page you want to bookmark.
2. Tap > .
Opening a bookmark
1. On the Chrome screen, tap > Bookmarks.
2. Select the bookmark of the website you want to view.
Customizing browser settings
1. On the Chrome screen, tap > Settings.
72
Page 73

2. In the Settings list, you can select options to customize the browser.
Tip: For more information, visit: google.com/intl/en/chrome/browser/mobile/.
Connectivity
The following topics address your phone’s connectivity options, including USB
file transfer, Wi-Fi, Bluetooth, IR connectivity, and more.
Transfer files between your phone and a computer
You can use the supplied USB cable to connect your phone directly to your
computer and transfer music, pictures, and other content files.
For example, if you have a music album stored on your computer that you
want to listen to on your phone with any of the music apps, just attach your
phone to the computer and copy the files to the music folder.
File transfer tips
If you want to save data to an SD card on your phone, make sure the SD card
is installed and active. For more information, see SD card.
• Avoid removing the battery or SD card while transferring data.
• Data exchange may use the methods outlined in the following table:
Method Description
File Transfer
PTP
Transfer files between your phone and PC such as
pictures, videos, and music.
Transfer picture and video files between your
phone and PC.
73
Page 74

Transfer files between the phone and a computer
1. Connect your phone to your computer using the supplied USB/charging
cable.
• Insert the end of the cable to the charger/accessory jack at the bot-
tom of the phone.
• Insert the USB end of the cable into an available USB port on your com-
puter. You may need to remove the USB cable from the charging adapter to access it.
2. Drag the status bar down to display the notification panel. You will see
Charging this device via USB.
3. To transfer files from your phone to your computer:
• From the Home screen, swipe up to access Apps, and tap Settings .
• Tap Connected devices > USB.
• Tap File Transfer. You can also select other options available.
74
Page 75

4. On your computer, navigate to the detected device (such as through the
My Computer menu) and open it.
5. If available, select a drive (Internal shared storage or SD card).
6. Select a folder and copy files from your computer to your phone or from
your phone to your computer.
7. When done, disconnect your phone from your computer.
Wi-Fi
Wi-Fi provides wireless Internet access over distances of up to 300 feet. To use
your phone’s Wi-Fi, you need access to a wireless access point or “hotspot.”
The availability and range of the Wi-Fi signal depends on a number of factors,
including infrastructure and other objects through which the signal passes.
75
Page 76

Turn Wi-Fi on and connect to a wireless network
Use the wireless and networks setting menu to enable your phone’s Wi-Fi
radio and connect to an available Wi-Fi network.
1. From the Home screen, swipe up to access Apps, and tap Settings .
2. Tap Network & Internet > Wi-Fi.
3. Slide the Wi-Fi switch to the On position.
• Wi-Fi is enabled. You will see the names and security settings of in-
range Wi-Fi networks.
• To disable Wi-Fi, slide the Wi-Fi switch to the Off position.
4. Tap a Wi-Fi network to connect, enter the password (if it’s not an open network), and then tap Connect.
Your phone is connected to the Wi-Fi network. You will see in the status
bar.
• The password, for a household wireless LAN router, is sometimes found
on a sticker on the router (WEP, WPA, KEY, etc.). Contact the router manufacturer for information. For the password for a public wireless LAN,
check with the user's service provider.
• Entering a password is not required if an access point is not security
protected.
Note: The next time your phone connects to a previously accessed secured
wireless network, you will not be prompted to enter the password again,
unless you reset your phone to its factory default settings or you instruct the
phone to forget the network.
76
Page 77

Note: Wi-Fi networks are self-discoverable, which means no additional steps
are required for your phone to connect to a Wi-Fi network. It may be necessary to provide a username and password for certain closed wireless networks.
Wi-Fi settings
Use the Wi-Fi settings menu to manually set your Wi-Fi connection options.
1. From the Home screen, swipe up to access Apps, and tap Settings .
2. Tap Network & Internet > Wi-Fi.
3. Slide the Wi-Fi switch to the On position.
• Wi-Fi is enabled. You will see the names and security settings of in-range
Wi-Fi networks.
• To disable Wi-Fi, slide the Wi-Fi switch to the Off position.
4. Tap Wi-Fi preferences on the bottom of the Wi-Fi screen.
5. Configure your Wi-Fi settings.
Bluetooth
Bluetooth is a short-range communications technology that allows you to
connect wirelessly to several Bluetooth devices, such as headsets, handsfree car kits, Bluetooth-enabled handhelds, computers, printers, and wireless
phones. The Bluetooth communication range is usually approximately 30 feet.
77
Page 78

Bluetooth hints
Question: Can’t use Bluetooth?
Answer: Is your phone in airplane mode? Bluetooth is unavailable in air-
plane mode.
Bluetooth function cautions
Information may not appear correctly on connected devices depending on
the transferred data.
Bluetooth information
Bluetooth is a technology that enables wireless connection with PCs, Bluetooth devices with handsfree features, etc.
Function Description
Audio output Wirelessly listen to music, podcasts, etc.
Hands-free calls
Data exchange Exchange data with Bluetooth devices.
Call hands-free, using Bluetooth-capable hands-free
devices and headsets.
Enable the Bluetooth feature
Use the settings menu to enable or disable your phone’s Bluetooth capabilities.
• Wireless connection to all Bluetooth functions is not guaranteed for the
phone.
• The phone may not connect properly depending on the other device.
78
Page 79

• Noise may be experienced with wireless calls and hands-free calls de-
pending on the conditions.
To enable Bluetooth:
1. From the Home screen, swipe up to access Apps, and tap Settings .
2. Tap Connected devices > Connection preferences > Bluetooth.
3. Slide the Bluetooth switch to the On position.
• To disable Bluetooth, slide the Bluetooth switch to the Off position.
Tip: You can also turn Bluetooth on or off with the toggle menu in the notification panel. Drag the status bar down to display the Notification panel and
then tap Bluetooth to turn it on.
Note: Turn off Bluetooth when not in use to conserve battery power or in
places where using a wireless phone is prohibited, such as aboard an aircraft
and in hospitals.
79
Page 80

Pair Bluetooth devices
Search for and pair nearby Bluetooth devices. Registered Bluetooth devices
can be connected simply. Enable the Bluetooth function on the Bluetooth
devices being paired beforehand.
To pair Bluetooth devices
1. From the Home screen, swipe up to access Apps, and tap Settings .
2. Tap Connected devices > Pair new device.
• Nearby devices appear in the “Available devices” list.
3. Tap a device from the “Available devices” list and follow the onscreen
instructions to pair with the device.
• Methods to accept a Bluetooth connection differ depending on the
devices used.
80
Page 81

To forget from a paired device
1. From the Home screen, swipe up to access Apps, and tap Settings .
2. Tap Connected devices.
3. Tap the paired device you wish to forget and tap FORGET under the paired
device.
4. The device is unpaired from your phone. To make another connection with
the device, you will need to pair again.
Connect to a paired Bluetooth device
You can listen to music over a Bluetooth stereo headset, or have hands-free
conversations using a compatible Bluetooth headset or car kit. It’s the same
procedure to set up stereo audio and hands-free devices.
1. From the Home screen, swipe up to access Apps, and tap Settings .
81
Page 82

2. Tap Connected devices.
3. Tap a connected device.
Your phone connects to the paired device.
The pairing and connection status is displayed below the device’s name in
the Bluetooth devices section. When the device is connected to your phone,
the Bluetooth paired icon is displayed in the status bar. Depending on the
type of device you have connected, you can then start using the headset or
car kit to listen to music or make and receive phone calls.
Note: Due to different specifications and features of other Bluetooth-compatible devices, display and operations may be different, and functions such
as transfer, or exchange may not be possible with all Bluetooth-compatible
devices.
Send information using Bluetooth
You can use Bluetooth to transfer information between your phone and another Bluetooth-enabled device such as a phone or notebook computer.
82
Page 83

Types of data you can send via Bluetooth
You can send the following types of information, depending on the device
you are sending to:
• Images and videos
• Calendar events
• Contacts
• Audio files
In the instructions below, Contacts data is being used as an example.
Sending contacts data via Bluetooth
1. From the Home screen, swipe up to access Apps, and tap Contacts .
2. Tap a contact to send.
3. Tap Menu > Share > Bluetooth.
83
Page 84

4. Tap a paired device to receive the data. The contact information is sent.
Receive information via Bluetooth
Your phone can receive a wide variety of file types with Bluetooth, including
pictures, music tracks, and documents such as PDFs.
1. When another device attempts to send a file to your phone via Bluetooth,
you will see a request to accept the file.
2. Tap ACCEPT.
Your phone has received the file.
• When your phone receives a file, you will see a notification. To open the
file immediately, drag the status bar down to display the notification
panel, and then tap the notification.
• When you open a received file, what happens next depends on the file
type:
Media files and documents are usually opened directly in a com-
◦
patible application. For example, if you open a music track, it starts
playing in the Music application.
For a vCalendar file, select the calendar where you want to save the
◦
event, and then tap Import. The vCalendar is added to your Calendar events. For more information on using Calendar, see Calendar.
For a vCard contact file, if there are multiple vCard files on your
◦
storage card, you can choose to import one, several, or all of those
contacts to your contacts list.
84
Page 85

Apps and entertainment
The topics in this section will explore the features that make your phone so
much more than a phone, from the camera and productivity apps to music,
entertainment, and more.
85
Page 86
Camera and video
You can use the camera or video camera to take and share pictures and
videos. Your phone comes with a 5-megapixel camera that lets you capture
sharp pictures and videos.
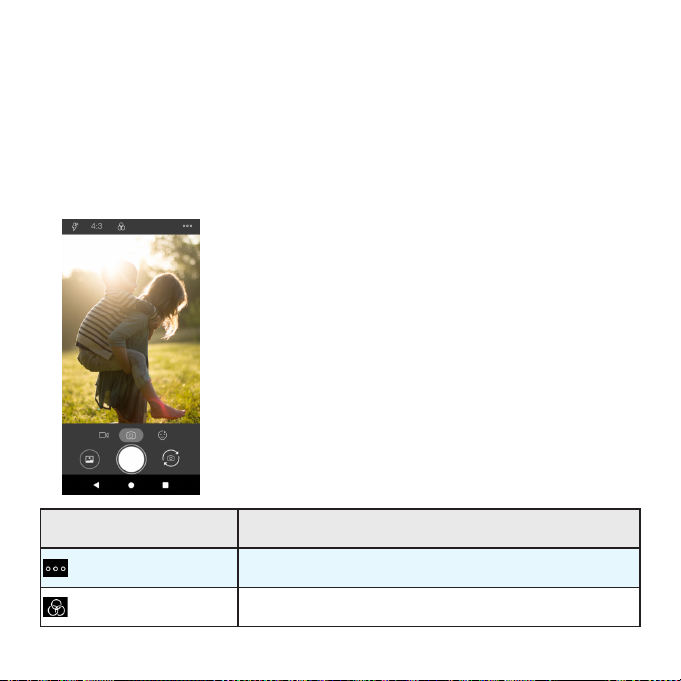
Camera overview
The camera's viewfinder screen lets you view your subject and access camera controls and options.
Menu Function/Service
Options menu
Theme
Tap to select camera mode and settings options.
Tap to select theme mode.
86
Page 87

Picture size ratio
Tap to set the photo quality and aspect ratio.
Flash
Video mode
Photo mode
Face Beauty
Pictures
Capture
Switch
Tap to select flash modes.
Tap to access Video mode.
Tap to access Photo mode.
Tap to access Face Beauty mode to make your
photo more beautiful.
View the last photo or video taken.
Capture a photo.
Switch between the front and main cameras.
Take pictures and record videos
The following topics teach you how to take pictures and record videos with
your phone’s camera.
Camera cautions
If the lens becomes dirty: Fingerprints/smudges on the lens prevent cap-
turing of clear, still images/videos. Wipe the lens with a soft cloth beforehand.
87
Page 88

Avoid exposure to direct sunlight: Be careful not to expose the lens to
direct sunlight for long periods. Direct sunlight may discolor the color filter
and affect the color of images.
Take a picture
You can take pictures using your phone’s camera.
Note: If you have an SD card installed, pictures and videos are stored to the
SD card. If no card is installed, pictures and videos are saved to your phone’s
memory.
1. From the Home screen, swipe up to access Apps, and tap Camera .
2. Tap to switch to Photo mode.
3. Aim the camera at your subject and tap to take the picture. The shutter
clicks and the picture is captured and saved to your phone or SD card.
Record videos
You can record high-quality videos with your phone’s video camera.
1. From the Home screen, swipe up to access Apps, and tap Camera .
2. Tap to switch to Video mode.
3. Aim the camera at your subject and tap to start recording a video.
4. Tap to stop recording. The camera stops recording and the video is
captured and saved to your phone or SD card.
88
Page 89

View pictures and videos using Photos
Using the Photos application, you can view pictures and watch videos that
you’ve taken with your phone’s camera, downloaded, or copied onto your
storage card or phone memory. You can also take a look at your pictures and
your friends’ pictures that are on your social networks.
For pictures that are on your storage card or phone memory, you can do
basic editing such as rotating and cropping. You can also easily assign a picture as your contact picture or wallpaper and share pictures with your friends.
View pictures and videos
You can access and view all your stored pictures and videos from your
phone’s Gallery.
1. From the Home screen, swipe up to access Apps, and tap Photos .
2. Tap Photos.
3. Tap an image or a video to view.
89
Page 90

Pictures and videos: review screen
After capturing a picture or video, from the camera screen, tap the thumbnail
image at the bottom left corner of the screen to see the item in the review
screen. From there, you can access options such as share, edit, check information, or delete the picture or video.
Pictures and videos: options while viewing
• Zoom in or out on a picture or video: Tap the screen twice or pinch the
screen to zoom in or out on a picture or video.
• Viewing videos: Use the onscreen controls to play, pause or stop the
video playback.
After selecting an album from the Albums tab, you can browse through the
pictures and videos of that album. Tap a picture or video to view it in full
screen.
Camera settings
You can adjust your camera’s settings using the icons on the main camera
screen and the full camera settings menu.
Set camera functions
You can configure your camera’s settings to fit any situation or event.
1. From the Home screen, swipe up to access Apps, and tap Camera .
2. Tap to display and adjust Camera settings.
90
Page 91

Menu Function/Service
Touch Shot
Self-timer
Shutter sound
Geo tagging
Picture size
Take a picture or start recording a video by
tapping anywhere on the viewfinder screen.
Tap to set the countdown time.
Tap to activate sound when taking a picture.
Tap to add location info to your picture.
Tap to set picture size.
91
Page 92
Anti-flicker
Tap to select anti-flicker mode. The camera
can be set to compensate for flickering electric
lighting at 50Hz or 60Hz.
Storage
Tap to select storage mode.
Productivity
Use your phone to stay ahead of the game with calendar, navigation, alarms,
and more productivity apps.
Calendar
Use Calendar to create and manage events, meetings, and appointments.
Your Calendar helps organize your time and reminds you of important events.
In order to sync with your Google calendar, you must sign in to a Google
Account on your phone. See Google Account.
Calendar view
There are several ways the calendar can be viewed.
92
Page 93

1. From the Home screen, swipe up to access Apps, and tap Calendar .
2. Tap .
• Schedule: Display all events.
• Day: Display today’s schedule by hour. Slide the screen to the left and
right to display the previous and next day, respectively.
• 3 Days: Display the previous day, today, and the next day. Slide the
screen to the left and right to view the previous and next three days.
• Week: Display the current week. Slide the screen to the left and right to
view the previous and next week, respectively.
• Month: Display the current month. Slide the screen to the left and right
to view the previous and next month, respectively.
93
Page 94

Add an event
Use your Calendar to create events.
1. From the Home screen, swipe up to access Apps, and tap Calendar .
2. Tap Add to add an event.
94
Page 95

3. Enter an event title, start date/time, end date/time, etc., and then tap
SAVE.
View calendar events
1. From the Home screen, swipe up to access Apps, and tap Calendar .
95
Page 96

2. Tap a date and tap an event to view the details.
Navigation apps
Your phone offers several location-based navigation programs to help you
figure out where you are and get you where you’re going.
Enable location services on your phone
Before using any location-based services, you must enable your phone’s
location feature. For information about setting your phone’s location options,
see Location.
96
Page 97

Google Maps
Use the Google Maps app to determine your location, find directions, browse
local businesses and attractions, rate and review places, and more.
View maps of specified places
Use Google Maps to locate and map a specific address or destination.
1. From the Home screen, swipe up to access Apps, and tap Maps Go .
If prompted, follow the onscreen instructions to accept terms of use.
2. Tap Find a place.
3. Enter an address, city, facility name, etc., and then tap a candidate in the
results list. A map of the specified location opens.
97
Page 98
Google Maps operations
• View current location: From the Maps app, tap .
• Obtain useful area information for current location: From the Maps
app, tap the search bar, enter the information you’re looking for and
then tap a result to view it.
• View traffic information, aerial photos, etc., in Maps: From the Maps
app, tap Menu and then tap Traffic, Satellite, etc.
• Check route to destination: From the Maps app, tap a method of trans-
port (car, public transit, on foot, or cycling), enter your current location
and your destination, and tap to start navigation.
• Check Detailed Operation for Maps: From the Maps app, tap Menu
> Help.
Google Search
Search information saved on the phone and in phone applications as well
as on the Internet.
Use Google Search
Type search terms in the Google Search bar to find information on your
phone and around the globe.
1. From the Home screen, tap the Google search bar, or swipe up to access
Apps and tap Google Go . The search window opens.
• If confirmation appears, follow onscreen instructions.
• If a description for Google Now appears, tap Next and read informa-
tion. Tap Enable on the last page if you want to use Google Now.
98
Page 99

2. Type your search keywords and tap Go .
• To search by voice, tap in the search bar and speak your search
terms.
Use Google voice search
Use your voice to search instead of typing, with Google Voice Search.
1. From the Home screen, swipe up to access Apps, and tap Google Go .
2. Tap Voice Search.
3. Speak your search terms, and search results will appear.
99
Page 100

Calculator
Your phone’s convenient built-in calculator lets you perform basic mathematical functions.
1. From the Home screen, swipe up to access Apps, and tap Calculator .
2. Enter the first number.
3. Tap an arithmetic function key and enter the second number.
4. Tap to view the result.
5. Tap to clear the results.
100
 Loading...