

Page 1

CentreVu
Call Management System
Release 3 Version 8
Software Installation and Setup
®
585-210-941
Comcode 108502360
Issue 1
December 1999
Page 2

Copyright© 1999 Lucent Technologies
All Rights Reserved
Printed in U.S.A.
Notice
Every effort was made to ensure that the information in this document was
complete and accurate at the time of printing. However, information is subject
to change.
Your Responsibility for Your System’s Security
Toll fraud is the unauthorized use of your telecommunications system by an
unauthorized party, for example, persons other than your company’s
employees, agents, subcontractors, or persons working on your company’s
behalf. Note that there may be a risk of toll fraud associated with your
telecommunications system and, if toll fraud occurs, it can result in
substantial additional charges for your telecommunications services.
You and your system manager are responsible for the security of your
system, such as programming and configuring your equipment to prevent
unauthorized use. The system manager is also responsible for reading all
installation, instruction, and system administration documents provided with
this product in order to fully understand the features that can introduce risk of
toll fraud and the steps that can be taken to reduce that risk. Lucent
Technologies does not warrant that this product is immune from or will
prevent unauthorized use of common-carrier telecommunication services or
facilities accessed through or connected to it. Lucent T echnologies will not be
responsible for any charges that result from such unauthorized use.
Lucent Technolog ies Fraud Intervention
suspect that you are being victimized
If you
technical support or assistance, call Technical Service Center Toll Fraud
Intervention Hotline at 1-800-643-2353.
Canadian Department of Communications (DOC)
Interference Information
This digital apparatus does not exceed the Class A limits for radio noise
emissions set out in the radio interference regulations of the Canadian
Department of Communications.
Le Présent Appareil Nomérique n’émet pas de bruits radioélectriques
dépassant les limites applicables aux appareils numériques de la class A
préscrites dans le reglement sur le brouillage radioélectrique édicté par le
ministére des Communications du Canada.
Trademarks
CentreVu
and
DEFINITY
3M
is a registered trademark of Minnesota Mining and Manufacturing.
are registered trademarks of Lucent Technologies.
Enterprise, OpenWindows, Sun, Sun Microsystems, SunOS,
SMCC
logo,
the
XGL
, and
Microsystems, Inc.
Exatape
INFORMIX
Maxell
Motif
is a registered trademark of Open Software Foundation, Inc.
OPEN LOOK
Sony
is a registered trademark of Sony Corporation.
SPARC
registered trademarks of SPARC In ternational, Inc.
SunLink, SunSelect, Solaris, Solstice, Solstice DiskSuite
Ultra
are trademarks or registered trademarks of Sun
is a trademark of Exabyte Corporation.
is a registered trademark of Informix Software, Inc.
is a registered trademark of Maxell, Inc.
is a registered trademark of Novell, Inc.
trademarks, including the
SPARCstorage, SPARCserver, SPARCengine, SPARCworks
SPARCompiler
bearing
Sun Microsystems, Inc.
UNIX
licensed exclusively through X/Open Company Limited.
XWindows
All other product names mentioned herein are the trademarks of their
respective owners.
are licensed exclusively to Sun Microsystems, Inc. Products
SPARC
trademarks are based upon an architecture developed by
is a registered trademark in the United States and other countries,
is a trademark of The Open Group.
by toll fraud and you need
SCD Compliant
the
Sun
logo,
Logo, are trademarks or
SPARCstation,
, and
,
Ordering Information
Call: Lucent Technologies Publications Center
Voice: 1-800-457-1235
International Voice: +1-317-361-5 353
Fax: 1-800-457-1764
International Fax: +1-31 7-3 61- 53 55
Write: Lucent Technologies Publications Center
P.O. Box 4100
Crawfordsville, IN 47933
U.S.A.
CentreVu
Order:
Document No.585-210-941
Comcode 108502360
Issue 1, December 1999
For additional documents, refer to the section entitled “Related Documents”
in the Preface.
You can be placed on a Standing Order list for this and other documents you
may need. Standing Order will enable you to automatically receive updated
versions of individual documents or document sets, billed to account
information that you provide. For more information on Standing Orders, or to
be put on a list to receive future issues of this document, please contact the
Lucent Technologies Publications Center.
Lucent Technologies National Customer Care Center
Lucent Technologies provides a telephone number for you to use to report
problems or to ask questions about your call center. The support telephone
number is 1-800-242-2121.
Document Support Telephone Number
Lucent Technologies provides telephone numbers for you to use to report
errors or to ask questions about the information in this document. The
support telephone numbers are:
Voice: 1-888-584-6366 and
International Voice: +1-317-322-6 848 .
European Union Declaration of Conformity
Lucent Technologies Business Communications Systems declares that the
equipment specified in this doc ument conforms to the referenced European
Union (EU) Directives and Harmonized Standards listed below:
EMC Directive 89/336/EEC
Low Voltage Directive 73/23/EEC
Heritage Statement
Lucent Technologies—formed as a result of AT&T’s planned restructuring—
designs, builds, and delivers a wide range of public and private networks,
communication systems and software, consumer and business telephone
systems, and microelectronics components. The world-renowned Bell
Laboratories is the research and development arm for the company.
Comments
To comment on this document, return the comment card at the front of the
document.
Acknowledgment
This document was developed by the Lucent Te chnologies Information
Development Organization for Global Learning Solutions.
CMS Software Installation and Setup
The “CE” mark affixed to the equipment means that it
conforms to the above Directives.
Page 3

CentreVu®
CMS R3V8 Software Installation and Setup
iii
CentreVu
®
Call Management System R3V8
Software Installation and Setup
Table of Contents
Preface . . . . . . . . . . . . . . . . . . . . . . . . . . . . . . P-1
Overview . . . . . . . . . . . . . . . . . . . . . P-1
Reasons for Reissue . . . . . . . . . . . . . . . . . P-1
Organization. . . . . . . . . . . . . . . . . . . . P-1
Conventions. . . . . . . . . . . . . . . . . . . . P-2
Related Documents . . . . . . . . . . . . . . . . . P-2
1 Introduction . . . . . . . . . . . . . . . . . . . . . . . . . . . . 1-1
Overview . . . . . . . . . . . . . . . . . . . . . 1-1
Supported Hardware Platforms . . . . . . . . . . . . . 1-1
Required and Optional Software . . . . . . . . . . . . . 1-1
Roles and Responsibilities . . . . . . . . . . . . . . . 1-3
CentreVu CMS Helplines. . . . . . . . . . . . . . . . 1-5
Customer Support for U.S. and Canada . . . . . . . . . 1-5
Customer and Technician Support Outside of U.S. and Canada . 1-5
Technician Support for U.S. and Canada . . . . . . . . . 1-5
International Support . . . . . . . . . . . . . . . 1-5
2 Installing Software and Setting Up CMS . . . . . . . . . . . . . . . . 2-1
Overview . . . . . . . . . . . . . . . . . . . . . 2-1
Summary of Procedures . . . . . . . . . . . . . . 2-1
Remote Terminal Access Tips . . . . . . . . . . . . 2-3
Prerequisites . . . . . . . . . . . . . . . . . . 2-3
Installing the Solaris Operating System . . . . . . . . . . 2-4
Overview . . . . . . . . . . . . . . . . . . . 2-4
Platform Considerations . . . . . . . . . . . . . . 2-4
Before You Begin. . . . . . . . . . . . . . . . . 2-5
Booting from the Solaris 7 Software 3/99 CD . . . . . . . 2-5
Identifying the System . . . . . . . . . . . . . . . 2-7
Setting the Date and Time . . . . . . . . . . . . . . 2-12
Selecting the Solaris 7 System Files . . . . . . . . . . 2-14
Partitioning the Hard Disks . . . . . . . . . . . . . 2-18
Installing the Selected Options . . . . . . . . . . . . 2-29
Assigning a Root Password . . . . . . . . . . . . . 2-31
Page 4

Opening a Terminal Window . . . . . . . . . . . . . 2-32
Enabling Korn Shell and the Backspace Key. . . . . . . . 2-33
Displaying and Setting the EEPROM Parameters . . . . . . 2-33
Turning On the System Activity Recorder. . . . . . . . . 2-36
Installing the Sun Online VTS 3.1 . . . . . . . . . . . . . 2-38
Overview . . . . . . . . . . . . . . . . . . 2-38
Platform Considerations . . . . . . . . . . . . . 2-38
Prerequisites. . . . . . . . . . . . . . . . . 2-38
Procedure . . . . . . . . . . . . . . . . . . 2-38
Installing Link and Port Packages. . . . . . . . . . . . . 2-40
Installing the SunLink HSI/S Software . . . . . . . . . . 2-40
Overview . . . . . . . . . . . . . . . . . . 2-40
Platform Considerations. . . . . . . . . . . . . 2-40
Prerequisites. . . . . . . . . . . . . . . . . 2-40
Procedure . . . . . . . . . . . . . . . . . . 2-40
Installing the HSI/P Software . . . . . . . . . . . . . 2-42
Overview . . . . . . . . . . . . . . . . . . 2-42
Platform Considerations . . . . . . . . . . . . . 2-42
Prerequisites. . . . . . . . . . . . . . . . . 2-42
Procedure . . . . . . . . . . . . . . . . . . 2-43
Installing the SAI/P Adapter Drivers . . . . . . . . . . 2-45
Overview . . . . . . . . . . . . . . . . . . 2-45
Platform Considerations . . . . . . . . . . . . . 2-45
Prerequisites. . . . . . . . . . . . . . . . . 2-45
Procedure . . . . . . . . . . . . . . . . . . 2-45
Installing the Aurora Port Drivers . . . . . . . . . . . 2-47
Overview . . . . . . . . . . . . . . . . . . 2-47
Platform Considerations. . . . . . . . . . . . . 2-47
Prerequisites. . . . . . . . . . . . . . . . . 2-47
Procedure . . . . . . . . . . . . . . . . . . 2-47
Installing the Bay Networks Annex NTS Drivers . . . . . . 2-51
Overview . . . . . . . . . . . . . . . . . . 2-51
Platform Considerations. . . . . . . . . . . . . 2-51
Prerequisites. . . . . . . . . . . . . . . . . 2-51
Procedure . . . . . . . . . . . . . . . . . . 2-51
Setting Up the NTS Start-Up Files . . . . . . . . . . . 2-56
Installing the Solstice for Server Connect X.25 Package . . . . 2-57
Overview . . . . . . . . . . . . . . . . . . 2-57
Platform Considerations. . . . . . . . . . . . . 2-57
Prerequisites. . . . . . . . . . . . . . . . . 2-57
Retrieving System Information . . . . . . . . . . . 2-58
Installing the Solstice for Server Connect X.25 Dri vers . . . 2-58
Setting Up the X.25 License . . . . . . . . . . . . 2-63
CentreVu®
CMS R3V8 Software Installation and Setup
iv
Installing INFORMIX . . . . . . . . . . . . . . . . . 2-67
Overview . . . . . . . . . . . . . . . . . . . 2-67
Platform Considerations . . . . . . . . . . . . . . 2-67
Prerequisites . . . . . . . . . . . . . . . . . . 2-67
Setting Up the INFORMIX Environment . . . . . . . . . 2-68
Installing the INFORMIX SQL 7.20 Package (Optional) . . . . 2-68
Installing the INFORMIX SE 7.22 Package (Required) . . . . . 2-71
Installing the INFORMIX Runtime ESQL 9.14 Package (Required) . 2-73
Page 5

Installing the INFORMIX ILS 2.11 Package (Required) . . . . . 2-76
Installing DiskSuite . . . . . . . . . . . . . . . . . 2-84
Installing the Solstice DiskSuite Software . . . . . . . . 2-84
Overview . . . . . . . . . . . . . . . . . . 2-84
Platform Considerations. . . . . . . . . . . . . 2-84
Prerequisites. . . . . . . . . . . . . . . . . 2-84
Procedure . . . . . . . . . . . . . . . . . . 2-84
Installing the Sun Solaris Patches . . . . . . . . . . . 2-86
Overview . . . . . . . . . . . . . . . . . . 2-86
Platform Considerations . . . . . . . . . . . . . 2-86
Prerequisites. . . . . . . . . . . . . . . . . 2-86
Procedure . . . . . . . . . . . . . . . . . . 2-86
Changing Directory Permissions . . . . . . . . . . . 2-87
Setting Up Solstice DiskSuite. . . . . . . . . . . . . 2-88
Overview . . . . . . . . . . . . . . . . . . 2-88
Platform Considerations. . . . . . . . . . . . . 2-88
Prerequisites. . . . . . . . . . . . . . . . . 2-88
Configuring DiskSuite on an unmirrored system . . . . . 2-88
Configuring DiskSuite on a mirrored system . . . . . . 2-93
Checking for Disk Recognition Errors . . . . . . . . 2-95
CentreVu®
CMS R3V8 Software Installation and Setup
v
Installing CMS Packages. . . . . . . . . . . . . . . . 2-103
Installing the CMS Supplemental Services Software . . . . . 2-103
Overview . . . . . . . . . . . . . . . . . . 2-103
Platform Considerations. . . . . . . . . . . . . 2-103
Prerequisites. . . . . . . . . . . . . . . . . 2-103
Procedure . . . . . . . . . . . . . . . . . . 2-103
Installing the CMS Software . . . . . . . . . . . . . 2-105
Overview . . . . . . . . . . . . . . . . . . 2-105
Platform Considerations. . . . . . . . . . . . . 2-105
Prerequisites. . . . . . . . . . . . . . . . . 2-105
Procedure . . . . . . . . . . . . . . . . . . 2-105
Installing the CMS Patches . . . . . . . . . . . . . 2-108
Overview . . . . . . . . . . . . . . . . . . 2-108
Platform Considerations . . . . . . . . . . . . . 2-109
Prerequisites. . . . . . . . . . . . . . . . . 2-109
Procedure . . . . . . . . . . . . . . . . . . 2-109
Installing the Open Database Connectivity Software . . . . . . 2-111
Overview . . . . . . . . . . . . . . . . . . 2-111
Platform Considerations. . . . . . . . . . . . . 2-111
Prerequisites. . . . . . . . . . . . . . . . . 2-111
Procedure . . . . . . . . . . . . . . . . . . 2-111
Installing Visual Vectors Server Software . . . . . . . . . . 2-115
Overview . . . . . . . . . . . . . . . . . . 2-115
Platform Considerations . . . . . . . . . . . . . 2-115
Prerequisites. . . . . . . . . . . . . . . . . 2-115
Procedure . . . . . . . . . . . . . . . . . . 2-115
Starting Visual Vectors Server Software . . . . . . . . . 2-116
Setting Up CMS. . . . . . . . . . . . . . . . . . . 2-117
Overview . . . . . . . . . . . . . . . . . . . 2-117
Page 6

Platform Considerations . . . . . . . . . . . . . . 2-117
Conventions . . . . . . . . . . . . . . . . . . 2-117
Prerequisites . . . . . . . . . . . . . . . . . . 2-117
Setting Authorizations . . . . . . . . . . . . . . . 2-118
Overview . . . . . . . . . . . . . . . . . . 2-118
Procedure . . . . . . . . . . . . . . . . . . 2-119
Setting Up Data Storage Parameters . . . . . . . . . . 2-124
Overview . . . . . . . . . . . . . . . . . . 2-124
Procedure . . . . . . . . . . . . . . . . . . 2-124
Setting Up a LAN for Switch Connections . . . . . . . . 2-127
Overview . . . . . . . . . . . . . . . . . . 2-127
Prerequisites. . . . . . . . . . . . . . . . . 2-127
Sample Configurations . . . . . . . . . . . . . 2-128
Remote Switch Network . . . . . . . . . . . . . 2-130
High Availability Configuration . . . . . . . . . . . 2-131
Procedures . . . . . . . . . . . . . . . . . 2-131
Setting Up the CMS Application . . . . . . . . . . . . 2-134
Overview . . . . . . . . . . . . . . . . . . 2-134
Prerequisites. . . . . . . . . . . . . . . . . 2-134
Setup Methods . . . . . . . . . . . . . . . . 2-135
CentreVu®
CMS R3V8 Software Installation and Setup
vi
Installing Feature Packages. . . . . . . . . . . . . . . 2-157
Installing the Forecasting Package . . . . . . . . . . . 2-157
Overview . . . . . . . . . . . . . . . . . . 2-157
Prerequisites. . . . . . . . . . . . . . . . . 2-157
Procedure . . . . . . . . . . . . . . . . . . 2-157
Installing the External Call History Package . . . . . . . . 2-161
Overview . . . . . . . . . . . . . . . . . . 2-161
Prerequisites. . . . . . . . . . . . . . . . . 2-161
Procedure . . . . . . . . . . . . . . . . . . 2-162
Setting Up the Remote Console . . . . . . . . . . . . . 2-167
Overview . . . . . . . . . . . . . . . . . . . 2-167
Platform Considerations . . . . . . . . . . . . . . 2-167
Administering the Remote Console Port . . . . . . . . . 2-167
Using the Remote Console Port . . . . . . . . . . . . 2-168
Setting Up the NTS . . . . . . . . . . . . . . . . . 2-171
Overview . . . . . . . . . . . . . . . . . . . 2-171
Platform Considerations . . . . . . . . . . . . . . 2-171
Prerequisites . . . . . . . . . . . . . . . . . . 2-172
Procedure . . . . . . . . . . . . . . . . . . . 2-172
Creating an Alternate Boot Device . . . . . . . . . . . . 2-179
Performing a CMSADM Backup . . . . . . . . . . . . . 2-181
Overview . . . . . . . . . . . . . . . . . . . 2-181
Platform Considerations . . . . . . . . . . . . . . 2-182
Prerequisites . . . . . . . . . . . . . . . . . . 2-182
Procedure . . . . . . . . . . . . . . . . . . . 2-183
3 Turning the System Over to the Customer . . . . . . . . . . . . . . . 3-1
Overview . . . . . . . . . . . . . . . . . . . . . 3-1
Page 7

Verifying the System Date and Time . . . . . . . . . . . . 3-2
Overview . . . . . . . . . . . . . . . . . . . 3-2
Checking the Solaris System Date and Time. . . . . . . . 3-2
Setting the System Date and Time . . . . . . . . . . . 3-2
Setting the System Country and Time Zones . . . . . . . 3-4
Testing the Connection to the TSC or COE. . . . . . . . . . 3-5
Overview . . . . . . . . . . . . . . . . . . . 3-5
Testing the Remote Access Port. . . . . . . . . . . . 3-5
Redirecting the Console to the Remote Console . . . . . 3-6
Redirecting the Console Back to the Local Console . . . . 3-8
Testing the ACD Link . . . . . . . . . . . . . . . . . 3-9
Overview . . . . . . . . . . . . . . . . . . . 3-9
Prerequisites . . . . . . . . . . . . . . . . . . 3-9
Procedure . . . . . . . . . . . . . . . . . . . 3-9
Testing the CMS Software . . . . . . . . . . . . . . . 3-10
Overview . . . . . . . . . . . . . . . . . . . 3-10
Prerequisites . . . . . . . . . . . . . . . . . . 3-10
Procedure . . . . . . . . . . . . . . . . . . . 3-10
CentreVu®
CMS R3V8 Software Installation and Setup
vii
Assigning Customer Passwords . . . . . . . . . . . . . 3-14
Overview . . . . . . . . . . . . . . . . . . . 3-14
Procedure . . . . . . . . . . . . . . . . . . . 3-14
Turning the System Over to the Customer . . . . . . . . . . 3-15
Overview . . . . . . . . . . . . . . . . . . . 3-15
Procedure . . . . . . . . . . . . . . . . . . . 3-15
4 Maintaining the CMS Software . . . . . . . . . . . . . . . . . . . . 4-1
Overview . . . . . . . . . . . . . . . . . . . . . 4-1
Remote Terminal Tip. . . . . . . . . . . . . . . . 4-1
Backing Up the CMS System . . . . . . . . . . . . . . 4-2
Overview . . . . . . . . . . . . . . . . . . . 4-2
Performing a CMSADM Backup . . . . . . . . . . . . . 4-3
Overview . . . . . . . . . . . . . . . . . . . 4-3
Platform Considerations . . . . . . . . . . . . . . 4-4
Prerequisites . . . . . . . . . . . . . . . . . . 4-4
Procedure . . . . . . . . . . . . . . . . . . . 4-5
Checking the Contents of the CMSADM Backup Tape. . . . . 4-9
Procedure . . . . . . . . . . . . . . . . . . 4-9
Doing CMS Maintenance Backups . . . . . . . . . . . 4-10
Adding the Informix SQL Package . . . . . . . . . . . . 4-11
Procedure . . . . . . . . . . . . . . . . . . . 4-11
5 Solving Installation-Related Problems . . . . . . . . . . . . . . . . . 5-1
Overview . . . . . . . . . . . . . . . . . . . . . 5-1
Troubleshooting a Solstice DiskSuite Software Ins tallation . . . . 5-2
Identifying Problems . . . . . . . . . . . . . . . 5-2
Page 8

Problems with CMS Administration Scripts. . . . . . . 5-3
Disk I/O Problems . . . . . . . . . . . . . . . 5-3
State Database Problems. . . . . . . . . . . . . 5-3
Metadevice Problems . . . . . . . . . . . . . . 5-4
Problems with the /cms File System . . . . . . . . . 5-5
Common Error Messages . . . . . . . . . . . . . . 5-7
Listing Pkgchk Errors. . . . . . . . . . . . . . . . . 5-10
Solving X.25 License Installation Problems . . . . . . . . . 5-11
Finding a Misplaced X.25 Password . . . . . . . . . . . . 5-12
Checking Installed Solaris Patches . . . . . . . . . . . . 5-12
Recognizing New Hardware Devices. . . . . . . . . . . . 5-13
Glossary . . . . . . . . . . . . . . . . . . . . . . . . GL-1
Index . . . . . . . . . . . . . . . . . . . . . . . . . IN-1
CentreVu®
CMS R3V8 Software Installation and Setup
viii
Page 9

Preface
Overview P-1
CentreVu®
CMS R3V8 Software Installation and Setup
Preface
Overview 0
This document is written for technicians and Lucent Technologies call center
customers who install and maintain Release 3, Version 8 of the
Call Management System (CMS) using the
Solaris* 7
operating system.
Reasons for Reissue 0
This is the first is s u e o f th is d oc u m e n t .
Organization 0
This document includes the following chapters:
●
Chapter 1 — Introduction
CentreVu
Provides an overview of the supported CMS software, supported
hardware platforms and required software.
●
Chapter 2 — Installing Software and Setti ng Up CMS
Outlines the software installation and setup procedures. These
procedures are used by technicians at customer sit es and personnel at
the factory.
●
Chapter 3 — Turning the System Over to the Customer
Provides the procedures that a technician performs before system
cutover and a worksheet that the technician fi lls out for the customer.
●
Chapter 4— Maintaining the CMS Software
Discusses file system backups and other maintenance procedures.
●
Chapter 5— Solving Installation-Related Problems
Discusses how to fix various software installation problems.
*
Solaris
is a registered trademark of Sun Microsystems, Inc.
Page 10

Preface
Conventions P-2
CentreVu®
CMS R3V8 Software Installation and Setup
Conventions 0
The following conventions are used in this document:
●
Unless specified otherwise, al l information and procedures in this
document apply to the
5 computer, the
Enterprise
●
The term “CMS” in this document always implies “
●
Commands you enter from the console are shown in courier
Sun Enterprise
3500 computer.
Sun SPARCserver
3000 computer and the
font.
●
Screens are shown to represent responses from the system.
Because of display constraints in this document, some screen
representations are not identical to the screens on your system.
●
Italic
●
Automatic Call Distribution (ACD) is a feature on the
text in screen displays represents variable information.
switch. The ACD feature is used to route in coming call s to groups of
agents. When this document refers to “connecting to an ACD,” it
refers to connecting to a switch that has ACD capabiliti es.
computers, the
Sun
CentreVu
DEFINITY
Sun
CMS.”
Ultra
Related Documents 0
The document set that supports the differ ent CMS computers and the
DEFINITY
lists where you can find specific informa tion about CMS. To order any of
these documents, call the BCS Publications Center at 1-800-457-1235
or +1-317-361-5353.
CentreVu® Call Management System Sun® Enterprise™ 3500 Computer
Hardware Installation
CentreVu® Call Management System Sun® Enterprise™ 3500 Computer
Connectivity Diagram
CentreVu® Call Management System Sun® Ultra™ 5 Computer Hardware
Installation
switches is being reorganized with this release. This section
Title
Document
Number
Installing CMS Computers
585-215-873
585-215-877
585-215-871
Page 11

Preface
Related Documents P-3
CentreVu®
CMS R3V8 Software Installation and Setup
Title
CentreVu® Call Management System Sun® Ultra™ 5 Computer Connectivity
Diagram
CentreVu® Call Management System Release 3 Vers ion 6 Sun®
Enterprise™ 3000 Computer Hardware Installation
CentreVu® Call Management System Release 3 Version 6 Sun®
Enterprise™ 3000 Computer Connectivity Diagram
CentreVu® Call Management System Release 3 Vers ion 6 Sun® SPARCserver™
Computers Hardware Installation
CentreVu® Call Management System Release 3 Vers ion 6 Sun® SPARCserver™
Computers Connectivity Diagram
CentreVu® Call Management System Release 3 Vers ion 5 Sun® SPARCserver™
Installation and Maintenance
CentreVu® Call Management System Release 3 Vers ion 5 Sun® SPARCserver™
Connectivity Diagram
Connecting and Administering the Switch
Document
Number
585-215-872
585-215-867
585-215-865
585-215-857
585-215-858
585-215-827
585-215-828
CentreVu® Call Management System Switch Connections and Administratio n
Installing and Setting Up Terminals, Printers, and Modems
CentreVu® Call Management System Terminals, Printers, and Modems
Maintaining and Troubleshooting a CMS Computer
CentreVu® Call Management System Release 3 Version 8 Hardware Maint enance
and Troubleshooting
CentreVu® Call Management System Sun® Enterprise™ 3500 Computer
Maintenance and Troubleshooting
Upgrading a CMS Computer
CentreVu® Call Management System Release 3 Version 8 Upgrades and
Migrations
Administering a CMS Computer
CentreVu® Call Management System Release 3 Vers ion 8 Administration
(Volumes 1 and 2)
CentreVu® Call Management System Release 3 Vers ion 6 Administration
(Volumes 1 and 2)
585-215-876
585-215-874
585-210-919
585-215-875
585-210-913
585-210-910
585-215-850
Page 12

Preface
Related Documents P-4
CentreVu®
CMS R3V8 Software Installation and Setup
Title
CentreVu® Call Management System Release 3 Version 5 Administration
(Volumes 1 and 2)
Other Documents
CentreVu® Call Management System Release 3 Version 8 Open Database
Connectivity
CentreVu® Call Management System Release 3 Version 6 Open Database
Connectivity
CentreVu® Call Management System Release 3 Version 8 External Call History
Interface
CentreVu® Call Management System Release 3 Version 6 External Call History
Interface
CentreVu® Call Management System Release 3 V ers ion 6 Planning, Configuration,
and Implementation
CentreVu® Call Management System Release 3 Version 5 Real-Time and
Historical Reports
Document
Number
585-215-820
585-210-911
585-215-852
585-210-912
585-215-854
585-215-879
585-215-821
CentreVu® Call Management System Release 3 Version 5 External Call History
Interface
CentreVu® Call Management System Release 3 Versi on 5 Open Database
Connectivity
CentreVu® Call Management System Release 3 Version 5 Custom Reports
CentreVu® Call Management System Release 3 Version 5 Forecast
Lucent Call Center Release 8 Change Description
Lucent Call Center Release 8 Documentation CD-ROM
585-215-824
585-215-839
585-215-822
585-215-825
585-210-925
585-210-926
Page 13

Introduction
Overview 1-1
CentreVu®
CMS R3V8 Software Installation and Setup
Introduction 1
Overview 1
CentreVu
®
Call Management System (CMS) is a softwar e application of fered
in association with the Automatic Call Distri bution (ACD) feature of Lucent
Technologies
DEFINITY
®
switches. The CMS application provides
monitoring and recording of ACD calls and agents handli ng these calls, and
the use of Vector Directory Numbers (VDNs) for these calls to measure Call
Center performance.
Supported Hardware Platforms 1
CMS is supported on the following platforms:
●
●
●
●
●
●
*
Sun
SPARCserver
Sun
SPARCserver 10 computer
Sun
SPARCserver 20 computer
Sun Ultra
Sun Enterprise§
Sun Enterprise
‡
5 computer
†
5 computer
3000 computer
3500 computer
Required and Optional Software 1
CMS requires the following software packages (optional packages are
noted):
●
Sun Solaris¶
●
Sun Validation Test Suite (VTS) 3.1
●
High-Speed Serial Interface/Sbus (HSI/S) (optional, required for
SPARCserver or Enterprise systems that have an HSI/S card)
●
High-Speed Serial Interface/PCI (HSI/P) (optional, required for
Ultra 5 systems that have an HSI/P card)
●
Serial Asynchronous Interface/PCI (SAI/ P) drivers (optional, r equired for
Sun
Ultra 5 systems that have an SAI/P card)
●
Aurora Ports Card drivers (optional,
*
Sun
is a registered trademark of Sun Microsystems, Inc.
†SPARCserver is a trademark of SPARC International, Inc.
‡
Ultra
is a trademark of Sun Microsystems, Inc.
Enterprise
§
Solaris
¶
is a trademark of Sun Microsystems, Inc.
is a registered trademark of Sun Microsystems, Inc.
7 operating system (Hardware: 3/99 version)
SPARCserver
only)
Sun
Sun
Page 14

Introduction
Required and Optional Software 1-2
●
Bay Networks Annex R10.0B (optional, required for systems using
Network Terminal Server
●
Solstice†
CentreVu®
CMS R3V8 Software Installation and Setup
*
[NTS])
for Server Connect X.25 Version 9.1 drivers (optional,
required for systems using an X.25 link to a switch)
●
INFORMIX
‡
— Structured Query Languag e (SQL ) 7.20 (optional)
— Standard Engine (SE) 7.22
— Runtime Enhanced SQL (ESQL) 9.14
— International Language Supplement (ILS) 2.11
●
Solstice DiskSuite
§
4.2 (contained on the Solaris Easy Access
Server 2.0 CD)
●
Sun Solaris
●
CMS Supplemental Services
●
CMS software
●
CMS patches
●
CMS Open Database Connectivity (ODBC) (optional)
●
Visual Vectors Server software
patches
*
Network Terminal Server
Solstice
†
INFORMIX
‡
§
Solstice DiskSuite
is a trademark of Sun Microsystems, Inc.
is a registered trademark of Informix Software, Inc.
is a trademark of Sun Microsystems, Inc.
is a trademark of Sun Microsystems, Inc.
Page 15

Introduction
Roles and Responsibilities 1-3
CentreVu®
CMS R3V8 Software Installation and Setup
Roles and Responsibilities 1
This document is written for:
●
Lucent Technologies on-site technicians
●
Lucent Technologies Technical Service Center (TSC) personnel
●
Lucent Technologies factory personnel
●
CMS customer administrators.
The following table lists the major software installation tasks, who is
responsible for performing each ta sk, and the chapter where the task is
described.
Task
On-Site
Tech
TSC Factory Customer
Chapter 2 — Installing Software and Setting Up CMS
“Installing the Solaris Operating System” on page 2-4 XXX
“Installing the Sun Online VTS 3.1” on page 2-38
“Installing Link and Port Packages” on page 2-40
“Installing INFORMIX” on page 2-67
“Installing DiskSuite” on page 2-84
“Installing CMS Packages” on page 2-103
“Installing the Open Database Connecti vity Software” on
XXX
XXX
XXX
XXX
X X X X (limited)
XX
page 2-111
“Installing Visual Vectors Server Software” on page 2-
XXX
115
“Setting Up CMS” on page 2-117
“Installing Feature Packages” on page 2-157
XXX
X
“Setting Up the Remote Console” on page 2-167
“Setting Up the NTS” on page 2-171
XX
XX
“Performing a CMSADM Backup” on page 2-181
Chapter 3 — T urning the System Over to the Customer
Verifying the system date and time X
Testing the connection to the TSC X
Page 16

Introduction
Roles and Responsibilities 1-4
CentreVu®
CMS R3V8 Software Installation and Setup
Task
On-Site
Tech
TSC Factory Customer
Testing the ACD link X
Testing the CMS software X
Assigning customer passwords X
Turning the syst em over to the customer X
Chapter 4 — Maintaining the CMS Software
Backing up the system X X
Restoring the system X X X
Removing
INFORMIX
to add SQL X X
Chapter 5 — Solving Installation-Related Problems
Solving installation-related problems X X
Page 17

Introduction
CentreVu CMS Helplines 1-5
CentreVu®
CMS R3V8 Software Installation and Setup
CentreVu
CMS Helplines 1
Customer Support for U.S. and Canada
Customer and
Techn ician
Support Outside
If an installation problem arises that requires assistance, customers or
Lucent Technologies technicians may call the numbers shown below.
1-800-242-2121
By calling this number , the custo mer reports the problem and generates a
trouble ticket so that the problem can be worked by the services
1
organization.
The customer is prompted to identify the type of problem (ACD,
hardware, or
organization.
For customer and technician support outside of the U.S. and Canada,
contact your Lucent Technologies representative or distributor for more
information.
CentreVu
CMS) and is connected to the appropriate servi ce
of U.S. and
Canada
Techn ician Support for U.S. and Canada
International Support
1
1-800-248-1234
Lucent Technologies technicians can receive help during installations by
using this number .
1
For international support, contact your Lucent Technologies
representative or distributor for more information.
1
Page 18

Introduction
CentreVu CMS Helplines 1-6
CentreVu®
CMS R3V8 Software Installation and Setup
Page 19

Installing Software and Setting Up CMS
Overview 2-1
CentreVu®
CMS R3V8 Software Installation and Setup
Installing Software and Setting Up CMS 2
Overview 2
Summary of Procedures
This chapter contains the procedures used to install and set up the
CentreVu
®
Call Management System (CMS) software, and other required
and optional software. If the software has already been installed at the
factory, the only procedures required at the customer site include:
●
“Setting Up CMS” on Page 2-117
●
“Installing Feature Packages” on Page 2-157
●
“Performing a CMSADM Backup” on Page 2-181
If the CMS software was not installed at the factor y, use the procedures in
this chapter to bring the CMS computer up to factory standards after a
system reconfiguration or repair. See
Maintenance and Troubleshooting
†
Enterprise
3500 Computer Maintenance and Troubleshooting
CentreVu® CMS R3V8 Hardware
(585-210-919) or
CentreVu® CMS Sun*
(585-215-875) for more information about field repairs.
The following table lists each of the factory software installation procedures
for R3V8, including the computer models f or which it appl ies ( E3000, E3500,
2
Ultra
‡
5,
SPARCserver
§
) and if it is required or optional. All procedures must
be performed in the sequence presented below.
Installing the
Installing the
Installing the
Sun Solaris
Sun
SunLink
Version 3.0 drivers
Procedure
Computer
Platform
7 operating system (3/99 version) All Required
Online Validation Test Suite (VTS) 3.1 All Required
*
High-Speed Serial Interface/Sbus (HSI/S)
E3000
E3500
Required/
Optional
Optional
SPARCserver
Installing the High-Speed Serial Interface/PCI Bus (HSI/P) Adapter
Ultra 5 Optional
2.0 drivers
Installing the Serial As ynchronous I nterfac e/PCI Bus ( SAI/P) Adapt er
Ultra 5 Optional
1.0 drivers
Installing the Aurora ports card drivers SPARCserver Optional
*
Sun
is a registered trademark of Sun Microsystems, Inc.
†
Enterprise
Ultra
‡
SPARCserver
§
is a trademark of Sun Microsystems, Inc.
is a trademark of Sun Microsystems, Inc.
is a registered trademark of SPARC International, Inc.
Page 20

Installing Software and Setting Up CMS
Overview 2-2
CentreVu®
CMS R3V8 Software Installation and Setup
Procedure
Computer
Platform
Required/
Optional
Installing the Bay Networks Annex R10.0B drivers All Optional
Installing the
Installing the
Solstice†
INFORMIX
- Structured Query Language (SQL) Version 7.20
- Standard Engine (SE) Version 7.22
- Runtime Enhanced SQL (ESQL) Version 9.14
- International Language Supplement (I LS) Version 2.11
Installing the
Installing the
Setting up
Solstice
Sun Solaris
Solstice
for Server Connect X.25 package All Optional
‡
software:
All
All
All
All
Optional
Required
Required
Required
DiskSuite 4.2 software All Required
patches All Required
DiskSuite All Required
Installing the CMS Supplemental Services software All Required
Installing the CMS software All Required
Installing the CMS patches All As needed
Installing the Open Database Connectivity (ODBC) software All Optional
Setting up the CMS software All Required
Installing feature packages All Required
Setting up the remote console All Required
Setting up the NTS All Optional
Backing up the system All Required
*
SunLink
Solstice
†
Informix
‡
is a registered trademark of Sun Microsystems, Inc.
is a trademark of Sun Microsystems, Inc.
is a registered trademark of Informix Software, Inc.
Page 21

Installing Software and Setting Up CMS
Overview 2-3
●
Remote T erminal
When executing commands that take a long time t o complete, (such
CentreVu®
CMS R3V8 Software Installation and Setup
as cpio and /olds commands), use the nohup command to
Access Tips
2
ensure that the command will complete without interruption in case
the data line disconnects. An example using the nohup command
is shown below:
nohup cpio -icmudf -C 10240 -I /dev/rmt/0c “/cms” | tee
●
When system reboots are required, verify that your terminal type is
set correctly after the reboot.
●
Prerequisites 2
Before beginning these procedures, ver ify that all hardware
components of the system, including port cards, external disk
drives, and tape drives, are correctl y installed. Otherwise, the
system hardware will not be recognized during the software
installation procedures.
Page 22

Installing Software and Setting Up CMS
Installing the Solaris Operating System 2-4
CentreVu®
CMS R3V8 Software Installation and Setup
Installing the
Solaris
Overview 2
Operating System B
The
Solaris
that guides you step by step through installing the
also has on-line help to answer your questions.
If the CMS computer you are installing requires disk mirroring, you
must use information from this section and the
Mirrored Systems
Procedures required to in stall the
computer include:
●
Booting from the
●
Identifying the system (Page 2-7)
●
Setting the date and time (Page 2-12)
●
Selecting the
●
Partitioning the hard disks (Page 2-18)
●
Installing the selected options (Page 2-29)
●
Assigning a root password (Page 2-31)
●
Enabling Korn shell and the backspace key (Page 2-33)
●
Setting EEPROM parameters for the A and B ports (Page 2-33)
●
Turning on the system activity recorder (Page 2-36)
●
Changing directory permissions (Page 2-87)
●
Installing the Sun Online Validation Test Suite (Page 2-38)
installation program is a menu-driven, interactive program
Solaris
NOTE:
software. It
CentreVu® CMS Disk-
R3V8
(585-210-940) document.
Solaris
Solaris
Solaris
7 Software (3/99) CD (Page 2-5)
7 system files (Page 2-14)
7 operating system on the CMS
Platform Considerations
●
All platforms.
B
Page 23

Installing Software and Setting Up CMS
Installing the Solaris Operating System 2-5
CentreVu®
CMS R3V8 Software Installation and Setup
Before You Begin
Booting fr om the
Solaris
7
Software 3/99 CD
Before you begin the Installation procedures described in this chapter,
perform the following tasks:
B
●
Obtain the
●
Identify the host name of the system, which is designat ed by the
Solaris
7 Software 3/99 CD
Lucent Technologies’ Technical Service Center [TSC])
●
Identify the system’s Internet Protocol (IP) address (thi s may be the
factory default or an address in a customer’s network)
●
Identify the number and size of disk drives on the system
●
Verify that all power cords are fully-connected to all hardware
devices (such as disk drives and tape drives), and that power is
applied to all hardware devices.
This section describes how to boot the system from the
Software
To perform this operation using a remote terminal, see
B
CD using the local console.
R3V8 Hardware Maintenance and Troubleshooting
Solaris
7
CentreVu® CMS
(585-210-919) or
CentreVu® CMS Sun® Enterprise™ 3500 Computer Maintenance and
Troubleshooting
(585-215-875).
NOTE:
The screens in this section are representative of a typical
installation. Not all screens will match your installation. When
possible, the recommended selections are shown with boxes
highlighting the selection.
1. Apply power to all of the external devices, such as disk drives and
tape drives.
2. Turn on the system. Depending on the model, it can take several
minutes for the system to boot up.
3. As the c onsole s hows t hat t he system is boot ing up, pr ess the Stop
and A keys simultaneously. The system responds:
ok
4. Load the
Solaris
7 Software 3/99 CD into the CD-ROM drive.
Page 24

Installing Software and Setting Up CMS
Installing the Solaris Operating System 2-6
CentreVu®
CMS R3V8 Software Installation and Setup
5. Boot the system from the CD by entering the following:
boot cdrom
The CD boot process varies between platforms, and requires
approximately 2 to 10 minutes to complete.
The Select Language and Locale screen appears:
6. Choose the Language and Locale se lections that are appropri ate for
your location and then click Continue.
7. The
Solaris
Installation Program screen appears:
8. Select Conti nue.
Page 25

Installing Software and Setting Up CMS
Installing the Solaris Operating System 2-7
CentreVu®
CMS R3V8 Software Installation and Setup
Identifying the System
The Identify This System screen appears:
B
1. Select Continue.
The Host Name screen appears:
2. Select the Host name box and enter the host name for the system.
The host name for a specific system is designated by TSC
Page 26

Installing Software and Setting Up CMS
Installing the Solaris Operating System 2-8
CentreVu®
CMS R3V8 Software Installation and Setup
Provisioning personnel. Host names are case-sensitive and cannot
start with a number. When finished, select Continue.
The Network Connectivity screen appears:
3. Select Yes, and then select Continue.
NOTE:
If the system is equipped with more than one network interface,
the Primary Network Interface screen appear s (otherwise, the IP
Address screen appears):
Page 27

Installing Software and Setting Up CMS
Installing the Solaris Operating System 2-9
CentreVu®
CMS R3V8 Software Installation and Setup
4. If the Prima ry Network Interface screen appears, select “hme0” for
Enterprise
an
SP ARCserver
a
3000,
Enterprise
3500, or
Ultra
5 computer , or “le0” for
computer, and then select Continue.
The IP Address screen appears:
5. Select the IP address box and enter the IP address. IP
address 192.168.2.1 is the factory default. You should enter the
factory default address unless there is an act ual network addr ess for
this site. Select Continue when finished.
The Confirm Information screen appears:
Page 28

Installing Software and Setting Up CMS
Installing the Solaris Operating System 2-10
CentreVu®
CMS R3V8 Software Installation and Setup
6. Select Continue if the displayed information is correct. If you select
Change, the program returns to the Host Name screen.
The Name Service screen appears:
7. Select None, and then select Continue.
The Confirm Information screen appears:
Page 29
Installing Software and Setting Up CMS
Installing the Solaris Operating System 2-11
CentreVu®
CMS R3V8 Software Installation and Setup
8. Select Continue if the displayed information is correct. If you select
Change, the program returns to the Name Service screen.
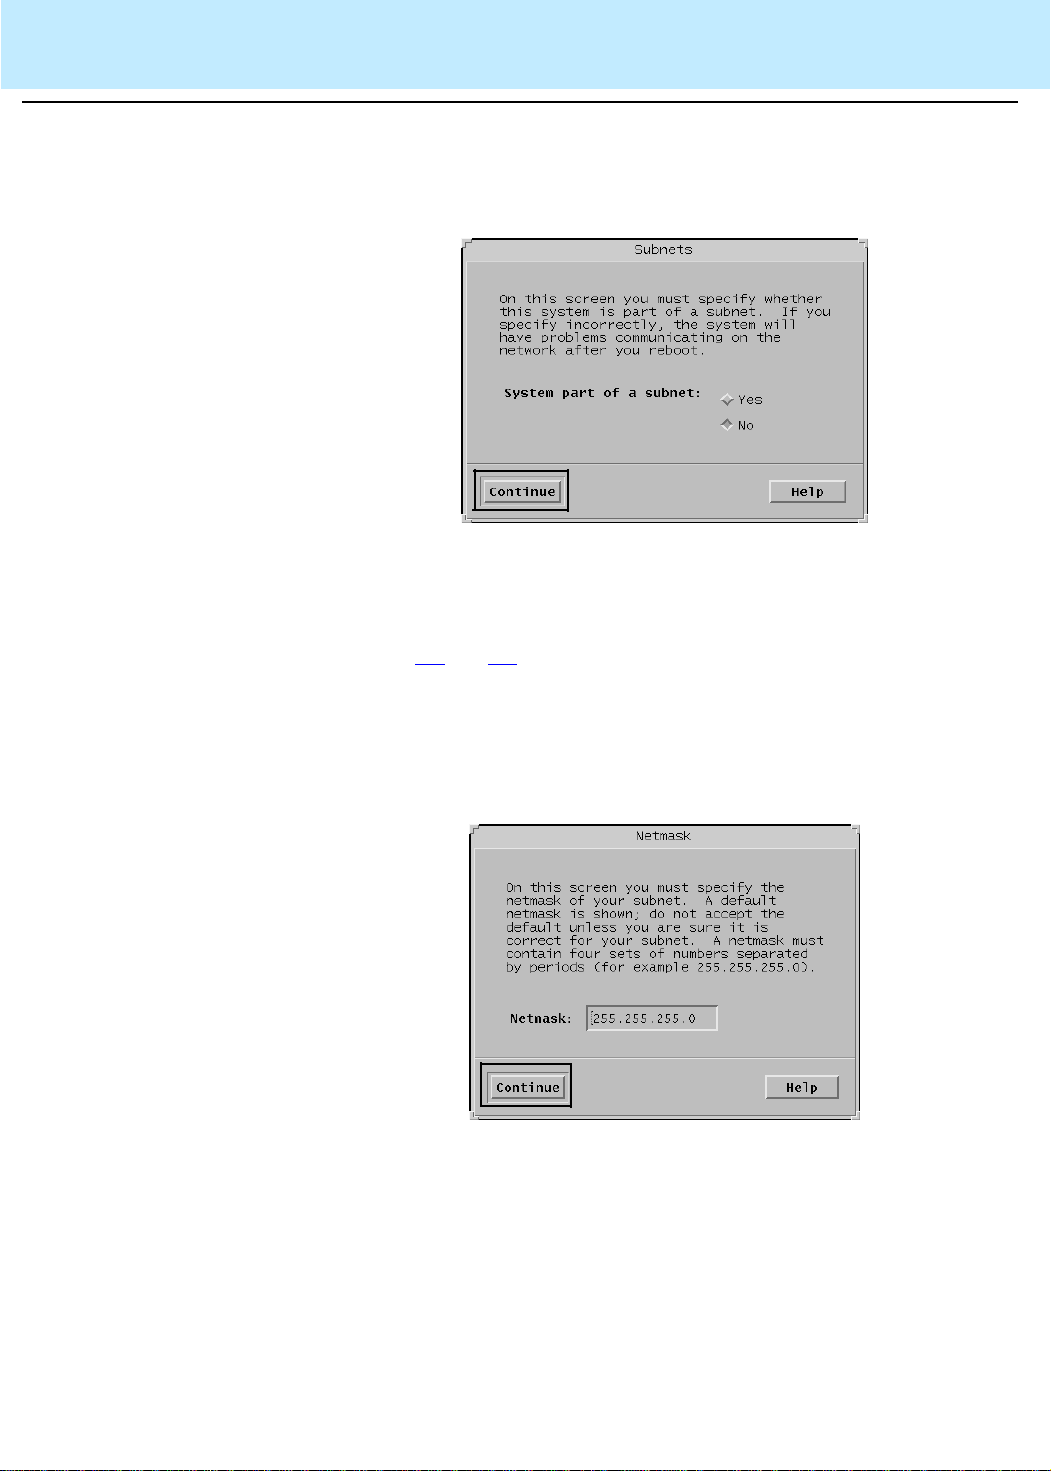
The Subnets screen appears
:
9. If this CMS computer is using LAN connectivity to the switch and is
part of a subnet on the customer’s network, you may need to select
Yes to administer a subnet mask. If you select Yes, continue with
Steps 10
and 11.
If you select No, continue with Setting the Date and Time.
10. After sel ecting Yes (if the system is part of a subnet), the Netmask
screen appears
:
11. Enter th e desi red subnet mask. Th e defau lt of 255.255.255.0 is
recommended. Select Continue.
Page 30

Installing Software and Setting Up CMS
Installing the Solaris Operating System 2-12
CentreVu®
CMS R3V8 Software Installation and Setup
Setting the Date and Time
The Time Zone screen appears:
B
1. Select Geographic region, and then select Set.
The Geographic Region screen appears:
Page 31

Installing Software and Setting Up CMS
Installing the Solaris Operating System 2-13
CentreVu®
CMS R3V8 Software Installation and Setup
2. Select the region and time zone where this system is located, and
then select Continue.
The Date and Time screen appears:
3. Select Continue to accept the displayed date and time, or if
necessary, enter t he corr ect date a nd t ime. When all the infor mati on
is correct, select Continue.
The Confirm Information screen appears:
4. If the dis played information is correct, select Continue. If you select
Change, the program returns to the Subnets screen.
The system date and time are now set. After a few minutes, the
program continues with the selection of
Solaris
7 system files.
Page 32

Installing Software and Setting Up CMS
Installing the Solaris Operating System 2-14
CentreVu®
CMS R3V8 Software Installation and Setup
Selecting the
Solaris
7 System
Files
If the system currently has an ear lier versi on of Solar i s instal led, the
first
minutes (if this screen is not displaye d, go to Step 2):
B
1. Select Initial.
Solaris
Interactive Installation screen appears after a few
The second
Solaris
Interactive Installation screen appears:
Page 33

Installing Software and Setting Up CMS
Installing the Solaris Operating System 2-15
CentreVu®
CMS R3V8 Software Installation and Setup
2. Select Continue.
The Allocate Client Services screen appears:
3. Select Continue.
The Select Languages screen appears. Select the languages you
want to see displayed in the user interface. English is automatically
installed by default.
4. When you have completed choosi ng your language select ions, cli ck
Continue.
Page 34

Installing Software and Setting Up CMS
Installing the Solaris Operating System 2-16
CentreVu®
CMS R3V8 Software Installation and Setup
The Select Software screen appears:
&OXVWHU,FRQ
5. Select End User System Support. Check to make sure that the
NOT
Solaris 64 Bit Support box is
(
NOT
Customize
NOTE
Continue).
selected, and then select
If you select Continue instead of Customize, the Disks screen
(shown on Page 2-18
) appears, which is incorrect. If this
happens, select Go Back from the Disks screen.
The Customize Software screen appears:
Page 35

Installing Software and Setting Up CMS
Installing the Solaris Operating System 2-17
CentreVu®
CMS R3V8 Software Installation and Setup
6. Select the packages listed below. Start at the top of the list and
make the package selections in the order shown below. When
necessary, click on the triangular icons to expand and collapse
package clusters. Do not exclude any packages that are already
selected.
●
Basic Networking
●
On-Line Manual Pages
●
open the cluster for Open Windows Version 3 (not Open
Windows Version 64) and select:
— X Windows system online user man pages
●
Point-to-Point Protocol (not Point-to-Point Protocol 64)
●
open the cluster for Programming tools and libraries and se lect:
— CCS tools bundled with SunOS
— Solaris bundled tools
●
System Accounting
●
Terminal Informa ti o n
7. When you have completed making the package selections, click
OK.
The Software screen reappears.
8. Select Continue.
The
Solaris
7 software packages are now selected and will be
installed after the disks are partitioned.
Page 36

Installing Software and Setting Up CMS
Installing the Solaris Operating System 2-18
CentreVu®
CMS R3V8 Software Installation and Setup
Partitioning the Hard Disks
The Disks screen appears. Add all of the available dis ks into the
B
“Selected Disks” column.
NOTE
In the above screen, all the disks equipped with the system
should be listed as available. If not, you may have a connectivity
or power problem. Check all cables and verify that the power is
switched on for the disk drives.
The screen examples in this section may differ according to your
system’s disk configur ation.
9. After all of the disks have been moved to the “Selected Disks”
column, select Continue.
Page 37

Installing Software and Setting Up CMS
Installing the Solaris Operating System 2-19
CentreVu®
CMS R3V8 Software Installation and Setup
The Preserve Data screen appears:
NOTE
The Preserve Data screen may not display if this is the fi rst time
the operating system has been installed on your machine.
10. Select Continue.
The Automatically Layout File Systems screen appears:
Page 38

Installing Software and Setting Up CMS
Installing the Solaris Operating System 2-20
CentreVu®
CMS R3V8 Software Installation and Setup
11. Select Manual Layout.
The File System and Disk Layout screen appears:
(
NOT
12. Select Customize
Continue).
The Customize Disks screen appears:
&\OLQGHU
,FRQ
Page 39
Installing Software and Setting Up CMS
Installing the Solaris Operating System 2-21
NOTE
CentreVu®
CMS R3V8 Software Installation and Setup
If all the disks on your system are not visible in the
screen, use the slidebar at the bottom of the window to
Disks
Customize
bring the partition columns for other system di sks into view.
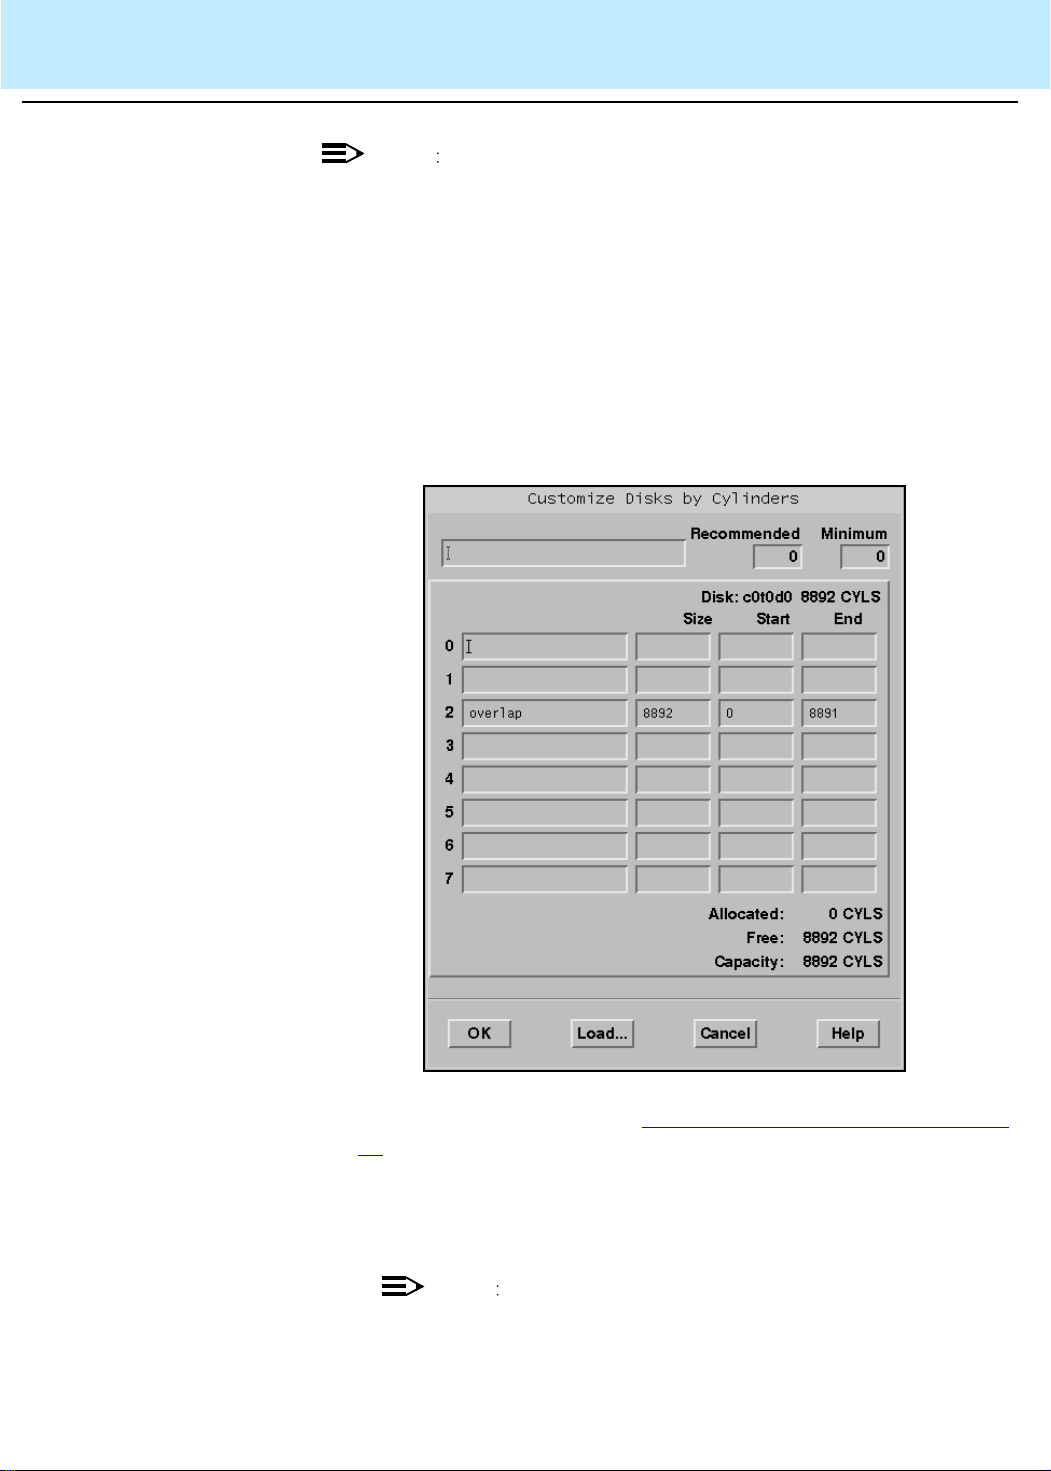
13. Disk par titioning should be done in cyl inders r ather than megab ytes.
To do this, select the cylinders icon for the first disk in the upper lef thand corner of the disk 1 column.
The Customize Disks by Cylinders screen for the first (boot) disk
appears:
14. Use the infor mation from the “Boot Disk Partition Table” on Page 2-
23 to partition the boot disk by filling in the slice name an d cylinder
values for each partition. As you move the cursor to each new
partition, the calculated cylinder values are displayed in the Start
and End fields in the two columns at the right of the screen.
NOTE
The size of the overlap file system always defaults to the size of
the entire disk. Do not change this value.
Page 40

Installing Software and Setting Up CMS
Installing the Solaris Operating System 2-22
CentreVu®
CMS R3V8 Software Installation and Setup
Boot disk partition
values 2
The boot disk cylinder values provided in the fol lowing table conform to
the R3V8 disk partitioning specific ations for all disk drives supported by
R3V8.
NOTES FOR MIRRORED SYSTEMS
When setting up disk partitions for mirrored Enter prise 3000 or 3500
systems, select the following disks (i f feasible) to partit ion as the boot and
alternate boot devices:
Enterprise 3000:
— boot - c0t0
— alternate boot - c0t1
Enterprise 3500:
— boot - c0t0
— alternate boot - c1t4
Be careful when you enter slice names for partition 0 on boot and
alternate boot disks:
●
For primary boot disks, the slice name for par tition 0 is
always “/”.
●
For alternate boot disks on mirrored systems, the slice
name for partition 0 must always remain blank.
Page 41

Installing Software and Setting Up CMS
Installing the Solaris Operating System 2-23
CentreVu®
CMS R3V8 Software Installation and Setup
Boot Disk Partition Table:
Disk Size (in cylinders)
9.1-GB SCSI
Slice Slice Name
0/
or
blank
) if alternate
(
boot on mirrored
systems
4.2-GB SCSI
(SPARCserver
and E-3000)
8.4-GB EIDE
(Ultra 5)
9.1-GB EIDE
(Ultra 5)
1023 2134 2032 616
(SPARCserver
and E-3000)
or
FCAL (E-3500)
1
2overlap
3
(blank)
*
(blank)
7777
3880 16706 17660 4924
1879 12533 13540 3716
4 swap 971 2032 2081 585
5-7
* O
verlap
These values indicate the total number of cylinders for the disk drive models used in CMS R3V8. If the disk drive
you are partitioning d oes not ma tch one of th ese valu es, you ha ve a non-st andard dis k. Escalate th e issue to Lucent
technical support.
(blank)
partition sizes are automatically displayed in the Customize Disks screen during the Solaris installation.
Page 42

Installing Software and Setting Up CMS
Installing the Solaris Operating System 2-24
CentreVu®
CMS R3V8 Software Installation and Setup
The following example shows how the Customize Disks by
Cylinders screen appears when the boot disk is a 4.3-GB IDE disk:
15. Select OK after setting up the partitions for the boot disk.
●
The Customize Disks screen re-appears. If there are more disks,
select the cylinders icon for the next disk to be partitioned; the
Customize Disks by Cylinders screen appears for the selected disk.
●
If there is not a second disk, go to Step 18.
16. Use the information from the “Non-boot Partition Table” on Page 2-
25 table to input the cylinder values for each disk partition. As you
move the cursor to each new partition, notic e that the Sta rt and
End fields automatically display the computed cylinder values.
Page 43
Installing Software and Setting Up CMS
Installing the Solaris Operating System 2-25
CentreVu®
CMS R3V8 Software Installation and Setup
Non-boot disk partition
values 2
Slice Slice Name
0
(blank)
The non-boot disk cylinder values provided in t he followi ng table confor m
to the R3V8 disk partitioning specifications for all disk drives supported
by R3V8.
NOTE
●
All slice names remain blank, except for “over lap”.
●
The size of the overlap file system always defaults to the si ze of the
entire disk. Do not change this value.
Non-boot Partition Table:
Disk Size (in cylinders)
4.2-GB SCSI
(SPARCserver
and E-3000)
22 2
9.1-GB EIDE
(Ultra 5)
9.1-GB SCSI
(SPARCserver,
E-3000) or
FCAL (E-3500)
1
2overlap
3
4-7
* O
verlap
installation. These values indicate the total number of cylinders for the disk drive models used in CMS
R3V8. If the disk drive you are partitioning does not match one of these values, you have a nonstandard disk. Escalate the issue to Lucent technical support.
(blank)
*
(blank)
(blank)
partition sizes are automatically displayed in the Customize Disks screen during the Sol aris
3878 17658 4922
3880 17660 4924
Page 44

Installing Software and Setting Up CMS
Installing the Solaris Operating System 2-26
CentreVu®
CMS R3V8 Software Installation and Setup
Properly set up, the Customize Disks by Cylinders screen for a non-boot
4.2-GB SCSI disk would appear:
Page 45

Installing Software and Setting Up CMS
Installing the Solaris Operating System 2-27
CentreVu®
CMS R3V8 Software Installation and Setup
17. Select OK.
The Customize Disks screen appears again:
CAUTION
If there are more disks installed on your system, repeat Steps 16
through 17
screen to display the additional disks. Go to Step 18
for each additional disk. Use the scroll bar on the
only when
you have partitioned every disk on your system.
Page 46

Installing Software and Setting Up CMS
Installing the Solaris Operating System 2-28
CentreVu®
CMS R3V8 Software Installation and Setup
18. Select the OK button on the Customize Disks screen.
The File System and Disk Layout screen appears:
19. Select Conti nue.
The Mount Remote File Systems screen appears:
Page 47
Installing Software and Setting Up CMS
Installing the Solaris Operating System 2-29
CentreVu®
CMS R3V8 Software Installation and Setup
20. Select Continue.
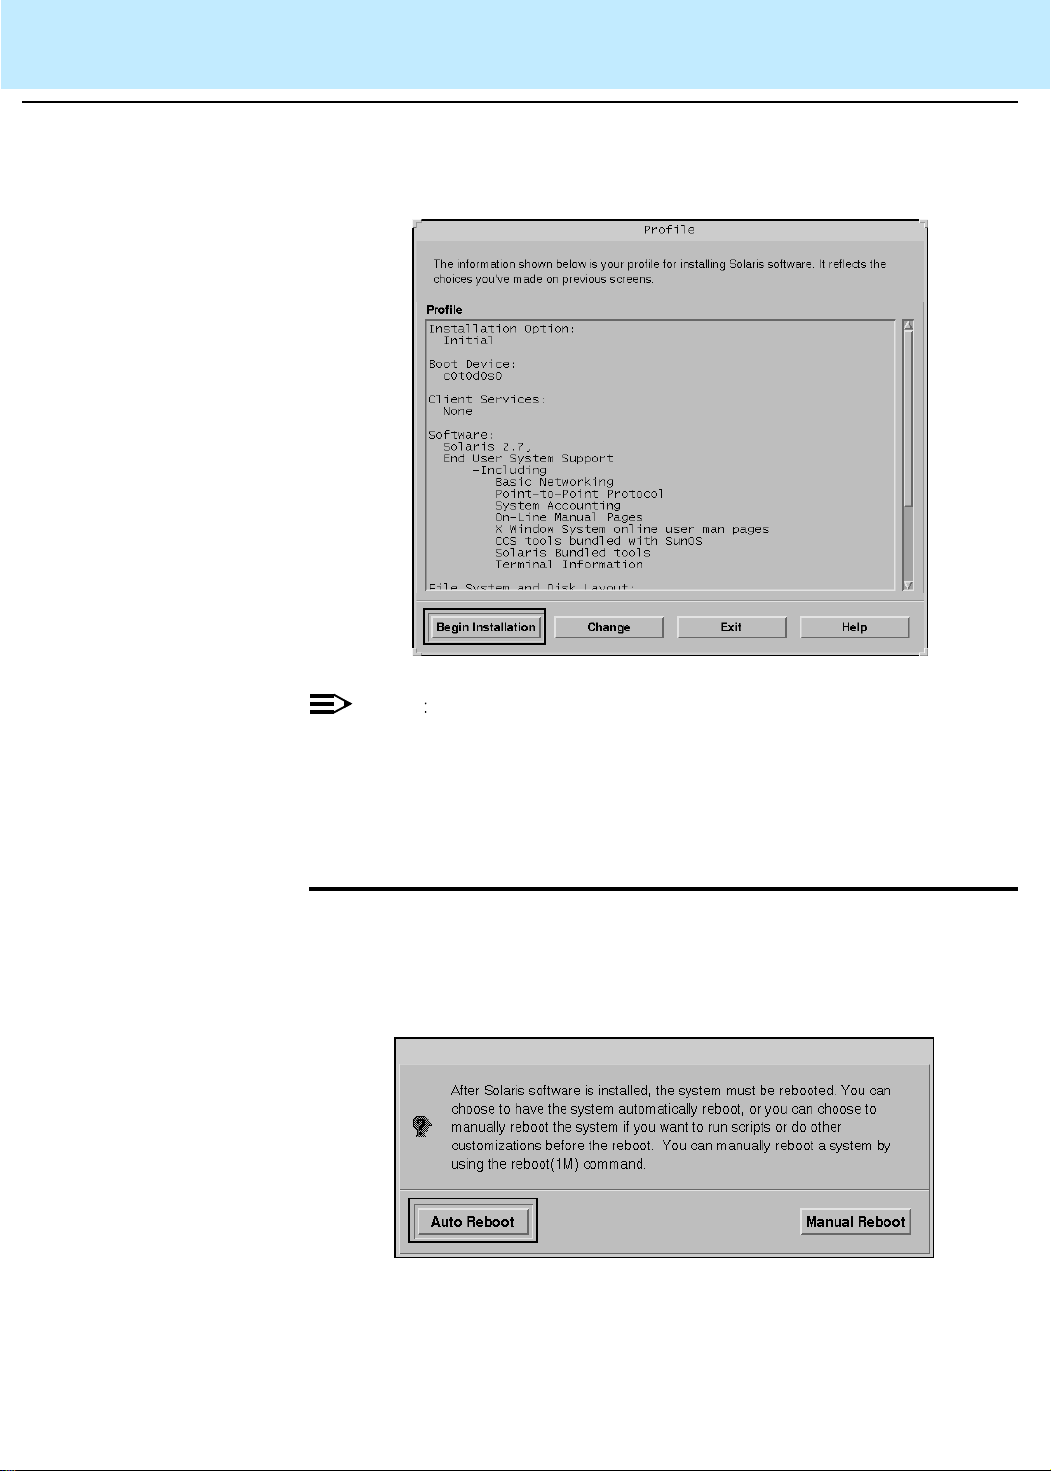
The Profile screen appears:
Installing the Selected Options
NOTE
If a previous Solaris 7 install has been performed on the system, you may
receive a message indicating that the boot disk has been altered. This
message can be disregarded; click OK to continue.
1. Select Begin Installation.
B
The program responds:
Page 48

Installing Software and Setting Up CMS
Installing the Solaris Operating System 2-30
CentreVu®
CMS R3V8 Software Installation and Setup
2. Select Auto Reboot .
The disk partitioning process begins wi th the display of the Inst alling
Solaris
- Progress screen:
This process may take several hours, depending on the number of
disks being partitioned, the hardware platform, and the speed of
your CD-ROM drive. As the disks are partitioned and
Solaris
7
system files are copied to the disk, the status bar indicates the
progress of the installation.
The progress screen may disappear during the process. Howe ver,
the
Solaris
Install Console screen should remain in the upper left
hand corner of your monitor screen and keep you posted on the
progress of the installation.
When the installation finishes, the system reboots and the “create a
root password” screen appears.
Page 49

Installing Software and Setting Up CMS
Installing the Solaris Operating System 2-31
CentreVu®
CMS R3V8 Software Installation and Setup
Assigning a Root Password 2
When the installation completes, the machine reboots and
responds:
On this screen you can create a root password.
A root password can contain any number of characters, but
only the first eight characters in the password are
significant. (For example, if you create ‘a1b2c3d4e5f6’ as
your root password, you can use ‘a1b2c3d4’ to gain root
access.)
You will be prompted to type the root password twice; for
security, the password will not be displayed on the screen
as you type it.
> If you do not want a root password, press RETURN twice.
Root password:
1. Enter t he root password. Unt il it is ti me to turn the syst em over to the
customer, it is recommended that you press Enter to assign a blank
password. The program responds:
Re-enter your root password.
Press Return to continue.
2. Re-enter the root password or press Enter for a blank password.
The program responds:
After 30 minutes of idle time on the system, your system
state will automatically be saved to disk, and the system
will power off.
Later, when you want to use the system again, and you turn
the power back on, you system will be restored to its
previous state, including all the programs you were running.
Do you want this automatic power-saving shutdown? (If this
system is used as a server, answer n) [y,n,?]
Page 50

Installing Software and Setting Up CMS
Installing the Solaris Operating System 2-32
CentreVu®
CMS R3V8 Software Installation and Setup
3. Enter n
The system responds:
Do you want the system to ask about this again, when you
next reboot? (This gives you the chance to try it before
deciding whether to keep it.) [y,n,?]
4. Enter n
The login console i s displ ayed. Enter r oot as user name, followed by
your password (if you submitted one to the system).
Opening a T erminal Window
5. The
Solaris
Welcome screen appears and prompts you to choose
your default desktop. Select Common Desktop Environment and
click OK. The Common Desktop Environment (CDE) is displayed.
A Terminal Window must be opened to allow keyboard input of
commands at the system prompt. To open a terminal window , perform the
B
following steps:
1. Use the mouse to move the cursor to an empty area of the desktop
display and click the right button on the mouse.
The Tools menu is displayed.
2. From the Tools menu, select the Terminal option.
A terminal window opens with the active cursor at the prompt.
Page 51

Installing Software and Setting Up CMS
Installing the Solaris Operating System 2-33
CentreVu®
CMS R3V8 Software Installation and Setup
Enabling Korn Shell and the Backspace Key
Displaying and Setting the EEPROM Parameters
Enter the following commands to enable the Korn shell and the
backspace key:
B
B
ksh -o vi
stty erase
where
This section describes how to set the firmware eeprom values for a
CMS computer . You must first display the current settings to determine if
the setting must be changed from the factory setting. To display the
current settings, enter the following command:
eeprom | more
<Backspace>
NOTE
If you log off and l og back in to t he sy stem, the Korn s hell an d the
backspace key will not work unless you reenter these commands.
After you install the
the system, these options will work automatically every time you
log in.
<Backspace>
is entered by pressing the backspace key.
DiskSuite
software (Page 2-84) and reboot
This will display the current eeprom settings. Compare these settings
with the following table.
Option Name Required Setting
#power-cycles 7
ansi-terminal? true
auto-boot? true
boot-command boot
boot-device disk
configuration-policy component
diag-device disk
diag-level min
diag-switch? false
fcode-debug? false
Page 52

Installing Software and Setting Up CMS
Installing the Solaris Operating System 2-34
CentreVu®
CMS R3V8 Software Installation and Setup
Option Name Required Setting
input-device keyboard
keyboard-click? false
load-base 16384
local-mac-address? false
memory-interleave max
mfg-mode off
mfg-switch? false
name options
oem-banner? false
oem-logo? false
output-device screen
pcia-probe-list sb=1,2,3,4
pcib-probe-list sb=1,2,3
powerfail-time 0
sbus-probe-default d3120
sbus-probe-list 541230
screen-#columns 80
screen-#rows 34
scsi-initiator-id 7
security-#badlogins 0
selftest-#megs 1
security-mode none
silent-mode? false
sunmon-compat? false
testarea 0
tpe-link-test? true
ttya-ignore-cd false
ttya-mode 9600,8,n,1,ttya-rts-dtr-off true
Page 53

Installing Software and Setting Up CMS
Installing the Solaris Operating System 2-35
CentreVu®
CMS R3V8 Software Installation and Setup
Option Name Required Setting
ttyb-ignore-cd false
ttyb-mode 9600,8,n,1,ttyb-rts-dtr-off true
use-nvramrc? false
watchdog-reboot? false
NOTE:
Not all options will display for al l CMS computers. Check only
those options that display for your computer. In addition, some
options will show “data not available” messages. Ignore those
options.
To change an eeprom option, use the following command:
eeprom
<option_name>=<option_value>
For example, to set the ttyA port for 9600 bps, 8 bit characters, no parit y,
and 1 stop bit, you would enter:
eeprom ttya-mode=9600,8,n,1,-
NOTE:
The character “1” in the ttya-mode and ttyb-mode option
settings is the number one, not the letter l.
Page 54

Installing Software and Setting Up CMS
Installing the Solaris Operating System 2-36
CentreVu®
CMS R3V8 Software Installation and Setup
Turning On the System Activity Recorder
1. Enter su - sys (be sure to use a space between “ - “ and “sys”)
to log in with the sys login id. The prompt changes to a $.
B
2. Enter id to confirm that you are using the sys id. The program
responds:
uid=3(sys) gid=3(sys)
Enter the following commands to create and edit the cron.sys
file:
cd /var/opt
crontab -l > cron.sys
vi cron.sys
The cron.sys file looks similar to the following:
#ident "@(#)sys 1.5 92/07/14 SMI" /* SVr4.0 1.2 */
#
# The sys crontab should be used to do performance collection.
# See cron and performance manual pages for details on startup.
#
# 0 * * * 0-6 /usr/lib/sa/sa1
# 20,40 8-17 * * 1-5 /usr/lib/sa/sa1
# 5 18 * * 1-5 /usr/lib/sa/sa2 -s 8:00 -e 18:01 -i 1200 -A
3. Remove the leading “ # ” character s that were used to comment out
the last three lines in the fil e. That is, change the lines to look like
the following:
#ident "@(#)sys 1.5 92/07/14 SMI" /* SVr4.0 1.2 */
#
# The sys crontab should be used to do performance collection.
# See cron and performance manual pages for details on startup.
#
0 * * * 0-6 /usr/lib/sa/sa1
20,40 8-17 * * 1-5 /usr/lib/sa/sa1
5 18 * * 1-5 /usr/lib/sa/sa2 -s 8:00 -e 18:01 -i 1200 -A
4. Enter :wq to save and quit the file.
Page 55

Installing Software and Setting Up CMS
Installing the Solaris Operating System 2-37
CentreVu®
CMS R3V8 Software Installation and Setup
5. Enter the following commands:
crontab -r
crontab cron.sys
6. Enter the f ollowi ng command to confi rm that the chan ges you made
are intact:
crontab -l
The program responds:
#ident "@(#)sys 1.5 92/07/14 SMI" /* SVr4.0 1.2 */
#
# The sys crontab should be used to do performance collection.
# See cron and performance manual pages for details on startup.
#
0 * * * 0-6 /usr/lib/sa/sa1
20,40 8-17 * * 1-5 /usr/lib/sa/sa1
5 18 * * 1-5 /usr/lib/sa/sa2 -s 8:00 -e 18:01 -i 1200 -A
7. Enter exit t o leave superuser mode (you may have to do this
twice).
The prompt changes back to the “#” character.
8. To remove the Solaris 7 installation CD, enter:
eject cdrom
Page 56

Installing Software and Setting Up CMS
Installing the Sun Online VTS 3.1 2-38
CentreVu®
CMS R3V8 Software Installation and Setup
Installing the
Sun
Overview 2
Platform
Considerations
Prerequisites 2
Procedure 2
Online VTS 3.1 2
Installing the
system.
●
All platforms.
2
●
The
●
Verify that you are logged in as
●
Obtain the “Software Supplement for the
Environment” CD.
1. Load the “Software Supplement for the
Environment 3/99” CD into the CD-ROM drive.
2. After about 15 second s, enter mount to verify the name of the
CD-ROM. The program responds with a list of devices and file
systems currently mounted. The la st line should displ ay the installed
CD as shown below:
Sun
Solaris
Online VTS 3.1 software provides test facilit ies for the
7 operating system must be installed.
root
at the console.
Solaris
Solaris
7 Operating
7 Operating
.
/cdrom/solaris_7_399_suppcd read only /setuid on
(current time and date)
Page 57

Installing Software and Setting Up CMS
Installing the Sun Online VTS 3.1 2-39
CentreVu®
CMS R3V8 Software Installation and Setup
3. Enter the command:
/usr/sbin/pkgadd -d /cdrom/cdrom0/Product SUNWvts SUNWvtsmn
The program responds:
Processing package instance <SUNWvts> from
</cdrom/solaris_7_399_suppcd/Product>
SunVTS
.
.
## Checking for conflicts with packages already installed.
## Checking for setuid/setgid programs.
This package contains scripts which will be executed with
super-user permission during the process of installing this
package.
Do you want to continue with the installation of <SUNWvts>
[y,n,?]
4. Enter y
The program responds:
Installing SunVTS as <SUNWvts>
## Installing part 1 of 1.
Executing i.inetdconf class script...
Completed editing /etc/inetd.conf
Sending signal to inetd to read the modified conf file...
. . . . .
Installation of <SUNWvtsmn> was successful.
Processing package instance <SUNWvtsmn> from
</cdrom/solaris7_399_suppcd/Product>
. . . . .
Installation of <SUNWvtsmn> was successful.
5. Enter eject cd to eject the CD-ROM from the computer.
Page 58

Installing Software and Setting Up CMS
Installing Link and Port Packages 2-40
CentreVu®
CMS R3V8 Software Installation and Setup
Installing Link and Port Packages 2
Installing the link and port packages includes the following:
●
Installing the
Installing
●
Installing HSI/P software
●
Installing SAI/P adapter drivers
●
Installing Aurora ports card dr ivers
●
Installing Bay Networks Annex NTS drive rs
●
Installing the
Sunlink
Solstice
HSI/S software
for Server Connect X.25 package.
SunLink
HSI/S
Software
Overview 2
Platform
Considerations
Prerequisites 2
Procedure 2
2
The
SunLink
HSI/S card(s) provides X.25 interface port s to the CMS
computer. If your system does not have an HSI/S card, skip this section.
●
2
●
●
●
●
1. Load the “
Enterprise
The
The HSI/S card(s) must be installed before install ing the software.
Verify that you are logged in as
Obtain the “
Solaris
3000,
Enterprise
3500, and
SPARCserver
7 operating system must be installed.
root
at the console.
SunLink
SunLink
HSI/S 3.0” CD.
HSI/S 3.0 Adapter” CD into the CD-ROM drive.
.
2. After about 15 second s, enter mount to verify the name of the
CD-ROM. The program responds with a list of devices and file
systems currently mounted. The la st line should displ ay the installed
CD, as shown below:
/cdrom/sunhsis_3_0 on /vol/dev/dsk/c0t2d0/sunhsis_3_0 read
only/setuid on (
current date and time
)
Page 59

Installing Software and Setting Up CMS
Installing Link and Port Packages 2-41
CentreVu®
CMS R3V8 Software Installation and Setup
3. Enter:
/usr/sbin/pkgadd -d /cdrom/cdrom0/Product
The program responds:
The following packages are available:
UNWhsis SunHSI/S Driver for SBUS
1 S
(sparc) 3.0,REV=1998.11.09
2 SUNWhsism SunHSI/S Man Pages for SBUS
(sparc) 3.0,REV=1998.11.09
3 SUNWhsisu SunHSI/S Utilities for SBUS
(sparc) 3.0,REV=1998.11.09
Select package(s) you wish to process
(or ‘all’ to process all pack ages. (default:all
[?,??,q]:
Press Enter
4.
Processing package instance <SUNWhsis> from
</cdrom/sunhsis_3_0/Product>
SunHSI/S Driver for SBus
. . . . . .
This package contains scripts which will be executed with
super-userpermission during the process of installing this
package.
Do you want to continue with the installation of <SUNWhsis>
[y,n,?]
Page 60

Installing Software and Setting Up CMS
Installing Link and Port Packages 2-42
CentreVu®
CMS R3V8 Software Installation and Setup
5. Enter: y
The program proceeds to install the SUNWhsis, SUNWhsism and
SUNWhsisu packages. When the installation is finished, the
program returns to the installation menu and prompts:
Installing SunHSI/S Driver for SBus as <SUNWhsis>
Select package(s) you wish to process (or ’all’
to process all packages). (default: all)
## Installing part 1 of 1.
[?,??,q]:
<
>
6. Enter: q
7. Enter: eject cdrom
Installing the HSI/P Software
Overview 2
Platform
Considerations
Prerequisites 2
2
The HSI/P card(s) provides interface ports to the CMS computer. If your
system does not have an HSI/P card, skip this section.
●
Ultra
5 only.
2
●
The
Solaris
●
The HSI/P card(s) must be installed before install ing the software.
●
Verify that you are logged in as
●
Obtain the “SunHSI/P Adapter 2.0” CD.
7 operating system must be installed.
root
at the console.
Page 61

Installing Software and Setting Up CMS
Installing Link and Port Packages 2-43
CentreVu®
CMS R3V8 Software Installation and Setup
Procedure 2
1. Load the “SunHSI/P Adapter 2.0” CD into the CD-ROM drive.
2. After about 15 seconds, enter mount to verify the name of the
CD-ROM. The program responds with a list of devices and file
systems currently mounted. The last line shoul d display the ins talled
CD, as shown below:
.
/cdrom/sunhsip_2_0 on /vol/dev/dsk/c0t2d0/sunhsip_2_0 read only
current time and date
on (
)
3. Enter:
/usr/sbin/pkgadd -d /cdrom/cdrom0/Product SUNWhsip
The following packages are available:
1 SUNWhsip SunHSI/P Driver for PCI
(sparc) 2.0,REV=1998.10.22
2 SUNWhsipm SunHSI/P Man Pages for PCI
(sparc) 2.0,REV=1998.10.22
3 SUNWhsipu SunHSI/P Utilities for PCI
(sparc) 2.0,REV=1998.10.22
Select package(s) you wish to process (or ’all’ to process
all packages). (default: all) [?,??,q]:
4. Press Enter
The program responds:
Processing package instance <SUNWhsip> from
</cdrom/sunhsip_2_0/Product>
SunHSI/P Driver for PCI
(sparc) 2.0,REV=1998.10.22
. . . . . . . . .
This package contains scripts which will be executed with
super-user permission during the process of installing this
package.
Do you want to continue with the
installation of <SUNWhsip> [y,n,?]
Page 62

Installing Software and Setting Up CMS
Installing Link and Port Packages 2-44
CentreVu®
CMS R3V8 Software Installation and Setup
5. Enter: y
The program proceeds to install the SUNWhsip, SUNWhsipm and
SUNWhsipu packages. When the installation is finished, the
program returns to the installation menu and prompts:
Select package(s) you wish to process (or
’all’ to process all packages). (default:
all) [?,??,q]:
6. Enter q:
7. Enter: eject cdrom
Page 63

Installing Software and Setting Up CMS
Installing Link and Port Packages 2-45
CentreVu®
CMS R3V8 Software Installation and Setup
Installing the SAI/P Adapter Drivers
Overview 2
Platform
Considerations
Prerequisites 2
Procedure 2
2
The SAI/P card/cards provides s erial async hronous i nter face por ts to the
CMS computer. If your system does not have an SAI/P card, go the next
procedure.
●
Ultra
5 only
2
●
The
Solaris
●
The SAI/P card(s) must be installed before instal ling the software.
●
Verify that you are logged in as
●
Obtain the “SunSAI/P Adapter 2.0” CD and load it in the CD-ROM
7 operating system must be installed.
root
at the console.
drive.
1. After about 15 seconds, enter mount to verify the name of the
CD-ROM. The program responds with a list of devices and file
systems currently mounted. The last line shoul d display the ins talled
CD as shown below:
/cdrom/sunsaip_2_0 on /vol/dev/dsk/c0t2d0/sunsaip_2_0
/cdrom/sunsaip_2_0 on /vol/dev/dsk/c0t2d0/sunsaip_2_0
read only on (
read only on (
current date and time
current date and time
)
)
Page 64

Installing Software and Setting Up CMS
Installing Link and Port Packages 2-46
CentreVu®
CMS R3V8 Software Installation and Setup
2. Enter:
/usr/sbin/pkgadd -d /cdrom/cdrom0/Product/saip_2
The program responds with a list of available packages:
The following packages are available:
1 SUNWsaip Serial Asynchronous Interface Driver (PCI)
(sparc) 2.0,REV=1998.10.19
2 SUNWsaipu Serial Asynchronous Interface Utilities (PCI)
(sparc) 2.0,REV=1998.10.19
Select package(s) you wish to process (or ’all’ to process
all packages). (default: all) [?,??,q]:
3. Press: Enter
The program responds:
This package contains scripts which will be executed
with super-user permission during the process of
installing this package.
Do you want to continue with the installation of
<SUNWsaip> [y,n,?]
4. Enter: y
The program installs the SAI/P driver packages and ret urns to the
installation menu.
5. Enter: q
6. Enter: eject cdrom
Page 65

r
Installing Software and Setting Up CMS
Installing Link and Port Packages 2-47
CentreVu®
CMS R3V8 Software Installation and Setup
Installing the Aurora Port Drivers
Overview 2
Platform
Considerations
Prerequisites 2
Procedure 2
2
The following procedures are u sed to instal l the Aurora po rts card dri vers.
●
SPARCserver only
2
●
The
Solaris
●
Verify that you are logged in as
●
Obtain the “Aurora Drivers” CD.
7 operating system must be installed.
root
at the console.
1. Load the “Aurora Drivers” CD into the CD-ROM drive.
2. After about 15 seconds, enter mount to verify the name of the
CD-ROM. The program responds with a list of devices and file
systems currently mounted. The last line shoul d display the ins talled
CD as shown below:
. . .
/cdrom/aurora_drivers on /vol/dev/dsk/c0t2d0/aurora_drivers
read only on (
current date and time
)
3. Add the Aurora package by entering the following:
/usr/sbin/pkgadd -d /cdrom/cdrom0
The program responds:
The following packages are available:
1 AURAacs Aurora 40X, 80X, WMS 2000/3000 Base Driver
(sparc) 6.14
2 AURAacsa Aurora 40X, 80X, WMS 2000/3000 Asynchronous Drive
(sparc) 3.14
3 AURAsio16 Aurora 1600SE device driver
(sparc) 5.13
Select package(s) you wish to process (or ’all’ to process
all packages). (default: all) [?,??,q]:
Page 66

Installing Software and Setting Up CMS
Installing Link and Port Packages 2-48
CentreVu®
CMS R3V8 Software Installation and Setup
4. Select 1 and 2 to install the 8-port car d drivers , select 3 to install
the 16-port card drivers, or pr ess Ente r to select both sets of d river s.
NOTE:
Do
not
try to install the 16-port card drivers and then install
the 8-port card drivers; you will g et errors during installation. The
following screens show the installation for both sets of drivers. If
you select one or the other, your installation screens will dif fer.
The program responds:
Processing package instance <AURAacs> from
</cdrom/aurora_drivers>
Aurora 40X, 80X, WMS 2000/3000 Base Driver
(sparc) 6.14
.
.
This package contains scripts which will be executed with
super-user permission during the process of installing this
package.
Do you want to continue with the installation of <AURAacs>
[y,n,?]
5. Enter y
The program responds:
Installing Aurora 40X, 80X, WMS 2000/3000 Base Driver
as <AURAacs>
## Installing part 1 of 1.
/etc/rc2.d/S91AURAacs
.
.
[ verifying class <sed> ]
## Executing postinstall script.
Installation of <AURAacs> successful.
There are 2 more packages to be installed.
Do you want to continue with installation [y,n,?]
Page 67

Installing Software and Setting Up CMS
Installing Link and Port Packages 2-49
CentreVu®
CMS R3V8 Software Installation and Setup
6. Enter y
The program responds:
Processing package instance <AURAacsa> from
</cdrom/aurora_drivers>
Aurora 40X, 80X, WMS 2000/3000 Asynchronous Driver
(sparc) 3.14
.
.
Using </opt> as the package base directory.
## Processing package information.
## Processing system information.
## Verifying package dependencies.
Do you want to continue with the installation of <AURAacsa>
[y,n,?]
7. Enter y
The program responds:
## Verifying disk space requirements.
## Checking for conflicts with packages already installed.
## Checking for setuid/setgid programs.
This package contains scripts which will be executed with superuser permission during the process of installing this package.
Do you want to continue with the installation of <AURAacsa>
[y,n,?]
8. Enter y
The program responds:
Installing Aurora 40X, 80X, WMS 2000/3000 Asynchronous Driver as
<AURAacsa>
## Installing part 1 of 1.
/etc/rc2.d/S92AURAacsa
.
.
## Executing postinstall script.
Installation of <AURAacsa> successful.
There is 1 more package to be installed.
Do you want to continue with installation [y,n,?]
Page 68

v
r
Installing Software and Setting Up CMS
Installing Link and Port Packages 2-50
CentreVu®
CMS R3V8 Software Installation and Setup
9. Enter y
The program responds:
Processing package instance <AURAsio16> from </cdrom/aurora_dri
Aurora 1600SE device driver
(sparc) 5.13
.
.
This package contains scripts which will be executed
with super-user permission during the process of
installing this package.
Do you want to continue with the installation of
<AURAsio16> [y,n,?]
10. Enter y
The program responds:
Installing Aurora 1600SE device driver as <AURAsio16>
## Installing part 1 of 1.
/kernel/drv/sio16
.
.
Installation of <AURAsio16> successful.
The following packages are available:
1 AURAacs Aurora 40X, 80X, WMS 2000/3000 Base Driver
(sparc) 6.14
2 AURAacsa Aurora 40X, 80X, WMS 2000/3000 Asynchronous Drive
(sparc) 3.14
3 AURAsio16 Aurora 1600SE device driver
(sparc) 5.13
Select package(s) you wish to process (or ’all’ to process
all packages). (default: all) [?,??,q]:
11. Enter q
12. Enter eject cdrom
Page 69

Installing Software and Setting Up CMS
Installing Link and Port Packages 2-51
CentreVu®
CMS R3V8 Software Installation and Setup
Installing the Bay Networks Annex NTS Drivers
Overview 2
Platform
Considerations
Prerequisites 2
Procedure 2
2
This procedure installs the NTS drivers. If your system is not using an
NTS, skip this section
NOTE:
If you are reinstalling the NTS drivers, the options presented will differ
slightly.
●
All platforms.
2
●
The
Solaris
●
Verify that you are logged in as
●
Obtain the “Annex Communication Server R10.0(B) Annex Host
7 operating system must be installed.
root
at the console.
Tools” CD.
1. Load the “Annex Communication Server R10.0(B) Annex Host
Tools” CD.
2. After about 15 seconds, enter mount to verify the name of the
CD-ROM. The program responds with a list of devices and file
systems currently mounted. The last line shoul d display the ins talled
CD, as shown below:
. . .
/cdrom/baynet_annex_system on /vol/dev/dsk/c0t2d0/baynet_annex_
system read only on (
current date and time
)
3. Enter:
/cdrom/cdrom0/install
Page 70

Installing Software and Setting Up CMS
Installing Link and Port Packages 2-52
CentreVu®
CMS R3V8 Software Installation and Setup
4. The program responds:
Do you want to continue (y/n/q=quit) [y]:
5. Press Enter
The program responds:
After installing one product you will be asked if you want
to install the other product.
Indicate desired action:
1) Install Comm.Server Software
2) Install Annex Manager
3) Quit
Enter desired action [1]:
6. Press Enter
The program responds:
Enter the name of the Comm. Server Software installation
directory.
Directory name [/usr/annex/cs_R10.0B]:
7. Press Enter
The program responds:
Comm. Server Software Installation Script
This installation shell script will examine your system and
possibly ask you questions to generate the needed configuration
to allow you to compile the Comm. Server host utilities.
.
Type carriage return to continue. Your cursor should be here-->
8. Press Enter
The program responds:
Where do you want the Annex utilities installed?
Utility directory [/usr/annex]:
Page 71

Installing Software and Setting Up CMS
Installing Link and Port Packages 2-53
CentreVu®
CMS R3V8 Software Installation and Setup
9. Press Enter
The program responds:
BFS directory [/usr/spool/erpcd/bfs]:
10. Press Enter
The program responds:
Do you wish to install manual pages at this time? [y]:
11. Press Enter
The program responds:
On-line manual pages will be installed in the appropriate
subdirectory (i.e., ANNEX and index) of the manual base
directory.
What is the the manual page base directory? (q=quit)
[/usr/man]:
12. Press Enter
The program responds:
Available installation options are:
1. Install binary images only (7MB)
2. Install source code only, but do not compile (11MB)
3. Get both binary images and source code, but do not
compile (13MB)
4. Quit
Enter installation choice [1]:
13. Press Enter
The program responds:
Are you ready to continue (y/q=quit) [y]:
Page 72

Installing Software and Setting Up CMS
Installing Link and Port Packages 2-54
CentreVu®
CMS R3V8 Software Installation and Setup
14. Press Enter
The program responds:
1) Com-Server Annex 3
2) Com-Server MicroAnnex
3) Install all images
Please select the annex model(s) you will be using.
You can specify a list separated by spaces or ’N’ for none:
15. Select the Install all images option.
The program responds:
To save room on your system, the above directories can be
removed. You may want to enter "?" at the prompt below to get
more help.
Remove these directories (y/n) [n]:
16. Enter y
The program responds:
TWhat is your default security regime:
1) acp
2) native UNIX
3) SecureID
4) safeword
5) kerberos
6) deny (access will be denied)
7) none (access is unconditionally granted)
8) radius
Enter security regime [1]:
17. Enter 7 to select the none option. The program responds:
Do you want the restrictions to apply to PPP and SLIP? [n]:
Page 73

Installing Software and Setting Up CMS
Installing Link and Port Packages 2-55
CentreVu®
CMS R3V8 Software Installation and Setup
18. Press Enter
The program responds:
Do you want the erpcd daemon to provide access control (y/n)
[y]:
19. Enter: n
The program responds:
Copies of the following files have been updated:
service annex-initd
Do you want to install any of these files (y/n) [y]
20. Press Enter. The program responds:
Copy file save/modified/service to /etc/services
(y/n) [y]:
21. Press Enter
The program responds:
Copy file save/modified/annex-initd
/etc/rc2.d/annex-initd
(y/n) [y]:
22. Press Enter
The program responds:
WARNING: The file annex-initd will have to be linked or
No more system files to create or update
copied to an appropriate file in /etc/rc2.d to have
the erpcd daemon started and shut-down automatically.
Do you want to start-up the new version of the erpcd
daemon? (y/n) [y]:
No more system files to create or update
Page 74

Installing Software and Setting Up CMS
Installing Link and Port Packages 2-56
CentreVu®
CMS R3V8 Software Installation and Setup
23. Press Enter
The program responds:
Starting-up the new version of the erpcd daemon.
Comm.Server Software Installation Script
Do you wish to install the Annex Manager (y/n/q=quit) [y]:
24. Enter: n
The program responds with the system prompt.
Setting Up the NTS Start-Up Files
The following commands create symbolic links to S99annex-initd
and other important files and then check to verify that the files were
linked successfully.
2
1. On a single command line, enter:
echo “/ect/rc2.d/annex-initd start” >
/etc/rc2.d/S99annex-initd
1. Enter:
chmod 744 /etc/rc2.d/annex-initd
chmod 744 /etc/rc2.d/S99annex-initd
2. Enter:
ls -l /etc/rc2.d/annex-initd
ls -l /etc/rc2.d/S99annex-initd
After each ls command, review the first column of the
output to
verify that file permissions are set correctly. The correct file
permissions will exhibit the following format:
- r w x r - - r - -
3. Enter:
ln -s /usr/annex/na /usr/bin/na
ln -s /usr/annex/rtelnet /usr/bin/rtelnet
ln -s /usr/annex/aprint /usr/bin/aprint
Page 75

Installing Software and Setting Up CMS
Installing Link and Port Packages 2-57
4. Enter:
ls -l /usr/bin/na
ls -l /usr/bin/rtelnet
ls -l /usr/bin/aprint
After each command, review the output and verify that the symbolic
links are set correctly. If the symbolic links are set correctly, the ls
command output will indicate the link at the end of each line. For
example, the ls -l /usr/bin/na command will generate the
following output:
CentreVu®
CMS R3V8 Software Installation and Setup
-rwxr--r-- 1 root other 563072 (
5. Enter: eject cdrom
Installing the
Solstice
for
Server Connect
X.25 Package
Overview 2
Platform
Considerations
2
This procedure installs the X.25 drivers used for connections to the
switch. If the CMS computer is using LAN connectivity fo r TCP/IP instead
of X.25 connectivity to the switch, ski p this section.
●
All platforms.
2
current date
) usr/bin/na -> usr/annex/na
Prerequisites 2
●
The
Solaris
●
Verify that you are logged in as
●
Obtain the “
●
Obtain the 21-character password for your X.25 license.
If the password for your X.25 license is not included with your CD,
you must contact
that is included with the CD for procedures you must follow t o obtain
your password. Note that the only way
is with a FAX or by electronic mail.
7 operating system must be installed.
root
at the console.
Solstice
for Server Connect, Version - March 1997” CD.
Sun
directly. See the Proof of License Certificate
Sun
will deliver this password
Page 76

Installing Software and Setting Up CMS
Installing Link and Port Packages 2-58
CentreVu®
CMS R3V8 Software Installation and Setup
Retrieving System
Information
If you already know your hostname, hostid, and X.25 license
password, fill in the table below, skip this procedure, and go to the
2
“Installing the Solstice for Server Connect X.25 Package
” procedure. If
you do not already know your hostname and hostid, use this
procedure to determine that information:
1. Enter the command: showrev
The program displays something similar to the fol lowing:
Hostname: XXXXXXXX
Hostid: XXXXXXX
Release: 5.7
Kernel architecture: sun4u
Application architecture: sparc
Hardware provider: Sun_Microsystems
Domain:
Kernel version: SunOS 5.7
Generic
<number & date>
2. Identify the Hostname and Hostid (similar to that shown in bold
on the previous screen). Use the following table to record this
information, along with your X.25 password.
Installing the
Solstice
Connect
for Server
X.25
Drivers
Hostname
Hostid
X.25 Password
1. Load the “
Solstice
for Server Connect, Version - March 1997” CD
into the CD-ROM drive.
2. After about 15 seconds, enter mount to verify the name of the
2
CD-ROM. The program responds with a list of devices and file
systems currently mounted. The la st line should displ ay the installed
CD, as shown below:
. . .
. . .
. . .
/cdrom/server_connect_397 on /vol/dev/dsk/c0t2d0/server_connect_
397 read only on (
current date and time
)
Page 77

Installing Software and Setting Up CMS
Installing Link and Port Packages 2-59
CentreVu®
CMS R3V8 Software Installation and Setup
3. Change directories by entering:
cd /cdrom/cdrom0/products
4. Enter:
/usr/sbin/pkgadd -d x25/Image/sparc
The program responds:
The following packages are available:
1 SUNWllc2a LLC2 kernel modules and include files for Solaris/SPARC
(sparc) 9.1
2 SUNW11c2b LLC2 user programs and man pages for Solaris/SPARC
(sparc) 9.1
3 SUNWx25a X.25 kernel modules and include files for Solaris/SPARC
(sparc) 9.1
4 SUNWx25b X.25 user programs and libraries for Solaris/SPARC
(sparc) 9.1
5 SUNWx25h Solstice X.25 9.1 documentation in HTML
(all) 1.1
Select package(s) you wish to process (or ‘all’ to process
all packages). (default: all) [?,??,q]:
5. Enter 1 2 3 4
The program responds:
Processing package instance <SUNWllc2a> from
</cdrom/server_connect_397/products/x25/Image/sparc>
.....
.....
.....
This package contains scripts which will be executed with super-user
permission during the process of installing this package.
Do you want to continue with the installation of <SUNWllc2a> [y,n,?]
Page 78

a
>
Installing Software and Setting Up CMS
Installing Link and Port Packages 2-60
CentreVu®
CMS R3V8 Software Installation and Setup
6. Enter y
The program responds:
Installing llc2a
,
,
,
The following files are already installed on the system and are being
used by another package:
*/opt/SUNWconn/man <attricute change only>
*/opt/SUNWconn/man/man7 <attribute change only>
* - conflict with a file which does not belong to any package.
Do you want to install these conflicting files [y,n,?,q]
7. Enter y
The program responds:
Installing LLC2 kernel modules and include files for Solaris/SPARC as <SUNWllc2
## Installing part 1 of 1.
This package contains scripts which will be executed with super-user
permission during the process of installing this package.
Do you want to continue with the installation of <SUNWx25a> [y,n,?]
.....
.....
.....
8. Enter y
The program responds:
Installing X.25 kernel modules and include files for Solaris/SPARC as <SUNWx25a
## Installing part 1 of 1.
This package contains scripts which will be executed with super-user
permission during the process of installing this package.
Do you want to continue with the installation of <SUNWx25b> [y,n,?]
.....
.....
.....
Page 79

Installing Software and Setting Up CMS
Installing Link and Port Packages 2-61
CentreVu®
CMS R3V8 Software Installation and Setup
9. Enter y
The program responds:
Installing X.25 user programs and libraries for Solaris/SPARC as <SUNWx25b>
## Installing part 1 of 1.
Installation of <SUNWx25b> was successful.
The following packages are available:
Select package(s) you wish to process (or ‘all’ to process
all packages). (default: all) [?,??,q]:
.....
1 SUNWllc2a LLC2 kernel modules and include files for Solaris/SPARC
(sparc) 9.1
2 SUNW11c2b LLC2 user programs and man pages for Solaris/SPARC
(sparc) 9.1
3 SUNWx25a X.25 kernel modules and include files for Solaris/SPARC
(sparc) 9.1
4 SUNWx25b X.25 user programs and libraries for Solaris/SPARC
(sparc) 9.1
5 SUNWx25h Solstice X.25 9.1 documentation in HTML
(all) 1.1
10. Enter q
The program responds with the system prompt.
11. Enter:
/usr/sbin/pkgadd -d licenses/Image/sparc SUNWcclit SUNWlicsw
The program responds:
Processing package instance <SUNWcclit> from
</cdrom/server_connect_397/products/Image/sparc>
....
....
This package contains scripts which will be executed with super-user
permission during the process of installing this package.
Do you want to continue with the installation of <SUNWcclit> [y,n,?]
Page 80

Installing Software and Setting Up CMS
Installing Link and Port Packages 2-62
CentreVu®
CMS R3V8 Software Installation and Setup
12. Enter y
The program responds:
Installing Solstice Connect Center license
information as <SUNWcclit>
## Installing part 1 of 1.
This package contains scripts which will be executed
with super-user permission during the process of
installing this package.
Do you want to continue with the installation of
<SUNWlicsw> [y,n,?]
.....
.....
13. Enter y
The program responds:
Installing FlexLM License System as <SUNWlicsw>
## Installing preinstall script.
## Installing part 1 of 1.
Installation of <SUNWlicsw> was successful.
#
.....
.....
14. Move to the root directory by entering cd
15. Enter eject cd
The X.25 license must now be setup.
Page 81

e
Installing Software and Setting Up CMS
Installing Link and Port Packages 2-63
CentreVu®
CMS R3V8 Software Installation and Setup
Setting Up the X.25
License
2
Do not change the host name of your computer after installing the
X.25 license. Changing the system’s host name disables the X.25
software license.
1. Enter the command:
/etc/opt/licenses/lit_tty
The program responds:
Select Product
[ ] Solstice Frame Relay 2.0 for SPARC
[ ] Solstice Frame Relay 2.0 for x86
[ ] Solstice PPP 3.0.1 for SPARC
[ ] Solstice PPP 3.0.1 for x86
[ ] Solstice OSI (Stack) 8.1 for SPARC
[ ] Solstice OSI (Stack) 8.1 for x86
[ ] Solstice FTAM 8.0.2 for SPARC
[ ] Solstice FTAM 8.0.2 for x86
[x] Solstice x.25 for Solaris 2 SPARC 9.1
Solstice x.25 for Solaris 2 x86 9.1
[ ]
[ ] Solstice x.400 MTA 9.0 for SPARC
[ ] Solstice x.400 Message Store 9.0 for SPARC
[ ] Solstice SMTP/x.400 Internet Adaptor 9.0 for SPARC
CAUTION:
[ ] Exit - Save Licenses [ ] Exit - Don’t Save Licens
** x=select product and go to license screen **
** Return=next product **
** n=Next Page p=Previous Page$
Page 1 of 2
2. Press Enter repeatedly (do not use the Tab or arrow keys) until the
cursor moves to the brackets in front of the line that reads
Solstice X.25 for Solaris 2 SPARC 9.1.
Page 82

Installing Software and Setting Up CMS
Installing Link and Port Packages 2-64
CentreVu®
CMS R3V8 Software Installation and Setup
3. Enter an x in the brackets. The program responds:
Solstice X.25 for Solaris 2 SPARC
9.1
Servers: [x] 1 [ ] 3 [ ] 5 **x=select. Tab=next count. Return=server name**
SERVER NAME HOST ID
1: <hostname> <hostid>
Phone Number List [ ] USA: (+1) 800-872-4786
Expiration Date:
Rights to Use: 1 Data Checksum: aa
Password: Password Checksum: xx
Done setting Up This License [x] Cancel This License [ ]
** x=select/deselect Return=next field **
4. Enter an x in the brackets between Servers: and 1. Press
Enter.
5. Enter the SERVER NAME (Hostname) as recorded earlier in the
section “Retrieving System Info rmation
.” Press Enter.
6. Enter the HOST ID (Hostid) as recorded earlier in the section
“Retrieving System Information
.” Press Enter.
7. Pressing Enter, position the cursor on th e Rights to Use: fi eld.
Enter a 1, and press Enter.
8. With the cursor on the Password: field, enter the 21-character
password, and press Enter
.
9. Before you continue, compare the Data Checksum and
Password Checksum values shown on this screen (in the
example on Page 2-65
, ce and 77). If the Rights to Use and
the X.25 password were entered correctly, these checksum values
should match the checksum values that are printed on your license
information that you received by FAX or electronic mail. These
checksum values are identified on your license as the DC and PC
values, and are found just to the right of your password.
Page 83

Installing Software and Setting Up CMS
Installing Link and Port Packages 2-65
CentreVu®
CMS R3V8 Software Installation and Setup
10. Enter an x in the brackets for the Done Setting Up This
License [ ] field.
The program displays a popup screen similar to the followi ng:
Solstice X.25 for Solaris 2 SPARC
9.1
Servers: [x] 1 [ ] 3 [ ] 5 **x=select. Tab=next count. Return=server name**
SERVER NAME HOST ID
1: pluto1 8083ad70
Licence information successfully entered for
Solstice X.25 for Solaris 2 SPARC 9.1
Type Any Key to Continue. . .
Phone Number List [ ] USA: (+1) 800-872-4786
Expiration Date:
Rights to Use: 1 Data Checksum: ce
Password: 08BDAD0311158CDAE0E6E Password Checksum: 77
11. Press any key to continue
12. Pressing Enter, move the cursor to the [ ] Exit - Save
Licenses field. Enter an x in that field.
The program responds:
Select Product
[ ] SunLink X.25 8.0.2 for Solaris 2 SPARC 8.0.2
[ ] Solstice Frame Relay 2.0 for SPARC
[ ] Solstice Frame Relay 2.0 for x86
[ ] Solstice PPP 3.0.1 for SPARC
[ ] Solstice PPP 3.0.1 for x86
[ ] Solstice OSI (Stack) 8.1 for SPARC
[ ] Solstice OSI (Stack) 8.1 for x86
[ ] Slolstice FTAM 8.0.2 for SPARC
[ ] Solstice FTAM 8.0.2 for x86
[x] Solstice x.25 for Solaris 2 SPARC 9.1
[ ]
[ ] Solstice x.400 MTA 9.0 for SPARC
[ ] Solstice x.400 Message Store 9.0 for SPARC
[ ] Solstice SMTP/x.400 Internet Adaptor 9.0 for SPARC
[ ] Exit - Save Licenses [ ] Exit - Don’t Save Licenses
** x=select product and go to license screen **
** Return=next product **
** n=Next Page p=Previous Page$
Licenses are being installed.
Please wait . . .
Solstice x.25 for Solaris 2 x86 9.1
x
Page 1 of 2
Page 84

Installing Software and Setting Up CMS
Installing Link and Port Packages 2-66
CentreVu®
CMS R3V8 Software Installation and Setup
When the license installation completes, the program responds:
Licenses are being installed.
[ ] Solstice FTAM 8.0.2 for x86
Please wait . . .
[x] Solstice x.25 for Solaris 2 SPARC 9.1
[ ]
Solstice x.25 for Solaris 2 x86 9.1
[ ] Solstice x.400 MTA 9.0 for SPARC
[ ] Solstice x.400 Message Store 9.0 for SPARC
[ ] Solstice SMTP/x.400 Internet Adaptor 9.0 for SPARC
[ ] Exit - Save Licenses [ ] Exit - Don’t Save Licenses
** x=select product and go to license screen **
** Return=next product **
** n=Next Page p=Previous Page
License Successfully Installed for:
Solstice X.25 for Solaris 2 SPARC 9.1
The license daemon log file is located in /tmp/license_log
Now Execute the Script
/etc/opt/license/LIC_CONFIG_SCRIPT
On Any Other Servers Containing the Product Software
#
Page 1 of 2
Disregard the Now Execute the Script statement on this
screen. This has already been done. The licensing of the X.25
software is complete.
13. Check the /tmp/license_log file to verify that the license was
installed correctly. The following is an example of a successful log
file.
16:21:22 (lmgrd) FLEXlm (v4.1) started on
16:21:22 (lmgrd) FLEXlm Copyright 1988-1994, Globetrotter Software, Inc
16:21:22 (lmgrd) License file: "/etc/opt/licenses/licenses_combined"
16:21:22 (lmgrd) Starting vendor daemons ...
16:21:22 (lmgrd) Started lic.SUNW
16:21:24 (lic.SUNW) Not logging IN messages
16:21:24 (lic.SUNW) Not logging OUT messages
16:21:24 (lic.SUNW) Not logging QUEUED messages
16:21:24 (lic.SUNW) Server started on
cmshost
cmshost
(Sun) (11/5/98)
for: solstice_x.25
Page 85

Installing Software and Setting Up CMS
Installing INFORMIX 2-67
CentreVu®
CMS R3V8 Software Installation and Setup
Installing
INFORMIX
Overview 2
Platform
Installing the
INFORMIX
tasks:
●
Set the environment
●
Install the
package (optional)
●
Install the
(required)
●
Install the
●
Install the
package (required).
●
All platforms.
software for R3V8 consists of the following
INFORMIX
INFORMIX
INFORMIX
INFORMIX
B
Structured Query Language (SQL) 7.20
Standard Engine (SE) 7.22 package
Runtime ESQL 9.14 package (required)
International Language Suppleme nt (ILS) 2.1 1
Considerations
Prerequisites 2
2
●
The
Solaris
●
Verify that you are logged in as
●
Obtain the “
7 operating system must be installed.
root
at the console.
INFORMIX
SQL Version 7.20” CD, License serial
number (S/N), and Serial Number Key (optional).
●
Obtain the “
INFORMIX
SE Version 7. 22” CD, License S/N, and
Serial Number Key (required).
●
Obtain the “Runtime ESQL 9.14” CD, License S/N, and Serial
Number Key (required).
●
Obtain the “
INFORMIX
ILS Version 2.11” CD (required).
Page 86

Installing Software and Setting Up CMS
Installing INFORMIX 2-68
CentreVu®
CMS R3V8 Software Installation and Setup
Setting Up the
INFORMIX
Environment
1. Set the terminal type by entering:
TERM=sun-cmd
2
export TERM
2. Add a new group and user to the system by entering:
groupadd -g 100 informix
useradd -g informix -u 100 -m -d /opt/informix
informix
3. Set the environment variables by entering:
INFORMIXDIR=/opt/informix
export INFORMIXDIR
PATH=$PATH:$INFORMIXDIR/bin
export PATH
INFORMIX
The
installation environment is now set.
Installing the
INFORMIX
SQL
7.20 Package
(Optional)
This software package is requir ed only if you are us ing c ustom r eports. If
you do not need this package, skip this section and go to the “Installing
the INFORMIX SE 7.22 Package (Required)” section on Page 2-71.
1. Use the following table to record the Serial Number and Serial
2
2. Load the “
Number Key for this
Serial Number
Serial Number Key
INFORMIX
INFORMIX
SQL 7.20” CD into the CD-ROM drive.
package.
Page 87

Installing Software and Setting Up CMS
Installing INFORMIX 2-69
CentreVu®
CMS R3V8 Software Installation and Setup
3. After about 15 seconds, enter mount to verify the name of the
CD-ROM. The program responds with a list of devices and file
systems currently mounted. The last line shoul d display the ins talled
CD, as shown below:
. . .
. . .
. . .
/cdrom/unnamed_cdrom on /vol/dev/dsk/c0t2d0/unnamed_cdrom read
only on (
current date and time
)
4. Change to the
INFORMIX
directory by entering:
cd $INFORMIXDIR
5. To verify that you are in the
INFORMIX
directory, enter:
pwd
The system should respond:
/opt/informix
6. Enter the following command to copy the
the CD-ROM to the current directory:
tar xvf /cdrom/cdrom0/sql.tar
The program responds:
x installsql,
x bin/cace,
. . . . .
. . . . .
. . . . .
x gls/lc11/os/sv.lc,
XXX
bytes, XX tape blocks
XXX
bytes, XX tape blocks
XXX
bytes, XX tape blocks
INFORMIX
SQL files from
Page 88

Installing Software and Setting Up CMS
Installing INFORMIX 2-70
CentreVu®
CMS R3V8 Software Installation and Setup
7. Start the
INFORMIX
SQL package installation by entering:
./installsql
The program responds:
INFORMIX-SQL Version 7.20.UC1
Copyright (C) 1984-1996 Informix Software, Inc.
Installation Script
This installation procedure must be run by root (superuser). It will change the owner, group, and mode of all
files of this package in this directory. There must be a
user "informix" and a group "informix" known to the system.
Press RETURN to continue,
or the interrupt key (usually CTRL-C or DEL) to abort.
8. Press Enter to continue with the install ation procedure. The program
responds:
Enter your serial number (e.g.,INF#R999999) >
9. Enter the 11-character License S/N (serial number) that is on your
license. The program responds:
Enter your serial number KEY (uppercase letters only) >
10. Enter the 6-character Serial Number Key that is on your license. The
program responds:
WARNING!
This software, and its authorized use and number of
users, are subject to the applicable license agreement with
Informix Software, Inc. If the number of users exceeds the
licensed number, the excess users may be prevented from using
the software. UNAUTHORIZED USE OR COPYING MAY SUBJECT YOU AND
YOUR COMPANY TO SEVERE CIVIL AND CRIMINAL LIABILITIES.
Press RETURN to continue,
or the interrupt key (usually CTRL-C or DEL) to abort.
Page 89

Installing Software and Setting Up CMS
Installing INFORMIX 2-71
CentreVu®
CMS R3V8 Software Installation and Setup
1 1. Press Enter to continue with the installation procedure. The program
responds:
Installing directory .
. . . . .
. . . . .
. . . . .
Installation of INFORMIX-SQL complete.
#
12. Enter eject cd
Installing the
INFORMIX
SE
7.22 Package
(Required)
1. Use the following table to record the Serial Number and Serial
Number Key for this INFORMIX package.
Serial Number
2
Serial Number Key
2. Load the “
INFORMIX
SE Version 7.22” CD into the CD-ROM drive.
After about 15 seconds, enter mount to verify the name of the
CD-ROM. The program responds with a list of devices and file
systems currently mounted. The last line shoul d display the ins talled
CD as shown below:
. . .
. . .
. . .
/cdrom/unnamed_cdrom on /vol/dev/dsk/c0t2d0/unnamed_cdrom read
only on (
current date and time
)
3. Change to the
INFORMIX
directory by entering:
cd $INFORMIXDIR
4. To verify that you are in the
system should respond:
/opt/informix
INFORMIX
directory, enter pwd. The
Page 90

Installing Software and Setting Up CMS
Installing INFORMIX 2-72
CentreVu®
CMS R3V8 Software Installation and Setup
5. Enter the following command to copy the
INFORMIX
the CD-ROM to the current directory:
tar xvf /cdrom/cdrom0/se.tar
The program responds:
x installse,
x bin/secheck,
. . . . .
. . . . .
. . . . .
x gls/lc11/os/sv.lc,
#
XXX
bytes, XX tape blocks
XXX
bytes, XX tape blocks
XXX
bytes, XX tape blocks
6. Enter the following to start the installation of the
software package:
./installse
The program responds:
SE files from
INFORMIX
SE
INFORMIX-SE Version 7.22.UC1
Copyright (C) 1984-1996 Informix Software, Inc.
Installation Script
This installation procedure must be run by root (super-user).
It will change the owner, group, and mode of all files of this
package in this directory. There must be a user “informix” and
a group “informix” known to the system.
Press RETURN to continue,
or the interrupt key (usually CTRL-C or DEL) to abort.
7. Press Enter to continue with the install ation procedure. The program
responds:
Enter your serial number (e.g.,INF#R999999) >
8. Enter the 11-character License S/N (serial number) that is on your
license. The program responds:
Enter your serial number KEY (uppercase letters only) >
Page 91

Installing Software and Setting Up CMS
Installing INFORMIX 2-73
CentreVu®
CMS R3V8 Software Installation and Setup
9. Enter the 6-character Serial Number Key that is on your license. The
program responds:
WARNING!
This software, and its authorized use and number of
users, are subject to the applicable license agreement with
Informix Software, Inc. If the number of users exceeds the
licensed number, the excess users may be prevented from using the
software. UNAUTHORIZED USE OR COPYING MAY SUBJECT YOU AND YOUR
COMPANY TO SEVERE CIVIL AND CRIMINAL LIABILITIES.
Press RETURN to continue,
or the interrupt key (usually CTRL-C or DEL) to abort.
10. Press Enter to continue with the installation. The program responds:
Installing the
INFORMIX
Runtime ESQL
9.14 Package
(Required)
Installing directory .
. . . . .
. . . . .
. . . . .
Installation of INFORMIX-SE complete.
#
11. Enter: eject cdrom
1. Use the following table to record the Serial Number and Serial
Number Key for this
INFORMIX
package.
Serial Number
Serial Number Key
2
2. Verify that the “
INFORMIX
ESQL Version 9.14” CD is already
loaded in the CD-ROM drive.
3. After about 15 seconds, enter mount to verify the name of the
CD-ROM. The program responds with a list of devices and file
systems currently mounted. The last line shoul d display the ins talled
CD, as shown below:
/cdrom/unnamed_cdrom on /vol/dev/dsk/c0t2d0/unnamed_cdrom read
only on (
current date and time
)
Page 92

Installing Software and Setting Up CMS
Installing INFORMIX 2-74
CentreVu®
CMS R3V8 Software Installation and Setup
4. Change to the
INFORMIX
directory by entering:
cd $INFORMIXDIR
5. To verify that you are in the
INFORMIX
directory, enter
pwd
6. The system should respond:
/opt/informix
7. Enter the following command to copy the
from the CD-ROM to the current directory:
tar xvf /cdrom/cdrom0/conn.tar
The program responds:
x conncontent.tar, 22489600 bytes, 43925 tape blocks
x installconn, 10704 bytes, 21 tape blocks
INFORMIX
ESQL files
8. Enter the following to start the installation of the
INFORMIX
ESQL
software package:
./installconn
The program responds:
INFORMIX-Connect Version 2.02.UC4
Copyright (C) 1984-1998 Informix Software, Inc.
cat: cannot open /opt/informix/etc/ClientSDK-cr
Your existing INFORMIX shared libraries, if any, will be
replaced and upgraded.
Are you sure? [yes/no]
9. Ignore the “cat” message, and enter y. The program responds:
Is I-Connect being installed along with Informix Dynamic
Server with Universal Data Option (Release 9, requires to
be run as user "informix")?
(yes or no)
Page 93

Installing Software and Setting Up CMS
Installing INFORMIX 2-75
CentreVu®
CMS R3V8 Software Installation and Setup
10. Enter n. The program responds:
Extracting files from conncontent file...
Installing I-Connect as user "root"...
Installation Script
Installation Script Requirements:
- A user "informix" and a group "informix" must be known
to the system.
- The product source files must have been loaded by user
root
- This installation procedure must be run by user root.
This script will change the owner, group, and mode of
many of the files of this package in this directory.
Press RETURN to continue, or the interrupt key
(usually CTRL-C or DEL) to abort.
1 1. Press Enter to continue with the installation procedure. The program
responds:
Enter your serial number (e.g.,INF#R999999) >
12. Enter the 11-character License S/N (serial number) that is on your
license. The program responds:
Enter your serial number KEY (uppercase letters only) >
13. Enter the 6-character Serial Number Key that is on your license. The
program responds:
WARNING!
This software, and its authorized use and number of
users, are subject to the applicable license agreement with
Informix Software, Inc. If the number of users exceeds the
licensed number, the excess users may be prevented from using
the software. UNAUTHORIZED USE OR COPYING MAY SUBJECT YOU AND
YOUR COMPANY TO SEVERE CIVIL AND CRIMINAL LIABILITIES.
Press RETURN to continue,
or the interrupt key (usually CTRL-C or DEL) to abort.
Page 94

Installing Software and Setting Up CMS
Installing INFORMIX 2-76
CentreVu®
CMS R3V8 Software Installation and Setup
14. Press Enter to continue with the install ation procedure. The program
responds:
Installing directory .
. . . . .
. . . . .
. . . . .
Installation of INFORMIX-Connect complete.
#
15. Enter eject cdrom to eject the CD-ROM from the computer.
16. Remove the CD-ROM from the disk tray and place the CD-ROM
back in its case. You must now install the
INFORMIX
ILS software.
Installing the
INFORMIX
ILS
2.11 Package
(Required)
1. Load the “
INFORMIX ILS Version 2.11
” CD into the CD-ROM drive.
2. After about 15 seconds, enter mount to verify the name of the
CD-ROM. The program responds with a list of devices and file
2
systems currently mounted. The la st line should displ ay the installed
CD, as shown below:
. . .
. . .
. . .
/cdrom/volume_1 on /vol/dev/dsk/c0t2d0/volume_1 read only
current date and time
on (
3. Change to the
INFORMIX
)
directory by entering:
cd $INFORMIXDIR
4. To verify that you are in the
INFORMIX
directory, enter pwd. The
system should respond:
/opt/informix
Page 95

E
Installing Software and Setting Up CMS
Installing INFORMIX 2-77
CentreVu®
CMS R3V8 Software Installation and Setup
5. Enter the following command to start the
INFORMIX
ILS installation
program:
sh /cdrom/cdrom0/install
The program responds:
INTERNATIONAL LANGUAGE SUPPLEMENT USER INTERFACE LANGUAG
(1) English (5) Russian
(2) German (6) Polish
(3) French (7) Czech
(4) Spanish (8) Slovak
(9) Help
(10) Exit
Select installer language?
6. Enter the number that corresponds with the language you wish to
use during the installation program (for example, enter 1 to select
English). If you select a language other than English, you must
also select a display character set. After you make that selection,
the program responds:
INFORMIX INTERNATIONAL LANGUAGE SUPPLEMENT (ILS)
INSTALLER FOR ALL UNIX PLATFORMS
Choose install type:
(1) Express Install
Installs everything relating to one or more languages.
(2) Custom Install
You specify exactly what you want to install.
Other options:
(3) Help
Displays information on the contents of this package,
and explains the options on this screen.
(4) Exit
Exit this installer.
(E)nglish (D)eutsch/German (F)rancais/French e(S)panol/Spanish
(R)ussian (P)oliski/Polish (C)ekych/Czech s(L)ovych/Slovak
Enter one choice, and hit ENTER:
Page 96

Installing Software and Setting Up CMS
Installing INFORMIX 2-78
CentreVu®
CMS R3V8 Software Installation and Setup
7. Enter 2 to select Custom Install. The program responds:
Custom Install
--------------
(1) User interface
Installs a localised user interface for Servers and Tools.
(2) Locale
Installs locales by language, territory and code page.
(3) Operating System locales
Installs operating system equivalent locales.
(4) Code set conversion
Installs code set conversion files between code pages.
(5) Help (6) GLS source install [Enabled]
(7) Previous Screen (8) Exit
(E)nglish (D)eutsch/German (F)rancais/French e(S)panol/Spanish
(R)ussian (P)oliski/Polish (C)ekych/Czech s(L)ovych/Slovak
Select the components to install:
8. Enter 2 4 to select the Locale and Code set conversion
options. The program responds:
LOCALES - LANGUAGES
Install locales and associated character maps for what languages?
(1) Arabic (11) Greek (21) Romanian
(2) Bulgarian (12) Hebrew (22) Russian
(3) Chinese (13) Icelandic (23) Serbo-Croatian
(4) Czech (14) Italian (24) Slovak
(5) Danish (15) Japanese (25) Spanish
(6) Dutch (16) Korean (26) Swedish
(7) English (17) Latvian (27) Thai
(8) Finnish (18) Norwegian (28) Turkish
(9) French (19) Polish (29) Ukrainian
(10) German (20) Portuguese
(30) Help (31) All Of The Above
(32) Custom Screen (33) Exit
(E)nglish (D)eutsch/German (F)rancais/French e(S)panol/Spanish
(R)ussian (P)oliski/Polish (C)ekych/Czech s(L)ovych/Slovak
Enter one or more choices, separated with spaces, and hit ENTER:
Page 97

Installing Software and Setting Up CMS
Installing INFORMIX 2-79
CentreVu®
CMS R3V8 Software Installation and Setup
9. Enter 7 15 to select English and Japanese. The program
responds:
LOCALES - TERRITORIES
Install English language locales for what territories?
(1) Australia
(2) United Kingdom
(3) United States
(4) Help (5) All Of The Above
(6) Custom Screen (7) Exit
(E)nglish (D)eutsch/German (F)rancais/French e(S)panol/Spanish
(R)ussian (P)oliski/Polish (C)ekych/Czech s(L)ovych/Slovak
Enter one or more choices, separated with spaces, and hit ENTER:
10. Enter 3 to select United States. The program responds
LOCALE - CODESETS
Install English language locales for what codesets?
(1) ISO 8859-1
(2) DOS Code Page 850
(3) Windows CP 1252
(4) UNICODE
(5) UTF8
(6) Help (7) All Of The Above
(8) Custom Screen (9) Exit
(E)nglish (D)eutsch/German (F)rancais/French e(S)panol/Spanish
(R)ussian (P)oliski/Polish (C)ekych/Czech s(L)ovych/Slovak
Enter one or more choices, separated with spaces, and hit ENTER:
Page 98

Installing Software and Setting Up CMS
Installing INFORMIX 2-80
CentreVu®
CMS R3V8 Software Installation and Setup
11. Enter 5 to select UTF8. The program responds:
LOCALE - CODESETS
Install Japanese language locales for what codesets?
(1) Standard-Shift-JIS
(2) Shift-JIS+JISX0212
(3) UJIS/EUC
(4) UTF8
(4) Help (5) All Of The Above
(6) Custom Screen (7) Exit
(E)nglish (D)eutsch/German (F)rancais/French e(S)panol/Spanish
(R)ussian (P)oliski/Polish (C)ekych/Czech s(L)ovych/Slovak
Enter one or more choices, separated with spaces, and hit ENTER:
12. Enter 4 to select UTF8. The program responds:
CODESET CONVERSION REGIONS
Choose the regions for which you require codeset conversion tables.
(1) Arabic (7) Japanese
(2) Baltic (8) Korean
(3) Cyrillic (9) Simplified Chinese
(4) Eastern European (10) Trad. Chinese
(5) Greek (11) Turkish
(6) Hebrew (12) Western European
(13) Help (14) All Of The Above
(15) Custom Screen (16) Exit
(E)nglish (D)eutsch/German (F)rancais/French e(S)panol/Spanish
(R)ussian (P)oliski/Polish (C)ekych/Czech s(L)ovych/Slovak
Enter one or more choices, separated with spaces, and hit ENTER:
Page 99

Installing Software and Setting Up CMS
Installing INFORMIX 2-81
CentreVu®
CMS R3V8 Software Installation and Setup
13. Enter 7 12 to select Japanese and Western Europe. The
program responds:
CODESET CONVERSION TABLES - CODESETS
Install Japanese codeset conversion tables for what codesets?
(1) Shift-JIS+JISX0212
(2) Standard-Shift-JIS
(3) UJIS/EUC
(4) UNICODE
(5) UTF8
(6) Help (7) All Of The Above
(8) Custom Screen (9) Exit
(E)nglish (D)eutsch/German (F)rancais/French e(S)panol/Spanish
(R)ussian (P)oliski/Polish (C)ekych/Czech s(L)ovych/Slovak
Select two or more options. All available combinations of the
selected options will be installed.
14. Enter 1 2 5 to select Shift-JIS+JISX0212, Standard-
Shift-JIS, and UTF8. The program responds:
CODESET CONVERSION TABLES - CODESETS
Install Western European codeset conversion tables for what codesets?
(1) ASCII 7-bit (9) IBM CCSID 00273 (17) IBM CCSID 871
(2) DOS Code Page 437 (10) IBM CCSID 00277 (18) ISO-7-Danish
(3) DOS Code Page 850 (11) IBM CCSID 00278 (19) ISO-7-German
(4) DOS Code Page 860 (12) IBM CCSID 00280 (20) ISO 8859-1
(5) DOS Code Page 863 (13) IBM CCSID 00284 (21) UNICODE
(6) DOS Code Page 865 (14) IBM CCSID 00285 (22) UTF8
(7) EBCDIC (15) IBM CCSID 00297 (23) Windows CP 1252
(8) HP-Roman8 (16) IBM CCSID 00500
(24) Help (25) All Of The Above
(26) Custom Screen (27) Exit
(E)nglish (D)eutsch/German (F)rancais/French e(S)panol/Spanish
(R)ussian (P)oliski/Polish (C)ekych/Czech s(L)ovych/Slovak
Select two or more options. All available combinations of the
selected options will be installed.
Page 100

Installing Software and Setting Up CMS
Installing INFORMIX 2-82
CentreVu®
CMS R3V8 Software Installation and Setup
15. Enter 20 22 to select ISO 8859-1 and UTF8. The program
responds
SUMMARY: You have chosen to install the following
-------------------------------------------------------------
Installing locales:
English United States UTF8
Japanese Japan UTF8
Installing codeset conversion tables:
Japanese Shift-JIS+JISX0212
Standard-Shift-JIS
UTF8
Western European ISO 8859-1
UTF8
Hit ENTER to confirm or ‘q‘ to return to main menu.
16. Press Enter to begin installation. The program responds:
Installing international software Please wait...
Installing gls...
Installation complete.
See $INFORMIXDIR/ils.log for a list of installed files.
See $INFORMIXDIR/release/README and
$INFORMIXDIR/release/ILS_COMPAT for further information.
Hit ENTER to return to main menu...
 Loading...