

Page 1
User’s manual
CN5345
Corded Telephone
HCD2310(1)P/TSD
Page 2

Congratulations
on your purchase of this AT&T product. Before using this AT&T product,
please read the Important safety information section on page 26 of
this manual. Please thoroughly read this user’s manual for all the feature
operations and troubleshooting information necessary to install and operate
your new AT&T product more easily. You can also visit our website or call our
customer service hotline.
Website:
www.telephones.att.cn
Customer service hotline: 400-022-9929.
Save your sales receipt in case it is necessary to return your telephone for
warranty service.
Product Type: Corded Telephone
China Product Model: HCD2310(1)P/TSD
Corporate Model Number: CN5345
© 2016 VTech Telecommunications Ltd. All Rights Reserved. AT&T and the AT&T logo
are trademarks of AT&T Intellectual Property licensed to VTech Telecommunications Ltd,
Hong Kong SAR. Printed in China.
Page 3
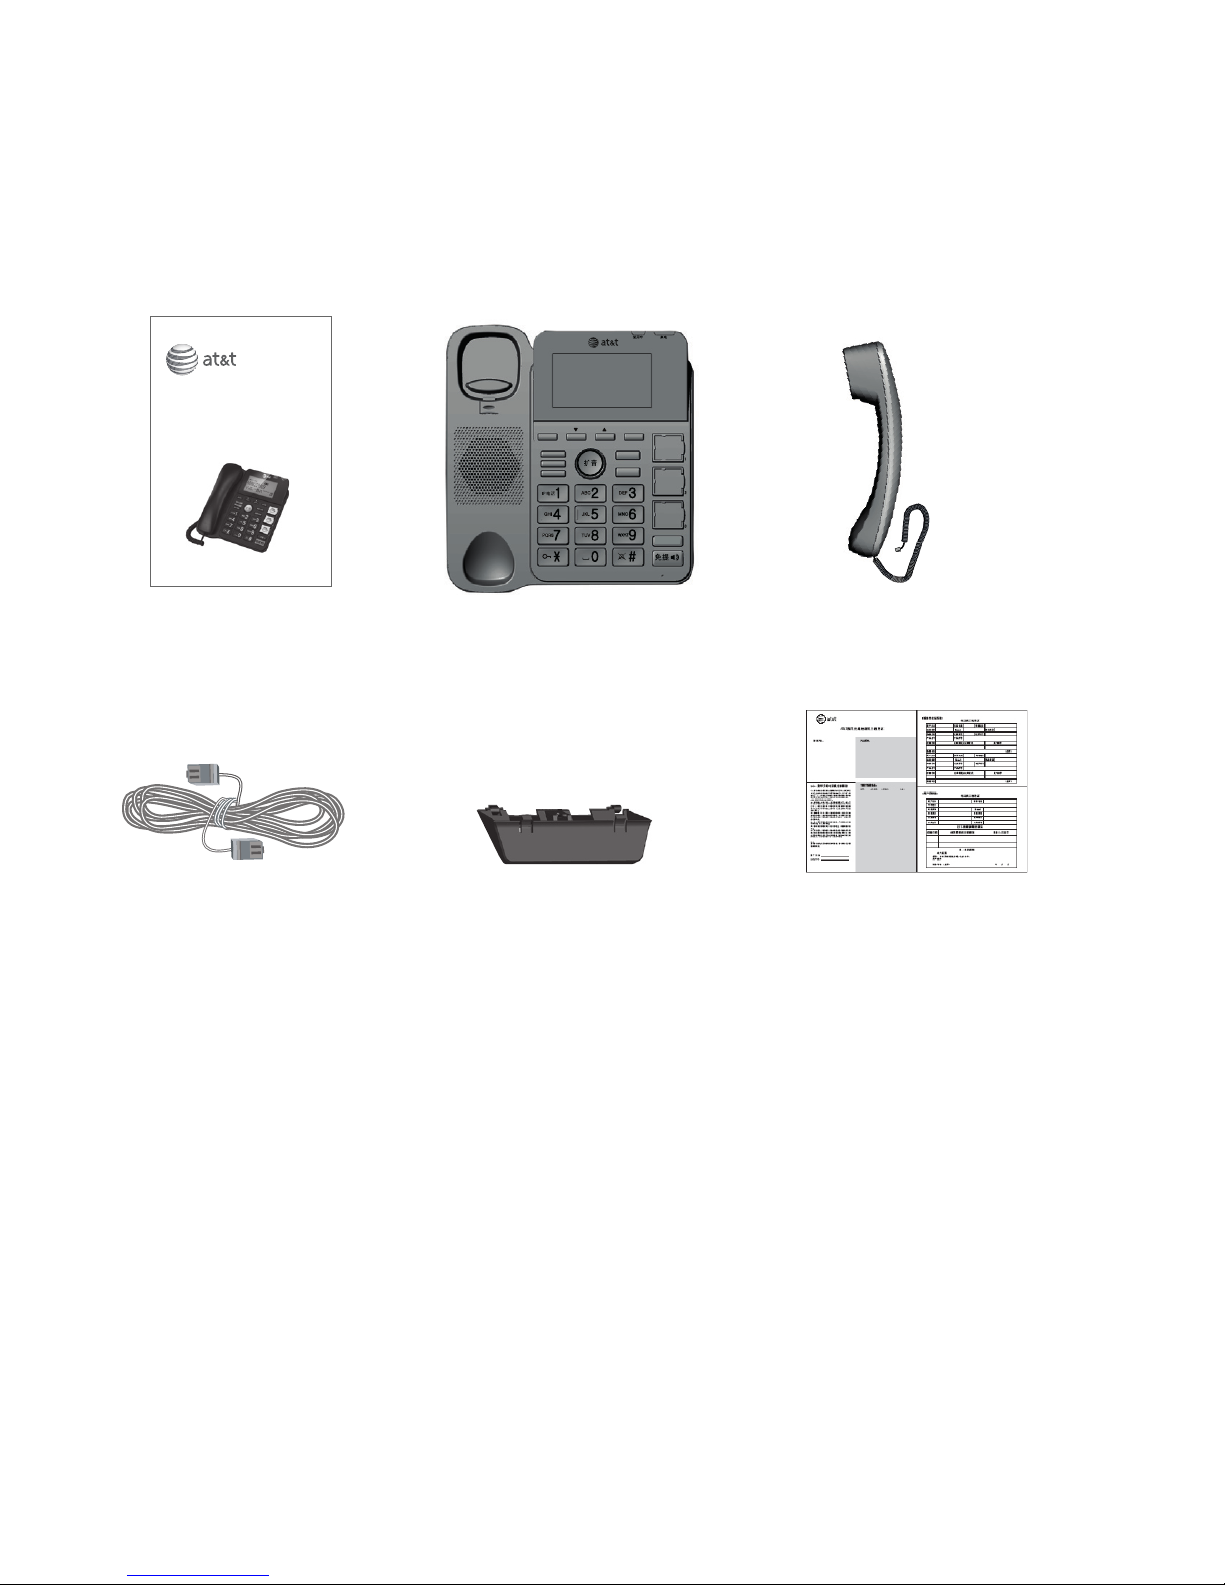
Parts checklist
Save your sales receipt in the event warranty service is necessary.
Your AT&T CN5345 package contains the following items.
Telephone line
cord
User’s manual
Telephone base
Warranty Card
Corded handset
Wall mount
bracket
HCD2310(1)P/TSD
௲դԥ Ծ ߛ ઢছ
ୟג
ލ
லӭஔ
ଏ֛Ոࢃ
ગޞ୕
Ȍ
用户手册
CN5345 按键电话机
Page 4

User’s manual
CN5345
Corded Telephone
Table of contents
Getting started ........................1
Installation ........................................1
Quick reference guide -
telephone base ..........................2
Telephone base and charger
installation ...................................4
Telephone base
installation .................................4
Installation options .......................5
Tabletop to wall mount
installation .................................5
Wall mount to tabletop
installation .................................6
Telephone base settings ............7
Set date/time .............................7
Ringer volume ............................7
Ringer tone ..................................7
Area code .....................................7
PABX code ...................................8
Dial mode .....................................8
Key tone ........................................9
Flash time .....................................9
IP number .....................................9
Telephone operation ........... 10
Telephone operation.................10
Making a call ............................10
On hook dialing
(predialing) ............................. 10
Answering a call ....................10
Ending a call ............................10
Handset speakerphone .......10
Volume booster ......................11
Quiet mode ...............................11
Keypad lock ..............................11
Last number redial ................12
Photo speed dial keys .........13
Volume control .......................15
Mute .............................................15
Directory ................................ 16
About the directory ................... 16
Capacity......................................16
Create a new directory
entry ..........................................16
Create directory entries ..........17
Dialing keys ..............................17
Review directory entries ....17
Dial, delete or edit directory
entries .........................................18
Display dial ...............................18
Delete a directory entry .....18
Page 5

Edit a directory entry ...........19
Delete all directory
entries .......................................19
Caller ID ................................. 20
About caller ID ............................20
Review the call list ...............20
Dial a call list entry ..............20
Delete a call list entry ........20
Delete all call list entries ..20
Add new call block entry ..21
Review the call block list ..21
Delete a call block list
entry ..........................................21
Delete all call block list
entries .......................................21
Telephone base screen
icons ..........................................22
Telephone base alert
tones ..........................................22
Troubleshooting ..........................23
Maintenance..................................25
Taking care of your
telephone ..................................25
Important safety
information ...............................26
Safety information .................26
Especially about cordless
telephones ..............................26
China RoHS ....................................27
Page 6

1
See page 4 for
easy instructions.
You must install the
telephone before use.
STOP!
Installation
Install the telephone base close to a telephone jack. The telephone base can
be placed on a flat surface or vertically mounted on the wall (see page 5). For
optimum range and better reception, place the telephone base in a central and
open location.
If you subscribe to high-speed Internet service (DSL - digital subscriber line)
through your telephone line, you must install a DSL filter between the telephone
line cord and the telephone wall jack (see page 4). The filter prevents noise and
caller ID problems caused by DSL interference. Please contact your DSL service
provider for more information about DSL filters.
Your product may be shipped with protective stickers covering the handset and
telephone base displays - remove them before use.
For customer service or product information, visit our website at
www.telephones.att.cn or call
400-022-9929
.
Avoid placing the telephone base too close to:
Communication devices such as television sets, VCRs, or other
cordless telephones.
Excessive heat sources.
Noise sources such as a window with traffic outside, motors, microwave ovens,
refrigerators, or fluorescent lighting.
Excessive dust sources such as a workshop or garage.
Excessive moisture.
Extremely low temperature.
Mechanical vibration or shock such as on top of a washing machine
or workbench.
•
•
•
•
•
•
•
Getting started
Page 7
2
Getting started
௲դԥ Ծ ߛ ઢছ
ୟג
ލ
லӭஔ
ଏ֛Ոࢃ
ગޞ୕
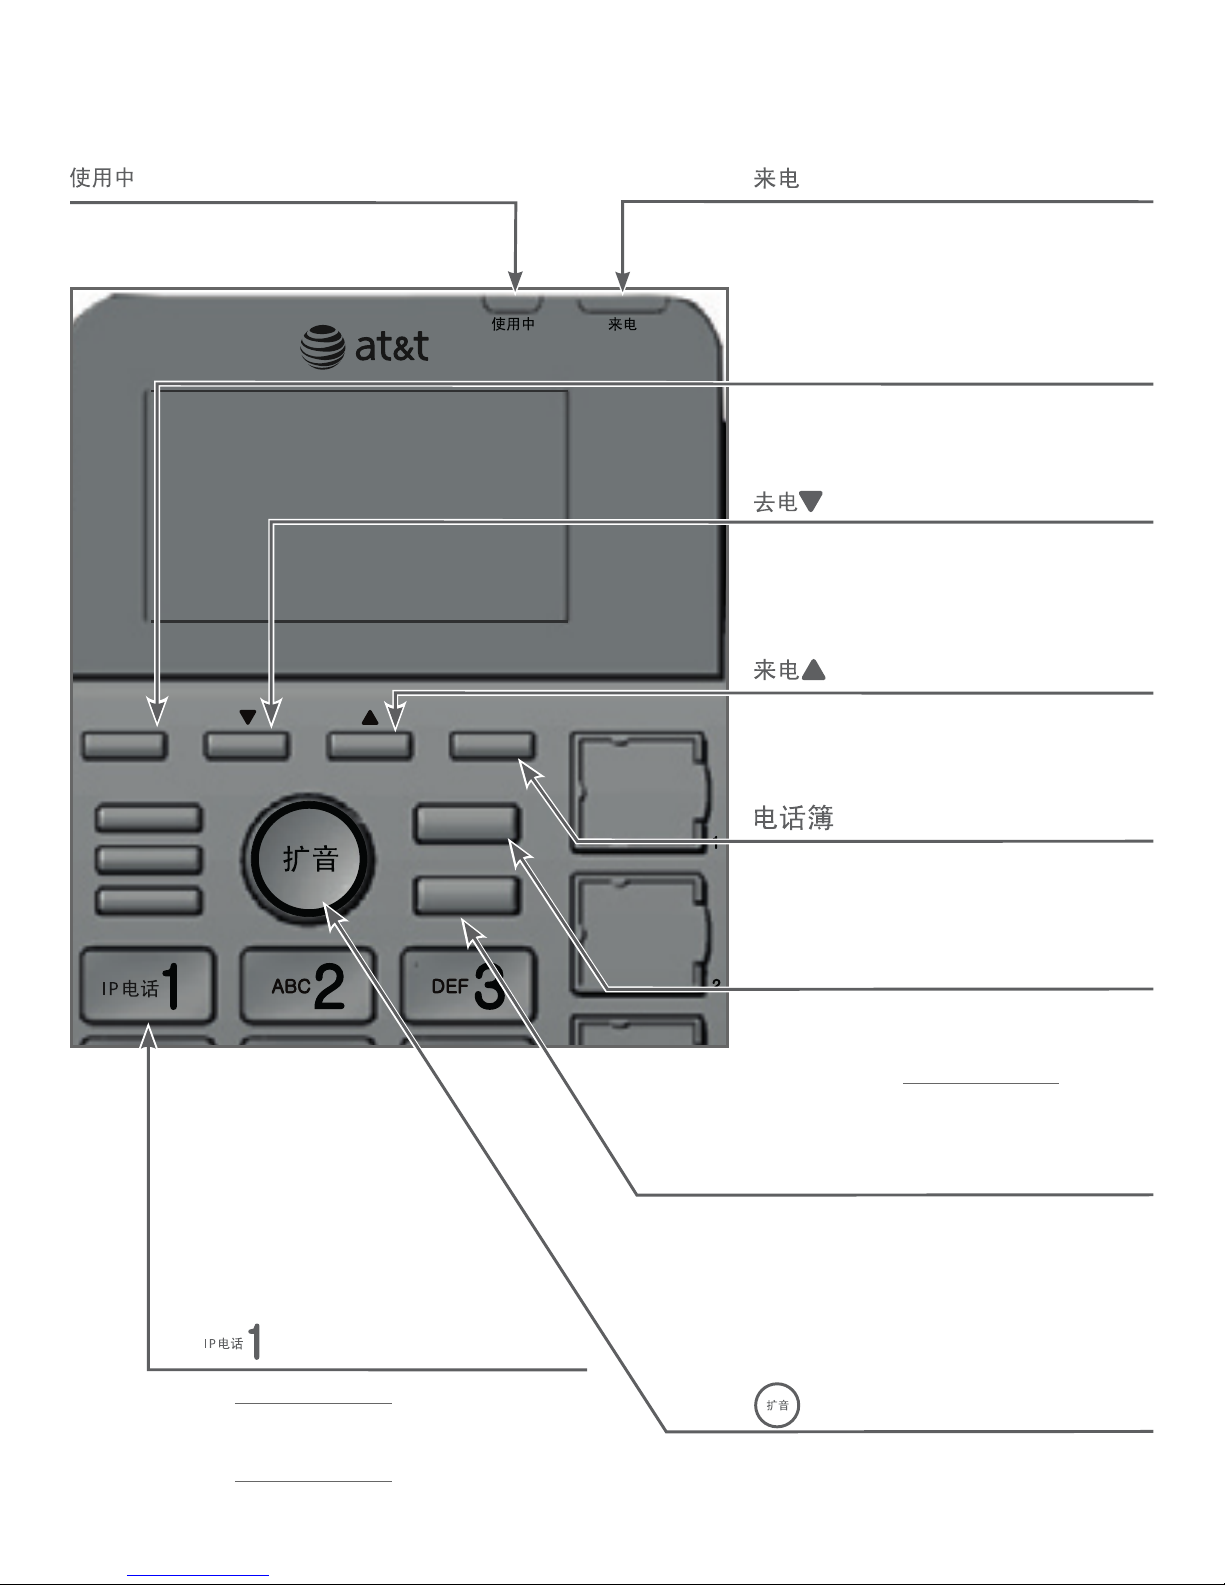
Quick reference guide - telephone base
IN-COMING CALL LIGHT
On when there is an in-coming
call.
Flashes when the handset is
registering to the telephone base.
•
•
IN USE LIGHT
On when the telephone base is in use.
黑名单 CALL BLOCK
Press to enter the call block list.•
REDIAL LIST
Press to show redial entries when
the telephone base is not in use.
Press to scroll down while in
menus.
•
•
CALL LIST
Press to show call list entries
when the handset is not in use.
Press to scroll up while in menus.
•
•
DIRECTORY
Press to enter the directory
number entry screen when the
telephone base is not in use.
•
设置/时钟 SET / ALARM
Press to confirm and save an
entry.
When idle, press and hold to enter
the menu to set date and time.
•
•
返回/取消 RETURN / CANCEL
While in a menu, press to return
to idle mode.
•
VOLUME BOOSTER
Press to turn on or off the audio
boost during a call using the
corded handset.
•
Press and hold to dial your IP
number when the telephone
base is not in use.
Press and hold to set the current
predial number as IP number.
•
•
Page 8

Getting started
3
௲դԥ Ծ ߛ ઢছ
ୟג
ލ
லӭஔ
ଏ֛Ոࢃ
ગޞ୕
Ȍ
Quick reference guide - telephone base
PHOTO SPEED DIAL KEYS (1/2/3)
Press to dial the number saved in
the direct memory location.
Press and hold to enter the direct
memory location for number
inputting or editing.
Press and hold to save the input
number to the photo speed dial key
when predialing.
•
•
•
– + – VOLUME +
Press to adjust the listening volume
when the phone is not in use or
during a call.
Press to adjust the ringer volume of
earpiece or speakerphone during an
in-coming call.
•
•
SPEAKER
Press to make or answer a call using
the speakerphone.
Press to switch between the
speakerphone and the corded
handset during a call in earpiece
mode.
•
•
FLASH
While entering numbers in predialing
mode, press to insert a flash.
During a call, press to send a flash
signal.
•
•
铃声
Press to switch to the next ringer
melody.
•
MUTE / DELETE
During a call, press to mute or end
mute the microphone.
While editing or predialing, press to
delete or digits; or press and hold to
delete all digits.
•
•
(pound key)
Press and hold to turn on or off the
ringer when idle.
•
Press and hold to lock or unlock the
keypad when idle.
During a call, press to switch to tone
dialing.
•
•
Page 9
4
Getting started
Telephone base and charger installation
IMPORTANT INFORMATION
Use only the telephone line cord supplied with this product.•
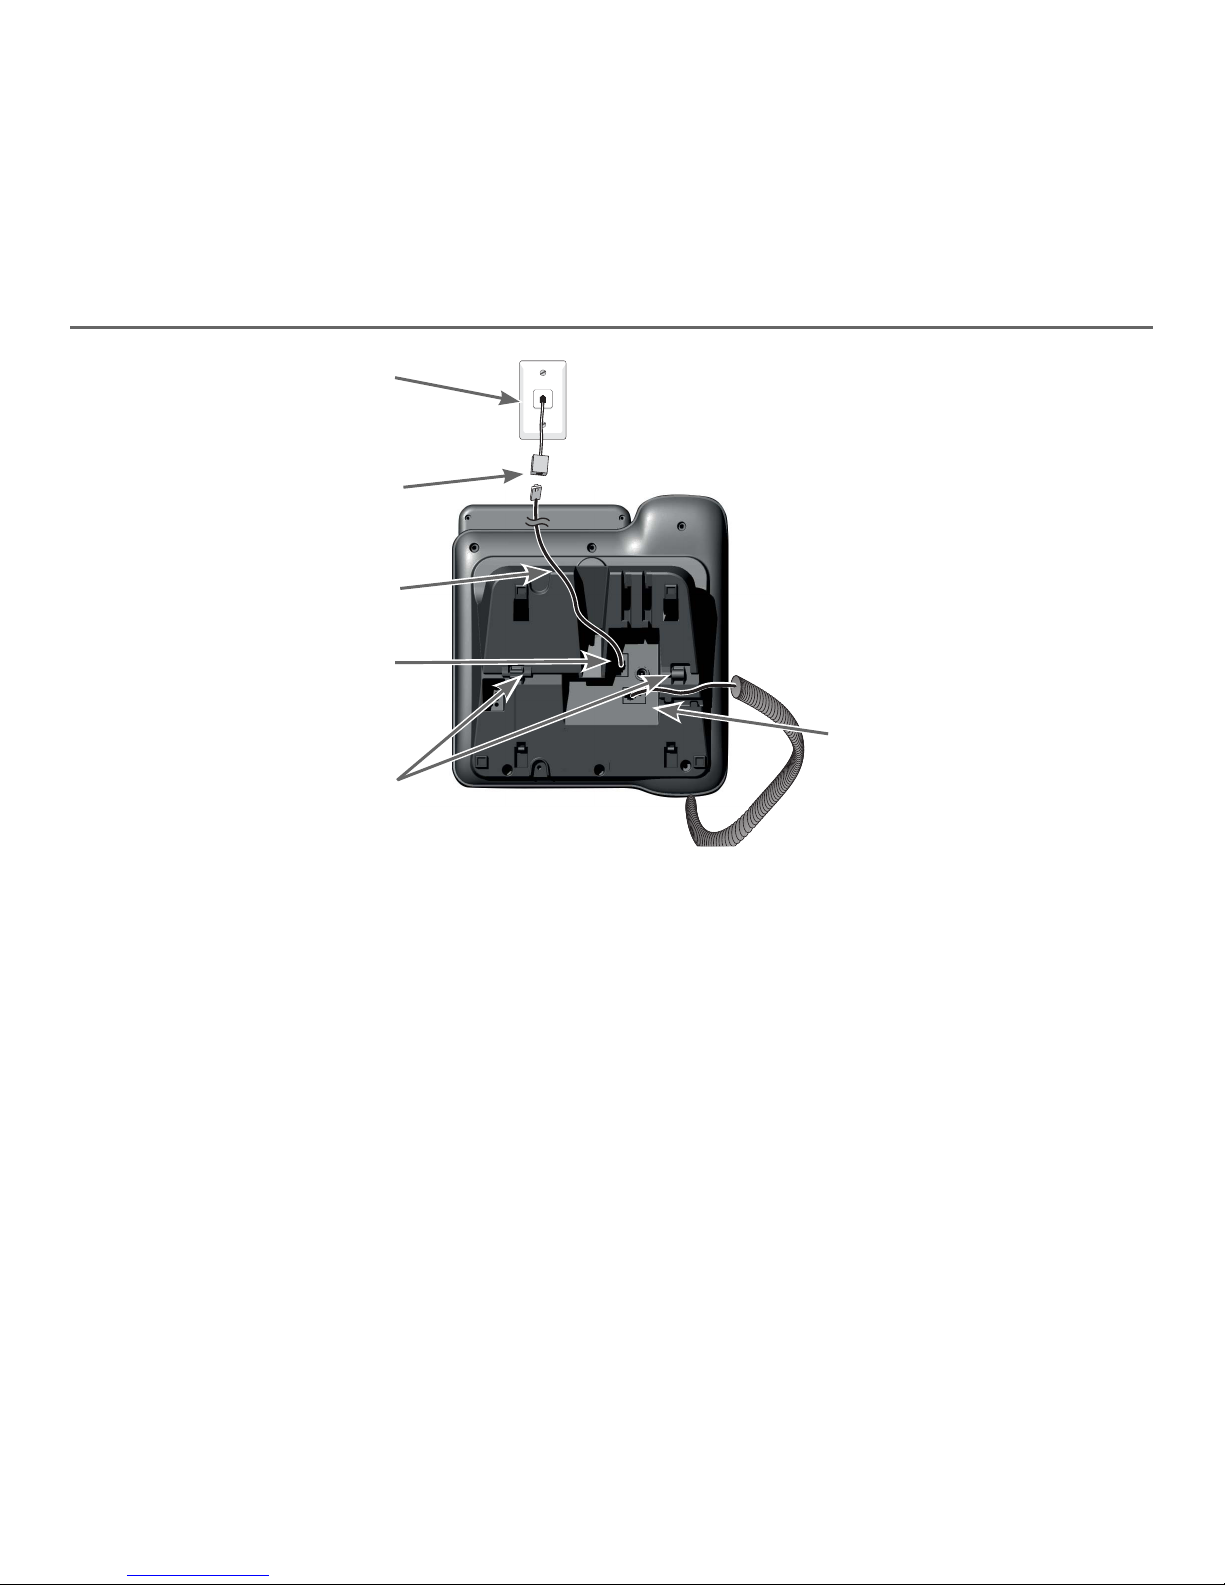
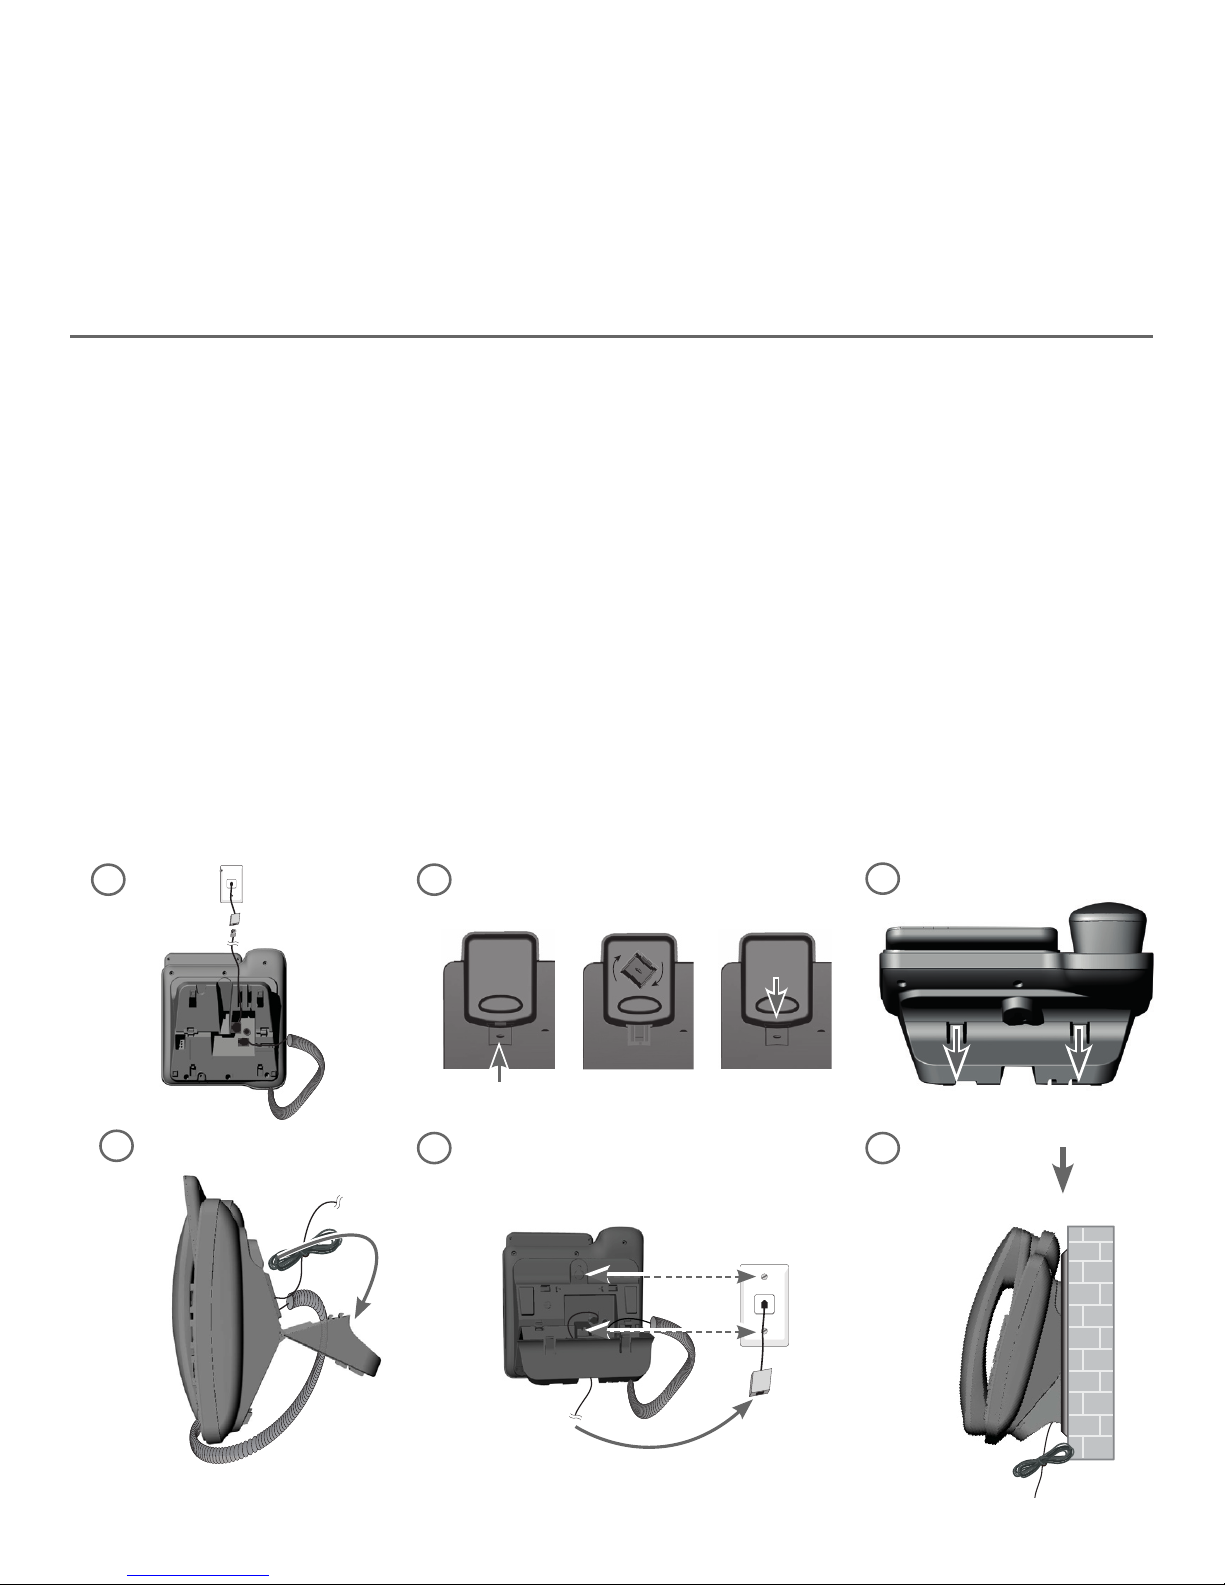
Telephone base installation
Install the telephone base and charger, as shown below.
The telephone base is ready for tabletop use. If you want to change to wall
mounting, see Installation options on page 5 for details.
Plug the corded handset
cord into the corded
handset jack on the back of
the telephone base.
Click the wall mount
bracket securely into the
mounting slots for tabletop
use.
Plug one end of the
telephone line cord into
a telephone jack or a DSL
filter.
If you have DSL high-speed
Internet service, a DSL filter
(not included) is required.
Route the telephone line
cord through this slot.
Plug the other end of the
telephone line cord into the
telephone jack on the back
of the telephone base.
Page 10
Getting started
5
Your telephone base is ready for tabletop use. If you want to mount your
telephone on a wall, follow the steps to connect the telephone base with a
standard dual-stud telephone wall mounting plate. You may need a professional
to install the mounting plate.
Tabletop to wall mount installation
1. Unplug the telephone line cord from the wall jack (or DSL filter).
2. Put the corded handset aside. Hold down the switch hook on the telephone
base, and then slide the handset tab upwards to remove it from the slot.
Rotate the handset tab by 180 degrees. Then, replace the handset tab into the
slot until it locks into position.
3. Press down on the tabs of the wall mount bracket to release it from tabletop
orientation.
4. Rotate the wall mount bracket down and push it into the telephone base until
it clicks into place.
5. Plug the telephone line cord (or DSL filter) into the wall jack. Align the slots on
the back of the telephone base with the studs of the wall mounting plate.
6. Slide the telephone base down until it locks securely. Bundle the telephone
line cord neatly with the twist tie.
Installation options
5
21
4
6
3
Page 11
6
Getting started
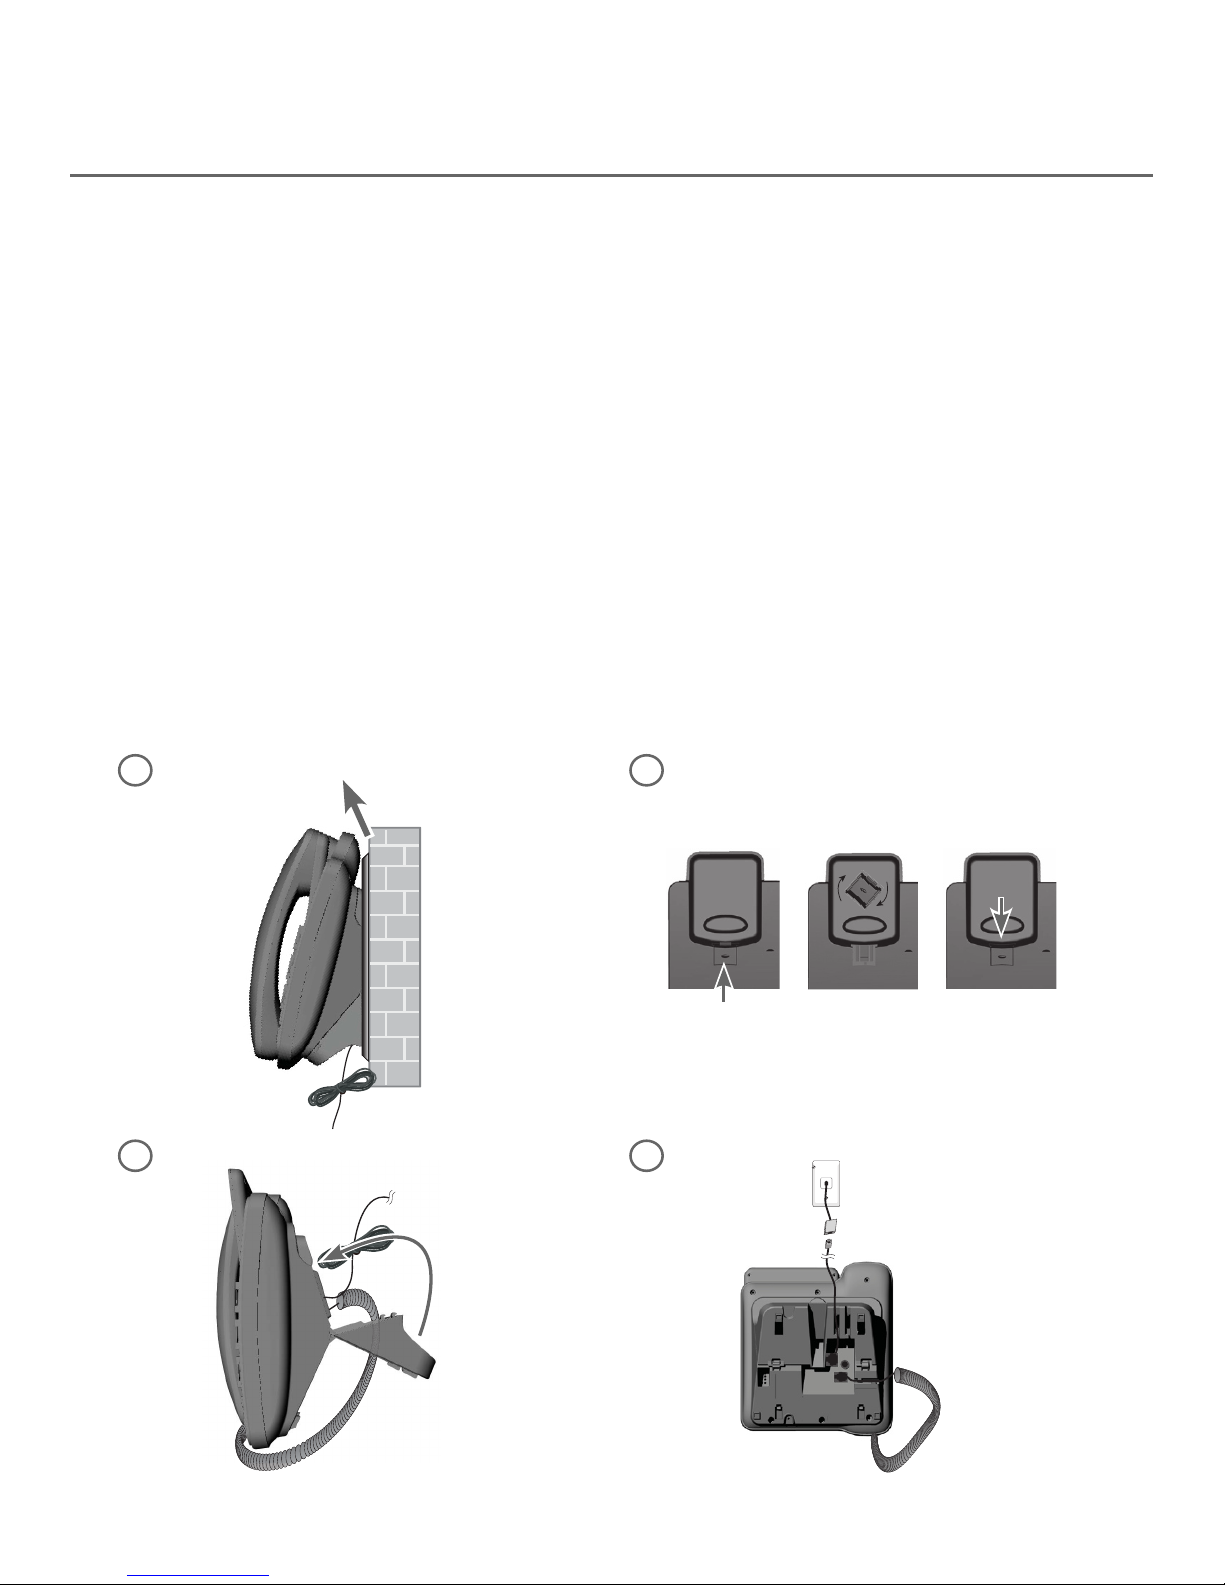
Wall mount to tabletop installation
1. Unplug the telephone line cord from the wall jack (or DSL filter). If the
telephone line cord is bundled, untie it first. Push the telephone base up to
remove it from wall.
2. Put the corded handset aside. Hold down the switch hook on the telephone
base, and then slide the handset tab upwards to remove it from the slot.
Rotate the handset tab by 180 degrees. Then, replace the handset tab into the
slot until it locks into position.
3. Gently pull upward to release the wall mount bracket. Rotate the wall mount
bracket up to tabletop position and push it into the telephone base until it
clicks into place.
4. Plug the telephone line cord (or DSL filter) into the wall jack. Bundle the telephone
line cord neatly with the twist tie if necessary.
Installation options
1 2
3 4
Page 12

Telephone settings
7
Set date/time
If you subscribe to caller ID service, the day, month and time are set
automatically with each in-coming call. The year must be set so that the day of
the week can be calculated from the caller ID information.
After a power failure, you will need to set the date and time.
1. Press and hold 设置/时钟 in idle mode to enter the date and time setting
mode.
2. Use the dialing keys to enter the year, month, and time. Then, press or to
scroll to 上午 or 下午.
3. Press 设置/时钟 to save the setting.
Press 返回/取消 to return to the idle mode.
Ringer volume
You can set the ringer volume for the telephone base.
Press
– +
in idle mode to adjust the ringer volume. Press 设置/时钟 to
save the setting.
Ringer tone
You can choose a ringer melody from five melodies.
Press 铃声 in idle mode to switch to the next melody. Press 设置/时钟 to save
the setting.
Area code
You can set an area code of your local area on the telephone base. When you
receive an in-coming call from your local area, the calling number that has
been saved in your call list will not show the area code.
1. Press 设置/时钟 in idle mode. The display shows SET_AREACODE.
2. Use the dialing keys to enter the area code, with a maximum of 5 digits.
3. Press 设置/时钟 to save the setting.
Press 返回/取消 to return to the idle mode.
•
•
•
•
Telephone base settings
Page 13

Telephone settings
8
Telephone base settings
PABX code
If your office uses PABX (Private Automated Branch Exchange) system to
operate, when you dial an external number, you will need to input a PABX code
first.
You can set the PABX code on the telephone base, so that the PABX code will be
inserted as a prefix before the external number, when you make a external call.
1. Press 设置/时钟 in idle mode, and then press or to scroll to
SET_PABXCODE.
2. Press 设置/时钟.
3. Use the dialing keys to enter the PABX code, with a maximum of 2 digits.
4. Press 设置/时钟 to save the setting.
Press 返回/取消 to return to the idle mode.
Dial mode
The default value of dial mode that is preset in your phone should be the best
suited for your country network and therefore you are not suggested to change
it. If you need to change it, consult your local service provider for getting the
correct settings of this feature.
1. Press 设置/时钟, and then press or to scroll to SET_DIALMODE.
2. Press 设置/时钟.
3. Press or to scroll to TONE or PULSE.
4. Press 设置/时钟 to save the setting.
Press 返回/取消 to return to the idle mode.
•
•
Page 14

Telephone settings
9
Telephone base settings
Key tone
You can turn the telephone base key tone on or off.
1. Press 设置/时钟, and then press or to scroll to SET_KEYTONE.
2. Press 设置/时钟.
3. Press or to scroll to ON 或 OFF.
4. Press 设置/时钟 to save the setting.
Press 返回/取消 to return to the idle mode.
Flash time
The default value of flash time that is preset in your phone should be the best
suited for your country network and therefore you are not suggested to change
it. If you need to change it, consult your local service provider for getting the
correct settings of this feature.
Press 闪断 in idle mode repeatedly to switch the flash time to FLASH_LONG,
FLASH_MID, or FLASH_SHORT. Press 设置/时钟 to save the setting.
IP number
You can store an IP number on the telephone base for quick dialing (the default
IP number is 17909).
To save an IP number:
1. Use the dialing keys to enter a IP number in idle mode.
2. Press and hold 1 to save the displayed number as the IP number.
If you have not set an IP number yet, when you press and hold 1 in idle mode,
the display will show EMPTY, and then return to the idle mode. When you have
stored an IP number, you can choose one of the following ways to dial the IP
number.
To dial the IP number:
Lift the handset, or press . Then, press and hold 1 and use the dialing
keys to enter the number you wish to call.
While reviewing the call list or redial list, press and hold 1 to insert the IP
number as a prefix of the number you wish to call. The call will be dialled out
automatically.
•
•
•
•
Page 15

10
Making a call
Lift the corded handset or press , and then enter the telephone number.
NOTE: The screen displays the elapsed time as you talk (in hours, minutes and seconds).
On hook dialing (predialing)
1. Enter the telephone number
Press to make corrections when entering the phone number.
2. Lift the corded handset or press to dial.
NOTE: The screen displays the elapsed time as you talk (in hours, minutes and seconds)
Answering a call
Lift the corded handset or press to answer a call.
Ending a call
Return the corded handset to the telephone base, or press to end a call.
Handset speakerphone
On a call using the corded handset:
Press on the telephone base to switch between normal corded
handset use and the speakerphone.
On a call using the telephone base:
Press on the telephone base to end a call.
•
•
•
•
•
Telephone operation
Telephone operation
Page 16

Telephone operation
11
Volume booster
The volume booster feature makes the listening volume louder and clearer on
the earpieces of corded handsets.
Using the corded handset:
To turn the volume booster feature on in the corded handset earpiece :
Press to turn on the booster feature at any time while you are on a call. The
screen shows .
To turn the volume booster feature off in the corded handset earpiece :
Press again to turn off the booster feature and return the handset
volume to normal level, disappears on the screen.
Quiet mode
When quiet mode is turned on, the telephone silences all sounds (except the
paging tone). After you turn on quiet mode, this feature activates immediately.
To turn quiet mode on:
Press and hold in idle mode to enter the quiet mode. The screen displays
the 静音 icon.
To turn quiet mode off:
While quiet mode is on, press and hold . The 静音 icon disappears on the
screen.
Keypad lock
You can lock the keypad to prevent accidental dialing while carrying the handset
around.
To turn keypad lock on:
Press and hold in idle mode to turn on the keypad lock. The screen
displays the 键盘已锁 icon.
To turn keypad lock off:
While keypad lock is on, press and hold . The 键盘已锁 icon disappears on
the screen.
•
•
•
•
•
•
Telephone operation
Page 17

Telephone operation
12
Last number redial
The telephone base stores the last 30 telephone numbers dialed.
To view the five most recently dialed numbers:
To display the most recently called number, press .
To view up to 30 recently called numbers, press , and then or
repeatedly.
The telephone beeps once at the end of the list. Press 退出 to exit.
To redial a number:
To dial the displayed number, lift the corded handset or press on the
telephone base.
To delete a redial entry:
While the screen displays the desired number, press to delete and
return to the previous menu. There is a confirmation tone.
To delete all redial entries:
While the screen displays a number, press and hold to delete and
return to the previous menu. There is a confirmation tone.
•
•
•
•
•
Telephone operation
Page 18

Telephone operation
13
Photo speed dial keys
You can store a number to one of the three photo speed dial keys locations on
the telephone base. This feature will be convenient when you want to dial a
certain number more quickly.
To set a photo speed dial key:
1. In idle mode, press and hold the photo speed dial key 1, 2, or 3 on the right
side of the telephone base.
2. Use the dialing keys to enter the telephone number.
Press to erase a digit.
Press and hold to erase all digits.
Press and hold 0 to enter a dialing pause (a P appears).
3. Press to save the setting and return to the previous menu. There is
a confirmation tone.
-OR-
1. Use the dialing keys to enter the telephone number.
Press to erase a digit.
Press and hold to erase all digits.
Press and hold 0 to enter a dialing pause (a P appears).
2. Press and hold the photo speed dial key 1, 2, or 3 on the right side of the
telephone base to save the setting and return to the previous menu. There is a
confirmation tone.
To dial from a speed dial key:
1. In idle mode, press the photo speed dial key 1, 2, or 3 on the right side of the
telephone base.
2. Lift the corded handset or press to dial.
-OR-
1. Lift the corded handset or press to take the line.
2. Press the photo speed dial key 1, 2, or 3 on the right side of the telephone
base to dial.
•
•
•
•
•
•
Telephone operation
Page 19

Telephone operation
14
To add a photo:
Using the telephone base:
You can add a desired photo into the photo speed dial compartment, or write the
contact name on the photo speed dial card.
1. Flip open the photo speed dial compartment cover and take out the photo
speed dial card.
2. Use the photo speed dial card as a tool to crop your desired photo.
3. Put the cropped photo into the photo speed dial compartment. Then flip down
the photo speed dial compartment cover.
Telephone operation
20mm
21.95 mm
ଏ֛Ոࢃ
ગޞ୕
Ȍ
Page 20

Telephone operation
15
Telephone operation
Volume control
You can set the listening volume to one of five levels.
Using the telephone base:
While on a call, press
– +
to adjust the listening volume.
NOTE: Cordless handset, corded handset, and speakerphone volume settings are independent.
Mute
Use the mute function to turn off the microphone. You can hear the caller, but
the caller cannot hear you.
To mute a call:
While on a call, press . The display shows 静音.
To end mute a call:
Press again. 静音 disappears from the display.
•
•
Page 21

16
Capacity
The telephone base directory can store up to 200 entries, with a maximum of
24 digits for telephone numbers.
Create a new directory entry
1. Use the dialing keys to enter a telephone number.
2. Press in idle mode to enter the directory.
3. Use the dialing keys to edit the telephone number, if necessary.
Press 或 move the cursor to the right or left.
Press to erase a character.
Press and hold to erase all characters.
4. Press 设置/时钟 to proceed to the name.
5. Use dialing keys to enter a name when prompted. Each time you press a
key, the character on the keys appears. Additional key presses produce other
characters on that key. See the chart on next page.
Press or to move the cursor to the right or left.
Press 0 to add a space.
Press to erase a character.
Press and hold to erase all characters.
6. Press 设置/时钟, and then press or to choose a ringer melody.
7. Press 设置/时钟 to store your new directory entry and return to the previous
menu. There is a confirmation tone.
•
•
•
•
•
•
•
About the directory
Directory
Page 22

Directory
17
Create directory entries
Dialing
keys
Characters by number of key presses
1 2 3 4 5 6 7 8 9 10 11
1
-- 1 ‘
2
A B C 2 ‘
3
D E F 3 ‘
4
G H I 4 ‘
5
J K L 5
6
M N O 6
7
P Q R S 7
8
T U V 8
9
W X Y Z 9
0
space 0
*
* ? / \ < >
#
# ‘
, - &
Dialing keys
Review directory entries
1. Press in idle mode to enter the directory.
2. Press or to browse through the directory.
NOTE: If there are no directory entries. EMPTY appears on the screen.
Page 23

Directory
18
To dial, delete or edit a directory entry (name and number), the entry must
be displayed on the screen. Refer to Review the directory to show an entry.
Display dial
Lift the corded handset or press to answer a call.
Delete a directory entry
1. Press in idle mode to enter the directory.
2. Press or to scroll to the desired directory entry
3. Press to confirm delete. The display shows DELETE?.
4. Press 设置/时钟 to confirm delete.
NOTE: You cannot retrieve a deleted entry.
Dial, delete or edit directory entries
Page 24

Directory
19
Edit a directory entry
1. Press in idle mode to enter the directory.
2. Press or to scroll to the desired directory entry, then press 设置/时钟.
3. Use the dialing keys to edit the telephone number.
Press 或 move the cursor to the right or left.
Press to erase a character.
Press and hold to erase all characters.
4. Press 设置/时钟 to proceed to the name.
5. Use dialing keys to edit the name when prompted. Each time you press a
key, the character on the keys appears. Additional key presses produce other
characters on that key. See the chart on page 19.
Press or to move the cursor to the right or left.
Press 0 to add a space.
Press to erase a character.
Press and hold to erase all characters.
6. Press 设置/时钟, and then press or to choose a ringer melody.
7. Press 设置/时钟 to store your updated directory entry and return to the
previous menu. There is a confirmation tone.
Delete all directory entries
1. Press in idle mode to enter the directory.
2. Press and hold . The display shows DELETE ALL?.
3. Press 设置/时钟 to confirm delete.
•
•
•
•
•
•
•
Dial, delete or edit directory entries
Page 25

20
About caller ID
This feature is available if you have subscribed to the caller ID service provided
by your telephone service provider. Your phone can store up to 99 received
calls with date/time information in the call list. The number will be shown on
the handset screen when the phone is ringing. If the number matches with one
of the entries in your directory, the caller’s name stored in the directory will be
displayed alternatively with the number. The handset will ring with the melody
associated with that directory entry.
Caller ID
Review the call list
Review the call list to find out who called, to return the call, or to copy the caller’s
name and number into your directory. All received calls are saved in the call list,
with the latest call shown at the top of the list. When the call list is full, the oldest
call will be replaced by a new call. EMPTY appears in the cordless handset screen
if there are no records in the call list.
1. Press in idle mode to enter the call list.
2. Press or to scroll through the call list.
Dial a call list entry
Lift the corded handset or press to answer a call.
Delete a call list entry
1. Press in idle mode to enter the call list.
2. Press or to scroll to the desired call list entry
3. Press to confirm delete. The display shows DELETE?.
4. Press 设置/时钟 to confirm delete.
Delete all call list entries
1. Press in idle mode to enter the call list.
2. Press and hold . The display shows DELETE ALL?.
3. Press 设置/时钟 to confirm delete.
Caller ID operation
Page 26

Caller ID
21
Your phone can store up to 20 call block entries. When you receive an
in-coming call from the number that had been stored in the call block list, your
phone will ring once, and then block the call automatically. The display will show
“BLOCKED CALL”. When the call is blocked, the caller will hear a busy tone.
Add new call block entry
1. Use dialing keys to enter the number to block.
2. Press 黑名单to save the new call block entry.
Review the call block list
1. Press 黑名单 in idle mode to enter the call block list.
2. Press or to scroll through the call block list.
NOTE: If there are no call block list entries. EMPTY appears on the screen.
Delete a call block list entry
1. Press 黑名单 in idle mode to enter the call block list.
2. Press or to scroll to the desired call block list entry
3. Press to confirm delete. The display shows DELETE?.
4. Press 设置/时钟 to confirm delete.
NOTE: You cannot retrieve a deleted entry.
Delete all call block list entries
1. Press in idle mode to enter the call block list.
2. Press and hold . The display shows DELETE ALL?.
3. Press 设置/时钟 to confirm delete.
Call block
Page 27

Appendix
22
Telephone base screen icons
对讲
Intercom - an intercom call is connected
successfully; icon flashes when there is an
incoming intercom call or the intercom call is
being put on hold.
电话簿
Directory - the directory is being viewed.
静音
Mute - the base microphone is off.
免打扰
Ringer off - the base ringer is off.
留言
Message - the answering system is on;
flashes when there is a new messsage (not
applicable to this model).
通话中
Talk on - a call is in progress; flashes when
there is an in-coming call.
免提
Speakerphone - the speakerphone is in use.
键盘已锁
Keypad locked - the keypad lock is activated.
Booster - the corded handset earpiece audio
booster is activated.
语音信箱
Voicemail - new voicemail has been received
but not yet read.
Sequential number - the sequential number
of the current entry inside the directory, call
list, or redial list.
Date - the current date, or the date
information of the selected call list entry.
Time - the current time, the time information
of the selected call list entry, or the call
connection time.
黑名单
Call block list - the call block list is being
viewed.
New message - there is a new missed call
(dependent on network subscription).
去电
Redial list - the redial list is being viewed.
来电
Call list - the call list is being viewed.
未接
Missed call - the current call list entry is a
missed call.
Telephone base alert tones
Key tone Tone of each key press. One short beep is emitted if key tone is turned on.
Alert tones and lights
Page 28

Appendix
23
If you have difficulty with your phone, please try the following suggestions.
For Customer Service, visit our website at www.telephones.att.cn or call
400-022-9929.
My telephone doesn’t work at all.
Make sure you plug the telephone line cord securely and firmly into the
telephone base and the telephone wall jack.
Reset the telephone base. Unplug the telephone line cord. Wait for
approximately 15 seconds, and then plug it back in. Allow up to one minute
for the cordless handset and telephone base to reset.
I cannot dial out.
Try all the suggestions, as mentioned above.
Make sure you have a dial tone before dialing. The cordless handset may take
a second or two to find the telephone base and produce a dial tone. This is
normal. Wait an extra second before dialing.
Eliminate any background noise. Noise from a television, radio or other
appliances may cause the phone to not dial out properly. If you cannot
eliminate the background noise, first try muting the cordless handset before
dialing, or dialing from another room with less background noise.
If other phones in your home are having the same problem, contact your
telephone service provider (charges may apply).
I hear other calls while using my phone.
Disconnect the telephone base from the telephone jack, and plug in a
different telephone. If you still hear other calls, call your telephone
service provider.
My phone does not ring when I receive a call.
Make sure that the ringer is not off. Refer to Ringer volume on page 7 in this
user’s manual.
Make sure you plug in the telephone line cord securely into the telephone base
and the telephone jack.
You may have too many extension phones on your telephone line to allow all
of them to ring simultaneously. Try unplugging some of the other phones.
If other phones in your home are having the same problem, contact your
telephone service provider (charges may apply).
•
•
•
•
•
•
•
•
•
•
•
Troubleshooting
Page 29

Appendix
24
Test a working phone at the phone jack. If another phone has the same
problem, contact your telephone service provider (charges may apply).
Your line cord may be defective. Try installing a new line cord.
My caller ID isn’t working.
Caller ID is a subscription service. You must subscribe to this service from your
telephone service provider for this feature to work on your phone.
The caller must be calling from an area that supports caller ID.
Both your and your caller’s telephone service providers must use caller ID
compatible equipment.
If you subscribe to high-speed Internet service (DSL - digital subscriber
line) through your telephone line, you must install a DSL filter between the
telephone line cord and the telephone wall jack (page 4). The filter prevents
noise and caller ID problems resulting from DSL interference. Please contact
your DSL service provider for more information about DSL filters.
System does not receive caller ID when on a call.
Make sure you subscribe to caller ID with call waiting features from your
telephone service provider. Caller ID features works only if both you and the
caller are in areas offering caller ID service, and if both telephone service
providers use compatible equipment.
Common cure for electronic equipment.
If the telephone does not seem to be responding normally, try putting the
cordless handset in the charger. If it does not fix the problem, do the following
(in the order listed):
1. Disconnect the cordless handset battery.
2. Wait a few minutes.
3. Connect telephone line cord to the telephone base and the telephone wall
jack.
•
•
•
•
•
•
•
Troubleshooting
Page 30

Appendix
25
Taking care of your telephone
Your cordless telephone contains sophisticated electronic parts, so you must
treat it with care.
Avoid rough treatment.
Place the handset down gently.
Save the original packing materials to protect your telephone if you ever need
to ship it.
Avoid water
You can damage your telephone if it gets wet. Do not use the handset in the
rain, or handle it with wet hands. Do not install the telephone base near a
sink, bathtub or shower.
Electrical storms
Electrical storms can sometimes cause power surges harmful to electronic
equipment. For your own safety, take caution when using electric appliances
during storms.
Cleaning your telephone
Your telephone has a durable plastic casing that should retain its luster for
many years. Clean it only with a soft cloth slightly dampened with water or
mild soap.
Do not use excess water or cleaning solvents of any kind.
•
•
•
•
•
•
•
•
Remember that electrical appliances can cause serious injury if used when you are wet or
standing in water. If the telephone base should fall into water, DO NOT RETRIEVE IT UNTIL YOU
UNPLUG THE TELEPHONE LINE CORD FROM THE WALL. Pull the unit out by the unplugged cord.
Maintenance
Page 31

Appendix
26
This symbol is to alert you to important operating or servicing instructions that may appear
in this user’s manual. Always follow basic safety precautions when using this product to
reduce the risk of injury, fire, or electric shock.
Safety information
Read and understand all instructions in the user’s manual.
Follow all warnings and instructions marked on the product.
Unplug this product from the wall outlet before cleaning. Do not use liquid cleaners or aerosol
cleaners. Use a damp cloth for cleaning.
Do not use this product near water (for example, near a bath tub, kitchen sink, swimming pool).
Do not expose the telephone to direct sunlight or extreme cold environment. Do not put the
telephone close to a heating source such as radiators, cookers, etc.
Do not overload wall outlets and extension cords as this can result in the risk of fire or electric
shock.
Unplug this product from the wall outlet and refer servicing to qualified technicians under the
following conditions:
• When the telephone line cord is damaged or frayed.
• If the product does not operate normally by following the operating instructions.
• If the product has been dropped and the casing has been damaged.
• If the product exhibits a distinct change in performance.
Avoid using a telephone (other than a cordless type) during an electrical storm. There may be a
remote risk of electric shock from lightning.
Do not use the phone close to sites of flammable, explosive or toxic gas leakage.
•
•
•
•
•
•
•
•
•
Important safety information
Especially about cordless telephones
Electrical power: The telephone base of this cordless telephone must be connected to a working
telephone wall jack. Calls cannot be made if the telephone base is unplugged, switched off, or if
the telephone line cord is damaged.
SAVE THESE INSTRUCTIONS
•
Page 32

Appendix
27
China RoHS
部件名称
有毒有害物质或元素
铅
(Pb)
汞
(Hg)
镉
(Cd)
六价铬
(Cr (VI))
多溴联苯
(PBB)
多溴二苯醚
(PBDE)
主机 × ○ ○ ○ ○ ○
同 包 装 物
品、选装件
○ ○ ○ ○ ○ ○
○:表示该有毒有害物质在该部件所有均质材料中的含量均在 SJ/T 11363-2006 标准规定
的限量要求以下。
×:表示该有毒有害物质至少在该部件的某一均质材料中的含量超出
SJ/T 11363-2006 标准规定的限量要求。
本表中以「×」所表示的物质,属于「欧盟 2003 年 2 月 RoHS 指令」中指出的以现在的科
学观点来看该物质的去除或替代在技术上被认为是不可行的、且属于有关限制特定有害物质
含有量的中华人民共和国(除台湾、香港和澳门外)「电子信息产品污染控制重点管理目
录」对象产品以外的物质。
Page 33

Appendix
28
China RoHS
环保使用期限:
本标志中的年数,是根据 2006 年 2 月 28 日公布的「电子信息产品污染控制管
理办法」和 SJ/T 11364-2006 「电子信息产品污染控制标识要求」,适用于在中
华人民共和国(除台湾、香港和澳门外)生产或进口的电子信息产品的「环保使
用期限」。
在遵守使用说明书中记载的有关本产品安全和使用上的注意事项、且没有其他法律、规定的
免责事由的情况下,在从生产日开始的上述年限内,产品中的有毒、有害物质或元素不会发
生外泄或突变,使用该产品不会对环境造成严重污染或对使用者人身、财产造成严重损害。
「环保使用期限」不是安全使用期限。尤其不同于基于电气性能安全、电磁安全等因素而被
限定的使用期限。
产品在适当地使用后予以废弃时,希望依照有关电子信息产品的回收或再利用的法律或规定
进行处理。
注:该年限为「环保使用期限」,不是产品的质量保证期限。电球、电池、墨粉盒等附属品
和产品一同包装的,产品和附属品的环保使用期限可能不同。
Page 34

© 2016 VTech Telecommunications Ltd. All Rights Reserved.
AT&T and the AT&T logo are trademarks of AT&T Intellectual Property
licensed to VTech Telecommunications Ltd, Hong Kong SAR.
Printed in China. Issue 1.0 AT&T 06/16
www.telephones.att.cn
Manufacturer
VTech Telecommunications (Shenzhen) Co., Ltd.
No.5, Keji South 12th Road, Nanshan District, China
Service Hotline: 400-022-9929
 Loading...