

Page 1

585-214-071
Issue 1
October 1991
Call Management System
for MERLIN LEGEND Communications System
Supervisor’s Guide
Page 2

Copyright 1991 AT&T
All Rights Reserved
Printed in U.S.A.
AT&T 585-214-071
Issue 1
October 1991
Notice
Every effort was made to ensure that the information in this book was complete and
accurate at the time of printing. However, information is subject to change.
Federal Communications Commission (FCC) Interference Notice
This equipment has been tested and found to comply with the limits of a Class A digital
device, pursuant to Part 15 of FCC rules. These limits are designed to provide reasonable
protection against harmful interference when the equipment is operated in a commercial
environment.
and, if not installed and used in accordance with the instruction manual, may cause
harmful interference, in which case the user will have to correct the interference at his or
her own expense. For additional FCC interference, registration, and repair information, see
the information located at the back of this book.
This
equipment generates, uses, and can radiate radio frequency energy
Trademarks
MERLIN LEGEND is a trademark of AT&T.
MERLIN is a registered trademark of AT&T.
MS-DOS is a registered trademark of Microsoft Corporation.
Warranty
AT&T provides a limited warranty to this product. Refer to the “Limited Use Software
License Agreement” card provided with this package.
Ordering Information
The order number for this book is 585-214-071. TO order additional books, call
1800432-6600 in the U.S. and 1800255-1242 in Canada. For more information
on how to order this and other system reference materials, see “About This Guide.”
Support Telephone Numbers
AT&T provides a toll-free customer helpline 24 hours a day. In the U.S. call the AT&T
Helpline at 1800628-2888 if you need assistance when installing, programming, or using
your system. In Canada, call one of the following Technical Assistance Centers for service
or technical assistance:
Eastern Canada and Ottawa:
Ontario:
Central and Western Canada:
1800363-1882
1800387-4268
1800663-9817
Page 3

Contents
1
About This Guide
■
Documentation Conventions
■ Related Documentation
How to Order Documentation
Introduction to CMS
■
CMS Supervisor’s Responsibilities
■ Basic Terms and Key Concepts
Automatic Call Distributor
Lines and Line Groups
Agents and Agent Splits
Shift Configuration
Main Splits and Secondary Splits
lntraflow and Intraflow Threshold
Logged Out State and Available State
After-Call-Work (ACW) State
Automatic After-Call-Work (Auto ACW) State
Supervisory Login/Logout
Call Management
Answer Delay, Force Delay, and Pri
■ A Typical CMS Application
CMS and Bon Voyage Travel
Bon Voyage Travel’s Other Call
CMS and Other Businesses
Day-to-Day Operation of CMS
Traffic
ority Lines
xiii
xiii
xiv
xv
1-1
1-2
1-3
1-3
1-3
1-3
1-4
1-4
1-4
1-4
1-4
1-5
1-6
1-6
1-7
1-7
1-7
1-10
1-11
1-11
iii
Page 4

Contents
2
Using Your PC with CMS
Starting CMS
Setting the Date and Time
Set the Date
Set the Time 2-4
CMS Screen Layouts 2-5
Entering and Editing Data
Editing Prompt and Function Keys
Guidelines for Entering
Alternate Editing Keys
Simple Editing Procedures
Getting Help
Leaving CMS
Data
2-1
2-1
2-3
2-3
2-8
2-9
2-10
2-11
2-11
2-12
2-12
3
iv
Programming CMS Shift Configurations
■
Creating or Changing Shift Configurations
Assigning Splits
Add Agent
Remove Agent
Move Agent
Replace (Substitute) Agent
New Agent
Change Split ID
Agent Directory
Assigning Line Group Options
Changing Answer Delay
3-1
3-3
3-8
3-9
3-10
3-11
3-11
3-12
3-13
3-14
3-17
3-18
Page 5

Contents
Changing Force Delay
Programming Automatic After-Call-Work (ACW)
Programming Call Flow
How Intraflow Works
Programming Considerations
Programming Instructions
Assigning Splits
Turning Flow On/Off
Setting the Intraflow Threshold
Turning All-Ring On/Off
■ Clearing Agents
■ Saving a Changed Configuration .
■
Naming or Renaming a Shift Configuration
■
Selecting a Startup Configuration
■
Backing Up and Restoring Shift Configurations
Backing Up Shift Configurations
Restoring Shift Configurations
3-20
3-20
3-22
3-22
3-23
3-24
3-25
3-26
3-26
3-27
3-29
3-30
3-32
3-33
3-34
3-34
3-35
4
Changing System Options and
Programming Exceptions
■ Changing System Options
Adjusting the Service Level Limit
Adjusting the Abandoned Call Threshold
Setting the Audible Alarm
Adjusting the Delay Message Length
Entering Your Business Name
■ Programming Exceptions
Instructions for Selecting Exceptions
4-1
4-3
4-5
4-6
4-7
4-7
4-8
4-9
4-10
v
Page 6

Contents
Agent Exceptions
Talk Time
ACW (After Call Work)
ACW Time Limit
Refused Call
Split Exceptions
Abandon Calls (Number of Abandoned Calls)
Calls Waiting (Number of Calls Waiting)
Oldest Call (Oldest Call Waiting)
Avg Speed (Average Speed of Answer)
Line Group Exceptions
Lines Busy (All Lines Busy)
HoldTime Maximum (Maximum Line Holding Time)
HoldTime Minimum (Minimum Line Holding Time)
Assigning External Alerts to Exceptions
Conditions for Assigning Alerts
Assigning Alerts to Line Buttons
4-13
4-14
4-15
4-16
4-17
4-17
4-18
4-19
4-20
4-21
4-22
4-23
4-24
4-25
4-26
4-28
4-29
5
vi
Changing or Removing Line Button Assignments
Assigning Exceptions and External Alerts
Simultaneously
4-31
4-32
CMS Telephones and Telephone Programming 5-1
■
CMS Supervisor’s Telephone
Supervisor’s Mode
Changing Agent Status
Group Page
Barge-In
Lights
5-2
5-6
5-7
5-7
5-8
5-8
Page 7

Contents
■ Agent Phones
Line Buttons
Work State Buttons (Available, ACW)
Announcing Availability
Automatic ACW
■ Call Handling
Answering CMS Calls
Answering Non-CMS Calls
Answering Extension Calls
Placing Outside Calls
Placing Extension Calls
Conferencing a Call
Transferring Calls
■
Optional Headset and Headset Adapter
Headsets with MLX Telephones
Headset Buttons
5-10
5-10
5-11
5-11
5-12
5-13
5-14
5-15
5-15
5-15
5-16
5-17
5-18
5-19
5-19
5-19
Headset Operation
Considerations
Feature Interactions
Headsets with Analog Phones
Optional Headset Button
■
Using MERLIN LEGEND Features with CMS
Feature Button
inside Auto Dial
Notify
Manual Signaling
Agent Assist
Transfer to Split or Queue .
All-Ring Operation
Ghost Telephones and Cover Buttons
Ringing Options
5-20
5-20
5-21
5-21
5-21
5-22
5-23
5-23
5-24
5-24
5-25
5-25
5-26
5-27
5-28
vii
Page 8

Contents
6
Personalized Ringing
■ Telephone Programming
Telephone Programming Instructions
Supervising CMS
■ Startup Procedures
■
Making Agents Available for CMS Calls
Agent Telephone Button Requirements
Agent Telephone Work States
Changing Agent Status
■ Monitoring Call Management
Using the System Status Screen
Line Group Information
Split Information
Function Keys
Using the Split Status Screens
Agent Status
Split Status
Call Flow Information
Function Keys
Using the Line Status Screen
Line Status
Line Group Summary
Split Status
Call Flow Information
Function Keys
Using the Events Log Screen
Function Keys
5-29
5-31
5-31
6-1
6-3
6-7
6-7
6-8
6-10
6-11
6-13
6-14
6-15
6-17
6-18
6-20
6-21
6-22
6-22
6-24
6-25
6-26
6-27
6-27
6-28
6-29
6-30
viii
Page 9

Contents
Multiple View Only Monitors
■ Dynamic Reconfiguration
Beginning Dynamic Reconfiguration
Function Keys
Reconfiguring Splits
Add Agent
Remove Agent
Move Agent
Replace Agent
New Agent
Change Split ID
Go to Configuration Screen
Agent Directory
Changing Line Group Options
Answer Delay
Changing Force Delay
Changing Automatic ACW
Reconfiguring Call Flow
Assign Splits
Flow On/Off
Set Intraflow Threshold
All-Ring On/Off
Using the Stored Shift Configurations Screen
Select Configuration
Save Configuration
Rename Configuration
Choose Startup
■
Selecting Day or Night Service
Change to Night Service
Change to Day Service
■ Printing CMS Screens
6-30
6-31
6-32
6-33
6-34
6-35
6-35
6-36
6-37
6-37
6-38
6-38
6-38
6-39
6-40
6-41
6-41
6-42
6-43
6-44
6-45
6-46
6-47
6-48
6-49
6-50
6-50
6-51
6-52
6-53
6-54
ix
Page 10

Contents
7
Generating Reports
■ Keeping Historical Data Accurate
■ Types of CMS Reports
Daily Agent Split Summary
Daily ACD Calls
Other Daily Calls
Additional Data
Cumulative Agent Split Summary
Daily Split Report
Time
ACD Calls
Other Calls
Additional Data for Daily Calls
Cumulative Split Report By Day
Cumulative Split Report By Hour
Daily Line Group Report
Time
ACD Calls
Traffic
Num Delay Anne
Other Calls
Additional Data for Daily Calls
Cumulative Line Group Report By Day
Cumulative Line Group Report By Hour
Events Log Report
■ How to Generate Reports
Generating Reports
Summary on Generating individual Reports
Summary on Generating All Reports
7-1
7-2
7-4
7-5
7-6
7-7
7-8
7-8
7-10
7-10
7-10
7-12
7-13
7-14
7-16
7-18
7-20
7-20
7-20
7-21
7-21
7-22
7-22
7-24
7-26
7-28
7-28
7-32
7-32
x
Page 11

Contents
8
Report Screen Messages
Exiting from Reports
Archiving and Restoring Data
■
Transferring Historical Data onto Diskettes
Saving the System Tables File
Saving Historical Data Files
Erasing Files from the Hard Disk
■
Generating Historical Reports
Saving the Current System Tables
Restoring the Historical System Tables
Restoring the Historical Data Files
■ Resuming Data Collection
Erasing the Historical Data from the Hard Disk
7-33
7-34
8-1
8-2
8-4
8-5
8-6
8-6
8-7
8-7
8-8
8-9
8-9
9
Restoring the Current System Tables
Troubleshooting
■ Error Messages
■ Warning Messages
■ System Errors
What They Mean
What to Do
If CMS is Managing Calls Correctly
If CMS has Stopped Managing Calls
■ Other Messages
8-10
9-1
9-2
9-7
9-17
9-17
9-17
9-18
9-18
9-18
xi
Page 12

Contents
■ Other Problems
Call Management Problems
Agent Problems
External Alert Problems
■ Fallback Plan
A
MERLIN LEGEND CMS Factory Settings
GL Glossary
9-21
9-21
9-25
9-26
9-28
A-1
GL-1
IN Index
xii
IN-1
Page 13

About This Guide
This guide assumes the Call Management System (CMS) has been initially
installed and programmed. It provides the CMS Supervisor with information
on each aspect of CMS operations and CMS programming for effective
management, maintenance, and customization of CMS.
Documentation Conventions
Several special symbols and typefaces appear in this manual. For example,
keys that appear on your
[F1]
(function key
(up arrow)
[^]
[ v ] (down arrow)
[< ] (left arrow)
[ >] (right arrow)
<
>
[ ] (tab key)
[ ] (enter key)
<
When two keys must be pressed simultaneously, it is shown like this:
<
[^] +[ ] press the up arrow and tab key simultaneously).
>
keyboard are shown like this:
F1)
xiii
Page 14

About This Guide
Different typefaces are used throughout this guide:
This typeface represents information the system
displays,
This bold typeface represents information you enter.
This italic typeface represents a system response:
such as prompts.
Sample screens from Bon Voyage Travel (a hypothetical business) are used
throughout this guide. Explanatory material is often “keyed” to these screens
with circled numbers (callouts) such as:
1
O.
Refer to the callouts on the
screens as you read the explanatory text.
In some instances, prompts that take up only one line on the display are
represented in the text on two lines. When this is the case, a backslash (\) is
used to show the break occurs in the text but not on the screens.
Prompt lines on screens show blanks (and a cursor) where you need to enter
information. In the text, an underscore is used to identify where you enter
information, as shown below.
ANSWER DELAY :
Group Letter: _
How Many Seconds:
PC responses may differ from the ones printed here, depending on the ver-
sion of the MS-DOS® program you are using.
Related Documentation
Other documents are available to help you setup, use, and maintain CMS with
the MERLIN LEGEND system. These documents are:
CMS Planning Guide and Forms
CMS Installation and System Programming Guide
CMS User’s Quick Reference
xiv
MERLIN LEGEND Communications System System Reference
Page 15

About This Guide
How to Order Documentation
The CMS documents listed above come with the system. You can order
TM
additional copies of those documents or the related MERLIN LEGEND
system documentation from the AT&T Customer Information Center. To order,
find the order number in the table below and call the telephone numbers
given on the inside front cover of this guide.
Document
Order Number
CMS
Planning Guide and Forms
585-214-050
Installation and Programming Guide 585-214-010
User’s Quick Reference (packages of 15)
585-214-070
MERLIN LEGEND Communications System
System Reference
555-610-110
xv
Page 16

Introduction to CMS
This section provides a brief overview of the Call Management System (CMS),
and the responsibilities of the CMS supervisor. A typical CMS application is
shown using the example of an imaginary business called Bon Voyage Travel.
CMS is an automatic call distributor (ACD) that answers calls and connects
them to available agents. When there’s more than one agent available for a
call, CMS connects the call to the agent who has been idle the longest. If no
agent is available, CMS connects the call to a delay message and then
places the call on hold until an agent becomes available.
Your MERLIN LEGEND Communications System and CMS work together to
meet your call management needs. Your AT&T account manager or
authorized dealer configured MERLIN LEGEND and CMS configurations
based on your particular call management needs. The implementor installed
and initially programmed your system based on these configurations.
You, the CMS supervisor, should become familiar with the basic configuration
of your system. As you observe how CMS manages your incoming call traffic
on a day-to-day basis, you can begin to fine-tune your system for more
efficient call management and more useful call-management reports. As your
needs change, you will want to change the system’s option settings to meet
these needs.
1-1
Page 17

Introduction to CMS
CMS Supervisor’s Responsibilities
In many cases the MERLIN LEGEND system manager and the CMS supervisor are the same person; in other cases, the two roles may be assigned to
different people. However, if different people are assigned to each role, the
MERLIN LEGEND system manager and the CMS supervisor must work
closely together to define the needs of both the MERLIN LEGEND system and
CMS.
While the MERLIN LEGEND system manager is responsible for systemwide
CMS options and features (such as line types, line assignments, and System
Speed Dial codes), most of the CMS operation is the responsibility of the CMS
supervisor. The primary function of CMS is to distribute incoming calls to
available agents. If agents are not available, CMS cannot perform its primary
function. Therefore, keeping agents available to answer calls is one of your
main duties as the CMS Supervisor. Anything you can do to ensure agents
are actively taking calls, not placing calls or doing anything other than CMS
activities, is in the best interests of your call handling goals.
The CMS Supervisor’s responsibilities include:
Creating shift configurations of line groups and agent splits. (See
Chapter 3, “Programming CMS Shift Configurations.”)
Changing system options and programming exceptions as business
4,
needs change. (See Chapter
“Changing System Options and Pro-
gramming Exceptions.)
Programming the attendant console and agent telephones and assist-
ing agents in the use of the MERLIN LEGEND system features that
they use to handle CMS calls. (See Chapter 5, “CMS Telephones and
Telephone Programming.”)
Monitoring line status, split status, call traffic, and system problems
during call management. (See “Monitoring Call Management” and
“Dynamic Reconfiguration,” in Chapter 6.)
Generating reports. (See Chapter
7,
“Generating Reports.”)
Using system status information and the Management Information System (MIS) data in the CMS reports to maintain efficient call
1-2
CMS Supervisor’s Responsibilities
Page 18

Introduction to CMS
management and agent productivity (See Chapter 7, “Generating
Reports,” for ongoing data collection and Chapter 8, “Archiving and
Restoring Data,” for storing CMS report data.)
■
Troubleshooting (See Chapter 9, “Troubleshooting.”)
Basic Terms and Key Concepts
The terms and descriptions in this section provide the key to understanding
how CMS works. More information about each of these aspects of CMS is
included in the relevant sections of this manual. Additional CMS terms are
included in the glossary.
Automatic Call Distributor
CMS is the automatic call distributor (ACD) for the MERLIN LEGEND system.
CMS distributes calls that come in on the MERLIN LEGEND system telephone
lines assigned to CMS.
Lines and Line Groups
The MERLIN LEGEND system telephone lines assigned to CMS are organized
into line groups. Usually the incoming calls for a line group are of the same
type. For example, the lines for incoming sales calls are in one line group
and the lines for service calls in another. CMS accommodates up to a total of
28 lines assigned to up to four line groups.
Agents and Agent Splits
Incoming calls are answered by agents who are assigned to agent splits. A
split is a team of agents who handle the same type of incoming calls. Each
split is assigned to answer calls for one or more line groups. There can be up
to six splits, with a maximum of 28 agents in a split. However, no more than
28 agents can be active in CMS at any one time.
Basic Terms and Key Concepts 1-3
Page 19

Introduction to CMS
Shift Configuration
A shift configuration is an arrangement of line groups and agent splits for
managing calls. You can create up to six different configurations to handle
different calling patterns in your business. However, only one shift
configuration can be active at a time, and no more than 28 agents can be in
that configuration.
Main Splits and Secondary Splits
In a configuration, some splits are main splits and others are
secondary splits. A main split has primary responsibility for answering calls
A
for a line group.
secondary split answers calls for a line group only if the
main split for that group is overloaded.
Intraflow and Intraflow Threshold
The sending of calls to agents in a secondary split is called intraflow.
Intraflow can be turned on and off. The number of seconds that the call waits
in the main split before it is sent to the secondary split is called the intraflow
threshold.
Logged Out State and Available State
When call management begins for a shift, the agents in the shift configuration
are in the logged out state. CMS keeps statistics on other calls made by
agents who are logged out, but doesn’t send calls to them, so the agents
have to signal CMS that they are ready to receive calls (in available state).
They do so by touching the programmed button labeled
Available
on their
telephones (MERLIN LEGEND system telephones).
After-Call-Work (ACW) State
When agents need time to complete work on their most recent CMS call
(such as processing an order or updating a record), they can leave the available state and enter the after-call-work (ACW) state by pressing the programmed button labeled
ACW
on their telephones. CMS does not send calls
to agents who are in this after-call-work state, but it does keep statistics on
1-4
Basic Terms and Key Concepts
Page 20

Introduction to CMS
them. To return to the available state from the after-call-work state, agents
simply touch their
Available
button.
Automatic After-Call-Work (Auto ACW) State
The automatic after-call-work (Auto ACW) feature automatically places agents
into the after-call-work state upon completion of an ACD call. During that
time, agents receive no calls as they complete their work. The CMS supervi-
sor can program a specific amount of time for this after-call-work state. When
the time specified in the Auto ACW parameters elapses, agents are automatically made available. Agents can make themselves available before the
specified time elapses by touching their
Available
button.
In addition to using the
Available
and
ACW
buttons on their phones to move
from work state to work state, agents in an active shift configuration always
know what state they’re in by the status of the lights next to the buttons.
■
Available
■ ACW light on=
■ Both lights off= logged out state
When agents touch the
next to the
light on = available state
after-call-work state
Available
Available
button goes on. When they touch the
button to enter the available state, the light
ACW
button to
move from the available state to the after-call-work state, the light next to the
Available
button goes off, and the light next to the
ACW
button goes on.
Agents who plan to be away from their phones for an extended period or who
are doing work unrelated to CMS can also log themselves out of CMS. They
move from the available state to the logged out state by touching the
able
call-work state to the logged out state by touching the
button and thus turning off its light. Likewise, they move from the after-
ACW
button and turn-
Avail-
ing off its light. Also, agents will be placed in the logged out state if they fail
to answer calls transferred to them by CMS.
Basic Terms and Key Concepts 1-5
Page 21

Introduction to CMS
Supervisory Login/Logout
The CMS supervisor can change an agent’s work state from the CMS PC or
the supervisor’s console. From the Split Status Information screen, the supervisor simply enters the agent’s ID at the appropriate prompt and enters the
new status (Logged out/Available/ACW). From the console, the supervisor
presses the agent’s Inside Auto Dial button then a programmed feature but-
ton for the desired work state.
Call Management
Call management is the automatic distribution of calls within a shift
configuration. When a call comes into CMS, the system goes through this
sequence of steps:
1. CMS looks for an available agent in the main split assigned to the line
group for the incoming call.
2. If an agent is available, CMS answers the call and transfers it to the
agent who has been available the longest.
3. If no agent is available, CMS waits a certain number of seconds, then
answers the call and connects it to a delay message. The length of
time CMS waits before answering the call is known as the answer delay.
If an agent becomes available at any time during the answer delay
interval or during the delay message, the call is transferred to the agent.
4. If no agent has become available and the delay message is finished,
CMS puts the call on hold.
5. As soon as an agent is available, CMS transfers the oldest waiting call
to the agent.
6. If the call has waited a certain amount of time (the intraflow threshold), it
may be sent (intraflowed) to an avail
able agent in the secondary split (if
intraflow is on).
1-6
Basic Terms and Key Concepts
Page 22

Introduction to CMS
Answer Delay, Force
Delay, and Priority Lines
The CMS supervisor can modify the basic call management sequence by
using the CMS answer delay and force delay options, and by making one or
more CMS lines priority lines. When no agent is available to answer the call,
the answer delay setting determines how long a call rings before CMS
answers and connects it to the delay message. With force delay active, all
calls are connected to the delay message whether or not there are available
agents, and callers hear the entire message before being connected to an
agent. Calls coming in on lines that have been designated priority are
answered before any other waiting calls.
A
Typical CMS Application
The following example shows how Bon Voyage Travel Agency, an
business, uses CMS to manage revenue-producing incoming call
CMS and Bon Voyag
At Bon Voyage Travel, agents plan and book trips for several types of customers. Most of the travel agency’s orders are placed by phone, so CMS is an .
important part of the agency’s daily business transactions.
In general, Bon Voyage’s customers fall into one of three groups: those who
plan personal travel, those who plan charter group travel, and those who plan
corporate travel. To handle these three types of calls and to manage the frequent overflow of calls, the agency divides the customer telephone lines into
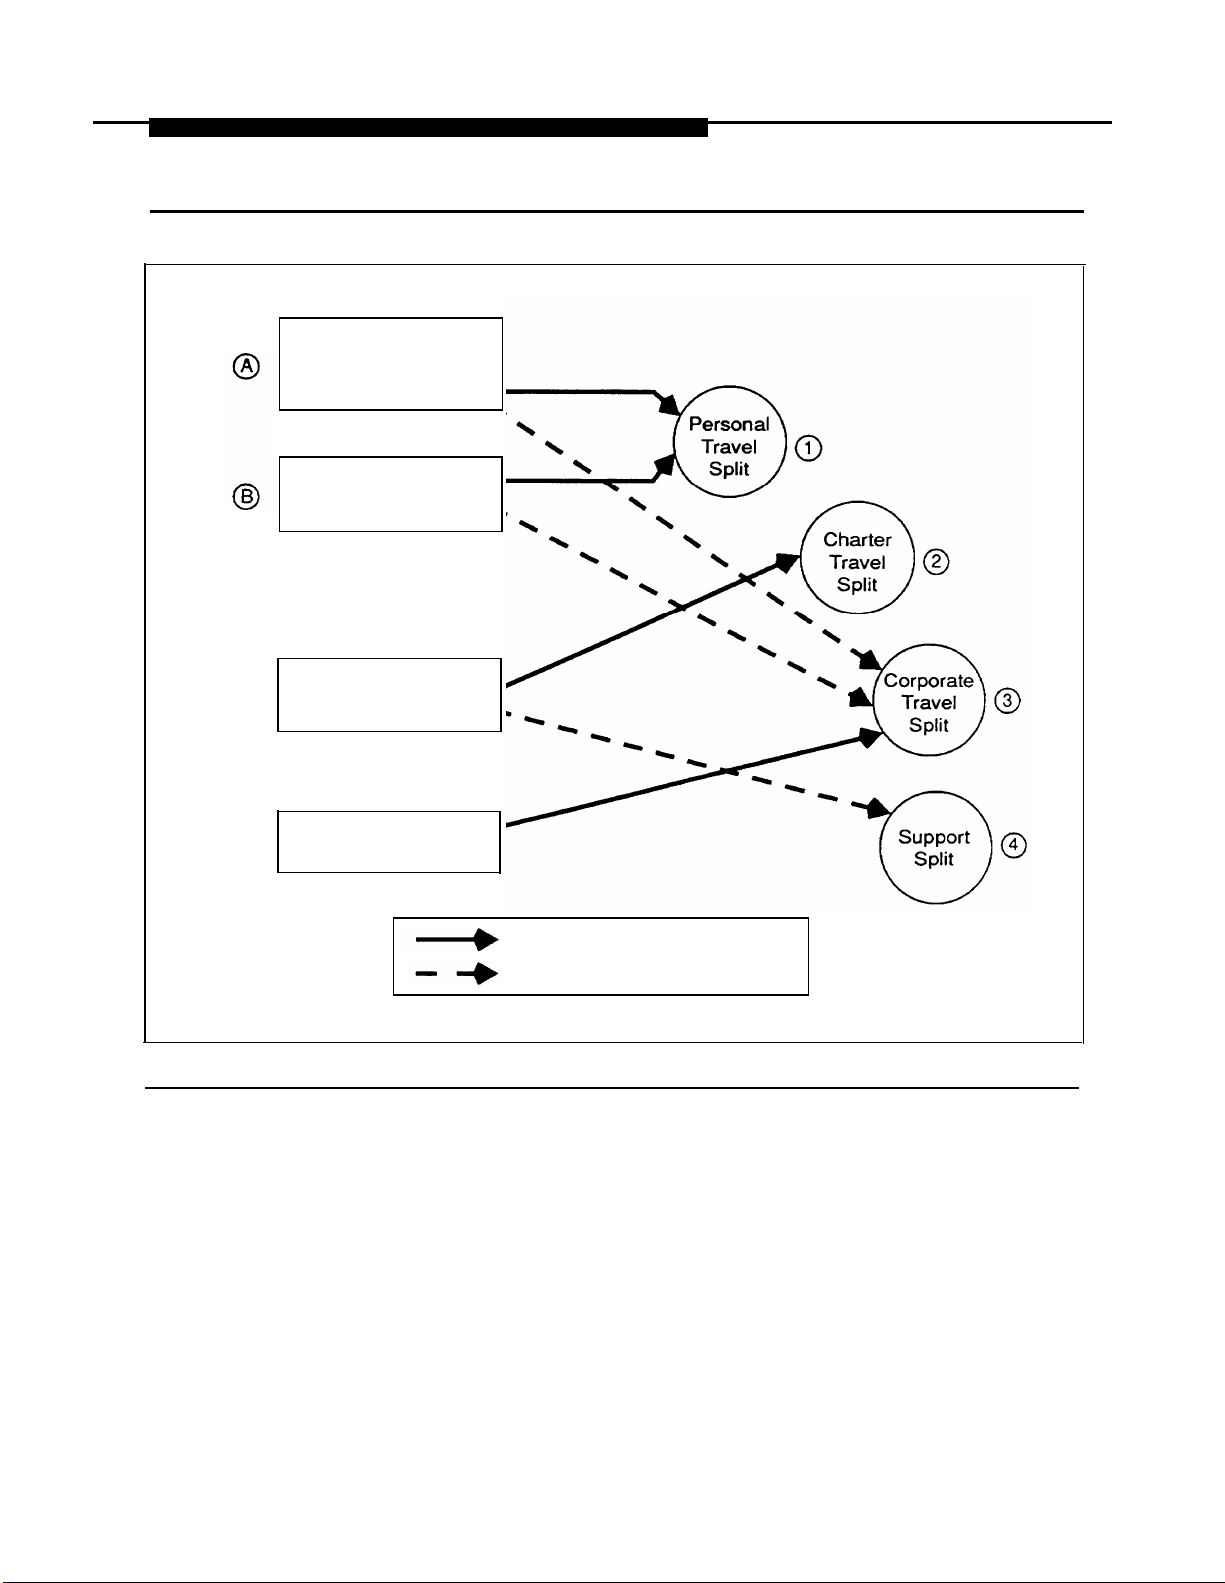
four line groups and organizes agents into four splits, as shown in Figure 1-1.
e Travel
imaginary
traffic.
A Typical CMS Application 1-7
Page 23
Introduction to CMS
Public Line Group
555-1816
555-1808
555-1818
555-8515
Special Line Group
555-8532
555-8518
555-8531
Charter Line Group
555-0911
555-0912
C
o
555-1913
555-0914
555-0915
555-0916
Corporate Line Group
D
o
555-0917
555-1918
Calls routed to main split
Calls intraflowed to secondary split
Figure 1-1. Bon Voyage Travel’s CMS
The following description of each split and its line groups is keyed to the
figure with circled numbers (callouts).
1-8 A Typical CMS Application
Page 24

Introduction to CMS
1
O
2
O
Personal Travel Split
The Personal Travel split
and book their personal vacations. There are seven agents in this
split.
Calls come into this split on two line groups: the Public line group
and the Special line group
lines (555-1 816, 555-1808, 555-1818, and 555-851 5), which are advertised in the Yellow Pages, local newspapers, and national travel magazines.
The Special line group has three lines (555-8532, 555-8518, and 5558531 ), which are reserved for valued repeat customers who may book
several trips with Bon Voyage Travel each year.
Charter Travel Split
The agents in the Charter Travel split arrange trips for groups and fre-
quently book trips for local and national holiday clubs. There are
seven agents in this split.
Calls to this split come in on the Charter line group
of six numbers: 555-0911,555-0912, 555-1913, 555-0914, 555-0915,
and 555-0916. Occasionally a customer who has previously made
travel arrangements through a holiday club may call one of these
numbers to make personal travel arrangements. In such cases the
agent in the Charter split who receives the call transfers it to an agent
in the Personal Travel split. (This feature, called Transfer-to-Split, or
Transfer-to-Queue, is explained in detail later in this guide and in the
CMS Installation and System Programming Guide.)
.
handIes calls from customers wanting to plan
A
O
B
O.
The Public line group consists of four
C
O
which consists
3
O
Corporate Travel Split
The Corporate Travel split handles business trips for large corpora-
tions, This split, consisting of two agents, is the main split for the Cor-
porate line group
group are 555-0917 and 555-1918.
Since both the Personal Travel split and the Corporate Travel split han-
dle individual trips, the Corporate Travel split serves as a secondary
split (a backup split) to handle call overflow from the Personal Travel
split.
D
O.
The telephone numbers for the Corporate line
A Typical CMS Application 1-9
Page 25

Introduction to CMS
4
O
Support Split
The number of agents available for CMS calls in Bon Voyage Travel’s
fourth split, the Support split, varies according to the incoming call
traffic. The employees who staff this split have primary responsibilities
that do not involve CMS, such as bookkeeping, advertising, and trip
packaging. But since these people have some experience as travel
agents, they are often asked to back up the Charter Travel split when
call traffic is heavy on the lines in the Charter line group
the Support split becomes a secondary split covering the Charter line
group.
People assigned to the Support split are often away from their desks,
so calls coming into the Support split on the Charter lines ring at all
phones in the split. Then the Support person who is free to answer the
call can pick up the nearest telephone. (This feature, called All-Ring
operation, is explained in more detail later in this guide and in the CMS
Installation and Programming Guide.)
Bon Voyage Travel’s Other Call Traffic
C
O.
That is,
All of Bon Voyage Travel’s phones and outside telephone lines are part of the
agency’s MERLIN LEGEND Communications System. However, some
phones and outside lines are not assigned to the Call Management System.
They operate outside of CMS.
Agents and non-agents use the lines not assigned to CMS for all outgoing
calls and all non-revenue-producing incoming calls. It is recommended that
CMS lines not be used to place outgoing calls or to accept non-revenue producing incoming calls.
Because this guide focuses on the operation of CMS, it refers to the components of Bon Voyage Travel’s MERLIN LEGEND system that are not
assigned to CMS only when necessary to clarify some point about CMS
operation.
1-10
A Typical CMS Application
Page 26

Introduction to CMS
CMS and Other Businesses
Bon Voyage Travel’s line groups and agent splits are typical for a travel
agency. Other businesses would have other names for their line groups and
splits. For example, a wholesale distributor might have line groups and splits
for inside sales and customer service (such as order tracking), while a bank
may have line groups and splits dedicated to specific types of loans and customer services (credit card and billing inquiries). A brokerage firm may have
line groups and splits for stock quotes and customer orders.
Day-to-Day Operation of CMS
Your day-to-day interaction with CMS primarily involves monitoring system
status during call management and using dynamic reconfiguration to make
any needed changes in the configuration being used to manage calls.
The following example illustrates how the CMS supervisor at Bon Voyage
Travel interacts with the system during a typical day.
At
9 a.m. each business day, Pat P. switches on Bon Voyage’s PC and starts
managing calls with the weekday configuration. All agents are automatically
in the logged out state when call management begins. Pat uses the MERLIN
LEGEND system Group Page feature to ask the agents in some splits to
touch the
Available
button on their telephones to signal they are available to
begin answering calls. Another split is using a line group with Auto After Call
Work; they automatically become available when the calls start coming in.
Pat makes several changes to the current configuration during the day. First,
Pat removes Tom Baker from his position in the Personal Travel split because
he is on vacation. He moves a new agent into Tom’s position in that split, and
tells the agent to move himself to the Available state.
As the peak calling hour approaches, Pat turns on intraflow for the Charter
line group. Pat uses the Group Page feature to tell the agents in the Support
split that they may now receive calls for the Charter line group. The Support
split is a secondary split for the Charter line group.
Throughout his shift, Pat takes time out from other work to monitor the System
Status screen, the Line Status screen, and the Split Status Information
A Typical CMS Application 1-11
Page 27

Introduction to CMS
screen. He can use the [^] + [Prt Sc] keys to print any of these screens if he
wants to. The screens provide a detailed picture of activity throughout the
system. Using different screens, Pat can tell when to turn intraflow on or off,
when a new agent may be having trouble handling calls, or when all lines in
line group are busy. Pat can use Dynamic Reconfiguration to correct these
situations as they occur.
Pat has set an external alert to be triggered whenever more than three calls
are waiting. This way he can be immediately aware of this condition no matter
where he is in the room. Also, agents are immediately aware of this condition
and know, without Pat telling them, that they have to move on to the next calls
quickly.
When Pat notices that three calls are waiting in the Personal Travel main split,
and there have been several abandoned calls, he turns on intraflow to allow
waiting calls to be sent to the Corporate Travel split (the secondary split for
the Personal line group). Pat also increases the answer delay (the length of
time calls ring before CMS answers them) so callers spend a little less time
on hold and any long distance charges on their line could be reduced.
a
Pat has a new agent in the Corporate Travel split. Yesterday, Pat spent time
with the new agent, explaining the telephone features he’ll be using. As the
new agent answers CMS calls for the first time, Pat watches the Split Status
screen to see when the new agent is on a call, and then joins the call using
the Barge In feature or by pressing the line button for the agent’s call. (A
tone is heard when the call is joined.) In this way, Pat is able to give the
agent advice on handling calls.
Pat also looks at the Management Information System (MIS) reports to determine if Bon Voyage Travel has an efficient number of lines and agents. He
prints some of the daily reports to review hourly call activity for the day and
prints cumulative daily and hourly reports to help develop a CMS profile for
the business.
If the Events Log Report lists many occurrences of the all lines busy exception, it signifies that many people hear a busy signal when they call. Pat can
use exception information like this to decide if more lines should be added to
some line groups.
1-12
A Typical CMS Application
Page 28

Using
This chapter gives instructions for using your PC for the CMS Supervisor’s
activities. The basic operations described here are starting CMS, setting the
time and date, and entering and editing data. For further information about
the operation of your PC, refer to the manuals provided with your PC.
Your PC with CMS
Starting CMS
The first step in using CMS is to start the program. The first CMS screen that
appears is the CMS Main Menu (Figure 2-1). This menu is the gateway to
CMS programming and to running call management. To start CMS and
display the CMS Main Menu:
1. Turn on the computer.
CMS starts automatically from the autoexec.bat file, and displays the CMS
Main Menu
2. To select an item from the Main Menu, press the appropriate function
key (for example, [F4] to program, or administer, CMS).
Starting CMS 2-1
Page 29

Using Your PC with CMS
Bon Voyage Travel
CALL
FOR
F Start
lCall Mgt
MANAGEMENT
THE AT&T MERLIN
(c)1991by AT&T
MAIN MENU
F1 -
Start Call Management
F4
- Administer CMS
(Agents, Lines,
Print Reports
F5 -
F8 -
Exit to DOS
F Admin F Print
4 CMS
SYSTEM
Configurations )
5Reports
CMS
LEGENDS
CMS R3.O 5:47p 03/04
(C MS)
F1O -
Help
F Exit
8 to DOS
Figure 2-1. CMS Main Menu
2-2 Starting CMS
Page 30

Using
Your PC with CMS
Setting the Date and Time
CMS uses the date and time from MS-DOS. The date and time are important
parts of your daily CMS statistics and must be represented correctly on your
PC screen. To change either the date or the time, follow the procedures
below. (When in CMS, you can check the time and date by looking at the
upper right-hand corner of any CMS Menu screen).
NOTE:
The date must be changed at the beginning of each year, and the time must
be adjusted for daylight savings time.
Set the Date
To check or change the date on your PC:
1
. When the CMS Main Menu appears upon starting CMS, press [F8] (Exit
to DOS).
2. When the DOS prompt appears, type date then press [ ] .
The following message appears on your screen:
(Example):
Current date is mm - dd – 19yy
Enter new date: (mm-dd-yy)
The current date is displayed, where Day= day of the week, mm = month,
dd = day, and yy = year.
3. If the date is correct, press [ ].
<
<
If the date is incorrect, type in the correct date (for example,
4-08-19XX) then press [ ]. XX represents the year.
<
4. To return to CMS, at the prompt, type cms.
The CMS Main Menu screen appears.
Setting the Date and Time 2-3
Page 31

Using Your PC with CMS
Set the Time
To check or change the time on your PC:
1. When the CMS Main Menu appears upon starting CMS, press [F8]
(Exit
to DOS).
2. When the DOS prompt appears, type time and press [ ]
The following message appears on your screen:
(Example):
Current time is HH:MM:SS. XX
Enter new time:
where HH = hour, MM = minute, SS = second, and XX = one hundredths of a
second.
3. If the time is correct, press [ ] .
<
<
If the time is incorrect, type in the correct hour and minute (for example,
19:03
then press [ ] . MS-DOS works on the basis of a 24-hour
<
clock, so if you want to enter the time as 2:30 p.m. you must type 14:30.
MS-DOS keeps track of the seconds and hundredths of seconds for
you.
4. To return to CMS, at the prompt, type
cms.
The CMS Main Menu screen appears.
2-4 Setting the Date and Time
Page 32

Using Your PC with CMS
CMS Screen Layouts
This section describes the layout of CMS screens. If you have questions
about MS-DOS, the layout of your keyboard, or other information about your
PC, refer to the accompanying manuals.
Figure 2-2 shows a typical CMS screen layout.
1
O
2
O
3
O
4
O
5
O
Bon Voyage Travel
AGENT SPLITS
Agent
Split
1 PERS
2 CHART
3 CORP
4 SUPPT
56-
Configuration #2 - CONFIG_2
You cannot cancel this prompt. Answer ‘Y’ or ‘N’
CLEAR AGENTS: Are You Sure? (Y/N):
F Cancel
1 Prompt
Pos ID
Split
Agent
Pos ID
Group Lines Delay Delay ACW
A PUBLC 4
B SPECL 3
C CHART 6
D CORP 2
Splits Intra
Gp Main Sec Flow
A-B-C-D--
FPrevious F
5 Field 6 Field
ADMIN CMS R3.0
LINE GROUP OPTIONS
Num Answer Force Auto
5s
5s
5s
5s
CALL FLOW
off
off
off
off
Next
4:llp
off
off
off
off 0s
Flow All
Spl Thresh Ring
1
30s off
2
30s off
3
30s off
4
30s off
5
30s off
6
30s off
03/04
0s
0s
0s
F Enter
8 Data
Figure 2-2. Typical CMS Screen
CMS Screen Layouts 2-5
Page 33

Usinq Your PC with CMS
.
The following types of information appear in each area of the screen. Each
number below corresponds to a number to the left of the screen,
1
O
2
O
ID line.
Information area.
information for a particular screen.
The ID line contains:
Business name.
Status indicators concerning problems with the PC hard disk, the
connections between CMS and the MERLIN LEGEND system
control unit, or the connections between CMS and the voice
announcement unit and/or printer. For information on resolving
problems, see Chapter 8, “Troubleshooting.”
CMS
Current CMS mode:
started. DAY or NIGHT indicates calls are being managed
using Day Service or Night Service mode (explained later in
manual). ADMIN indicates CMS is being used for programming
instead of call management.
Print Reports screen.
CMS Release number.
Time and date.
This area contains screen names, menus, or status
appears when the system is first
REPT
this
appears when you use the
3
O
2-6 CMS Screen Layouts
Error line.
■
Error messages indicate that you made an invalid entry, such as
entering a number in a field where only letters are valid.
■
Exception messages indicate that one of the exception thres-
holds you have set has been reached, and an unusual or
undesirable situation may be occurring.
■
System messages indicate that part of CMS is malfunctioning (for
instance, the voice announcement unit is not working).
In many cases, the PC beeps when a message appears in the error
line. Exception messages and system messages remain on the screen
until another message overwrites them or until you move to another
Three types of messages can appear in the error line:
Page 34

Using Your PC with CMS
screen. Error messages remain on the screen until you correct the
error.
4
O
5
O
Prompt line.
appear after you press most function keys or in response to certain
error conditions.
When no prompt appears, the words F10 - Help appear to the far
right in the prompt line to remind you that pressing [F10] lets you access
the help screens.
Function keys.
current meaning of the function keys on your keyboard. The function
keys are used for different activities on each screen (except [F10],
is always access to a help screen). When you press a function key, a
new screen or a prompt appears. When a prompt appears, the function
key labels change to permit data entry functions.
This line contains requests for your input. Prompts
The Iabels at the bottom of the screen tell you the
which
CMS Screen Layouts 2-7
Page 35

Using Your PC with CMS
Entering and Editing Data
You can enter and edit data only on certain CMS screens. These screens
display the data entry prompt and the editing function keys. For example, the
Shift Configuration screen shown in Figure 2-2 is not an editing screen. If we
press [F2]
tion of the screen with a box (Figure 2-3).
(Line Groups) on that screen, CMS highlights the Line Groups sec-
Bon Voyage Travel
AGENT SPLITS
Agent
Split
1 PERS
2 CHART
Configuration #1 - DAY
F Answer
1 Delay
Pos ID
16 TOM
17 CLIFF
19 ERNIE
21 DEB
23 BOB
24 SHERM
25 WALT
27 BEN
28 SAM
29 NORM
31 DI A
32 CARLA
33 BJ
35 MAX
F Force
2 Delay
F Auto
3 ACW
Split
3 CORP
4 SUPPT
56-
Agent
Pos ID
37 IKE
39 TINA
40 DIANA
42 RON
43 NANCY
ADMIN CMS R3.O 3:13p 03/04
LINE GROUP OPTIONS
Num
Answer Force Auto
Group Lines Delay
A PUBLC 4
B SPECL 3
C CHART 6
D CORP 2
CALL FLOW
Splits Intra
Gp Main Sec Flow
1 3 On
B
1 3 On
C 2 4 On
D
3-
Off
Delay ACW
5s
5s off 30s
5s
5s
F Config
7 Screen
off
off 10s
off 15s
Flow All
Spl Thresh Ring
1
10s off
2
3
4
5
6
5s off
30s off
30s off
30s off
30s off
F10 -
20s
Help
Figure 2-3. Line Groups Screen
The Line Groups screen is also not an editing screen. However, pressing any
of the function keys on that screen brings up an editing screen on which we
can enter specific line group information. Figure 2-4 shows the Answer Delay
editing screen that appears when we press [F1]
(Answer Delay) on the Line
Groups screen.
2-8 Entering and Editing Data
Page 36

Using Your PC with CMS
Bon Voyage Travel
AGENT SPLITS
Agent
Split
1 PERS
2 CHART
Configuration #1 - DAY
ANSWER DELAY:
F Cancel
1 Prompt
Pos ID
16 TOM
17 CLIFF
19 ERNIE
21 DEB
23 BOB
24 SHERM
25 WALT
27 BEN
28 SAM
29 NORM
31 DI
32 CARLA
33 BJ
35 MAX
Group Letter:
Split
3 CORP
4 SUPPT
5 6-
How Many Seconds:
Agent
Pos ID
37 IKE
39 TINA
40 DIANA
42 RON
43 NANCY
ADMIN CMS R3.0 3:25P 03/04
LINE GROUP OPTIONS
Group Lines Delay
A PUBLC 4
B SPECL 3
E
C CHART 6
c
D CORP 2
I
Splits Intra
Gp Main Sec Flow
1 3 On
A
B
1 3 On
2 4 On
c
D
3-
FPrevious F
5 Field
Next
6 Field
Answer Force Auto
Num
Delay ACW
5s
5s
5s
5s
CALL FLOW
Spl Thresh Ring
1
2
3
4
Off
5
6
off
off 30s
off
off
20s
10s
15s
Flow All
10s off
off
5s
30s off
30s off
30s off
30s off
F Enter
8 Data
Figure 2-4. Answer Delay Editing Screen
Editing Prompt and Function Keys
On each editing screen, an editing prompt appears on the line above the
function keys. The cursor moves to the first field of the editing prompt and
the function keys change to provide editing capabilities. For the Answer
Delay editing screen, the prompt is:
ANSWER DELAY:
Group Letter: _
How Many Seconds:
Entering and Editing Data 2-9
Page 37

Using Your PC with CMS
The editing function keys for this screen and all editing screens are:
F Cancel
1 Prompt
F Previous F Next
5 Field
6 Field
To enter data at the prompt, simply type in the entry for the field
cursor is located. To move to the next prompt field, press [F6].
entry and return to the normal function keys, press [F8]. To cancel the
prompt at any time and return to the normal function keys, press [F1].
Guidelines for Entering Data
entering data at a prompt, note the following guidelines:
CMS accepts uppercase or lowercase letters. In the examples in this
manual, entries are usually shown in lowercase letters. On the com-
puter screen, almost all entries appear as uppercase letters, even if
entered as lowercase letters. (However, the system displays agent
names and the business name exactly as you type them.)
Some fields require numbers or special characters. Spaces are not
allowed, so use an underscore instead. To enter an underscore, use
the shift of the hyphen, located in the top row of the keyboard.
F Enter
8 Data
where the
To save the
Press [F8]
(Enter Data), [Return], or [ ] when you finish typing an entry
to tell the computer to process the data you have entered. The cursor
can be in any field when you press these keys.
The computer beeps and displays an error message if you have
skipped a required field in a prompt and pressed [F8] , [Return], or [ ].
The computer also beeps and displays an error message if you make
an invalid entry, such as entering a letter instead of a number. Reenter
the correct data and continue.
2-10 Entering and Editing Data
<
<
Page 38

Using Your PC with CMS
Alternate Editing Keys
In addition to the
tasks.
Table
Press
Table 2-1
2-1. CMS
Or
[F1]
[F5]
[^] + [ ]
[F6]
[F8]
<
[ ]
editing function keys,
shows these alternate
Editing Keys
Cancel a prompt.
<
>
Move to the beginning of the previous field.
Move to the beginning of the next field.
Indicate you have finished your response.
other keys perform some of the same
keys.
To
Simple Editing Procedures
After you have entered data, you may need to change the entries. CMS
screens include simple editing capabilities as described in Table 2-2.
Table 2-2. Editing Procedures
To
Change a character in a field
Add characters at
end of
an entry
Insert characters
in an entry
Move the cursor to the incorrect character and type
another character over it.
Press [ >] after the last character and type additional
characters.
Move the cursor to the first character you want to
change and retype the entire entry from that character.
(You cannot use [Insert] to insert a character between
other characters. )
Do this
Entering and Editing Data 2-11
Page 39

Using Your PC with CMS
Replace a long
entry with a
shorter entry
Type over the characters you want to change, then
press the space bar after the last character of the new
entry. The remaining characters in the previous entry
disappear.
For example, to change “Joseph” to “Joe”:
1. Move the cursor to “s”
2. Type “e”
3. Press the space bar.
The letters “eph” disappear.
Getting Help
You can press [F10] on any screen to receive more information about that
screen and its prompts. To exit a help screen and return to your previous
place, press any key. If you press a function key to exit a help screen, you
can exit help and then perform the function of that particular function key.
Leaving CMS
You can leave CMS at any time by using the function keys. The exact procedure changes depending on the screen on which you are working. In gen-
eral, pressing [F7]
you are at the CMS Menu, make sure you have saved your changes. Once
you have, simply turn the computer off.
2-12 Leaving CMS
or [F8] returns you to the previous level of screens. Once
Page 40

Programming CMS
Shift Configurations
This chapter describes the tasks involved in changing your CMS shift
configurations, including:
■
Building and editing shift configurations (assigning splits and line
groups and programming call flow)
■ Saving shift configurations
■ Programming shift configurations
■ Selecting a start-up configuration
■ Backing up shift configurations.
The shift configuration determined by you and your AT&T Account Manager
during the system planning process is set up and CMS is managing calls.
Use this section only if you want to change the basic configuration and stop
managing calls during programming. If, however, you do not want to make
changes at this time, go to Chapter 5, “Supervising CMS, ” where you can go
through the steps needed to begin operations. If you want to make changes
to the shift configurations while CMS is managing calls, go to Chapter 5 and
follow the instructions for “Dynamic Reconfiguration.” Before building
additional configurations or changing established configurations, review
“CMS Requirements and Capacities” in CMS Planning Guide, then go on to
the next section in this chapter.
Be sure to record your changes on the appropriate planning forms, found in
the back cover pocket of this guide.
3-1
Page 41

Programming CMS Shift Configurations
Figure 3-1, “A Map for CMS Configuration Screens,” shows
the relationship
between the various screens used in CMS programming.
To use the map, determine which function you wish to perform, then, starting
with the CMS Main Menu, press the indicated function keys to move down the
map to the desired action. For example, to configure line groups, press the
following keys
1. [F4]
2. [F1]
3. [F1]
4. [F2]
-To
-To
-To
-To
in order:
select the Administration Menu.
go to the Stored Shift Configurations screen.
select a configuration to build or edit.
configure line groups.
CMS MENU
F5
START CALL
MANAGEMENT
ADMINISTRATION
MENU
PRINT
REPORTS
F1
STORED SHIFT
CONFIGURATIONS
I
CONFIGURATION
F2 F3 F5
AGENT
DIRECTORY
ADMINISTER LINES
AND LINE GROUPS
SET
OPTIONS
Note: CMS does not manage calls
F1
AGENT
SPLITS
when programming is performed from
the Administration Menu. To create or
edit shift configurations while CMS is
F3
F2
LINE
GROUPS
CALL
FLOW
managing calls, follow instructions for
“Dynamic Reconfiguration” in Chapter
Figure 3-1. Map for CMS Configuration Screens
F6
ADMINISTER
EXCEPTIONS
5.
.
32
Page 42

Programming CMS Shift Configurations
Creating or Changing
Shift Configurations
Creating or changing shift configurations involves these activities:
■ Assigning agents to splits
■
Programming line group options: Answer Delay (the number of
seconds a call rings before CMS answers it), Force Delay (forces all
calls in the line group to hear the entire recorded message before
being connected to an agent, regardless of availability), and Auto
ACW (the number of seconds after a completed call that an agent is
automatically in the after-call-work state)
■
Programming call flow (assigning main and secondary splits, program-
ming intraflow, and if you want, designating AH-Ring operation for
some splits).
Before you can create or change a shift configuration, your lines and line
groups must have been identified and programmed by your AT&T implementor or Authorized AT&T Dealer.
Refer to the CMS Agent Splits Planning Form to see how your splits were
assigned to your line groups. “
NOTE:
Your CMS does not manage calls while you are using these procedures. To
edit an active shift configuration, follow the instructions in “Dynamic
Reconfiguration” in Chapter 5. CMS must be running under Call Manage-
ment to use dynamic reconfiguration.
To create or change a shift configuration, follow these steps:
1
. From the CMS Main Menu, press [F4] (Admin CMS).
The Administration Menu (Figure
3-2)
appears.
Creating or Changing Shift Configurations
3-3
Page 43

Programming CMS Shift Configurations
Bon Voyage Travel
F Config
1 List
F Agent F Lines/
2Directry 3 Groups 5Options
ADMIN CMS R3.O 3:27p 03/04
Administration Menu
F1 Build/Edit Shift Configurations
F2 Build Agent Directory (Names and IDs)
F3 Administer Lines and Line Groups
F5 Set Options
F6 Select Exception Thresholds to be Monitored
F8 Exit From the Administration Module
SELECT ADMINISTRATION FUNCTION
F Set
F Select
6Exceptns
F1O -
F Exit
8 Admin
Help
Figure 3-2. Administration Menu
2. At the Administration Menu, press [F1] (Config List).
The Stored Shift Configurations screen (Figure 3-3) appears.
3-4
Creating or Changing Shift Configurations
Page 44

Programming CMS Shift Configurations
Bon Voyage Travel
Last Name
Anders
Baker son
Bakerson
Chanleys
Chapman
Claren
Clover
Easttree
Fielding
Fielding
Hall
Honelly
Kiley
Kloner
Mailer
F Add F Remove
1 Agent 2 Agent
First
Harry
Tom
Tom
Diane
Charlie
Clifford
Ward
Clint
Sally
William
Benny
BillyJoe
Gene
Maxwell
Sam
F Change
3Agt Info
AGENT DIRECTORY
ID
HARRY
TOM
TOM2
DI
CHUCK
CLIFF
WARD
CLINT
SALLY
BILL
BENNY
BJ
GENE
MAX
SAM
Last Name
Middon
O’Rourke
Pantilly
Patrick
Peters
Piers
Price
Reynolds
Rice
Rice
Turner
Turtone
Turtone
Weiss
ADMIN CMS R3.O
First
Beth
Walter
Ernie
Bob
Norman
Benjamin
Sherman
Nancy
Diana
Ronald
Carla
Ike
Tina
Debra
F Config F Admin
7 Splits
l:25p 07/19
ID
BETH
WALT
ERNIE
BOB
NORM
BEN
SHERM
NANCY
DIANA
RON
CARLA
IKE
TINA
DEB
F1O - Help
8 Menu
Figure 3-3. Stored Shift Configurations Screen
3. From the Stored Shift Configurations screen, press [F1] (Select Config).
The function keys change and the following prompt is displayed:
SELECT CONFIGURATION:
Config #: _
4. To edit an existing configuration, enter the number of that configuration.
To build a new configuration, enter a number labeled
UNUSED
.
5. Press [F8] (Enter Data).
The Configuration screen appears with the shift configuration you selected.
If you are editing an existing shift configuration, the fields are populated
with the shift configuration parameters. You can change these parameters by overwriting previously entered data.
Creating or Changing Shift Configurations
3-5
Page 45

Programming CMS Shift Configurations
Figure 3-4 is an example of a Configuration screen for
configuration. Notice that all areas on the screen that
building a new
have to do with
splits are either blank or display hyphens. The factory settings for the
line group options and call flow are also displayed.
Bon Voyage Travel
AGENT SPLITS LINE GROUP OPTIONS
Agent
Split
1 PERS
2 CHART
3 CORP
4 SUPPT
56-
Configuration #2 - CONFIG_2
Pos ID
Split
Agent
Pos ID Group Lines Delay
Gp Main Sec Flow
A--
B-c-D--
ADMIN CMS R3.0 3:35p 03/04
Num Answer Force Auto
Delay ACW
A PUBLC 4
B SPECL 3
C CHART 6
D CORP 2
Splits Intra
5s
5s
5s
5s
CALL FLOW
Spl Thresh Ring
off
off
off
off
off
off
off
off
1
2
3
4
5
6
20s
30s
10s
15s
Flow All
30s off
30s off
30s off
30s off
30s off
30s off
F Splits
1
F Line F Call
2 Groups 3 Flow
Figure 3-4. New Configuration Screen
■
Under “Agent Splits” on the left side of the screen:
— Split numbers 1 through 6 are displayed.
— Agents are unassigned.
3-6
Creating or Changing Shift Configurations
F Clear
5 Agents
F Config
7 List
F10 -
F Admin
8 Menu
Help
Page 46

Programming CMS Shift Configurations
■
Under “Line Group Options” in the upper right corner of the
screen:
— Answer delay is set to 5 seconds.
— Force delay is turned off.
— Automatic After-Call-Work is set to 0 seconds (off).
■
Under “Call Flow” in the lower right corner of the screen:
— Main and secondary splits are unassigned (indicated by
hyphens).
— Intraflow is turned off.
— Intraflow thresholds are set to 30 seconds.
— All-Ring is turned off.
6. Determine which, if any, of the factory settings you want to change.
Make the changes as instructed in the following sections of this chapter:
■
Assigning Splits.
Add, move, or remove agents in the splits in a
configuration.
■
Assigning Line Group Options.
Program how you want CMS to
control the answering of calls.
■
Programming Call Flow.
Assign splits to groups, set intraflow
thresholds, turn intraflow on or off, and designate splits for All-
Ring operation (optional).
7.
Press
8. Choose an activity from the Configuration screen or press [F7]
[F7]
(Config Screen) to return to the Configuration screen.
to return
to the Stored Shift Configurations screen.
9. Choose an activity from the Stored Shift Configurations screen or press
[F8] to return to the Administration Menu.
Creating or Changing Shift Configurations
3-7
Page 47

Programming CMS Shift Configurations
Assigning Splits
Assigning agents to splits is the first step in building a configuration. The list
of agents on the Agent Directory screen is your master list of agents. Follow
the instructions below to assign agents to splits.
NOTE:
If you want to add an agent who is not listed on the agent directory screen,
use the new agent activity ( [F5]
the split and the Agent Directory.
Be sure to add the agent to the Agent Directory P/arming Form and Agent
Planning Form, found in the back cover pocket of this guide.
Split
1.
From the Configuration screen, press [F1] (Splits).
). The agent will simultaneously be added to
The Split Configuration screen (Figure
2.
Follow the instructions given for each activity listed below.
3-5)
appears.
HINT:
You can move between the Agent Directory and the Split Configuration
screens by pressing [F8]
screen, or [F7]
(Config Splits) from the Agent Directory.
(Agent Directory) from the Split Configuration
3-8
Creating or Changing Shift Configurations
Page 48

Programming CMS Shift Configurations
Bon Voyage Travel
AGENT SPLITS
Agent
Split
1 PERS
2 CHART
3 CORP
4 SUPPT
56-
Configuration #2 - CONFIG_2
F Add
1 Agent
Pos ID
F Remove F Move
2 Agent 3 Agent
Split
ADMIN CMS R3.O
LINE GROUP OPTIONS
Agent
Pos ID Group Lines Delay
A PUBLC 4
B SPECL 3
C CHART 6
D CORP 2
Splits Intra
Gp Main Sec Flow
A-B-c-D--
FReplace
4 Agent
F New F Change
5 Agent
Num Answer Force Auto
CALL FLOW
off
off
off
off
6Split ID 7 Screen 8Directry
3:39p 03/04
Delay ACW
5s
5s
5s
5s
F Config
off
off
off
off
Flow All
Spl Thresh Ring
1
30s off
2
30s off
3
30s off
4
30s off
5
30s off
6
30s off
F10 - Help
0s
0s
0s
0s
F Agent
Figure 3-5. Split Configuration Screen
Add Agent
1. To add an agent to a split, press [F1] (Add Agent). You can now assign
any agent listed on the Agent Directory screen to a split. A split may
up
have
to 28 agents.
The prompt line is displayed as follows:
ADD AGENT: ID:
Pos #:
Split #: _
2. Enter an agent ID.
Creating or Changing Shift Configurations
3-9
Page 49

Programming CMS Shift Configurations
3.
Enter an unused position (extension) number between 10 and 67.
NOT
Enter a split number (1 through 6). You may have up to six splits.
4.
use extension numbers assigned to the CMS PC.
DO
Press [F8]
5.
Configuration screen.
Repeat steps 1 through 5 to add another agent, or press [F7] to return
6.
to the Configuration screen.
7.
Choose an activity from the Configuration screen or press [F7]
to the Stored Shift Configurations screen.
8.
Choose an activity from the Stored Shift Configurations screen or press
[F8] to return to the Administration Menu.
Remove Agent
To choose this activity, press [F2] (Remove Agent). You can now
1.
remove an agent from a split. (The agent entry remains listed on the
Agent Directory screen.)
The prompt line is displayed
REMOVE AGENT : ID:
(Enter Data) to save your data and return to the Split
to return
as
follows:
3-10
Enter an agent ID and press [F8] (Enter Data) to save data and return to
2.
the Split Configuration screen.
You are prompted to enter y or n to confirm your request.
Repeat steps 1 and 2 to remove another agent or press [F7] to return to
3.
the Configuration screen.
4.
Choose an activity from the Configuration screen or press [F7]
to return
to the Stored Shift Configurations screen.
Choose an activity from the Stored Shift Configurations screen or press
5.
[F8] to return to the Administration Menu.
Creating or Changing Shift Configurations
Page 50

Programming CMS Shift Configurations
Move Agent
1.
To choose this activity, press [F3] (Move Agent). You can now shift an
agent from one split to another or from one extension to another.
The prompt line is displayed as follows:
MOVE AGENT : ID:
Enter an agent ID.
2.
Enter a new position (extension) number, or press [F6] (Next Field) to
3.
New Pos #:
New Split #:
skip this field. If you skip this field, the agent keeps the same extension
number.
4.
Enter the number of the agent’s new split.
Press [F8]
5.
(Enter Data) to save data and return to the Split Configuration
screen.
Repeat steps 1 through 5 to move another agent or press [F7] to return
6.
to the Configuration screen.
7.
Choose an activity from the Configuration screen or press [F7]
to return
to the Stored Shift Configurations screen.
Choose an activity from the Stored Shift Configurations screen or press
8.
to return to the Administration Menu.
[F8]
Replace (Substitute) Agent
To substitute one agent for another at a particular position (extension), both
agents must exist in the Agent Directory.
1. To choose this activity, press [F4] (Replace Agent).
The prompt line is displayed as follows:
REPLACE AGENT : Pos #
:
New Agent ID:
2. Enter the extension number of the agent you want to replace.
3. Enter the agent ID of the agent you want in the extension.
Creating or Changing Shift Configurations
3-11
Page 51

Programming CMS Shift Configurations
4.
Press [F8] (Enter Data) to save data and return to the Split Configuration
screen.
The agent originally assigned to that extension is removed.
Repeat steps 1 through 4 to replace another agent or press [F7] to
5.
return to the Configuration screen.
6.
Choose an activity from the Configuration screen or press [F7]
to the Stored Shift Configurations screen.
7.
Choose an activity from the Stored Shift Configurations screen or press
.
[F8] to return to the Administration Menu,
New Agent
1. To choose this activity, press [F5] (New Agent). You can now add an
agent who is not already listed on the Agent Directory screen.
The agent is simultaneously added to a split and to the Agent Directory screen.
The prompt line is displayed as follows:
NEW AGENT :
First:
Last Name:
ID:
Pos:
\
Split #: _
2. Complete the fields as follows:
Last name: up to 12 letters, numbers, or special characters
First: up to 8 letters, numbers, or special characters
to return
3-12
ID: up to 5 letters, numbers or special characters
Position: a 2-digit MERLIN LEGEND system extension number (1 O
through 67)
(Do Not
use extension numbers assigned to the CMS PC.)
Split: a number from 1 through 6
Remember, IDs must be unique.
Creating or Changing Shift Configurations
Page 52

Programming CMS Shift Configurations
Press [F8] (Enter Data) to save data and return to the Split Configuration
3.
screen.
The new agent is added to the Agent Directory and is assigned to a split.
4.
Repeat steps 1 through 3 to add another agent or press [F7] to return to
the Configuration screen.
5.
Choose an activity from the Configuration screen or press [F7] to return
to the Stored Shift Configurations screen.
Choose an activity from the Stored Shift Configurations screen or press
6.
[F8] to return to the Administration Menu.
Change Split ID
1.
To choose this activity, press [F6] (Change Split ID). You can now
assign or change the ID for a split. Split IDs make it easier to identify
splits on screens and in reports. Although each split ID must be
unique, a split and a line group can have the same ID.
The prompt line is displayed as follows:
CHANGE SPLIT ID:
2.
Enter a split number from 1 through 6.
Enter a new split ID (up to 5 letters, numbers, or special characters).
3.
4.
Press [F8]
(Enter Data) to save data and return to the Split Configuration
Split #:
_ New Split ID:
screen.
Repeat steps 1 through 4 to change another split ID or press [F7] to
5.
return to the Configuration screen.
Choose an activity from the Configuration screen or press [F7] to return
6.
to the Stored Shift Configurations screen.
7.
Choose an activity from the Stored Shift Configurations screen or press
[F8] to return to the Administration Menu.
Creating or Changing Shift Configurations
3-13
Page 53

Programming CMS Shift Configurations
Agent Directory
1. To view the Agent Directory, press [F8] (Agent Directry) from the
Configuration screen or press [F2] (Agent Directry) from the Administra-
tion Menu.
An Agent Directory screen like the one shown in Figure 3-6 appears.
You can refer to this screen while building a shift configuration, or you
can change agent information.
Bon Voyage Travel
Last Name
Anders Harry
Bakerson
Bakerson
Chanleys
Chapman
Claren
Clover
Easttree
Fielding
Fielding
Hall
Honelly Billy Joe BJ
Kiley
Kloner Maxwell MAX
Mailer
F
Add
1 Agent 2 Agent
F Remove F Change
AGENT DIRECTORY
First
Tom
Tom
Diane
Charlie
Clifford CLIFF
Ward
Clint
Sally SALLY
William
Benny BENNY
Gene GENE
Sam
3Agt Info
ID
HARRY
TOM O‘Rourke
TOM2
DI
CHUCK
WARD
CLINT Reynolds
BILL
SAM
ADMIN CMS R3.O
Last Name
Middon
Pantilly
Patrick
Peters
Piers
Price
Rice Diana
Rice Ronald
Turner
Turtone
Turtone
Weiss
First
Beth BETH
Walter
Ernie
Bob
Norman
Benjamin
Sherman
Nancy
Carla CARLA
Ike IKE
Tina TINA
Debra
F Con fig
7 Splits
l:25p 07/19
ID
WALT
ERNIE
BOB
NORM
BEN
SHERM
NANCY
DIANA
RON
DEB
F10 - Help
F Admin
8 Menu
Figure 3-6. Agent Directory Screen
3-14
Creating or Changing Shift Configurations
Page 54

Programming CMS Shift Configurations
.
2. If you want to make changes to the Agent Directory, press the function
key for the activity you want to perform (add agent, remove agent, or
change agent information).
3. Perform the activity as described on the following pages.
NOTE:
Record any changes you make on the Agent Directory Planning Form,
found in the back cover pocket of this guide.
4. Press [F7]
[F8]
If the Agent Directory contains more than 30 agents, [F5]
(Config Splits) to return to the Configuration screen, or press
(Admin Menu) to return to the Administration Menu.
is labeled “Next
Page.” Pressing this key allows you to look at the second page of agent
information. When the second page of agent information is being displayed,
is labeled “Previous Page,” and pressing it returns you to the first page of
[F5]
the Agent Directory.
Adding Agents to the Agent Directory
NOTE:
If any agent is regularly assigned to more than one split, give that agent a
different ID for each split. Then use the appropriate ID when you add the
agent to a configuration. The different IDs provide separate tracking of the
agent’s statistics in each split. For example, Tom works in split 1 and split 4,
depending on the call traffic. Tom’s supervisor added him to the directory
twice. Once with the ID TOM1 and again as TOM4.
To add an agent to the Agent Directory do the following:
1. From the Agent Directory screen, press [F1]
The function keys change and the following prompt appears:
ADD AGENT :
ID:
Last Name:
.
First:
\
2. Enter the agent’s last name at the prompt (up to 12 letters, numbers, or
special characters, such as * or #).
Creating or Changing Shift Configurations
3-15
Page 55

Programming CMS Shift Configurations
Enter the agent’s first name at the prompt (up to 8 letters, numbers, or
3.
special characters).
Enter the agent’s ID at the prompt (up to 5 letters, numbers, or special
4.
characters).
Remember, each ID must be unique. The IDs appear on the screen in
uppercase letters, even if you enter lowercase letters.
Press [F8] (Enter Data).
5.
Removing Agents from the Agent Directory
IMPORTANT:
If you have been managing calls and recording historical data for an
agent, removing the agent may delete the agent’s historical data. If you
have any historical reports that have not yet been printed, print them
before you remove the agent. Otherwise, you may lose the data for that
agent. If you are archiving the historical data, be sure to copy the system tables as well as the data files. For more information, see Chapter
8, “Archiving and Restoring Data.”
To remove an agent from the Agent Directory, do the following:
1.
From the Agent Directory screen, press [F2] .
The function keys change and the following prompt appears:
REMOVE AGENT : ID
2.
Enter the agent’s ID.
A confirmation prompt like the one shown below appears:
3-16
REMOVE AGENT : ID:
Type y to confirm your request or n to deny it.
3.
4.
Press [F8] (Enter Data).
Creating or Changing Shift Configurations
TOM2 (Baker son, Tom) ? (Y/N) :
Page 56

Programming CMS Shift Configurations
Changing Agent Information
To change agent information in the Agent Directory, do the following:
From the Agent Directory screen, press [F3] (Change Agt Info).
1.
The function keys change and the following prompt appears:
CHANGE AGENT INFO : ID:
First:
Enter the agent’s ID.
2.
Move to the field(s) you want to change. Information will not change in
3.
Last Name:
\
the fields left blank.
4.
Press [F8]
(Enter Data).
Assigning Line Group Options
You can program your CMS to use any, some, or all of the following line
group
Descriptions and programming procedures for these options are given on the
following pages.
options when handling incoming calls:
Answer Delay
Force Delay
Automatic After-Call-Work (ACW)
To program line group options:
1. From the Configuration screen, press [F2]
A box appears around the Line Group Options portion of the screen and the
Line Group Options function keys are displayed (Figure
(Line Groups).
3-7).
2. Follow the instructions in this section for the options you want to pro-
gram.
NOTE:
Record any changes you make on the CMS Options Planning Form, found in
the back cover pocket of this guide.
Creating or Changing Shift Configurations
3-17
Page 57

Programming CMS Shift Configurations
Bon Voyage Travel
AGENT SPLITS
Agent
Split
1 PERS
2 CHART
3 CORP
4 SUPPT
56-
Configuration #2 - CONFIG_2
F Answer F Force
1 Delay
Pos ID
2 Delay
F Auto
3 ACW
Split
Agent
Pos ID
ADMIN CMS R3.O 3:57p 03/04
LINE GROUP OPTIONS
Num Answer Force Auto
Group Lines Delay
A PUBLC 4
B SPECL 3
C CHART 6
D CORP 2
CALL FLOW
Splits Intra
Gp Main Sec Flow
A-B-c-D--
off 2 30s off
off
off
off
Delay ACW
5s
5s
5s
5s
F Config
7 Screen
off
off
off
off
Flow All
Spl Thresh Ring
30s off
1
3
30s off
4
30s off
5
30s off
6
30s off
F10 -
0s
0s
0s
0s
Help
Figure
3-7.
Line Group Options Screen
Changing Answer Delay
If an agent is not available when a call first rings, CMS allows the call to ring
for a certain number of seconds before it answers the call and connects it to
the voice announcement unit. If an agent becomes available during that
period, the call is transferred immediately to the available agent, not the
voice announcement unit. Answer delay is the number of seconds CMS waits
before it answers a call. The factory setting for answer delay is five seconds.
Think of answer delay as a trade-off between the time a customer spends
listening to ringing and the time the customer spends on hold. You can set a
different answer delay value for each line group, depending on the type of
lines in the group and the amount of time the caller is likely to wait before an
agent is available.
3-18
Creating or Changing Shift Configurations
Page 58

Programming CMS Shift Configurations
Consider these factors when choosing an answer delay value for a line group:
■
If you have toll lines (such as 800 lines), you begin paying for a call as
soon as the line is answered. If calls are likely to be on hold before an
agent is available, you can increase the answer delay value in order to
decrease the amount of time on hold.
■
You can increase the answer delay if you know callers have to wait for
an agent. Callers may be less likely to hang up if they wait longer for
CMS to answer but spend less time on hold.
To change the answer delay, do the following:
1.
From the Line Group Options screen, press [F1] (Answer Delay).
The editing function keys appear with this prompt:
ANSWER DELAY :
2.
Enter a group letter (A-D).
Enter the number of seconds (0 through 99) a call should ring for that
3.
Group Letter: _
How Many Seconds:
group before CMS answers.
The factory setting is five seconds, the approximate time from the
beginning of one ring to the beginning of the next.
4.
Press [F8] (Enter Data).
The Line Group Options screen reappears and the answer delay for the
specified line group is updated.
Repeat steps 1 through 4 to adjust the answer delay for another group,
5.
or press [F7]
6.
Choose an activity from the Configuration screen or press [F7]
to return to the Configuration screen.
to return
to the Stored Shift Configurations screen.
7.
Choose an activity from the Stored Shift Configurations screen or press
[F8] to return to the Administration Menu.
Creating or Changing Shift Configurations
3-19
Page 59

Programming CMS Shift Configurations
Changing Force Delay
The force delay option controls the transfer of calls to and from the voice
announcement unit. If force delay is on, calls that arrive for a group are not
transferred to an agent until callers have heard the entire message, even if an
agent is free. If it is off, they are transferred to an agent as soon as one
becomes available. If answer delay is set to zero and force delay is on, all
incoming calls connect directly to the voice announcement. This means that
callers hear the delay message even when agents are available.
Remember that the force delay option can sometimes cause calls to back up,
especially if your delay message is long.
To change force delay, do the following:
1.
From the Line Group Option screen, press [F2] (Force Delay).
The Force Delay editing keys appear with this prompt:
FORCE DELAY :
Type in the group letter for the line group you want to program.
2.
Press [F8] (Enter Data),
3.
The setting toggles automatically to on or off, depending on the setting
Group Letter: _
before
you made the change. (The factory setting is off.)
4.
Repeat steps 1 through 4 to adjust the force delay for another group, or
press [F7]
5.
Choose an activity from the Configuration screen or press [F7]
to return to the Configuration screen.
to return
to the Stored Shift Configurations screen.
Choose an activity from the Stored Shift Configurations screen or press
6.
[F8] to return to the Administration Menu.
-
Programming Automatic After-Call-Work (ACW)
The automatic after-call-work option provides for hands-free operation allowing an agent to use an automatic answer headset adapter. After an agent
completes a call, the automatic after-call-work option automatically puts that
3-20
Creating or Changing Shift Configurations
Page 60

Programming CMS Shift Configurations
agent into the ACW state for a programmed period of time. When that time
has elapsed, auto ACW makes an agent available to receive calls.
The agent remains in the ACW state for the number of seconds programmed
for that line group (1–999). During the ACW period, the agent can complete
the necessary paper work related to that call without pressing the
Available
buttons on the telephone. When the agent completes the paper-
ACW
or
work related to the previous call, he or she can manually override the
automatic ACW state by pressing the Available button on the telephone.
To program Auto ACW, do the following:
1.
From the Line Group Options screen, press [F3] (Auto ACW).
The following prompt appears near the bottom portion of the screen:
AUTOMATIC ACW: Group Letter: _ Seconds:
2.
Enter a group letter (A through D) for the group to be programmed.
Enter the number of seconds (0 through 999), for the number of
3.
seconds agents are to be in the ACW state.
NOTE:
“0” means the Auto ACW feature is not in effect.
Press [F8] (Enter Data).
4.
Repeat steps 1 through 5 to program auto ACW for another line group,
5.
or press [F7]
6.
Choose an activity from the Configuration screen or press [F7]
to return to the Configuration screen.
to return
to the Stored Shift Configurations screen.
7.
Choose an activity from the Stored Shift Configurations screen or press
[F8] to return to the Administration Menu.
Creating or Changing Shift Configurations
3-21
Page 61

Programming CMS Shift Configurations
Programming Call Flow
The way CMS routes incoming calls to agents is called call flow. Call flow
programming includes the following:
■
Assigning a main split and an optional secondary split for each line
group
■ Turning Intraflow on or off
■
Setting an Intraflow threshold for each split
■
Designating splits for All-Ring operation (optional).
To program call flow, you should understand main and secondary splits,
intraflow and intraflow threshold. If you are unclear about these aspects of
CMS, refer to the Glossary.
NOTE:
Record any changes you
the back cover pocket of
make on the CMS Options Planning Form, found in
this guide.
How Intraflow Works
If a call comes in and no agent is available in the main split, the call is treated
as follows:
1.
The call continues to ring in the main split for the answer delay interval
you established (see “Line Group Options,” page 3-17).
2.
CMS answers the call and connects it to the voice announcement unit
for a delay message.
The call is put on hold (or connected to Music-on-Hold) and is added to
3.
the waiting calls in the main split.
4.
The call is intraflowed (sent) to an agent in the secondary split if all of
the following conditions are met:
3-22
— The call is the oldest call eligible for intraflow into the secondary
split.
Creating or Changing Shift Configurations
Page 62

Programming CMS Shift Configurations
.
— The amount of time the call has waited (that is, from the time the call
started ringing until present) has exceeded the intraflow threshold
for the main split.
— There is no available agent in the main split.
— There is an available agent in the secondary split.
— The oldest waiting call in the secondary split has not waited longer
than the intraflow threshold for the secondary split.
Once the call is transferred to an agent the caller will hear ringing.
5. If there is no agent available in the secondary split, the call remains
waiting in the main split. The call is answered by the first available
agent in either the main split or the secondary split (if the secondary
split’s intraflow threshold is not exceeded by another call).
If an agent becomes available at any step, CMS immediately transfers the
call to that agent.
Programming Considerations
If your only consideration in building a shift configuration is to have every call
answered as quickly as possible by any available agent, you can assign all of
your agents to one split and make it the main split for all of your line groups.
You cannot have more than 28 agents in a split. If you assign all 28 to one
split, there can be no agents in other splits to receive intraflow calls. Therefore, there are no secondary splits and you would not need to program for
intraflow in that shift configuration.
Consider these points when establishing your intraflow threshold(s):
■
How long do you want your customers to wait for an agent in the main
split if there are agents available in your secondary split? Remember,
the waiting time starts as soon as the call begins ringing, Answering
this question helps determine a reasonable intraflow threshold for the
main split.
■
If your secondary split serves as a main split for another line group,
you may not want that split to accept intraflowed calls if it is busy with
Creating or Changing Shift Configurations
3-23
Page 63

Programming CMS Shift Configurations
its own calls. The secondary split’s intraflow threshold determines how
long its own calls may wait before the split refuses to accept
intraflowed calls. If a secondary split is not a main split as well, you
don’t need to set a threshold for that split.
Programming Instructions
1.2.From the Configuration screen, press [F3] (Call Flow).
The Call Flow Configuration screen (Figure
Press the key for the task you want to perform. Instructions for each
task are given on the following pages.
Bon Voyage Travel
AGENT SPLITS
Agent
Split
1 PERS
2 CHART
3 CORP
4 SUPPT
5-
6-
Configuration #2 - CONFIG 2
Pos ID
Split
3-8) is
Agent
Pos ID Group Lines Delay
A PUBLC 4
B SPECL 3
C CHART 6
D CORP 2
Splits Intra
Gp Main Sec Flow
A-B-- off
c-D--
displayed.
ADMIN CMS R3.0 4:03p 03/04
LINE GROUP OPTIONS
Num Answer Force Auto
5s
5s
5s
5s
CALL FLOW
off
off
off
Delay ACW
off
off
off
off
Flow All
Spl Thresh Ring
1
2
3
4
5
6
0s
0s
0s
0s
30s off
30s off
30s off
30s off
30s off
30s off
F Assign
1 Splits 2 On/Off 3 Thresh 5 On/Off
F Flow F Set FAll-Ring
Figure 3-8. Call Flow Configuration Screen
3-24
Creating or Changing Shift Configurations
F Con fig
7 Screen
F10 -
Help
Page 64

Programming CMS Shift Configurations
Assigning Splits
To choose this activity,
1.
Press [F1] (Assign Splits). You can now assign main splits and secondary splits to line groups.
The prompt is displayed as follows:
ASSIGN SPLITS :
Secondary Split #: _
Line Group Letter: _ Main Split #: _\
Initially, all splits are unassigned; choose which split answers calls for
each line group.
If you do not want to assign a secondary split,
leave that field
unchanged.
To remove a secondary split already assigned
to the line group, type a
hyphen in that field.
2.
Enter a line group letter (A through D).
Enter the number of the main split (1 through 6) that is to answer calls
3.
for the line group. (If the field is left blank, it remains unchanged.)
4.
Enter a secondary split number, or enter a hyphen if you do not want to
assign a secondary split for intraflow. (If the field is left blank, it remains
unchanged.)
5.
Press [F8] (Enter Data).
6.
Repeat steps 1 through 5 to assign a split to another line group, or
press [F7]
7.
Choose an activity from the Configuration screen or press [F7]
to return to the Configuration screen.
to return
to the Stored Shift Configurations screen.
8.
Choose an activity from the Stored Shift Configurations screen or press
to return to the Administration Menu.
[F8]
Creating or Changing Shift Configurations
3-25
Page 65

Programming CMS Shift Configurations
Turning Flow On/Off
Main and secondary splits must be identified in the Call Flow section of the
Configuration screen for intraflow to work.
To choose this activity:
1.
Press [F2] (Flow On/Off). You can now turn intraflow on or off for a particular line group.
Each line group’s intraflow status appears in the Intraflow column of the Call
Flow area of the screen. The prompt is displayed as follows:
.
CHANGE INTRAFLOW :
Enter a line group letter (A through D).
2.
Press [F8]
3.
The intraflow designation for that line group automatically changes from Off to
On
or vice versa.
4.
Repeat steps 1 through 3 to turn intraflow on or off for another line
(Enter Data).
group, or press [F7]
5.
Choose an activity from the Configuration screen or press [F7]
Line Group Letter: _
to return to the Configuration screen.
to the Stored Shift Configurations screen.
6.
Choose an activity from the Stored Shift Configurations screen or press
[F8] to return to the Administration Menu.
Setting the Intraflow Threshold
To choose this activity:
1. Press [F3] (Set Thresh). You can now set the intraflow threshold for
each split. This threshold is based on the number of seconds the oldest
call has been waiting in a split. The initial setting is 30 seconds.
to return
3-26
The prompt is displayed as follows:
SET INTRAFLOW THRESHOLD:
Threshold (seconds) :
Split #: _\
Creating or Changing Shift Configurations
Page 66

Programming CMS Shift Configurations
2. Enter a split number (1 through 6).
3. Enter the number of seconds from 0 through 999.
4. Press [F8]
(Enter Data).
5. Repeat steps 1 through 4 to set the intraflow threshold for another split,
or press [F7] to return to the Configuration screen.
6. Choose an activity from the Configuration screen or press [F7] to return.
to the Stored Shift Configurations screen.
7.
Choose an activity from the Stored Shift Configurations screen or press
[F8] to return to the Administration Menu.
Turning All-Ring On/Off
You can program certain splits so that each call rings at all agents’ tele-
phones and an available agent closest to a telephone can answer the call.
(In normal CMS operation, a call rings at only one agent’s telephone.) AllRing operation is useful for splits in which agents are not always near their
telephones.
NOTE:
AlI-Ring operation is dependent on both your CMS configuration and your
MERLIN LEGEND system programming.
NOTE:
When All-Ring operation is in effect, agents can not log in or out. That is, all
phones will ring regardless of agent availability.
To make an All-Ring split:
1. Assign a “ghost” agent as the only member of the split. Your MERLIN
LEGEND system administrator must give you an unused extension
number for your “ghost” agent.
2. See that your “real” agents have Cover buttons on their telephones that
correspond to (cover) the “ghost agent’s” extension number.
Creating or Changing Shift Configurations
3-27
Page 67

Programming CMS Shift Configurations
3. The real agents do not need to be assigned to a split.
If you do assign them to a split, they cannot be in the same split as the
“ghost” agent. Consult the CMS Agent Splits Planning Form to see
which of your splits, if any, should be All-Ring. This form should be in
the pocket of the back cover of this guide.
If you change a split from All-Ring operation to normal operation, remove the
“ghost” agent and add the real agents to the split.
For more information on setting up an All-Ring split, see the discussion of this
topic in “Agent Splits” under the general heading “Planning the Call Management System” in the CMS Planning Guide.
For more detailed information on how “real” agents use a Cover button to
up
pick
calls to a “ghost” agent in an AH-Ring split, see “Using a Cover But-
ton” and “Answering Calls in All-Ring Operation” in Chapter 5, “CMS Tele-
phones and Telephone Programming,” in this manual.
To choose this activity:
1.
Press [F5] (All-Ring On/Off). You can now change a split from automatic
call distributor (ACD) to All-Ring operation, or vice versa.
In the All-Ring column of the Call Flow area of the screen,
that a split has All-Ring operation, and
operation.
The
prompe is displayed as follows:
CHANGE ALL-RING OPERATION :
2.
Enter a split number (1 through 6).
Press [F8] (Enter Data).
3.
4.
Repeat steps 1 through 3 to change another split to All-Ring or ACD
operation, or press [F7]
Choose an activity from the Configuration screen or press [F7]
5.
to the Stored Shift Configurations screen.
On
off
indicates normal ACD
Split #: _
to return to the Configuration screen.
indicates
to return
3-28
6.
Choose an activity from the Stored Shift Configurations screen or press
[F8] to return to the Administration Menu.
Creating or Changing Shift Configurations
Page 68

Programming CMS Shift Configurations
Clearing Agents
To clear agents from a configuration:
1. From the Configuration screen, press [F5]
This clears all agents from a shift configuration.
The prompt appears as follows:
CLEAR AGENTS :
2. Type y or n and press [F8] (Enter
Are you sure? (Y/N) :
Data).
NOTE:
If you accidentally clear agents from a
configuration, you can restore
them.
1. Press [F7] (Config List), to select
the Stored Shift Configurations
screen.
2. Press [F1] (Select Config).
A prompt asks if you want to save your previous editing changes (which
includes clearing the agents).
3. Type n to restore the cleared agents.
(Clear Agents).
—
3. Choose another activity from the Configuration screen or press [F7]
to
return to the Stored Shift Configurations screen.
4. Choose an activity from the Stored Shift Configurations screen or press
[F8] to return to the Administration Menu.
Clearing Agents 3-29
Page 69

Programming CMS Shift Configurations
Saving a Changed Configuration
When you build a new shift configuration or make changes in an existing one,
the word
(changed)
configuration number. You can store the last edited configuration in a previously unused configuration or store it in place of another configuration.
For example, you could change configuration 1 and replace the original with
the updated copy. If you want to keep the original shift 1 configuration as
well as the updated copy, you can store the copy in an unused configuration
number by following the procedure outlined below.
1.
From the Configuration screen, press [F7] (Config List).
appears on the configuration list to the left of the
The Stored Shift Configurations screen (Figure
Press [F2] (Save Config) on the Stored Shift Configurations screen.
2.
The word (changed) appears next to the configuration you last edited and
the prompt appears as follows:
SAVE CONFIGURATION :
Press [F8] (Enter Data) to save the edited configuration under the same
3.
Into Config #: _
3-9)
appears.
configuration name and number as the original (in other words, to
replace the original with the updated copy).
or
Enter a configuration number and press [F8]
(Enter Data) to save the
edited configuration under a different configuration number.
The prompt appears as follows:
SAVE CONFIGURATION :
NAME? (Y/N):
where x is a number 1 through 6 and
—
Replace Contents of Config X -\
NAME is
the name of the configuration.
3-30
The number and name of the configuration you changed appears in this
prompt.
Saving a Changed Configuration
Page 70

Programming CMS Shift Configurations
.
Bon Voyage Travel
F Select
1 Config 2 Config 3 Config
F Save
F Rename
STORED SHIFT CONFIGURATIONS
DAY (startup default)
1-
2
- CONFIG_2
- UNUSED
3
4- UNUSED
- UNUSED
5
6-
UNUSED
F Choose
4Startup
ADMIN CMS R3.O 4:17p 03/04
F10 - Help
F Config
7 Screen 8 Menu
F Admin
Figure 3-9. Stored Shift Configurations Screen
4. Type y to confirm your request or n to cancel it.
5. Press [F8] (Enter Data).
The function keys change.
6. Choose another activity from the Stored Shift Configurations screen or
press [F8] to return to the Administration Menu.
Saving a Changed Configuration 3-31
Page 71

Proqramminq CMS Shift Configurations
. .
Naming or Renaming
a Shift Configuration
When your CMS was installed, at least one shift configuration was built for
you. You can have a total of six different configurations or call handling patterns in your CMS. If you do not name the configurations when you begin to
build them, the system automatically supplies the name “Config x,” where x is
the number of the configuration (1 through 6). We recommend, however, that
you name the configurations so that their identity is meaningful for your business.
For instance, a business may require these configurations:
■ Shift 1
■ Shift 2
■ Night
■ Weekend
In this example shift 1 and shift 2 configurations are for the two weekday
shifts of agents. The night configuration is for calls after business hours that
are answered at a central answering extension, such as a guard’s desk. The
weekend configuration is for weekends and holidays.
NOTE:
Night Service mode is different from a night configuration. During Night Service, CMS connects all incoming calls to a message and automatically
disconnects the calls when the message is over. For more information, see
“Selecting Day or Night Service” in Chapter 6.
To name or rename a configuration:
1. Press [F3]
The prompt appears as follows:
RENAME CONFIGURATION :
(Rename Config) on the Stored Shift Configurations screen.
Config #: _ New Name: _
2. Enter the configuration number (1 through 6)
3-32
Naming or Renaming a Shift Configuration
Page 72

Programming CMS Shift Configurations
Enter the new name (up to 10 letters, numbers, or special characters).
3.
NOTE:
Configuration names can contain as many as 10 letters, numbers, or
special characters. Spaces are not allowed, so you may want to use
underscores instead.
4.
Press [F8]
The function keys change.
5.
Choose another activity .from the Stored Shift Configurations screen or
press [F8]
(Enter Data).
to return to the Administration Menu.
Selecting a Startup Configuration
You should select one of the six shift configurations to be invoked automatically during the CMS startup procedure. However, if you want to choose a
configuration each time you begin managing calls, do not select a startup
configuration at this time.
To choose this activity:
From the Stored Shift Configurations screen, press [F4] (Choose
1.
Startup).
The prompt appears as follows:
CHOOSE STARTUP CONFIGURATION :
Config #: _
Enter the number of the configuration you want to use as the startup
2.
(Enter ‘-’
for none ) \
configuration, or enter a hyphen if you do not want a startup
configuration.
Press [F8]
3.
The words (startup default ) appear next to the configuration you
selected.
4.
Choose another activity from the Stored Shift Configurations screen or
press [F8]
(Enter Data).
to return to the Administration Menu.
Selecting a Startup Configuration 3-33
Page 73

Programming CMS Shift Configurations
Backing Up and Restoring Shift Configurations
You should routinely make a backup copy of your shift configurations. That
way the most current version is available to use if you need to restore your
system after a problem.
You should also copy the system tables at the same time you copy the shift
configurations. The system tables contain the Agent Directory and line
assignments CMS needs to interpret the shift configurations.
NOTE:
You should copy the system tables each time you make a change in your
shift configurations. The most current system tables are then available to
interpret each day’s historical data. Both the shift configurations and system
tables fit on one floppy diskette.
Backing Up Shift Configurations
To make a backup copy of your shift configurations and system tables, follow
these steps:
1. From the CMS Main Menu, press [F8]
2. Insert the diskette labeled “CMS Backup” into disk drive A.
3. At the DOS prompt, type the following commands to change to the
cmsmgmt directory (a subdirectory within the CMS directory) on the
hard disk.
cd c:\cms\cmsmgmt [< ]
4. To get into the cmsmgmt directory on the floppy diskette, type the following commands.
a:
[< ]
cd a: \cms\cmsmgmt
[< ]
(Exit to DOS).
3-34
Backing Up and Restoring Shift Configurations
Page 74

Programming CMS Shift Configurations
5. To copy all your shift configurations from the hard disk onto the floppy
diskette, type
copy c: Shift*. cms a:
[< ]
6. To copy the system tables onto the floppy diskette, type
copy c:systbls. cms a:
7.
Remove the data backup disk when the light on disk drive A goes out.
[< ]
8. Write the current date on a label and attach it to the duplicate.
9. To return to the cms directory on disk drive C, type these commands:
c:
[< ]
c:
cd\cms
[< ]
Restoring Shift Configurations
If you ever lose a shift configuration (for instance, if you clear a configuration
by accident), restore the desired configuration (or all configurations) from the
duplicate as follows:
1. Repeat steps 1 through 4 in the previous procedure.
2. To restore all your shift configurations from the duplicate onto the hard
disk, type:
copy a: shift*.cms
c :\cms\cmsmgmt
[< ]
To restore a single shift configuration from the duplicate, type:
copy a:shiftX.cms
c:\cms\cmsmgt
[< ]
(Replace X with the number of the shift configuration.)
3. To restore the system tables from the duplicate copy onto the hard disk,
type:
copy a:systbls.cms
c:\cms\cmsmgt
[< ]
4. Remove the data backup disk when the light on disk drive C goes out.
Backing Up and Restoring Shift Configurations
3-35
Page 75

Programming CMS Shift Configurations
For more information on restoring CMS after system problems, see Chapter 9,
“Troubleshooting.”
3-36
Backing Up and Restoring Shift Configurations
Page 76

Changing
System Options and
Programming Exceptions
This chapter explains how you can program your CMS to meet the call
management needs of your particular business by:
■
Changing Options.
abandoned call threshold, and message length. You can also set your
PC to beep whenever an unusual or undesirable situation occurs.
Define your business name, service threshold,
■
Programming Exceptions.
as talk time and refused calls) that are appropriate for your business.
System options and exceptions were determined by you and your AT&T
Account Manager during the system planning process. Use this section only
if you want to change the basic configuration and stop managing calls during
programming. If, however, you do not want to make changes at this time, go
to Chapter 5, “Supervising CMS, ” where you can go through the steps
needed to begin operations. If you want to change options and exceptions
while CMS is managing calls, go to Chapter 5 and follow the instructions for
“Dynamic Reconfiguration.”
Figure 4-1, “A Map for CMS Options and Exceptions,” on page 4-2 shows the
relationship between the various screens used in this aspect of CMS
programming.
Select and program the exceptions (such
4-1
Page 77

Changing System Options and Programming Exceptions
To use the map, determine which function you wish to perform, then, starting
with the CMS Main Menu, press the indicated function keys to move down the
map to the desired action. For example, to turn the alarm on or off, press the
following keys
in order:
1. [F4] -To
2. [F5]
3. [F3]
STORED SHIFT
CONFIGURATIONS
-To
-To
F1
Note: CMS does not manage
calls when programming
is performed from the
Administration Menu.
select the Administration Menu.
go to the Set Options screen.
turn the alarm on or off.
CMS MENU
F4
START CALL
MANAGEMENT
AGENT
DIRECTORY
ADMINISTRATION
MENU REPORTS
ADMINISTER LINES
AND LINE GROUPS
SET
OPTIONS
F2
F3
F4
PRINT
F5
SERVICE
LEVEL
ABANDON
THRESHOLD
ALARM
DELAY MSG
LENGTH
ADMINISTER
EXCEPTIONS
ON/OFF
F6
F1
F2
F3
F4
AGENT
EXCEPTIONS
SPLIT
EXCEPTIONS
LINE GROUP
EXCEPTIONS
ASSIGN
ALERTS
BUSINESS
F5
NAME
Figure 4-1. Map for CMS Options and Exceptions
4-2
Page 78

Changing System Options and Programming Exceptions
Changing System Options
You may reset several system options. Initial settings are in effect for these
options until you define new values. The options are listed below (with factory
settings in parentheses):
■ Service Level Limit (20 seconds)
■
Abandoned Call Threshold (10 seconds)
■ Audible Alarm (’on’)
■ Delay Message Length (10 seconds)
■ Business Name
To begin changing system options, do the following:
1. From the CMS Main Menu, press [F4]
The Administration Menu appears.
(Admin CMS).
2. From the Administration Menu, press [F5] (Set Options).
The Set Options screen (Figure 4-2) appears. This is the screen used to select
system options.
Changing System Options 4-3
Page 79

Changing System Options and Programming Exceptions
. .
Bon Voyage Travel
F1
F2
F3
F4
F5
FService
1 Level
FAbandon F Alarm
2 Thresh 3 On/Off
SET OPTIONS
Opt ion
Service Level Limit
Abandoned vs.
Audible Alarm (On/Off)
Delay Message Length
Business Name
Incoming Call Threshold
FDelayMsg FBusiness
4 Length 5 Name
ADMIN CMS R3.0
Value
10 sec
2 sec
On
10 sec
Bon Voyage Travel
4:33p 03/04
F10 -
Help
F Admin
8 Menu
Figure 4-2. Set Options Screen
The function keys appearing on this screen are:
— [F1]
— [F2]
(Service Level). Used to adjust the Service Level Limit value.
(Abandon Thresh). Used to adjust the Abandon vs. Incoming Call
Threshold value.
— [F3] (Alarm On/Off). Used to turn the Audible Alarm on or off.
— [F4]
— [F5]
— [F8]
(DelayMsg Length). Used to adjust the Delay Message Length value.
(Business Name). Used to enter or change your Business Name.
(Admin Menu). Used to return to the Administration Menu.
4-4 Changing System Options
Page 80

Changing System Options and Programming Exceptions
Adjusting the Service Level Limit
The service level is a measure of how quickly your customers’ calls are
answered. The service level is the percentage of calls that were connected
to agents within a specified number of seconds (called the service level limit).
For instance, during a particular hour your agents may answer 9070 of the
CMS calls within 20 seconds.
Since the length of time between the beginning of one ring and the beginning
of the next is about 5 seconds, 20 seconds equals about four rings. The factory setting, 20 seconds, may be too long or too short for your requirements
and you may want to adjust it.
The service level limit is measured from the time a call first rings until the call
is connected to an agent. This can include answer delay time (if any), time
connected to the voice announcement unit (if any), and time on hold (if any).
You need to decide how quickly you want the majority of your calls answered.
The service level is displayed on the System Status screen and is continually
updated while CMS is managing calls. If the service level drops below an
acceptable level, it may indicate the need to activate Intraflow or to add more
agents to a split. To reset the service level limit:
1.
From the Set Options screen, press [F1 ]. (Service Level). You can now
adjust the Service Level value.
The prompt is displayed as follows:
SERVICE LEVEL: Calls should be seviced within \
n seconds. n:
The percentage of calls within the value chosen will be displayed on the
reports.
2.
Enter a number 1 through 999.
Press [F8] (Enter Data).
3.
The prompt clears and the function keys change.
4.
Choose another activity
from this screen or press [F8]
to return to the
Administration Menu.
Changing System Options 4-5
Page 81

Changing System Options and Programming Exceptions
Adjusting the Abandoned Call Threshold
One important function of CMS is tracking the number of abandoned calls,
that is, the number of callers who hang up before they’ve been connected to
an agent. if a CMS agent services a call in an amount of time less than this
threshold, CMS considers the call abandoned. Occasionally an abandoned
call gets transferred to an agent. When this happens, the agent answers the
call and finds no one on the line.
The purpose of the abandoned versus incoming call threshold is to discriminate between those abandoned calls that are connected to agents and calls
that are actually handled by the agents. Distinguishing serviced calls from
abandoned ones gives a more accurate picture of the service level of your
system.
To establish a realistic abandoned call threshold, you need to know how long
agents usually spend talking to callers. If your agents usually spend at least
30 seconds talking to each customer, then you can assume that most calls
that took less than 15 seconds were probably abandoned calls. However, if
your agents often receive calls that take only a few seconds to handle, you
may want to set a low abandoned call threshold, realizing that the possibility
of mistaking an abandoned call “for a “real” call, or vice versa can increase.
You should evaluate the factory setting (10 seconds) for the abandoned call
threshold in light of these factors. If you decide to reset the value, you should
have a good idea of how long your agents spend on each call to reduce the
possibility of mistaking “real” for abandoned calls. You may have to do some
experimenting.
To adjust the Abandoned Call Threshold value:
1. From the Set Options screen, press [F2] (Abandon Thresh). You can
now adjust the Abandoned Call Threshold value.
The prompt is displayed as follows:
ABANDON THRESHOLD: Seconds:
2. Enter a number 1 through 99.
4-6 Changing System Options
Page 82

Changing System Options and Programming Exceptions
3. Press [F8] (Enter Data).
The prompt clears and the function keys change.
4. Choose another activity from this screen or press
[F8]
to return to the
Administration Menu.
Setting the Audible Alarm
When the audible alarm is on, your PC beeps every time an exception mes-
sage, a system message, or an error message appears. An exception
occurs when a service or performance threshold you set has been exceeded.
The alarm is helpful since it alerts you to potential problems, should you not
be looking at your PC screen.
To turn the alarm off:
From the Set Options screen, press [F3] (Alarm On/Off).
1.
When On the PC beeps, and when Off the PC doesn‘t beep.
Each press of the key sets the alarm to off or on.
2.
Press [F8] (Enter Data).
The prompt clears and the function keys change.
Choose another activity from this screen or press [F8] to return to the
3.
Administration Menu.
Adjusting the Delay Message Length
You can set the delay message length so that CMS can check for errors in
the delay message unit. The message length must be properly set for your
call traffic because of its effect on the number of calls CMS can manage
within a given period of time. For this reason you may want to keep the mes-
sage as short as possible.
When the message starts playing to a caller, a timer is started. If the message has not ended within five seconds of the delay message length you
Changing System Options 4-7
Page 83

Changing System Options and Programming Exceptions
specify on the options screen, the following warning message appears on
your screen:
WARNING –
Message Unit Problem.
Check Message Length.
The factory setting for the message length option is 10 seconds.
To change the delay message length:
1.
From the Set Options screen, press [F4] (Delay Msg Length). You can
now adjust the Delay Message Length value.
The prompt is displayed as follows:
SET DELAY MESSAGE LENGTH :
2.
Enter a number 1 through 99.
Press [F8]
3.
The prompt clears and the function keys change.
4.
Choose another activity from this screen or press [F8] to return to the
(Enter Data).
Seconds: –
Administration Menu.
Entering Your Business Name
You can enter the name of your business (up to 20 characters) in this field so
that it appears on all CMS screens and reports. You can use both capital and
lower case letters. The system does not, however, accept the space charac-
ter. Use the underscore character (_) to designate a space.
To enter your business name,
1. From the Set Options screen, press [F5] (Business Name). You can
now enter your Business Name.
The prompt line is displayed as follows:
ENTER BUSINESS NAME :
2. Enter a business name (up to 20 characters) including underscores.
4-8 Changing System Options
Page 84

Changing System Options and Programming Exceptions
3. Press [F8] (Enter Data).
The prompt clears and the function keys change.
4.
Choose another activity from this screen or Press
[F8]
to return to the
Administration Menu.
Programming Exceptions
An exception message indicates that a particular performance threshold has
been reached or exceeded and an unusual or undesirable situation may be
occurring. Exceptions allow you to customize performance goals for each
split or line group. For instance, you may establish a threshold of 3 minutes
4
as an acceptable talk time for one split and
time for another split. You may want to use CMS for a few days before you
select your exceptions and set your exception thresholds. In the meantime,
all exceptions are set to off.
minutes as an acceptable talk
When you turn on an exception, you receive an exception message on your
PC screen whenever a threshold for that exception has been reached or
exceeded. For instance, you may choose to receive an exception message
when an agent has refused a call or when all the lines in a line group have
been busy for a certain number of seconds. If you want your PC to beep
when an exception occurs, turn on the audible alarm option described in
“Changing System Options,” page 4-7.
External lamps or bells can also be used as alerts to visually notify agents
when certain exceptions occur (see page 4-26).
Exceptions are an important management tool as they free you to do more
productive work. Instead of constantly monitoring system status on your PC,
you can set certain exceptions to notify you when problems arise.
Most businesses need only two or three exceptions. Using all the exceptions
available or setting unrealistic exception thresholds merely gives you unus-
Programming Exceptions 4-9
Page 85

Changing System Options and Programming Exceptions
able or inappropriate data. Consider these points when choosing the excep-
tions for your business:
■
In sales line groups, the exceptions that indicate the length of time all
lines are busy and the number of abandoned calls are important.
When all lines are busy, potential customers may not be able to get
through and may call a competitor. This could mean lost revenue for
your business. Abandoned calls (instances where a caller hangs up
before being connected to an agent) signal that there are callers who
are tired of waiting for an agent and who might not call back—again,
possible lost revenue.
The thresholds for these exceptions depend on the dollar value of
each call versus the expense of an additional agent:
In businesses where each call generates high revenue (or where
customer service directly affects sales), the thresholds should be
set low. Thus the exception messages can alert the supervisor
before too many calls are lost.
In businesses where the revenue per call is low, it may not be
economical to have enough lines and agents to handle all calls.
Exception thresholds could be set high.
■
In a service business, agent productivity and cost per call may be
important concerns. In this situation, the length of time an agent
spends on a call (talk time) and in the after-call-work state may be the
most important exceptions to monitor.
Instructions for Selecting Exceptions
To select exceptions:
1. From the CMS Main Menu, press [F4]
The Administration Menu appears.
2. From the Administration Menu, press [F6] (Select Exceptns).
The Exception Settings screen (Figure 4-3), appears.
(Admin CMS).
4-10 Programming Exceptions
Page 86

Changing System Options and Programming Exceptions
Bon Voyage Travel
Exception
AGENTS
Talk Time >= xxx sec
After Call Work >= xxx min
ACW Time Limit >= xxx min off - - - - - Refused Call
SPLITS
# Abandon Calls >= xx
# Calls Waiting >= xx
Oldest Call Wait >= xxx sec
Avg Speed Answer >= xxx sec
LINE GROUPS
All Lines Busy >= xxx sec
Line Hold Time >= xx min
Line Hold Time <= xx sec
ALERTS
Alert Line Button Numbers
F Agent
lExceptns 2Exceptns 3Exceptns 4 Alert
F Split
F Group F Assign
EXCEPTION SETTINGS
Split/Line Group—,
On/Off
off - - - - - off - - - - - -
off
off
off 3/1 2/1
off
off 12s/-
off 5s/off - - - off
l/A
10s/2 5s/2
1: 29 2: 30 3: - 4: -
2/B 3/C
3s/- 10s/- -/- -/- -/-
4s/-
ADMIN CMS R3.O ll:20p 03/25
4/D
2/1 -/- -/- -/-
3s/2 -/- -/- -/-
4s/- -/-
5
F10 -
F Admin
8 Menu
6
Help
Figure 4-3. Exception Settings Screen
Use this screen to turn exceptions on or off and set exception thresholds for
each split or line group.
From this screen you may also assign line button numbers to external wallmountable lamps or bells to be used as external alerts. The external alerts
can be associated with those exceptions that are displayed with the dividing
slash(-/-). When assigned, the external alert Iamp is lit or the bell rings whenever the corresponding exception occurs. External alerts are discussed in
detail starting on page 4-26.
Initially, all exceptions are set to Off and all thresholds are blank.
Programming Exceptions 4-11
Page 87

Changing System Options and Programming Exceptions
The function keys appearing on the Exception Settings screen are:
(Agent Exceptns). Used to select exceptions for agents: talk time,
[F1]
ACW time, agent Iogout ACW, and refused call.
[F2] (Split Exceptns). Used to select exceptions for splits: abandoned
calls, calls waiting, oldest call waiting, and average speed of answer.
(Group Exceptns). Used to select exceptions for line groups: all lines
[F3]
busy, line hold time - rein, and line hold time - max.
(Assign Alert). Used to assign alerts to line button numbers.
[F4]
Exceptions are divided into three types—agent, split, and line group. General
instructions for programming exceptions and assigning external alerts to
them are listed below. After you familiarize yourself with the procedures, turn
to the descriptions of the type of exceptions you want to program.
To program exceptions, do as follows:
Press the function key for the type of exception you want to program—
agents, splits, or groups. Alert assignments are discussed later in this
section.
A box appears around the corresponding area of the Exception Settings
screen, and the function key labels change.
Press the function key for the exception you want to program. For
example, you could press [F2] (Call Waiting) on the Split Exceptions
screen.
if you decide not to program that exception, press [F1] (Cancel Prompt)
to cancel the prompt.
Enter
enter
on
in the “On/Off” field of the prompt to turn the exception on, or
Off
to turn the exception off.
Enter thresholds for splits or line groups. Keep these points in mind:
— You do not need to enter a threshold for each split or line group. If
you don’t want to enter a threshold for a particular split or line group,
4-12 Programming Exceptions
Page 88

Changing System Options and Programming Exceptions
simply leave it blank. This feature allows you to turn on an exception
for some splits or groups, but not all of them.
------
To delete a threshold value, enter a hyphen (-) over the value you
want to erase.
— You may enter thresholds even if you turn off an exception. For
example, you may want to turn on the talk time exception when call
traffic is heavy. During slow periods, however, you might not care
how long an agent talks to customers. You may want to turn off the
talk time exception then, but still keep the thresholds.
— Skip over fields that you don’t want to change using the tab or
appropriate function key:
Enter an alert number or a hyphen in the field to the right of the slash.
5.
See page 4-26 for more on alerts and alert assignments.
Press [F8]
6.
7.
Press a different function key to program another exception on that
(Enter Data) after you make an entry in the last field.
screen.
Press [F8] (Admin Exceptns) to return to the Exception Settings screen.
8.
Press [F8]
9.
(Admin Menu) when you finish programming exceptions.
Agent Exceptions
Agent exceptions let you monitor agent activity. You can use these exceptions to indicate reasonable expectations for call handling, and to see where
extra training is necessary. You can set different exception thresholds for
each split to tailor the exception for the type of calls each split handles. For
instance, some splits may need more after-call-work time than others.
Press [F1]
the Agent Exceptions screen (Figure 4-4). The box in the screen indicates
the four agent exceptions: talk time, after call work, agent logged out, and
refused calls.
(Agent Exceptns) from the Administer Exceptions screen to select
Programming Exceptions 4-13
Page 89

Changing System Options and Programming Exceptions
Bon Voyage Travel
Exception
AGENTS
[Talk Time >= xxx sec
After Call Work >= xxx min off - - ACW Time Limit >= xxx min
Refused Call
# Abandon Calls >= XX ,
# Calls Waiting >= xx
Oldest Call Wait >= xxx sec
Avg Speed Answer >= xxx sec
LINE GROUPS
All Lines Busy >= xxx sec
Line Hold Time >= xx min
Line Hold Time <= xx sec
ALERTS
Alert Line Button Numbers
F Talk F ACW
1 Time 2
F Agent FRefused
3 Logout
EXCEPTION SETTINGS
Split/Line Group—
On/Off
off - - -
off - - - - - off
off - - - off
off
off
off
off
off - - - -
4 Call
l/A 2/B 3/C
3/1 2/1
10s/2 5s/2
12s/- 3s/-
5s/- 4s/- 4s/-
1: 29 2: 30 3: - 4: -
ADMIN CMS R3.O ll:22p 03/25
3s/2 -/- -/- -/-
10s/- -/- -/- -/-
4/D
2/1 -/- -/- -/-
-/-
5
F10 -
6
Help
F Admin
8Exceptns
l
Figure 4-4. Agent Exceptions Screen
Talk Time
Talk time is the number of seconds an agent is connected to a call. If you
turn on this exception, CMS notifies you when an agent’s talk time meets or
exceeds the threshold set for that split.
1. From the Agent Exception screen, press [F1]
The following prompt appears:
ON
TALK TIME(seconds):
Split 1: – 2: - 3: – 4: – 5: - 6: -
/OFF ?
.—
(Talk Time).
\
4-14 Programming Exceptions
Page 90

Changing System Options and Programming Exceptions
2. Enter on or off.
Press [F6] (Next Field) to keep the current value.
3. Enter the number of seconds (1 through 999) for the maximum talk time
for each split.
To leave the exception turned off for a split, enter a hyphen.
4.
Press
[F8]
(Enter Data) after the last field.
The prompt clears and the function keys change.
5. Choose another activity from this screen, or press [F8] (Admin
Exceptns) to return to the Exception Settings screen.
6. Press [F8] (Admin Menu) when you finish programming exceptions.
The following is an example of a message that appears when the exception
threshold is met:
*** Split 1
- Agent TOM - Talk Time >= 180 sec
ACW (After Call Work)
The after-call-work state refers to the time agents make themselves tem-
porarily unavailable for calls. If you turn on this exception, CMS notifies you
when an agent has been in the ACW state as long as or longer than the
threshold set for that split.
1. Press [F2] (ACW).
The following prompt appears:
ACW (minutes) : ON/OFF ?
Split l: - 2: – 3: – 4: - 5: – 6:-
——
\
2. Enter on or off Press [F6] (Next Field) to keep the current value.
3. Enter a number of minutes (1 through 999) for each split. To leave the
exception turned off for a split, enter a hyphen.
4. Press
[F8]
(Enter Data) after the last field.
The prompt clears and the function keys change.
Programming Exceptions 4-15
Page 91

Changing System Options and Programming Exceptions
5. Choose another activity from this screen, or press [F8] (Admin
Exceptns) to return to the Exception Settings screen.
6. Press [F8] (Admin Menu) when you finish programming exceptions.
The following is an example of a message that appears when the exception
threshold is met:
*** Split 3
- Agent BEN -
After Call Work >= 5 min
ACW Time Limit
If you turn on this exception, CMS puts agents in the logged out state when
they have remained in the ACW state for the specified threshold.
Press [F3] (Agent Logout).
1.
The following prompt appears:
AGENT OUT (minutes) :
Split l: – 2: – 3: – 4: - 5: - 6:-
2.
Enter
on
or
off
at the
ON/OFF ?
ON/OFF?
prompt, or press [F6] (Next Field)
\
to keep the current value.
Enter a number of minutes (1 through 999) for each split. To leave the
3.
exception turned off for a split, enter a hyphen.
4.
Press [F8] (Enter Data) after the last field.
The prompt clears and the function keys change.
Choose another activity from this screen, or press [F8] (Admin
5.
Exceptns) to return to the Exception Settings screen.
Press [F8]
6.
The following is an example of a message that appears when the exception
threshold is met:
*** Split 2
(Admin Menu) when you finish programming exceptions.
- Agent MAX
4-16 Programming Exceptions
– Logged Out
– ACW >= 5 minutes
Page 92

Changing System Options and Programming Exceptions
Refused Call
If you turn on this exception, CMS notifies you whenever an agent refuses a
call.
1. Press [F4] (Refused Call).
The following prompt appears:
REFUSED CALLS :
ON /OFF?
2. Enter on or off.
3. Press [F8] (Enter Data).
The prompt c/ears and the function keys change.
4. Choose another activity from this screen, or press
[F8]
(Admin
Exceptns) to return to the Exception Settings screen.
5. Press [F8] (Admin Menu) when you finish programming exceptions.
The followings an example of a message that appears when the exception
threshold is met:
*** Split 2
- Agent SAM
– Refused Call
Split Exceptions
Split exceptions alert you to unusual or undesirable situations affecting a
whole split. For example, you can be notified when the number of calls waiting in a split meets or exceeds a threshold you set. Split exceptions can alert
you to a need for more agents or faster call handling. Some split exceptions
can be used to activate an external lamp.
Pressing [F2]
(Split Exceptns) from the Exception Settings screen selects the
Split Exceptions screen (Figure 4-5). The box indicates the split exceptions:
abandoned calls, calls waiting, oldest call, and average speed of answer.
Programming Exceptions 4-17
Page 93

Changing System Options and Programming Exceptions
Bon Voyage Travel
Exception
AGENTS
Talk Time >= xxx sec
After Call Work >= xxx min
ACW Time Limit >= xxx min
Refused Call
SPLITS
# Abandon Calls >= xx
,
# Calls waiting >= xx
Oldest Call Wait >= xxx sec off
Avg Speed Answer >= xxx sec
All Lines Busy >= xxx sec
Line Hold Time >= xx min
Line Hold Time <= xx sec
ALERTS
Alert Line Button Numbers
FAbandon
1 Calls
F Calls
2Waiting 3 Call
F Oldest
EXCEPTION SETTINGS
On/Off
off
off
off
off
off
off
off 12s/-
off
off
off
F Avg
4 Speed
ADMIN CMS R3.O ll:23p 03/25
I—-Split/Line Group—
1/A
10s/2
5s/-
1: 29 2: 30 3: - 4: -
2/B
3/1 2/1
5s/2
3s/-
4s/-
3/C 4/D
2/1 -/- -/- -/-
3s/2 -/- -/- -/-
10s/- -/- -/- -/-
4s/- -/-
5
F1O
6
- Help
F Admin
8Exceptns
l
.
Figure 4-5. Split Exceptions Screen
Abandon Calls (Number of Abandoned
Calls)
When a caller hangs up before speaking to an agent, the call is considered
an abandoned call. If you turn on this exception, CMS notifies you whenever
the number of abandoned calls in the current hour reaches or exceeds the
threshold you set.
1. Press [F1] (Abandon Calls).
The following prompt appears:
# ABANDON CALLS:
ON/ OFF ?
Split 1: - 2: – 3: – 4: – 5: - 6: -
\
4-18 Programming Exceptions
Page 94

Chanqinq System Options and Programming Exceptions
2.
Enter
on
or
off
to turn this exception on or off, or press [F6] (Next
Field) to keep the current value.
If you want to enter threshold values, enter a number 1 through 99 for
3.
each split. If you do not want to activate this exception for a particular
split, enter a hyphen.
Press [F8] (Enter Data).
4.
The prompt clears and the function keys change.
Choose another activity from this screen, or press [F8] (Admin
5.
Exceptns) to return to the Exception Settings screen.
Press [F8]
6.
The following is the exception message that appears when the exception
threshold is met:
*** Split 2
(Admin Menu) when you finish programming exceptions.
– # Abandoned Calls >= 5
Calls Waiting (Number of Calls Waiting)
The calls waiting exception refers to the number of calls on hold and waiting
to be connected to agents, and calls in the main split that are eligible for
intraflow to the secondary split. With this exception, CMS notifies you when
the number of calls waiting in a split meets or exceeds the threshold you set
for that split. The maximum number of calls that can be waiting for a split is
equal to the number of lines assigned to that split. You can assign an exter-
nal alert to this exception.
1. Press [F2]
The following prompt appears:
# CALLS WAITING:
3:-
(Calls Waiting).
ON/OFF ?
/- 4:- /- 5:- /- 6:- /-
(#/a) 1:- /- 2:- /- \
The symbols (#/a) are shown to remind you that the threshold value for
the number of calls is entered before the slash, and the alert number (if
any) is entered after the slash.
Programming Exceptions 4-19
Page 95

Changing System Options and Programming Exceptions
2. Enter on or off to turn this exception on or off, or press [F6] (Next
Field) to keep the current value.
3. If you want to enter threshold values, enter numbers (before the slash)
that are less than or equal to the number of lines assigned to each split
(1 through 99). If you do not want to activate this exception for a partic-
ular split, enter a hyphen.
4. Enter an alert number or
(See page 4-26 for more
a hyphen in the field to the right of the slash.
on alerts.)
5. Press [F8] (Enter Data).
The prompt clears and the
function keys change.
6. Choose another activity from this screen, or press [F8] (Admin
Exceptns) to return to the Exception Settings screen.
7.
Press [F8] (Admin Menu) when you finish programming exceptions.
The following is an example of a message that appears when the exception
threshold is met:
*** Split 1
An alert, if assigned, is activated when the threshold is met.
- # Calls Waiting >= 2
Oldest Call (Oldest Call Waiting)
The oldest call is the call that has been waiting the longest (to be answered
by an agent) in a split. If you turn on this exception, CMS notifies you when
the number of seconds the oldest call has been waiting meets or exceeds the
threshold you set. You can assign an external alert to this exception.
1. Press [F3] (Oldest Call).
The following prompt appears:
OLDEST CALL :
/-5:- /- 6:- /-
4:-
ON/OFF ?
(s/a) 1:- /- 2:- /- 3:- /- \
2. Enter on or off press [F6] (Next Field) to keep the current value.
4-20 Programming Exceptions
Page 96

Changing System Options and Programming Exceptions
If you want to enter threshold values, enter a number of seconds (1
3.
through 999) for each split. If you do not want to activate this exception
for a particular split, enter a hyphen.
4.
Enter an alert number or a hyphen in the field to the right of the slash.
(See page 4-26 for more on alerts.)
Press [F8]
5.
The prompt clears and the function keys change.
6.
Choose another activity from this screen, or press [F8] (Admin
(Enter Data).
Exceptns) to return to the Exception Settings screen.
7.
Press [F8]
The following message appears when the exception threshold is met:
*** Split 2 -
An alert, if assigned, is activated when the threshold is met.
(Admin Menu) when you finish programming exceptions.
Oldest Call Waiting >= 5 sec
Avg Speed (Average Speed of Answer)
The average speed of answer is the average time it takes from the time a call
rings until it is connected to an agent in a given split. This includes the
answer delay (the amount of time a call rings before CMS answers it), the
time connected to the voice announcement unit, the time on hold, and the
time it takes to transfer the call to an agent.
If you turn on this exception, CMS notifies you when the average speed of
answer in a split meets or exceeds the threshold you set for the current hour.
You can assign an external alert to this exception.
1. Press [F4] (Avg Speed).
The following prompt appears:
AVG SPEED ANS : ON/OFF?
3
:- /- 4:- /- 5:- /- 6:- /-
(s/a) 1:- /- 2:- /- \
The symbols (s/a) are shown to remind you that the threshold value (in
seconds) is entered before the slash, and the alert number (if any) is
entered after the slash.
Programming Exceptions 4-21
Page 97

Changing System Options and Programming Exceptions
Enter
2.
If you want to enter threshold values, enter, to the left of the slash, a
3.
on
or
off
press [F6] (Next Field) to keep the current value.
number of seconds (1 through 999) for each split. If you do not want to
activate this exception for a particular split, enter a hyphen,
4.
Enter an alert number or a hyphen in the field to the right of the slash.
(See page 4-26 for more on alerts.)
5.
Press [F8] (Enter Data).
The prompt clears and the function keys change.
6.
Choose another activity from this screen, or Press [F8] (Admin
Exceptns) to return to the Exception Settings screen.
7.
Press [F8]
The following message appears when the exception threshold is met:
*** Split 3
An alert, if assigned, is activated when the threshold is met.
(Admin Menu) when you finish programming exceptions.
– Avg Speed Answer >= 10 seconds
Line Group Exceptions
Line group exceptions alert you to unusual or undesirable situations affecting
lines or line groups. For instance, the all lines busy exception notifies you
when all lines in a line group have been busy more than a certain number of
seconds.
Press [F3] (Group Exceptns) from the Exception Settings screen to select the
Line Group Exceptions screen (Figure 4-6). The box indicates the line group
exceptions which include all lines busy, line hold time maximum, and line hold
time minimum.
4-22 Programming Exceptions
Page 98

Changing System Options and Programming Exceptions
Bon Voyage Travel
Exception
AGENTS
Talk Time >= xxx sec
After Call Work >= xxx min
ACW Time Limit >= xxx min
Refused Call
SPLITS
# Abandon Calls >= xx
# Calls Waiting >= xx
Oldest Call Wait >= xxx sec
Avg Speed Answer >= xxx sec
—LINE GROUPS
All Lines Busy >= xxx sec
Line Hold Time >= xx min
Line Hold Time <= xx sec
ALERTS
Alert Line Button Numbers 1: 29 2: 30 3: - 4: -
F Lines
1 Busy
FHoldTime FHoldTime
2Maximum 3Minimum
EXCEPTION SETTINGS
I—Split/Line Group—
On/Off
off
off
off
off
off - off 3/1
off
off 12s/-
off
off
off
1/A
10s/2 5s/2
5s/-
2/B 3/C
3s/-
4s/-
ADMIN CMS R3.0 ll:24p 03/25
4/D
2/1
2/1 -/- -/- -/-
3s/2 -/- -/- -/-
10s/- -/- -/- -/-
4s/- -/-
5
F10 -
l
6
Help
F Admin
8Exceptns
Figure 4-6. Line Group Exceptions Screen
Lines Busy (All Lines Busy)
The all lines busy exception refers to the number of seconds all lines in a line
group are busy within the current hour. If you turn on this exception, CMS
notifies you when the length of time all lines are busy meets or exceeds the
threshold you set. When all lines in a line group are busy, incoming calls are
blocked and callers receive a busy signal. You can assign an external alert
to this exception.
1. From the Line Groups Exception screen, press [F1]
The following prompt appears:
ALL LINES BUSY:
C:-
/- D:- /-
ON /OFF?
(s/a) A:- /- B:- /- \
(Lines Busy).
Programming Exceptions 4-23
Page 99

Changing System Options and Programming Exceptions
The symbols (s/a) are shown to remind you that the threshold value (in
seconds) is entered before the slash, and the alert number (if any) is
entered after the slash.
Enter on or off to turn this exception on or off, or ress [F6] (Next
2.
Field) to keep the current value.
3.
If you want to enter threshold values, enter a number of seconds (1
through 999) for each group. If you do no t want to activate this exception for a particular group, enter a hyphen.
Enter an alert number or a hyphen in the field to the right of the slash.
4.
See page 4-26 for more on alirts and alert assignments.
Press [F8] (Enter Data).
5.
The prompt clears and the function keys change.
Choose another activity from this screen, or press [F8] (Admin
6.
Exceptns) to return to the Exception Settings screen.
Press [F8] (Admin Menu) when you finish programming exceptions.
7.
The following is an example of a mesage that appears when the exception
threshold is met:
*** Group A -
An alert, if assigned, is activated when the threshold is met.
All Lines Busy >= 5 seconds
HoldTime Maximum (Maximum Line Holding Time)
The line holding time refers to the number of seconds a line has been in use
for a single call, not just the amount of time it has been “on hold.” If you turn
on this exception, the maximum line holding time exception allows you to set
an upper limit on the length of time a line is in use. CMS notifies you when
the length of time a line has been seized meets or exceeds the threshold you
set for its line group.
4-24 Programming Exceptions
Page 100

Changing System Options and Programming Exceptions
1.
From the Line Group Exceptions screen, press [F2] (HoldTime Maximum).
The following prompt appears:
MAXIMUM HOLDTIME (minutes) :
Line Group A: - B: - C: - D: -
2.
Enter
on
or
off
to turn this exception on or off, or press [F6] (Next
ON/OFF?
\
Field) to keep the current value.
If you want to enter threshold values, enter a number of minutes (1
3.
through 99) for each group. If you do not want to activate this exception for a particular group, enter a hyphen.
4.
Press [F8] (Enter Data).
The prompt clears and the function keys change.
Choose another activity from this screen, or press [F8] (Admin
5.
Exceptns) to return to the Exception Settings screen.
Press [F8]
6.
The following message appears when the exception threshold is met:
*** Group A –
(Admin Menu) when you finish programming exceptions.
Line XXXXX Hold Time >= 3 minutes
HoldTime Minimum (Minimum Line Holding Time)
The line holding time refers to the number of seconds a line has been in use
for a single call. If you turn on this exception, CMS notifies you when the
length of time a line has been in use is less than the threshold you set. If the
holding time of a line is consistently short, it may indicate a problem with the
line.
1. Press [F3] (HoldTime Minimum).
The following prompt appears:
MINIMUM HOLDTIME (seconds) :
Line Group A: - B: - C: - D: -
ON/OFF ?
\
Programming Exceptions 4-25
 Loading...