


User’s manual
CL4939
Big button big display telephone/answering system with caller ID/ call waiting

Congratulations
on purchasing your new AT&T product.
Before using this AT&T product, please read the Important safety information on page 60 of this user’s manual.
Please thoroughly read the user’s manual for all the feature operations and troubleshooting information you need to install and operate your new AT&T product. You can also visit our website at www.telephones.att.com or call 1 (800) 222-3111.
In Canada, dial 1 (866) 288-4268.
Model #: CL4939
Type: Big button big display telephone with answering system
Serial #:__________________________________________________________________
Purchase date:____________________________________________________________
Place of purchase:_ _______________________________________________________
Telephones identified with this logo have reduced noise and interference when used with most T-coil equipped hearing aids and cochlear implants. The TIA-1083 Compliant Logo is a trademark of the Telecommunications Industry Association. Used under license.
Audio assist™ and Message guard™ are trademarks of Advanced American Telephones.
© 2009 Advanced American Telephones. All Rights Reserved. AT&T and the AT&T logo are trademarks of AT&T Intellectual Property licensed to Advanced American Telephones, San Antonio, TX 78219.

Parts checklist
Your telephone package contains the following items. Save your sales receipt and original packaging in the event warranty service is necessary.
|
|
|
|
|
|
|
|
|
|
|
|
|
|
|
|
|
|
|
|
|
|
|
|
|
|
|
|
|
|
|
|
|
|
|
|
|
|
|
|
|
|
|
|
|
|
|
|
|
|
|
|
|
|
|
|
|
|
|
|
|
|
|
|
|
|
|
|
|
|
|
|
|
|
|
|
|
|
|
|
|
|
|
|
|
|
|
|
|
|
|
|
|
|
|
|
|
|
|
|
|
|
|
|
|
|
|
|
|
|
|
|
|
|
|
|
|
|
|
|
|
|
|
|
|
|
|
|
|
|
|
|
|
|
|
|
|
|
|
|
|
|
|
|
|
|
|
|
|
|
|
|
|
|
|
|
|
|
|
|
|
|
|
|
|
Telephone base with mounting |
Handset |
|
|
|||||||||||
|
|
bracket installed |
|
|
|
|||||||||
|
|
|
|
|
|
|
|
|
|
|
|
|
|
|
|
|
|
|
|
|
|
|
|
|
|
|
|
|
|
|
|
|
|
|
|
|
|
|
|
|
|
|
|
|
|
|
|
|
|
|
|
|
|
|
|
|
|
|
|
|
|
|
|
|
|
|
|
|
|
|
|
|
|
|
|
|
|
|
|
|
|
|
|
|
|
|
|
|
|
|
|
|
|
|
|
|
|
|
|
|
|
|
|
|
|
|
|
|
|
|
|
|
|
|
|
|
|
|
|
|
|
|
|
|
|
|
|
|
|
|
|
|
|
|
Coiled handset cord |
Power adapter |
Telephone line cord |
||||||||||||
|
|
|
|
|
|
|
|
|
|
|
|
|
|
|
|
|
|
|
|
|
|
|
|
|
|
|
|
|
|
|
|
|
|
|
|
|
|
|
|
|
|
|
|
|
|
|
|
|
|
|
|
|
|
|
|
|
|
|
|
|
|
|
|
|
|
|
|
|
|
|
|
|
|
|
|
|
|
|
|
|
|
|
|
|
|
|
|
|
|
|
|
|
|
|
|
|
|
|
|
|
|
|
|
|
|
|
|
|
|
|
|
|
|
|
|
|
|
|
|
User’s manual |
Quick start guide |

STOP!
If you subscribe to high-speed Internet service (digital subscriber line - DSL) through your telephone line, you must install a DSL filter between the telephone line cord and the telephone wall jack (page 7). The filter prevents noise and caller ID problems caused by DSL interference. Please contact your DSL service provider for more information about DSL filters.
Your product may be shipped with a protective sticker covering the telephone base display - remove it before use.
For customer service or product information, visit our website at www.telephones.att.com or call 1 (800) 222-3111. In Canada, dial 1 (866) 288-4268.
Avoid placing the telephone base too close to:
•Communication devices such as: television sets, VCRs, or cordless telephones.
•Excessive heat sources.
•Noise sources such as a window with traffic outside, motors, microwave ovens, refrigerators, or fluorescent lighting.
•Excessive dust sources such as a workshop or garage.
•Excessive moisture.
•Extremely low temperature.
•Mechanical vibration or shock such as on top of the washing machine or work bench.
User’s manual
CL4939
Big button big display telephone/answering system with caller ID/ call waiting
Table of contents |
|
Getting started |
|
Introduction............................................... |
1 |
Quick reference guide......................... |
2 |
Indicator lights and tones.................. |
4 |
Screen messages.................................... |
5 |
Telephone installation......................... |
7 |
Installation options................................ |
9 |
Telephone settings |
|
Volume control..................................... |
14 |
Menu setup............................................. |
15 |
Telephone operation |
|
Making and answering a call......... |
21 |
Chain dialing.......................................... |
22 |
Last number redial.............................. |
23 |
Options while on calls...................... |
24 |
Line power mode |
|
(no AC power)................................. |
26 |
Two-touch memory |
|
Two-touch memory overview |
|
and storage...................................... |
27 |
Reviewing and dialing a |
|
two-touch number........................ |
28 |
Deleting a two-touch number...... |
29 |
Directory |
|
Directory overview.............................. |
30 |
Directory storage................................. |
31 |
Reviewing and dialing a directory |
|
entry..................................................... |
32 |
Deleting a directory entry............... |
33 |
Caller ID operation |
|
Caller ID overview............................... |
34 |
Reviewing call history....................... |
37 |
Returning a call.................................... |
38 |
Storing a call history entry in the |
|
directory............................................. |
39 |
Storing a call history entry in a |
|
two-touch location....................... |
40 |
Deleting call history entries........... |
41 |
Answering system operation |
|
Answering system overview.......... |
42 |
Answering mode.................................. |
43 |
Outgoing announcement................ |
44 |
Message playback............................... |
46 |
Recording and playing memo....... |
48 |
Call screening, priority call |
|
and call intercept.......................... |
49 |
Remote access...................................... |
50 |
Appendix |
|
Troubleshooting................................... |
52 |
General product care........................ |
59 |
Important safety information........ |
60 |
FCC and ACTA information............. |
61 |
Part 15 of FCC rules.......................... |
63 |
Limited warranty.................................. |
64 |
Technical specifications................... |
66 |
Index.......................................................... |
67 |
Remote access wallet card............ |
69 |
ii
Getting started
Introduction
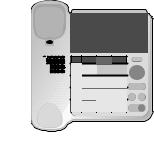
This AT&T CL4939 big button big display telephone has a large tilt display for easy viewing and extra large buttons for easy viewing and dialing.
You must use the supplied power adapter to use most features of this telephone. In the event of power failure, this telephone works only to make or answer calls with the handset. Refer to Line power mode (no AC power) on page 26 for more details.
This telephone is hearing-aid compatible. This telephone features a speakerphone for hands-free use.
This telephone also features 10 two-touch memory locations for speed dialing and has a directory that can store up to 25 additional numbers with names.
This telephone supports caller ID with call waiting service. (Caller ID services are subscriber services available from your telephone service providers and fees may apply.)
This telephone also features a built-in digital answering system that can store approximately 19 minutes of messages and memos with a total of up to 99 messages. You can access the answering system from a remote touch-tone telephone.
This user’s manual contains detailed instructions for using your AT&T CL4939 big button big display telephone. Please read this user’s manual before using this CL4939 telephone.
Getting started
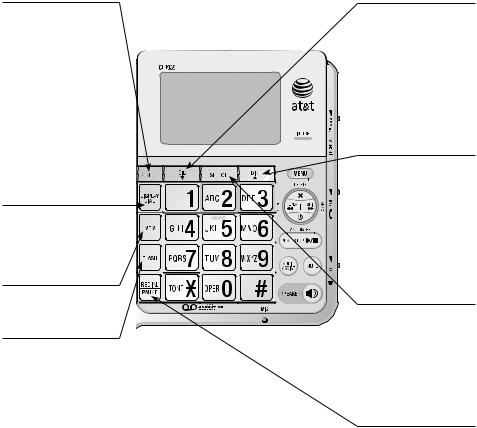
Quick reference guide
REMOVE
While reviewing the call history entries, press and hold to clear the call history (page 41).
While reviewing an entry stored in the directory or call history, press to
delete (pages 33 and 41).
While entering names (or numbers), press to backspace and erase a character (or digit)
(page 31).
DISPLAY DIAL
Press to dial the number currently displayed (pages 32 and 38).
MEM
Press to access the twotouch memory (page 27).
FLASH
During a call, press to answer an incoming call if you subscribe to call waiting service provided by your telephone service provider
(page 25).
Press to cancel an operation and return to idle mode (page 15).
CID/
Press to display the call history (page 37).
While using the menu, press to scroll through the settings (page 15).
While reviewing the directory or call history, press to scroll down (pages 32 and 37).
DIR/
Press to enter the directory (page 32).
While using the menu, press to scroll through the settings (page 15).
While reviewing the directory or call history, press to scroll up (pages 32 and 37).
SELECT
While using the menu, press to save the setting and move to the next menu option (page 15).
While reviewing the call history, press to show dialing formats (page 38).
REDIAL/PAUSE
While using the handset or speakerphone, press to dial the last number dialed (page 23).
While editing numbers in the two-touch memory or directory, press to copy the last number dialed
(pages 27 and 31).
While entering numbers, press to insert a foursecond dialing pause (page 21).

Getting started
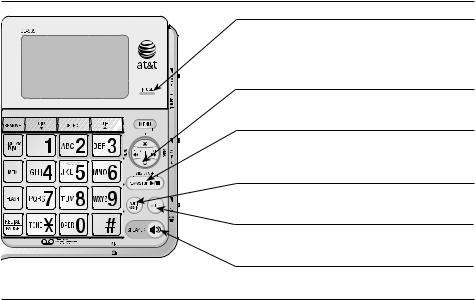
Quick reference guide
MENU
Press to enter the menu (page 15).
While reviewing the call history, press to store the displayed name and number in the directory (page 39).
MUTE
During a call, press to mute the handset or speakerphone microphone. Press again to resume your
conversation (page 24).
AUDIO ASSIST™
Some voices will sound louder and clearer
if you press AUDIO ASSIST while you are on a call using the handset (page 24).
 REPEAT/MEMO
While the telephone is playing the day and time the current message was received, press to go back to the previous message (page 46).
After the telephone plays the day and time the current message was received, press
to repeat the current message (page 46).
Press to record memos (page 48).
 ANS ON/OFF
Press to turn the answering system on or off (page 43).
Audio assistTM is a trademark of Advanced American Telephones.
RINGER VOL switch
Slide to adjust the ringer volume (page 14).
 VOL switch
Slide to adjust the listening volume on the handset (page 14).
 VOL switch
Slide to adjust the listening volume on the speakerphone (page 14).
While playing back messages, slide to adjust the playback volume (page 46).
 SPEAKER
Press to turn on the base speakerphone. Press again to end the call (page 21).
 DELETE
Press to delete the message currently playing (page 46).
Press twice to delete all old messages when the telephone is not in use (page 47).
 SKIP/ANNC
Press to skip to the next message (page 46).
Press to record or play the outgoing announcement (pages 44 and 45).
PLAY/STOP 
Press to start or stop message playback (page 46).
Press to stop recording (pages 44 and 48).
Getting started
Indicator lights and tones
Indicator lights
IN USE
On when the line is in use or the answering system is answering a call.
Flashes when there is an incoming call.
 ANS ON/OFF
On when the answering system is on.
PLAY/STOP 
Flashes when there are new (unreviewed) messages.
AUDIO ASSIST
On when the audio assistance feature is in use.
MUTE
On when the microphone is muted.
 SPEAKER
On when the speakerphone is in use.
Alert tones
Beep |
A key is pressed. |
(Key tone) |
|
|
|
Beeeep |
Command of the answering system is completed successfully. |
(One short beep) |
|
|
|
Beeeeeeeep |
The answering system begins to record an announcement or a |
(One long beep) |
memo. |
|
|
Three short high-pitched beeps |
Command is completed successfully. |
(Confirmation tone) |
|
|
|
One long low-pitched beep |
• Command has failed. |
(Error tone) |
• The number you entered in the directory or two-touch |
|
|
|
memory is over 24 digits. |
|
• The name you entered in the directory is over 15 characters. |
|
• There are no telephone numbers stored in the directory. |
|
• You have reached the end of the directory records. |
|
• There are no call history entries. |
|
• You have reached the end of the call history entries. |
|
• There is no telephone number in the call history entry you |
|
dialed. |
|
• There is no telephone number in the call history entry you |
|
saved in the directory or two-touch memory. |
|
|
Beep-beep every 15 seconds |
There are new messages. |
(Message alert tone) |
|
|
|
Four highthen low-pitched |
The incoming call is a priority call. |
beeps |
|
(Priority call tone) |
|
|
|
Getting started
Screen messages
Screen icons
|
|
NEW |
The displayed call history entry is unreviewed. |
|
|
|
|
|
|
REP |
You have received more than one call from this |
16 CALLS 5 NEW |
|
number. |
|
16 |
The position of the number stored in the call |
||
16 ERR 12:00AM11-20 15 |
|
|
history. |
|
|
|
|
|
|
The ringer is turned off. |
|
|
|
|
|
|
|
|
|
|
|
|
There is an error in the caller ID information. |
|
|
|
|
|
|
|
|
Message window displays
16 CALLS 5 NEW
 16 ERR 12:00AM11-20 15
Message window
The message window usually displays the total number of messages. See the table below for explanations of other displays in this window.
(blank) |
The answering system is off. |
--The answering system is answering a call.
-OR-
The answering system is being accessed remotely.
0 No messages.
1-99 Total number of messages and memos. During playback, the number of the message.
0-59 Elapsed time while recording a memo. (counting)
A |
You have accessed the announcement menu. |
|
|
AP |
The announcement you recorded is playing. |
|
|
dE |
All old messages are deleted, the message |
|
currently playing is deleted, or the announcement |
|
currently playing is deleted. |
FThe answering machine memory is full. Delete some messages to make room for more.

Getting started
Screen messages
Display screen messages
DELETED |
All the entries stored in call history have |
|
been deleted. |
|
-OR- |
|
The directory or two-touch memory entry |
|
has been deleted. |
|
|
DIRECTORY EMPTY |
There are no telephone numbers stored in |
|
the directory. |
|
|
CALL LOG EMPTY |
There are no entries in the call history. |
|
|
END OF LIST |
You have reached the end of the call |
|
history records. |
|
|
LINE IN USE |
Another telephone on the same line is in |
|
use. |
|
-OR- |
|
No telephone line cord is connected to |
|
the telephone. |
|
|
RINGING |
There is an incoming call. |
|
|
NO AC POWER |
There is no AC power. Check the power |
|
adapter connection to the telephone and |
|
the electrical wall outlet. |
|
|
MEMORY FULL |
The directory is full. |
|
|
ONLY 15 ALLOWED |
The name you entered in the directory is |
|
over 15 characters. |
|
|
ONLY 24 ALLOWED |
The number you entered in the directory |
|
or two-touch memory is over 24 digits. |
|
|
SET CLOCK |
The clock needs to be set. |
|
|
STORED |
The entry is saved in the directory or |
|
two-touch memory location successfully. |
|
|
XX CALLS YY NEW |
There are XX calls in the call history |
|
and YY of them are new (missed and |
|
unreviewed). |
|
|
Getting started
Telephone installation
If you subscribe to high-speed Internet service (digital subscriber line - DSL) through your telephone line, you must install a DSL filter between the telephone line cord and the telephone wall jack. The filter prevents noise and caller ID problems caused by DSL interference. Please contact your DSL service provider for more information about DSL filters.
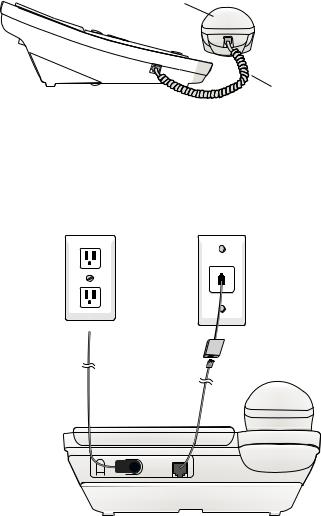
Follow the steps below to install the telephone.
1.Plug one end of the coiled handset cord into the handset jack on the left side of the telephone base. Plug the other end into the handset and hang up.
Handset
Coiled handset cord
2.Plug one end of the telephone line cord into the TEL LINE jack on the back of the telephone base. Plug the other end of the telephone line cord into a telephone wall jack.
3.Plug the small end of the power adapter into the POWER jack on the back of the telephone base. Plug the large end into an electrical outlet not controlled by a wall switch.
Electrical outlet |
Telephone wall jack |
not controlled by |
|
a wall switch |
|
Telephone line cord
DSL filter (not included) is required if you have DSL high-speed Internet service.

Getting started
Telephone installation
4.Lift the handset or press  SPEAKER to check for a dial tone.
5.Rotate the top of the display up or down to adjust the angle of the screen for maximum visibility.
 NOTES:
•Use only the power adapter provided with this product. To obtain a replacement, visit our website at www.telephones.att.com or call
1 (800) 222-3111. In Canada, dial 1 (866) 288-4268.
•The power adapter is intended to be correctly oriented in a vertical or floor mount position. The prongs are not designed to hold the plug in place if it is plugged into a ceiling, under-the-table or cabinet outlet.
•You can use this telephone without the power adapter installed. In this case, the telephone works only to make or answer calls with the handset, or adjust the ringer volume or handset listening volume. For optimal performance, power your telephone with the supplied power adapter.

Getting started
Installation options
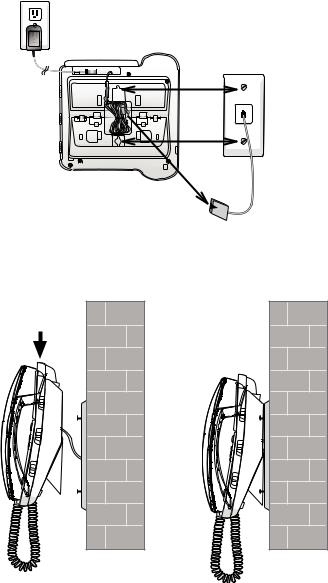
The telephone base comes with the bracket mounted for tabletop use. If you want to mount your telephone on a wall, use the mounting bracket to connect with a standard dual-stud telephone wall mounting plate. If you do not have this mounting plate, you can purchase one from many hardware or consumer electronic retailers. Professional assistance may be required to install the mounting plate.
Tabletop to wall-mount installation
To install the telephone base in the wall-mount position, make sure you first unplug the power adapter from the electrical outlet and unplug the telephone line cord from the wall outlet.
1.Lift the handset and place it aside. Hold down the switch hook on the telephone base, then slide the handset tab upwards to remove it from the slot. Rotate the handset tab 180 degrees. Push the handset tab down into the grooves so it settles into position.
Switch hook
Handset tab
2.Grasp and squeeze as the arrows indicate to open the hinged bracket. Rotate the bracket and lock it into wall-mount position as indicated below.
|
|
|
|
|
|
|
|
|
|
|
|
|
|
|
|
|
|
|
|
|
|
|
|
|
|
|
|
|
|
|
|
|
|
|
|
|
|
|
|
|
|
|
|
|
|
|
|
|
|
|
|
|
|
|
|
|
|
|
|
|
|
|
|
|
|
|
|
|
|
|
|
|
|
|
|
|
|
|
|
|
|
|
|
|
|
|
|
|
|
|
|
|
|
|
|
|
|
|
|
|
|
|
|
|
|
|
|
|
|
|
|
|
|
|
|
|
|
|
|
|
|
|
|
|
|
|
|
|
|
|
|
|
|
|
|
|
|
|
|
|
|
|
|
|
|
|
|
|
|
|
|
|
|
|
|
|
|
|
|
|
|
|
|
|
|
|
|
|
|
|
|
|
|
|
|
|
|
|
|
|
|
|
|
|
|
|
|
|
|
|
|
|
|
|
|
|
|
|
|
|
|
|
|
|
|
|
|
|
|
|
|
|
|
|
|
|
|
|
|
|
|
|
|
|
|
|
|
|
|
|
|
|
|
|
|
|
|
|
|
|
|
|
|
|
|
|
|
|
|
|
|
|
|
|
|
|
|
|
|
|
|
|
|
|
|
|
|
|
|
|
|
|
|
|
|
|
|
|
|
|
|
|
|
|
|
|
|
|
|
|
|
|
|
|
|
|
|
|
|
|
|
|
|
|
|
|
|
|
|
|
|
|
|
|
|
|
|
|
|
|
|
|
|
|
|
|
|
|
|
|
|
|
|
|
|
|
|
|
|
|
|
|
|
|
|
|
|
|
|
|
|
|
|
|
|
|
|
|
|
|
|
|
|
|
|
|
|
|
|
|
|
|
|
|
|
|
|
|
|
|
|
|
|
|
|
|
|
|
|
|
|
|
|
|
|
|
|
|
|
|
|
|
|
|
|
|
|
|
|
|
|
|
|
|
|
|
|
|
|
|
|
|
|
|
|
|
|
|
|
|
|
|
|
|
|
|
|
|
|
|
|
|
|
|
|
|
|
|
|
|
|
|
|
|
|
|
|
|
|
|
|
|
|
|
|
|
|
|
|
|
|
|
|
|
|
|
|
|
|
|
|
|
|
|
|
|
|
|
|
|
|
|
|
|
|
|
|
|
|
|
|
|
|
|
|
|
|
|
|
|
|
|
|
|
|
|
|
|
|
|
|
|
|
|
|
|
|
|
|
|
|
|
|
|
|
|
|
|
|
|
|
|
|
|
|
|
|
|
|
|
|
|
|
|
|
|
|
|
|
|
|
|
|
|
|
|
|
|
|
|
|
|
|
|
|
|
|
|
|
|
|
|
|
|
|
|
|
|
|
|
|
|
|
|
|
|
|
|
|
|
|
|
|
|
|
|
|
|
|
|
|
|
|
|
|
|
|
|
|
|
|
|
|
|
|
|
|
|
|
|
|
|
|
|
|
|
|
|
|
|
|
|
|
|
|
|
|
|
|
|
|
|
|
|
|
|
|
|
|
|
|
|
|
|
|
|
|
|
|
|
|
|
|
|
|
|
|
|
|
|
|
|
|
|
|
|
|
|
|
|
|
|
|
|
|
|
|
|
|
|
|
|
|
|
|
|
|
|
|
|
|
|
|
|
|
|
|
|
|
|
|
|
|
|
|
Tabletop |
|
|
|
Wall-mount |
||||||||||
|
|
|
|
|
|
|
|
|
|
|
|
|
|
|
|
|
|
|
|
|
|
|
|
|
position |
|
|
|
|
position |
||||||||
Getting started
Installation options
3.Plug one end of the telephone line cord into the TEL LINE jack on the back of the telephone base. Route the telephone line cord through the slot. Bundle the telephone line cord and secure it with a twist tie. Place the bundled telephone line cord inside the hole in the center of the telephone bottom.
4.Plug the other end of the telephone line cord into a telephone wall jack.
DSL filter (not included) is required if you have DSL  high-speed Internet service.
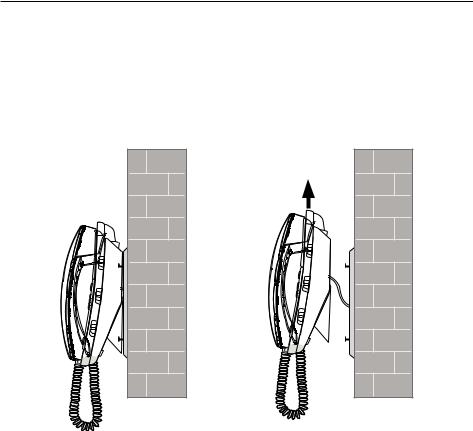
5.Place the telephone just above the telephone outlet mounting studs. Slide the telephone down until the telephone is held securely on the telephone outlet mounting studs. Place the handset in the telephone base.
10
Getting started
Installation options
6.Plug the small end of the power adapter into the POWER jack on the back of the telephone base. Plug the large end into an electrical outlet not controlled by a wall switch.
7.Rotate the top of the display up or down to adjust the angle of the screen for maximum visibility.
Wall-mount to tabletop installation
To change the telephone base from the wall-mount position to tabletop position, follow the steps below.
1.Unplug the large end of the power adapter from the electrical outlet. Unplug the small end of the power adapter from the POWER jack on the back of the telephone base.
2.Slide the telephone base upwards, then pull the telephone base away from the wall and remove from the studs.
3.Unplug the telephone line cord from the telephone base and telephone wall jack. Untie the bundled telephone line cord. Remove the telephone line cord from the slot on the bottom of the telephone base.
11

Getting started
Installation options
4.Lift the handset and place it aside. Hold down the switch hook on the telephone base, then slide the handset tab upwards to remove it from the slot. Rotate the handset tab 180 degrees. Push the handset tab down into the grooves so it settles into position.
Switch hook
Handset tab
5. Lift and rotate the bracket and lock it into tabletop position as indicated below.
|
|
|
|
|
|
|
|
|
|
|
|
|
|
|
|
|
|
|
|
|
|
|
|
|
|
|
|
|
|
|
|
|
|
|
|
|
|
|
|
|
|
|
|
|
|
|
|
|
|
|
|
|
|
|
|
|
|
|
|
|
|
|
|
|
|
|
|
|
|
|
|
|
|
|
|
|
|
|
|
|
|
|
|
|
|
|
|
|
|
|
|
|
|
|
|
|
|
|
|
|
|
|
|
|
|
|
|
|
|
|
|
|
|
|
|
|
|
|
|
|
|
|
|
|
|
|
|
|
|
|
|
|
|
|
|
|
|
|
|
|
|
|
|
|
|
|
|
|
|
|
|
|
|
|
|
|
|
|
|
|
|
|
|
|
|
|
|
|
|
|
|
|
|
|
|
|
|
|
|
|
|
|
|
|
|
|
|
|
|
|
|
|
|
|
|
|
|
|
|
|
|
|
|
|
|
|
|
|
|
|
|
|
|
|
|
|
|
|
|
|
|
|
|
|
|
|
|
|
|
|
|
|
|
|
|
|
|
|
|
|
|
|
|
|
|
|
|
|
|
|
|
|
|
|
|
|
|
|
|
|
|
|
|
|
|
|
|
|
|
|
|
|
|
|
|
|
|
|
|
|
|
|
|
|
|
|
|
|
|
|
|
|
|
|
|
|
|
|
|
|
|
|
|
|
|
|
|
|
|
|
|
|
|
|
|
|
|
|
|
|
|
|
|
|
|
|
|
|
|
|
|
|
|
|
|
|
|
|
|
|
|
|
|
|
|
|
|
|
|
|
|
|
|
|
|
|
|
|
|
|
|
|
|
|
|
|
|
|
|
|
|
|
|
|
|
|
|
|
|
|
|
|
|
|
|
|
|
|
|
|
|
|
|
|
|
|
|
|
|
|
|
|
|
|
|
|
|
|
|
|
|
|
|
|
|
|
|
|
|
|
|
|
|
|
|
|
|
|
|
|
|
|
|
|
|
|
|
|
|
|
|
|
|
|
|
|
|
Wall-mount |
|
|
|
|
|
|
Tabletop position |
||||||||||||||||||||
|
|
position |
|
|
|
|
|
|
|
|
|
|
|
|
|
|
|
|
|||||||||
6.Plug one end of the telephone line cord into the TEL LINE jack on the back of the telephone base. Plug the other end of the telephone line cord into a telephone wall jack. Place the handset in the telephone base.
12
Getting started
Installation options
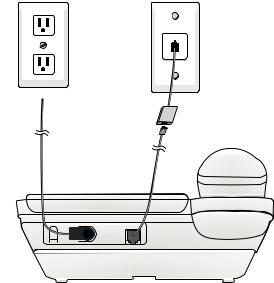
7.Plug the small end of the power adapter into the POWER jack on the back of the telephone base. Plug the large end into an electrical outlet not controlled by a wall switch.
Electrical outlet |
Telephone wall jack |
not controlled by |
|
a wall switch |
|
Telephone line cord
DSL filter (not included) is required if you have DSL high-speed Internet service.
8.Rotate the top of the display up or down to adjust the angle of the screen for maximum visibility.
13
Telephone settings
Volume control
Ringer volume
Use the RINGER VOL switch on the right side of the telephone base to set the ringer volume or turn the ringer off.
Adjust the RINGER VOL switch to set the ringer volume to off, low, middle or high. When set to off, the screen shows  .
.
 NOTE: The volume of the priority call tone cannot be adjusted. Refer to Priority call on page 49 for details.
Handset volume
Use the  VOL switch on the right side of the telephone base to adjust the listening volume from the handset.
Speakerphone volume
Use the  VOL switch on the right side of the telephone base to adjust the listening volume from the speakerphone.
14
Telephone settings
Menu setup
Menu operation
The screen display prompts help you set up the telephone when you press MENU.
 NOTE: You can exit feature setup at any time by pressing FLASH or by lifting the handset when there is no incoming call. For complete feature setup options, see Feature summary on this page.
Set features
You can customize how the features of this product work.
1.Press MENU repeatedly until the screen shows the desired feature.
2.Press DIR/ or CID/
 until the screen displays your selected setting. Refer to Feature summary on this page for a full description of the features and your choices.
3.Press SELECT or MENU to save your selection and automatically move to the next option. When you finish setting features, the telephone automatically returns to standby after 30 seconds, or you can press FLASH to exit programming immediately.
Feature summary
Default settings are indicated by * in the following list.
Feature/options
SET TIME/DATE
--:-- -----
Function
Set the date and time. Use the dial pad keys to change the digits.
Refer to Set date and time on page 18 for details.
SET CONTRAST |
Adjust screen brightness to a comfortable |
1, 2*, 3, 4 |
level, from 1 (light) to 4 (dark). |
|
|
CALL LOG |
Choose whether incoming calls are stored. |
ALL CALLS* |
The telephone stores all calls received. |
NO CALLS |
The telephone does not store call history. |
|
|
15

Telephone settings
Menu setup
Feature/options |
Function |
REPEATED CALLS |
Choose how new calls from the same |
|
number are displayed. |
COMBINED |
The screen shows only the most recent |
|
call from this number. REP displays to |
|
indicate multiple calls from this number. |
|
Each call from this number is listed |
SEPARATE* |
separately. |
|
|
CALL LIST ORDER |
Choose in what order received calls are |
|
displayed. |
BY TIME* |
Most recently received calls are |
|
displayed first. |
NEW CALLS FIRST |
Unreviewed calls are displayed first, |
|
then calls as they were received (most |
|
recent first). |
LANGUAGE |
Choose whether the display text |
ENGLISH* |
appears in English, Spanish or French. |
|
|
ESPANOL |
|
FRANCAIS |
|
HOME AREA CODE
HAC- _ _ _
Set the telephone to recognize calls from your area code.
Refer to Set home area code on page 19 for details.
LOCAL AREA |
Program up to four local area codes |
CODE |
that do not require dialing a 1 before |
LAC 1- _ _ _ |
them. |
|
|
LAC 2- _ _ _ |
Refer to Set local area code on page |
LAC 3- _ _ _ |
19 for details. |
LAC 4- _ _ _ |
|
DIAL TYPE
TONE*
PULSE
Set tone (touch-tone) or pulse (dialpulse) dialing.
 NOTE: If you have dial-pulse dialing service only, you can temporarily switch from dial-pulse to touch-tone dialing during a call (see Temporary tone dialing on page 25).
16

Telephone settings
Menu setup
Feature/options |
Function |
|
# OF RINGS |
Set how many times the telephone |
|
|
rings before the answering system picks |
|
2, 3, 4*, 5, 6, 7, |
up the call. |
|
|
||
tS 2-4, tS 4-6 |
If you choose tS 2-4 (or tS 4-6), the |
|
|
answering system answers after two |
|
|
(four, if you select tS 4-6) rings if there |
|
|
are new messages. When there are no |
|
|
new messages, the answering system |
|
|
answers after four (six, if you select tS |
|
|
4-6) rings. When retrieving messages |
|
|
from a long distance call, disconnect |
|
|
your call after three (five, if you select |
|
|
tS 4-6) rings to avoid long distance |
|
|
charges (also known as toll saver). |
|
|
|
|
MESSAGE ALERT |
Turn the audible message alert on or off. |
|
ON |
The telephone beeps every 15 seconds |
|
|
when there are new messages. |
|
OFF* |
No audible message alert. |
|
|
|
|
REMOTE CODE |
Select a three-digit number to allow |
|
500* |
remote access from another telephone |
|
(away from your home or office). |
||
|
||
|
Refer to Remote access on page 50 for |
|
|
details. |
|
|
NOTE: If the remote code you |
|
|
entered is the same as the priority code, |
|
|
the telephone plays an error tone when |
|
|
you save it. |
|
PRIORITY CODE |
Select a three-digit number as your |
|
999* |
priority code for the answering system. |
|
|
||
|
Refer to Priority call on page 49 for |
|
|
details. |
|
|
|
|
CALL SCREENING |
Choose whether incoming messages are |
|
|
played through the speaker while they |
|
|
are being recorded. |
|
ON* |
The incoming messages are played |
|
|
through the speaker while they are |
|
|
being recorded. |
|
OFF |
The speaker does not play incoming |
|
|
messages while they are being |
|
|
recorded. |
|
|
Refer to Call screening on page 49 for |
|
|
details. |
|
|
|
17
 Loading...