

Page 1
Atrust t60 / t62 Thin Clients
User’s Manual
Version 1.06
Copyright © 2012-14 Atrust Computer Corp.
Page 2

UM-t60.t62-EN-14071611
Page 3

Copyright and Trademark Statements
Copyright © 2012-14 Atrust Computer Corp. All rights reserved.
This document contains proprietary information that is protected by copyright. No part of this document may be
photocopied, reproduced, or translated to another language without the prior written consent of Atrust Computer
Corp.
Disclaimer
Atrust Computer Corp. (“Atrust”) makes no representations or warranties with respect to the contents or use of
this document, and specically disclaims any express or implied warranties of merchantability or tness for any
particular purpose. Atrust is not liable for technical or editorial errors or omissions contained herein. The information
in this document is subject to change without notice.
Trademark Statements
Atrust is a trademark of Atrust Computer Corp.
Microsoft, Windows, Windows Server, RemoteFX, and MultiPoint are trademarks or registered trademarks of the
Microsoft group of companies.
i
Citrix, ICA, XenApp, XenDesktop, and VDI-in-a-Box are trademarks of Citrix Systems, Inc. and/or one or more of its
subsidiaries, and may be registered in the United States Patent and Trademark Oce and in other countries.
VMware, VMware View, and VMware Horizon View are trademarks or registered trademarks of the VMware, Inc.
PCoIP is a registered trademark of Teradici Corporation in the United States and/or other countries.
Other product names mentioned herein are used for identication purposes only and may be trademarks and/or
registered trademarks of their respective companies.
Page 4
ii
About This User’s Manual
This manual provides detailed instructions on how to set up, use, manage, and maintain Atrust t60/t62 thin clients.
Manual Structure and Subjects
Chapter Subject
1 Provides an overview of Atrust t60/t62 thin clients.
2 Provides detailed instructions on how to set up Atrust t60/t62 thin clients.
3 Provides the basics of how to use Atrust t60/t62 thin clients.
4
Appendices
Specications Provides detailed information on key components of Atrust t60/t62 thin clients.
Provides instructions on how to congure client settings and customize Atrust t60/t62
thin clients with the Atrust Client Setup console.
Provides supplementary instructions on the maintenance and upgrade of
Atrust t60/t62 thin clients.
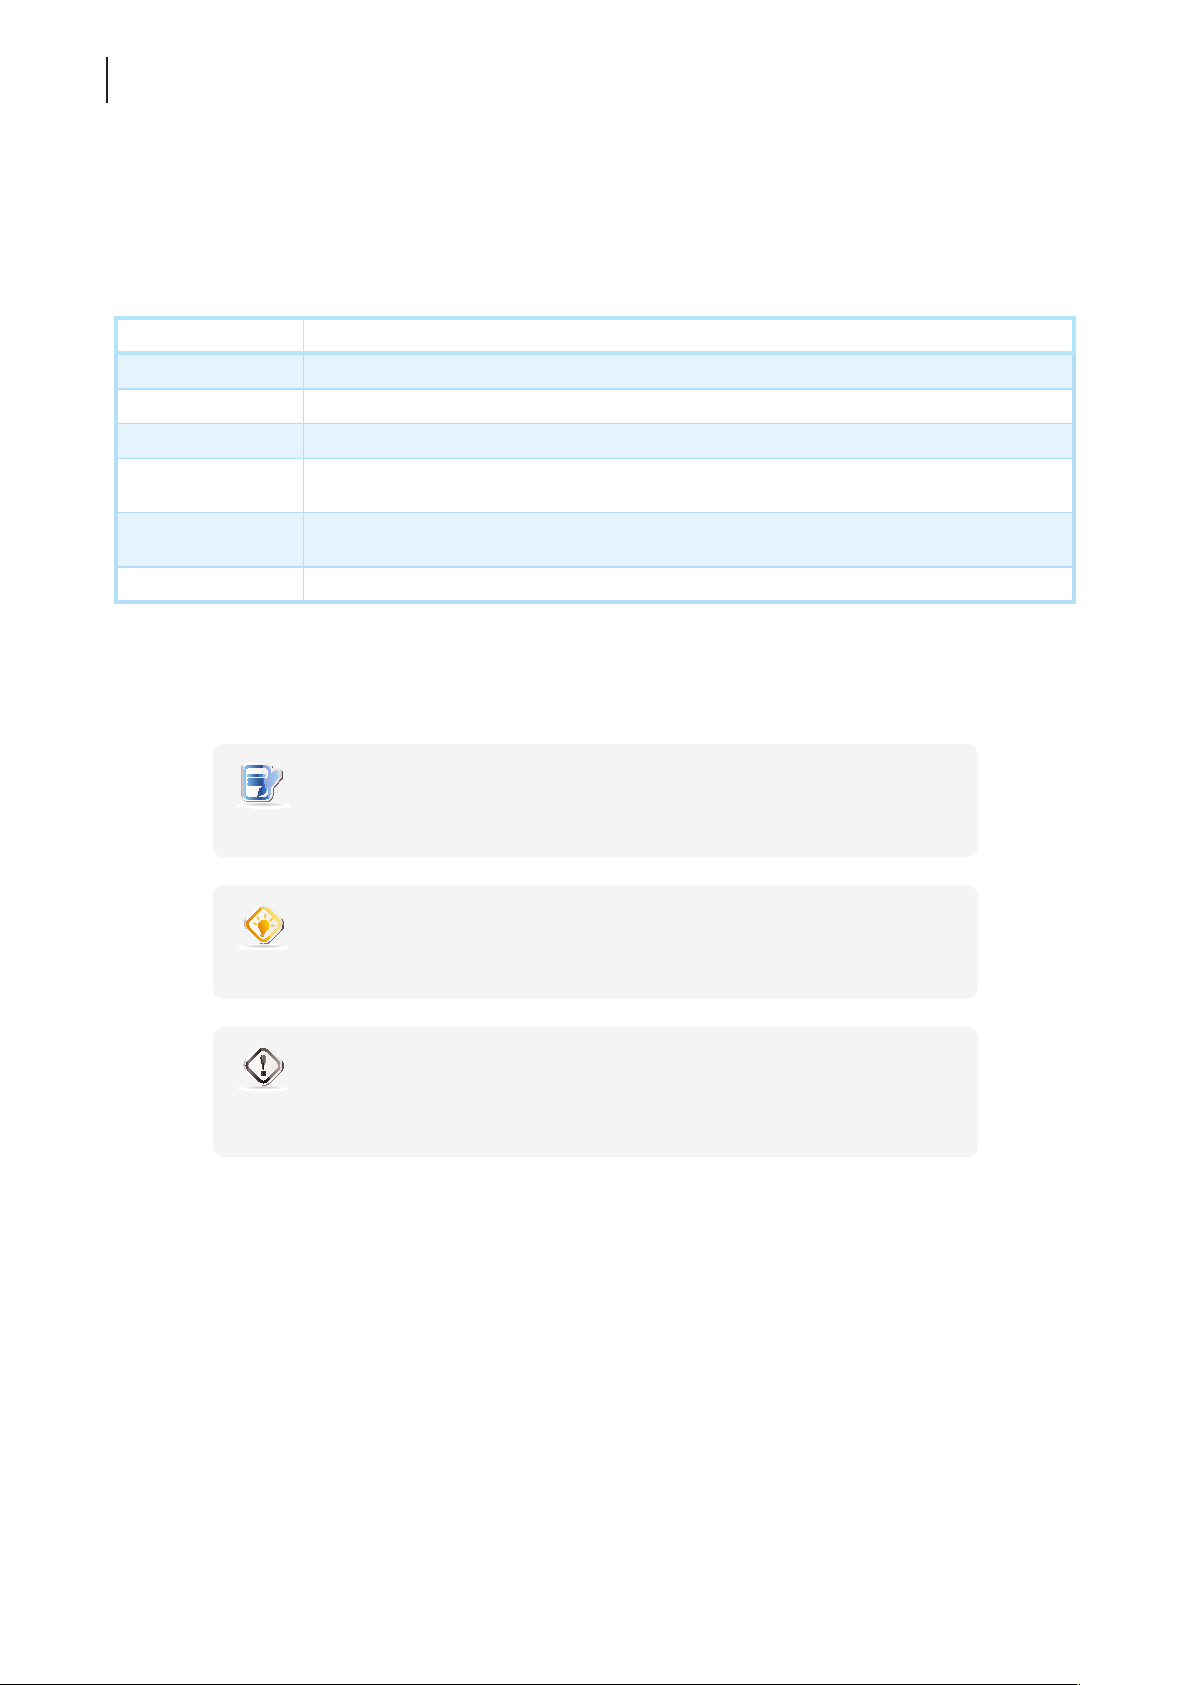
Notes, Tips, and Warnings
Throughout this manual, the notes, tips, and warnings in the following formats are used to provide important
information, useful advice, and prevent injuries to you, damage to your devices, or loss of data on your system.
NOTE
• A note provides important information for a specic situation.
TIP
• A tip gives a piece of useful advice to perform a task more eciently.
WARNING
• A warning provides crucial information that must be followed to prevent injuries to
you, damage to your devices, or loss of data on your system.
Page 5

Style Conventions
The following styles are used throughout this manual while referring to operational items on input devices,
hardware panels, or application interfaces.
Item Style Example
keys on the keyboard bold Ctrl + F2, Alt + F9, Alt + Tab
iii
application windows or
entry lists
buttons or tabs on a
window, toolbars, taskbar,
or menu
options on a window,
screen, list, or menu
selecting a series of options bold
rst letter
capitalized
bold OK, Next, Save, Applications tab
bold Add, Domain, Connection Type, High Quality
Conrm Dialog window, RDP Connection list, ICA Connection list,
View Connection list
Applications > Citrix ICA, Applications > Remote Desktop,
Applications > VMware View, Network > Wireless,
Devices > Printer, System > Time Zone
Page 6

iv
Safety and Regulatory Information
Regulatory Statement
Federal Communications Commission Interference Statement
This equipment has been tested and found to comply with the limits for a Class B digital device, pursuant to Part
15 of the FCC Rules. These limits are designed to provide reasonable protection against harmful interference in a
residential installation. This equipment generates, uses and can radiate radio frequency energy and, if not installed
and used in accordance with the instructions, may cause harmful interference to radio communications. However,
there is no guarantee that interference will not occur in a particular installation. If this equipment does cause
harmful interference to radio or television reception, which can be determined by turning the equipment o and
on, the user is encouraged to try to correct the interference by one of the following measures:
• Reorient or relocate the receiving antenna.
• Increase the separation between the equipment and receiver.
• Connect the equipment into an outlet on a circuit dierent from that to which the receiver is connected.
• Consult the dealer or an experienced radio/TV technician for help.
FCC Caution: Any changes or modications not expressly approved by the party responsible for compliance could
void the user’s authority to operate this equipment. This device complies with Part 15 of the FCC Rules. Operation is
subject to the following two conditions: (1) This device may not cause harmful interference, and (2) this device must
accept any interference received, including interference that may cause undesired operation.
IMPORTANT NOTE:
FCC Radiation Exposure Statement
This equipment complies with FCC radiation exposure limits set forth for an uncontrolled environment. This
equipment should be installed and operated with minimum distance 20 cm between the radiator & your body.
This transmitter must not be co-located or operating in conjunction with any other antenna or transmitter.
Page 7

Regulatory Information
WEEE (Waste Electrical and Electronic Equipment) Directive
In the European Union, this symbol indicates that this product should not be disposed of with
household waste. It should be deposited at an appropriate facility to enable recovery and recycling. For
Safety Information
proper disposal, please contact your local recycling or hazardous waste center.
WARNING
• Use only power supplies listed in the user instructions.
WARNING
• Don’t use a keyboard and mouse that in total require more than 200 mA of rated
current during operation.
v
WARNING
• For safety, do not make mechanical or electrical modications to the equipment.
• Do not remove equipment covers and access any of the components inside the
equipment. Any access inside the equipment without an authorized or certied
technician may cause serious injuries and damage. For any problem, contact your
dealer for assistance.
• You should only make repairs as authorized by the product documentation.
Repairs, replacement, expansion, and upgrades not performed by a certied service
technician may cause injuries to you, damage your system, and void your warranty.
Page 8
vi
Certication Information
Atrust t60/t62 thin clients that earn the ENERGY STAR prevent
greenhouse gas emissions by meeting strict energy eciency
guidelines set by the U.S. Environmental Protection Agency and
the U.S. Department of Energy.
NOTE
• Display Sleep Mode. Within 10 minutes of user inactivity, the display will enter
the Display Sleep mode with a blank screen and reduced power consumption by
the factory default settings. The display returns to the Display Normal mode upon
sensing a request from a user such as moving the mouse or pressing a key.
• To adjust settings for the Display Sleep mode, please refer to section “4.3.7
Conguring Screensaver Settings” on page 73.
• System Sleep Mode. Atrust t60/t62 doesn’t support the System/Client Sleep mode.
NOTE
• The default power management settings have been selected for compliance with
ENERGY STAR that are recommended by the ENERGY STAR program for optimal
energy savings.
Page 9

Table of Contents
Copyright and Trademark Statements i
Disclaimer i
Trademark Statements i
About This User’s Manual ii
Manual Structure and Subjects ii
Notes, Tips, and Warnings ii
Style Conventions iii
Safety and Regulatory Information iv
Regulatory Statement iv
Regulatory Information v
Safety Information v
Certication Information vi
1 Overview 1
1.1 Introduction 3
vii
1.2 Features 3
1.3 Package Contents 3
1.4 Exterior Views 4
1.5 Panel Components 5
1.6 LED Indicators 9
2 Setting Up Your t60/t62 11
2.1 Positioning Your t60 13
2.2 Positioning Your t62 15
2.3 Assembling the AC Adapter 18
2.4 Getting Connected 19
3 Getting Started 21
3.1 Learning the Basics 23
4 Conguring Client Settings 37
4.1 Atrust Client Setup 39
4.1.1 Interface Overview 39
4.1.2 Client Settings at a Glance 40
4.2 Conguring System Settings 41
4.2.1 System Tab Overview 41
4.2.2 Available Settings at a Glance 42
4.2.3 Conguring Time Zone and Time Server 43
4.2.4 Conguring the Access Privileges and Passwords of Atrust Client Setup 44
4.2.5 Conguring Shadow Settings for Remote Assistance 46
4.2.6 Updating Firmware from the Management Computer 48
4.2.7 Enabling or Disabling the Appliance Mode 50
4.2.8 Enabling or Disabling the Quick Connection Mode 54
4.2.9 Enabling or Disabling the Command-line Functions 56
Page 10

viii
4.2.10 Collecting Event Logs and Capturing Related Screens 57
4.2.11 Importing Certicates for Remote Computers 59
4.3 Conguring User Interface Settings 63
4.3.1 User Interface Tab Overview 63
4.3.2 Available Settings at a Glance 64
4.3.3 Conguring Display Settings 64
4.3.4 Customizing Desktop and System Language Settings 68
4.3.5 Hiding or Showing Quick Access Shortcuts 70
4.3.6 Adjusting Keyboard Settings 71
4.3.7 Conguring Screensaver Settings 73
4.4 Conguring External Device Settings 74
4.4.1 Devices Tab Overview 74
4.4.2 Available Settings at a Glance 75
4.4.3 Conguring Settings for USB Storage Devices 75
4.4.4 Manually Mount and Unmount Attached USB Storage Devices 76
4.4.5 Disabling or Enabling Attached Audio Devices 77
4.4.6 Adding a Local Printer 78
4.4.7 Adding a Network Printer 81
4.5 Conguring Network Settings 82
4.5.1 Network Tab Overview 82
4.5.2 Available Settings at a Glance 83
4.5.3 Conguring Wired Network Settings 84
4.5.4 Establishing and Stopping a VPN connection 87
4.5.5 Conguring Virtual Private Network Settings 91
4.5.6 Creating the Mapping of IP Addresses to Names of Host Servers 92
4.5.7 Changing the Host Name of Your Thin Client 94
4.5.8 Establishing and Stopping a Wireless Connection 95
4.5.9 Conguring Wireless Network Settings 98
4.5.10 Conguring Proxy Settings for Web-based Access to Services 99
4.6 Conguring Service Access Settings 101
4.6.1 Applications Tab Overview 101
4.6.2 Available Settings at a Glance 102
4.6.3 Conguring Basic RDP Connection Settings 103
4.6.4 Accessing Remote Desktop Services 112
4.6.5 Conguring Advanced RDP Connection Settings 118
4.6.6 Conguring Basic ICA Connection Settings 132
4.6.7 Accessing Citrix Services 141
4.6.8 Conguring Advanced ICA Connection Settings 145
4.6.9 Conguring Basic VMware View Connection Settings 159
4.6.10 Accessing VMware View or Horizon View Services 161
4.6.11 Conguring Advanced View Connection Settings 163
4.6.12 Conguring SSH Connection Settings 166
4.6.13 Launching SSH and Telnet Sessions 168
Appendices 169
A.1 Resetting Your t60/t62 to the Factory Default 171
A.2 Updating Firmware for Your t60/t62 with a USB Flash Drive 172
Specications 175
Page 11

Overview
1
This chapter provides an overview of your t60/t62 thin clients.
1.1 Introduction
Desktop virtualization and simple endpoint devices 3
1.2 Features
Key features of Atrust t60/t62 3
1.3 Package Contents
Check your package contents 3
1.4 Exterior Views
Overview of thin client outside elements 4
1.5 Panel Components
Descriptions of front and rear panel components 5
1.6 LED Indicators
Descriptions of signals for LED indicators 9
Page 12

Page 13
Overview
Introduction
1.1 Introduction
Desktop virtualization provides a new perspective to reconsider the design and implementation of an IT
infrastructure. In a desktop virtualization infrastructure, a station is no longer a cumbersome desktop, but simply
an endpoint device for users to access delivery services from the server(s).
With the introduction of the desktop virtualization technologies, you can considerably benet from:
• On-demand applications/desktops
• Centralized management of work environments
• Drastically reduced endpoint software/hardware issues
• Simplied system maintenance and Improved system security
• More scalability with low-cost endpoint devices
1.2 Features
The key features of Atrust t60/t62 thin clients are:
3
• Support for a wide range of desktop virtualization solutions from industry-leading companies:
Microsoft® Remote Desktop
Citrix® XenApp™, XenDesktop®, and VDI-in-a-Box™
VMware® View™ and Horizon View™
• Support for high-denition technologies:
Microsoft® RemoteFX®
Citrix® HDX™
VMware® View™ PCoIP®
• Simple click-access to various applications/desktops
• Built-in Atrust Client Setup as the local client management console
1.3 Package Contents
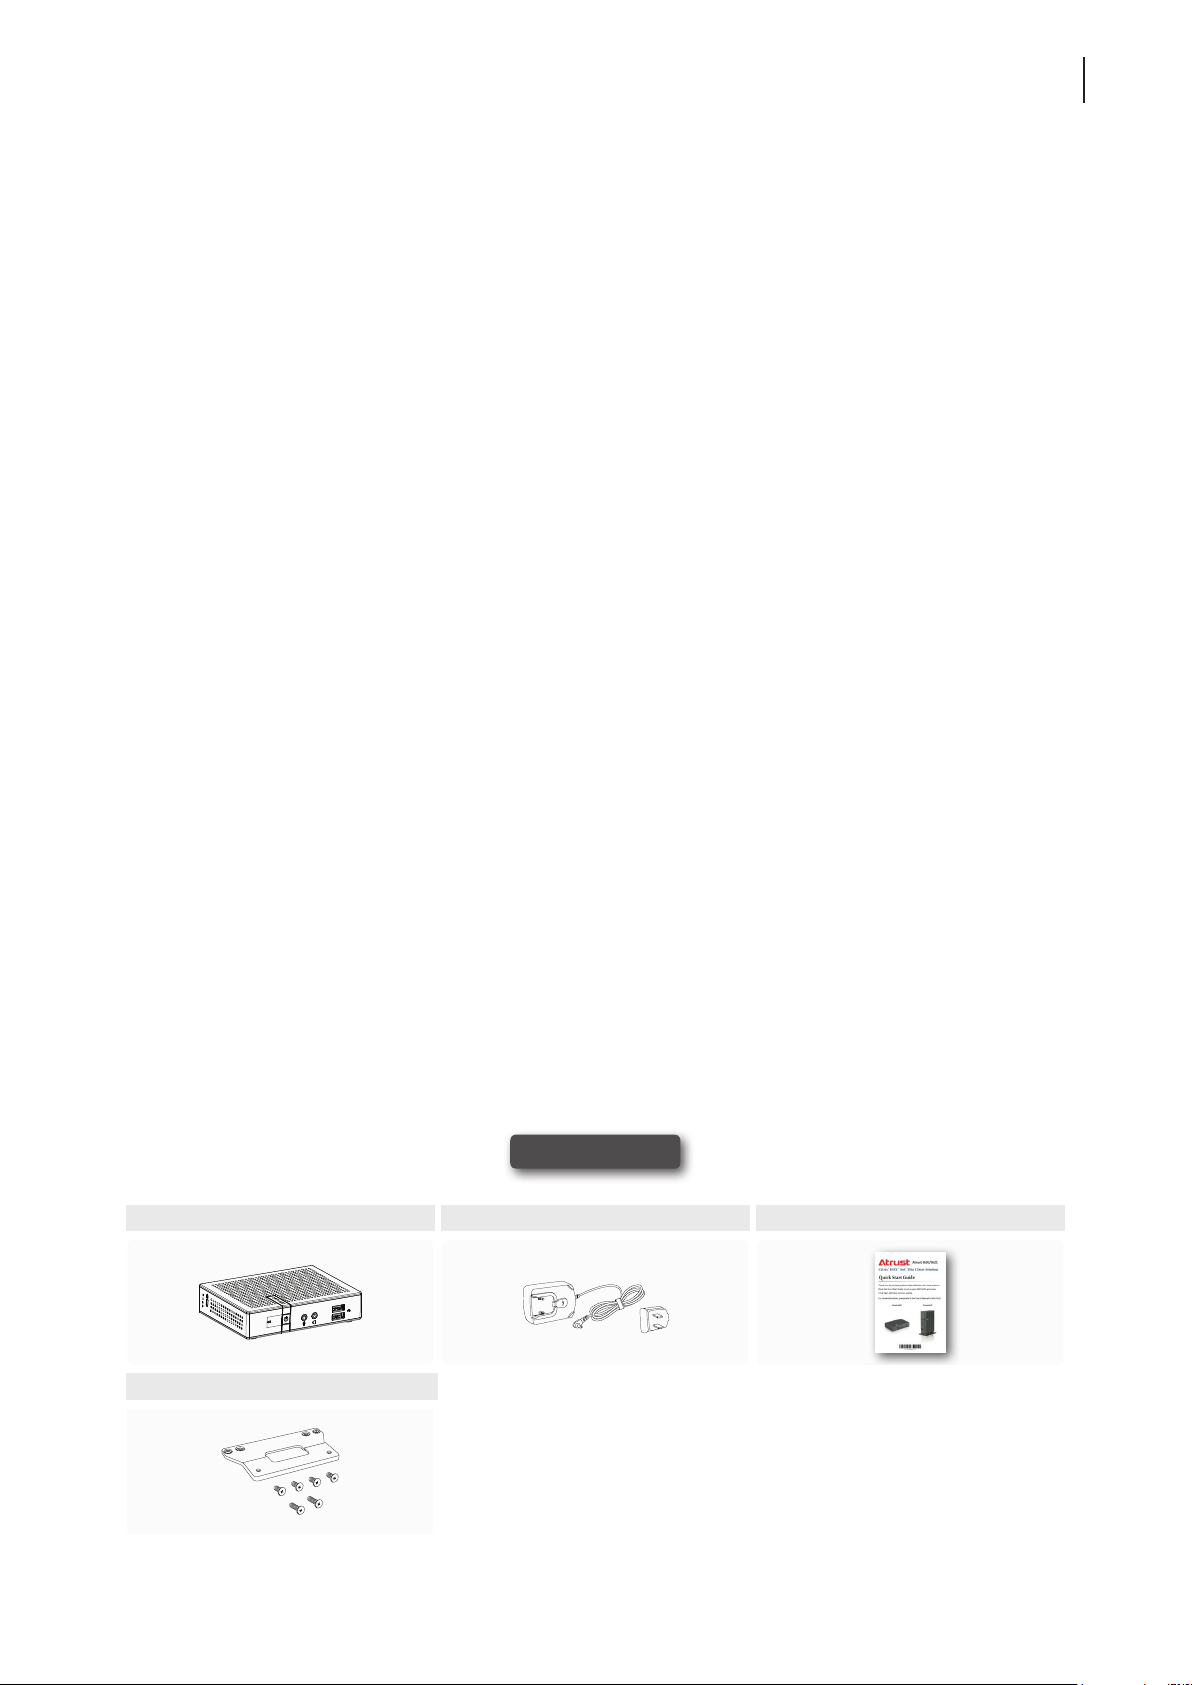
Please check your package contents. Ensure that all of the items are present in your package. If any items are
missing or damaged, please contact your dealer immediately.
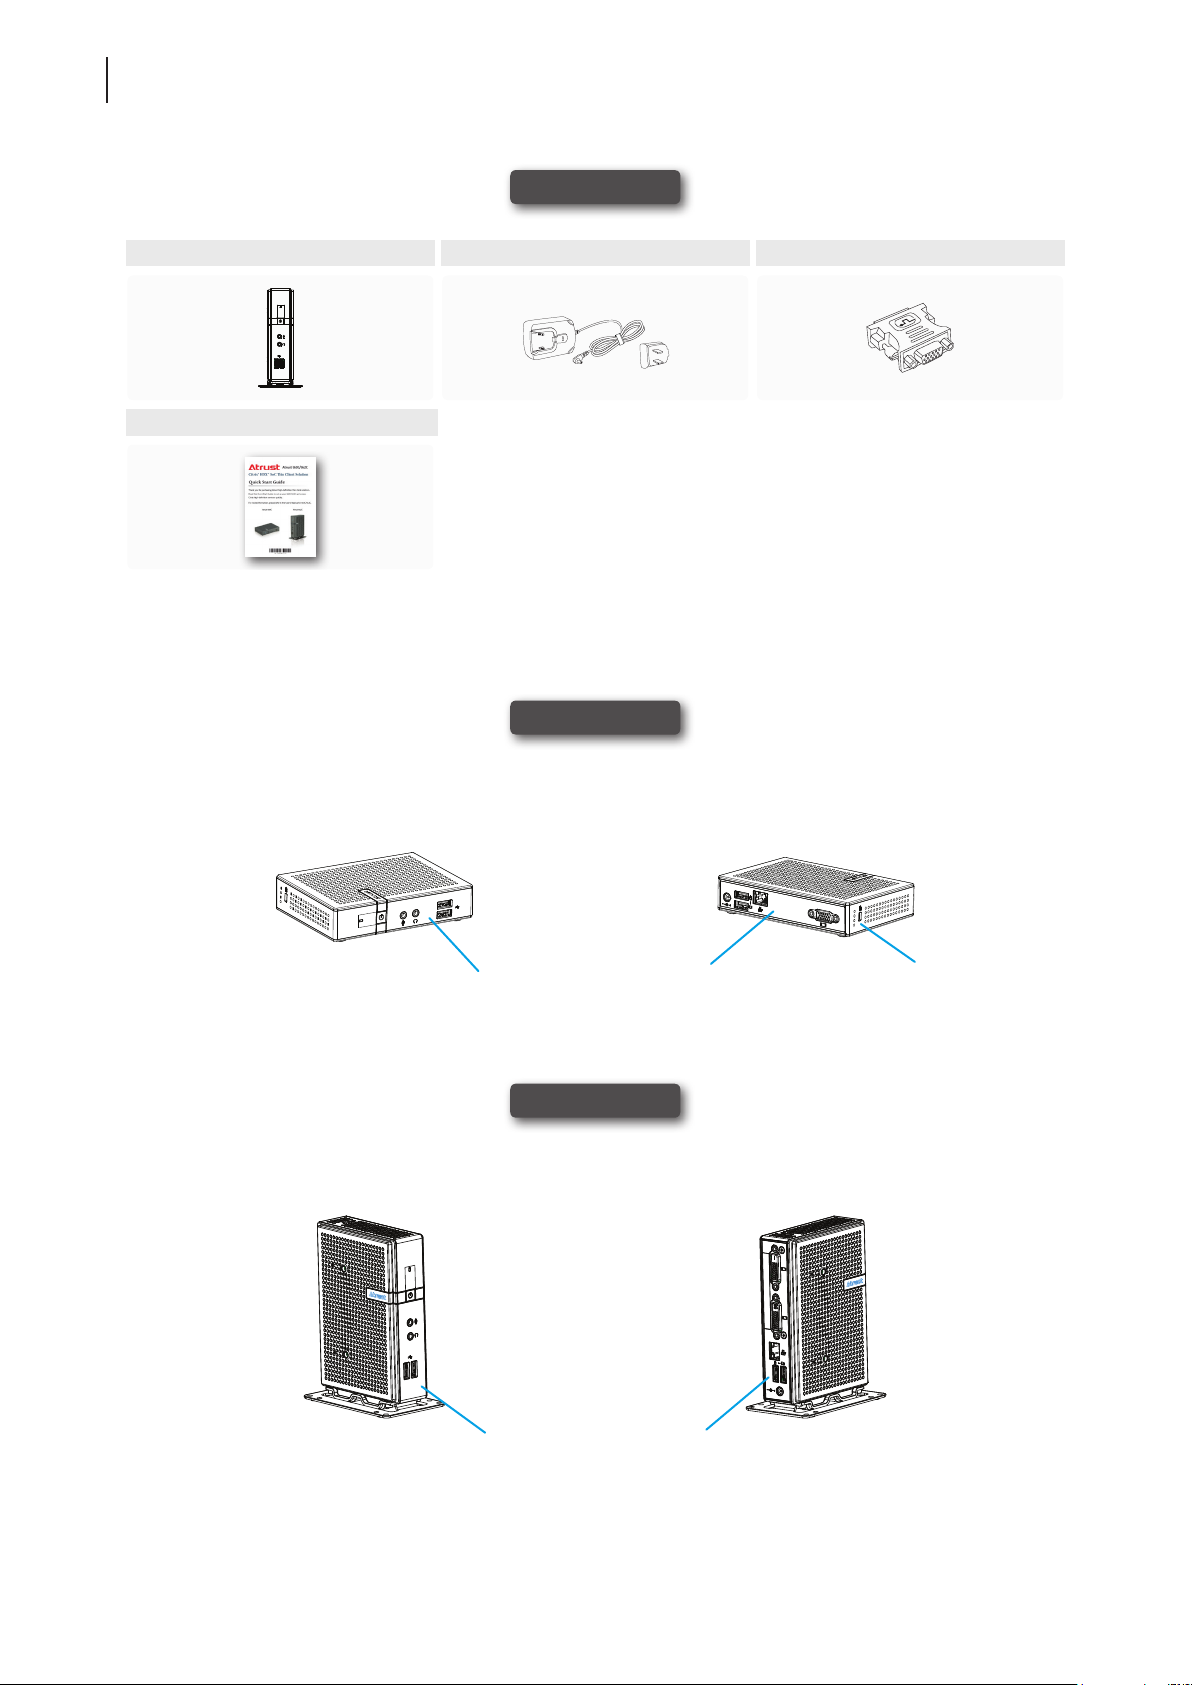
Atrust t60
Atrust t60 AC adapter Quick Start Guide
VESA mount kit (Optional)
NOTE: Your package may not contain a hard copy of the Quick Start
Guide. In this case, a soft copy in PDF format will be provided.
Page 14
Overview
4
Exterior Views
Atrust t62
Atrust t62 AC adapter DVI-I to VGA adapter
Quick Start Guide
1.4 Exterior Views
Left Front View Right Rear View
NOTE: Your package may not contain a hard copy of the Quick Start
Guide. In this case, a soft copy in PDF format will be provided.
Atrust t60
Front Panel
Rear Panel
Kensington
lock slot
Atrust t62
Left Front View Right Rear View
Rear PanelFront Panel
Page 15
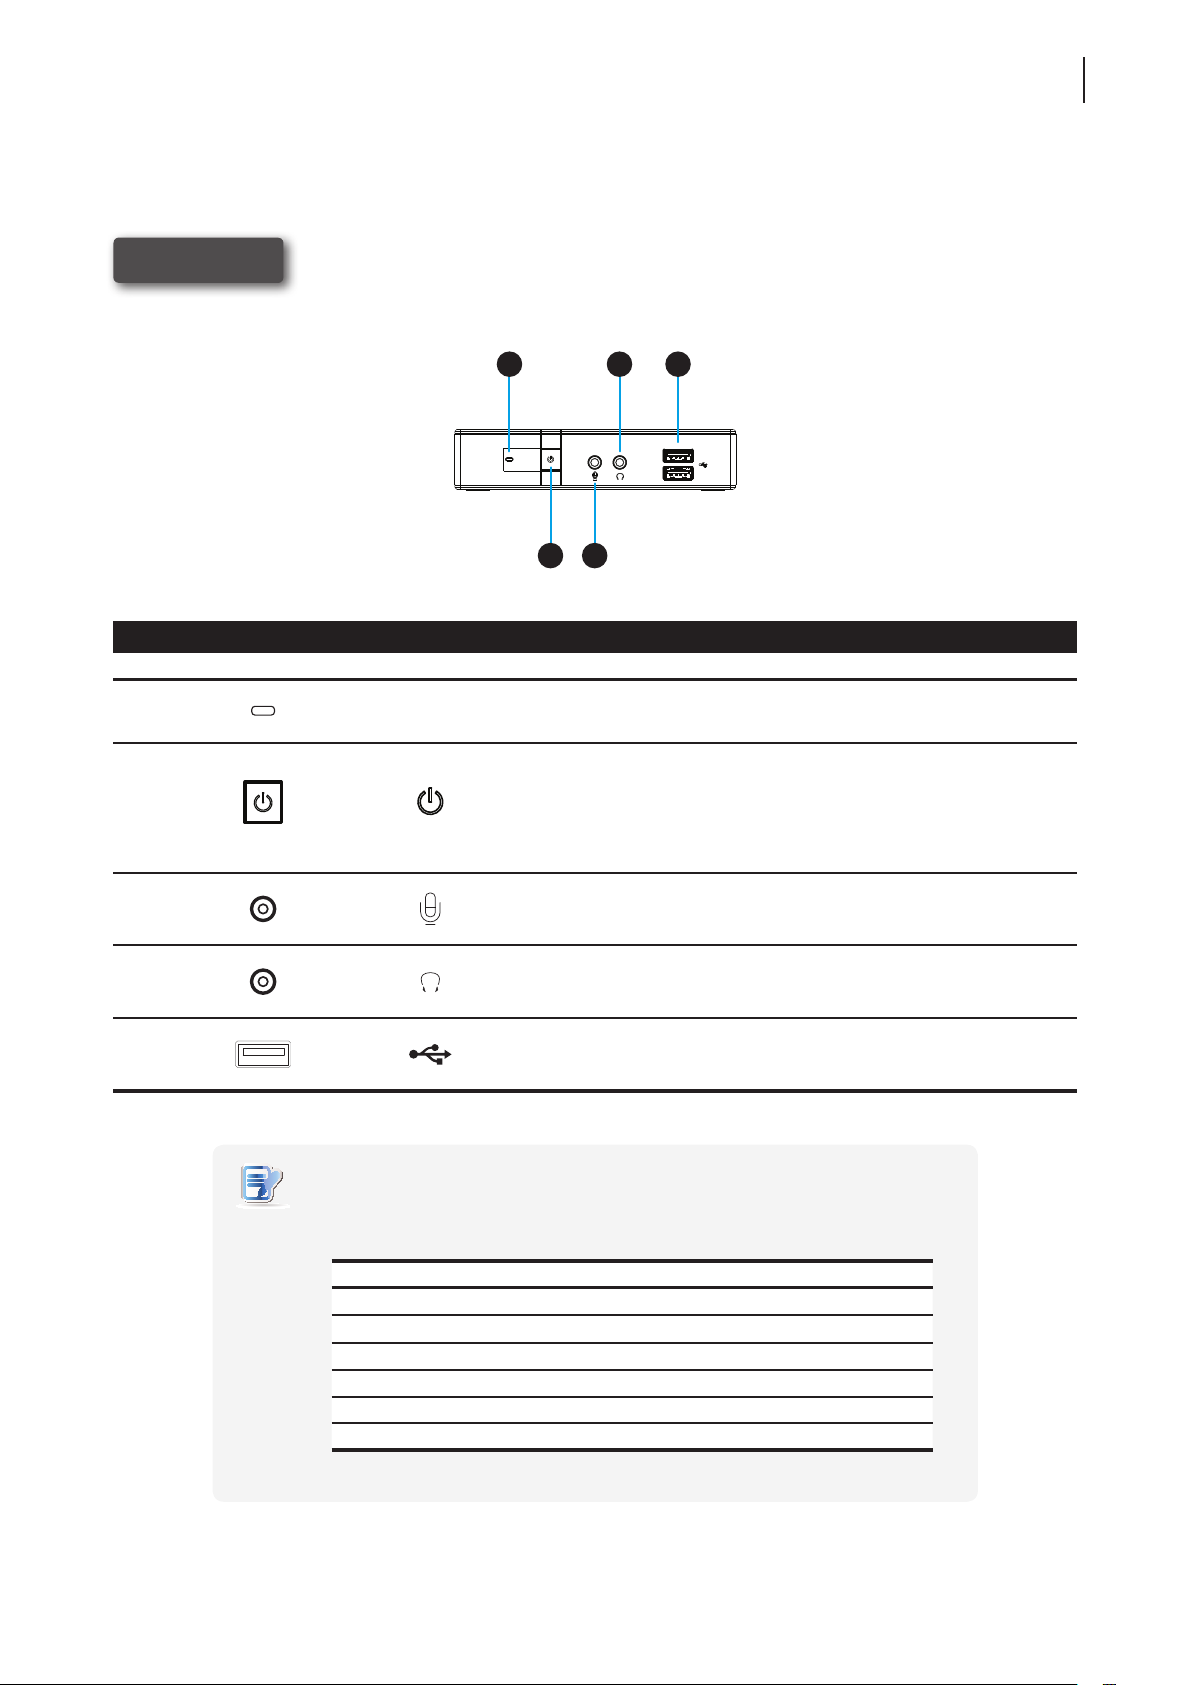
1.5 Panel Components
Atrust t60
Overview
Panel Components
5
1
2
3
Front Panel
No. Component Sign Name Description
1
2
3
Power LED Indicates the status of power.
Power button
Microphone port Connects to a microphone.
5
4
• Press to power on the thin client.
• Long press to force power off the thin client.
• In Power-off state, connect a monitor to the
client, and then long press 6 to 8 seconds to
enter Atrust Thin Client Menu.
4
5
Headphone port
USB port Connects to a USB device.
Connects to a set of headphones or
a speaker system.
NOTE
• Six options are available on Atrust Thin Client Menu (see the table below).
For more information, please refer to “Appendices” on page 169.
Menu Option Description
Normal Mode Boots up your t60/t62 as the normal startup procedure.
Safe Mode Clears and resets the current screen resolution setting.
Reset Mode Resets your t60/t62 to the factory default.
Firmware update Updates rmware for your t60/t62.
Reboot Reboots your t60/t62.
Shutdown Shuts down your t60/t62.
Page 16
Overview
6
Panel Components
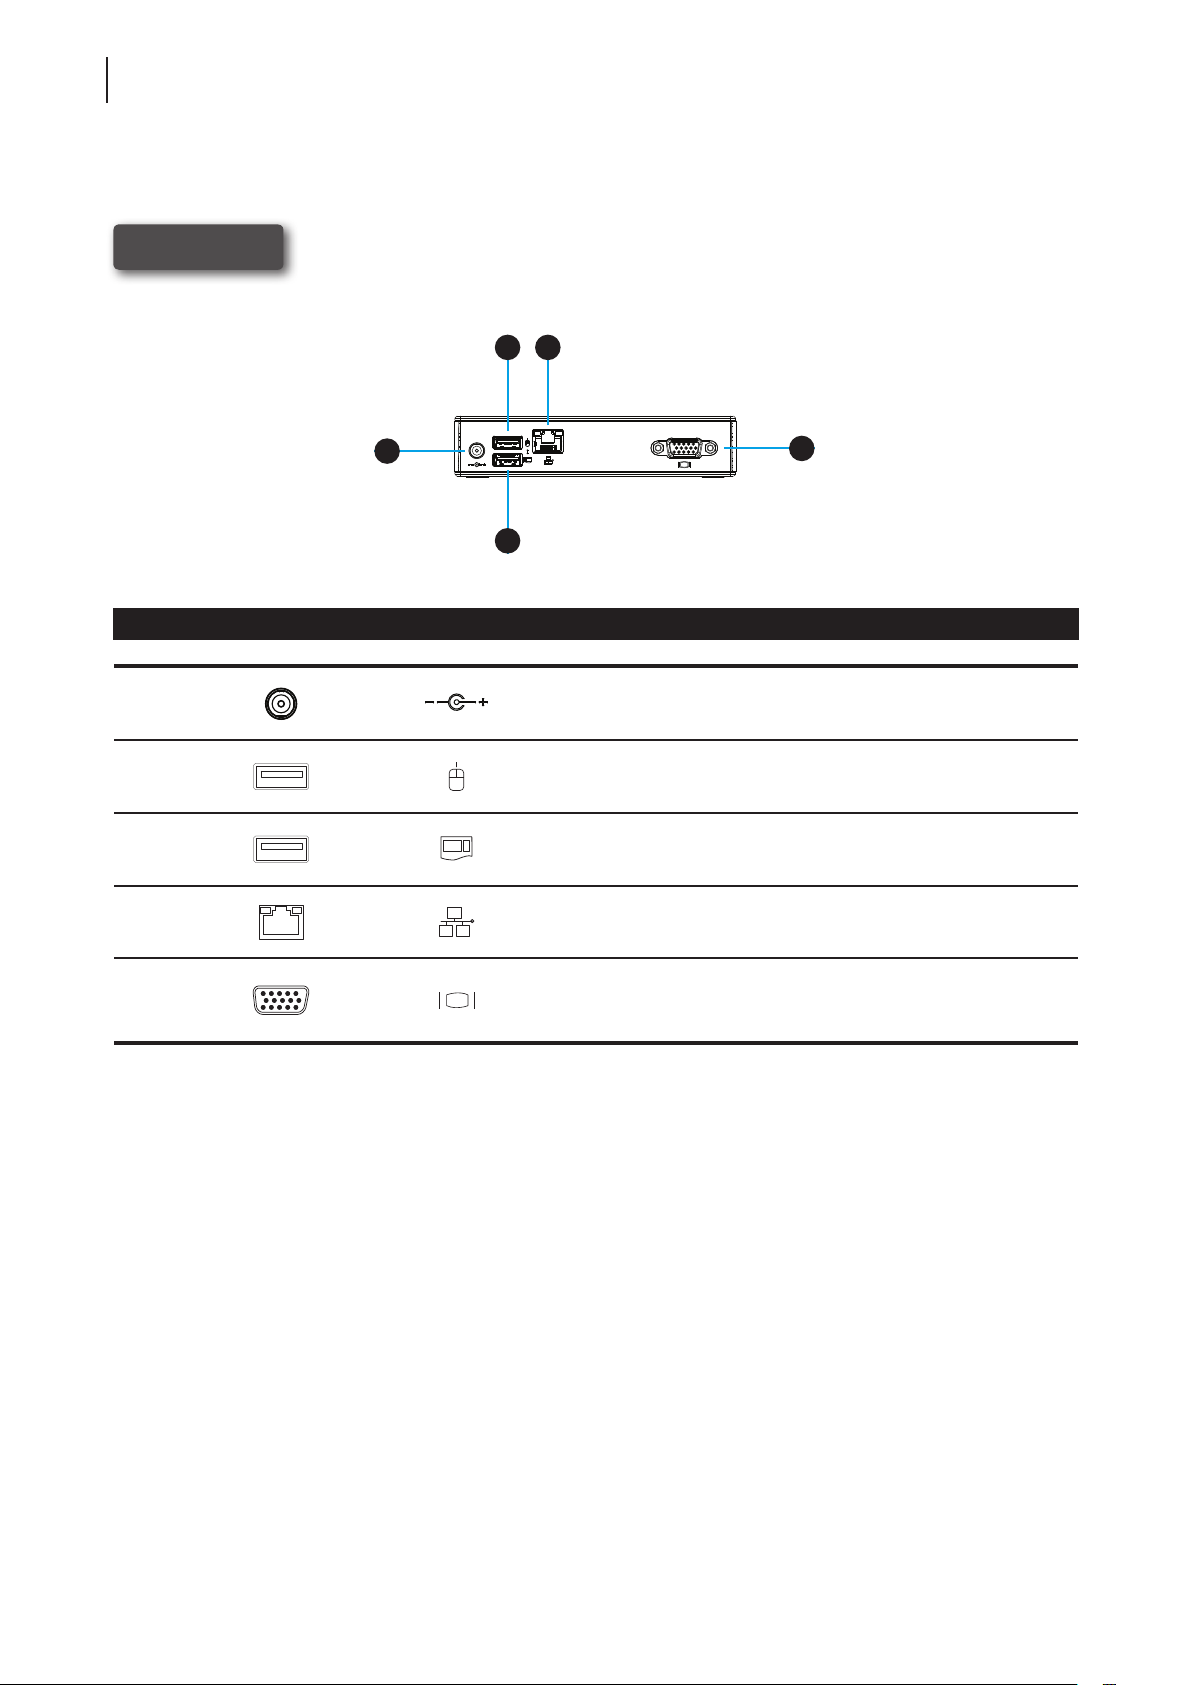
Atrust t60
7
9
6
10
8
Rear Panel
No. Panel Component Sign Component Name Description
6
7
8
9
10
DC IN Connects to an AC adapter.
USB port Connects to a mouse.
USB port Connects to a keyboard.
LAN port Connects to a network.
VGA port Connects to a monitor.
Page 17
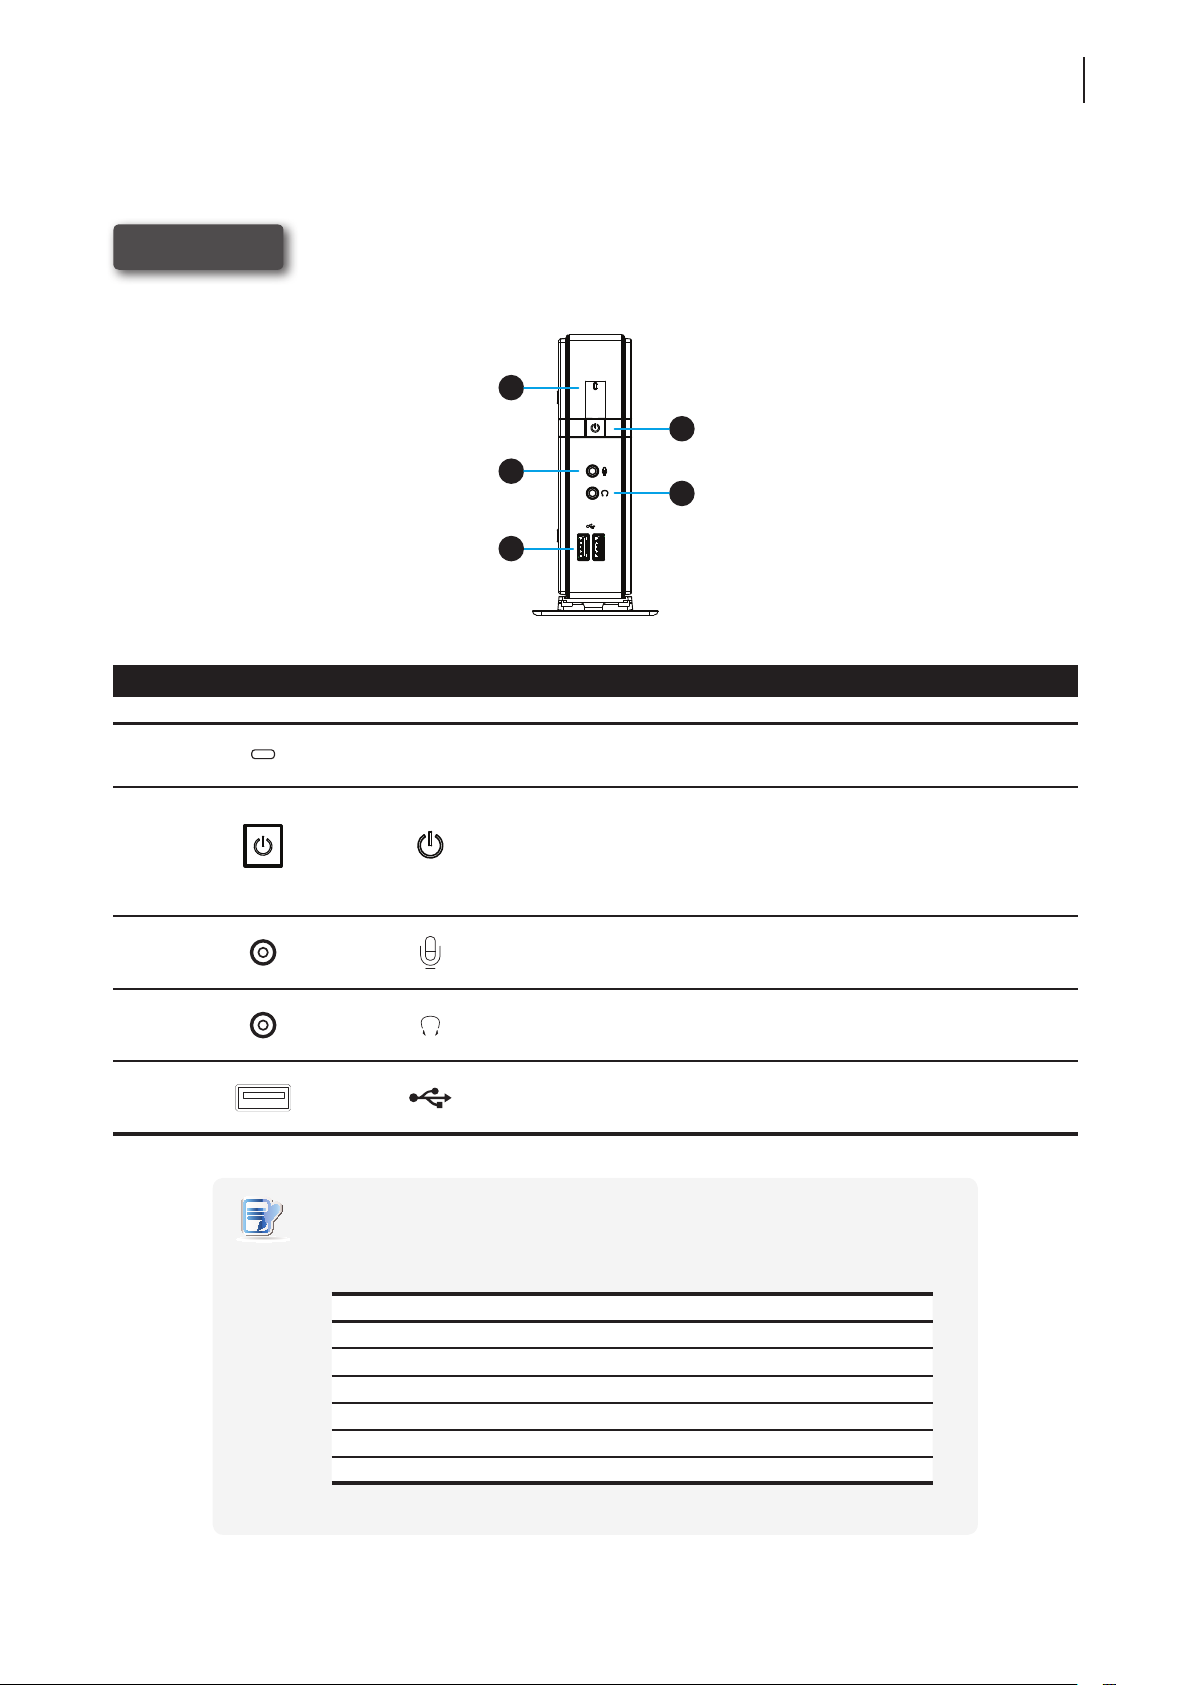
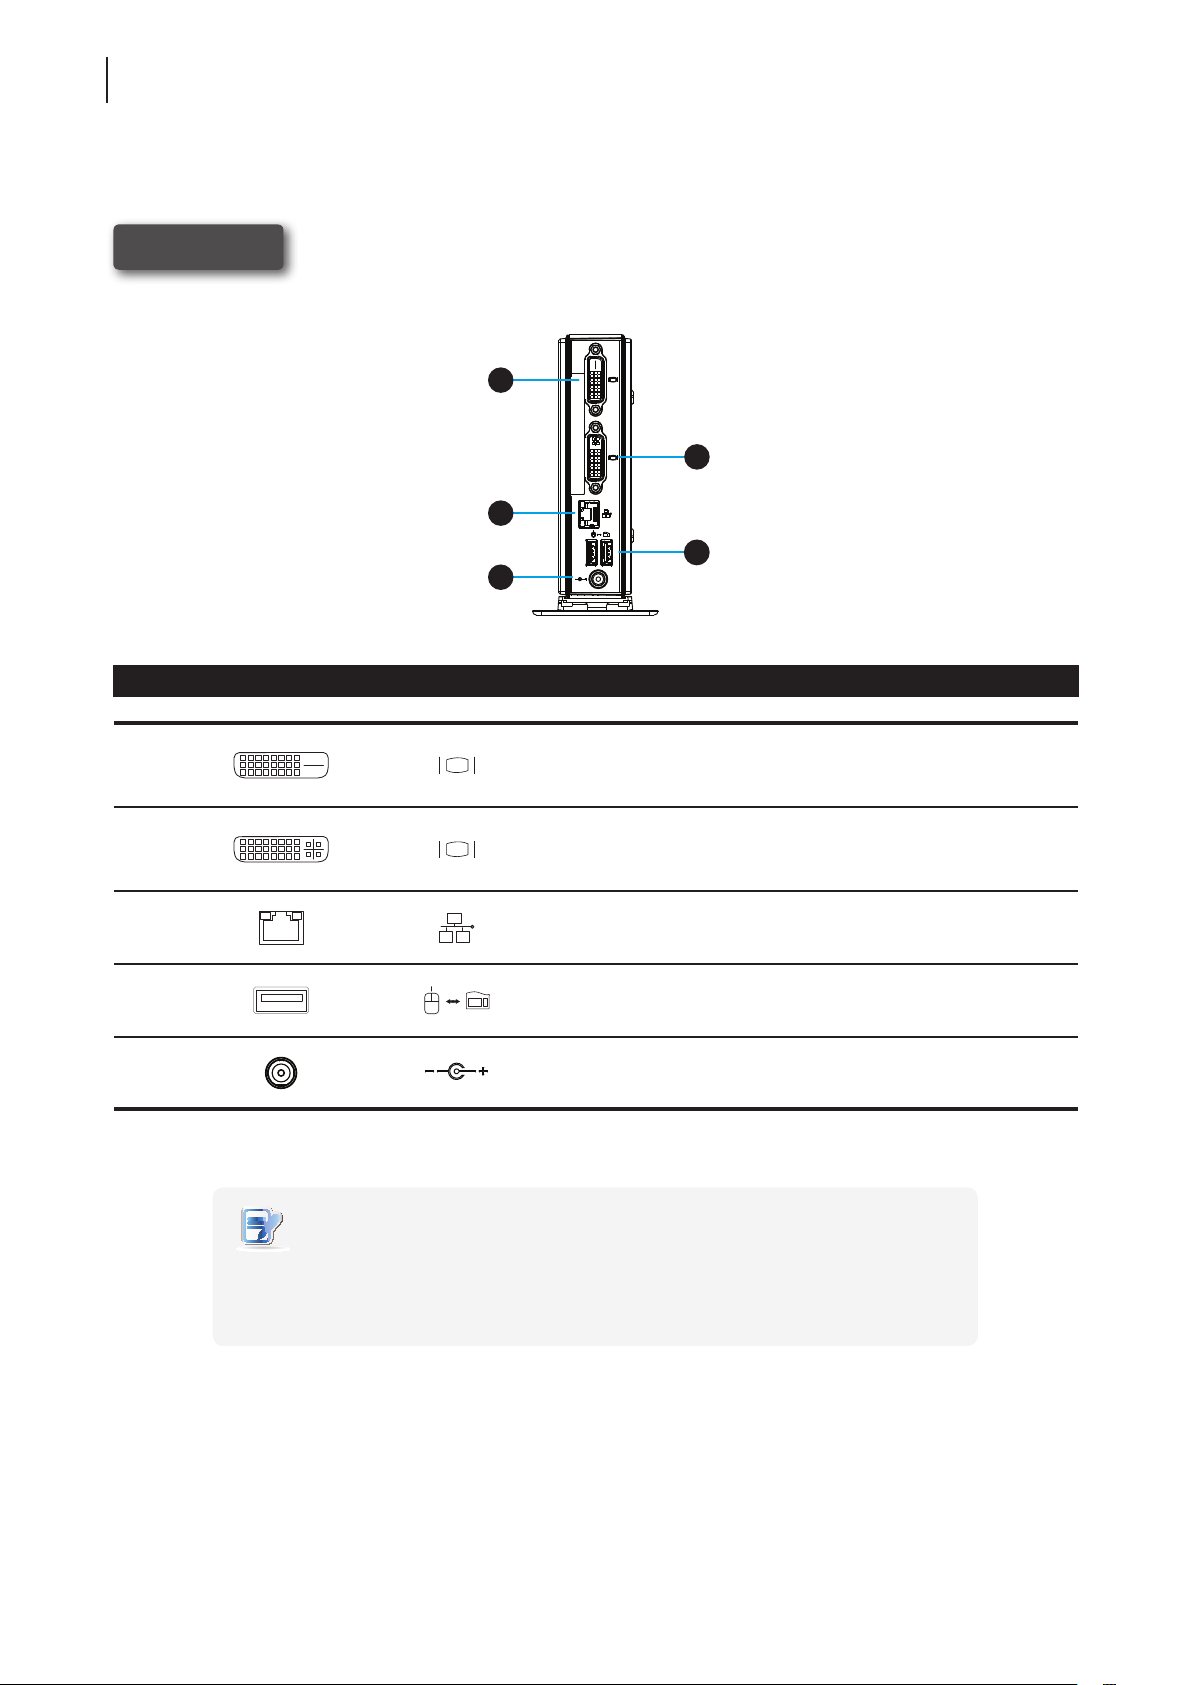
Atrust t62
Overview
Panel Components
7
1
2
3
4
5
Front Panel
No. Component Sign Name Description
1
2
3
4
5
Power LED Indicates the status of power.
• Press to power on the thin client.
Power button
Microphone port Connects to a microphone.
Headphone port
USB port Connects to a USB device.
• Long press to force power off the thin client.
• In Power-off state, connect a monitor to the
client, and then long press 6 to 8 seconds to
enter Atrust Thin Client Menu.
Connects to a set of headphones or
a speaker system.
NOTE
• Six options are available on Atrust Thin Client Menu (see the table below).
For more information, please refer to “Appendices” on page 169.
Menu Option Description
Normal Mode Boots up your t60/t62 as the normal startup procedure.
Safe Mode Clears and resets the current screen resolution setting.
Reset Mode Resets your t60/t62 to the factory default.
Firmware update Updates rmware for your t60/t62.
Reboot Reboots your t60/t62.
Shutdown Shuts down your t60/t62.
Page 18
Overview
8
Panel Components
Atrust t62
6
7
8
9
10
Rear Panel
No. Panel Component Sign Component Name Description
Connects to a high quality digital display
device such as a LCD monitor or
a digital projector.
Connects to a high quality digital display
device such as a LCD monitor or
a digital projector.
10
6
7
8
9
DVI-D port
DVI-I port
LAN port Connects to a network.
USB port Connects to a keyboard or mouse.
DC IN Connects to an AC adapter.
NOTE
• Your t62 comes with a DVI-I to VGA adapter. If only the VGA monitor is available, use
the supplied DVI-I to VGA adapter to connect your VGA monitor to t62’s DVI-I port.
For detailed instructions, please see section “2.4 Getting Connected” on page 19.
Page 19

LED Indicators
1.6 LED Indicators
Your t60/t62 is equipped with a Power LED to indicate the state of power. The meanings of LED signals
are described as follows:
LED Signal Meaning
Power LED
The LAN port of your t60/t62 has two LED indicators showing the state of networking. The meanings of
LED signals are described as follows:
Off The client is off.
Blue The client is on.
Overview
9
LED Signal
Left LED
(transmission rate)
Off Off The client is not connected to a LAN.
Off Amber blinking The client connects to a 10 Mbps LAN.
Orange Amber blinking The client connects to a 100 Mbps LAN.
Green Amber blinking The client connects to a 1000 Mbps LAN.
Right LED
(transmission activity)
Meaning
Page 20

10
Overview
Page 21

Setting Up Your t60/t62
This chapter provides detailed instructions on how to set up your
t60/t62 thin clients.
2.1 Positioning Your t60
2.2 Positioning Your t62
To mount your t60
Step 1: Understand Your VESA Mount Kit for t60
Step 2: Mount Your t60
To mount your t62
Step 1: Remove the Stand from Your t62
Step 2: Understand Your Stand / VESA Mount Kit for t62
Step 3: Store Screws inside the Bracket
Step 4: Remove Screws from the Bracket
Step 5: Mount Your t62
2
13
14
15
16
17
17
18
2.3 Assembling the AC Adapter
How to assemble the AC adapter and its detached plug 18
2.4 Getting Connected
How to connect peripherals and power for t60/t62 19
Page 22

Page 23
2.1 Positioning Your t60
There are two ways to position your t60:
• Put it on a desk or a desired place horizontally.
• Mount it on the back of a monitor using a VESA mount kit.
NOTE
• The VESA mount kit is an optional accessory for your t60. Your package may not
contain a VESA mount kit. Contact your dealer if needed.
To mount your t60 on the back of a monitor, please follow the steps below:
Step 1: Understand Your VESA Mount Kit for t60
Step 2: Mount Your t60
Setting Up Your t60/t62
Positioning Your t60
13
Step 1: Understand Your VESA Mount Kit for t60
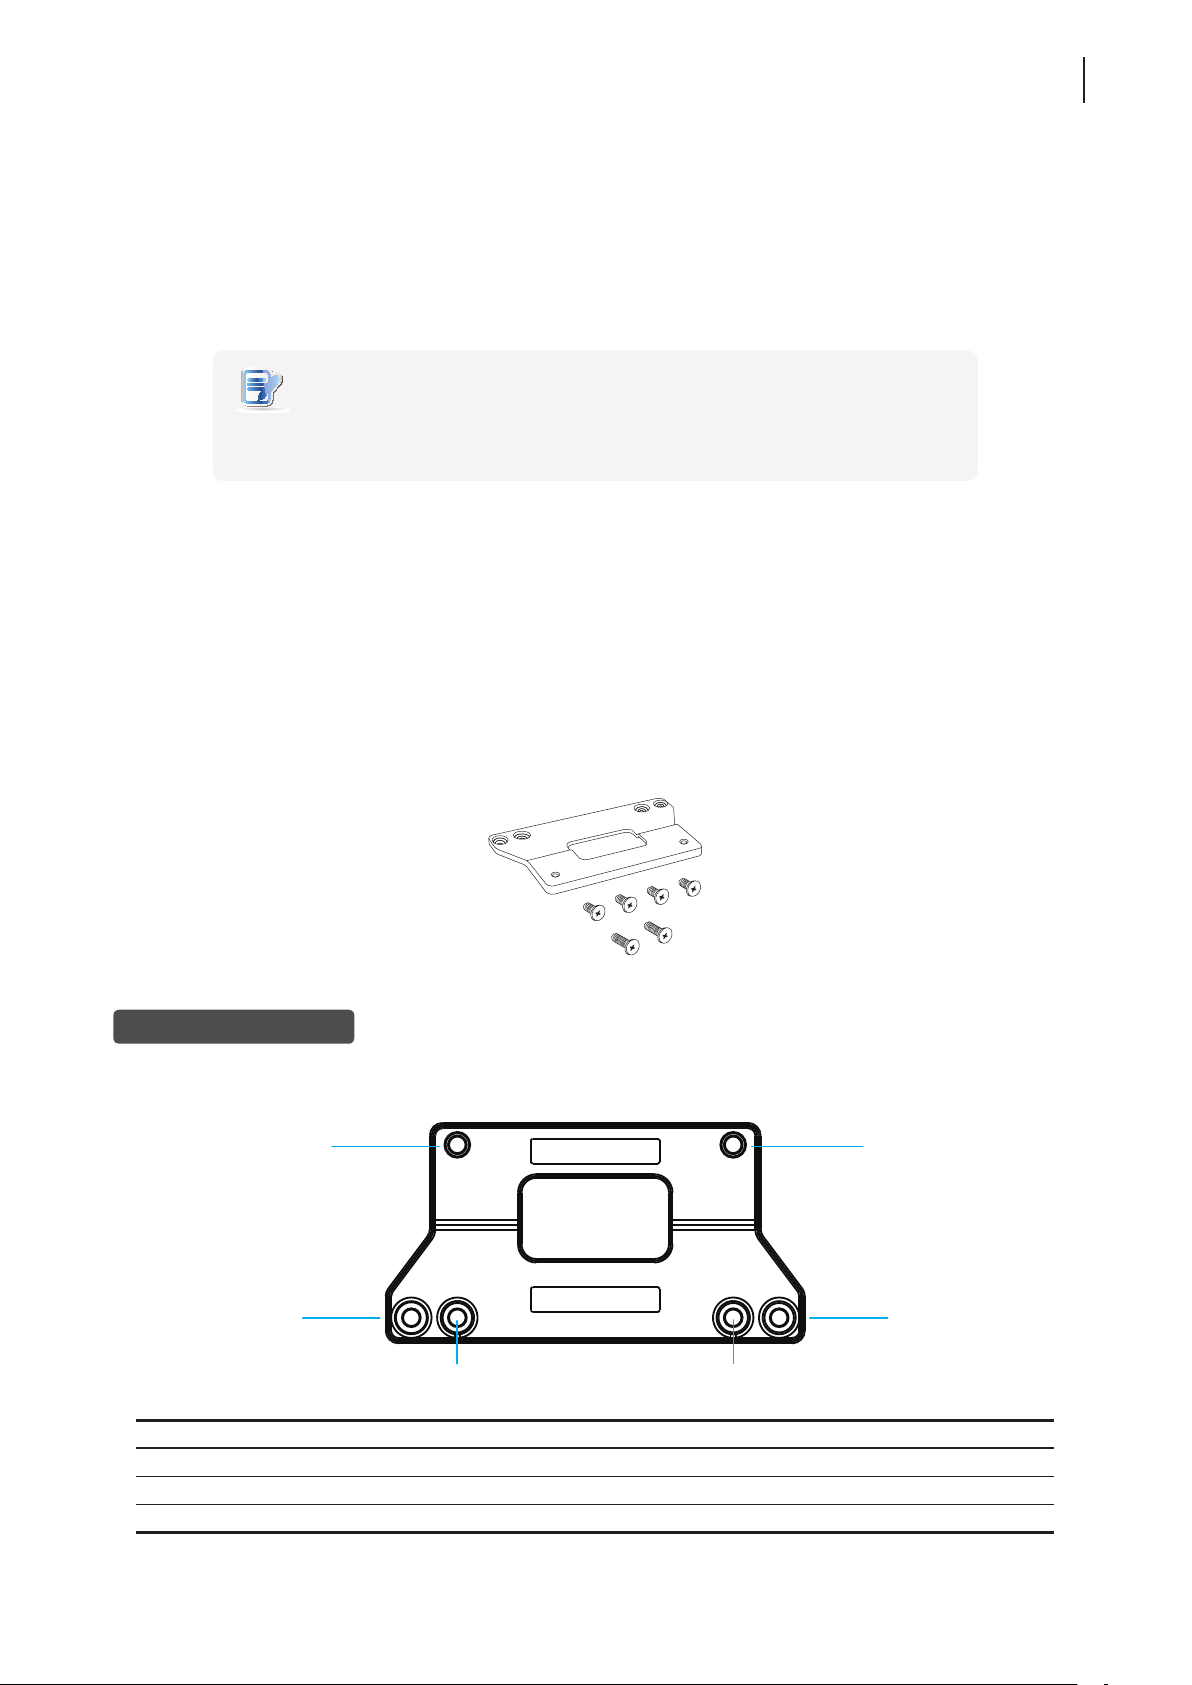
Your t60’s VESA mount kit consists of a bracket and six screws.
Mount bracket
Six screws with
two types
Mount Bracket for t60
Refer to the following gure and descriptions for the VESA mount holes on the mount bracket for t60.
1
1
2
3
Mount Hole Description
1 The VESA mount holes used to secure the bracket to your t60.
2 The VESA mount holes (with the distance of 100 mm) used to secure the bracket to a monitor.
3 The VESA mount holes (with the distance of 75 mm) used to secure the bracket to a monitor.
3
2
Page 24

Setting Up Your t60/t62
1
1
14
Positioning Your t60
Mount Screws for t60
1
Screw Type Number Description
1 4 The screws used to secure the bracket to your t60 and to a monitor.
2 2
The longer screws used to secure the bracket to a monitor if the screws of type 1
cannot rmly secure the bracket and your t60 to the monitor.
Step 2: Mount Your t60
To mount your t60 on the back of the monitor, please do the following:
2
1. Place your t60 on a at surface with the VESA mount hole side upward.
2. With the bracket side marked with Atrust facing downward, align two mount holes on the bracket with two
mount holes on your t60 such that the bracket projects out and is closer to the rear panel than the front one
as shown below, and then secure the bracket to your t60 with two (2) screws of type
.
3. Align the mount holes on the bracket with the mount holes on the back of the monitor, and then secure the
bracket to the monitor with two (2) screws of
or 2. Ensure that the rear panel of your t60
is facing downward as shown below.
Have t60’s rear panel
facing downward.
Page 25
2.2 Positioning Your t62
There are two ways to position your t62:
• Put it (with its stand) on a desk or a desired place uprightly.
• Mount it on the back of a monitor using a VESA mount kit.
To mount your t62 on the back of a monitor, please follow the steps below:
Step 1: Remove the Stand from Your t62
Step 2: Understand Your Stand / VESA Mount Kit for t62
Step 3: Store Away Screws inside the Bracket
Step 4: Remove Screws from the Bracket
Step 5: Mount Your t62
Step 1: Remove the Stand from Your t62
Setting Up Your t60/t62
Positioning Your t62
15
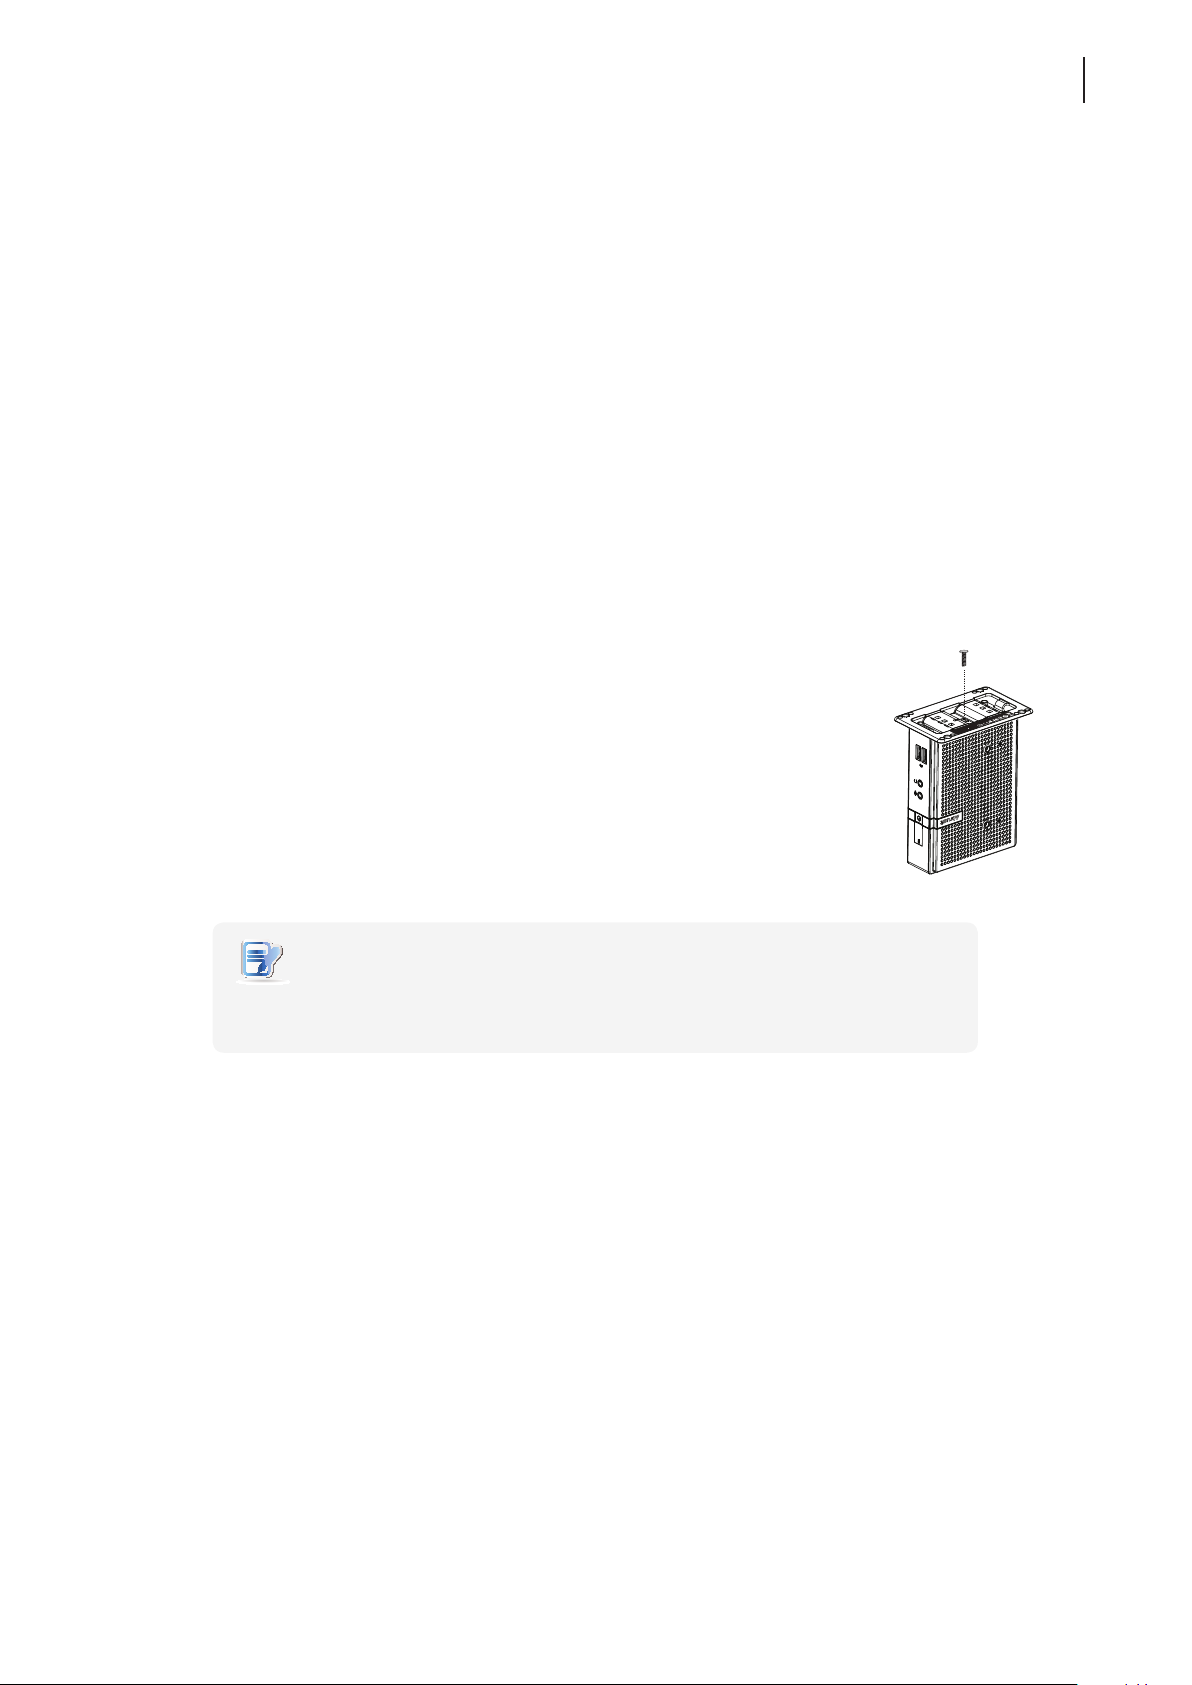
To remove the stand from your t62, please do the following:
1. Place your t62 on a at surface with the stand side upward.
2. Remove the screw that xes the stand to your t62.
3. Store away the removed screw inside the stand. Detailed instructions will be
provided in Step 2 and 3.
NOTE
• It’s highly recommended to store screws away inside the stand when not needed
to prevent them getting lost.
Manufacturer
Model Name
Model / 型號 / 型号 : Atrust t62
Input/輸入 / 输入
台灣製造 / 台湾制造 / Made in Taiwan
冠信电脑股份有限公司
:
精致型电脑
:
JPAA
製造商:冠信電腦股份有限公司 制造商
精簡型電腦 产品名称
:
Atrust Computer Corp.
:
Thin Client 產品名稱
:
+5V 3A
:
Page 26
Setting Up Your t60/t62
16
Positioning Your t62
Step 2: Understand Your Stand / VESA Mount Kit for t62
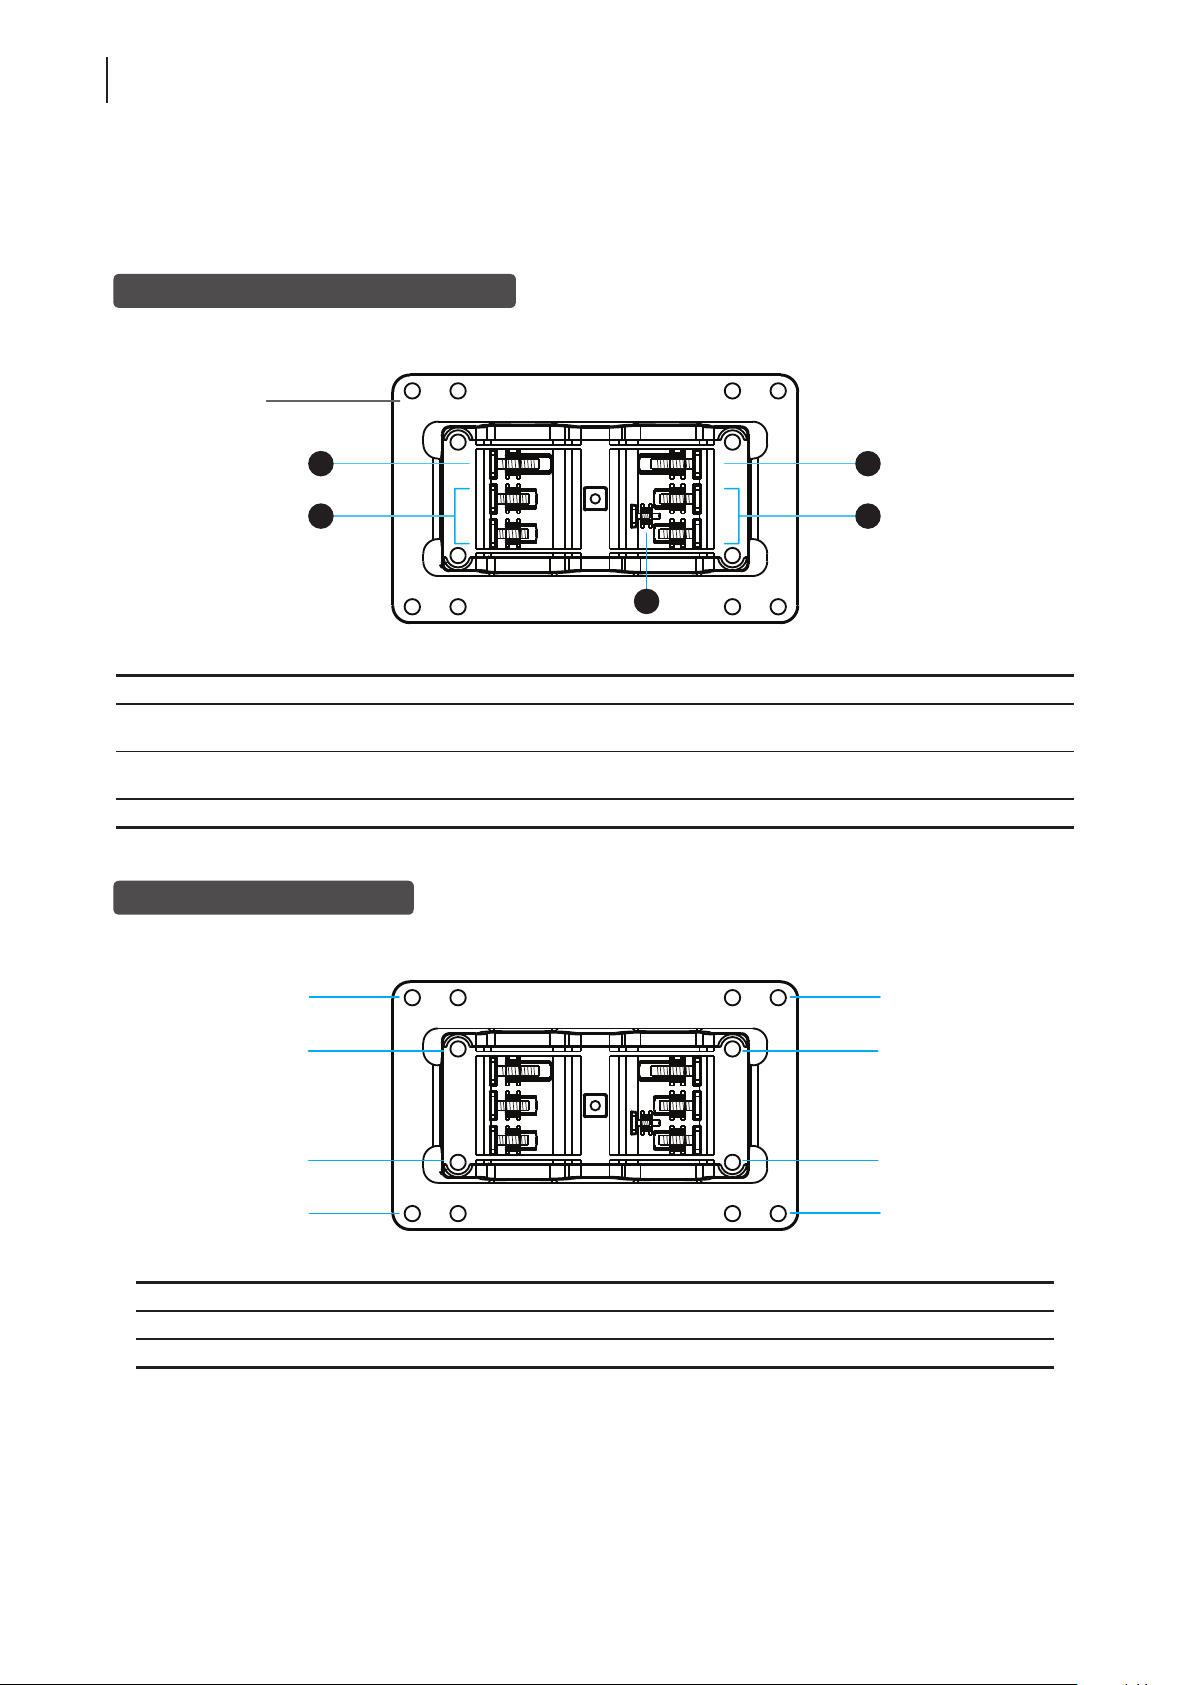
The stand for your t62 is dual-purpose: it can be used as a stand or as a VESA mount kit. All screws of dierent types
supplied with the stand / VESA mount kit can be stored away inside the main bracket when not needed.
Screws Stored Away inside the Bracket
The following gure shows dierent types of screws stored away inside the main bracket.
Dual-purpose
bracket
1
2
3
Screw Type Number Description
1 2
2 4
3 1 The smallest-size screw used to secure the bracket to your t62 as a stand.
The largest-size screws used to secure the bracket to a monitor as a VESA mount if
the middle-size screws cannot rmly secure the bracket and your t62 to the monitor.
The middle-size screws used to secure the bracket to your t62 and to a monitor when
using the bracket as a VESA mount.
Mount Holes on the Bracket
Refer to the following gure and descriptions for the VESA mount holes on the bracket.
1
1
2
1
2
2
1
Mount Hole Description
1 The VESA mount holes used to secure the bracket to a monitor (only two of them will be used).
2 The VESA mount holes used to secure the bracket to your t62 (only two of them will be used).
2
2
1
Page 27
Setting Up Your t60/t62
Positioning Your t62
Step 3: Store Screws inside the Bracket
To store screws inside the bracket, please do the following:
NOTE
• It’s highly recommended to store screws inside the bracket when not needed
to prevent them getting lost.
1. Place a sheet of paper or a piece of cloth on a at surface, and then put your bracket on that paper or cloth
with the screw storage side upward.
2. Place the screw upon its storage space, and push the screw into the space with your nger until it clicks
into place. For the smallest-size screw, use the tip of a screwdriver instead to push the screw.
NOTE
• Please refer to the gure and descriptions in “Step 2: Understand Your Stand / VESA
Mount Kit for t62” for the correct storage space of each screw.
17
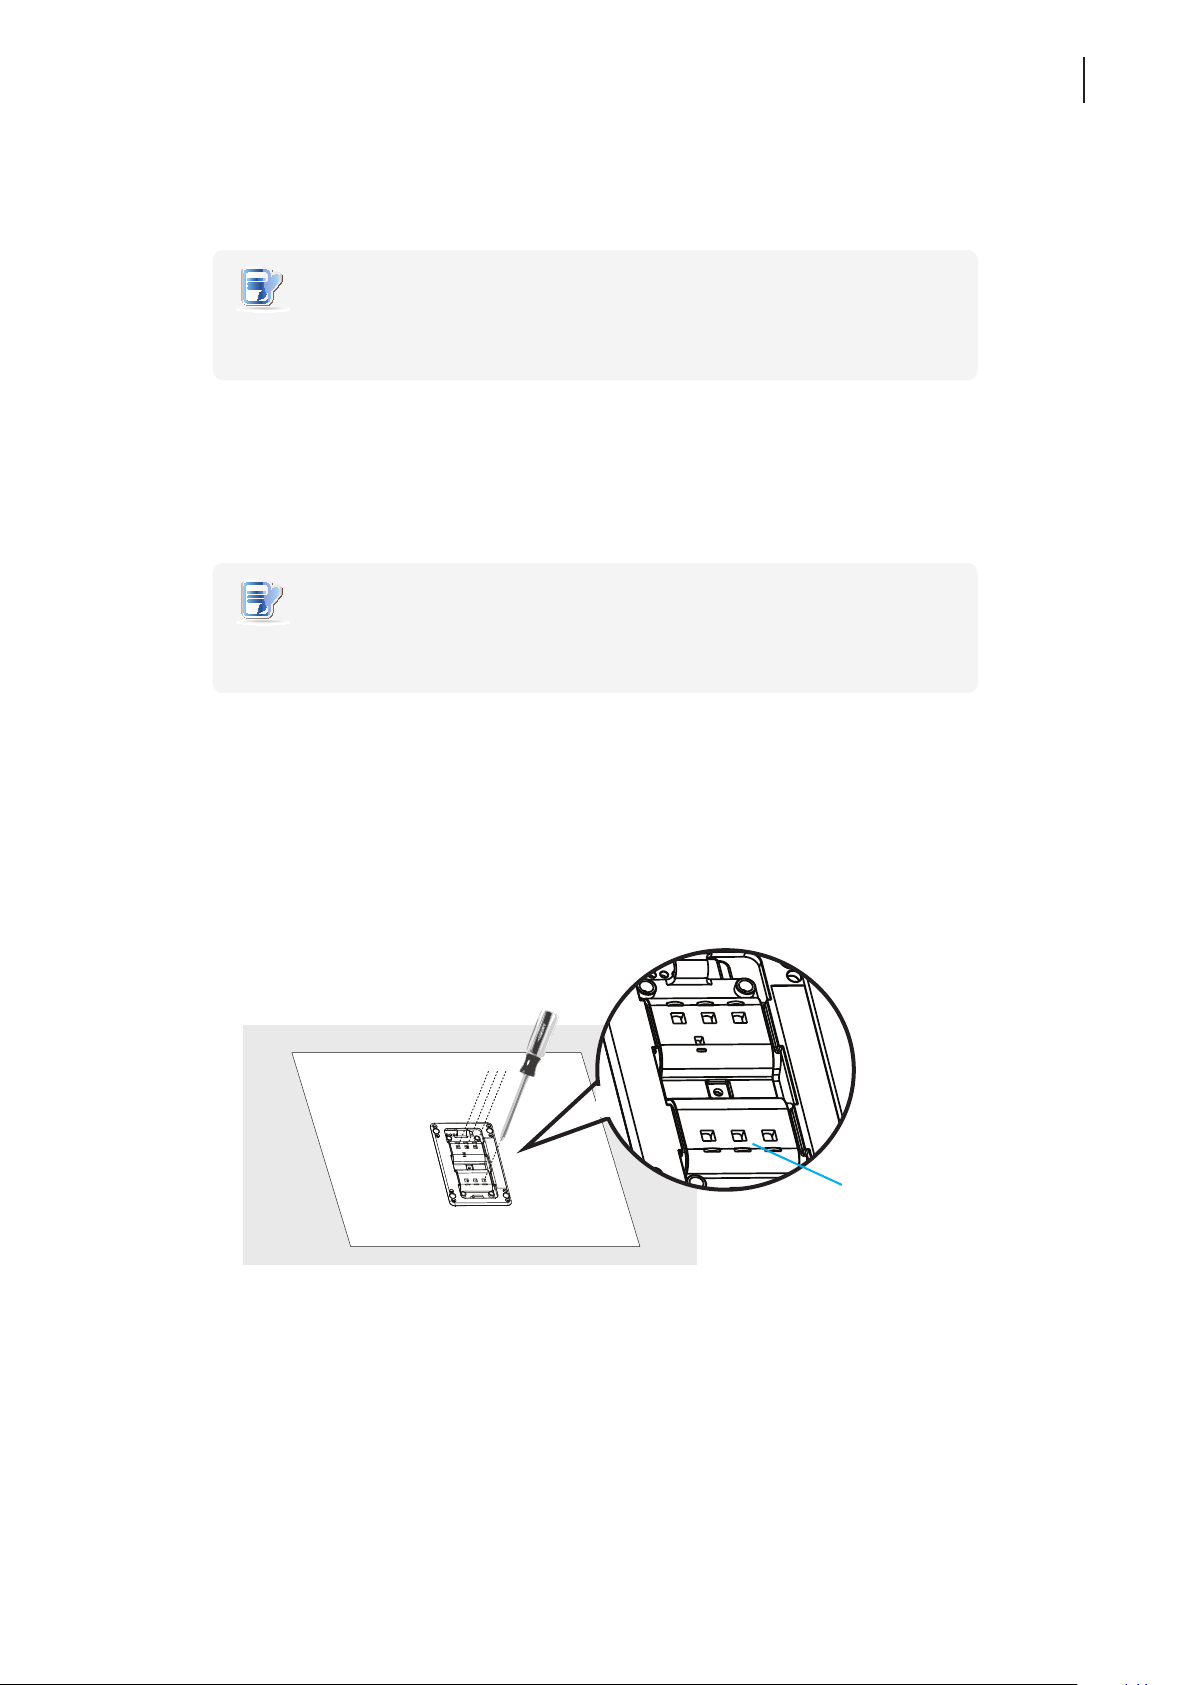
Step 4: Remove Screws from the Bracket
To remove screws stored inside the bracket, please do the following:
1. Place a sheet of paper or a piece of cloth on a at surface, and then put your bracket on that paper or cloth
with the screw storage side downward.
2. Insert the tip of a screwdriver into the square holes to remove the desired screws from the bracket.
Square Hole
Page 28
Setting Up Your t60/t62
2
1
2
2
18
Assembling the AC Adapter
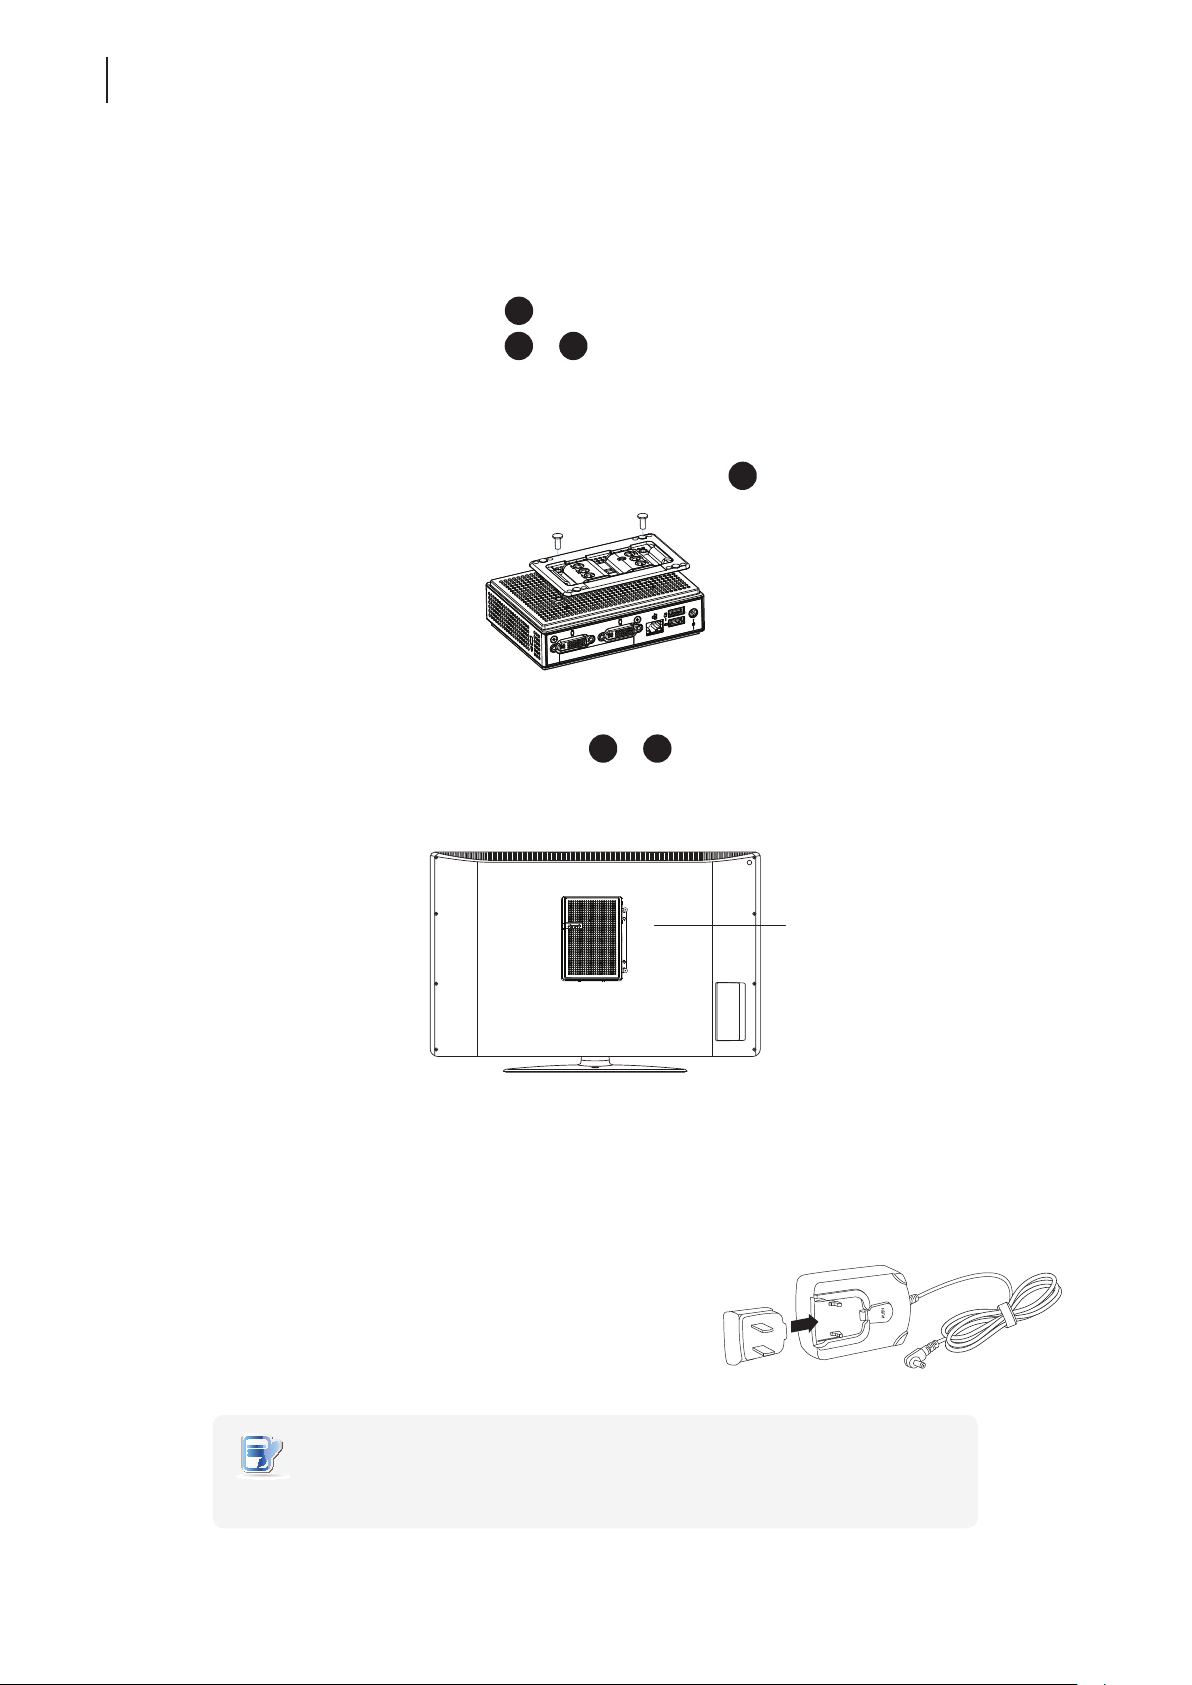
Step 5: Mount Your t62
To mount your t62 on the back of a monitor, please do the following:
1. Refer to Step 2 and Step 4 to prepare required screws for mounting your t62.
• You will need two (2) screws of type
• You will need two (2) screws of type
2. Place your t62 on a at surface with the VESA mount hole side upward.
3. Refer to Step 2 to choose two of the four VESA mount holes on the bracket to align with two mount holes on
your t62 such that the bracket projects out and is closer to the rear panel than the front one as shown below,
and then secure the bracket to your t62 with two (2) screws of type
4. Align the mount holes on the bracket with the mount holes on the back of the monitor, and then secure the
bracket to the monitor with two (2) screws of type
the monitor and the rear panel of your t62 is facing rightward as shown below.
to secure the bracket to your t62.
or 2 to secure the bracket to the monitor.
.
or 1. Ensure that your t62 is located in the center of
2.3 Assembling the AC Adapter
To assemble the AC adapter for your t60/t62, please do the following:
1. Unpack your thin client package and take out the AC adapter
and its detached plug.
2. Slide the plug into the AC adapter until it clicks into place.
NOTE
• The supplied plug may vary, depending on dierent areas.
Have t62’s rear panel
facing rightward.
Page 29
2.4 Getting Connected
To make connections for your t60/t62, please do the following:
1. Connect your t60/t62 to your local network with an Ethernet cable.
2. Connect a keyboard and mouse to your t60/t62.
3. Connect and turn on the monitor(s).
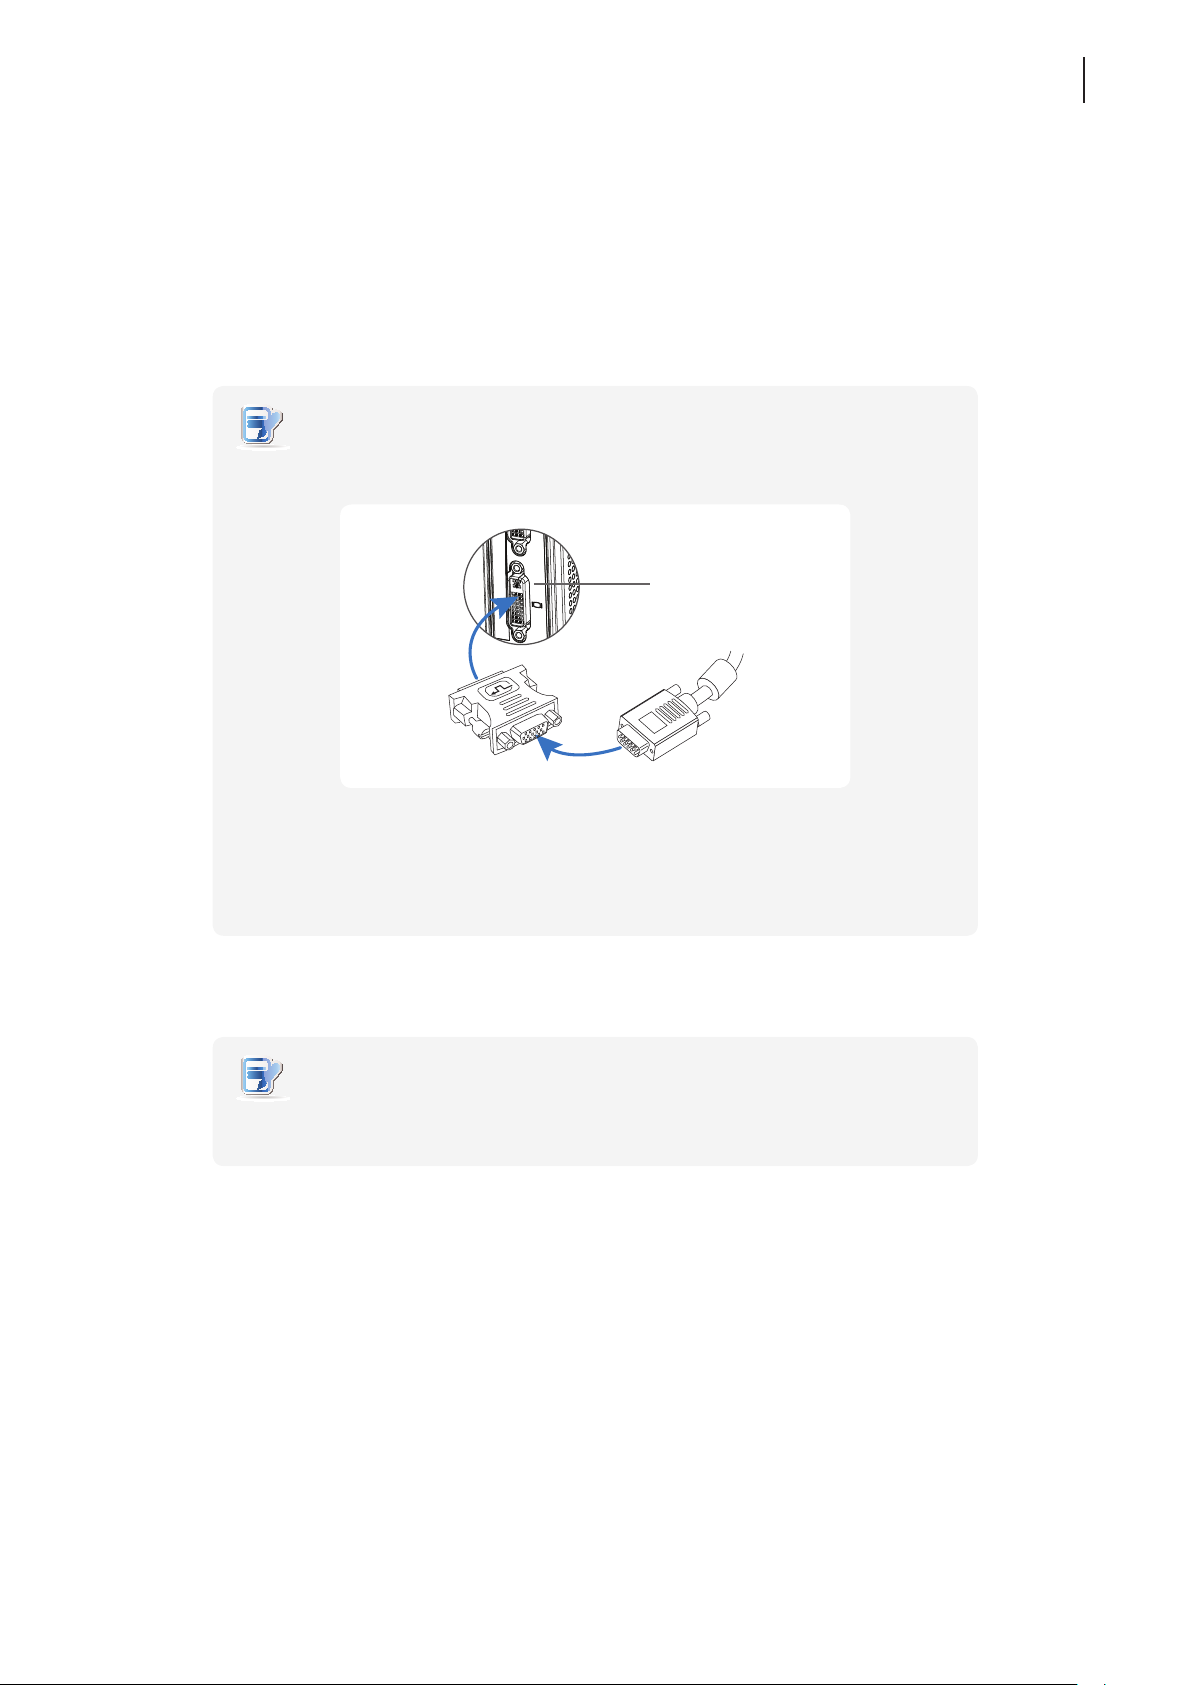
NOTE
• For your t62, if only the VGA monitor is available, use the supplied DVI-I to VGA
adapter to connect your t62 and monitor.
DVI-I port
(t62 only)
Setting Up Your t60/t62
Getting Connected
19
DVI-I to VGA
adapter
• Please note that you need to connect and turn on your monitor(s) before
powering up your thin client. Otherwise, the client may fail to set
an appropriate resolution for the monitor(s).
VGA cable
4. Connect your t60/t62 to a power outlet using the AC adapter included in the package.
NOTE
• For detailed instructions on how to assemble the supplied AC adapter, please refer
to section “2.3 Assembling the AC Adapter” on page 18.
5. Connect other peripherals for your t60/t62 if needed.
Page 30

Setting Up Your t60/t62
20
Page 31

Getting Started
3
This chapter provides the basics of how to use your t60/t62.
3.1 Learning the Basics
Topic 1: Powering On Your t60/t62
Topic 2: Conguring the Time Zone
Topic 3: Returning to the Quick Connection Screen
Topic 4: Accessing Desktops or Applications
24
25
26
27
Page 32

Page 33
3.1 Learning the Basics
The following topics will guide you through the basics of using your t60/t62:
Topic 1: Powering On Your t60/t62
Topic 2: Conguring the Time Zone
Topic 3: Returning to the Quick Connection Screen (if needed)
Topic 4: Accessing Desktops or Applications
• Microsoft Remote Desktop Services (RDP sessions)
• Citrix Services (ICA sessions)
• VMware View or Horizon View Services (View sessions)
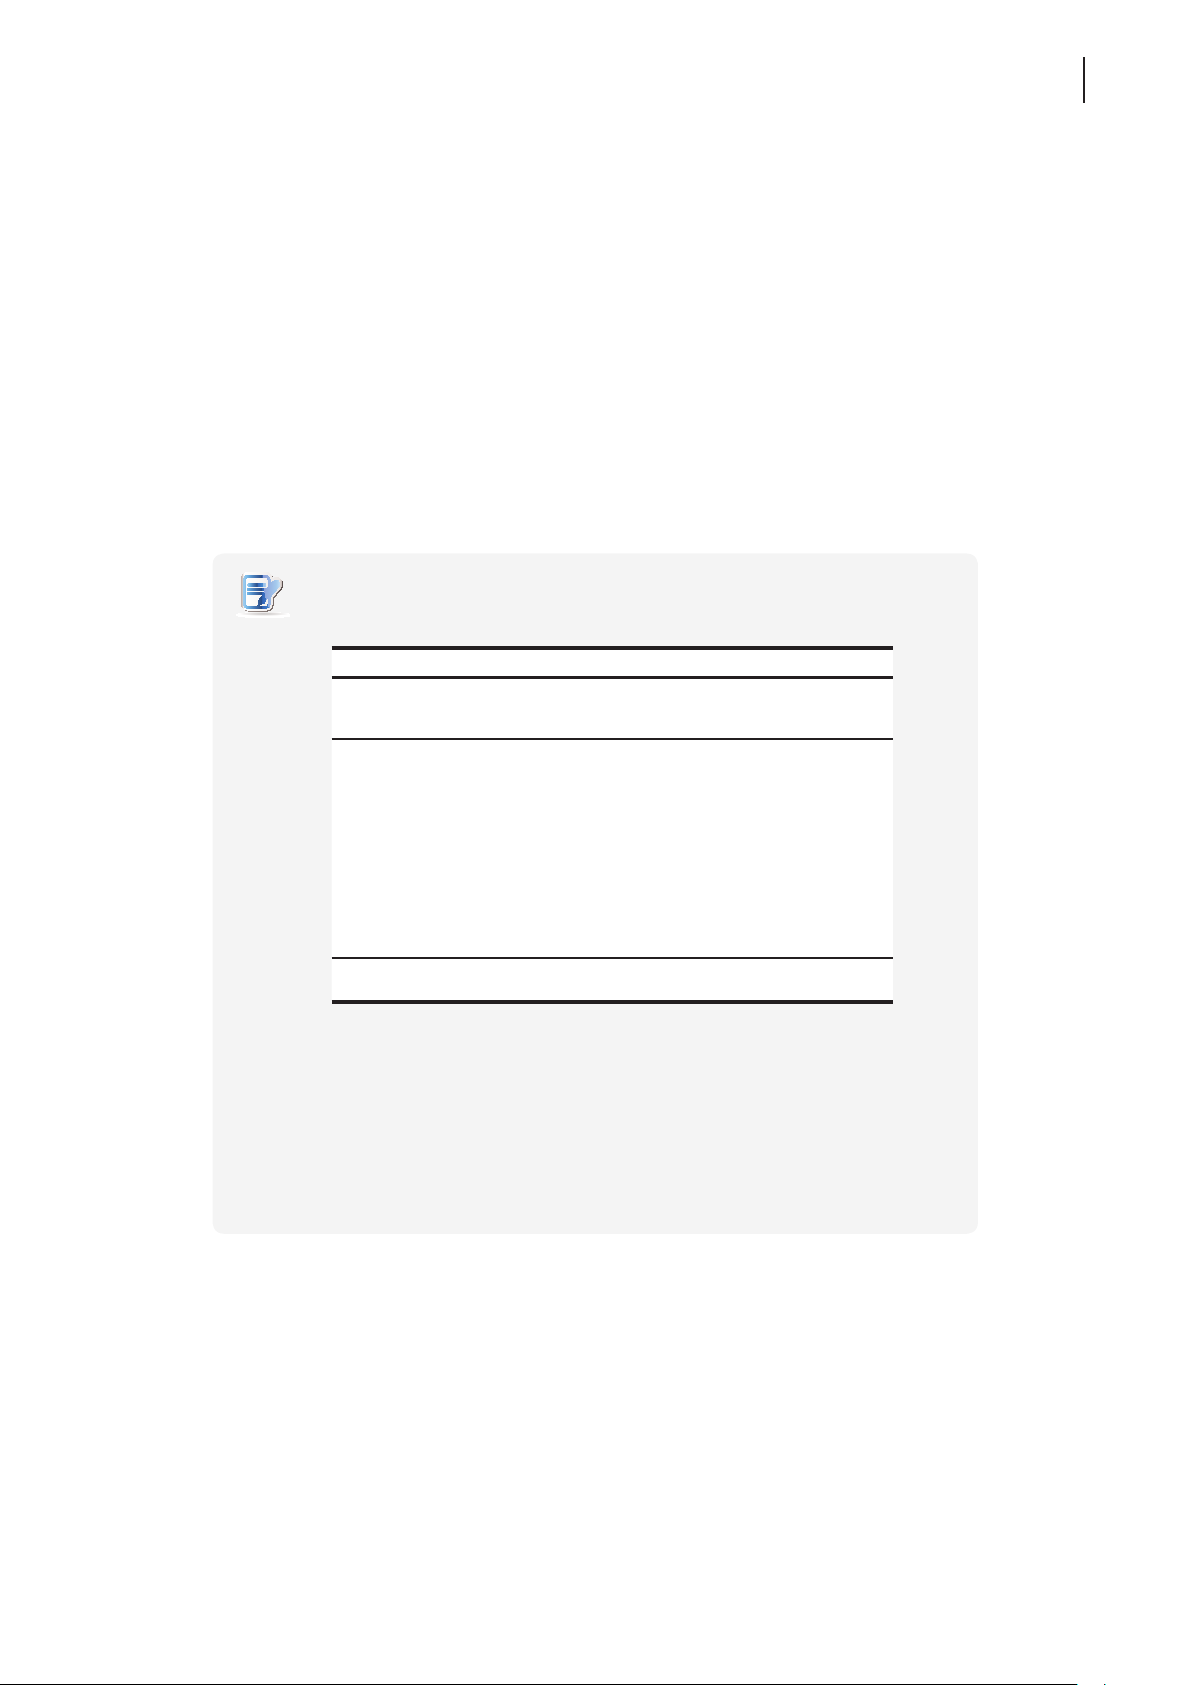
NOTE
• Three client modes are available for your t60/t62:
Getting Started
Learning the Basics
23
No. Mode Description
1 Appliance
2 Autostart
3 Quick Connection
The client will start up directly with the desired
RDP / ICA / View session and turn off after
existing the session.
The client will start up directly with the desired
RDP / ICA / View session and perform the
congured action after existing the session.
Available actions include:
• Returning to the local desktop
• Re-launching a new session
• Restarting the thin client
• Turning off the thin client
The default. The client will enter Atrust Quick
Connection screen after system startup.
• In Quick Connection mode, you can access Microsoft Remote Desktop /Citrix /
VMware View or Horizon View services quickly without much client conguration
required. The main purpose of this chapter is to guide you through the use of your
t60/t62 under the Quick Connection mode.
• To understand other modes, congure advanced settings, and customize your
t60/t62, please refer to chapter 4 “Conguring Client Settings” on page 37.
Page 34
Getting Started
24
Learning the Basics
Topic 1: Powering On Your t60/t62
To start using your t60/t62, please do the following:
1. Ensure that your monitor(s) is connected and turned on.
NOTE
• Please note that you need to connect and turn on your monitor(s) before
powering up the thin client. Otherwise, the client may fail to set an appropriate
resolution for the monitor(s).
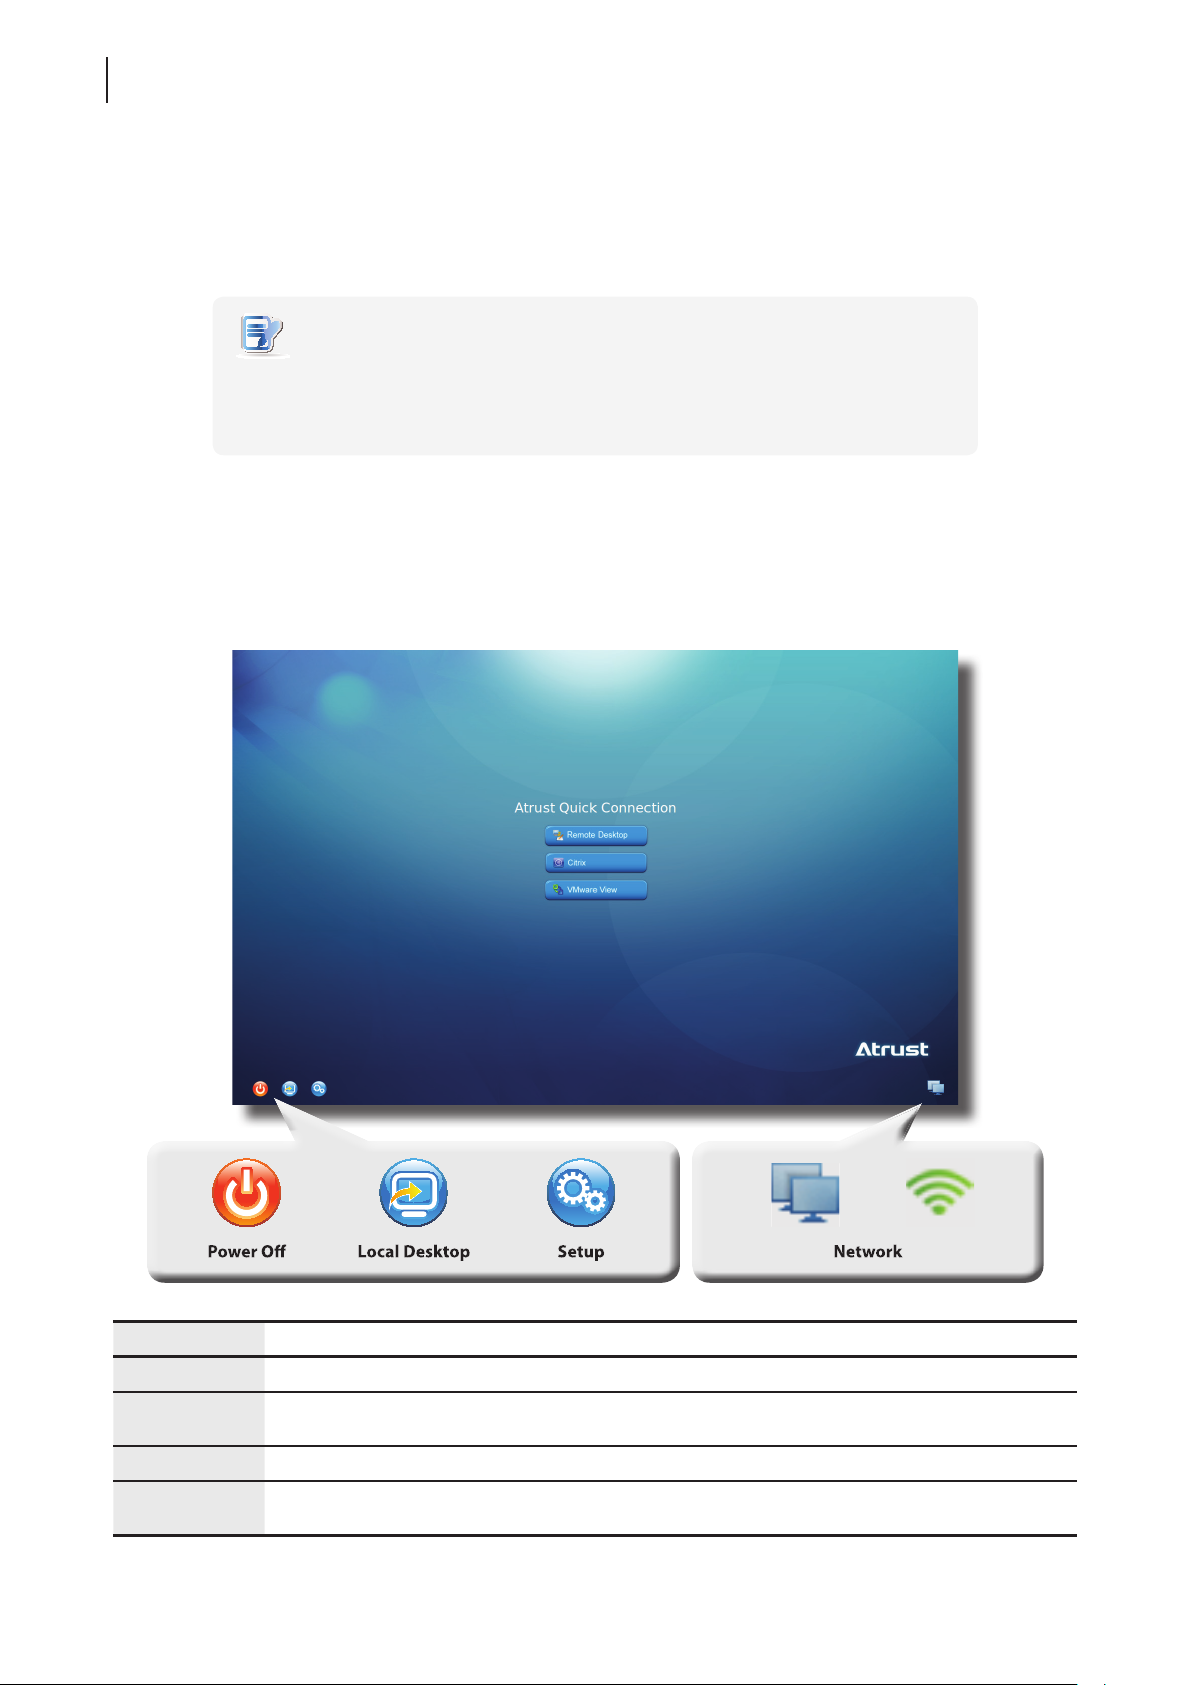
2. Press the Power button to turn on the client. Wait a moment for Atrust Quick Connection screen to appear.
3. (a) Go to Topic 2 to set the time zone for the rst time use.
(b) Go to Topic 4 if the time zone had been set.
Atrust Quick Connection Screen
Icon Description
Power Off Click the icon to shut down or restart the system.
Local Desktop
Setup Click the icon to launch Atrust Client Setup.
Network
Click the icon to enter the local Linux desktop.
To return to this screen from the local Linux desktop, see Topic 3.
Indicates the network type (wired or wireless) and status.
Click the icon to congure network settings.
Page 35
Topic 2: Conguring the Time Zone
To set the time zone for your t60/t62, please do the following:
Getting Started
Learning the Basics
25
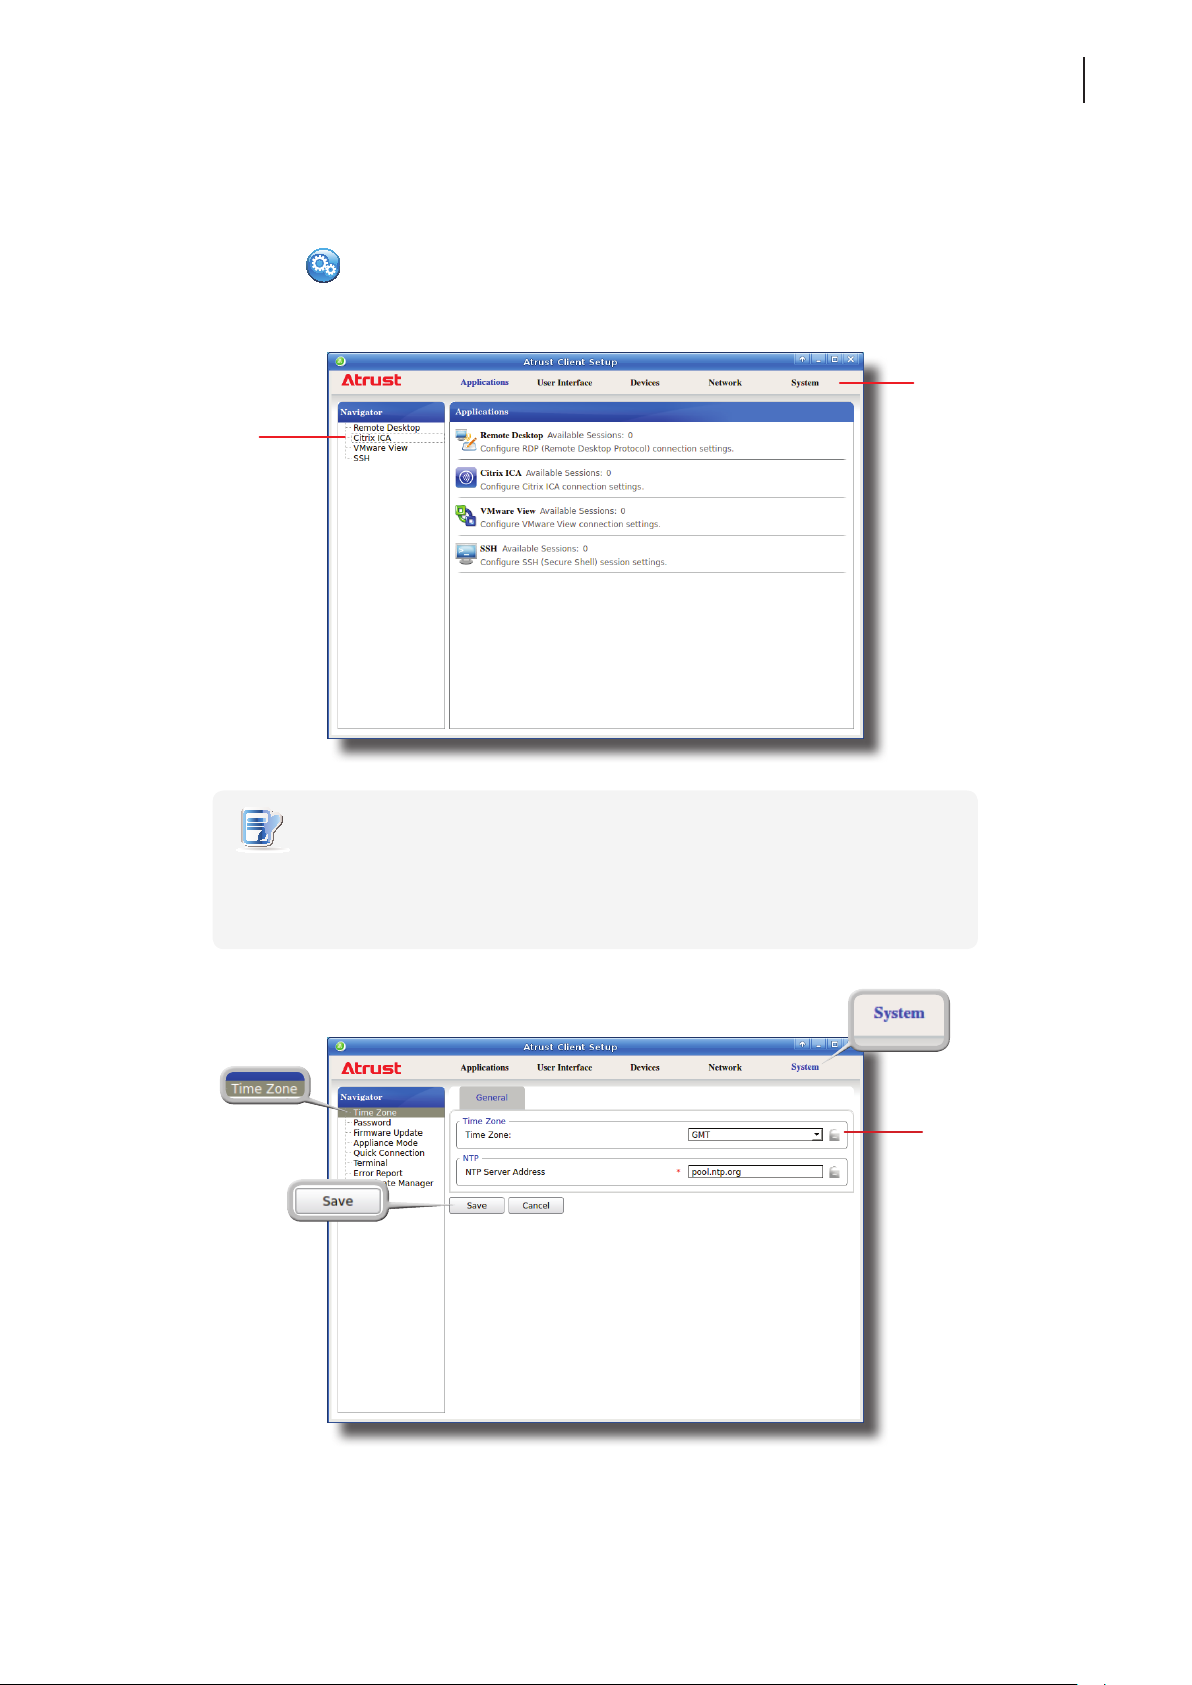
1. Click the Setup
Navigation Area
Click to select
a setting item
or entry.
icon to launch Atrust Client Setup.
Atrust Client Setup
Category Tabs
Click a tab to select
a setting category.
NOTE
• For detailed instructions on how to congure client settings and customize your
t60/t62 with Atrust Client Setup, please refer to chapter 4 “Conguring Client
Settings” on page 37.
2. On Atrust Client Setup, click System > Time Zone.
3. Click the Time Zone drop-down menu to select the desired time zone.
4. Click Save to apply, and then close Atrust Client Setup.
Time Zone
drop-down menu
Page 36
Getting Started
26
Learning the Basics
Topic 3: Returning to the Quick Connection Screen
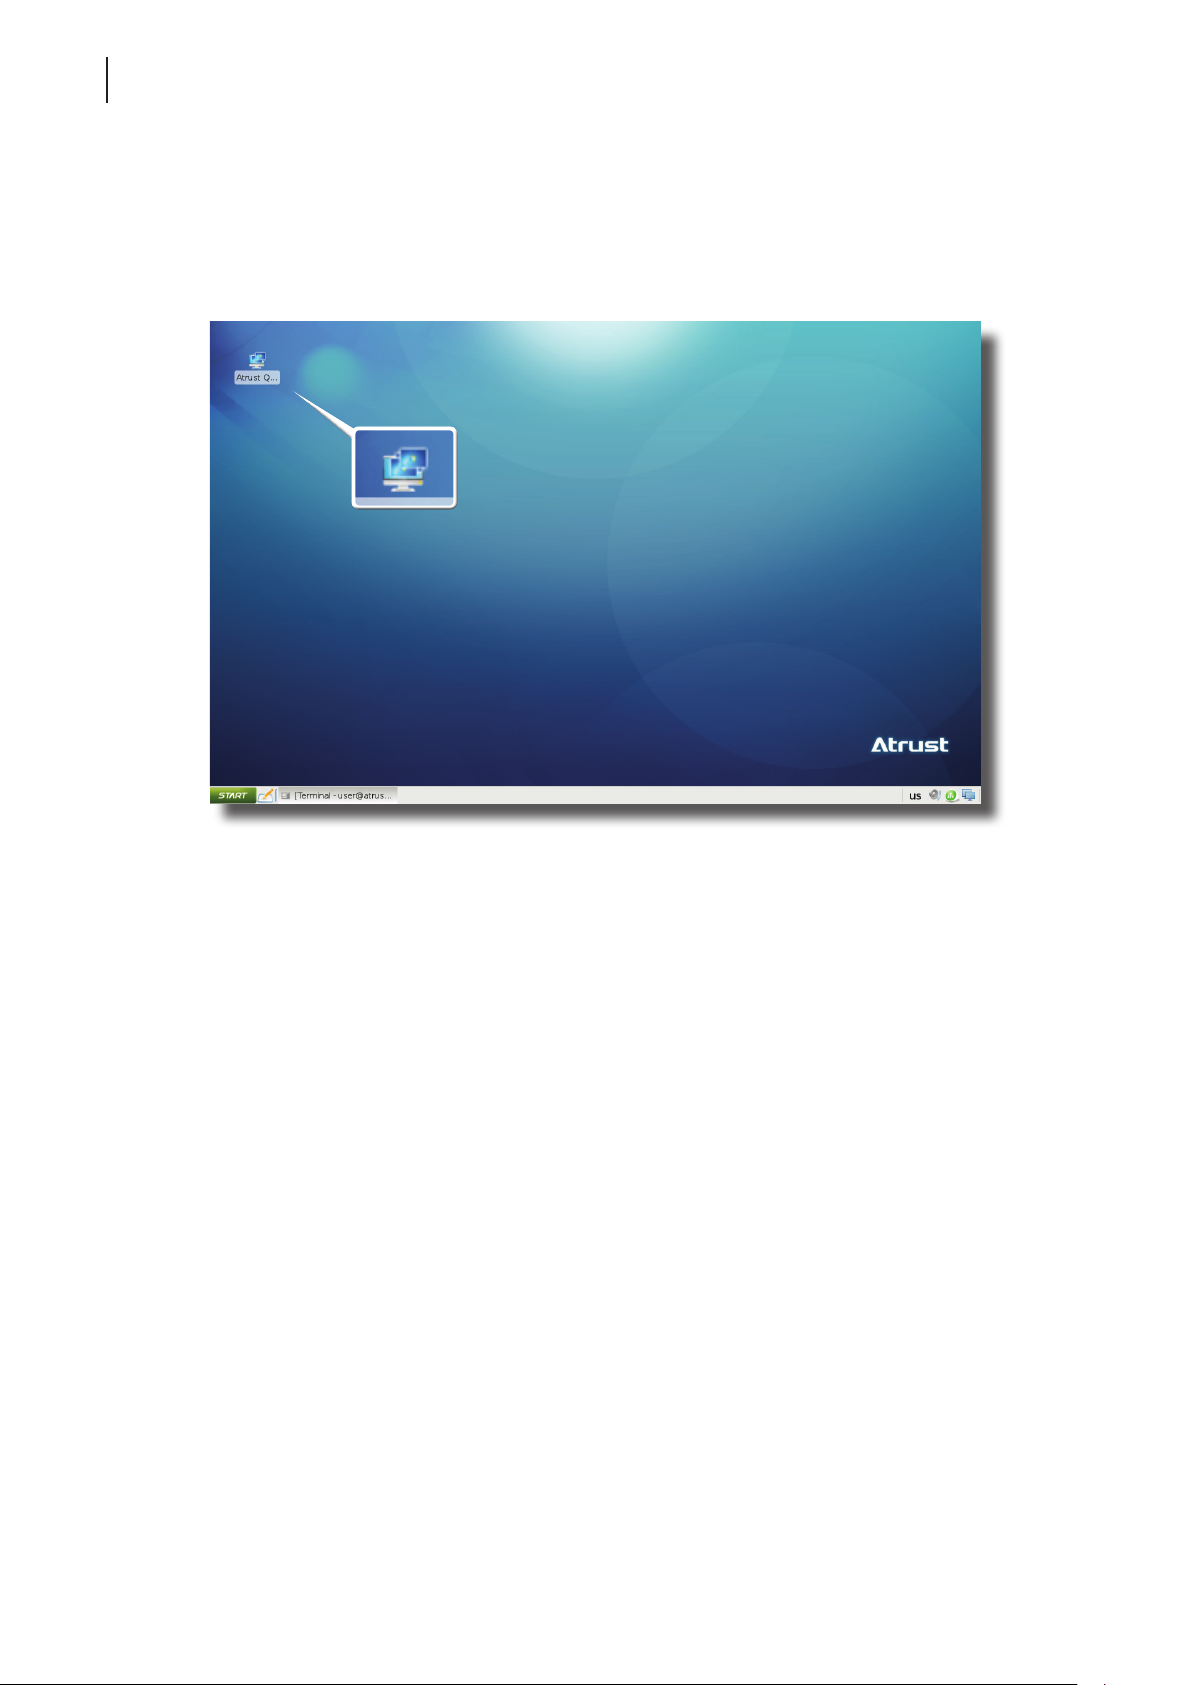
To return to Atrust Quick Connection screen when on local Linux desktop, please double click
Atrust Quick Connection on that desktop.
Local Linux Desktop
Atrust Quick Connection
Page 37
Getting Started
Learning the Basics
Topic 4: Accessing Desktops or Applications
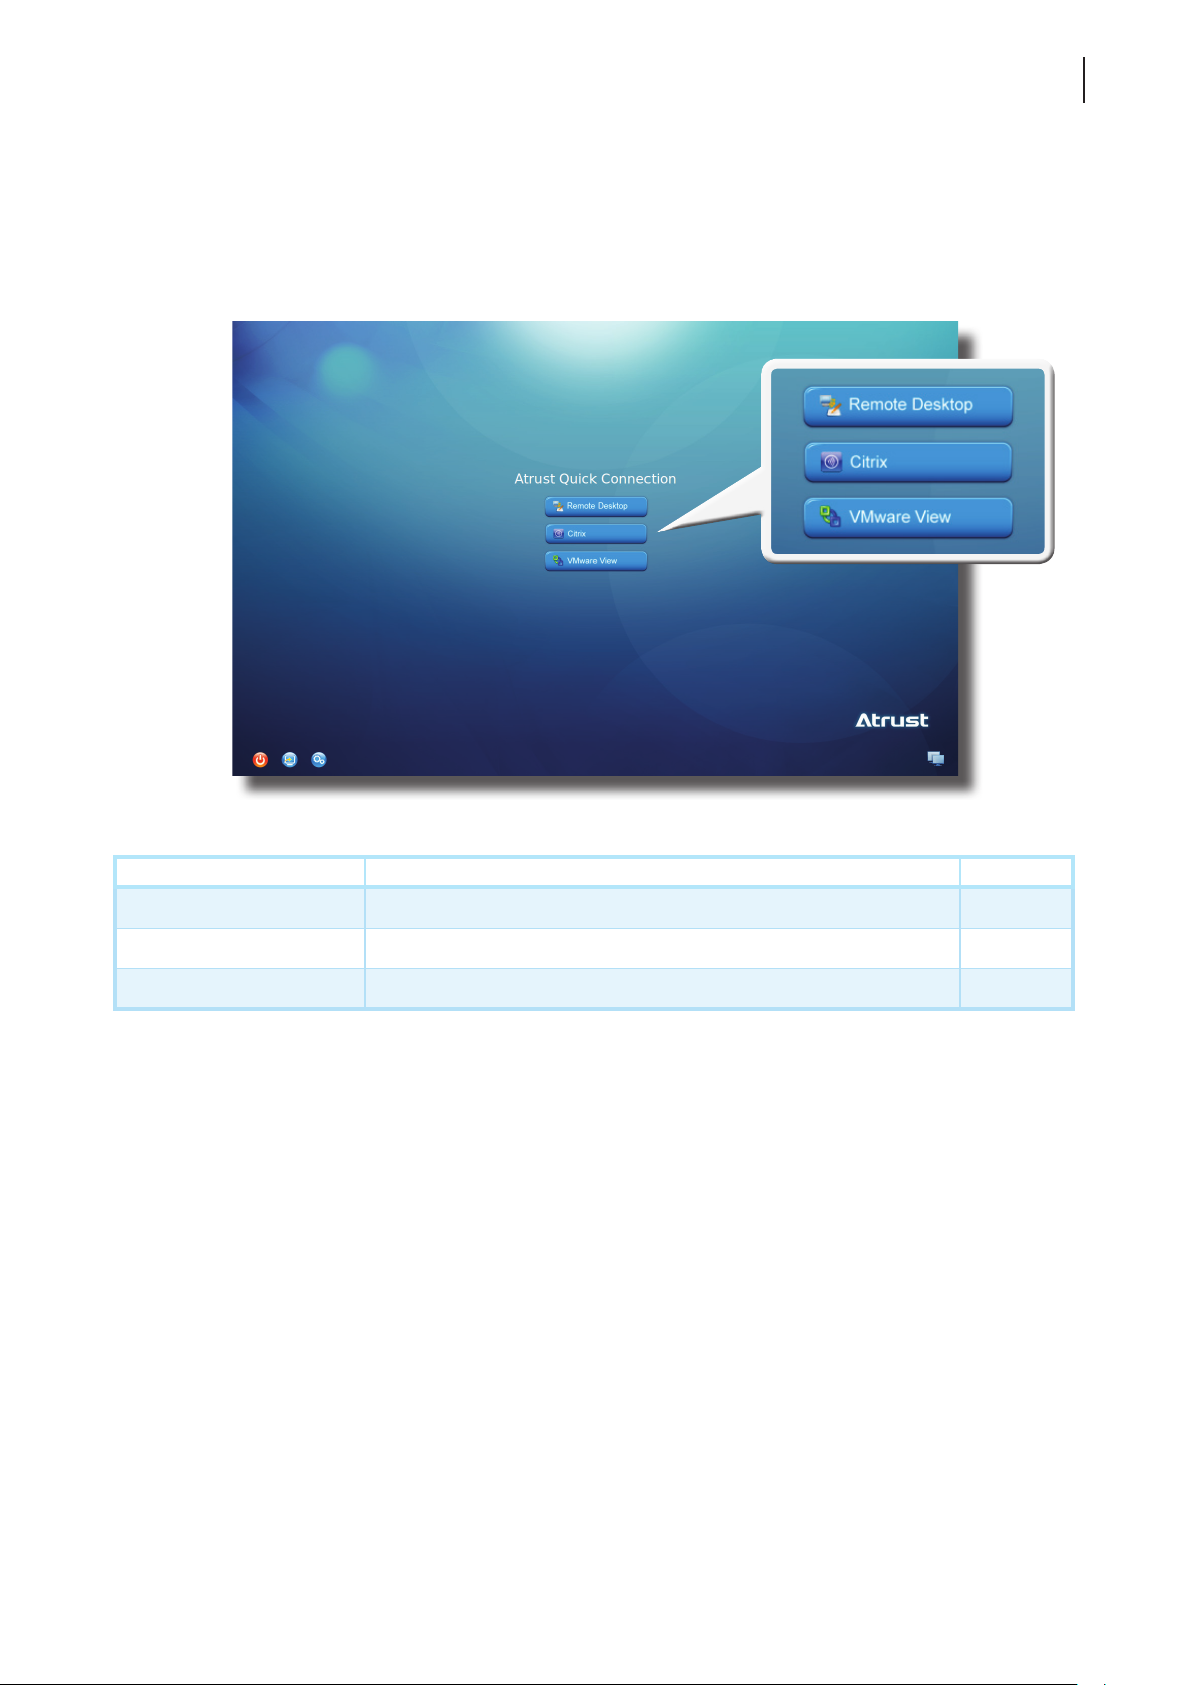
Through Atrust Quick Connection screen, you can access three types of desktop virtualization services:
Remote Desktop, Citrix, and VMware View.
Atrust Quick Connection Screen
27
Icon Description Page
Remote Desktop Click to access Microsoft Remote Desktop services. 28
Citrix Click to access Citrix XenApp, XenDesktop, or VDI-in-a-Box services. 29
VMware View Click to access VMware View or Horizon View services. 35
Page 38
Getting Started
28
Learning the Basics
Accessing Microsoft Remote Desktop Services
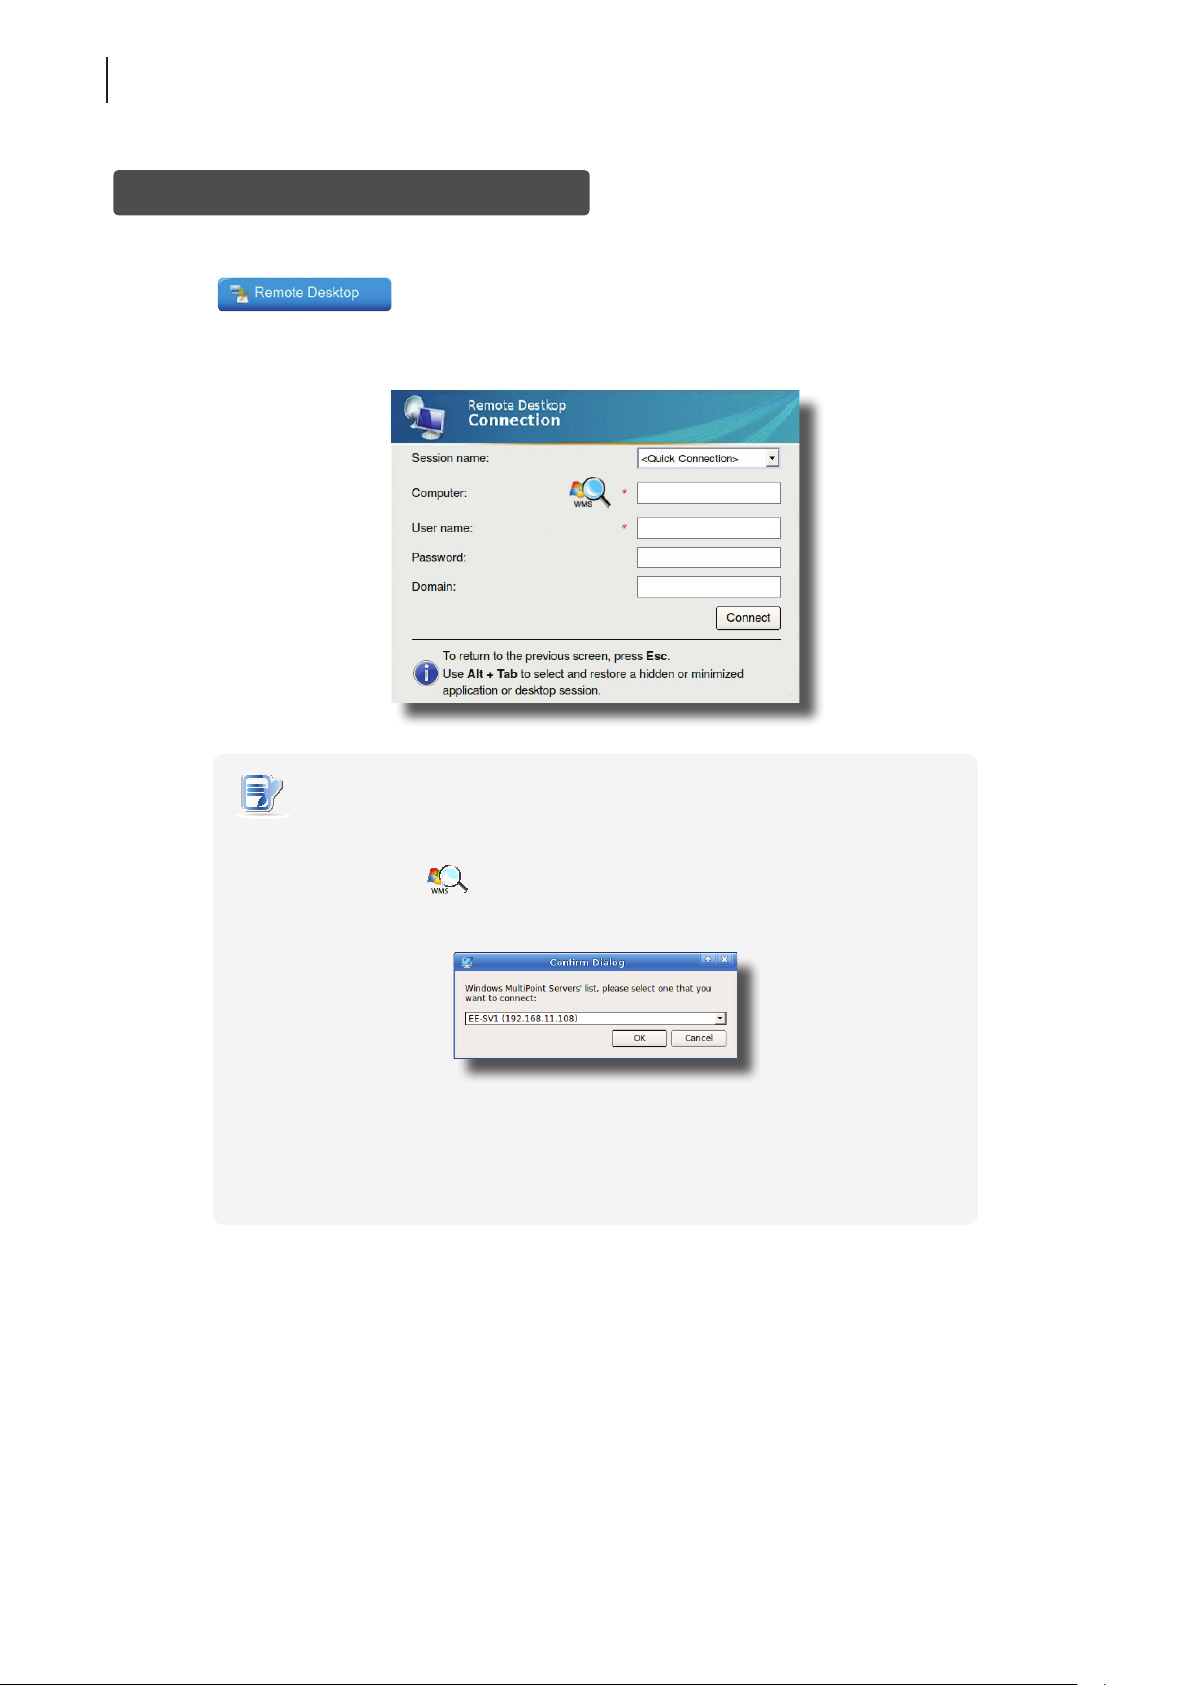
To access Microsoft Remote Desktop services, please do the following:
1. Click
on Atrust Quick Connection screen (see the screen in Topic 4).
2. On the appeared window, type in the computer name or IP address of the server, user name, password, and
domain (if any), and then click Connect.
NOTE
• To discover available Windows MultiPoint Server systems over your network,
please do the following:
1. Click
2. Upon completion, a window appears with the search result.
3. Click the drop-down menu to select the desired system, and then click OK.
4. The IP address of the selected system will appear in the Computer eld.
• To return to Atrust Quick Connection screen (see the screen in Topic 4), press Esc.
on the left of the Computer eld.
3. The remote desktop will be displayed on the screen.
Page 39
Accessing Citrix Services
Connecting to the Server
To connect to the server where the Citrix Web Interface is hosted, please do the following:
Getting Started
Learning the Basics
29
1. Click
on Atrust Quick Connection screen (see the screen in Topic 4).
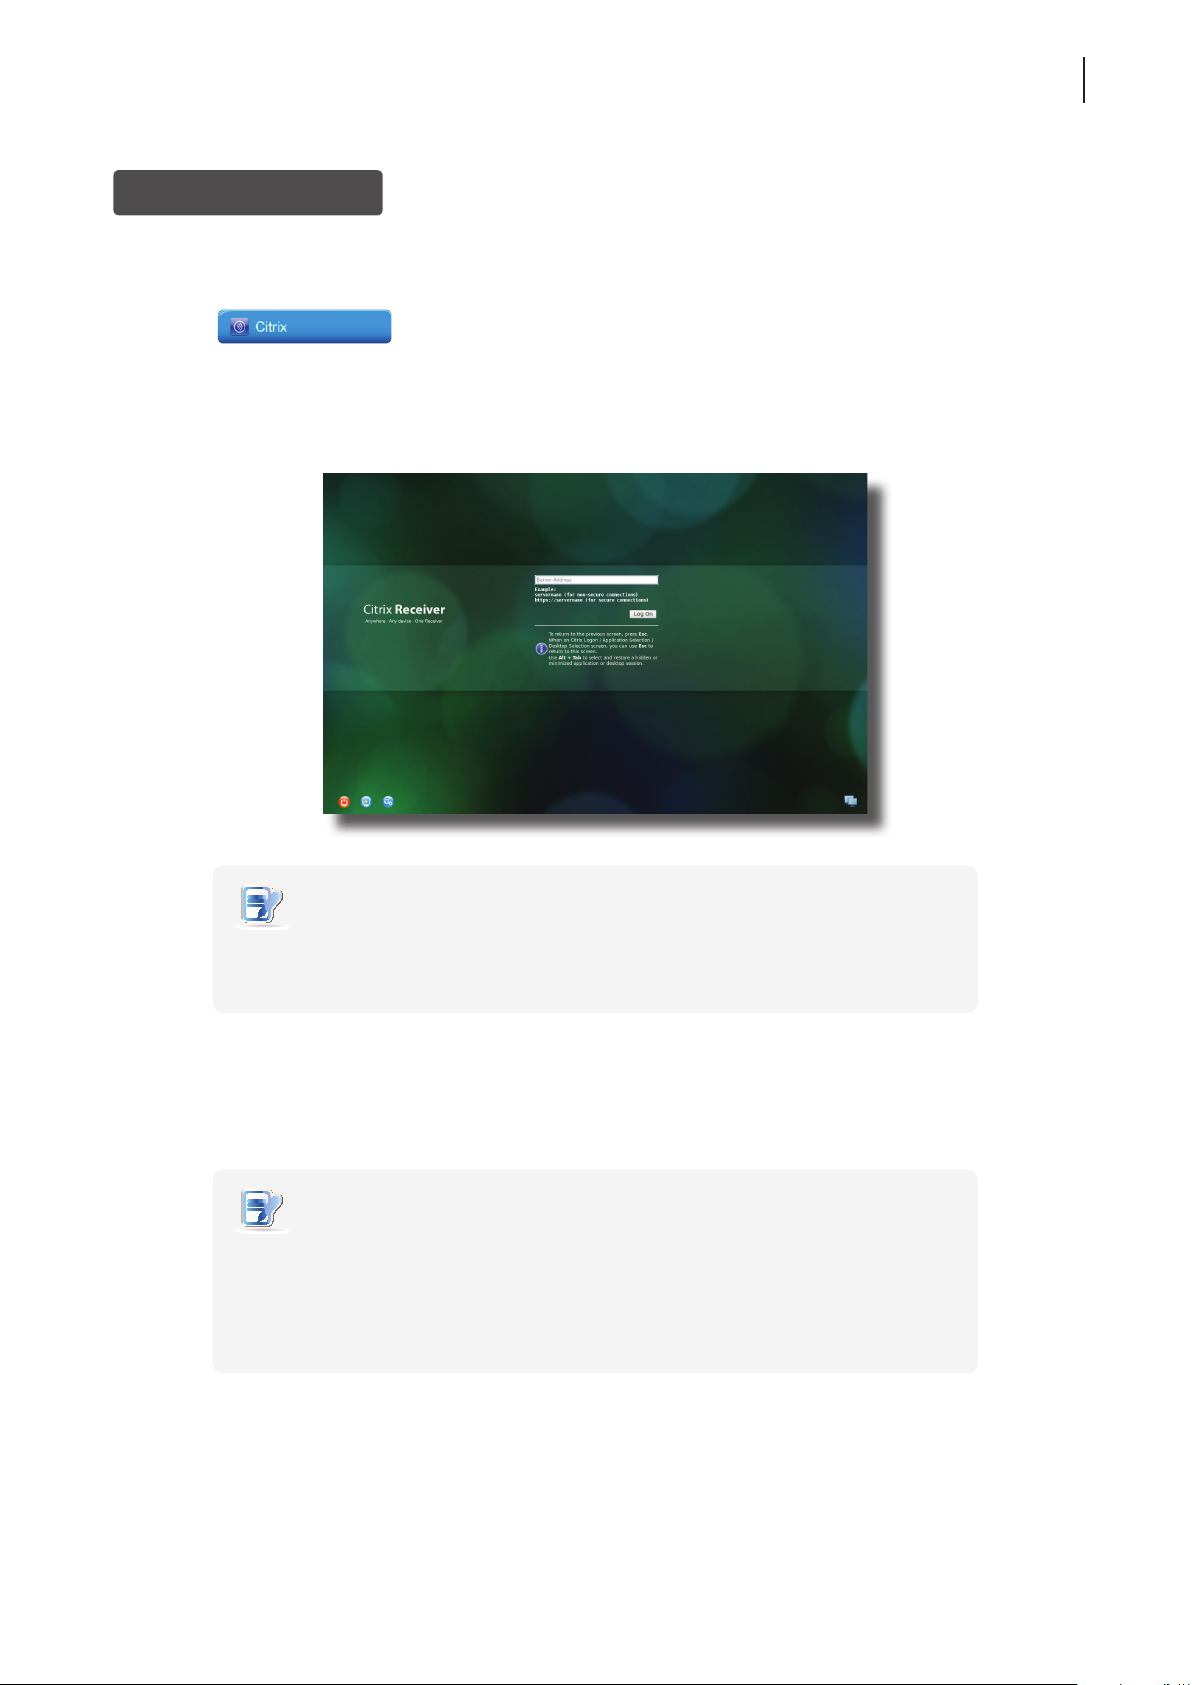
2. On the appeared Atrust Citrix Connection screen, enter the IP address / URL / FQDN of the server,
and then click Log On.
Atrust Citrix Connection Screen
NOTE
• FQDN is the acronym of Fully Qualied Domain Name.
• To return to Atrust Quick Connection screen (see the screen in Topic 4), press Esc.
Logging On to Citrix Services
When connected to the server, the Citrix Logon screen appears. The appeared screen and required credentials for
Citrix services may vary with the service type and version.
NOTE
• A warning message “This Connection is Untrusted“ might appear. Consult the
IT administrator for details and ensure the connection is secure rst. To import
a security certicate, please refer to section “4.2.11 Importing Certicates for
Remote Computers” on page 59. To bypass, click I Understand the Risks > Add
Exception > Conrm Security Exception.
Page 40
Getting Started
30
Learning the Basics
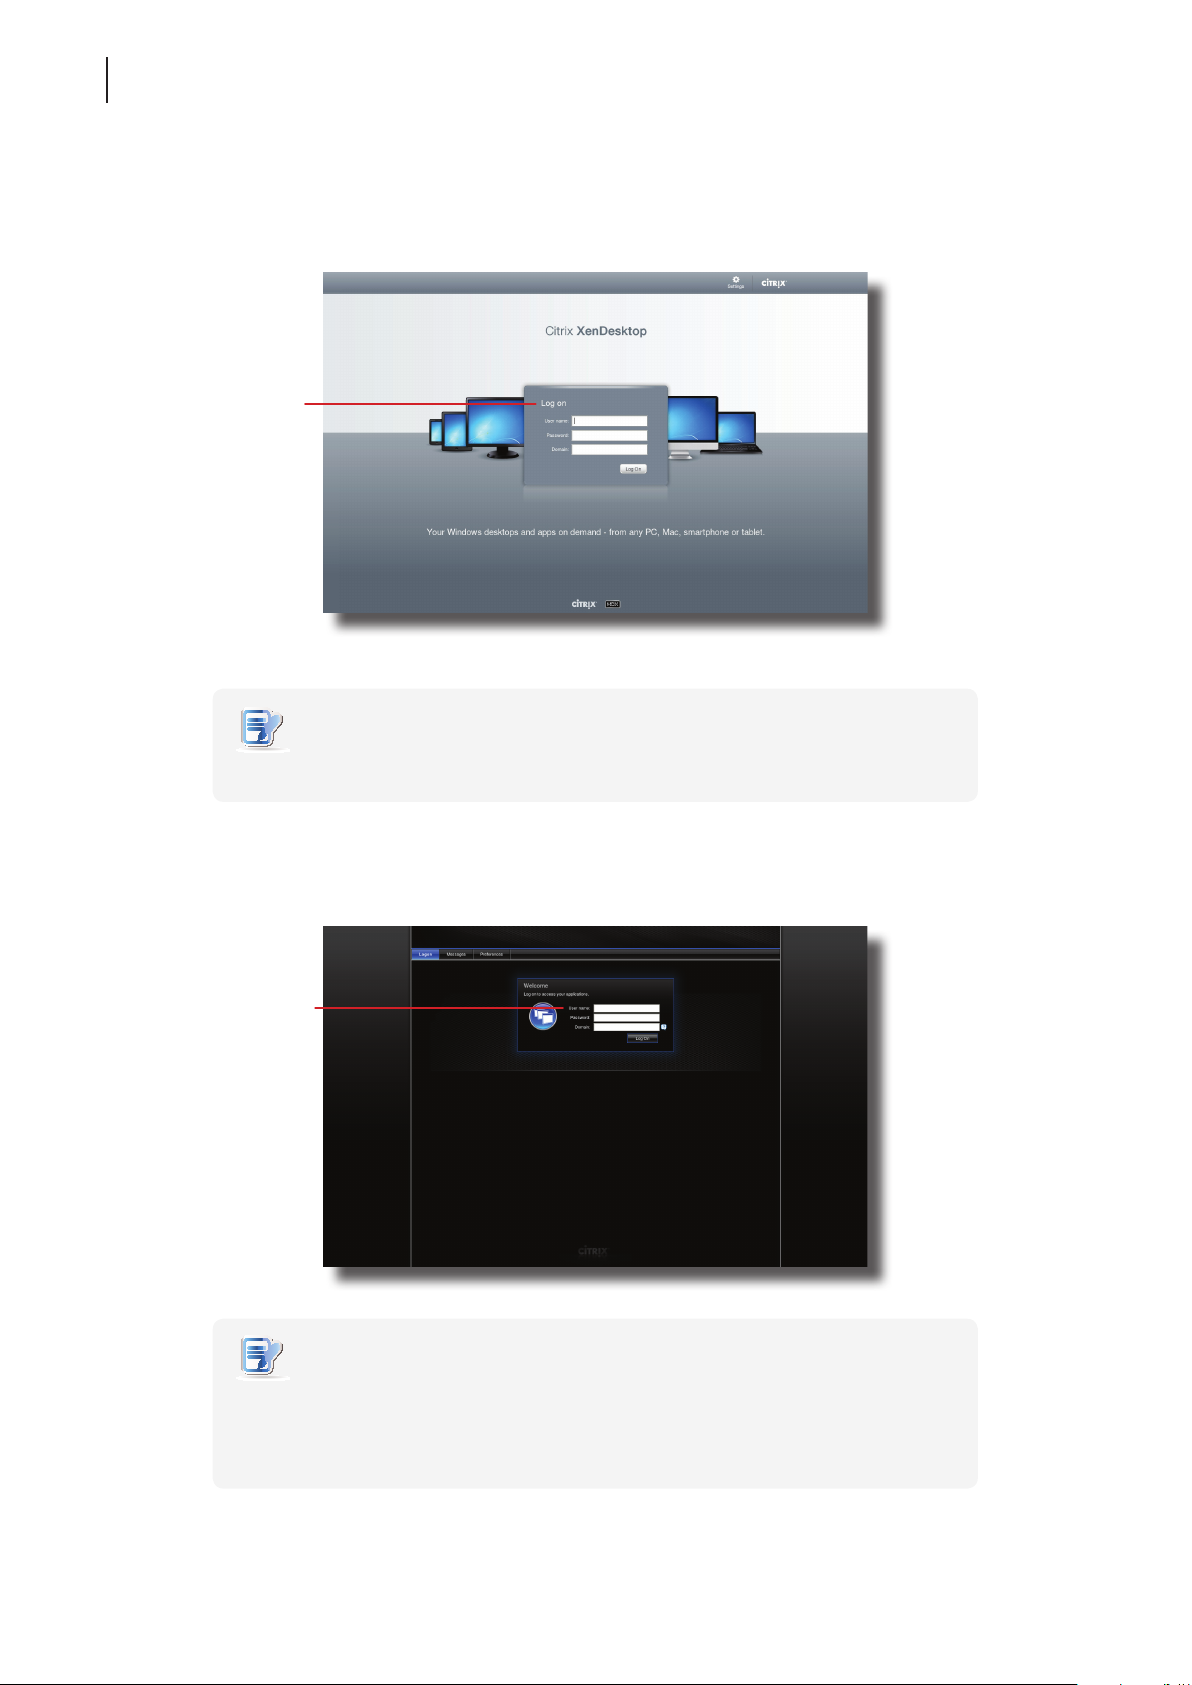
The following are some examples of Citrix Logon screens.
XenDesktop 5.6 Platinum:
Type the required
user name, password,
and then click
Log On to access
virtual desktops.
Citrix Logon Screen
NOTE
• To return to Atrust Quick Connection screen, press Esc.
XenApp 6.0 Fundamentals:
Type the required
user name, password,
domain, and then click
Log On to access
virtual applications.
Citrix Logon Screen
NOTE
• To return to Atrust Quick Connection screen, press Esc.
• If your XenApp server doesn’t belong to any domain, type the computer name of
the server in the Domain eld.
Page 41
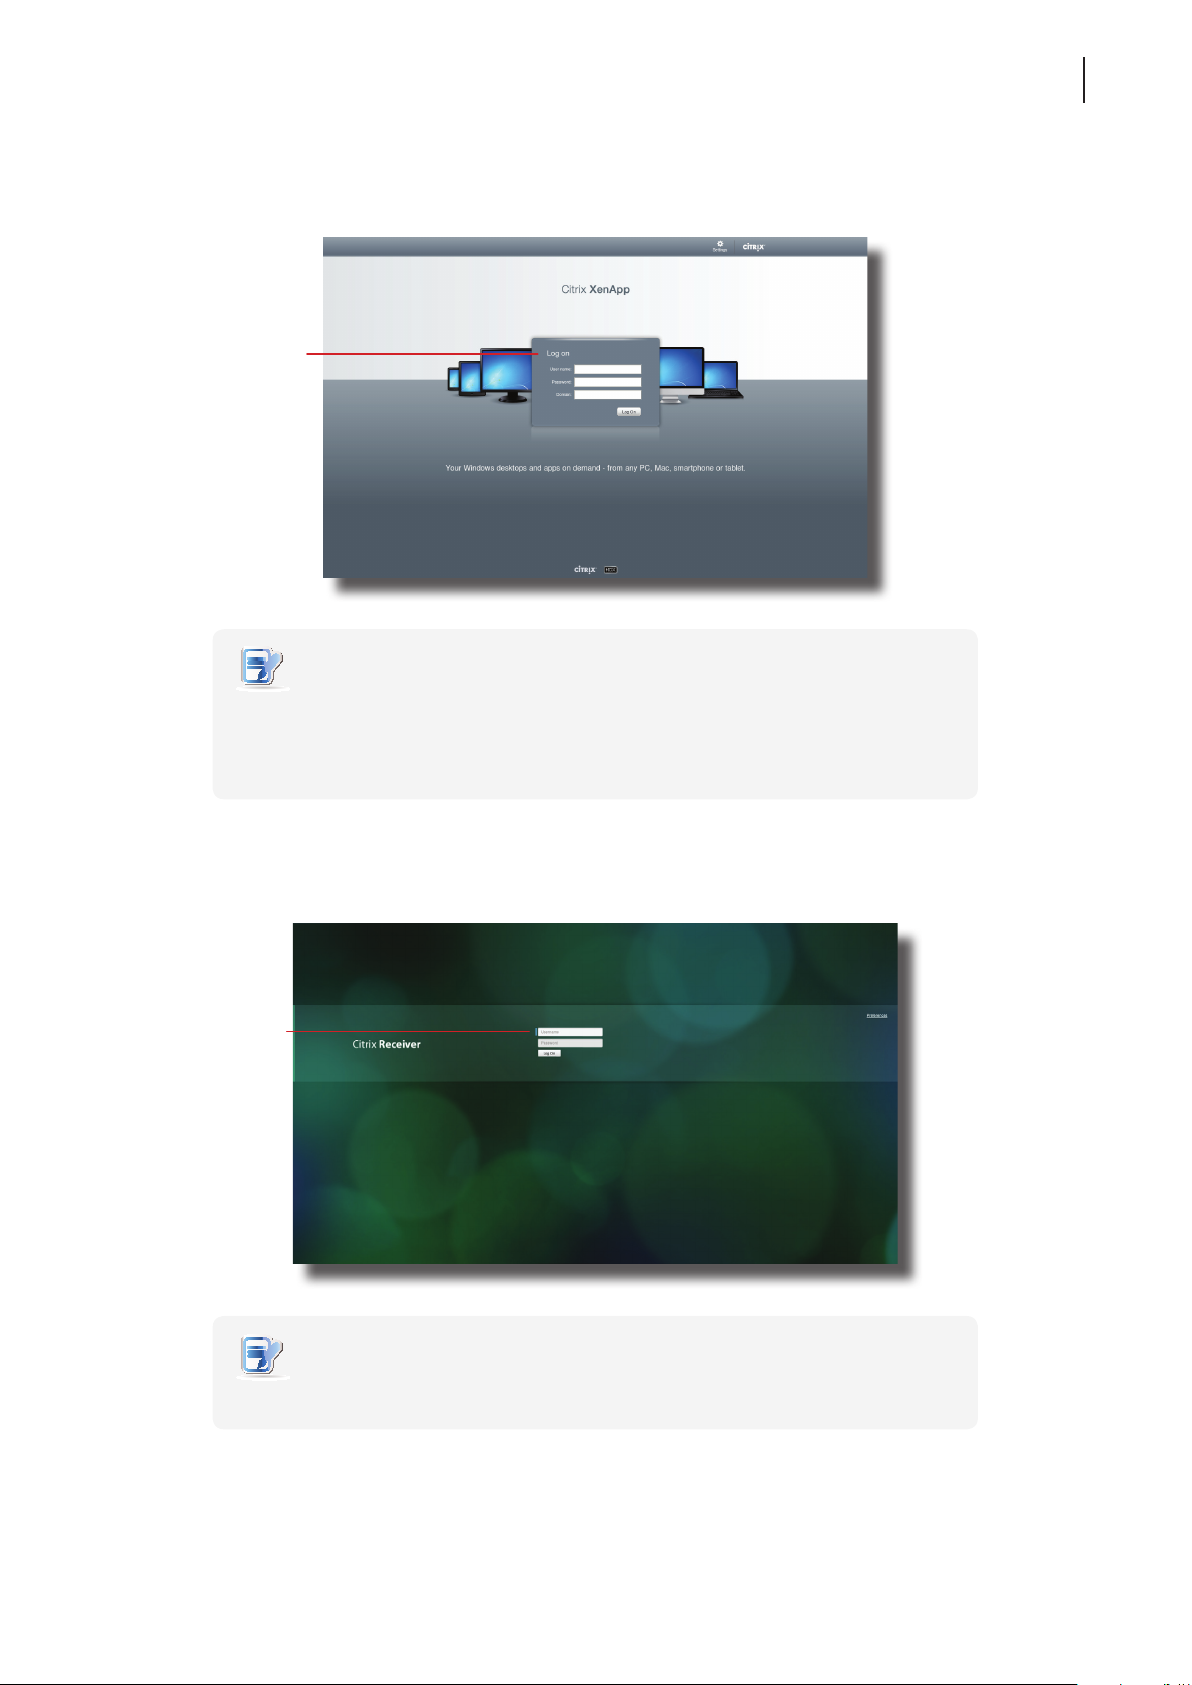
XenApp 6.5 Platinum:
Type the required
user name, password,
domain, and then click
Log On to access
virtual applications.
Citrix Logon Screen
Getting Started
Learning the Basics
31
VDI-in-a-Box:
Type the required user
name, password,
and then click
Log On to access
virtual desktops.
NOTE
• To return to Atrust Quick Connection screen, press Esc.
• If your XenApp server doesn’t belong to any domain, type the computer name of
the server in the Domain eld.
Citrix Logon Screen
NOTE
• To return to Atrust Quick Connection screen, press Esc.
Page 42
Getting Started
32
Learning the Basics
Accessing Virtual Desktops and Applications
You will enter the Desktop Selection or Application Selection screen after logon. On the screen you can click to select
the desired desktop or application(s).
NOTE
• You might enter the virtual desktop directly if only one type of virtual desktop is
assigned to the provided credentials.
TIP
• Use Alt + Tab to select and restore a hidden or minimized application or desktop.
The following are some examples of Selection screens and delivered desktops and applications.
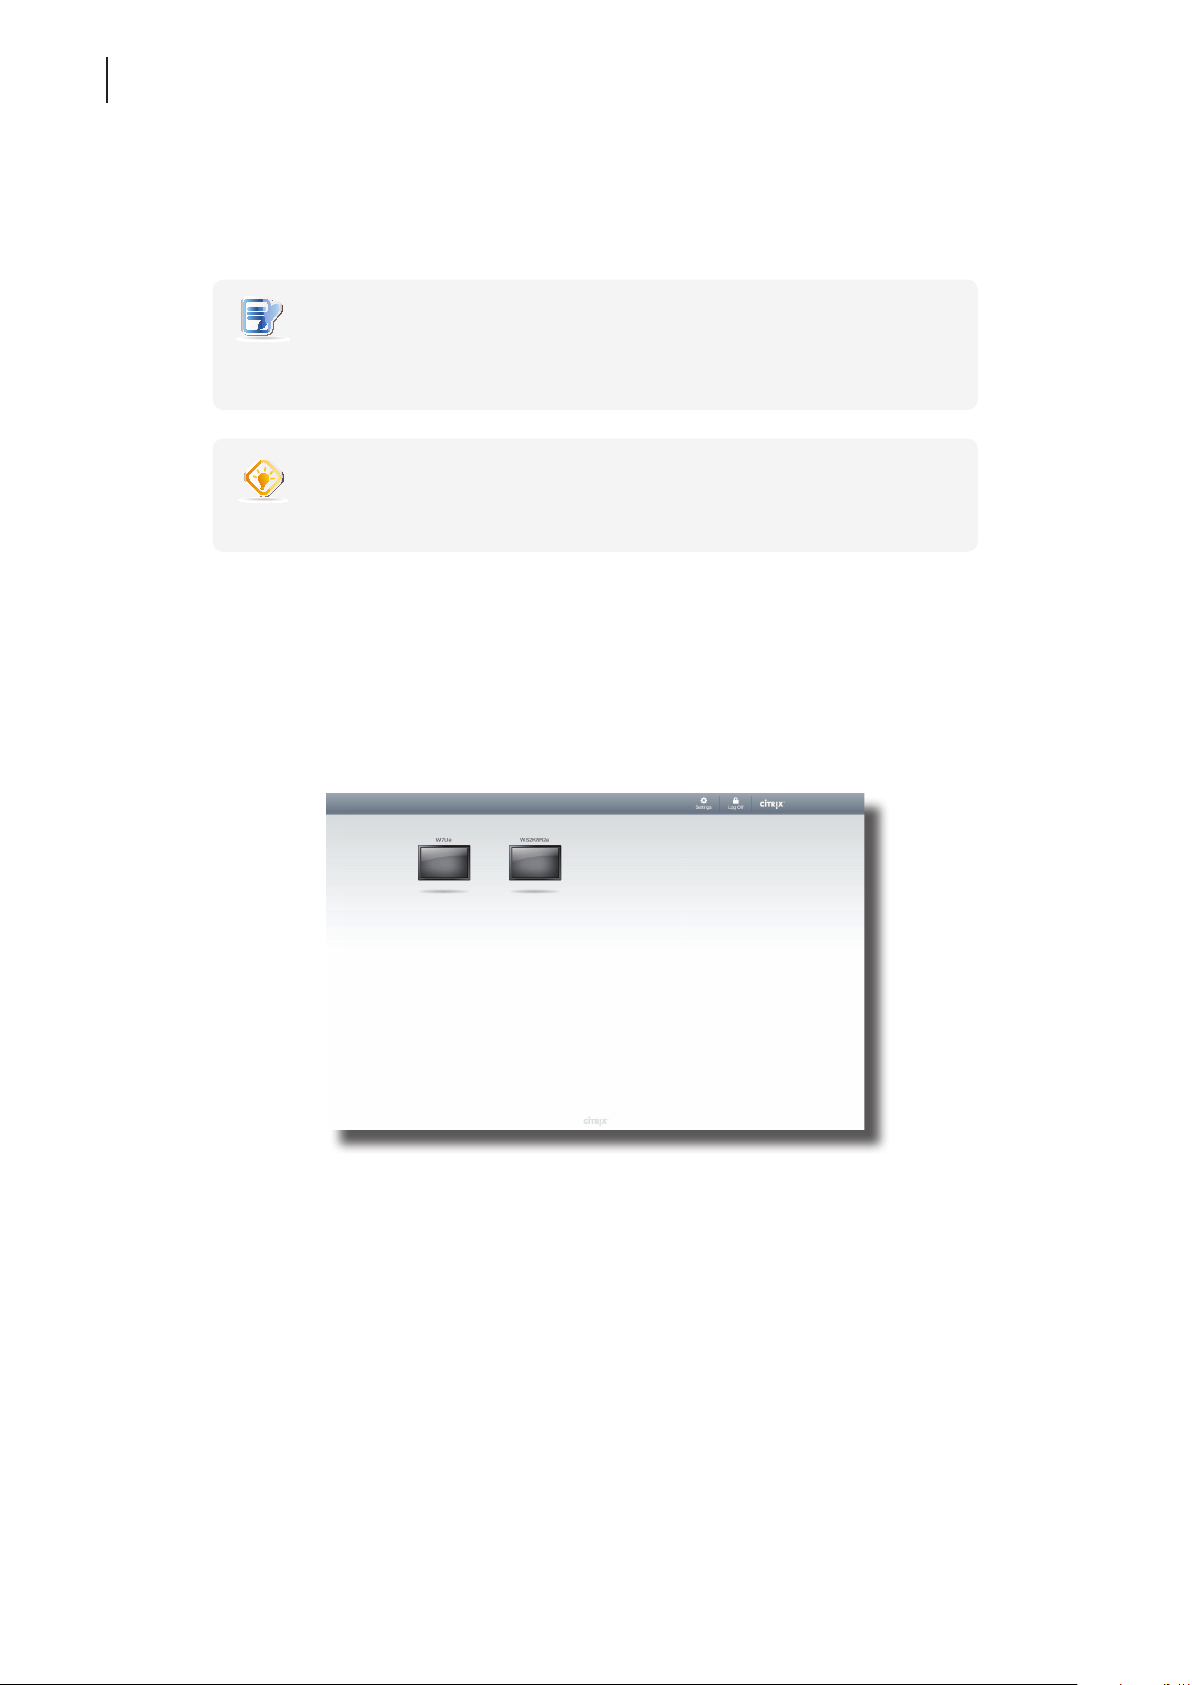
XenDesktop 5.6 Platinum:
1. The Desktop Selection screen appears after logon.
Desktop Selection Screen
2. Click to select the desired desktop.
3. The selected virtual desktop will be displayed on the screen.
Page 43
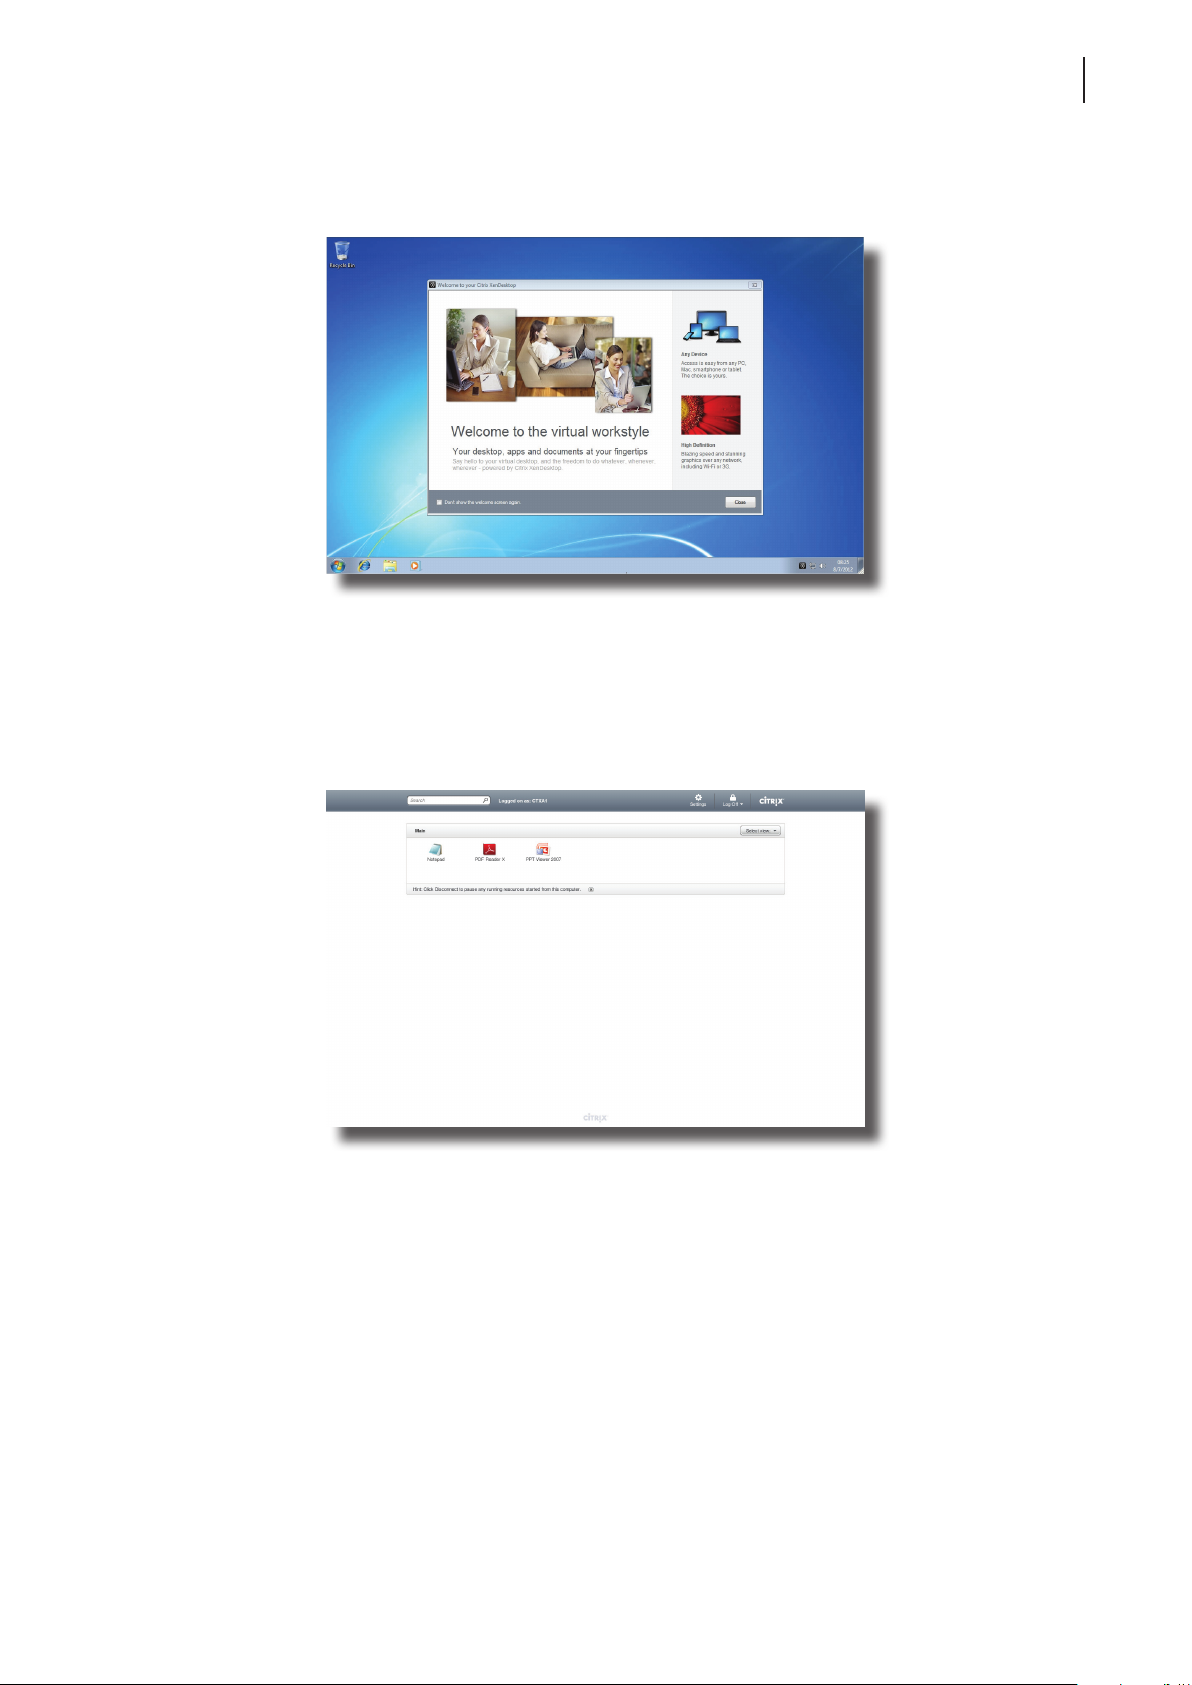
Virtual Desktop Example: Windows 7 Ultimate
Getting Started
Learning the Basics
33
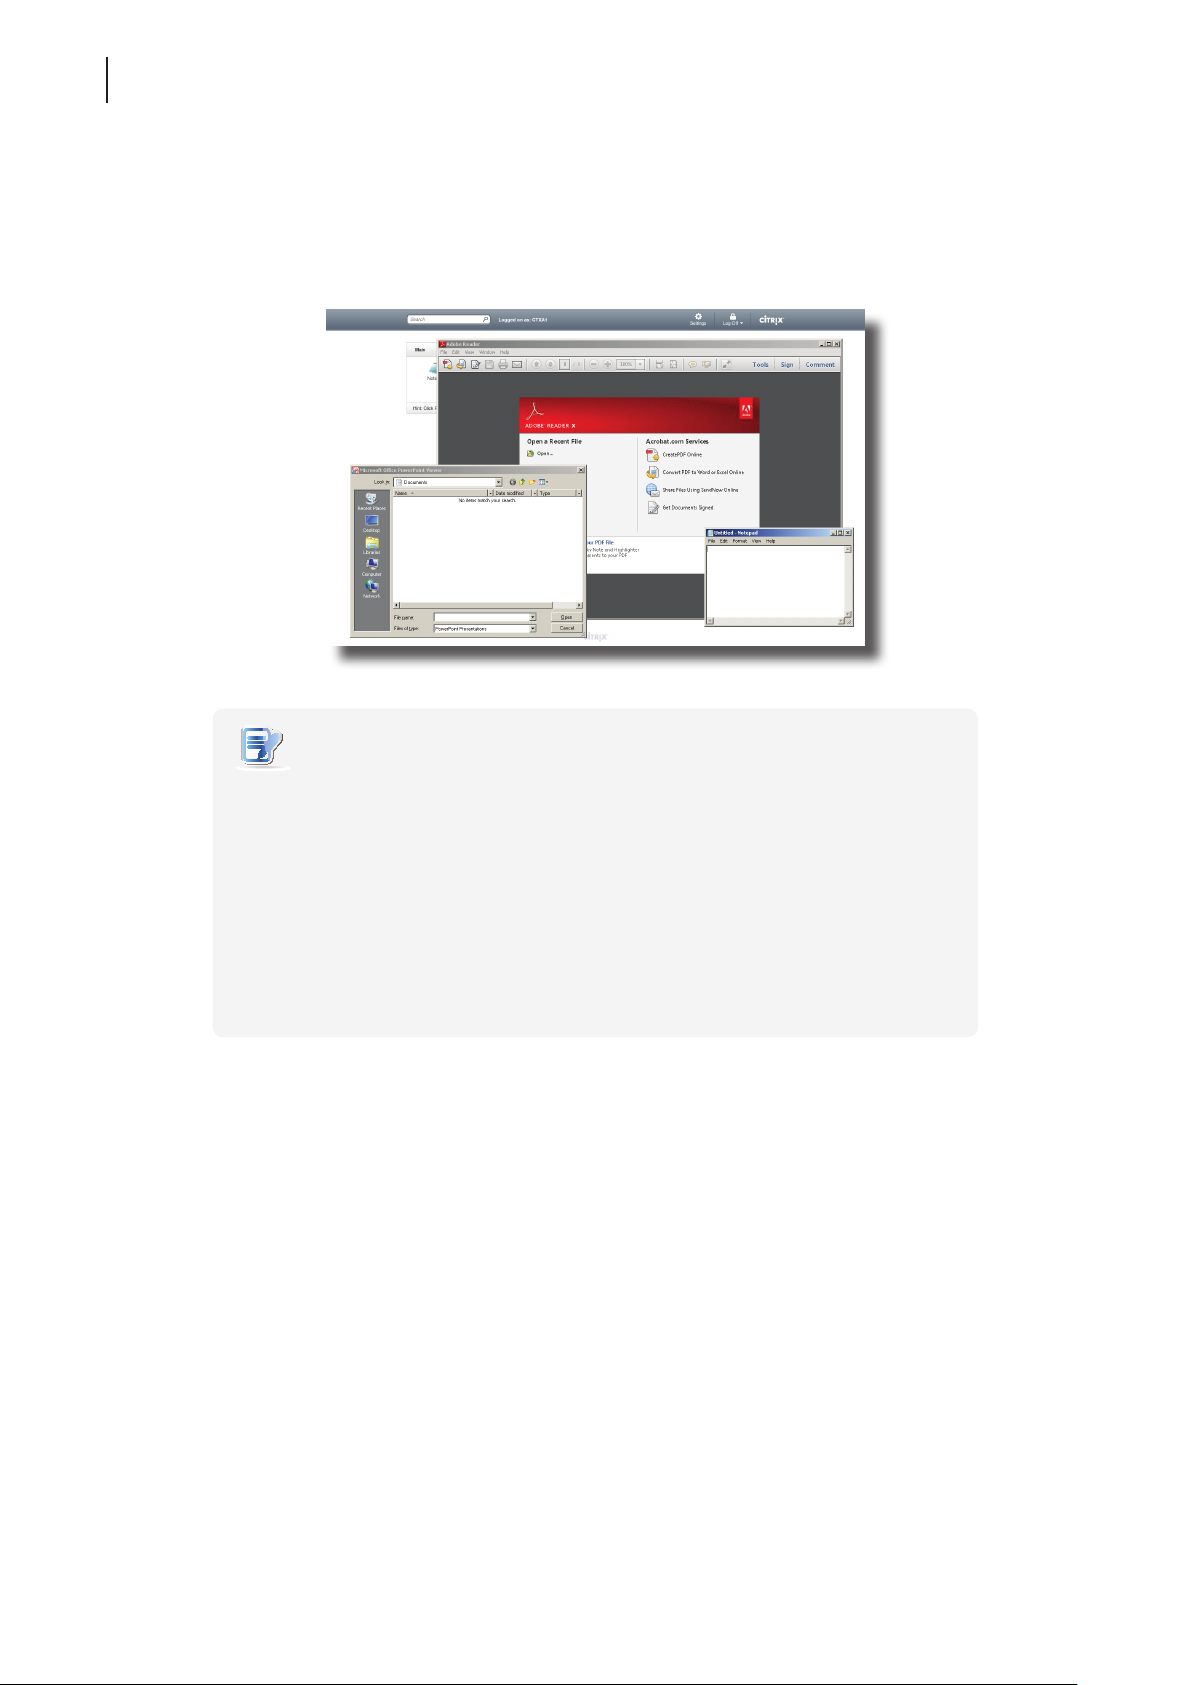
XenApp 6.5 Platinum:
1. The Application Selection screen appears after logon.
Application Selection Screen
2. Click to select the desired application(s).
Page 44
Getting Started
34
Learning the Basics
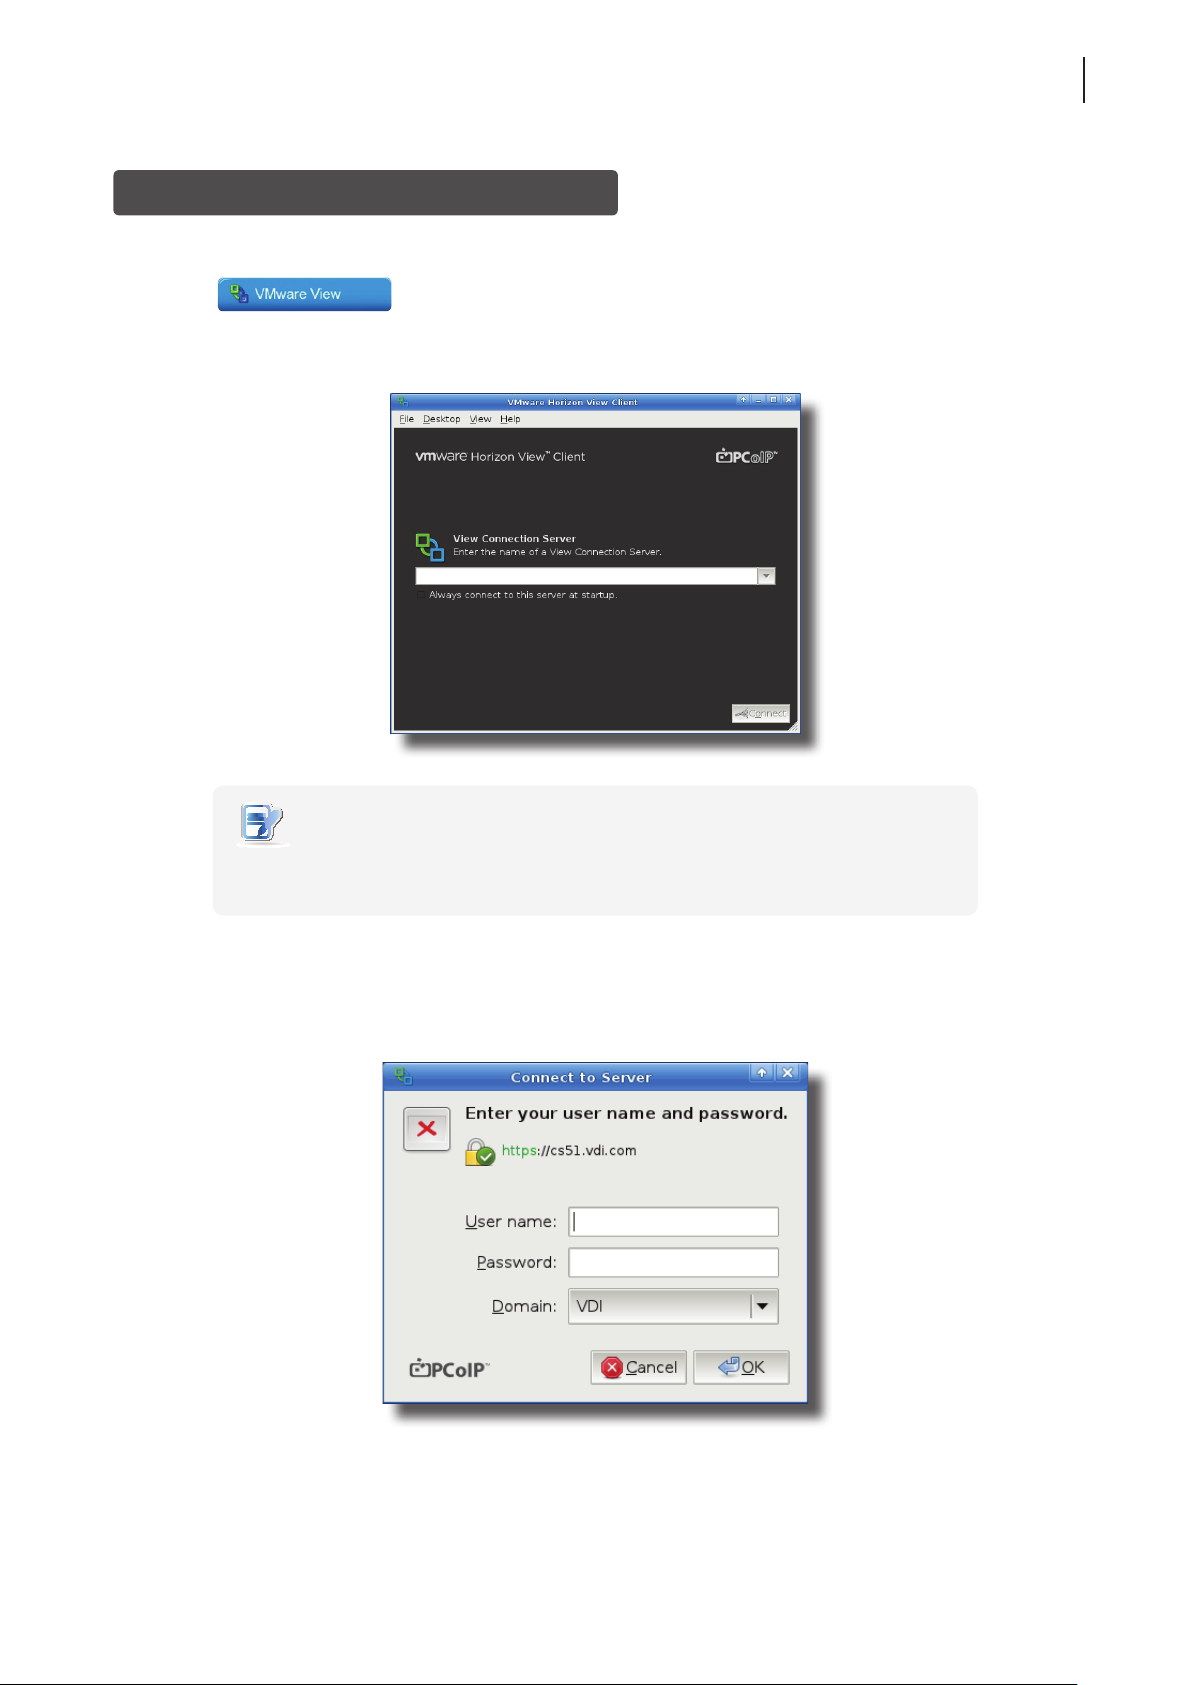
3. The selected application(s) will be displayed on the screen.
Virtual Application Examples
PowerPoint Viewer, Adobe Reader, and Notepad
NOTE
• Clicking on Application Selection screen will bring the screen to the front and leave
all launched application windows hidden behind. Use Alt + Tab to select and restore
a hidden or minimized application window.
• Exiting a virtual desktop or application will return to the Desktop Selection or
Application Selection screen. On the screen, you can:
Click to launch another virtual desktop if any or to launch other applications.
Click Log O on the top of the screen to return to the Citrix Logon screen.
Press Esc to return to Atrust Quick Connection screen directly.
Page 45
Accessing VMware View or Horizon View Services
To access VMware View or Horizon View services, please do the following:
Getting Started
Learning the Basics
35
1. Click
on Atrust Quick Connection screen (see the screen in Topic 4).
2. On the opened window, enter the IP address or computer name of the VMware View Connection Server, and
then click Connect.
NOTE
• To return to Atrust Quick Connection screen (see the screen in Topic 4), close the
opened window.
3. A Welcome window might appear, click OK to continue.
4. A window appears prompting for the credentials. Enter your user name, password, click the Domain
drop-down menu to select the domain, and then click OK.
Page 46
Getting Started
36
Learning the Basics
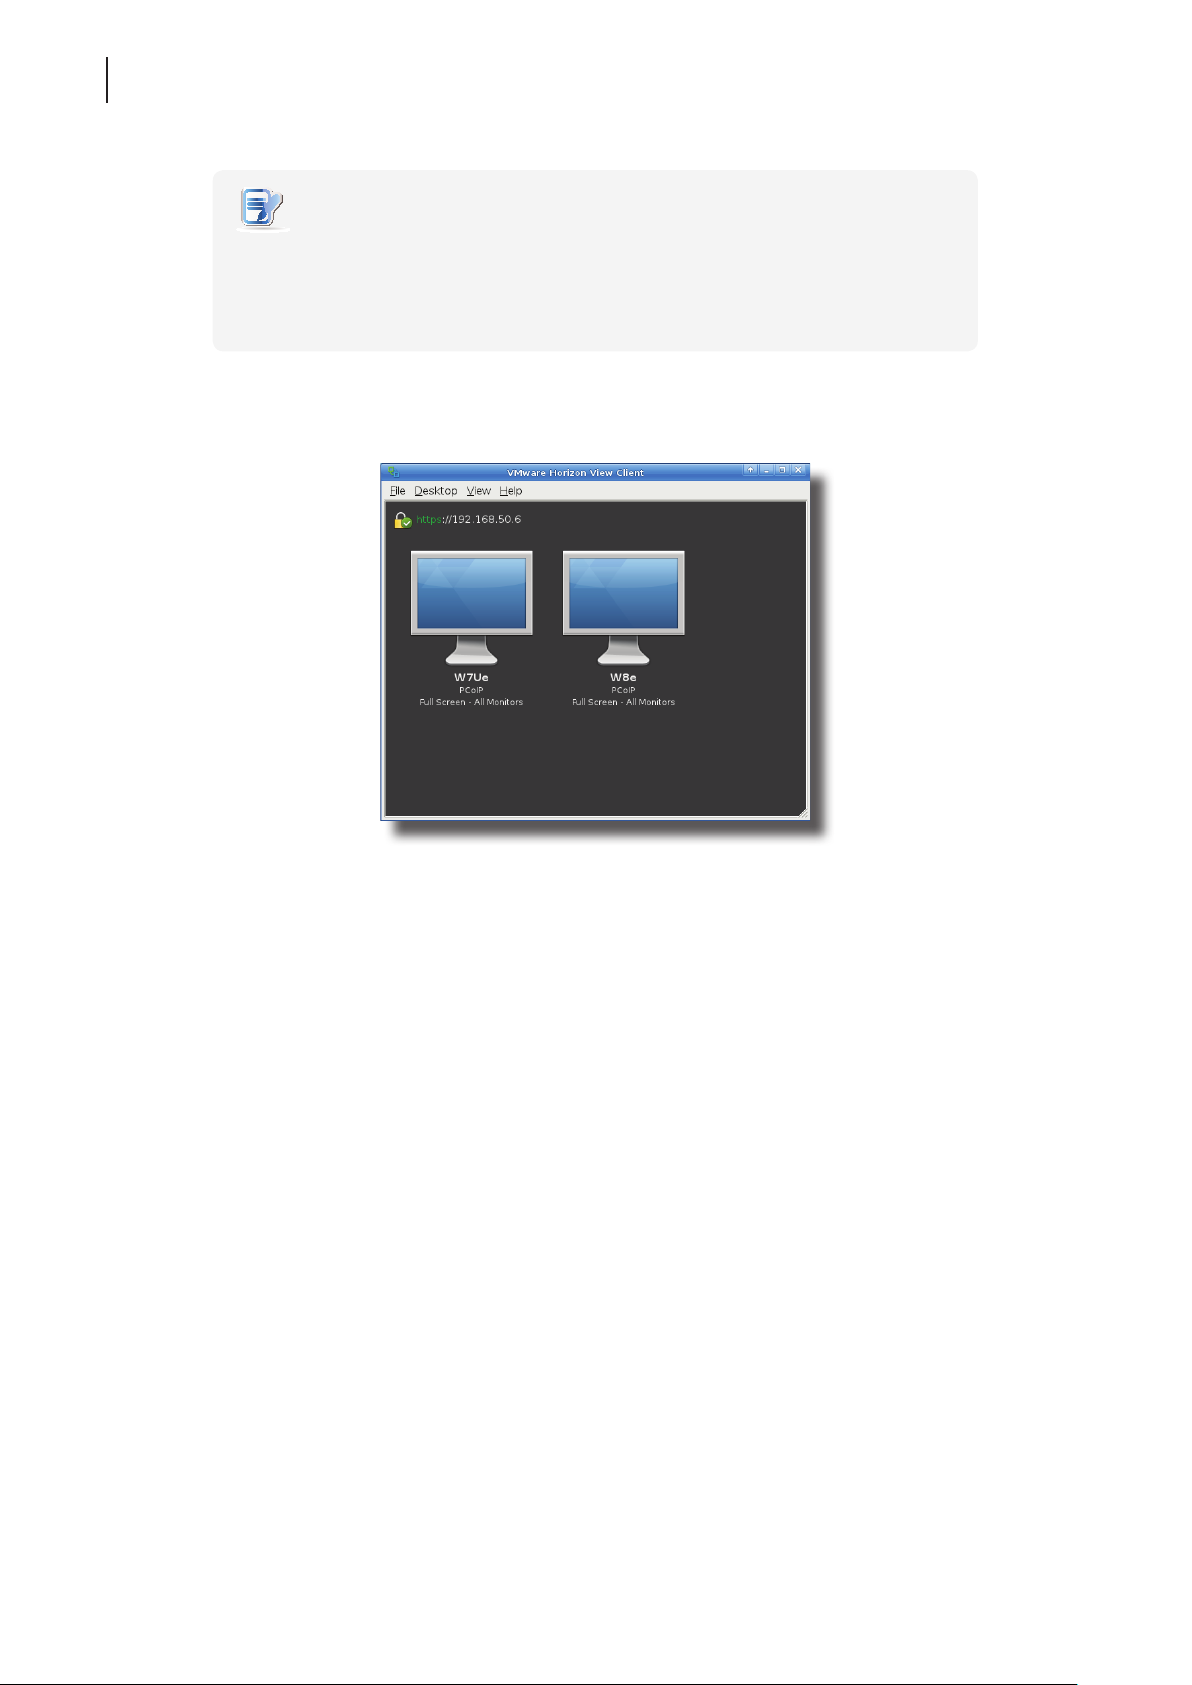
5. A window appears with available desktops for the provided credentials. Double click to select
the desired desktop.
NOTE
• A window might appear with a certicate message about the remote server.
Consult the IT administrator for details and ensure the connection is secure rst.
To import a security certicate, please refer to section “4.2.11 Importing Certicates
for Remote Computers” on page 59. To bypass, click Connect Insecurely.
6. The virtual desktop will be displayed on the screen.
Page 47

Conguring Client Settings
This chapter provides instructions on how to congure advanced
settings and customize your t60/t62 with Atrust Client Setup.
4.1 Atrust Client Setup
4.2 Conguring System Settings
4.3 Conguring User Interface Settings
Interface overview
Available settings at glance
System tab overview
Available settings at a glance
User Interface tab overview
Available settings at a glance
4
39
40
41
42
63
64
4.4 Conguring External Device Settings
Devices tab overview
Available settings at a glance
4.5 Conguring Network Settings
Network tab overview
Available settings at a glance
4.6 Conguring Service Access Settings
Applications tab overview
Available settings at a glance
74
75
82
83
101
102
Page 48

Page 49
Conguring Client Settings
Atrust Client Setup
4.1 Atrust Client Setup
Your t60/t62 comes with Atrust Client Setup, the built-in local client management console to help you congure
client settings and customize your t60/t62.
4.1.1 Interface Overview
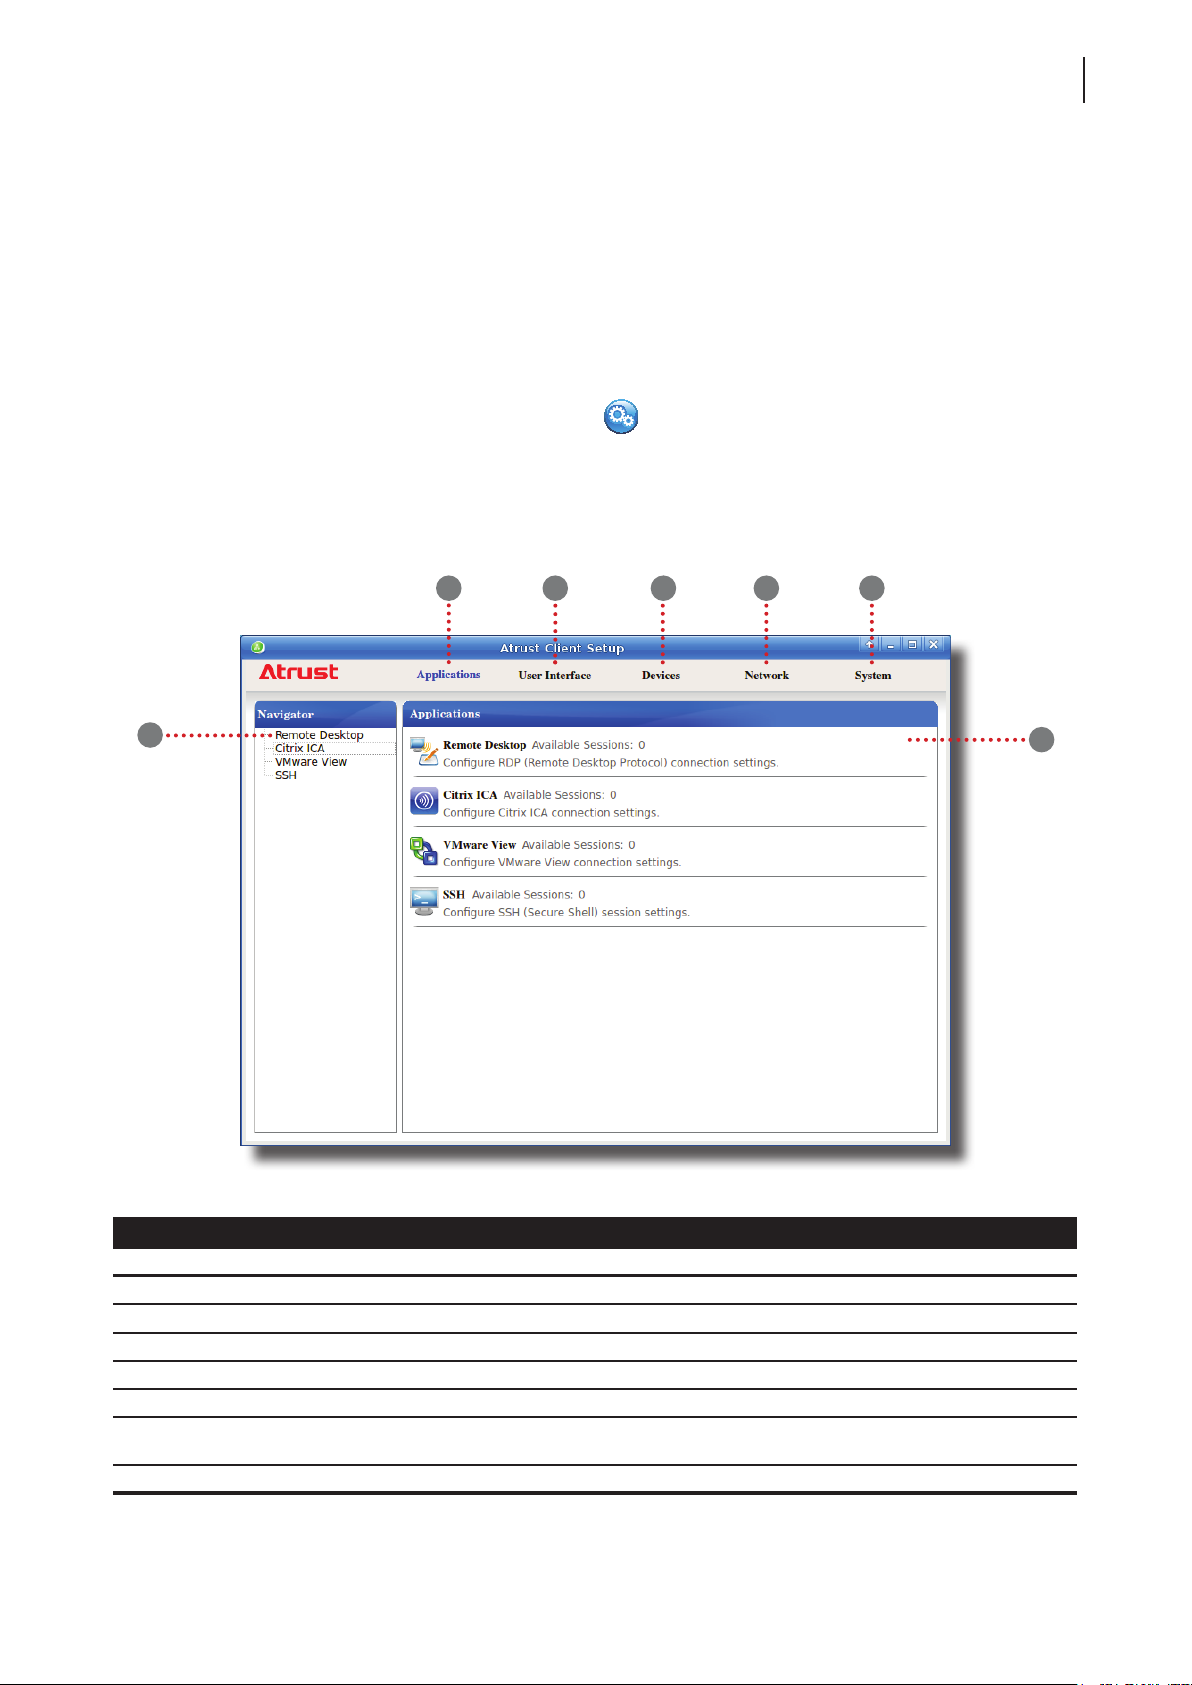
To access Atrust Client Setup on your t60/t62, please do the following:
39
1. On Atrust Quick Connection screen, click the Setup
2. The Atrust Client Setup window appears.
Interface Overview
1
2
6
icon to launch Atrust Client Setup.
43
5
7
Interface Elements
No. Name Description
1 Applications tab Click to congure settings for service access through the client.
2 User Interface tab Click to congure settings for the user interface of the client.
3 Devices tab Click to congure settings for external devices of the client.
4 Network tab Click to congure settings for the connectivity of the client to networks and servers.
5 System tab Click to congure settings for the operation and maintenance of the client.
6 Navigation area
7 Conguration area Congures setting values when a setting item or entry is selected.
Click to select a setting item under a selected tab or to select a setting entry under
a selected setting item.
Page 50

Conguring Client Settings
40
Atrust Client Setup
4.1.2 Client Settings at a Glance
The following table provides a brief description of each setting item under ve main setting categories.
Tab Setting Item Section Page
• Conguring time zone and time server
• Conguring passwords
• Conguring remote assistance settings
• Updating rmware
System
User Interface
• Enabling/Disabling the Appliance mode
• Enabling/Disabling Quick Connection
• Enabling/Disabling the execution of the
text-based (command-line) functions
• Collecting event logs and capturing related
screens for error reporting
• Importing certicates for remote computers
• Conguring display settings
• Customizing desktop and system language
• Hiding/Showing Quick Access shortcuts
• Adjusting keyboard settings
• Conguring screensaver settings
4.2 Conguring System Settings 41
4.3 Conguring User Interface Settings 63
Devices
Network
Applications
• Conguring settings for USB storage devices
• Conguring settings for audio devices
• Conguring settings for local/network printers
• Conguring wired network settings
• Conguring VPN settings
• Creating the mapping of IP addresses to the
names of host servers
• Changing the host name of your client
• Conguring wireless network settings
• Conguring proxy settings for Web-based
access to services
• Conguring Microsoft RDP connection settings
• Conguring Citrix ICA connection settings
• Conguring VMware View connection settings
• Conguring SSH connection settings
4.4 Conguring External Device Settings 74
4.5 Conguring Network Settings 82
4.6 Conguring Service Access Settings 101
Page 51
Conguring Client Settings
Conguring System Settings
4.2 Conguring System Settings
4.2.1 System Tab Overview
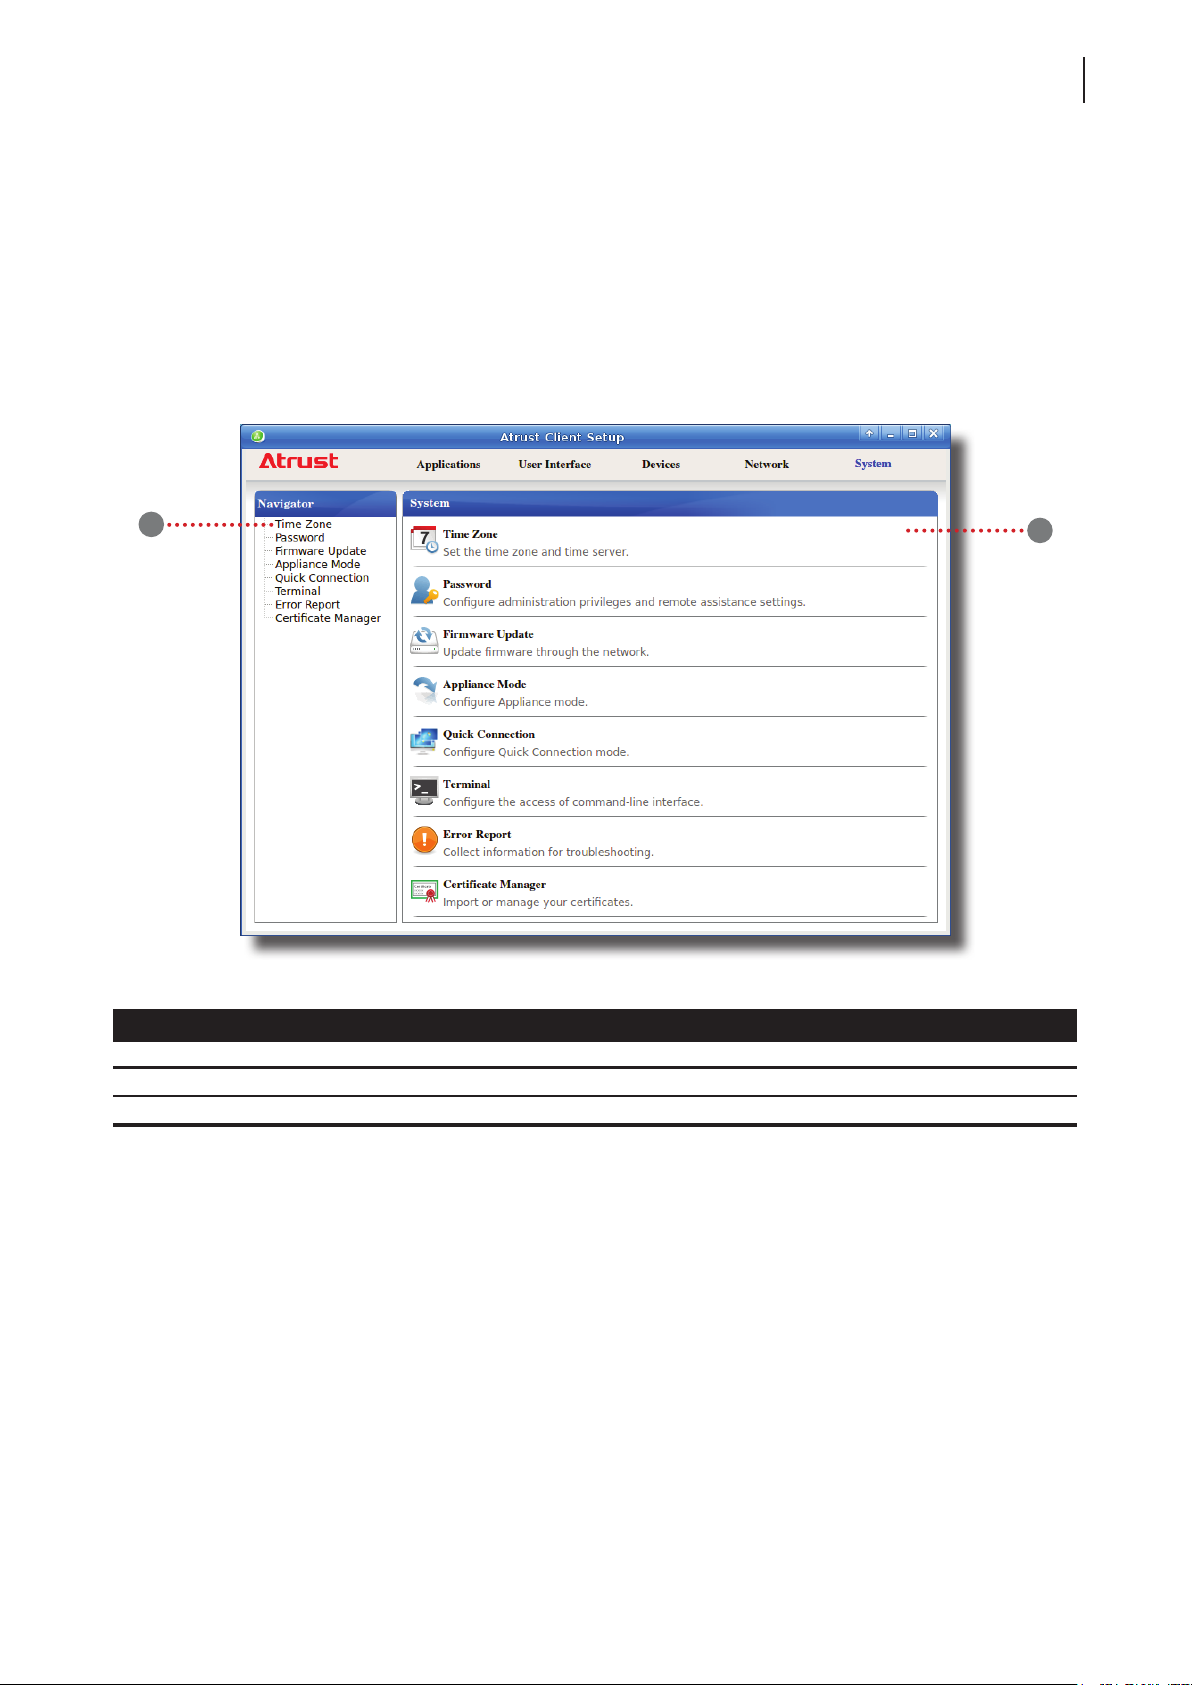
System tab enables you to congure settings for the operation and maintenance of clients. To access available
settings of System tab, click the tab on Atrust Client Setup.
System Tab Overview
41
1
Interface Elements
No. Name Description
1 Navigation area Click to select a setting item under System tab.
2 Conguration area Congures setting values when a setting item or entry is selected.
2
Page 52
Conguring Client Settings
42
Conguring System Settings
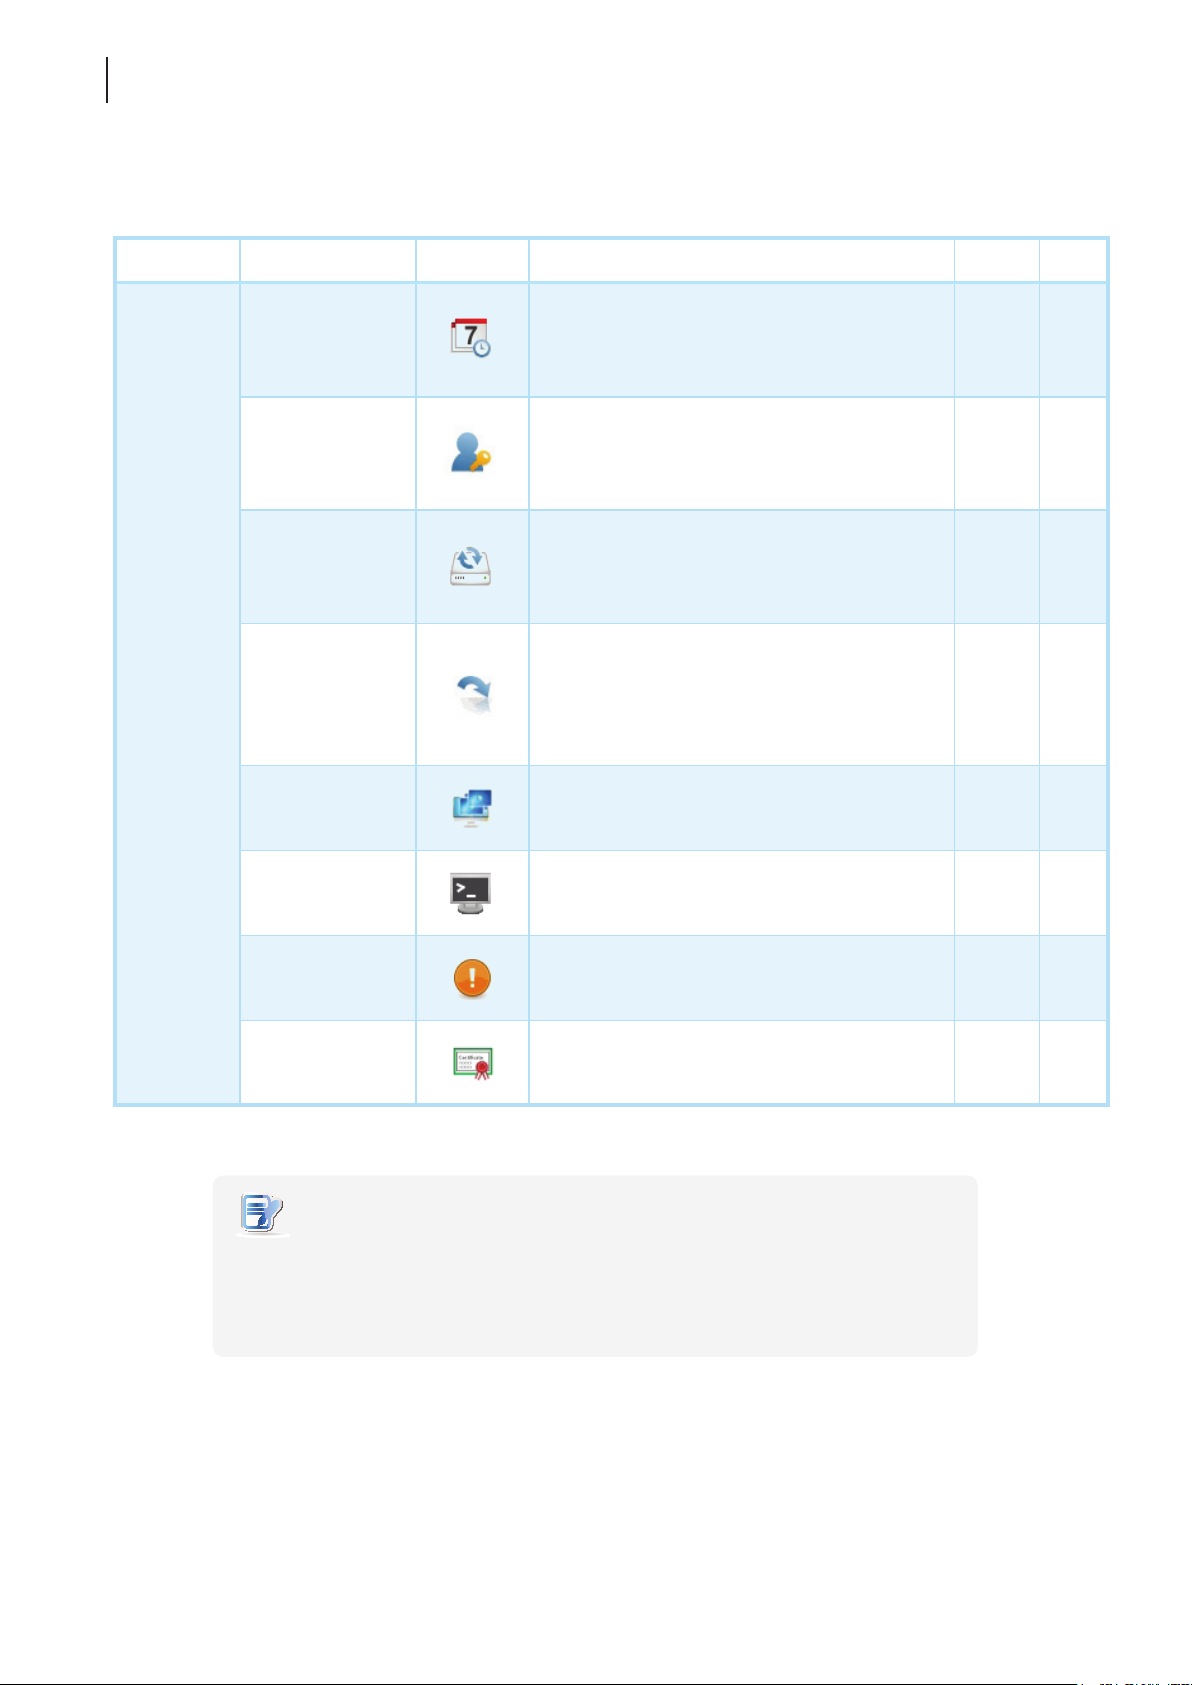
4.2.2 Available Settings at a Glance
Tab Setting Icon Description Section Page
System
Time Zone
Password
Firmware Update
Appliance Mode
Quick Connection
Terminal
Click to congure the time zone and time server
for your t60/t62.
Click to congure the access privileges of Atrust
Client Setup for t60/t62 users.
Click to congure settings for remote assistance.
Click to update rmware through the network.
This feature is applicable to the client only when
the client is managed by the remote Atrust Device
Manager console.
Click to enable/disable the Appliance mode to
allow/disallow the automatic RDP / ICA / View
sessions. In Appliance mode, the client starts up
with the desired RDP / ICA / View session and
shuts down when the user logs out.
Click to enable/disable the Quick Connection
mode after system startup.
Click to enable/disable the execution of the
text-based (command-line) functions.
4.2.3 43
4.2.4
4.2.5
4.2.6 48
4.2.7 50
4.2.8 54
4.2.9 56
44
46
Error Report
Certicate Manager
NOTE
• Atrust Device Manager is a remote and mass client management console,
helping you remotely manage a large number of endpoint devices in a desktop
virtualization infrastructure. For more information about Atrust Device Manager,
please refer to the User’s Manual for Atrust Device Manager.
Click to collect error log and launch the screen
capturing program for error reporting.
Click to import or manage certicates for
remote computers.
4.2.10 57
4.2.11 59
Page 53
Conguring Client Settings
Conguring System Settings
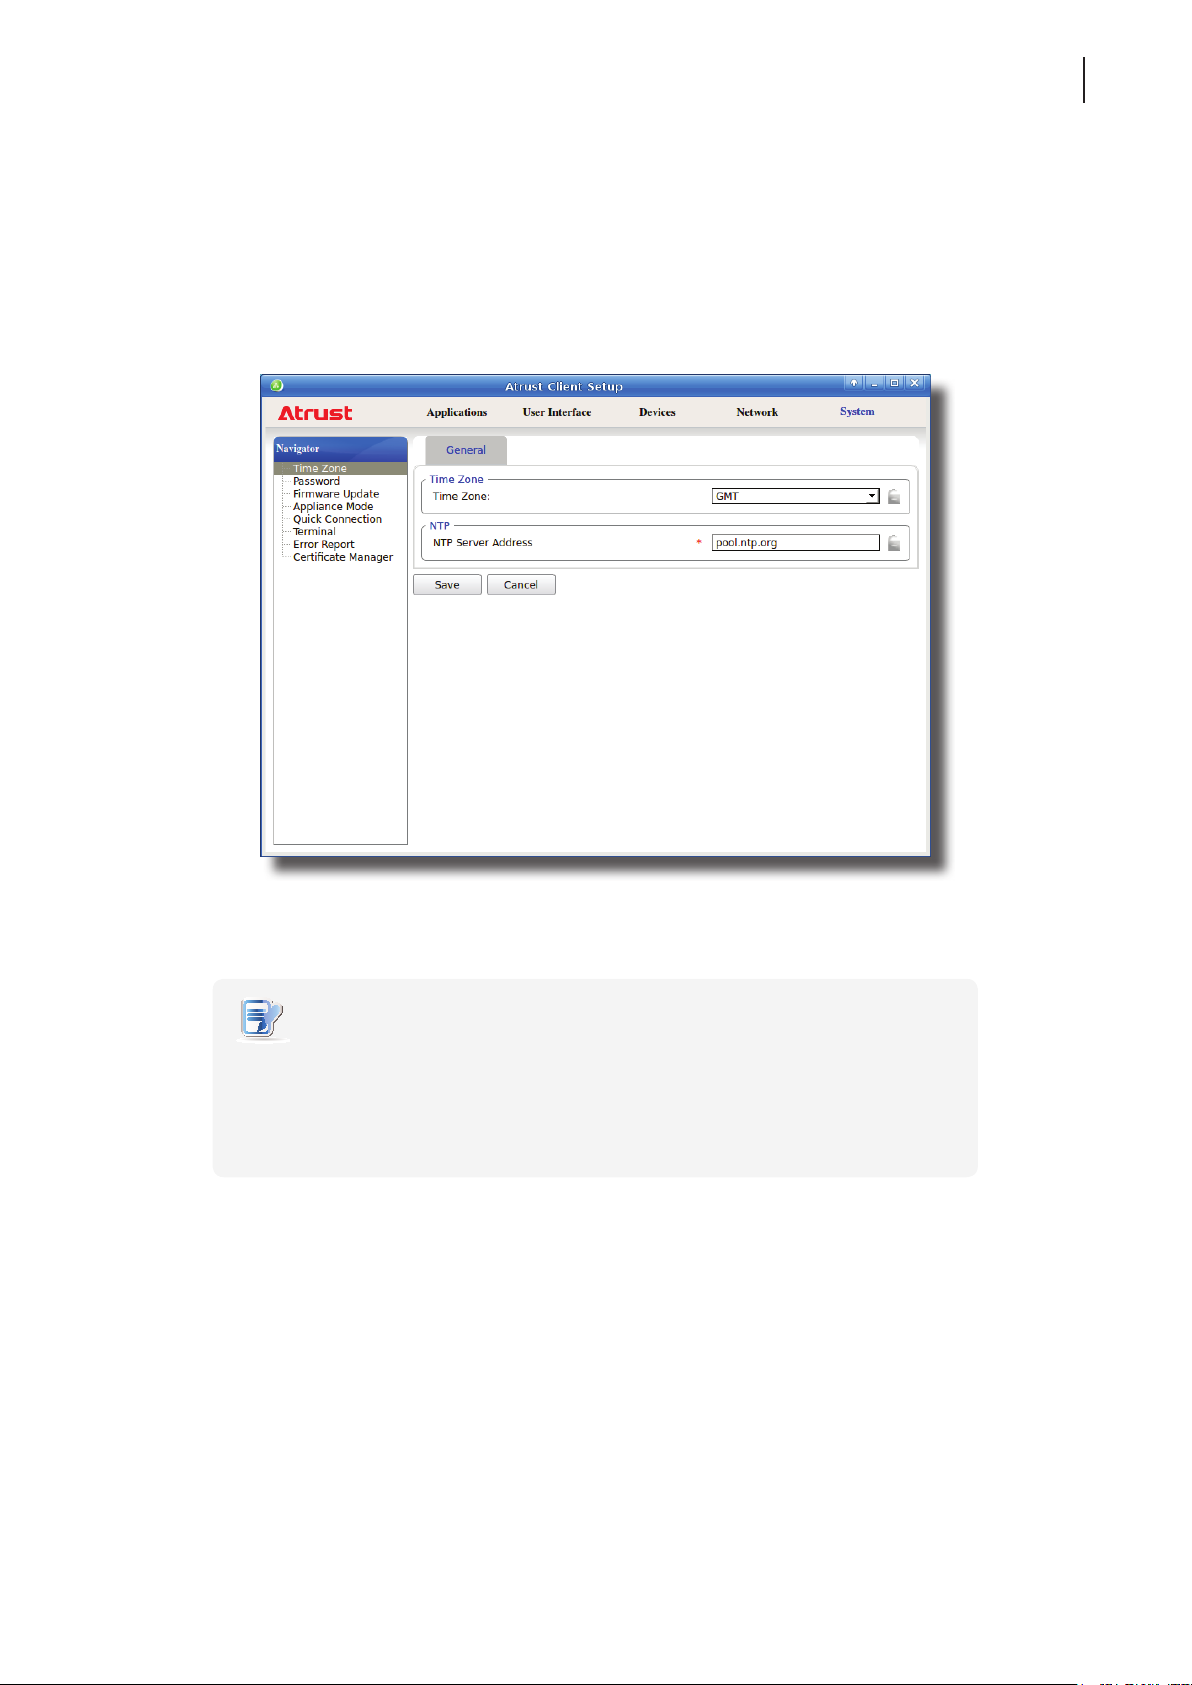
4.2.3 Conguring Time Zone and Time Server
The Time Zone setting allows you to congure the desired time zone and time server to get the accurate system
time for your t60/t62.
To set the desired time zone and time server, please do the following:
1. On Atrust Client Setup, click System > Time Zone.
43
2. Under the Time Zone section, click the drop-down menu to select the desired time zone.
3. Under the NTP (Network Time Protocol) section, use the default or type in the desired time server.
NOTE
• The IP address of the default time server is pool.ntp.org. For more information on
the default, please refer to the website for the NTP Pool Project at www.pool.ntp.org.
• Ensure the connectivity of your t60/t62 to the network or Internet in order to get
accurate time from the time server.
4. Click Save to apply.
Page 54
Conguring Client Settings
44
Conguring System Settings
4.2.4 Conguring the Access Privileges and Passwords of Atrust Client Setup
You can congure the access privileges of Atrust Client Setup for t60/t62 users by the Password setting.
NOTE
• All t60/t62 users are allowed to access Atrust Client Setup by factory default.
You can make changes as desired using this setting.
Setting Access Privileges and Password Only for Administrators
To set access privileges and password only for administrators, please do the following:
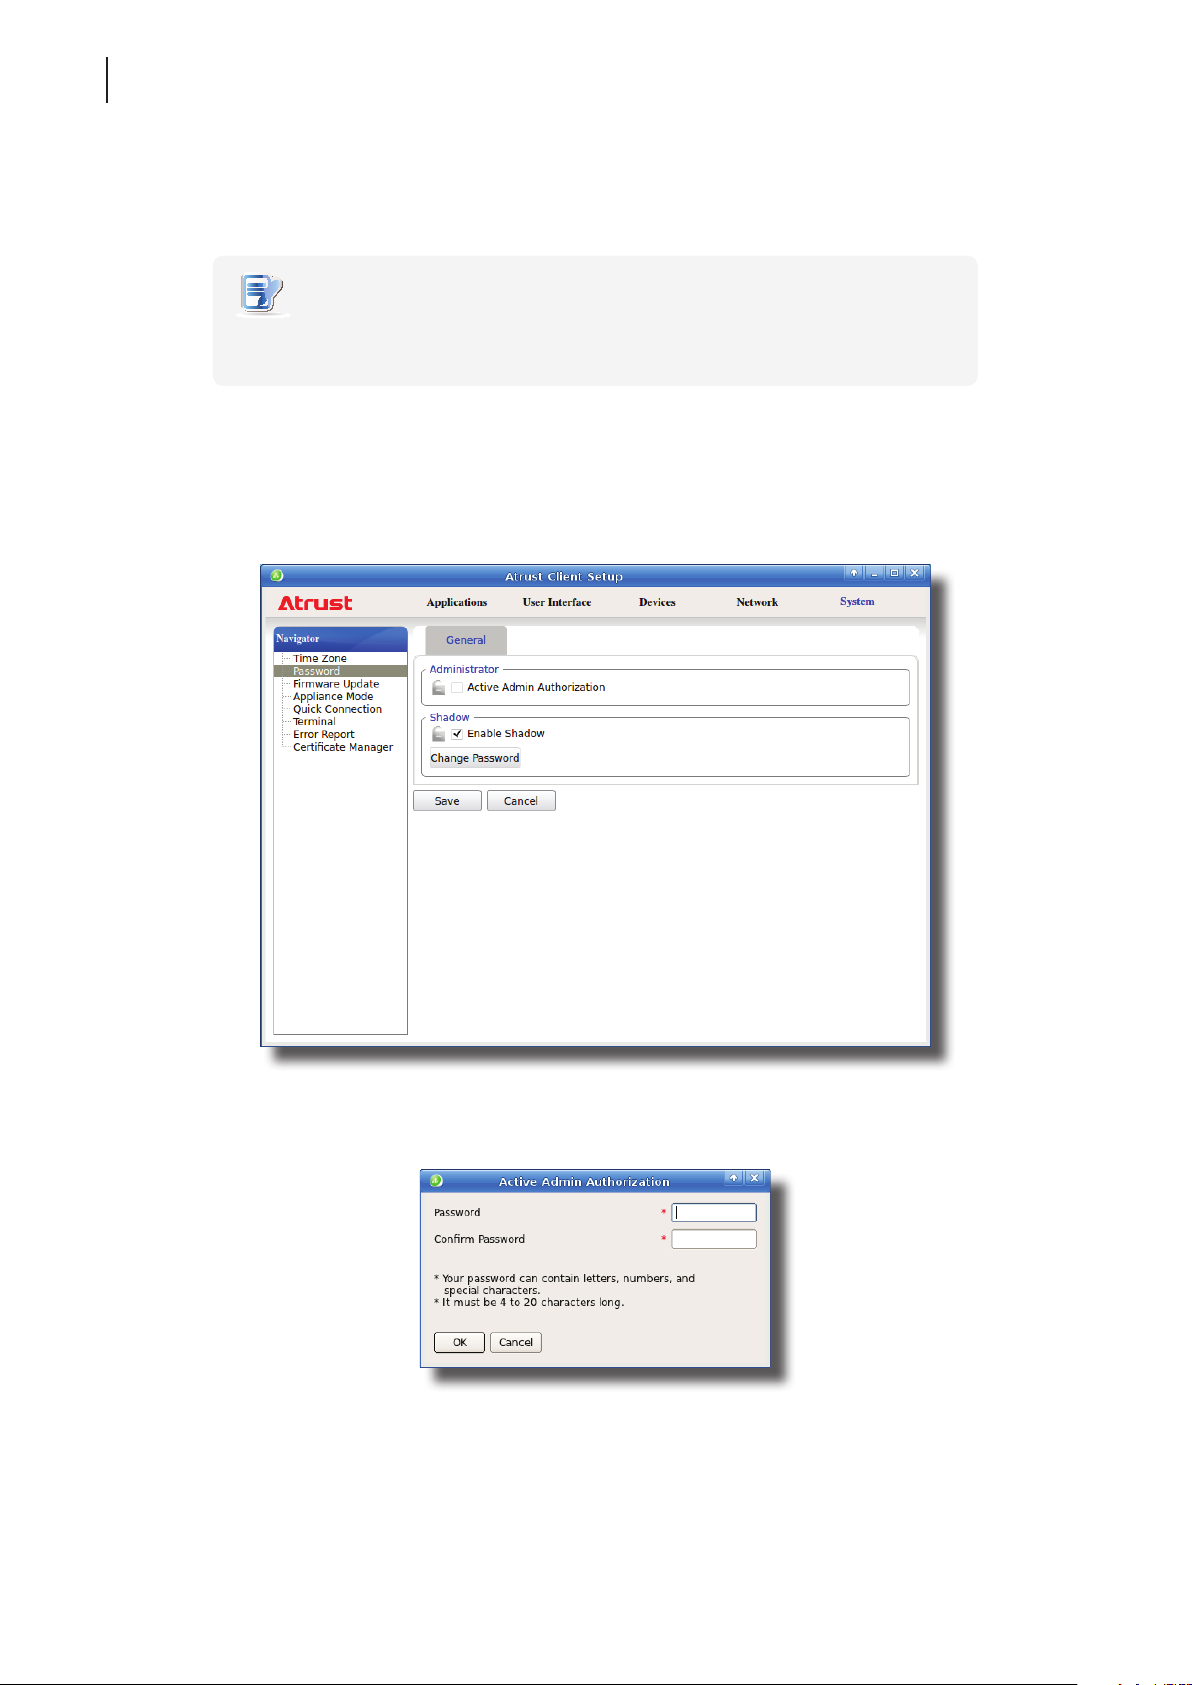
1. On Atrust Client Setup, click System > Password.
2. Under the Administrator section, click to check Active Admin Authorization.
3. The access privileges for administrators are granted and a window appears for you to set the password.
4. Type in the desired password, and then click OK to conrm.
5. Click Save to save all the changes.
Page 55
Conguring Client Settings
Conguring System Settings
Setting Access Privileges and Password Also for Standard Users
To set access privileges and password also for standard users, please do the following:
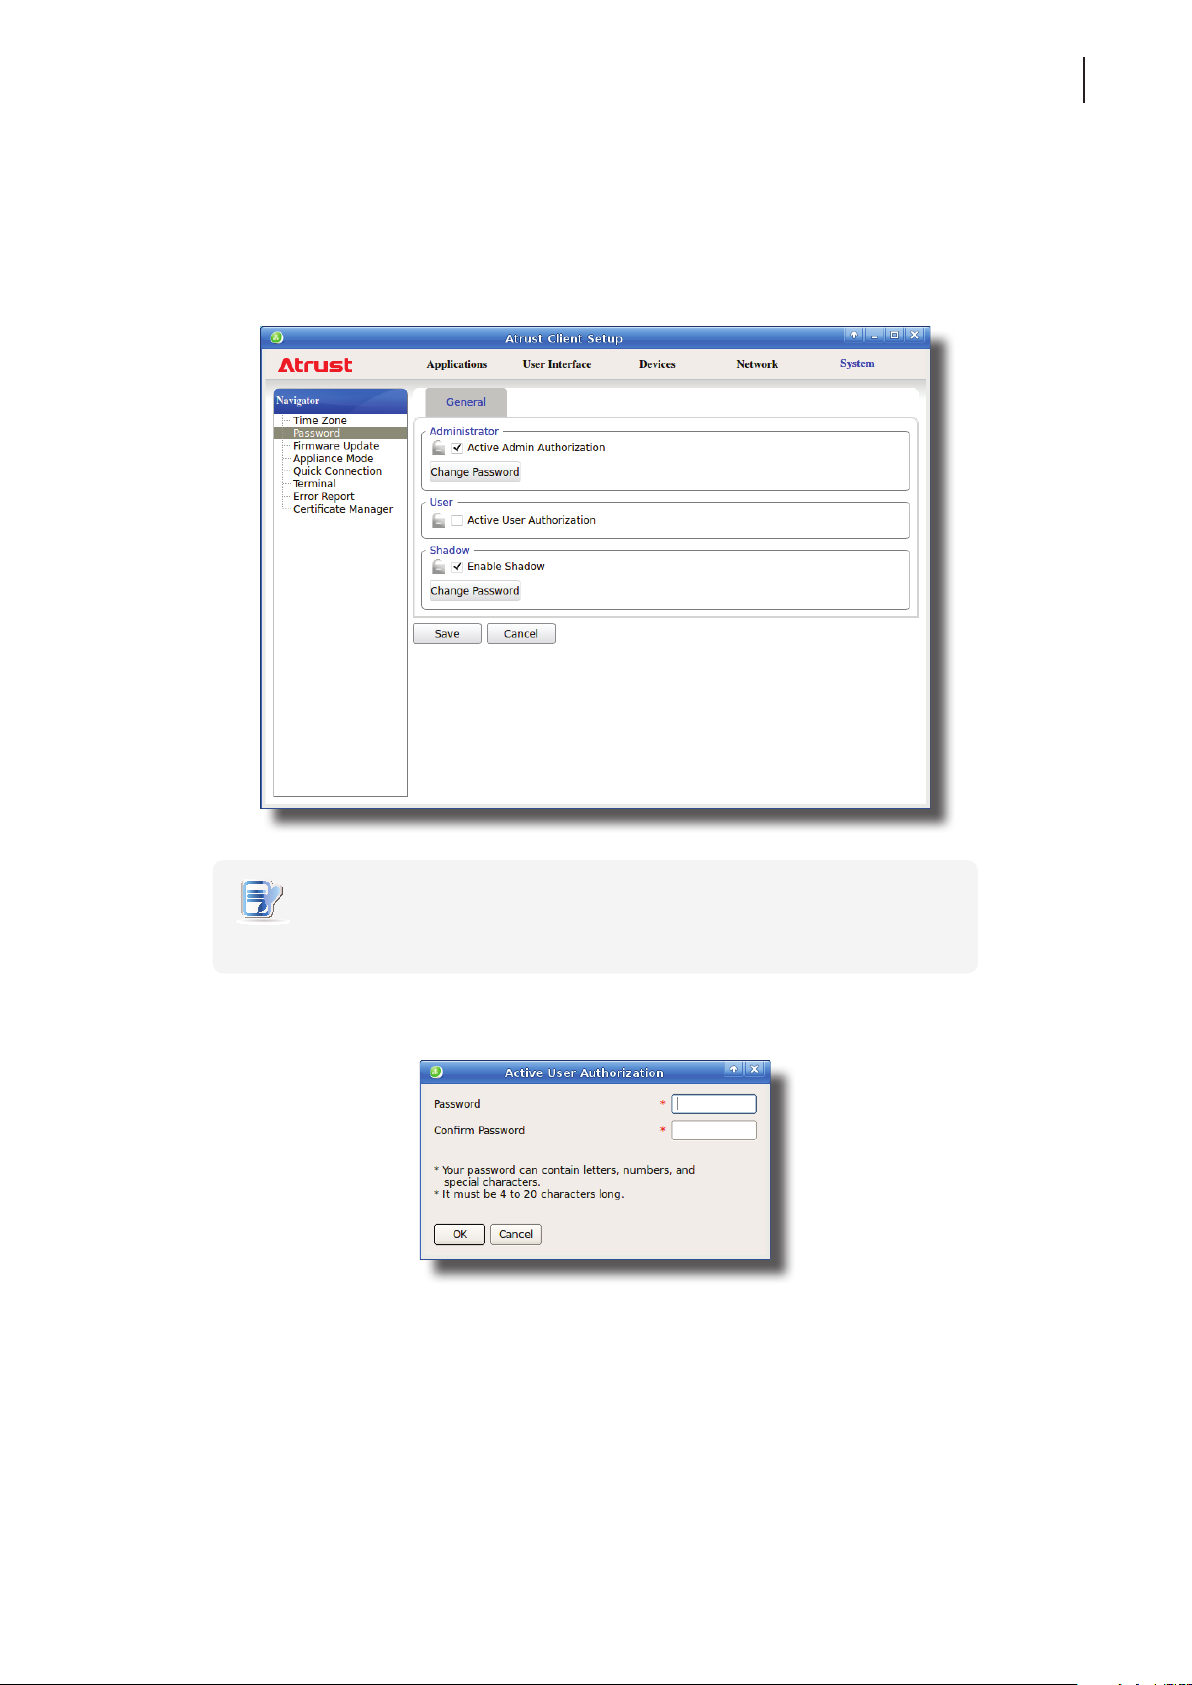
1. On Atrust Client Setup, click System > Password.
2. Under the User section, click to check Use Password.
45
NOTE
• The User section appears only when Active Admin Authorization is checked.
3. The access privileges for standard users are granted and a window appears for you to set the password.
4. Type in the desired password, and then click OK to conrm.
5. Click Save to save all the changes.
Page 56
Conguring Client Settings
46
Conguring System Settings
4.2.5 Conguring Shadow Settings for Remote Assistance
The Shadow feature allows an administrator to remotely assist client users in resolving problems or conguring local
settings. When this feature is enabled, an administrator can monitor and control a client from a remote computer
just like a local user.
NOTE
• To use the Shadow feature on a remote computer, you need to install the
Atrust Device Manager console and Java software on that computer, and add your
t60/t62 into a managed group under Atrust Device Manager. For details, please refer
to the User’s Manual for Atrust Device Manager.
To enable the Shadow feature and set the password for remote assistance, please do the following:
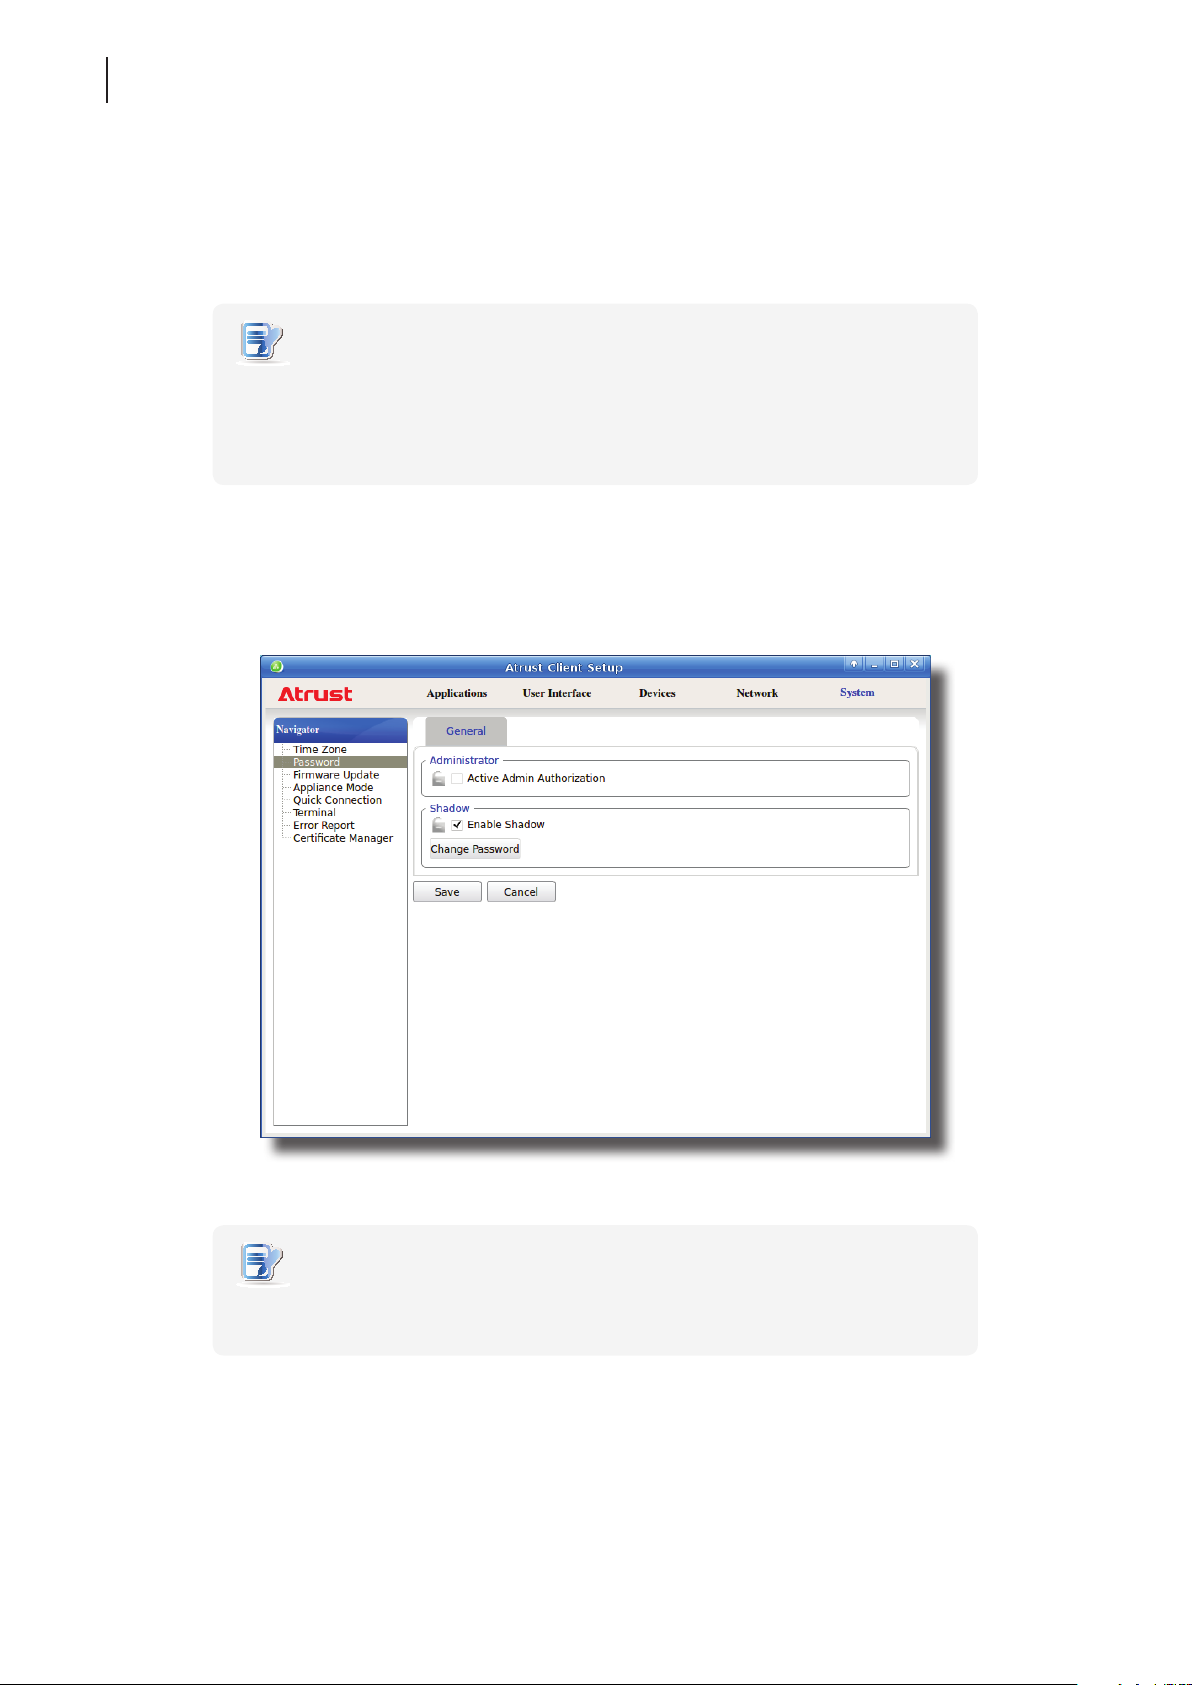
1. On Atrust Client Setup, click System > Password.
2. Under the Shadow section, click to check Enable Shadow if it’s not checked.
NOTE
• By default, the Shadow feature is enabled. Click Change Password, and then follow
the next step to set your password.
3. The Shadow feature is enabled and a window appears for you to set the password for remote assistance.
Page 57
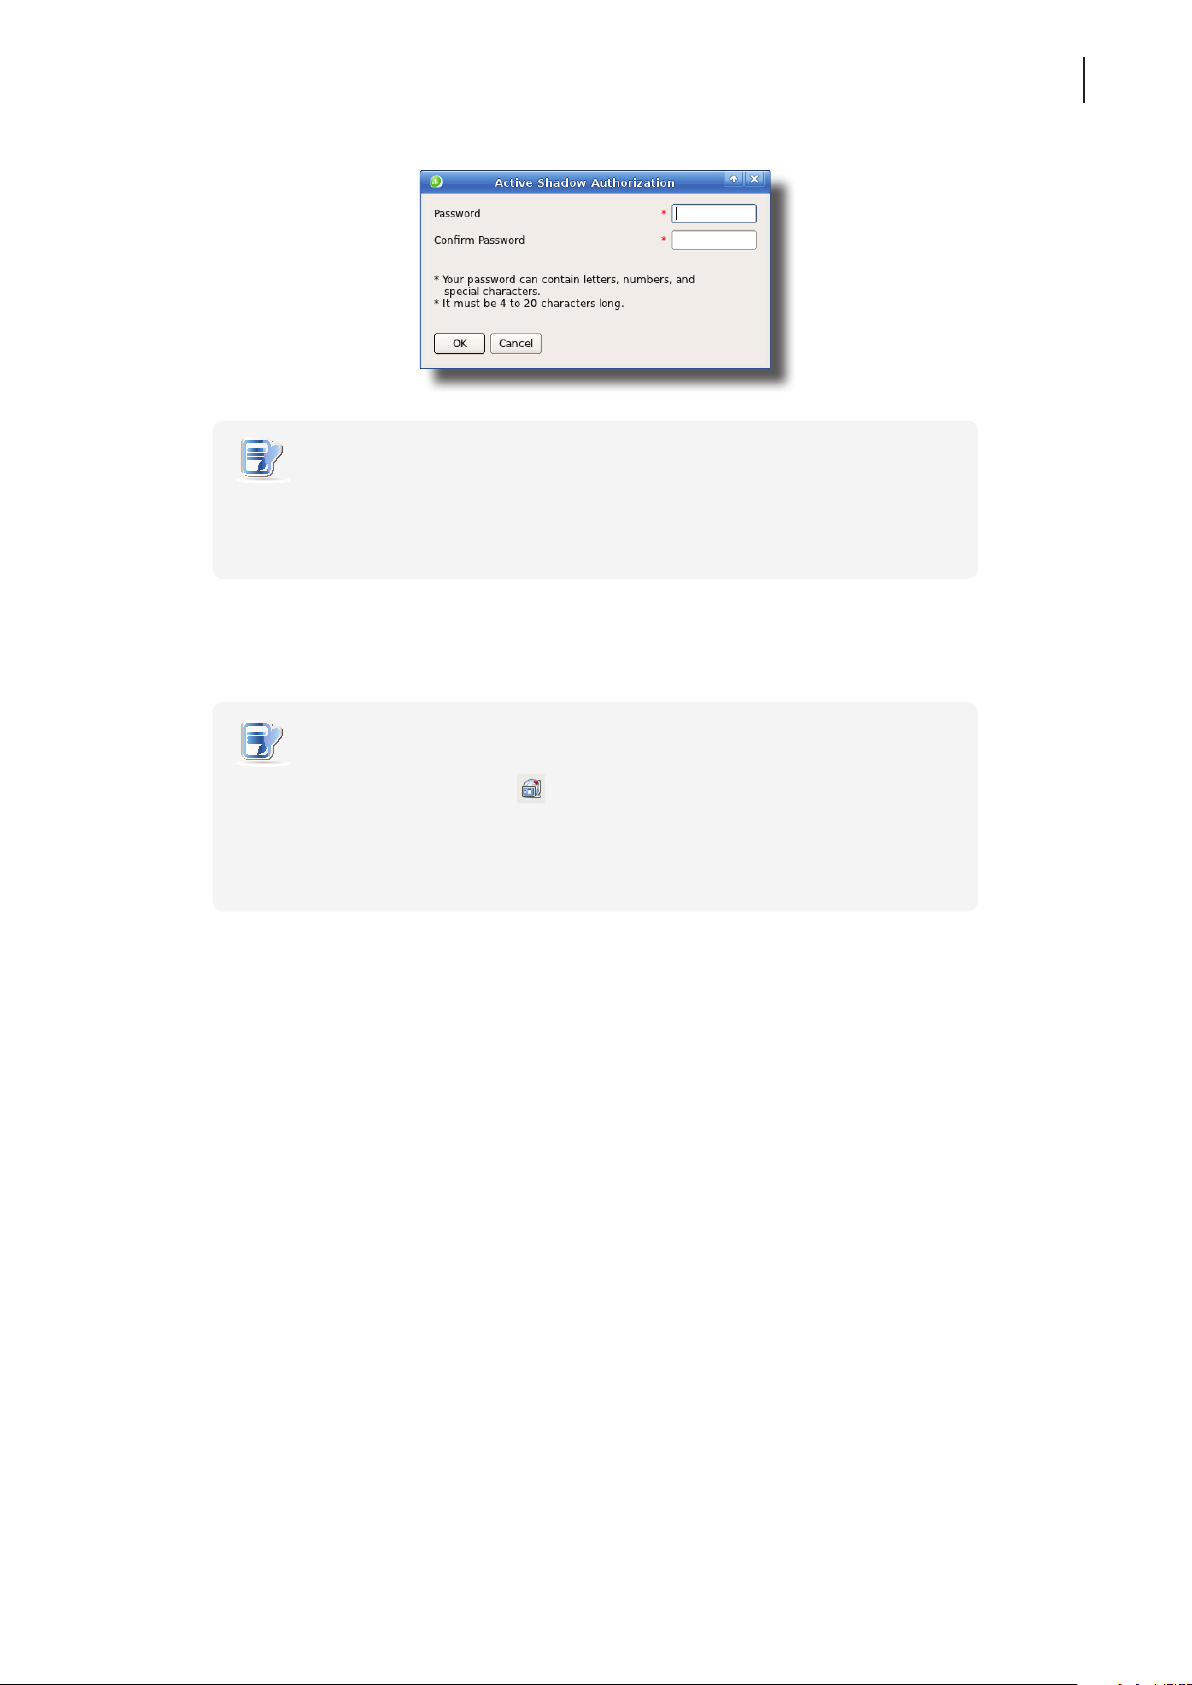
NOTE
• On a remote computer, an administrator will need this password to use the Shadow
feature (remote assistance) with the Atrust Device Manager console. For more
information, please refer to the User’s Manual of Atrust Device Manager.
4. Type in the desired password, and then click OK to conrm.
Conguring Client Settings
Conguring System Settings
47
5. Click Save to save all the changes.
NOTE
• When the Shadow feature is performed from a remote Atrust Device Manager, on
the target client, an icon
and a notication pops up in the bottom-right corner. If you are under the Quick
Connection mode (the default for t60/t62 thin clients), a notication would pop up
in the upper-left corner on Atrust Quick Connection screen.
appears on the Taskbar of the local Linux desktop
Page 58
Conguring Client Settings
48
Conguring System Settings
4.2.6 Updating Firmware from the Management Computer
Update Firmware allows client users to update rmware from its management computer.
NOTE
• Ensure that your t60/t62 has been added into a managed group under Atrust
Device Manager installed on a remote computer, and that you have imported client
rmware les into Atrust Device Manager. These are prerequisites of this feature.
• For more information on rmware update and Atrust Device Manager, please refer
to the User Manual for Atrust Device Manager.
To update rmware from the management computer, please do the following:
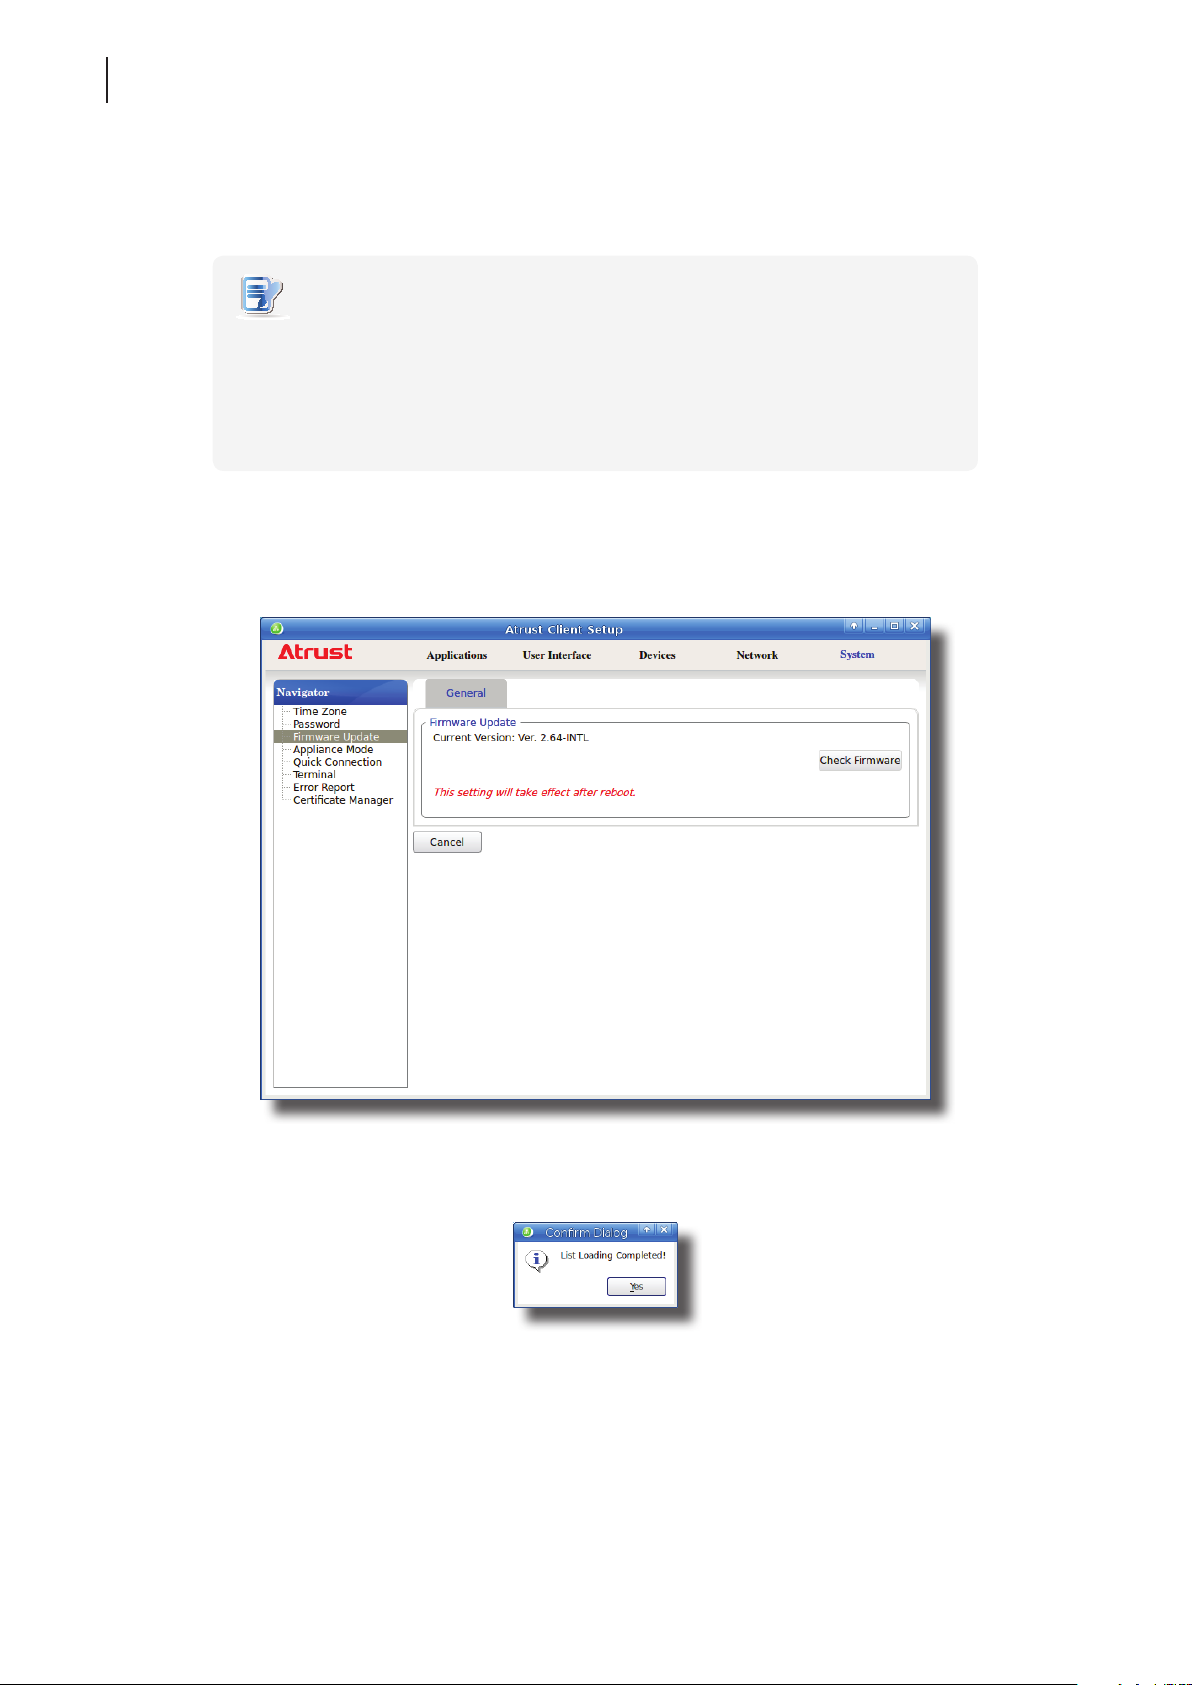
1. On Atrust Client Setup, click System > Firmware Update.
2. Under the Firmware Update section, click Check Firmware.
3. Upon completion, a window appears notifying you that the Firmware list has been loaded.
4. Click Yes to continue.
Page 59
Conguring Client Settings
Conguring System Settings
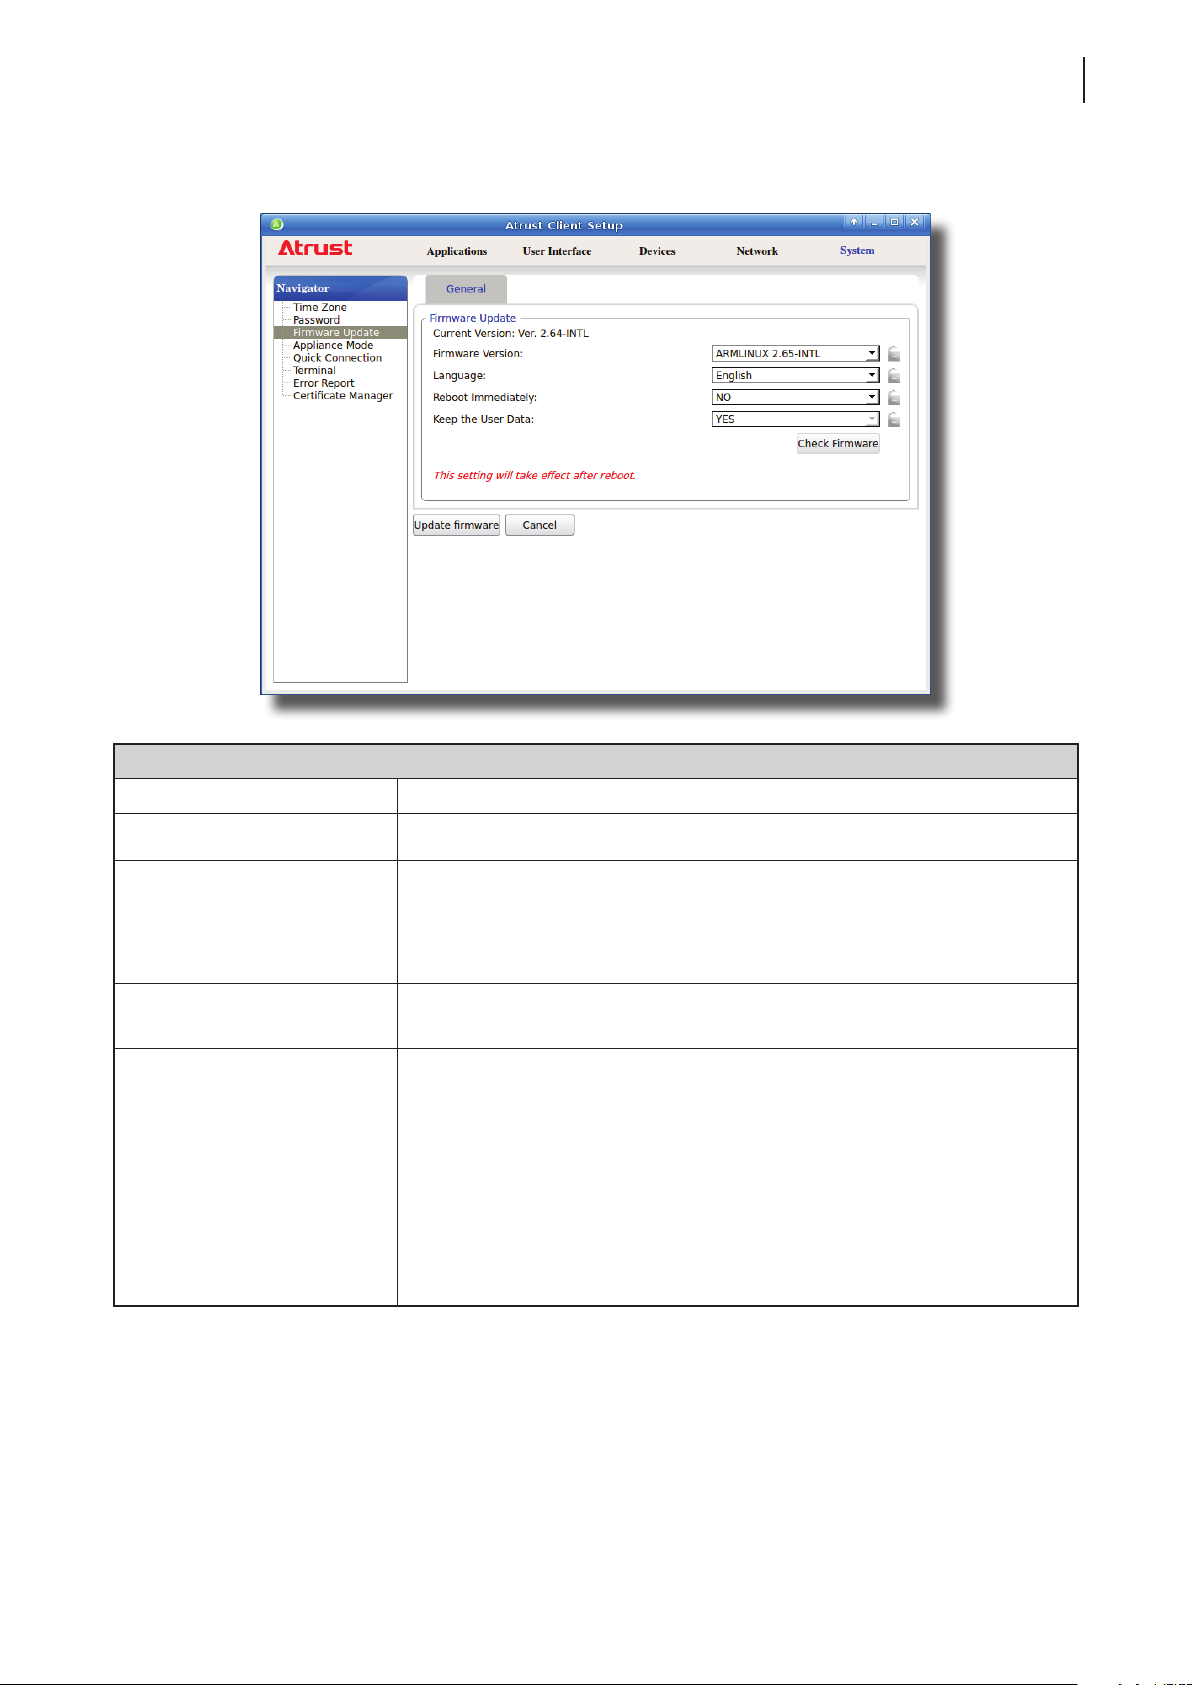
5. Click the drop-down menus to select the desired rmware version and other update options.
49
Firmware Update Options
Item Description
Firmware Version Click to select the desired rmware version.
Click to select the interface language of the system, including the
Language
Reboot immediately
Keep the user data
Atrust Client Setup console.
NOTE: Available languages may vary with the selected rmware version.
Click to choose whether to restart the system immediately for rmware update
or manually restart the system later.
Click to choose if to keep the setting values under Atrust Client Setup.
NOTE: If Yes is selected, all setting values under Atrust Client Setup will remain
unchanged after rmware update.
If No is selected, all setting values will be restored to the factory default.
This option may not be available on your system.
NOTE: If the client is managed by Atrust Device Manager and here No is
selected, Atrust Device Manager will fail to manage the client after
rmware update. For more information on Atrust Device Manager, please
refer to the User’s Manual for Atrust Device Manager.
6. Click Update rmware to conrm your selections. The system will start updating its rmware after restart.
Page 60
Conguring Client Settings
50
Conguring System Settings
4.2.7 Enabling or Disabling the Appliance Mode
The Appliance mode allows your t60/t62 to start up directly with the desired Microsoft Remote Desktop, Citrix ICA,
VMware View or Horizon View session. Under the Appliance mode, users will feel as if they were using a standalone
desktop computer; the underlying client operating system, Atrust ARM Linux, is hidden from the very beginning.
NOTE
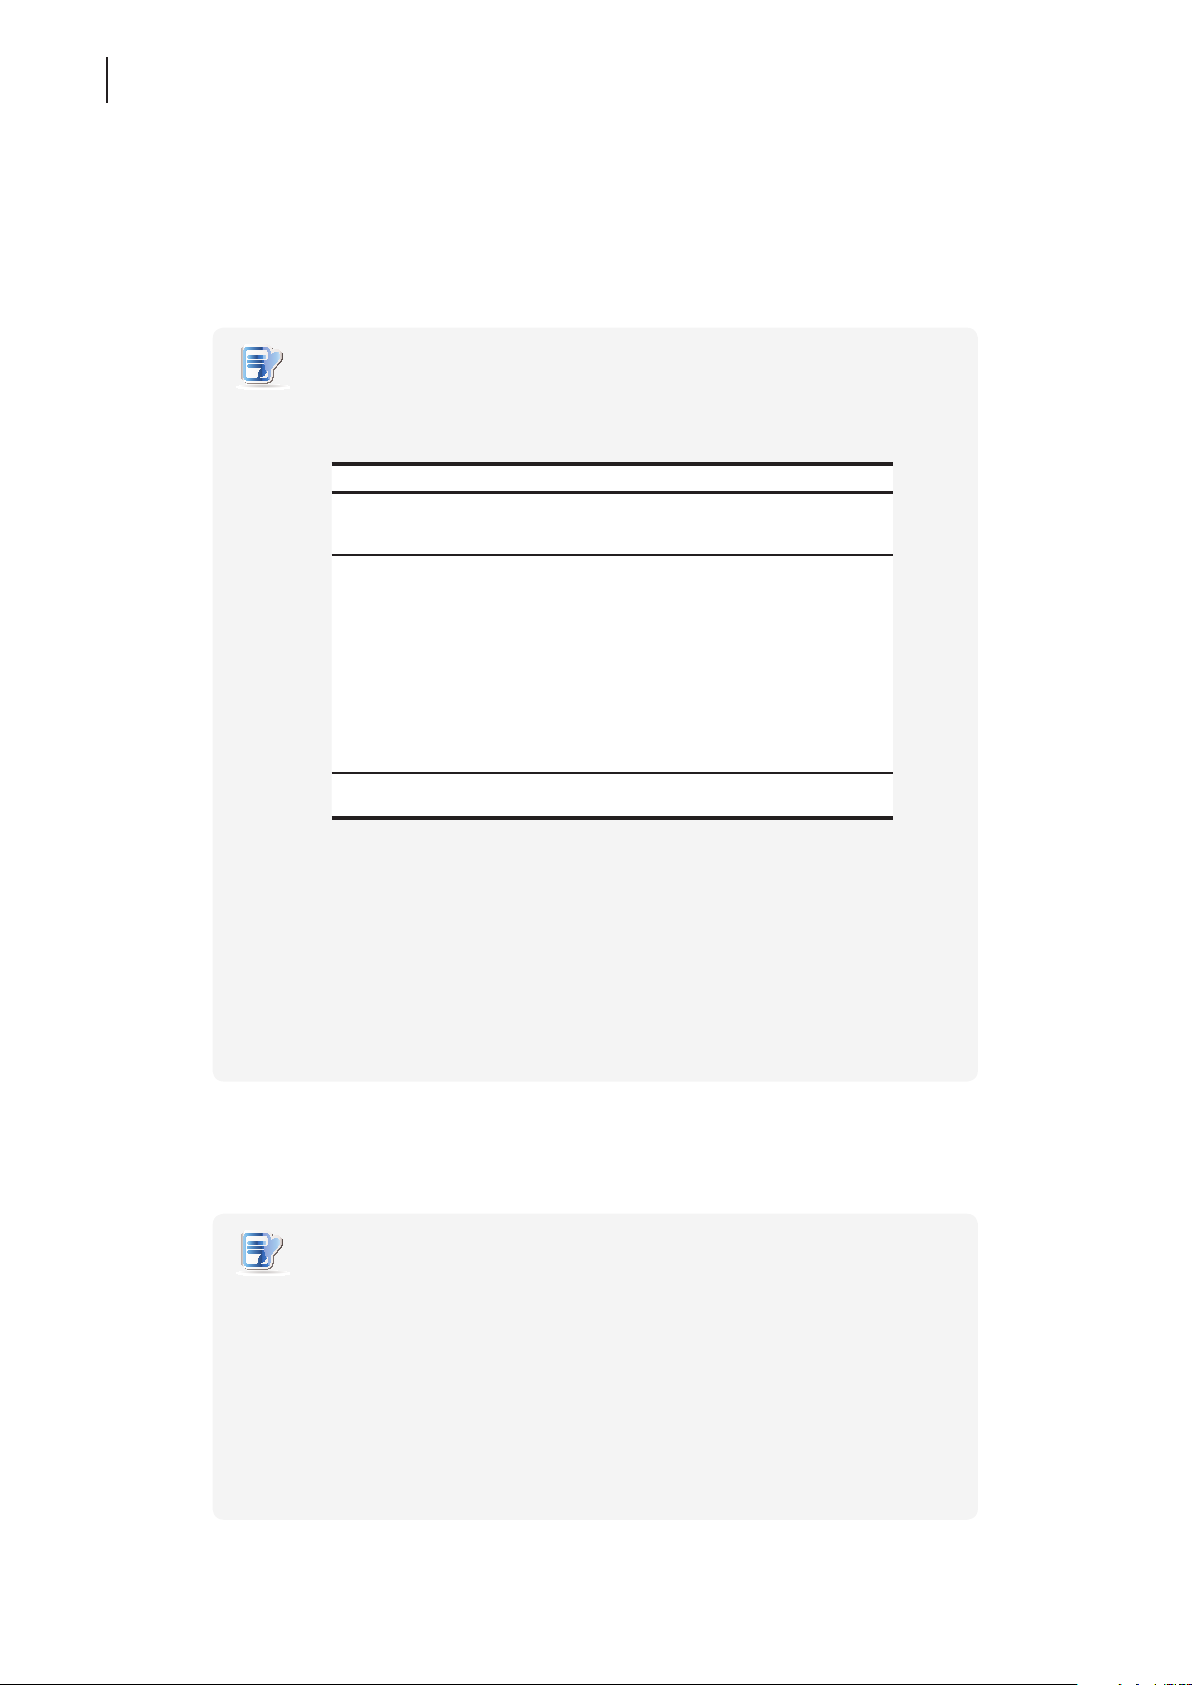
• There are three similar but dierent modes for your t60/t62 and only one mode
will take eect if all are enabled. Three modes and the order of priority are
listed as follows:
No. Mode Description
1 Appliance
2 Autostart
The client will start up directly with the desired
RDP / ICA / View session and turn off after
existing the session.
The client will start up directly with the desired
RDP / ICA / View session and perform the
congured action after existing the session.
Available actions include:
• Returning to the local desktop
• Re-launching a new session
• Restarting the thin client
• Turning off the thin client
3 Quick Connection
The default. The client will enter Atrust Quick
Connection screen after system startup.
• For more information on these modes, please refer to sections:
4.2.8 on page 54 and 3.1 on page 23 (Quick Connection mode)
4.2.7 on page 50 (Appliance mode)
4.6.5 on page 118 (Autostart mode for RDP sessions)
4.6.8 on page 145 (Autostart mode for ICA sessions)
4.6.11 on page 163 (Autostart mode for View sessions)
Enabling the Appliance Mode
To enable the Appliance mode, please do the following:
NOTE
• Ensure that you have congured the connection settings for the desired Microsoft
Remote Desktop, Citrix ICA, VMware View or Horizon View session under
Applications tab. You need to specify which service type and connection settings
entry will be used under the Appliance mode. For detailed instructions, please see
sections:
”4.6.3 Conguring Basic RDP Connection Settings” on page 103
“4.6.6 Conguring Basic ICA Connection Settings” on page 132
“4.6.9 Conguring Basic VMware View Connection Settings” on page 159
Page 61
NOTE
• Please note that the Autostart mode also enables the client to start up directly with
an RDP / ICA / View session and provides more conguration exibility than the
Appliance mode. For detailed information on the Autostart mode, please refer to
the following sections:
“4.6.5 Conguring Advanced RDP Connection Settings” on page 118
“4.6.8 Conguring Advanced ICA Connection Settings” on page 145
“4.6.11 Conguring Advanced View Connection Settings” on page 163
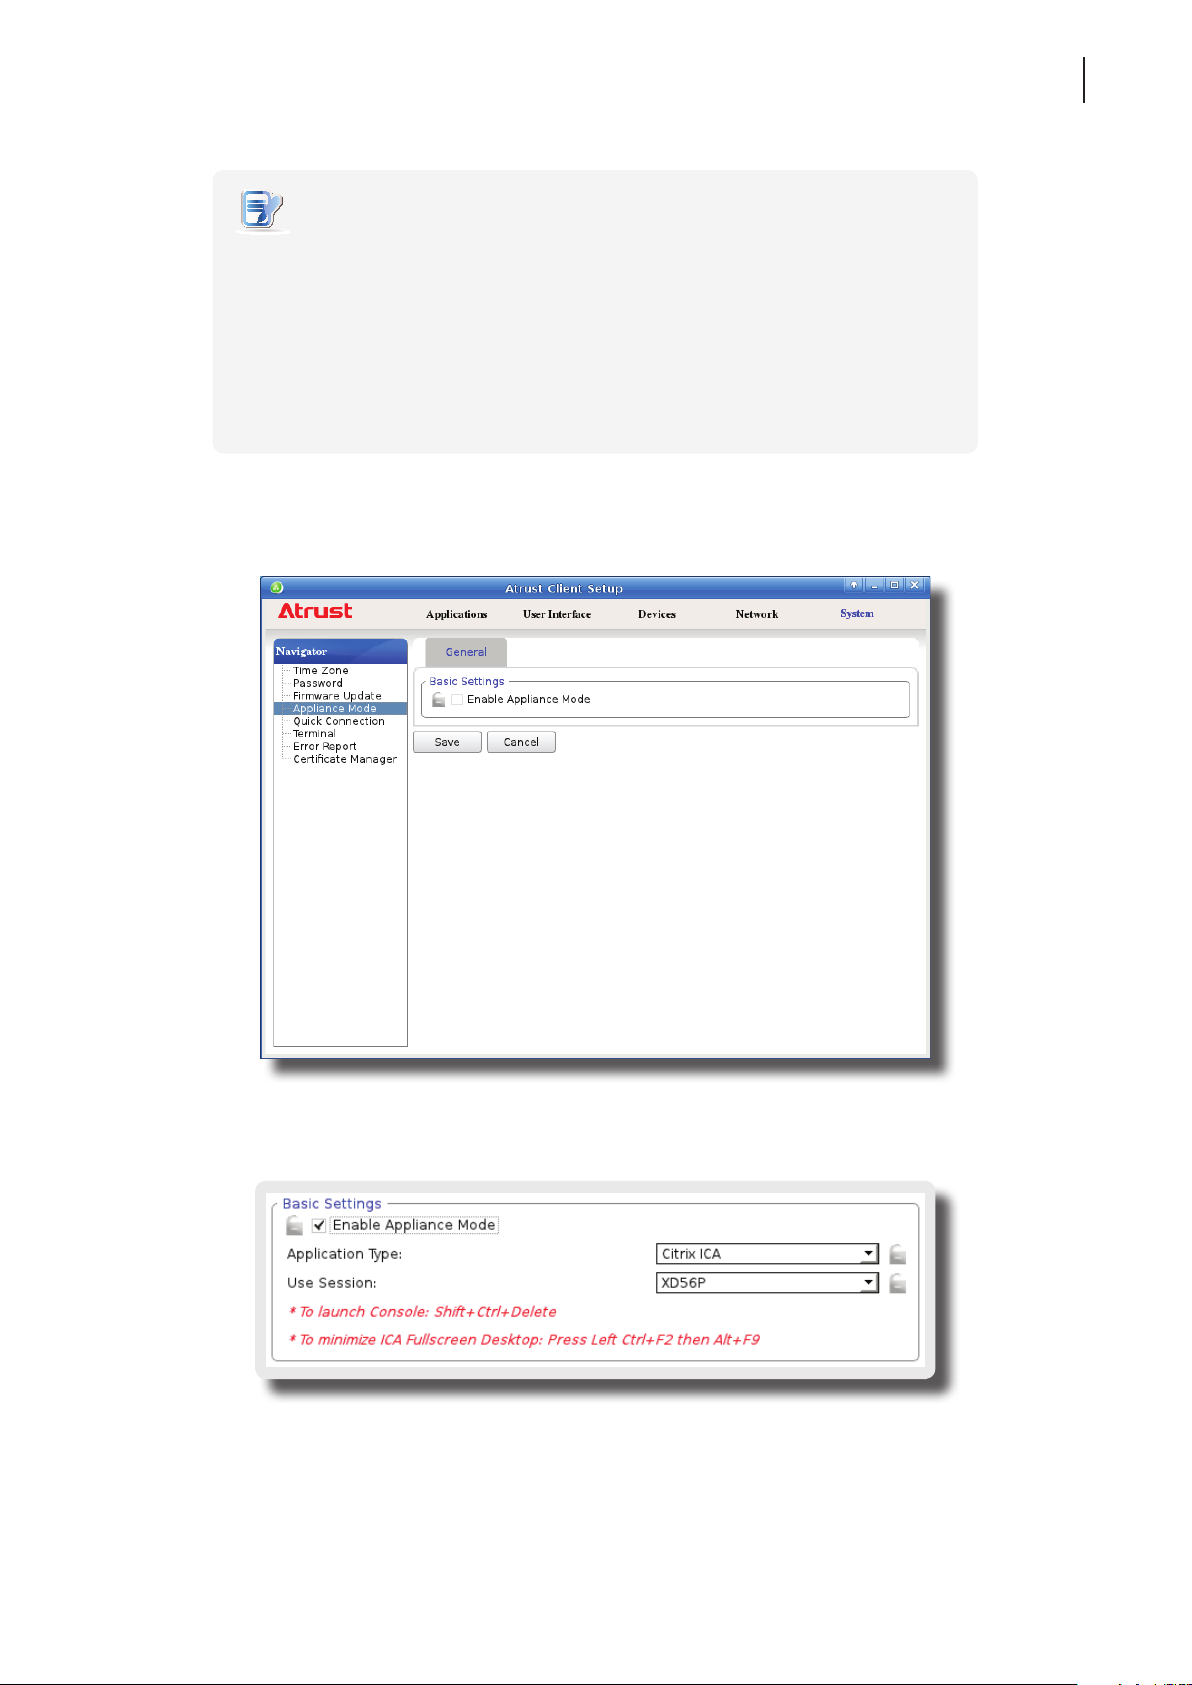
1. On Atrust Client Setup, click System > Appliance Mode.
Conguring Client Settings
Conguring System Settings
51
2. Click to check Enable Appliance Mode.
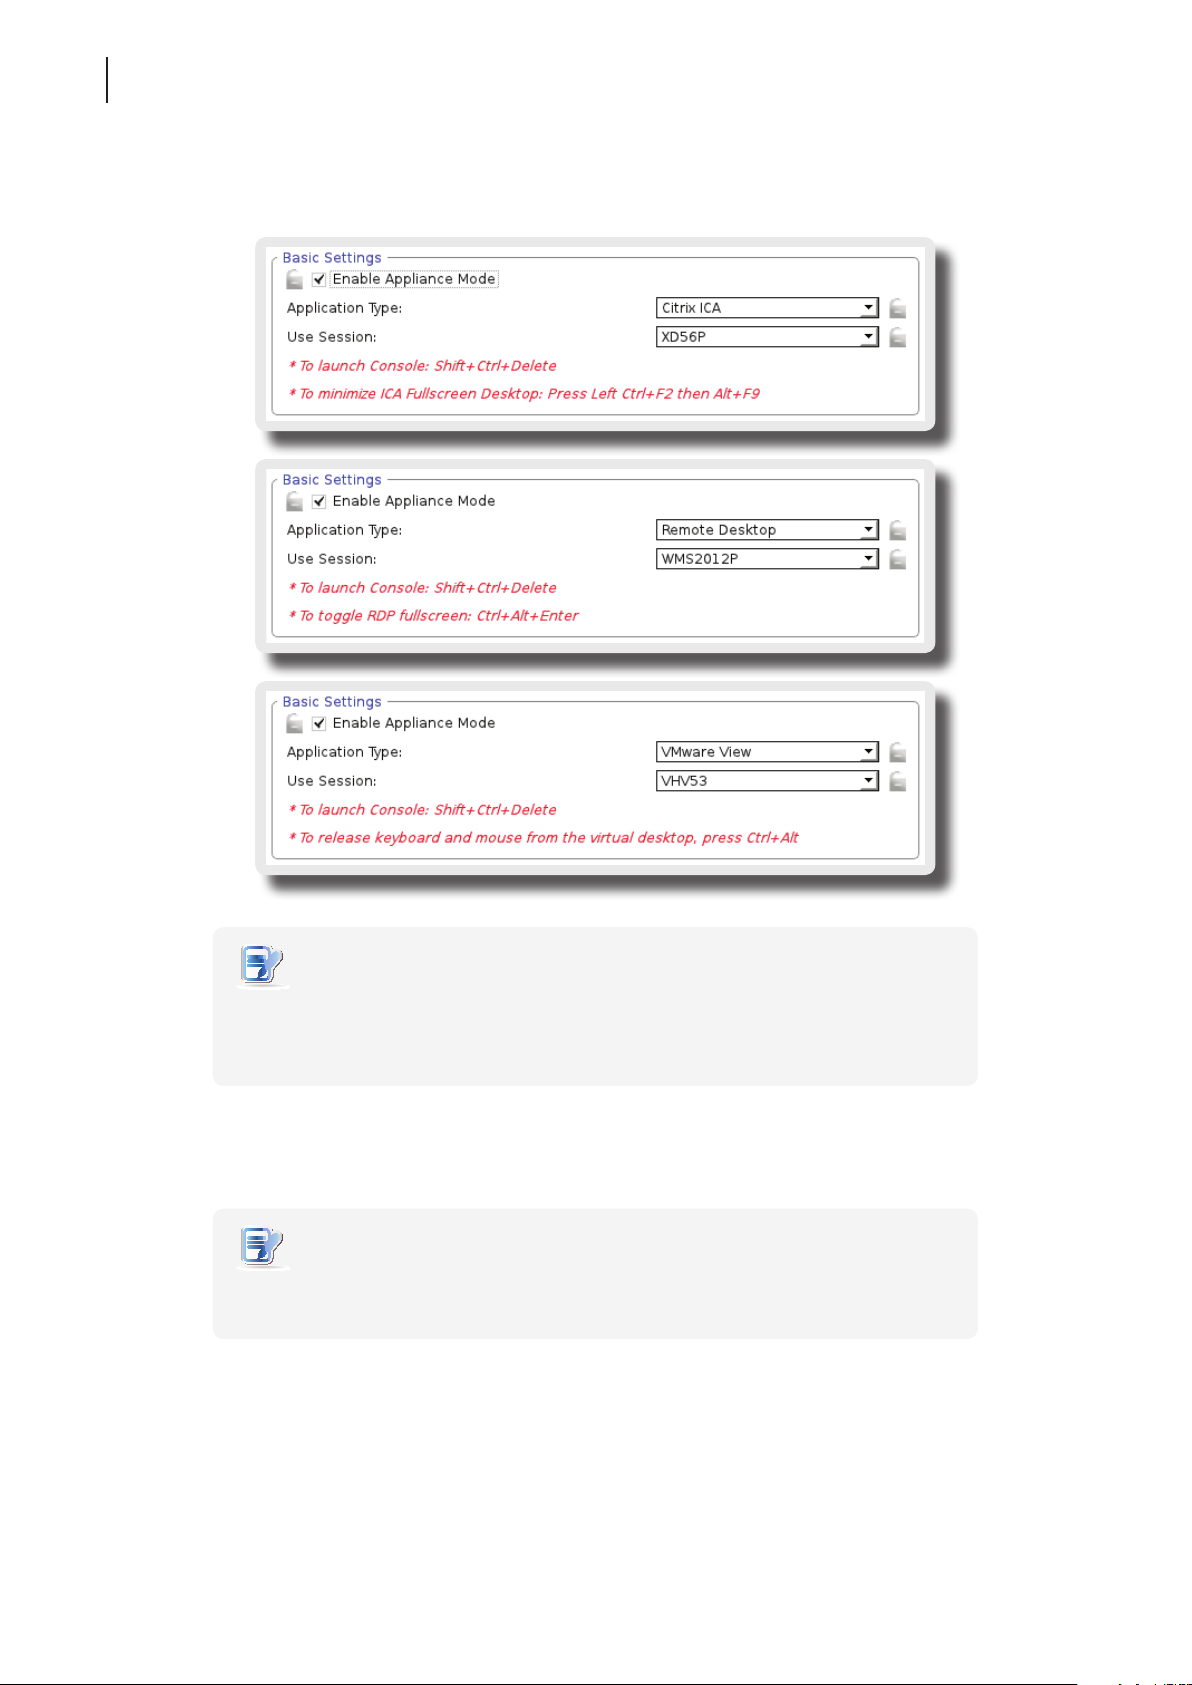
3. Other settings of the Appliance mode appear.
Page 62
Conguring Client Settings
52
Conguring System Settings
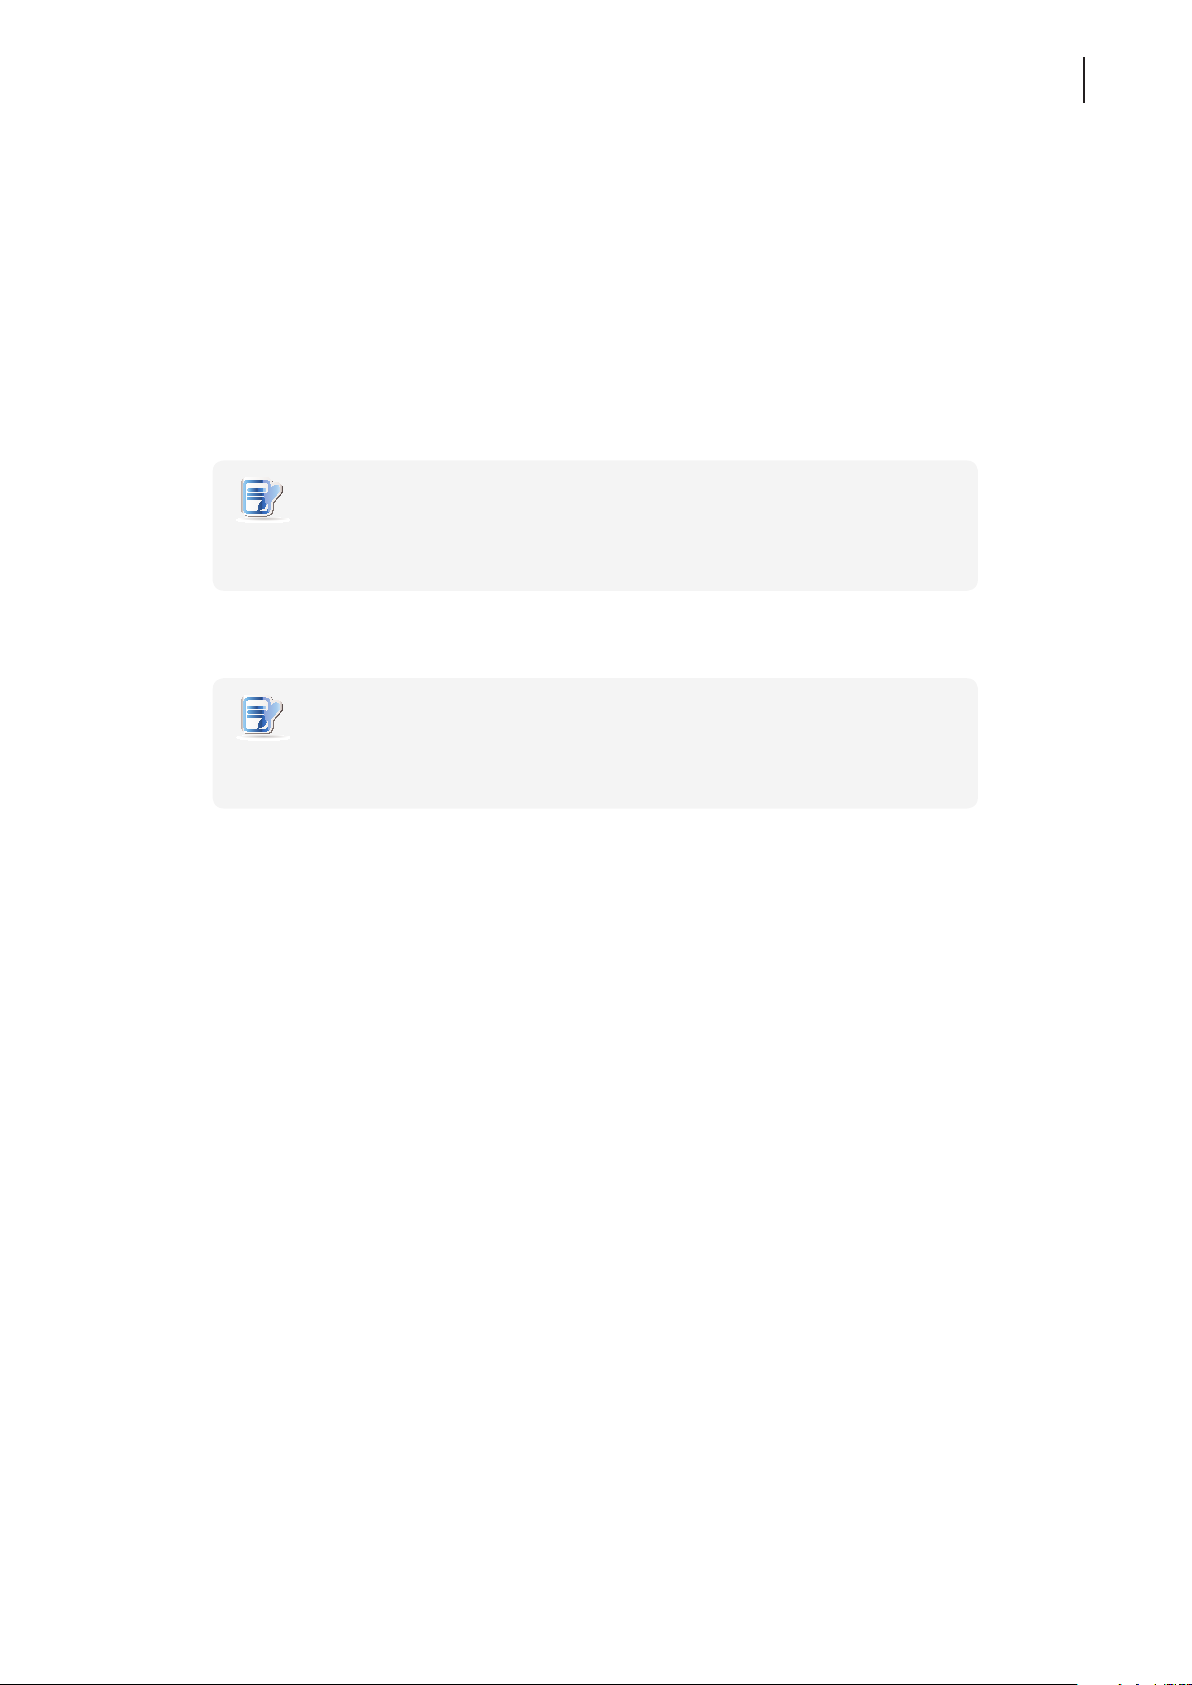
4. Click drop-down menus to select the application (or service) type: Citrix ICA, Remote Desktop, or
VMware View, and the specic service available in that type.
NOTE
• No matter which Resolution option you choose for the selected RDP / ICA / View
service, RDP / ICA / View sessions under the Appliance mode will always use the Full
Screen mode to display the remote/virtual desktop.
5. Click Save to conrm your selections.
6. The system will enter the Appliance mode after restart.
NOTE
• To disable the Appliance mode or to access Atrust Client Setup under the Appliance
mode, please refer to “Disabling the Appliance Mode” on page 53.
Page 63
Conguring Client Settings
Conguring System Settings
Disabling the Appliance Mode
To disable the Appliance mode, please do the following:
1. Under the Appliance mode, exit the Full Screen mode of the RDP / ICA session, or release the keyboard and
mouse from the View session (virtual desktop):
• To exit the Full Screen mode of the RDP session, press Ctrl + Alt + Enter, and then minimize
the session window.
• To exit the Full Screen mode of the ICA session, press Ctrl + F2, and then Alt + F9.
• To release the keyboard and mouse from the View session (virtual desktop), press Ctrl + Alt.
NOTE
• Please note that the View session (virtual desktop) will remain on the background
after you release the keyboard and mouse from the View session (virtual desktop).
2. Click Ctrl + Shift + Del to launch Atrust Client Setup.
53
NOTE
• You cannot access the Taskbar of the client operating system (Atrust ARM Linux)
under the Appliance mode.
3. On Atrust Client Setup, click System > Appliance Mode.
4. Click to uncheck Enable Appliance Mode, and then click Save to apply the change.
5. Return to the current RDP / ICA / View session:
• To return to the current RDP / ICA session, use Alt + Tab (press and hold Alt, and then press Tab to switch
between dierent items) to select and restore the current RDP / ICA session.
• To return to the current View session, click any place of the View session (virtual desktop)
on the background.
6. Log o from the current RDP / ICA / View session.
7. The client will shut down then. Restart your client manually.
Page 64
Conguring Client Settings
54
Conguring System Settings
4.2.8 Enabling or Disabling the Quick Connection Mode
The Quick Connection mode enables you to enter the Atrust Quick Connection screen after system startup.
This setting is enabled by default.
NOTE
• For detailed instructions on how to use your t60/t62 under the Quick Connection
mode, please refer to section “3.1 Learning the Basics” on page 23.
• There are three similar but dierent modes for your t60/t62 and only one mode
will take eect if all are enabled. Three modes and the order of priority are
listed as follows:
No. Mode Description
1 Appliance
2 Autostart
The client will start up directly with the desired
RDP / ICA / View session and turn off after
existing the session.
The client will start up directly with the desired
RDP / ICA / View session and perform the
congured action after existing the session.
Available actions include:
• Returning to the local desktop
• Re-launching a new session
• Restarting the thin client
• Turning off the thin client
3 Quick Connection
The default. The client will enter Atrust Quick
Connection screen after system startup.
NOTE
• To use the Quick Connection mode, ensure that both the Appliance and Autostart
modes are disabled. By default, your t60/t62 is in the Quick Connection mode, and
both the Appliance and Autostart modes are disabled. However, if either of two
modes are enabled, the Quick Connection mode will fail to work.
• For more information on the Appliance mode, please refer to section “4.2.7 Enabling
or Disabling the Appliance Mode” on page 50.
• For more information on the Autostart mode, please refer to the following sections:
“4.6.5 Conguring Advanced RDP Connection Settings” on page 118
“4.6.8 Conguring Advanced ICA Connection Settings” on page 145
“4.6.11 Conguring Advanced View Connection Settings” on page 163
Page 65
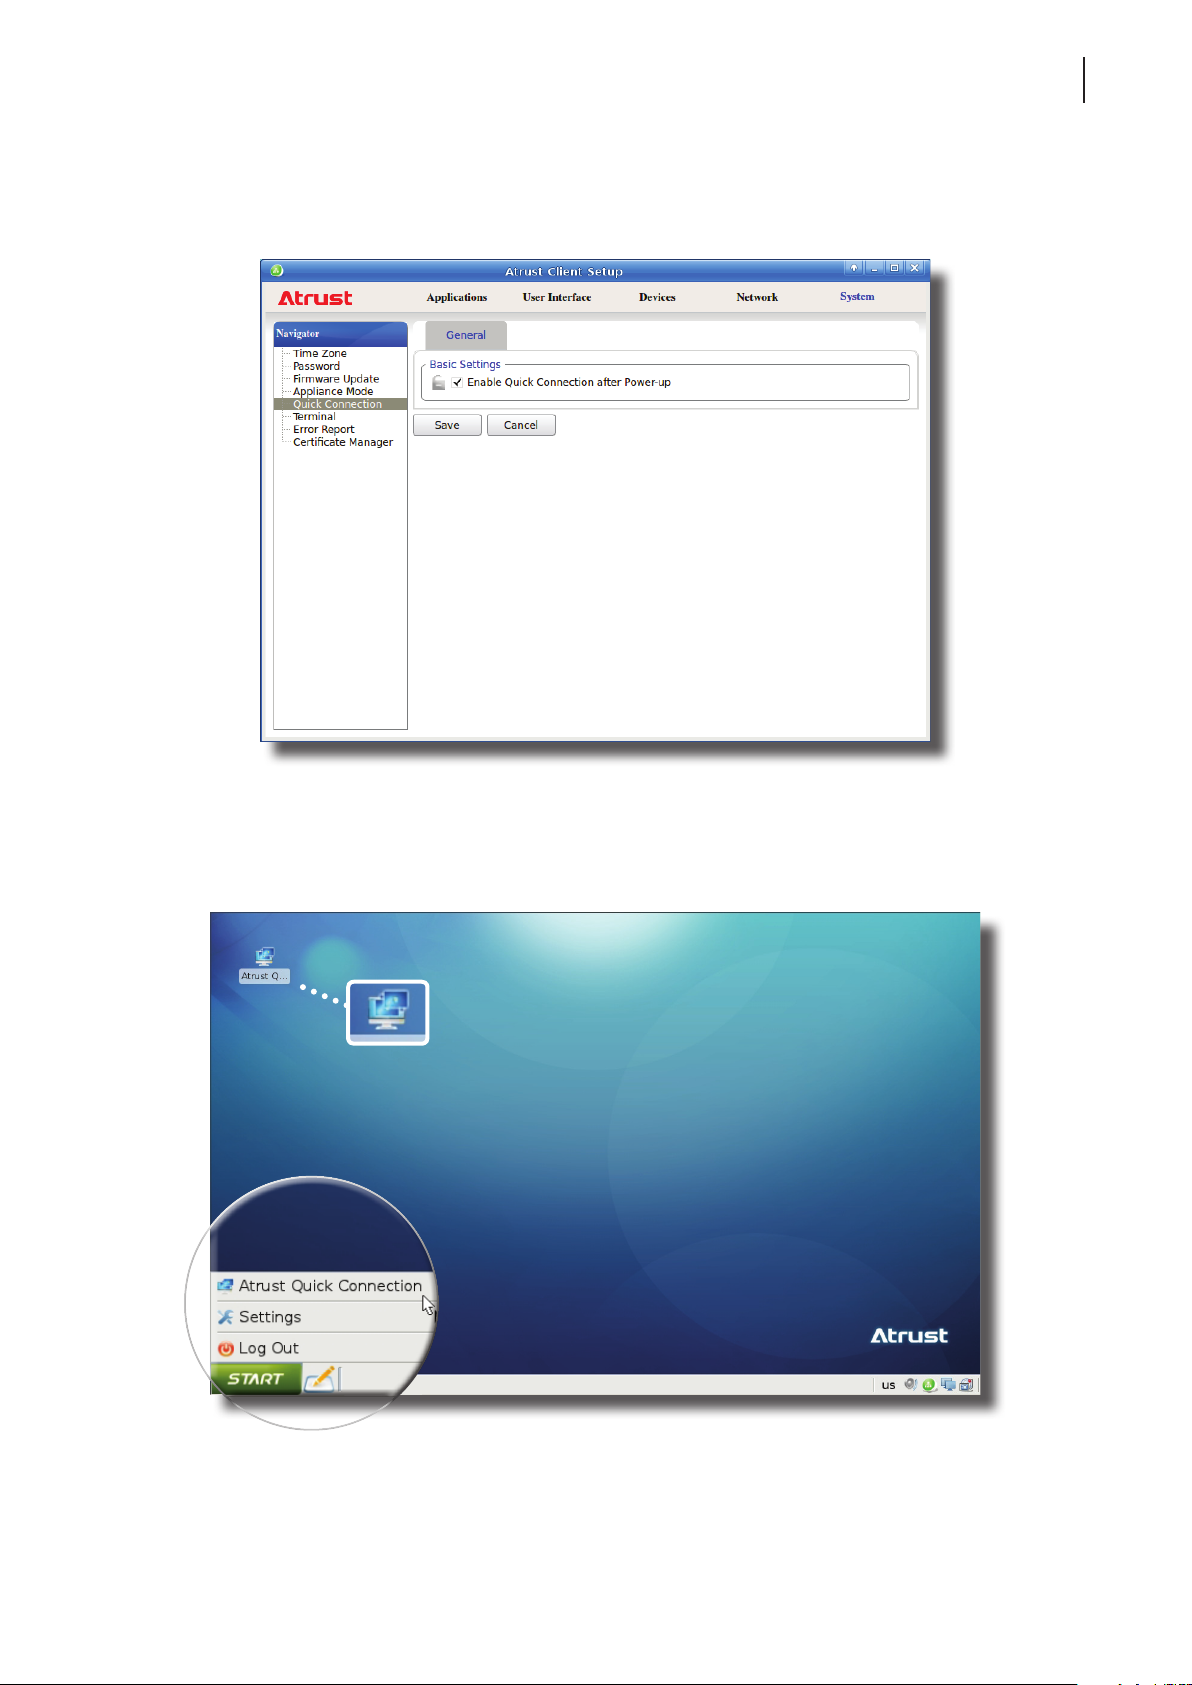
To enable/disable the Quick Connection mode, please do the following:
1. On Atrust Client Setup, click System > Quick Connection.
Conguring Client Settings
Conguring System Settings
55
2. Click to check/uncheck Enable Quick Connection after Power-up to enable/disable the Quick Connection
mode, and then click Save to apply the change.
3. Switch shortcuts are also added to or removed from the START menu and local Linux desktop
as shown below.
Page 66
Conguring Client Settings
56
Conguring System Settings
4.2.9 Enabling or Disabling the Command-line Functions
To enable/disable the execution of the text-based (command-line) functions, please do the following:
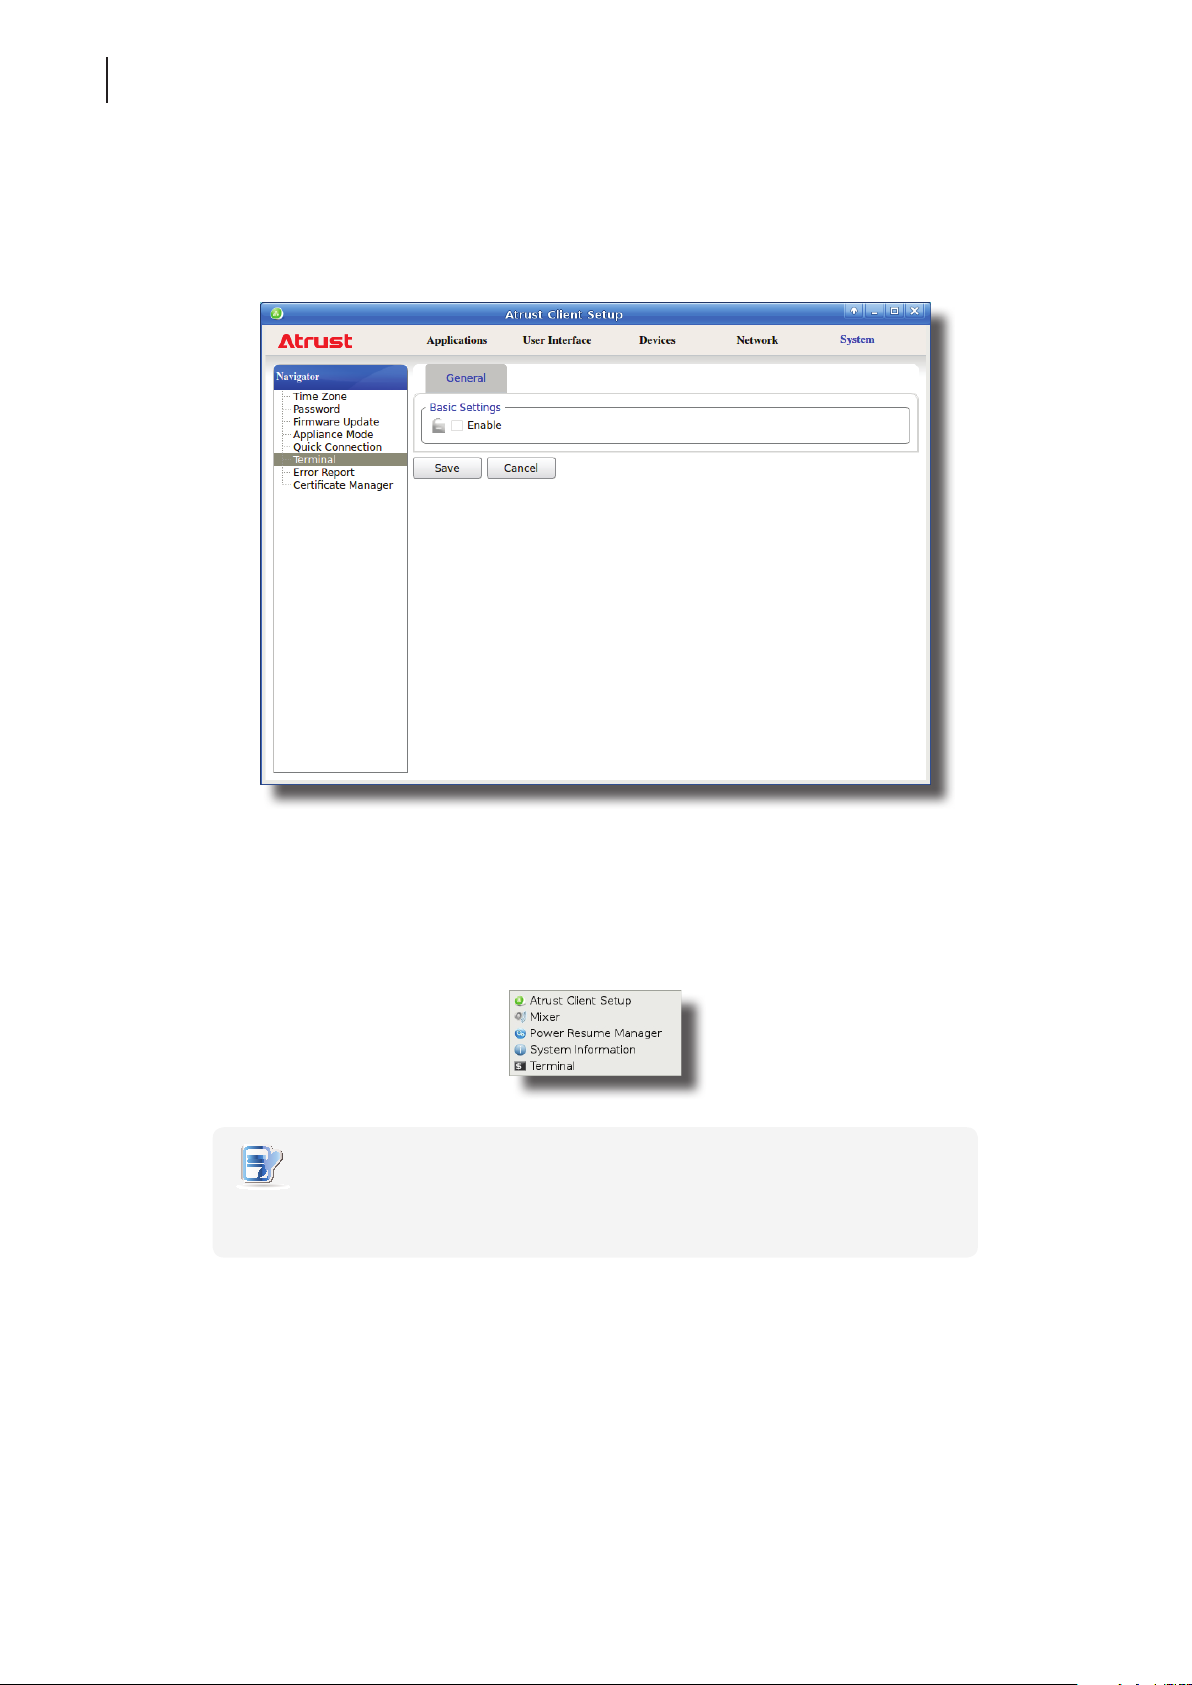
1. On Atrust Client Setup, click System > Terminal.
2. Click to check/uncheck Enable to allow/disallow the execution of the command-line functions.
3. Click Save to conrm your change.
4. The shortcut appears/disappears on the Start menu for access.
NOTE
• On the local Linux desktop, click START > Settings > Terminal to open the
Terminal window.
Page 67
Conguring Client Settings
Conguring System Settings
4.2.10 Collecting Event Logs and Capturing Related Screens
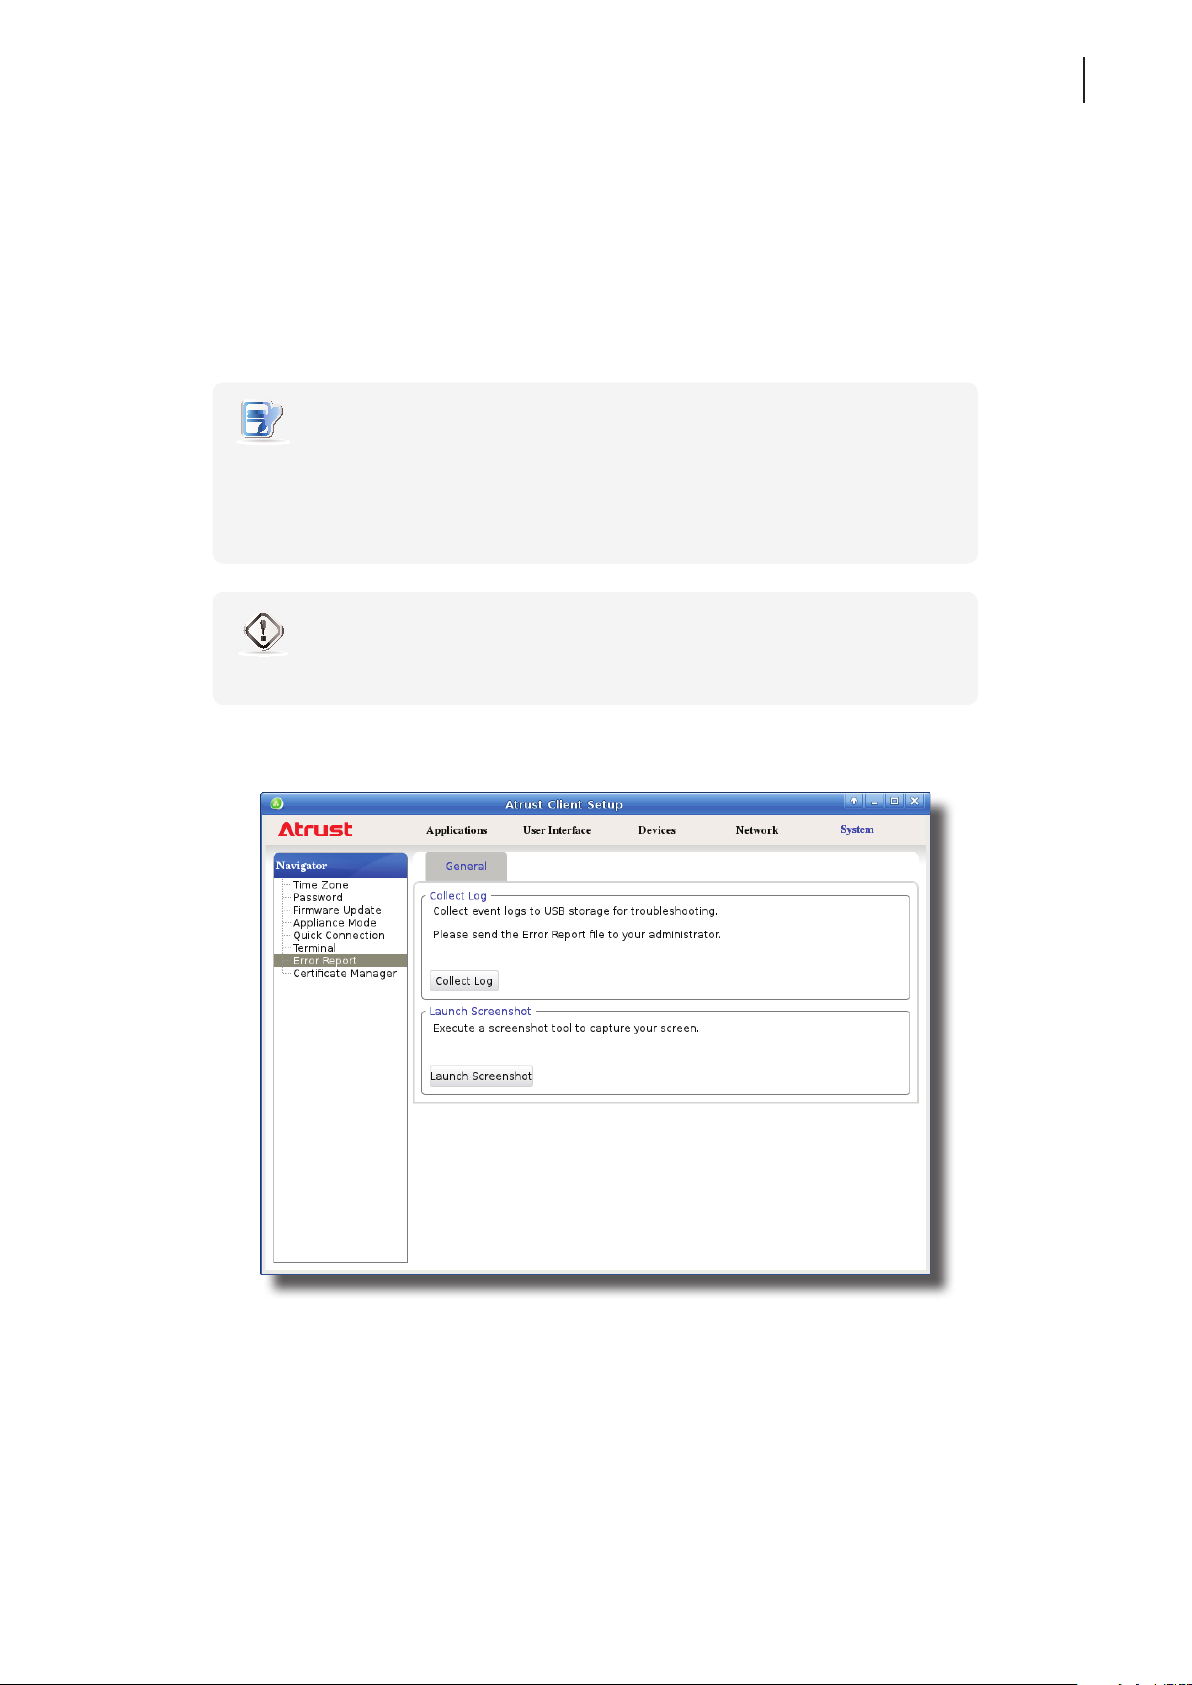
The Error Report feature allows you to collect event logs and capture related screens for error reporting.
Collecting Event Logs
To collect event logs of your t60/t62, please do the following:
1. Plug a USB ash drive into your t60/t62.
NOTE
• This USB ash drive will be used for storing the event logs of your t60/t62.
• Ensure that you have enabled the access and automount of USB storage devices.
For detailed instructions, please refer to section “4.4.3 Conguring Settings for USB
Storage Devices” on page 75.
WARNING
• Please note that les saved on the local desktop will be deleted after restart.
57
2. On Atrust Client Setup, click System > Error Report.
Page 68
Conguring Client Settings
58
Conguring System Settings
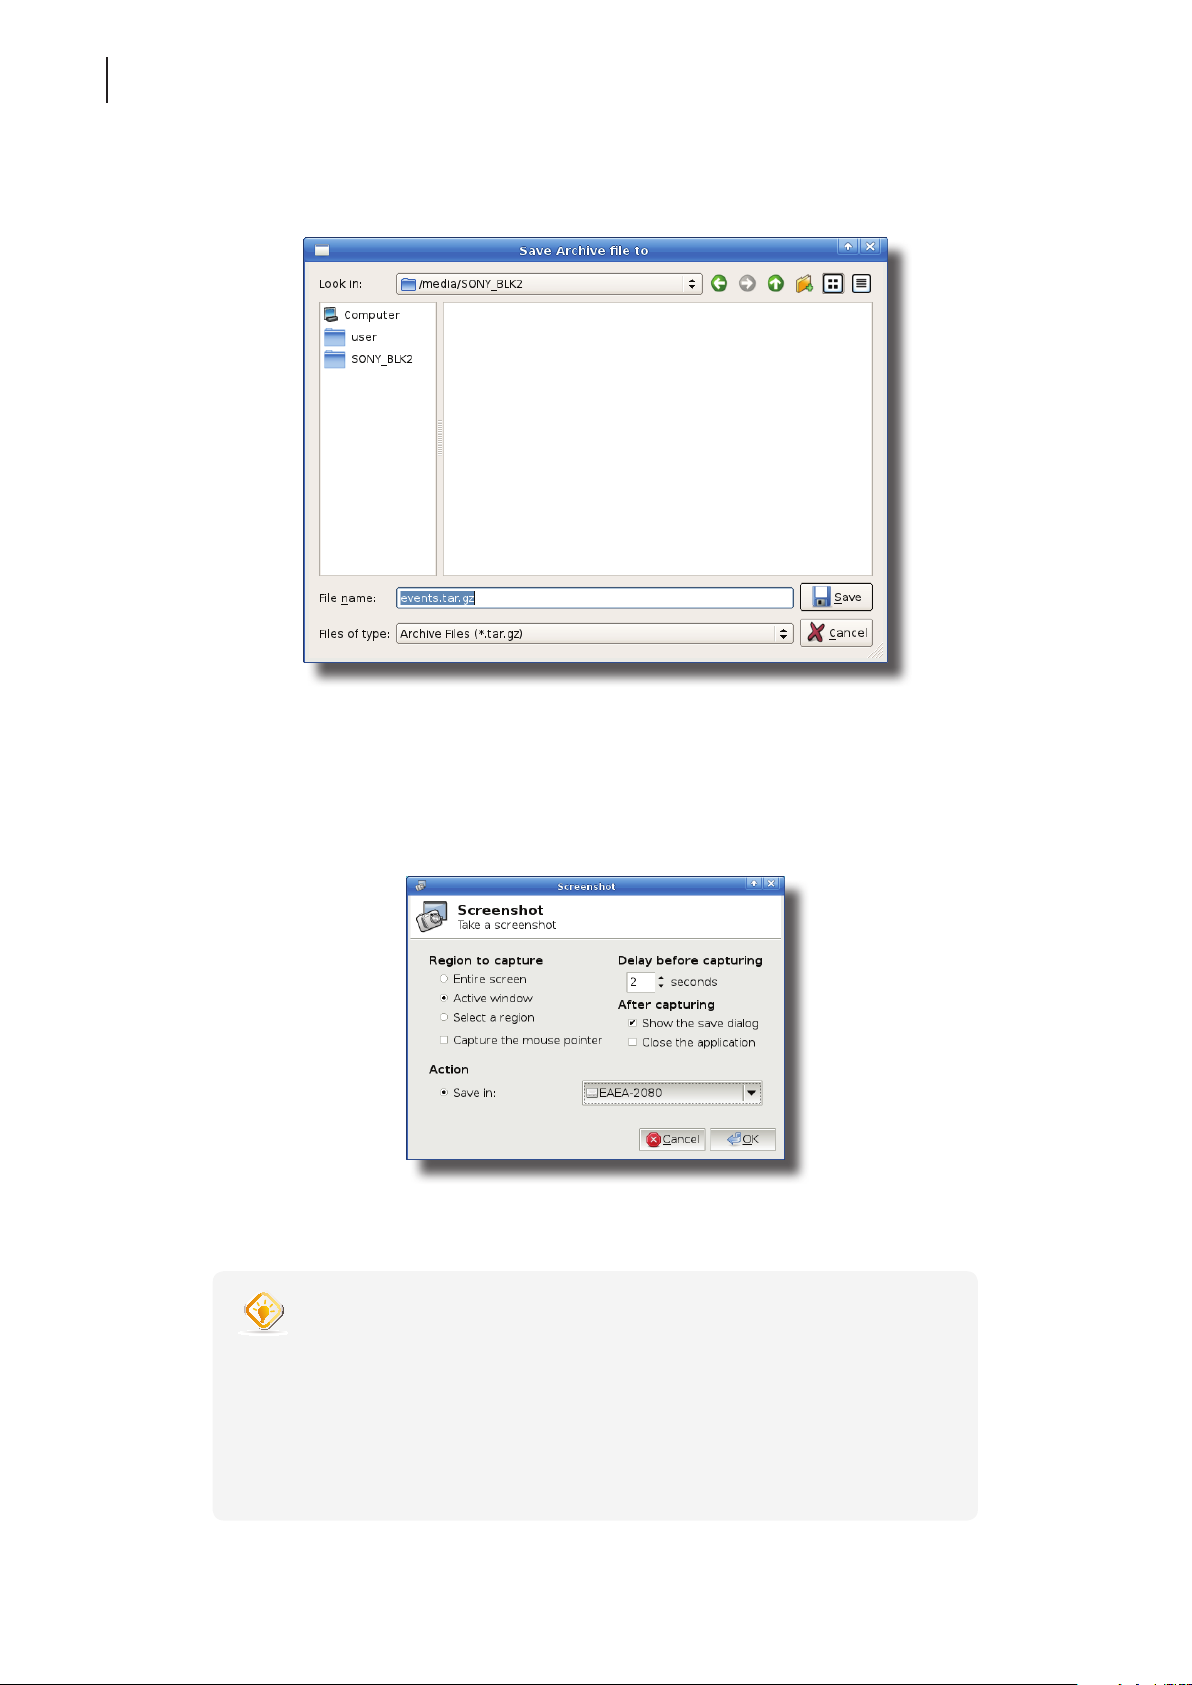
3. Click Collect Log. A window appears prompting you to choose where to save the log le set (named
events.tar.gz). The attached USB ash drive is the default location if attached. Click Save to apply.
Capturing Error-Related Screens
To capture error-related screens of your t60/t62, please do the following:
1. On Atrust Client Setup, click System > Error Report.
2. Click Launch Snapshot to open the screen capturing program.
3. Congure screen capturing settings directly on the opened window if needed, and then click OK to capture
the desired screen.
TIP
• It’s recommended to set the delay time before capturing to at least 2 seconds to
reserve time for switching to the desired screen or window.
• It’s recommended to save the captured screens in the same USB ash drive where
the event logs were saved. Click the Save in drop-down menu to select that USB
ash drive.
• Please note that les saved on the local desktop will be deleted after restart.
Page 69
Conguring Client Settings
Conguring System Settings
4.2.11 Importing Certicates for Remote Computers
You can import certicates for remote computers through:
• A local device (from a USB storage device)
• The network (from a remote computer or the management console)
NOTE
• The available management console for t60 / t62 is Atrust Device Manager, a remote
and group management console for multiple thin clients. For more information,
please refer to the User’s Manual for Atrust Device Manager.
Importing certicates through a USB storage device
To import certicates for remote computers through a USB storage device, please do the following:
1. Copy your certicates to a USB storage device, and then connect this storage device to your t60 / t62.
59
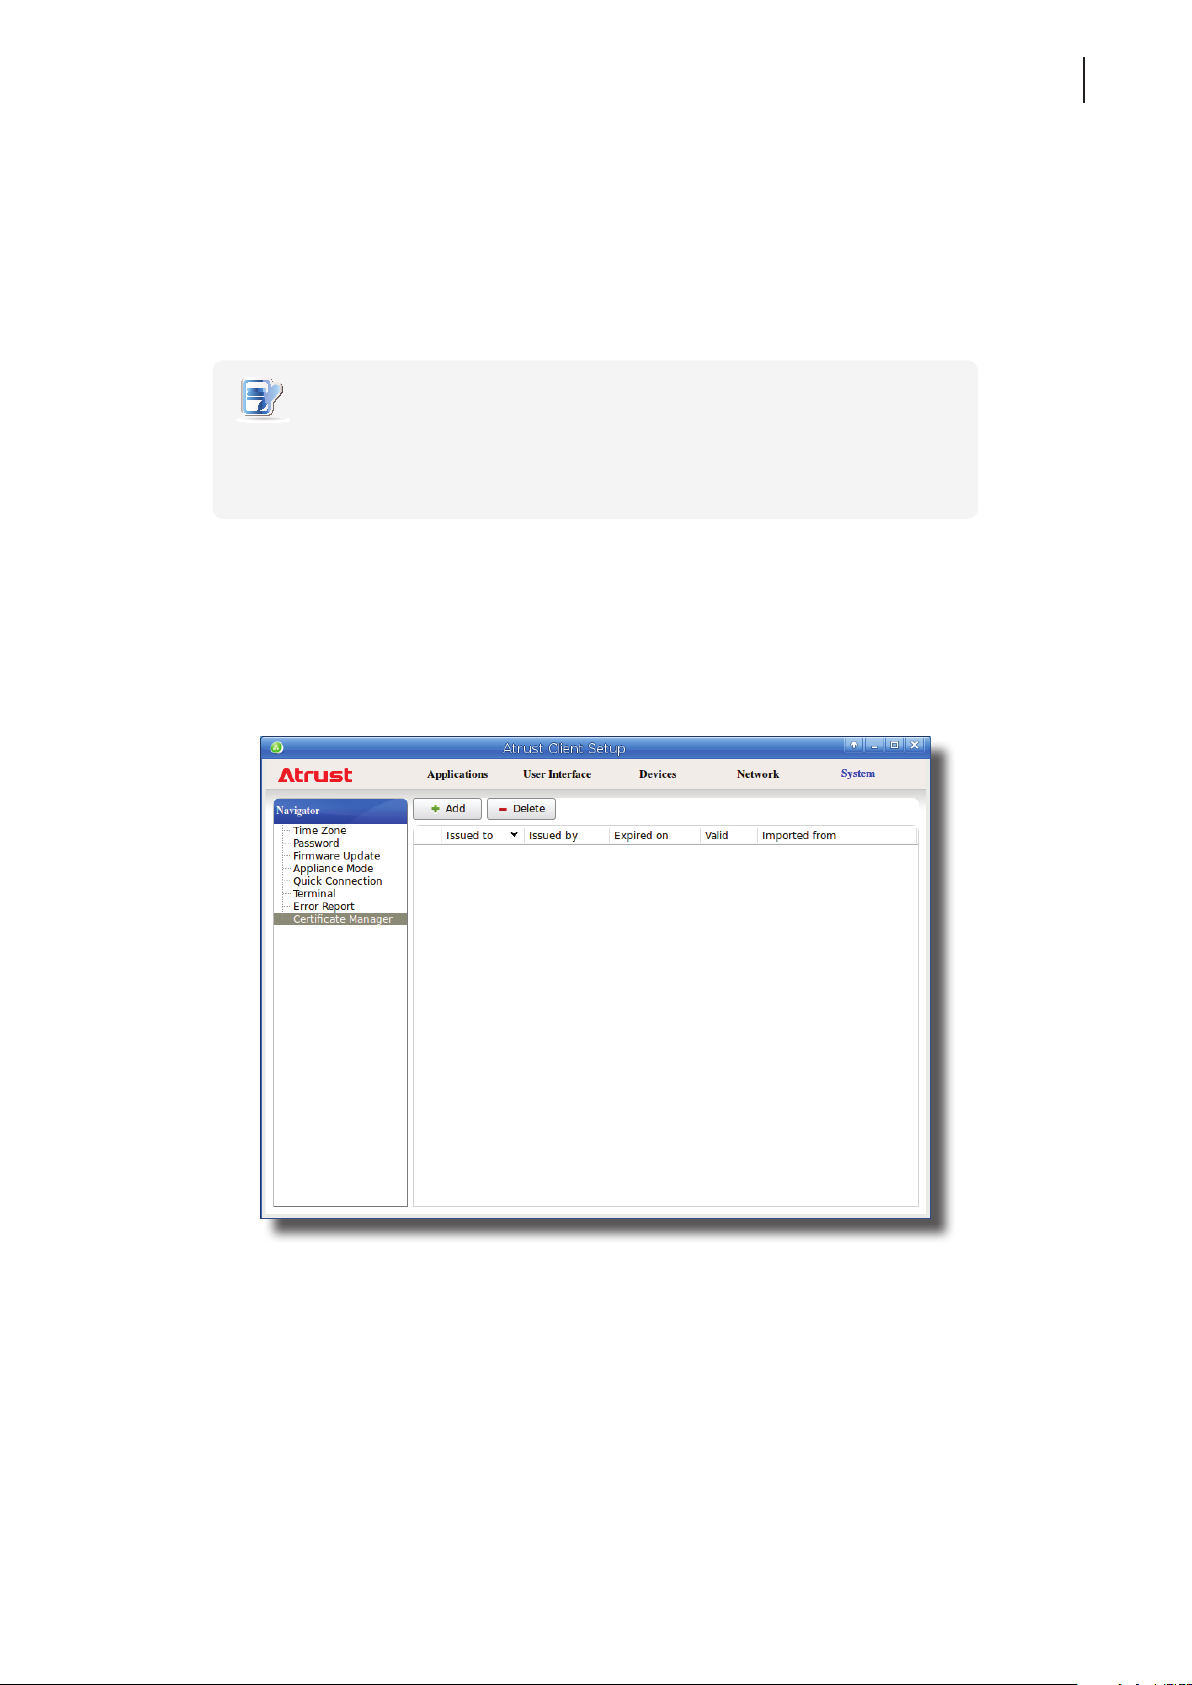
2. On Atrust Client Setup, click System > Certicate Manager.
3. Click Add on the top of the Certicate list.
Page 70
Conguring Client Settings
60
Conguring System Settings
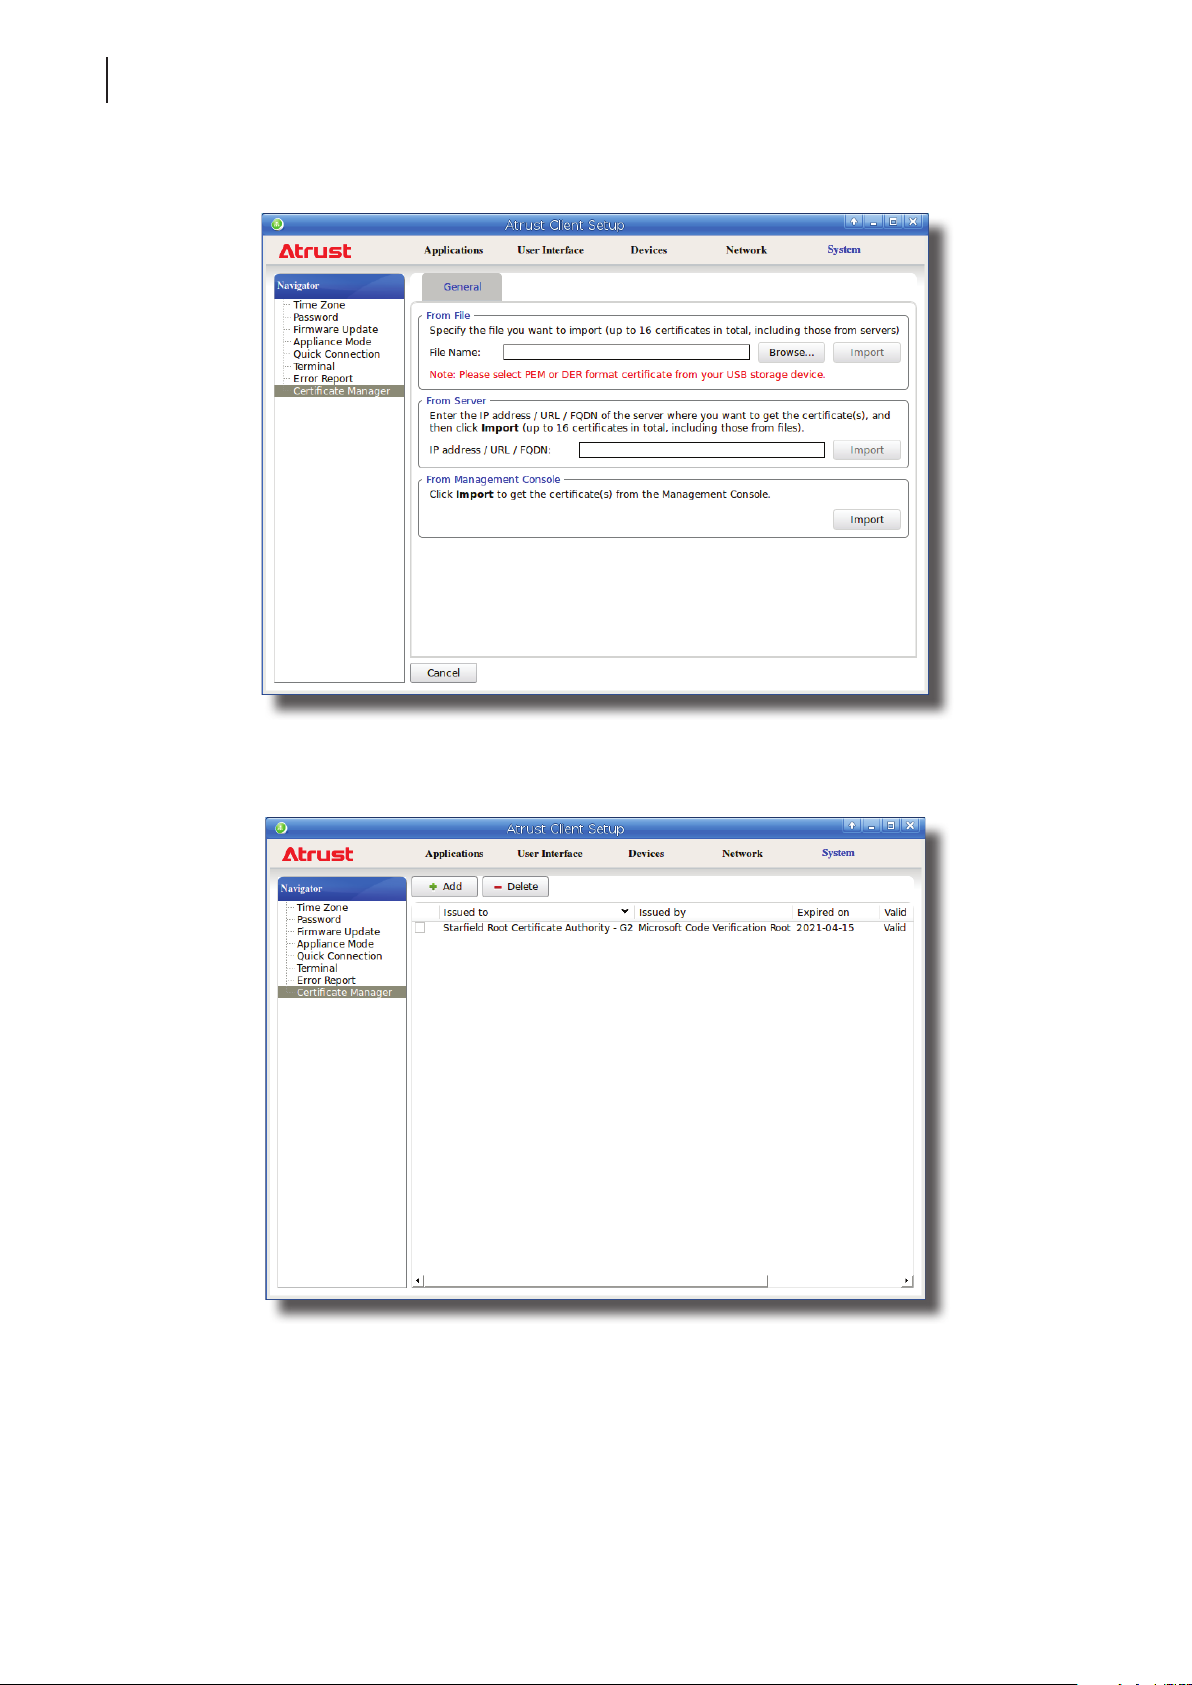
4. In the From File section, click Browser to locate the desired certicate le, and then click Open to conrm.
5. Click Import to start importing the certicate.
6. On completion, the certicate is shown in the Certicate list.
Page 71
Conguring Client Settings
Conguring System Settings
Importing certicates from remote computers through the network
To import the certicate from a remote computer through the network, please do the following:
1. On Atrust Client Setup, click System > Certicate Manager.
2. Click Add on the top of the Certicate list.
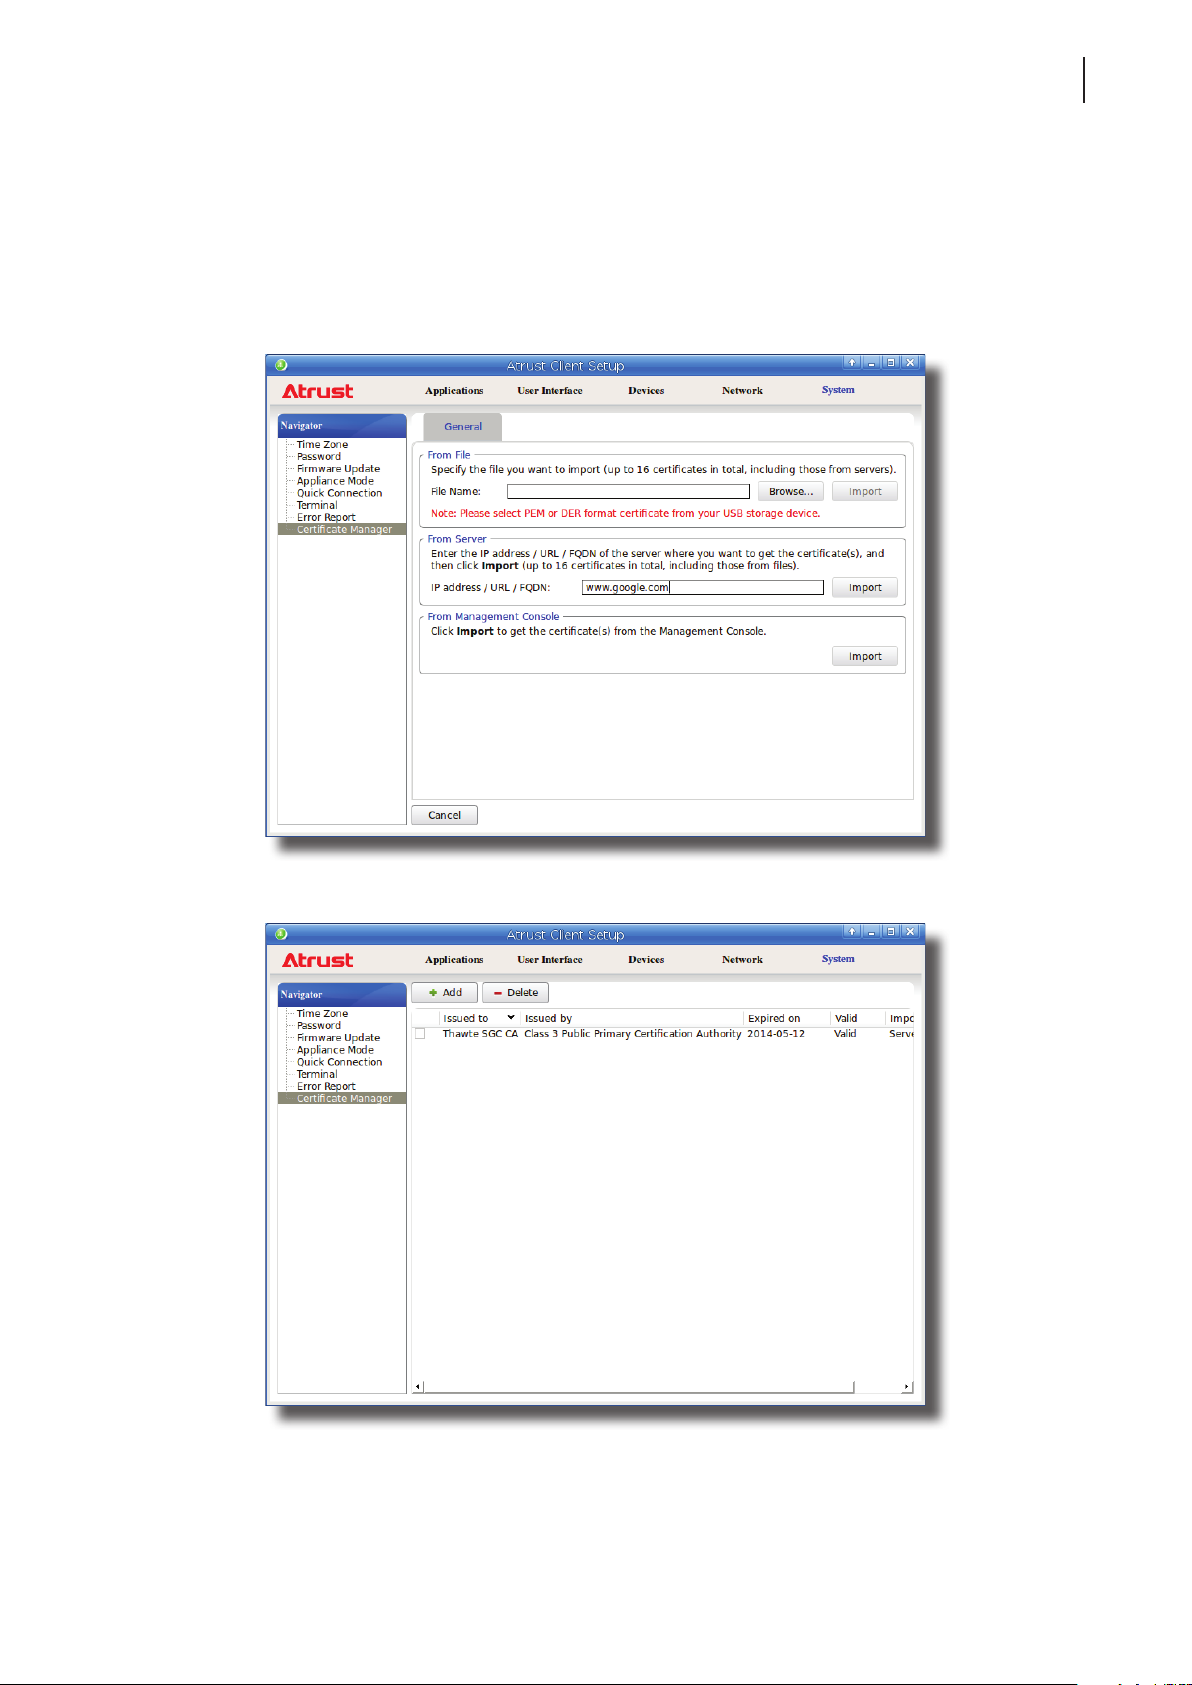
3. In the From Server section, type the IP address / URL / FQDN of the remote computer, and then click Import.
61
4. On completion, the certicate is shown in the Certicate list.
Page 72
Conguring Client Settings
62
Conguring System Settings
Importing certicates from the management console through the network
To import certicates from the management console through the network, please do the following:
NOTE
• Before proceeding, ensure that (1) your thin client has been added into a managed
group in the management console, that is, Atrust Device Manager, and that (2) you
have imported certicates into the management console.
1. On Atrust Client Setup, click System > Certicate Manager.
2. Click Add on the top of the Certicate list.
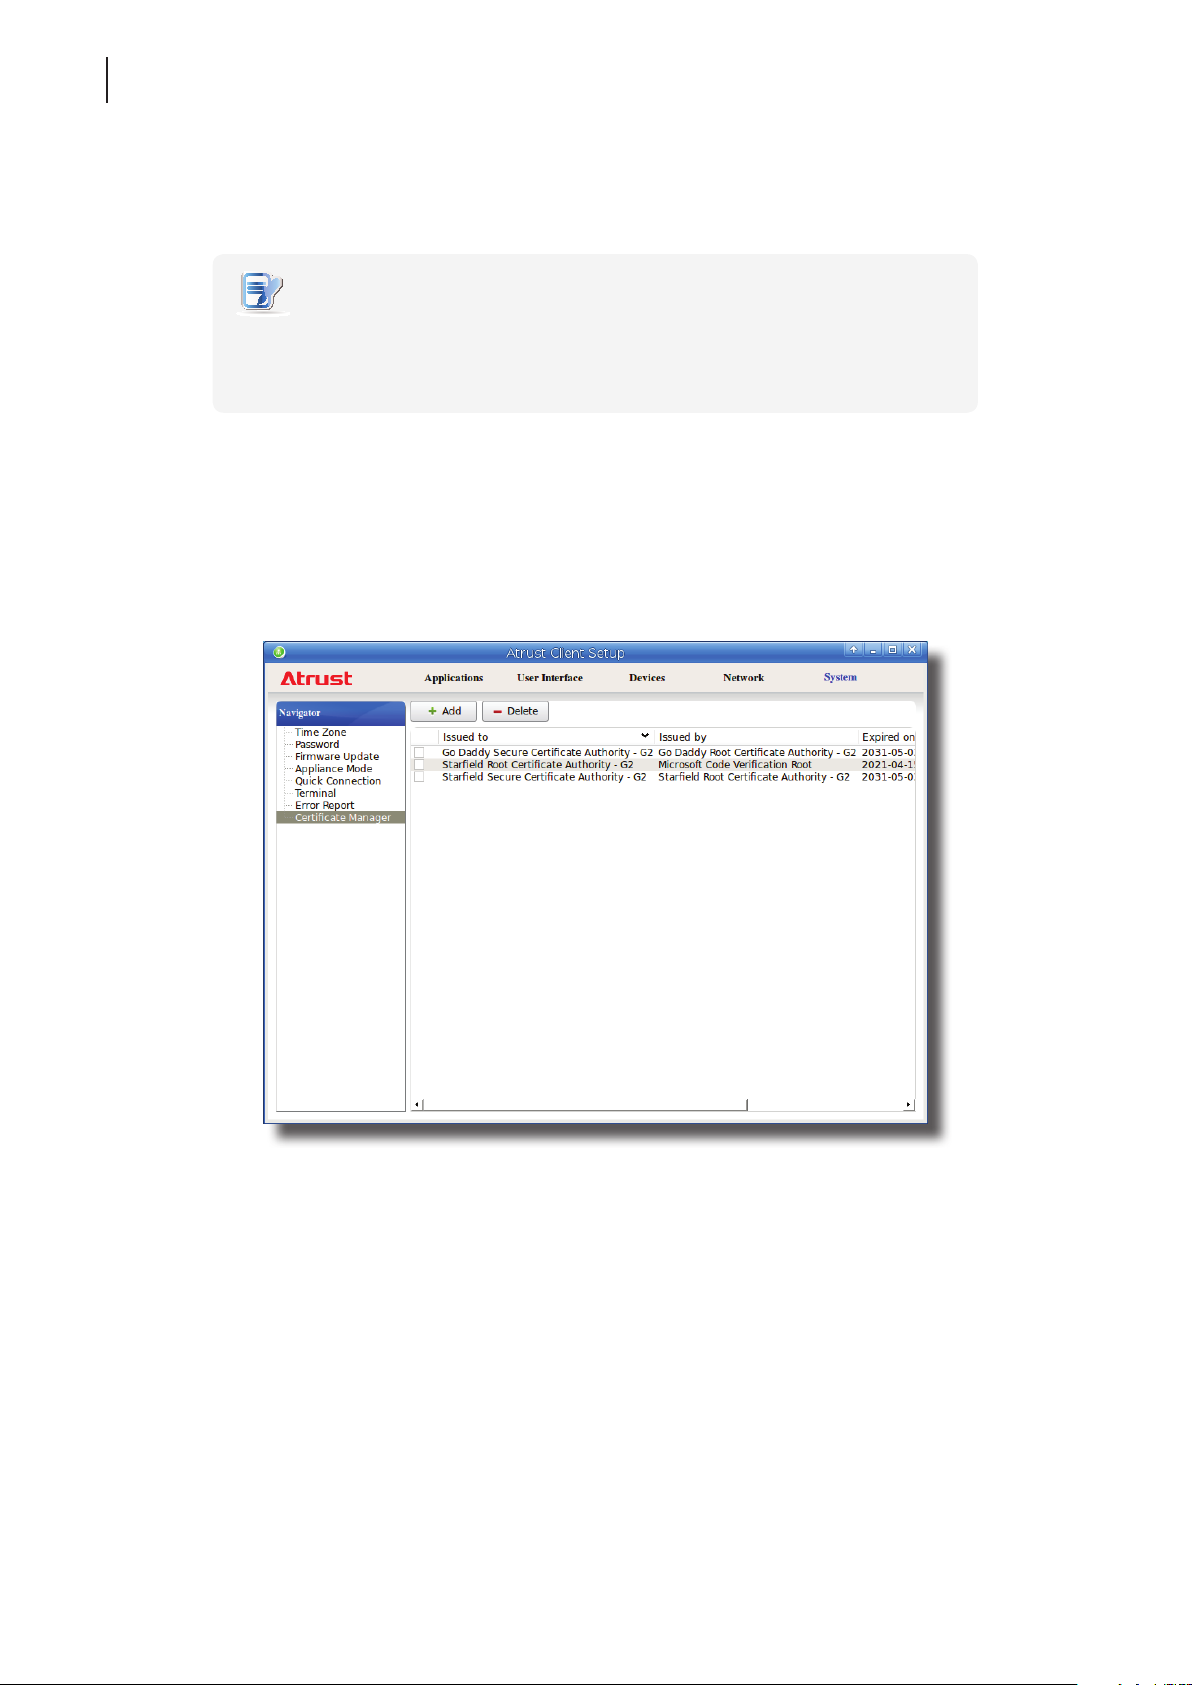
3. In the From Management Console section, click Import to start importing all certicates available in the
management console.
4. On completion, the certicates are shown in the Certicate list.
Page 73
Conguring Client Settings
Conguring User Interface Settings
4.3 Conguring User Interface Settings
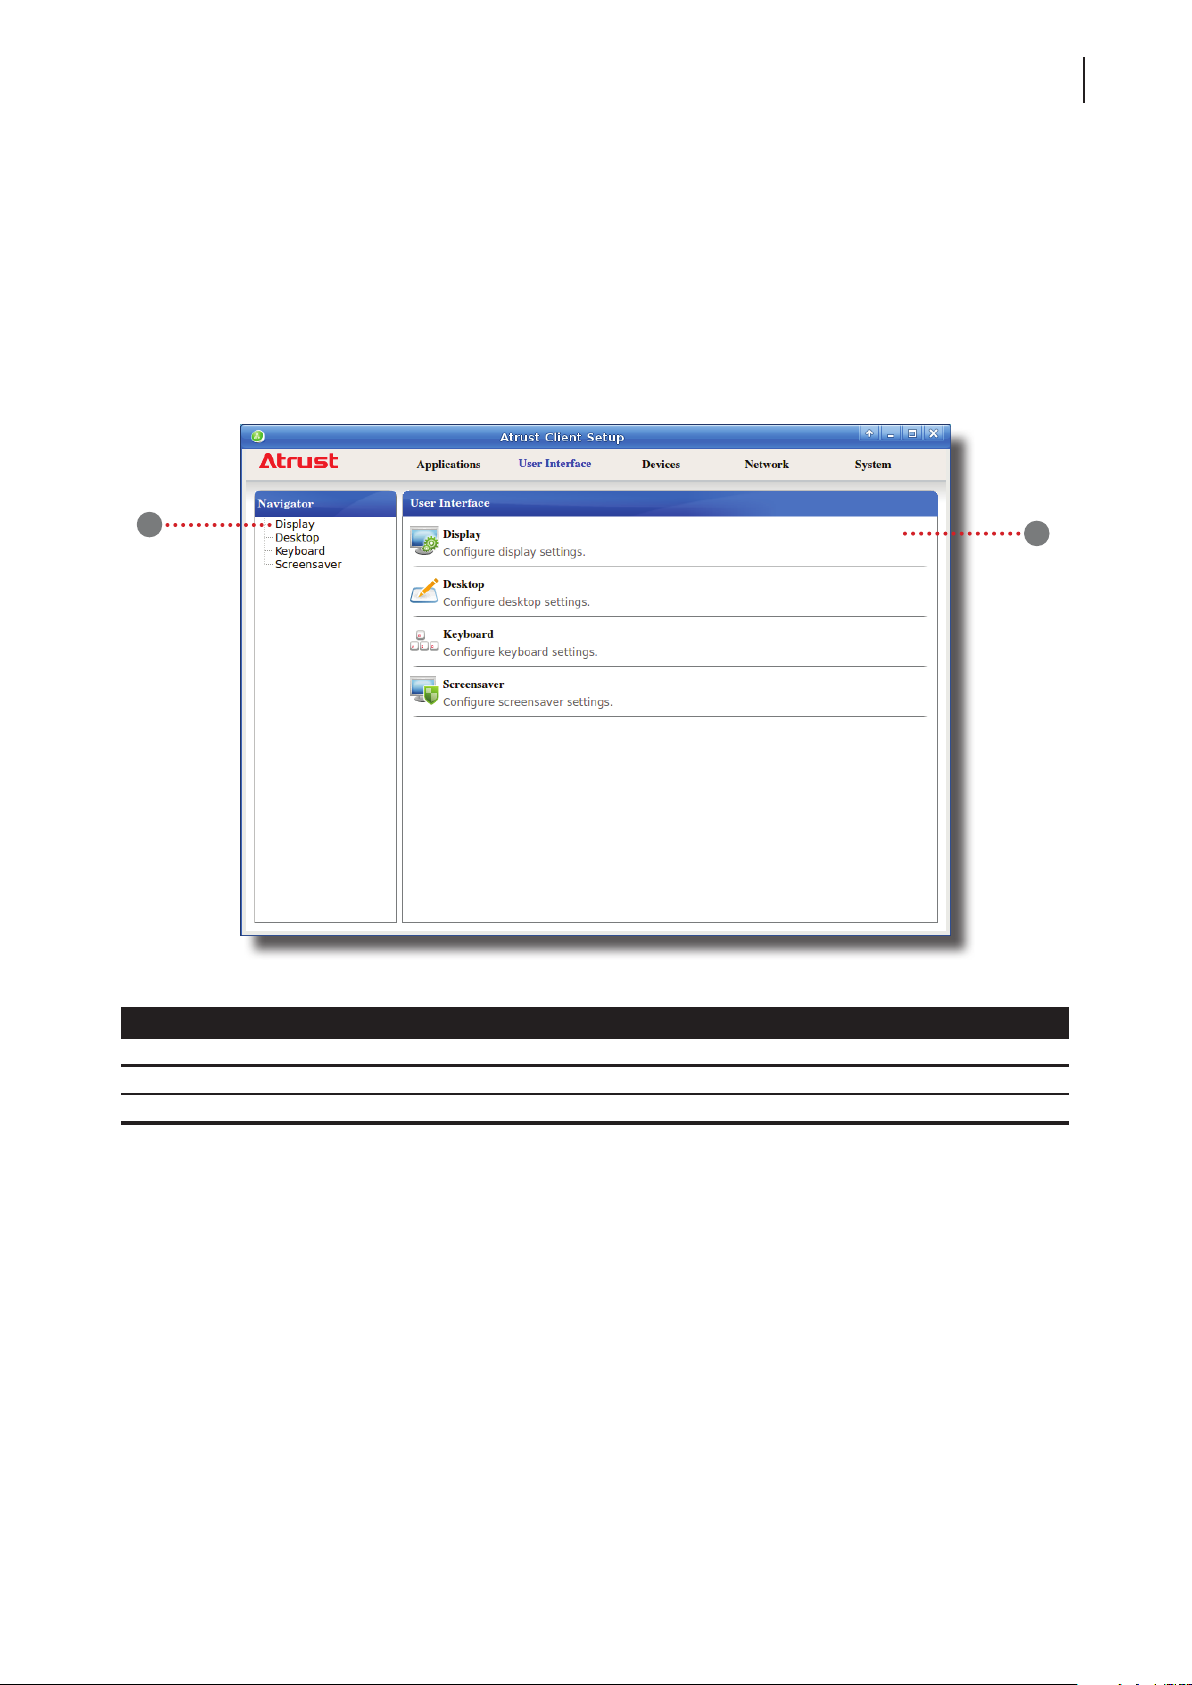
4.3.1 User Interface Tab Overview
User Interface tab enables you to congure settings for the user interface of clients. To access available settings of
User Interface tab, click the tab on Atrust Client Setup.
User Interface Tab Overview
63
1
Interface Elements
No. Name Description
1 Navigation area Click to select a setting item under User Interface tab.
2 Conguration area Congures setting values when a setting item or entry is selected.
2
Page 74
Conguring Client Settings
64
Conguring User Interface Settings
4.3.2 Available Settings at a Glance
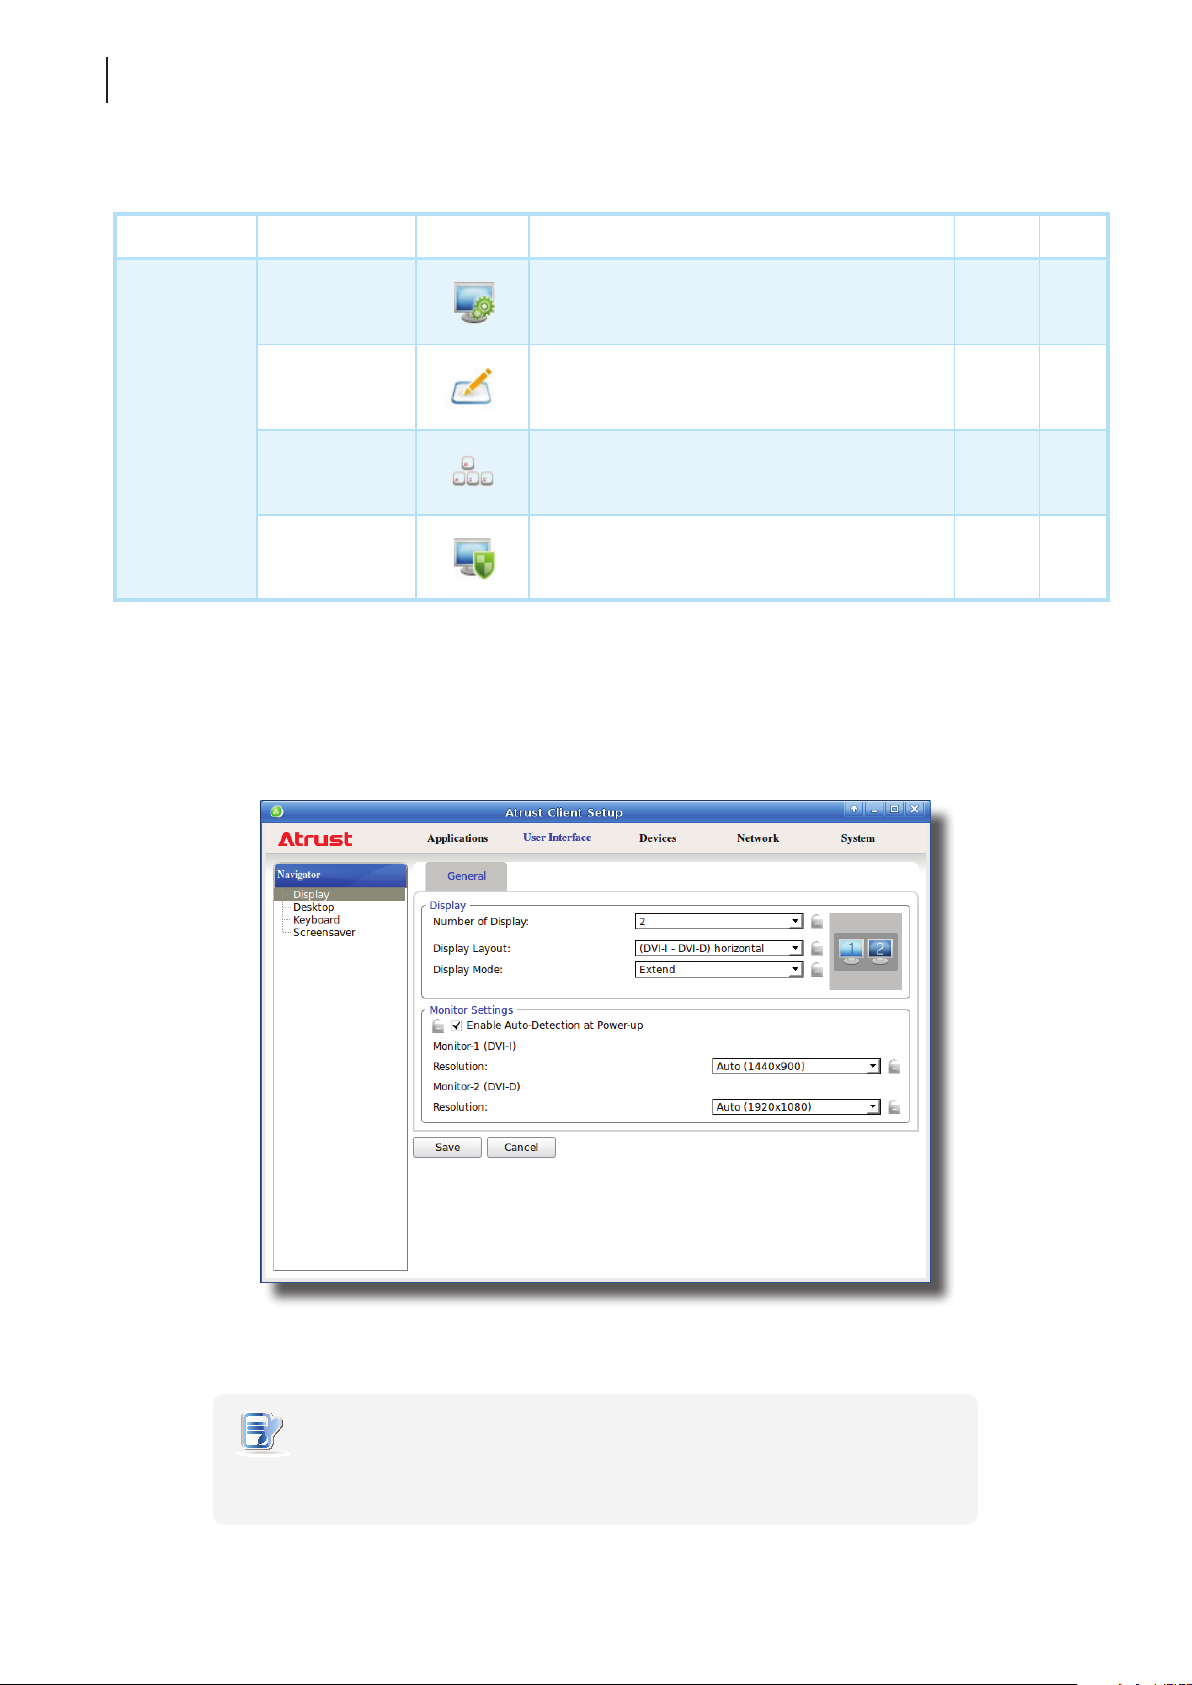
Tab Setting Icon Description Section Page
Display
Desktop
User Interface
Keyboard
Screensaver
Click to congure display settings. 4.3.3 64
Click to customize desktop and system language. 4.3.4 68
Click to adjust keyboard settings. 4.3.6 71
Click to congure screensaver settings. 4.3.7 73
4.3.3 Conguring Display Settings
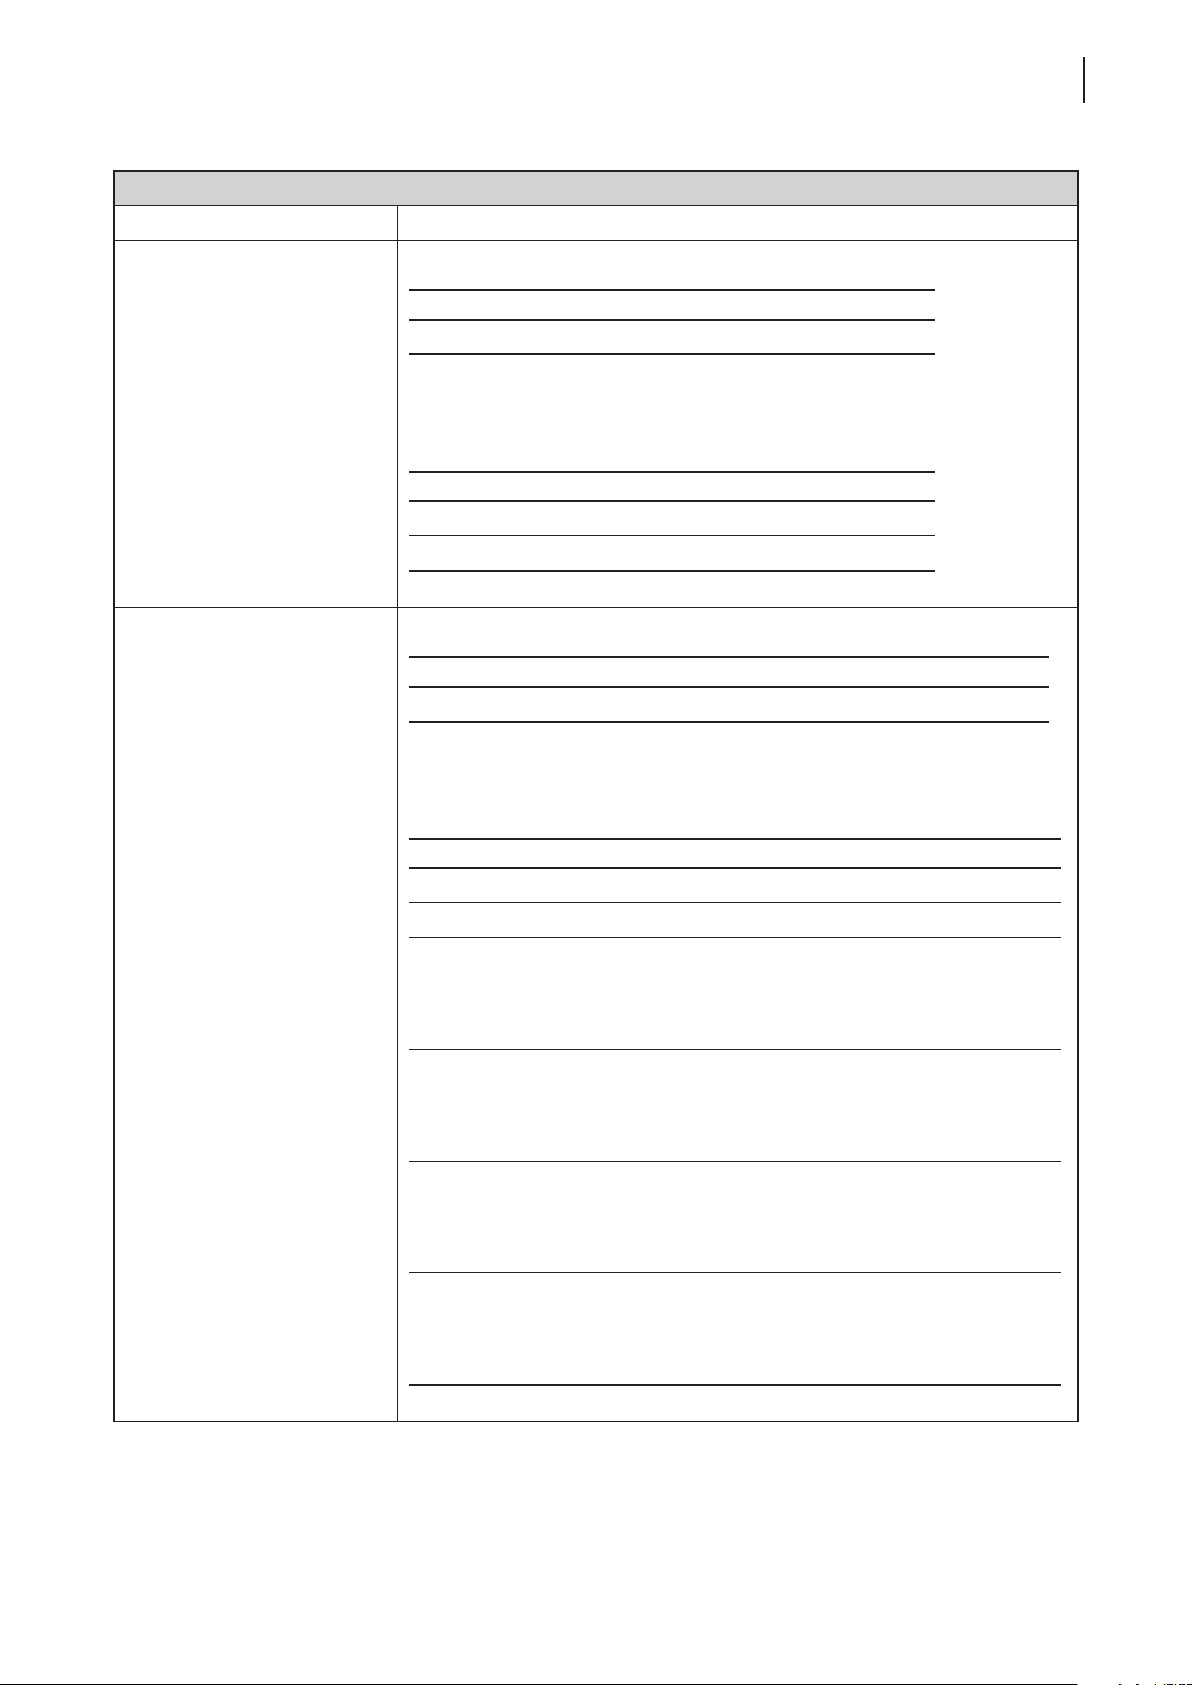
To congure display settings for your t60/t62, please do the following:
1. On Atrust Client Setup, click User Interface > Display.
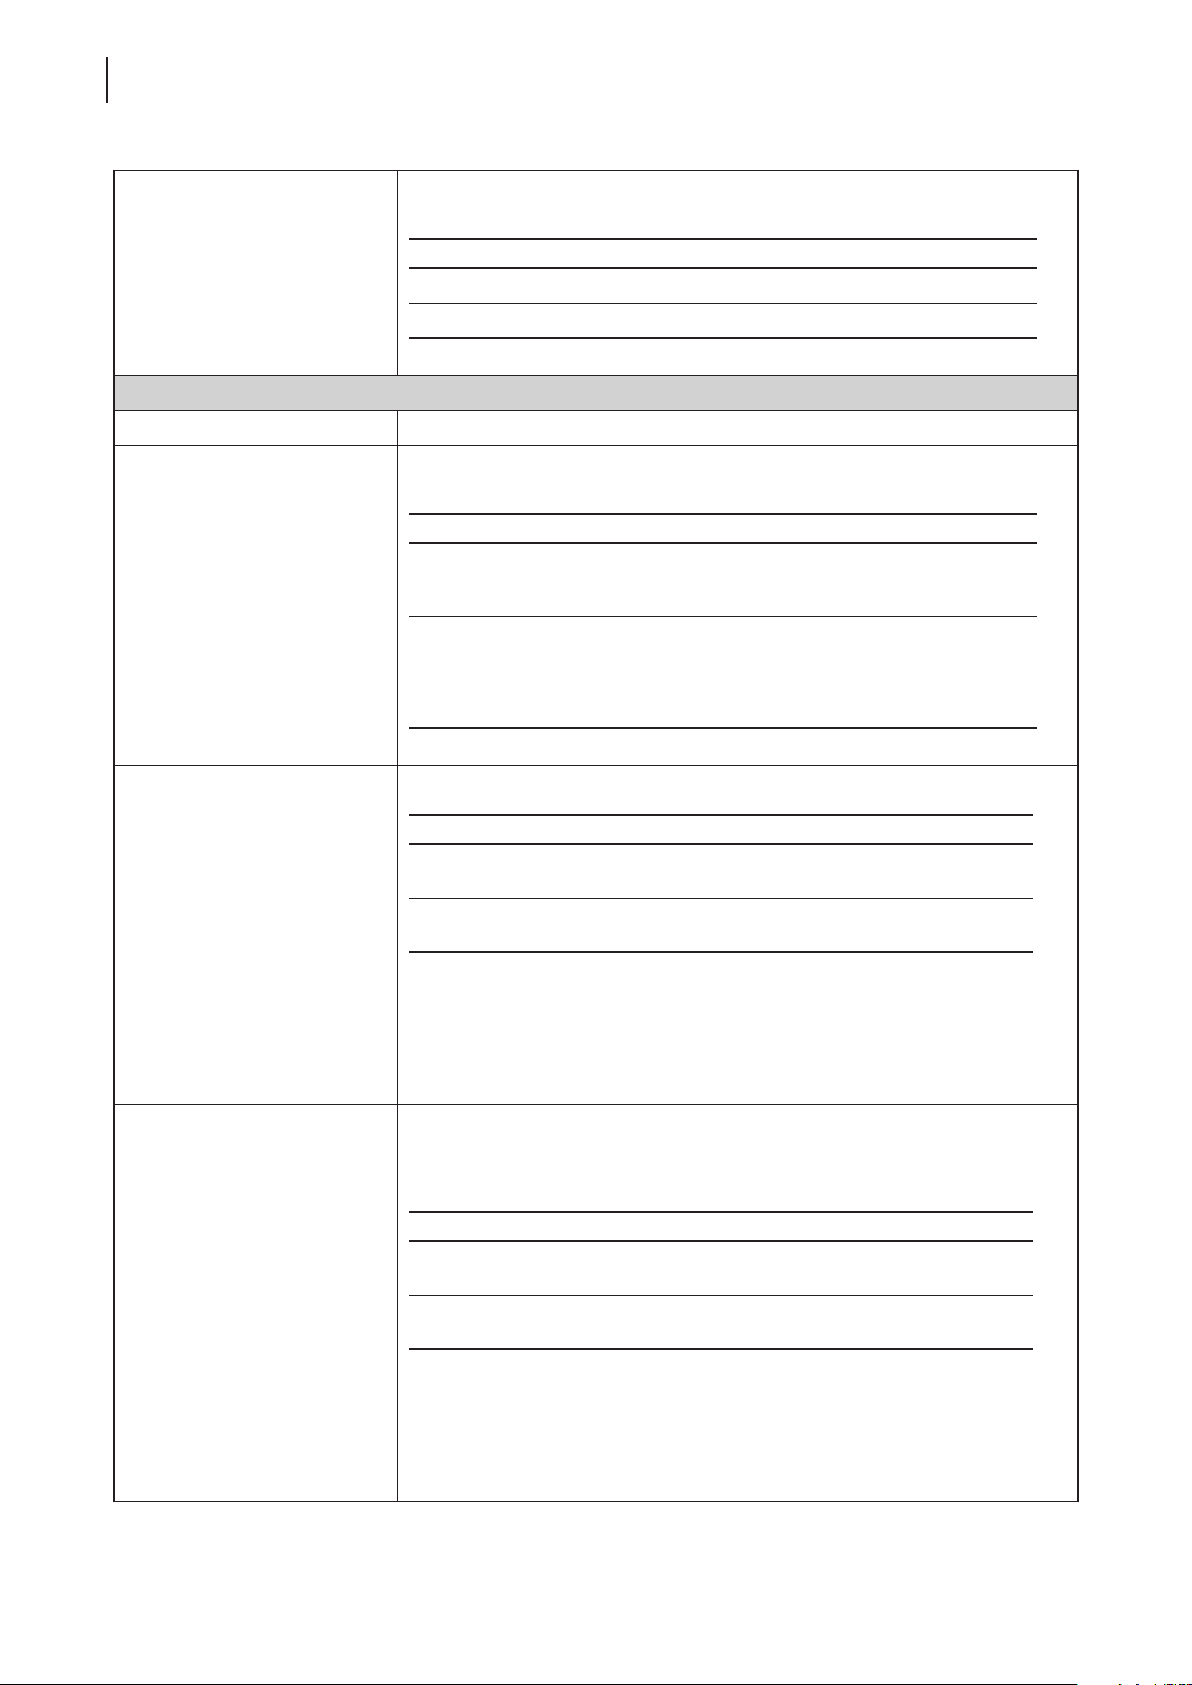
2. Click drop-down menus to select the number of attached display(s), arrangement of displays, display mode
for multiple displays, and resolution. Refer to the following table to select appropriate setting values.
NOTE
• The available setting items vary, depending on your model and the selected
number of display(s).
Page 75
Display
Item Description
Number of Display
Conguring Client Settings
Conguring User Interface Settings
For t60, only one option is available:
Option Description
1 One display is attached.
NOTE: t60 is equipped with only one VGA port.
For t62, two options are available:
Option Description
1 One display is attached.
2 Two displays are attached.
For t60, only one option is available:
65
Display Layout
Option Description
Use VGA Use the display that is attached to the VGA port.
NOTE: t60 is equipped with only one VGA port.
For t62, six options are available:
Option Description
Use DVI-I Use the single display that is attached to the DVI-I port.
Use DVI-D Use the single display that is attached to the DVI-D port.
Use dual displays.
(DVI-I - DVI-D)
horizontal
(DVI-D - DVI-I)
horizontal
(DVI-I - DVI-D)
vertical
Two displays are arranged horizontally:
the DVI-I one is on the left; the DVI-D the right.
The DVI-I one is the main display for local desktop when
Extend is selected.
Use dual displays.
Two displays are arranged horizontally:
the DVI-D one is on the left; the DVI-I the right.
The DVI-D one is the main display for local desktop
when Extend is selected.
Use dual displays.
Two displays are arranged vertically:
the DVI-I one is on the top; the DVI-D the bottom.
The DVI-I one is the main display for local desktop when
Extend is selected.
(DVI-D - DVI-I)
vertical
Use dual displays.
Two displays are arranged vertically:
the DVI-D one is on the top; the DVI-I the bottom.
The DVI-D one is the main display for local desktop
when Extend is selected.
Page 76
Conguring Client Settings
66
Conguring User Interface Settings
This item is available only for t62 and only when 2 is selected in the Number of
Display drop-down menu:
Display Mode
Monitor Settings
Item Description
Enable Auto-Detection at
Power-up
Option Description
Extend One display is used as the extended display of the other.
Clone Two displays have the same display content.
Check/Uncheck to enable/disable the automatic detection of the attached
monitor(s) when the client is powered on.
Option Description
Enabled
Disabled
Use this item to set an appropriate resolution for the attached display.
Option Description
Auto
Automatic detection of the attached monitor(s) is enabled.
The system would set an appropriate resolution for the
attached monitor(s) when the client is powered on.
Automatic detection of the attached monitor(s) is disabled.
All resolutions supported by the client will be listed in the
Resolution drop-down menu when Auto-Detection at
Power-up is disabled. Please note that some resolutions
may not be applicable to your monitor(s).
This option is available only when Enable Auto-Detection
at Power-up is selected.
Monitor Resolution
Monitor-1 (DVI-I) Resolution
Other
options
NOTE: All resolutions supported by the client will be listed in the Resolution
drop-down menu when Auto-Detection at Power-up is disabled.
Please note that some resolutions may not be applicable to
your monitor(s).
This item is available only for t62 and only when 2 is selected in the Number of
Display drop-down menu.
Use this item to set an appropriate resolution for the attached DVI-I display.
Option Description
Auto
Other
options
NOTE: When Auto-Detection at Power-up is disabled, all resolutions
supported by the client will be listed in the Resolution drop-down menu.
Please note that some resolutions may not be applicable to
your monitor(s).
Select the desired resolution from the Resolution drop-down
menu for the attached display.
This option is available only when Enable Auto-Detection
at Power-up is selected.
Select the desired resolution from the Resolution drop-down
menu for the attached display.
Page 77
Monitor-2 (DVI-D) Resolution
Conguring Client Settings
Conguring User Interface Settings
This item is available only for t62 and only when 2 is selected in the Number of
Display drop-down menu.
Use this item to set an appropriate resolution for the attached DVI-D display.
Option Description
Auto
Other
options
This option is available only when Enable Auto-Detection
at Power-up is selected.
Select the desired resolution from the Resolution drop-down
menu for the attached display.
67
NOTE: When Auto-Detection at Power-up is disabled, all resolutions
supported by the client will be listed in the Resolution drop-down menu.
Please note that some resolutions may not be applicable to
your monitor(s).
NOTE
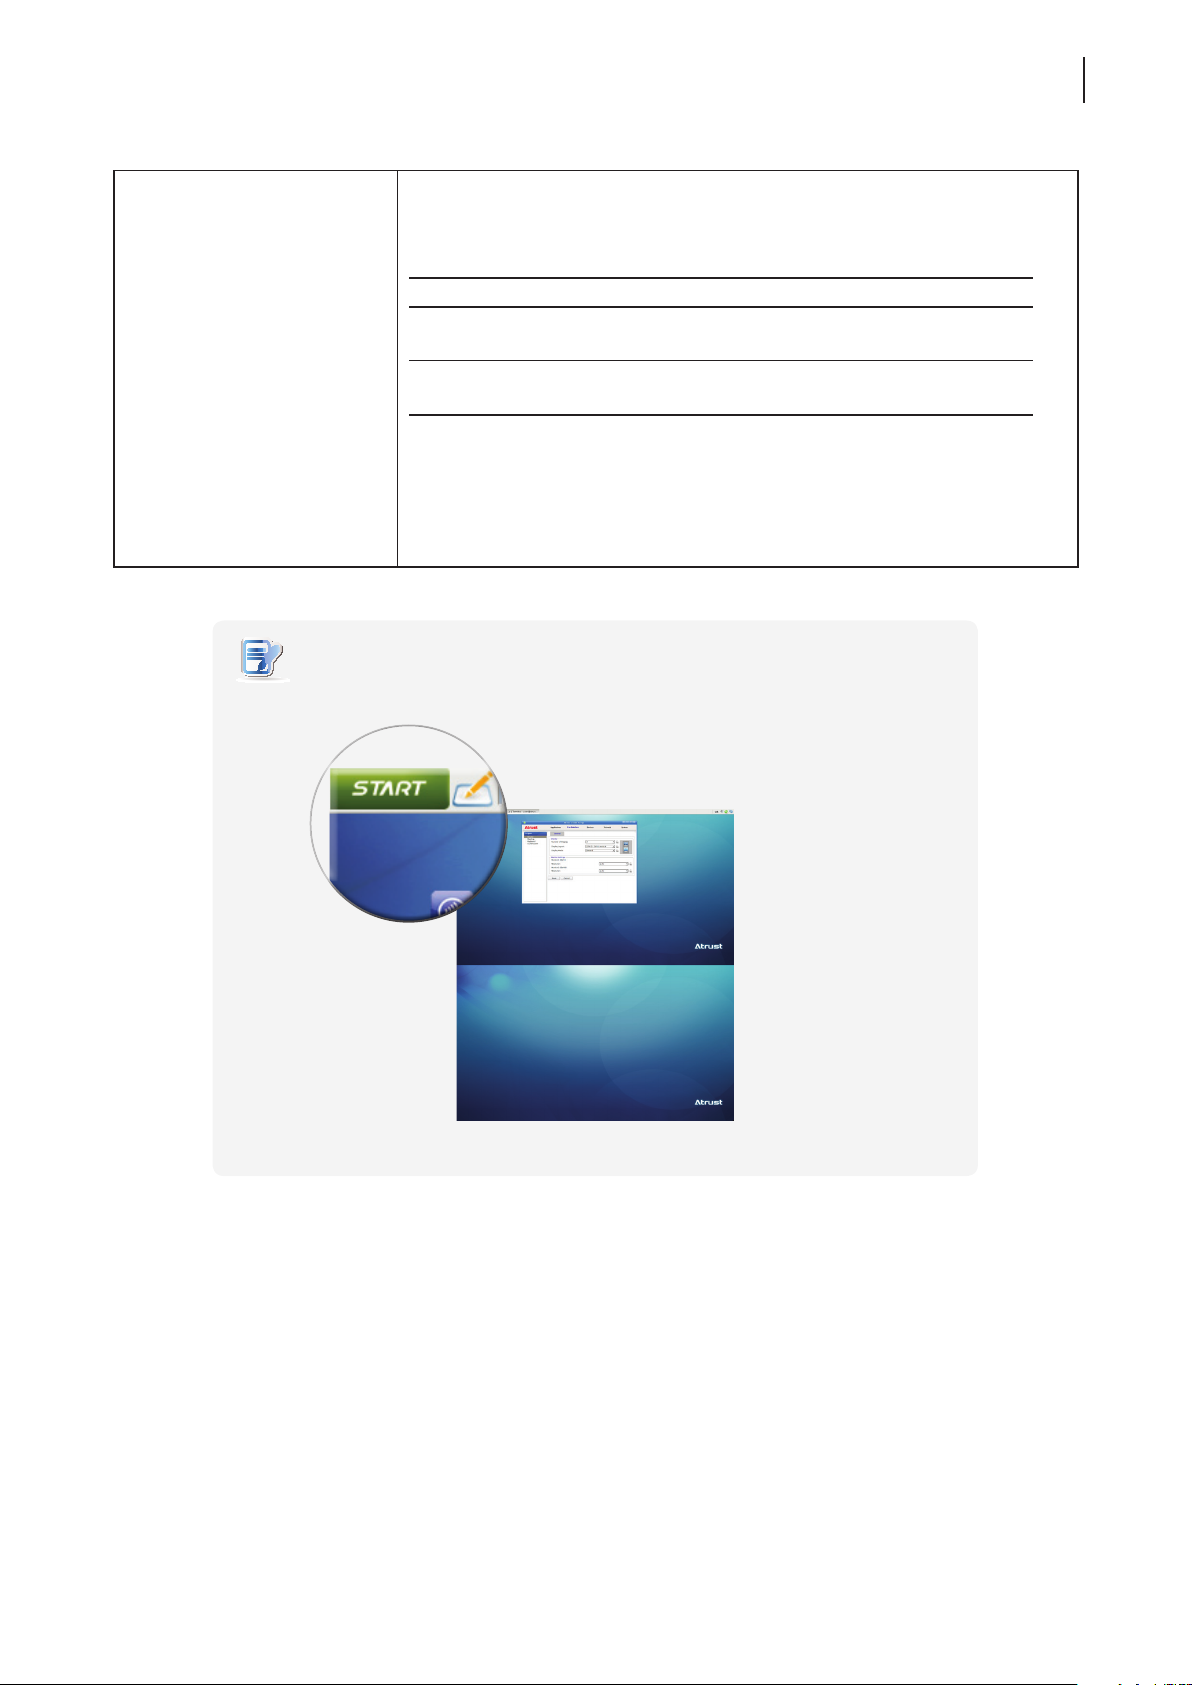
• When the vertical Display Layout and Extend display mode are selected, the Taskbar
will be moved to the top of the main desktop as shown below.
Page 78
Conguring Client Settings
68
Conguring User Interface Settings
4.3.4 Customizing Desktop and System Language Settings
To customize desktop and system language settings for your t60/t62, please do the following:
1. On Atrust Client Setup, click User Interface > Desktop.
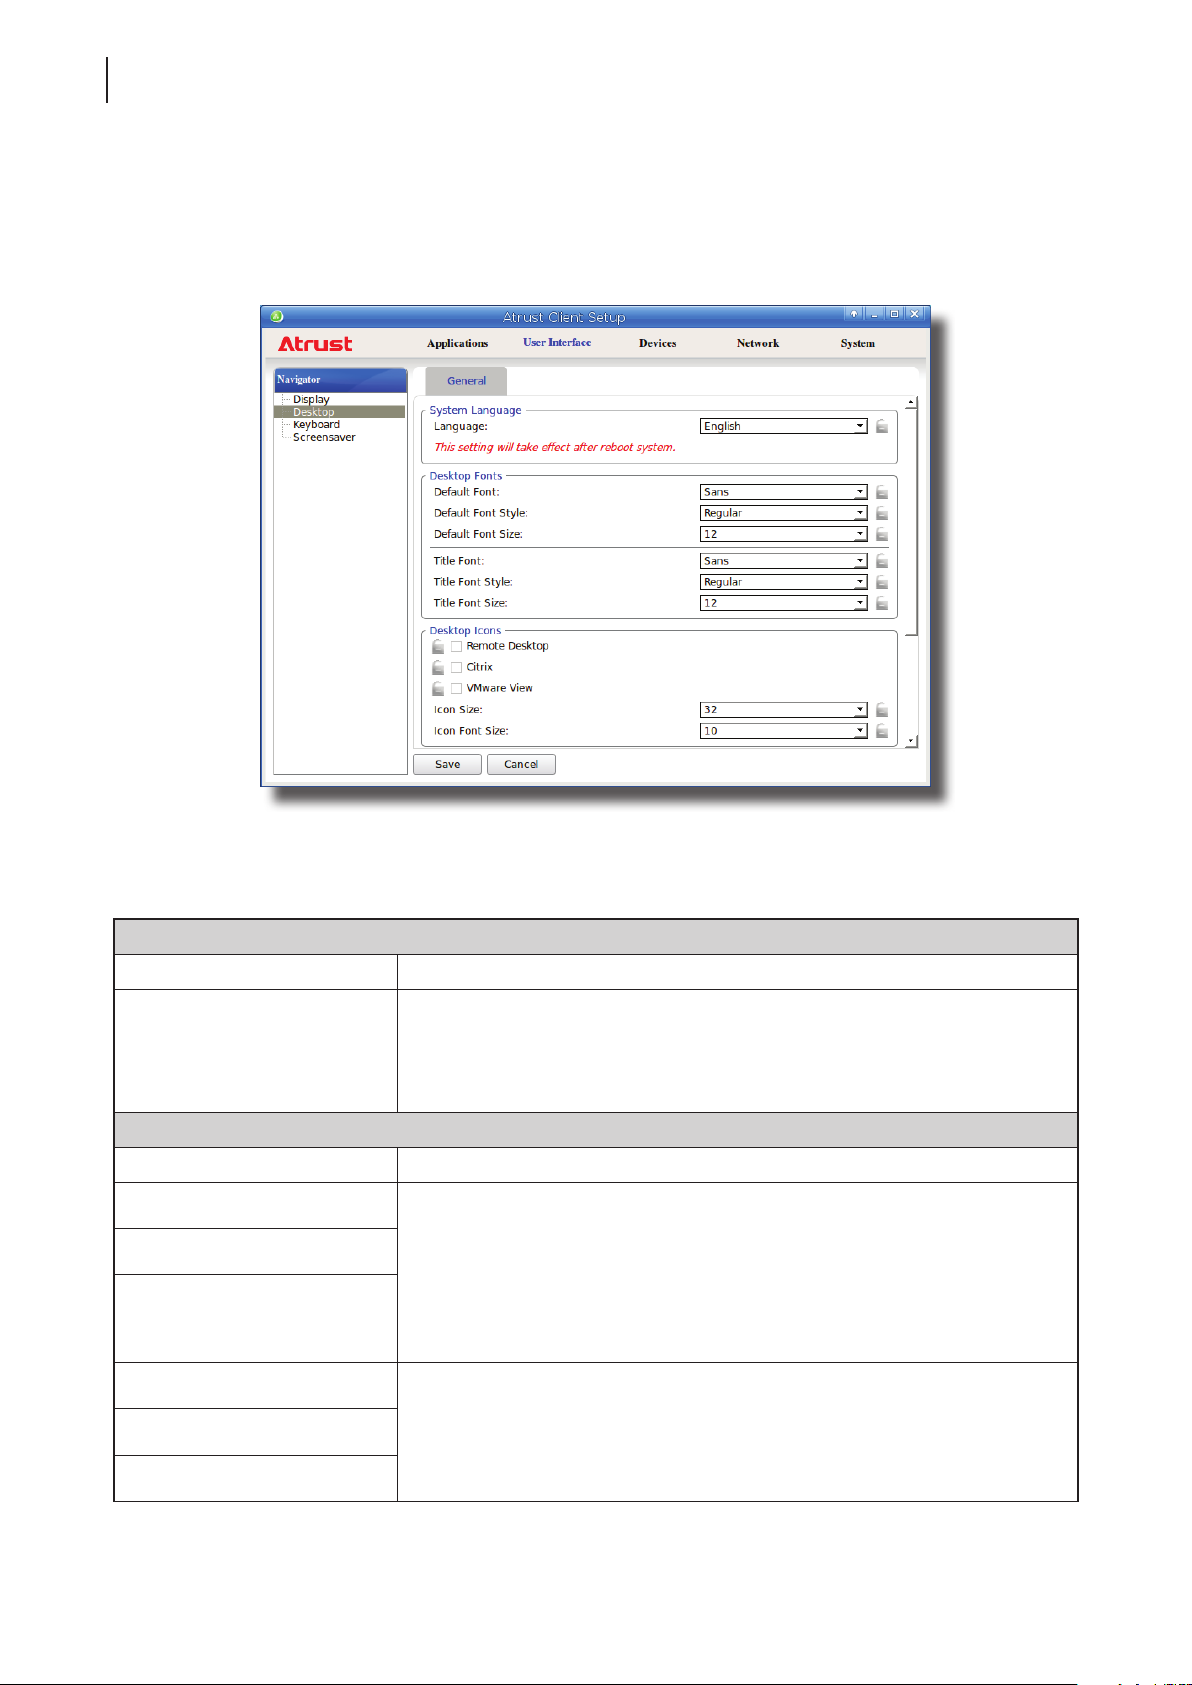
2. Click drop-down menus or tick/untick checkboxes to choose desired settings. Refer to the following table for
a description of each setting item.
System Language
Item Description
Click the drop-down menu to select the system language.
Language
Desktop Fonts
Item Description
Default Font Click the drop-down menus to select the desired font, its style and size used for
Default Font Style
Default Font Size
Title Font
NOTE: Available languages may vary with the rmware version of your device.
NOTE: You need to restart the system for the change to take effect.
the user interface of the operating system, such as menus, options on menus,
text labels for desktop shortcuts, tabs on program windows etc.
NOTE: Your changes will not apply to the titles of opened windows, the Atrust
Client Setup console, and the System Information window (START >
System Settings > System Information).
Title Font Style
Title Font Size
Click the drop-down menus to select the desired font, its style and size used for
the titles of the opened windows.
Page 79
Desktop Icons
Item Description
Conguring Client Settings
Conguring User Interface Settings
69
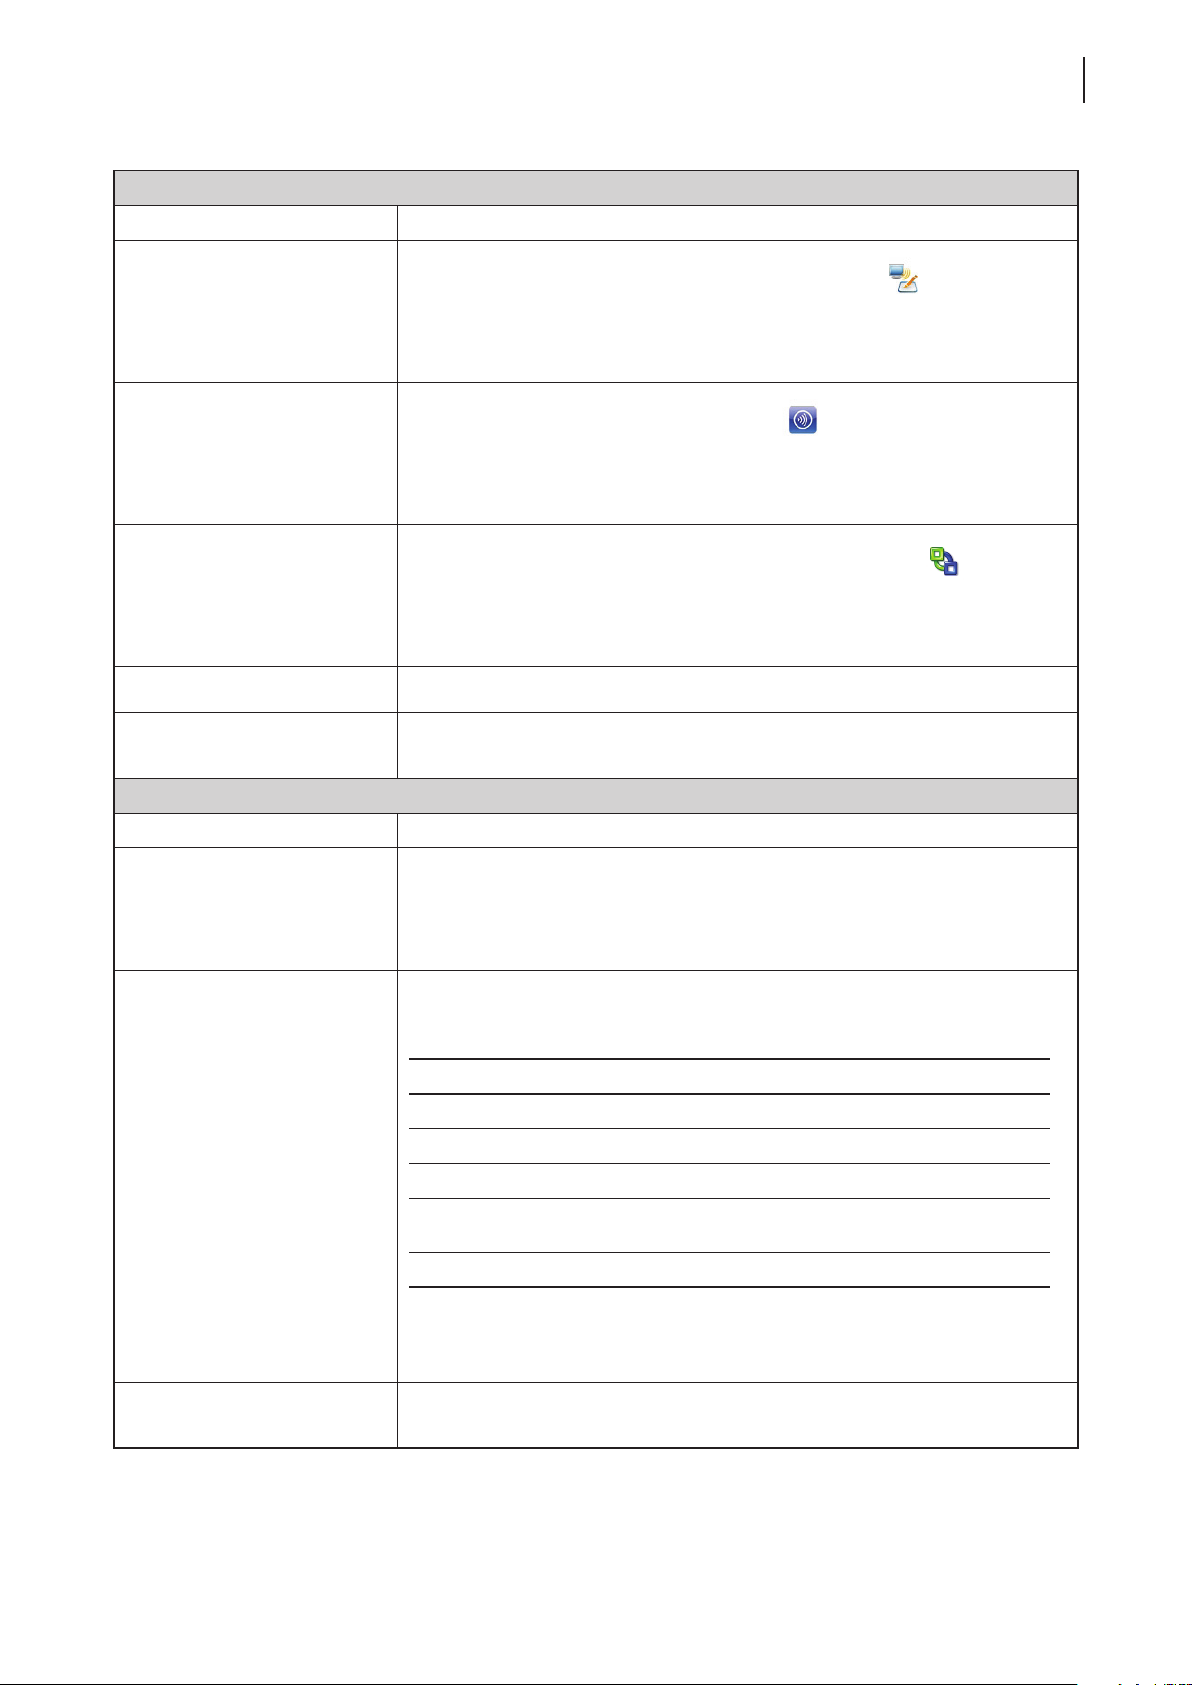
Check/Uncheck to show/hide shortcuts Remote Desktop
Remote Desktop
Citrix
VMware View
Icon Size Click the drop-down menu to select the desired size of desktop icons/shortcuts.
Icon Font Size
Desktop Background
Item Description
menu and local Linux desktop for service quick access.
For more information, please refer to section “4.3.5 Hiding or Showing Quick
Access Shortcuts” on page 70.
Check/Uncheck to show/hide shortcuts Citrix
Linux desktop for service quick access.
For more information, please refer to section “4.3.5 Hiding or Showing Quick
Access Shortcuts” on page 70.
Check/Uncheck to show/hide desktop shortcuts VMware View
START menu and local Linux desktop for service quick access.
For more information, please refer to section “4.3.5 Hiding or Showing Quick
Access Shortcuts” on page 70.
Click the drop-down menu to select the desired text label size of desktop
icons/shortcuts.
on the START menu and local
on the START
on the
Enable Desktop Wallpaper
Wallpaper Style
Wallpaper
Check/Uncheck to enable/disable the use of Atrust wallpaper.
NOTE: If this setting is disabled, the solid color background (dark blue) will
Click the drop-down menu to select the way to apply the wallpaper. Five options
are available: Centered, Tiled, Stretched, Scaled, and Zoomed.
NOTE: Depending on the size of the connected display, two options might have
Click the drop-down menu to select the color of Atrust wallpaper. Four colors are
available: Green, Blue, Orange, and Cyan.
be used.
Option Description
Centered Centers the original image on the screen.
Tiled Tiles the screen with the original image.
Stretched Centers and extends/shrinks the image to t the screen.
Scaled
Zoomed Centers and sizes the image proportionally to ll the screen.
the same effect.
Centers and sizes the image proportionally to t the screen
until the top-bottom or left-right sides t the screen.
3. Click Save to apply.
Page 80
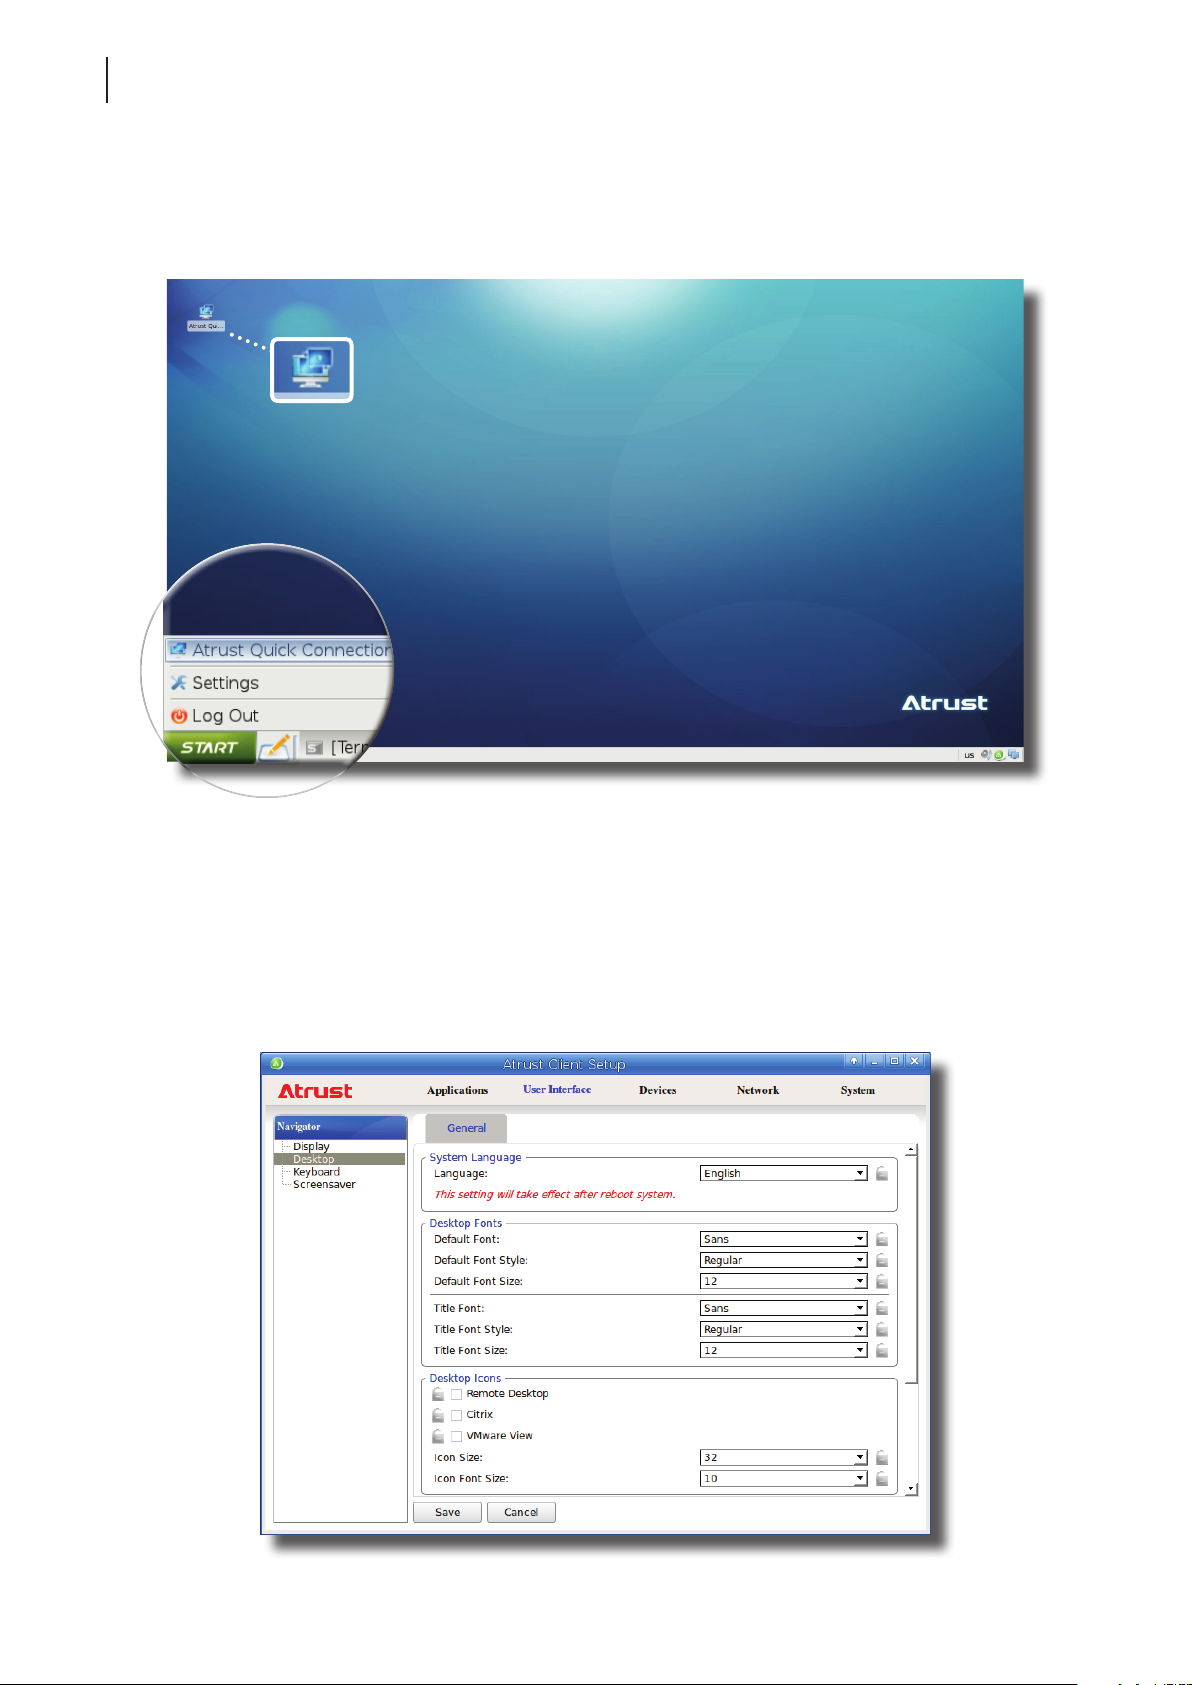
Conguring Client Settings
70
Conguring User Interface Settings
4.3.5 Hiding or Showing Quick Access Shortcuts
When the Quick Connection mode is disabled, the switch shortcuts Atrust Quick Connection on the START menu
and local Linux desktop will be hidden.
In case you want to access services quickly when the Quick Connection mode is disabled, you can choose to show
Quick Access shortcuts Remote Desktop / Citrix / VMware View on the START menu and local Linux desktop.
These shortcuts enable you to access services quickly when the Quick Connection mode is disabled. They’re hidden
by default.
To show/hide shortcuts Remote Desktop / Citrix / VMware View on the START menu and local Linux desktop,
please do the following:
1. On Atrust Client Setup, click User Interface > Desktop.
Page 81
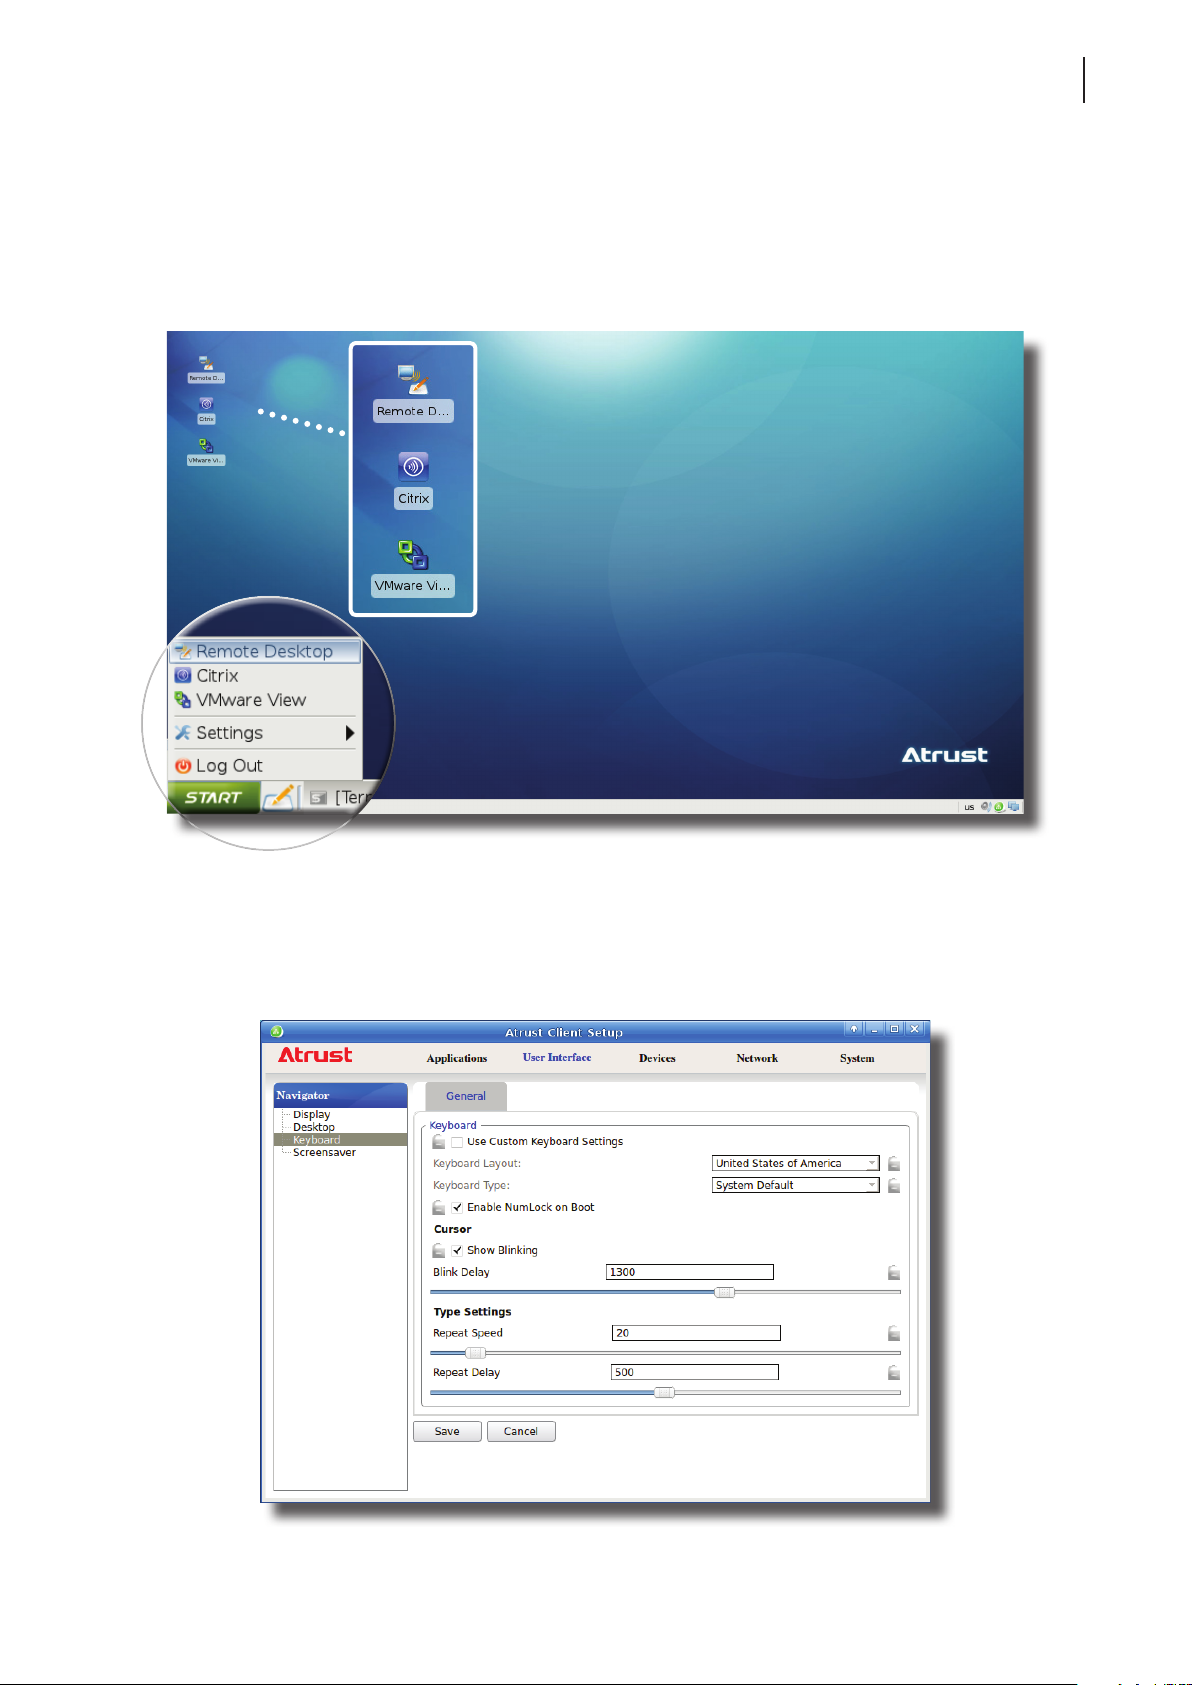
Conguring Client Settings
Conguring User Interface Settings
2. Click to check/uncheck Remote Desktop / Citrix / VMware View in the Desktop Icons section to show/hide
the quick access shortcuts Remote Desktop / Citrix / VMware View on the START menu and
local Linux desktop.
3. Click Save to apply the change.
4. The selected shortcuts will be shown/hidden.
71
4.3.6 Adjusting Keyboard Settings
To adjust keyboard settings for your t60/t62, please do the following:
1. On Atrust Client Setup, click User Interface > Keyboard.
Page 82
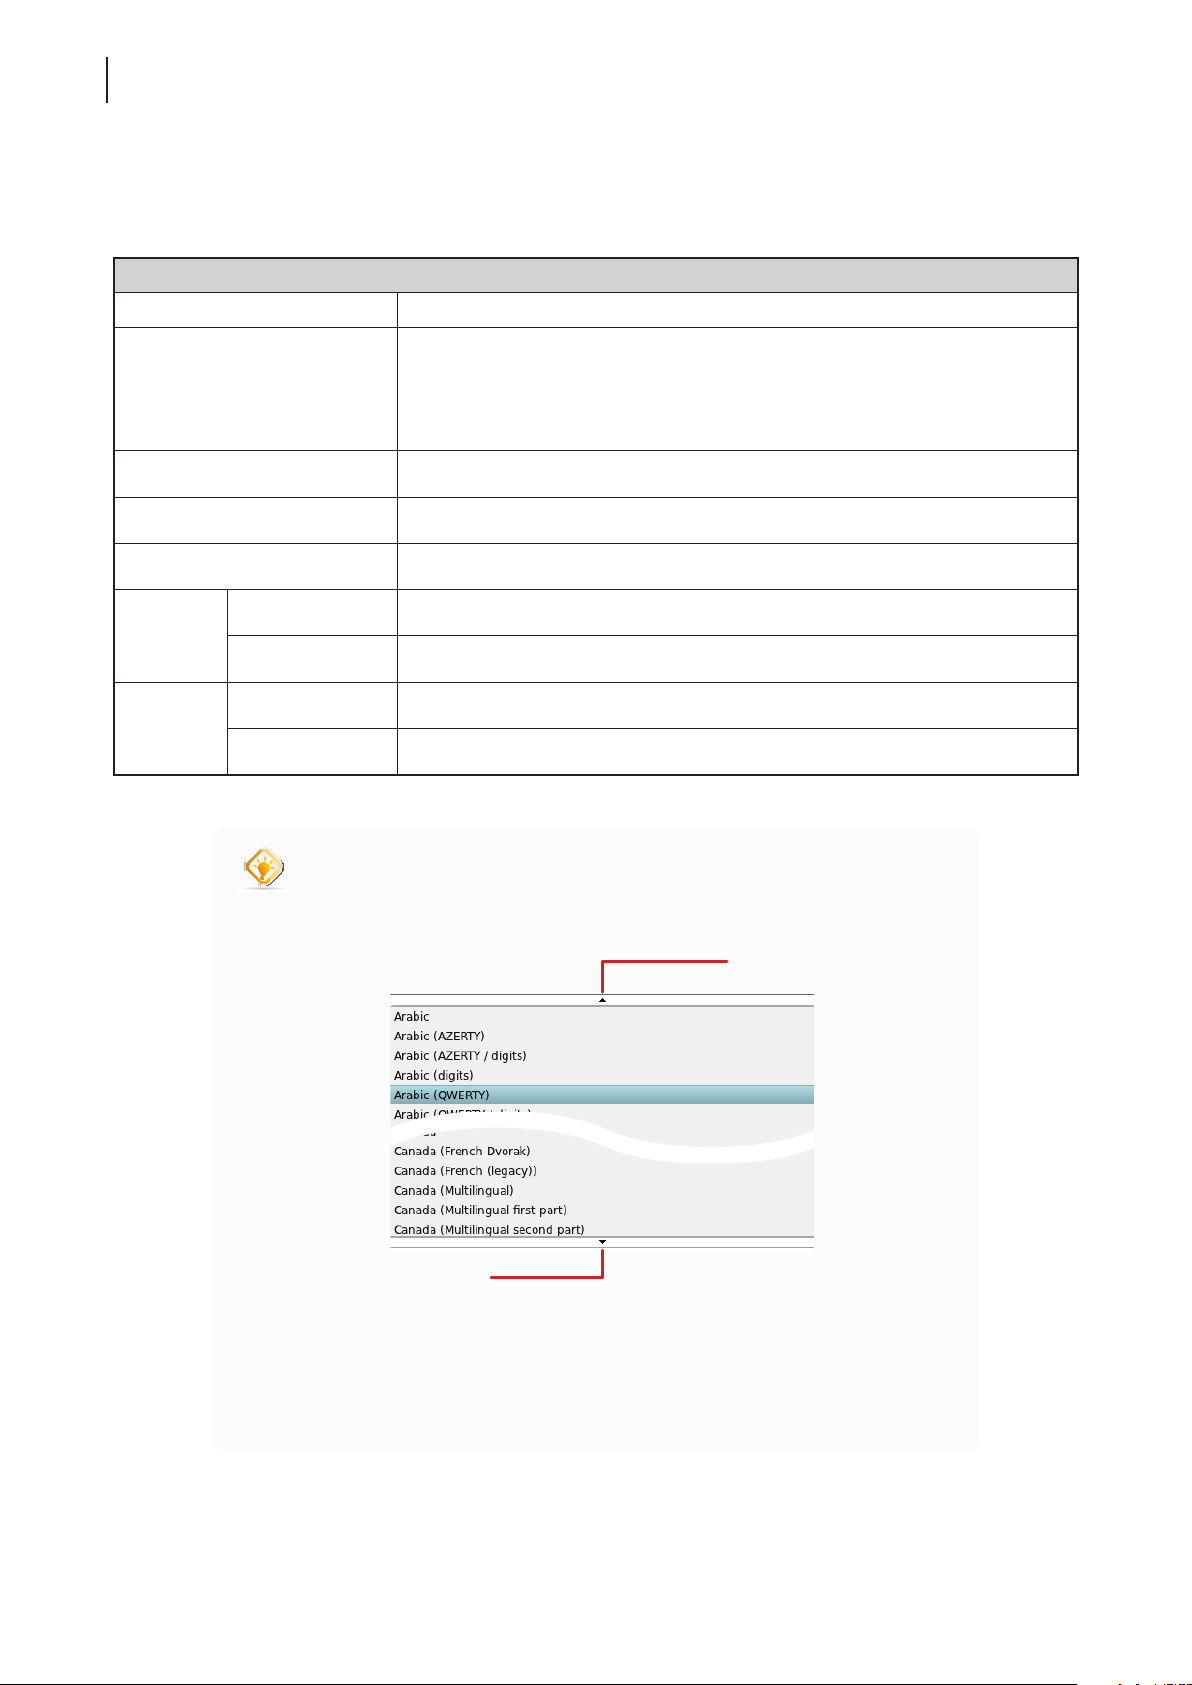
Conguring Client Settings
72
Conguring User Interface Settings
2. Click drop-down menus, tick/untick checkboxes, or move sliders to choose desired settings. Refer to the
following table for a description of each setting item.
Keyboard
Item Description
Check/Uncheck to enable/disable the use of custom keyboard settings.
Use Custom Keyboard Settings
Keyboard Layout Click the drop-down menu to select the desired keyboard layout.
Keyboard Type Click the drop-down menu to select the desired keyboard type.
Enable NumLock on Boot Check/Uncheck to enable/disable the NumLock key after system startup.
Show Blinking Check/Uncheck to show/hide the Blink Delay slider.
Cursor
Blink Delay Move the slider to select the blink delay between each occurrence of cursor.
Type
Settings
Repeat Speed Move the slider to select the character repeat rate when a key is held down.
Repeat Delay Move the slider to select the character repeat delay between its each occurrence.
NOTE: You are allowed to set the keyboard layout and type only when this
setting is enabled.
TIP
• Hang your mouse over the Up/Down arrow to quickly scroll up/down the Keyboard
Layout list.
Up arrow
• To ne-tune a setting value, click its slider, and then use the Right/Left key to
3. Click Save to apply.
Down arrow
increase/decrease the value by 1 or the Page Up/Page Down key to increase/
decrease by 10.
Page 83
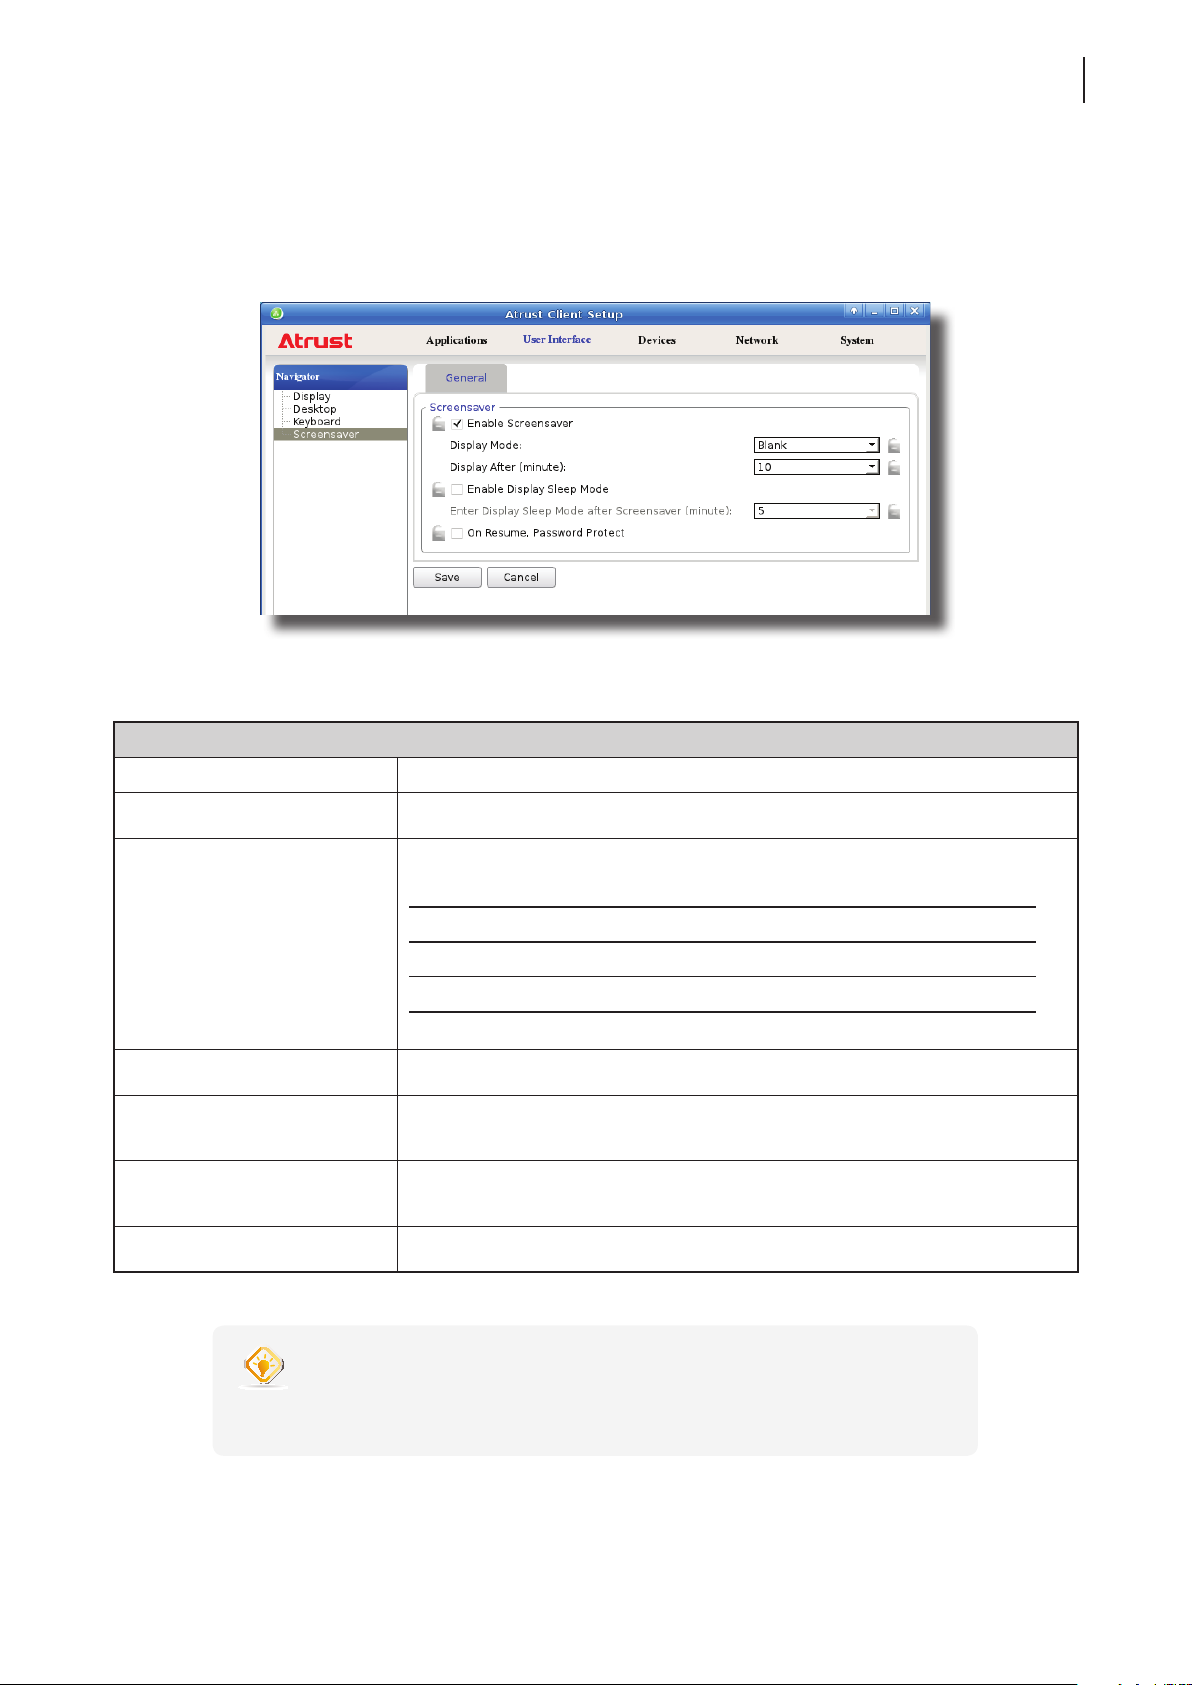
4.3.7 Conguring Screensaver Settings
To congure screensaver settings for your t60/t62, please do the following:
1. On Atrust Client Setup, click User Interface > Screensaver.
Conguring Client Settings
Conguring User Interface Settings
73
2. Click drop-down menus or tick/untick checkboxes to choose desired settings.
Screensaver
Item Description
Enable Screensaver Check/Uncheck to enable/disable Screensaver.
Click to select the display mode of the screensaver. Two options are available:
Blank and Logo.
Display Mode
Display After (minute) Click to select the wait time for screensaver.
Enable Display Sleep Mode
Enter Display Sleep Mode after
Screensaver (minute)
Option Description
Blank Displays a black screen.
Logo Displays the Atrust oating logo.
Check to turn off (i.e. stop sending signals to) the display to maximize the
energy savings.
Click to select when to turn off (i.e. stop sending signals to) the display after
Screensaver starts.
On Resume, Password Protect Check/Uncheck to resume with/without a password.
TIP
• While setting wait time for screensaver, you can hang your mouse over the Up/
Down arrow to quickly scroll up/down the Minute list.
3. Click Save to apply.
Page 84
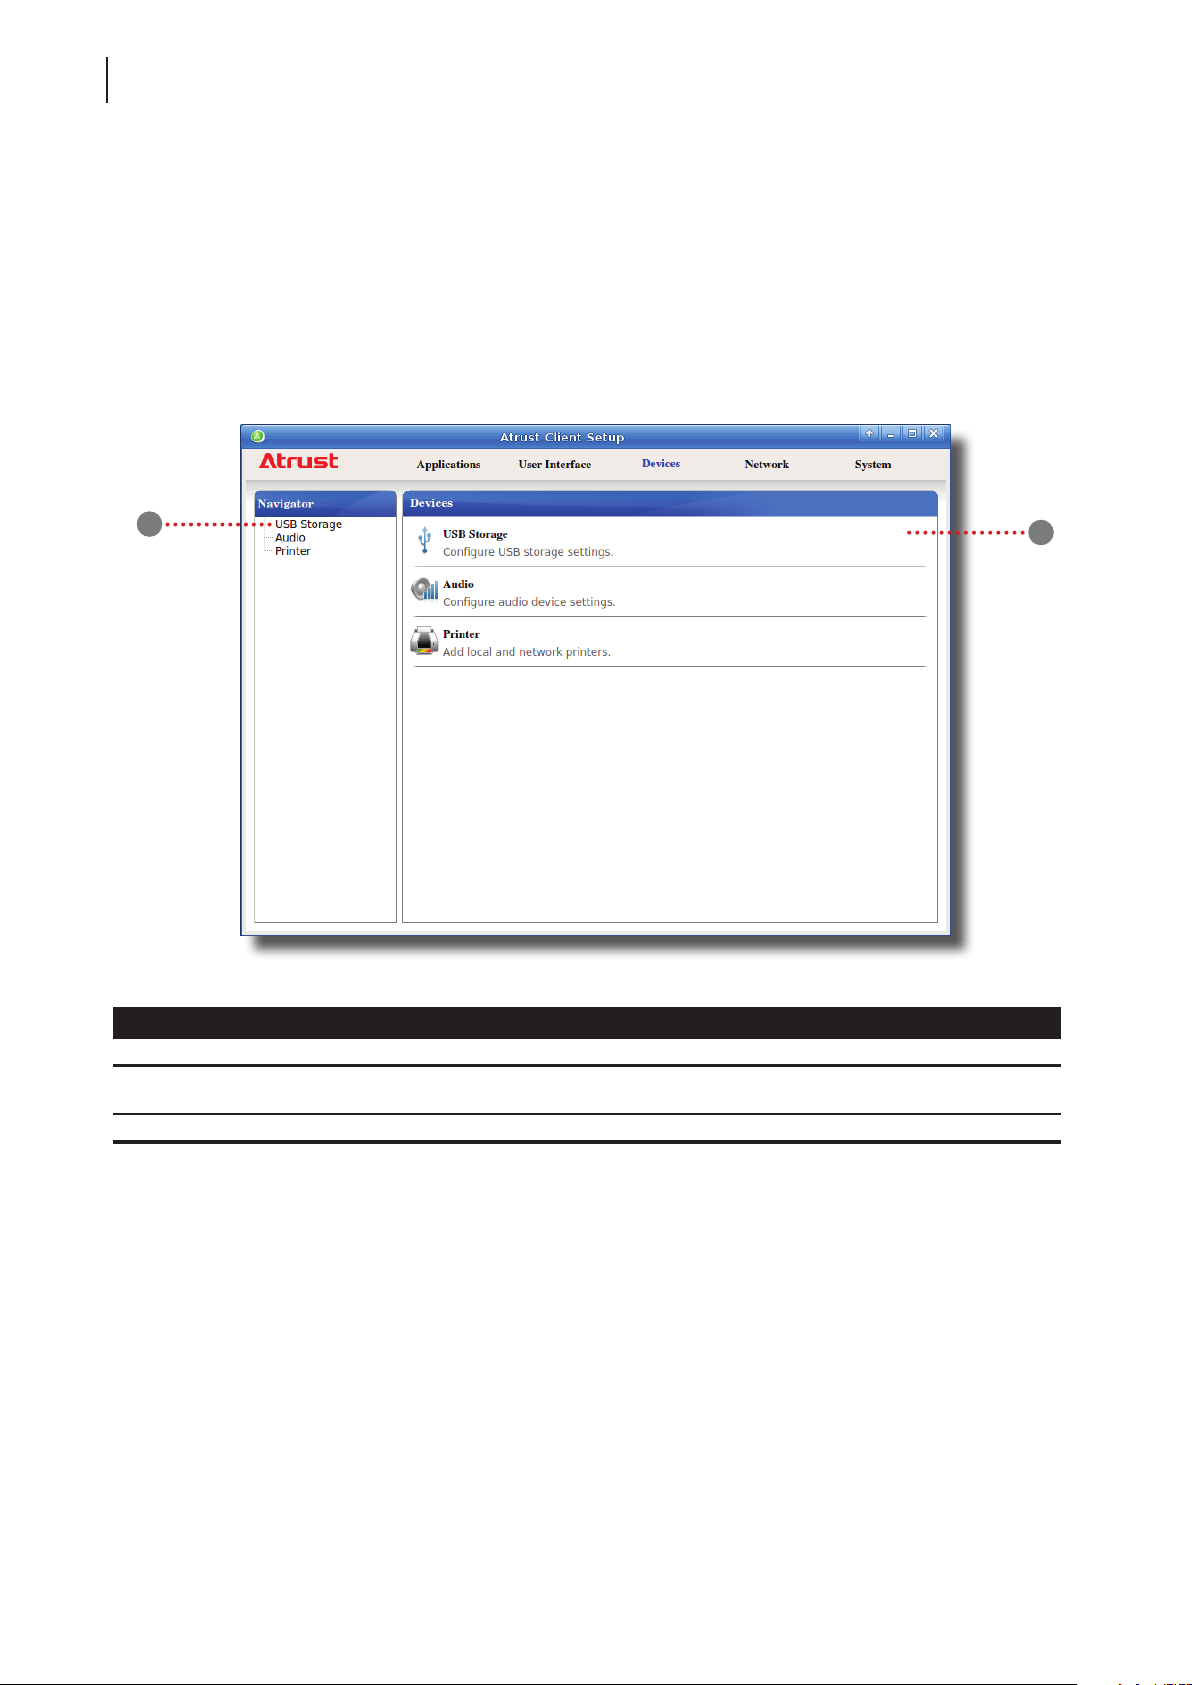
Conguring Client Settings
74
Conguring External Device Settings
4.4 Conguring External Device Settings
4.4.1 Devices Tab Overview
Devices tab enables you to congure settings for external devices of clients. To access available settings of Devices
tab, click the tab on Atrust Client Setup.
Devices Tab Overview
1
Interface Elements
No. Name Description
1 Navigation area
2 Conguration area Congures setting values when a setting item or entry is selected.
Click to select a setting item under Devices tab or to select a setting
entry under a selected setting item.
2
Page 85
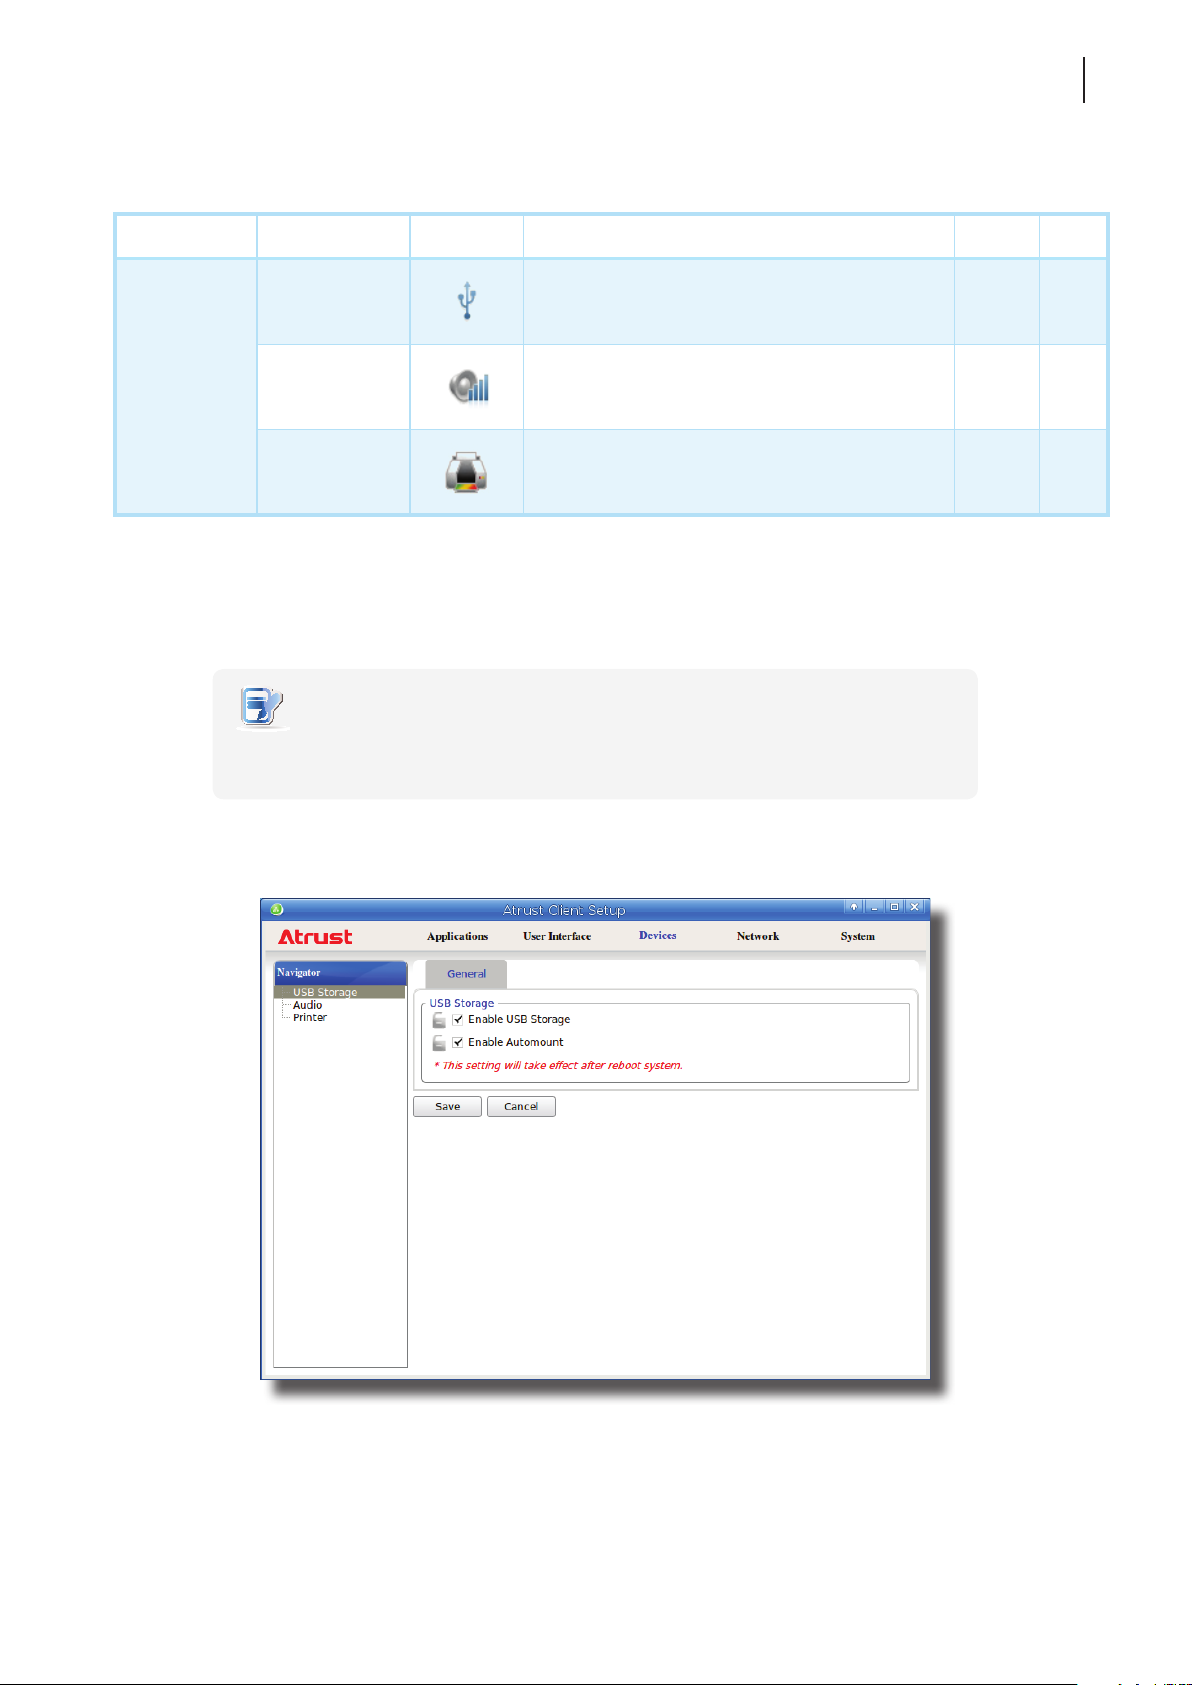
Conguring Client Settings
Conguring External Device Settings
4.4.2 Available Settings at a Glance
Tab Setting Icon Description Section Page
75
Devices
USB Storage
Audio
Printer
Click to congure settings for USB storage devices.
Click to congure settings for audio devices. 4.4.5 77
Click to add local or network printers.
4.4.3 Conguring Settings for USB Storage Devices
To congure settings for USB storage devices, please do the following:
NOTE
• To access locally attached USB storage devices in a local or virtual session, you need
to congure appropriate settings under this setting item.
1. On Atrust Client Setup, click Devices > USB Storage.
4.4.3
4.4.4
4.4.6
4.4.7
75
76
78
81
2. Tick/untick the checkboxes to choose the desired settings.
Page 86
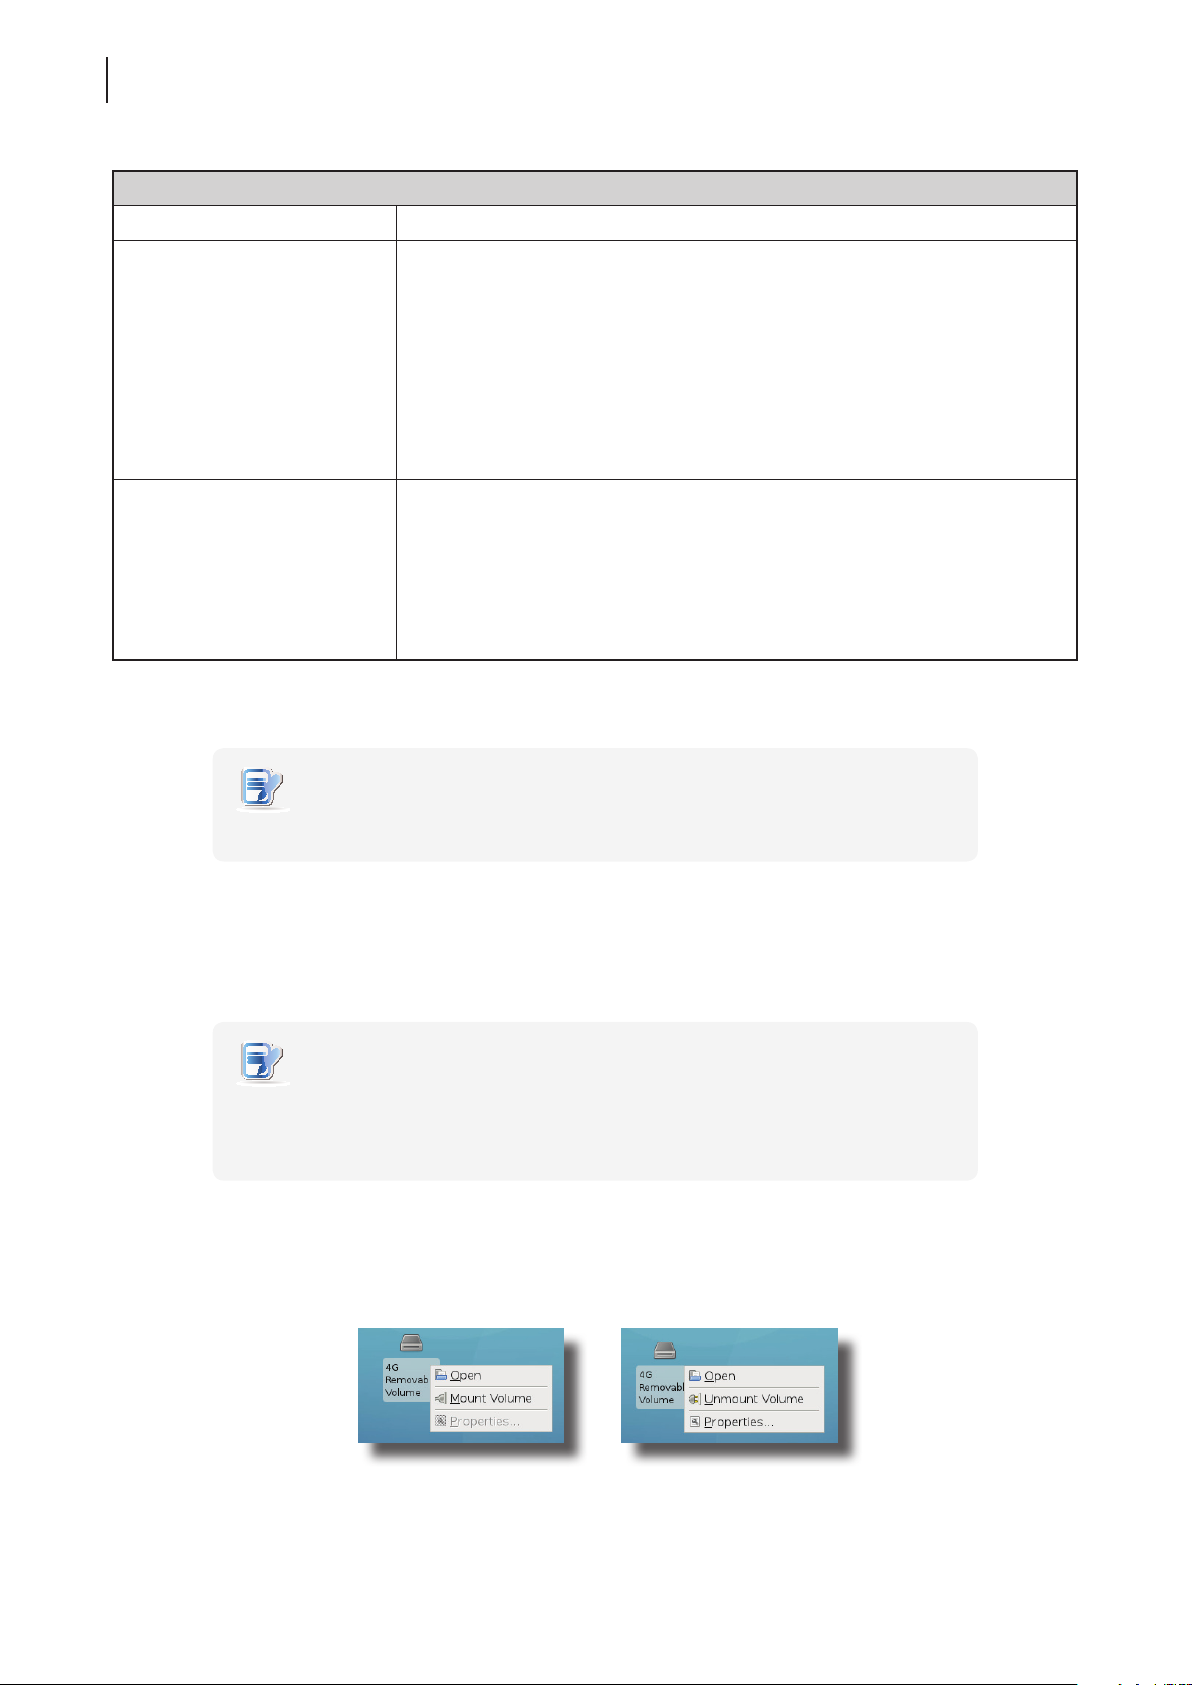
Conguring Client Settings
76
Conguring External Device Settings
Settings for USB Storage Devices
Item Description
Tick/Untick this checkbox to allow/disallow the access of USB storage devices.
Enable USB Storage
Enable Automount
3. Click Save to save your change.
NOTE
• For your changes to take eect, you need to restart your system.
NOTE: To use the locally attached USB storage devices in an RDP / ICA / View
session, the mapping of local USB storage devices must be enabled
in this session’s RDP / ICA / View connection settings. For detailed
instructions and more related settings, please refer to sections:
“4.6.5 Conguring Advanced RDP Connection Settings” on page 118
“4.6.8 Conguring Advanced ICA Connection Settings” on page 145
“4.6.11 Conguring Advanced View Connection Settings” on page 163
Tick/Untick this checkbox to enable/disable the automount of
USB storage devices.
NOTE: If this setting is disabled, users need to manually mount the attached
USB storage devices. For detailed instructions, please refer to section
“4.4.4 Manually Mount and Unmount Attached USB Storage Devices” on
page 76.
4.4.4 Manually Mount and Unmount Attached USB Storage Devices
To mount/unmount an attached USB storage device, please do the following:
NOTE
• If Enable Automount is checked (see section “4.4.3 Conguring Settings for USB
Storage Devices” on page 75), then an attached USB storage device will be
mounted automatically.
1. Right click the desktop icon of the attached USB storage device.
2. A popup menu appears.
3. Click to select Mount Volume/Unmount Volume to mount\unmount the attached USB storage device.
Page 87
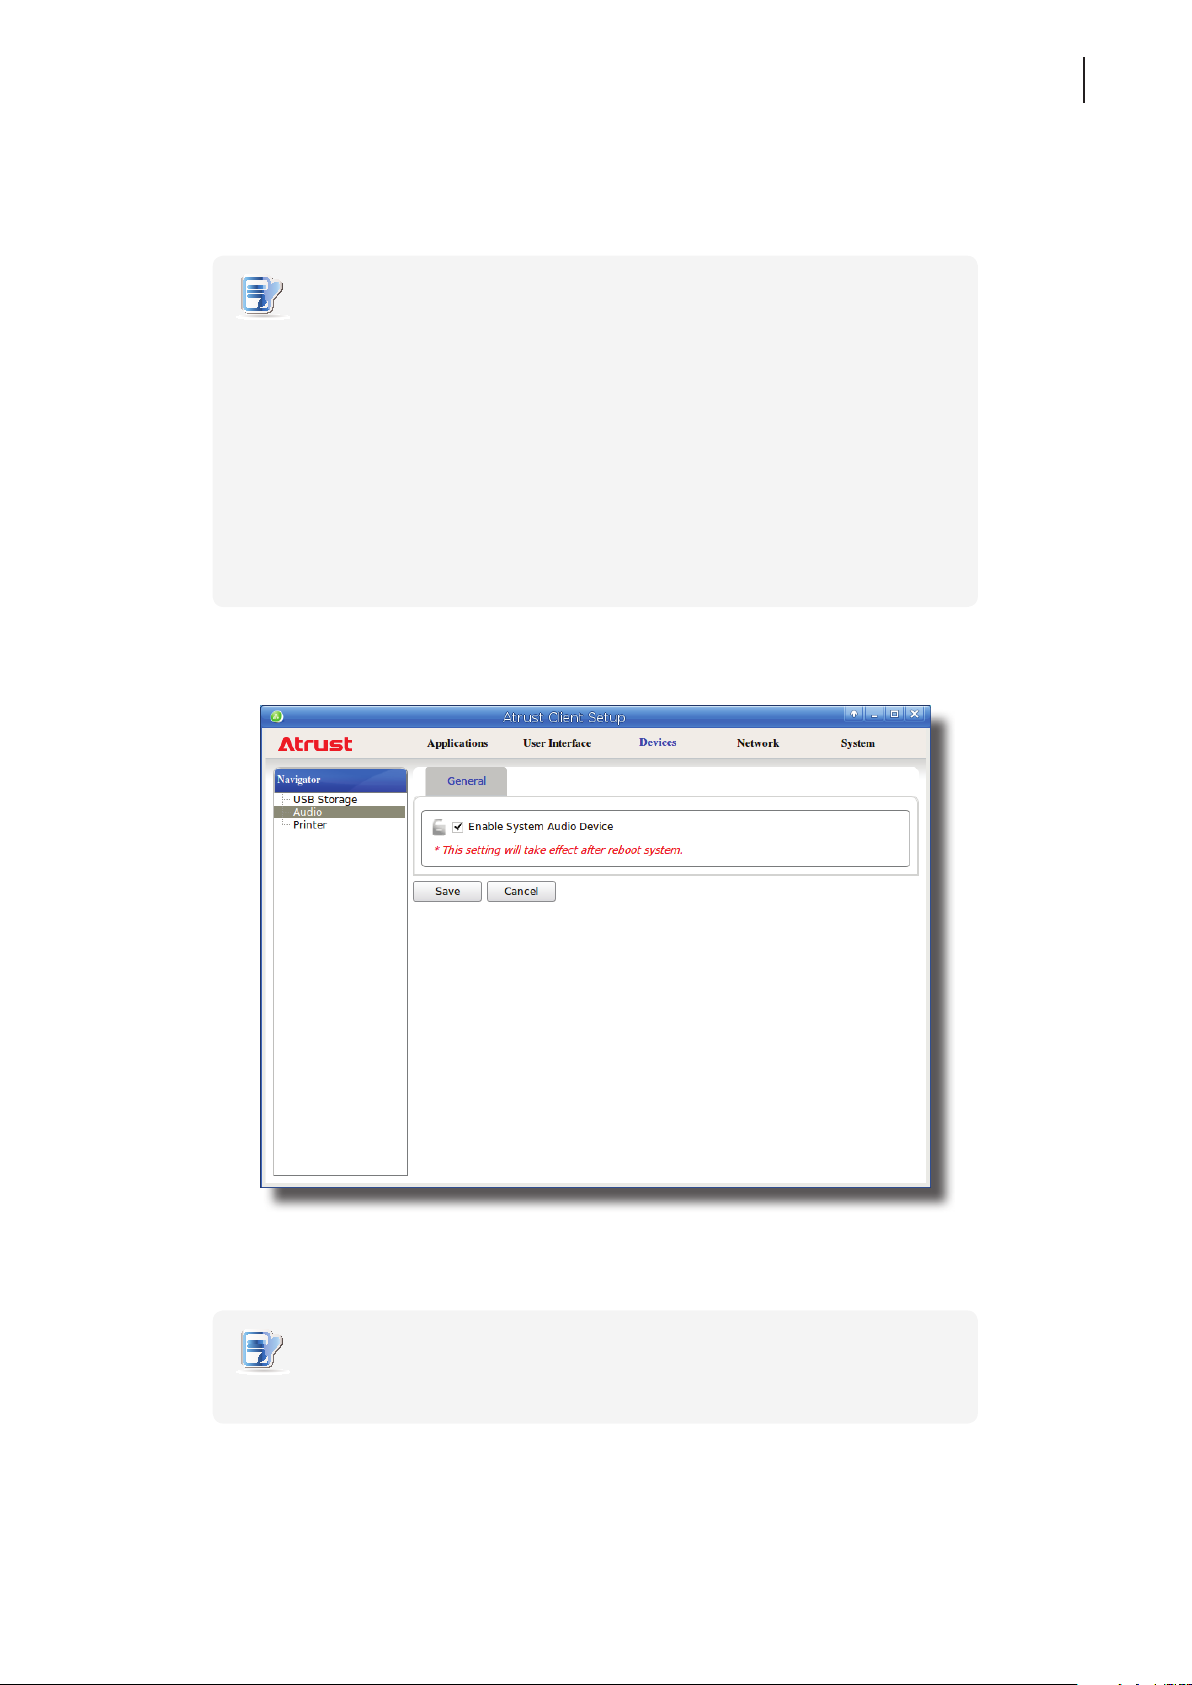
4.4.5 Disabling or Enabling Attached Audio Devices
To disable/enable attached audio devices, please do the following:
NOTE
• If you disable locally attached audio devices, client users are not allowed to perform
audio playback or recording with these devices in an RDP / ICA / View session.
• To perform audio playback or recording with local audio devices in an RDP / ICA /
View session, you need to enable locally attached audio devices here
(the Audio setting item under Devices tab) and congure audio related settings
in the RDP / ICA / View connection settings. For detailed instructions, please
refer to sections:
“4.6.5 Conguring Advanced RDP Connection Settings” on page 118
“4.6.8 Conguring Advanced ICA Connection Settings” on page 145
“4.6.11 Conguring Advanced View Connection Settings” on page 163
Conguring Client Settings
Conguring External Device Settings
77
1. On Atrust Client Setup, click Devices > Audio.
2. Click to check/uncheck Enable System Audio Device.
3. Click Save to conrm your selection.
NOTE
• The change will not take eect until t60/t62 has been restarted.
Page 88
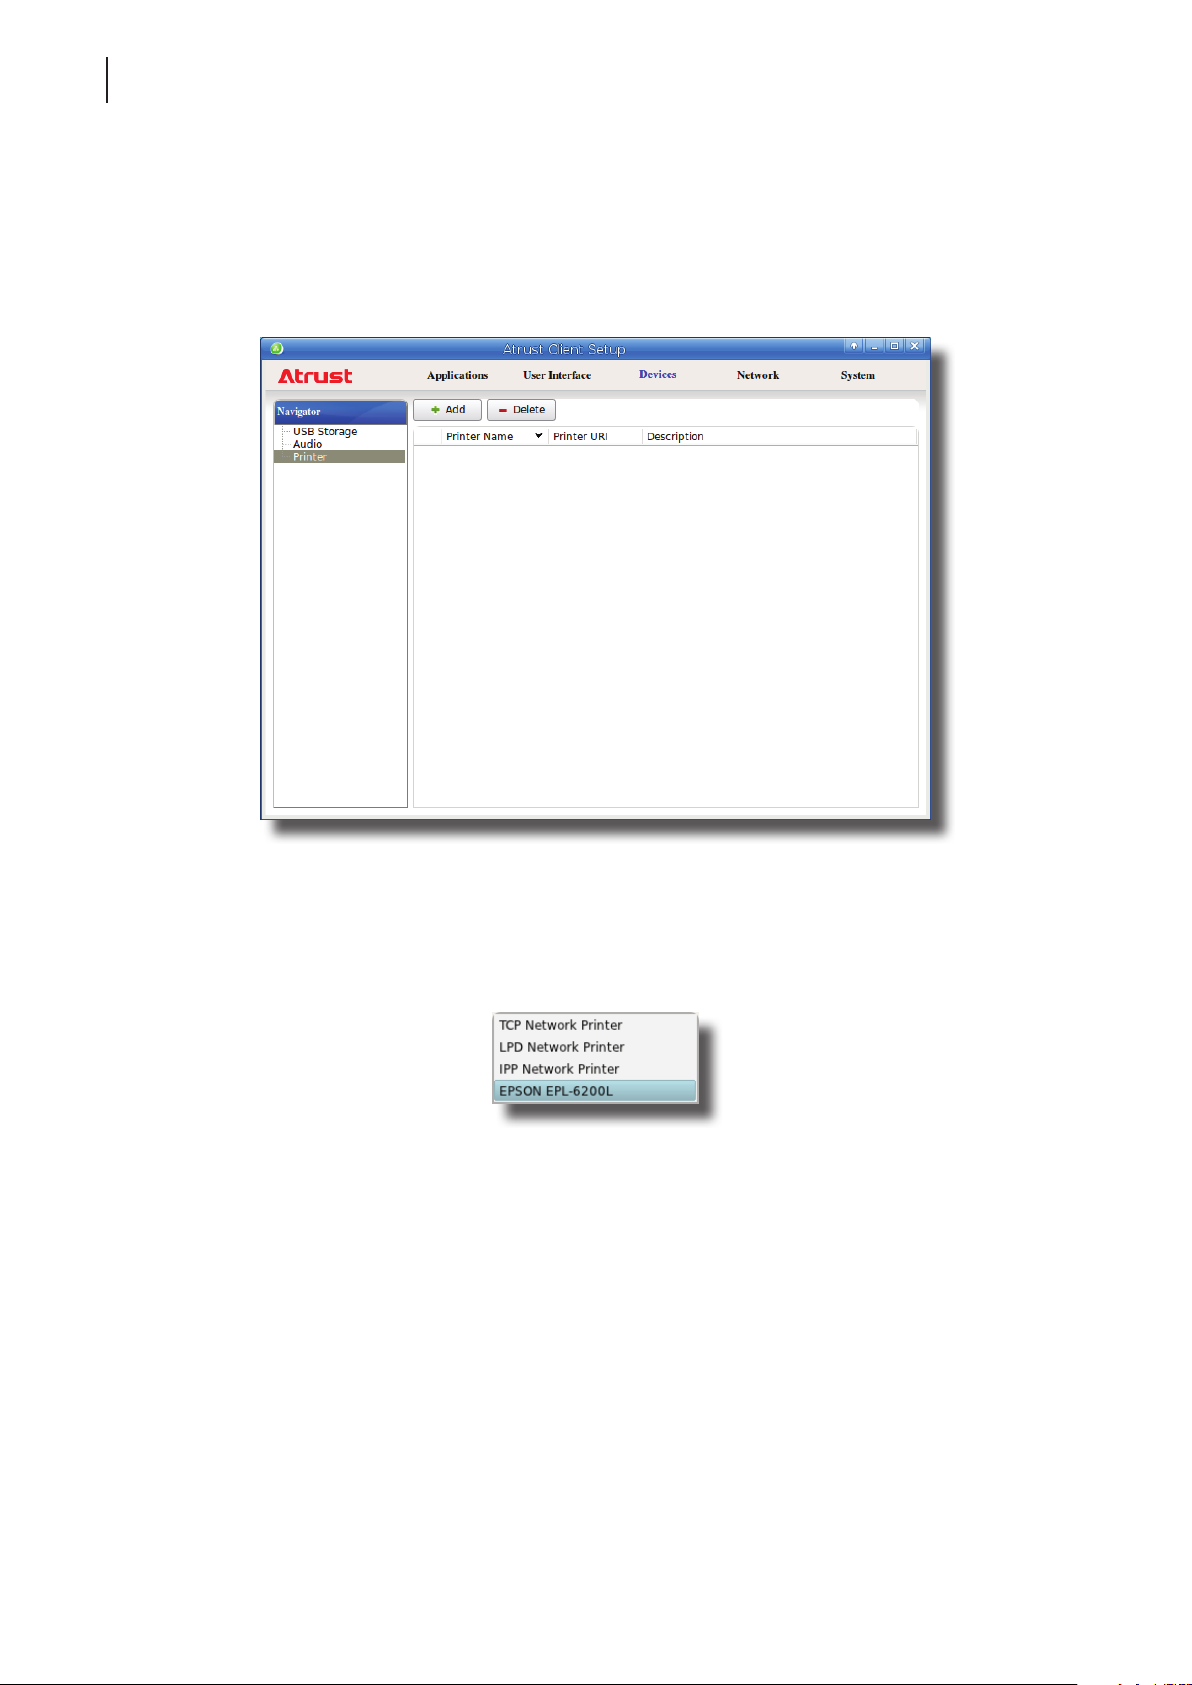
Conguring Client Settings
78
Conguring External Device Settings
4.4.6 Adding a Local Printer
To add a local printer for your t60/t62, please do the following:
1. Connect the desired printer to your t60/t62 and turn on the printer.
2. On Atrust Client Setup, click Devices > Printer.
3. Click Add on the top of the Printer list.
4. The system automatically start searching for available local printers.
5. Upon completion, the discovered local printers will be listed on the Printer Port drop-down menu.
6. Click the Printer Port drop-down menu to select the desired local printer.
7. Fields in the Add Printer section will automatically change to t the type of the selected printer.
Page 89
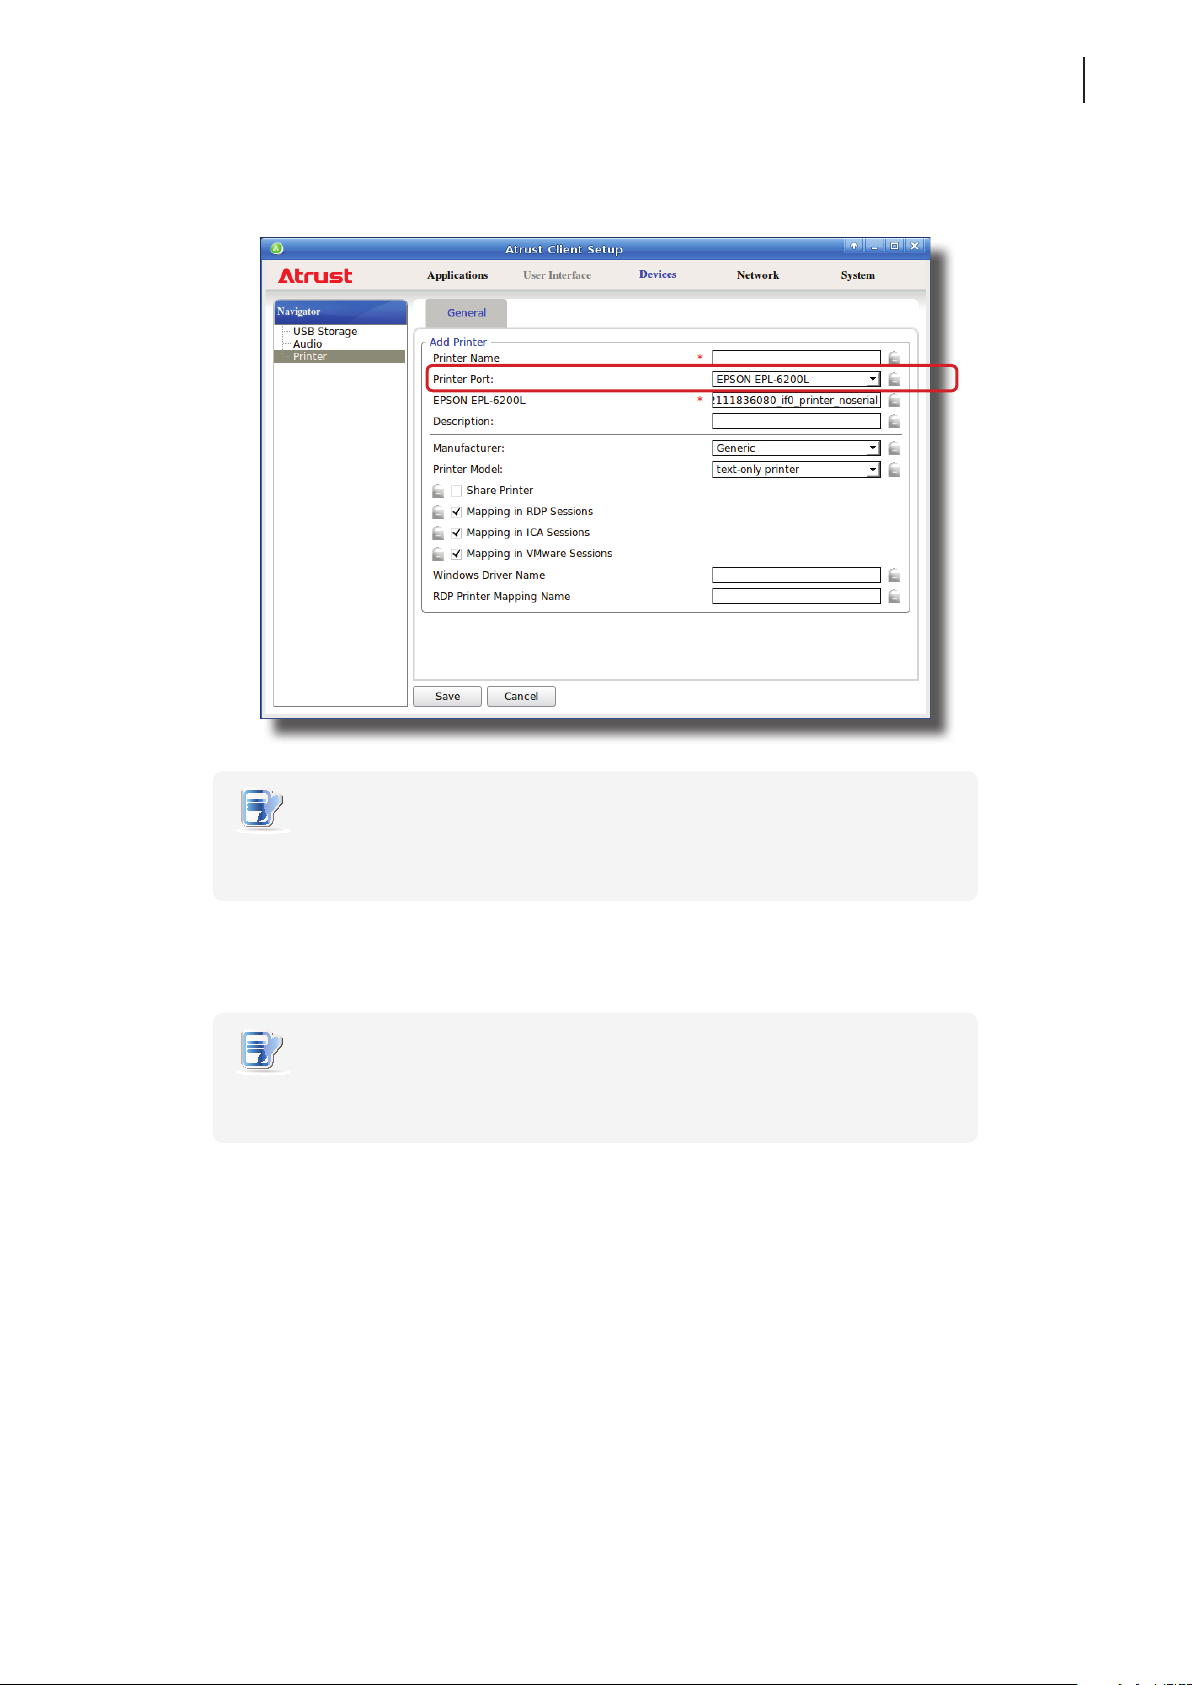
Conguring Client Settings
Conguring External Device Settings
8. A eld for the selected printer appears and the printer URI (Uniform Resource Identier) data is automatically
lled out in the eld.
79
NOTE
• A URI (Uniform Resource Identier) is a sequence of characters that is used to
identify a resource on the Internet.
9. Click the Manufacturer and Printer Model drop-down menus to select the manufacturer and model for the
attached local printer.
NOTE
• For the printer to operate normally, you need to specify the correct information in
these two elds. Otherwise, the printer would fail to work.
10. Refer to the following table to congure desired settings, and then click Save to apply.
Page 90
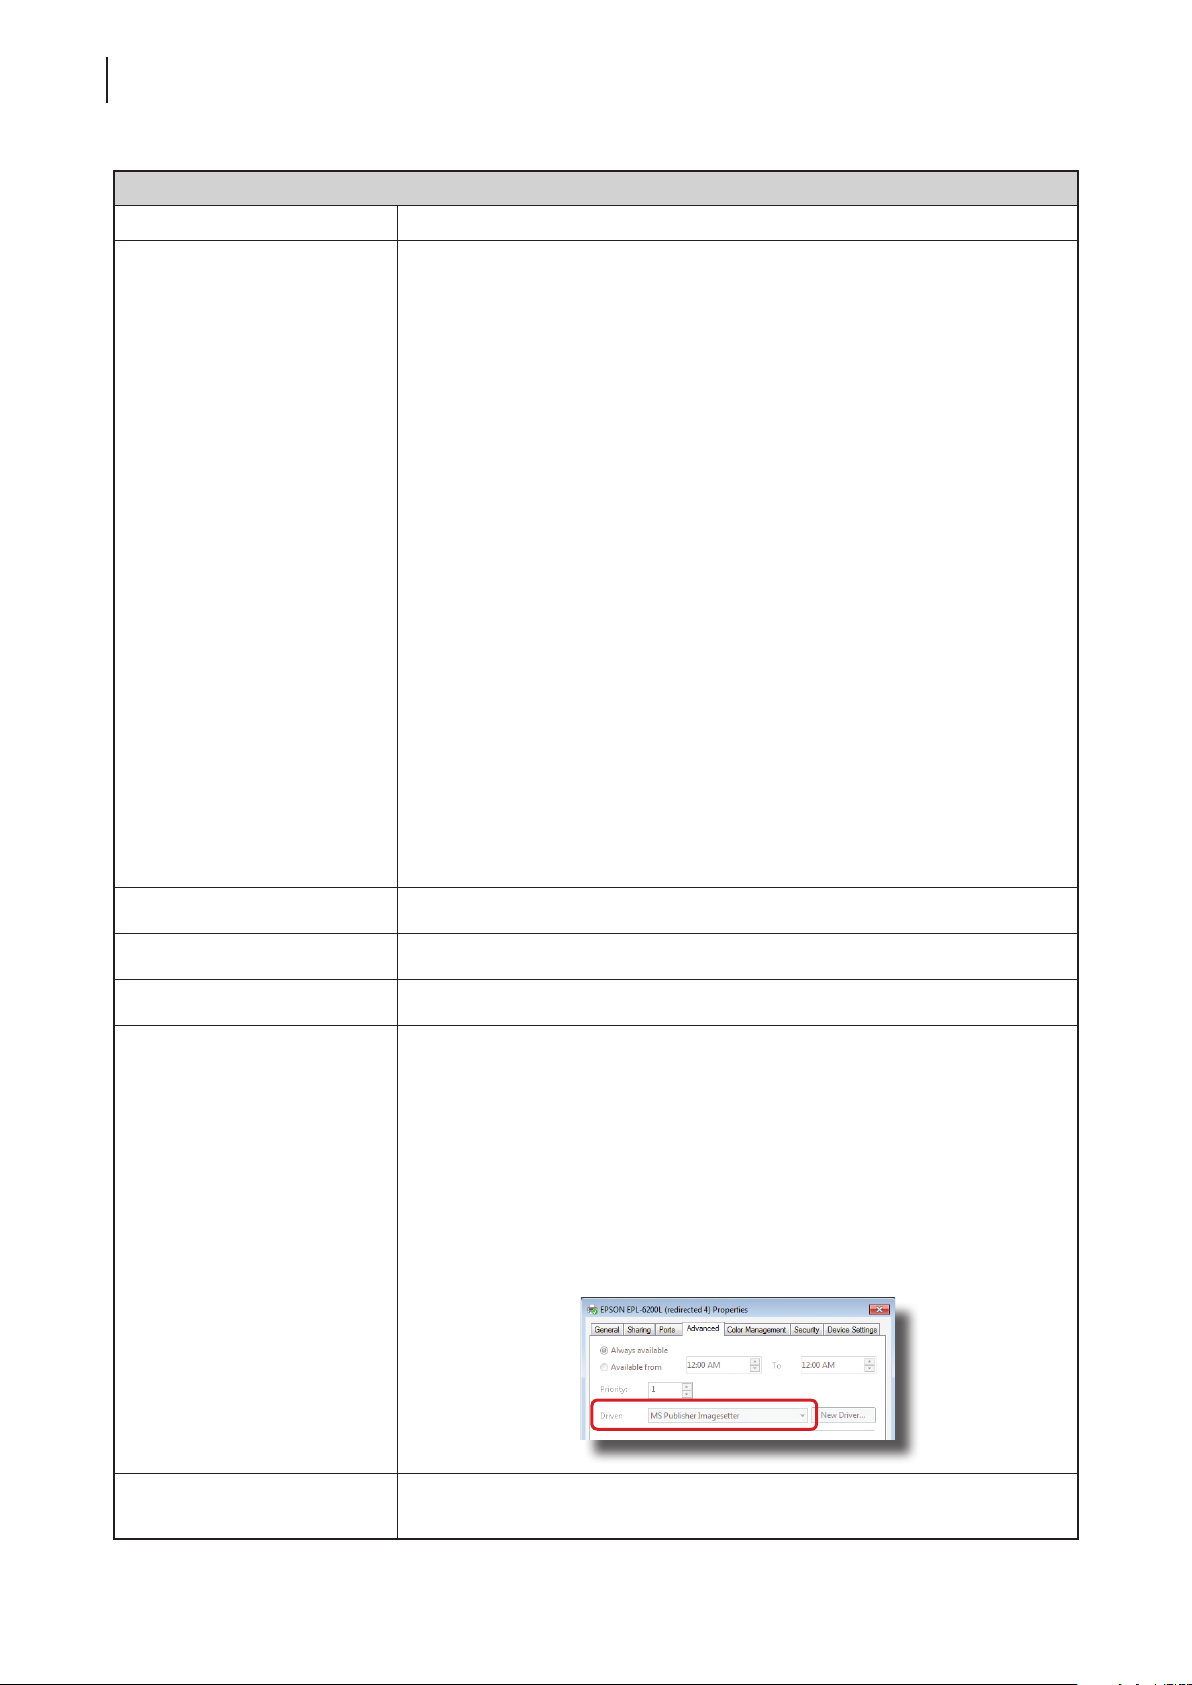
Conguring Client Settings
80
Conguring External Device Settings
Settings for Printers
Item Description
Share Printer
Check/Uncheck to share the printer.
Once Share Printer is checked, other computers in the same network segment
will be allowed to use the printer.
To add this shared printer for use on other computers, please do the following:
1. For computers running a Windows Server operating system, such as
Windows Server 2008 R2, please add the Internet Printing Client
feature rst (Click Start > All Programs > Administrative Tools >
Server Manager > Action > Add Features > Internet Printing Client,
follow the wizard to complete the task, and then restart your system).
2. Click Start > Devices and Printers > Add a printer >
Add a network, wireless or Bluetooth printer.
3. Click Stop to cancel the automatic printer search, and then click
The printer that I want isn’t listed.
4. Under Select a shared printer by name, enter
http://IP address of your t60 or t62:631/printers/Printer Name.
NOTE: For example, if a printer is locally attached to your t60/t62 and is
added as a local printer through Atrust Client Setup with the printer
name EPS, and the IP address of your t60/t62 is 192.168.50.146.
Here you should enter: http://192.168.50.146:631/printers/EPS
5. Click Next to continue.
6. Select the manufacturer and model of the printer, and then click OK to
install the correct driver.
7. Upon completion, a success message appears. Click Next to continue.
8. On the appeared page, click Print a test page to test the printer.
9. Click Finish to apply. The printer is added to the Printers and Faxes list.
Mapping in RDP Sessions Check/Uncheck to enable/disable the locally connected printer in an RDP session.
Mapping in ICA Sessions Check/Uncheck to enable/disable the locally connected printer in an ICA session.
Mapping in VMware Sessions Check/Uncheck to enable/disable the locally connected printer in a View session.
Keep this eld blank, if the printer works well in an RDP session using the current
RDP connection settings. In case that the printer fails to work, lling in this eld
may solve the problem.
To nd out the required information, please do the following:
1. In the RDP session, click Start > Devices and Printers.
2. In the opened window, right click the printer to open a popup menu.
3. On the popup menu, click to select Printer properties.
Windows Driver Name
(for RDP sessions only)
4. In the opened window, click Advanced. The Windows driver name is
shown on the tab.
RDP Printer Mapping Name
(for RDP sessions only)
Type in the desired printer name in a session (Windows desktop). If this eld
remains blank, the name you typed in the Printer Name eld will be used.
Page 91
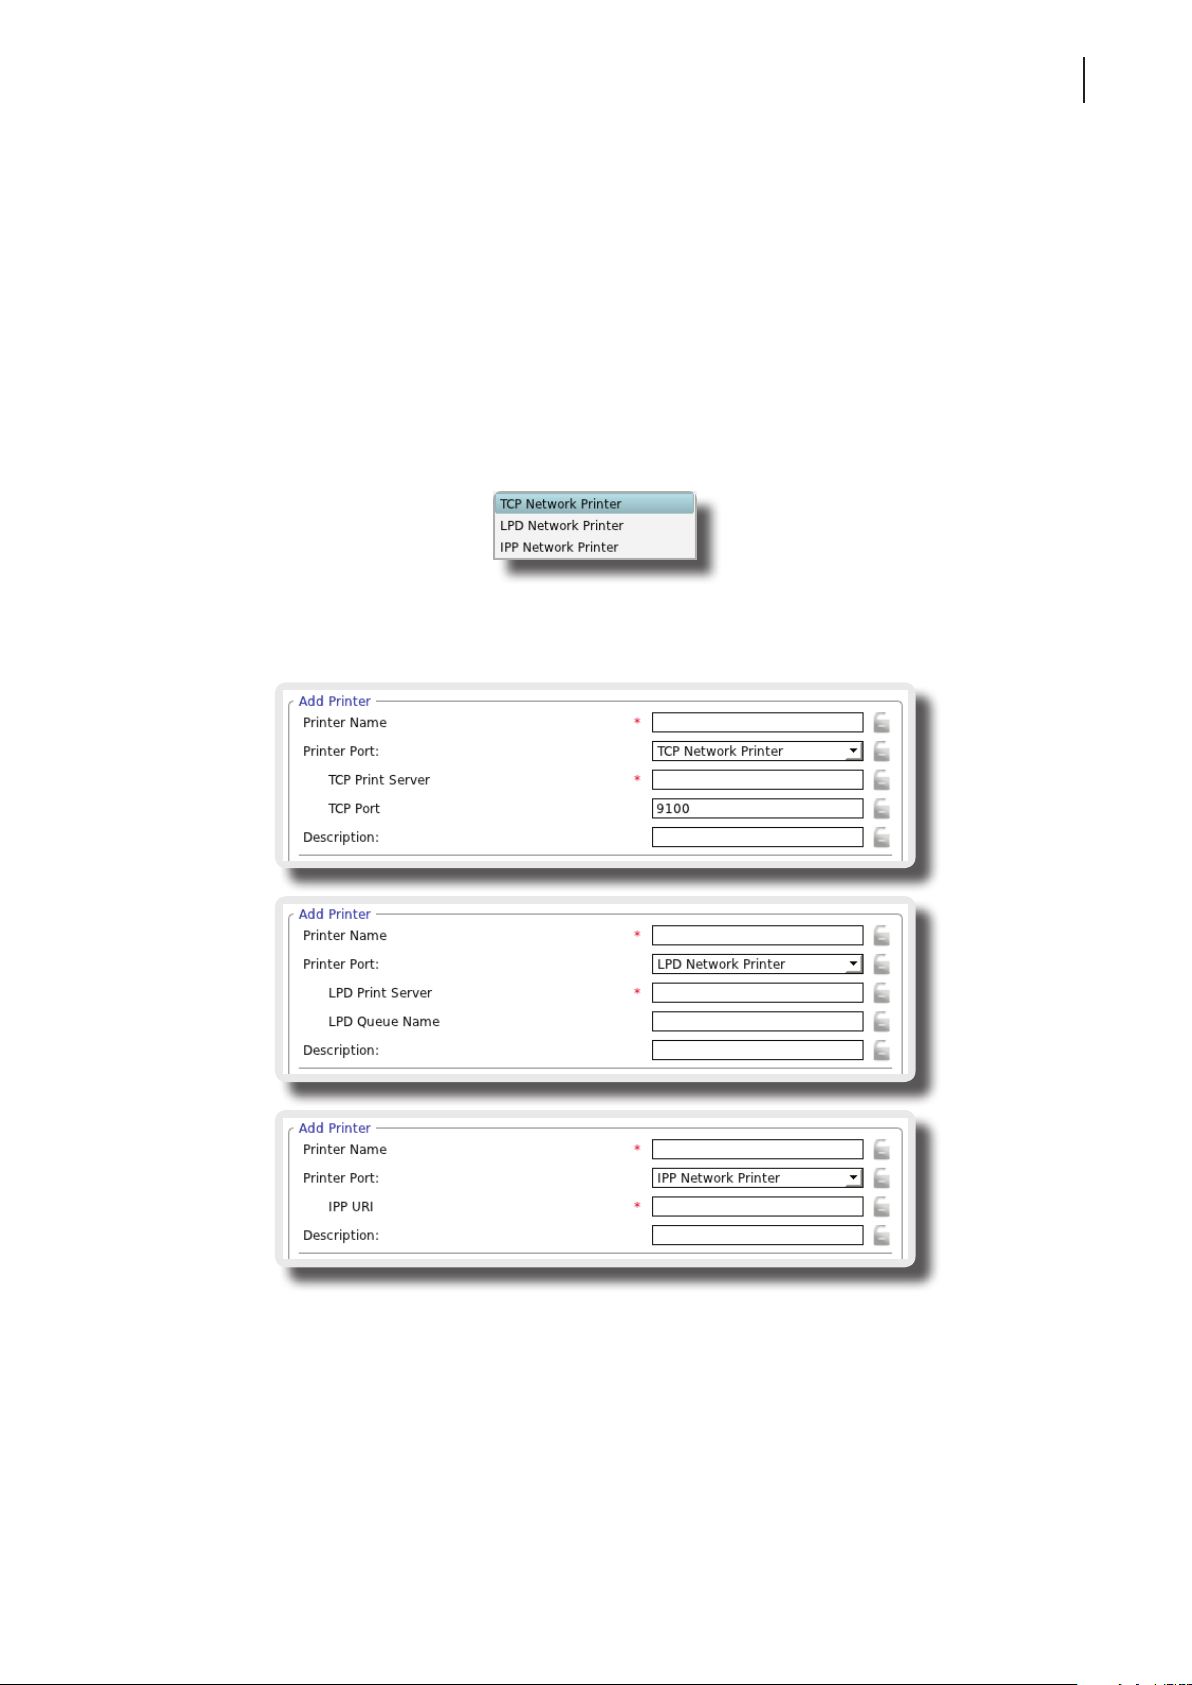
Conguring Client Settings
Conguring External Device Settings
4.4.7 Adding a Network Printer
To add a network printer for your t60/t62, please do the following:
1. Ensure that your t60/t62 is connected to the network and the desired network printer is turned on.
2. On Atrust Client Setup, click Devices > Printer.
3. Click Add on the top of the Printer list.
4. The system automatically starts searching for available local printers. Upon completion, the discovered local
printers will be listed on the Printer Port drop-down menu.
5. Click the Printer Port drop-down menu to select the desired network printer. Three types of network printers
are available: TCP Network Printer, LPD Network Printer, and IPP Network Printer.
6. Fields in the Add Printer section will automatically change to t the type of the selected printer.
81
7. Type in the IP address of the network printer in the TCP Printer Server, LPD Printer Server, or IPP URI eld.
8. Click the Manufacturer and Printer Model drop-down menus to select the manufacturer and model for the
desired network printer.
9. Refer to the table on page 80 to congure other printer settings, and then click Save to apply.
Page 92
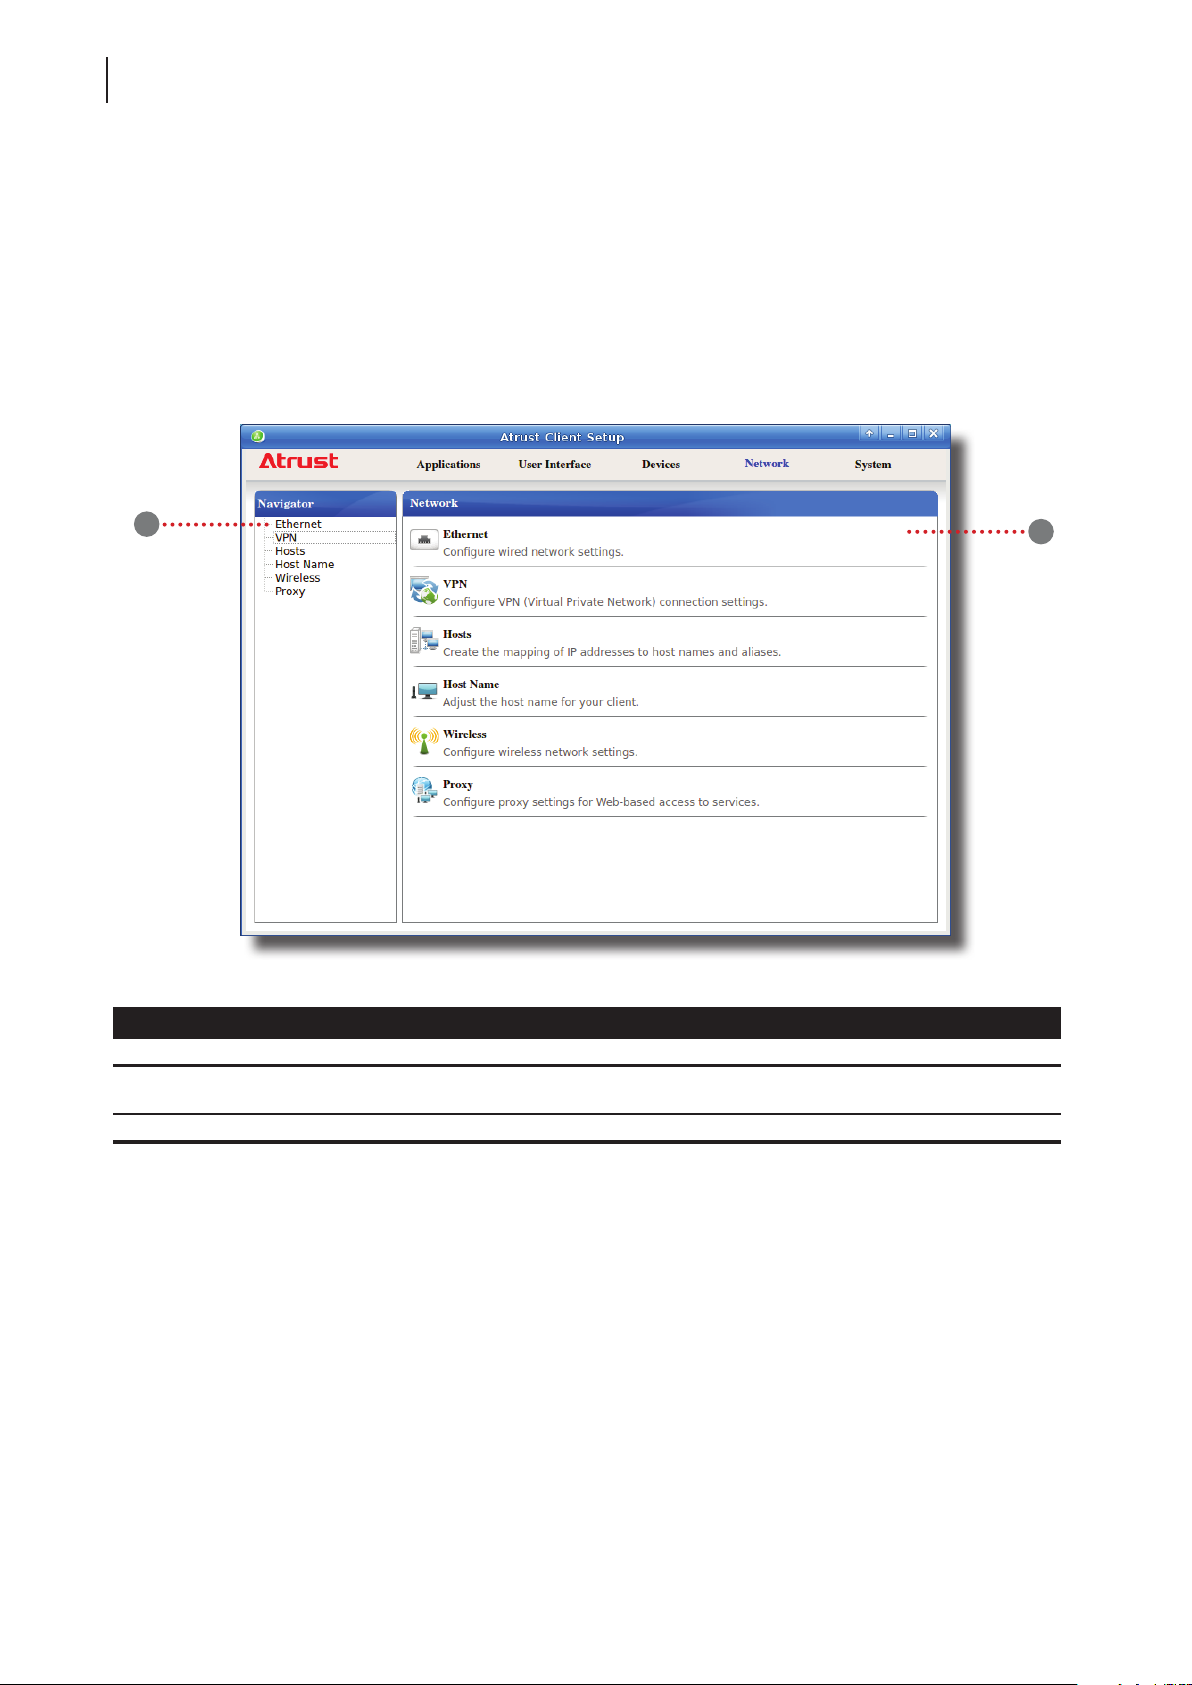
Conguring Client Settings
82
Conguring Network Settings
4.5 Conguring Network Settings
4.5.1 Network Tab Overview
Network tab enables you to congure network settings for clients. To access available settings of Network tab, click
the tab on Atrust Client Setup.
Network Tab Overview
1
Interface Elements
No. Name Description
1 Navigation area
2 Conguration area Congures setting values when a setting item or entry is selected.
Click to select a setting item under Network tab or to select a setting
entry under a selected setting item.
2
Page 93
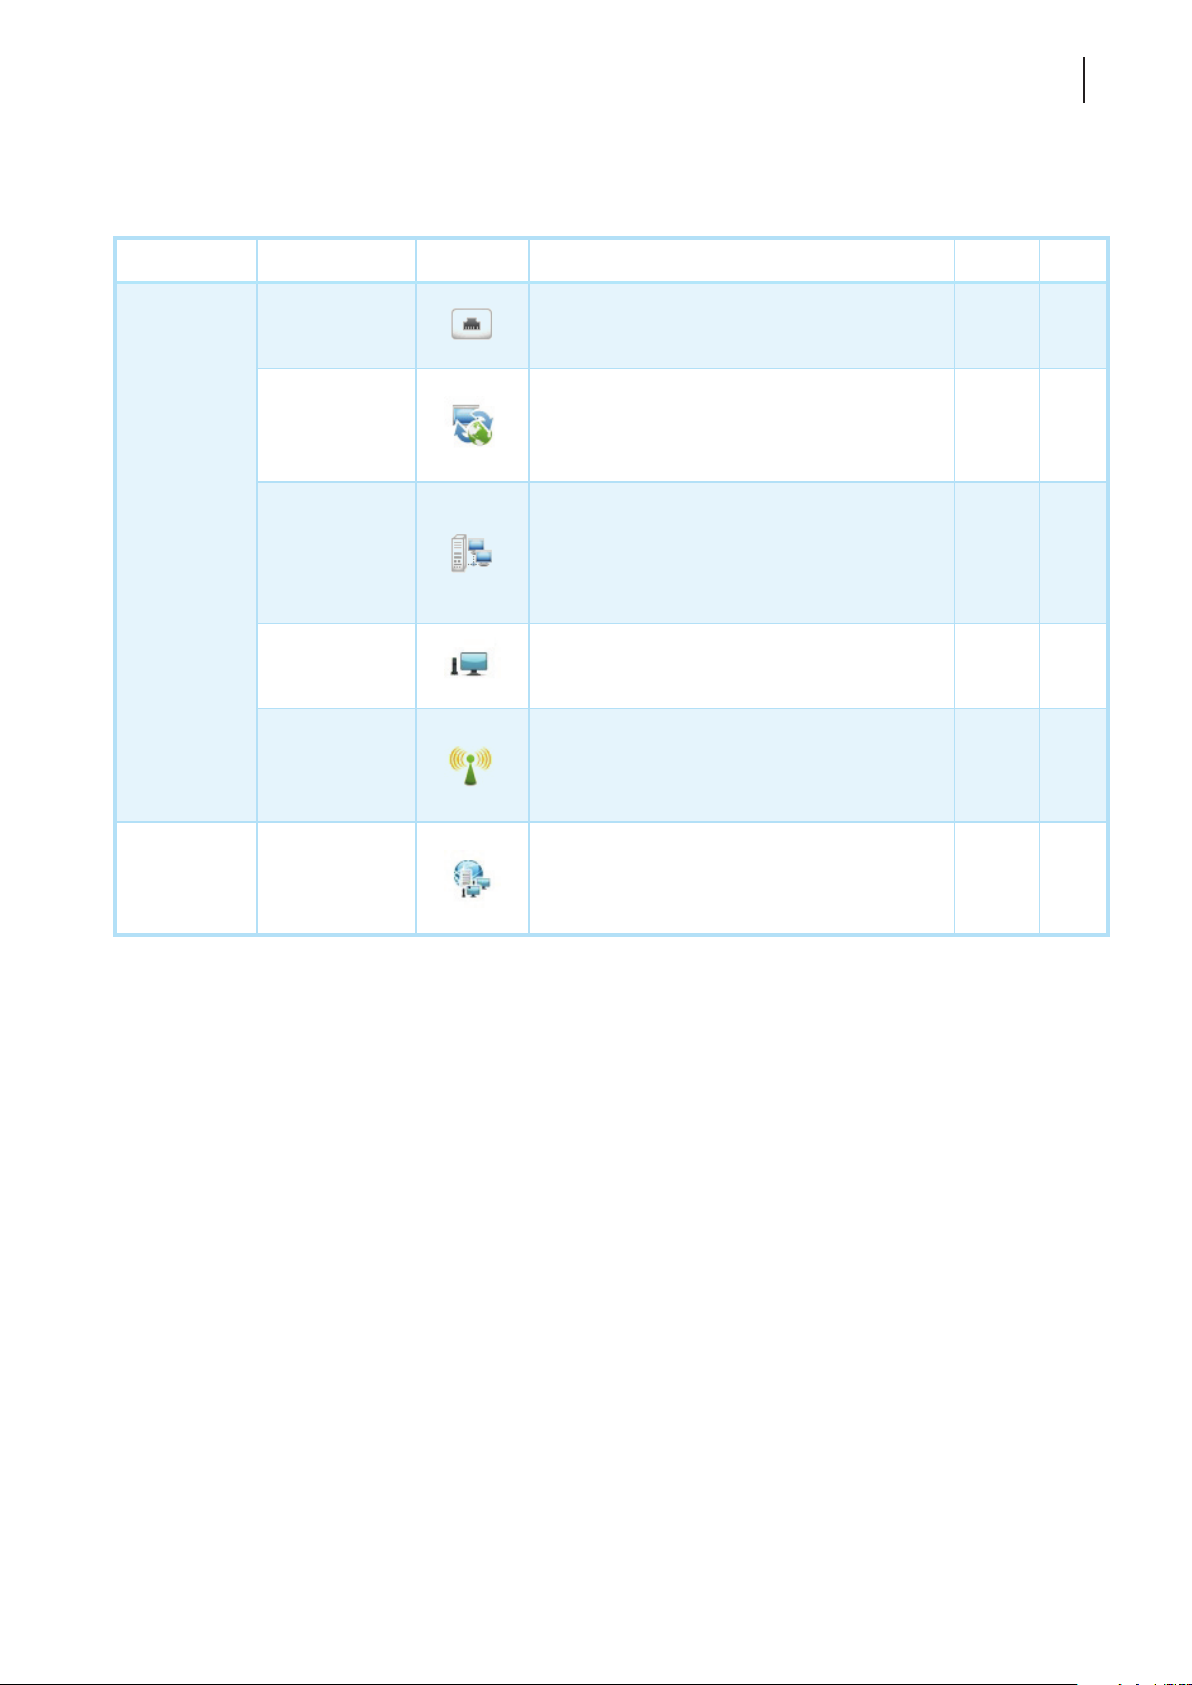
Conguring Client Settings
Conguring Network Settings
4.5.2 Available Settings at a Glance
Tab Setting Icon Description Section Page
83
Network
Ethernet
VPN
Hosts
Host Name
Wireless
Proxy
Click to congure wired network settings. 4.5.3 84
Click to congure VPN (Virtual Private Network)
connection settings and create a VPN connection.
Click to create the mapping of IP addresses to
the names of host servers. You can then use the
name of a host server instead of its IP address
wherever you need to specify an IP address while
conguring client settings.
Click to change the host name of your thin client. 4.5.7 94
Click to congure wireless network settings and
create a wireless connection.
Click to congure proxy settings for Web-based
access to services.
4.5.4
4.5.5
4.5.6 92
4.5.8
4.5.9
4.5.10 99
87
91
95
98
Page 94
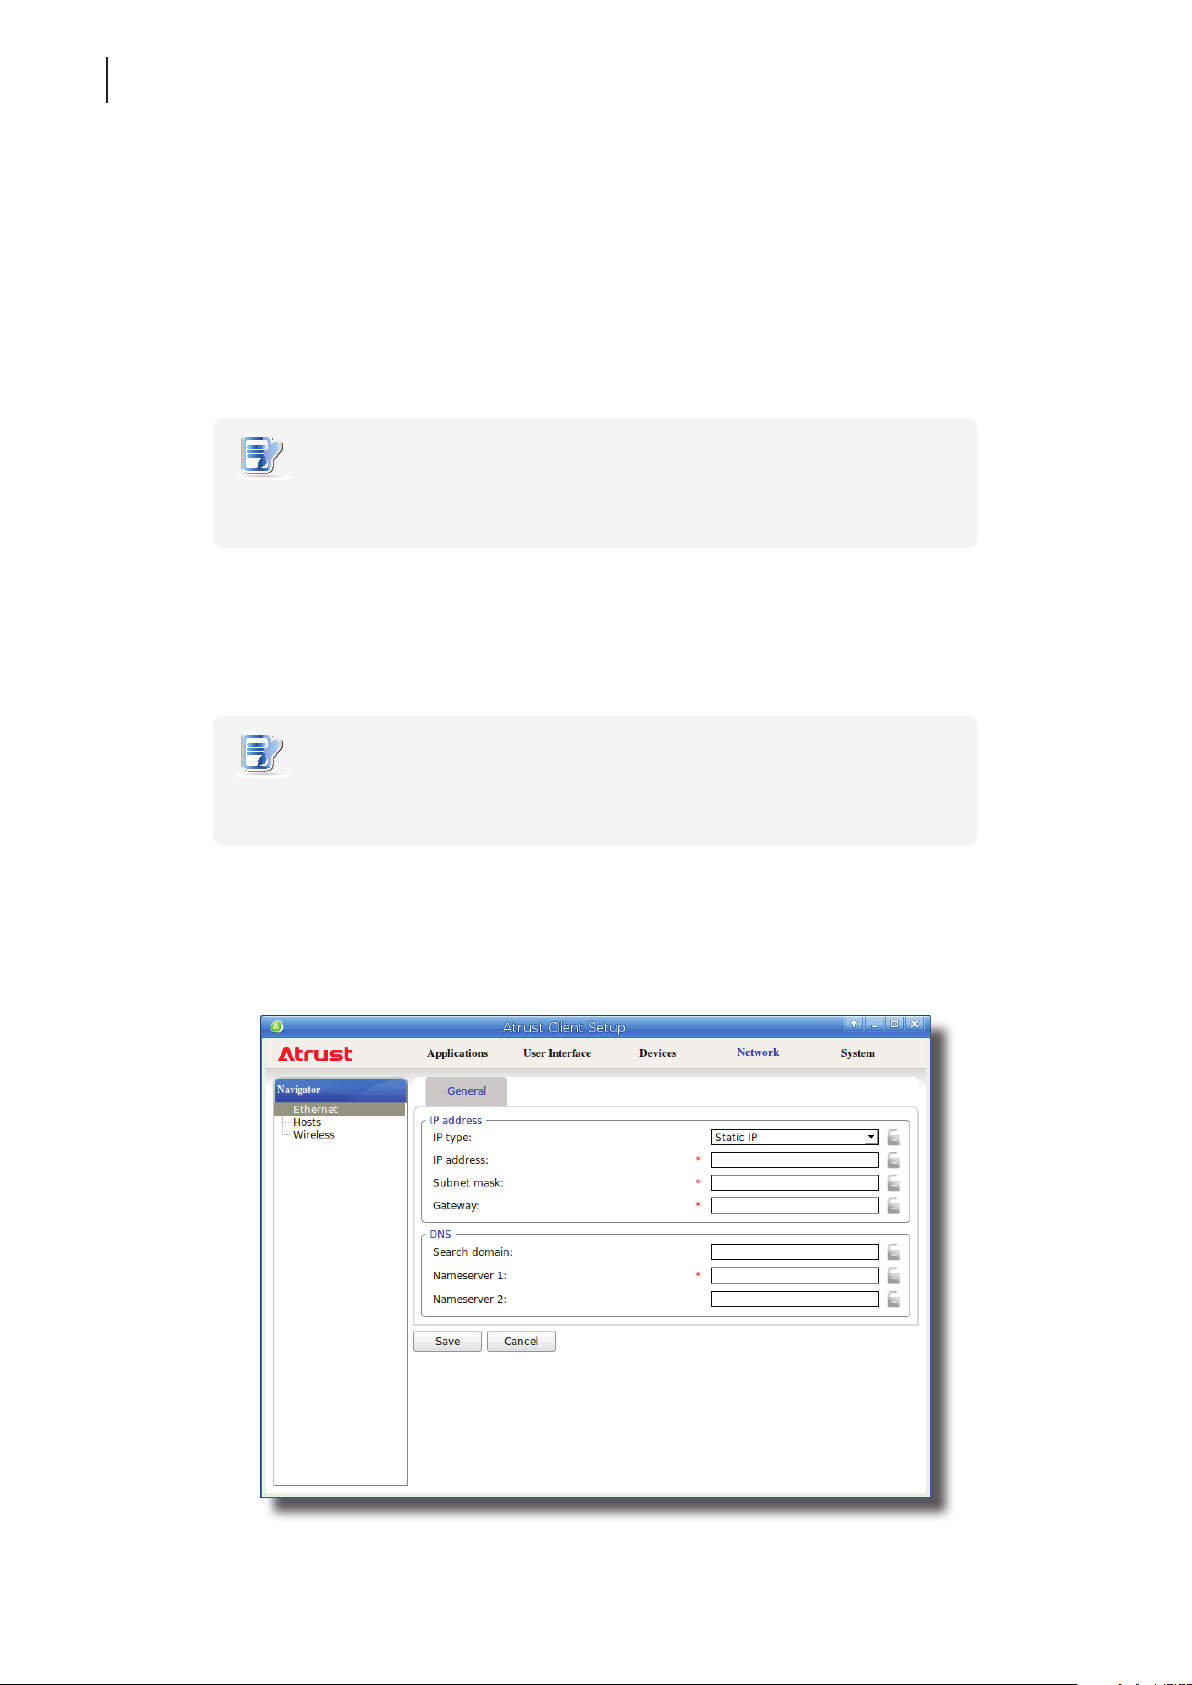
Conguring Client Settings
84
Conguring Network Settings
4.5.3 Conguring Wired Network Settings
The Ethernet setting enables you to congure the wired network settings for your t60/t62 thin client.
Using a Dynamic IP Address
To use a dynamic IP address, please do the following:
1. On Atrust Client Setup, click Network > Ethernet.
2. Under the IP address section, click the drop-down menu to select DHCP for the IP type eld.
NOTE
• If DHCP is selected, the DHCP server over the network will automatically assign
an IP address to your t60/t62 thin client. This is the default setting.
3. Click Save to apply.
Using a Static IP Address
To use a static IP address, please do the following:
NOTE
• It’s recommended to use a dynamic IP address for your t60/t62 thin client in a
corporate network environment.
1. On Atrust Client Setup, click Network > Ethernet.
2. Under the IP address section, click the drop-down menu to select Static IP for the IP type eld.
3. The IP address, Subnet mask, and Gateway elds appear in the IP address section.
Page 95
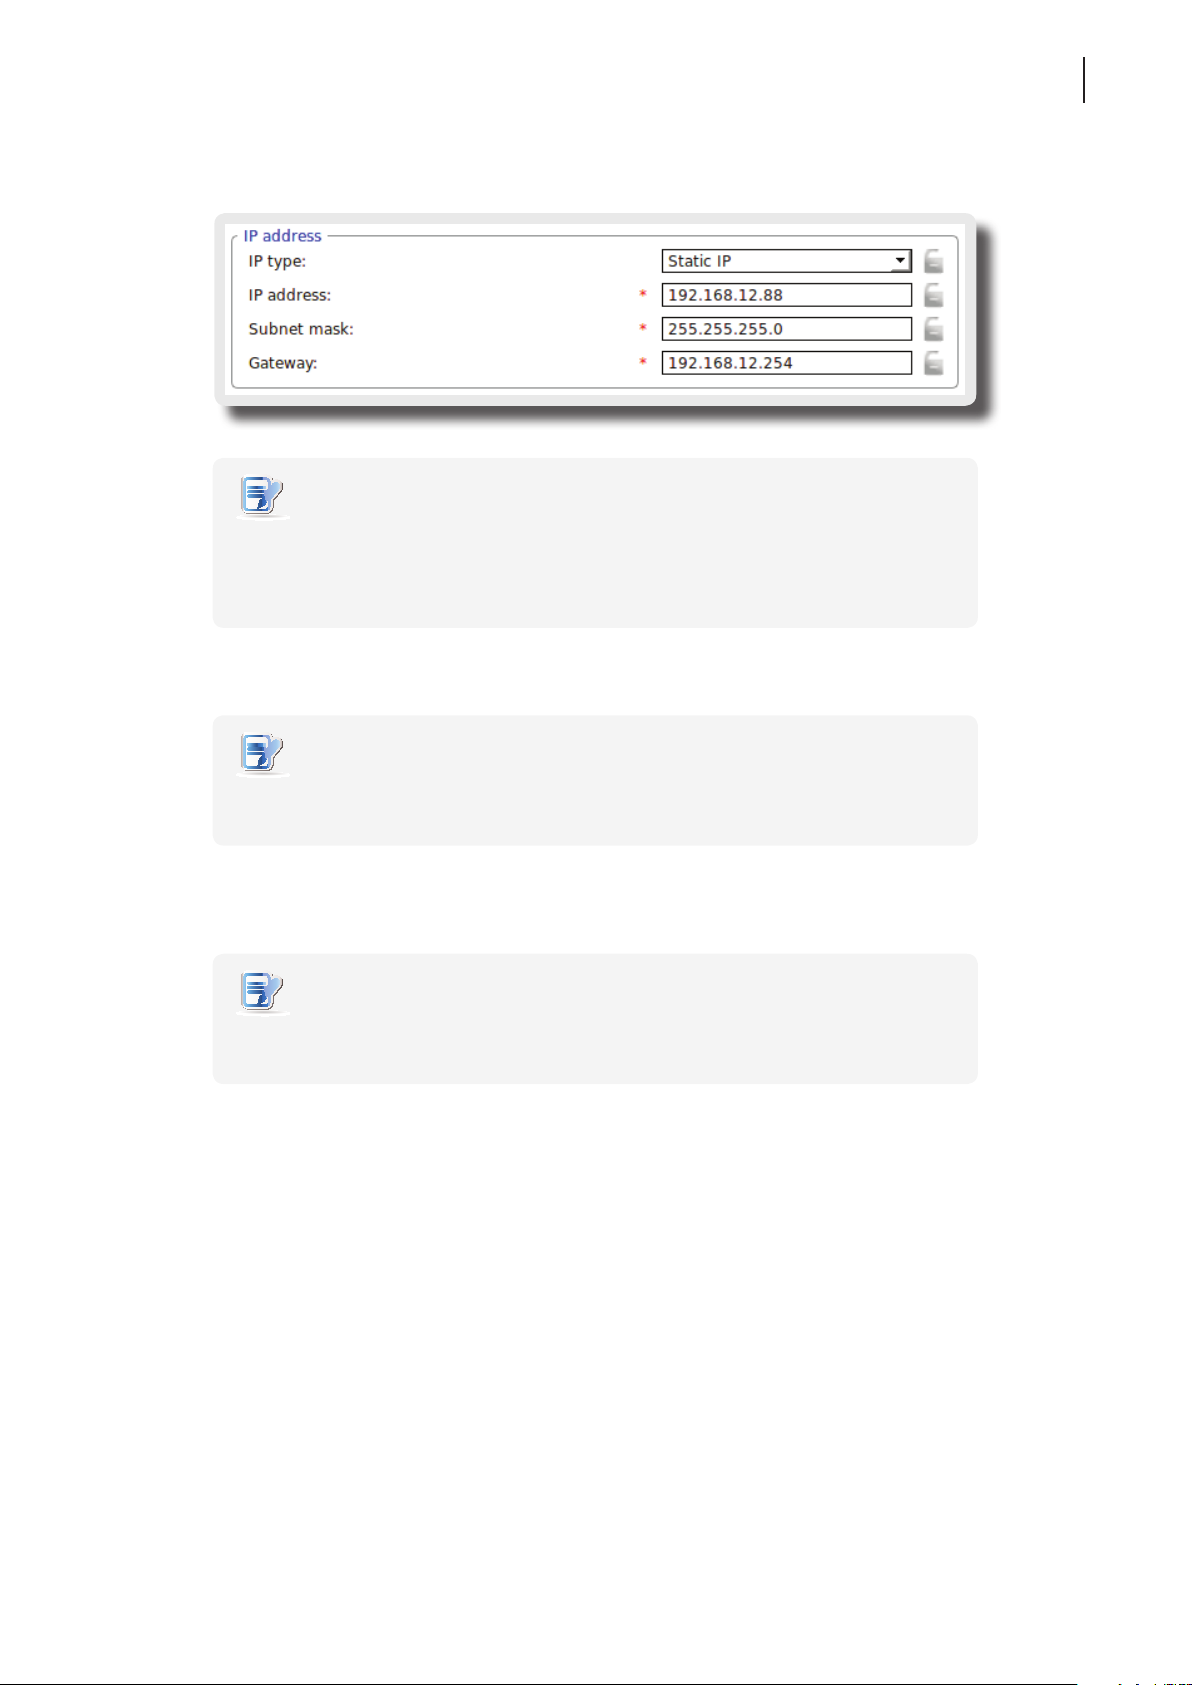
Conguring Client Settings
4. Type in the IP address, subnet mask, and gateway for your t60/t62 thin client.
NOTE
• Consult your network administrator for a free IP address and other required data
about the network to which your t60/t62 connects.
• The red asterisks indicate the required elds.
85
Conguring Network Settings
5. Click Save to apply.
NOTE
• You need to further specify DNS server addresses manually if you choose to use a
static IP address.
Obtaining DNS Server Addresses Automatically
To obtain DNS Server addresses automatically, please do the following:
NOTE
• You cannot obtain DNS server addresses automatically through the DHCP server if
you choose not to get the IP address via the DHCP server.
1. On Atrust Client Setup, click Network > Ethernet.
2. Under the DNS section, click the drop-down menu to select Dynamic DNS (via DHCP) for the DNS type eld.
3. Click Save to apply.
Specifying DNS Server Addresses Manually
To specify DNS Server addresses manually, please do the following:
1. On Atrust Client Setup, click Network > Ethernet.
2. Under the DNS section, click the drop-down menu to select Manual setting.
3. The Search domain, Nameserver 1, and Nameserver 2 elds appear in the DNS section.
Page 96
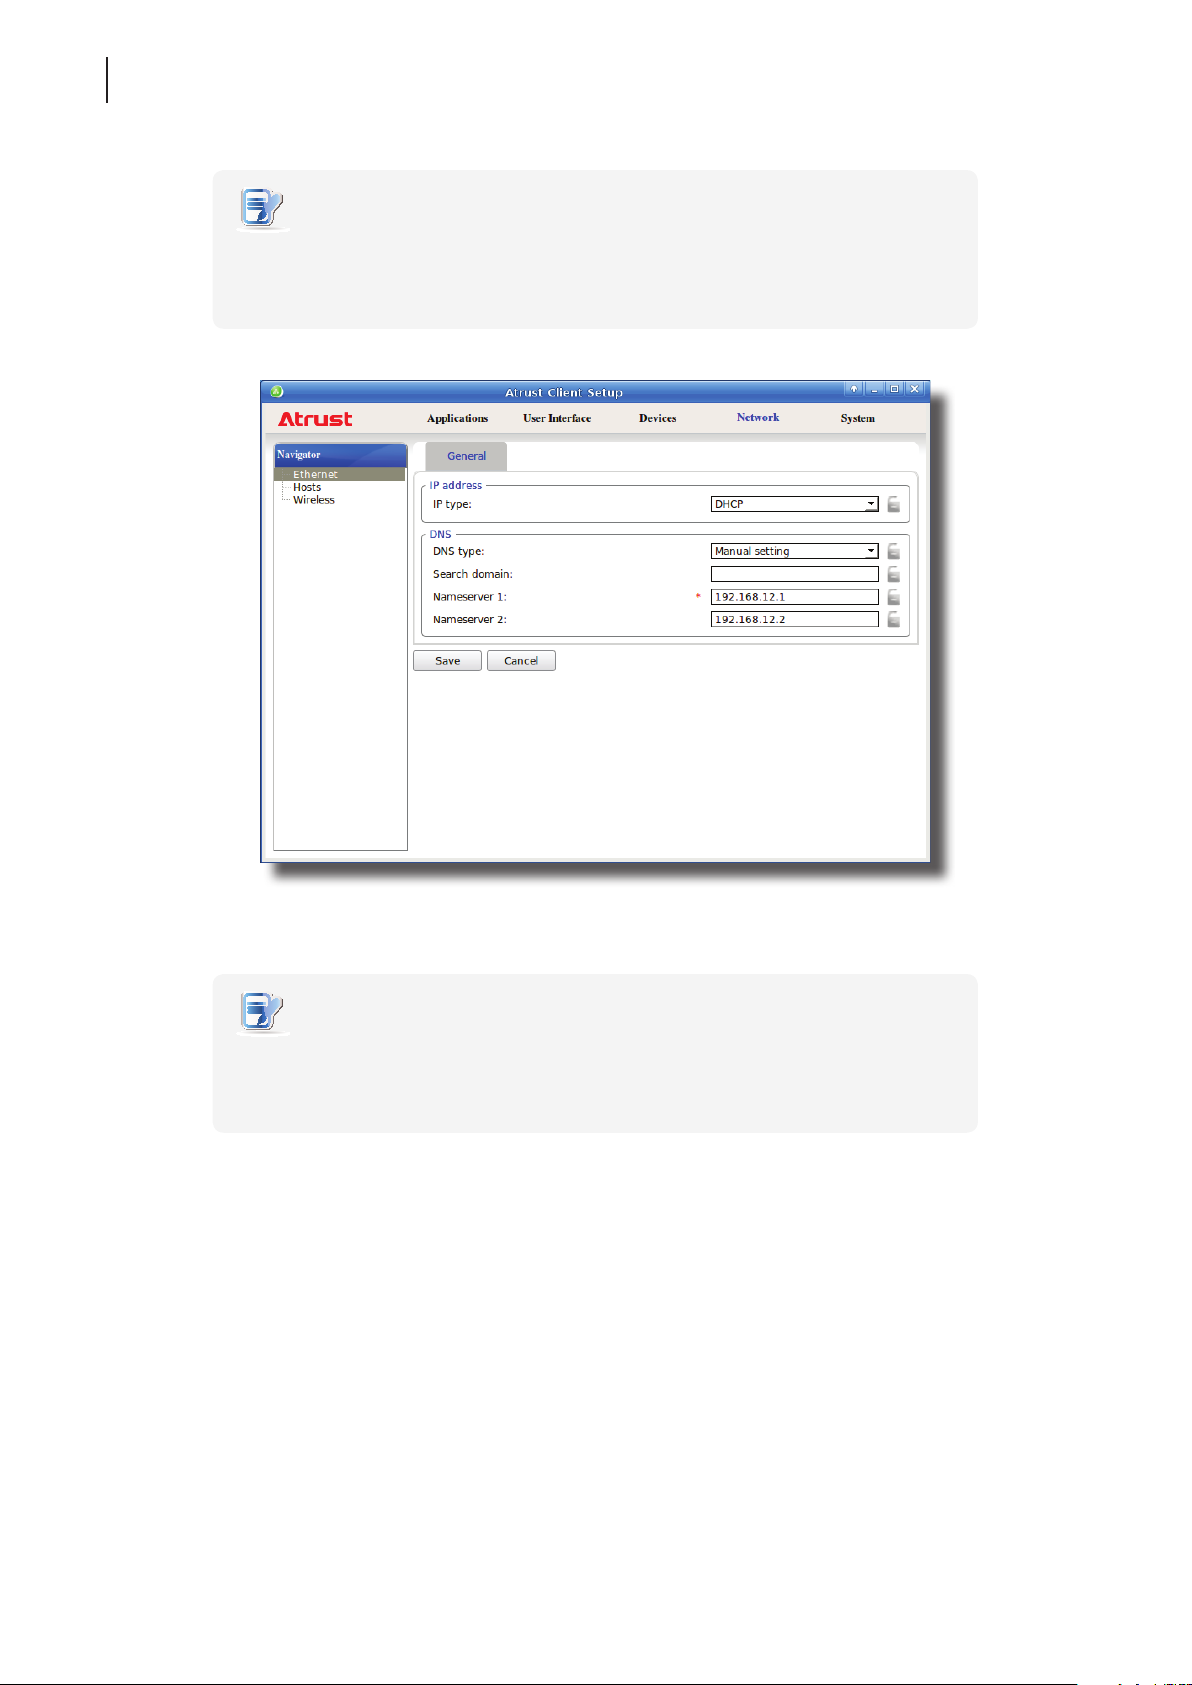
Conguring Client Settings
86
Conguring Network Settings
NOTE
• If you choose to use a static IP address for your t60/t62 thin client, then you need
to specify DNS server addresses manually. In this case, the DNS type eld will not
appear for you to select Manual setting or Dynamic DNS (via DHCP).
4. Type in the preferred DNS server address in the Nameserver 1 eld and the alternate DNS server address in
the Nameserver 2 eld if any.
NOTE
• Specifying a domain name in the Search Domain eld will enable your system to
discover a computer in that domain simply with its computer name rather than its
FQDN (Fully Qualied Domain Name).
5. Click Save to apply.
Page 97
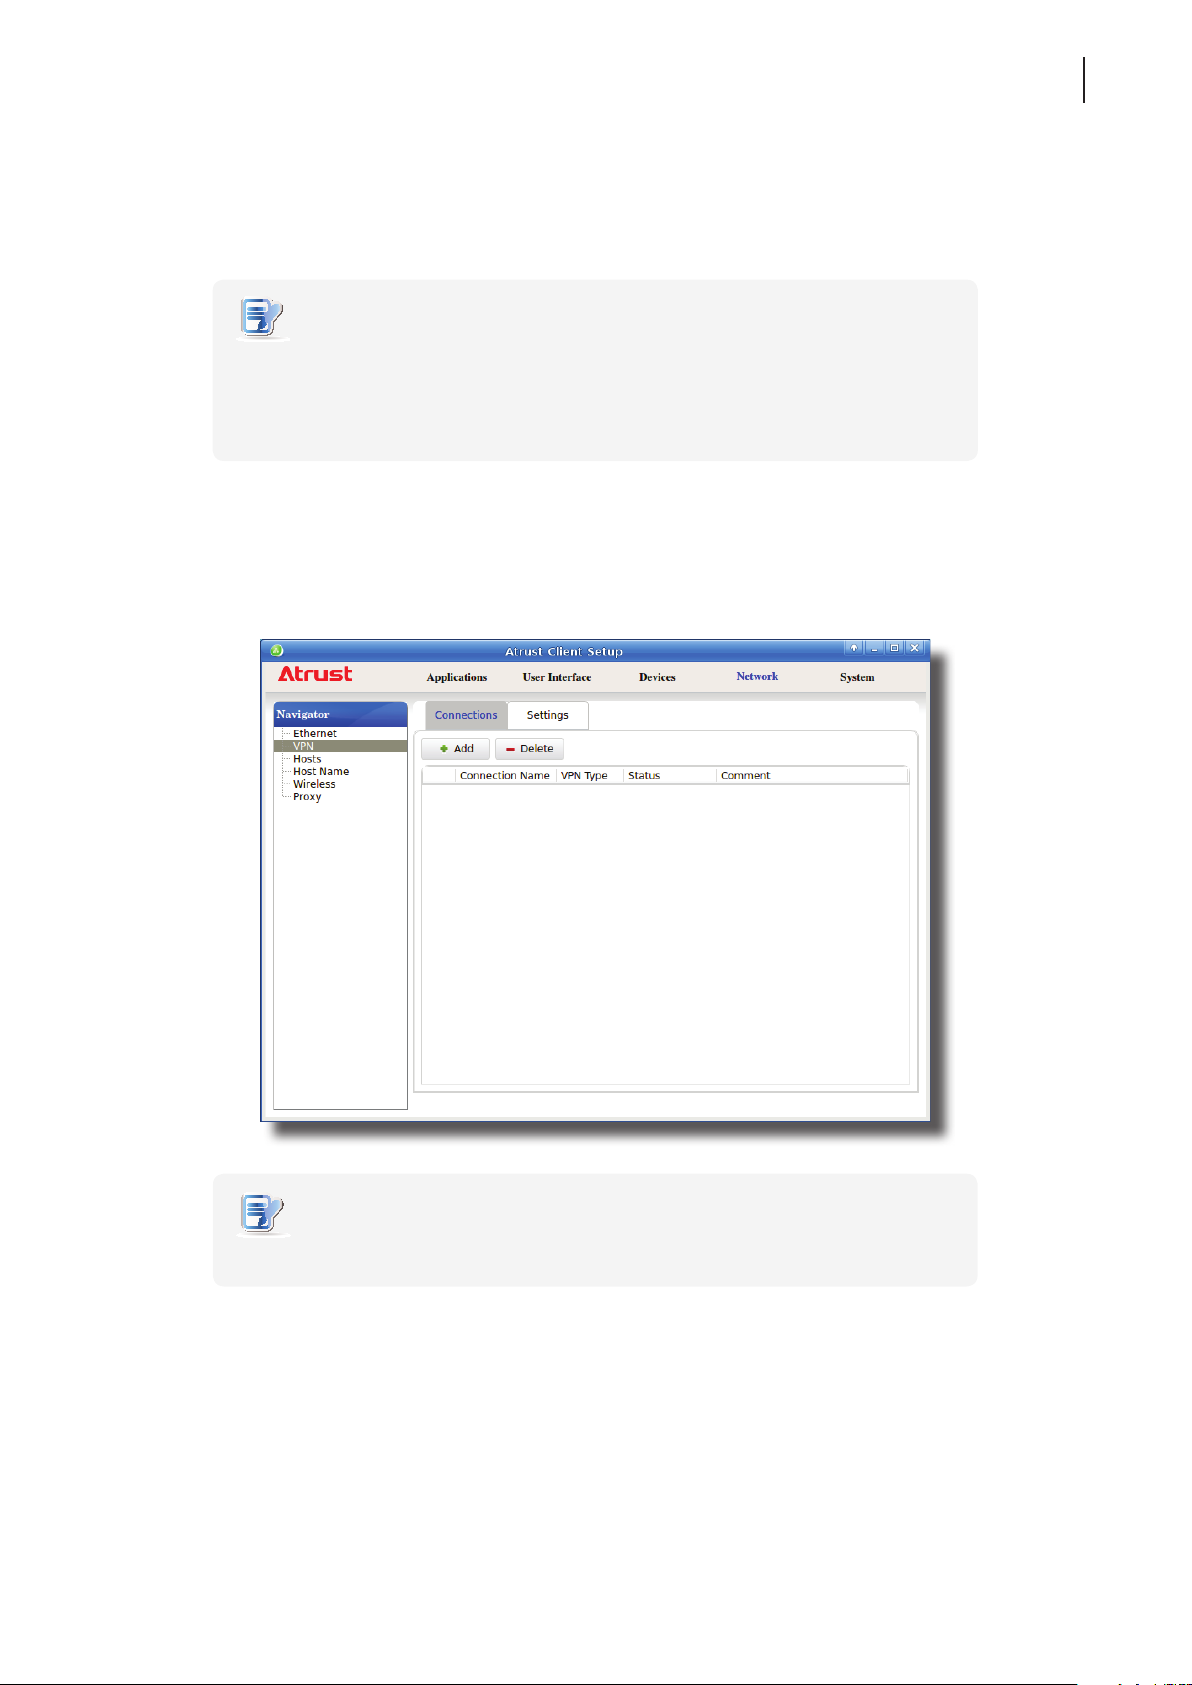
Conguring Client Settings
Conguring Network Settings
4.5.4 Establishing and Stopping a VPN connection
The VPN setting enables you to establish/stop a virtual private network connection for your t60/t62 thin client.
NOTE
• The VPN setting also allows you to congure and manage virtual private network
settings. For instructions on how to congure and manage virtual private network
settings, please refer to section “4.5.5 Conguring Virtual Private Network Settings”
on page 91.
Adding a Virtual Private Network
To add a virtual private network, please do the following:
1. On Atrust Client Setup, click Network > VPN to open the Virtual Private Network list.
87
NOTE
• If you haven’t created any entry, the Virtual Private Network list will be empty.
2. Click Add on the top of the Virtual Private Network list.
Page 98
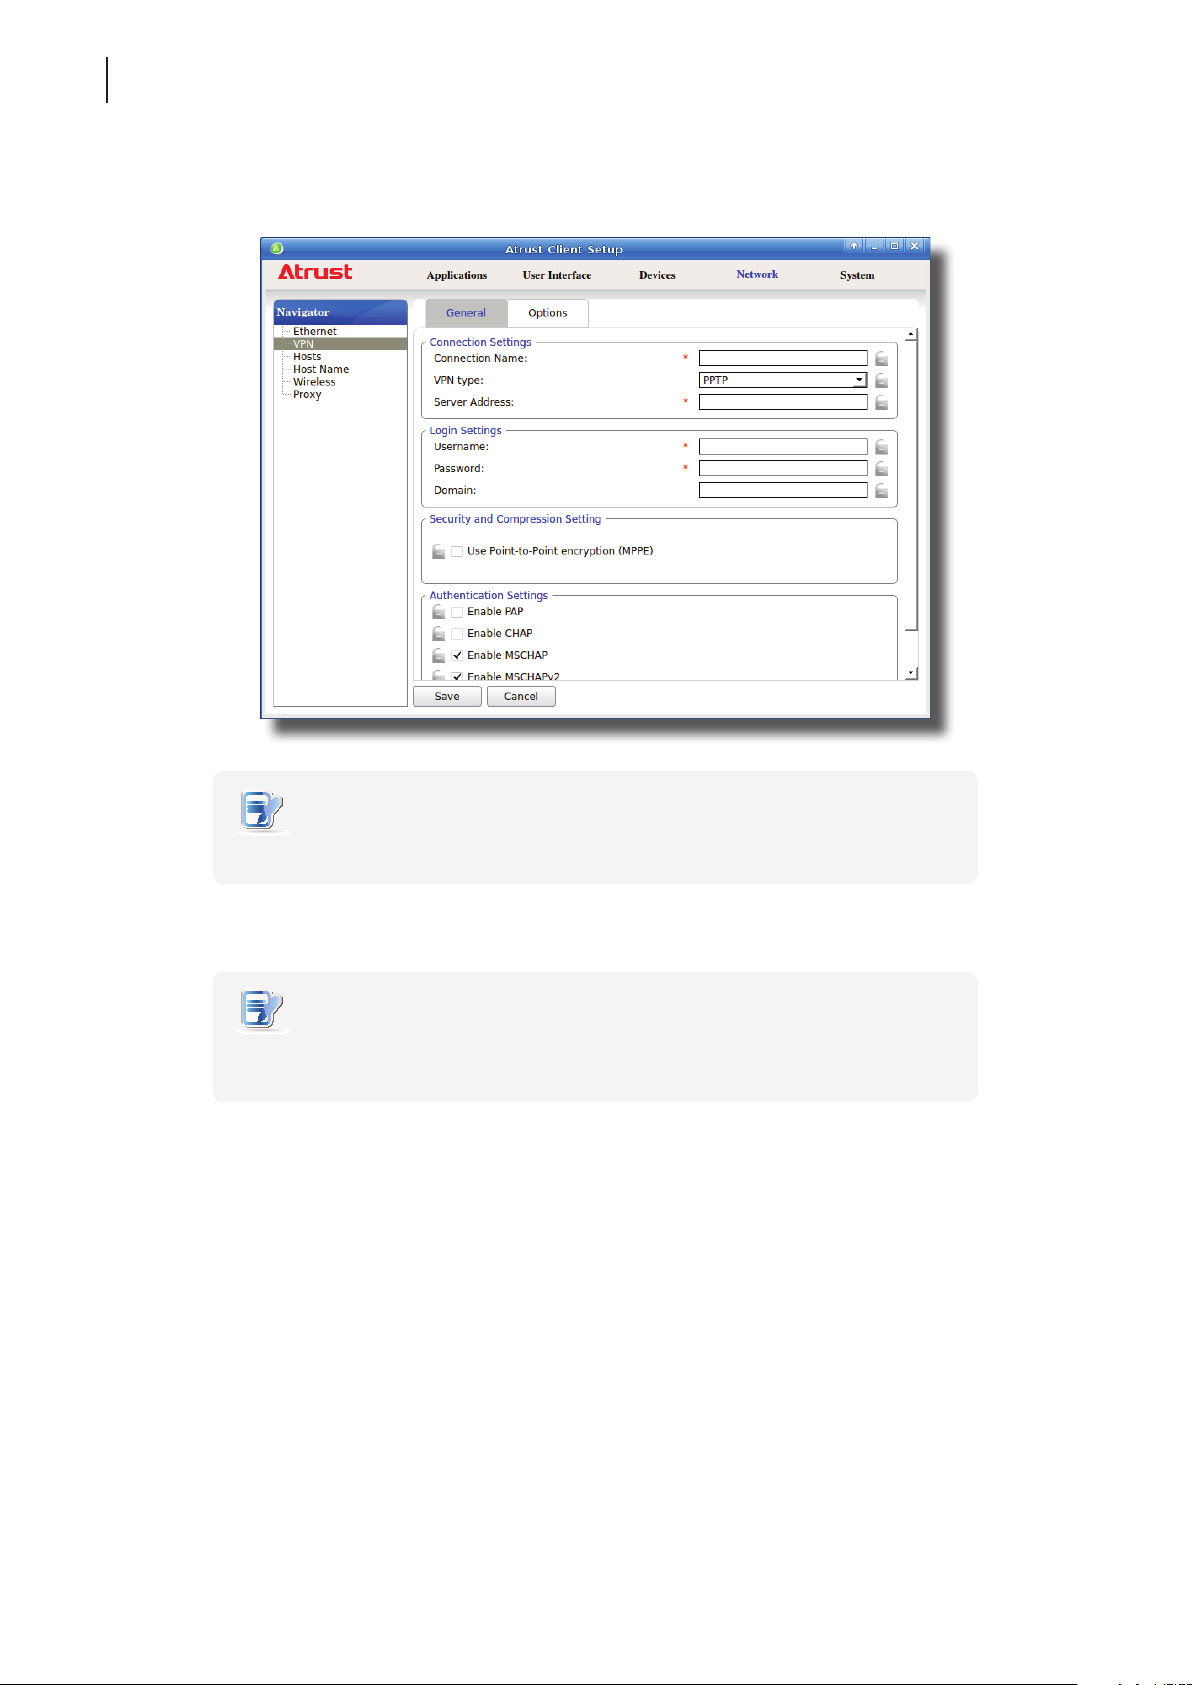
Conguring Client Settings
88
Conguring Network Settings
3. On General tab, click the drop-down menu to select the desired VPN type. Three types are available: PPTP,
L2TP, and Cisco AnyConnect.
NOTE
• The setting items will vary with the selected VPN type.
4. Type in or click drop-down menus to provide information about conguration and authentication.
NOTE
• Consult your network administrator for required information on conguration and
authentication.
5. On Options tab, congure the DNS-related settings if needed.
6. Click Save to add the virtual private network.
Establishing a Virtual Private Network Connection
To establish a virtual private network connection for your t60/t62 thin client, please do the following:
1. On Atrust Client Setup, click Network > VPN to open the Virtual Private Network list.
Page 99
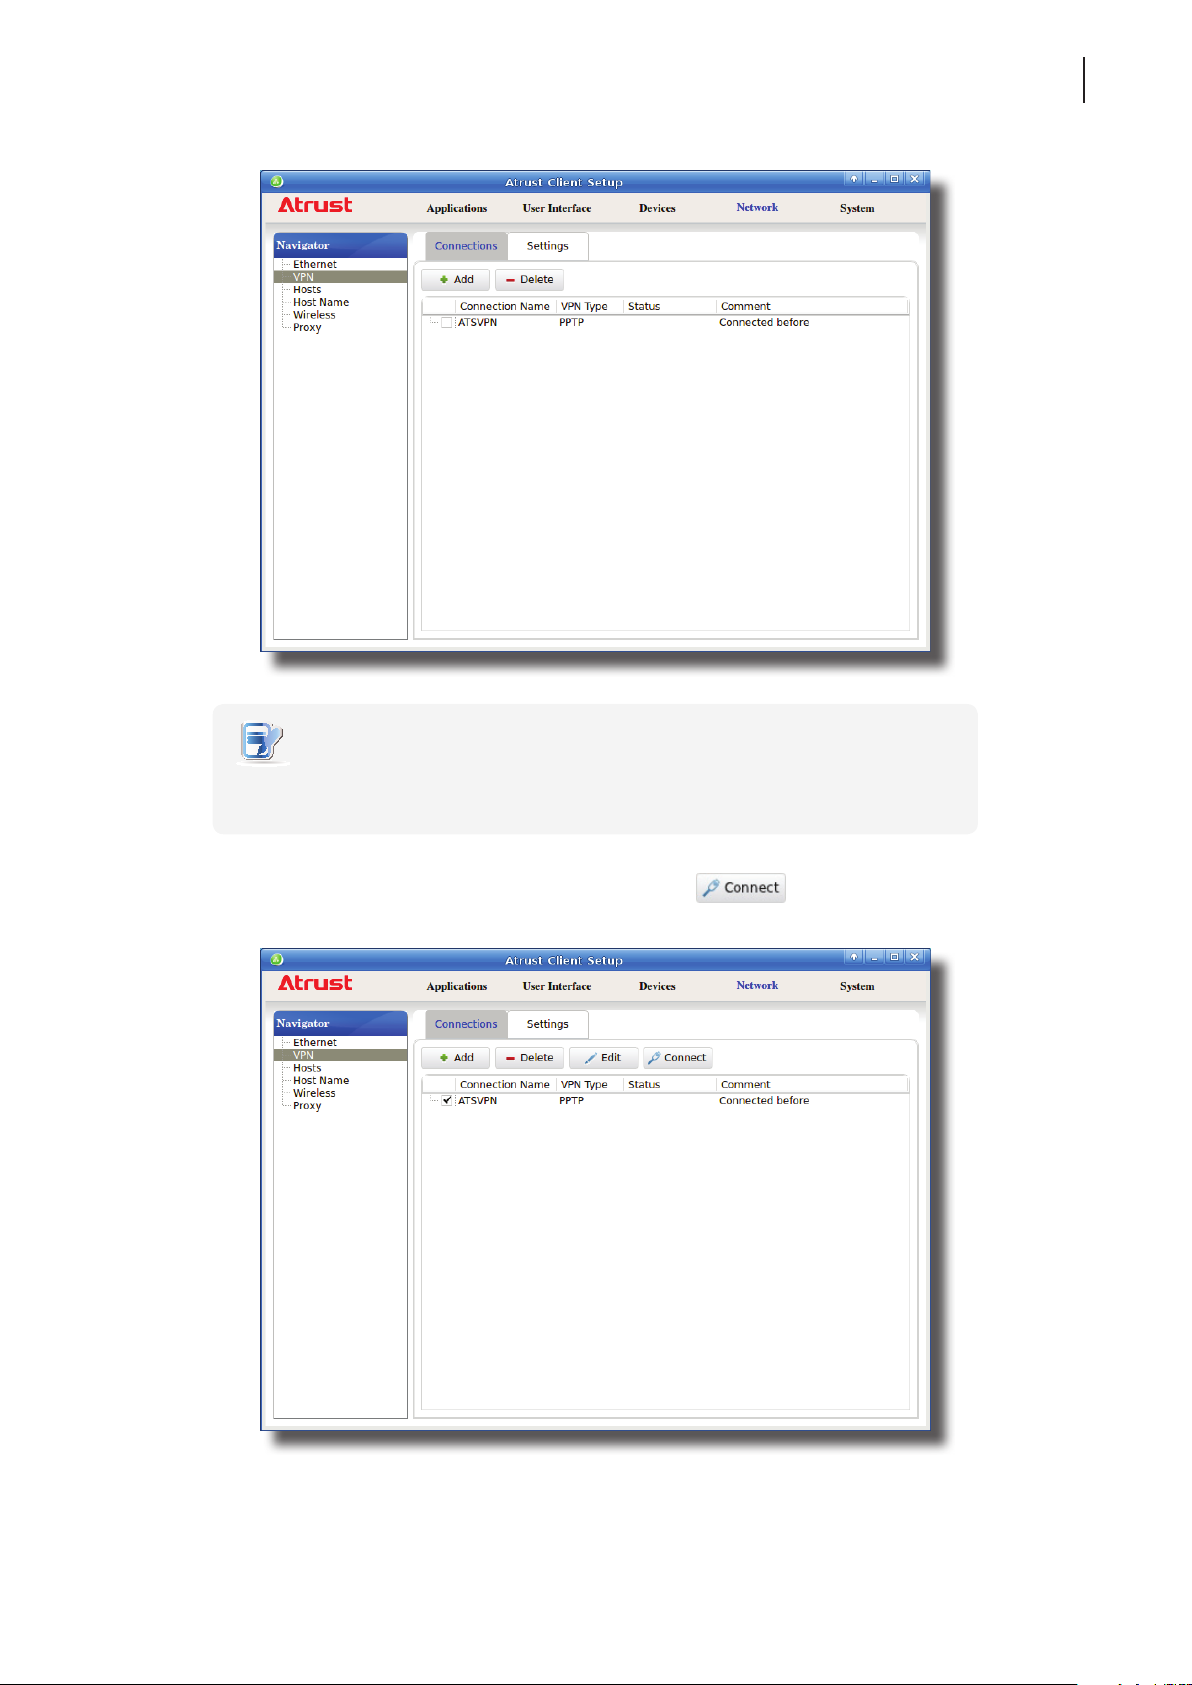
Conguring Client Settings
Conguring Network Settings
89
NOTE
• If you haven’t created any entry, the Virtual Private Network list will be empty. For
instructions on adding a virtual private network, please see the preceding topic.
2. Click to check the desired virtual private network. The Connect button then appears on the top
of the Virtual Private Network list.
3. Click Connect to create a virtual private network connection through the selected network entry.
Page 100
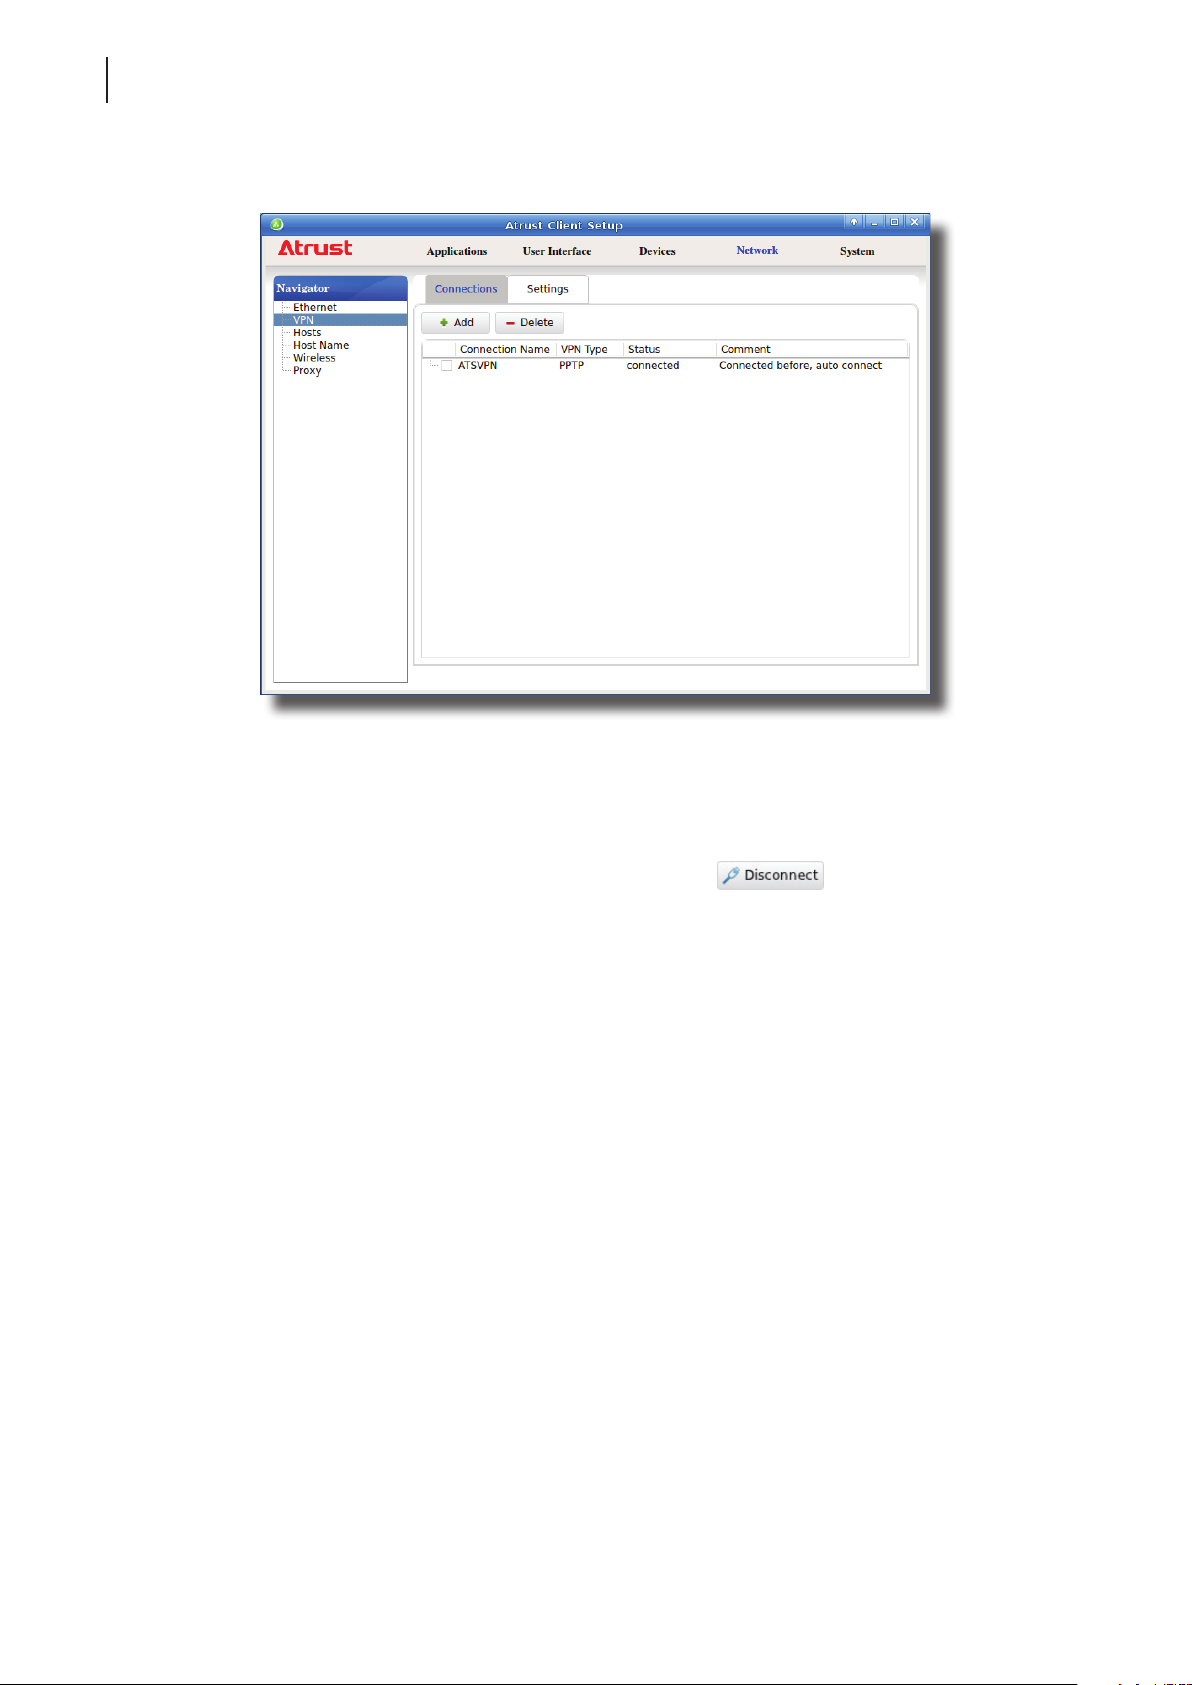
Conguring Client Settings
90
Conguring Network Settings
4. Upon completion, the Status column of the virtual private network will show connected.
Stopping a Virtual Private Network Connection
To stop a virtual private network connection, please do the following:
1. On Atrust Client Setup, click Network > VPN to open the Virtual Private Network list.
2. Click to check the desired virtual private network. The Disconnect
the Virtual Private Network list.
3. Click Disconnect to stop the virtual private network connection.
Deleting a Virtual Private Network
To delete a virtual private network, please do the following:
1. On Atrust Client Setup, click Network > VPN to open the Virtual Private Network list.
2. Click to check the desired virtual private network.
3. Click Delete to remove the selected virtual private network.
button appears on the top of
 Loading...