

Page 1
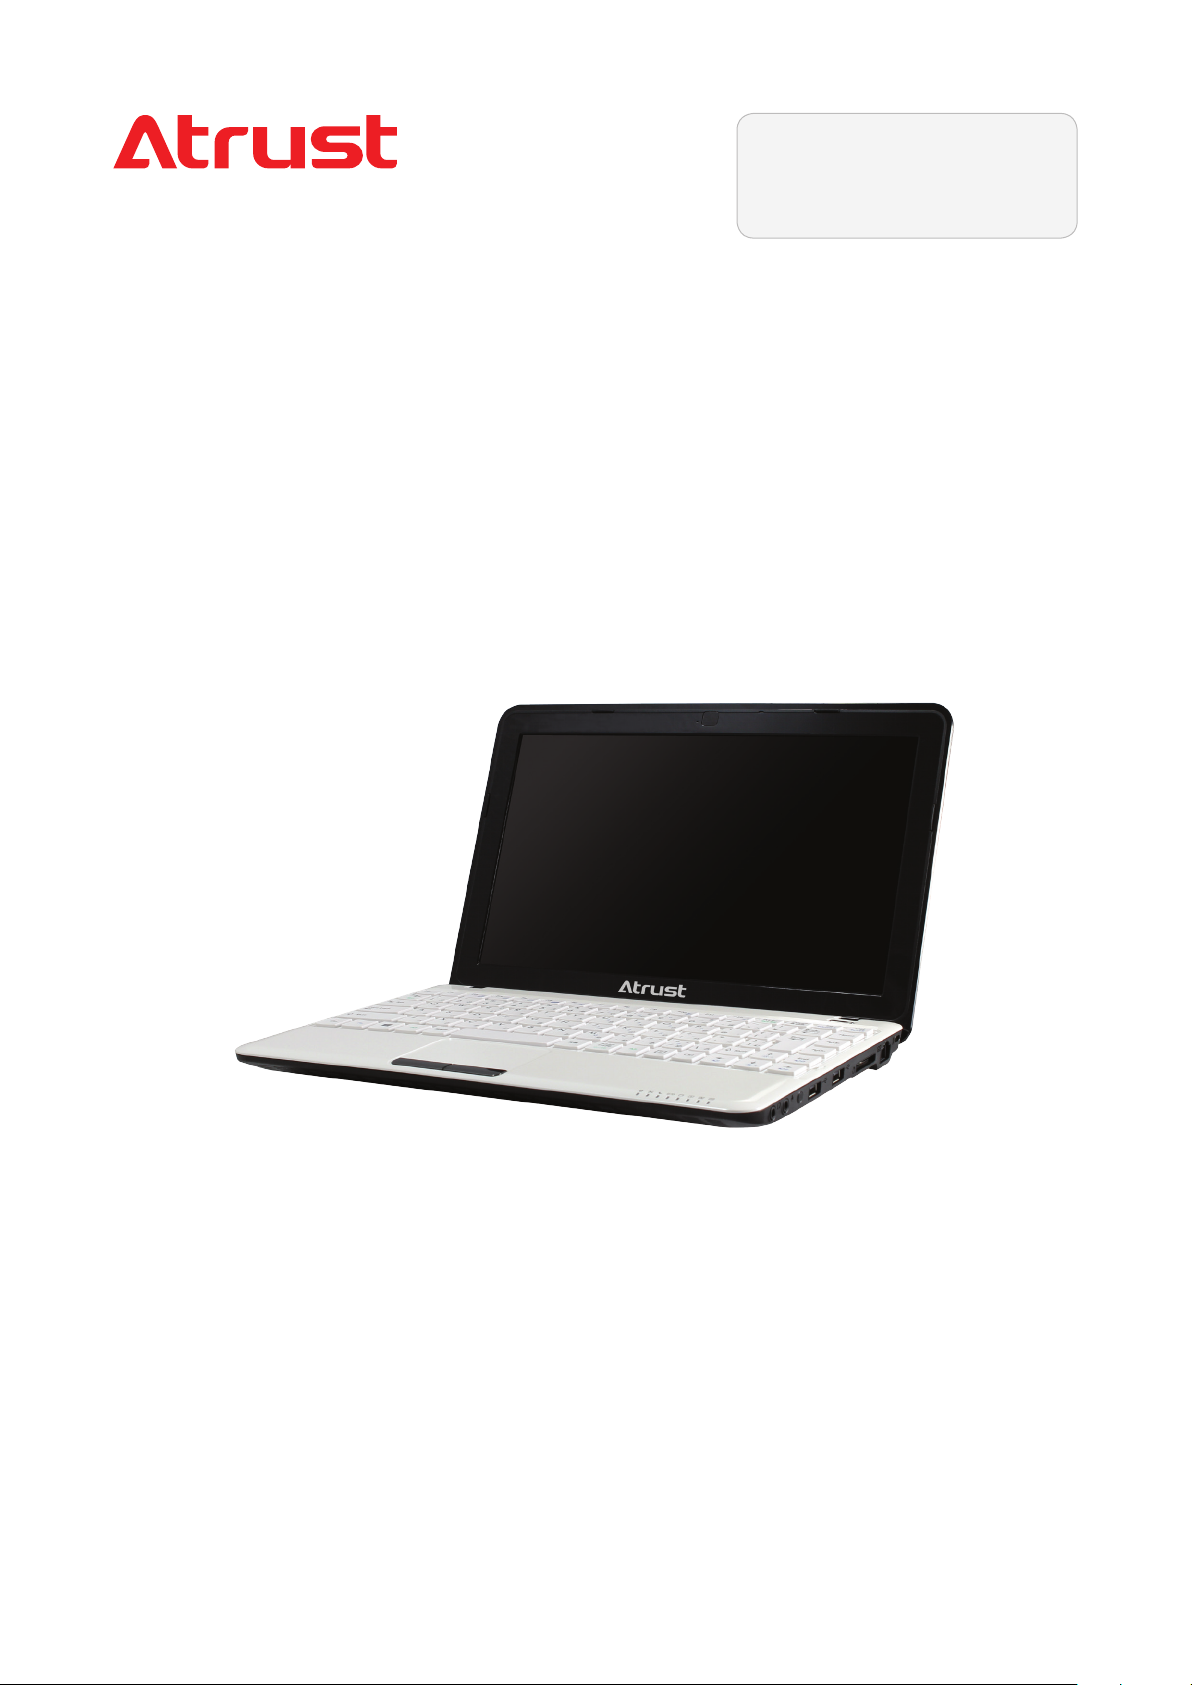
Mobile Thin Client Solution
Atrust mt168L
Topics Covered:
Setup and Maintenance
Basics as an Endpoint Device in VDI
Atrust Client Setup Console
User’s manual
Page 2

Internal Draft 0.04
Copyright © 2015-16 Atrust Computer Corp.
UM-mt168L-EN-16050915
Page 3

Copyright and Trademark Statements
Copyright © 2015-16 Atrust Computer Corp. All rights reserved.
This document contains proprietary information that is protected by copyright. No part of this document may be
photocopied, reproduced, or translated to another language without the prior written consent of Atrust Computer
Corp.
Disclaimer
Atrust Computer Corp. (“Atrust”) makes no representations or warranties with respect to the contents or use of
this document, and specically disclaims any express or implied warranties of merchantability or tness for any
particular purpose. Atrust is not liable for technical or editorial errors or omissions contained herein. The information
in this document is subject to change without notice.
Trademark Statements
Atrust is a trademark of Atrust Computer Corp.
Intel is a registered trademark of Intel Corporation or its subsidiaries in the United States and other countries.
i
Microsoft, Windows, Windows Server, RemoteFX, and MultiPoint are trademarks or registered trademarks of the
Microsoft group of companies.
Citrix, ICA, XenApp, XenDesktop, and VDI-in-a-Box are trademarks of Citrix Systems, Inc. and/or one or more of its
subsidiaries, and may be registered in the United States Patent and Trademark Oce and in other countries.
VMware, VMware View, and VMware Horizon View are trademarks or registered trademarks of the VMware, Inc.
PCoIP is a registered trademark of Teradici Corporation in the United States and/or other countries.
Other product names mentioned herein are used for identication purposes only and may be trademarks and/or
registered trademarks of their respective companies.
Page 4
ii
About This User’s Manual
This manual provides detailed instructions on how to set up, use, and maintain Atrust mt168L mobile thin clients.
Manual Structure and Subjects
Chapter Subject
1 Provides an overview of Atrust mt168L mobile thin clients.
2 Provides detailed instructions on how to set up Atrust mt168L mobile thin clients.
3 Provides the basics of how to use Atrust mt168L mobile thin clients.
4
Appendices
Specications Provides detailed information on key components of Atrust mt168L mobile thin clients.
Provides instructions on how to congure client settings and customize Atrust mt168L
mobile thin clients with the Atrust Client Setup console.
Provides supplementary instructions on advanced settings, maintenance, and upgrade for
Atrust mt168L mobile thin clients.
Notes, Tips, and Warnings
Throughout this manual, the notes, tips, and warnings in the following formats are used to provide important
information, useful advice, and prevent injuries to you, damage to your devices, or loss of data on your system.
NOTE
• A note provides important information for a specic situation.
TIP
• A tip gives a piece of useful advice to perform a task more eciently.
WARNING
• A warning provides crucial information that must be followed to prevent injuries to
you, damage to your devices, or loss of data on your system.
Page 5

Style Conventions
The following styles are used throughout this manual while referring to operational items on input devices,
hardware panels, or application interfaces.
Item Style Example
keys on the keyboard bold Ctrl + F2, Alt + F9, Alt + Tab
iii
application windows or
entry lists
buttons or tabs on a
window, toolbars, taskbar,
or menu
options on a window,
screen, list, or menu
selecting a series of options bold
rst letter
capitalized
bold OK, Next, Save, Applications tab
bold Add, Domain, Connection Type, High Quality
Conrm Dialog window, RDP Connection list, ICA Connection list,
View Connection list
Applications > Citrix ICA, Applications > Remote Desktop,
Applications > VMware View, Network > Wireless,
Devices > Printer, System > Time Zone
Page 6

iv
Safety and Regulatory Information
Regulatory Statement
Federal Communications Commission Interference Statement
This equipment has been tested and found to comply with the limits for a Class B digital device, pursuant to Part
15 of the FCC Rules. These limits are designed to provide reasonable protection against harmful interference in a
residential installation. This equipment generates, uses and can radiate radio frequency energy and, if not installed
and used in accordance with the instructions, may cause harmful interference to radio communications. However,
there is no guarantee that interference will not occur in a particular installation. If this equipment does cause
harmful interference to radio or television reception, which can be determined by turning the equipment o and
on, the user is encouraged to try to correct the interference by one of the following measures:
• Reorient or relocate the receiving antenna.
• Increase the separation between the equipment and receiver.
• Connect the equipment into an outlet on a circuit dierent from that to which the receiver is connected.
• Consult the dealer or an experienced radio/TV technician for help.
FCC Caution: Any changes or modications not expressly approved by the party responsible for compliance could
void the user’s authority to operate this equipment. This device complies with Part 15 of the FCC Rules. Operation is
subject to the following two conditions: (1) This device may not cause harmful interference, and (2) this device must
accept any interference received, including interference that may cause undesired operation.
IMPORTANT NOTE:
FCC Radiation Exposure Statement
This equipment complies with FCC radiation exposure limits set forth for an uncontrolled environment. This
equipment should be installed and operated with minimum distance 20 cm between the radiator & your body.
This transmitter must not be co-located or operating in conjunction with any other antenna or transmitter.
Page 7
Regulatory Information
WEEE (Waste Electrical and Electronic Equipment) Directive
In the European Union, this symbol indicates that this product should not be disposed of with
household waste. It should be deposited at an appropriate facility to enable recovery and recycling. For
Safety Information
proper disposal, please contact your local recycling or hazardous waste center.
WARNING
• Use only power supplies listed in the user instructions.
WARNING
• Danger of explosion if battery is incorrectly replaced. Replace only with the same or
equivalent type recommended by the manufacturer.
v
WARNING
• For safety, do not make mechanical or electrical modications to the equipment.
• Do not remove equipment covers and access any of the components inside the
equipment. Any access inside the equipment without an authorized or certied
technician may cause serious injuries and damage. For any problem, contact your
dealer for assistance.
• You should only make repairs as authorized by the product documentation.
Repairs, replacement, expansion, and upgrades not performed by a certied service
technician may cause injuries to you, damage your system, and void your warranty.
Page 8

vi
Page 9

Table of Contents
Copyright and Trademark Statements i
Disclaimer i
Trademark Statements i
About This User’s Manual ii
Manual Structure and Subjects ii
Notes, Tips, and Warnings ii
Style Conventions iii
Safety and Regulatory Information iv
Regulatory Statement iv
Regulatory Information v
Safety Information v
1 Overview 1
1.1 Introduction 3
1.2 Features 3
vii
1.3 Package Contents 3
1.4 Exterior Views 4
1.5 Exterior Components 5
2 Setting Up Your mt168L 11
2.1 About the AC Adapter 13
2.2 Charging Your Lithium-ion Battery 13
2.3 Setting Up Your mt168L 14
3 Getting Started 15
3.1 Learning the Basics 17
4 Conguring Client Settings 41
4.1 Atrust Client Setup 43
4.1.1 Interface Overview 43
4.1.2 Client Settings at a Glance 44
4.2 Conguring System Settings 45
4.2.1 System Tab Overview 45
4.2.2 Available Settings at a Glance 46
4.2.3 Conguring Time Zone and Time Server 47
4.2.4 Conguring the Access Privileges and Passwords of Atrust Client Setup 48
4.2.5 Conguring the Login Password for the Local Desktop 50
4.2.6 Conguring Shadow Settings for Remote Assistance 52
4.2.7 Updating Firmware from the Management Computer 54
4.2.8 Enabling or Disabling the Appliance Mode 56
4.2.9 Enabling or Disabling Auto Setup 60
4.2.10 Conguring the Quick Connection Mode 60
4.2.11 Conguring Advanced Quick Connection Settings 62
4.2.12 Managing the Use of Power 66
4.2.13 Enabling or Disabling the Command-line Functions 67
4.2.14 Collecting Event Logs and Capturing Related Screens 68
4.2.15 Uploading Files for Error Reporting 70
4.2.16 Importing Certicates for Remote Computers 71
4.2.17 Enabling or Disabling Auto Registration 75
Page 10

viii
4.3 Conguring User Interface Settings 76
4.3.1 User Interface Tab Overview 76
4.3.2 Available Settings at a Glance 77
4.3.3 Conguring Display Settings 77
4.3.4 Customizing Desktop and System Language Settings 80
4.3.5 Hiding or Showing Quick Access Shortcuts 82
4.3.6 Using a Custom Wallpaper 83
4.3.7 Adjusting Keyboard Settings 84
4.3.8 Adjusting Mouse Settings 86
4.3.9 Conguring Screensaver Settings 87
4.4 Conguring External Device Settings 88
4.4.1 Devices Tab Overview 88
4.4.2 Available Settings at a Glance 89
4.4.3 Conguring Settings for USB Storage Devices 89
4.4.4 Manually Mount and Eject Attached USB Storage Devices 90
4.4.5 Disabling or Enabling Attached Audio Devices 91
4.4.6 Using USB Audio Devices 92
4.4.7 Adding a Local Printer 93
4.4.8 Adding a Network Printer 96
4.5 Conguring Network Settings 97
4.5.1 Network Tab Overview 97
4.5.2 Available Settings at a Glance 98
4.5.3 Conguring Wired Network Settings 99
4.5.4 Establishing and Stopping a VPN connection 102
4.5.5 Conguring Virtual Private Network Settings 106
4.5.6 Creating the Mapping of IP Addresses to Names of Hosts 107
4.5.7 Conguring the Failover Cluster List 109
4.5.8 Changing the Host Name of Your Thin Client 111
4.5.9 Enabling or Disabling the Wireless Interface 112
4.5.10 Conguring the Trigger Threshold for Roaming 113
4.5.11 Establishing and Stopping a Wireless Connection 114
4.5.12 Conguring Wireless Connection Settings 117
4.5.13 Conguring Proxy Settings for Web-based Access to Services 118
4.6 Conguring Service Access Settings 120
4.6.1 Applications Tab Overview 120
4.6.2 Available Settings at a Glance 121
4.6.3 Conguring Basic RDP Connection Settings 122
4.6.4 Accessing Remote Desktop Services 131
4.6.5 Conguring Advanced RDP Connection Settings 137
4.6.6 Conguring Basic ICA Connection Settings 152
4.6.7 Switching the Citrix Receiver Version 165
4.6.8 Enabling or Disabling Esc to Quit on the Web Logon Screen 166
4.6.9 Conguring Keyboard Layout and Type for Citrix ICA Sessions 167
4.6.10 Accessing Citrix Services 168
4.6.11 Conguring Advanced ICA Connection Settings 175
4.6.12 Conguring Basic VMware View Connection Settings 204
4.6.13 Accessing VMware View or Horizon View Services 206
4.6.14 Conguring Advanced View Connection Settings 208
4.6.15 Conguring SSH Connection Settings 213
4.6.16 Launching SSH and Telnet Sessions 215
Appendices 217
A.1 Resetting Your mt168L to the Factory Default 219
A.2 Updating Firmware for Your mt168L 220
A.3 Using SECUREMATRIX Authentication for VMware Connections 222
A.4 Auto Setup Flowchart 229
Specications 231
Page 11

Overview
1
This chapter provides an overview of Atrust mt168L.
1.1 Introduction
Desktop virtualization and simple endpoint devices 3
1.2 Features
Key features of Atrust mt168L 3
1.3 Package Contents
Check your package contents 3
1.4 Exterior Views
Exterior design of Atrust mt168L 4
1.5 Exterior Components
Exterior components of Atrust mt168L 5
Page 12

Page 13
Overview
Introduction
1.1 Introduction
Desktop virtualization provides a new perspective to reconsider the design and implementation of an IT
infrastructure. In a desktop virtualization infrastructure, a station is no longer a cumbersome desktop, but simply
an endpoint device for users to access delivery services from the server(s).
With the introduction of the desktop virtualization technologies, you can considerably benet from:
• On-demand applications/desktops
• Centralized management of work environments
• Drastically reduced endpoint software/hardware issues
• Simplied system maintenance and improved system security
• More scalability with low-cost endpoint devices
1.2 Features
The key features of Atrust mt168L mobile thin clients are:
3
• Built-in Wireless 802.11 a/b/g/n and Ethernet network interface
• Support for a wide range of desktop virtualization solutions from industry-leading companies:
⪧ Microsoft® Remote Desktop
⪧ Citrix® XenApp™, XenDesktop®, and VDI-in-a-Box™
⪧ VMware® View™ and Horizon View™
• Support for high-denition technologies
⪧ Microsoft® RemoteFX®
⪧ Citrix® HDX™
⪧ VMware® View™ PCoIP®
• Simple click-access to various applications/desktops
• Built-in Atrust Client Setup as the local client management console
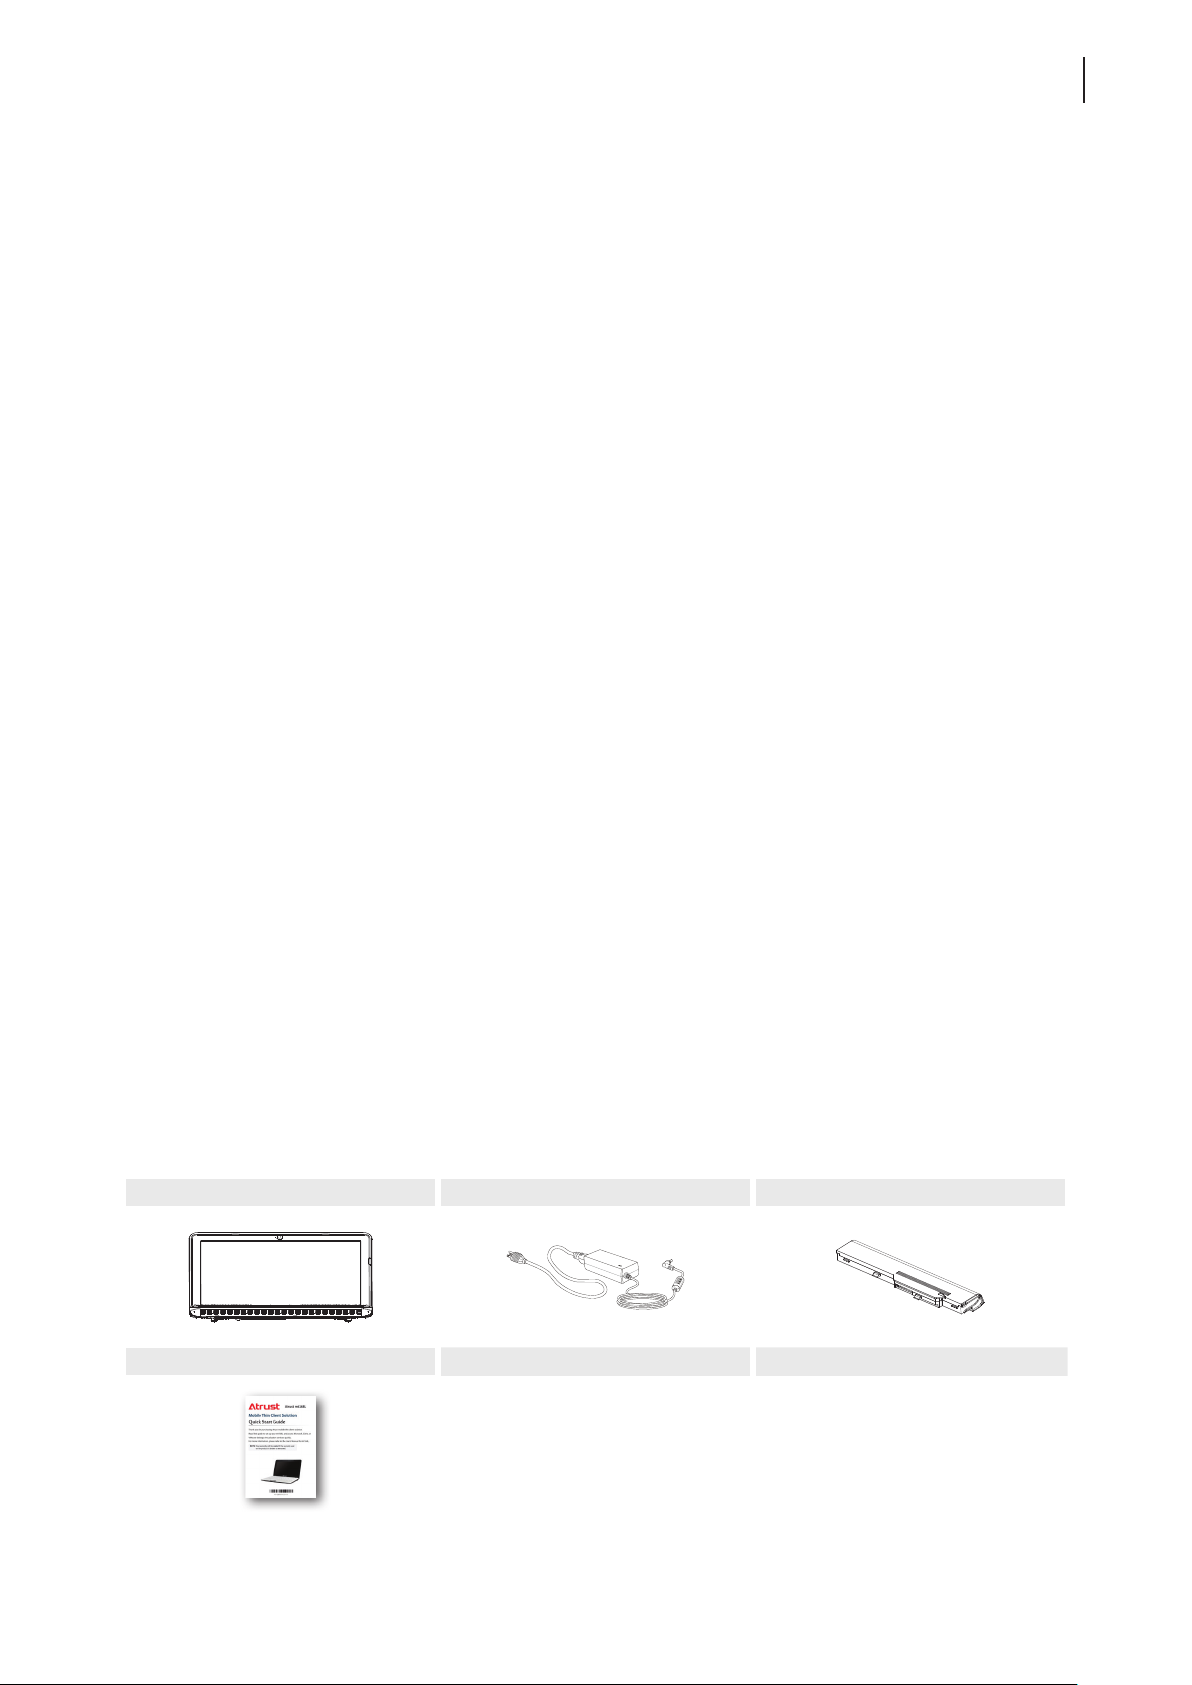
1.3 Package Contents
Please check your package contents. Ensure that all of the items are present in your package. If any items are
missing or damaged, please contact your dealer immediately.
Atrust mt168L AC adapter Battery
Quick Start Guide
NOTE: Your package may not contain a hard copy of the Quick Start Guide.
In this case, a soft copy in PDF format will be provided.
Page 14
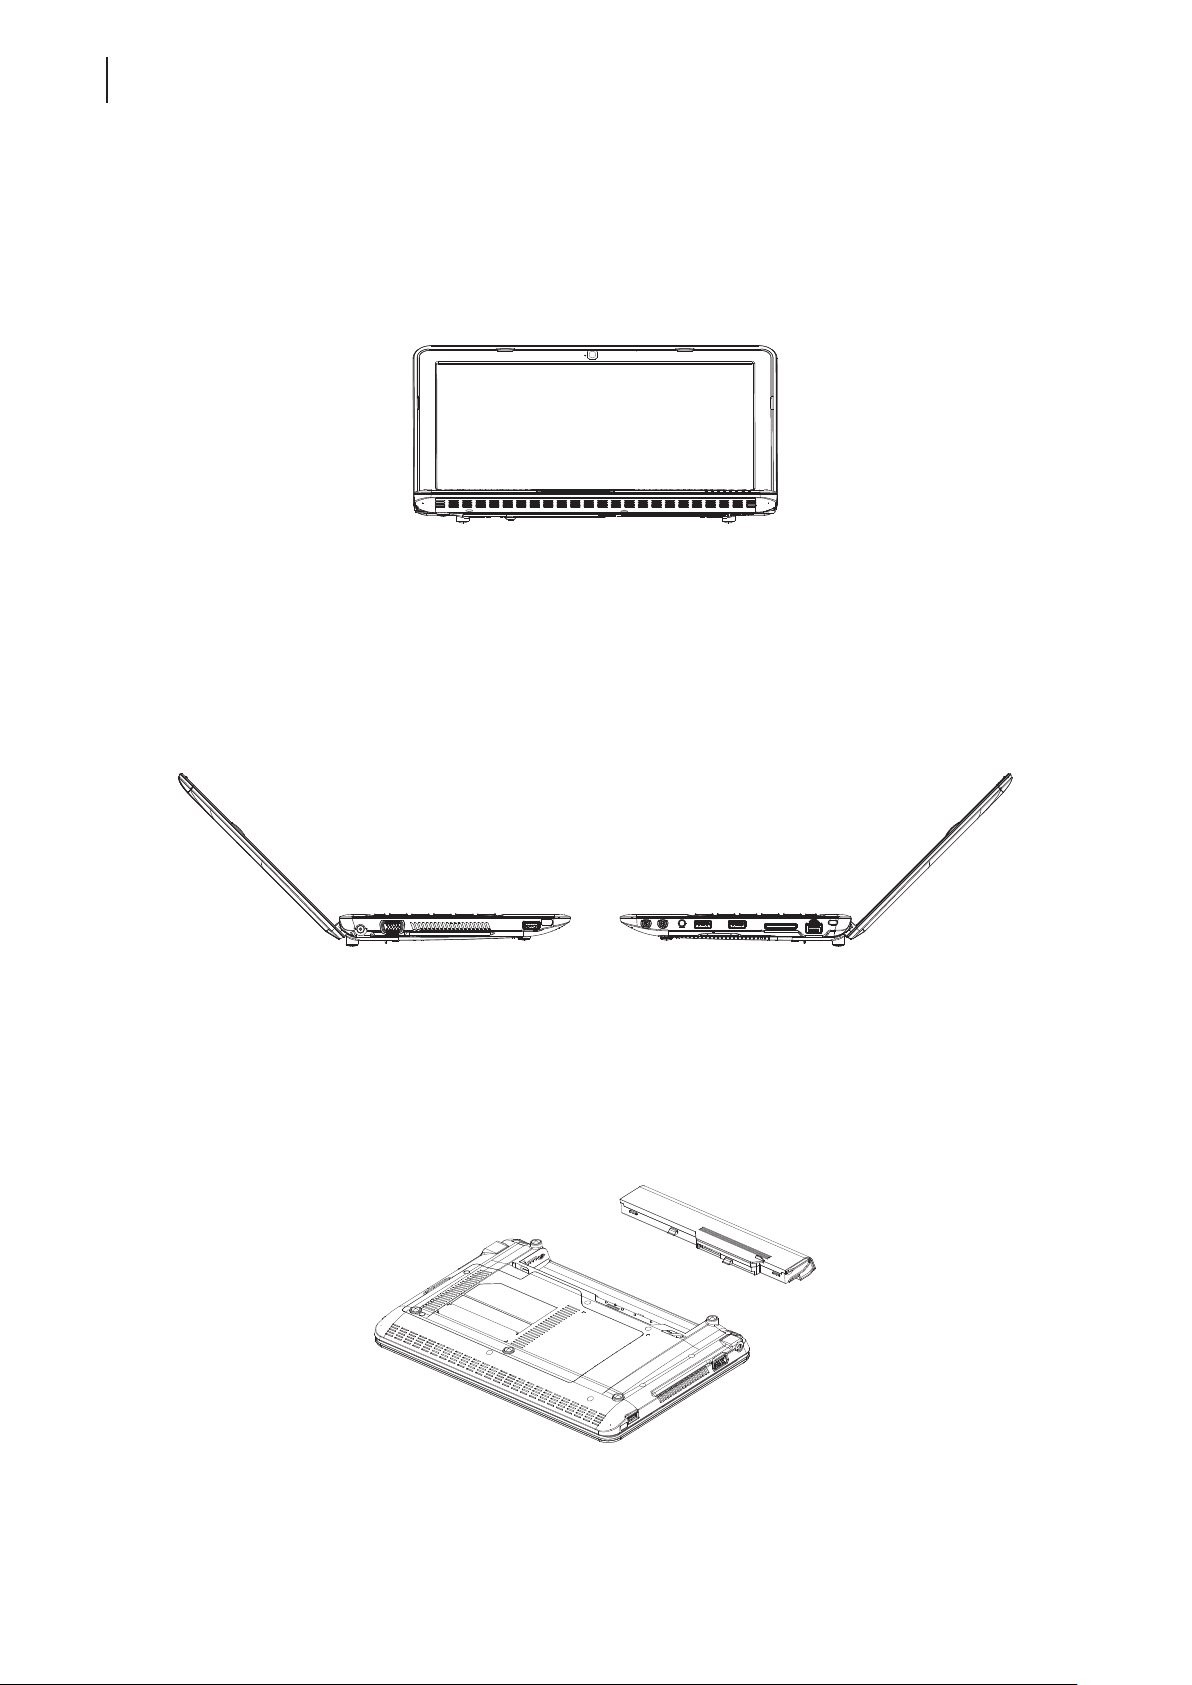
Overview
4
Exterior Views
1.4 Exterior Views
Front View
Left View Right View
Bottom View and Battery
Page 15
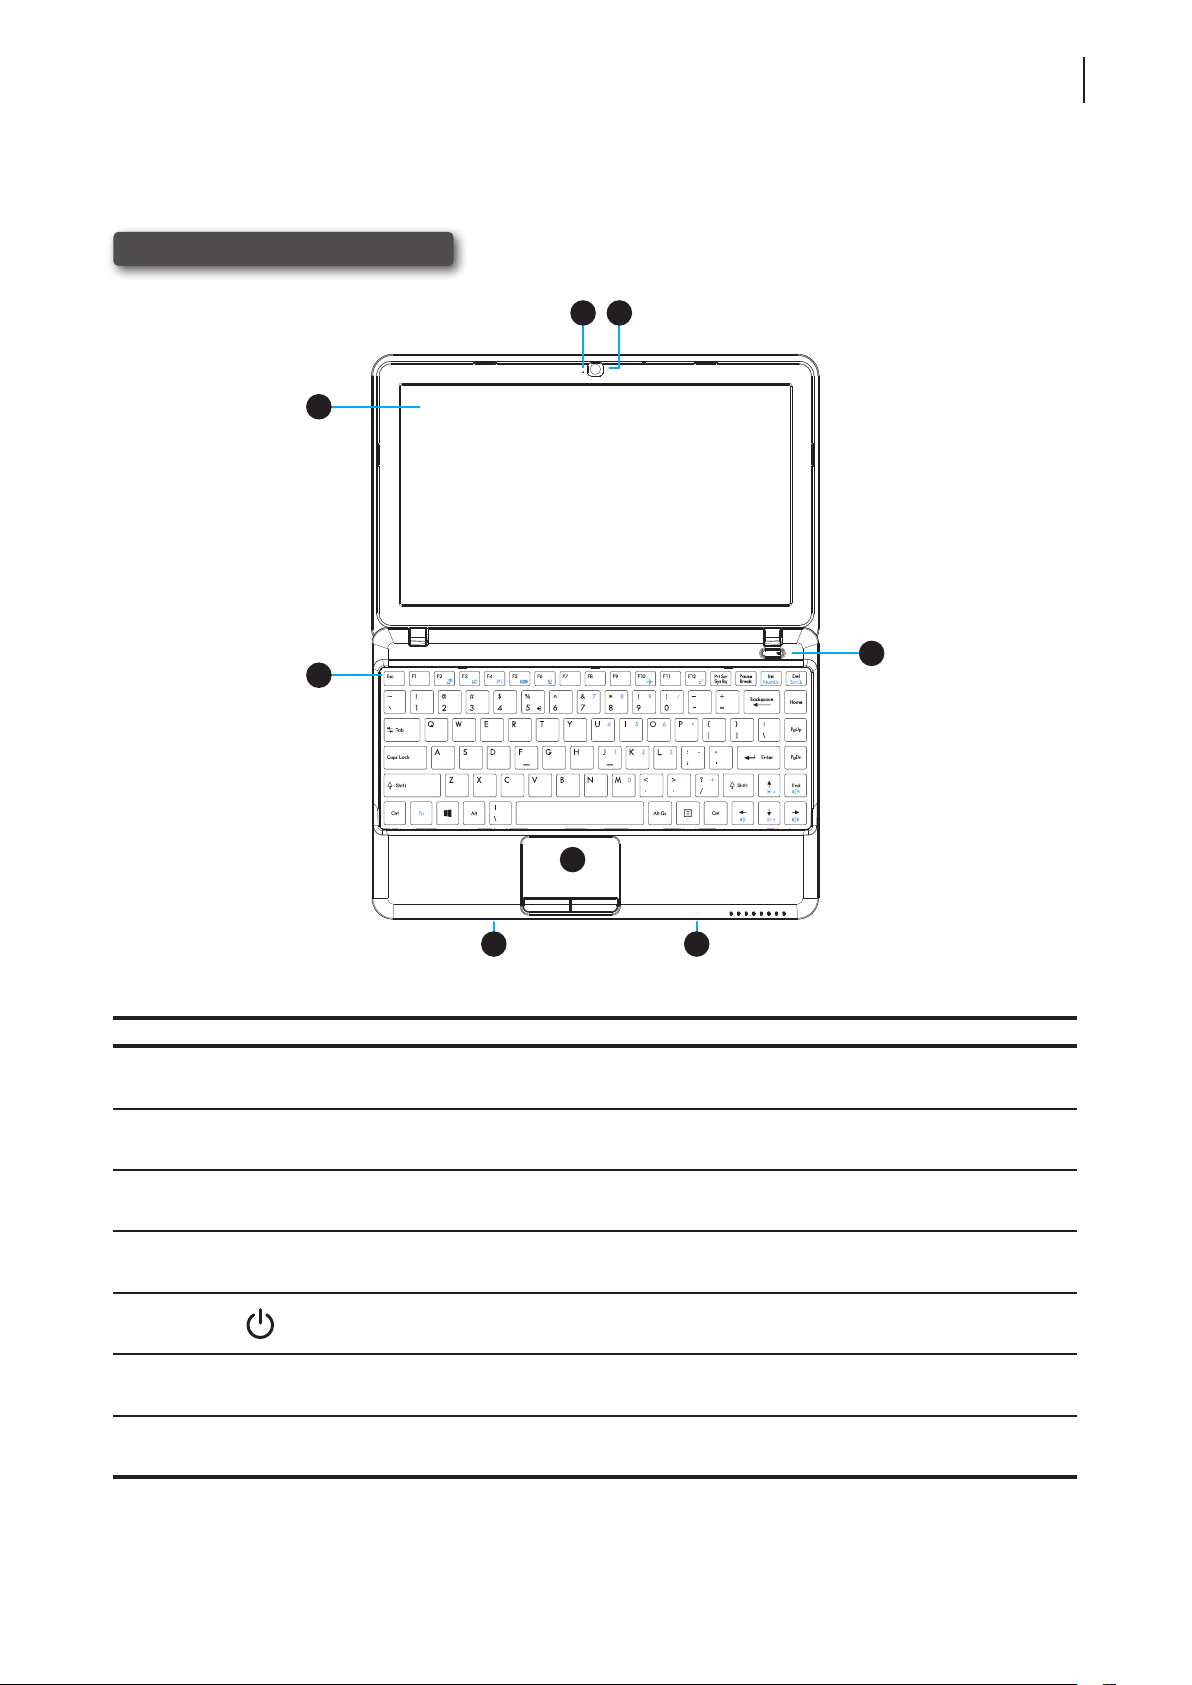
1.5 Exterior Components
Display and Base Components
1
Overview
Exterior Components
2
3
5
4
6
7 7
No. Sign Component Description
1 LCD display Built-in display for visual output.
2 Microphone Built-in microphone for audio input.
3 Webcam (optional) Built-in video camera for real-time video.
5
4 Keyboard Built-in keyboard for control and input.
5
6 Touchpad Built-in pointing device for control and input.
7 Speaker Built-in speakers for audio output.
Power button
• Press to power on / shut down the mobile thin client.
• Press to resume from the System Sleep mode (Orange LED).
Page 16
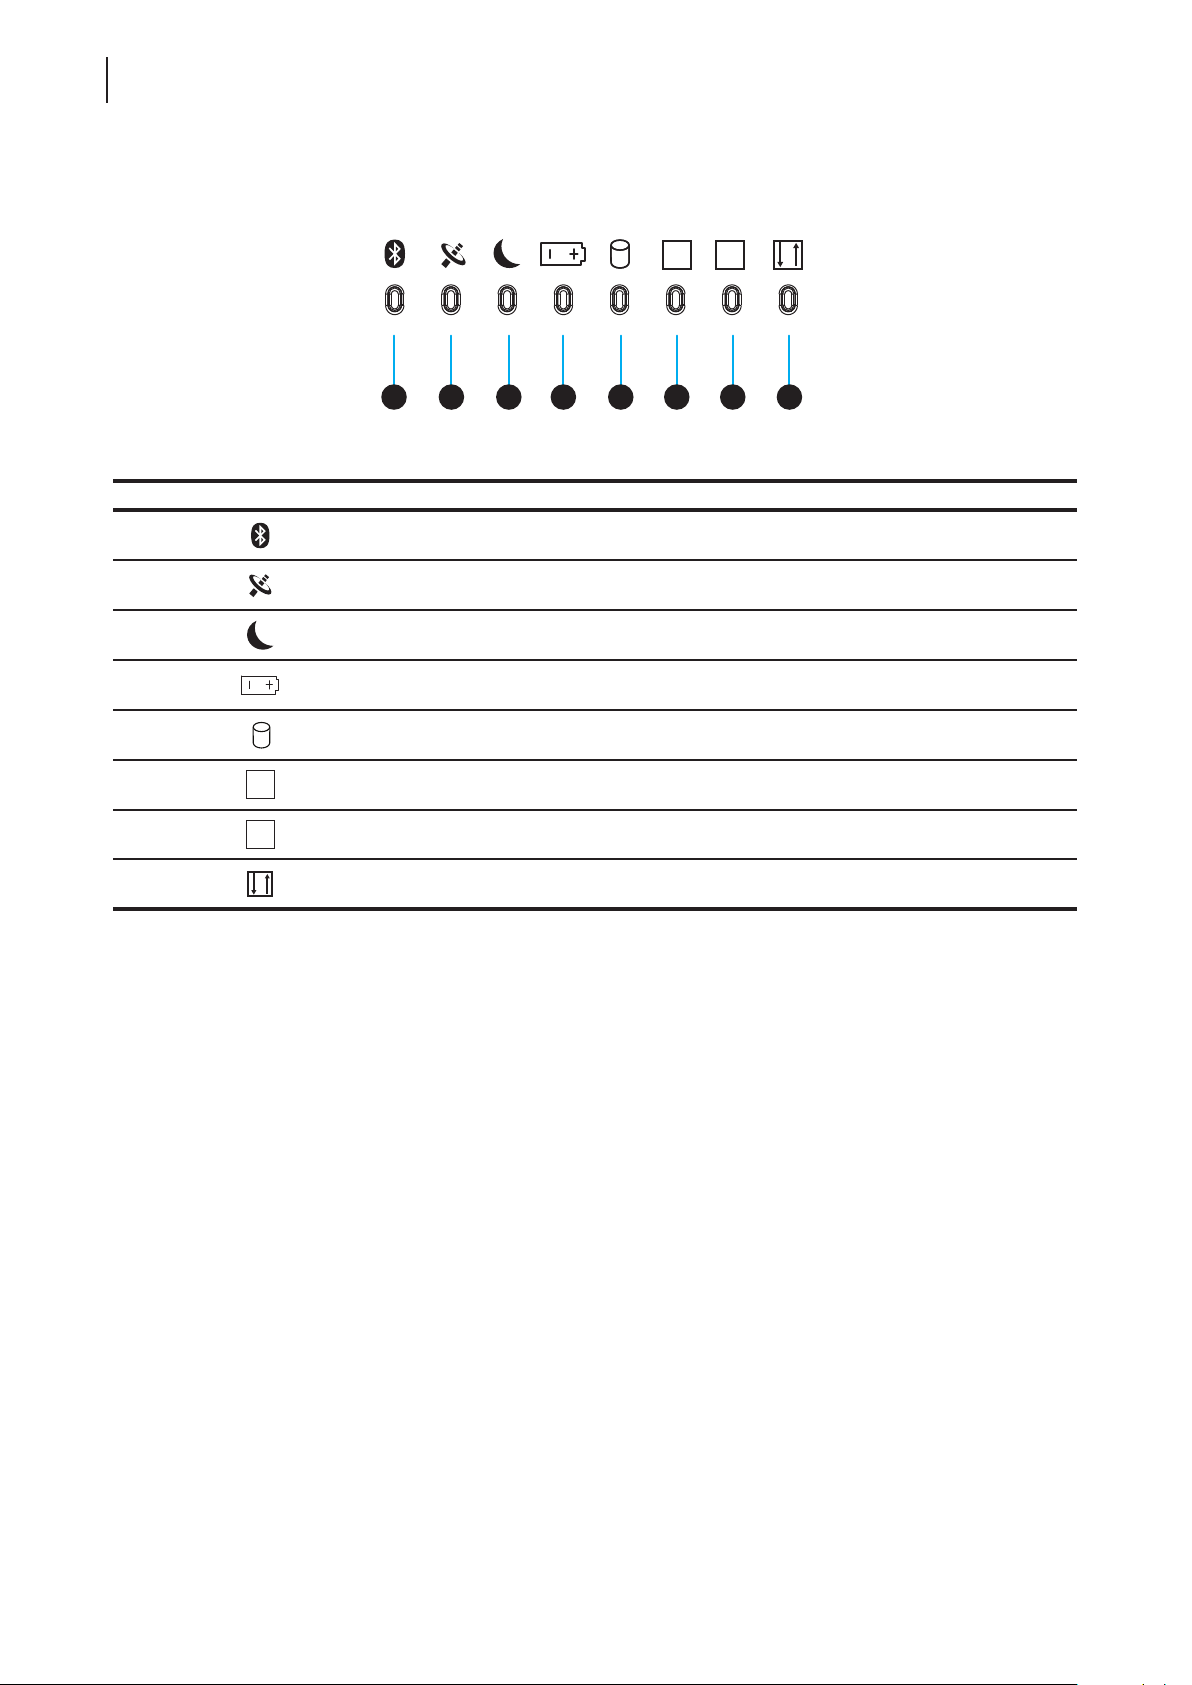
Overview
6
Exterior Components
8 9 1210 11 13 14 15
No. Sign Component Description
1 A
8
9
10
11 Battery LED
12
13
14
15
1
A
Bluetooth LED Glows blue when Bluetooth is enabled (not supported).
Wi-Fi LED Glows blue when Wi-Fi is enabled.
Sleep Mode LED Glows orange when the system is in Sleep mode.
Storage LED Glows blue when ash memory is being accessed.
Num Lock LED Glows blue when Num Lock is enabled.
Caps Lock LED Glows blue when Caps Lock is enabled.
Scroll Lock LED Glows blue when Scroll Lock is enabled.
Glows orange when the battery is being charged.
Glows blue when the battery is fully charged.
Page 17
Overview
Exterior Components
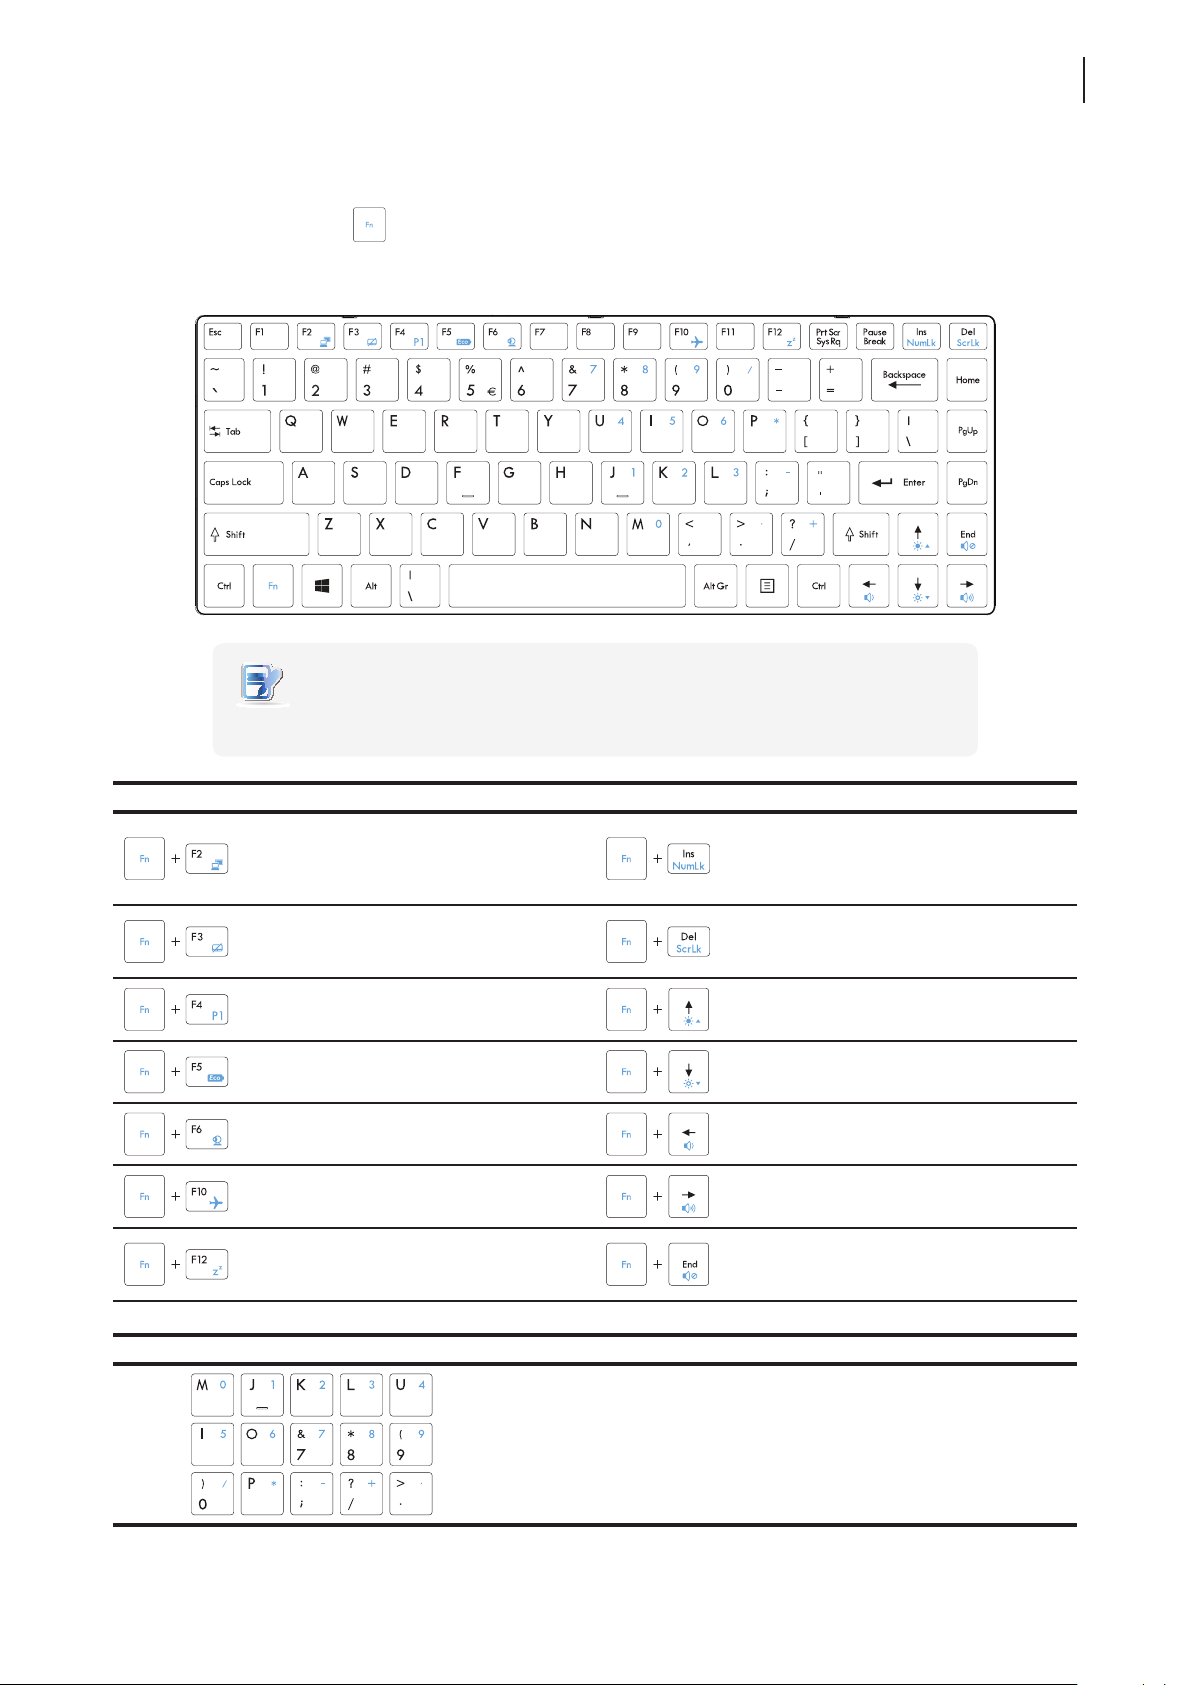
Fn Key Combinations
With the combination of Fn plus another specic key (with one printed blue symbol on it), you can quickly
adjust hardware settings to suit your needs.
7
NOTE
• To use an Fn key combination, press and hold Fn, and then press another key.
Combination Description Combination Description
Use to enable / disable Num Lock mode.
Use to switch the use of displays.
Use to enable / disable the touchpad.
Use to dene the custom action.
This is not supported by your model.
Use to enable / disable the ECO mode.
ECO Mode: Screen Off mode
This combination is not supported
by your model.
Use to enable / disable the Flight mode.
Flight Mode: disabled wireless module
Use to enter the System Sleep mode.
Press the Power button or any key on the
keyboard to exit.
Num Lock Mode: switches specic keys
to enter digits and symbols. See table
below for details.
Use to enable / disable Scroll Lock mode.
Scroll Lock Mode: allows to scroll
through the screen with arrow keys.
Use to increase the brightness of
the LCD display.
Use to decrease the brightness of
the LCD display.
Use to decrease the volume of
the built-in speakers.
Use to increase the volume of
the built-in speakers.
Use to mute / unmute the sound.
Digits and Symbols in Num Lock Mode Description
Use to type in the desired digit or symbol (blue one on the key).
NOTE: You must enable the Num Lock mode rst.
NOTE: To customize Num Lock mode, please see “4.3.7 Adjusting
Keyboard Settings” on page 84.
Page 18
Overview
8
Exterior Components
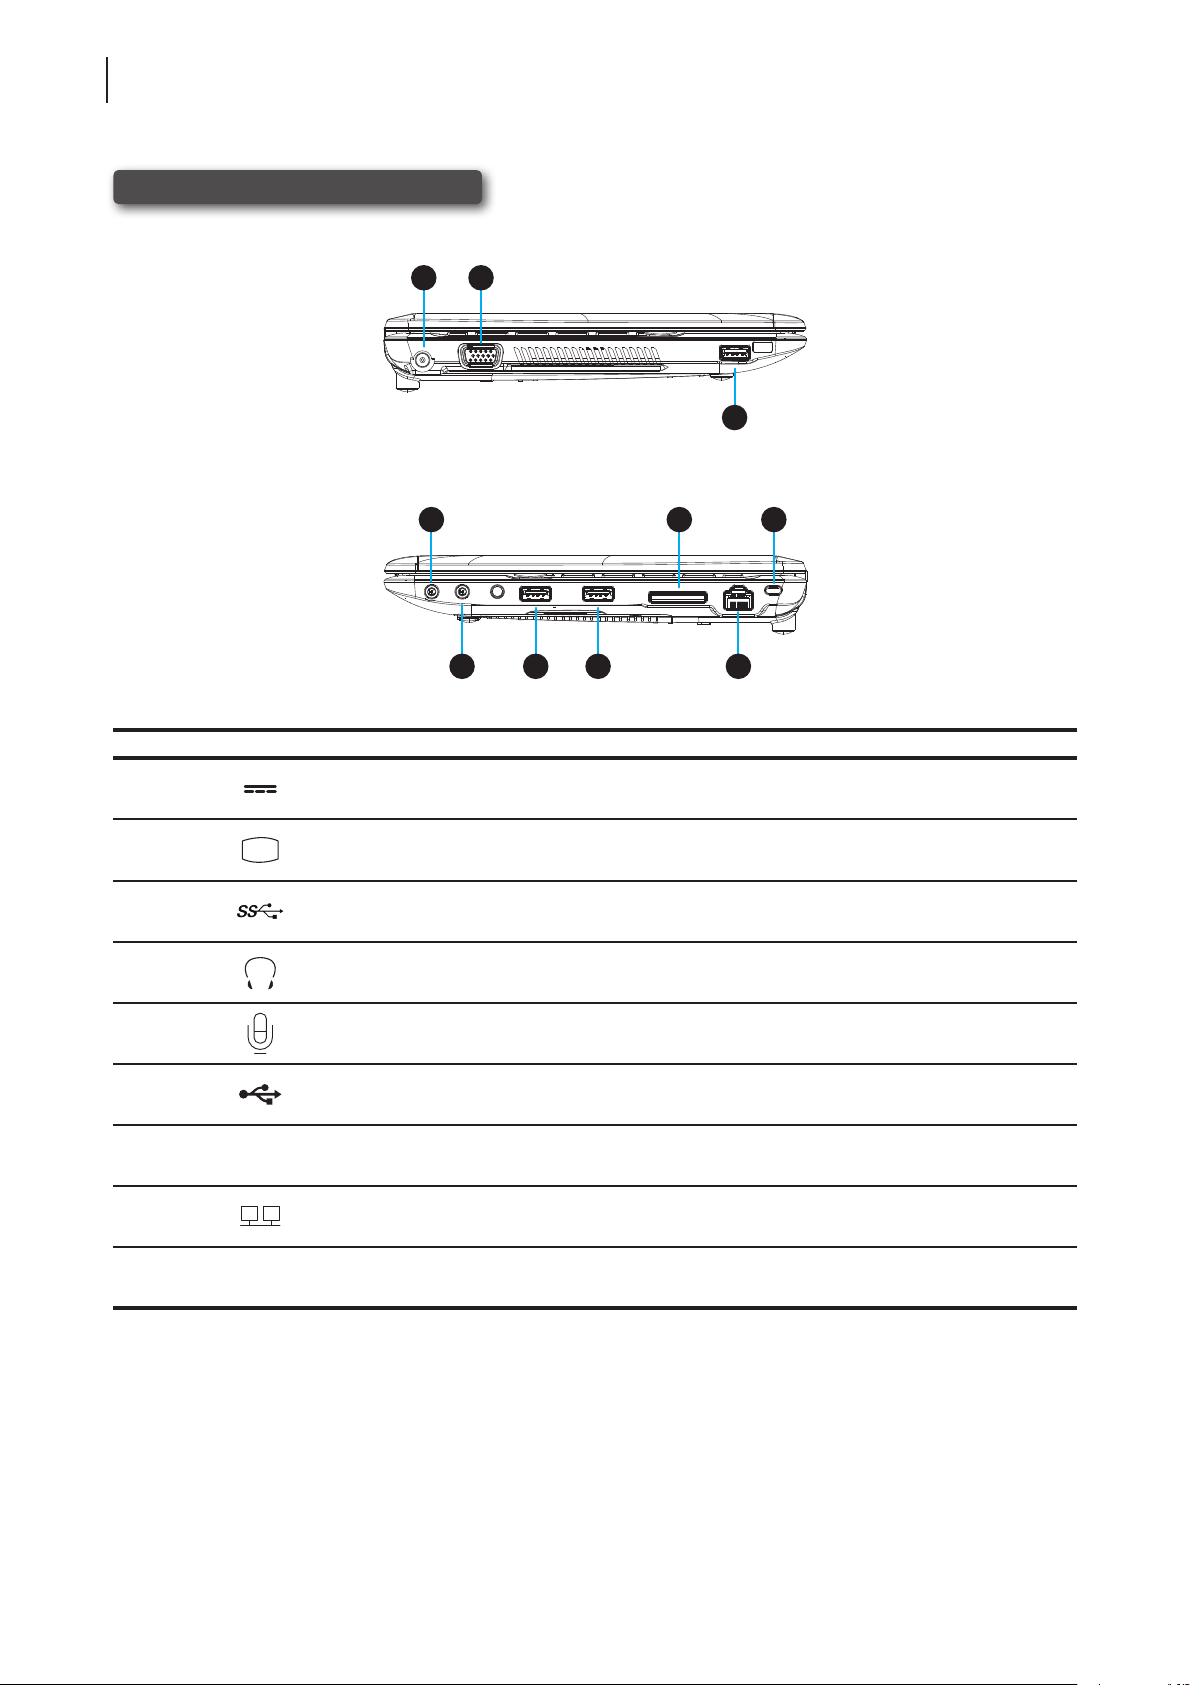
Left and Right Side Components
16 17
19 24
2120
No. Sign Component Description
16
17
18
19
DC IN Connects to an AC adapter.
VGA port Connects to an external display.
USB port (USB 3.0) Connects to a USB device.
Headphone port Connects to a set of headphones or a speaker system.
21 23
22
18
20
21
22 SD card slot (optional) Reads/Writes data from a SD card.
23
24 Kensington security slot Connects a Kensington cable to secure the mobile thin client.
Microphone port Connects to a microphone.
USB port (USB 2.0) Connects to a USB device.
LAN port Connects to a network.
Page 19
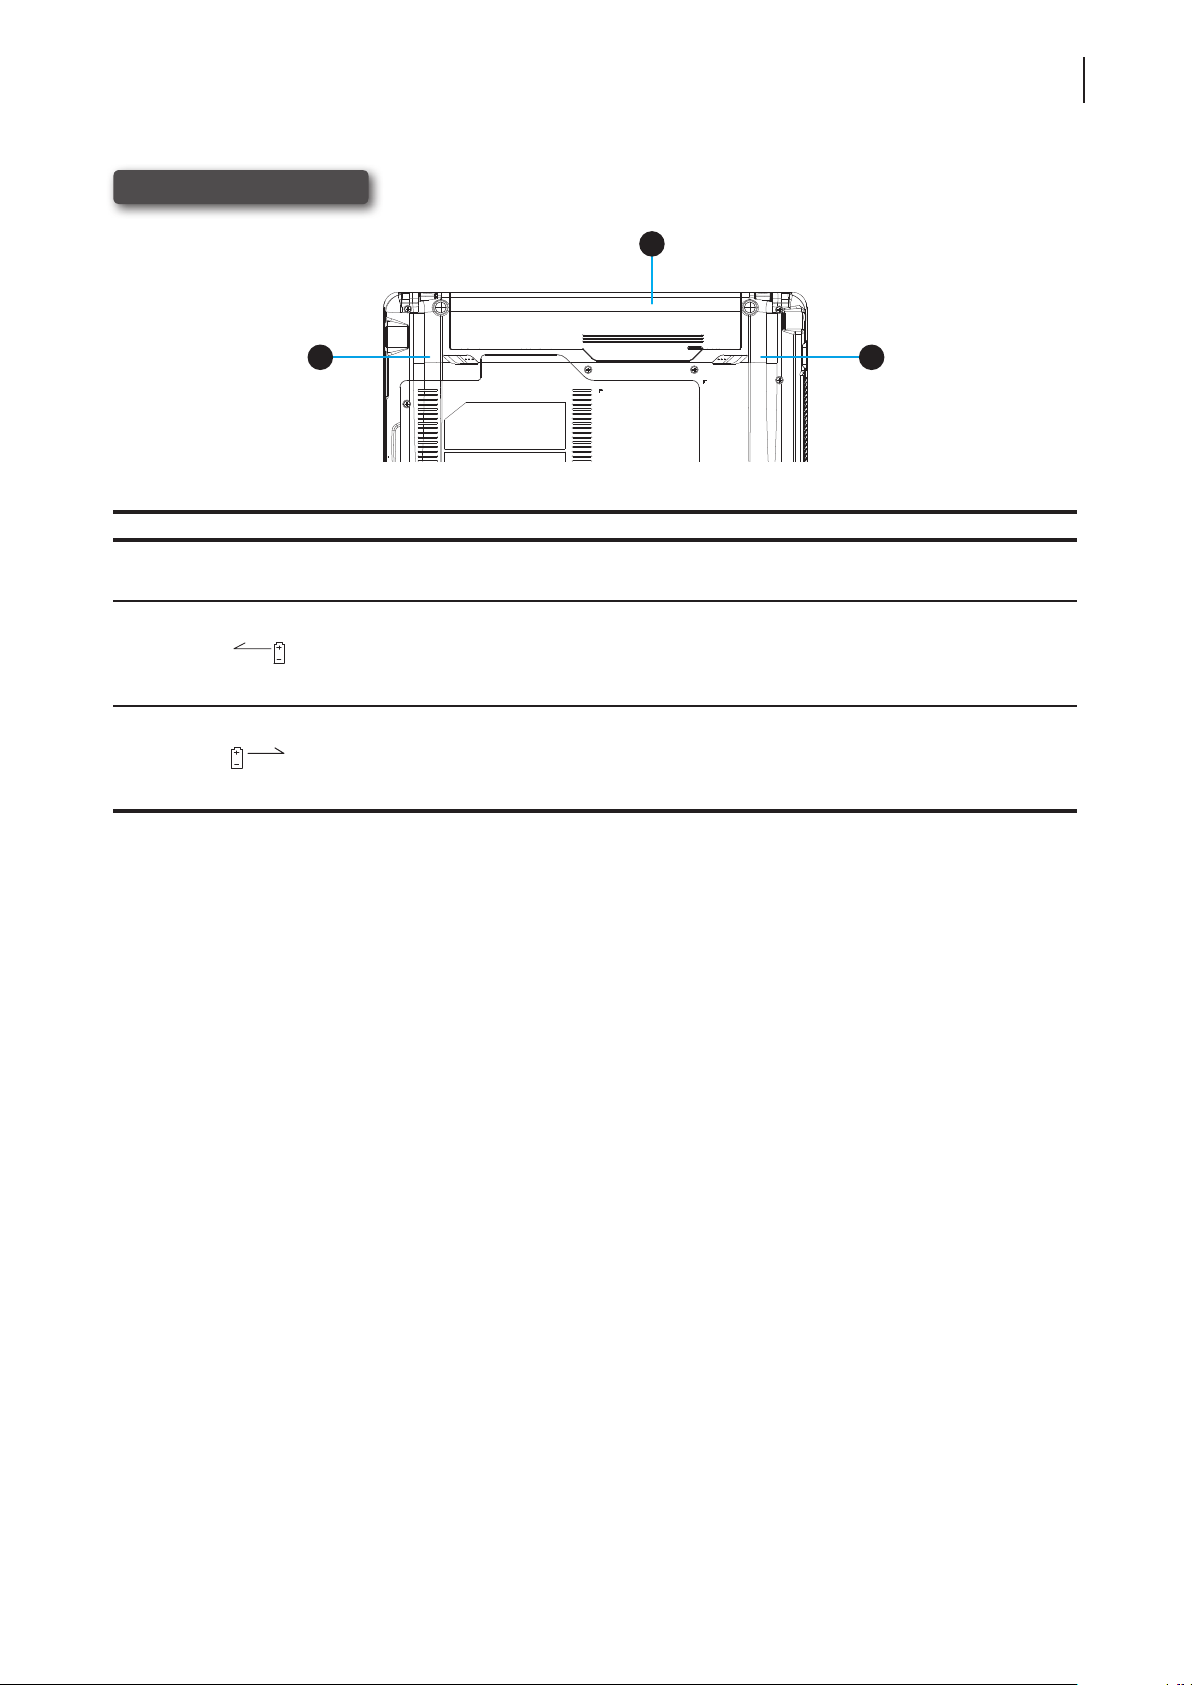
Bottom Components
26 27
No. Sign Component Description
25
Overview
Exterior Components
9
25 Lithium-ion battery
26
27
RELEASE
UNLOCK
Left battery latch
Right battery latch
Supplies the mobile thin client with the power when an external
power source is not available.
Unlocks the battery by sliding and holding left.
NOTE: To remove the battery, use the right battery latch to
unlock the battery, and then slide left and hold this latch
to remove the battery.
Locks / Unlocks the battery by sliding left / right.
NOTE: To remove the battery, use this latch to unlock the
battery, and then slide left and hold the left battery latch
to remove the battery.
Page 20

10
Overview
Page 21

Setting Up Your mt168L
This chapter provides detailed instructions on how to set up
your mt168L mobile thin client.
2
2.1 About the AC Adapter
Information on the use of the AC adapter 13
2.2 Charging Your Lithium-ion Battery
How to charge your lithium-ion battery
(Recommended for rst time use)
2.3 Setting Up Your mt168L
How to set up your mt168L 14
13
Page 22

Page 23
Setting Up Your mt168L
About the AC Adapter
2.1 About the AC Adapter
To use the supplied AC adapter, please do the following:
1. Unpack your mt168L package, and then take out the AC adapter and its detached power cord.
2. Attach the power cord to the AC adapter to assemble your AC adapter.
2.2 Charging Your Lithium-ion Battery
NOTE
• For the rst time use, it’s recommended to charge your Lithium-ion battery rst.
To charge your lithium-ion battery, please do the following:
13
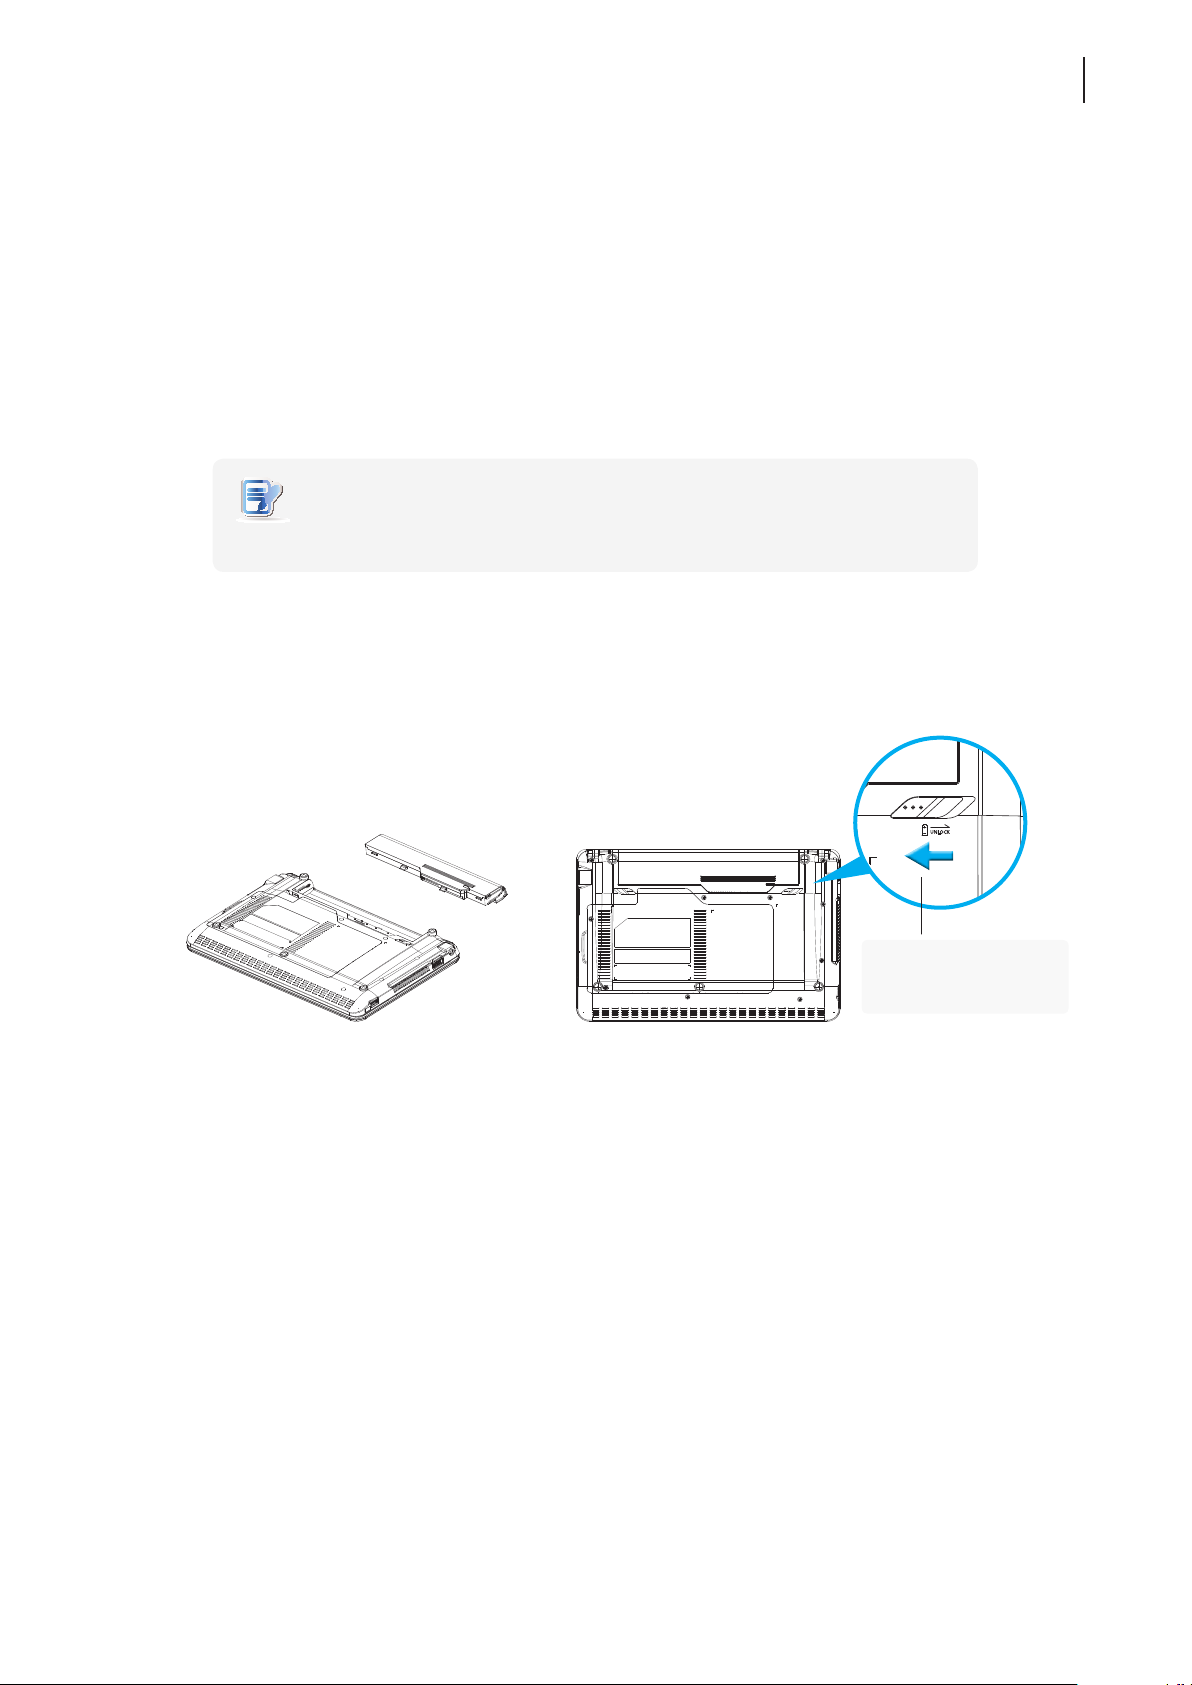
1. Slide the battery into the battery compartment until it clicks into place, and then Slide left the right battery
latch to lock the battery securely.
UNLOCK
Slide left completely to
ensure the battery is
securely locked.
2. Attach the DC plug of the AC adapter to your mt168L, and then connect the AC plug of the adapter
to a power outlet.
3. The Battery LED glows orange while the battery is being charged.
4. On completion, the Battery LED glows blue.
Page 24
Setting Up Your mt168L
14
Setting Up Your mt168L
2.3 Setting Up Your mt168L
To set up your mt168L, please do the following:
1. Use the AC adapter or the Lithium-ion battery as the power source:
• To use the AC adapter, attach its DC plug to your mt168L, and connect its AC plug to a power outlet.
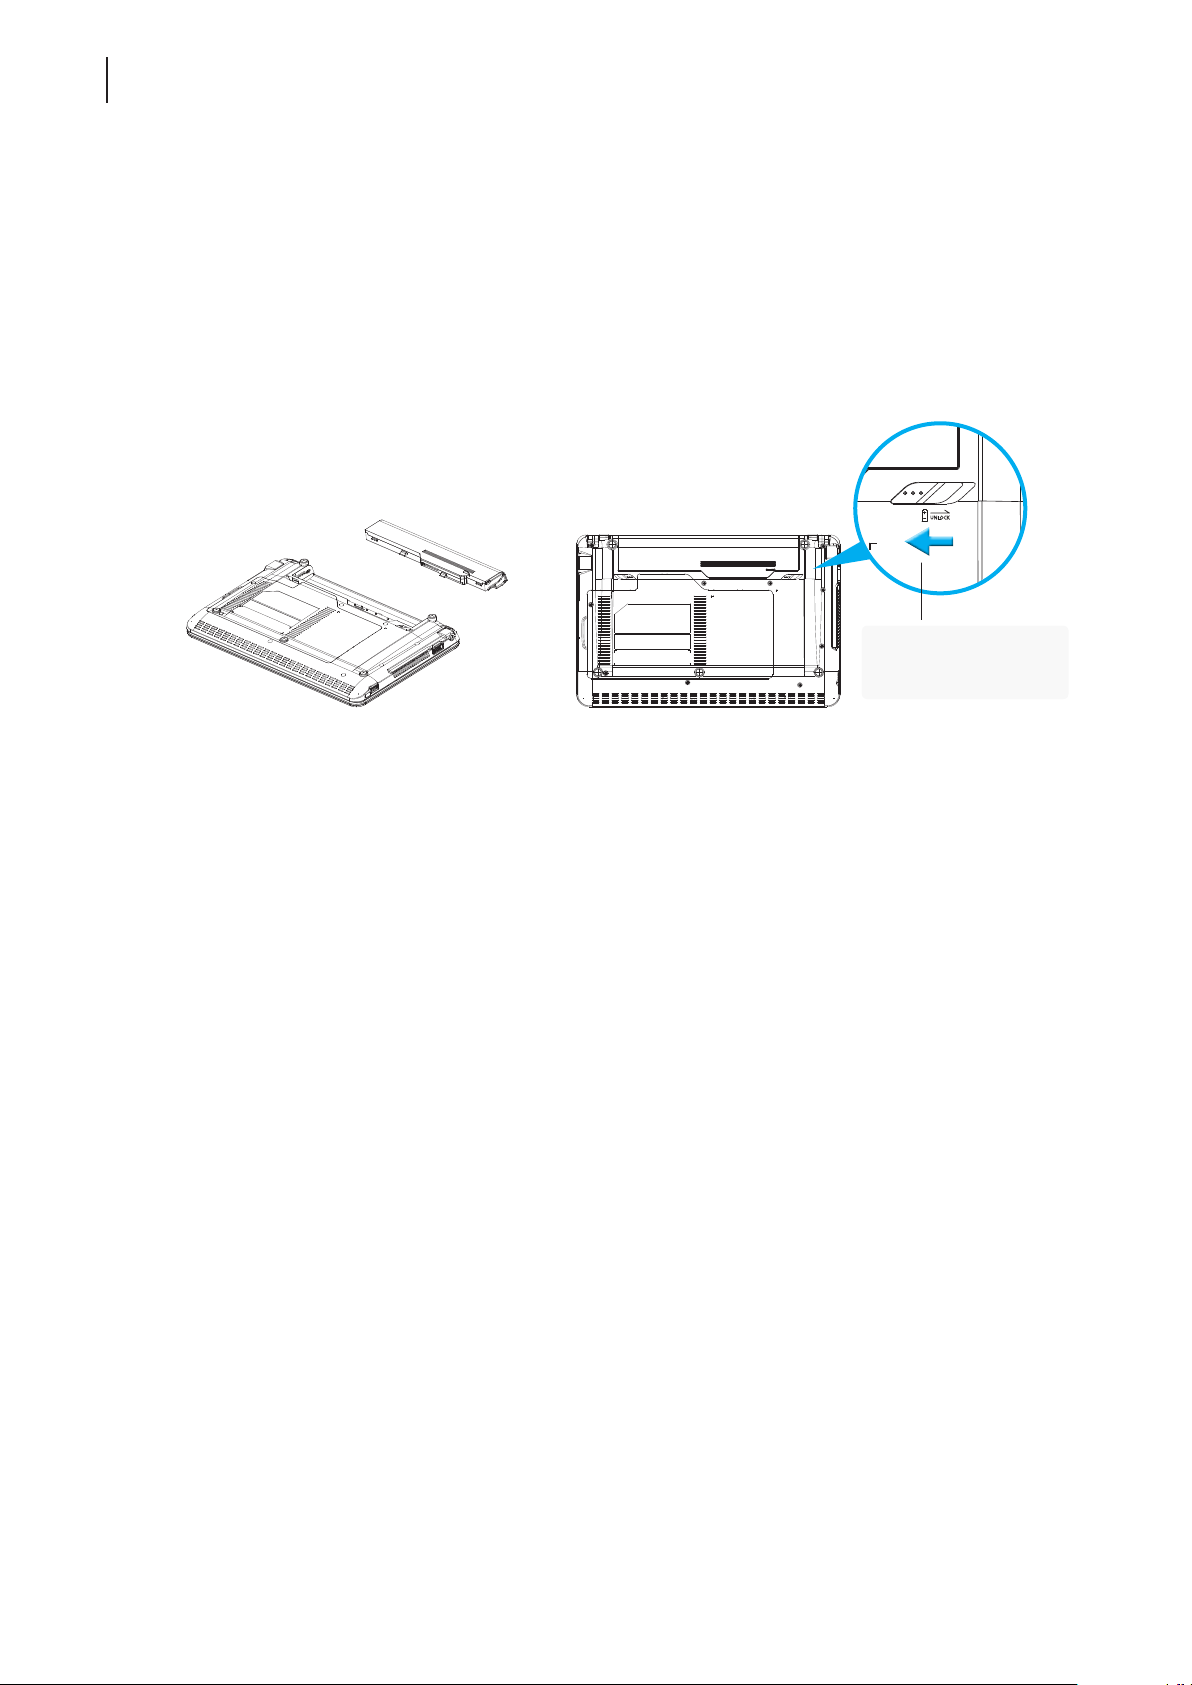
• To use the Lithium-ion battery, slide it into the battery compartment until it clicks into place, and then
slide left the right battery latch to lock the battery securely.
UNLOCK
Slide left completely to
ensure the battery is
securely locked.
2. Connect the LAN port to your local network with an Ethernet cable or set up a wireless connection later (see
“Topic 2: Setting Up a Wireless Connection” on page 20).
Page 25

Getting Started
3
This chapter provides the basics of how to use your mt168L.
3.1 Learning the Basics
Topic 1: Atrust Quick Connection
Topic 2: Setting Up a Wireless Connection
Topic 3: Conguring the Time Zone
Topic 4: Accessing Desktops or Applications
Topic 5: Using Built-in Applications
Topic 6: Viewing and Managing the Use of Power
18
20
22
23
37
39
Page 26

Page 27
3.1 Learning the Basics
The following topics will guide you through the basics of using your mt168L:
Topic 1: Atrust Quick Connection
Topic 2: Setting Up a Wireless Connection
Topic 3: Conguring the Time Zone
Topic 4: Accessing Desktops or Applications
• Microsoft Remote Desktop Services (RDP sessions)
• Citrix Services (ICA sessions)
• VMware View or Horizon View Services (View sessions)
Topic 5: Using Built-in Applications
Topic 6: Viewing and Managing the Use of Power
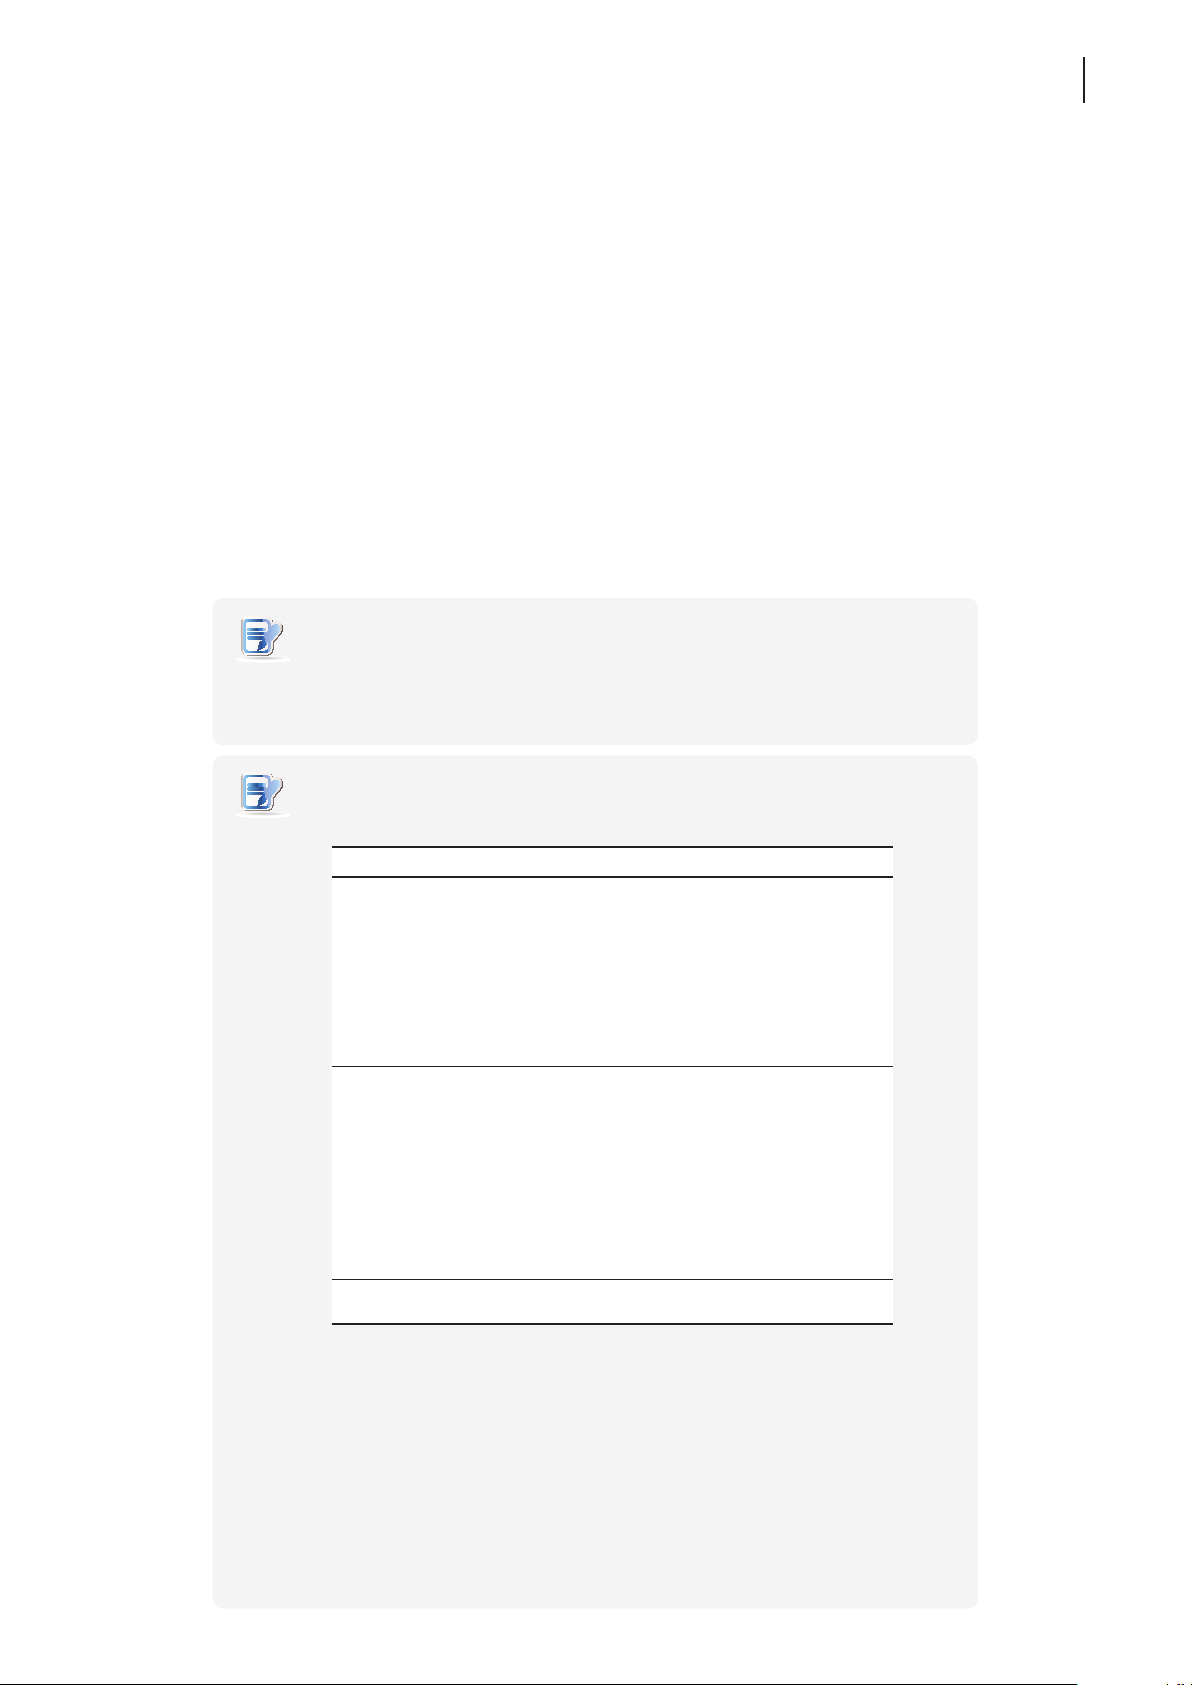
NOTE
• In case that by default your mt168L is Auto Setup enabled, its user environment
might be dierent from here and will vary with preset congurations. See section
4.2.9 and appendix A.4, and consult your IT administrator for details.
Getting Started
Learning the Basics
17
NOTE
• Three client modes are available for your mt168L:
No. Mode Description
The client will start up directly with the desired
RDP / ICA / View session and perform the
congured action after exiting the session.
1 Appliance
2 Autostart
3 Quick Connection
Available actions include:
• Re-launching a new session
• Restarting the thin client
• Turning off the thin client
The client will start up directly with the desired
RDP / ICA / View session and perform the
congured action after exiting the session.
Available actions include:
• Returning to the local desktop
• Re-launching a new session
• Restarting the thin client
• Turning off the thin client
The client will enter Atrust Quick Connection
screen after system startup.
• In Quick Connection mode, you can access Microsoft Remote Desktop / Citrix /
VMware View or Horizon View services quickly without much client conguration
required. The main purpose of this chapter is to guide you through the use of your
mt168L under the Quick Connection mode. The default of your mt168L is NOT the
Quick Connection mode (after restart it will enter the local Linux desktop rather
than Atrust Quick Connection screen), but you can enter Atrust Quick Connection
screen through its shortcut on the local desktop or START menu.
• To understand other modes, congure advanced settings, and customize your
mt168L, please refer to chapter 4 “Conguring Client Settings” on page 41.
Page 28
Getting Started
18
Learning the Basics
Topic 1: Atrust Quick Connection
To start using your mt168L, please do the following:
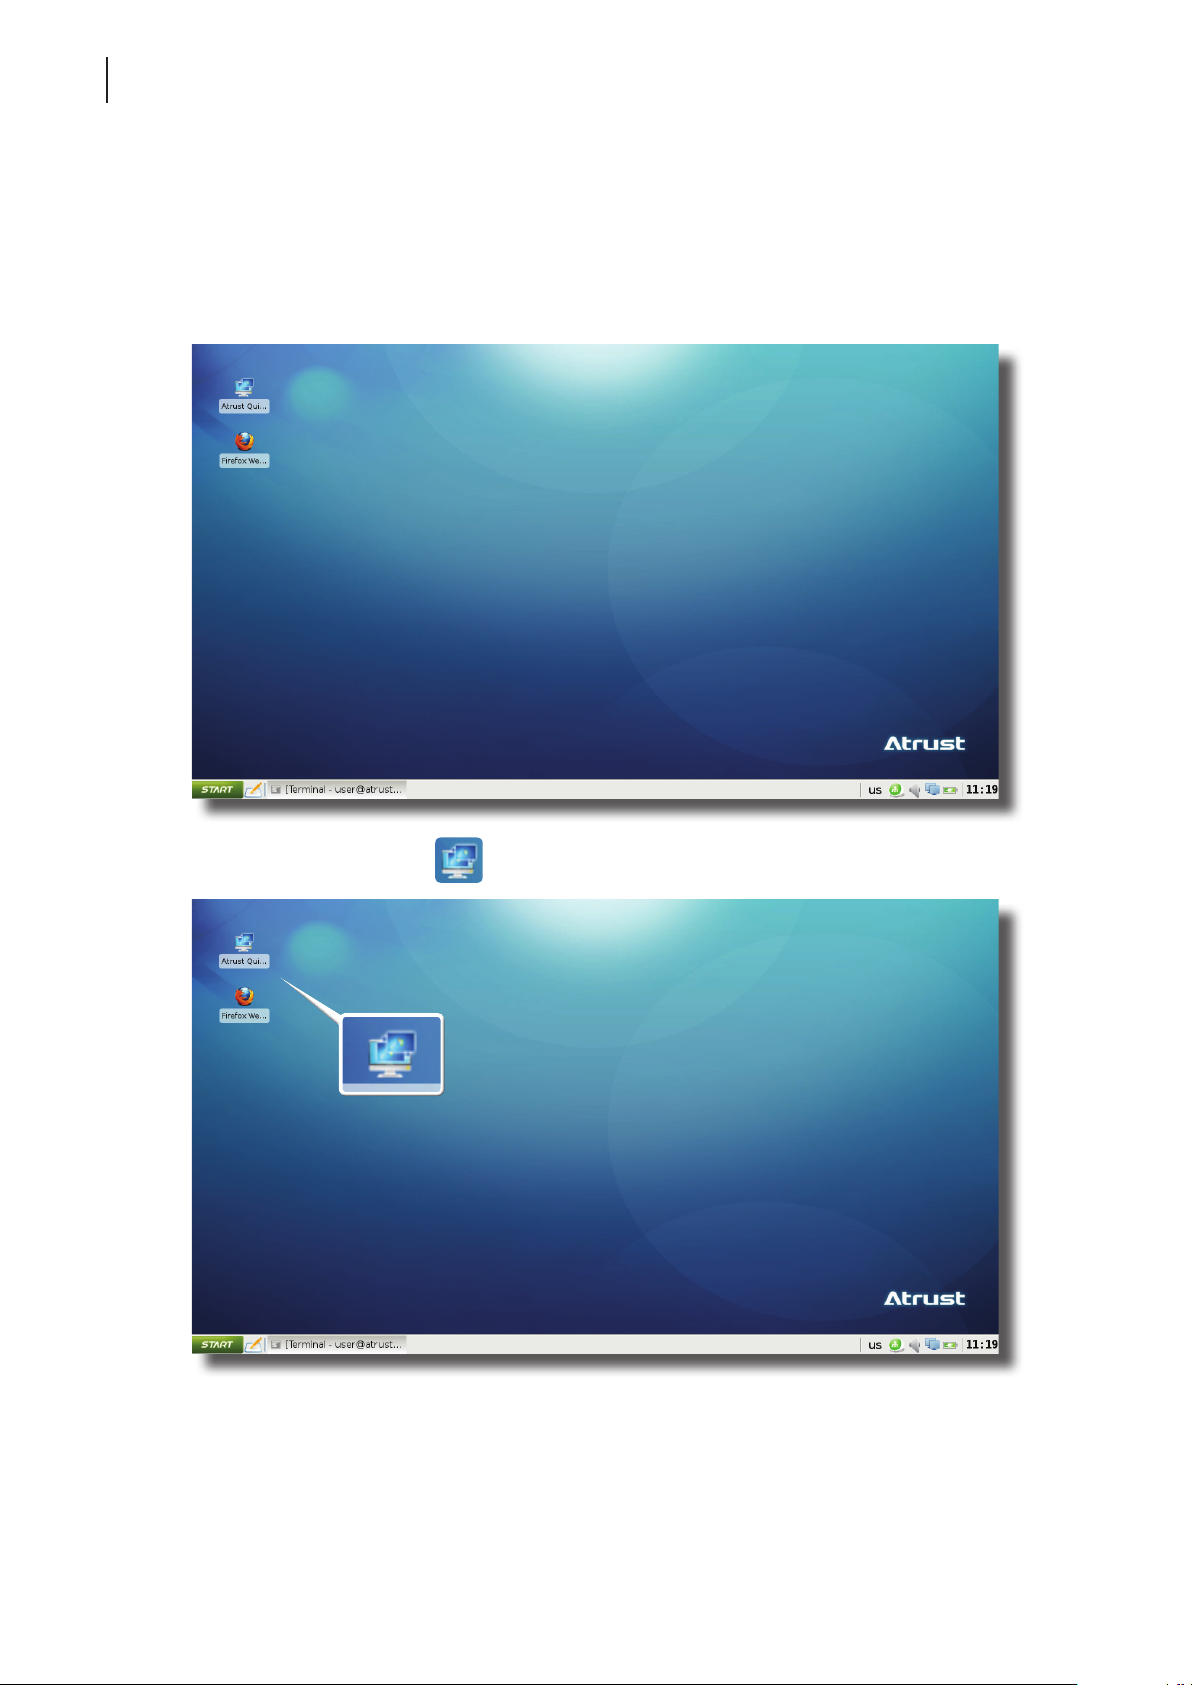
1. Press the Power button to turn on the client. Wait a moment for the system to enter the local Linux desktop.
Local Linux Desktop
2. Click Atrust Quick Connection on the desktop to enter Atrust Quick Connection screen.
Atrust Quick Connection
Page 29
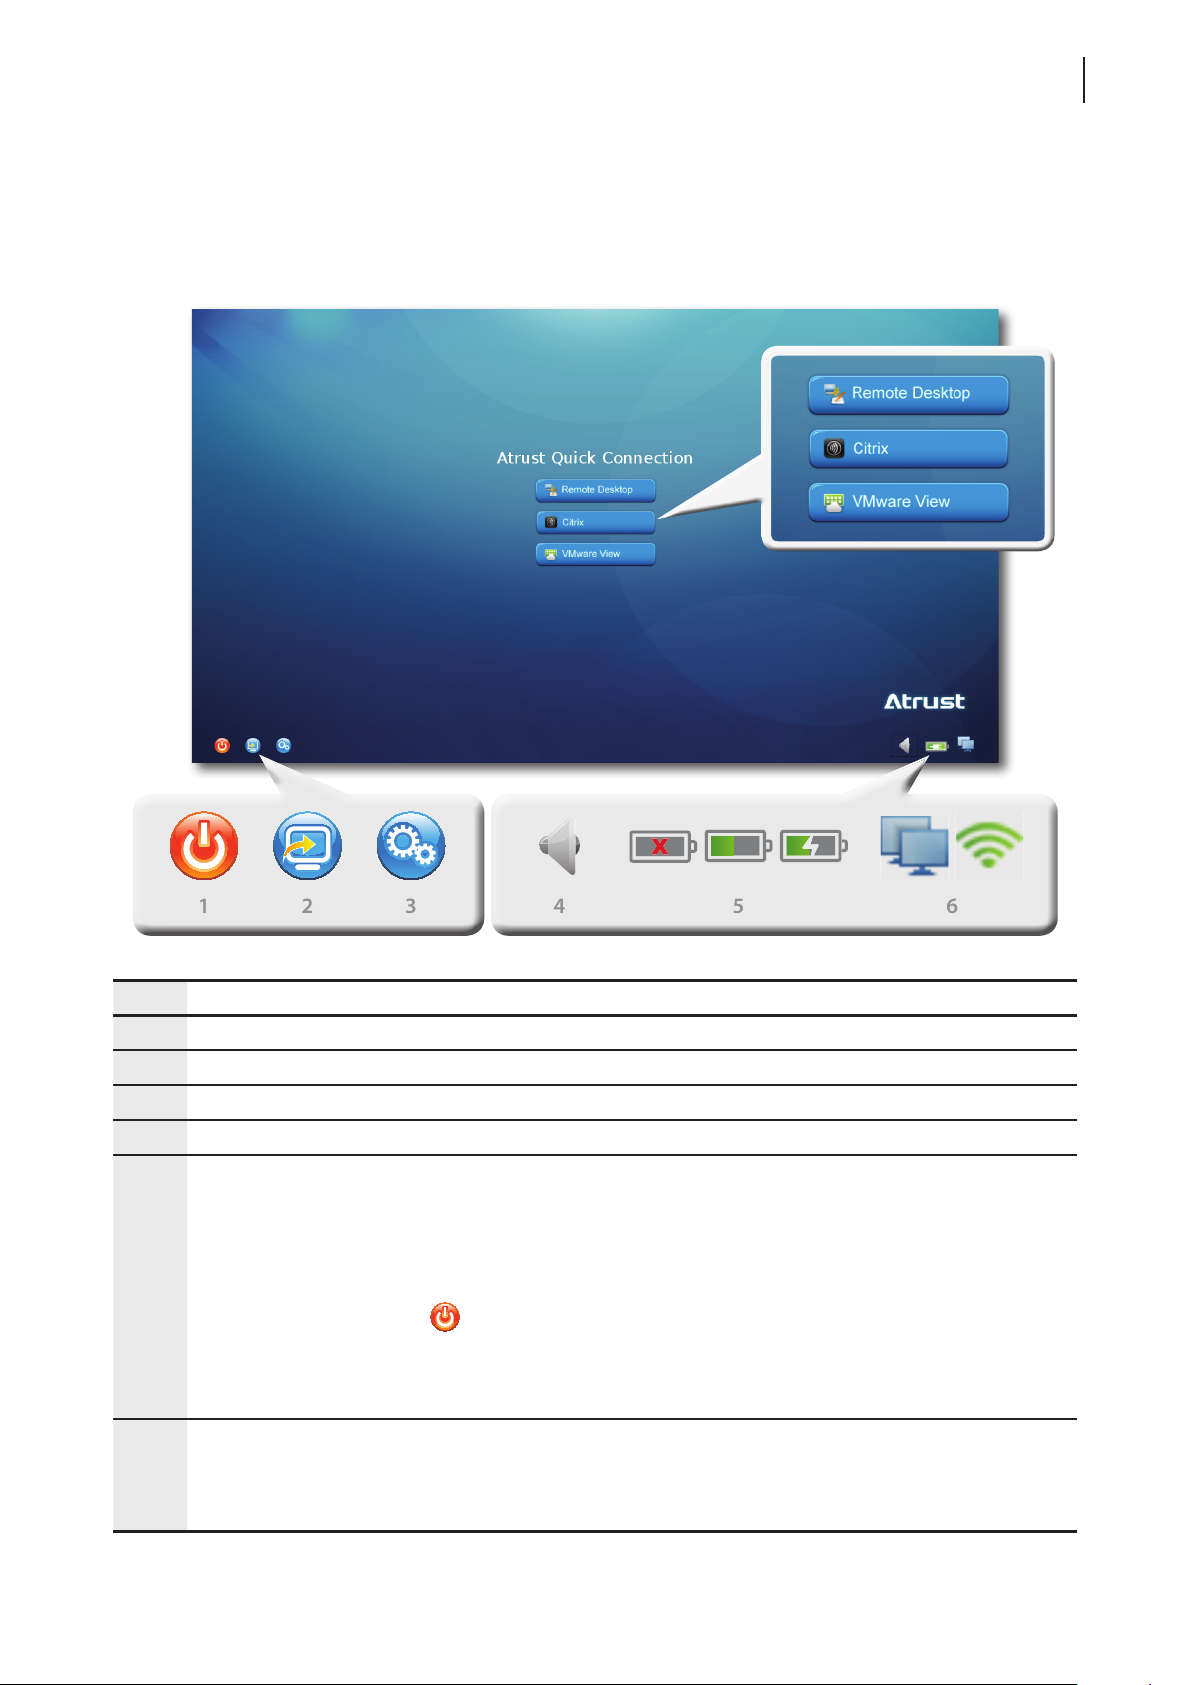
3. (a) Go to Topic 2 to set up a wireless connection if needed.
1 2 31 2 3
654 654
(b) Go to Topic 3 to set the time zone for the rst time use.
(c) Go to Topic 4 for service access if the time zone had been set.
Atrust Quick Connection Screen
Getting Started
Learning the Basics
19
No. Icon Description
1 Power Off Click to shut down, suspend, or restart the system.
2 Local Desktop Click to return to the local Linux desktop.
3 Setup Click to launch Atrust Client Setup.
4 Mixer Click to congure audio settings.
Indicates the power source (adapter, battery, or both) and status.
Click to launch Power Management for details.
5 Power
6 Network
NOTE: Power Management enables you to congure power-saving settings for your
NOTE: When your mt168L enters System Sleep mode manually (Fn + F12 or
NOTE: When using only the battery as the power source, ensure that it has enough
Indicates the network type (wired or wireless) and status.
Click to congure network settings.
NOTE: To set up a wireless connection, please see “Topic 2: Setting Up a Wireless
mt168L. You can choose appropriate options to suit your needs. See “Topic 6:
Viewing and Managing the Use of Power” on page 39 for details.
> Suspend) or automatically (congured in Atrust Client Setup through
System > Power Management), it still requires a certain amount of power.
You can use Shut down option instead to save the power to a greater degree.
power to prevent data loss.
Connection” on page 20.
Page 30
Getting Started
20
Learning the Basics
Topic 2: Setting Up a Wireless Connection
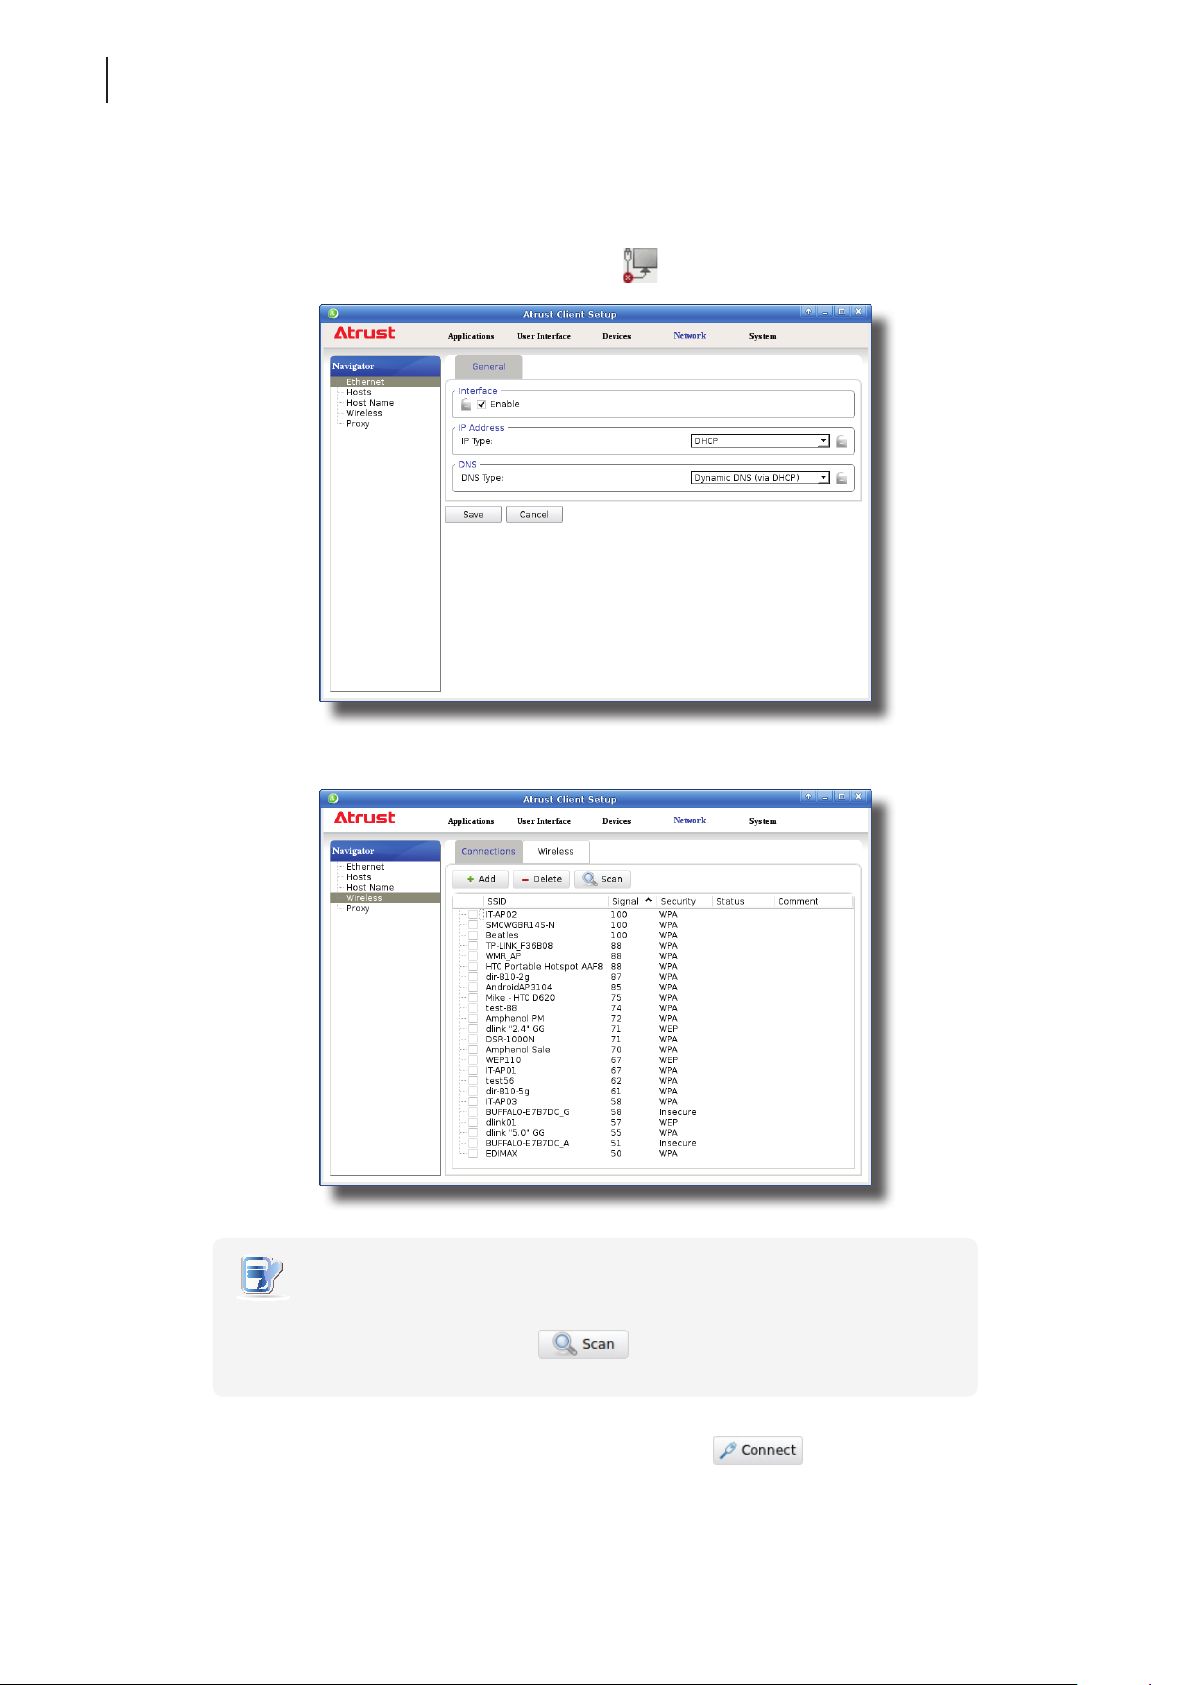
To set up a wireless connection, please do the following:
1. On Atrust Quick Connection screen, click the Network
icon. Atrust Client Setup is launched.
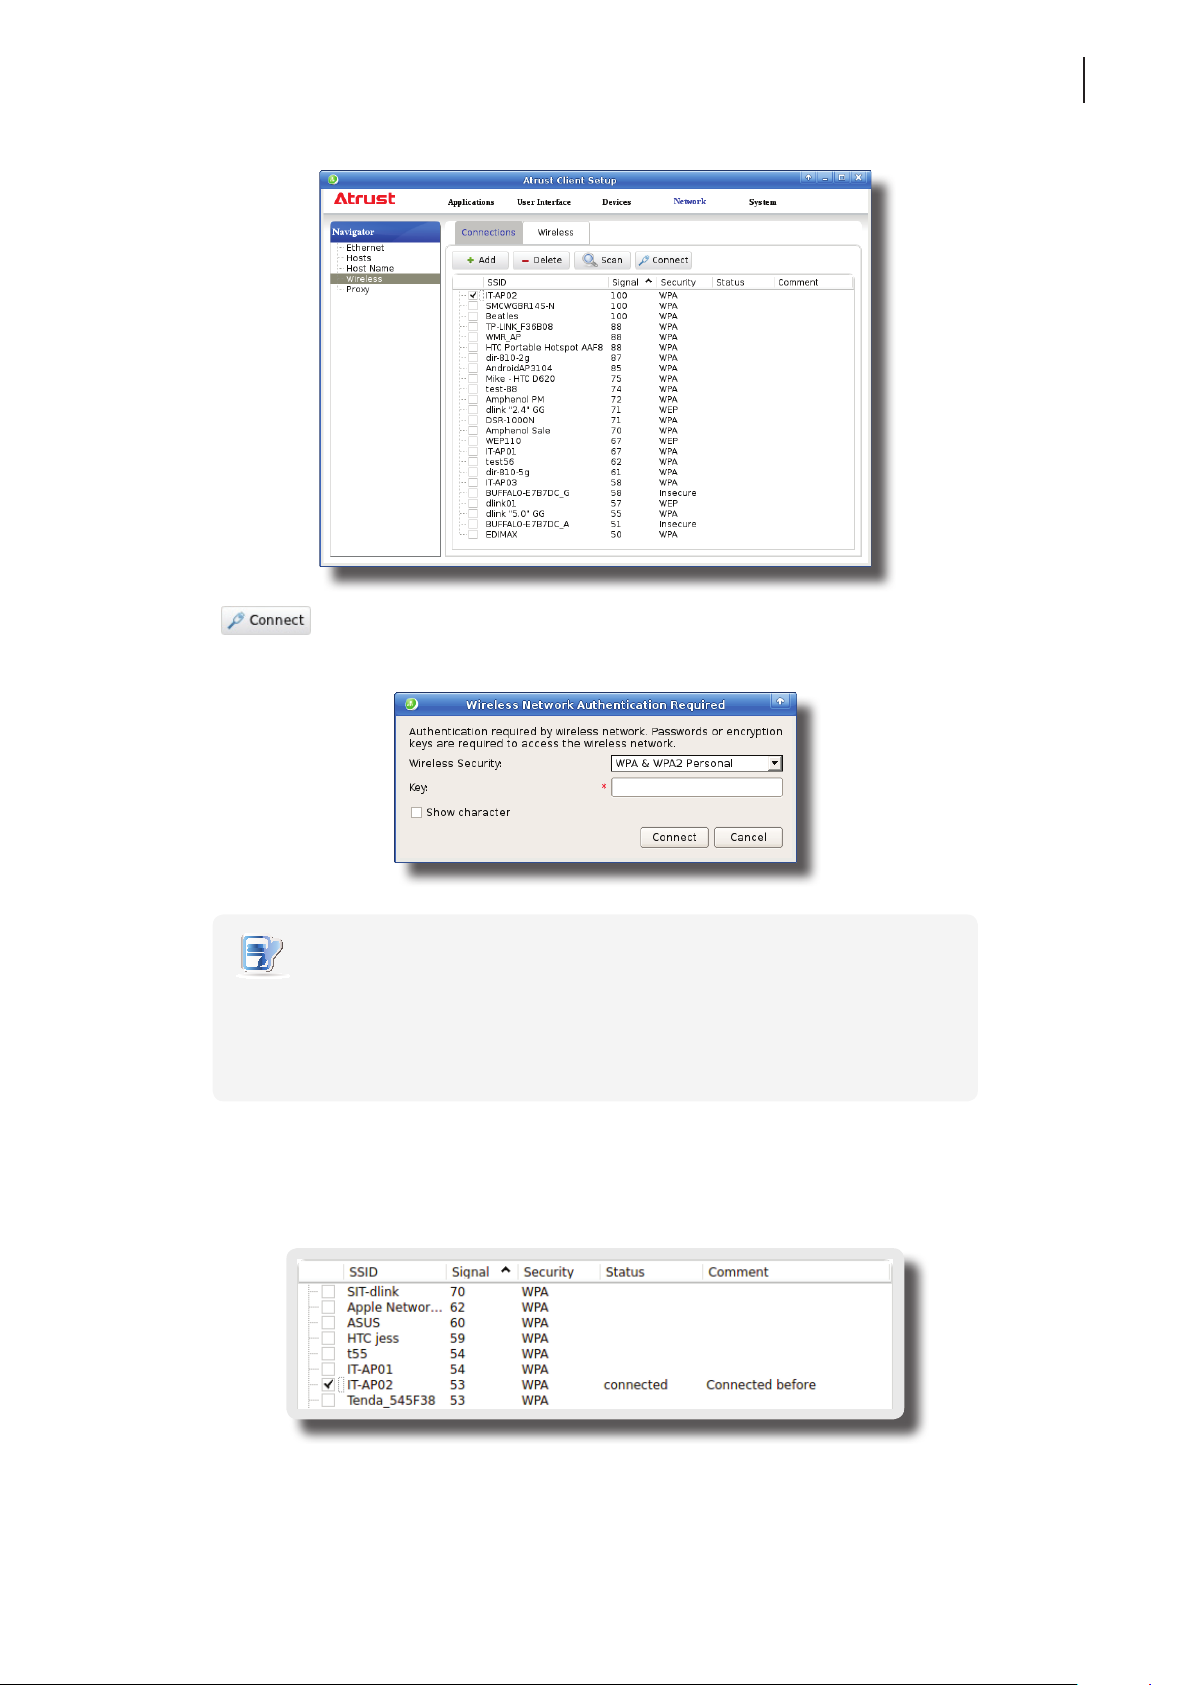
2. Click Wireless. The Wireless Network list will be shown under the Connections sub-tab.
NOTE
• Your mt168L will perform network discovery once and specify all available wireless
networks in the Wireless Network list under the Connections sub-tab. To refresh this
Wireless Network list, click
on the top of the list.
3. Click to check the desired wireless network. The Connect button then appears on the top of the
Wireless Network list.
Page 31
Getting Started
Learning the Basics
4. Click to create a wireless network connection through the selected wireless network.
21
5. A window appears prompting for conrmation or authentication.
NOTE
• If you ever accessed this wireless network before, the password will be automatically
recorded for future access. In this case, you don’t need to provide the password
again; you only need to conrm the establishment of a wireless connection.
• Consult your network administrator for required information on authentication.
6. Type in the required password, and then click Connect to continue. Or, click OK to conrm the establishment
of a wireless connection.
7. Upon completion, the Status column of the wireless network will show connected.
8. Close Atrust Client Setup.
Page 32
Getting Started
22
Learning the Basics
Topic 3: Conguring the Time Zone
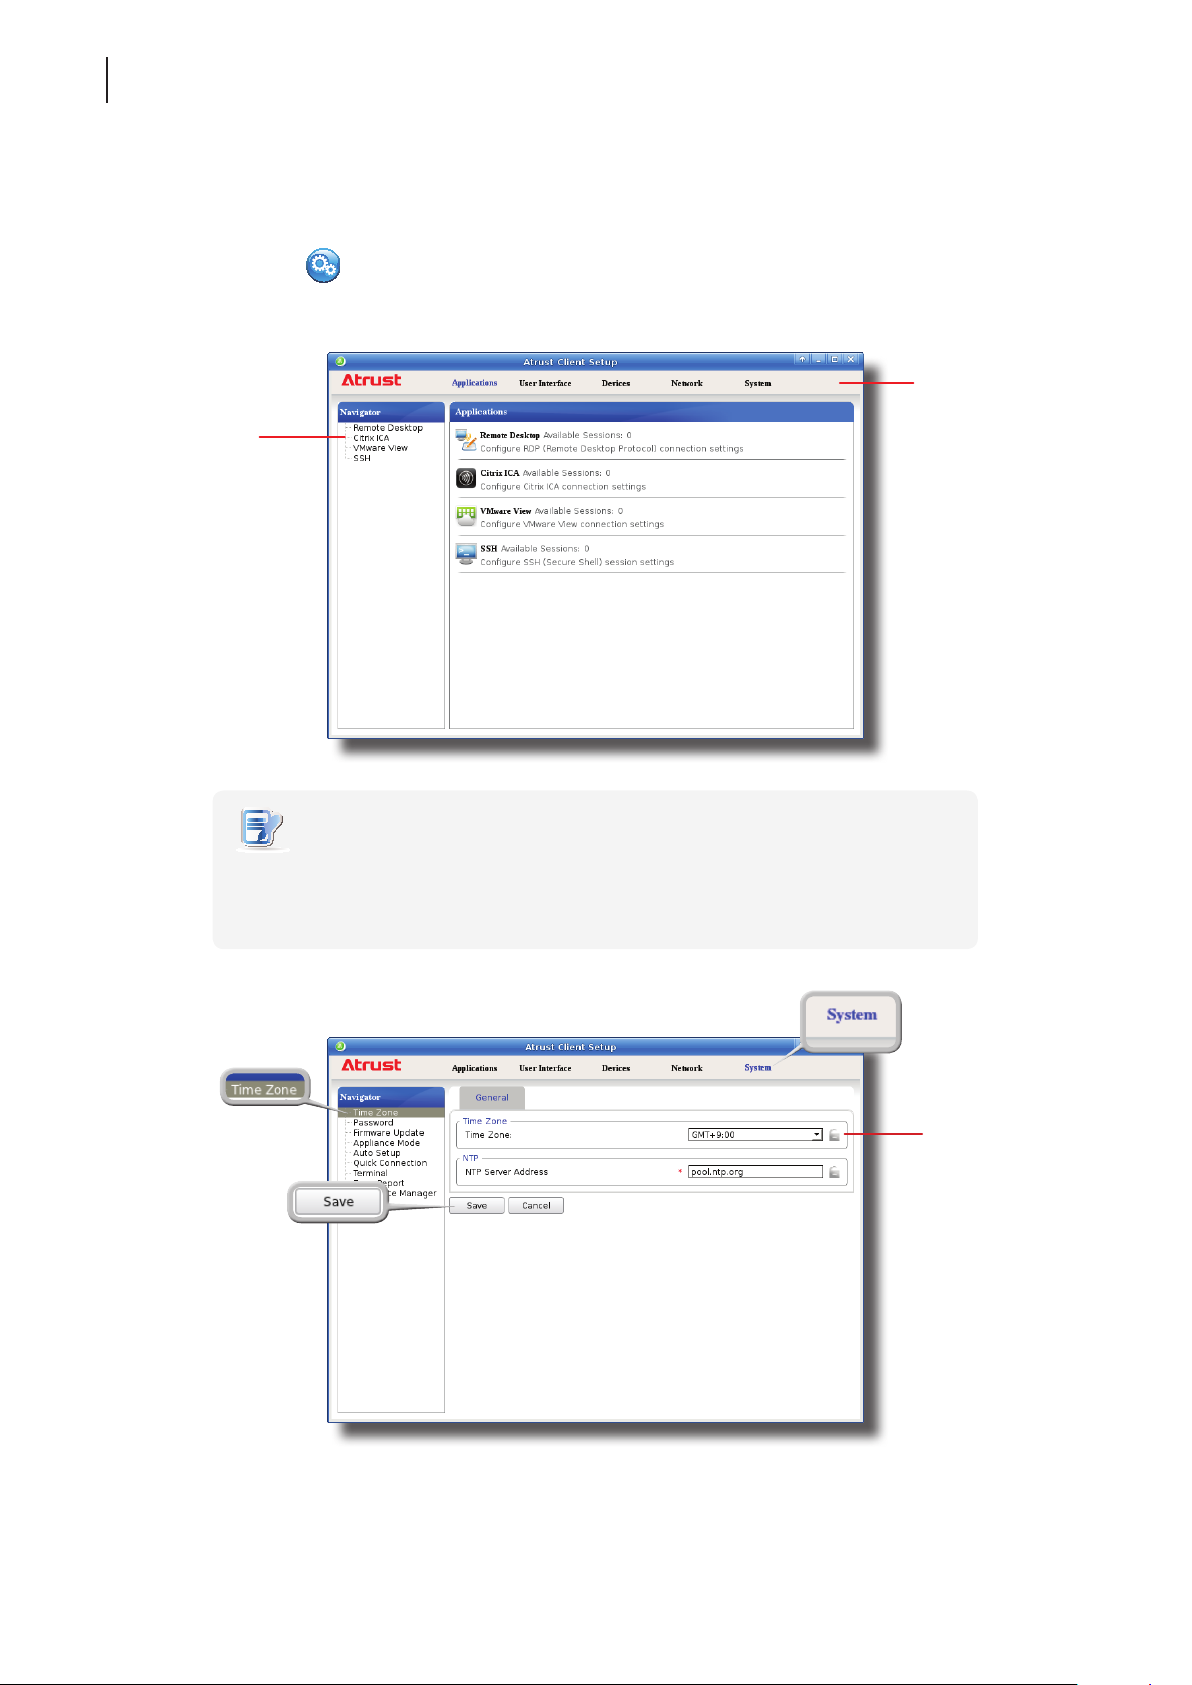
To set the time zone for your mt168L, please do the following:
1. Click the Setup
Navigation Area
Click to select
a setting item
or entry.
icon to launch Atrust Client Setup.
Atrust Client Setup
Category Tabs
Click a tab to select
a setting category.
NOTE
• For detailed instructions on how to congure client settings and customize your
mt168L with Atrust Client Setup, please refer to chapter 4 “Conguring Client
Settings” on page 41.
2. On Atrust Client Setup, click System > Time Zone.
3. Click the Time Zone drop-down menu to select the desired time zone.
4. Click Save to apply, and then close Atrust Client Setup.
Time Zone
drop-down menu
Page 33
Getting Started
Learning the Basics
Topic 4: Accessing Desktops or Applications
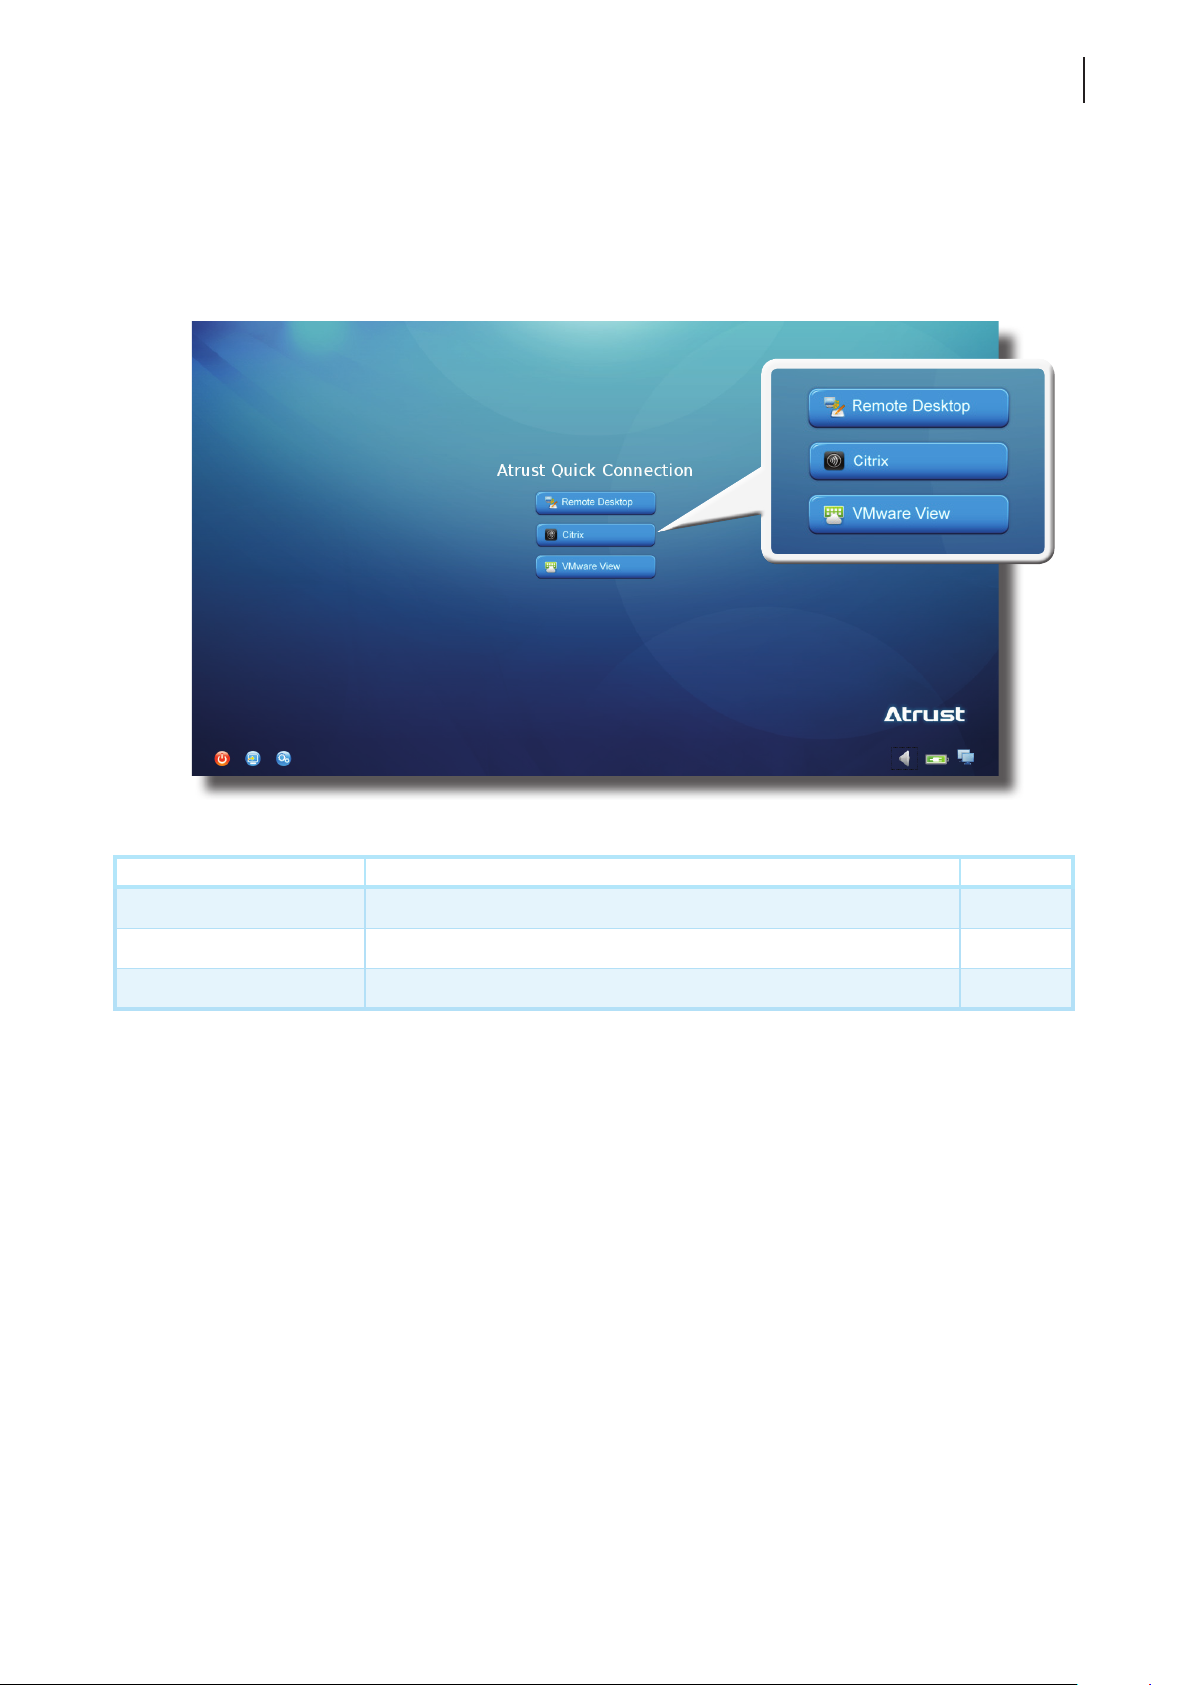
Through Atrust Quick Connection screen, you can access three types of desktop virtualization services:
Remote Desktop, Citrix, and VMware View.
Atrust Quick Connection Screen
23
Icon Description Page
Remote Desktop Click to access Microsoft Remote Desktop services. 24
Citrix Click to access Citrix XenApp, XenDesktop, or VDI-in-a-Box services. 25
VMware View Click to access VMware View or Horizon View services. 34
Page 34
Getting Started
24
Learning the Basics
Accessing Microsoft Remote Desktop Services
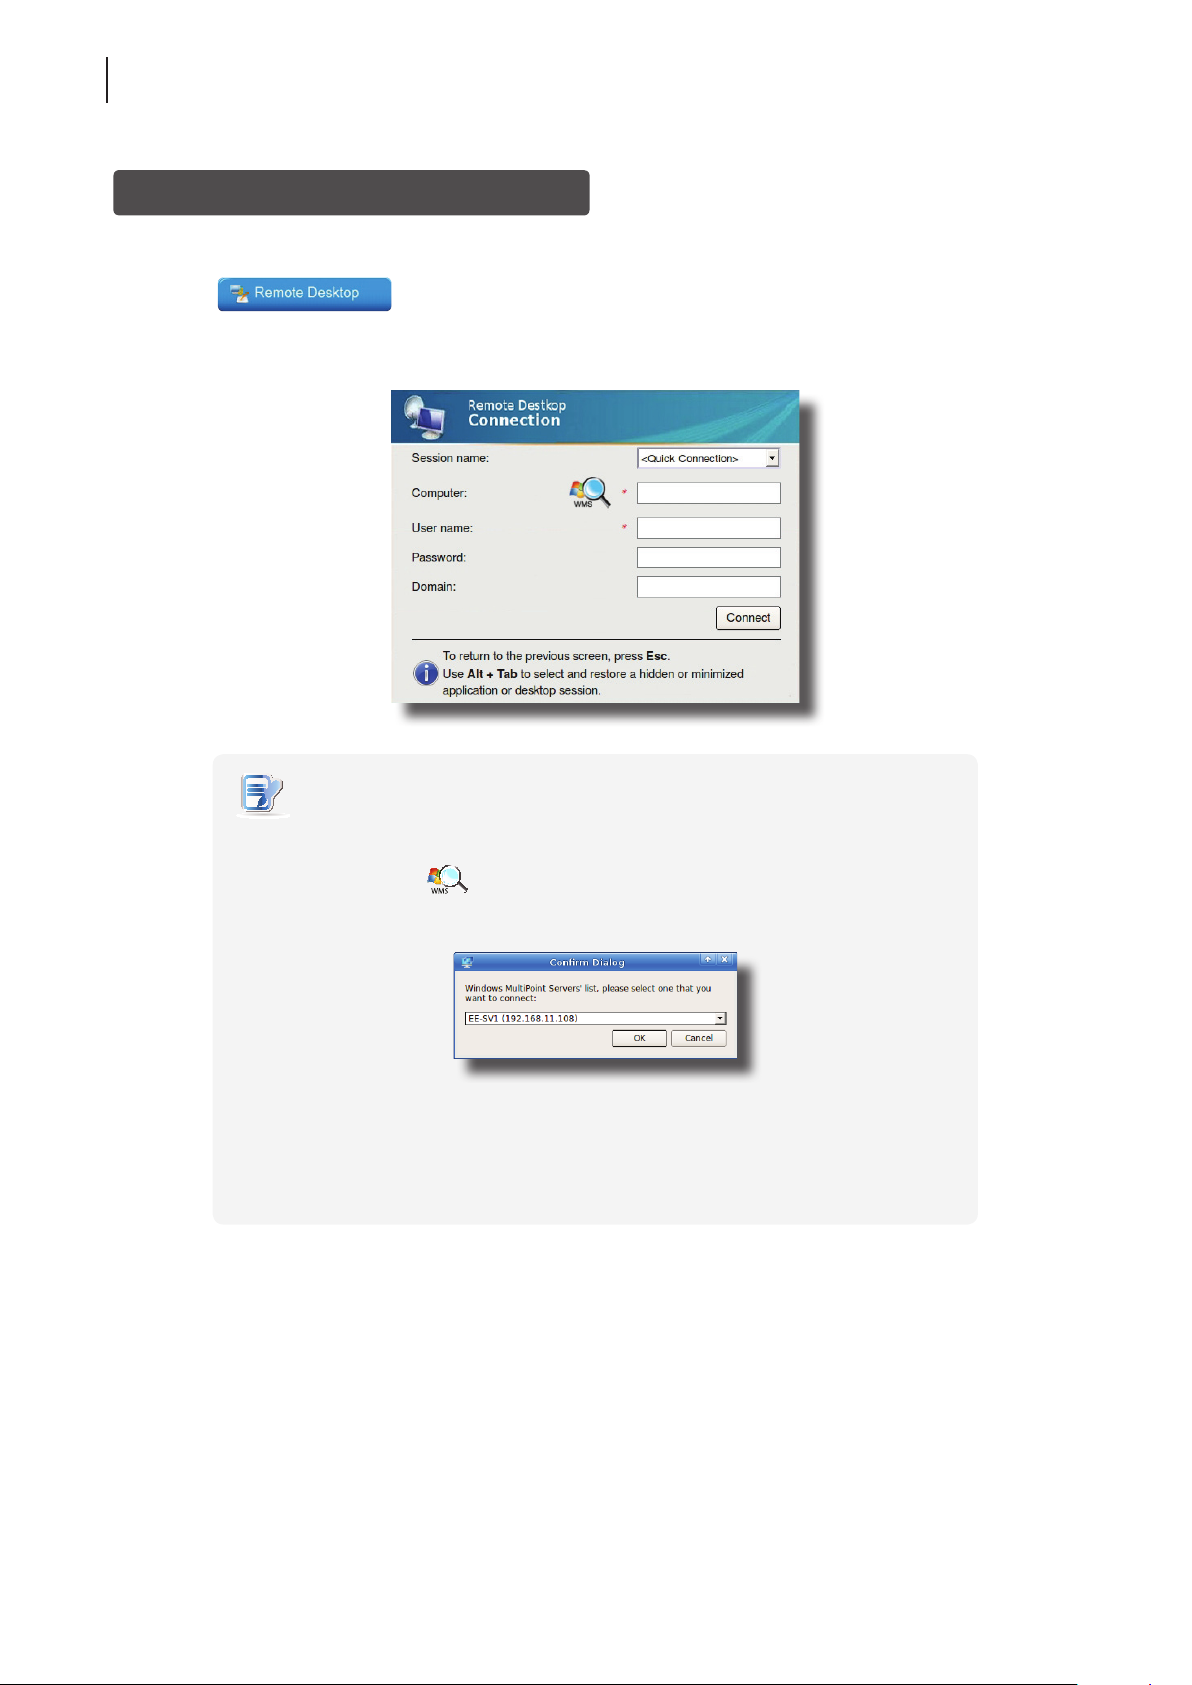
To access Microsoft Remote Desktop services, please do the following:
1. Click
on Atrust Quick Connection screen (see the screen in Topic 4).
2. On the appeared window, type in the computer name or IP address of the server, user name, password, and
domain (if any), and then click Connect.
NOTE
• To discover available Windows MultiPoint Server systems over your network,
please do the following:
1. Click
2. Upon completion, a window appears with the search result.
3. Click the drop-down menu to select the desired system, and then click OK.
4. The IP address of the selected system will appear in the Computer eld.
• To return to Atrust Quick Connection screen (see the screen in Topic 4), press Esc.
on the left of the Computer eld.
3. The remote desktop will be displayed on the screen.
Page 35
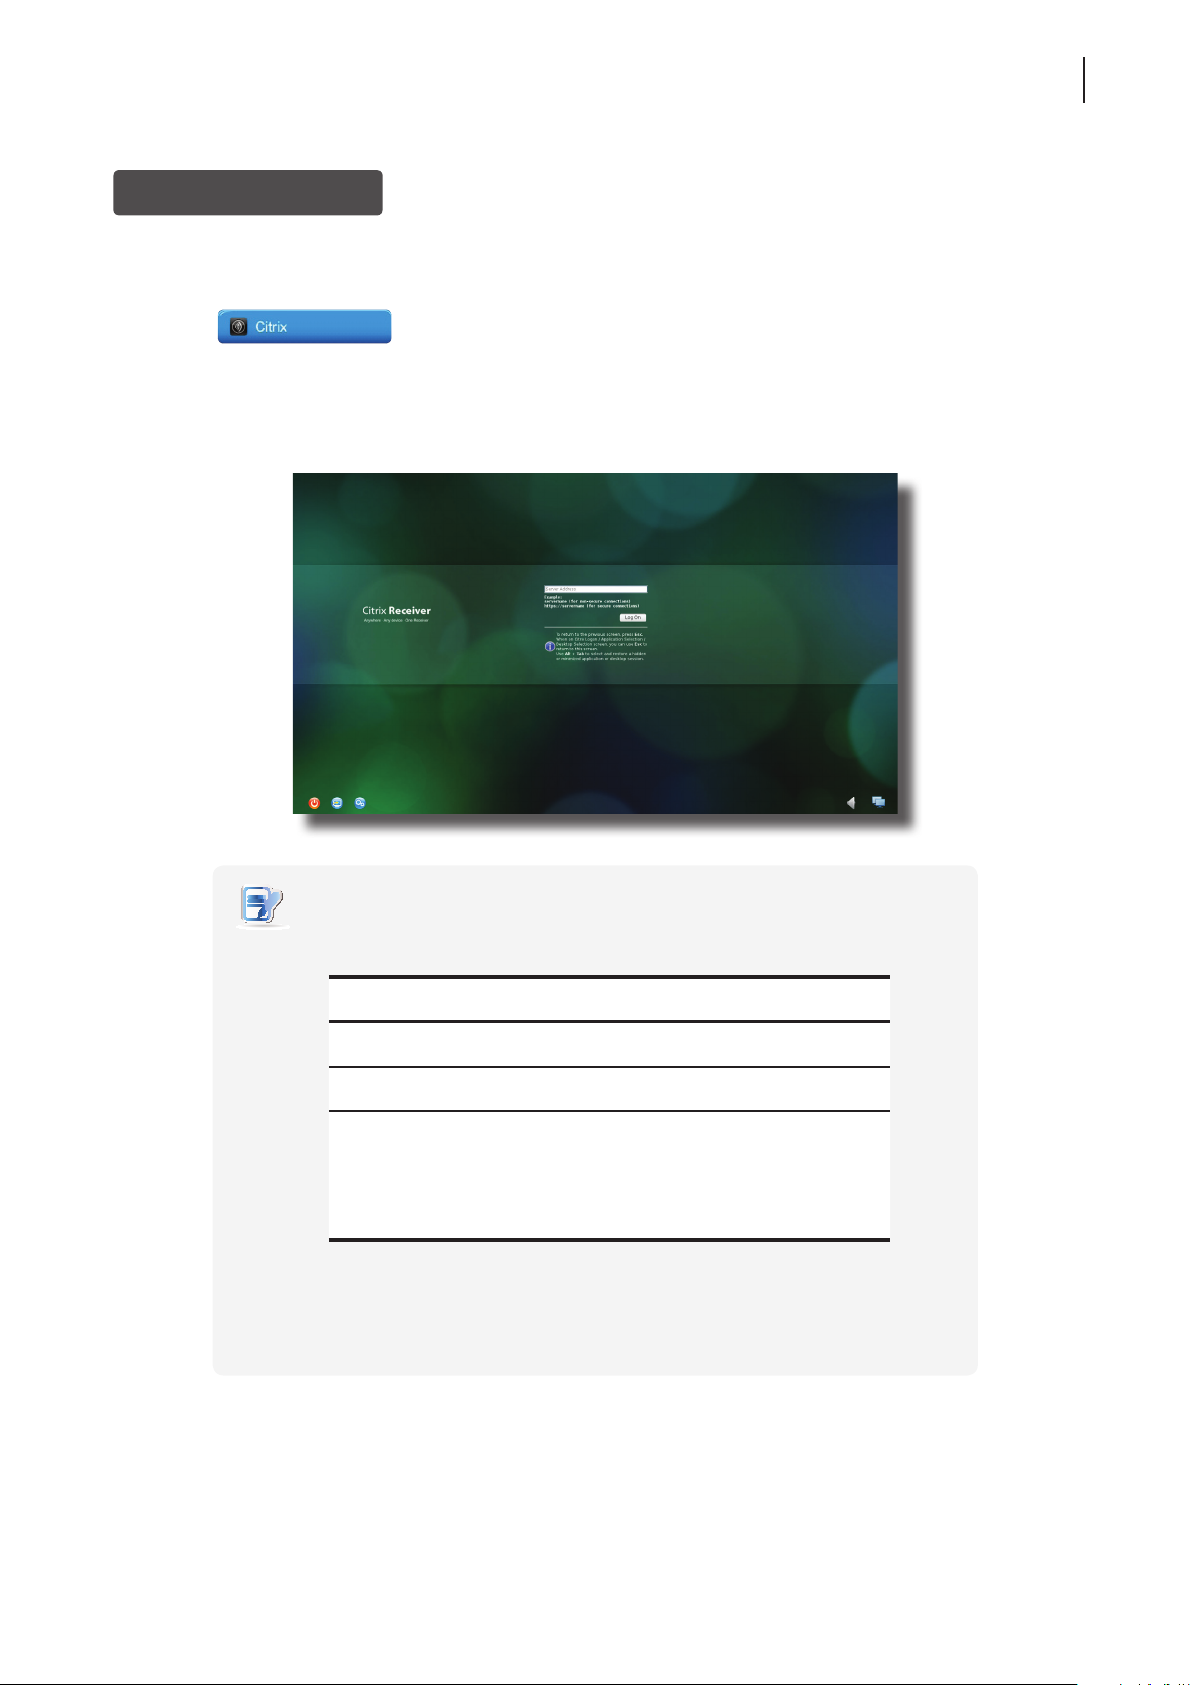
Accessing Citrix Services
Connecting to the Server
To connect to the server through which Citrix services are accessible, please do the following:
Getting Started
Learning the Basics
25
1. Click
on Atrust Quick Connection screen (see the screen in Topic 4).
2. On the appeared Atrust Citrix Connection screen, enter the appropriate IP address / URL / FQDN of the server,
and then click Log On.
Atrust Citrix Connection Screen
NOTE
• For newer versions of XenDesktop and XenApp, you may need to further specify
the sub-path of the server. Refer to the following table for details:
Citrix Product
XenApp 6.5 or
earlier
XenDesktop 5.6
or earlier
XenApp and
XenDesktop 7.5
Component to
Connect
Web Interface IP / URL / FQDN
Web Interface IP / URL / FQDN
StoreFront
Connection Address
IP / URL / FQDN plus sub-path
For example —
FQDN: X75.CTX.poc
Sub-path: /Citrix/StoreWeb (default)
Connection Address:
X75.CTX.poc/Citrix/StoreWeb
• FQDN is the acronym of Fully Qualied Domain Name.
• To return to Atrust Quick Connection screen (see the screen in Topic 4), press Esc.
Page 36
Getting Started
26
Learning the Basics
Logging On to Citrix Services
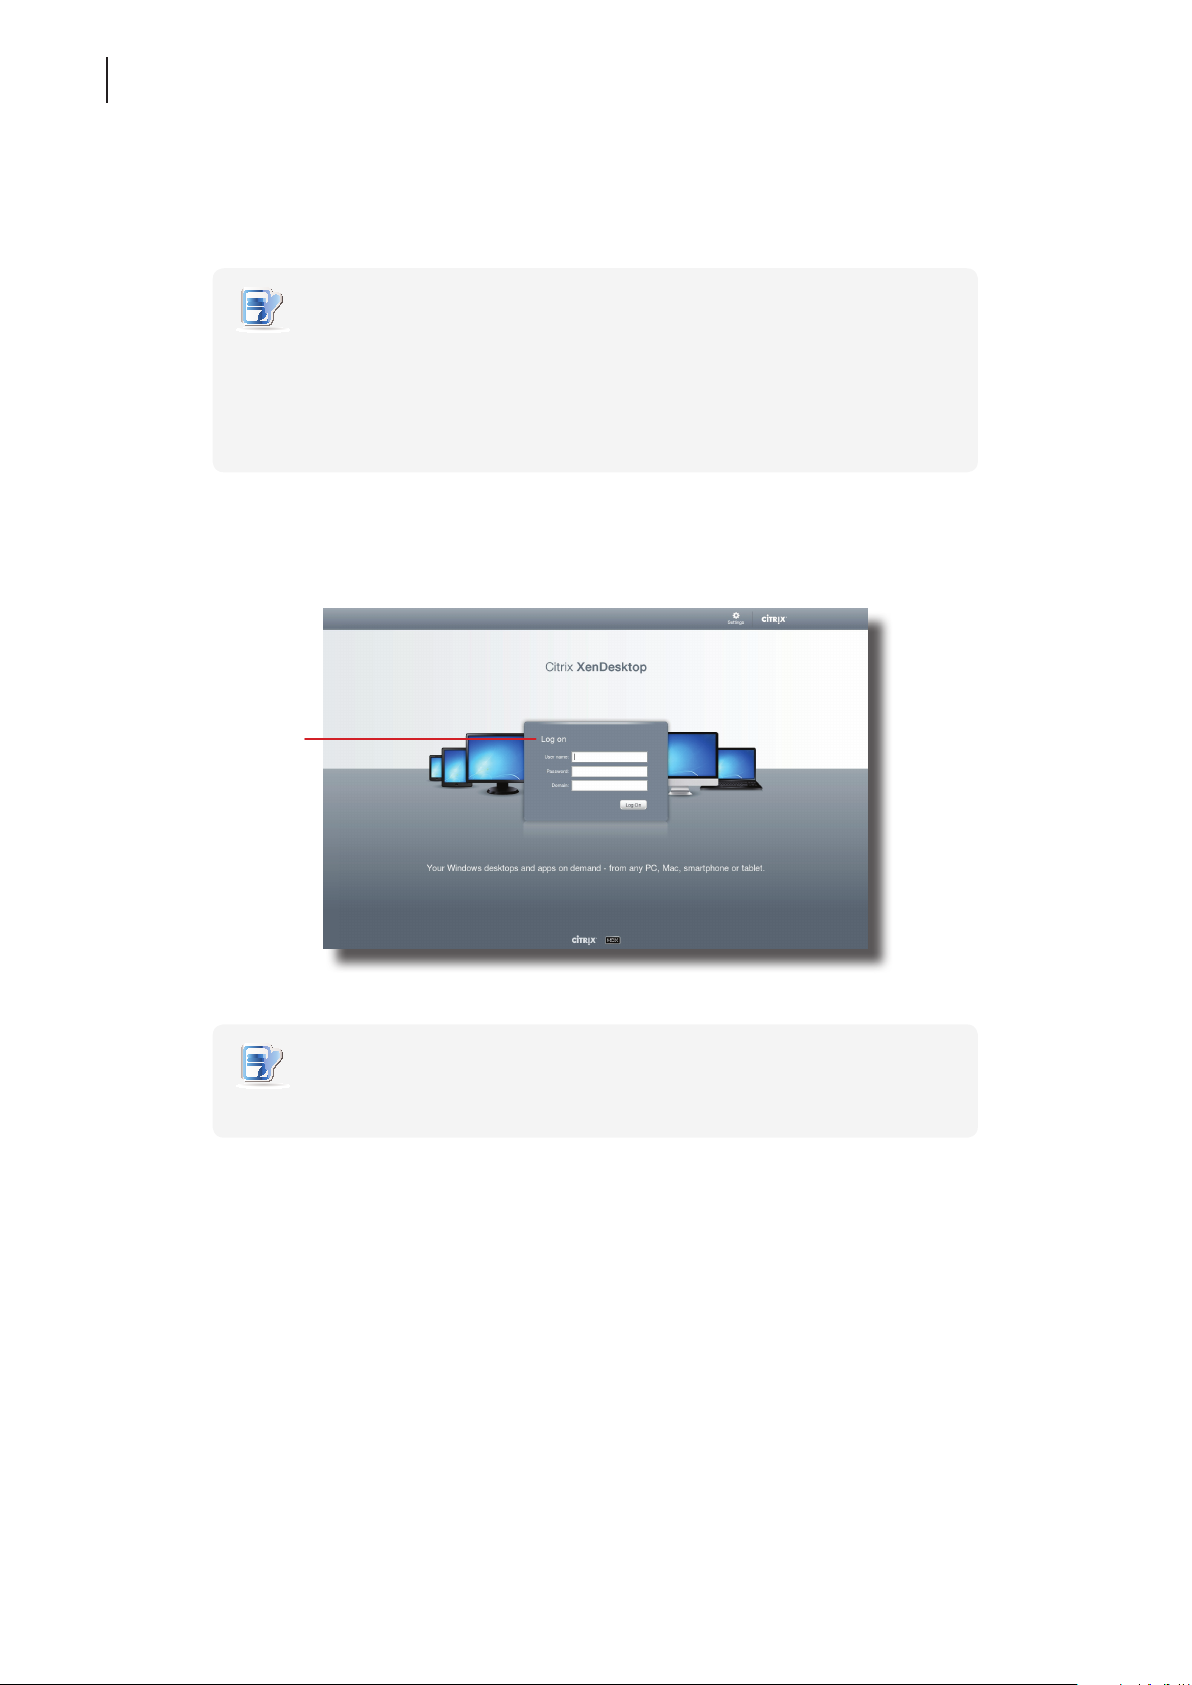
When connected to the server, the Citrix Logon screen appears. The appeared screen and required credentials for
Citrix services may vary with the service type and version.
NOTE
• A warning message “This Connection is Untrusted“ might appear. Consult the
IT administrator for details and ensure the connection is secure rst. To import
a security certicate, please refer to section “4.2.16 Importing Certicates for
Remote Computers” on page 71. To bypass, click I Understand the Risks > Add
Exception > Conrm Security Exception.
The following are some examples of Citrix Logon screens.
XenDesktop 5.6 Platinum:
Citrix Logon Screen
Type the required
user name, password,
and then click
Log On to access
virtual desktops.
NOTE
• To return to Atrust Quick Connection screen, press Esc.
Page 37
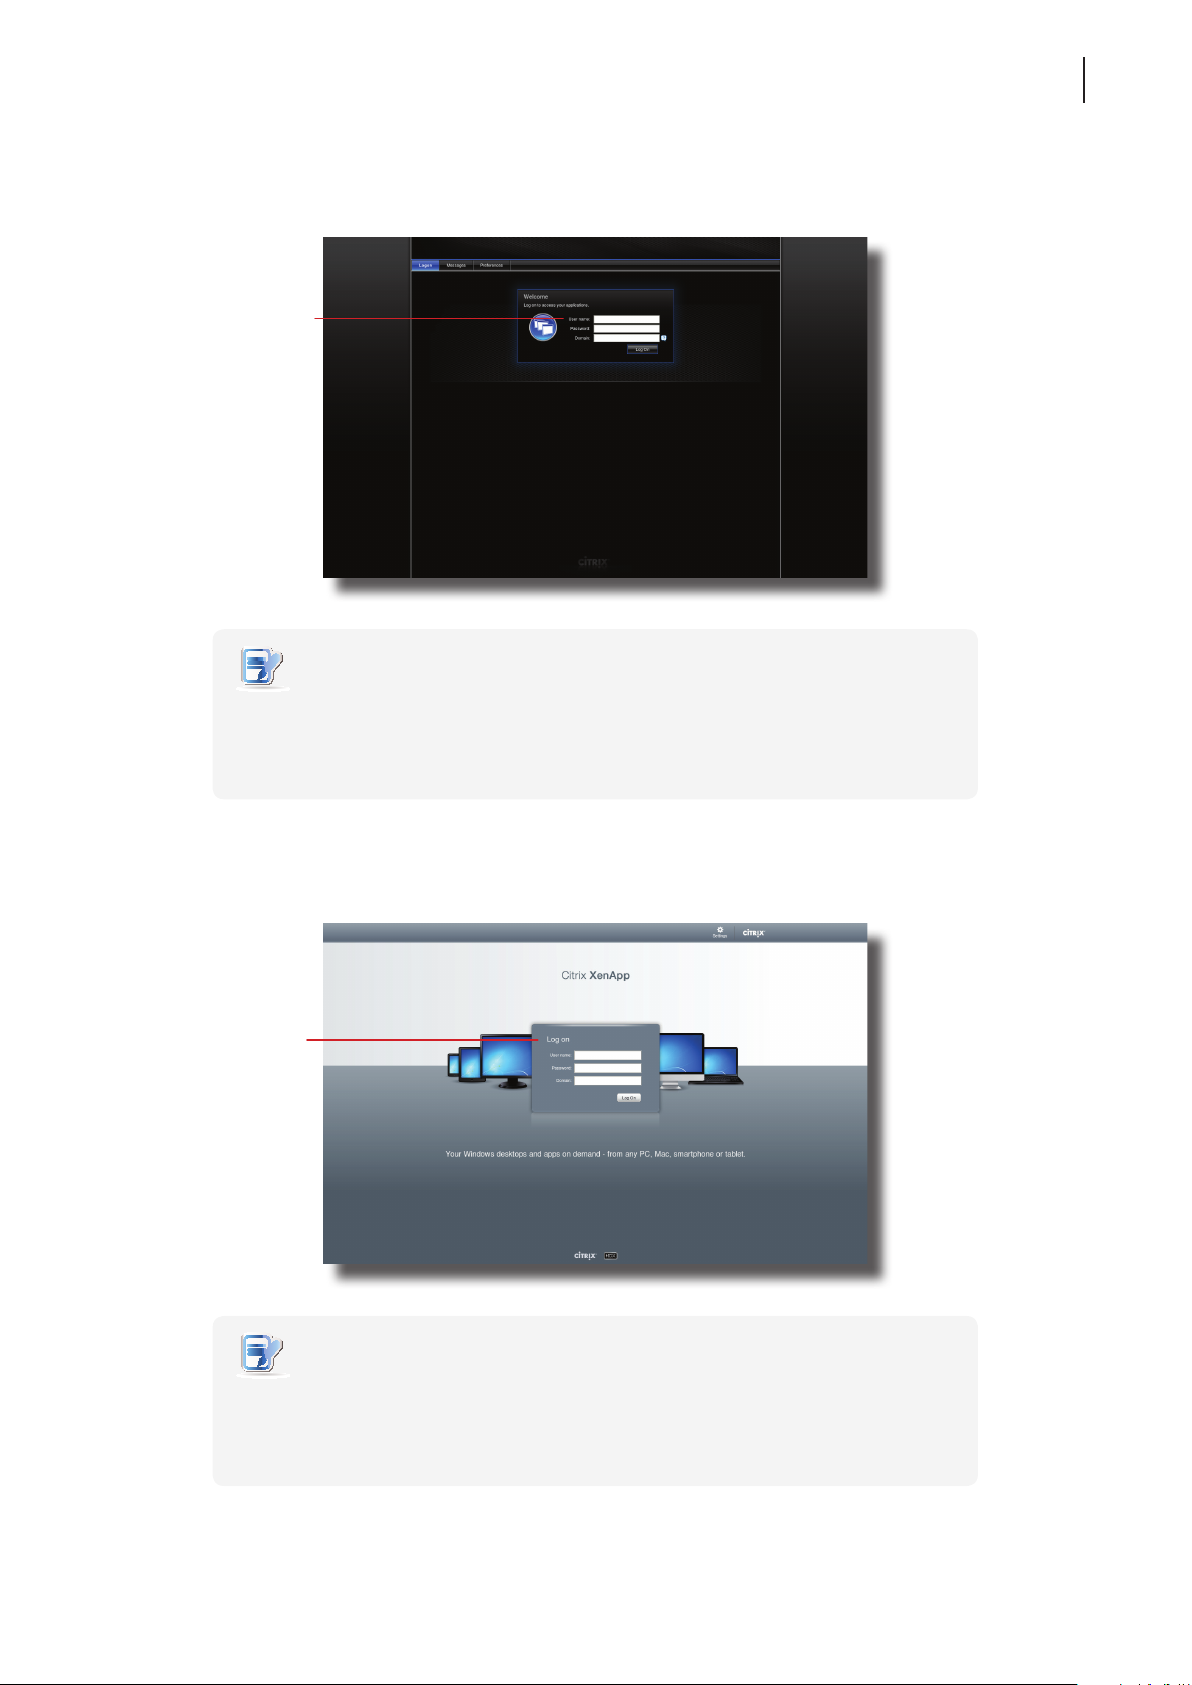
XenApp 6.0 Fundamentals:
Type the required
user name, password,
domain, and then click
Log On to access
virtual applications.
Citrix Logon Screen
Getting Started
Learning the Basics
27
XenApp 6.5 Platinum:
Type the required
user name, password,
domain, and then click
Log On to access
virtual applications.
NOTE
• To return to Atrust Quick Connection screen, press Esc.
• If your XenApp server doesn’t belong to any domain, type the computer name of
the server in the Domain eld.
Citrix Logon Screen
NOTE
• To return to Atrust Quick Connection screen, press Esc.
• If your XenApp server doesn’t belong to any domain, type the computer name of
the server in the Domain eld.
Page 38
Getting Started
28
Learning the Basics
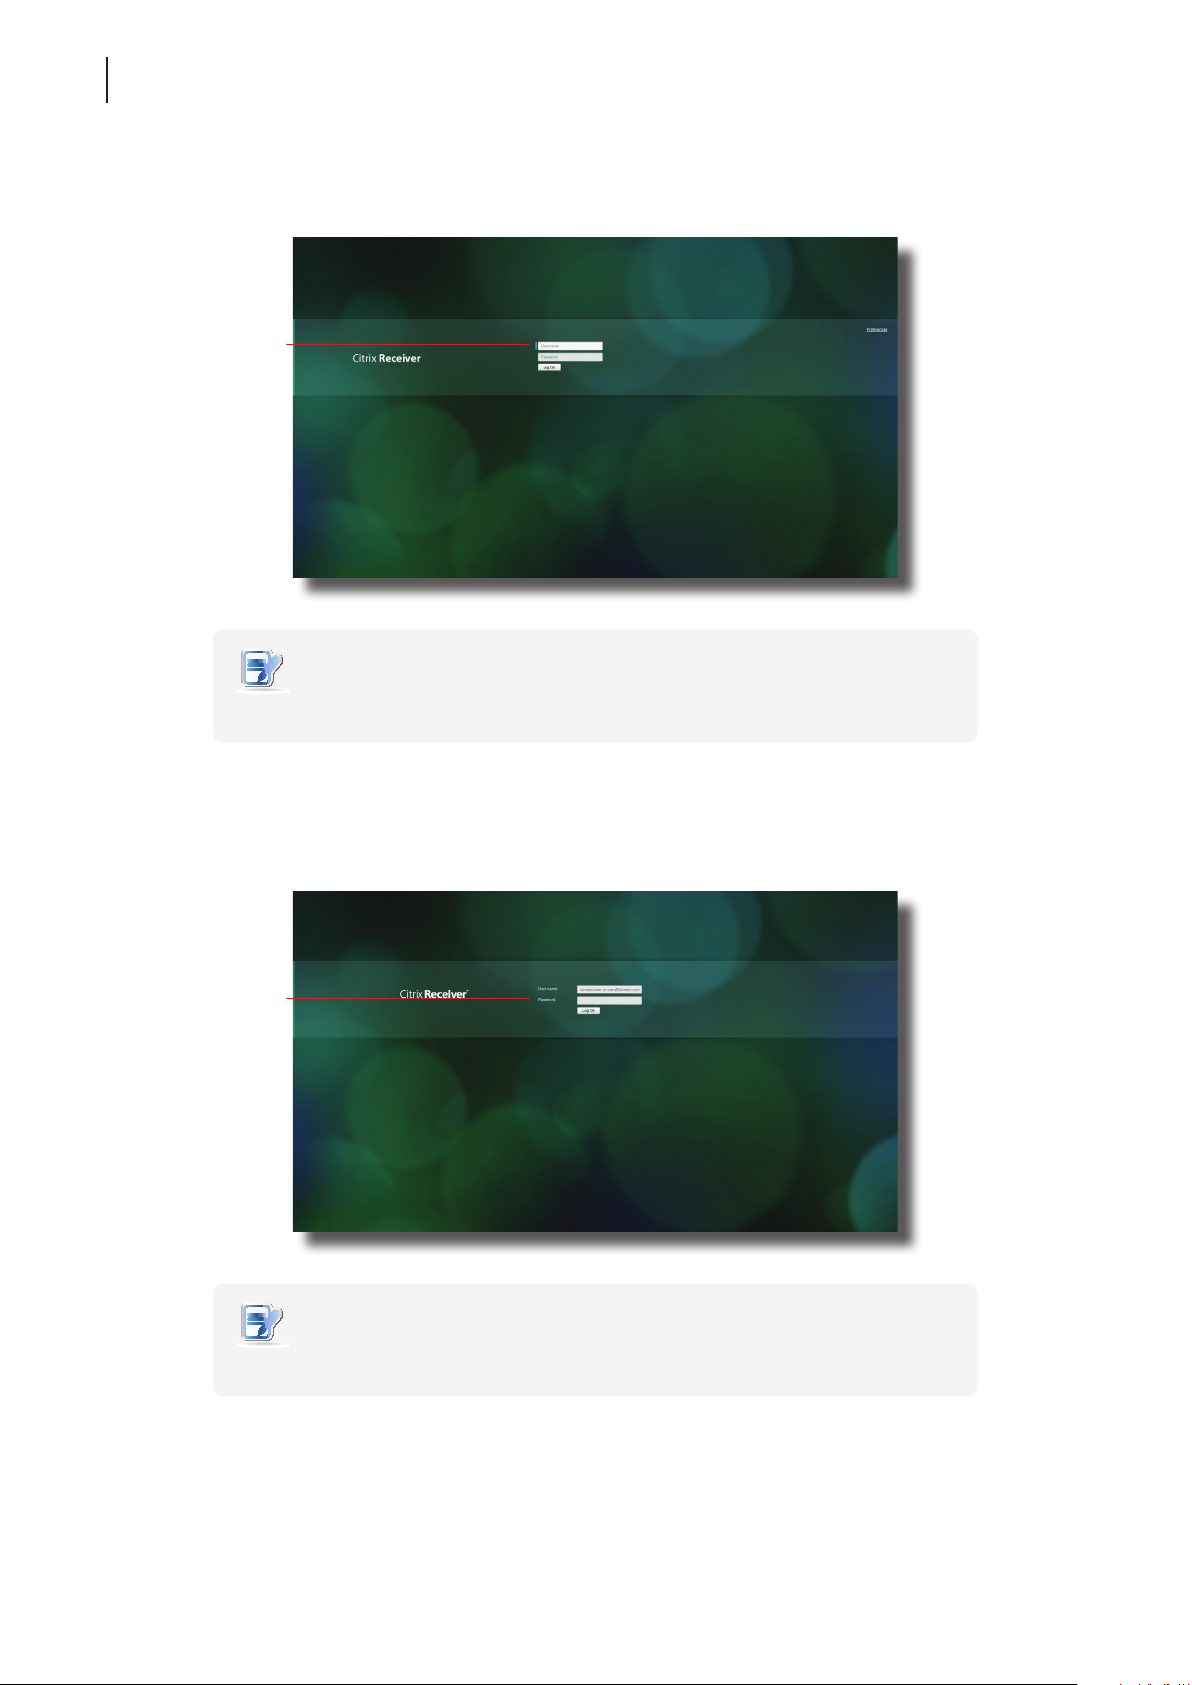
VDI-in-a-Box:
Type the required user
name, password,
and then click
Log On to access
virtual desktops.
Citrix Logon Screen
NOTE
• To return to Atrust Quick Connection screen, press Esc.
XenApp and XenDesktop 7.5 Platinum:
Type the required user
name, password,
and then click
Log On to access
virtual desktops.
Citrix Logon Screen
NOTE
• To return to Atrust Quick Connection screen, press Esc.
Page 39
Getting Started
Learning the Basics
Accessing Virtual Desktops and Applications
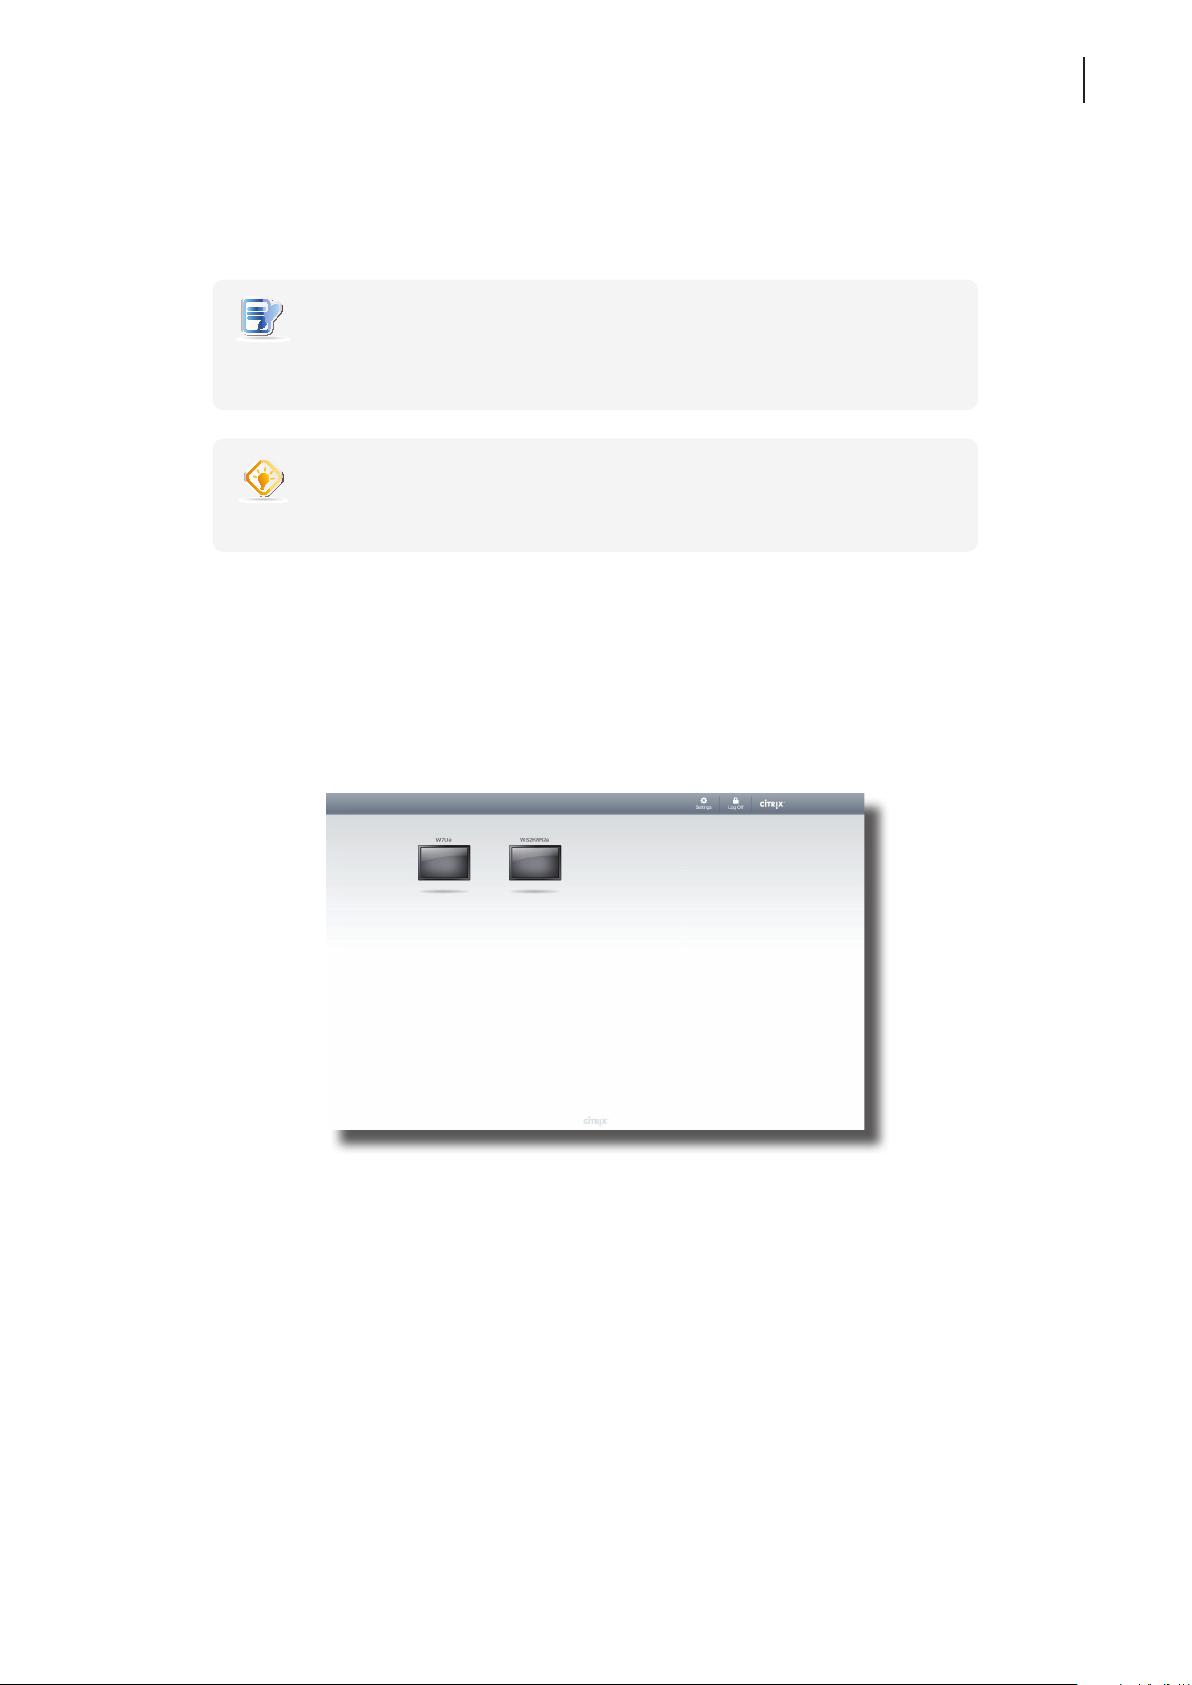
You will enter the Desktop Selection or Application Selection screen after logon. On the screen you can click to select
the desired desktop or application(s).
NOTE
• You might enter the virtual desktop directly if only one type of virtual desktop is
assigned to the provided credentials.
TIP
• Use Alt + Tab to select and restore a hidden or minimized application or desktop.
The following are some examples of Selection screens and delivered desktops and applications.
29
XenDesktop 5.6 Platinum:
1. The Desktop Selection screen appears after logon.
Desktop Selection Screen
2. Click to select the desired desktop.
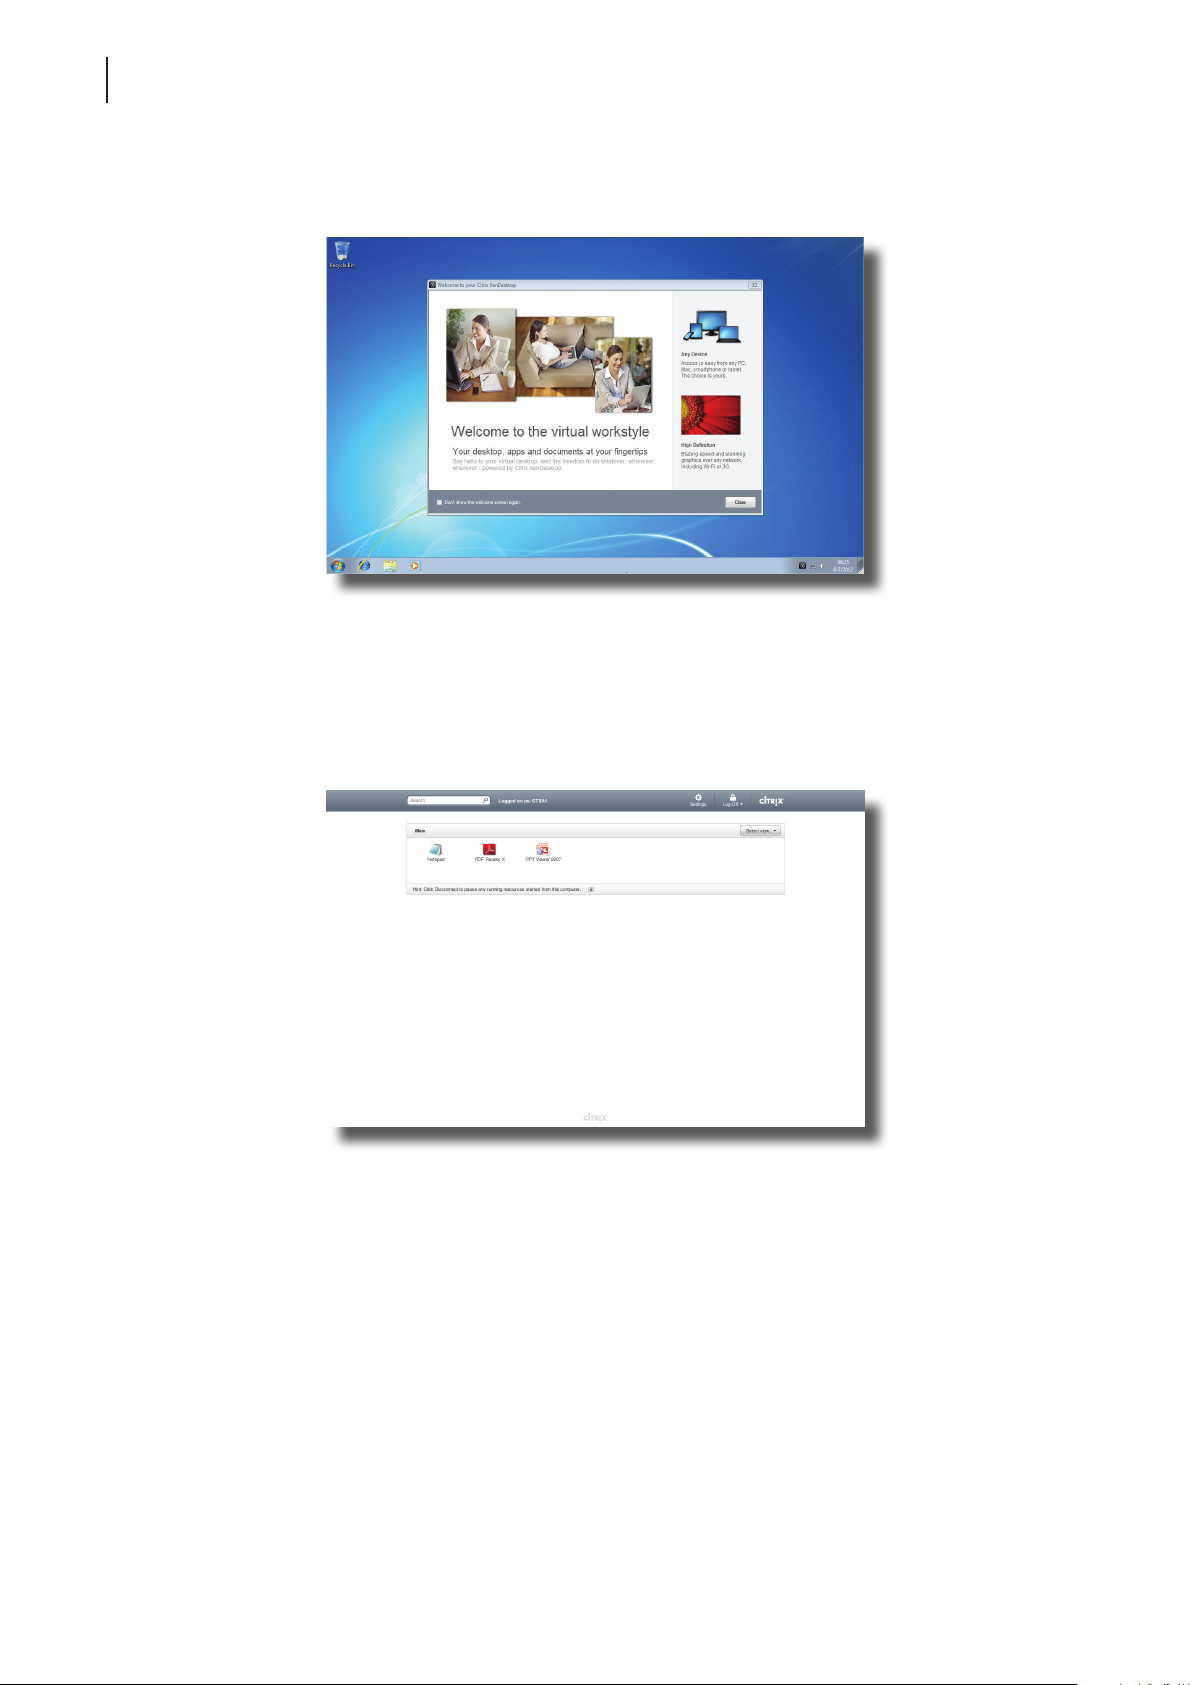
3. The selected virtual desktop will be displayed on the screen.
Page 40
Getting Started
30
Learning the Basics
Virtual Desktop Example: Windows 7 Ultimate
XenApp 6.5 Platinum:
1. The Application Selection screen appears after logon.
Application Selection Screen
2. Click to select the desired application(s).
3. The selected application(s) will be displayed on the screen.
Page 41
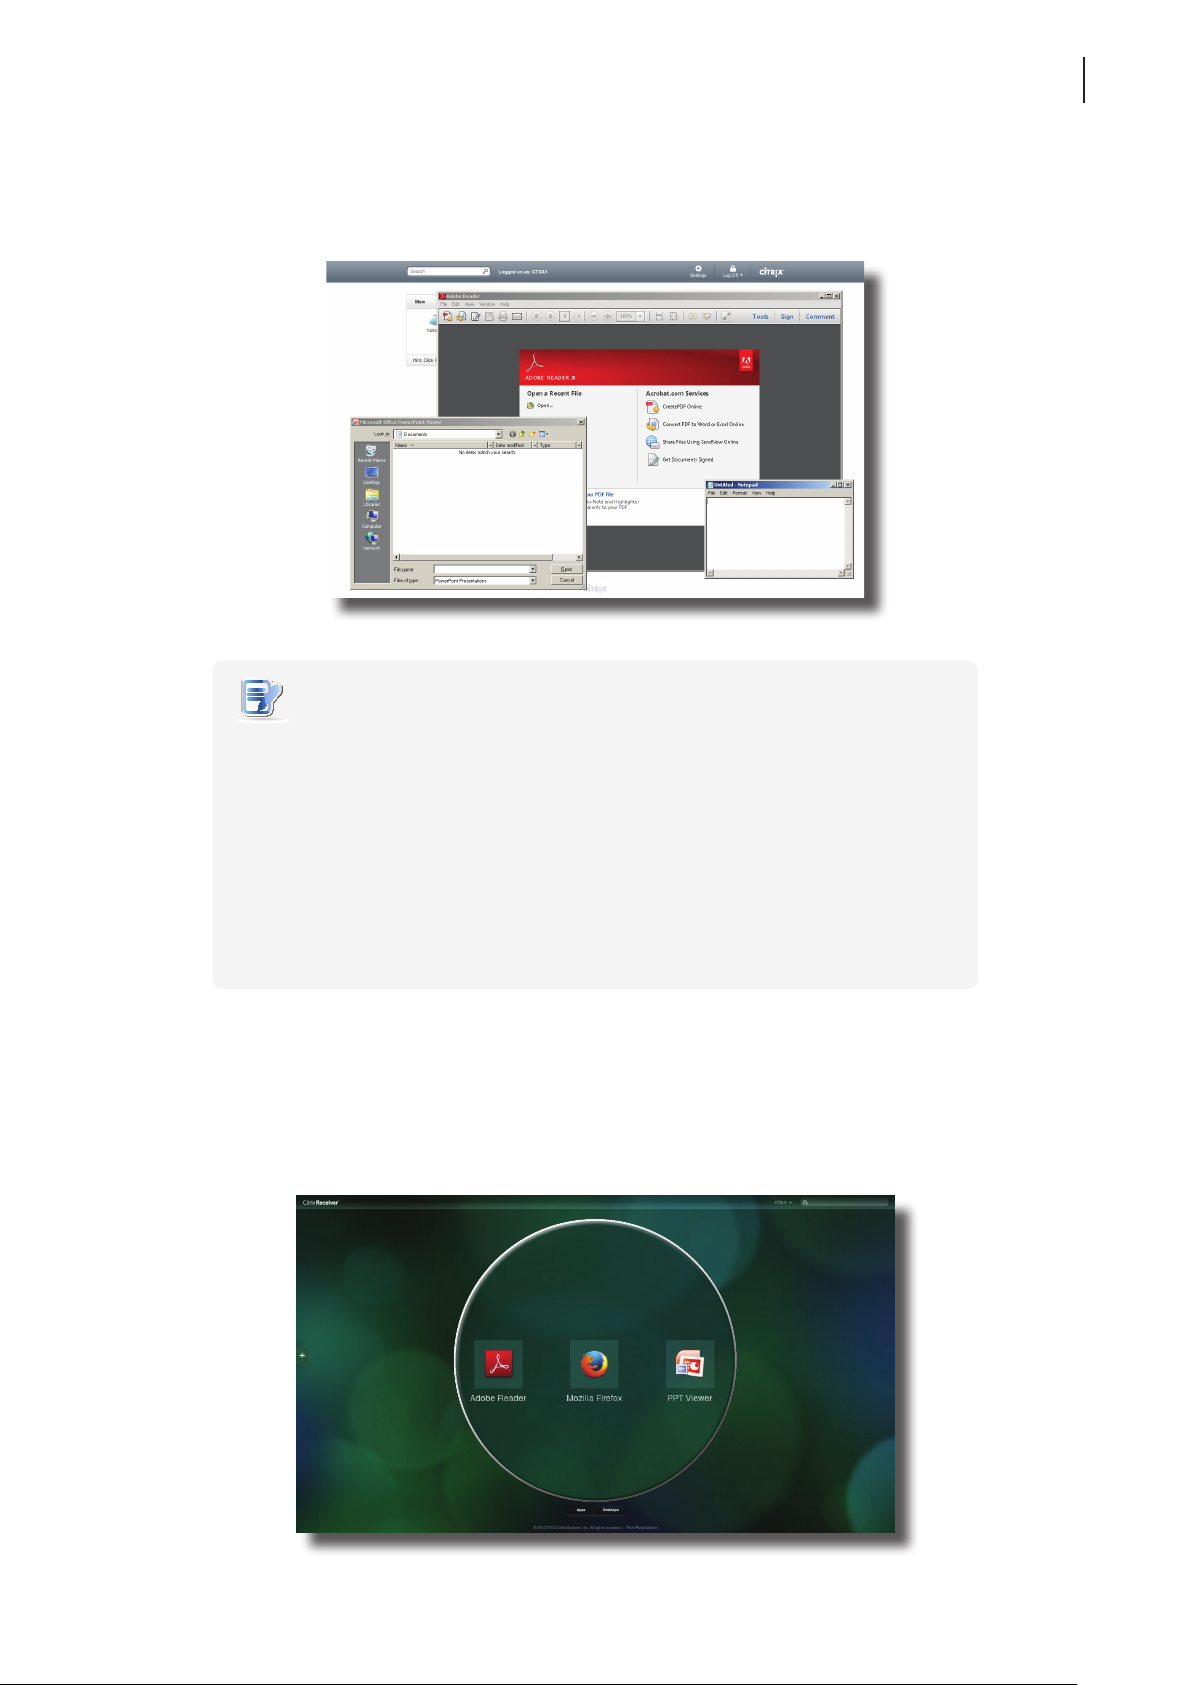
Virtual Application Examples
PowerPoint Viewer, Adobe Reader, and Notepad
Getting Started
Learning the Basics
31
NOTE
• Clicking on Application Selection screen will bring the screen to the front and leave
all launched application windows hidden behind. Use Alt + Tab to select and restore
a hidden or minimized application window.
• Exiting a virtual desktop or application will return to the Desktop Selection or
Application Selection screen. On the screen, you can:
Click to launch another virtual desktop if any or to launch other applications.
Click Log O on the top of the screen to return to the Citrix Logon screen.
Press Esc to return to Atrust Quick Connection screen directly.
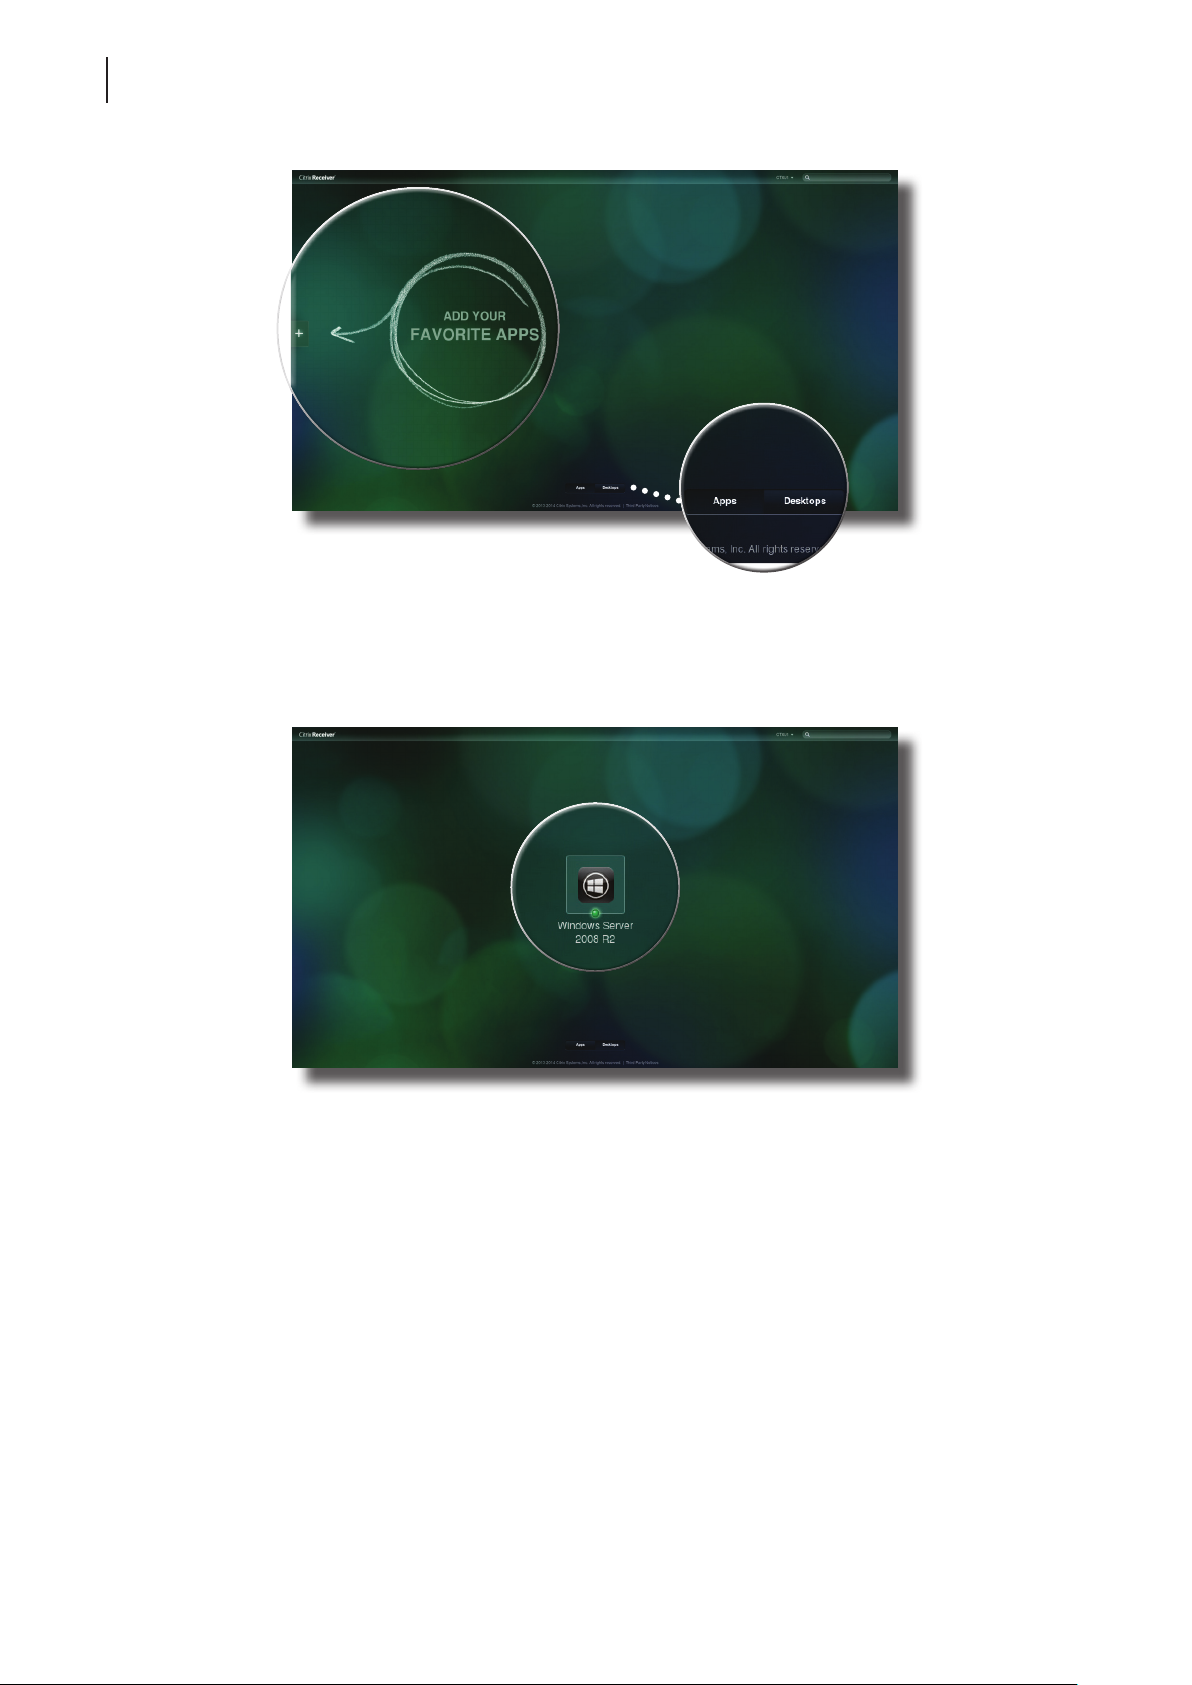
XenApp and XenDesktop 7.5 Platinum:
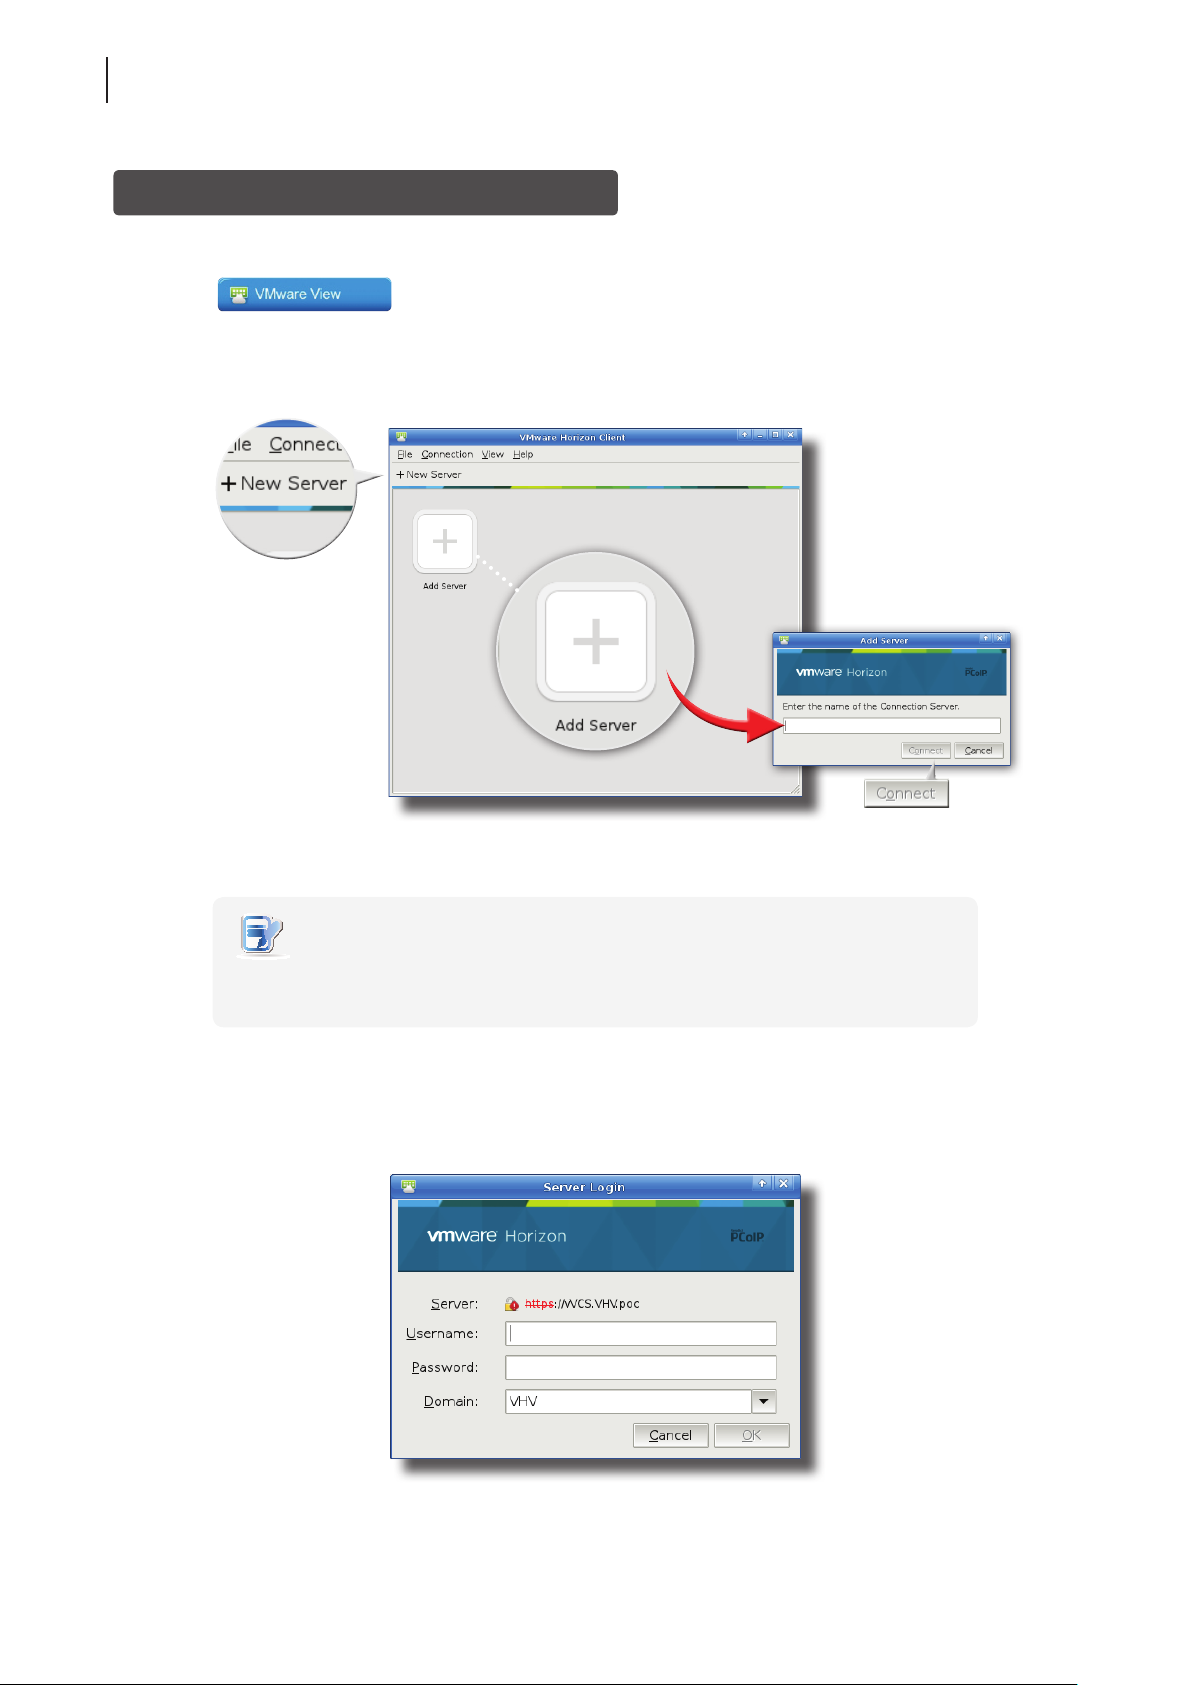
1. The Application Selection / Desktop Selection screen appears after logon.
Application Selection Screen
Page 42
Getting Started
32
Learning the Basics
You might see this
screen when you log
in to XenApp 7.5 for
rst time. Just click
to add your favorite
apps from a list.
Two buttons may be available
for your to switch between
Application and Desktop
Selection screen, depending on
your server-side deployment.
Desktop Selection Screen
2. Click to select the desired application(s) or desktop.
3. The selected application(s) or desktop will be displayed on the screen.
Page 43
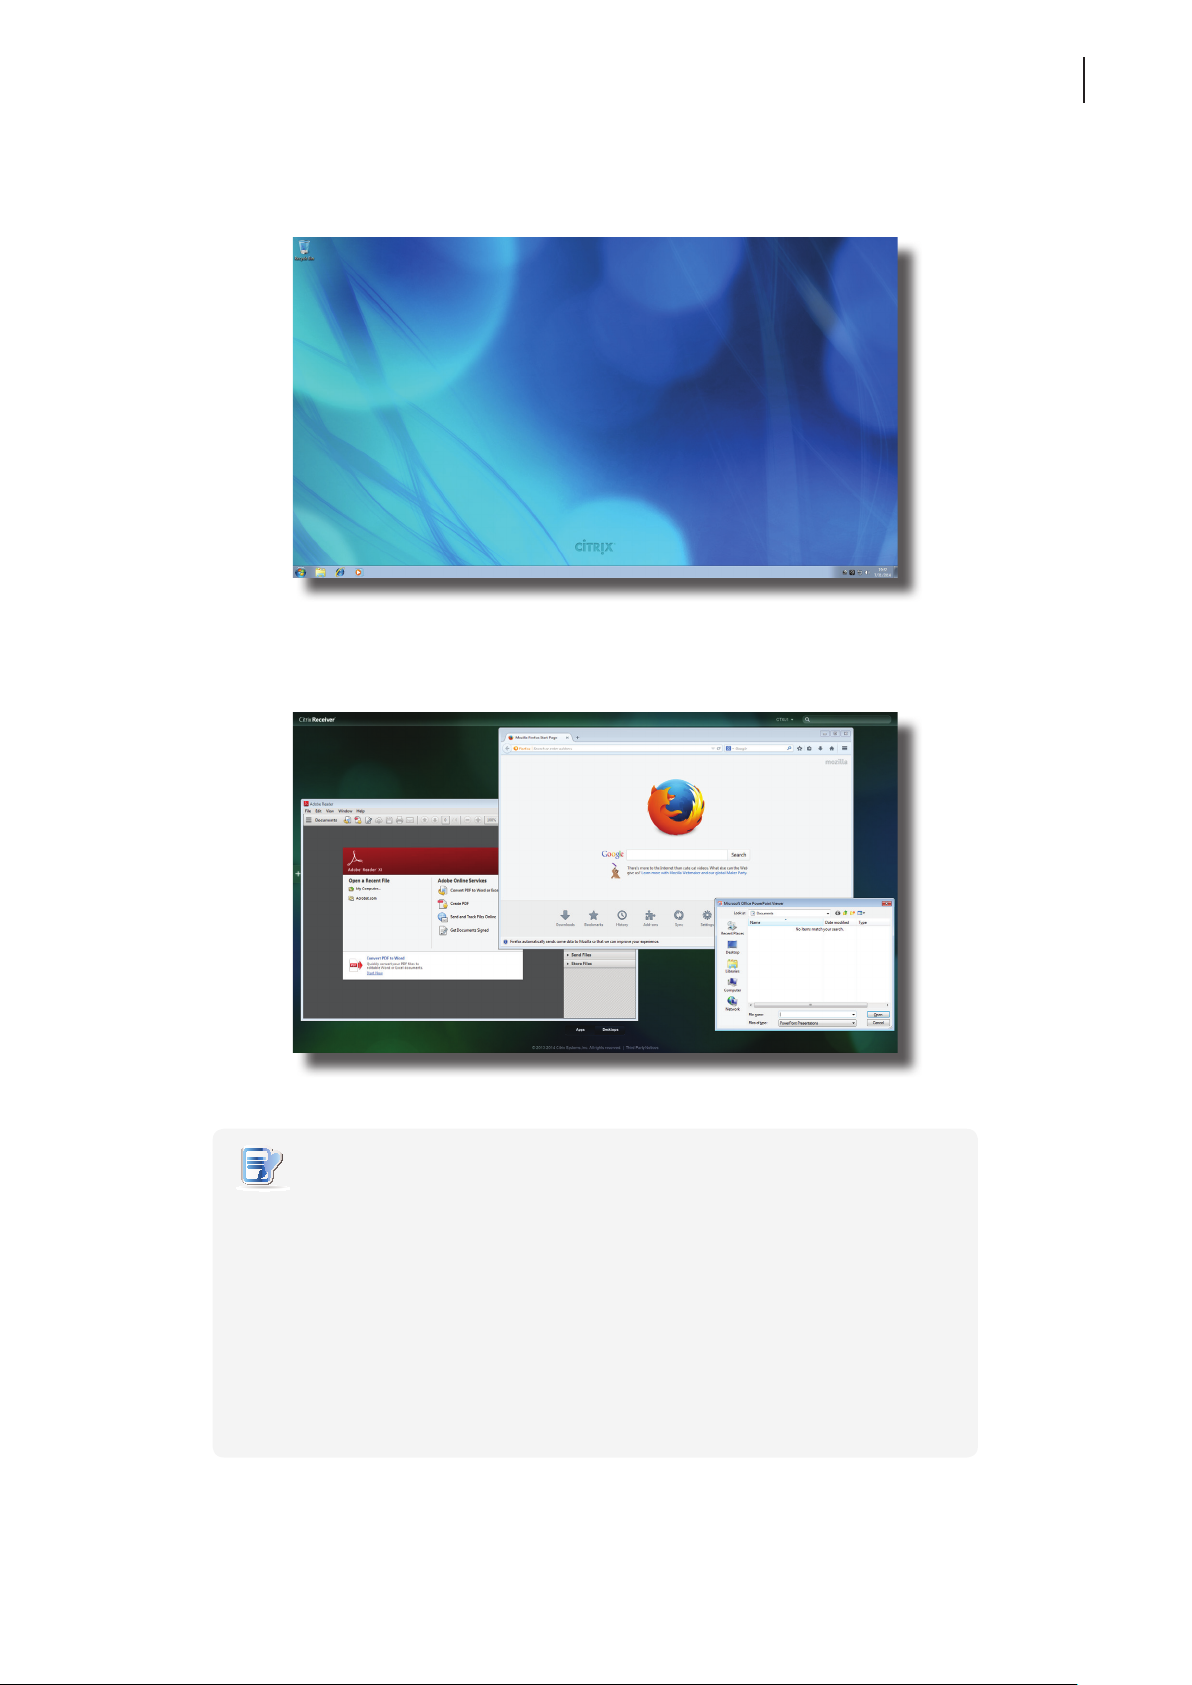
Virtual Desktop Example: Windows Server 2008 R2
Getting Started
Learning the Basics
33
Virtual Application Examples
Adobe Reader, Mozilla Firefox, and PowerPoint Viewer
NOTE
• Clicking on Application Selection screen will bring the screen to the front and leave
all launched application windows hidden behind. Use Alt + Tab to select and restore
a hidden or minimized application window.
• Exiting a virtual desktop or application will return to the Desktop Selection or
Application Selection screen. On the screen, you can:
Click to launch another virtual desktop if any or to launch other applications.
Click Log O on the top of the screen to return to the Citrix Logon screen.
Press Esc to return to Atrust Quick Connection screen directly.
Page 44
Getting Started
34
Learning the Basics
Accessing VMware View or Horizon View Services
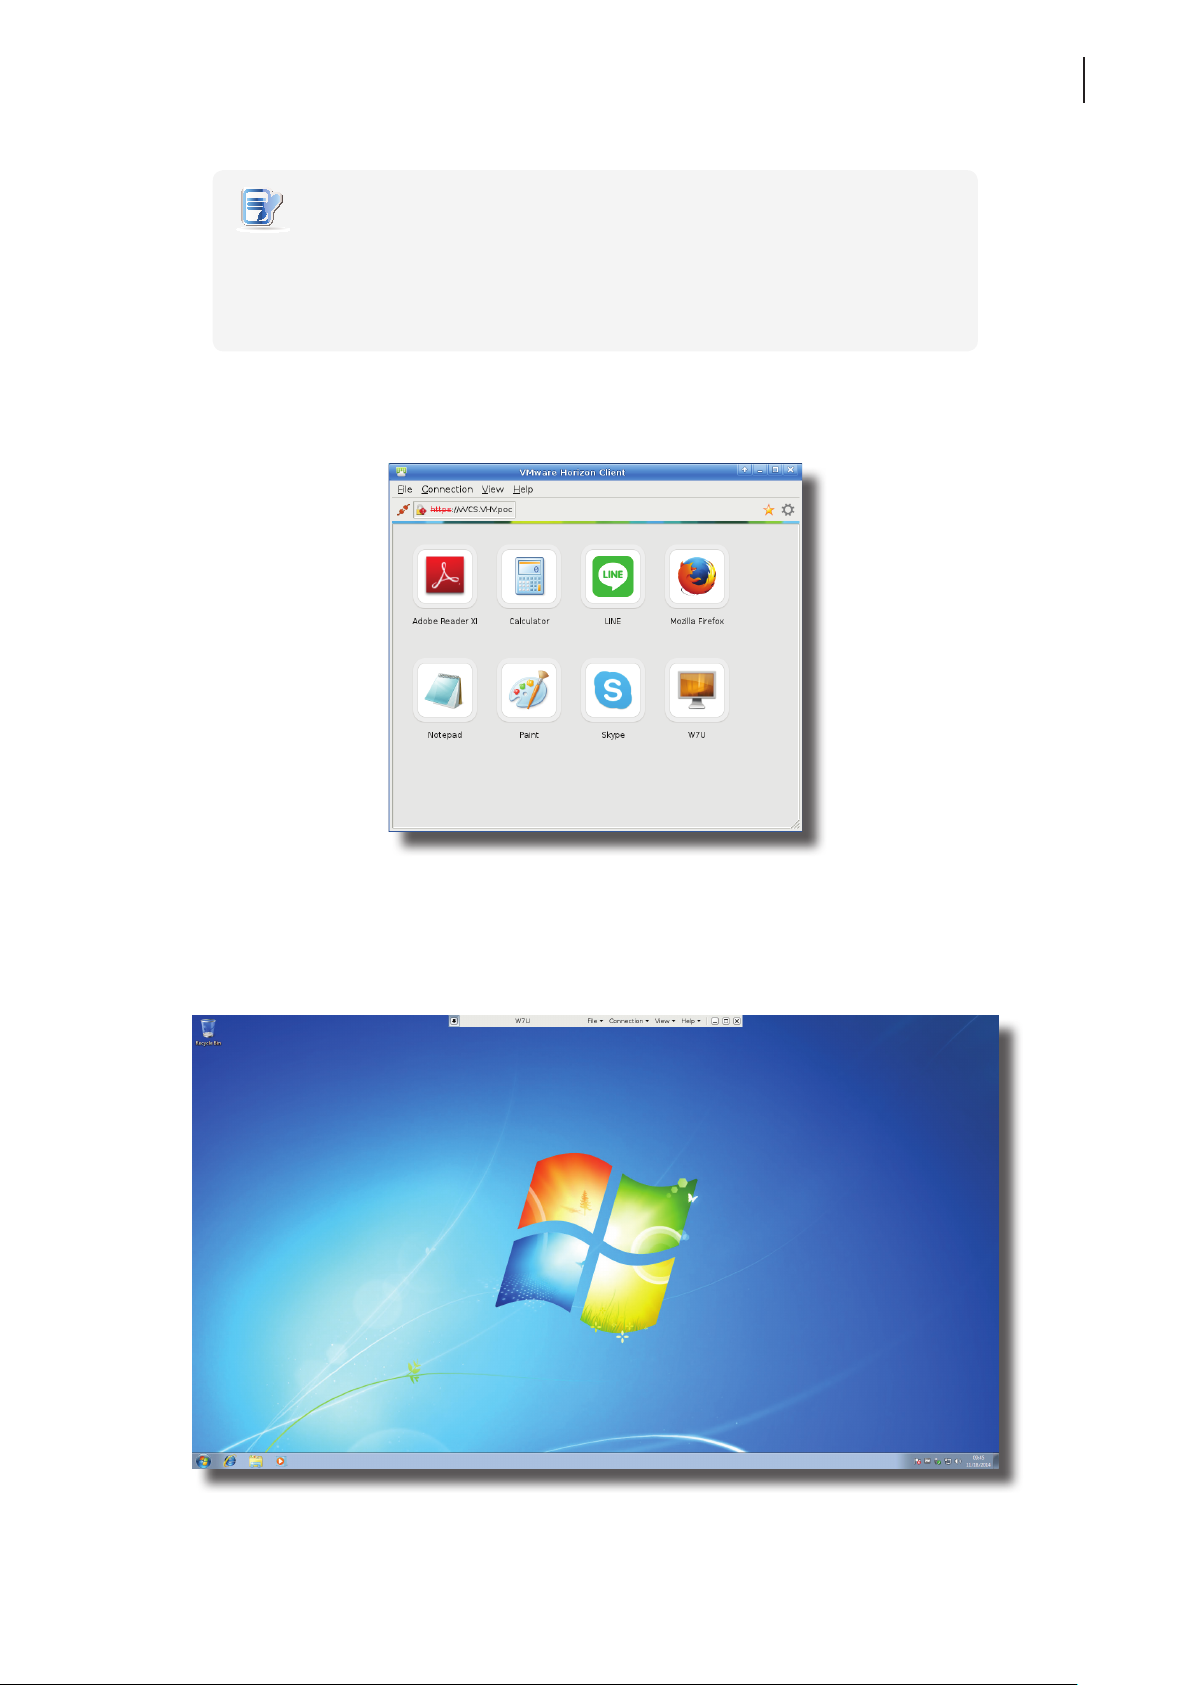
To access VMware View or Horizon View services, please do the following:
1. Click
on Atrust Quick Connection screen (see the screen in Topic 4).
2. On the opened window, double-click Add Server icon or click New Server in the top-left corner. A window
appears prompting for the name or IP address of the VMware View Connection Server.
3. Enter the required information, and then click Connect.
NOTE
• To return to Atrust Quick Connection screen (see the screen in Topic 4), close the
opened window.
4. A Welcome window might appear, click OK to continue.
5. A window appears prompting for the credentials. Enter your user name, password, click the Domain
drop-down menu to select the domain, and then click OK.
Page 45
Getting Started
Learning the Basics
NOTE
• A window might appear with a certicate message about the remote server.
Consult the IT administrator for details and ensure the connection is secure rst.
To import a security certicate, please refer to section “4.2.16 Importing Certicates
for Remote Computers” on page 71. To bypass, click Connect Insecurely.
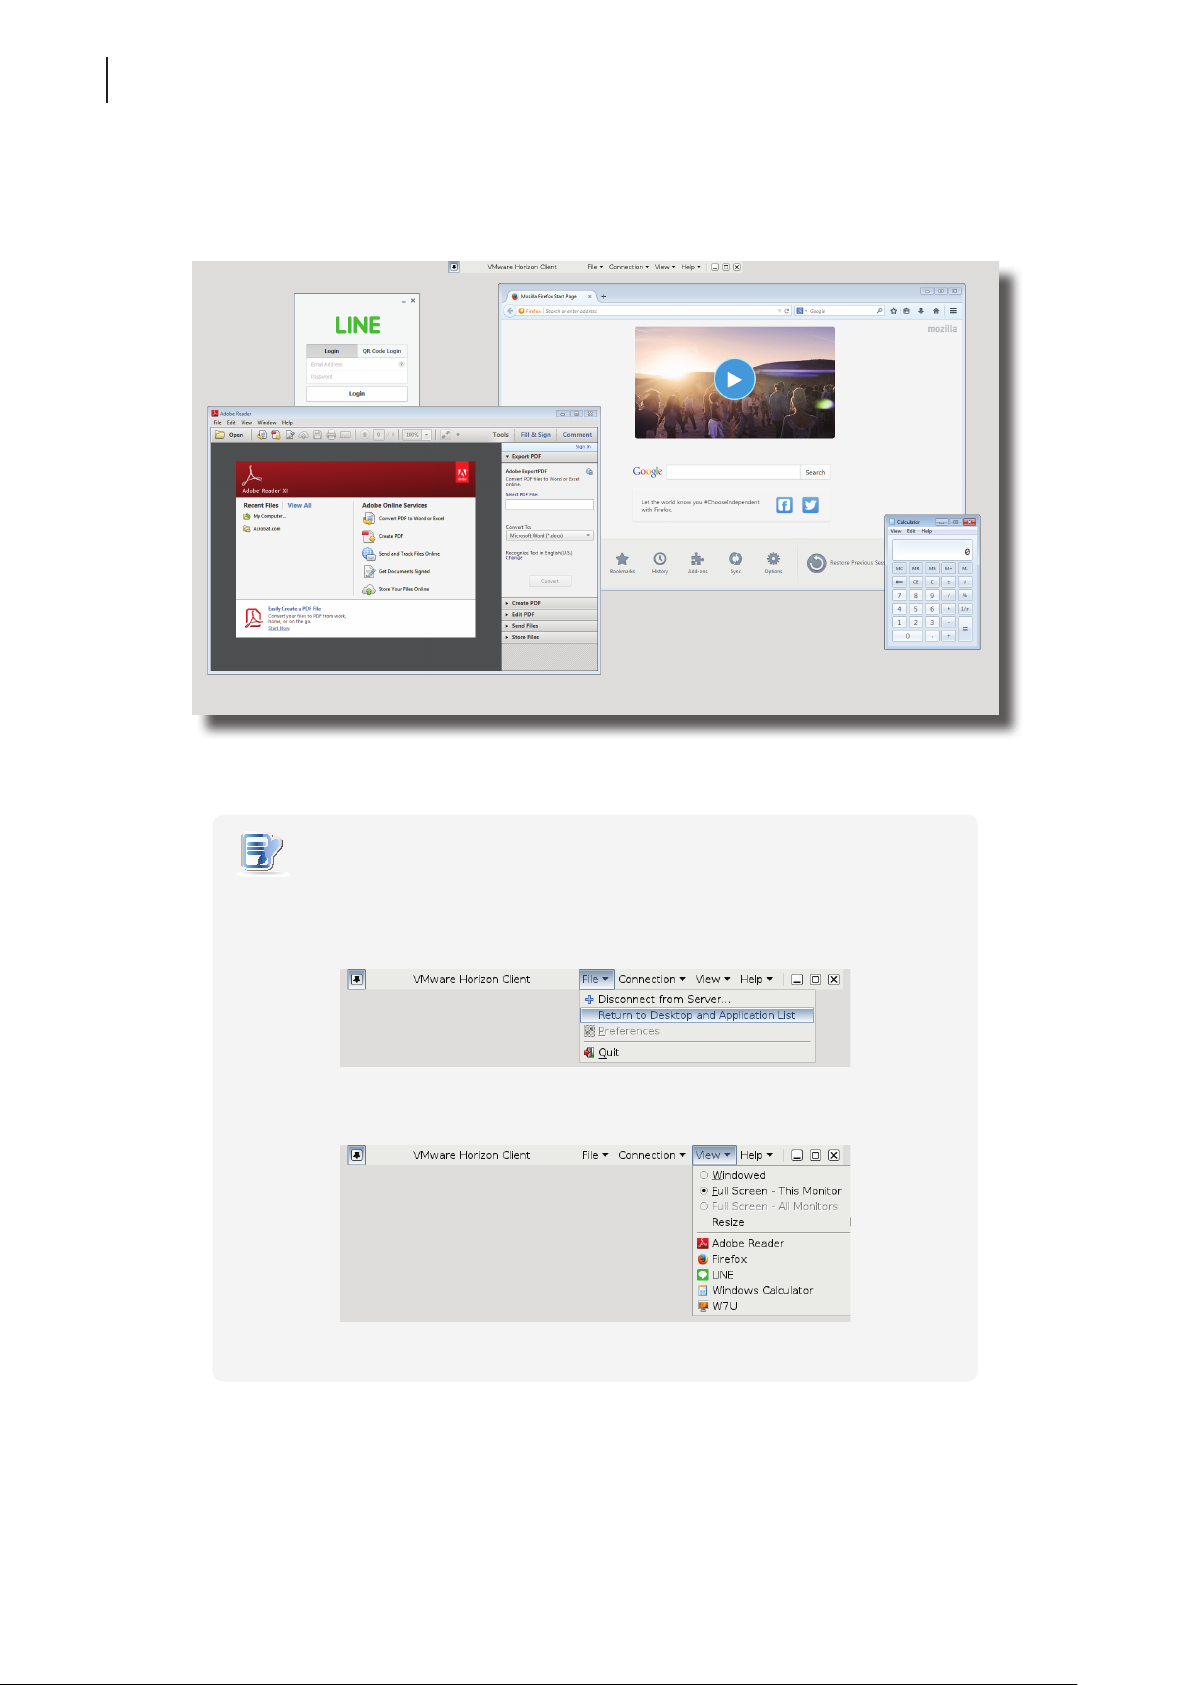
6. The Desktop and Application list appears with available desktops and/or applications for the provided
credentials. Double click to select the desired desktop or application.
35
7. The virtual desktop or application will be displayed on the screen.
Virtual Desktop Example
Windows 7 Ultimate
Page 46
Getting Started
36
Learning the Basics
Virtual Application Examples (VMware Horizon 6 with View)
LINE, Adobe Reader, Mozilla Firefox, and Calculator
NOTE
• Your desktop or application will be displayed in full screen. You can:
Click File > Return to Desktop and Application List on the top tool bar to
recall the Desktop and Application list.
Click View on the top tool bar to switch to a virtual desktop or application.
Page 47
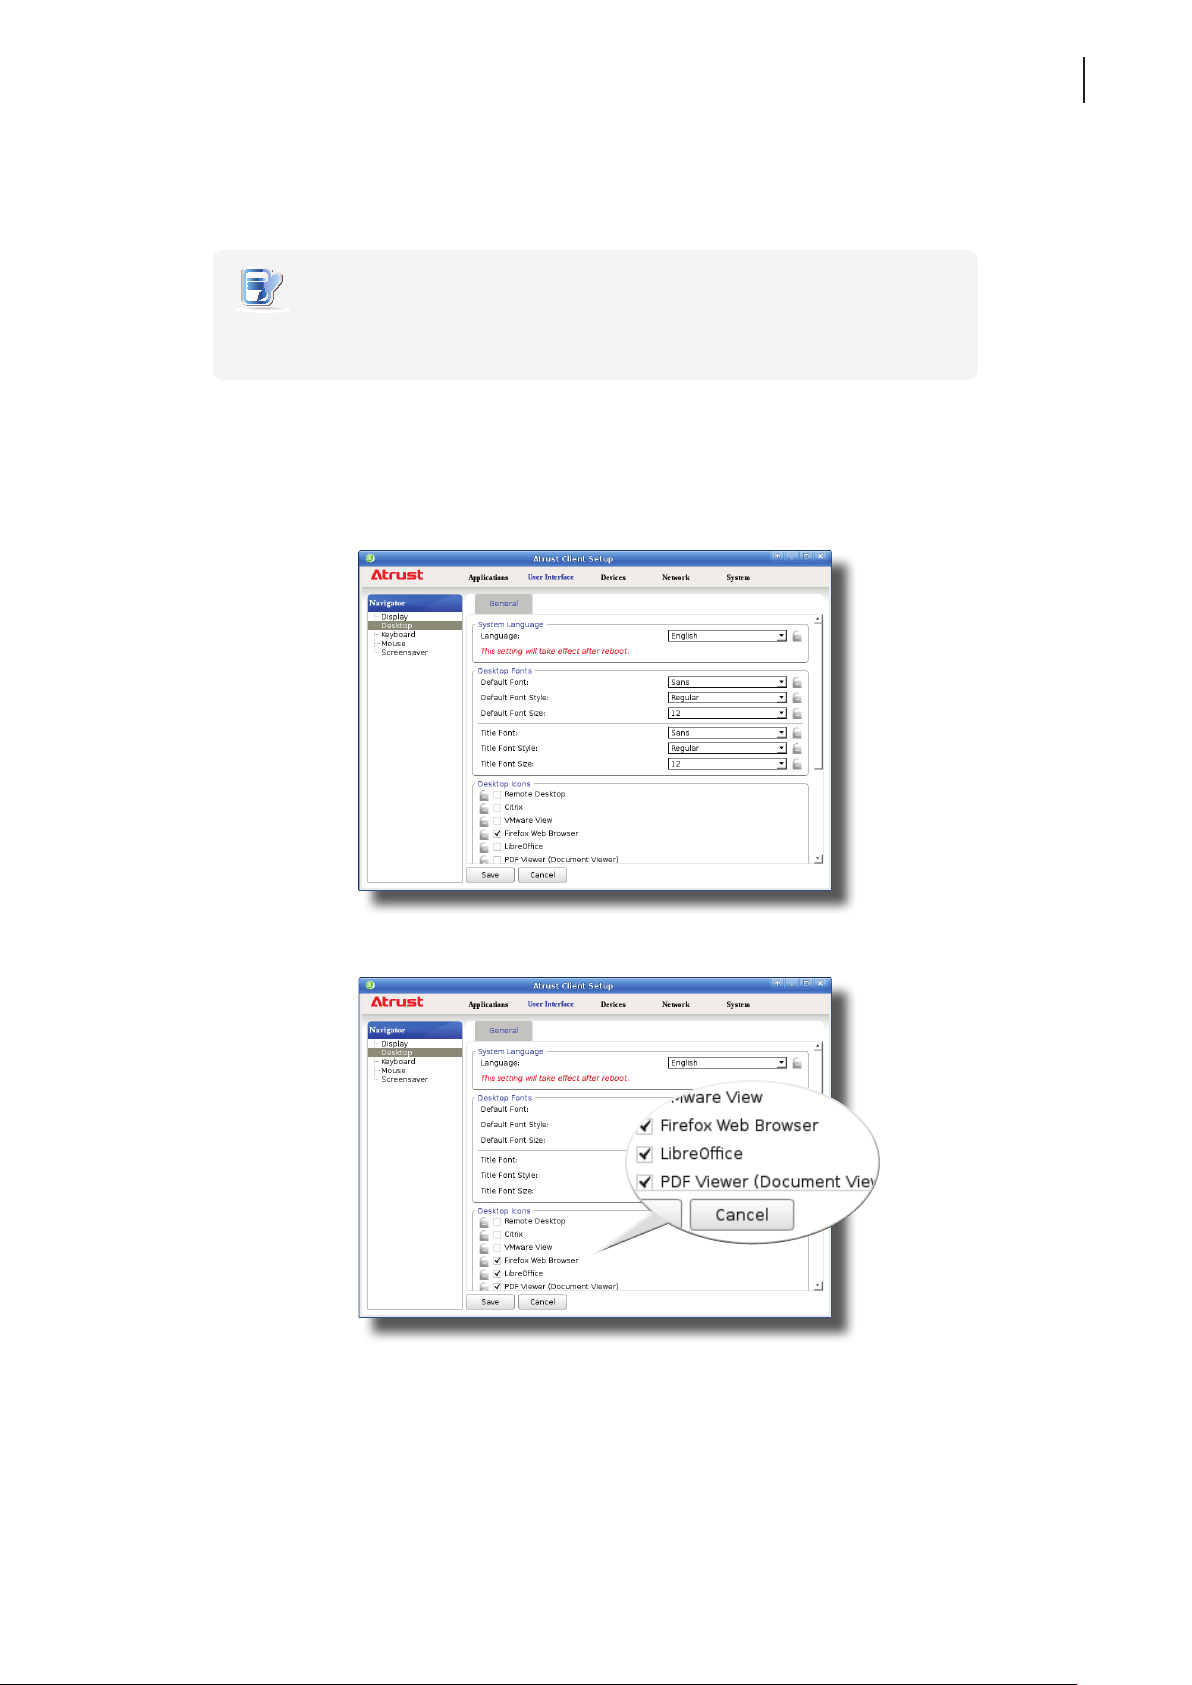
Learning the Basics
Topic 5: Using Built-in Applications
To use built-in applications (Web browser, PDF viewer, LibreOce, etc), please do the following:
NOTE
• The access shortcuts for built-in applications may be hidden by default. You need to
enable the display of those shortcuts on the desktop and START menu rst.
1. Enable the display of application shortcuts on the local desktop and START menu.
1) On the local desktop, click START > Settings > Atrust Client Setup to launch Atrust Client Setup.
2) On Atrust Client Setup, click User Interface > Desktop.
Getting Started
37
3) Click to check LibreOce and PDF Viewer, and then click Save to apply.
4) Close Atrust Client Setup.
Page 48
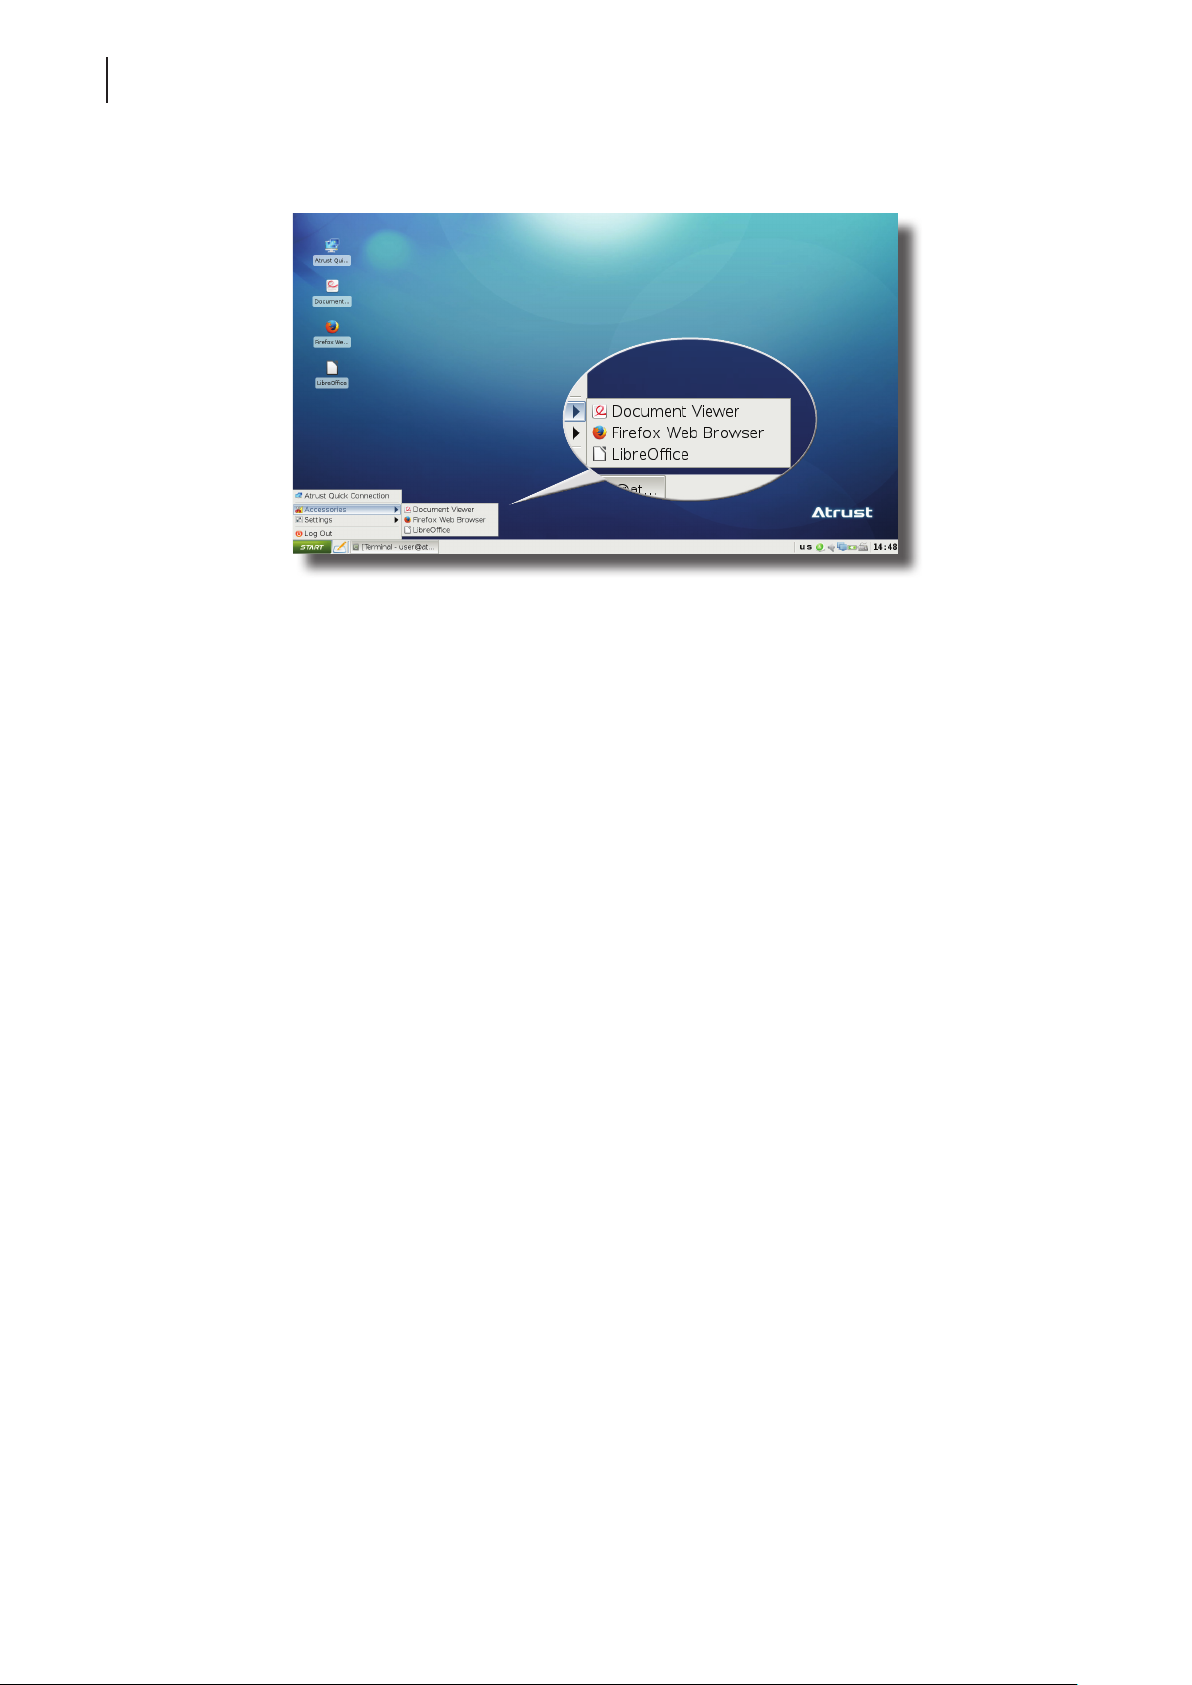
Getting Started
38
Learning the Basics
2. The shortcuts appear on the local desktop and START menu.
3. Click shortcuts on the desktop or START menu to launch applications.
Page 49
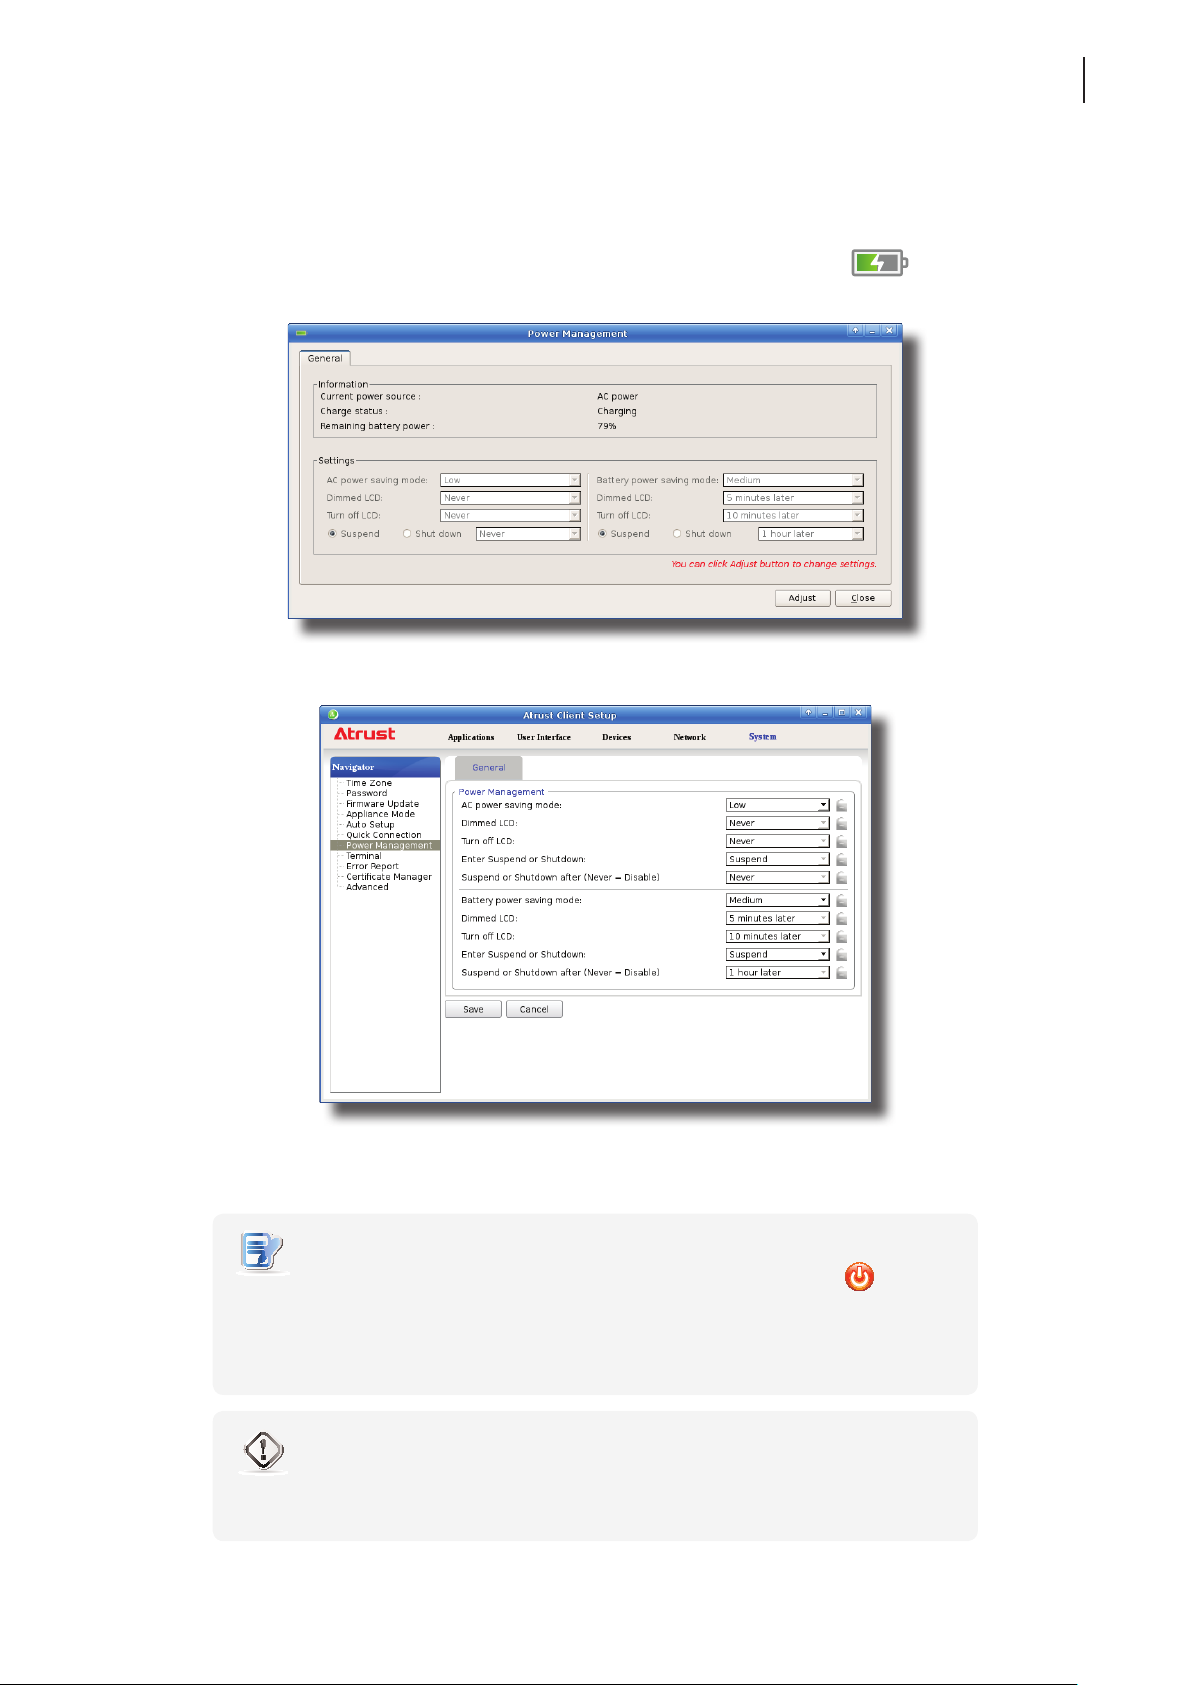
Topic 6: Viewing and Managing the Use of Power
To view and manage the use of power for your mt168L, please do the following:
Getting Started
Learning the Basics
39
1. On Atrust Quick Connection screen or on the local Linux desktop, click the Power
icon in the
bottom-right corner to launch Power Management. Here you can view the use and settings of power.
2. If needed, click Adjust to launch Atrust Client Setup to congure the settings of power.
3. Choose the desired power-saving mode for your AC power and battery, or choose Custom to customize
individual settings, and then click Save to apply.
NOTE
• When your mt168L enters System Sleep mode manually (Fn + F12 or >
Suspend) or automatically (congured in Atrust Client Setup through System >
Power Management), it still requires a certain amount of power. You can use
Shut down option instead to save the power to a greater degree.
WARNING
• When using only the battery as the power source, ensure that it has enough power
to prevent data loss.
Page 50

Getting Started
40
Learning the Basics
Page 51

Conguring Client Settings
This chapter provides instructions on how to congure advanced
settings and customize your mt168L with Atrust Client Setup.
4.1 Atrust Client Setup
4.2 Conguring System Settings
4.3 Conguring User Interface Settings
Interface overview
Available settings at glance
System tab overview
Available settings at a glance
User Interface tab overview
Available settings at a glance
4
43
44
45
46
76
77
4.4 Conguring External Device Settings
Devices tab overview
Available settings at a glance
4.5 Conguring Network Settings
Network tab overview
Available settings at a glance
4.6 Conguring Service Access Settings
Applications tab overview
Available settings at a glance
88
89
97
98
120
121
Page 52

Page 53
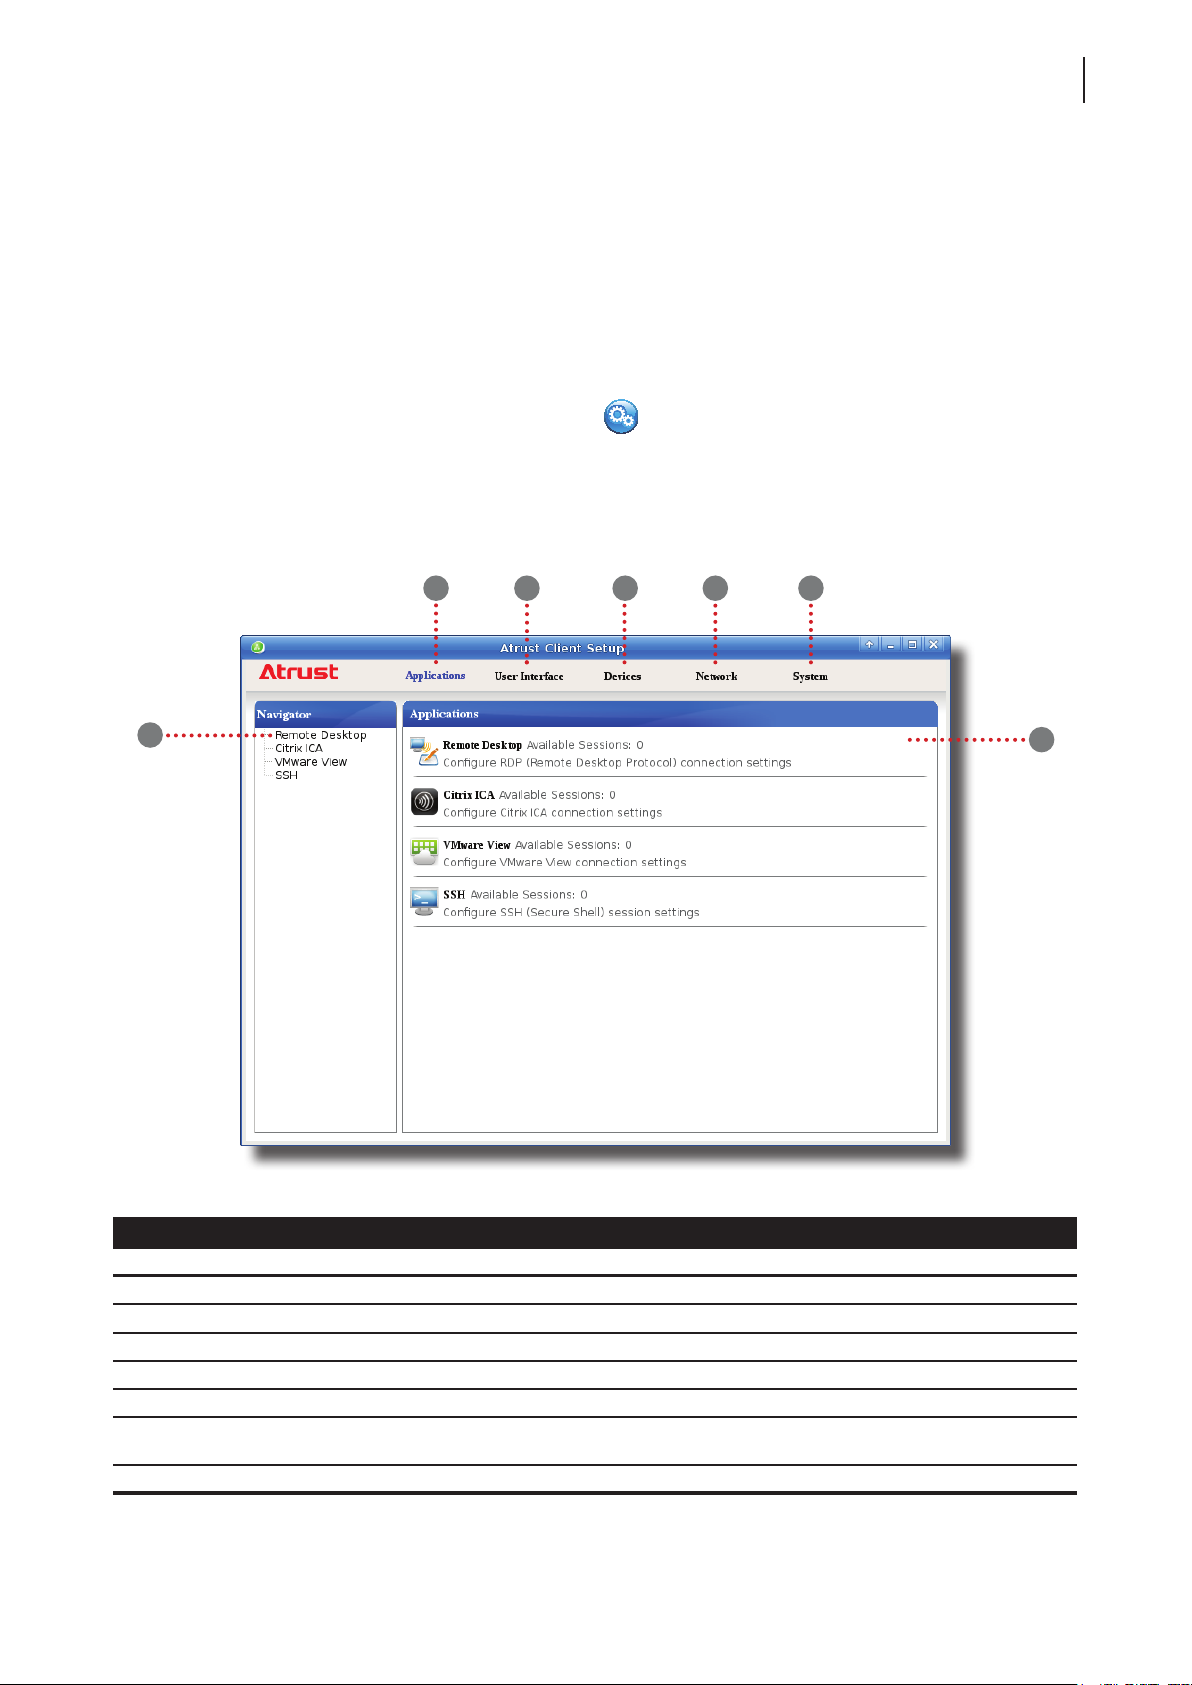
Conguring Client Settings
Atrust Client Setup
4.1 Atrust Client Setup
Your mt168L comes with Atrust Client Setup, the built-in local client management console to help you congure
client settings and customize your mt168L.
4.1.1 Interface Overview
To access Atrust Client Setup on your mt168L, please do the following:
43
1. On Atrust Quick Connection screen, click the Setup
2. The Atrust Client Setup window appears.
Interface Overview
1
2
6
icon to launch Atrust Client Setup.
43
5
7
Interface Elements
No. Name Description
1 Applications tab Click to congure settings for service access through the client.
2 User Interface tab Click to congure settings for the user interface of the client.
3 Devices tab Click to congure settings for external devices of the client.
4 Network tab Click to congure settings for the connectivity of the client to networks and servers.
5 System tab Click to congure settings for the operation and maintenance of the client.
6 Navigation area
7 Conguration area Congures setting values when a setting item or entry is selected.
Click to select a setting item under a selected tab or to select a setting entry under
a selected setting item.
Page 54

Conguring Client Settings
44
Atrust Client Setup
4.1.2 Client Settings at a Glance
The following table provides a brief description of each setting item under ve main setting categories.
Tab Setting Item Section Page
• Conguring time zone and time server
• Conguring passwords
• Conguring remote assistance settings
• Updating rmware
• Enabling/Disabling the Appliance mode
• Enabling Auto Setup
System
• Conguring Quick Connection
• Managing the use of power
• Enabling/Disabling the execution of the
text-based (command-line) functions
• Collecting event logs, capturing related
screens, and upload les for error reporting
• Importing certicates for remote computers
• Enabling/Disabling Auto Registration
4.2 Conguring System Settings 45
User Interface
Devices
Network
Applications
• Conguring display settings
• Customizing desktop and system language
• Hiding/Showing Quick Access shortcuts
• Using a custom wallpaper
• Adjusting keyboard settings
• Adjusting mouse settings
• Conguring screensaver settings
• Conguring settings for USB storage devices
• Conguring settings for audio devices
• Conguring settings for local/network printers
• Conguring wired network settings
• Conguring VPN settings
• Creating the mapping of IP addresses to the
names or aliases of hosts
• Creating the Failover Cluster list
• Changing the host name of your client
• Conguring wireless network settings
• Conguring proxy settings for Web-based
access to services
• Conguring Microsoft RDP connection settings
• Conguring Citrix ICA connection settings
• Conguring VMware View connection settings
• Conguring SSH connection settings
4.3 Conguring User Interface Settings 76
4.4 Conguring External Device Settings 88
4.5 Conguring Network Settings 97
4.6 Conguring Service Access Settings 120
Page 55
Conguring Client Settings
Conguring System Settings
4.2 Conguring System Settings
4.2.1 System Tab Overview
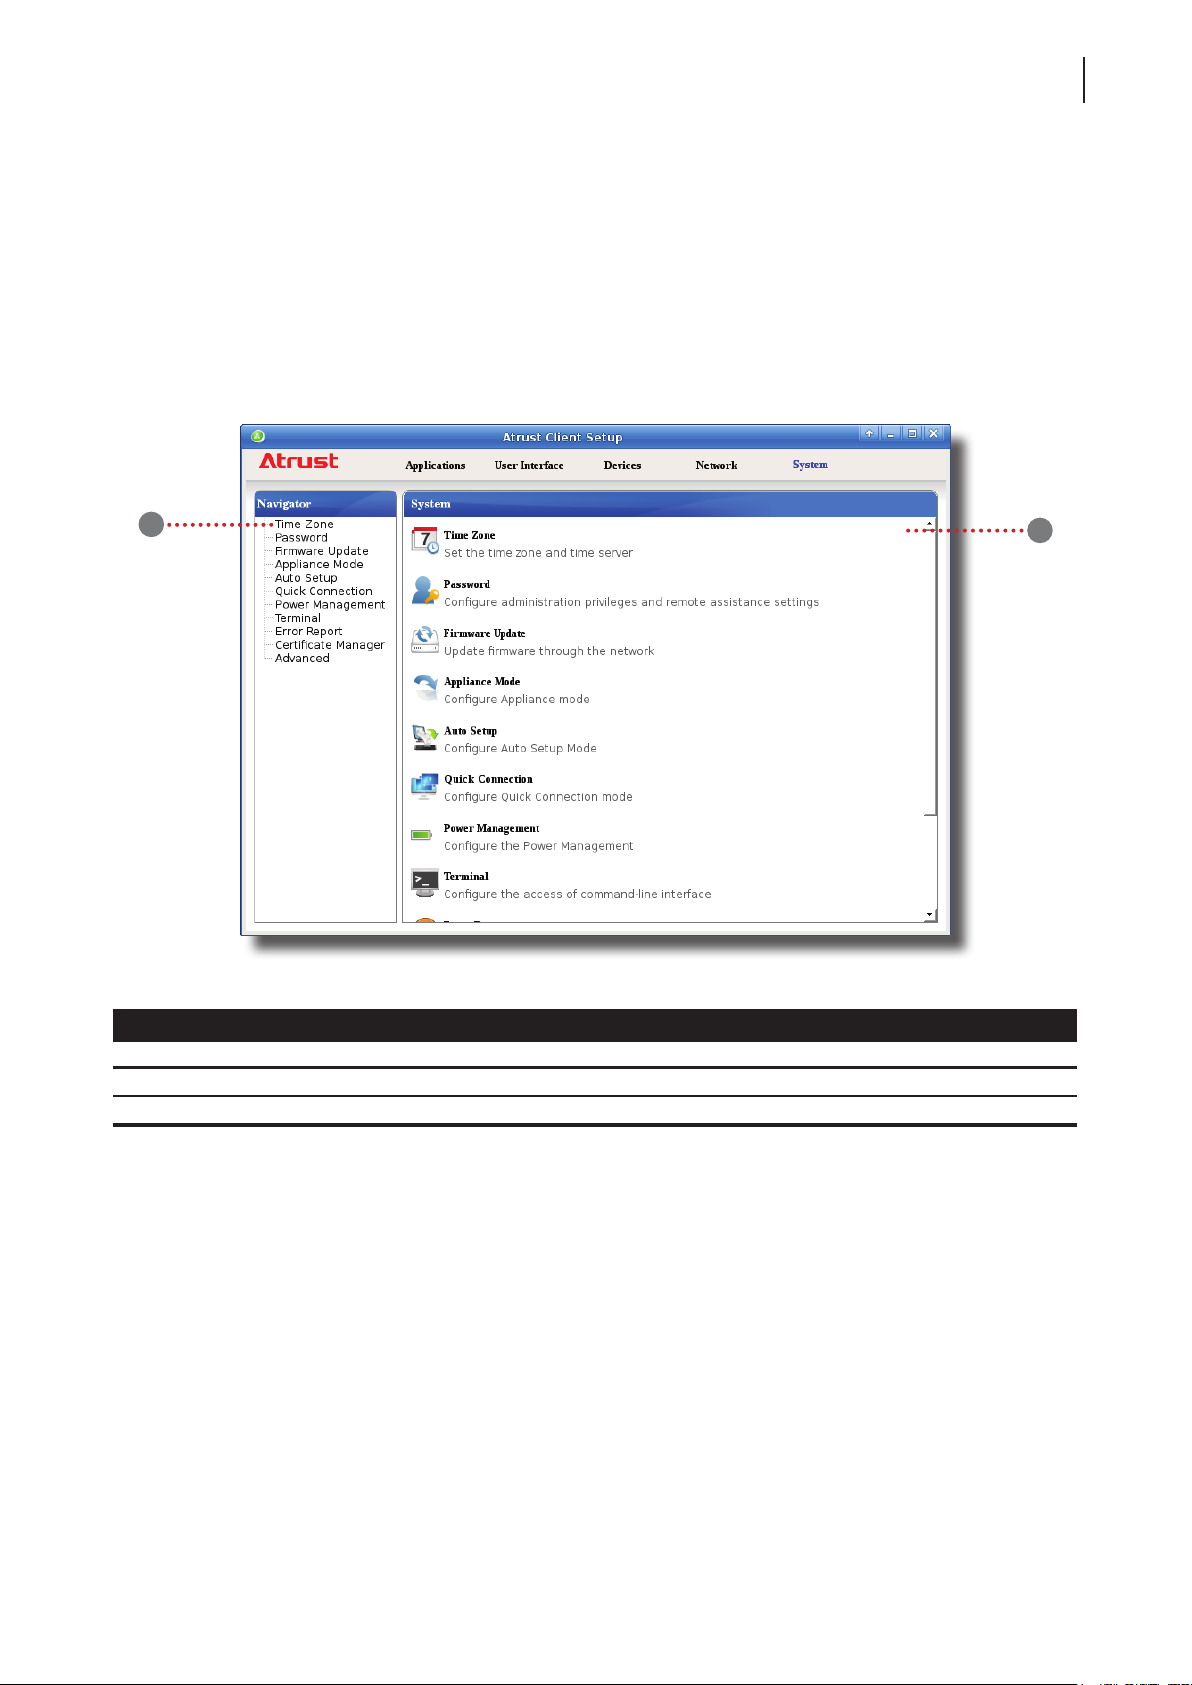
System tab enables you to congure settings for the operation and maintenance of clients. To access available
settings of System tab, click the tab on Atrust Client Setup.
System Tab Overview
45
1
Interface Elements
No. Name Description
1 Navigation area Click to select a setting item under System tab.
2 Conguration area Congures setting values when a setting item or entry is selected.
2
Page 56
Conguring Client Settings
46
Conguring System Settings
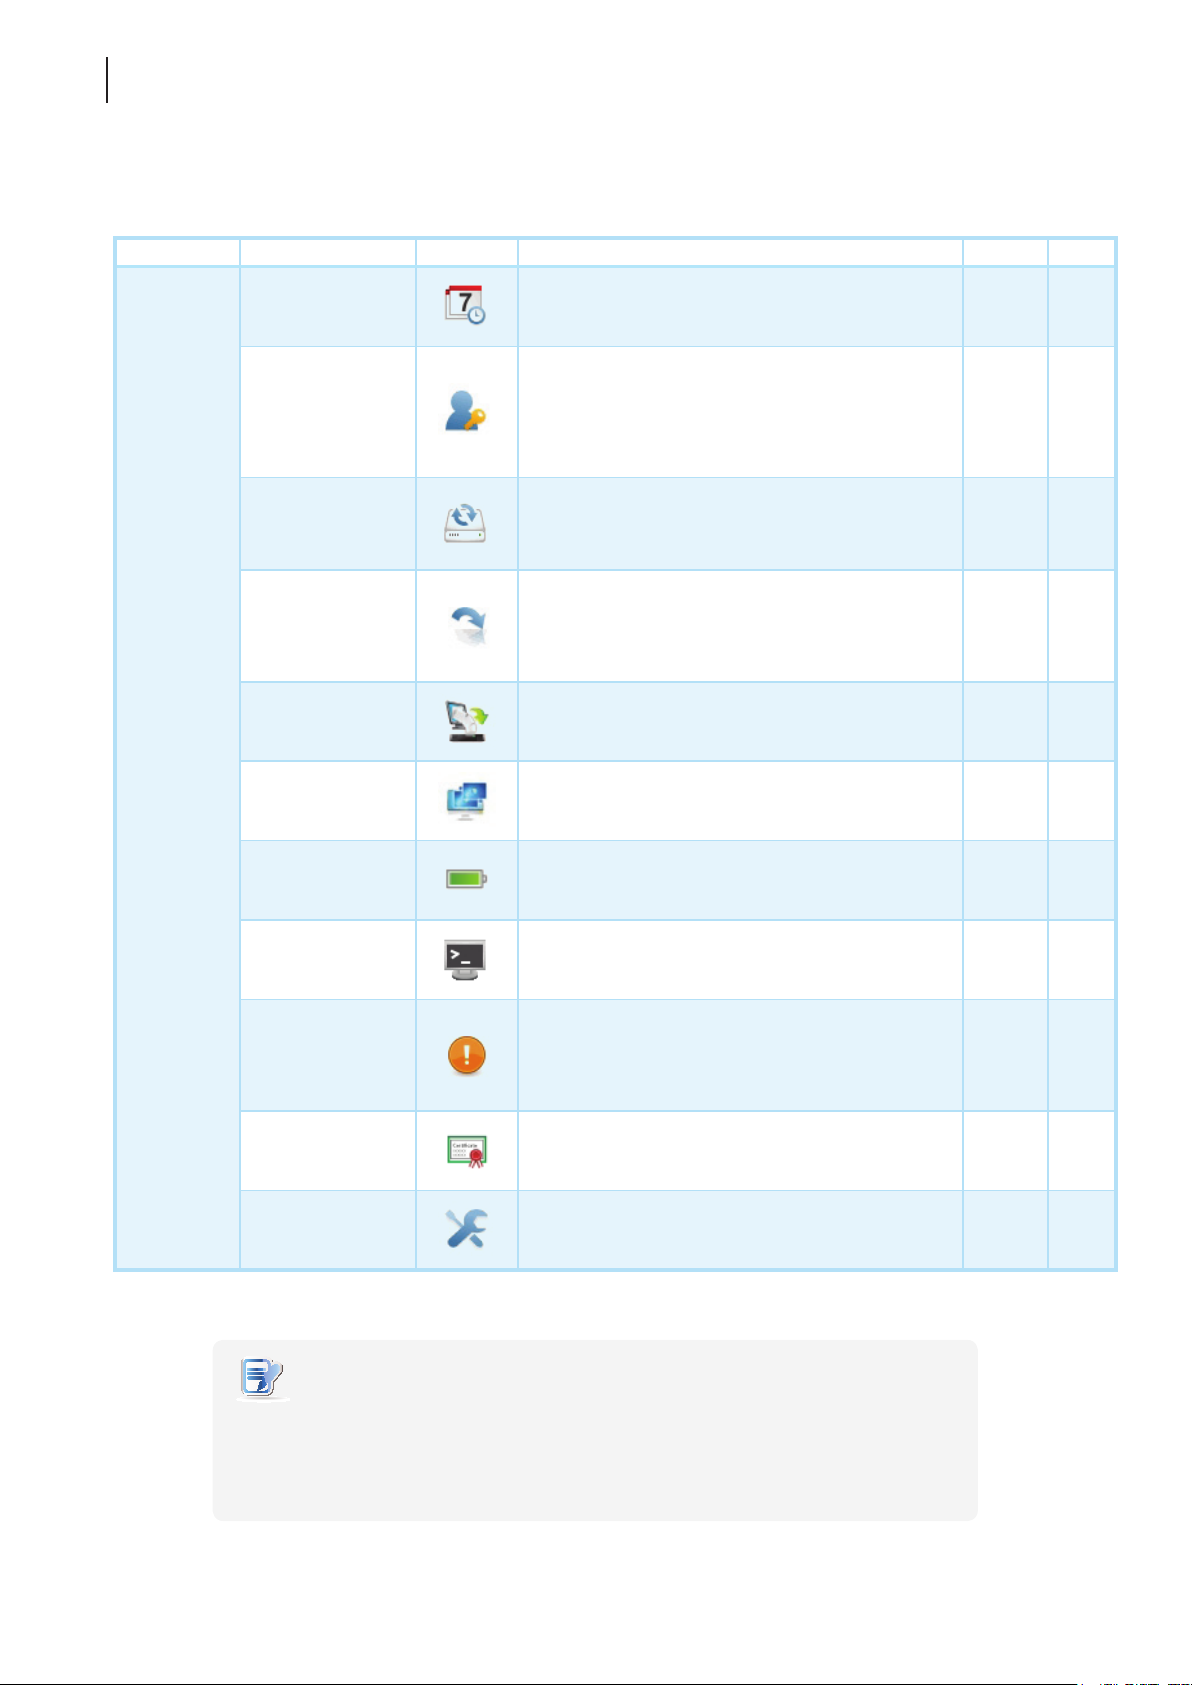
4.2.2 Available Settings at a Glance
Tab Setting Icon Description Section Page
System
Time Zone
Password
Firmware Update
Appliance Mode
Auto Setup
Quick Connection
Power
Management
Click to congure the time zone and time server for
your mt168L.
Click to congure the access privileges of Atrust
Client Setup for mt168L users.
Click to set the login password for the local desktop.
Click to congure settings for remote assistance.
Click to update rmware through the network.
This feature is applicable to the client only when
the client is managed by the remote Atrust Device
Manager console.
Click to enable/disable the Appliance mode to allow/
disallow the automatic RDP / ICA / View sessions.
In Appliance mode, the client starts up directly with
the desired RDP / ICA / View session and performs
the congured action after exiting the session.
Click to enable Auto Setup to allow the client to get
its preset congurations on startup and enter the
desired user environment automatically.
Click to congure the Quick Connection mode.
Click to manage the use of power. 4.2.12 66
4.2.3 47
4.2.4
4.2.5
4.2.6
4.2.7 54
4.2.8 56
4.2.9 60
4.2.10
4.2.11
48
50
52
60
62
Terminal
Error Report
Certicate
Manager
Advanced
Click to enable/disable the execution of the
text-based (command-line) functions.
Click to collect error log and launch the screen
capturing program for error reporting.
Click to upload les to a specied FTP server for
error reporting.
Click to import or manage certicates for
remote computers.
Click to congure advanced settings such as
Auto Registration.
NOTE
• Atrust Device Manager is a remote and mass client management console,
helping you remotely manage a large number of endpoint devices in a desktop
virtualization infrastructure. For more information about Atrust Device Manager,
please refer to the User’s Manual for Atrust Device Manager.
4.2.13 67
4.2.14
4.2.15
4.2.16 71
4.2.17 75
68
70
Page 57
Conguring Client Settings
Conguring System Settings
4.2.3 Conguring Time Zone and Time Server
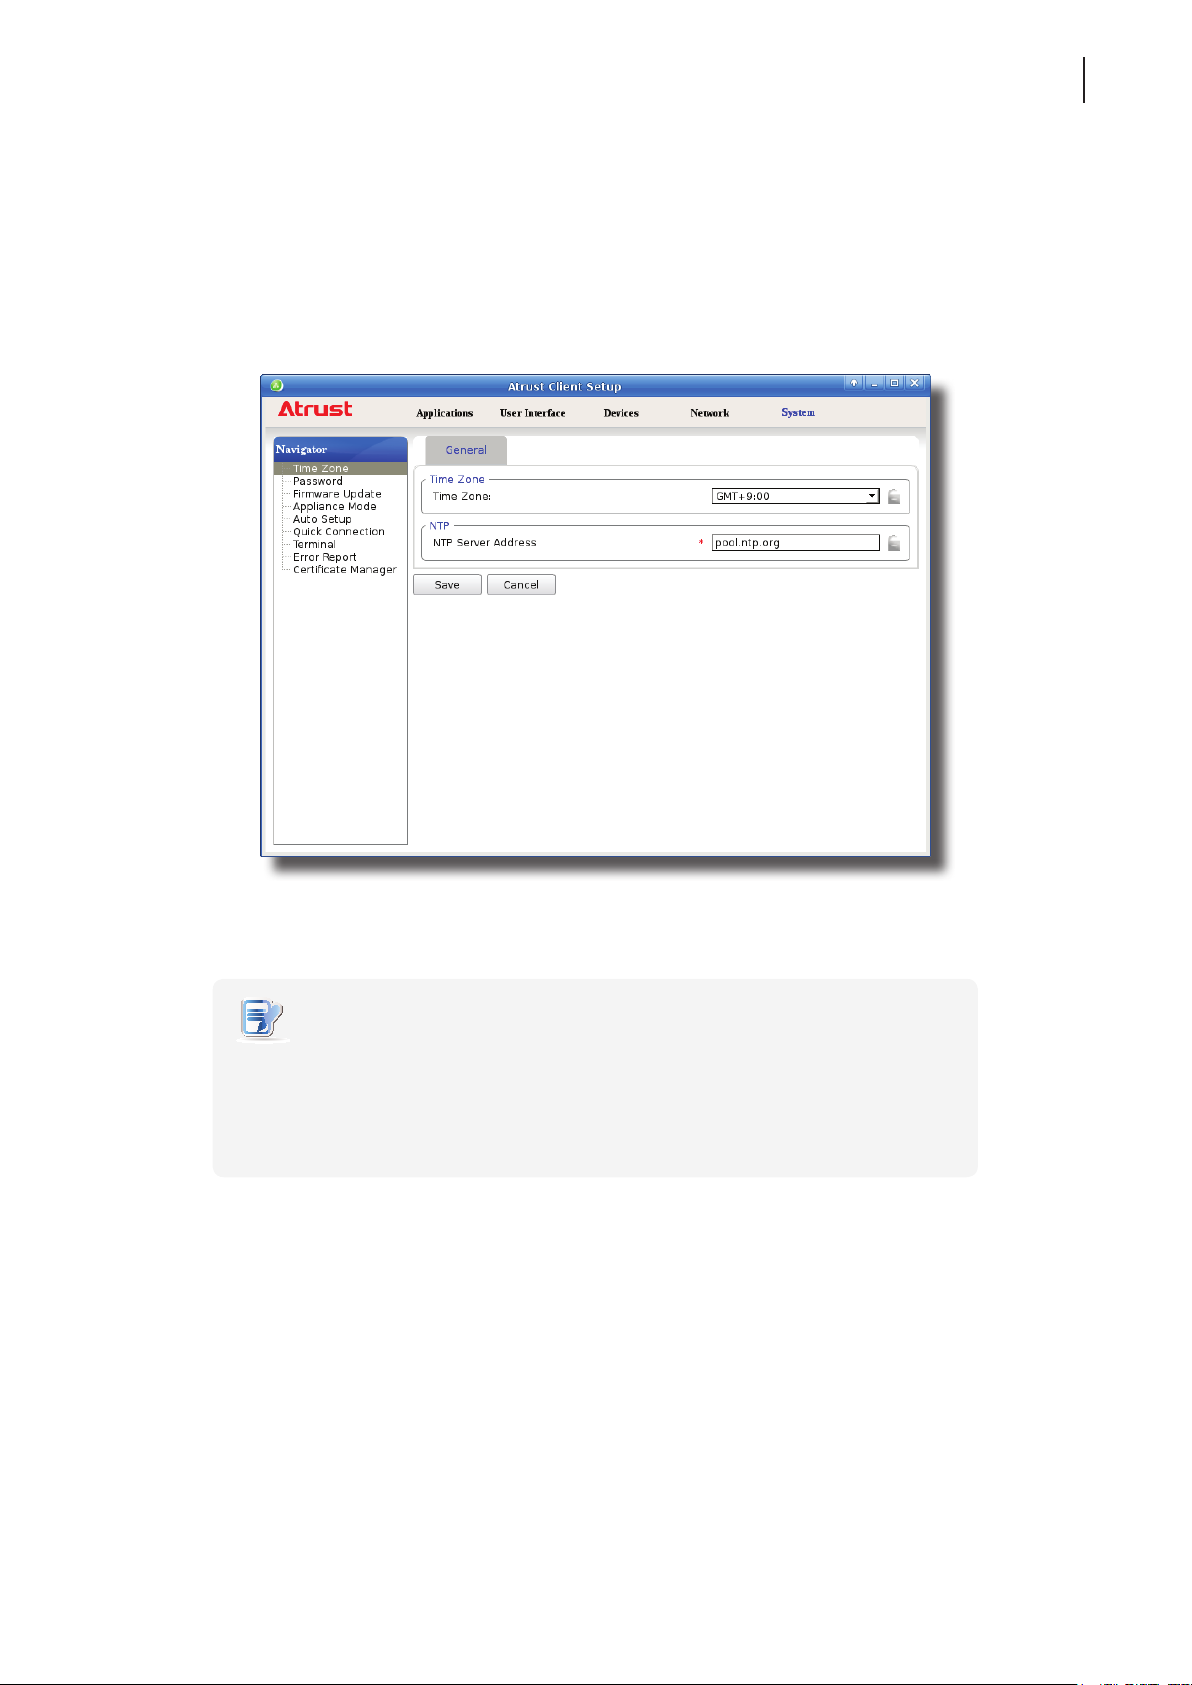
The Time Zone setting allows you to congure the desired time zone and time server to get the accurate system
time for your mt168L.
To set the desired time zone and time server, please do the following:
1. On Atrust Client Setup, click System > Time Zone.
47
2. Under the Time Zone section, click the drop-down menu to select the desired time zone.
3. Under the NTP (Network Time Protocol) section, use the default or type in the desired time server.
NOTE
• The IP address of the default time server is pool.ntp.org. For more information on
the default, please refer to the website for the NTP Pool Project at www.pool.ntp.org.
• Ensure the connectivity of your mt168L to the network or Internet in order to get
accurate time from the time server.
4. Click Save to apply.
Page 58
Conguring Client Settings
48
Conguring System Settings
4.2.4 Conguring the Access Privileges and Passwords of Atrust Client Setup
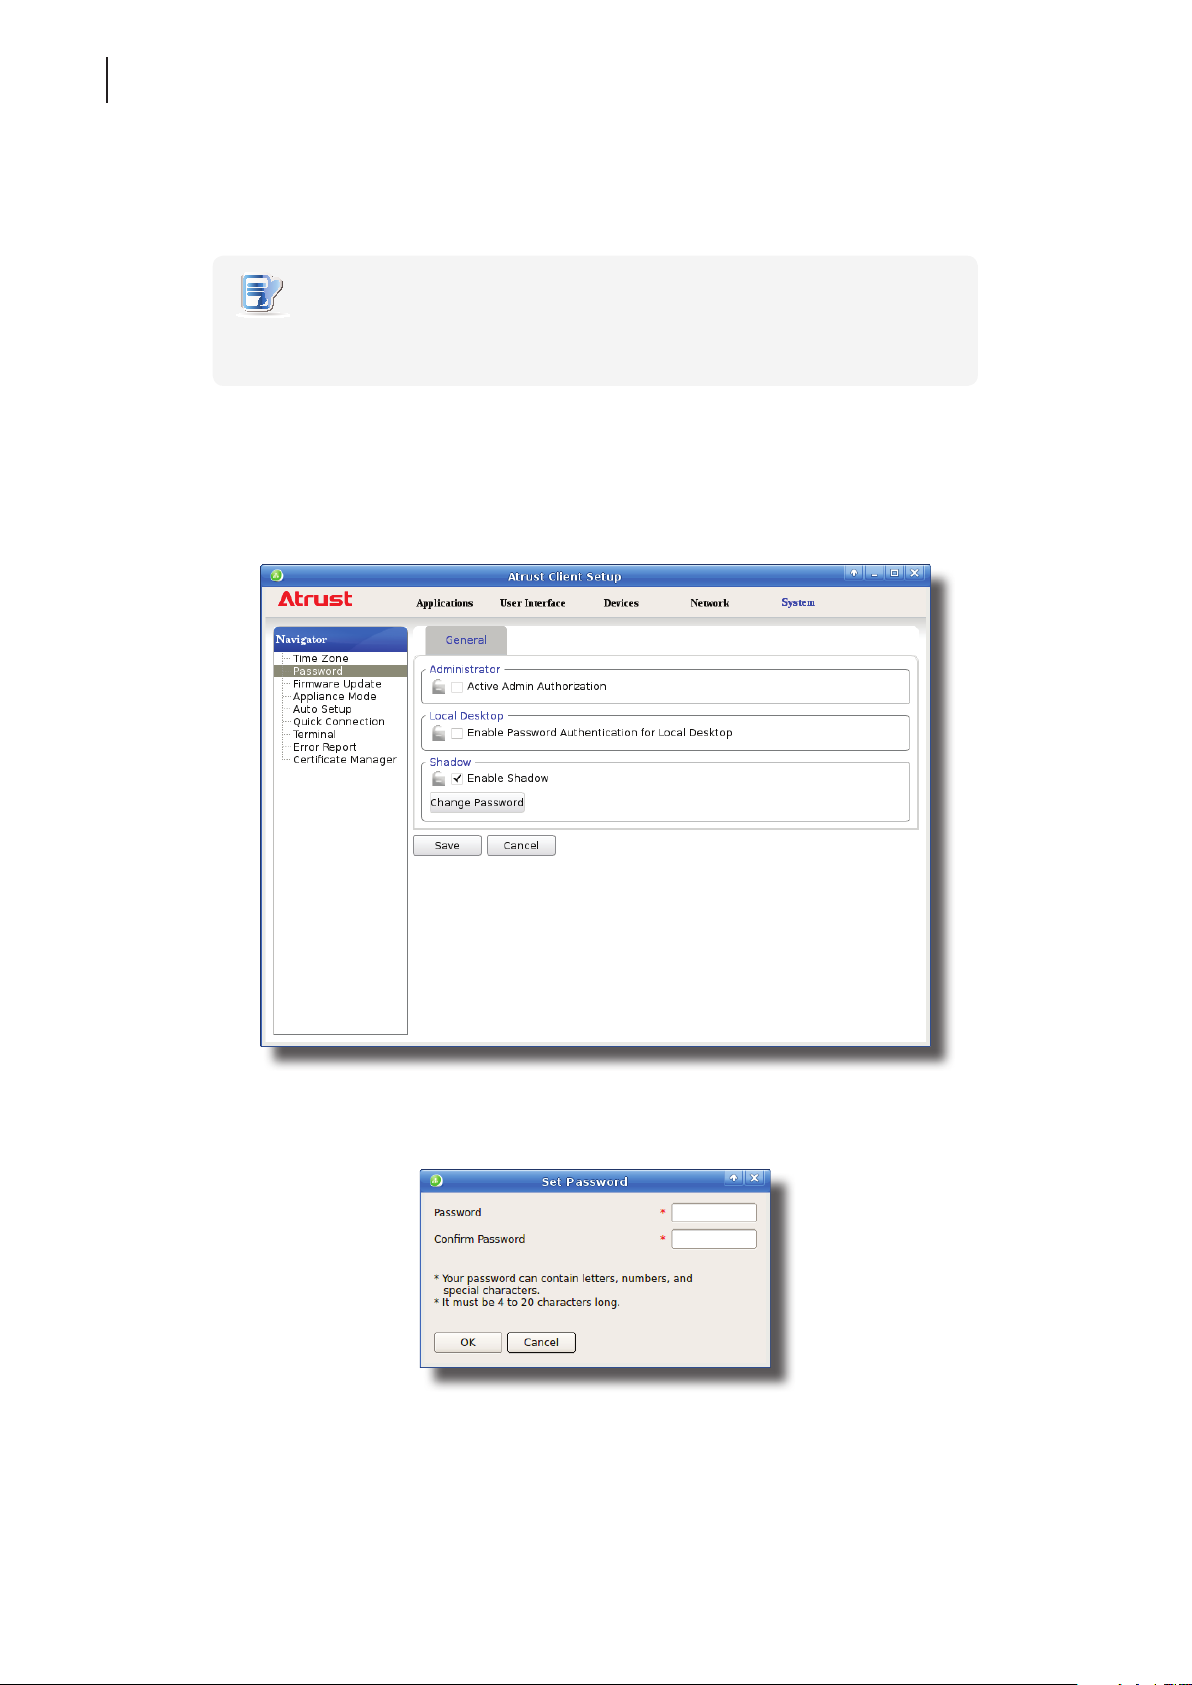
You can congure the access privileges of Atrust Client Setup for mt168L users by the Password setting.
NOTE
• All mt168L users are allowed to access Atrust Client Setup by factory default.
You can make changes as desired using this setting.
Setting Access Privileges and Password Only for Administrators
To set access privileges and password only for administrators, please do the following:
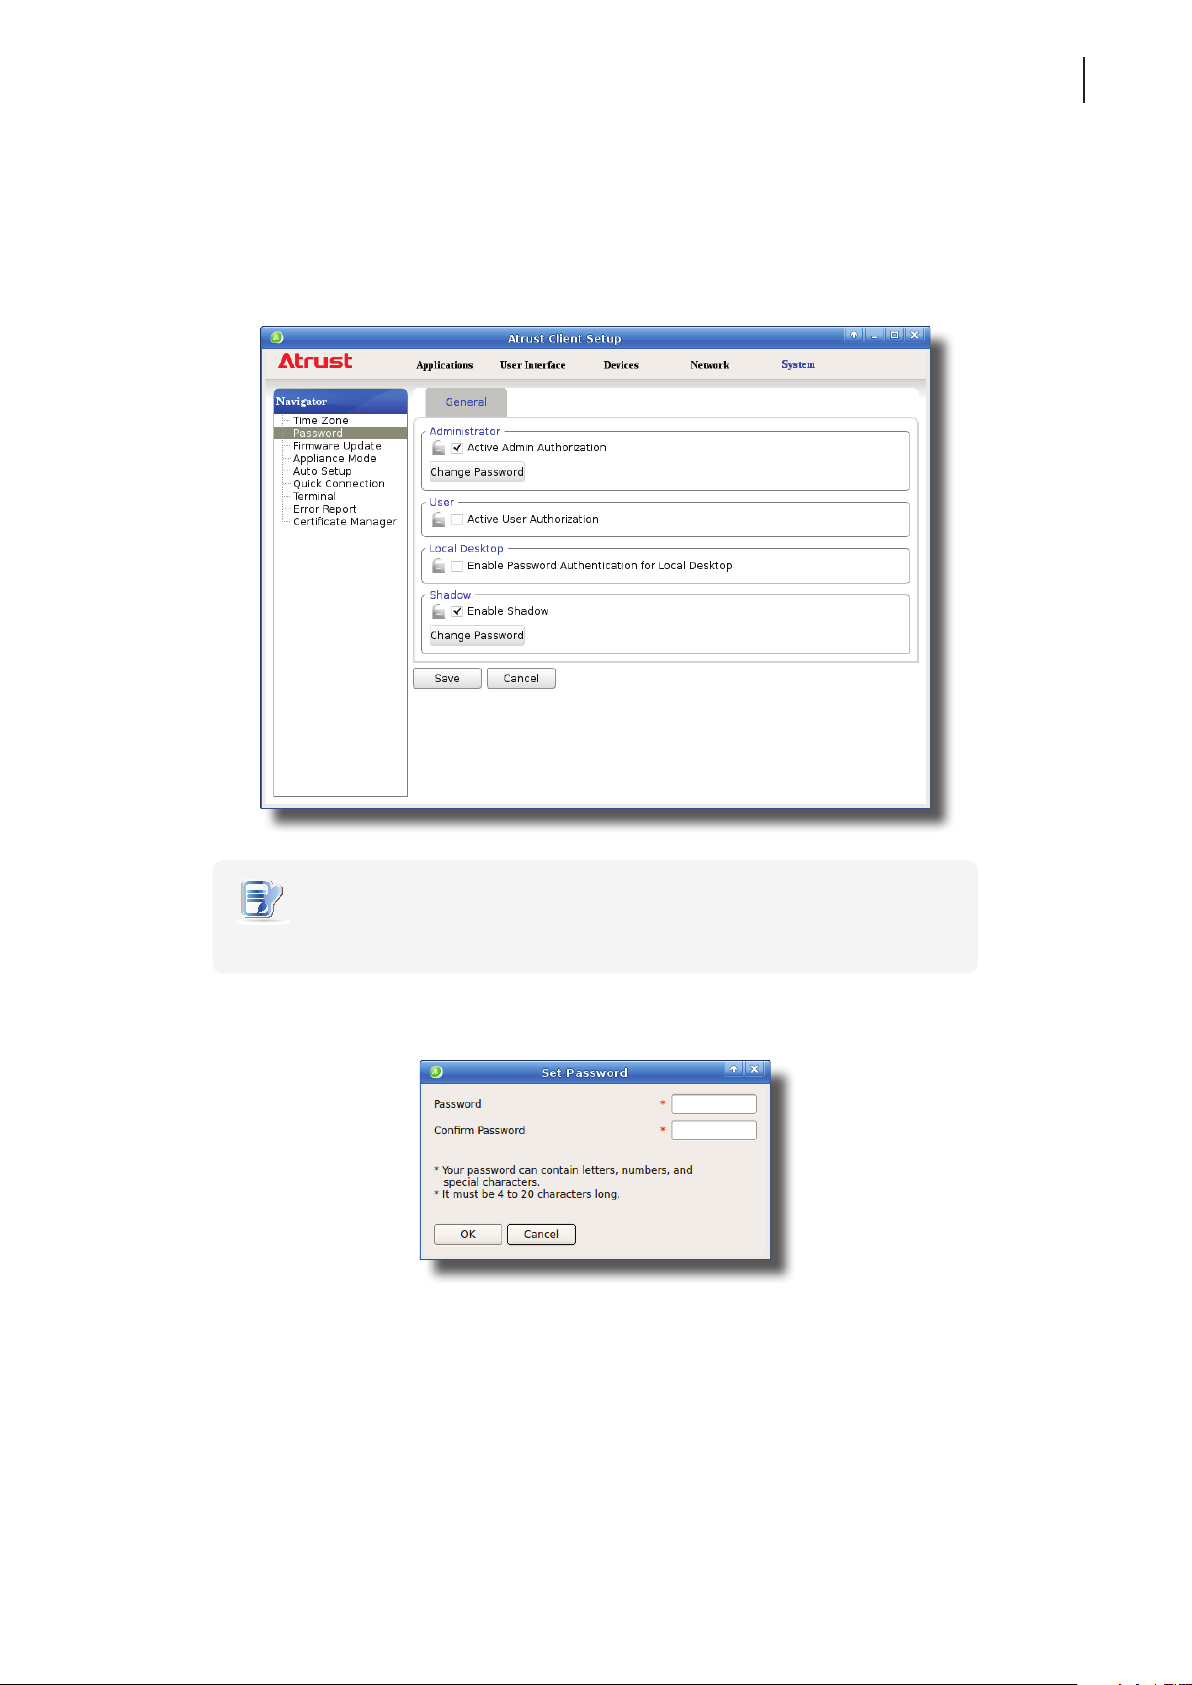
1. On Atrust Client Setup, click System > Password.
2. Under the Administrator section, click to check Active Admin Authorization.
3. The access privileges for administrators are granted and a window appears for you to set the password.
4. Type in the desired password, and then click OK to conrm.
5. Click Save to save all the changes.
Page 59
Conguring Client Settings
Conguring System Settings
Setting Access Privileges and Password Also for Standard Users
To set access privileges and password also for standard users, please do the following:
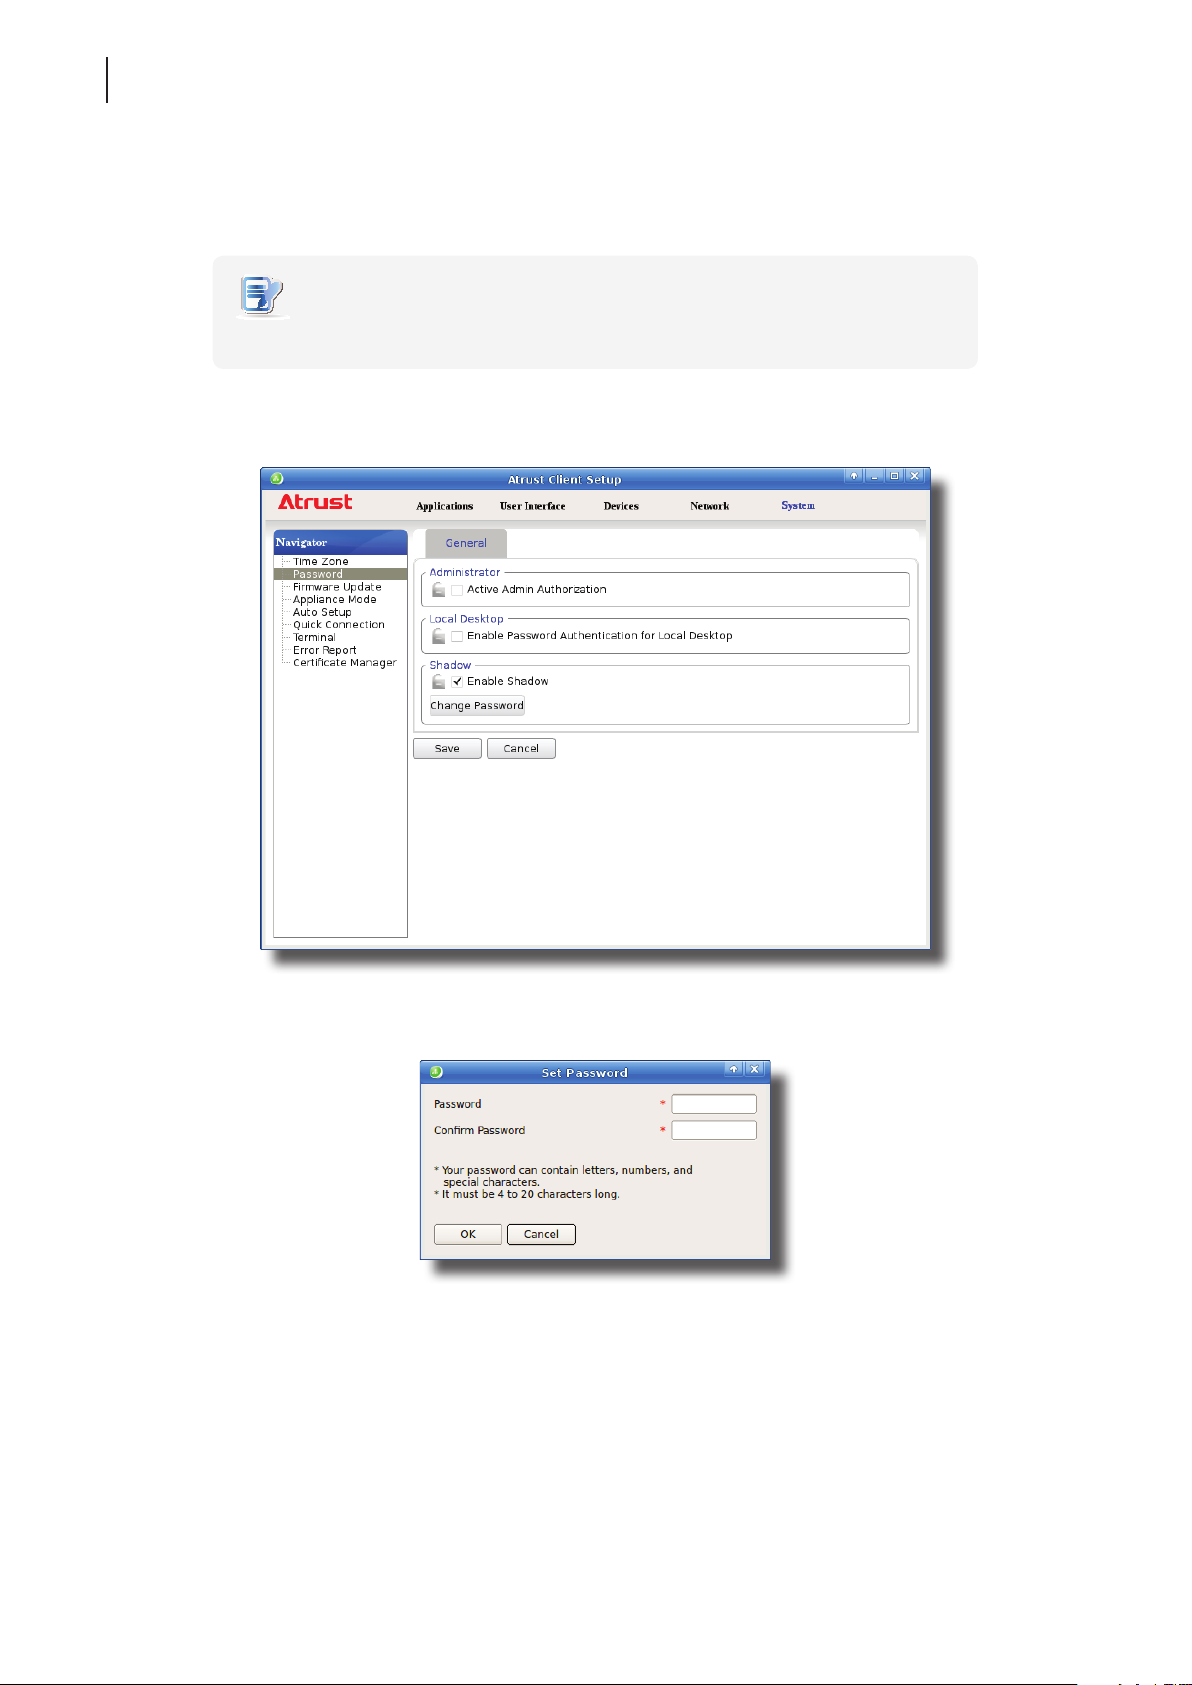
1. On Atrust Client Setup, click System > Password.
2. Under the User section, click to check Active User Authorization.
49
NOTE
• The User section appears only when Active Admin Authorization is checked.
3. The access privileges for standard users are granted and a window appears for you to set the password.
4. Type in the desired password, and then click OK to conrm.
5. Click Save to save all the changes.
Page 60
Conguring Client Settings
50
Conguring System Settings
4.2.5 Conguring the Login Password for the Local Desktop
To enable and set the login password for the local desktop, please do the following:
NOTE
• The default behavior is to enter the local desktop without any login password.
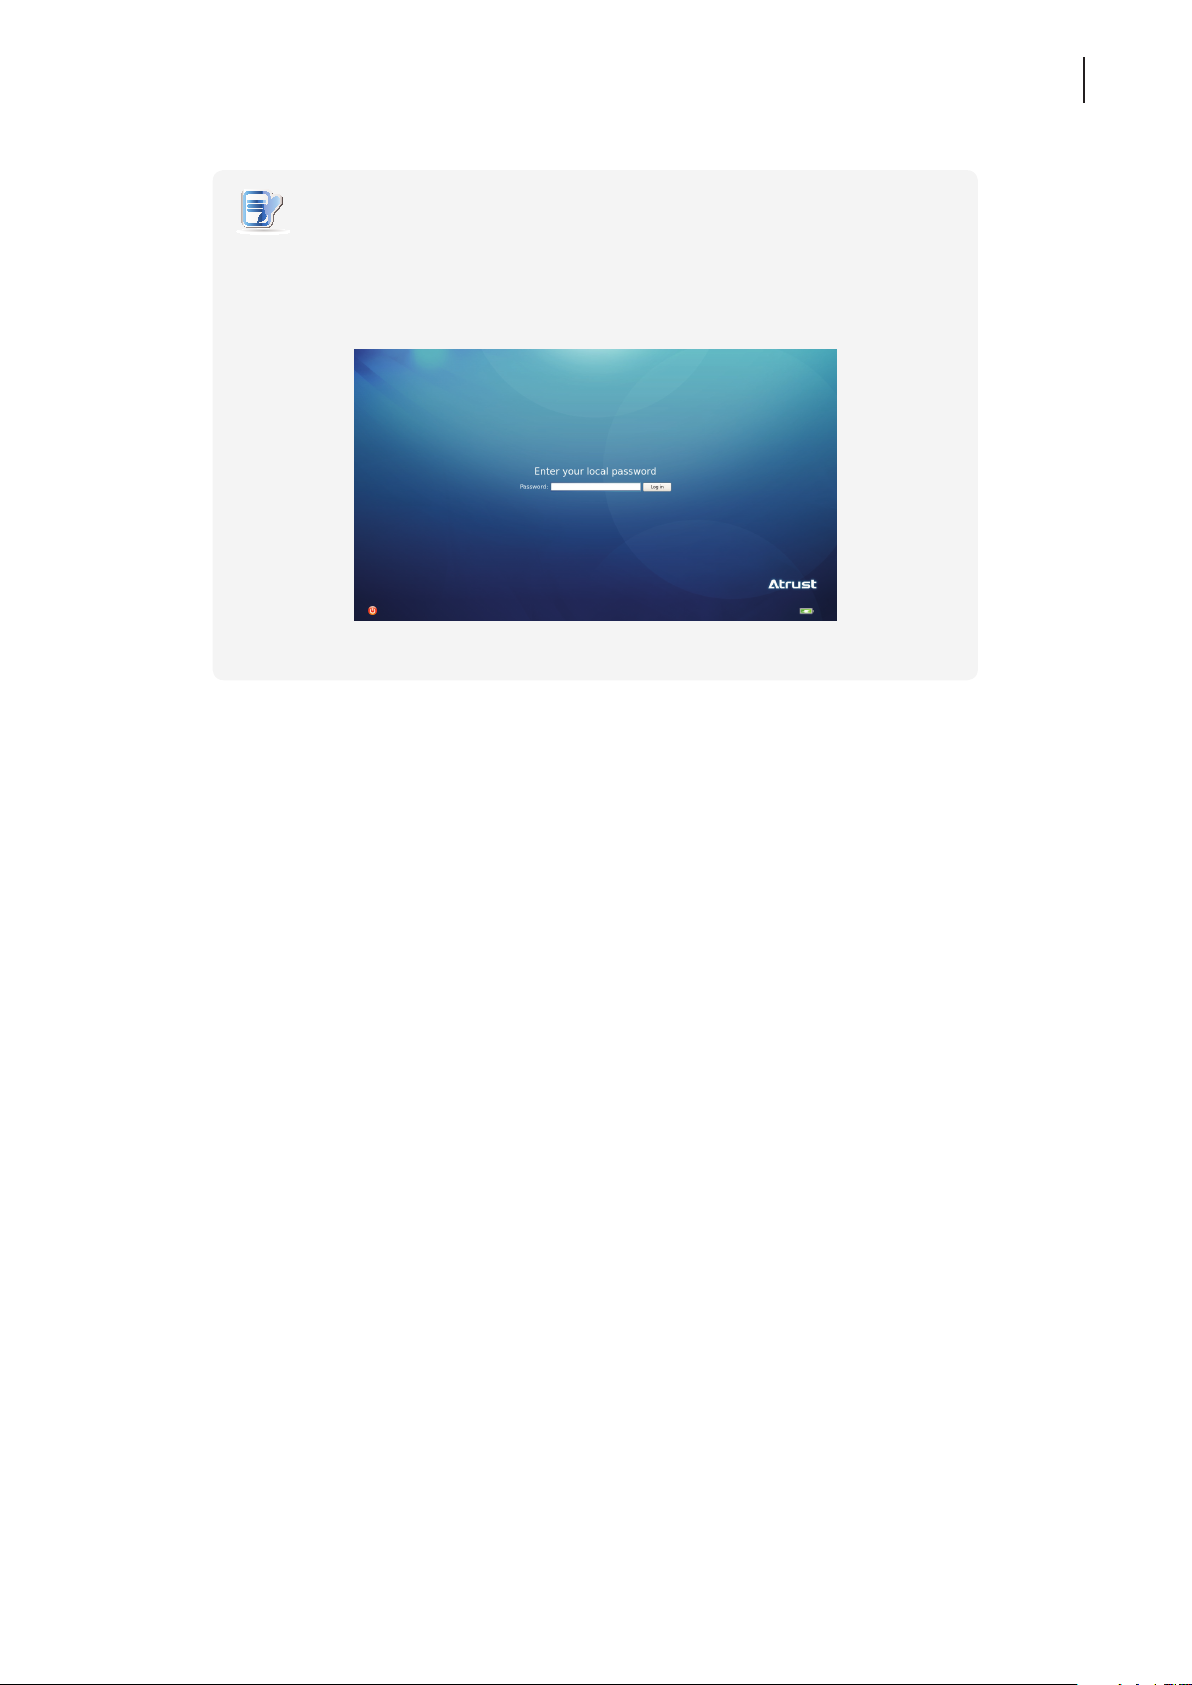
1. On Atrust Client Setup, click System > Password.
2. Under the Local Desktop section, click to check Enable Password Authentication for Local Desktop.
A window appears for you to set the password.
3. Type in the desired password, and then click OK to conrm.
4. Click Save to apply.
Page 61
Conguring Client Settings
Conguring System Settings
NOTE
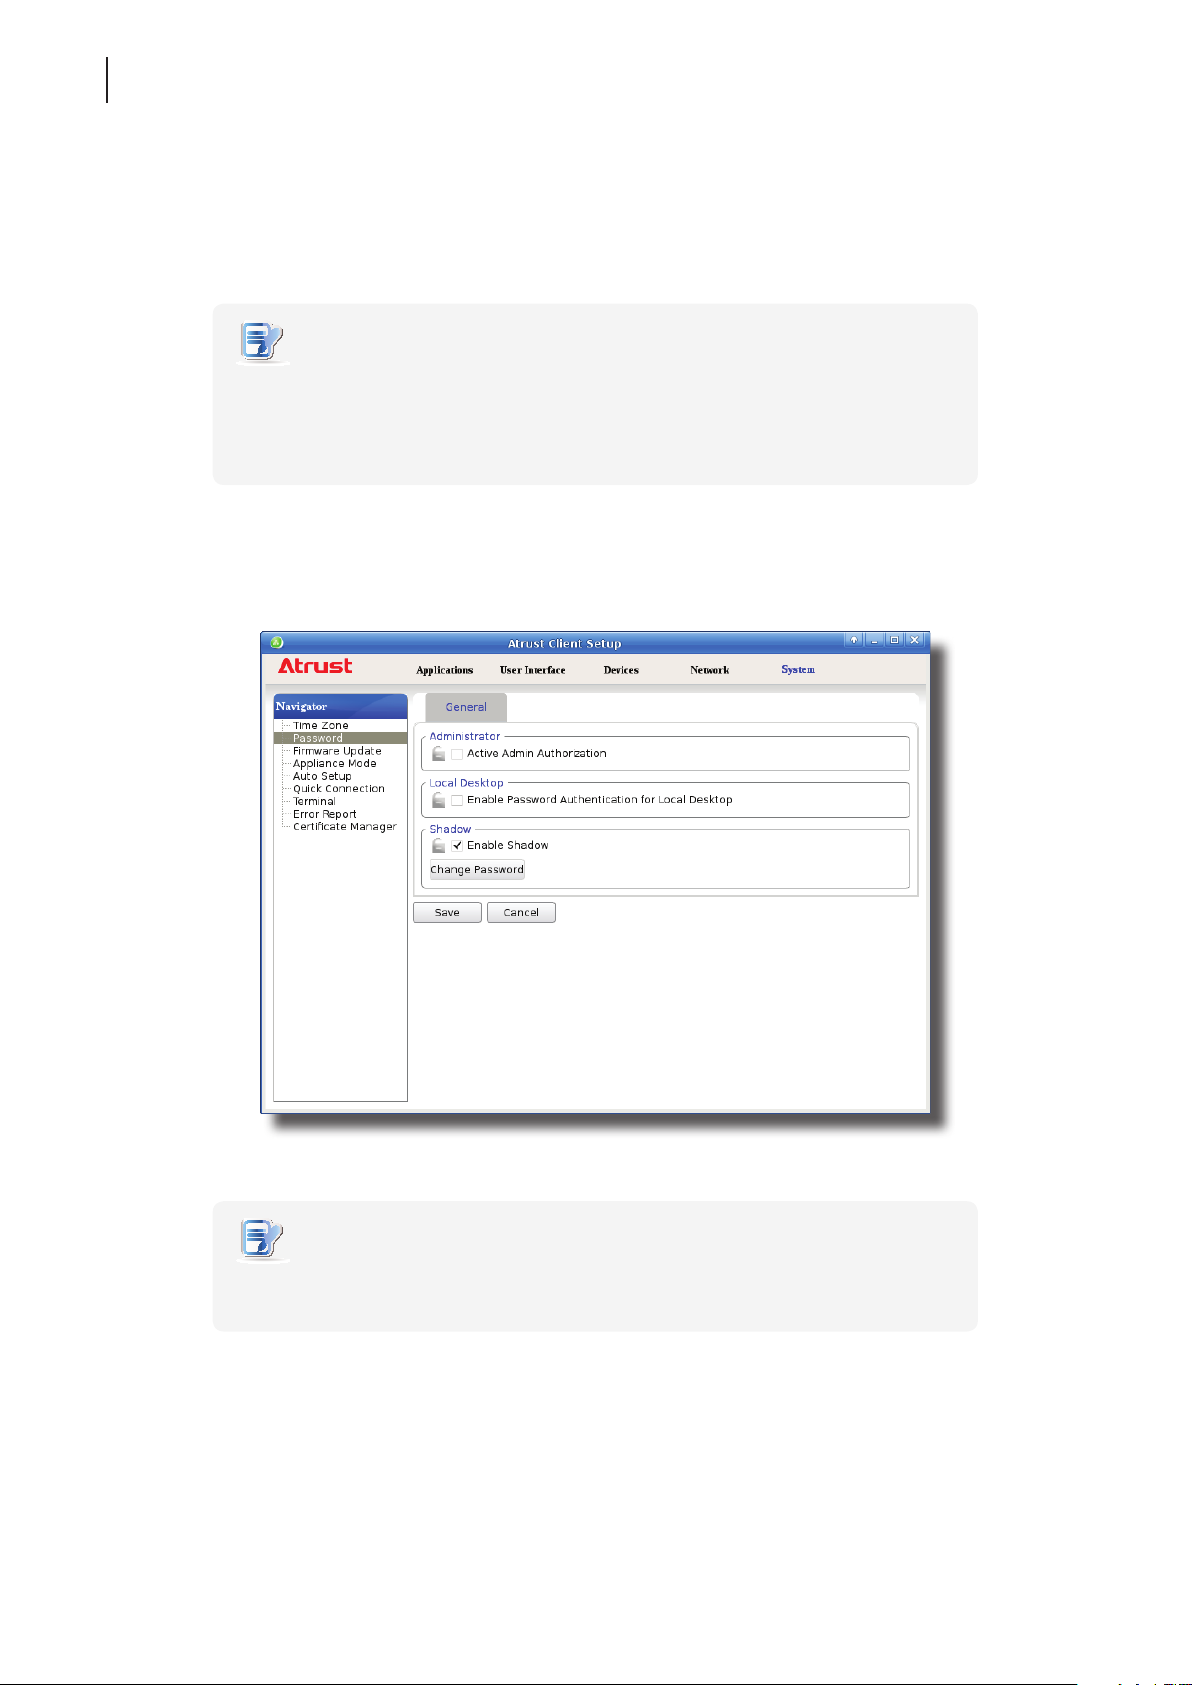
• When this feature is enabled, each time when you start or restart your mt168L,
you will be prompted to provide the Login password for the local desktop.
The Login screen is shown as below.
Login Screen of Local Desktop
51
Page 62
Conguring Client Settings
52
Conguring System Settings
4.2.6 Conguring Shadow Settings for Remote Assistance
The Shadow feature allows an administrator to remotely assist client users in resolving problems or conguring local
settings. When this feature is enabled, an administrator can monitor and control a client from a remote computer
just like a local user.
NOTE
• To use the Shadow feature on a remote computer, you need to install the Atrust
Device Manager console on that computer, and add your mt168L into a managed
group under Atrust Device Manager. For details, please refer to the User’s Manual
for Atrust Device Manager.
To enable the Shadow feature and set the password for remote assistance, please do the following:
1. On Atrust Client Setup, click System > Password.
2. Under the Shadow section, click to check Enable Shadow if it’s not checked.
NOTE
• By default, the Shadow feature is enabled. Click Change Password, and then follow
the next step to set your password.
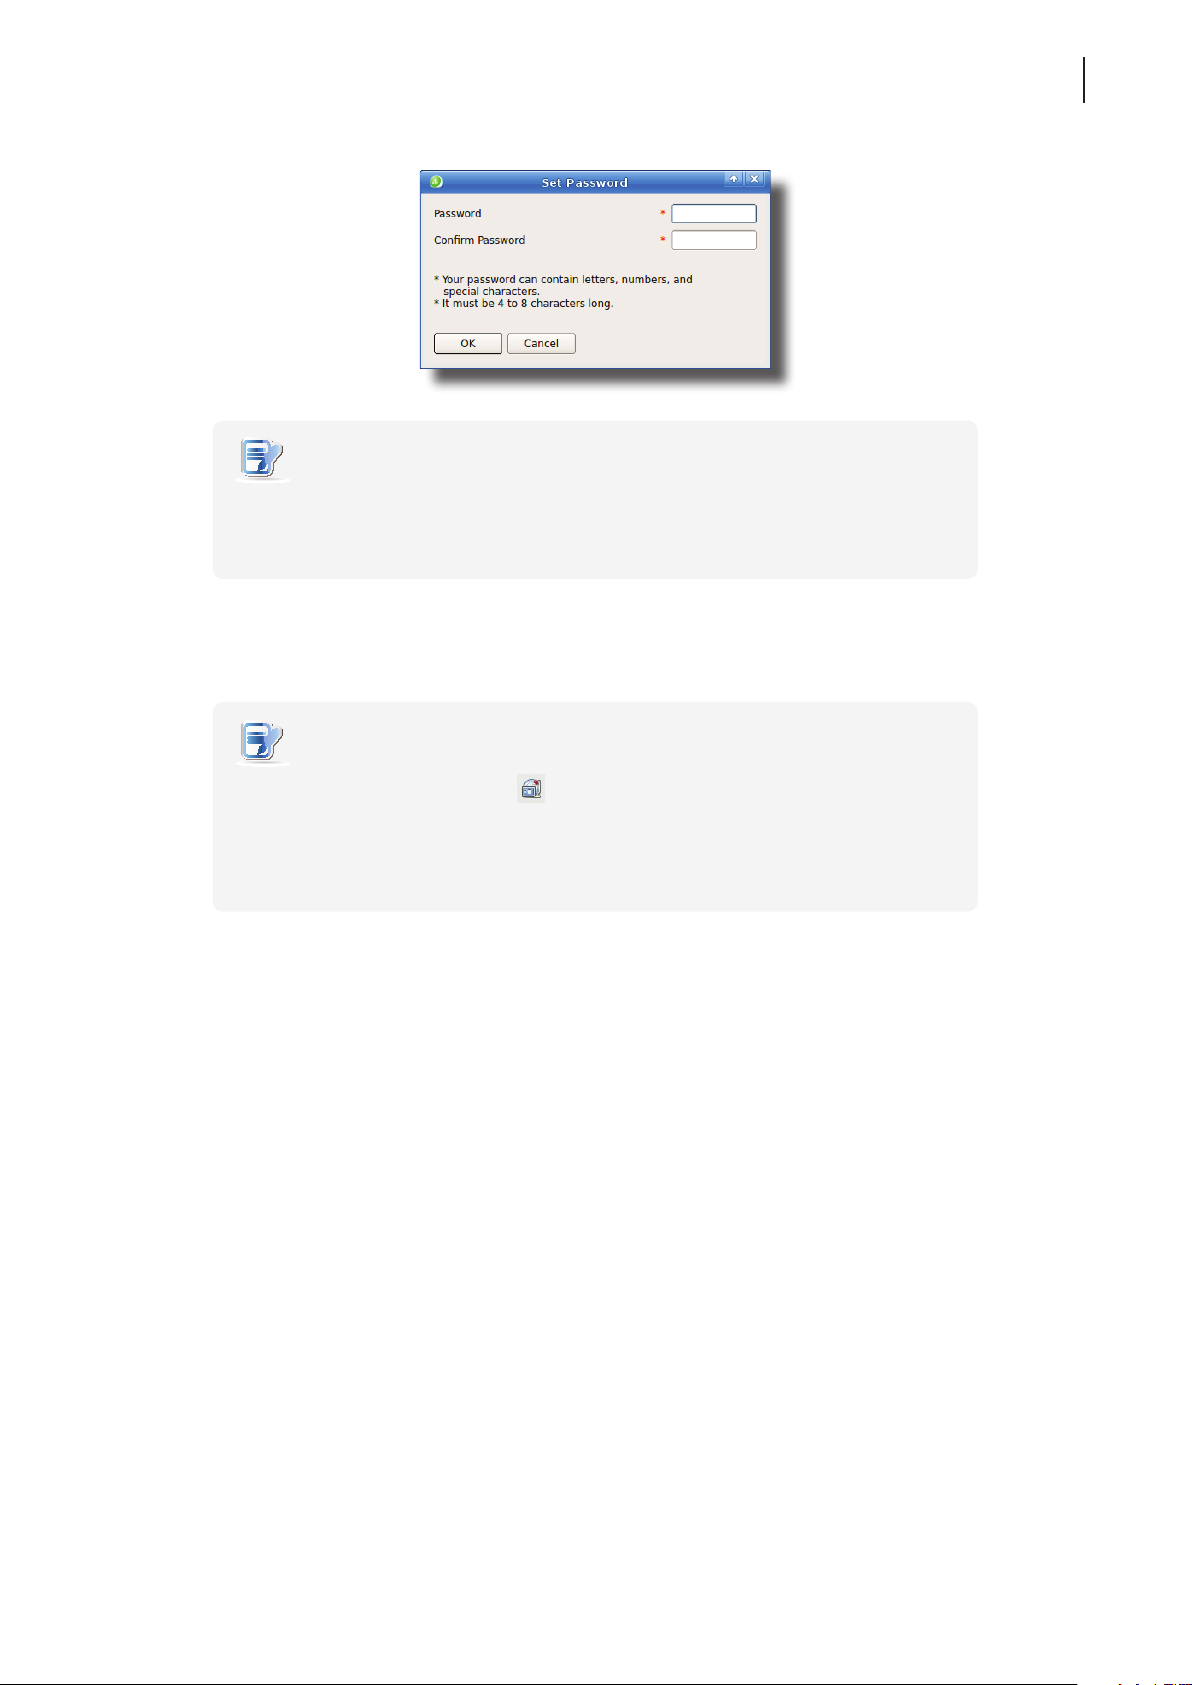
3. The Shadow feature is enabled and a window appears for you to set the password for remote assistance.
Page 63
NOTE
• On a remote computer, an administrator will need this password to use the Shadow
feature (remote assistance) with the Atrust Device Manager console. For more
information, please refer to the User’s Manual of Atrust Device Manager.
4. Type in the desired password, and then click OK to conrm.
Conguring Client Settings
Conguring System Settings
53
5. Click Save to save all the changes.
NOTE
• When the Shadow feature is performed from a remote Atrust Device Manager, on
the target client, an icon
and a notication pops up in the bottom-right corner. If you are under the Quick
Connection mode (the default for mt168L thin clients), a notication would pop up
in the upper-left corner on Atrust Quick Connection screen.
appears on the Taskbar of the local Linux desktop
Page 64
Conguring Client Settings
54
Conguring System Settings
4.2.7 Updating Firmware from the Management Computer
Update Firmware allows client users to update rmware from its management computer.
NOTE
• Ensure that your mt168L has been added into a managed group under Atrust
Device Manager installed on a remote computer, and that you have imported client
rmware les into Atrust Device Manager. These are prerequisites of this feature.
• For more information on rmware update and Atrust Device Manager, please refer
to the User Manual for Atrust Device Manager.
To update rmware from the management computer, please do the following:
1. On Atrust Client Setup, click System > Firmware Update.
2. Under the Firmware Update section, click Check Firmware.
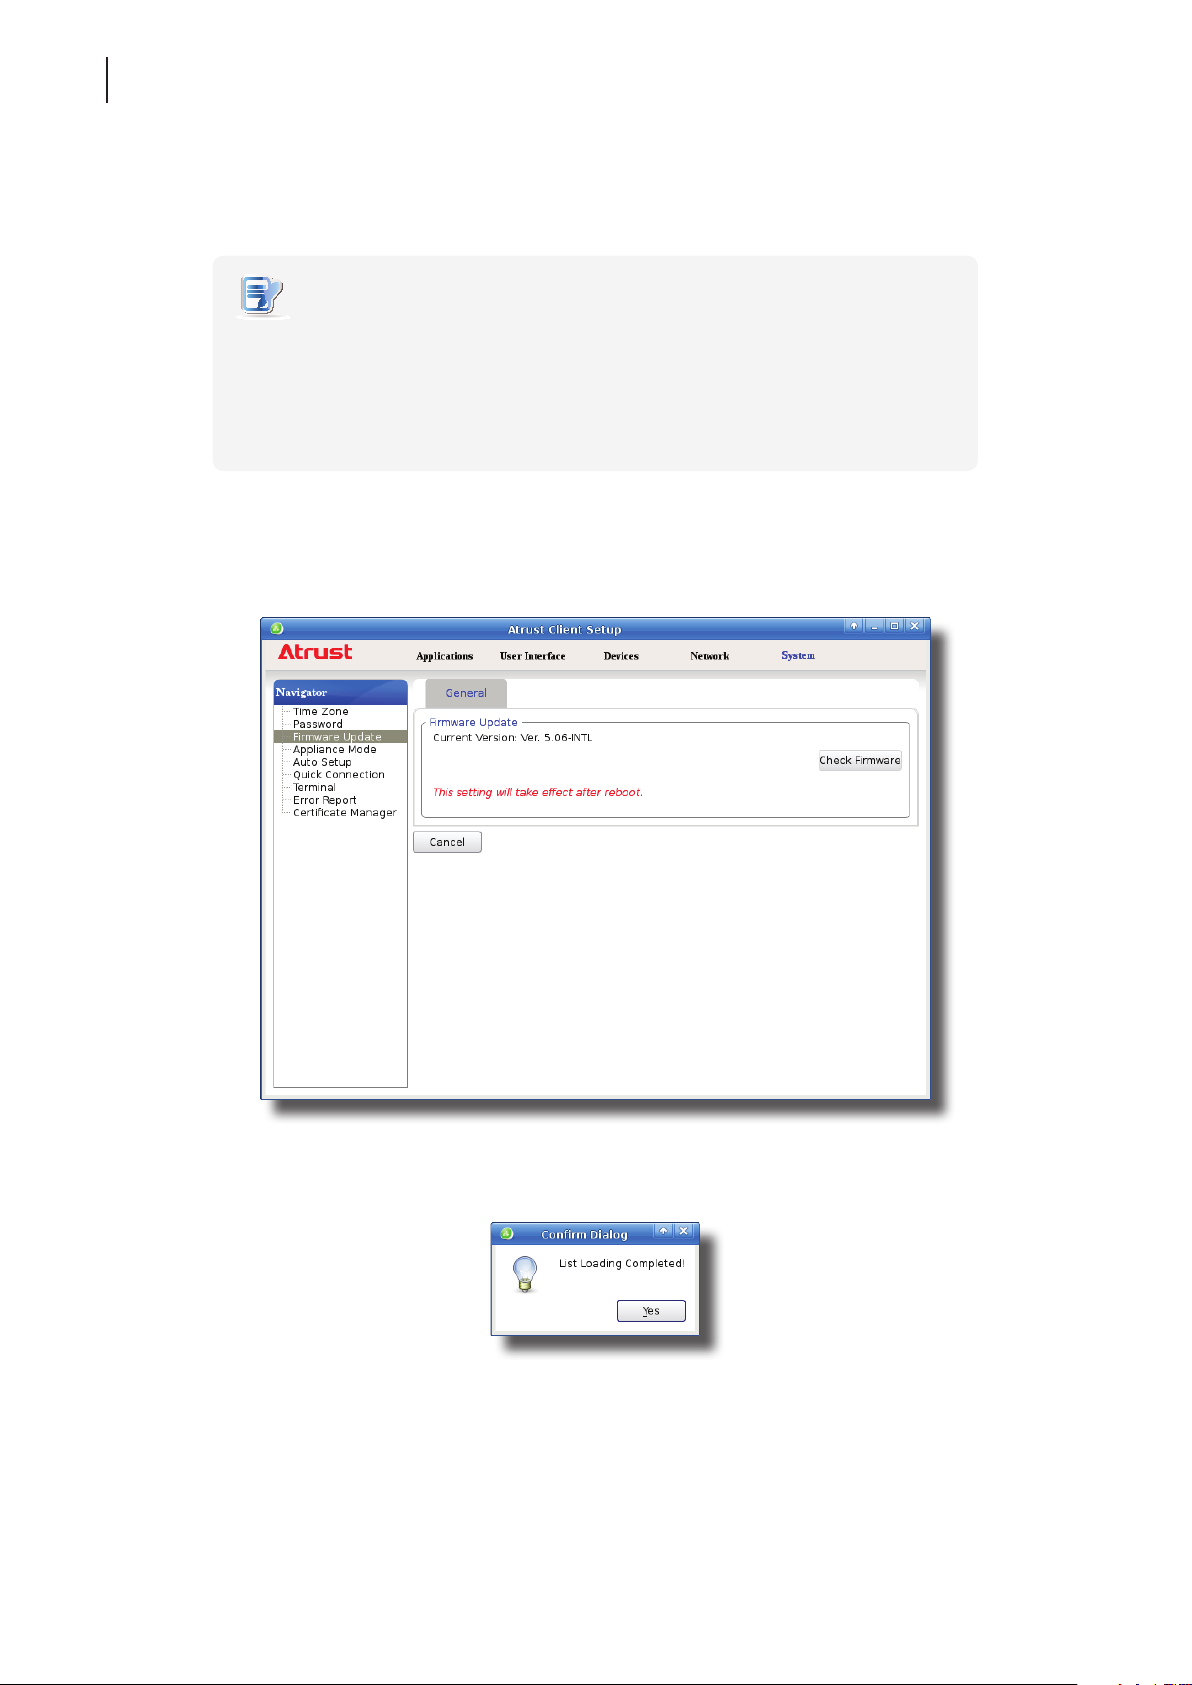
3. Upon completion, a window appears notifying you that the Firmware list has been loaded.
4. Click Yes to continue.
Page 65
Conguring Client Settings
Conguring System Settings
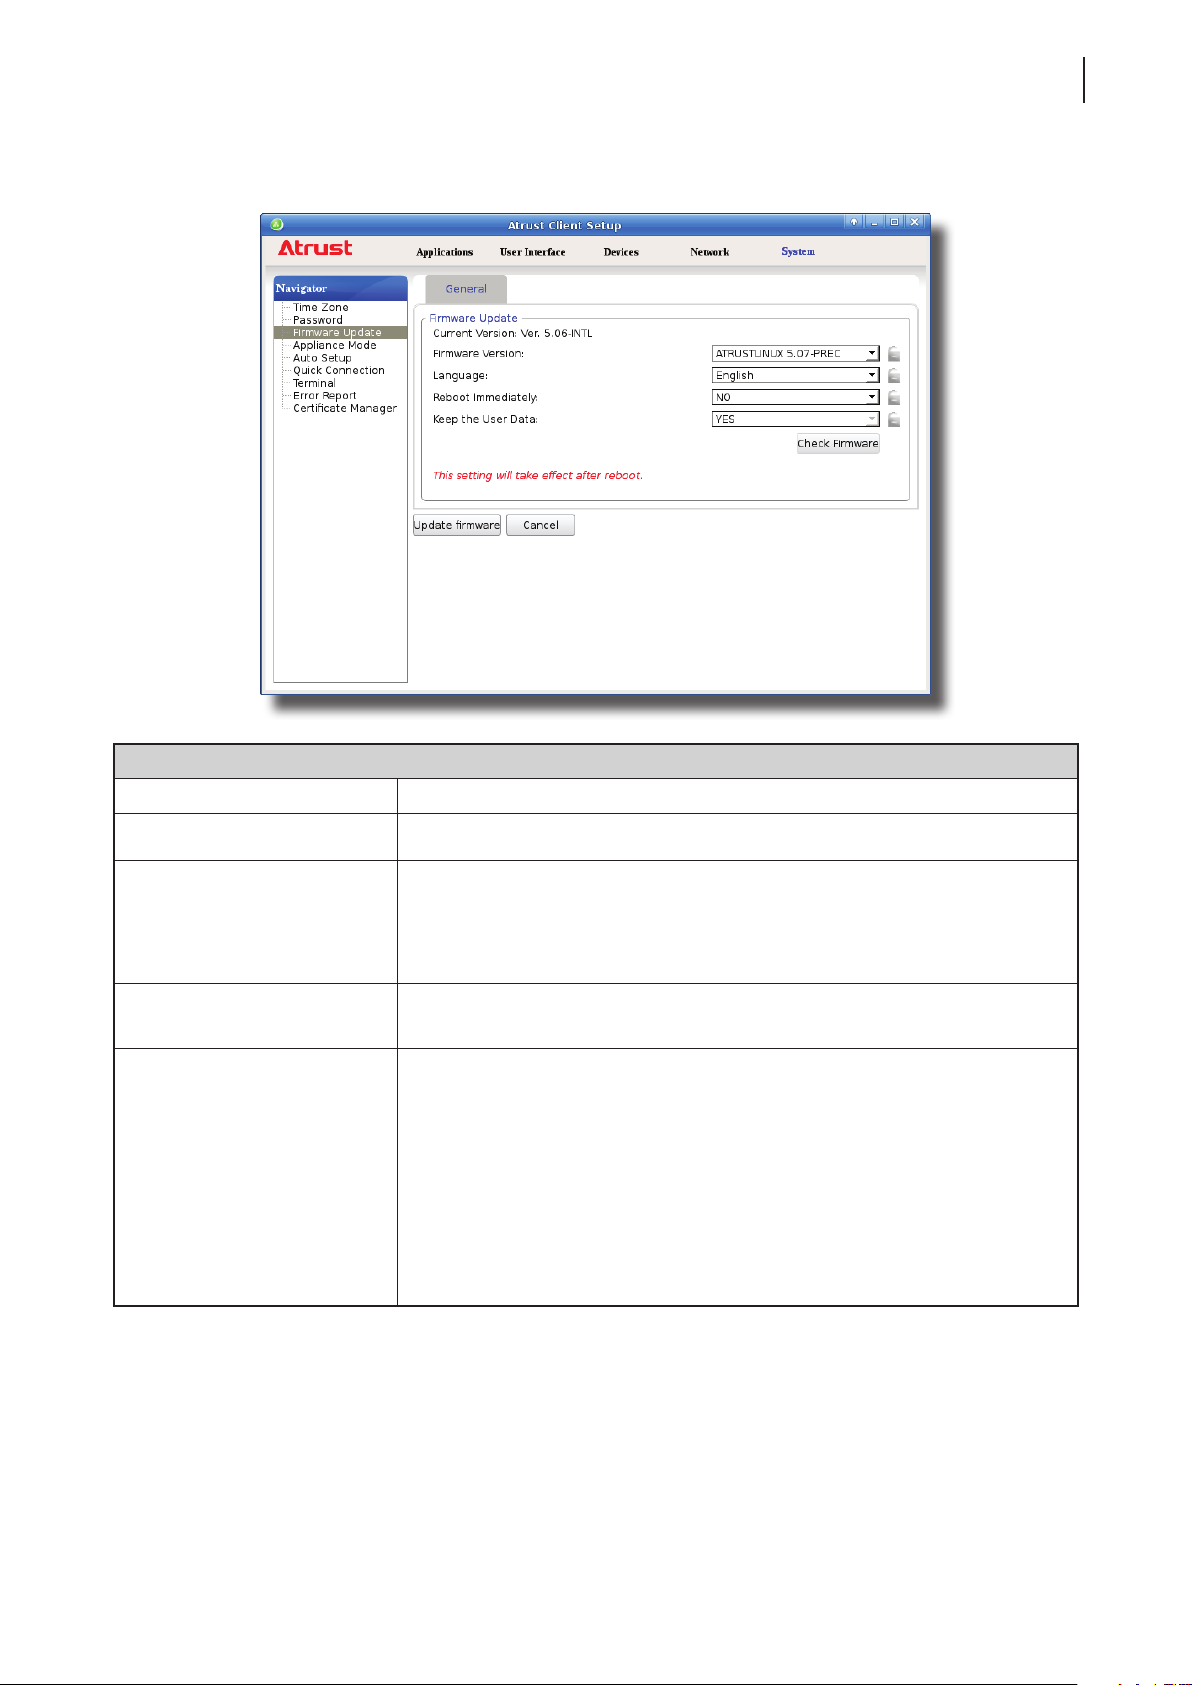
5. Click the drop-down menus to select the desired rmware version and other update options.
55
Firmware Update Options
Item Description
Firmware Version Click to select the desired rmware version.
Click to select the interface language of the system, including the
Language
Reboot Immediately
Keep the User Data
Atrust Client Setup console.
NOTE: Available languages may vary with the selected rmware version.
Click to choose whether to restart the system immediately for rmware update
or manually restart the system later.
Click to choose if to keep the setting values under Atrust Client Setup.
NOTE: If Yes is selected, all setting values under Atrust Client Setup will remain
unchanged after rmware update.
If No is selected, all setting values will be restored to the factory default.
This option may not be available on your system.
NOTE: If the client is managed by Atrust Device Manager and here No is
selected, Atrust Device Manager will fail to manage the client after
rmware update. For more information on Atrust Device Manager, please
refer to the User’s Manual for Atrust Device Manager.
6. Click Update rmware to conrm your selections. The system will start updating its rmware after restart.
Page 66
Conguring Client Settings
56
Conguring System Settings
4.2.8 Enabling or Disabling the Appliance Mode
The Appliance mode allows your mt168L to start up directly with the desired Microsoft Remote Desktop, Citrix ICA,
VMware View or Horizon View session. Under this mode, users will feel as if they were using a standalone desktop
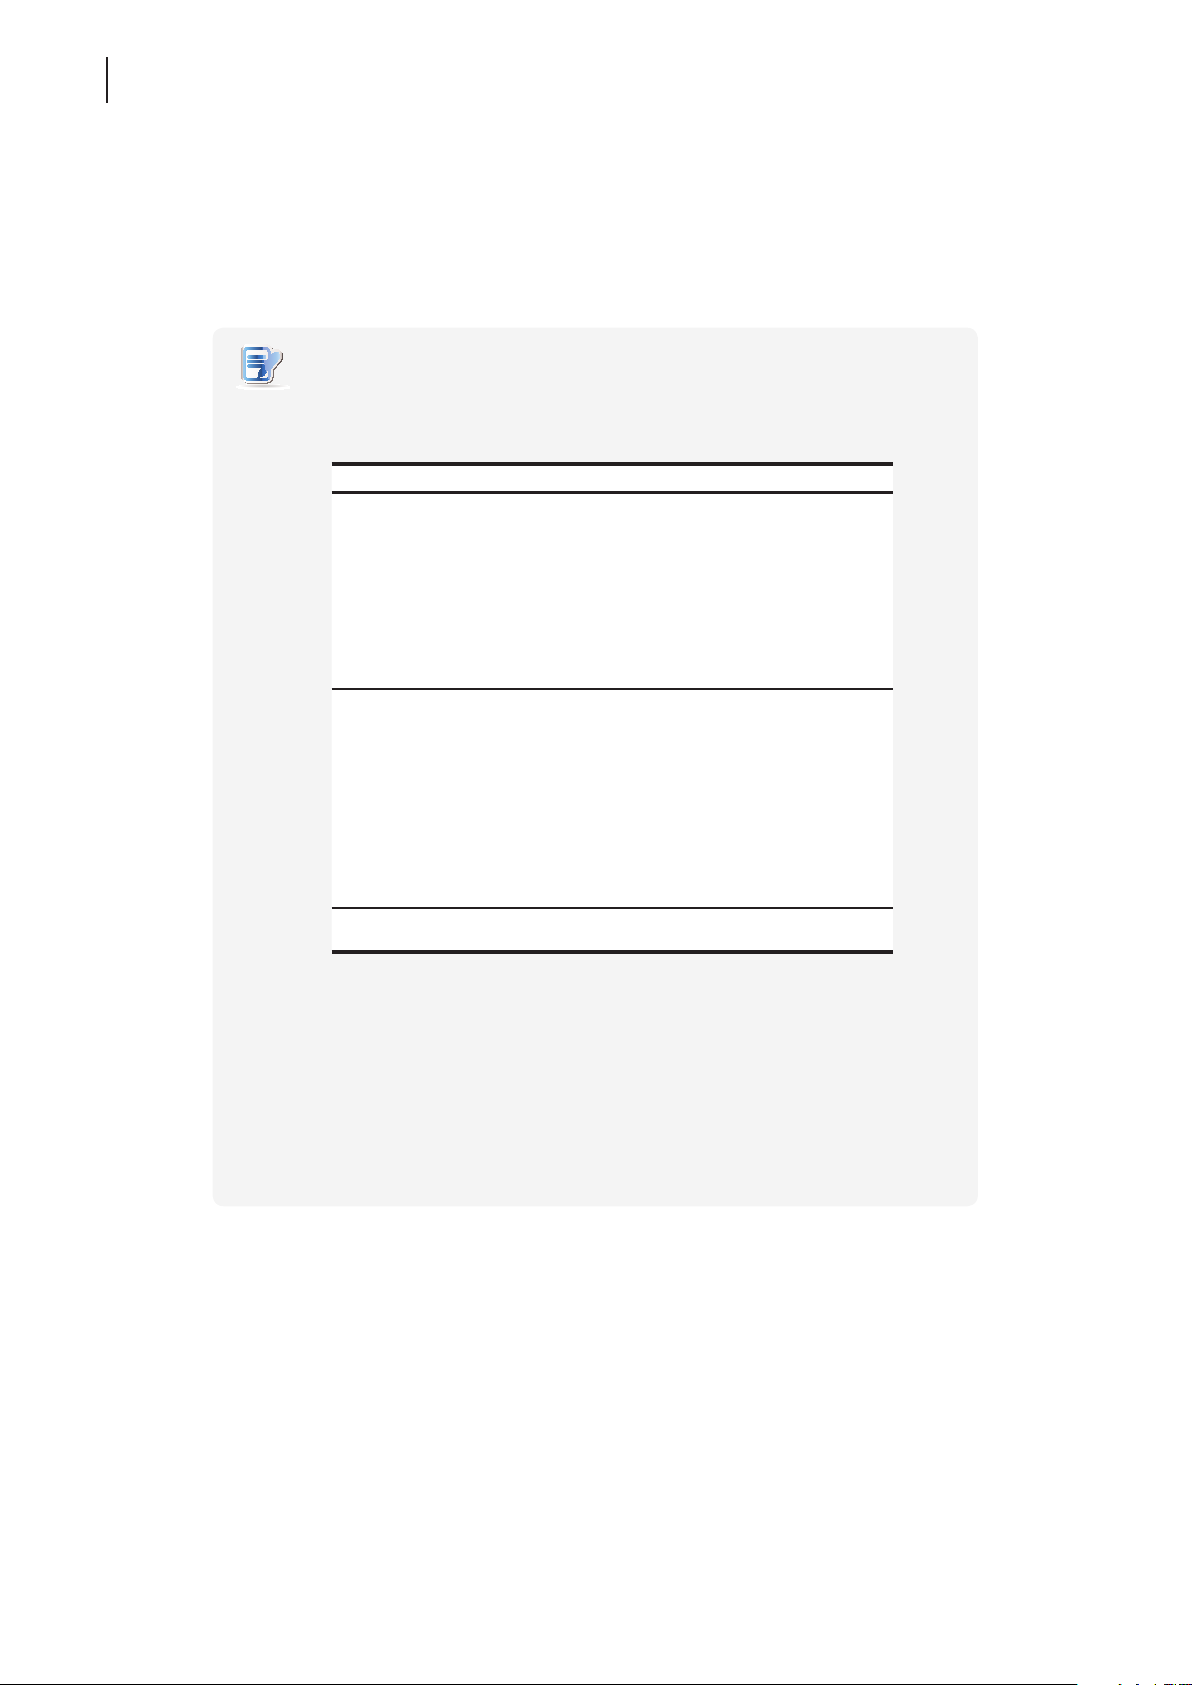
computer; the underlying client operating system, Atrust Linux, is hidden from the very beginning.
NOTE
• There are three similar but dierent modes for your mt168L and only one mode
will take eect if all are enabled. Three modes and the order of priority are listed
as follows:
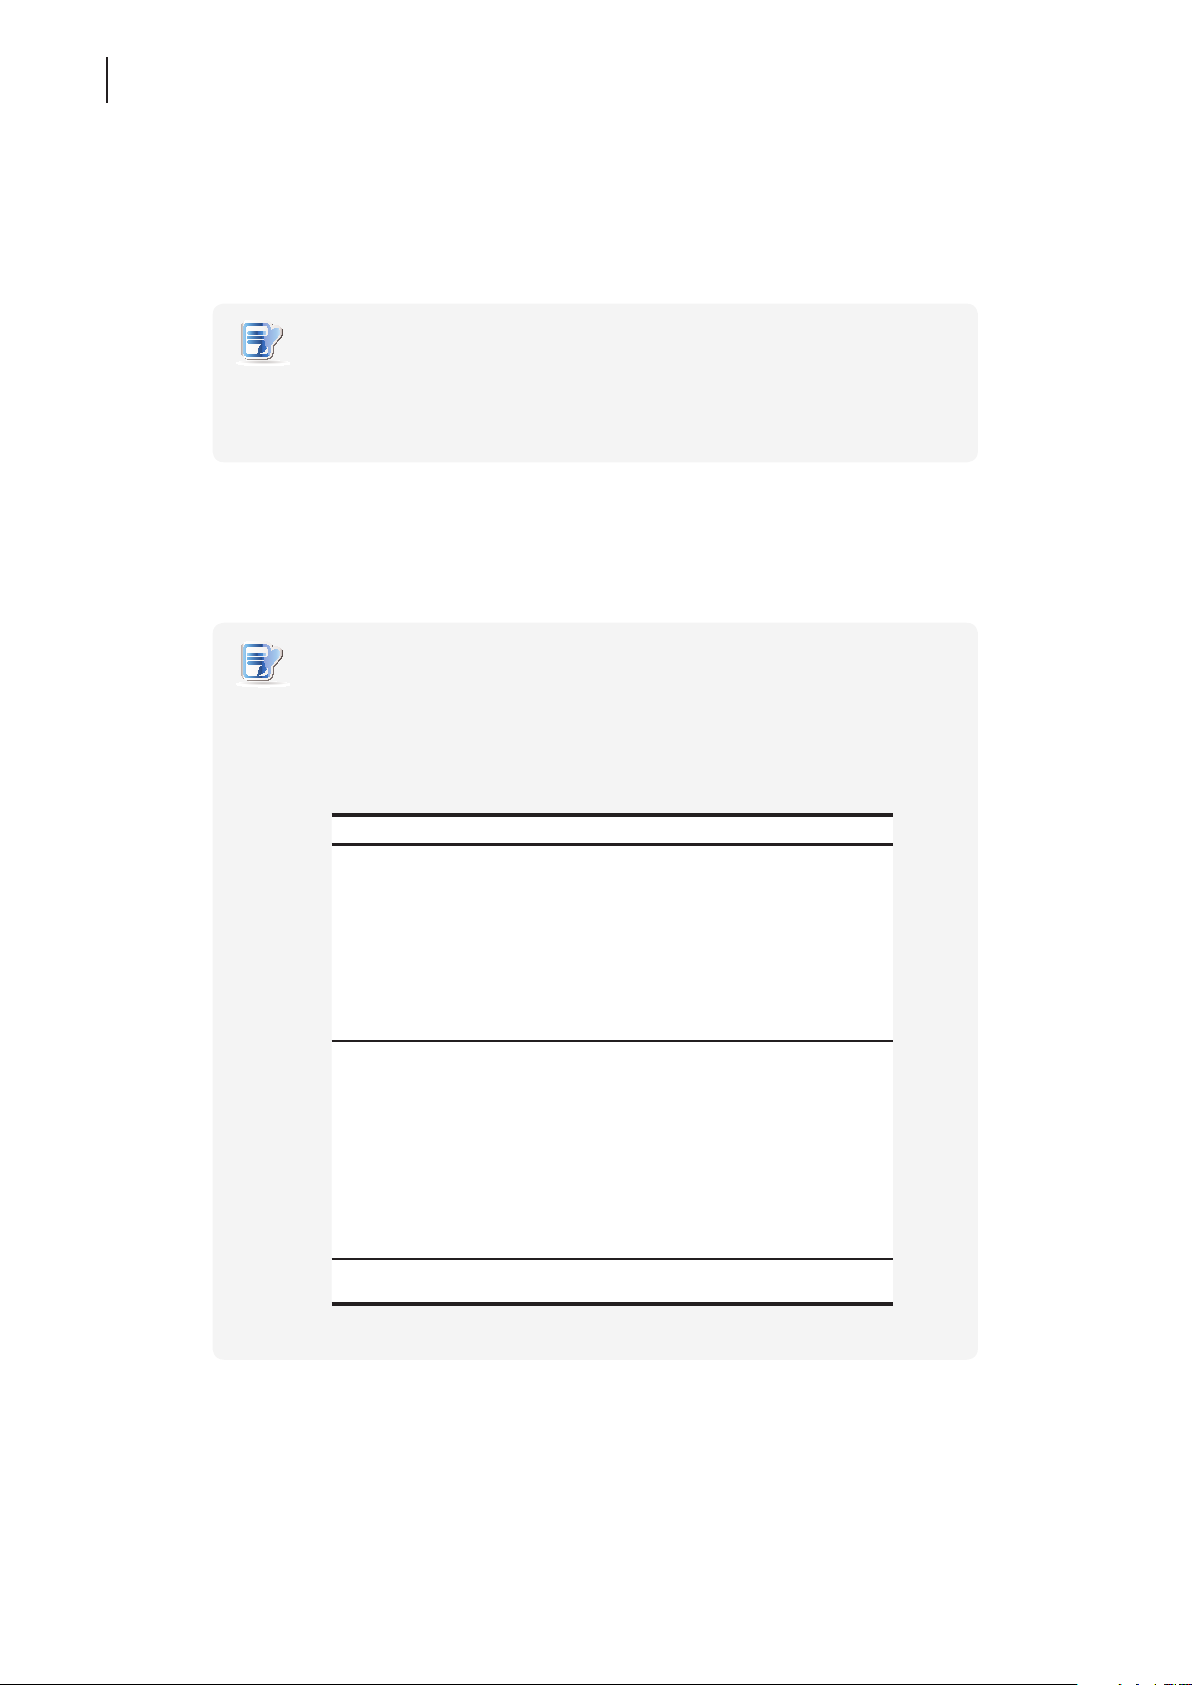
No. Mode Description
The client will start up directly with the desired
RDP / ICA / View session and perform the
congured action after exiting the session.
1 Appliance
Available actions include:
• Re-launching a new session
• Restarting the thin client
• Turning off the thin client
The client will start up directly with the desired
RDP / ICA / View session and perform the
congured action after exiting the session.
Available actions include:
2 Autostart
3 Quick Connection
• Returning to the local desktop
• Re-launching a new session
• Restarting the thin client
• Turning off the thin client
The client will enter Atrust Quick Connection
screen after system startup.
• For more information on these modes, please refer to sections:
4.2.10 on page 60 and 3.1 on page 17 (Quick Connection mode)
4.2.8 on page 56 (Appliance mode)
4.6.5 on page 137 (Autostart mode for RDP sessions)
4.6.11 on page 175 (Autostart mode for ICA sessions)
4.6.14 on page 208 (Autostart mode for View sessions)
Page 67
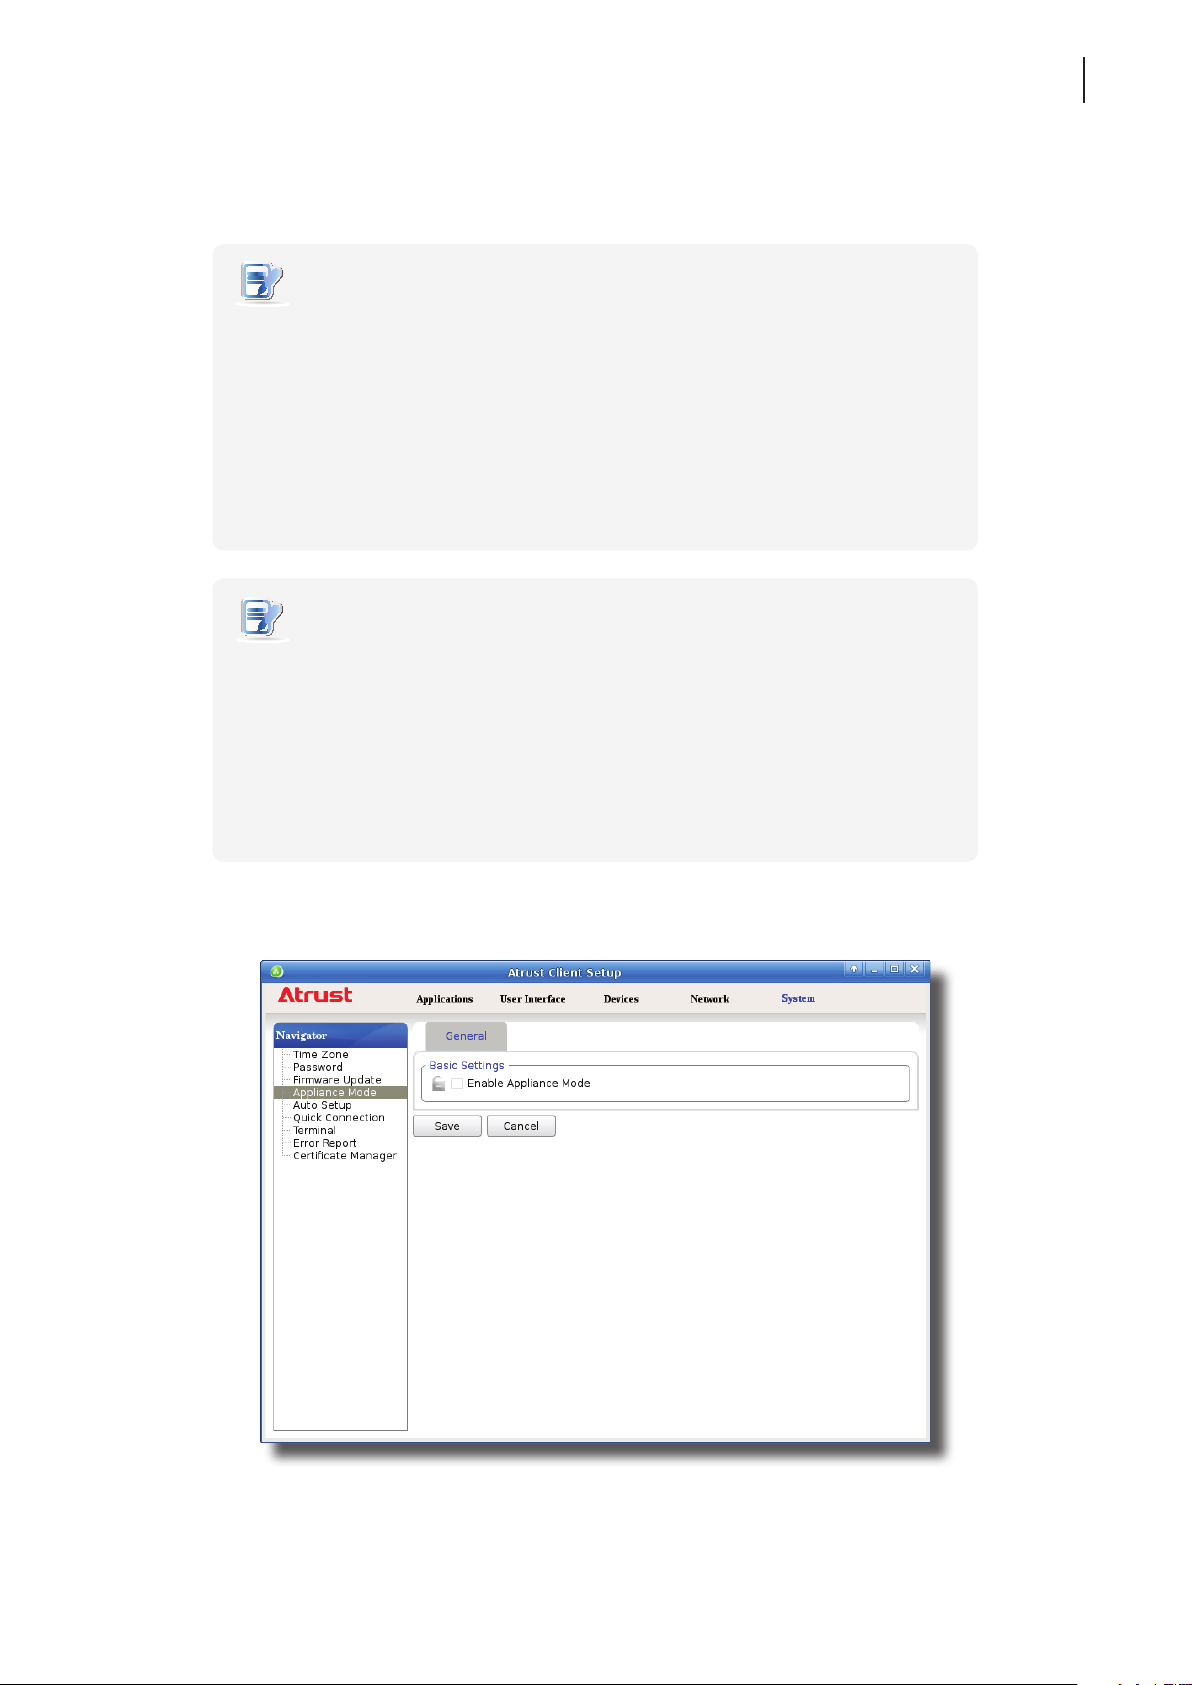
Enabling the Appliance Mode
To enable the Appliance mode, please do the following:
NOTE
• Ensure that you have congured the connection settings for the desired Microsoft
Remote Desktop, Citrix ICA, VMware View or Horizon View session under
Applications tab. You need to specify which service type and connection settings
entry will be used under the Appliance mode. For detailed instructions, please see
sections:
”4.6.3 Conguring Basic RDP Connection Settings” on page 122
“4.6.6 Conguring Basic ICA Connection Settings” on page 152
“4.6.12 Conguring Basic VMware View Connection Settings” on page 204
NOTE
• Please note that the Autostart mode also enables the client to start up directly with
an RDP / ICA / View session and provides more conguration exibility than the
Appliance mode. For detailed information on the Autostart mode, please refer to
the following sections:
Conguring Client Settings
Conguring System Settings
57
“4.6.5 Conguring Advanced RDP Connection Settings” on page 137
“4.6.11 Conguring Advanced ICA Connection Settings” on page 175
“4.6.14 Conguring Advanced View Connection Settings” on page 208
1. On Atrust Client Setup, click System > Appliance Mode.
2. Click to check Enable Appliance Mode.
Page 68
Conguring Client Settings
58
Conguring System Settings
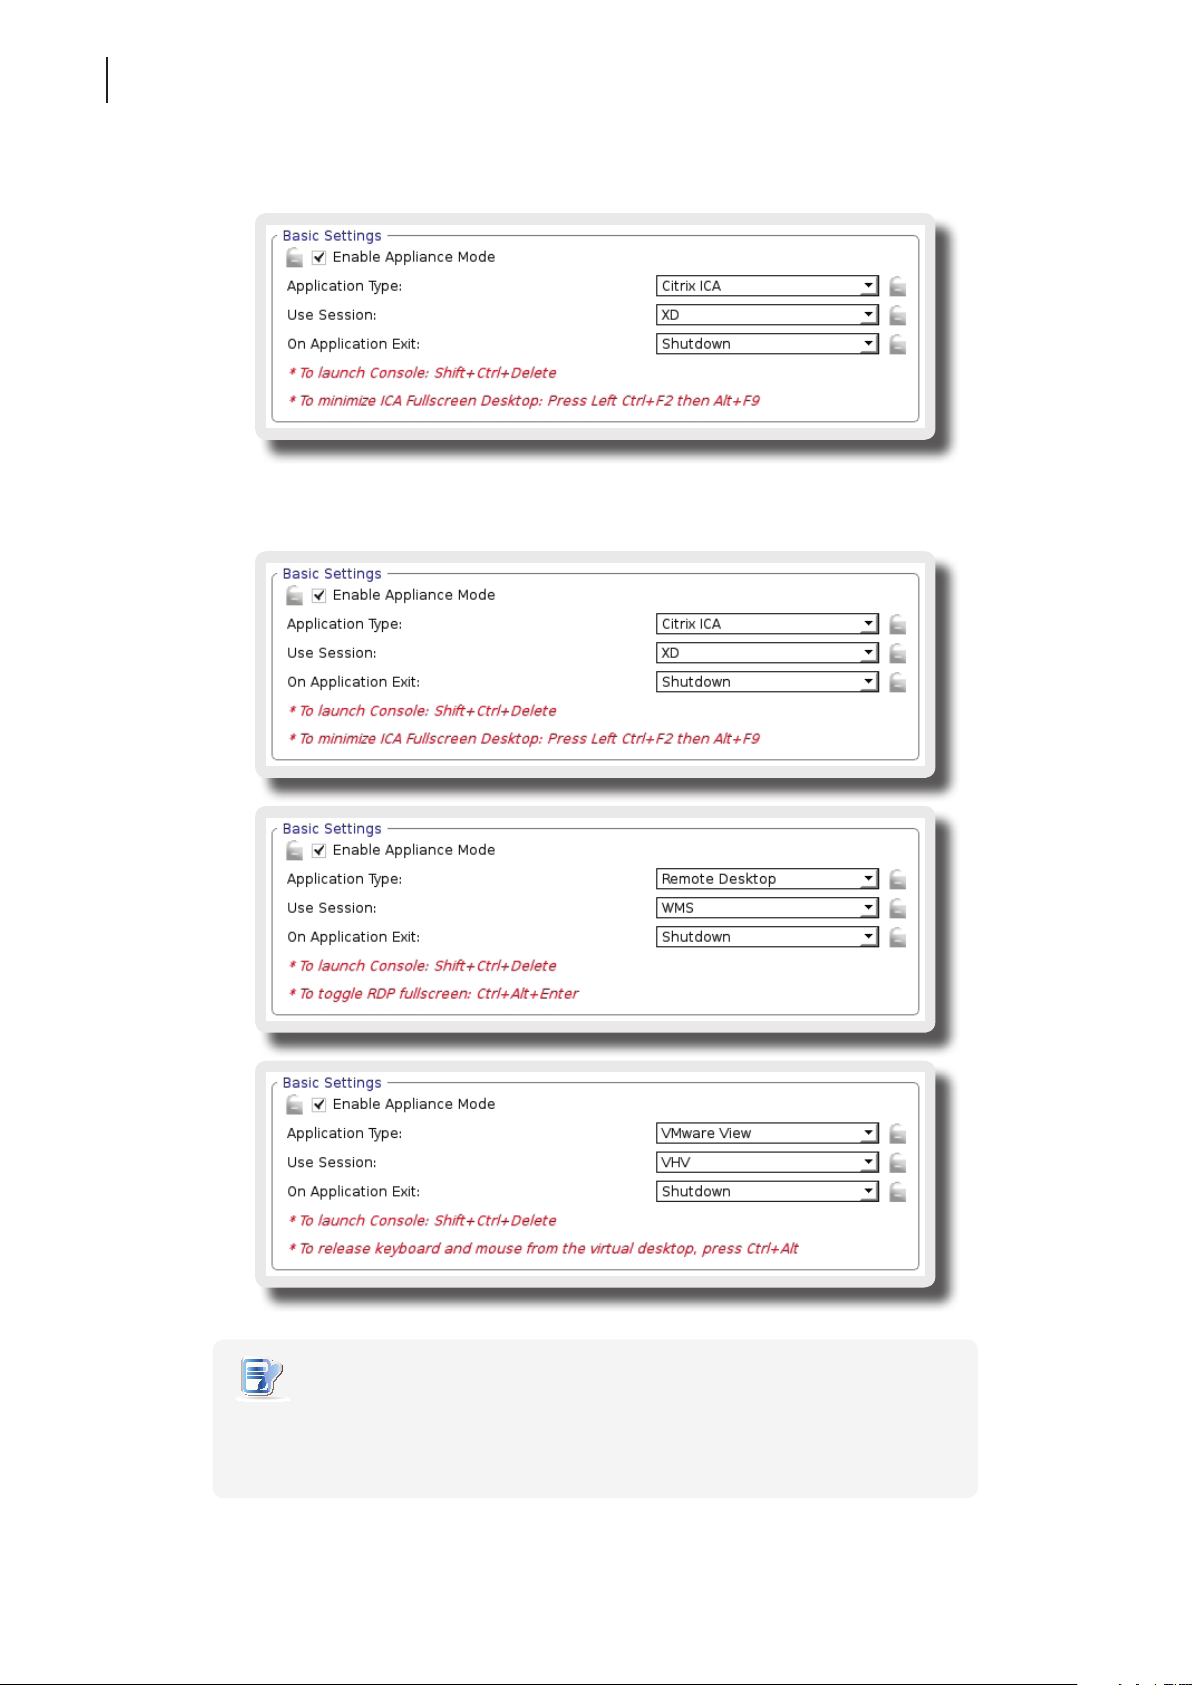
3. Other settings of the Appliance mode appear.
4. Click drop-down menus to select the application (or service) type: Citrix ICA, Remote Desktop, or
VMware View, the specic service available in that type, and the desired action after exiting a session.
NOTE
• No matter which Resolution option you choose for the selected RDP / ICA / View
service, RDP / ICA / View sessions under the Appliance mode will always use the
Full Screen mode to display the remote/virtual desktop.
Page 69

Conguring Client Settings
Conguring System Settings
5. Click Save to conrm your selections.
6. The system will enter the Appliance mode after restart.
NOTE
• To disable the Appliance mode or to access Atrust Client Setup under the Appliance
mode, please refer to “Disabling the Appliance Mode” on page 59.
Disabling the Appliance Mode
To disable the Appliance mode, please do the following:
1. Under the Appliance mode, exit the Full Screen mode of the RDP / ICA session, or release the keyboard and
mouse from the View session (virtual desktop):
• To exit the Full Screen mode of the RDP session, press Ctrl + Alt + Enter, and then minimize
the session window.
• To exit the Full Screen mode of the ICA session, press Ctrl + F2, and then Alt + F9.
• To release the keyboard and mouse from the View session (virtual desktop), press Ctrl + Alt.
59
NOTE
• Please note that the View session (virtual desktop) will remain on the background
after you release the keyboard and mouse from the View session (virtual desktop).
2. Click Ctrl + Shift + Del to launch Atrust Client Setup.
NOTE
• You cannot access the Taskbar of the client operating system (Atrust Linux) under
the Appliance mode.
3. On Atrust Client Setup, click System > Appliance Mode.
4. Click to uncheck Enable Appliance Mode, and then click Save to apply the change.
5. Return to the current RDP / ICA / View session:
• To return to the current RDP / ICA session, use Alt + Tab (press and hold Alt, and then press Tab to switch
between dierent items) to select and restore the current RDP / ICA session.
• To return to the current View session, click any place of the View session (virtual desktop)
on the background.
6. Log o from the current RDP / ICA / View session.
7. The client will shut down then. Restart your client manually.
Page 70
Conguring Client Settings
60
Conguring System Settings
4.2.9 Enabling or Disabling Auto Setup
Auto Setup allows your thin client to get its preset congurations on startup and enter the desired user environment
automatically. Its operation requires Auto Setup environment and network connectivity, except for Auto Setup on
the client side. For details, please refer to “A.4 Auto Setup Flowchart” on page 229 and User’s Guide for Auto Setup.
NOTE
• To disable Auto Setup after your thin client got its preset congurations, reset
your client. Please refer to “A.1 Resetting Your mt168L to the Factory Default” on
page 219.
4.2.10 Conguring the Quick Connection Mode
The Quick Connection mode enables you to enter the Atrust Quick Connection screen after system startup.
This setting is disabled by default for mobile thin clients.
NOTE
• For detailed instructions on how to use your mt168L under the Quick Connection
mode, please refer to section “3.1 Learning the Basics” on page 17.
• There are three similar but dierent modes for your mt168L and only one mode will
take eect if all are enabled. Three modes and the order of priority are
listed as follows:
No. Mode Description
The client will start up directly with the desired
RDP / ICA / View session and perform the
congured action after exiting the session.
1 Appliance
2 Autostart
Available actions include:
• Re-launching a new session
• Restarting the thin client
• Turning off the thin client
The client will start up directly with the desired
RDP / ICA / View session and perform the
congured action after exiting the session.
Available actions include:
• Returning to the local desktop
• Re-launching a new session
• Restarting the thin client
• Turning off the thin client
3 Quick Connection
The client will enter Atrust Quick Connection
screen after system startup.
Page 71
NOTE
• To use the Quick Connection mode, ensure that both the Appliance and Autostart
modes are disabled. If either of two modes are enabled, the Quick Connection
mode will fail to work.
• For more information on the Appliance mode, please refer to section “4.2.8 Enabling
or Disabling the Appliance Mode” on page 56.
• For more information on the Autostart mode, please refer to the following sections:
“4.6.5 Conguring Advanced RDP Connection Settings” on page 137
“4.6.11 Conguring Advanced ICA Connection Settings” on page 175
“4.6.14 Conguring Advanced View Connection Settings” on page 208
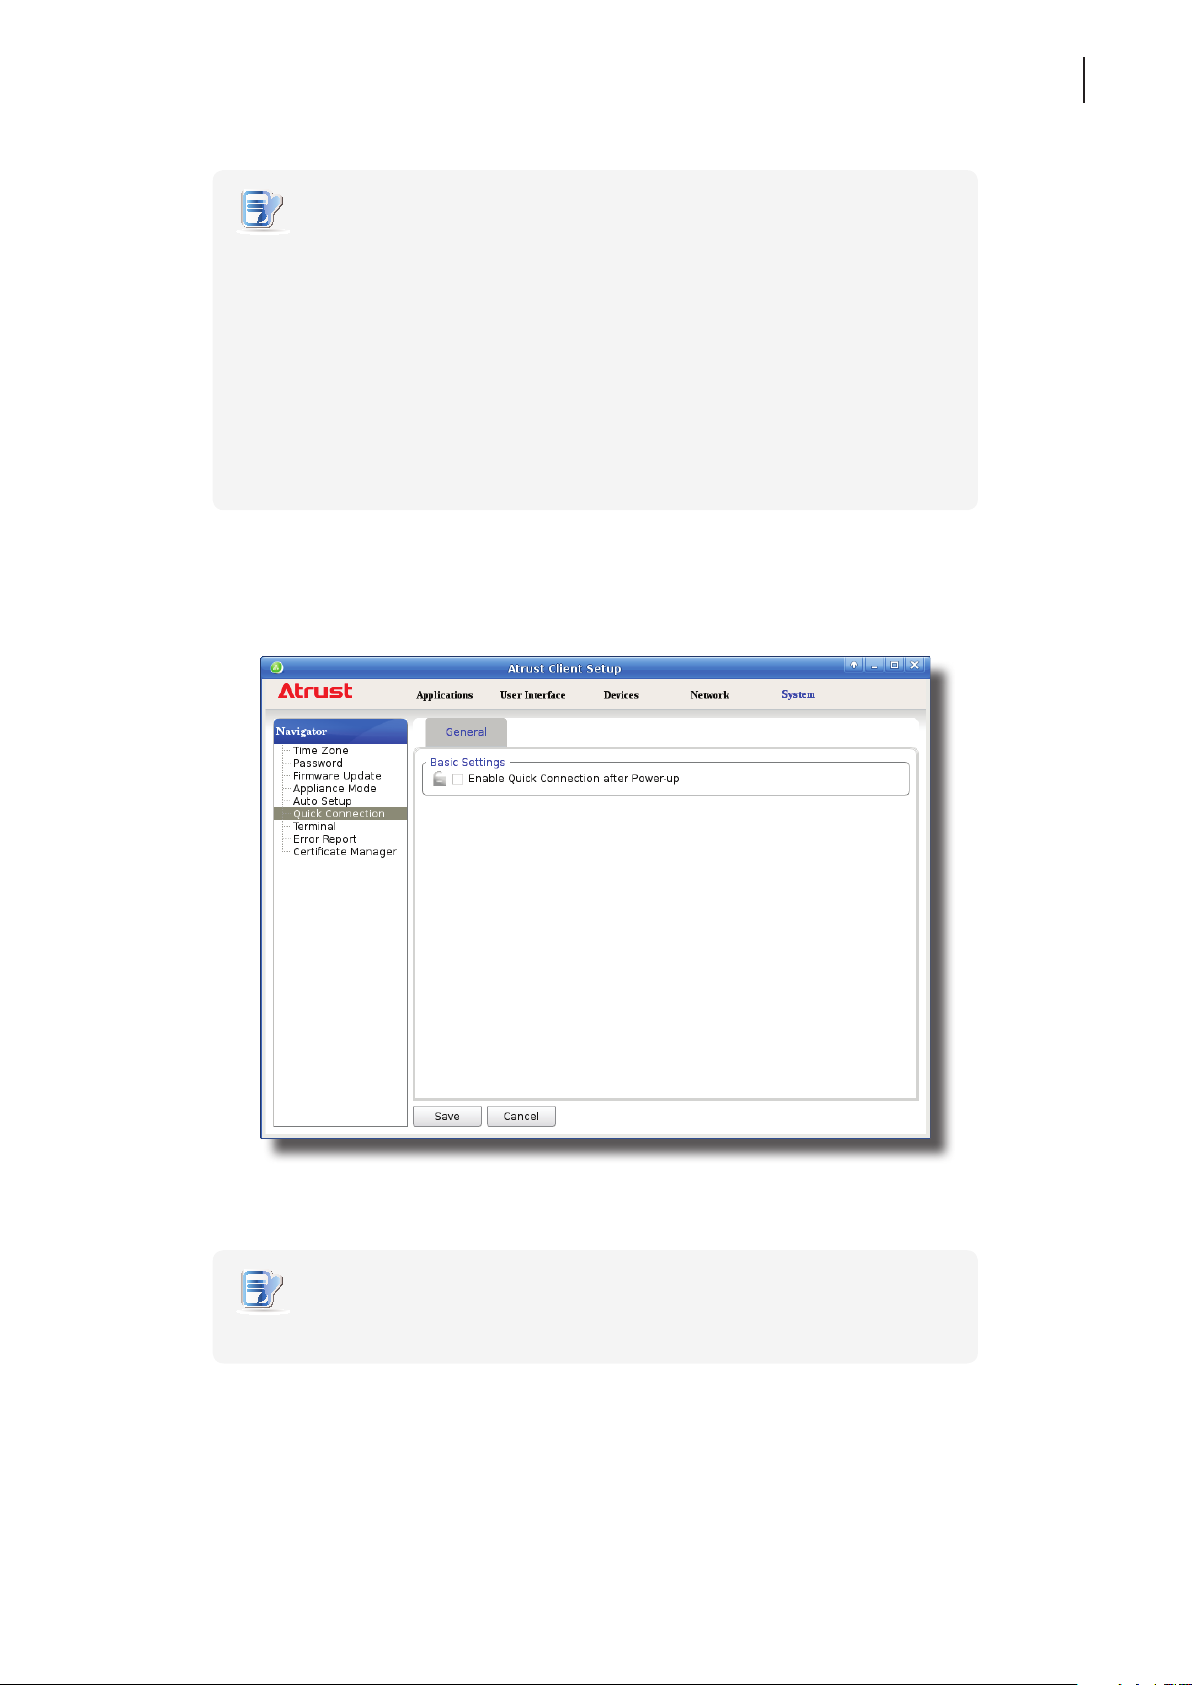
To enable/disable the Quick Connection mode, please do the following:
1. On Atrust Client Setup, click System > Quick Connection.
Conguring Client Settings
Conguring System Settings
61
2. Click to check/uncheck Enable Quick Connection after Power-up to enable/disable the Quick Connection
mode, and then click Save to apply the changes.
NOTE
• For advanced Quick Connection settings, please refer to the next section (4.2.11).
Page 72
Conguring Client Settings
62
Conguring System Settings
4.2.11 Conguring Advanced Quick Connection Settings
You are allowed to congure advanced Quick Connection settings for Remote Desktop, Citrix ICA, and
VMware View sessions through System > Quick Connections on Atrust Client Setup.
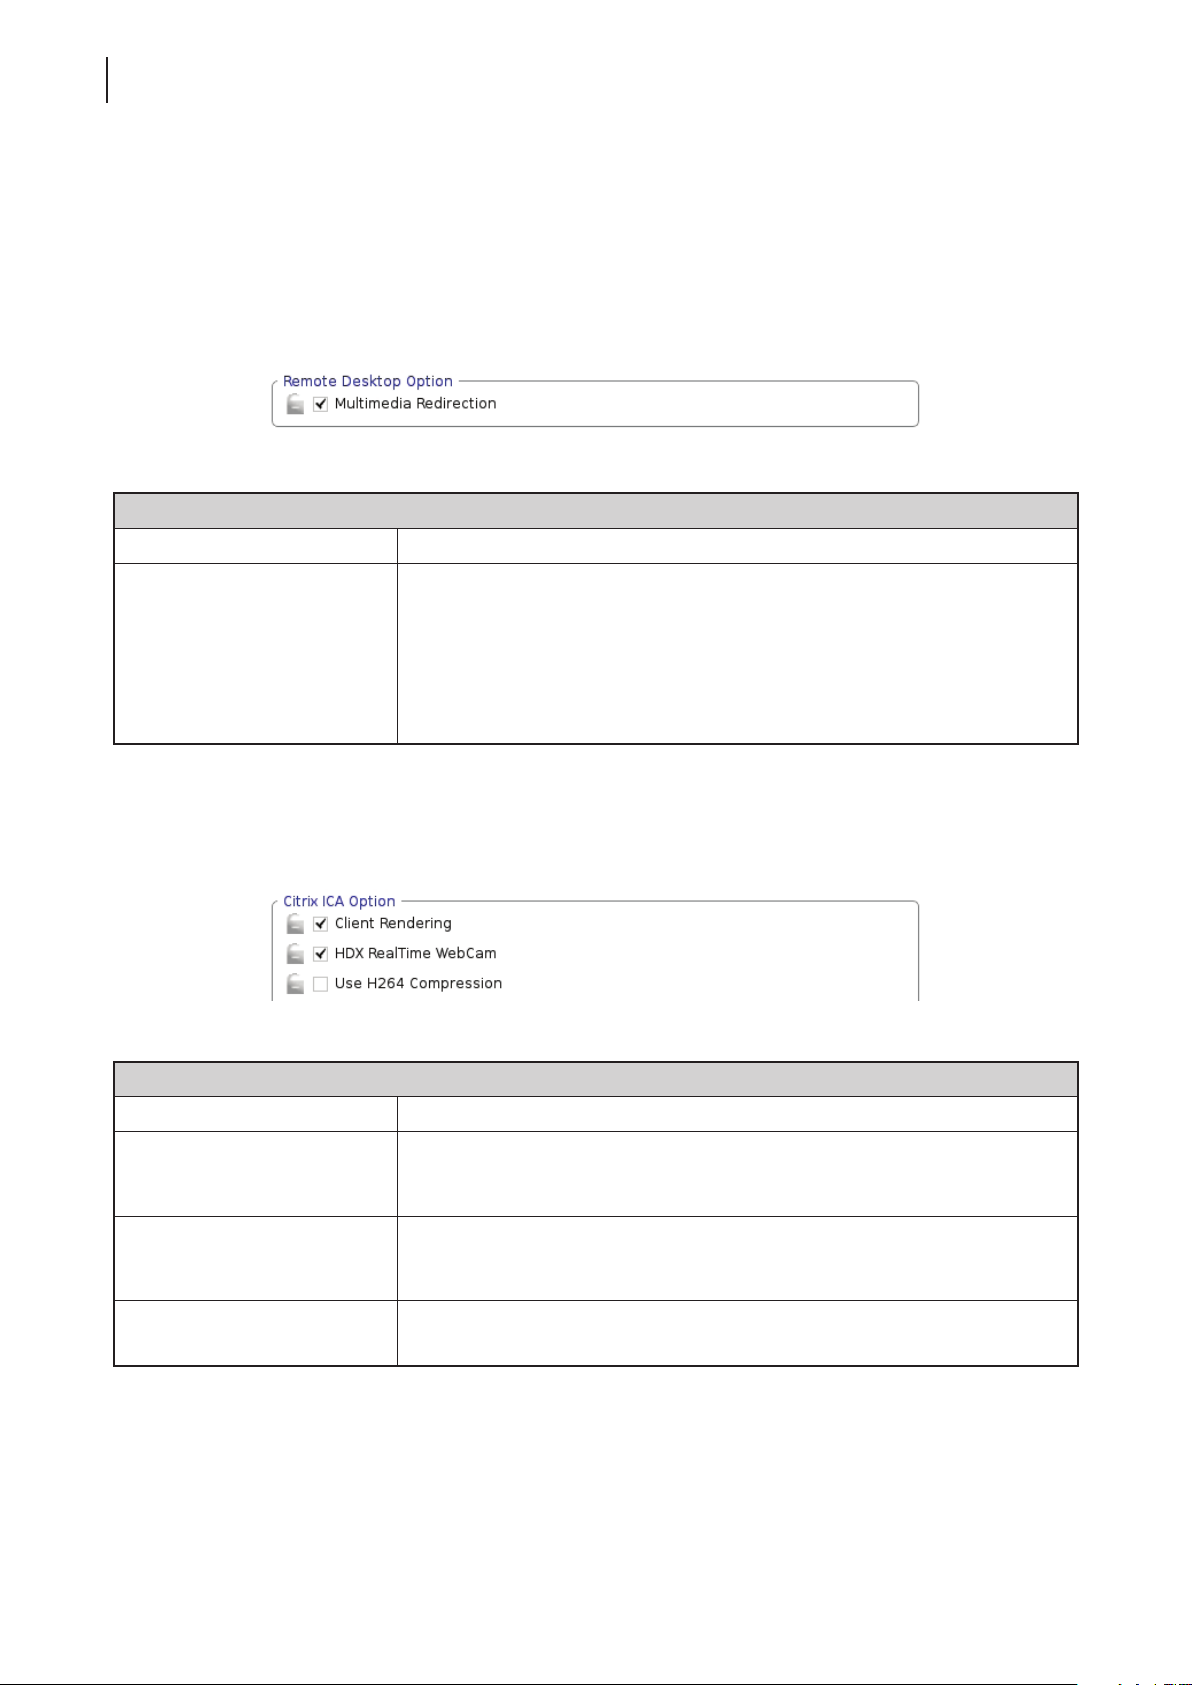
Advanced Quick Connection Settings for Remote Desktop Sessions
To congure advanced Quick Connection settings for Remote Desktop sessions, please refer to the table below:
Remote Desktop Option
Item Description
Check/Uncheck to enable/disable multimedia redirection.
When enabled, the client receives original compressed multimedia streams and
Multimedia Redirection
decodes locally for display. This feature increases the load on the client, but
saves server resources, decreases the bandwidth usage, and improves audio and
video playback experiences.
It’s enabled by default (when Quick Connection mode is enabled).
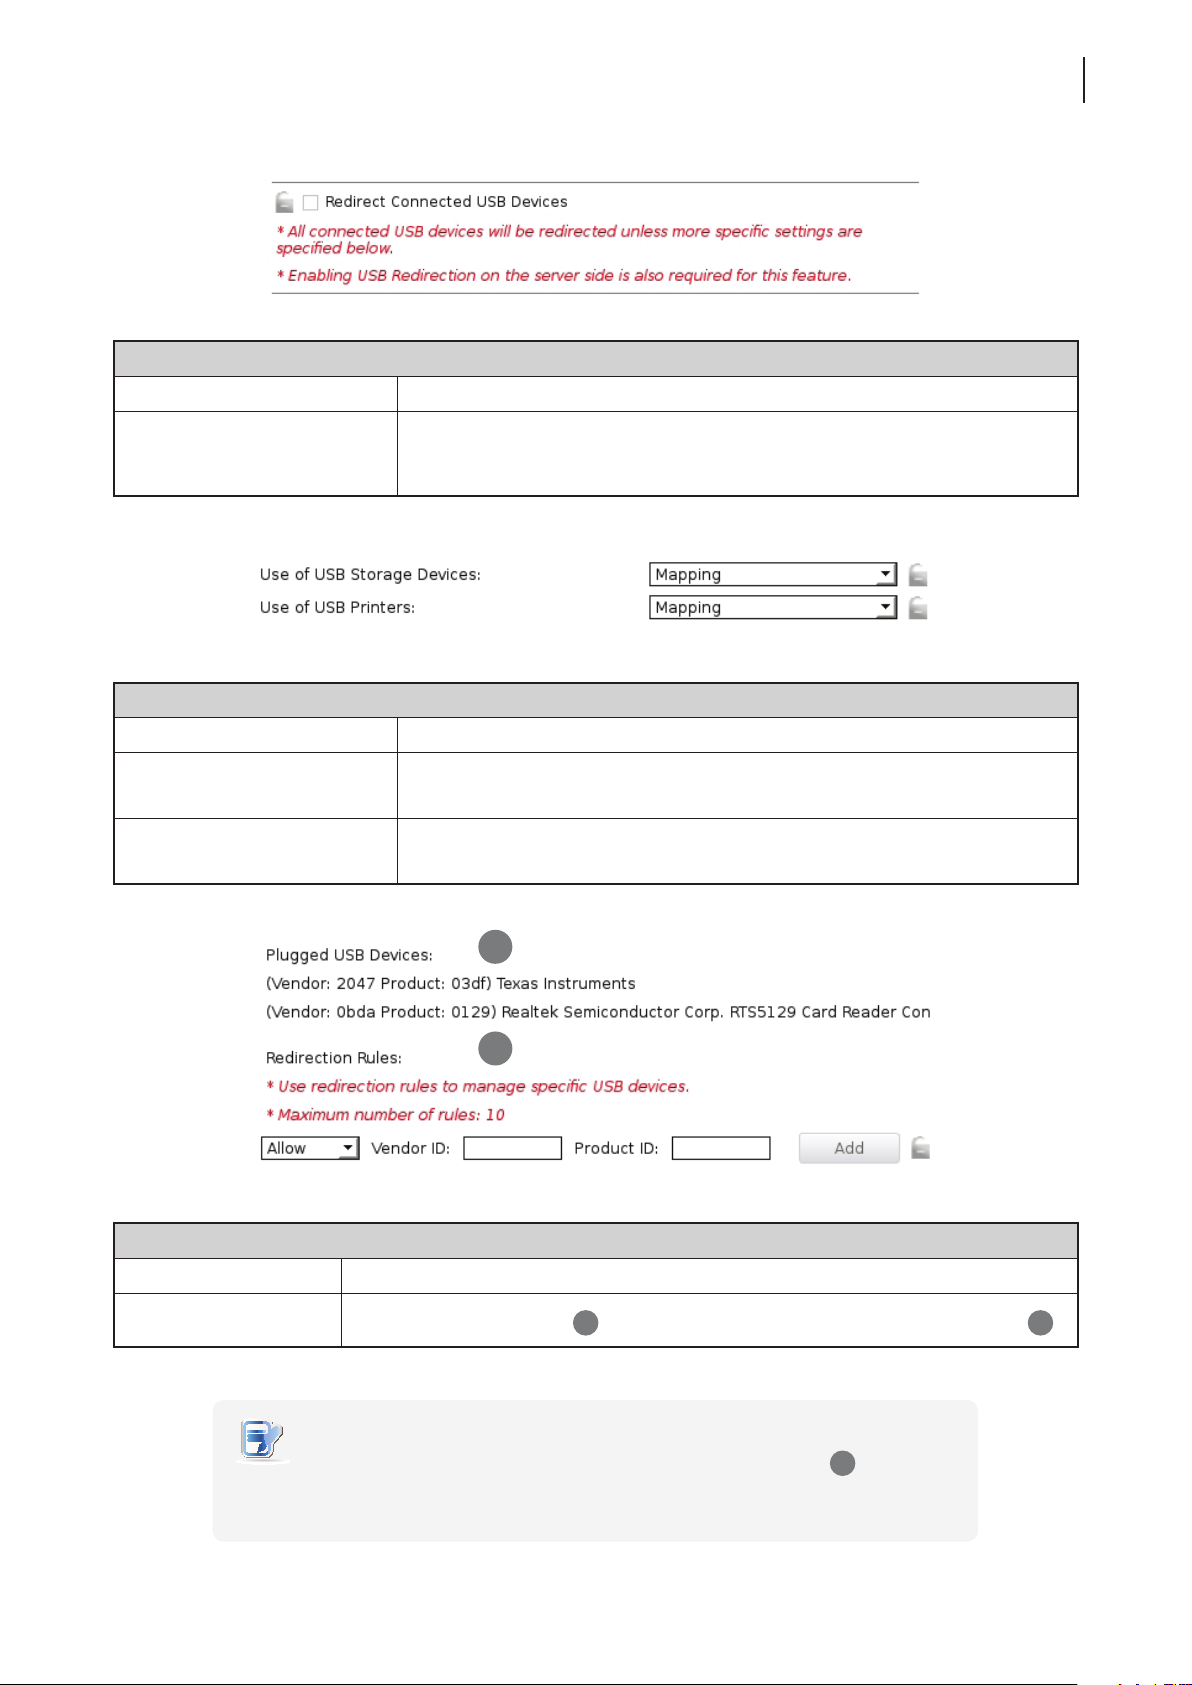
Advanced Quick Connection Settings for Citrix ICA Sessions
To congure advanced Quick Connection settings for Citrix ICA sessions, please refer to the tables below:
Citrix ICA Option
Item Description
Client Rendering
HDX RealTime WebCam
Check/Uncheck to enable/disable client rendering.
When Client Rendering is disabled, Server Rendering is used.
This item is available only when Client Rendering is selected.
When Yes is selected, a locally attached webcam can be used in an ICA session.
Use H264 Compression
Check to enable H.264 compression support on the client, allowing session data
are sent from the server side using H.264 format encoding.
Page 73
Citrix ICA Option
Item Description
Conguring Client Settings
Conguring System Settings
63
Redirect Connected
USB Devices
Citrix ICA Option
Item Description
Use of USB Storage Devices
Use of USB Printers
Check to enable redirection for connected USB devices in Quick Connection
mode. All connected USB devices will be redirected unless more specic settings
are specied below.
Click to select how to use USB storage devices in ICA sessions. Three options are
available: Mapping, Redirection, and Disabled.
Click to select how to use USB printers in ICA sessions. Three options are
available: Mapping, Redirection, and Disabled.
1
Citrix ICA Option
Item Description
Redirection Rules
2
Create redirection rules on
NOTE
• All attached USB devices will be listed under Plugged USB Devices (1) with vender
and product information needed for creating rules.
to manage specic USB devices with information on 1.
2
Page 74
Conguring Client Settings
64
Conguring System Settings
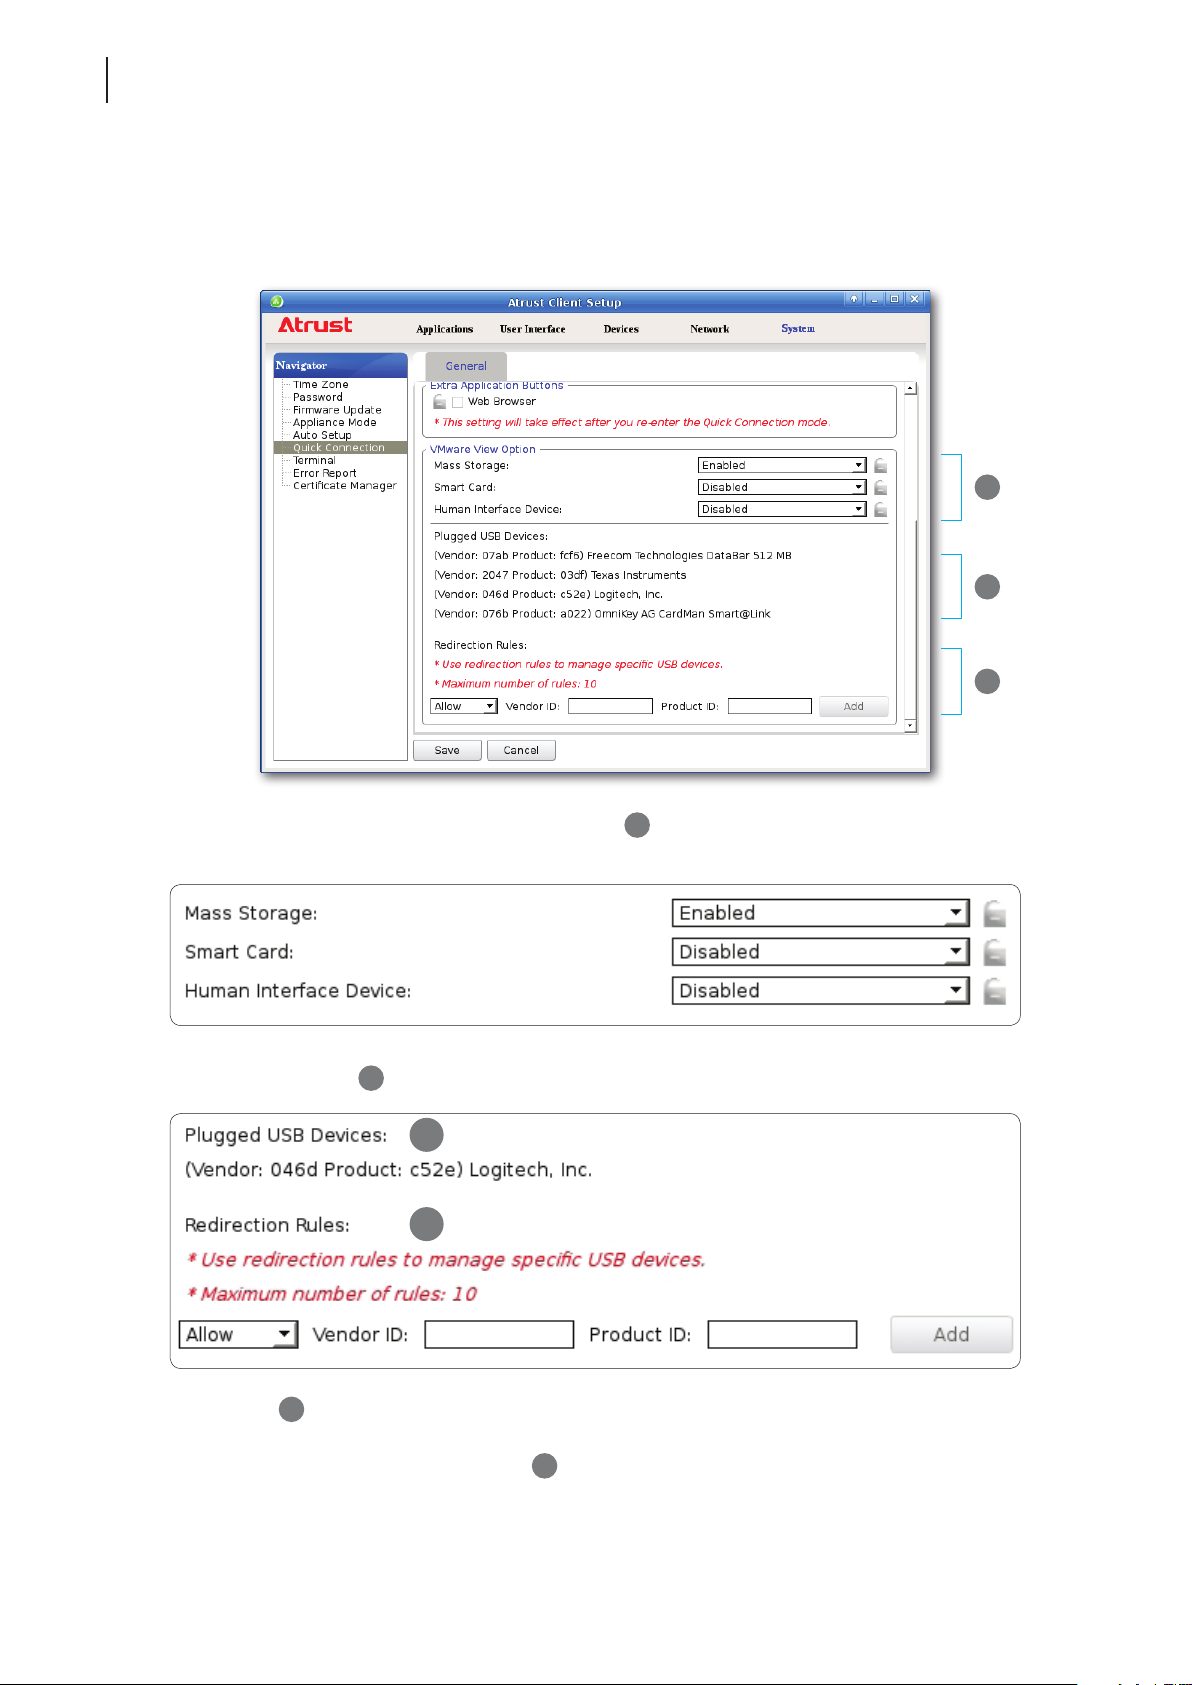
Advanced Quick Connection Settings for VMware View Sessions
To congure advanced Quick Connection settings for VMware View sessions, please do the following:
1. On Atrust Client Setup, click System > Quick Connection.
1
2
2. Click drop-down menus to congure Generic Settings (
interface devices. Two options are available: Enabled or Disabled.
3. Use Redirection Rules (
) to manage specic USB devices:
3
1
2
3
3
) for mass storage devices, smart cards, and human
• Refer to (
Allow or Deny.
• Click Add on the right to add a rule on (
) to ll in the Vender and Product IDs for a specic device, click the drop-down menu to select
2
).
3
Page 75
Conguring Client Settings
Conguring System Settings
NOTE
• All attached USB devices will be listed under Plugged USB Devices (2) with vender
and product information needed for creating rules.
65
• Redirection Rules (
) have priority over Generic Settings (1).
3
4. Click Save to apply.
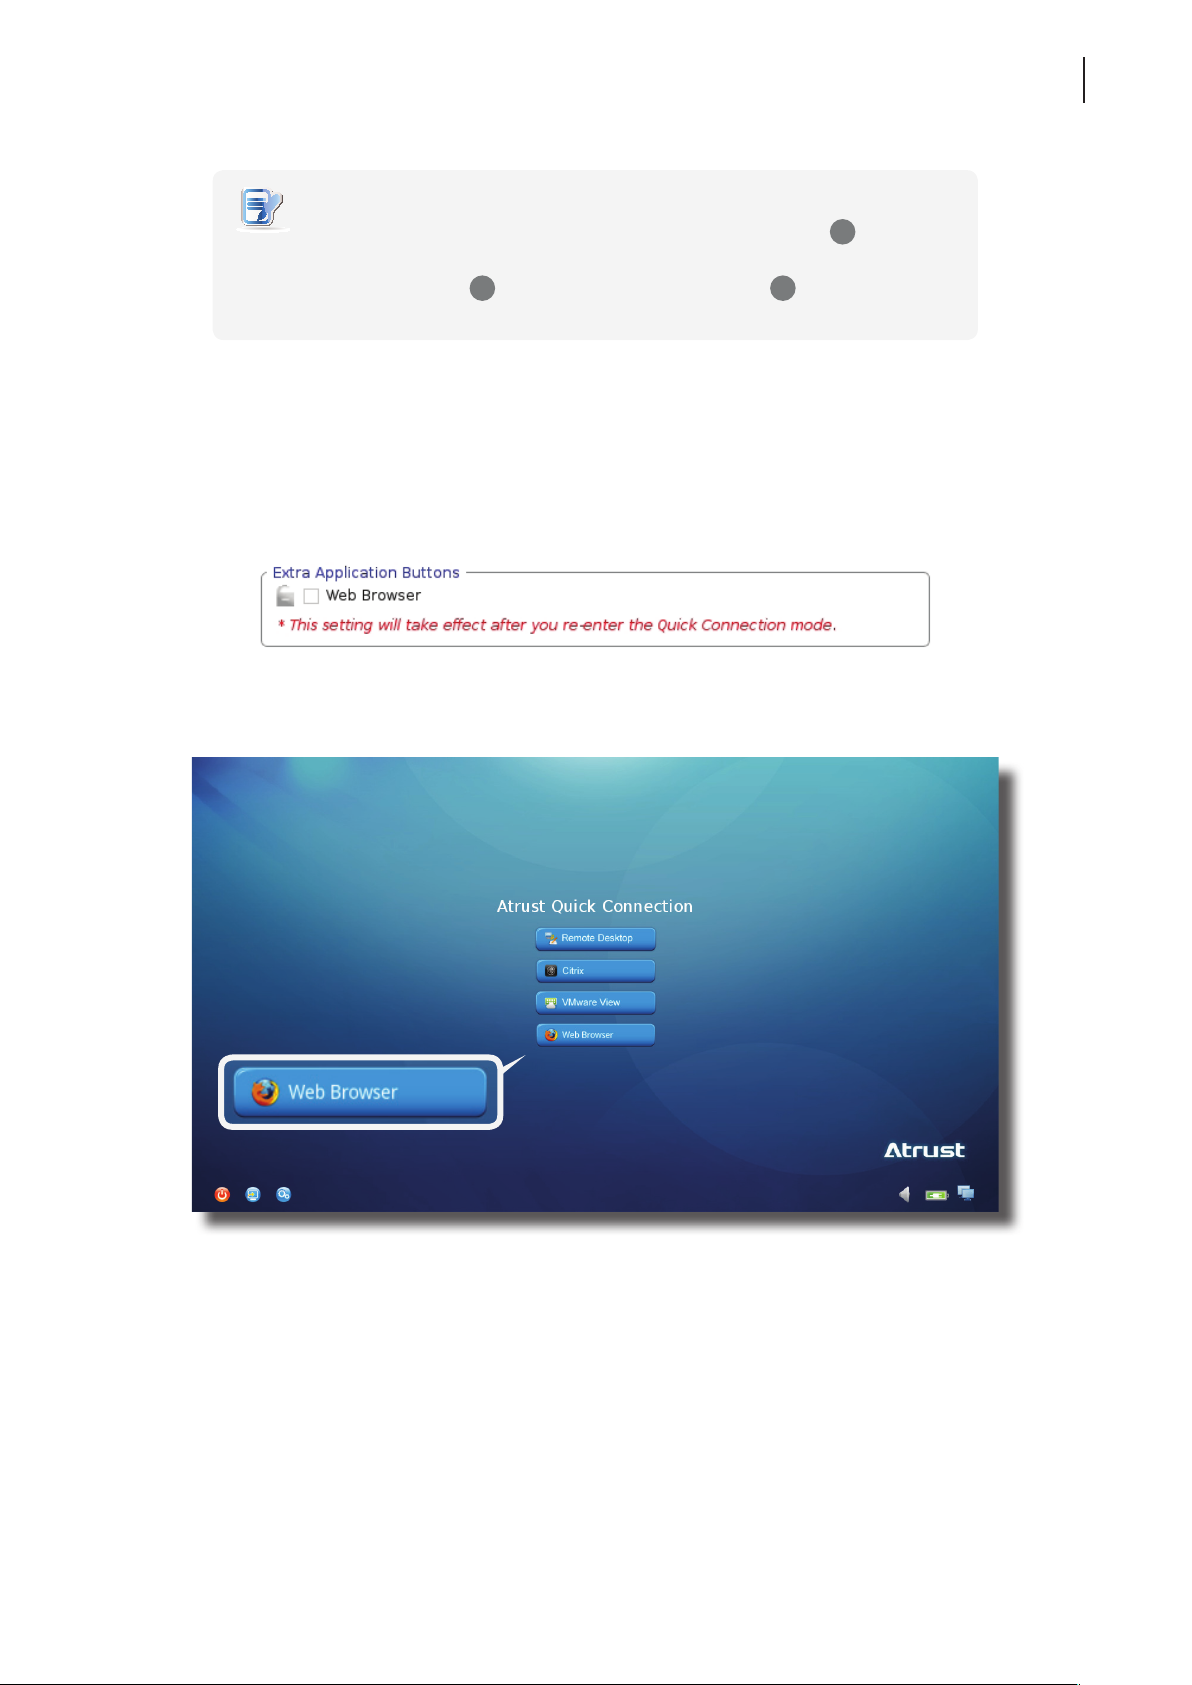
Accessing the Internet Locally in Quick Connection Mode
To access the Internet locally in Quick Connection mode, you can congure to show the Web Browser button on
Atrust Quick Connection screen:
Atrust Quick Connection Screen
Page 76
Conguring Client Settings
66
Conguring System Settings
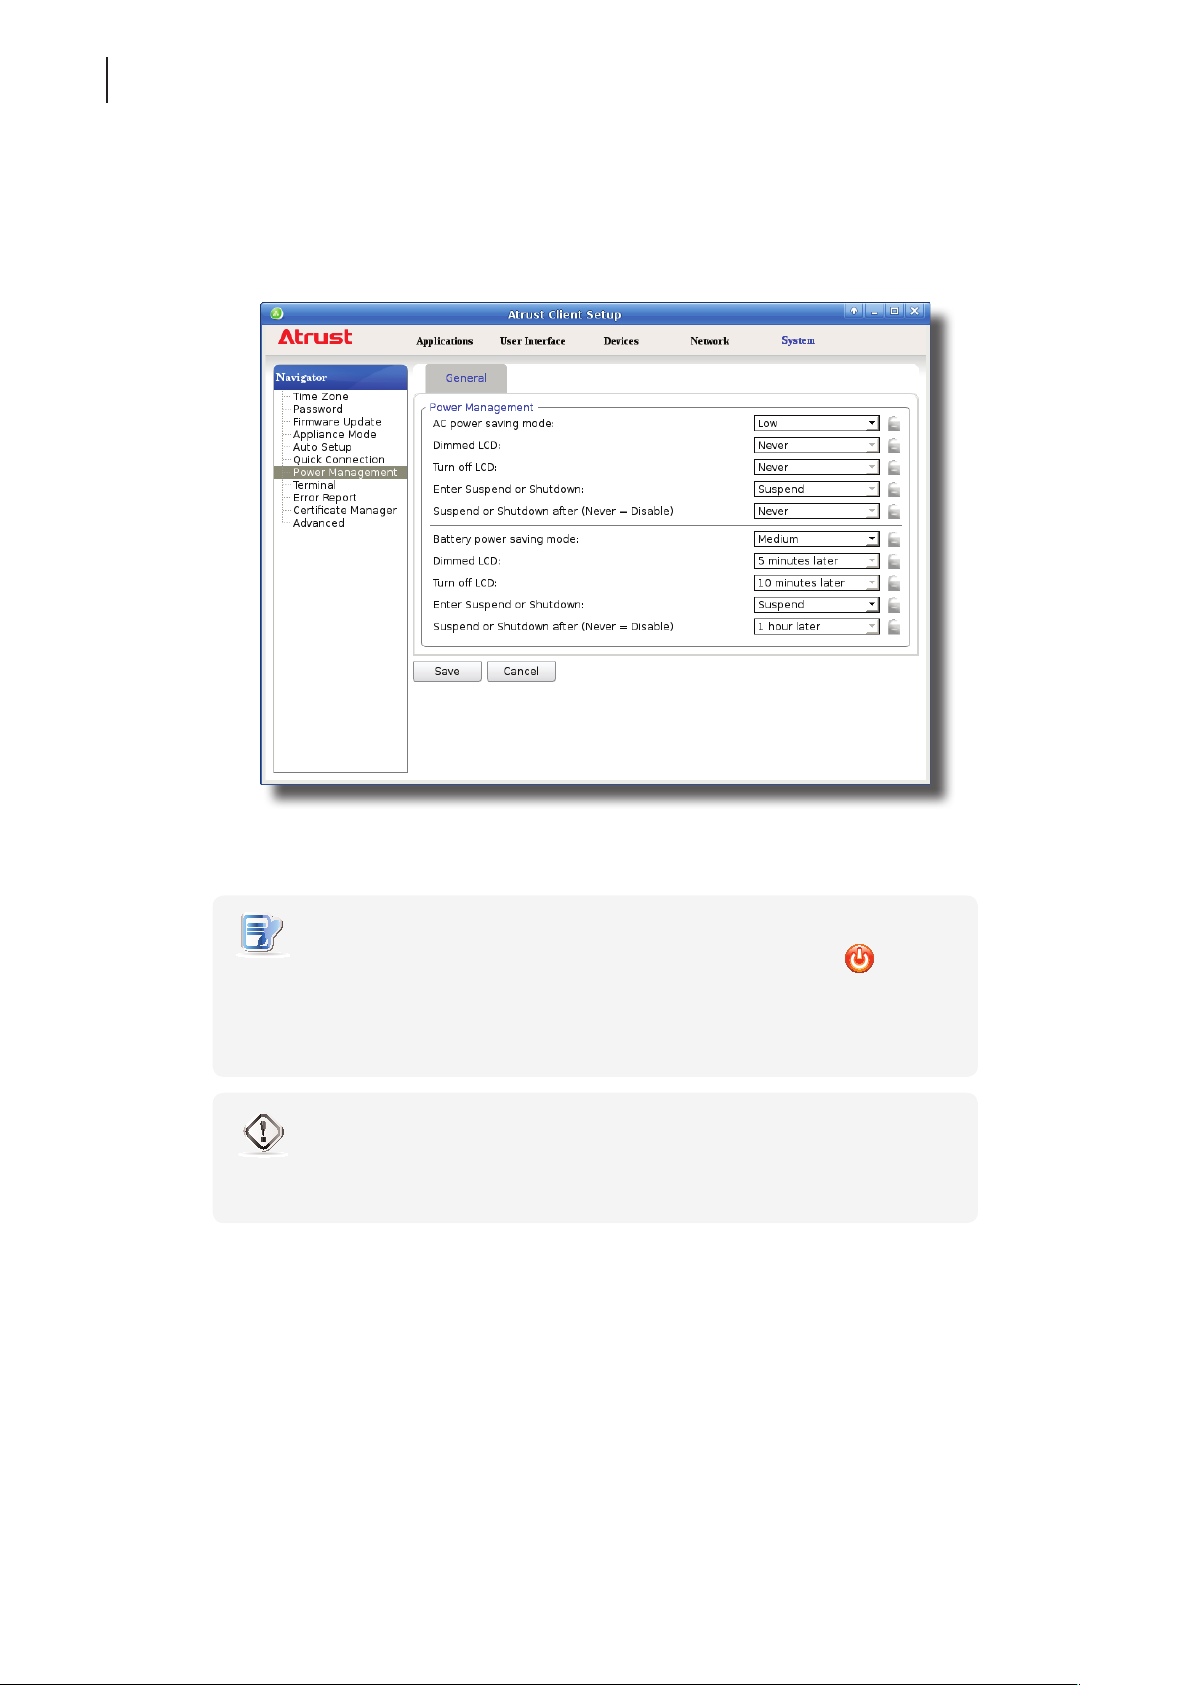
4.2.12 Managing the Use of Power
To manage the use of power for your mobile thin client, please do the following:
1. On Atrust Client Setup, click System > Power Management.
2. Choose the desired power-saving mode for your AC power and battery, or choose Custom to customize
individual settings, and then click Save to apply.
NOTE
• When your mt168L enters System Sleep mode manually (Fn + F12 or >
Suspend) or automatically (congured in Atrust Client Setup through System >
Power Management), it still requires a certain amount of power. You can use
Shut down option instead to save the power to a greater degree.
WARNING
• When using only the battery as the power source, ensure that it has enough power
to prevent data loss.
Page 77
Conguring Client Settings
Conguring System Settings
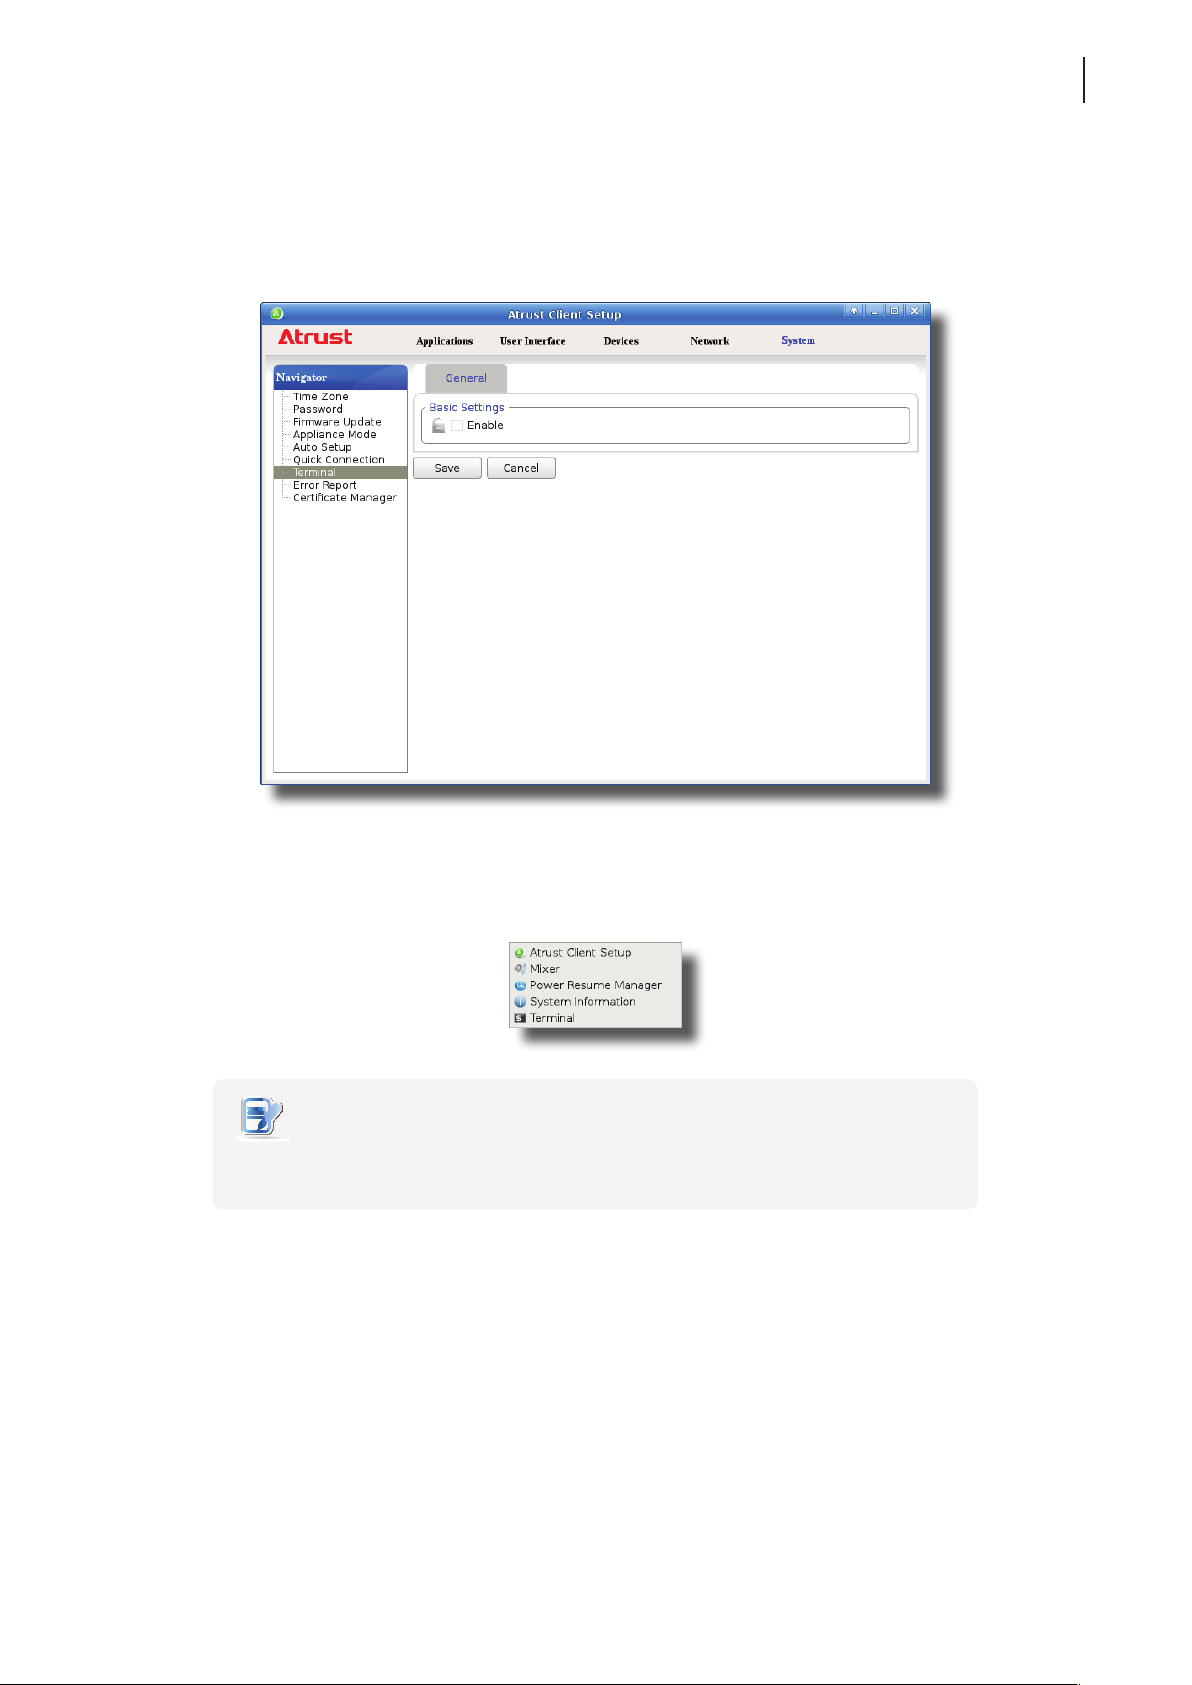
4.2.13 Enabling or Disabling the Command-line Functions
To enable/disable the execution of the text-based (command-line) functions, please do the following:
1. On Atrust Client Setup, click System > Terminal.
67
2. Click to check/uncheck Enable to allow/disallow the execution of the command-line functions.
3. Click Save to conrm your change.
4. The shortcut appears/disappears on the Start menu for access.
NOTE
• On the local Linux desktop, click START > Settings > Terminal to open the
Terminal window.
Page 78
Conguring Client Settings
68
Conguring System Settings
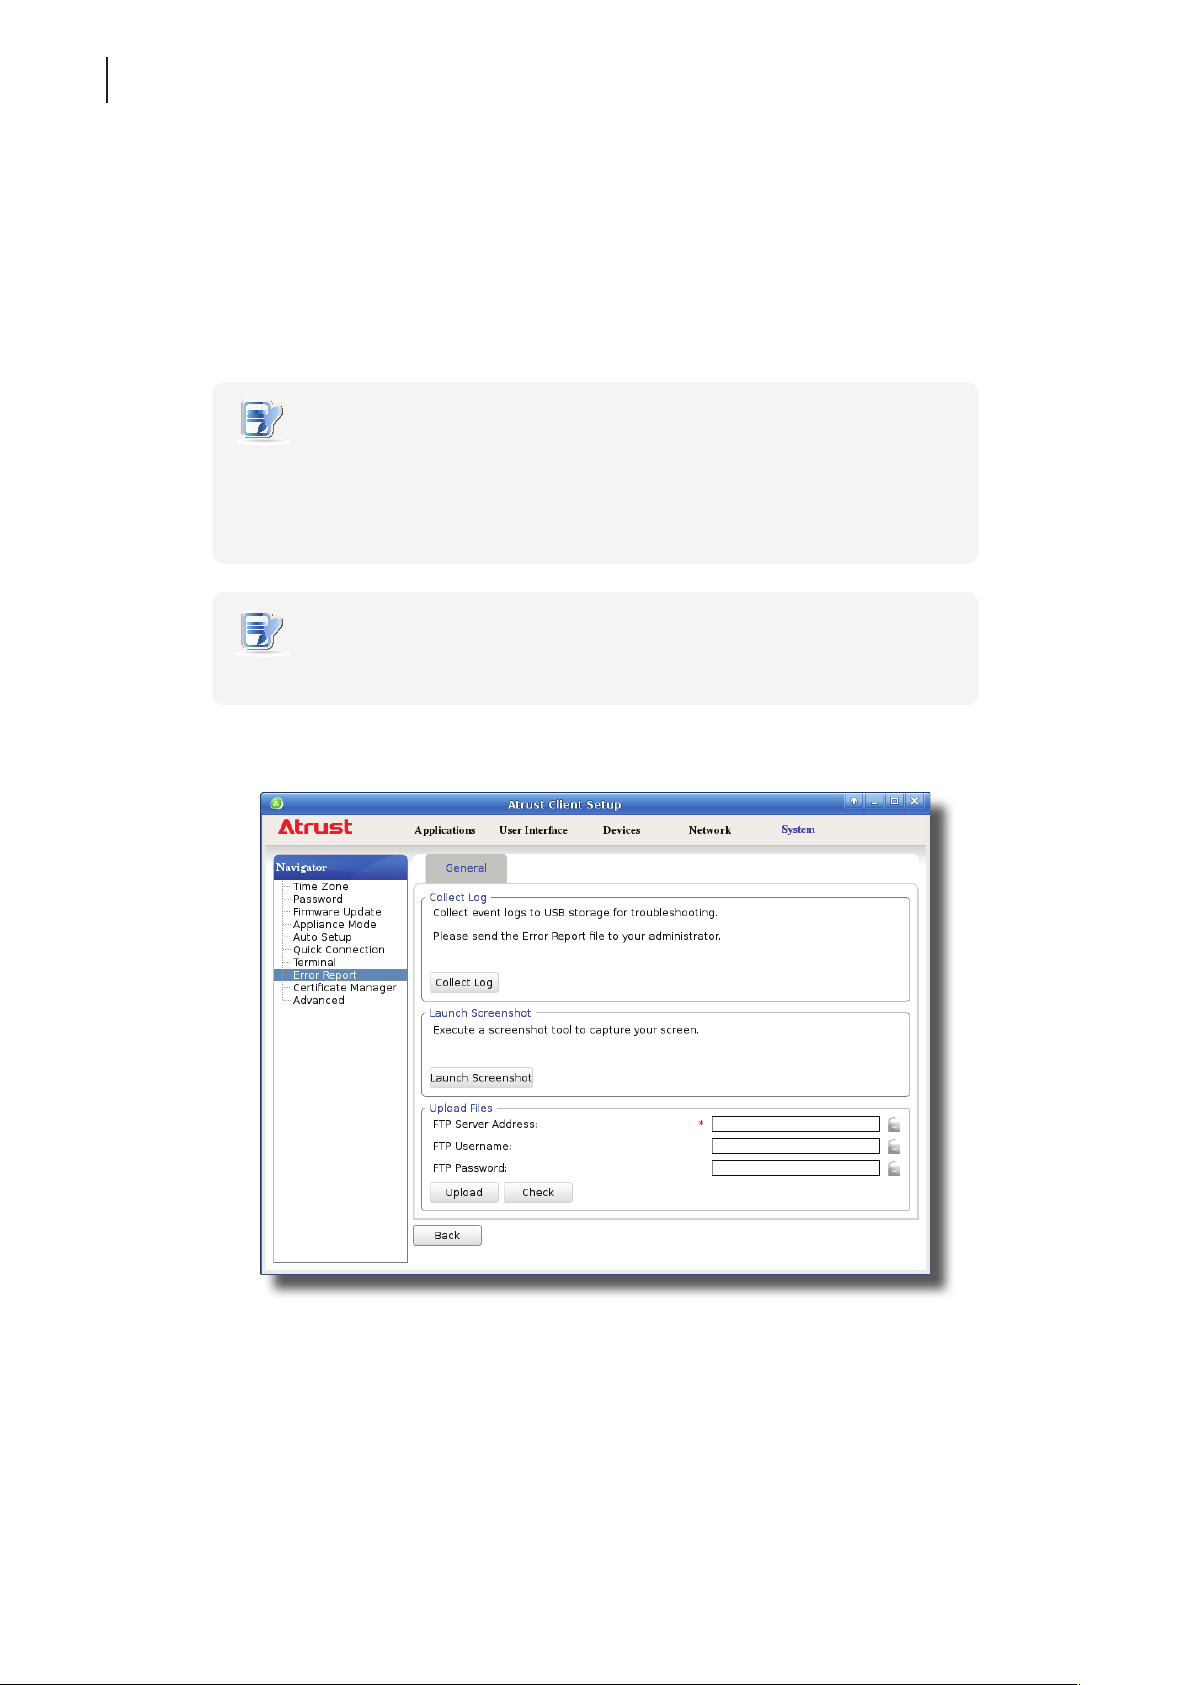
4.2.14 Collecting Event Logs and Capturing Related Screens
The Error Report feature allows you to collect event logs and capture related screens for error reporting.
Collecting Event Logs
To collect event logs of your mt168L, please do the following:
1. Plug a USB ash drive into your mt168L.
NOTE
• This USB ash drive will be used for storing the event logs of your mt168L.
• Ensure that you have enabled the access and automount of USB storage devices.
For detailed instructions, please refer to section “4.4.3 Conguring Settings for USB
Storage Devices” on page 89.
NOTE
• Please note that les saved on the local desktop will be deleted after restart.
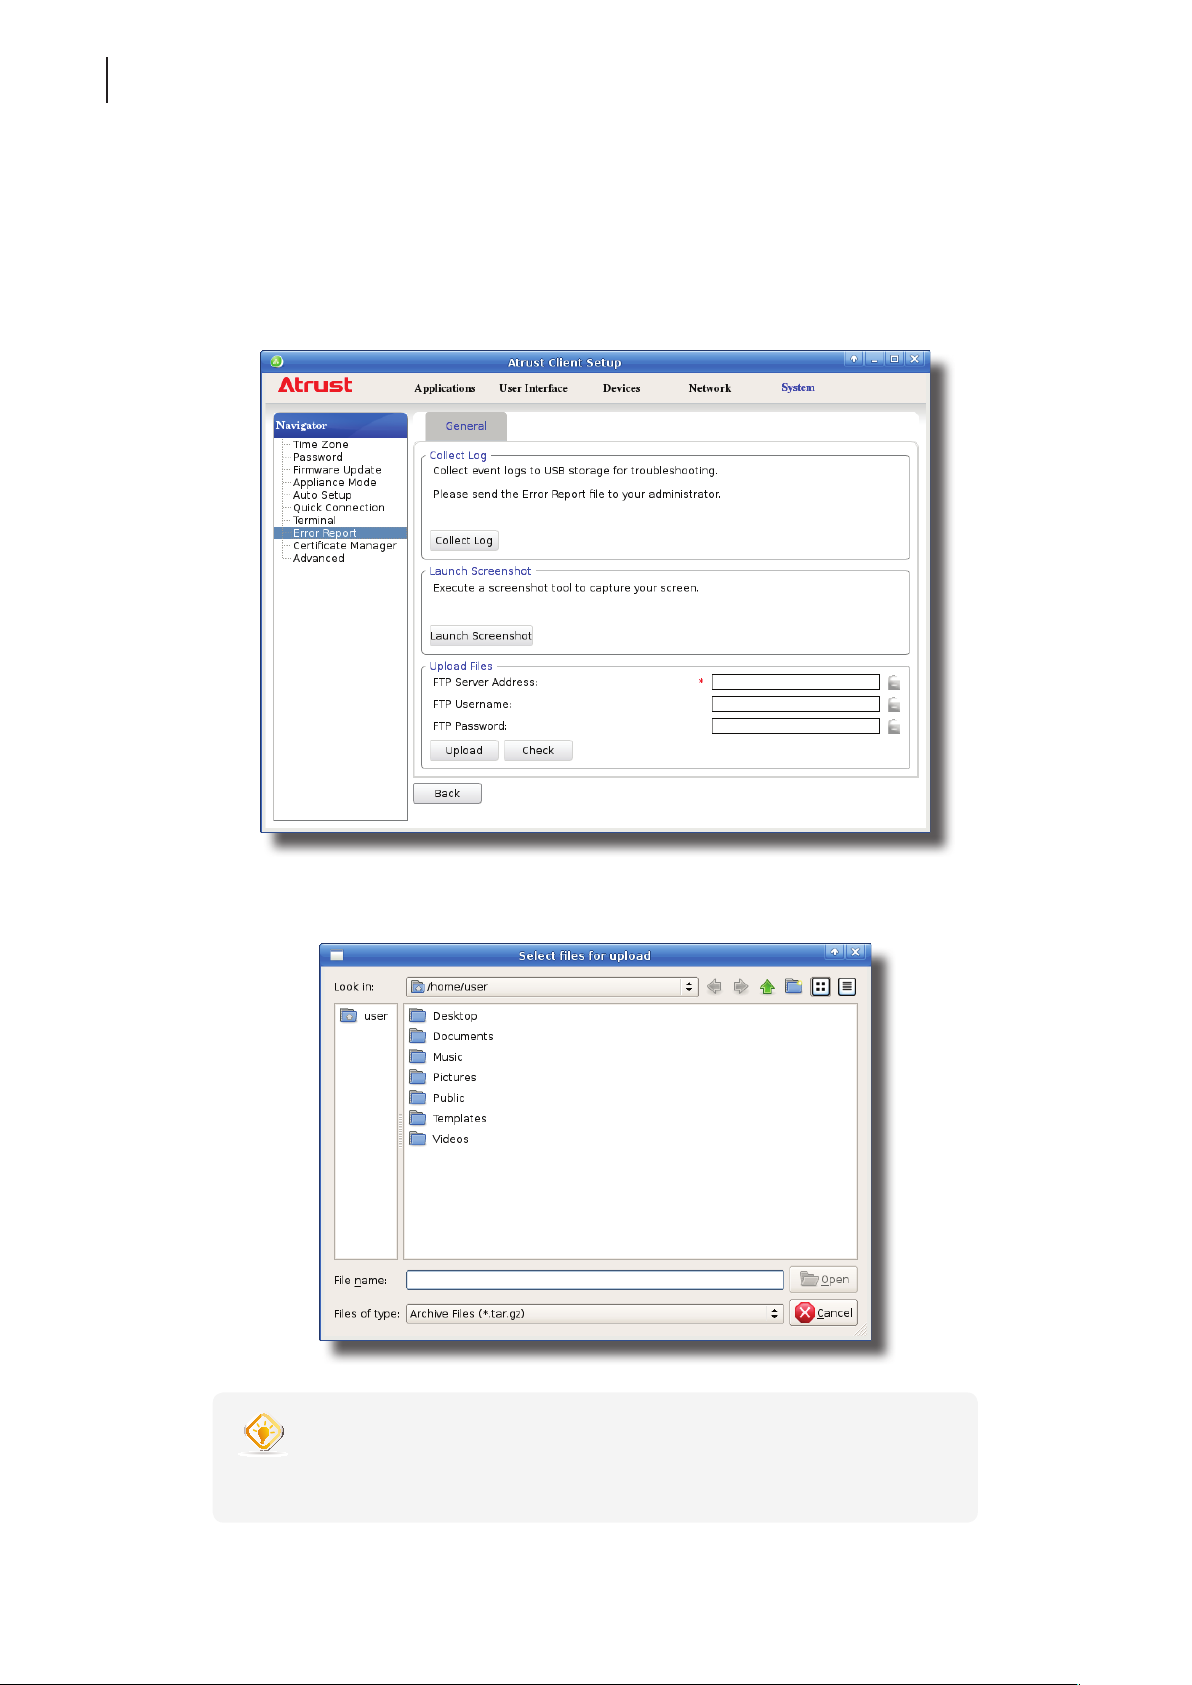
2. On Atrust Client Setup, click System > Error Report.
Page 79
Conguring Client Settings
Conguring System Settings
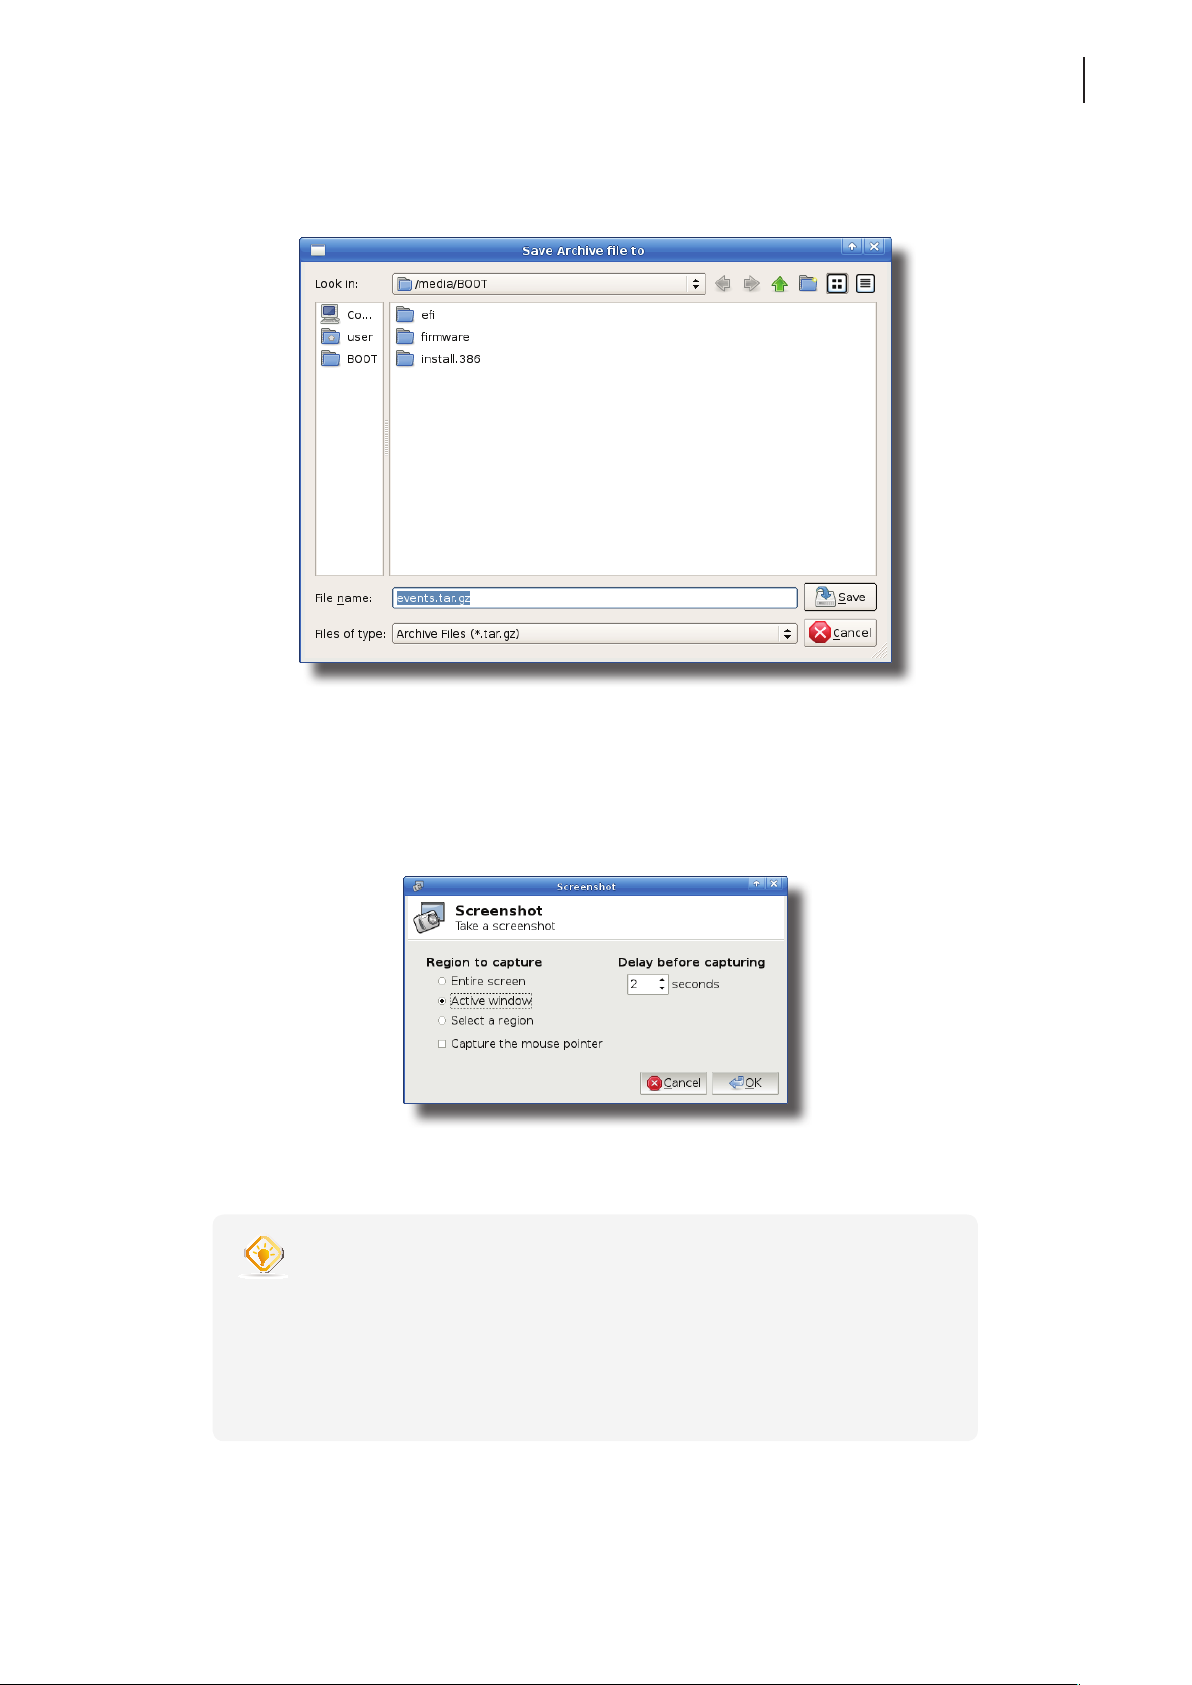
3. Click Collect Log. A window appears prompting you to choose where to save the log le set (named
events.tar.gz). The attached USB ash drive is the default location if attached. Click Save to apply.
69
Capturing Error-Related Screens
To capture error-related screens of your mt168L, please do the following:
1. On Atrust Client Setup, click System > Error Report.
2. Click Launch Snapshot to open the screen capturing program.
3. Congure screen capturing settings directly on the opened window if needed, and then click OK to capture
the desired screen.
TIP
• It’s recommended to set the delay time before capturing to at least 2 seconds to
reserve time for switching to the desired screen or window.
• It’s recommended to save the captured screens in the same USB ash drive where
the event logs were saved.
• Please note that les saved on the local desktop will be deleted after restart.
Page 80
Conguring Client Settings
70
Conguring System Settings
4.2.15 Uploading Files for Error Reporting
You can upload les to a specied FTP server for error reporting.
To upload les to an FTP server, please do the following:
1. On Atrust Client Setup, click System > Error Report.
2. Under the Upload Files section, type the IP address of the FTP server and credentials, click Upload to select
and upload les to that FTP server.
TIP
• You can check the validity of the IP address and credentials rst through the
Check button.
Page 81
Conguring Client Settings
Conguring System Settings
4.2.16 Importing Certicates for Remote Computers
You can import certicates for remote computers through:
• A local device (from a USB storage device)
• The network (from a remote computer or the management console)
NOTE
• The available management console for mt168L is Atrust Device Manager, a remote
and group management console for multiple thin clients. For more information,
please refer to the User’s Manual for Atrust Device Manager.
Importing certicates through a USB storage device
To import certicates for remote computers through a USB storage device, please do the following:
1. Copy your certicates to a USB storage device, and then connect this storage device to your mt168L.
71
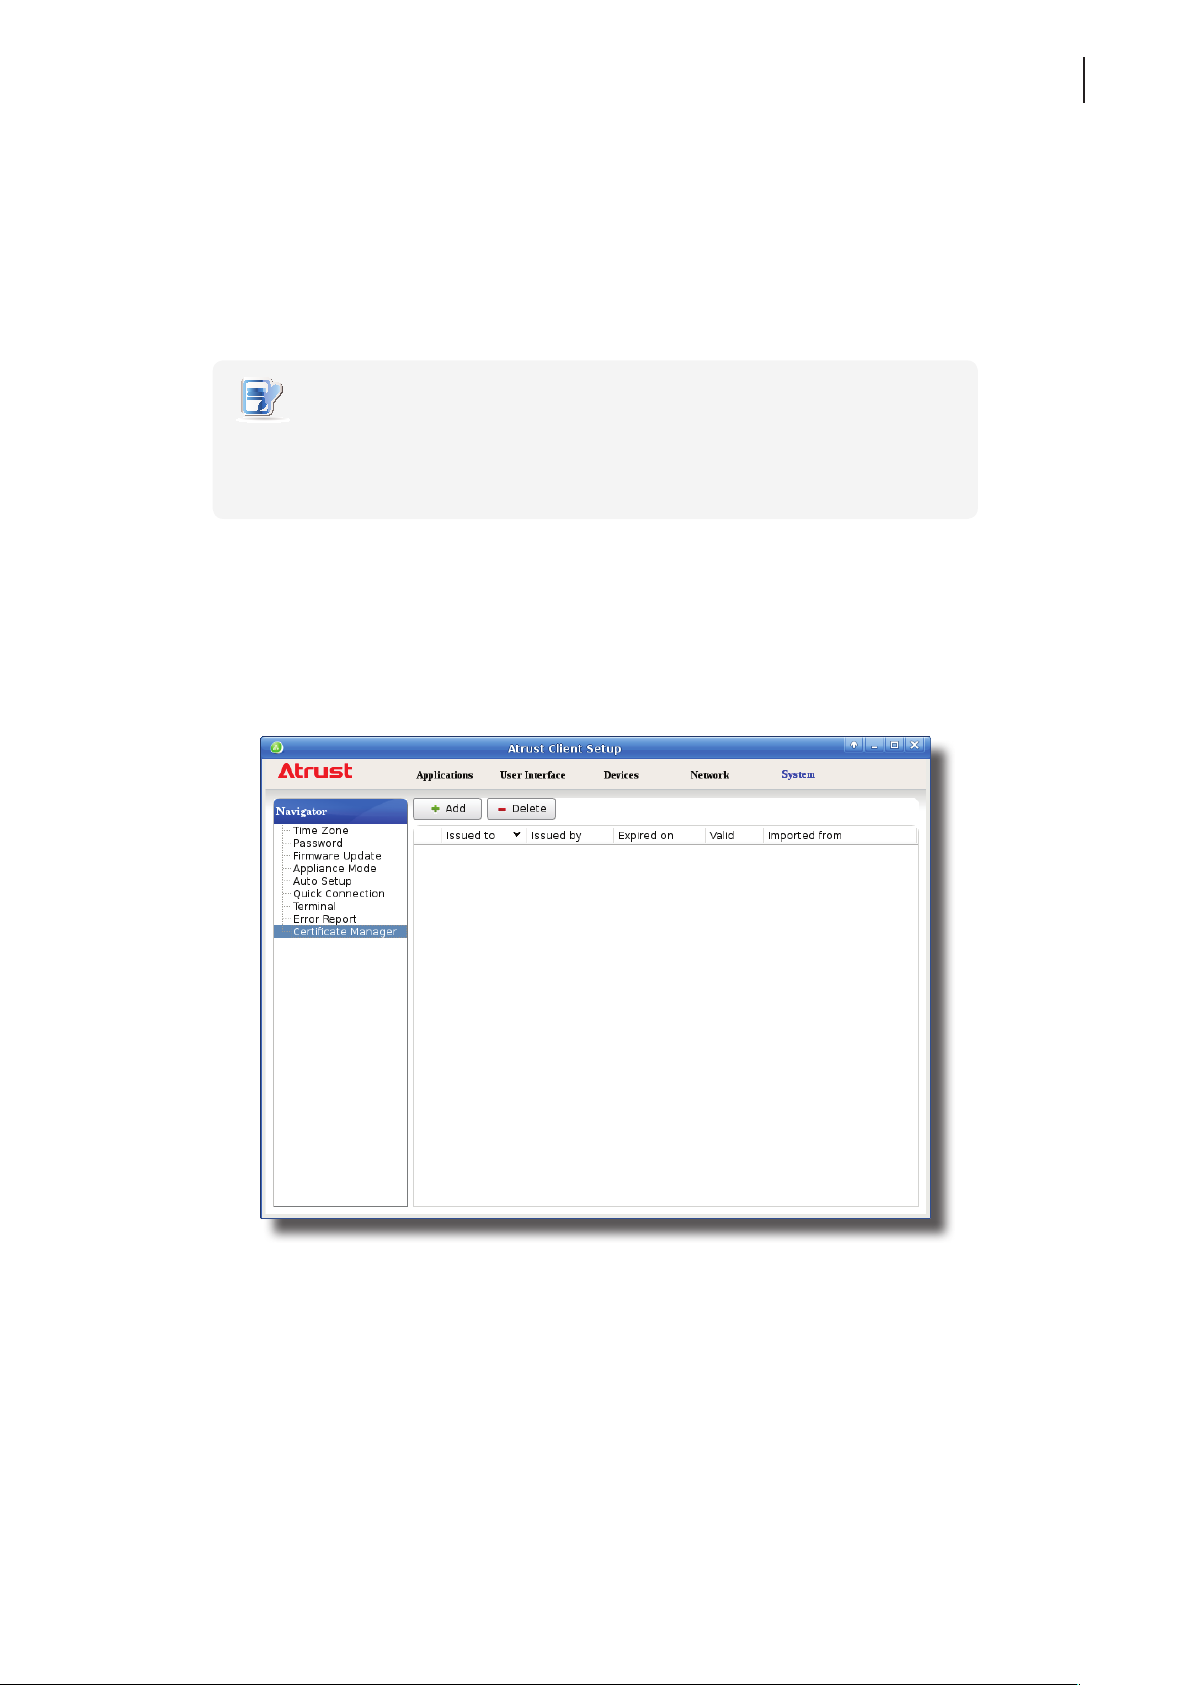
2. On Atrust Client Setup, click System > Certicate Manager.
3. Click Add on the top of the Certicate list.
Page 82
Conguring Client Settings
72
Conguring System Settings
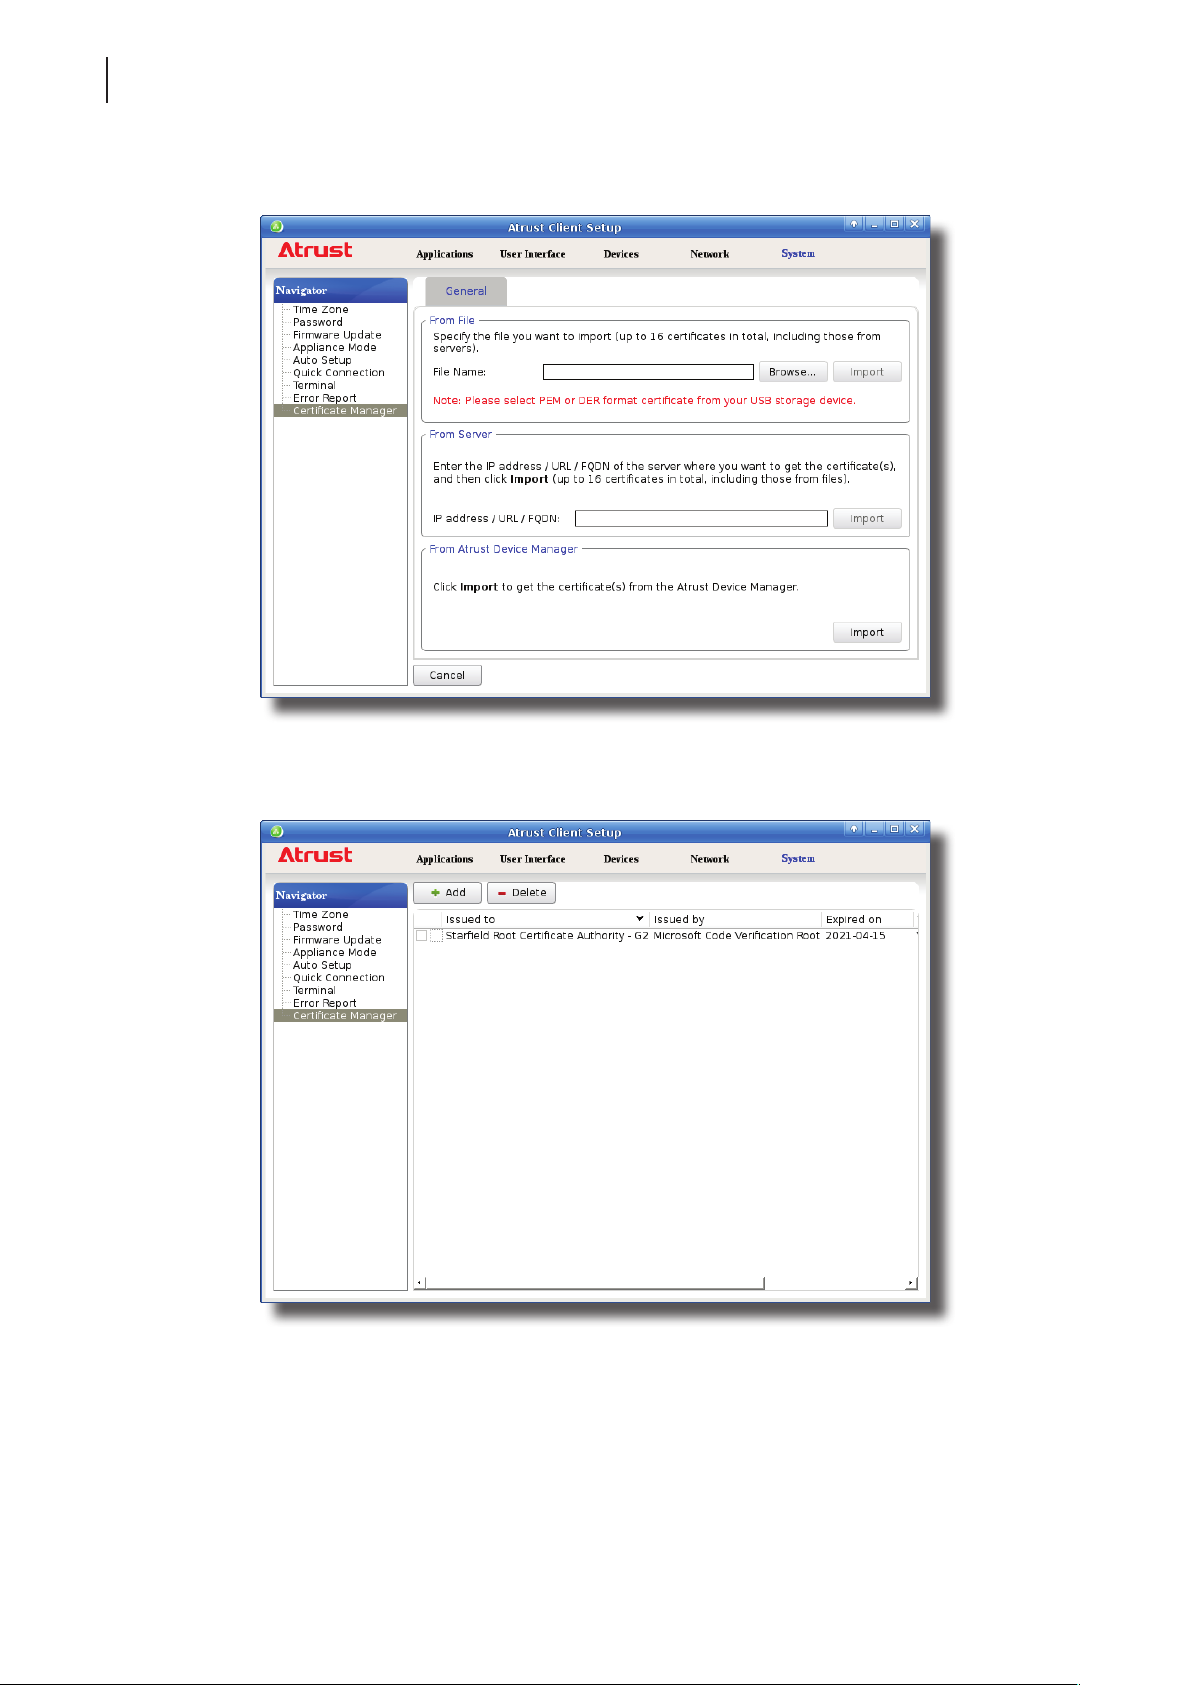
4. In the From File section, click Browse to locate the desired certicate le, and then click Open to conrm.
5. Click Import to start importing the certicate.
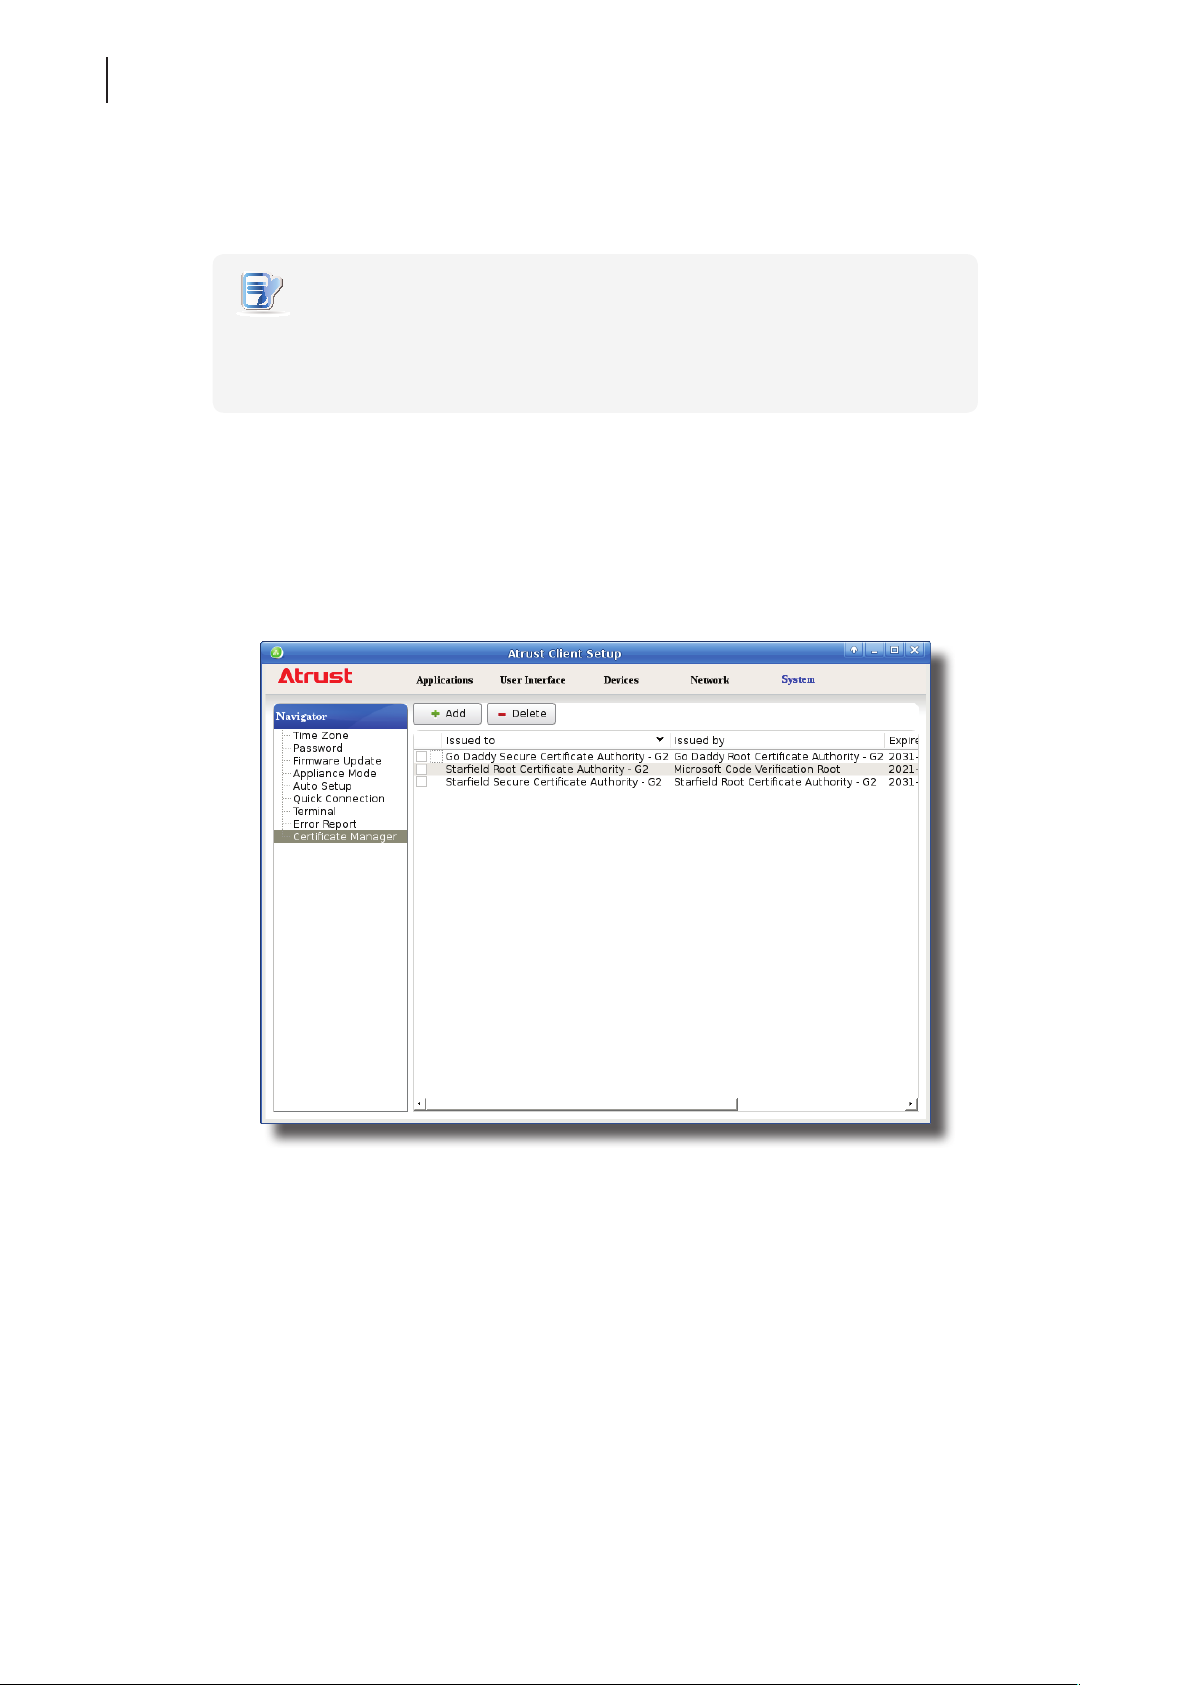
6. On completion, the certicate is shown in the Certicate list.
Page 83
Conguring Client Settings
Conguring System Settings
Importing certicates from remote computers through the network
To import the certicate from a remote computer through the network, please do the following:
1. On Atrust Client Setup, click System > Certicate Manager.
2. Click Add on the top of the Certicate list.
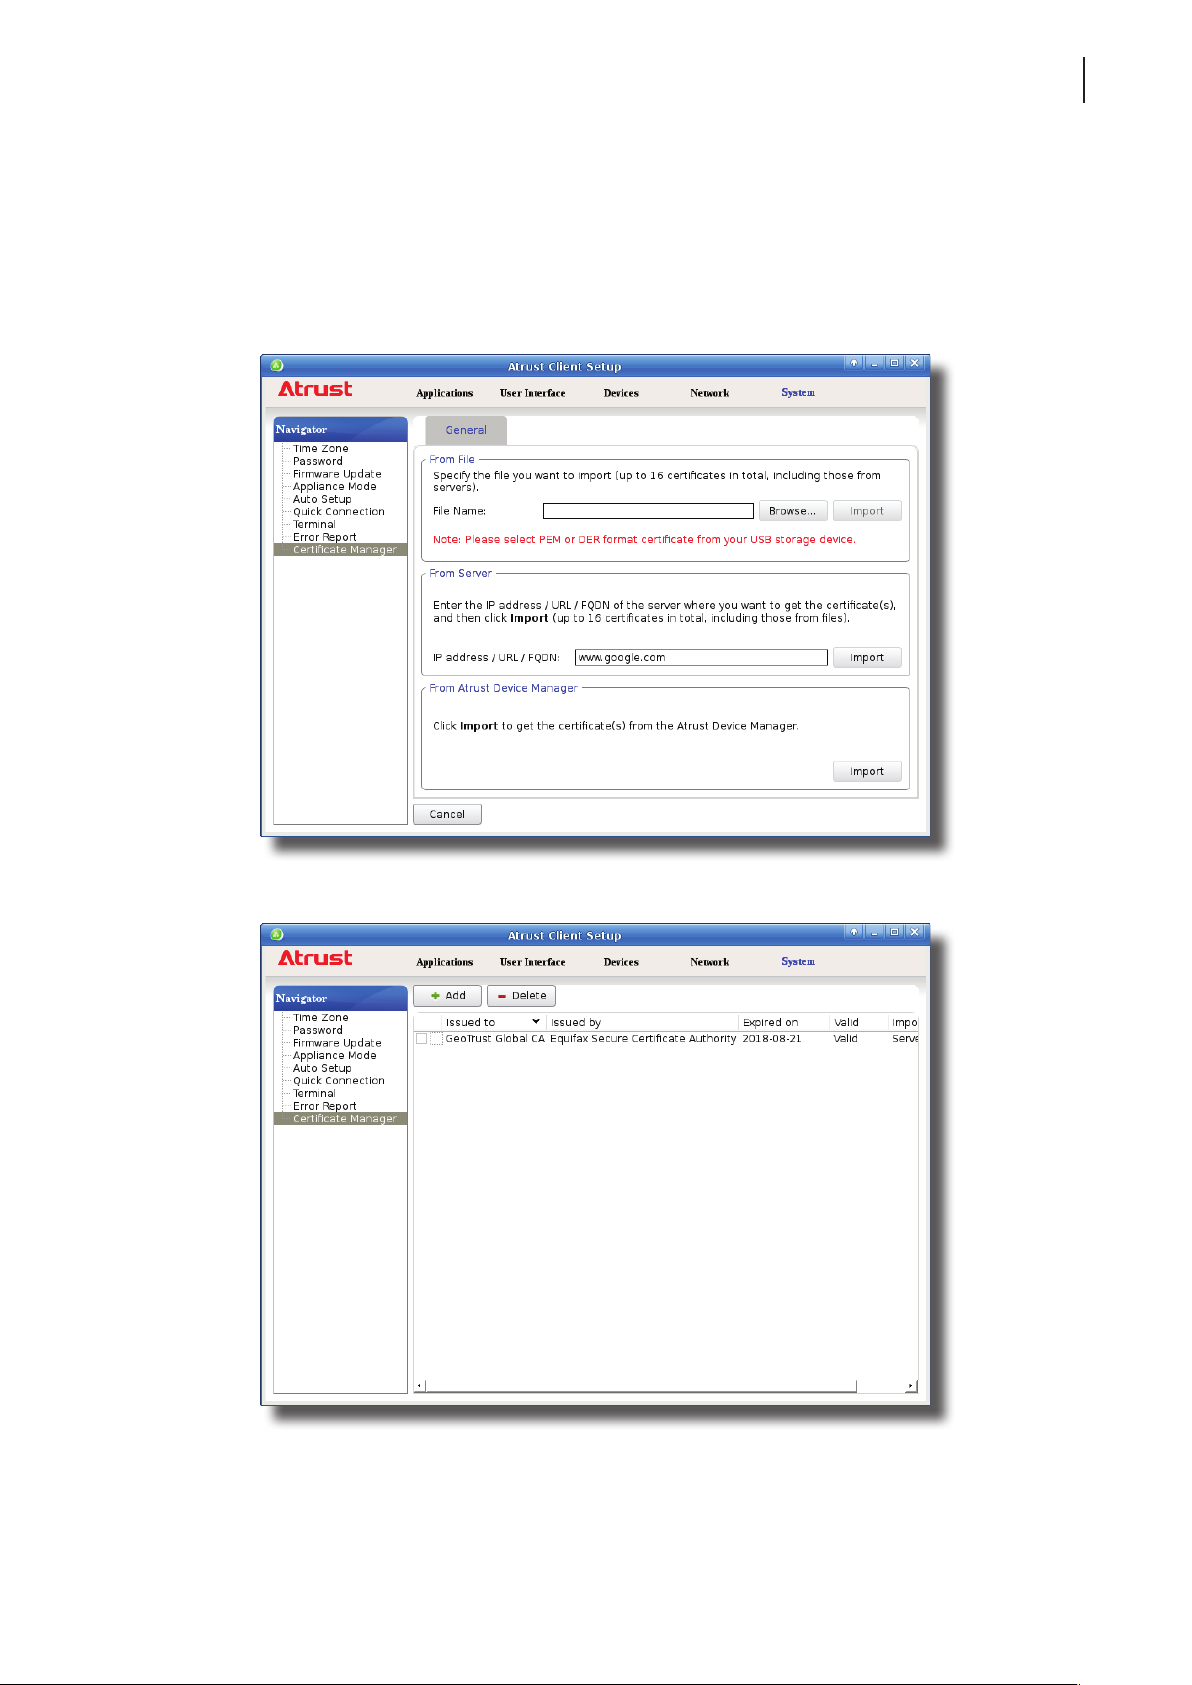
3. In the From Server section, type the IP address / URL / FQDN of the remote computer, and then click Import.
73
4. On completion, the certicate is shown in the Certicate list.
Page 84
Conguring Client Settings
74
Conguring System Settings
Importing certicates from Atrust Device Manager through the network
To import certicates from Atrust Device Manager through the network, please do the following:
NOTE
• Before proceeding, ensure that (1) your thin client has been added into a managed
group in the management console, that is, Atrust Device Manager, and that (2) you
have imported certicates into the management console.
1. On Atrust Client Setup, click System > Certicate Manager.
2. Click Add on the top of the Certicate list.
3. In the From Atrust Device Manager section, click Import to start importing all certicates available in
Atrust Device Manager.
4. On completion, the certicates are shown in the Certicate list.
Page 85
Conguring Client Settings
Conguring System Settings
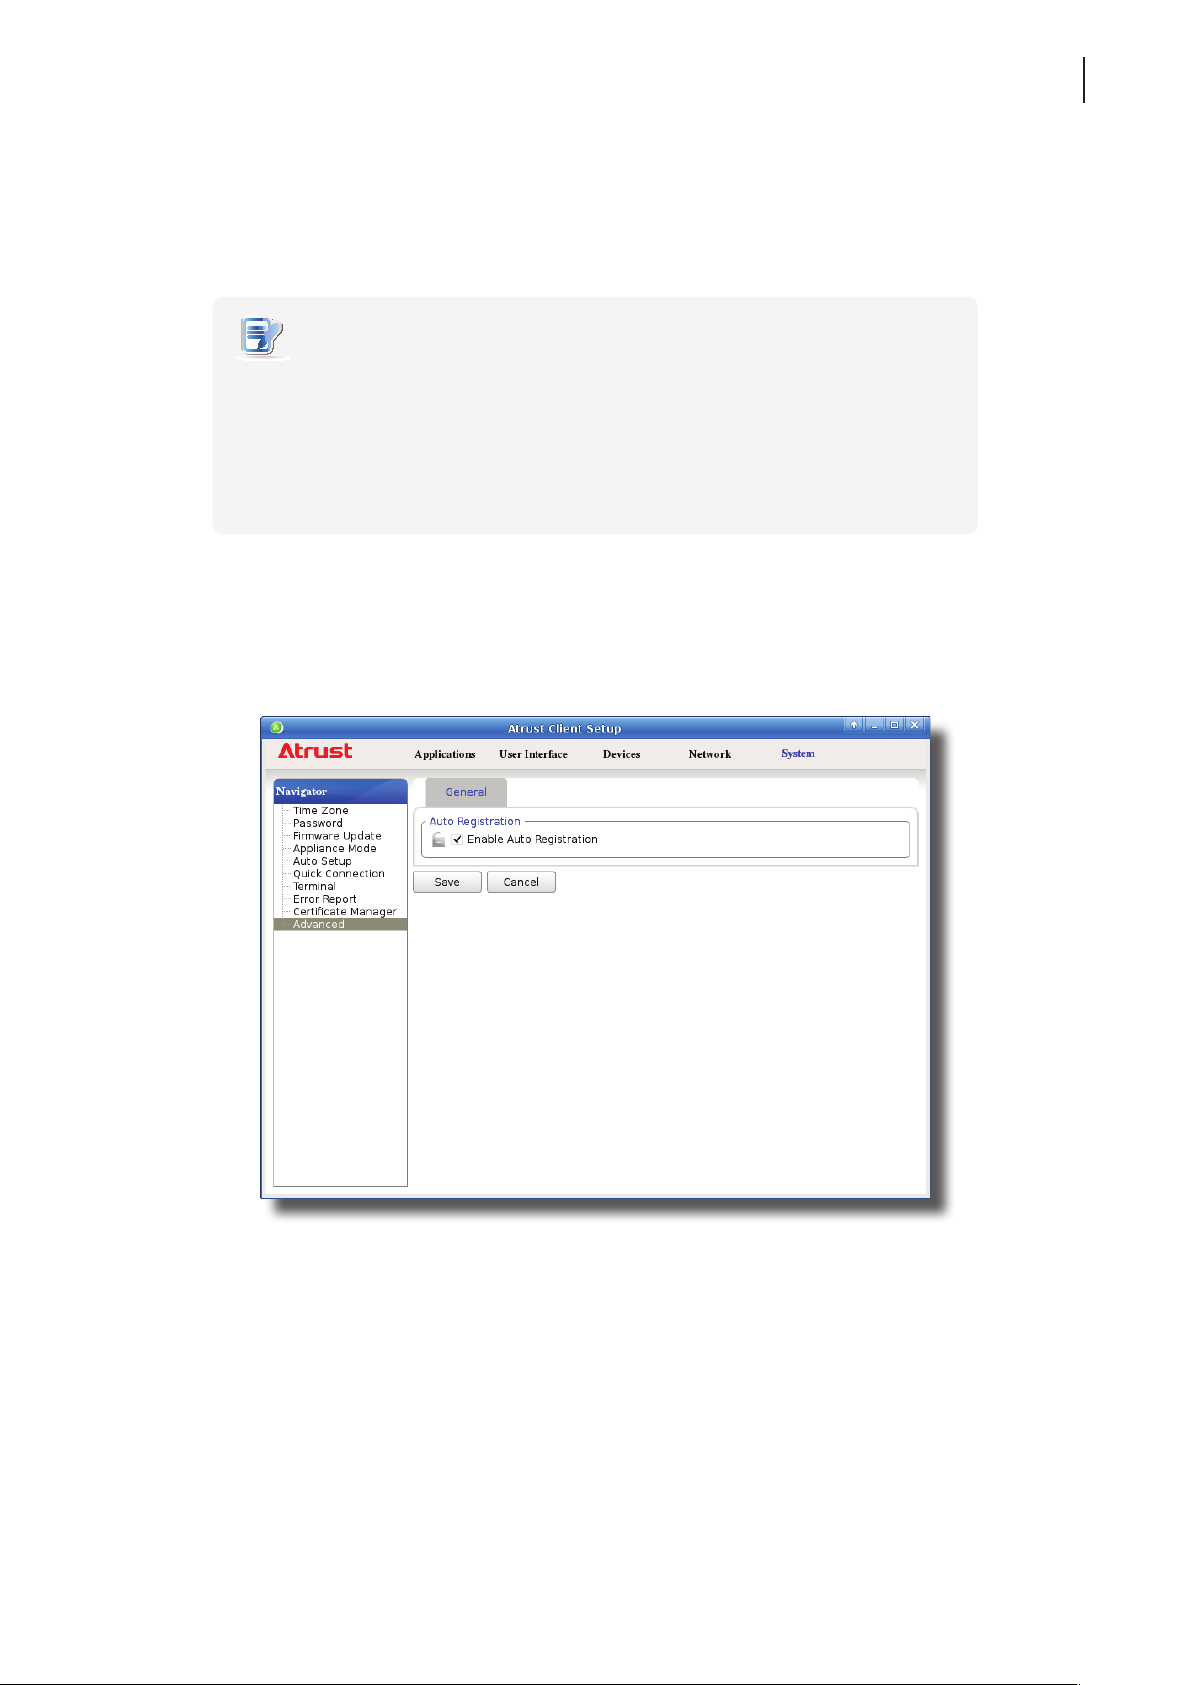
4.2.17 Enabling or Disabling Auto Registration
Auto Registration allows that thin clients automatically register with Atrust Device Manager when they are online
and then become managed by Atrust Device Manager.
NOTE
• For this feature to work, Auto Registration must be enabled on both sides: thin
clients and target Atrust Device Manager. In addition, some congurations on
DHCP or DNS server over your network are required. For details, please refer to the
User’s Manual for Atrust Device Manager.
• By default, Auto Registration is enabled on thin client side, disabled Atrust
Device Manger.
To enable or disable Auto Registration on your thin client, please do the following:
75
1. On Atrust Client Setup, click System > Advanced.
2. Check / Uncheck to Enable Auto Registration to enable / disable Auto Registration.
3. Click Save to apply.
Page 86
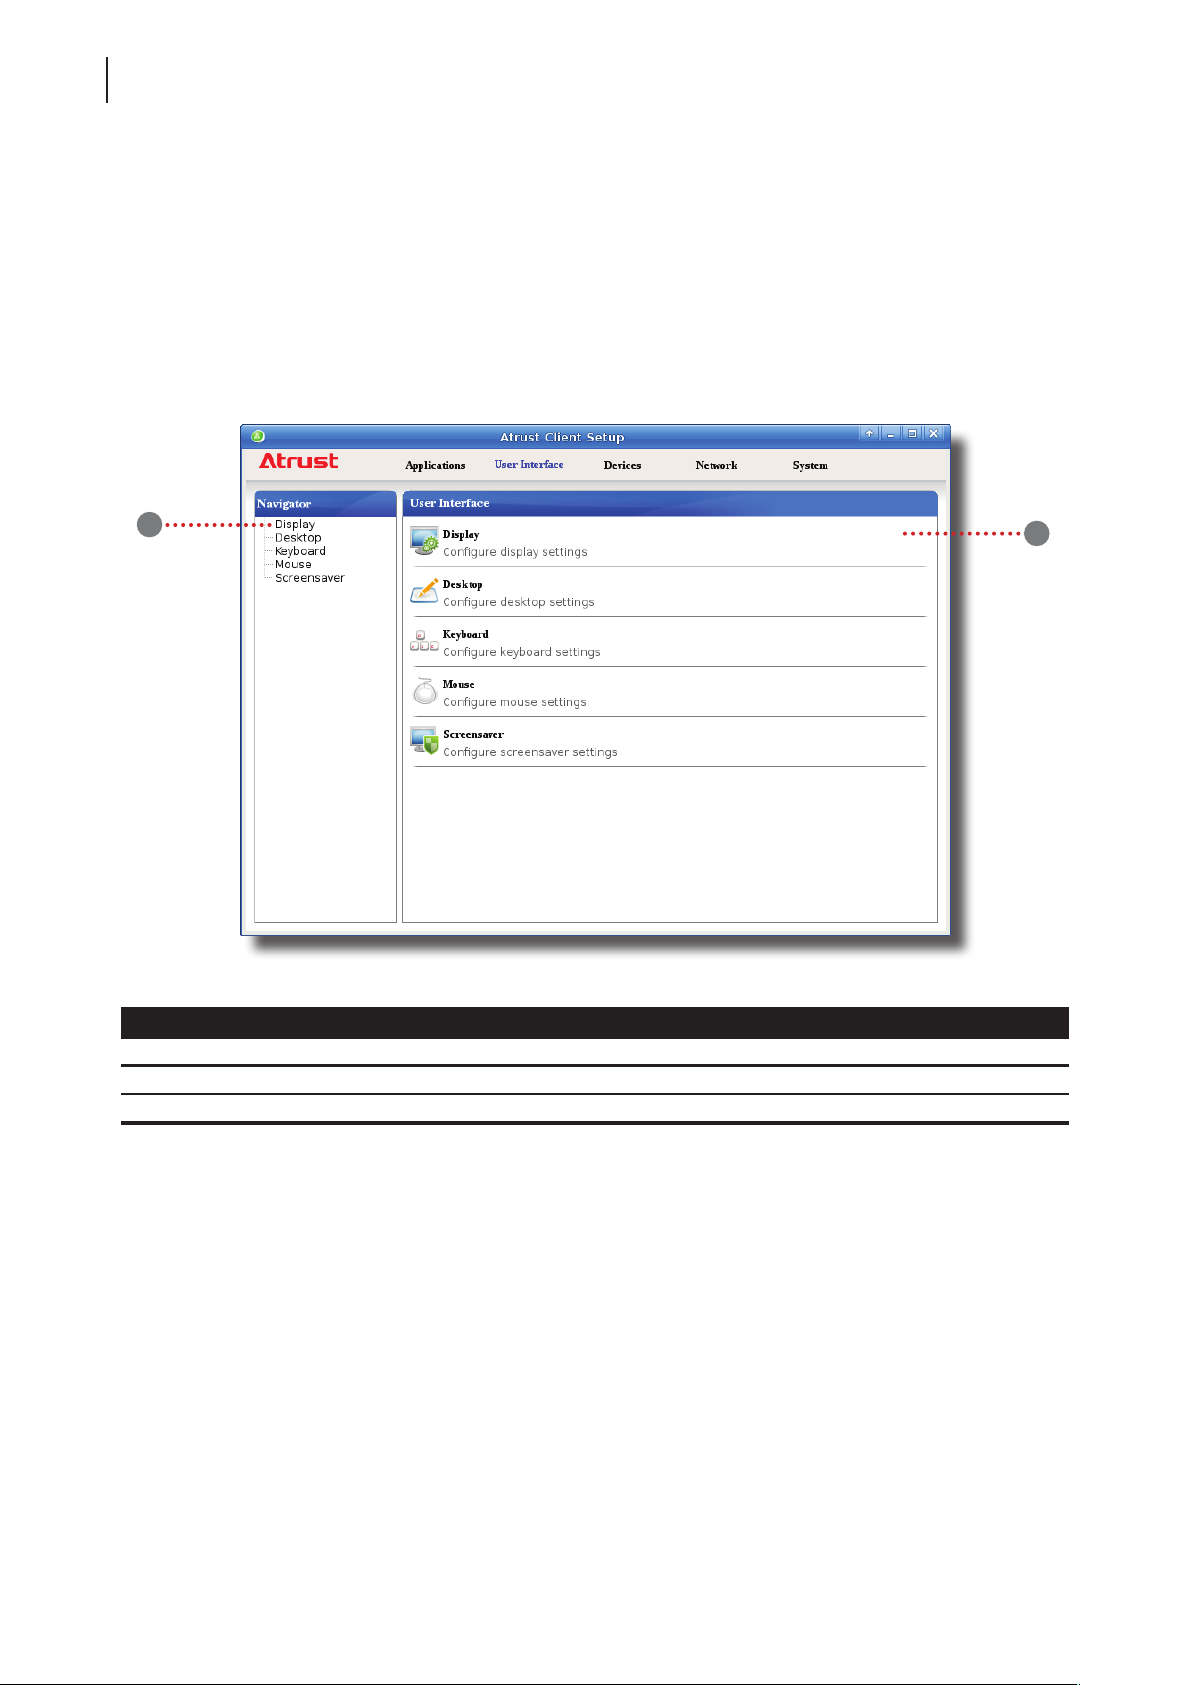
Conguring Client Settings
76
Conguring User Interface Settings
4.3 Conguring User Interface Settings
4.3.1 User Interface Tab Overview
User Interface tab enables you to congure settings for the user interface of clients. To access available settings of
User Interface tab, click the tab on Atrust Client Setup.
User Interface Tab Overview
1
Interface Elements
No. Name Description
1 Navigation area Click to select a setting item under User Interface tab.
2 Conguration area Congures setting values when a setting item or entry is selected.
2
Page 87
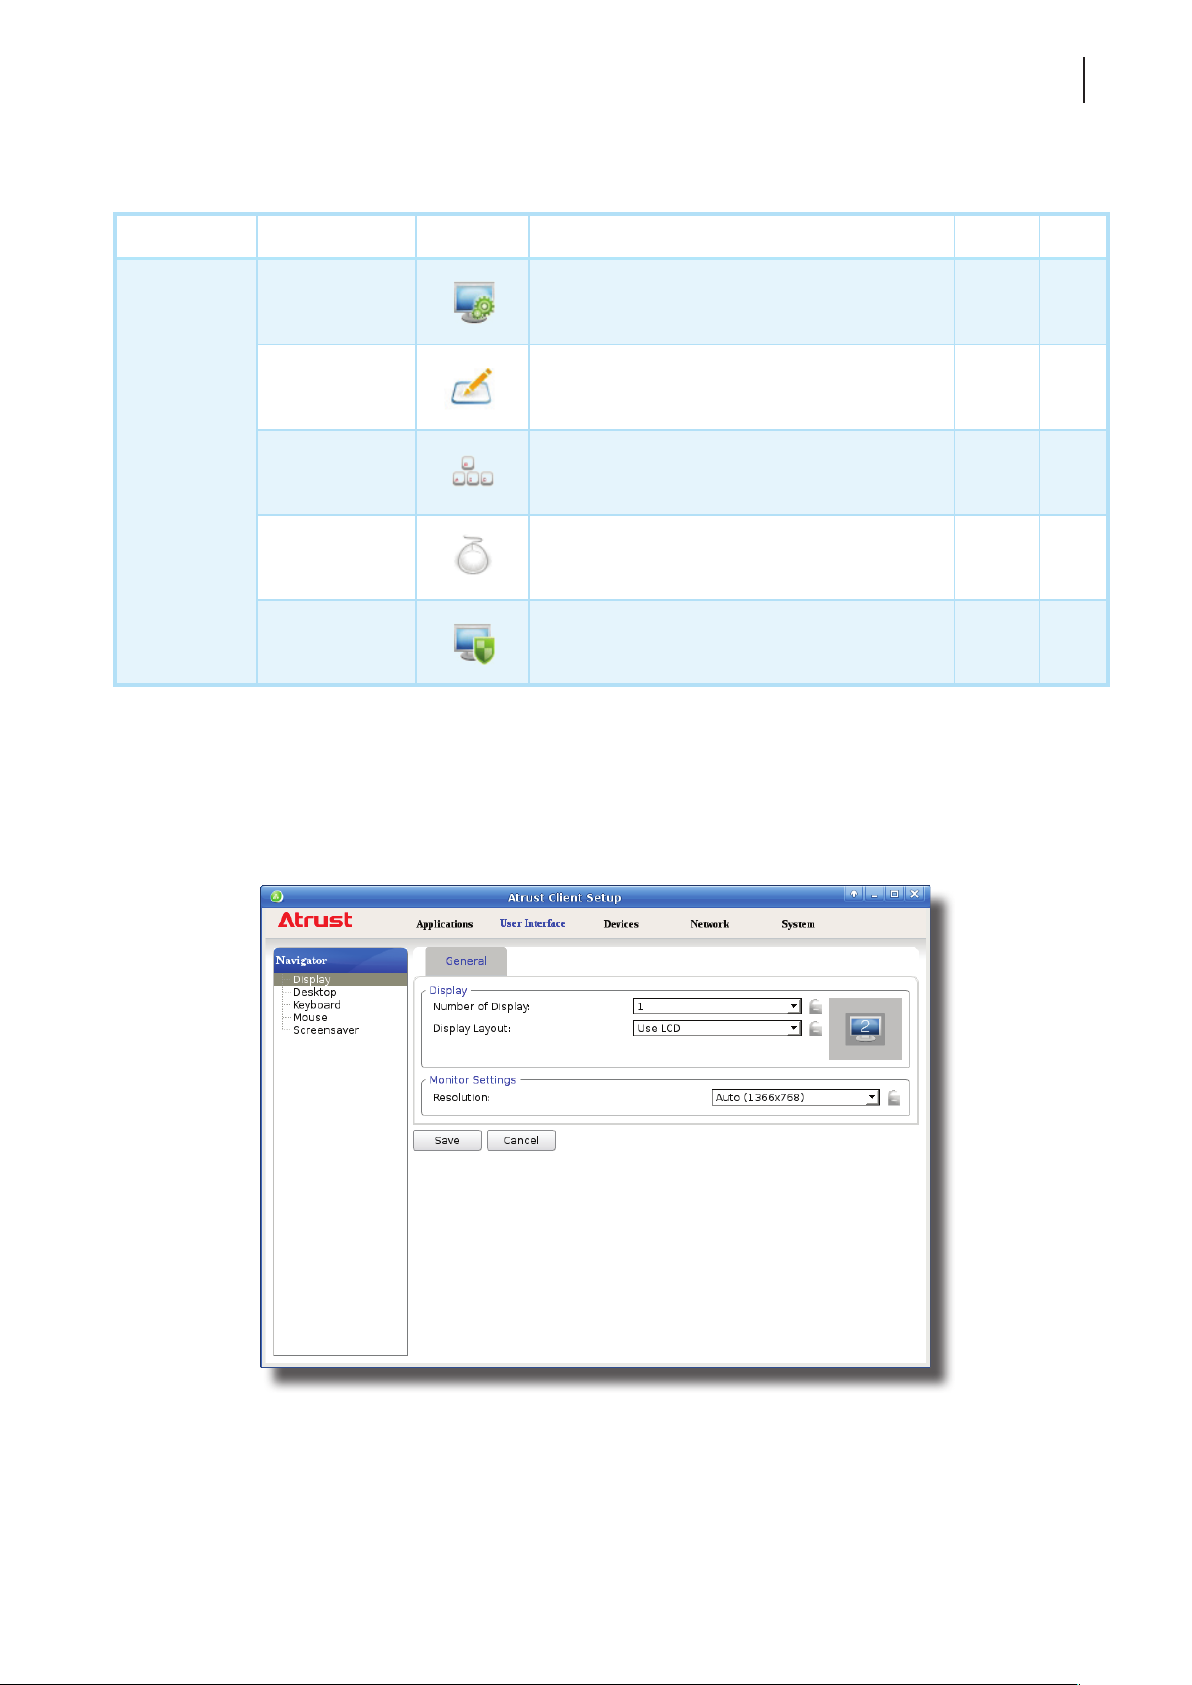
Conguring Client Settings
Conguring User Interface Settings
4.3.2 Available Settings at a Glance
Tab Setting Icon Description Section Page
77
Click to congure display settings. 4.3.3 77
Click to customize desktop and system language.
Click to adjust keyboard settings. 4.3.7 84
Click to adjust mouse settings. 4.3.8 86
Click to congure screensaver settings. 4.3.9 87
User Interface
Display
Desktop
Keyboard
Mouse
Screensaver
4.3.3 Conguring Display Settings
To congure display settings for your mt168L, please do the following:
1. On Atrust Client Setup, click User Interface > Display.
4.3.4
4.3.5
4.3.6
80
82
83
2. Click drop-down menus to select the number of attached display(s), arrangement of displays, resolution, etc.
Refer to the following table to select appropriate setting values.
Page 88
Conguring Client Settings
78
Conguring User Interface Settings
NOTE
Display
Item Description
Number of Display
• The available setting items vary, depending on your model and the selected
number of display(s).
Click to select the number of used display(s).
Option Description
1 One display is used.
2 Two displays are used.
Click to select the arrangement of displays.
Display Layout
Display Mode
Option Description
Use LCD Use the single internal display (LCD panel).
Use VGA Use the single external display attached to the VGA port.
Use dual displays.
(LCD - VGA)
horizontal
(VGA - LCD)
horizontal
This item is available only when 2 is selected in the Number of Display drop-
down menu:
Option Description
Extend One display is used as the extended display of the other.
Clone Two displays have the same display content.
Two displays are arranged horizontally:
the LCD one is on the left; the VGA the right.
The LCD one is the main display for local desktop when
Extend is selected.
Use dual displays.
Two displays are arranged horizontally:
the VGA one is on the left; the LCD the right.
The VGA one is the main display for local desktop when
Extend is selected.
Page 89
Monitor Settings
Item Description
Check/Uncheck to enable/disable the automatic detection of the used monitor(s)
when the client is powered on.
Option Description
Enable Auto-Detection at
Power-up
Enabled
Disabled
Use this item to set an appropriate resolution for the used display.
Option Description
Auto
Conguring Client Settings
Conguring User Interface Settings
Automatic detection of the used monitor(s) is enabled.
The system would set an appropriate resolution for the
used monitor(s) when the client is powered on.
Automatic detection of the used monitor(s) is disabled.
All resolutions supported by the client will be listed in the
Resolution drop-down menu when Auto-Detection at
Power-up is disabled. Please note that some resolutions
may not be applicable to your monitor(s).
This option is available only when Enable Auto-Detection
at Power-up is selected.
79
Monitor Resolution
Other
options
NOTE: All resolutions supported by the client will be listed in the Resolution
drop-down menu when Auto-Detection at Power-up is disabled.
Please note that some resolutions may not be applicable to
your monitor(s).
Select the desired resolution from the Resolution drop-down
menu for the used display.
Page 90
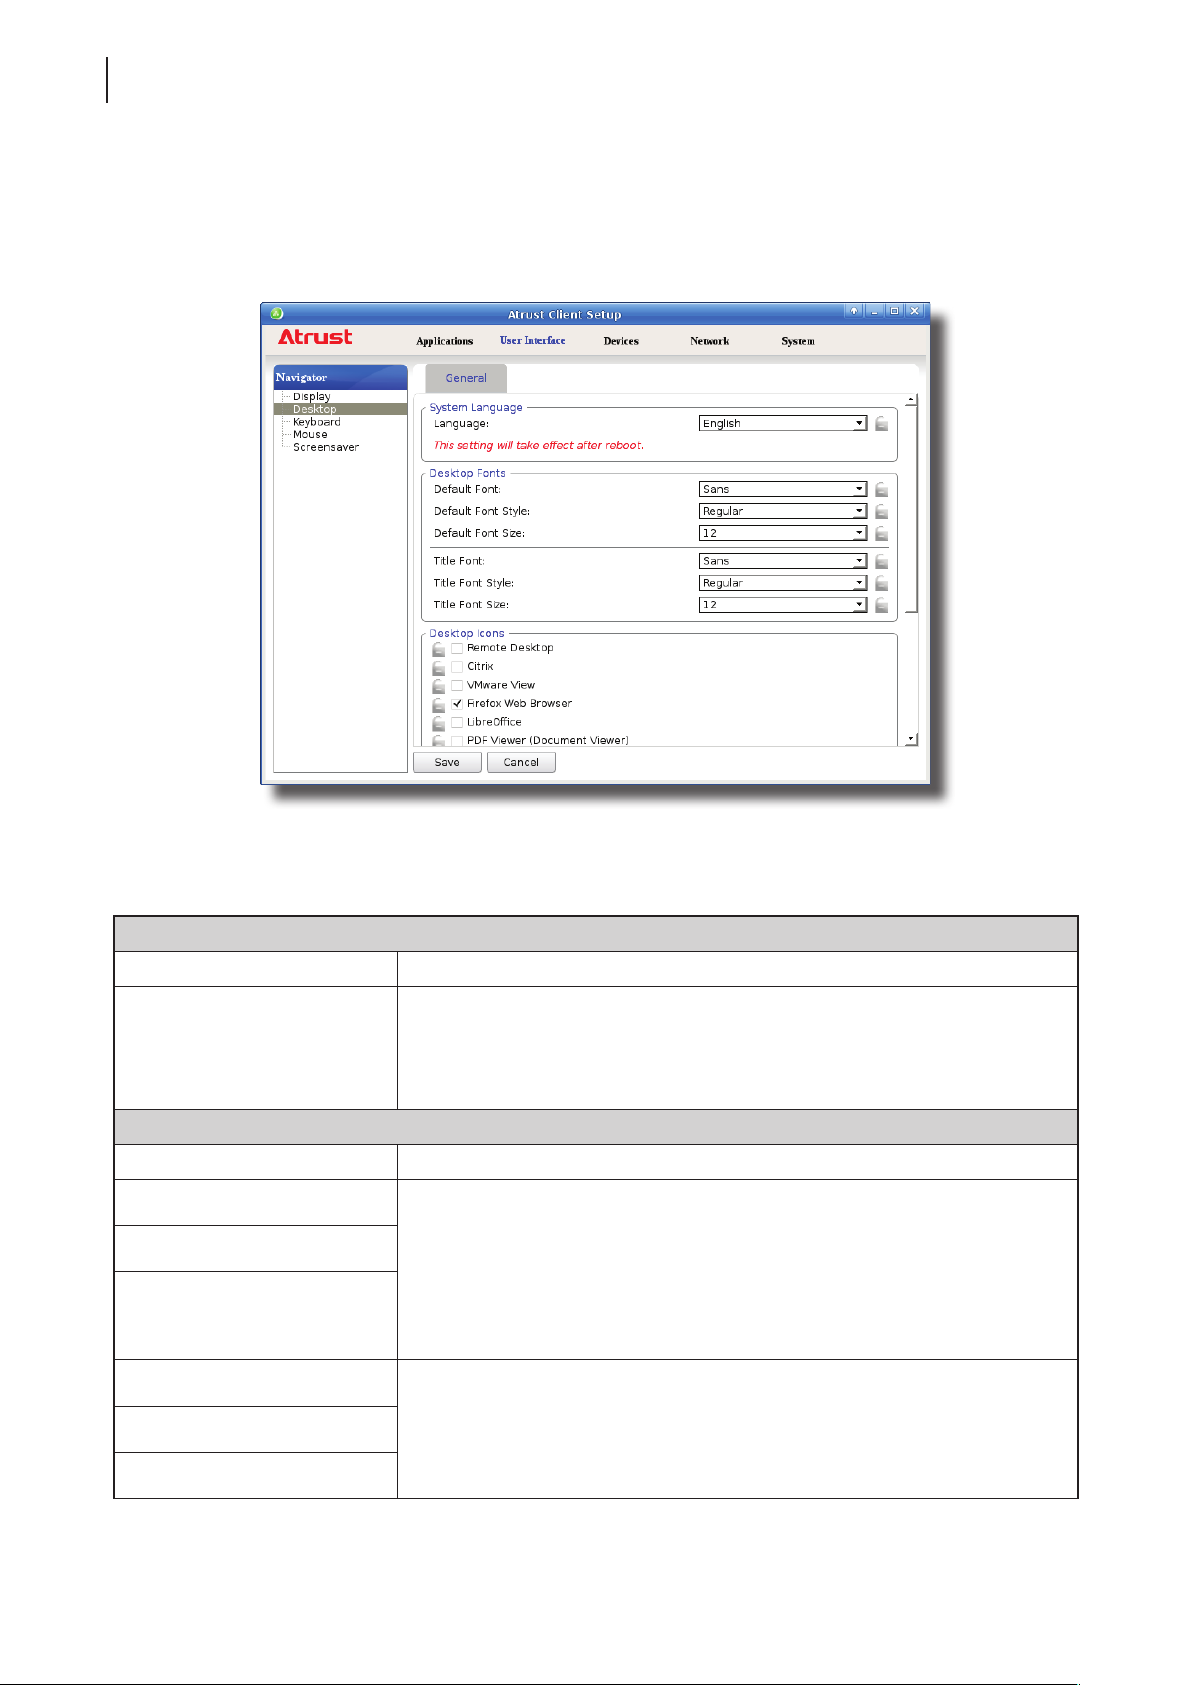
Conguring Client Settings
80
Conguring User Interface Settings
4.3.4 Customizing Desktop and System Language Settings
To customize desktop and system language settings for your mt168L, please do the following:
1. On Atrust Client Setup, click User Interface > Desktop.
2. Click drop-down menus or tick/untick checkboxes to choose desired settings. Refer to the following table for
a description of each setting item.
System Language
Item Description
Click the drop-down menu to select the system language.
Language
Desktop Fonts
Item Description
Default Font Click the drop-down menus to select the desired font, its style and size used for
Default Font Style
Default Font Size
Title Font
NOTE: Available languages may vary with the rmware version of your device.
NOTE: You need to restart the system for the change to take effect.
the user interface of the operating system, such as menus, options on menus,
text labels for desktop shortcuts, tabs on program windows etc.
NOTE: Your changes will not apply to the titles of opened windows, the Atrust
Client Setup console, and the System Information window (START >
System Settings > System Information).
Title Font Style
Title Font Size
Click the drop-down menus to select the desired font, its style and size used for
the titles of the opened windows.
Page 91
Desktop Icons
Item Description
Conguring Client Settings
Conguring User Interface Settings
81
Check/Uncheck to show/hide shortcuts Remote Desktop
Remote Desktop
Citrix
VMware View
Icon Size Click the drop-down menu to select the desired size of desktop icons/shortcuts.
Icon Font Size
Desktop Background
Item Description
Enable Desktop Wallpaper
menu and local Linux desktop for service quick access.
For more information, please refer to section “4.3.5 Hiding or Showing Quick
Access Shortcuts” on page 82.
Check/Uncheck to show/hide shortcuts Citrix
Linux desktop for service quick access.
For more information, please refer to section “4.3.5 Hiding or Showing Quick
Access Shortcuts” on page 82.
Check/Uncheck to show/hide desktop shortcuts VMware View
START menu and local Linux desktop for service quick access.
For more information, please refer to section “4.3.5 Hiding or Showing Quick
Access Shortcuts” on page 82.
Click the drop-down menu to select the desired text label size of desktop
icons/shortcuts.
Check/Uncheck to enable/disable the use of Atrust wallpaper.
NOTE: If disabled, the solid color background (dark blue) will be used.
on the START menu and local
on the START
on the
Enable Custom Wallpaper Check/Uncheck to enable/disable the use of a custom wallpaper. More settings
Download From
Custom Wallpaper File
Wallpaper Style
Wallpaper
appear when checked.
For details, please refer to “4.3.6 Using a Custom Wallpaper” on page 83.
Click the drop-down menu to select the way to apply the wallpaper. Five options
are available: Centered, Tiled, Stretched, Scaled, and Zoomed.
Option Description
Centered Centers the original image on the screen.
Tiled Tiles the screen with the original image.
Stretched Centers and extends/shrinks the image to t the screen.
Scaled
Zoomed Centers and sizes the image proportionally to ll the screen.
NOTE: Depending on the size of the connected display, two options might have
the same effect.
Click the drop-down menu to select the color of Atrust wallpaper. Four colors are
available: Green, Blue, Orange, and Cyan.
Centers and sizes the image proportionally to t the screen
until the top-bottom or left-right sides t the screen.
3. Click Save to apply.
Page 92
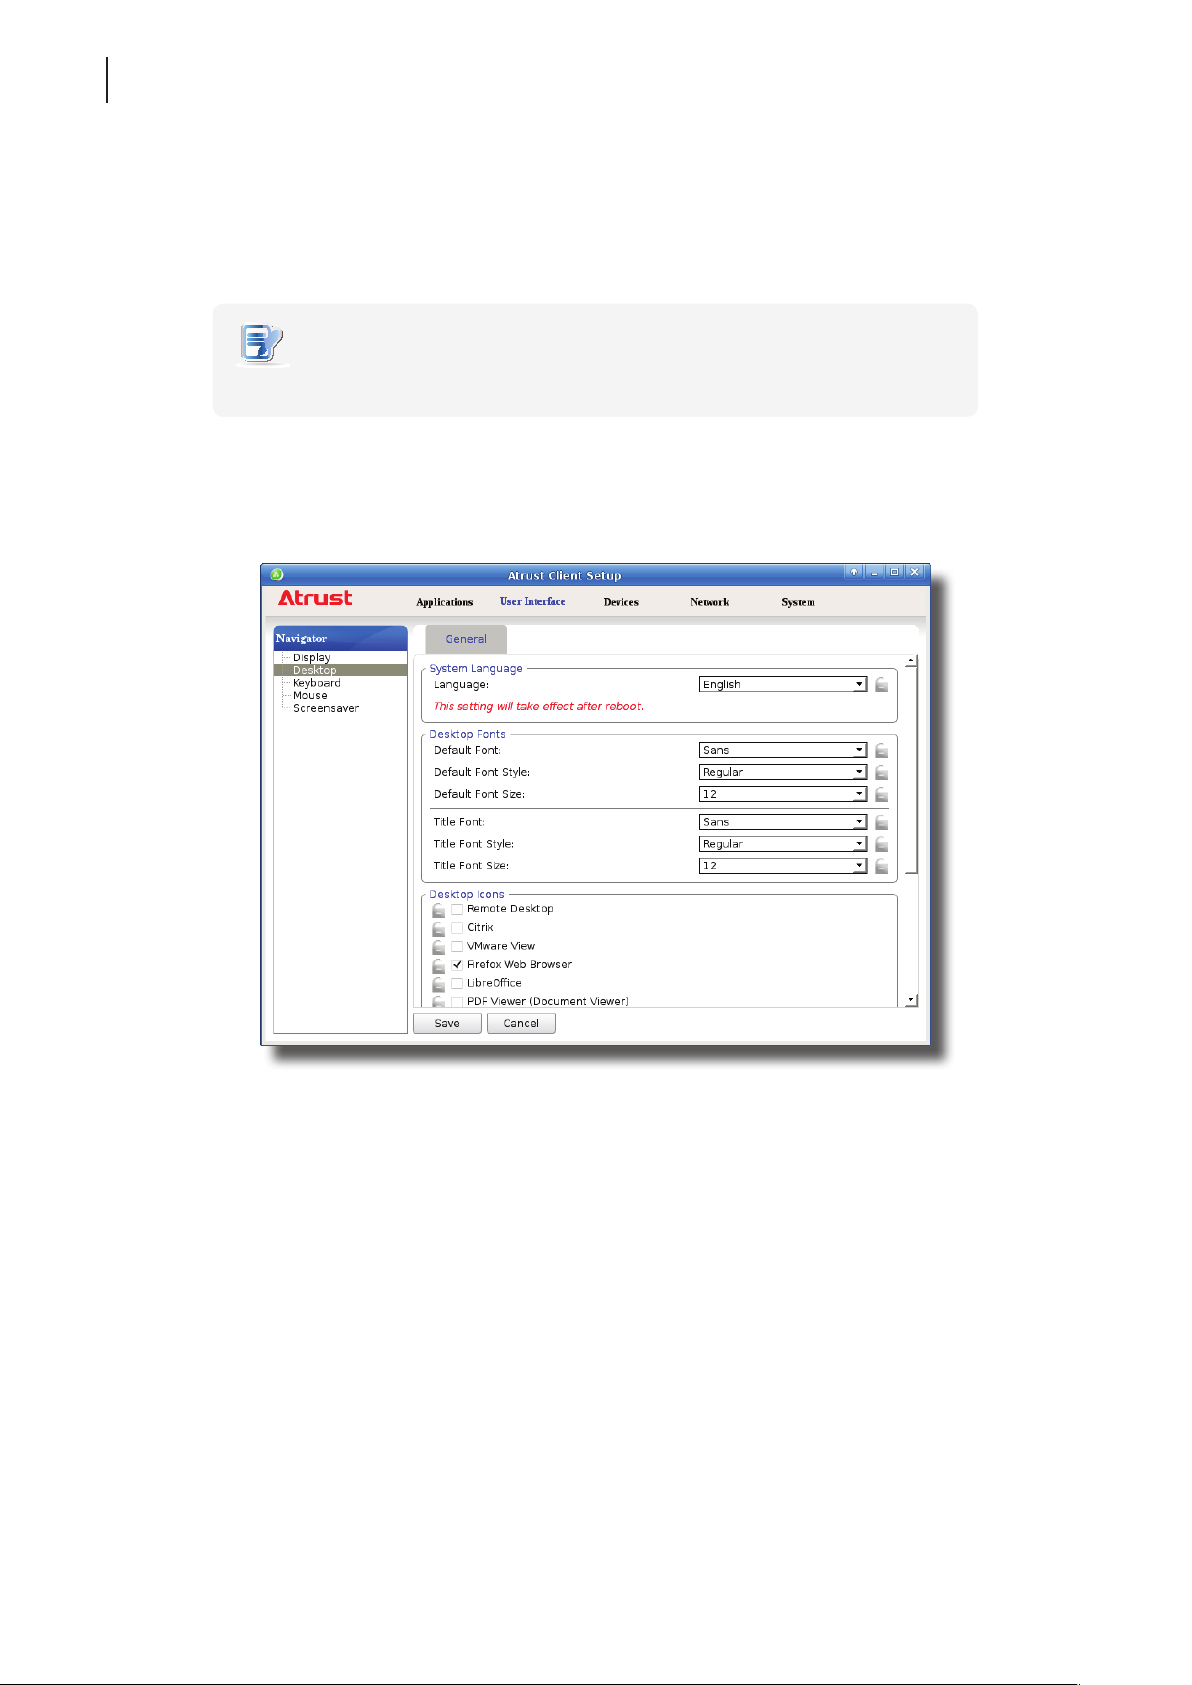
Conguring Client Settings
82
Conguring User Interface Settings
4.3.5 Hiding or Showing Quick Access Shortcuts
In case you want to access services quickly right on the local desktop, you can choose to show Quick Access
shortcuts Remote Desktop / Citrix / VMware View on the START menu and local Linux desktop. These shortcuts
enable you to access services quickly by clicking.
NOTE
• They’re hidden by default.
To show/hide shortcuts Remote Desktop / Citrix / VMware View on the START menu and local Linux desktop,
please do the following:
1. On Atrust Client Setup, click User Interface > Desktop.
2. Click to check/uncheck Remote Desktop / Citrix / VMware View in the Desktop Icons section to show/hide
the quick access shortcuts Remote Desktop / Citrix / VMware View on the START menu and
local Linux desktop.
3. Click Save to apply the change.
Page 93
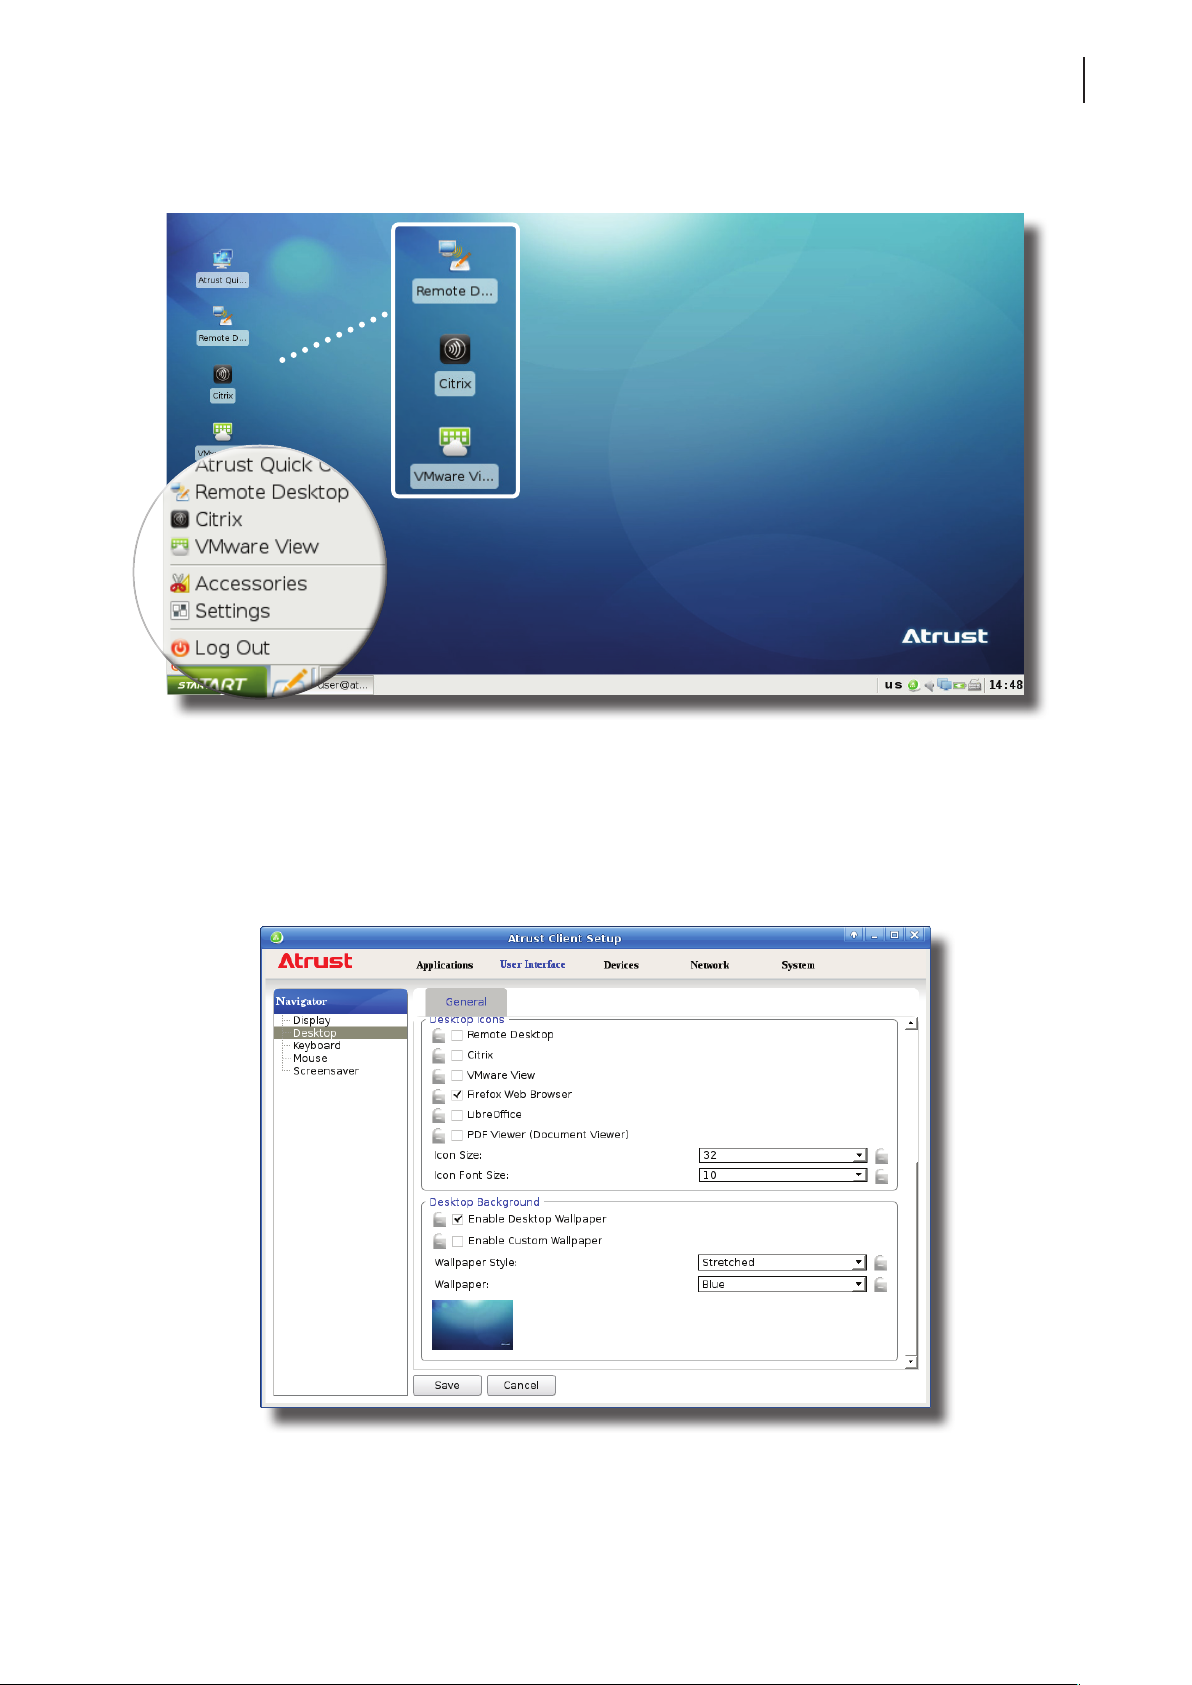
4. The selected shortcuts will be shown/hidden.
Conguring Client Settings
Conguring User Interface Settings
83
4.3.6 Using a Custom Wallpaper
To use a custom wallpaper, please do the following:
1. On Atrust Client Setup, click User Interface > Desktop.
2. Check or Uncheck Enable Custom Wallpaper to enable or disable the use of a custom wallpaper.
Page 94
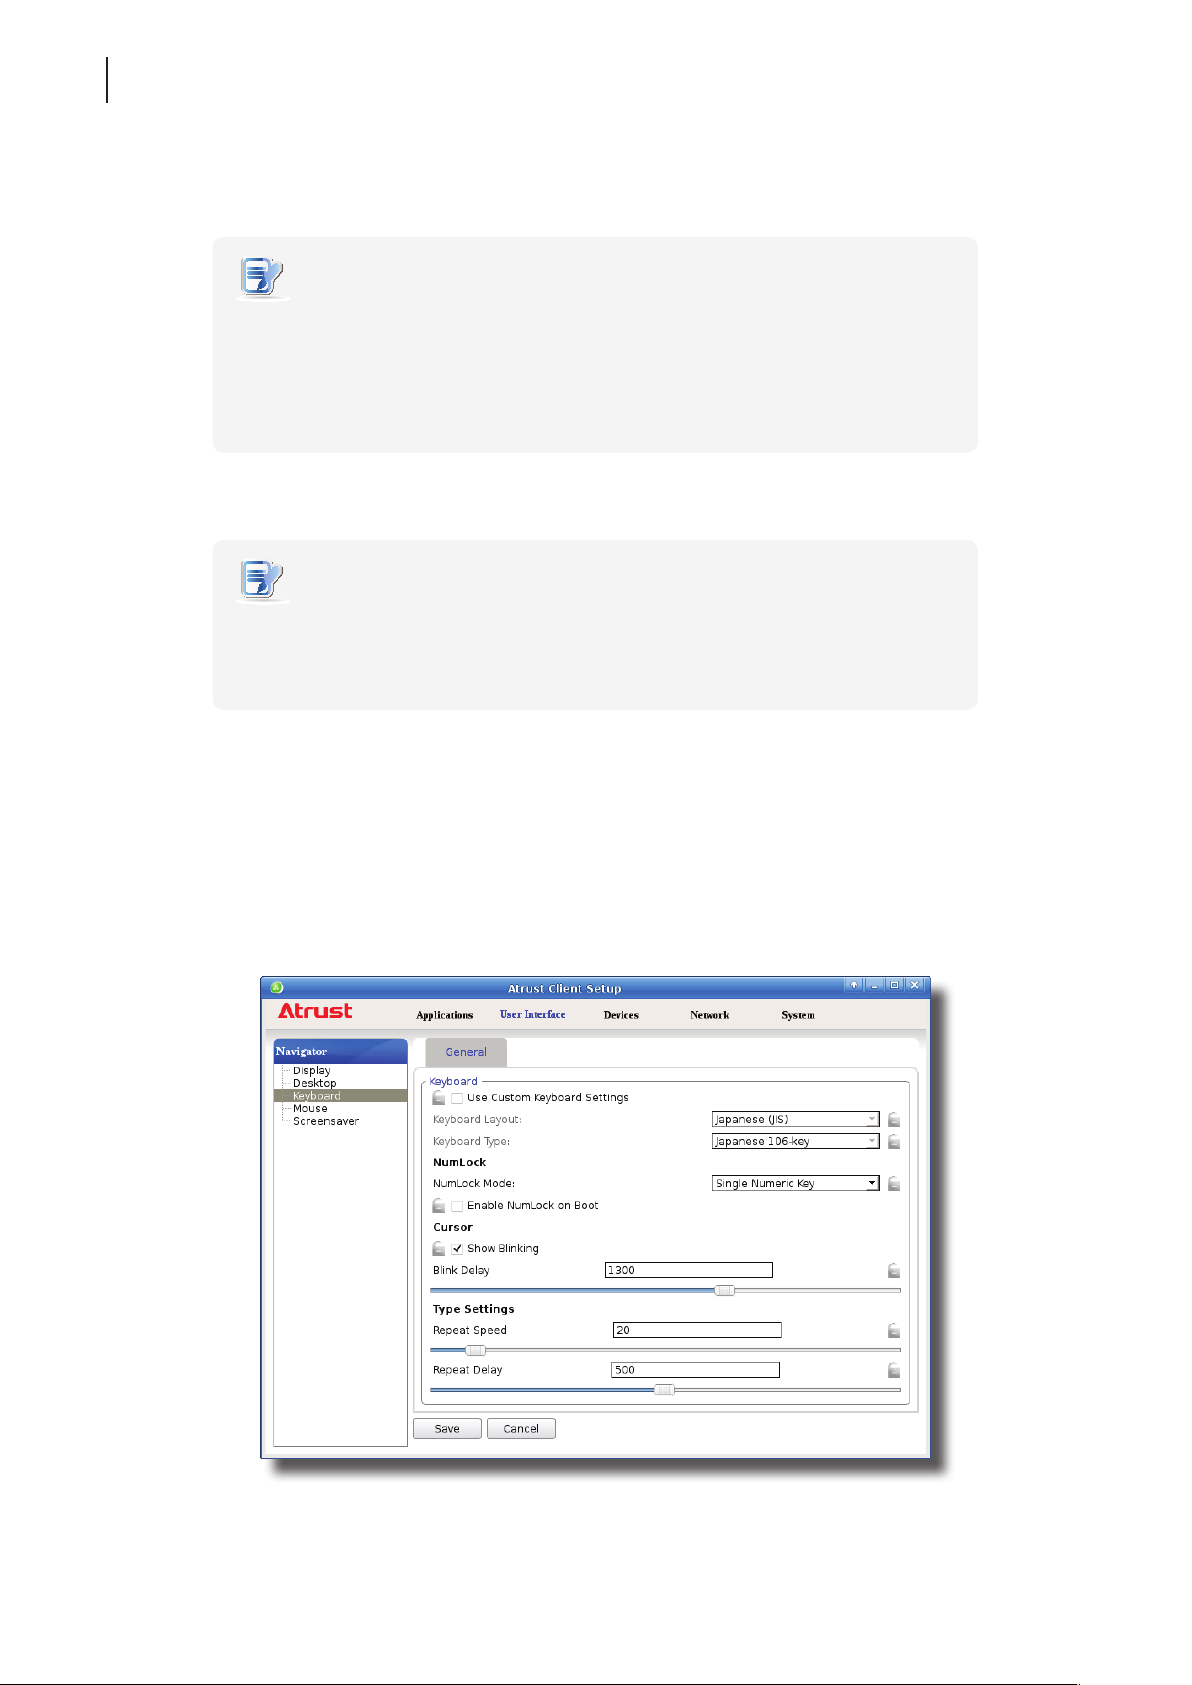
Conguring Client Settings
84
Conguring User Interface Settings
3. Select the way to apply the wallpaper and where to download or get the image le. Three options are
available to get the wallpaper: Auto Setup, Atrust Device Manager, and File.
NOTE
4. Provide other information if required.
NOTE
• If Auto Setup is selected, your thin client must be in Auto Setup environment and
be well-congured for that environment. Please see “4.2.9 Enabling or Disabling
Auto Setup” on page 60 for more information.
• If Atrust Device Manager is selected, your thin client must be managed by Atrust
Device Manager. For details, please see the User’s Manual for Atrust Device Manager.
• If File is selected, you need to specify where to get the image le locally, for
example, a locally attached USB ash drive.
• The maximum allowed size of a custom wallpaper le is 5 MB.
5. Click Save to conrm.
4.3.7 Adjusting Keyboard Settings
To adjust keyboard settings for your mt168L, please do the following:
1. On Atrust Client Setup, click User Interface > Keyboard.
2. Click drop-down menus, tick/untick checkboxes, or move sliders to choose desired settings. Refer to the
following table for a description of each setting item.
Page 95
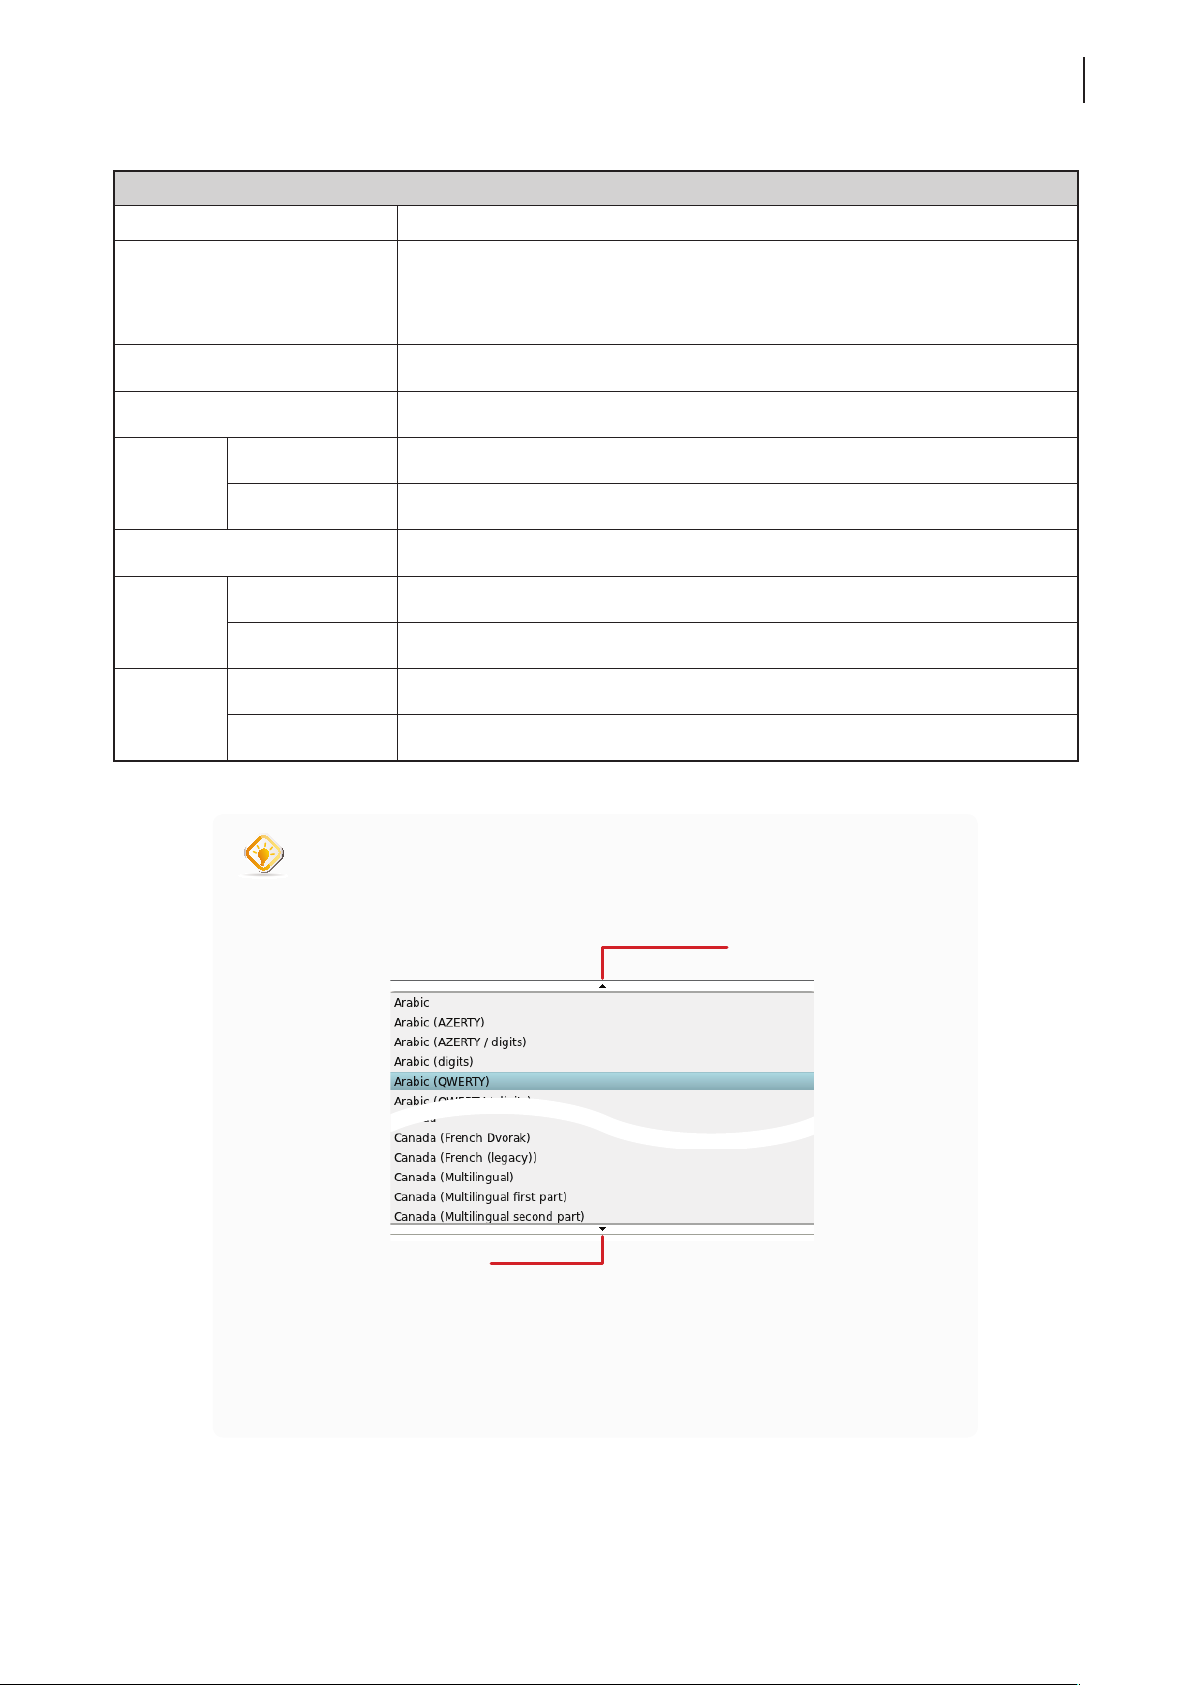
Conguring Client Settings
Conguring User Interface Settings
Keyboard
Item Description
Check/Uncheck to enable/disable the use of custom keyboard settings.
Use Custom Keyboard Settings
Keyboard Layout Click the drop-down menu to select the desired keyboard layout.
Keyboard Type Click the drop-down menu to select the desired keyboard type.
NOTE: You are allowed to set the keyboard layout and type only when this
setting is enabled.
85
NumLock
Mode
Enable NumLock on Boot Check/Uncheck to enable/disable the NumLock key after system startup.
Cursor
Type
Settings
Single Numeric Key In NumLock mode, single numeric key is sufcient to enter a number.
Fn + Numeric Key In NumLock mode, Fn plus numeric key is required to enter a number.
Show Blinking Check/Uncheck to enable/disable the cursor blinking (local desktop only).
Blink Delay Move the slider to select the blink delay between each occurrence of cursor.
Repeat Speed Move the slider to select the character repeat rate when a key is held down.
Repeat Delay Move the slider to select the character repeat delay between its each occurrence.
TIP
• Hang your mouse over the Up/Down arrow to quickly scroll up/down the Keyboard
Layout list.
Up arrow
• To ne-tune a setting value, click its slider, and then use the Right/Left key to
3. Click Save to apply.
Down arrow
increase/decrease the value by 1 or the Page Up/Page Down key to increase/
decrease by 10.
Page 96
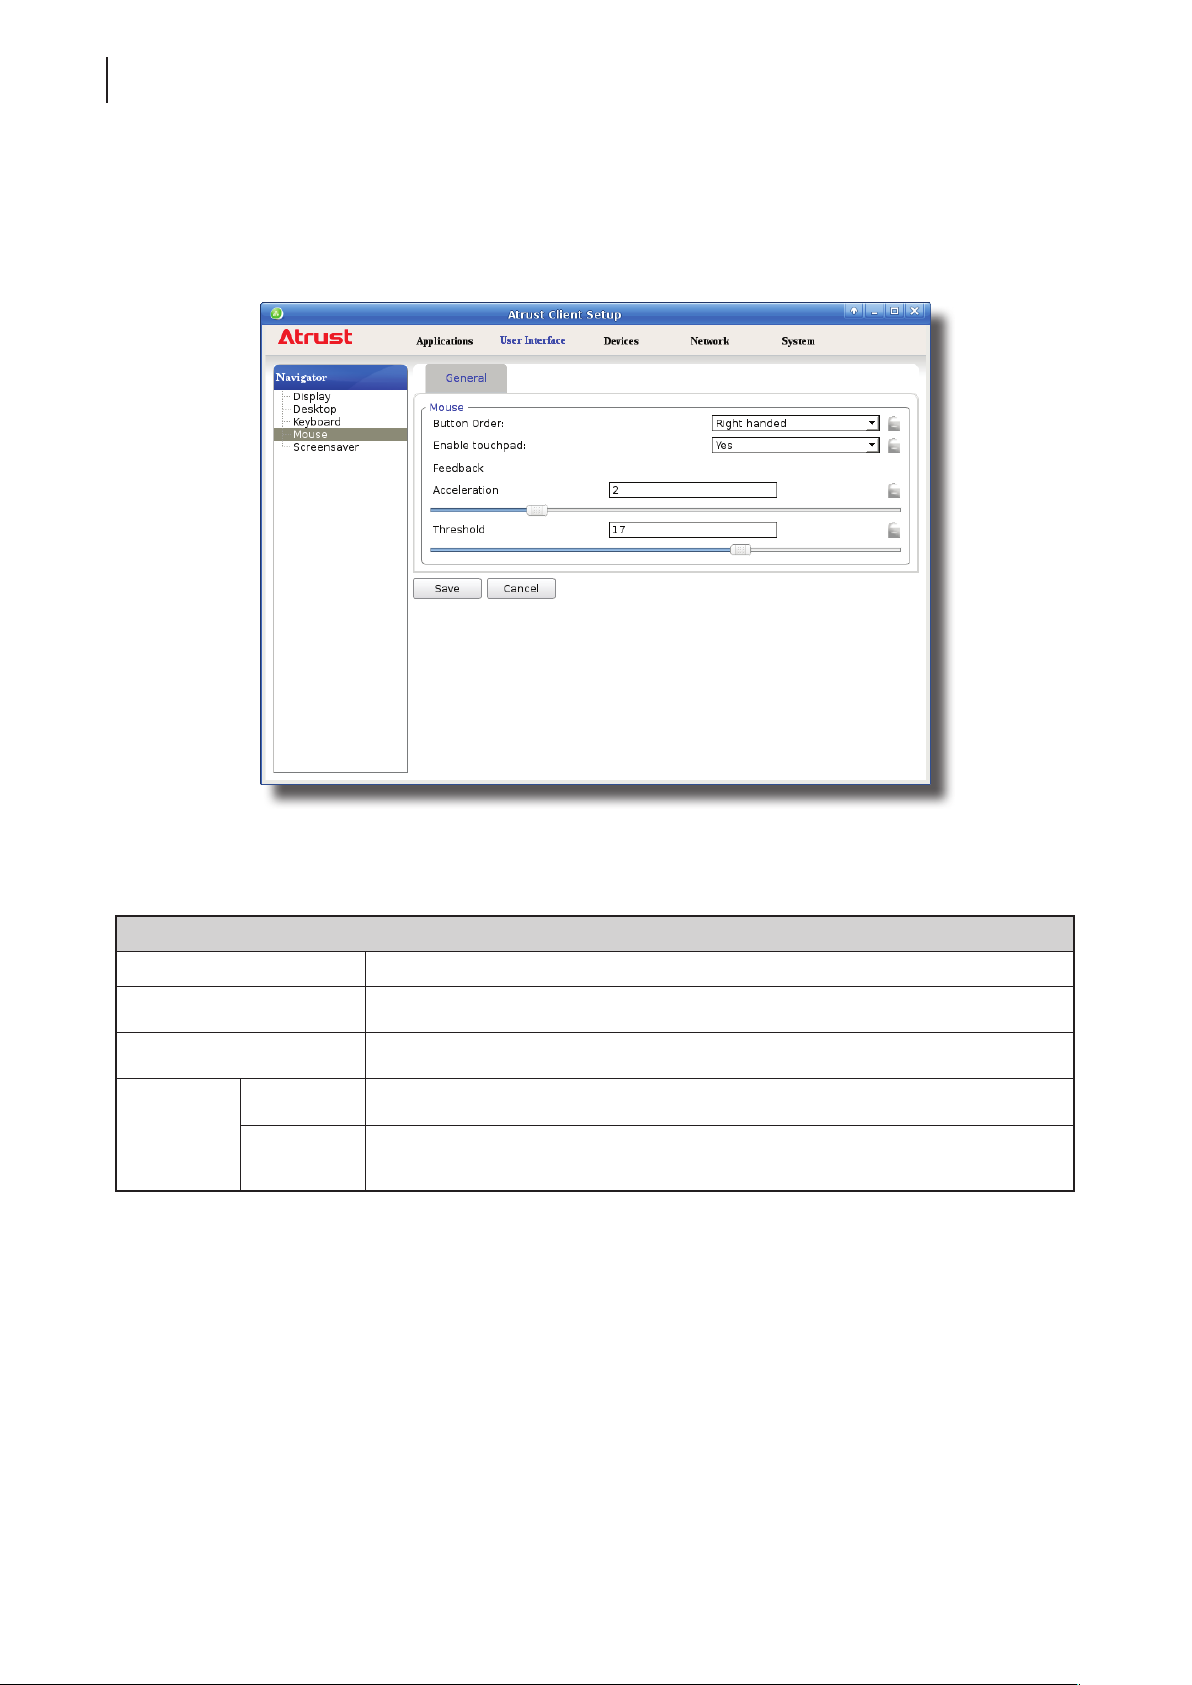
Conguring Client Settings
86
Conguring User Interface Settings
4.3.8 Adjusting Mouse Settings
To adjust mouse settings for your mt168L, please do the following:
1. On Atrust Client Setup, click User Interface > Mouse.
2. Click the drop-down menu or move sliders to choose desired setting values. Refer to the following table for a
description of each setting item.
Mouse
Item Description
Button Order Click the drop-down menu to switch mouse buttons for right-hand/left-hand use.
Enable Touchpad Click the drop-down menu to enable or disable the touchpad.
Acceleration Move the slider to select the rate at which the mouse increases speed while moving.
Feedback
Threshold
Move the slider to select the moved distance (pixels) after which the mouse starts
to accelerate.
Page 97
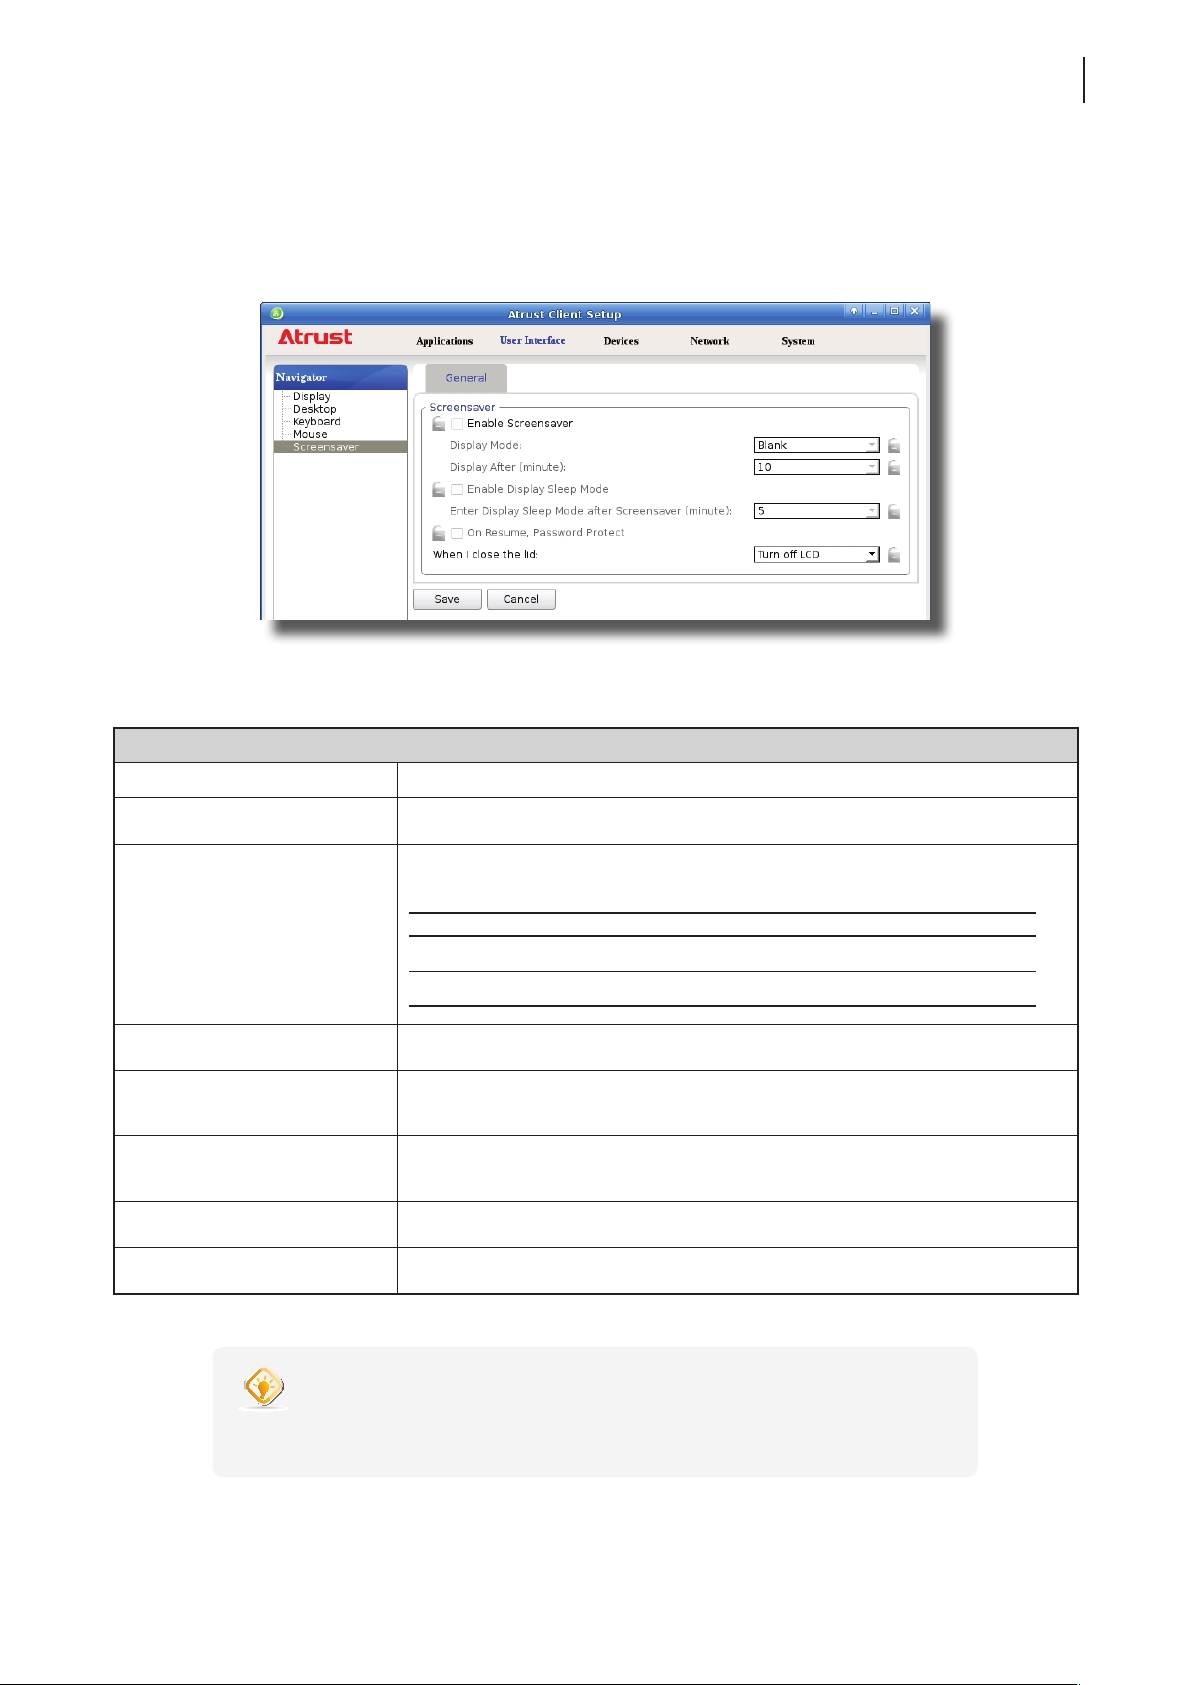
4.3.9 Conguring Screensaver Settings
To congure screensaver settings for your mt168L, please do the following:
1. On Atrust Client Setup, click User Interface > Screensaver.
Conguring Client Settings
Conguring User Interface Settings
87
2. Click drop-down menus or tick/untick checkboxes to choose desired settings.
Screensaver
Item Description
Enable Screensaver Check/Uncheck to enable/disable Screensaver.
Click to select the display mode of the screensaver. Two options are available:
Blank and Logo.
Display Mode
Display After (minute) Click to select the wait time for screensaver.
Enable Display Sleep Mode
Enter Display Sleep Mode after
Screensaver (minute)
On Resume, Password Protect Check/Uncheck to resume with/without a password.
Option Description
Blank Displays a black screen.
Logo Displays the Atrust oating logo.
Check to turn off (i.e. stop sending signals to) the display to maximize the
energy savings.
Click to select when to turn off (i.e. stop sending signals to) the display after
Screensaver starts.
When I close the lid Click to select what to do when closing the lid.
TIP
• While setting wait time for screensaver, you can hang your mouse over the Up/
Down arrow to quickly scroll up/down the Minute list.
3. Click Save to apply.
Page 98
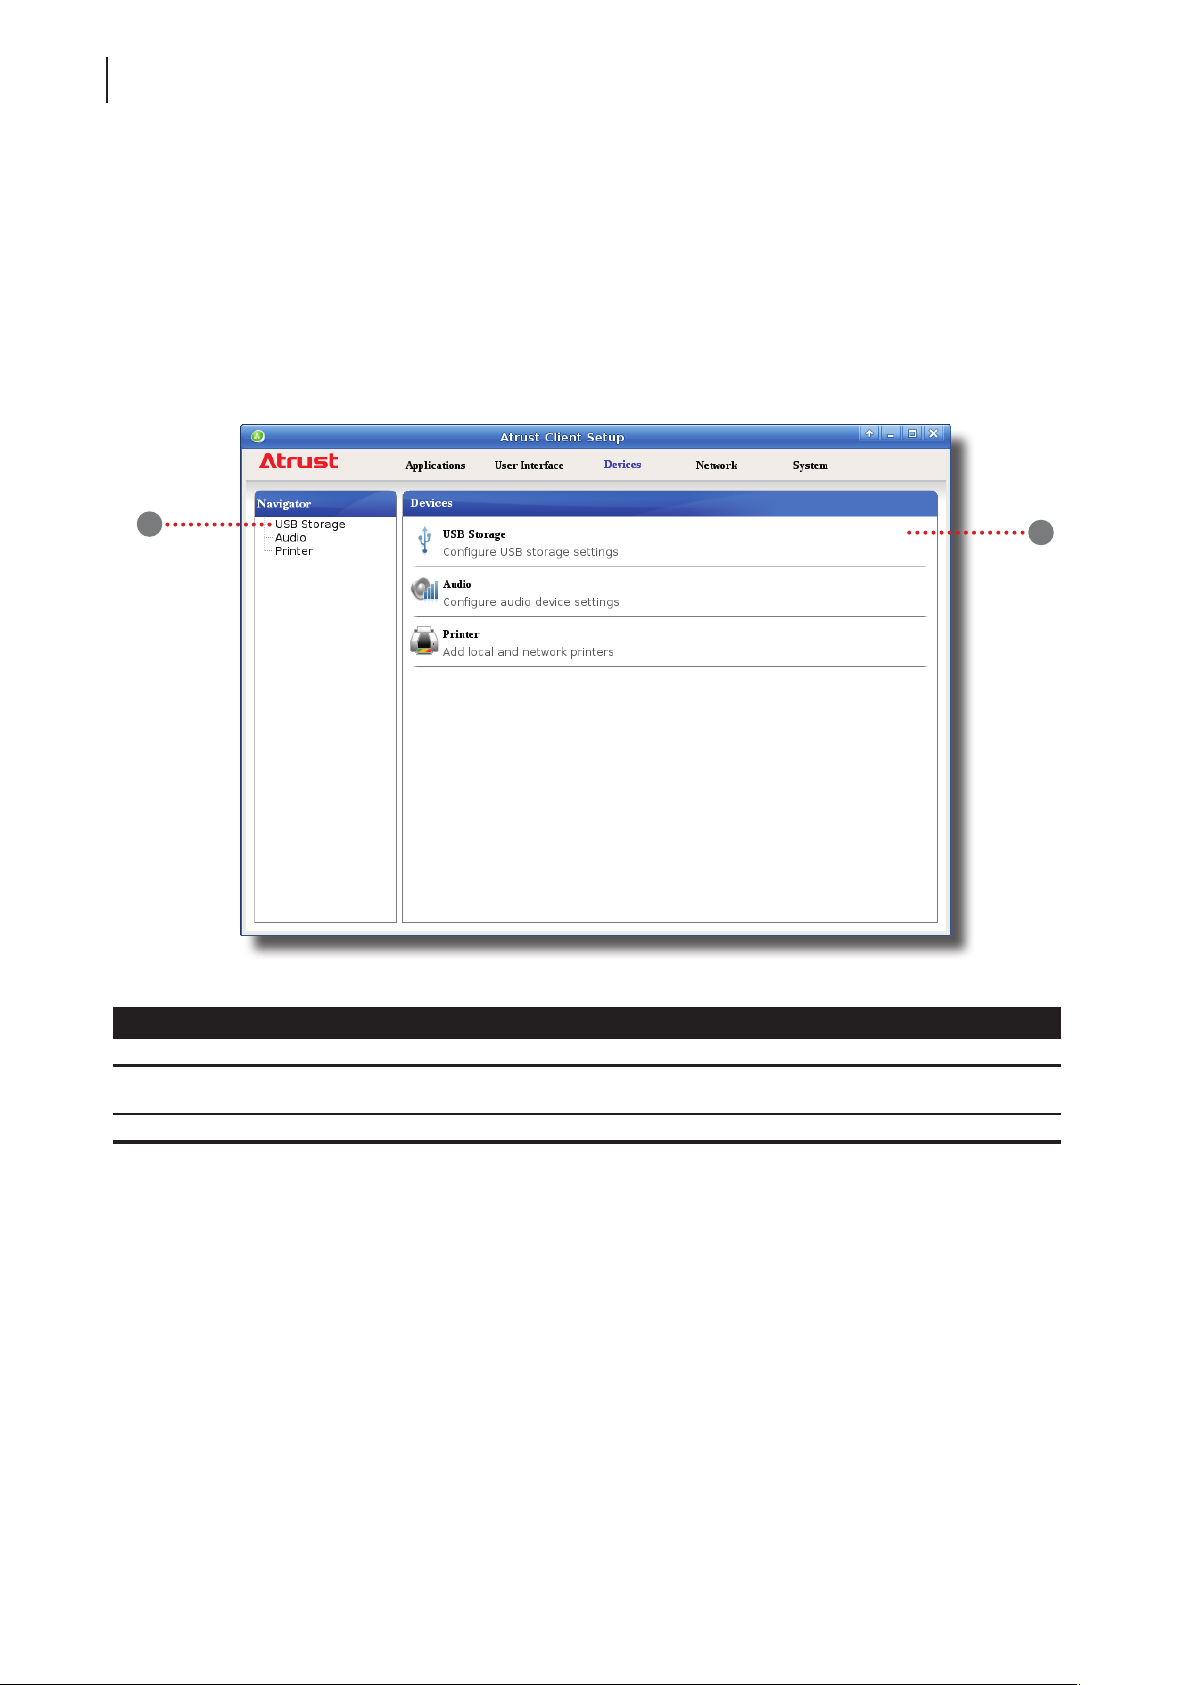
Conguring Client Settings
88
Conguring External Device Settings
4.4 Conguring External Device Settings
4.4.1 Devices Tab Overview
Devices tab enables you to congure settings for external devices of clients. To access available settings of Devices
tab, click the tab on Atrust Client Setup.
Devices Tab Overview
1
Interface Elements
No. Name Description
1 Navigation area
2 Conguration area Congures setting values when a setting item or entry is selected.
Click to select a setting item under Devices tab or to select a setting
entry under a selected setting item.
2
Page 99
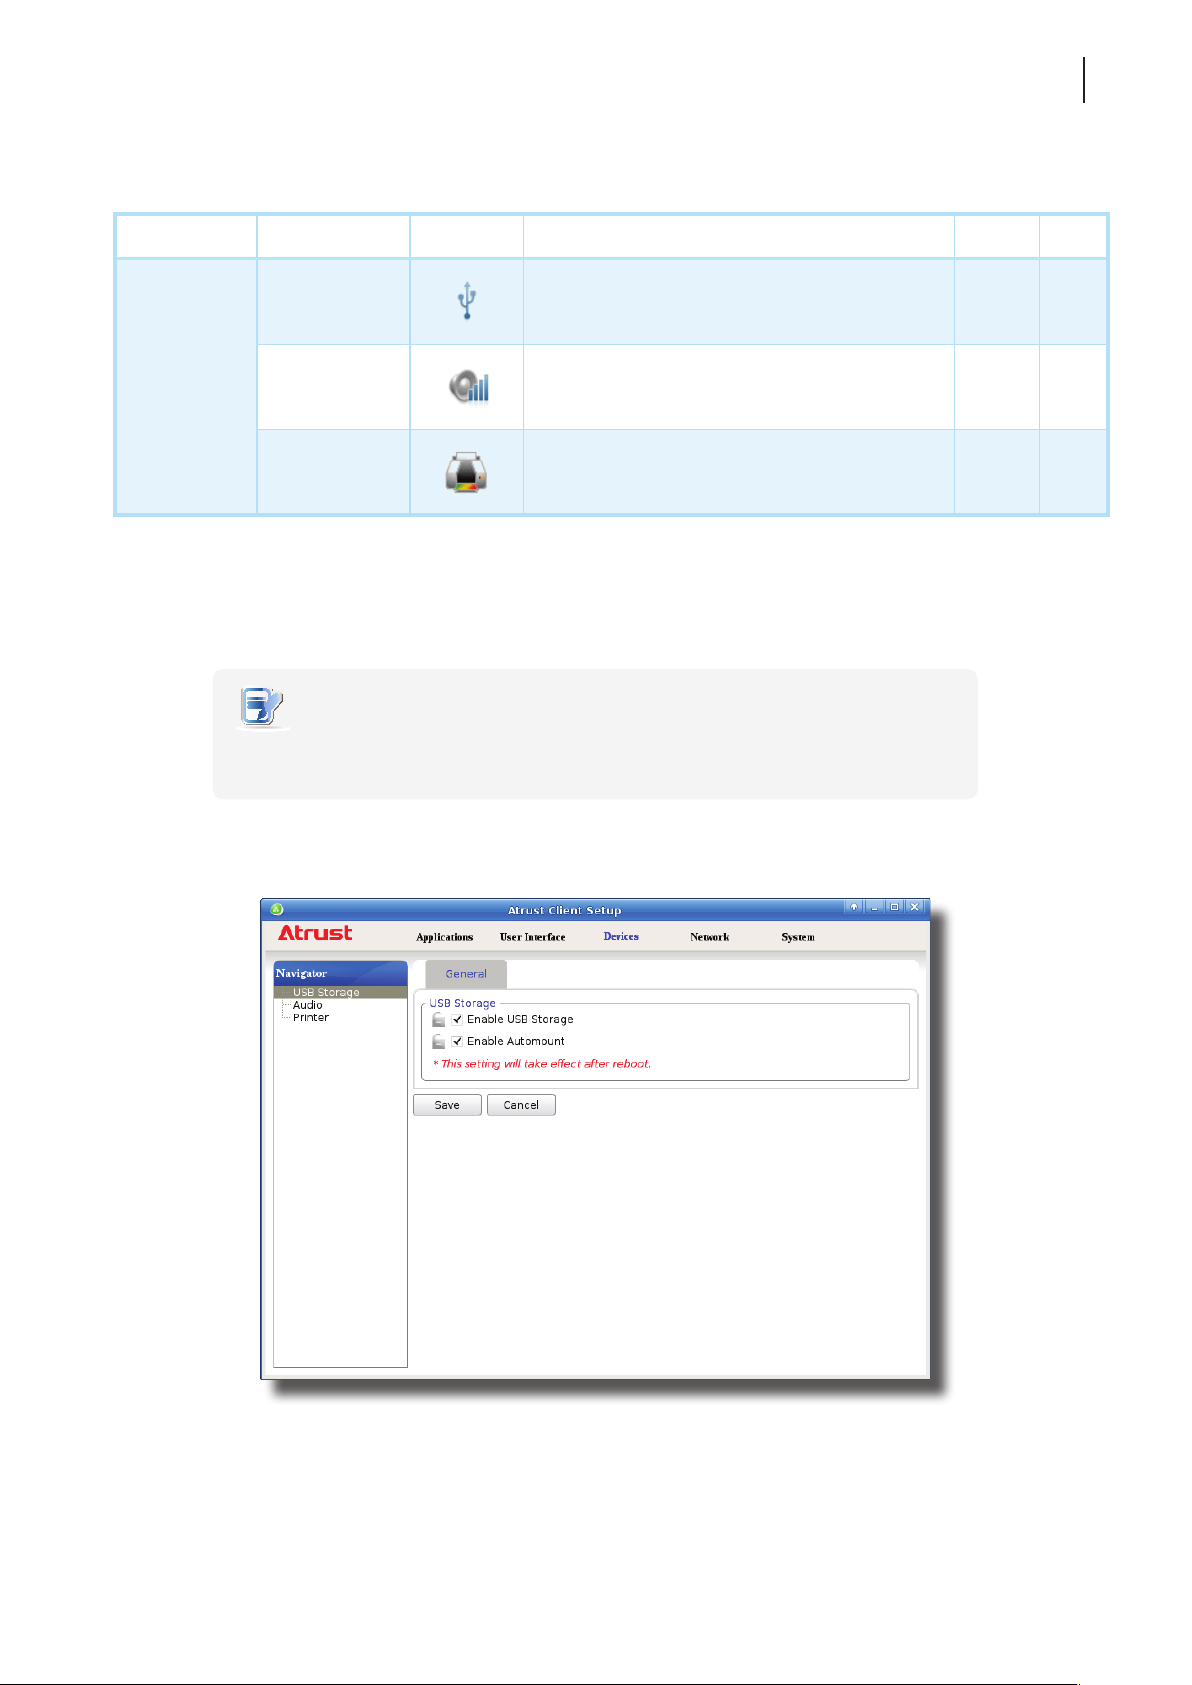
Conguring Client Settings
Conguring External Device Settings
4.4.2 Available Settings at a Glance
Tab Setting Icon Description Section Page
89
Devices
USB Storage
Audio
Printer
Click to congure settings for USB storage devices.
Click to congure settings for audio devices.
Click to add local or network printers.
4.4.3 Conguring Settings for USB Storage Devices
To congure settings for USB storage devices, please do the following:
NOTE
• To access locally attached USB storage devices in a local or virtual session, you need
to congure appropriate settings under this setting item.
1. On Atrust Client Setup, click Devices > USB Storage.
4.4.3
4.4.4
4.4.5
4.4.6
4.4.7
4.4.8
89
90
91
92
93
96
2. Tick/untick the checkboxes to choose the desired settings.
Page 100
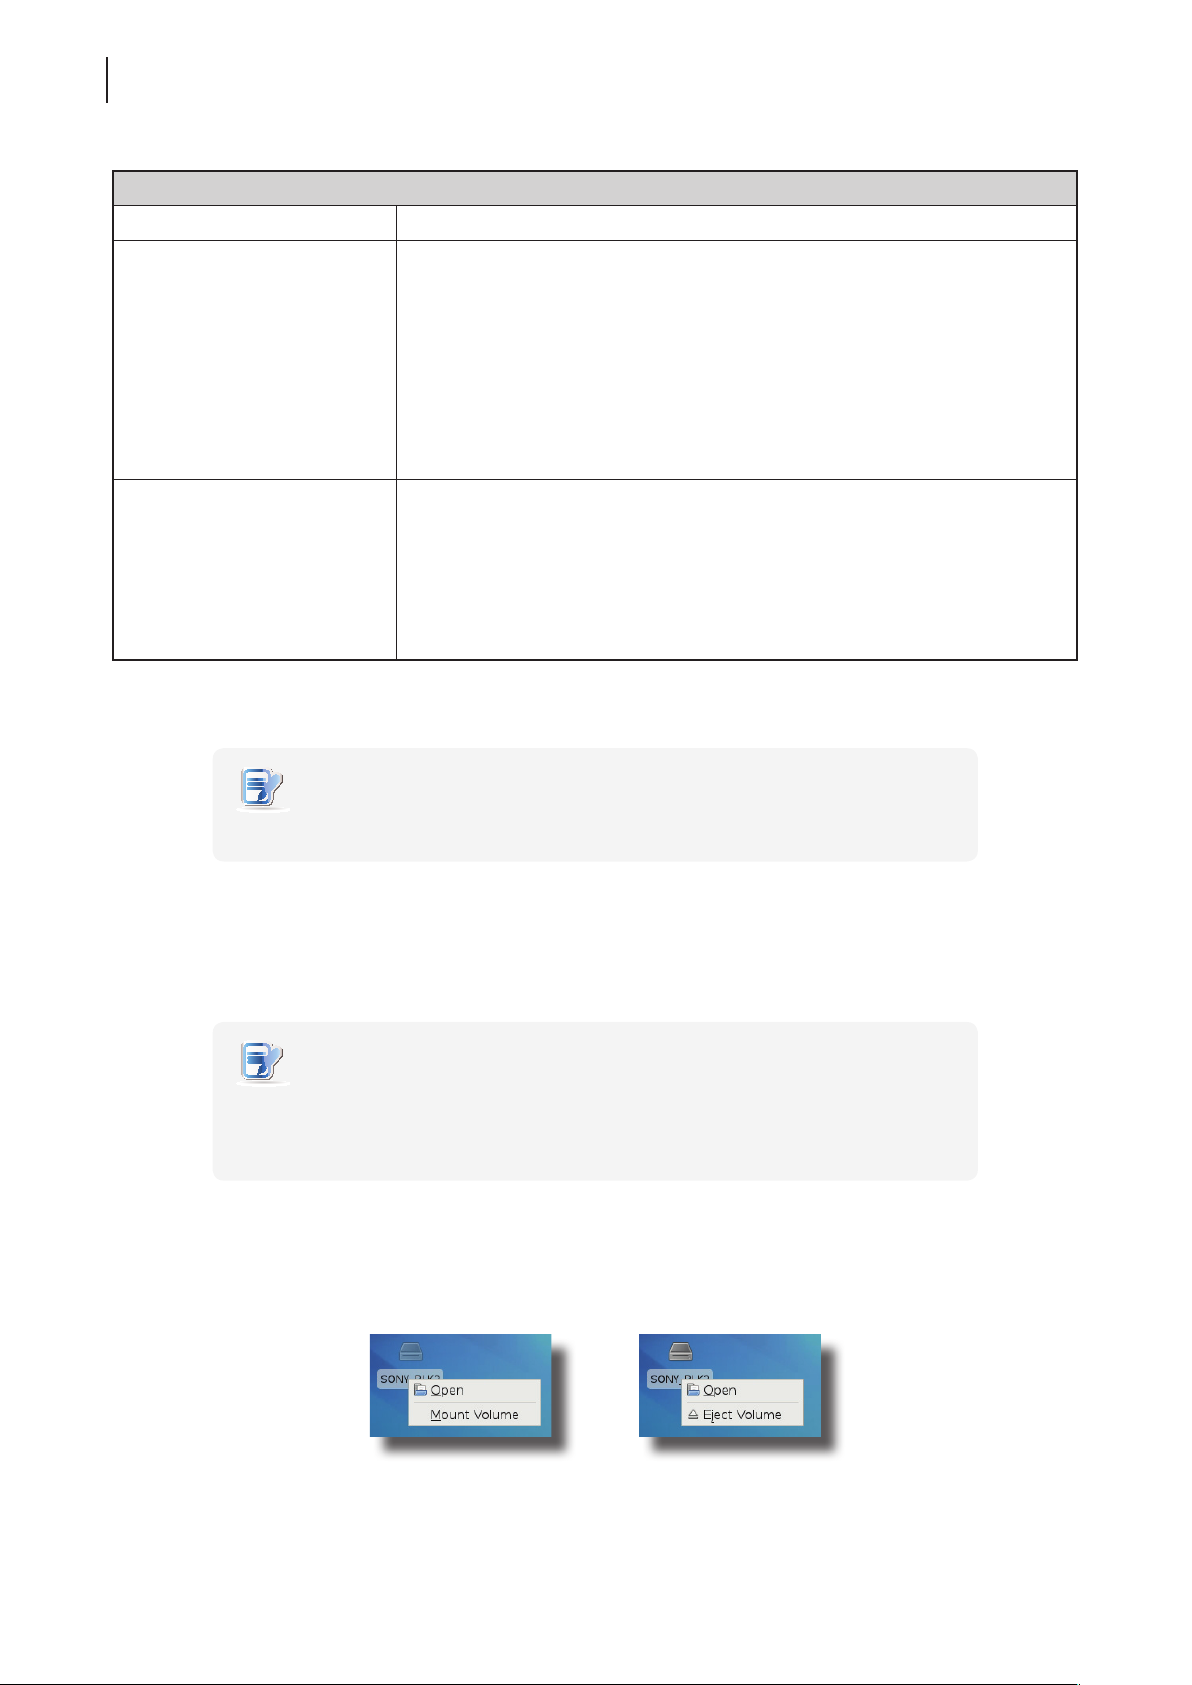
Conguring Client Settings
90
Conguring External Device Settings
Settings for USB Storage Devices
Item Description
Tick/Untick this checkbox to allow/disallow the access of USB storage devices.
Enable USB Storage
Enable Automount
3. Click Save to save your change.
NOTE
• For your changes to take eect, you need to restart your system.
NOTE: To use the locally attached USB storage devices in an RDP / ICA / View
session, the mapping of local USB storage devices must be enabled
in this session’s RDP / ICA / View connection settings. For detailed
instructions and more related settings, please refer to sections:
“4.6.5 Conguring Advanced RDP Connection Settings” on page 137
“4.6.11 Conguring Advanced ICA Connection Settings” on page 175
“4.6.14 Conguring Advanced View Connection Settings” on page 208
Tick/Untick this checkbox to enable/disable the automount of
USB storage devices.
NOTE: If this setting is disabled, users need to manually mount the attached
USB storage devices. For detailed instructions, please refer to section
“4.4.4 Manually Mount and Eject Attached USB Storage Devices” on page
90.
4.4.4 Manually Mount and Eject Attached USB Storage Devices
To mount/eject an attached USB storage device, please do the following:
NOTE
• If Enable Automount is checked (see section “4.4.3 Conguring Settings for USB
Storage Devices” on page 89), then an attached USB storage device will be
mounted automatically.
1. Right click the desktop icon of the attached USB storage device.
2. A popup menu appears.
3. Click to select Mount Volume/Eject Volume to mount\eject the attached USB storage device.
 Loading...