

Page 1

Table Of Contents
TABLE OF CONTENTS
.............................................................................1
STK503 USER GUIDE.....................................................................................................2
INTRODUCTION...............................................................................................................2
Features.......................................................................................................................................2
Known Issues.......................................................................................................................3
Getting Started ....................................................................................................................4
Hardware overview...............................................................................................................................4
Mounting the STK503 ..........................................................................................................................5
Placing the AVR in the ZIF socket......................................................................................................5
Programming the AVR....................................................................................................7
In-System Programming (ISP)............................................................................................................7
High-Voltage Parallel Programming (HVPP) ....................................................................................8
JTAG Programming ...................................................................................................................9
STK503 Clock Sources................................................................................................10
The XTAL switch.................................................................................................................................10
The TOSC switch................................................................................................................................11
The External Memory Interface...............................................................................11
SRAM footprint....................................................................................................................................11
Address latch....................................................................................................................................... 12
High address jumpers ........................................................................................................................12
RS-232 Driver....................................................................................................................13
Debugging with JTAGICE mkII ...............................................................................14
Connecting the JTAGICE ..................................................................................................................14
Troubleshooting Guide.................................................................................................15
Programming problems......................................................................................................................15
General problems.....................................................................................................................15
Problem.......................................................................................................................................15
Appendix............................................................................................................................... 16
Port Connectors ..................................................................................................................................16
SRAM ...................................................................................................................................................16
Schematic and layout ..............................................................................................................17
1
Page 2
STK503 User Guide
Introduction
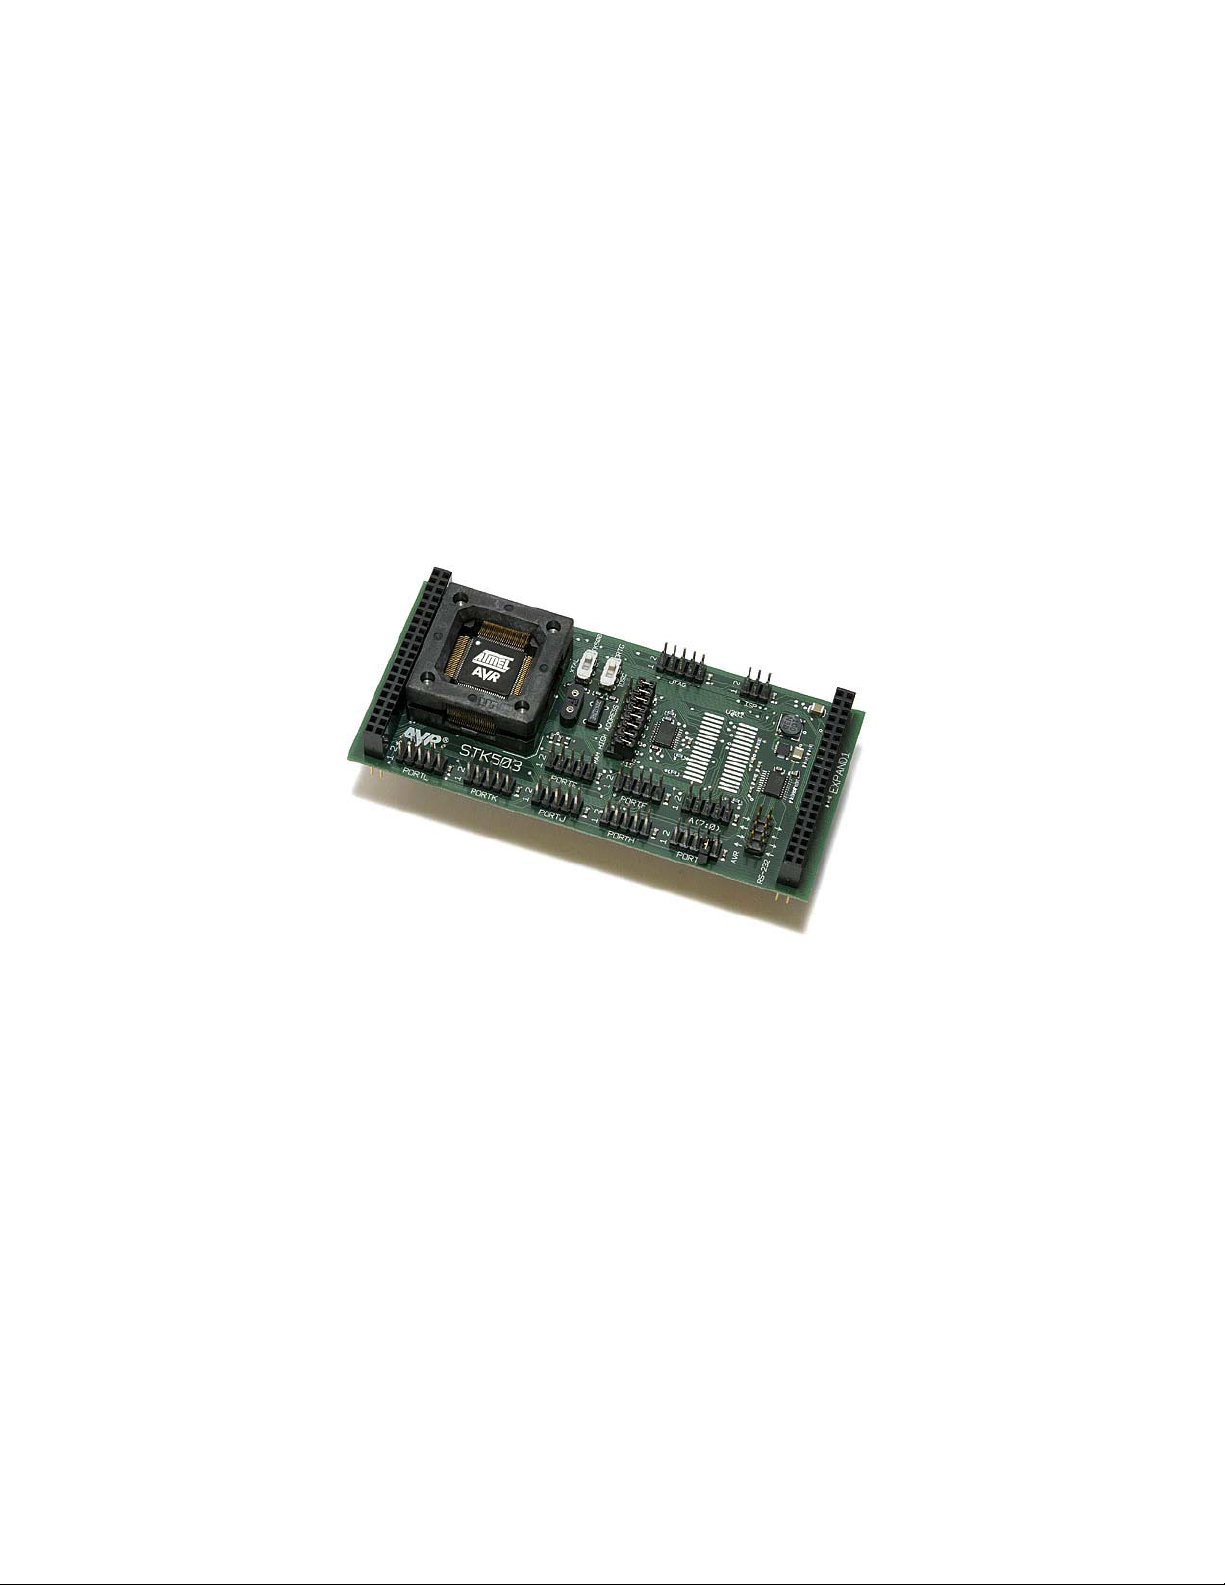
STK503 is a top module to the STK500 development board from Atmel
Corporation. It adds support for 100-pin AVR microcontrollers (ATmega2560,
ATmega1280 and ATmega640).
STK503 includes connectors and hardware allowing full utilization of the features
of these devices, while the Zero Insertion Force (ZIF) socket makes it easy to
use TQFP packages for prototyping.
This user guide is a general getting started guide as well as a complete technical
reference for advanced users.
Figure 1-1 The STK503 starter kit
Features
• Supports the ATmega2560, ATmega1280 and ATmega640.
•
Zero Insertion Force (ZIF) socket for 100-pin TQFP packages
•
Supports High Voltage Parallel Programming through STK500
•
Supports Serial programming through STK500
•
Port connectors for port E, F G, H, J, K and L
•
On-board RS-232 converter covering the whole operation range from 1.8
to 5.5V
•
Footprint for user-mountable SRAM chip
•
On-board address latch for easy connection to memory and peripherals
•
JTAG Connector for on-chip debugging using JTAGICE mkII
•
On-board 32 kHz crystal for easy Real Time Clock implementations
•
Supported by AVR Studio 4
2
Page 3

Known Issues
January 2005: There are no known issues.
3
Page 4
Getting Started
In this chapter you will get an overview of all the features of the STK503. You will
learn how to use the STK503 with STK500 and how to mount the AVR in the ZIF
socket.
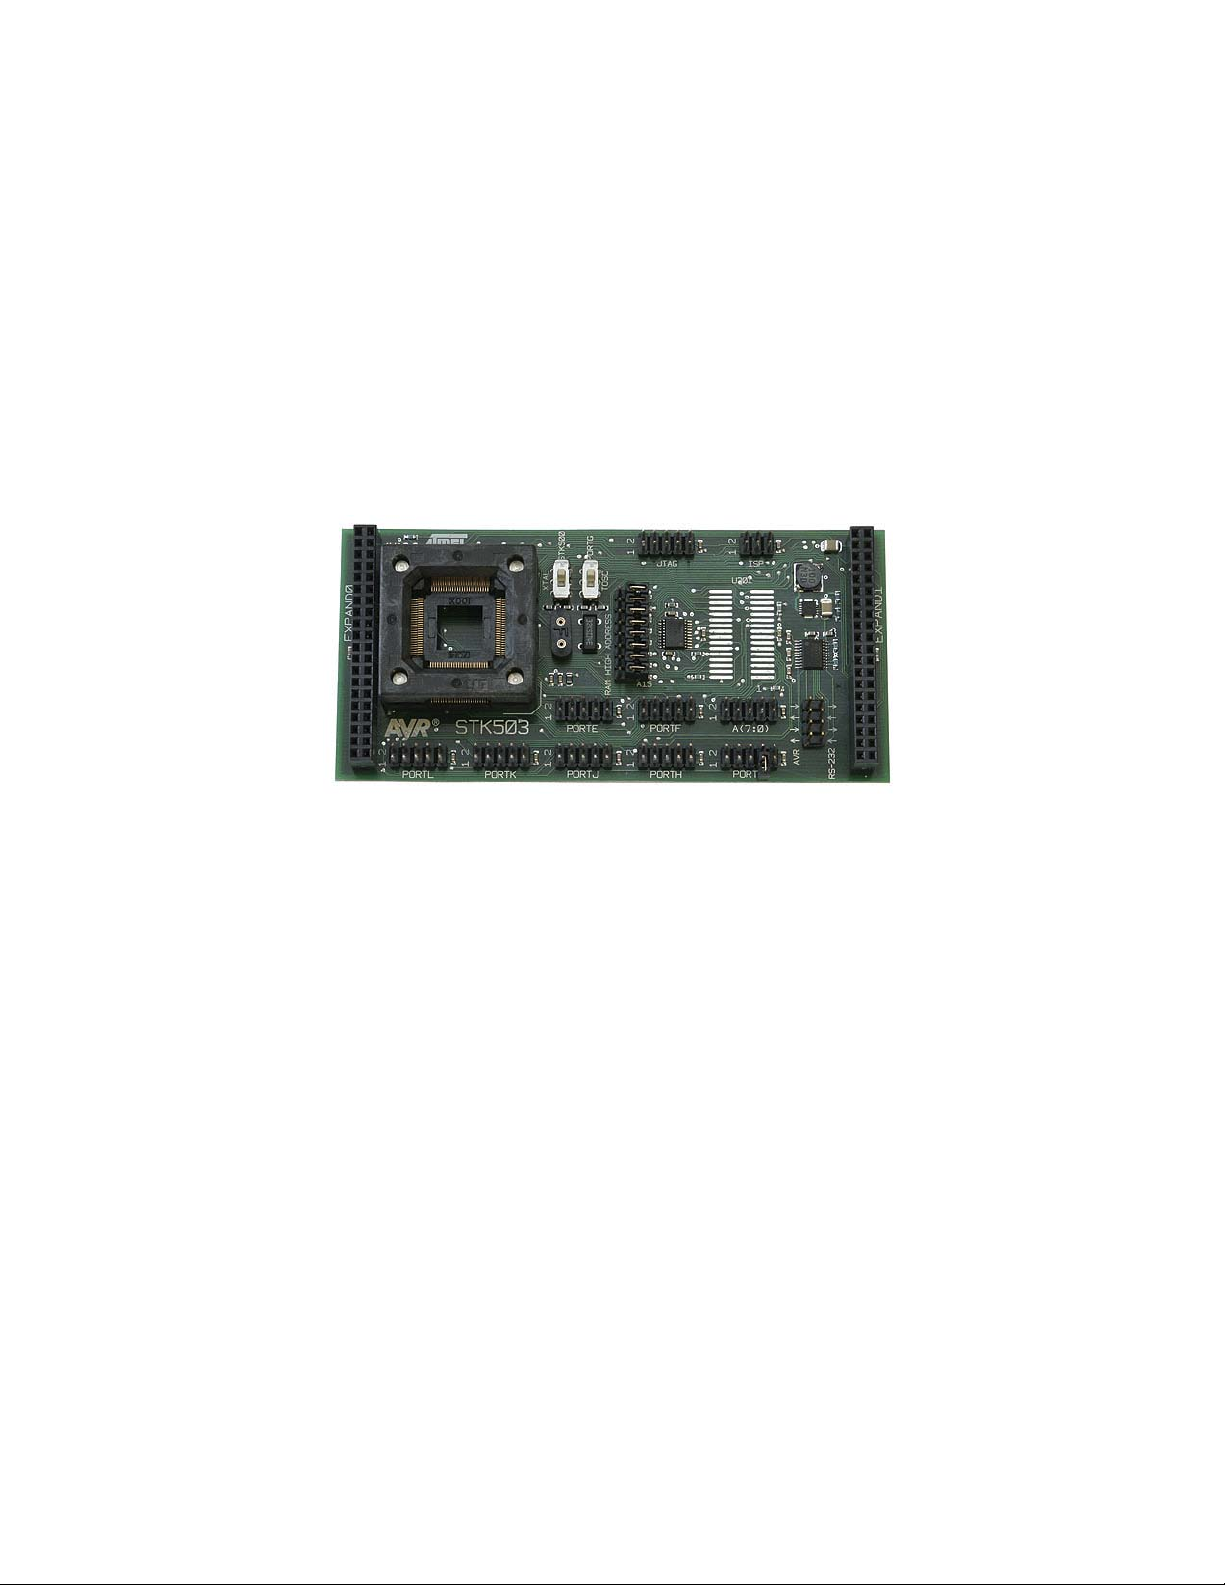
Hardware overview
The STK503 is a flexible tool to start developing and debugging applications for
100-pin AVRs as the ATmega2560. There are connectors for all available
signals, making it easy to connect to your own hardware, if required.
Figure 3-1: STK503
ZIF socket:
Here you place the AVR. See Placing the AVR for more details.
JTAG connector:
This is the connection that lets you upload and debug your application
with the JTAGICE mk II. See JTAG programming and JTAG debugging.
ISP connector:
By mounting a cable between this connector and the programming
connector on STK500, you can easily upload new programs to the AVR.
See In-System Programming for a description on how to use AVR Studio
and how connect the cable.
Clock source switches:
The STK503 has two switches that lets you select between different onboard and external clock sources. This is described in the Clock options
chapter.
SRAM footprint:
The board has a footprint for an SRAM chip. No SRAM is mounted, so
you can select an SRAM with the right operating voltage. For more
information on using the SRAM and it connection, see the External
Memory Interface chapter.
4
Page 5
RAM HIGH ADDRESS jumpers:
These jumpers are for disabling some of the address lines from the
controller to the SRAM. See the External Memory Interface chapter.
RS-232 connector:
The STK503 has an on-board RS-232 converter. In order to use it, you
must connect the AVR to the AVR side of the connector, and the external
RS-232 equipment (such as a PC) to the RS-232 side. See RS-232
Driver for more information.
PORTx connectors:
All of the AVR ports are accessible on the port connectors. They are
marked with text corresponding to the name of the AVR port. In addition
to the port pins, they also have VCC and GND pins. See the Appendix for
pinout.
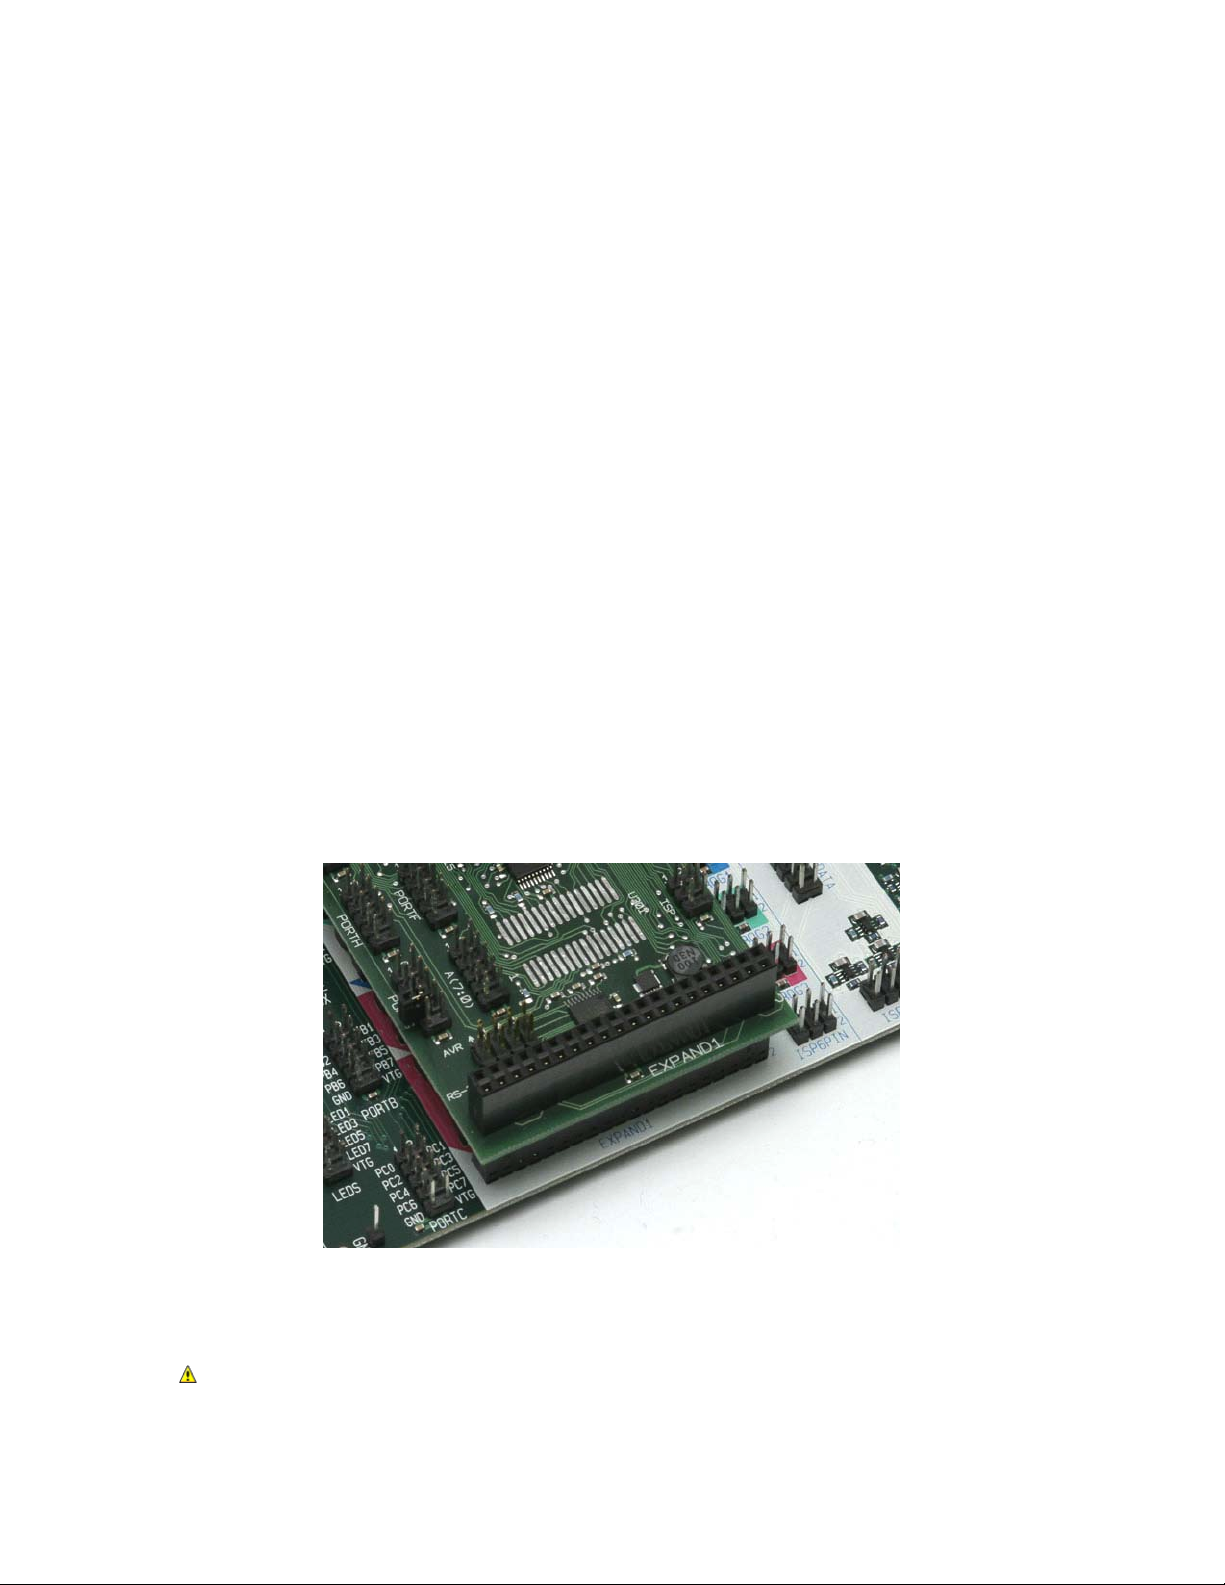
Mounting the STK503
First of all the STK503 must be mount on top of the STK500.
1.
Turn off power on the STK500.
2.
Remove any other top cards.
3.
Remove any devices from sockets of the STK500.
4.
Place the STK503 on STK500. Make sure the EXPAND0 and EXPAND1
headers on both cards align properly.
Figure 3-2: Mounting the STK503
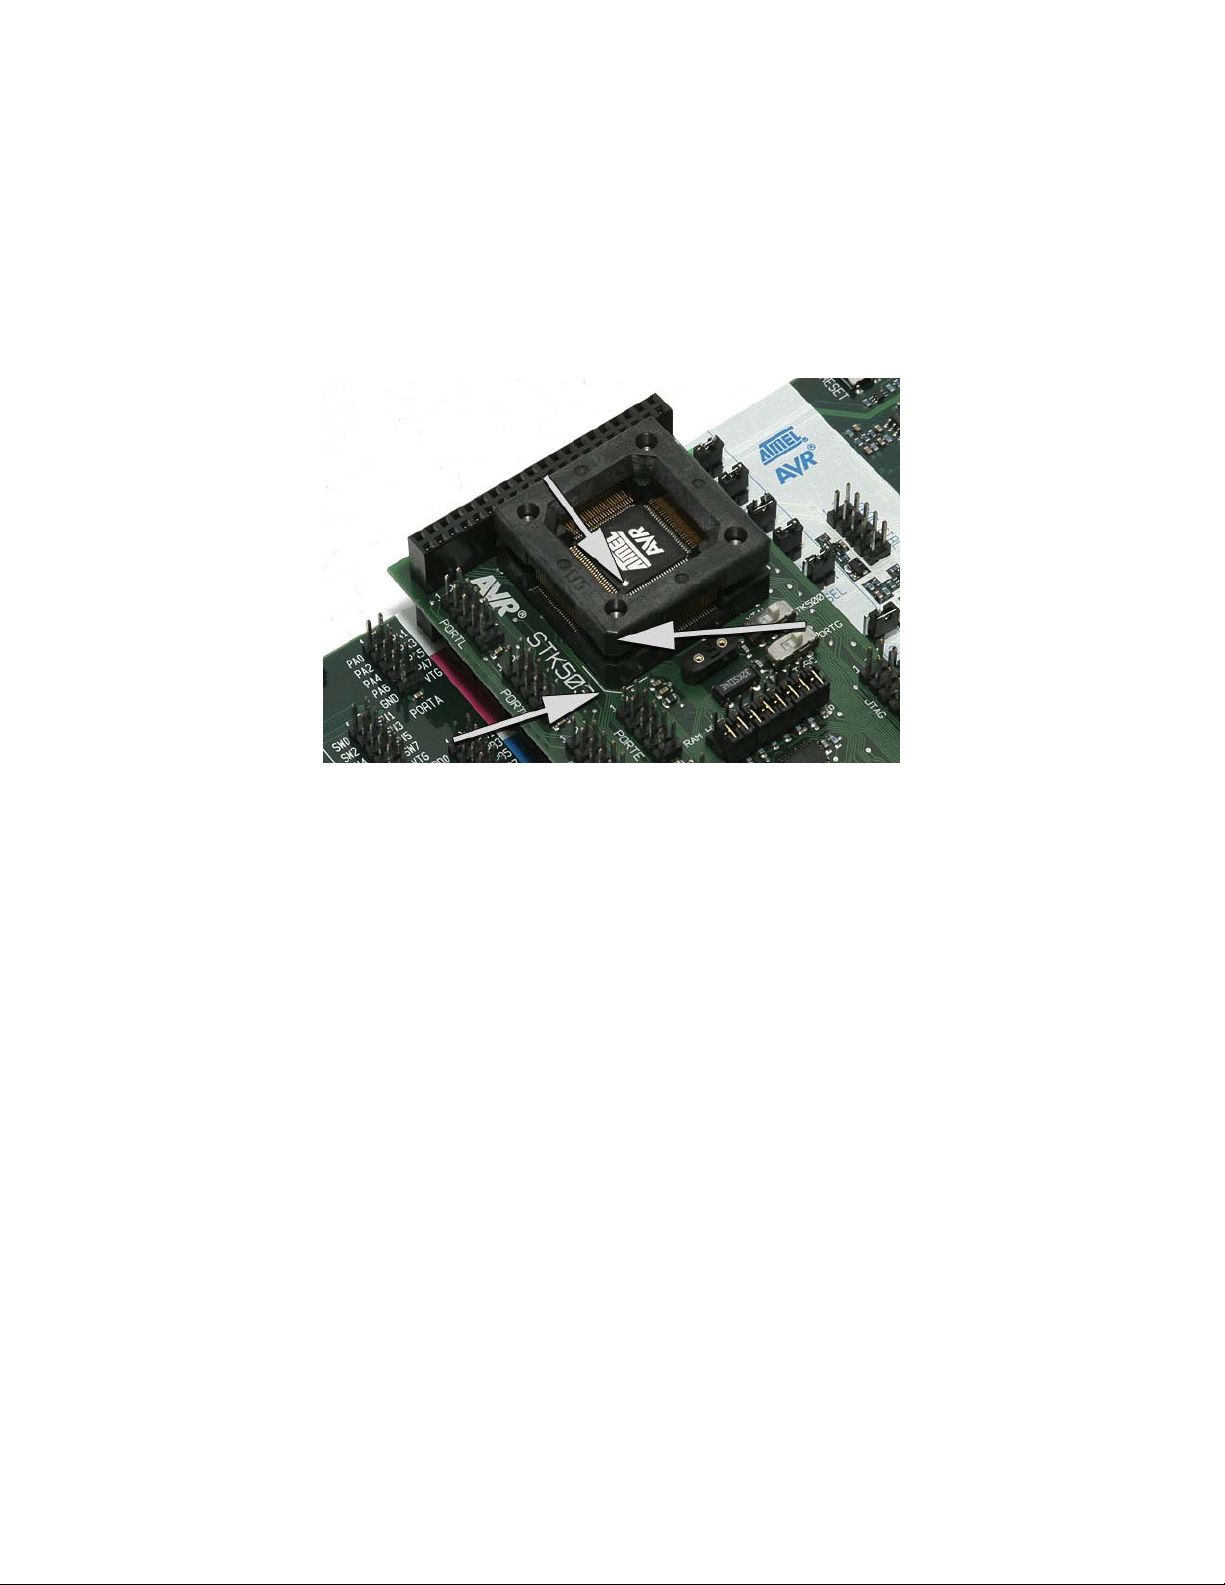
Placing the AVR in the ZIF socket
The ZIF socket on STK503 takes AVRs in 100-pin TQFP packages.
To use STK500 and 100-pin AVR devices with LCD controller such as the
ATmega3290 and ATmega6490, you must use the STK504 top module, not
5
Page 6
STK503.
1.
Make sure the STK500 power is switched off.
2.
Make sure that the STK503 is properly mounted on STK500. (See
Mounting the STK503 for details.)
3.
Place the AVR in the ZIF socket. Pay attention to the pin 1 marking on the
device and on the ZIF socket and PCB.
Figure 3-3: Placing the AVR in the ZIF socket.
6
Page 7

Programming the AVR
The AVR on STK503 can be programmed in four different ways:
1.
In-System Programming (ISP)
2.
High-Voltage Parallel Programming (HVPP)
3.
JTAG Programming
4.
Self Programming
Self Programming in not described in this document. Please consult the specific
AVR's datasheet.
In-System Programming (ISP)
In order to ISP program an AVR, it must have the ISP programming enable
fuse set. This fuse can be set by High-Voltage Parallel Programming or JTAG
Programming.
Figure 4-1: ISP programming the AVR
To ISP program an AVR on STK503, do the following:
1.
Turn off power on STK500.
2.
Connect the 6-pin cable between the ISP6PIN connector on STK500 and
the ISP connector on STK503.
3.
Turn on power on STK500.
4.
Connect a serial cable to the RS232 CTRL connector on STK500 and
your PC.
5.
Start AVR Studio. On the Tools menu, select "Program AVR/ Connect..."
The device is now ready to be programmed. For more information on how to use
the programming dialog, see the Frontend software section in the STK500 user
7
Page 8

guide.
High-Voltage Parallel Programming (HVPP)
HVPP programming is always available. The other programming modes, ISP and
JTAG programming, can be disabled. With HVPP, the other programming modes
can be enabled.
HVPP requires the target voltage to be set to 5V. If you have any external
hardware connected to STK500/STK503 that does not tolerate 5V, it must be
disconnected before you HVPP program the AVR.
Figure 4-2: HVPP programming the AVR
To HVPP program the AVR on STK503, follow these steps:
1.
Turn off power on STK500.
2.
Disconnect any hardware that does not tolerate 5V.
3.
Connect the PROGCTRL connector to PORTD and PROGDATA to
PORTB on the STK500 as show in the figure below.
4.
Set jumpers and switches according to Table 4-1.
5.
Connect a serial cable to the RS232 CTRL connector on STK500 and
your PC.
6.
Turn on power on STK500.
7.
Start AVR Studio. On the Tools menu, select "Program AVR/ Connect..."
8.
On the Board tab, make sure the VTarget slider shows 5V. If not, adjust it
and press Write Voltages .
You are now ready to program the device. For more information on how to use
the programming dialog, see the Frontend software section in the STK500 user
guide.
8
Page 9

Table 4-1: High-Voltage programming jumper settings
STK500
VTARGET Mounted
AREF Optional
RESET Mounted
XTAL1 Mounted
OSCSEL Mounted, pin 1 and 2
BSEL2 Mounted
PJUMP Open
STK503
XTAL switch position near crystal socket
TOSC switch not important
JTAG Programming
The JTAGICE mkII can, in adittion to help debug your code, be used as a
programmer.
In order to JTAG program an AVR, its OCD Enable fuse must be set. The fuse
can be set by ISP or HVPP programming.
Figure 4-3: JTAG programming the AVR
Follow these steps to JTAG program the AVR:
1. Turn off power on STK500.
2.
Connect the JTAGICE mkII probe to the JTAG connector on STK503.
3.
Remove the RESET jumper on STK500.
4.
Connect a serial cable or a USB cable beetween the JTAGICE mkII and
your PC.
5.
Turn on power on STK500.
9
Page 10

Start AVR Studio. On the Tools menu, select "Program AVR/ Connect..."
6.
You are now ready to program the device. For more information on how to use
the programming dialog, see the Frontend software section in the STK500 user
guide.
STK503 Clock Sources
The ATmega2560 and its like have two clock inputs; XTAL and TOSC. Two
switches on the STK503 selects what is connected to these two inputs.
Figure 5-1: The clock selection switches XTAL and TOSC
The XTAL switch
A clock source connected to the XTAL clock input is used to drive the internal
chip clock. The source can be a crystal, a resonator or an external clock signal.
The XTAL switch sitting on STK503 selects what is connected to the XTAL pins.
STK500 can supply two different clock signals:
•
STK500 can generate a software controlled signal with a maximum
frequency of 3.69MHz
•
A crystal can be placed in the crystal socket.
You select between these two sources with the OSCSEL jumper. This signal is
available on STK503.
The STK503 also has a socket for a crystal. This socket should be used instead
of the one on STK500, at least for high-frequency crystals (>8MHz).
The XTAL switch selects what signal is routed to the XTAL pin on the AVR:
•
The STK500 supplied clock (set the switch to the position indicated by the
text STK500)
•
The crystal socket on STK503 (set the switch to the position nearest the
crystal socket)
10
Page 11

The TOSC switch
The TOSC inputs can be configured as normal I/O pins, or as input pins for a
low-frequency oscillator that can clock the asynchronous timer. The STK503 has
a 32kHz crystal that can be connected to these pins.
The TOSC switch selects what is connected to the TOSC pins on the AVR:
•
Normal port pins - the TOSC pins are connected to the PORTG connector
(set the switch to the position indicated by the text PORTG)
•
32kHz crystal (set the switch to the position nearest the 32kHz crystal)
The External Memory Interface
The AVRs supported by STK503 can access external memories or peripherals
through its External Memory Interface. This interface consist of PORTA
(multiplexed data and address low byte), PORTC (address high byte), and
PORTG[2:0] (RD, WR and ALE).
SRAM footprint
STK503 has a footprint where an SRAM chip can be mounted. The footprint
takes 128Kx8 SOJ and TSOP packages.
Figure 6-1: The SRAM footprint. The arrow shows pin 1.
11
Page 12

Only SRAM chips with center power pins can be used. See the Appendix for
details.
Address latch
The data bus and the low byte of the address bus is multiplexed on PORTA. The
ALE signal indicates when the address is present. This low byte must be stored
by a latch until the memory access cycle is completed.
The STK503's a latch is connected to the ALE signal. The latched low byte of the
address is routed to the SRAM footprint, and is also accessible on the connector
marked A[7:0].
High address jumpers
Some or all of the highest eight address pins on the External Memory Interface
can be disabled and used as general I/O. This feature is supported on STK503
by mounting the appropriate RAM HIGH ADDRESS jumpers. The lines which are
disconnected from the SRAM footprint are pulled low so the address lines of the
SRAM isn't floating.
12
Page 13

RS-232 Driver
The STK503 has an RS-232 driver operating at target voltages from 1.8 to 5.5V
with a maximum speed of 480kbps. There are two transmit and two receive pins.
With the RS-232 port available on STK500, you have three channels available for
your design.
The driver pins are available on the connector in the lower right corner of the
STK503 (see figure 7-1 and 7-2).
Figure 7-1: The RS-232 connector
To use the driver you must connect the logic level pins to the AVR and the RS232 pins to the external device. The connector is marked with AVR and RS-232,
where the pins on the AVR side must be connected to the RxD and TxD pins on
the AVR, and RS-232 side connects to a connector or your RS-232-enabled
device. The arrows show the signal directions.
Figure 7-2: RS-232 connection
As the STK503 has no 9-pin or 25-pin connector, you must make your own
connection. You can however decide if you will use only TxD/RxD lines, giving
you two channels, or if handshake signals like RTS/CTS or DTR/DSR will be
used. In the latter case, you must connect the handshake signals to regular
PORT pins that are controlled by software.
13
Page 14

Debugging with JTAGICE mkII
ATMEL's JTAGICE mkII can debug AVRs that supports the JTAG or the
debugWire debugger interface.
Connecting the JTAGICE
Figure 8-1: Connecting the JTAGICE to STK503
Connect the JTAGICE probe to the JTAG connector as show in the figure above.
To be able to use this interface for debugging, you must also remove the RESET
jumper from STK500.
14
Page 15

Troubleshooting Guide
Programming problems
Problem Cause Solution
ISP programming
does not work
ISP cable is not connected Connect a 6-pin cable between the ISP6PIN
connector on STK500 and the ISP connector on
STK503. See also Programming the AVR.
ISP programming
does not work
High-Voltage
programming does
not work.
High-Voltage
programming does
not work.
High-Voltage
programming does
not work.
The ISP clock is to fast if
the AVR is running at a low
clock frequency.
The 10-pin cables are not
connected correctly.
The BSEL2, OSCSEL,
RESET and VTARGET
jumpers on STK500 are not
set right.
The STK504 clock switch is
in the wrong position.
Make sure the clock switch on STK503 is in the
right position. In the Board page of the
programming dialog in AVR Studio, try reducing
the ISP clock frequency.
See the Programming the AVR chapter for
setup.
See the Programming the AVR chapter for
setup.
Set the switch to the STK500 position. See also
Programming the AVR.
General problems
Problem Cause Solution
Some of the port pins are
not working .
The code isn't running. The AVR has
The AVR will not run on x
MHz, but works ok on
lower frequencies.
The AVR will not run on x
MHz, but works ok on
lower frequencies. I have
a x MHz crystal mounted
on STK500
The AVR is not
properly mounted in
the ZIF socket.
no/wrong clock
source.
The clock frequency
is exceeding the
clock rate of the AVR
(at a certain
operating voltage).
Crystals should be
placed in the crystal
socket on STK503.
Make sure the chip is properly aligned in the
socket. When the spring-loaded latch is
depressed, the chip should fit nicely into the
bottom of the socket.
According to the clock fuse setting, select the
appropriate clock source on STK500 and
STK503. Check the OSCSEL jumper on
STK500 and clock switch on STK503. If you are
using a crystal in one of the sockets, check that
it is firmly mounted in its socket.
Check that you are running the AVR within
specifications. Check the speed grade of the
AVR and consult the datasheet for operating
frequencies and voltages.
Place the crystal in the socket on STK503. Set
the clock switch to the position closest to the
crystal socket..
15
Page 16

Appendix
Port Connectors
The STK503 has seven port connectors in addition to those available on
STK500. These are PORTE, PORTF, PORTG, PORTH, PORTJ, PORTK and
PORTL. The pinout of each connector is described below.
Table A-1: STK503 port connectors pinout
PORTE
PE0 1 2 PE1
PE2 3 4 PE3
PE4 5 6 PE5
PE6 7 8 PE7
GND 9 10 VTG
PORTJ
PJ0 1 2 PJ1
PJ2 3 4 PJ3
PJ4 5 6 PJ5
PJ6 7 8 PJ7
GND 9 10 VTG
PORTF
PF0 1 2 PF1
PF2 3 4 PF3
PF4 5 6 PF5
PF6 7 8 PF7
GND 9 10 VTG
PORTK
PK0 1 2 PK1
PK2 3 4 PK3
PK4 5 6 PK5
PK6 7 8 PK7
GND 9 10 VTG
PG0 1 2 PG1
PG2 3 4 PG3
PG4 5 6 PG5
SRAMEN
GND 9 10 VTG
PL0 1 2 PL1
PL2 3 4 PL3
PL4 5 6 PL5
PL6 7 8 PL7
GND 9 10 VTG
PORTG
7 8 A16
PORTL
PORTH
PH0 1 2 PH1
PH2 3 4 PH3
PH4 5 6 PH5
PH6 7 8 PH7
GND 9 10 VTG
SRAM
The following SRAM chips can be used on STK503:
Manufacturer Part number VCC Package
ISSI IS63LV1024-T 3,3V TSOP-II
ISSI IS63LV1024-J 3,3V SOJ 300-mil
ISSI IS63LV1024-K 3,3V SOJ 400-mil
IDT IDT71124-Y 5V SOJ 400-mil
IDT IDT71V124SA-TY 3,3V SOJ 300-mil
IDT IDT71V124SA-Y 3,3V SOJ 400-mil
IDT IDT71V124SA-PH 3,3V TSOP-II
Cypress CY7C1019-V 5V SOJ 400-mil
Cypress CY7C1019B-V 5V SOJ 400-mil
Cypress CY7C1018BV33-V 3,3V SOJ 300-mil
Cypress CY7C1019BV33-V 3,3V SOJ 400-mil
Toshiba TC558128BJ 5V SOJ 400-mil
Toshiba TC558128BFT 5V TSOP-II
Toshiba TC55V8128BJ 3,3V SOJ 400-mil
Toshiba TC55V8128BFT 3,3V TSOP-II
Samsung K6R1008C1C-J 5V SOJ 400-mil
Samsung K6R1008C1C-T 5V TSOP-II
Alliance AS7C31025A-HFC 5V TSOP-II
16
Page 17

Schematic and layout
STK503 schematic: STK503.pdf
STK503 component placement: STK503_asm.pdf
Disclaimer: The information in this document is provided in connection with Atmel products. No license, express or implied, by estoppel or
otherwise, to any intellectual property right is granted by this document or in connection with the sale of Atmel products. EXCEPT AS SET
FORTH IN ATMEL’S TERMS AND CONDITIONS OF SALE LOCATED ON ATMEL’S WEB SITE, ATMEL ASSUMES NO LIABILITY
WHATSOEVER AND DISCLAIMS ANY EXPRESS, IMPLIED OR STATUTORY WARRANTY RELATING TO ITS PRODUCTS
INCLUDING, BUT NOT LIMITED TO, THE IMPLIED WARRANTY OF MERCHANTABILITY, FITNESS FOR A PARTICULAR PURPOSE,
OR NON-INFRINGEMENT. IN NO EVENT SHALL ATMEL BE LIABLE FOR ANY DIRECT, INDIRECT, CONSEQUENTIAL, PUNITIVE,
SPECIAL OR INCIDENTAL DAMAGES (INCLUDING, WITHOUT LIMITATION, DAMAGES FOR LOSS OF PROFITS, BUSINESS
INTERRUPTION, OR LOSS OF INFORMATION) ARISING OUT OF THE USE OR INABILITY TO USE THIS DOCUMENT, EVEN IF
ATMEL HAS BEEN ADVISED OF THE POSSIBILITY OF SUCH DAMAGES. Atmel makes no representations or warranties with respect
to the accuracy or completeness of the contents of this document and reserves the right to make changes to specifications and product
descriptions at any time without notice. Atmel does not make any commitment to update the information contained herein. Unless
specifically provided otherwise, Atmel products are not suitable for, and shall not be used in, automotive applications. Atmel’s products are
not intended, authorized, or warranted for use as components in applications intended to support or sustain life.
© Atmel Corporation 2006. All rights reserved. Atmel®, logo and combinations thereof, Everywhere You Are®, AVR®,
AVR Studio® and others, are the registered trademarks or trademarks of Atmel Corporation or its subsidiaries. Other
terms and product names may be trademarks of others.
17
 Loading...