

Page 1

NOTICE D’UTILISATION ET D’INSTALLATION
Installation and operating manual / Bedien-und montage anleitung / Gebruiks- en installatiehandleiding /
Manual de utilización e instalación / Manual do Utilizador e de Instalação /
TIMELIS
RADIATEUR SÈCHE-SERVIETTES ÉLECTRONIQUE
MODÈLES CLASSIQUE ET VENTILO
Towel rail electronic radiator - Conventional and fan models
Elektronischer Handtuchtrockner - Modelle Classique und Ventilo
Elektrisch en gemengd model - Klassieke en Ventilatie modellen
Radiador secatoallas electrónico - Modelos Clásico y Ventilo
Toalheiro electrónico - Modelos "Classique" e "Ventilo"
F
GB
D
NL
SP
P
PL
GUIDE À CONSERVER
PAR L’UTILISATEUR
Manuel must be kept by end user
Dokument muss vom benutzer aufbewahrt werden
Gids te bewaren door de gebruiker
Guía que deberá conservar el usuario
Guia a conservar pelo utilizador
Page 2
Nous vous remercions de votre choix et de votre confiance. Le radiateur sèche-serviettes que vous
venez d’acquérir a été soumis à de nombreux tests et contrôles afin d’en assurer la qualité et ainsi
vous apporter une entière satisfaction.
Conservez la notice, même après l’installation
du radiateur sèche-serviettes.
Sommaire
Installation
1/ Préparer l’installation du radiateur sèche-serviettes . . . . . . . . . . . . . . . . . . . . . . . . . . . . . . .2
2/ Raccorder le radiateur sèche-serviettes . . . . . . . . . . . . . . . . . . . . . . . . . . . . . . . . . . . . . . . .3
3/ Fixer le radiateur sèche-serviettes . . . . . . . . . . . . . . . . . . . . . . . . . . . . . . . . . . . . . . . . . . .4/5
4/ Monter et démonter les patères . . . . . . . . . . . . . . . . . . . . . . . . . . . . . . . . . . . . . . . . . . . . . .5
Fonctionnement . . . . . . . . . . . . . . . . . . . . . . . . . . . . . . . . . . . . . . . . . . . . . . . . . . . . . . . . . . . . .6
Utilisation
1/ Chauffer votre pièce : utilisation du mode Confort . . . . . . . . . . . . . . . . . . . . . . . . . . . . . . .7
2/ Elever la température de votre pièce : utilisation du mode Turbo . . . . . . . . . . . . . . . . . . .7
3/ Elever quotidiennement et à la même heure la température de votre pièce : utilisation du
mode 24h auto . . . . . . . . . . . . . . . . . . . . . . . . . . . . . . . . . . . . . . . . . . . . . . . . . . . . . . . . . . . .8
Conseils
1/ Conseils d’utilisation . . . . . . . . . . . . . . . . . . . . . . . . . . . . . . . . . . . . . . . . . . . . . . . . . . . . . . .9
2/ Mise en garde . . . . . . . . . . . . . . . . . . . . . . . . . . . . . . . . . . . . . . . . . . . . . . . . . . . . . . . . . . . .10
3/ Entretien . . . . . . . . . . . . . . . . . . . . . . . . . . . . . . . . . . . . . . . . . . . . . . . . . . . . . . . . . . . . . . . .10
4/ En cas de problème . . . . . . . . . . . . . . . . . . . . . . . . . . . . . . . . . . . . . . . . . . . . . . . . . . . . .11/12
F
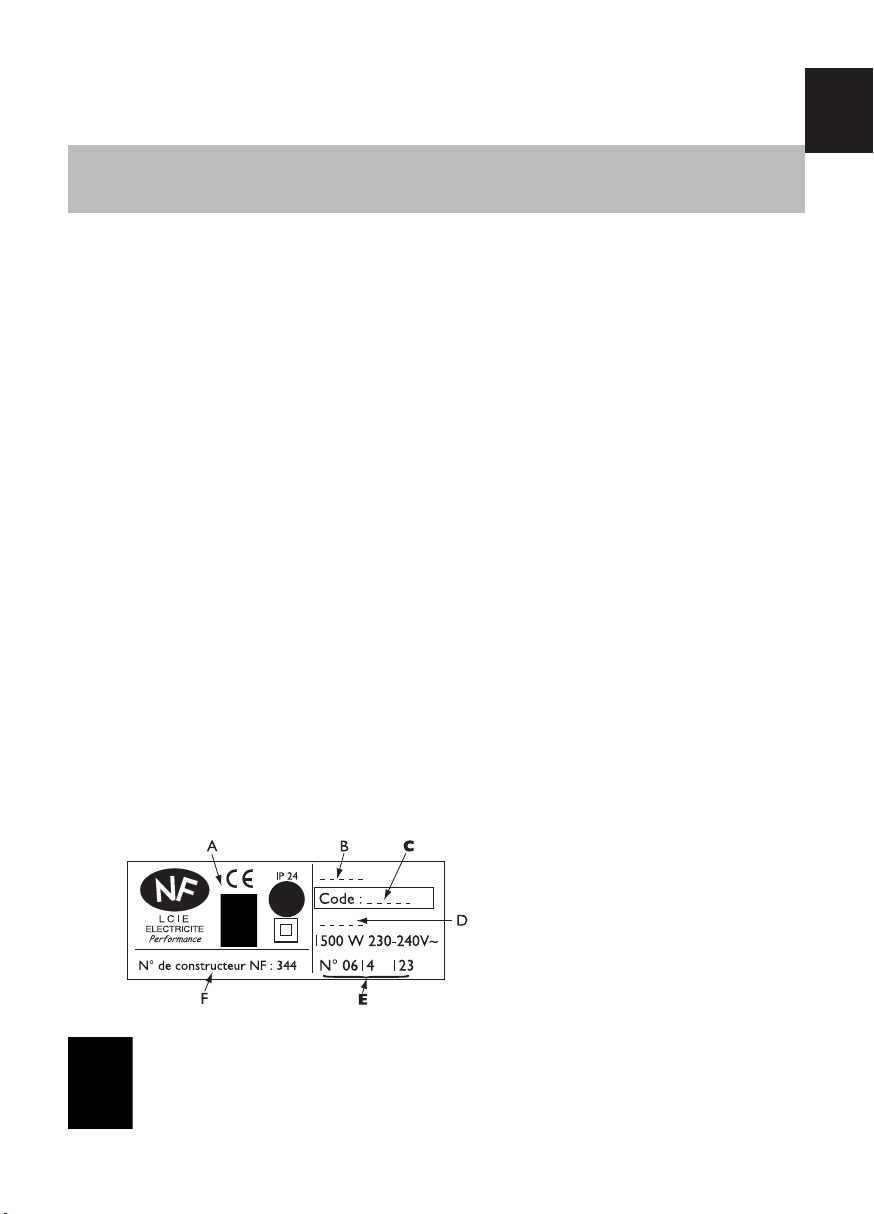
Les références du radiateur sèche-serviettes
Elles sont situées sur le côté droit du radiateur sèche-serviettes.
Le Code commercial et le Numéro de série identifient auprès du constructeur le radiateur sècheserviettes que vous venez d’acquérir.
A Normes, labels de qualité
B Nom commercial
C Code commercial
D Référence de fabrication
E N° de série
F N° de constructeur
Les appareils munis de ce symbole ne doivent pas être mis avec les ordures ménagères,
mais doivent être collectés séparément et recyclés.
La collecte et le recyclage des produits en fin de vie doivent être effectués selon les dispositions et les décrets locaux.
1
Page 3
Installation
150 mm mini
200 mm mini
150 mm mini
1/ Préparer l’installation du radiateur sèche-serviettes
Règles d’installation
- Ce radiateur sèche-serviettes a été conçu pour être installé dans un local résidentiel. Dans tout autre
cas, veuillez consulter votre distributeur.
- L’installation d oit être faite d ans les règles de l’art et conforme aux normes en vigueur dans
le pays d’installation (NFC 15100 pour la France).
- Le radiateur sèche-serviettes doit être alimenté en 230 V Mono 50Hz.
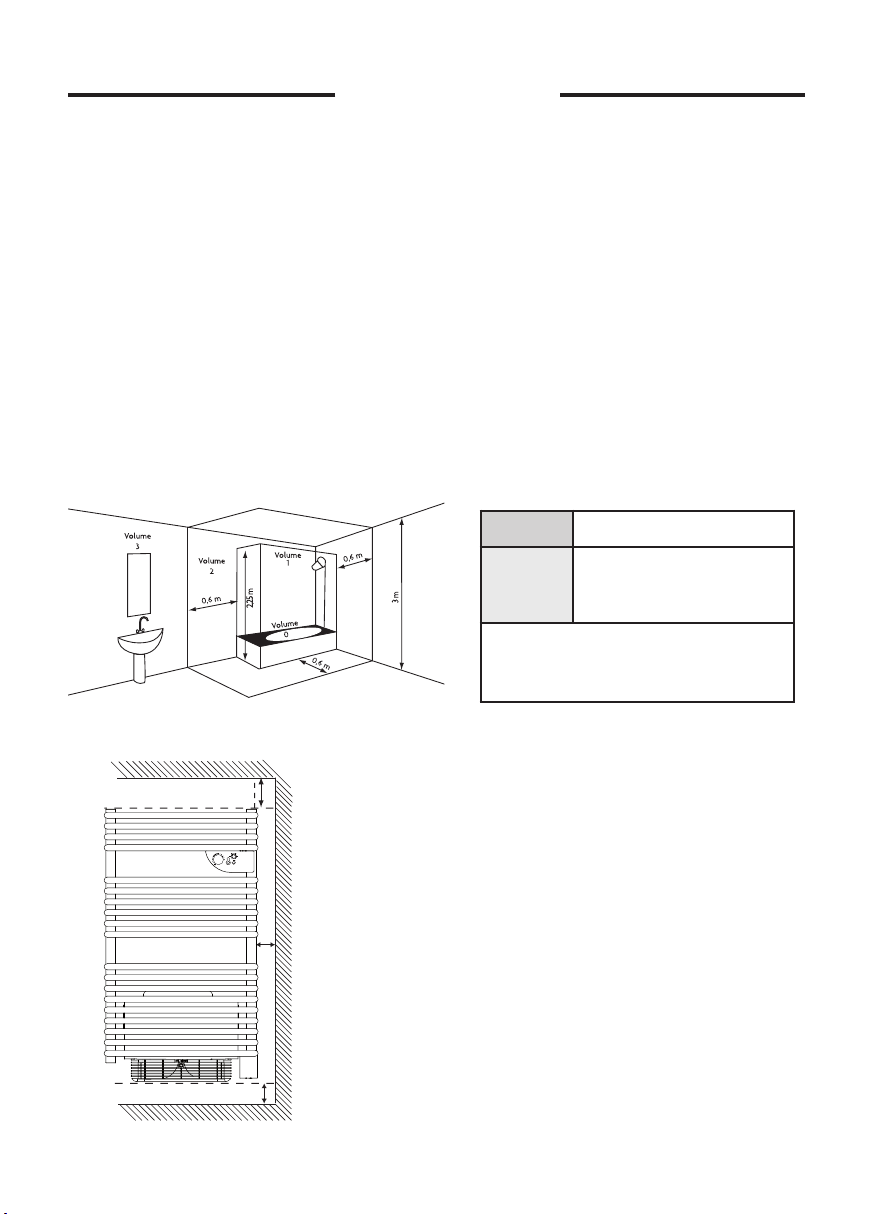
Dans des locaux humides comme les salles de bains et les cuisines, vous devez installer le boîtier de rac-
cordement au moins à 25 cm du sol.
Tenir le radiateur sèche-serviettes éloigné d’un courant d’air susceptible de perturber
son fonctionnement (ex : sous une Ventilation Mécanique Centralisée,etc...).
Ne pas l’installer sous une prise de courant fixe.
Volume 1 Pas d’appareil électrique
Volume 2
Volume 3
Respectez les distances minimales avec le
mobilier pour l’emplacement de l’appareil.
Appareil électrique IPX4
(Norme EN 60335-2-43 :
2003/A2 : 2008)
2
Page 4
2/ Raccorder le radiateur sèche-serviettes
5'
3''
5'
7''
Règles de raccordement
- Le radiateur sèche-serviettes doit être alimenté en 230 V Mono 50Hz.
- L’alimentation du radiateur sèche-serviettes doit être directement raccordée au réseau après le disjoncteur et sans interrupteur intermédiaire.
- Le raccordement au secteur se fera à l’aide du câble du radiateur sèche-serviettes par l’intermédiaire
d’un boîtier de raccordement. Dans des locaux humides comme les salles de bains et les cuisines, il
faut installer le boîtier de raccordement au moins à 25 cm du sol.
- Le raccordement à la terre est interdit.Ne pas brancher le fil pilote (fil noir) à la terre.
- L’installation doit être équipée d’un dispositif de coupure omnipolaire ayant une distance d’ouverture de
contact d’au moins 3 mm.
- Si le câble d’alimentation est endommagé, il doit être remplacé par un professionnel.
- Si vous utilisez le fil pilote et s’il est protégé par un différentiel 30mA (ex : salle de bains), il est nécessaire de protéger l’alimentation du fil pilote sur ce différentiel.
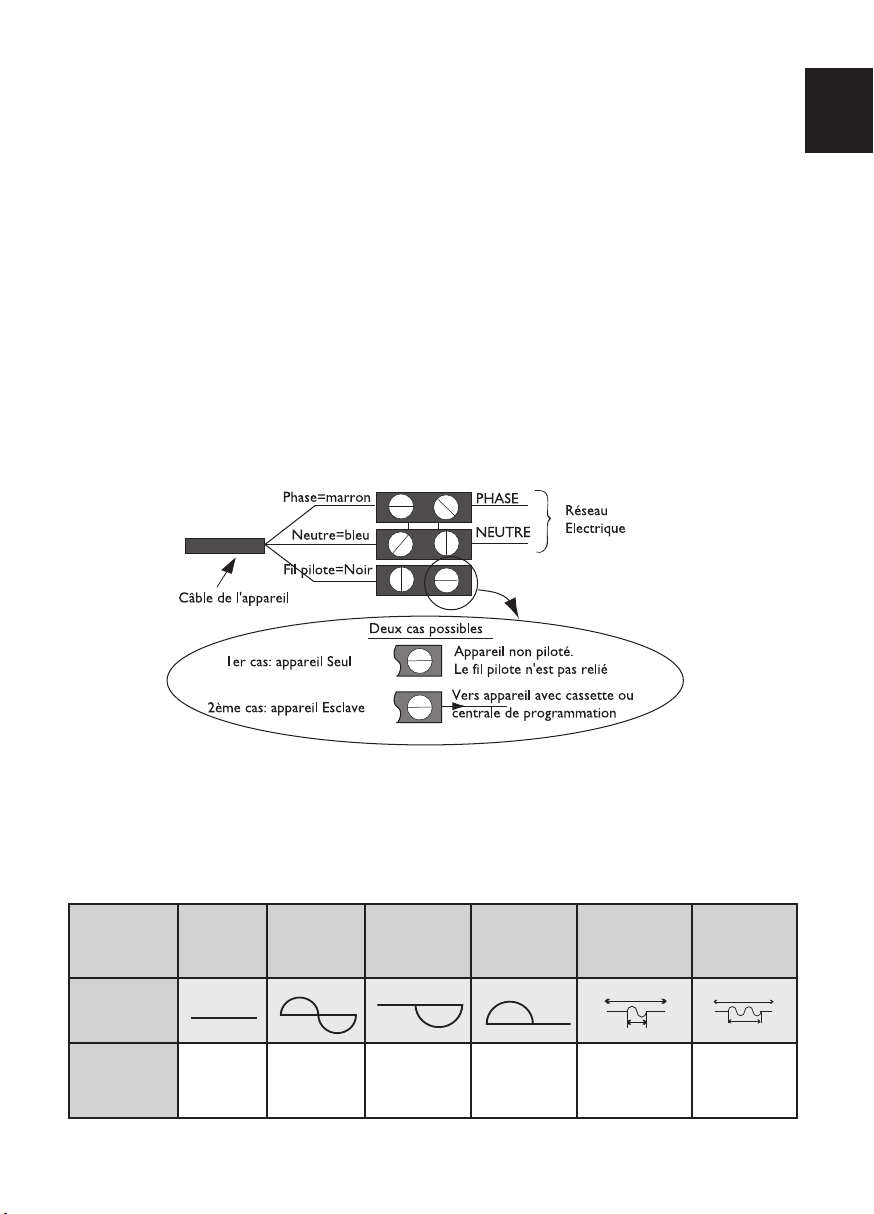
Schéma de raccordement du radiateur sèche-serviettes
Coupez le courant et branchez les fils d’après le schéma suivant :
F
Vous pouvez raccorder le fil pilote si votre maison est équipée d’une centrale de programmation, d’un
programmateur ou d’un gestionnaire.
Dans ce cas, pour vérifier la transmission correcte des ordres de programmation, procédez aux vérifications suivantes en fonction des modes choisis (Confort, Eco, ...) :
Mode CONFORT ECO HORS GEL
ARRET DU
CHAUFFAGE
DELESTAGE
CONFORT
-1°C
Signal à
transmettre
Mesure entre
le fil pilote et
le neutre
0 Volt 230 Volt
-115 Volts
négative
3
+115 Volts
positive
230 Volts
pendant 3 s
CONFORT
-2°C
230 volts
pendant 7 s
Page 5
3/ Fixer le radiateur sèche-serviettes au mur
A version classique
klassieke versie
B version ventilo
Ventilo versie
400 mm
556 mm
version ventilo
Ventilo versie
322 mm
version classique
klassieke versie
SOL
Prenez le couvercle
1
de l’emballage et dépliez le rabat afin de
bien le poser sur le
sol.
Repérez et pointez
2
les 4 points du
gabarit de perçage
dessiné sur la face
marquée du
couvercle.
Cote A
Puissance
(version
classique
)
500 W 819 mm 585 mm
750 W 1209 mm 975 mm
1000 W 1599 mm 1365 mm
Enlevez le
3
couvercle.
Avec un crayon, dessinez une croix de 2
cm de large afin de
la visualiser lorsque
vous aurez installé
les fourreaux à
l’étape 4.
Percez les 4 trous et
mettez des
chevilles.
En cas de support
particulier, utilisez
des chevilles
adaptées
(ex : plaque de plâtre).
Cote B
(version
)
ventilo
Vissez et
4
orientez les
f o u r r e a u x
(utilisez les
rondelles sous
chaque vis).
Gardez accessibles les
vis de blocage vers le
haut.
4
Page 6
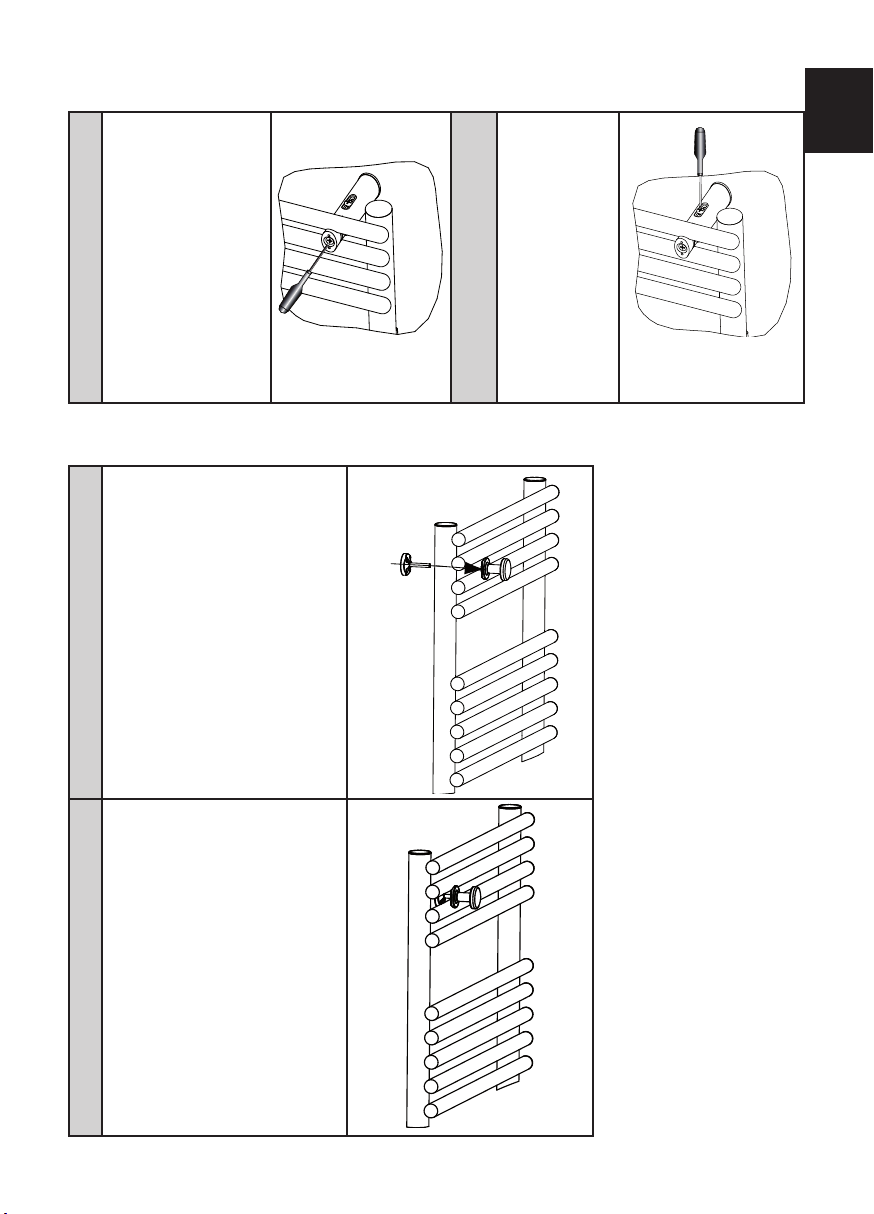
3/ Fixer et verrouiller le radiateur sèche-serviettes au mur
••
Vissez les plots sur
5
les tubes sans les bloquer.
Vérifiez leur positionnement en les mettant avec le radiateur
sèche-serviettes dans
les fourreaux.
Une fois la position
trouvée, bloquez les
vis de chaque plot.
Mettez le ra-
6
diateur sècheserviettes au
mur dans les
fourreaux.
Vissez chacune
des vis de blocage.
Mettez les capuchons au
bout des plots.
4/ Monter et démonter la patère
Positionnez la base avec la vis
1
derrière le radiateur sèche-serviettes dans la position désirée.
F
Vissez la patère sur le cadre et
2
serrez avec une légère pression.
5
Page 7
Fonctionnement
A
B
C
D
Vous pouvez faire fonctionner votre radiateur sèche-serviettes dans plusieurs modes, quel que soit le
type de commande que vous aurez choisi (commande manuelle ou par programmation) :
• Le mode Confort qui vous permet d’obtenir la bonne température ambiante.
• Le mode Turbo qui vous permet de monter rapidement la température de votre salle de bains
(marche forcée ou marche forcée + ventilo selon votre modèle).
• Le mode 24h auto qui vous permet de bénéficier chaque jour à la même heure du confort optimal
procuré par votre radiateur sèche-serviettes. Ce mode active la marche forcée de l’appareil pendant
2h mais n’active pas le ventilo pour les appareils qui en sont équipés.
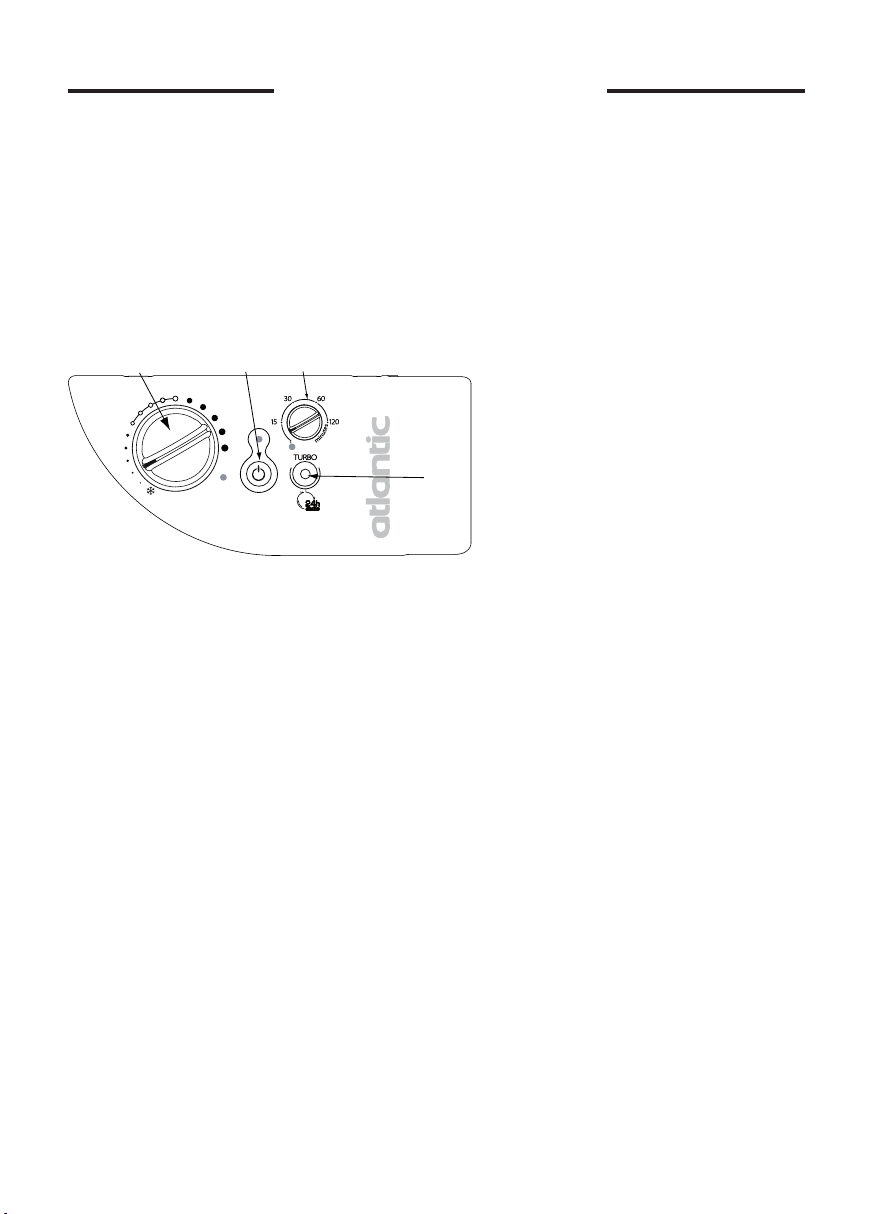
Commande manuelle
Molette de réglage de la température
A
de confort de la salle de bains.
Interrupteur et voyant Marche / Arrêt
B
du chauffage.
Molette de réglage de la durée du
C
mode Turbo.
Bouton de mise en marche du mode
D
Turbo / Mode 24h auto.
Commande par programmation centralisée
La programmation centralisée vous permet de réaliser des économies en programmant les abaissements de température quand vous le souhaitez, en fonction de la période d’utilisation de la salle de
bains.
Votre radiateur sèche-serviettes peut être programmé de façon centralisée par le biais du fil pilote. Préparez votre programmation avec la notice fournie.
6
Page 8
Utilisation
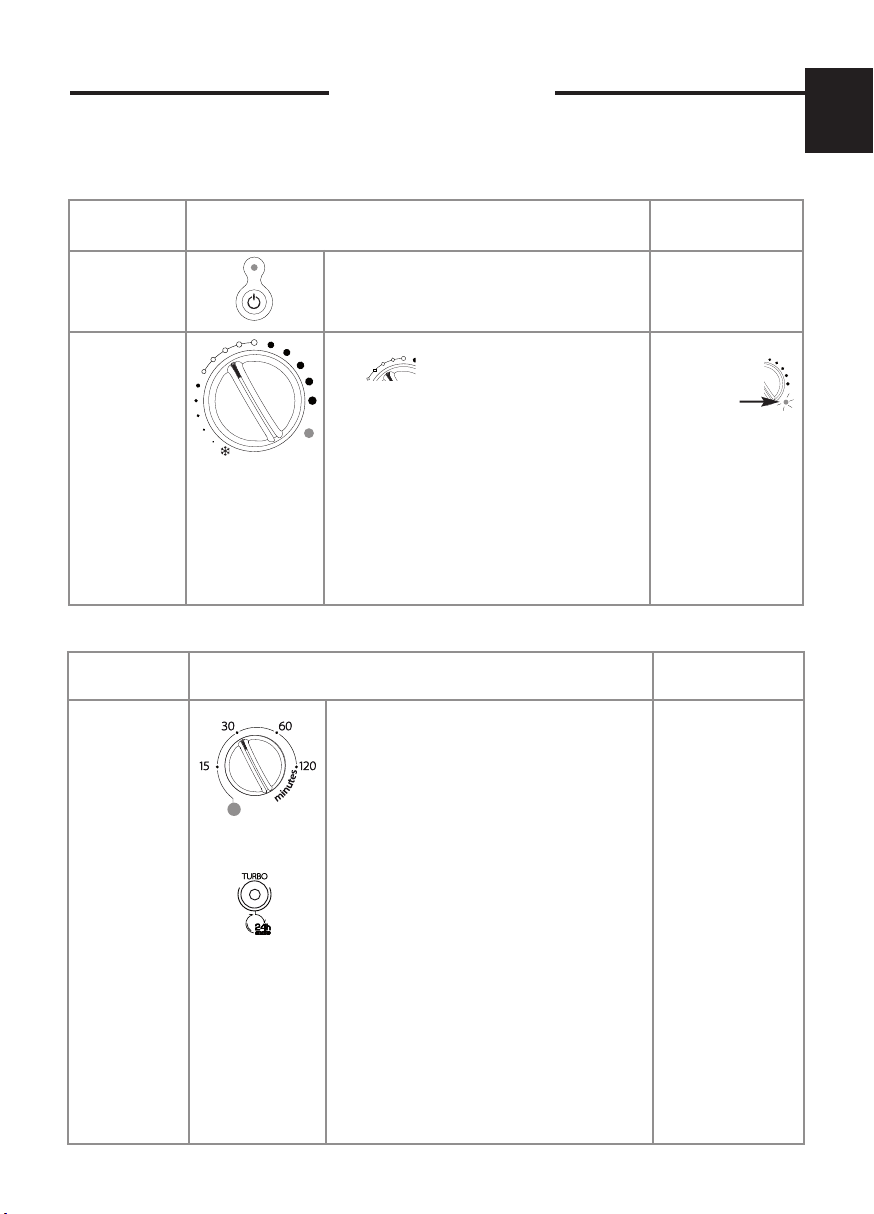
1/ Chauffer votre pièce : utilisation du mode Confort
Ce mode vous permet d’avoir une bonne température ambiante dans la pièce.
CE QUE VOUS
VOULEZ FAIRE
Mettre en
marche le
chauffage.
CE QUE VOUS DEVEZ FAIRE POUR L’OBTENIR
J’appuie sur l’interrupteur B. Le voyant de l’in-
F
CE QUI VA SE
PASSER
terrupteur B s’allume.
Trouver
la bonne
température.
Je tourne la molette de température A
sur .
Le voyant de chauffe s’allume si la température ambiante est inférieure à celle désirée.
J’attends quelques heures pour que celle-ci
se stabilise.
Si la température de la pièce me convient, le
réglage est terminé.
Si la température ne me convient pas,
j’ajuste la molette en procédant progressivement en m’aidant des crans (un cran à la
fois).
Le voyant de
chauffe
s’allume.
J’ai trouvé la température qui me
procure une sensation de bien-être.
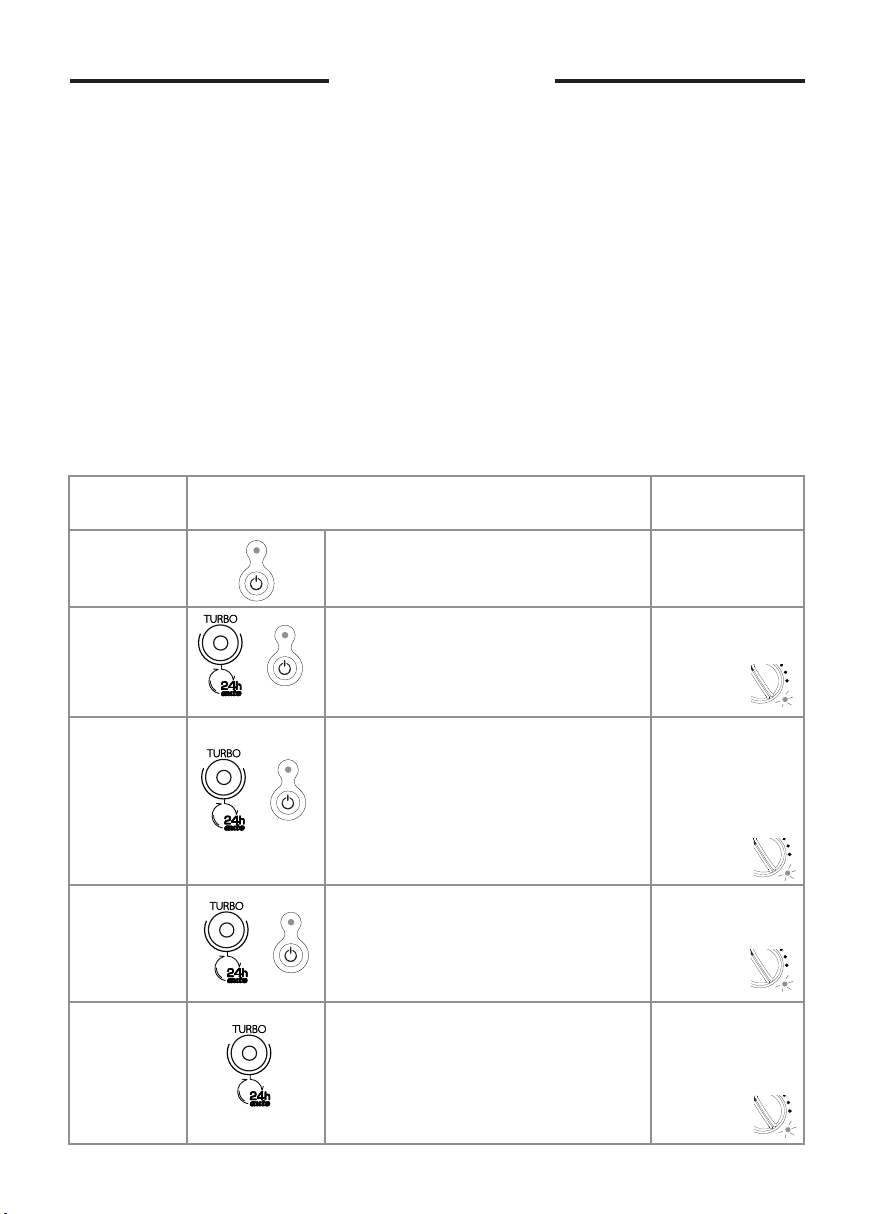
2/ Elever la température de votre pièce : utilisation du modeTurbo
CE QUE VOUS
VOULEZ FAIRE
Elever
la température
dans ma salle
de bains
CE QUE VOUS DEVEZ FAIRE POUR L’OBTENIR
Je règle la durée du mode Turbo en tournant la molette C :
- J’ai un modèle classique, les réglages préconisés pour un confort optimal sont
compris entre 1 et 2 heures.
- J’ai un modèle ventilo, nous vous préconisons une durée entre 1/4 et 1/2 heure.
J’appuie sur le bouton D pour déclencher
le Turbo.
A la fin de la durée choisie, le Turbo s’éteint et
le radiateur sèche-serviettes continue de chauffer en mode Confort.
Nota : Si vous éteignez votre appareil (par
appui sur l’interrupteur B) pendant le cycle
turbo, celui-ci se poursuivra à la prochaine remise en marche.
CE QUI VA
SE PASSER
Le voyant D de
mise en marche du
Turbo s’allume.
Mon radiateur
sèche-serviettes
fonctionne au
maximum de sa
puissance pendant
la durée choisie.
Si j’ai un modèle
ventilo, celui-ci se
déclenche.
7
Page 9
Utilisation
3/ Elever quotidiennement et à la même heure la température de votre
pièce : utilisation du mode 24h auto
Ce mode vous permet d’enregistrer une répétition journalière d’une marche forcée de 2h (sans le ventilo) afin que vous puissiez bénéficier chaque jour à la même heure du confort optimal procuré par
votre radiateur sèche-serviettes.
La durée de ce mode n’est pas modifiable avec la molette C, elle est systématiquement de 2 heures.
Pour que votre fonction répétition journalière 24h auto reste active, n’éteignez pas votre appareil (le
voyant B doit rester allumé).
Exemple d’utilisation :
Vous souhaitez obtenir un confort optimal à 7h.
Le premier jour, à 7h, maintenir l’appui sur le bouton
B (arrêt et remise en marche du radiateur sèche-serviettes).Votre radiateur sèche-serviettes se met immédiatement en marche forcée (ventilo non activé) pendant 2 h et s’arrêtera automatiquement au terme de ces 2h.
Le lendemain et les jours suivants,votre radiateur sèche-serviettes déclenchera automatiquement la marche forcée (ventilo non activé) à 6h15 pour votre confort à 7h.
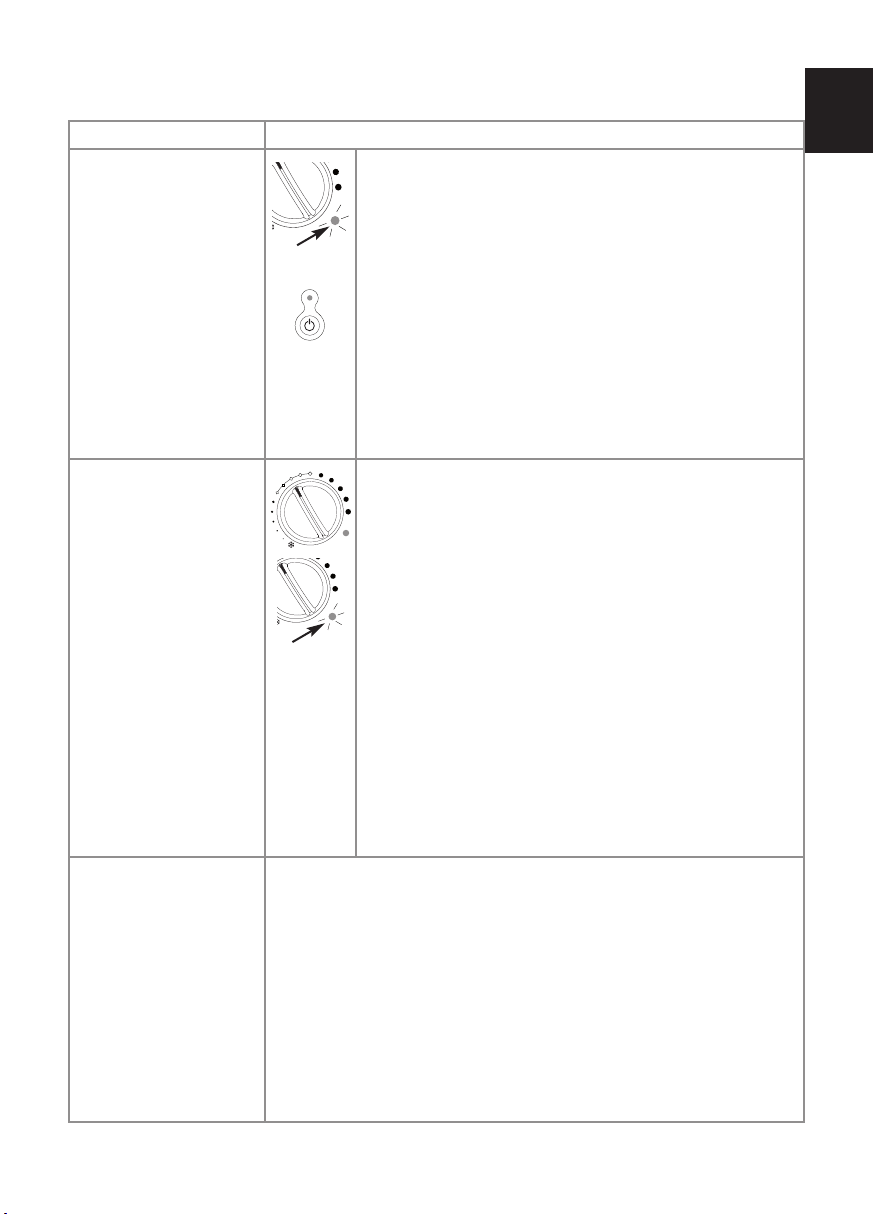
CE QUE VOUS
VOULEZ FAIRE
CE QUE VOUS DEVEZ FAIRE POUR L’OBTENIR
Assurez-vous que votre radiateur sècheserviettes est allumé.S’il ne l’est pas, enfoncez l’interrupteur B.
D tout en appuyant deux fois de suite sur l’interrupteur
CE QUI VA
SE PASSER
Le voyant de l’interrupteur B est
allumé.
Activer
le mode
24h auto
Changer
l’heure de
mise en
marche du
m od e 24 h
auto
Désactiver
le mode
24h auto
Interrompre le cycle
de marche
forcée avant
la findes 2h
Maintenir l’appui sur le bouton D tout en
appuyant 2 fois de suite sur l’interrupteur
B (arrêt et remise en marche du radiateur
sèche-serviettes).
Désactivez le mode 24h auto
et à la nouvelle heure choisie, réactivez-le.
Maintenir l’appui sur le bouton D tout en
appuyant 2 fois de suite sur l’interrupteur
B (arrêt et remise en marche du radiateur
sèche-serviettes).
Faites un appui long (5 secondes minimum)
sur le bouton D.
8
Le voyant de chauffe
clignote 5 fois rapidement.
Le voyant de chauffe
clignote 3 fois lentement.
Le voyant de chauffe
clignote 5 fois rapidement.
Le voyant de chauffe
clignote 3 fois lentement.
Le voyant de chauffe
clignote 2 fois rapidement. Le mode 24h
auto resteraactif pour
le lendemain.
Page 10
Conseils
BUTEE GAUCHE
BUTEE DROITE
LIMITE INFÉRIEURE
DE LA PLAGE
BUTEE GAUCHE
BUTEE DROITE
LIMITE SUPÉRIEURE
DE LA PLAGE
BUTEE GAUCHE
BUTEE DROITE
1/ Conseils d’utilisation
- Il est inutile de mettre le radiateur sèche-serviettes au maximum, la température de la salle de bains
ne montera pas plus vite.
- Pour un chauffage optimal, les serviettes doivent être disposées sur les tubes chauffants et les peignoirs
sur les patères fournies.
F
CE QUE VOUS
VOULEZ FAIRE
M’absenter
pendant une
durée comprise entre 2
et 24 heures
(baisser le réglage de la
température).
Partir plus de
24 heures
Verrouiller
les réglages du
radiateur
sècheserviettes
CE QUE VOUS DEVEZ FAIRE CE QUI VA SE PASSER
Je tourne la molette de température A sur les repères
Je tourne la molette de température A sur .
Je désactive le mode 24h aut o
( voir page 8 )
Je mets la molette de température
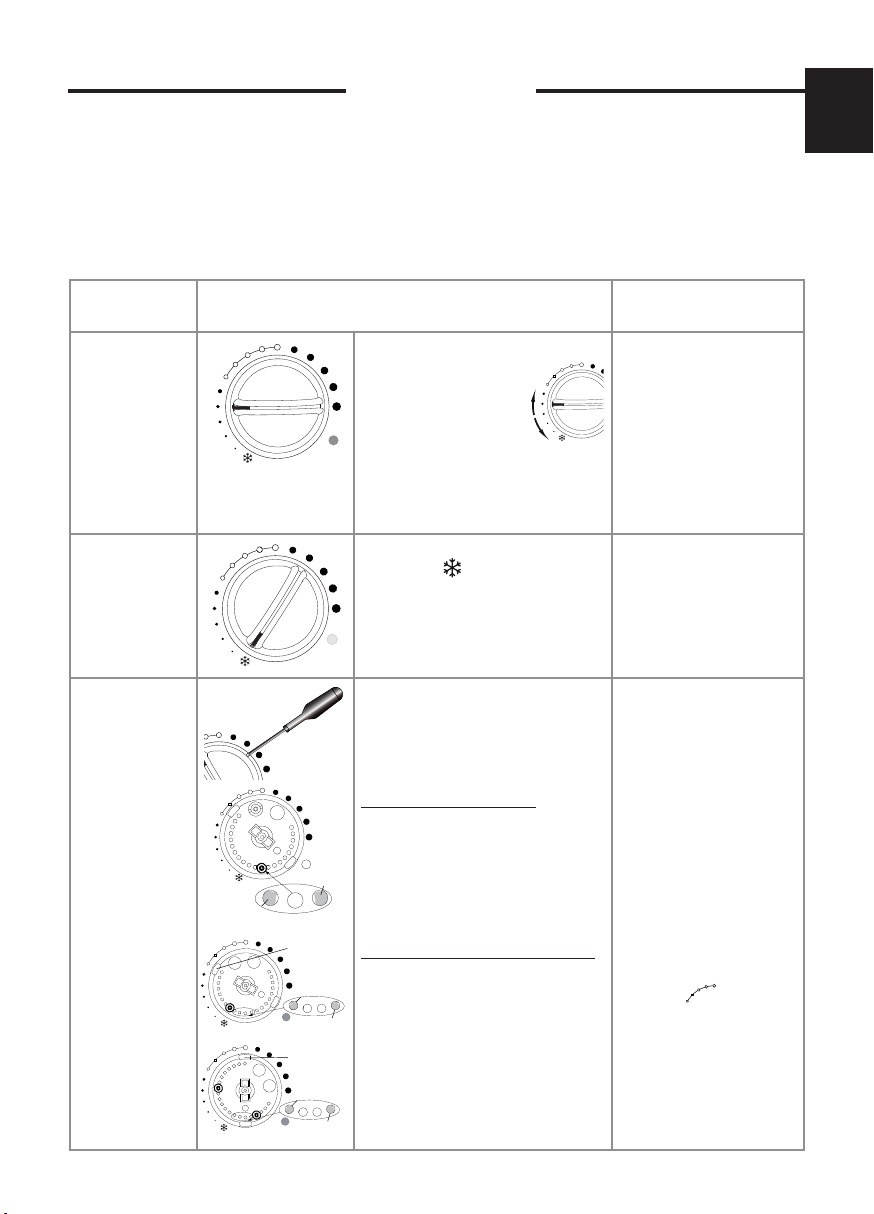
A sur la position souhaitée.
Je dégage à l’aide d’un tournevis
plat de petite taille le bouchon de
la molette.
Pour bloquer la molette
:
Je détache un pion de son support
à l’aide d’un outil coupant.
Je le positionne dans l’alignement
comme indiqué sur le schéma cicontre, entre les deux butées.
La température sera
abaissée. Si elle ne l’est
pas suffisamment, ajustez
la molette en vous aidant
des crans (un cran à la
fois).
Mon radiateur sècheserviettes maintiendra
une température d’environ 7°C correspondant
à une température Hors
Gel.
La position de la molette
est bloquée.
Pour limiter la plage d’utilisation
Je détache les deux pions.
Je positionne le premier pion
comme sur le schéma ci-contre.
Je tourne la molette et positionne
le deuxième pion comme sur le
schéma ci-contre.
Je remets le bouchon de la molette.
9
:
L’utilisation de la molette est limitée à la zone
Confort .
Si vous souhaitez choisir
une autre plage d’utilisation, positionnez vos
pions différemment.
Page 11
2/Mise en garde
- Les enfants ne doivent pas escalader le radiateur sèche-serviettes.
- Veillez à ce que les enfants ne s'appuient pas sur le radiateur sèche-serviettes et ne jouent pas à
proximité quand il fonctionne, la surface de celui-ci risquant dans certaines circonstances de causer
des brûlures sur la peau, notamment du fait que leurs réflexes ne sont pas encore acquis ou sont plus
lents que ceux d’un adulte. En cas de risque, prévoyez l'installation d'une grille de protection devant
le radiateur sèche-serviettes.
- Ce radiateur sèche-serviettes n’est pas prévu pour être utilisé par des personnes (y compris les en-
fants) dont les capacités physiques, sensorielles ou mentales sont réduites, ou des personnes dénuées d’expérience ou de connaissance, sauf si elles ont pu bénéficier, par l’intermédiaire d’une
personne responsable de leur sécurité, d’une surveillance ou d’instructions préalables concernant
l’utilisation du radiateur sèche-serviettes.
- Pour éviter tout danger pour les très jeunes enfants, il est recommandé d’installer cet appareil de
façon telle que le barreau chauffant le plus bas soit au moins 600 mm au-dessus du sol.
- Pour des raisons de sécurité, il est formellement interdit de re-remplir les appareils. En cas de besoin, contactez le service après-vente du fabricant ou un professionnel qualifié.
- Toutes interventions sur les parties électriques doivent être effectuées par un professionnel qualifié.
- Veillez à ne pas introduire d’objets ou de papier dans le radiateur sèche-serviettes.
- A la première mise en chauffe, une légère odeur peut apparaître correspondant à l’évacuation
des éventuelles traces liées à la fabrication du radiateur sèche-serviettes.
- Le boîtier peut être chaud, même à l’arrêt du chauffage du radiateur sèche-serviettes.
3/Entretien
Pour conserver les performances du radiateur sèche-serviettes, il est nécessaire, environ deux fois
par an, d’effectuer son dépoussiérage (avec un chiffon doux ou la brosse d’un aspirateur). Eteignez préa-
lablement votre chauffage en appuyant sur l’interrupteur B et laissez-le refroidir.
Ne jamais utiliser de produits abrasifs et de solvants.
Nota : Eteindre le radiateur sèche-serviettes lorsque le mode 24h auto est activé décale la répétition journalière d’une durée équivalente à l’arrêt.
Pour les modèles ventilo :
- Nettoyez avec un aspirateur les grilles d’entrée et de sortie d’air.
- Le ventilateur est équipé d’un filtre anti-poussière qui, lorsqu’il est saturé, peut provoquer son arrêt
(voyant rouge allumé sous le radiateur sèche-serviettes).
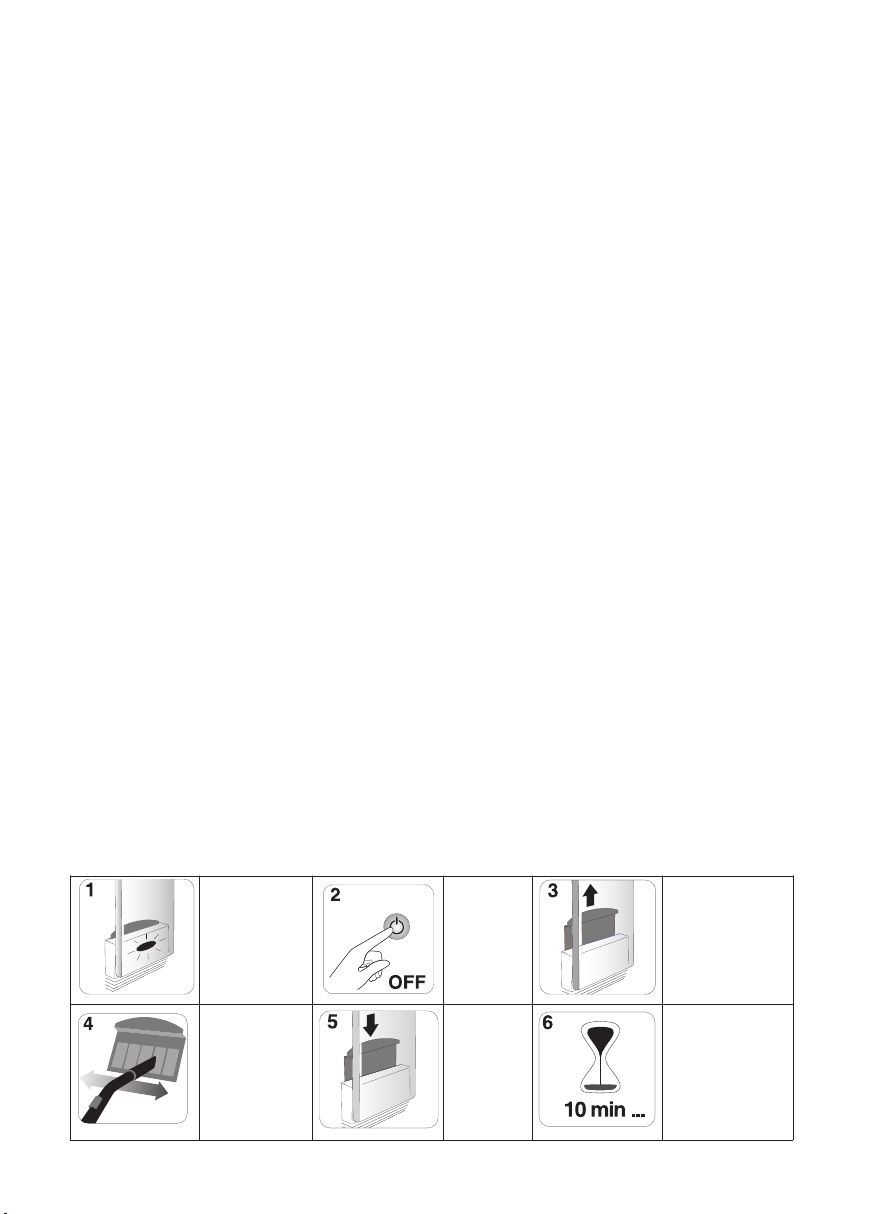
Pour une meilleure utilisation, nettoyez votre filtre régulièrement en suivant les instructions :
Voyant rouge Eteignez le
radiateur
sècheserviettes
Nettoyez le
filtre
Remettez
le filtre en
place
10
Tirez le
filtre situé à l’arrière du radiateur sècheserviettes
Attendez 10 minutes avant la
remise en
marche du radiateur sècheserviettes
Page 12
4/ En cas de problème
PROBLÈME RENCONTRÉ VÉRIFICATION À FAIRE
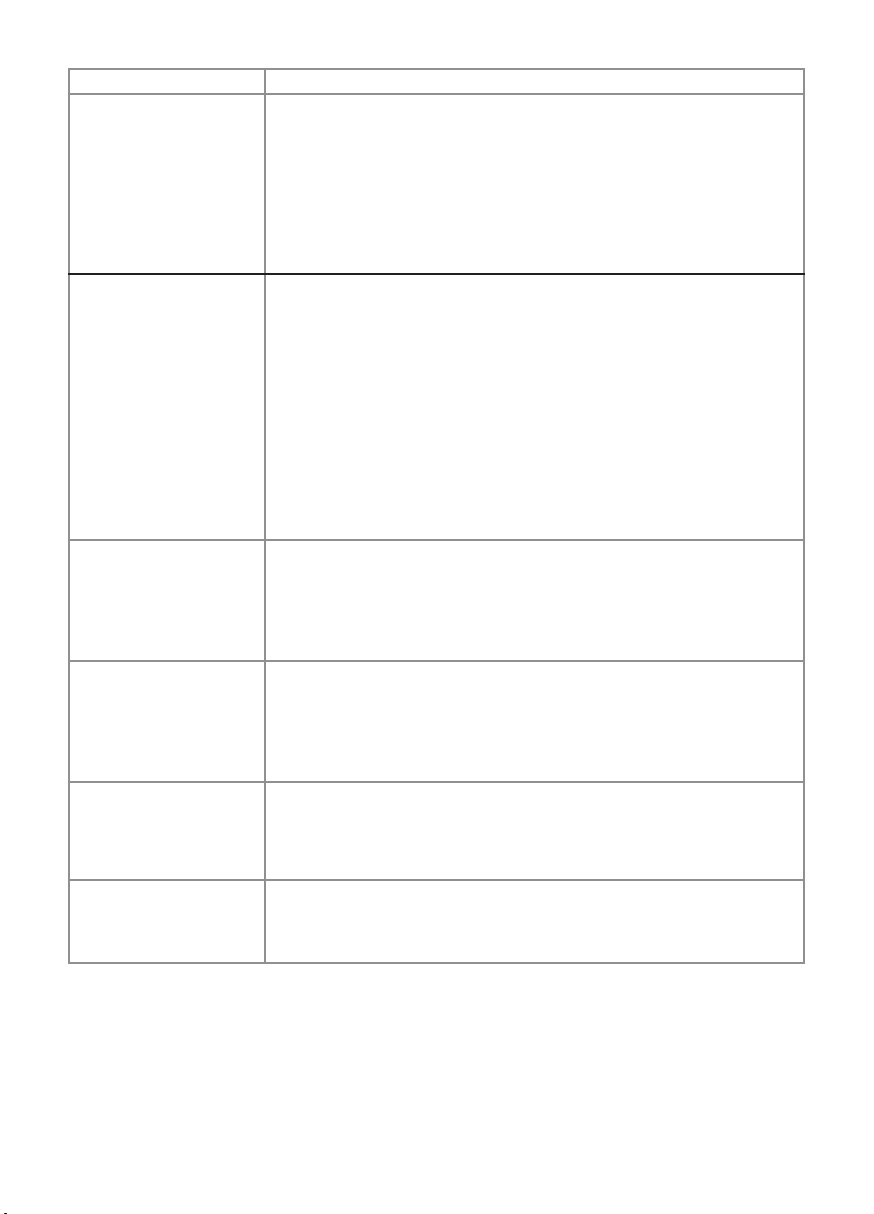
Le radiateur sèche-serviettes ne chauffe pas.
- Assurez-vous que les disjoncteurs de l’installation sont enclenchés, ou bien que le délesteur (si vous en avez un) n’a pas
coupé l’alimentation du radiateur sèche-serviettes.
- Vérifiez la température ambiante de la pièce : si elle est trop
élevée, le voyant de chauffe B ne s’allume pas: le radiateur
sèche-serviettes ne chauffe pas.
- Eteignez, puis rallumez votre chauffage à l’aide de l’interrupteur B :
• Si le voyant de chauffe B clignote en permanence (cligno-
tement lent toutes les secondes): la sonde de mesure est détériorée. Consultez le service après-vente du fabricant
pour procéder à son remplacement.
F
Le radiateur sèche-serviettes ne chauffe pas
assez la salle de bains.
Le radiateur sèche-serviettes chauffe tout le
temps.
- Augmentez la température en tournant la molette A.
- Si le voyant de chauffe B clignote en permanence (clignote-
ment lent toutes les secondes), la sonde de mesure est détériorée. Consultez le service après-vente du fabricant pour
procéder à son remplacement.
- Si la température est réglée au maximum (28°C), faîtes les
vérifications suivantes :
• Vérifiez si un autre mode de chauffage existe dans la
pièce.
• Assurez-vous que votre radiateur sèche-serviettes ne
chauffe que la pièce (porte fermée).
• Faites vérifier la tension d’alimentation du radiateur
sèche-serviettes.
• Vérifiez si la puissance de votre radiateur sèche-serviettes
est adaptée à la taille de votre pièce (nous vous préconisons
en moyenne 50W / m
- Vérifiez que le radiateur sèche-serviettes n’est pas situé dans un courant d’air (porte ouverte à proximité) ou que le réglage de température n’a
pas été modifié.
- Vérifiez que le mode 24h auto est activé. Faites un appui long (5 secondes minimum) sur le bouton D. Le voyant de chauffe clignote 2 fois
rapidement et la chauffe s’arrête si le voyant Turbo est éteint. S’il est allumé, coupez le mode Turbo par appui sur le bouton D.
- Il peut y avoir un aléa dans le réseau électrique. En cas de problème
(thermostat bloqué,...), coupez l’alimentation du radiateur sèche-serviettes
(fusible, disjoncteur) pendant environ 10 minutes, puis rallumez-le.
- Si le phénomène se reproduit fréquemment, faîtes contrôler l’alimentation par votre distributeur d’énergie.
3
).
11
Page 13
PROBLÈME RENCONTRÉ VÉRIFICATION À FAIRE
Le radiateur sèche-serviettes est très chaud en
surface
Le ventilateur s’arrête
prématurément
Des traces de
salissures apparaissent
sur le mur autour du
radiateur sècheserviettes
Les derniers éléments
hauts et bas sont plus
tièdes que le reste du radiateur sèche-serviettes
Il est normal que le radiateur sèche-serviettes soit chaud lorsqu'il fonctionne, la température maximale de surface étant limitée conformément à
la norme NF Electricité Performance. Si toutefois vous jugez que votre radiateur sèche-serviettes est toujours trop chaud, vérifiez que la puissance
est adaptée à la surface de votre pièce (nous vous préconisons
50W / m
3
) et que le radiateur sèche-serviettes n'est pas placé dans un cou-
rant d'air qui perturberait sa régulation
- Vérifiez que les grilles d’entrée et de sortie d’air ne sont pas obstruées.
Procédez à leur nettoyage si c’était le cas (reportez-vous au paragraphe En-
tretien).
- Vérifiez que la température de la pièce n’a pas atteint un niveau trop
élevé. Dans ce cas, l’arrêt du ventilateur est normal. Attendez simplement que la température ambiante diminue avant de réutiliser le mode
Turbo.
- Si votre habitation est située à plus de 1000 m d’altitude, l’air étant moins
dense, il peut provoquer une élévation plus rapide de la température de
la pièce. Ce problème risque donc de se reproduire (sans gravité sur la
durée de vie des composants de l’appareil).
Les salissures sont uniquement liées à la qualité de l’air ambiant (bougie,
fumée de cigarette, mauvaise ventilation, ...).
- Pour le haut, les éléments supérieurs ne sont pas complètement remplis
pour permettre la dilatation du fluide thermodynamique. Ils se réchauffent seulement par conduction.
- Pour le bas, les éléments inférieurs canalisent le retour du fluide qui a
transmis sa chaleur.
Le radiateur sèche-serviettes fait un bruit de vibration continu pendant
la chauffe.
La répétition journalière
du mode 24h auto ne
fonctionne pas.
Vérifiez qu’il est bien fixé sur son support.
Si le radiateur sèche-serviettes est fixé sur une cloison creuse, la vibration
est possible.
Vérifiez qu’il n’y a pas eu de coupure d’alimentation électrique.
Si besoin, se reporter à la page 8 “Changer l’heure de mise en marche du
mode 24h auto”.
12
Page 14

PROBLÈME RENCONTRÉ VÉRIFICATION À FAIRE
La répétition journalière
du mode 24 h auto ne démarre pas à l’heure souhaitée.
Pour les appareils en programmation :
Le radiateur sèche-serviettes ne suit pas les ordres de programmation.
Le voyant de chauffe s’allume lorsque le radiateur
sèche-serviettes est en
mode ECO.
Si vous n’avez pas réussi à résoudre votre problème, contactez le service après-vente du
fabricant, munissez-vous des références du radiateur sèche-serviettes : code commercial
et numéro de série (voir page 1).
Mesurez la température de la pièce et informez-vous du système de programmation éventuel.
- Vérifiez qu’il n’y a pas eu de changement d’heure Hiver / Eté.
- Si votre radiateur sèche-serviettes a été arrêté pendant un certain nombre d’heures, la répétition journalière du mode 24h auto sera décalée
d’autant. Dans ce cas, se reporter page 8 “Changer l’heure de mise en
marche du mode 24h auto”.
Ex :A 7h,s’enclenche la répétition journalière du mode 24h auto pour une durée
de 2h, soit jusqu’à 9h.
A 10h, vous arrêtez le chauffage de votre radiateur sèche-serviettes (appui sur
l’interrupteur B).
A 22h, vous le rallumez (appui de nouveau sur l’interrupteur B).
Votre radiateur sèche-serviettes a été mis en position “Arrêt du chauffage” pendant 12 h. La répétition journalière du mode 24h auto se déclenchera donc à
19h le lendemain (7h + 12h).
Assurez-vous de la bonne utilisation de la centrale de programmation
(voir la notice d’utilisation).
Ce fonctionnement est normal.
Le radiateur sèche-serviettes peut chauffer de manière à maintenir une
température de -3,5°C par rapport à la température CONFORT.
F
13
Page 15

Thank you for your choice and your trust in us.The heated towel rail that you have bought has been
rigorously checked and tested to ensure its quality and give you complete satisfaction.
Keep these instructions, even after
the heated towel rail has been installed.
Contents
Installation
1/ Preparing to install the heated towel rail . . . . . . . . . . . . . . . . . . . . . . . . . . . . . . . . . . . . . .15
2/ Connecting the heated towel rail . . . . . . . . . . . . . . . . . . . . . . . . . . . . . . . . . . . . . . . . . . . .16
3/ Fixing the heated towel rail . . . . . . . . . . . . . . . . . . . . . . . . . . . . . . . . . . . . . . . . . . . . . .17/18
4/ Attaching and removing the clothes hook . . . . . . . . . . . . . . . . . . . . . . . . . . . . . . . . . . . . .18
Operation . . . . . . . . . . . . . . . . . . . . . . . . . . . . . . . . . . . . . . . . . . . . . . . . . . . . . . . . . . . . . . . . .19
Use
1/ Heating your room: using the Comfort mode . . . . . . . . . . . . . . . . . . . . . . . . . . . . . . . . . .20
2/ Raising the temperature of your room: using the Boost mode . . . . . . . . . . . . . . . . . . . . .20
3/ Raising the temperature of your room every day at the same time: how to use 24h Auto
mode . . . . . . . . . . . . . . . . . . . . . . . . . . . . . . . . . . . . . . . . . . . . . . . . . . . . . . . . . . . . . . . . . . .21
Advice
1/ Advice for use . . . . . . . . . . . . . . . . . . . . . . . . . . . . . . . . . . . . . . . . . . . . . . . . . . . . . . . . . . .22
2/ Advice . . . . . . . . . . . . . . . . . . . . . . . . . . . . . . . . . . . . . . . . . . . . . . . . . . . . . . . . . . . . . . . . .23
3/ Maintenance . . . . . . . . . . . . . . . . . . . . . . . . . . . . . . . . . . . . . . . . . . . . . . . . . . . . . . . . . . . . .23
4/ If there are problems . . . . . . . . . . . . . . . . . . . . . . . . . . . . . . . . . . . . . . . . . . . . . . . . . . .24/25
The references of the heated towel rail
These are located on the right-hand side of the heated towel rail.
The sales reference and the serial number enable the manufacturer to identify the heated towel rail
that you have just bought.
A Standards, quality labels
B Retail name
C Sales reference
D Manufacturer’s reference
E Serial number
F Number of manufacturer
Appliances bearing this symbol must not be disposed of along with the domestic rubbish;
they must be collected separately and recycled.
Products that have reached the end of their useful life should be collected and recycled as
instructed under local by-laws.
14
Page 16

Installation
150 mm mini
200 mm mini
150 mm mini
1/ Preparing to install the heated towel rail
Location of the device
- This device was designed to be installed in residential premises. In any other case, please
call your distributor.
- Installation must comply with the standards
currently enforced in the country of use.
- Locate the heater within minimum distances
from obstacles.
Do not install the device :
• In a draft likely to affect its control
(under centralised mechanical ventilation,
etc…).
• Under a fixed mains outlet.
• Inside zones 0 and 1 in bathrooms.
The device has to be installed so that switches and other
controls cannot be touched by a person in the bath or
shower, except in the UK where IEE Regulations 701.512.2
and 701.512.3 apply. These allow the use of IP24 rated
products and their integral controls in Zone 2 and ouside
zones.
GB
15
Page 17

2/ Connecting the device
Panel heater cable
Live=brown
Neutral=blue
LIVE
NEUTRAL
Electricity
grid
Two possible cases
Pilot wire=Black
1st case: only one heater
2nd case: multiple heaters
The pilot wire end is insulated
and not further connected
The pilot wire of all heaters in a
control group, up to a maximum
of 20 units with any one them used
as the Master, are connected
by a 1.0mm
2
220-240V insulated cable
5'
3''
5'
7''
- The device must be supplied with 230V, 50Hz.
- Mains connection must be ensured using the 3-wire cable factory fitte to the heater , through a
connecting box. In damp premises, such as bathrooms and kitchens, install the connecting box at least
25cm from the ground..
- The installation must comply with local national regulation. If in doubt, ask the national Atlantic distributor.
- Ground connection is forbidden.
Do not connect the pilot wire (black) to ground.
- If power cable is damaged or too short, to avoid any danger it must be replaced by a qualified electrician using special tools.
- If a heater pilots or is piloted by a 30mA differential (e.g.bathroom), the pilot wire supply must be protected on this differential.
3) Programming
The device can be controlled remotely if its pilot wire is connected to a device fitted with a programmer, a programming unit or an energy management unit.
Chart indicating the orders the device can receive over
its pilot wire
(to be measured between the pilot wire and the neutral).
STOP HEA-
Mode
achieved
Ref/neutral
oscilloscope
Measurement
between the
control cable
and neutral
COMFORT ECO STANDBY
0 Volt 230 Volts
-115 Volts
negative
16
TING
LOAD SHED-
DING
+115 Volts
positive
COMFORT
-1°C
230 Volts
for 3 sec
COMFORT
-2°C
230 volts
for 7 sec
Page 18

3/ Fixing the heated towel rail to the wall
A version classique
klassieke versie
B version ventilo
Ventilo versie
400 mm
556 mm
version ventilo
Ventilo versie
322 mm
version classique
klassieke versie
SOL
Unfasten the carton’s
1
flaps and place it
against the wall with
the lower flap folded
back andresting flat on
the floor. Prick out the
four drill holes though
the packaging (without
drilling) and then remove the packaging.
Carefully mark the
2
drilling points with a
pencil (draw a cross,
4cm wide).
GB
Cote A
Puissance
version
(
classique
)
500 W 819 mm 585 mm
750 W 1209 mm 975 mm
1000 W 1599 mm 1365 mm
Drill the four holes
3
Cote B
version
(
)
ventilo
Position the
4
four hooks
and screw
them tight.
17
Page 19

3/ Fastening and locking the towel-drying radiator to the wall
••
Screw the supports
5
onto the tubes without blocking them.
Check their position
by putting them with
the towel-drying radiator into the
sheaths.
Once you found the
right position, lock
the screws for each
contact.
4/ Fitting and removing the hanger
Fit the base with the screw be-
1
hind the towel-drying radiator
in the wanted position.
Fit the towel-
6
drying radiator
on the wall in
the sheaths.
Screw down
each of the
locking blocks.
Put the caps
on the end of
the supports.
Screw the hanger onto the
2
frame and tighten gently.
18
Page 20

Using the device
A
B
C
D
You can operate your heated towel rail in several modes, whatever the type of controls you have chosen (manual or programmed) :
• Comfort mode allows you to maintain the correct ambient temperature.
• Turbo mode enables you to rapidly increase your bathroom’s temperature (forced air or forced air
+ fan, depending on your model).
• 24hAuto mode enables you to have optimum comfort at the same time every day provided by your
towel-drying radiator. This mode activates forced air operation by the appliance for 2 hours but does
not activate the ventilation fan for models equipped with this facility.
Manual control
Knob to adjust the comfort tempera-
A
ture of the bathroom
Heating On/Off Switch and indicator
B
Knob to adjust the length of the Boost
C
mode
Button to start the Boost mode /
D
Mode 24h auto.
Control from a centralised programmer
GB
Centralised programming means you can make savings by programming lower temperatures when you
want them, when you know the bathroom will not be in use.
Your heated towel rail can be programmed centrally by means of the control cable. Prepare your programming with the instructions provided.
19
Page 21

Use
1/ Heating your room: using the Comfort mode
This mode enables you to adjust the right ambient temperature in the room.
WHAT YOU
WANT TO
ACHIEVE
Start the
heating.
WHAT YOU HAVE TO DO WHAT WILL HAPPEN
Press B. The indicator on
switch B will light
up.
Set
the right
temperature
Turn temperature knob A to
The heating indicator will come on if the
ambient temperature is cooler than desired.
Wait for a few hours for the temperature
to stabilise.
If the temperature in the room is comfortable, the adjustment is complete.
If you are not happy with the temperature,
adjust the knob one click at a time.
The heating
indicator will
come on.
Eventually you
should feel comfortable with the temperature
2/ Raising the temperature of your room: using the Boost mode
WHAT YOU
WANT TO
ACHIEVE
Raise the
temperature
of the bathroom
WHAT YOU HAVE TO DO
Adjust the duration of the Boost mode by
turning knob C to the chosen time.
- On the standard model, the settings recommended for optimal comfort are
between 60 and 120 minutes.
- On the fan-powered model, we recommend a period of between 15 and 30 minutes.
Press the Boost button D to start the
Boost.
At the end of the chosen time, the Boost will
switch off and the heated towel rail will continue
heating in Comfort mode.
WHAT WILL HAP-
Boost indicator D
will light up.
Your heated towel
rail will run at
maximum power
for the period
chosen.
If you have a fan
model, the fan will
operate.
PEN
NB: if you switch off your appliance during the
Turbo cycle (by pressing switch B), the cycle will
continue when you switch on the appliance
again.
20
Page 22

Use
3/ Raise the temperature of your room every day at the same time: how
to use 24h Auto mode.
his mode enables you to programme daily repetition of 2 hours of forced air operation (without the
fan) so you can have optimum comfort at the same time every day provided by your towel-drying
radiator.
The length of this mode cannot be altered using knob C; it is automatically 2 hours. Do not switch
off your appliance, otherwise the set 24h daily repetition will no longer continue to function (indica-
tor light B must remain light up).
An example of use:
On the first day, at 7:00 AM, keep pressure on button D and simultaneously press B two times (stopping and
restarting the towel-drying radiator).The towel-drying radiator immediately switches to forced air operation for
2 hours (the fan is not activated) and stops automatically at the end of the 2-hour period.The following day and
all subsequent days,your towel-drying radiator will switch to forced air operation automatically at 6:15 AM (the
fan is not activated) to achieve your comfort temperature for 7:00 AM.
GB
WHAT YOU
WANTTO
ACHIEVE
Activate
24h Auto
mode
Change the
starting
time for 24h
Auto mode
Deactivate
24h Auto
mode.
The heatinglight
flashes 3 times
in slowly succession.
WHAT YOU HAVE TO DO
EEnnssuurree tthhaatt yyoouurr ttoowweell--ddrryyiinngg rraaddiiaattoorr iiss
sswwiittcchheedd oonn.. IIff iitt iiss nnoott,, pprreessss BB..
Keep pressure on D and simultaneously
press switch B two times (stopping and re-
starting the towel-drying radiator).
Deactivate 24h Auto mode, choose the
new time desired and reactivate the mode.
Keep pressure on D and simultaneously
press switch B twice in succession B (stop-
ping and restarting the towel-drying radiator).
Keep pressure on D (for 5 seconds mini-
mum).
WHAT WILL HAP-
PEN
The indicator light
for switch B is on.
The heating light
flashes 5 times in rapid
succession.
The heating light blink
slowly 3 times.
The heating light blink
rapidly 5 times.
The heating light blink
slowly 3 times.
The heating light blink
rapidly 2 times.
24h Auto mode will
remain active for the
following day.
21
Page 23

Advice
P
L
1/ Advice for use
- There is no point in setting the heated towel rail to maximum, the bathroom will not heat up any quicker.
- For optimum heating, towels should be hung over the warm rails and dressing-gowns on the clothes
hooks supplied.
WHAT YOU
WANT TO
ACHIEVE
To go away
for between 2
and 24 hours
(lower the temperature setting).
WHAT YOU HAVE TO DO WHAT WILL HAPPEN
Turn temperature knob A to the
marks
The temperature will fall.
If it’s still not low enough, adjust the knob
one notch at a time.
To go away
for more than
24 hours
To lock the
temperature
level of the
towel rail
Turn temperature knob A to
Deactivate 24h Auto mode (see
Page 21)
Turn temperature knob A to the
position you want.
Using a small flat screwdriver,
lever off the cap from the knob.
To lock the knob:
Cut a plastic peg from its support.
Position it in the row as shown in
the diagram opposite, between
the two stops.
To restrict the temperature range:
Cut off two pegs.
Position the first peg as shown in
the diagram opposite.
Turn the knob and position the second peg as shown in the diagram
opposite.
Replace the cap on the knob.
Your towel rail will
maintain a temperature
of about 7°C which is
adequate to prevent
freezing.
The position of the knob
Is locked.
The use of the knob is
restricted to the Comfort zone
If you want to choose a
different temperature
range, position your
pegs differently.
22
Page 24

2/Advice
- Children must not climb on the towel rail.
- Do not let children lean against the towel rail or play nearby when it is on. In some circumstances
its surface can get hot enough to burn, especially since their reflexes are still undeveloped or are slower than an adult’s. If there is a risk, consider installing a protective grille in front of the heated towel
rail.
- rille in front of the heated towel rail.
- This heated towel rail is not untended for use by people (including children) whose physical, sensorial
or mental capacities are reduced, by people who are inexperienced or unaware, unless the person
responsible for their safety is supervising them, or has given them instructions in advance on how to
use the heated towel rail.
- For avoid any danger for very young children, you are advised to install this appliance so that the lowest heating bar is at least 600 mm from the floor.
- For safety reasons, it is strictly forbidden to re-fill the appliance. If this is needed, contact the manufacturer’s after-sales department or a qualified professional.
- Any repairs to the electrical parts must be done by a qualified professional.
- Do not insert objects or paper in the heated towel rail.
- The first time the towel rail heats up a slight smell may appear, from the release of the last
traces of material used in its manufacture.
- The box may be warm, even when the towel rail has stopped heating.
3/Maintenance
To maintain the performance of the heated towel rail, it needs dusting about twice a year with a soft
cloth or a vacuum cleaner with brush attachment. Turn the heating off first by pressing switch B and
let it cool down.
Do not use abrasives or solvents.
GB
NB: Switching off the towel-drying radiator when 24h Auto mode is active postpones the daily repetition for an
equivalent time period to the stoppage time.
For fan models:
- Clean the air inlet and outlet grilles with a vacuum cleaner.
- The fan is fitted with a dust filter. If this gets clogged the fan may stop, and the red indicator underneath the heated towel rail will come on.
For best performance, clean your filter regularly as follows:
Red indicator
light comes
on
Clean the filter
Turn off
the radiators
Replace
the filter
23
Extract the filter
which is at the
back of the radiator
Wait 10 minutes
before restarting
the radiator
Page 25

4/ If there are problems
PROBLEM
ENCOUNTERED
The radiator does not
heat up.
The radiator does not
warm the bathroom
enough.
WHAT TO DO
- Ensure that the mains switches are turned on, and that the
load-shedding device (if you have one) has not cut off the
power supply to the heated towel rail.
- Check the ambient temperature of the room: if it is too high,
the heating indicator B will not come on and the heated
towel rail will not heat up.
- Switch the heating off, then switch it on again using switch B:
• If the heating indicator B flashes continually (slow flashing
once a second): the sensor is faulty. Consult the manufacturer’s after-sales department for a replacement.
- Increase the temperature by turning knob A.
- If the heating indicator B flashes continually (slow flashing once
a second), the sensor is faulty. Consult the manufacturer’s
after-sales department for a replacement.
- If the temperature is turned up to the maximum (28°C),
check the following points:
• Check that there is no other heater in the room.
• Ensure that your heated towel rail is only warming the one
room (i.e. the door is closed).
• Have someone check the supply voltage of the radiator.
• Check that the power of your heated towel rail is suitable
for the size of your room (on average we recommend 50W
per cubic metre).
The radiator heats all
the time.
- Check that the heated towel is not in a draught (near an open door for exam-
ple) and that the temperature has not been re-adjusted.
-Check that 24h Auto mode is activated. Keep pressure on D (for 5 seconds
minimum). The heating light blink rapidly 2 times and heating stops if the
Turbo light is off. If it is on, switch off Turbo mode by pressing button D.
- There may be a hitch in the electrical supply. If this is the problem (a
blocked thermostat for instance), switch off the supply to the heated towel
rail by removing the fuse or switching off the trip-switch for about 10 minutes, then switch it back on again.
- If this happens frequently, hove your power company check the supply.
24
Page 26

PROBLEM
ENCOUNTERED
The surface of the radiator is very hot
The fan switches off
prematurely
WHAT TO DO
It is normal that the heated towel rail will get hot when it is running, but the
maximum surface temperature is limited by the French Electricity Performance standard. However, if you judge that your radiator is still too hot,
check that the power is suitable for the size of your room (we recommend
50W per cubic metre) and that the heated towel rail is not in a draught which
will disturb its setting.
- Check that the air inlet and outlet grilles are not obstructed. If they are,
clean them (refer to the paragraph on Maintenance).
- Check that the temperature of the room has not reached too high a level.
If it is, it is normal that the fan should stop. Simply wait till the ambient temperature goes down before you re-use the Boost mode.
- If your home is more than 1000 m (3,300 feet) above sea level, the air is less
dense which may lead to the room heating up more quickly. So this problem may recur, but it will not adversely affect the life expectancy of the
components in the appliance.
GB
Dirty marks appear on
the wall around the
radiator
The top and bottom
rails are cooler than
the rest of the heated
towel rail
The heated towel rail
makes a continuous
noise of vibration while
it warms up
Daily repetition in 24h
Auto mode is not working.
These marks depend entirely on the quality of the air (candle smoke, cigarette
smoke, poor ventilation, etc).
- The top rails are not completely filled, to allow for expansion of the thermodynamic fluid. They only heat by conduction.
- The lower rails channel the return of the fluid as it cools down.
Check that it is solidly fixed to its support.
If the heated towel rail is fastened to a hollow wall, this may cause vibration.
Check that the electrical power supply is not cut off.
If necessary, please refer to Page 21 “Changing the starting time for 24h Auto
mode”.
25
Page 27

PROBLEM
ENCOUNTERED
Daily repetition in 24h
Auto mode does not
start at the wanted time.
For program-controlled appliances:
The heated towel rail does
not follow the orders from
the program.
The heating indicator
comes on when the radiator is in ECO mode.
- Check that the time has not changed from Summer to Winter time or vice
versa.
- If your towel-drying radiator has been off for a certain number of hours,
daily repetition in 24h Auto mode is postponed by the same number of
hours. In this case, please refer to Page 21 “Changing the starting time for 24h
Auto mode”.
E.g.: At 7:00 AM, 24h Auto mode’s daily repetition cycle starts for a period of 2 hours,
i.e. until 9:00 AM.
At 10:00 AM, you switch off the heating from your towel-drying radiator (by pressing
switch B).
At 10:00 PM, you switch it back on again (by pressing switch B again).
Your towel-drying radiator was in “Heating OFF” status for 12 hours. 24h Auto mode’s
daily repetition will therefore start at 7:00 PM the following day (7:00 AM + 12
hours).demain (7h + 12h).
WHAT TO DO
Make sure that the programmer is properly set according to the instruction book.
This is normal.
The heated towel rail may heat up to maintain a temperature of 3.5°C
below the COMFORT temperature.
If you do not manage to solve your problem, contact the manufacturer’s after-sales department. Have the references of the heated towel rail handy: the sales reference and serial number (see page 14).
Measure the temperature of the room and have information available on the system of
programming if there is one.
26
Page 28

WARRANTY CONDITIONS
KEEP THIS DOCUMENT IN A SAFE PLACE
(To be presented by the user only in the event of a claim)
- The guarantee period is two years from the date of installation or purchase and may not exceed 30
months from the date of manufacture in the absence of a receipt.
- The guarantee covers the replacement and supply of components recognised as being defective, excluding any damages or interest.
- The user is responsible for any labour or transport costs.
- The guarantee does not cover any damage arising from improper installation, abnormal use or nonobservance of the requirements of the said instructions for installation and use .
- The stipulations of the present guarantee conditions do not exclude any of the purchaser’s legal
rights of guarantee against faults or hidden defects, which are applicable in all cases under the stipulations of Articles 1641 of the Civil Code.
- Present this certificate to your distributor or installer only in the event of a claim, together with
your purchase invoice.
TYPE OF DEVICE*: . . . . . . . . . . . . . . . . . . . . . . . . . . . . . . . . . . . . . . . . . . . . . . . . . . . .
SERIAL NUMBER*: . . . . . . . . . . . . . . . . . . . . . . . . . . . . . . . . . . . . . . . . . . . . . . . . . . . .
CUSTOMER’S NAME AND ADDRESS: . . . . . . . . . . . . . . . . . . . . . . . . . . . . . . . . . . . . . . . . . . . . . . . . . .
. . . . . . . . . . . . . . . . . . . . . . . . . . . . . . . . . . . . . . . . . . . . . . . . . . . .
. . . . . . . . . . . . . . . . . . . . . . . . . . . . . . . . . . . . . . . . . . . . . . . . . . . .
* This information can be found on the information plate situated on the left-hand side of the device.
FOR SALES IN AUSTRALIA
ATLANTIC AUSTRALASIA PTY LTD Free Call: 1800 677 857
4/13-25 Church Street Phone: 03 9852 9599
Hawthom, Victoria 3122 Fax: 03 9852 9844
Australia Web: www.atlantics.com.au
GB
FOR SALES IN THE U.K
ATLANTIC UK Limited Phone: 01825 767474
The Old Mill Fax: 01825 767478
Mill Lane e-mail: sales@atlantic-uk.co.uk
Uckfield
East Sussex TN22 5AA
FOR SALES IN NEW ZEALAND
ATLANTIC AUSTRALASIA Phone: 0800 422 000
Website: www.atlantics.co.nz Fax: 0011 64 43 800 509
OTHER COUNTRIES
ATLANTIC INTERNATIONAL Phone: 00 33 146836000
27
Page 29

Wij danken u voor uw keuze en uw vertrouwen. De handdoekdroger die u zojuist hebt aangeschaft heeft
talrijke tests en controles ondergaan om u een optimale kwaliteit en volledige voldoening te bieden.
De handleiding van de handdoekendroger radiator bewaren
zelfs na hem geïnstalleerd te hebben.
Inhoud
Installatie
1/ De installatie van de handdoekdroger voorbereiden . . . . . . . . . . . . . . . . . . . . . . . . . . . .15
2/ Aansluiten van de handdoekdroger . . . . . . . . . . . . . . . . . . . . . . . . . . . . . . . . . . . . . . . . . . .16
3/ Bevestigen van de handdoekdroger . . . . . . . . . . . . . . . . . . . . . . . . . . . . . . . . . . . . . . .17/18
4/ Monteren en demonteren van de haken . . . . . . . . . . . . . . . . . . . . . . . . . . . . . . . . . . . . . .18
Werking . . . . . . . . . . . . . . . . . . . . . . . . . . . . . . . . . . . . . . . . . . . . . . . . . . . . . . . . . . . . . . . . . . .19
Gebruik
1/ Verwarmen van het vertrek : gebruik van de Comfort modus . . . . . . . . . . . . . . . . . . . . .20
2/ Opvoeren van de temperatuur in het vertrek : gebruik van de Turbo modus . . . . . . . . .20
3/ Dagelijks op hetzelfde tijdstip opvoeren van de temperatuur in het vertrek : gebruik van de
24 u auto modus . . . . . . . . . . . . . . . . . . . . . . . . . . . . . . . . . . . . . . . . . . . . . . . . . . . . . . . . .21
Tips
1/ Gebruikstips . . . . . . . . . . . . . . . . . . . . . . . . . . . . . . . . . . . . . . . . . . . . . . . . . . . . . . . . . . . . .22
2/ Waarschuwing . . . . . . . . . . . . . . . . . . . . . . . . . . . . . . . . . . . . . . . . . . . . . . . . . . . . . . . . . . .23
3/ Onderhoud . . . . . . . . . . . . . . . . . . . . . . . . . . . . . . . . . . . . . . . . . . . . . . . . . . . . . . . . . . . . . .23
4/ In geval van problemen . . . . . . . . . . . . . . . . . . . . . . . . . . . . . . . . . . . . . . . . . . . . . . . . . .24/25
De referenties van de handdoekdroger
Deze staan vermeld aan de rechter zijkant van de handdoekdroger.
De handelscode en het serienummer dienen ter identificatie van de handdoekdroger die u zojuist hebt
aangeschaft, bij de constructeur.
A Normen, kwaliteitlabels
B Handelsnaam
C Handelscode
D Referentie fabricatie
E Serienummer
F Constructeur nummer
Apparaten voorzien van dit symbool mogen niet afgevoerd worden met het huisvuil maar
moeten apart afgevoerd en gerecycleerd worden.
Versleten producten moeten worden opgehaald en gerecycleerd in overeenstemming met
de plaatselijk vigerende bepalingen en verordeningen.
28
Page 30

Installatie
150 mm mini
200 mm mini
150 mm mini
1/ Voorbereiden van de installatie van de handdoekdroger
Installatie regels
- Deze handdoekdroger is ontworpen voor een installatie in een woonruimte. Voor alle andere gevallen, moet u uw distributeur eerst raadplegen.
- De i nstal latie moe t tot stand gebracht worden volgens de regels der kun st e n in ove reenstemmi ng met de vigeren de normen in het land va n installa ti e (NFC 15100 voor Fran-
krijk).
- De handdoekdroger moet gevoed worden met 230 V enkelfase 50Hz.
In vochtige ruimtes zoals een badkamer en een keuken, moet de aansluitkast op zijn minst op 25 cm
boven de vloer geïnstalleerd worden.
De handdoekdroger uit de buurt van tocht houden, deze zou zijn werking kunnen verstoren (voorbeeld :onder een Centrale Mechanische Ventilatie enzovoor t...).
Niet installeren onder een vaste contactdoos.
Volume 1 Geen elektrisch apparaat
Volume 2
Volume 3
Elektrisch apparaat IPX4
(Norm EN 60335-2-43 :
2003/A2 : 2008)
NL
De minimale afstand ten opzichte van de
meubels in acht nemen bij het plaatsen
van het apparaat.
29
Page 31

2/ Aansluiten van de handdoekdroger
Kabel van het apparaat
Fase=Bruin
Nulleider=Blauw
FASE
NULLEIDER
Elektriciteitsnet
1e geval : apparaat alleen
Stuurstroomdraad=Zwart
Drie mogelijke gevallen
Apparaat niet bestuurd
De stuurstroomdraad is
nergens op aangesloten
2e geval: slavenapparaat
Naar apparaat met cassette of de
programmeringscentrale
5'
3''
5'
7''
Regels met betrekking tot de aansluiting
- De handdoekdroger moet gevoed worden met 230 V enkelfase 50Hz.
- De voeding van de handdoekdroger moet direct op het stroomnet aangesloten worden, achter de
lastschakelaar en zonder tussenschakelaar.
- De aansluiting op het stroomnet moet tot stand gebracht worden met de kabel van de radiator, via
een aansluitkast. In vochtige ruimtes, zoals een badkamer en een keuken, moet de aansluitkast tenminste 25 cm boven de vloer geïnstalleerd worden.
- Aansluiting op de aarde verboden. De piloot draad (zwarte draad) mag niet op de aarde
aangesloten worden.
- De installatie moet voorzien worden van een meerpolen uitschakel inrichting met een contact openingsafstand van tenminste 3 mm.
- Als de voedingskabel is beschadigd, moet hij door de fabrikant, zijn servicedienst of een andere vakman vervangen worden om ieder gevaar te voorkomen.
- Indien u de piloot draad gebruikt en als deze beschermd wordt door een differentieel van 30 mA (bij-
voorbeeld badkamer), dan moet de voeding van deze piloot draad op de betreffende differentieel beschermd worden.
Aansluitschema van de handdoekdroger
De stroom uitschakelen en de draden aansluiten zoals aangegeven in het hieronder staande schema:
U kunt de piloot draad aansluiten indien uw huis voorzien is van een programmeer centrale, een programmaregelaar of een beheerprogramma.
In dit geval moet u, om de juiste overbrenging van de programmeeropdrachten te verifiëren, overgaan tot de volgende controles naar gelang de gekozen modus (Comfort, Eco, ...) :
COMFORT
-1°C
230 Volts
3 s lang
Modus COMFORT ECO VORSTVRIJ
Over te bren-
gen signaal
Meting tussen
de piloot
draad en de
neutrale draad
0 Volt 230 Volt
-115 Volts
negatief
STOPPEN
VAN DE UIT-
VAL VER-
WARMING
+115 Volts
positief
30
COMFORT
-2°C
230 volts
7 s lang
Page 32

3/ Bevestigen van de handdoekdroger aan de muur
A version classique
klassieke versie
B version ventilo
Ventilo versie
400 mm
556 mm
version ventilo
Ventilo versie
322 mm
version classique
klassieke versie
SOL
Neem het deksel
1
van de verpakking en
vouw de omslag
terug zodat het geheel mooi op de
grond blijft liggen.
Lokaliseer en mar-
2
keer de 4 punten
van de boormal afgetekend op de gemerkte zijde van het
deksel.
NL
MaatcijVermogen
fer A
klassieke
(
versie
)
500 W 819 mm 585 mm
750 W 1209 mm 975 mm
1000 W 1599 mm 1365 mm
Verwijder het deksel
3
en teken met een
potlood een kruis
van 2 cm breed dat
zichtbaar is en blijft
als u de kokers in
etappe 4 geïnstalleerd hebt.
Boor de 4 gaten en
zet er pluggen in.
Bij een speciale onderlaag, hiervoor geschikte pluggen
gebruiken (bijvoor-
beeld gipsplaten).
Maatcij-
fer B
versie
(
)
ventilator
Draai de
4
schroef en
kekers vast
ze in de juiste
richting (ge-
bruik onderleg
ringetjes onder
i e d e r e
schroef).
Zorg ervoor
dat de bovenzijde van
de borgs c hr o e v en
toegankelijk
blÿven.
31
Page 33

3/ Bevestigen en vergrendelen van de handdoekdroger aan de muur.
••
De contactblokjes op
5
de tubes schroeven
zonder ze te blokkeren.
Hun juiste stand verifiëren door ze, met
de radiator zelf, even
te plaatsen in de kokers.
Als u de juiste stand
gevonden heeft, kunt
u de schroeven van
ieder contactblokje
blokkeren.
6
4/ Monteren en demonteren van de haak
Plaats de basis met de schroef
1
achter de handdoekdroger in
de gewenste richting.
Nu de radiator
tegen de muur
in de kokers
laten zakken.
De blokkeerschroeven om
de beurt aandraaien.
De dopjes op
het uiteinde
van de
contactblokjes
zetten.
Schroef de haak op het frame
2
en draai met een lichte druk.
32
Page 34

Werking
A
B
C
D
U kunt de handdoekdroger op verschillende manieren gebruiken en dit ongeacht de door u gekozen
bedieningsmodus (handmatig of via een programmaregelaar) :
• Modus Comfort : deze modus maakt het mogelijk de juiste omgevingstemperatuur te bereiken.
• Modus Turbo om snel de temperatuur in de badkamer op te voeren (geforceerde werking of ge-
forceerde werking + ventilator naar gelang het model).
• Modus 24u auto in deze modus zorgt de handdoekdroger ervoor dat u iedere dag op hetzelfde tijds-
tip kunt genieten van een optimaal comfort. Deze modus activeert de geforceerde werking van het
apparaat 2 uur lang maar niet de ventilator indien deze aanwezig is op het apparaat.
Handmatige bediening
Geribbelde knop voor het instellen van
A
het comforttemperatuur in de badkamer
Waarschuwingslampje opwarmen
B
Aan / Uit schakelaar en lampje van de
C
verwarming
Geribbelde knop voor het instellen van
D
de duur en het aanzetten van de Turbostand.
NL
Bediening via gecentraliseerde programmaregelaar.
De gecentraliseerde programmaregelaar maakt het u mogelijk energie te besparen door de temperatuur te laten dalen op het door u gewenste moment, naar gelang de tijdstippen waarop de badkamer
wordt gebruikt.
De handdoekdroger kan geprogrammeerd worden via de piloot draad. Het programmeren moet tot
stand gebracht worden aan de hand van de meegeleverde handleiding.
33
Page 35

Gebruik
1/ Verwarmen van het vertrek : gebruik van de modus Comfort
Deze modus zorgt voor een aangename omgevingstemperatuur in het vertrek.
WAT U WILT
DOEN
De verwarming aanzet-
ten.
De juiste temperatuur vin-
den.
WAT U HIERVOOR MOET DOEN
Drukken op schakelaar B. Het controlelampje
De temperatuurknop A aarzetten
De controlelampje van de verwarming gaat
branden als de omgevingstemperatuur lager
is dan de gewenste temperatuur.
Enkele uren wachten totdat de temperatuur zich gestabiliseerd heeft.
Zodra de temperatuur van het vertrek naar
mijn gading is, hoeft er verder niets bijgesteld te worden.
Als de temperatuur niet naar mijn gading is,
moet ik het draaiknopje bijstellen door het
heel voorzichtig (stap voor stap) door te
draaien.
WAT ER GAAT
GEBEUREN
van de schakelaar
B gaat branden.
Het verwarmingslampje gaat
branden.
De temperatuur
die u een gevoel
van welzijn geeft, is
bereikt.
2/ Opvoeren van de temperatuur van het vertrek : gebruik van de modus
Turbo
WAT U WILT
DOEN
De temperatuur in de badkamer
opvoeren
WAT U HIERVOOR MOET DOEN
De Turbo modus aanzetten door aan het
wieltje C te draaien :
- U hebt een klassiek model, de aanbevolen instellingen voor een optimaal comfort liggen tussen 1 en 2 uur.
- U hebt een model met een ventilator, wij
raden u een tijdsduur aan tussen ¼ en
een ½ uur.
Druk op knop D om de Turbo in werking te
stellen.
Bij afloop van de gekozen tijdsduur, gaat de
Turbo uit en blijft de radiator doorverwarmen
in de modus Comfort.
Opmerking : Als u het apparaat uitzet (door te
drukken op de schakelaar B) tijdens de Turbo
cyclus, zal deze verder gaan met zijn programma als de radiator opnieuw aangezet
wordt.
WAT ER GAAT
GEBEUREN
Het controlelampje D van de
Turbo gaat branden, dit lampje
geeft de inwerkingstelling van de
Turbo aan. De radiator zal op volle
toeren draaien gedurende de gekozen tijdsduur. Als
het model van een
ventilator is voorzien, treedt deze
ook in werking.
34
Page 36

Gebruik
3/ Dagelijks instellen op hetzelfde tijdstip van een bepaalde temperatuur
in het vertrek : gebruik van de modus 24u auto
In deze modus kunt u iedere dag opnieuw 2 uur lang de geforceerde werking instellen (zonder de ventilator) om al doende iedere dag opnieuw op hetzelfde tijdstip te kunnen genieten van een optimaal
comfort dankzij de handdoekdroger.
De tijdsduur van deze modus kan niet bijgesteld worden met het draaiknopje C, deze tijdsduur bedraagt systematisch 2 uur.
Om ervoor te zorgen dat deze dagelijkse functie van 24u auto actief blijft, mag u het apparaat niet uitzetten (het controlelampje B moet blijven branden).
Voorbeeld van gebruik :
U wilt om 7 uur ‘s ochtends een behaaglijk warme badkamer.
De eerste dag moet u dan, om 7 uur, de knop
ken op de schakelaar B. (uitzetten en opnieuw in werking stellen van de radiator). De radiator gaat nu onmiddellijk 2 uur lang in de geforceerde werking (zonder de ventilator) en gaat automatisch uit na afloop van deze
twee uren. De dag erop en de volgende dagen, treedt de geforceerde werking automatisch in werking (zonder de
ventilator) om kwart over zes zodat de badkamer behaaglijk warm is om 7 uur.
WAT U
WILT DOEN
WAT U HIERVOOR MOET DOEN
D ingedrukt houden en tegelijkertijd twee keer achter elkaar druk-
WAT ER GAAT
GEBEUREN
CCoonnttrroolleerreenn ooff ddee rraaddiiaattoorr wweell aaaann ssttaaaatt..
IInnddiieenn ddiitt nniieett hheett ggeevvaall iiss,, mmooeett uu ddee sscchhaa--
kkeellaaaarr BB iinnddrruukkkkeenn..
Het controlelampje
van de schakelaar
B brandt.
NL
De 24u auto
modus activeren
Het tijdstip
waarop de
24u auto
m od u aange-
zet moet
worden wijzigen
De 24u auto
modus uitzetten
De cyclus geforceerde
werking underbreken
voordat de ingestelde 2 uur
verstreken zijn
De knop D ingedrukt houden en 2 keer
achter elkaar drukken op de schakelaar B
(uitzetten en opnieuw aanzetten van de
handdoekdroger).
De 24u auto modus uitschakelen en opnieuw activeren op het nieuwe ingestelde
tijdstip.
De knop D ingedrukt houden en 2 keer
achter elkaar drukken op de schakelaar B
(uitzetten en opnieuw aanzetten van de
handdoekdroger).
Lang drukken (op zijn minst 5 seconden) op
knop D.
35
Het controlelampje
van de verwarming
knippert 5
keer snel
Het controlelampje
van de verwarming
knippert 3 keer langzaam. Het controlelampje van de
verwarming
knippert 5
keer snel.
Het controlelampje
van de verwarming
knippert 3
keer langzaam.
Het controlelampje
van de verwarming
knippert 2 keer snel.
De 24u auto modus
blijft actief voor de
vo l g e nde
dag.
Page 37

Tips
P
L
1/ Gebruikstips
- Het is niet nodig de radiator op volle toeren te laten draaien, de temperatuur in de badkamer zal hierdoor niet sneller oplopen.
- Voor een optimale verwarming, moeten de handdoeken gehangen worden over de verwarmingsbuizen en de badjassen aan de meegeleverde haken.
WAT U WILT
Weggaan
Voor een tijdsduur gelegen
tussen 2 en 24
uur (de temperatuur lager
instellen).
Meer dan 24
uur lang weg-
gaan
De instellingen
van de handdoekdroger
vergrendelen
DOEN
WAT U MOET DOEN
De temperatuurknop A op de
merktekens zetten
De temperatuurknop A op
zetten.
De modus 24u auto uitzetten
(zie bladzijde 21)
De temperatuurknop A op de ge-
wenste stand zetten. Met een
kleine platte schroevendraaier het
dopje van het knopje afhalen.
Om het knopje te blokkeren
Een pen uit zijn houder halen met
behulp van een scherp voorwerp
en deze in lijn zetten zoals aangegeven in het hiernaast staande
schema, tussen twee aanslagen.
Om het temperatuurbereik te be
perken :
Twee pennen loshalen en de
eerste pen plaatsen zoals aangegeven op het hiernaast staande
schema. Het knopje draaien en
zetten op de tweede pen zoals
aangegeven in het hiernaast
staande schema. Dan het dopje
terug op zijn plaats brengen op
het knopje.
36
WAT ER GAAT GEBEU-
REN
De temperatuur gaat
naar beneden. Als hij te
laag is, moet u het
knopje bijstellen door
het stap voor stap verder te draaien.
De handdoekdroger
houdt hier een temperatuur van ongeveer 7°C
in stand, dit komt overeen met een vorstvrije
temperatuur.
:
De stand van het knopje
is nu geblokkeerd.
-
Het gebruik van het
knopje is beperkt tot de
Comfort zone. .
Indien u een ander temperatuurbereik wenst in
te stellen, moet u de
pennetjes op een andere
manier plaatsen.
Page 38

2/Waarschuwing
- Kinderen mogen niet klimmen op de handdoekdroger.
-
Ervoor zorgen dat kinderen niet leunen of steunen op de radiator en niet spelen in de nabijheid hiervan
als hij in werking is, de oppervlakte van de radiator kan immers warm worden en in bepaalde omstandigheden brandwonden aan de huid veroorzaken, dit is temeer het geval als de kinderen nog niet de juiste
reflexbewegingen hebben aangeleerd of als ze langzamer reageren dan een volwassene. Indien er enig risico bestaat, moet men een beschermingsrooster voor de handdoekdroger installeren.
- Deze handdoekdroger is niet geschikt om te worden gebruikt door personen (kinderen inbegrepen)
wier lichamelijke, zintuiglijke of geestelijke vermogens verminderd zijn of door personen zonder ervaring of kennis van zaken behoudens indien zij onder toezicht staan van iemand door voor hun veiligheid verantwoordelijk is of door laatstgenoemde van te voren instructies hebben ontvangen met
betrekking tot het gebruik van de handdoekdroger.
- Om ieder gevaar voor kleine kinderen te voorkomen, is het aangeraden dit apparaat zodanig te installeren dat de laagste verwarmingsbuis op zijn minst 600 mm boven de vloer wordt aangebracht.
- Veiligheidshalve is het strikt verboden het apparaat te vullen. Indien nodig moet u contact opnemen
met de servicedienst van de fabrikant of een gekwalificeerde vakman.
- Alle ingrepen op de elektrische delen moeten door een gekwalificeerde vakman uitgevoerd worden.
- Ervoor zorgen dat er geen voorwerpen of papier in de handdoekdroger gestoken kunnen worden.
- Bij de eerste inwerkingstelling van de verwarming, kan het zijn dat men een lichte geur ruikt, deze
wordt veroorzaakt door het verdampen van eventuele sporen achtergelaten tijdens de vervaardiging van de handdoekdroger.
- De kast kan warm worden, zelfs als de radiator niet verwarmt.
3/Onderhoud
Om ervoor te zorgen dat de radiator een optimaal prestatievermogen blijft leveren, moet hij ongeveer
twee keer per jaar van stof ontdaan worden (met een zachte doek of de borstel van een stofzuiger). De
verwarming eerst uitzetten door te drukken op de schakelaar B en hem laten afkoelen.
Nooit schurende producten of oplosmiddelen gebruiken.
Opmerking: Als men de handdoekdroger uitzet terwijl de 24u auto modus actief is, wordt de dagelijkse herhaling hiervan opgeschoven met de tijdsduur die overeenkomt met het uitzetten van de radiator.
Modellen met ventilator :
- De roosters van de luchttoevoer en –afvoer moet een stofzuiger schoonmaken.
- De ventilator is voorzien van een stoffilter die, als hij verzadigd is, de ventilator uit kan zetten(rode
controlelampje brandt onder de handdoekdroger).
Voor een optimaal gebruik is het aangeraden de filter regelmatig schoon te maken volgens de instructies :
NL
Rood controlelampje
Maak de filter
schoon.
Schakel de
verwarming uit
Plaats de
filter terug.
37
Trek aan de filter
aan de achterkant van het apparaat
Wacht 10 minuten totdat de
verwarming
weer in bedrijf
is.
Page 39

4/ In geval van problemen
PROBLEEM DIT MOET U NAKIJKEN
De handdoekdroger verwarmt niet.
De handdoekdroger verwarmt de badkamer niet
voldoende.
- Controleren of de lastschakelaars van de installatie wel ingeschakeld zijn of dat de omschakelaar (indien aanwezig) de
voeding van de radiator niet heeft onderbroken.
- Controleer de omgevingstemperatuur van het vertrek : als
deze temperatuur te hoog is, gaat het verwarmingslampje B
niet branden: de radiator verwarmt dan niet.
- Zet het apparaat uit en dan weer aan met behulp van de
schakelaar B :
• Als het verwarmingslampje B blijft knipperen (knippert om
de seconde) : dan is de meetsonde beschadigd. Neem
contact op met de servicedienst van de fabrikant om deze
te laten vervangen.
- De temperatuur opvoeren door het knopje A te draaien.
- Als het verwarmingslampje B blijft knipperen (knippert om
de seconde), dan is de meetsonde beschadigd. Neem contact
op met de servicedienst van de fabrikant om deze te laten
vervangen.
- Als de temperatuur op de maximale waarde is ingesteld
(28°C), moet u de volgende punten controleren :
• Kijk of er nog een andere verwarmingsbron bestaat in
het vertrek.
• Ervoor zorgen dat de handdoekdroger alleen het betreffende vertrek kan verwarmen (deur sluiten).
• De voedingsspanning van de radiator laten controleren.
• Controleren of het vermogen van uw handdoekdroger
geschikt is voor de grootte van het vertrek (wij raden, ge-
middeld, 50W / m3 aan).
De handdoekdroger
blijft werken.
- Controleren of de handdoekdroger niet in de tocht staat (een deur in de
buurt staat open) of dat de temperatuurinstelling niet is gewijzigd.
- Controleren of de 24u auto modus geactiveerd is. Lang drukken (minimaal 5 seconden) op de knop D. Het verwarmingslampje knippert 2 keer
snel en de verwarming gaat uit als het Turbo controlelampje niet brandt.
Als dit lampje wel brandt, moet u de Turbo modus uitzetten door te
drukken op knop D.
- Er kan een storing in het stroomnet zijn opgetreden. In geval van problemen (thermostaat geblokkeerd,...), moet u de voeding van de handdoekdroger ongeveer 10 minuten uitzetten (zekering, lastschakelaar) en
dan opnieuw aanzetten.
- Als dit vaak gebeurt, moet u de voeding laten nakijken voor uw energie
leverancier.
38
Page 40

PROBLEEM DIT MOET U NAKIJKEN
De buitenkant van de
handdoekdroger wordt
heet
De ventilator gaat veel
te vroeg uit
Om de handdoekdroger
heen verschijnen vuilsporen op de muur
De laatste elementen
boven en beneden zijn
veel minder warm dan de
overige elementen van
de handdoekdroger
Tijdens de werking is het normaal dat de radiator warm wordt, de oppervlakte temperatuur is echter beperkt in overeenstemming met de norm
NF « Electricité Performance”. Indien u echter van mening bent dat uw
handdoekdroger wel te heet wordt, moet u controleren of het vermogen
wel is aangepast aan de oppervlakte van het vertrek (wij raden 50W / m3
aan) en of de handdoekdroger niet in de tocht staat want dit zou zijn werking kunnen verstoren.
- Controleren of de toevoer- en afvoerroosters niet verstopt zijn.
Mocht dit het geval zijn, dan moet u ze schoonmaken (zie paragraaf On-
derhoud).
- Controleren of de temperatuur in het vertrek niet te hoog is. In dit geval
is het normaal dat de ventilator uitgaat. U moet dan eenvoudigweg wachten tot de omgevingstemperatuur daalt voordat u de Turbo modus opnieuw gaat gebruiken.
- Als uw woning op een hoogte van meer dan 1000 meter ligt, is de lucht
minder dicht en kan de temperatuur in het vertrek sneller oplopen. Dit
probleem zal zich in dit geval dus vaker voordoen (dit heeft verder geen
enkele invloed op de levensduur van de componenten van het apparaat).
De vuilsporen worden veroorzaakt door de kwaliteit van de omgevingslucht (kaarsen, sigarettenrook, slechte ventilatie, ...).
- Wat betreft de bovenste elementen, deze worden niet volledig gevuld
met het oog op de uitzetting van de thermodynamische vloeistof. Zij
worden alleen via geleiding verwarmd.
- Wat betreft de onderste elementen, zij geleiden de terugloop van de
vloeistof die zijn warmte heeft afgegeven.
NL
De handdoekdroger
maakt trilgeluiden tijdens
het verwarmen
De dagelijkse herhaling
van de 24u auto modus
werkt niet
Controleren of hij naar behoren op zijn houder is vastgezet. Als de handdoekdroger op een holle wand is bevestigd, is het mogelijk dat hij gaat
trillen.
VControleren of er zich geen stroomonderbreking heeft voorgedaan. .
Zie, indien nodig, bladzijde 21 “Het tijdstip van de inwerkingstelling van de 24u
auto modus wijzigen”.
39
Page 41

PROBLEEM DIT MOET U NAKIJKEN
De dagelijkse herhaling
van de 24u auto modus
gaat niet op het gewenste
tijdstip van start.
Apparaten met programmering :
De handdoekdroger volgt
de programmeeropdrachten niet op.
Het verwarmingslampje
gaat branden als de handdoekdroger in de ECO
modus staat.
- Controleren of men niet van de zomertijd op de wintertijd of omgekeerd, is overgegaan.
- Als de handdoekdroger een aantal uren is uitgezet, zal de dagelijkse herhaling van de 24u auto modus verschoven worden. Zie in dit geval bladzijde 21 “Het tijdstip van de inwerkingstelling van de 24u auto modus
wijzigen”.
Voorbeeld:Om 7 uur treedt de dagelijkse herhaling van de 24u auto modus in
werking voor een tijdsduur van 2 uren, dus tot aan 9 uur.
Om 10 uur zet u de verwarming van uw handdoekdroger uit (druk op de schakelaar B).
Om 22 uur, zet u hem weer aan (druk op de schakelaar B).
De radiator is dus 12 uur lang uitgezet. De dagelijkse herhaling van de 24u auto
modus zal dientengevolge om 19 uur de dag erop in werking treden (7 uur +
12 uur).
Controleren of de programmeringcentrale wel naar behoren gebruikt
wordt. (zie gebruikshandleiding).
Deze werking is normaal, de handdoekdroger kan blijven draaien om
een temperatuur van -3,5°C ten opzichte van de COMFORT temperatuur in stand te houden.
Indien u er niet in bent geslaagd om het probleem op te lossen, moet u contact opnemen
met de servicedienst van de fabrikant, zorg ervoor dat u de referenties van de handdoekdroger in handbereik hebt: te weten de handelscode en het serienummer (zie blad-
zijde 14).
Meet de temperatuur in het vertrek op en win inlichtingen in met betrekking tot het mogelijke programmeersysteem.
40
SFMG MAR 10 17-80-0165-A
Page 42

GARANTIE
DOCUMENT À CONSERVER PAR L’UTILISATEUR,
À PRÉSENTER UNIQUEMENT EN CAS DE RÉCLAMATION
La durée de garantie est de 2 ans à compter de la date d’installation ou d’achat et ne saurait excéder
30 mois à partir de la date de fabrication en l’absence de justificatif.
Atlantic assure l’échange ou la fourniture des pièces reconnues défectueuses à l’exclusion de tous
dommages et intérêts.
Les frais de main d’œuvre, de déplacement et de transport sont à la charge de l’usager.
Les détériorations provenant d’une installation non conforme, d’un réseau d’alimentation ne respectant
pas la norme NF EN 50160, d’un usage anormal ou du non respect des prescriptions de ladite notice ne
sont pas couvertes par la garantie.
Les dispositions des présentes conditions de garantie ne sont pas exclusives du bénéfice, au profit de
l’acheteur, de la garantie légale pour défauts et vices cachés qui s’applique en tout état de cause dans
les conditions des articles 1641 et suivants du code civil.
Présenter le présent certificat uniquement en cas de réclamation auprès du distributeur ou de votre
installateur, en y joignant votre facture d’achat.
TYPE DE L’APPAREIL* : ...............................................................................................
N° DE SÉRIE* : .............................................................................................................
LE NOM ET L'ADRESSE DU CLIENT : ..........................................................................
.....................................................................................................................................
* Ces renseignements se trouvent sur la plaque signalétique, côté droit de l’appareil.
Cachet du distributeur
SATC
Rue Monge - ZI Nord
85002 LA ROCHE SUR YON Cedex
www.atlantic.fr
Tous les litiges relèvent de la compétence exclusive
des tribunaux de la Roche-sur-Yon.
Edition 2010
 Loading...