

Page 1
c724e.book Page i Friday, January 27, 2006 10:26 AM
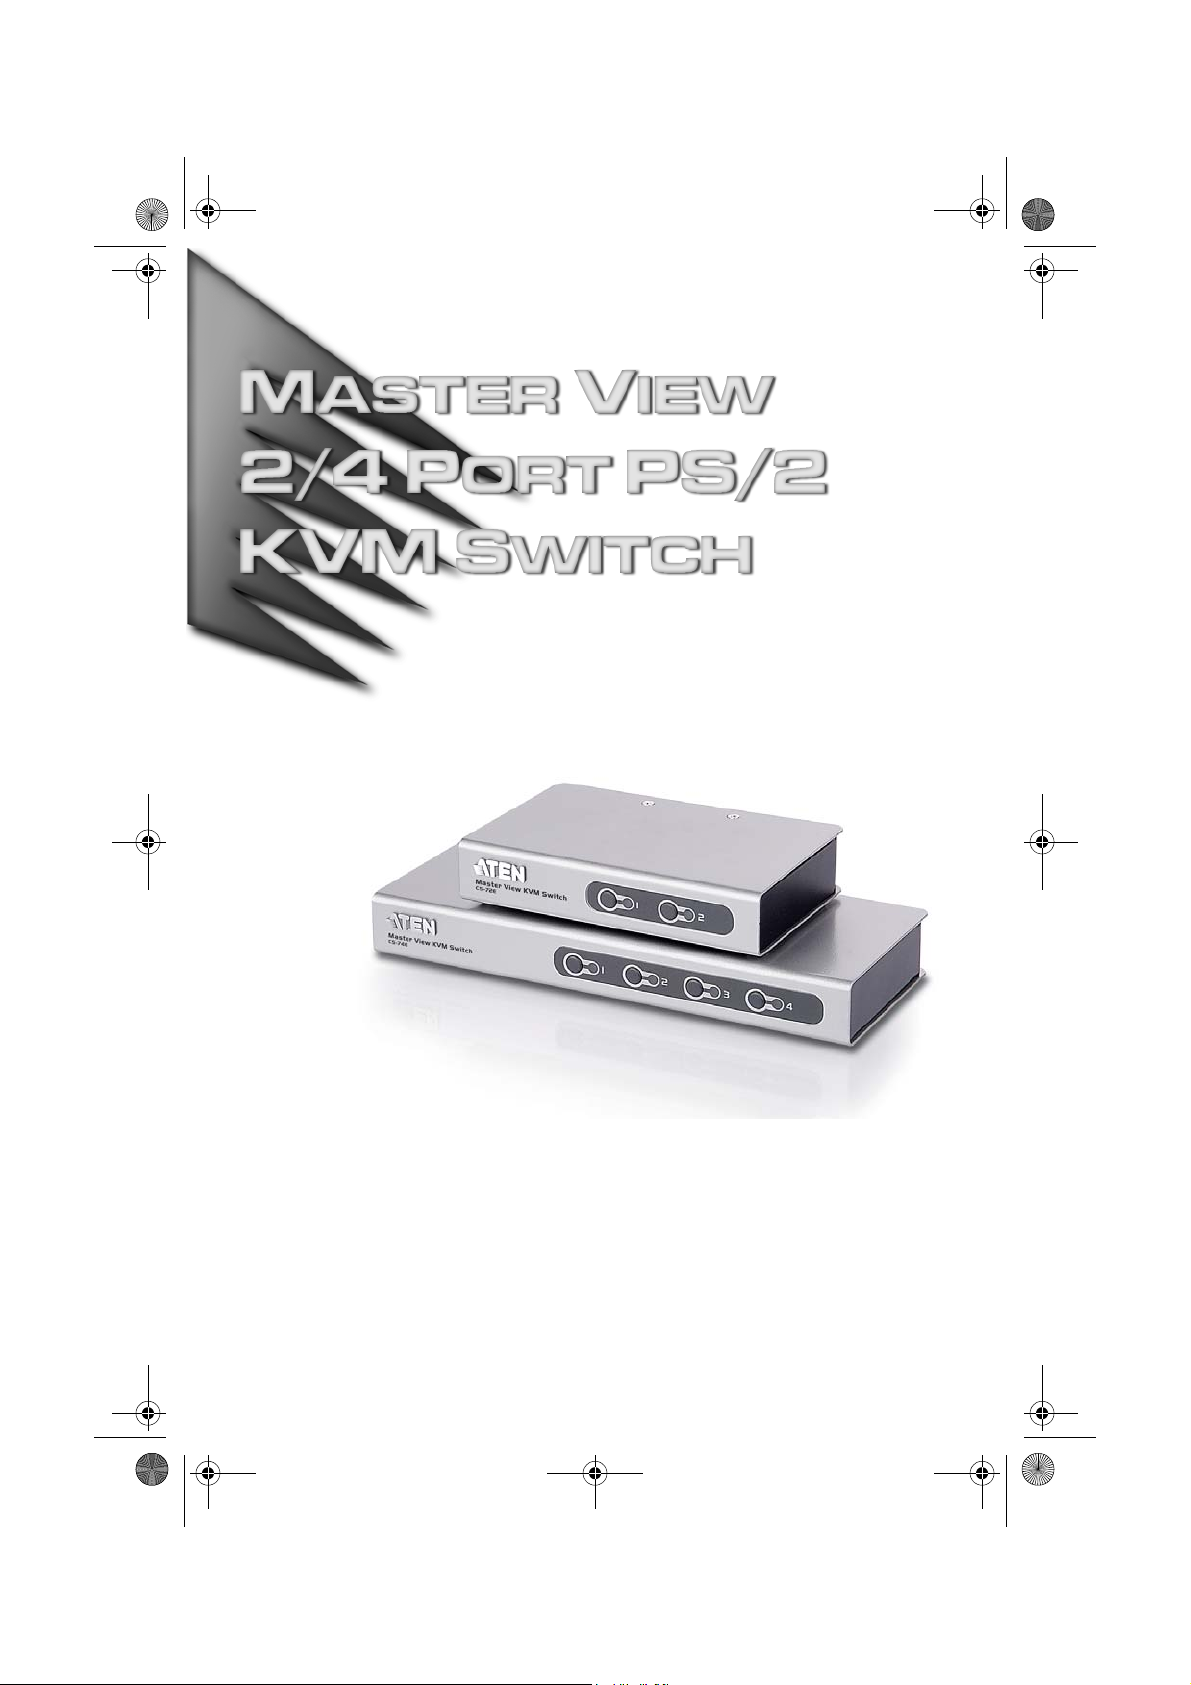
USER MANUAL
CS-72E
CS-74E
Page 2
c724e.book Page ii Friday, January 27, 2006 10:26 AM
CS-72E / CS-74E User Manual
FCC Information
This is an FCC Class A product. In a domestic environment this product may
cause radio interference in which case the user may be required to take
adequate measures.
This equipment has been tested and found to comply with the limits for a Class
A digital device, pursuant to Part 15 of the FCC Rules. These limits are
designed to provide reasonable protection against harmful interference when
the equipment is operated in a commercial environment. This equipment
generates, uses and can radiate radio frequency energy and, if not installed and
used in accordance with the instruction manual, may cause harmful
interference to radio communications. Operation of this equipment in a
residential area is likely to cause harmful interference in which case the user
will be required to correct the interference at his own expense.
RoHS
This product is RoHS compliant.
ii
Page 3
c724e.book Page iii Friday, January 27, 2006 10:26 AM
User Notice
All information, documentation, and specifications contained in this manual
are subject to change without prior notification by the manufacturer. The
manufacturer makes no representations or warranties, either expressed or
implied, with respect to the contents hereof and specifically disclaims any
warranties as to merchantability or fitness for any particular purpose. Any of
the manufacturer's software described in this manual is sold or licensed `as is'.
Should the programs prove defective following their purchase, the buyer (and
not the manufacturer, its distributor, or its dealer), assumes the entire cost of all
necessary servicing, repair and any incidental or consequential damages
resulting from any defect in the software.
The manufacturer of this system is not responsible for any radio and/or TV
interference caused by unauthorized modifications to this device. It is the
responsibility of the user to correct such interference.
The manufacturer is not responsible for any damage incurred in the operation
of this system if the correct operational voltage setting was not selected prior
to operation. PLEASE VERIFY THAT THE VOLTAGE SETTING IS
CORRECT BEFORE USE.
CS-72E / CS-74E User Manual
iii
Page 4

c724e.book Page iv Friday, January 27, 2006 10:26 AM
CS-72E / CS-74E User Manual
Safety Instructions
Read all of these instructions. Save them for future reference.
Follow all warnings and instructions marked on the device.
Do not place the device on any unstable surface (cart, stand, table, etc.). If
the device falls, serious damage will result.
Do not use the device near water.
Do not place the device near, or over, radiators or heat registers.
The device cabinet is provided with slots and openings to allow for
adequate ventilation. To ensure reliable operation, and to protect against
overheating, these openings must never be blocked or covered.
The device should never be placed on a soft surface (bed, sofa, rug, etc.) as
this will block its ventilation openings. Likewise, the device should not be
placed in a built in enclosure unless adequate ventilation has been
provided.
Never spill liquid of any kind on the device.
Unplug the device from the wall outlet before cleaning. Do not use liquid
or aerosol cleaners. Use a damp cloth for cleaning.
The device should be operated from the type of power source indicated on
the marking label. If you are not sure of the type of power available,
consult your dealer or local power company.
Do not allow anything to rest on the power cord or cables. Route the
power cord and cables so that they cannot be stepped on or tripped over.
If an extension cord is used with this device make sure that the total of the
ampere ratings of all products used on this cord does not exceed the
extension cord ampere rating. Make sure that the total of all products
plugged into the wall outlet does not exceed 15 amperes.
T o help protect your system from sudden, transient increases and
decreases in electrical power, use a surge suppressor, line conditioner, or
uninterruptible power supply (UPS).
Position system cables and power cables carefully; Be sure that nothing
rests on any cables.
When connecting or disconnecting power to hot pluggable power supplies,
observe the following guidelines:
If the system has multiple sources of power, disconnect power from the
system by unplugging all power cables from the power supplies.
iv
Page 5
c724e.book Page v Friday, January 27, 2006 10:26 AM
Never push objects of any kind into or through cabinet slots. They may
touch dangerous voltage points or short out parts resulting in a risk of fire
or electrical shock.
Do not attempt to service the device yourself. Refer all servicing to
qualified service personnel.
If the following conditions occur, unplug the device from the wall outlet
and bring it to qualified service personnel for repair.
The power cord or plug has become damaged or frayed.
Liquid has been spilled into the device.
The device has been exposed to rain or water.
The device has been dropped, or the cabinet has been damaged.
The device exhibits a distinct change in performance, indicating a need
for service.
The device does not operate normally when the operating instructions
are followed.
Only adjust those controls that are covered in the operating instructions.
Improper adjustment of other controls may result in damage that will
require extensive work by a qualified technician to repair.
CS-72E / CS-74E User Manual
v
Page 6
c724e.book Page vi Friday, January 27, 2006 10:26 AM
CS-72E / CS-74E User Manual
Package Contents
The CS-72E / CS-74E package consists of:
1 CS-72E or CS-74E PS/2 KVM Switch
1 Console Connector Cable
2 Custom KVM Cables (CS-72E), or
4 Custom KVM Cables (CS-74E)
1 User Manual*
1 Quick Start Guide
Check to make sure that all of the components are present and in good order.
If anything is missing, or was damaged in shipping, contact your dealer.
Read this manual thoroughly and follow the installation and operation
procedures carefully to prevent any damage to the switch or to any other
devices on the installation.
* Features may have been added to the product since this manual was printed.
Please visit our website to download the most up to date version of the
manual.
© Copyright 2006 ATEN® International Co., Ltd.
Manual Part No. PAPE-0259-100G
Printing Date: 01/2006
ATEN and the ATEN logo are registered trademarks of ATEN International Co., Ltd. All rights reserved. All
other brand names and trademarks are the registered property of their respective owners.
vi
Page 7

c724e.book Page vii Friday, January 27, 2006 10:26 AM
Contents
FCC Information . . . . . . . . . . . . . . . . . . . . . . . . . . . . . . . . . . . . . . . . . .ii
RoHS. . . . . . . . . . . . . . . . . . . . . . . . . . . . . . . . . . . . . . . . . . . . . . . . . . .ii
User Notice. . . . . . . . . . . . . . . . . . . . . . . . . . . . . . . . . . . . . . . . . . . . . iii
Safety Instructions . . . . . . . . . . . . . . . . . . . . . . . . . . . . . . . . . . . . . . . iv
Package Contents . . . . . . . . . . . . . . . . . . . . . . . . . . . . . . . . . . . . . . . . vi
About this Manual . . . . . . . . . . . . . . . . . . . . . . . . . . . . . . . . . . . . . . . ix
Conventions . . . . . . . . . . . . . . . . . . . . . . . . . . . . . . . . . . . . . . . . . . . . .x
Getting Help . . . . . . . . . . . . . . . . . . . . . . . . . . . . . . . . . . . . . . . . . . . . .x
1. Introduction
Overview. . . . . . . . . . . . . . . . . . . . . . . . . . . . . . . . . . . . . . . . . . . . . . . .1
Features. . . . . . . . . . . . . . . . . . . . . . . . . . . . . . . . . . . . . . . . . . . . . . . . .2
Requirements . . . . . . . . . . . . . . . . . . . . . . . . . . . . . . . . . . . . . . . . . . . .3
Console . . . . . . . . . . . . . . . . . . . . . . . . . . . . . . . . . . . . . . . . . . . . . .3
Computers. . . . . . . . . . . . . . . . . . . . . . . . . . . . . . . . . . . . . . . . . . . .3
Cables . . . . . . . . . . . . . . . . . . . . . . . . . . . . . . . . . . . . . . . . . . . . . . .3
2. Hardware Setup
CS-72E Front View . . . . . . . . . . . . . . . . . . . . . . . . . . . . . . . . . . . . . . .5
CS-72E Rear View . . . . . . . . . . . . . . . . . . . . . . . . . . . . . . . . . . . . . . . .6
CS-74E Front View . . . . . . . . . . . . . . . . . . . . . . . . . . . . . . . . . . . . . . .7
CS-74E Rear View . . . . . . . . . . . . . . . . . . . . . . . . . . . . . . . . . . . . . . . .8
Installation . . . . . . . . . . . . . . . . . . . . . . . . . . . . . . . . . . . . . . . . . . . . . .9
CS-72E / CS-74E User Manual
3. Operation
Manual Port Selection. . . . . . . . . . . . . . . . . . . . . . . . . . . . . . . . . . . . .11
Hotkey Port Selection. . . . . . . . . . . . . . . . . . . . . . . . . . . . . . . . . . . . .12
Port Selection . . . . . . . . . . . . . . . . . . . . . . . . . . . . . . . . . . . . . . . .12
Auto Scan Mode . . . . . . . . . . . . . . . . . . . . . . . . . . . . . . . . . . . . . .13
Appendix
CS-74E Hotkey Summary Table . . . . . . . . . . . . . . . . . . . . . . . . . . . .15
Specifications . . . . . . . . . . . . . . . . . . . . . . . . . . . . . . . . . . . . . . . . . . .16
Troubleshooting . . . . . . . . . . . . . . . . . . . . . . . . . . . . . . . . . . . . . . . . .17
LED Display. . . . . . . . . . . . . . . . . . . . . . . . . . . . . . . . . . . . . . . . . . . .18
Limited Warranty . . . . . . . . . . . . . . . . . . . . . . . . . . . . . . . . . . . . . . . .18
vii
Page 8
c724e.book Page viii Friday, January 27, 2006 10:26 AM
CS-72E / CS-74E User Manual
This Page Intentionally Left Blank
viii
Page 9
c724e.book Page ix Friday, January 27, 2006 10:26 AM
About this Manual
This User Manual is provided to help you get the most from your c/c system.
It covers all aspects of installation, configuration and operation. An overview
of the information found in the manual is provided below.
Chapter 1, Introduction, introduces you to the CS-72E / CS-74E. Its
purpose, features and benefits are described.
Chapter 2, Hardware Setup, presents the front and back panel
components, and explains how to connect the switch to your computers.
Chapter 3, Operation, describes the various port switching procedures.
An Appendix, provides specifications and other technical information
regarding the CS-72E / CS-74E
CS-72E / CS-74E User Manual
ix
Page 10

c724e.book Page x Friday, January 27, 2006 10:26 AM
CS-72E / CS-74E User Manual
Conventions
This manual uses the following conventions:
Monospaced Indicates text that you should key in.
Indicates keys you should press. For example, [Enter] means to
[ ]
1. Numbered lists represent procedures with sequential steps.
♦ Bullet lists provide information, but do not involve sequential steps.
→
press the Enter key. If keys need to be chorded, they appear
together in the same bracket with a plus sign between them:
[Ctrl+Alt].
Indicates selecting the option (on a menu or dialog box, for example), that comes next. For example, Start
the Start menu, and then select Run.
Indicates critical information.
→ Run means to open
Getting Help
If you need to contact ATEN technical support with a problem, visit or website
at www.aten.com.
x
Page 11

c724e.book Page 1 Friday, January 27, 2006 10:26 AM
Overview
The CS-72E / CS-74E KVM (Keyboard, Video, Mouse), switch is a control
unit that allows access to two (CS-72E) or four (CS-74E) computers from a
single console (keyboard, monitor, and mouse).
With its custom designed connectors, the CS-72E / CS-74E significantly
reduces the number of ports required for a 2 or 4 port KVM switch. The design
features a custom SPHD-15 male connector for the keyboard, video, and
mouse, and SPHD-15 female connectors for the cables that connect the switch
to the computers.
The SPHD connectors provide several advantages over standard KVM switch
implementations: 1) increased reliability; 2) a handsome, space-saving,
modern appearance; and 3) neater, more efficient, cabling that eliminates the
usual tangled cable mess. Combined with the modern looking, compact, dual
function case that allows the unit to either stand upright or lay flat, the switch
can easily be placed in almost any convenient, unobtrusive location.
Chapter 1.
Introduction
Setup is fast and easy; plugging cables into their appropriate ports is all that is
entailed. There is no software to configure; no need to get involved in complex
installation routines; and no need to be concerned with incompatibility
problems. Since the CS-72E / CS-74E intercepts keyboard and mouse input
directly, it works on any hardware platform and with most operating systems.
The CS-72E / CS-74E provides two convenient methods to bring the KVM
focus to the target computer: 1) by pressing one of the port selection switches
located on the unit's front panel; and 2) by entering hotkey combinations from
the keyboard.
There is no better way to access your multiple computer installation than with
a CS-72E / CS-74E KVM switch. By allowing a single console to manage all
of the computers, the CS-72E / CS-74E eliminates the expense of purchasing a
separate keyboard, monitor, and mouse for each one. Additionally, it saves the
extra space and energy costs that additional consoles would require, and it
eliminates the inconvenience and wasted effort involved in constantly having
to move around from one computer to another.
1
Page 12

c724e.book Page 2 Friday, January 27, 2006 10:26 AM
CS-72E / CS-74E User Manual
Features
Compact, modern, dual function, case – stands upright or lays flat for
convenient placement
Custom SPHD-15 connectors and custom KVM cables requires only 3
(CS-72E) or 5 ports (CS-74E) for a neat and tidy cable layout
Easy to install – no software required – connecting cables to the computers
is all it takes
Easy to operate – computer selection via port selection switches or hotkeys
Power on detection – automatically switches to the first powered on port
Auto scan function to monitor computer operation
LED display for easy status monitoring
Hot pluggable – add or remove computers without powering down the
switch
Caps Lock, Num Lock, and Scroll Lock states are saved and restored when
switching
Keyboard and mouse emulation for error free computer booting
Supports Microsoft IntelliMouse and the scrolling wheel on most mice
Superior video quality – up to 2048 x 1536@60MHz; DDC; DDC2;
DDC2B
Non-powered
Saves Time, Space, Power, and Equipment Costs
Supports Windows, Linux, FreeBSD
2
Page 13

c724e.book Page 3 Friday, January 27, 2006 10:26 AM
Requirements
Console
A VGA, SVGA, or Multisync monitor capable of the highest resolution
that you will be using on any computer in the installation
A PS/2 style keyboard
A PS/2 style mouse
Computers
The following equipment must be installed on each computer that is to be
connected to the system:
A VGA, SVGA or Multisync port.
A PS/2 Style keyboard port.
A PS/2 Style mouse port.
1. Introduction
Cables
Only cable sets specifically designed to work with this switch may be used.
The CS-72E package provides one Console Connector Cable and two
1.2m KVM cable sets.
The CS-74E package provides one Console Connector Cable; two 1.2m
KVM cable sets; and two 1.8m KVM cable sets.
KVM cable sets are also available in 3 and 6 meter lengths. If you need
additional cable sets, contact your dealer – refer to the table below for length
and part number:
Length (m) Part Number
1.2 2L5201P-2
1.8 2L5202P-2
3.0 2L5203P-2
6.0 2L5206P-2
3
Page 14

c724e.book Page 4 Friday, January 27, 2006 10:26 AM
CS-72E / CS-74E User Manual
This Page Intentionally Left Blank
4
Page 15

c724e.book Page 5 Friday, January 27, 2006 10:26 AM
CS-72E Front View
Chapter 2.
Hardware Setup
1
2
1. Port Selection Switches
Press a switch to give the KVM focus to the computer attached to its
corresponding port.
Pressing Buttons 1 and 2 simultaneously for more than 3 seconds starts
Auto Scan Mode (see p. 13).
While in Auto Scan Mode, pressing any button exits Auto Scan Mode
and switches the KVM focus to its corresponding port.
2. Port LEDs
The Port LEDs are built into the Port Selection Switches. A lit LED
indicates that its corresponding Port is the one that has the KVM focus.
Depending on the Port's status, the LED may flash according to a specific
pattern (see p. 18 for details).
5
Page 16

c724e.book Page 6 Friday, January 27, 2006 10:26 AM
CS-72E / CS-74E User Manual
CS-72E Rear View
1
2
3
1. KVM Ports*
The KVM cables that connect the unit to the keyboard, video, and mouse
ports on the computers you are installing can plug into any available port.
2. Console Port*
The Console Adapter Cable plugs in here.
3. Power Jack
The power adapter cable plugs in here.
Note: The CS-72E does not require external power. Use of a power adapter
is optional, and requires a separate purchase. (See the note under the
Installation section on page 9).
* The shape of the KVM and Console port connectors has been specifically
modified so that only cables designed to work with this switch can plug in
(see Cables, page 3 , fo r details).
6
Page 17

c724e.book Page 7 Friday, January 27, 2006 10:26 AM
CS-74E Front View
1. Port Selection Switches
Press a switch to give the KVM focus to the computer attached to its
corresponding port.
Pressing Buttons 1 and 2 simultaneously for more than 3 seconds starts
Auto Scan Mode (see p. 13).
While in Auto Scan Mode, pressing any button exits Auto Scan Mode
and switches the KVM focus to its corresponding port.
2. Hardware Setup
1
2
2. Port LEDs
The Port LEDs are built into the Port Selection Switches. A lit LED
indicates that its corresponding Port is the one that has the KVM focus.
Depending on the Port's status, the LED may flash according to a specific
pattern (see p. 18 for details).
7
Page 18

c724e.book Page 8 Friday, January 27, 2006 10:26 AM
CS-72E / CS-74E User Manual
CS-74E Rear View
1
2
3
1. KVM Ports*
The KVM cables that connect the unit to the keyboard, video, and mouse
ports on the computers you are installing can plug into any available port.
2. Console Port*
The Console Adapter Cable plugs in here.
3. Power Jack
The power adapter cable plugs in here.
Note: The CS-74E does not require external power. Use of a power adapter
is optional, and requires a separate purchase. (See the note under the
Installation section on page 9).
* The shape of the KVM and Console port connectors has been specifically
modified so that only cables designed to work with this switch can plug in
(see Cables, page 3 for details).
8
Page 19

c724e.book Page 9 Friday, January 27, 2006 10:26 AM
Installation
1. Important safety information regarding the placement of this
device is provided on page iv. Please review it before proceeding.
2. Make sure that power to all the devices you will be connecting
up have been turned off. You must unplug the power cords of
any computers that have the Keyboard Power On function.
Refer to the installation diagrams on the next page (the numbers in the
diagrams correspond to the steps indicated below) as you do the following:
1. Plug the Console Adapter Cable into the Console Port Connector on the
rear panel of the switch.
2. Plug your keyboard, monitor and mouse into their respective connectors
on the Console Adapter Cable. The connectors are color coded and marked
with an appropriate icon for easy identification.
2. Hardware Setup
3. Use the custom KVM cable sets (described in the Cables section, page 3),
to connect the CS-74E KVM Ports to the monitor, keyboard and mouse
ports of the computers you are installing.
4. If you choose to use external power, plug the power adapter into an AC
power source, then plug the power adapter cable into the unit's Power
Jack.
Note: Under ordinary circumstances the switch doesn't require external
power. If, for some reason, you find that the quality deteriorates
(when using long cables, for example), you may want to add a power
adapter. The power adapter should be DC9V; 300mA, with the
inside positive and the outside negative:
5. Turn on the power to the computers.
Note: The CS-74E's default is to link to the first computer you turn on.
9
Page 20

c724e.book Page 10 Friday, January 27, 2006 10:26 AM
CS-72E / CS-74E User Manual
3
2
4
1
2
10
3
Page 21

c724e.book Page 11 Friday, January 27, 2006 10:26 AM
Manual Port Selection
With manual port selection you simply press the appropriate port selection
switch on the unit's front panel to give the KVM focus to its corresponding
port. The port’s Port LED lights to indicate that it has the KVM focus.
Pressing and holding buttons 1 and 2 for more than 3 seconds invokes
Auto Scan Mode. Auto Scan Mode allows you to automatically cycle
through the ports at regular 5 seconds intervals so that you can monitor the
computer activity without having to constantly switch ports yourself.
When a port is being accessed under Auto Scan Mode, its corresponding
Port LED flashes.
While Auto Scan Mode is in effect, ordinary keyboard and mouse
functions are suspended. Y ou must exit Auto Scan Mode in order to regain
normal control of their use.
T o exit Auto Scan Mode, press any port selection switch. The KVM focus
goes to the port that corresponds to the switch you pressed.
Chapter 3.
Operation
11
Page 22

c724e.book Page 12 Friday, January 27, 2006 10:26 AM
CS-72E / CS-74E User Manual
Hotkey Port Selection
Hotkey port selection allows you to directly access a computer from the
keyboard, instead of having to manually switch to it with the port selection
switches. For both the CS-72E and CS-74E, hotkey operations begin by
tapping the Scroll Lock key twice.
Port Selection
For the two port CS-72E, tapping [Scroll Lock] [Scroll Lock] toggles the
KVM focus between the two ports.
For the four port CS-74E, hotkey port switching is explained in the table
below:
Hotkey Action
[Scroll Lock] [Scroll Lock] [È] Brings the KVM focus from the port that
currently has the focus to the next port on the
installation: 1 to 2; 2 to 3; 3 to 4; 4 to 1.
[Scroll Lock] [Scroll Lock] [Ç] Brings the KVM focus from the port that
[Scroll Lock] [Scroll Lock] [Fn] Where Fn represents a function key (from [F1]
12
currently has the focus to the previous port on
the installation: 4 to 3; 3 to 2; 2 to 1; 1 to 4.
to [F4]) that corresponds to the CS-74E’s KVM
port (1 to 4). When you enter the combination
the KVM focus goes directly to the port that
corresponds to the function key.
For example, if you were to enter the following
combination:
[Scroll Lock] [Scroll Lock] [F4]
The KVM focus would go to the computer
connected to port 4.
Page 23

c724e.book Page 13 Friday, January 27, 2006 10:26 AM
Auto Scan Mode
In addition to manually invoking Auto Scan Mode (discussed on page 11), the
CS-74E also provides hotkey invocation.
To invoke Auto Scan Mode using hotkeys instead of manually, enter the
following combination:
[Scroll Lock] [Scroll Lock] [A][Enter]
While Auto Scan Mode is in effect, ordinary keyboard and mouse
functions are suspended. Y ou must exit Auto Scan Mode in order to regain
normal control of their use.
To exit Auto Scan Mode, press [Esc] or [Spacebar]. The KVM focus
stays with the last port that was accessed under Auto Scan Mode.
3. Operation
13
Page 24

c724e.book Page 14 Friday, January 27, 2006 10:26 AM
CS-72E / CS-74E User Manual
This Page Intentionally Left Blank
14
Page 25

c724e.book Page 15 Friday, January 27, 2006 10:26 AM
CS-74E Hotkey Summary Table
The CS-74E hotkey functions are summarized in the following table:
Hotkey Action
[Scroll Lock] [Scroll Lock] [È] Brings the KVM focus from the port that currently
Appendix
has the focus to the next port on the installation: 1
to 2; 2 to 3; 3 to 4; 4 to 1.
[Scroll Lock] [Scroll Lock] [Ç] Brings the KVM focus from the port that currently
[Scroll Lock] [Scroll Lock] [Fn] Where Fn represents a function key (from [F1] to
[Scroll Lock] [Scroll Lock]
[A] [Enter]
[Esc] or [Spacebar] Exits Auto Scan Mode.
has the focus to the previous port on the
installation: 4 to 3; 3 to 2; 2 to 1; 1 to 4.
[F4]) that corresponds to the CS-74E’s KVM port (1
to 4). When you enter the combination the KVM
focus goes directly to the port that corresponds to
the function key.
For example, if you were to enter the following
combination:
[Scroll Lock] [Scroll Lock] [F4]
The KVM focus would go to the computer
connected to port 4.
Invokes Auto Scan Mode.
15
Page 26

c724e.book Page 16 Friday, January 27, 2006 10:26 AM
CS-72E / CS-74E User Manual
Specifications
Function CS-72E CS-74E
KVM Ports 2 4
Port Selection Pushbutton; Hotkey
Connectors KVM 2 x SPHD-15 F (Yellow) 4 x SPHD-15 F (Yellow)
Console 1 x SPHD-15 M (Yellow)
LEDs 2 x Selected Port (Green) 4 x Selected Port (Green)
Power Consumption 0.4W 0.8W
Power Adapter DC9V; 300mA
Emulation Keyboard PS/2
Mouse PS/2
Video 2048 x 1536 @ 60MHz
Scan Interval 5 Seconds
Environment Operating Temperature: 0 ~ 50° C
Storage Temperature: -20 ~ 60° C
Humidity: 0 ~ 80% RH – Noncondensing
Housing Metal
Weight (kg) .316 .488
Dimensions (L x W x H cm) 12.5 x 8.15 x 2.5 20.0 x 8.15 x 2.5
16
Page 27

c724e.book Page 17 Friday, January 27, 2006 10:26 AM
Troubleshooting
Symptom Cause Action
1
Loose cables. Check all cable connections to make sure
2
Not
Switch is in Auto
Scan Mode.
Keyboard
and/or
Mouse
Responding
Appendix
they are completely seated in their sockets.
1. Press a port selection switch to manually
exit Auto Scan Mode.
2. Press [Esc] or [Spacebar] to hotkey exit
Auto Scan Mode. (CS-74E only)
Video
Problems
Keyboard / Mouse
needs to be reset.
Mouse set to serial
mode.
Incorrect mouse
driver.
Switch needs to be
reset.
Loose cables. Check all cable connections to make sure
Resolution and/or
bandwidth set too
high.
Unplug the keyboard / mouse from the
Console Keyboard Port, then plug it back in.
Some mice can be set to act as a PS/2 or a
serial mouse. Make sure the mouse is set to
PS/2 mode.
Check your Device Manager to be sure that
the correct driver for your mouse (obtained
from the manufacturer, or supplied by the
operating system), has been installed.
Because of the wide variety of mouse driver
standards for the modern series of mice (the
ones with the extra buttons and wheels), this
unit only supports all of the extra features of
the Microsoft Intellimouse. It supports the
scroll wheel function of most other mice.
Turn off the computers; wait 5 seconds; turn
the computers back on.
they are completely seated in their sockets.
This unit supports VGA, SVGA, Multisync,
and XGA (interlaced), with resolutions of up
to 2048x1536.
1. This unit is designed to work with PS/2 keyboards and mice. XT (84 key) and AT keyboards will not work. Serial mice will not work.
2. Some Notebooks, notably the IBM Thinkpad and Toshiba Tecra, have trouble when
their mouse and keyboard ports are used simultaneously. To avoid this, only connect
the mouse port or the keyboard port. If you connect the mouse port, you will need to
use the notebook's keyboard when the notebook becomes the active computer.
17
Page 28

c724e.book Page 18 Friday, January 27, 2006 10:26 AM
CS-72E / CS-74E User Manual
LED Display
The information provided by the front panel LED activity is explained in the
following table:
Activity Explanation
Off Port is not selected.
On – Steady The computer connected to the LED's corresponding port
is the one that has the KVM focus.
On – Flashing The computer connected to the LED's corresponding port
is the one that has the KVM focus and is being accessed in
Auto Scan mode.
Limited Warranty
IN NO EVENT SHALL THE DIRECT VE NDOR'S LIABILITY EXCEED THE PRICE PAID
FOR THE PRODUCT FROM DIRECT, INDIRECT, SPECIAL, INCIDENTAL, OR
CONSEQUENTIAL DAMAGES RESULTING FROM THE USE OF THE PRODUCT, DISK,
OR ITS DOCUMENTATION.
The direct vendor makes no warranty or representation, expressed, implied, or statutory with
respect to the contents or use of this documentation, and especially disclaims its quality,
performance, merchantability, or fitness for any particular purpose.
The direct vendor also reserves the right to revise or update the device or documentation without
obligation to notify any individual or entity of such revisions, or update. For further inquiries,
please contact your direct vendor.
18
 Loading...