

Page 1
USB HD Audio/Video KVM Switch
USER MANUAL
CS692
Page 2
EMC Information
FEDERAL COMMUNICATIONS COMMISSION INTERFERENCE
STATEMENT: This equipment has been tested and found to comply with
the limits for a Class A digital device, pursuant to Part 15 of the FCC Rules.
These limits are designed to provide reasonable protection against harmful
interference when the equipment is operated in a commercial
environment. This equipment generates, uses, and can radiate radio
frequency energy and, if not installed and used in accordance with the
instruction manual, may cause harmful interference to radio
communications. Operation of this equipment in a residential area is likely
to cause harmful interference in which case the user will be required to
correct the interference at his own expense.
The device complies with Part 15 of the FCC Rules. Operation is subject
to the following two conditions: (1) this device may not cause harmful
interference, and (2) this device must accept any interference received,
including interference that may cause undesired operation.
FCC Caution: Any changes or modifications not expressly approved by
the party responsible for compliance could void the user's authority to
operate this equipment.
Warning: Operation of this equipment in a residential environment could
cause radio interference.
KCC Statement
?? ??? / A? ?? (??? ?? ?? ?? )
? ??? ??? (A? ) ????????? ??? ?? ???? ??
? ????? ??? , ?? ?? ???? ???? ?? ???? ???
.
Page 3
RoHS
This product is RoHS compliant.
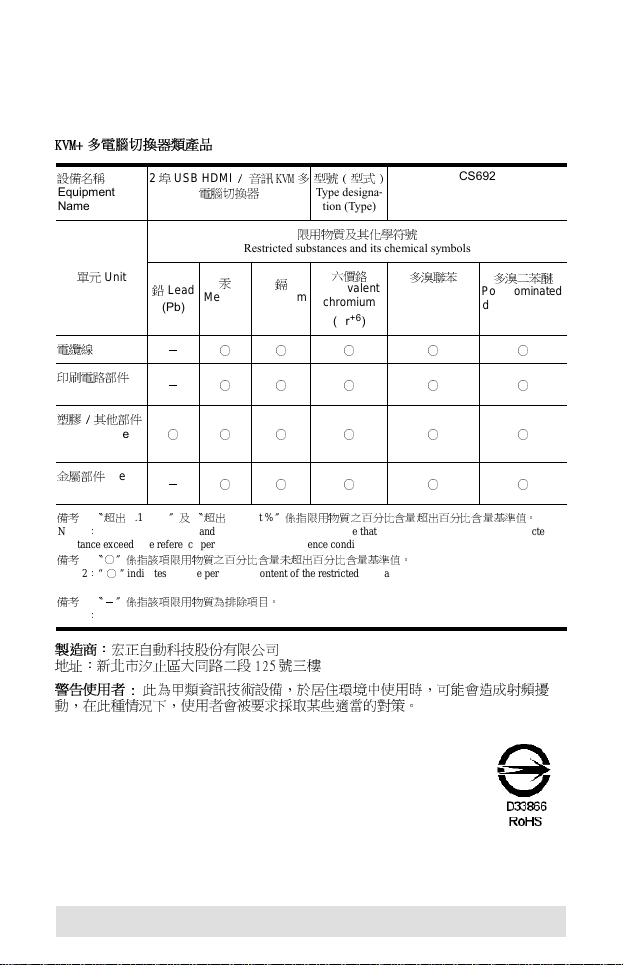
KVM+ 多電腦切換器類產品
多溴聯苯
biphenyls
(PBB)
CS692
多溴二苯醚
Polybrominated
diphenyl ethers
(PBDE)
設備名稱
Equipment
Name
單元
電纜線
印刷電路部件
PCBA
塑膠 / 其他部件
Plastic / Other
parts
金屬部件
parts
備考1.〝超出
Note 1:“Exceeding 0.1 wt %” and “exceeding 0.01 wt %” indicate that the percentage content of the restric ted
substance exceeds the reference percentage value of presence condition.
備考2.〝○〞係指該項限用物質之百分比含量未超出百分比含量基準值。
Note 2:“○” indicates that the percentage content of the restricted substance does not exceed the percentage of
reference value of presence.
備考3.〝-〞係指該項限用物質為排除項目。
Note 3:“−” indicates that the restricted substance corresponds to the exemption.
Unit
Cable
Metal
2埠USB HDMI
鉛
Lead
(Pb)
-○ ○ ○ ○ ○
-○ ○ ○ ○ ○
○○ ○ ○ ○ ○
-○ ○ ○ ○ ○
0.1 wt %
〞及 〝超出
/ 音訊 KVM 多
電腦切換器
Restricted substances and its chemical symbols
汞
Mercury
(Hg)
0.01 wt %
型號 (型式)
Type designa-
tion (Type)
限用物質及其化學符號
六價鉻
鎘
Cadmium
Hexavalent
chromium
(Cd)
(Cr+6)
〞係指限用物質之百分比含量超出百分比含量基準值。
Polybrominated
製造商:
宏正自動科技股份有限公司
地址:新北市汐止區大同路二段 125 號三樓
警告使用者 :
此為甲類資訊技術設備,於居住環境中使用時,可能會造成射頻擾
動,在此種情況下,使用者會被要求採取某些適當的對策。
- 3 -
Page 4
CS692 User Manual
Online Registration
International
http://eservice.aten.com
Telephone Support
International 886-2-8692-6959
China 86-400-810-0-810
Japan 81-3-5615-5811
Korea 82-2-467-6789
North America 1-888-999-ATEN ext 4988
1-949 -428-1111
Technical Support
For international online technical support – including
troubleshooting, documentation, and software updates:
http://eservice.aten.com
For North American technical support:
Email Support support@aten-usa.com
Online
Technical
Support
Telephone Support 1-888-999-ATEN ext 4998
Troubleshooting
Documentation
Software Updates
http://www.aten-usa.com/support
- 4 -
Page 5

Package Contents
Copyright © 2010–2019 ATEN® International Co., Ltd.
Manual Date: 2019-04-25 - Manual Part No. PAPE-1349-AT4G
ATEN and the ATEN logo are trademarks of ATEN International Co., Ltd. All rights
reserved. All other trademarks are the property of their respective owners.
The CS692 USB HD Audio/Video KVM Switch package contains
the following items:
1 CS692 USB HD Audio/Video KVM Switch with Remote
Port Selector
2 Hotkey Stickers
1 User Manual*
1 Quick Start Guide
Check to make sure that all the components are present and that
nothing got damaged in shipping. If you encounter a problem,
contact your dealer.
Read this manual thoroughly and follow the installation and
operation procedures carefully to prevent any damage to the unit,
and/or any of the devices connected to it.
* Features may have been added to the CS692 since this
manual was printed. Please visit our website to download the
most up-to-date version of the manual.
- 5 -
Page 6

Overview
The CS692 USB HD Audio/Video KVM Switch links two HD
audio/video-enabled PCs or devices to a single USB keyboard,
USB mouse, and HD audio/video display console. The CS692
Switch takes a giant step forward from prior cable KVM models in
the Petite series, by offering full HD audio/video functionality,
USB 2.0 peripheral sharing (via a USB hub attached to the USB
mouse port), and a firmware upgrade function that allows you to
keep up with latest available versions.
Another new feature of the CS692 is the implementation of a
remote port selector. This means that you can now control port
switching from the desktop while the switch itself can be placed
in a convenient, out-of-the-way, location. Also, in addition to new
hotkeys, the CS692 offers the latest mouse port-switching
function – simply double-click on the scroll wheel of a USB mouse
to change ports.
Furthermore, the CS692 features ATEN’s patented Video
DynaSync technology, which eliminates boot-up display
problems and optimizes resolution when switching between
ports.
Finally, the CS692's new Power on detection feature means that
if one of the computers is powered off, switch will automatically
switch to the other powered-on computer.
Featuring an unbeatable combination of HD audio/video
functionality, USB 2.0 peripheral sharing convenience, gaming
keyboard support, and enhanced user-friendly operations, the
CS692 allows users to keep up with the latest innovations in
desktop multimedia applications.
- 6 -
Page 7

Features
One HD audio/video console controls two USB computers
Computer selection via remote port selector, hotkeys, and
USB mouse
Audio-enabled – full bass response provides a rich
experience for 2.1 channel surround sound systems
Independent switching of the KVM and Audio focus – one
computer has the KVM focus and the other the Audio focus*
Multiplatform support – Windows 2000 / XP / Vista / 7, Mac,
Linux
Compact design, built-in all-in-one cables (2 x 1.2 m)
Superior video quality – up to 1920 x 1200
Compatible with widescreen LCD monitors
Video DynaSync – exclusive ATEN technology eliminates
boot-up display problems and optimizes resolution when
switching between ports
Power on detection – if one computer is powered off, the
CS692 will automatically switch to the other computer
Supports gaming and multimedia keyboards
Supports multifunction and wireless keyboards and mice
Console mouse port emulation/bypass feature supports most
mouse drivers and multifunction mice
Mac keyboard support and emulation**
USB 2.0 mouse port can be used for USB hub and USB
peripheral sharing***
Non-Powered
Firmware upgradable
Note: 1. HD audio through the monitor’s built-in speakers cannot be switched
independently.
2. PC keyboard combinations emulate Mac keyboards. Mac keyboards
work only with their own computers.
3. May require an additional power adapter.
4. To use the USB 2.0 mouse port as a USB hub, you must first disable
mouse emulation mode. See Hotkey Summary Tabl e, page 16 for
information.
- 7 -
Page 8

System Requirements
Console
An HD audio/video monitor
A USB keyboard and a USB mouse
Speakers and microphone (optional)
Computers
The following equipment must be installed on each computer that
is to be connected to the system:
An HD audio/video port
USB Type A port
Speaker and microphone ports (optional)
Cables
The CS692’s innovative design features built-in KVM and audio
cables for extra convenience. No further cables are necessary.
- 8 -
Page 9

Operating Systems
Supported operating systems are shown in the table, below:
OS Version
Windows 2000 / XP / 2003 / 2008 / Vista / 7
Linux RedHat 9.0, Fedora and higher
SuSE 10 / 11.1 and higher
Debian 3.1 / 4.0
Ubuntu 7.04 / 7.10
UNIX FreeBSD 5.5 / 6.1 / 6.2
Novell Netware 6.0 / 6.5
Mac OS 9 and higher
DOS 6.2 and higher
- 9 -
Page 10

Components
2
3
4
6
1
5
7
CS692
Remote Port Selector
- 10 -
Page 11

No. Component Description
1 Port LEDs The LED lights on to indicate that the
2 Console Keyboard
Port
3 Console Monitor Port Your HD audio/video console monitor
4 Console Mouse Port Your USB console mouse plugs in
5 KVM Cables The connectors at the end of these
6 Console Audio Ports Your console speakers* and
7 Port Selection
Pushbutton
computer attached to its
corresponding port is selected and
has the KVM focus.
The LED flashes to indicate that the
computer attached to its
corresponding port is being scanned
by the Auto Scan function.
The LED is off to indicate the port is
not selected.
Your USB console keyboard plugs in
here.
plugs in here.
here.
built-in KVM cables attach to the two
HD audio/video computers/devices in
your CS692 installation. See the
diagram on page 13 for further details.
microphone plug in here.
Press the Port Selection Pushbutton
to toggle the KVM and Audio focus
between the two computers/devices.
* If your console monitor has built-in speakers and supports
audio through its HD audio/video interface, separate speakers
are not needed.
- 11 -
Page 12

Installation
1. Make sure that the power to any device that you
connect to the installation has been turned off. You
must unplug the power cords of any computers that
have the Keyboard Power On function.
2. To prevent damage to your installation from power
surges or static electricity. It is important that all
connected devices are properly grounded.
1. Plug your keyboard and mouse into their USB ports, located
on the front of the CS692. The ports are color coded and
labeled with an appropriate icon.
Note: The mouse connector is actually a USB 2.0 port, and
can accept any USB compatible peripheral. You can
even connect a hub to install multiple USB devices (This
may require an extra power adapter).
2. Plug your monitor into the HD audio/video port, located on the
front of the CS692. Power on the monitor.
3. Plug your speakers and microphone into the console audio
ports, located on the front of the CS692 (Optional).
Note: If your console monitor has built-in speakers and
supports audio through its HD audio/video interface,
separate speakers are not needed.
4. Plug the USB, HD audio/video, and audio connectors of the
KVM cables into their respective ports on the computers you
are installing.
5. Power on the computers.
Note:By default the switch links to the first computer that
is powered on.
Make sure the computers and devices that the
CS692 connects to are also properly grounded.
- 12 -
Page 13

Installation Diagram
3
2
4
1
2
1
or
4
- 13 -
Page 14

Operation
The CS692 provides three convenient methods of selecting
computers: Manual – click the pushbutton on the Remote Port
Selector; Mouse – click the mouse’s scroll wheel; and Hotkey –
enter combinations from the keyboard.
Manual Port Selection
Press the port selection pushbutton on the Remote Port Selector
to toggle the KVM and Audio focus between the two computers.
The Port LED lights to indicate that the computer attached to its
corresponding port has the focus.
Note: Do not switch ports while a USB device is in operation. For
independent USB switching, please see the USB KVMP
switches on our website.
Mouse Port Selection
Simply double-click the scroll wheel on your USB mouse to
switch between ports. The mouse port-switching function allows
you to toggle back and forth between the ports.
Note: 1. This feature is only supported by USB 3-key scroll
wheel mice.
2. The default setting is OFF.
3. This feature is only supported when mouse emulation is
enabled. See Hotkey Summary Table, page 16 for
further details.
- 14 -
Page 15

Hotkey Port Selection
All hotkey operations begin by tapping the Scroll Lock key twi ce .
See the Hotkey Summary Table for full details.
Note: If using [Scroll Lock] conflicts with other programs, [Ctrl]
can be used instead.
Alternate Entering Hotkey Mode
Press [Scroll Lock] [Scroll Lock] [x] [Enter]. The entering
hotkey mode hotkey is now [Ctrl].
or
Press and hold the remote port selector switch for three
seconds. The entering hotkey mode hotkey is now [Ctrl].
Note: These procedures toggle between the two methods.
- 15 -
Page 16

Hotkey Summary Table
Combination Function
[Scroll
Lock]
[Scroll
Lock] +
[Enter] Toggles the KVM and Audio focus between the two
[k] [Enter] Toggles the KVM focus only.
[s] [Enter] Toggles the Audio focus only.
[a] [Enter] Starts Auto Scan. The KVM focus cycles from port
[a] [Enter] [n] Starts Auto Scan. The KVM focus cycles from port
[x] [Enter] Toggles the hotkey invocation key between [Scroll
[m] [Enter] Enables/disables mouse emulation function.
[n] [Enter] Enables/disables keyboard emulation.
[w] [Enter] Enables/disables mouse port-switching function.
[F2] [Enter] Activates Mac keyboard mapping.
[F10] [Enter] Automatically detects and sets the keyboard
[F4] [Enter] Lists current switch settings.
[F5] [Enter] Performs a USB keyboard and mouse reset.
[F6] [nn] [Enter] Sets the keyboard language layout.
[d] [Enter] Invokes the Video DynaSync function, which
[e] [Enter] Enables/Disables the Power on Detection feature.
[r] [Enter] Resets hotkeys to the default setting.
ports.
Note: If the KVM and Audio focus are on different
ports, only the KVM focus switches.
to port at 5 second intervals.
to port at n second intervals.
Note: Replace n with a numb er bet ween 1 and 4 ( 1
= 3 secs; 2 = 5 secs (default); 3 = 10 secs; 4 = 20
secs).
To exit Auto Scan, press [Esc] or [Spacebar]. Auto
Scanning stops when you exit Auto Scan mode.
Lock] and [Ctrl].
operating platform.
Note: nn is a two digit number that represents one
of the following keyboard language codes: US
English 33; French 08; Japanese 15
eliminates boot-up display problems and optimizes
resolution when switching between ports.
- 16 -
Page 17

Keyboard Emulation
PC Keyboard Mac Keyboard
[Shift] Shift
[Ctrl] Ctrl
[Ctrl] [1]
[Ctrl] [2]
[Ctrl] [3]
[Ctrl] [4]
[Alt] Alt
[Print Screen] F13
[Scroll Lock] F14
[Enter] Return
[Backspace] Delete
[Insert] Help
[Ctrl]
=
F15
Note: When using key combinations, press and release the first
key (Ctrl), then press and release the activation key.
- 17 -
Page 18

The Firmware Upgrade Utility
To upgrade the CS692’s firmware, do the following:
1. From a computer that is not part of your KVM installation,
download the latest Firmware Upgrade package for the
CS692 from our Internet support site (
2. Disconnect the CS692 from your KVM installation. Press and
hold the Remote Port Selector’s pushbutton. While you are
still holding the pushbutton, connect the KVM cable’s purple
USB connector to a USB port on the computer you have
downloaded the Firmware Upgrade package to.
3. The CS692 now enters Firmware Upgrade Mode. The two
Ports LEDs flash together to indicate that the unit is in
Firmware Upgrade Mode.
Note: While the CS692 is i n Firmware Upgra de M ode, normal
keyboard and mouse functions are suspended. You
must complete the firmware upgrade or exit Firmware
Upgrade Mode to regain normal control of the console.
4. Run the Firmware Upgrade Package file. The Firmware
Upgrade Utility Welcome screen appears.
5. Read the License Agreement and enable to I Agree button.
6. Click Next to continue. The Firmware Upgrade Utility main
screen appears. All the devices capable of being upgraded by
the package are listed in the Devices List panel.
7. Select your device. Its description appears in the Device
Description panel. Click Next to perform the upgrade.
As the upgrade proceeds, status messages appear in the
Status Messages panel, and the progress towards completion
is shown in the Progress bar.
8. After the upgrade has completed, a screen appears to inform
you that procedure was successful. Click Finish to close the
Firmware Upgrade Utility.
9. Set up your KVM installation again. See Installation, page 12.
www.aten.com
).
- 18 -
Page 19

Upgrade Failed
If the Upgrade Succeeded screen doesn’t appear, it means that
the upgrade failed to complete successfully, in which case you
should do the following:
1. Disconnect the USB connectors on the KVM cables from the
computer.
2. Press and hold the Remote Port Selector’s pushbutton. While
you are still holding the pushbutton, reconnect the KVM
cable’s USB connectors to the computer.
3. Power on the CS692. It will now work with the factory default
firmware. Follow steps 3 to 9 on page 17 again.
Troubleshooting
Symptom Possible Cause Action
Monitor does
not display
after the KVM
cable set is
hot-plugged.
Mouse and/or
keyboard is
not
responding.
Mouse portswitching
function is not
responding.
Cannot switch
ports by
pressing
[Scroll Lock]
twice.
HD audio/video
graphics card is
not compatible
with cable set hotplugging.
Graphics card
driver is not up-todate.
Switch needs to
be reset.
Mouse does not
support this
function.
Mouse emulation
is disabled.
Keyboard is
incompatible with
[Scroll Lock]
invocation.
Power off all devices on the
installation; power off the CS692;
confirm all KVM cables are
properly connected; power on the
CS692; power on the computers.
Upgrade to the latest graphics
card driver.
Power off all devices on the
installation; power off the CS692;
wait five seconds; power on the
CS692 again.
This feature is only supported by
USB 3-key scroll wheel mice.
Enable mouse emulation. See
Hotkey Summary Table, page 16,
for details.
Switch to the alternate HSM
invocation keys. See Alternate
Entering Hotkey Mode, page 15,
for details.
- 19 -
Page 20

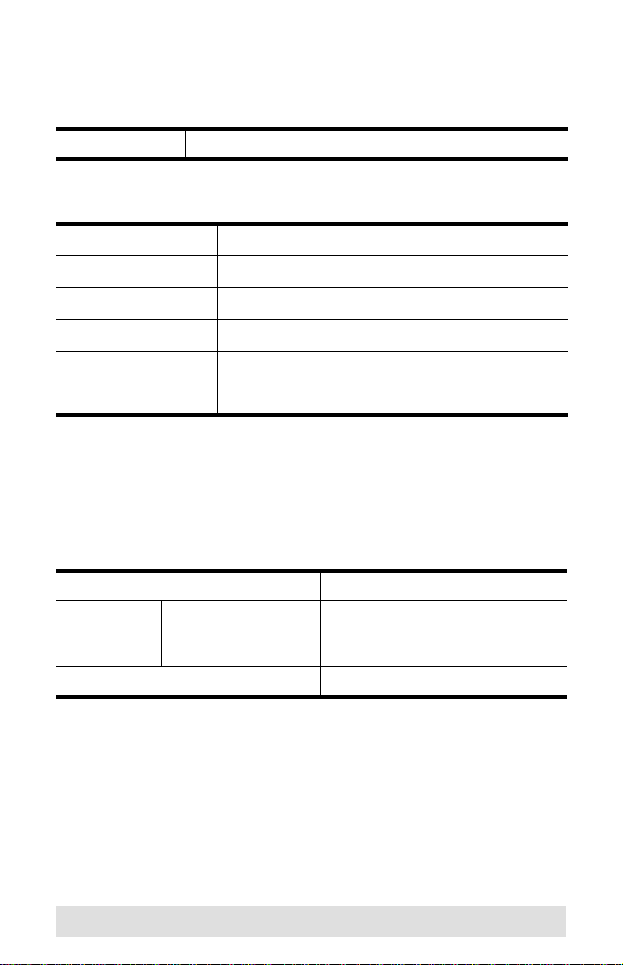
Specifications
Function CS692
Computer Connections 2
Console Connections 1
Port Selection Remote Port Selector, Mouse, Hotkeys
Connectors Console
LEDs KVM 2 (Green)
Cable Length KVM 2 x 1.2 m
Emulation Keyboard / Mouse USB
Video 1080p; 1920 x 1200
Scan Interval 3, 5, 10, 20 secs. (default 5 secs.)
Power Consumption DC 5 V, 0.72W
Environment Operating Temp. 0–50ºC
Physical
Properties
Ports
KVM Ports Keyboard 2 x USB Type A Male (Purple)
Remote Port Selector 1. 8 m
Storage Temp. -20–60ºC
Humidity 0–80% RH, Non-condensing
Housing Plastic
Weight 0.41 kg
Dimensions (L x W x H) 6.70 x 8.20 x 2.65 cm
Keyboard 1 x USB Type A Female (Silver)
Video 1 x HD audio/video Type A Female (White)
Mouse 1 x USB Type A Female (Silver)
Speakers 1 x Mini Stereo Jack Female (Green)
Mic. 1 x Mini Stereo Jack Female (Pink)
Video 2 x HD audio/video Type A Male (Black)
Mouse 2 x USB Type A Male (Black)
Speakers 2 x Mini Stereo Plug Male (Green)
Mic. 2 x Mini Stereo Plug Male (Pink)
- 20 -
Page 21

Factory Default Hotkey Settings
Setting Default
Port Switching Hotkey [Scroll Lock] [Scroll Lock]
Invoking HSM [Scroll Lock] [Scroll Lock]
Auto Scan Interval 5 seconds
Keyboard Operating Platform PC Compatible
Mouse Emulation Enabled
Keyboard Emulation Enabled
Mouse Port-Switching Disabled
Power on Detection Enabled
- 21 -
Page 22

Limited Warranty
ATEN warrants its hardware in the country of purchase against
flaws in materials and workmanship for a Warranty Period of two
[2] years (warranty period may vary in certain regions/countries)
commencing on the date of original purchase. This warranty
period includes the LCD panel of ATEN LCD KVM switches.
Select products are warranted for an additional year (see A+
Warranty for further details). Cables and accessories are not
covered by the Standard Warranty.
What is covered by the Limited Hardware Warranty
ATEN will provide a repair service, without charge, during the
Warranty Period. If a product is detective, ATEN will, at its
discretion, have the option to (1) repair said product with new or
repaired components, or (2) replace the entire product with an
identical product or with a similar product which fulfills the same
function as the defective product. Replaced products assume the
warranty of the original product for the remaining period or a
period of 90 days, whichever is longer. When the products or
components are replaced, the replacing articles shall become
customer property and the replaced articles shall become the
property of ATEN.
To learn more about our warranty policies, please visit our
website:
http://www.aten.com/global/en/legal/policies/warranty-policy/
- 22 -
Page 23

MEMO
- 23 -
Page 24

MEMO
- 24 -
 Loading...