

Page 1
gebruiksaanwijzing
Stoomoven
instructions for use
Steam oven
SX4511D
SX4592D
Page 2

NL Handleiding NL 3 - NL 42
EN Manual EN 3 - EN 41
Gebruikte pictogrammen - Pictograms used
Belangrijk om te weten - Important information
Tip - Tip
Page 3

NL 3
UW OVEN
Uw oven
Inleiding 4
Bedieningspaneel 5
Beschrijving 6
Geleiderails 7
Deur 7
Koelventilator 7
Hoofdfuncties 8
Toetsen 9
Navigatie 10
Eerste gebruik
Eerste gebruik 12
Bediening
Uw functie kiezen 15
Functie instelstand 15
Voortgangsstand 17
Eindscherm 17
Instellingen wijzigen tijdens voortgang 18
Gebruik
Functietabel 19
Stoomfunctie 21
Stoomtabellen 24
Menu 'Instellingen' 26
Plusmenu 27
Kookinformatie 28
Snel voorverwarmen 28
Uitgestelde start 29
Meerfase koken 30
Ga naar handmatige bereiding 31
Programma's en favorieten 31
Kookwekker 32
Kinderslot 32
Verwarmen 33
Ontdooien 33
Reinigen
Het apparaat reinigen 34
Stoomreinigen 34
Het filter van de watertank reinigen 35
Ontkalken 35
Geleiderails verwijderen en reinigen 36
Ovenlampje vervangen 37
Ovendeur verwijderen 38
Glas van de ovendeur verwijderen 39
Problemen oplossen
Algemeen 40
Uw oven en het milieu
Afvoeren van het apparaat en de verpakking 42
Page 4

NL 4
Inleiding
Gefeliciteerd met uw keuze voor deze stoomoven van Atag.
Dit product is ontworpen voor eenvoudige bediening en optimale
gebruiksvriendelijkheid. De oven heeft vele verschillende instellingen
waardoor u telkens de juiste methode kunt kiezen.
Deze handleiding informeert u hoe u deze oven het beste kunt
gebruiken. Naast informatie over de bediening van de oven vindt u hier
ook achtergrondinformatie die van pas kan komen bij het gebruik van
het apparaat.
Lees eerst de afzonderlijke veiligheidsinstructies
voordat u het apparaat gaat gebruiken!
Lees deze handleiding door voordat u het apparaat in gebruik
neemt, en berg de handleiding daarna veilig op voor toekomstig
gebruik.
De installatie-instructies worden afzonderlijk meegeleverd.
UW OVEN
Page 5
NL 5
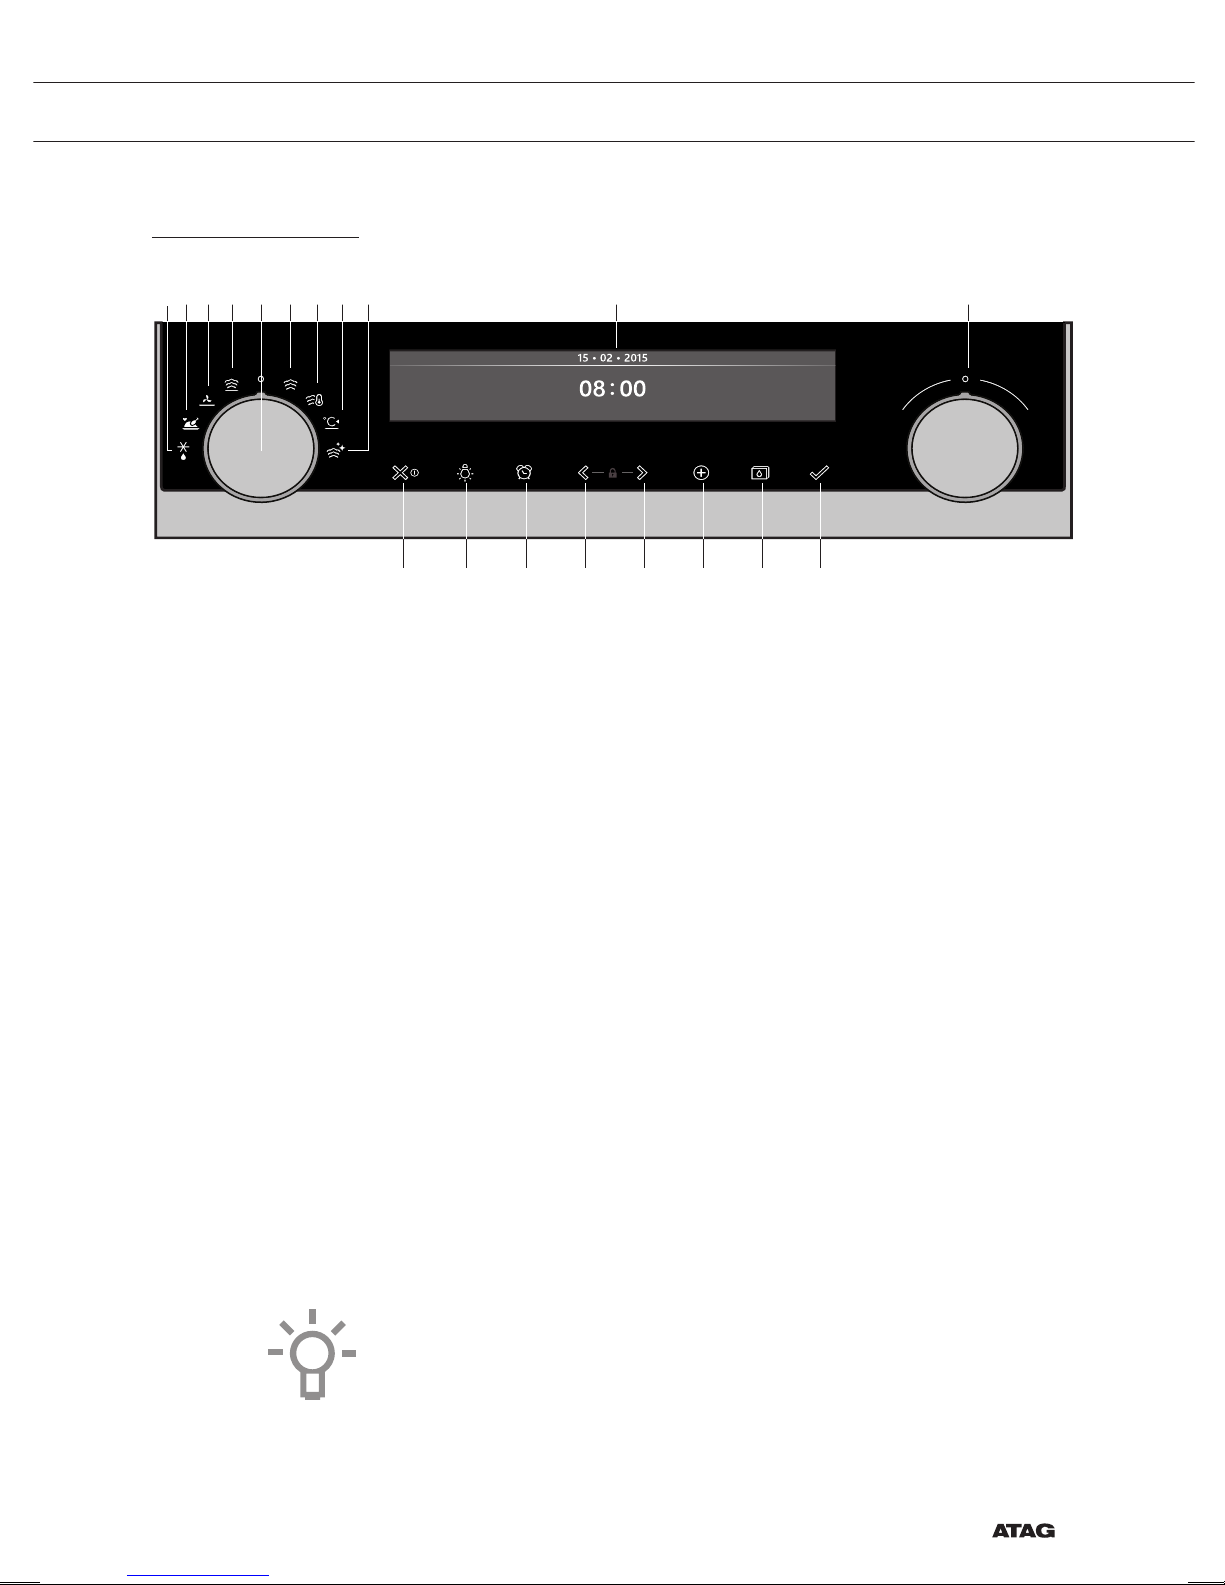
Bedieningspaneel
12
13 14 15 16 17 18 19
1 10 116 7 8 95432
1. Functieknop (in de ‘Uit’ stand)
2. Ontdooien
3. Programma's & favorieten
4. Extra’s
5. Regenereren
6. Stomen
7. Sous vide
8. Verwarmen
9. Stoomreinigen
10. Display
11. Keuzeknop
12. Aan/uittoets en stoptoets (cancel)
13. Verlichtingstoets
14. Kookwekkertoets
15. Navigatietoets links*
16. Navigatietoets rechts*
17. Plustoets
18. Toets waterreservoir
19. Bevestigingstoets
* 15 + 16 indrukken activeert het kinderslot
Opmerking:
Raak voor de beste werking de toetsen aan met een groot deel van de
vingertop. Telkens als u een toets indrukt tijdens het gebruik, klinkt er
een korte toon.
UW OVEN
Page 6
NL 6
UW OVEN
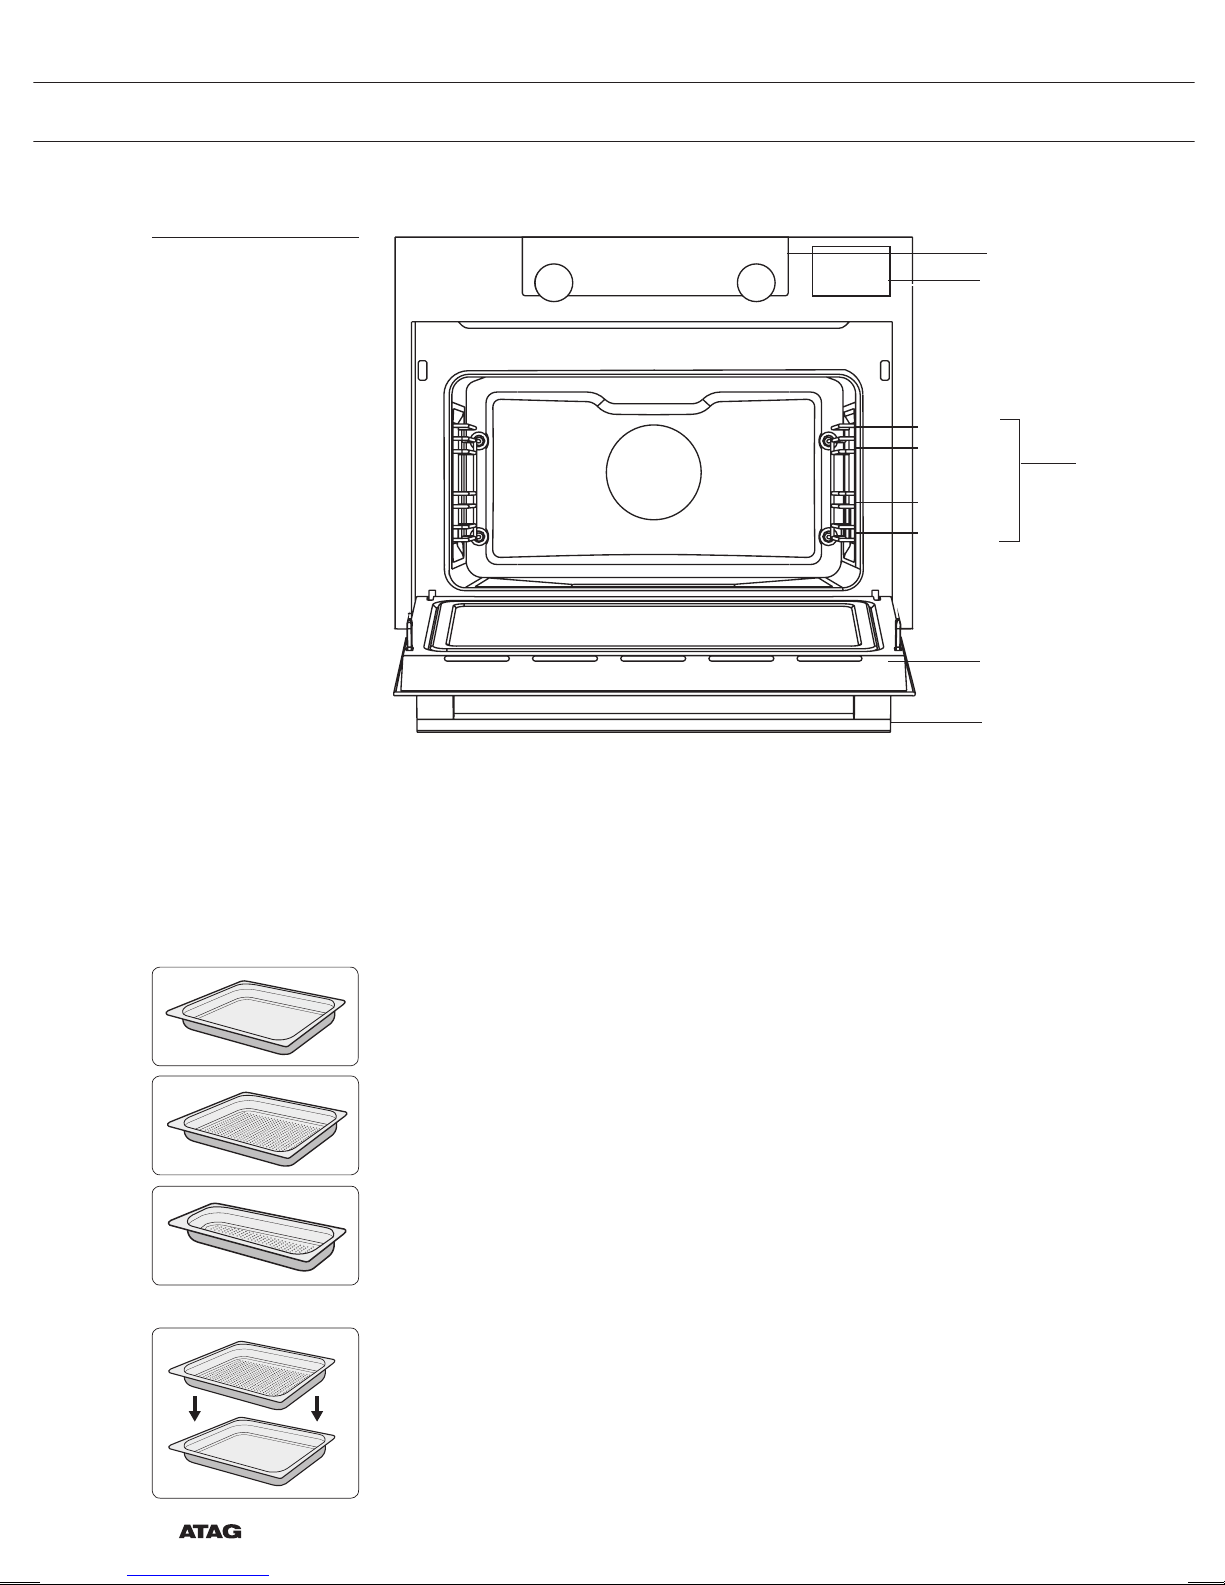
Beschrijving
1
4
1
2
3
4
3
5
2
Niveau
Niveau
Niveau
Niveau
1. Bedieningspaneel
2. Klep van het waterreservoir
3. Inschuifniveaus
4. Ovendeur
5. Deurgreep
De volgende accessoires worden met uw oven meegeleverd:
• Niet-geperforeerde stoomschaal; 40 mm diep (handig voor het
opvangen van vocht tijdens het stomen)
• Geperforeerde stoomschaal; 1/3GN
• Geperforeerde stoomschaal; 1/2GN
▷ De bakplaten voor de stoomoven kunnen op twee niveaus
tegelijk worden gebruikt (d.w.z. de bakplaat zonder gaten op
niveau 1 en de bakplaat met gaten op niveau 2).
▷ Voor het stomen kunt u de geperforeerde stoomschaal in
de niet-geperforeerde stoomschaal plaatsen. Deze kunnen
alleen samen op een niveau met een telescoopgeleider worden
gebruikt.
▷ Opmerking: bij alle stoomschalen kan verkleuring ontstaan
bij temperaturen boven 180°C! Dit heeft geen invloed op het
correct functioneren van de oven.
Page 7
NL 7
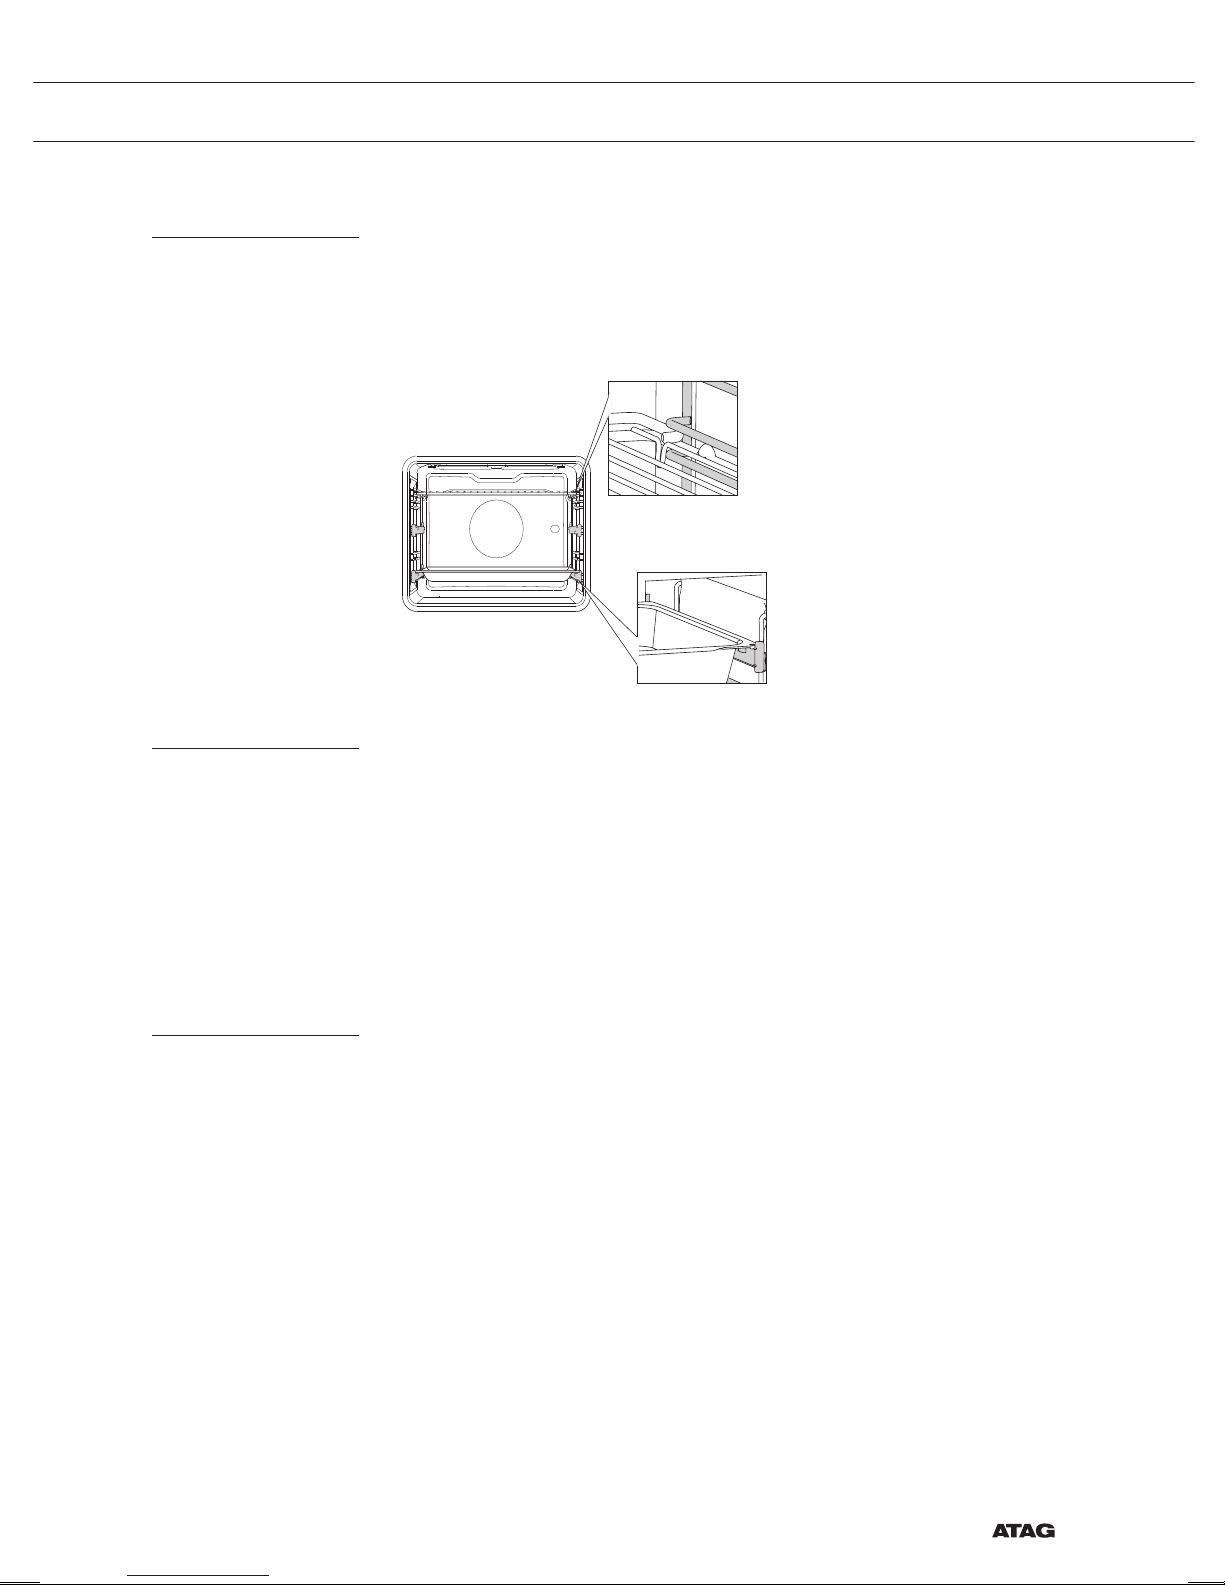
Geleiderails
• De oven heeft vier of vijf roosterniveaus, afhankelijk van het model.
Niveau 1 wordt voornamelijk gebruikt in combinatie met
onderwarmte.
• Plaats de stoomschalen in de ruimte tussen de geleiders van de rails.
Deur
• De deurschakelaars onderbreken de werking van de oven wanneer
de ovendeur tijdens het gebruik wordt geopend.
De werking wordt hervat wanneer de deur wordt gesloten.
• Deze oven heeft een systeem om de ovendeur zachtjes te sluiten.
Wanneer de ovendeur wordt gesloten, dempt dit systeem de kracht
van de beweging, vanuit een bepaalde hoek, en wordt de deur
rustig gesloten.
Koelventilator
Het apparaat is uitgerust met een koelventilator die de behuizing en het
bedieningspaneel koelt.
UW OVEN
Page 8
NL 8
UW OVEN
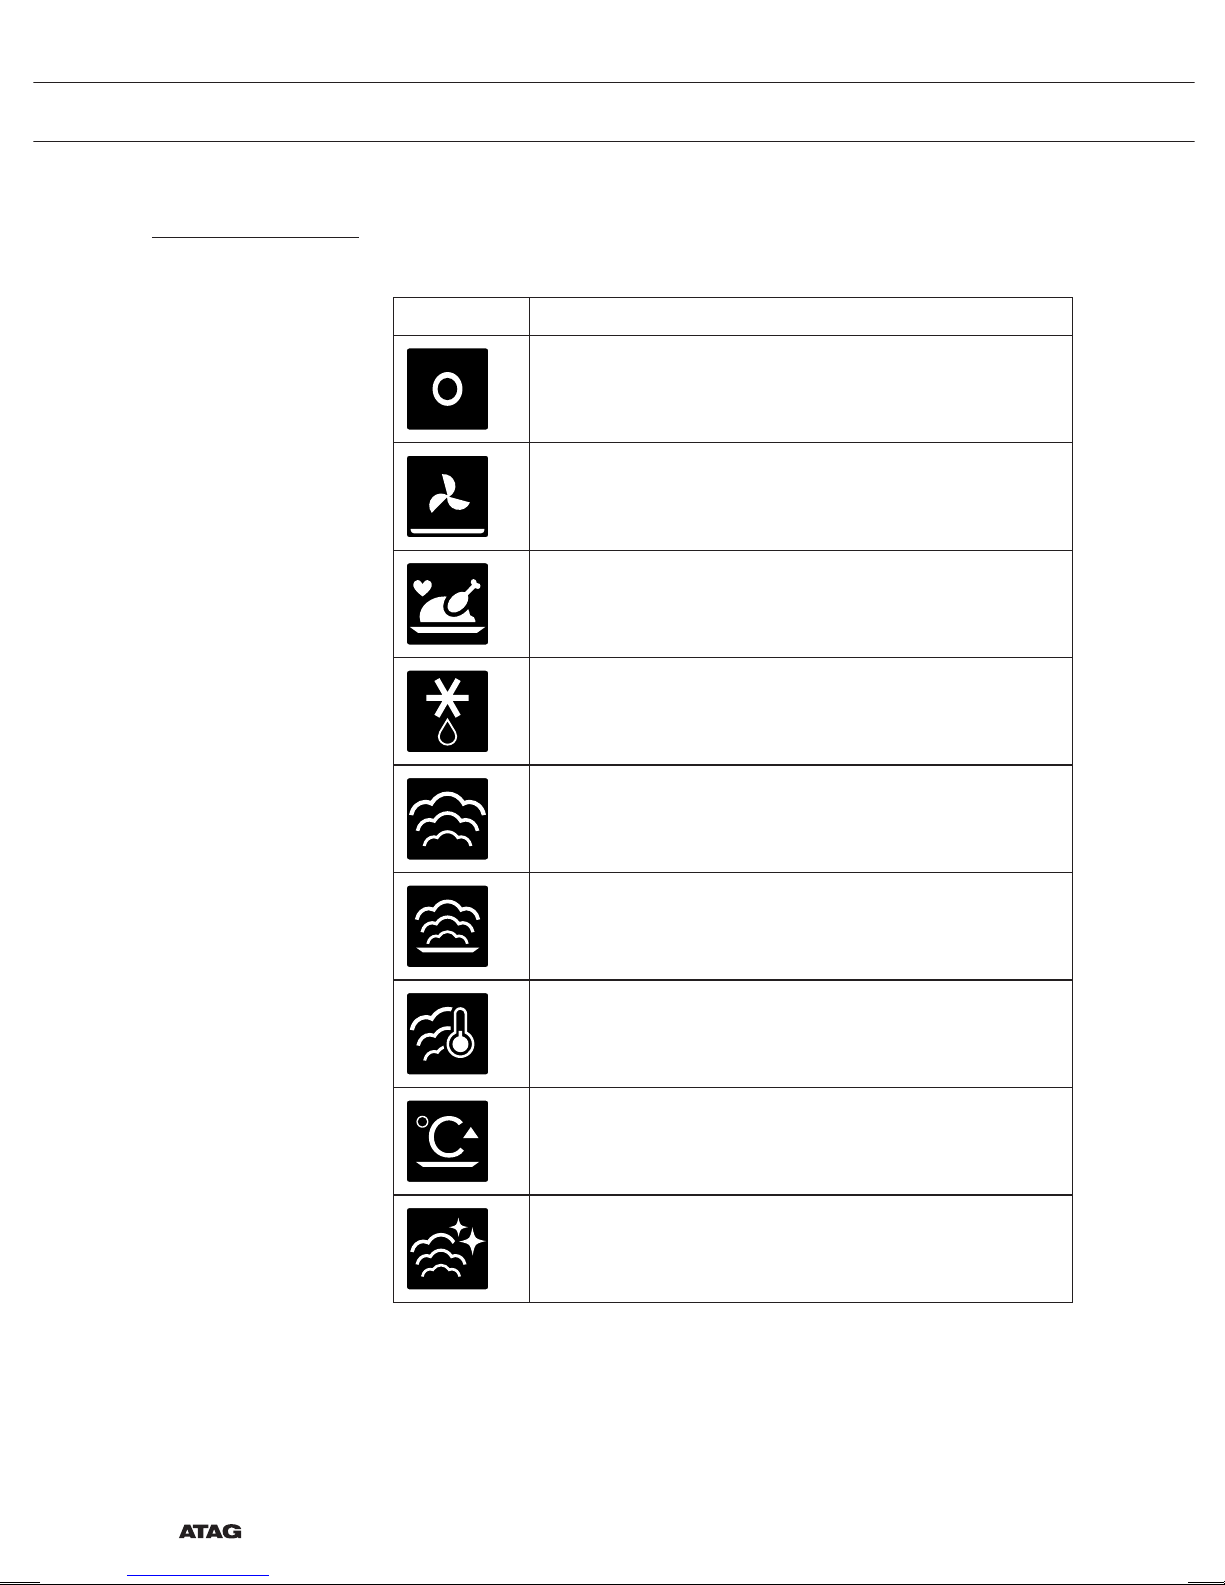
Hoofdfuncties
Met de functieknop kunt u de hoofdfuncties van uw oven kiezen.
Instelling Beschrijving
Uit/Stand-by
Extra’s
Onderwarmte
Onderwarmte + ventilator
Programma's en favorieten
Favorieten
Programma's
Ontdooien
Handmatig ontdooien
Stomen
Stomen
Stomen - Lage temperatuur
Regenereren
Sous vide
Verwarmen
Bordenwarmen
Warmhouden
Stoomreinigen
Page 9
NL 9
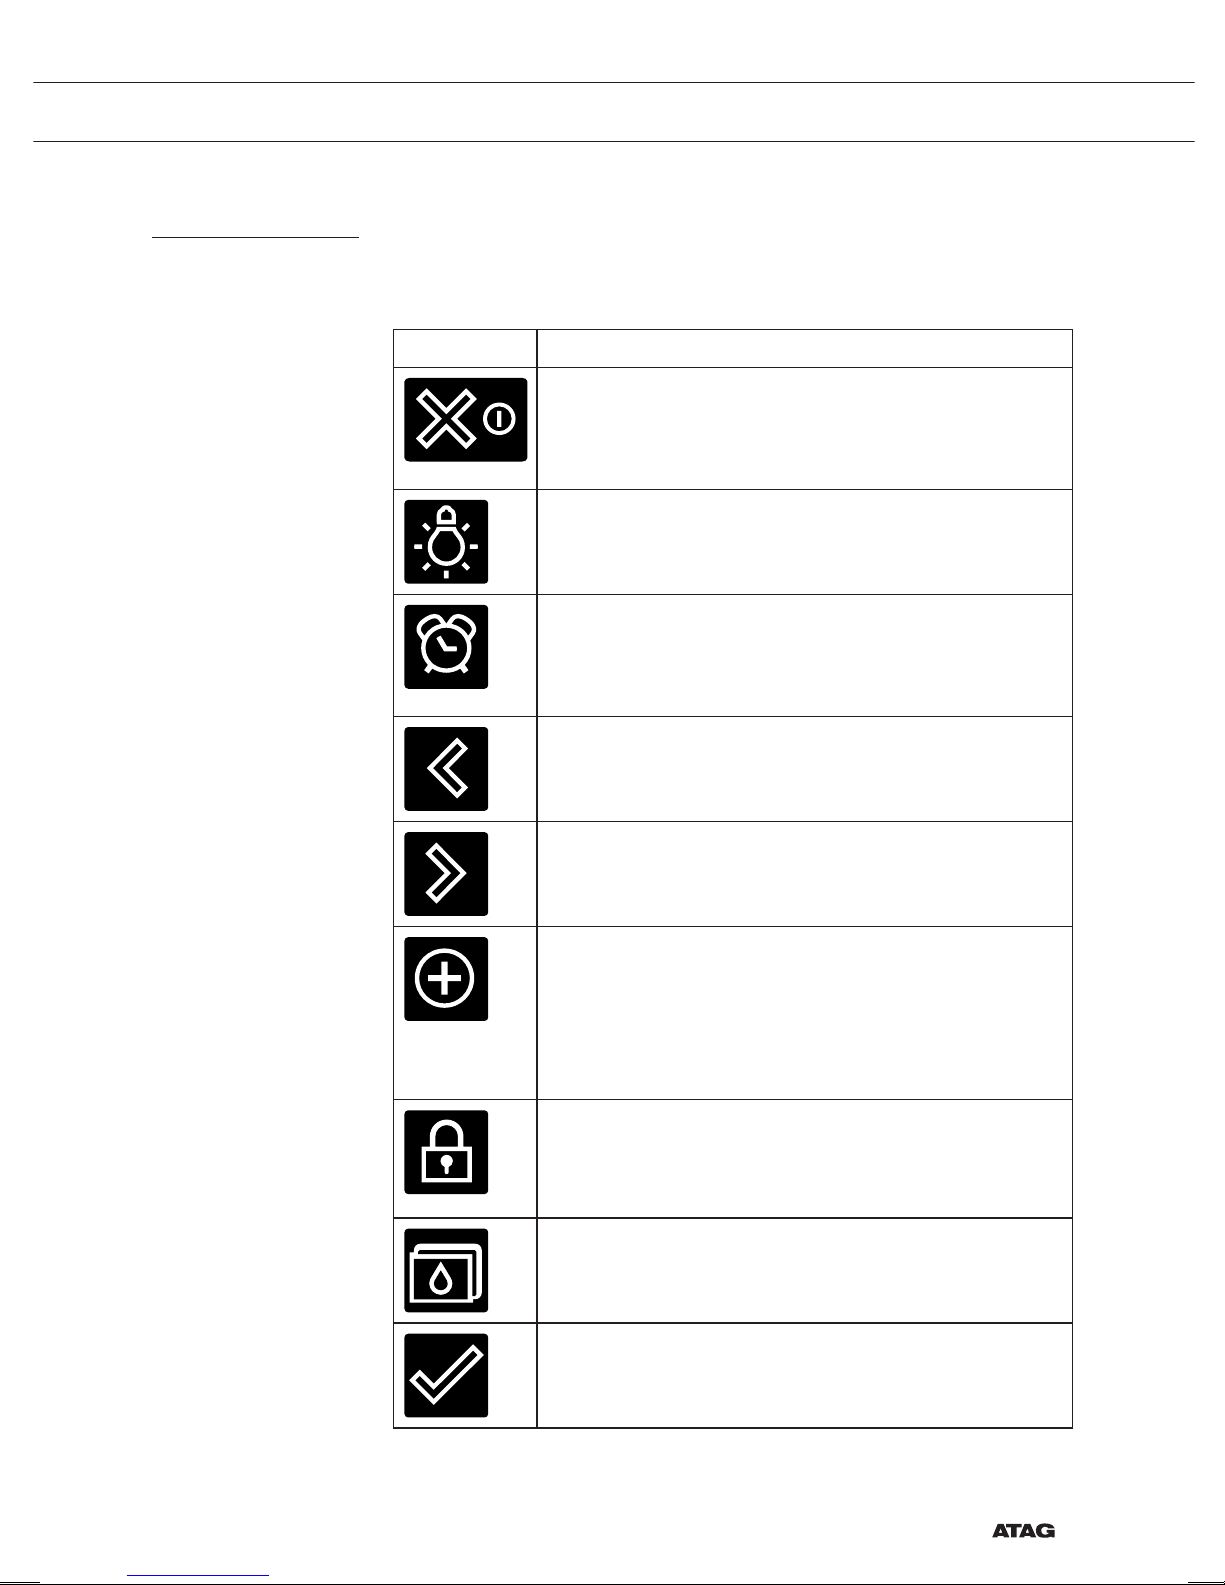
Toetsen
In de onderstaande tabel vindt u de beschrijving van de verschillende
toetsen.
Toetsen Beschrijving van de toetsen
Aan/uittoets en stoptoets
- Kort indrukken: instelling annuleren of één stap
teruggaan in het menu.
- Lang indrukken: het apparaat aan- of uitzetten.
Verlichtingstoets:
- Het ovenlampje aan- of uitzetten.
Kookwekker
- De kookwekker kan onafhankelijk van de oven
worden gebruikt.
- De langst mogelijke timerinstelling is 23:59.
Navigatietoets links
- Het actieve gebied naar links verplaatsen.
Navigatietoets rechts
- Het actieve gebied naar rechts verplaatsen.
Plustoets
- Het instellingenmenu openen of sluiten (in standbystand).
- Het plusmenu openen of sluiten; dit menu bevat de
extra opties die op dat moment mogelijk zijn (in de
stand 'Aan').
Kinderslot
- Op beide navigatietoetsen (links en rechts)
tegelijkertijd drukken en ingedrukt houden om het
apparaat te vergrendelen.
Toets waterreservoir
- De klep van het waterreservoir openen.
Bevestigingstoets
- Alle witte instellingen/elementen op het scherm
bevestigen.
UW OVEN
Page 10
NL 10
UW OVEN
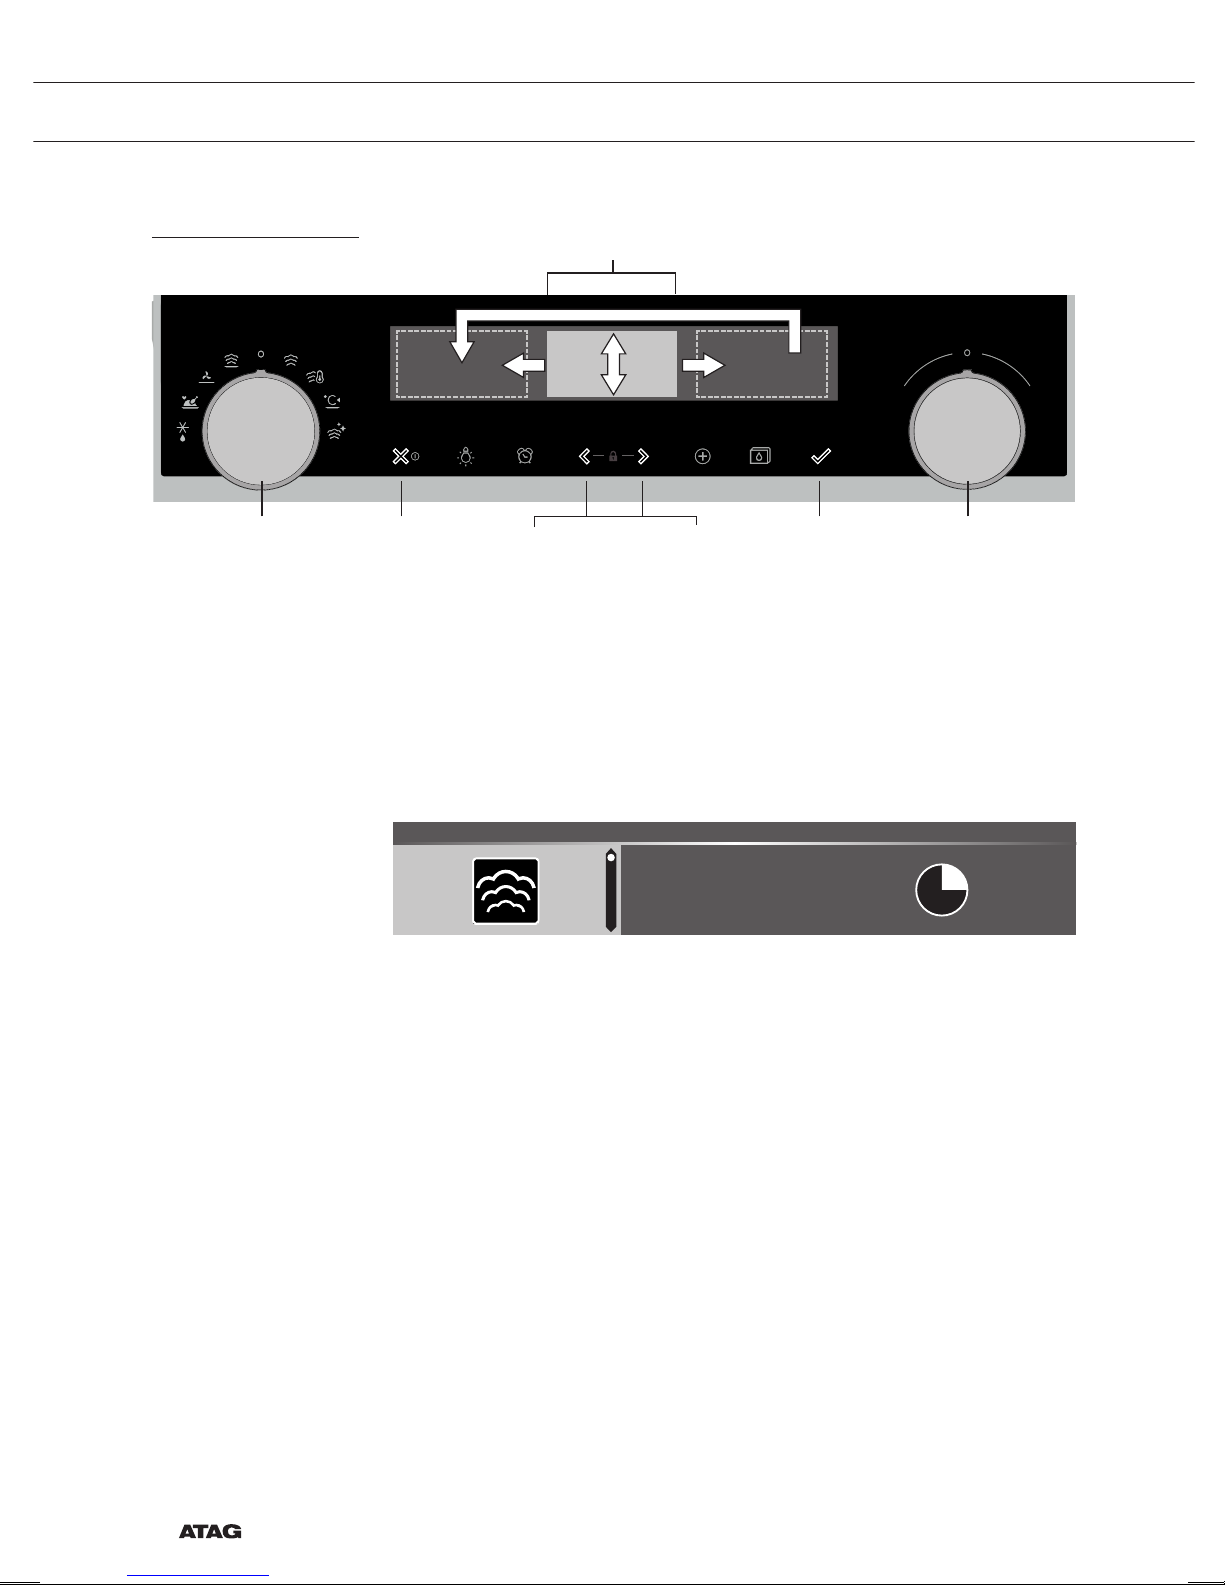
Navigatie
actieve gebied
stoptoets bevestigingstoetsfunctieknop keuzeknopnavigatietoetsen
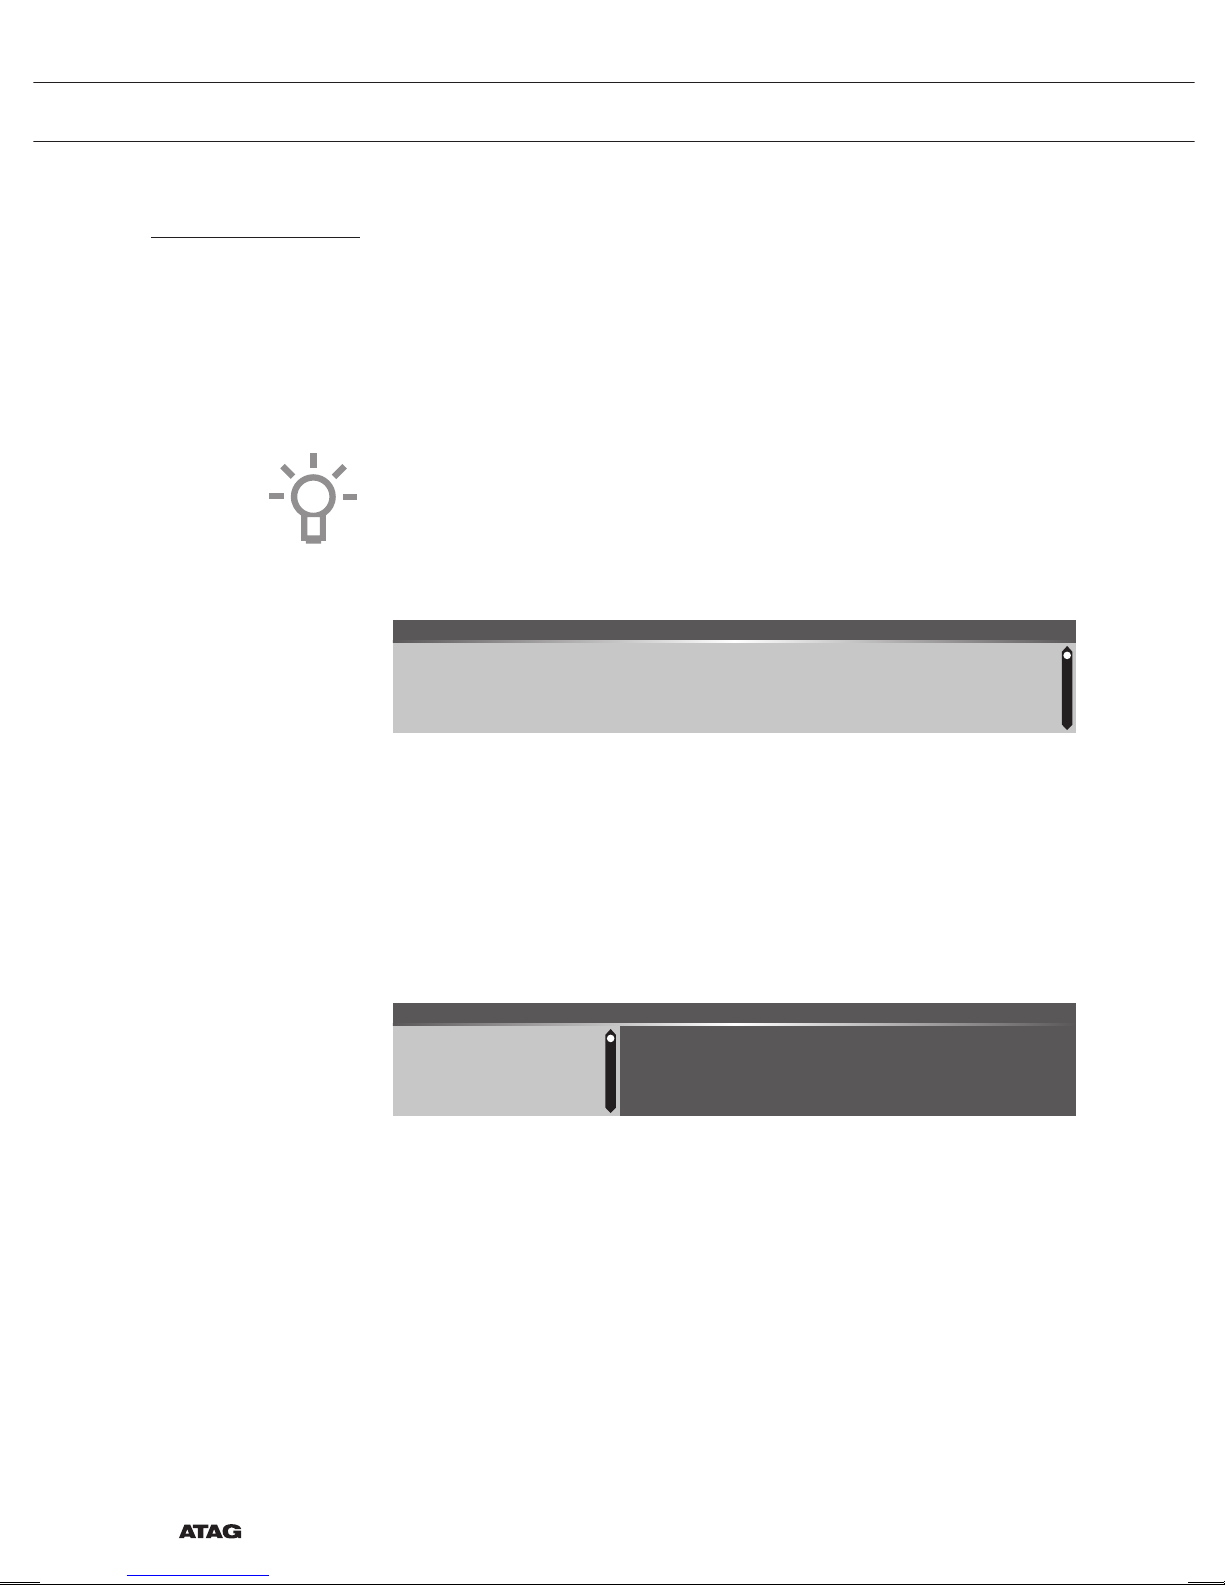
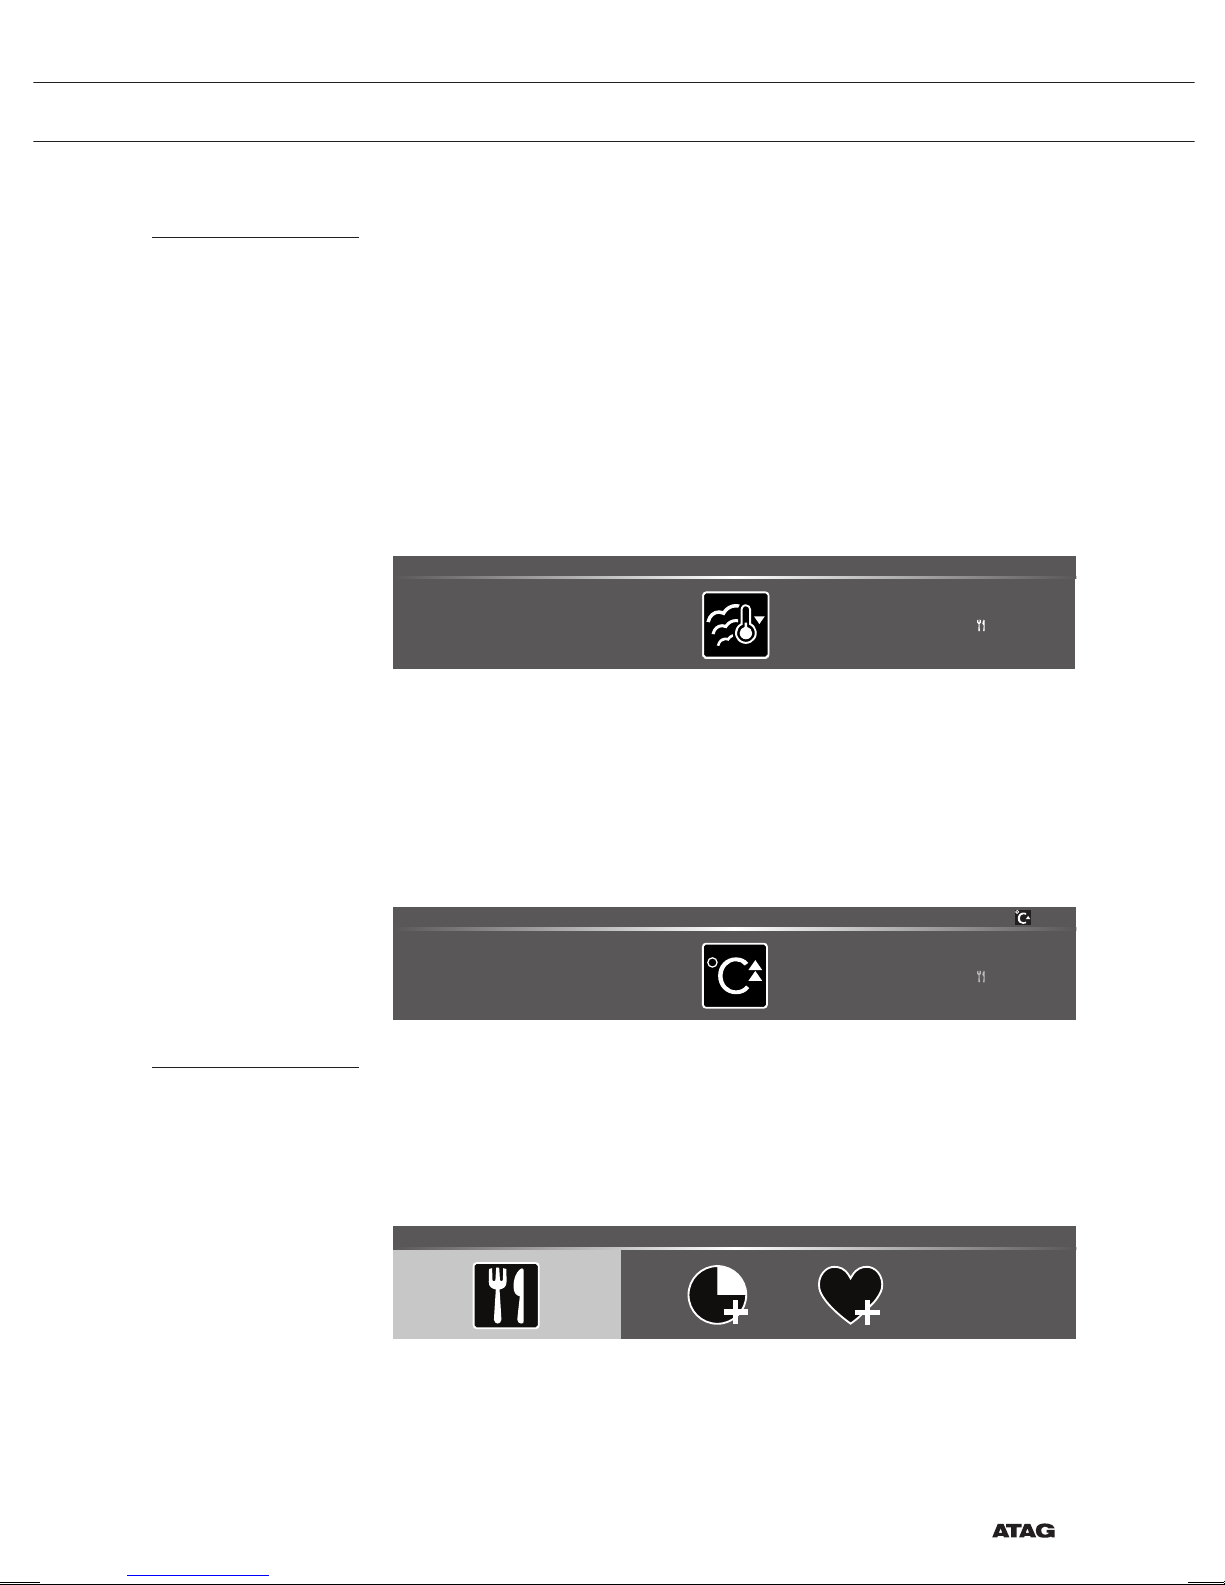
Als u de functieknop uit de 0-stand draait, wordt het pictogram van de
gekozen hoofdfunctie verlicht. Op de display worden het pictogram
en de naam van de geactiveerde functie ongeveer 1,5 seconden
weergegeven. Vervolgens ziet u de gekozen hoofdfunctie en subfunctie
aan de bovenkant van de display in de informatiebalk. Tevens worden de
functie-instellingen actief (grijze achtergrond). In dit geactiveerde gebied
kunt u uw instellingen kiezen met behulp van de keuzeknop.
180
°C
STOMEN l STOMEN 14:30
In elk menu is de navigatie als volgt:
• Gebruik de navigatietoetsen of druk op de keuzeknop om het
actieve gebied (grijze achtergrond) te verplaatsen.
• De instelling van het actieve gebied kan worden gewijzigd door
aan de keuzeknop te draaien (naar links = verkleinen, naar rechts =
vergroten). De instelling wordt automatisch opgeslagen.
• Als alle elementen op het scherm zijn ingesteld, bevestigt u deze
instellingen door op de bevestigingstoets te drukken (deze toets
begint te knipperen wanneer het mogelijk is het programma te
starten).
• Druk op de stoptoets om één stap terug in het menu te gaan.
Page 11
NL 11
Bovenaan de display staat een informatiebalk. Deze balk geeft aan
waar u in het menu bent en welke instelling u wijzigt. Functies /
instellingen worden gescheiden door een verticale lijn.
INSTELLINGEN l ALGEMEEN l GELUID l TOETSGELUID
PROGRAMMA'S l ... l GEVULDE KIP
UW OVEN
Page 12
NL 12
EERSTE GEBRUIK
Eerste gebruik
• Reinig de binnenkant van de oven en de accessoires met heet water
en afwasmiddel. Gebruik geen agressieve schoonmaakmiddelen,
schuursponsjes en dergelijke.
• De oven geeft een specifieke geur af wanneer deze voor de eerste
keer wordt gebruikt; dat is normaal. Zorg voor goede ventilatie
tijdens het eerste gebruik.
Wanneer het apparaat voor het eerst wordt aangesloten op de
netspanning of nadat het apparaat langere tijd zonder stroom is
geweest, moet u de 'Taal', 'Datum', 'Tijd' en 'Waterhardheid' instellen.
Taal instellen
English
Deutsch
TAAL
Wanneer u de tekst op de display liever in een andere taal wilt zien, kunt
u de taal van uw voorkeur instellen. De standaardinstelling is Engels.
1. Draai aan de keuzeknop en kies de gewenste taal uit de
weergegeven lijst.
2. Bevestig de instelling door op de bevestigingstoets te drukken.
Het volgende scherm wordt weergegeven.
De datum instellen
01 2015
01
02
DATUM l DAG
1. Draai aan de keuzeknop om de eerste instelling (Dag) te wijzigen.
2. Bevestig deze instelling door op de navigatietoets rechts of op de
keuzeknop te drukken.
3. Draai aan de keuzeknop om de volgende instelling (Maand) te
wijzigen.
4. Bevestig deze instelling door op de navigatietoets rechts of op de
keuzeknop te drukken.
5. Draai aan de keuzeknop om de laatste instelling (Jaar) te wijzigen.
6. Bevestig de instelling door op de bevestigingstoets te drukken.
Het volgende scherm wordt weergegeven.
Page 13

NL 13
De tijd instellen
: 00
11
12
13
TIJD | UUR
1. Draai aan de keuzeknop om de uren te wijzigen.
2. Bevestig deze instelling door op de navigatietoets rechts te drukken
of door op de keuzeknop te drukken.
3. Draai aan de keuzeknop om de minuten te wijzigen.
4. Bevestig de instelling door op de bevestigingstoets te drukken.
De waterhardheid instellen
1 rood streepje Zacht water
WATERHARDHEID
Voordat het apparaat voor het eerst in gebruik wordt genomen, moet
de waterhardheid worden ingesteld.
Als het water zachter of harder is dan de standaardinstelling kunt u het
ingestelde hardheidsniveau wijzigen.
De waterhardheid controleren
U kunt de waterhardheid meten met behulp van de papieren teststrip
die met het apparaat wordt meegeleverd. Voor informatie over
de hardheid van het water in uw gemeente kunt u terecht bij uw
waterleidingbedrijf.
De papieren teststrip gebruiken
Dompel de teststrip gedurende 1 seconde in water. Wacht 1 minuut en
lees de hoeveelheid streepjes van de papieren strip af. Kijk in de tabel
voor de juiste instelling van de waterhardheid.
De waterhardheid instellen
1. Vergelijk de teststrip met de afbeelding op de display.
2. Draai aan de keuzeknop totdat de streepjes op het scherm
overeenkomen met de streepjes op de teststrip.
3. Druk op de bevestigingsknop om de ingestelde waterhardheid op
te slaan.
De apparatuur is nu zo geprogrammeerd dat u bericht krijgt om de
apparatuur te ontkalken in overeenstemming met de daadwerkelijke
hardheid van het water.
EERSTE GEBRUIK
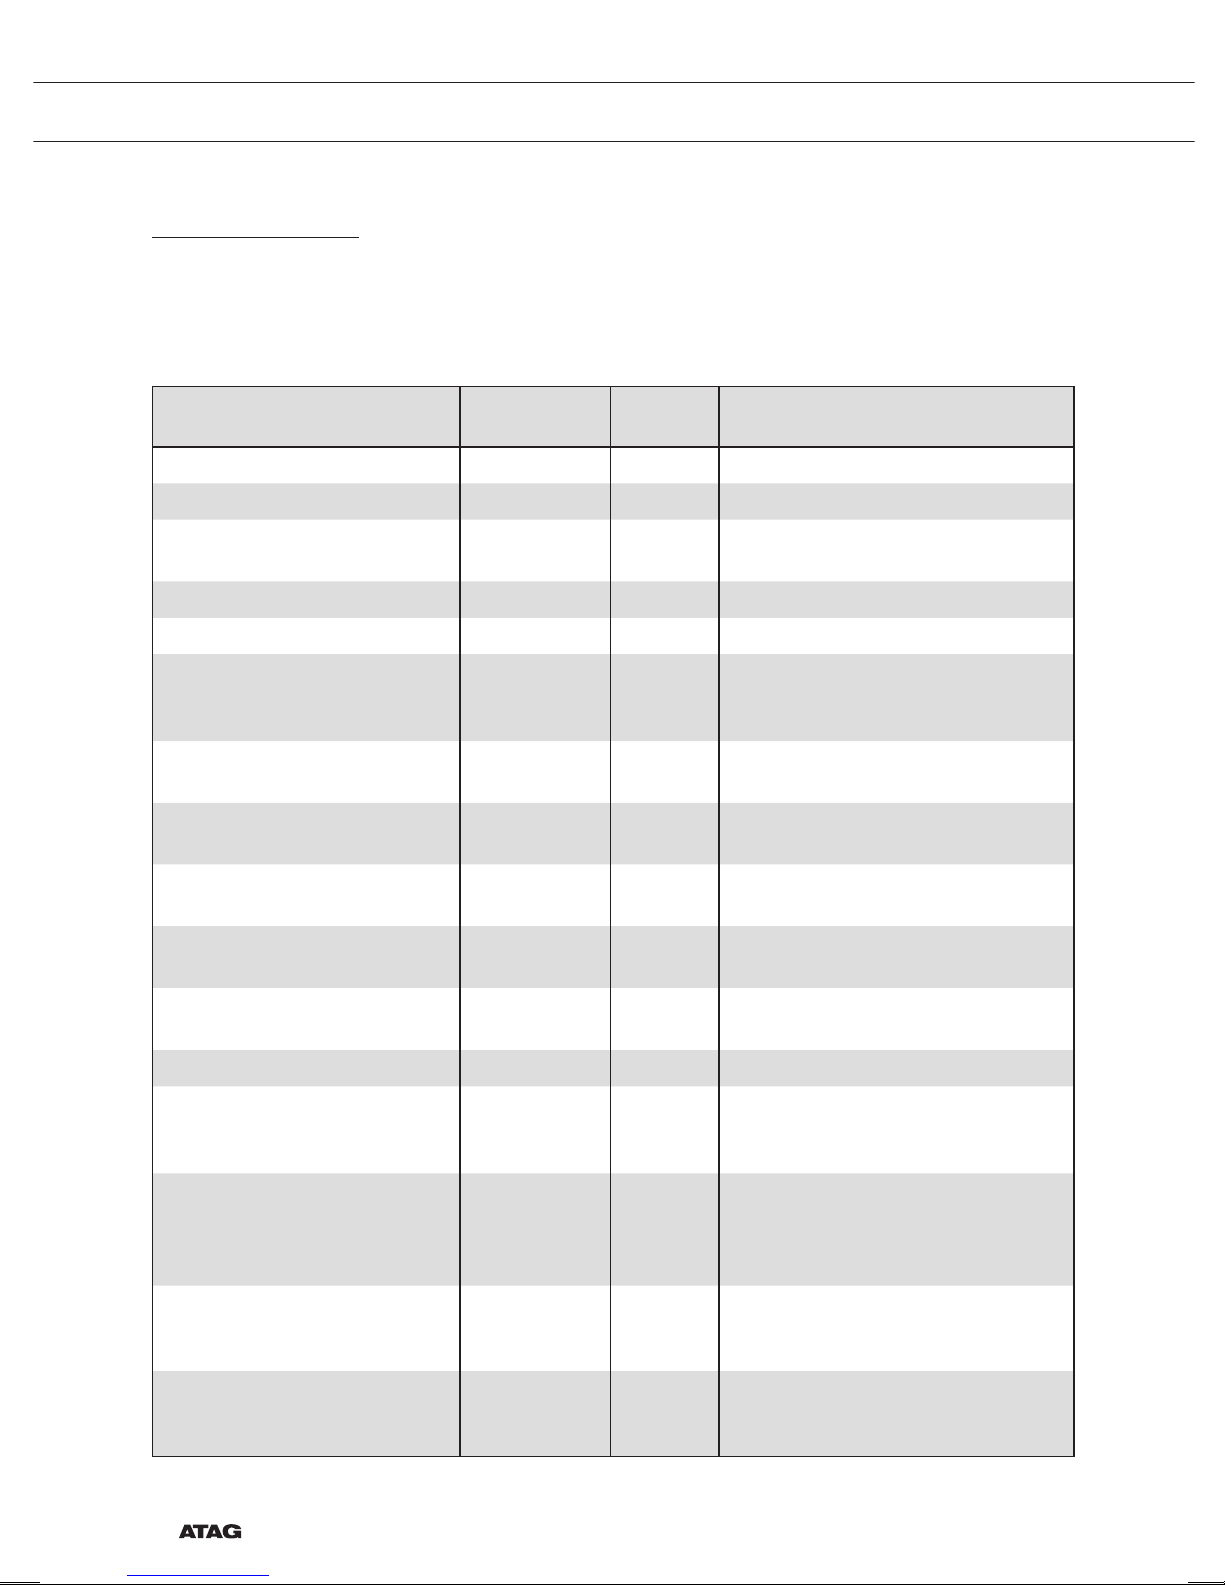
Page 14
NL 14
Display
Nummer/kleur
van de streepjes
op de teststrip
Type PPM
Franse
hardheid (°df)
Duitse hardheid
(°dH)
1 4 groene streepjes Zeer zacht water 0 - 90 0 - 9 0 - 5
2 1 rood streepje Zacht water 90 -178 9 - 18 5 - 10
3 2 rode streepjes Tamelijk hard water 178 - 267 18 - 26 10 - 15
4 3 rode streepjes Hard water 267 - 356 26 - 35 15 - 20
5 4 rode streepjes Zeer hard water
> 356 > 35
> 20
Alle aanvangsinstellingen zijn nu ingesteld en op de display wordt het
stand-by scherm weergegeven.Het apparaat is nu voor gebruik gereed.
De taal, tijd, datum en waterhardheid kunnen worden aangepast
in het menu 'Instellingen' (zie hoofdstuk 'Menu Instellingen'). Het
instellingenmenu kan worden geopend vanuit het beginscherm via het
plusmenu.
Stand-by scherm
Het stand-by scherm toont de tijd, de temperatuur in de oven (indien
deze hoger is dan 80 °C) en de timer (indien ingesteld). Het apparaat
gaat naar de stand-bystand nadat:
• De functieknop is naar 0 gedraaid (‘Uit’ stand).
• De stoptoets meerdere keren is ingedrukt (dieper in het menu).
12 : 00
03 • 05 • 2015
‘Uit’ stand
• Standaard wordt het apparaat uitgeschakeld na
30 minuten inactiviteit.
• Druk op de stoptoets en houd deze ingedrukt om het apparaat
handmatig uit te schakelen.
Het apparaat inschakelen
• Druk op de stoptoets en houd deze ingedrukt om het apparaat in te
schakelen.
• Het apparaat kan ook worden ingeschakeld door de functieknop
naar een functie te draaien.
OM TE BEGINNEN
Page 15
NL 15
Uw functie kiezen
Kies een functie die geschikt is voor de maaltijd die u wilt bereiden.
Raadpleeg de tabel in het hoofdstuk ‘Functietabel’ om te zien welke
functies beschikbaar zijn.
• Ga direct naar de voortgangsstand door op de bevestigingstoets te
drukken (deze toets begint te knipperen wanneer het mogelijk is het
programma te starten).
Nadat u de hoofdfunctie hebt gekozen, wordt het scherm 'Functieinstellingen' actief (grijze achtergrond). In dit geactiveerde gebied is het
nu mogelijk om de instellingen van deze functie te wijzigen.
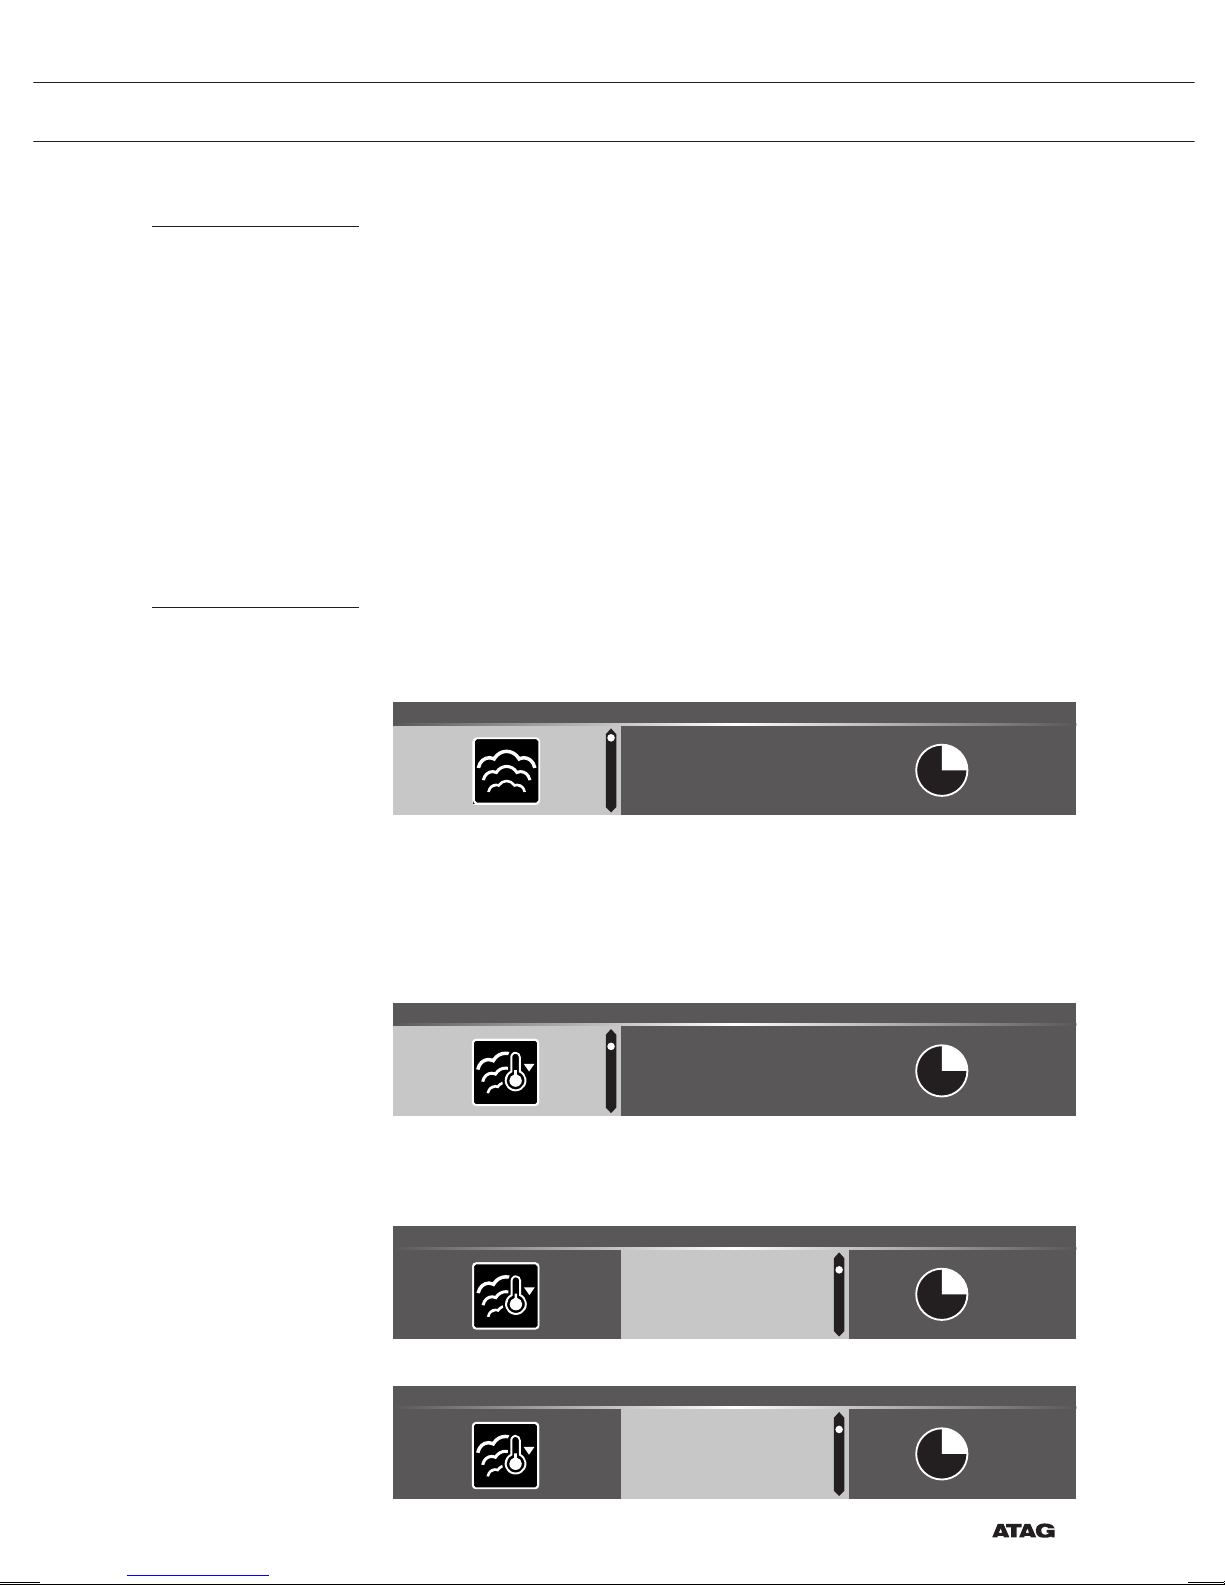
Functie instelstand
Voorbeeld (Stomen / stomen op lage temperatuur / 40 minuten)
1. Kies een hoofdfunctie door aan de functieknop te draaien.
De eerste subfunctie-instelling wordt actief.
80
°C
STOMEN l STOMEN 14:30
Nu kunnen de instellingen naar wens worden gewijzigd. Het volgende
kan worden ingesteld:
• De functie (raadpleeg de tabel in het hoofdstuk 'Functietabel').
• De temperatuur.
• De tijd.
2. Draai aan de keuzeknop om de instelling te wijzigen.
80
°C
STOMEN | STOOM MET LAGE TEMPERATUUR 14:30
3. Bevestig de instelling door op de navigatietoets rechts of op de
keuzeknop te drukken.
De volgende subfunctie-instelling wordt actief.
200
°C
STOMEN l TEMPERATUUR 14:30
75
80
°C
4. Draai aan de keuzeknop om de instelling te wijzigen.
200
°C
STOMEN l TEMPERATUUR 14:30
70
75
°C
80
BEDIENING
Page 16
NL 16
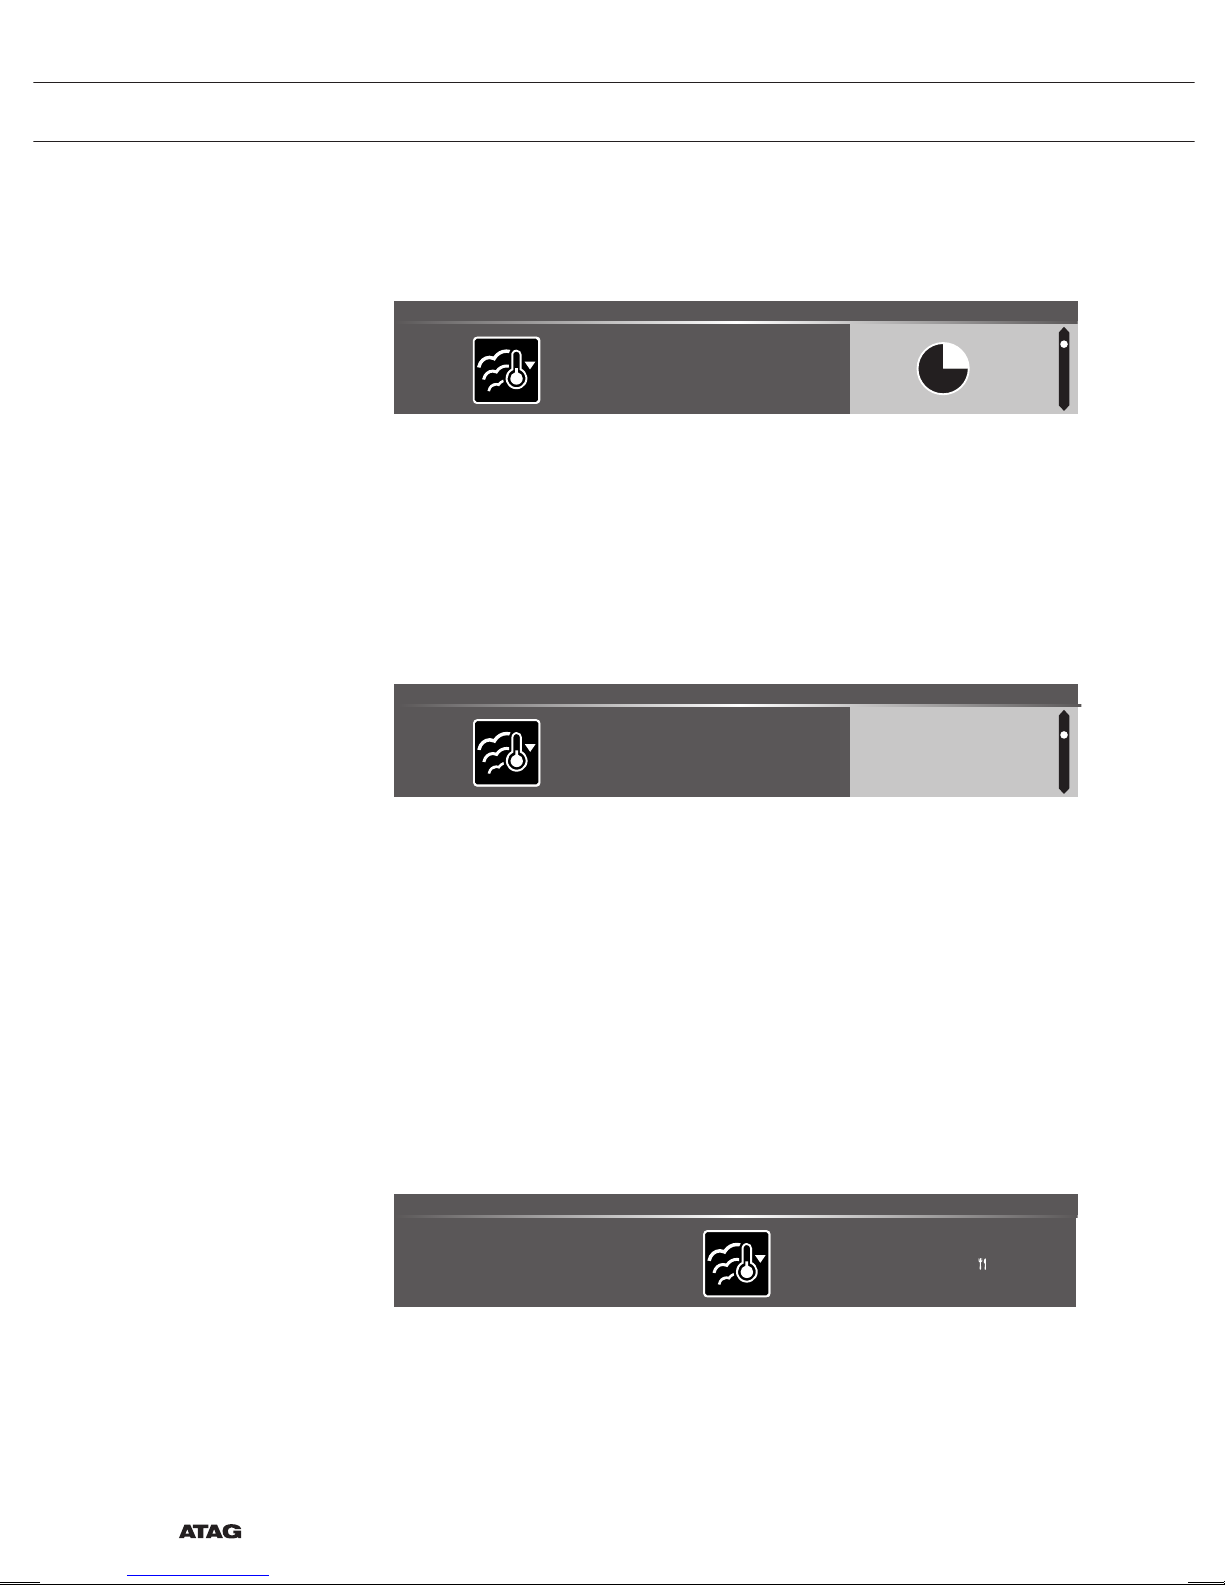
5. Bevestig de instelling door op de navigatietoets rechts of op de
keuzeknop te drukken.
De volgende subfunctie-instelling wordt actief.
75
°C
STOMEN l BEREIDINGSTIJD 14:30
▷ Het timerpictogram geeft aan dat er voor deze functie geen
timer nodig is. Druk op de bevestigingstoets om het programma
met de gekozen instellingen direct te starten (zie stap 7).
▷ Ga naar stap 6 voor het instellen van de timer.
▷ Als er voor de huidige functie een timer nodig is, wordt
daarvoor de standaardinstelling weergegeven in plaats van het
timerpictogram.
6. Draai aan de keuzeknop om de instelling te wijzigen.
75
°C
STOMEN l BEREIDINGSTIJD 14:30
0:39
0:40 U:M
0:41
▷ H:M-notatie
7. Indien gewenst kunt u aanvullende instellingen kiezen met behulp
van het plusmenu (bijvoorbeeld snel voorverwarmen). Zie voor meer
informatie het hoofdstuk 'Plusmenu'.
8. Als bij de gekozen functie stoom wordt gebruikt, moet de tank
worden gevuld met schoon water voordat u het programma start.
9. Het programma starten: druk op de bevestigingstoets om naar de
voortgangsstand te gaan.
Het programma begint met de gekozen instellingen; de oven
gaat naar de voortgangsstand en het voortgangsscherm wordt
weergegeven.
75
°C
14:30
0:40
LAGE TEMP STOMEN
15:10
BEDIENING
H:M
H:M
Page 17
NL 17
Voortgangsstand
• Aan de linkerkant van het scherm wordt de temperatuur
weergegeven (als de ingestelde temperatuur nog niet is bereikt,
schakelt de temperatuur heen en weer tussen oventemperatuur
(grijs) en ingestelde temperatuur (wit)). Als de ingestelde
temperatuur is bereikt, verschijnt een pop-up met de tekst 'de
ingestelde temperatuur is bereikt'.
• Aan de rechterkant van het scherm wordt de tijd aangegeven: de
resterende tijd (aftellen vanaf ingestelde tijd) of de verstreken tijd
(als geen tijd is ingesteld). Naast de bereidingstijd ziet de gebruiker
de eindtijd.
75
°C
14:30
0:40
LAGE TEMP STOMEN
15:10
• Als gekozen is voor voorverwarmen, wordt in de voortgangsstand
eerst de voorverwarmingsdisplay (voorverwarming in de
informatiebalk en het pictogram voor voorverwarming). Alle
instellingen worden weergegeven, alleen zijn de kleuren verwisseld.
De temperatuur van de oven is wit en de gekozen instellingen zijn
grijs. Als de ingestelde temperatuur is bereikt, verschijnt de tekst:
'De ingestelde temperatuur is bereikt. Plaats gerecht in de oven.'
210
°C
14:30
0:40
ONDERWARMTE
15:10
Eindscherm
Als de timer is afgelopen, wordt het eindscherm weergegeven.
De volgende keuzes zijn mogelijk:
• De voortgang stoppen.
• Extra tijd toevoegen
• Opslaan als favoriet
EINDE | EET SMAKELIJK 14:30
De voortgang stoppen.
1. Druk op de bevestigingstoets
Het eindscherm wordt gesloten en het stand-by scherm wordt
weergegeven.
▷ Na 10 minuten inactiviteit schakelt de display over naar stand-by.
BEDIENING
Page 18

NL 18
BEDIENING
Extra tijd toevoegen
1. Druk op de navigatietoets rechts om ‘Extra tijd toevoegen’ te
selecteren.
2. De tijdinstelling wordt actief en kan rechtstreeks worden gewijzigd
door aan de keuzeknop te draaien.
3. Bevestigen door middel van de bevestigingstoets.
Het voorgaande proces is opnieuw geactiveerd.
Opslaan als favoriet
1. Druk op de rechter navigatietoets om ‘Opslaan als favoriet’ te
selecteren.
Het volgende scherm toont 10 posities waarin een programma kan
worden opgeslagen.
2. Selecteer een positie voor uw recept door aan de keuzeknop te
draaien en druk op de bevestigingstoets om het op te slaan.
3. Geef het recept een naam. Draai aan de keuzeknop om de juiste
letter te selecteren; druk op de keuzeknop om te bevestigen en
naar de volgende letter te gaan.
▷ U kunt een teken wissen door middel van de functie backspace
(pijl) in de lijst met tekens.
4. Druk op de bevestigingstoets om het recept op te slaan.
Instellingen wijzigen tijdens voortgang
• Als u tijdens de voortgang op de navigatietoetsen, wordt het actieve
gebied weergegeven. De geselecteerde instelling kan nu worden
gewijzigd, zie hoofdstuk 'Functie instelstand'.
• Na bevestiging met de bevestigingstoets wordt het
voortgangsscherm met de gewijzigde instellingen weergegeven.
• Na 5 seconden inactiviteit worden de voortgangsinstellingen
geannuleerd en keert de display terug naar het voortgangsscherm.
Page 19
NL 19
GEBRUIK
Functietabel
Raadpleeg de tabel om de gewenste functie te kiezen. Raadpleeg ook
de bereidingsinstructies op de verpakking van het gerecht.
• Gebruik alleen glazen schalen die bestand zijn tegen een
temperatuur van 275 °C.
Functie Beschrijving
Ovenfuncties
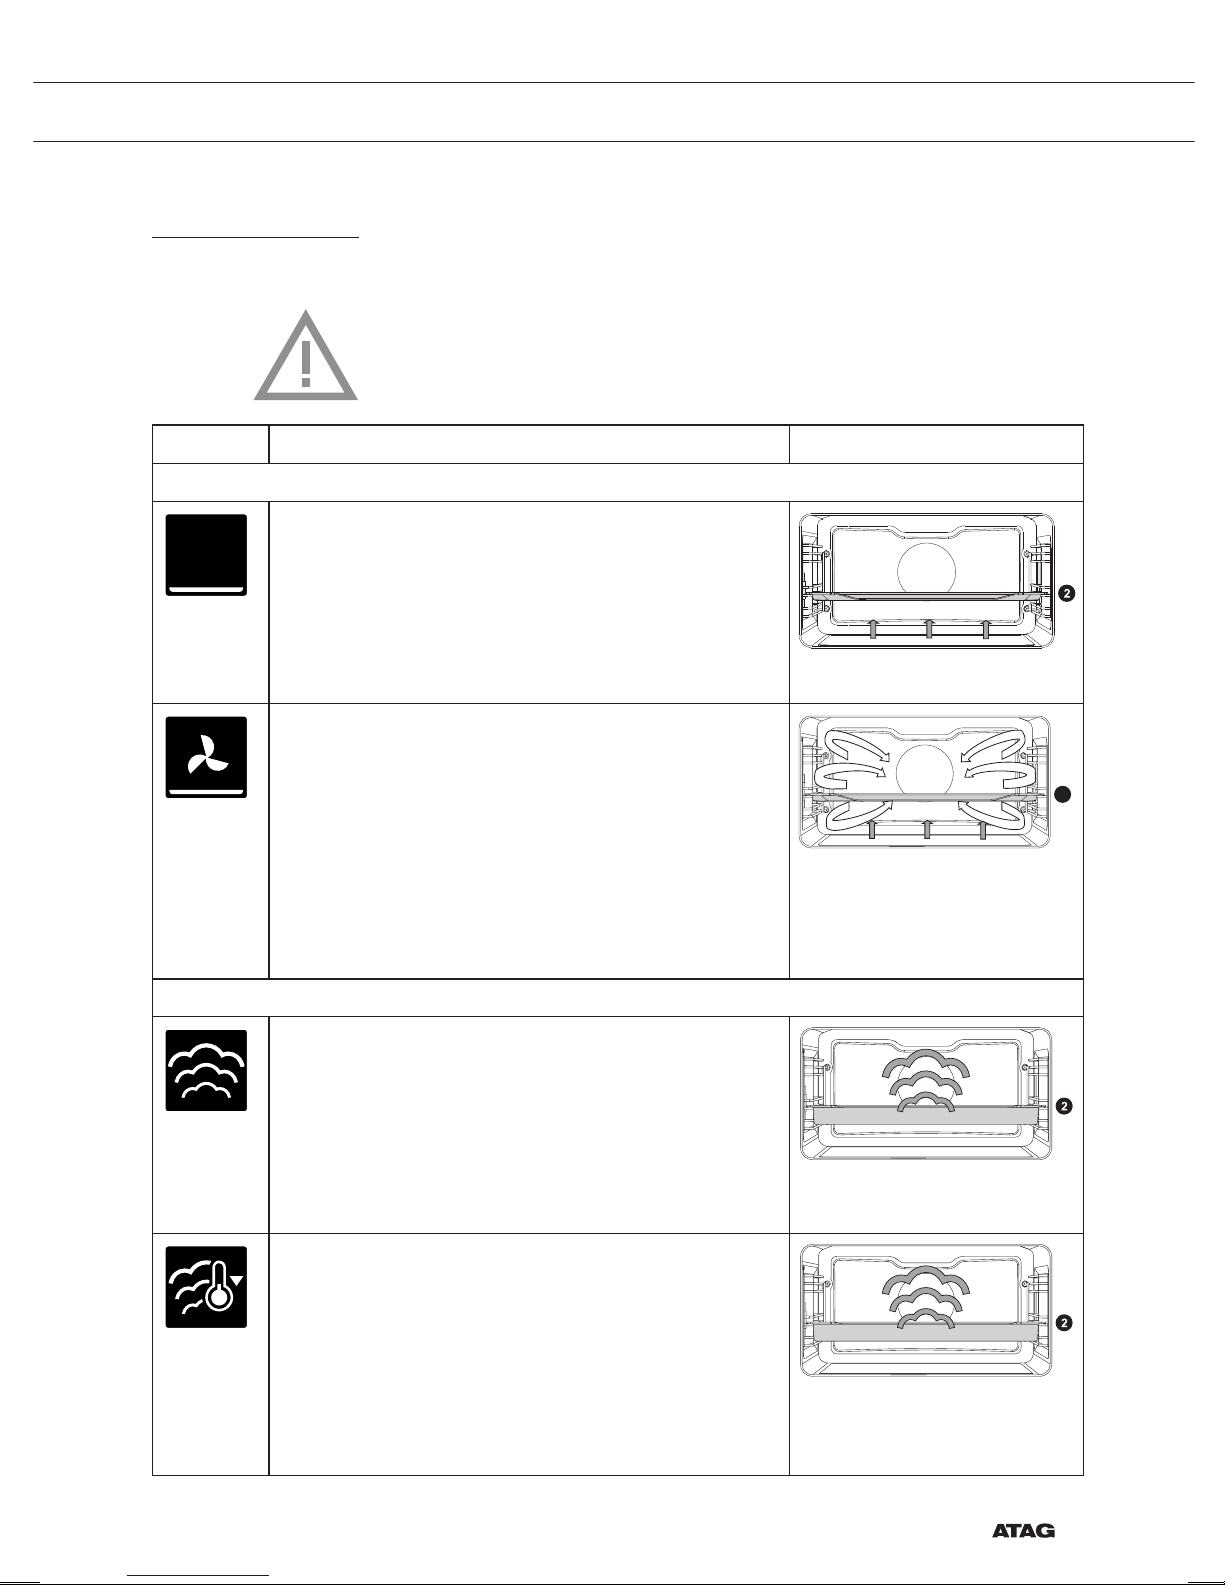
Onderwarmte
• Verwarming alleen door middel van het onderste
verwarmingselement.
• Plaats de bakplaat of het ovenrooster op niveau 2.
• Aanbevolen temperatuur: 160 °C
• Bedoeld voor het verwarmen van borden of het
conserveren van voedsel.
Onderwarmte + Ventilator
• Verwarming door middel van het onderste
verwarmingselement. De warmte wordt door de
ventilator verspreid.
• Plaats een bakplaat die niet te hoog mag zijn op
niveau 2, zodat hete lucht ook over de bovenkant
van het voedsel kan circuleren.
• Aanbevolen temperatuur: 180 °C
• Bedoeld voor het verwarmen van borden of het
conserveren van voedsel.
2
Stoomfuncties
Stoom
• Verwarmen met behulp van stoom.
• Zie het hoofdstuk 'Stoomfunctie' voor meer
informatie.
• Stoom van 100 °C wordt met regelmatige
tussenpozen in de oven gespoten.
• Deze stand kan worden gebruikt om bijvoorbeeld
groenten, eieren, fruit en rijst te stomen
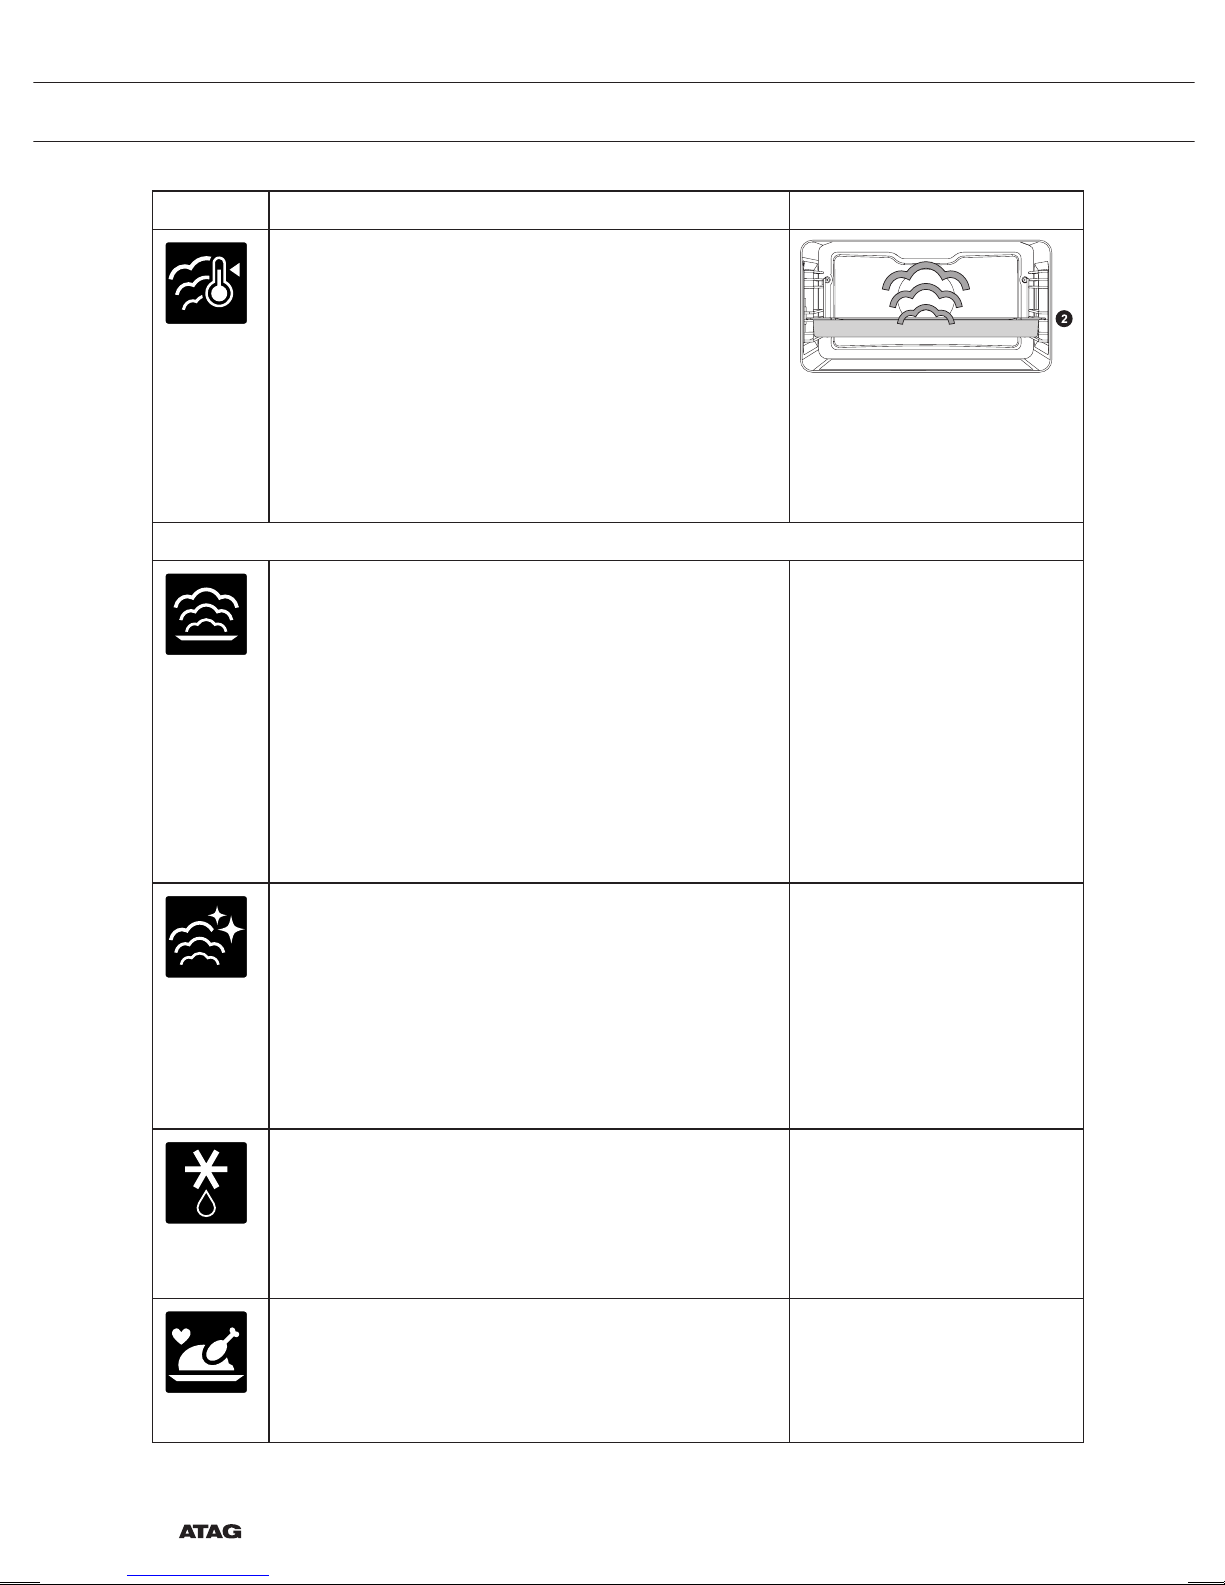
Stoom met lage temperatuur
• Verwarmen met behulp van stoom.
• Zie het hoofdstuk 'Stoomfunctie' voor meer
informatie.
• Stoom wordt met regelmatige tussenpozen in de
oven gespoten.
• Dit menu kan worden gebruikt om groenten en vis
te stomen, om voedsel warm te houden en om
voedsel te ontdooien.
Page 20
NL 20
GEBRUIK
Functie Beschrijving
Sous vide
• Verwarmen met behulp van stoom.
• Zie het hoofdstuk 'Stoomfunctie' voor meer
informatie.
• Het in vacuüm verpakte voedsel wordt langzaam
bereid bij lage temperatuur.
• Met deze methode blijven smaak, vitaminen
en mineralen in het voedsel behouden. De
vacuümverpakking houdt het gerecht langer goed.
• Gebruik deze functie om groenten, fruit, vlees,
gevogelte en vis te bereiden.
Extra functies
Verwarmen
• Borden verwarmen: deze functie wordt gebruikt
om servies (borden, kopjes) te verwarmen zodat
de geserveerde gerechten langer heet blijven.
• Warmhouden: deze stand wordt gebruikt om
reeds bereide gerechten warm te houden.
• Regenereren: deze stand wordt gebruikt om reeds
bereide gerechten te verwarmen. Het gebruik
van stoom betekent dat er geen kwaliteitsverlies
is. Smaak en textuur blijven behouden alsof het
gerecht net is bereid. Verschillende gerechten
kunnen tegelijkertijd worden geregenereerd.
Stoomreinigen
• Met deze functie en een vochtige doek kunt
u gemakkelijk vet en vuil van de ovenwanden
verwijderen.
• Gebruik deze functie alleen als de oven volledig
is afgekoeld. Stoom wordt met regelmatige
tussenpozen in de oven gespoten.
• Na inweken kunnen voedselresten worden
verwijderd met een vochtige doek.
Ontdooien
• Deze functie laat de lucht circuleren door middel
van een ventilator. De lucht wordt verwarmd tot
een temperatuur van 30 °C.
• Gebruik deze functies om bevroren gerechten te
ontdooien.
Programma's en favorieten
• Programma’s voor stomen. Kies een gerecht uit
de lijst met voorgeprogrammeerde gerechten.
• Favorieten: Kies een van uw eigen opgeslagen
stoom recepten.
Page 21
NL 21
GEBRUIK
Functie Beschrijving
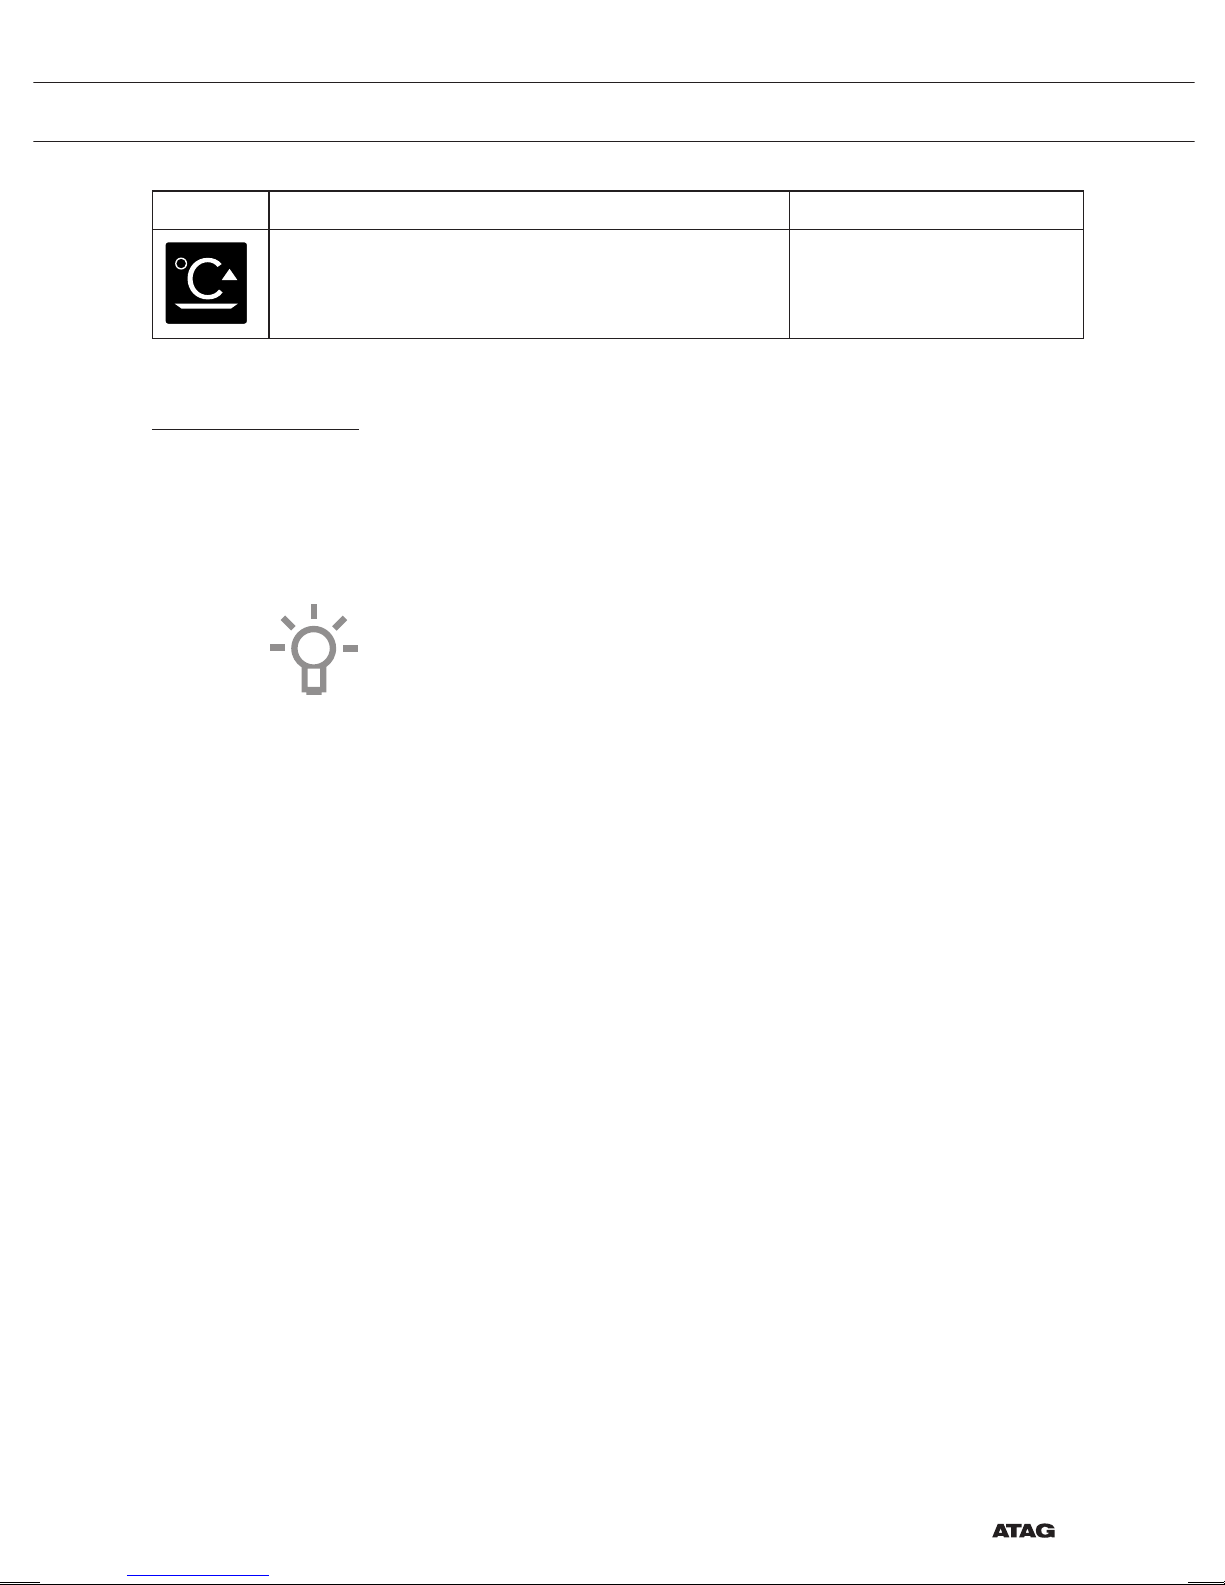
Verwarmen
• Verwarmen van servies
• Warm houden
Stoomfunctie
Stoomkoken
Bij stoomkoken blijven de kleur en smaak van het gerecht op gezonde
en natuurlijke wijze behouden. Bij deze manier van koken komen geen
geurtjes vrij. Het is niet nodig zout of extra kruiden toe te voegen aan
het water in het reservoir.
Opmerking: Telkens als de bereiding met stoom gereed is, wordt het
watersysteem geleegd. Deze actie is hoorbaar en vormt onderdeel van
de normale werking van de stoomoven.
Voordelen van stoomkoken
• Stoomkoken (stoven, garen, braden) begint voordat de temperatuur
in de oven 100 °C heeft bereikt.
• Langzaam koken (stoven, garen, braden) is ook mogelijk bij lagere
temperaturen. Het is gezond: vitaminen en mineralen blijven
behouden aangezien slechts een klein daarvan oplost in het
verwarmde vocht van het gerecht.
• Bij stoomkoken is het niet nodig een vorm van vet of olie toe te
voegen.
• Stoom behoudt de smaak van het gerecht.
• Stoom verspreidt geen geur of smaak, zodat vlees of vis samen
met de groenten bereid kunnen worden.
• Stoom is ook geschikt voor blancheren, ontdooien en opwarmen of
warm houden van voedsel.
Sous vide
De sous vide stoomfunctie gebruiken:
• Vacumeren
▷ Eerst verpakt u de etenswaren in plastic met behulp van een
vacuüm machine. Dit proces verwijdert de meeste lucht uit de
plastic zak. De zak zorgt ervoor dat voedingsstoffen en smaak
behouden blijven bij het koken, wat resulteert in gerechten die
sappiger, zachter en smakelijker zijn.
Page 22

NL 22
GEBRUIK
• Vacuümkoken
▷ Bereid het gerecht op de juiste temperatuur en met de juiste
kooktijd met behulp van de Sous vide stoominstelling van de
oven (Zie ‘Recepten en kooktijden’).
▷ De meeste gerechten kunnen wel een paar uur op gebruiks-
temperatuur worden gehouden (ongeveer 60 °C) ,
wat mise en place zeer eenvoudig maakt: u haalt eenvoudig het
gerecht uit de oven wanneer u het nodig hebt.
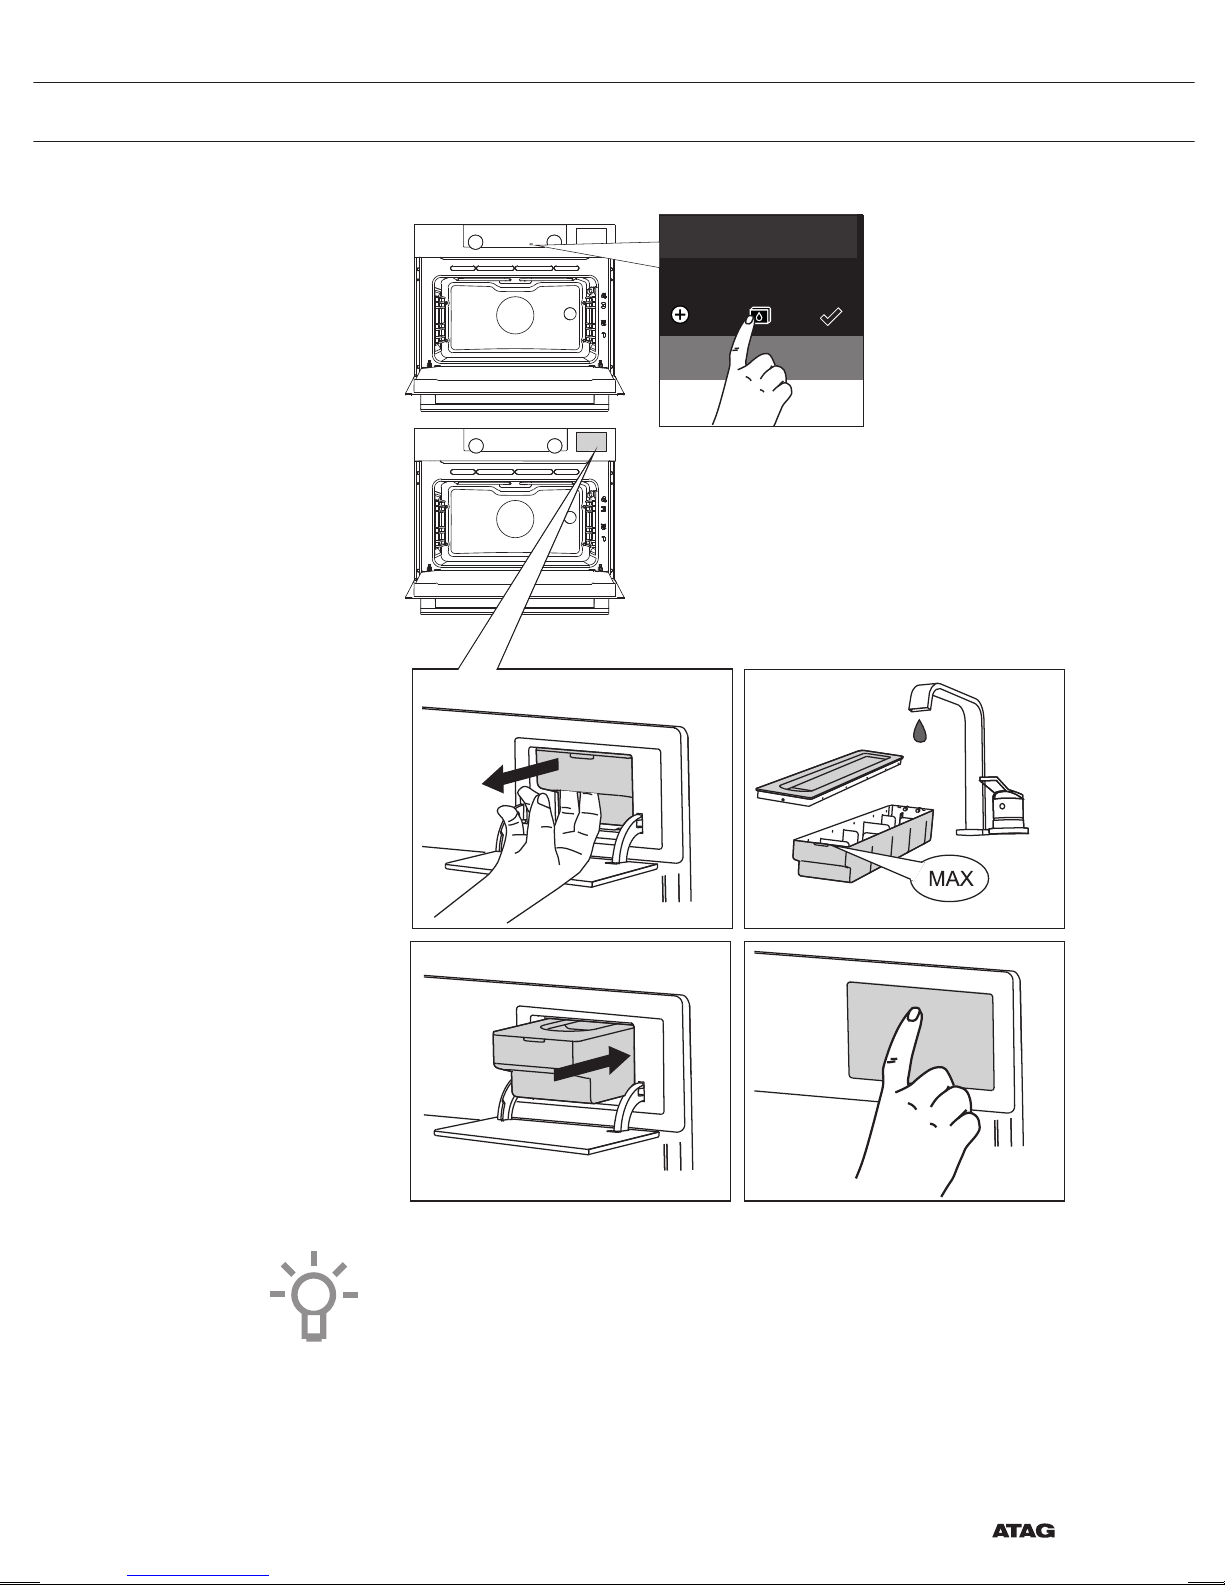
Het waterreservoir vullen
Vul altijd het reservoir voordat u de stoomfunctie gebruikt.
Gebruik schoon, koud leidingwater, flessenwater zonder toevoeging
van mineralen of gedistilleerd water dat geschikt is voor consumptie.
1. Druk op de toets 'waterreservoir' om de klep van het waterreservoir
te openen.
2. Haal het reservoir uit de oven met behulp van het handvat.
3. Verwijder de deksel van het waterreservoir en maak het reservoir
schoon met schoon water.
4. Vul het reservoir met water tot aan de markering 'MAX' op het
reservoir (ongeveer 1,2 liter).
5. Plaats het waterreservoir terug in de oven en druk het aan totdat u
een klik hoort (positieschakelaar is geactiveerd).
6. Sluit de klep van het waterreservoir.
Page 23
NL 23
GEBRUIK
Water dat na bereiding in het stoomsysteem achterblijft, wordt
teruggepompt naar het waterreservoir. Leeg, reinig en droog het
waterreservoir nadat u de stoomfunctie hebt gebruikt. Vul het reservoir
pas vlak voor u het gaat gebruiken!
Page 24
NL 24
GEBRUIK
Stoomtabellen
Stomen en Lage temperatuur stomen
Neem de instellingen en tijden in deze tabel als richtlijn voor het
stomen. Vul het waterreservoir altijd tot de markering ‘max’ met vers
water.
Gerecht Temperatuur
Tijd
(min.)
Accessoire (niveau)
Broccoliroosjes 100 °C 12 - 16 Geperforeerde stoomschaal (2)
Hele wortelen 100 °C 25 - 30 Geperforeerde stoomschaal (2)
Gesneden groenten (paprika,
courgette, wortelen, uien)
100 °C 15 - 20 Geperforeerde stoomschaal (2)
Sperziebonen 100 °C 20 - 25 Geperforeerde stoomschaal (2)
Asperges 100 °C 15 - 20 Geperforeerde stoomschaal (2)
Hele groenten
(artisjokken, bloemkool,
maïskolven)
100 °C 25 - 35 Geperforeerde stoomschaal (2)
Geschilde aardappelen
(in vier stukken)
100 °C 25 - 35 Geperforeerde stoomschaal (2)
Visfilet
(2 cm dik)
80 °C 15 - 20
Geperforeerde stoomschaal in een
niet geperforeerde stoomschaal (2)
Garnalen
(rauw/ongekookt)
100 °C 10 - 14
Geperforeerde stoomschaal in een
niet geperforeerde stoomschaal (2)
Kipfilet 100 °C 23 - 28
Geperforeerde stoomschaal in een
niet geperforeerde stoomschaal (2)
Gekookte eieren
(hard gekookt)
100 °C 15 - 20 Niet geperforeerde stoomschaal (2)
Broodje bapao (bevroren) 100 °C 25 - 30 Geperforeerde stoomschaal (2)
Witte rijst (basmati of pandan)
(voeg twee keer zoveel water
toe)
100 °C 30 - 35 Niet geperforeerde stoomschaal (2)
Fruitcompote
(gebruik een platte, ronde,
glazen ovenschaal, voeg 1 tl
suiker en 2 el water toe)
100 °C 25 - 35 Bakplaat of ovenrooster (2)
Flan/puddinkjes
(6 dessertschaaltjes, elk 100 ml,
bedek de schaaltjes met folie)
90 °C 20 - 30 Bakplaat of ovenrooster (2)
Custardvla (gebruik een grote,
platte, glazen ovenschaal,
afgedekt met folie)
90 °C 30 - 40 Bakplaat of ovenrooster (2)
Page 25
NL 25
GEBRUIK
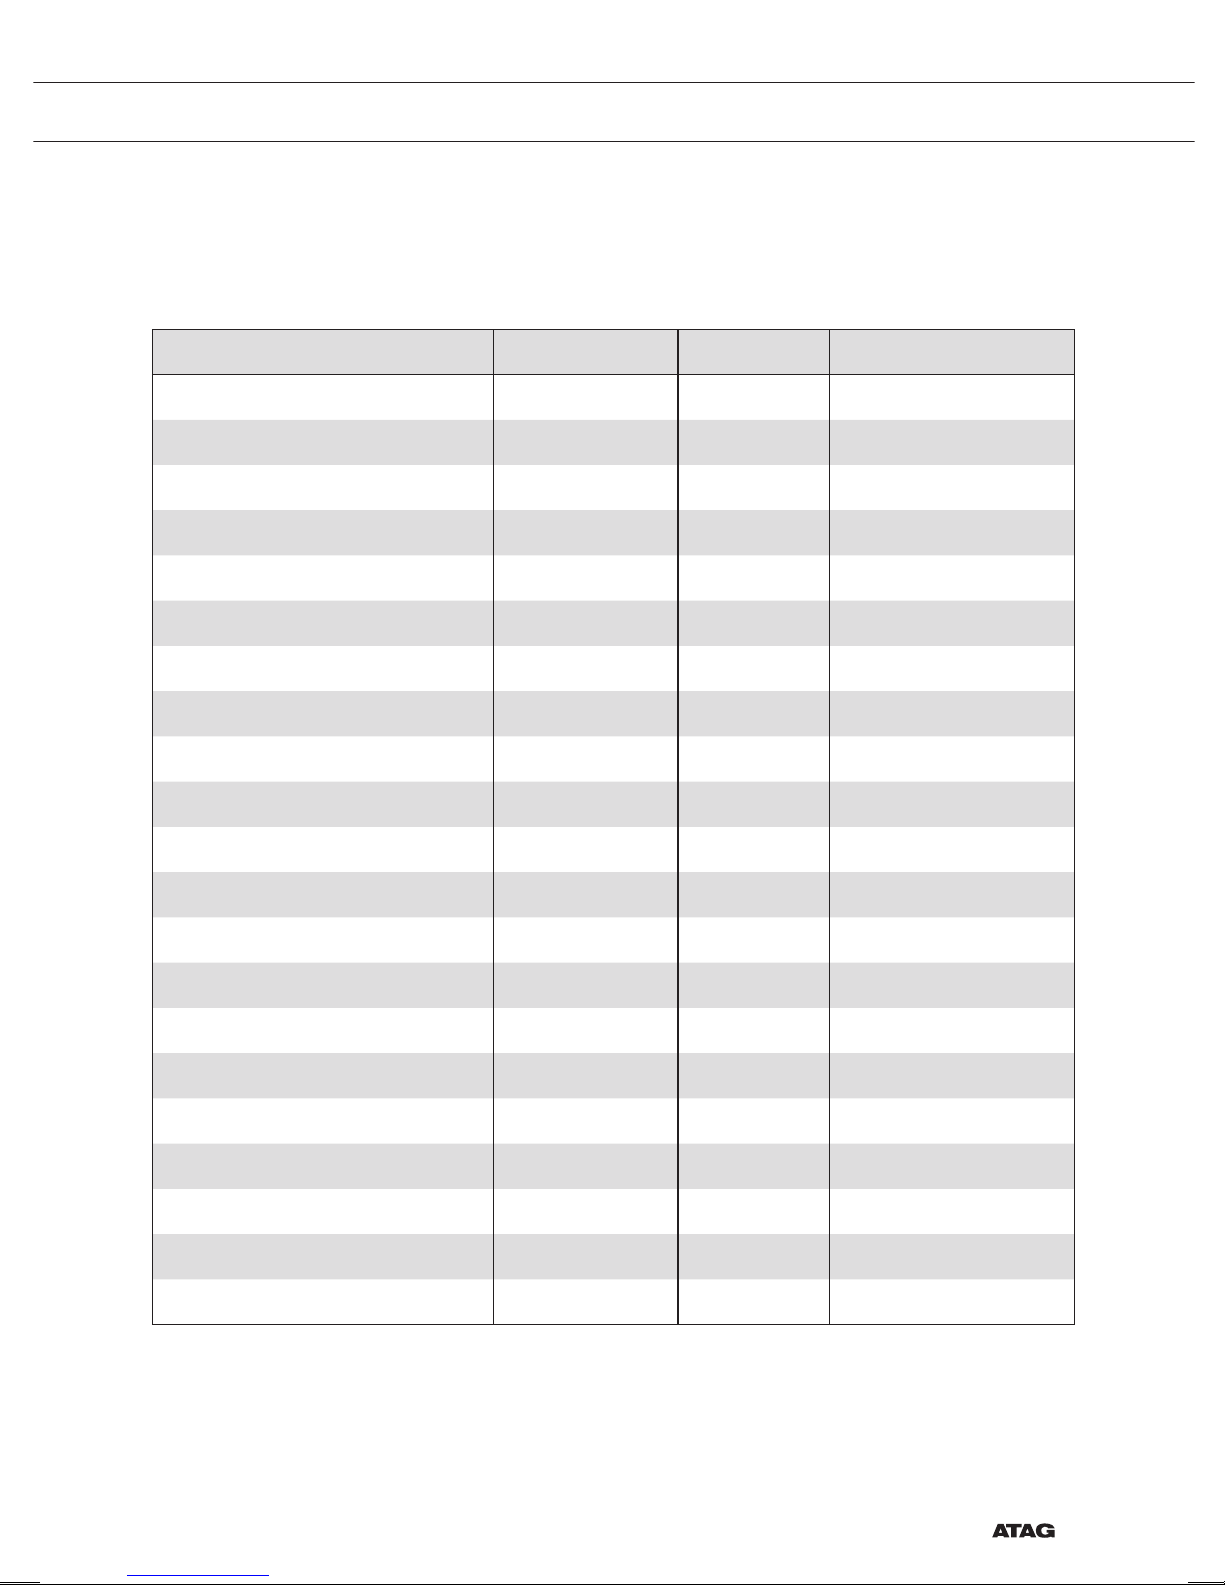
Sous vide
Sous Vide koken is het garen van vacuüm verpakte gerechten op lage
constante temperatuur, gedurende een lange tijd.
Gerecht Temperatuur(°C ) Tijd (min.) Accessoire (niveau)
Ossenhaas medium (4 cm dik) 60 °C 110 - 120 Ovenrooster (2)
Ossenhaas well done (4 cm dik) 65 °C 90 - 100 Ovenrooster (2)
Lamsvlees rare (3 cm dik) 60 °C 180 - 190 Ovenrooster (2)
Lamsvlees medium (3 cm dik) 65 °C 105 - 115 Ovenrooster (2)
Kippenborst zonder bot (3 cm dik) 70 °C 70 - 80 Ovenrooster (2)
Eendeborst zonder bot (2 cm dik) 70 °C 75 - 85 Ovenrooster (2)
Kalkoenborst zonder bot (2 cm dik) 70 °C 75 - 85 Ovenrooster (2)
Zeebaarslet (4 stuks/1 cm dik) 70 °C 25 Ovenrooster (2)
Kabeljauw (2 stuks/2 cm dik) 65 °C 70 - 75 Ovenrooster (2)
Coquilles (groot) 60 °C 100 - 110 Ovenrooster (2)
Mosselen (met schelp) 95 °C 20 - 25 Ovenrooster (2)
Garnalen (zonder schelp/groot) 75 °C 26 - 30 Ovenrooster (2)
Octopus 85 °C 100 - 110 Ovenrooster (2)
Forellet (2 stuks/1,5 cm dik) 65 °C 55 - 65 Ovenrooster (2)
zalmlet (3 cm dik) 65 °C 100 - 110 Ovenrooster (2)
Asperges groen (geheel) 90 °C 40 - 50 Ovenrooster (2)
Asperges wit (geheel) 90 °C 50 - 60 Ovenrooster (2)
Courgette (plakjes van 1 cm) 90 °C 35 - 40 Ovenrooster (2)
Aubergine (plakjes van 1 cm) 90 °C 30 - 35 Ovenrooster (2)
Wortels (plakjes van 0,5 cm) 95 °C 35 - 45 Ovenrooster (2)
Aardappelen (plakjes van 1 cm) 95 °C 35 - 45 Ovenrooster (2)
Page 26
NL 26
GEBRUIK
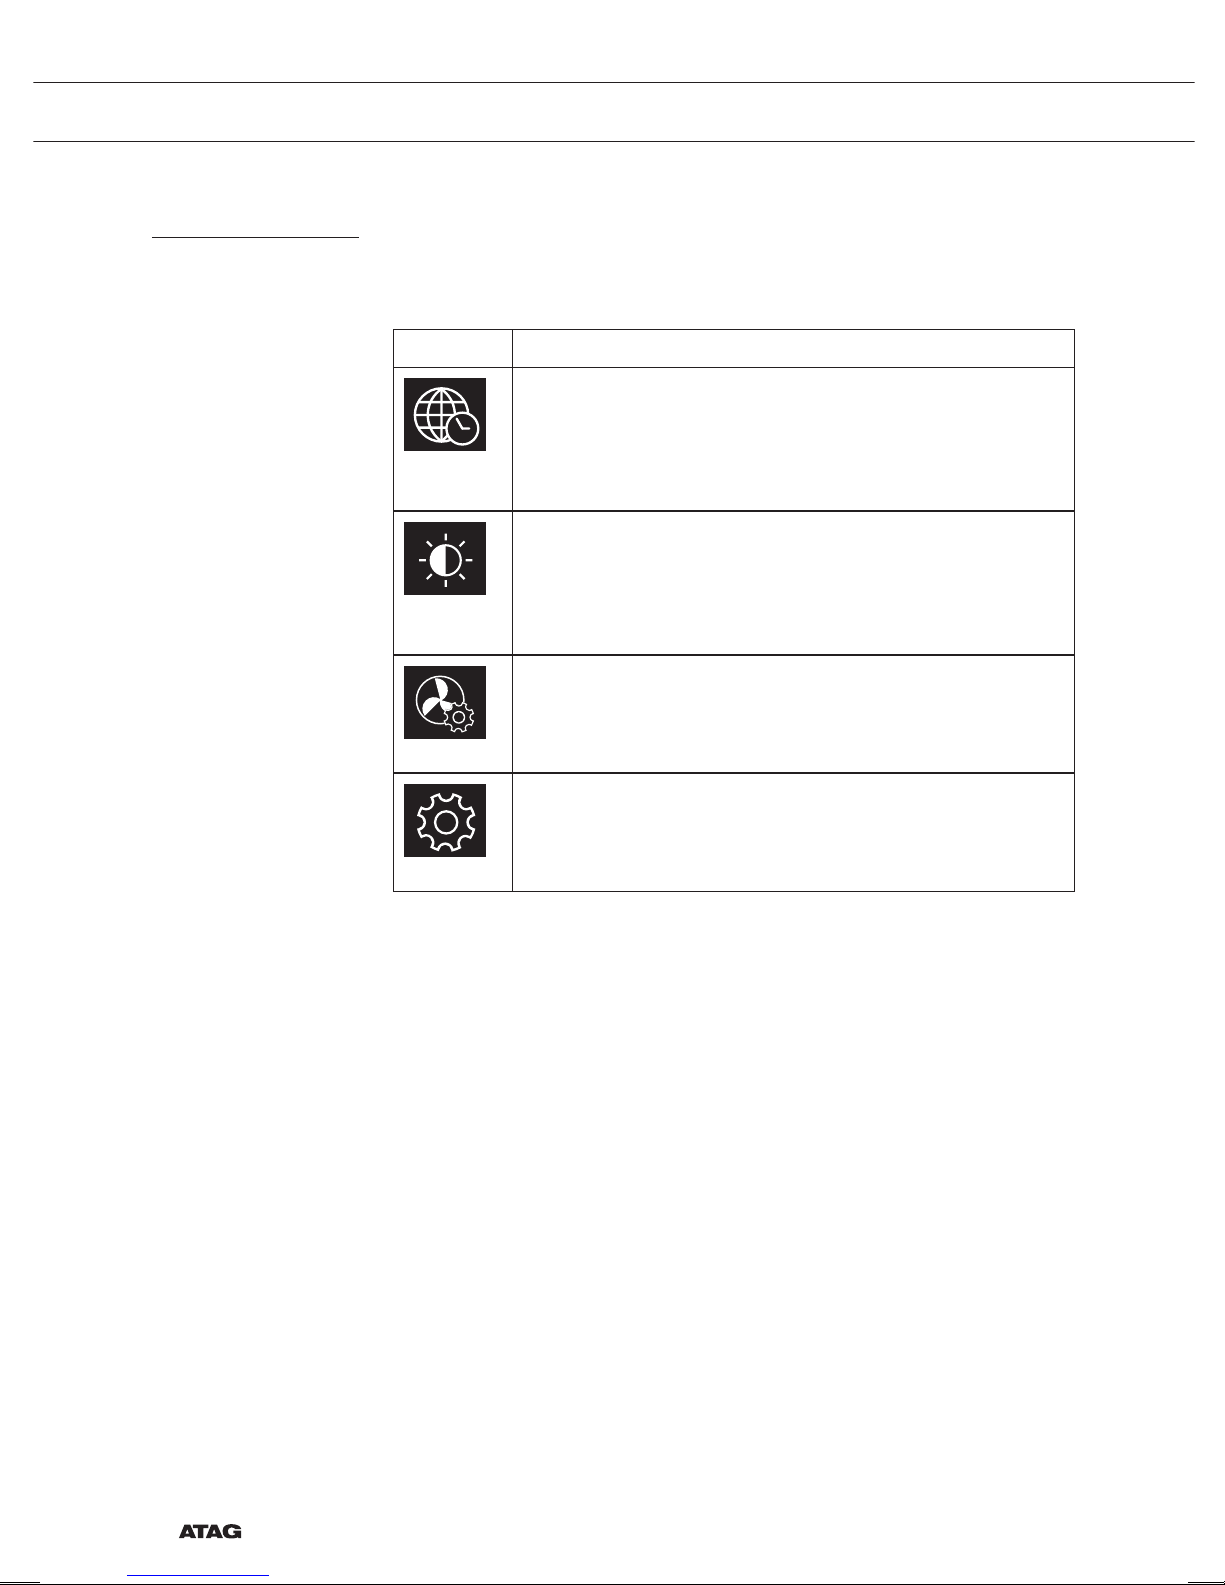
Menu 'Instellingen'
Het menu 'Instellingen' is alleen beschikbaar via het indrukken van de
plustoets wanneer het apparaat op stand-by staat.
Instelling Beschrijving
Algemeen
Taal
Tijd
Datum
Geluid
Scherm
Helderheid
Klok afmeting
Nachtstand
Toestel naar stand-by stand
Koken
Standaard programma intensiteit
Stomen
Voorverwarmen instellingen
Systeem
Toestelinformatie
Ovenverlichting
Fabrieksinstellingen
Algemeen
In dit menu kunt u het volgende instellen:
• Taal (taal van de display)
• Tijd (altijd in 24-uurs indeling)
• Tijdweergave (24 uurs- of 12 uurs-indeling)
• Datum (altijd in de indeling dag-maand-jaar)
• Datumweergave (ddmmjjjj of mmddjjjj)
• Volume (volume van de algemene tonen en alarmsignalen)
• Toetsgeluid (aan/uit)
• Opstart-/afsluitgeluid (geluid aan/uit bij opstarten/afsluiten)
Scherm
In dit menu kunt u het volgende instellen:
• Helderheid (laag, gemiddeld, hoog)
• Nachtstand (start- en eindtijd voor minder helderheid op de display:
stel starttijd in op eerste display, eindtijd op tweede display)
• Formaat klok (klein/groot)
• Stand-by (automatisch uitschakelen / handmatig uitschakelen)
Page 27

NL 27
GEBRUIK
Overschakelen naar handmatig uitschakelen verhoogt het
energieverbruik. Als de oven handmatig wordt uitgeschakeld
(of bij een onderbreking van de voedingsspanning) dan wordt
deze functie gereset (de display wordt dan weer automatisch
uitgeschakeld).
Instellingen voor bereiding
In dit menu kunt u het volgende instellen:
• Standaard programma intensiteit (laag / gemiddeld / hoog)
• Voorverwarmen (voorverwarmen standaard aan of uit)
• Instellingen stomen (waterhardheid / ontkalken)
Systeem
In dit menu kunt u het volgende instellen:
• Toestelinformatie (verzoek toestelinformatie)
• Fabrieksinstellingen (terug naar fabrieksinstellingen)
• Ovenlampje (automatisch uitschakelen na 1 minuut / handmatig)
Plusmenu
Afhankelijk van de functie kan het mogelijk zijn extra functionaliteit te
kiezen (na het kiezen van de hoofdfunctie en de benodigde functie-
instellingen) door op de plustoets te drukken.
• Een klein pictogram naast de huidige tijd geeft aan welke functies
in het plusmenu zijn geactiveerd. De kleur van het pictogram geeft
aan of het actief (wit) of inactief (grijs) is.
• U kunt het plusmenu verlaten door op de stoptoets of de plustoets
te drukken; op de display wordt dan weer het voorgaande scherm
weergegeven.
• Een extra functionaliteit kan worden geannuleerd door op
'Annuleren' te drukken (pictogram met een rood streepje).
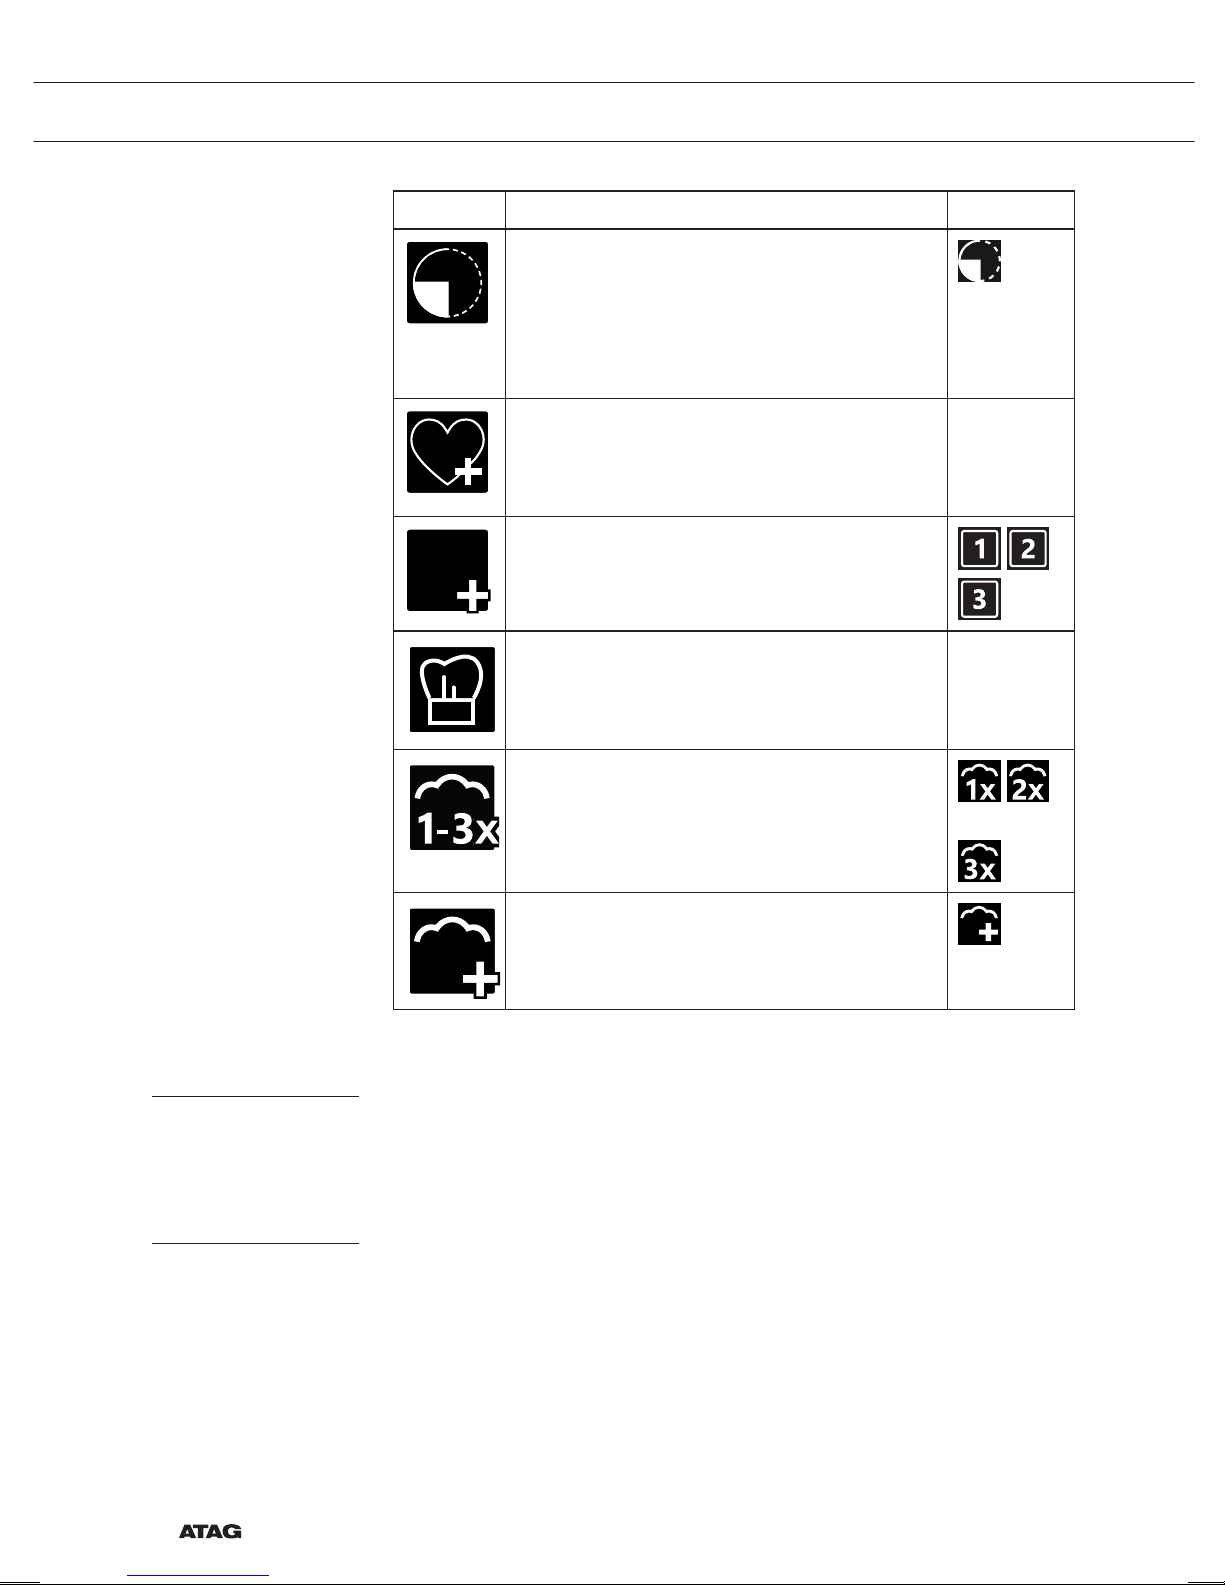
+ Menu Beschrijving Pictogram
Informatie over bereiding
Meer informatie vragen over de
geselecteerde functie.
Snel voorverwarmen
Verwarm de oven snel voor naar de
gewenste temperatuur (niet beschikbaar in
combinatie met uitgestelde start).
Page 28
NL 28
GEBRUIK
+ Menu Beschrijving Pictogram
Uitgestelde start
Het bereidingsproces start automatisch
en is op de gewenste tijd gereed. Alleen
beschikbaar als een bereidingstijd is
ingesteld (niet beschikbaar in combinatie
met voorverwarmen).
Toevoegen aan favorieten
Om de instellingen voor het klaargemaakte
gerecht toe te voegen aan uw favorieten (zie
hoofdstuk over het ‘Eindscherm’).
Meerfase koken
Combineer maximaal drie functies in één
kookproces.
Ga naar handmatige bereiding
Voor het bewerken van een
standaardprogramma ten behoeve van
meerfase koken.
Stoom toevoegen 1-3x
Verdeel de drie stoomcycli gelijkmatig over
het bereidingsproces. Kies minimaal
10 minuten bereidingstijd.
Stoom toevoegen
Voeg een stoomcyclus toe aan het
bereidingsproces.
Informatie over bereiding
Het scherm met bereidingsinfo geeft meer informatie over de gekozen
functie, zoals het benodigde accessoires en de doelen waarvoor de
functie wordt gebruikt.
Snel voorverwarmen
Er zijn twee manieren om snel voorverwarmen te gebruiken:
Snel voorverwarmen activeren in het menu Instellingen (standaard
aan of uit).
1. Druk op de plustoets wanneer het apparaat op stand-by staat. Ga
naar ‘Koken’ en selecteer of snel voorverwarmen standaard aan of uit
moet staan.
2. Druk op de bevestigingstoets.
Page 29

NL 29
GEBRUIK
▷ Als de functie Snel voorverwarmen is ingesteld op ‘standaard
aan’ wordt het kleine pictogram voor deze functie afgebeeld om
aan te geven dat het voorverwarmen actief is.
▷ Deze optie is alleen beschikbaar voor de ovenfuncties.
Snel voorverwarmen activeren in het plusmenu (tijdens gebruik).
1. Druk op de plustoets (in de functie instelstand)
2. Selecteer ‘Snel voorverwarmen’ door op de navigatietoets rechts te
drukken.
3. Druk op de bevestigingstoets om snel voorverwarmen te activeren.
Het kleine pictogram voor voorverwarming wordt weergegeven
naast de huidige tijd.
▷ Wanneer voorverwarmen is geactiveerd, wordt de uitgestelde start
grijs weergegeven, omdat deze functies niet tegelijk kunnen werken.
▷ Wanneer de uitgestelde start wordt geactiveerd, wordt het
voorverwarmen grijs weergegeven.
▷ Druk opnieuw op de bevestigingstoets om te annuleren.
Beginnen met snel voorverwarmen
• Als een programma is gestart en het begint met snel
voorverwarmen, wordt een pop-up weergegeven. Na 15 sec.
verdwijnt de pop-up automatisch. In het voortgangsscherm wordt
het pictogram voor snel voorverwarmen weergegeven, de tijd wordt
grijs afgebeeld.
• Als de ingestelde temperatuur is bereikt, verschijnt een pop-up met de
tekst 'de ingestelde temperatuur is bereikt'. Het gerecht kan worden
geplaatst. Plaats het gerecht en de timer start automatisch (na het
sluiten van de deur). De pop-up verdwijnt pas wanneer de deur is
geopend en weer gesloten of door op de bevestigingstoets te drukken.
▷ Door het indrukken van de bevestigingstoets wordt niet aan de
bereidingstijd begonnen maar wordt het toestel op de ingestelde
temperatuur gehouden. Die toestand blijft gehandhaafd totdat
de deur wordt geopend.
Uitgestelde start
Gebruik de functie ‘Uitgestelde start’ om op een later moment te
beginnen met koken door het instellen van de gewenste eindtijd.
1. Druk op de plustoets (in de functie instelstand).
2. Kies ‘Uitgestelde start’ met de navigatietoets rechts.
3. Druk op de bevestigingstoets.
Op het display worden het symbool voor uitgestelde start, de
bereidingstijd en de eindtijd weergegeven.
Page 30

NL 30
GEBRUIK
4. Verander de eindtijd door aan de keuzeknop te draaien en bevestig
de keuze met de bevestigingstoets.
Er wordt een klein pictogram weergegeven om aan te geven dat de
functie actief is.
▷ De uitgestelde start annuleren: ga naar ‘Uitgestelde start’
en selecteer ‘Uitgestelde start annuleren’ (een pop-up wordt
weergegeven om te bevestigen dat de uitgestelde start is
geannuleerd).
5. Het programma starten: druk op de bevestigingstoets om naar de
voortgangsstand te gaan.
De functie start automatisch op de berekende starttijd.
Meerfase koken
Met deze functie kunt u maximaal drie functies combineren in één
kookproces. Selecteer verschillende functies en instellingen om het
door u gewenste bereidingsproces samen te stellen.
1. Druk op de plustoets (in de functie instelstand).
2. Selecteer 'Meerfase koken' door op de navigatietoets rechts te
drukken.
3. Druk op de bevestigingstoets
Een klein pictogram wordt weergegeven naast de huidige tijd. De
eerste fase is al gevuld met de huidige instellingen voor de functie.
Als er geen tijd is ingesteld, wordt de standaardtijd ingesteld voor
de eerste fase.
4. Om een fase toe te voegen, kiest u de tweede functie door op de
navigatietoetsen te drukken of door op de keuzeknop te drukken.
5. Druk op de bevestigingstoets
De display schakelt over naar het scherm 'Instellingen'.
6. Selecteer de gewenste functie en stel de temperatuur en tijd in.
7. Sla de fase op en keer terug naar het overzicht voor meerfase
koken door op de bevestigingstoets te drukken.
▷ Als u op de stoptoets drukt, wordt de instelling geannuleerd en
keert de display terug naar het vorige scherm.
8. Indien gewenst, kunt u een derde fase toevoegen. Herhaal de
stappen 4, 5, 6 en 7.
9. Na bevestiging worden op de display de ingestelde fasen
weergegeven met een pictogram voor bewerken en wissen.
10. Als alle fasen naar wens zijn ingesteld, keert u terug naar het
scherm met instellingen voor de oven. Druk op de plustoets om het
plusmenu te sluiten.
Page 31

NL 31
Op de display wordt het normale scherm met instellingen
weergegeven met de instellingen voor de eerste fase (wit fase
1-pictogram).
11. Begin het proces door op de bevestigingstoets te drukken.
▷ Als u op de stoptoets drukt, wordt het menu voor meerfase
koken gesloten en keert de display terug naar de normale stand.
Ga naar handmatige bereiding
• In de stand 'handmatige bereiding' kunt u een standaardprogramma
kiezen uit de functie 'Programma's en favorieten' en dit op dezelfde
manier bewerken als in de stand 'Meerfase koken'.
• Als u de handmatige functie kiest in het plusmenu, wordt een pop-
up weergegeven: 'Overschakelen naar handmatige bereiding?' Na
bevestiging schakelt de display om naar de stand 'Meerfase koken'
als het geselecteerde programma meerdere fasen heeft.
Programma's en favorieten
Automatische programma's
• U kunt automatische programma's gebruiken voor het
bereiden van voedsel door een gerecht te kiezen uit de lijst met
voorgeprogrammeerde gerechten. Kies eerst het soort gerecht en
dan het gerecht zelf uit de beschikbare lijst.
• Alle programmacategorieën zijn voorzien van een afbeelding. Als
een gerecht eenmaal is gekozen, worden de instellingen van het
programma weergegeven. De naam van het gerecht en de naam
van de actieve keuze worden weergegeven in de tekstbalk.
• Bij de instellingen is eerst een afbeelding van het gerecht zichtbaar
(niet bewerkbaar), het gewicht (het hangt af van het gerecht of
dit bewerkbaar is), de intensiteit (niet altijd bewerkbaar) en de
bereidingstijd. Indien nodig, past u de intensiteit en/of het gewicht aan.
Favorieten (zie hoofdstuk 'Eindscherm')
• U kunt kiezen voor een van uw eigen recepten die in de favorieten
zijn opgeslagen.
• Als er geen opgeslagen recepten zijn, wordt een pop-up
weergegeven: 'Geen opgeslagen recepten'.
• De naam van het recept verschijnt in de tekstbalk en de opgeslagen
oveninstellingen worden weergegeven
GEBRUIK
Page 32

NL 32
Kookwekker
De kookwekker kan onafhankelijk van de oven worden gebruikt.
1. Druk op de kookwekkertoets.
2. Verander de tijd door aan de keuzeknop te draaien.
▷ De langst mogelijke instelling is 23:59.
3. Bevestig de instelling door op de bevestigingstoets te drukken.
De kookwekker wordt gestart.
▷ U kunt de timer annuleren door de tijd terug te stellen naar 0:00
en op de bevestigingstoets te drukken.
▷ Om het kookwekkermenu te sluiten, drukt u op de
kookwekkertoets of de stoptoets.
4. Wanneer de kookwekker afgaat, verschijnt er een pop-up met de
tekst 'Kookwekker afgelopen' en er klinkt een akoestisch signaal.
Druk op de stoptoets om het signaal uit te schakelen en het popupmenu te sluiten.
▷ Het geluid stopt na ongeveer 2 minuten automatisch.
Kinderslot
Het bedieningspaneel van de oven kan worden vergrendeld met het
kinderslot om onbedoeld gebruik van de oven te voorkomen.
1. Druk op beide navigatietoetsen (links en rechts) tegelijkertijd en
houd deze ingedrukt.
Het apparaat wordt daarmee vergrendeld. Er wordt een popup weergegeven. Na 3 seconden sluit de pop-up met de tekst
'Toetsvergrendeling is actief'. De huidige staat van het apparaat is
zichtbaar.
▷ Als de toetsvergrendeling wordt geactiveerd terwijl een
bereidingsproces in gang is, wordt het proces voortgezet.
▷ Als tijdens de toetsvergrendeling op een toets wordt gedrukt,
wordt opnieuw de tekst 'Toetsvergrendeling is actief'
weergegeven.
▷ De stoptoets is tijdens de vergrendeling nog wel actief. Als
het apparaat wordt uitgeschakeld, wordt het bereidingsproces
gestopt. Voordat u het apparaat weer kunt inschakelen, dient u
eerst de toetsvergrendeling te deactiveren.
2. U kunt de toetsvergrendeling deactiveren door opnieuw op beide
navigatietoetsen (links en rechts) tegelijkertijd te drukken en deze
ingedrukt te houden.
GEBRUIK
Page 33

NL 33
Verwarmen
• Regenereren
▷ Deze functie wordt gebruikt om reeds bereide gerechten op
te warmen. Door het gebruik van stoom is er geen verlies van
kwaliteit. Smaak en textuur blijven behouden, net als bij vers
bereide gerechten. Er kunnen verschillende gerechten gelijktijdig
worden geregenereerd.
• Bordenwarmen
▷ Deze functie kunt u gebruiken wanneer u servies (borden, kopjes)
wilt verwarmen zodat de geserveerde gerechten langer heet blijven.
▷ Voor deze functie kunt u de temperatuur en duur van het
verwarmen instellen.
• Warmhouden
▷ Gebruik deze functie om gerechten die al zijn bereid, op
temperatuur te houden.
▷ Voor deze functie kunt u de temperatuur en duur van het warm
houden instellen.
Ontdooien
• Deze functie maakt gebruik van hete lucht (30 ºC). Deze functie
wordt gebruikt voor het langzaam ontdooien van bevroren
gerechten (cakes, biscuit, koekjes, brood, broodjes en bevroren
fruit).
• Voor deze functie kunt u de duur instellen.
• Draai het voedsel halverwege de ontdooitijd om; roer in het gerecht
en als er grote stukken samengeklonterd zijn, breekt u deze uiteen.
GEBRUIK
Page 34

NL 34
REINIGEN
Het apparaat reinigen
Reinig de oven regelmatig om te voorkomen dat vet- en voedseldeeltjes
zich ophopen, vooral op de interne en externe oppervlakken, de deur
en de afdichting.
• Activeer het kinderslot (om te voorkomen dat het apparaat per
ongeluk wordt ingeschakeld).
• Reinig de oppervlakken aan de buitenkant met een zachte doek en
warm water met zeep.
• Neem vervolgens de oppervlakken af met een schone, vochtige
doek en maak ze droog.
• Verwijder spatten en vlekken op de oppervlakken van de binnenkant
met een doek en een sopje.
• Neem vervolgens de oppervlakken af met een schone, vochtige
doek en maak ze droog.
Belangrijk
• Let erop dat er geen water in de ventilatieopeningen komt.
• Gebruik nooit schurende schoonmaakmiddelen of chemische
oplosmiddelen.
• Zorg er altijd voor dat de afdichting van de deur schoon is. Dat
voorkomt dat zich vuil ophoopt en zorgt ervoor dat u de deur altijd
goed kunt sluiten.
Stoomreinigen
Met de functie stoomreinigen en een vochtige doek kunt u gemakkelijk
vet en vuil van de ovenwanden verwijderen.
Stoomreinigen gebruiken
Gebruik het stoomreinigen alleen als de oven volledig is afgekoeld. Het
is moeilijker om vet en vuil te verwijderen als de oven heet is.
Het stoomreinigingsprogramma duurt 30 minuten.
Voedselresten op de geëmailleerde wanden zijn na 30 minuten
voldoende geweekt, zodat ze kunnen worden verwijderd met een
vochtige doek.
1. Verwijder alle accessoires uit de oven.
2. Selecteer de functie 'stoom'.
3. Druk op de bevestigingsknop om het stoomreinigen te starten.
Let op: Tijdens het reinigingsproces de deur niet openen.
Page 35

NL 35
Het filter van de watertank reinigen
Als het filter van de watertank vuil is, kunt u deze afspoelen onder de
kraan.
1. Verwijder het aanzuigpijpje met het filter.
2. Spoel het af onder de kraan en plaats het weer terug. Zorg ervoor
dat het filter de bodem van de watertank raakt.
Ontkalken
Tijdens het stoomproces kunnen afgezette mineralen zich ophopen in
het stoomsysteem. Deze moeten van tijd tot tijd worden verwijderd.
Deze taak moet worden uitgevoerd wanneer het bericht 'Apparaat moet
worden ontkalkt' wordt weergegeven.
Als het apparaat na drie waarschuwingen nog niet is ontkalkt, zijn de
stoomfuncties niet langer beschikbaar. Gebruik deze functie alleen
als de oven volledig is afgekoeld. Het ontkalkingsproces bestaat
uit ontkalken en naspoelen. Tijdens het proces wordt op de display
informatie weergegeven en wordt aangegeven welke handelingen
moeten worden uitgevoerd.
1. Schenk water met ontkalkingsmiddel in het waterreservoir.
Kijk op de verpakking van het ontkalkingsmiddel voor de juiste
mengverhouding.
2. Open het menu 'Instellingen'
3. Kies 'Bereidingsinstellingen'
4. Kies 'Stoominstellingen'
5. Kies ‘Ontkalken’ om deze functie te selecteren.
6. Druk op de bevestigingstoets om het ontkalken te starten.
Opmerking
Wij raden u aan NOKALK/DLS te gebruiken voor het ontkalken.
NOKALK/DLS is een uiterst efficiënt ontkalkingsmiddel op basis van
natuurlijke, volledig biologisch afbreekbare ingrediënten. De oplossing
is niet-corrosief,
REINIGEN
Page 36

NL 36
niet agressief en milieuvriendelijk.
Het product ontkalkt niet alleen effectief, het heeft ook een reinigend en
antibacterieel effect, wat ervoor zorgt dat de interne componenten
van het apparaat in een optimale hygiënische staat worden gehouden.
De goede smaak van voedsel wordt daarmee behouden en de
gebruiksduur van het apparaat verlengd.
• Water wordt gebruikt voor het stoomproces. Water bevat calcium
en magnesium. Door verwarming condenseert het water, waardoor
afzetting van mineralen optreedt (niet schadelijk voor mensen).
• Wanneer de ontkalkingscyclus wordt onderbroken voordat de
cyclus is beëindigd,
moet het programma opnieuw worden gestart vanaf het begin.
Verwijderen en reinigen van de geleiderails
Gebruik enkel conventionele schoonmaakmiddelen om de geleiderails
te reinigen.
• Verwijder de schroef met een schroevendraaier.
• Haal de geleiderails los uit de gaten in de achterwand.
REINIGEN
Page 37

NL 37
Ovenlamp vervangen
De lamp in dit huishoudelijke apparaat is uitsluitend bedoeld voor
verlichting van dit apparaat. De lamp is niet geschikt voor de
verlichting van een huishoudelijke ruimte.
De lampen (2x halogeen G9, 230 V, 25 W) zijn gebruiksartikelen en
vallen daarom niet onder de garantie. Verwijder eerst de bakplaten, de
ovenroosters en de inschuifgeleiders.
• Maak het toestel spanningsloos door de stekker uit de
stopcontact te verwijderen of de zekering in de meterkast uit te
schakelen!
• Let op; de halogeenlamp kan zeer heet zijn! Gebruik bescherming
voor het verwijderen van de lamp.
1. Draai de vier schroeven van het afdekplaatje los. Verwijder het
afdekplaatje, het glas en de afdichtring.
2. Verwijder de defecte halogeenlamp en vervang deze door een nieuwe.
3. Plaats het afdekplaatje, het glas en de afdichtring weer terug.
Let op: de afdichtring moet perfect in de uitsparing in de ovenwand
passen.
REINIGEN
Page 38

NL 38
Ovendeur verwijderen
Houd uw vingers uit de buurt van de scharnieren van de
ovendeur. De scharnieren zijn voorzien van veren en kunnen letsel
veroorzaken als ze terugveren.
Controleer of de scharniervergrendelingen correct zijn
aangebracht om de scharnieren te vergrendelen.
Verwijder de ovendeur.
1. Open de deur tot deze volledig in open is.
2. Til beide blokkeerhendels (A) iets op en trek deze in de richting van
de ovendeur (B).
De scharnieren worden vergrendeld onder een hoek van 45°.
3. Doe de deur voorzichtig een beetje dicht totdat deze in een hoek
van 45° staat.
4. Verwijder de deur door deze op te tillen en te kantelen in de richting
van de oven (C). De scharnieren moeten uit de sleuven in de oven
worden getild.
B
A
C
Ovendeur installeren.
1. Houd de deur onder een hoek van ongeveer 45° vóór de oven.
2. Plaats de scharnieren in de sleuven en controleer of ze beide
correct zijn geplaatst.
3. Open de deur tot deze volledig in open is.
4. Til scharniervergrendelingen op en beweeg ze in de richting van de
oven.
5. Sluit de ovendeur zachtjes en controleer of deze correct is gesloten.
Als de deur niet correct opent of sluit, controleer dan of de
scharnieren goed in de sleuven zijn geplaatst.
REINIGEN
Page 39
NL 39
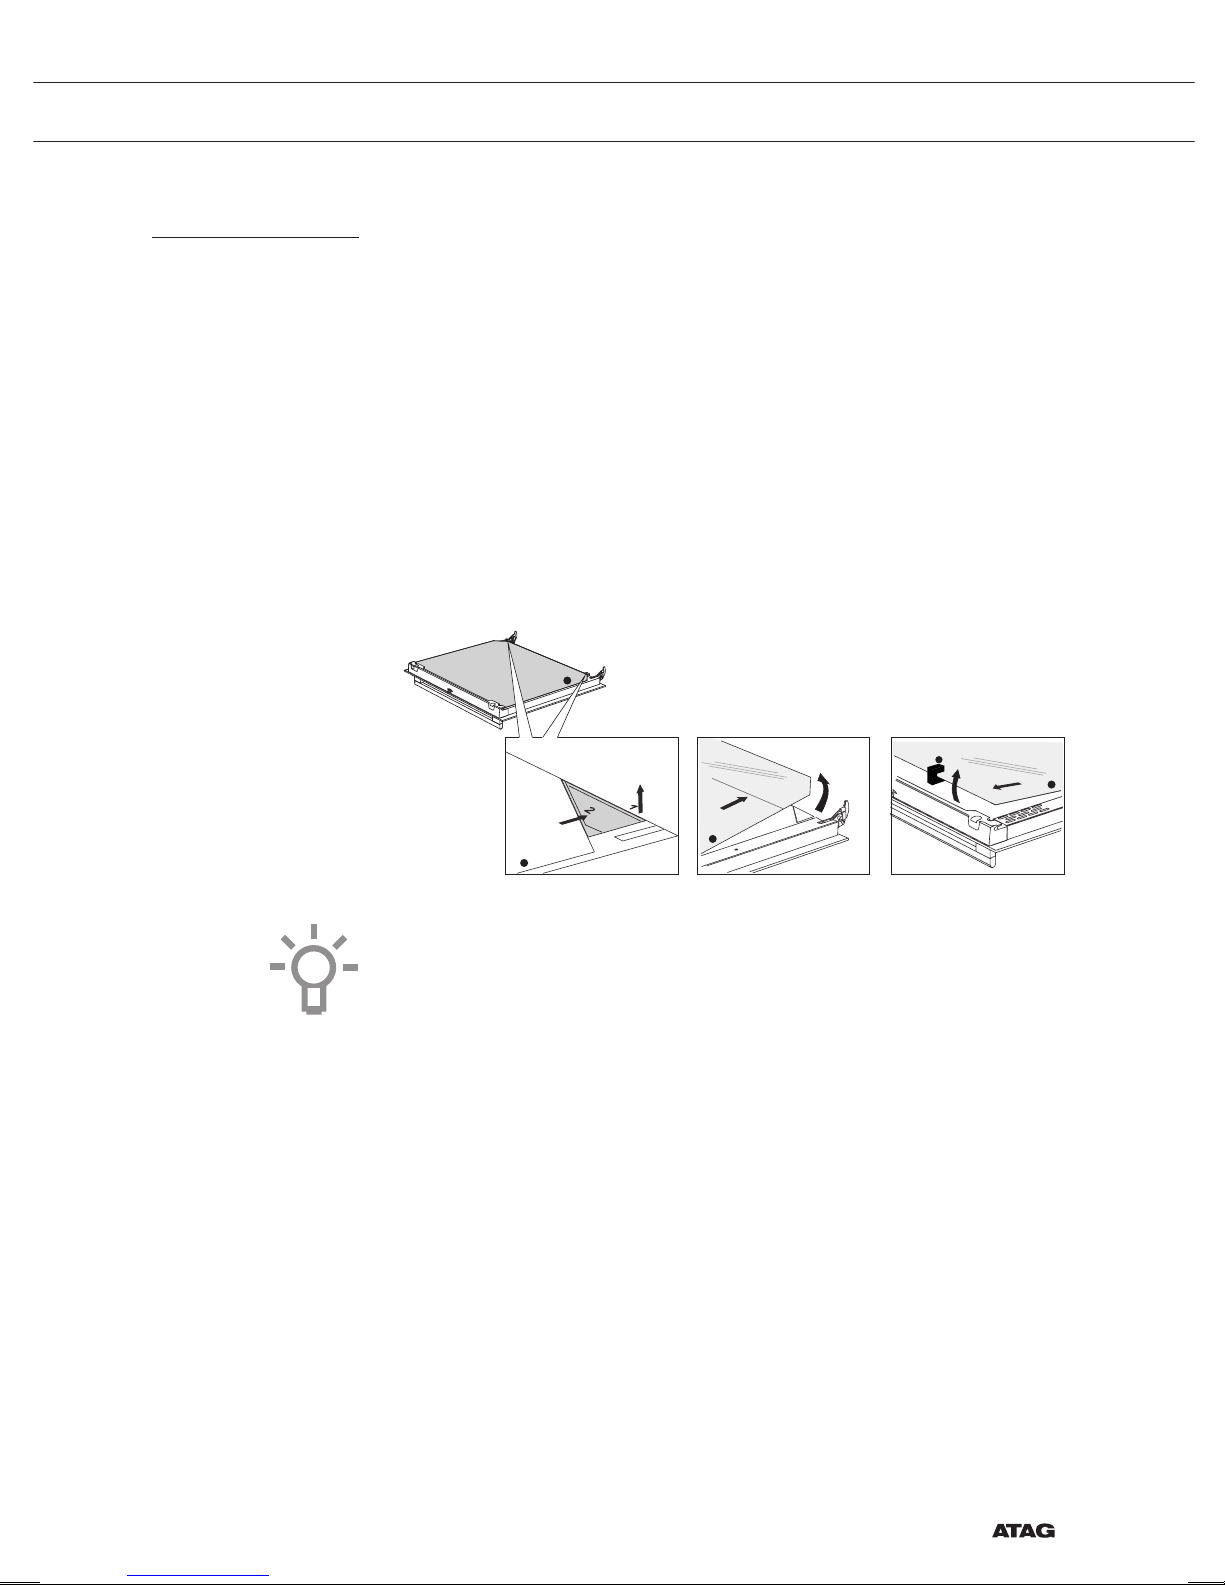
Glazen deur van de oven verwijderen
De binnenkant van het glas in de ovendeur kan worden gereinigd.
Hiervoor moet het glas eerst uit de ovendeur worden gehaald.
1. Aan de onderkant van het glas zitten rechts en links twee
klemmetjes; til (1) deze een klein beetje op en verplaats (2) ze om
het glas vrij te maken.
2. Pak het glas (A) aan de onderkant beet, til het voorzichtig op (3) en
verschuif (4) het om het uit de ondersteuning bovenaan te halen.
3. Het binnenste glas (B) (afhankelijk van het model) kan worden
verwijderd door het voorzichtig op te tillen (5) en te verschuiven (6)
om het uit de ondersteuning onderaan te halen. Verwijder ook de
rubberen afstandsstukjes (C) van het binnenste glas.
B
A
A
A
C
4 3
5
6
Plaats het glas in omgekeerde volgorde terug.
REINIGEN
Page 40

NL 40
Algemeen
Raadpleeg het onderstaande overzicht met oplossingen als u
problemen hebt met uw oven. Neem contact op met de afdeling
klantenservice als de problemen zich blijven voordoen.
Het voedsel blijft rauw
• Controleer of de timer is ingesteld en of u op de bevestigingstoets
hebt gedrukt.
• Is de deur wel goed gesloten?
• Controleer of er een zekering is doorgebrand of dat een
stroomonderbreker de voeding heeft onderbroken.
Voedsel is te gaar of niet gaar genoeg
• Controleer of de juiste bereidingstijd is ingesteld.
De toetsen reageren niet; de display reageert niet op de toetsen.
• Koppel het apparaat gedurende een paar minuten los van de
stroomvoorziening (verwijder de hoofdstekker uit de contactdoos
zet de stroomonderbreker op uit); sluit vervolgens het apparaat
weer aan en zet het aan.
Stroomstoring kan de oorzaak zijn dat de display wordt gereset.
• Koppel het apparaat gedurende een paar minuten los van de
stroomvoorziening (verwijder de hoofdstekker uit de contactdoos
zet de stroomonderbreker op uit); sluit vervolgens het apparaat
weer aan en zet het aan.
• Stel de tijd opnieuw in.
Er vindt condensatie plaats in de ovenruimte.
• Dit is normaal. Neem na gebruik de oven af met een doek.
De ventilator blijft nog werken nadat de oven is uitgezet.
• Dit is normaal. De ventilator blijft nog enige tijd werken nadat de
oven is uitgezet.
Bij de deur en aan de buitenkant van het apparaat is een
luchtstroom voelbaar.
• Dit is normaal.
Er ontsnapt stoom via de deur of de ventilatieopeningen.
• Dit is normaal.
Er klinken klikgeluiden wanneer de oven in werking is, vooral bij
ontdooien.
• Dit is normaal.
PROBLEMEN OPLOSSEN
Page 41

NL 41
De stroomonderbreker schakelt regelmatig uit.
• Raadpleeg een servicemonteur.
Op de display staat een foutcode, FOUT XX ...
(XX geeft het nummer van de fout aan).
• Er is een storing in de elektronische module. Koppel het apparaat
enkele minuten los van de stroomvoorziening. Sluit het vervolgens
weer aan en stel de huidige tijd in.
• Raadpleeg een servicemonteur als de fout blijft optreden.
De oven opbergen en repareren
Reparaties mogen uitsluitend worden uitgevoerd door een
gekwalificeerde servicemonteur.
Als er onderhoud nodig is, verwijdert u de stekker uit de contactdoos
en neemt contact op met de klantenservice van ATAG.
Zorg dat u het volgende bij de hand hebt als u opbelt:
• Het modelnummer en serienummer (vermeld op de binnenzijde van
de ovendeur)
• Garantiegegevens
• Een duidelijke omschrijving van het probleem
Kies een schone, droge plek als u de oven tijdelijk moet opslaan;
stof en vocht kunnen het apparaat beschadigen.
PROBLEMEN OPLOSSEN
Page 42

NL 42
Afvoeren van het apparaat en de verpakking
Dit product is gemaakt van duurzame materialen. Aan het einde van
de gebruiksduur moet het echter op een verantwoorde manier worden
afgevoerd. De overheid kan u hierover informeren.
De verpakking van het apparaat is recyclebaar. Er is gebruikgemaakt
van de volgende materialen:
• karton
• polyethyleen wikkel (PE)
• CFC-vrij polystyreen (hard PS-schuim)
U moet deze materialen op een verantwoorde manier afvoeren in
overeenstemming met de wettelijke vereisten.
Op dit product staat een pictogram van een vuilnisvat met een kruis
erdoorheen.
Deze geven aan dat huishoudelijke apparaten apart moeten
worden afgevoerd. Dat betekent dat het apparaat aan het einde
van zijn economische levensduur niet mag worden verwerkt via
de normale afvalstroom. U moet het inleveren bij een gemeentelijk
afvalinzamelingspunt of bij een verkooppunt dat oude apparaten
inneemt.
Huishoudelijke apparatuur apart inzamelen voorkomt schade aan
het milieu en aan de openbare gezondheid. De materialen die bij de
vervaardiging van dit apparaat zijn gebruikt, kunnen worden hergebruikt
en dat betekent een aanzienlijke besparing
in energie en grondstoffen.
Verklaring van overeenstemming
Wij verklaren hierbij dat onze producten voldoen aan de betreffende
Europese richtlijnen, normen en voorschriften, alsook aan alle vereisten
in de normen waarnaar wordt verwezen.
UW OVEN EN HET MILIEU
Page 43

EN 3
YOUR OVEN
Your oven
Introduction 4
Control panel 5
Description 6
Guide rails 7
Door 7
Cooling fan 7
Main functions 8
Keys 9
Navigation 10
Initial use
What to do first 12
Operation
Selecting your function 15
Functions settings mode 15
Progress mode 17
Finish display 17
Changing settings during the progress 18
Use
Functions table 19
Steam function 21
Steam tables 24
Settings menu 26
Plus menu 27
Cooking information 28
Fast preheat 28
Delayed start 29
Stage cooking 30
Go to manual cooking 30
Programs and Favourites 31
Egg timer 31
Child lock 31
Warming 32
Defrost 32
Cleaning
Cleaning the appliance 33
Steam clean 33
Cleaning the water tank filter 34
Descaling 34
Removing and cleaning the guide rails 35
Replacing the oven light bulb 36
Removing the oven door 36
Removing the oven door glass 37
Solving problems
General 38
Your oven and the environment
Disposing of the appliance and the packaging 41
Page 44

EN 4
Introduction
Congratulations on choosing this Atag steam oven.
This product is designed to offer simple operation and optimum
user-friendliness. The oven has a wide range of settings, enabling you
to select the correct cooking method every time.
This manual shows how you can best use this oven. In addition to
information about operating the oven, you will also find background
information that may be useful when using the appliance.
Please read the separate safety instructions
carefully before using the appliance!
Read this manual before using the appliance and keep it in a safe
place for future use.
Installation instructions are supplied separately.
YOUR OVEN
Page 45

EN 5
Control panel
12
13 14 15 16 17 18 19
1 10 116 7 8 95432
1. Function knob (in ‘Off’ position)
2. Defrost
3. Programs & Favourites
4. Extras
5. Regenerate
6. Steam
7. Sous vide
8. Warming
9. Steam clean
10. Display
11. Selection knob
12. On/off key and stop key (cancel)
13. Light key
14. Timer key
15. Navigation key left*
16. Navigation key right*
17. Plus key
18. Water reservoir key
19. Confirm key
* pressing 15+16 activates Child lock
Note:
The keys respond best if you touch them with a large area of your
fingertip. Every time you press a key during use, a short acoustic signal
will sound.
YOUR OVEN
Page 46

EN 6
YOUR OVEN
Description
1
4
Level 1
Level 2
Level 3
Level 4
3
5
2
1. Control panel
2. Water reservoir cover
3. Oven levels
4. Oven door
5. Door handle
The following accessories are supplied with your oven:
• Non-perforated steam dish; 40 mm deep (useful for collecting
moisture during steaming)
• Perforated steam dish;1/3GN
• Perforated steam dish;1/2GN
▷ The steam dishes can be used simultaneously on two levels
(i.e. the non perforated steam dish on level 1 and the perforated
steam dish on level 2).
▷ For steaming you can place the ‘perforated steam dish’ in the
‘non-perforated steam dish’. These can only be used together
on a level with telescopic guide rails.
▷ Note: at the steamdishes, discolouration can occur at
temperatures above 180 °C! This will not influence proper
function of the oven.
Page 47

EN 7
Guide rails
• The oven has four or five shelf levels, depending on the model.
Level 1 is mainly used in combination with bottom heat.
• Place the steam dishes in the gap between the guide
rail sliders.
Door
• The door switches interrupt the operation of the oven when the door
is opened during use. The oven continues operating when the door
is closed.
• This oven has a ‘Soft close door system’. When closing the oven
door, this system dampens the movement, from a certain angle, and
silently closes the oven door.
Cooling fan
The appliance is equipped with a cooling fan that cools the casing and
control panel.
YOUR OVEN
Page 48

EN 8
YOUR OVEN
Main functions
With the function knob you can select the main functions of your oven.
Setting Description
Off/standby mode
Extras
Bottom heat
Bottom heat + fan
Programs and favourites
Favourites
Programs
Defrost
Manual defrost
Steam
Steam
Steam - low temperature
Regenerate
Sous vide
Warming
Plate warming
Keep warm
Steam clean
Page 49

EN 9
Keys
In the table below you can find the discription of the different keys.
Keys Description of the keys
On/off key and stop key
- Press short: cancel operation or go one step back in
the menu.
- Press long: turn the appliance off or on.
Light key
- To turn the cavity light on or off.
Egg timer
- The egg timer can be used independent of the oven
function.
- The longest possible timer setting is 23:59.
Navigation key left
- To move the active area to the left.
Navigation key right
- To move the active area to the right.
Plus key
- To open or exit the settings menu (in standbymode).
- To open or exit the plus menu with the extra options
possible at that moment (in on-mode).
Child lock
- Press and hold the left navigation key and right
navigation key simultaniously to lock the appliance.
Water reservoir key
- To open the water reservoir hatch.
Confirm key
- To confirm all the white settings/elements in the
screen.
YOUR OVEN
Page 50

EN 10
YOUR OVEN
Navigation
active area
stop key confirm keyfunction knob selection knobnavigation keys
By turning the function knob away from the 0-position, the icon of the
chosen main function is lit. The display will show the icon and name
of the activated function for about 1,5 seconds. Next you will see the
chosen main function and sub-function at the top of the display in the
feedback bar. Also the function settings mode will become active (grey
background). In this activated area you can select your settings using
the selection knob.
180
°C
STEAM l STEAM 14:30
Within every menu the navigation is as follows:
• Use the navigation keys or press the selection knob to move the
active area (grey background).
• The setting in the active area can be changed by turning the
selection knob (left = decrease, right = increase). The setting will be
saved automaticallly.
• When all elements in the screen are set, then confirm these settings
by pressing the confirm key (this key will start blinking when it is
possible to start the program).
• Press the stop key to go one step back in the menu.
Page 51

EN 11
At the top of the display is a feedback bar. This bar shows where you
are in the menu and what setting you are changing. Functions / settings
are separated with a vertical line.
SETTINGS l GENERAL l SOUND l KEY SOUND
PROGRAMS l ... l STUFFED CHICKEN
YOUR OVEN
Page 52

EN 12
INITIAL USE
What to do first
• Clean the oven interior and accessories with hot water and
washing-up liquid. Do not use aggressive cleaning agents, abrasive
sponges and similar.
• The oven will emit a particular odor when it is used for the first time;
this is normal. Make sure that there is good ventilation during initial
use.
When the appliance is plugged in for the first time or after the appliance
was disconnected from the mains for a longer period of time, you have
to set ‘Language’, ‘Date’, ‘Time’ and ‘Water hardness’.
Setting the language
English
Deutsch
LANGUAGE
In case you are not comfortable with the language on the display, you
can select another language. The default setting is ‘English’.
1. Turn the selection knob and select your preferred language from the
displayed list.
2. Confirm the setting by pressing the confirm key.
The next screen will be displayed.
Setting the date
01 2015
01
02
DATE l DAY
1. Turn the selection knob and change the first setting (Day).
2. Confirm this setting by pressing the right navigation key or by
pressing the selection knob.
3. Turn the selection knob and change the next setting (Month).
4. Confirm this setting by pressing the right navigation key or by
pressing the selection knob.
5. Turn the selection knob and change the last setting (Year).
6. Confirm this setting by pressing the confirm key.
The next screen will be displayed.
Page 53

EN 13
Setting the time
: 00
11
12
13
TIME l HOUR
1. Turn the selection knob and change the hours.
2. Confirm this setting by pressing the right navigation key or by
pressing the selection knob.
3. Turn the selection knob and change the minutes.
4. Confirm this setting by pressing the confirm key.
Setting the water hardness
1 red Soft water
WATER HARDNESS
The water hardness must be set prior to initial use.
If the water is softer or harder than the default setting, you can alter the
set hardness level.
Checking the water hardness
You can measure water hardness using the ‘paper test strip’ supplied
with your appliance. For information about water hardness in your
region please contact your local water board.
Using the ‘paper test strip’
Dip the test strip in water for 1 second. Wait 1 minute and read the
number of bars on the paper strip. Check the table for the correct water
hardness setting.
Setting the water hardness
1. Compare the test strip with the image on the display.
2. Turn the secection knob until the bars on the screen correspond
with those on the test strip.
3. Press the confirm button to save the set water hardness.
The equipment has now been programmed so that the descaling
notification will appear in accordance with the actual water hardness.
INITIAL USE
Page 54
EN 14
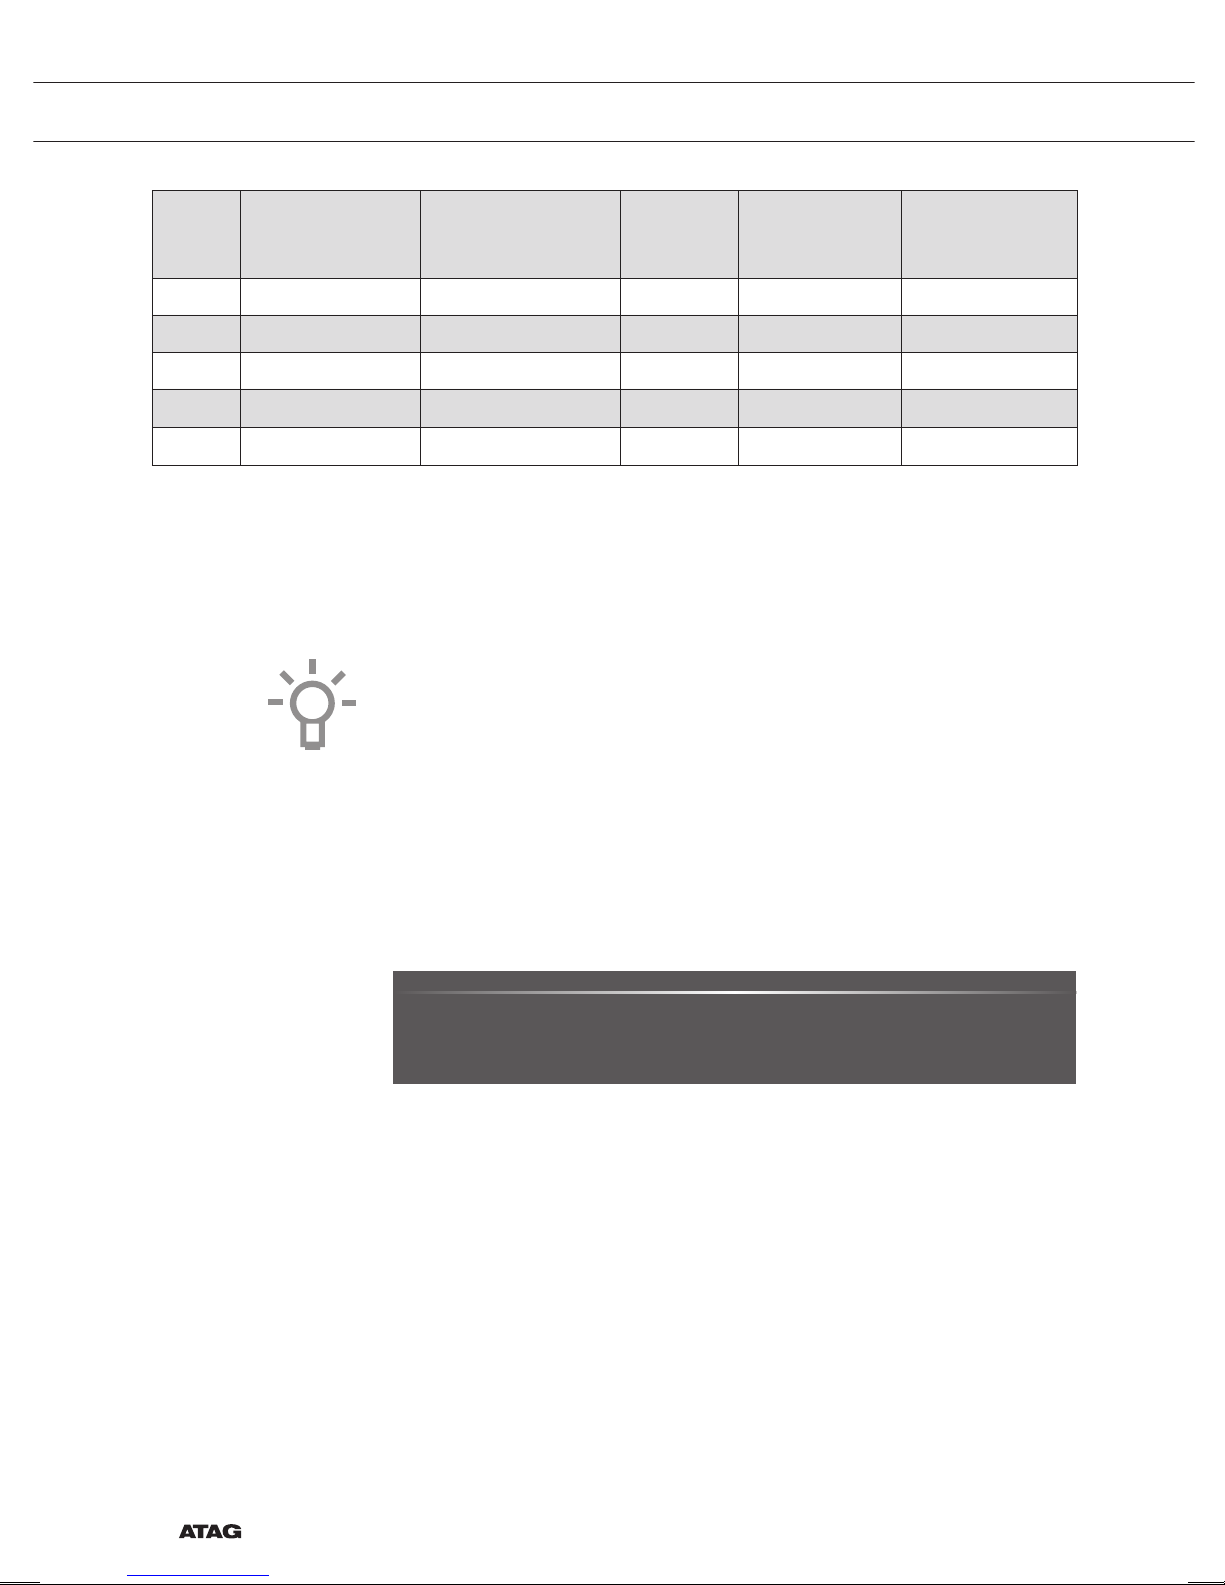
Display
Test strip
number/colour
of the bars
Type PPM
French
hardness (°df)
German
hardness (°dH)
1 4 green bars Very soft water 0 - 90 0 - 9 0 - 5
2 1 red bar Soft water 90 -178 9 - 18 5 - 10
3 2 red bars Rather hard water 178 - 267 18 - 26 10 - 15
4 3 red bars Hard water 267 - 356 26 - 35 15 - 20
5 4 red bars Very hard water
> 356 > 35
> 20
All the start-up settings are now set and the display will show the
standby screen.
The appliance is now ready for use.
The language, time, date and water hardness can be adjusted in the
settings menu (see ‘Settings menu’ chapter). The settings menu can be
opened from the start display via the ‘Plus’ menu.
Standby display
The standby display will show the time, cavity temperature (if this is
higher than 80 °C) and the timer (if set). The appliance goes to standby
mode after:
• Turning the function knob to 0 (‘off’ position);
• Pressing the stop key multiple times (deeper in the menu).
12 : 00
03 • 05 • 2015
Off mode
• Default the appliance will shut down after no action for a set time of
30 minutes.
• Press and hold the stop key to shut down the appliance manually.
Switching on the appliance
• Press and hold the stop key to switch on the appliance.
• The appliance can also be switched on by turning the function knob
to a function.
INITIAL USE
Page 55

EN 15
Selecting your function
Select a function appropriate for the meal you are cooking. Consult the
table in chapter ‘Functions table’ to see which functions are available.
• Go directly to the progress mode by pressing the confirm key (this
key is blinking if it is possible to start the program).
After you have chosen a main function, the function settings mode is
active (grey background). In this activated area, it is now possible to
change the settings in this funtion.
Function settings mode
Example (Steam / low temperature steam /40 minutes)
1. Choose a main function by turning the function knob.
The first sub-function setting becomes active.
80
°C
STEAM l STEAM 14:30
Now the settings can be changed as desired. There is the possibility to
set:
• The function (consult the table in chapter ‘Functions table’).
• The temperature.
• The time.
2. Turn the selection knob and change the setting.
80
°C
STEAM l LOW TEMPERATURE STEAM 14:30
3. Confirm the setting by pressing the right navigation key or by
pressing the selection knob.
The next sub-function setting becomes active.
200
°C
STEAM l TEMPERATURE 14:30
75
80
°C
4. Turn the selection knob and change the setting.
200
°C
STEAM l TEMPERATURE 14:30
70
75
°C
80
OPERATION
Page 56

EN 16
5. Confirm the setting by pressing the right navigation key or by
pressing the selection knob.
The next sub-function setting becomes active.
75
°C
STEAM l COOKING TIME 14:30
▷ The timer icon shows that there is no timer necessary for this
function. Press the confirm key to start the program directly with
the chosen settings (see step 7).
▷ To set the timer, go to step 6.
▷ If there is a timer necessary for a current function, the default
timer setting is displayed instead of the timer icon.
6. Turn the selection knob and change the setting.
75
°C
STEAM l COOKING TIME 14:30
0:39
0:40
H:M
0:41
▷ H:M notation.
7. If preferred, select any additional setting using the plus menu (for
example fast preheat). See for more information chapter ‘Plus
menu’.
8. If the chosen function involves steam, then the tank must be filled
with clean water before starting the program.
9. Start the program: press the confirm key to go to the progress
mode.
The program will start with the chosen settings; the oven will go to
the progress mode and the progress screen is shown.
75
°C
14:30
0:40
LOW TEMP STEAM
15:10
OPERATION
Page 57

EN 17
Progress mode
• Left side on the screen, the temperature is displayed (if the set
temperature is not reached, the temperature will switch between
cavity temp (grey) and set temp (white)). If the set temp is reached a
pop-up will appear ‘set temperature is reached’.
• Right side on the screen, the time (counting down) or the progress
time (counting up if no time was set) is displayed. Next to the
cooking time the user can see the finishing time.
75
°C
14:30
0:40
LOW TEMP STEAM
15:10
• If preheating is chosen, the progress mode will first show the
preheating display (preheating in the feedback bar and the
preheating icon). All settings are displayed only the colours are
switched. The cavity temperature is white and the chosen settings
are grey. If the set temperature is reached, a pop-up will appear:
‘Set temperature is reached. Insert dish’.
210
°C
14:30
0:40
BOTTOM HEAT
15:10
Finish display
When the timer is finished, the ‘finish display’ will appear. Now it is
possible to:
• Stop the progress.
• Add extra time.
• Save as favourite.
FINISH l ENJOY 14:30
Stop the progress
1. Press the confirm key.
The finish display will be closed and the standby screen will be
shown.
▷ If there is no action within 10 minutes, the display will switch to
standby mode.
OPERATION
Page 58

EN 18
OPERATION
Add extra time
1. Press the right navigation key to select ‘Add extra time’.
2. The time setting becomes active and can be changed directly by
rotating the selection knob.
3. Confirm by means of the confirm key.
The previous process is activated again
Save as favourite
1. Press the right navigation key to select ‘Save as favourite’.
The next screen will show 10 positions where the program can be
positioned.
2. Select a position for your recipe by rotating the selection knob and
press the confirm key to save it.
3. Give the recipe a name. Rotate the selection knob to select the
appropriate letter and press the selection knob to confirm and go to
the next letter.
▷ You can delete a character by means of the backspace function
in the character list (arrow).
4. Press the confirm key to save the recipe.
Changing settings during the progress
• During progress, pressing the navigation keys will show the active
area. The selected setting can now be changed, see chapter
‘Function settings mode’.
• After confirmation with the confirm key the progress screen will be
shown with the changed settings.
• After 5 seconds without actions the progress settings are cancelled
and the display will return to the progress screen.
Page 59

EN 19
USE
Functions table
Consult the table to choose the desired function. Also consult the
instructions for preparation on the dish packaging.
• Only use glass dishes that can withstand temperatures of
275 °C.
Function Description
Oven functions
Bottom Heat
• Heating only by means of the lower heating
element.
• Place the baking tray or oven rack on level 2.
• Suggested temperature: 160 °C
• Intended for plate warming or preservation of
food.
Fan + Bottom Heat
• Heating by means of the lower heating element.
The heat is distributed by the fan.
• Place a not too high baking tray on level 2, so that
hot air can also circulate over the upper surface
of the food.
• Suggested temperature: 180 °C
• Intended for plate warming or preservation of
food.
2
Steam functions
Steam
• Heating by means of steam.
• See chapter ‘Steam function’ for more
information.
• Steam of 100 °C is sprayed into the oven cavity at
regular intervals.
• This mode can be used to steam vegetables,
eggs, fruit and rice, for example.
Steam - Low temperature
• Heating by means of steam.
• See chapter ‘Steam function’ for more
information.
• Steam is sprayed into the oven cavity at regular
intervals.
• This menu can be used to steam vegetables and
fish, to keep food warm and defrost food.
Page 60

EN 20
USE
Function Description
Sous vide
• Heating by means of steam.
• See chapter ‘Steam function’ for more
information.
• The vacuum-sealed food is slow-cooked at a low
temperature.
• With this method the food’s flavour, vitamins and
minerals are preserved. Vacuum sealing gives the
dish a longer shelf life.
• Use this function to cook vegetables, fruit, meat,
poultry and fish.
Extra functions
Warming
• Plate warming: this function is used for warming
tableware, so that the served food stays hotter for
longer.
• Keep warm: this mode is used to keep already
cooked dishes warm.
• Regenerate: this mode is used to warm already
cooked dishes. The use of steam means there is
no loss of quality. Taste and texture are preserved
as though the dish is freshly-cooked. Various
dishes can be regenerated simultaneously.
Steam clean
• With this function and a damp cloth, you can
easily remove grease and dirt from the oven walls.
• Use this function only when the oven has cooled
down fully. Steam is sprayed into the oven cavity
at regular intervals.
• After soaking, food residues can be removed
using a damp cloth.
Defrost
• With this function, the air circulates by means of
the fan. The air will be heated to a temperature of
30 °C.
• Use this function to defrost frozen dishes.
Programs and Favourites
• Programs’ for steaming preparations. Select a dish
from a list of pre-programmed dishes.
• Favourites: Select your own steam recipes.
Page 61

EN 21
USE
Function Description
Warming
• Plate warming
• Keep warm
Steam function
Steam cooking
Healthy and natural, steam cooking retains the colour and taste of the
dish. No odors are released using this cooking method.
It is not necessary to add salt or extra herbs to the water in the
reservoir.
Note: The water system empties each time the steam function is
finished. This action is audiable and is part of the steam oven’s normal
operation.
Advantages of steam cooking
• Steam cooking (stewing, cooking, roasting) starts before the oven
cavity temperature reaches 100 °C.
• Slow cooking (stewing, cooking, roasting) is also possible at lower
temperatures. It is healthy: vitamins and minerals are preserved as only
a small proportion of these dissolve in the hot moisture of the dish.
• It is not necessary to add any form of fat or oil during steam cooking.
• Steam retains the taste of the dish.
• Steam does not distribute smell or taste, enabling meat or fish to
be cooked together with vegetables.
• Steam is also suitable for blanching, defrosting and warming or
keeping a dish warm.
Page 62

EN 22
USE
Sous vide
Using the sous vide steam function:
• Vacuuming
▷ First vacuum the food in plastic using a vacuuming machine.
This process removes most of the air from the plastic bag. The
bag preserves nutrients and taste during cooking, resulting in
food that is juicier, softer and tastier.
• Vacuum cooking
▷ Cook the dish at the correct temperature and the correct time
using the oven’s Sous Vide steam setting (see ‘recipes and
cooking times’).
▷ Most dishes can be kept at serving temperature (around 60 °C)
for a few hours, which makes mise en place very easy: you simply
remove the dish from the oven when you need it.
Filling the water reservoir
Always fill the reservoir prior to using a steam function.
Use clean and cold tap water, bottled water without added minerals or
distilled water suitable for consumption.
1. Press the ‘water reservoir’ key to open the water reservoir cover.
2. Use the handle to remove the reservoir from the oven.
3. Remove the water reservoir lid and clean the water reservoir with
clean water.
4. Fill the reservoir with water up to the ‘MAX’ mark on the reservoir
(around 1.2 litres).
5. Push the water reservoir back in the oven until a click is heard
(position switch is activated).
6. Close the water reservoir cover.
Page 63

EN 23
USE
Any water remaining in the steam system after cooking will be pumped
back into the water reservoir. Empty, clean and dry the water reservoir
after using the steam function. Only fill the reservoir just prior to using it!
Page 64

EN 24
USE
Steam tables
Steam and Low temperature steam
Use the settings and times in this table as guide lines for steaming.
Always fill the water tank with fresh water to the maximum level.
Dish
Temperature
Time
(min.)
Accessory (shelf level)
Broccoli Florets 100 °C 12 - 16 Perforated steam dish (2)
Whole Carrots 100 °C 25 - 30 Perforated steam dish (2)
Sliced Vegetables (pepper,
courgettes, carrots, onions)
100 °C 15 - 20 Perforated steam dish (2)
Green Beans 100 °C 20 - 25 Perforated steam dish (2)
Asparagus 100 °C 15 - 20 Perforated steam dish (2)
Whole Vegetables
(artichokes, whole cauliflower, corn
on the cob)
100 °C 25 - 35 Perforated steam dish (2)
Peeled Potatoes (cut into quarters) 100 °C 25 - 35 Perforated steam dish (2)
Fish Fillet (2 cm thickness) 80 °C 15 - 20
Perforated steam dish in a
non-perforated steam dish (2)
Prawns (raw/uncooked) 100 °C 10 - 14
Perforated steam dish in a
non-perforated steam dish (2)
Chicken Breast 100 °C 23 - 28
Perforated steam dish in a
non-perforated steam dish (2)
Boiled Eggs (hardboiled) 100 °C 15 - 20 Non-perforated steam dish (2)
Frozen Yeast Dumplings 100 °C 25 - 30 Perforated steam dish (2)
White Rice (basmati or pandan)
(add double quantity of water)
100 °C 30 - 35 Non-perforated steam dish (2)
Fruit Compote
(use a flat round glass pyrex, add 1
teaspoon sugar and 2 tbsp. water)
100 °C 25 - 35 Baking tray or oven rack (2)
Flan/Crème (6 dessert dishes,
each 100 ml, cover dishes with foil)
90 °C 20 - 30 Baking tray or oven rack (2)
Egg Custard (use a large flat glass
pyrex dish, cover dish with foil)
90 °C 30 - 40 Baking tray or oven rack (2)
Page 65

EN 25
USE
Sous Vide table
Sous Vide cooking is cooking vacuum-packed food at low constant
temperature over a long period of time.
Dish
Temperature
Time (min.) Accessory (shelf level)
Beef llet medium (4 cm thickness) 60 °C 110 - 120
Oven rack (2)
Beef llet well done (4 cm thickness) 65 °C 90 - 100
Oven rack (2)
Lamb rare (3 cm thickness) 60 °C 180 - 190
Oven rack (2)
Lamb medium (3 cm thickness) 65 °C 105 - 115
Oven rack (2)
Chicken breast boneless (3 cm thickness) 70 °C 70 - 80
Oven rack (2)
Duck boneless (2 cm thickness) 70 °C 75 - 85
Oven rack (2)
Turkey boneless (2 cm thickness) 70 °C 75 - 85
Oven rack (2)
Sea bass (4 llets/1 cm thickness) 70 °C 25
Oven rack (2)
Cod sh (2 llets/2 cm thickness) 65 °C 70 - 75
Oven rack (2)
Scallops (big size) 60 °C 100 - 110
Oven rack (2)
Mussels with shell 95 °C 20 - 25
Oven rack (2)
Prawns without shell (big size) 75 °C 26 - 30
Oven rack (2)
Octopus 85 °C 100 - 110
Oven rack (2)
Trout llet (2 llets/1,5 cm thickness) 65 °C 55 - 65
Oven rack (2)
Salmon llet (3 cm thickness) 65 °C 100 - 110
Oven rack (2)
Asparagus green (whole) 90 °C 40 - 50
Oven rack (2)
Asparagus white (whole) 90 °C 50 - 60
Oven rack (2)
Courgette (slices of 1 cm) 90 °C 35 - 40
Oven rack (2)
Egg plant (slices of 1 cm) 90 °C 30 - 35
Oven rack (2)
Carrots (slices of 0,5 cm) 95 °C 35 - 45
Oven rack (2)
Page 66

EN 26
USE
Settings menu
The settings menu is only available by pressing the ‘plus key’ when the
appliance is in standby mode.
Setting Description
General
Language
Time
Date
Sound
Display
Brightness
Clock size
Night mode
Appliance to stand-by mode
Cooking
Default program intensity
Steam
Preheat settings
System
Appliance information
Factory settings
Oven light
General
You can set the following from this menu:
• Language (language of the display)
• Time (always in 24H format)
• Time display (24H or 12H format)
• Date (always day-month-year format)
• Date display (ddmmyyyy or mmddyyyy)
• Sounds (volume of the general sounds and alarms)
• Key sounds (on/off)
• Welcome sound (startup/shutdown sound on/off)
Display
You can set the following from this menu:
• Brightness (low, mid, high)
• Night mode (start and end time for lower display brightness: first
display set start timer, second display set end time)
Page 67

EN 27
USE
• Clock size (small / large)
• Standby (auto switch off / manually switch off)
Changing to manually switch off will increase energy consumption.
If the oven is switched off manually (or when an interruption of the
power supply occurs) this function will be reset (the display will
automatically switch off).
Cooking settings
You can set the following from this menu:
• Default program intensity (low / medium / high)
• Preheat (set preheat default on or off)
• Steam settings (Water hardness / Descaling)
System
You can set the following from this menu:
• Appliance information (request appliance information)
• Factory settings (back to factory settings)
• Oven light (auto switch off after 1 min / manual)
Plus menu
Depending on the the function, there is a possibility to choose extra
functionality (after you have chosen a main function and settings in the
‘Function settings mode’) by pressing the ‘plus key’.
• A small icon next to the curent time will give an indication about the
activated plus menu functions. The colour of the icon will indicate if
it is active (white) or inactive (grey).
• To exit the plus menu, press the ‘stop key’ or ‘plus key’; the display
will show the previous screen again.
• To cancel an extra functionality, select ‘cancel’ (icon with a red
stripe).
+ Menu Description Icon
Cooking
Request more information about the selected
function.
Page 68

EN 28
USE
+ Menu Description Icon
Fast preheat
Preheat the oven to the desired temperature
quickly (not available in combination with
delayed start).
Delayed start
The cooking process will start automatically
and will be finished at the preferred time.
Only available if a cooking time is set, not
available in combination with preheat.
Add to favourites
To add the settings for the cooked dish to
your favourites (see chapter ‘Finish display’).
Stage cooking
Combine up to three functions in one
cooking process.
Go to manual cooking
To edit a standard program as stage cooking
program.
Add steam 1-3x
Divide up to three steam cycles evenly over
the cooking process. Choose at least
10 minutes cooking time.
Add steam
Add a steam cycle to the cooking process.
Cooking information
The cooking info screen will give more information about the chosen
function, like the needed equipment and for what kind of purposes the
function is used.
Fast preheat
There are two different ways to use fast preheat:
Activate the fast preheat in the settings menu (to be default on
or off)
1. Press the plus key when the appliance is in standby mode. Go to
‘Cooking settings’ and select if the fast preheat should be default
on or off.
Page 69

EN 29
USE
2. Press the confirm key.
▷ If the fast preheat is set to ‘default on’ the small preheat icon will
be shown to indicate the active preheat function.
▷ This option is only available for the oven functions.
Activate the fast preheat in the plus menu.
1. Press the plus key (in the ‘Function settings mode’).
2. Select ‘Fast preheat’ by pressing the right navigation key.
3. Press the confirm key to activate fast preheat.
The small preheat icon will be shown next to the current time.
▷ When preheat is activated, the delayed start will be greyed out,
because these functions do not work together.
▷ When delayed start is activated preheat will be greyed out.
▷ To cancel the preheat: press the confirm key again.
Starting with fast preheat
• If a program is started and it will start with the fast preheat, a
pop-up will appear. After 15 sec. the pop-up will automatically
disappear. The progress screen will show the fast preheat icon, fast
preheat text and the time will be greyed out.
• If the set temperature is reached a pop-up will show ‘The set
temperature is reached. Please insert the dish’. Insert the dish and
the program will start automatically on door closing.
▷ Pressing the confirm key (without opening the door) keeps the
appliance at the set temperature. This situation will remain until
the door is opened.
Delayed start
Use the ‘delayed start’ function to start cooking at a later time, by setting
the desired finishing time.
1. Press the plus key (in the ‘Function settings mode’).
2. Select ‘Delayed start’ with the right navigation key.
3. Press the confirm key.
The display will show the delay start symbol, the cooking time and
the end time.
4. Change the finishing time by turning the selection knob and confirm
with the confirm key.
A small icon will appear to indicate that the function is active.
▷ To cancel the delayed start: go to ‘Delayed start’ and select
‘cancel delayed start’ (a pop-up will appear to confirm the
cancellation of the delayed start).
5. Start the program: press the confirm key to go to the progress mode.
The function will start automatically at the calculated starting time.
Page 70

EN 30
USE
Stage cooking
This function allows you to combine up to three functions in one
cooking process. Select different functions and settings to compose
the cooking process of your preference.
1. Press the plus key (in the ‘Function settings mode’).
2. Select ‘Stage cooking’ by pressing the right navigation key.
3. Press the confirm key.
A small icon will appear next to the current time. The first stage is
already filled with the current settings of the function. If there is no
time set, then the default time will be set for the first stage.
4. To add a stage, choose the second function by pressing the
navigation keys or pressing the selection knob.
5. Press the confirm key.
The display will switch to the settings screen.
6. Select the desired function, set the temperature and time.
7. Save the stage and return to the stage cooking overview by
pressing the confirm key.
▷ If the stop key is pressed the setting will be cancelled and the
display will turn to the previous display.
8. If desired, add a third stage. Repeat steps 4, 5, 6 and 7.
9. After confirmation, the display will show the set stages, with an edit
and delete icon.
10. If all stages are set according to your wishes, then return to the
oven setting screen. Press the ‘plus key’ to close the plus menu.
The display will show the normal oven setting screen with the
settings of the first stage (stage 1 icon white).
11. Start the process by pressing the confirm key.
▷ If the stop key is pressed, the stage cooking menu will be closed
and the oven will return to the normal mode.
Go to manual cooking
• In the manual cooking mode, a standard program from the
‘Programs and favorites’ function can be chosen and edited as in
‘Stage cooking’ mode.
• By selecting the manual function in the plus menu, a popup will
appear: ‘Switch to manual mode?’. After confirmation the display
will switch to the stage cooking mode if the selected program has
more stages.
Page 71

EN 31
Programs and Favourites
Automatic programs
• You can use ‘automatic programs’ for food preparation by selecting
a dish from a list of pre-programmed dishes. First select the type of
dish and then the dish itself from the available list.
• All the program categories have a picture. When a dish is selected,
the program settings will appear. The name of the dish and and the
name of the active selection are shown in the text bar.
• In the settings, first a picture of the dish is visible (not editable),
the weight (depending on the dish) (if it is editable), the intensity
(not always editable) and the cooking time. If necessary, adjust the
intensity and/or the weight.
Favourites (see chapter ‘Finish display’)
• You can select your own stored recipes in ‘favourites’.
• If there are no saved recipes, a pop-up will appear: ‘No saved
dishes’.
• The name of the recipe appears in the text bar and the saved oven
settings are shown.
Egg timer
The egg timer can be used independent of the oven function.
1. Press the timer key.
2. Change the time by rotating the selection knob.
▷ The longest possible timer setting is 23:59.
3. Confirm the setting by pressing the confirm key.
The egg timer is started.
▷ To cancel the timer, set the time back to 0:00 and confirm by
pressing the confirm key
▷ To close the egg timer menu, press the timer key or the stop key.
4. When the egg timer goes off, a pop-up will appear with the text
‘Egg timer expires’ and an acoustic signal will sound. Press the
stop key to switch off the signal and close the pop-up menu.
▷ The sound will stop automatically after approximately 2 minutes.
USE
Page 72

EN 32
Child lock
The oven’s control panel can be locked by means of the Child Safety
Lock, to protect the oven against unintended use.
1. Press and hold the left navigation key and the right navigation key
simultaniously.
The appliance will go into key lock mode. A pop-up will be shown.
After 3 seconds the ‘Key lock is active’ pop-up will close. The
current state of the appliance will be visible.
▷ If the key lock has been activated during a cooking process, the
process will keep running.
▷ If a key is pressed during key lock, the ‘Key lock is active’ pop-
up will show again.
▷ The stop key is still active during lock mode. If the appliance
is switched off, the process will stop. To turn the appliance on
again, deactivate the key lock mode.
2. To deactivate the key lock mode, press and hold the left navigation
key and the right navigation key simultaniously again.
Warming
• Regenerate
▷ This mode is used to warm already cooked dishes. The use of
steam means there is no loss of quality. Taste and texture are
preserved as though the dish is freshly-cooked. Various dishes
can be regenerated simultaneously.
• Plate warming
▷ This function is used when you want to warm tableware (plates,
cups) so that the served food stays hotter for longer.
▷ For this function you can set the warming-up temperature and
duration.
• Keep warm
▷ Use this function to keep already cooked food at temperature.
▷ For this function you can set the food-warming temperature and
duration.
Defrost
• This function uses hot air (30 ºC). Use this function for slow
defrosting of frozen dishes (cakes, biscuits, cookies, bread, bread
rolls and frozen fruit).
• For this function you can set the duration.
• Turn the food over after half the defrost time has elapsed; stir the
food or break up large pieces if these are frozen together.
USE
Page 73

EN 33
CLEANING
Cleaning the appliance
Clean the oven regularly to prevent fat and food particles from
accumulating, especially on the surfaces of the interior and the exterior,
the door and the seal.
• Activate the child lock (to prevent that the appliance is switched on
accidentally).
• Clean the exterior surfaces with a soft cloth and warm soapy water.
• Next wipe with a clean, damp cloth and dry the surfaces.
• Remove splashes and stains on the interior surfaces with a
cloth and soapy water.
• Next wipe with a clean, damp cloth and dry the surfaces.
Important
• Make sure that no water enters the vents.
• Never use abrasive cleaning materials or chemical solvents.
• Always make sure that the seal of the door is clean. This prevents
accumulation of dirt and allows you to close the door properly.
Steam clean
With the steam clean function and a damp cloth, you can easily remove
grease and dirt from the oven walls.
Using steam clean
Only use steam clean when the oven has cooled down fully. It is more
difficult to remove dirt and grease if the oven is hot.
The steam clean program takes 30 minutes.
Food particles on the enamel walls will be sufficiently soaked after 30
minutes so that they can be removed with a damp cloth.
1. Remove all accessories from the oven.
2. Select the ‘Steam clean’ function
3. Press the confirm button to start steam clean.
Please note: Do not open the door during the cleaning process.
Page 74

EN 34
Cleaning the water tank filter
If the water tank filter is dirty, you can clean it under the tap.
1. Remove the suction tube with the filter.
2. Clean it out under the tap and put it back into position. Ensure that
the filter touches the base of the water tank
Descaling
During the steam process, there can be an accumulation of mineral
deposit in the steam system. This needs to be removed from time
to time. You need to carry out this task when the ‘Appliance needs
descaling’ notification is shown.
If the appliance is not descaled after three notifications, the steam
functions will no longer be available. Use this function only when the
oven has cooled down fully. The descaling process comprises descaling
and rinsing. Notifications with information and requests for actions will be
shown on the display during the process.
1. Pour water mixed with descaling agent into the water reservoir.
Consult the descaling agent instructions for the correct mixing ratio.
2. Open the ‘Settings’ menu
3. Select ‘Cooking settings’
4. Select ‘Steamer settings’
5. Select ‘Descaling’ to select the function.
6. Press the confirm key to start descaling.
Note
We advise using NOKALK/DLS for descaling. NOKALK/DLS is an
extremely efficient descaling agent based purely on natural, entirely
biodegradable ingredients. The solution is non-corrosive,
not aggressive and is environmentally-friendly.
CLEANING
Page 75

EN 35
As well as an effective descaling action, it also has a cleansing and
anti-bacterial effect, ensuring that the appliance’s internal components
are preserved in an optimum hygienic state. Therefore food’s good
taste is preserved and the appliance’s service life is extended.
• Water is used for the steaming process. Water contains calcium
and magnesium. Heat causes the water to condense, leaving a
mineral deposit (not harmful to humans).
• If the descaling cycle is interrupted prior to the end of the cycle,
the program must be restarted from the beginning.
Removing and cleaning the guide rails
Use conventional cleaning products to clean the guide rails.
• Remove the screw using a screwdriver.
• Remove the guide rails from the holes in the back wall.
CLEANING
Page 76
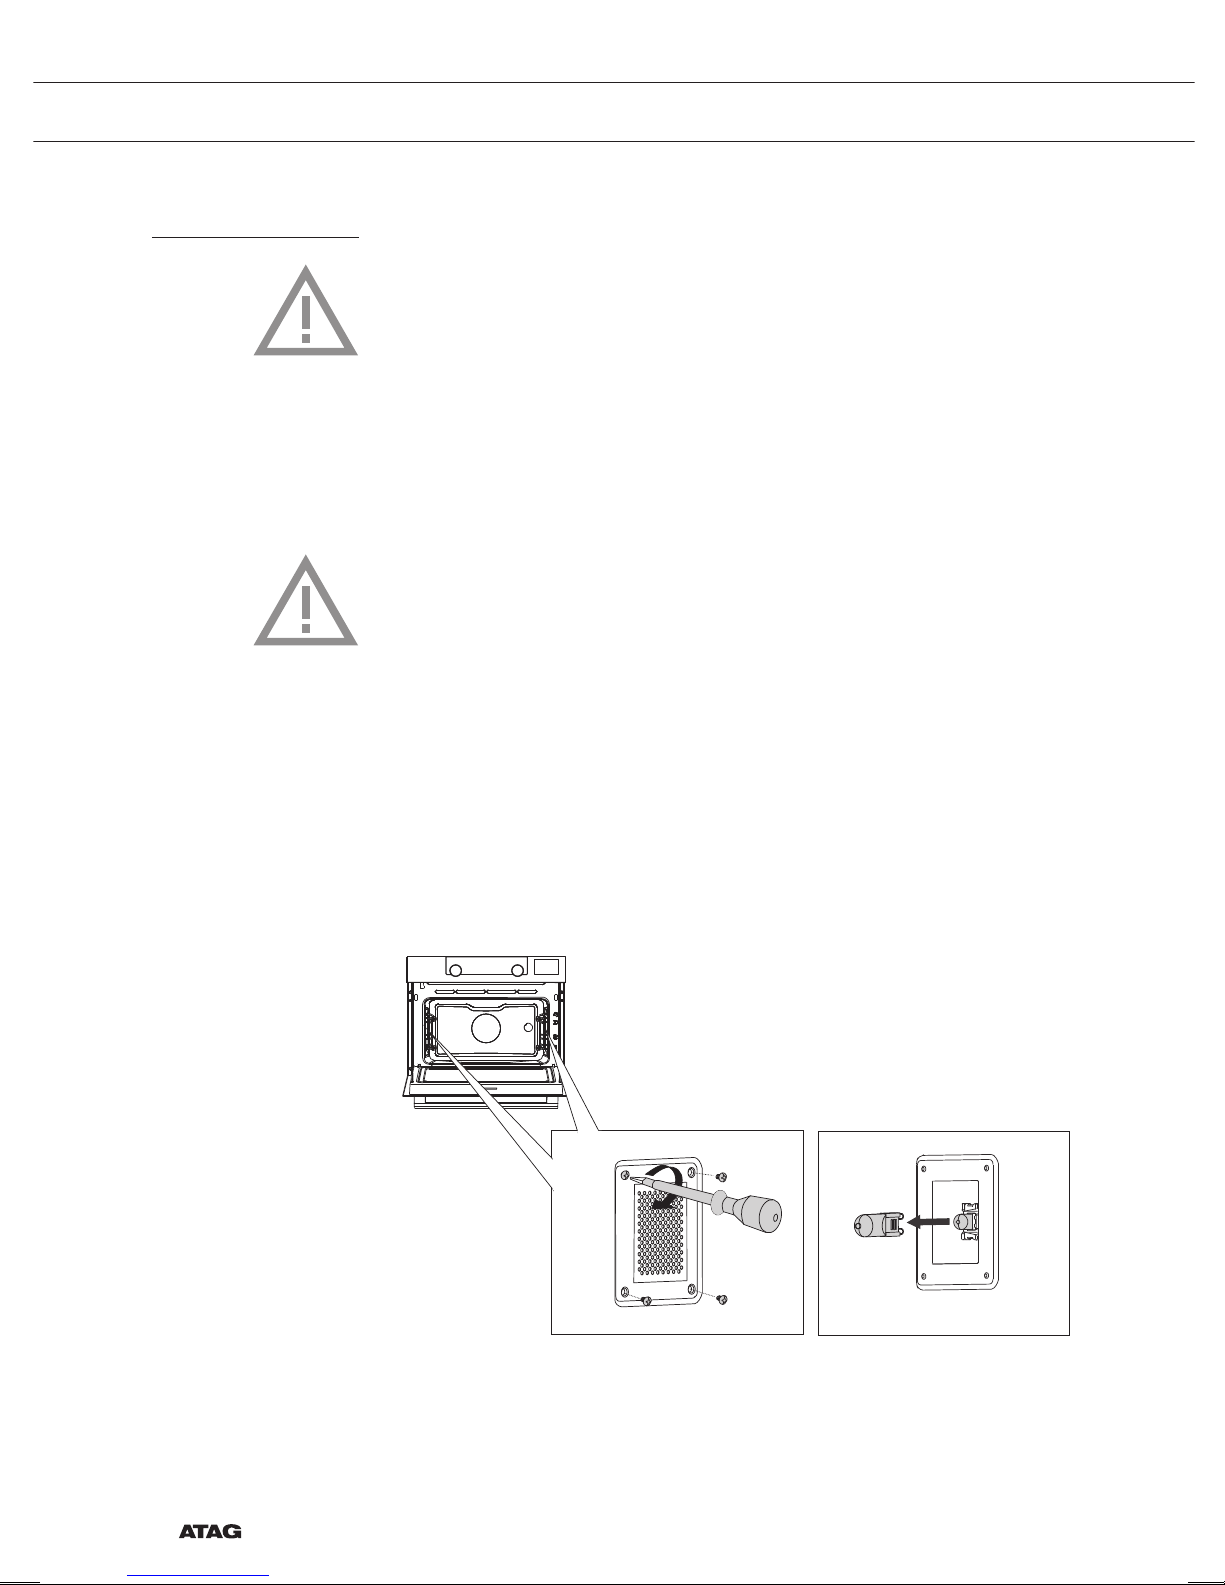
EN 36
Replacing the oven light bulb
The lamp in this household appliance is only suitable for
illumination of this appliance. The lamp is not suitable for
household room illumination.
The light bulbs (2x) (halogen G9, 230 V, 25 W) are a consumer items
and therefore not covered by warranty. To replace it, first remove the
baking tray, oven rack and guide rails.
• Disconnect the appliance from the power supply by removing the plug
from the socket or by switching off the circuit breaker in the fuse box.
• Please note: the light bulb can be very hot! Use protection to
remove the bulb.
1. Remove the four screws from the cover panel. Remove the cover
panel, the glass and the sealing ring.
2. Remove the faulty halogen lamp and replace it with a new one.
3. Replace the cover panel, the glass and the sealing ring.
Attention: The sealing ring needs to fit perfectly in the oven wall
recess.e cover panel. The seal must fit perfectly in the oven wall
recess.
CLEANING
Page 77

EN 37
Removing the oven door
Keep your fingers away from the hinges of the oven door. The hinges
are spring loaded and can cause injury if they spring back.
Make sure that the hinge latches are applied correctly to lock the
hinges.
Remove the oven door.
1. Open the door to the fully open position.
2. Lift both hinge latches (A) and pull them towards the oven door (B).
The hinges will be locked in the 45° position.
3. Gently close the door until it reaches a 45° angle.
4. Remove the door by lifting and tilting it towards the oven (C). The
hinges need to come out of the slots in the oven.
B
A
C
Install the oven door.
1. Hold the door at an angle of approximately 45° in front of the oven.
2. Insert the hinges into the slots and make sure they are both
positioned correctly.
3. Open the door to the fully open position.
4. Lift both hinge latches and move them towards the oven.
5. Gently close the oven door and make sure that it closes correctly.
If the door does not open or close correctly, then make sure that the
hinges are positioned correctly in their slots.
CLEANING
Page 78

EN 38
Removing the oven door glass
The inside of the glass in the oven door can be cleaned. For this it must
be removed from the oven door.
1. Slightly lift (1) and shift (2) the clamps at the lower left and right of
the door to release the glass (A).
2. Grab the glass (A) at the bottom and gently lift (3) and shift (4) it to
remove it from the upper support.
3. The inner glass (B) (depending on the model) can be removed by
carefully lifting (5) and shifting (6) it to removing it from the lower
support. Also remove the rubber spacers (C) from the inner glass.
B
A
A
A
C
4 3
5
6
Install the glass in reverse order.
CLEANING
Page 79

EN 39
General
If you have problems with your oven, then consult the error overview
below. Should the problems persist, then please contact the Customer
Services Department.
The food stays raw
• Check whether the timer has been set and you have pressed the
‘confirm key’.
• Is the door closed properly?
• Check whether a fuse has blown or a circuit breaker has been
activated.
The food is overcooked or undercooked
• Check whether the correct cooking time has been set.
The keys do not respond; the display does not respond to the
keys.
• Disconnect the appliance from the power supply for a few minutes
(remove the mains plug from the socket or switch the circuit
breaker to off); then reconnect the appliance and switch it on.
Power failure can cause the display to reset.
• Disconnect the appliance from the power supply for a few minutes
(remove the mains plug from the socket or switch the circuit
breaker to off); then reconnect the appliance and switch it on.
• Set the time again.
There is condensation in the oven.
• This is normal. Wipe the oven clean after use.
The fan keeps working after the oven is switched off.
• This is normal. The fan will keep working for a while after the oven
is switched off.
Air flow can be felt at the door and the exterior of the appliance.
• This is normal.
Steam escapes via the door or the vents.
• This is normal.
SOLVING PROBLEMS
Page 80

EN 40
Clicking sounds can be heard when the oven is working, particularly
in the defrost setting.
• This is normal.
The circuit breaker switches off regularly.
• Consult a service technician.
The display gives an error code, ERROR XX ...
(XX indicates the number of the error).
• There is a fault in the electronic module. Disconnect the appliance
from the power supply for a few minutes. Then reconnect it and set
the current time.
• Consult a service technician if the error persists.
Storing and repairing the oven
Repairs should only be performed by a qualified service technician.
If maintenance is required, then remove the mains plug from the socket
and contact the ATAG customer service.
Have the following information to hand when you call:
• The model number and serial number (stated on the inside of the
oven door)
• Warranty details
• A clear description of the problem
Choose a clean, dry place if you have to store the oven temporarily,
as dust and moisture can damage the appliance.
SOLVING PROBLEMS
Page 81

EN 41
Disposal of the appliance and packaging
This product is made from sustainable materials. However, the
appliance must be disposed of responsibly at the end of its useful life.
The government can provide you with information about this.
The packaging of the appliance can be recycled. The following materials
have been used:
• cardboard
• polyethylene wrap (PE)
• CFC-free polystyrene (hard PS foam)
Dispose of these materials responsibly in accordance with legal provisions.
The product has a pictogram of a rubbish bin with a cross through it.
This indicates that household appliances must be disposed of
separately. This means that the appliance may not be processed via
the regular waste flow at the end of its useful life. You should take it to
a special municipal waste depot or a sales outlet that offers to do this
for you.
Collecting household equipment separately prevents harm to the
environment and public health. The materials used in manufacturing
this appliance can be recycled, which provides considerable savings
in energy and raw materials.
Declaration of conformity
We hereby declare that our products comply with the relevant European
directives, standards and regulations as well as all requirements
referred to in the standards.
YOUR OVEN AND THE ENVIRONMENT
Page 82

EN 42
Page 83

EN 43
Page 84

527942 / VER 3 / 01-03-2016
Het toestel-identificatieplaatje bevindt zich aan de binnenzijde van het
toestel.
The appliance identification card is located on the inside of the appliance.
Houd, wanneer u contact opneemt met de serviceafdeling, het complete
typenummer bij de hand.
When contacting the service department,
have the complete type number to hand.
Adressen en telefoonnummers van de serviceorganisatie vindt u op de garantiekaart.
You will find the addresses and phone numbers of the service organisation on the
guarantee card.
527942
527942
 Loading...