

Page 1
instructions for use
steam oven
SQ4211B
SQ4292B
SQ4311B
SQ4392B
Page 2

Page 3

3
Contents
Control Panel . . . . . . . . . . . . . . . . . . . . . . . . . . . . . . . . . . . . . . . . . . . . . . . . . . . . . . . . . . . . . 4
Oven Features . . . . . . . . . . . . . . . . . . . . . . . . . . . . . . . . . . . . . . . . . . . . . . . . . . . . . . . . . . . . . 5
Accessories . . . . . . . . . . . . . . . . . . . . . . . . . . . . . . . . . . . . . . . . . . . . . . . . . . . . . . . . . . . . . . . 6
Using This Manual . . . . . . . . . . . . . . . . . . . . . . . . . . . . . . . . . . . . . . . . . . . . . . . . . . . . . . . . . . 7
Before Installaton . . . . . . . . . . . . . . . . . . . . . . . . . . . . . . . . . . . . . . . . . . . . . . . . . . . . . . .7
Safety Precautions . . . . . . . . . . . . . . . . . . . . . . . . . . . . . . . . . . . . . . . . . . . . . . . . . . . . . . 8
Important Information about the Use of the Appliance . . . . . . . . . . . . . . . . . . . . . . . . . . . 9
Causes of Damage . . . . . . . . . . . . . . . . . . . . . . . . . . . . . . . . . . . . . . . . . . . . . . . . . . . . . 10
Important Information about Installing The Combi Steam Oven . . . . . . . . . . . . . . . . . . . 10
Filling The Water Tank . . . . . . . . . . . . . . . . . . . . . . . . . . . . . . . . . . . . . . . . . . . . . . . . . . . . . . 11
Setting The Clock . . . . . . . . . . . . . . . . . . . . . . . . . . . . . . . . . . . . . . . . . . . . . . . . . . . . . . . . . 12
Modes And Settings. . . . . . . . . . . . . . . . . . . . . . . . . . . . . . . . . . . . . . . . . . . . . . . . . . . . . . . .13
Default Settings . . . . . . . . . . . . . . . . . . . . . . . . . . . . . . . . . . . . . . . . . . . . . . . . . . . . . . . . . . . 15
Using The Steam Mode . . . . . . . . . . . . . . . . . . . . . . . . . . . . . . . . . . . . . . . . . . . . . . . . . . . . . 16
Using The Combi Steam Mode . . . . . . . . . . . . . . . . . . . . . . . . . . . . . . . . . . . . . . . . . . . . . . 20
Using The Reheat Mode . . . . . . . . . . . . . . . . . . . . . . . . . . . . . . . . . . . . . . . . . . . . . . . . . . . . 22
Using The Convection Mode . . . . . . . . . . . . . . . . . . . . . . . . . . . . . . . . . . . . . . . . . . . . . . . . . 23
Using The Grill Mode . . . . . . . . . . . . . . . . . . . . . . . . . . . . . . . . . . . . . . . . . . . . . . . . . . . . . . . 25
Cooking Time Reservation Function . . . . . . . . . . . . . . . . . . . . . . . . . . . . . . . . . . . . . . . . . . . 27
Using The Auto Cook Mode . . . . . . . . . . . . . . . . . . . . . . . . . . . . . . . . . . . . . . . . . . . . . . . . . 28
Using The Defrost Mode . . . . . . . . . . . . . . . . . . . . . . . . . . . . . . . . . . . . . . . . . . . . . . . . . . . . 33
Using The Keep Warm Mode . . . . . . . . . . . . . . . . . . . . . . . . . . . . . . . . . . . . . . . . . . . . . . . . 35
Using The Memory Mode . . . . . . . . . . . . . . . . . . . . . . . . . . . . . . . . . . . . . . . . . . . . . . . . . . . 36
Setting The Water Hardness . . . . . . . . . . . . . . . . . . . . . . . . . . . . . . . . . . . . . . . . . . . . . . . . . 38
Descaling . . . . . . . . . . . . . . . . . . . . . . . . . . . . . . . . . . . . . . . . . . . . . . . . . . . . . . . . . . . . . . . . 39
Using The Steam Clean Feature . . . . . . . . . . . . . . . . . . . . . . . . . . . . . . . . . . . . . . . . . . . . . . 41
Cleaning . . . . . . . . . . . . . . . . . . . . . . . . . . . . . . . . . . . . . . . . . . . . . . . . . . . . . . . . . . . . . . . . 42
Switching Off The Beeper / Reading Out The Temperature . . . . . . . . . . . . . . . . . . . . . . . . . 44
Child Safety Lock. . . . . . . . . . . . . . . . . . . . . . . . . . . . . . . . . . . . . . . . . . . . . . . . . . . . . . . . . . 45
Cleaning And Care . . . . . . . . . . . . . . . . . . . . . . . . . . . . . . . . . . . . . . . . . . . . . . . . . . . . . . . .46
Changing The Oven Lamp . . . . . . . . . . . . . . . . . . . . . . . . . . . . . . . . . . . . . . . . . . . . . . . . . . 47
Error Codes . . . . . . . . . . . . . . . . . . . . . . . . . . . . . . . . . . . . . . . . . . . . . . . . . . . . . . . . . . . . . . 48
Technical Specifi cations . . . . . . . . . . . . . . . . . . . . . . . . . . . . . . . . . . . . . . . . . . . . . . . . . . . . 49
Page 4
4
3928
4
18
1
567
16
10 11 12 13 14 15 17 19
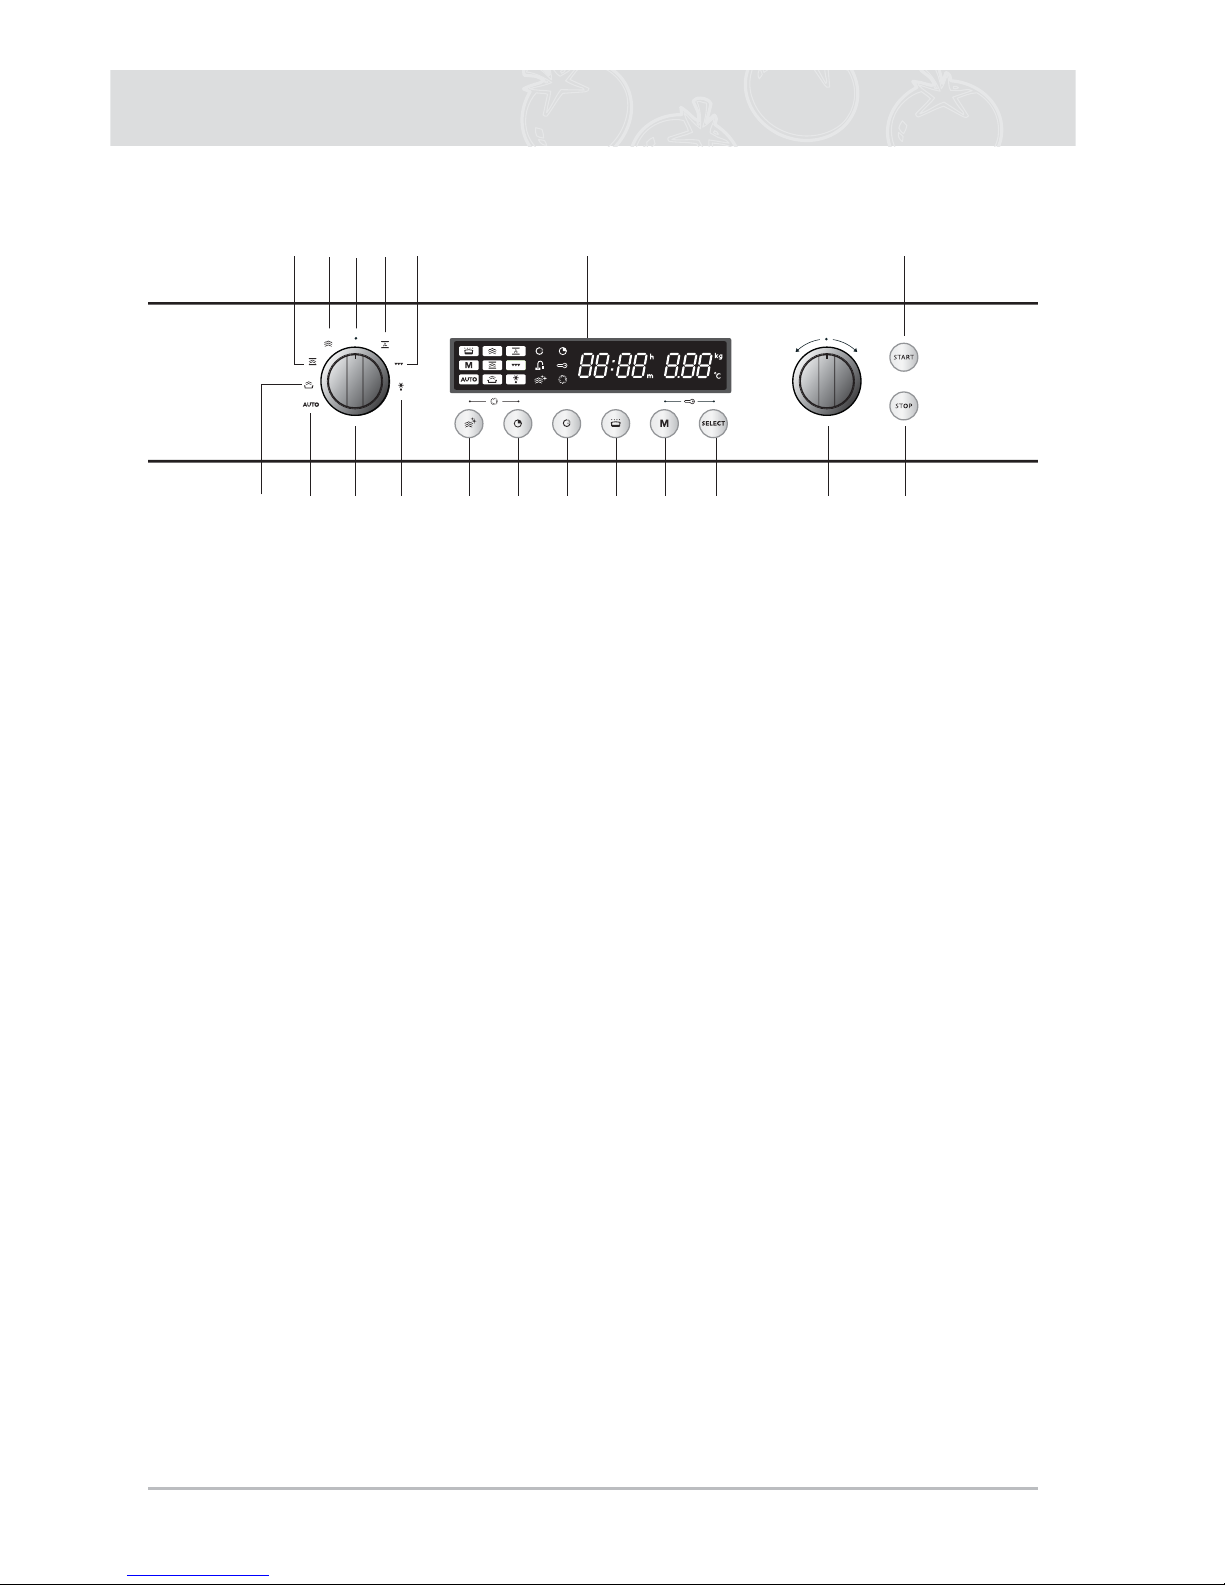
1. OFF
2. AUTO PROGRAMMES
3. REHEAT MODE
4. COMBI STEAM MODE
5. STEAM MODE
6. CONVECTION MODE
7. GRILL MODE
8. DEFROST MODE
9. FUNCTION KNOB
10. STEAM CLEAN MODE
11. TIMER
12. START TIME
13. KEEP WARM MODE
14. MEMORY
15. SELECT
16. DISPLAY
17. SELECTION KNOB
18. START
19. STOP / CANCEL
10+11. DESCALE
14+15. CHILD LOCK
Control Panel
Page 5
5
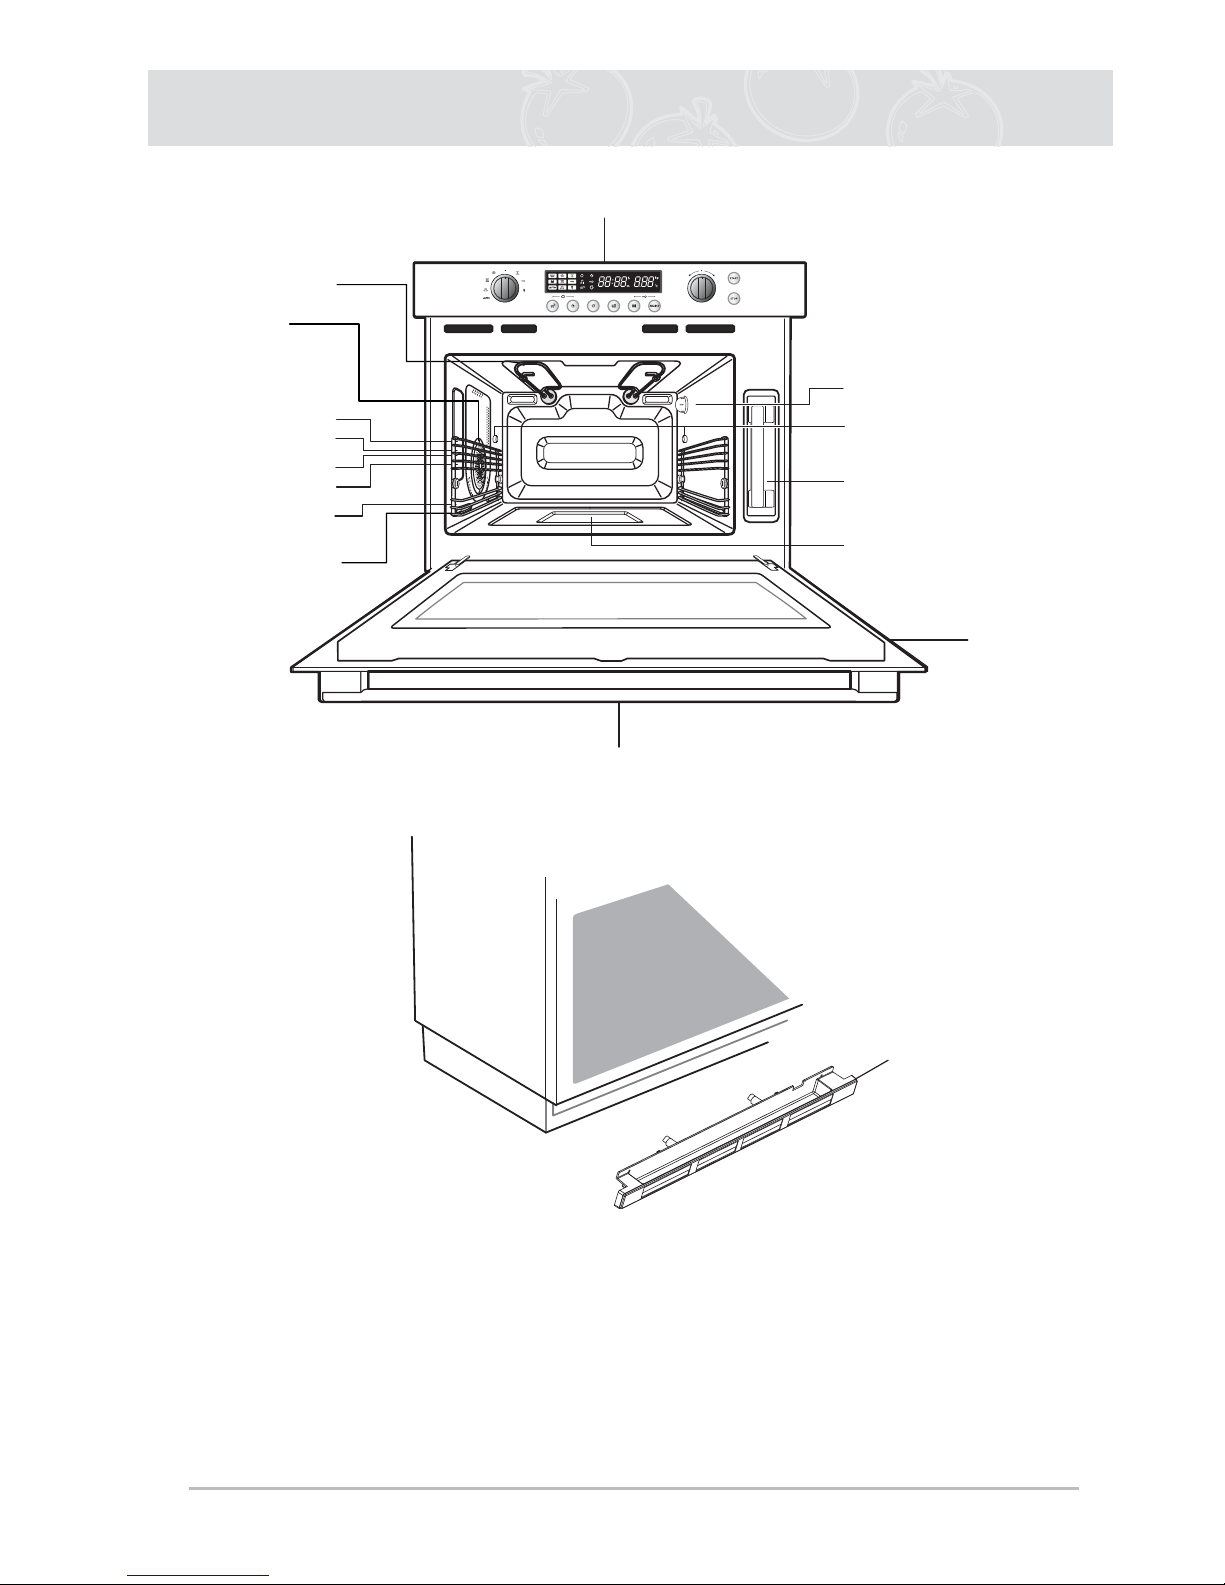
Note
● Shelf levels are numbered from the bottom up.
● The levels 4, 5 and 6 are mainly used for the grill function.
● Levels 1 is mainly used for baking and roasting.
● Please refer to the Cooking Guides provided throughout this booklet to determine the
appropriate shelf level for your dishes.
Oven Features
Control Panel
Oven Light
Top Heating
Elements
Water Tank
Steam Outlet
Fan
Evaporator dish
Level 6
Level 5
Level 4
Level 3
Level 2
Level 1
Door Handle
Drip Tray
Door
Page 6
6
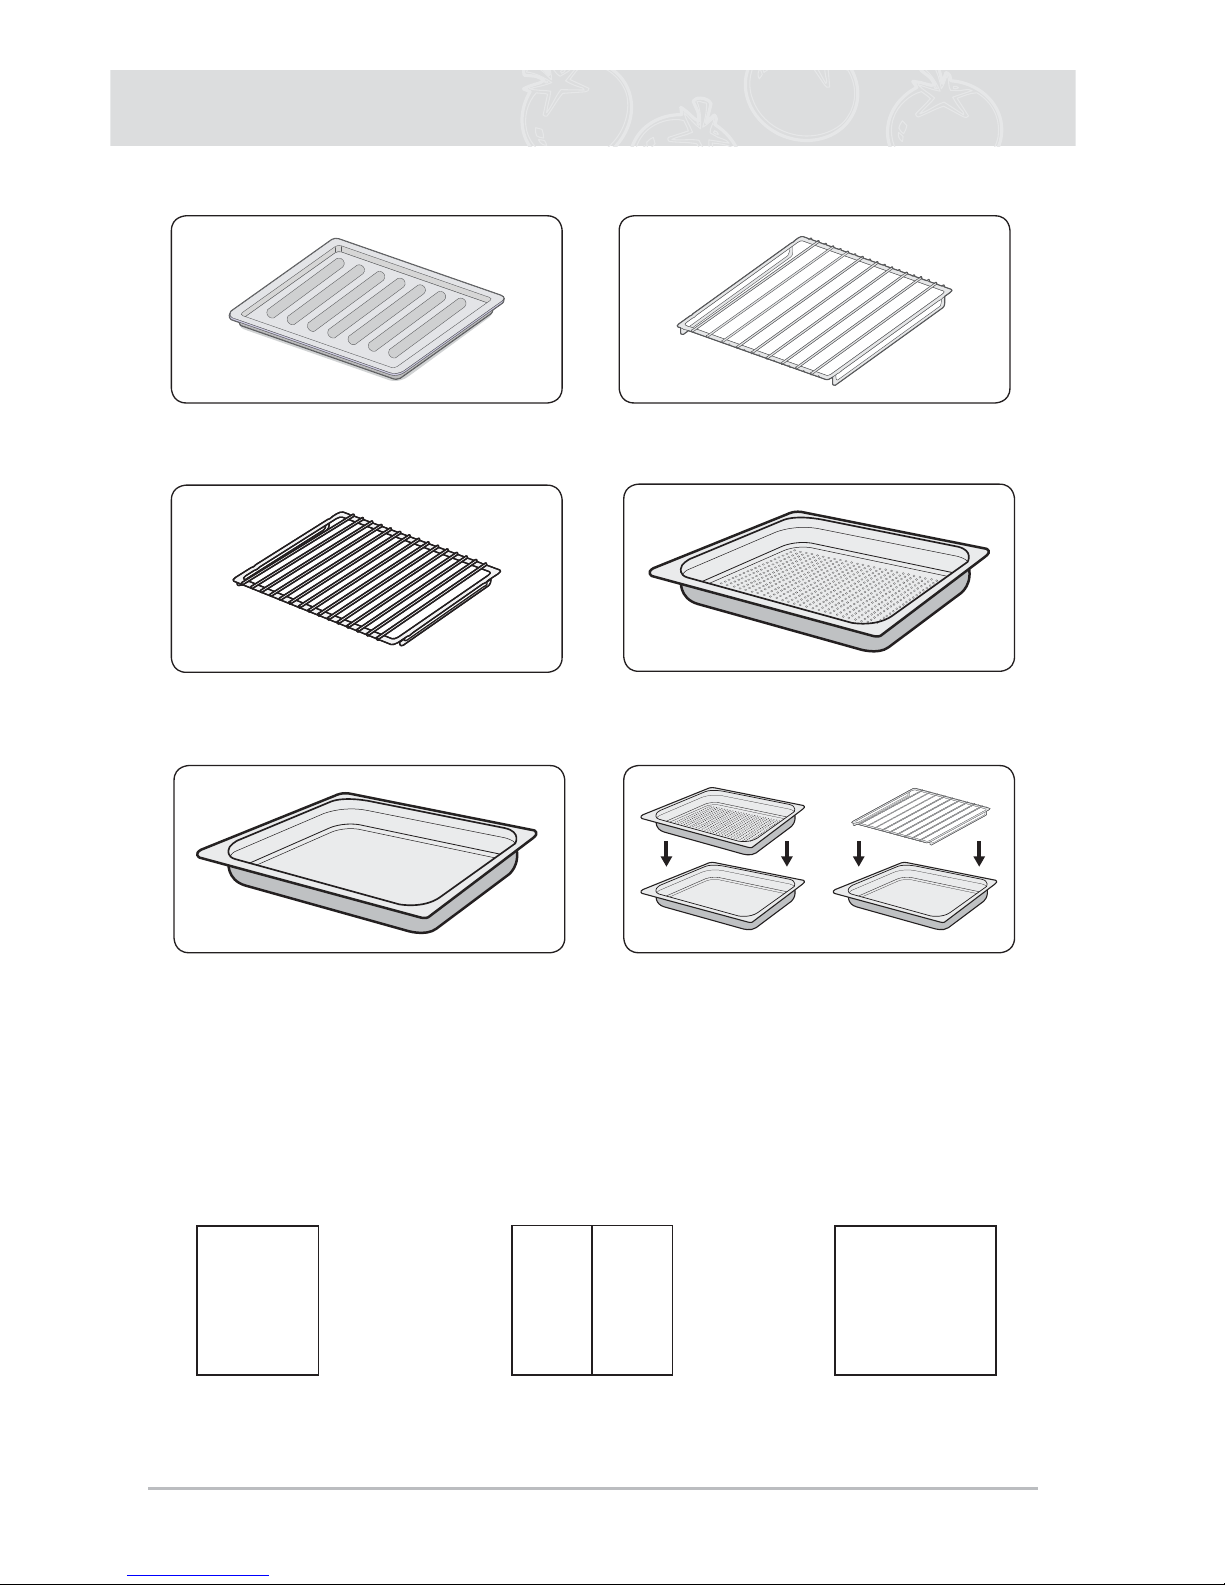
Accessories
The following accessories are provided with your Combi Steam Oven:
1
Multi pan (for level 1 or 6)
2
Grill insert for multi pan or for
unperforated steam dish
3
Wire rack (for all levels)
4
Large steam dish, perforated, 40 mm
deep, GN 2/3 (useful for steam mode,
for level 2, 3, 4 and 5)
5
Large steam dish, unperforated,
40 mm deep, GN 2/3 (useful during
steam mode for collecting condensation, for level 2, 3, 4 and 5)
For steaming, you can place the perfora ted steam dish or the grill insert into
the unperforated steam dish.
Accessories can be purchased from www.atag.nl.
Use only the accessories supplied with the product or available from the after-sales service.
They are specially designed for your appliance.
325 mm
265 mm
175 mm 175 mm
325 mm
GN 1/3GN 1/3
GN 1/2
350 mm
325 mm
GN 2/3
Page 7

7
Using This Manual
Thank you for purchasing this ATAG Combi Steam Oven.
Your Owner’s Manual contains important safety instructions and essential infor-
mation on using and caring for your new Combi Steam Oven.
Before using your oven, please read all the information in this manual and keep
it for future reference.
Before installaton
Environmentally-friendly
disposal
Unpack the appliance and dispose of the packaging in an
environmentally-responsible manner.
This appliance is labelled in accordance with European
Directive 2002/96/EU on Waste Electrical and Electronic
Equipment - WEEE.
The directive gives a framework for the collection and
recycling of old appliances, which is valid across the EU.
After unpacking Do not open the cooking compartment door while the
appliance is on the fl oor. The cooking compartment
door could touch the fl oor and be damaged.
Check the appliance for damage after unpacking it.
Do not connect the appliance if it has been damaged
in transport.
Your appliance was thoroughly factory tested for
proper operation. It may therefore contain some
remaining water.
Installation and connection Please observe the special installation instructions.
Electrical connection If the power cable is damaged, it must be replaced by
customer service in order to prevent hazards.
Page 8

8
Using This Manual (Continued)
Safety precautions
This appliance is intended only for domestic use. This
appliance must only be used for food preparation.
• This appliance is not intended for use by persons
(including children) with reduced physical, sensory or
mental capabilities, or lack of experience and knowledge,
unless they have been given supervision or instruction
concerning use of the appliance by a person responsible
for their safety.
• Children should be supervised to ensure that they do not
play with the appliance.
Hot cooking cavity There is a risk of burning!
• During use the appliance becomes hot. Care should be
taken to avoid touching heating elements.
• Open the cooking compartment door carefully. Hot steam
can escape.
WARNING
• Accessible parts may become hot during use. Young
children should be kept away.
Risk of fi re!
• Never store combustible items in the cooking compartment.
There is a risk of short-circuiting!
• Never trap cables of electrical appliances in the hot cooking compartment door. The cable insulation could melt.
Hot accessories There is a risk of burning!
• Never take accessories out of the appliance without
using oven gloves.
Cleaning Risk of scalding!
• Do not clean the appliance immediately after switching it
off. The water in the evaporator dish is still hot. Wait until
the appliance has cooled down.
• A Steam cleaner is not to be used.
Repairs Danger of electric shock!
• Incorrect repairs are dangerous. Repairs may only
be carried out by one of our experienced after-sales
engineers. If the appliance is faulty, switch it off using the
fuse in the fuse box or disconnect the appliance at the
mains connection. Contact the after-sales service.
WARNING: Ensure that the appliance is switched off before
replacing the lamp to avoid the possibility of electric shock.
Page 9

9
Using This Manual (Continued)
Important information about the use of the appliance
Do not use the cooking compartment door as a shelf.
Do not store any food in the appliance. This can lead to
corrosion.
Ovenware Use only the accessories provided. They are specially
designed for your appliance.
Ovenware must be heat and steam resistant. Silicone
baking tins are not suitable for combined operation with
hot air and steam.
Do not use ovenware that shows signs of rust. Even the
smallest spots of rust can lead to corrosion in the cooking
compartment.
Care and cleaning The cooking compartment in your appliance is made of steel
covered with enamel. Improper care can lead to corrosion
in the cooking compartment. Refer to the care and cleaning
instructions in the instruction manual.
Salts are very abrasive. If salt is deposited in the cooking
compartment, rust could develop in places.
Acidic sauces, such as ketchup and mustard, or salted foods,
e.g. cured roasts, contain chloride and acids. These affect the
stainless steel surface. Clean the cooking compartment after
each use.
DO NOT use harsh abrasive cleaners or sharp metal
scrapers to clean the oven door glass since they can scratch
the surface, which may result in shattering of the glass
(if provided).
Page 10

10
Using This Manual (Continued)
Causes of damage
Very dirty seal If the seal on the outside of the cooking compartment is
very dirty, the cooking compartment door will no longer
close properly during operation. The fronts of adjacent
units could be damaged. Keep the seal clean.
Cooking compartment door
as a seat
Do not stand or sit on the cooking compartment door.
Transport Do not hold or carry the appliance by the door handle.
The door handle cannot hold the weight of the appliance
and may break off.
Important information about installing the combi steam
oven
• This appliance is NOT intended for use in a commercial environment.
• Please observe the installation instructions provided and note that this appliance should
only be installed by a qualifi ed technician.
• The appliance is fi tted with a plug and must only be connected to a properly installed
earthed socket. The fuse protection must be rated at 16 amps (L or B-type miniature
circuit breakers).
• In case a new socket is needed, installation and cable connection must only be done
by a qualifi ed electrician. If the plug is no longer accessible following installation, a pole
disconnecting device must be present on the installation site with a contact gap of at
least 3 mm.
• Adapters, multiway strips and extension cords must not be used. Overloading can result
in fi re.
• Plug in
When the appliance has been connected for the fi rst time, all segments are lit for a
second. After 3 seconds, 12:00 fl ashes in the display prompting you to select the clock.
Do not forget to reset the clock when you switch to and from summer or winter (see the
instructions on page 12).
Page 11
11
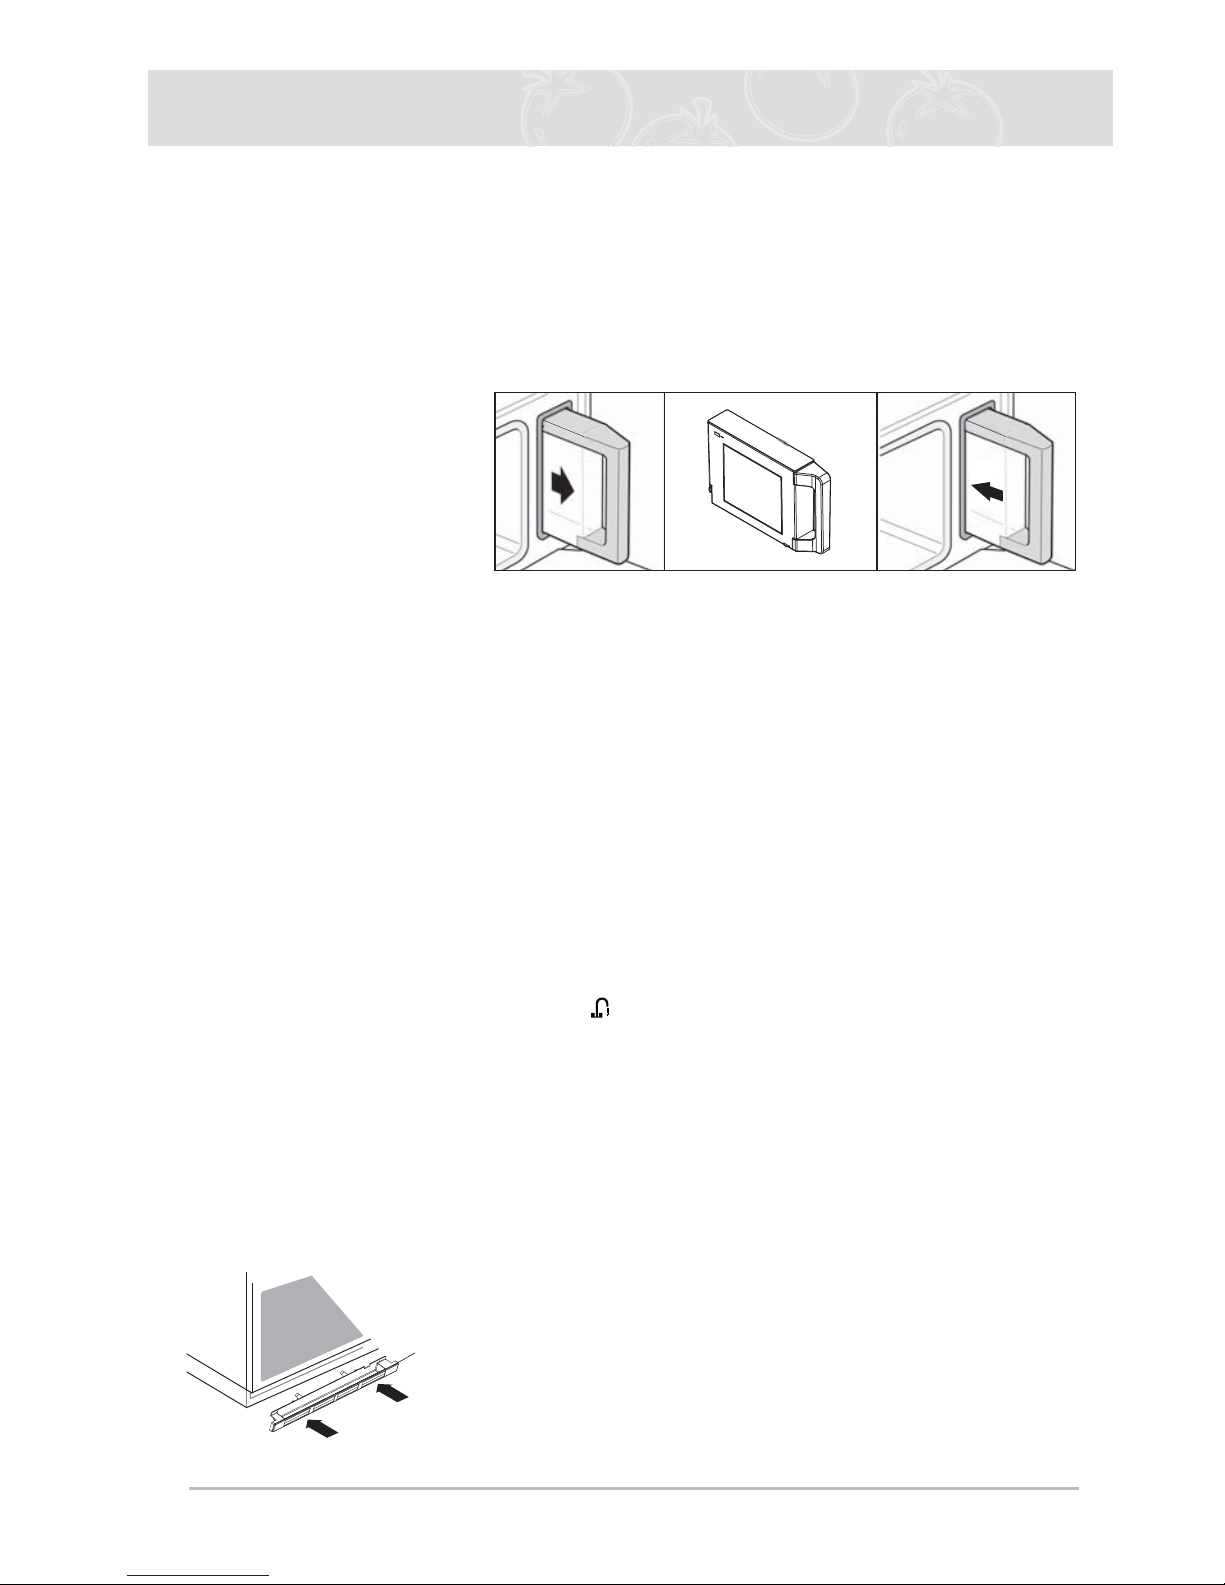
Filling The Water Tank
When you open the cooking compartment door, you will see the water tank on the right-hand
side. Only fi ll the tank with fresh tap water or with still bottled water. If your water is very hard,
we recommend that you use softened water (see also “Water hardness).
Caution Do not fi ll the water tank with distilled water or any other
liquids.
Fill the water tank before
each use
Lift the water tank over the interlock and pull the tank out of
the appliance. Fill the water tank with cold water up to the
“max.” mark. Close the lid until you feel it engage.
Slide the water tank back until it engages.
Empty the water tank after
each use
Pull the water tank out of the appliance slowly. Pulling it
out quickly may cause water to spill. Hold the water tank
horizontally, so that no remaining water can drip out of the
valve seat.
Empty out the water.
Thoroughly dry the water tank in the appliance and the seal
in the lid.
“Fill water tank” display If the water tank is empty, a signal sounds.
A symbol
appears in the display. The operation is inter-
rupted.
1. Open the cooking compartment door carefully. Steam will
escape.
2. Take out the water tank, fi ll to the “max” mark and rein-
sert.
3. Press the START button.
Removing drip tray Empty drip tray at regular intervals. Push drip tray in until
you hear a click, and remove tray from locked position.
Drip tray
Push in and remove
Page 12
12
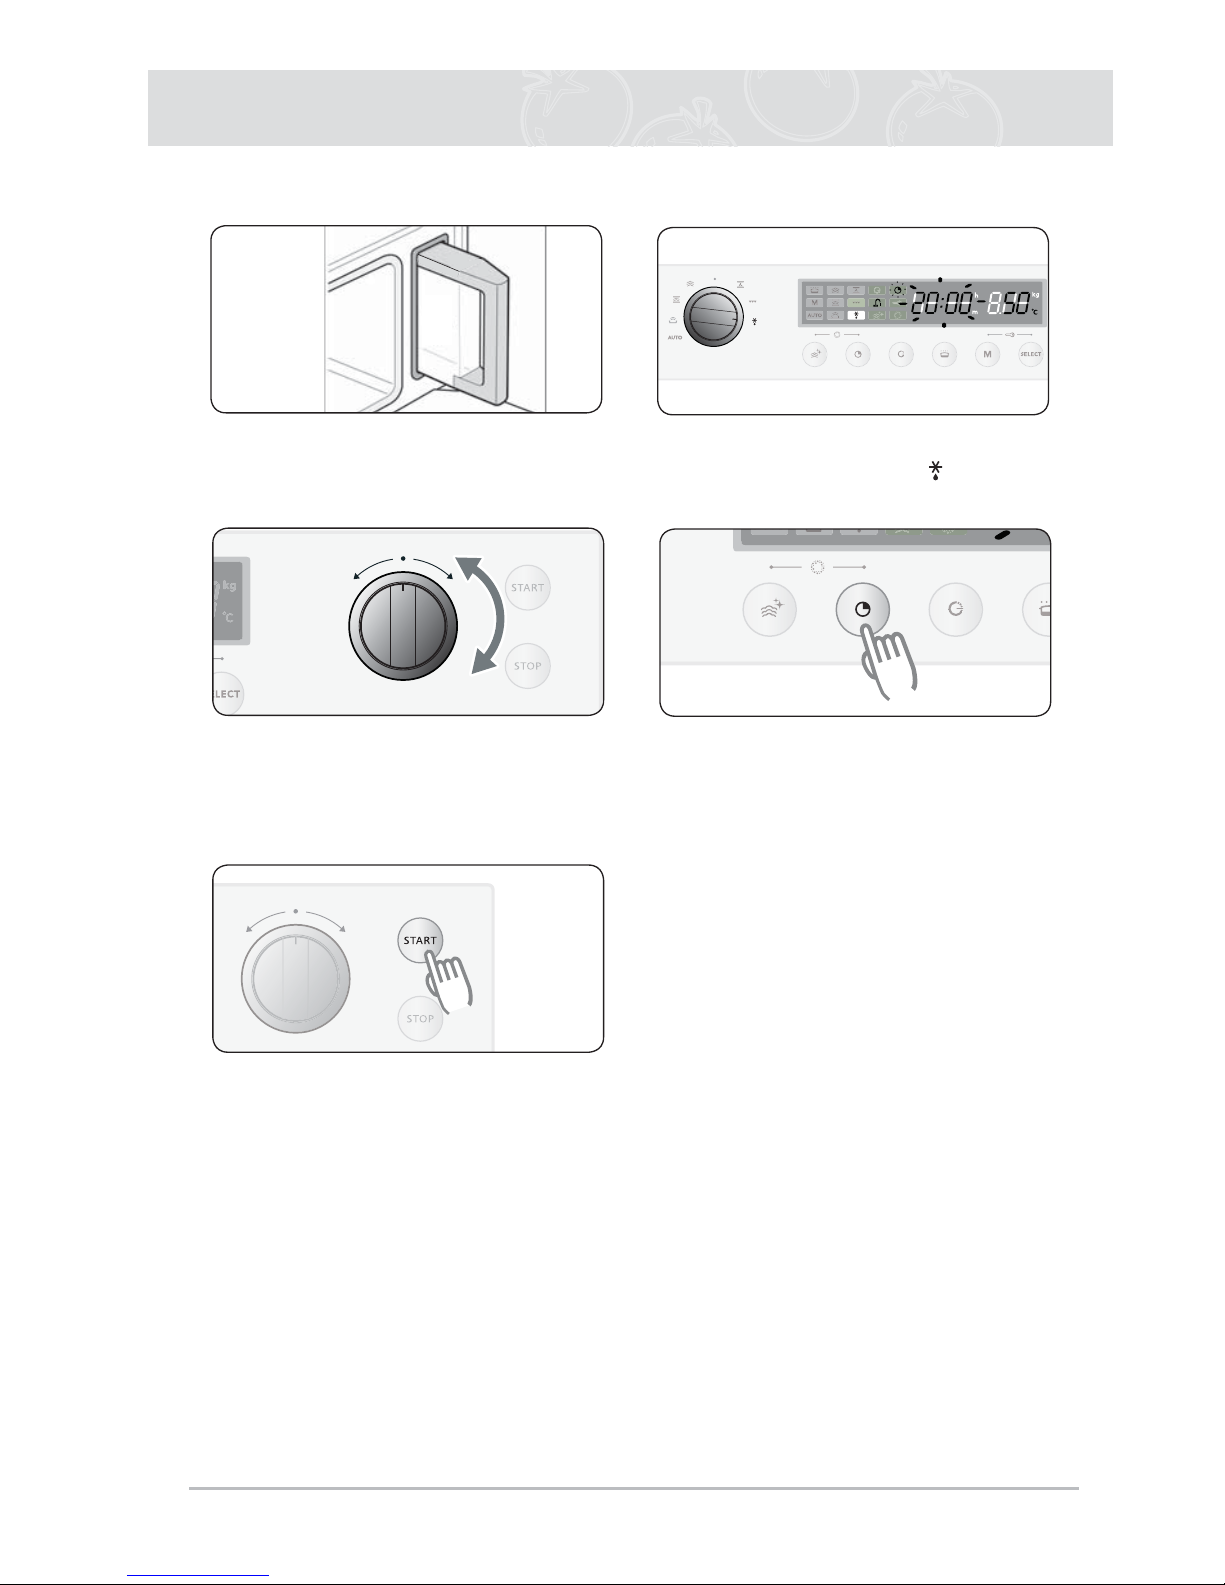
When the appliance is fi rst plugged in, the display lights up.
Setting the Clock (example 15:15)
1
Turn the FUNCTION KNOB to the
“OFF” position.
2
Press SELECT. The “12” starts
blinking.
3
Turn the SELECTION KNOB to set
the hour.
4
Press SELECT again. The “00” starts
blinking.
5
Turn the SELECTION KNOB to set
the minutes.
6
Press SELECT again. The clock sets
by itself within 5 seconds.
Setting The Clock
Page 13
13
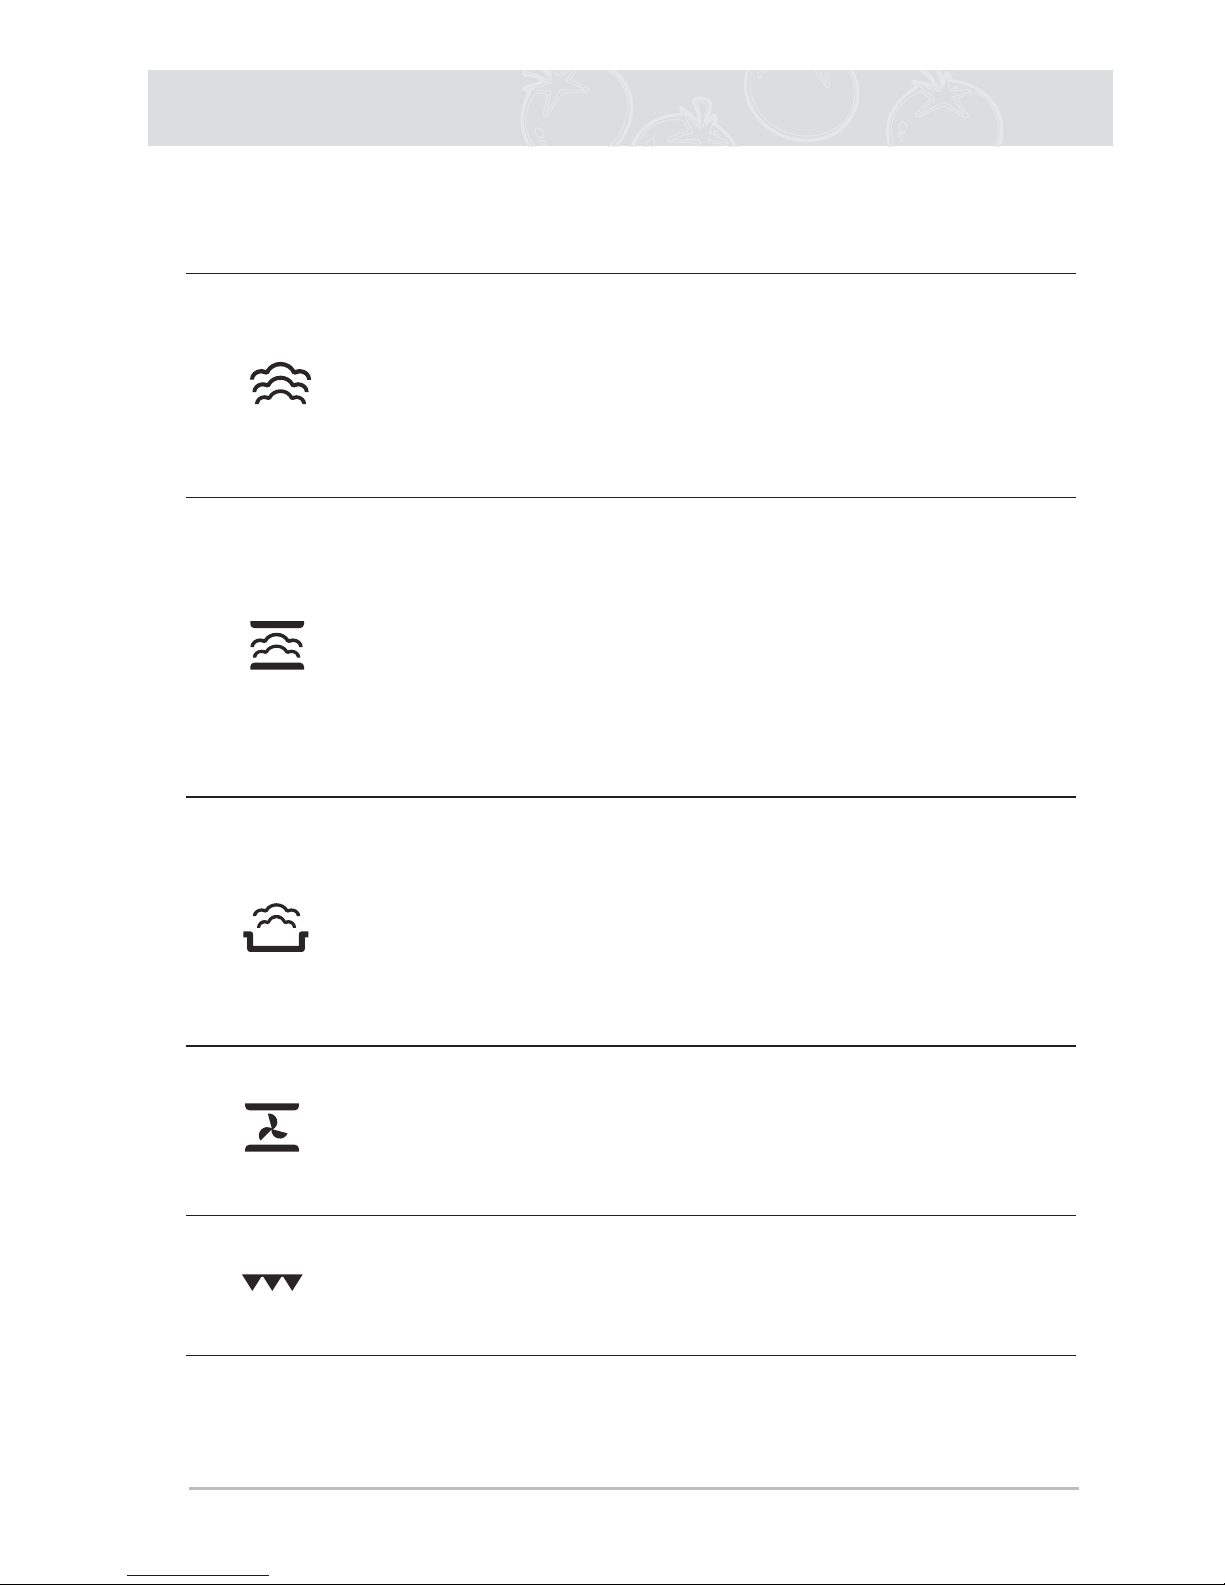
Modes And Settings
The following table represents the various oven modes and settings of your oven.
Use the cooking guide tables for those modes as guidelines for cooking.
Steam Mode
Food is cooked by steam provided by the steam generator and injected
into the cavity by two jet nozzles.
This mode is suitable for steaming food like vegetables, fi sh, eggs, fruits
and rice. When cooking by using this mode, always fi ll the water tank
with fresh water.
Temperature range: 40~100 °C
Steam Combi Mode
Food is cooked by convection mode and the help of steam. The steam
is provided by the steam generator and injected into the cavity by
interval.
This mode is suitable for baking pastries, such as puff pastry, brioches,
yeast buns, bread rolls, gratins and roasting meat. The superheated
steam will provide a nice crisp, shiny surface and fl uffy structure. Meat
roasts and fi sh will keep a more juicy texture inside. When cooking with
this mode always fi ll the water tank with fresh water.
Temperature range: 100~230 °C
Reheat Mode
Food is reheated by convection mode and the help of steam. The
steam is provided by the steam generator and injected into the cavity by
interval.
This mode is suitable for plated meals. Dishes can be gently reheated
without drying out. When reheating with this mode always fi ll the water
tank with fresh water.
Temperature: 120 °C
Convection Mode
Food is heated by two heating elements on top of cavity and one bottom
heating element, while the fan from the side distributes the hot air evenly.
This setting is suitable for roasting meat, baking pizza and cake.
Temperature range: 40~230 °C
Grill Mode
Food is heated by the top heating elements. We recommend this mode
for grilling smaller pieces of meat, such as steaks and sausages, as well
for making toasts.
Page 14
14
Modes And Settings (Continued)
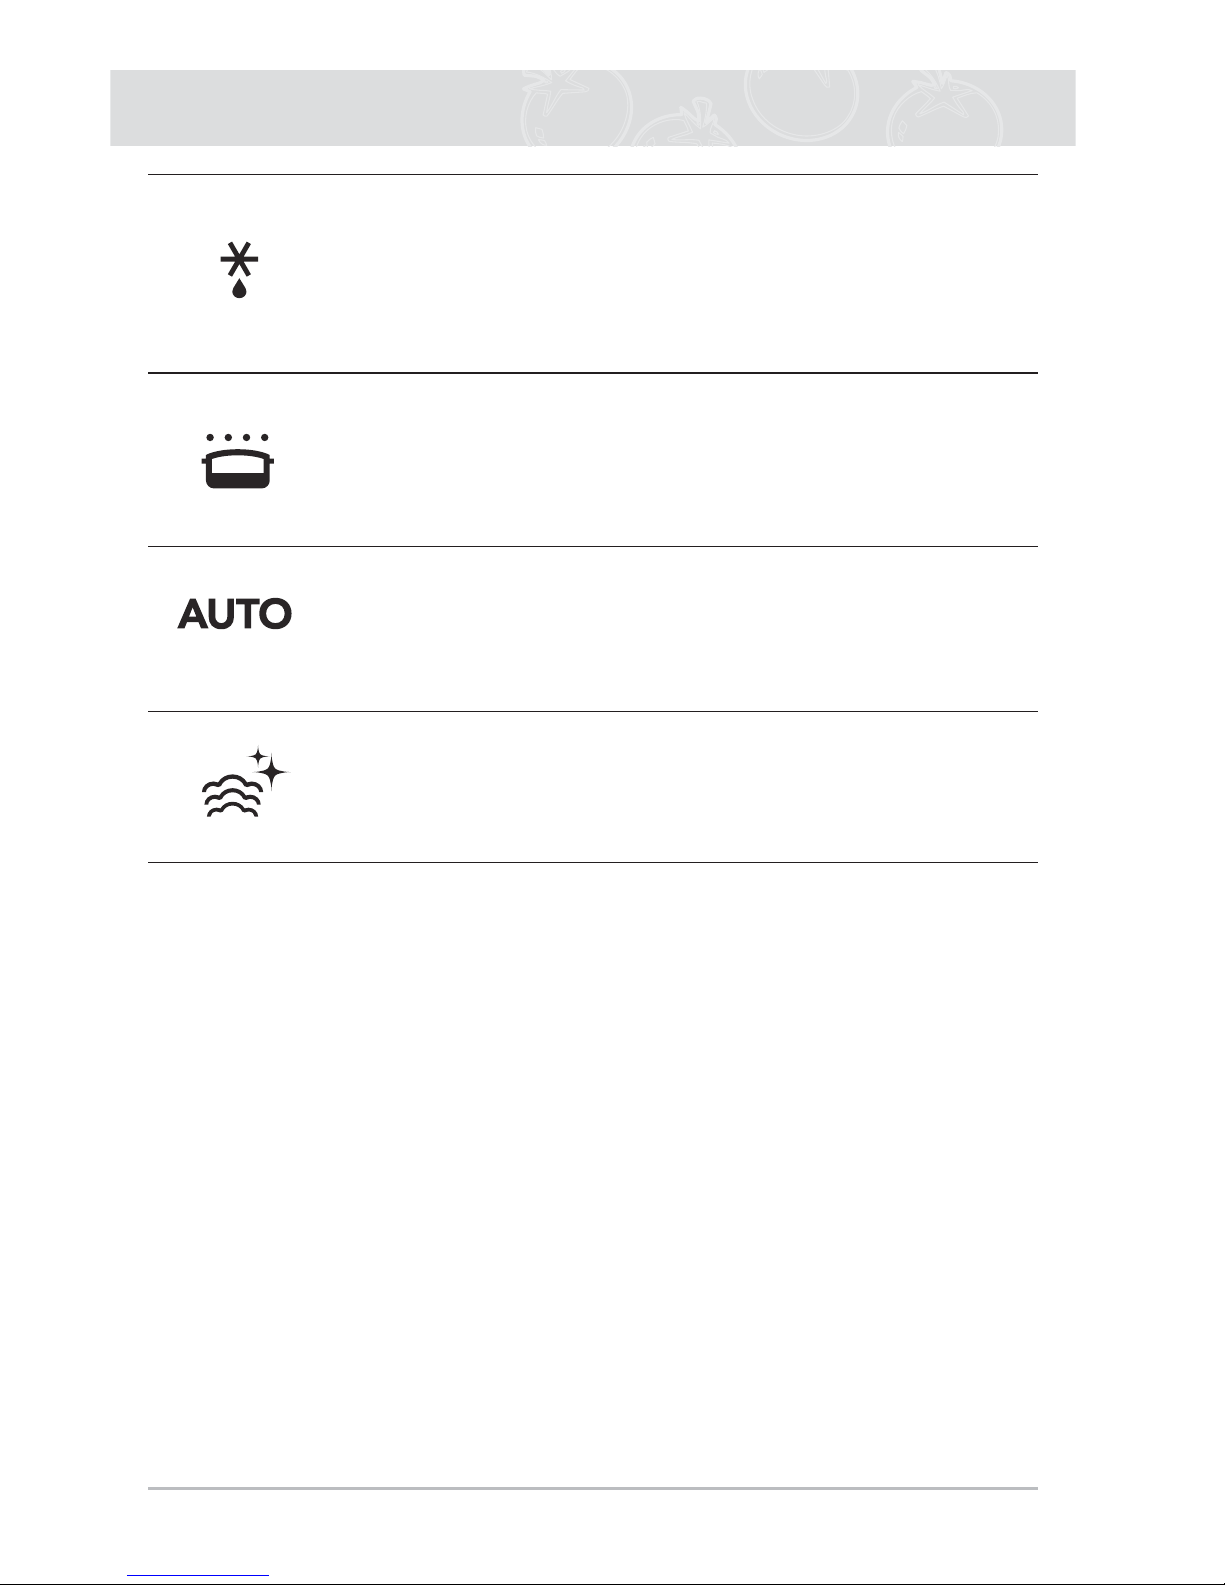
Defrost Mode
Frozen food is defrosted by steam. The steam is provided by the steam
generator and injected into the cavity by interval.
This mode is suitable for frozen meat, poultry, fi sh and fruit. When
defrosting with this mode always fi ll the water tank with fresh water.
Temperature range: 40~70 °C
Keeping warm
This mode is suitable for keeping warm food.
(Do not keep food warm for longer than 2 hours. Warm food spoils more
quickly).
Temperature: 70 °C
Auto Cook Programmes
40 pre-programmed auto cook settings can be selected for your
convenience. Time and temperature will be set automatically. You
simply select the programme, the weight of your dish and start the
steam cooking process.
Steam Clean
By the help of hot steam the surface of the oven cavity will be soaked
and you can easily clean your oven. The steam clean programme takes
only 10 minutes time.
Page 15
15
Default Settings
During blinking of the default cook time or default temperature (after you have
choosen a setting with the FUNCTION KNOB), you can change the time or
temperature by turning the SELECTION KNOB.
If the blinking has stopped, you can change the settings by following the steps as
described later in this manual.
During cooking, COOK TIME or TEMPERATURE can always be changed.
► Cooking time: press the TIMER button and then turn the SELECTION KNOB.
► Temperature: press the SELECT button and then turn the SELECTION KNOB.
1
Turn the FUNCTION KNOB to choose
the function you want to use. 2
The default time or default tempera-
ture starts to blink.
3
While the default time/temperature is
blinking: turn the SELECTION KNOB
to set the desired time/temperature.
Page 16
16
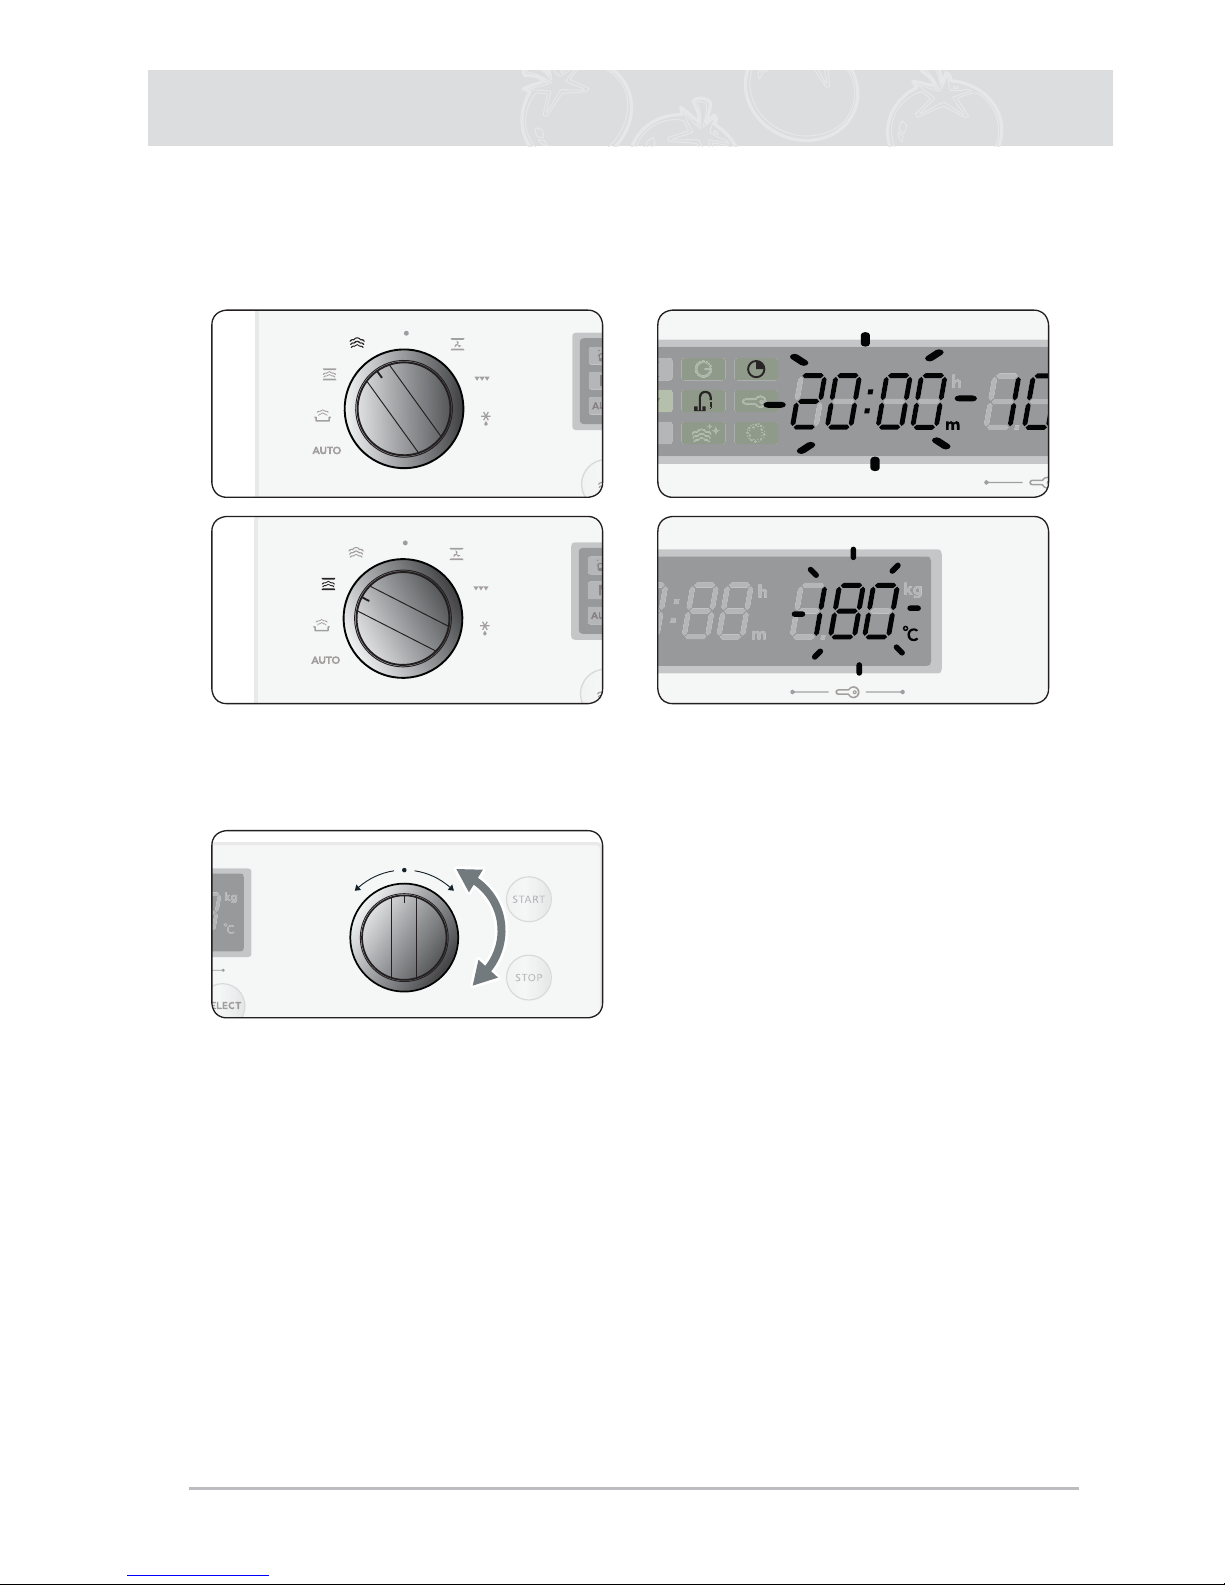
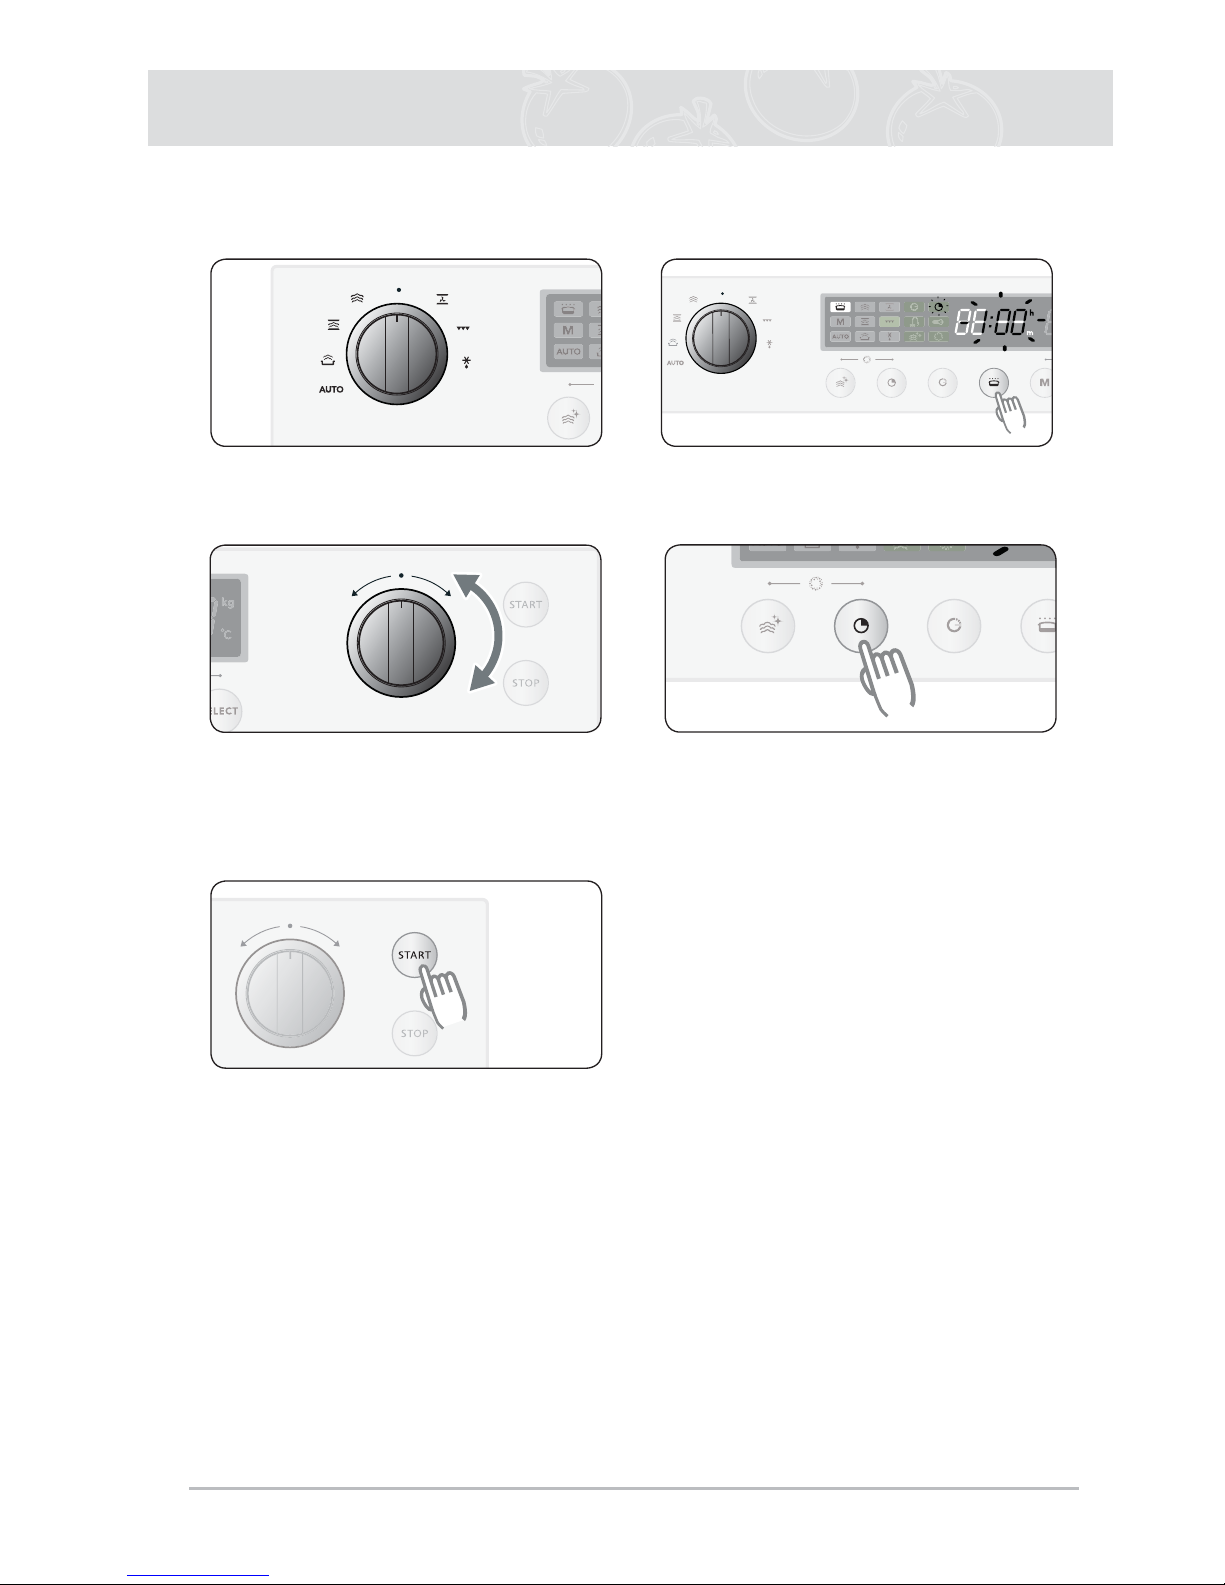
Using The Steam Mode
Steam Mode Setting
1
Fill the water tank up to the maximum
line and place it back. Then place your
food into the cooking cavity.
2
Turn the FUNCTION KNOB to Steam
mode position (default cook time
20 min. temperature 100 °C). The time
is blinking.
3
During blinking, turn the SELECTION
KNOB and set the desired cooking
time.
If the blinking has already stopped
before you have set the time, press
the TIMER button fi rst and then turn
the SELECTION KNOB.
4
Press SELECT. The temperature is
blinking.
5
Turn the SELECTION KNOB and set
the temperature.
6
Press the START button.
► The temperature indicator (°C)
on the display will blink. After the
temperature is reached, it stops
blinking.
Page 17

17
If there is too little water while cooking, you will see the
symbol in the display along with a beep being played. Add
water into the tank and press START to continue with the
steaming.
• You can add water into the tank at any time while cooking.
Note
1) During cooking, COOK TIME and TEMPERATURE can be changed.
► Cooking time: press the TIMER button and then turn the SELECTION KNOB.
► Temperature: press SELECT and then turn the SELECTION KNOB.
2) In Steam mode settings, the top and bottom steam heating elements switch off and on
throughout cooking to regulate the temperature.
3) Be careful when removing the plate as it is hot. First leave the door a little open to allow
the hot steam to escape. Pay attention to the steam outlets as well.
4) When you have fi nished cooking, pour out the water in the drip tray and empty the tank.
5) Dry the cooking cavity with a dry cloth if there is any remaining water.
6) The cooling fan always works for 3 minutes after a steaming process. However, this is not
a malfunction and you do not need to worry about this.
Using The Steam Mode (Continued)
Page 18

18
Using The Steam Mode (Continued)
Steam Mode Setting
Food is cooked by steam provided by the steam generators and injected into the
cavity by two jet nozzles.
Perforated steam dish, together with solid steam dish, is usually placed on level .
Cooking Guide
Use settings and times in this table as guide lines for steaming.
We recommend to always fi ll the water tank with fresh water to the maximum level.
Food Item
Steam mode
(°C )
Accessory (shelf level) Time (min.)
Broccoli Florets 100 °C
Perforated steam dish together with
solid steam dish (3)
12-16
Whole carrots 100 °C
Perforated steam dish together with
solid steam dish (3)
25-30
Sliced Vegetables
(pepper, courgettes,
carrots, onions)
100 °C
Perforated steam dish together with
solid steam dish (3)
9-14
Green Beans 100 °C
Perforated steam dish together with
solid steam dish (3)
28-33
Asparagus 100 °C
Perforated steam dish together with
solid steam dish (3)
15-20
Whole Vegetables
(artichokes,
whole caulifl ower,
corn on the cob)
100 °C
Perforated steam dish together with
solid steam dish (3)
30-45
Peeled Potatoes
(cut into quarters)
100 °C
Perforated steam dish together with
solid steam dish (3)
30-35
Fish fi llet
(2 cm thickness)
80 °C
Perforated steam dish together with
solid steam dish (3)
13-18
Prawns
(raw/uncooked)
100 °C
Perforated steam dish together with
solid steam dish (3)
11-14
Chicken Breast 100 °C
Perforated steam dish together with
solid steam dish (3)
23-28
Page 19

19
Using The Steam Mode (Continued)
Food Item
Steam mode
(°C )
Accessory (shelf level) Time (min.)
Boiled Eggs
(hardboiled)
100 °C
Perforated steam dish together with
solid steam dish (3)
15-20
Frozen Yeast
Dumplings
100 °C
Perforated steam dish together with
solid steam dish (3)
23-28
White Rice (basmati or
pandan)
(use a pyrex bowl, add
rice, add double quantity
of water)
100 °C Wire rack (1) 30-35
Milk Rice
(use a fl at pyrex dish,
add double or four times
quantity of milk)
100 °C Wire rack (1) 40-50
Fruit Compote
(use a fl at round glass
pyrex, add 1 teaspoon
sugar and 2 tbsp. water)
100 °C Solid steam dish (4/5) 25-35
Flan/Crème (6 dessert
dishes, each 100 ml,
cover dishes with foil)
90 °C Wire rack (3) 35-40
Egg Custard (use a
large fl at glass pyrex
dish, cover dish with foil)
90 °C Wire rack (3) 37-42
Two Level Steam Cooking
Use settings and times in this table as guide lines for steam cooking.
We recommend to always fi ll the water tank with fresh water to the maximum level. If you have
different food with a similar preparation time, you can put al the items in the oven at the same
time. Otherwise put in fi rst the item with the longest preparation time.
Put one tray on level 1 and the other tray on level 5.
Food Item
Steam mode
(°C )
Accessory (shelf level) Time (min.)
2-level cooking:
Dual Meals
(fi sh fi llets/
sliced vegetables)
100 °C
Solid steam dish (5)
/ grill insert with multi pan (1)
15-20
2-level cooking:
Dual Meals
(chickenbreasts/
whole vegetables)
100 °C
Solid steam dish (5)
/ grill insert with multi pan (1)
25-30
Page 20
20
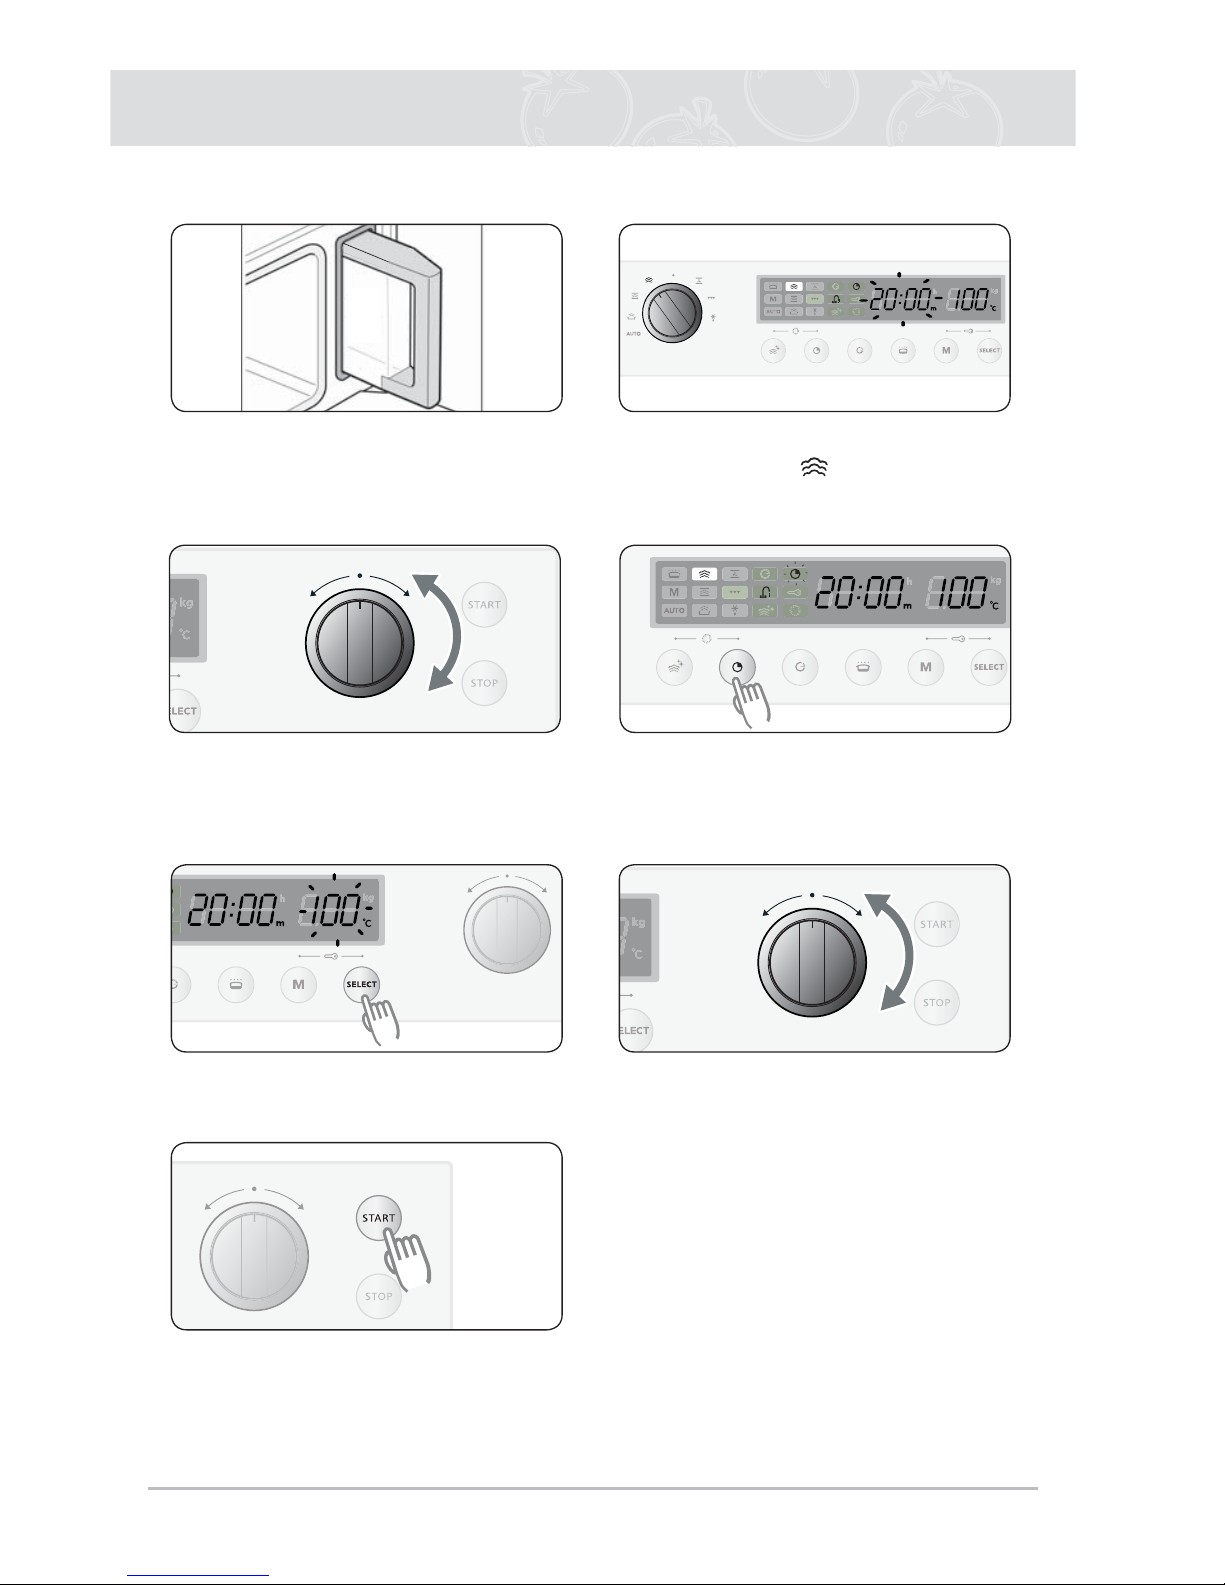
Using The Combi Steam Mode
Combi Steam Mode Setting
1
Fill the water tank up to the maximum
line and place it back. Then place your
food into the cooking cavity.
2
Turn the FUNCTION KNOB to Combi
Steam mode position (default:
180 °C). The temperature is blinking.
3
During blinking, turn the SELECTION
KNOB and set the desired tempera-
ture.
If the blinking has already stopped
before you have set the temperature,
press the SELECT button fi rst and
then turn the SELECTION KNOB.
4
Press the TIMER button to set the
desired cooking time. The time is
blinking.
5
Turn the SELECTION KNOB and set
the desired cooking time.
Note
1) During cooking, COOK TIME and TEMPERATURE can be changed.
► Cooking time: press the TIMER button and
then turn the SELECTION KNOB.
► Temperature: press the SELECT button and
then turn the SELECTION KNOB.
2) In Combi Steam Mode settings, the top bottom
and steam heating elements switch off and on
throughout cooking to regulate the temperature.
Important
When using the Combi Steam mode, be sure that
the baking dishes are suitable for 100-230 °C
cooking temperatures.
6
Press the START button.
► The temperature indicator (°C)
on the display will blink. After the
temperature is reached, it stops
blinking.
Page 21

21
Using The Combi Steam Mode (Continued)
Combi Steam Mode Setting
Food is cooked by convection mode and the help of steam. The steam is provided
by the steam generators and injected into the cavity by interval.
Place the multi pan on level .
Cooking Guide
Use settings and times in this table as guide lines for baking and roasting.
We recommend to always fi ll the water tank with fresh water to the maximum level.
Food Item
Combi steam mode
(°C )
Accessory (shelf level)
Time
(min.)
Puff Pastry Stripes
(add grated cheese)
200 °C Multi pan (1) 15-20
Homemade Bread
180 °C
(preheating)
Wire rack (1) 30-35
Vegetable Gratin /
Potato Gratin
170-180 °C Wire rack (1) 35-50
Pork Roast
(well done)
(1.0 kg)
1. stage:
200 °C convection mode
2. stage:
170 °C combi steam
mode
Grill insert with multi pan (1)
1. stage:
25-35
2. stage:
25-35
Oven Fish 200 °C Solid steam dish (4/5) 18-22
Croissants (all
ready made croissant dough)
180 °C Multi pan (1) 17-23
Page 22

22
Using The Reheat Mode
Reheat Mode Setting
1
Fill the water tank up to the maximum
line and place it back. Then place your
food into the cooking cavity.
2
Turn the FUNCTION KNOB to
Reheat position (default: 20 min.).
The time is blinking.
3
During blinking, turn the SELECTION
KNOB and set the desired cooking
time.
If the blinking has already stopped
before you have set the time, press
the TIMER button fi rst and then turn
the SELECTION KNOB.
4
Press the START button.
► The reheat starts. When the
reheat has finished, the oven will
beep and “End” will flash four
times. The oven will then beep
one time per minute.
Reheat Cooking
Use settings and times in this table as guide lines for reheating.
We recommend to always fi ll the water tank with fresh water to the maximum level.
Food Item Mode Accessory (shelf level) Time (min.)
Plated Meal
(250-500 g)
Reheat Wire rack (3) 13-19
2-level reheating:
Plated Meals
(two plated meals,
each 250-500 g)
Reheat
Wire rack (4)
/ grill insert with multi pan (1)
17-23
Page 23

23
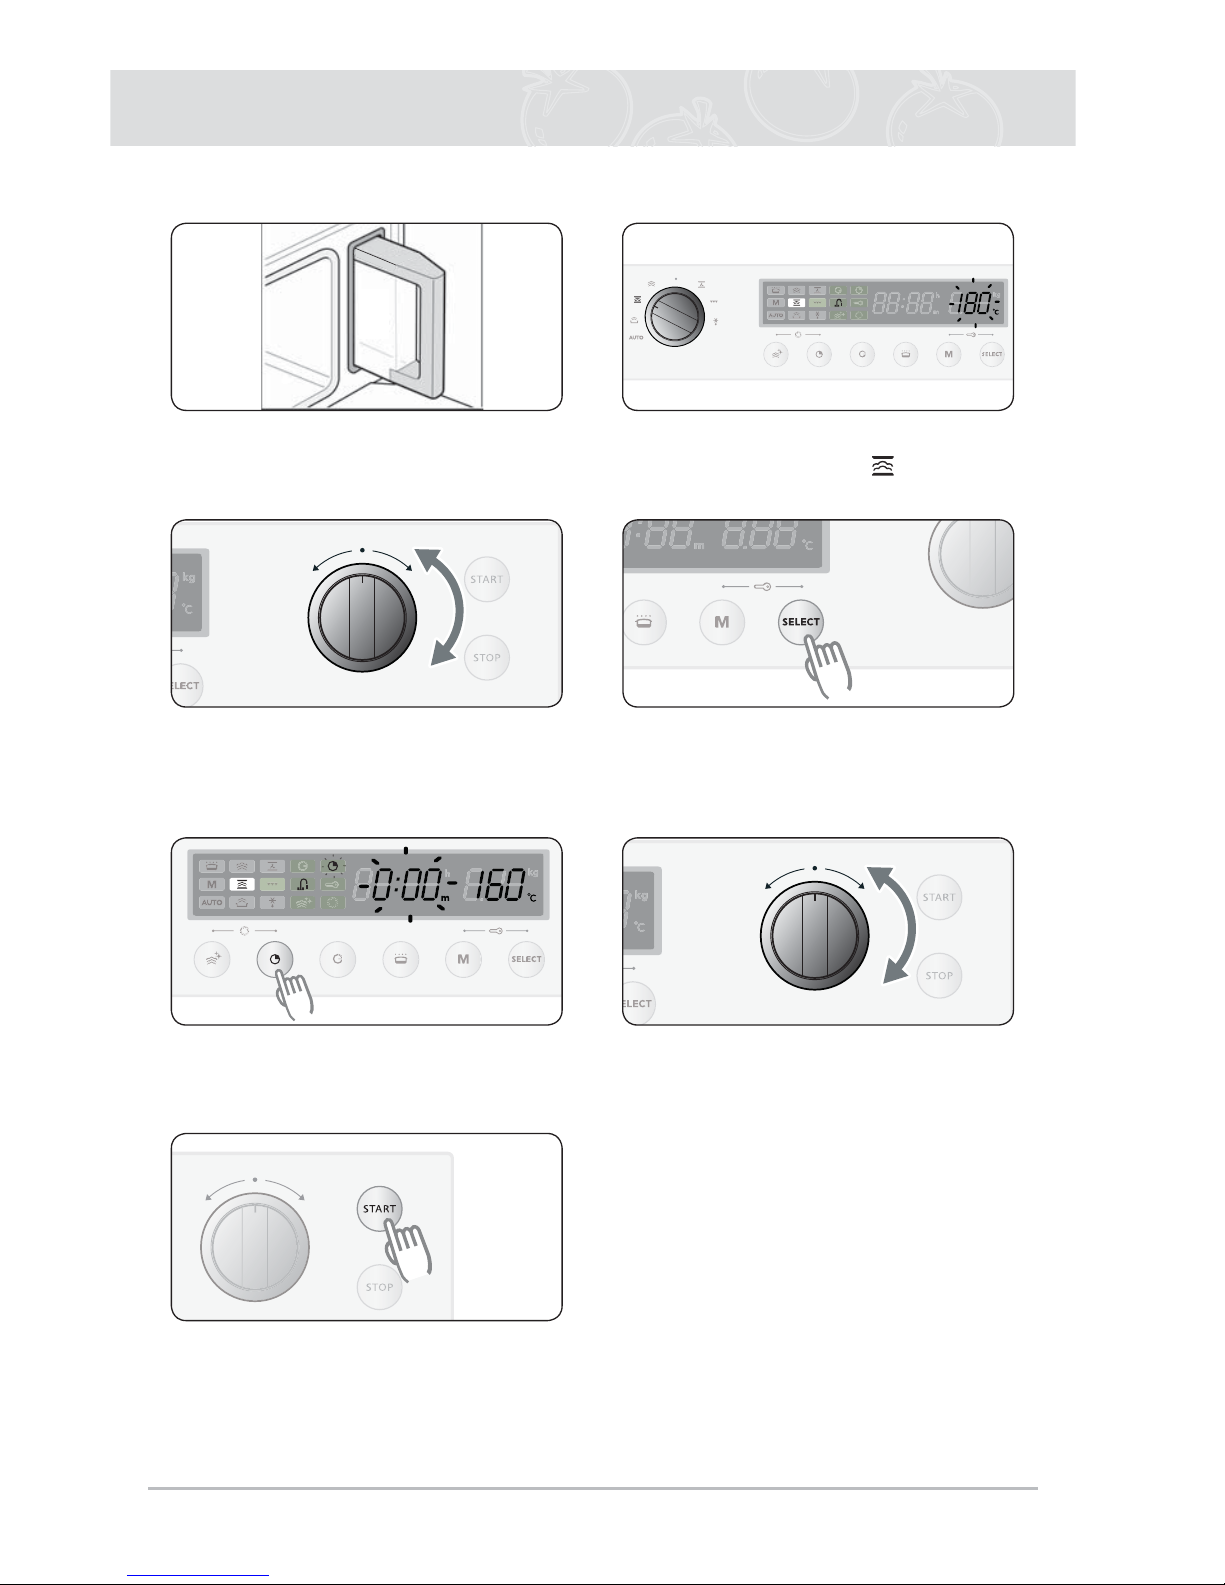
Using The Convection Mode
Convection Setting
1
Turn the FUNCTION KNOB to Con-
vection mode position (default:
180 °C). The temperature is blinking.
2
During blinking, turn the SELECTION
KNOB and set the desired tempera-
ture.
If the blinking has already stopped
before you have set the temperature,
press the SELECT button fi rst and
then turn the SELECTION KNOB.
3
Press the TIMER button to set the
desired cooking time. The time is
blinking.
4
Turn the SELECTION KNOB and set
the desired cooking time (the maximum cooking time is 10:00 h).
5
Press the START button.
► The temperature indicator (°C)
on the display will blink. After the
temperature is reached, it stops
blinking.
Note
1) During cooking, COOK TIME and TEMPERATURE can be changed.
► Cooking time: press the TIMER button and then turn the SELECTION KNOB.
► Temperature: press the SELECT button and then turn the SELECTION KNOB.
2) In Convection Mode settings, the top and bottom heating elements switch off and on
throughout cooking to regulate the temperature.
Important
When using the Convection mode, be sure the baking dishes are suitable for 40 - 230 °C
cooking temperatures.
Page 24

24
Using The Convection Mode (Continued)
Convection Setting
Food is heated by two heating elements on top of the cavity and one bottom
heating element, while the fan on the side distributes the hot air evenly.
Place the multi pan or wire rack on level .
Cooking Guide
Use settings and times in this table as guide lines for baking and roasting.
Food Item
Convection
mode (°C )
Accessory (shelf level) Time (min.)
Frozen Pizza (350 g) 220 °C Multi pan (1) 14-15
Frozen French Fries
(450 g)
200 °C Multi pan (1) 21-26
Frozen Bread Roll
(250 g)
180 °C
(preheating)
Wire rack (1) 8-12
Frozen Apple Pie 180 °C Multi pan (1) 30-40
Homemade Pizza
(1300 g)
220 °C Multi pan (1) 20-25
Sponge Cake (500 g)
160 °C
(preheating)
Wire rack (1) 30-35
Cake (700 g)
150 °C
(preheating)
Wire rack (1) 50-60
Muffi ns (300 g)
170 °C
(preheating)
Wire rack (1) 17-20
Brownies 150 °C Wire rack (1) 35-45
Page 25

25
Using The Grill Mode
Grill Setting
1
Turn the FUNCTION KNOB to Grill
mode position (default:
1:00 min.). The time is blinking.
2
During blinking, turn the SELECTION
KNOB and set the desired cooking
time (the maximum cooking time is
1:30 h).
If the blinking has already stopped
before you have set the time, press
the TIMER button fi rst and then turn
the SELECTION KNOB.
3
Press the START button.
Important
1) Always use oven gloves when touching the recipients in the oven, as they will be very hot.
2) Check that the heating elements are in the horizontal position.
Page 26

26
Using The Grill Mode (Continued)
Grill Setting
Food is heated by the top heating elements (horizontal position).
For grilling, the grill insert with multi pan is
placed on level . Use the solid steam dish on
level .
Cooking Guide
Use settings and times in this table as guide lines for grilling.
Food Item Mode Accessory (shelf level) Time (min.)
Toast (4 slices) Grill Grill insert with multipan (6)
1
st
side: 4-6
2
nd
side: 2-3
Cheese Toast (4 pcs,
put some cheese on
top at 2
nd
side)
Grill Multi pan (6)
1
st
side: 4-6
2
nd
side: 3-5
Beef Steaks (500 g)
Grill
(preheating
10 minutes)
Grill insert with multi pan (6)
1
st
side: 6-9
2
nd
side: 4-7
Lamb Chops (400 g)
Grill
(preheating
10 minutes)
Grill insert with multi pan (6)
1
st
side: 8-10
2
nd
side: 6-8
Fresh Vegetables
(250 g)
Grill Solid steam dish (5) 13-17
Page 27
27
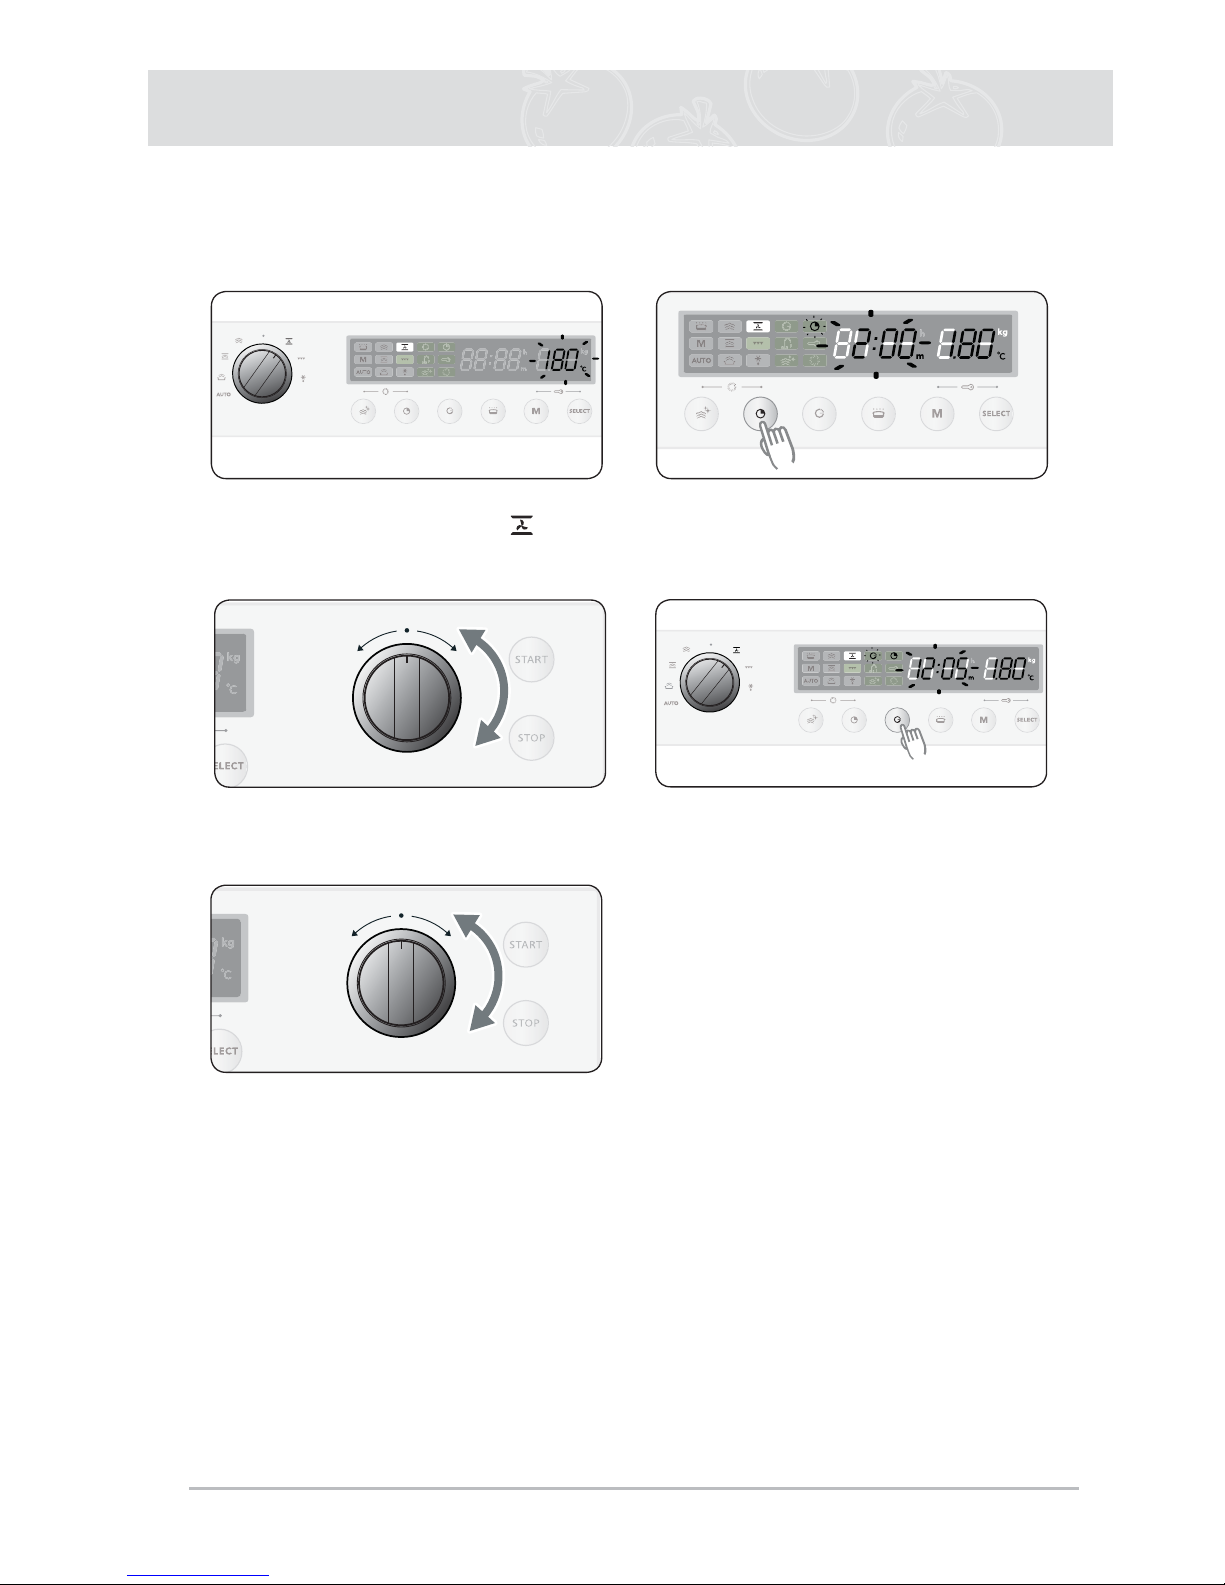
Cooking Time Reservation Function
Example by using the convection mode: Current time: 12:05
Cook time: 2:00
Start time: you wish to start cooking at 16:00
1
Turn the FUNCTION KNOB to
Convection mode position .
2
Press the TIMER button to set the
desired cooking time. The time is
blinking.
3
Turn the SELECTION KNOB and set
the desired cooking time (2:00).
4
Press the button START TIME. The
current time is displayed.
5
Turn the SELECTION KNOB to set
the desired START TIME (16:00). The
start time is displayed.
Page 28

28
Using The Auto Cook Mode
The 40 Auto Cook features include/provide pre-programmed cooking times. You
do not need to set either the cooking times or the temperature.
1
Turn the FUNCTION KNOB to
“AUTO” position.
2
If you see the symbol in the
display, fi ll the water tank up to the
maximum line and place it back.
Place your food into the cooking
cavity.
3
Turn the SELECTION KNOB to
choose a auto cook feature (see the
table on page 29, 30, 31 and 32).
4
Press SELECT. The weight range
starts blinking.
5
If you want to change the weight; turn
the SELECTION KNOB. 6
Press the START button.
► Auto cooking starts. When the
cooking has finished, the oven
will beep and “End” will flash four
times. The oven will then beep
one time per minute.
Page 29

29
Using The Auto Cook Mode (Continued)
The following table presents 40 Auto Programmes for various cooking.
It contains its quantities, standing times after cooking and appropriate recommendations.
Programmes S-1 to S-12 are for Steaming. Programmes b-1 to b-8 are for Baking.
Programmes G-1 to G-6 are for Grilling. Programmes r-1 to r-6 are for Roasting.
Programmes C-1 to C-3 are for Convenience. Programmes d-1 to d-5 are for Defrosting.
Code Food
Serving
Size (kg)
Recommendations
Steaming
S-1 Sliced Vegetables 0.2-0.6
Fill water tank with fresh water up to maximum level. Put
sliced vegetables, such as courgettes, broccoli fl orets,
pepper, carrots on the perforated steam dish and place it
together with the solid steam dish on shelf level 3.
S-2 Whole Vegetables 0.2-0.6
Fill water tank with fresh water up to maximum level. Put
whole vegetables or big pieces of vegetables, such as
caulifl ower, broccoli, corn on the cob and artichokes on the
perforated steam dish and place it together with the solid
steam dish on shelf level 3.
S-3 Fish Fillets 0.2-1.0
Fill water tank with fresh water up to maximum level. Put
fi sh fi llets (± 2 cm thickness), such as pollock, sea-wolf fi sh
and cod fi sh side by side on the perforated steam dish and
place it together with the solid steam dish on shelf level 3.
S-4 Fish Steak 0.2-1.0
Fill water tank with fresh water up to maximum level. Put fi sh
steaks (± 3 cm thickness), such as salmon and tuna steaks
side by side on the perforated steam dish and place it
together with the solid steam dish on shelf level 3.
S-5
Prawns
(Raw/Uncooked) 0.2-0.5
Fill water tank with fresh water up to maximum level. Put
prawns (raw/uncooked-peeled or unpeeled) on the perforat-
ed steam dish and place it together with the solid steam
dish on shelf level 3.
S-6 Chicken Breast 0.2-1.0
Fill water tank with fresh water up to maximum level. Put
chicken breasts side by side on the perforated steam dish
and place it together with the solid steam dish on shelf
level 3.
S-7 Eggs 0.1-0.6
Fill water tank with fresh water up to maximum level. Pierce
a hole in medium sized eggs (M). Put 2-10 eggs on the
perforated steam dish and place it together with the solid
steam dish on shelf level 3.
S-8 Peeled Potatoes 0.2-0.8
Fill water tank with fresh water up to maximum level. Peel
potatoes and cut into quarters, or use small potatoes. Put on
the perforated steam dish and place it together with the
solid steam dish on shelf level 3.
S-9
White Rice
(Basmati or
Pandan)
0.1-0.5
Fill water tank with fresh water up to maximum level. Distribute white rice(basmati or pandan) evenly in a fl at glass pyrex
dish. Add 2 x water (for 250 g rice add 500 ml hot water). Put
dish on the wire rack, shelf level 1.
Page 30

30
Using The Auto Cook Mode (Continued)
Code Food
Serving
Size (kg)
Recommendations
S-10 Flan 0.4-0.6
Fill water tank with fresh water up to maximum level. Put fl an
mixture in 6 small fl an dishes (100 ml in each). Cover with
plastic foil. Put dishes on wire rack, shelf level 3.
S-11 Fruit Compote 0.2-0.5
Fill water tank with fresh water up to maximum level. Put
small pieces of apples, pears or apricots in a fl at glass pyrex
dish. Add 1 teaspoon sugar and 2 tablespoons water on dish.
Put dish on solid steam dish, shelf level 4/5.
S-12 Melting Chocolate 0.1-0.3
Fill water tank with fresh water up to maximum level. Break
chocolate (pure or baking chocolate) into pieces, put in a
small glass pyrex dish and cover with plastic foil or lid. Put
dish on the wire rack, shelf level 1. Keep covered during
programme. After taking out stir well.
(For white or milk chocolate decrease with 5 minutes).
Baking
b-1 Cake 0.7-0.8
Preheat the oven, using convection mode to 150 °C. Put fresh
batter into suitable sized rectangular metal baking dish. Put
dish lengthways to the door, on the wire rack, shelf level 1.
This programme is suitable for cake and also such as lemon
cake, hazelnut cake and marble cake.
b-2
Base for fruit pie
(based on cake
batter)
0.3-0.5
Preheat the oven, using convection mode to 150 °C. Put
fresh batter into metal fl an base dish on the wire rack, shelf
level 1.
b-3 Muffi ns 0.5-0.7
Preheat the oven, using convection mode to 170 °C. Put muffi n dough into paper muffi n cups. Set paper cups in the middle
of multi pan, shelf level 1. Or use suitable muffi n dish for
12 muffi ns, and then use wire rack, shelf level 1.
b-4 Sponge Cake 0.3-0.6
Preheat the oven, using convection mode to 160 °C. Put
300 g dough into 18 cm, 400 g~500 g into 24 cm and 600 g
into 26 cm diameter round black metal baking dish. Set dish
in the middle of wire rack, shelf level 1.
b-5 Bread 0.7-0.8
Prepare dough according to food manufacturers instructions.
Preheat the oven, using convection mode to 180 °C. Then,
put dough into a black metal rectangular baking dish (length
30 cm).
Put dish wideways to the door on wire rack, shelf level 1.
b-6
Yeast Dough
Fermentation
0.3-0.6
Prepare yeast dough for pizza, cake or bread. Put into a large
round heat-resistant dish. Do not cover. Put dish on wire
rack, shelf level 1.
b-7 Apple Pie 1.2-1.4
Preheat the oven, using convection mode to 180 °C. Prepare
apple pie in a round black metal dish with a diameter of 20 cm
for 1300, 24 cm for 1400 g.
Put dish on the wire rack, shelf level 1.
Page 31

31
Code Food
Serving
Size (kg)
Recommendations
b-8 Homemade Pizza 0.6-1.0
Prepare 300 g pizza dough and roll out . Put on baking paper
on multi pan shelf level 1.
Grilling
G-1 Beef Steak
0.3-0.6
0.6-0.8
Preheat the oven, using Grill mode to 10 min. Put beef steaks
side by side in the middle of grill insert with solid steam
dish, shelf level 5.
Turn over as soon as the oven beeps.
Push start button to continue process.
The fi rst serving size is for thin beef steaks, the second
serving size is for thick beef steaks.
G-2 Chicken Pieces
0.4-0.6
0.7-0.9
Brush chilled chicken pieces, such as drumsticks, chicken
legs and wings with oil and spices. Put skin-side down on grill
insert + solid steam dish, shelf level 3. Turn over, as soon as
the oven beeps. Push start button to continue process.
G-3 Fish Steak 0.3-0.6
Marinate Fish steaks(± 3 cm thickness), such as salmon
steaks or tuna steaks. Put side by side on multi pan, shelf
level 6. Turn over, as soon as the oven beeps. Push start
button to continue process.
G-4 Fish Fillet 0.3-0.6
Marinate Fish fi llets(± 2 cm thickness), such as pollock, sea-
wolf fi sh, cod fi sh or gamba’s. Put side by side on multi pan,
shelf level 6. Turn over, as soon as the oven beeps. Push
start button to continue process.
G-5 Sausages 0.3-0.6
Put sausages side by side on grill insert + solid steam dish,
shelf level 4. Turn over, as soon as the oven beeps. Push
start button to continue process.
G-6 Hamburger 0.5-1.0
Put raw hamburger side by side on grill insert + solid steam
dish, shelf level 4. Turn over, as soon as the oven beeps.
Push start button to continue process.
Roasting
r-1 Whole Chicken
1.2-1.3
1.4-1.5
Brush chilled chicken with oil and spices.
Put breast-side-down, in the middle of grill insert with multi
pan, shelf level 1. Turn over, as soon as the oven beeps.
Push start button to continue process.
r-2
Roast Beef
(Medium)
1.1-1.3
Brush the beef/ with oil and spices (pepper only, salt should
be added after roasting). Put it on the grill insert with multi
pan, shelf level 1. Turn over, as soon as the oven beeps.
Press start to continue cooking process.
After roasting and during standing time it should be wrapped
in aluminium foil and leave to stand for 15 minutes.
Using The Auto Cook Mode (Continued)
Page 32

32
Code Food
Serving
Size (kg)
Recommendations
r-3
Pork Roast
(Well done)
0.8-1.2
Fill water tank with fresh water up to maximum level. Put pork
roast, brushed with oil and spices, with the fat-side down on
the grill insert with multi pan, shelf level 1. Turn over, as
soon as the beep sounds.
Push start button to continue process. After roasting and
during standing time it should be wrapped in aluminium foil
and leave to stand for 15 minutes.
r-4 Whole Fish 0.4-0.8
Brush skin of whole fi sh with oil and add herbs and spices.
Put fi sh side by side, head to tail, widthways solid steam
dish, shelf level 5. Turn over, as soon as the beep sounds.
Push start button to continue process.
r-5 Roast Vegetables 0.2-0.5
Slice vegetables, such as courgettes, pepper, egg plants and
onions. Add cherry tomatoes and mushrooms. Sprinkle with a
mixture of olive oil, herbs, salt and pepper.
Put vegetables on multi pan, shelf level 6.
r-6 Oven Potatoes 0.4-0.8
Use middle sized to large potatoes (each 200 g). Wash and
clean potatoes. Brush skin with a mixture of olive oil, salt pepper and herbs. Put potatoes side by side on multi pan, shelf
level 1. Turn over, as soon as the beep sounds. Push start
button to continue process.
Convenience
C-1
Frozen Pizza
(-18 °C)
0.3-0.35
0.4-0.45
Place one frozen pizza on the multi pan, shelf level 1.
C-2
Frozen Oven Fries
(-18 °C)
0.4-0.45
Distribute frozen chips (suitable for preparation in oven)
evenly on the multi pan, shelf level 1.
C-3
Frozen Fish
Fingers
(-18 °C)
0.3-0.5
Distribute frozen fi sh fi ngers evenly on the multi pan,
shelf level 1.
Defrosting
d-1
Defrosting
Meat
(-18 °C)
0.3-0.5
0.8-1.5
This programme is suitable for beef, lamb, pork, steaks,
chops, minced meat. Put the meat on the grill insert with
multi pan, shelf level 1. (cover minced meat with plastic foil
while defrosting)
d-2
Defrosting
Poultry
(-18 °C)
0.3-0.6
0.9-1.3
This programme is suitable for whole chicken as well as for
chicken portions.
Put poultry on the grill insert with multi pan, shelf level 1.
d-3
Defrosting
Fish
(-18 °C)
0.3-0.8
This programme is suitable for whole fi shes as well as for
fi sh fi llets. Put fi sh on perforated steam dish together with
solid steam dish on shelf level 3.
d-4
Defrosting
Bread
(-18 °C)
0.1-0.3
0.4-0.6
0.1-0.3 is suitable for slices of bread (spread them all out)
0.4-0.6 is suitable for all kinds of bread, whole, as well as
for bread rolls and baguettes. Arrange bread on a piece of
kitchen paper and put bread on the multi pan, shelf level 1.
d-5
Defrosting
Fruit
(-18°C)
0.2-0.6
Distribute fruits evenly into perforated steam dish together
with solid steam dish on shelf level 3. This programme is
suitable for all kinds of sliced fruits or berries.
Using The Auto Cook Mode (Continued)
Page 33
33
Using The Defrost Mode
Defrost Setting
1
Fill the water tank up to the maximum
line and place it back. Then place
your food into the cooking cavity.
2
Turn the FUNCTION KNOB to the
Defrost mode position (default:
20:00 min.). The time is blinking.
3
During blinking, turn the SELECTION
KNOB and set the desired defrosting
time (the maximum defrosting time is
max. 10:00 h).
If the blinking has already stopped
before you have set the time, press
the TIMER button fi rst and then turn
the SELECTION KNOB.
4
Press the START button.
Note
1) During defrosting, COOK TIME and TEMPERATURE can be changed.
► Cooking time: press the TIMER button and then turn the SELECTION KNOB.
► Temperature: press the SELECT button and then turn the SELECTION KNOB.
2) When you have fi nished defrosting, pour out the water in the tray and wash out the tank.
3) Dry the cooking room with a dry cloth if there is any remaining water.
4) The cooling fan always works for 3 minutes after defrost mode. However, this is not a
malfunction and you do not need to worry about this.
Page 34

34
Using The Defrost Mode (Continued)
Defrost Setting
Use settings and times in this table as guide lines for defrosting.
We recommend to always fi ll the water tank with fresh water to the maximum level.
Remove all kind of package material before defrosting!
After defrosting, let the food stand at room temperature for 15-30 minutes for an even distribu-
tion of the heat.
Food Item
Defrost mode
(°C )
Accessory (shelf level) Time (min.)
Minced Meat
500 g (covered)
50 °C Grill insert with multi pan (1) 25-35
Roast Beef /
Minced Meat
(covered) 1.0 kg
50 °C Grill insert with multi pan (1) 70-90
Chicken Pieces
500 g
50 °C Grill insert with multi pan (1) 25-30
Whole Chicken
1.1 kg
50 °C Grill insert with multi pan (1) 50-70
Fruit / Berries 50 °C
Perforated steam dish together with
solid steam dish (3)
13-18
Fish Fillet 50 °C
Perforated steam dish together with
solid steam dish (3)
15-25
Important
1) After defrosting meat (particularly poultry), operate the empty oven about 10 minutes in the
convection mode (200 °C) for killing bacteria in the cavity.
2) Do not refreeze food once it has thawed.
Page 35
35
Using The Keep Warm Mode
Keep Warm Setting
1
Turn the FUNCTION KNOB to the
“OFF” position.
2
Press the KEEPING WARM button
(default: 1:00 h). The time is blinking.
3
During blinking, turn the SELECTION
KNOB and set the desired cooking
time (the maximum cooking time is
10:00 h).
If the blinking has already stopped
before you have set the time, press
the TIMER button fi rst and then turn
the SELECTION KNOB.
4
Press the START button.
Page 36
36
Using The Memory Mode
You can store 3 individual programmes in the memory and call them up at any
time. The memory is useful if you prepare one dish particularly frequently.
You can also store one dish from the automatic programmes.
Example: Steam 20 min., 100
°C
1
Turn the FUNCTION KNOB to
“Steam” position.
2
Set the temperature and the time as
described before.
3
Press the SELECT button.
4
Press the MEMORY button (press
one time for code 1, two times for
code 2 or three times for code 3).
5
Press the SELECT button (the
memory code is saved).
You can always store a new individual programm:
1)
Select the mode, temperature and time.
2) Press the SELECT button.
3) Press the MEMORY button (code 1, 2 or 3).
4) Press the SELECT button.
5) The ‘old’ programm is now replaced by the new one.
Page 37

37
Using The Memory Mode (Continued)
Starting the memory function
It is very easy to start the stored programme at any time.
Example in the picture: Memory location 1 (steam 20 min., 100 °C)
Place the dish in the steam oven.
1
Turn the FUNCTION KNOB to “OFF”
position.
2
Press the MEMORY button (one time
for code 1).
3
If you see the symbol in the
display, fi ll the water tank up to the
maximum line and place it back.
4
Press the START button.
Page 38

38
Setting The Water Hardness
It is necessary to descale your appliance at regular intervals. This is the only way to prevent
damage.
Your appliance has a system that automatically displays when it needs descaling. It is preset
to a water hardness 4. Change the value if your water is softer.
Checking the water hardness
Information on the hardness of the water in your area can be obtained from the local water
board.
Changing the water hardness
1
Turn the FUNCTION KNOB to “OFF”
position.
2
Press the STEAM CLEAN and the
START button at the same time and
hold for 3 seconds.
3
Turn the SELECTION KNOB to the
desired water hardness. 4
Press the SELECT button.
► The appliance is now programmed
to provide the descaling warning
when necessary, based on the
actual hardness of the water.
Display Type PPM
French deg.
(°df)
German deg.
(°dH)
1 Soft Water 0 - 105 0 - 11 0 - 6
2 Medium Soft water 125 - 230 12 - 23 7 - 13
3 Medium Hard Water 250 - 350 24 - 36 14 - 20
4
(Default)
Hard Water > 375 > 37 > 21
Page 39

39
Descaling
When you see the message on the control panel, the machine needs to be
descaled.
1
Pour in 100 ml descaler supplied
with the machine and fi ll up to the
maximum line with fresh water. Mix
thoroughly.
2
Pour the mixed water into the water
tank and close the lid before installing
it into the main unit.
3
Turn the FUNCTION KNOB to “OFF”
position.
4
Close the door and press and hold
down both the TIMER and STEAM
CLEAN buttons for 3 seconds. The
machine displays “40:00” and starts
descaling.
5
When it has progressed for about
30 minutes, the machine displays
“10:00” and stops operating with a
beep.
Remove the tank and empty any
remaining water. Wash the tank with
water and fi ll up to the maximum line
with water. Close the lid and install it
into the main unit.
6
Press the START button. A rinsing
process takes place with clean water.
Page 40

40
Descaling (Continued)
7
When done, the machine will make
a beep. Empty both the tank and
the drip tray and clean the tank with
water.
8
Open the door and wipe inside the
cooking cavity with a dry cloth.
Note
• We advise to use NOKALK/DLS when you descale the machine. NOKALK/DLS
is a highly effective descaler made exclusively from natural, totally biodegradable
substances. It is non-corrosive, non-aggressive and has no environmental impact.
As well as being an effective descaler, it also has an antimicrobial sanitising action, thus
helping to ensure the hygiene of the machine’s internal components, preserve the taste
of the food over time and extend the working life of the machine.
• For subsequent descaling operations with NOKALK/DLS, descaling solvent can be
purchased from www.atag.nl
• Water which is used for steam cooking, contains calcium and magnesium. Through
heating, water evaporates and only the fl oating materials (minerals) remain (not harmful
to humans).
• If the descaling cycle is interrupted before completion, the programme must be started
again from the beginning.
Page 41

41
Using The Steam Clean Feature
The Steam Clean feature allows you to sanitize your oven in just 10 minutes.
The STEAM CLEAN process takes 7 minutes, and the standby time for the
process is 3 minutes. In these 3 minutes the steam will soak all the leftovers and
you can wipe them from the ceiling or walls with a soft cloth.
1
Fill the water tank up to the maximum
line and place it back. 2
Turn the FUNCTION KNOB to “OFF”
position.
3
Press the STEAM CLEAN button.
The oven will start automatically. 4
When the process is fi nished: open
the door and wipe inside the cooking
cavity with a dry cloth.
Important
• Use this feature only when the oven has cooled completely to room temperature.
• DO NOT use distilled water.
• DO NOT use high-pressure water cleaners or steam jet cleaners for safety reasons.
Page 42

42
Cleaning
1
Cleaning the top grill
► Opening the top grill to the left or
right, as shown in the figure, will
facilitate cleaning. (When cleaning
is finished, make sure to close the
grill).
2
Cleaning inside the cavity.
► Lift up both left and right shelves at
the front (1). Move them towards
the middle (2) and pull them out.
Wipe any leftovers from the ceiling
or walls using a neutral cloth
dipped in detergent.
► When completed, install both
shelves back into the correct
positions.
► Even solid, difficult stains or dry
leftovers can be removed by using
the steam clean process.
2
1
Page 43

43
Cleaning (Continued)
3
Cleaning the oven surface, control
panel and window
► The surface of the oven can
be wiped with a wet dish towel,
followed by a dry cloth to remove
the water completely.
► Do not use force when cleaning
the control panel as it can be
damaged while cleaning.
► Clean the transparent window with
a neutral detergent-dipped dish
towel and then with a dry cloth until
no water remains.
4
Cleaning the water tank and the tray
► Wipe them with a sponge dipped in
a neutral detergent and then rinse
them with water.
5
Cleaning the accessories.
► Wipe them with a neutral detergent
and dry them before inserting them
back into the cooking cavity.
► Do not use force on the acces-
sories when wiping them with a
scrubber, as this may damage the
coated surface.
WARNING:
• NEVER use benzene, thinner or a metal scrubber to clean. Otherwise, it can cause
discoloration or damage to the surface.
• Do not spray water onto the machine when cleaning it. This can lead to electric shock
or fi re.
• Do not expose the water tank or tray to direct sunlight to dry it. This can result in malformation or damage.
Page 44

44
Switching Off The Beeper / Reading out the temperature
The oven beeps at the end of cooking and “End” blinks 4 times on the display.
1
Turn the FUNCTION KNOB to “OFF”
position.
2
To switch the beeper off, press STOP
and START at the same time and hold
for one second. “OFF” appears in the
display.
3
To switch the beeper back on, press
STOP and START again at the same
time and hold for one second. “ON”
appears in the display.
Reading Out The Current Temperature
1
If the temperature indicator (°C)
on the display is blinking, the programmed temperature hasn’t been
reached yet. You can read out the
current temperature on the display
by pressing the KEEP WARM and
MEMORY button at the same time.
Page 45
45
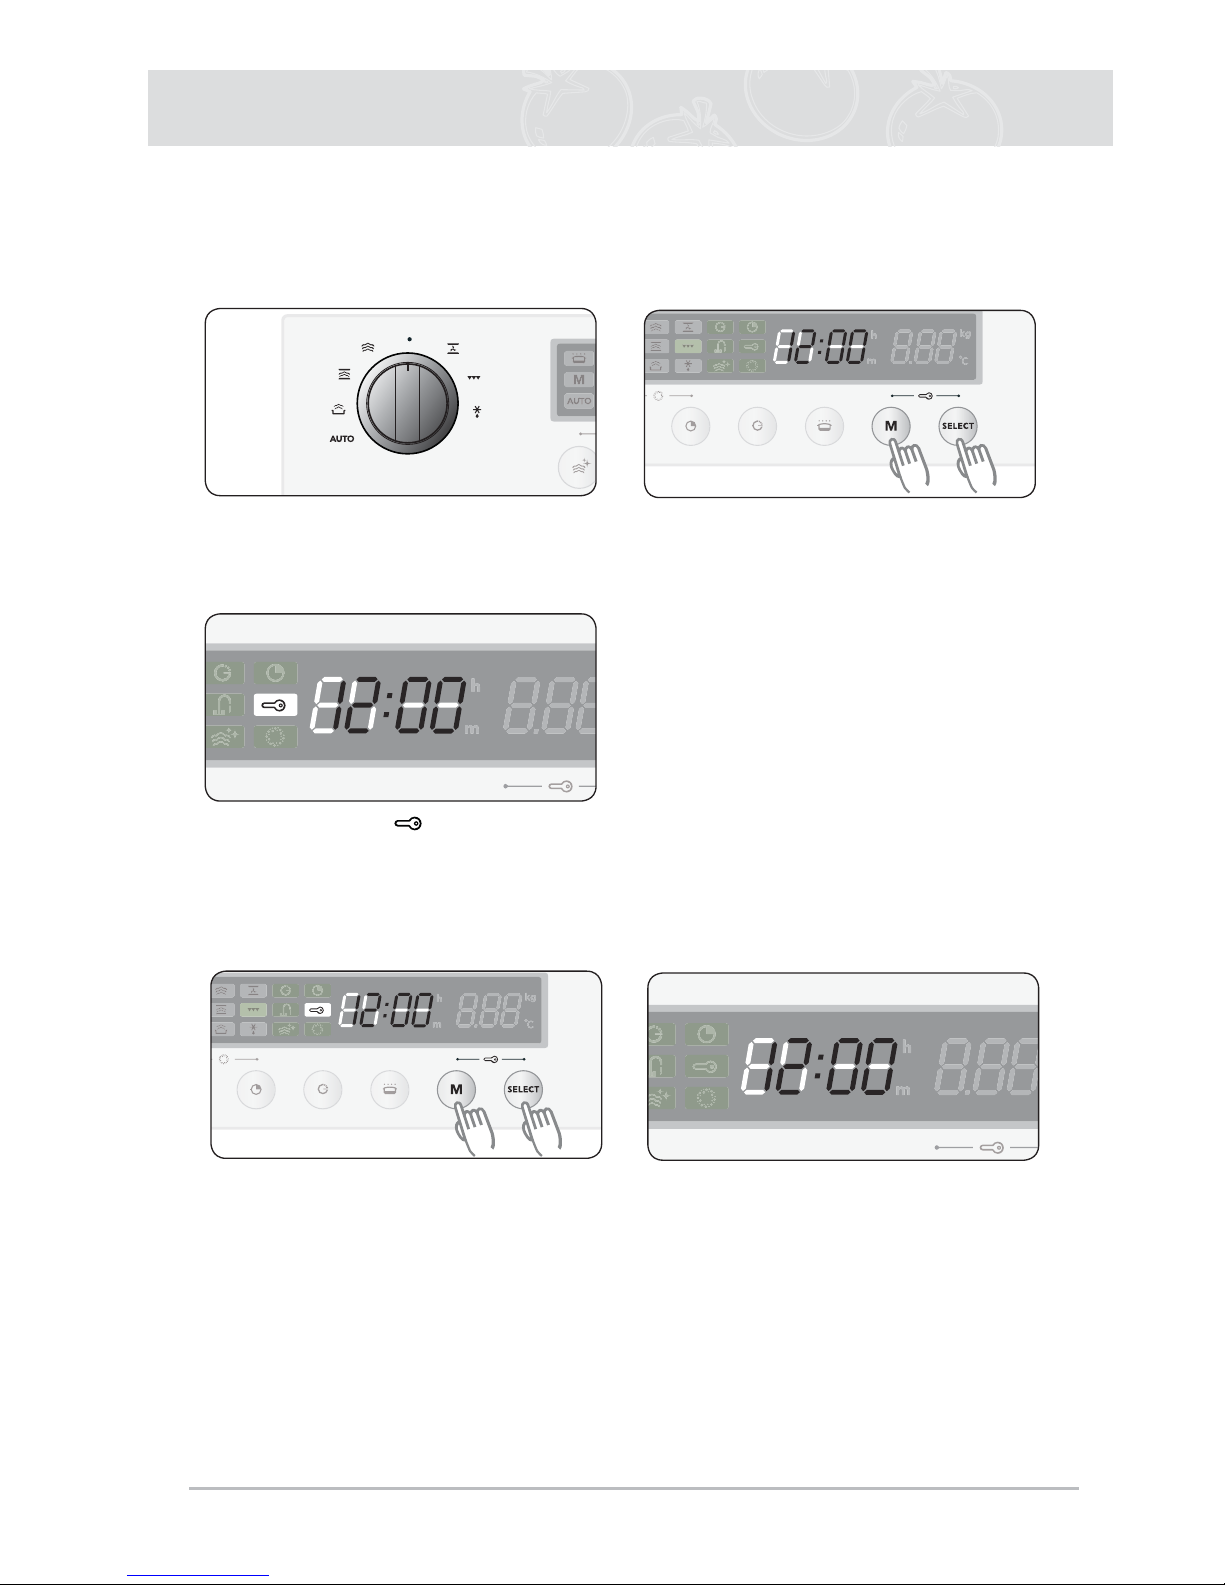
Child Safety Lock
The oven’s Child Safety Lock allows you to lock the control panel to protect the
oven against unintended use.
To Lock the Oven
1
Turn the FUNCTION KNOB to “OFF”
position.
2
Press the MEMORY and SELECT
button at the same time and hold for
3 seconds.
3
A lock symbol appears in the
display, indicating that all functions
are locked.
To Unlock the Oven
1
Turn the FUNCTION KNOB to “OFF”
position. Press the MEMORY and
SELECT button at the same time and
hold for 3 seconds.
2
The Lock symbol disappears in the
display, indicating that all functions
are unlocked.
Page 46

46
Cleaning And Care
Removing the Cooking Compartment
You can remove the oven door for easier cleaning.
Do not reach into the door hinges. There is a risk of injury.
1.Open the cooking compartment door fully.
2. Move the two locking levers up on the left and right-hand
sides.
3. Close the cooking compartment door halfway. With both
hands, grip the top of the door on the left and right-hand
sides. Close the door a little more and pull it out.
Fitting the Cooking Compartment Door
Refi t the cooking compartment door after cleaning.
1. Insert the door hinges straight into the openings on the
left and right-hand sides of the cooking compartment.
The notch on the hinge must engage on both sides.
2. Open the cooking compartment door fully and fold the
locking lever upwards.
3. Close the cooking compartment door.
Page 47
47
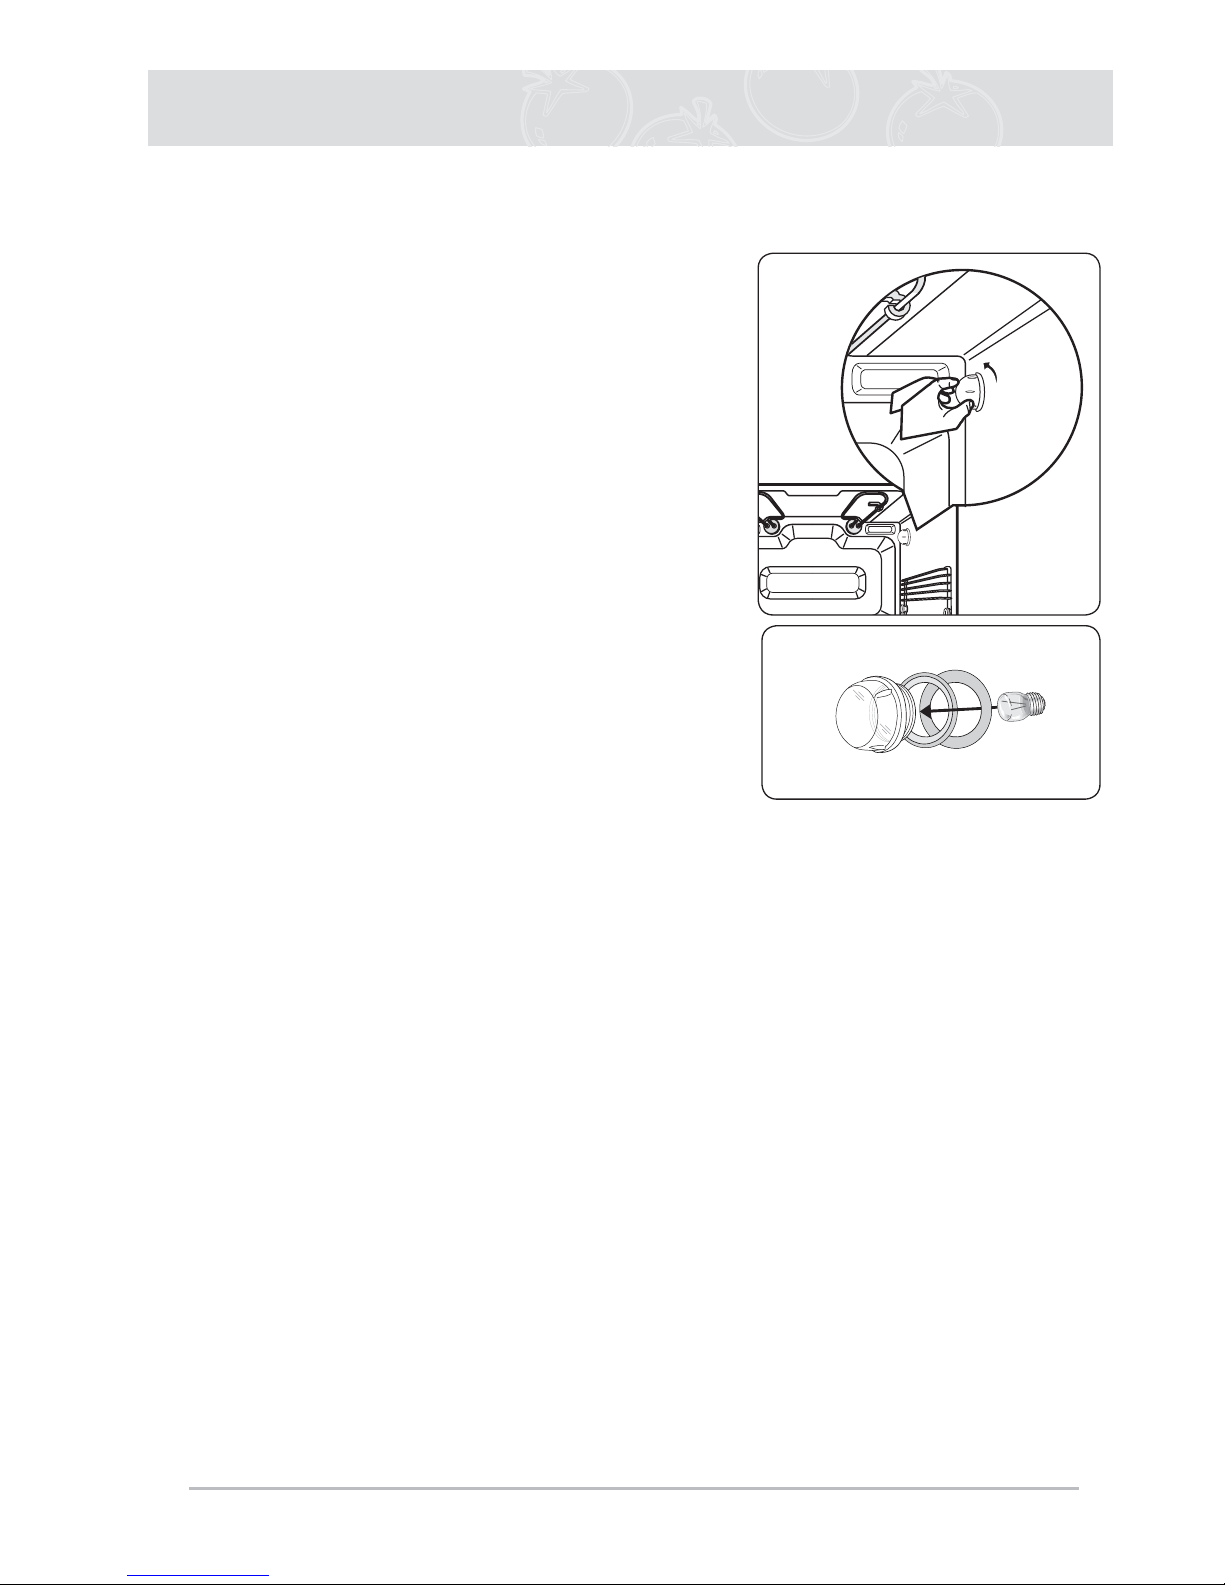
Changing The Oven Lamp
Replacing the oven lamp and cleaning the glass cap
1. Take off the cap by turning counterclockwise.
2. Remove the metal ring and the sheet ring and
clean the glass cap.
3. If necessary, replace the bulb with a
25 Watt, 230 V, 300 °C heat resistant oven
light bulb.
4. Fit the metal and the sheet ring to the glass
cap.
5. Reinstall the glass cap.
Page 48

48
Error Codes
Error Code General Functions
TEMP SENSOR OPEN
In case the value of the temperature sensor is more than 250 °C during
operation / cancellation.
TEMP SENSOR SHORT
In case the value of the temperature sensor is less than 5 °C during
operation / cancellation.
UNFINISHED PREHEAT
In case the oven has not reached the desired temperature although a
certain amount of time has passed (unfi nished preheating).
OVER 250 °C DURING OPERATION OF CONVECTION
In case the temperature rises over 250 °C during operation of
convection mode.
STEAM SENSOR OPEN
In case the value of the temperature sensor is less than 30 °C
after operation of the steam heater for a certain time.
STEAM SENSOR SHORT
DESCALE MAX. TIME OVER (or STEAM USE MAX TIME OVER)
In case the steam operating time after the descaling message has been
passed. The oven must be descaled before you can use it
(see page 40).
If any of these errors occur, please contact ATAG Customer Service.
Page 49

49
Technical Specifi cations
Model SQ4211BUU / SQ4292BUU
Power Source 230 V ~ 50 Hz
Power Consumption
Maximum Power
Grill
Convection
Steam
3200 W
1530 W
2050 W
1700 W - 2200 W
Cooling Method Cooling fan motor
Dimensions (W x H x D)
Outside
Oven Cavity Net.
595 x 460 x 473 mm
400 x 215 x 385 mm
Volume Cet.
Volume Gross
30 liter
36 liter
Weight
Net
Shipping
25 kg approx
31 kg approx
Page 50

50
Notes
Page 51

51
Notes
Page 52

Code No.: DE68-03594N
700003560001
 Loading...