

Page 1

Index
1. English ............................................................................ 1
2. Français .......................................................................... 9
3. Deutsch .........................................................................17
4. Italiano ............................................................................25
5. Español...........................................................................33
6. Русский ...........................................................................41
7. Türkçe .............................................................................49
Page 2

GigaX1024X
English
User Guide
Copyright © 2006 ASUSTeK COMPUTER INC. All Rights Reserved.
1
Page 3

Introduction
English
The GigaX1024X rack mountable switch provides non-blocking, wire-speed
performance to meet your intensive network needs. This switch comes with
24 Fast Ethernet ports with auto-sensing and auto MDI/MDIX capabilities.
With easy connectivity, ow control, and QoS, GigaX1024X is guaranteed to
enhance your network performance and productivity.
Features
• 24 x 10/100 Mbps RJ-45 ports
• Up to 200Mbps transmit speed for all ports in full-duplex mode
• Switch capacity: 4.8Gbps Forwarding rate: 3.6Mpps
• Plug and play – auto MDI/MDIX, and auto-sensing for speed and
duplex mode on all ports
• Flow control schemes (802.3x in full-duplex mode) to support zero loss
under temporary network congestion
• Head of Line (HOL) blocking preventions
• IEEE802.1p/TOS/DS supported to meet QoS requirements
• 8K MAC address learning and aging for concurrent connections to
8K nodes
• Easy-to-read LEDs provide quick indication of link status and speed
• Fan-less design for quiet operation
• Desktop or rack mount placement options
Package contents
Before installing the GigaX1024X switch, check your package for the
following items.
• GigaX1024X switch
• Power cable
• User guide
• Mounting kit (2 brackets and 6 screws)
. Contact your retailer if any of the items is damaged or missing.
NOTE
2 ASUS GigaX1024X
Page 4

Technical specications
Physical Dimensions
444 mm (W) x 180mm (D) x 43.5mm (H)
Environmental Ranges
Operating temperature 0ºC ~ 50ºC (32ºF to 122ºF)
Storage temperature -25ºC ~ 70ºC (-13ºF to 158ºF)
Operating humidity 0 to 90%
Storage humidity 0 to 90%
Operating altitude up to 15,000 ft (4,500m)
Storage altitude up to 40,000 ft (12,000m)
Power
Input 100V ~ 240V AC/50-60Hz
Power Consumption 12 Watts
Certication
FCC Class A, CE, CCC
English
ASUS GigaX1024X 3
Page 5
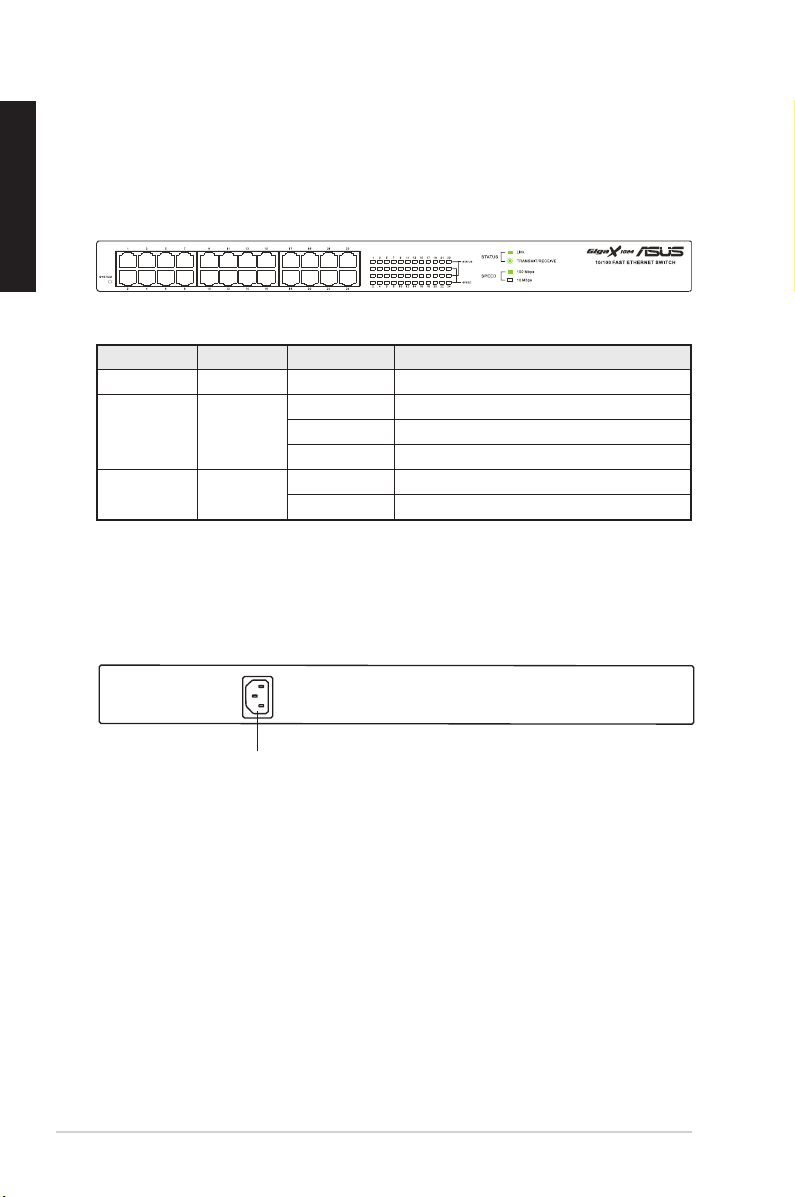
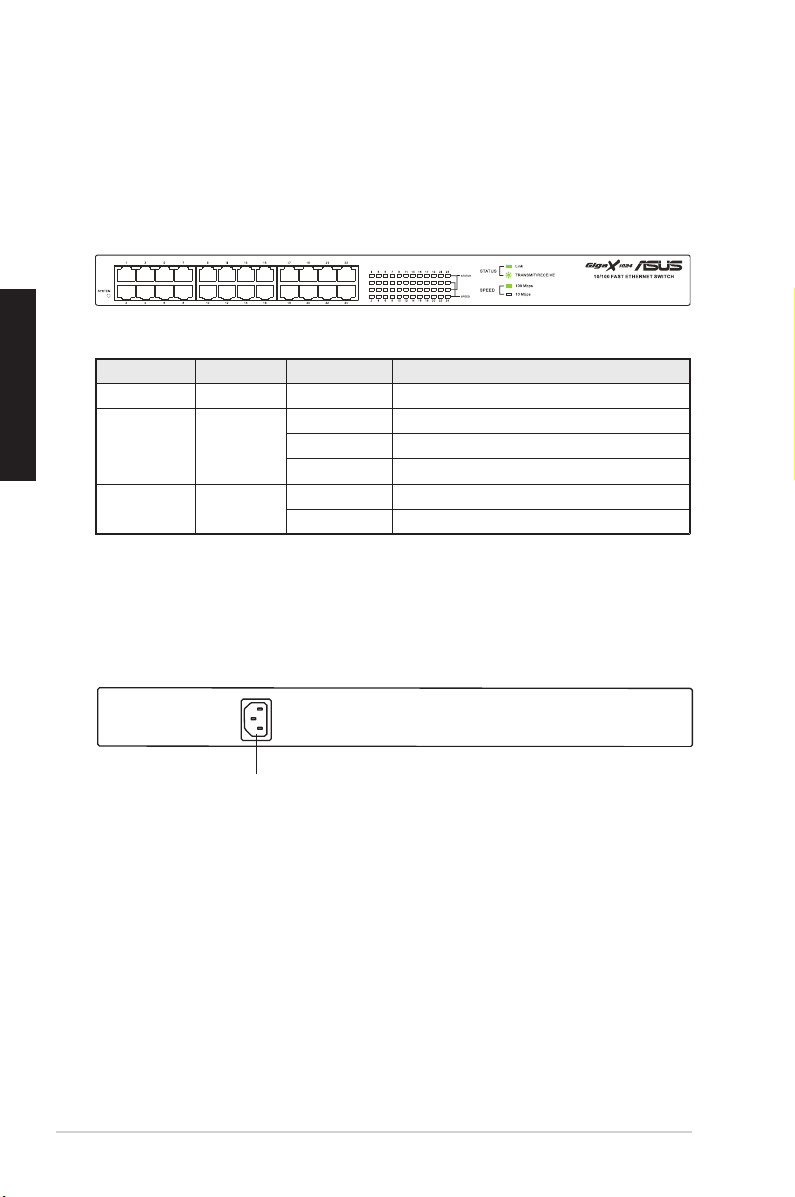
Front panel
English
The front panel of GigaX1024X contains twenty-four 10/100Mbps RJ-45
Ethernet ports and LED indicators that shows the working condition of the
switch.
Table 1 LED indicators
LED Color Status Description
SYSTEM Green ON The power is ON
STATUS Green ON A device is connected to the port
Flashing Transmitting data
OFF No device connected
SPEED Green ON 100Mbps
OFF 10Mbps
Rear panel
The rear panel of GigaX1024X contains a power connector.
Power connector
4 ASUS GigaX1024X
Page 6
Placement options
Placing the switch on a at surface
Place the GigaX1024X on a at and stable surface. Make sure the location
meets the operating environment specication. See page 3 for details.
The length of the UTP Category 5 cable length should not
NOTE.
exceed 100 meters (328 feet).
Mounting the switch on a rack
You may also mount the GigaX1024X switch on a rack with the supplied
mounting brackets and screws.
To mount the switch on a rack:
1. Locate three screw holes on both sides of the switch.
2. Align the mounting brackets with the switch screw holes.
3. Secure the mounting brackets with three screws supplied in the
mounting kit on both sides of the switch.
4. Place the switch in a 19-inch rack, then secure both sides with four
rack mount screws.
English
The rack mount screws are not supplied.
NOTE.
ASUS GigaX1024X 5
Page 7
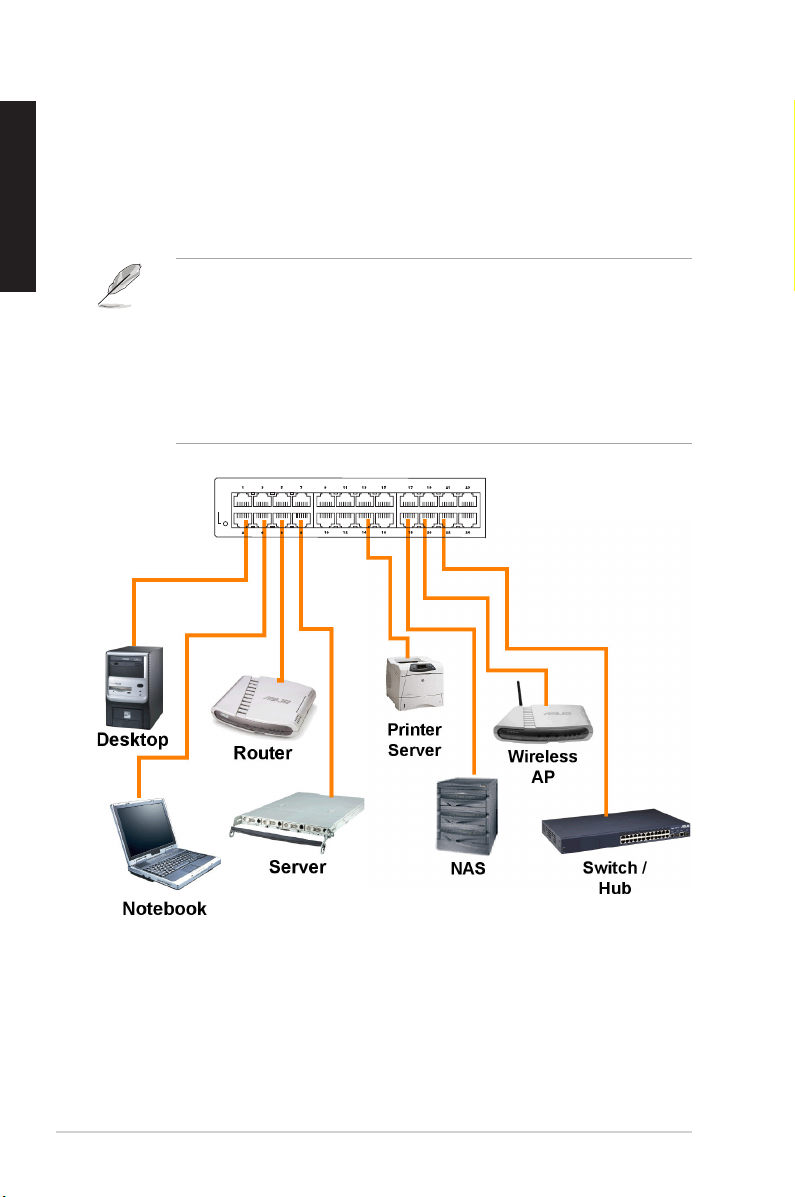
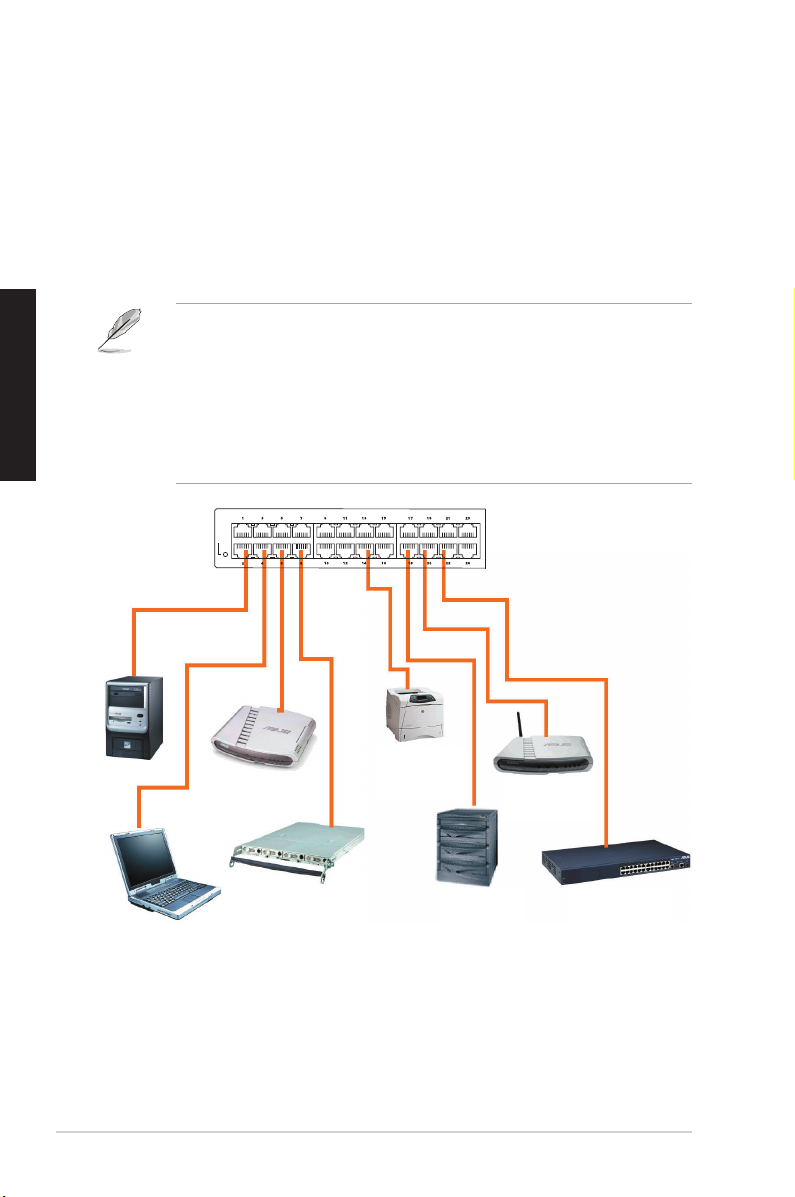
Connecting network devices
POWER
100M
10M
SPEED
TRANSMIT/RECEIVE
FULL DUPLEX
COLLISION
STATUS / SPEED
DUPLEX / COLLISION
10 BASE-T / 100 BASE-TX
10/100 Fast Ethernet Switch
English
To connect network devices to the GigaX1024X switch:
1. Connect one end of the Ethernet cable to an Ethernet port on the
switch front panel. Connect the other end to the Ethernet port of the
network device. Repeat this step to connect additional network devices.
NOTES
• We recommend the use of Category 5 Ethernet straight-through
cables to ensure proper connections between the switch and other
network devices.
• You may use the switch Ethernet ports as an uplink to another
switch, hub, bridge or repeater. The switch is capable of detecting
either cross-over or straight-through cables.
2. Plug one end of the power cable to the power connector on the switch
rear panel, then plug the other end to an electrical outlet.
3. The Power LED and LED indicators for active Ethernet ports light up to
indicate that the device is on and in use. Refer to the front panel Label/
LED table in page 4 for LED indications.
6 ASUS GigaX1024X
Page 8

Troubleshooting
This troubleshooting guide provides answers to some common problems
which you may encounter while installing and/or using the ASUS
GigaX1024X switch. These problems requires simple troubleshooting that
you can perform by yourself. Contact the ASUS Technical Support if you
encounter problems not mentioned in this section.
Problem Action
English
The POWER LED does not
light up.
The STATUS/SPEED LED
does not light up even
after an Ethernet cable is
connected.
Check if the power cable is properly
connected to the switch and to
an electrical outlet with a correct
voltage output.
• Check if the Ethernet cable is
properly connected to the switch
and to the network device.
• Make sure that the switch
and your network device are
powered on.
• Check if the Ethernet cable
is sufcient to your network
requirements. Make sure you
use Category 5 cables. 10Mbit/
sec cables may work with lower
quality cables.
ASUS GigaX1024X 7
Page 9

Glossary
English
10BASE-T
100BASE-T
1000BASE-T
Auto MDI/MDIX
Ethernet
Mbps
network
10 Mbps Ethernet over twisted pair cable (Category 3).
100 Mbps Ethernet over twisted pair cable (Category 5)
1000 Mbps Ethernet over twisted pair cable (Category 5)
Allows network connections using either straight or cross
cable.
The most commonly installed computer network
technology, usually using twisted pair wiring. Ethernet
data rates are 10 Mbps, 100 Mbps, and 1000 Mbps.
Abbreviation for Megabits per second, or one million bits
per second. Network data rates are often expressed in
Mbps.
A group of computers that are connected together,
allowing them to communicate with each other and
share resources, such as software, les, etc. A network
can be small, such as a LAN, or very large, such as the
Internet.
8 ASUS GigaX1024X
Page 10

GigaX1024X
Guide
Français
Copyright © 2006 ASUSTeK COMPUTER INC. Tous droits réservés.
9
Page 11

Introduction
Le switch GigaX1024X fournit une performance de commutation non
bloquante et de haute vitesse pour satisfaire à tous vos besoins réseau. Le
switch inclut 24 ports Fast Ethernet avec auto-sensing et possibilités d'auto
MDI/MDIX, des fonctions de connectivité simplifiées, contrôle de flux, et
QoS. Avec tous ces avantages, le GigaX1024 vous permet d'améliorer vos
performances réseau et votre productivité.
Français
Fonctions
• 24 ports 10/100 Mbps RJ-45
• Vitesse de transmission jusqu’à 200Mbps pour tous les ports en full duplex
• Capacité de commutation: 4.8Gbps Taux de transfert: 3.6Mpps
• Plug and play – auto MDI/MDIX, et auto-sensing pour vitesse et mode
duplex sur tous les ports
• Contrôle de flux (802.3x en mode full-duplex) ne supportant aucune
perte en congestion réseau temporaire
• Préventions de bloquage Head of Line (HOL)
• IEEE802.1p/TOS/DS supporté pour les besoins QoS
• Adressage MAC 8K avec learning et aging pour les connexion
concurrentes sur des noeuds 8K
• Voyants LED simplifiés fournissant une indication rapide de la vitesse
et du statut d’un lien
• Design sans ventilateur pour un fonctionnement silencieux
• Options de placement sur bureau ou sur rack
Contenu de la boîte
Avant d’installer le switch GigaX1024X, vérifiez que la boîte contient bien
les éléments suivants.
• Switch GigaX1024X
• Câble d’alimentation
• Guide
• kit de montage (2 supprots et 6 vis)
. Si l’un des éléments ci-dessus était manquant ou endommagé,
NOTE
contactez votre revendeur.
10 ASUS GigaX1024X
Page 12

Spécifications techniques
Dimensions physiques
444 mm (L) x 180mm (Pr) x 43.5mm (H)
Plages environmentales
Température de fonctionnement 0ºC ~ 50ºC (32ºF à 122ºF)
Température de stockage -25ºC ~ 70ºC (-13ºF à 158ºF)
Humidité de fonctionnement 0 à 90%
Humidité de stockage 0 à 90%
Altitude de fonctionnement jusqu’à 4,500m (15,000 pieds)
Altitude de stockage jusqu’à 12,000m (40,000 pieds)
Alimentation
Entrée 100V ~ 240V AC/50-60Hz
Consommation 12 Watts
Certification
FCC Classe A, CE, CCC
Français
ASUS GigaX1024X 11
Page 13
Panneau avant
Le panneau avant du GigaX1024X intègre 24 ports Ethernet 10/100Mbps
RJ-45 et des indicateurs LED affichant le statut du switch.
Français
Tableau 1 Indicateurs LED
LED Couleur Statut Description
SYSTEM Vert Allumé L'unité est alimentée
STATUS Vert
SPEED Vert Allumé 100Mbps
Allumé Un périphérique est connecté au port
Clignotant Transmission de données
Eteint Pas de périphérique connecté
Eteint 10Mbps
Panneau arrière
Le panneau arrière du GigaX1024X intègre un connecteur d'alimentation.
Connecteur d’alimentation
12 ASUS GigaX1024X
Page 14

Options de placement
Disposition du switch sur une surface plane
Placez le switch GigaX1024X sur une surface plane et stable. Assurez-vous
que l’emplacement correspond aux spécifications relatives à l’environnement
d’opération. Voir page 11 pour plus de détails.
La longueur maximale d’un câble UTP de catégorie 5 est de
NOTE.
100 mètres (328 pieds).
Montage du switch dans un rack
Vous pouvez aussi placer le GigaX1024X sur un rack à l’aide des supports
et des vis du kit de montage.
Pour monter le switch sur un rack:
1. Localisez les trois ouvertures pour vis de chaque côté du switch.
2. Alignez les supports sur ces ouvertures.
3. Sécurisez chaque côté de l’appareil avec les supports à l’aide des six
vis du kit de montage.
4. Placez le switch dans le rack, puis sécurisez chaque côté de l’appareil
avec quatre vis de montage de rack.
Les vis destinées à la fixation du swith sur un rack ne sont pas
NOTE.
fournies.
Français
ASUS GigaX1024X 13
Page 15
Connecter des périphériques réseau
100M
10M
SPEED
TRANSMIT/RECEIVE
FULL DUPLEX
COLLISION
STATUS / SPEED
DUPLEX / COLLISION
10 BASE-T / 100 BASE-TX
10/100 Fast Ethernet Switch
Pour connecter des périphériques réseau au switch GigaX1024X:
1. Connectez une extrémité du câble Ethernet à un port Ethernet du
panneau avant du switch. Connectez l’autre extrémité au port Ethernet
du périphérique réseau. Répetez cette étape pour connecter des
périphériques réseau additionnels..
XFrançais
PC
NOTES
• Il est recommandé d’utilisé des câbles Ethernet droit de catégorie
5 pour une meilleure qualité de connexion entre le switch et les
périphériques réseau.
• Vous pouvez utiliser les ports Ethernet du switch comme liaison
montante vers un autre switch, hub, bridge ou répetiteur. Le switch
est capable de détecter des câbles droits ou croisés.
POWER
Imprimante
Routeur
Serveur
serveur
NAS
Point d’accès
sans fil
Hub/switch
PC portable
2. Connectez une extrémité du cordon d’alimentation au jack d’alimentation
du switch, puis branchez l’autre extrémité à une prise électrique murale.
3. La LED d’alimentation et les LED pour les ports Ethernet actifs s’allument
pour indiquer que l’appareil est en état de fonctionnement. Voir le tableau
des indicateurs LED page 4 pour plus d’informations.
14 ASUS GigaX1024X
Page 16

Dépannage
Cette section fournit des réponses pour certains problèmes que vous
pouvez rencontré lors de l’installation ou de l’utilisation du switch
GigaX1024X d’ASUS. Ces problèmes requièrent un dépannage simple
que vous pourrez vous-même effectuer. Contactez le service de support
technique ASUS si vous rencontrez des problèmes non mentionnés dans
cette section.
Problème Action
La LED POWER ne s’allume
pas.
La LED STATUS/SPEED ne
s’allume pas même après
qu’un câble Ethernet ait été
connecté.
Vérifiez que le câble d’alimentation
est correctement connecté au switch
et à une source d’alimentation avec
le voltage approprié.
• Vérifiez si le câble Ethernet est
correctement connecté au switch
et au périphérique réseau.
• Assurez-vous que le switch et
votre périphérique réseau soient
bien alimentés.
• Vérifiez si le câble Ethernet
correspond à vos besoins
réseau. Assurez-vous que vous
utilisez bien des câbles de
catégorie 5.
Français
ASUS GigaX1024X 15
Page 17

Glossaire
Français
10BASE-T
100BASE-T
1000BASE-T
Auto MDI/MDIX
Ethernet
Mbps
Réseau
Ethernet 10 Mbps via un câble à paires torsadées (Cat. 3).
Ethernet 100 Mbps via un câble à paires torsadées (Cat. 5)
Ethernet 1000 Mbps via un câble à paires torsadées (Cat. 3)
Permet des connexions réseau utilisant des câbles
droits ou croisés.
Technologie réseau la plus répandue, utilisant
généralement des câbles à paires torsadées. Les taux
de débit de données Ethernet sont 10 Mbps, 100 Mbps,
et 1000 Mbps.
Abréviation de Megabits per second, ou un million de
bits par secondes. Le taux de débit des données réseau
est souvent exprimé en Mbps.
Groupe d’ordinateurs connectés ensemble, permettant
de communiquer entre eux et partager des ressources,
comme des logiciels, fichiers, etc. Un réseau peut être
réduit, comme un réseau local (LAN), ou très étendu,
comme Internet.
16 ASUS GigaX1024X
Page 18

GigaX1024X
Schnellstartanleitung
Deutsch
Copyright © 2006 ASUSTeK COMPUTER INC. Alle Rechte vorbehalten.
17
Page 19

Deutsch
Einführung
Der GigaX1024X-Regal-Switch bietet unblockierte Leistung mit Kabelgeschwindigkeit, um den intensiven Ansprüchen Ihres Netzwerks zu genügen. Dieser Switch ist mit 24 Fast-Ethernet-Ports mit automatischer
Erkennung und automatischen MDI/MDIX-Fähigkeiten ausgestattet. Mit
einfachen Abschlussmöglichkeiten, Flußkontrolle und QoS garantiert der
GigaX1024X eine Steigerung Ihrer Netzwerkleistung und Produktivität.
Funktionen
• 24 x 10/100 Mbps RJ-45-Ports.
• Bis zu 200Mbps Übertragungsgeschwindigkeit für alle Ports im Vollduplexmodus.
• Switch-Kapazität: 4,8Gbps Weiterleitungsrate: 3,6Mpps.
• Plug and play – automatisches MDI/MDIX und automatische
Erkennung für Geschwindigkeit und Duplexmodus an allen Ports.
• Flußkontrollschemata (802.3x im Vollduplexmodus), um Null Verluste.
bei Netzwerküberlastung sicherzustellen.
• Head of Line (HOL)-Blockierungsverhinderung.
• IEEE802.1p/TOS/DS-Unterstützung, um den QoS-Anforderungen zu
entsprechen.
• 8kb MAC-Adressen-Lernen und -Alterung für gleichzeitigen Zugriff auf
8kb-Knoten.
• Leicht-zu-Lesen LEDs bieten eine schnelle Erkennung des Linkstatus
und der Geschwindigkeit.
• Lüfterloses Design für leises Arbeiten.
• Tischaufstellung oder Regalmontage möglich.
Paketinhalt
Bevor Sie den GigaX1024X-Switch installieren, überprüfen Sie bitte die
Verpackung auf die folgenden Teile:
• GigaX1024X-Switch
• Netzkabel
• Benutzeranleitung
• Montageset (2 Klammern und 6 Schrauben)
HINWEIS
ist oder fehlt.
18 ASUS GigaX1024X
: Kontaktieren Sie Ihren Händler, wenn eines der Teile defekt
Page 20

Technische Daten
Abmessungen
444 mm (B) x 180mm (T) x 43,5mm (H)
Umgebungsbedingungen
Arbeitstemperatur 0ºC - 50ºC
Lagertemperatur -25ºC - 70ºC
Arbeitsluftfeuchtigkeit 0 bis 90%
Lagerluftfeuchtigkeit 0 bis 90%
Arbeitshöhe bis zu 4500m
Lagerhöhe bis zu 12000m
Stromversorgung und Leistung
Eingang 100V - 240V ~ 50-60Hz
Leistungsverbrauch 12 Watt
Zertifizierung
FCC Klasse A, CE, CCC
Deutsch
ASUS GigaX1024X 19
Page 21

Frontseite
An der Frontseite des GigaX1024X befinden sich 24 10/100Mbps-RJ45Ethernet-Ports und LED-Anzeigen für den Arbeitszustand des Switch.
Deutsch
Tabelle
1 LED-Anzeigen
LED Farbe Status Beschreibung
SYSTEM Grün EIN Der Strom ist eingeschaltet
STATUS
SPEED Grün EIN 100Mbps
Grün EIN Ein nGerät ist mit dem Port verbunden
BLINKEND Datenübertragung
AUS Kein Gerät angeschlossen
AUS 10Mbps
Rückseite
An der Rückseite des GigaX1024X befindet sich die Netzanschlussbuchse.
Stromanschluss
20 ASUS GigaX1024X
Page 22

Aufstellungsmöglichkeiten
Aufstellen des Switch auf einer ebenen Oberfläche
Stellen Sie den GigaX1024X auf eine ebene, stabile Oberfläche. Vergewissern Sie sich, dass der Platz den Arbeitsumgebungsanforderungen
entspricht. Siehe Seite 19 für Details.
HINWEIS:
überschreiten.
Die Länge der UTP-Kategorie 5-Kabel sollte 100m nicht
Montage des Switch in einem Regal
Sie können den GigaX1024X-Switch mit den mitgelieferten Montageklammern und Schrauben auch in einem Regal motieren.
Montage des Switch in einem Regal:
1. Suchen Sie die drei Schraubenlöcher an beiden Seiten des Switch.
2. Richten Sie die Montageklammmern an den Löchern am Switch aus.
3. Befestigen Sie die Montageklammern mit den im Montageset
mitgelieferten 3 Schrauben an beiden Seiten des Switch.
4. Schieben Sie den Switch in ein 19”-Regal und befestigen ihn mit 4
Schrauben auf beiden Seiten am Regal.
HINWEIS:
Lieferumfang enthalten.
Die Schrauben zum Befestigen am Regal sind nicht im
Deutsch
ASUS GigaX1024X 21
Page 23

Anschluss von Netzwerkgeräten
100M
10M
SPEED
TRANSMIT/RECEIVE
FULL DUPLEX
COLLISION
STATUS / SPEED
DUPLEX / COLLISION
10 BASE-T / 100 BASE-TX
10/100 Fast Ethernet Switch
Anschluss von Netzwerkgeräten am GigaX1024X-Switch:
1. Verbinden Sie ein Ende des Ethernetkabels mit einem Ethernetport an
der Frontseite des Switch. Verbinden Sie das andere Ende mit dem
Ethernetport des Netzwerkgerätes. Wiederholen Sie diese Schritte, um
mehr Netzwerkgeräte anzuschließen.
HINWEISE:
• Wir empfehlen die Verwendung von gerade durchgeführten Kategorie
5-Netzwerkkabeln, um eine korrekte Verbindung zwischen dem
Switch und den anderen Netzwerkgeräten zu gewährleisten.
• Sie können die Ethernetports des Switch als einen Uplink zu einem
anderen Switch, Hub, Bridge oder Repeater benutzen. Der Switch
kann sowohl Cross-Over-Kabel als auch gerade durchgeführte
(straight-through)-Kabel erkennen.
Deutsch
POWER
2. Stecken Sie ein Ende des Netzkabels in die Buchse an der Rückseite
des Switch und den Stecker des anderen Endes in die Steckdose.
3. Die Strom-LED und die LED-Anzeigen für aktive Ethernetports
leuchten auf, um anzuzeigen, dass der Switch eingeschaltet ist und
arbeitet. Zur Erklärung der LED-Anzeigen beziehen Sie sich bitte auf
die Frontseitenbeschriftung/LED-Tabelle auf Seite 4.
22 ASUS GigaX1024X
Page 24

Fehlerbehebung
Diese Fehlerbehebungsanleitung gibt Ihnen Antworten zu einigen
bekannten Problemen, die während der Installation und/oder der
Benutzung Ihres ASUS GigaX1024X-Switch auftreten können. Diese
Probleme können einfach von Ihnen selbst behoben werden. Kontaktieren
Sie die technische Unterstützung von ASUS, wenn Sie auf Probleme
treffen, die nicht in diesem Abschnitt beschrieben sind.
Problem Aktion
Die Strom-LED leuchtet
nicht auf.
Die STATUS/SPEED-LED
leuchtet nicht auf, selbst
wenn ein Ethernetkabel
angeschlossen ist.
Überprüfen Sie, ob das Netzkabel richtig
mit dem Switch und einer Steckdose
mit korrekter Versorgungsspannung
verbunden ist.
• Überprüfen Sie, ob das Ethernetkabel
richtig mit dem Switch und dem
Netzwerkgerät verbunden ist.
• Vergewissern Sie sich, dass der Switch
und das Netzwerkgerät eingeschaltet
sind.
• Überprüfen Sie, ob das Ethernetkabel
den Netzwerkanforderungen
entspricht. Vergewissrn Sie sich, dass
Sie Kabel der Kategorie 5 verwenden.
10Mbit/s Kabel können auch mit
Kabeln geringerer Qualität arbeiten.
Deutsch
ASUS GigaX1024X 23
Page 25

Glossar
Deutsch
10BASE-T
100BASE-T
1000BASE-T
Auto MDI/MDIX
Ethernet
Mbps
Netzwerk
10 Mbps-Ethernet über Twisted-Pair-Kabel (Kategorie
3).
100 Mbps Ethernet über Twisted-Pair-Kabel (Kategorie
5)
1000 Mbps-Ethernet über Twisted-Pair-Kabel (Kategorie
5).
Erlaubt Netzwerkverbindungen mit gerade
durchgeführten oder Cross-Over (gekreuzten)-Kabeln.
Die bekannteste installierte Computernetzwerk-
technologie, normalerweise unter Verwendung von
Twisted-Pair-Kabeln. Die Ethernet-Datenraten liegen bei
10 Mbps, 100 Mbps und 1000 Mbps.
Abkürzung für Megabits per second (Megabit pro
Sekunde) oder eine Million Bits pro Sekunde.
Netzwerkdatenraten werden oft in Mbps angegeben.
Eine Gruppe von Computern, die miteinander
verbunden sind und miteinander kommunizieren und
sich Ressourcen, wie z.B. Software, Dateien usw., teilen
können. Ein Netzwerk kann klein sein, z.B. ein LAN oder
sehr groß, z.B. das Internet.
24 ASUS GigaX1024X
Page 26

GigaX1024X
Guida dell’utente
Italiano
Copyright © 2006 ASUSTeK COMPUTER INC. Tutti i diritti riservati.
25
Page 27

Italiano
Introduzione
Lo Switch montabile su rack GigaX1024X fornisce prestazioni di commutazione “nonblocking wire-speed” per soddisfare le esigenze della rete. Lo Switch include 24 porte
Fast Ethernet con rilevamento automatico e capacità MDI/MDIX, e mette a disposizione
facile connettività, controllo del flusso e QoS. Grazie a questi vantaggi, è garantito che
GigaX1024X migliora le prestazioni e la produttività di rete.
Caratteristiche
• 24 porte RJ-45 10/100 Mbps
• Velocità di trasmissione fino a 200Mbps per tutte le porte in modalità Full-Du
plex
• Capacità di commutazione: 4.8Gbps Velocità d’inoltro: 3.6Mpps
• Plug and play - MDI/MDIX automatico e rilevamento automatico velocità e mo
dalità Duplex su tutte le porte
• Schemi di controllo del flusso (802.3x in modalità Full-Duplex) per supportare
perdita zero durante le congestioni temporanee di rete
• Prevenzioni blocco HOL (Head of Line)
• Supporto IEEE802.1p/TOS/DS per soddisfare i requisiti QoS
• Apprendimento ed azzeramento indirizzi MAC 8K per connessioni concorrenti a
nodi 8K
• I LED di facile lettura forniscono indicazioni rapide sullo stato dei collegamenti
e della velocità
• Design senza ventoline per un funzionamento silenzioso
• Può essere installato sia su rack sia su tavolo
-
-
Contenuti della confezione
Prima di installare lo Switch GigaX1024X, controllare che la confezione contenga i seguenti elementi.
• GigaX1024X Commutatore
• Cavo d’alimentazione
• Guida dell’utente
• Kit montaggio (2 staffe e 6 viti)
:
NOTA
mettersi in contatto con il rivenditore se uno qualsiasi
degli elementi sopra elencati manca o è danneggiato.
26 ASUS GigaX1024X
Page 28

Specifiche tecniche
Dimensioni fisiche
444mm x 180mm x 43.5mm (larghezza x altezza x profondità)
Portate ambientali
Temperatura operativa: da 0oC a 50oC (da 32oF a 122oF)
Temperatura
d’immagazzinamento: da -25oC a 70oC (da -13oF a 158oF)
Umidità operativa: da 0 a 90%
Umidità
d’immagazzinamento: da 0 a 90%
Altitudine operativa: fino a 15.000 piedi (4.500 m)
Altitudine
d’immagazzinamento: fino a 40.000 piedi (12.000 m)
Alimentazione
Input 100V ~ 240V AC/50-60Hz
Consumo energetico: 12 Watts
Certificazioni
FCC Class A, CE, CCC
ASUS GigaX1024X 27
Italiano
Page 29

Pannello frontale
Il pannello frontale dello Switch GigaX1024X consiste di ventiquattro porte
RJ-45 10/100Mbps ed indicatori LED che mostrano le condizioni operative
dello Switch.
Italiano
Tabelle 1
SISTEMA Verde Acceso L’alimentazione è attiva
Velocità Verde
indicatori LED
LED Colore Stato Descrizione
Stato
Verde Acceso Un dispositivo è collegato alla porta
Lampeggiante Trasmissione dei dati
Spento Nessun dispositivo collegato
Acceso 100Mbps
Spento 10Mbps
Pannello posteriore
Il panne llo posteriore di GigaX1024X è dotato di un connettore d’
alimentazione.
Connettore
alimentazione
28 ASUS GigaX1024X
Page 30

Opzioni d’installazione
Installazione dello Switch su una superficie piatta
Collocare lo Switch GigaX1024X su una superficie piatta e stabile.
Accertarsi che la posizione soddisfi le specifiche dell’ambiente operativo.
Fare riferimento a pagina 27 per i dettagli.
: La lunghezza del cavo UTP categoria 5 non deve eccedere i
NOTA
100 metri (328 feet).
Montaggio su rack del commutatore
Lo Switch GigaX1024X può anche essere montato su rack usando le staffe
e le viti fornite in dotazione.
Per montare su rack lo Switch:
1. Individuare i tre fori su entrambi i lati dello Switch.
2. Allineare le staffe di montaggio con i fori dello Switch.
3. Fissare le staffe, su entrambi i lati dello Switch, usando le viti fornite in
dotazione nel kit di montaggio.
4. Collocare lo Switch in un rack da 19 pollici, quindi fissare entrambi i tali
con quattro viti.
Le viti per il montaggio su rack non sono incluse.
NOTA:
ASUS GigaX1024X 29
Italiano
Page 31

Collegamento dei dispositivi di rete
100M
10M
SPEED
TRANSMIT/RECEIVE
FULL DUPLEX
COLLISION
STATUS / SPEED
DUPLEX / COLLISION
10 BASE-T / 100 BASE-TX
10/100 Fast Ethernet Switch
Collegamento di dispositivi di rete allo Switch GigaX1024X:
1. Collegare una estremità del cavo Ethernet alla porta Ethernet sul
pannello frontale dello Switch. Collegare l’altra estremità del cavo
alla porta Ethernet del dispositivo di rete. Ripetere questa fase per
collegare altri dispositivi di rete.
.
NOTE
•
Si raccomanda di usare cavi Ethernet a passante diretto di
categoria 5 per assicurare connessioni appropriate tra lo Switch e
gli altri dispositivi di rete.
•
Le porte Ethernet dello Switch possono essere usate come porte
di caricamento dati ad un altro Switch, Hub, Bridge o ripetitore. Lo
Switch è in rado di rilevare i cavi incrociati o a passante diretto.
POWER
Italiano
S e r v e r d i
stampa
2. Inserire una estremità dell’adattatore di corrente al connettore d’
alimentazione sul pannello posteriore dello Switch, poi inserire l’altra
estremità ad una presa di corrente elettrica.
3. Il LED Power (Alimentazione) e gli indicatori LED delle porte Ethernet
attive, si accendono per indicare che il dispositivo è acceso ed in uso.
Le indicazioni dei LED sono esposte nella Tabella di pagina 3.
30 ASUS GigaX1024X
AP wireless
Page 32

Risoluzione dei problemi
Questa guida alla risoluzione dei problemi fornisce le risposte ai problemi
comuni che si possono riscontrare durante l’installazione e/o l’uso dello
Switch ASUS GigaX1024X. Questi problemi richiedono una semplice
risoluzione che può essere eseguita da sé. Mettersi in contatto con il
Supporto tecnico ASUS se si riscontrano problemi che non sono descritti
in questa sezione.
Problema Azione
Il LED POWER
(Alimentazione) non si
illumina.
Il LED STATUS/SPEED (Stato/
Velocità) non si illumina
nemmeno dopo avere
collegato il cavo Ethernet.
Controllare che il cavo d’
alimentazione sia collegato in modo
appropriato allo Switch e ad una
presa di corrente con il corretto
voltaggio.
•
Controllare che il cavo
Ethernet sia collegato in modo
appropriato allo Switch ed al
dispositivo di rete.
•
Assicurarsi che lo Switch ed il
dispositivo di rete siano accesi.
•
Verificare che il cavo Ethernet
soddisfi i requisiti della rete.
Accertarsi che il cavo sia di
categoria 5. I cavi 10Mbit/sec
possono funzionare con cavi di
qualità inferiore.
Italiano
ASUS GigaX1024X 31
Page 33

Glossario
Italiano
10BASE-T
100BASE-T
1000BASE-T
MDI/MDIX
automatico
Ethernet
Mbps
rete
E thernet 10 Mbps su cavo a dopp ino intrecciato
(categoria 3).
Ethernet 100 Mbps su cavo a doppino intrecciato
(categoria 5).
Ethernet 1000 Mbps su cavo a doppino intrecciato
(categoria 5).
Consente le connessioni di rete usando un cavo a
passante diretto o cavo incrociato.
La tecnologia di rete più comunemente installata sui
computer, solitamente usando cablaggio con doppini
intrecciati. Le velocità dei dati Ethernet sono 10 Mbps e
100 Mbps.
Abbreviazione di Megabits per second (Megabit per
secondo), o un milione di bit per secondo. Le velocità
dei dati della rete sono spesso espresse in Mbps.
Un gruppo di computer collegati tra loro, che consentono
la vicendevole comunicazione e condivisione di risorse
come software, file, eccetera. Una rete può essere
piccola, come una LAN, oppure molto grande, come
Internet.
32 ASUS GigaX1024X
Page 34

GigaX1024X
Manual del Usuario
Español
Copyright © 2006 ASUSTeK COMPUTER INC. Todos los Derechos Reservados.
33
Page 35

Introducción
El Switch GigaX1024X para instalación en rack proporciona un rendimiento
sin bloqueos y de velocidad máxima para ajustarse a sus necesidades
de red. El switch incluye 24 puertos Fast Ethernet con capacidades de
auto-sensing y auto MDI/MDIX. Con una fácil conectividad, control de
flujo y QoS, GigaX1024X esta garantizado para mejorar el rendimiento y
productividad de su red.
Características
• 24 puertos RJ-45 10/100 Mbps
• Velocidad de transmisión de hasta 200Mbps para todos los puertos en modo
full-duplex
• Capacidad del
• Plug and play – auto MDI/MDIX, y auto-sensing para alta velocidad y modo
duplex en todos los puertos
• Esquemas de control de flujo (802.3x en modo full-duplex) para soportar que
no haya pérdidas en congestiones temporales de red
• Prevenciones de bloqueo de cabecera de línea (HOL)
• Soporte IEEE802.1p/TOS/DS para soportar requerimientos QoS
• 8K de direcciones MAC con capacidades de aprendizaje y envejecimiento de
direcciones (address learning and aging), para conexiones concurrentes de 8K
nodos
• LEDs de fácil lectura para proporcionar una rápida indicación del estado y
velocidad de los enlaces
• Diseño sin ventiladores para una operación silenciosa
• Opciones de emplazamiento en sobremesa o rack
switch: 4.8Gbps Tasa de envío: 3.6Mpps
Español
Contenidos
Antes de instalar el Switch GigaX1024X, compruebe que los siguientes
elementos están incluidos:
• Switch GigaX1024X
• Cable de alimentación
• Manual del usuario
• Kit de montaje (2 soportes y 6 tornillos)
. Contacte con su punto de venta si alguno de estos elementos
NOTA
ha sido dañado o no esta presente.
34 ASUS GigaX1024X
Page 36

Especificaciones técnicas
Dimensiones Físicas
444 mm (Ancho) x 180mm (Profundidad) x 43.5mm (Altura)
Rangos Ambientales
Temperatura de operación: 0ºC ~ 50ºC (32ºF a 122ºF)
Temperatura de almacenamiento: -25ºC ~ 70ºC (-13ºF a 158ºF)
Humedad en operación: 0 a 90%
Humedad en almacenamiento: 0 a 90%
Altitud en operación: hasta 15,000 ft (4,500m)
Altitud en almacenamiento: hasta 40,000 ft (12,000m)
Alimentación
Entrada 100V ~ 240V AC/50-60Hz
Consumo 12 Vatios
Certificaciones
FCC Clase A, CE, CCC
ASUS GigaX1024X 35
Español
Page 37

Panel frontal
El panel frontal del switch GigaX1024X contiene veinticuatro puertos
Ethernet 10/100Mbps RJ-45 e indicadores LED que muestra estados y
condiciones de trabajo del switch.
Tabla 1 Indicadores LED
LED Color Status Descripcción
SYSTEM Verde ENCENDIDO Unidad encendida y con energía
STATUS Verde
SPEED Verde ENCENDIDO 100Mbps
ENCENDIDO Dispositivo conectado al puerto
Intermitente Transmitiendo datos
APAGADO
APAGADO
No hay dispositivo conectado
10Mbps
Panel trasero
El panel trasero del switch GigaX1024X contiene el conector de alimentación.
Conector de alimentación
Español
36 ASUS GigaX1024X
Page 38

Opciones de emplazamiento
Emplazamiento del switch en una superficie plana
Coloque la unidad GigaX1024X en una superficie plana y estable.
Asegúrese de que la localización se ajusta a las especificaciones
ambientales. Consulte página 35 para más detalles.
La longitud máxima de un cable UTP de categoría no debe
NOTA.
exceder los 100 metros (328 pies).
Emplazamiento del switch en un rack
Puede instalar el switch GigaX1024X en un rack con los soportes y tornillos
suministrados.
Para emplazar el switch en un rack:
1. Localice los tres agujeros para tornillos en los laterales del switch.
2. Alinee tos soportes de montaje con los agujeros para tornillos del
switch.
3. Asegure los soportes de montaje con los tres tornillos suministrados
en el kit de montaje en ambos laterales del switch.
4. Coloque el switch en un rack de 19 pulgadas, asegurando ambos
laterales con cuatro tornillos de montaje.
Tornillos de montaje en rack no son suministrados.
NOTA.
ASUS GigaX1024X 37
Español
Page 39

Conectando dispositivos de red
100M
10M
SPEED
TRANSMIT/RECEIVE
FULL DUPLEX
COLLISION
STATUS / SPEED
DUPLEX / COLLISION
10 BASE-T / 100 BASE-TX
10/100 Fast Ethernet Switch
Para conectar dispositivos de red al switch GigaX1024X:
1. Conecte un extremo del cable Ethernet a uno de los puertos Ethernet
del panel frontal del switch. Conecte el otro extremo del cable Ethernet al
dispositivo de red. Repita este paso para añadir otros dispositivos de red.
NOTAS
• Recomendamos el uso de cables Ethernet directos de categoría
5 para asegurar una conexión apropiada entre el switch y otros
dispositivos de red.
• Puede usar los puertos Ethernet del switch como enlace uplink
a otro switch, hub, bridge o repetidor. Este switch es capaz de
detectar cables cruzados o directos.
POWER
Español
2. Conecte un extremo del cable de alimentación al conector de
alimentación en la parte trasera del switch. Conecte el otro extremo a
una fuente de alimentación o enchufe.
3. Los LEDs de alimentación e indicadores en todos los puertos Ethernet
activos se iluminarán para indicar que el dispositivo esta encendido y
en uso. Refiérase a la tabla de LEDs del panel frontal en página 4 para
más información.
38 ASUS GigaX1024X
Page 40

Solución de problemas
Esta guía de solución de problemas proporciona respuestas a problemas
comunes que pudiera encontrar durante el proceso de instalación o uso
del switch ASUS GigaX1024X. Estos problemas requieren soluciones con
procesos simples que puede realizar usted mismo/a. Para problemas no
mencionados en esta sección, por favor contacte con el soporte técnico de
ASUS.
Problema Acción
Los LEDs de alimentación so
se iluminan.
Los LEDs de STATUS/SPEED
no se iluminan incluso una
vez que los cables Ethernet
han sido conectados.
Compruebe que el cable de
alimentación esta conectado
correctamente al switch y a una
fuente de alimentación con el
voltaje adecuado.
• Compruebe que el cable
Ethernet esta conectado
correctamente al switch y al
dispositivo de red.
• Asegúrese de que el switch
y el dispositivo de red están
encendidos.
• Compruebe que el cable
Ethernet se ajusta a los
requerimientos de su red.
Asegúrese de que esta
utilizando cables de categoría
5. Cables a 10Mbit/sec pueden
funcionar con otros de calidad
inferior.
Español
ASUS GigaX1024X 39
Page 41

Glosario
10BASE-T
100BASE-T
1000BASE-T
Auto MDI/MDIX
Ethernet
Mbps
Red
E t herne t a 1 0 M bps sobre c a b l e p a r cruzado
(Categoría 3).
Etherne t a 100 Mb p s sobre cable par cruzad o
(Categoría 5).
Ethe rnet a 1000 M bps s obre cable par cruz ado
(Categoría 5).
Permite conexiones de red utilizando cables directos o
cruzados.
Es la tecnología de red para PCs más utiliz ada,
utilizando usualmente cableado par cruzado. Tasas de
transferencia de datos en Ethernet son 10 Mbps, 100
Mbps, y 1000 Mbps.
Abreviatura de Megabits por segundo, o un millón de
bits por segundo. Las tasas de datos suelen estar
expresadas en Mbps.
Un grupo de PCs conectados juntos, permitiendo que
éstos puedan comunicarse entre ellos y compartir
recursos tales como Software o archivos. Una red puede
ser pequeña, como una Red de Área Local (LAN), o
muy grandes, como Internet.
Español
40 ASUS GigaX1024X
Page 42

GigaX1024X
Русский
Руководство пользователя
Copyright © 2006 ASUSTeK COMPUTER INC. Все права защищены.
41
Page 43

42 ASUS GigaX1024X
Page 44

FCC Class A, CE, CCC
ASUS GigaX1024X 43
Page 45

SYSTEM
STATUS
SPEED
44 ASUS GigaX1024X
Page 46

.
.
ASUS GigaX1024X 45
Page 47

46 ASUS GigaX1024X
Page 48

.
.
ASUS GigaX1024X 47
Page 49

10BASE-T
100BASE-T
1000BASE-T
Auto MDI/MDIX
Ethernet
network
48 ASUS GigaX1024X
Page 50

GigaX1024X
Kullanıcı Kılavuzu
Türkçe
Telif Hakkı © 2006 ASUSTeK COMPUTER INC. Bütün Hakları Saklıdır.
49
Page 51

Giriş
GigaX1024X rafa monte edilebilir switch’i yoğun ağ gereksinimlerinizi
karşılamak için bloke olmayan, kablo hızında performans sunmaktadır.
Bu switch, otomatik algılamalı ve otomatik MDI/MDIX kapasitesine sahip
24 Hızlı Ethernet portu ile birlikte gönderilmektedir. Kolay bağlanabilirlik,
akış kontrolü ve QoS sağladığından, GigaX1024X ağ performansınızı ve
üretkenliğinizi artırmayı garantilemektedir.
Türkçe
Özellikler
• 24 x 10/100Mbps RJ-45 portu
• Full-Duplex modda 200Mbps’e kadar veri transfer hızı
• Switch kapasitesi: 4.8Gbps İletme hızı: 3.6Mpps
• Tak ve Kullan – tüm portlarda otomatik MDI/MDIX ve en uygun hıza
otomatik olarak geçiş
• Veri kaybını önlemek için Akım kontrol şemaları (full duplex modda
802.3x)
• Hat Başı (HOL) bloklama önlemleri
• QoS gereklerini karşılamak için 802.1p/TOS/DS görür
• MAC Adres Tablosu: 8K
• Kolay okunan LED’ler link durumunun ve hızının kolayca gösterilmesini
sağlamaktadır
• Sessiz çalışma için fansız dizayn
• Düz zemin veya rack mount kurulumu
Paketin İçindekiler
GigaX1024X switch’ini kurmadan önce, aşağıdaki öğeler için paketinizi
kontrol edin.
• GigaX1024X
• AC güç kablosu
• Kullanım Kılavuzu
• Rack Mounting kit
Eğer yu karıda belir tilenlerden herhangi bir i eksik ya d a
NOT:
kusurluysa, lütfen satıcınızla irtibata geçiniz.
50 ASUS GigaX1024X
Page 52

Teknik Özellikler
Boyutları
444 mm (E) x 180mm (Y) x 43.5mm (U)
Ortam Aralıkları
Sıcaklık:
Çalışma 0ºC ~ 50ºC (32ºF - 122ºF)
Depolama -25ºC ~ 70ºC (-13ºF - 158ºF)
Nem:
Çalışma %0 - %90
Depolama %0 - %90
Yükseklik:
Çalışma maksimum 4.500m
Depolama maksimum 12.000m
Güç
Giriş 100V ~ 240V AC/50-60Hz
Güç Tüketimi 12 Watt
Uyumluluk
FCC Class A, CE, CCC
Türkçe
ASUS GigaX1024X 51
Page 53

Ön Panel
GigaX1024X’ün ön panelinde yirmi dört 10/100Mbps RJ-45 Ethernet portu
ve switch’in çalışma durumunu gösteren LED göstergeleri bulunmaktadır.
Türkçe
Tablo 1 LED göstergeleri
LED Renk Durum
SİSTEM Yeşil Açık Güç AÇIK
Durum Yeşil Açık Porta aygıt bağlandı
Yanıp sönüyor Veri aktarıyor
Kapalı Hiçbir aygıt bağlanmadı
Hız Yeşil Açık 100Mbps
Kapalı 10Mbps
Arka Panel
GigaX1024X’ün arka panelinde güç konektörü vardır.
Güç konnektörü
Açıklama
52 ASUS GigaX1024X
Page 54

Yerleştirme Seçenekleri
Switch’in düz bir yüzeye yerleştirilmesi
GigaX1024X Anahtarını düz ve sağlam bir yüzeye yerleştirin. Yerin işletim
ortamının teknik özelliklerini karşıladığından emin olun. Ayrıntılar için 51.
sayfaya bakın.
UTP Kategori 5’deki maksimum kablo uzunluğu 100 metredir
NOT:
(328 fit).
Rack mount talimatları
GigaX1024X switch’ini verilen montaj destekleri ve vidalarını kullanarak bir
rafa monte edebilirsiniz.
GigaX1024X aynı zamanda bir rack’e yerleştirebilir:
1. Üç vida deliğini de switch’in her iki deliğine de yerleştirin.
2. Montaj desteklerini switch vida delikleri ile hizalayın.
3. Switch’in her iki tarafında da verilen montaj kitindeki üç vidayı
kullanarak montaj desteğini sabitleyin.
4. Anahtarı bir 19” rack’e yerleştirin, daha sonra iki rack mount vidayla
sıkıca kapatın.
Raf montaj vidaları verilmemektedir.
NOT:
Türkçe
ASUS GigaX1024X 53
Page 55

Türkçe
100M
10M
SPEED
TRANSMIT/RECEIVE
FULL DUPLEX
COLLISION
STATUS / SPEED
DUPLEX / COLLISION
10 BASE-T / 100 BASE-TX
10/100 Fast Ethernet Switch
Ağ aygıtlarının bağlanması
Ağ aygıtlarını GigaX1024X Anahtarına bağlamak için aşağıdaki adımları
yerine getirin:
1. Ethernet kablosunun bir ucunu Anahtarın ön panelinde bulunan
Ethernet portuna bağlayın. Diğer ucunu ise ağ aygıtının ethernet
portuna bağlayın. İlave ağ aygıtı bağlamak için bu adımı tekrarlayın.
NOT:
• Anahtar ve diğer ağ aygıtları arasında düzgün bir bağlantı kurmak
için Category 5 ethernet paralel kablosunu kullanınız.
• Anahtarın üzerindeki ethernet portları, diğer bir anahtar, köprü veya
aygıta uplink portu olarak kullanılabilir.Anahtar, paralel veya çapraz
kabloyu bulabilir.
POWER
2. Güç kablosunun bir ucunu Anahtarın arka panelinde bulunan güç
konektörüne bağlayın, ardından diğer ucunu elektrik prizine bağlayın.
3. Güç göstergesi ve aktif Ethernet portları için LED göstergeleri
anahtarın açık ve kullanımda olduğunu göstermek için yanacaktır. LED
göstergeleri için sayfa 4’e bakınız.
54 ASUS GigaX1024X
Page 56

Sorun Giderme
Bu sorun giderme kılavuzu, ASUS GigaX1024X switch’ini kurarken ve/veya
kullanırken karşılaşabileceğiniz bazı genel sorunlara yanıt vermektedir. Bu
sorunlar kendi kendinize yapabileceğiniz basit sorun giderme işlemlerini
gerektirmektedir. Bu bölümde belirtilmeyen sorunlar ile karşılaştırsanız
ASUS Teknik Desteği ile irtibata geçiniz.
Sorun
GÜÇ LED’i yanmıyor.
DURUM/HIZ LED’i Ethernet
kablosu bağlandıktan sonra
dahi yanmıyor.
İşlem
Güç kablosunun switch’e ve doğru
voltaj çıkışına sahip elektrik prizine
düzgün bağlanıp bağlanmadığını
kontrol edin.
• Ethernet kablosunun switch’
e ve ağa bağlı aygıta düzgün
bağlanıp bağlanmadığını kontrol
edin.
• Switch’in ve ağa bağlı aygıtın
gücünün açıldığından emin olun.
• E t he r n et k a b l o s u n un a ğ
gereksinimleriniz için yeterli olup
olmadığını kontrol edin. Kategori
5 kablolarını kullandığınızdan
emin olun. 10Mbit/ sn kabloları
daha düşük kalitedeki kablolar
ile kullanılabilir.
Türkçe
ASUS GigaX1024X 55
Page 57

Sözlük
Türkçe
10BASE-T
100BASE-T
1000BASE-T
Otomatik
MDI/MDIX
Ethernet
Mbps
Birbiriyle iletişim kurabilen ve yazılım, dosya vb.
ağ
İkili büklüm kablodaki 10 Mbps Ethernet (Kategori 3).
İkili büklüm kablodaki 100 Mbps Ethernet (Kategori 5).
İkili büklüm kablodaki 1000 Mbps Ethernet (Kategori 5).
düz veya çap raz kablo kul lana rak ağ bağ lantısı
kurulmasına olanak sağlar.
En çok kurulan bilgisayar ağ teknolojisi, genellikle
kıvrımlı çift kablolama kullanılır. Ethernet veri hızı 10
Mbps ve 100 Mbps’dir.
Saniye başı Megabitler için kısaltma, ya da saniyede bir
milyon bit. Ağ veri hızları sık sık Mbps ile ifade edilir.
kaynakları paylaşabilen birbirine bağlanmış bilgisayar
grubu. Bir a LAN gibi küçük olabilir ya da Internet gibi
çok geniş olabilir.
56 ASUS GigaX1024X
 Loading...