


USB2.0_HZ-1 DOCKING-STATION
Asus USB2.0_HZ-1 DOCKING-STATION User Manual
USB 2.0 Docking Station
E5389 / January 2010
User Guide
English
®

2
English
USB 2.0 Docking Station User Guide
Table of contents
Knowing your USB 2.0 docking station ............................................... 3
Package contents ............................................................................................3
Specications summary .................................................................................3
Hardware features ...........................................................................................4
Installing your USB 2.0 docking station ............................................... 5
Installing the drivers .......................................................................................5
Installing the drivers on Windows® OS ..........................................................5
Installing the drivers on Mac OS X ................................................................5
Setting up your docking station ....................................................................6
Using your USB 2.0 docking station ..................................................... 7
Connecting an external monitor ....................................................................7
Extending your desktop to an external monitor .............................................8
Mirroring your desktop to an external monitor ...............................................10
Connecting to the Internet .............................................................................11
Disconnecting your USB 2.0 docking station ...................................... 12

3
English
USB 2.0 Docking Station User Guide
Package contents
• ASUS Docking Station x1
• Power adapter x1
• Driver CD x1
• USB 2.0 cable x1
• User Guide x1
NOTE: If any of the items is damaged or missing, contact your retailer.
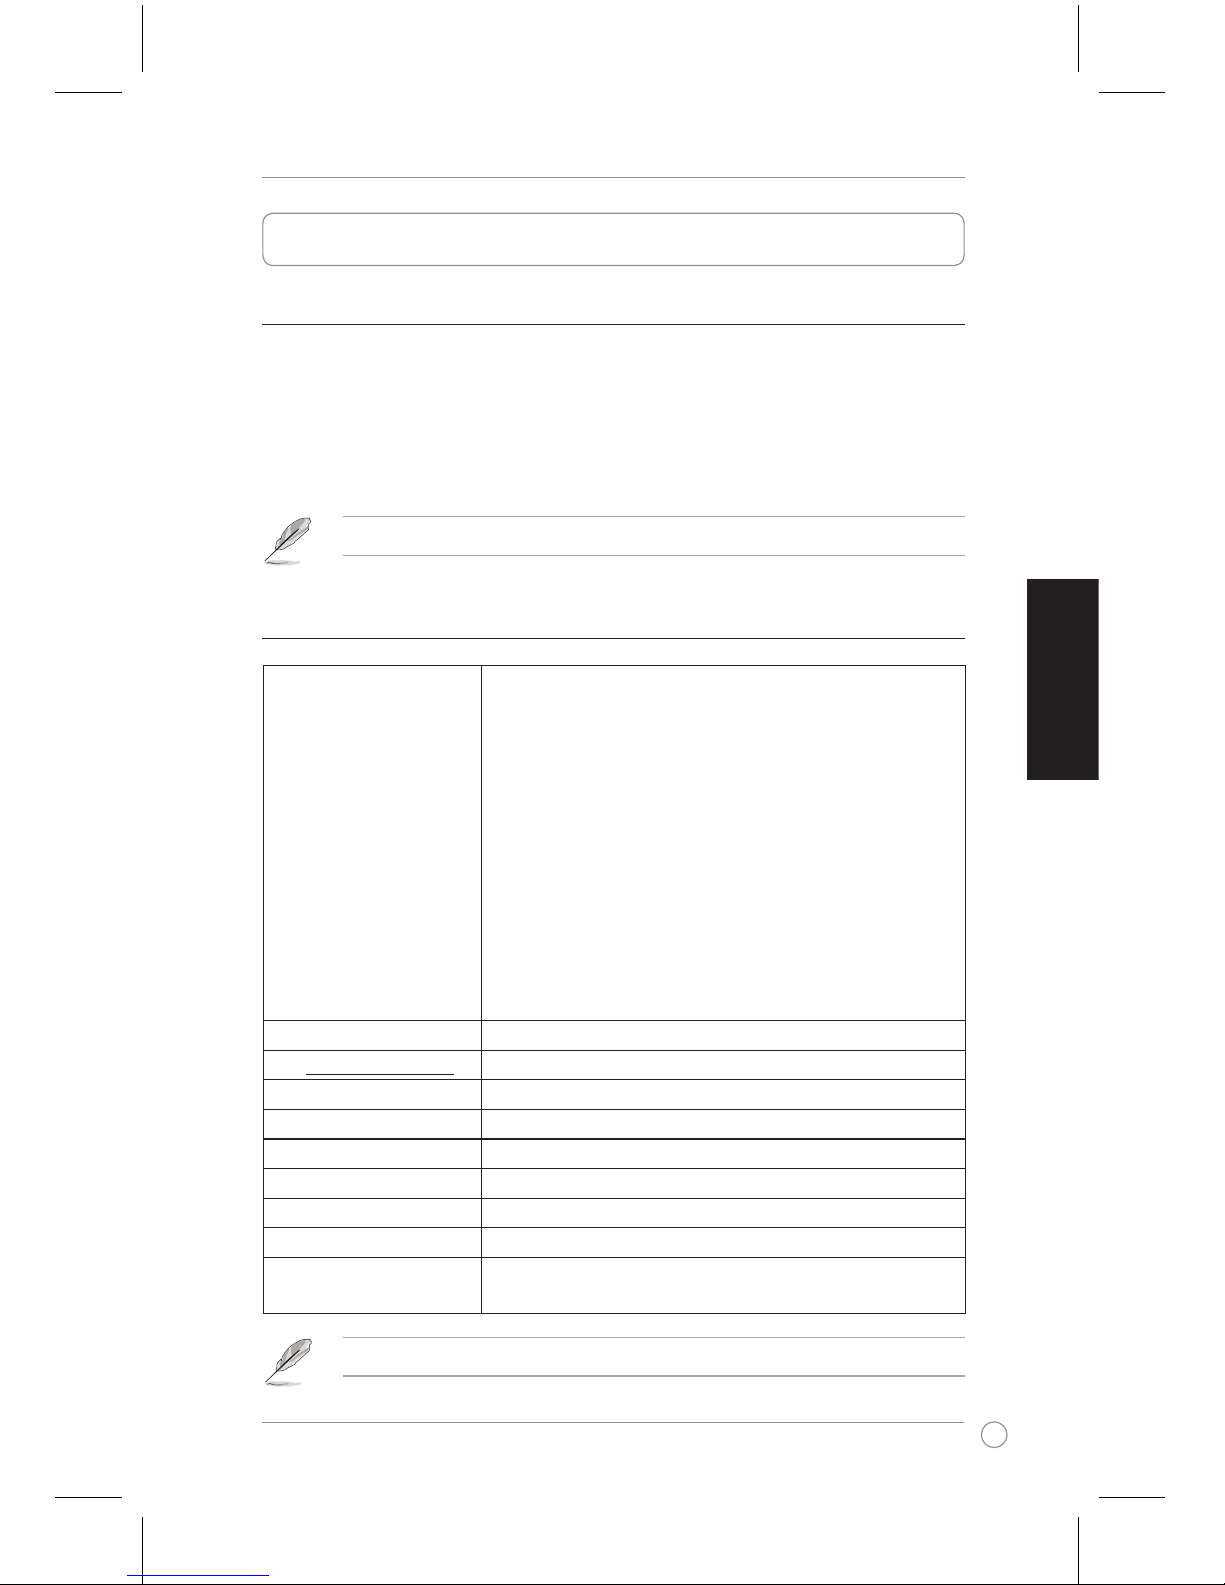
Specications summary
Ports
USB 2.0 downstream port for a USB 2.0 device
(Type A receptacle) x4
* Powered port supplying up to 1000 mA of current x2
Standard port supplying up to 500 mA of current x2
Microphone port x1
Headphone port x1
10/100Mbps LAN (RJ-45) port x1
Dual Link DVI-I port x1
VGA port x1
DC IN port x1
USB 2.0 upstream port for a notebook/desktop computer
(Type B receptacle) x1
Security solution
Security lock hole x2
USB power mode
Self power mode
Power adapter
Input: AC 100-240V Output: DC 5V/2.6A
Physical dimensions
264 x 87 x 23 mm (L x W x H)
Weight
285g
Operating temperature
0ºC ~ 40ºC
Storage temperature
-10ºC ~ 80ºC
Humidity
90% RH
OS support
Windows® 2000(SP4) / XP(SP2/SP3) / Vista(SP1/SP2) / 7
Intel® CPU based computer running Mac OS X v10.4 or
later
NOTE: Specications are subject to change without prior notice.
Knowing your USB 2.0 docking station
4
English
USB 2.0 Docking Station User Guide
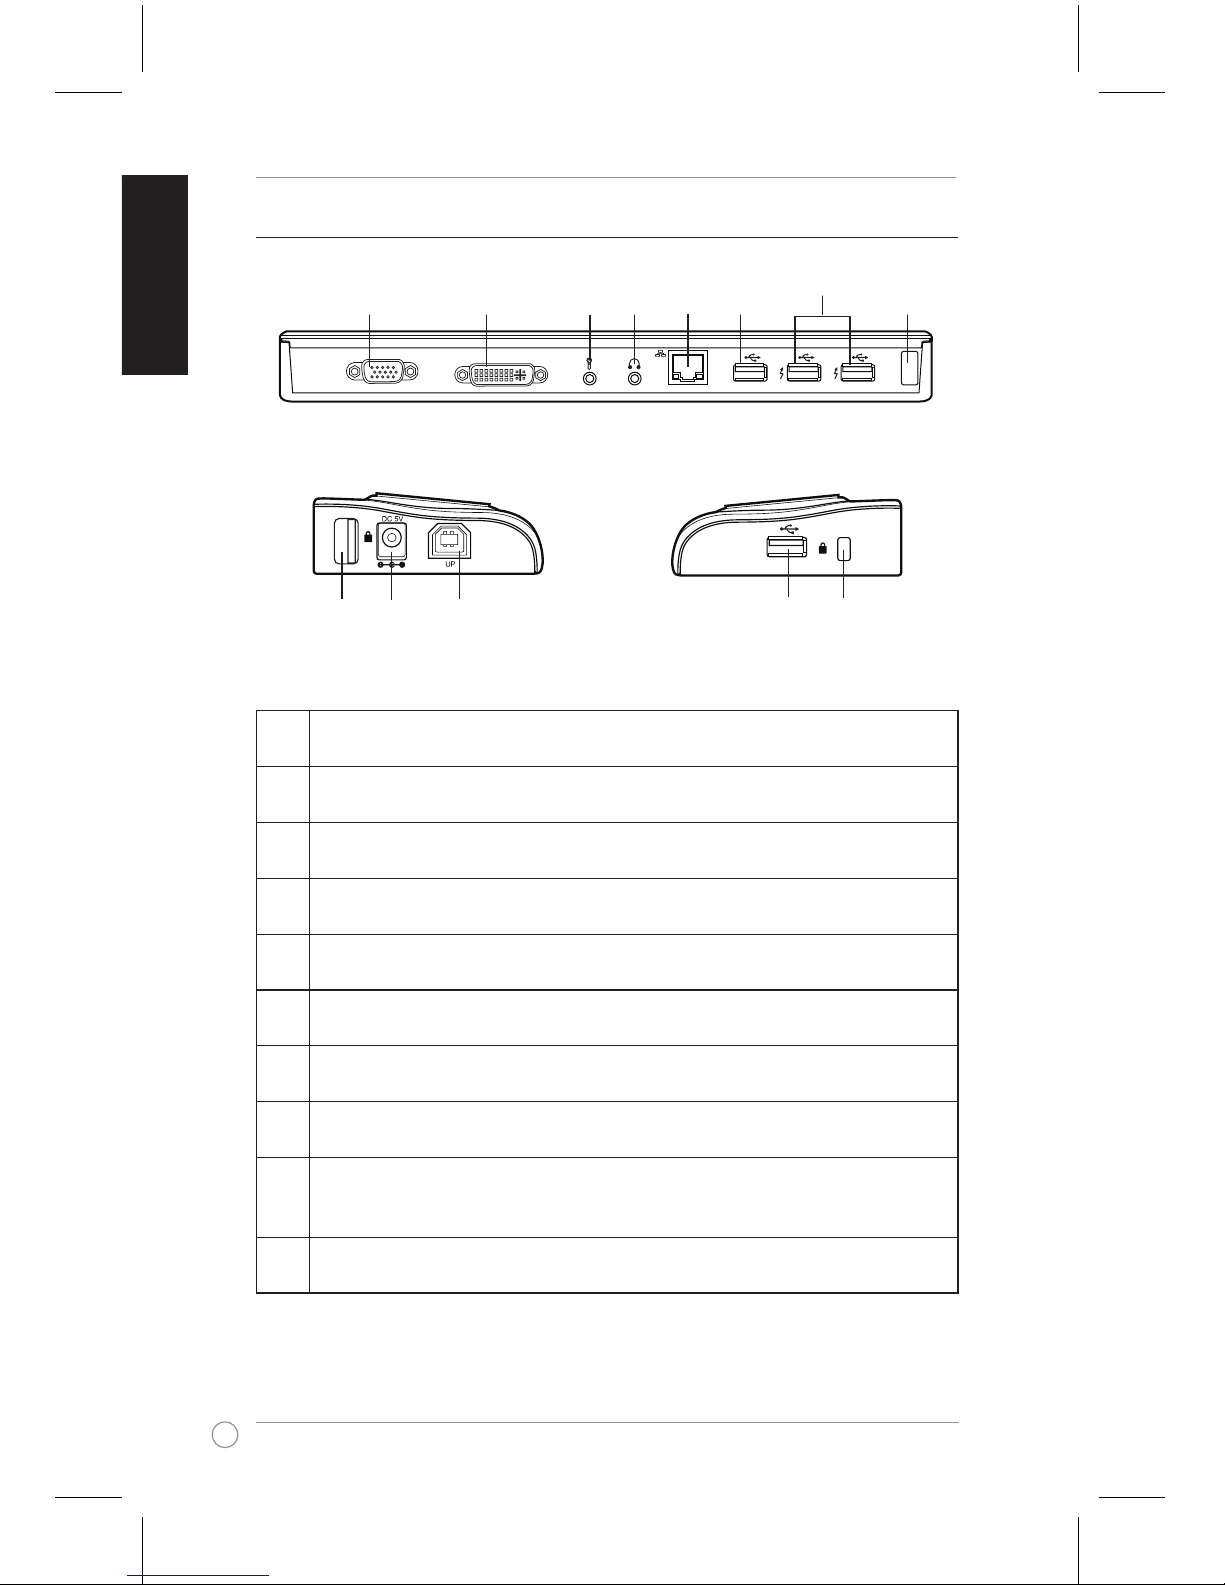
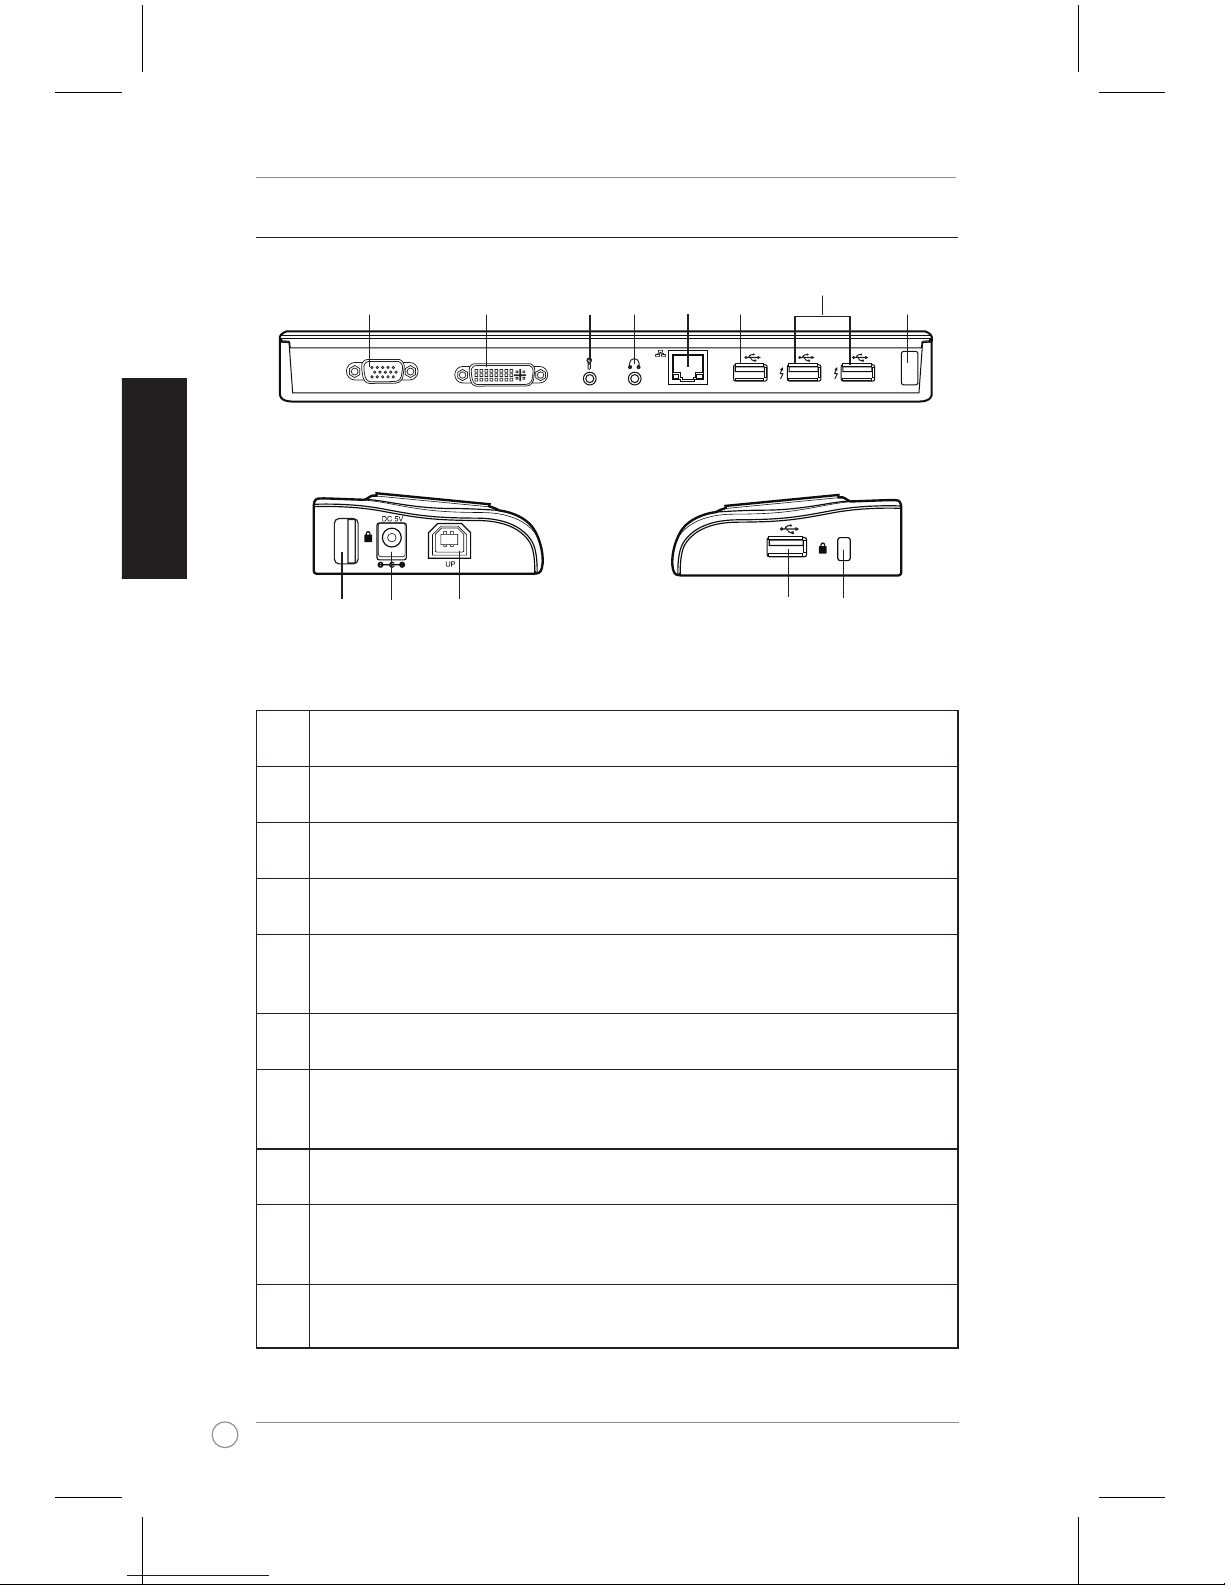
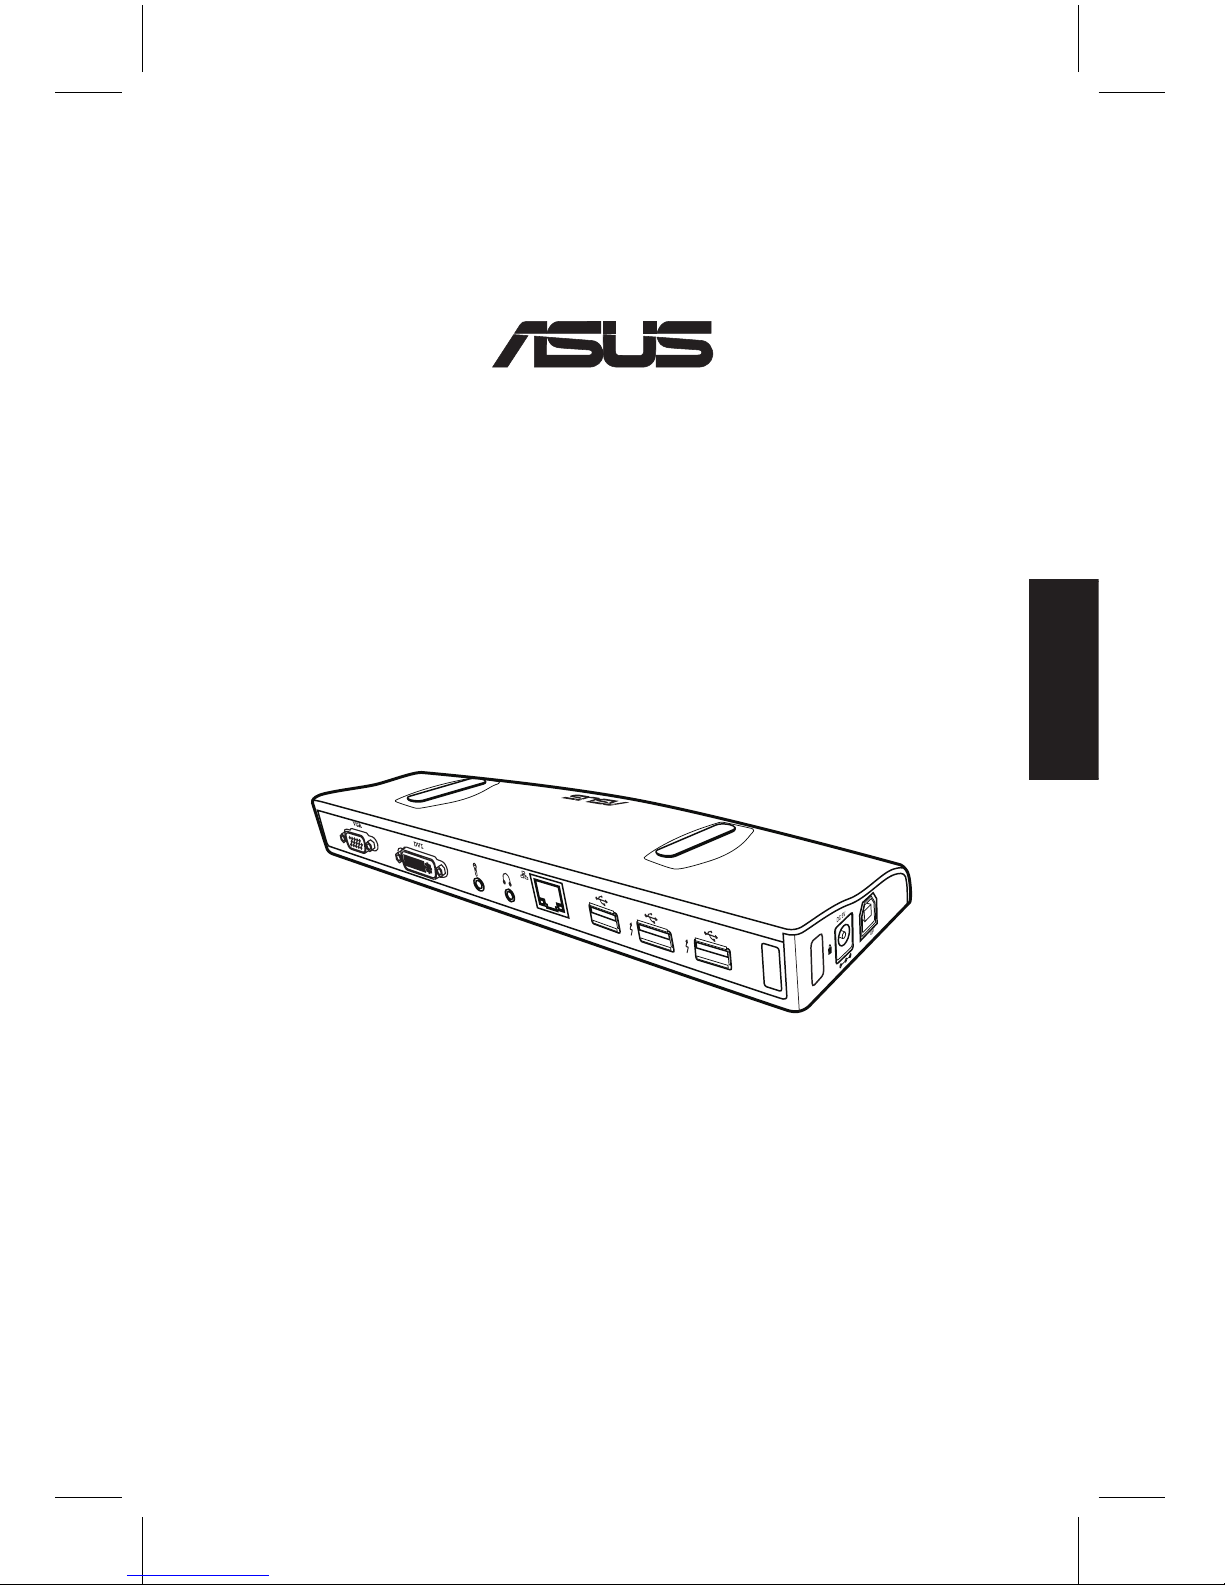
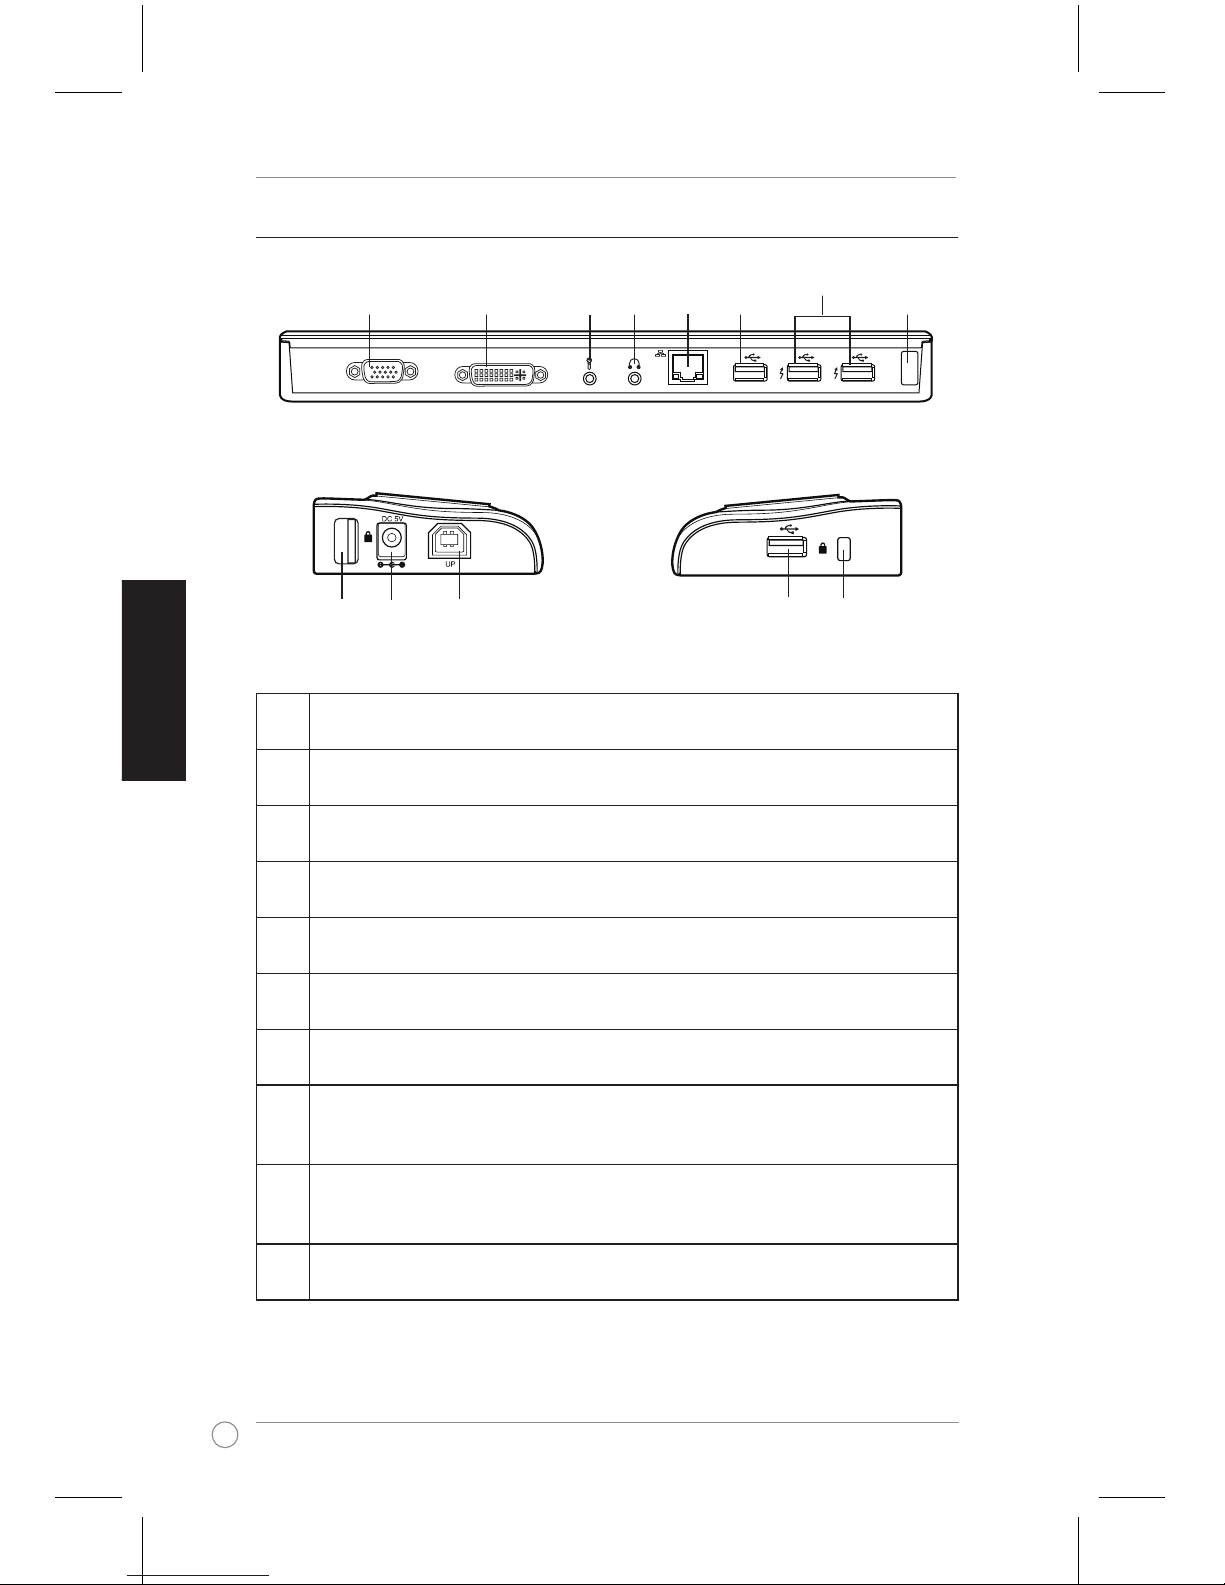
Hardware features
1 VGA port
Connects to a VGA monitor or other VGA compatible devices.
2 Dual Link DVI-I port
Connects to a DVI-I monitor or other DVI-I compatible devices.
3 Microphone port
Connects to a microphone.
4 Headphone port
Connects to a pair of headphones or a speaker.
5 10/100Mbps LAN (RJ-45) port
Connects to a cable/DSL modem or a local area network (LAN).
6 Standard USB 2.0 downstream port
Connects to a USB 2.0 device such as a mouse and joystick.
7 Powered USB 2.0 downstream port
Connects to a USB 2.0 device and supplies more power than the standard port.
8 Security lock hole
Secure your docking station to an immovable object using a security lock.
9 DC IN port
Insert the power adapter into this port to supply power to your docking station and
the devices connected to it.
10 USB 2.0 upstream port
Connects and passes data to your computer.
6
8
DVI
VGA
1 2 3
4
5 6
7
8
8
9
10
Back view
Right side view
Left side view
5
English
USB 2.0 Docking Station User Guide
Installing your USB 2.0 docking station
Installing the drivers
Installing the drivers on Windows® OS
To install the drivers on Windows® OS:
1. Place the Driver CD into your computer's optical drive.
2. Click USB Docking Install.
3. Select your language and click I Accept.
4. Wait until the drivers are installed successfully on your computer.
NOTE: It is normal if your computer screen goes black or ashes temporarily during the driver
installation process.
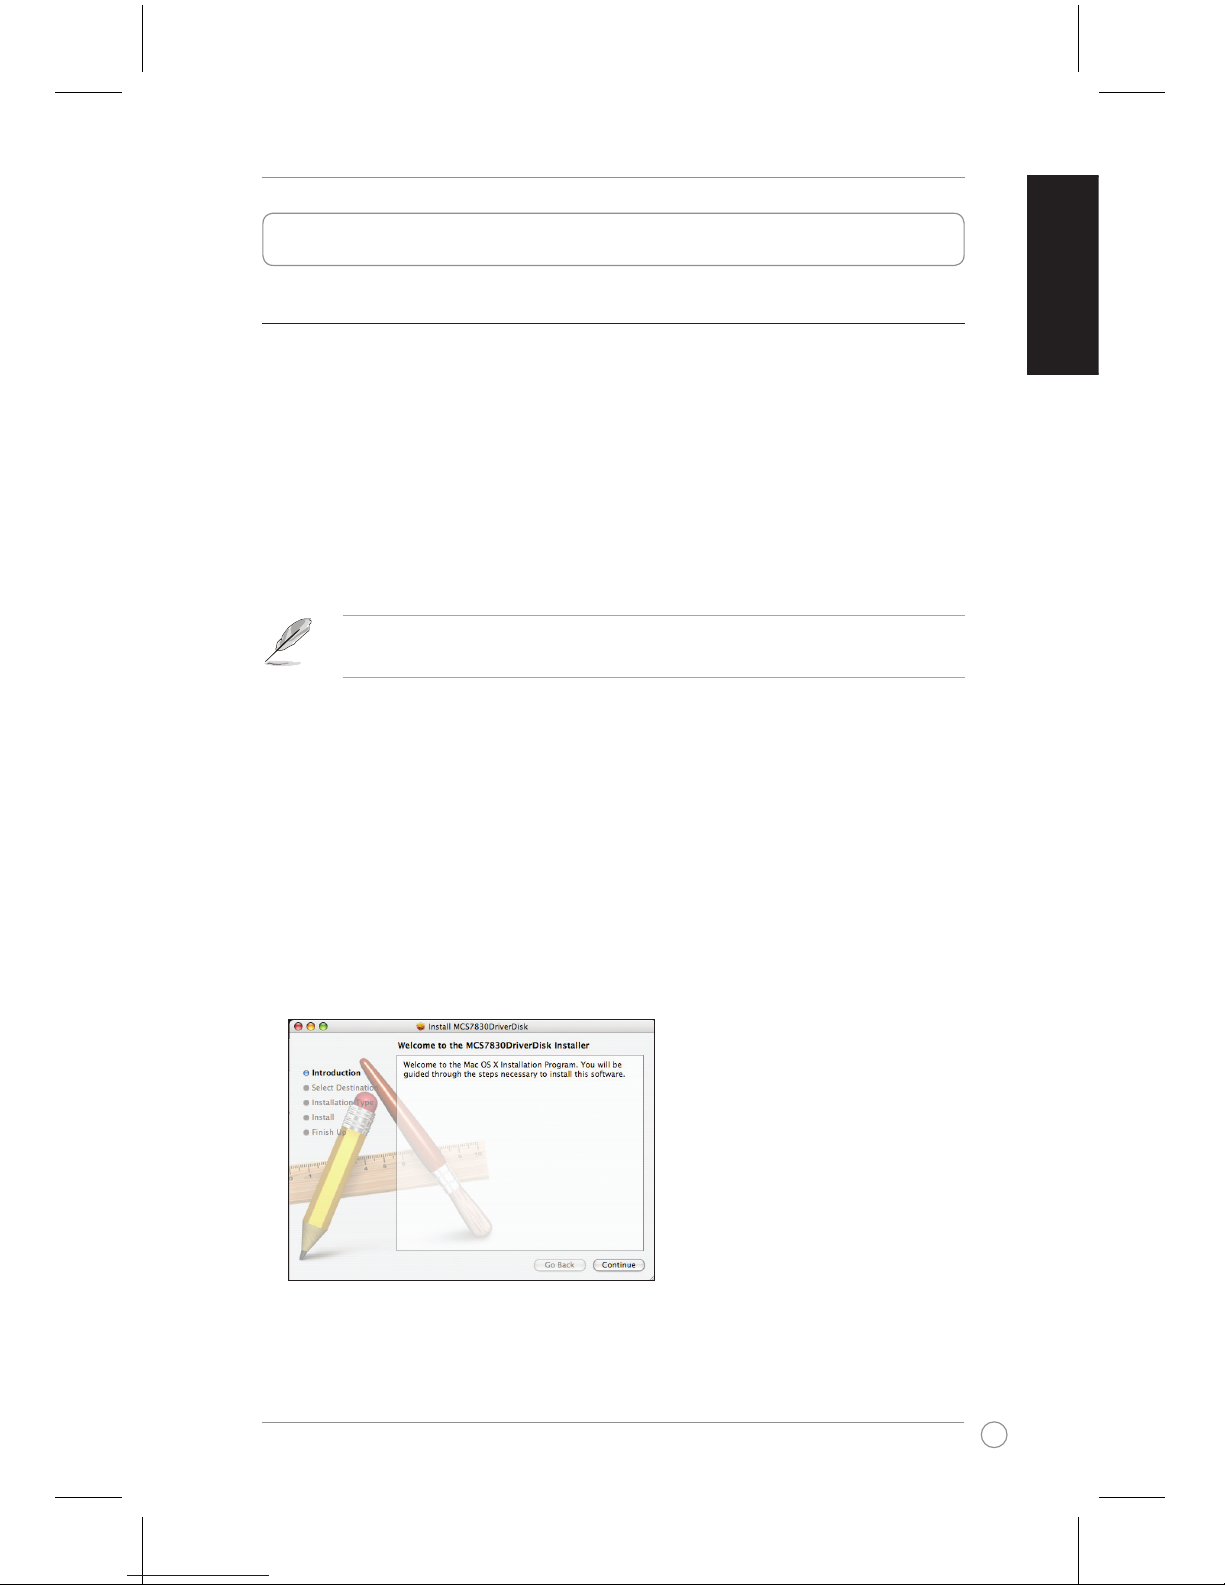
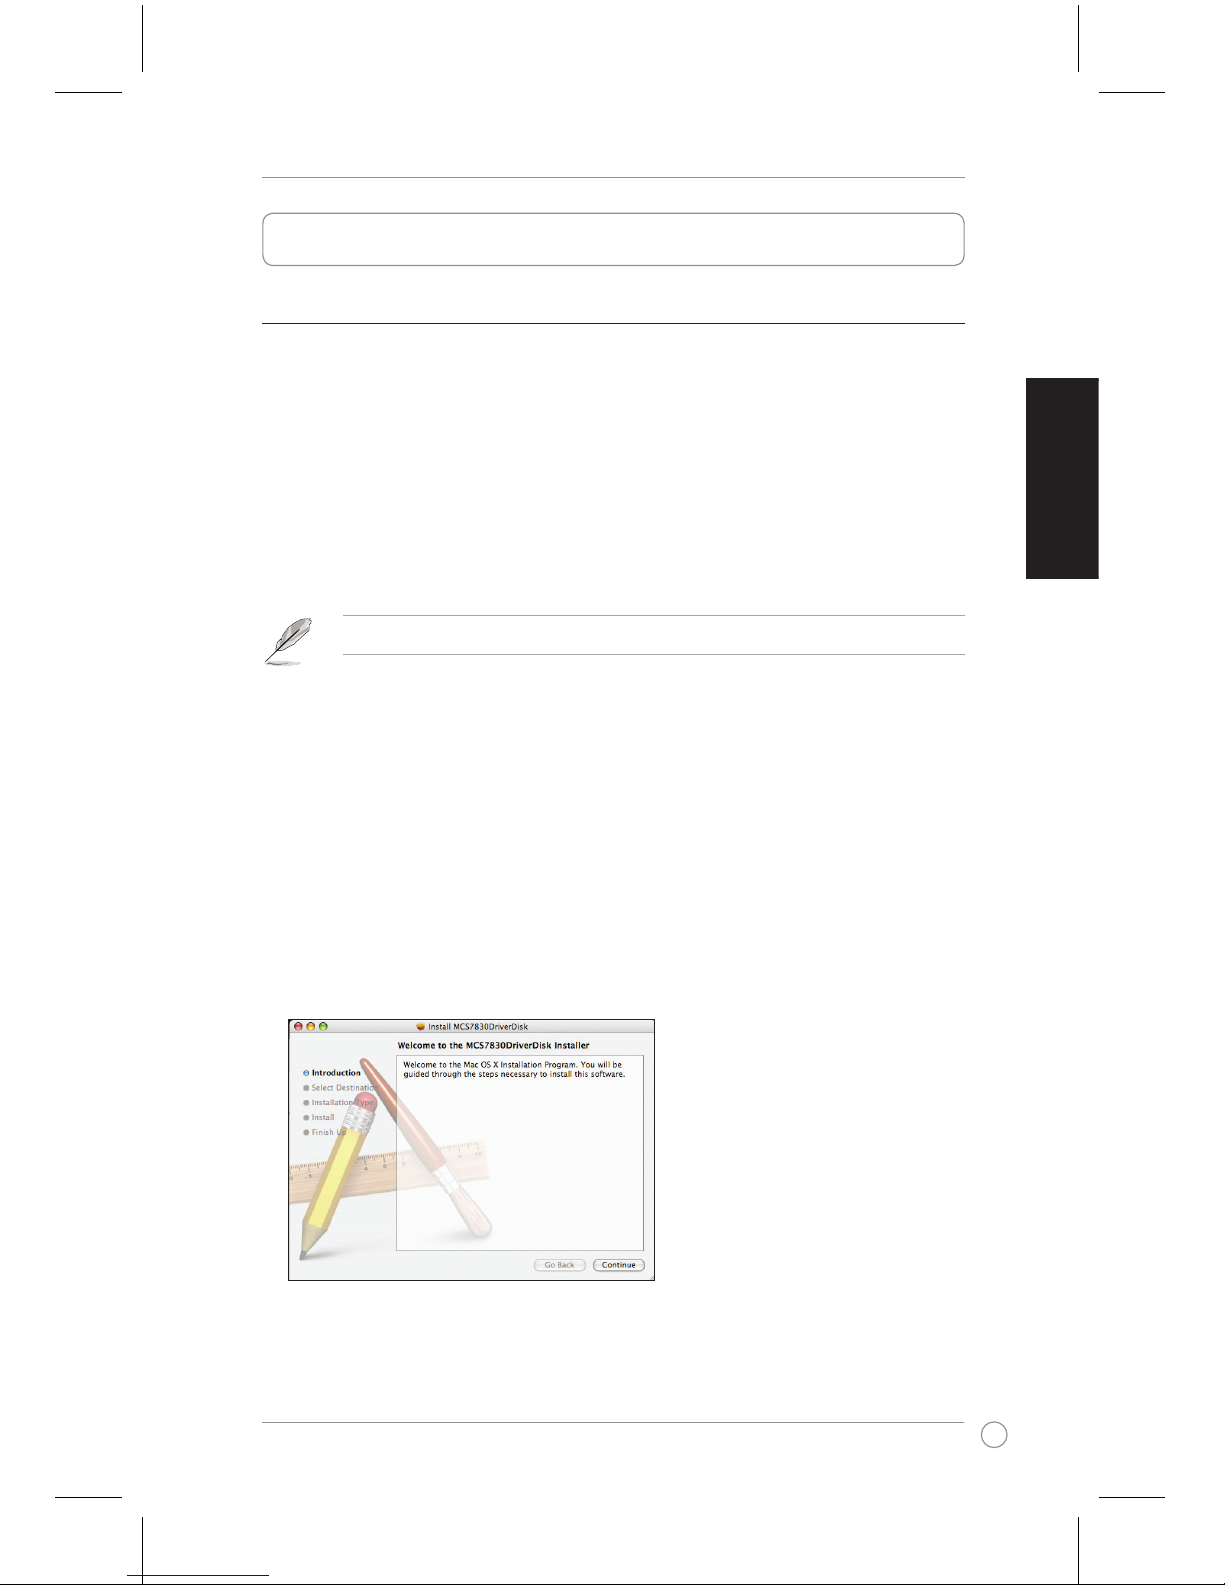
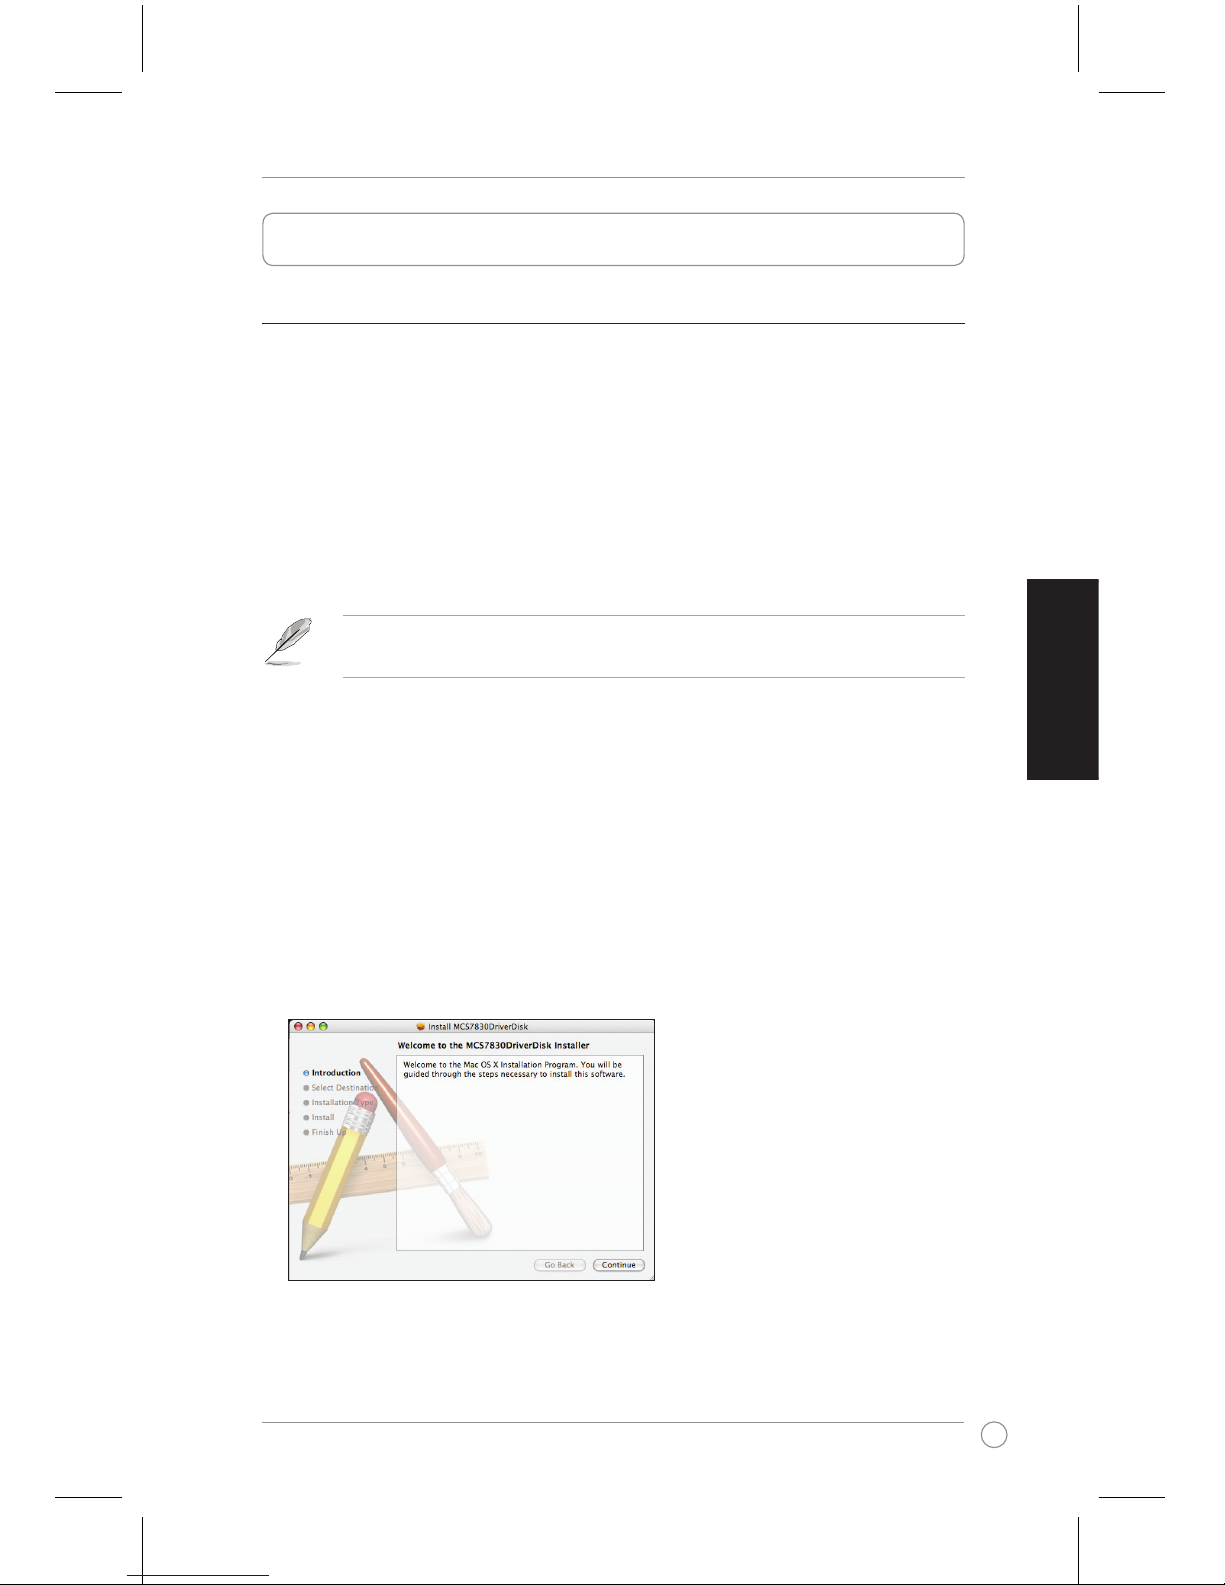
Installing the drivers on Mac OS X
To install the drivers on Mac OS X:
1. Place the Driver CD into your computer's optical drive.
2. Double-click the CD icon on the Mac desktop.
3. Double-click Mac > USB Ethernet > MCS7830DriverDisk.pkg.
4. Follow the onscreen instructions to install the USB Ethernet driver and restart your
computer when done.
6
English
USB 2.0 Docking Station User Guide
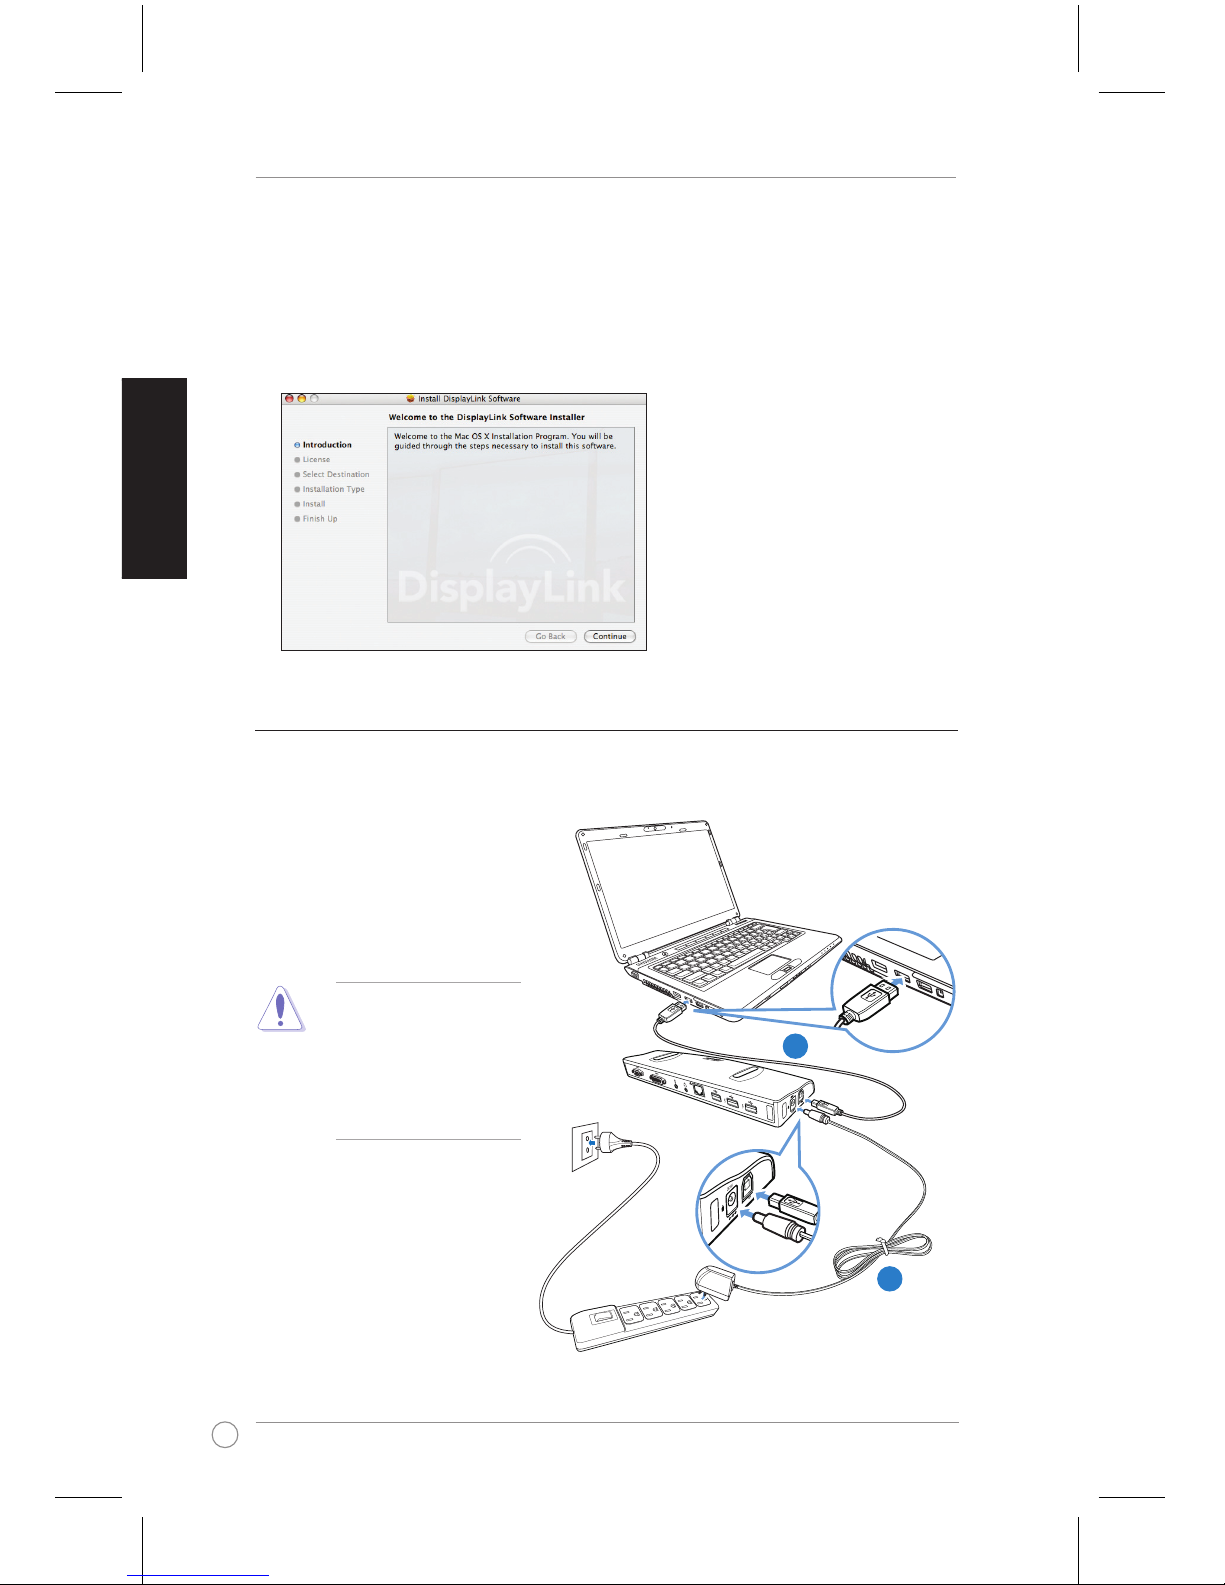
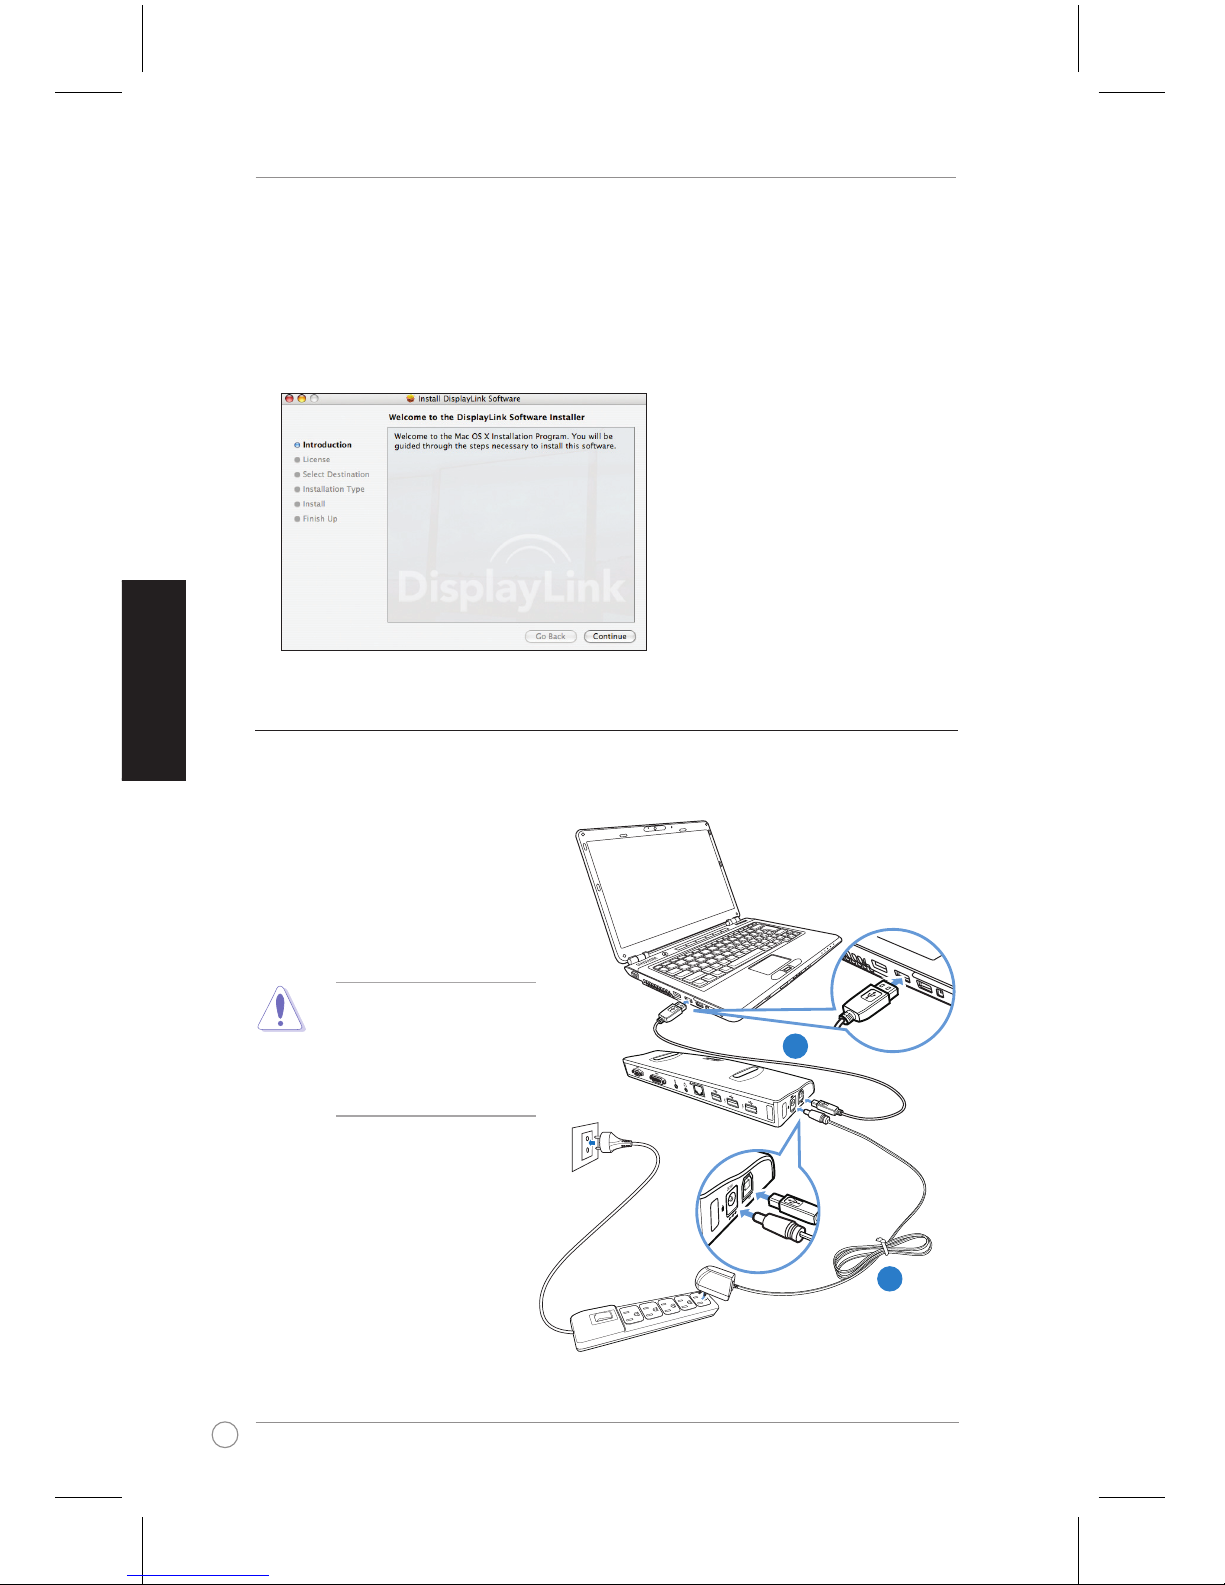
5. Double-click the CD icon on the Mac desktop.
6. Double-click Mac > USB Video > DisplayLink-OSX-1.1.dmg > DisplayLink Software
Installer.
7. Follow the onscreen instructions to install the USB Video driver and restart your computer
when done.
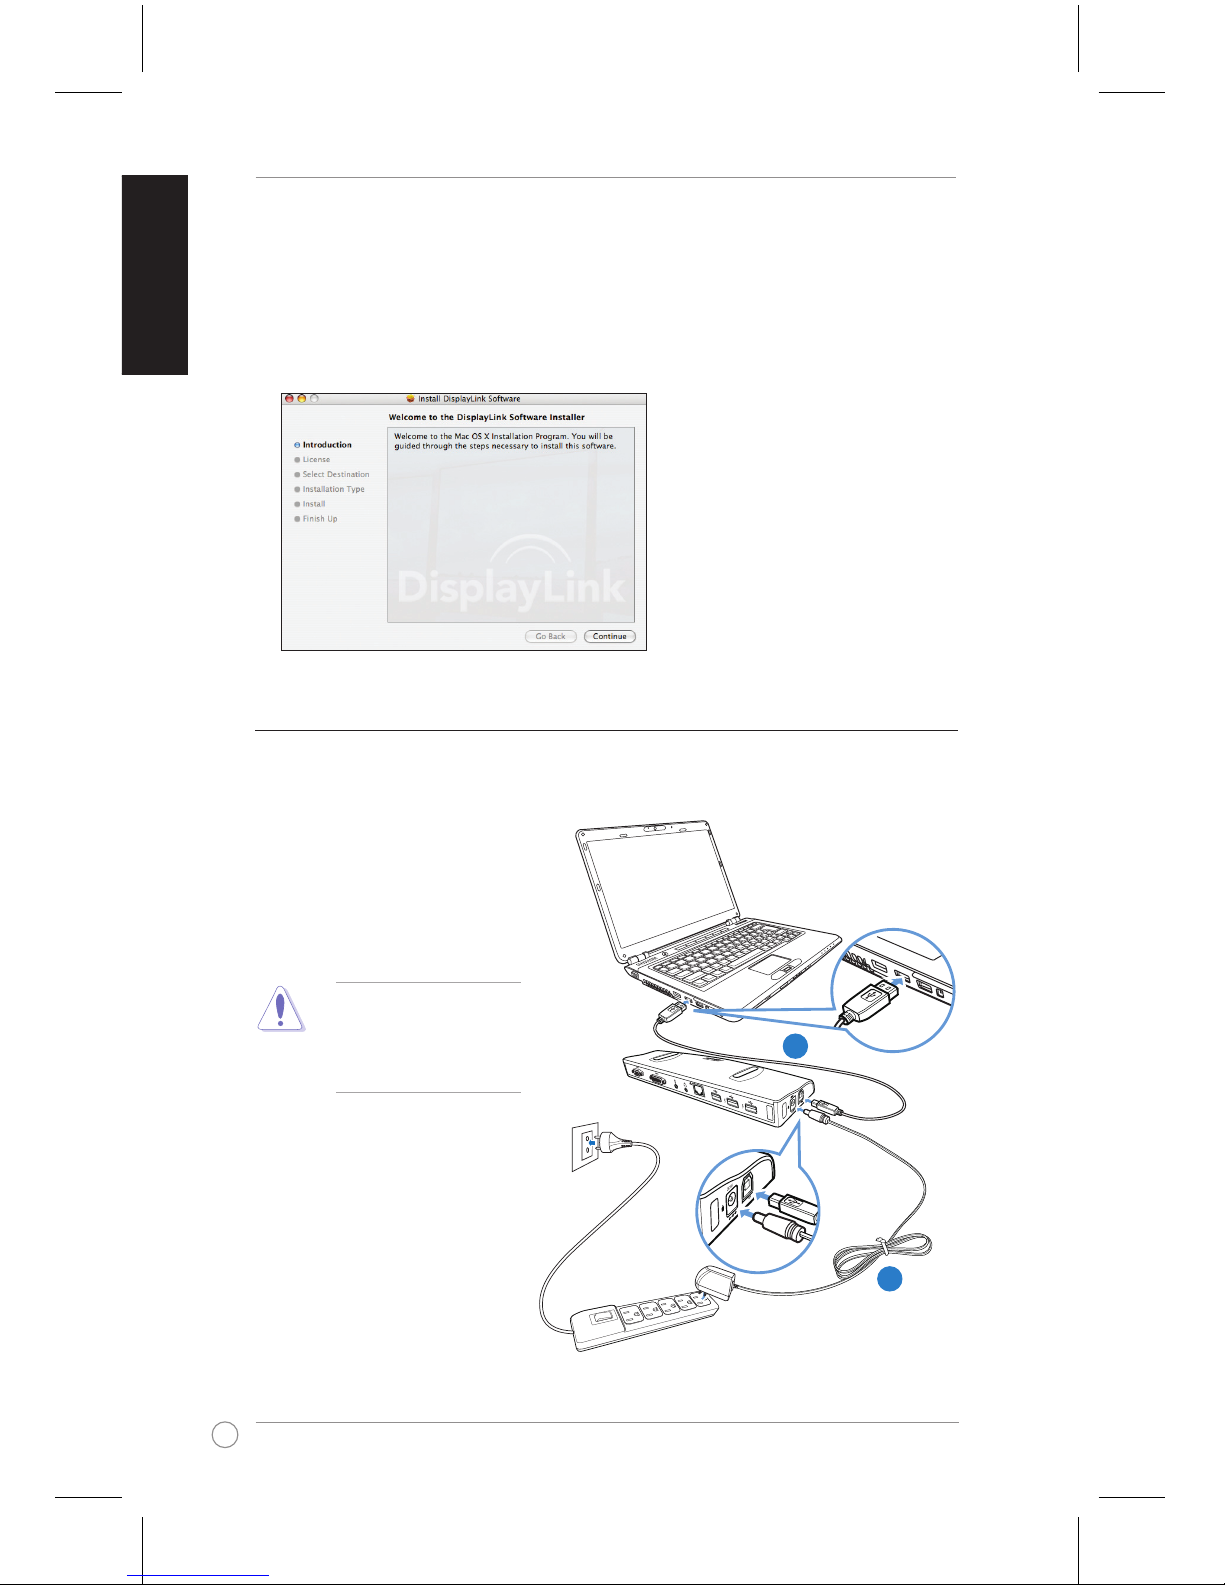
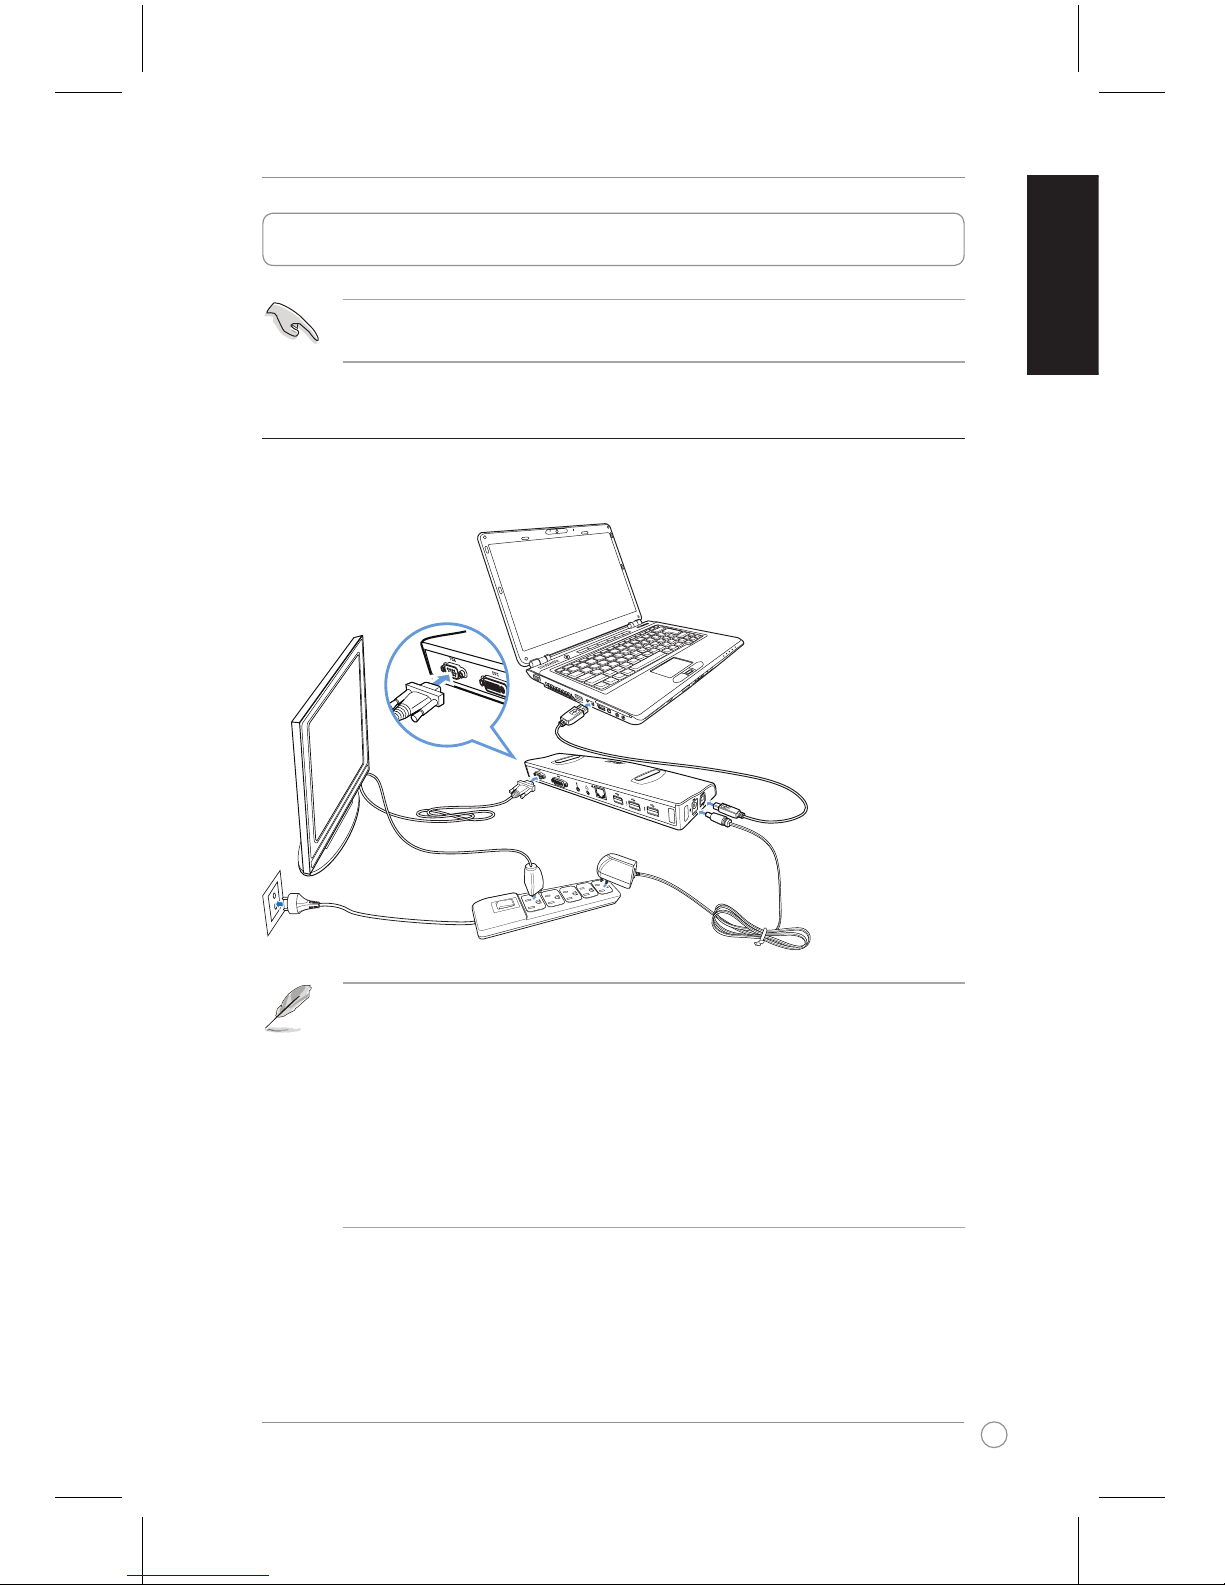
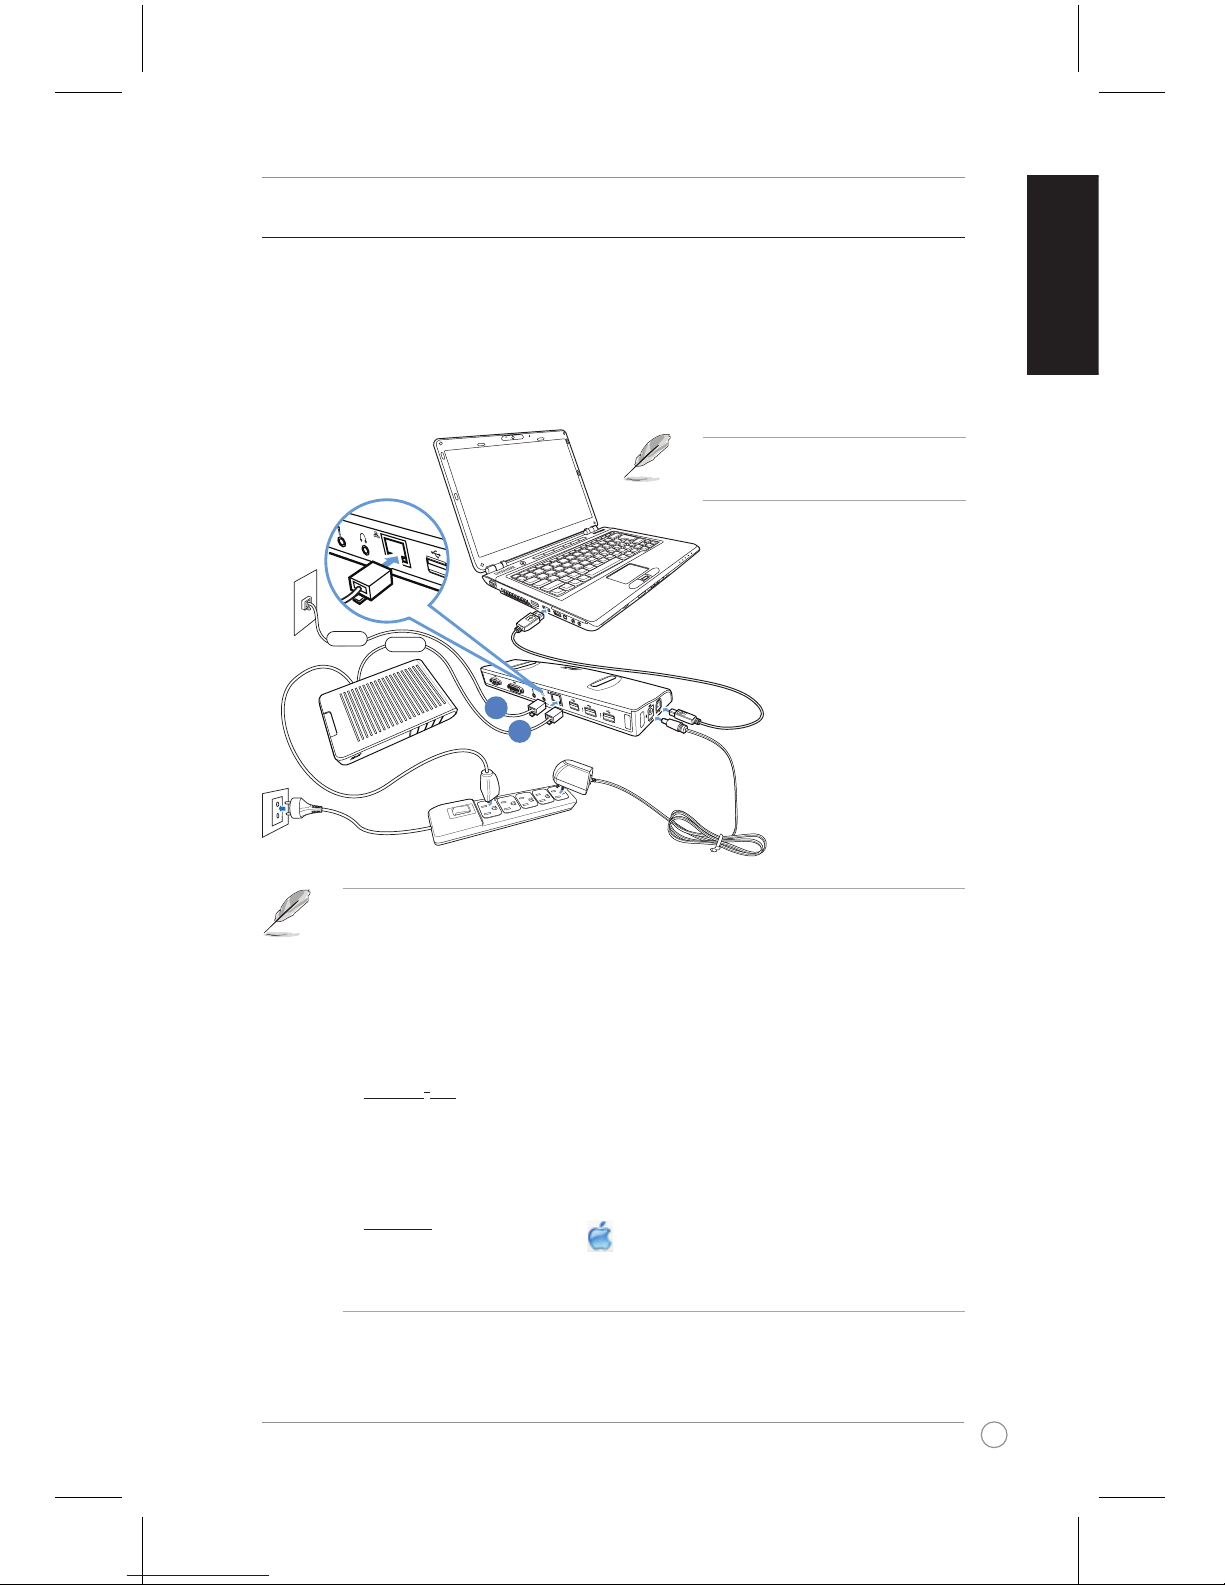
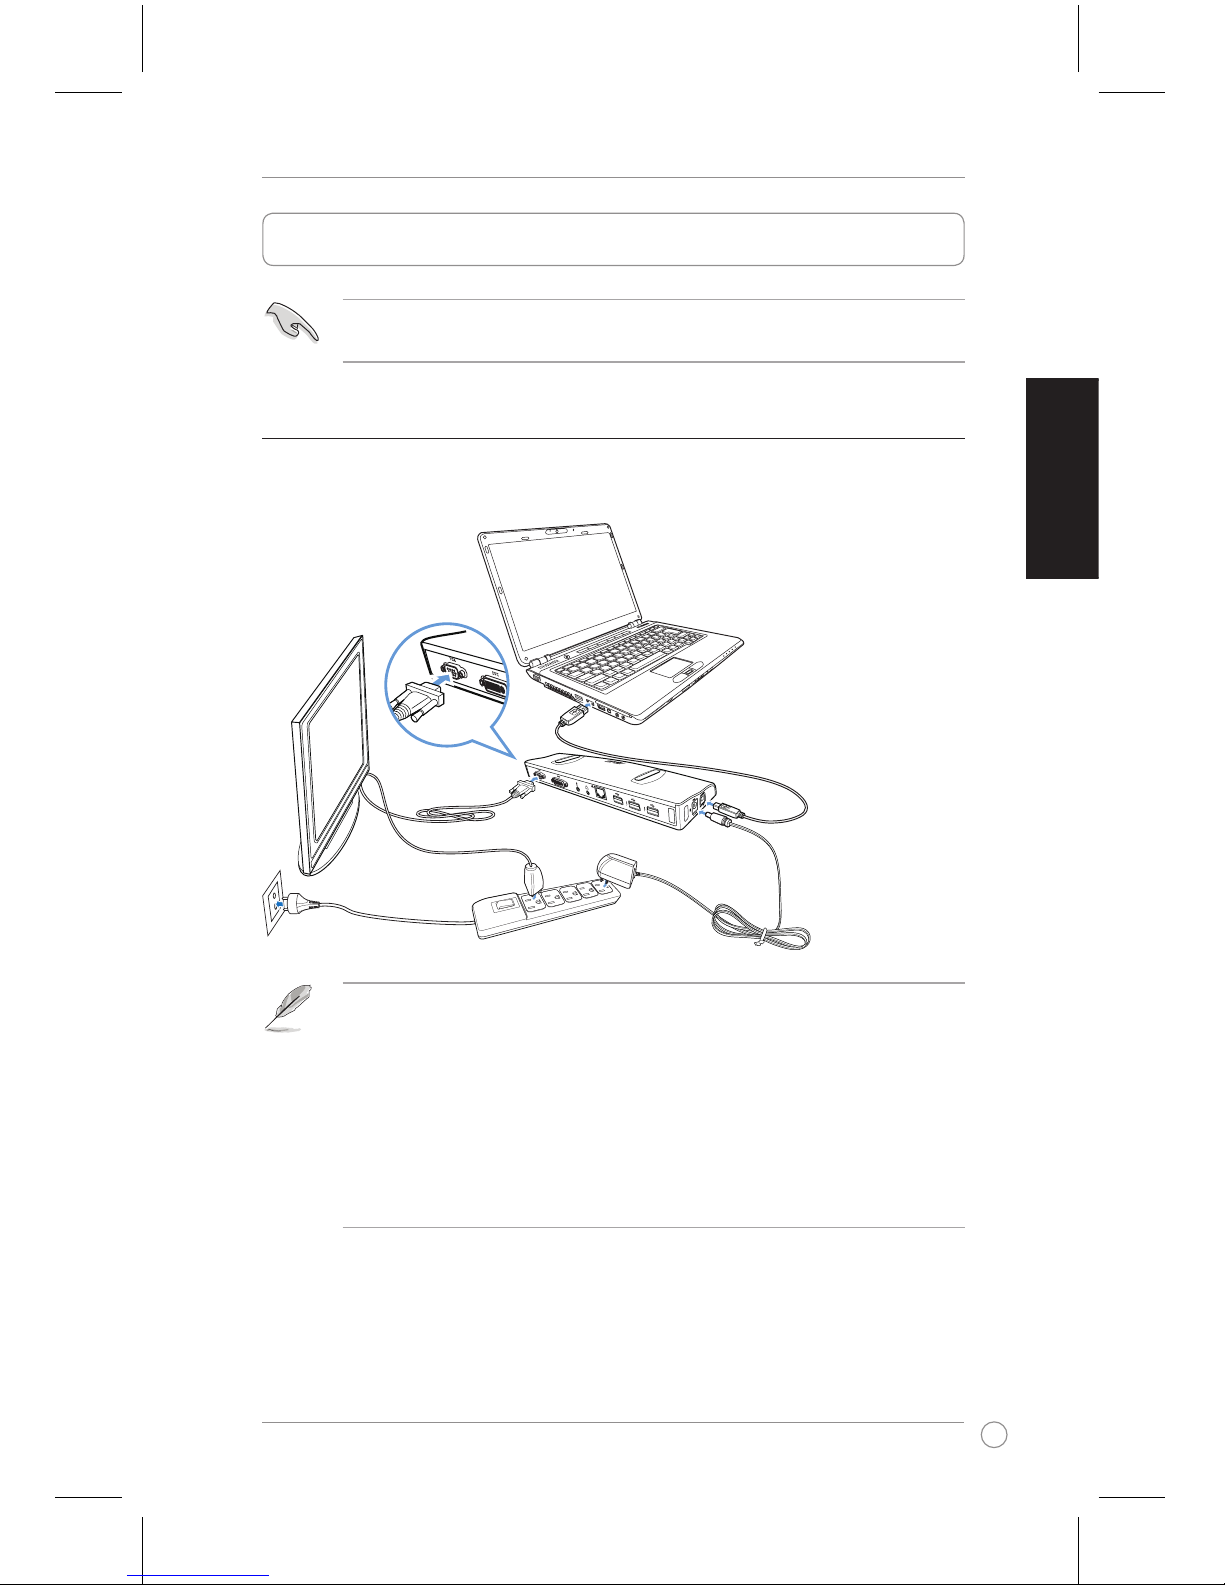
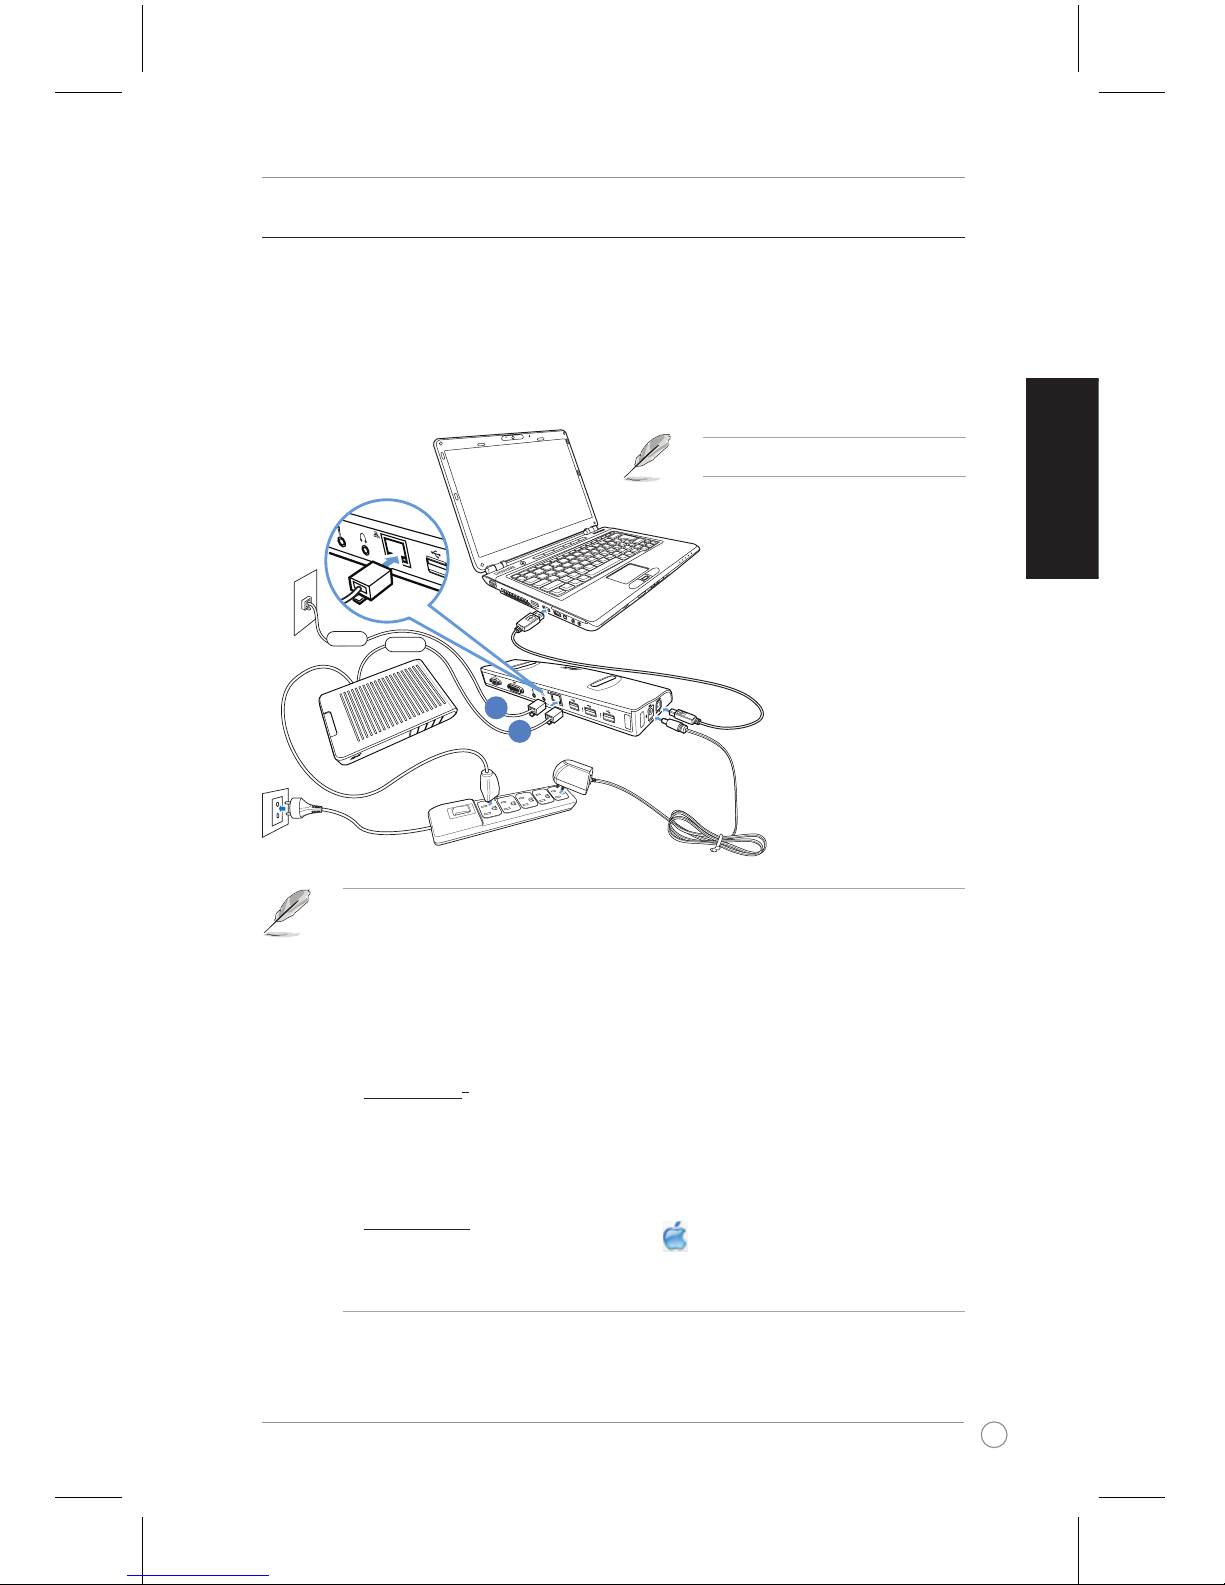
Setting up your docking station
To set up your docking station:
1. Connect one end of the supplied
power adapter to the DC IN port
on your docking station and the
other end to a 100-240V AC
power outlet.
1
2
CAUTION: Use only the
supplied power adapter.
Using other power adapters
may damage your device.
2. Connect the square end of the
supplied USB 2.0 cable to the
USB 2.0 upstream port on your
docking station and the other end
to your computer's USB 2.0 port.
7
English
USB 2.0 Docking Station User Guide
Connecting an external monitor
Use a VGA or a DVI-I cable to connect an external monitor to your docking station.
Using your USB 2.0 docking station
IMPORTANT: While using your docking station, keep it connected to a power outlet.
Otherwise, the devices connected to it will not function properly.
NOTE:
• The VGA / DVI-I cable is purchased separately.
• We recommend that you connect one external monitor (VGA or DVI-I) at a time. When
you use the VGA and DVI-I ports simultaneously, the screen resolution of the VGA monitor
is automatically adjusted to that of the DVI-I monitor, which may cause undesirable display
on the VGA monitor.
• Refer to Release Note.txt in the Driver CD for more information on the video feature of
your docking station.
8
English
USB 2.0 Docking Station User Guide
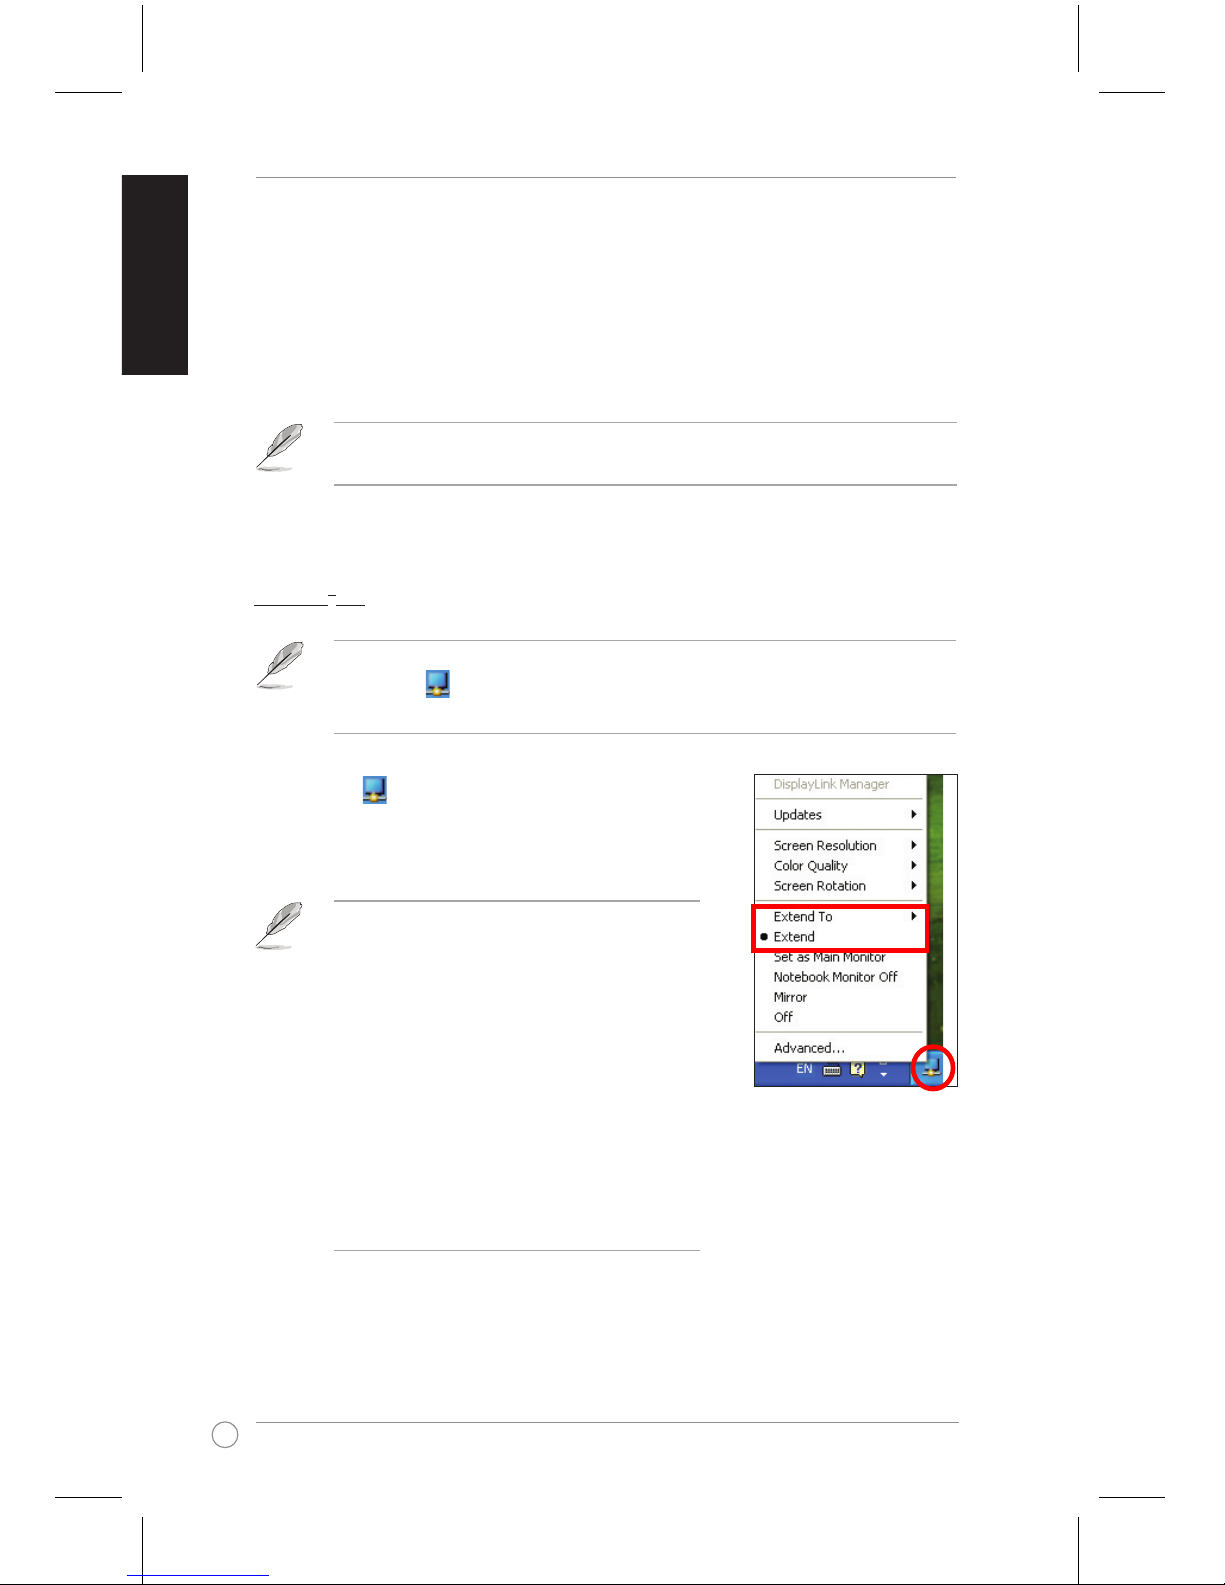
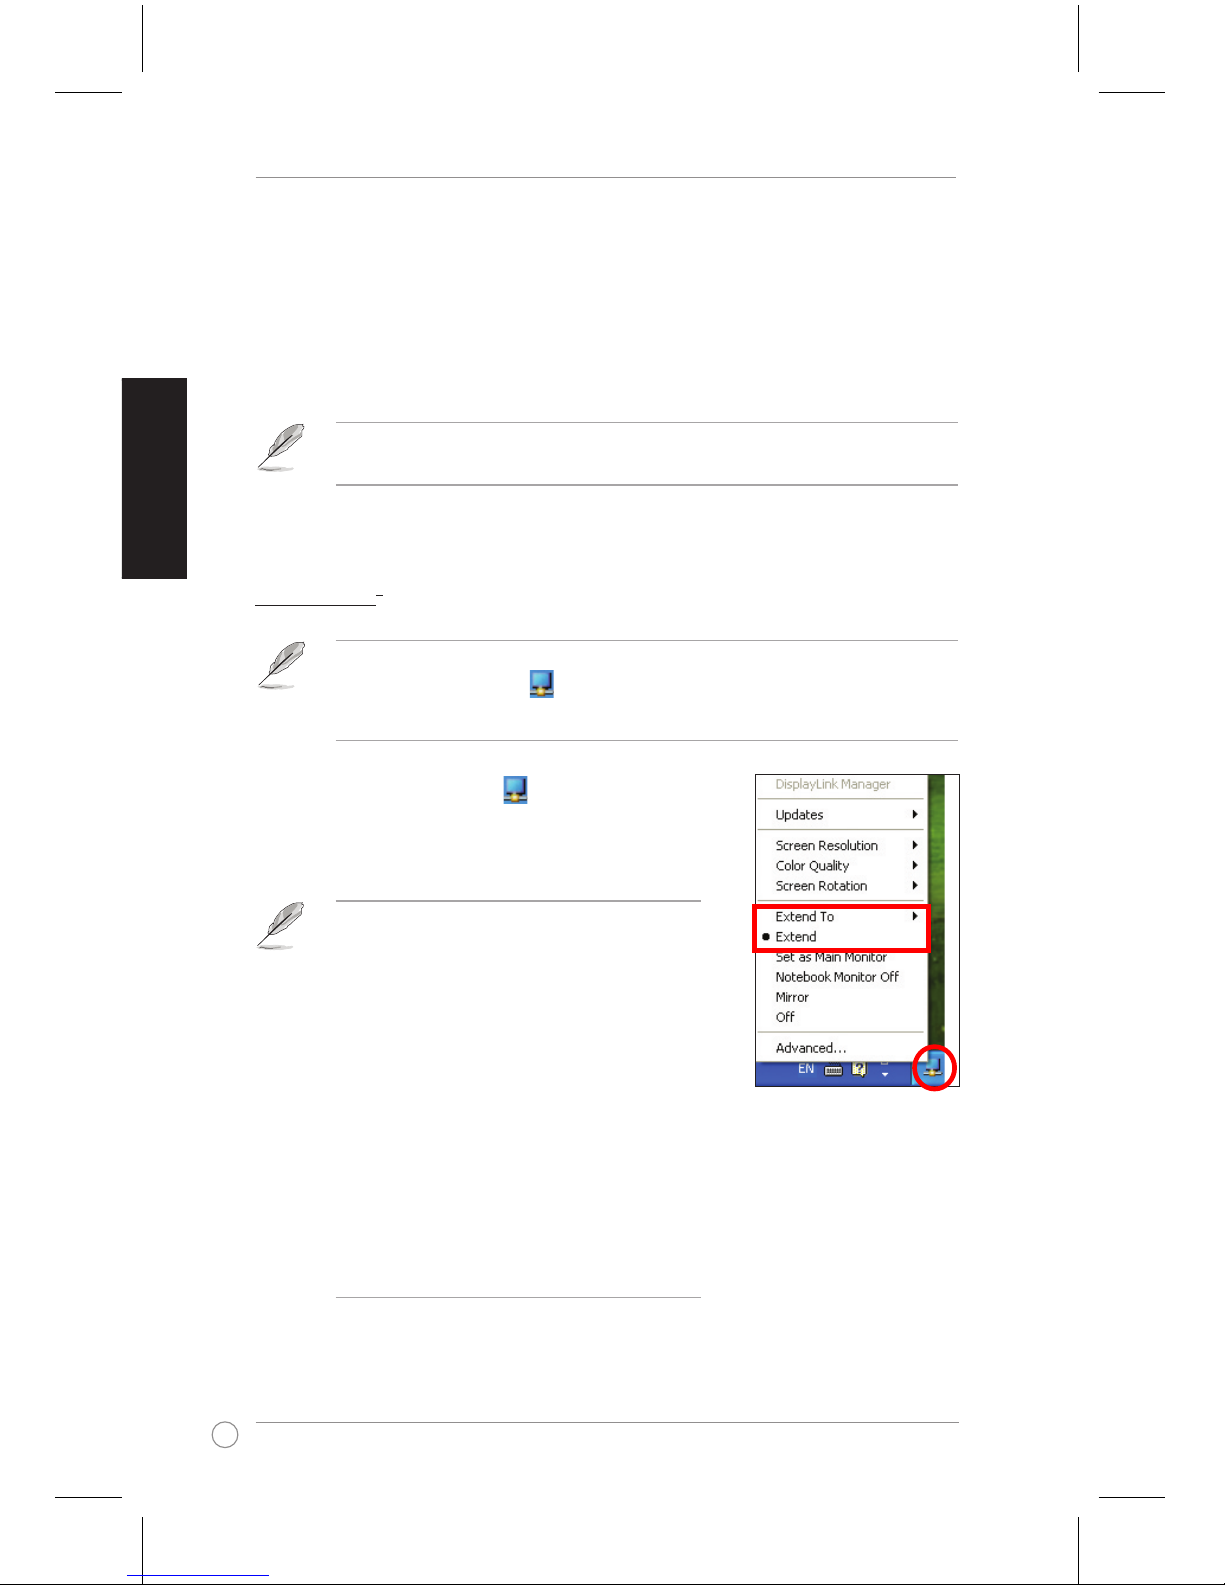
NOTE: Each time you connect an external monitor to the docking station, a DisplayLink
software icon is shown in the Windows® notication area. The DisplayLink software allows
you to connect and manage an external display.
To extend your desktop to an external monitor:
Windows® OS
1. Right-click in the notication area to open the DisplayLink
menu.
2. Click Extend.
NOTE:
• In Extend mode, the external monitor cannot be set
as the main monitor.
• From the DisplayLink menu:
- Click Extend To to specify the position for the
display of your external monitor.
- Click Screen Resolution, Color Quality, and
Screen Rotation to adjust the properties for
your external monitor.
- Click Off to disable the display of your external
monitor. Click Set as Main Monitor to enable it.
- Click Advanced to manage your displays using
the Windows® utility.
Extending your desktop to an external monitor
Use an external monitor to extend your desktop and have an additional workspace. This
allows you to:
• Display one document or application across your computer monitor and external
monitor;
• Use each monitor to display a different document or application.
NOTE: It is normal if your computer screen goes black or ashes temporarily after you change
the display mode of your external monitor.
9
English
USB 2.0 Docking Station User Guide
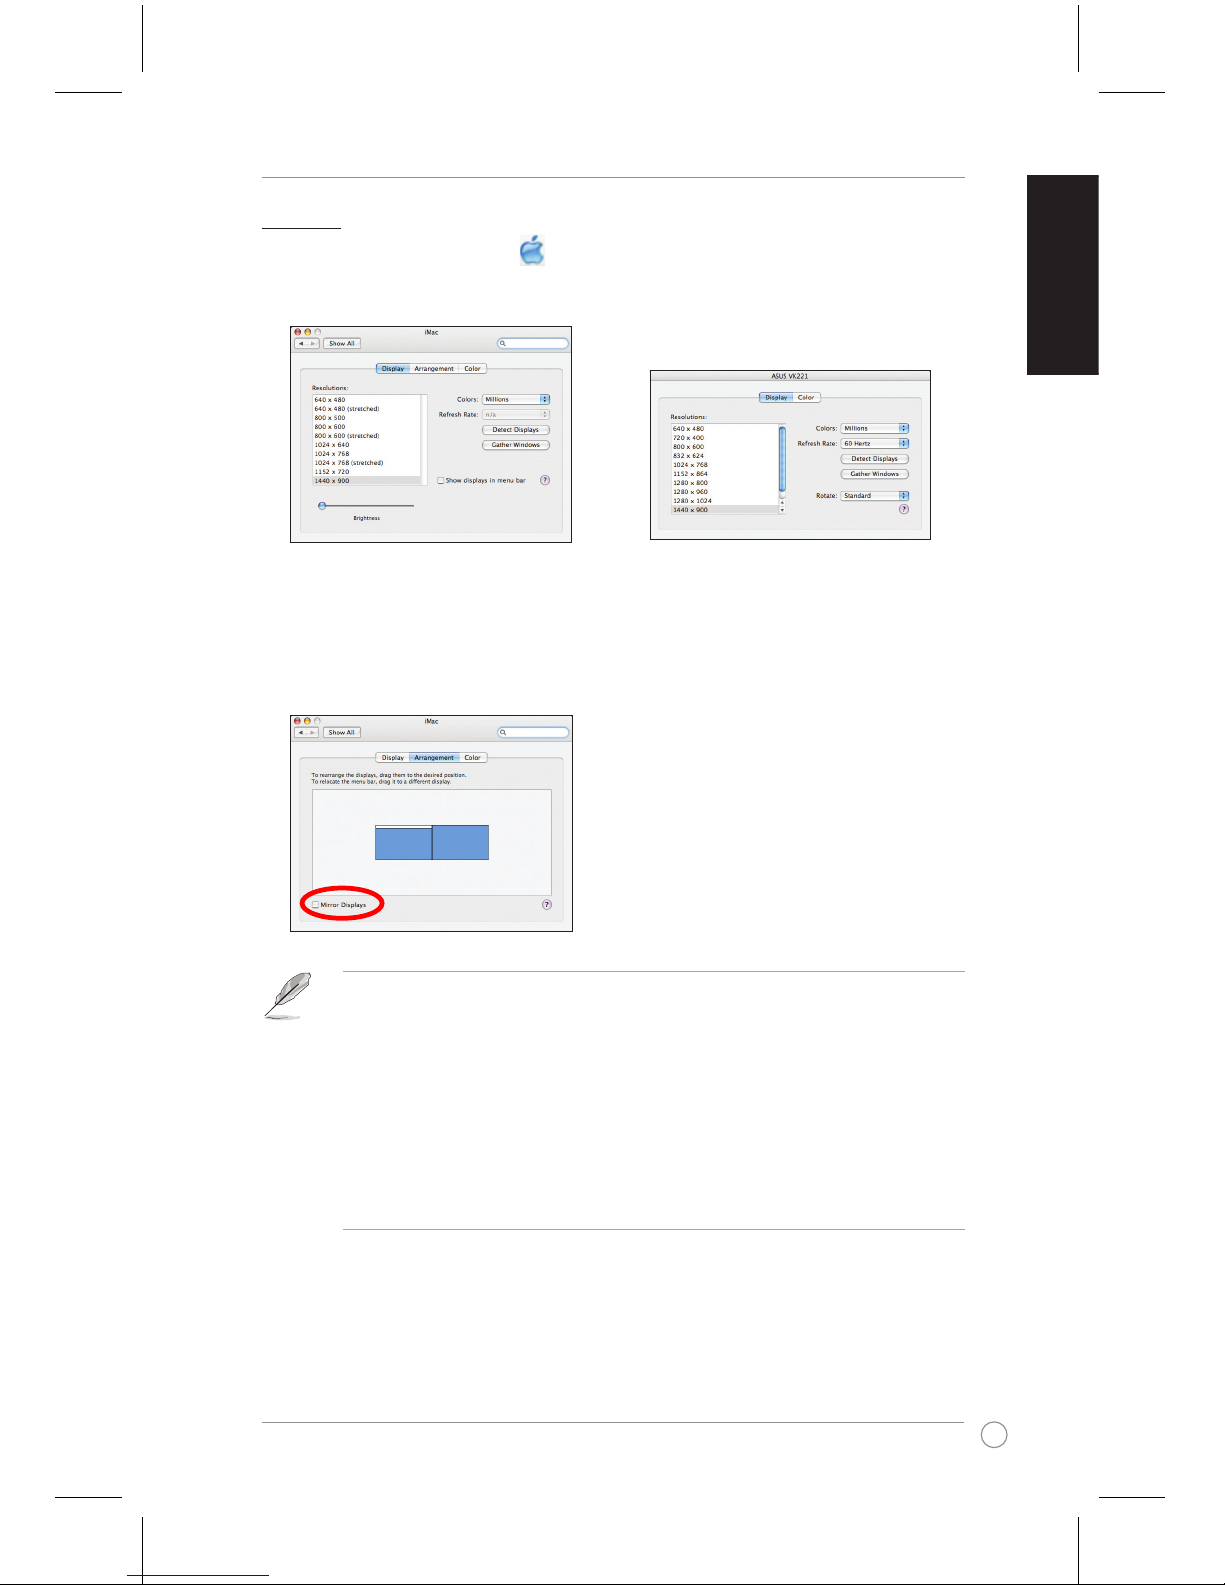
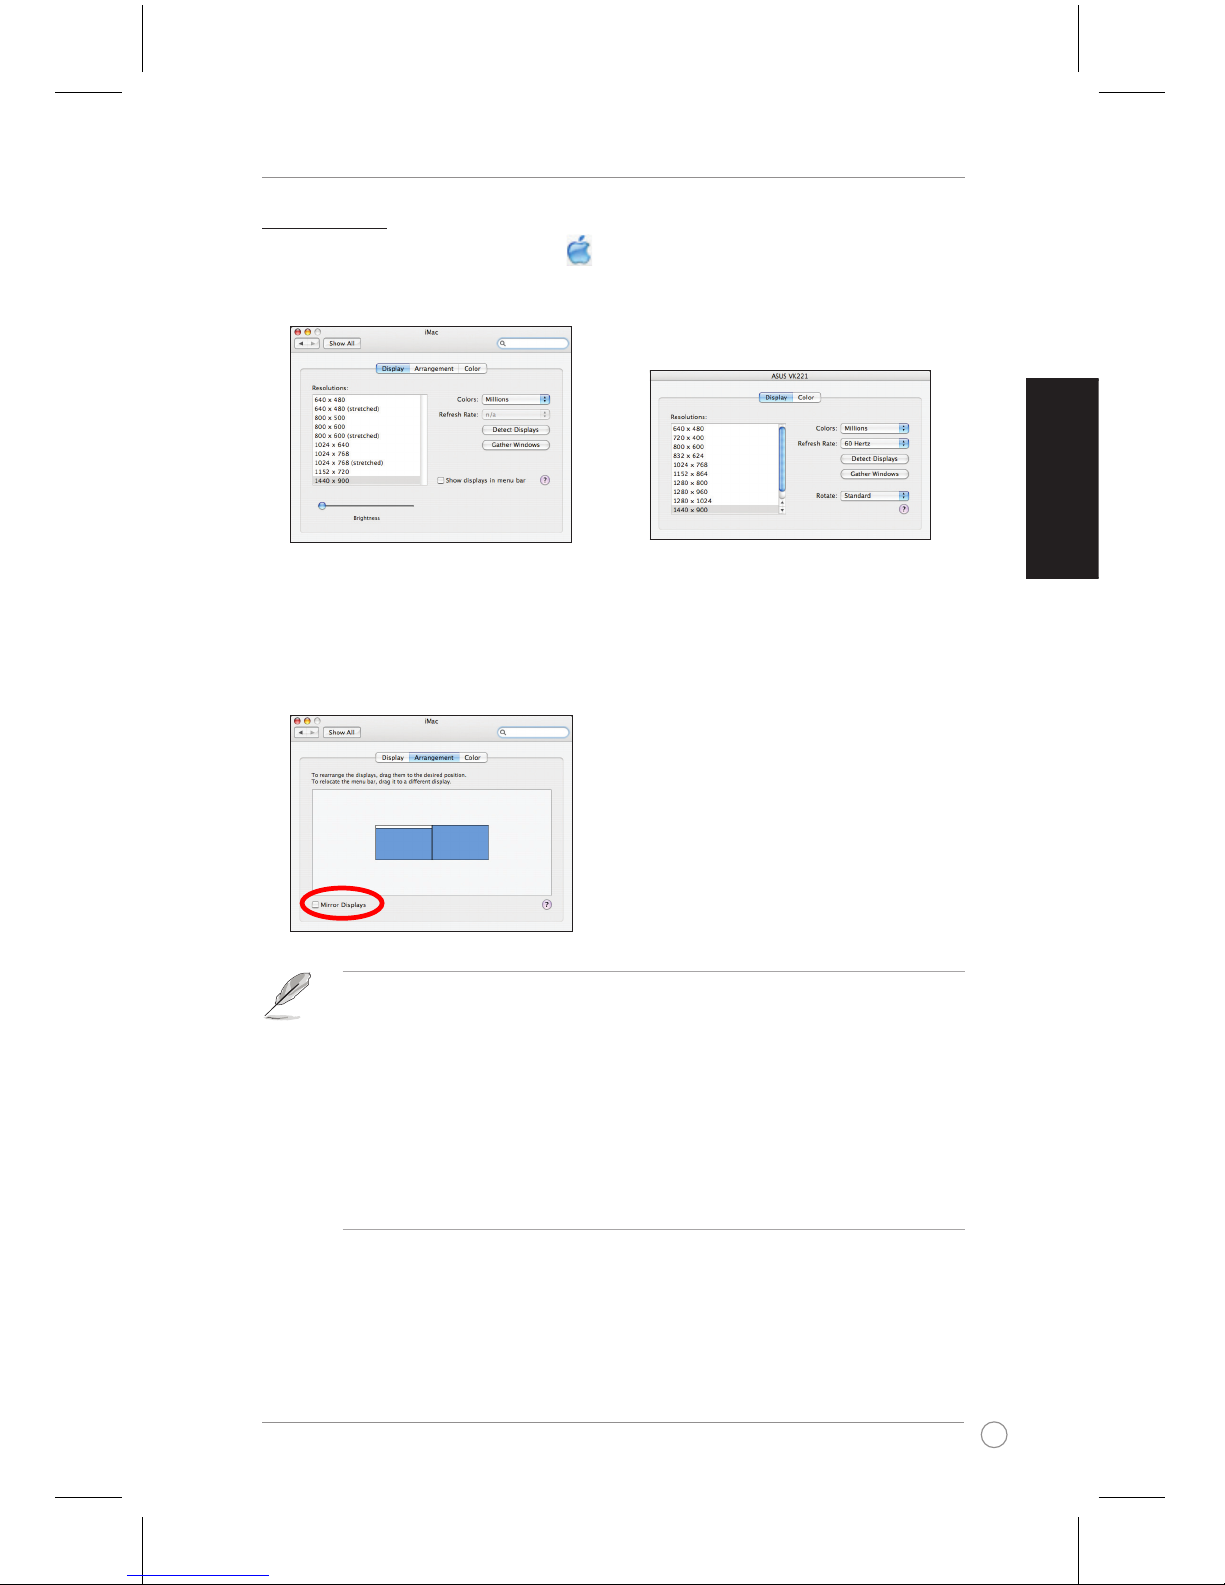
Mac OS X
1. From the Mac menu bar, Click > System Preferences > Displays to open the display
conguration windows for your computer and external monitor.
2. From the display conguration window for your computer, select Arrangement.
3. Ensure that Mirror Displays is not ticked.
NOTE:
• From the Arrangement page of the display conguration window for your computer:
- To set a display as the main display, drag and drop the white bar into it.
- To specify the position for a display, drag it to the desired positon.
• From the display conguration window for your external monitor, adjust its display
properties.
• From the Driver CD folder, double-click Mac > USB Video to nd a detailed guide about
managing displays on Mac OS X.
For your computer
For your external monitor
10
English
USB 2.0 Docking Station User Guide
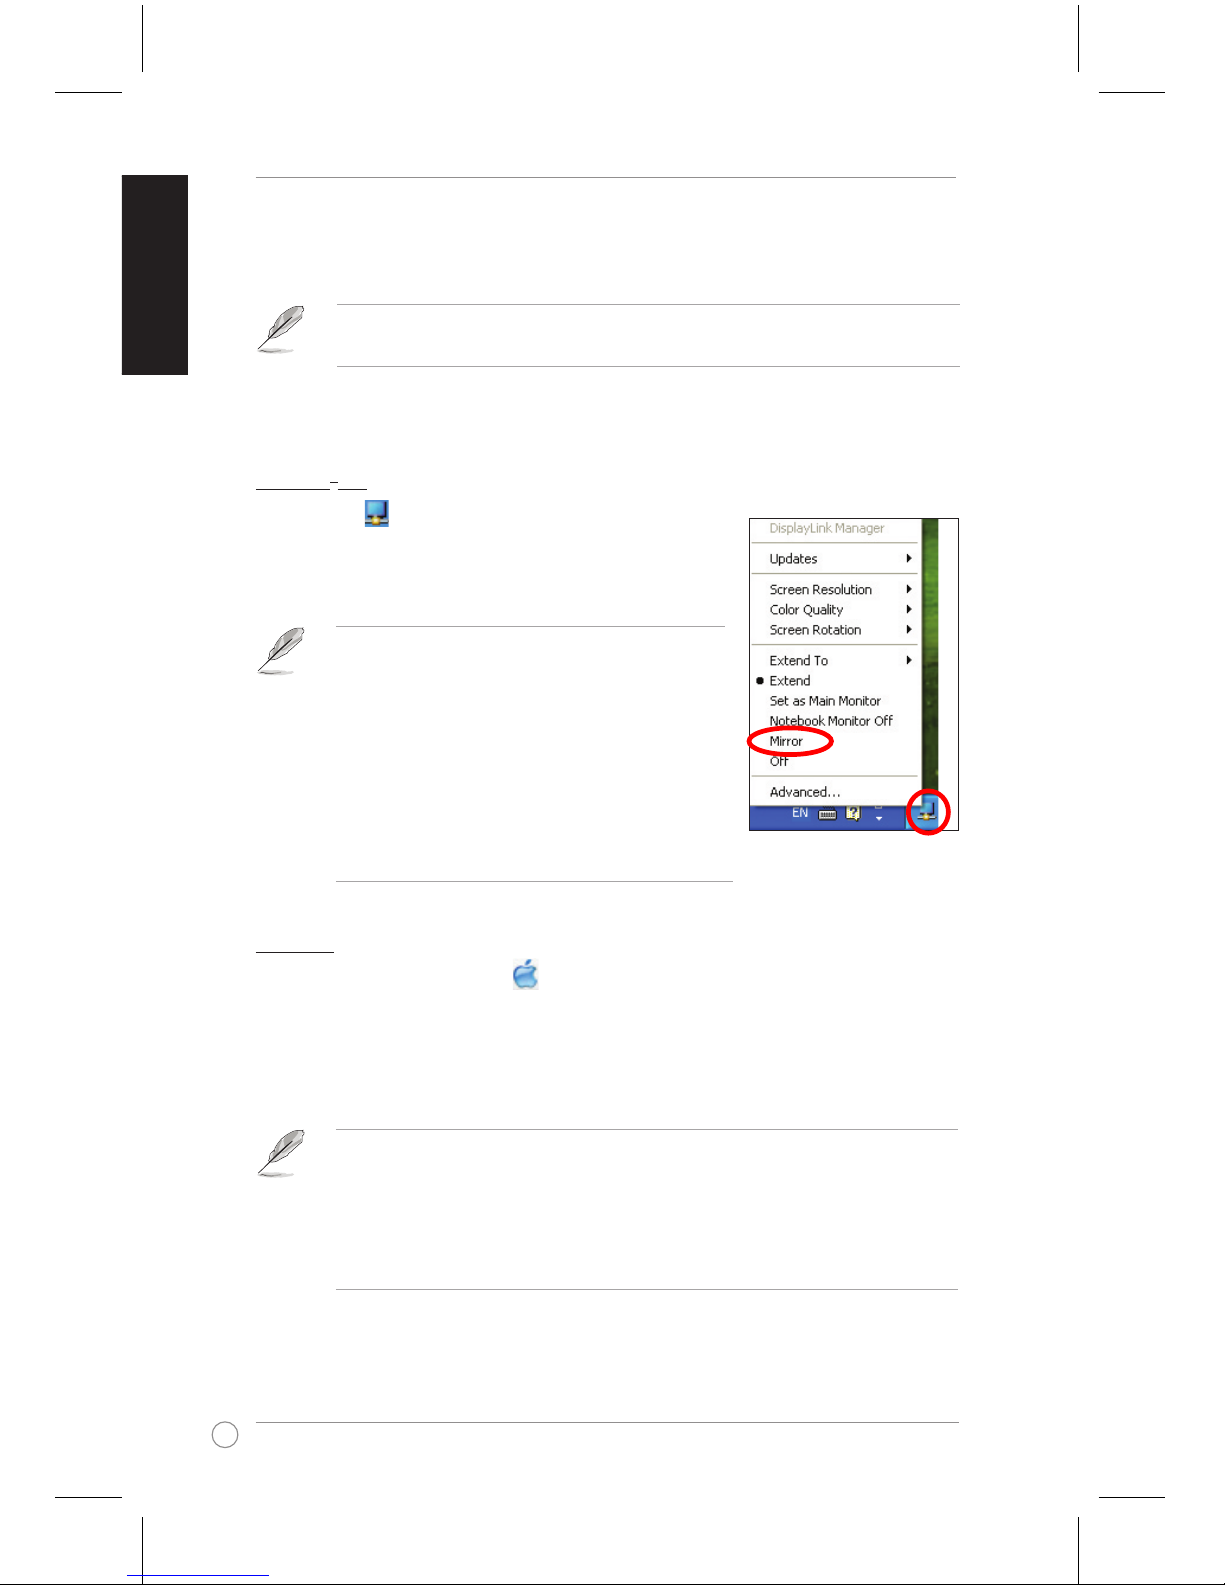
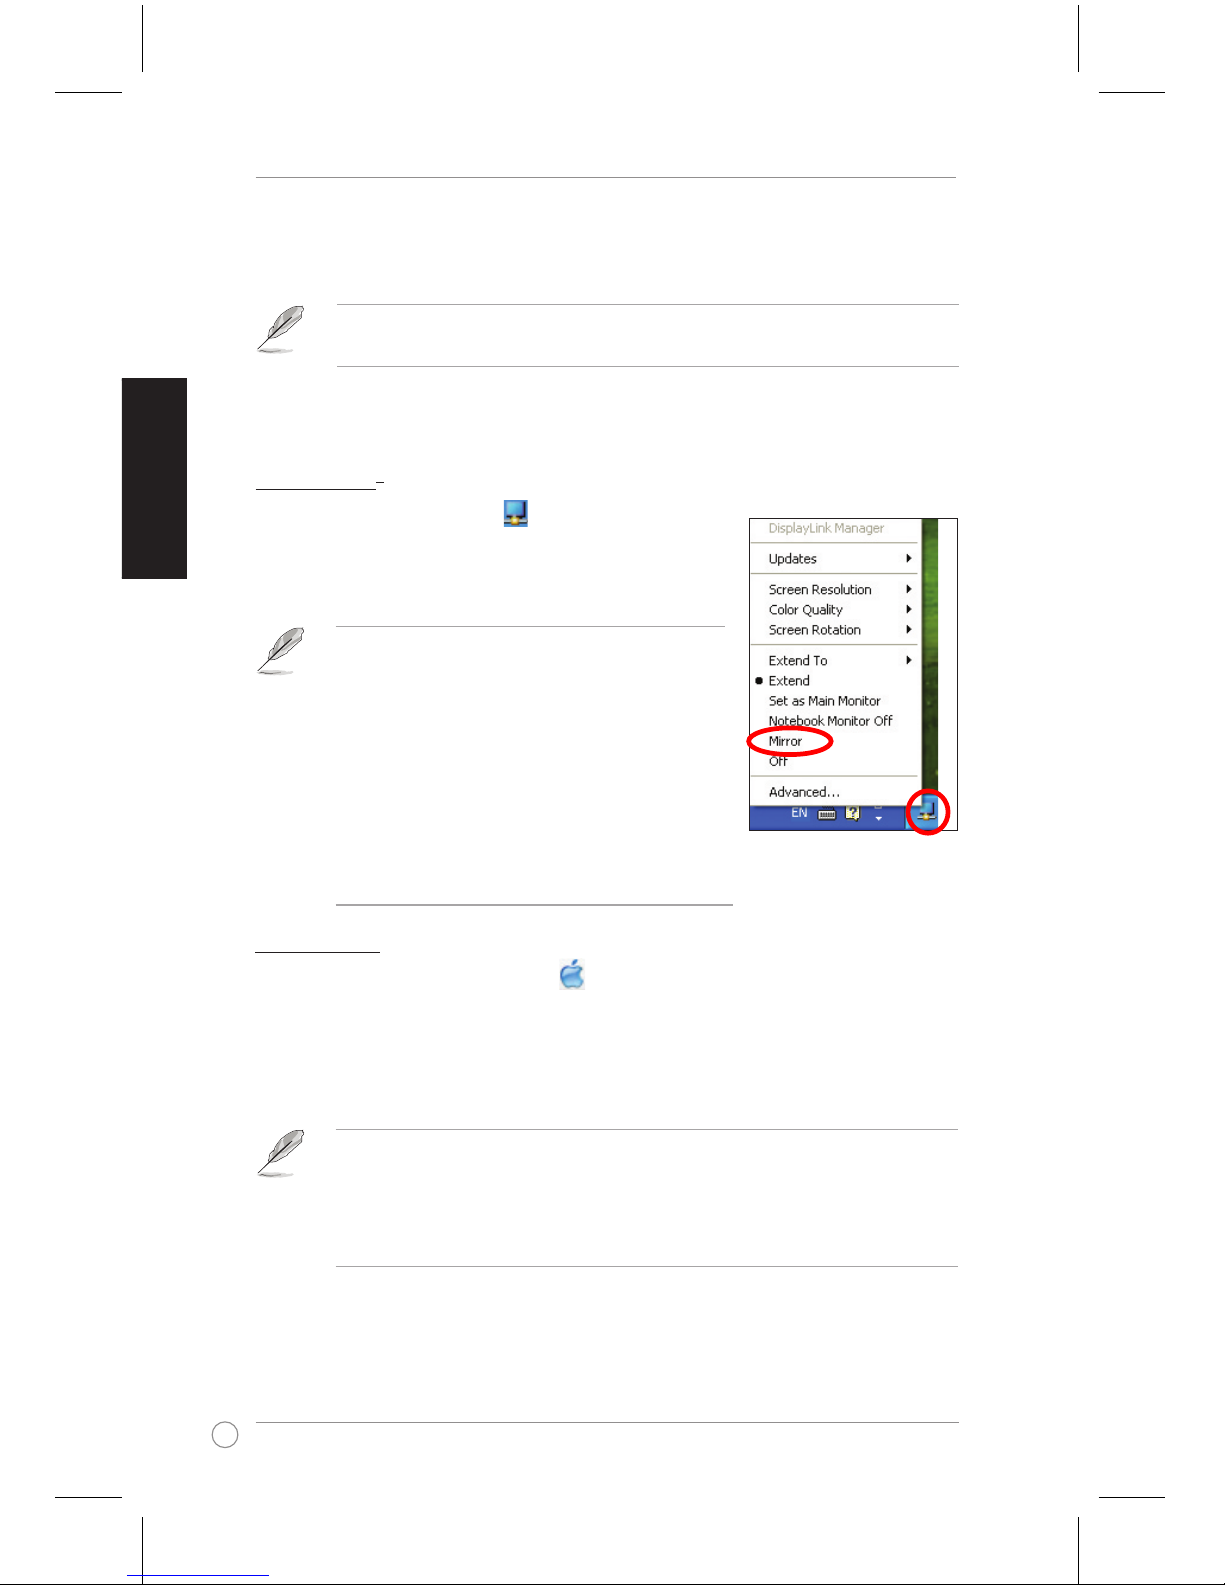
To mirror your desktop to an external monitor:
Windows® OS
1. Right-click in the notication area to open the
DisplayLink menu.
2. Click Mirror.
Mac OS X
1. From the Mac menu bar, Click > System Preferences > Displays to open the display
conguration windows for your computer and external monitor.
2. From the display conguration window for your computer, select Arrangement.
3. Check Mirror Displays.
NOTE:
• In Mirror mode, the screen resolution and color quality
for your external monitor are not user-congurable. The
docking station automatically adjusts the settings.
• From the DisplayLink menu:
- Click Off to disable the display of your external
monitor. Click Set as Main Monitor to enable it.
- Click Advanced to manage your displays using the
Windows® utility.
NOTE:
• From the display conguration window for your external monitor, adjust its display
properties.
• From the Driver CD folder, double-click Mac > USB Video to nd a detailed guide about
managing displays on Mac OS X.
NOTE: It is normal if your computer screen goes black or ashes temporarily after you change
the display mode of your external monitor.
Mirroring your desktop to an external monitor
Use an external monitor to duplicate your desktop area.
11
English
USB 2.0 Docking Station User Guide
Connecting to the Internet
Use an RJ-45 cable to connect the LAN port on your docking station to a local area network
(LAN) (A) or a DSL/cable modem (B).
The yellow LED on the LAN port lighs up when there is an Internet connection. The green
LED lights up when there is Internet activity.
NOTE:
• If you fail to connect to the Internet using the docking station at your ofce, check with the
network administrator if the MAC address of the docking station is blocked by your
company's rewall.
• Check the bottom of your docking station for its MAC address. You may also obtain the
MAC address through the following ways:
Windows® OS
1. From the Windows® desktop, click Start > All programs > Accessories > Command
prompt.
2. At the command prompt, key in ipcong -all and then Press <Enter>.
3. Locate HighSpeed USB-Ethernet Adapter.
Mac OS X
1. From the Mac menu bar, Click > About This Mac > More Info to display the
System Prole window.
2. From the Contents pane, click Network > Ethernet Adaptor (en2).
RJ-45
RJ-45
Modem
LAN
A
B
NOTE: The RJ-45 cable is purchased
separately.

12
English
USB 2.0 Docking Station User Guide
Disconnecting your USB 2.0 docking station
IMPORTANT:
DO NOT disconnect the docking station while data is being transferred between your
computer and the docking station. Wait until data transfer has completed.
DO NOT disconnect the docking station while you are connecting to the Internet via its LAN
port. Disconnect the Internet connection rst.
To disconnect your USB 2.0 docking station:
Windows® OS
1. Use the Safely remove hardware feature from the notication area to eject the
USB-Ethernet adapter and the connected devices such as a USB ash drive and USB
hard disk drive.
2. Unplug the docking station from your computer and the power outlet.
Mac OS X
1. Drag and drop the icons for the connected devices on the Mac desktop to Trash.
2. Unplug the docking station from your computer and the power outlet.
You can connect and disconnect the docking station while your computer is running.
Station d’accueil USB 2.0
F5389 / Janvier 2010
Guide de l’utilisateur
Français
®

2
Guide de l'utilisateur pour station d'accueil USB 2.0
Français
Table des matières
Présentation de votre station d’accueil USB 2.0 ................................. 3
Contenu de l'emballage ..................................................................................3
Résumé des caractéristiques ........................................................................3
Caractéristiques matérielles ..........................................................................4
Installation de votre station d’accueil USB 2.0 ................................... 5
Installer les pilotes ..........................................................................................5
Installer les pilotes sous Windows® ...............................................................5
Installer les pilotes sous Mac OS X ...............................................................5
Congurer votre station d'accueil .................................................................6
Utilisation de votre station d’accueil USB 2.0 ..................................... 7
Connecter un moniteur externe .....................................................................7
Etendre l'afchage de votre ordinateur vers un moniteur externe .................8
Obtenir un double afchage de votre écran sur un moniteur externe ...........10
Uilisez un moniteur externe pour obtenir un double afchage sur deux
écrans............................................................................................................10
Se connecter à Internet ..................................................................................11
Déconnecter votre station d’accueil USB 2.0 ...................................... 12
3
Guide de l'utilisateur pour station d'accueil USB 2.0
Français
Contenu de l'emballage
• Station d’accueil ASUS x 1
• Adaptateur secteur x 1
• CD de pilotes x 1
• Câble USB 2.0 x 1
• Guide de l’utilisateur x 1
NOTE : si un de ces éléments est endommagé ou manquant, contactez votre revendeur.
Résumé des caractéristiques
Ports
Port de liaison descendante USB 2.0 pour un périphérique
USB 2.0 (réceptacle de type A) x 4
* port alimenté fournissant jusqu’à 1000 mA x 2
port standard fournissant jusqu’à 500 mA x 2
Port microphone x1
Port pour casque audio x 1
Port LAN 10/100Mbps (RJ-45) x 1
Port Dual Link DVI-I x 1
Port VGA x 1
Port DC IN x 1
Port de liaison ascendante USB 2.0 pour connecter un PC
portable ou PC de bureau
(réceptacle de type B) x 1
Sécurité
Verrou de sécurité x 2
Mode d’alimentation USB
Mode d’alimentation automatique
Adaptateur secteur
Entrée : AC 100 à 240 V Sortie : DC 5 V/2.6 A
Dimensions
264 x 87 x 23 mm (L x l x H)
Poids
285 g
Température en opération
0º C à 40º C
Température de stockage
-10º C à 80º C
Humidité
90 % d’humidité
Systèmes d’exploitation
supportés
Windows® 2000(SP4) / XP(SP2/SP3) / Vista(SP1/SP2) / 7
et MAC OS X v10.4 ou une version ultérieure utilisant un
processeur Intel
®
NOTE : les caractéristiques sont sujettes à modications sans avertissement préalable.
Présentation de votre station d’accueil USB 2.0
4
Guide de l'utilisateur pour station d'accueil USB 2.0
Français
Caractéristiques matérielles
1 Port VGA
Permet de connecter un moniteur VGA ou un autre périphérique compatible VGA.
2 Port Dual Link DVI-I
permet de connecter un moniteur DVI-I ou un autre périphérique compatible DVI-I.
3 Port Microphone
Permet de connecter un microphone.
4 Port pour casque audio
Permet de connecter un casque audio ou un système d’enceintes.
5 Port LAN (RJ-45) 10/100Mbps
Permet de connecter un modem câblé / DSL ou de se connecter à un réseau local
(LAN).
6 Port standard de liaison descendante USB 2.0
Permet de connecter un périphérique USB 2.0 tel qu’une souris ou un joystick.
7 Port alimenté de liaison descendante USB 2.0
Permet de connecter un périphérique USB 2.0. Ce port offre une alimentation plus
élevée que le port standard.
8 Verrou de sécurité
Fixez votre station à un objet xe à l’aide du verrou de sécurité.
9 Port DC IN
Connectez l’adaptateur secteur sur ce port pour alimenter station d’accueil et les
périphériques connectés.
10
Port de liaison ascendante USB 2.0
Se connecte et transfère des données vers votre ordinateur.
6
8
DVI
VGA
1 2 3
4
5 6
7
8
8
9
10
Vue de dos
Vue de droite
Vue de gauche
5
Guide de l'utilisateur pour station d'accueil USB 2.0
Français
Installation de votre station d’accueil USB 2.0
Installer les pilotes
Installer les pilotes sous Windows
®
Pour installer les pilotes sous Windows® :
1. Placez le CD de pilotes dans le lecteur optique de votre ordinateur.
2. Cliquez sur USB Docking Install.
3. Sélectionnez la langue puis cliquez sur I Accept.
4. Patientez durant l'installation des pilotes sur votre ordinateur.
NOTE : Il est normal que l'écran devienne noir ou clignote durant l'installation des pilotes.
Installer les pilotes sous Mac OS X
Pour installer les pilotes sous Mac OS X :
1. Placez le CD de pilotes dans le lecteur optique de votre ordinateur.
2. Double-cliquez sur l'icône du CD située sur le bureau Mac.
3. Double-cliquez sur Mac > USB Ethernet > MCS7830DriverDisk.pkg.
4. Suivez les instructions à l'écran pour installer le pilote Ethernet USB puis redémarrer
votre ordinateur.
6
Guide de l'utilisateur pour station d'accueil USB 2.0
Français
5. Double-cliquez sur l'icône du CD située sur le bureau Mac.
6. Double-cliquez sur Mac > USB Video > DisplayLink-OSX-1.1.dmg > DisplayLink
Software Installer.
7. Suivez les instructions à l'écran pour installer le pilote Vidéo USB puis redémarrer votre
ordinateur.
Congurer votre station d'accueil
Pour congurer votre station d'accueil :
1. Connectez une des extrêmités du
câble d'alimentation au port DC IN
de votre station d'accueil et l'autre
extrêmité à une prise de courant
de CA de 100-240 V.
1
2
ATTENTION : utilisez
l'adaptateur secteur fourni.
Utiliser un adaptateur
secteur différent peut
endommager votre station
d'accueil.
2. Connectez l'extrêmité carrée
du câble USB 2.0 au port de
liaison montante USB 2.0 de
votre station d'accueil et l'autre
extrémité à un port USB 2.0 de
votre ordinateur.
7
Guide de l'utilisateur pour station d'accueil USB 2.0
Français
Connecter un moniteur externe
Utilisez un câble VGA ou DVI-I pour connecter un moniteur externe à votre station d'accueil.
Utilisation de votre station d’accueil USB 2.0
IMPORTANT : lorsque vous utilisez votre station d'accueil, gardez celle-ci connectée à une
prise de courant. Sinon, les périphériques connectés ne fonctionneront pas correctement.
NOTE :
• Le câble VGA / DVI-I n'est pas fourni.
• Nous vous recommandons de ne connecter qu'un seul moniteur externe (VGA ou DV-I)
à la fois. Lorsque vous utilisez les ports VGA et DV-I simultanément, la résolution d'écran
du moniteur VGA est ajustée automatiquement sur la résolution du moniteur DV-I, ce qui
peut entraîner des problèmes d'afchage sur le moniteur VGA.
• Référez-vous au chier Release Note.txt situé dans le CD de pilotes pour plus
d'informations sur les capacités vidéo de votre station d'accuei.
8
Guide de l'utilisateur pour station d'accueil USB 2.0
Français
NOTE : à chaque fois que vous connectez un moniteur externe à la station d'accueil, une
icône du logiciel DisplayLink apparaît dans la zone de notication de Windows®. Le
logiciel DisplayLink vous permet de connecter et de gérer votre moniteur externe.
Pour étendre l'afchage de votre ordinateur vers un moniteur externe :
Sous Windows
®
1. Faites un clic droit sur l'icône de la zone de notication
pour ouvrir le menu DisplayLink.
2. Cliquez sur Extend.
NOTE:
• En mode Extend, le moniteur externe ne peut pas
être conguré comme afchage principal.
• Dans le menu DisplayLink :
- Cliquez sur Extend pour spécier la position du
moniteur externe.
- Cliquez sur Screen Resolution (Résolution
d'écran), Color Quality (Qualité de couleur),
et Screen Rotation (Rotation de l'écran) pour
ajuster les propriétés de votre moniteur externe.
- Cliquez sur Off pour désactiver l'afchage
sur votre moniteur externe. Cliquez sur Set as
Main Monitor pour activer l'afchage.
- Cliquez sur Advanced pour gérer vos écrans à
l'aide de l'utilitaire Windows®.
Etendre l'afchage de votre ordinateur vers un moniteur externe
Utilisez un moniteur externe pour étendre l'afchage de votre ordinateur pour obtenir un
espace de travail supplémentaire. Ceci vous permet :
• D’afcher un document sur les deux écrans;
• D’utiliser chaque écran pour afcher un document différent.
NOTE : Il est normal que l'écran devienne noir ou clignote lorsque vous modiez le mode
d'afchage de votre moniteur externe.
9
Guide de l'utilisateur pour station d'accueil USB 2.0
Français
Sous Mac OS X
1. Dans la barre de menus Mac, Cliquez sur > Préférences Système > Moniteurs pour
ouvrir la fenêtre de conguration de l'écran de votre ordinateur et du moniteur externe.
2. Dans la fenêtre de conguration, cliquez sur Arrangement.
3. Assurez-vous que l'option Mirror Displays ne soit pas cochée.
NOTE :
• Sur l'écran Arrangement de la page de conguration de l'afchage de votre ordinateur :
- Pour congurer un écran comme afchage principal, glissez/déposez la barre blanche
sur l'écran désiré
- Pour congurer la position de l'écran, faites glisser l'écran sur la position désirée.
• Ajustez les propriétés de l'écran externe à partir de la fenêtre de conguration.
• Dans le CD de pilotes, double-cliquez sur Mac > USB Video pour obtenir une description
détaillée de la gestions des écrans sous Mac OS X.
Pour votre ordinateur
Pour votre moniteur externe
10
Guide de l'utilisateur pour station d'accueil USB 2.0
Français
Pour obtenir un double de l'afchage de votre écran sur un moniteur externe :
Sous Windows
®
1. Faites un clic droit sur l'icône de la zone de notication
pour ouvrir le menu DisplayLink.
2. Cliquez sur Mirror.
Sous Mac OS X
1. Dans la barre de menus Mac, Cliquez sur > Préférences Système > Moniteurs pour
ouvrir la fenêtre de conguration de l'écran de votre ordinateur et du moniteur externe.
2. Dans la fenêtre de conguration, cliquez sur Arrangement.
3. Cochez l'option Mirror Displays.
NOTE:
• En mode Miroir, la résolution de l'écran et la qualité des
couleurs ne sont pas congurables. La station d'accueil
règle automatiquement les paramètres.
• Dans le menu DisplayLink :
- Cliquez sur Off pour désactiver l'afchage
sur votre moniteur externe. Cliquez sur Set as
Main Monitor pour activer l'afchage.
- Cliquez sur Advanced pour gérer vos écrans à
l'aide de l'utilitaire Windows®.
NOTE :
• Ajustez les propriétés de l'écran externe à partir de la fenêtre de conguration.
• Dans le CD de pilotes, double-cliquez sur Mac > USB Video pour obtenir une description
détaillée de la gestions des écrans sous Mac OS X.
NOTE : Il est normal que l'écran devienne noir ou clignote lorsque vous modiez le mode
d'afchage de votre moniteur externe.
Obtenir un double afchage de votre écran sur un moniteur externe
Uilisez un moniteur externe pour obtenir un double afchage sur deux écrans.
11
Guide de l'utilisateur pour station d'accueil USB 2.0
Français
Se connecter à Internet
Utilisez un câble RJ-45 pour connecter le port LAN de votre station d'accueil à un réseau
local (LAN) (A) ou à modem DSL / câblé (B).
La LED jaune du port LAN s'allume lorsqu'une connexion à Internet est établie. LA LED verte
s'allume en cas d'activité sur Internet.
NOTE:
• Si vous n'arrivez pas à vous connecter à Internet au bureau avec votre station d'accueil,
vériez avec votre administrateur réseau que l'adresse MAC de votre station d'accueil ne
soit pas bloquée par le pare-feu de votre entreprise.
• Vous trouverez l'adresse MAC de votre station d'accueil sur le dessous de celle-ci. Vous
pouvez également obtenir l'adresse MAC de la manière suivante :
Sous Windows®
1. Depuis le bureau de Windows®, cliquez sur Démarrer > Tous les programmes >
Accessoires > Invite de commandes.
2. Sur l'écran qui apparaît, saisissez ipcong -all puis appuyez sur <Entrée>.
3. Localisez l'élément HighSpeed USB-Ethernet Adapter.
Sous Mac OS X
1. Dans la barre de menus Mac, Cliquez sur > A propos de ce Mac > Plus d'infos
pour afcher la fenêtre Prol du système.
2. Dans la collone de gauche, cliquez sur Réseau > Ethernet intégré (en2).
RJ-45
RJ-45
Modem
LAN
A
B
NOTE : le câble RJ-45 n'est pas fourni.

12
Guide de l'utilisateur pour station d'accueil USB 2.0
Français
Déconnecter votre station d’accueil USB 2.0
IMPORTANT:
NE DECONNECTEZ PAS la station d'accueil lorsque des données sont en cours de transfert
entre votre ordinateur et la station d'accueil. Veuillez patienter le temps que le transfert des
données soit terminé.
NE DECONNECTEZ PAS la station d'accueil lorsque vous êtes connecté à Internet via le port
LAN. Déconnectez-vous d'Internet en premier.
Pour déconnecter votre station d'accueil USB 2.0 :
Sous Windows
®
1. Utilisez la fonction "Retirer le périphérique en toute sécurité" à partir de la barre des
tâches pour éjecter l'adaptateur Ethernet USB et les périphériques connectés tels qu'une
clé USB ou un disque dur USB.
2. Débranchez la station d'accueil de votre ordinateur et de la prise de courant.
Sous Mac OS X
1. Glissez déposez les icônes des périphériques connectés situés sur le bureau dans la
Corbeille.
Vous pouvez connecter ou déconnecter la station d'accueil lorsque votre ordinateur est
allumé.
USB 2.0 Docking Station
G5389 / Januar 2010
Benutzeranleitung
Deutsch
®

2
USB 2.0 Docking Station Benutzeranleitung
Deutsch
Inhaltsverzeichnis
Kennenlernen Ihrer USB 2.0 Docking Station...................................... 3
Packungsinhalt ................................................................................................3
Spezikationsübersicht ..................................................................................3
Hardware-Funktionen .....................................................................................4
Installieren Ihrer USB 2.0 Docking Station........................................... 5
Installieren der Treiber ....................................................................................5
Installieren der Treiber in Windows®-Betriebssystemen ................................5
Installieren der Treiber in Mac OS X .............................................................5
Einrichten Ihrer Docking Station ...................................................................6
Benutzen Ihrer USB 2.0 Docking Station ............................................. 7
Anschließen eines externen Monitors ..........................................................7
Erweitern der Anzeige Ihres Computers auf den externen Monitor...............8
Spiegeln der Anzeige Ihres Computers auf den externen Monitor ................10
Verbinden mit dem Internet ............................................................................11
Trennen Ihrer USB 2.0 Docking Station................................................ 12
3
USB 2.0 Docking Station Benutzeranleitung
Deutsch
Packungsinhalt
• 1x ASUS Docking Station
• 1x Netzteil
• 1x Treiber-CD
• 1x USB 2.0-Kabel
• 1x Benutzeranleitung
HINWEIS: Wenn ein Teil fehlt oder beschädigt ist, kontaktieren Sie bitte umgehend Ihren Händler.
Spezikationsübersicht
Anschlüsse
4x USB 2.0 Downstream-Anschluss für USB 2.0-Gerät
(Type A-Anschluss)
* 2x Leistungs-Anschluss mit bis zu 1000 mA
Stromversorgung
2x Standard-Anschluss mit bis zu 500 mA
Stromversorgung
1x Mikrofonanschluss
1x Kopfhöreranschluss
1x 10/100Mbps LAN (RJ-45) -Anschluss
1x Dual Link DVI-I-Anschluss
1x VGA-Anschluss
1x Stromeingang
1x USB 2.0 Upstream-Anschluss für einen Notebook-/
Desktop-Computer (Type B-Anschluss)
Sicherungslösung
2x Sicherheitsschloss-Anschluss
USB-Stromversorgung
Selbstversorgungsmodus
Netzteil
Eingang: ~ 100-240V Ausgang: 5V/2.6A Gleichspannung
Abmessungen
264 x 87 x 23 mm (L x B x H)
Gewicht
285g
Betriebstemperatur
0ºC - 40ºC
Lagertemperatur
-10ºC - 80ºC
Luftfeuchtigkeit
90% RH
Unterstützte
Betriebssysteme
Windows® 2000 (SP4)/XP (SP2/SP3) / Vista (SP1/SP2) /7
Computer mit Intel® CPU unter Mac OS X v10.4 oder später
HINWEIS: Die Spezikationen können ohne vorherige Benachrichtigung geändert werden.
Kennenlernen Ihrer USB 2.0 Docking Station
4
USB 2.0 Docking Station Benutzeranleitung
Deutsch
Hardware-Funktionen
1 VGA-Anschluss
Anschluss für einen VGA-Monitor oder andere VGA-Geräte.
2 Dual Link DVI-I-Anschluss
Anschluss für einen DVI-I-Monitor oder andere DVI-I-Geräte.
3 Mikrofonanschluss
Anschluss für ein Mikrofon.
4 Kopfhöreranschluss
Anschluss für einen Kopfhörer oder ein Lautsprecher-Set.
5 10/100Mbps LAN (RJ-45) -Anschluss
Verbindung zu einen Kabel-/DSL-Modem oder einen lokalen Netzwerk (LAN).
6 USB 2.0 Downstream-Standardanschluss
Anschluss für ein USB 2.0-Gerät, z.B- Maus, Joystick.
7 USB-2.0-Downstream-Leistungsanschluss
Anschluss für ein USB 2.0-Gerät und liefert mehr Leistung als der Standardanschluss.
8 Sicherheitsschloss-Anschluss
Anschluss zum Sichern Ihrer Docking Station mittels eines Schlosses an einen
festen Objekt.
9 Stromeingang
Anschluss für den Stromausgang des Netzteils, um Ihre Docking Station und die
daran angeschlossenen Geräte mit Strom zu versorgen.
10 USB 2.0 Upstream-Anschluss
Anschluss zur Übertragung der Daten zu Ihren Computer.
6
8
DVI
VGA
1 2 3
4
5 6
7
8
8
9
10
Rückseitenansicht
Rechte Seitenansicht
Linke Seitenansicht
5
USB 2.0 Docking Station Benutzeranleitung
Deutsch
Installieren Ihrer USB 2.0 Docking Station
Installieren der Treiber
Installieren der Treiber in Windows®-Betriebssystemen
So installieren Sie die Treiber in Windows®:
1. Legen Sie die Treiber-CD in das optische Laufwerk Ihres Computers.
2. Klicken Sie auf USB Docking Install.
3. Wählen Sie Ihre Sprache und klicken Sie dann auf I Accept.
4. Warten Sie, bis die Treiber erfolgreich in Ihren Computer installiert wurden.
HINWEIS: Es ist normal, dass der Bildschirm schwarz wird oder kurzzeitig ackert, wenn die
Treiber installiert werden.
Installieren der Treiber in Mac OS X
So installieren Sie die Treiber in Mac OS X:
1. Legen Sie die Treiber-CD in das optische Laufwerk Ihres Computers.
2. Doppelklicken Sie auf das CD-Symbol auf Ihren Mac-Bildschirm.
3. Doppelklicken Sie auf Mac > USB Ethernet > MCS7830DriverDisk.pkg.
4. Folgen Sie den Bildschirmanweisungen, um den USB Ethernet-Treiber zu installieren und
Ihren Computer danach neu zu starten.
6
USB 2.0 Docking Station Benutzeranleitung
Deutsch
5. Doppeklicken Sie auf das CD-Symbol auf Ihren Mac-Bildschirm.
6. Doppeklicken Sie auf Mac > USB Video > DisplayLink-OSX-1.1.dmg > DisplayLink
Software Installer.
7. Folgen Sie den Bildschirmanweisungen, um den USB-Videotreiber zu installieren und
starten Sie danach Ihren Computer neu.
Einrichten Ihrer Docking Station
So richten Sie Ihre Docking Station ein:
1. Verbinden Sie ein Ende des
mitgelieferten Netzteils mit dem
Stromeingang an Ihrer Docking
Station und das andere Ende mit
einer 100-240V-Steckdose.
1
2
ACHTUNG: Benutzen Sie nur
das mitgelieferte Netzeteil,
da Sie durch die verwendung
eines anderen Netzteils Ihr
Gerät beschädigen können.
2. Verbinden Sie das quatratische
Ende des mitgelieferten USB
2.0-Kabels mit dem USB 2.0Upstream-Anschluss an Ihrer
Docking Station und das andere
Ende mit dem USB 2.0-Anschluss
Ihres Computers.
 Loading...