

Page 1

User Guide
SP6540/ SP6540-T
Ver.01
Page 2

Contents
Safety Information......................................................................................i
Care & Cleaning...........................................................................................ii
Chapter 1: Product Introduction
1.1 Welcome! .................................................................................................1-1
1.2 Package Contents.................................................................................1-1
1.3 Interactive Whiteboard introduction..........................................1-2
1.3.1 Front View.............................................................................1-2
1.3.2 Input/ Output Terminals ......................................................1-4
1.3.3 Control Panel...........................................................................1-5
1.3.4 AC-IN & VESA mount grid....................................................1-6
1.3.5 Remote Control............................................................................1-7
Chapter 2: Connecting the Cables
2.1 Using VGA input…...………………………………….......................2-1
2.2 Using DVI input......................................................................2-2
2.3 Using DP input......................................................................2-3
2.4 Using HDMI input....................................................................2-4
2.5 Connect External Speakers………...................................................2-5
2.6 Display Control Connection……………………………….....................2-6
2.7 Touch Module Connection……….......................................................2-7
Chapter 3: General Instructions
3.1 OSD (On-Screen Display) menu...................................................3-1
3.1.1 How to reconfigure...................................................................3-1
3.1.2 OSD function introduction....................................................…3-2
3.2 Specifications Summary...............................................................…..4-1
3.3 Troubleshooting(FAQ).....................................................................5-1
3.4 Supported Operation Modes........................................................…6-1
Page 3

Safety Information
• Before setting up the IWB, carefully read all the documentation that came with
the package.
• To prevent fire or shock hazard , never expose the IWB to rain or moisture.
• Never try to open the IWB cabinet. The dangerous high voltages inside the IWB
may result in serious physical injury.
• If the power supply is broken, do not try to fix it by yourself . Contact a
qualified service technician or your retailer.
• Before using the product, make sure all cables are correctly connected and the
power cables are not damaged. If you detect any damage, contact your dealer
immediately.
• Slots and openings on the back or top of the cabinet are provided for
ventilation. Do not block these slots. Never place this product near or over a
radiator or heat source unless proper ventilation is provided.
• The IWB should be operated only from the type of power source indicated on
the label. If you are not source of the type of power supply to your home,
consult your dealer or local power company.
• Use the appropriate power plug which complies with your local power
standard.
• Do not overload power strips and extension cords. Overloading can result in
fire or electric shock.
• Avoid dust, humidity, and temperature extremes. Do not place the IWB in any
area where it may become wet. Place the IWB on a stable surface.
• Unplug the unit during a lightning storm or if it will not be used for a long
period of time. This will protect the IWB from damage due to power surges.
• Never push objects or spill liquid into the slots on the IWB cabinet.
• To ensure satisfactory operation, use the IWB only with personal computers
which have appropriate configured receptacles marked between 100-240V AC.
• If you encounter technical problems with the IWB, contact a qualified service
technician or your retailer.
• A warning that an apparatus with CLASS I construction shall be connected to
a MAINS socket outlet with a protective earthing connection.
• When you connect the product to other equipment, turn off the power and
unplug all of the equipment from the wall outlet. Failure ti di so may cause
an electric shock and serious personal injury. Read the owner’s manual of the
other equipment carefully and follow the instruction when making any
connections
• The mains plug or an appliance coupler is used as the disconnect device, the
disconnect device shall remain readily operable.
• Warning: battery exposure to heat missing
The symbol of the crossed out wheeled bin indicates that the product
(electrical, electronic equipment, and mercury-containing button cell
battery) should not be placed in municipal waste. Please check local
regulations for disposal of electronic products.
Page 4

Care & Cleaning
• Before you lift or reposition your IWB, it is better to disconnect the cables and
power cord. Follow the correct lifting techniques when positioning the IWB.
When lifting or carrying the IWB, grasp the edges of the IWB. Do not lift the
display by the stand or the cord.
• Cleaning. Turn your IWB off and unplug the power cord. Clean the IWB surface
with a lint-free, non-abrasive cloth. Stubborn stains may be removed with a
cloth dampened with mild cleaner.
• Avoid using a cleaner containing alcohol or acetone. Use a cleaner intended for
use with the IWB. Never spray cleaner directly on the screen, as it may drip
inside the IWB and cause an electric shock.
The following symptoms are normal with the IWB:
• You may find slightly uneven brightness on the screen depending on the
desktop pattern you use.
• When the same image is displayed for hours, an afterimage of the previous
screen may remain after switching in the image. The screen will recover slowly
or you can turn off the Power Switch for hours.
• When the screen becomes black or flashes, or cannot work anymore, contact
your dealer or service center to fix it. Do not repair the screen by yourself!
Conventions used in this guide
WARNING: Information to prevent injury to yourself when trying to
complete a task.
CAUTION: Information to prevent damage to the components when
trying to complete a task.
IMPORTANT: Information that you MUST follow to complete a task.
NOTE: Tips and additional information to aid in completing a task.
Page 5

Where to find more information
Refer to the following sources for additional information and
software updates
1. ASUS websites
The ASUS websites worldwide provide updated information on ASUS hardware
and software products. Refer to http://www. asus.com
2. Optional documentation
Your product package may include optional documentation that may have been
added by your dealer. These documents are not part of the standard package.
Page 6

1.1 Welcome!
Thank you for purchasing the ASUS® Interactive Whiteboard (IWB)!
The latest widescreen interactive whiteboard from ASUS provides a broader,
brighter and crystal clear display, plus a host of features that enhance your viewing
experience.
With these features, you can enjoy the convenience and delightful visual experience
that the IWB brings to you
1.2 Package Contents
Check your package for the following items:
Interactive Whiteboard
Remote Control with battery (CR2025)
Quick start guide
Warranty card
Power cord
Touch USB A-B type cable
HDMI Cable (*depends on the region)
Touch Pan(*depends on the region)
If any of the above items is damaged or missing, contact your retailer
immediately.
Page 7
1.3 IWB Introduction
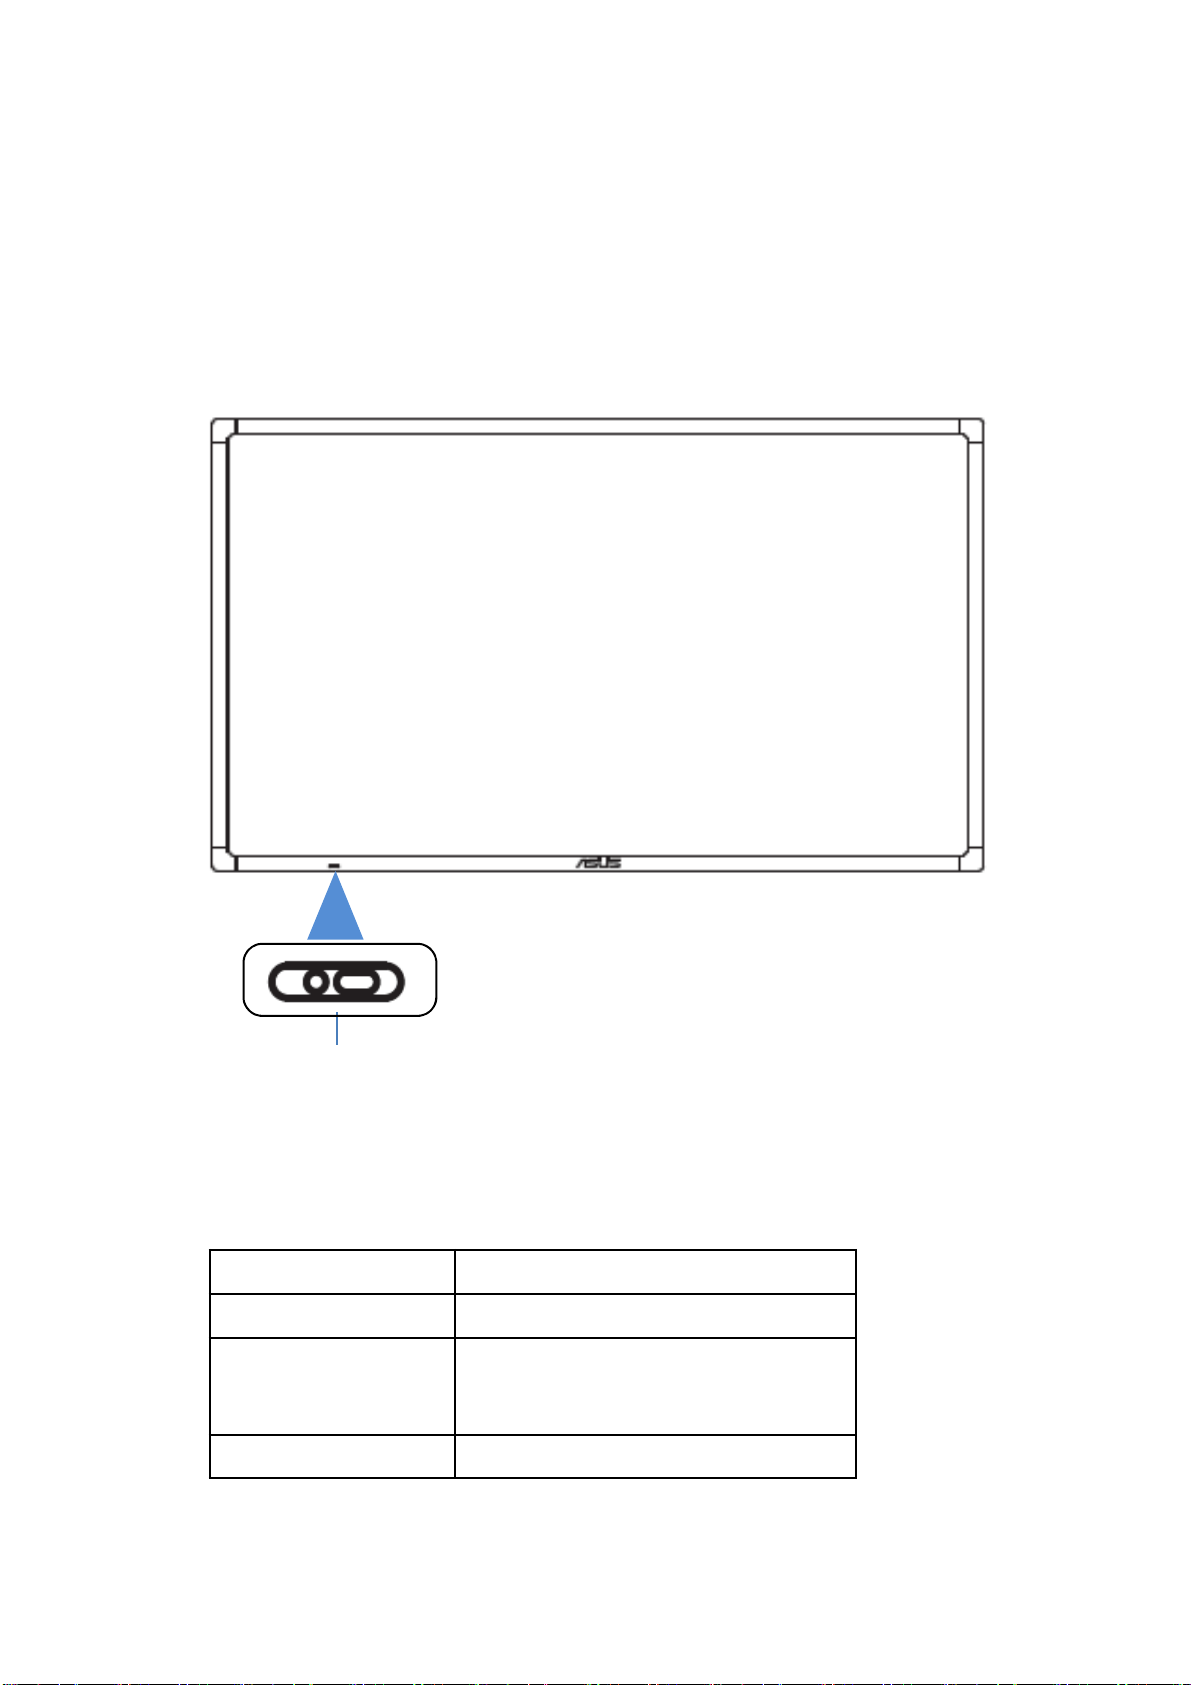
1.3.1 Front View
Remote control sensor
• Receives command signals from the remote control
• Represent the status of the IWB without any OPS
Status Description
White ON
White Flicker Stand by/ Power Saving
OFF OFF
Page 8

1.3.2 Input/ Output Terminals
Touch USB
Connect with PC for IWB for
IWB touch function
5V DC OUT
To supply 5V DC power
HDMI
HDMI video/ audio input
Display Port
Display Port video input
DVI
DVI-D video input
VGA
VGA video input
AUDIO IN/OUT
Audio input from external AV device
Audio output to an external AV device
RS232 OUT
RS232C network output for the loopthrough function
RS232 IN
RS232C network input for the loopthrough function
Page 9

1.3.3 Control Panel
POWER button
Use this button to turn the display
on or put the display to standby.
button
• Brightness hotkey.
• Move the highlight bar up to
adjust the selected item while OSD
menu is on.
MENU button
• Turns on the OSD menu.
• Exits the OSD menu or go back
to the previous menu when the
OSD menu is active.
• Speaker volume hotkey.
• Move the highlight bar down to
adjust the selected item while OSD
menu is on.
button
• Selects a desired preset mode.
•Automatically adjusts the image to
its optimized position, clock, and
phase by pressing this button for 24 seconds (for VGA mode only).
Show the IWB information.
button
Selects an available input sources
after connection HDMI/Display Port
/DVI/VGA cable with the IWB.
button
button
Key Lock
Press 5 secs
Page 10

1.3.4 AC-IN & VESA mount grid
POWER switch
Press the switch to turn on/off power
AC-IN port
This port connects the power cord
(power source requirement:100-240V~50/60Hz 2.5A )
VESA mount
Mount this IWB by wall mount, ceiling mount, table stand, etc.
For the wall-counting kit, use M6 mounting screws (having a length 20 mm
longer than the thickness of the mounting bracket) and tighten them
securely.
Page 11

1.3.5 Remote Control
[ ] button
Key Lock
[ ] button
Press to switch on the display
from standby mode. Press again to
turn it off and back into standby
mode.
[ ] button
Press to move the selection up in
OSD menu.
[ ] button
Press to move the selection left in
OSD menu.
[ ] button
Press to move the selection down
in OSD menu.
[ ] button
Press to adjust Brightness.
[ ] button
Press to decrease the speaker
value.
Press to turn the OSD menu on/off
[ ] button
Selects an available input sources
[ ] button
Press to activate the setting inside
the OSD menu.
[ ] button
Press to move the selection right in
OSD menu.
[ ] button
Press to turn back to the previous
OSD menu.
[ ] button
Press to increase the speaker value
[ ] button
Press to turn the mute function on
/off
Page 12

2. Connecting the Cables
2.1 Using VGA input
2.2 Using DVI input
Page 13

2.3 Using DP input
2.4 Using HDMI input
Page 14

2.5 Connecting External Speakers
2.6 Display Control Connection
Connect the [RS232C OUT] connector of DISPLAY 1 to the [RS232C IN] connector
of DISPLAY 2.
DISPLAY 1 DISPLAY 2
[RS232C]
[RS232C IN] [RS232C OUT] [RS232C IN]
Page 15

2.7 Touch Module Connection
Connect the [TOUCH USB] connector to PC or devices [USB TYPE A] connector.
[USB TYPE A]
TOUCH USB
Please keep the gap between your fingers at least 50mm while you are
using multi-touch capability.
Page 16

3.1 OSD (On-Screen Display) menu
3.1.1 How to reconfigure
1. Press the「MENU」button to activate the OSD menu.
2. Press the and buttons to navigate through the functions.
Highlight the desired function and press the MENU button to activate it. if the
function selected has a sub-menu, press the and buttons to navigate
through the sub-menu functions. Highlight the desired sub-menu functions and
press the MENU button to activate it.
3. Press the and buttons change the settings of the selected function.
4. To exit and save the OSD menu, press the button repeatedly until the OSD
menu disappear adjust other functions, repeat steps 1-3. T
Page 17

3.1.2 OSD function introduction
1. Mode
This function contains 4 sub-functions you can select for your preference. Each
mode has the Reset selection, allowing you to maintain your setting or return
to the preset mode.
• Standard Mode: more items are adjustable in the Color menu.
• PC Mode: best choice for document editing
• Photo Mode: best choice for scenery photo display.
• Theater Mode: best choice for movies.
Function Standard
Mode
Brightness Yes No Yes Yes
Contrast Yes No Yes Yes
Saturation No No Yes Yes
Color
Temperature
Yes No Yes Yes
PC Mode Photo
Mode
Theater
Mode
Skin Tone No No Yes Yes
Page 18

3.1.2 OSD function introduction
2. Color
Set a desired color setting from this menu.
• Brightness:the adjusting range is from 0 to 100
• Contrast: the adjusting range is from 0 to 100
• Saturation: the adjusting range is from 0 to 100
• Color Temperature : contains 3 modes including Cool, War, and User Mode.
• Skin Tone : contains 3 modes including Reddish, Nature and Yellowish.
3. Image
Set the image related setting from this menu.
Page 19

• Sharpness:the adjusting range is from 0 to 100.
• Aspect Control:adjusts the aspect ratio to full, 4:3, 1:1 or OverScan.
4:3 is only available when input source is in 4:3 format. OverScan is only
available for HDMI input source
• ASCR:turns on/off the ASCR(ASUS Smart Contrast Ratio)function.
• Position:adjusts the horizontal position (H-Position) and the vertical position
(V-Position) of the image. The adjusting range is from 0 to 100.
• Focus: reduces Horizontal-line noise and Vertical-line noise of the image by
adjusting(Phase) and (Clock) separately. The adjusting range is from 0
to 100.
4. Input Select
In this function, you can select your desired input source.
Page 20

3.1.2 OSD function introduction
5. System Setup
Allows you to adjust the system.
• Volume: the adjusting range is from 0 to 100.
• OSD Setup :
* Adjusts the horizontal position (H-Position)/the vertical position (V-Position) of
the OSD from 0 to 100.
* Adjusts the OSD timeout from 10 to 120 seconds.
• Language:select OSD language。There are 21 languages for your selection,
including English, French, German, Spanish, Italian, Dutch, Russian, Simplified
Chinese, Traditional Chinese and Japanese…,etc.
• Information: shows the IWB information.
• Power Indicator: turns the power LED indicator on/off.
• All Reset:“Yes” allows you to restore the default settings.
Page 21

3.2. Specifications summary
Display
Touch
Input / Output
Terminals
Model Name
Active Area/Diagonal 1428x804mm / 64.5"
Resolution/Frame Rate 1920x1080 / 120Hz
Pixel Pitch 0.74mm
Brightness 350 cd/m2
Contrast Ratio 4000:1 (normal)
ASCR Smart Contrast Ratio 4,000,000 :1
Viewing Angle 178°(H)/178°(V)
Response Time 8ms (G to G)
PC connector USB
Driver Windows 7, Windows 8.1
Detection Method
Coordinate Resolution 32,767 x 32,767 pixel
Detecting Rate 100pps
Display Port
HDMI
Video Input
DVI DVI-D x1
RGB D-sub x1
Audio Input Stereo 3.5mm jack x1
Stereo
Audio Output
Built-in speakers
Optical touch detecting,
4 points simultaneously
SP6540-T
DP x1
HDMI x1
3.5mm jack x1
10W (x2)
Control
Power
Mechanical
Design
USB Ports
Wired
Wireless
Operating (Max.) 220W
Stand-By (Max.) 0.5 W
Chassis
Mounting Interface(mm) 400x400
Dimension (W x H x D) 1507x 882x 96mm
Net Weight(kg) 40kg
Serial Bus
Controller
USB2.0 with charging
Capability 0.5A
RS232C in, RS232C out
IR remote
Black Painted steel front bezel
Black plastic rear Cover
Page 22

3.3. Trouble Shooting (FAQ)
Problem Possible Solution
• Press the button to check if the IWB is in the
ON mode
• Check if the power cord is properly connected to
Power LED is not ON
The power LED lights
on but there is no
screen image
the IWB and the power outlet.
• Check power LED function in the OSD menu,
press on to active it.
Check if the IWB and the computer are in the ON
mode.
•Make sure the signal cable is properly connected
the IWB and the computer.
• Inspect the signal cable and make sure none of
the pins are bent.
• Connect the computer with another available IWB
to check if the computer is properly working.
Screen image bounces
or a wave pattern is
present in the image
No sound or the sound
is too low
Touch function is not
working
Screen image is too
light or dark
•Make sure the signal cable is properly connected
to the IWB and the computer.
• Move electrical devices that may cause electrical
interference.
• Adjust the volume setting between the IWB and
the PC.
• Make sure the computer already install and active
the computer card device driver.
• Check the IWB is properly connected to the
computer through the USB cable.
• Computer must have Windows 7 version or
above and does not support Android system.
• Check if the computer have HID device.
• Check if the reflective tape in the front bezel are
dirty or broken.
Adjust the Contrast and Brightness settings via OSD
Page 23

3.4. Supported Timing
The following table displays optimum quality modes that the LCD IWB provides.
If the other video modes are used, the IWB will stop working or display a poor
quality picture.
Mode
VGA 640x480@60Hz 800 x 525 31.469 59.940 25.175
SVGA 800x600@60Hz 1056 x 628 37.879 60.317 40.000
XGA 1024x768@60Hz 1344x806 48.363 60.004 65.000
SXGA
WXGA
WXGA+ 1440x900@60Hz 1904x934 55.935 59.887 106.500
UXGA 1600x1200@60Hz 2160x1250 75.000 60.000 162.000
WSXGA+ 1680x1050@60Hz 2240*1089 65.290 59.954 146.250
WUXGA
Resolution
(active dot)
1280x1024@60Hz 1688x1066 63.981 60.020 108.000
1280x960@60Hz 1800x1000 60.000 60.000 108.00
1280x800@60Hz 1680x831 49.702 59.810 83.500
1280x720@60Hz 1650x750 45.00 60.000 74.25
1280x768@60Hz 1664x798 47.776 59.870 79.5
1360x768@60Hz 1792x795 47.712 60.015 85.500
1366x768@60Hz 1792x798 47.712 59.790 85.500
1920x1080@60Hz 2200x1125 67.500 60.000 148.500
1920x1080@60Hz 2080x1111 66.587 59.934 138.500
Resolution
(total dot)
Horizontal
Frequency
(KHz)
Vertical
Frequency
(Hz)
Nominal
Pixel
Clock (MHz)
• HDMI-AV mode support: 480p/ 720p/ 1080p
 Loading...