

Asus Nuvifone G60 User Manual [ru]

nüvifone
nüvifone
™
G60
™
G60
owner’s manual
owner’s manual
© 2009 Garmin Ltd. or its subsidiaries and ASUSTeK Computer, Inc.
0682
Garmin International, Inc.
1200 East 151st Street,
Olathe, Kansas 66062,
USA
Tel. (913) 397.8200 or
(800) 800.1020
Fax (913) 397.8282
All rights reserved. Except as expressly provided herein, no part of this manual may be reproduced,
copied, transmitted, disseminated, downloaded or stored in any storage medium, for any purpose without
the express prior written consent of Garmin and ASUS. Garmin and ASUS hereby grants permission to
download a single copy of this manual onto a hard drive or other electronic storage medium to be viewed
and to print one copy of this manual or of any revision hereto, provided that such electronic or printed
copy of this manual must contain the complete text of this copyright notice and provided further that any
unauthorized commercial distribution of this manual or any revision hereto is strictly prohibited.
Information in this document is subject to change without notice. Garmin and ASUS reserve the right
to change or improve its products and to make changes in the content without obligation to notify any
person or organization of such changes or improvements. Visit www.garminasus.com for current updates
and supplemental information concerning the use and operation of this and other Garmin-Asus products.
The combined Garmin-Asus logo is a trademark of Garmin Ltd. and ASUSTeK Computer, Inc.
Garmin® is a trademark of Garmin Ltd. or its subsidiaries, registered in the USA and other countries.
Ciao!™, nüMaps Guarantee™, and nüvifone™ are trademarks of Garmin Ltd. or its subsidiaries. These
trademarks may not be used without the express permission of Garmin.
The Bluetooth® word mark and logos are owned by the Bluetooth SIG, Inc., and any use of such marks
by Garmin is under license. Microsoft®, Windows®, and Outlook® are registered trademarks of Microsoft
Corporation in the United States and/or other countries. Mac
Computer, Inc., registered in the U.S. and other countries. microSD
subsidiaries. Wi-Fi is a registered mark of the Wi-Fi Alliance.
October 2009 Part Number 190-01118-00 Rev. B Printed in China
Garmin (Europe) Ltd.
Liberty House
Hounsdown Business Park,
Southampton, Hampshire
SO40 9LR UK
Tel. +44 (0) 870.8501241
(outside the UK)
0808 2380000
(within the UK)
Fax +44 (0) 870.8501251
Garmin Corporation
No. 68
Jangshu 2nd Road,
Shijr, Taipei County
Taiwan
Tel. 886/2.2642.9199
Fax 886/2.2642.9099
®
is a registered trademark of Apple
™
is a trademark of SanDisk or its
ASUSTeK
Computer Inc.
15 Li-Te Road
Peitou, Taipei
Taiwan 11259
Tel.
886/2.2894.3447
Fax
886/2.2890.7698

Table of Contents
Table of Contents
Set Up Your nüvifone ......... 1
Look at Your nüvifone ................ 1
Understand the Home Screen
Icons ....................................... 2
Understand the Scrolling Screen
Icons ....................................... 3
Understand the Status
Bar Icons ................................. 4
Install the SIM Card and the
Battery ..................................... 6
Charge the Battery .................... 7
Install the microSD Card............ 8
Remove the microSD Card........ 8
Orient the Screen ...................... 9
Scroll the Screen ....................... 9
Lock the Screen......................... 9
Mount Your nüvifone ................ 10
Acquire Satellites ......................11
nüvifone G60 owner’s manual iii
Use Your Phone ................ 12
Dial a Number.......................... 12
Call a Contact .......................... 12
Set Up Voice Mail .................... 12
Call Voice Mail ......................... 12
Use Call History ....................... 13
Do a Reverse Lookup .............. 14
Receive a Call ......................... 14
Use In-Call Options ................. 14
End a Call ................................ 15
Redial a Number...................... 15
Set Your Ringtones .................. 15
Forward a Call ......................... 16
Use Call Waiting ...................... 17
Make a Conference Call .......... 17

Table of Contents
Search for Locations ........ 18
Find an Address....................... 18
Use the Location Page ............ 19
Find a Point of Interest ............ 19
Call a Location ......................... 19
Navigate to a Contact .............. 20
Set a Home Location ............... 20
Go Home ................................. 20
Find Locations with Local
Search ................................... 21
Save Favorite Locations .......... 21
Find Favorite Locations ........... 21
Find Recently Found
Locations ............................... 22
Search the White Pages .......... 22
Find Movie Times .................... 23
the Map ................................. 25
Plan and Save a Route............ 26
Follow Your Route ............ 27
View the Next Turn Page ......... 28
View the Turn List Page ........... 28
View the Trip Computer Page .. 29
Use the Compass .................... 30
Take a Detour .......................... 30
Add a Stop ............................... 30
About Usage Modes ................ 31
View Trafc ........................ 32
About Trafc ............................ 32
Understand Trafc on Your
Route .................................... 32
Use the Trafc Menu ............... 33
Find Upcoming Events ............ 23
Find Cities................................ 24
Navigate with Photos ............... 24
Find Gas Prices ....................... 25
Enter Coordinates.................... 25
Find a Location Using
iv nüvifone G60 owner’s manual

Table of Contents
Work with Contacts .......... 34
Add a Contact .......................... 34
Edit a Contact .......................... 34
Assign a Picture to a Contact .. 34
Assign a Location to an Existing
Contact .................................. 35
Work with the SIM Phone
Book ...................................... 35
Delete a Contact ...................... 35
Use SMS/Text Messaging 36
Send a Text Message .............. 36
Read a Text Message .............. 36
Send a Location Message ....... 36
Use Text Messaging Options ... 37
Delete Text Messages ............. 37
nüvifone G60 owner’s manual v
Use the Camera ................ 38
Take a Picture .......................... 38
Add Location Information to a
Picture ................................... 38
View a Picture .......................... 38
View a Slideshow .................... 38
Set Your Wallpaper .................. 39
Share a Picture ........................ 39
Navigate to a Picture ............... 39
Use the Music Player........ 40
Play a Song ............................. 40
Create a Playlist ...................... 40
Play a Playlist .......................... 40
Save the Current Playlist ......... 41
Edit a Playlist ........................... 41

Table of Contents
Browse the Web ................ 42
Enter a URL ............................. 42
Use the Browser ...................... 42
Set Your Browser Home
Page ...................................... 43
Save Bookmarks ..................... 43
Clear Your History.................... 43
Use E-Mail ......................... 44
Set Up E-Mail .......................... 44
Send an E-Mail Message ........ 44
Check E-Mail Messages .......... 45
Delete E-Mail Messages.......... 46
Use E-Mail Options.................. 46
Use Ciao!™ ......................... 49
Register with Ciao! .................. 49
Join Ciao!................................. 49
Invite a Friend .......................... 50
Accept an Invitation ................. 50
Remove a Friend ..................... 51
Hide/Show Your Location ........ 51
View My Details ....................... 52
View Ciao! Networks ............... 52
Disable Ciao! ........................... 52
View the Weather
Forecast............................. 53
View a Weather Forecast for
Another Location ................... 53
Update Weather Manually ....... 53
Use the Calendar .............. 54
View the Calendar ................... 54
Schedule an Appointment........ 54
View an Appointment ............... 55
Delete an Appointment ............ 55
vi nüvifone G60 owner’s manual

Table of Contents
Connect to Other
Devices .............................. 56
About Bluetooth Technology .... 56
Synchronize Your nüvifone ...... 58
Transfer Files ........................... 58
Set Up a Wi-Fi Connection ...... 59
Use the Tools .................... 61
Use Where Am I? .................... 61
Use the Calculator ................... 61
Use the Clock .......................... 61
Check Flight Status ................. 63
Use the Converter ................... 64
Use Notes ................................ 65
Work with Checklists ............... 65
nüvifone G60 owner’s manual vii
Customize Your
nüvifone ............................. 67
Change General Settings ........ 67
Change Security Settings ........ 67
Change SIM Card Security
Settings ................................. 68
Change Language Settings ..... 68
Change Date/Time Settings .... 69
Change Audio Settings ............ 69
Change Phone Settings........... 71
Change Navigation Settings .... 71
Change Application Settings.... 73
Change Browser Settings ........ 74
Change the Main Menu Order . 74
Change Display Settings ......... 75
Restore Settings ...................... 76
Clear All User Data .................. 76

Appendix ........................... 77
Get Support ............................. 77
Register Your Product.............. 77
View Software Information ....... 77
nüMaps Guarantee™ ................ 77
Additional Maps ....................... 77
Update the Software ................ 78
Reset the nüvifone................... 78
About GPS Satellite Signals .... 78
About the Battery ..................... 78
Replace the Battery ................. 79
Change the Fuse in the Vehicle
Power Cable ......................... 79
Mount on Your Dashboard ....... 80
Remove the SIM Card ............. 80
Declaration of Conformity ........ 80
Troubleshooting ....................... 81
Specications .......................... 83
Index .................................. 85
Set Up Your nüvifone
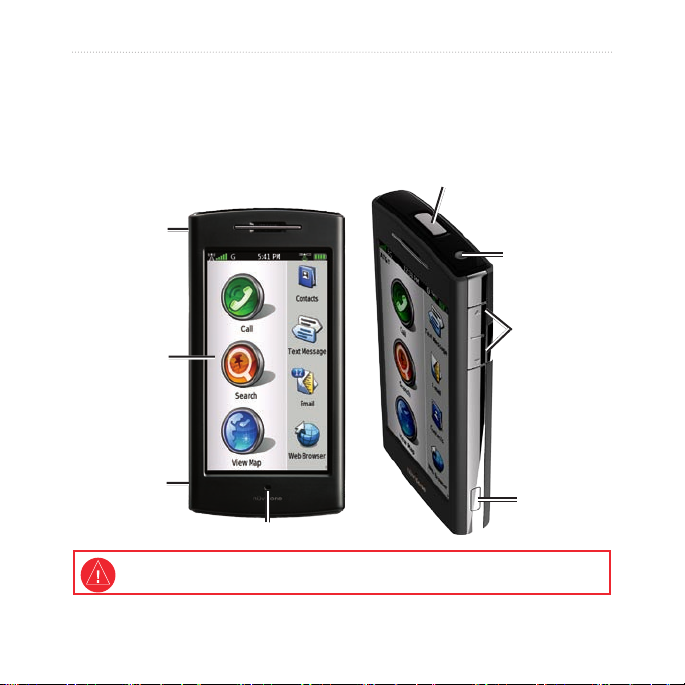
Look at Your nüvifone
Power key: Press and hold to turn on/off; press
and release to lock and unlock the screen.
microSD™
card slot
(under cap)
Touchscreen
Set Up Your nüvifone
Headphone/
audio out jack
Volume
up/down
keys
Mini-USB
connector
Microphone
See the Important Safety and Product Information section in the quick start manual in the
product box for product warnings and other important information.
nüvifone G60 owner’s manual 1
Camera key
Set Up Your nüvifone
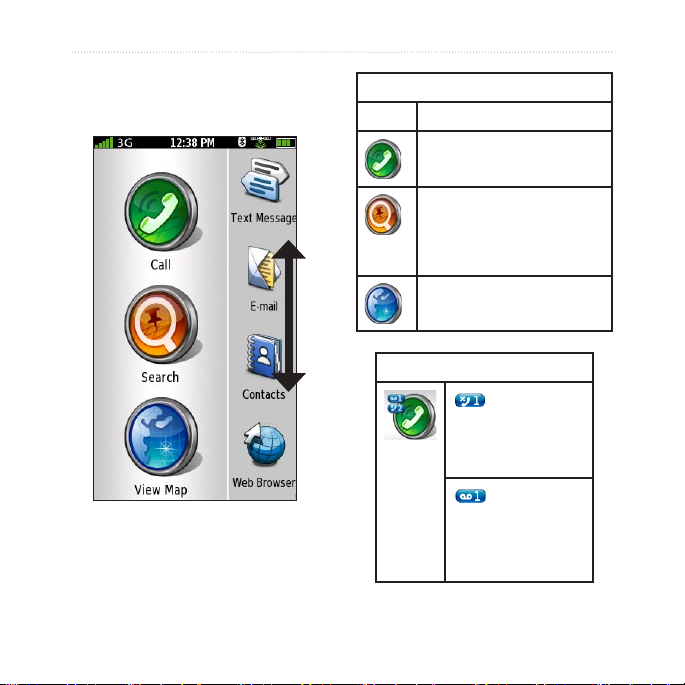
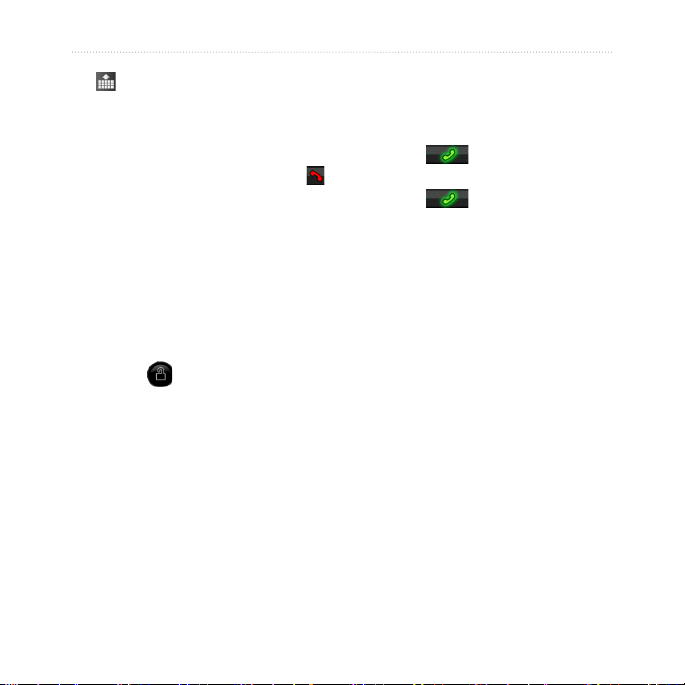
Understand the Home Screen Icons
The nüvifone Home screen has
scrollable icons. Touch and drag
to view all the icons. For more
Icon Description
Main Icons
Touch to make a phone
call.
Touch to search for
locations, including
restaurants, hotels, and
auto services.
Touch to view the map.
Call Icons
—Missed call
icon showing the
number of missed
calls.
—Voice mail
icon showing the
number of new
voice mails.
information, see pages 3–4.
2 nüvifone G60 owner’s manual
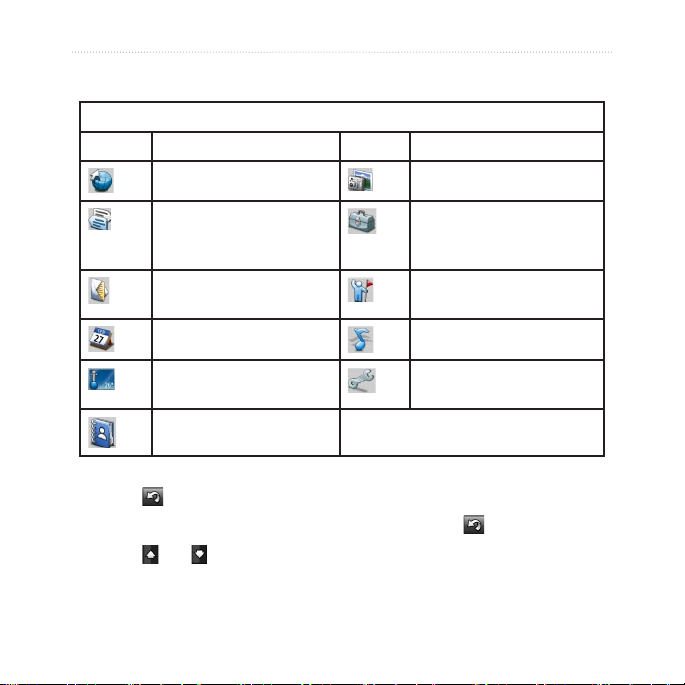
Understand the Scrolling Screen Icons
Scrolling Icons
Icons Application Icons Application
Browse the web. Use the camera.
Access text messages. Access the tools, such as
checklists and the alarm
clock.
Access your e-mail
account(s).
Access your calendar. Open the music player.
Open Ciao!.
Set Up Your nüvifone
View weather information
for your area.
Access your contacts.
Access the settings for
your phone.
Tips and Shortcuts
Touch to return to the previous screen.
•
To quickly return to the Home screen, touch and hold from any screen.
•
Touch and to see more choices. Quickly tap these buttons to scroll
•
faster.
nüvifone G60 owner’s manual 3
Set Up Your nüvifone
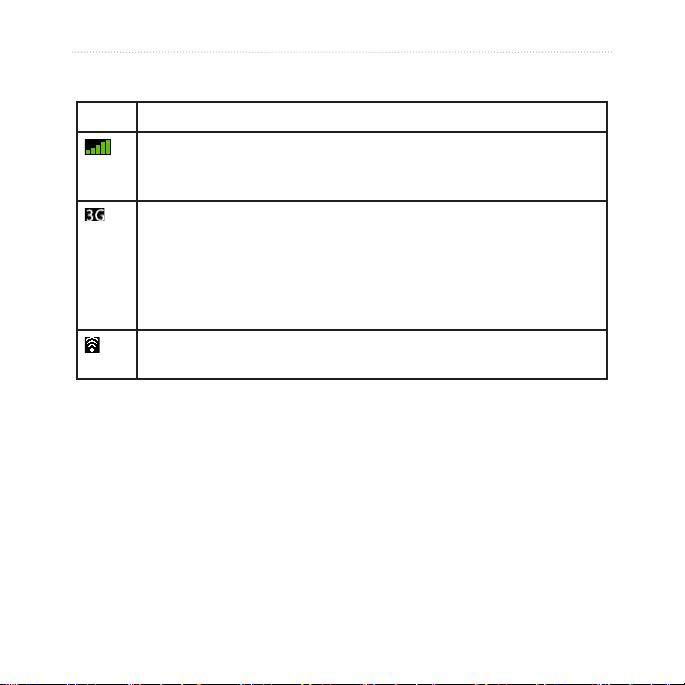
Understand the Status Bar Icons
Icon Description
Mobile signal strength. The more colored bars that appear, the
stronger the signal. A red “X” indicates no mobile signal strength.
Network connectivity. This icon appears when the nüvifone is
connected for Internet access. If the icon is white, the connection
is in use. If the icon is gray, your nüvifone is trying to establish the
data connection with the network. The connection type appears
next to the icon: G—GPRS (2.5), E—Edge (2.75), 3G—3G (3.0).
Wi-Fi® connectivity. This icon appears in place of the network
connectivity icon when the nüvifone is using Wi-Fi.
4 nüvifone G60 owner’s manual
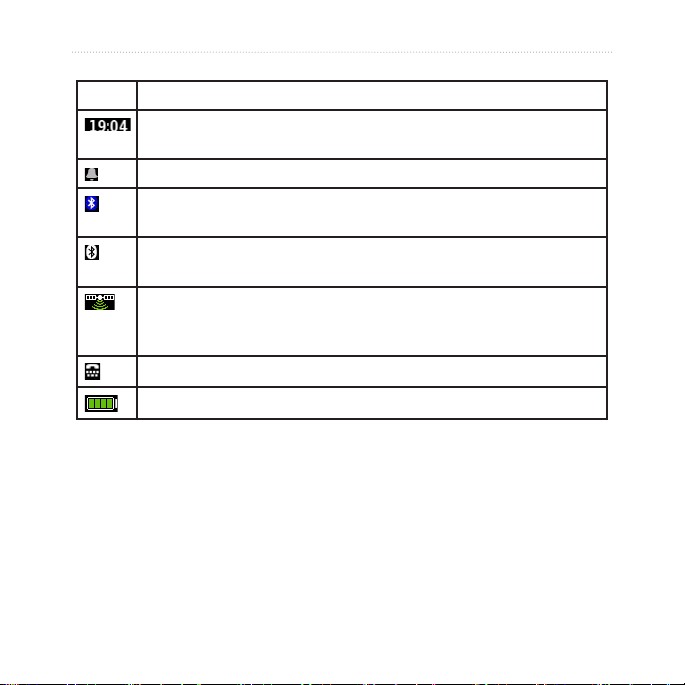
Icon Description
Current time. The time is based on the location of the device or the
selected time zone.
An alarm is set.
The nüvifone is connected to a device using Bluetooth
technology.
Bluetooth wireless technology is enabled. The nüvifone is not
connected to a device.
Satellite connectivity. The more colored bars that appear, the
stronger the satellite signal. If there is no satellite signal or the
nüvifone is in simulator mode, a red “X” appears.
Teletypewriter (TTY) mode is activated.
Battery charge. See page 7 for more information.
Set Up Your nüvifone
®
wireless
nüvifone G60 owner’s manual 5
Set Up Your nüvifone
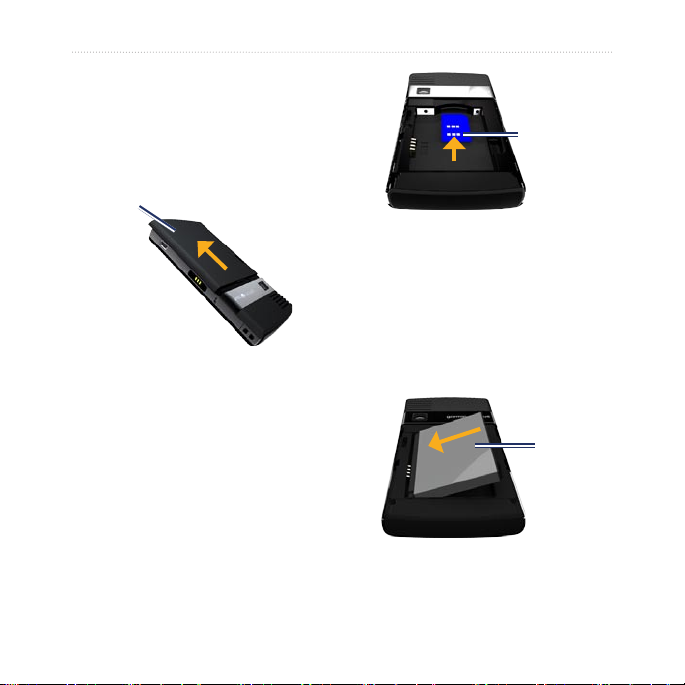
Install the SIM Card and the Battery
1. Press down rmly on the battery
cover and slide it off the back of
your nüvifone.
Battery cover
2. Insert the SIM card in the
slot at the top of the battery
compartment. Insert the notched
corner of the SIM card rst with
the gold contacts facing up. The
SIM card clicks into place.
SIM card
3. Locate the lithium-ion battery that
came in the product box.
4. Locate the metal contacts on the
end of the lithium-ion battery.
5. Insert the battery so that the
metal contacts on the battery
match up with the metal contacts
inside the battery compartment.
Battery
6. Slide the battery cover onto the
back of your nüvifone.
6 nüvifone G60 owner’s manual
Set Up Your nüvifone
Charge the Battery
1. Insert the appropriate plug
adapter into the AC adapter.
2. Connect the small end of the USB
cable to the mini-USB connector
on the side of your nüvifone.
3. Connect the large end of the USB
cable to the AC adapter.
4. Plug the AC adapter into a power
outlet.
Alternate Charging Methods
Insert your nüvifone into the
•
cradle, and connect the vehicle
power cable to the cradle.
Connect the vehicle power cable
•
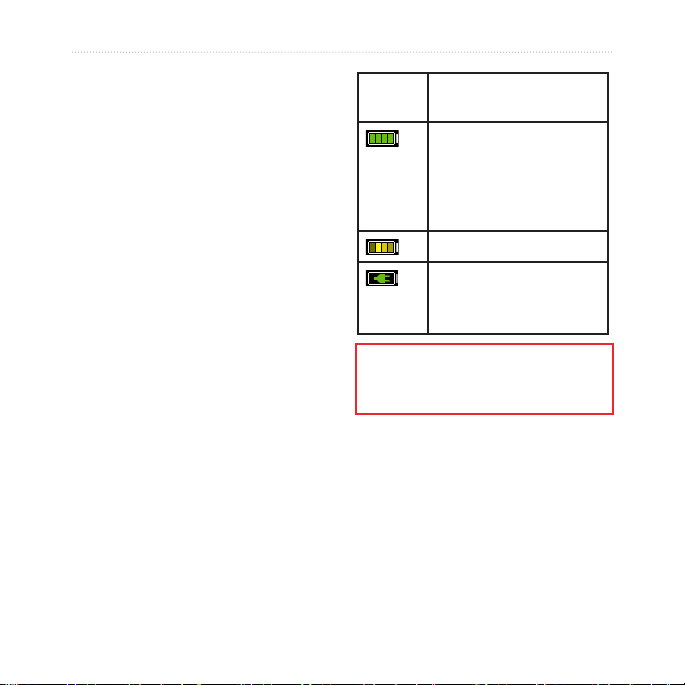
Battery
Icons
WARNING: This product contains a lithium-
ion battery. To prevent damage, remove the
device from the vehicle when exiting or store it
out of direct sunlight.
Meaning
Battery life. The more
colored bars that
appear, the greater
the remaining battery
charge.
Battery is charging.
External power is
connected, and the
battery is fully charged.
to your nüvifone.
Connect your nüvifone to a
•
computer using the USB cable
included in the box.
Insert the battery into the battery
•
charger (accessory). For more
information about accessories, go
to www.garminasus.com.
nüvifone G60 owner’s manual 7
Set Up Your nüvifone
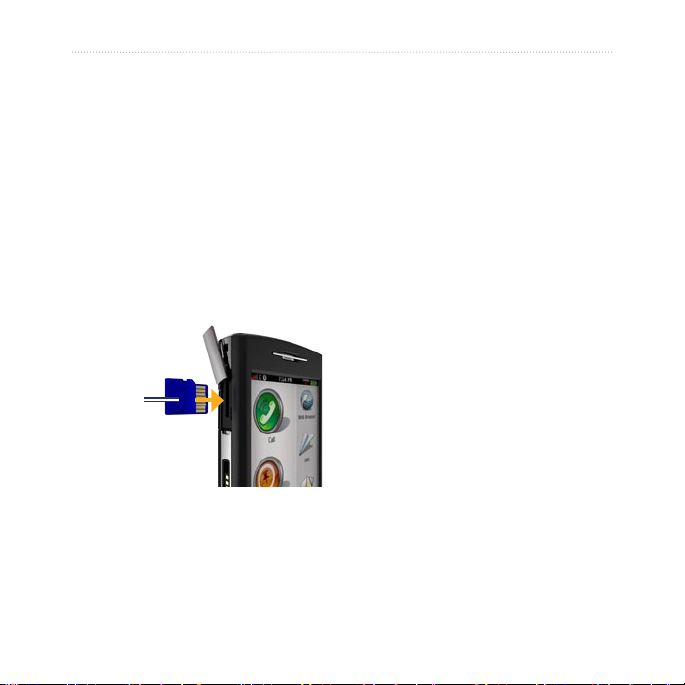
Install the microSD Card
The use of a microSD card is
optional.
1. On the side of your nüvifone, ip
up the rectangular plastic cap and
slide it over to reveal the microSD
card slot.
2. Insert the microSD card with
the contacts facing the nüvifone
screen. The microSD card will
lock into place.
microSD
card
3. Push the plastic cap back into
place.
8 nüvifone G60 owner’s manual
Remove the microSD Card
1. On the side of your nüvifone, ip
up the rectangular plastic cap and
slide it over to reveal the microSD
card slot.
2. Push the microSD card in until it
clicks.
3. Pull out the microSD card.
Set Up Your nüvifone
Orient the Screen
Rotate your nüvifone to the left
•
or the right to view in horizontal
(landscape) mode.
From horizontal mode, rotate
•
your nüvifone to the left or the
right to view in vertical (portrait)
mode.
Scroll the Screen
Touch and slide your nger to
•
slowly scroll the menu.
Touch, quickly slide, and lift your
•
nger to continue scrolling the
menu after removing your nger.
Touch the screen to stop
•
scrolling, or wait for the image to
slow to a stop.
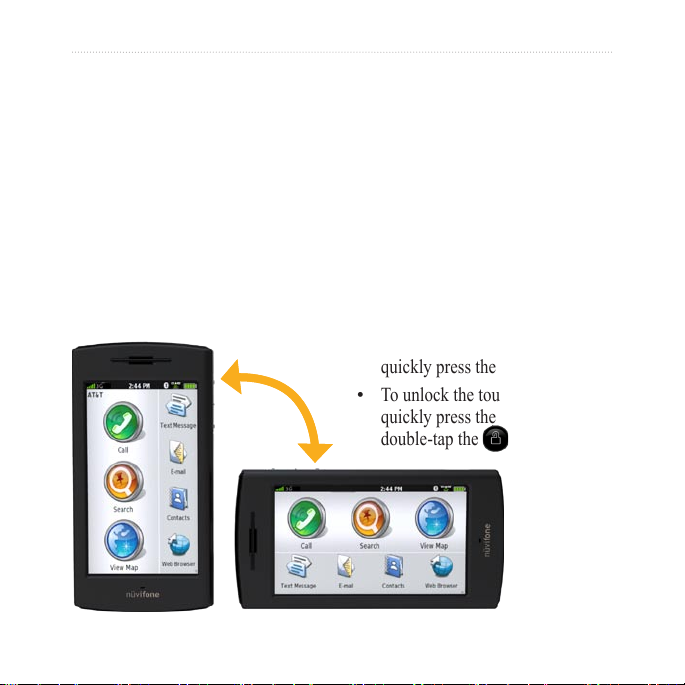
Lock the Screen
With your nüvifone turned on,
•
quickly press the Power key.
To unlock the touchscreen,
•
quickly press the Power key and
double-tap the unlock icon.
nüvifone G60 owner’s manual 9
Set Up Your nüvifone
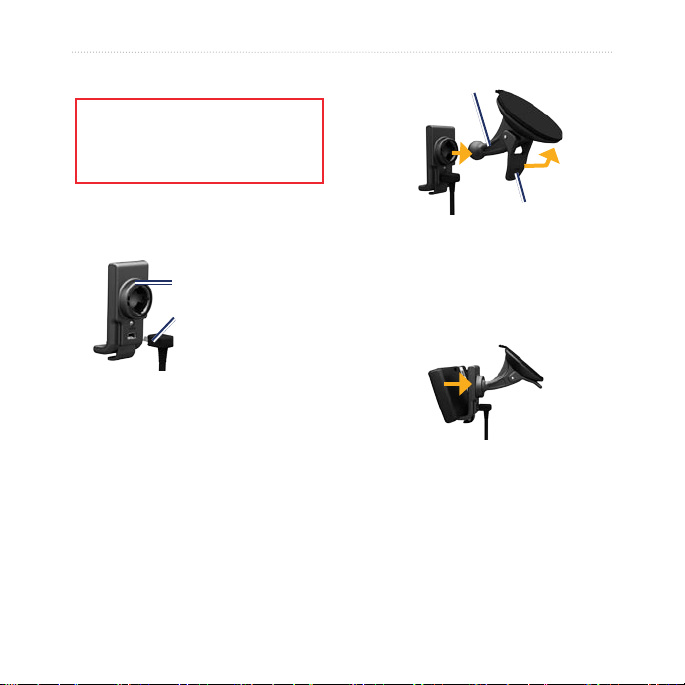
Mount Your nüvifone
Before mounting the nüvifone, see the
Important Safety and Product Information
section in the Quick Start Manual for
information about laws pertaining to
windshield mounting.
1. Plug the vehicle power cable into
the power connector on the back
of the cradle.
Cradle
6. Fit the gold contacts on the left
Suction cup arm
Lever
side of your nüvifone into the
cradle.
7. Tilt the nüvifone back until it
Vehicle power
snaps into the cradle.
cable
2. Remove the clear plastic from the
suction cup. Clean and dry your
windshield and the suction cup
with a lint-free cloth.
3. Place the suction cup on the
windshield.
8. Plug the other end of the vehicle
power cable into a power outlet in
your vehicle.
4. Flip the lever back, toward the
windshield.
5. Snap the cradle onto the suction
cup arm.
10 nüvifone G60 owner’s manual

Acquire Satellites
1. Go outdoors to an open area,
away from tall buildings and trees.
2. Turn on your nüvifone.
Acquiring satellite signals can take a
few minutes. The satellite icon
indicates satellite strength. When
at least one of the lines is green,
your nüvifone has acquired satellite
signals.
Set Up Your nüvifone
nüvifone G60 owner’s manual 11

Use Your Phone
Use Your Phone
Dial a Number
The rst time you touch the call
icon, the nüvifone opens the Dial
page.
1. From the Home screen, touch
Call (> Dial).
2. Enter the phone number using
the touch keypad.
3. Touch
number.
Call a Contact
1. From the Home screen, touch
Call > Contacts.
2. Select a contact, and touch
For more information about adding
to dial the phone
Call.
Set Up Voice Mail
1. From the Home screen, touch
Settings > Phone > Voice Mail
Number, and verify that your
voice mail number is correct.
2. Touch
Call > Contacts > Voice
Mail, and follow the prompts.
Call Voice Mail
The voice mail icon appears on the
Home screen when you have new
voice mail.
Select one of following methods
to call your voice mail:
Touch Call > Contacts >
•
Voice Mail.
Touch Call > Dial, and touch
•
and hold “1.”
Touch Contacts > Voice Mail.
•
and editing contacts, see page 35.
12 nüvifone G60 owner’s manual
Use Your Phone
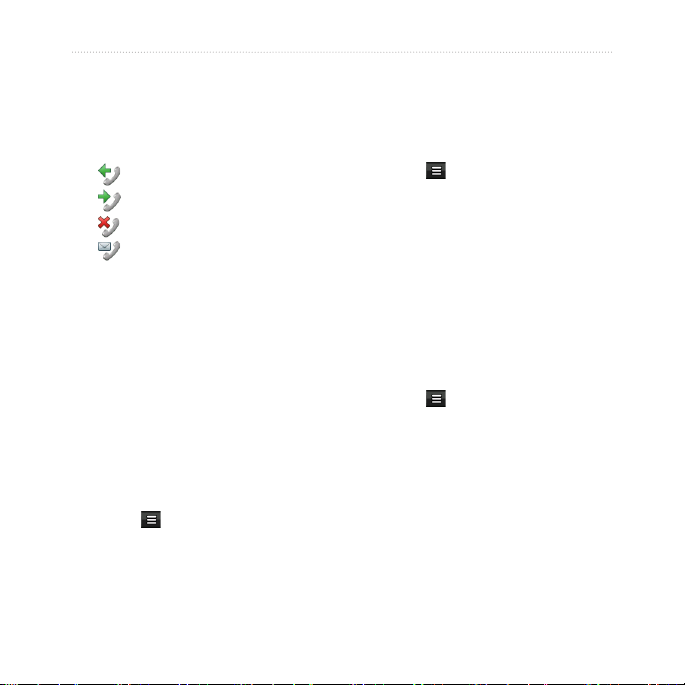
Use Call History
1. From the Home screen, touch
Call > Call History. Calls are
organized into four categories:
—Dialed call
—Received call
—Missed call
—Voice mail
2. Select a call.
3. Select an option:
Call—call the number.
•
Text—send a text message.
•
Go!—navigate to the location
•
assigned to the number, if
available.
Delete All Calls
1. From the Home screen, touch
Call > Call History.
2. Touch
nüvifone G60 owner’s manual 13
> Clear All History.
Delete a Call
1. From the Home screen, touch
Call > Call History.
2. Select a call.
3. Touch
History.
4. Touch
> Delete from Call
Yes.
View Related Calls
Related calls are calls made to or
received from the same number.
1. From the Home screen, touch
Call > Call History.
2. Select a call.
3. Touch
> View Related Calls.
A list of related calls appears
displaying the length of each call or
a status message.

Use Your Phone
Do a Reverse Lookup
This service is available as a paid
subscription. Reverse lookup is not
available in all areas.
A reverse lookup allows you to
search for the address of a phone
number that called you.
1. From the Home screen, touch
Call > Call History.
2. Select a call.
3. Touch
> Reverse Lookup.
Receive a Call
Touch Answer to answer the call.
Touch
NOTE: With some mobile phone
To answer a call when the screen
14 nüvifone G60 owner’s manual
Ignore to ignore a call.
plans, touching Ignore will send
the call to your voice mail.
is locked, double-tap .
To ignore a call when the screen
is locked, press the Power key.
To silence a call, touch the
Volume down key.
Use In-Call Options
When you are on a call, you can
perform other tasks. The following
options are available on the In-Call
page:
Speaker—activate the
•
speakerphone.
Mute—silence the audio input
•
to the microphone. The other
caller will not be able to hear you
speak.
Add—select a number to add to
•
the current call when placing a
conference call.
Hold—place the current call on
•
hold.
End Call—end the current call.
•
Use Your Phone
—open a numeric keypad for
•
automated systems that require
numeric entries.
To return to the In-Call page, touch
Call on the Home screen or touch
(when available).
End a Call
During a call, your nüvifone dims
and goes into sleep mode to prevent
accidental taps.
1. If the screen is dimmed, doubletap the unlock icon.
If the screen is black, press and
release the Power key.
2. Touch
nüvifone G60 owner’s manual 15
End Call.
Redial a Number
1. From the Home screen, touch
Call > Dial.
2. Touch
appears in the white bar.
3. Touch
number.
. The last-dialed call
again to call the
Set Your Ringtones
You can set a default ringtone and
assign different ringtones to contacts.
If you have loaded music onto your
nüvifone, the songs are also available
as ringtones. For more information
on transferring music les to your
nüvifone, see page 59.

Use Your Phone
Set a Default Ringtone
1. From the Home screen, touch
Settings > Audio > Sounds.
2. Touch the button under
3. Touch
4. Select a ringtone, and touch
Ringtones.
Phone.
OK.
Set a Ringtone for a Contact
1. From the Home screen, touch
Call > Contacts.
2. Select a contact.
2. Touch
3. Scroll down to the Personal
category, and touch Ringtone.
4. Select a ringtone, and touch
16 nüvifone G60 owner’s manual
> Edit Contact.
OK.
Forward a Call
You can forward incoming calls to
another number.
1. From the Home screen, touch
Settings > Phone.
2. Touch the button under
Forward.
3. Touch the button under
Forwarding.
4. Touch
5. Select an option:
On > OK.
History—select a number
•
from your call history.
Contacts—select a number
•
from your contacts.
Enter Number—enter a
•
number.
Call

Use Your Phone
Use Call Waiting
1. From the Home screen, touch
Settings > Phone.
2. Touch the button under
Waiting.
3. Touch
On > OK.
Call
Make a Conference Call
1. Dial the rst phone number.
2. Touch
3. Select an option to dial the
4. Touch
The Conference Call page appears.
nüvifone G60 owner’s manual 17
Add.
second phone number.
Join.
Speak Privately During a
Conference Call
1. From the Conference Call page,
touch . A list appears with the
participating callers.
2. Touch
Private next to the caller
you want to speak privately with.
Other members of the conference
call can continue to speak to each
other.
Disconnect a Participating
Call
1. From the Conference Call page,
touch . A list appears with the
participating callers.
2. Touch
Drop next to the caller you
want to disconnect.

Search for Locations
Search for Locations
3. Touch
Use the Search menu to nd
addresses, Points of Interest
(restaurants, hotels, attractions), and
other items included in the built-in
map data.
4. Enter the number of the address,
Find an Address
NOTE: Depending on the version of
the built-in map data on your device,
the button names and the order of
steps could be different than the
steps below.
1. From the Home screen, touch
Search > Address.
2. Change the state, country, or
province, if necessary.
18 nüvifone G60 owner’s manual
5. Enter the street name, and touch
6. Select the correct street in the list,
7. Touch the address, if necessary.
8. Touch
Touch to save the location or to
send a location message.
Spell City, enter the
city/postal code, and touch Done.
Select the city/postal code in the
list. (Not all map data provides
postal code searching.) If you are
unsure of the city, touch Search
All.
and touch Done.
Done.
if necessary.
Go!, or touch View Map to
view the location on the map.
Search for Locations
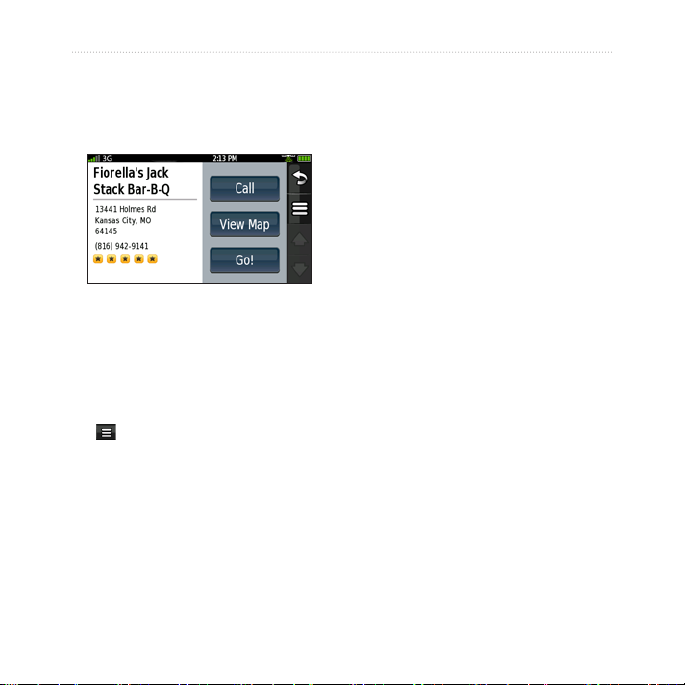
Use the Location Page
When you select a location, the
Location page appears.
Find a Point of Interest
The detailed maps loaded in your
nüvifone contain millions of points
of interest, such as restaurants,
hotels, and auto services.
1. From the Home screen, touch
Search > Points of Interest.
2. Select a category and a
subcategory, if necessary.
Call—touch to call the location.
•
View Map—touch to view the
•
location on the map.
Go!—touch to create a route to
•
the location.
—touch to save the location or
•
to send the location in a location
message.
nüvifone G60 owner’s manual 19
3. Select a destination.
Call a Location
Phone numbers are not included for
all locations.
1. From the Home screen, touch
Search.
2. Touch a category and a
subcategory, if necessary.
3. Select a location.
4. Touch
Call.

Search for Locations
Navigate to a Contact
If you have entered address
information for a contact, you
can create a route to the contact’s
address.
1. From the Home screen, touch
Search > Contacts.
2. Select a contact from the list.
3. Touch
Go!.
Set a Home Location
Set your home location for the place
you return to most often.
1. From the Home screen, touch
Search > Home.
2. Select an option:
Enter My Address
•
Use My Current Location
•
Choose from Recently
•
Found
20 nüvifone G60 owner’s manual
Go Home
To navigate home after you have set
your home location, touch Search
> Home > Go!. Your home location
is also stored in your Favorites. See
page 21 for more information.
Edit Your Home Location
1. From the Home screen, touch
Search > Home.
2. Touch
3. Select an option:
•
•
•
•
•
> Edit.
Change Name
Attach Picture or Change
Picture
Change Map Symbol
Change Phone Number
Change Categories

Search for Locations
Delete Your Home Location
1. From the Home screen, touch
Search > Home.
2. Touch
3. Touch
4. Touch
> Edit.
> Delete.
Yes.
TIP: To enter a new home location,
touch Search > > Set Home
Location. Select an option.
Find Locations with Local Search
A data connection is required to use
this service. Businesses listed with
Local Search include ratings based
on user reviews.
1. From the Home screen, touch
Search > Local Search.
2. Select a category, or touch
Name.
3. Select a location.
nüvifone G60 owner’s manual 21
Spell
NOTE: Local Search is not available
in all areas.
Save Favorite Locations
You can save locations in your
Favorites so you can quickly nd
them and create routes to them.
Your nüvifone can store about 3,000
favorite locations.
1. After you select a location, touch
> Save to save the location to
your Favorites.
2. Touch
OK.
Find Favorite Locations
1. From the Home screen, touch
Search > Favorites. Your saved
locations are listed by category.
2. Touch
All Categories to search
all your saved locations.

Search for Locations
Find a Favorite Location by
Spelling the Name
1. From the Home screen, touch
Search > Favorites.
2. Select a category, if necessary.
3. Touch
4. Enter the name of the location,
Spell.
and touch Done.
This process clears the list of
recently found locations. These
locations will not be deleted from
your nüvifone.
Search the White Pages
This service is available as a paid
subscription. White Pages are
not available in all areas. A data
Find Recently Found Locations
Your nüvifone stores the last 50
locations you have found.
1. From the Home screen, touch
Search > Recently Found.
2. Select a location.
Clear the Recently Found List
1. From the Home screen, touch
Search > Recently Found.
2. Touch
3. Touch
22 nüvifone G60 owner’s manual
> Clear.
Yes.
connection is required for this
feature.
Search by Name in White
Pages
1. From the Home screen, touch
Search > White Pages > By
Name.
2. Enter the last name, and touch
Next.
3. Enter the rst name, if necessary,
and touch Done.
To re-enter the name, touch Retry.
 Loading...