

Page 1

®
TV Tuner Card
The PCI-based
TV T uner Card
USER’S MANUAL
Hardware & Video Drivers
Page 2

USER’S NOTICE
No part of this manual, including the products and software described in it, may be reproduced, transmitted, transcribed, stored in a retrieval system, or translated into any language
in any form or by any means, except documentation kept by the purchaser for backup purposes, without the express written permission of ASUSTeK COMPUTER INC. (“ASUS”).
ASUS PROVIDES THIS MANUAL “AS IS” WITHOUT WARRANTY OF ANY KIND,
EITHER EXPRESS OR IMPLIED, INCLUDING BUT NOT LIMITED TO THE IMPLIED
W ARRANTIES OR CONDITIONS OF MERCHANTABILITY OR FITNESS FOR A P ARTICULAR PURPOSE. IN NO EVENT SHALL ASUS, ITS DIRECTORS, OFFICERS,
EMPLOYEES OR AGENTS BE LIABLE FOR ANY INDIRECT, SPECIAL, INCIDENTAL, OR CONSEQUENTIAL DAMAGES (INCLUDING DAMAGES FOR LOSS OF
PROFITS, LOSS OF BUSINESS, LOSS OF USE OR DAT A, INTERRUPTION OF BUSINESS AND THE LIKE), EVEN IF ASUS HAS BEEN ADVISED OF THE POSSIBILITY
OF SUCH DAMAGES ARISING FROM ANY DEFECT OR ERROR IN THIS MANUAL
OR PRODUCT.
Product warranty or service will not be extended if: (1) the product is repaired, modified or
altered, unless such repair, modification of alteration is authorized in writing by ASUS; or
(2) the serial number of the product is defaced or missing.
Products and corporate names appearing in this manual may or may not be registered trademarks or copyrights of their respective companies, and are used only for identification or
explanation and to the owners’ benefit, without intent to infringe.
• Windows, MS-DOS, and DirectX are registered trademarks of Microsoft Corporation.
• Adobe and Acrobat are registered trademarks of Adobe Systems Incorporated.
The product name and revision number are both printed on the product itself. Manual revisions are released for each product design represented by the digit before and after the period
of the manual revision number. Manual updates are represented by the third digit in the
manual revision number.
For previous or updated manuals, BIOS, drivers, or product release information, contact ASUS
at http://www.asus.com.tw or through any of the means indicated on the following page.
SPECIFICATIONS AND INFORMATION CONTAINED IN THIS MANUAL ARE FURNISHED FOR INFORMATIONAL USE ONLY, AND ARE SUBJECT TO CHANGE AT
ANY TIME WITHOUT NOTICE, AND SHOULD NOT BE CONSTRUED AS A COMMITMENT BY ASUS. ASUS ASSUMES NO RESPONSIBILITY OR LIABILITY FOR
ANY ERRORS OR INACCURACIES THAT MA Y APPEAR IN THIS MANUAL, INCLUDING THE PRODUCTS AND SOFTWARE DESCRIBED IN IT.
Copyright © 2002 ASUSTeK COMPUTER INC. All Rights Reserved.
Product Name: ASUS TV Tuner Card
Manual Revision: 1.01 E1102
Release Date: Augest 2002
2
ASUS TV Tuner Card User’s Manual
Page 3

ASUS CONTACT INFORMATION
ASUSTeK COMPUTER INC. (Asia-Pacific)
Address: 150 Li-Te Road, Peitou, Taipei, Taiwan 112
General Tel: +886-2-2894-3447
General Fax: +886-2-2894-3449
General Email: info@asus.com.tw
Technical Support
MB/Others (Tel): +886-2-2890-7121 (English)
Notebook (Tel): +886-2-2890-7122 (English)
Desktop/Server (T el): +886-2-2890-7123 (English)
Support Fax: +886-2-2890-7698
Support Email: tsd@asus.com.tw
Web Site: www.asus.com.tw
Newsgroup: cscnews.asus.com.tw
ASUS COMPUTER INTERNATIONAL (America)
Address: 6737 Mowry Avenue, Mowry Business Center,
Building 2, Newark, CA 94560, USA
General Fax: +1-510-608-4555
General Email: tmd1@asus.com
Technical Support
Support Fax: +1-510-608-4555
General Support: +1-502-995-0883
Web Site: www.asus.com
Support Email: tsd@asus.com
ASUS COMPUTER GmbH (Europe)
Address: Harkortstr. 25, 40880 Ratingen, BRD, Germany
General Fax: +49-2102-442066
General Email: sales@asuscom.de (for marketing requests only)
Technical Support
Support Hotline: MB/Others: +49-2102-9599-0
Notebook (Tel): +49-2102-9599-10
Support Fax: +49-2102-9599-11
Support (Email): www.asuscom.de/de/support (for online support)
Web Site: www.asuscom.de
ASUS TV Tuner Card User’s Manual 3
Page 4

CONTENTS
I. Introduction.......................................................................... 7
Highlights.............................................................................................. 7
Models A vailable .................................................................................. 7
Getting started....................................................................................... 8
2. Hardware Setup.................................................................... 9
Operating System Requirements .....................................................9
ASUS TV Tuner Card Layout........................................................10
Installation Procedures................................................................... 11
Connecting the Audio ....................................................................12
ASUS TV Tuner Card Connectors.................................................12
Using Your Tuner Card ..................................................................13
Connecting Your Tuner Card .........................................................15
Using the Remote Control .............................................................17
Installing Batteries .........................................................................17
ASUS Remote Controller Layout ..................................................18
ASUS Remote Controller Functions..............................................20
3. Software Setup .................................................................... 23
Device Driver Installation..............................................................23
Windows 98/ME ................................................................................. 23
Method 1: ASUS Quick Setup Program ....................................... 23
Method 2: Plug and Play .............................................................. 24
Windows 2000/XP .............................................................................. 26
Method 1: ASUS Quick Setup Program ....................................... 26
Method 2: Plug and Play .............................................................. 27
Install ASUS Remote Controller Driver ............................................. 29
Method : ASUS Quick Setup Program ......................................... 29
Install DirectX..................................................................................... 31
Uninstall the TV Tuner Card Drivers.................................................. 32
Windows 98 / ME......................................................................... 32
Method : Usingt he Control Panel.......................................... 32
Windows 2000 / XP...................................................................... 33
Method : Using Control Panel................................................ 33
Install V ideoSecurity........................................................................... 34
Install PowerVCR II ........................................................................... 35
Install PowerDirector Pro ................................................................... 36
Install Medi@Show ............................................................................ 37
Install ASUSDVD XP......................................................................... 38
4. Software Reference............................................................. 39
ASUS Remote Master....................................................................39
PowerVCR II .................................................................................41
4
ASUS TV Tuner Card User’s Manual
Page 5

CONTENTS
Displaying Options ............................................................................. 43
Recording............................................................................................ 43
Instant TV Replay ............................................................................... 46
Programming with CyberEPG ............................................................ 47
PowerDirector 2.0 ..........................................................................48
Medi@Show ..................................................................................50
ASUS V ideoSecurity .....................................................................52
5. Resolution Table.................................................................. 57
6. Troubleshooting .................................................................. 59
ASUS TV Tuner Card User’s Manual 5
Page 6

FCC & DOC COMPLIANCE
Federal Communications Commission Statement
This device complies with FCC Rules Part 15. Operation is subject to the following
two conditions:
• This device may not cause harmful interference, and
• This device must accept any interference received, including interference that
may cause undesired operation.
This equipment has been tested and found to comply with the limits for a Class B
digital device, pursuant to Part 15 of the FCC Rules. These limits are designed to
provide reasonable protection against harmful interference in a residential installation. This equipment generates, uses and can radiate radio frequency energy and, if
not installed and used in accordance with manufacturer’s instructions, may cause
harmful interference to radio communications. However, there is no guarantee that
interference will not occur in a particular installation. If this equipment does cause
harmful interference to radio or television reception, which can be determined by
turning the equipment off and on, the user is encouraged to try to correct the interference by one or more of the following measures:
• Reorient or relocate the receiving antenna.
• Increase the separation between the equipment and receiver.
• Connect the equipment to an outlet on a circuit different from that to which
the receiver is connected.
• Consult the dealer or an experienced radio/TV technician for help.
WARNING! The use of shielded cables for connection of the monitor to the
graphics card is required to assure compliance with FCC regulations. Changes
or modifications to this unit not expressly approved by the party responsible for
compliance could void the user’s authority to operate this equipment.
Canadian Department of Communications Statement
This digital apparatus does not exceed the Class B limits for radio noise emissions
from digital apparatus set out in the Radio Interference Regulations of the Canadian Department of Communications.
This Class B digital apparatus complies with Canadian ICES-003.
Cet appareil numérique de la classe B est conforme à la norme NMB-003 du Canada.
Macrovision Corporation Product Notice
This product incorporates copyright protection technology that is protected by
method claims of certain U.S. patents and other intellectual property rights owned
by Macrovision Corporation and other rights owners. Use of this copyright protection technology must be authorized by Macrovision Corporation, and is intended
for home and other limited viewing uses only unless otherwise authorized by
Macrovision Corporation. Reverse engineering or disassemby is prohibited.
6
ASUS TV Tuner Card User’s Manual
Page 7

I. Introduction
Thank you for purchasing an ASUS TV tuner card. The first TV tuner card to attain
®
Microsoft
programs, making scheduled recordings, capturing video from TVs or camcorders,
and making movies on your PC. The ASUS TV TUNER CARD introduces a new
dimension in video quality by incorporating the newest video/audio decoder for
enhanced performance, functionality and enjoyment. Combined with the ASUS
remote control and useful software bundle, the ASUS TV TUNER CARD lets your
PC be a smart multimedia center!
Highlights
• Use the advanced video/audio decoder - Conexant CX23880 that has
a 10-bit video ADCs for most excellent video quality
• Philips NTSC TV tuner module built-in
• Enjoy a total TV experience fr om the convenience of your computer
• Provide with special TV experience - viewing, TimeShift, scheduled
recording, capture still image with MPEG I, II compression
WHQL Certification, provides a total solution suitable for watching TV
1. Introudction
1. Introudction
Highlights/Models
• Support STEREO and SAP modes while watching TV
• Come with a remotes control for the ultimate in convenience
• Video-in connector for external video stream
• Let you capture/edit/author/burn your favorite videos and images in
one software package
• Build your own video security and monitoring system
• WDM video capture driver for Windows 98/ME/2000/XP
• Microsoft
• Microsoft
®
DirectShow
®
WHQL certified drivers inside
TM
compliant
• PCI revision 2.2 compliant
• Videoconference over the Internet
7ASUS TV Tuner Card User’s Manual
Page 8

Highlights/Models
1. Introudction
1. Introudction
Getting Started
The following steps will help you get your ASUS TV Tuner Card connected and
working quickly and assume that your computer is shut down and turned off.
1 Unpack your ASUS TV Tuner Card pagkage.
Shown here are the TV tuner card and accessories.
ASUS TV tuner card
Cables
(1) Video-in cable for connection to video camera or camcorder
(2) Audio cable for connection to sound card
Software
(1) ASUS installation driver CD
(2) ASUS VideoSecurity utility
(3) ASUSDVD XP
(4) CyberLink
(5) CyberLink
(6) CyberLink
I. Introduction
utility
®
PowerVCR II bundled
®
PowerDirector bundled
®
Medi@Show bundled
Remote control with transmitter, receiver and batteries
ASUS TV Tuner Card user’s manual
2 Connect cables and other accessories.
•
Details for connecting a cable TV system and home antenna to your tuner starts
on page 13.
•
Details for connecting other devices to your tuner card are on page 15.
3 Install batteries in remote control.
•
Details are on page 17.
4 Start your computer.
5 Install the Device drivers.
•
Details for installing the software to run your tuner card are on page 23.
6 Install the DirectX.
•
Details for installing the software to run your tuner card are on page 31.
7 Installing software.
•
Details for installing the software to run your tuner card are on page 34.
8 Using software.
•
Details for using the software to run your tuner card are on page 39.
ASUS TV Tuner Card User’s Manual8
Page 9

2. Hardware Setup
Operating System Requirements
• Intel® or AMD® chipset-based mainboard recommended
• One available PCI compliant slot
• Minimum 64 MB system memory
• VGA card with 16MB memory above
• CD-ROM drive (for driver installation)
• Sound card needed
®
• Microsoft Windows 9X
• DirectX® 8 or above needed
NOTES
/ME®/2000®/XP
®
• To avoid damage to your tuner card, unplug your computer’s power sup-
ply before inserting your tuner card into the PCI slot.
• V ideoconferencing requires the addition of a video camera or video camcorder .
2. H/W Setup
9ASUS TV Tuner Card User’s Manual
Page 10
2. H/W Setup
R
PHILIPS
PHILIPS
CONEXANT
Broadcast Decoder
CX23880
Cable/
Antenna
Connector
AV Input
(8pin)
CATV
Antenna
ASUS AV Adapter
Sound Card
Audio Out
S
2. Hardware Setup
cannot be connected at the same time.
and
ASUS TV T uner Card
Notes
• Use the same TV standard for all devices.
• Drawings are for reference only; actual cards may vary.
•
ASUS TV Tuner Card (NTSC)
User’s Manual
ASUS TV Tuner Card User’s Manual10
Item Checklist
ASUS Driver and Utility CD Disc
Page 11

2. Hardware Setup
NOTE: This TV Tuner card can only be installed in motherboards with a PCI slot.
WARNING! Computer boards and components contain very delicate Integrated
Circuit (IC) chips. To protect the computer board and other components against
damage from static electricity, you must follow some precautions.
1. Make sure that you unplug your power supply when adding or removing
expansion cards or other system components. Failure to do so may cause
severe damage to both your motherboard and expansion cards.
2. Keep all components such as the host adapter in its antistatic bag until you
are ready to install it.
3. Use a grounded wrist strap before handling computer components. If you do
not have one, touch both of your hands to a safely grounded object or to a
metal object, such as the power supply case. Hold components by the edges
and try not to touch the IC chips, leads, or circuitry.
4. Place components on a grounded antistatic pad or on the bag that came with the
component whenever the components are separated from the system.
Installation Procedures
2. H/W Setup
New T uner Card
1. Unplug all electrical cords on your computer.
2. Remove the system unit cover.
3. Locate the PCI bus expansion slot. Make sure this slot is unobstructed.
4. Remove the corresponding expansion slot cover from the computer chassis.
5. Ground yourself to an antistatic mat or other grounded source .
6. Pick up the board (still in its sleeve) by grasping the edge bracket with one hand
and then remove the plastic sleeve.
7. Position the card directly over the PCI slot and insert one end of the board in the
slot first. Firmly but gently press the bus connector on the bottom of the card
down into the slot. Be sure the metal contacts on the bottom of the host adapter
are securely seated in the slot.
8. Anchor the board’s mounting bracket to the computer chassis using the screw
from the slot cover that you set aside previously.
9. Replace the cover on the system unit.
10. Connect cables and devices, if available.
11ASUS TV Tuner Card User’s Manual
Page 12
T
2. H/W Setup
2. Hardware Setup
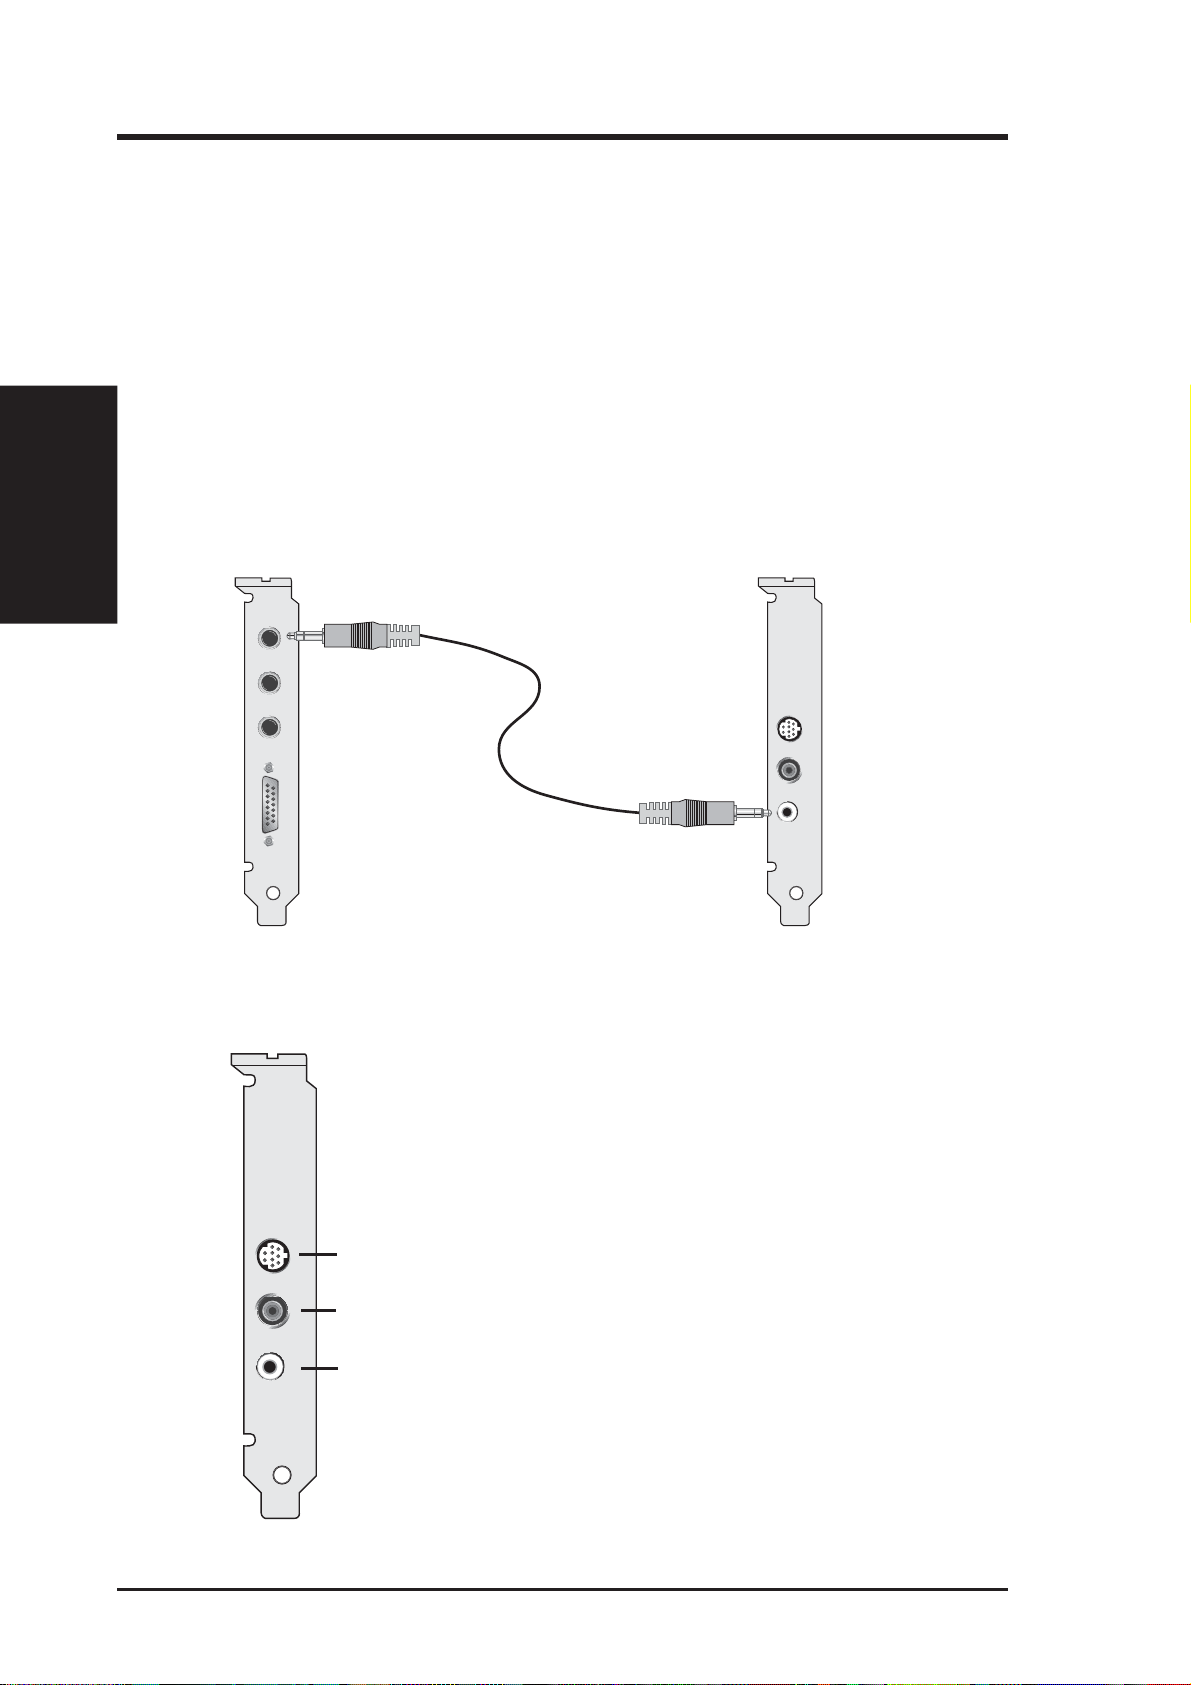
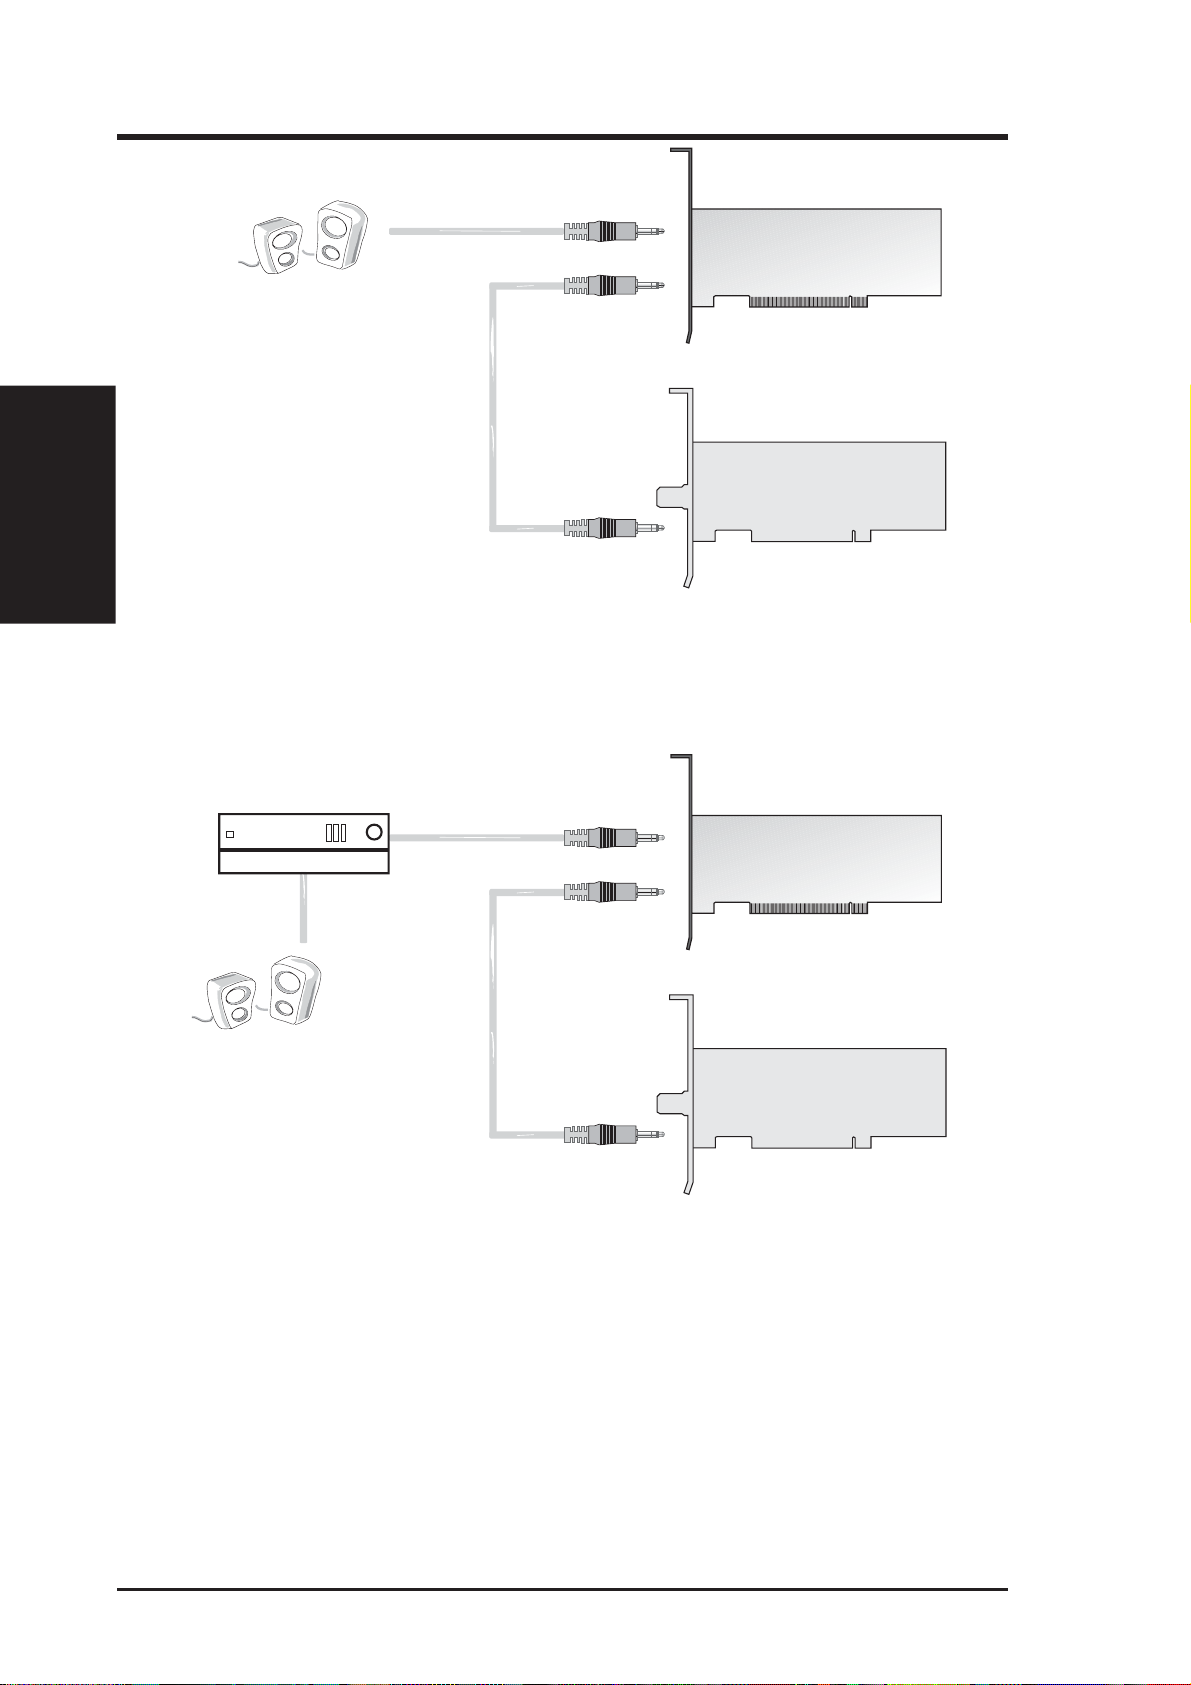
Connecting the Audio
You may connect the audio portion either externally . Follow the procedure below to
connect the audio.
External Audio Connection
1. Looking at the back of your computer, locate the audio out connector on the
ASUS TV T uner Card.
2. Locate the Line-In connector on your sound card. If necessary, refer to the
documentation supplied with your sound card.
3. Attach one end of the sound cable to the Audio Out the ASUS TV Tuner Card
and the other end to the Line-In on your sound card.
LINE IN
MIC IN
SPK/LINE
JOYSTICK
AV-IN
RF-IN
AUDIO-OUT
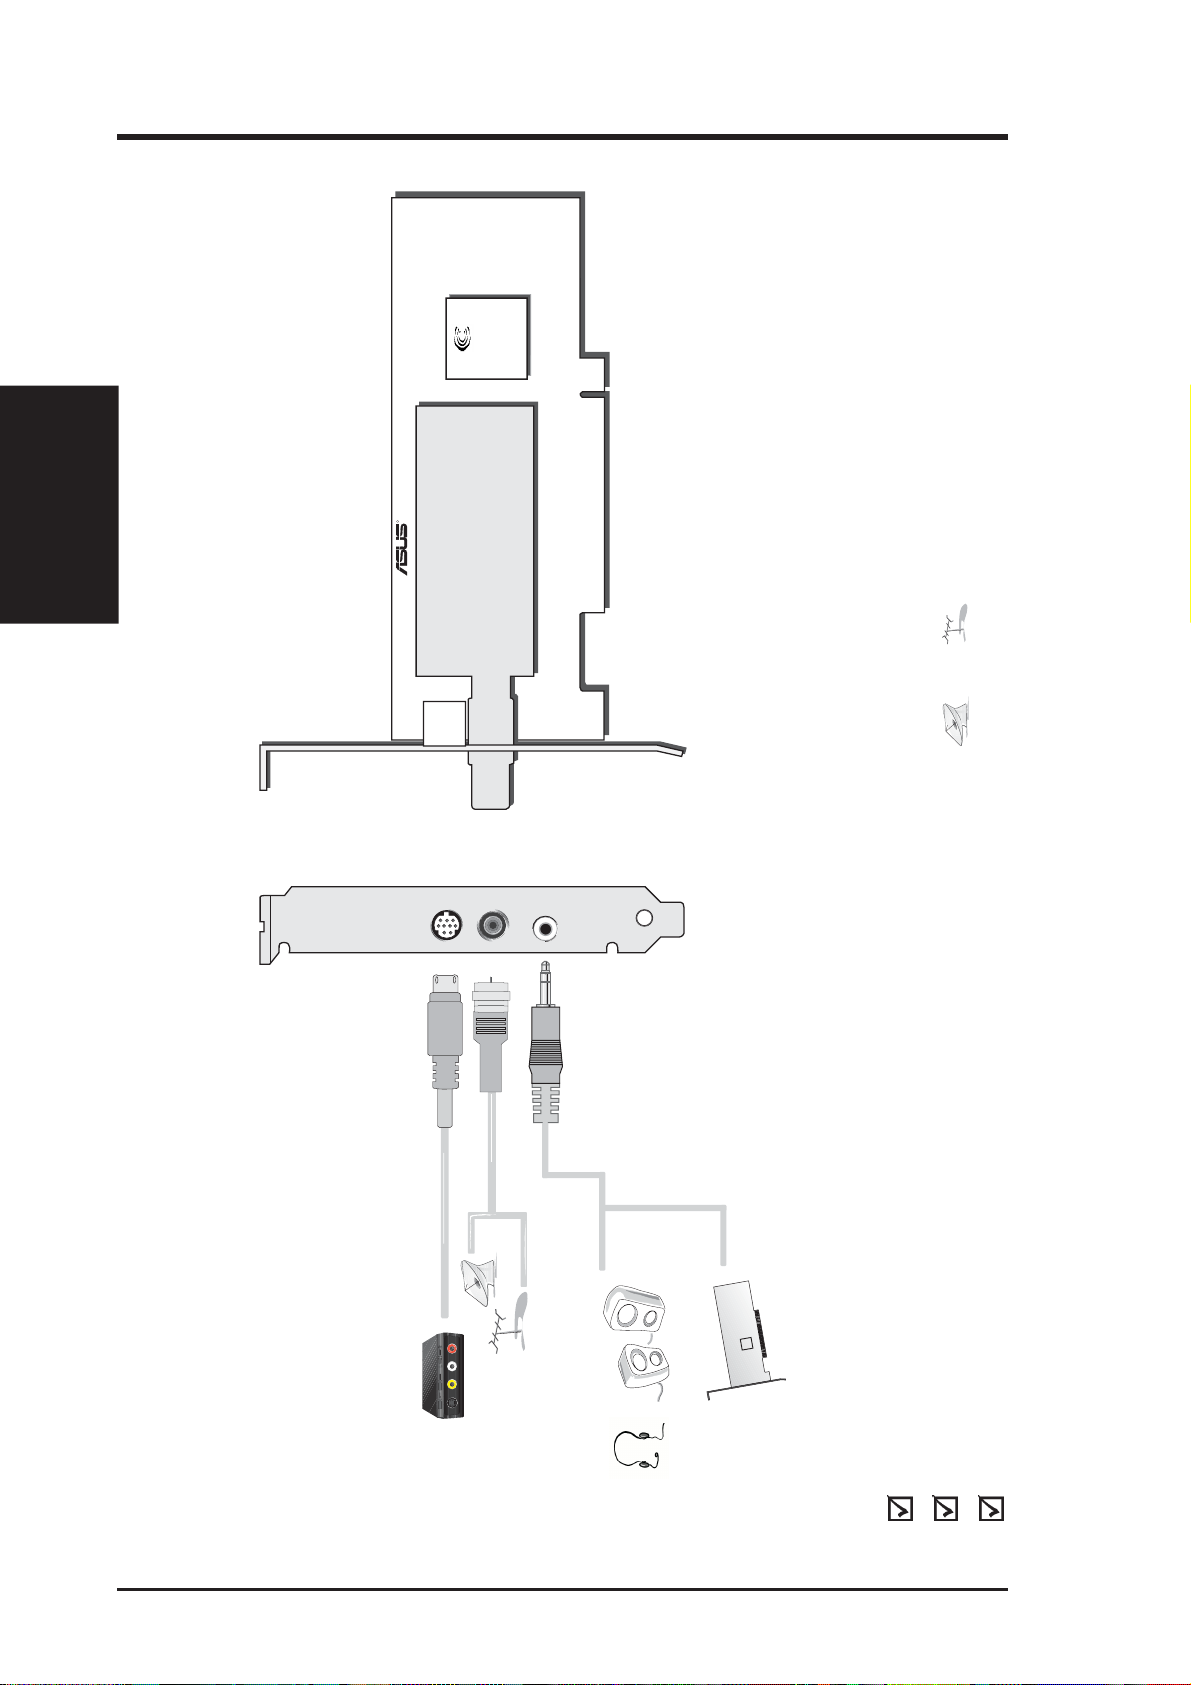
ASUS TV Tuner Card Connectors
The TV Tuner Card provides stereo audio output, and two video input connectors.
AV-IN
RF-IN
AUDIO-OU
AV Input (8 pin)
Cable/Antenna
connector
Audio out
For input from composite video source.
For input from cable TV or antenna.
For stereo audio input from external sources.
ASUS TV Tuner Card User’s Manual12
Page 13
2. Hardware Setup
Using Your TV Tuner Card
There are three general steps in using or setting-up your TV Tuner Card.
Step 1 Disconnect the CATV system or antenna from your TV system.
Step 2 Reconnect the CATV system or antenna to your TV Tuner Card.
Step 3 Connect the included and other accessories to your TV Tuner Card.
CA TV/Home Antenna Connections
There are various types of cable TV (CATV) and antenna connections. Each type
requires a different method of connection.
NOTE Consult your dealer for the type of adaptor, splitter , A/B switch or combiner
that may be required when setting up your TV Tuner Card.
Your TV Tuner Card is capable of receiving up to 100 channels. If you do not have
a CATV system, you may use an indoor or outdoor antenna that carries only VHF
(channels 2–13), only UHF (channels 14–69), or VHF and UHF channels to connect
to your TV Tuner Card.
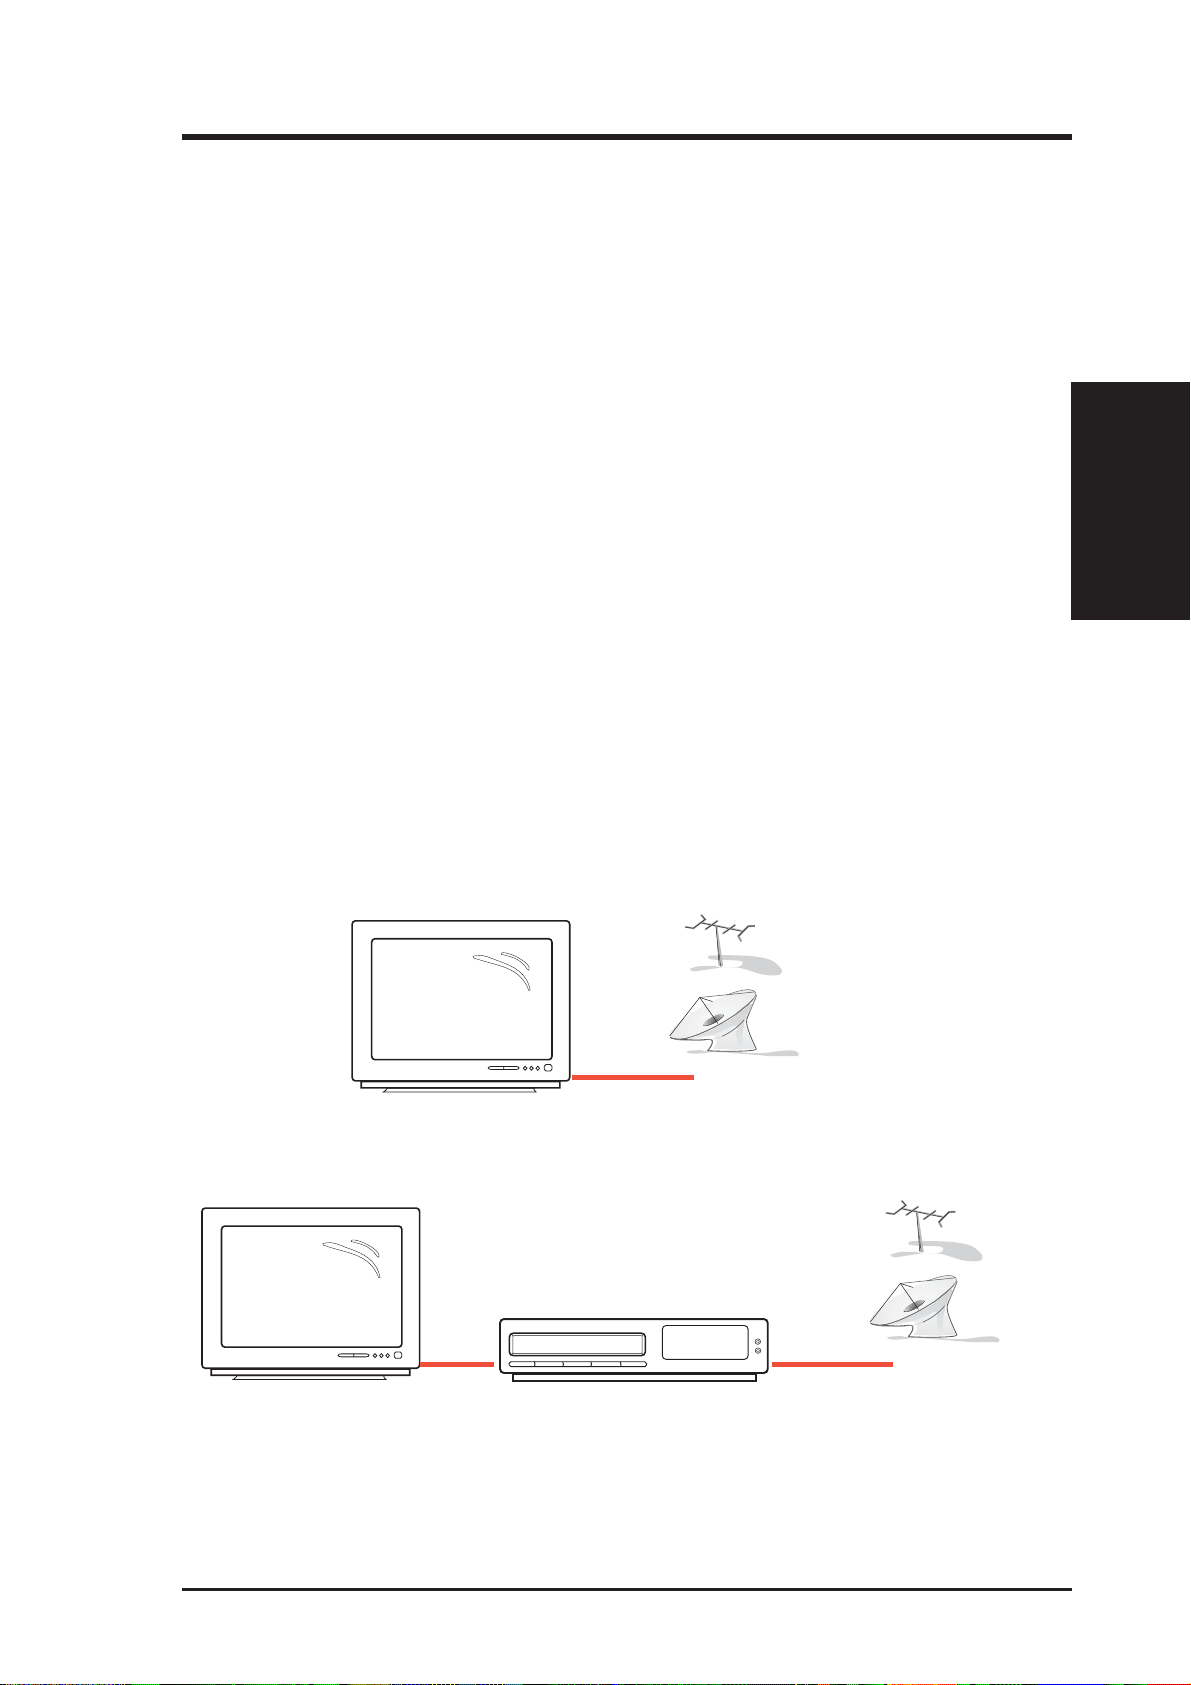
Y our CATV sytem or antenna may be connected in either of the following two ways:
direct to the TV or through a VCR system.
Connection Through a TV System
CATV
Connection Through a VCR System
2. H/W Setup
CATV
To start using your TV Tuner Card, follow the steps and sketch on the following
pages to connect a CATV system or home antenna to your TV Tuner Card.
13ASUS TV Tuner Card User’s Manual
Page 14

2. H/W Setup
2. Hardware Setup
Step 1
Disconnect the CATV system or antenna from your TV system.
CATV
Disconnection from a TV System
Disconnection from a VCR System
Step 2
Reconnect the CATV system or antenna to your TV Tuner Card.
TV Tuner Card
CATV
Direct Connection
Cable/
Antenna
Connector
TV Tuner Card
CATV
Cable/
CATV
Antenna
Connector
Connection Through either an Adaptor, Splitter, A/B Switch or Combiner
ASUS TV Tuner Card User’s Manual14
Page 15
2. Hardware Setup
Connecting Your TV Tuner Card
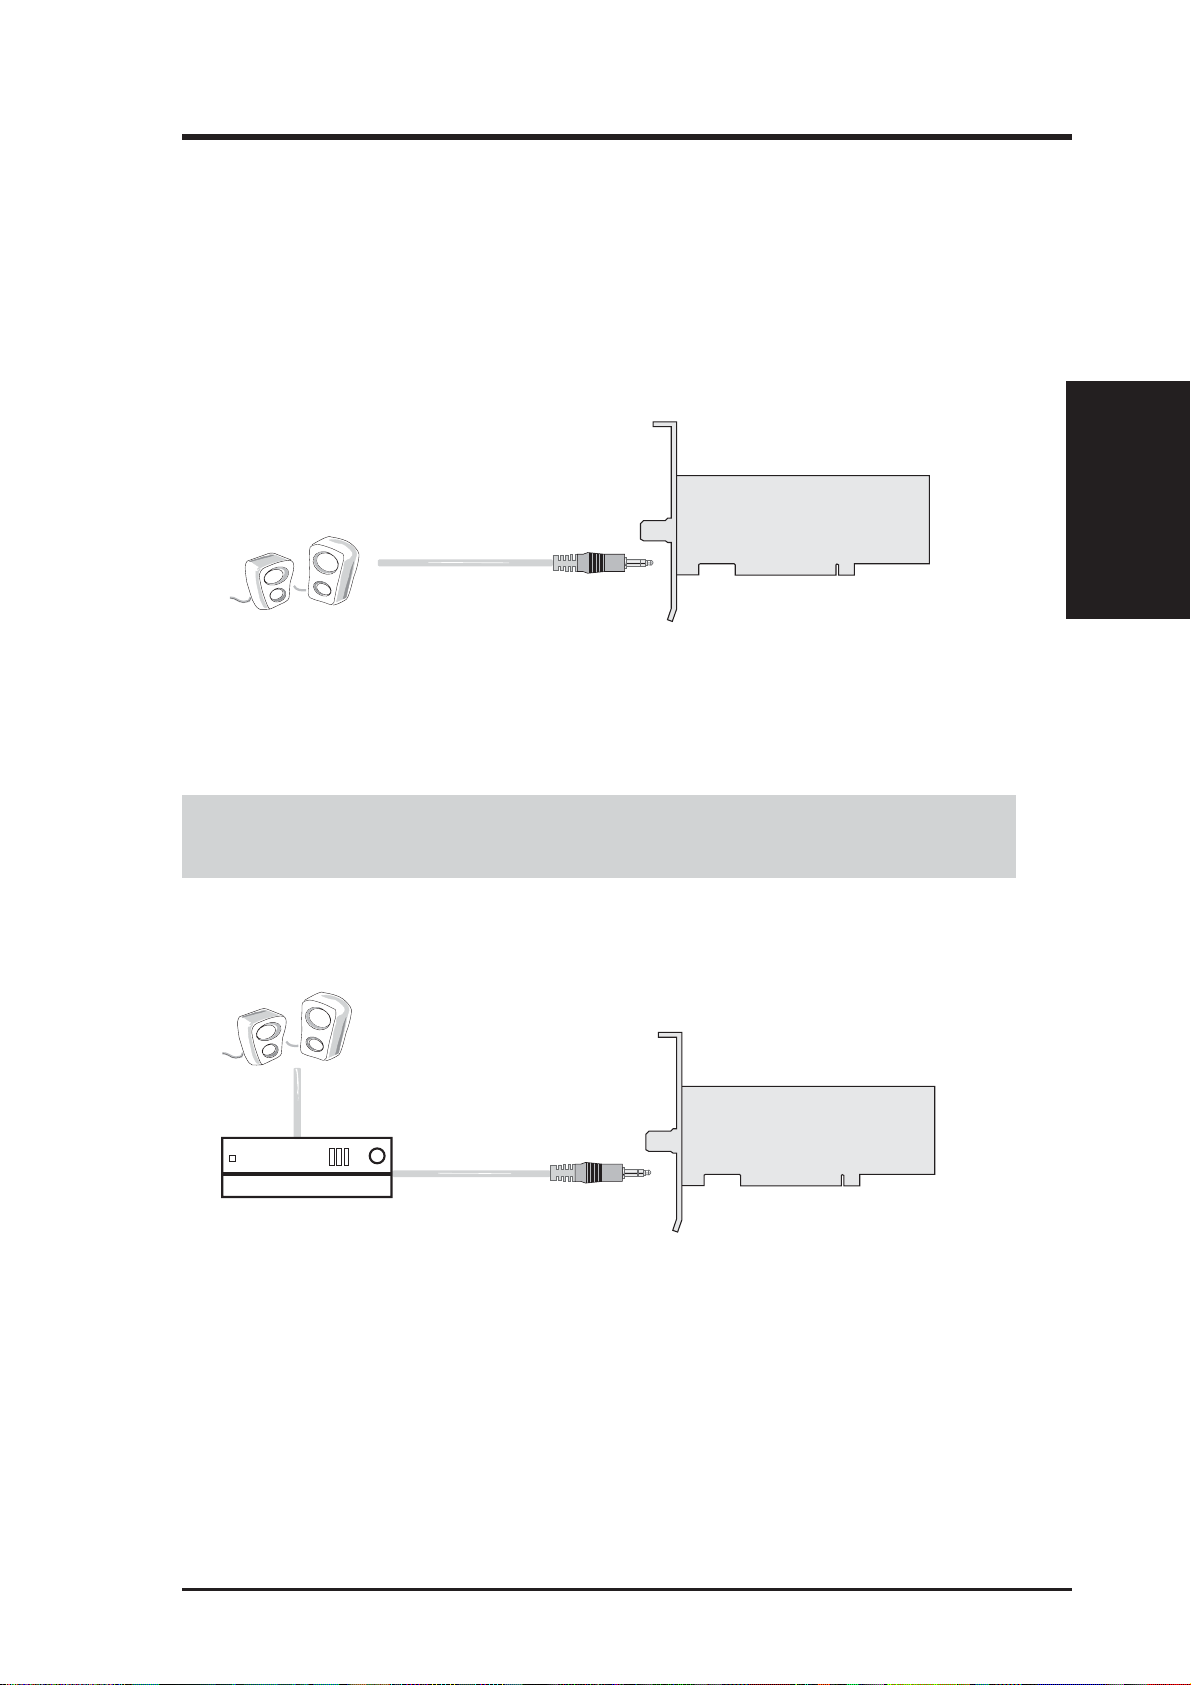
Step 3
Connect the audio system to your TV Tuner Card.
TV Tuner Card
Audio Out
Connect to speaker
NOTES: Audio out is unamplified. Connect to amplified speakers or to an
amplifier.
TV Tuner Card
2. H/W Setup
Amplifier
Audio Out
Connection through Stereo Audio System
15ASUS TV Tuner Card User’s Manual
Page 16
2. Hardware Setup
Sound Card
Audio Out
Audio In
2. H/W Setup
Amplifier
TV Tuner Card
Audio Out
Connection through sound card with Audio System
Sound Card
Audio Out
Audio In
Connection through sound card with Stereo Audio System
You are now ready to install the software.
ASUS TV Tuner Card User’s Manual16
Audio Out
Page 17
2. Hardware Setup
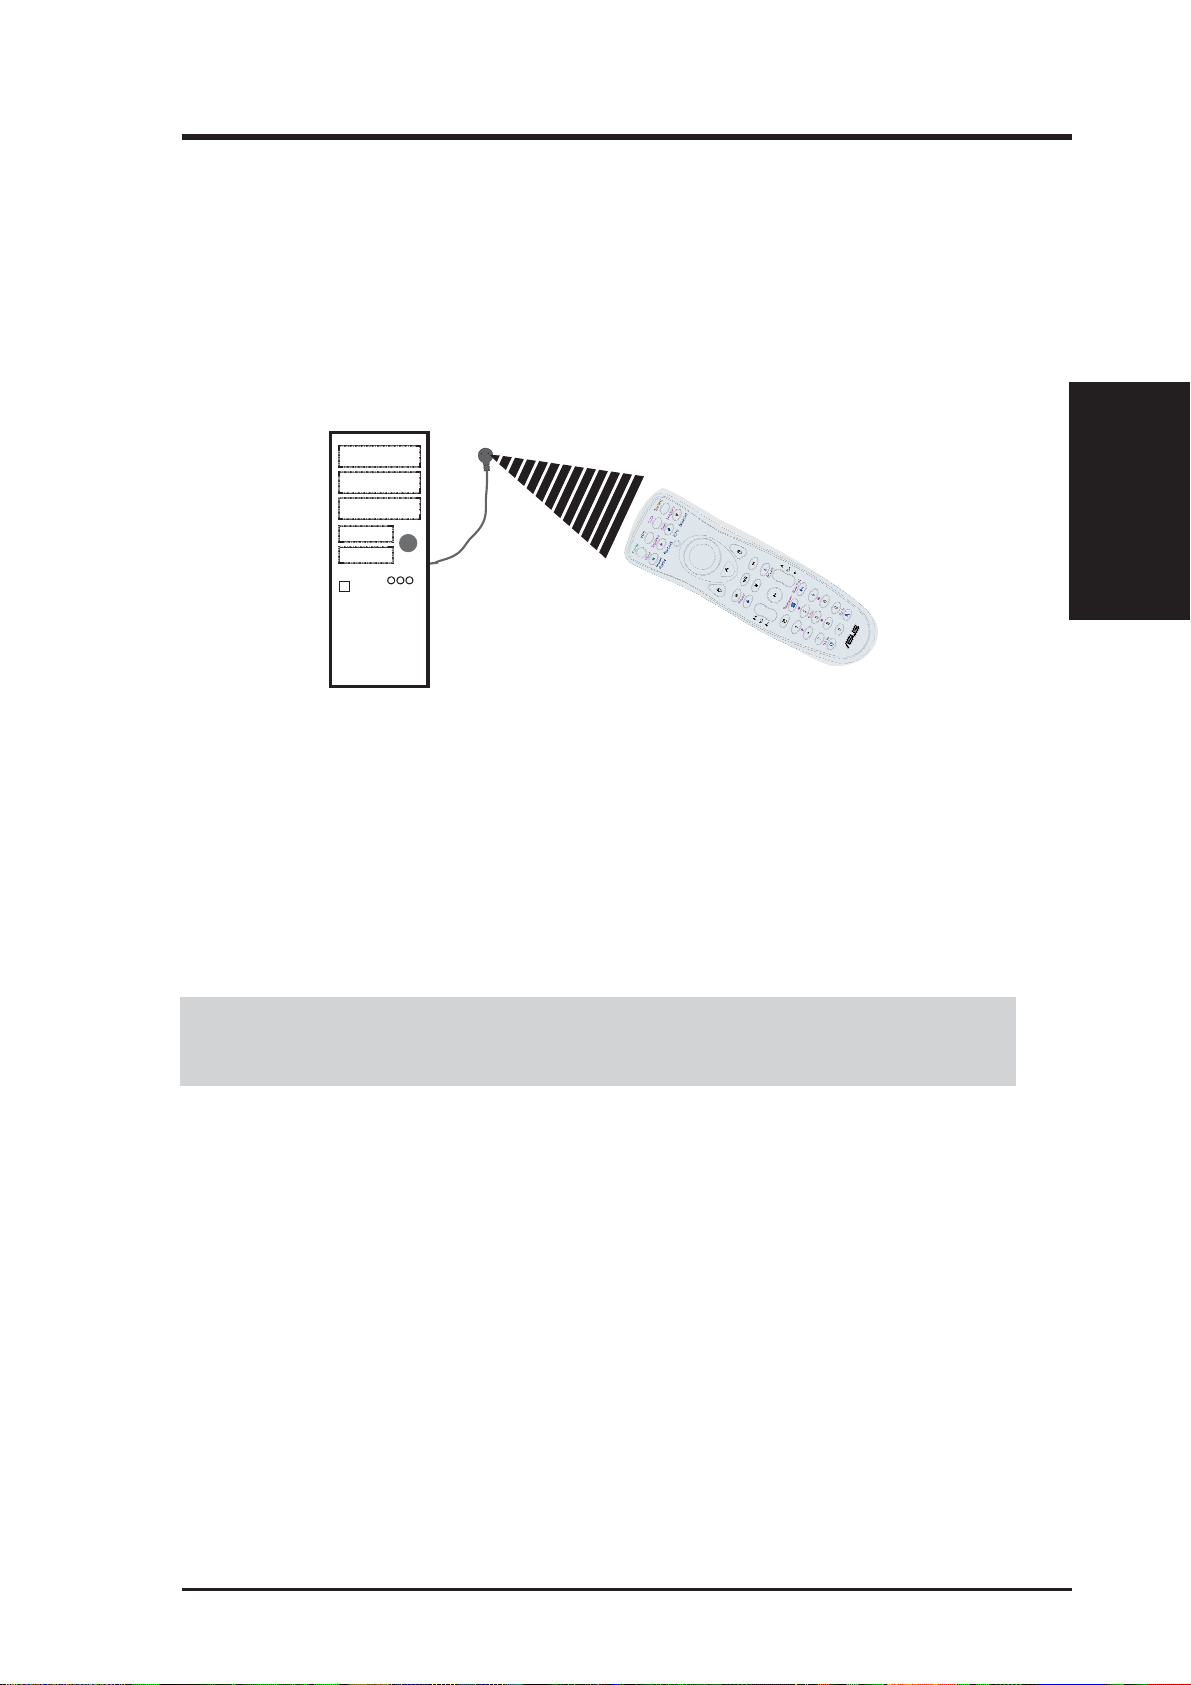
Using the Remote Control
The Remote Control allows you to operate the VCR/ DVD at a distance. It has all
the major controls necessary for operating your tuner card, such as turning your TV
on/off, viewing the TV, and changing the channels and volume. Aim the front of the
Remote Control at the Remote Control Receiver and press the control buttons as
you would on the infrared rays receiver.
2. H/W Setup
The remote control receiver may be
placed anywhere, as long as it is not
blocked
Installing Batteries
Open the back cover of Remote Controller and put in two pieces AAA betteries
(alkaline battery recommended).
If the Remote Control does not operate or fails to function normally , replace the batteries.
The Remote Control operates on two AAA (UM-4) 1.5 volt batteries, available at most
stores, such as electronics and camera stores.
Installing receiver of ASUS remote control kit
Plugging receiver (with USB port on it) into the USB port of your computer and
have the receiver grip on the top of computer panel or your favorite location for easy
operation.
17ASUS TV Tuner Card User’s Manual
Page 18
2. H/W Setup
2. Hardware Setup
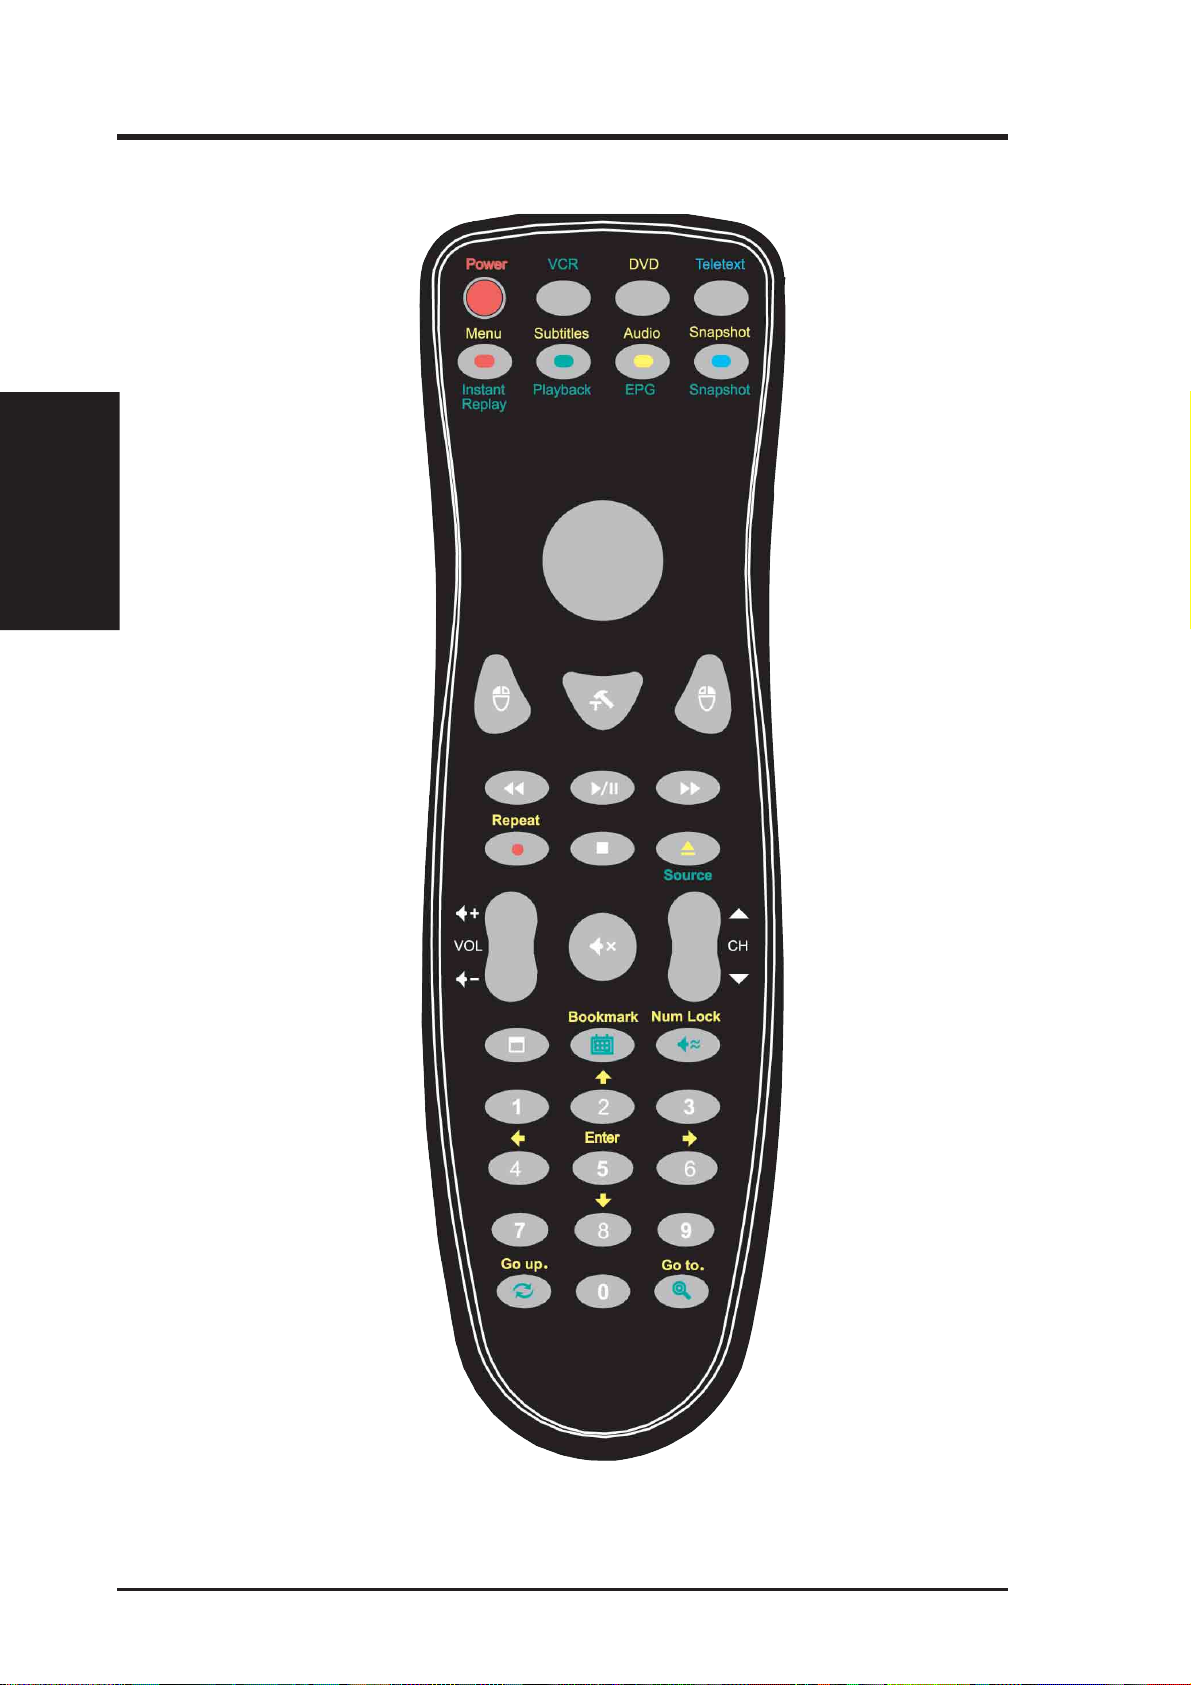
ASUS Remote Controller
ASUS Remote Controller Layout
ASUS TV Tuner Card User’s Manual18
Page 19

2. Hardware Setup
Features:
1. Innovation design of ASUS Remote Controller for controlling ASUSDVD XP/
PowerVCR II/EPG software with desktop PC.
2. Mouse mode can be used as mouse function while you aren’t in front of your
computer.
3. Receiver with USB Port, it’s easy to connect with your computer.
4. Provide default settings for four computer software (DVD button -ASUSDVD
VCR button-PowerVCR II, EPG Button-Titan.com / TVTV .com) and can be resetup depends on user demands.
5. Convenient to edit personal hot key for each computer software with easy operation
setting program.
Specifications:
2. H/W Setup
•
Operation Voltage : 3V ; Battery : AAA Battery x 2 (alkaline battery recommended)
•
Receiver Inter face : USB Port
19ASUS TV Tuner Card User’s Manual
Page 20

Functions
2. Hardware Setup
2. H/W Setup
Button
Mode 1 Mode2 Mode3
Power On/Off Power On/Off Power On/Off
VCR Mode
-
-
--
DVD Mode
-
Teletext Mode
(for PAL system only)
-
Instant Replay Menu -
Playback Subtitles -
EPG
(Electronic Program Guide)
Audio
(Switch available audio)
Snapshot Snapshot -
Mouse Mouse -
Mouse
Left button
Mouse
Left button
System settings Configuration -
Mouse
Right button
Mouse
Right button
Backward Backward -
(1X /2X / 3X / 4X / 8X / 16X / 32X)
-
-
-
Play/Pause Play/Pause -
(1X)
Forward Forward -
(1X /2X / 3X / 4X / 8X / 16X / 32X)
ASUS TV Tuner Card User’s Manual20
Page 21

2. Hardware Setup
Button
Mode 1 Mode2
Record Repeat
Stop Stop
Switch current
video sources
Volume
Up / Down
Mute Mute
Channel
Up / Down
Eject
Volume
Up / Down
Chapter
Next / Previous
2. H/W Setup
Fullscreen Fullscreen
TV Wall Bookmark
(Adds bookmarks for specific DVD scenes)
SAP/Stereo/Mono Number Lock*
1 1*
2 Up/2*
3 3*
4 Left/4*
5 Enter/5*
21ASUS TV Tuner Card User’s Manual
Page 22

2. Hardware Setup
2. H/W Setup
Button
Mode 1 Mode2
6 Right/6*
7 7*
8 Down/8*
9 9*
Return Go Up.
(Return to the last channel viewed)
0 0*
(Go to previous section when
navigating DVD title menu selections)
Auto Scan Go To.
(Auto scans for available channels)
If you want to use the functions what have “*” symbol, must be enabled Number Lock
function. Then press those function key twice.
(Go to bookmark)
ASUS TV Tuner Card User’s Manual22
Page 23

3. Software Setup
Device Driver Installation
You can use the below method to install the device drivers for your tuner card,
depending on your operating system.
NOTE: The screens displayed in this manual may not exactly reflect the screen
contents displayed on your screen. The contents of the support CD are subject to
change at any time without notice.
Windows 98 / ME
Method 1: ASUS Quick Setup Program
1. Start Windows.
2. Insert the CD installation disc into your
CD-ROM drive.
3. The Install Shell appears. Click Tuner
Driver on the dialog box.
4. Follow the onscreen instructions to
complete the setup.
5. When Setup has finished installing all
the necessary files on your computer,
it will prompt you to restart your
computer. Click OK to restart your
computer and to complete Setup.
3. S/W Setup
3. S/W Setup
23ASUS TV Tuner Card User’s Manual
Page 24

3. S/W Setup
3. Software Setup
Method 2: Plug and Play
1. Start Windows and insert support CD
into your CD-ROM drive.
2. Windows detects the ASUS TV tuner
card and displays the New Hardware
Found window.Wait for Windows to
search for the required driver.
3. Select the option Specify the location
of the driver (Advanced). Click Next.
4. Select the option Search for the best
driver for you device (Recommended)
and check the option Removable
Media(Floppy, CD-ROM...). Click
Next.
5. When the wizard finds the driver
location, click Next to install the driver .
ASUS TV Tuner Card User’s Manual24
Page 25

3. Software Setup
6. Click Finish when Windows has
finished installing the driver.
7. The procedure to install this driver is
the same as Steps 2 to 6.
8. The procedure to install this driver is
the same as Steps 2 to 6.
3. S/W Setup
25ASUS TV Tuner Card User’s Manual
Page 26

3. S/W Setup
3. Software Setup
Windows 2000 / XP
Method 1: ASUS Quick Setup Program
1. Start Windows.
2. Windows detects the ASUS TV Tuner
card and displays the Found New
Hardware Wizard window. Click
Cancel.
3. Insert support CD into your CD-ROM
drive.The Install Shell appears. Click
Tuner Driver on the dialog box.
4. Follow the onscreen instructions to
complete the setup. Click OK.
5. Setup has finished installing all the
necessary files on your computer, Click
OK to complete Setup.
ASUS TV Tuner Card User’s Manual26
Page 27

3. Software Setup
Windows 2000 / XP
Method2 : Plug and Play
1. Start Windows and insert support CD
into your CD-ROM drive.
2. Windows detects the ASUS TV tuner
card and displays the New Hardware
Found window.
3. Click Next to allow W indows to search
for the required driver.
4. Select the option Search for a suitable
driver for my device (Recommended)
and Click Next.
5. Check the option CD-ROM drives and
Click Next.
3. S/W Setup
27ASUS TV Tuner Card User’s Manual
Page 28

3. S/W Setup
3. Software Setup
6. When the wizard finds the driver
location, click Next to install the driver .
7. Click Finish when Windows has
finished installing the driver.
8. The procedure to install this driver is
the same as Steps 2 to 7.
9. The procedure to install this driver is
the same as Steps 2 to 7.
ASUS TV Tuner Card User’s Manual28
Page 29

Install ASUS Remote Controller Driver
Method : ASUS Quick Setup Program
1. Start Windows.
2. Insert support CD into your CD-ROM
drive.The Install Shell appears. Click
ASUS Remote Driver on the dialog
box.
3. Setup windows appears. Click Next.
4. If you want to install a different folder,
click Browse and select another folder .
If not, click Next.
3. S/W Setup
29ASUS TV Tuner Card User’s Manual
Page 30

3. S/W Setup
5. Setup will add program icons to the
program folder, click Next.
5. Setup has finished installing all the
necessary files on your computer, check
the option Launch Remote Master
now! then click Finish to complete
Setup.
ASUS TV Tuner Card User’s Manual30
Page 31

3. Software Setup
Install DirectX
Microsoft DirectX allows 3D hardware acceleration support in Windows 98,
Windows 2000, and Windows XP. For Software MPEG support in Windows 98, you
must first install Microsoft DirectX, and then an MPEG-compliant video player.
1. Insert the CD installation disc into
your CD-ROM drive or double click
the CD drive icon in My Computer
to bring up the autorun screen or run
Setup32.exe in the directory
\AutoRun of your CD-ROM drive.
Click DirectX Runtime Libraries.
2. The DriectX(R) Setup box appears.
Click Install button to install driver.
3. The installation program will
automatically install the DirectX
8.1 runtime libraries into your
system.
4. Setup will prompt when it has
finished copying all the files to
your computer . Click OK to finish
the installation.
3. S/W Setup
WARNING! Some games written for older DirectX versions may not work
properly under DirectX8. Make sure that your applications or games support
DirectX8 before installing the DirectX8 runtime libraries. DirectX8 currently
cannot be uninstalled by regular means, such as outlined in 3. Software Setup
| Uninstall Display Driver.
31ASUS TV Tuner Card User’s Manual
Page 32

3. S/W Setup
3. Software Setup
Uninstall the TV Tuner Card Drivers
If you want to update your TV Tuner Card drivers or if you no longer need the TV
Tuner Card drivers for your card, you can use following procedures to completely
uninstall the drivers from your system to save disk space.
Windows 98 / ME
Method: Using the Control Panel
1. Click Start , and then point to Settings.
2. Click Control Panel.
3. Double-click the Add/Remove
Programs icon.
4. Click the Install/Uninstall tab.
5. Click ASUS TV Tuner Card
Drivers from the list then click Add/
Remove.
6. Click OK to uninstall drivers.
7. The system will prompt you to restart
your computer. Click OK to restart.
ASUS TV Tuner Card User’s Manual32
Page 33

3. Software Setup
Windows 2000 / XP
Method : Using Control Panel
1. Click Start , and then point to Settings.
2. Click Control Panel.
3. Double-click the Add/Remove
Programs icon.
4. Click the Change/Remove Programs
icon.
5. Click ASUS TV Tuner Card
Drivers from the list.
6. Click Change/Remove.
7. The system will prompt you to
uninstall your Tuner Card Drivers.
Click OK to uninstall.
3. S/W Setup
33ASUS TV Tuner Card User’s Manual
Page 34

Install VideoSecurity
V ideoSecurity is a powerful video stream comparison and detection utility that helps
in detecting potential errors or intrusions at a specific time interval by using a video
capture device, such as a digital camera.
1. Insert the CD installation disc into
your CD-ROM drive or double click
the CD drive icon in My Computer
to bring up the autorun screen or run
Setup32.exe in the directory
\AutoRun of your CD-ROM drive.
3. S/W Setup
3. Software Setup
2. Click ASUS VideoSecurity.
3. When the Welcome box appears,
click Next to start the installation.
To complete the installation, simply
follow the on-screen instructions or
prompts.
ASUS TV Tuner Card User’s Manual34
Page 35

3. Software Setup
Install PowerVCR II
PowerVCR II is opening doors to an entirely different technological dimension for
computer users acroos the globe. The analog-to-digital movement is well under way-
-let PowerVCR II take you to the digital paradise with its incredible recording features
that capture raw video data from analog camcorders, VCRs, and TVs with MPEG-2
technology.
1. Insert the CD installation disc into
your CD-ROM drive or double click
the CD drive icon in My Computer
to bring up the autorun screen .
Select the language from the choices
then click Next.
2. The PowerVCR II Setup window
appears. Click Next to start the
installation.
To complete the installation, simply
follow the on-screen instructions or
prompts.
3. S/W Setup
35ASUS TV Tuner Card User’s Manual
Page 36

Install PowerDirector Pro
Ever thought about directing your own movie? How about having all the creative
controls and being in charge of the entire editing and post-production process? Well,
today’s computing technology has made all this possible for anyone who has recording devices, capture devices, acomputer, and of course, the sensational new
software application, PowerDirector.
1. Insert the CD installation disc into
your CD-ROM drive or double click
the CD drive icon in My Computer
to bring up the autorun screen .
Select the language from the choices
3. S/W Setup
then click Next.
3. Software Setup
2. The PowerDiector Pro Setup
window appears. Click Next to start
the installation.
To complete the installation, simply
follow the on-screen instructions or
prompts.
ASUS TV Tuner Card User’s Manual36
Page 37

3. Software Setup
Install Medi@Show
Medi@Show is a great tool that creates and publishes multimedia slide shows on
desktops and the Internet. It incorporates video, image, audio content and PowerPoint
files together with its spectacular 3D slide transitional and animated text effects.
Medi@Show’s one-click publishing capability makes it simple and fun to create
high impact and professional slide shows. Best for business and home users alike.
1. Insert the CD installation disc into
your CD-ROM drive or double click
the CD drive icon in My Computer
to bring up the autorun screen .
The Welcome window appears.
Click Next to start the installation.
2. The Software License Agreement
window appears. Click Yes to start
the installation.
To complete the installation, simply
follow the on-screen instructions or
prompts.
3. S/W Setup
37ASUS TV Tuner Card User’s Manual
Page 38

Install ASUSDVD XP
ASUSDVD XP is the latest evolution of the world acclaimed DVD software program that offers maximum video and audio playback entertainment on the PC.
ASUSDVD XP offers universal support for all DVD/CD formats, is WHQL certified for all Microsoft Windows Operating Systems, and can be utilized on virtually
any media storage device. It comes complete with numerous customizable video/
audio controls that can deliver the highest quality viewing and listening experience.
1. Insert the CD installation disc into
your CD-ROM drive or double click
the CD drive icon in My Computer
to bring up the autorun screen .
The ASUSDVD XP Setup window
3. S/W Setup
appears. Click Next to start the
installation.
3. Software Setup
2. The License Agreement window
appears. Click Yes to start the
installation.
To complete the installation, simply
follow the on-screen instructions or
prompts.
ASUS TV Tuner Card User’s Manual38
Page 39

4. Software Reference
ASUS Remote Master
1. Start to use remote control kit
The application of Remote Controller will execute automatically after power up
your computer. Then Remote Controller is on working condition; If you close
automatic execute file, while you are using Remote Controller, please press Start
and Program Files, and then click Remote Control Administrator and Remote
Master to execute application and activate Remote Controller.
2. Aim at infrared rays receiver
Before you start to use ASUS Remote Controller, please aim at infrared rays
receiver under effective range.
How to use current setting software -- If your computer is under Remote Controller
default settings, please activate AsusDVDXP after press DVD button, activate Power
VCR II after press VCR button or press others buttons to activate different functions.
3. How to use this software
You may also define other hotkeys to execute a software of your choice. Rightclick the
If you want to change other software HotKey setting, select User Defined and
Select HotKey Setting, then click Advance to setup the software Hotkey setting.
icon on the taskbar to launch the ASUS Remote Master editor.
4. S/W Reference
If you doesn’t want to change any settings, keep the selection on Default.
39ASUS TV Tuner Card User’s Manual
Page 40

4. Software Reference
4. How to set up HotKey for the other new software -- Regarding setting Hot Key
for additional new software, press Advance button. Then press New button of
Advanced program to add a new computer software HotKey ( Recommend to
get computer software Hot Key list first) Or you may also click one HotKey
setting and modify your demands, and then press Save As button for new HotKey
setting. Exit button of ASUS Remote Controller is for your Ctrl+W button of
keyboard if it is IE (Iexplorer) HotKey condition. (That means the HotKey setting
of IE (Iexplorer) Exit is Ctrl+W in the keyboard.) The computer screen will
display Exit function of using (OSD, On Screen Display) You may also modify
OSD.
4. S/W Reference
5. How to use Mouse Mode -- Please control Mouse button as external Mouse
function. ASUS Remote Controller becomes your wireless mouse when you are
not in front of your computer.
ASUS TV Tuner Card User’s Manual40
Page 41

4. Software Reference
PowerVCR II
NOTES
1. The following can only be used as a general reference and may not be an
exact reflection of the software version you are using. The contents are
subject to change at any time without notice.
2. For MPEG-1 recording, the minimum system requirement is Pentium II 350
or AMD K6 family at 450 MHz. For MPEG-2 recording, the minimum system requirement is Pentium III 650 MHz or Athlon 650 Mhz.
PowerVCR II features:
1. With PowerVCR II, you can watch and record TV programs from your TV tuner
card, and also can enjoy all kinds of medias effortlessly from numerous signal
inputs, such as analog, digital camcoderers, VCRs, and PC cameras.
2. Time-shifting function allows users to simultaneously watch and record video
content.
3. Supports real-time and high-resolution digital video MPEG-1 and MPEG-2 compression video recording.
4. Schedule recording tasks in advance.
5. Recording reminders that provide information on recording length limitations
and disk drive availability.
6. Surfs and previews multiple channels at a time.
NOTE: You should already have installed DirectX 8 or later to use PowerVCR II
(see 3. Software Setup | Install DirectX)
4. S/W Reference
41ASUS TV Tuner Card User’s Manual
Page 42

4. Software Reference
Running PowerVCR II
To run the utility, click
PowerVCR II
and then click
Start
and point to
PowerVCR II.
Programs
and then
CyberLink
You may also run PowerVCR II by clicking the icon on the desktop.
Uninstalling PowerVCR II
To uninstall the software, click Start and point to Programs and then PowerVCR
II and then click Uninstall PowerVCR II. You may also uninstall the software
using the Add/Remove Programs Properties dialog box at the Windows
Setup tab. See Windows online help for more information on removing a
Windows component.
Easy Access
The user-friendly skin allows you to easily operate the PowerVCR II. Just like your
TVsets and VCRs, you can quickly access to most of the functions with one single
click.
Minimize Power off
Full Screen
Live/Digital
Recorder
Instant TV
4. S/W Reference
Replay
File Player
Recording
Scheduler
Video
Trimmer
CyberEPG
i-Power
Surf ChanneIs
About PowerVCR II
Turn off PowerVCR II
Step Left
System Settings
Replay Indicator
Help
time remaining until
next scheduled task
current channel
current file size
current file size
total time for
current file
playback volume
Play
Step Left
Record Stop
Time-shirting
Record
Rewind Fast Forward
Minimize
shows/hides the
TV tuner control
Resize
Always On Top
TV tuner control
Next Channel
Previous Channel
Stereo/SAP/Mono
Return
ASUS TV Tuner Card User’s Manual42
Page 43

4. Software Reference
Displaying Options
Enable full screen
Click on the Full Screen icon to enlarge your video display to its maximum.
Resize your video display
Click on the Resize to enlarge or minimize your video display.
Always on top
Click on the Always on Top icon so that the video display is always visible and
overlaps all desktop application windows.
Recording
Channel Surfing
Before recording, you might just want to learn how to surf with PowerVCR II. The
incredible surfing function gives you a break from all the channel flipping and mouseclicking endured when watching TV by providing a preview of sixteen channels at a
time.
1. Be sure that your TV Tuner card is installed correctly or your PowerVCR II
screen will be blank.
2. Click on Surf Channels located in the video display area.
4. S/W Reference
3. Click on Auto Page to allow a continuous refresh of sixteen new channels.
4. Click Next and Previous Page to preview other channels.
5. Click Auto Scan to scan for available channels.
6. Click Cancel surfing to exit or select one specific channel by clicking on it to
return to the normal display.
43ASUS TV Tuner Card User’s Manual
Page 44

4. Software Reference
Recording with the TV Tuner Control
1. Be sure that your TV Tuner card is installed correctly or your PowerVCR II
screen will be blank.
2. Start PowerVCR II. Click the source indicator until the indicator reads TV if
you have an antenna or CATV if you have a cable wire.
Note: PowerVCR II will automatically detect and select the country region of your cable
provider and the correct video signal format. If not, please see Changing System Settings
for more details.
3. Click the arrow located on the right edge of the PowerVCR II panel to activate
the TV T uner Control.
4. Select a desired channel by using the number pad or left and right arrows.
5. Click on Return to return to the last channel.
4. S/W Reference
6. Click Auto Scan to scan all the possible channels. To cancel the scanning, click
Cancel once the Auto Scan dialog box appears and you will be returned to the
original channel.
Note: Unlike the playback volume, the recording volume is automatically set and is not
allowed for adjustment in PowerVCR II.
Note: Keep in mind that the TV T uner Control only works with capture devices utilizing
WDM drivers.
7. After you have selected the desired channel, click Record.
T ips: While recor ding, click on the recor ding button to display the Recording T imer menu.
Select one of the time durations and PowerVCR II will automatically stop the recording
once the set time duration has expired.
8. Click Stop when you are finished.
9. The playlist will appear for you to save it.
Info: Because of the inherent limitations of the Windows operating system in
handling files over 2 GB, PowerVCR II will automatically save and chunk your
video files into 600 MB files if the file's size is over this limit. Thus, when you
select the appropriate playlist for playback, all the chunked files will play
continuously like a single file.
ASUS TV Tuner Card User’s Manual44
Page 45

4. Software Reference
10.To delete all the file(s), click Delete.
Note: When you click Delete, the file(s) will be deleted from your playlist.
11.Click OK when the dialog box appears to confirm your deletion.
12.Click on Save to... to save it to another folder other than the default folder.
13.A dialog box will appear for you to save it in another folder or to rename it. Click
Save when you are finished.
Recording Analog Video from a Variety Of Sources
Not only can you record TV programming with PowerVCR II, there are a lot
more sources you may record from. Converting all the analog video content
(e.g. videotapes) in your private collection into everlasting digital technology is
also not out of the question:
• PC cameras
• camcorders
• VCRs
• TVs
For the aforementioned capturing devices, make sure they are installed properly
with the proper drivers. Refer to their respective user's guide for more information.
1. Start PowerVCR II.
2. Select the correct source by clicking on the source indicator.
3. If the screen is still blank, click System Settings to properly configure the source.
4. After it is properly configured, a live shot of the current video source should be
displayed.
Note: If the video display is blank, be sure your video source is functioning properly.
Other possibilities may be that the connections aren't set up properly or you selected the
wrong input settings.
5. Click Record when you're ready.
Tips: While recording, click on the recording button again to display the Recording Timer
menu. Select one of the time durations and PowerVCR II will automatically stop the
recording once the set time duration has expired.
4. S/W Reference
6. Click Stop when you are finished.
7. The playlist will appear for you to save it.
45ASUS TV Tuner Card User’s Manual
Page 46

4. Software Reference
Info: Because of the inherent limitations of the Windows operating system in
handling files over 2 GB, PowerVCR II will automatically save and chunk your
video files into 600 MB files if the file's size is over this limit. Thus, when you
select the appropriate playlist for playback, all the chunked files will play
continuously like a single file.
8. To delete all the file(s), click Delete.
Note: When you click Delete, all the files will be deleted from your playlist.
9. Click OK when the dialog box appears to confirm your deletion.
10.You may save it to another folder other than the default folder with a different
name. Click on Save to....
11.A dialog box will appear for you to save it in another folder or to rename it. Click
Save when you are finished.
Tips: T o enlar ge the video display to full screen, click anywhere on the screen. To restore
to original size, click again.
Instant TV Replay
Your own personal up-close and instant replay is at your fingertips with
PowerVCR II's sterling new Replay feature. No more annoying and prolonged
4. S/W Reference
periods of waiting for an instant replay from your TV station, you can simply
invoke the Replay function while watching TV for your own private instant
replay!
Note: Replay files are temporarily stored in your hard drive, but are automatically deleted
as soon as exiting Replay mode.
1. While watching TV with PowerVCR II , switch to the Instant TV Replay function
by clicking it in the Master panel and instant replay playback will commence.
Refer to Changing System Settings for more details.
2. Refer to the next section for more details on Navigating in Replay Mode.
Note: There is no Stop function in Instant TV Replay mode.
ASUS TV Tuner Card User’s Manual46
Page 47

4. Software Reference
Programming with CyberEPG
The marriage between the Web and personal software applications are deeply
ingrained in today’s computer industry. This holds true even for scheduling
recording programs directly from the Web that are automatically registered in
your own PowerVCR II software application! Scheduling TV shows on the W eb
with CyberEPG is nothing short of spectacular in terms of simplicity and
flexibility.
CyberEPG is CyberLInk’s proprietary Web service that allows for PowerVCR
II user to schedule recording tasks on the Web simply with one click.
Depending on your country of origin and cable providers, the following
steps for adding CyberEPG scheduling tasks may differ.
1. Start PowerVCR II. Click i-Power.
Note: Be sure you have access to the Internet before using i-Power.
2. Locate the CyberEPG link and click it.
3. Select your region. Click it.
4. You will be linked to the location you chose. From the drop-down menu, select
your location.
5. You will be linked to the location you chose. From the drop-down menu, select
your cable provider.
6. A schedule will appear . Select a date and the time to display your favorite shows
from the drop-down menus located above the schedule.
7. Select program types in order to display one specific type of programming (e.g.
action, comedy, excrcise).
8. Click on the orange arrows to advance an hour ahead or back.
9. Click on the channel stations (left column) to display all the available shows on a
given day for a specific channel.
10.After finding your show, click on it.
11.The program information will be provided. Click on the Add to EPG icon to add
this scheduled task into PowerVCR II.
12.PowerVCR II’ s CyberEPG scheduling program will appear . Confirm the channel,
recording time and dates. Click Next.
13.Finally , select a profile and click Finish. This scheduled task is now registered in
PowerVCR II.
4. S/W Reference
47ASUS TV Tuner Card User’s Manual
Page 48

4. Software Reference
PowerDirector Pro
Introduction
Ever thought about directing your own movie? How about having all the creative
controls and being in charge of the entire editing and post-production process? Well,
today's computing technology has made all this possible for anyone who has recording
devices, capture devices, a computer, and of course, the sensational new software
application, PowerDirector .
Admittingly, video editing software is not without its drawbacks. Since the advent
of computers and its incredible growth in usage and processing speed power, video
editing software applications have taken off to astronomical heights. Yet, a great
inherent limitation, such as requiring a huge amount of disk space because of the
raw video data it captures, still remains. This is why many still choose to edit with
analog devices.
What makes PowerDirector the megastar of its industry in one quick flash is its
ability to save precious producing time because of its Smart Video Rendering
Technology (SVRT). Say goodbye to raw video data, which is usually captured in
.AVI format, and say hello to plenty of hard drive space with the MPEG and DV AVI
formats. No additional compression nor decompression is required when producing
4. S/W Reference
scenes with MPEG or DV AVI formats that do not contain effects, which saves you
huge amounts of time compared to our competitors that compress and decompress
the entire movie regardless!
ASUS TV Tuner Card User’s Manual48
Page 49

4. Software Reference
And adding SVRT wonderful features that simply enthrall, amaze and stupefy
including:
altering video speeds
• detecting scenes
• capturing directly from DV camcorders in real-time or non real-time
• a disc wizard that creates and burns movie discs a cinch!
• adding titles to clips
• adding audio streams to clips
• picture-in-pictures (adding video or images to an existing video clip)
• a huge collection of transitions, video and titles effects
• master audio files
• watermarks
...and there is nothing left to be desired!
4. S/W Reference
49ASUS TV Tuner Card User’s Manual
Page 50

4. Software Reference
Medi@Show
Publishing and creating isn't what it used to be. Welcoming you to a new era in
showmanship, Medi@Show , the software that creates and publishes multimedia presentations virtually anywhere, does it all with a flamboyant yet unassuming flair.
A multi-purpose, multi-tasking, and multi-producing application, Medi@Show incorporates compiling, arranging, and producing files in a simple and straightforward software package.
Import a vast array of files from business charts and photo images to audio and
video clips via TWAIN acquire, from your own personal folders or directly off the
Internet! And after compiling and assembling, arrange and edit sequences with numerous text effects, fantastic transition effects, cool audio clips, and smashing masking
effects to complete your masterpiece.
By integrating such astounding features, the newly lionized Medi@Show is truly
the Messiah of Multimedia.
Main Features
4. S/W Reference
• Integrates all types of multimedia files into one presentation
• Acquires images directly from TWAIN compliant devices such as scanners or
digital camcorders
• Over 100 dazzling 2D & 3D transition and text effects, smashing masking effects,
and cool audio clips
• Present your masterpiece through:
• xecutable files
• screen savers
• HTML & DHTML files for Internet publication
• Internet Streaming slide shows
• executable files for stand-alone playback
• FLZæthe exclusive data format for Medi@Show software
• i-Power function features an embedded browser and all the right links to unlim-
ited video, audio and image resources
• Drag and drop files directly from your Internet browser
ASUS TV Tuner Card User’s Manual50
Page 51

4. Software Reference
• Two simultaneous audio soundtracks
• Imports PowerPoint presentation files directly allowing for original playback or
as an image format for re-editing
4. S/W Reference
51ASUS TV Tuner Card User’s Manual
Page 52

4. Software Reference
ASUS VideoSecurity
The ASUS VideoSecurity lets you detect intruders into your system and environmental changes and monitor a specified location or any incoming visitor. If
V ideoSecurity detects any deviation from the norm that you set, it may give an error
message or not. Regardless of any messages, VideoSecurity will record:
• The last two detected snapshot image files from the video captured stream (saved
into a access file named watch dog.mdb). Any image processing or editing
software can then be used to view, modify, or distribute them.
Limitations
Because of differences in hardware sensitivity, VideoSecurity may not completely
detect all possible errors. Before you execute VideoSecurity, there are some
limitations you have to understand so that you can appropriately use it.
• Due to changing temperatures, the captured image of some CCDs will be twisted,
which may give a wrong detection.
• If the features (e.g., color, luminance) of the object are similar to that of
background, the object may not be detected clearly.
• The CCD cannot capture the object smoothly and immediately when an object
moves too fast.
VideoSecurity is designed for the widest environments possible and error
conditions, therefore it is necessary to tune the parameters in VideoSecurity
4. S/W Reference
Setup Wizard to get the best detection results.
Setup Wizard
Setup Wizard guides you through setting up the VideoSecurity features.
1. To open Setup Wizard, click
the Start button, and then point to
Programs, ASUS Video Security,
and then click Setup Wizard. The
Video Security Setup Wizard
dialog box appears.
ASUS TV Tuner Card User’s Manual52
Page 53

4. Software Reference
NOTE: The following descriptions are only for selected features of the ASUS
V ideoSecurity utility . For a full description of the features described in this manual
and other features, refer to the ASUS VideoSecurity Online Help (HTML)
format included with your support CD. You may also click the Help button to
open the online help file.
Detecting Sensibility
This is an important parameter when setting up VideoSecurity. Your environment
may change often but V ideoSecurity is concerned only when there is a change in the
environment. Make sure that you select a suitable sensitivity for your environment.
Detecting Interval(frame/sec)
This sets the scan rate. Default is 2 frames/sec. The higher the scan rate, the more
accurate is the detection. Higher rates, however , entails a higher CPU usage. Do not
use a high rate when you plan to use VideoSecurity while using other applications.
Working Directory
The W orking Directory is the folder where the utility stores its temporary working
and log files. The default is
VideoSecurity is ran, a sub-directory automatically created under the main directory, using the current date and time as the folder name. For example,
“1999.11.30_12.30.20” means that V ideoSecurity was started on 30 November 1999
at 12:30:20 PM.
Do not change the working folder’s name while V ideoSecurity is running. Otherwise,
a fatal runtime error will occur.
C:\VIDEOSEC. The directory is user-configurable. When
Detect Region
• Full window detects all visible area when watchdog function is on.
• User define region detects only the area defined by the user when watchdog
function is on. Feature will take effect only when VideoSecurity runs the next time.
Window Style
• Normal Window is the default style, that is, VideoSecurity will function as a
standard Windows program.
• Minimized as a tray icon lets you hide the main VideoSecurity window. This is
useful when you don’t want anyone to know you are monitoring. When this option is selected, the VideoSecurity icon will appear on the taskbar in the lowerright corner of your screen. Whenever VideoSecurity detects a problem, it will
run. You may also run VideoSecurity by clicking the icon.
4. S/W Reference
• Always on Top is like a Normal Window except that the main window and
control panel is shown always on top of other programs or utilities. You may
right click to enable or disable this function at the main window anytime.
53ASUS TV Tuner Card User’s Manual
Page 54

4. Software Reference
Working Mode
Click the Working Mode tab to define
tracing procedure. VideoSecurity not
only detects errors or problems in your
card, but also detects an intrusion.
This box appears when an error occurs.
Use this Tracing Box to choose the
error processing method for tracing.
Handling Procedure
Click the Handling Procedure tab to set
up personalized handling procedure
through Recording, Send email, Make
phone call or Execute specific program.
VideoSecurity will execute procedures
4. S/W Reference
set up by the user once any error is detected.
Devices
Click the Devices tab to select capture
devices and video standard.
Use mouse to fine tune the Video
Security screen and then click OK when
done.
ASUS TV Tuner Card User’s Manual54
Page 55

4. Software Reference
Running ASUS VideoSecurity
Click the ASUS icon on the taskbar’s status area. Clicking this icon opens the ASUS
Control Panel, then click the ASUS VideoSecurity to run VideoSecurity.
Detect Region
Click the Detect Region button to define your VideoSecurity video window. Use
your mouse to drag your intended rectangular region.
4. S/W Reference
55ASUS TV Tuner Card User’s Manual
Page 56

4. Software Reference
Show History
Click the Show History button to see the abnormal situation record including the
date, time, and other information.
4. S/W Reference
ASUS TV Tuner Card User’s Manual56
Page 57

5.Capture Resolution Table
Capture resolution table
Video Standard Supported Resolution
NTSC
720X480, 720X288, 720X240, 640X480
640X288, 640X240, 352X288, 352X240
320X240, 240X180, 240X176, 176X144
160X120, 128X 96, 88X 72, 80X 60
PAL/SECAM
720X576, 720X480, 720X288, 720X240
704X576, 640X480, 640X288, 640X240
352X288, 352X240, 320X240, 240X180
240X176, 128X 96, 88X 72, 80X 60
International TV Systems and Standards
IMPORTANT! Because systems and standards may change or grow, the information
below are provided only as reference. Be sure that the TV Tuner Card model that
you purchased is appropriate for the system and standard of the country where you
will be installing TV Tuner Card. For example, you should have the NTSC model if
you plan to use your TV Tuner Card in countries with NTSC systems, or PAL/
SECAM systems.
Country TV Color Stereo Subtitles
Albania B/G PAL
Argentina N PAL-N
Australia B/G PAL FM-FM Teletext
Austria B/G PAL FM-FM Teletext
Azores Is. (Portugal)B PAL
Bahamas M NTSC
Bahrain B PAL
Barbados N NTSC
Belgium B/G PAL Nicam Teletext
Bermuda M NTSC
Brazil M PAL-M MTS
Bulgaria D SECAM
Canada M NTSC MTS CC
Canary Is B PAL
China D PAL
Colombia N NTSC
Cyprus B PAL
Czech Republic D/K SECAM/PAL
Denmark B PAL Nicam TeleText
Egypt B SECAM
Faroe Islands (DK) B PAL
Finland B/G PAL Nicam TeleText
France E/L SECAM Antiope
Gambia I PAL
Germany B/G PAL FM-FM TeleText
Germany
Gibraltar B PAL
Greece B/H SECAM
Hong Kong I PAL Nicam
(prev East)
B/G SECAM/PAL
5. Resolution
5. Resolution
57ASUS TV Tuner Card User’s Manual
Page 58

Country TV Color Stereo Subtitles
Hungary B/G & D/K PAL (was SECAM)Nicam (Budapest only)
Iceland B PAL
India B PAL
Indonesia B PAL
Iran H SECAM
Ireland I PAL Nicam TeleText
Israel B/G PAL Nicam TeleText
Italy B/G PAL FM/FM TeleText
Jamaica M SECAM
Japan M NTSC Matrix
Jordan B PAL
Kenya B PAL
Korea M NTSC
Luxembourg B/G PAL - TeleText
Madeira B PAL
Madagascar B SECAM
Malaysia B PAL
Malta B/G PAL
Mauritius B SECAM
Mexico M NTSC MTS CC
Monaco L/G SECAM/PAL
Morocco B SECAM
Netherlands B/G PAL FM-FM TeleText
New Zealand B/G PAL Nicam TeleText
North Korea D/K? SECAM
Norway B/G PAL Nicam
Pakistan B PAL
Paraguay N PAL
Peru M NTSC
Philipines M NTSC
Poland D/K PAL Teletext
Portugal B/G PAL Nicam Teletext
Romania G PAL
Russia D/K SECAM
Saudi Arabia B SECAM
5. Resolution
5. Resolution
Seychelles I PAL
Singapore B PAL
South Africa I PAL
South Korea N NTSC
Spain B/G PAL Nicam
Sri Lanka B/G PAL
Sweden B/G PAL Nicam Teletext
Switzerland B/G PAL FM-FM TeleText
Tahiti KI SECAM
Taiwan M NTSC
Thailand B PAL
Trinidad M NTSC
Tunisia B SECAM
Turkey B PAL - TeleText
5.Capture Resolution Table
ASUS TV Tuner Card User’s Manual58
Page 59

6. T roubleshooting
Description Recommended Action
My monitor is not capable
of high resolution or r efresh
rate.
DirectX or the other
applications report no
AGP memory available.
My MPEG player displays
bad quality video clips.
I am using Video Security
and it seems my hard disk
space is almost exhausted.
• It depends on the display characteristics of your
monitor . Consult your monitor documentation for the
proper configuration.
• Windows 95 is not OSR2.1 or later.
• DirectX version is not 6.0 or later.
• You have not installed appropriate drivers for the
AGP chipset. (e.g. VGAR TD.VXD for Intel 440LX).
• Incorrect BIOS setting. BIOS must support at least
64MB for AGP aperture size.
• Y ou must install DirectX 8 or later so that your player
can take advantage of the hardware acceleration
mode (DirectDraw).
• Try to switch to a lower resolution, color depth, or
refresh rate. Switching to a lower mode allows your
player to use hardware acceleration mode.
• Switch dual view mode to VGA or TV mode.
• This is a very important issue when you decide to
use V ideoSecurity with the “never stop” option. Y ou
must be aware of the free space of your hard disk—
it must be enough for storing temporary files in the
current working directory . If disk space is exhausted,
V ideoSecurity will not store any information and give
you a warning message.
6. Troubleshooting
System can not find USB
Human Interface Device
(HID) drivers in Windows
98.
• Y ou must install HID drivers from W indows 98 setup
CD.
5. Resolution
5. Resolution
59ASUS TV Tuner Card User’s Manual
Page 60

NOTE
 Loading...