

Page 1

Contents
English .............................................................................. 1
Dansk .............................................................................34
Suomi .............................................................................66
Norsk .............................................................................. 98
Svenska ........................................................................ 130
Page 2
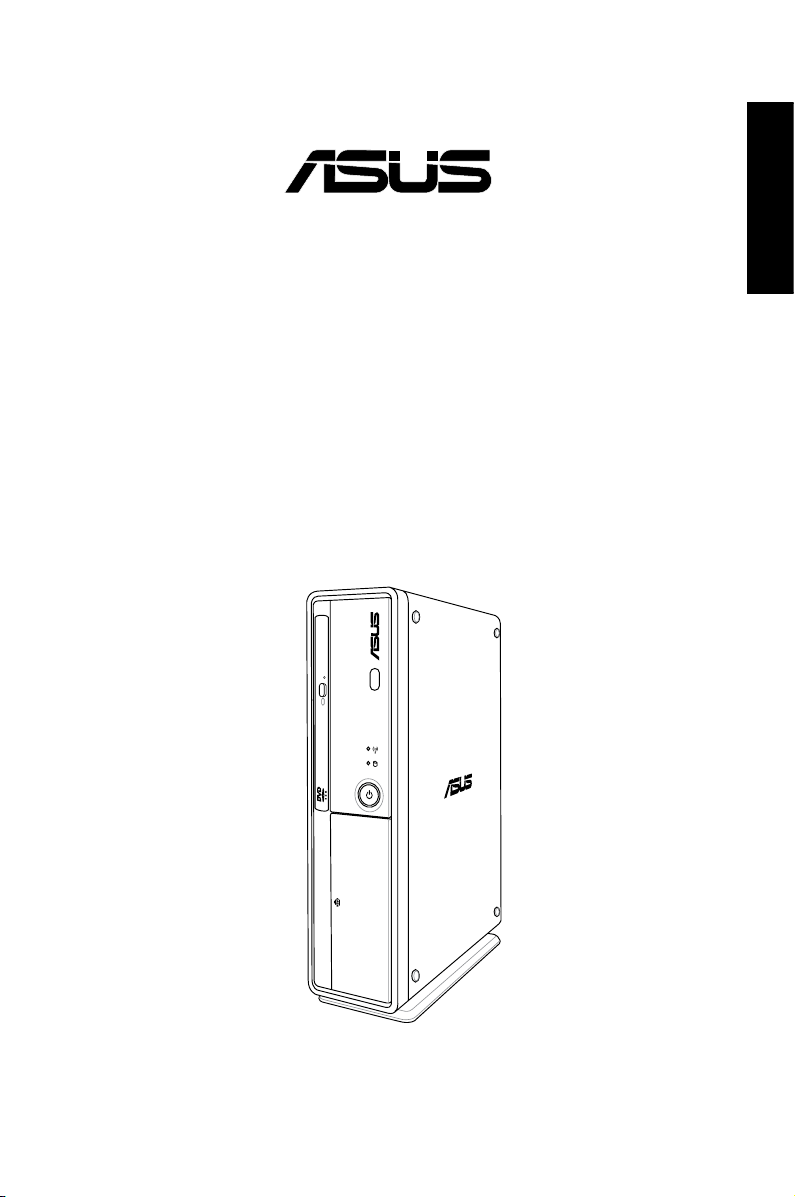
BS5000/M5100
®
ASUS Desktop PC
User Manual
English
Page 3

English
E4030
First Edition V1
July 2008
Copyright © 2008 ASUSTeK Computer, Inc. All Rights Reserved.
No part of this manual, including the products and software described in it, may be reproduced,
transmitted, transcribed, stored in a retrieval system, or translated into any language in any form or by any
means, except documentation kept by the purchaser for backup purposes, without the express written
permission of ASUSTeK Computer Inc. (“ASUS”).
Product warranty or service will not be extended if: (1) the product is repaired, modied or altered, unless
such repair, modication of alteration is authorized in writing by ASUS; or (2) the serial number of the
product is defaced or missing.
ASUS PROVIDES THIS MANUAL “AS IS” WITHOUT WARRANTY OF ANY KIND, EITHER EXPRESS
OR IMPLIED, INCLUDING BUT NOT LIMITED TO THE IMPLIED WARRANTIES OR CONDITIONS OF
MERCHANTABILITY OR FITNESS FOR A PARTICULAR PURPOSE. IN NO EVENT SHALL ASUS, ITS
DIRECTORS, OFFICERS, EMPLOYEES OR AGENTS BE LIABLE FOR ANY INDIRECT, SPECIAL,
INCIDENTAL, OR CONSEQUENTIAL DAMAGES (INCLUDING DAMAGES FOR LOSS OF PROFITS,
LOSS OF BUSINESS, LOSS OF USE OR DATA, INTERRUPTION OF BUSINESS AND THE LIKE),
EVEN IF ASUS HAS BEEN ADVISED OF THE POSSIBILITY OF SUCH DAMAGES ARISING FROM ANY
DEFECT OR ERROR IN THIS MANUAL OR PRODUCT.
SPECIFICATIONS AND INFORMATION CONTAINED IN THIS MANUAL ARE FURNISHED FOR
INFORMATIONAL USE ONLY, AND ARE SUBJECT TO CHANGE AT ANY TIME WITHOUT NOTICE,
AND SHOULD NOT BE CONSTRUED AS A COMMITMENT BY ASUS. ASUS ASSUMES NO
RESPONSIBILITY OR LIABILITY FOR ANY ERRORS OR INACCURACIES THAT MAY APPEAR IN THIS
MANUAL, INCLUDING THE PRODUCTS AND SOFTWARE DESCRIBED IN IT.
Products and corporate names appearing in this manual may or may not be registered trademarks or
copyrights of their respective companies, and are used only for identication or explanation and to the
owners’ benet, without intent to infringe.
2
Page 4

ASUS contact information
ASUSTeK COMPUTER INC.
Address 15 Li-Te Road, Peitou, Taipei, Taiwan 11259
Telephone +886-2-2894-3447
Fax +886-2-2890-7798
E-mail info@asus.com.tw
Web site www.asus.com.tw
Technical Support
Telephone +86-21-38429911
Online support support.asus.com
ASUS COMPUTER INTERNATIONAL (America)
Address 800 Corporate Way, Fremont, CA 94539, USA
Telephone +1-510-739-3777
Fax +1-510-608-4555
Web site usa.asus.com
Technical Support
Telephone +1-812-282-2787
Support fax +1-812-284-0883
Online support support.asus.com
ASUS COMPUTER GmbH (Germany and Austria)
Address Harkortstr. 21-23, 40880 Ratingen, Germany
Telephone +49-02102-95990
Fax +49-02102-9599-11
Web site www.asus.de
Online contact www.asus.de/sales
English
Technical Support
Telephone +49-01805-010923
Support Fax +49-02102-9599-11
Online support support.asus.com
3
Page 5

Notices
English
Federal Communications Commission Statement
This device complies with Part 15 of the FCC Rules. Operation is subject to the
following two conditions:
•
This device may not cause harmful interference, and
•
This device must accept any interference received including interference that
may cause undesired operation.
This equipment has been tested and found to comply with the limits for a
Class B digital device, pursuant to Part 15 of the FCC Rules. These limits are
designed to provide reasonable protection against harmful interference in a
residential installation. This equipment generates, uses and can radiate radio
frequency energy and, if not installed and used in accordance with manufacturer’s
instructions, may cause harmful interference to radio communications. However,
there is no guarantee that interference will not occur in a particular installation. If
this equipment does cause harmful interference to radio or television reception,
which can be determined by turning the equipment off and on, the user is
encouraged to try to correct the interference by one or more of the following
measures:
•
Reorient or relocate the receiving antenna.
•
Increase the separation between the equipment and receiver.
•
Connect the equipment to an outlet on a circuit different from that to which the
receiver is connected.
•
Consult the dealer or an experienced radio/TV technician for help.
The use of shielded cables for connection of the monitor to the graphics card is
required to assure compliance with FCC regulations. Changes or modications
to this unit not expressly approved by the party responsible for compliance
could void the user’s authority to operate this equipment.
Canadian Department of Communications Statement
This digital apparatus does not exceed the Class B limits for radio noise emissions
from digital apparatus set out in the Radio Interference Regulations of the
Canadian Department of Communications.
This class B digital apparatus complies with Canadian ICES-003
4
.
Page 6

Safety information
Electrical safety
•
To prevent an electric shock hazard, disconnect the power cable from the
electric outlet before relocating the system.
• When adding or removing any devices to or from the system, contact a
qualied service technician or your retailer. Ensure that all the power cables for
the devices are unplugged before the signal cables are connected. If possible,
disconnect all the power cables from the existing system before you add or
remove a device to or from the system.
•
If the power supply is broken, do not try to x it by yourself. Contact a qualied
service technician or your retailer.
Operation safety
• Before installing devices into the system, carefully read all the documentation
that comes with the package.
• Before using this product, ensure that all cables are correctly connected and
the power cables are not damaged. If you detect any damage, contact your
dealer immediately.
• To avoid short circuits, keep paper clips, screws, and staples away from
connectors, slots, sockets, and circuitry.
• Avoid dust, humidity, and extreme temperatures. Do not place this product in a
location where it may get wet. Place this product on a at and stable surface.
• When using this product, do not block any air inlet/outlet on the chassis.
• It is recommended that you use this product in environments with an ambient
temperature below 35ºC.
• If you encounter technical problems with this product, contact a qualied
service technician or your retailer.
English
Lithium-Ion Battery Warning
CAUTION: Danger of explosion if battery is incorrectly replaced. Replace
only with the same or equivalent type recommended by the manufacturer.
Dispose of used batteries according to the manufacturer’s instructions.
VORSICHT: Explosionsgetahr bei unsachgemäßen Austausch der Batterie.
Ersatz nur durch denselben oder einem vom Hersteller empfohlenem
ähnljchen Typ. Entsorgung gebrauchter Batterien nach Angaben des
Herstellers.
LASER PRODUCT WARNING
CLASS 1 LASER PRODUCT
5
Page 7

English
General precautions
Before using the ASUS BS5000/M5100 Desktop PC, carefully read the general
precautions below. Improper operation could lead to personal injury or damage to
the product.
• Before using the product, ensure that all components are correctly installed
and all cables are correctly connected. If you detect any damage, contact your
dealer immediately.
• Avoid dust and extreme temperatures. Do not place this product in a location
where it may receive direct sunlight.
• Do not place this product in a location where it may get wet.
• Do not block the air vents on the chassis. Always provide proper ventilation for
this product.
• Before turning on the system, check if all the peripherals are correctly
connected.
• To avoid short circuits, keep scraps, screws, and threads away from
connectors, slots, sockets, and circuitry.
• Do not insert any object or spill liquid into the air vents on the chassis.
• If this product has been used for a long time, avoid direct contact with the
heatsinks and the surfaces of IC as they may become very warm and hot.
Check if the system receives proper ventilation.
• Before you add or remove a peripheral device to or from the system, ensure
that you unplugged the system from the power source.
• If the power supply is broken, do not try to x it by yourself. Contact a qualied
service technician or your retailer.
• Do not service this product yourself.
• Though the system casing is elaborately designed to protect users from
scratches, be careful with those sharp tips and edges. Put on a pair of gloves
before you remove or replace the system cover.
• Unplug this product from the power source when it is left unused for a long
period of time.
• It is recommended that you use this product in environments with an ambient
temperature below 35ºC.
• Use this product only with the correct voltage as instructed by the
manufacturer.
• To prevent re or electric shock, do not overload power outlets and extension
cords.
• Warning: Ensure that you replace the battery with a correct type; otherwise, it
may cause an explosion hazard.
6
Page 8

About this guide
Audience
This guide provides general information about ASUS BS5000/M5100 Desktop
PC and instructions on how to use the Support CD that comes with the system
package. This guide is intended for experienced users and integrators with
hardware knowledge of personal computers.
How this guide is organized
This guide contains the following parts:
1. Chapter 1: System introduction
This chapter gives a general description of ASUS BS5000/M5100 Desktop
PC. The chapter lists the system features, including introduction on the front
and rear panels.
2. Chapter 2: Getting started
This chapter helps you power up the system and install drivers and utilities
from the support CD.
English
7
Page 9
English
Conventions used in this guide
To ensure that you perform certain tasks properly, take note of the following
symbols used throughout this guide.
WARNING: Information to prevent injury to yourself when trying to
complete a task.
CAUTION: Information to prevent damage to the components when
trying to complete a task.
IMPORTANT: Instructions that you MUST follow to complete a task.
NOTE: Tips and additional information to aid in completing a task.
Where to nd more information
Refer to the following sources for additional information and for product and
software updates.
1. ASUS Websites
The ASUS websites worldwide provide updated information on ASUS
hardware and software products. Refer to the ASUS contact information.
2. Optional Documentation
Your product package may include optional documentation, such as warranty
yers, that may have been added by your dealer. These documents are not
part of the standard package.
8
Page 10
System package contents
Check your BS5000/M5100 system package for the following items.
Standard items
1. ASUS BS5000/M5100 Desktop PC with
• ASUS Desktop PC x 1
• Foot stand x 1
• Mouse x 1
• Keyboard x 1
2. Cables
• AC power cord x 1
3. Accessories
• AC power adapter x 1
• Mouse pad x 1
4. Support CD x 1
5. User Manual x 1
6. Warranty card x 1
• If any of the items is damaged or missing, contact your retailer immediately.
• Specications are subject to the desktop PC you purchased. Check with
your supplier for exact offers.
English
9
Page 11

English
10
Page 12
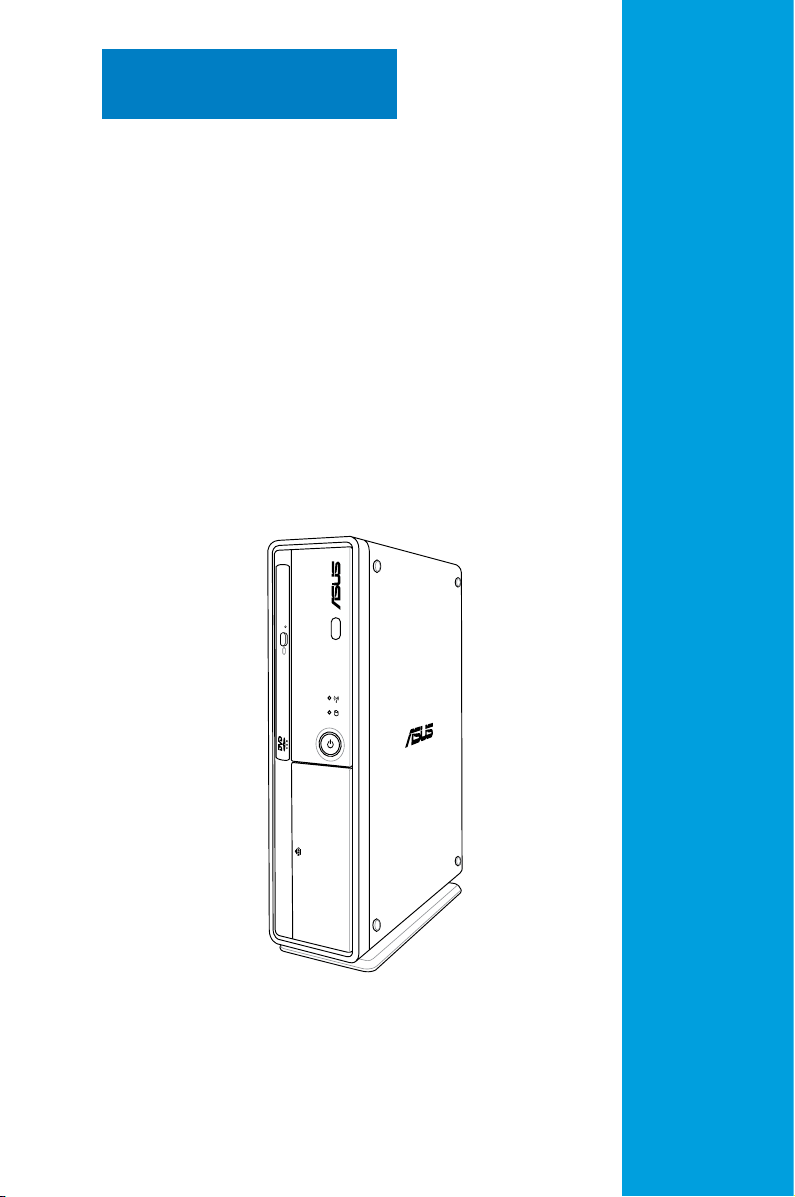
Chapter 1
This chapter gives a general
description of the desktop PC. The
chapter lists the system features
including introduction on the front and
rear panels.
System introduction
Page 13
English
2.0
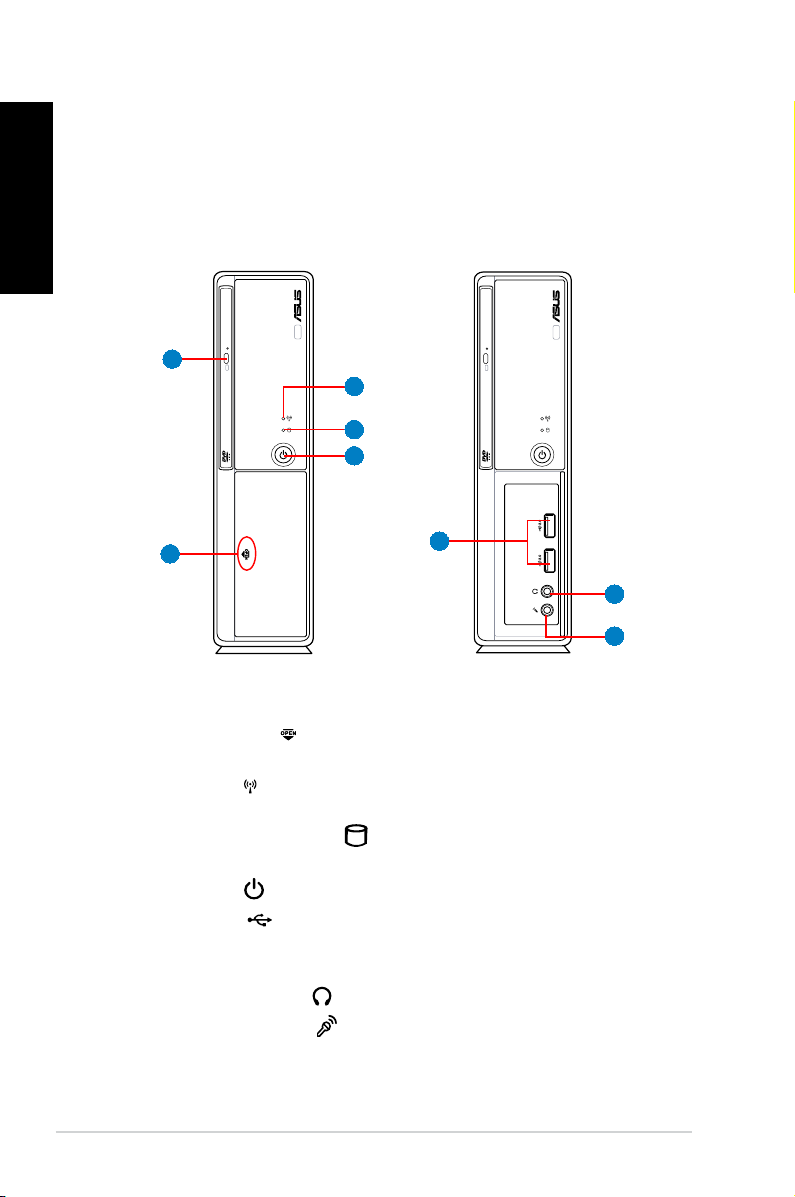
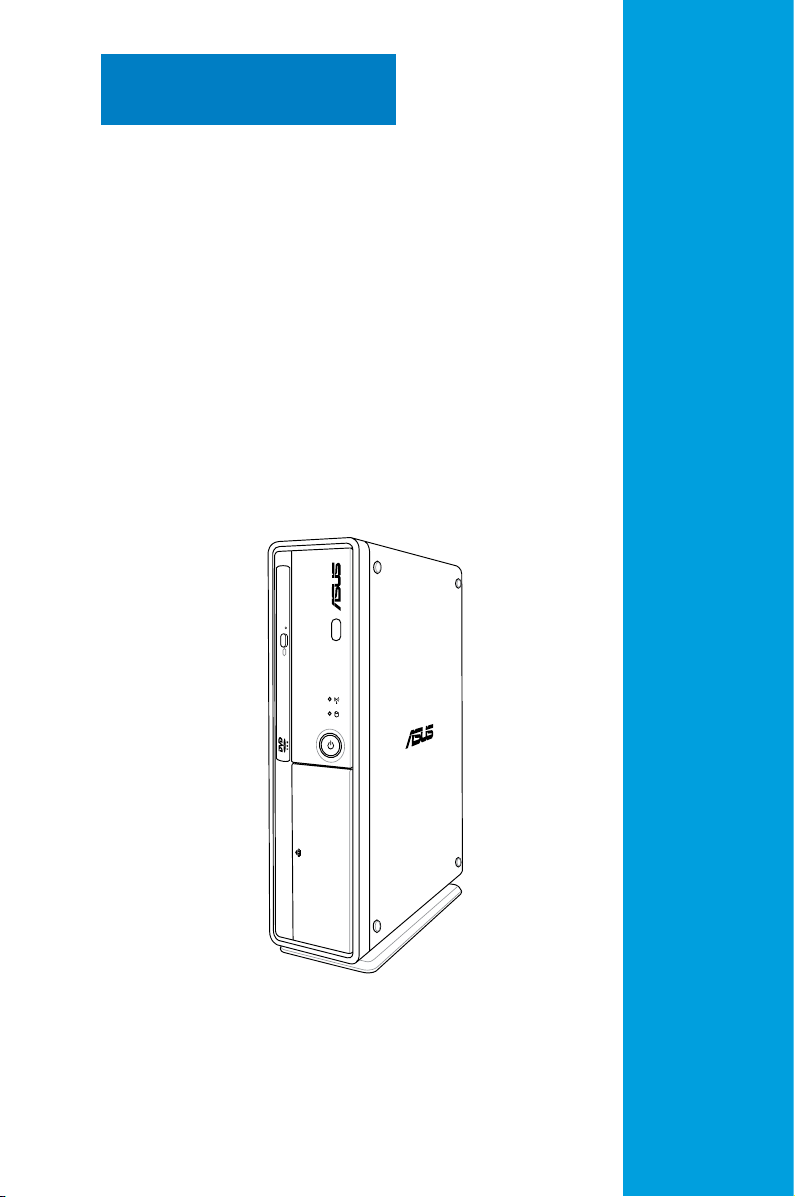
1.1 Front panel
The ASUS BS5000/M5100 Desktop PC includes an ASUS motherboard, a power
supply unit, a front panel, and a rear panel. All of these components are integrated
in a system casing elaborately designed by ASUS.
The illustrations below show the front panel and the components on it.
Close
1
3
4
5
2
Open
6
7
8
1. Optical disk drive (ODD) eject button. Press this button to eject the optical
disk drive.
2. Front panel cover
. Pull outward to open the front panel cover. Inside are
two USB 2.0 ports, one Microphone port, and one Headphone port.
3. Network LED
. This LED lights up when a wireless/wired network
connection is established on the system.
4. Hard disk drive (HDD) LED
. This LED lights up when data is being read
from or written to the hard disk drive.
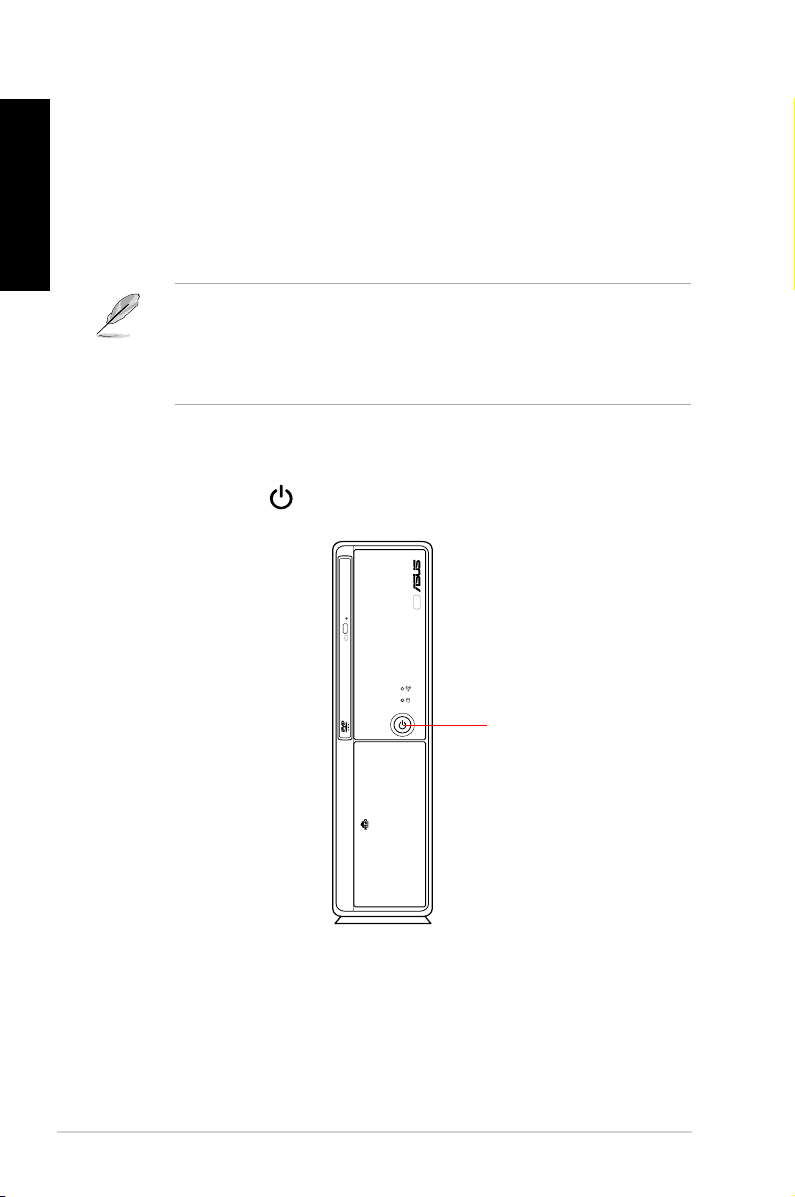
5. Power button
. Press this button to turn the system on.
6. USB 2.0 ports
. These Universal Serial Bus 2.0 (USB 2.0) ports are
available for connecting USB 2.0 devices such as a mouse, printer, scanner,
camera, PDA, and others.
7. Headphone port (lime)
8. Microphone port (pink)
12 Chapter 1: System introduction
. This port connects a headphone.
. This port connects a microphone.
Page 14

1.2 Rear panel
The system rear panel includes the power input port and several I/O ports that
allow convenient connection of devices.
The illustration below shows the rear panel and the components on it.
The ASUS BS5000/M5100 Desktop PC provides two types of models for you to
choose from. The two types differ in Port 2 on the rear panel.
Type 1: Port 2 is a Modem (RJ-11) port.
Type 2: Port 2 is a COM port.
Type 1
1
9
10
11
12
13
1. Air vents. These vents allow air ventilation.
2a
3
4
5
6
7
8
9
10
11
12
13
English
Type 2
1
2b
3
4
5
6
7
8
DO NOT block the air vents on the top and rear panels of the system chassis.
The components inside the chassis may overheat and be damaged without
adequate ventilation.
2a. Modem (RJ-11) port. This port connects to remote Network (Internet)
through a dialup modem.
2b. COM2 port. This port is for pointing devices or other serial devices.
3. PS/2 keyboard port
. This port is for a PS/2 keyboard.
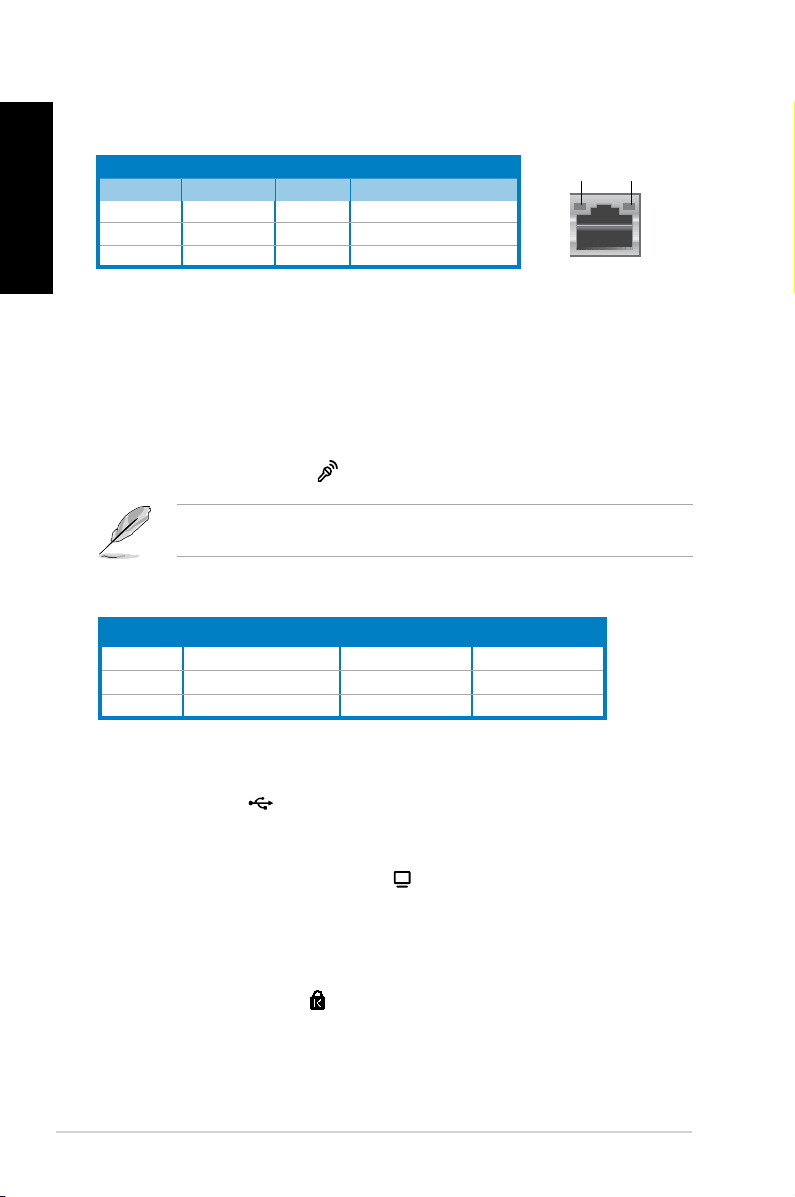
4. LAN (RJ-45) port. This port allows Fast Ethernet connection to a Local Area
Network (LAN) through a network hub. Refer to the table on the next page for
the LAN port LED indications.
13ASUS BS5000/M5100
Page 15
English
2.0
LAN port LED indications
LED
LAN port
SPEED
LED
Activity/Link LED Speed LED
Status Description Status Description
OFF No link OFF 10 Mbps connection
ORANGE Linked ORANGE 100 Mbps connection
BLINKING Data activity GREEN 1 Gbps connection
ACT/LINK
5. COM1 port. This port is for pointing devices or other serial devices.
6. Line In port (light blue). This port connects a tape, CD, DVD player, or other
audio sources.
7. Line Out port (lime). This port connects a headphone or a speaker. In
4-channel or 6-channel conguration, the function of this port becomes Front
Speaker Out.
8. Microphone port (pink) . This port connects a microphone.
Refer to the audio conguration table below for the function of the audio ports in
2, 4, or 6-channel conguration.
Audio 2, 4, or 6-channel conguration
Port Headset 2-channel 4-channel 6-channel
Light Blue Line In Rear Speaker Out
Lime Line Out Front Speaker Out Front Speaker Out
Pink Mic In Mic In
Rear Speaker Out
Bass/Center
9. DC IN input port. This port connects the DC output plug of an AC power
adapter.
10. USB 2.0 ports
. These Universal Serial Bus 2.0 (USB 2.0) ports are
available for connecting USB 2.0 devices such as a mouse, printer, scanner,
camera, PDA, and others.
11. Video Graphics Array (VGA) port
. This port connects a VGA monitor or
other VGA-compatible devices.
12. DVI-D Out port. This port is for any DVI-D compatible device and is HDCP
compliant allowing playback of HD DVD, Blu-Ray and other protected
content.
13. Kensington® lock port . This port allows the PC to be secured to a xed
object using Kensington®.compatible security products.
14 Chapter 1: System introduction
Page 16
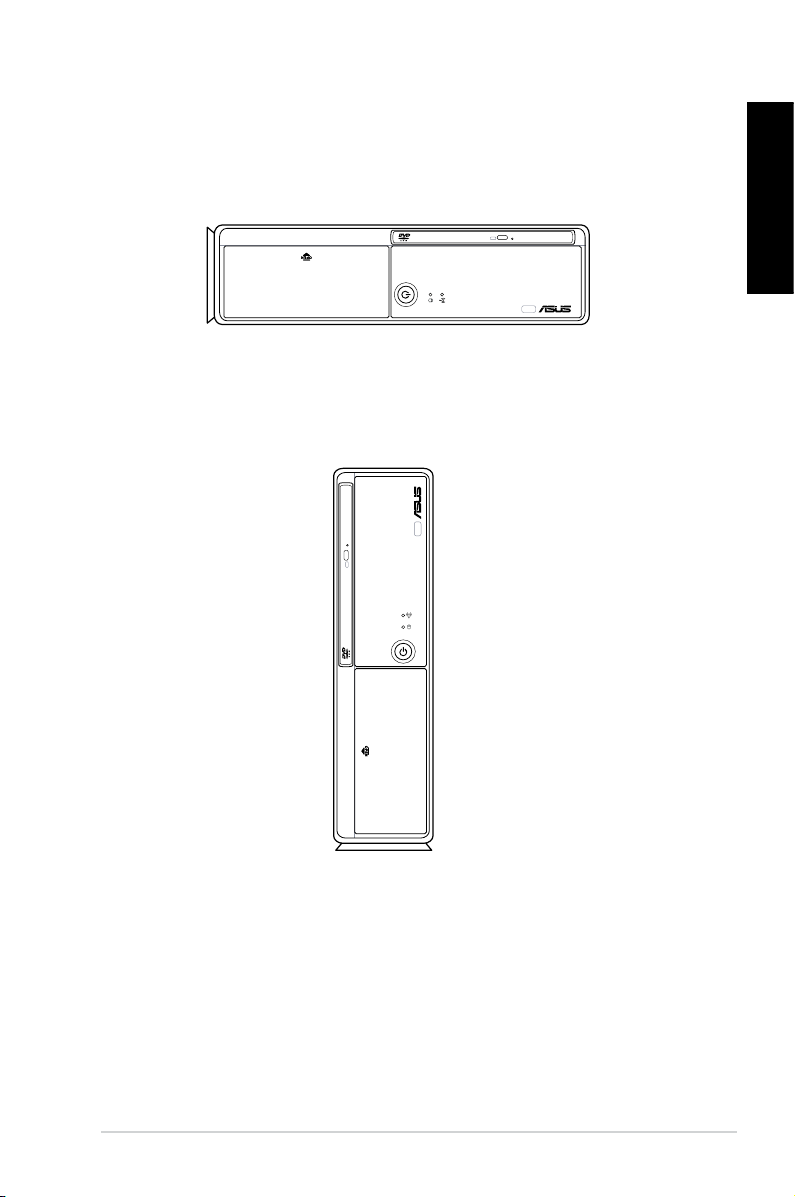
1.3 Placement options
1.3.1 Horizontal placement
Place your desktop PC horizontally.
1.3.2 Vertical placement
Install the foot stand supplied in the system package. Place your desktop PC
vertically.
English
To install the foot stand:
1. Locate the screw hole on the bottom of your desktop PC.
2. Secure the foot stand to your desktop PC with the supplied screw.
15ASUS BS5000/M5100
Page 17
English
1.4 Connecting to the keyboard and the
mouse
The ASUS BS5000/M5100 Desktop PC is equipped with a PS/2 keyboard and a
USB mouse. Connect the PS/2 keyboard to the PS/2 keyboard port at the rear
panel. Connect the USB mouse to a USB port either at the rear or front panel.
If you are using a wireless USB keyboard or mouse, refer to the documentation
that comes with the device or contact your supplier directly for information on
how to congure it.
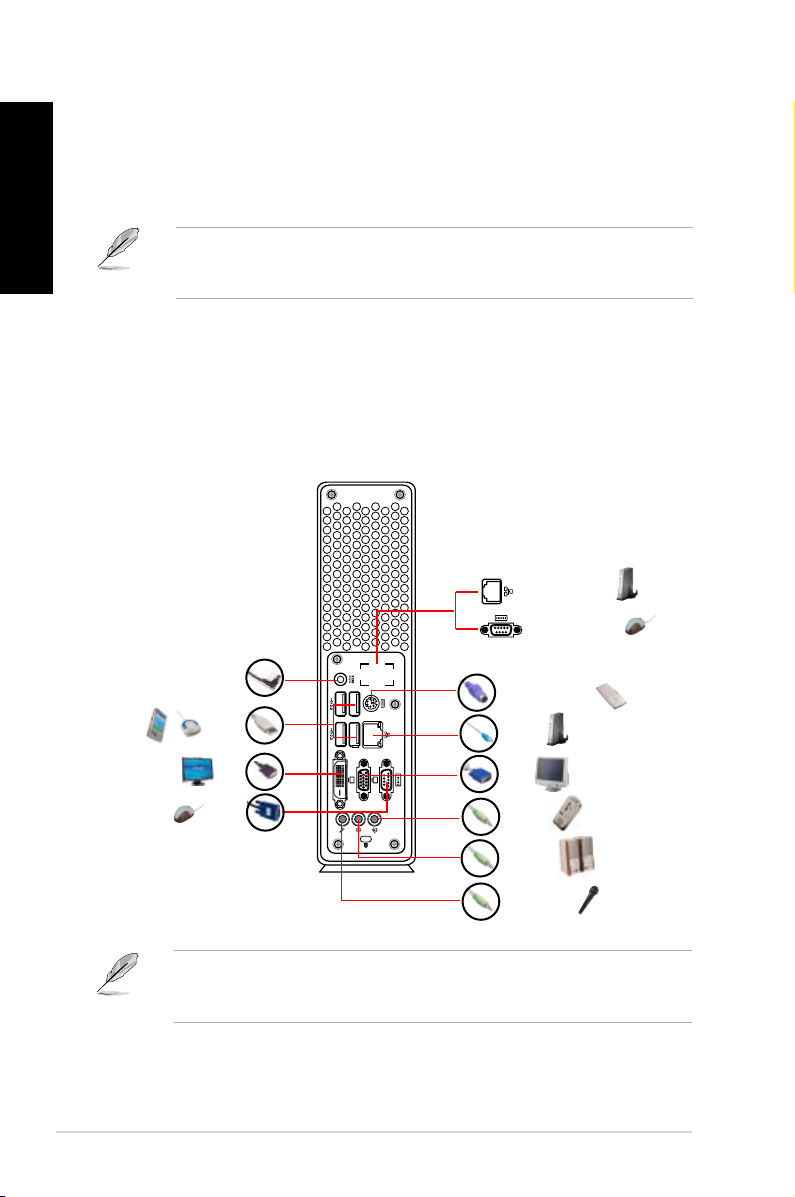
1.5 Connecting to other peripheral devices
The ASUS BS5000/M5100 Desktop PC is equipped with a number of I/O ports at
the rear and front panels where you can connect peripheral devices to the system.
Refer to the illustration below for details.
RJ-11 (Type 1)
COM2 (Type 2)
Power jack
USB
DVI
COM1
Before you connect a peripheral device to the system, refer to the
documentation that comes with the device or contact your supplier directly for
information on how to install it.
16 Chapter 1: System introduction
PS/2 keyboard
RJ-45
VGA
Line In
Line Out
Microphone
(Dialup modem)
Page 18
Chapter 2
This chapter helps you to power up the
system and install drivers and utilities
from the support CD.
Getting started
Page 19
English
2.1 Installing an operating system
This motherboard supports Windows® XP / Vista operating systems (OS). Always
install the latest OS version and the corresponding updates to maximize the
features of your hardware. When you start the system for the rst time, the system
automatically detects the built-in audio and graphics chips and attempts to install
the drivers that come with the OS. Select NO when a window appears asking if
you want to restart the system. Install drivers according to the instructions in the
following sections.
• To ensure that the OS works properly, install the drivers bundled in the
Support CD.
• Motherboard settings and hardware options vary. Use the setup
procedures presented in this chapter for reference only. Refer to your OS
documentation for detailed information.
2.2 Powering your system
Press the Power button to power up the system.
Press to turn ON the system
18 Chapter 2: Getting started
Page 20
2.3 Support CD information
The Support CD that comes with the system package contains the drivers,
software applications, and utilities that you can install to avail all system features.
The contents of the Support CD are subject to change at any time without
notice. Visit the ASUS website at www.asus.com for updates.
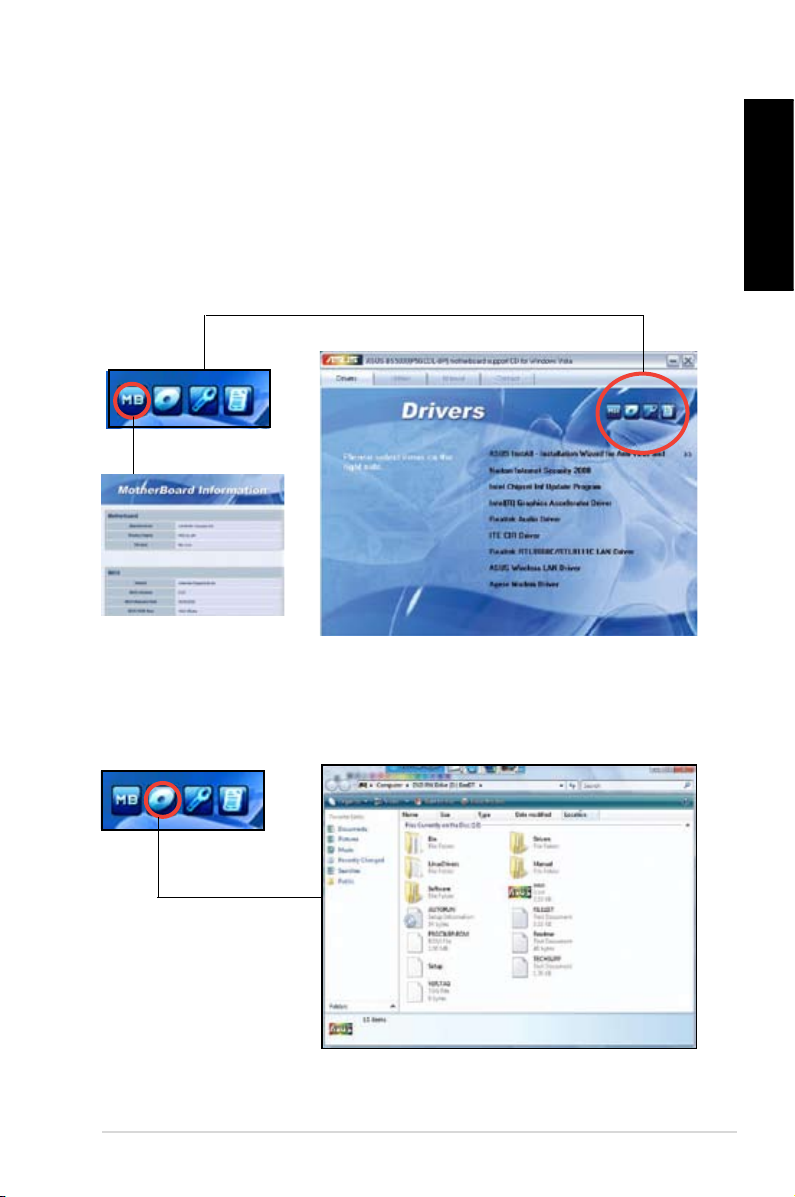
2.3.1 Running the Support CD
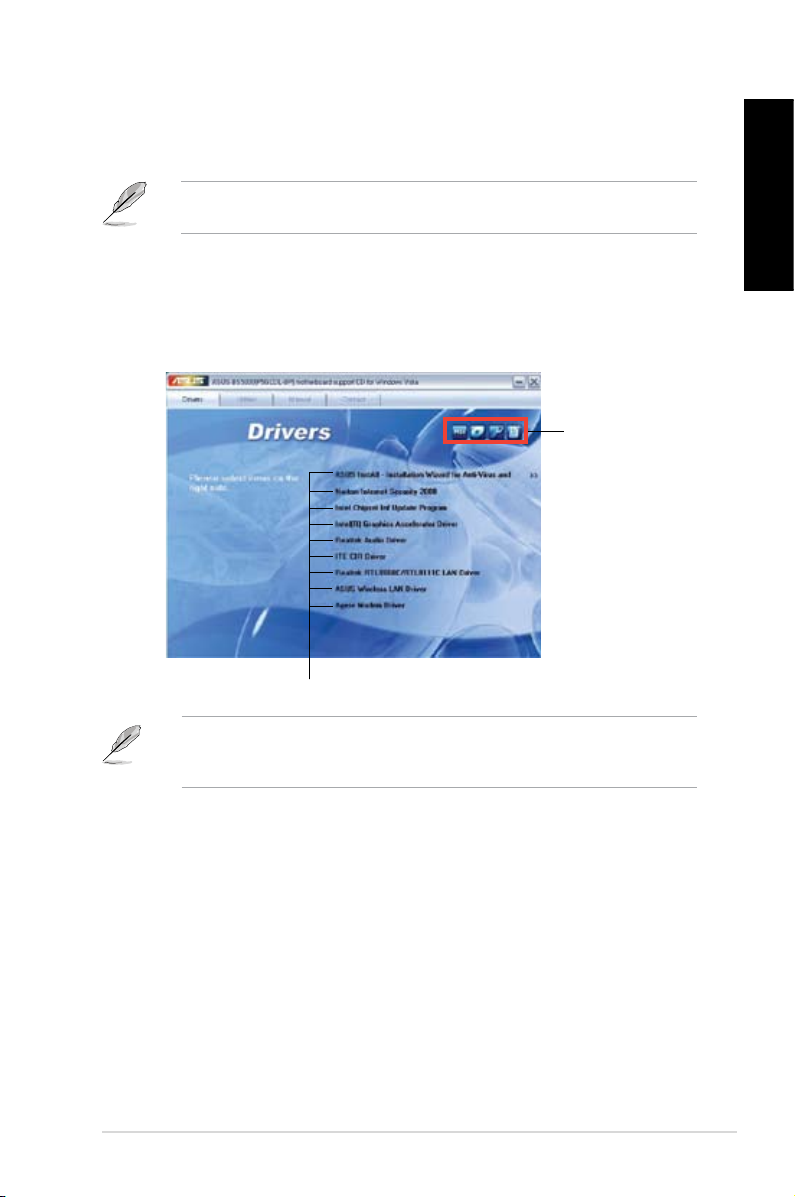
Place the Support CD into the optical drive. The CD automatically displays the
Drivers menu if Autorun is enabled on your computer.
Click an icon to
display Support
CD/motherboard
information
English
Click an item to install
If Autorun is NOT enabled on your computer, browse the contents of the
Support CD to locate the le ASSETUP.EXE from the BIN folder. Double-click
the ASSETUP.EXE to run the CD.
ASUS BS5000/M5100 19
Page 21
English
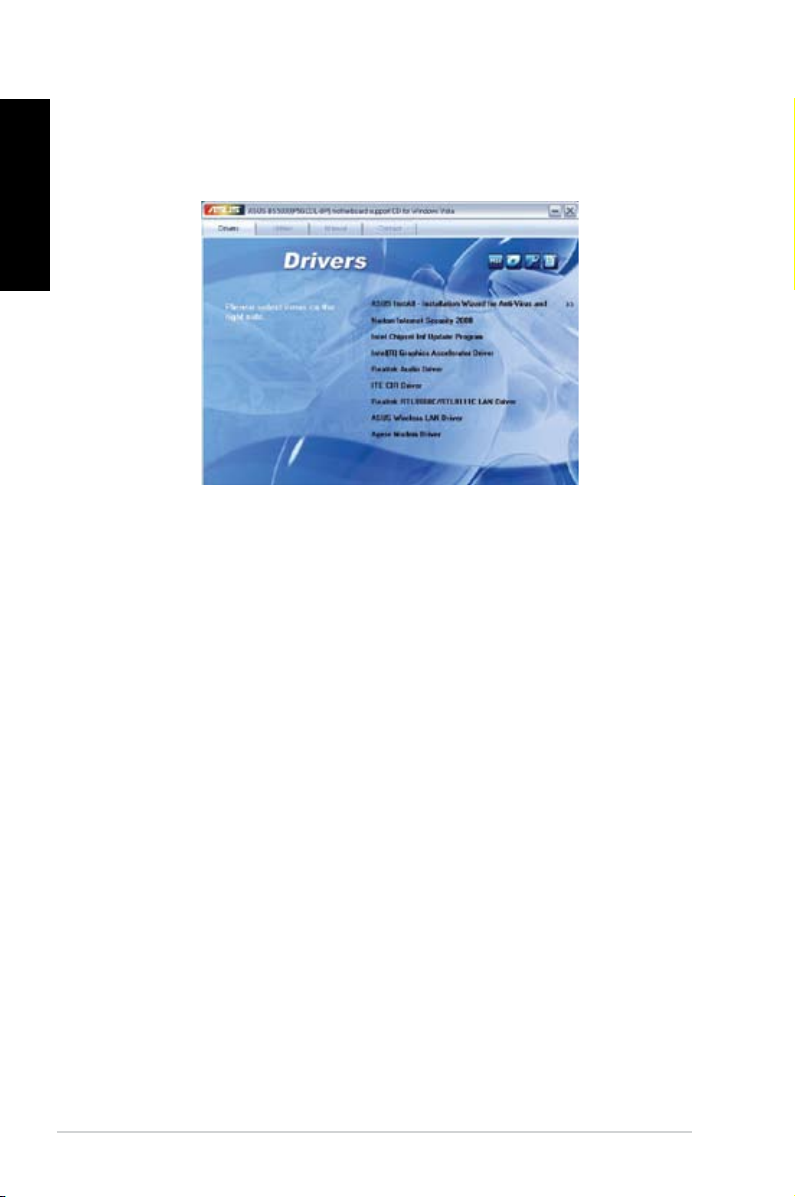
2.3.2 Drivers menu
The Drivers menu shows the available device drivers if the system detects
installed devices. Install the necessary drivers to activate the devices.
ASUS InstAll - Installation Wizard for Anti-Virus and Drivers
Installs all of the drivers using the installation wizard.
Norton Internet Security 2008
Installs Norton Internet Security 2008.
Intel Chipset Inf Update Program
Installs the Intel® chipset Inf update program.
Intel(R) Graphics Accelerator Driver
Installs the Intel® graphics accelerator driver.
Realtek Audio Driver
Installs the Realtek® audio driver and application.
ITE CIR Driver
Installs the ITE CIR driver.
Realtek RTL8168C/RTL8111C LAN Driver
Installs the Realtek® RTL8168C/RTL8111C LAN driver.
ASUS Wireless LAN Driver
Installs the ASUS wireless LAN driver.
Agere Modem Driver
Installs the Agere modem driver.
20 Chapter 2: Getting started
Page 22

2.3.3 Utilities menu
The Utilities menu shows the applications and other software that the
motherboard supports. Tap an item from the screen to install.
ASUS InstAll - Installation Wizard for Utilities
Installs all of the utilities through the Installation Wizard.
ASUS Update
Allows you to download the latest version of BIOS from the ASUS website.
Before using the ASUS Update, ensure that you have an Internet connection so
that you can connect to the ASUS website.
English
ASUS AI Manager
Installs the ASUS AI Manager where you can launch AI Disk, AI Security, and AI
Probe easily.
Adobe Acrobat Reader 8
Installs the Adobe Acrobat Reader 8. The manuals in the Support CD are in PDF
(Portable Document Format) format, which can be opened with Adobe Acrobat
Reader.
ASUS BS5000/M5100 21
Page 23
English
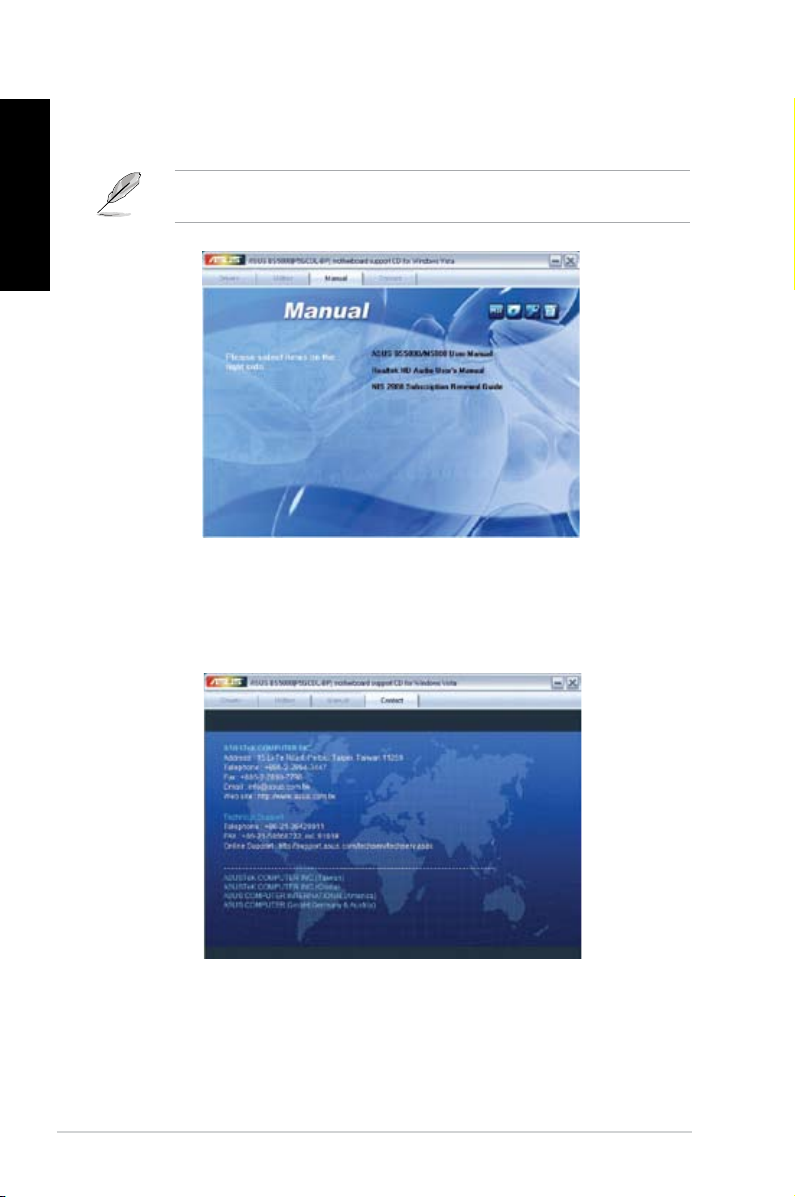
2.3.4 Manuals menu
The Support CD includes a list of supplementary user manuals.
The manual is in PDF format. To open it, install the Adobe Acrobat Reader from
the Utilities menu.
2.3.5 ASUS contact information
Click the Contact tab to display the ASUS contact information.
22 Chapter 2: Getting started
Page 24
2.3.6 Other information
The icons on the top right corner of the screen give additional information on the
motherboard and the contents of the Support CD. Click an icon to display the
specied information.
Motherboard Info
Displays the general specications of the motherboard.
English
Browse this CD
Displays the Support CD contents in graphical format.
ASUS BS5000/M5100 23
Page 25
English
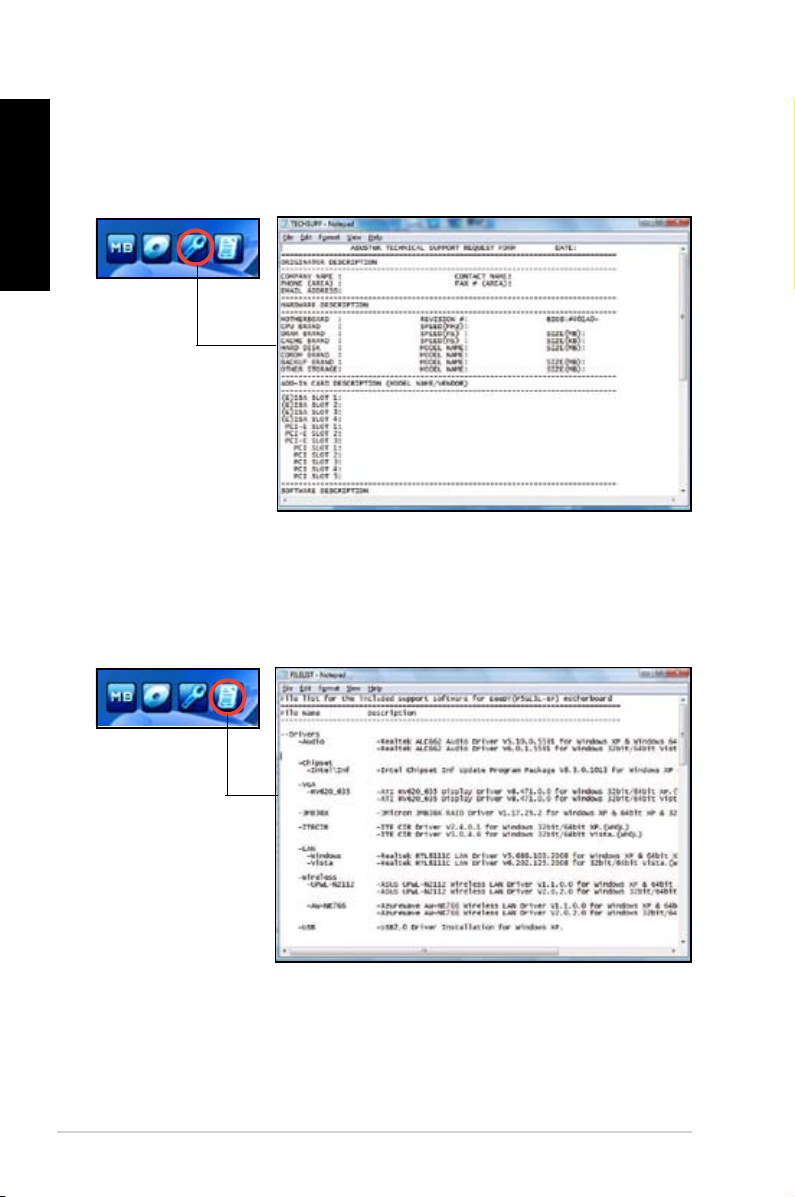
Technical support Form
Displays the ASUS Technical Support Request Form that you have to ll out when
requesting technical support.
Filelist
Displays the contents of the Support CD and a brief description of each in text
format.
24 Chapter 2: Getting started
Page 26
2.4 ASUS AI Manager
ASUS AI Manager allows you to launch AI Disk, AI Security, and AI Probe easily.
2.4.1 Installing AI Manager
To install AI Manager on your computer:
1. Place the Support CD into the optical drive. The CD automatically displays
the
Drivers menu if Autorun is enabled on your computer.
If Autorun is NOT enabled on your computer, browse the contents of the
Support CD to locate the le ASSETUP.EXE from the BIN folder. Double-click
the ASSETUP.EXE to run the CD.
2. Click the Utilities tab, then click ASUS AI Manager.
3. Follow the screen instructions to complete the installation.
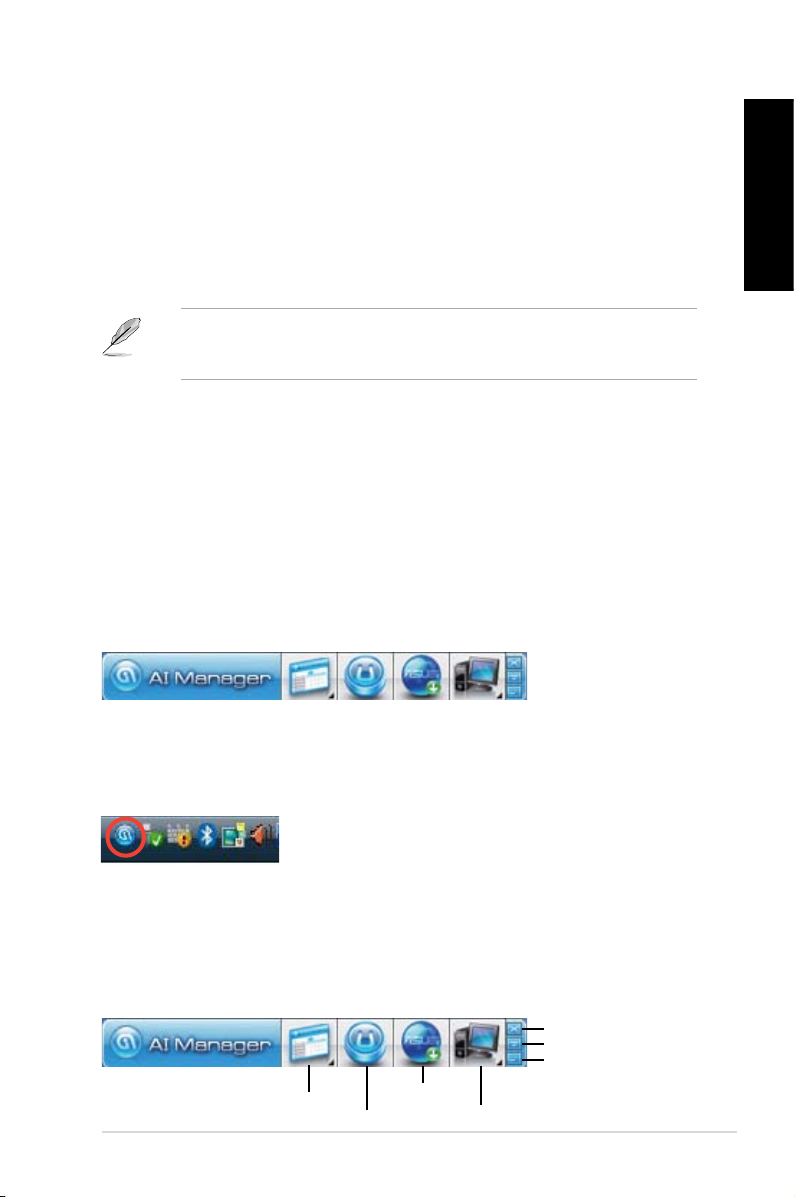
2.4.2 Launching AI Manager
You can launch AI Manager right after installation or anytime from the Windows®
desktop.
®
To launch AI Manager from the Windows
ASUS > AI Manager > AI Manager v1.xx.xx. The AI Manager Quick Bar appears.
desktop, click Start > All Programs >
English
After launching the application, the AI Manager icon appears in the Windows®
taskbar. Right-click this icon for more options.
2.4.3 AI Manager Quick Bar
Click the Main, My favorites, Support, or Information icon from the Quick Bar to
show the corresponding menu.
Close
Maximize/Resume
Minimize
Main
My Favorites
ASUS BS5000/M5100 25
Support
Information
Page 27
English
Click to switch between a full-screen AI Manager window and the Quick bar.
Click
Click
to keep AI Manager in the taskbar.
to close AI Manager.
2.4.4 Main
Launch AI Disk, AI Security, or AI Probe from the Main menu. Click the small
triangle to open or close the Main menu.
Click to open/close the Main menu
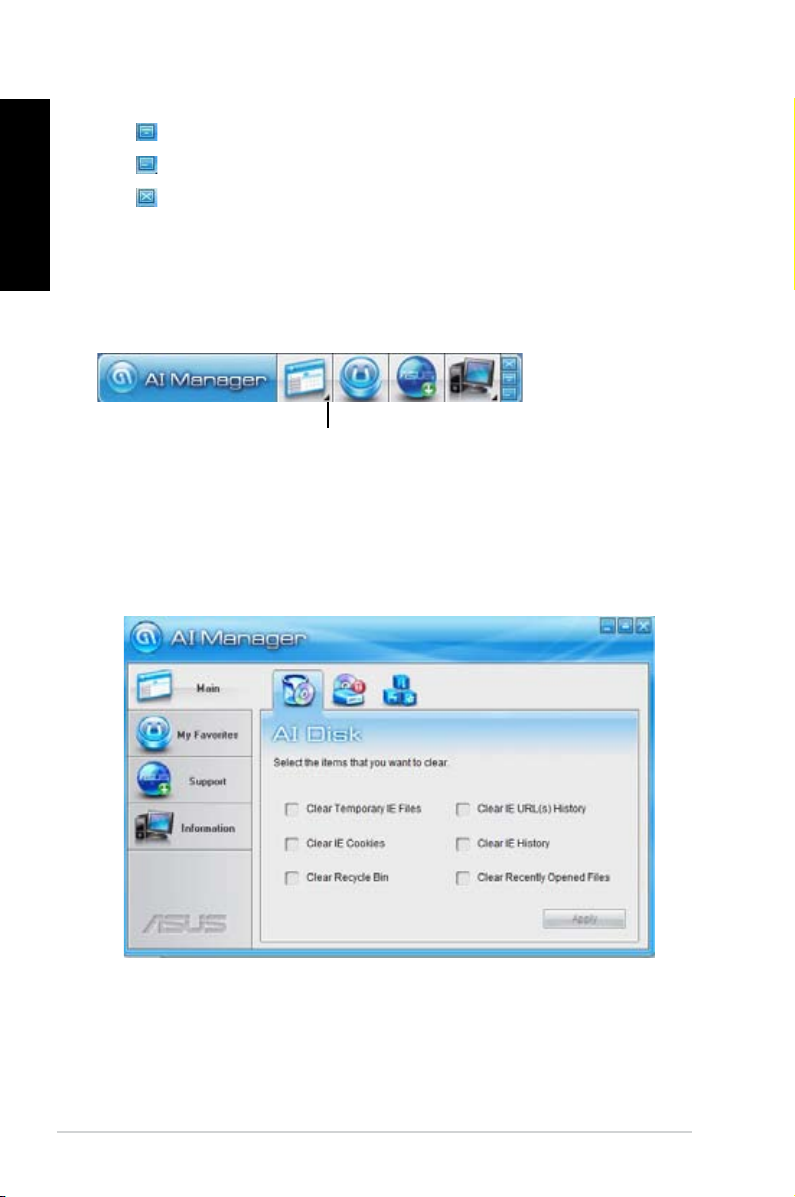
AI Disk
AI Disk allows you to easily clear the temporary IE les, IE URLs, IE cookies, IE
history list, Recycle Bin, and recently opened les list. Select the item that you
want to clear, then click
Apply.
26 Chapter 2: Getting started
Page 28

AI Security
AI Security allows you to set passwords to lock your removable storage devices
such as a USB ash disk and a CD/DVD disk, which ensures more security for
your data.
To lock a device:
1. If you are using AI Security for the rst time, key in a password that consists
of no more than 20 letters, numbers, or symbols.
2 Conrm your password.
3. Key in your password hint (optional).
4. Click
OK.
English
5. Select the device you want to lock, then click Apply.
ASUS BS5000/M5100 27
Page 29
English
6. Key in your password, then click OK. The device you selected cannot be
accessed without the password.
To unlock a device:
1. Deselect the device you locked, then click
2. Key in your password, then click
To change your password, click
instructions.
OK.
Change Password and follow the screen
Apply.
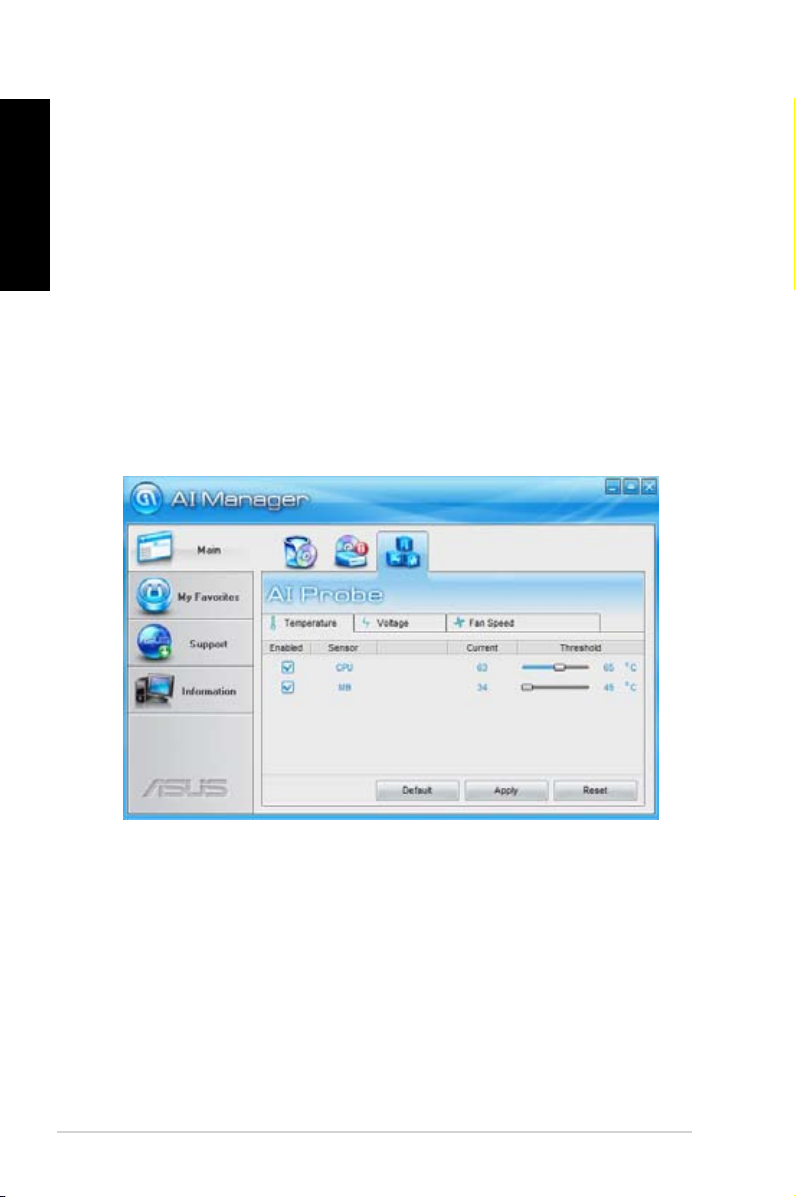
AI Probe
AI Probe automatically detects the motherboard and CPU temperatures, CPU fan
speed, and CPU voltage. It also allows you to adjust these values manually.
28 Chapter 2: Getting started
Page 30
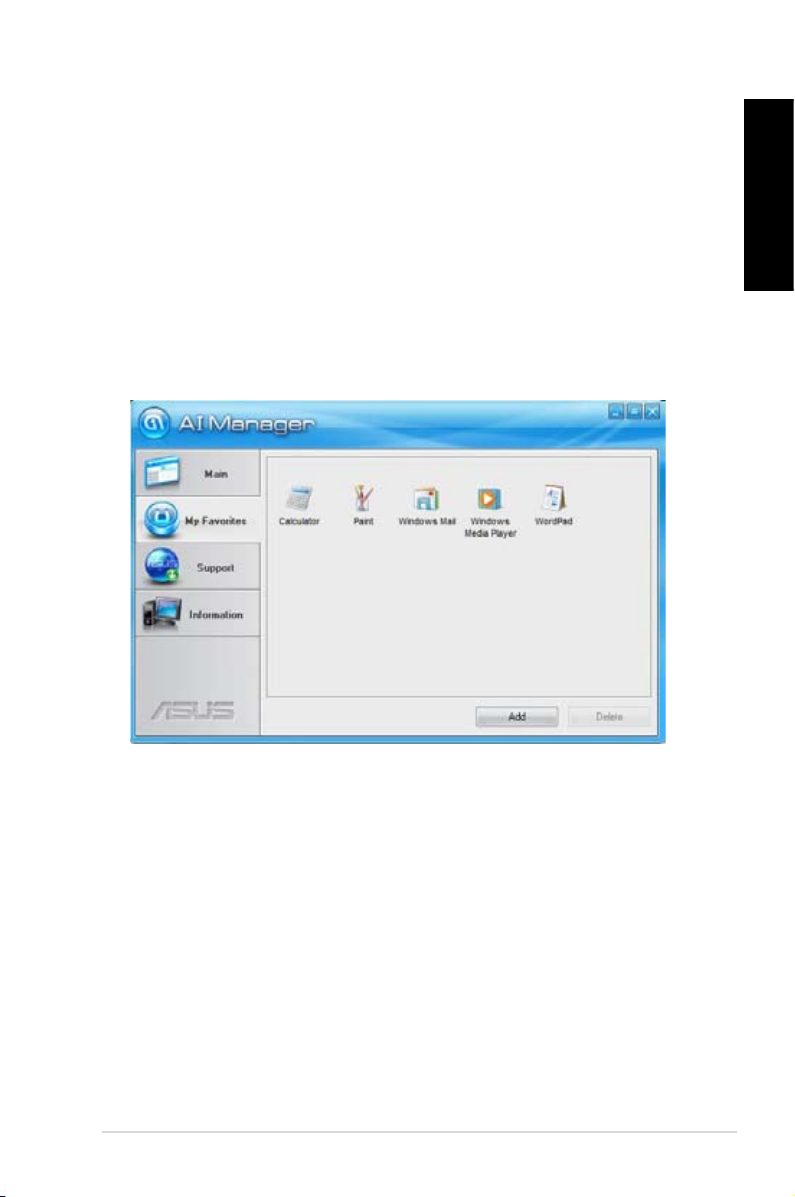
2.4.5 My favorites
Add your favorite applications to the My Favorites menu.
To add an application:
1. Click
2. Click
Right-click an icon in the My Favorites menu to open, delete, or rename the
corresponding application.
Double-click an icon to open the corresponding application.
Add and then select from the succeeding screen the application you
want to add to the My Favorites menu.
Open. The application you selected is added and its icon appears.
English
ASUS BS5000/M5100 29
Page 31

English
2.4.6 Support
The Support menu displays links to the ASUS international website, online
technical support website, online download support website, and contact
information website.
2.4.7 Information
The Information menu displays the general information of your system,
motherboard, CPU, BIOS, memory, and other devices installed.
30 Chapter 2: Getting started
Page 32

2.5 Loading the initial OS default settings
If you want to load the initial default settings for your system, press <F3> during the
Power-On Self-Test (Post).
2.6 Recovery CD (optional)
The ASUS PC Recovery CD assists you in reinstalling the OS and restoring it to its
original working state. Before using the recovery CD, copy your data les to a USB
ash disk or to a network drive and make note of any customized conguration
settings such as network settings.
The availability of the ASUS PC Recovery CD depends on the desktop PC you
purchased. Check with your supplier for exact offers.
2.6.1 Recovering a Windows® XP OS
To recover a Windows XP OS:
1. Insert the rst Recovery CD into the optical disk drive. Press
ASUS logo appears . Select the optical drive as the boot device.
2. Select
3. A conrmation screen pops up. Click
4. Check
5. A list displays the contents you are going to recover. Click
6. Insert the second Recovery CD, then click
7. Insert the Support CD, then click
8. After the system reboots, the Windows XP will begin system congurations.
Recover system to a partition or Recovery system to entire HD.
Click Next.
Next to conrm.
I accept from the succeeding screen and click Next.
The recovery process starts.
OK.
OK. The system restarts.
Follow the onscreen instructions to complete the process, and then restarts
the system. Adjust the screen to a suitable display resolution.
<F8> when the
Yes to conrm.
English
The ASUS PC Recovery CD is for ASUS Desktop PC only. DO NOT use it on
other systems. Visit the ASUS website at www.asus.com for any updates.
ASUS BS5000/M5100 31
Page 33

English
2.6.2 Recovering a Windows® Vista OS
To recover a Windows Vista OS:
1. Turn on your ASUS Desktop PC and press
2. Insert the recovery CD into the optical drive when a
device menu appears. Select the optical drive as the boot device and then
press Enter to continue.
If you want to recover the system from the hidden partition, press F9 when the
ASUS logo appears. Then follow the instructions 3-6 below.
F8 when the ASUS logo appears.
Please select boot
3. After the system reboots, an ASUS Preload window appears. Press
continue.
4. Select where to install a new system. Options are:
Recover Windows to rst partition only:
This option deletes only the rst partition, allows you to keep other
partitions, and creates a new system partition as drive “C”.
Recover Windows to entire HD:
This option deletes all partitions from your hard disk and creates a new
system partition as drive “C”.
Recover Windows to entire HD with 2 partitions:
This option deletes all partitions from your hard disk and creates two new
system partitions. The rst partition takes up 60% of the whole hard disk
size and the second partition takes up 40%. The new system is installed in
the rst partition. You can back up your data in the second partition.
5. When a window appears querying
Are you sure you want to recover now,
click Finish. The process percentage is displayed on the screen.
6. When
Recovery nish message appears, click OK and the system restarts.
After it restarts, follow the onscreen instructions to complete the system
congurations.
The ASUS PC Recovery CD is for ASUS Desktop PC only. DO NOT use it on
other systems. Visit the ASUS website at www.asus.com for any updates.
Next to
32 Chapter 2: Getting started
Page 34

English
ASUS BS5000/M5100 33
Page 35

BS5000/M5100
®
ASUS Desktop PC
Brugervejledning
Page 36

DA4030
Første udgave V1
September 2008
Copyright © 2008 ASUSTeK COMPUTER INC. Alle rettigheder forbeholdt.
Ingen del af denne brugervejledning, herunder produkterne og softwaret beskrevet deri, må kopieres,
overføres, lagres i et søgesystem eller oversættes til noget sprog i nogen form eller på nogen måde,
undtagen, hvis det er til køberens egne reserveformål, uden udtrykkelig, skriftlig tilladelse fra ASUSTeK
COMPUTER INC. (“ASUS”).
Produktgaranti og -service vil ikke fortsætte, hvis: (1) produktet repareres, modiceres eller ændres,
medmindre en sådan reparation, modikation eller ændring er skriftlig godkendt af ASUS, eller 2) hvis
produktets serienummer er ødelagt/ulæseligt eller mangler.
ASUS LEVERER DENNE BRUGERVEJLEDNING, “SOM DEN ER”, OG UDEN GARANTI AF NOGEN
ART, HVERKEN UDTRYKKELIG ELLER UNDERFORSTÅET, HERUNDER, MEN IKKE BEGRÆNSET
TIL, UNDERFORSTÅEDE GARANTIER OG BETINGELSER MED HENSYN TIL SALGBARHED
ELLER EGNETHED TIL ET SPECIELT FORMÅL. I INTET TILFÆLDE ER ASUS, DETS DIREKTØRER,
CHEFER, ANSATTE ELLER AGENTER ANSVARLIGE FOR NOGEN INDIREKTE, SÆRLIG, HÆNDELIG
ELLER FØLGAGTIG SKADE (HERUNDER SKADER I FORM AF TAB AF FORTJENESTE, TAB AF
FORRETNING, TAB AF DATA, FORSTYRRELSE AF FORRETNING OG LIGNENDE), SELVOM ASUS
ER BLEVET GJORT OPMÆRKSOM PÅ MULIGHEDEN FOR EN SÅDAN SKADE, DER OPSTÅR PÅ
GRUND AF EN FEJL I DENNE BRUGERVEJLEDNING ELLER PRODUKT..
SPECIFIKATIONER OG OPLYSNINGER I DENNE BRUGERVEJLEDNING TJENER TIL OPLYSNING
OG KAN TIL HVER EN TID OG UDEN VARSEL ÆNDRES, OG MÅ DERFOR IKKE ANSES SOM
EN FORPLIGTELSE FRA ASUS. ASUS PÅTAGER SIG INTET ANSVAR FOR NOGEN FEJL ELLER
UNØJAGTIGHEDER I DENNE BRUGERVEJLEDNING, HERUNDER I FORBINDELSE MED
PRODUKTERNE OG SOFTWARET BESKREVET DERI.
Vare- og rmanavne, der forekommer i den brugervejledning, anvendes udelukkende til identikation eller
som forklaring og til ejerens fordel, uden hensigter om lovbrud.
Dansk
35
Page 37

Dansk
ASUS kontaktinformation
ASUSTeK COMPUTER INC.
Adresse 15 Li-Te Road, Beitou, Taipei, Taiwan 11259
Telefon +886-2-2894-3447
Fax +886-2-2890-7798
E-mail info@asus.com.tw
Websted www.asus.com.tw
Teknisk hjælp
Telefon +86-21-38429911
Online-brugerhjælp support.asus.com
ASUS COMPUTER INTERNATIONAL (Amerika)
Adresse 800 Corporate Way, Fremont, California 94539, USA
Telefon 001-510-739-3777
Fax +1-510-608-4555
Websted usa.asus.com
Teknisk hjælp
Telefon +1-812-282-2787
Kundehjælp (fax) +1-812-284-0883
Online-brugerhjælp support.asus.com
ASUS COMPUTER GmbH (Tyskland & Østrig)
Adresse Harkortstr. 21-23, 40880 Ratingen, Tyskland
Telefon +49-01805-010923
Fax +49-02102-9599-11
Websted www.asus.de
Onlinekontakt www.asus.de/sales
Teknisk hjælp
Telefon +49-01805-010923
Kundehjælp (fax) +49-02102-9599-11
Online-brugerhjælp support.asus.com
36
Page 38

Bemærkninger
Federal communications commission erklæring
Denne enhed opfylder FCC reglerne, del 15. Drift er underlagt følgende to vilkår:
• Enheden må ikke udsende skadelig interferens, og
• Enheden skal acceptere al modtagen interferens, inklusive interferens,
der kan forårsage uønsket drift.
Enheden er blevet testet og er fundet til at opfylde grænseværdierne for en klasse
B digital enhed, under del 15 af Federal Communications Commission (FCC)
reglerne. Disse grænseværdier er designet til at levere fornuftig beskyttelse
mod skadelig interferens i beboelsesinstallationer. Dette udstyr genererer,
bruger og kan udstråle radioenergi og, hvis det ikke er installeret og brugt i
overensstemmelse med instruktionerne, kan det forårsage skadelig interferens på
radiokommunikationen. Imidlertid, er der ingen garanti for, at der ikke vil optræde
interferens i en given installation. Hvis dette udstyr forårsager interferens på radio
eller fjernsynsmodtagelsen, som kan fastslås ved at slukke og tænde for udstyret,
er brugeren forpligtiget til at prøve at afhjælpe interferensen ved hjælp af en, eller
ere af følgende foranstaltninger:
• Reorienter eller nde en anden placering til modtageantennen.
• Forøge afstanden mellem udstyret og modtageren.
• Forbinde udstyret til en stikkontakt på et andet kredsløb, end det, hvor
modtageren er forbundet.
• Kontakt forhandleren, eller en erfaren radio/TV tekniker for hjælp.
Dansk
Brug af afskærmede kabler ved tilslutning af skærmen til grakkortet er
nødvendig for at sikre overholdelse af FCC regulativer. Ændringer eller
modikationer ved denne enhed, som ikke er udtrykkelig godkendt af parten
ansvarlig for overholdelse, kan annullere brugerens ret til at anvende dette
udstyr.
“Canadian Department of Communications” erklæring
Dette klasse B digitale udstyr opfylder alle krav i henhold til “Canadian
Interference-Causing Equipment Regulations
Dette B-digitale apparat opfylder “Canadian ICES-003”.
37
Page 39

Dansk
Sikkerhedsinformation
Elektrisk sikkerhed
• For at undgå faren for elektrisk stød, skal du fjerne netledningen fra
stikkontakten, inden du ytter systemet til et andet sted.
• Når du tilføjer eller fjerner enheder til/fra systemet, skal du søge hjælp
hos en autoriseret servicetekniker eller hos forhandleren. Inden du
tilslutter eller fjerner en enhed til/fra systemet, skal du tjekke, at alle
netledninger er afbrudt.
• Hvis strømforsyningen går i stykker, må du ikke prøve på selv at
reparere den. Kontakt en autoriseret servicetekniker eller forhandleren.
Driftssikkerhed
• Inden du installerer enheder i systemet, skal du omhyggeligt læse al
dokumentation, som lå i pakken.
• Inden du bruger produktet, skal du sikre, at alle kabler er korrekt forbundet
og, at netledningerne ikke er beskadigede. Hvis du opdager en skade, skal du
straks kontakte forhandleren.
• For at undgå kortslutninger, skal du holde clips, skruer og hæfteklammer væk
fra stik, indstik og kredsløb.
• Undgå støv, fugt og ekstreme temperaturer. Anbring ikke produktet på et sted,
hvor det kan blive vådt. Anbring produktet på en stabil overade.
• Når du bruger produktet, må du ikke blokere luftindgange- og udgange.
o
• Den maksimale omgivelsestemperatur må ikke overstige 35
• Hvis du oplever tekniske problemer med produktet, skal du kontakte en
autoriseret servicetekniker eller forhandleren.
C.
38
Lithium-Ion Battery Warning
CAUTION: Danger of explosion if battery is incorrectly replaced. Replace
only with the same or equivalent type recommended by the manufacturer.
Dispose of used batteries according to the manufacturer’s instructions.
VORSICHT: Explosionsgetahr bei unsachgemäßen Austausch der Batterie.
Ersatz nur durch denselben oder einem vom Hersteller empfohlenem
ähnljchen Typ. Entsorgung gebrauchter Batterien nach Angaben des
Herstellers.
LASER PRODUCT WARNING
CLASS 1 LASER PRODUCT
Page 40

Generelle forholdsregler
Inden du bruger ASUS BS5000/M5100 desktop-pc, skal du omhyggeligt
læse nedenstående, generelle forholdsregler. Forkert betjening kan medføre
personskade eller skade produktet.
• Inden du bruger produktet, skal du kontrollere, at alle dele er korrekt installeret
og, at alle kabler er korrekt forbundet. Hvis du opdager en skade, skal du
straks kontakte forhandleren.
• Undgå støv og ekstreme temperaturer. Anbring ikke produktet på et sted, hvor
det udsættes for direkte sollys.
• Opbevar produktet på et tørt sted. Regndråber, fugt og væsker kan indeholde
mineraler og skade kredsløbet.
• Af hensyn til ventilationen skal du sørge for, at der er tilstrækkeligt med frit rum
omkring produktet. I modsat fald kan det overophede.
• Inden du tænder for systemet, skal du tjekke, at alle perifere enheder er korrekt
forbundet.
• Undgå at spise, mens du bruger computeren. Det kan forurene delene og få
systemet til at fejlfungere.
• For at undgå kortslutninger, skal du holde stumper, skruer og ledninger væk fra
stik, indstik og kredsløb.
• Anbring ikke noget inde i delene. Det kan forårsage kortslutning og skade
kredsløbet.
• Hvis computeren har været brugt i lang tid, skal du undgå direkte kontakt med
det integrerede kredsløbs varmeaedere (’heat-sinks’) og overader, da disse
kan blive meget varme. Sørg for, at systemet ventileres tilstrækkeligt.
• Inden du tilføjer eller fjerner en perifer enhed til eller fra systemet, skal du
fjerne netledningerne fra kontakterne,
• Hvis strømforsyningen går i stykker, må du ikke prøve på selv at reparere den.
Kontakt en autoriseret servicetekniker eller forhandleren.
• Selvom systemets dæksel er konstrueret til at beskytte brugeren mod
skrammer, skal du alligevel passe på skarpe spidser og kanter. Tag handsker
på, inden du fjerner eller anbringer systemets dæksel.
• Hvis du ikke skal bruge computeren i længere tid, skal du lukke den og fjerne
netledningerne fra stikkontakterne.
o
• Det anbefales ikke at bruge dette produkt, hvis temperaturen er over 35
• Advarsel: Udskift batteriet med et af rigtig type. I modsat fald kan der være fare
for eksplosion.
C.
Dansk
39
Page 41

Dansk
Om denne brugervejledning
Brugere
Denne brugervejledning oplyser generelt om ASUS BS5000/M5100 desktop-pc’en
og giver anvisninger på brugen af hjælpe-CD’en, som leveres med sammen med
systemet. Brugervejledningen er udformet med henblik på erfarne brugere med
kendskab til pc-hardware.
Opdelingen af vejledningen
Vejledningen indeholder følgende dele:
1. Kapitel 1: System-introduktion
Dette afsnit giver en generel beskrivelse af ASUS BS5000/M5100 desktoppc. Afsnittet oplister systemets funktioner, ligesom der gives en oversigt over
for- og bagpanelerne.
2. Kapitel 2: Kom i gang
Dette afsnit hjælper dig med at tænde for systemet og installere drivere og
hjælpeprogrammer fra hjælpe-CD’en.
40
Page 42

Konventioner brugt i denne vejledning
For at sikre, at du udfører bestemte opgaver korrekt, skal du følge nedenstående
symboler, brugt i vejledningen.
ADVARSEL: Oplysninger for at undgå, at du skader dig selv under
udførelse af et job.
PAS PÅ: Oplysninger for at undgå skader på dele under udførelse af
et job.
VIGTIGT: Instruktioner, som SKAL følges, for at kunne fuldføre et job.
BEMÆRK: Tip og yderligere oplysninger under udførelsen af et job.
Yderligere oplysninger
Med hensyn til yderligere oplysninger vedrørende produkter og softwareopdateringer, se følgende kilder:
1. ASUS websteder
ASUS webstederne verden over indeholder opdateret information vedrørende
ASUS hardware- og software-produkter. Se ASUS kontaktinformationen.
2. Ekstra dokumentation
Produktpakken kan indeholde ekstra dokumentation såsom garantioversigter,
der kan være lagt i af forhandleren. Disse dokumenter hører ikke til
standardparkken.
Dansk
41
Page 43

Dansk
Systempakke-indhold
Tjek, at din BS5000/M5100 systempakke indeholder følgende ting:
Standardting
1. ASUS BS5000/M5100 Desktop PC with
• ASUS Desktop PC x 1
• Fod x 1
• Mus x 1
• Tastatur x 1
2. Kabler
• AC netledning x 1
3. Tilbehør
• AC strømadapter x 1
• Musemåtte x 1
4. Hjælpe-CD x 1
5. Brugervejledning x 1
6. Garantibevis x 1
• Hvis nogle af delene er beskadigede eller mangler, skal du straks kontakte
din forhandler.
• Specikationerne afhænger den anskaffede desktop pc. Tjek med
forhandleren med hensyn til specikke tilbud.
42
Page 44

Kapitel 1
Dette afsnit indeholder en generel
beskrivelse af desktop-pc’en. Afsnittet
oplister systemets funktioner, ligesom
det giver en oversigt over for- og
bagpanelerne.
System-introduktion
Page 45

1.1 Forpanel
2.0
ASUS BS5000/M5100 desktop-pc inkluderer et ASUS bundkort,
strømforsyningsenhed, et forpanel og et bagpanel. Alle disse dele er integreret i en
systemkasse, nøje designet af ASUS.
Nedenfor ses frontpanelet og dets dele.
Dansk
Luk
1
3
4
5
2
Åbn
6
7
8
1. Udskydningsknap til optisk diskdrev (ODD). Tryk på denne knap for at
udskyde det optiske diskdrev.
2. Forpanel-dæksel
. Træk udad for at åbne forpaneldækslet. Indenfor er
der to USB 2.0 porte, en mikrofonport samt en port til hovedtelefoner.
3. Network LED
. Netværks LED. Denne LED lyser, når der etableres en
trådløs/ledningsført forbindelse til systemet.
4. LED for harddiskdrev (HDD)
. Denne LED lyser, når data læses fra eller
skrives til harddiskdrevet.
5. Strømknap
. Tryk på denne knap for at tænde for systemet.
6. USB 2.0 porte2.0
. Disse USB 2.0 porte bruges til at tilslutte USB 2.0
enheder såsom mus, printer, skanner, kamera, PDA og andet.
7. Port til hovedtelefoner (limegrøn)
8. Mikrofonport (lyserød)
44 Kapitel 1: System-introduktion
. Til tilslutning af mikrofon.
. Til tilslutning af hovedtelefoner.
Page 46

1.2 Bagpanel
Systemets bagpanel omfatter strømindgangsporten samt en række I/O porte til
tilslutning af enheder.
Nedenfor ses bagpanelet og dets dele.
Der er to typer ASUS BS5000/M5100 desktop-pc at vælge imellem. De to typer
er forskellige med hensyn til port 2 på bagpanelet.
Type 1: Port 2 er en Modem (RJ-11) port.
Type 2: Port 2 er en COM port.
Type 1
1
9
10
11
12
13
2a
3
4
5
6
7
8
9
10
11
12
13
Type 2
1. Ventilationsåbninger. Disse bruges til luftventilation.
Bloker IKKE ventilationsåbningerne oven og bag på systemkassen. Uden den
nødvendige ventilation kan de indvendige dele overophede og beskadiges.
1
2b
3
4
5
6
7
8
Dansk
2a. Modem (RJ-11) port. Denne port forbinder til fjernnetværk (internet) via et
opkaldsmodem.
2b. COM2 port. Denne port er til pege-enheder og andre serielle enheder.
3. PS/2 tastaturport
. Denne port bruges til et PS/2 tastatur.
4. LAN (RJ-45) port.Denne port muliggør hurtig ethernet-forbindelse til et lokalt
områdenetværk (LAN) via en netværksstikdåse. Med hensyn til LAN port LED
indikationerne, se oversigten på næste side.
45ASUS BS5000/M5100
Page 47

Dansk
2.0
LAN port - LED indikationer
LED
LAN port
HASTIGHEDS
LED
Aktivitet/Led LED Hastigheds LED
Status Beskrivelse Status Beskrivelse
FRA Ikke noget led FRA 10 Mbps forbindelse
ORANGE Sammenkæde ORANGE 100 Mbps forbindelse
BLINKER Data-aktivitet GRØN 1 Gbps forbindelse
AKT/LINK
5. COM1 port. Denne port er til pege-enheder og andre serielle enheder.
6. Linje ind port (lyseblå). Til denne port forbindes tape-, CD-, DVD- og andre
lydkilder.
7. Linje ud port (limegrøn). Til denne port forbindes hovedtelefoner eller
højtaler. I en 4- eller 6-kanals konguration fungerer denne port som
forhøjtaler-ud.
8. Mikrofonport (lyserød)
Se nedenstående lydkongurations-oversigt vedrørende lydportenes funktion i
en 2-, 4- eller 6-kanals konguration.
. Til tilslutning af mikrofon.
Lyd 2-, 4- eller 6-kanals konguration
Port Hovedtelefoner 2-kanal 4-kanal 6-kanal
Lyseblå Linje ind Baghøjtaler ud
Limegrøn Linje ud Forhøjtaler ud Forhøjtaler ud
Lyserød Mic In Mic In
Baghøjtaler ud
Bass/Center
9. DC IND indgangsport. Denne port forbinder til en AC strømadapters DC
udgangsstik.
10. USB 2.0 porte
. Disse USB 2.0 port bruges til at tilslutte USB 2.0
enheder såsom mus, printer, skanner, kamera, PDA og andet.
11. VGA (Video Graphics adapter) port . Denne port forbinder til en VGA
skærm eller andre VGA kompatible enheder.
12. DVI-D ud-port. Denne port er beregnet til enhver DVI-D kompatibel enhed
og er HDCP overholdende og tillader således afspilning af HD CD, Blu-ray og
andet beskyttet indhold.
13. Port til Kensington® lås . Med denne port kan pc’en sikres til en fast
genstand med Kensington® kompatible sikkerhedsprodukter.
46 Kapitel 1: System-introduktion
Page 48

1.3 Anbringelse
1.3.1 Vandret anbringelse
Anbring din desktop-pc vandret.
1.3.2 Lodret anbringelse
Monter foden, der fulgte med ved leveringen. Anbring din desktop-pc lodret.
Dansk
Sådan monteres foden:
1. Find hullet til skruen under desktop-pc’en.
2. Skru foden sikkert fast på desktop-pc’en med den medfølgende skrue.
47ASUS BS5000/M5100
Page 49

1.4 Tilslutning til tastatur og mus
ASUS BS5000/M5100 desktop-pc’en er udstyret med et PS/2 tastatur og en USB
mus. Forbind PS/2 tastaturet til bagpanelets PS/2 tastaturport. Forbind USB musen
til en USB port på for- eller bagpanelet.
Hvis du bruger et trådløst USB tastatur eller en trådløs mus - se
dokumentationen, der følger med enheden, eller kontakt forhandleren for
oplysninger om, hvordan det skal kongureres.
Dansk
1.5 Tilslutning til andre perifere enheder
ASUS BS5000/M5100 desktop-pc’en er udstyret med en række I/O porte på for- og
bagpanelerne, hvormed du kan forbinde periferiske enheder til systemet.
Se nedenstående illustration for yderligere oplysninger.
(Opkaldsmodem)
Strømstik
USB
DVI
COM1
RJ-11 (Type 1)
COM2 (Type 2)
PS/2 tastatur
RJ-45
VGA
Linje ind
Linje ud
Mikrofon
Inden du forbinder en periferisk enhed til systemet, skal du tjekke den
medfølgende dokumentation eller kontakte forhandleren med hensyn til,
hvordan du installerer den.
48 Kapitel 1: System-introduktion
Page 50

Kapitel 2
Dette afsnit hjælper dig med at tænde
for systemet og installere drivere og
hjælpeprogrammer fra hjælpe-CD’en.
Kom i gang
Page 51

Dansk
2.1 Installation af styresystem
Dette bundkort understøtter Windows® XP / Vista styresystemer (OS). Installer altid
den seneste OS version og de tilhørende opdateringer for at optimere hardwarets
funktioner. Når du starter systemet første gang, nder systemet automatisk de
indbyggede lyd- og grak-chip og forsøger at installere driverne, som kommer
med OS. Vælg NO (NEJ), når et vindue spørger dig, om du ønsker at genstarte
systemet. Installer drivere i henhold til instruktionerne i nedenstående afsnit.
• For at sikre, at OS fungerer korrekt, skal du installere driverne på hjælpe-
CD’en.
• Bundkort-indstillinger og hardware-funktioner er forskellige. Installationsprocedurerne i dette afsnit tjener derfor kun til reference. Se din OS
dokumentation for yderligere oplysninger.
2.2 Tænding for systemet
Tryk på strømknappen for at tænde for systemet.
Tryk for at TÆNDE for
systemet
50 Kapitel 2: Kom i gang
Page 52

2.3 Hjælpe-CD information
Hjælpe-CD’en, som leveres sammen med systempakken, indeholder driverne,
software-programmerne samt hjælpeprogrammerne, som du kan installere for at
gøre brug af alle funktionerne.
Hjælpe-CD’ens indhold kan til enhver tid ændres uden varsel. Besøg ASUS
webstedet www.asus.com for opdateringer.
2.3.1 Kørsel af hjælpe-CD’en
Anbring hjælpe-CD’en i det optiske drev. CD’en viser automatisk Driver-menuen,
hvis ‘Autom. kørsel’ er aktiveret i computeren.
Klik på en ikon
for at se HjælpeCD/bundkort
Klik på emne, der skal installeres
Hvis ’Autom. kørsel’ IKKE er aktiveret i computeren, skal du gennemse hjælpeCD’ens indhold for at nde ASSETUP.EXE len i BIN mappen. Dobbeltklik på
ASSETUP.EXE for at køre CD’en.
Dansk
ASUS BS5000/M5100 51
Page 53

Dansk
2.3.2 Drivermenu
Drivermenuen viser enhedsdrivere til rådighed, når systemet nder installerede
enheder. Installer de nødvendige drivere for at aktivere enhederne.
ASUS InstAll - Installations-guide til anti-virus og drivere
Installerer alle driverne med installations-guiden.
Norton Internet Security 2008
Installerer Norton Internet Security 2008
Intel® Chipset Inf opdateringsprogram
Installerer Intel® chipset info-opdateringsprogrammet.
Intel® Graphics Accelerator Driver
Installerer Intel® grakaccelerator-driveren
Realtek lyddriver
Installerer Realtek® lyddriveren og hjælpeprogrammet.
ITE CIR Driver
Installerer ITE CIR driveren.
Realtek RTL8168C/RTL8111C LAN Driver
Installerer Realtek RTL8168C/RTL8111C LAN driveren.
ASUS Wireless LAN Driver
Installs the ASUS wireless LAN driver.
ASUS trådløs LAN driver
Installerer ASUS trådløs LAN driveren.
52 Kapitel 2: Kom i gang
Page 54

2.3.3 Hjælpeprogrammer-menu
Hjælpeprogrammer-menuen viser programmerne og andet software, som
bundkortet undestøtter. Tryk på et emne på skærmen, som skal installeres.
ASUS InstAll - installations-guide for hjælpeprogrammer
Installerer alle hjælpeprogrammerne via installations-guiden.
ASUS opdatering
Tillader dig at downloade den seneste version af BIOS fra ASUS webstedet.
For at kunne bruge ASUS Opdatering, skal du have en internet-forbindelse, så
du kan forbinde til ASUS-webstedet.
Dansk
ASUS AI Manager
Installerer ASUS AI Manager, hvor du let kan starte AI Disk, AI Security og AI
Probe.
Adobe Acrobat Reader 8
Installerer Adobe Acrobat Reader 8. Brugervejledningerne på hjælpe-CD’en er i
PDF- (Portable Document Format) format, som kan åbnes med Adobe Acrobat
Reader.
ASUS BS5000/M5100 53
Page 55

Dansk
2.3.4 Brugervejledning-menu
Hjælpe-cd’en indeholder en liste med supplerende brugervejledninger.
Manualen er i PDF format. For at kunne åbne den, skal du installere Adobe
Acrobat Reader i Utilities (Hjælpeprogrammer)-menuen.
2.3.5 ASUS kontaktinformation
Klik på Contact (kontakt)-fanen for at se ASUS kontaktinformationen.
54 Kapitel 2: Kom i gang
Page 56

2.3.6 Anden information
Ikonerne i skærmens øverste, højre hjørne giver yderligere information om
bundkortet og hjælpe-CD’ens indhold. Klik på en ikon for at se den pågældende
information.
Bundkort-info
Viser bundkortets generelle specikationer.
Dansk
Gennemse denne CD
Viser hjælpe-CD’ens indhold i grask format.
ASUS BS5000/M5100 55
Page 57

Dansk
Formular til teknisk hjælp
Viser formularen i forbindelse med teknisk hjælp fra ASUS, som du skal udfylde,
når du anmoder om teknisk hjælp.
Filliste
Viser hjælpe-CD’ens indhold og giver i tekstformat en kort beskrivelse af hver l.
56 Kapitel 2: Kom i gang
Page 58

2.4 ASUS AI Manager
Med ASUS AI Manager kan du let starte AI Disk, AI Security og AI Probe.
2.4.1 Installation af AI Manager
Sådan installeres AI Manager på din computer:
1. Anbring hjælpe-CD’en i det optiske drev. CD’en viser automatisk
Driver-
menuen, hvis ‘Autom. kørsel’ er aktiveret i computeren.
Hvis ’Autom. kørsel’ IKKE er aktiveret i computeren, skal du gennemse hjælpeCD’ens indhold for at nde ASSETUP.EXE len i BIN mappen. Dobbeltklik på
ASSETUP.EXE for at køre CD’en.
2. Klik på Utilities (Hjælpeprogrammer)-fanen og derefter på ASUS AI
Manager.
3. Følg instruktionerne på skærmen for at fuldføre installationen.
2.4.2 Start af AI Manager
Du kan starte AI Manager straks efter installationen og ellers når som helst fra
Windows® skrivebordet.
®
For at starte AI Manager fra Windows
> ASUS > AI Manager > AI Manager v1.xx.xx (Start > Alle programmer > ASUS >
AI Manager > AI Manager v1.xx.xx). AI Manager kvikbjælken ses.
Når programmet er startet, ses AI Manager ikonen på Windows® jobbjælken.
Højreklik på ikonen for ere valgmuligheder.
skrivebordet, klik på Start > All Programs
Dansk
2.4.3 AI Manager kvikbjælke
Klik på Main- (Hoved-), My favorites- (Favoritter-), Support- (Hjælp-) eller
Information- (Information-) ikonen på kvikbjælken for at se den tilsvarende menu.
Luk
Maksimer/Genoptag
Minimer
Hoved
Favoritter
ASUS BS5000/M5100 57
Hjælp
Information
Page 59

Dansk
Klik på for at skifte mellem et fuld skærm AI Manager vindue og kvikbjælken.
Klik på
Klik på
for at beholde AI Manager i jobbjælken.
for at lukke AI Manager
2.4.4 Hovedmenu
Start AI Disk, AI Security og AI Probe i hovedmenuen. Klik på den lille trekanht for
at åbne eller lukke hovedmenuen.
Click to open/close the Main menu
AI Disk
Med AI Disk kan du let slette de midlertidige IE ler, IE URL, IE cookies, IE historik,
papirkurven samt llister åbnet for nyligt. Vælg punktet, du ønsker at rydde, og klik
derefter på
Apply (Anvend).
58 Kapitel 2: Kom i gang
Page 60

AI Security
Med AI Security kan du indstille adgangskoder til at låse dine ytbare lagerenheder
såsom en USB ash-disk og en CD/DVD-disk, hvilket giver større datasikkerhed.
Sådan låses en enhed:
1. Første gang du bruger AI Security, skal du indtaste en adgangskode, som
højst må bestå af 20 bogstaver, tal eller symboler.
2 Bekræft adgangskoden.
3. Indtast adgangskode-antydningen (valgfrit).
4. Klik på
OK (OK).
Dansk
5. Vælg enheden, du ønsker at låse, og klik derefter på Apply (Anvend).
ASUS BS5000/M5100 59
Page 61

6. Indtast adgangskoden og klik derefter på OK (OK). Den valgte enhed kan
ikke åbnes uden adgangskoden.
Sådan oplåses en enhed:
Dansk
1. Fravælg den låste enhed og klik på
2. Indtast adgangskoden og klik derefter på
For at ændre adgangskoden, klik på
følg skærminstruktionerne.
Apply (Anvend).
OK (OK).
Change Password (Ændr adgangskode) og
AI Probe
AI Probe registrerer automatisk bundkort- og CPU temperaturer, CPU
ventilatorhastighed og CPU spændingen. Du kan indstille disse værdier manuelt.
60 Kapitel 2: Kom i gang
Page 62

2.4.5 Favoritter
Føj dine foretrukne programmer til My Favorites (Favoritter) menuen.
Sådan tilføjes et program:
1. Klik på
2. Klik på
Højreklik på en ikon i My Favorites (Favoritter) menuen for at åbne, slette eller
omdøbe det tilsvarende program.
Dobbeltklik på en ikon for at åbne det tilsvarende program.
Add (Tilføj) og vælg derefter fra de efterfølgende skærme
programmet, du ønsker at tilføje til My Favorites (Favoritter) menuen.
Open (Åbn). Det valgte program er tilføjet, og dets ikon ses.
Dansk
ASUS BS5000/M5100 61
Page 63

Dansk
2.4.6 Hjælp
Support (Hjælp) menuen viser led til ASUS’s internationale websted, online teknisk
hjælp-webstedet, online download hjælp-webstedet samt til kontaktinformationwebstedet.
2.4.7 Information
Information (Information) menuen viser generel information om dit system,
bundkort, CPU, BIOS hukommelse samt om andre installerede enheder.
62 Kapitel 2: Kom i gang
Page 64

2.5 Indlæsning af indledende OS
standardindstillinger
Hvis du ønsker at indlæse systemets indledende standardindstillinger, skal du
trykke på <F3> under start-selvtesten (efterfølgende).
2.6 Genopretnings-cd (valgfrit)
ASUS PC genopretnings-cd’en hjælper dig med at geninstallere OS og genoprette
det til dets oprindelige arbejdstilstand. Inden du bruger genopretnings-cd’en, skal
du kopiere dine dataler over på en USB ash-disk eller et netværksdrev og notere
dig alle brugertilpassede indstillinger såsom netværksindstillinger.
Tilstedeværelsen af en ASUS PC genopretnings-cd afhænger af den anskaffede
desktop-pc. Tjek med forhandleren med hensyn til specikke tilbud.
2.6.1 Genopretning af Windows® XP OS
Genopretning af Windows® XP OS:
Dansk
1. Anbring genopretnings-cd’en i det optiske drev. Tryk
logoet (bomærket) ses. Vælg det optiske drev som startenhed.
2. Vælg
3. En bekræftelsesskærm dukker op. Klik på
4. Afmærk I
5. Der ses en liste med indholdet, som genoprettes. Klik på
6. Anbring den anden genopretnings-cd og klik på
7. Anbring hjælpe-CD’en og klik derefter på
8. Efter at systemet er genstartet, begynder Windows
Recover system to a partition (Genopret system til en partition) eller
Recovery system to entire HD (Genopret system til hele HD). Klik på Next
(Næste).
Next (Næste) for at bekræfte.
accept (Jeg accepterer) på den efterfølgende skærm og klik på
Next (Næste).
bekræfte. Genopretningsprocessen begynder.
OK (OK). Systemet genstarter.
systemkongurationer. Følg instruktionerne på skærmen for at fuldføre
processen og genstart derefter systemet. Indstil skærmen på en passende
opløsning.
ASUS PC genopretnings-cd’en er kun til brug for ASUS desktop-pc’en. Brug
den IKKE på andre systemer. Gå til ASUS webstedet www.asus.com for
opdateringer.
på <F8>, når ASUS
Yes (Ja) for at
OK (OK).
®
Vista™
ASUS BS5000/M5100 63
Page 65

Dansk
2.6.2 Genopretning af Windows® Vista OS
Genopretning af Windows Vista OS:
1. Tænd for ASUS desktop-pc’en og tryk på F8, når ASUS logoet (bomærket)
ses.
2. Anbring genopretnings-cd’en i det optiske drev, når en
device (Vælg startenhed) menu ses. Vælg det optiske drev som startenhed
og tryk derefter på Enter (Enter) for at fortsætte.
Hvis du ønsker at genoprette systemet fra den skjulte partition, skal du trykke på
F9, når ASUS logoet (bomærket) ses. Følge derefter nedenstående anvisninger
3-6.
Please select boot
3. Når systemet er genstartet, ses et ASUS Preload vindue. Tryk på
(Næste) for at fortsætte.
4. Vælg, hvor et nyt system skal installeres. Mulighederne er:
Recover Windows to rst partition only (Genopret kun Windows til
første partition):
Denne valgmulighed sletter kun den første partition, tillader dig at beholde
andre partitioner og opretter en ny systempartition som drev “C”.
Recover system to entire HD (Genopret system til hele HD)
Denne valgmulighed sletter alle partitioner på harddisken og opretter en ny
systempartition som drev ”C”.
Recover Windows to entire HD with 2 partitions (Genopretter
Windows til hele HD med 2 partitioner):
Denne valgmulighed sletter alle partitioner på harddisken og opretter to
nye systempartitioner. Den første partition optager 60% af hele harddisken
og den anden 40%. Det nye system installeres i den første partition. Du
kan sikkerhedskopiere (backup) dine data i den anden partition.
5. Når et vindue dukker op og spørger
Are you sure you want to recover now
(Er du sikker på, at du ønsker at genoprette nu), skal du klikke på Finish
(Afslut). Procesprocentdelen ses på skærmen.
6. Når
Recovery nish (Afslut genopretning) ses, klik på OK (OK), hvorefter
systemet genstarter. Når det er genstartet, skal du følge instruktionerne på
skærmen for at fuldføre system-kongurationerne.
Next
ASUS pc-genopretnings-cd’en er kun til brug for ASUS desktop-pc’en. Brug
den IKKE på andre systemer. Besøg ASUS webstedet www.asus.com for
opdateringer.
64 Kapitel 2: Kom i gang
Page 66

Dansk
ASUS BS5000/M5100 65
Page 67

Suomi
®
BS5000/M5100
ASUS-työpöytätietokone
Käyttäjän käsikirja
Page 68

FI4030
Ensimmäinen painos V1
Heinäkuu 2008
Copyright © 2008 ASUSTeK COMPUTER INC. Kaikki oikeudet pidätetään.
Mitään osaa tästä käsikirjasta, mukaan lukien siinä kuvattuja tuotteita ja
ohjelmistoja, ei saa jäljentää, välittää, siirtää toiselle tietovälineelle, tallentaa
tallennusjärjestelmään tai kääntää millekään kielelle missään muodossa tai millään
menetelmällä, paitsi ostajan omaa varmuuskopiokäyttöä varten, ilman ASUSTeK
COMPUTER INC.:in (”ASUS”) kirjallista lupaa.
Tuotteen takuuta tai huoltoa ei jatketa seuraavissa tapauksissa: (1) tuotetta on
korjattu, muutettu tai muokattu ilman ASUSin kirjallista korjaus-, muutos- tai
muokkaustyön valtuutusta; tai (2) tuotteen sarjanumero on turmeltu tai puuttuu..
ASUS TOIMITTAA TÄMÄN KÄSIKIRJAN KÄYTTÄJÄLLE “SIINÄ KUNNOSSA
KUIN SE ON” ILMAN MINKÄÄNLAISTA SUORAA TAI PIILEVÄÄ TAKUUTA,
MUKAAN LUETTUNA, MUTTA EI NIIHIN RAJOITTUEN, PIILEVÄT TAKUUT,
VIRHEETTÖMYYSEHDOT TAI SOPIVUUS TIETTYYN TARKOITUKSEEN.
ASUS, SEN JOHTAJAT, TOIMIHENKILÖT, TYÖNTEKIJÄT TAI AGENTIT EIVÄT
OLE MISSÄÄN TAPAUKSESSA VASTUUSSA MISTÄÄN EPÄSUORISTA,
ERITYISISTÄ, SATUNNAISISTA TAI VÄLILLISISTÄ VAHINGOISTA (MUKAAN
LUETTUNA ANSIOIDEN MENETYKSET, LIIKETOIMINTAA KOSKEVAT
MENETYKSET, TIEDONMENETYKSET, LIIKETOIMINNAN KESKEYTYMINEN,
JNE.), VAIKKA ASUSILLE OLISI ILMOITETTU TÄLLAISTEN VAHINKOJEN
MAHDOLLISUUDESTA, JOIDEN SYYNÄ ON TÄSSÄ KÄSIKIRJASSA TAI
TUOTTEESSA OLEVA VIKA TAI VIRHE.
TÄMÄN KÄSIKIRJAN MÄÄRITYKISET JA TIEDOT ANNETAAN VAIN TIEDOKSI,
NE VOIVAT MUUTTUA MILLOIN TAHANSA ILMAN ILMOITUSTA EIKÄ NIIDEN
PIDÄ TULKITA SITOVAN ASUSIA. ASUS EI VASTAA MISTÄÄN TÄSSÄ
KÄSIKIRJASSA MAHDOLLISESTI ESIINTYVISTÄ VIRHEISTÄ, MUKAAN LUKIEN
SIINÄ KUVATUT TUOTTEET JA OHJELMISTO.
Tässä käsikirjassa esiintyvät tuote- ja toiminimet voivat olla omistajayhtiöidensä
rekisteröityjä tavaramerkkejä tai tekijänoikeuden alaisia, ja niitä käytetään
ainoastaan tunnistus- tai selvennystarkoituksissa omistajien eduksi, ilman
pyrkimystä tekijänoikeusloukkaukseen.
Suomi
67
Page 69

Suomi
ASUS-yhteystiedot
ASUSTeK COMPUTER INC.
Osoite 15 Li-Te Road, Peitou, Taipei, Taiwan 11259
Puhelin +886-2-2894-3447
Faksi +886-2-2890-7798
Sähköposti info@asus.com.tw
Verkkosivusto www.asus.com.tw
Tekninen tuki
Puhelin +86-21-38429911
Online-tuki support.asus.com
ASUS COMPUTER INTERNATIONAL (USA)
Osoite 800 Corporate Way, Fremont, California 94539, USA
Faksi +1-510-608-4555
Verkkosivusto usa.asus.com
Tekninen tuki
Puhelin +1-812-282-2787
Tukifaksi +1-812-284-0883
Online-tuki support.asus.com
ASUS COMPUTER GmbH (Saksa ja Itävalta)
Osoite Harkortstr. 21-23, 40880 Ratingen, Germany
Puhelin +49-01805-010923
Faksi +49-02102-9599-11
Verkkosivusto www.asus.de
Online-yhteystiedot www.asus.de/sales
Tekninen tuki
Puhelin +49-01805-010923
Tukifaksi +49-02102-9599-11
Online-tuki support.asus.com
68
Page 70

Notices
Federal Communications Commission Statement
This device complies with Part 15 of the FCC Rules. Operation is subject to the
following two conditions:
•
This device may not cause harmful interference, and
•
This device must accept any interference received including interference that
may cause undesired operation.
This equipment has been tested and found to comply with the limits for a
Class B digital device, pursuant to Part 15 of the FCC Rules. These limits are
designed to provide reasonable protection against harmful interference in a
residential installation. This equipment generates, uses and can radiate radio
frequency energy and, if not installed and used in accordance with manufacturer’s
instructions, may cause harmful interference to radio communications. However,
there is no guarantee that interference will not occur in a particular installation. If
this equipment does cause harmful interference to radio or television reception,
which can be determined by turning the equipment off and on, the user is
encouraged to try to correct the interference by one or more of the following
measures:
•
Reorient or relocate the receiving antenna.
•
Increase the separation between the equipment and receiver.
•
Connect the equipment to an outlet on a circuit different from that to which the
receiver is connected.
•
Consult the dealer or an experienced radio/TV technician for help.
Suomi
The use of shielded cables for connection of the monitor to the graphics card is
required to assure compliance with FCC regulations. Changes or modications
to this unit not expressly approved by the party responsible for compliance
could void the user’s authority to operate this equipment.
Canadian Department of Communications Statement
This digital apparatus does not exceed the Class B limits for radio noise emissions
from digital apparatus set out in the Radio Interference Regulations of the
Canadian Department of Communications.
This class B digital apparatus complies with Canadian ICES-003
.
69
Page 71

Suomi
Turvallisuustiedot
Sähköturvallisuus
• Sähköiskun vaaran välttämiseksi irrota virtajohto sähköpistokkeesta
ennen kuin siirrät järjestelmää.
• Kun lisäät laitteita järjestelmään tai poistat niitä, ota yhteyttä pätevään
huoltoteknikkoon tai jälleenmyyjään apua varten. Varmista, että kaikki
virtajohdot on irrotettu, ennen kuin lisäät laitteita järjestelmään tai poistat niitä.
• Jos virtalähde ei toimi, älä yritä korjata sitä itse. Ota yhteyttä pätevään
teknikkoon tai jälleenmyyjääsi.
Käyttöturvallisuus
• Ennen laitteiden asentamista järjestelmään, lue huolellisesti kaikki pakkauksen
mukana tulleet asiakirjat.
• Varmista, että kaikki johdot on kytketty oikein ja että virtajohdot eivät ole
vahingoittuneita, ennen kuin käytät tuotetta. Jos huomaat mitään vaurioita, ota
välittömästi yhteys jälleenmyyjään.
• Oikosulkujen välttämiseksi pidä paperiliittimet, ruuvit ja niitit etäällä liittimistä,
aukoista, paikoista ja virtapiireistä.
• Vältä pölyä, kosteutta ja äärimmäisiä lämpötiloja. Älä aseta tuotetta mihinkään
paikkaan, jossa se voi kastua. Aseta tuote vakaalle pinnalle.
• Kun tuote on käytössä, älä peitä kotelon ilmanottoaukkoja.
• Ympäristön lämpötila saa olla korkeintaan 35ºC.
• Jos kohtaat teknisiä ongelmia tuotteen kanssa, ota yhteyttä pätevään
huoltoteknikkoon tai jälleenmyyjääsi.
70
Lithium-Ion Battery Warning
CAUTION: Danger of explosion if battery is incorrectly replaced. Replace
only with the same or equivalent type recommended by the manufacturer.
Dispose of used batteries according to the manufacturer’s instructions.
VORSICHT: Explosionsgetahr bei unsachgemäßen Austausch der Batterie.
Ersatz nur durch denselben oder einem vom Hersteller empfohlenem
ähnljchen Typ. Entsorgung gebrauchter Batterien nach Angaben des
Herstellers.
LASER PRODUCT WARNING
CLASS 1 LASER PRODUCT
Page 72

Yleiset varotoimenpiteet
Lue seuraavat varotoimenpiteet huolellisesti ennen kuin käytät ASUS Essentio
ES5000/ES5000-P -pöytätietokonetta. Virheellinen käyttö voi aiheuttaa
loukkaantumisen tai tuotteen vahingoittumisen.
• Varmista, että kaikki osat on asennettu oikein ja kaikki johdot kytketty oikein,
ennen kuin käytät tuotetta. Jos huomaat mitään vaurioita, ota välittömästi
yhteys jälleenmyyjään.
• Vältä pölyä ja äärimmäisiä lämpötiloja. Älä aseta tuotetta mihinkään paikkaan,
jossa se voi joutua suoraan auringonvaloon.
• Säilytä tuote kuivassa paikassa. Sadepisarat, kosteus ja nesteet voivat sisältää
mineraaleja ja vahingoittaa virtapiirejä.
• Jätä riittävästi tilaa tuotteen ympärille riittävää tuuletusta varten. Muuten se voi
ylikuumentua.
• Tarkista, että kaikki oheislaitteet ovat oikein kytketty, ennen kuin kytket
järjestelmän päälle.
• Vältä syömistä tietokonetta käyttäessäsi. Se voi saastuttaa osia ja aiheuttaa
virhetoimintoja järjestelmässä.
• Oikosulkujen välttämiseksi pidä roskat, ruuvit ja muut pienet esineet etäällä
liittimistä, aukoista, paikoista ja virtapiireistä.
• Älä työnnä mitään osien päälle. Muuten ne voivat oikosulkeutua tai
vahingoittua.
• Jos tietokonetta on käytetty pitkään, vältä suoraa kosketusta virtapiirien
jäähdyttimiin ja pintoihin, koska ne voivat olla kuumia. Tarkista, tuulettuuko
järjestelmä riittävästi.
• Varmista, että olet irrottanut virtajohdot, ennen kuin lisäät oheislaitteita
järjestelmään tai poistat niitä.
• Jos virtalähde ei toimi, älä yritä korjata sitä itse. Ota yhteyttä pätevään
teknikkoon tai jälleenmyyjääsi.
• Vaikka järjestelmän kotelo on suunniteltu suojaamaan käyttäjää naarmuilta,
varo teräviä kulmia ja reunoja. Käytä hansikkaita, jos irrotat tai vaihdat
järjestelmän kotelon.
• Jos et käytä tietokonetta pitkään aikaan, sammuta se ja irrota virtajohdot.
• On suositeltavaa, että tätä tuotetta ei käytetä yli 35 ºC:ssa.
• Varoitus: Varmista, että vaihdat pariston oikeantyyppiseen, koska muuten on
olemassa räjähdyksen vaara.
Suomi
71
Page 73

Suomi
Tietoja tästä oppaasta
Lukijakunta
Tämä opas tarjoaa yleistietoja ASUS Essentio ES5000/ES5000-P pöytätietokoneesta ja ohjeita siitä, kuinka järjestelmäpakkauksen mukana tullut
tuki-DVD-levyä voi käyttää. Tämä opas on tarkoitettu kokeneille käyttäjille ja
henkilöille, joilla on laitteistotuntemusta henkilökohtaisista tietokoneista.
Miten tämä opas on järjestetty
Tämä opas sisältää seuraavat osat:
1. Kappale 1: Järjestelmän esittely
Tässä kappaleessa on yleinen kuvaus ASUS Essentio ES5000/ES5000P -pöytätietokoneesta. Kappaleessa kerrotaan järjestelmäominaisuudet,
mukaan lukien etu- ja takapaneelin esittely.
2. Kappale 2: Alkutoimet
Tämä kappale auttaa käynnistämään järjestelmän ja asentamaan ohjaimia
sekä apuohjelmia tuki-DVD-levyltä.
72
Page 74

Merkkien selitykset
Jotta osaisit varmasti suorittaa tietyt toiminnat oikein, huomaa seuraavat tässä
oppaassa käytettävät symbolit.
VAROITUS: Tietoja, jotka voivat estää loukkaantumisen tehtävää
suoritettaessa.
MUISTUTUS: Tietoja, jotka voivat estää osien vahingoittumisen
tehtävää suoritettaessa.
TÄRKEÄÄ: Ohjeita, joita ON PAKKO noudattaa tehtävän suorittamista
varten.
HUOMAUTUS: Vinkkejä ja lisätietoja, jotka auttavat tehtävän
suorittamisessa.
Mistä saa lisää tietoa
Voit etsiä seuraavista lähteistä lisätietoja ja tuote- ja ohjelmistopäivityksiä.
1. ASUS-verkkosivusto
ASUS-verkkosivusto tarjoaa päivitettyä tietoa ASUS-laitteistotuotteista ja
-ohjelmistotuotteista maailmanlaajuisesti. Katso ASUS-yhteystiedot.
2. Lisäasiakirjat
Tuotepakkauksesi saattaa sisältää lisäasiakirjoja, kuten takuulappusia,
joita jälleenmyyjäsi on voinut lisätä. Nämä asiakirjat eivät kuulu tavalliseen
pakkaukseen.
Suomi
73
Page 75

Suomi
Järjestelmäpakkauksen sisältö
Tarkista, että BS5000/M5100 -järjestelmäpakkauksessa on seuraavat osat.
Tavalliset kohteet
1. ASUS BS5000/M5100 -pöytätietokone
• ASUS-pöytätietokone x 1
• Jalusta x 1
• Hiiri x 1
• Näppäimistö x 1
2. Johdot
• Virtajohto x 1
3. Lisävarusteet
• Virtamuuntaja x 1
• Hiirimatto x 1
4. Tuki-DVD-levy x 1
5. Käyttöohje x 1
6. Takuulappu x 1
• Jos mikään puuttuu tai on vahingoittunut, ota heti yhteyttä jälleenmyyjääsi.
• Tekniset tiedot vaihtelevat eri pöytätietokoneiden välillä. Tarkista tarkat
tarjoukset jälleenmyyjältäsi.
74
Page 76

Kappale 1
Tässä kappaleessa on yleinen kuvaus
pöytätietokoneesta. Kappaleessa
kerrotaan järjestelmäominaisuudet,
mukaan lukien etu- ja takapaneelin
esittely.
Järjestelmän esittely
Page 77

1.1 Etupaneeli
2.0
ASUS Essentio ES5000/ES5000-P -pöytätietokone sisältää ASUSemolevyn, virtalähteen, etupaneelin ja takapaneelin. Nämä kaikki osat ovat
järjestelmäkotelossa, jonka ASUS on taidokkaasti suunnitellut.
Seuraavissa kuvissa näkyy etupaneeli ja sen osat.
Suomi
Kiinni
1
3
4
5
2
Auki
6
1. Optisen levyaseman (ODD) poistopainike. Poista levy asemasta
painamalla tätä painiketta.
2. Etupaneelin kansi
. Avaa etupaneelin kansi vetämällä taaksepäin. Sisällä
on kaksi USB 2.0 -porttia, yksi E-SATA-portti, yksi mikrofoniportti ja yksi
kuulokeportti.
3. Verkon merkkivalo
. This LED lights up when a wireless/wired network
connection is established on the system.
4. Kiintolevyn (HDD) merkkivalo
. Tämä merkkivalo palaa, kun kiintolevy
lukee tai kirjoittaa tietoja.
5. Virtapainike
. Voit käynnistää järjestelmän painamalla tätä painiketta.
7
8
6. USB 2.0 -portit
. 2.0. Näihin Universal Serial Bus 2.0 (USB 2.0)
-portteihin voidaan kytkeä USB 2.0 -laitteita, kuten hiiri, tulostin, skanneri,
kamera, kämmentietokone tai vastaava.
7. Kuulokeportti (vihreä)
8. Mikrofoniportti (vaaleanpunainen)
76 Kappale 1: Järjestelmän esittely
. Tähän porttiin voi kytkeä kuulokkeet.
. Tähän porttiin voi kytkeä mikrofonin.
Page 78

1.2 Takapaneeli
Järjestelmän takapaneeli sisältää virtaliitännän ja useita I/O-portteja, joihin on
kätevä kytkeä laitteita.
Seuraavassa kuvassa näkyy takapaneeli ja sen osat.
ASUS BS5000/M5100 -työpöytäkoneesta on kaksi eri mallia. Tyypit eroavat
toisistaan takapaneelin portin 2 suhteen. Tyyppi 1: Portti 2 on Modem-portti (RJ-
11). Tyyppi 2: Portti 2 on COM-portti.
Tyyppi 1
1
9
10
11
12
13
2a
3
4
5
6
7
8
10
12
Tyyppi 2
9
11
13
1. Tuuletusaukot. Tuuletusaukkojen avulla ilma voi kiertää.
ÄLÄ peitä laitteen kotelon päällä ja takapaneelissa olevia tuuletusaukkoja.
Kotelon sisällä olevat osat voivat ylikuumentua ja vahingoittua ilman riittävää
tuuletusta.
1
2b
3
4
5
6
7
8
Suomi
2a. Modem (RJ-11) -portti Tämä portti yhdistää paikallisverkkoon (Internet)
valintamodeemin kautta.
2b. COM2-portti. Tämä portti on osoitinlaitteille tai muille sarjalaitteille.
3. PS/2-näppäimistöportti
. Tähän porttiin voi kytkeä PS/2-näppäimistön.
4. Verkkoportti (RJ-45). Tällä portilla voi luoda nopean Ethernet-yhteyden
lähiverkkoon verkkokeskittimen kautta. Katso LAN-portin LED-ilmaisimet
seuraavan sivun taulukosta.
77ASUS BS5000/M5100
Page 79

Suomi
2.0
Lähiverkkoportin merkkivalot
VALO
Verkkoportti
NOPEUSVALO
Toiminta-/yhteysmerkkivalo Nopeuden merkkivalo
TOIM/YHT-
Tila Kuvaus Tila Kuvaus
POIS Ei yhteyttä Pois 10 Mb/s -yhteys
ORANSSI Yhteys ORANSSI 100 Mb/s -yhteys
VILKKUVA Tietoa liikutetaan VIHREÄ 1 Gb/s -yhteys
5. COM1-portti. Tämä portti on osoitinlaitteille tai muille sarjalaitteille.
6. Linjatuloportti (vaaleansininen). Tähän porttiin voi kytkeä nauhurin, CD- tai
DVD-soittimen tai muun äänilähteen.
7. Linjalähtöportti (vihreä). Tähän porttiin voi kytkeä kuulokkeet tai
kaiuttimet. 4- tai 6-kanavaisessa asennuksessa tämän portin toimintona on
etukaiutinlähtö.
8. Mikrofoniportti (vaaleanpunainen) . Tähän porttiin voi kytkeä mikrofonin.
Katso seuraavasta asetustaulukosta audioporttien toiminnot 2-, 4- tai 6kanavaiselle asennukselle.
2-, 4- tai 6-kanavainen audioasennus
Portti Kuulokkeet, 2 kanavaa 4 kanavaa 6 kanavaa
Vaaleansininen Linjatulo Takakaiuttimien lähtö
Vihreä Linjalähtö Etukaiuttimien lähtö Etukaiuttimien lähtö
Vaaleanpunainen Mikrofonitulo Mikrofonitulo
Takakaiuttimien lähtö
Basso/keskikaiutin
9. Virtatuloportti. Tähän porttiin kytketään vaihtovirtamuuntajan tasavirtajohto.
10. USB 2.0 -portit
2.0. Näihin Universal Serial Bus 2.0 (USB 2.0)
-portteihin voidaan kytkeä USB 2.0 -laitteita, kuten hiiri, tulostin, skanneri,
kamera, kämmentietokone tai vastaava.
11. Videosovitinportti (VGA)
. Tähän porttiin kytketään VGA-näyttö tai muu
VGA-yhteensopiva laite.
12. DVI-D Out -portti Tämä portti on tarkoitettu mille tahansa DVI-D-
yhteensopivalle laitteelle ja se on HDCP-yhteensopiva, joka mahdollistaa HD
DVD- ja Blu-Ray-levyjen sekä muun suojatun sisällön toistamisen.
13. Kensington® -lukkoportti . Tällä portilla tietokoneen voi kytkeä varmasti
kiinteään esineeseen Kensington®-yhteensopivilla turvatuotteilla.
78 Kappale 1: Järjestelmän esittely
Page 80

1.3 Asetteluvaihtoehdot
1.3.1 Vaakatasoon asettaminen
Aseta pöytätietokone vaakatasoon.
1.3.2 Pystysuoraan asettaminen
Asenna järjestelmäpakkauksen mukana tullut jalusta. Aseta pöytätietokone
pystysuoraan.
Suomi
Jalustan asentaminen:
1. Etsi ruuvinreikä pöytätietokoneen pohjasta.
2. Kiinnitä jalusta tietokoneeseen mukana tulleella ruuvilla.
79ASUS BS5000/M5100
Page 81

Suomi
1.4 Näppäimistön ja hiiren kytkeminen
ASUS BS5000/M5100 -pöytätietokoneessa on mukana PS/2-näppäimistö ja
USB-hiiri. Kytke PS/2-näppäimistö takapaneelin PS/2-näppäimistöporttiin. Kytke
USB-hiiri joko etu- tai takapaneelin USB-porttiin.
Jos käytät langatonta USB-näppäimistöä tai hiirtä, katso laitteen mukana tulleita
ohjeita tai kysy suoraan jälleenmyyjältäsi tietoja sen käyttöönotosta.
1.5 Muiden oheislaitteiden kytkeminen
ASUS BS5000/M5100 -pöytätietokoneessa on etu- ja takapaneelissa useita I/Oportteja, joiden avulla voit kytkeä oheislaitteita järjestelmään.
Katso lisätietoja seuraavasta kuvasta.
RJ-11 (Tyyppi 1)
COM2 (Tyyppi 2)
Virtaliitin
USB
DVI
COM1
Ennen kuin kytket oheislaitteita järjestelmään, lue laitteen mukana tulleet
asiakirjat tai ota yhteyttä suoraan jälleenmyyjään asennusohjeita varten.
80 Kappale 1: Järjestelmän esittely
PS/2-näppäimistö
RJ-45
VGA
Linjatulo
Linjalähtö
Mikrofoni
(Valintamodeemi)
Page 82

Kappale 2
Tämä kappale auttaa käynnistämään
järjestelmän ja asentamaan ohjaimia
sekä apuohjelmia tuki-CD-levyltä.
Alkutoimet
Page 83

Suomi
2.1 Käyttöjärjestelmän asentaminen
Tämä emolevy tukee Windows® XP / Vista -käyttöjärjestelmiä. Asenna aina
viimeisin käyttöjärjestelmän versio ja vastaavat päivitykset, jotta saat eniten irti
laitteistosi ominaisuuksista. Kun käynnistät järjestelmän ensimmäistä kertaa,
järjestelmä tunnistaa automaattisesti sisäiset audio- ja graikkasirut ja yrittää
asentaa käyttöjärjestelmän mukana tulevia ohjaimia. Valitse No (Ei), kun sinulta
kysytään, haluatko käynnistää järjestelmän uudelleen. Asenna ohjaimet seuraavien
osioiden ohjeiden mukaisesti.
• Jotta käyttöjärjestelmä varmasti toimii oikein, asenna tuki-CD-levyllä olevat
ohjaimet.
• Emolevyn asetukset ja laitteistot voivat vaihdella. Käytä tämän kappaleen
asennustoimenpiteitä vain viitteellisinä. Katso käyttöjärjestelmäsi
ohjekirjasta lisätietoja.
2.2 Virran kytkeminen järjestelmään
Voit kytkeä järjestelmän päälle virtapainikkeesta .
Kytke järjestelmä PÄÄLLE painamalla
82 Kappale 2: Alkutoimet
Page 84

2.3 Tuki-CD-levyn tiedot
Järjestelmäpakkauksen mukana tuleva tuki-CD-levy sisältää ohjaimia,
ohjelmasovelluksia ja työkaluja, jotka voit asentaa kaikkien ominaisuuksien
käyttöön ottamista varten.
Tuki-VD-levyn sisältö voi muuttua ilman erillistä huomautusta. Voit hakea
päivityksiä ASUS-verkkosivustolta osoitteessa www.asus.com.
2.3.1 Tuki-CD-levyn käynnistäminen
Aseta tuki-CD-levy optiseen asemaan. CD-levy näyttää automaattisesti Drivers
(Ohjaimet) -valikon, jos tietokoneessa on automaattinen käynnistys päällä.
Näytä tuki-CDlevy/emolevy
napsauttamalla
kuvaketta
Suomi
Asenna napsauttamalla kohdetta
Jos automaattinen käynnistys EI OLE päällä tietokoneessa, selaa tuki-CDlevyn sisältöä ja etsi BIN-kansiosta tiedosto ASSETUP.EXE. Käynnistä CD-levy
kaksoisnapsauttamalla ASSETUP.EXE-tiedostoa.
ASUS BS5000/M5100 83
Page 85

Suomi
2.3.2 Drivers (Ohjaimet) -valikko
Drivers (Ohjaimet) -valikko näyttää saatavilla olevat laiteohjaimet, kun järjestelmä
tunnistaa asennettuja laitteita. Aktivoi laitteet asentamalla tarpeelliset ohjaimet.
ASUS InstAll - Virustorjuntaohjelman ja laiteohjaimien ohjattu
asennusohjelma
Asentaa kaikki laiteohjaimet ohjattua asennustoimintoa käyttäen.
Norton Internet Security 2008
Asentaa Norton Internet Security 2008 -ohjelman
Intel(R) Chipset Inf Update Program
Asentaa Intel® Chipset Inf -päivitysohjelman.
Intel(R)- graikkakiihdyttimen laiteohjain
Asentaa Intel®-graikkakiihdyttimen laiteohjaimen
Realtek Audio Driver
Asentaa Realtek®-ääniohjaimen ja sovelluksen.
ITE CIR Driver
Asentaa ITE CIR -ohjaimen.
Realtek RTL8168C/RTL8111C LAN Driver
Asentaa Realtek® RTL8168C/RTL8111C LAN -ohjaimen.
ASUS Wireless LAN Driver
Asentaa langattoman verkon ASUS-ohjaimen.
Agere-modeemilaiteohjain
Asentaa Agere-modeemilaiteohjaimen.
84 Kappale 2: Alkutoimet
Page 86

2.3.3 Utilities (Apuohjelmat) -valikko
Utilities (Apuohjelmat) -valikossa näkyy sovelluksia ja muita ohjelmia, joita
emolevy tukee. Voit asentaa kohteen napsauttamalla sitä ruudulta.
ASUS InstAll - Installation Wizard for Utilities
Asentaa kaikki apuohjelmat asennusohjelmalla.
ASUS Update
Voit ladata viimeisimmän BIOS-version ASUS-verkkosivustolta.
Ennen kuin käytät ASUS Update -päivitystä, varmista, että Internet-yhteys on
luotu, jotta voit yhdistää ASUS-verkkosivustolle.
Suomi
ASUS AI Manager
Asentaa ASUS AI Manager -sovelluksen, josta voit käynnistää helposti sovellukset
AI Disk, AI Security ja AI Probe.
Adobe Acrobat Reader 8
Asentaa Adobe Acrobat Reader 8 -sovelluksen. Tuki-CD-levyllä olevat ohjekirjat
ovat PDF-muodossa, joka voidaan avata Adobe Acrobat Reader -sovelluksella.
ASUS BS5000/M5100 85
Page 87

Suomi
2.3.4 Manual (Ohjekirja) -valikko
Tuki-CD sisältää luettelon lisäkäyttöohjeista.
Ohjekirja on PDF-muodossa. Asenna sen avamista varten Adobe Acrobat
Reader Utilities (Apuohjelmat) -valikosta.
2.3.5 ASUS-yhteystiedot
Napsauttamalla Contact (Yhteystiedot) -välilehteä voit näyttää ASUS-yhteystiedot.
86 Kappale 2: Alkutoimet
Page 88

2.3.6 Muita tietoja
Ruudun oikean yläkulman kuvakkeet tarjoavat lisätietoja emolevystä ja tuki-CDlevyn sisällöstä. Näytä tiedot napsauttamalla kuvaketta.
Emolevyn tiedot
Näyttää emolevyn yleiset tekniset tiedot.
Suomi
Selaa tätä CD-levyä
Näyttää tuki-CD-levyn sisällön graasessa muodossa.
ASUS BS5000/M5100 87
Page 89

Suomi
Tekninen tukilomake
Näyttää ASUS- teknisen tukipyyntölomakkeen, joka on täytettävä, kun pyydetään
teknistä tukea.
Tiedostoluettelo
Näyttää tuki-CD-levyn sisällön ja lyhyen kuvauksen kaikesta tekstimuodossa.
88 Kappale 2: Alkutoimet
Page 90

2.4 ASUS AI Manager
ASUS AI Manager -sovelluksen avulla voit käynnistää helposti sovellukset AI Disk,
AI Security ja AI Probe.
2.4.1 AI Managerin asentaminen
Voit asentaa AI Managerin tietokoneellesi seuraavasti:
1. Aseta tuki-CD-levy optiseen asemaan. CD-levy näyttää automaattisesti
Drivers (Ohjaimet) -valikon, jos tietokoneessa on automaattinen käynnistys
päällä.
Jos Autorun EI ole päällä, selaa tuki-CD-levyn sisältöä ja etsi tiedosto
ASSETUP.EXE BIN-kansiosta. Käynnistä CD-levy kaksoisnapsauttamalla
ASSETUP.EXE-tiedostoa.
2. Napsauta Utilities (Apuohjelmat) -välilehteä ja sitten ASUS AI Manager.
3. Suorita asennus loppuun noudattamalla ruudun ohjeita.
2.4.2 AI Managerin käynnistäminen
Voit käynnistää AI Manager -sovelluksen heti asennuksen jälkeen tai milloin
tahansa Windows®-työpöydältä.
Voit käynnistää AI Manager -sovelluksen Windows®-työpöydältä napsauttamalla
Start (Käynnistä) > All Programs (Kaikki ohjelmat) > ASUS > AI Manager > AI
Manager v1.xx.xx. AI Manager -pikapalkki tulee näkyviin.
Suomi
Kun sovellus on käynnistetty, AI Manager -kuvake näkyy Windows®tehtäväpalkissa. Voit näyttää lisäasetuksia napsauttamalla kuvaketta oikealla
painikkeella.
2.4.3 AI Manager -pikapalkki
Napsauta pikapalkista kuvaketta Main (Päävalikko), My Favorites (Omat suosikit),
Support (Tuki) tai Information (Tiedot) vastaavaa valikkoa varten.
Sulje
Suurenna/Palauta
Pienennä
Päävalikko
Omat suosikit
ASUS BS5000/M5100 89
Tuki
Tiedot
Page 91

Suomi
Napsauttamalla voit vaihtaa koko ruudulla olevan AI Managerin ja pikapalkin
välillä.
Napsauttamalla
Napsauttamalla
voit pitää AI Managerin tehtäväpalkissa.
voit sulkea AI Managerin.
2.4.4 Main (Päävalikko)
Käynnistä AI Disk, AI Security tai AI Probe päävalikosta. Napsauttamalla pientä
kolmiota voit avata tai sulkea päävalikon.
Avaa/sulje päävalikko
AI Disk
AI Disk -sovelluksen avulla voit helposti tyhjentää väliaikaiset IE-tiedostot, IEosoitteet, IE-evästeet, IE-historian, roskakorin ja viimeksi avattujen tiedostojen
luettelon. Valitse kohteet, jotka haluat tyhjentää, ja napsauta
Apply (Käytä).
90 Kappale 2: Alkutoimet
Page 92

AI Security
AI Security -sovelluksen avulla voit asettaa salasanan lukitsemaan siirrettävät
säilytyslaitteet, kuten USB-ash-levyn ja CD-/DVD-levyn, mikä antaa parhaimman
turvan tiedoillesi.
Voit lukita laitteen seuraavasti:
1. Jos käytät AI Security -sovellusta ensimmäisen kerran, kirjoita salasana,
jossa on korkeintaan 20 kirjainta, numeroa tai merkkiä.
2 Vahvista salasana.
3. Kirjoita salasanavihje (valinnainen).
4. Napsauta
OK.
Suomi
5. Valitse laite, jonka haluat lukita, ja napsauta Apply (Käytä).
ASUS BS5000/M5100 91
Page 93

6. Kirjoita salasana ja napsauta OK. Valittua laitetta ei voi käyttää ilman
salasanaa.
Voit avata laitteen seuraavasti:
Suomi
1. Poista valinta lukitulta laitteelta ja napsauta
2. Kirjoita salasana ja napsauta
Voit vaihtaa salasanaa napsauttamalla
noudattamalla ruudun ohjeita.
OK.
Change Password (Muuta salasana) ja
Apply (Käytä).
AI Probe
AI Probe tunnistaa automaattisesti emolevyn ja prosessorin lämpötilan,
prosessorin tuuletinnopeuden ja prosessorin jännitteen. Voit myös muuttaa näitä
arvoja manuaalisesti sen avulla.
92 Kappale 2: Alkutoimet
Page 94

2.4.5 My favorites (Omat suosikit)
Lisää suosikkisovelluksesi My Favorites (Omat suosikit) -valikkoon.
Voit lisätä sovelluksen seuraavasti:
1. Napsauta
haluat lisätä My Favorites (Omat suosikit) -valikkoon.
2. Napsauta
näkyviin.
Napsauttamalla oikealla painikkeella My Favorites (Omat suosikit) -valikossa
olevaa kuvaketta voit avata, nimetä uudelleen tai poistaa sovelluksen valikosta.
Kaksoisnapsauttamalla kuvaketta voit avata sovelluksen.
Add (Lisää) ja valitse sitten seuraavasta ruudusta sovellus, jonka
Open (Avaa). Valitsemasi sovellus lisätään ja sen kuvake tulee
Suomi
ASUS BS5000/M5100 93
Page 95

Suomi
2.4.6 Support (Tuki)
Support (Tuki) -valikossa on linkkejä kansainväliselle ASUS-verkkosivustolle,
teknisen tuen sivustolle, latausten tukisivustolle ja yhteystietosivustolle.
2.4.7 Information (Tiedot)
Information (Tiedot) -valikossa on yleisiä tietoja järjestelmästä, emolevystä,
prosessorista, BIOS-sovelluksesta, muistista ja muista asennetuista laitteista.
94 Kappale 2: Alkutoimet
Page 96

2.5 Käyttöjärjestelmän oletusasetusten
lataaminen
Jos haluat ladata järjestelmän alkuperäiset oletusasetukset, paina <F3>
alkukäynnistysruudussa (Power-On Self-Test, POST).
2.6 Palautus-CD-levy (valinnainen)
ASUS-palautus-CD-levy auttaa käyttöjärjestelmän asennuksessa ja sen
palauttamisessa alkuperäiseen toimintakuntoon. Ennen kuin käytät levyä, kopioi
tärkeät tiedostosi USB-muistille tai verkkoasemalle ja huomioi mahdolliset
muokatut määritysasetukset, kuten verkkoasetukset.
ASUS-palautus-CD-levyn saatavuus voi vaihdella ostamasi tietokoneen
mukaan. Tarkista tarkat tarjoukset jälleenmyyjältäsi.
2.6.1 Windows® XP -käyttöjärjestelmän palauttaminen:
Voit palauttaa Windows XP -käyttöjärjestelmän seuraavasti:
1. Aseta palautus-CD-levy optiseen asemaan. Paina
näkyy näytöllä. Valitse optinen asema käynnistyslaitteeksi.
2. Valitse
3. Vahvistusruutu tuleen näkyviin. Vahvista napsauttamalla
4. Valitse
5. Luettelossa näkyy sisältö, joka palautetaan. Vahvista napsauttamalla
6. Aseta toinen palautus-CD-levy ja napsauta
7. Aseta tuki-CD-levy ja napsauta
8. Kun järjestelmä on käynnistynyt uudelleen, Windows XP aloittaa
Recover system to a partition (Palauta järjestelmä osiolle) tai
Recovery system to entire HD (Palauta järjestelmä koko kiintolevylle).
Napsauta Next (Seuraava).
I accept (Hyväksy) seuraavasta ruudusta ja napsauta Next
(Seuraava).
(Kyllä). Palautustoimenpide käynnistyy.
OK. Järjestelmä käynnistyy uudelleen.
järjestelmämääritykset. Suorita toimenpide loppuun noudattamalla ruudun
ohjeita ja käynnistä tietokone uudelleen. Säädä ruudun tarkkuus sopivaksi.
ASUS-palautus-CD-levy on vain ASUS-pöytätietokoneille. ÄLÄ käytä sitä
muissa järjestelmissä. Voit hakea mahdollisia päivityksiä ASUS-verkkosivustolta
osoitteessa www.asus.com.
<F8> kun ASUS-logo
Next (Seuraava).
OK.
Suomi
Yes
ASUS BS5000/M5100 95
Page 97

2.6.2 Windows® Vista-käyttöjärjestelmän palauttaminen:
Voit palauttaa Windows Vista -käyttöjärjestelmän seuraavasti:
Suomi
1. Käynnistä ASUS-pöytätietokone ja paina
2. Aseta palautus-CD-levy optiseen asemaan, kun
<F8> kun ASUS-logo tulee näkyviin.
Please select boot device
(Valitse käynnistyslaite) -valikko tulee näkyviin. Valitse optinen asema
käynnistyslaitteeksi ja jatka painamalla <Enter>.
Jos haluat palauttaa järjestelmän salaiselta osiolta, paina <F9> kun ASUS-logo
tulee näkyviin. Noudata sitten vaiheita 3-6.
3. Kun järjestelmä on käynnistynyt uudelleen, ASUS-esilatausikkuna tulee
näkyviin. Jatka napsauttamalla
Next (Seuraava).
4. Valitse, minne haluat asentaa uuden järjestelmän. Vaihtoehdot ovat:
Recover Windows to rst partition only (Palauta Windows vain
ensimmäiselle osiolle):
Tämä vaihtoehto poistaa vain ensimmäisen osion, jolloin voit säästää muut
osiot, ja luo uuden järjestelmäosion C-asemaksi.
Recover Windows to entire HD (Palauta Windows koko kiintolevylle):
Tämä vaihtoehto poistaa kiintolevyn kaikki osiot ja luo uuden
järjestelmäosion C-asemaksi.
Recover Windows to entire HD with 2 partitions (Palauta Windows
koko kiintolevylle 2 osiona):
Tämä vaihtoehto poistaa kiintolevyn kaikki osiot ja luo kaksi uutta
järjestelmäosiota. Ensimmäisen osio vie 60 % koko kiintolevytilasta ja
toinen osio 40 %. Uusi järjestelmä asennetaan ensimmäiselle osiolle. Voit
varmuuskopioida tiedot toiselle osiolle.
5. Napsauta
Finish (Valmis), kun sinulta kysytään: Are you sure you want
to recover now (Haluatko varmasti palauttaa nyt). Näytöllä näkyy
toimenpiteen suoritusprosentti.
6. Kun
Recovery nish (Palautus valmis) -viesti tulee näkyviin, napsauta OK
niin järjestelmä käynnistyy uudelleen. Kun se on käynnistynyt uudelleen, voit
suorittaa järjestelmän määrityksen loppuun noudattamalla ruudun ohjeita.
ASUS-palautus-CD-levy on vain ASUS-pöytätietokoneille. ÄLÄ käytä sitä
muissa järjestelmissä. Voit hakea mahdollisia päivityksiä ASUS-verkkosivustolta
osoitteessa www.asus.com.
96 Kappale 2: Alkutoimet
Page 98

ASUS BS5000/M5100 97
Suomi
Page 99

Norsk
®
Essentio
BS5000/M5100
ASUS stasjonær PC
Bruksanvisning
Page 100

NW4030
Første utgave V1
Juli 2008
Copyright © 2008 ASUSTeK COMPUTER INC. Med enerett.
Ingen deler av denne håndboken, produktene og programvaren beskrevet i den, kan
gjenproduseres, overføres, skrives av, lagres i et gjennningssystem eller oversettes til et
annet språk i noe form eller på noe måte, utenom dokumentasjon som beholdes av kjøper
for som en sikkerhetskopi, uten uttrykkelig skriftlig tillatelse fra ASUSTeK COMPUTER INC.
(“ASUS”).
Produktgaranti eller service kan ikke utvides hvis: (1) produktet er reparert, tilpasset eller
endret, med mindre slik reparasjon, tilpasning eller endring er skriftlig godkjent av ASUS; eller
(2) serienummeret til produktet er uleselig eller mangler.
ASUS LEVERER DENNE HÅNDBOKEN ”SOM DEN ER” UTEN GARANTI AV NOE
SLAG, UANSETT UTTRYKT ELLER UNDERFORSTÅTT, INKLUDERT, MEN IKKE
BEGRENSET TIL, ENHVER INNEFORSTÅTTE GARANTIER ELLER TILSTANDER FOR
SALGBARHET ELLER EGNETHET FOR ET SPESIELT FORMÅL. IKKE I NOE TILFELLE
SKAL ASUS, DETS DIREKTØRER, TJENESTEMENN, ANSATTE ELLER AGENTER
VÆRE ANSVARLIGE FOR INDIREKTE SKADER, FØLGESKADER, UHELL, (INKLUDERT
SKADER FOR TAP AV FORTJENESTE, DRIFTSAVBRUDD ELLER TAP AV FORRETNING,
TAP AV BRUK ELLER DATA ELLER LIGNENDE), SELV OM ASUS HAR BLITT
UNDERRETTET OM MULIGHETEN FOR SLIKE SKADER SOM OPPSTÅR SOM FØLGE
AV DEFEKT ELLER FEIL I DENNE HÅNDBOKEN ELLER PRODUKTET.
SPESIFIKASJONER OG INFORMASJON I DENNE HÅNDBOKEN ER KUN SATT SAMMEN
FOR INFORMASJON, OG KAN ENDRES NÅR SOM HELST UTEN FORVARSEL, OG
BØR IKKE ANSES SOM EN FORPLIKTELSE AV ASUS. ASUS PÅTAR SEG IKKE NOE
ANSVAR ELLER FORPLIKTELSER OR EVENTUELLE FEIL ELLER UNØYAKTIGHETER
SOM KAN FREMKOMME I DENNE VEILEDNINGEN, INKLUDERT PRODUKTENE OG
PROGRAMVAREN SOM BESKRIVES I VEILEDNINGEN.
Produkter og rmanavn i denne håndboken kan være registrerte varemerker eller
kopibeskyttet av deres respektive rmaer, og brukes kun for identisering eller forklaring og til
eierens fordel, uten gjøre inngrep.
Norsk
99
 Loading...