

Page 1

L8
T954 1.00
2002 2
Page 2
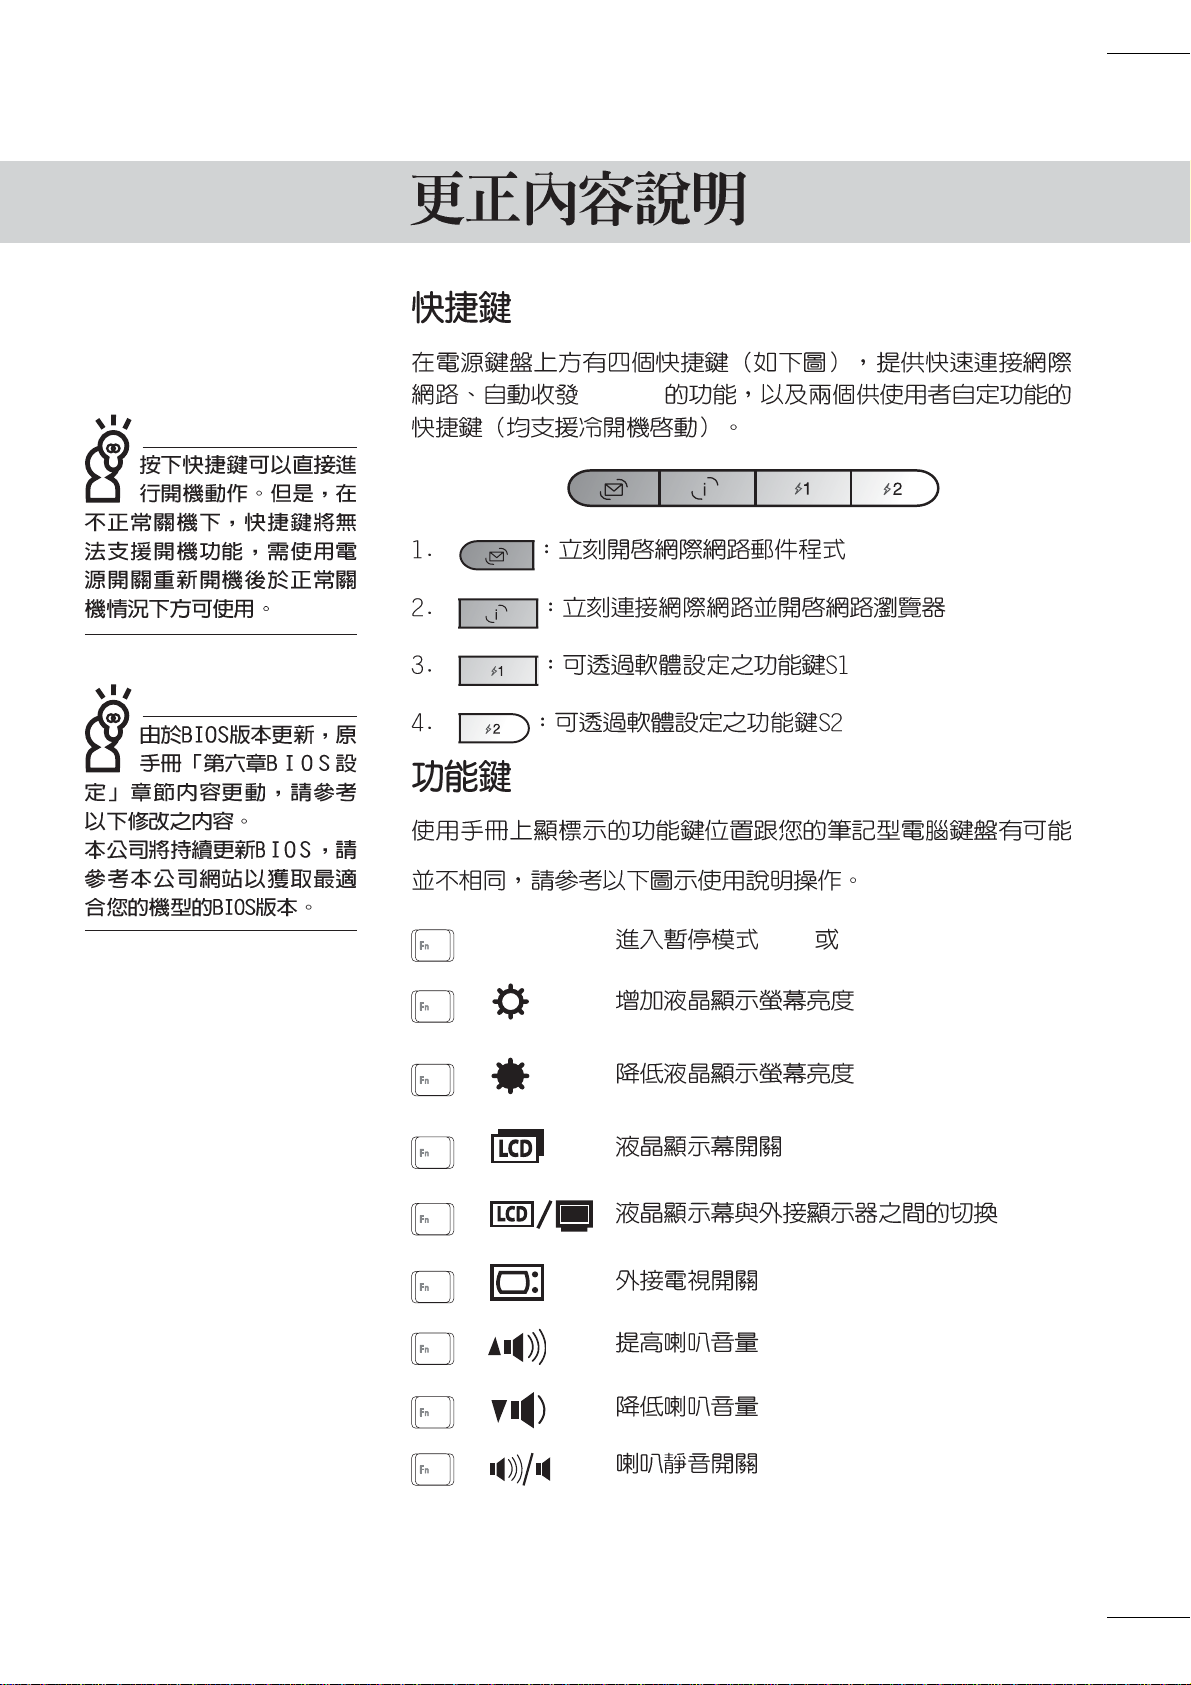
(Instant Key)
SUSPEND
E-Mail
(Instant Key)
+
+
+
+
+
TV
+
+
+
+
(STR STD)
Page 3
6-1 .........4
6-2
6-3
6-4
6-5 Main
6-6 Advanced
6-7 Security
6-8 Power
6-9 Boot
6-10 Exit
BIOS ....4
................5
................6
......................6
.........11
............15
.......16
.................19
.................21
Page 4
6-1
6-1
BIOS Basic Input / Output System
BIOS
BIOS
BIOS
BIOS BIOS
BIOS
BIOS
BIOS
BIOS
BIOS
POST
BIOS F2
BIOS BIOS
BIOS
F2 BIOS
4
Page 5
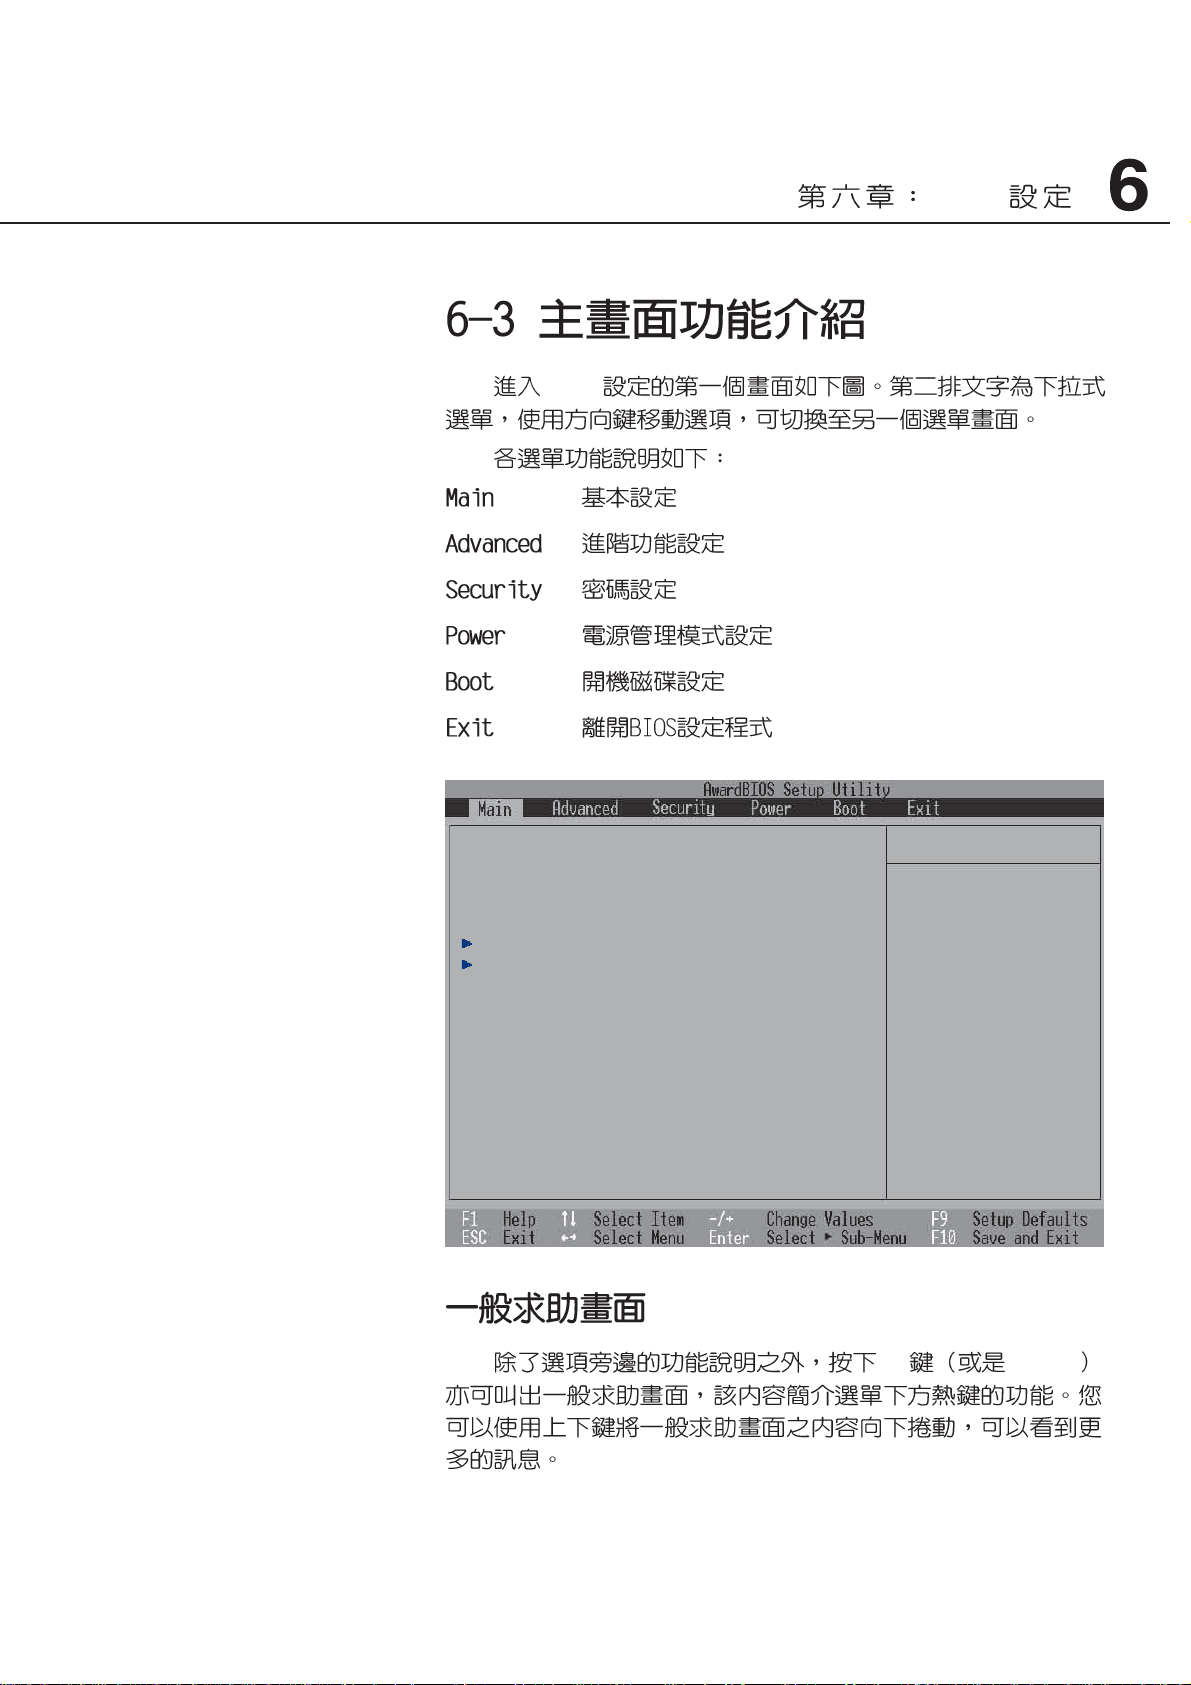
BIOS
BIOS
System Time [17:15:00]
System Date [01/18/2002]
Legacy Diskette A [1.44M, 3.5 in.]
Primary Master [Auto]
Primary Slave [Auto]
Video Display Device [LCD & CRT]
Installed Memory 128 MB
Item Specific Help
<Enter> to select field;
<+>,<-> to change value.
F1 Alt+H
5
Page 6
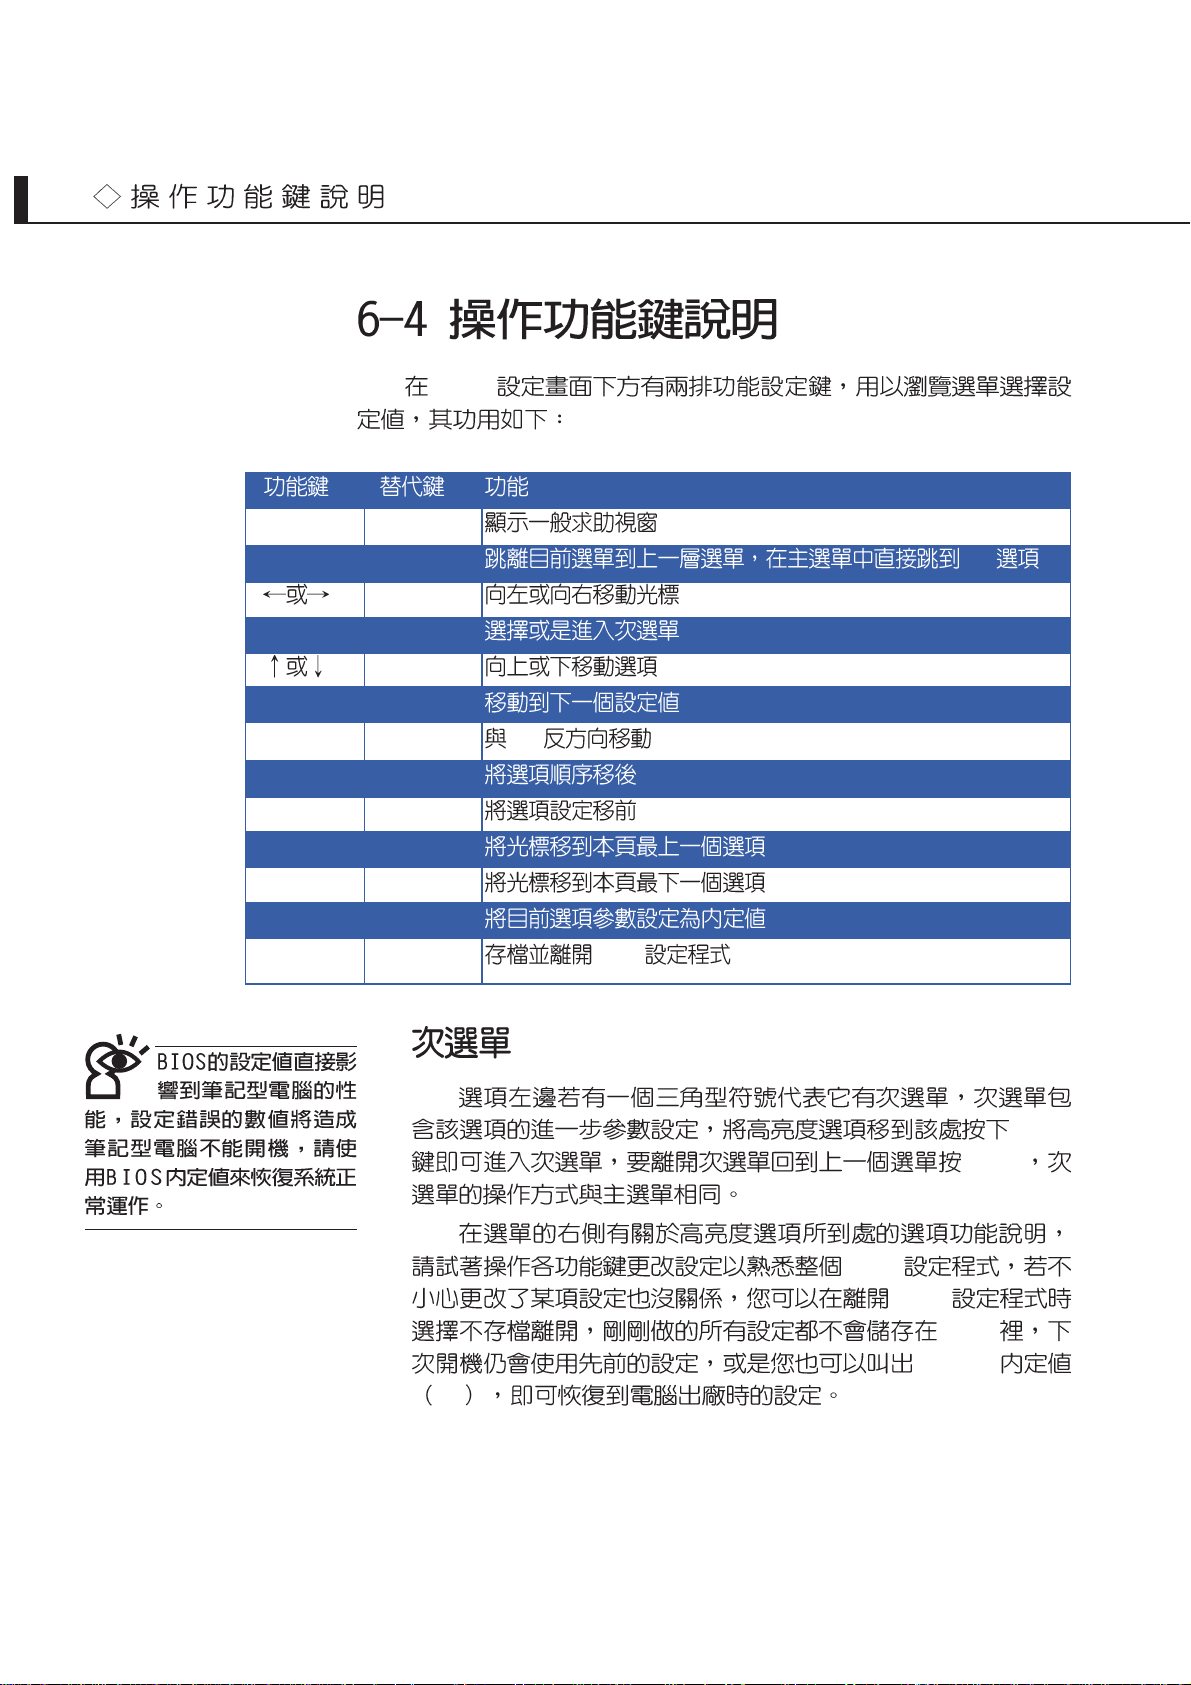
6-4
BIOS
F1 Alt+H
Esc Alt+X Exit
Enter
Tab
Shift+Tab Tab
-
+
Home PgUp
End PgDn
F9
F10 BIOS
F9
Enter
ESC
BIOS
BIOS
BIOS
BIOS
6
Page 7

BIOS L8L L8F
L8L L8F
BIOS
System Time [17:15:00]
System Date [01/22/2002]
Legacy Diskette A [1.44M, 3.5 in.]
Primary Master [Auto]
Primary Slave [Auto]
Installed Memory 128 MB
BIOS Revision L8L BIOS 0008
Item Specific Help
<Enter> to select field;
<+>,<-> to change value.
System Time
System Date
System Time [17:15:00]
System Date [01/18/2002]
Legacy Diskette A [1.44M, 3.5 in.]
Primary Master [Auto]
Primary Slave [Auto]
Video Display Device [LCD & CRT]
Installed Memory 128 MB
Tab Tab + Shift
Item Specific Help
<Enter> to select field;
<+>,<-> to change value.
Tab Tab + Shift
Legacy Diskette A
Primary Master Primary Slave
7
Page 8

6-5 Main
Primary Master
Enter
L8LPrimary Master L8FPrimary Master
IDE
Primary Master [IC25N030ATDA04-0]
Type: [Auto]
Cylinders [ 1024]
Heads [255]
Sectors [63]
CHS Capacity 8422MB
Maximum LBA Capacity 30005MB
Multi-Sector Transfers [Maximum]
SMART Monitoring [Disabled]
PIO Mode [4]
Ultra DMA Mode [5]
Item Specific Help
<Enter> to select the
type of the IDE drive.
[User Type HDD] allows
you to set each entry on
your own.
WARNING: Ultra DMA mode
3/4/5 can be enabled
only when BIOS detects
shielded 80-pin cable.
Type
Auto User Type HDD None CD-
ROM Auto
IDE
Auto
User
IDE
None
Translation Method
Type User Type HDD
[LBA] Translation Method [LBA]
[Large] [Nomal] [Mach Partition Table] [Manual]
Cylinders
Type User Type HDD Translation
Method Manual Cylinders Heads Sectors Cylinder
8
Page 9

Head
Head
Sector
Sector
CHS Capacity
BIOS CHS
Maximum LBA Capacity
LBA
Multi-Sector Transfers
BIOS
Type User
[Maximum]
Multi-Sector Transfers [Disabled] [2 Sectors] [4 Sectors]
[8 Sectors] [16 Sectors] [32 Sectors]
SMART Monitoring
S.M.A.R.T. Self Monitoring Analysis Reporting Technology
[Disable] Smart Monitoring Smart Monitoring
[Enabled] [Disable]
PIO Mode
PIO IDE
Type User Type HDD
[4] PIO Mode [0] [1] [2] [3] [4]
Ultra DMA Mode
Type User Type HDD
[4] Ultra DMA Mode [0] [1] [2] [3] [4] [5]
9
Page 10

6-5 Main
Primary Slave
Enter
Primary Slave Primary Slave Auto User Type
HDD CD-ROM None
Primary Master
Primary Master
L8L Primary Slave L8F Primary Slave
IDE
Primary Slave [TOSHIBA DVD-ROM SD-C2502]
Type [Auto]
PIO Mode [4]
ULTRA DMA Mode [2]
Item Specific Help
<Enter> to select the
type of the IDE drive.
[User Type HDD] allows
you to set each entry on
your own.
Type [Auto]
PIO Mode [4]
ULTRA DMA Mode [2]
Main
Installed Memory
BIOS Revision
BIOS
Primary Slave [TOSHIBA DVD-ROM SD-C2502]
Item Specific Help
<Enter> to select the
type of the IDE drive.
[User Type HDD] allows
you to set each entry on
your own.
10
Page 11

(Advanced)
L8L Advanced L8F Advanced
BIOS
CPU Speed 1133MHz
I/O Device Configuration
Processor Serial Number [Enabled]
Quick Power On Self Test [Enabled]
Item Specific Help
<Enter> to go to the
sub-menu.
I/O Device Configuration
Processor Serial Number [Enabled]
Internal Pointing Device [Enabled]
Quick Power On Self Test [Enabled]
L8L
CPU Speed L8L
I/O Device Configuration
Item Specific Help
<Enter> to go to the
sub-menu.
Enter
L8L I/O Device Configuration L8F I/O Device Configuration
I/O Device Configuration
Onboard Serial Port [3F8H/IRQ4]
Onboard IR Port [2F8H/IRQ3]
IR Mode [FIR]
DMA Channel [1]
Onboard Parallel Port [378H/IRQ7]
Parallel Port Mode [ECP+EPP]
ECP DMA Select [3]
Item Specific Help
<Enter> to select the
I/O Address & IRQ for
Infrared.
I/O Device Configuration
Serial Port A: [3F8H/IRQ4]
IR Port [2F8H/IRQ3]
Mode [FIR]
DMA Channel [1]
Parallel Port [378H/IRQ7]
Mode [ECP+EPP]
ECP DMA Channel [3]
Item Specific Help
<Enter> to select the
I/O Address & IRQ for
Infrared.
11
Page 12

6-6 Advanced
L8L I/O Device Configuration
Onboard Serial Port L8L
COM
[3F8H/IRQ4] [3F8H/IRQ4] [2F8H/IRQ3]
[3E8H/IRQ4] [2E8H/IRQ10] [Disabled]
Onboard IR Port L8L
IR Infrared
[2F8H/IRQ3]
[3F8H/IRQ4] [2F8H/IRQ3] [3E8H/IRQ4] [2E8H/IRQ10]
[Disabled]
IR Mode L8L
Onboard IR Port [FIR]
[Disabled] [SIR] [FIR]
DMA Channel L8L
Onboard IR Port [1]
[1] [3]
Onboard Parallel Port L8L
Parallel Port
[378H/IRQ7] [Disabled] [378H/IRQ7]
[278H/IRQ5]
Parallel Port Mode L8L
Parallel Port [ECP+EPP] Mode
[Normal] [EPP] [ECP] [ECP+EPP]
ECP DMA Select L8L
Parallel Port [3] ECP DMA Select
[1] [3]
12
Page 13

BIOS
L8F I/O Device Configuration
Serial Port A L8F
COM
[3F8H/IRQ4] [3F8H/IRQ4] [2F8H/IRQ3]
[3E8H/IRQ4] [2E8H/IRQ3] [Disabled]
IR Port L8F
IR Infrared
[2F8H/IRQ3]
[3F8H/IRQ4] [2F8H/IRQ3] [3E8H/IRQ4] [2E8H/IRQ3]
[Disabled]
Mode L8F
IR Port [FIR] Mode
[SIR] [FIR]
DMA Channel L8F
IR Port [1] DMA Channel
[1] [3]
Parallel Port L8F
Parallel Port
[378H/IRQ7] [Disabled] [378H/IRQ7]
[278H/IRQ5]
Mode L8F
Parallel Port [ECP+EPP] Mode
[Normal] [EPP] [ECP] [ECP+EPP]
ECP DMA Select L8F
Parallel Port [3] ECP DMA Select
[1] [3]
13
Page 14

6-6 Advanced
I/O Device Configuration Esc
Internal Pointing Device L8F
[Enabled] [Enabled]
[Disabled]
Processor Serial Number
( Intel CPU ) Processor
Serial Number
CPU [Disabled]
[Enabled] [Disabled]
Quick Power On self Test
[Disabled]
Quick Power On self Test
[Enabled] [Enabled]
14
Page 15

Security
L8L Security L8F Security
BIOS
BIOS
Supervisor Password [Disabled]
User Password [Disabled]
Hard disk Password [Enter]
Item Specific Help
Supervisor password
controls full access.
<Enter> to change
password ; <Enter> again
to disable password.
System Password [Enter]
Password on boot [Disabled]
Hard disk Password [Enter]
Item Specific Help
Supervisor password
controls full access.
<Enter> to change
password ; <Enter> again
to disable password.
Supervisor Password [Disabled](L8L )
BIOS
BIOS
Enter 6-2 63
6-2
Enter Password
6-3
Confirm Password
[Enabled]
Enter [Disabled]
8
Enter
15
Page 16

6-7 Security
User Password [Disabled] (L8L )
BIOS
Enter 6-2
6-3
[Enabled]
Enter [Disabled]
Hard disk Password(L8F/L8L )
Enter 6-2
6-3 confirm Hdd Password
System Password(L8F )
Enter 6-2
6-3
Set
Enter Enter
Password on Boot(L8F )
System Password
Disable
Disable
Enable
5
16
Page 17

L8L Power L8F Power
BIOS
Start Battery Refreshing
Item Specific Help
By slowing down CPU
speed when AC adapter
not in use to conserve
battery power
LCD auto power saving [Enabled]
Start Battery Refreshing
By slowing down CPU
speed when AC adapter
not in use to conserve
battery power
LCD auto Power saving L8F
LCD
[Disabled] [Enabled] [Disabled]
Item Specific Help
17
Page 18

6-8 Power
Start Battery Refreshing
Battery refresh utility
This will recalibrate the battery gauge
Please be sure you have AC adapter inserted
Battery internal registersre-initialized
Please wait while the batteryis charging...
Please Remove AC adapter and wait the machine shut down.
Please leave the machine on until it shutdown.
18
Page 19

Boot
L8L Boot L8F Boot
BIOS
1. Removable Device [Legacy Floppy]
2. IDE Hard Drive [IC25N030ATDA04-0]
3. AT API CD-ROM [TOSHIBA DVD-ROM SD-R2102]
Item Specific Help
Boot Sequence:
<Enter> to select the
device.
To select the boot
sequence, use the up or
down arrow. Press <+> to
move the device up the
list, or <-> to move it
down the list.
1.Removable Device
2.IDE Hard Drive
3.ATAPI CD-ROM
1. Removable Device [Legacy Floppy]
2. IDE Hard Drive [IC25N030ATDA04-0]
3. AT API CD-ROM [TOSHIBA DVD-ROM SD-R2102]
Item Specific Help
Boot Sequence:
<Enter> to select the
device.
To select the boot
sequence, use the up or
down arrow. Press <+> to
move the device up the
list, or <-> to move it
down the list.
19
Page 20

6-10 Exit
BIOS
BIOS
L8L Exit L8F Exit
Exit Saving Changes
Exit Discarding Changes
Load Setup Defaults
Discard Changes
Save Changes
Item Specific Help
Exit setup utility and
save your changes to
CMOS.
Exit Saving Changes
Exit Discarding Changes
Load Setup Defaults
Discard Changes
Save Changes
Exit Saving Changes
BIOS
CMOS Enter 6-4
6-4
Item Specific Help
Exit setup utility and
save your changes to
CMOS.
20
Yes CMOS BIOS
No BIOS
Exit Discarding Changes
BIOS
Enter 6-5
Page 21

6-5
Yes BIOS
No BIOS
Load Setup Defaults
6-6
Yes BIOS
No BIOS
BIOS
Enter 6-6
Discard Changes
Enter 6-7
6-7
Yes BIOS CMOS
BIOS No BIOS
Save Changes
Enter 6-8
6-8
Yes CMOS BIOS
No BIOS
BIOS
21
Page 22

22
Page 23

23
 Loading...