

ASUS Hyper M.2 X16 Gen 4 Card Service Manual

ASUS HYPER M.2
X16 Gen 4 Card
Quick Start Guide
E16246
First Edition
December 2019
15060-0GR20000
M.2 LED
1234
Parts and features
M.2_LED4
M.2_LED3
M.2_LED2
M.2_LED1
M.2_1 M.2_2 M.2_3 M.2_4
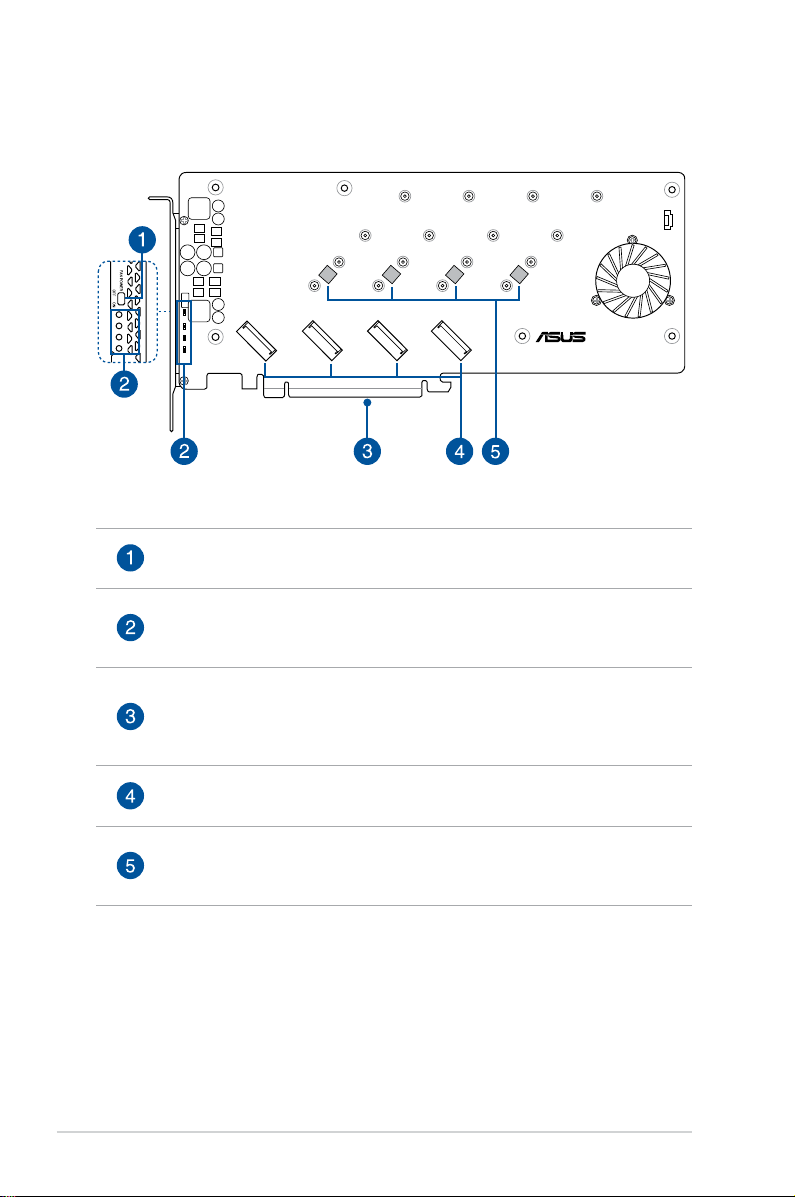
FAN Power Switch
This switch allows you to turn the fan on or off.
M.2 Access LEDs
These LEDs will blink to indicate that data are being read/written from/into the
M.2 storage devices.
PCI Express interface
This is the interface for the ASUS HYPER M.2 X16 GEN 4 CARD to be installed
in your motherboard’s PCI Express slot. Ensure to install the ASUS HYPER M.2
X16 GEN 4 CARD into a PCI Express 4.0/3.0 slot for optimum results.
HYPER M.2 X16 GEN4 CARD
PCIe M.2 storage device connectors
These connectors allow you to install PCIe M.2 storage devices.
Pre-installed M.2 rubber pads
These 1 mm rubber pads are installed on the ASUS HYPER M.2 X16 GEN 4
CARD by default and are compatible with double sided M.2 storage devices.
2

Specifications summary
Interface
External Connectors
LED and Switch
Thermal Solution
RAID support
Dimension (L x W x H)
Compatible Models
• Specifications are subject to change without notice. Please refer to the ASUS website
• M.2 storage devices are not included in the package.
PCI Express 4.0 x16 interface
4 x M.2 slots (Key M), type 2242/2260/2280/22110 (supports PCIe 4.0)*
* Supports PCIe M.2 storage devices only.
1 x M.2 FAN Power Switch
4 x M.2 Instruction LEDs
Active fan with heatsink
AMD TRX40 / X570 Series Motherboard models with PCIe Gen 4 support.
Supports PCIe Gen 3 bandwidth for other RAID on CPU models.
27 x 12.2 x 1.5 cm
Visit to www.asus.com for the latest compatible model lists.
for the latest specifications.
Getting started
To install M.2 storage devices onto your ASUS HYPER M.2 X16 GEN 4 CARD:
1. Remove the six (6) cover screws that secure the cover to the ASUS HYPER M.2 X16
GEN 4 CARD, then remove the cover and set it aside.
3
 Loading...