


E13603
First Edition / February 2018
G SERIES
GAMING NOTEBOOK PC

Top View
NOTE:
•The keyboard’s layout may vary per region or country.The Notebook view may also vary in appearance depending on the Notebook PC model.
•Closing the lid when the system is under high load forces your Notebook PC to go into sleep mode to prevent overheating.
Array microphones
Camera indicator
Camera
Display panel
Status indicators |
Air vents |
Power button |
Airplane mode indicator |
Numeric keypad |
Keyboard |
Touchpad |
Capital lock indicator
2 |
Notebook PC User Guide |

I/O ports and slots
|
|
|
|
|
|
|
|
|
|
|
|
|
|
|
|
|
|
|
|
|
|
|
|
|
|
|
|
|
|
|
|
|
|
|
|
|
|
|
|
|
|
|
|
|
|
|
|
|
|
|
|
|
|
|
|
|
|
|
|
|
|
|
|
|
|
|
|
|
|
|
|
|
|
|
|
|
|
|
|
USB 3.1 Gen 2 port |
|
Power (DC) input port |
|||||||||||||||||||||
|
|
USB 3.1 Gen 2Type-C™/Thunderbolt 3 |
|
HDMI port |
|||||||||||||||||||||
|
|
combo port |
|
||||||||||||||||||||||
|
|
|
|
|
|
|
|
|
|
|
|
|
|
|
|||||||||||
|
|
Security slot |
|
USB 3.1 Gen 2 port with USB Charger+ |
|||||||||||||||||||||
|
|
|
|
|
|
|
|
|
|
|
|
|
|
Headphone/Headset/Microphone jack |
|||||||||||
Getting started
1.Charge your Notebook PC
A.Connect the DC power connector into your Notebook PC’s power (DC) input port.
B.Plug the AC power adapter into a 100V~240V power source.
NOTE: The power adapter may vary in appearance, depending on models and your region.
Charge the Notebook PC for 3 hours before using it in battery mode for the first time.
2.Lift to open the display panel
3.Press the power button
Notebook PC User Guide |
3 |

Maintaining your Notebook PC
Removing the bottom cover for cleaning
WARNING! Turn off your Notebook PC and disconnect all connected peripherals before removing the bottom cover. Do not turn on your Notebook PC before reattaching the bottom cover.
A.Remove the screws from the Notebook PC’s bottom cover.
B.Lift your display panel half-open and position your Notebook PC as shown below.
C.Face the bottom cover and firmly hold both sides of your Notebook PC.
4 |
Notebook PC User Guide |
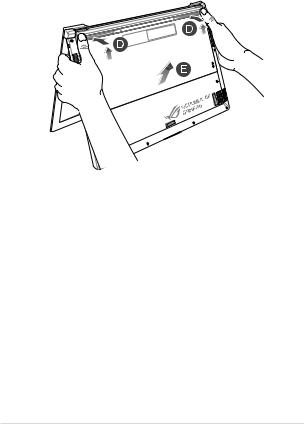
D.Use your thumbs to slightly slide the bottom cover upwards and firmly press on the top corners until the bottom part pops open.
E.Pull out the bottom cover and remove it completely from your Notebook PC.
Notebook PC User Guide |
5 |

To reattach the bottom cover:
A.Align and hook the bottom cover to your Notebook PC as shown below.
B.Adjust the bottom cover to ensure the clips are inserted in place.
C.Close your display panel.
6 |
Notebook PC User Guide |
 Loading...