

Eee Box PC
User Manual
English
Eee Box B2 Series / EB Series

English
Index
1. English .................................................................................1
2.
.................................................................................4��
日本語
2 Eee Box PC

E5019
Second Edition V2
August 2009
English
Copyright © 2009 ASUSTeK COMPUTER INC. All Rights Reserved.
No part of this manual, including the products and software described in it, may
be reproduced, transmitted, transcribed, stored in a retrieval system, or translated
into any language in any form or by any means, except documentation kept by the
purchaser for backup purposes, without the express written permission of ASUSTeK
COMPUTER, INC. (“ASUS”).
Products and corporate names mentioned in this manual may or may not be
registered trademarks or copyrights of their respective companies, and are used
for identification purposes only. All trademarks are the property of their respective
owners.
Every effort has been made to ensure that the contents of this manual are correct
and up to date. However, the manufacturer makes no guarantee regarding the
accuracy of its contents, and reserves the right to make changes without prior
notice.

English
Contents
Contents ....................................................................................................... 3
Notices ..........................................................................................................5
Safety information ..................................................................................10
Notes for this manual ............................................................................13
Welcome ....................................................................14
Package contents ....................................................................................14
Knowing your Eee Box PC ........................................15
Front view ..................................................................................................15
Rear view ....................................................................................................17
Top view .....................................................................................................19
Using the wireless antenna .................................................................20
Setting up the remote control (on selected models) ................21
Using the remote control (on selected models) ..........................22
Positioning your Eee Box PC ....................................25
Installing the stand .................................................................................25
Installing your Eee Box PC to a monitor .........................................26
Setting up your Eee Box PC ......................................27
Connecting to a display ........................................................................27
Connecting to USB devices .................................................................27
Connecting to a network device .......................................................28
Turning on the system ..........................................................................29
Using your EeeBox PC ..............................................30
Configuring wireless connection ......................................................30
Configuring wired connection ...........................................................31
Bluetooth wireless connection (on selected models) ...............35
Configuring audio output via an HDMI device ............................37
ASUS Easy Update ..................................................................................39
TotalMedia Center ..................................................................................40
Main menu ..........................................................................................40
4 Eee Box PC

Contents
Game.....................................................................................................40
Movie ....................................................................................................41
Music .....................................................................................................41
Photo ....................................................................................................42
Video .....................................................................................................42
TotalMedia Theater 3 .............................................................................43
Recovering your system ...........................................44
Using the hidden partition ..................................................................44
Boot Booster .............................................................................................45
English
Eee Box PC 5

English
Notices
Federal Communications Commission Statement
This device complies with Part 15 of the FCC Rules. Operation is
subject to the following two conditions:
• This device may not cause harmful interference, and
• This device must accept any interference received including
interference that may cause undesired operation.
This equipment has been tested and found to comply with the limits
for a Class B digital device, pursuant to Part 15 of the FCC Rules.
These limits are designed to provide reasonable protection against
harmful interference in a residential installation. This equipment
generates, uses and can radiate radio frequency energy and, if not
installed and used in accordance with manufacturer’s instructions,
may cause harmful interference to radio communications. However,
there is no guarantee that interference will not occur in a particular
installation. If this equipment does cause harmful interference to
radio or television reception, which can be determined by turning
the equipment off and on, the user is encouraged to try to correct
the interference by one or more of the following measures:
• Reorient or relocate the receiving antenna.
• Increase the separation between the equipment and receiver.
• Connect the equipment to an outlet on a circuit different from
that to which the receiver is connected.
• Consult the dealer or an experienced radio/TV technician for
help.
CAUTION: Any changes or modifications not expressly approved by
the grantee of this device could void the user’s authority to operate
the equipment.
6 Eee Box PC

RF exposure warning
This equipment must be installed and operated in accordance with
provided instructions and the antenna(s) used for this transmitter
must be installed to provide a separation distance of at least 20
cm from all persons and must not be co-located or operating in
conjunction with any other antenna or transmitter. End-users and
installers must be provide with antenna installation instructions
and transmitter operating conditions for satisfying RF exposure
compliance.
Declaration of Conformity
(R&TTE directive 1999/5/EC)
The following items were completed and are considered relevant
and sufficient:
• Essential requirements as in [Article 3]
• Protection requirements for health and safety as in [Article 3.1a]
• Testing for electric safety according to [EN 60950]
• Protection requirements for electromagnetic compatibility in
[Article 3.1b]
• Testing for electromagnetic compatibility according to [EN 301
489-1] & [EN 301 489-17]
• Effective use of the radio spectrum as in [Article 3.2]
• Radio test suites according to [EN 300 328-2]
English
CE Mark Warning
This is a Class B product, in a domestic environment, this product
may cause radio interference, in which case the user may be
required to take adequate measures.
Wireless Operation Channel for Different Domains
N. America 2.412-2.462 GHz Ch01 through CH11
Japan 2.412-2.484 GHz Ch01 through Ch14
Europe ETSI 2.412-2.472 GHz Ch01 through Ch13
Eee Box PC 7

English
France Restricted Wireless Frequency Bands
Some areas of France have a restricted frequency band. The worst
case maximum authorized power indoors are:
• 10mW for the entire 2.4 GHz band (2400 MHz–2483.5 MHz)
• 100mW for frequencies between 2446.5 MHz and 2483.5 MHz
Channels 10 through 13 inclusive operate in the band 2446.6 MHz
to 2483.5 MHz.
There are few possibilities for outdoor use: On private property or on
the private property of public persons, use is subject to a preliminary
authorization procedure by the Ministry of Defense, with maximum
authorized power of 100mW in the 2446.5–2483.5 MHz band. Use
outdoors on public property is not permitted.
In the departments listed below, for the entire 2.4 GHz band:
• Maximum authorized power indoors is 100mW
• Maximum authorized power outdoors is 10mW
Departments in which the use of the 2400–2483.5 MHz band is
permitted with an EIRP of less than 100mW indoors and less than
10mW outdoors:
01 Ain 02 Aisne 03 Allier
05 Hautes Alpes 08 Ardennes 09 Ariège
11 Aude 12 Aveyron 16 Charente
24 Dordogne 25 Doubs 26 Drôme
32 Gers 36 Indre 37 Indre et Loire
41 Loir et Cher 45 Loiret 50 Manche
55 Meuse 58 Nièvre 59 Nord
60 Oise 61 Orne 63 Puy du Dôme
64 Pyrénées Atlantique 66 Pyrénées Orientales
67 Bas Rhin 68 Haut Rhin
70 Haute Saône 71 Saône et Loire
75 Paris 82 Tarn et Garonne
84 Vaucluse 88 Vosges 89 Yonne
90 Territoire de Belfort 94 Val de Marne
8 Eee Box PC

This requirement is likely to change over time, allowing you to use
your wireless LAN card in more areas within France. Please check
with ART for the latest information (www.art-telecom.fr)
Your WLAN Card transmits less than 100mW, but more than 10mW.
Canadian Department of Communications Statement
This digital apparatus does not exceed the Class B limits for
radio noise emissions from digital apparatus set out in the
Radio Interference Regulations of the Canadian Department of
Communications.
This class B digital apparatus complies with Canadian ICES-003.
IC Radiation Exposure Statement for Canada
This equipment complies with IC radiation exposure limits set forth
for an uncontrolled environment. To maintain compliance with IC
RF exposure compliance requirements, please avoid direct contact
to the transmitting antenna during transmitting. End users must
follow the specific operating instructions for satisfying RF exposure
compliance.
English
Operation is subject to the following two conditions:
• This device may not cause interference and
• This device must accept any interference, including interference
that may cause undesired operation of the device.
Eee Box PC 9

English
Macrovision Corporation Product Notice
This product incorporates copyright protection technology that
is protected by method claims of certain U.S. patents and other
intellectual property rights owned by Macrovision Corporation and
other rights owners. Use of this copyright protection technology
must be authorized by Macrovision Corporation, and is intended
for home and other limited viewing uses only unless otherwise
authorized by Macrovision Corporation. Reverse engineering or
disassembly is prohibited.
REACH
Complying with the REACH (Registration, Evaluation, Authorization,
and Restriction of Chemicals) regulatory framework, we publish
the chemical substances in our products at ASUS REACH website at
http://green.asus.com/english/REACH.htm.
10 Eee Box PC

Safety information
Your Eee Box PC is designed and tested to meet the latest standards
of safety for information technology equipment. However, to
ensure your safety, it is important that you read the following safety
instructions.
Setting up your system
• Read and follow all instructions in the documentation before you
operate your system.
• Do not use this product near water or a heated source such as a
radiator.
• Set up the system on a stable surface with the provided stand.
Never use the system alone without the stand.
• Openings on the chassis are for ventilation. Do not block or cover
these openings. Make sure you leave plenty of space around the
system for ventilation. Never insert objects of any kind into the
ventilation openings.
• Use this product in environments with ambient temperatures
between 0˚C and 35˚C.
• If you use an extension cord, make sure that the total ampere
rating of the devices plugged into the extension cord does not
exceed its ampere rating.
English
Care during use
• Do not walk on the power cord or allow anything to rest on it.
• Do not spill water or any other liquids on your system.
• When the system is turned off, a small amount of electrical
current still flows. Always unplug all power, modem, and network
cables from the power outlets before cleaning the system.
• If you encounter the following technical problems with the
product, unplug the power cord and contact a qualified service
technician or your retailer.
• The power cord or plug is damaged.
Eee Box PC 11

English
• Liquid has been spilled into the system.
• The system does not function properly even if you follow
the operating instructions.
• The system was dropped or the cabinet is damaged.
• The system performance changes.
Lithium-Ion Battery Warning
CAUTION: Danger of explosion if battery is incorrectly
replaced. Replace only with the same or equivalent type
recommended by the manufacturer. Dispose of used batteries
according to the manufacturer’s instructions.
LASER PRODUCT WARNING
CLASS 1 LASER PRODUCT
NO DISASSEMBLY
The warranty does not apply to the products that
have been disassembled by users
12 Eee Box PC
DO NOT throw the Eee Box PC in municipal waste. This product has
been designed to enable proper reuse of parts and recycling. This
symbol of the crossed out wheeled bin indicates that the product
(electrical, electronic equipment, and mercury-containing button
cell battery) should not be placed in municipal waste. Check local
technical support services for product recycling.
DO NOT throw the battery in municipal waste. This symbol of the
crossed out wheeled bin indicates that the battery should not be
placed in municipal waste. Check local technical support services
for battery replacement.

European Union Eco-label
This Eee Box PC has been awarded the EU Flower label, which means
that this product has the following characteristics:
1. Decreased energy consumption during use and stand-by
modes.
2. Limited use of toxic heavy metals.
3. Limited use of substances harmful to the environment and
health.
4. Reduction of the use of natural resources by encouraging
recycling.
5. Extended product lifetime through the availability of spare
parts.
6. Reduced solid waste through takeback policy.
For more information on the EU Flower label, please visit the
European Union Eco-label website at http://europa.eu.int/ecolabel.
Takeback and Recycling
Old computers, notebook computers, and other electronic equipment
contain hazardous chemicals that are harmful to the environment
when disposed in a landfill with trash. By recycling the metals, plastics,
and components found in an old computer will be broken down and
reused to make new products. And, the environment is protected from
any uncontrolled release of harmful chemicals.
English
ASUS works with recycling vendors with the highest standards for
protecting our environment, ensuring worker safety, and complying
with global environmental laws. Our commitment to recycling our
old equipment grows out of our work to protect the environment in
many ways.
For further information about ASUS product recycling and contacts,
please visit GreenASUS Takeback and Recycling page (http://green.
asus.com/english/takeback.htm)
Eee Box PC 13
English
Notes for this manual
To make sure that you perform certain tasks properly, take note of
the following symbols used throughout this manual.
WARNING: Vital information that you MUST follow to prevent
injury to yourself.
IMPORTANT: Instructions that you MUST follow to complete a
task.
TIP: Tips and useful information that help you complete a task.
NOTE: Additional information for special situations.
14 Eee Box PC
Welcome
Quick Start Guide
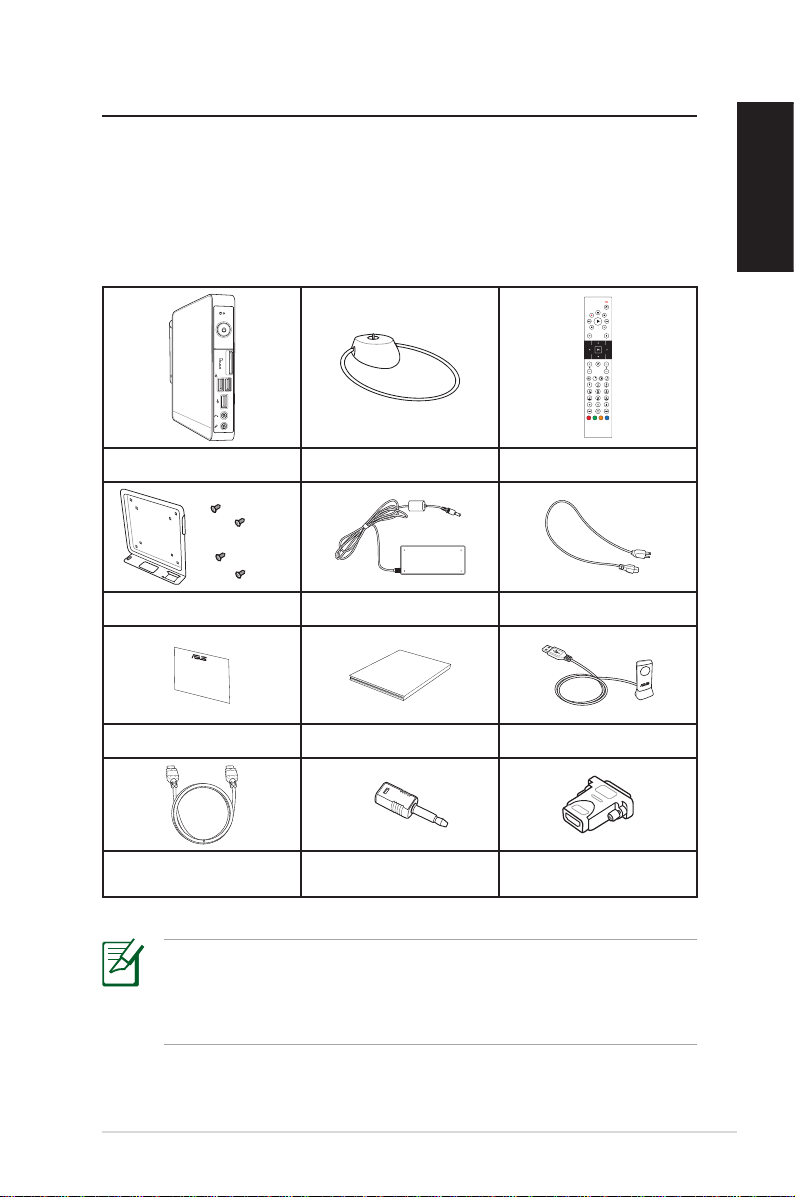
Congratulations on your purchase of the Eee Box PC. The following
illustration displays the package contents of your new Eee Box PC. If
any of the below items is damaged or missing, contact your retailer.
Package contents
Eee Box PC Stand Remote control (optional)
VESA mount and Screw pack AC adapter Power cord
English
Warranty card Quick start guide IR receiver (optional)
HDMI cable (optional)
Mini jack to S/PDIF
adapter (optional)
HDMI-DVI adapter
(optional)
If the device or its components fail or malfunction during normal
and proper use within the warranty period, bring the warranty
card to the ASUS Service Center for replacement of the defective
components.
Eee Box PC 15
Knowing your Eee Box PC
English
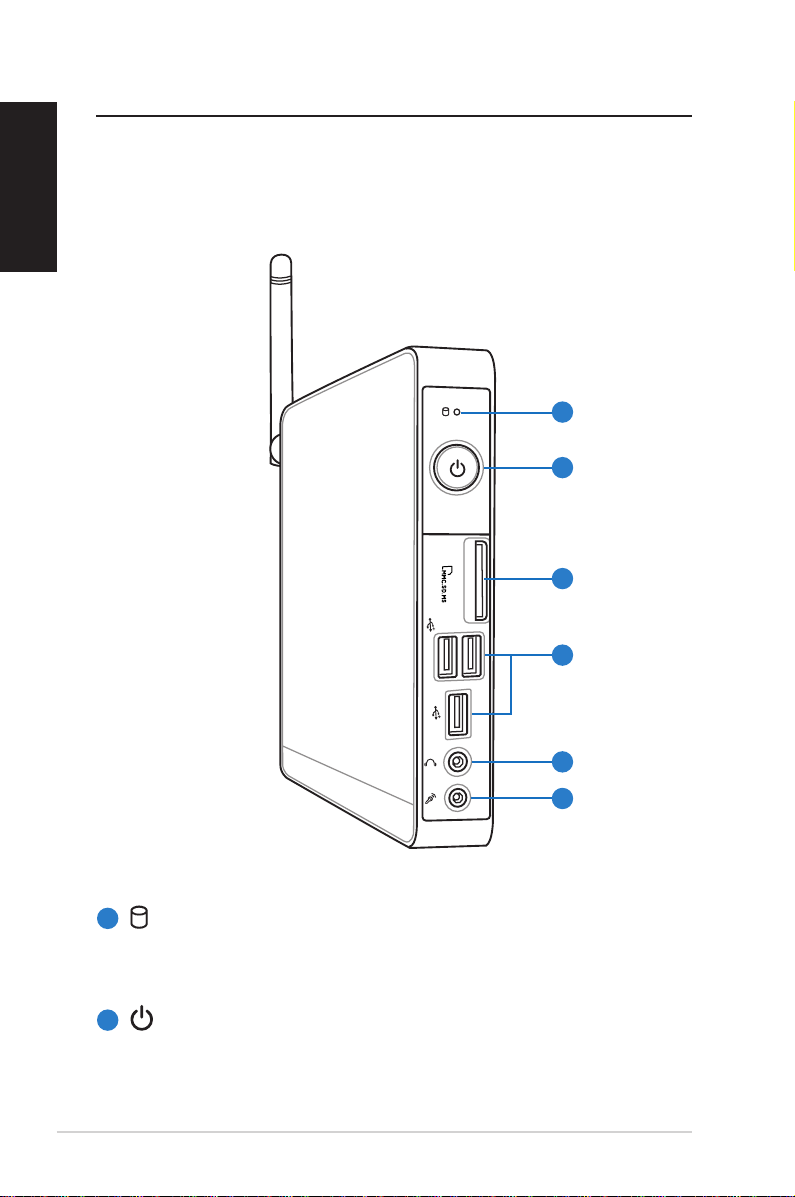
Front view
Refer to the diagram below to identify the components on this side
of the system.
1
2
3
4
1
Hard disk LED
The hard disk LED blinks when data is being written into or
2
Power switch
The power switch allows powering ON and OFF the system.
16 Eee Box PC
5
6
read from the hard disk drive.
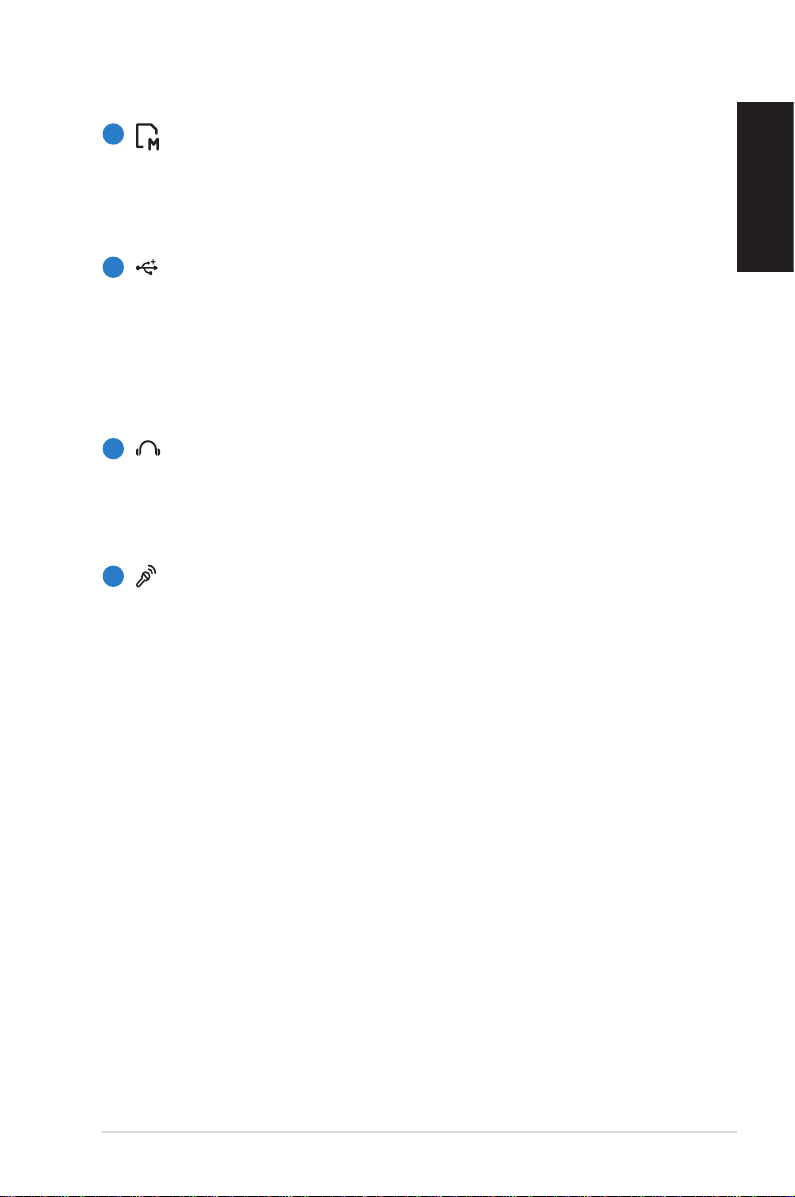
3
Memory card slot
The built-in memory card reader reads MMC/SD/SDHC/
MS/MS Pro cards used in devices like digital cameras, MP3
players, mobile phones, and PDAs.
4
USB port
The USB (Universal Serial Bus) port is compatible with
USB devices such as keyboards, mouse devices, cameras,
and hard disk drives. USB allows many devices to run
simultaneously on a single computer, with some peripheral
acting as additional plug-in sites or hubs.
5
Headphone/Audio Out jack
The stereo headphone jack (3.5mm) is used to connect
the system’s audio out signal to amplified speakers or
headphones.
6
Microphone jack
The microphone jack is designed to connect the
microphone used for video conferencing, voice narrations,
or simple audio recordings.
English
Eee Box PC 17
English
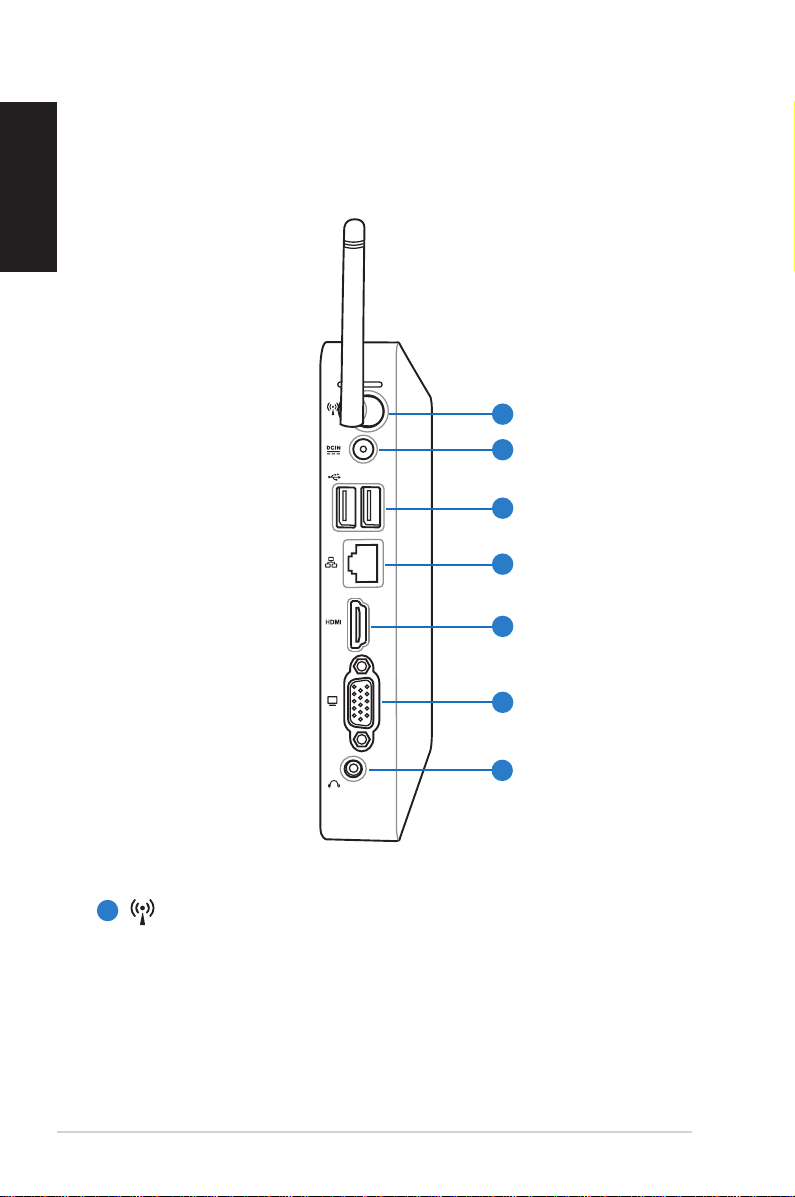
Rear view
Refer to the diagram below to identify the components on this side
of the system.
1
2
3
4
5
1
Wireless antenna jack
The jack is used to connect the supplied wireless antenna to
18 Eee Box PC
6
7
enhance wireless signal reception.
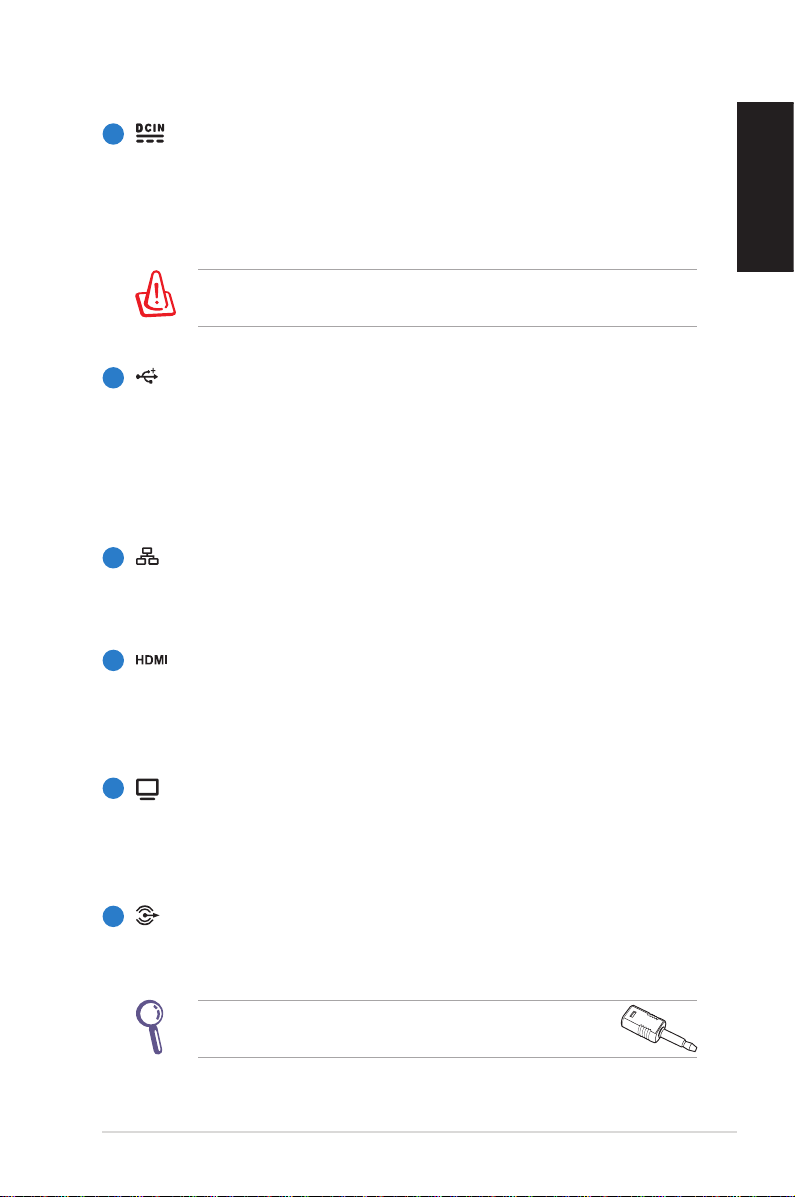
2
Power input (DC 19V)
The supplied power adapter converts AC power to DC
power for use with this jack. Power supplied through this
jack supplies power to the PC. To prevent damage to the PC,
always use the supplied power adapter.
The power adapter may become warm to hot when in use. Do
not cover the adapter and keep it away from your body.
3
USB port
The USB (Universal Serial Bus) port is compatible with
USB devices such as keyboards, mouse devices, cameras,
and hard disk drives. USB allows many devices to run
simultaneously on a single computer, with some peripheral
acting as additional plug-in sites or hubs.
4
LAN port
The eight-pin RJ-45 LAN port supports a standard Ethernet
cable for connection to a local network.
5
HDMI port
The HDMI (High Definition Multimedia Interface) port
supports a Full-HD device such as an LCD TV or monitor to
allow viewing on a larger external display.
English
6
Display (Monitor) Output
The 15-pin D-sub monitor port supports a standard
VGA-compatible device such as a monitor or projector to
allow viewing on a larger external display.
7
Audio Out (S/PDIF Out) jack
Plug an 3.5mm mini-jack audio cable into this jack for
analog or digital audio transfer.
For S/PDIF Out function, use the optional mini jack
to S/PDIF adapter to connect to your amplifier.
Eee Box PC 19
English
E-SATA
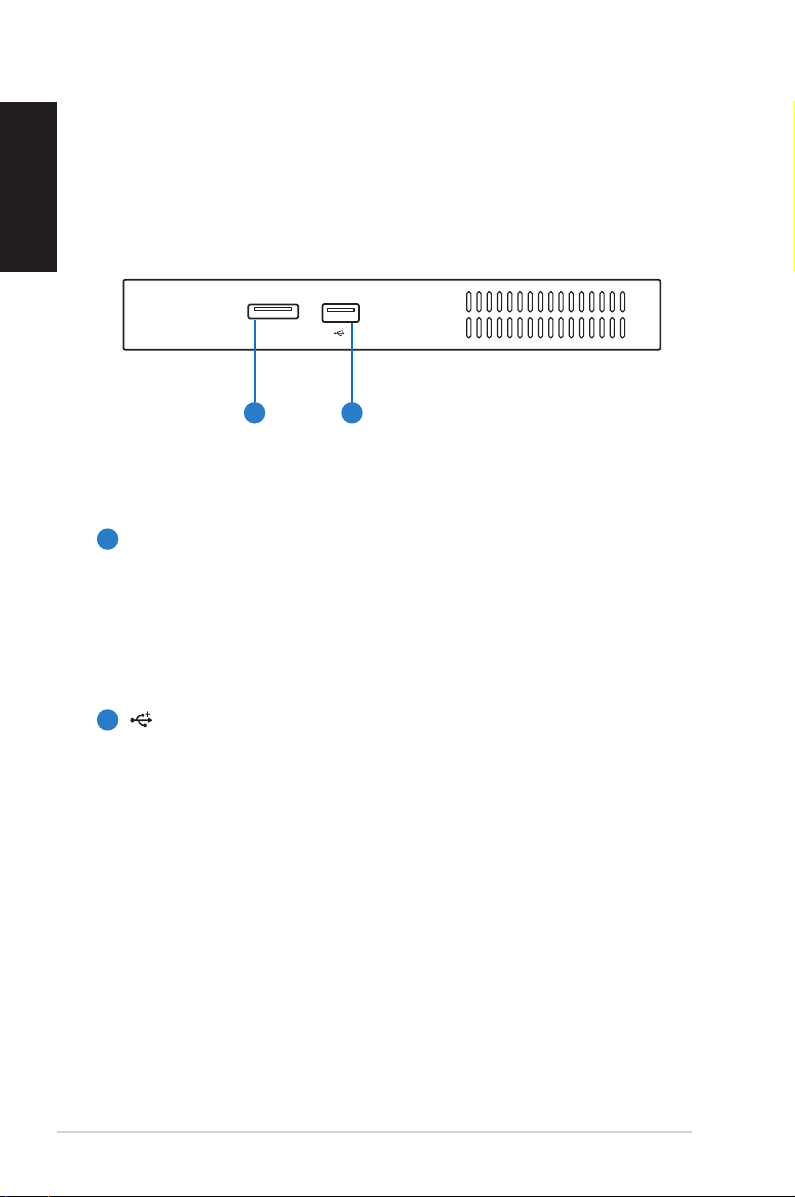
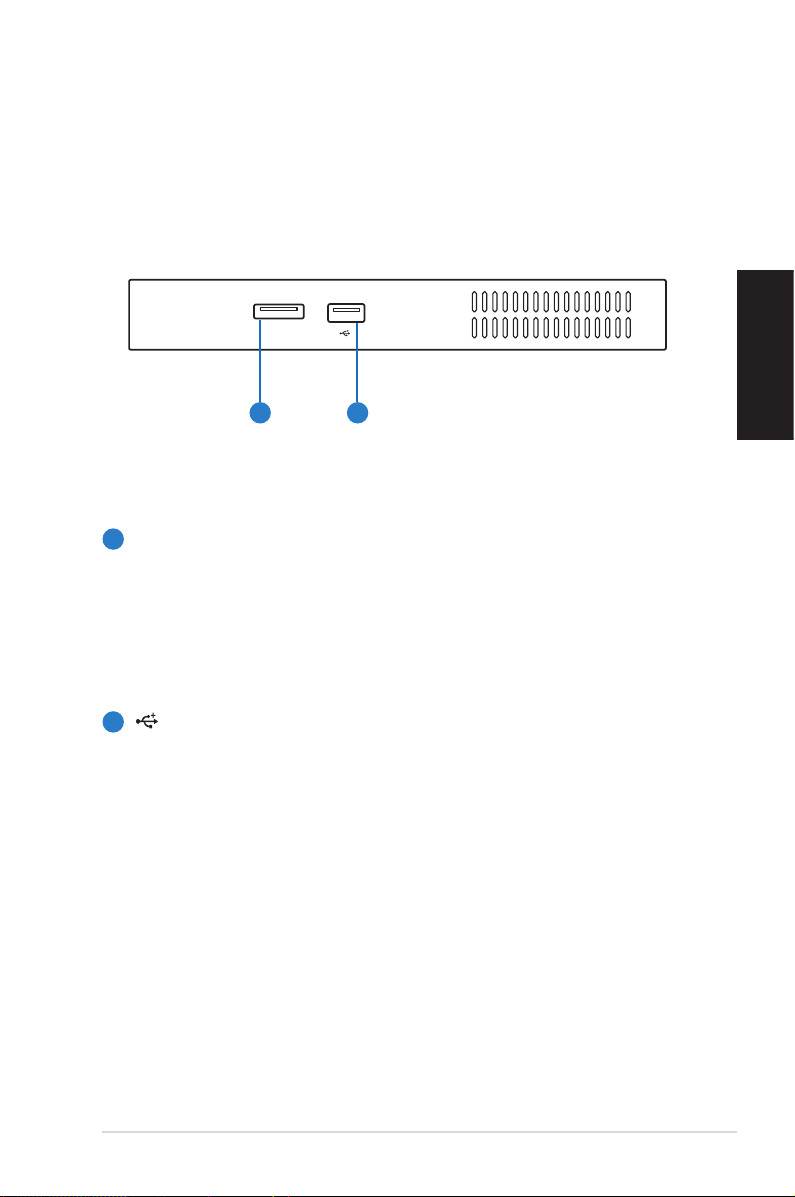
Top view
Refer to the diagram below to identify the components on this side
of the system.
1 2
E-SATA
1
e-SATA Port
External SATA or eSATA allows external connection of
Serial-ATA devices originally designed for use inside the
computer. It is up to six times faster than existing USB 2.0, &
1394 for external storage solutions and is also hot pluggable
using shielded cables and connectors up to two meters.
2
USB port
The USB (Universal Serial Bus) port is compatible with
20 Eee Box PC
USB devices such as keyboards, mouse devices, cameras,
and hard disk drives. USB allows many devices to run
simultaneously on a single computer, with some peripheral
acting as additional plug-in sites or hubs.
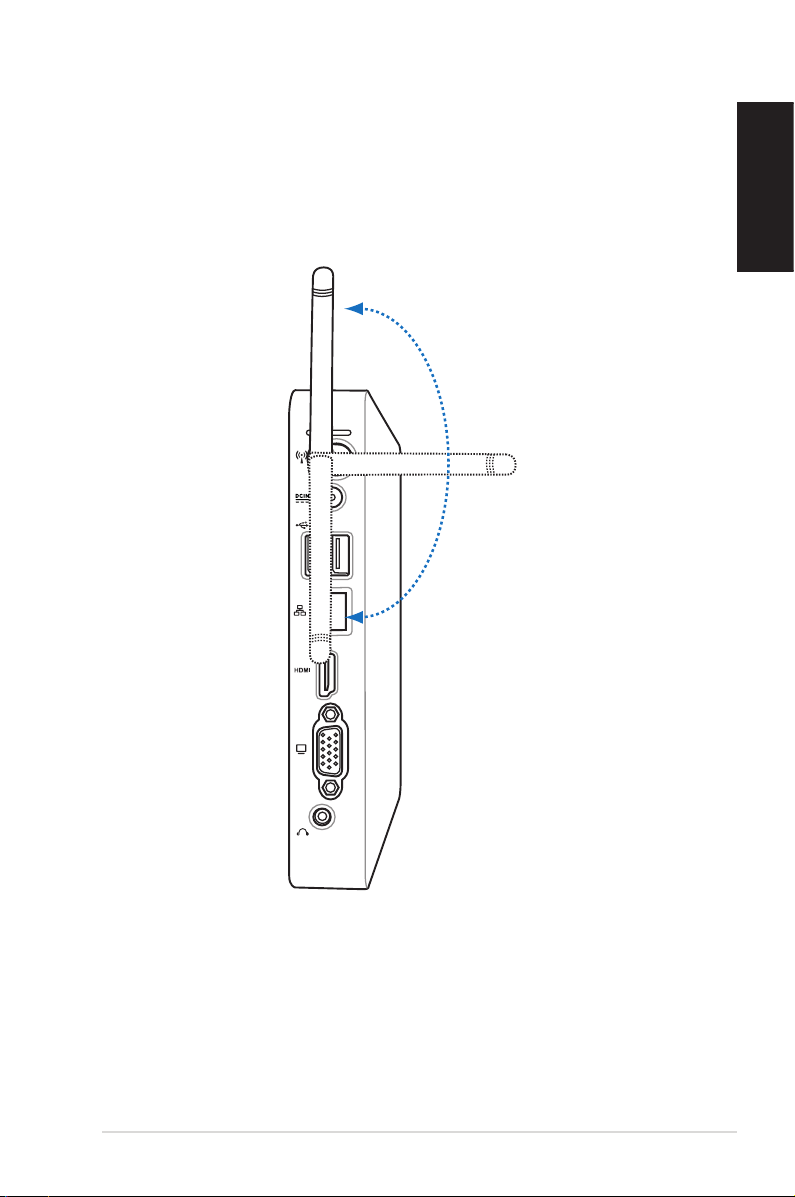
Using the wireless antenna
The wireless antenna is connected to your Eee Box PC for enhancing
wireless signal reception. Do not rotate the wireless antenna to the
180°–270° angle for preventing damage.
English
Eee Box PC 21
English
Setting up the remote control (on selected models)
1. Plug the IR receiver into any of the USB ports on your Eee Box
PC.
2. Place the IR receiver on a stable surface.
3. Aim the remote control at the receiver when using the remote.
22 Eee Box PC

Using the remote control (on selected models)
Use the remote control the TotalMedia Center to play media files.
Refer to the next page to familiarize yourself with the functions of
the remote control buttons.
1
2
3
26
25
24
4
5
6
7
English
23
22
21
20
19
18
17
16
15
8
9
10
11
12
13
14
Eee Box PC 23
English
1
LED indicator: Lights up red when you press a button.
2
Power: Press to toggle between on and standby mode.
3
Pause: Press to pause a playback.
4
Stop: Press to stop playing a media file.
5
Play: Press to play a media file.
6
Fast-foward: Press to fast-forward a media file.
7
Next track: Press to go to the next track.
8
Information: Press to display program information or other
menu options.
9
OK: Press to confirm an action.
10
Channel up/down: Press to change TV channels.*
11
Video: This button is available on certain applications only.
12
Music: This button is available on certain applications only.
13
Enter: Press to confirm a selection.
14
Color buttons: The buttons are available on certain applications
only.
15
Teletext on/off: Press to turn on/off Teletext mode. (This
function is available in certain areas only.)
16
Clear: Press to clear input information.
17
Numeric buttons: Press to enter numbers or select a channel.*
18
Eee: This button is available on certain applications only.
19
Photos: This button is available on certain applications only.
20
Volume up/down: Press to increase/decrease volume.
21
Mute: Press to disable audio output.
22
Four-way navigation buttons: Press to scroll through menu
options.
23
Return: Press to return to the previous page.
24 Eee Box PC

24
Previous track: Press to go back to the previous track.
25
Rewind: Press to rewind a media file.
26
Record: Press to start recording TV.*
*The TV function is available in certain areas only.
English
Eee Box PC 25
E-SATA
Positioning your Eee Box PC
English
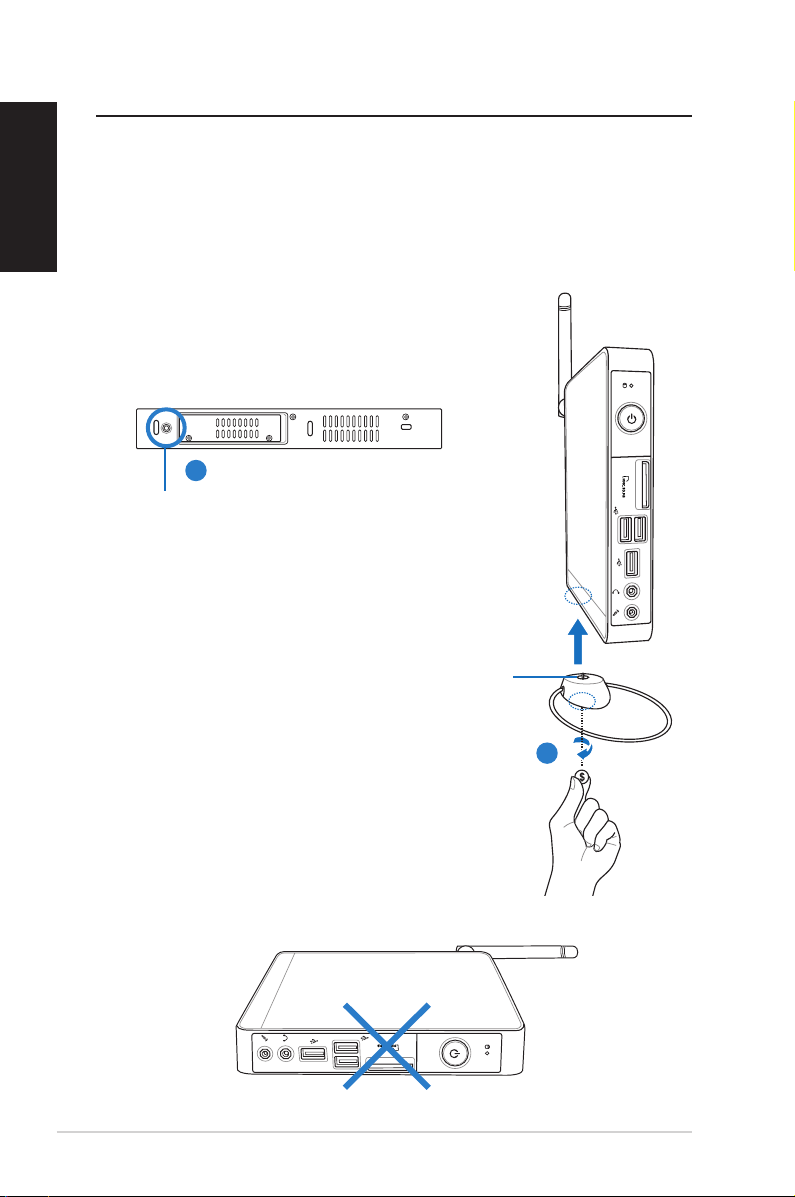
Installing the stand
Erect your Eee Box PC with the supplied stand. To do so:
1. Locate the screw hole on the bottom of the Eee Box PC.
2. Align the stand screw to the PC screw hole, and then secure the
stand to the PC with a coin.
Eee Box PC bottom view
1
Screw hole
Stand screw
2
Do not place your Eee Box PC on the desktop without the stand.
26 Eee Box PC
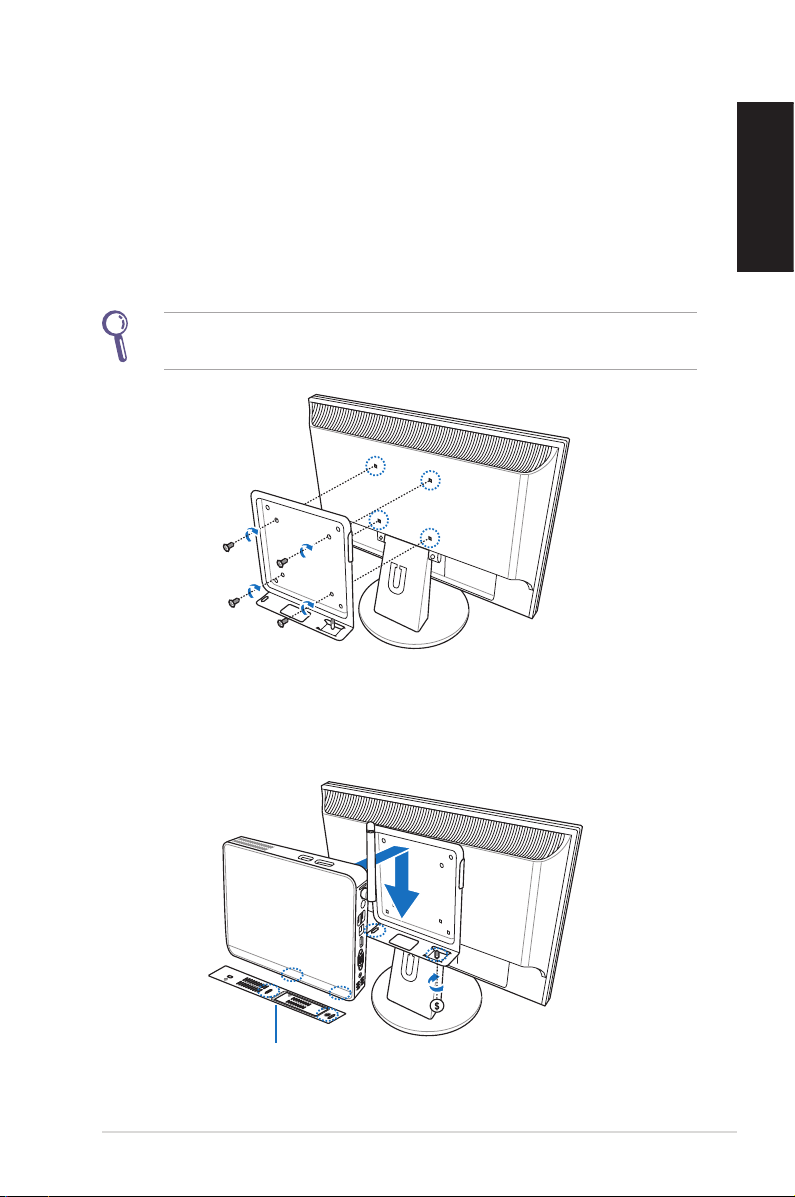
Installing your Eee Box PC to a monitor
You can also install your Eee Box PC to the back of a monitor. To do
so:
1. Secure the VESA mount to your monitor with four screws (HNM/
M4 x 8).
To fasten the VESA mount, your monitor must comply with VESA75
or VESA100 standard.
English
2. Place your Eee Box PC on the VESA mount noting the correct
alignment, and then secure the PC to the VESA mount with a
coin.
Eee Box PC bottom view
Eee Box PC 27
Setting up your Eee Box PC
English
You need to connect peripherals before using your Eee Box PC.
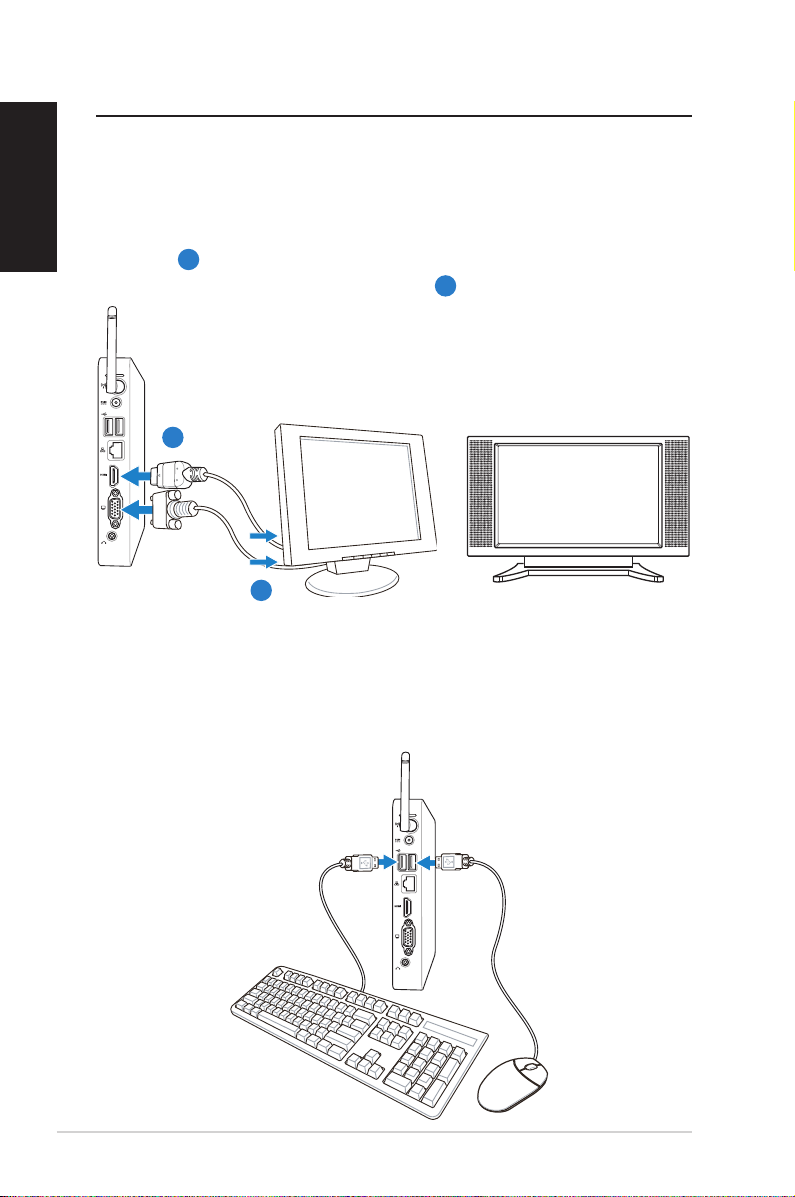
Connecting to a display
Connect one end of the HDMI/VGA cable to an LCD TV or an LCD
monitor (1) and the other end to the HDMI/Display (Monitor)
Output port on the system rear panel (2).
LCD monitor LCD TV
2
–or–
–or–
1
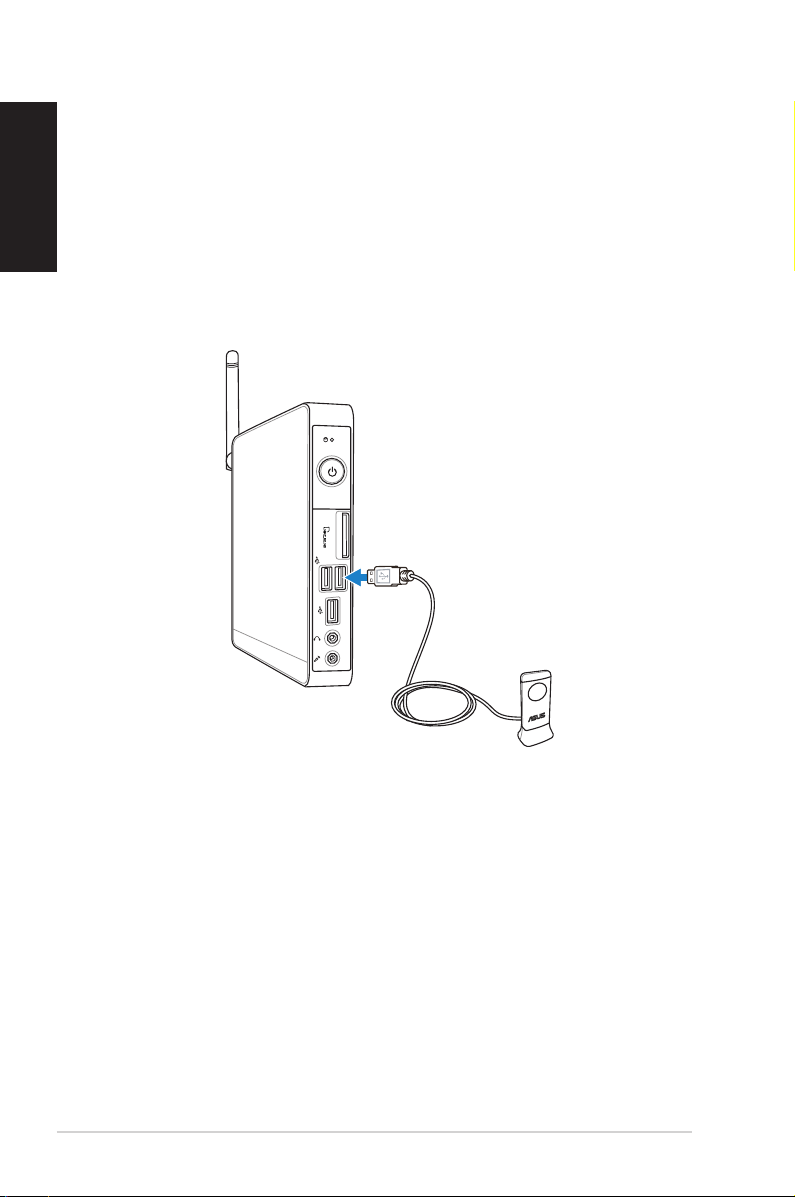
Connecting to USB devices
Connect USB devices like wired/wireless keyboards (varying with
areas), mouse devices, and printers to the USB ports on the system
rear panel.
28 Eee Box PC
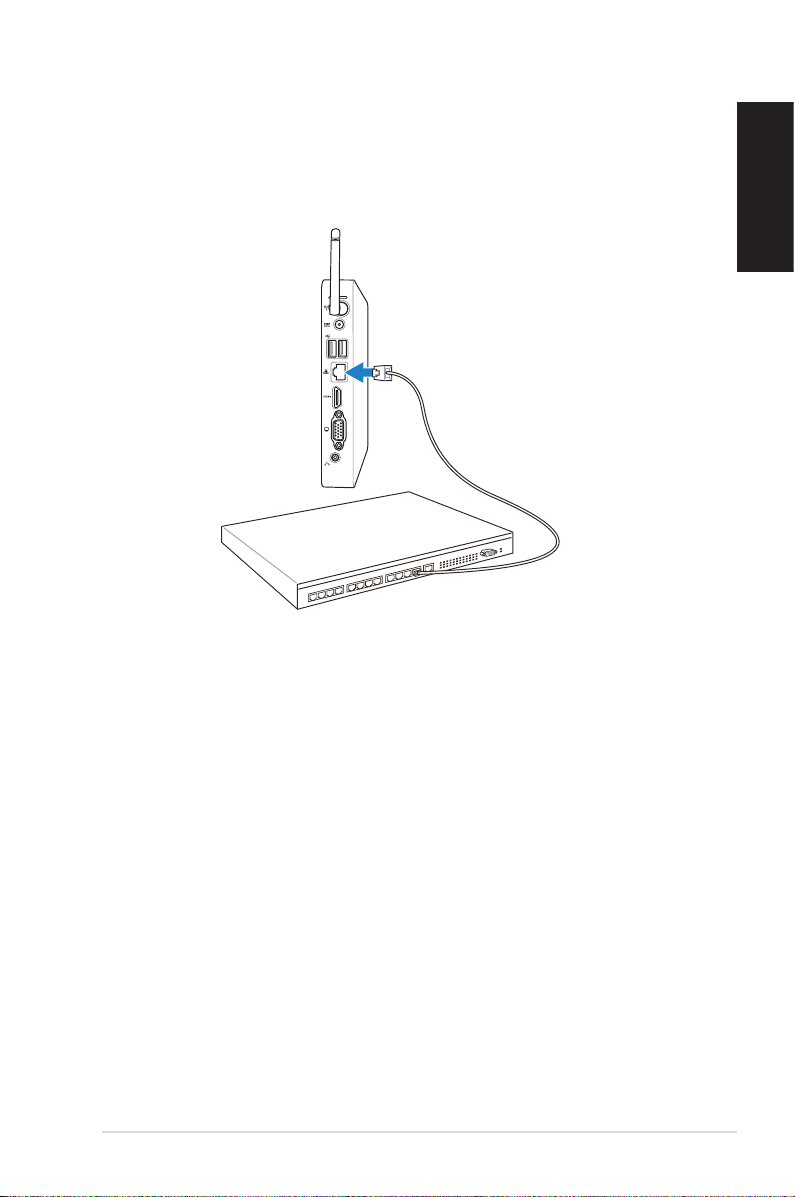
Connecting to a network device
Connect one end of a network cable to the LAN port on the system
rear panel and the other end to a hub or switch.
Network cable with RJ-45 connectors
Network hub or switch
English
Eee Box PC 29

English
Turning on the system
Connect the supplied AC adapter to the DC IN jack on the system
rear panel, and then press the power switch on the front panel to
turn on the system.
3
4
2
1
30 Eee Box PC
• When your Eee Box PC is not in use, unplug the power adapter
or switch off the AC outlet to save on power consumption.
• Adjust the power management settings in the Window®
Control Panel. This is to ensure that your Eee Box PC is set to a
low power consumption mode and is fully operational at the
same time.
To enter the BIOS setup, press <F2> repeatedly during bootup.

Using your EeeBox PC
All screenshots in this section are for reference only. Actual screen
images may vary with operating systems. Visit the ASUS website at
www.asus.com for the latest information.
Conguring wireless connection
To connect to a wireless network, follow the instructions below:
For security concerns, DO NOT connect to an unsecured network.
Otherwise, the transmitted information without encryption might
be visible to others.
1. Click the wireless network icon with an orange star in the
Windows® Notification area.
2. Select the wireless access point you
want to connect to from the list and click
Connect to build the connection.
If you cannot find the desired access
point, click the Refresh icon on the
upper right corner to refresh and search
in the list again.
English
3. When connecting, you may have to enter a password.
4. After a connection has been established, the connection is
shown on the list.
5. You can see the wireless network icon in the Notification
area.
Eee Box PC 31
English
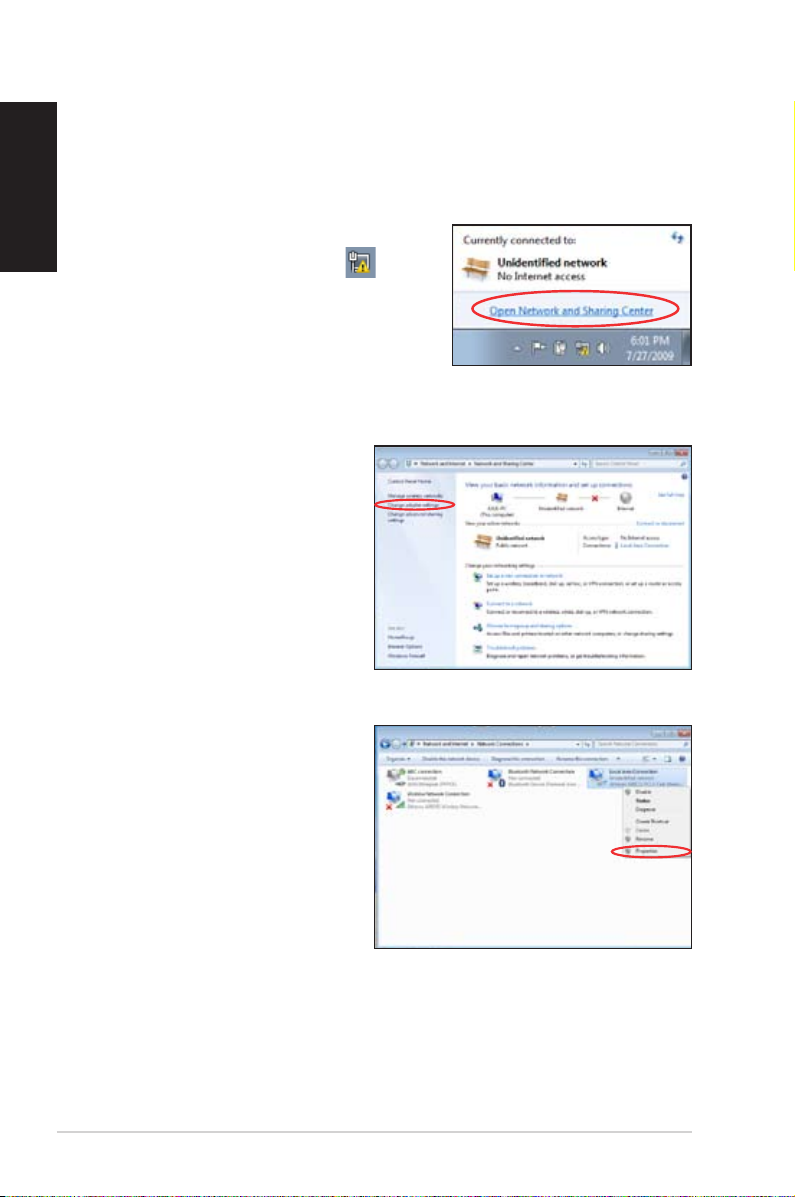
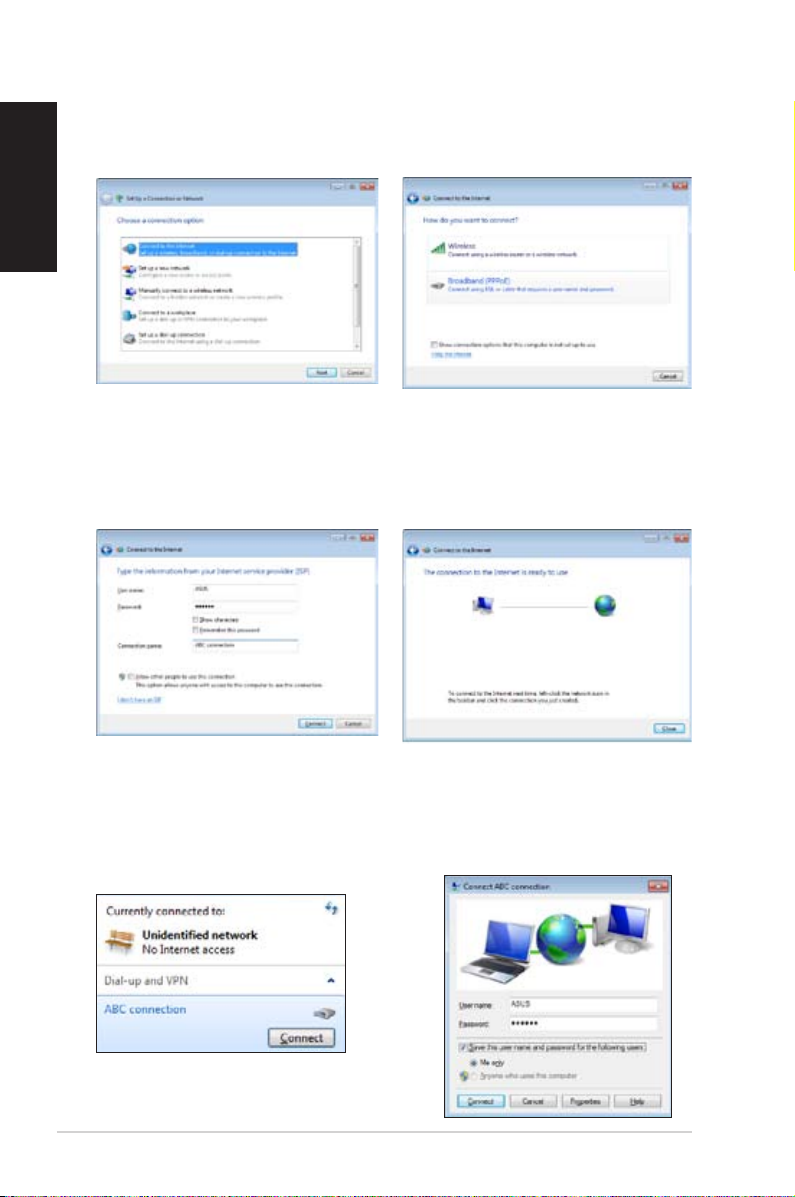
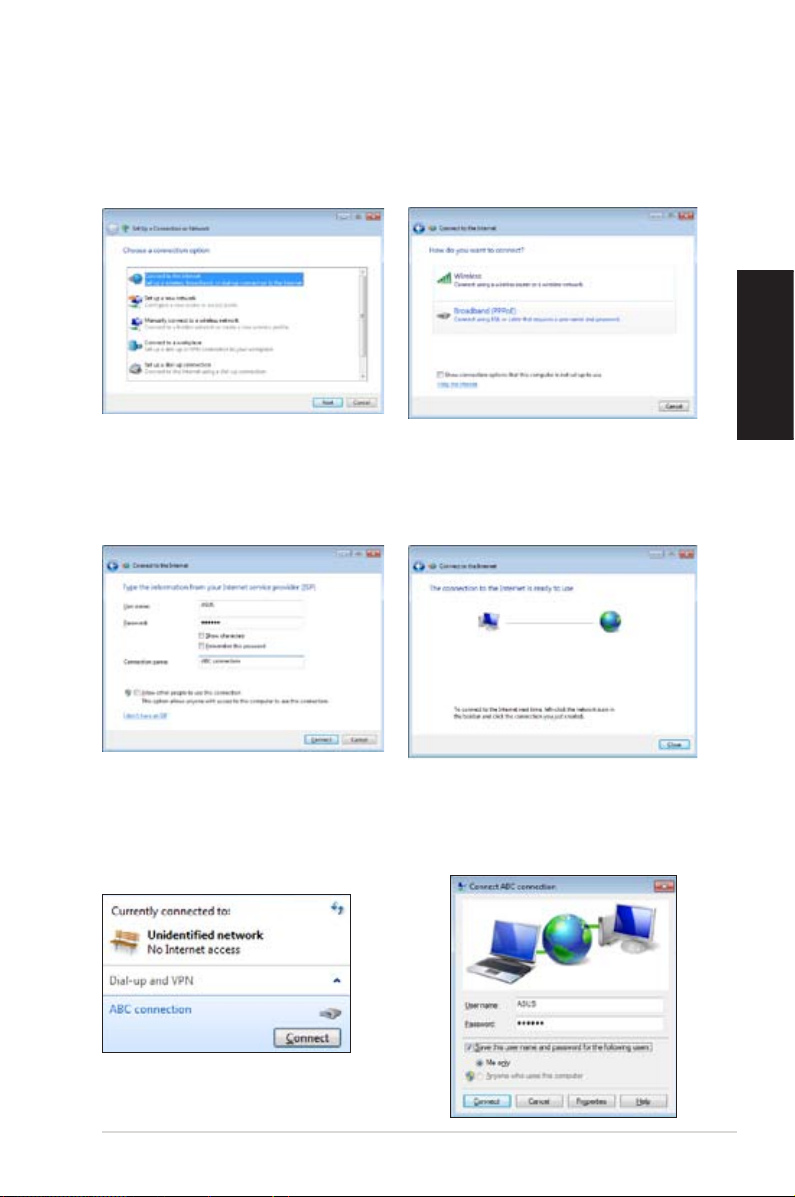
Conguring wired connection
To establish a wired network, follow the instructions below:
Using a dynamic IP / PPPoE network connection:
1. Click the network icon with a
yellow warning triangle in the
Windows® Notification area and
select Open Network and Sharing
Center.
2. Click Change adapter
settings in the left blue
pane.
3. Right-click Local Area
Connection and select
Properties.
32 Eee Box PC

4. Click Internet Protocol
Version 4(TCP/IPv4) and
click Properties.
5. Click Obtain an IP address
automatically and click
OK.
(Continue the following steps if using PPPoE)
6. Return to the Network
and Sharing Center and
then click Set up a new
connection or network.
English
Eee Box PC 33
English
7. Select Connect to the
Internet and click Next.
8. Select Broadband (PPPoE)
and click Next.
9. Enter your User name and,
Password, and Connection
name. Click Connect.
11. Click the network icon
in the taskbar and click
the connection you just
created.
10. Click Close to finish the
configuration.
12. Enter your user name and
password. Click Connect to
connect to the Internet.
34 Eee Box PC

Using a static IP:
1. Repeat the step 1–4 of Using a
dynamic IP to start the static IP
network configuration.
2 Click Use the following IP
address.
3. Enter the IP address, Subnet
mask and Gateway from your
service provider.
4. If needed, enter the preferred
DNS Server address and
alternative address.
5. After entering all the related values, click OK to build the
network connection.
English
Eee Box PC 35

English
Bluetooth wireless connection (on selected models)
Follow the instructions below to build Bluetooth wireless connection.
1. From Control Panel, go to
Network and Internet
> Network and Sharing
Center and then click
Change adapter settings
in the left blue pane.
2. Right-click Bluetooth
Network Connection
and select View
Bluetooth Network
Devices.
3. Click Add a device to look
for new devices.
36 Eee Box PC

4. Select a Bluetooth-enabled
device from the list and click
Next.
5. Enter the Bluetooth security
code into your device and
start pairing.
6. The paired relationship
is successfully built. Click
Close to finish the setting.
English
Eee Box PC 37

English
Conguring audio output via an HDMI
device
If you use your TV with an HDMI connector as an audio output
device, connect it to the Home Theater PC and follow the steps
below to configure audio settings:
1. Right-click the Volume
Mixer icon on the Windows®
notification area and click
Playback devices.
2. Under the Playback
window, select Digital
Audio (HDMI) and click Set
Default.
3. Click Configure and the
Speaker Setup window
pops up.
4. Select Stereo and click
Next.
38 Eee Box PC

5. Check the Front left and
right box, and then click
Next.
6. Click Finish to exit the
speaker setup.
English
Eee Box PC 39

English
ASUS Easy Update
ASUS Easy Update is a software tool that automatically detects and
downloads the latest BIOS, drivers, and applications for your
EeeBox PC.
1. From the Windows® notification
area, right-click the ASUS Easy
Update icon.
2. Select Schedule to set how
often you want to update
your system.
3. Select Update to activate
the update.
4. Click OK to display the
items you can download.
5. Check the item(s) you want
to download, and then click
OK.
40 Eee Box PC

TotalMedia Center
TotalMedia Center is a complete multimedia center that enhances
the enjoyment of your music, photos, videos, and movies.
To launch the program, click the TotalMedia Center icon on the desktop.
TotalMedia Center is only available on selected models.
Main menu
The main menu contains five functions including Game, Movie,
Music, Photo, and Video. Click any of the icons to open the function
you want to use.
English
Game
The Game function offers you several games.
Eee Box PC 41

English
Movie
The Movie function allows you to play DVDs.
The built-in optical disk drive and the supported format may vary
with models.
Music
The Music function allows you to listen to music files or audio CDs
with visualizations and create playlists for your favorite songs.
42 Eee Box PC

Photo
The Photo function lets you view your photos in a slideshow or
apply minor fixes to your photos.
Video
The Video function allows you to play your video files.
English
Eee Box PC 43
English
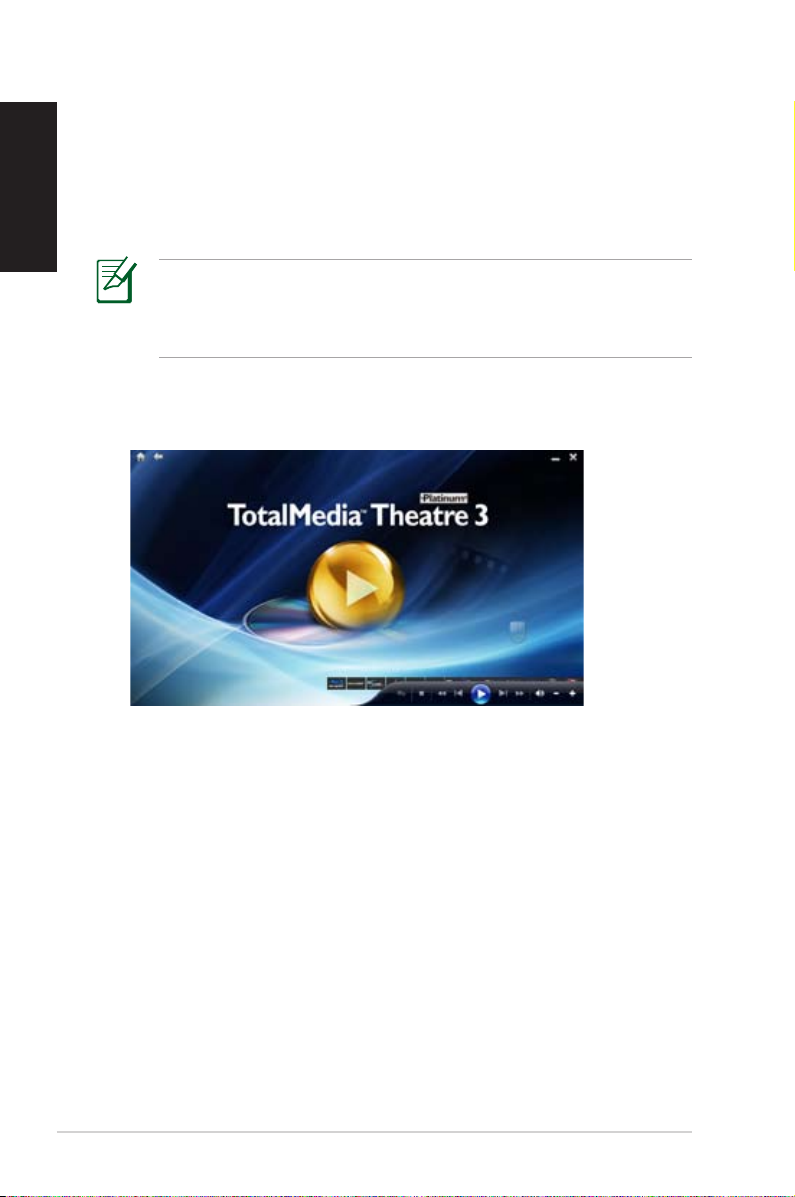
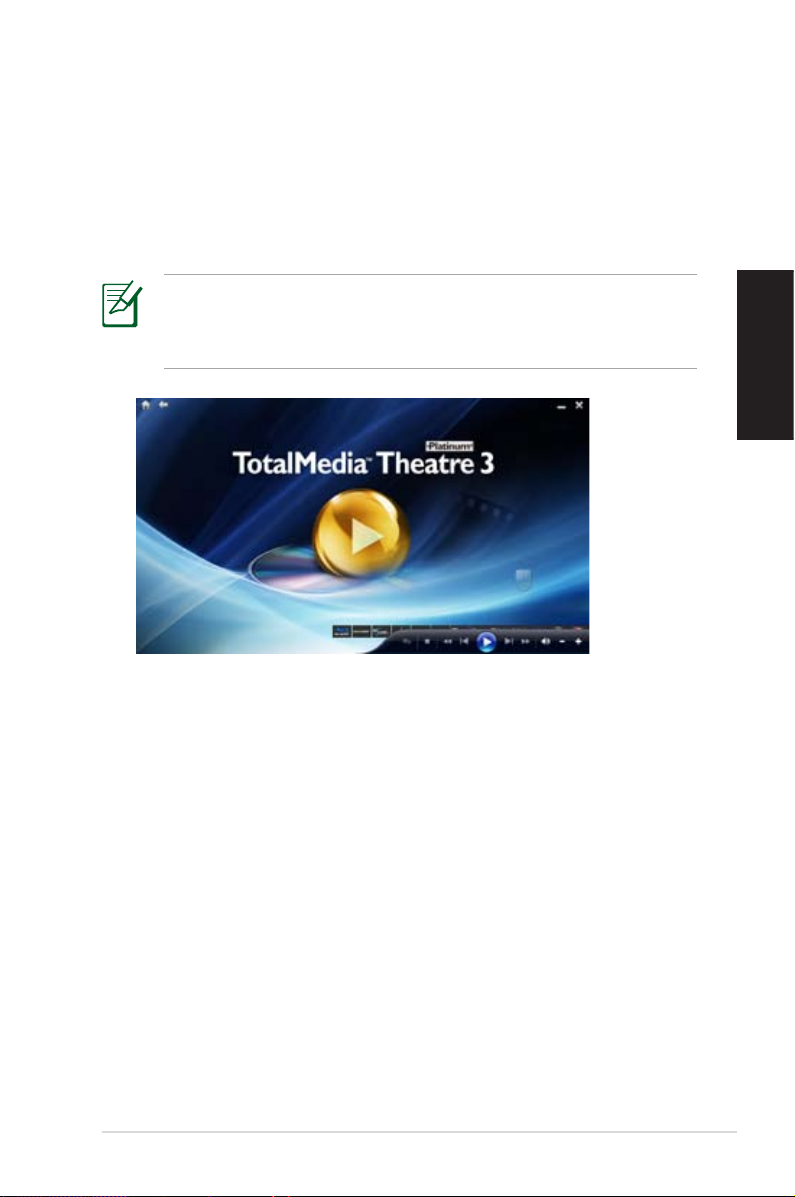
TotalMedia Theater 3
TotalMedia Theater 3 allows you to play DVDs. When you insert
a DVD into the optical drive, it will begin to play automatically.
TotalMedia Theater 3 also supports Youtube DXVA, WMV HD DXVA,
MCE plug-in, and playback of video files.
• TotalMedia Theater 3 is only available on selected models.
• The built-in optical disk drive and the supported format may
vary with models.
44 Eee Box PC
Recovering your system
Using the hidden partition
The recovery partition includes an image of the operating system,
drivers, and utilities installed on your system at the factory. The
recovery partition provides a comprehensive recovery solution that
quickly restores your system’s software to its original working state,
provided that your hard disk drive is in good working order. Before
using the recovery partition, copy your data files (such as Outlook
PST files) to a USB device or to a network drive and make note of any
customized configuration settings (such as network settings).
DO NOT delete the partition named “RECOVERY.” The recovery
partition is created at the factory and cannot be restored by the
user if deleted. Take your system to an authorized ASUS service
center if you have problems with the recovery process.
Disable Boot Booster in BIOS setup before your perform system
recovery from the hidden partition. Refer to the Boot Booster
section for details.
1. Press <F9> during bootup (requires a recovery partition).
2. The ASUS Recovery System window appears. Select Recover
system to a partition.
3. Select a partition with min. 20GB space and click Next.
4. Follow the on-screen instructions to complete the recovery
process.
5. Restart the computer after the system recovery is completed.
6. Set up your language, time zone, keyboard, computer name, and
user name to enter the Windows® OS.
English
Eee Box PC 45
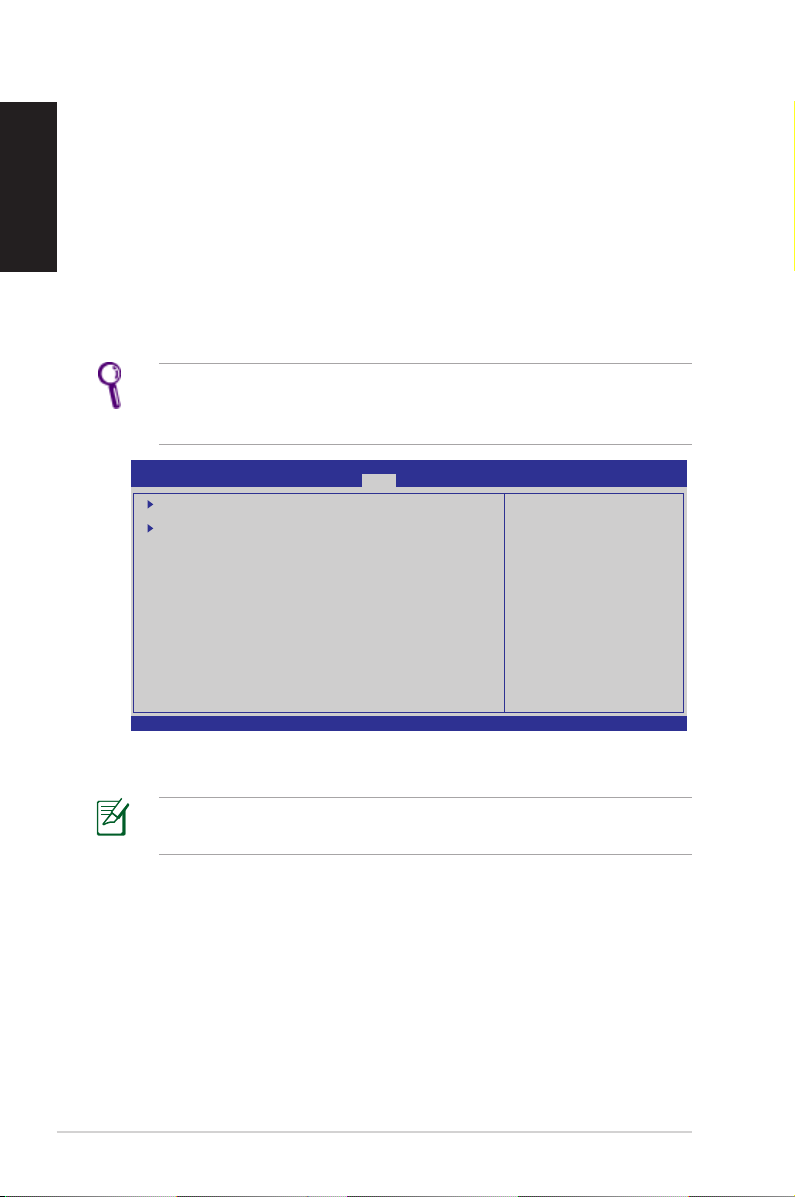
Boot Booster
English
The Boot Booster item in BIOS setup helps shorten your EeeBox PC
bootup time. However, you MUST disable this BIOS item before you
change any EeeBox PC components or perform system recovery
(from hidden partition). Follow the instructions below to disable
Boot Booster:
1. Start the system and press <F2> on bootup to show the POST
screen. Press <F2> again to enter the BIOS setup.
2. Set Boot Booster to [Disabled]
If you fail to see the POST screen or enter the BIOS setup by doing
the instruction above, restart the system and try pressing <F2>
repeatedly on bootup.
Main Advanced Security Boot Exit
Boot Device Priority
BootSettingsConguration
OnBoard LAN Boot ROM [Enabled]
Boot Booster [Disabled]
v02.58 (C)Copyright 1985-2009, American Megatrends, Inc.
BIOS SETUP UTILITY
SpeciestheBoot
Device Priority
sequence.
Avirtualoppydisk
drive (Floppy Drive
B: ) may appear when
you set the CD-ROM
driveastherst
boot device.
Select Screen
←→
Select Item
↑↓
Enter Go to Sub Screen
F1 General Help
F10 Save and Exit
ESC Exit
3. Press <F10> to save the configuration and restart EeeBox PC.
Remember to enable Boot Booster after you complete hardware
change or system recovery.
46 Eee Box PC

ASUS contact information
ASUSTeK COMPUTER INC.
Address 15 Li-Te Road, Peitou, Taipei, Taiwan 11259
Telephone +886-2-2894-3447
Fax +886-2-2890-7798
E-mail info@asus.com.tw
Web site www.asus.com.tw
Technical Support
Telephone +86-21-38429911
Online support support.asus.com
ASUS COMPUTER INTERNATIONAL (America)
Address 800 Corporate Way, Fremont, CA 94539, USA
Telephone +1-510-739-3777
Fax +1-510-608-4555
Web site usa.asus.com
Technical Support
Telephone +1-812-282-2787
Support fax +1-812-284-0883
Online support support.asus.com
ASUS COMPUTER GmbH (Germany and Austria)
Address Harkort Str. 21-23, D-40880 Ratingen, Germany
Fax +49-2102-959911
Web site www.asus.de
Online contact www.asus.de/sales
English
Technical Support
Component Telephone +49-1805-010923
System/Notebook/Eee/ +49-1805-010920
LCD Telephone
Support Fax +49-2102-9599-11
Online support support.asus.com
Eee Box PC 47
日
本
語
EeeBox PC
ユーザーマニュアル
EeeBox B2 Series / EB Series

J5019
第2版 V2
2009年9月
日
本
語
Copyright © 2009 ASUSTeK COMPUTER INC. All Rights Reserved.
バックアップの目的で利用する場合を除き、本書に記載されているハードウェア・
ソフトウェアを含む、全ての内容は、ASUSTeK Computer Inc. (ASUS)の文書によ
る許可なく、編集、転載、引用、放送、複写、検索システムへの登録、他言語への翻
訳などを行うことはできません。
本マニュアルに記載の製品名及び企業名は、登録商標や著作物として登録されて
いる場合がありますが、本書では、識別、説明、及びユーザーの便宜を図るために
使用しており、これらの権利を侵害する意図はありません。
本マニュアルの記載内容には万全を期しておりますが、その内容を完全に保証す
るものではなく、記載内容は予告なしに変更することがあります。

日
本
語
もくじ
もくじ .....................................................................................................50
ご注意 ...................................................................................................52
安全上のご注意 ................................................................................57
このマニュアルについて ................................................................60
ようこそ ...................................................................61
パッケージの内容 .............................................................................61
EeeBox PCの概要 ...................................................62
前面 ......................................................................................................62
背面 ......................................................................................................64
トップ.....................................................................................................66
無線アンテナを使用する ................................................................67
リモコンをセットアップする(特定モデルのみ) ......................68
リモコンを使用する(特定モデルのみ) .....................................69
EeeBox PCを設置する ............................................72
スタンドを取り付ける ......................................................................72
EeeBox PCをディスプレイに取り付ける ...................................73
EeeBox PCをセットアップする .................................74
ディスプレイを接続する .................................................................74
USBデバイスを接続する ................................................................74
ネットワークデバイスを接続する ................................................75
システムをONにする .......................................................................76
EeeBox PCを使用する ............................................77
無線接続を設定する ........................................................................77
有線ネットワーク接続を設定する ...............................................78
Bluetooth 無線接続(特定モデルのみ) ....................................82
HDMI デバイスでオーディオ出力構成を行う .........................84
ASUS Easy Update ...........................................................................86
TotalMedia Center ...........................................................................87
Main menu ...................................................................................87
50 EeeBox PC

もくじ
Game ..............................................................................................87
Movie .............................................................................................88
音楽 .................................................................................................88
Photo ..............................................................................................89
ビデオ .............................................................................................89
TotalMedia Theater 3 .....................................................................90
システムをリカバリーする ........................................ 91
隠しパーティションを使用する .....................................................91
Boot Booster ......................................................................................92
ASUSコンタクトインフォメーション ............................................93
日
本
語
EeeBox PC 51

日
本
語
ご注意
Federal Communications Commission Statement
This device complies with Part 15 of the FCC Rules. Operation is
subject to the following two conditions:
• This device may not cause harmful interference, and
• This device must accept any interference received including
interference that may cause undesired operation.
This equipment has been tested and found to comply with
the limits for a Class B digital device, pursuant to Part 15 of the
FCC Rules. These limits are designed to provide reasonable
protection against harmful interference in a residential
installation. This equipment generates, uses and can radiate
radio frequency energy and, if not installed and used in
accordance with manufacturer’s instructions, may cause
harmful interference to radio communications. However, there
is no guarantee that interference will not occur in a particular
installation. If this equipment does cause harmful interference
to radio or television reception, which can be determined by
turning the equipment o and on, the user is encouraged to
try to correct the interference by one or more of the following
measures:
• Reorient or relocate the receiving antenna.
• Increase the separation between the equipment and
receiver.
• Connect the equipment to an outlet on a circuit dierent
from that to which the receiver is connected.
• Consult the dealer or an experienced radio/TV technician for
help.
CAUTION:Any changes or modications not expressly
approved by the grantee of this device could void the user’s
authority to operate the equipment.
52 EeeBox PC

RF exposure warning
This equipment must be installed and operated in accordance
with provided instructions and the antenna(s) used for this
transmitter must be installed to provide a separation distance
of at least 20 cm from all persons and must not be co-located or
operating in conjunction with any other antenna or transmitter.
End-users and installers must be provide with antenna
installation instructions and transmitter operating conditions
for satisfying RF exposure compliance.
Declaration of Conformity
(R&TTE directive 1999/5/EC)
The following items were completed and are considered
relevant and sucient:
• Essential requirements as in [Article 3]
• Protection requirements for health and safety as in [Article
3.1a]
• Testing for electric safety according to [EN 60950]
• Protection requirements for electromagnetic compatibility
in [Article 3.1b]
• Testing for electromagnetic compatibility according to [EN
301 489-1] & [EN 301 489-17]
• Eective use of the radio spectrum as in [Article 3.2]
• Radio test suites according to [EN 300 328-2]
日
本
語
CE Mark Warning
This is a Class B product, in a domestic environment, this
product may cause radio interference, in which case the user
may be required to take adequate measures.
Wireless Operation Channel for Dierent Domains
N. America 2.412-2.462 GHz Ch01 through CH11
Japan 2.412-2.484 GHz Ch01 through Ch14
Europe ETSI 2.412-2.472 GHz Ch01 through Ch13
EeeBox PC 53

日
本
語
France Restricted Wireless Frequency Bands
Some areas of France have a restricted frequency band. The
worst case maximum authorized power indoors are:
• 10mW for the entire 2.4 GHz band (2400 MHz–2483.5 MHz)
• 100mW for frequencies between 2446.5 MHz and 2483.5
MHz
Channels 10 through 13 inclusive operate in the band 2446.6
MHz to 2483.5 MHz.
There are few possibilities for outdoor use:On private property
or on the private property of public persons, use is subject
to a preliminary authorization procedure by the Ministry of
Defense, with maximum authorized power of 100mW in the
2446.5–2483.5 MHz band. Use outdoors on public property is
not permitted.
In the departments listed below, for the entire 2.4 GHz band:
• Maximum authorized power indoors is 100mW
• Maximum authorized power outdoors is 10mW
Departments in which the use of the 2400–2483.5 MHz band
is permitted with an EIRP of less than 100mW indoors and less
than 10mW outdoors:
01 Ain 02 Aisne 03 Allier
05 Hautes Alpes 08 Ardennes 09 Ariège
11 Aude 12 Aveyron 16 Charente
24 Dordogne 25 Doubs 26 Drôme
32 Gers 36 Indre 37 Indre et Loire
41 Loir et Cher 45 Loiret 50 Manche
55 Meuse 58 Nièvre 59 Nord
60 Oise 61 Orne 63 Puy du Dôme
64 Pyrénées Atlantique 66 Pyrénées Orientales
67 Bas Rhin 68 Haut Rhin
70 Haute Saône 71 Saône et Loire
75 Paris 82 Tarn et Garonne
84 Vaucluse 88 Vosges 89 Yonne
90 Territoire de Belfort 94 Val de Marne
54 EeeBox PC

This requirement is likely to change over time, allowing you to
use your wireless LAN card in more areas within France. Please
check with ART for the latest information (www.art-telecom.fr)
Your WLAN Card transmits less than 100mW, but more than
10mW.
Canadian Department of Communications
Statement
This digital apparatus does not exceed the Class B limits for
radio noise emissions from digital apparatus set out in the
Radio Interference Regulations of the Canadian Department of
Communications.
This class B digital apparatus complies with Canadian ICES-003.
IC Radiation Exposure Statement for Canada
This equipment complies with IC radiation exposure limits set
forth for an uncontrolled environment. To maintain compliance
with IC RF exposure compliance requirements, please avoid
direct contact to the transmitting antenna during transmitting.
End users must follow the specic operating instructions for
satisfying RF exposure compliance.
Operation is subject to the following two conditions:
• This device may not cause interference and
• This device must accept any interference, including
interference that may cause undesired operation of the
device.
日
本
語
EeeBox PC 55

日
本
語
Macrovision Corporation Product Notice
This product incorporates copyright protection technology that
is protected by method claims of certain U.S. patents and other
intellectual property rights owned by Macrovision Corporation
and other rights owners. Use of this copyright protection
technology must be authorized by Macrovision Corporation,
and is intended for home and other limited viewing uses only
unless otherwise authorized by Macrovision Corporation.
Reverse engineering or disassembly is prohibited.
REACH
Complying with the REACH (Registration, Evaluation,
Authorization, and Restriction of Chemicals) regulatory
framework, we publish the chemical substances in our products
at ASUS REACH website at http://green.asus.com/english/
REACH.htm.
56 EeeBox PC

電気・電子機器に含有される化学物質の表示について
資源有効利用促進法では、JIS C 0950:2008(J-Moss)の定める規
格により、製造元に対し特定の電気・電子機器に含まれる化学物質
の情報提供を義務付けています。J-Moss とは、電気・電子機器に含
有される化学物質の表示に関するJIS規格の略称で、正式名称は
「The marking when content other than exemption does not
exceed reference value of percentage content(電気・電子機器の
特定の化学物質の含有表示方法)」です。なお、この規格は2008年
8月1日より適用されます。
この規格に関する詳細情報は巻末の表、またはASUSのサイト
(http://green.asus.com/english/)に記載の「The marking when
content other than exemption does not exceed reference value
of percentage content(電気・電子機器の特定の化学物質の含有
表示方法)」をご参照ください。
電気・電子機器に含有される化学物質の表示について
日
本
語
Eee Box PC
分類
マザーボード、プ
ロセッサ及びプ
ロセッサヒート
シンク
ハードディスクド
ライブ
ケース/その他 除外項目※ ○ ○ ○ ○ ○
メモリ 除外項目※ ○ ○ ○ ○ ○
電源アダプター 除外項目※ ○ ○ ○ ○ ○
キーボード 除外項目※ ○ ○ ○ ○ ○
ディスプレイパ
ネル
注1.「○」:算出対象物質の含有率が含有率基準値以下であることを示す。
注2.「除外項目」について:J-Mossでは、現在の技術では特定の化学物質の代
替が困難であり、含有されていることが明白である用途については、含有表示の
除外項目としている。
JIS C 0950:2008
2008年5月4日現在
モデル B202、 B204、 B206
化学物質記号 化学物質記号
Pb Hg Cd Cr (VI) PBB PBDE
除外項目※ ○ ○ ○ ○ ○
除外項目※ ○ ○ ○ ○ ○
除外項目※ 除外項目※ ○ ○ ○ ○
EeeBox PC 57

安全上のご注意
EeeBox PC(以降「本機」とも記載)は IT の最新安全規格を満たす
よう設計されており、それら基準を満たすことが実証されています
が、より安全にお使いいただくため、ご使用の前には以下の安全に
関する注意事項をよくお読みください。
システムをセットアップする
日
本
語
• 本機を使用する前に、本マニュアルに記載の説明及び指示を全
て読み、それに従ってください。
• 湿気のある場所および熱を発する熱源のそばで本機を使用し
ないでください。
• 本機は安定した場所に設置してください。設置する際は必ずス
タンドを使用し、縦置きで設置してください。
• ケースの開口部は通気孔です。紙、本、衣類、ケーブルまたはそ
の他の物で通気孔を塞がないようにしてください。設置の際は、
本体と壁などの間にスペースを空けて設置してください。また、
通気孔に物を入れる等の行為はお止めください。
• 動作可能な温度環境は周囲温度 0℃〜 35℃です。
• 延長コードを使用する際は、接続した全てのデバイスの定格電
流の総量が、延長コードの定格電流を超過しないようにしてく
ださい。
使用中のお手入れ
• 電源コードを踏まないでください。また、物を乗せないでくださ
い。
• システムに液体がかからないようにしてください。
• システムの電源がOFFのときも、微量の電流が流れています。シ
ステムのお手入れをする際は、必ず電源ケーブル、モデムケー
ブル、ネットワークケーブル等のケーブルを全てコンセントから
抜いてください。
• 以下のような技術的な問題が発生した場合は電源コードを抜
き、公認の販売代理店あるいはサポートセンターにご相談くだ
さい。
• 電源コード/プラグが破損している。
• システム内部に液体が入った。
58 EeeBox PC

• 本マニュアルの指示通りに操作してもシステムが正常に動
作しない。
• システムが落下した、またはキャビネットが破損した。
• システムのパフォーマンスに異変が生じた。
リチウムイオンバッテリーについての警告
バッテリーは正しく取り付けないと破裂の原因となります。バ
ッテリーは製造元が指定するもの、またはそれに相応するも
のをご使用ください。バッテリーの廃棄の際は、製造元の指
示に従ってください。
レーザー製品
クラス 1 レーザー製品
分解禁止
お客様が本機を分解した場合、
保証の対象外となります。
禁止:本機は電気製品または電子装置であり、水銀を含むボタン
電池を使用しており、地域のゴミと一緒に捨てられません。また、
本機のコンポーネントはリサイクル性を考慮した設計を採用して
おります。製品のリサイクルについては、サポートセンターにお問
い合わせください。
禁止:本機のバッテリーを通常ゴミとして廃棄しないでください。
バッテリーの交換の際は、サポートセンターにご相談ください。
日
本
語
修理をご依頼の場合
修理をご依頼される際は元のメモリとHDDに戻してください。
なお、工場出荷時に本機に取り付けられているパーツ以外を
取り付けたことに起因する故障は、
保証の対象外とさせていただきます。
EeeBox PC 59

日
本
語
European Union Eco-label
This EeeBox PC has been awarded the EU Flower label, which
means that this product has the following characteristics:
1. Decreased energy consumption during use and stand-by
modes.
2. Limited use of toxic heavy metals.
3. Limited use of substances harmful to the environment and
health.
4. Reduction of the use of natural resources by encouraging
recycling.
5. Extended product lifetime through the availability of spare
parts.
6. Reduced solid waste through takeback policy.
For more information on the EU Flower label, please visit the
European Union Eco-label website at http://europa.eu.int/
ecolabel.
回収とリサイクルについて
使用済みのコンピュータ、ノートパソコン等の電子機器には、環境
に悪影響を与える有害物質が含まれており、通常のゴミとして廃棄
することはできません。リサイクルによって、使用済みの製品に使用
されている金属部品、プラスチック部品、各コンポーネントは粉砕さ
れ新しい製品に再使用されます。また、その他のコンポーネントや
部品、物質も正しく処分・処理されることで、有害物質の拡散の防止
となり、環境を保護することに繋がります。
ASUSはリサイクル業者と提携し、各国の環境法等を満たし、またリ
サイクル従事者の作業の安全を図るよう、環境保護に関する厳し
い基準を設定しております。ASUSのリサイクルに対する姿勢は、多
方面において環境保護に大きく貢献しています。
60 EeeBox PC

このマニュアルについて
注意事項等は重要性によって以下のように区別されています。
警告:本体の破損、データの消失および人体への障害を防止する
ための情報です。
重要:タスクを完了するために必ず行わなければならない事項
です。
ヒント:作業の参考になるヒントです。
注:作業を完了するために必要な追加情報です。
日
本
語
EeeBox PC 61

日
Quick Start Guide
本
語
ようこそ
EeeBox PCをお買い上げ頂き、ありがとうございます。セットアップ
を始める前に、パッケージの内容を確認してください。不足や破損
等の問題がある場合は、お手数ですがお買い上げの販売店にご連
絡ください。
パッケージの内容
EeeBox PC スタンド リモコン(オプション)
VESAマウント、専用ネジ ACアダプター 電源コード
HDMI ケーブル(オプション)
62 EeeBox PC
保証書 クイックスタートガイド 赤外線レシーバー(オプシ
ミニジャック - S/PDIFアダ
プター(オプション)
本体、キーボード、マウスは通常のご使用条件で使用し不具合が
発生した場合、保証期間内であれば無料で修理・交換致します
(その他付属品・ディスク等は保証適用外です)。
なお、保証を受けるには保証書をASUSのサービスセンターまで
ご送付いただく必要があります。
初期不良については購入後1ヶ月間となります。
HDMI-DVI アダプター(オプ
ション)

EeeBox PCの概要
前面
下図で各部の名称と場所をご確認ください。
日
本
語
1
2
3
4
5
6
ハードディスクLED
1
このLEDはハードディスクでデータのやり取りが行われる
と点滅します。
電源スイッチ
2
システムの電源ON/OFFを切り替えます。
EeeBox PC 63

日
本
語
3
メモリーカードスロット
このスロットにはメモリーカードリーダーが内蔵されてお
り、デジタルカメラやMP3 プレーヤー、携帯電話、PDA等で
使用するMMC/SD/SDHC/MS/MS Pro 等のメモリーカード
を読み込みます。
USBポート
4
USB対応のキーボードやマウス、カメラ、ハードディスク等
のデバイスを接続することができます。このポートを使用
すれば、複数のデバイスを1つのシステムで同時に利用す
ることができます。
5
ヘッドフォン/オーディオ出力ジャック
このジャックのサイズは 3.5mm で、システムオーディオ出
力をアンプやヘッドフォンに出力します。
マイクジャック
6
マイクを接続します。ビデオ会議や音声ナレーション、録音
等にご使用ください。
64 EeeBox PC

背面
下図で各部の名称と場所をご確認ください。
日
本
語
1
2
3
4
5
1
無線アンテナジャック
付属の無線アンテナを接続します。
6
7
EeeBox PC 65

日
本
語
2
電源入力(DC19V)
付属のACアダプターを接続し、システムに電源を供給しま
す。付属のACアダプター以外は使用しないでください。故
障の原因となります。
ACアダプターは、使用中高温となることがあります。アダプタ
ーを物で覆ったり、また身体に密着して使用しないでくださ
い。
3
USBポート
USB対応のキーボードやマウス、カメラ、ハードディスク等
のデバイスを接続することができます。このポートを使用
すれば、複数のデバイスを1つのシステムで同時に利用す
ることができます。
LANポート
4
このポートは8ピンRJ-45LANポートでRJ45 LANケーブル
をサポートしています。
HDMI ポート
5
液晶TVやディスプレイやフルHDデバイスをサポートして
います。より高画質で大きな画面での映像が楽しめます。
ディスプレイ(モニター)出力
6
D-Sub 15ピンモニターポートは、モニタープやプロジェク
タなどの標準VGA互換デバイスをサポートし、それらに画
面を表示することが可能です。
オーディオ出力(S/PDIF出力)ジャック
7
3.5mm ミニジャックケーブルをこのジャックに接続します。
66 EeeBox PC
このジャックはアナログ/デジタルの両方の出力に対応し
ています。
S/PDIF出力を利用する際は、オプションのミニジャ
ックS/PDIFアダプターをアンプに接続してくださ
い。
E-SATA
トップ
下図で各部の名称と場所をご確認ください。
1 2
E-SATA
1
外部SATAポート
本来コンピュータ内蔵用に設計されたSerial ATAデバイス
をこのポートに接続することができます。現行のUSB 2.0、
IEEE1394と比較して6倍のバンド幅を実現。ホットプラグ
機能に対応し最長2メートルのケーブルが使用可能です
(シールドケーブル適用時)。
日
本
語
2
USBポート
USB対応のキーボードやマウス、カメラ、ハードディスク等
のデバイスを接続することができます。このポートを使用
すれば、複数のデバイスを1つのシステムで同時に利用す
ることができます。
EeeBox PC 67

日
本
語
無線アンテナを使用する
無線アンテナを本機に接続することで、無線信号の受信感度が上
がります。無線アンテナは180°〜270° に角度を変えないでくださ
い。故障の原因となります。
68 EeeBox PC

リモコンをセットアップする(特定モデルのみ)
1. 赤外線レシーバーを本機の任意のUSBポートに接続します。
2. 赤外線レシーバーを安定した場所に置きます。
3. リモコンをレシーバの方に向けて操作します。
日
本
語
EeeBox PC 69

リモコンを使用する(特定モデルのみ)
リモコンを使用し、TotalMedia Center の操作が可能です。リモコ
ンの各ボタンの機能については、 次項をご参照ください。
日
本
語
26
25
24
23
22
21
20
19
18
17
1
2
3
4
5
6
7
8
9
10
11
12
70 EeeBox PC
16
15
13
14

1
LEDインジケータ:ボタンを押すと赤く点灯します。
2
電源:ONモードとスタンドバイモードを切り替えます。
3
一時停止:再生中に押すと一時停止します。
4
停止:再生を停止します。
5
再生:メディアファイルを再生します。
6
早送り:メディアファイルを早送りします。
7
次のトラック:次のトラックに進みます。
8
情報:プログラムの情報または他のメニューオプションを表示
します。
9
「OK」:操作の確認用ボタンです。
10
チャンネル+/−:TVのチャンネルを切り替えます。*
11
ビデオ:特定のアプリケーションでのみご利用頂けるボタンで
す。
12
音楽:特定のアプリケーションでのみご利用頂けるボタンで
す。
13
Enter:選択した内容を確認します。
14
カラーボタン:特定のアプリケーションでのみご利用頂けるボ
タンです。
日
本
語
15
テレテキストON/OFF:テレテキストモードのON/OFFを切り替
えます。(この機能は特定のエリアのみで利用できます)
16
クリア:入力データを消去します。
17
数字ボタン::数字の入力、またはチャンネルを選択します。*
18
Eee:特定のアプリケーションでのみご利用頂けるボタンです。
19
フォト:特定のアプリケーションでのみご利用頂けるボタンです。
20
音量+/−:音量を調節します。
21
ミュート:音量をゼロにします。
ナビゲーションボタン:メニューオプションをスクロール表示し
22
ます。
23
戻る:前のページに戻ります。
EeeBox PC 71

日
本
語
24
前のトラック:1つ前のトラックに戻ります。
25
巻き戻し:メディアファイルを巻き戻します。
26
録画:TV録画を開始します。*
**TV機能は特定エリアでのみ利用可能です。
72 EeeBox PC

E-SATA
EeeBox PCを設置する
スタンドを取り付ける
本機を設置する際は、付属のスタンドを使用して縦置きで設置して
ください。
1. 本機の底部にあるネジ穴の位置を確認します。
2. スタンド用ネジをネジ穴に合わせ、ネジでスタンドと本機をコ
インやドライバーなどで固定します。
本機底面図
1
ネジ穴
スタンド用ネジ
日
本
語
2
設置する際は必ずスタンドを使用し、縦置きで設置してください。
EeeBox PC 73

日
本
語
EeeBox PCをディスプレイに取り付ける
本機はディスプレイに直接取り付けることができます。
1. VESAマウントをディスプレイの背面に取り付け、4本のネジで
固定します。(HNM/M4 x 8)。
VESAマウントを使用するには、お使いのディスプレイがVESA75/
VESA100 規格準拠である必要があります。
2. ネジ穴の位置を確認しながら、本機をVESAマウントに取り付
け、コインやドライバーなどで固定します。
本機底面図
74 EeeBox PC

EeeBox PCをセットアップする
本機を使用する前に、周辺機器を取り付けます。
ディスプレイを接続する
HDMI/VGAケーブルの一端を液晶TVまたは液晶ディスプレイ (1)に
接続し、もう一端をHDMI/ディスプレイ(モニター)出力ポートに接続
します(2)。
液晶ディスプレイ 液晶TV
2
日
本
語
–or–
1
または
USBデバイスを接続する
無線/有線キーボード、マウス、プリンタ等のUSBデバイスを任意の
USB ポートに接続します。
EeeBox PC 75

ネットワークデバイスを接続する
ネットワークケーブルの一端をバックパネルのLANポートに接続
し、もう一端をモデム/ルータに接続します。
日
本
語
LANケーブル
モデム/ルータ
76 EeeBox PC

システムをONにする
付属のACアダプターをバックパネルのDC INジャック(電源入力)
に接続し、電源スイッチを押してシステムをONにします。
3
4
2
1
• 本機を使用しないときは、電源アダプターを抜くか、AC電源を
OFFにしてください。電力消費を抑えることができます。
• Window® のコントロールパネルで電源管理設定を行うこと
により、パフォーマンスを維持しながら本機の消費電力を抑え
ることができます。
日
本
語
BIOS Setup Utilitiy を開くには、 システム起動中に <F2> を繰り
返し押します。
EeeBox PC 77

EeeBox PCを使用する
本項に記載のスクリーンショットは参照用です。実際のスクリーン
ショットはOSにより異なります。最新情報は弊社サイトでご確認く
ださい(http:www.asus.co.jp)。
無線接続を設定する
無線ネットワークに接続するには、以下の手順に従ってください。
日
本
語
セキュリティの観点から、信頼できないネットワークには接続しな
いでください。転送した情報が暗号化されず、他の不特定のユー
ザーに情報が漏れてしまう危険性があります。
1. Windows®のシステムトレイの無線ネットワークアイコン
をクリックします。
2. 接続したい無線アクセスポイントをリス
トから選択し、「Connect(接続)」をクリ
ックします。
接続するアクセスポイントが表示され
ない場合は、画面右上の 「Refresh(更
新)」アイコン をクリックします。
3. 必要に応じて、パスワードを入力します。
4. ネットワークに接続すると、「Connection(接続)」と表示されま
す。
5. 無線ネットワークアイコン がシステムトレイに表示されま
す。
78 EeeBox PC

有線ネットワーク接続を設定する
有線ネットワークに接続するには、以下の手順に従ってください。
動的IP(ダイナミックIP)を使用する
1. Windows® システムトレイのネッ
トワークアイコン をクリックし、
「Open Network and Sharing
Center(ネットワークと共有センタ
ーを開く)」を選択します。
2. 左メニューの「Change
adapter settings(アダプ
ター設定の変更)」をクリ
ックします。
日
本
語
3. 「Local Area
Connection(ローカル�ローカル�
リア接続))」を右クリック
し、「Properties(プロパ
ティ)」を選択します。
EeeBox PC 79

日
本
語
4. 「Internet Protocol
Version 4(TCP/IPv4)[インタインタ
ーネットプロトコルbバージョ
ン4(TCP/IPv4)(TCP/IPv4)」をクリックし
「Properties(プロパティ)」
を選択します。
5. 「Obtain an IP address
automatically (IPアドレス
を自動的に取得する)」をク
リックし「OK」をクリックし
ます。
(PPPoEを使用する場合)
6. 「Network and
Sharing Center(ネッ
トワークと共有センタ
ー)」に戻り、「Set up
a new connection or
network(新しい接続ま
たはネットワークのセット
アップ)」をクリックしま
す。
80 EeeBox PC
7. 「Connect to the Internet
(インターネットに接続しま
す)」をクリックし「Next(次
へ)」を選択します。
8. 「Broadband (PPPoE)[ブ
ロードバンド]」をクリックし
「Next(次へ)」を選択しま
す。
日
本
語
9. ユーザー名、パスワード、
接続名を入力し、
「Connect(接続)」をクリ
ックします。
11. タスクバーのネットワーク
アイコンをクリックし、設定
した接続をクリックします。
10. 「Close(閉じる)」をクリック
します。
12. ユーザー名とパスワードを
入力し、「Connect(接続)」
をクリックします。
EeeBox PC 81

日
本
語
静的IP(スタティックIP)を使用する
1. 静的 IP の手順 1〜4 を実行し
ます。
2 「Use the following IP
address(次の IP アドレスを使次の IP アドレスを使
う))」をクリックします。
3. 「IP アドレス」、「サブネット マ
スク」、「デフォルト ゲートウェ
イ」の欄を入力します。
4. 必要に応じてPreferred DNS
Server アddress(優先DNSサ
ーバー)の欄にアドレスを入力
します。
5. 関連する値を全て入力したら、「OK」をクリックし、ネットワーク
接続を作成します。
82 EeeBox PC

Bluetooth 無線接続(特定モデルのみ)
次の手順に従い、Bluetooth 接続の設定を行います。
1. コントロールパネル
から、「Network and
Internet(ネットワークと
インターネット)」→
「Network and Sharing
Center(ネットワーク
と共有センター)」の
順に進み、左メニュー
の「Change adapter
settings(アダプター設定の変更) 」をクリックします。
2. 「Bluetooth Network
Connection
(Bluetooth ネットワ
ーク接続)」を右クリッ
クし、「View Bluetooth
Network Devices
(Bluetoothネットワーク
デバイスを参照)」を選択
します。
日
本
語
3. 「Add a device(デバイス
の追加」を選択し、新しい
デバイスを探します。
EeeBox PC 83

日
本
語
4. リストからBluetooth有効デ
バイスを選択し、「Next(次
へ)」をクリックします。
5. Bluetooth セキュリティコー
ドをお使いのデバイスに入
力し、ペアリングを開始しま
す。
6. ペアリングが完了しました。
「Close(閉じる)」をクリック
し、設定終了です。
84 EeeBox PC

HDMI デバイスでオーディオ出力構成を行う
HDMI コネクタ搭載のTVをオーディオ出力デバイスとして利用する
場合は、以下の手順でオーディオ設定を行います。
1. Windows® システムトレイの音
量ミキサーアイコンを右クリック
し、「Playback Devices(再生デ
バイス)」を選択します。
2. Playback(再生)タブから、
「Digital Audio (HDMI)」
をクリックし「Set Default」
を選択します。
3. 「Congure」をクリックす
ると、Speaker Setup ウイン
ドウが表示されます。
日
本
語
4. 「Stereo」をクリックし
「Next」をクリックします。
EeeBox PC 85

日
本
語
5. 「Front left and right」ボ
ックスにチェックを入れ、
「Next」をクリックします。
6. 「Finish」をクリックし、設
定終了です。
86 EeeBox PC

ASUS Easy Update
ASUS Easy Update は自動的に本機の最新BIOSとドライバ、アプリ
ケーションを検出し、ダウンロードするソフトウェアです。
1. Windows® システムトレーの
ASUS Easy Update アイコンを
右クリックします。
2. 「Schedule (ケジュール)」
をクリックし、システムをアッ
プデートする頻度を設定しま
す。
3. 「Update(アップデート)」を
選択します。
4. 「OK」をクリックし、ダウン
ロードする項目を表示させ
ます。
日
本
語
5. ダウンロードする項目にチ
ェックを入れ、「OK」をクリッ
クします。
EeeBox PC 87

日
本
語
TotalMedia Center
TotalMedia Center は完全型マルチメディアセンターです。音楽や
写真、ビデオ、映画等をお楽しみください。
プログラムを起動するには、デスクトップ上の TotalMedia Center
アイコンをクリックします。
TotalMedia Center は特定モデルのみのサポートです。
Main menu
メインメニューにはGame、Movie、Music、Photo、Videoの機能が
あります。使用する機能のアイコンをクリックします。
Game
各種ゲームをお楽しみください。
88 EeeBox PC

Movie
DVDの再生が可能です。
内蔵型光学ドライブとサポートするフォーマットはモデルにより
異なります。
音楽
音楽ファイルとオーディオCDをビジュアル付きで再生します。また、
再生リストを作成することもできます。
日
本
語
EeeBox PC 89

日
本
語
Photo
写真をスライドショーで再生します。また、画像に修正を加えること
も可能です。
ビデオ
ビデオファイルを再生します。
90 EeeBox PC
TotalMedia Theater 3
TotalMedia Theater 3 は、DVDの再生が可能です(Blu-ray Disk の
再生は特定モデルのみです)。DVDを光学ドライブにセットする
と、自動的に再生が始まります。TotalMedia Theater 3 はYoutube
DXVA、WMV HD DXVA、MCEプラグイン、ビデオファイルの再生も
サポートしています。
• TotalMedia Theater 3 は、特定モデルのみのサポートです。
• 内蔵型光学ドライブとサポートするフォーマットはモデルによ
り異なります。
日
本
語
EeeBox PC 91
日
本
語
システムをリカバリーする
隠しパーティションを使用する
リカバリーパーティションには、工場出荷時にシステムにインスト
ールされたOSイメージ及び各ドライバ、各ユーティリティ等が保存
されています。リカバリーパーティションは優れたリカバリーソリュ
ーションで、ハードディスクドライブが正常に動作していれば、シス
テムのソフトウェアを本来の動作状態に復元します。リカバリーパ
ーティションを使用する前には必ずデータファイル(Outlook PST
ファイルなど)をUSBフラッシュメモリやネットワークドライブなど
にコピーし、また各ユーザー設定(ネットワーク設定等)もバックア
ップしてください。
「RECOVERY」という名前のパーティションは削除しないでくだ
さい。リカバリーパーティションは工場で作成され、一度削除する
とユーザーは復元することができません。リカバリー中に問題が
発生した場合は、ASUS公認のサービスセンターまでご連絡くだ
さい。
1. 電源をONにし、起動中に <F9> (リカバリーパーティションを
必要とします)。
システムリカバリーを隠しパーティションから行う場合は、事前に
「Boot Booster」をBIOSで無効にしてください。詳細は次項をご
参照ください。
2. <ASUS Recovery System> ウィンドウが表示されますので、
「Recover system to a partition」を選択します。
3. 最低20GBの空き容量があるパーティションを選択し、「Next」
をクリックします。
4. 画面に表示される指示に従ってリカバリーを実行します。
5. リカバリーが終了したらシステムを再起動します。
6. 使用言語及びタイムゾーン、キーボード、コンピュータ名、ユー
ザー名等をセットアップし、Windows® を開きます。
92 EeeBox PC

Boot Booster
BIOSセットアップ項目「Boot Booster」を有効にすると、Eee PCの起
動時間は短くなりますが、Eee PCコンポーネントを変更したり、シス
テムリカバリーを外部オプションドライブ、または非表示になった
パーティションから行う場合は、事前にこの項目を無効にする必要
があります。以下の指示に従って、Boot Booster を無効にしてくだ
さい。
Boot Booster を利用するには以下の条件を満たす必要があり
ます。
・ 出荷時にバンドルのOSを使用する。
・ SATA2ハードディスクを使用している場合は、ハードディス
クのパスワードを全て無効にする。
・ BIOS起動時のパスワードを設定しない。
1. システムを起動し、起動時に <F2> を押してPOST画面を表示
させます。<F2> を再び押してBIOSセットアップに入ります。
上記の操作を実行してもPOST画面が表示されない場合、または
BIOSセットアップが開かない場合は、システムを再起動し、起動
時に<F2>を繰り返し押してください。
2. Boot Booster を [Disabled] に設定します。
Main Advanced Security Boot Exit
B o o t D e v i c e P r i o r i t y
BootSettingsConguration
OnBoard LAN Boot ROM [Enabled]
Boot Booster [Disabled]
v02.58 (C)Copyright 1985-2005, American Megatrends, Inc.
BIOS SETUP UTILITY
S p e c i f i e s t h e B o o t
D e v i c e P r i o r i t y
sequence.
A virtu al flop py disk
drive (Floppy Drive B:
) may appear when you
se t th e CD -R OM d ri ve
a s t h e f i r s t b o o t
device.
Se l ec t S cr e en
←→
S e l e c t I t e m
↑↓
Enter Go to Sub Screen
F 1 G e n e r a l H e l p
F1 0 Sa v e an d E xi t
ESC Exit
日
本
語
3. <F10> を押して設定を保存し、Eee PCを再起動します。
ハードウェアの変更、システムリカバリーの後は、Boot Boosterを
有効にしてください。
EeeBox PC 93

日
本
語
ASUSコンタクトインフォメーション
ASUSTeK COMPUTER INC.
住所: 15 Li-Te Road, Peitou, Taipei, Taiwan 11259 15 Li-Te Road, Peitou, Taipei, Taiwan 11259
電話: +886-2-2894-3447
ファックス: +886-2-2890-7798
電子メール info@asus.com.tw
Webサイト www.asus.com.tw
テクニカルサポート
電話: +86-21-38429911
オンラインサポート support.asus.com
ASUS COMPUTER INTERNATIONAL (アメリカ)
住所: 800 Corporate Way, Fremont, CA 94539, USA
電話: +1-510-739-3777
ファックス: +1-510-608-4555
Webサイト usa.asus.com
テクニカルサポート
電話: +1-812-282-2787
サポートファックス: +1-812-284-0883
オンラインサポート support.asus.com
ASUS サポートセンター (日本)
電話: 0800-123-2787
※携帯電話やPHSなど、サポート受付電話番号をご利用できない場合
047-390-5630 (通話料お客様負担)
ファックス: 047-390-5630
Webサイト: http://www.asus.co.jp/
オンラインサポート: http://vip.asus.com/eservice/techserv.aspx
94 EeeBox PC

日
本
語
EeeBox PC 95
 Loading...