

Page 1
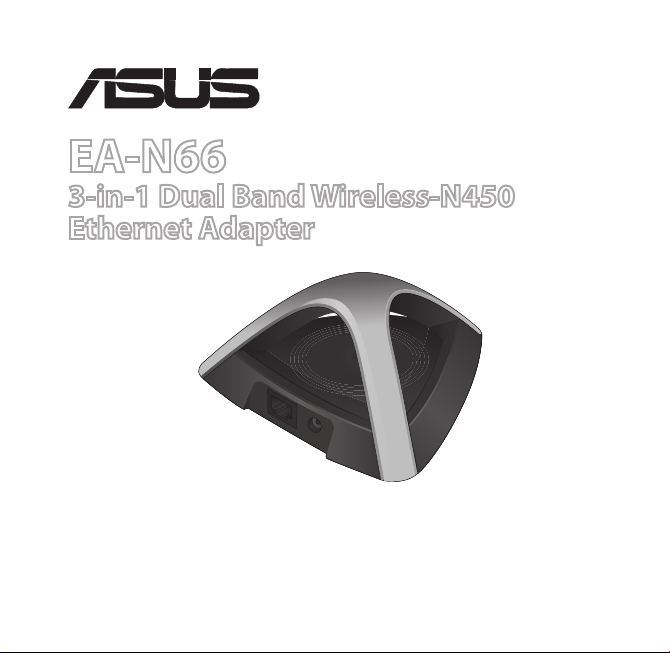
EA-N66
®
3-in-1 Dual Band Wireless-N450
Ethernet Adapter
Quick Start Guide
Page 2

English ................................................................................................................................3
French ................................................................................................................................. xx
Brazilian .............................................................................................................................. xx
Portuguese .......................................................................................................................xx
Spanish ............................................................................................................................... xx
E8111 / Second Edition / January 2013
Page 3
Package contents
EA-N66 Power adapter
Network cable Quick Start Guide
NOTE: If any of the items is damaged or missing, contact your retailer.
Mounting options
Out of the box, ASUS EA-N66 is designed to sit on a raised at surface like a le
cabinet or book shelf. The unit may also be converted for mounting to a wall or
ceiling.
1. Look on the underside for the mounting hook.
2. Mark an upper hole in a at surface.
3. Tighten one screw until only 1/4’’ is showing.
4. Latch the hook of your EA-N66 onto the screw.
NOTES:
• Re-adjust the screw if you cannot latch EA-N66 onto the screw or if it is too
loose.
• The screw is not included in the EA-N66 package contents.
English
3
Page 4
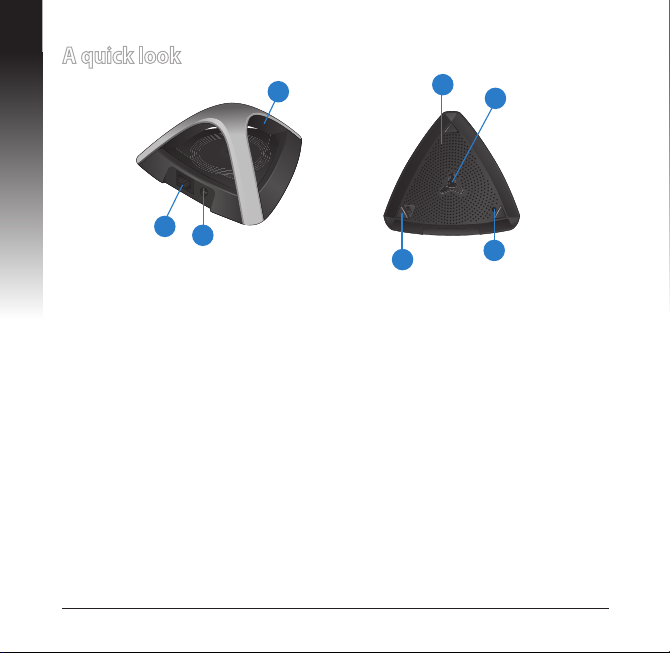
A quick look
3
English
1
2
1) Ethernet port
2) DC In port
3) LED indicator
OFF: No power or physical connection
Blinking slowly: Establishing connection
Solid light: Excellent connection
Flickering light: Weak connection
Blinking fast intermittently: Establishing WPS connection
4) Air vent
5) Mounting hole
6) WPS button
7) Reset button
4
4
5
6
7
Page 5
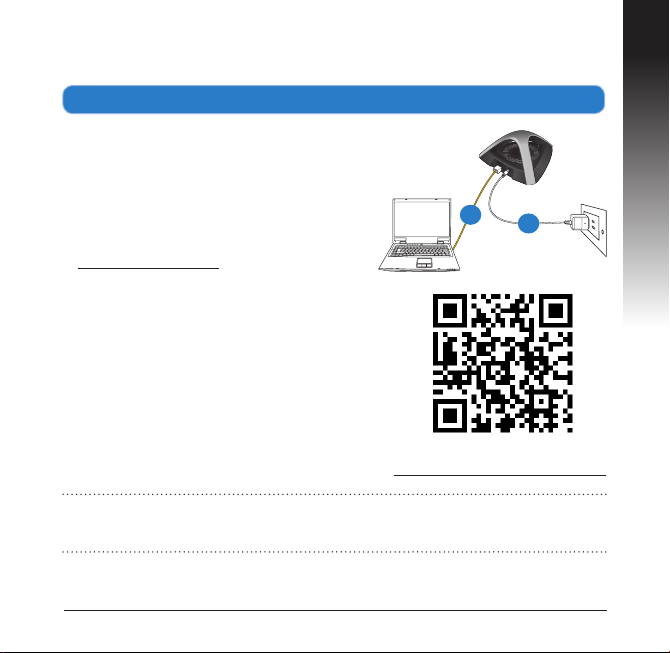
Getting started
Wall Power Outlet
Setting up your EA-N66
a. Insert your EA-N66’s power adapter to the
DC-In port and plug it to a power outlet.
b. Using the bundled network cable, connect
your computer to your EA-N66’s LAN port.
EA-N66’s LED blinks slowly indicating that it
is booting up and establishing connection.
c. In your web browser, key in
www.asusrouter.com. Key in admin as the
default username and password to log
into EA-N66’s web graphical user interface
(Web GUI).
d. From EA-N66’s Web GUI, select your pre-
ferred operation mode.
e. Follow the onscreen instructions to com-
plete the wireless connection setup.
f. Check if EA-N66’s LED indicator turns a solid
light, which indicates that EA-N66 has successfully connected to the wireless network.
See the setup tutorial video at
http://youtu.be/MseyzQVjaPY
NOTE: You can use the WPS function to connect your EA-N66 as an Ethernet
adapter to your wireless network without logging into its Web GUI. For more
details, refer to the next section Using WPS.
b
a
English
5
Page 6

Using WPS
The WPS (Wi-Fi Protected Setup) button allows
you to connect to a secured and protected
English
network with a simple click.
a. Insert your EA-N66’s power adapter to the
DC-In port and plug it to a power outlet.
b. Press the WPS button on your EA-N66 and
on your router until the power LEDs of these
devices blink fast and intermittently, which
indicates that EA-N66 is establishing connection with your router or wireless network.
c. Wait until EA-N66’s power LED turns a solid
light, which indicates that it has successfully
established connection with your wireless
network.
d. Using the bundled network cable, connect your HD media player, Internet TV,
set top box, or other Ethernet-enabled device, to your EA-N66’s LAN port.
e. You can now start doing Internet or network related activities such as media
streaming, Internet surng, and others.
IMPORTANT: If your EA-N66’s LED indicator turns into a ickering light, which
indicates a weak connection, move your EA-N66 closer to your router.
See the WPS tutorial video at
http://youtu.be/uUB1zie6ty4
6
Page 7

Operation modes
ASUS EA-N66 provides three operation modes: Ethernet Adapter, Access Point
(AP), and Repeater.
NOTE: Please follow the GUI Setup Wizard for these modes.
Ethernet Adapter mode
By default, EA-N66 is set to the Ethernet
Adapter mode. In this mode, you can connect any Ethernet-enabled device to your
wireless home network via the
wireless router. This mode is perfect for
home theater devices such as Internet TV,
TiVo, and Blu-ray player.
IMPORTANT:
• For the best wireless performance, place EA-N66 at a distance of more than 1.5
meters away from the parent Access Point (AP).
• You can adjust the transmission power of EA-N66 from its web interface.
Internet TV
ADSL/
Cable
modem
English
7
Page 8

Frequently Asked Questions
Q1: I cannot access the web GUI to congure the EA-N66 settings.
• Close all running web browsers and launch again.
English
• Follow the steps below to congure your computer settings based on its
operating system.
Windows 7
A. Disable the proxy server, if enabled.
1. Click Start > Internet Explorer to launch the web
browser.
2. Click Tools > Internet options > Connections tab >
LAN settings.
3. From the Local Area Network (LAN) Settings screen,
untick Use a proxy server for your LAN.
4. Click OK when done.
B. Set the TCP/IP settings to automatically obtain an
IP address.
1. Click Start > Control Panel > Network and Internet
> Network and Sharing Center > Manage network
connections.
2. Select Internet Protocol Version 4 (TCP/IPv4), then
click Properties.
3. Tick Obtain an IP address automatically.
4. Click OK when done.
8
Page 9

Mac 10.5.8
A. Disable the proxy server, if enabled.
1. From the menu bar, click Safari >
Preferences... > Advanced tab.
2. Click Change Settings... in the Proxies eld.
3. From the list of protocols, deselect FTP Proxy
and Web Proxy (HTTP).
4. Click OK when done.
B. Set the TCP/IP settings to automatically
obtain an IP address.
1. Click the Apple icon > System Preferences > Network.
2. Select Ethernet and select Using DHCP in
the Congure eld.
3. Click Apply when done.
Q2: When I set my EA-N66 to Repeater Mode, should I use the same
SSID with my parent AP?
• We recommend that you use a dierent SSID for your EA-N66 so you can
choose the one with the best signal strength (between your EA-N66 and your
parent AP).
9
English
Page 10

SUPPORT HOTLINE
USA/ CANADA
Hotline Number: 1-812-282-2787
Language: English
Availability: Mon. to Fri.
8:30-12:00am EST
(5:30am-9:00pm PST)
Sat. to Sun.
9:00am-6:00pm EST
(6:00am-3:00pm PST)
BRAZIL
Hotline Number: 4003 0988
(Capital) / 0800 880 0988 (demais
localidades)
Language: Portuguese
Availability: Mon. to Fri.
9:00am-18:00
Manufacturer
ASUSTeK Computer Inc.
Tel: +886-2-2894-3447
Address: No. 150, LI-TE RD., PEITOU, TAIPEI 112, TAIWAN
Authorised representative in Europe
ASUS Computer GmbH
Address: HARKORT STR. 21-23, 40880 RATINGEN, GERMANY
Authorised distributors in Turkey
BOGAZICI BIL GISAYAR SAN. VE TIC. A.S.
Tel: +90 212 3311000
Address: AYAZAGA MAH. KEMERBURGAZ CAD. NO.10 AYAZAGA/ISTANBUL
CIZGI Elektronik San. Tic. Ltd. Sti.
Tel: +90 212 3567070Address: CEMAL SURURI CD. HALIM MERIC IS MERKEZI
No: 15/C D:5-6 34394 MECIDIYEKOY/ ISTANBUL
EEE Yönetmeliğine Uygundur.
Page 11

ASUS Recycling/Takeback Services
ASUS recycling and takeback programs come from our commitment to the highest standards for protecting our environment. We believe in providing solutions
for you to be able to responsibly recycle our products, batteries, other components, as well as the packaging materials. Please go to
http://csr.asus.com/english/Takeback.htm for the detailed recycling information
in dierent regions.
REACH
Complying with the REACH (Registration, Evaluation, Authorisation, and Restriction of Chemicals) regulatory framework, we published the chemical substances
in our products at ASUS REACH website at http://csr.asus.com/english/REACH.htm
Federal Communications Commission Statement
This device complies with Part 15 of the FCC Rules. Operation is subject to the
following two conditions:
• This device may not cause harmful interference.
• This device must accept any interference received, including interference that
may cause undesired operation.
This equipment has been tested and found to comply with the limits for a class
B digital device, pursuant to part 15 of the FCC Rules. These limits are designed
to provide reasonable protection against harmful interference in a residential
installation.
This equipment generates, uses and can radiate radio frequency energy and, if
not installed and used in accordance with the instructions, may cause harmful interference to radio communications. However, there is no guarantee that
interference will not occur in a particular installation. If this equipment does cause
harmful interference to radio or television reception, which can be determined
by turning the equipment o and on, the user is encouraged to try to correct the
interference by one or more of the following measures:
• Reorient or relocate the receiving antenna.
Page 12

• Increase the separation between the equipment and receiver.
• Connect the equipment into an outlet on a circuit dierent from that to which
the receiver is connected.
• Consult the dealer or an experienced radio/TV technician for help.
WARNING: Any changes or modications not expressly approved by the party
responsible for compliance could void the user’s authority to operate the equipment.Prohibition of Co-locationThis device and its antenna(s) must not be co-located or operating in conjunction with any other antenna or transmitter.
Prohibition of Co-location
This device and its antenna(s) must not be co-located or operating in conjunction
with any other antenna or transmitter.
IMPORTANT NOTE:
Radiation Exposure Statement: This equipment complies with FCC radiation
exposure limits set forth for an uncontrolled environment. End users must follow
the specic operating instructions for satisfying RF exposure compliance. To
maintain compliance with FCC exposure compliance requirement, please follow
operation instruction as documented in this manual.
Declaration of Conformity for R&TTE directive 1999/5/EC
Essential requirements – Article 3
Protection requirements for health and safety – Article 3.1a
Testing for electric safety according to EN 60950-1 has been conducted. These are
considered relevant and sucient.
Protection requirements for electromagnetic compatibility – Article 3.1b
Testing for electromagnetic compatibility according to EN 301 489-1 and EN 301
489-17 has been conducted. These are considered relevant and sucient.
Eective use of the radio spectrum – Article 3.2
Page 13

Testing for radio test suites according to EN 300 328- 2 has been conducted. These
are considered relevant and sucient.
CE Mark Warning
This is a Class B product, in a domestic environment, this product may cause radio
interference, in which case the user may be required to take adequate measures.
Operation Channels: CH1~11 for N. America; Ch1~14 for Japan; CH1~13 for
Europe (ETSI)
IC Warning
This device complies with Industry Canada licence-exempt RSS standard(s).
Operation is subject to the following two conditions: (1) this device may not cause
interference, and () this device must accept any interference, including interference that may cause undesired operation of the device.”
Le présent appareil est conforme aux CNR d’Industrie Canada applicables aux appareils radio exempts de licence. L’exploitation est autorisée aux deux conditions
suivantes : (1) l’appareil ne doit pas produire de brouillage, et (2) l’utilisateur de
l’appareil doit accepter tout brouillage radioélectrique subi, même si le brouillage
est susceptible d’en compromettre le fonctionnement.”
Industry Canada Statement
This device complies with RSS-210 of the industry Canada Rules. Operation is
subject to the following two conditions:
• This device may not cause harmful interference.
• This device must accept any interference received, including interference that
may cause undesired operation.
IMPORTANT NOTE:
Radiation Exposure Statement: This equipment complies with IC radiation ex-
posure limits set forth for an uncontrolled environment. End users must follow the
specic operating instructions for satisfying RF exposure compliance. To maintain
compliance with IC RF exposure compliance requirement, please follow operation
instruction as documented in this manual.
Page 14

NCC 警語
經型式認證合格之低功率射頻電機,非經許可,公司、商號或使用者均不得擅
自變更頻率、加大功率或變更原設計之特性及功能。
低功率射頻電機之使用不得影響飛航安全及干擾合法通信;經發現有干擾現象
時,應立即停用,並改善至無干擾時方得繼續使用。
前項合法通信,指依電信法規定作業之無線電通信。
低功率射頻電機須忍受合法通信或工業、科學及醫療用電波輻射性電機設備
之干擾。
Safety Warning
SAFE TEMP: This wireless router should be only used in environments with ambient temperatures between 50C (410F) and 400C (1040F).
DO NOT expose to or use near liquids, rain, or moisture. DO NOT use during
electrical storms.
 Loading...