

Page 1

User Manual
Page 2

E8837
First Edition
Model: ASUS_T00I
Copyright © 2014 ASUSTeK COMPUTER INC.
All Rights Reserved.
No part of this manual, including the products
and software described in it, may be reproduced,
transmitted, transcribed, stored in a retrieval system,
or translated into any language in any form or by any
means, except documentation kept by the purchaser
for backup purposes, without the express written
permission of ASUSTeK COMPUTER INC. (“ASUS”).
Product warranty or service will not be extended if:
(1) the product is repaired, modified or altered, unless
such repair, modification of alteration is authorized
in writing by ASUS; or (2) the serial number of the
product is defaced or missing.
ASUS PROVIDES THIS MANUAL “AS IS” WITHOUT
WARRANTY OF ANY KIND, EITHER EXPRESS
OR IMPLIED, INCLUDING BUT NOT LIMITED TO
THE IMPLIED WARRANTIES OR CONDITIONS
OF MERCHANTABILITY OR FITNESS FOR A
PARTICULAR PURPOSE. IN NO EVENT SHALL
ASUS, ITS DIRECTORS, OFFICERS, EMPLOYEES
OR AGENTS BE LIABLE FOR ANY INDIRECT,
SPECIAL, INCIDENTAL, OR CONSEQUENTIAL
DAMAGES (INCLUDING DAMAGES FOR LOSS OF
PROFITS, LOSS OF BUSINESS, LOSS OF USE OR
DATA, INTERRUPTION OF BUSINESS AND THE
LIKE), EVEN IF ASUS HAS BEEN ADVISED OF
THE POSSIBILITY OF SUCH DAMAGES ARISING
FROM ANY DEFECT OR ERROR IN THIS MANUAL
OR PRODUCT.
SPECIFICATIONS AND INFORMATION
CONTAINED IN THIS MANUAL ARE FURNISHED
FOR INFORMATIONAL USE ONLY, AND ARE
SUBJECT TO CHANGE AT ANY TIME WITHOUT
NOTICE, AND SHOULD NOT BE CONSTRUED
AS A COMMITMENT BY ASUS. ASUS ASSUMES
NO RESPONSIBILITY OR LIABILITY FOR ANY
ERRORS OR INACCURACIES THAT MAY APPEAR
IN THIS MANUAL, INCLUDING THE PRODUCTS
AND SOFTWARE DESCRIBED IN IT.
Products and corporate names appearing in this
manual may or may not be registered trademarks
or copyrights of their respective companies, and are
used only for identification or explanation and to the
owners benefit, without intent to infringe.
Page 3

Thank you for purchasing this ASUS
product!
Before you start, ensure that you have
read all the safety information and
operating instructions in this User
Manual to prevent injury or damage to
your device.
NOTE: For the latest updates and
more detailed information, please visit
www.asus.com.
Getting started with the
ZenFone 4
Front
Earpiece receiver
Front camera
Touch
screen
display
Touch
keys
Page 4

Side
Audio jack
Power Key
MicroUSB
Microphone
Volume key
Page 5

Rear
Rear camera
Speaker
Page 6
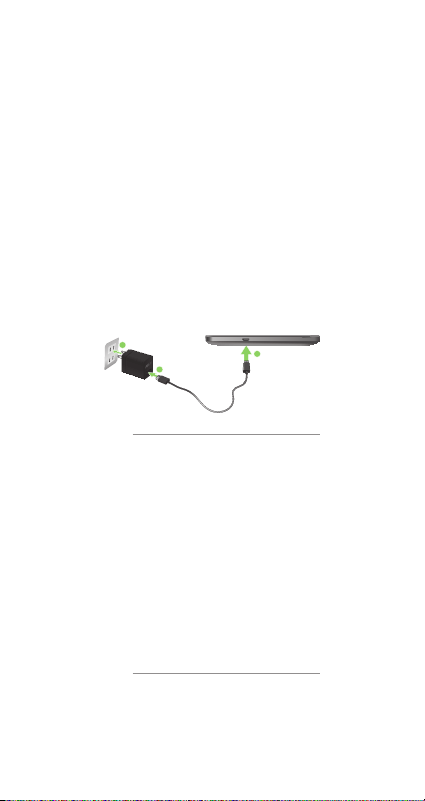
Charging the ZenFone 4
After installing your Micro-SIM card, we
strongly recommend that you charge
your device fully before powering it ON.
To charge your ZenFone 4:
1. Connect the USB connector into the
power adapters USB port.
2. Connect the other end of the USB
cable to the ZenFone 4.
3. Plug the power adapter into a wall
socket.
3
1
NOTES:
• Use only the power adapter that
came with your device.Using
a different power adapter may
damage your device.
• Using the bundled power adapter
and ZenFone 4 signal cable to
connect your ZenFone 4 to a
power outlet is the best way to
charge your ZenFone 4.
• The input voltage range between
the wall outlet and this adapter
is AC 100V - 240V. The output
voltage of the micro USB cable is
DC 5.2V, 1.35A.
2
Page 7
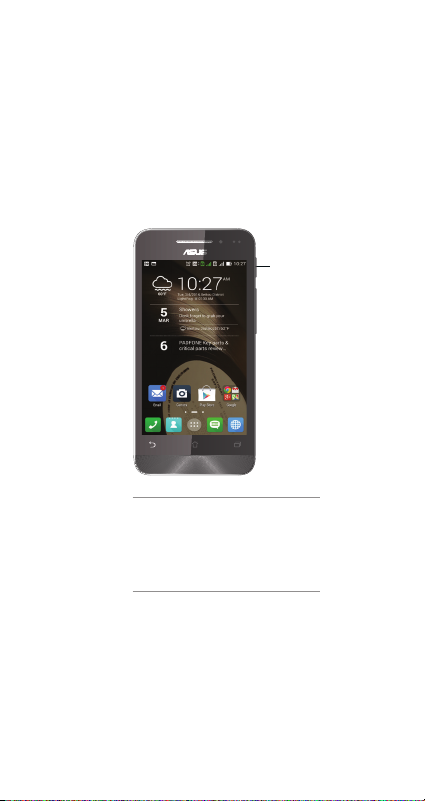
Turning your ZenFone 4 on
or off
Press the power key at the side of your
ZenFone 4 to power the device on or to
power it off.
Power key
IMPORTANT: The first time you power
on your ZenFone 4, you will see the
Welcome screen. Touch the menu to
select your preferred language then
touch Next Step. Follow the onscreen
instructions to set up your ZenFone 4.
Page 8
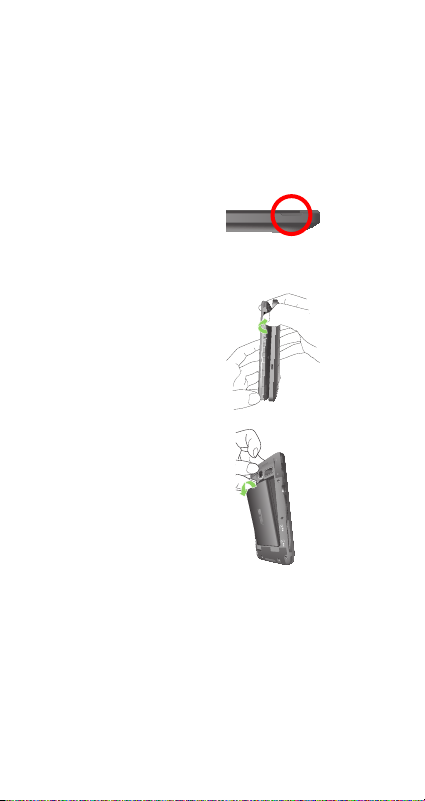
Removing / Inserting the
battery of the ZenFone 4
To remove the battery of your
ZenFone 4:
1. Locate the
groove on the
lower-left corner
of the ZenFone 4.
2. With the phone
upside down,
pry the cover
loose and then
pull the rear
cover off.
3. Using your finger,
push the battery
in the direction of
the arrow.
4. Remove the
battery.
Page 9

To insert the battery of your ZenFone 4:
1. Locate the contact points on
one end of the battery and align
them with the metallic pins on the
ZenFone 4.
2. Insert the battery into your ZenFone 4.
3. Locate the openings for the side
buttons on the rear cover.
4. Align the side buttons of the
ZenFone 4 with the rear cover and
ease the ZenFone 4 in place.
Page 10

Installing a Micro-SIM card
To install a Micro-SIM card into the
ZenFone 4:
1. Remove the rear cover.
2. Locate the Micro-SIM card slots.
3. Insert a Micro-SIM card into one of
the slots.
IMPORTANT: This device uses the
Micro-SIM standard. A Micro-SIM
card is available from your mobile
service provider. Avoid cutting the
Micro-SIM card yourself as this may
cause problems with the devices SIM
card slot.
NOTE: All specifications are subject to
change without notice and may vary by
country and region.
Page 11

Installing a microSD card
To install a microSD card:
1. Locate the groove on the bottom-left
corner of your ZenFone 4.
2. Pry the cover loose and then pull
the rear cover off.
3. Insert the microSD card into the
microSD card slot.
4. Replace the
rear cover.
5. Press down
the rear cover
on all sides
to secure it in
place.
Page 12

Safety information
ZenFone 4 care
• Do notDo not leave your ZenFone 4
exposed to strong sunlight or
excessive heat for a prolonged
period. This may damage it.
• Do not handle your ZenFone 4
device with wet hands or expose
it to moisture or liquids of any
kind. Continuous changes from a
cold to a warm environment may
lead to condensation inside your
ZenFone 4, resulting in corrosion
and possible damage.
• When traveling, avoid packing
the device inside a suitcase.
Cramming the device into a
suitcase may crack the LCD
display. Remember to switch off
your wireless connection during
air travel.
• Use your Z enFone 4 in an
environment with ambient
temperatures between 0 °C (32
°F) and 35 °C (95 °F).
IMPORTANT! To provide electrical
insulation and maintain electrical
safety, a coating is applied to insulate
the ASUS ZenFone 4 body except
on the sides where the I/O ports are
located.
Page 13

The battery
• Avoid charging in extremely high
or low temperature. The battery
performs optimally in an ambient
temperature of +5 °C to +35 °C.
• Do not remove and immerse the
battery in water or any other liquid.
• Never try to open the battery as it
contains substances that might be
harmful if swallowed or allowed to
come into contact with unprotected
skin.
• Do not remove and short-circuit
the battery, as it may overheat and
cause a fire. Keep it away from
jewellery and other metal objects.
• Do not remove and dispose of the
battery in fire. It could explode and
release harmful substances into the
environment.
• Do not remove and dispose of the
battery with your regular household
waste. Take it to a hazardous
material collection point.
• Do not touch the battery terminals.
CAUTION:
• Risk of explosion if battery is
replaced by an incorrect type.
• Dispose of used batteries according
to the instructions.
Page 14

The charger
• Use only the charger supplied
with your ZenFone 4.
• Never pull the charger cord to
disconnect it from the power
socket. Pull the charger itself.
Cleaning and storing
• Your ZenFone 4 should always be
handled with care and protected
from dirt, dust and dampness. To
avoid scratches, never place your
ZenFone 4 face down.
• If cleaning is necessary, turn your
ZenFone 4 off and wipe carefully
with a soft, slightly damp (not
wet) cloth. Use a cotton swab
to clean the camera lens. Allow
your ZenFone 4 to dry completely
before switching it on. Never use
solvents for cleaning.
• If you are not going to use your
ZenFone 4 for some time, fully
charge the battery and store
your ZenFone 4 in a dry place
away from direct sunlight. Your
ZenFone 4 should be switched off
during storage. Recharge every 6
to 12 months.
• Never expose your ZenFone 4 to
heat or strong sunlight.
• Never expose your ZenFone 4 to
moisture or liquids of any kind.
Page 15

• Do not place stickers that may
block the keypad or affect
other components such as the
microphone, earpiece or camera
lens.
WARNING! Failure to follow these
instructions may lead to serious personal
injury and possible property damage.
Driving safely
Never use handheld phones while
driving. It is an offence, that while driving,
to hold a phone or cradle it in your neck
at any point, during the setup, making
or taking of a phone call, text message
or any other data related mobile
communication. Use of fully installed car
kits are still permitted, as are the use of
alternate handsfree accessories.
In the interest of safety, we would
recommend the use of a cradle while
using any form of handsfree accessory.
While driving, we recommend that you
use voicemail wherever possible, and
that you listen to your messages when
you are not in the car. If you must make a
handsfree call when driving, keep it brief.
Do not place objects, including both
installed or portable wireless equipment,
in the area over the airbag or in the
airbag deployment area. An airbag
inflates with great force. If the airbag
inflates, serious injury could result.
Page 16

Electronic devices
Most modern electronic equipment is
shielded from RF energy.
However, certain electronic equipment
may not be shielded against the RF
signals from your device.
Pacemakers
The Health Industry Manufacturers
Association recommends that a
minimum separation of six (6”) inches
be maintained between a phone
and a pacemaker to avoid potential
interference with the pacemaker.
These recommendations are consistent
with the independent research by
and recommendations of Wireless
Technology Research.
If you have a pacemaker:
• Always keep your ZenFone 4 more
than six inches (15cm) from your
pacemaker when turned on.
• Do not carry your ZenFone 4 in your
breast pocket.
• Use the ear opposite the pacemaker
to minimize the potential for
interference.
• If you have any reason to suspect
that interference is taking place,
switch off your ZenFone 4
immediately.
Hearing aids
Some digital phones may interfere
with some hearing aids. In the event of
such interference, call ASUS Customer
Service to discuss alternatives.
Page 17

Other medical devices
If you use any other personal medical
device, consult the manufacturer of your
device to determine if it is adequately
shielded from external RF energy. Your
physician may be able to assist you in
obtaining this information.
Turn your ZenFone 4 off in healthcare
facilities when any regulations posted in
these areas instruct you to do so.
Hospitals or healthcare facilities may be
using equipment that could be sensitive
to external RF energy.
Vehicles
RF signals may affect improperly
installed or inadequately shielded
electronic systems in motor vehicles.
Check with the manufacturer or its
representative regarding your vehicle.
You should also consult the manufacturer
of any equipment added to your vehicle.
Posted facilities
Turn your ZenFone 4 off where posted
notices so require.
Magnetic media
Magnetic fields generated by mobile
devices may damage data on magnetic
storage media, such as credit cards,
computer discs or tapes. Do not place
your ZenFone 4 next to such media.
You should never expose your ZenFone
4 to strong magnetic fields as this may
cause temporary malfunction.
Page 18

Other Safety Guidelines
Aircraft
Regulations prohibit using your mobile
device while onboard an aircraft. Switch
off your ZenFone 4 before boarding
an aircraft or turn off the wireless
connection.
Blasting areas
To avoid interfering with blasting
operations, turn your ZenFone 4 off when
in a blasting area or in areas posted:
“Turn off two-way radio.” Obey all signs
and instructions.
Potentially explosive environments
Turn your ZenFone 4 off when in
any area with a potentially explosive
environment and obey all signs and
instructions.
Sparks in such areas could cause an
explosion or fire resulting in bodily injury
or even death.
Areas with a potentially explosive
environment are often, but not always,
clearly marked. They include fuelling
areas such as gas stations, below decks
on boats, fuel or chemical transfer or
storage facilities, vehicles using liquified
petroleum gas (such as propane or
butane), areas where the air contains
chemicals or articles, such as grain, dust,
or metal powders, and any other area
where you would normally be advised to
turn off your vehicles engine.
Choking
Keep your ZenFone 4 away from children
as the SIM card and other small parts
present a choking hazard.
Page 19

Caution
Your ZenFone 4 is a high quality piece
of equipment. Before operating, read all
instructions and cautionary markings on
the (1) AC Adapter.
• Do not use the ZenFone 4 in an
extreme environment where high
temperature or high humidity exists.
The ZenFone 4 performs optimally
in an ambient temperature between
0 °C (32 °F) and 35 °C (95 °F).
• Do not abuse the ZenFone 4. Avoid
striking, shaking, or subjecting the
device to impact. When not using
the unit, place the device in a
safe place to avoid damage to the
product.
• Do not expose the ZenFone 4 to
rain or moisture.
• Do not use unauthorized
accessories.
• Do not disassemble the ZenFone
4 or its accessories. If service or
repair is required, return the unit
to an authorized service center. If
the unit is disassembled, a risk of
electric shock or fire may result.
• Do not short-circuit the battery
terminals with metal items.
Operator access with a tool
If a TOOL is necessary to gain access to
an OPERATOR ACCESS AREA, either
all other compartments within that area
containing a hazard shall be inaccessible
to the OPERATOR by the use of the
same TOOL, or such compartments shall
be marked to discourage OPERATOR
access.
Page 20

This equipment may be
operated in:
AE BH CZ DA DE
ES Fl FR HK HU
ID IL IT KSA MY
NL NO PL PT RU
SG SK SW TH TR
TW UA UK VN WB
Specific Absorption Rate
(SAR)
Body worn operation
For body worn operation, this device
has been tested and meets the FCC
RF exposure guidelines for use with an
accessory that contains no metal and
is positioned a minimum of 1.5 cm from
the body. Use of other enhancements
may not ensure compliance with FCC
RF exposure guidelines. If you do not
use a body worn accessory and are not
holding the device to the ear, position the
handset a minimum of 1.5 cm from your
body when the device is switched on.
EU Declaration of Conformity
This device complies with the R&TTE
Directive (1999//5/EC), the EMC Directive
(2004/108/EC), and the Low Voltage
Directive (2006/95/EC) issued by the
Commission of the European Community.
Page 21

CE (SAR)
This device meets the EU requirements
(1999/519/EC) on the limitation of
exposure of the general public to
electromagnetic fields by way of health
protection.
The limits are part of extensive
recommendations for the protection
of the general public. These
recommendations have been developed
and checked by independent scientific
organizations through regular and
thorough evaluations of scientific
studies. The unit of measurement for
the European Councils recommended
limit for mobile devices is the “Specific
Absorption Rate” (SAR), and the SAR
limit is 2.0 W/ kg averaged over 10 gram
of body tissue. It meets the requirements
of the International Commission on NonIonizing Radiation Protection (ICNIRP).
For body worn operation, this device
has been tested and meets the ICNIRP
exposure guidelines and the European
Standard EN 50566 and EN 62209-2, for
use with dedicated accessories. Use of
other accessories which contain metals
may not ensure compliance with ICNIRP
exposure guidelines.
SAR is measured with the device at a
separation of 0 cm and 1.5 cm to the
body, while transmitting at the highest
certified output power level in all
frequency bands of the mobile device.
The maximum SAR value of ZenFone 4
for each frequency band is listed below:
Page 22

10g
Highest
Body SAR
(1.5 cm Gap)
(W/kg)
10g
Band
GSM900 0.606 1.02
GSM1800 0.576 0.0044
WCDMA I 1.04 0.585
WCDMA
VIII
2.4 G
WLAN
Bluetooth N/A N/A
This device have been tested to
comply with the Sound Pressure Level
requirement laid down in the applicable
EN 50332-1and/or EN 50332-2
standards. Permanent hearing loss
may occur if earphones or headphones
are used at high volume for prolonged
periods of time.
Highest
Head SAR
(W/kg)
0.641 0.442
0.141 0.036
Page 23

Prevention of Hearing Loss
Warning statement requirement under
EN 60950-1:A12.
WARNING: To prevent
possible hearing damage,
do not listen at high volume
levels for long periods.
NOTE: For France, headphones/
earphones for this device are
compliant with the sound pressure
level requirment laid down in the
applicable EN 50332-1: 2000 and/or
EN50332-2: 2003 standard as required
by French Article L.5232-1.
Page 24

EC Declaration of Conformity
2200
We, the undersigned,
Manufacturer:
Address, City:
Country:
Authorized representative in Europe:
Address, City:
Country:
declare the following apparatus:
Product name :
Model name :
conform with the essential requirements of the following directives:
2004/108/EC-EMC Directive
EN 55022: 2010+AC:2011 Class B
EN 61000-3-2:2006+ A2: 2009+A2: 2009 Class A
EN 55013 :2001+A1: 2003+A2: 2006
1999/5/EC-R &TTE Directive
EN 300 328 V1.7.1(2006-10)
EN 300 440-1 V1.6.1(2010-08)
EN 300 440-2 V1.4.1(2010-08)
EN 301 511 V9.0.2(2003-03)
EN 301 908-1 V6.2.1(2013-04)
EN 301 908-2 V5.2.1(2011-07)
EN 301 893 V1.6.1(2011-11)
EN 302 544-2 V1.1.1(2009-01)
EN 302 623 V1.1.1(2009-01)
EN 62209-1: 2006
EN 62209-2: 2010
EN 62479:2010
EN 50566: 2013
2006/95/EC-LVD Directive
EN 60950-1 / A12:2011 EN 60065:2002 / A12:2011
2009/125/EC-ErP Directive
Regulation (EC) No. 1275/2008
Regulation (EC) No. 642/2009
2011/65/EU-RoHS Directive
CE marking
Declaration Date: 21/03/2014
Year to begin affixing CE marking: 2014
ASUSTeK COMPUTER INC.
4F, No. 150, LI-TE Rd., PEITOU, TAIPEI 112, TAIWAN
TAIWAN
ASUS COMPUTER GmbH
HARKORT STR. 21-23, 40880 RATINGEN
GERMANY
ZenFone 4
ASUS_T00I
EN 55024: 2010
EN 61000-3-3: 2008
EN 55020: 2007+A11: 2011
EN 301 489-1 V1.9.2(2011-09)
EN 301 489-3 V1.6.1(2013-08)
EN 301 489-4 V1.4.1(2009-05)
EN 301 489-7 V1.3.1(2005-11)
EN 301 489-9 V1.4.1(2007-11)
EN 301 489-17 V2.2.1(2012-09)
EN 301 489-24 V1.5.1(2010-10)
EN 302 326-2 V1.2.2(2007-06)
EN 50332-1 (2000-03)
EN 50332-2 (2003-12)
EN 50360: 2001
EN 50360/A1 :2012
Regulation (EC) No. 278/2009
Regulation (EC) No. 617/2013
Ver. 130816
(EC conformity marking)
Position : CEO
Name :
Jerry Shen
Signature :
__________
Page 25

Address: 15 Li-Te Road, Peitou,
Taipei, Taiwan
Tel: 886228943447
Fax: 886228907698
Declaration
We declare that the IMEI codes for this
product, ASUS ZenFone 4, are unique
to each unit and only assigned to this
model. The IMEI of each unit is factory
set and cannot be altered by the user
and that it complies with the relevant
IMEI integrity related requirements
expressed in the GSM standards.
Should you have any questions or
comments regarding this matter, please
contact us.
Sincerely yours,
ASUSTeK COMPUTER INC.
Tel: 886228943447
Fax: 886228907698
Support:
http://vip.asus.com/eservice/techserv.aspx
ASUS
Page 26

1 5 060-31300000
 Loading...