

Page 1

Notebook PC
E-Manual
Page 2

E7780
January 2013
COPYRIGHT INFORMATION
No part of this manual, including the products and software described in it, may be
reproduced, transmitted, transcribed, stored in a retrieval system, or translated into any
language in any form or by any means, except documentation kept by the purchaser for
backup purposes, without the express written permission of ASUSTeK COMPUTER INC. (“ASUS”).
ASUS PROVIDES THIS MANUAL “AS IS” WITHOUT WARRANTY OF ANY KIND, EITHER EXPRESS
OR IMPLIED, INCLUDING BUT NOT LIMITED TO THE IMPLIED WARRANTIES OR CONDITIONS
OF MERCHANTABILITY OR FITNESS FOR A PARTICULAR PURPOSE. IN NO EVENT SHALL ASUS,
ITS DIRECTORS, OFFICERS, EMPLOYEES OR AGENTS BE LIABLE FOR ANY INDIRECT, SPECIAL,
INCIDENTAL, OR CONSEQUENTIAL DAMAGES (INCLUDING DAMAGES FOR LOSS OF PROFITS,
LOSS OF BUSINESS, LOSS OF USE OR DATA, INTERRUPTION OF BUSINESS AND THE LIKE), EVEN
IF ASUS HAS BEEN ADVISED OF THE POSSIBILITY OF SUCH DAMAGES ARISING FROM ANY
DEFECT OR ERROR IN THIS MANUAL OR PRODUCT.
Products and corporate names appearing in this manual may or may not be registered
trademarks or copyrights of their respective companies, and are used only for identication or
explanation and to the owners’ benet, without intent to infringe.
SPECIFICATIONS AND INFORMATION CONTAINED IN THIS MANUAL ARE FURNISHED FOR
INFORMATIONAL USE ONLY, AND ARE SUBJECT TO CHANGE AT ANY TIME WITHOUT NOTICE,
AND SHOULD NOT BE CONSTRUED AS A COMMITMENT BY ASUS. ASUS ASSUMES NO
RESPONSIBILITY OR LIABILITY FOR ANY ERRORS OR INACCURACIES THAT MAY APPEAR IN THIS
MANUAL, INCLUDING THE PRODUCTS AND SOFTWARE DESCRIBED IN IT.
Copyright © 2013 ASUSTeK COMPUTER INC. All Rights Reserved.
LIMITATION OF LIABILITY
Circumstances may arise where because of a default on ASUS’ part or other liability, you are
entitled to recover damages from ASUS. In each such instance, regardless of the basis on which
you are entitled to claim damages from ASUS, ASUS is liable for no more than damages for
bodily injury (including death) and damage to real property and tangible personal property;
or any other actual and direct damages resulted from omission or failure of performing legal
duties under this Warranty Statement, up to the listed contract price of each product.
ASUS will only be responsible for or indemnify you for loss, damages or claims based in
contract, tort or infringement under this Warranty Statement.
This limit also applies to ASUS’ suppliers and its reseller. It is the maximum for which ASUS, its
suppliers, and your reseller are collectively responsible.
UNDER NO CIRCUMSTANCES IS ASUS LIABLE FOR ANY OF THE FOLLOWING: (1) THIRDPARTY CLAIMS AGAINST YOU FOR DAMAGES; (2) LOSS OF, OR DAMAGE TO, YOUR RECORDS
OR DATA; OR (3) SPECIAL, INCIDENTAL, OR INDIRECT DAMAGES OR FOR ANY ECONOMIC
CONSEQUENTIAL DAMAGES (INCLUDING LOST PROFITS OR SAVINGS), EVEN IF ASUS, ITS
SUPPLIERS OR YOUR RESELLER IS INFORMED OF THEIR POSSIBILITY.
SERVICE AND SUPPORT
Visit our multi-language web site at http://support.asus.com
2
Notebook PC E-Manual
Page 3

Table of Contents
About this manual ............................................................................................. 7
Conventions used in this manual ............................................................... 8
Icons ............................................................................................................... 8
Typography ......................................................................................................... 8
Safety precautions ............................................................................................. 9
Using your Notebook PC................................................................................9
Caring for your Notebook PC .....................................................................10
Proper disposal ................................................................................................11
Chapter 1: Hardware Setup
Getting to know your Notebook PC ..........................................................14
Top View .............................................................................................................14
Bottom .............................................................................................................18
Right Side ..........................................................................................................20
Left Side .............................................................................................................22
Rear View ...........................................................................................................24
Chapter 2: Using your Notebook PC
Getting started ..................................................................................................26
Install the battery pack (on selected models). .....................................26
Charge your Notebook PC. ..........................................................................27
Lift to open the display panel. ...................................................................28
Press the power button. ...............................................................................28
Gestures for the touchpad ............................................................................29
Moving the pointer ........................................................................................29
One-nger gestures .......................................................................................30
Two-nger gestures .......................................................................................32
Three-nger gestures ....................................................................................33
Using the keyboard .........................................................................................34
Function keys ...................................................................................................34
Function keys for ASUS Apps .....................................................................35
Windows®8 keys ..............................................................................................35
Multimedia control keys .............................................................................36
Numeric keypad ..............................................................................................36
Using the optical drive ...................................................................................37
Notebook PC E-Manual
3
Page 4

Chapter 3: Working with Windows® 8
Starting for the first time ...............................................................................40
Windows® 8 lock screen .................................................................................. 40
Windows® UI .......................................................................................................41
Start screen .......................................................................................................41
Windows® apps ...............................................................................................41
Hotspots.............................................................................................................42
Working with Windows® apps ......................................................................44
Launching apps ...............................................................................................44
Customizing apps ...........................................................................................44
Closing apps .....................................................................................................45
Accessing the Apps screen ..........................................................................46
Charms bar ........................................................................................................48
Snap feature .....................................................................................................50
Other keyboard shortcuts .............................................................................52
Connecting to wireless networks ...............................................................54
Wi-Fi .............................................................................................................54
Bluetooth ..........................................................................................................56
Airplane mode .................................................................................................58
Connecting to wired networks....................................................................59
Conguring a dynamic IP/PPPoE network connection ....................59
Conguring a static IP network connection .........................................63
Turning your Notebook PC off .....................................................................64
Putting your Notebook PC to sleep .........................................................64
Chapter 4: ASUS apps
Featured ASUS Apps .......................................................................................66
LifeFrame ...........................................................................................................66
Power4Gear Hybrid........................................................................................68
USB Charger+ ...................................................................................................69
Instant On ..........................................................................................................71
4
Notebook PC E-Manual
Page 5

Chapter 5: Power-on Self-test (POST)
The Power-on Self-test (POST) ....................................................................74
Using POST to access BIOS and Troubleshoot .....................................74
BIOS ...................................................................................................................74
Accessing BIOS ................................................................................................74
BIOS Settings ....................................................................................................75
Troubleshoot......................................................................................................83
Refresh your PC ...............................................................................................83
Reset your PC ...................................................................................................84
Advanced options ..........................................................................................85
Chapter 6: Upgrading your Notebook PC
Installing a Random Access Memory (RAM) module ..........................88
Replacing the Hard Disk Drive (HDD) .......................................................92
Installing a new battery pack .......................................................................98
Appendices
DVD-ROM Drive Information (on selected models) ........................ 102
Blu-ray ROM Drive Information (on selected models) ...................104
Internal Modem Compliancy .................................................................. 105
Overview......................................................................................................... 105
Network Compatibility Declaration ...................................................... 105
Network Compatibility Declaration ..................................................... 106
Non-Voice Equipment ............................................................................... 106
Federal Communications Commission Statement .......................... 108
FCC Radio Frequency (RF) Exposure Caution Statement ..............110
Declaration of Conformity (R&TTE directive 1999/5/EC) ...............110
CE Marking ..................................................................................................... 111
IC Radiation Exposure Statement for Canada ................................... 111
Déclaration d’Industrie Canada relative
à l’exposition aux ondes radio ............................................................... 112
Wireless Operation Channel for Dierent Domains ........................ 113
Notebook PC E-Manual
5
Page 6

France Restricted Wireless Frequency Bands .................................... 113
UL Safety Notices ......................................................................................... 115
Power Safety Requirement.......................................................................116
TV Tuner Notices ..........................................................................................116
REACH .......................................................................................................... 116
Nordic Lithium Cautions (for lithium-ion batteries) ........................ 116
Optical Drive Safety Information ...........................................................118
Macrovision Corporation Product Notice ...........................................118
CTR 21 Approval (for Notebook PC with built-in Modem) ........... 119
ENERGY STAR complied product ........................................................... 120
European Union Eco-label ........................................................................ 121
Prevention of Hearing Loss ......................................................................121
Coating Notice ..............................................................................................121
Global Environmental Regulation Compliance and Declaration 122
ASUS Recycling/Takeback Services ....................................................... 122
Regional notice for Singapore ................................................................ 122
6
Notebook PC E-Manual
Page 7

About this manual
This manual provides information about the hardware and software
features of your Notebook PC, organized through the following
chapters:
Chapter 1: Hardware Setup
This chapter details the hardware components of your
Notebook PC.
Chapter 2: Using your Notebook PC
This chapter shows you how to use the dierent parts of your
Notebook PC.
Chapter 3: Working with Windows® 8
This chapter provides an overview of using Windows® 8 in your
Notebook PC.
Chapter 4: ASUS Apps
This chapter features the ASUS apps included with your
Notebook PC.
Chapter 5: Power-on Self-test (POST)
This chapter shows you how to use POST to change the settings
of your Notebook PC.
Chapter 6: Upgrading your Notebook PC
This chapter guides you through the process of replacing and
upgrading parts of your Notebook PC.
Appendices
This section includes notices and safety statements for your
Notebook PC.
Notebook PC E-Manual
7
Page 8

Conventions used in this manual
To highlight key information in this manual, some text are presented
as follows:
IMPORTANT! This message contains vital information that must be
followed to complete a task.
NOTE: This message contains additional information and tips that can
help complete tasks.
WARNING! This message contains important information that must
be followed to keep you safe while performing tasks and prevent
damage to your Notebook PC's data and components.
Icons
The icons below indicate the devices you can use for completing a
series of tasks or procedures on your Notebook PC.
= Use the touchpad.
= Use the keyboard.
Typography
Bold = This indicates a menu or an item that must be selected.
Italic = This indicates sections that you can refer to in this manual.
8
Notebook PC E-Manual
Page 9
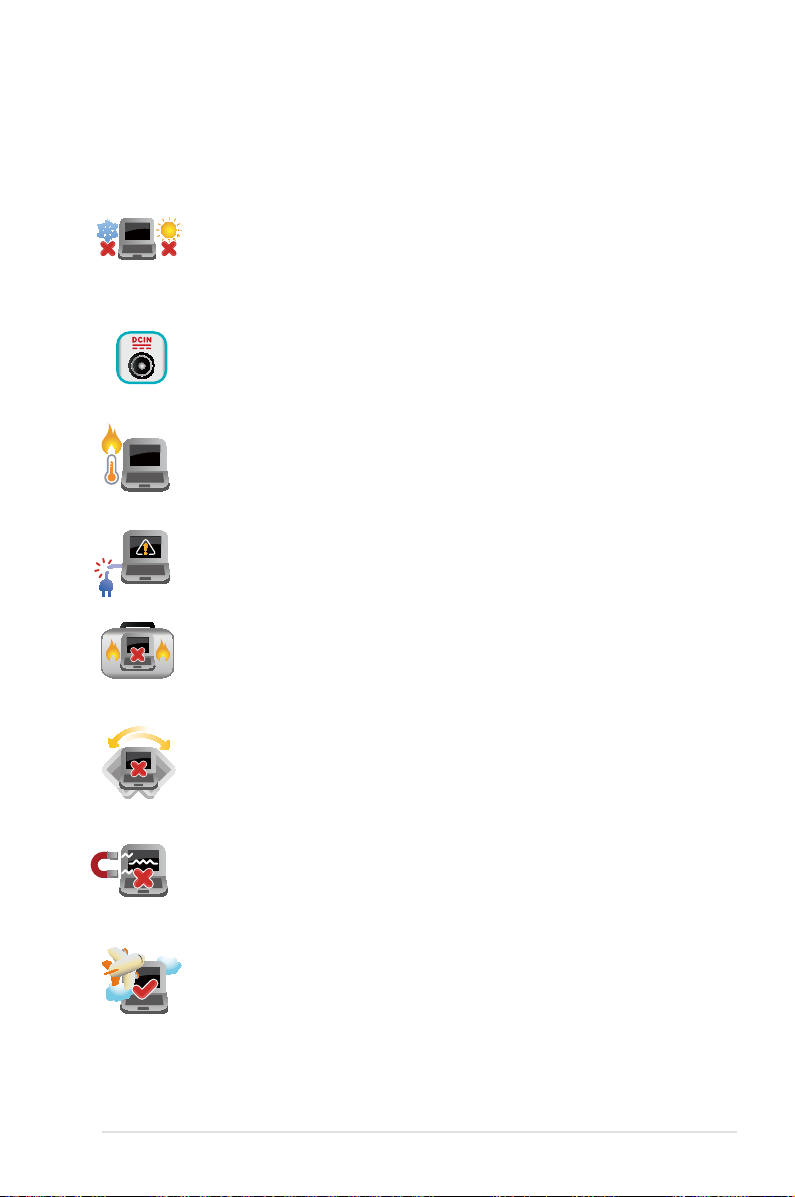
Safety precautions
Using your Notebook PC
This Notebook PC should only be used in environments
with ambient temperatures between 5°C (41°F) and 35°C
(95°F).
Refer to the rating label on the bottom of your Notebook
PC and ensure that your power adapter complies with
this rating.
Do not leave your Notebook PC on your lap or near any
part of your body to prevent discomfort or injury from
heat exposure.
Do not use damaged power cords, accessories, and other
peripherals with your Notebook PC.
While powered on, ensure that you do not carry or cover
your Notebook PC with any materials that can reduce air
circulation.
Do not place your Notebook PC on uneven or unstable
work surfaces.
You can send your Notebook PC through x-ray machines
(used on items placed on conveyor belts), but do not
expose them to magnetic detectors and wands.
Contact your airline provider to learn about related
inight services that can be used and restrictions that
must be followed when using your Notebook PC inight.
Notebook PC E-Manual
9
Page 10
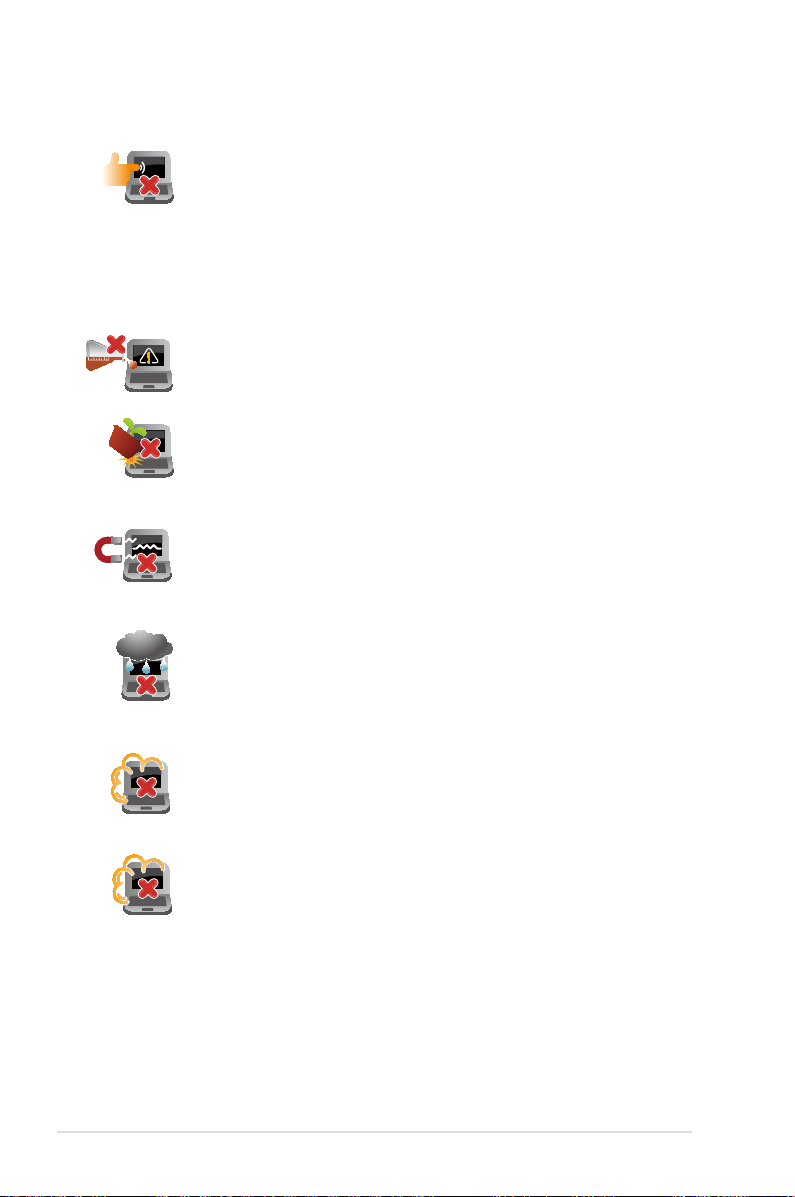
Caring for your Notebook PC
Disconnect the AC power and remove the battery pack
(if applicable) before cleaning your Notebook PC. Use a
clean cellulose sponge or chamois cloth dampened with
a solution of nonabrasive detergent and a few drops
of warm water. Remove any extra moisture from your
Notebook PC using a dry cloth.
Do not use strong solvents such as thinners, benzene, or
other chemicals on or near your Notebook PC.
Do not place objects on top of your Notebook PC.
Do not expose your Notebook PC to strong magnetic or
electrical elds.
Do not use or expose your Notebook PC near liquids, rain,
or moisture.
10
Do not expose your Notebook PC to dusty environments.
Do not use your Notebook PC near gas leaks.
Notebook PC E-Manual
Page 11

Proper disposal
Do not throw your Notebook PC in municipal waste.
This product has been designed to enable proper reuse
of parts and recycling. The symbol of the crossed out
wheeled bin indicates that the product (electrical,
electronic equipment and mercury-containing button cell
battery) should not be placed in municipal waste. Check
local regulations for disposal of electronic products.
Do not throw the battery in municipal waste. The symbol
of the crossed out wheeled bin indicates that the battery
should not be placed in municipal waste.
Notebook PC E-Manual
11
Page 12

12
Notebook PC E-Manual
Page 13

Chapter 1: Hardware Setup
Notebook PC E-Manual
13
Page 14
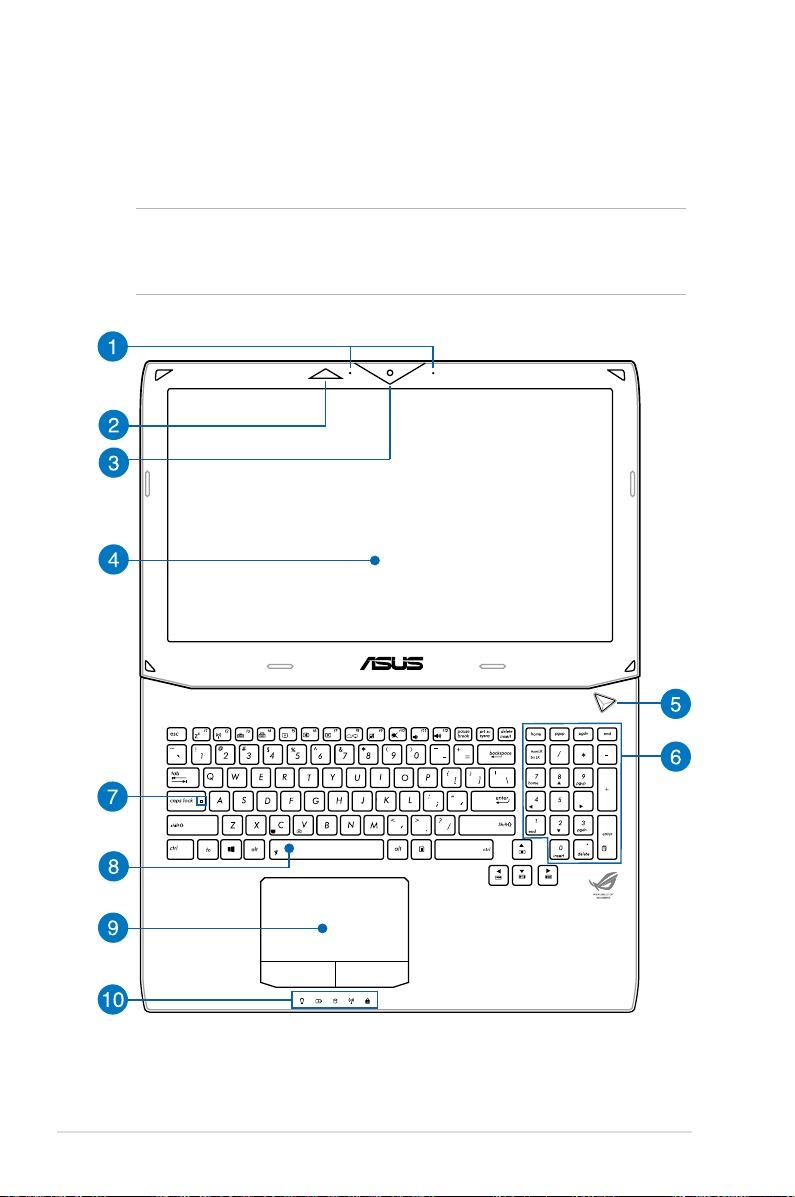
Getting to know your Notebook PC
Top View
NOTE: The keyboard's layout may vary per region or country. The top
view may also vary in appearance depending on the Notebook PC
model.
14
Notebook PC E-Manual
Page 15

Microphone
The built-in microphone can be used for video conferencing,
voice narrations, or simple audio recording.
3D Vision IR port (on selected models)
The 3D Vision IR port transmits 3D Vision signals to your 3D
glasses while playing 3D video games or watching 3D movies.
Camera
The built-in camera allows you to take pictures or record videos
using your Notebook PC.
Display panel
This display panel provides excellent viewing features for
photos, videos, and other multimedia les on your Notebook
PC.
NOTE: The display resolution may vary depending on Notebook
PC model.
Power button
Press the power button to turn your Notebook PC on or o.
You can also use the power button to put your Notebook PC to
sleep or hibernate mode and wake it up from sleep or hibernate
mode.
In the event that your Notebook PC becomes unresponsive,
press and hold the power button for about four (4) seconds
until your Notebook PC shuts down.
Numeric keypad
The numeric keypad toggles between these two functions: for
numeric input and as pointer direction keys.
NOTE: For more details, refer to the Numeric keypad section in
this manual.
Notebook PC E-Manual
15
Page 16
Capital lock indicator
This indicator lights up when the capital lock function is
activated. Using capital lock allows you to type capitalized
letters (such as A, B, C) using your Notebook PC’s keyboard.
Keyboard
The keyboard provides full-sized QWERTY keys with a
comfortable travel depth for typing. It also enables you to
use the function keys, allows quick access to Windows®, and
controls other multimedia functions.
NOTE:
• The keyboard layout diers by model or territory.
• Some selected models come with a backlit keyboard.
Touchpad
The touchpad allows the use of multi-gestures to navigate
onscreen, providing an intuitive user experience. It also
simulates the functions of a regular mouse.
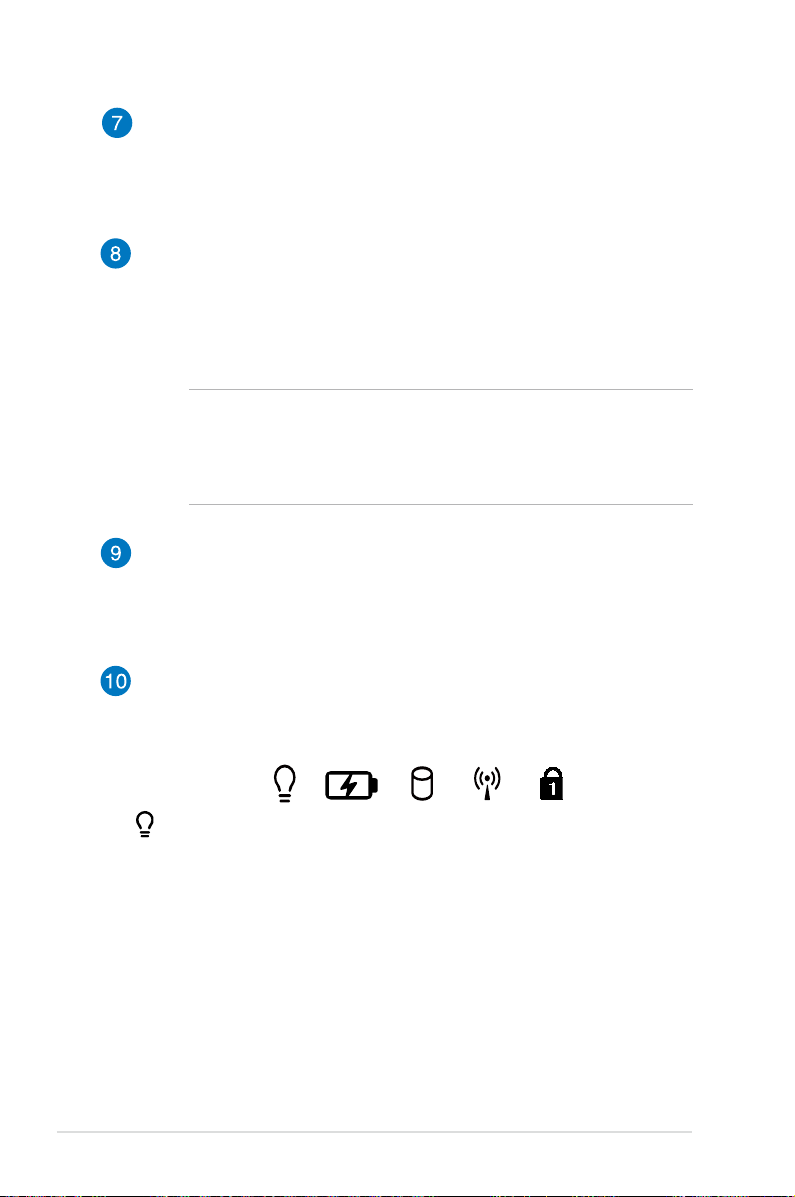
Status indicators
The status indicators help identify the current hardware status
of your Notebook PC.
16
Power indicator
The power indicator lights up when the Notebook PC is
turned on and blinks slowly when the Notebook PC is in
sleep mode
Notebook PC E-Manual
Page 17

Two-color battery charge indicator
The two-color LED provides a visual indication of the
battery’s charge status. Refer to the following table for
details:
Color Status
Solid Green The Notebook PC is plugged to a
power source, charging its battery,
and the battery power is between
95% and 100%.
Solid Orange The Notebook PC is plugged to a
power source, charging its battery,
and the battery power is less than
95%.
Blinking Orange The Notebook PC is running on
battery mode and the battery
power is less than 10%.
Lights o The Notebook PC is running on
battery mode and the battery
power is between 10% to 100%.
Drive activity indicator
This indicator lights up when your Notebook PC is
accessing the internal storage drives.
Bluetooth / Wireless indicator
This indicator lights up when your Notebook PC’s
wireless function (Bluetooth or Wi-Fi) is enabled.
Number lock indicator
This indicator lights up when the number lock function
is activated. This allows you to use some of the keys on
your keyboard for numeric input.
Notebook PC E-Manual
17
Page 18
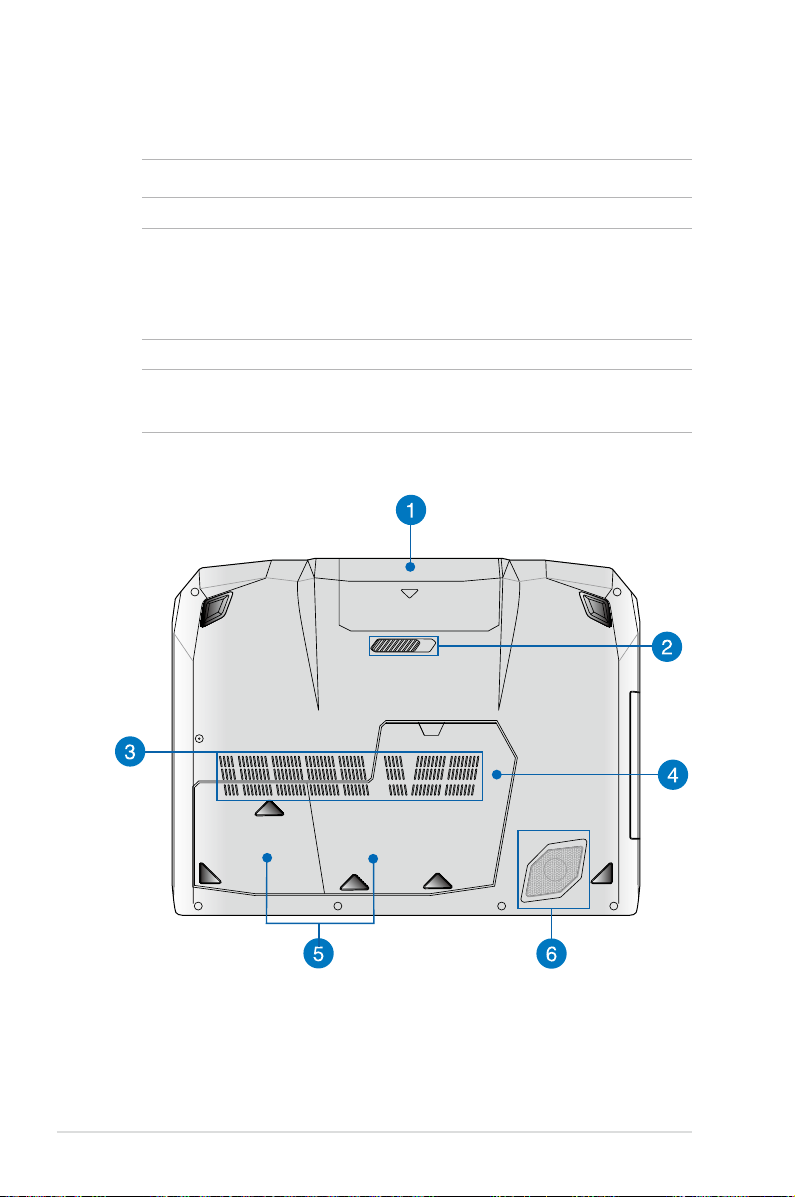
Bottom
NOTE: The bottom side may vary in appearance depending on model.
WARNING! The bottom of the Notebook PC can get warm to hot
while in use or while charging the battery pack. When working on
your Notebook PC, do not place it on surfaces that can block the
vents.
IMPORTANT! Battery time varies by usage and by the specications
for this Notebook PC. The battery pack cannot be disassembled.
18
Notebook PC E-Manual
Page 19

Battery pack
The battery pack is automatically charged when your Notebook
PC is connected to a power source. When charged, the battery
pack supplies power to your Notebook PC.
Spring battery lock
The spring battery lock automatically locks the battery pack in
place once it is inserted into the battery slot.
IMPORTANT! This lock should be held in an unlocked position
when removing the battery pack.
Air vents
The air vents allow cool air to enter and warm air to exit the
Notebook PC.
WARNING! Ensure that paper, books, clothing, cables, or other
objects do not block any of the air vents or else overheating
may occur.
Random-access memory module (RAM) compartment
The RAM compartment allows you to add RAM memory
modules to increase the memory capacity of your Notebook
PC.
Hard disk drive compartments
These compartments are reserved spaces for the hard disk
drives of your Notebook PC.
Subwoofer
The subwoofer speaker produces low-pitched audio
frequencies for fuller and richer bass sounds suited for playing
PC games or watching movies on your Notebook PC.
Notebook PC E-Manual
19
Page 20

Right Side
Headphone output and S/PDIF output combo jack port
This port allows you to connect your Notebook PC to amplied
speakers or headphones. You can also use this port to connect
your Notebook PC to Sony/Philips Digital Interconnect Format
(S/PDIF) compliant devices.
Microphone input jack port
The microphone input jack port is used to connect your
Notebook PC to an external microphone.
USB 3.0 port with USB Charger+
This USB 3.0 port with the icon comes with the USB Charger+
feature. USB Charger+ allows you to quick charge mobile
devices and can be used even while your Notebook PC is on
sleep, hibernate, or shutdown mode (on selected models).
20
USB 3.0 port
This Universal Serial Bus 3.0 (USB 3.0) port provides a transfer
rate of up to 5 Gbit/s and is backward compatible to USB 2.0.
Mini DisplayPort/Thunderbolt port (varies by model)
Use a Thunderbolt adapter to connect your Notebook PC to a
DisplayPort, VGA, DVI, or HDMI external display and experience
high-resolution display features via Intel® Thunderbolt™
technology.
Notebook PC E-Manual
Page 21

HDMI port
This port is for a High-Denition Multimedia Interface (HDMI)
connector and is HDCP compliant for HD DVD, Blu-ray, and
other protected content playback.
LAN port
Insert the network cable into this port to connect to a local
area network (LAN).
VGA port
This port allows you to connect your Notebook PC to a
standard VGA-compatible device, such as monitors or
projectors.
Power (DC) input port
Insert the bundled power adapter into this port to charge the
battery pack and supply power to your Notebook PC.
WARNING! The adapter may become warm to hot while in use.
Ensure not to cover the adapter and keep it away from your
body while it is connected to a power source.
IMPORTANT! Use only the bundled power adapter to charge
the battery pack and supply power to your Notebook PC.
Notebook PC E-Manual
21
Page 22

Left Side
Kensington® security slot
The Kensington® security slot allows you to secure your
Notebook PC using Kensington® compatible Notebook PC
security products.
USB 3.0 ports
These Universal Serial Bus 3.0 (USB 3.0) ports provide a transfer
rate of up to 5 Gbit/s and are backward compatible to USB 2.0.
Optical drive
Your Notebook PC’s optical drive may support several disc
formats such as CDs, DVDs, recordable discs, or rewritable
discs.
22
Optical drive indicator
This indicator lights up when the optical drive electronic eject
button is pressed while the Notebook PC is powered on. This
indicator also lights up when the optical drive is currently
reading data from or writing data to a disc.
Optical disc drive eject button
Press this button to eject the optical drive tray.
Notebook PC E-Manual
Page 23

Manual eject hole
The manual eject hole is used to eject the drive tray in case the
electronic eject button does not work.
WARNING! Use the manual eject hole only when the electronic
eject button does not work.
NOTE: For more details, refer to the Using the optical drive
section in this manual.
Memory card reader
This Notebook PC has a single built-in memory card reader slot
that supports MMC and SD card formats.
Notebook PC E-Manual
23
Page 24

Rear View
Air vents
The air vents allow cool air to enter and warm air to exit from
your Notebook PC.
IMPORTANT! Ensure that paper, books, clothing, cables, or
other objects do not block any of the air vents to prevent
overheating.
24
Notebook PC E-Manual
Page 25

Chapter 2: Using your Notebook PC
Notebook PC E-Manual
25
Page 26

Getting started
Install the battery pack (on selected models).
IMPORTANT! If your Notebook PC does not have its battery pack
installed, use the following procedures for installation.
Align and insert the battery pack into the Notebook PC’s battery slot.
26
Notebook PC E-Manual
Page 27
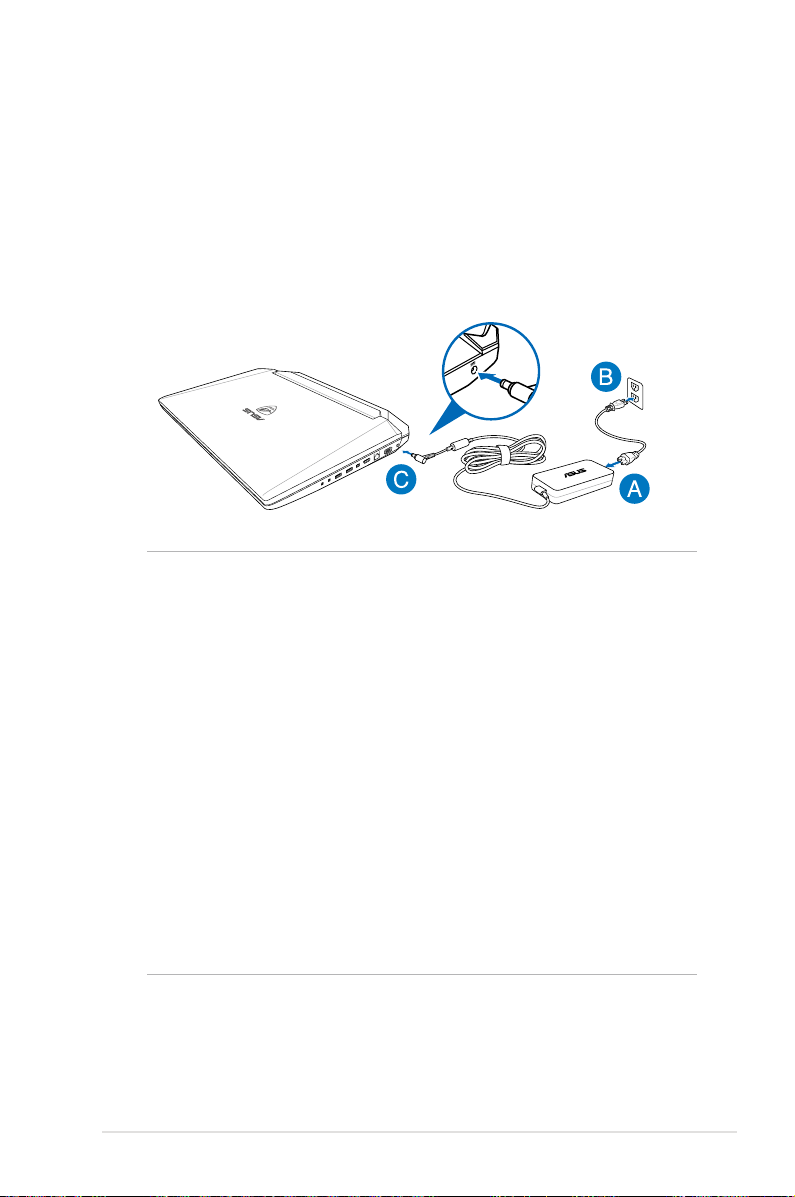
Charge your Notebook PC.
A. Connect the AC power cord to the AC/DC adapter.
B. Plug the AC power cord into a 100V~240V power source.
C. Connect the DC power connector into your Notebook PC’s
power (DC) input port.
IMPORTANT!
• Ensure that your Notebook PC is connected to the power adapter
before turning it on for the rst time.
• Locate the input/output rating label on your Notebook PC and
ensure that it matches the input/output rating information on
your power adapter.
• When using your Notebook PC on power adapter mode, the
socket outlet must be near to the unit and easily accessible.
• Power adapter information:
- Input voltage: 100-240Vac
- Input frequency: 50-60Hz
- Rating output current: 180W (19.5V, 9.23A)
- Rating output voltage: 19V
Notebook PC E-Manual
27
Page 28

Lift to open the display panel.
Press the power button.
28
Notebook PC E-Manual
Page 29
Gestures for the touchpad
Gestures allow you to launch programs and access the settings of
your Notebook PC. Refer to the following illustrations when using
hand gestures on your touchpad.
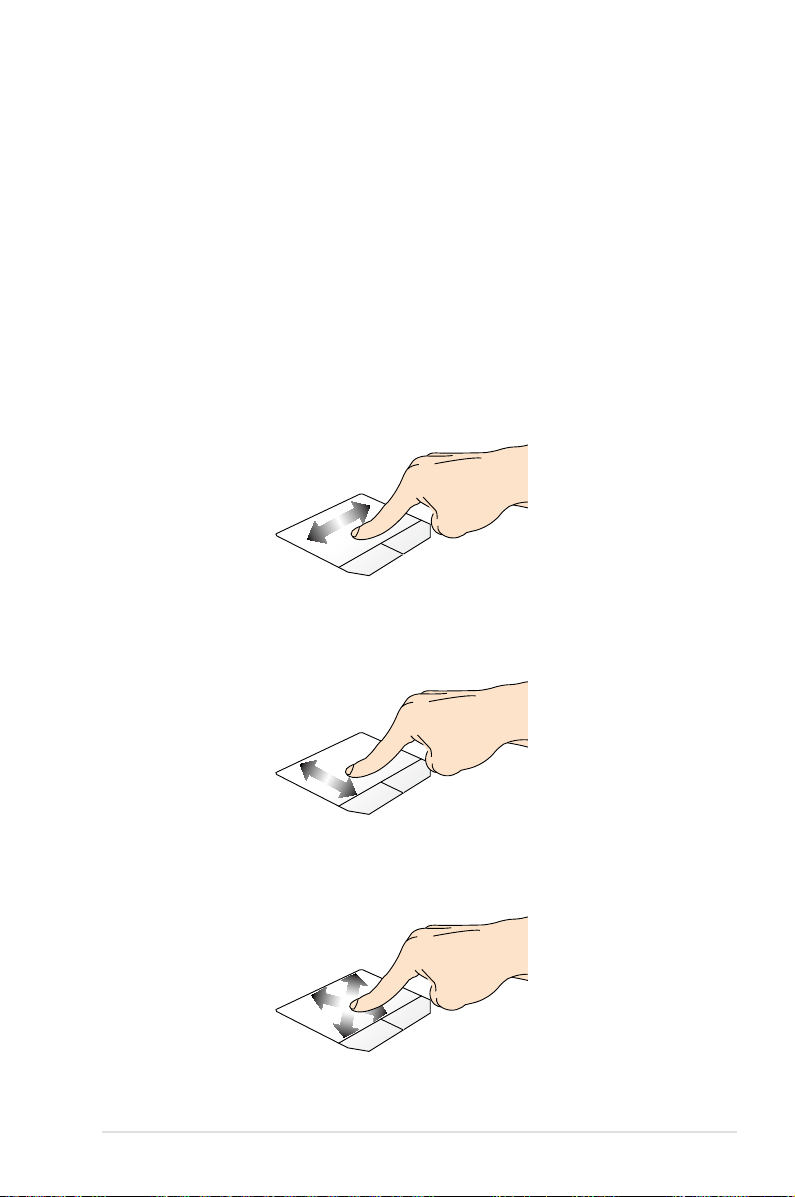
Moving the pointer
You can tap or click anywhere on the touchpad to activate its
pointer, then slide your nger on the touchpad to move the pointer
onscreen.
Slide horizontally
Slide vertically
Slide diagonally
Notebook PC E-Manual
29
Page 30

One-nger gestures
Tap/Double tap
• In the Start screen, tap on an app to launch it.
• In Desktop mode, double-tap an application to launch it.
Left-click Right-click
• In the Start screen, click on
an app to launch it.
• In Desktop mode, doubleclick an application to launch
it.
30
• In the Start screen, click
on an app to select it and
launch the settings bar. You
can also press this button to
launch the All Apps bar.
• In Desktop mode, use this
button to open the rightclick menu.
Notebook PC E-Manual
Page 31

Drag and drop
Double-tap an item, then slide the same nger without lifting it o
the touchpad. To drop the item to its new location, lift your nger
from the touchpad.
Top edge swipe
• In the Start screen, swipe from the top edge to launch the All
Apps bar.
• In a running app, swipe from the top edge to view its menu.
Left edge swipe Right edge swipe
Swipe from the left edge to shue
your running apps.
Notebook PC E-Manual
Swipe the right edge to launch
the Charms bar.
31
Page 32

Two-nger gestures
Tap Rotate
Tap two ngers on the touchpad
to simulate the right-click
function.
To rotate an image, place two
ngers on the touchpad then
turn one nger clockwise or
counterclockwise while the other
stays still.
Two-nger scroll (up/down) Two-nger scroll (left/right)
Slide two ngers to scroll up or
down.
Slide two ngers to scroll left or
right.
Zoom out Zoom in
Bring together your two ngers
on the touchpad.
32
Spread apart your two ngers on
the touchpad.
Notebook PC E-Manual
Page 33

Drag and drop
Select an item then press and hold the left button. Using your other
nger, slide down the touchpad to drag and drop the item to a new
location.
Three-nger gestures
Swipe up Swipe down
Swipe three ngers upward to
show all running applications.
Notebook PC E-Manual
Swipe three ngers downward to
show the Desktop mode.
33
Page 34

Using the keyboard
Function keys
The function keys on your Notebook PC’s keyboard can trigger the
following commands:
Puts the Notebook PC into Sleep mode
Turns Airplane mode on or o
NOTE: When enabled, the Airplane mode disables
all wireless connectivity.
Decreases keyboard brightness for Notebook PC
models with a backlit keyboard
Increases keyboard brightness for Notebook PC
models with a backlit keyboard
Decreases display brightness
34
Increases display brightness
Turns the display panel o
Toggles the display mode
NOTE: Ensure that the second display is connected
to your Notebook PC.
Enables or disables the touchpad
Notebook PC E-Manual
Page 35

Turns the speaker on or o
Turns the speaker volume down
Turns the speaker volume up
Function keys for ASUS Apps
Your Notebook PC also comes with a special set of function keys that
can be used to launch ASUS apps.
Toggles the ASUS Splendid Video Enhancement
Technology app to switch between these display
color enhancement modes: Gamma Correction,
Vivid Mode, Theater Mode, Soft Mode, My Prole,
and Normal.
Launches the ASUS LifeFrame app
Launches the ASUS Power4Gear Hybrid app
Windows®8 keys
There are two special Windows® keys on your Notebook PC’s
keyboard used as below:
Press this key to go back to the Start screen. If you are
already in the Start screen, press this key to go back to the
last app you opened.
Press this key to simulate the right-click functions.
Notebook PC E-Manual
35
Page 36

Multimedia control keys
The multimedia control keys allow you to control multimedia les,
such as audios and videos, when played in your Notebook PC.
Press in combination with the arrow keys on your Notebook
PC, illustrated as below:
Stop
Numeric keypad
Skip to
previous
track or
rewind
Play or
pause
Skip to
next track
or fast
forward
A numeric keypad is available on
selected Notebook PC models. You
can use this keypad for numeric input
or as pointer direction keys.
To use the numeric keypad as
pointer direction keys, press
.
To use the numeric keypad
for numeric input only, press
.
36
Notebook PC E-Manual
Page 37

Using the optical drive
NOTE: The actual location of the electronic eject button may vary
depending on your Notebook PC model.
Inserting an optical disc
1. While the Notebook PC is
on, press the electronic eject
button to partially eject the
optical drive tray.
2. Gently pull out the drive tray.
IMPORTANT! Be careful not
to touch the optical drive lens.
Ensure that there are no objects
that may get jammed under the
drive tray.
3. Hold the disc by the edge,
with its printed side up, then
gently place it inside the hub.
4. Push down the disc’s plastic
hub until it snaps onto the
optical drive hub.
Notebook PC E-Manual
37
Page 38

5. Push the drive tray gently to
close the optical drive.
NOTE: While data is being
read, it is normal to hear some
spinning and vibrating in the
optical drive.
Manual eject hole
The manual eject hole is located on the optical drive door and is
used to eject the optical drive tray in case the electronic eject button
does not work.
To manually eject the optical drive tray, insert a straightened paper
clip into the manual eject hole until the drive tray opens.
WARNING! Use the manual eject hole only when the electronic eject
button does not work.
38
Notebook PC E-Manual
Page 39

Chapter 3: Working with Windows® 8
Notebook PC E-Manual
39
Page 40

Starting for the rst time
When you start your computer for the rst time, a series of screens
appear to guide you in conguring the basic settings of your
Windows® 8 operating system.
To start your Notebook PC for the rst time:
1. Press the power button on your Notebook PC. Wait for a few
minutes until the setup screen appears.
2. From the setup screen, pick a language to use on your Notebook
PC.
3. Carefully read the License Terms. Tick I accept the terms for
using Windows then click Accept.
4. Follow the onscreen instructions to congure the following
basic items:
• Keep your PC secure
• Personalize
• Wireless
• Settings
• Sign in to your PC
5. After conguring the basic items, the Windows®8 tutorial
appears. Watch this to learn more about Windows®8
functionalities.
Windows® 8 lock screen
The Windows®8 lock screen may appear when your Notebook PC
enters the Windows®8 operating system. To proceed, tap on the lock
screen or press any key on your Notebook PC's keyboard.
40
Notebook PC E-Manual
Page 41

Windows® UI
Windows® 8 comes with a tile-based user interface (UI) which allows
you to organize and easily access Windows® apps from the Start
screen. It also includes the following features that you can use while
working on your Notebook PC.
Start screen
The Start screen appears after successfully signing in to your user
account. It helps organize all the applications you need in just one
place.
User account
Zoom in/out button
Windows® apps
These are apps pinned on the Start screen and displayed on tiledformat for easy access.
NOTE: Some apps require signing in to your Microsoft account before
they are fully launched.
Notebook PC E-Manual
41
Page 42

Hotspots
Onscreen hotspots allow you to launch programs and access the
settings of your Notebook PC. The functions in these hotspots can be
activated using the touchpad.
Hotspots on a running app
Hotspots on the Start screen
42
Notebook PC E-Manual
Page 43

Hotspot Action
upper left corner Hover your mouse pointer on the upper left
corner then tap on the recent app’s thumbnail
to revert back to that running app.
If you launched more than one app, slide down
to show all running apps.
lower left corner From a running app’s screen:
Hover your mouse pointer on the lower left
corner then tap on the Start screen thumbnail
to go back to the Start screen.
NOTE: You can also press the Windows key
on your keyboard to go back to the
Start screen.
From the Start screen:
Hover your mouse pointer on the lower
left corner then tap on the running app’s
thumbnail to go back to that app.
top side Hover your mouse pointer on the top side until
it changes to a hand icon. Drag then drop the
app to a new location.
NOTE: This hotspot function only works on
a running app or when you want to use the
Snap feature. For more details, refer to the
Snap feature under Working with Windows®
apps.
upper or lower
right corner
Notebook PC E-Manual
Hover your mouse pointer on the upper or
lower right corner to launch the Charms bar.
43
Page 44

Working with Windows® apps
Use your Notebook PC’s touchpad or keyboard to launch and
customize your apps.
Launching apps
Position your mouse pointer over the app then left-click or
tap once to launch it.
Press twice then use the arrow keys to browse
through the apps. Press to launch an app.
Customizing apps
You can move, resize, or unpin apps from the Start screen using the
following steps:
Moving apps
Double-tap on the app then drag and drop the app to a
new location.
Resizing apps
Unpinning apps
44
Right-click on the app to activate its settings bar then tap
or .
To unpin an app from the Start screen, right-click on the
app to activate its settings then tap .
Notebook PC E-Manual
Page 45

Closing apps
1. Move your mouse pointer on the top side of the
2. Drag then drop the app to the bottom of the
From the running app’s screen, press .
launched app then wait for the pointer to change
to a hand icon.
screen to close it.
Notebook PC E-Manual
45
Page 46

Accessing the Apps screen
Aside from the apps already pinned on your Start screen, you can
also open other applications through the Apps screen.
Horizontal scroll bar
Launching the Apps screen
Launch the Apps screen using your Notebook PC's touchpad or
keyboard.
46
Swipe from the top edge to launch the All Apps bar.
From the Start screen, press to select the All
Apps icon then press .
Notebook PC E-Manual
Page 47

Pinning more apps on the Start screen
You can pin more apps on the Start screen using your touchpad.
1. Position the mouse pointer over the app you want to
pin on the Start screen.
2. Right-click on the app to activate its settings.
3. Tap on the icon.
Notebook PC E-Manual
47
Page 48

Charms bar
The Charms bar is a toolbar that can be triggered on the right side
of your screen. It consists of several tools that allow you to share
applications and provide quick access for customizing the settings of
your Notebook PC.
Charms bar
Launching the Charms bar
NOTE: When called out, the Charms bar initially appears as a set of
white icons. The image above shows how the Charms bar looks like
once activated.
Use your Notebook PC’s touchpad or keyboard to launch the Charms
bar.
Move your mouse pointer on the upper or lower right
corner of the screen.
Press .
48
Notebook PC E-Manual
Page 49

Inside the Charms bar
Search
This tool allows you to look for les, applications, or
programs in your Notebook PC.
Share
This tool allows you to share applications via social
networking sites or email.
Start
This tool reverts the display back to the Start screen.
From the Start screen, you can also use this to revert
back to a recently opened app.
Devices
This tool allows you to access and share les with the
devices attached to your Notebook PC such as an
external display or printer.
Settings
This tool allows you to access the PC settings of your
Notebook PC.
Notebook PC E-Manual
49
Page 50

Snap feature
The Snap feature displays two apps side-by-side, allowing you to
work or switch between apps.
IMPORTANT! Ensure that your Notebook PC’s screen resolution is set
to 1366 x 768 pixels or higher before using the Snap feature.
Snap bar
Using Snap
Use your Notebook PC’s touchpad or keyboard to activate and use
Snap.
1. Launch the app you wish to snap.
2. Hover the mouse point on the top side of your
screen.
3. Once the pointer changes to a hand icon, drag then
drop the app to the left or right side of the display
panel.
4. Launch another app.
50
Notebook PC E-Manual
Page 51

1. Launch the app you wish to snap.
2. Press .
3. Launch another app.
4. To switch between apps, press .
Notebook PC E-Manual
51
Page 52

Other keyboard shortcuts
Using the keyboard, you can also use the following shortcuts to help
you launch applications and navigate Windows®8.
\
Switches between the Start screen and the last
running app
Launches the desktop
Launches the Computer window on Desktop
mode
Opens the File search pane
Opens the Share pane
Opens the Settings pane
Opens the Devices pane
Activates the Lock screen
Minimizes the Internet Explorer window
52
Notebook PC E-Manual
Page 53

Opens the Second screen pane
Opens the Apps search pane
Opens the Run window
Opens Ease of Access Center
Opens the Settings search pane
Opens a menu box of Windows® tools
Launches the magnier icon and zooms in your
screen
Zooms out your screen
Opens the Narrator Settings
Enables the print screen function
Notebook PC E-Manual
53
Page 54

Connecting to wireless networks
Wi-Fi
Access emails, surf the Internet, and share applications via social
networking sites using your Notebook PC’s Wi-Fi connection.
IMPORTANT! The Airplane mode disables this feature. Ensure that
Airplane mode is turned o before enabling the Wi-Fi connection of
your Notebook PC.
Enabling Wi-Fi
Activate Wi-Fi in your Notebook PC using the following steps:
1. Launch the Charms bar.
2. Tap and tap .
3. Select an access point from the list of available Wi-Fi
connections.
54
Notebook PC E-Manual
Page 55

4. Tap Connect to start the network connection.
NOTE: You may be prompted to enter a security key to
activate the Wi-Fi connection.
5. If you want to enable sharing between your Notebook
PC and other wireless-enabled systems, tap Yes, turn
on sharing and connect to devices. Tap No, don't
turn on sharing or connect to devices if you do not
want to enable the sharing function.
Notebook PC E-Manual
55
Page 56

Bluetooth
Use Bluetooth to facilitate wireless data transfers with other
Bluetooth-enabled devices.
IMPORTANT! The Airplane mode disables this feature. Ensure that
Airplane mode is turned o before enabling Bluetooth on your
Notebook PC.
Pairing with other Bluetooth-enabled devices
You need to pair your Notebook PC with other Bluetooth-enabled
devices to enable data transfers. To do this, use your touchpad as
follows:
1. Launch the Charms bar.
2. Tap then tap Change PC Settings.
3. Under PC Settings, select Devices then tap Add a
Device to search for Bluetooth-enabled devices.
56
Notebook PC E-Manual
Page 57

4. Select a device from the list. Compare the passcode on
your Notebook PC with the passcode sent to your chosen
device. If they are the same, tap Yes to successfully pair
your Notebook PC with the device.
NOTE: For some bluetooth-enabled devices, you may be
prompted to key in the passcode of your Notebook PC.
Notebook PC E-Manual
57
Page 58

Airplane mode
The Airplane mode disables wireless communication, allowing you
to use your Notebook PC safely while in-ight.
Turning Airplane mode on
1. Launch the Charms bar.
2. Tap and tap .
3. Move the slider to the right to turn the Airplane mode
on.
Press .
Turning Airplane mode o
1. Launch the Charms bar.
2. Tap and tap .
58
3. Move the slider to the left to turn the Airplane mode
o.
Press .
NOTE: Contact your airline provider to learn about related inight
services that can be used and restrictions that must be followed when
using your Notebook PC in-ight.
Notebook PC E-Manual
Page 59

Connecting to wired networks
You can also connect to wired networks, such as local area networks
and broadband Internet connection, using your Notebook PC’s LAN
port.
NOTE: Contact your Internet Service Provider (ISP) for details or
your network administrator for assistance in setting up your Internet
connection.
To congure your settings, refer to the following procedures.
IMPORTANT! Ensure that a network cable is connected between your
Notebook PC’s LAN port and a local area network before performing
the following actions.
Conguring a dynamic IP/PPPoE network
connection
1. LaunchLaunch Desktop.
2. From the Windows® taskbar, right-click the network
icon then tap Open Network and Sharing
Center.
3. In the Network and Sharing Center window, tap
Change adapter settings.
4. Right-click on your LAN then select Properties.
Notebook PC E-Manual
59
Page 60

5. Tap Internet Protocol Version 4(TCP/IPv4) then tap
Properties.
6. Tap Obtain an IP address automatically then tap OK.
60
NOTE: Proceed to the next steps if you are using PPPoE connection.
Notebook PC E-Manual
Page 61

7. Return to the Network and Sharing Center window
then tap Set up a new connection or network.
8. Select Connect to the Internet then tap Next.
Notebook PC E-Manual
61
Page 62

9. Tap Broadband (PPPoE).
10. Type your User name, Password, and Connection name
then tap Connect.
11. Tap Close to nish the conguration.
12. Tap on the taskbar then tap the connection you
just created.
13. Type your user name and password then tap Connect
to start connecting to the Internet.
62
Notebook PC E-Manual
Page 63

Conguring a static IP network connection
1. Repeat steps 1 to 5 under Conguring a dynamic IP/
PPPoE network connection.
2 Tap Use the following IP address.
3. Type the IP address, Subnet mask and Default gateway
from your service provider.
4. If needed, you can also type the preferred DNS server
address and alternate DNS server address then tap
OK.
Notebook PC E-Manual
63
Page 64

Turning your Notebook PC off
You can turn o your Notebook PC by doing either of the following
procedures:
• Tap from the Charms bar then tap >
Shut down to do a normal shutdown.
• From the log-in screen, tap > Shut down.
• You can also shut down your Notebook PC using
Desktop mode. To do this, launch the desktop then
press alt + f4 to launch the Shut Down window. Select
Shut Down from the drop-down list then select OK.
• If your Notebook PC is unresponsive, press and hold
the power button for at least four (4) seconds until
your Notebook PC turns o.
Putting your Notebook PC to sleep
To put your Notebook PC on Sleep mode, press the power button
once.
You can also put your Notebook PC to sleep mode using
Desktop mode. To do this, launch the desktop then press
alt + f4 to launch the Shut Down window. Select Sleep
from the drop-down list then select OK.
64
Notebook PC E-Manual
Page 65

Chapter 4: ASUS apps
Notebook PC E-Manual
65
Page 66

Featured ASUS Apps
LifeFrame
Enhance your webcam functions through the LifeFrame app. Create
snapshots, edit photos, record videos, record audio les, use your
webcam as a security monitoring device, and play games using this
app.
To launch LifeFrame
Press .
The archive toolbar displays
a function's saved files in
thumbnail view.
66
Action button
Capture button
Modes
Webcam settings
Face tracking
button
Zoom in/out
Notebook PC E-Manual
Page 67

LifeFrame functions
Camera
Use this function to take pictures using your webcam.
Camcorder
Use this function to take videos through your webcam.
Monitor
This function lets you use your webcam as a security
video monitor as it automatically detects movement
then captures it on photo.
Voice Recorder
Use this function to record audio les in your Notebook
PC.
Game
This function lets you play games using the webcam.
Notebook PC E-Manual
67
Page 68

Power4Gear Hybrid
Optimize the performance of your Notebook PC using the power
saving modes in Power4Gear.
NOTE: Unplugging the Notebook PC from its power adapter
automatically switches Power4Gear Hybrid to Battery Saving mode.
To launch Power4Gear Hybrid
Press .
Select from these power saving modes.
Use these options to customize
your power saving mode.
Allows you to hide the desktop icons
onscreen and turns the presentation
mode on or o.
Performance mode
Use this mode when doing high-performance activities like playing
games or conducting business presentations using your Notebook
PC.
Battery Saving mode
This mode extends your Notebook PC’s battery life while plugged in
to the power adapter or while running on battery power only.
68
Notebook PC E-Manual
Page 69

USB Charger+
USB Charger+ allows you to quick-charge mobile devices via your
ASUS Notebook PC’s USB charge port.
This feature can also be used even while your Notebook PC is on
sleep, hibernate, or shutdown mode (available on selected models
only).
NOTE: USB Charger+ is available in your USB 3.0 charge port with the
icon.
WARNING: If your connected device overheats, remove it
immediately.
Using the USB Charger+ Settings
The USB Charger+ Settings lets you set the charge limit when your
ASUS Notebook PC is running on battery power and allows you to
charge devices while your Notebook PC is on sleep, hibernate, or
shutdown mode.
1. Right-click on the
USB Charger+ icon
on the desktop
tray, then click
Settings.
2. Tick Enable USB
Charger+ in battery
mode.
Notebook PC E-Manual
69
Page 70

3. Select one or both of
these charging options:
Enable quick charge
when the system is
running or Enable quick
charge when the system
is in sleep/hibernate/
shutdown mode.
NOTE: On some models, the
USB Charger+ automatically
selects both options. You
can deselect these two
options, if necessary.
4. Move the percentage
slider to the left or to the
right to set the limit for
charging devices.
5. Tap OK to save the
settings made. Otherwise,
tap Cancel.
70
Notebook PC E-Manual
Page 71

Instant On
Save battery power while your Notebook PC is on deep sleep mode
(Deep S3) using Instant On.
NOTE: Deep S3 is a technology that lets you save more battery power
while your ASUS Notebook PC is on sleep mode.
IMPORTANT! The standby time varies according to your Notebook
PC's remaining battery capacity, computer model, conguration, and
operating conditions.
Performance mode
This mode is default-enabled in
your Notebook PC. It allows the
system to return to its last working
state in two seconds, even after
your Notebook PC has entered
into deep sleep mode.
Battery saving mode
This mode enables longer standby
times allowing the battery to last
for up to thirty (30) days or more.
When enabled, the Notebook PC
returns to its last working state
in as fast as seven seconds, four
hours after entering into deep
sleep mode.
Notebook PC E-Manual
Tap this to activate the
battery saving mode.
71
Page 72

72
Notebook PC E-Manual
Page 73

Chapter 5: Power-on Self-test (POST)
Notebook PC E-Manual
73
Page 74

The Power-on Self-test (POST)
The Power-on Self-test (POST) is a series of software-controlled
diagnostic tests that run when you turn on or restart your Notebook
PC. The software that controls the POST is installed as a permanent
part of the Notebook PC’s architecture.
Using POST to access BIOS and Troubleshoot
During POST, you can access the BIOS settings or run
troubleshooting options using the function keys of your Notebook
PC. You may refer to the following information for more details.
BIOS
The Basic Input and Output System (BIOS) stores system hardware
settings that are needed for system startup in the Notebook PC.
The default BIOS settings apply to most conditions of your Notebook
PC. Do not change the default BIOS settings except in the following
circumstances:
• An error message appears onscreen during system bootup and
requests you to run the BIOS Setup.
• You have installed a new system component that requires
further BIOS settings or updates.
WARNING: Using inappropriate BIOS settings may result to system
instability or boot failure. We strongly recommend that you change
the BIOS settings only with the help of a trained service personnel.
Accessing BIOS
Restart your Notebook PC then press during POST.
74
Notebook PC E-Manual
Page 75

BIOS Settings
NOTE: The BIOS screens in this section are for reference only. The
actual screens may dier by model and territory.
Boot
This menu allows you to set your boot option priorities. You may
refer to the following procedures when setting your boot priority.
1. On the Boot screen, select Boot Option #1.
Main Advance Boot Security Save & Exit
Boot Conguration
Launch CSM [Enabled]
Launch PXE OpROM [Disabled]
Driver Option Priorities
Boot Option Priorities
Boot Option #1 [Windows Boot Manager]
Boot Option #2 [P1: Hitachi HTS547..]
Boot Option #3 [Atheros Boot Agent]
CD/DVD ROM Drive BBS Priorities
Network Device BBS Priorities
Add New Boot Option
Delete Boot Option
Aptio Setup Utility - Copyright (C) 2012 American Megatrends, Inc.
Version 2.15.1231. Copyright (C) 2012 American Megatrends, Inc.
Sets the system boot
order
: Select Screen
→←
: Select Item
↑↓
Enter: Select
+/— : Change Opt.
F1 : General Help
F9 : Optimized Defaults
F10 : Save & Exit
ESC : Exit
Notebook PC E-Manual
75
Page 76

2. Press and select a device as the Boot Option #1.
Main Advance Boot Security Save & Exit
Boot Conguration
Launch CSM [Enabled]
Launch PXE OpROM [Disabled]
Driver Option Priorities
Boot Option Priorities
Boot Option #1 [Windows Boot Manager]
Boot Option #2 [P1: Hitachi HTS547..]
Boot Option #3 [Atheros Boot Agent]
CD/DVD ROM Drive BBS
Network Device BBS Priorities
Add New Boot Option
Delete Boot Option
Aptio Setup Utility - Copyright (C) 2012 American Megatrends, Inc.
Boot Option #1
Atheros Boot Agent
P1: Hitachi HTS547575A9E384
Windows Boot Manager
Disabled
Version 2.15.1231. Copyright (C) 2012 American Megatrends, Inc.
Set s the syst em bo ot
order
: Select Screen
→←
: Select Item
↑↓
Enter: Select
+/— : Change Opt.
F1 : General Help
F9 : Optimized Defaults
F10 : Save & Exit
ESC : Exit
76
Notebook PC E-Manual
Page 77

Security
This menu allows you to set up the administrator and user password
of your Notebook PC. It also allows you to control the access to your
Notebook PC’s hard disk drive, input/output (I/O) interface, and USB
interface.
NOTE:
• If you install a User Password, you will be prompted to input this
before entering your Notebook PC's operating system.
• If you install an Administrator Password, you will be prompted
to input this before entering BIOS.
Main Advance Boot Security Save & Exit
Password Description
If ONLY the Administrator’s password is set,then this
only limits access to Setup and is only asked for when
entering Setup. If ONLY the user’s password is set,
then this is a power on password and must be entered
to boot or enter Setup. In Setup, the User will have
Administrator rights.
Administrator Password Status NOT INSTALLED
User Password Status NOT INSTALLED
Administrator Password
User Password
HDD User Password Status : NOT INSTALLED
Set Master Password
Set User Password
I/O Interface Security
Secure Boot Control [Enabled]
Aptio Setup Utility - Copyright (C) 2012 American Megatrends, Inc.
Set Administrator
Password. The password
length must be in the
following range:
Minimum length 3
Maximum length 20
Must type with
character:
a-z, 0-9
: Select Screen
→←
: Select Item
↑↓
Enter: Select
+/— : Change Opt.
F1 : General Help
F9 : Optimized Defaults
F10 : Save & Exit
ESC : Exit
Version 2.15.1231. Copyright (C) 2012 American Megatrends, Inc.
To set the password:
1. On the Security screen, select Administrator Password or
User Password.
2. Type in a password then press .
3. Re-type to conrm the password then press .
Notebook PC E-Manual
77
Page 78

To clear the password:
1. On the Security screen, select Administrator Password or
User Password.
2. Type in the current password then press .
3. Leave the Create New Password eld blank then press
.
4. Select Yes in the conrmation box then press .
I/O Interface Security
In the Security menu, you can access I/O Interface Security to
lock or unlock some interface functions of your Notebook PC.
Aptio Setup Utility - Copyright (C) 2012 American Megatrends, Inc.
Security
I/O Interface Security
LAN Network Interface [UnLock]
Wireless Network Interface [UnLock]
HD AUDIO Interface [UnLock]
SATA 2nd HDD Interface [UnLock]
SATA ODD Interface
USB Interface Security
LAN Network Interface
Lock
UnLock
If Locked, LAN controller
will be disabled.
: Select Screen
→←
: Select Item
↑↓
Enter: Select
+/— : Change Opt.
F1 : General Help
F9 : Optimized Defaults
F10 : Save & Exit
ESC : Exit
78
Version 2.15.1231. Copyright (C) 2012 American Megatrends, Inc.
To lock an interface:
1. On the Security screen, select I/O Interface Security.
2. Select an interface you would like to lock then press
.
3. Select Lock.
Notebook PC E-Manual
Page 79

USB Interface Security
Through the I/O Interface Security menu, you can also access
USB Interface Security to lock or unlock ports and devices.
Aptio Setup Utility - Copyright (C) 2012 American Megatrends, Inc.
Security
USB Interface Security
USB Interface [UnLock]
External Ports [UnLock]
CMOS Camera [UnLock]
Card Reader [UNLOCKED]
Version 2.15.1231. Copyright (C) 2012 American Megatrends, Inc.
Lock
UnLock
USB Interface
If LOCKED, all USB
devices will
be disabled
: Select Screen
→←
: Select Item
↑↓
Enter: Select
+/— : Change Opt.
F1 : General Help
F9 : Optimized Defaults
F10 : Save & Exit
ESC : Exit
To lock the USB interface:
1. On the Security screen, select I/O Interface Security > USB
Interface Security.
2. Select an interface that you would like to lock then select
Lock.
NOTE: Setting the USB Interface to Lock also locks and hides the
External Ports and other devices included under USB Interface
Security.
Notebook PC E-Manual
79
Page 80

Set Master Password
In the Security menu, you can use Set Master Password to set
up a password-enabled access to your hard disk drive.
Aptio Setup Utility - Copyright (C) 2012 American Megatrends, Inc.
Main Advance Boot Security Save & Exit
Password Description
If ONLY the Administrator’s password is set,then this only
limits access to Setup and is only asked for when entering
Setup. If ONLY the user’s password is set, then this is
a power on password and must be entered to boot or enter
Setup. In Setup, the User will have Administrator rights.
Administrator Password Status NOT INSTALLED
User Password Status NOT INSTALLED
Administrator Password
User Password
HDD User Pwd Status : NOT INSTALLED
Set Master Password
Set User Password
I/O Interface Security
Secure Boot Control [Disabled]
Aptio Setup Utility - Copyright (C) 2011 American Megatrends, Inc.
Set HDD Master Password.
***Advisable to Power
Cycle System after
Setting Hard Disk
Passwords***
: Select Screen
→←
: Select Item
↑↓
Enter: Select
+/— : Change Opt.
F1 : General Help
F9 : Optimized Defaults
F10 : Save & Exit
ESC : Exit
Version 2.15.1231. Copyright (C) 2012 American Megatrends, Inc.
To set the HDD password:
1. On the Security screen, select Set Master Password.
80
2. Type in a password then press .
3. Re-type to conrm the password then press .
4. Select Set User Password then repeat the previous steps to
set up the user password.
Notebook PC E-Manual
Page 81

Save & Exit
To keep your conguration settings, select Save Changes and Exit
before exiting the BIOS.
Main Advance Boot Security Save & Exit
Save Changes and Exit
Discard Changes and Exit
Save Options
Save Changes
Discard Changes
Restore Defaults
Boot Override
Atheros Boot Agent
P1: Hitachi HTS547575A9E384
Windows Boot Manager
Launch EFI Shell from lesystem device
Aptio Setup Utility - Copyright (C) 2012 American Megatrends, Inc.
Exit system setup after
saving the changes.
: Select Screen
→←
: Select Item
↑↓
Enter: Select
+/— : Change Opt.
F1 : General Help
F9 : Optimized Defaults
F10 : Save & Exit
ESC : Exit
Version 2.15.1231. Copyright (C) 2012 American Megatrends, Inc.
To update the BIOS:
1. Verify the Notebook PC’s exact model then download the latest
BIOS le for your model from the ASUS website.
2. Save a copy of the downloaded BIOS le to a ash disk drive.
3. Connect your ash disk drive to your Notebook PC.
4. Restart your Notebook PC then press during POST.
5. From the BIOS menu, Select Advanced > Start Easy Flash, then
press .
Notebook PC E-Manual
81
Page 82

Aptio Setup Utility - Copyright (C) 2012 American Megatrends, Inc.
Main Advance Boot Security Save & Exit
Start Easy Flash
Internal Pointing Device [Enabled]
Wake on Lid Open [Enabled]
Power Off Energy Saving [Enabled]
ASUS USB Charger+ in battery mode [Disabled]
Intel Virtualization Technology [Enabled]
Intel AES-NI [Enabled]
CPU C states [Disabled]
VT-d [Enabled]
SATA Conguration
Graphics Conguration
Intel (R) Thunderbolt
USB Conguration
Intel (R) Anti-Theft Technology Corporation
Network Stack
Aptio Setup Utility - Copyright (C) 2011 American Megatrends, Inc.
Press Enter to run the
uti li ty to s ele ct and
update BIOS.
: Select Screen
→←
: Select Item
↑↓
Enter: Select
+/— : Change Opt.
F1 : General Help
F9 : Optimized Defaults
F10 : Save & Exit
ESC : Exit
Version 2.15.1231. Copyright (C) 2012 American Megatrends, Inc.
6. Locate your downloaded BIOS le in the ash disk drive then
press .
ASUSTek Easy Flash Utility
FLASH TYPE: Winbond 25X/Q Series
Current BIOS
Platform: G750JX
Version: T30
Build Date: Dec 22 2012
Build Time: 12:43:56
FSO
FS1
FS2
FS3
0 EFI <DIR>
New BIOS
Platform: Unknown
Version: Unknown
Build Date: Unknown
Build Time: Unknown
[
←→]:
Switch [
Choose [q]: Exit [Enter]: Enter/Execute
↑↓]:
7. After the BIOS update process, select Exit > Restore Defaults to
restore the system to its default settings.
82
Notebook PC E-Manual
Page 83

Troubleshoot
By pressing during POST, you can access Windows® 8
troubleshoot options which includes the following:
• Refresh your PC
• Reset your PC
• Advanced options
Refresh your PC
Use Refresh your PC if you want to refresh your system without
losing your current les and applications.
To access this during POST:
1. Restart your Notebook PC then press during
POST.
2. Wait for Windows® to load the Choose an option
screen then tap Troubleshoot.
3. Tap Refresh your PC.
4. In the Refresh your PC screen, read the bullet points
to learn more about using this option then tap Next.
5. Tap the account you would like to refresh.
6. Type your account password then tap Continue.
7. Tap Refresh.
IMPORTANT! Ensure that your Notebook PC is plugged in
to a power source before refreshing your system.
Notebook PC E-Manual
83
Page 84

Reset your PC
IMPORTANT! Back up all your data before performing this option.
Use Reset your PC to restore your Notebook PC to its default
settings.
To access this during POST:
1. Restart your Notebook PC then press during
POST.
2. Wait for Windows® to load the Choose an option
screen then tap Troubleshoot.
3. Tap Reset your PC.
4. In the Reset your PC screen, read the bullet points to
learn more about using this option then tap Next.
5. Tap your preferred reset option: Just remove my les
or Fully clean the drive.
6. Tap Reset.
84
IMPORTANT! Ensure that your Notebook PC is plugged in
to a power source before resetting your system.
Notebook PC E-Manual
Page 85

Advanced options
Use Advanced options to perform additional troubleshooting
options in your Notebook PC.
To access this during POST:
1. Restart your Notebook PC then press during
POST.
2. Wait for Windows® to load the Choose an option
screen then tap Troubleshoot.
3. Tap Advanced options.
4. In the Advanced options screen, select the
troubleshooting option you wish to perform.
5. Follow the succeeding steps to complete the process.
Using System Image Recovery
Under Advanced options, you can use System Image Recovery to
recover your system using your Notebook PC’s original image le.
To access this during POST:
1. Restart your Notebook PC then press during
POST.
2. Wait for Windows® to load the Choose an option
screen then tap Troubleshoot.
3. Tap Advanced options.
Notebook PC E-Manual
85
Page 86

4. In the Advanced options screen, select System Image
Recovery.
5. Choose an account you would like to recover using a
system image le.
6. Type your account password then tap Continue.
7. Select Use the latest available system image
(recommended), then tap Next. You can also choose
Select a system image if your system image is in an
external device or DVD.
8. Follow the succeeding steps to complete the system
image recovery procedure.
NOTE: We strongly recommend that you regularly backup
your system to prevent data loss in case your Notebook PC
stops working.
86
Notebook PC E-Manual
Page 87

Chapter 6: Upgrading your Notebook PC
Notebook PC E-Manual
87
Page 88

Installing a Random Access Memory (RAM) module
Upgrade the memory capacity of your Notebook PC by installing a
RAM module in the memory module compartment. The following
steps show you how to install a RAM module into your Notebook PC:
WARNING! Disconnect all the connected peripherals, any telephone
or telecommunication lines and power connector (such as external
power supply, battery pack, etc.) before removing the compartment
cover.
IMPORTANT! Visit an authorized service center or retailer for
information on RAM module upgrades for your Notebook PC.
Purchase RAM modules from authorized retailers of this Notebook PC
to ensure maximum compatibility and reliability.
NOTE: The appearance of your Notebook PC’s bottom side and RAM
module may vary per model but the RAM module installation remains
the same.
88
Notebook PC E-Manual
Page 89

A. Pull out the rubber cover on the bottom side of your Notebook
PC.
B. Loosen the screw of the Notebook PC’s compartment cover.
C. Pull out the compartment cover and remove it completely from
your Notebook PC.
Notebook PC E-Manual
89
Page 90

D. Align and insert the RAM module into the RAM module slot.
2
1
E. Push down the RAM module until it clicks in place
30o angle
notches
90
Notebook PC E-Manual
Page 91

F. Align then push down the compartment cover back into place.
G. Reattach and tighten the screw that you removed earlier.
H. Reattach the rubber cover on the compartment cover.
Notebook PC E-Manual
91
Page 92

Replacing the Hard Disk Drive (HDD)
Refer to the following steps if you need to replace the hard disk drive
of your Notebook PC.
IMPORTANT! Purchase an HDD from authorized retailers of this
Notebook PC to ensure maximum compatibility and reliability.
It is recommended that you replace the HDD under professional
supervision. You may also visit an authorized service center for further
assistance.
WARNING! Disconnect all the connected peripherals, any telephone
or telecommunication lines and power connector (such as external
power supply, battery pack, etc.) before removing the compartment
cover.
NOTE: The appearance of your Notebook PC’s bottom side and HDD
may vary per model but the HDD installation remains the same.
92
Notebook PC E-Manual
Page 93

A. Pull out the rubber cover on the bottom side of your Notebook
PC.
B. Loosen the screw of the Notebook PC’s compartment cover.
C. Pull out the compartment cover and remove it completely from
your Notebook PC.
Notebook PC E-Manual
93
Page 94

D. Remove the screws securing the HDD bay to the compartment.
1
E. Disconnect the HDD bay from the HDD port then remove the
HDD bay from the compartment.
HDD bay
F. Turn the HDD bay upside down then remove the screws.
G. Remove the old HDD from the HDD bay.
94
HDD
HDD bay
Notebook PC E-Manual
Page 95

H. Place the new HDD with its PCB (printed circuit board) facing
the HDD bay. Ensure that the port connectors of your HDD are
not obstructed by any part of the HDD bay.
I. Reattach and secure the HDD with the screws you removed
earlier.
Notebook PC E-Manual
95
Page 96

J. Replace the HDD bay back in the compartment, with the HDD
2
connector aligned with the Notebook PC’s HDD port. Push the
HDD bay until it connects with the Notebook PC.
K. Secure the HDD bay with the screws you removed earlier.
HDD bay
96
Notebook PC E-Manual
Page 97

L. Align then push down the compartment cover back into place.
M. Reattach and tighten the screw that you removed earlier.
N. Reattach the rubber cover on the compartment cover.
Notebook PC E-Manual
97
Page 98

Installing a new battery pack
WARNING! Turn o your Notebook PC and disconnect all connected
peripherals, any telephone or telecommunication lines and power
connector, before removing the battery pack.
IMPORTANT! Purchase battery packs from authorized retailers of this
Notebook PC to ensure maximum compatibility and reliability.
NOTE: The following steps are also applicable for removing and
replacing the battery pack of your Notebook PC.
Refer to the following steps when installing a new battery pack for
your Notebook PC.
A. Move and hold the spring battery lock to an unlocked position.
B. Pull out the old battery pack from the battery slot then release
your hold on the spring battery lock.
98
Notebook PC E-Manual
Page 99

C. Align and insert the new battery pack into the Notebook PC’s
battery slot.
Notebook PC E-Manual
99
Page 100

100
Notebook PC E-Manual
 Loading...