

Page 1
R
High-Speed CD-ROM Drive
ATAPI / Enhanced IDE Interface
E226
With Quick Installation Guides in 9 different languages
USER’S MANUAL
USER’S MANUAL
Page 2

No part of this manual, including the products and software described in it, may be reproduced, transmitted, transcribed, stored in a retrieval system, or translated into any language in
any form or by any means, except documentation kept by the purchaser for backup purposes,
without the express written permission of the ASUSTeK COMPUTER INC. (“ASUS”).
ASUS PROVIDES THIS MANUAL “AS IS” WITHOUT WARRANTY OF ANY KIND, EITHER EXPRESS OR IMPLIED, INCLUDING BUT NOT LIMITED TO THE IMPLIED
WARRANTIES OR CONDITIONS OF MERCHANTABILITY OR FITNESS FOR A PARTICULAR PURPOSE. IN NO EVENT SHALL ASUS, ITS DIRECTORS, OFFICERS, EMPLOYEES OR AGENTS BE LIABLE FOR ANY INDIRECT, SPECIAL, INCIDENT AL, OR
CONSEQUENTIAL DAMAGES (INCLUDING DAMAGES FOR LOSS OF PROFITS, LOSS
OF BUSINESS, LOSS OF USE OR DATA, INTERRUPTION OF BUSINESS AND THE
LIKE), EVEN IF ASUS HAS BEEN ADVISED OF THE POSSIBILITY OF SUCH DAMAGES ARISING FROM ANY DEFECT OR ERROR IN THIS MANUAL OR PRODUCT .
Product warranty or service shall not be extended if: (1) the product is repaired, modified or
altered, unless such repair, modification of alteration is authorized in writing by ASUS; or (2)
the serial number of the product is defaced or missing.
Products and corporate names appearing in this manual may or may not be registered trademarks or copyrights of their respective companies, and are used only for identification or
explanation and to the owners’ benefit, without intent to infringe.
• Windows and MS-DOS are registered trademarks of Microsoft Corporation.
• Intel is a registered trademark of Intel Corporation.
• OS/2 are registered trademarks of International Business Machines.
• WinBench is a registered trademark of Ziff-Davis Inc.
The product name and revision number are both printed on the product itself. Manual revi-
sions are released for each product design represented by the digit before and after the period
of the manual revision number. Manual updates are represented by the third digit in the manual
revision number.
For previous or updated manuals, drivers, or product release information, contact ASUS at
http://www.asus.com.tw or through any of the means indicated on the back cover.
SPECIFICATIONS AND INFORMATION CONTAINED IN THIS MANUAL ARE FURNISHED FOR INFORMATIONAL USE ONLY, AND ARE SUBJECT TO CHANGE AT
ANY TIME WITHOUT NOTICE, AND SHOULD NOT BE CONSTRUED AS A COMMITMENT BY ASUS. ASUS ASSUMES NO RESPONSIBILITY OR LIABILITY FOR
ANY ERRORS OR INACCURACIES THAT MA Y APPEAR IN THIS MANUAL, INCLUDING THE PRODUCTS AND SOFTWARE DESCRIBED IN IT.
Copyright © 1998 ASUSTeK COMPUTER INC. Al1 Rights Reserved.
Product Name: ASUS High-Speed CD-ROM Drive
Manual Revision: 1.04
Release Date: April 1998
2 ASUS High-Speed CD-ROM Drive User’s Manual
Page 3

CONTENTS
I. INTRODUCTION 7
II. HARDWARE INSTALLATION 8
Rear Panel Features ........................................................................................... 8
Pin Definitions............................................................................................... 8
Removing Your Computer’s Cover ................................................................... 9
Setting Your CD-ROM Drive ............................................................................ 9
Inserting Your CD-ROM Drive into Your Computer ........................................ 9
Connecting Cables to the CD-ROM Drive ...................................................... 10
Reassembling Your Computer ......................................................................... 10
III. SOFTWARE INSTALLATION 11
DOS/Windows 3.x ........................................................................................... 11
Windows 95/Windows NT .............................................................................. 12
OS/2 and Other Operating Systems ................................................................. 12
IV. CD-ROM DRIVE OPERATION 13
Front Panel Controls ........................................................................................ 13
Inserting a CD Disc in the Drive ..................................................................... 14
Removing a CD Disc from the Drive .............................................................. 14
CD Handling Tips ........................................................................................ 14
Emergency Eject .............................................................................................. 15
V. TROUBLESHOOTING 16
QUICK INSTALLATION GUIDES 19
English ............................................................................................................. 21
French .............................................................................................................. 22
German ............................................................................................................ 23
Italian ............................................................................................................... 24
Spanish............................................................................................................. 25
Russian............................................................................................................. 26
Japanese ........................................................................................................... 27
Simplified Chinese .......................................................................................... 28
Traditional Chinese.......................................................................................... 29
ASUS CONTACT INFORMATION
ASUS High-Speed CD-ROM Drive User’s Manual 3
Page 4

FCC & DOC COMPLIANCE
Federal Communications Commission Statement
This device complies with FCC Rules Part 15. Operation is subject to the following
two conditions:
• This device may not cause harmful interference, and
• This device must accept any interference received, including interference that
may cause undesired operation.
This equipment has been tested and found to comply with the limits for a Class B
digital device, pursuant to Part 15 of the FCC Rules. These limits are designed to
provide reasonable protection against harmful interference in a residential installation. This equipment generates, uses and can radiate radio frequency energy and, if
not installed and used in accordance with manufacturer’s instructions, may cause
harmful interference to radio communications. However, there is no guarantee that
interference will not occur in a particular installation. If this equipment does cause
harmful interference to radio or television reception, which can be determined by
turning the equipment off and on, the user is encouraged to try to correct the interference by one or more of the following measures:
• Re-orient or relocate the receiving antenna.
• Increase the separation between the equipment and receiver.
• Connect the equipment to an outlet on a circuit different from that to which the
receiver is connected.
• Consult the dealer or an experienced radio/TV technician for help.
WARNING! The use of shielded cables for connection of the monitor to the
graphics card is required to assure compliance with FCC regulations. Changes
or modifications to this unit not expressly approved by the party responsible for
compliance could void the user’s authority to operate this equipment.
Canadian Department of Communications Statement
This digital apparatus does not exceed the Class B limits for radio noise emissions
from digital apparatus set out in the Radio Interference Regulations of the Canadian
Department of Communications.
4 ASUS High-Speed CD-ROM Drive User’s Manual
Page 5

SAFETY WARNINGS
ASUS High-Speed CD-ROM Drive Safety Warnings
CLASS 1 LASER PRODUCT
APPAREIL A LASER DE CLASSE 1
KLASS 1 LASER APPARAT
LUOKAN 1 LASERLAITE
PRODUIT LASER CATEGORIE 1
CAUTION INVISIBLE LASER RADIATION WHEN OPEN. DO NOT STARE INTO BEAM.
ADVARSEL LASERSTRÅLING VED ÅBNING SE IKKE IND I STRÅLEN.
ADVARSEL LASERSTRÅLING NÅR DEKSEL ÅPNES. STIRR IKKE INN I STRÅLEN.
VARNING LASERSTRÅLNING NÅR DENNA DEL ÄR ÖPPNAD. STIRRA EJ IN I STRÅLEN.
VARO! AVATTAESSA OLET ALTTIINA LASERSÄTEILYLLE.
VARNING LASERSTRÅLNING NÄR DENNA DEL ÄR ÖPPNAD. ÄLÄ TUIJOTA
SÄTEESEEN. STIRRA EJ IN I STRÅLEN.
VORSICHT UNSICHTBARE LASERSTRAHLUNG WENN GEÖFFNET. NICT IN DEN
STRAHL SEHEN.
A TTENTION RADIATION DU FAISCEAU LASER INVISIBLE EN CAS D’OUVERTURE.
EVITER TOUTE EXPOSITION AU FAISCEAU.
CAUTION USE OF ANY CONTROLS OR ADJUSTMENTS OR PROCEDURES OTHER
THAN THOSE SPECIFIED HEREIN MAY RESULT IN HAZARDOUS RADIATION EXPOSURE. TO PREVENT EXPOSURE TO LASER EMANATIONS (HARMFUL TO HUMAN
EYES), DO NOT ATTEMPT TO DISASSEMBLE THIS UNIT.
ASUS High-Speed CD-ROM Drive User’s Manual 5
Page 6
ITEM CHECKLIST
The package should contain the following items along with the drive. Check to see
if you have all these items. If you discover damaged or missing items, contact your
retailer .
(1) CD-ROM Drive
(1) CD audio cable
(1) bag of mounting screws
(1) installation disk
• CD-ROM driver
• Installation utility
• Readme files for descriptions and use of the files
(1) User’s Manual with Quick Installation Guides in different languages
6 ASUS High-Speed CD-ROM Drive User’s Manual
Page 7

I. INTRODUCTION
Thank you for purchasing the High-Speed CD-ROM Drive. The CD-ROM Drive
adds multimedia capabilities, such as sound and video, into your system. With it,
you can take advantage of the thousands of CD titles available today for your entertainment, education, and productivity.
One of the features of the CD-ROM Drive is that it is connected by means of the
IDE connector of your computer. This connector is usually used to install the hard
disk to your computer. By using the IDE connection, you avoid the need to use an
interface card.
This User’s Manual explains how to install the CD-ROM Drive and the software to
use your new drive. Installation is quick and easy if you follow the instructions
carefully.
You’ll also learn from this manual how to use your CD-ROM Drive and detect and
solve any problems you might encounter.
Overview
I. INTRODUCTION
ASUS High-Speed CD-ROM Drive User’s Manual 7
Page 8
II. HARDWARE INSTALLATION
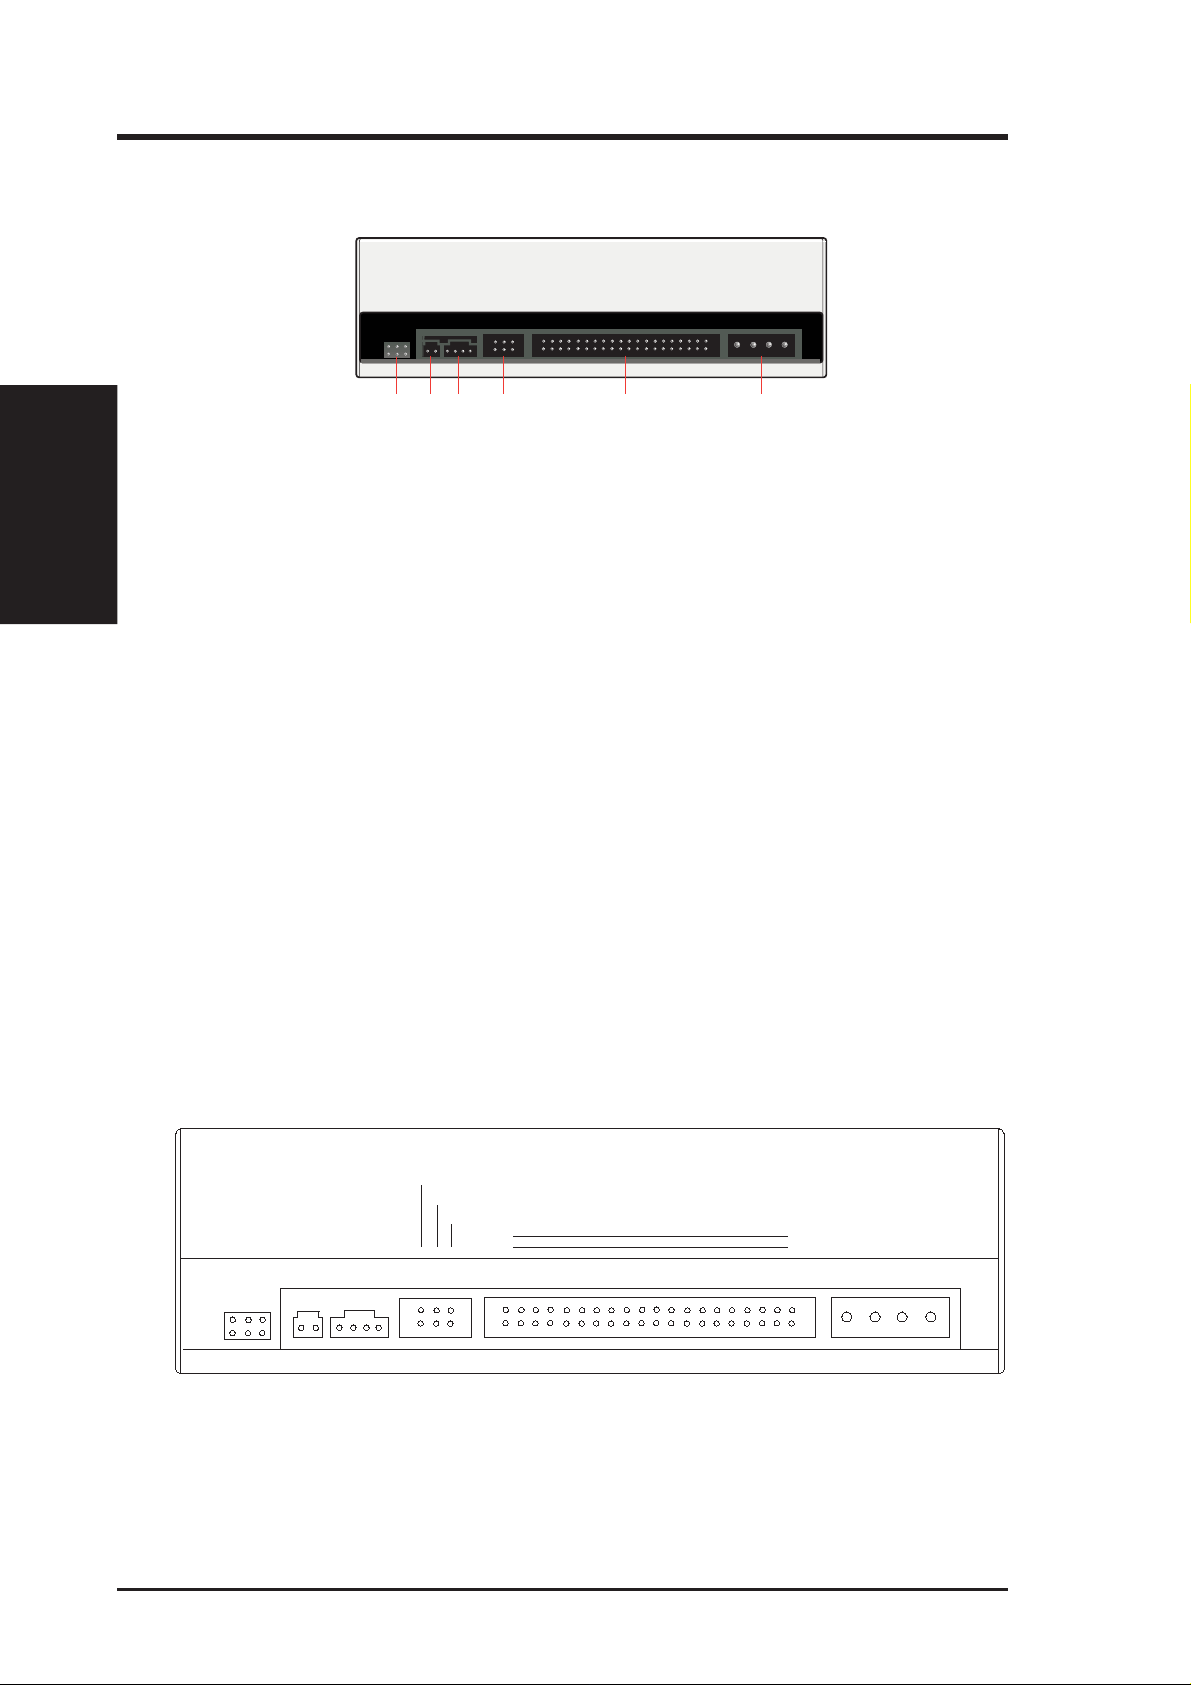
Rear Panel Features
II. H/W INST ALLATION
Rear Panel
➅
➂
➃➄
➁
➀
➀ Power Supply connector connects the CD-ROM Drive to the computer’s power
supply .
➁ IDE Interface connector connects the CD-ROM Drive to the 40-pin interface
cable.
➂ Device configuration jumper allows you to set your CD-ROM Drive as the
Master or Slave drive. The default setting is Slave, wherein the jumper is on
“SLAVE”. “CABLE SELECT” is reserved and should not be used.
➃ Analog Audio line out connector has two channels, right (“R”) and left (“L”)
audio outputs, and allows you to direct audio output from your CD-ROM Drive
to your sound card when connected using a CD audio cable. “G” is for Ground.
➄ Digital Audio output connector offers high quality audio effect by outputting
digital signal to a D/A converter or for recording to a digital audio tape (DAT) or
professional audio recording system. The connector follows the EBU-IEC958
standard set by the European Broadcast Union.
➅ Testing jumpers are reserved for manufacturer ’s internal testing or diagnostic
purposes.
Pin Definitions
CABLE SELECT
SLAVE
MASTER
L
G
O
OO
OROGO
D: Digital; G: Ground; R: Right audio channel; L: Left audio channel
O
39
40
IDE INTERFACE
1
+5VOGOGO+12V
2
POWER
DOG
O
ANALOG
AUDIO
DIGITAL
AUDIO
NOTE: The pin settings or definitions of the connectors and jumpers are
also engraved on the Rear Panel of your CD-ROM Drive.
8 ASUS High-Speed CD-ROM Drive User’s Manual
O
Page 9
II. HARDWARE INSTALLATION
Before you begin to install your CD-ROM Drive, read through at least once the installation process. You’ll find the installation easier and you’ll also be able to know whether
you need to take alternative steps for installing your drive. You might need both a flatblade and a Phillips-head screwdriver to complete the hardware installation.
Removing Your Computer’s Cover
1. Quit any applications you may be running and turn off the power to your computer and peripheral devices, such as your printer.
2. Ground yourself by using a wrist strap. If you do not have one, touch both of
your hands to a safely grounded object or a metal object on your system.
NOTE: Your computer must be plugged into a three-prong grounded socket
if you choose to ground yourself by touching your system.
3. Remove the cover from your computer. Refer to your computer ’s manual for
specific instructions.
II. H/W INST ALLATION
Removing/Setting/Inserting
Setting Your CD-ROM Drive
Set your drive as either the Master or Slave (default) drive by placing the jumper cap
on the desired jumper ➂.
Slave Drive (Default) Master Drive
NOTE: If your computer only allows you to connect a maximum of two devices and you have two hard disks, remove the Slave hard disk — you need the
other IDE connector for your CD-ROM Drive. If you only have one hard disk,
set your CD-ROM Drive as Slave. If your computer has two IDE connectors
and two hard disks installed, either set your CD-ROM Drive as Master on
the secondary IDE connector or remove the Slave hard disk and replace it
with your CD-ROM Drive. Refer to your computer’s manual for your system’ s
configuration and instructions on hardware installation.
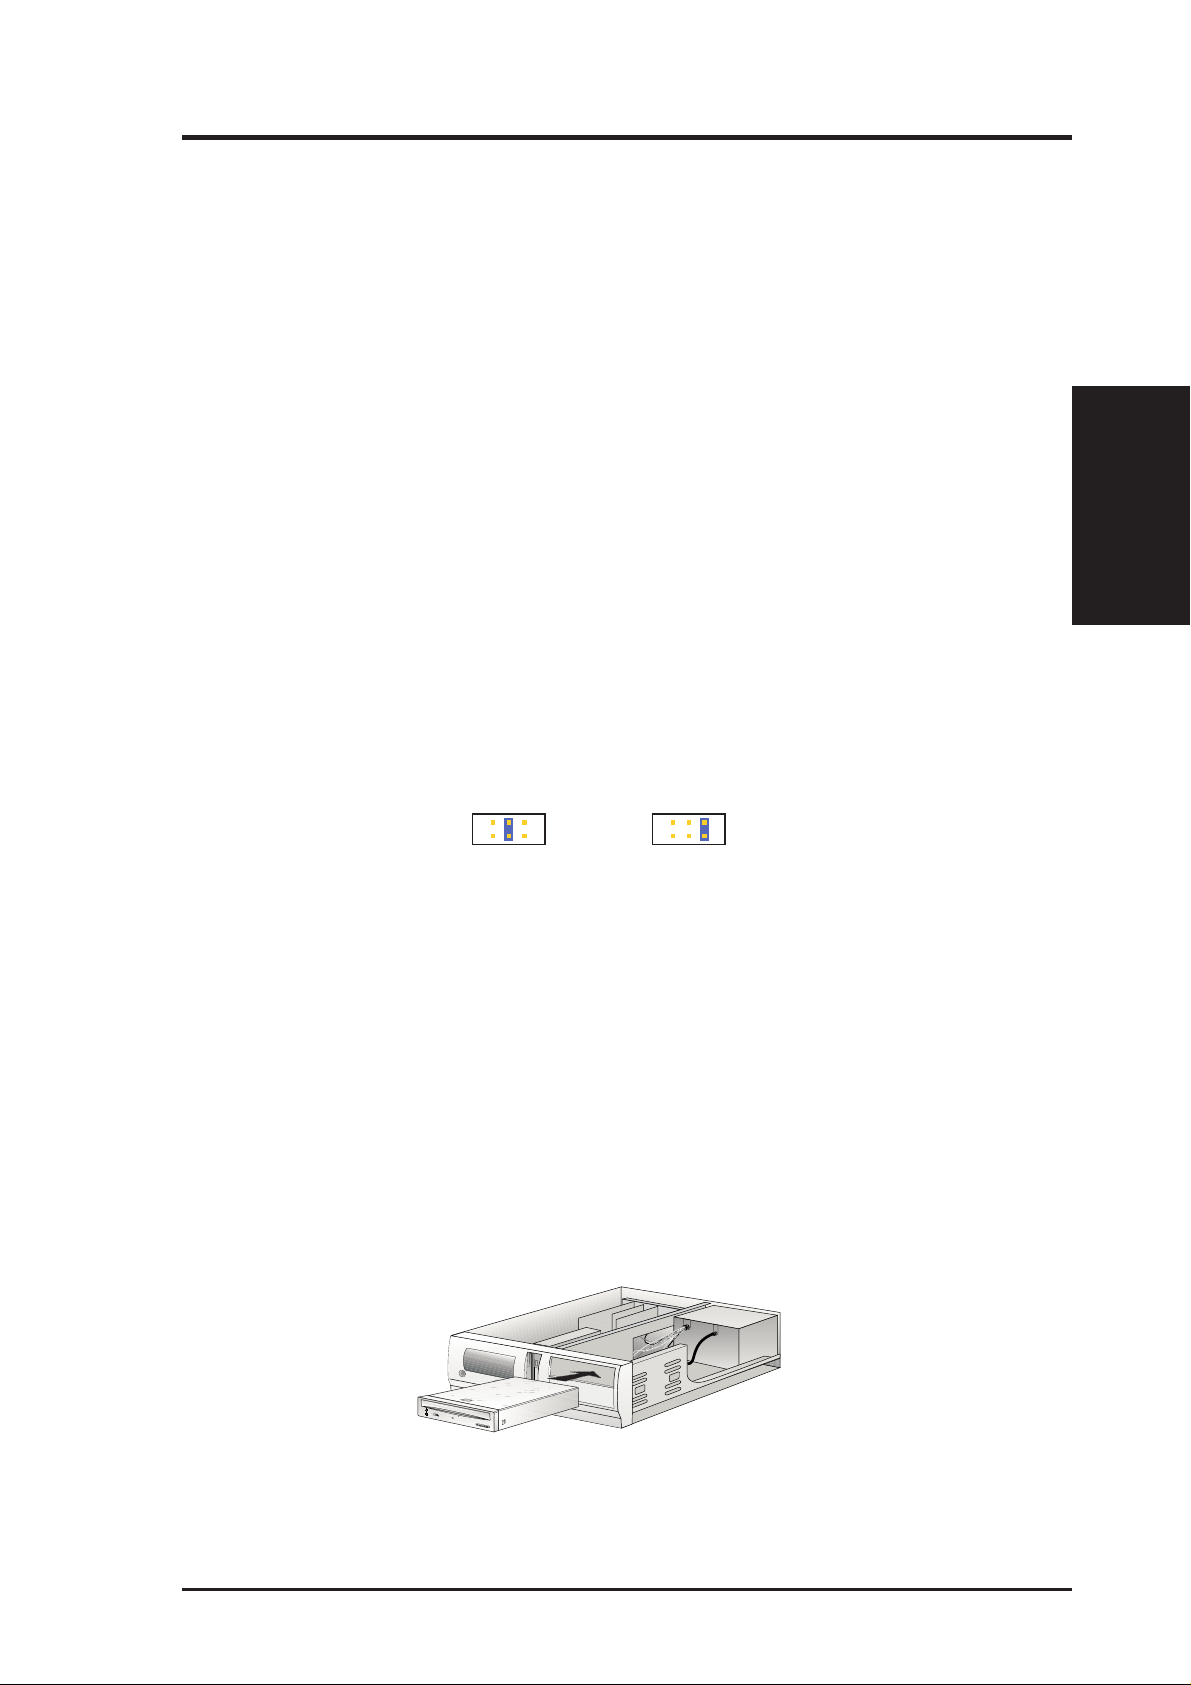
Inserting Your CD-ROM Drive into Your Computer
Insert the CD-ROM Drive into one of the free 5.25-inch bays available for disk drives.
NOTE: Do not slide the drive completely into the vacant drive bay . Leave some
space at the rear so that it is easier for you to connect cables to your drive.
ASUS High-Speed CD-ROM Drive User’s Manual 9
Page 10
II. HARDWARE INSTALLATION
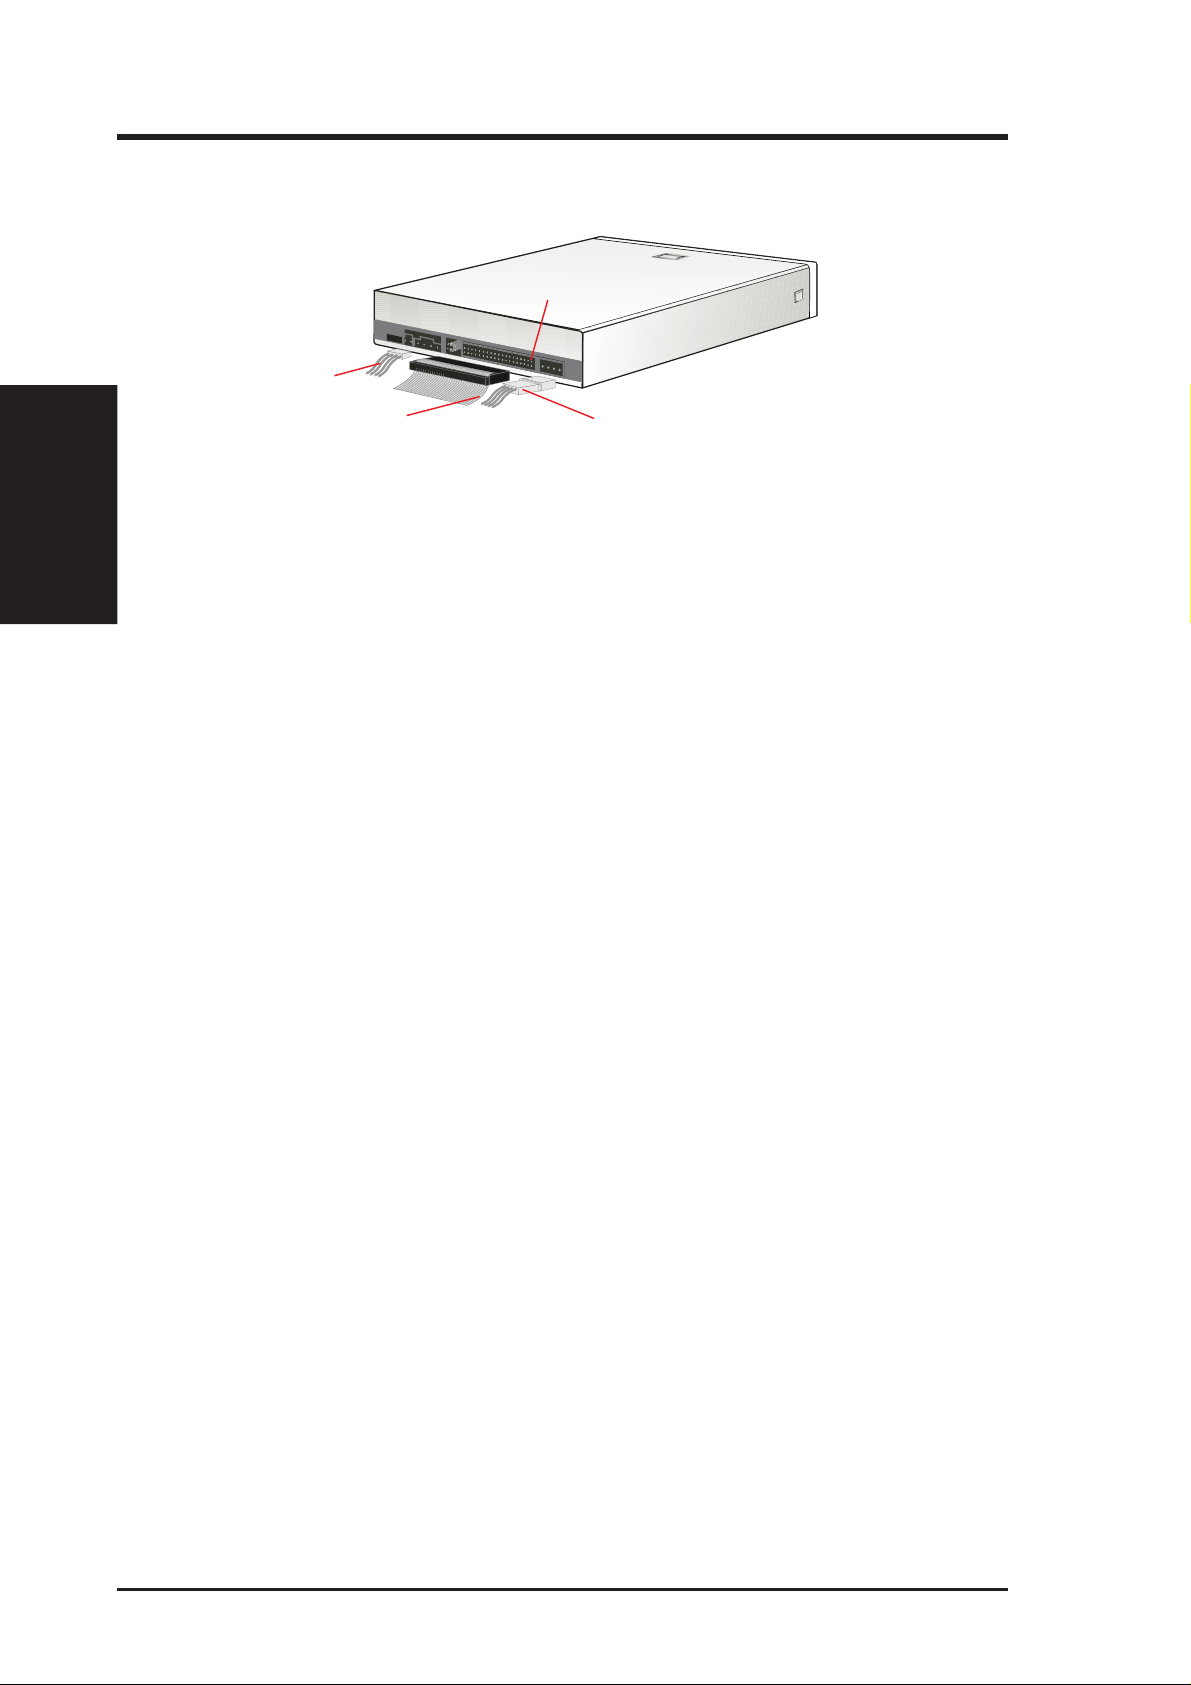
Connecting Cables to the CD-ROM Drive
Pin 1
Connecting/Reassembling
II. H/W INST ALLATION
CD Audio Cable
Red stripe (IDE Ribbon Cable)
1. Connect an unused power supply cable to the back ➀ of your CD-ROM Drive.
2. Connect the 40-pin IDE ribbon cable to the back ➁ of your CD-ROM Drive.
NOTE: Orient the red stripe on the cable with Pin 1 of the CD-ROM Drive’ s
IDE Interface connector.
3. If you have a sound card, connect the 4-pin CD audio cable to the CD-ROM Drive’ s
Analog Audio line out connector ➃. Otherwise, proceed to the next step.
NOTE: If the pin definitions on your sound card are not the same as that
(see preceding section) on your CD-ROM Drive, check with your dealer for
a compatible cable.
4. If you do not have a sound card, plug earphones, headphones, or powered/selfamplified speakers to the Headphones Jack on your CD-ROM’s front panel (see
CD-ROM DRIVE OPERATION). Set the volume controls of your drive and powered/self-amplified speakers to minimum before starting or restarting your computer . This is to prevent possible damage to the earphones, headphones, or speakers.
Power Supply Cable
NOTE: The Headphones Jack can only be used to listen to audio discs.
Reassembling Your Computer
1. Tuck all cables behind the drives so that they do not protrude above the power
supply unit.
2. Double-check your connections to make sure they are secure.
3. If you removed any drive or other items other than your CD-ROM Drive, put
them back into place and secure them to your computer.
4. Slide your CD-ROM Drive now into place and fasten it to your system with the
screws provided.
5. Replace the cover on your computer and secure it with the screws you removed
earlier .
6. Reconnect the power supply.
You can now go on to install the software.
10 ASUS High-Speed CD-ROM Drive User’s Manual
Page 11

III. SOFTWARE INSTALLATION
The CD-ROM Drive comes with a CD-ROM Driver for DOS/Win 3.x Installation
disk, which includes an installation utility that installs the driver needed to access
and use a CD-ROM disc in your CD-ROM Drive. The disk contents include:
• ASUSCD.SYS DOS/Win 3.x Driver
• INSTALL.EXE Installation utility
• README.TXT Description and use of the files
In addition to the hardware-dependent driver, a software-dependent driver is installed:
MSCDEX.EXE (version 2.21 or later), which is the Microsoft CD-ROM Extension, a
standard mechanism for interfacing CD-ROM drives with computers. The driver comes
with your operating system, for example, MS-DOS.
DOS/Windows 3.x
1. Restart your computer in DOS Mode.
2. Insert the CD-ROM Driver for DOS/Win 3.x Installation disk into either drive A
or drive B.
3. Type A: install (or B: install) and then press [Enter].
4. Choose your preferred setup option and then follow the instructions on the screen.
Express Setup
Choose the express setup option for quick and easy installation. For most users,
this option, which installs the default CD-ROM driver setting, works just fine.
A directory , C:\ASUS_CD, containing the CD-ROM Driver and installation file,
is created during the installation, and your AUTOEXEC.BA T and CONFIG.SYS
files will be updated with the following entered:
DOS/Windows/Special
III. S/W INST ALLATION
AUTOEXEC.BAT: C:\DOS\MSCDEX.EXE /D:MSCD000
CONFIG.SYS: DEVICE=C:\ASUS_CD\ASUSCD.SYS /D:MSCD000
ASUS High-Speed CD-ROM Drive User’s Manual 11
Page 12

III. SOFTWARE INSTALLATION
Custom Setup
Choose the custom setup option to customize installation settings, such as the
target directory for the driver and installation files, and special settings.
To take advantage of the special settings to fully use your drive’s capability,
highlight Transfer Mode under the Custom Setup dialog box and then press
[Enter]. The different transfer mode options will be displayed:
• PIO Mode or Programmed Input/Output Mode is the most common way computers
transfer data to and from the disk drive. PIO Mode 4, which is the mode installed,
differs only from the standard PIO transfer in how often the drive issues interrupts. In
PIO Mode 4, each interrupt indicates the drive is ready for 4 sectors of data (read) or
has completed the transfer of 4 sectors of data (write), compared with the one interrupt
required in standard PIO for each sector . This eliminates some of the system overhead
involved in a PIO transfer .
Windows 95/Windows NT
III. S/W INST ALLATION
• Multi-word DMA Mode or Multi-word Direct Memory Access Mode is used in
EISA-, VESA Local Bus-, and PCI-equipped systems. This mode is capable of very
fast transfer rates using Bus Mastering. The advantage of using the Bus Master DMA
is that it uses less CPU resources than PIO and therefore, it is useful in multitasking
environments, where the CPU can work on a different program while data is transferred to or from the hard disk drive, or in your case, your CD-ROM Drive.
• Ultra DMA Mode, also known as Ultra-ATA (ATA is the “official” name for what the
computer industry calls IDE or Integrated Drive Electronics) or Ultra-DMA/33, is the
latest advancements to the AT A specifications. Ultra-DMA, among others, almost doubles
the maximum transfer speed of the AT A-3 standard and improves data integrity.
NOTE: These special settings require that you have a motherboard or install an
adapter that supports either or all of these modes.
5. Choose your preferred transfer mode and then press [Enter].
6. Highlight Start Installation and then press [Enter]. The installation utility will
update your AUTOEXEC.BAT and CONFIG.SYS files with the appropriate
settings and create the other options that you chose.
7. After the installation is completed, restart your computer.
Windows 95/Windows NT
If your CD-ROM Drive is already installed, W indows 95 or W indows NT will automatically detect it and determine the appropriate settings for the drive and install or
load the correct driver.
OS/2 and Other Operating Systems
Y our CD-ROM Drive supports the ATAPI drive interface. Your system should be able
to automatically detect your CD-ROM Drive and load the appropriate device driver.
12 ASUS High-Speed CD-ROM Drive User’s Manual
Page 13

IV. CD-ROM DRIVE OPERATION
Now that you’ve installed your CD-ROM Drive, you’re ready to start using it. To
start using your CD-ROM Drive, you need to know how to (1) operate the CDROM Drive using the controls on the front panel, (2) insert CD discs into and remove them from the drive, and (3) handle CD discs.
Front Panel Controls
➂➁
➀
➀ Headphones Jack allows you to connect a pair of earphones or headphones to
the drive for private listening. It also allows you to connect a pair of powered/
self-amplified speakers. Just plug them into the Headphones Jack.
➁ Volume Controls allows you to adjust the volume of your earphones, headphones
or powered/self-amplified speakers connected to the Headphones Jack. This control has no effect on the audio output from devices (such as speakers) connected to
your sound card.
➂ Disc Indicator lights up when there is a disc inside your CD-ROM Drive, other-
wise this indicator will not light. This indicator flashes whenever your CD-ROM
Drive is busy reading information from your disc or when your drive is in use.
➃ Emergency Ejection Hole allows you to manually eject the tray in case of power
failure. See Emergency Eject for more information.
➄ Select Buttons allows you to manually control your audio discs without having
to run any software program.
Open/Close/Stop Button
The right button has three states: OPEN, CLOSE, and STOP. If tray
is closed, pressing this button will OPEN or eject it. If tray is out,
pressing this button will CLOSE it. If the drive is playing, pressing
this button will STOP CD playback.
➃
➄
Front Panel
IV. OPERATION
Play/Skip Button
The left button has two states: PLAY track and SKIP track. If the drive
is idle, pressing this button will start PLAYing audio discs from the
first track on. If the drive has been PAUSEd, pressing this button will
resume CD playback or rePLA Y the audio discs. If the drive is playing,
pressing this button will SKIP to the next track of an audio disc.
ASUS High-Speed CD-ROM Drive User’s Manual 13
Page 14

IV. CD-ROM DRIVE OPERATION
Inserting a CD Disc in the Drive
1. Select the disc you want to use and remove it from its storage case.
2. Eject the disc tray by pressing the Open/Close/Pause/Stop button on your CDROM Drive.
3. Handling the CD disc by its outer edges, place it in the tray.
NOTE: All CD discs have printing on one side and this side should always
be facing up when the disc rests in the disc tray . See CD Handling Tips for
more suggestions.
4. Close the tray by pressing the Open/Close/Pause/Stop button or by gently pressing the tray panel until you encounter slight resistance and then giving it a slight
nudge. Your drive will pull the tray in the rest of the way.
Removing a CD Disc from the Drive
1. Check to make sure that your CD-ROM Drive is not in use before attempting to
remove it.
2. Press the Open/Close/Pause/Stop button on the drive Front Panel to eject the
CD tray.
3. Remove the CD disc from the tray and store it back to its original case.
Inserting/Removing CD
IV. OPERATION
CD Handling Tips
Your CD disc collection will probably grow over time. You should, therefore, always exercise care when handling CD discs.
• Keep your CD discs in their original case when they’re not in use. Scratches on the
surface of a disc can distrort the information, or even make it impossible to read.
• Always handle CD discs by their outer edges. Oily fingerprints or other smudges
on the surface tend to accumulate dirt. Placing a dirty disc in your CD-ROM
Drive can distort your data or even damage the drive mechanism.
• If a CD disc becomes dirty , clean both sides with a damp cloth by wiping gently
from the center spindle hole out toward the edge of the disc. Wiping in any
other direction grinds the dirt into the protective surface.
• When cleaning any CD discs, do not use abrasives or chemical solvents, includ-
ing benzine, thinner, or commercial cleaners intended for use with audio discs.
• Insert CD discs in the tray with the printed side facing up.
• Store your CD discs where they will not be subjected to direct sunlight or high
temperatures.
• Do not apply adhesive labels or tapes to, or write on any part of a CD disc.
14 ASUS High-Speed CD-ROM Drive User’s Manual
Page 15

IV. CD-ROM DRIVE OPERATION
Emergency Eject
In case of power failure or if the tray of your CD-ROM Drive won’t open using the
Open/Close/Pause/Stop button or your software, you may have to manually eject
the tray.
NOTE: Use the manual method only when necessary or as a last resort. Do
not use this method in lieu of the Open/Close/Pause/Stop button when, for
example, you forgot to eject the tray while the computer is on. Turn your
computer back on to eject the tray, if possible.
To manually eject the tray:
1. Turn off your computer.
WARNING! If you don’t turn off your computer before you attempt to eject
the tray using the steps below, you may damage your CD-ROM Drive.
2. Locate the Emergency Ejection Hole of your CD-ROM Drive. See Front Panel
Controls for the location.
3. Insert the end of a large straightened paper clip about 3 cm (1.25 inches) into the
Emergency Ejection Hole, slightly toward the right.
4. Push gently but firmly until the tray is released, then carefully pull the tray open.
WARNING! Do not force the tray open; wait until the paper clip has dis-
lodged it to be sure you don’t break the front of the tray.
5. Remove the CD disc, turn on your computer, and press the Open/Close/Pause/
Stop button of your CD-ROM Drive to see if it is working properly.
NOTE: If ejecting the tray using a paper clip does not work, your CD-ROM
Drive may be damaged. Contact your dealer for further assistance.
ASUS High-Speed CD-ROM Drive User’s Manual 15
IV. OPERATION
Emergency Eject
Page 16

V. TROUBLESHOOTING
PROBLEM Unable to access CD-ROM Drive.
CAUSES 1. The information in your CONFIG.SYS or AUTOEXEC.BAT
or both files might be incorrect. (DOS only.)
2. Some BIOS that include power management features use IRQ14
or IRQ 15, which should be reserved for IDE devices like your
CD-ROM Drive. (DOS only.)
SOLUTIONS 1. Check the LASTDRIVE= entry in your CONFIG.SYS file. You
might have to set the drive letter to one higher than your actual
last drive letter . For example, if the last drive on your system is
drive D, try setting the parameter in the CONFIG.SYS file to
LASTDRIVE=E. (DOS only.)
• Your CD-ROM Drive requires the drivers, MSCDEX.EXE
and ASUSCD.SYS, to access the drive. Check your AUTOEXEC.BAT file for the statement C:\DOS\MSCDEX.EXE
/D:MSCD000 and CONFIG.SYS file for the statement
DEVICE=C:\ASUS_CD\ ASUSCD.SYS /D:MSCD000 (see
Software Installation for more information). (DOS only.)
PROBLEM No sound from speakers.
CAUSES 1. Audio cable or speakers are not connected properly.
V. TROUBLESHOOTING
SOLUTIONS 1. Check that the CD audio cable is connected to the Analog Audio
2. Change the IRQ setting of the device that is using IRQ 14 or IRQ
15, for example, sound card or motherboard. Refer to the card or
motherboard documentation for more information. (DOS only .)
2. The volume is not adjusted to an audible level.
3. The drive may be faulty.
4. The card may be faulty.
line out connector on the drive and sound card. Check also that
the pin definitions of your CD-ROM Drive and sound card are
the same. If not, check with your dealer for a compatible CD
audio cable or ask a qualified technician to adjust the cables to
match your CD-ROM Drive’s pin definitions. Also, check that
the speakers are connected to the correct jack on the sound card.
2. Make sure the volume control is turned up to an audible range.
3. Connect earphones or headphones to the Headphones Jack. If
there is no sound from your earphones or headphones, consult
your dealer about your faulty drive.
16 ASUS High-Speed CD-ROM Drive User’s Manual
Page 17

V. TROUBLESHOOTING
4. Connect earphones or headphones to the sound card’ s Headphones
Jack. If there is no sound from your earphones or headphones, check
to see the CD audio cable is connected from the drive to the sound
card (refer to your sound card manual for more information). If the
audio cable is connected and there is still no sound from your earphones or headphones, consult your dealer about your faulty card.
PROBLEM Cannot detect the CD-ROM Drive (Windows 95 or Windows NT).
CAUSE There are times when Windows cannot detect a new hardware.
SOLUTION Install the drivers manually.
• Start the Add New Hardware wizard by clicking My Com-
puter | Control Panel | Add New Hardware and then follow
the instructions on your screen.
NOTE: Let Windows detect your CD-ROM Drive. Make sure
you have installed and connected your CD-ROM Drive in your
computer before running the wizard.
PROBLEM Cannot achieve the maximum data transfer rate performance speci-
fied for the CD-ROM Drive using benchmarking utilities.
CAUSE Your CD-ROM Drive uses Constant Angular V elocity (CAV) tech-
nology , wherein the spindle motor is running at the same velocity ,
while the drive is accessing data at the inner or outer tracks. In
this way, the CD-ROM will achieve lower data transfer rates at
the inner tracks and higher transfer rates at the outer tracks. Thus
using older benchmarking utilities, such as WinBench 96, will
give lower data transfer rates because these utilities use the drive’ s
inner tracks for its performance tests.
SOLUTION Upgrade your benchmarking utility to one that supports tests on
the outer tracks of your drive, for example, WinBench 98.
PROBLEM When playing a CD disc, there’s no image on the screen.
CAUSE The disc may be an audio CD that does not have any screen im-
ages, or the disc may be defective.
SOLUTION Make sure the disc is not audio-only. To check if a disc is defec-
tive, examine it closely for deep scratches, pitting, or warping.
CD discs are covered with a hard coating that protects the disc,
but deep scratches, pitting, and warping can make a disc
unplayable.
V. TROUBLESHOOTING
ASUS High-Speed CD-ROM Drive User’s Manual 17
Page 18

V. TROUBLESHOOTING
PROBLEM Data transfer rate performance seems slower than expected.
CAUSE Given the signal quality issues with PIO Mode 4 transfer rates in
some systems and such variables as error correction, caching, processor overhead, and rotational speed, higher transfer rates may
not be achievable with the default transfer mode. Thus transfer
rates may be lower.
SOLUTION Change the transfer mode of your CD-ROM Drive to Multi-word
or Ultra DMA Mode to maximize its capability.
• For DOS, see Custom Setup under SOFTWARE INSTALLA-
TION for more information.
• For Windows 95 or Windows NT, Bus Master driver must be
installed. Unless your computer dealer installed the driver when
you bought it or your motherboard supports Bus Master mode,
Windows will not use bus mastering for your CD-ROM Drive.
PROBLEM Cannot display the directory on an audio CD disc with the DIR
CAUSE The DIR command does not work with audio CD discs while in
V. TROUBLESHOOTING
• Click My Computer | Control Panel | System | Device Man-
ager | CD-ROM controllers. If you are using the bus master ,
PCI Bus Master will be displayed. If not and your motherboard has the new PCI controller chipsets from Intel, for example, the 430TX or 440BX, but does not have a CMOS setting for Bus Master mode, you may have to get the driver
from Intel. Check with your dealer for more information.
command.
DOS. You can use the command, however, to display the directory on a data CD.
NOTE: You can use the DIR command to display the directory
on an audio disc while in W indows using the command prompt or
MS-DOS Prompt. Refer to your W indows manual on how to find
the command prompt.
18 ASUS High-Speed CD-ROM Drive User’s Manual
Page 19

R
High-Speed CD-ROM Drive
Quick Installation Guides
English
French
German
Italian
Spanish
Russian
Japanese
Simplified Chinese
Traditional Chinese
Page 20

ENGLISH
E226
QUICK INSTALLATION GUIDE
I. Check that your package is complete: CD-ROM Drive, CD audio cable, mounting screws,
installation disk, and user’s manual.
II. Hardware Installation
1.Turn off your computer and peripheral devices, such as your printer.
2.Ground yourself by using a wrist strap. If you do not have one, touch both of your
hands to a safely grounded object or to a metal object on your system.
3.Remove the cover from your computer.
4.Set your drive as either the Master or Slave (default) drive by placing the jumper
cap on the desired jumper.
5.Insert the CD-ROM Drive into one of the free 5.25-inch bays available for disk drives.
6.Connect an unused power supply cable to the back of your CD-ROM Drive.
7.Connect the 40-pin IDE ribbon cable to the back of your CD-ROM Drive. Make
sure that the red stripe on the cable is aligned to Pin 1 of the IDE connector.
8.If you have a sound card, connect the 4-pin CD audio cable to the CD-ROM Drive’s
Analog Audio line out connector. If you do not have a sound card, plug earphones,
headphones, or powered/self-amplified speakers to the Headphones Jack on your
CD-ROM’s front panel. Set the volume controls of your drive and powered/selfamplified speakers to minimum before starting or restarting your computer.
9.If you removed any drive or other items other than your CD-ROM Drive, put them
back into place and secure them to your computer.
10.Slide your CD-ROM Drive now into place and fasten it to your system with the
screws provided.
11.Replace the cover on your computer and secure it with the screws you removed earlier.
12.Reconnect the power supply.
III. Software Installation
1.For DOS/Windows 3.x, insert the CD-ROM Driver for DOS/Win 3.x Installation disk
into either drive A or drive B, type A: install (or B: install) and then press [Enter],
choose your preferred setup option and then follow the instructions on the screen, and
then restart your computer after installation is complete.
2.For Windows 95 or Windows NT, Windows will automatically detect and determine the current settings for your drive and install the correct driver.
3.For other operating systems, your CD-ROM Drive supports the ATAPI drive interface and your system should be able to load the appropriate driver for your drive.
Sound Card
Power
Switch
CD-ROM Drive
Power Supply
Power Supply
Cables
Insert Your CD-ROM Drive
Into a Free Drive Bay
ASUS High-Speed CD-ROM Drive
Page 21

FRENCH
F226
GUIDE D’INSTALLATION RAPIDE
I. Vérifiez que votre ensemble est complet: Lecteur de CD-ROM, câble CD audio, vis de
montage, disque d’installation, et notice d’explication.
II. Installation du Matériel
1.Eteignez votre ordinateur et ses périphériques, tel que l’imprimante.
2.Reliez vous à la terre par une courroie à votre poignet. A défaut, maintenez le contact
de vos deux mains avec un objet lui-même relié à la terre, ou à une partie en métal de
votre système.
3.Enlevez le couvercle de votre ordinateur.
4.Réglez votre lecteur en tant que lecteur Maître ou Esclave (choix par défaut) en plaçant
le cavalier sur la position désirée.
5.Insérez le lecteur de CD-ROM dans l’un des emplacement libre de 5.25 pouces
disponible pour les drivers.
6.Connectez un câble d’alimentation inutilisé à l’arrière de votre lecteur de CD-ROM.
7.Connectez la nappe 40 broches à l’arrière de votre lecteur de CD-ROM. Assurez vous
que la bande rouge du câble est aligné avec la broche 1 du connecteur IDE.
8.Si vous possédez une carte son, connectez le câble CD-audio 4 broches à la prise
Analog Audio line out du lecteur de CD-ROM. Si vous n’avez pas de carte son, branchez
des écouteurs, casques ou enceintes autonomes à la prise jack du panneau frontal de
votre lecteur de CD-ROM. Avant de redémarrer votre ordinateur, baissez le volume du
lecteur et vos enceintes au minimum.
9.Si au cours de l’opération vous avez retiré des éléments autres que votre CD-ROM,
remettez les en place.
10.Faites glisser votre lecteur de CD-ROM dans son emplacement et fixez le au système
avec les vis fournies.
11.Replacez le couvercle de votre ordinateur avec les vis que vous avez enlevées préalablement.
12.Rebranchez l’alimentation électrique.
III. Installation du Logiciel
1.Pour les environnements DOS/Windows 3.x, insérez la disquette d’installation du lecteur
de CD-ROM pour DOS/Win 3.x dans le lecteur A ou B, tapez A: install (ou B: install)
puis tapez [Entrée], choisissez vos paramètres d’installation et suivez les instruction
sur l’écran, redémarrez votre ordinateur après la fin de l’installation.
2.Pour Windows 95 ou Windows NT, Windows détectera et déterminera automatiquement
les paramètres présents et installera le bon pilote.
3.Pour les autres systèmes d’exploitation, votre lecteur de CD-ROM supporte l’interface
ATAPI ce qui permettra à votre système de charger le pilote correspondant à votre lecteur.
Carte Son
Bouton
d’Alimentation
Lecteur de CD-ROM
Alimentatión
Câbles
d’Alimentatión
Insérer votre Lecteur de CD-ROM dans un Espace pour Lecteur Disponible
Lecteur de CD-ROM Haute Vitesse ASUS
Page 22

GERMAN
G226
EINFACHE INSTALLATIONANLEITUNG
I. Überprüfen Sie, ob Ihr Paket komplett ist: CD-ROM-Laufwerk, CD-Audio-Kabel,
Schrauben, Installationsdiskette und Handbuch.
II. Installation der Hardware
1.Schalten Sie Ihren Computer und periphäre Geräte, wie z. B. Drucker, aus.
2.Erden Sie sich durch ein spezielles Band am Handgelenk. Ist ein solches Band nicht
verfügbar, sollten Sie ein sicheres, geerdetes Objekt oder ein Objekt aus Metall an
Ihrem PC berühren.
3.Entfernen Sie die Abdeckung Ihres Computers.
4.Schließen Sie Ihr Laufwerk entweder als Master oder Slave (default) an, indem Sie den Jumper an
die gewünschte Stelle setzen.
5.Setzen Sie das CD-ROM-Laufwerk in die dafür vorgesehene Aussparung in Ihrem System.
6.Schließen Sie ein ungenutztes Stromversorgungskabel an Ihrem CD-ROM-Laufwerk an.
7.Schließen Sie das 40-pin IDE Kabel an Ihrem CD-ROM-Laufwerk an. Vergewissern
Sie sich, dass der rote Streifen auf der Seite von Pin 1 des IDE-Anschlusses liegt.
8.Sollten Sie eine Soundkarte haben, schließen Sie das 4-pin CD-Audiokabel am Analog Audio
line out-Anschluß des CD-ROM-Laufwerks an. Haben Sie keine Soundkarte, schließen Sie
einen Kopfhörer oder Lautsprecher an die Lautsprecherbuchse auf der Vorderseite des CD-ROMLaufwerks an. Drehen Sie die Lautstärkeregler des Laufwerks und der Lautsprecher auf Minimum
bevor Sie Ihren Computer starten oder neu starten.
9.Falls Sie außer Ihrem CD-ROM-Laufwerk noch andere Geräte entfernt haben, setzen
Sie diese wieder ein und verbinden Sie mit Ihrem System.
10.Setzen Sie nun Ihr Laufwerk ein und befestigen Sie es mit den mitgelieferten Schrauben.
11.Setzen Sie die Abdeckung wieder auf Ihren Computer und befestigen Sie sie mit
den vorher entfernten Schrauben.
12.Schließen Sie die Stromversorgung wieder an.
III. Installation der Software
1.Unter DOS/Windows 3.x legen Sie die Treiberdiskette für DOS/Windows 3.x in Laufwerk
A oder B und geben A:install (oder B:install) ein. Drücken Sie die Enter-Taste und
wählen Sie die bevorzugte Setup Option aus. Folgen Sie danach den Anweisungen auf
dem Bildschirm und starten Ihren Computer nach Beendigung der Installation erneut.
2.Unter Windows95 oder Windows NT werden automatisch die richtigen Einstellungen
vorgenommen und der richtige Treiber installiert.
3.Bei anderen Betriebssystemen unterstützt Ihr CD-ROM-Laufwerk das ATAPI-Treiberinterface
und Ihr System ist in der Lage, den jeweiligen Treiber für Ihr Laufwerk zu laden.
Soundkarte
Schalter
CD-ROM Laufwerk
Stromversorgung
Stromkabel
Setzen Sie Ihr Laufwerk in eine dafür vorgesehene Aussparung
ASUS High-Speed CD-ROM-Laufwerk
Page 23

ITALIAN
I226
GUIDA PER UNA INSTALLAZIONE VELOCE
I. Verificate che la confezione sia completa di: drive CD-ROM, cavo CD audio, viti di
montaggio, dischetto d’installazione e il manuale d’uso.
II. Installazione Hardware
1.Spegnete il computer e i dispositivi periferici, quali la stampante.
2.Collegatevi alla massa con un bracciale anti statico. Se non ne avete uno, toccate
con entrambe le mani una superficie collegata a terra o una parte metallica del vostro
sistema.
3.Aprite il cabinato.
4.Configurate il CD-ROM drive come master o come slave (default) spostando il
jumper nella posizione adeguata.
5.Inserite il CD-ROM drive in un vano da 5,25” libero.
6.Alimentate il CD-ROM con un cavo di alimentazione non utilizzato.
7.Connettete il cavo IDE da 40 poli al connettore IDE del CD-ROM. Assicuratevi che
il lato con la striscia rossa sia allineato al pin 1 del connettore IDE.
8.Se avete una scheda sonora connettete il cavo audio a 4 pin al connettore Analog
Audio line out del CD-ROM. Se non avete una scheda sonora inserite una cuffia o
delle casse acustiche all’uscita per cuffie sul pannello frontale del CD-ROM.
Impostate il controllo del volume del drive e delle casse acustiche al minimo prima
di avviare il computer.
9.Se avete rimosso altri dispositivi per installare il CD-ROM drive rimettetele al posto
e fissatele al computer.
10.Fissate nella giusta posizione il CD-ROM tramite le viti fornite.
11.Richiudete il computer.
12.Riconnettete il cavo di alimentazione.
III. Installazione Software
1.Per i sistemi operativi DOS/Windows 3.x, inserite il dischetto con il driver per DOS/
Win 3.x nel drive A o drive B, digitate A: install (o B: install) e premete [Invio],
scegliete le opzioni di setup preferiti e seguite le istruzioni a schermo. Al termine
dell’installazione riavviate il computer.
2.Per Windows 95 o Windows NT, Windows rileverà automaticamente il vostro drive
e installerà il driver corretto.
3.Per altri sistemi operativi il drive CD-ROM supporta l’interfaccia ATAPI e il vostro
sistema dovrebbe essere in grado di caricare il driver appropriato.
Scheda Sonora
Pulsante di
Accensione
Drive CD-ROM
Alimentatore
Cavi di
Alimentazione
Inserite il Vostro Drive CD-ROM
in un Vano Libero
CD-ROM ASUS ad Alta Velocità
Page 24

SPANISH
S226
GUÍA DE INSTALACIÓN RÁPIDA
I. Compruebe que los siguientes elementos estén incluidos en el embalaje: lector de CD-
ROM , cable CD audio, tornillos de montaje, disco de instalación y manual de usuario.
II. Instalación de la Unidad
1.Apague su equipo y los periféricos conectados a él, como, por ejemplo, la impresora.
2.Utilice una muñeca antiestática para evitar dañar el equipo. Si no dispone de una, ponga en
contacto ambas manos con un objeto con toma de tierra o con un objeto metálico de su sistema.
3.Retire la cubierta de su ordenador.
4.Configure su unidad como Principal o Subordinada -por defecto- (maestro o esclavo)
conectando la salida del cable al conector que desee.
5.Inserte la unidad del CD-ROM en una de las bahías de 5.25” libres para unidades de disco.
6.Conecte un cable de alimentación libre en la parte trasera del lector de CD-ROM.
7.Conecte el cable plano IDE de 40 pines en la parte posterior de su unidad de CD-ROM.
Asegúrese de que la franja roja del cable esté alineada con el pin 1 del conector IDE.
8.Si posee usted una tarjeta de sonido, conecte el cable CD audio de 4 pines al conector de salida
de audio analógica (Analog Audio line out) del lector de CD-ROM. Si no dispone de tarjeta de
sonido, conecte los auriculares, altavoces o altavoces autoamplificados en la clavija (tipo jack)
para auriculares localizada en el panel frontal del lector de CD-ROM. Configúre los controles
de volumen de su unidad y de los altavoces al mínimo antes de iniciar o reiniciar su ordenador.
9.En caso de que hubiese extraído alguna unidad o cualquier otro elemento además de su
lector de CD-ROM, emplácelos de nuevo en su anterior posición y fíjelos debidamente.
10.Inserte el lector de CD-ROM en la posición deseada y fíjelo con los tornillos
entregados.
11.Coloque de nuevo la cubierta de su ordenador y fíjela con los tornillos retirados anteriormente.
12.Conecte de nuevo la fuente de alimentación.
III. Instalación del Software
1.Para DOS/Windows 3.x, inserte el disco de instalación para DOS/Win 3.x en las
unidades A o B, teclee A: install (o B: install) y a continuación pulse [Enter], escoja
la opción de sistema adecuada y siga las instrucciones en pantalla. Reinicie su
ordenador una vez completada la instalación.
2.En Windows 95 o Windows NT, Windows detectará automáticamente la unidad y realizará
los ajustes necesarios para el lector de CD-ROM, así como la instalación del driver necesario.
3.Para otros sistemas operativos, el lector de CD-ROM soporta la interfaz de drive ATAPI
y su sistema operativo podrá cargar el driver adecuado para el lector de CD-ROM.
Tarjeta de
Sonido
Botón de
Encendido/
Apagado
Lector de CD-ROM
Fuente de
Alimentación
Cables de
Alimentación
Inserte el Lector de CD-ROM
en una Bahía Libre
ASUS CD-ROM de Alta Velocidad
Page 25

Spanish
25
Page 26

Russian
26
Page 27

Japanese
27
Page 28

Simplified Chinese
28
Page 29

Traditional Chinese
29
Page 30

(This page was intentionally left blank)
30 ASUS High-Speed CD-ROM Drive User’s Manual
Page 31

(This page was intentionally left blank)
ASUS High-Speed CD-ROM Drive User’s Manual 31
Page 32

High-Speed CD-ROM Drive
ATAPI / Enhanced IDE Interface
R
ASUS CONTACT INFORMATION
ASUSTeK COMPUTER INC.
Marketing Technical Support
Address: 150 Li-Te Road Fax: +886-2-2895-9254
Peitou, T aipei, Taiwan 112 BBS: +886-2-2896-4667
T elephone: +886-2-2894-3447 Email: tsd@asus.com.tw
Fax: +886-2-2894-3449 WWW: www .asus.com.tw
Email: info@asus.com.tw FTP: ftp.asus.com.tw/pub/ASUS
ASUS COMPUTER INTERNATIONAL
Marketing Technical Support
Address: 6737 Mowry Avenue Fax: +1-510-608-4555
Mowry Business Center, Building 2 BBS: +1-510-739-3774
Newark, CA 94560, USA Email: tsd-usa@asus.com.tw
Fax: +1-510-608-4555 WWW: www.asus.com
Email: info-usa@asus.com.tw FTP: ftp.asus.com.tw/pub/ASUS
ASUS COMPUTER GmbH
Marketing Technical Support
Address: Harkort Str. 25 Hotline: 49-2102-499712
40880 Ratingen, BRD, Germany BBS: 49-2102-448690
Telephone: 49-2102-445011 Email: tsd-ger@asus.com.tw
Fax: 49-2102-442066 WWW: www.asuscom.de
Email: info-ger@asus.com.tw FTP: ftp.asuscom.de/pub/ASUSCOM
USER’S MANUAL
USER’S MANUAL
32
Rev. 1.04
ASUS Doc. # AS9804AO
 Loading...