

Page 1
E1470
English
®
Quick Setup Guide
Copyright © 2003 ASUSTeK COMPUTER INC. All Rights Reserved.
Page 2

English
Getting started.......................................................................... 2
Hardware installation............................................................... 6
Contents
Package contents........................................................................... 3
DiGiMatrix overview ....................................................................... 4
Preparation..................................................................................... 6
Basic components to install............................................................ 6
Removing the top cover ................................................................. 6
Hardware installation...................................................................... 7
Installing a hard disk drive.............................................................. 7
Installing a CPU.............................................................................. 8
Installing a DIMM............................................................................ 9
Replacing the top cover.................................................................. 9
Connecting cables ................................................................. 10
Power adapter and cable ............................................................. 10
Radio antenna .............................................................................. 10
Audio/Video cable ........................................................................ 10
HDTV cable ...................................................................................11
Video out cable..............................................................................11
Audio out cable..............................................................................11
Connecting external devices ........................................................ 12
DiGiMatrix operations............................................................ 12
Powering up ................................................................................. 13
Using the storage card reader...................................................... 13
Using the optical drive .................................................................. 14
Software installation .............................................................. 15
Support CD information................................................................ 15
Music Wizard................................................................................ 16
Audio DJ....................................................................................... 18
ASUS Home Theater.................................................................... 20
Remote controller .................................................................. 22
2
ASUS DiGiMatrix (AB-V10)
Page 3
Getting started
This Quick Setup Guide will help you get your ASUS DiGiMatrix PC up and running
quickly. Refer to the ASUS DiGiMatrix manual when using this quick installation
guide for detailed setup instructions.
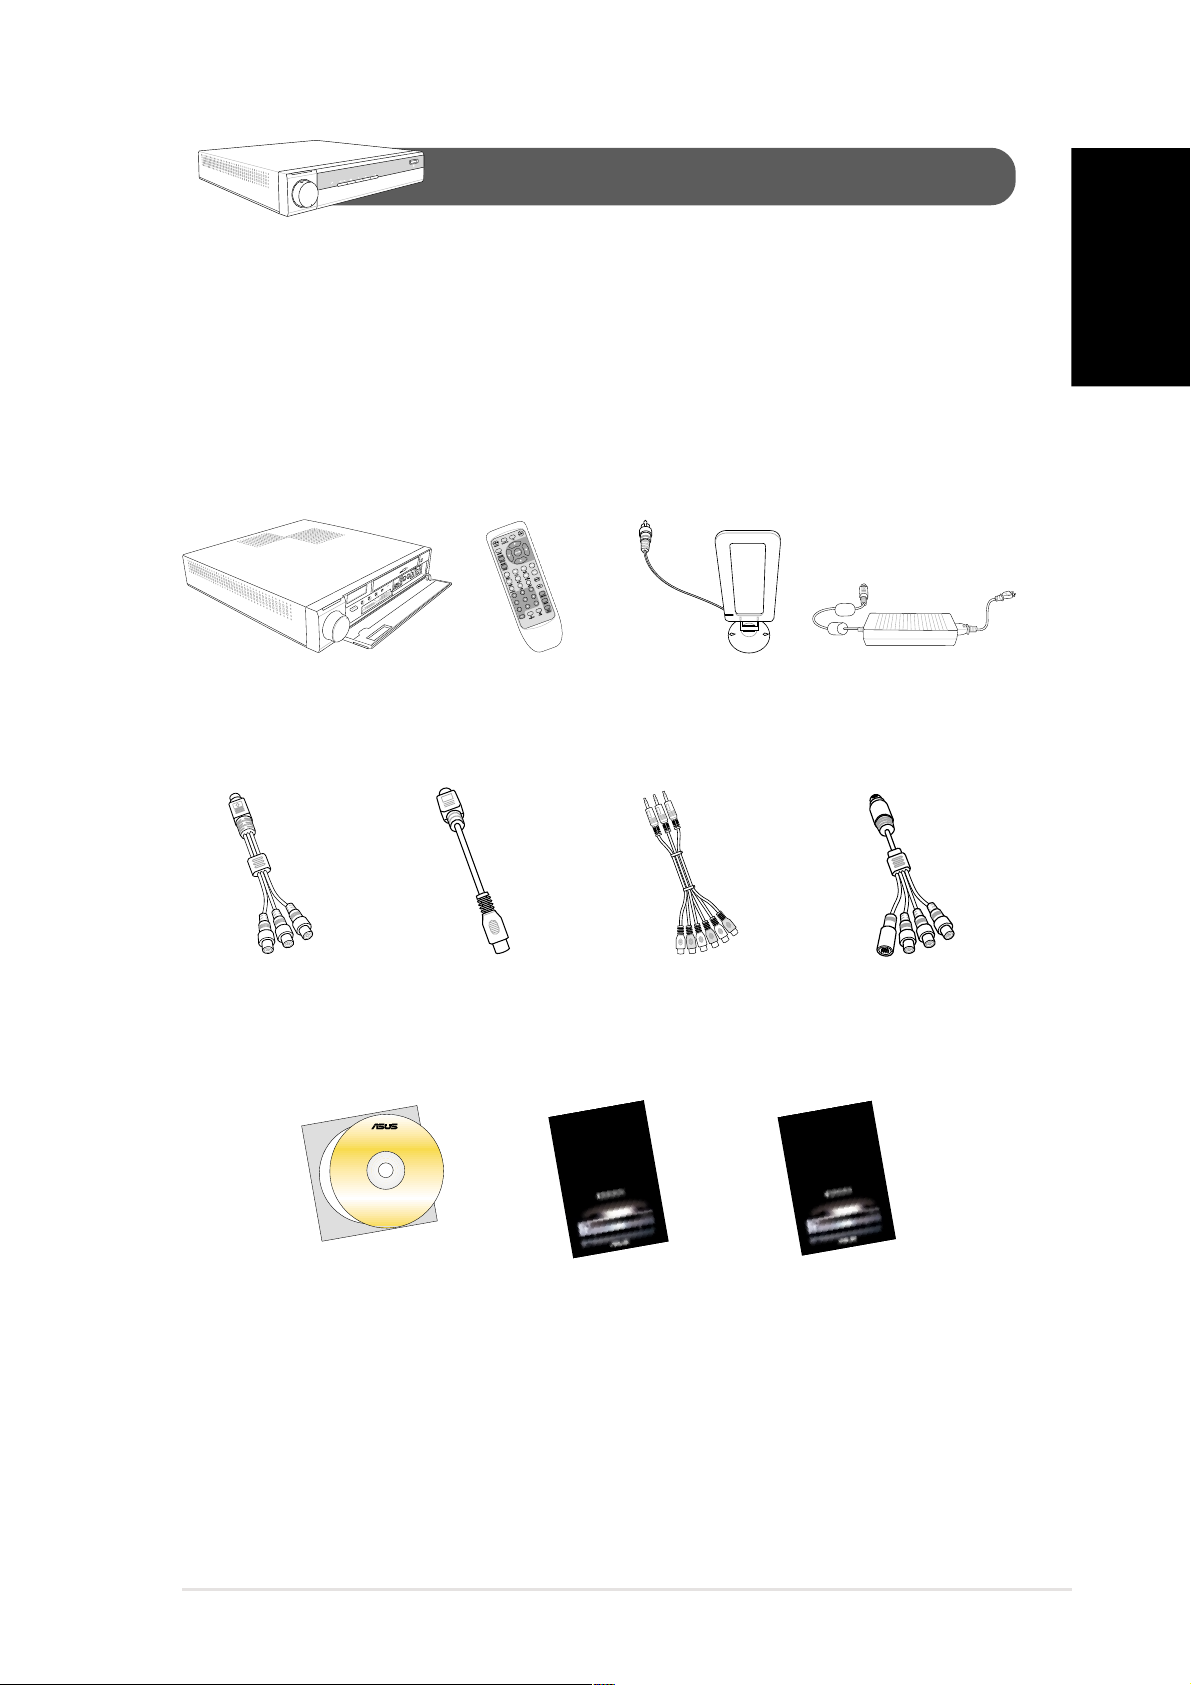
Package contents
Unpack the ASUS DiGimatrix and set it on a flat, stable surface. Inspect the
package and make sure the following items are present and in good condition.
English
DiGiMatrix system
HDTV cable Video out cable Audio out cable Audio/video cable
Remote controller Radio antenna Universal power
adapter and cable
®
User Guide
Quick Start Guide
Quick Setup Guide
Support CD User Guide Quick Setup Guide
Quick Setup Guide
3
Page 4
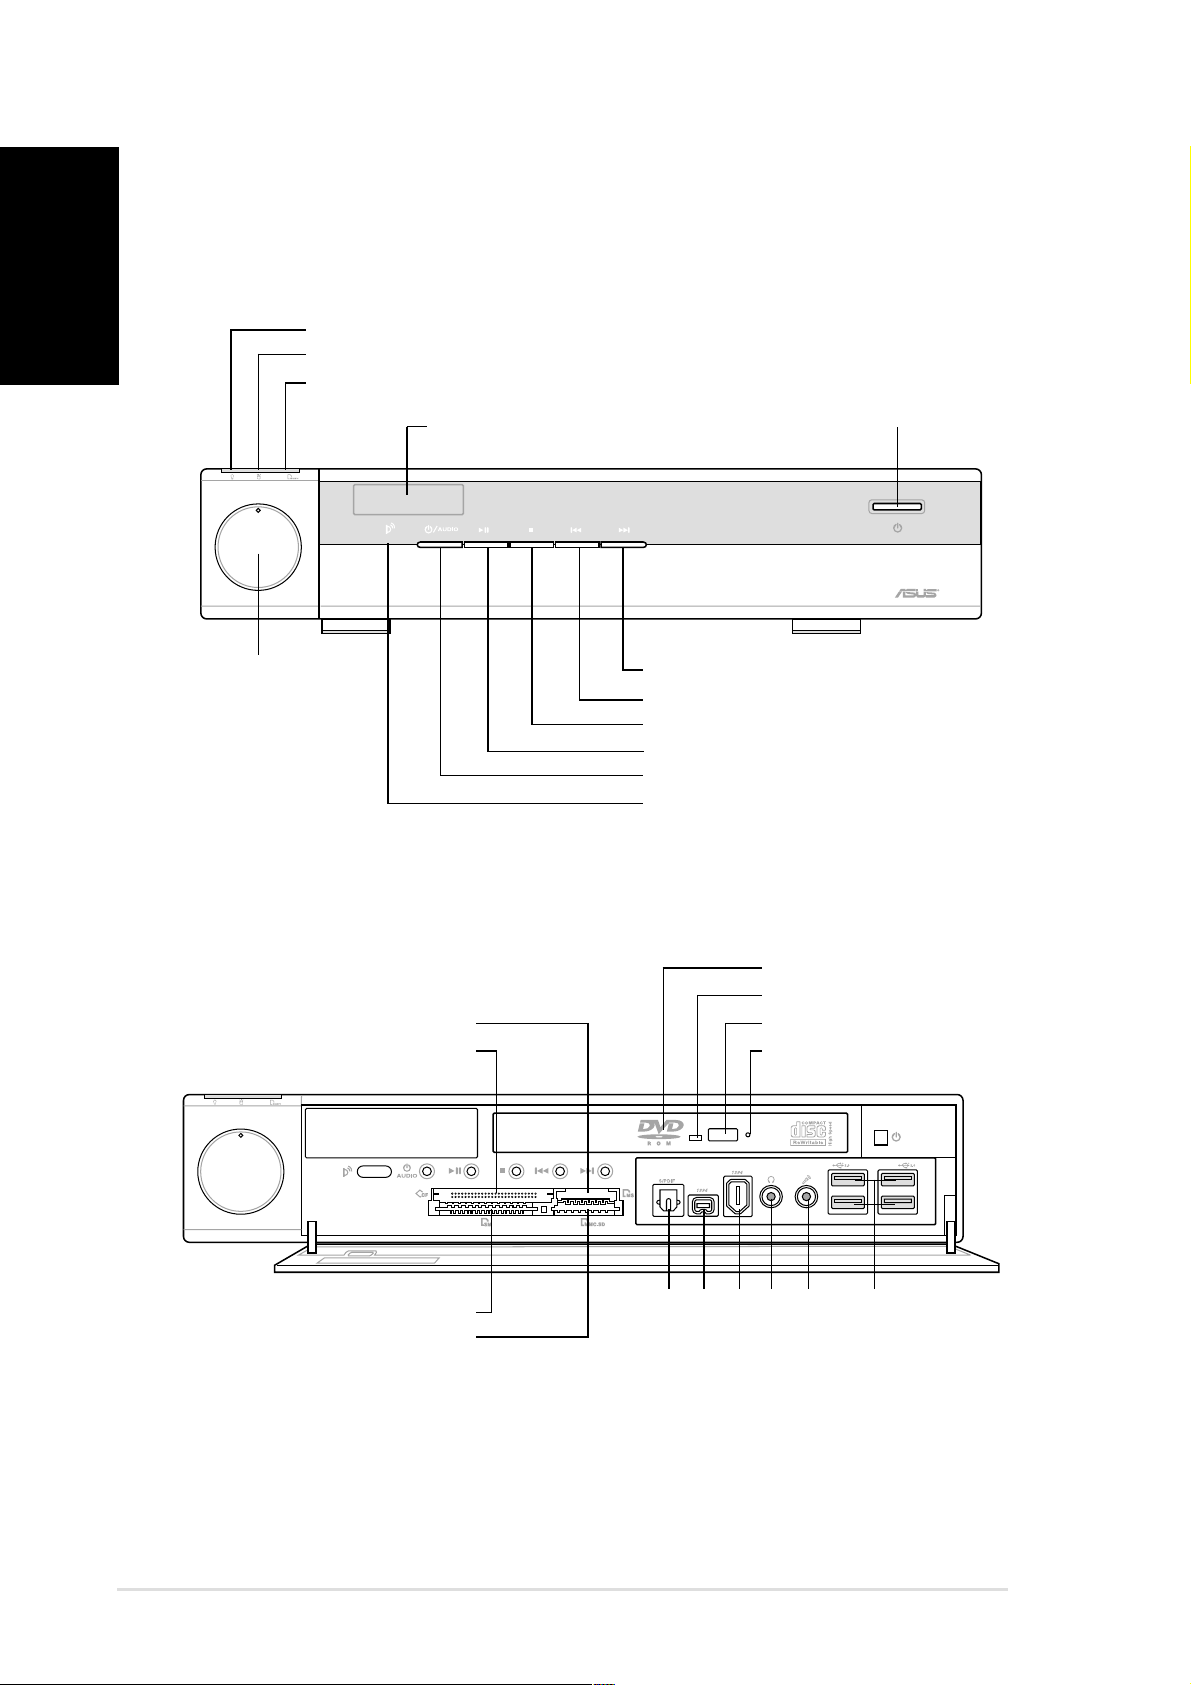
DiGiMatrix overview
English
Front panel (external)
Power LED
HDD LED
Card reader LED
System power button
LED panel
— VOLUME +
System volume
dial
Front panel (internal)
MS®/MS Pro™ card slot
CF®/Microdrive™ card slot
— VOLUME +
NEXT button
PREVIOUS button
STOP button
PLAY/PAUSE button
Audio DJ power button
Remote sensor
Slim optical drive
Drive activity LED
STOP/EJECT button
Emergency eject pinhole
SM® card slot
SD™/MMC card slot
IEEE 1394 port
IEEE 1394 port
Optical S/PDIF port
4
ASUS DiGiMatrix (AB-V10)
USB ports
Mic port
Headphone port
Page 5
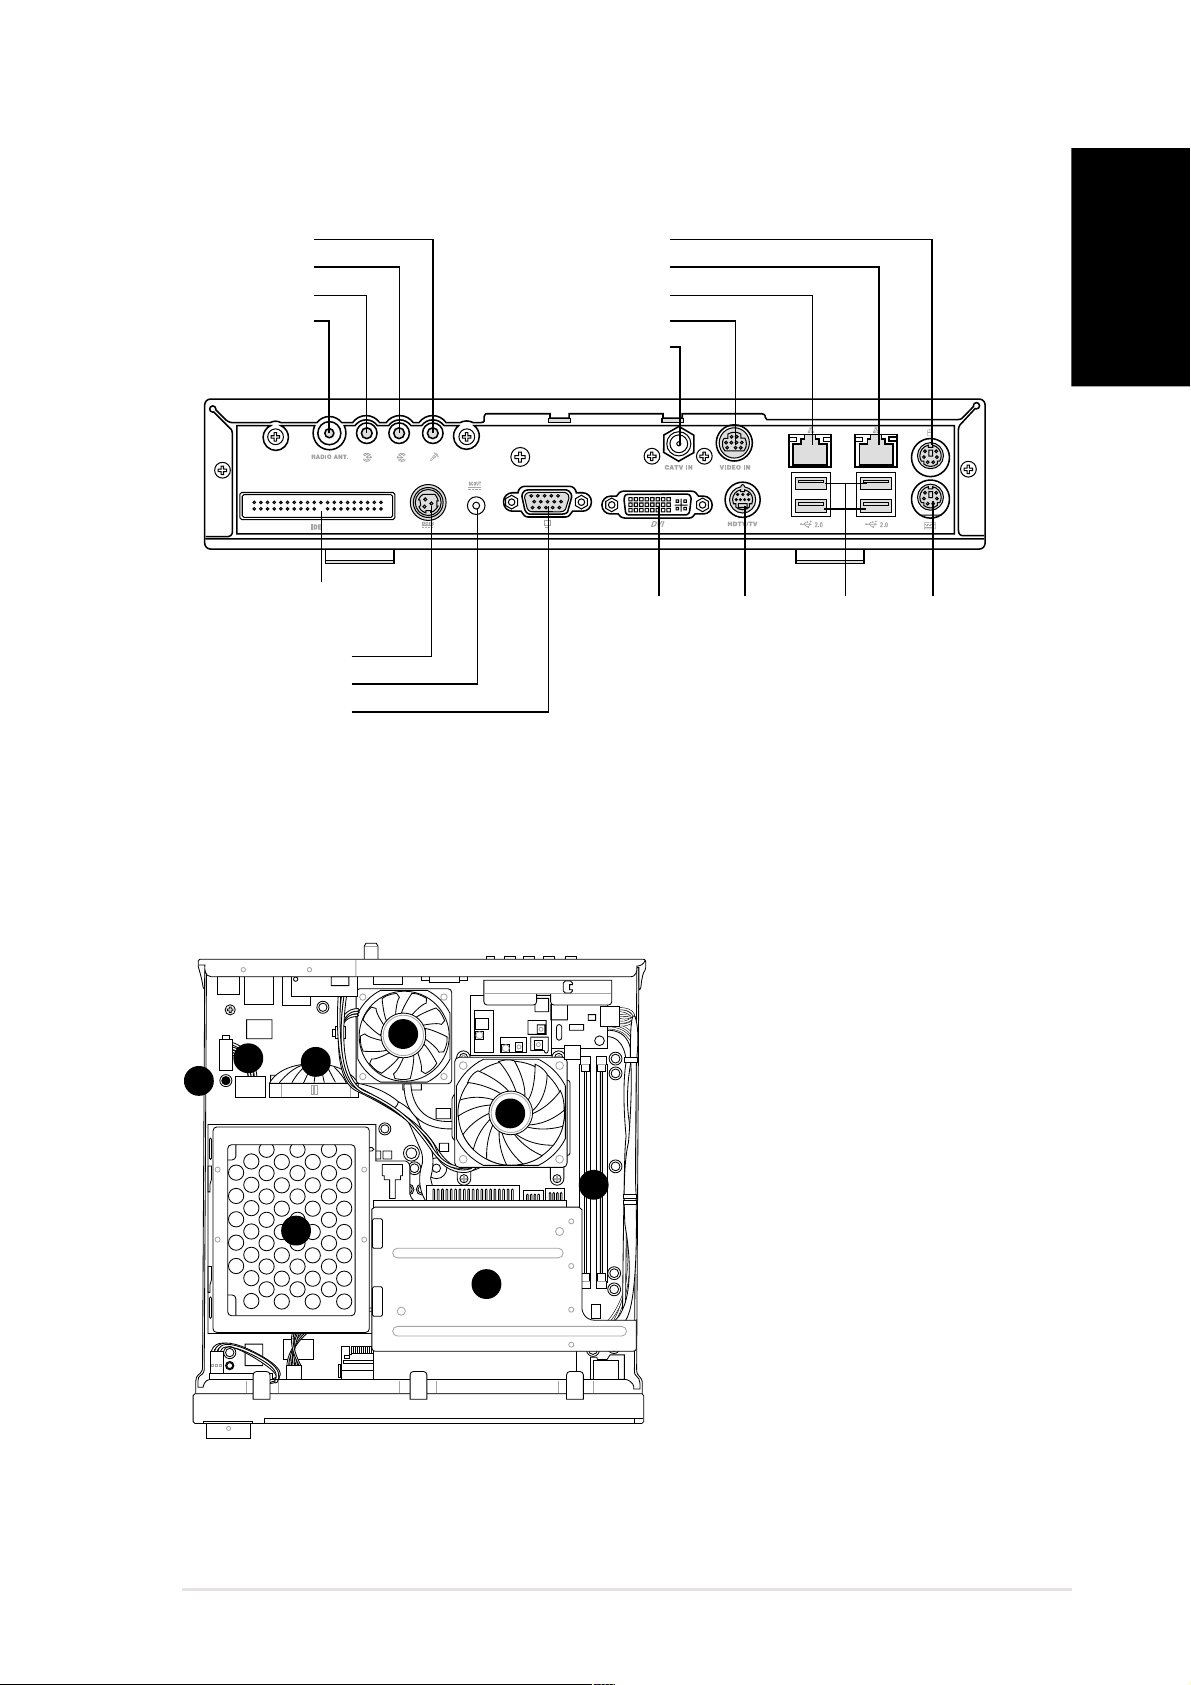
Rear panel
Mic port
Line Out port
Line In port
Antenna port
Secondary IDE
connector
DC In socket
DC Out socket
VGA port
PS/2 mouse port
Gigabit LAN port
Ethernet LAN port
Video In port
Cable TV connector
DVI port
English
USB ports
HDTV/TV port
PS/2 keyboard port
Internal components
4
2
1
3
7
8
1. Standby power LED
2. HDD power plug
5
(to HDD power connector)
3. IDE cable (to HDD connector)
6
4. Chassis fan
5. CPU fan
6. DIMM sockets
7. HDD metal tray
8. Optical drive drive shield
Quick Setup Guide
5
Page 6
English
Preparation
Before you proceed, make sure that you have all the components that you plan to
install in the DiGiMatrix system.
Basic components to install
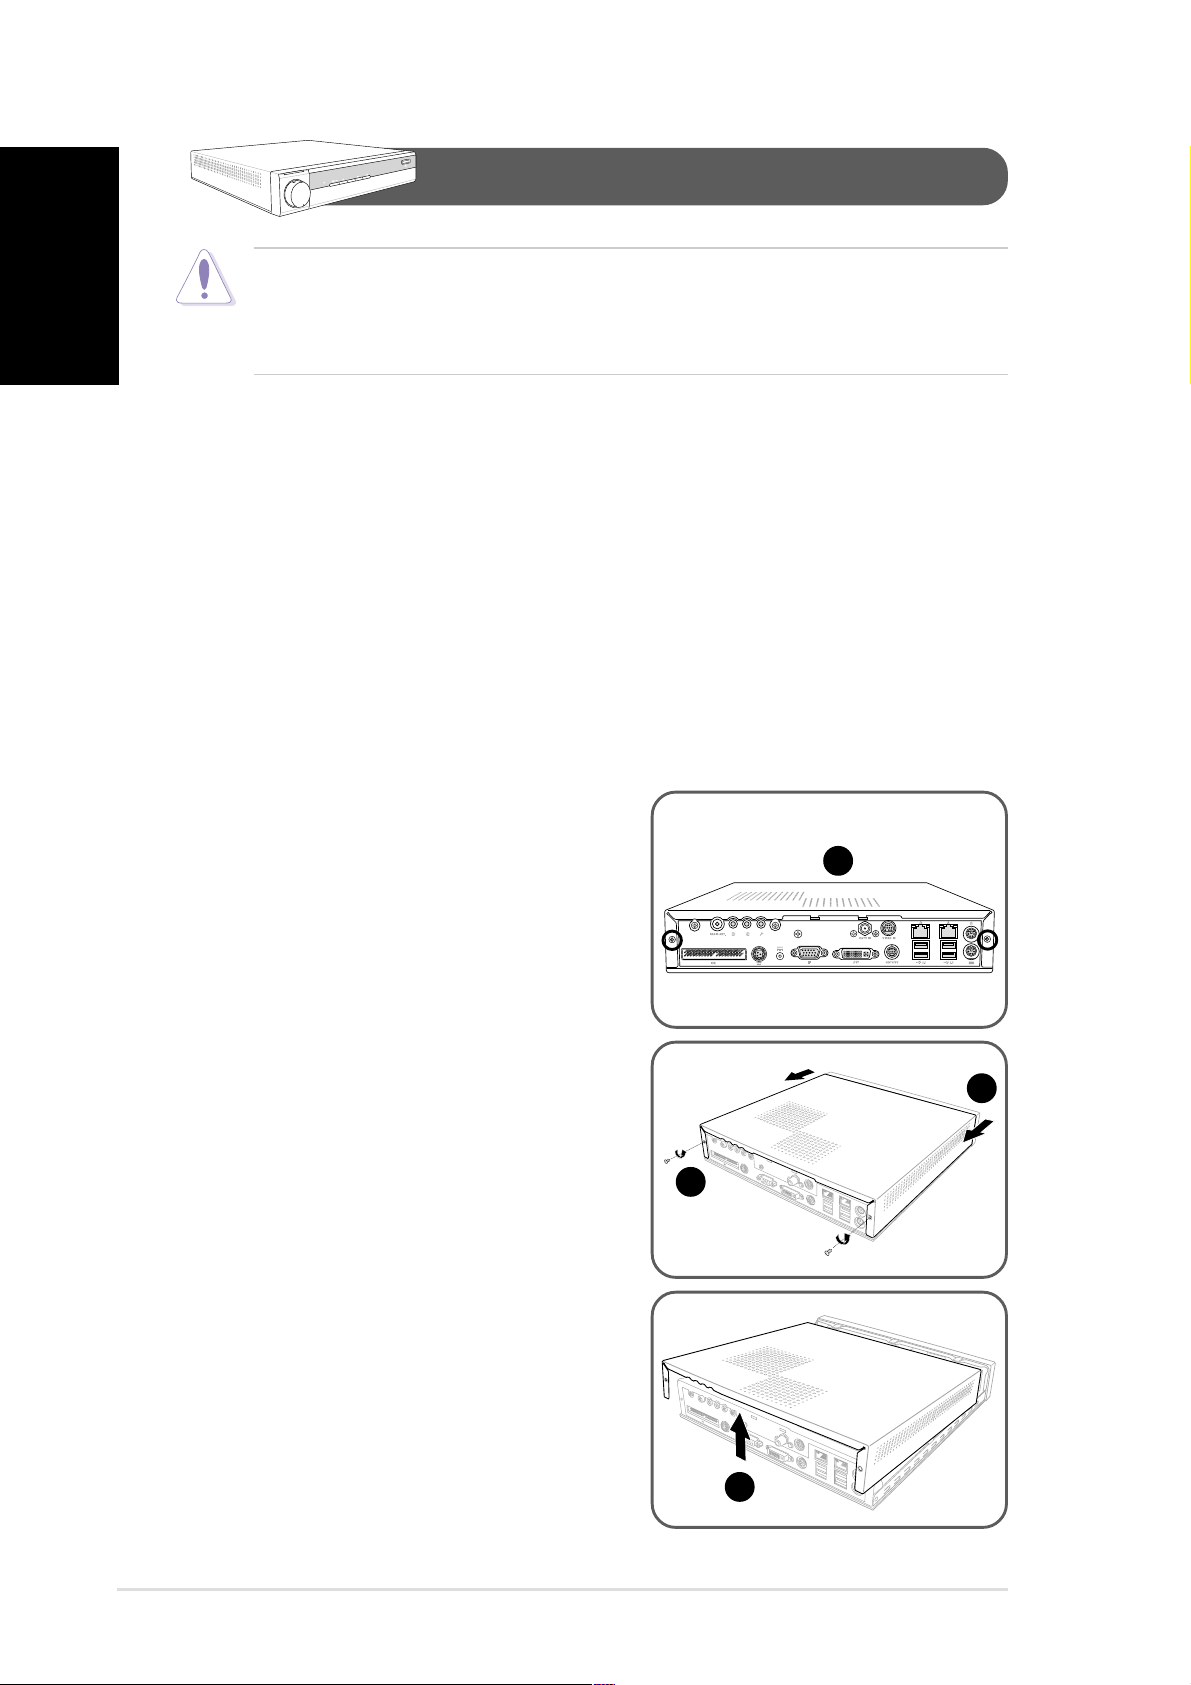
Removing the top cover
Hardware installation
CAUTION! Computer components are extremely sensitive to electrostatic discharge
(ESD). Before handling any components, be sure to wear an anti-static wrist strap
(not included) and touch the computer case, to release any static electricity from
your body.
1. Hard disk drive (HDD)
2. Central processing unit (CPU)
3. DDR Dual Inline Memory Module (DIMM)
1. On the rear panel, locate the two
screws that secure the top cover to the
chassis.
2. Use a Phillips (cross) screw driver to
remove the top cover screws. Keep the
screws for later use.
3. Pull the top cover slightly toward the
rear panel until the side tabs are
disengaged from the chassis.
4. Hold the center edge of the top cover,
then lift it up from the chassis. Set the
top cover aside.
1
3
2
4
6
ASUS DiGiMatrix (AB-V10)
Page 7
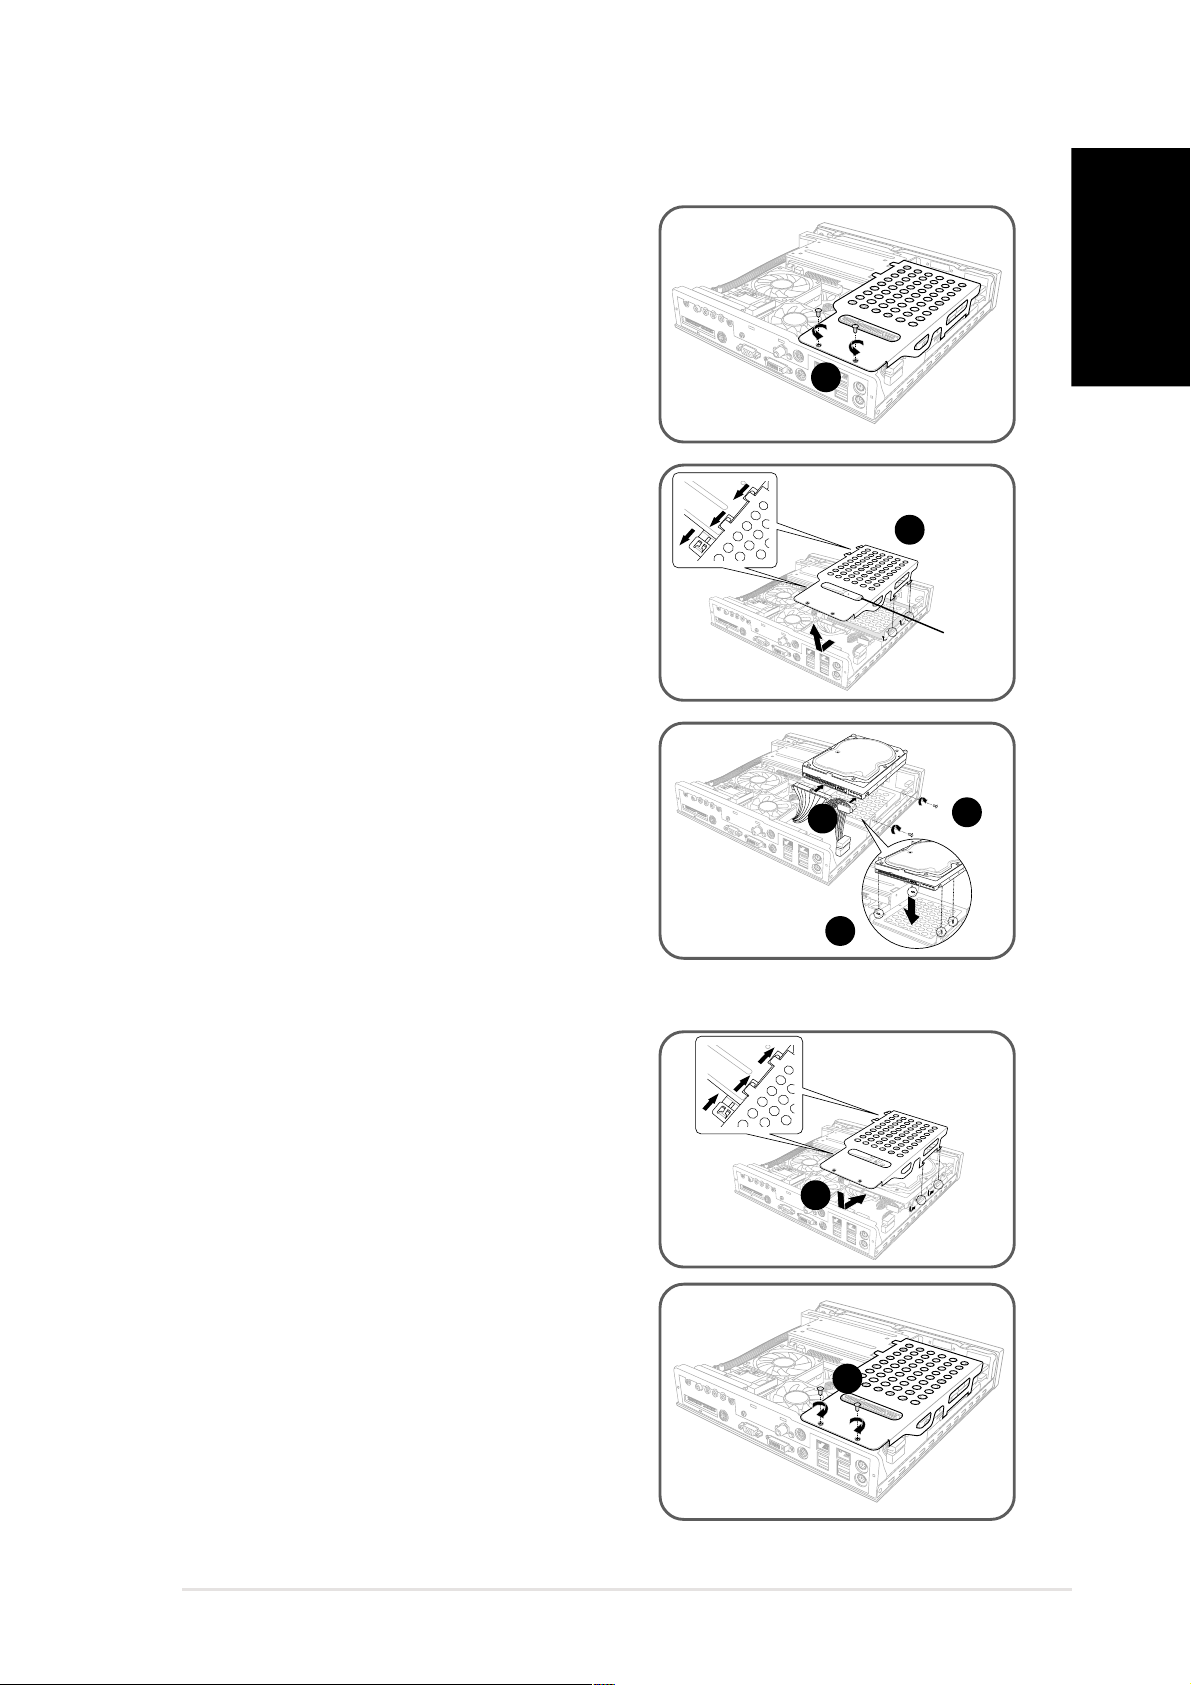
Installing a hard disk drive
1. Remove the two metal cover screws.
Keep the screws for later use.
2. Slide the metal cover toward the rear
panel. Lift the metal cover after the
side hooks are disengaged from the
HDD tray rail and optical drive shield.
3. Connect the 40-pin IDE cable to the
IDE connector on the drive, then
connect the 4-pin power plug to the
HDD power connector.
English
1
2
Hand slot
3
5
4. Place the drive on the tray. Insert the
tray metal tacks into the drive screw
holes (two on the side and two on the
bottom).
5. Secure the drive with two side screws.
6. Replace the metal cover by aligning its
side hooks with the tray rail and optical
drive shield. Slide the metal cover
toward the front panel until it fits in
place.
7. Secure the metal cover with the screws
that you removed earlier.
4
6
7
Quick Setup Guide
7
Page 8

Installing a CPU
English
1. Loosen the CPU fan screws.
2. Disconnect the CPU fan cable from the
3. Remove the bracket screw that
4. Disconnect the chassis fan cable from
5. Locate the 478-pin CPU socket on the
6. Position the CPU above the socket
CPU fan connector on the
motherboard, then lift the CPU fan.
secures the chassis fan and heatsink
assembly to the rear panel.
the chassis fan connector, then lift the
chassis fan and heatsink assembly.
motherboard. Unlock the socket by
pressing the lever sideways then lifting
it up to a 90° angle.
such that its marked corner (gold mark)
matches the base of the socket lever.
1
2
3
4
6
5
7. Carefully insert the CPU to the socket
until it fits in place.
CAUTION! The CPU fits only in one
correct orientation. DO NOT force the
CPU into the socket to prevent bending
the pins and damaging the CPU!
8. When the CPU is in place, push down
the socket lever to secure the CPU.
9. Re-install the chassis fan and heatsink
assembly.
10. Re-install the CPU fan.
7
8
9
10
8
ASUS DiGiMatrix (AB-V10)
Page 9

Installing a DIMM
1. Locate the two DIMM sockets on the
motherboard.
2. Unlock a socket by pressing the
retaining clips outward.
3. Align a DIMM on the socket such that
the notch on the DIMM matches the
break on the socket.
4. Firmly insert the DIMM to the socket
until the retaining clips snap back in
place and the DIMM is properly seated.
CAUTION! A DDR DIMM is keyed with a
notch so that it fits in only one direction.
DO NOT force a DIMM into a socket to
avoid damaging the DIMM.
2
English
1
2
3
4
Replacing the top cover
1. Position the front edge of the top cover
at least two inches from the front panel
cover. Fit the top cover tabs with the
chassis rail and the front panel cover
tabs.
2. Lower the rear edge of the top cover as
shown.
3. Push the top cover slightly toward the
front panel until it fits in place.
4. Secure the top cover with two screws.
4
Tabs
1
2
3
3
4
Quick Setup Guide
4
9
Page 10

English
Power adapter and cable
1. Connect the power cable (female plug)
2. Connect the other end of the power
3. Check the power adapter LED. The
4. Connect the DC IN power plug to the DiGiMatrix DC IN socket.
Radio antenna
Connect the radio antenna plug to the
DiGiMatrix antenna port.
to the power adapter.
cable (male plug) to a power outlet.
LED lights up to indicate that the power
from the source is within the operating
range.
Connecting cables
4
2
1
3
Audio/Video cable
1. Connect the Audio/Video cable plug to
the S-Video port.
2. Connect the S-Video output plug to the
S-Video port of your video casette
recorder. Connect the audio output
plugs to the audio input ports of your
video cassette recorder.
1
2
10
ASUS DiGiMatrix (AB-V10)
Page 11

HDTV cable
1. Insert the HDTV cable plug into the
HDTV port.
2. Connect the HDTV cable red, green,
and blue jacks to the corresponding
HDTV RCA input ports.
NOTE. You may also connect a regular
TV set using the HDTV cable by
connecting the blue jack to the video
input port of the TV set. The TV set only
receives video signals from the
DiGiMatrix system.
Video out cable
The video out cable connects a television set
with an S-Video feature. Insert one end of
the video out cable to the HDTV port.
Connect the other end to the S-Video port on
your TV.
1
2
English
Audio out cable
1. Insert the Line In, Line Out, and Mic
plugs of the audio out cable to the
audio I/O ports.
2. Insert the input/output jacks of the audio
out cable to the sound system input
ports.
Quick Setup Guide
1
2
11
Page 12

Connecting external devices
English
To the front panel
— VOLUME +
To the rear panel
Audio Devices
Camera
HDD
Headphone
Mic
Scanner
Line OutLine In Mic
DiGiMatrix subsystem
Cable TV
VGA USB MouseDVI
RJ-45
PS/2 Mouse
PS/2 KB
12
ASUS DiGiMatrix (AB-V10)
Page 13

Powering up
DiGiMatrix operations
DiGiMatrix has two power buttons located in the front panel. Press the system
power button ( ) to enter the DiGiMatrix operating system (OS). Press the Audio
DJ power button ( /AUDIO) to turn on the DiGiMatrix Audio DJ feature.
System power buttonAudio DJ power button
— VOLUME +
Using the storage card reader
1. Install the USB Card Reader Tool
from the support CD. Refer to page
15 for details.
2. Select the appropriate slot for your
storage card. Insert the storage card
firmly to the slot.
English
3. Open My Computer or Windows
Explorer. A green arrow anchored
on a Removable Disk icon
indicates that the slot is in use. An
idle slot is indicated by a red square.
4. Double click the Removable Disk
icon.
5. Access files or images from your
storage cards as you would open,
copy, move or delete files or images
from your hard disk or floppy disk.
CAUTION! Do not remove a memory card when the card activity LED is lit or
blinking. This may result to data loss!
The storage card reader drivers are not included in the Recovery CD. If you recover
your DiGiMatrix system using the Recovery CD, you must re-install the USB Card
Reader Tool from the support CD before using the storage card reader.
Quick Setup Guide
13
Page 14

Using the optical drive
English
1. Press the EJECT button of the
optical drive.
CAUTION! Avoid touching the optical drive lens. This may damage the drive.
3. Place a CD/DVD on the drive tray.
IMPORTANT. Hold a CD/DVD by
the edges. Avoid touching the disc
surface.
2. When the drive tray ejects,
carefully pull it out.
4. With one hand supporting the
loading tray, push the CD/DVD
hole into the drive spindle. The
spindle clips snap into the hole
indicating that the disc is in place.
5. Push the drive tray until it clicks in
place.
14
ASUS DiGiMatrix (AB-V10)
Page 15

Support CD information
Software installation
Drivers
To begin using the support CD, place
the CD into your CD-ROM drive. The
CD automatically displays the Drivers
menu if Autorun is enabled in your
computer.
Utilities
The Utilities menu shows the
applications and other software that the
motherboard supports.
English
Click an item to install
Click to display additional drivers
Click an icon to display other information
Contact information
Click the Contact tab to display the
ASUS contact information.
Quick Setup Guide
15
Page 16

Music Wizard
English
The Music Wizard allows you to create and save MP3 playlists to your hard disk
drive and lets you play them using the Audio DJ feature. The Music Wizard utility is
included in the support CD that came with the DiGiMatrix package.
Launching Music Wizard
1. Launch the Music Wizard utility
from the Windows® desktop by
clicking Start > All Programs >
O2Micro Music Wizard > Music
Wizard.
Creating a Playlist or Folder
1. Click Add to create a playlist or
folder. A New Playlist or New
Folder window appears.
2. The Music Wizard window displays
the playlists or folders (P1 to P9)
and command buttons located at
the bottom of the window.
2. Locate the MP3 files/folders you
wish to add to the playlist.
3. Select the MP3 file/folder, then
click Select to add the file.
4. Click OK when done.
NOTE. You may also drag and drop
MP3 files to the Selected Files
window to add more files to the
playlist.
16
ASUS DiGiMatrix (AB-V10)
Page 17

Saving your playlist or folder
Editing your playlist or folder
English
1. Type a file name for the playlist,
then click Save.
2. The Music Wizard window
displays the created playlist and
folder.
1. Select a playlist, then click Edit.
2. To add a file, select the file from
the Existing Files window, then
click Select. Click OK when done.
To remove a file, select the file
from the Selected Files window,
then click Unselect.
3. Click a playlist icon to view all
MP3 files saved on that playlist
or folder.
Quick Setup Guide
3. A confirmation window appears.
Click OK to remove the file from
the playlist.
17
Page 18

Audio DJ
English
Audio DJ is an application that allows you to play MP3 files from your hard disk
drive, audio CD/DVD, or tune into a FM radio station without entering the
DiGiMatrix operating system.
To turn on the Audio DJ feature, press the Audio DJ power button ( /
AUDIO) located
on the front panel or press the button of the remote controller.
IMPORTANT. You must install Audio DJ from the support CD to use this feature.
Copyright (C) 2003, 2002, 2001, 02Micro International Ltd., All Rights Reserved.
O2MiniOS Version 4.11.0 Player Version 4.10.9
Hard Disk:
P1 : Twisted Angel
P2 : Backstreet Boys - The Hits Chapter One
P3 :
P4 :
P5 :
P6 :
P7 :
P8 :
P9 :
CD/DVD Device 1
Radio FM Device
play media : hdd mp3
Track 0001
Player Status : Playing
IMPORTANT. The Audio DJ feature is disabled when you disconnect the power plug
and cable from the DiGiMatrix system. To enable the Audio DJ feature:
1. Connect the power pug and cable.
2. Press the system power button to turn on the system.
®
3. Use the Windows
4. Press the Audio DJ power button to put DiGIMatrix in Audio DJ mode.
shutdown procedures to turn off the system.
Selecting an audio source
The Audio DJ window displays the audio sources (Hard Disk, CD/DVD Device 1,
and Radio FM Device), play medium, and player status.
To select an audio source:
1. Press the STOP ( ) button until the Player Status displays Playlist Mode.
2. Press the STOP ( ) button again, or the button on the remote controller
to select another audio source.
18
ASUS DiGiMatrix (AB-V10)
Page 19

Playing MP3 files from the hard disk drive
Audio DJ displays the playlists you created using the Music Wizard utility. If you
selected Hard Disk as audio source, the first playlist is automatically selected.
To play an MP3 playlist:
1. Press the STOP ( ) button, or the button on the remote controller to
select a playlist.
2. Press the PLAY/PAUSE button to start playing the first MP3 file on the playlist.
Playing an audio CD/DVD
To play an audio CD/DVD:
1. Insert an audio CD/DVD to the optical drive.
2. Select CD/DVD Device 1 as your audio source.
3. Press the PLAY/P AUSE button to start playing the first track of the audio CD/DVD.
4. Press the NEXT or the PREVIOUS button to skip to the next track or to return
to the previous track.
5. Press STOP to stop playing an audio track.
Tuning into an FM radio station
To tune into an FM station:
1. Select Radio FM Device as your audio source.
2. Scan the radio frequency by pressing the PLAY/PAUSE button. The scanning
stops when a station is detected. The LED panel displays the radio frequency.
English
3. Press the NEXT or PREVIOUS button or the buttons on the remote
controller to select a preset station, if any.
Presetting a station
To preset an FM station:
1. Press the PLAY button to scan available radio stations.
2. After you have selected a radio station, press the PLAY/PAUSE button for at
least 2 seconds until a preset number blinks on the LED panel. You may also
press the button on the remote controller.
3. Press the NEXT or PREVIOUS button or the buttons on the remote
controller to select a preset number (1-9) for the selected station.
4. Press the PLAY button to confirm the preset station.
Adjusting the volume
Adjust the volume by turning the volume dial clockwise (volume up) or
counterclockwise (volume down). You may also press the or on the
remote controller. Press the volume dial to MUTE sound.
Quick Setup Guide
19
Page 20

ASUS Home Theater
English
The ASUS Home Theater allows you to maximize the DiGiMatrix multimedia
features.
Installing ASUS Home Theater
1. Place the ASUS Home Theater
CD into the optical drive to start
installation.The initial installation
window appears. Click Next.
3. When prompted, select the
program folder you wish to save
the ASUS Home Theater program
icons. Click Next.
2. Read the License Agreement,
then, click Yes.
4. The Home Theater application is
copied into your system. Reboot
your computer after completing
installation.
5. To launch the ASUS Home
Theater , click Start > All
Programs > Home Theater >
Home Theater.
20
ASUS DiGiMatrix (AB-V10)
Page 21

Using ASUS Home Theater
The ASUS Home Theater is an integrated multimedia application that allows you to
watch TV, play a DVD or video clip, tune into an FM radio station, listen to audio
files, or browse pictures with your DiGiMatrix system.
Window
control buttons
Entertainment
mode buttons
Mode
display
Mode display - Displays the current or last entertainment mode used.
Entertainment mode buttons
Mode Functions
TV Click this button to watch TV in your DiGiMatrix system.
English
Radio Click this button to tune into an FM radio station.
Music Select this option to play audio CD/DVD tracks, MP3 files and
radio recordings in your DiGimatrix system
Pictures View and print pictures saved in your hard disk using this mode.
Video Clips Use this mode to view, play and organize your video clips.
DVD/VCD Watch a movie with the ASUS Home Theater DVD/VCD player.
Setup - Click this button to display the setup window.
WWW - Click this button to open the ASUS website.
Window control buttons
Click to return to the previous window.
Click to minimize the window.
Click to maximize the window.
Click to exit Home Theater , put the system in standby mode, or shutdown the system.
Use the control panel buttons or navigation buttons on the remote controller
( ) to navigate through the Home Theater windows.
Quick Setup Guide
21
Page 22

The control panel
English
Each Home Theater window is equipped with a control panel to control the
entertainment modes.
Stop
Play
Pause
Previous
NOTE. Some control panel buttons change from one entertainment system to
another.
Replay
Rewind/
Forward
Next
down
Channel
Channel up
down
Volume
Mute
Record
Volume up
Snapshot
Remote controller
Operating range 5 meters (max)
Power Source 2 x “AA” batteries
Receiver Built-in infrared receiver
Multimedia buttons
Mode/Memory buttons
Control buttons
Numeric buttons
Screen control buttons
OS start button
Navigation buttons
Audio control buttons
Record button
DVD control buttons
22
ASUS DiGiMatrix (AB-V10)
 Loading...