

Page 1
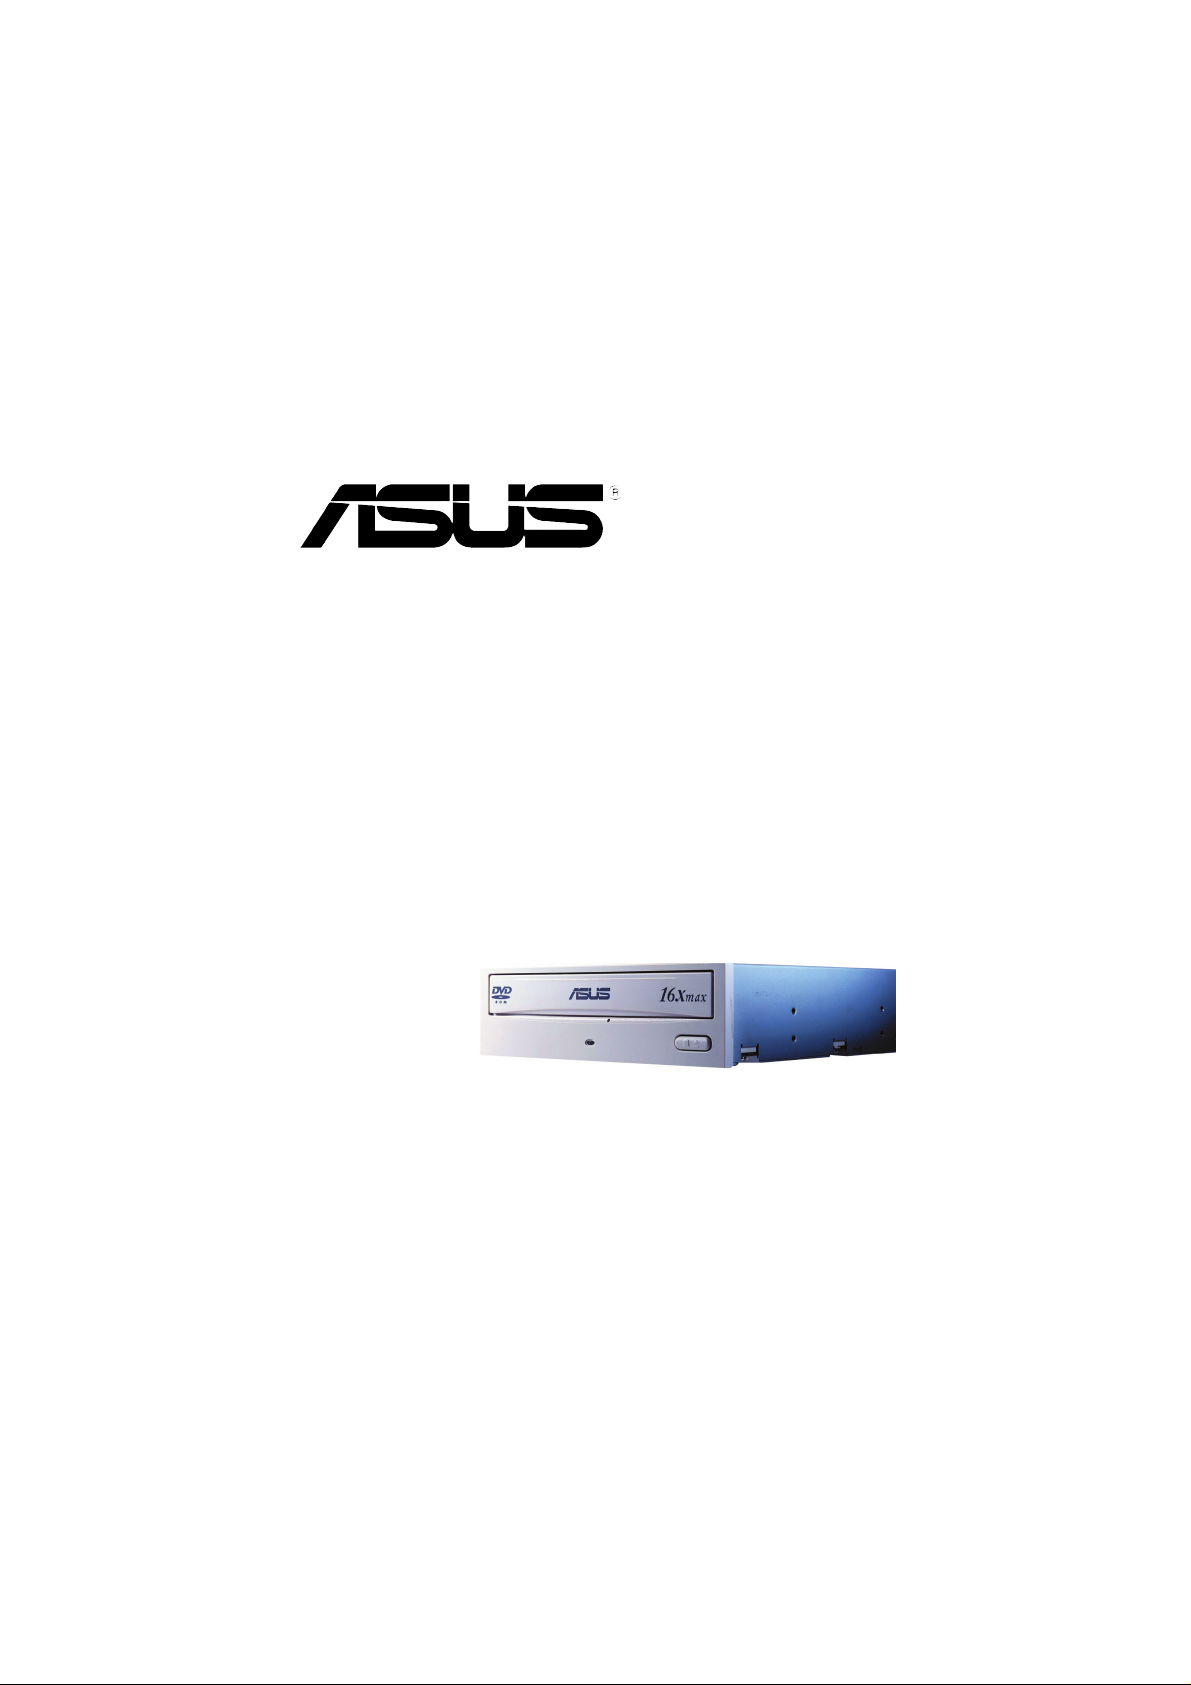
DVD-E616P1
DVD-ROM Drive
User Manual
1
Page 2

Copyrights/Disclaimer
Copyright © 2003 ASUSTeK COMPUTER INC. All Rights Reserved.
No part of this manual, including the products and software described in it, may be
reproduced, transmitted, transcribed, stored in a retrieval system, or translated into any
language in any form or by any means, except documentation kept by the purchaser for
backup purposes, without the express written permission of ASUSTeK COMPUTER INC.
(“ASUS”).
ASUS PROVIDES THIS MANUAL “AS IS” WITHOUT WARRANTY OF ANY KIND, EITHER
EXPRESS OR IMPLIED, INCLUDING BUT NOT LIMITED TO THE IMPLIED WARRANTIES
OR CONDITIONS OF MERCHANTABILITY OR FITNESS FOR A PARTICULAR PURPOSE.
IN NO EVENT SHALL ASUS, ITS DIRECTORS, OFFICERS, EMPLOYEES OR AGENTS BE
LIABLE FOR ANY INDIRECT, SPECIAL, INCIDENTAL, OR CONSEQUENTIAL DAMAGES
(INCLUDING DAMAGES FOR LOSS OF PROFITS, LOSS OF BUSINESS, LOSS OF USE
OR DATA, INTERRUPTION OF BUSINESS AND THE LIKE), EVEN IF ASUS HAS BEEN
ADVISED OF THE POSSIBILITY OF SUCH DAMAGES ARISING FROM ANY DEFECT OR
ERROR IN THIS MANUAL OR PRODUCT.
Product warranty or service will not be extended if: (1) the product is repaired, modified or
altered, unless such repair, modification of alteration is authorized in writing by ASUS; or (2)
the serial number of the product is defaced or missing.
The product name and revision number are both printed on the product itself. Manual
revisions are released for each product design represented by the digit before and after the
period of the manual revision number. Manual updates are represented by the third digit in
the manual revision number.
SPECIFICATIONS AND INFORMATION CONTAINED IN THIS MANUAL ARE FURNISHED
FOR INFORMATIONAL USE ONLY, AND ARE SUBJECT TO CHANGE AT ANY TIME
WITHOUT NOTICE, AND SHOULD NOT BE CONSTRUED AS A COMMITMENT BY ASUS.
ASUS ASSUMES NO RESPONSIBILITY OR LIABILITY FOR ANY ERRORS OR
INACCURACIES THAT MAY APPEAR IN THIS MANUAL, INCLUDING THE PRODUCTS
AND SOFTWARE DESCRIBED IN IT.
Products and corporate names appearing in this manual may or may not be registered
trademarks or copyrights of their respective companies, and are used only for identification or
explanation and to the owners’ benefit, without intent to infringe.
Product Name: ASUS DVD-E616P1
Manual Version: First Edition V1 E1305
Release Date: June 2003
2
ASUS DVD-E616P1 User Manual
Page 3

Contents
Copyrights/Disclaimer....................................................... 2
Notices ................................................................................ 4
ASUS Contact Information ................................................ 5
Safety Information ............................................................. 6
Installation Notices....................................................... 6
Using the Device.......................................................... 7
Conventions used in this guide.................................... 7
Package Contents.............................................................. 8
Welcome! ............................................................................ 9
Product Introduction ......................................................... 9
Specifications............................................................... 9
Front Panel ................................................................ 10
Rear Panel................................................................. 11
Setting the Jumper Terminals .................................... 12
Installing the DVD-ROM Drive......................................... 13
Connecting the Drive Cables ..................................... 15
DVD-ROM Drive Basics ................................................... 16
Placing a Disc into the Drive...................................... 16
Ejecting a Disc from the Drive ................................... 17
Using the Emergency Eject Pinhole .......................... 18
Using Compact Discs ...................................................... 19
Cleaning a Disc.......................................................... 19
Handling a Disc.......................................................... 19
Technical Information ...................................................... 20
Environmental Specifications..................................... 20
Electrical and Audio Specifications............................ 20
DVD Region Codes .......................................................... 21
Quick Installation Guide.................................................. 23
ASUS DVD-E616P1 User Manual
3
Page 4

Notices
Federal Communications Commission Statement
This device complies with FCC Rules Part 15. Operation is subject to the following
two conditions:
• This device may not cause harmful interference, and
• This device must accept any interference received including interference that
may cause undesired operation.
This equipment has been tested and found to comply with the limits for a Class B
digital device, pursuant to Part 15 of the FCC Rules. These limits are designed to
provide reasonable protection against harmful interference in a residential
installation. This equipment generates, uses and can radiate radio frequency
energy and, if not installed and used in accordance with manufacturer’s
instructions, may cause harmful interference to radio communications. However,
there is no guarantee that interference will not occur in a particular installation. If
this equipment does cause harmful interference to radio or television reception,
which can be determined by turning the equipment off and on, the user is
encouraged to try to correct the interference by one or more of the following
measures:
• Reorient or relocate the receiving antenna.
• Increase the separation between the equipment and receiver.
• Connect the equipment to an outlet on a circuit different from that to which the
receiver is connected.
• Consult the dealer or an experienced radio/TV technician for help.
WARNING! The use of shielded cables for connection of the
monitor to the graphics card is required to assure compliance with
FCC regulations. Changes or modifications to this unit not
expressly approved by the party responsible for compliance could
void the user’s authority to operate this equipment.
Canadian Department of Communications Statement
This digital apparatus does not exceed the Class B limits for radio noise emissions
from digital apparatus set out in the Radio Interference Regulations of the
Canadian Department of Communications.
This class B digital apparatus complies with Canadian ICES-003.
4
ASUS DVD-E616P1 User Manual
Page 5

ASUS Contact Information
ASUSTeK COMPUTER INC. (Asia-Pacific)
Address: 150 Li-Te Road, Peitou, Taipei, Taiwan 112
General Tel: +886-2-2894-3447
General Fax: +886-2-2894-3449
General Email: info@asus.com.tw
Technical Support
MB/Optical Drives (Tel):+886-2-2890-7121 (English)
Notebook (Tel): +886-2-2890-7122 (English)
Desktop/Server (Tel): +886-2-2890-7123 (English)
Support Fax: +886-2-2890-7698
Web Site: www.asus.com.tw
ASUS COMPUTER INTERNATIONAL (America)
Address: 44370 Nobel Drive, Fremont, CA 94538, USA
General Fax: +1-502-933-8713
General Email: tmd1@asus.com
Technical Support
Support Fax: +1-502-933-8713
General Support: +1-502-995-0883
Notebook Support: +1-510-739-3777 x5110
Web Site: www.asus.com
Support Email: tsd@asus.com
ASUS COMPUTER GmbH (Germany and Austria)
Address: Harkortstr. 25, 40880 Ratingen, BRD, Germany
General Email: sales@asuscom.de (for marketing requests only)
General Fax: +49-2102-9599-31
Technical Support
Support Hotlines: (Components) +49-2102-9599-0
(Notebook PC) +49-2102-9599-10
Support Fax: +49-2102-9599-11
Support Email: www.asuscom.de/support (for online support)
Web Site: www.asuscom.de
ASUS DVD-E616P1 User Manual
5
Page 6
Safety Information
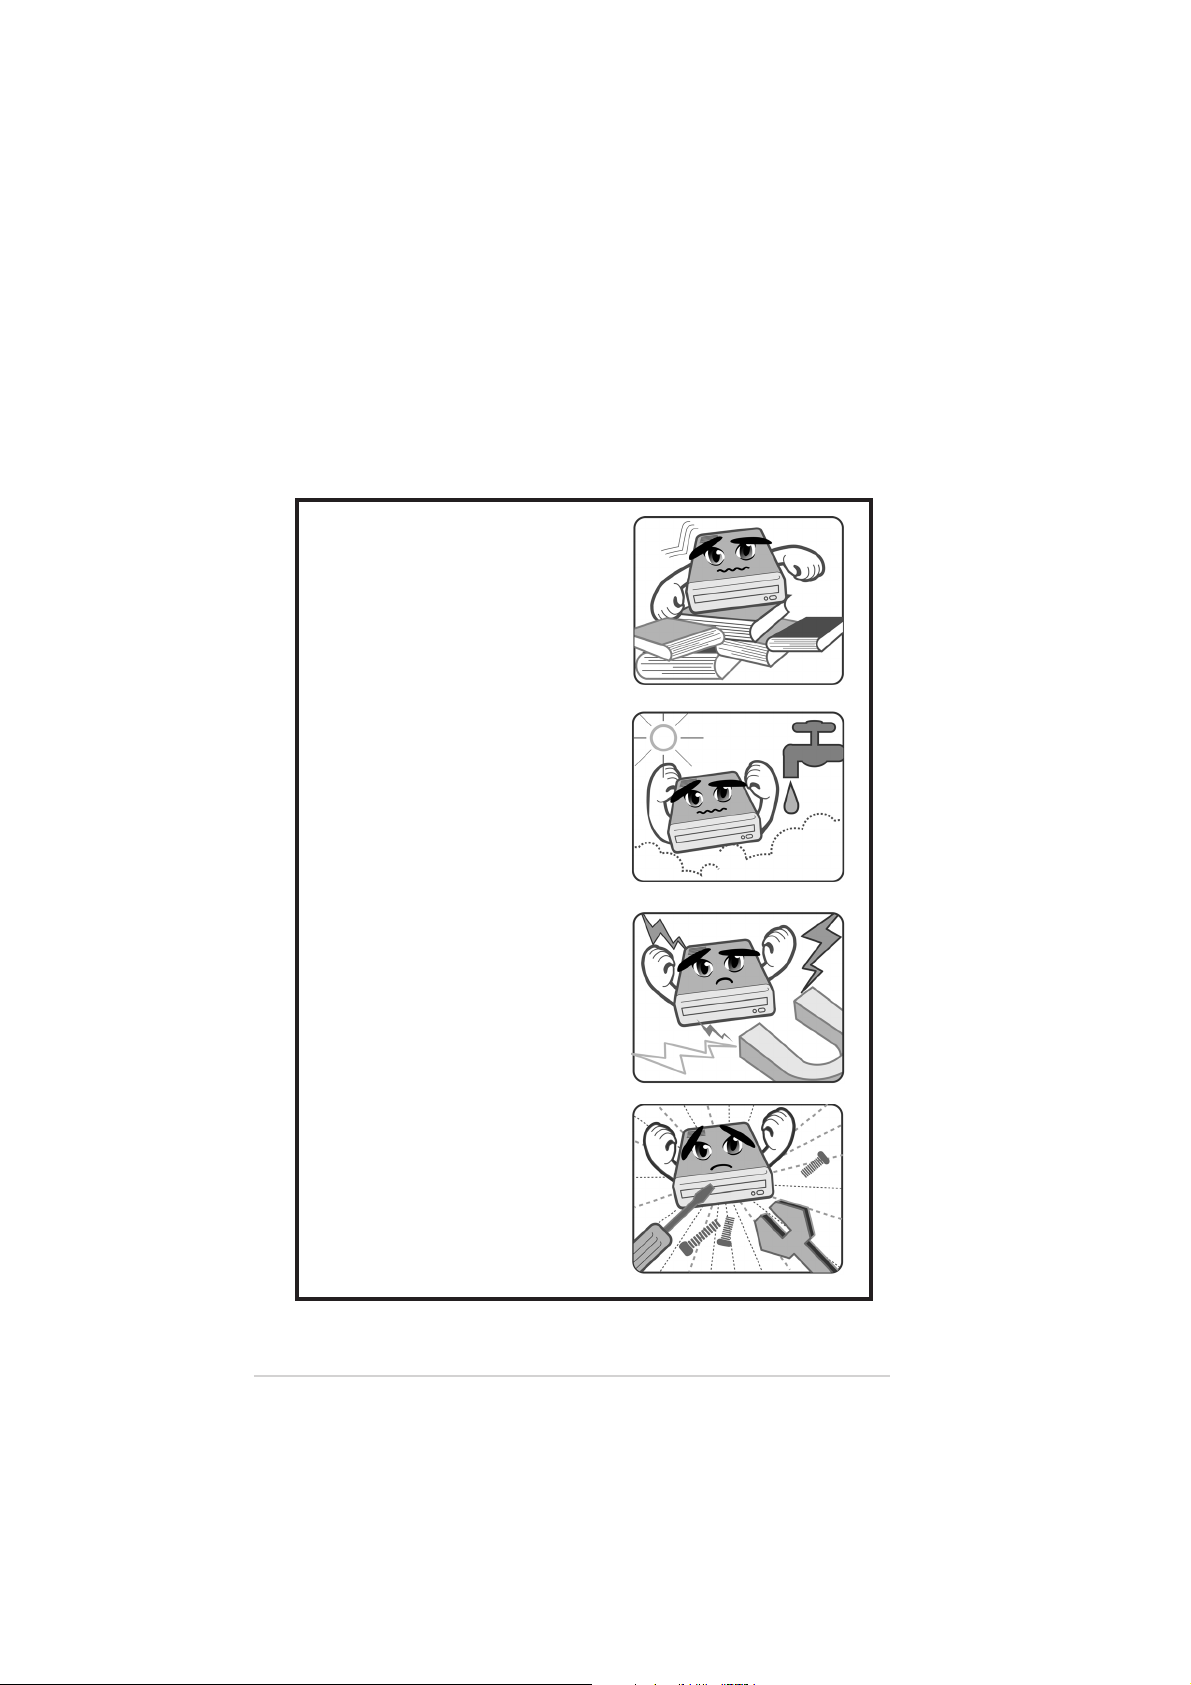
Observe the following precautions before installing and using the ASUS
DVD-E616P1
Installation Notices
Do not place this device in an
unstable position, or on vibrating
surfaces.
Do not place this device under
direct sunlight or in humid or
damp places.
Do not use or place this device
near magnetic fields, televisions,
or radios to avoid electronic
interference that affects drive
performance.
Do not attempt to disassemble or
repair the drive. Opening the drive
may result to laser radiation
exposure.
6
ASUS DVD-E616P1 User Manual
Page 7

Safety Information
Using the Device
• Use of any controls, adjustments, or procedures other than those
specified in this manual may result to hazardous radiation exposure.
• Do not attempt to disassemble the drive.
• Do not move the device from a cold to a warm or hot environment.
Drastic change of temperature is harmful to the device.
• Before moving or uninstalling the drive, remove disc from it, if any.
• Prevent liquids and metal objects to get into the device. If this situation
occurs, contact your retailer for assistance.
• Do not use any evaporating solvents to clean the device. If you
accidentally sprayed any solvent on the device, use a clean cloth to
wipe it. You may also use a neutral cleaner to dilute the solvent to
easily wipe it from the device.
• Try not to interrupt the supply of power while the device is in reading or
writing mode.
• Do not place damaged or warped discs inside the device. A warped
disc may break while in use and damage the device.
• Do not place discs into the device immediately if they came from a cold
environment, especially during cold seasons. Wait until the discs have
reached room temperature.
Conventions used in this guide
To make sure that you perform certain tasks properly, take note of the
following symbols used throughout this manual.
WARNING/DANGER: Information to prevent injury to yourself
when trying to complete a task.
CAUTION: Information to prevent damage to the components
when trying to complete a task.
IMPORTANT: Information that you MUST follow to complete a
task.
NOTE: Tips and additional information to aid in completing a task.
ASUS DVD-E616P1 User Manual
7
Page 8

Package Contents
Upon opening your ASUS DVD-E616P1 drive package, check if all the
following items are present and in good condition. If any of the items is
damaged or missing, contact your retailer immediately.
• ASUS DVD-E616P1 DVD-ROM Drive
• Audio cable
• Mounting screw package
• DVD-ROM driver disc
• User Manual (English) with 12-Language Quick Installation Guide
• DVD playback software CD
The above items are available in retail boxes only.
8
ASUS DVD-E616P1 User Manual
Page 9

Welcome!
Thank you for buying the ASUS DVD-E616P1 Drive!
To ensure proper installation and use of this device, read the instructions
and other important information contained in this manual.
Product Introduction
Specifications
The DVD-E616P1 has the following specifications:
• Sustained Transfer Rate
DVD 16x max. ~ 21600 KB/sec
CD 48x max. ~ 7200 KB/sec
• Random Access Time DVD: 90 msec and CD: 85 msec
• Interface ATAPI specification
• Data Buffer Size 256 KB/s
• Application discs 12cm or 8 cm diameter, 1.2mm thick
DVD: DVD-ROM, DVD-R, DVD-RW,
DVD-Video, DVD+R, DVD+RW
CD: CD-ROM, CD-ROM/XA, Photo CD,
CD-DA, CD-Extra, CD-R, CD-RW,
• OS compatibility Windows® 98SE/ME/2000/XP
• Power supply DC 5 x (1 +/- 5%) V
DC 12 x (1 +/- 10%) V
• Dimensions 148.0 (w) x 198.0 (d) x 42.3 mm (h)
• Mass 900 g
Refer to the section “Technical Information” on page 20 for detailed
specifications.
ASUS DVD-E616P1 User Manual
9
Page 10
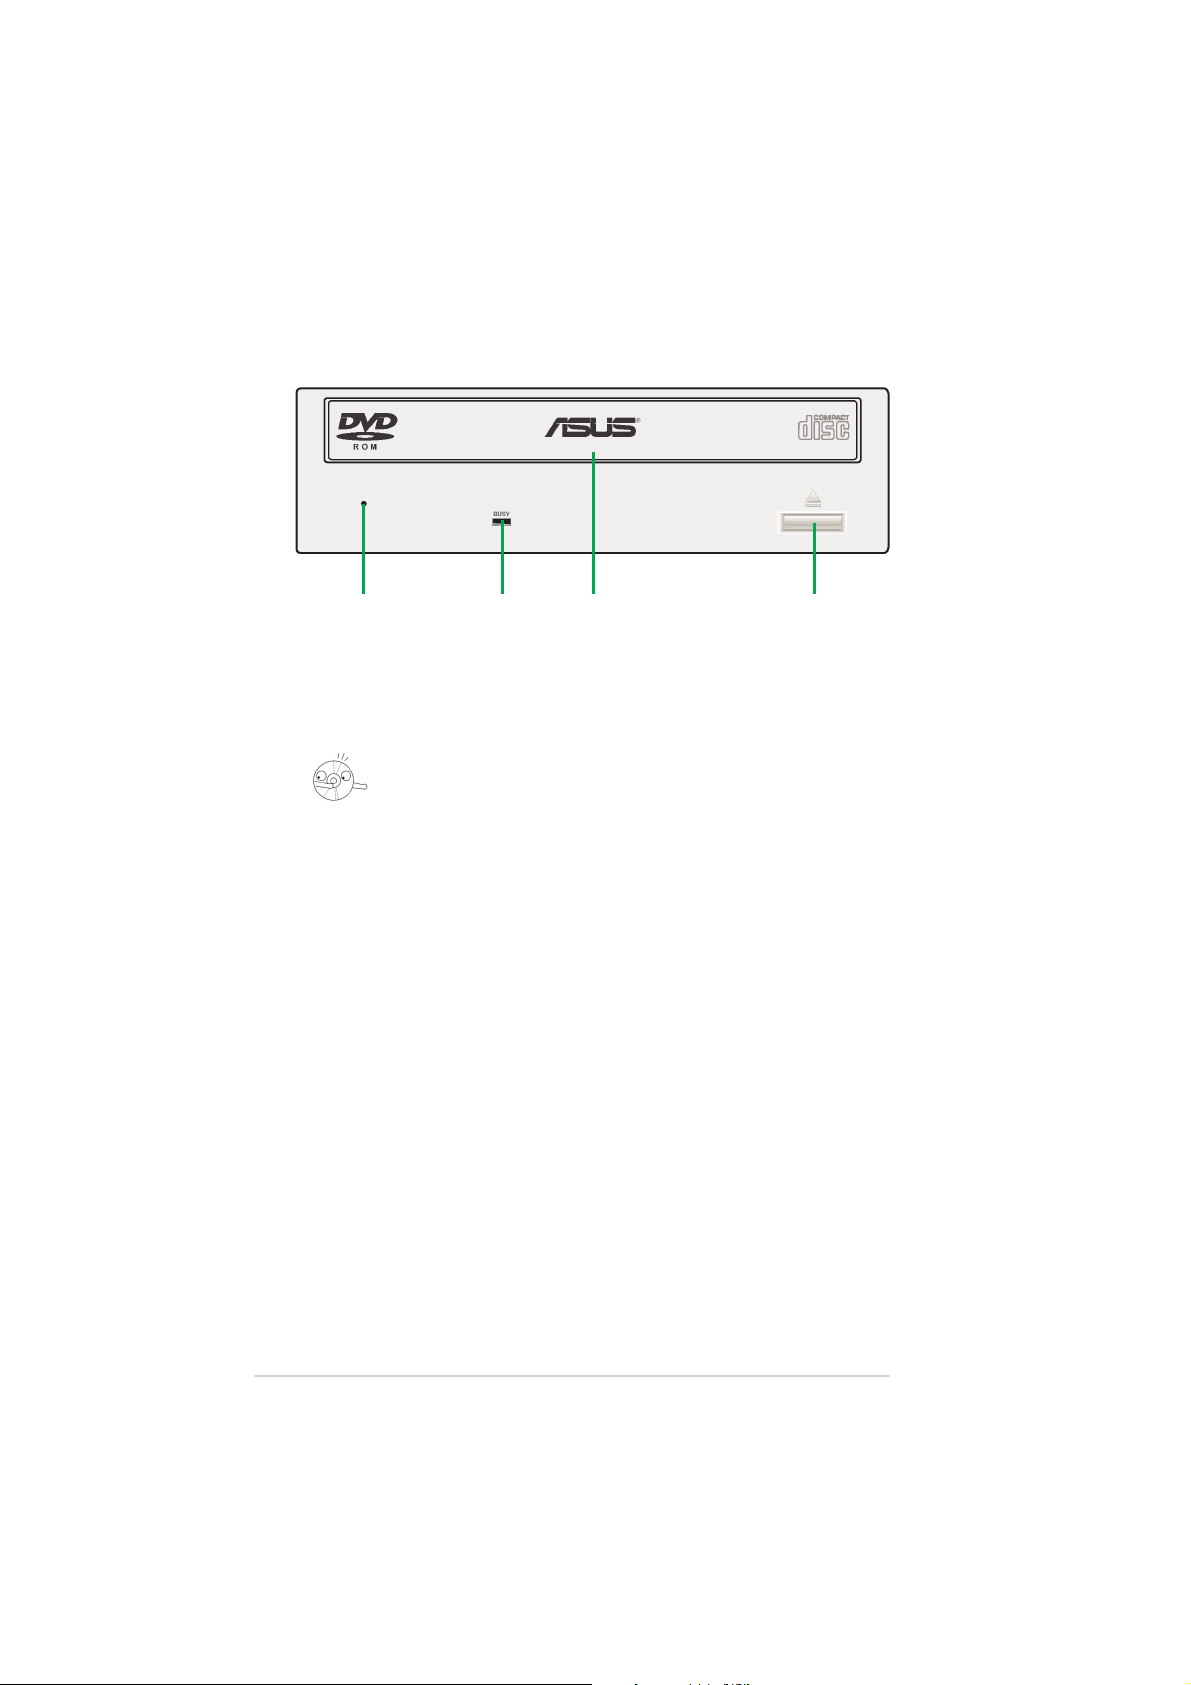
Front Panel
123 4
1. Emergency Eject Pinhole
In cases when you cannot eject a disc from the drive using the eject
button due to power failure or software problems, insert a pin or a paper
clip into this hole to manually eject the tray and the disc.
Make sure the power of the drive is turned off and wait more than one
minute till the disc rotation is stopped.
2. READ Indicator
This LED (Green) is lit on all disc read activity.
3. Disc Loading Tray
This tray holds the optical disk media.
Open the loading tray by pressing the Eject Button, then place a CD or
DVD with the label side up. Press the Eject Button or push the front part
of the tray to load the tray back in place.
4. Eject Button
Press this button to load or unload a disc.
10
ASUS DVD-E616P1 User Manual
Page 11
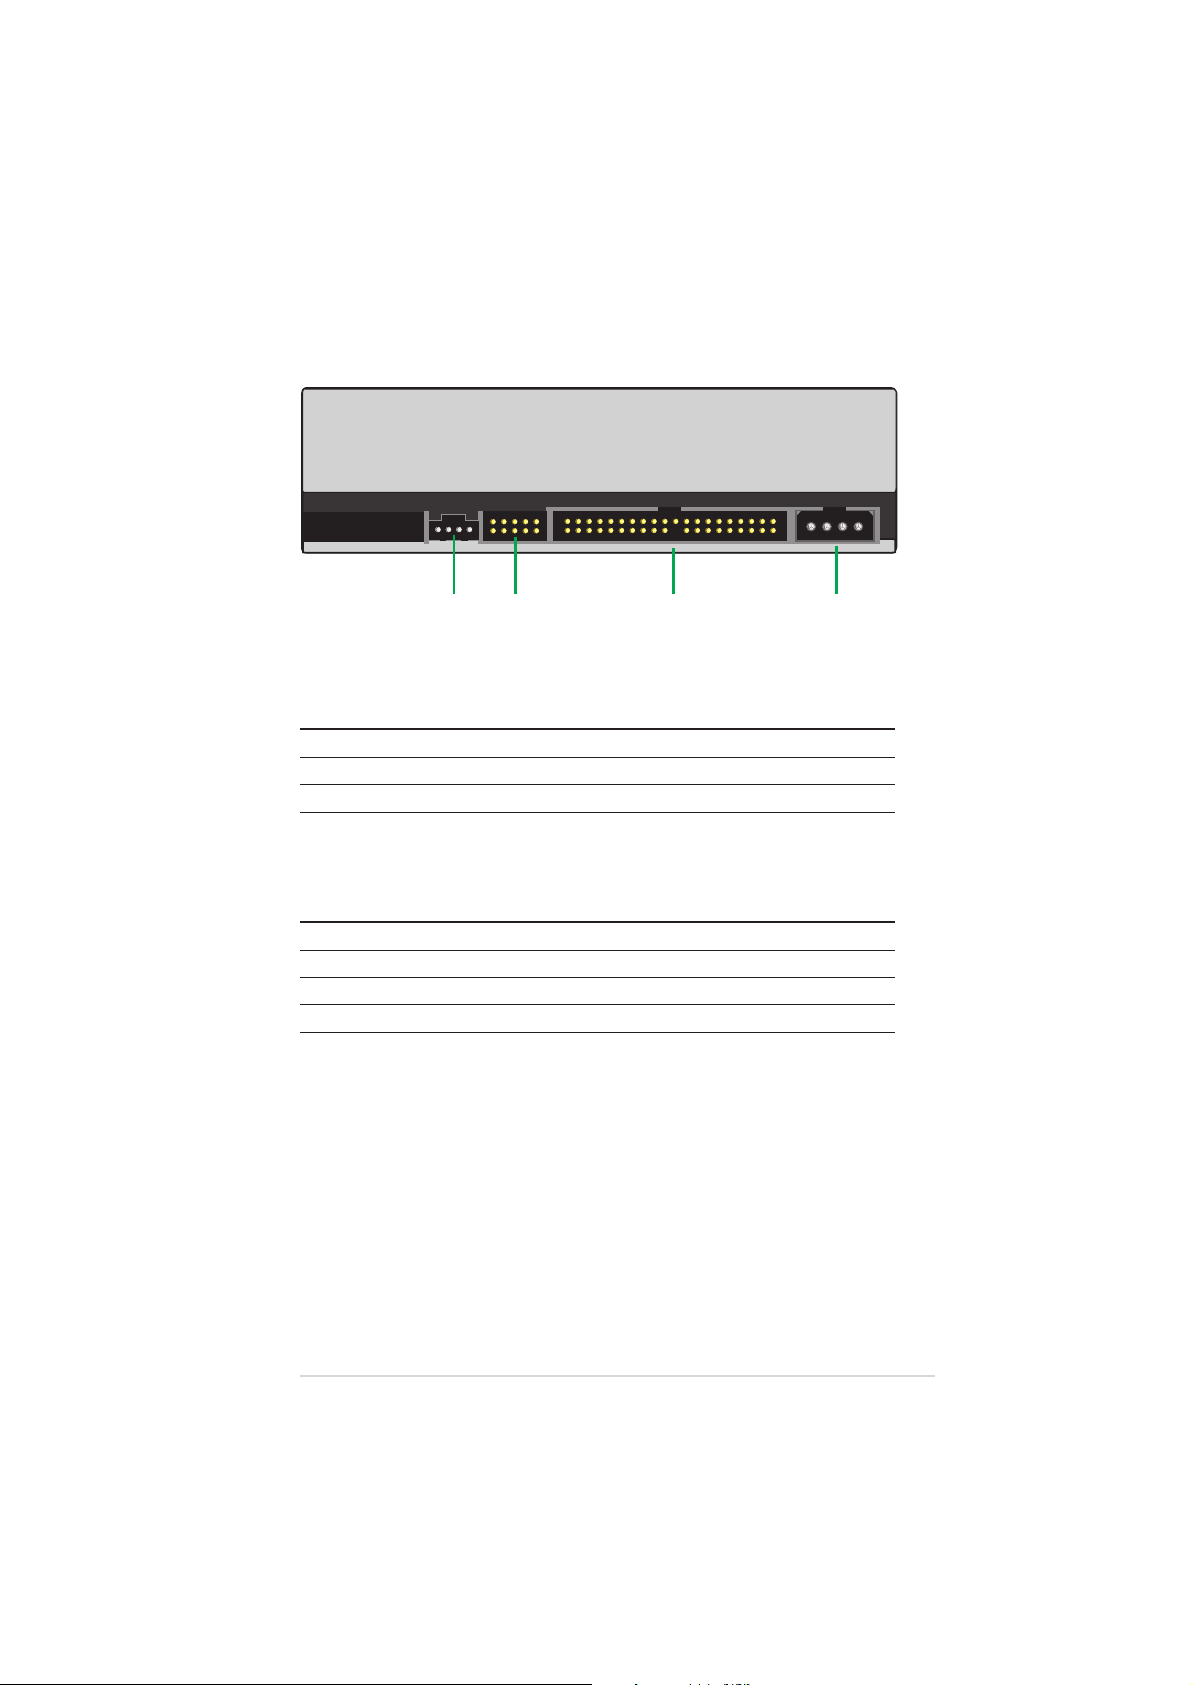
Rear Panel
78 9 10
7. Audio Output
This connector is for an analog audio output cable. This connector is
compatible with “Molex 70553”.
Pin Name Description
1 L Left channel audio output
2 & 3 G Ground
4 R Right channel audio output
8. Device Configuration Jumper
These pins allow you to select either Master, Slave, or Cable Select
mode for the DVD-ROM device. (Refer to page 12 for jumber settings.)
Pin Name Switch Status Description
1 MA ON Master mode
2 SL ON Slave mode
3 CS ON Cable select mode
4-5 Reserved
9. Host IDE Interface
This connector is for a 40-pin IDE cable to connect the drive to the IDE
interface on the motherboard.
10. DC Input
This DC connector is for a 4-pin power cable from the system power
supply .
ASUS DVD-E616P1 User Manual
11
Page 12

Setting the Jumper Terminals
Configure the jumpers to set the device to master or slave mode before
physically installing it to your computer chassis. Use jumper blocks to short
the pins to your desired setting.
Make sure to correctly put the jumper blocks over the pins. Failure to do
so may cause irreparable damage to the drive!
JUMPER
TERMINALS
Master Mode
RESERVED PIN 1
Cover the two pins labeled MA (see illustration)
to set the DVD-ROM drive as a secondary
master drive. This is possible only if your
computer supports four IDE devices. The hard
disk in the computer is set as Primary Master.
Slave Mode
RESERVED PIN 1
Cover the two pins labeled SL (see illustration) to
set the DVD-ROM drive as a slave device if your
computer supports only two IDE devices.
If your computer supports four IDE devices, this
setting sets your DVD-ROM drive either as a
Primary Slave or a Secondary Slave.
Cable Select Mode
RESERVED PIN 1
Cover the two pins labeled CS (see illustration) if
your computer supports a Cable Select (CSEL)
signal. You need an exclusive interface cable for
this setting. Refer to your computer manual for
details.
MA
SL
CS
12
ASUS DVD-E616P1 User Manual
Page 13

Installing the DVD-ROM Drive
Follow these steps to install the drive into the computer chassis.
Refer to your computer manual for specific instructions on
opening the chassis and installing drives.
1. Remove the cover of an empty 5.25-inch external drive bay.
2. Carefully insert the DVD-ROM drive into the bay and push it inward until
it is flushed to the chassis front panel. The holes on the sides of the drive
should align with the holes on the drive bay .
ASUS DVD-E616P1 User Manual
13
Page 14

3. Secure the drive with screws that came with the drive package. Use two
screws on each side of the drive.
Depending on the space on your chassis, you may need to connect the
drive cables before securing the drive into the chassis. For cable
connections, proceed to the following section, “Connecting the Drive
Cables.”
14
ASUS DVD-E616P1 User Manual
Page 15

Connecting the Drive Cables
1. Connect the power cable plug to the power connector on the rear panel.
2. Connect the 40-pin IDE cable plug to the IDE connector, matching the
red pin stripe on the cable with Pin 1 on the connector.
3. If your computer has a sound card or an onboard audio feature, connect
an audio interface cable to the 4-pin analog audio connector on the rear
of the drive. Connect the other end of the audio cable to the connector
on the sound card or on the 4-pin CD connector on the motherboard.
All the cable plugs are slotted so that they fit in only one orientation. If
a plug does not fit in completely, try reversing it. DO NOT apply too
much force when fitting the cable plugs.
Power Cable
4-pin Audio Cable
Replace the computer cover according to your computer manual.
ASUS DVD-E616P1 User Manual
IDE Cable
15
Page 16

DVD-ROM Drive Basics
Placing a Disc into the Drive
1. Press the eject button on the front of the drive to eject the tray .
2. When the drive tray ejects out of the drive, place the disc on the tray with
the label (printed) side up.
16
ASUS DVD-E616P1 User Manual
Page 17

If you are using a 12-cm disc, place it on the tray making sure that it
fits the outer circular border. This border helps hold the disc in place. If
you are using an 8-cm disc, place it on the inner circular border on the
tray.
12-cm
Disc
8-cm
Disc
3. Press the drive eject button or lightly push the center of the drive tray to
replace the tray inside the drive.
Ejecting a Disc from the Drive
1. Press the eject button on the front of the drive to eject the tray .
2. Carefully remove the disc from the tray.
3. Press the drive eject button or lightly push the center of the drive tray to
load the tray back into the drive.
ASUS DVD-E616P1 User Manual
17
Page 18

Using the Emergency Eject Pinhole
The emergency eject pinhole on the front of the drive allows you to
manually eject the drive tray and remove a disc from the drive in cases
when:
• supply of power to the computer is cut due to electrical power outage
• the drive malfunctions.
Use the manual method only as a last resort when the eject button
does not work. Make sure that you have turned off your computer
before ejecting the drive tray.
Follow these steps to eject the drive tray using the emergency pinhole.
1. Insert a paper clip or any pointed rod small enough to fit into the
emergency pinhole.
2. Carefully pull the tray out and remove the disc.
Do not force the tray open; wait until the eject pin has dislodged the
tray to avoid breaking the tray panel.
18
ASUS DVD-E616P1 User Manual
Page 19

Using Compact Discs
Take note of the instructions in this section when using compact discs.
These instructions will help you avoid damaging the discs and your
DVD-ROM drive.
Cleaning a Disc
Spray the disc with compressed air for about five seconds to get rid of the
dust on a disc.
Handling a Disc
Hold a disc by the edges. Do not touch the disc surface.
ASUS DVD-E616P1 User Manual
19
Page 20

Technical Information
Environmental Specifications
Temperature Operation: +5°C to +45°C
Storage: - 20°C to +60°C
Humidity Operation: 5% to 85% non-condensing
Storage: 5% to 90% non-condensing
Vibration Operation: 0.25G peak at 10 ~ 300 Hz
Storage: 1.5G peak at 10 ~ 300 Hz
Impact Non-operation: 1 oct/min – no damage
Less than 50G –
(at 11ms/half sine wave,
3 shock/each side)
Packaged: 1 oct/min – no damage
60 cm high –
(1 corner, 3 edges, 6 surfaces)
Acoustic Noise Less than 49dB
(Without loading operation, on 1m hemisphere,
with 0.25 imbalance disc at 8,600 rpm.)
Reliability MTBF: 100,000 power on hours
Mean Time To Repair (MTTR) 30 minutes
Electrical and Audio Specifications
Power Source Voltage +5V DC +12V DC
Tolerance +/- 5% +/- 10%
I/O Terminal Power connector 4-pin +5V, +12V
A TAPI terminal 40-pin
Audio out 4-pin (analog)
Audio No. of channels 2 (stereo)
Sampling frequency 44.1 kHz
Quantization 16 bits
Distortion 0.2% max. (at 1 kHz)
S/N ratio 70 dB
Output: Line Out 0.7 V rms (typical)
20
ASUS DVD-E616P1 User Manual
Page 21

DVD Region Codes
Region codes are part of the DVD standard. However, Region code on
DVD discs are optional. DVD discs with no specified region code can be
played on all DVD players.
The world is set up into regions according to DVD titles. There are six
regions around the world as illustrated by the map below.
This DVD drive can be changed to play a DVD from any region in the
world but can ONLY be changed five times. This restriction makes the
drive adaptable for use in any region while still maintaining compliance
with RPC-II regulations.
The ability to switch from one region to another is not an ongoing
feature. Please set the drive to your local region only or you may risk
setting the drive permanently for a region that is not compliant with the
media available in your part of the world.
Region Code Area
1 U.S., U.S. Territories, Canada
2 Europe, Middle East, Japan, Egypt, S. Africa, Greenland
3 South Eastern Asia, Taiwan, Hong Kong, Korea
4 Australia, New Zealand, Latin America, Pacific Islands
5 (former Russia),Eastern Europe, India, Africa, North Korea
6 China
ASUS DVD-E616P1 User Manual
21
Page 22

22
ASUS DVD-E616P1 User Manual
Page 23

DVD-E616P1
DVD-ROM Drive
Quick Installation Guide
In 12 Languages
23
Page 24

Quick Installation Guide
English
Hardware Installation
1. Turn off your computer and any peripheral devices connected to it.
2. Use a grounded wrist strap or touch a safely grounded object or a metal object,
such as the power supply case, before handling the device to avoid damaging it
due to static electricity.
3. Remove the computer cover.
4. Configure the DVD-ROM drive jumpers to set the device to master or slave
mode before installing it into the chassis. Use jumper blocks to short the pins to
your desired setting. (See page 13 for details.)
5. Insert the DVD-ROM drive into an
available 5.25-inch bay.
6. Connect a 4-pin power supply cable to
the DC input connector of the
DVD-ROM drive.
7. Connect one end of the IDE ribbon
cable to the IDE connector at the back
of the DVD-ROM drive, matching the
colored stripe on the cable with Pin 1
on the IDE connector. Connect the
other end of the IDE cable to the IDE
connector on the motherboard.
8. Connect one end of the 4-pin audio cable to the audio output connector of the
DVD-ROM drive. Connect the other end to the audio connector of an installed
sound card, or to the audio connector on the motherboard, if available.
9. Slide the DVD-ROM drive into the bay and secure it with four screws.
10. Replace the computer cover.
11. Turn on your computer.
Software Installation
Windows® 98SE/2000/ME/XP automatically detects the current settings for
your drive and installs the appropriate driver.
24
Page 25

Guide d’Installation Rapide
Installation Matérielle
1. Eteignez votre ordinateur et tous les périphériques connectés.
2. Utilisez un bracelet anti-statique relié à la terre ou touchez un objet relié à la
masse ou un objet métallique, tel le boîtier d’alimentation, avant de manipuler
l’équipement pour éviter de l’endommager à cause de l’électricité statique.
3. Enlevez le couvercle de l’ordinateur.
4. Configurez les cavaliers du lecteur de DVD-ROM pour régler l’équipement en
mode maître ou mode esclave avant de l’installer dans le châssis. Utilisez les
cavaliers pour court-circuiter les broches et obtenir les paramètres désirés. (Voir
la page 13 pour les détails.)
5. Insérez le lecteur de DVD-ROM dans
une baie de 5.25-pouces disponible.
6. Connectez un câble d’alimentation 4broches au connecteur d’entrée DC
du lecteur de DVD-ROM.
7. Connectez une extrémité de la nappe
de connexion IDE au connecteur IDE
situé à l’arrière du lecteur de DVDROM, en faisant correspondre la ligne
coloriée sur le câble à la Broche 1 du
connecteur IDE. Connectez l’autre extrémité de la nappe de connexion IDE au
connecteur IDE situé sur la carte mère.
8. Connectez une extrémité du câble audio 4-broches au connecteur de sortie
audio du lecteur de DVD-ROM. Connectez l’autre extrémité du câble au
connecteur audio de la carte son installée, ou à celui de la carte mère, si
disponible.
9. Faites glisser le lecteur de DVD-ROM dans la baie et fixez-le avec quatre vis.
10. Remettez le couvercle de l’ordinateur en place.
11. Allumez votre ordinateur.
Français
Installation Logicielle
Windows® 98SE/2000/ME/XP détecteront automatiquement les
paramètres actuels de votre lecteur et installeront le pilote adapté.
25
Page 26

Deutsch
Schnellinstallationsanleitung
Hardwareinstallation
1. Schalten Sie Ihren Computer und alle angeschlossenen Peripheriegeräte aus.
2. Um Schäden durch statische Elektrizität zu vermeiden, tragen Sie bitte eine
geerdete Manschette oder berühren Sie einen richtig geerdeten Gegenstand
oder Metallgegenstand wie z.B. das Netzteilgehäuse, bevor Sie das Gerät in die
Hand nehmen.
3. Entfernen Sie die Abdeckung des Computers.
4. Konfigurieren Sie vor dem Einbau des DVD-ROM-Laufwerks ins
Computergehäuse den Jumper, um das Laufwerk als Master oder Slave zu
verwenden. Stecken Sie die
Jumpersteckbrücke über die Pole
entsprechend Ihrer gewünschten
Einstellung (Einzelheiten hierzu siehe
Seite 13).
5. Legen Sie das DVD-ROM-Laufwerk in
ein freies 5,25-Zoll Fach ein.
6. Verbinden Sie ein 4-pol. Stromkabel
mit dem DC-Eingang am DVD-ROMLaufwerk.
7. Verbinden Sie ein Ende des IDEFlachbandkabels mit dem IDE-Anschluss an der Rückseite des DVD-ROMLaufwerks. Richten Sie dabei den farbigen Streifen am Kabel auf den Pol 1 des
IDE-Anschlusses aus. Verbinden Sie das andere Ende des IDE-Kabels mit dem
IDE-Anschluss am Motherboard.
8. Verbinden Sie ein Ende des 4-pol. Audiokabels mit dem Audioausgang des
DVD-ROM-Laufwerks. Verbinden Sie das andere Ende mit dem Audioanschluss
einer installierten Soundkarte oder, wenn vorhanden, mit dem integrierten
Audioanschluss am Motherboard.
9. Schieben Sie das DVD-ROM-Laufwerk in das Fach hinein und befestigen es mit
vier Schrauben.
10. Bringen Sie die Abdeckung des Computers erneut an.
11. Schalten Sie Ihren Computer ein.
Softwareinstallation
Windows® 98SE/2000/ME/XP erkennt automatisch die derzeitigen
Einstellungen Ihres Laufwerks und installiert den passenden Treiber.
26
Page 27

Guida all’installazione rapida
Installazione dell'hardware
1. Spegnere il computer e tutte le periferiche ad esso collegate.
2. Prima di maneggiare il dispositivo provocando danni causati dall'energia statica,
indossare una fascetta antistatica, oppure toccare un oggetto protetto con
massa a terra, o un oggetto metallico come la scatola d'alimentazione.
3. Rimuovere la copertura del computer.
4. Prima di installare il dispositivo, configurare i jumper dell'unità DVD-ROM per
impostarlo sulla modalità master o slave. Impiegare blocchi jumper per
cortocircuitare i pin nell'impostazione desiderata. (Si veda pagina 13 per i
dettagli sull'argomento.)
5. Inserire l'unità DVD-ROM in una
nicchia disponibile da 5.25 pollici.
6. Collegare un cavo d'alimentazione a 4
pin al connettore ingresso CD
dell'unità DVD-ROM.
7. Collegare un'estremità del cavo a
nastro IDE al connettore IDE sul retro
dell'unità DVD-ROM, facendo
coincidere la striscia colorata sul cavo
al Pin 1 sul connettore IDE. Collegare
l'atra estremità del cavo IDE al connettore IDE sulla scheda madre.
8. Collegare un'estremità del cavo audio 4 pin al connettore uscita audio dell'unità
DVD-ROM. Collegare l'altra estremità al connettore audio di una scheda audio
installata, oppure al connettore audio sulla scheda madre, se disponibile.
9. Far scorrere l'unità DVD-ROM nella nicchia e fissarla con le quattro viti.
10. Rimettere la copertura del computer.
11. Accendere il computer.
Italiano
Istallazione del software
Windows® 98SE/2000/ME/XP rileva automaticamente le impostazioni
attuali dell'unità ed installa i driver appropriati.
27
Page 28

Español
Guía de instalación rápida
Instalación del hardware
1. Apague su equipo y cualquier dispositivo periférico que se encuentre conectado
al mismo.
2. Utilice una muñequera de toma de tierra o toque un objeto a tierra seguro o un
objeto de metal, como por ejemplo la carcasa de la fuente de alimentación,
antes de manipular el dispositivo para evitar dañarlo debido a la electricidad
estática.
3. Retire la cubierta del equipo.
4. Configure los puentes de la unidad DVD-ROM para ajustar el dispositivo al
modo maestro o secundario antes de
instalarlo dentro del chasis. Utilice los
bloques de puente para acortar los
contactos según la configuración
deseada. (Consulte la página 13 para
obtener detalles.)
5. Inserte la unidad DVD-ROM dentro de
una bahía de 5.25 pulgadas
disponible.
6. Conecte un cable de alimentación de
4 contactos al conector de entrada CD
de la unidad DVD-ROM.
7. Conecte un extremo del cable de lazo IDE al conector IDE situado en la parte
trasera de la unidad DVD-ROM, haciendo coincidir la tira coloreada del cable
con Pin 1 en el conector IDE. Conecte el otro extremo del cable IDE al conector
IDE situado en la placa base.
8. Conecte un exttremo del cable de audio de 4 contactos al conector de salida de
audio de la unidad DVD-ROM. Conecte el otro extremo del conector de audio a
una tarjeta de sonido instalada o al conector de audio situado en la placa base,
si estuviera disponible.
9. Deslice la unidad DVD-ROM dentro de la bahía y fíjela con cuatro tornillos.
10. Vuelva a colocar la tapa del equipo.
11. Encienda el equipo.
Instalación del software
Windows® 98SE/2000/ME/XP detecta automáticamente la configuración
actual para su unidad e instala el controlador apropiado.
28
Page 29

29
Page 30

30
Page 31

®
31
Page 32

Snelle installatiegids
Hardware-installatie
1. Zet de computer uit en maak alle verbindingen los.
2. Gebruik een geaard polsbandje of raak een goed geaard voorwerp aan, zoals
3. Open de behuizing van de computer.
4. Configureer de dvd-lezer door hem met jumpers in te stellen als master of slave,
5. Doe de dvd-lezer in een vrije vak met
Nederlands
6. Sluit de vierpolige voedingskabel aan
7. Sluit het ene uiteinde van de IDE-
8. Sluit het ene uiteinde van de vierpolige audiokabel aan op de audio-uitgang van
9. Schuif de dvd-lezer op zijn plaats en zet hem met vier schroeven vast.
10. Sluit de behuizing van de computer
11. Zet de computer aan.
een radiator, voordat u de onderdelen hanteert. U zou anders schade kunnen
veroorzaken door statische elektriciteit.
voordat u hem in de computer monteert. Met jumpertjes kunt u de juiste
instellingen maken. Zie pagina 13 voor meer details.
een breedte van 5 1/4 inch.
op de voedingsaansluiting van de dvdlezer
bandkabel aan op de IDE-connector
van de dvd-lezer. Let op de gekleurde
streep op de kabel, deze moet
overeenkomen met pin 1 van de dvdlezer. Sluit het andere uiteinde van de
IDE-kabel aan op de IDE-connector van het moederbord.
de dvd-lezer. Sluit het andere uiteinde aan op de geïnstalleerde geluidskaart, of
op de audioaansluiting van het moederbord.
Software-installatie
Windows® 98Se/2000/Me/XP zal de dvd-lezer automatisch herkennen en
de juiste stuurprogramma’s installeren.
32
Page 33

нст укция по монтажу
онтаж п ивода DVD-дисков
1. Отключите питание компьюте а и всех подключенных к компьюте у
пе ифе ийных уст ойств.
2. о избежание пов еждения уст ойств статическим элект ичеством п и
установке компьюте ного обо удования используйте заземляющий
б аслет или п икоснитесь к заземленному обо удованию или
металлическому п едмету (нап име , ко пус блока питания) п ежде чем
взять в уки обо удование, чувствительное к статическому
элект ичеству.
3. нимите кожух с ко пуса
компьюте а.
4. Установите ежим аботы п ивода
DVD-дисков (master или slave) до
того, как установите п ивод в
шасси. ля установки ежима
пользуйтесь пе емычками. олее
под обно см. на ст . 13.
5. ставьте п ивод DVD-дисков в
свободный док для уст ойств
азме ом 5,25 дюймов.
6. одключите четы ехконтактный азъем питания ко входу питания
постоянным током п ивода.
7. Один конец IDE-шлейфа подключите к IDE- азъему, асположенному на
задней панели п ивода. и подключении следите за тем, чтобы
ма ки ованный п оводник шлейфа совпал с 1 выводом IDE- азъема.
угой конец шлейфа подключите к IDE - азъему, асположенному на
системной плате.
8. одключите один конец четы ехконтактного звукового кабеля к азъему
звукового выхода п ивода. угой конец звукового кабеля подключите к
установленной звуковой плате, а если звуковая плата интег и ована в
системную плату, подключите к звуковому азъему на системной плате.
9. ставьте п ивод DVD-дисков в док и зафикси уйте его четы ьмя
винтами.
10 . аденьте кожух на ко пус компьюте а.
11 . ключите компьюте .
усский
Установка п ог аммного обеспечения
Опе ационные системы Windows® 98SE/2000/ME/XP
автоматически обна ужат текущие наст ойки п ивода и
установят соответствующий д айве .
33
Page 34

Svenska
Snabbinstallationsguide
Installation av maskinvara
1. Stäng av datorn och all ansluten kringutrustning.
2. Använd en jordad handledsrem eller rör vid ett säkert jordat föremål eller ett
metallföremål som t ex strömkällans hölje, innan du hanterar enheten för att inte
skada den med statisk elektricitet.
3. Ta bort datorns kåpa.
4. Konfigurera DVD-ROM-enhetens byglar för att försätta enheten i master(primärt) eller slavläge (sekundärt ) innan den monteras i datorn. Använd
bygelblock för att ställa in stiften på önskat vis. (Se sidan 13 för detaljer.)
5. Sätt i DVD-ROM-enheten i ett ledigt
5,25-tums fack.
6. Anslut en 4-stifts strömkabel till
likströmsingången på DVD-ROMenheten.
7. Anslut ena änden av IDE-bandkabeln
till IDE-anslutningen på baksidan av
DVD-ROM-enheten, och matcha
färgranden på kabeln med stift 1 på
IDE-anslutningen. Anslut den andra
änden av IDE -kabeln till IDEanslutningen på moderkortet.
8. Anslut ena änden av 4-stifts ljudkabeln till ljudutgången på DVD-ROM-enheten.
Anslut den andra änden till ljudanslutningen på ett installerat ljudkort, eller till
ljudanslutningen på moderkortet, om sådan finns.
9. Skjut in DVD-ROM-enheten i facket och sätt fast den med fyra skruvar.
10. Sätt tillbaka datorns kåpa.
11. Slå på datorn.
Installation av programvara
Windows® 98SE/2000/ME/XP hittar automatiskt aktuella inställningar för
din enhet och installerar lämplig drivrutin.
34
Page 35

Hýzlý Kurulum Kýlavuzu
Donaným Kurulumu
1. Bilgisayarýnýz ve baðlý tüm çevresel aygýtlarý kapatýnýz.
2. Vücudunuzdaki statik elektriðin donanýma zarar vermemesi için aygýt üzerinde herhangi
bir iþlem yapmadan önce topraklamalý bileklik kullanýn veya düzgün bir þekilde
topraklanmýþ güç kaynaðý muhafazasý gibi metal bir nesneye dokunun.
3. Bilgisayar kapaðýný açýn.
4. Kasaya takmadan önce DVD-ROM sürücü jumperlarýný aygýtý master veya slave
modlarýný getirmek için yapýlandýrýn. Pinleri Ýstediðiniz ayara getirmek için jumper
bloklarýný kullanýn. (Ayrýntýlar için Bkz sayfa 13 .)
5. DVD-ROM sürücüsünü uygun bir 5.25
inç yuvaya oturtunuz..
6. DVD-ROM sürücüsü elektrik (DC) giriþ
konnektörüne bir 4-pin güç kablosu
baðlayýn.
7. IDE þerit kablosu ucunu, kablo üzerindeki
renkli þerit IDE konnektörünün Pin 1i ne
eþleþecek þekilde DVD-ROM sürücü
arkasýndaki IDE konnektörüne baðlayýn.
IDE kablosu diðer ucunu anakart
üzerindeki IDE konnektörüne baðlayýn..
8. 4-pin ses (audio) kablosunun bir ucunu DVD-ROM sürücünün ses çýkýþ konnektörüne
baðlayýn. Diðer ucunu, varsa anakart üzerindeki ses konnektörüne veya kurulu bir ses
kartýnýn ses konnektörüne baðlayýn.
9. DVD-ROM sürücüsünü yuvasýna kaydýrarak oturtun ve dört vidayla sabitleyin.
10. Bilgisayarýn kapaðýný kapatýn..
11. Bilgisayarýnýzý açýn.
Yazýlým Yüklenmesi
Windows® 98SE/2000/ME/XP sürücünüz için geçerli ayarlarý otomatik olarak
algýlayarak uygun sürücüleri yükler.
Türkçe
35
Page 36

 Loading...