

Page 1
DSL-N13 Wireless ADSL 2/2+
®
Modem Router
User Manual
E3738 / April 2008
Page 2

Manufacturer Contact Information
ASUSTeK COMPUTER INC. (Asia-Pacic)
Company address: 15 Li-Te Road, Beitou, Taipei 11259
General (tel): +886-2-2894-3447 Web site address: www.asus.com.tw
General (fax): +886-2-2894-7798 General email: info@asus.com.tw
ASUS COMPUTER INTERNATIONAL (America)
Company address: 44370 Nobel Drive, Fremont, CA 94538, USA
General (fax): +1-510-608-4555 Web site address: usa.asus.com
Technical support
General support: +1-502-995-0883 Support (fax): +1-502-933-8713
Online support: http://vip.asus.com/eservice/techserv.aspx
ASUS COMPUTER GmbH (Germany & Austria)
Company address: Harkort Str. 25, D-40880 Ratingen, Germany
General (tel): +49-2102-95990 Web site address: www.asuscom.de
General (fax): +49-2102-959911 Online contact: www.asuscom.de/sales
Technical support
Components: +49-2102-95990 Online support: www.asuscom.de/support
Notebook: +49-2102-959910 Support (fax): +49-2102-959911
Page 3
DSL-N13 Wireless ADSL 2/2+ Modem Router User Manual
Table of contents
Package contents ...........................................................................3
Hardware overview .........................................................................4
Front panel .......................................................................................4
Rear panel .......................................................................................5
Product features ............................................................................... 5
Hardware connections ..................................................................... 6
Connecting to the Internet .............................................................7
Before start ......................................................................................7
Preparing your WAN ........................................................................ 7
Preparing your LAN .........................................................................7
Login the Web conguration interface .............................................8
Quick setup ...................................................................................... 9
Manual Setup ................................................................................. 11
EZSetup ......................................................................................... 15
Connecting DSL-N13 with ASUS WLAN Card ............................... 19
Wireless settings ..........................................................................21
Setting up SSID .............................................................................21
Setting up wireless security ...........................................................21
MAC lter ....................................................................................... 26
Wireless bridge .............................................................................. 26
Wireless advanced settings ........................................................... 30
Network security...........................................................................31
Setting up access right to DSL-N13 ............................................... 31
Setting up port triggering ................................................................ 32
Setting up virtual server ................................................................. 33
Setting up DMZ host ...................................................................... 34
1
Page 4

DSL-N13 Wireless ADSL 2/2+ Modem Router User Manual
Allowing SIP request through NAT ................................................. 34
Firewall - Outgoing IP lter ............................................................. 34
Firewall- Incoming IP lter .............................................................. 35
Access time restriction ................................................................... 36
Advanced settings........................................................................37
WAN ............................................................................................... 37
LAN ............................................................................................... 37
Setting up DNS server ................................................................... 38
Setting up dynamic DNS ............................................................... 38
Setting up default gateway ............................................................. 41
Setting up static route .................................................................... 41
Setting up routing protocol - RIP .................................................... 42
ASUS AiDisk Setup ........................................................................ 43
USB applications ..........................................................................46
FTP server function ........................................................................ 46
Sharing USB printer ....................................................................... 48
Management ..................................................................................51
Conguration backup ..................................................................... 51
Restore settings from a backup le ................................................ 51
Reset to factory default .................................................................. 51
Setting up time server .................................................................... 52
Firmware update ............................................................................ 52
2
Page 5

DSL-N13 Wireless ADSL 2/2+ Modem Router User Manual
Package contents
• DSL-N13 Wireless ADSL2/2+ Modem Router
• AC power adapter (type varies by region)
• Categroy 5 (Cat. 5) Ethernet cable
• Telephone cable
• Splitter (type varies by region)
• Support CD (with electronic user manual included)
• Quick Start Guide
3
Page 6
DSL-N13 Wireless ADSL 2/2+ Modem Router User Manual
Hardware overview
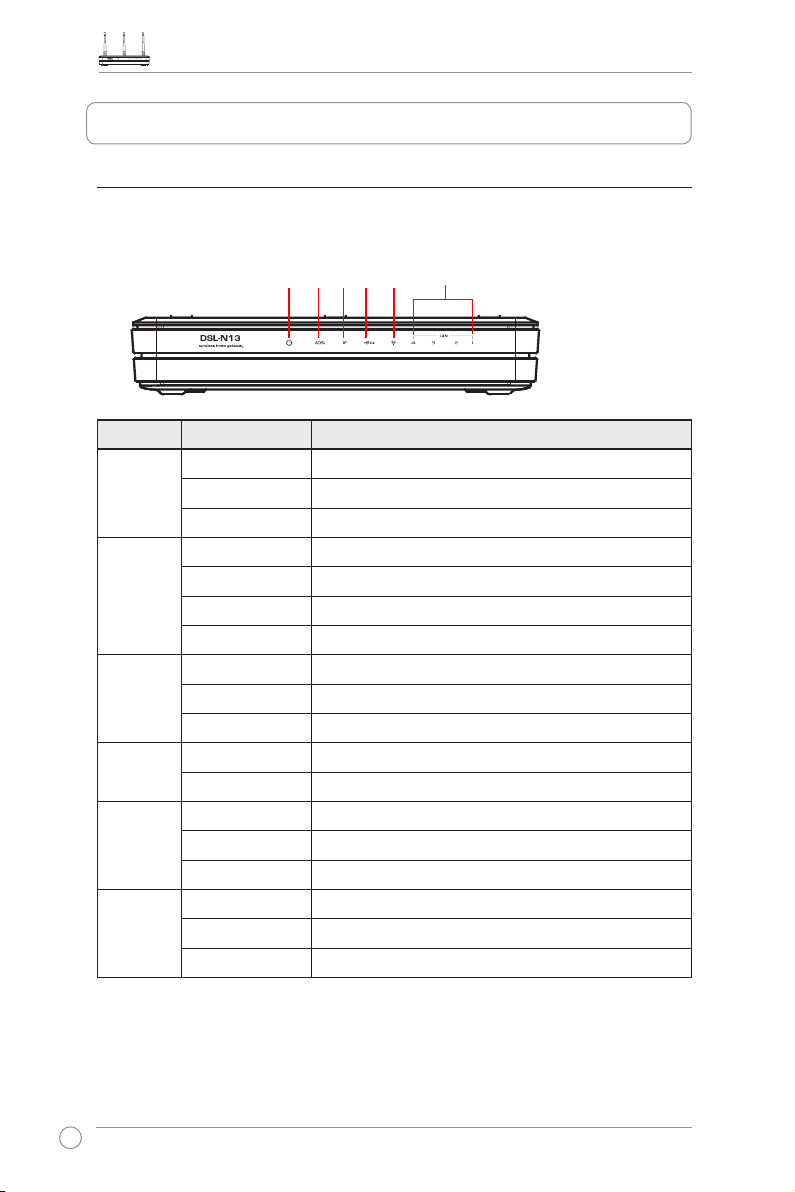
Front panel
The DSL-N13 Wireless ADSL2/2+ Modem Router front panel contains LED indicators
which shows the status of DSL-N13.
PWR
ADSL
AIR
IP USB
LAN
Label Activity Description
PWR
(Power)
ON Power ON
OFF No power
Blink Restoring to factory default
ADSL ON (Green) ADSL link up
Blink (Green) ADSL training
ON (Red) ADSL link down
OFF ADSL is down
IP ON (Green) ADSL is up and the link is PPP
ON (Red) ADSL is up, but the link is not PPP
OFF ADSL is down
USB 2.0 ON USB device detected
OFF No USB device detected
AIR ON Wireless LAN ready
Blink Transmiting or receiving data through wireless
OFF No power or wireless LAN not ready
LAN 1-4 ON Physically connected to an Ethernet device
Blink Transmitting or receiving data through Ethernet cable
OFF No power or no physical connection
4
Page 7
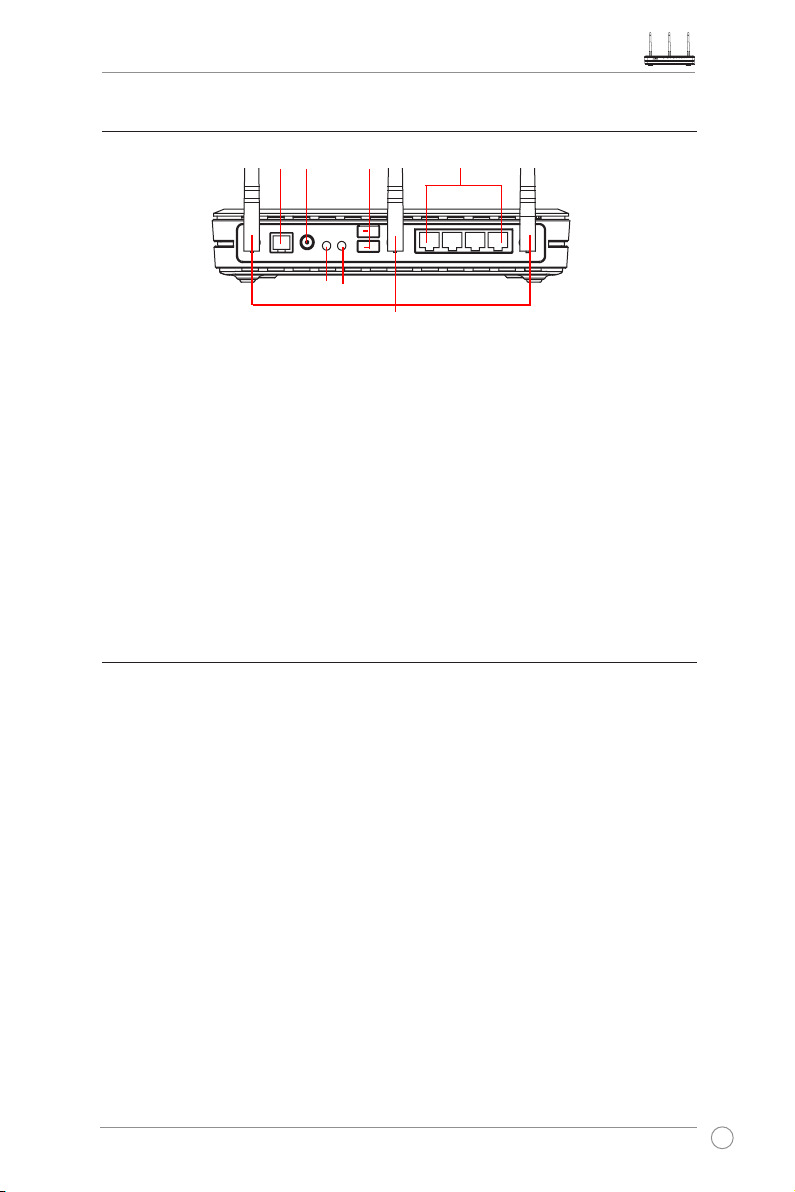
Rear panel
DSL-N13 Wireless ADSL 2/2+ Modem Router User Manual
ADSL
PWR
EZSetup
USB 2.0
Reset
Antenna
LAN
Viewed from left to right, the rear panel of DSL-N13 contains the following elements:
• ADSL port
• Power connector
• Power switch
• Four Local Area Network (LAN) ports
• USB 2.0 ports
• EZSetup button
• Reset button
• SMA antenna connector
Product features
The DSL-N13 Wireless ADSL 2/ 2+ Modem Router provides the following features:
• Built-in ADSL modem
• Built-in firewall
• IEEE802.11n standard-based wireless network, backward compatible with
802.11b/g devices
• Easy-to-use Web-based configuration interface: Quick Setup for ADSL connection,
wireless, and security configuration
• EZSetup™ utility for ADSL connection, wireless network and security quick setup
5
Page 8
DSL-N13 Wireless ADSL 2/2+ Modem Router User Manual
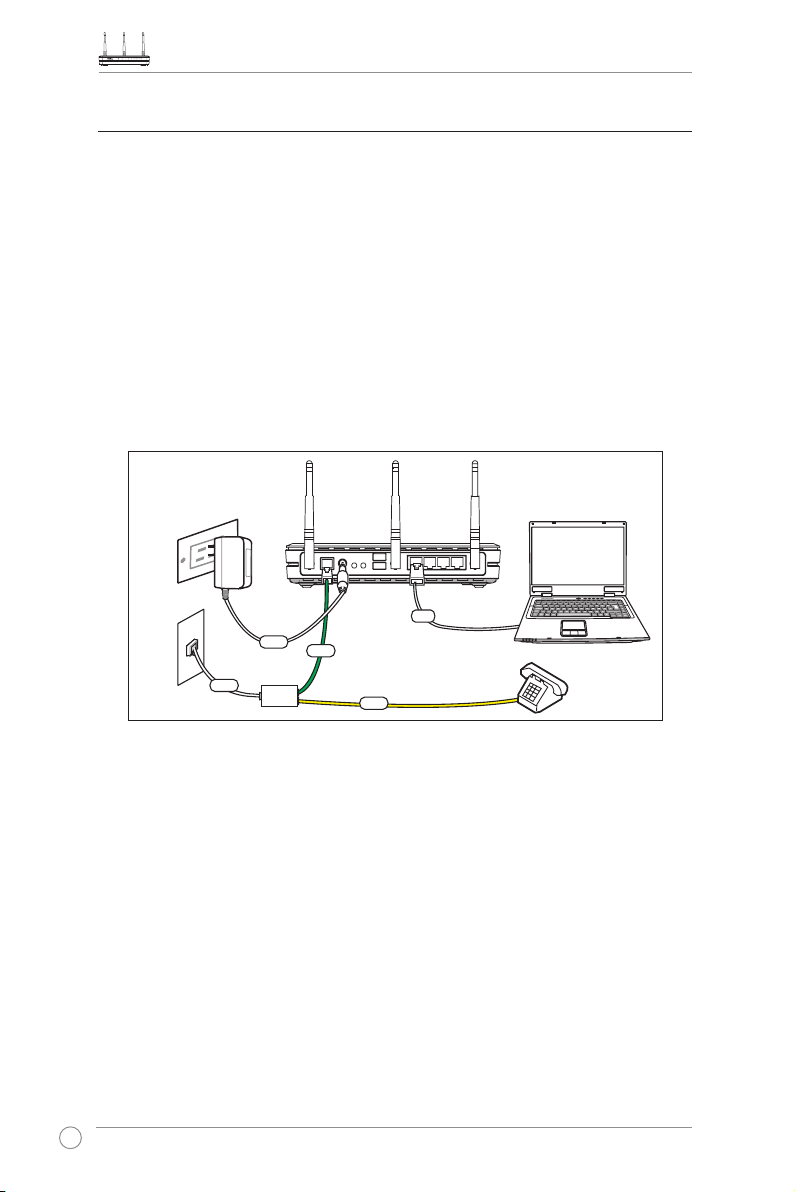
Wall power outlet
ASUS Wireless Router
Wall telephone outlet
Splitter
Phone
DSL
Power
Line
LAN
DSL Phone
Line
Hardware connections
ADSL connection
Use the ADSL splitter supplied in the package to split ADSL signal and telephone
service. Connect your ASUS DSL-N13 Wireless ADSL2/2+ Modem Router to the
DSL port of the splitter with the telephone cable supplied in the package. Use another
telephone cable to connect your telephone to the Phone port of the ADSL splitter.
Ethernet connection
Use Category 5 (CAT5) Ethernet cable to build up your wired LAN connections. The
ASUS DSL-N13 Wireless ADSL2/ 2+ Modem Router is a Fast Ethernet device that
provides 100Mbps network connection. To ensure the connection quality, use CAT5
Ethernet cable to connect your network devices, such as desktop computers and
network printers.
6
Wireless connection
To access Internet via wireless connection, you need to install an IEEE802.11b/g
wireless adapter on your computer, such as ASUS WL-167g, WL-100gE, WL-100gD,
WL-169gE, WL-106gM, WL-160N, and USB-N11.
Page 9
DSL-N13 Wireless ADSL 2/2+ Modem Router User Manual
Connecting to the Internet
Before start
Before start, you need to:
• make sure the cable connections are correct and DSL-N13 is powered ON;
• acquire an active Internet service, such as an ADSL account.
We recommend using wired connection for initial conguration, which may
help avoid possible setup problems due to wireless instability. Use a CAT5
cable to connect an Ethernet-enabled computer to a LAN port of DSL-N13.
Preparing your WAN
Depending on your ISP's requirements, you may need to acquire some of the
information listed below for setting up Internet connection on DSL-N13.
• Vitual Path Identifier (VPI)
• Virtual Channel Identifier (VCI)
• Host name
• Domain name
• ISP login user name and password
• ISP Domain Name System (DNS) server address
• Static IP address
Preparing your LAN
To use the DSL-N13 Wireless ADSL2/2+ Modem Router on your network, you need to install
a network interface card (NIC) or an IEEE802.11b/g wireless network card to your computer.
LAN conguration requirement
For initial conguration, we recommend you to connect a computer to one of the LAN
port of DSL-N13 and congure the TCP/IP settings of your computer. The default IP
settings of DSL-N13 are:
IP address: 192.168.1.1
Subnet mask: 255.255.255.0
DHCP server: enabled
To access DSL-N13, you must set your computer in the same subnet with the ADSL
router. You can make the computer accept a dynamic IP address assigned by the
DHCP server of DSL-N13, or manually set up IP address for your computer.
7
Page 10
DSL-N13 Wireless ADSL 2/2+ Modem Router User Manual
Getting dynamic IP address
Open
Control Panel
Connection
icon, then double-click
address automatically
->
Local Area Network Connection
Internet Protocol (TCP/IP).
and
Obtain DNS server address automatically
, double-click
Select
Obtain an IP
, then click
Local
OK.
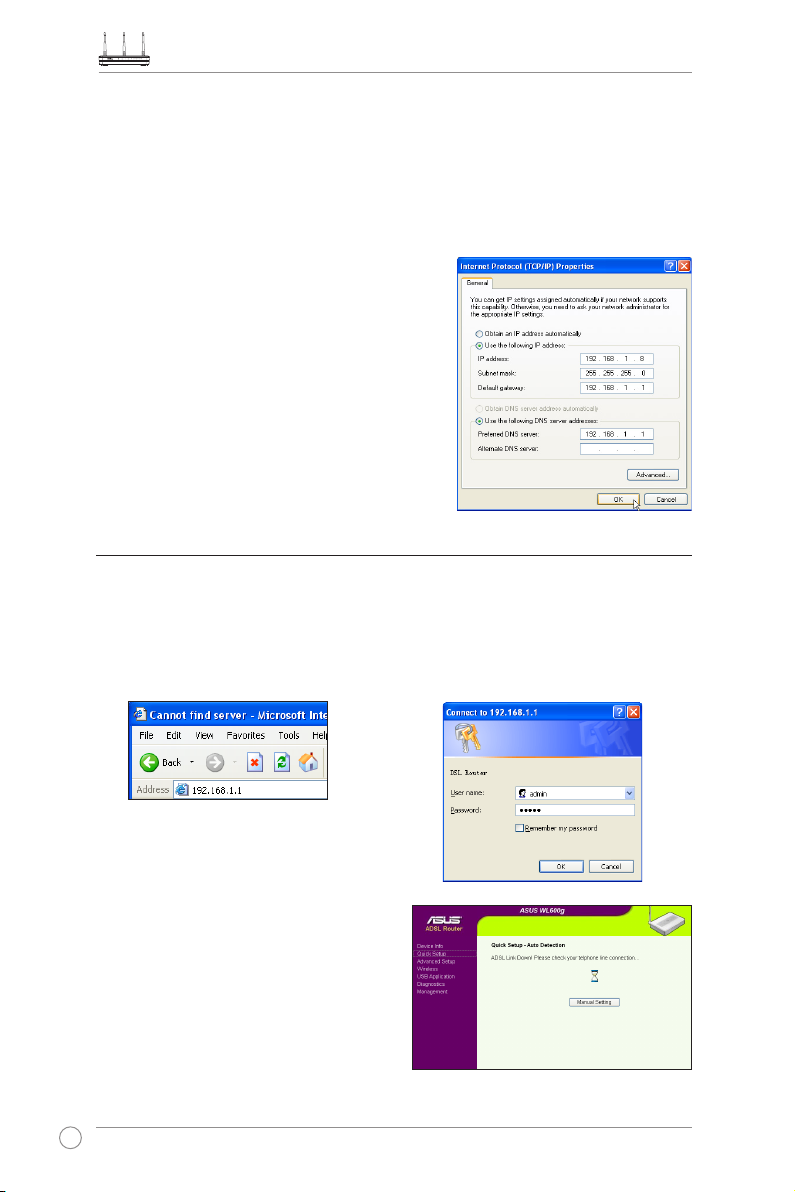
Assigning IP address manually
Open
Control Panel
Connection
, double-click
icon, then double-click
. Follow the descriptions below to setup the
IP)
TCP/IP on your computer.
• IP address: 192.168.1.xxx (xxx can be any
number between 2 and 254, make sure the
IP address is not used by other device)
• Subnet Mask: 255.255.255.0
• Gateway: 192.168.1.1
• DNS: 192.168.1.1
->
Local Area Network
Local Connection
Internet Protocol (TCP/
Login the Web conguration interface
To change the ADSL and wireless settings, you need to login to the Web conguration
interface.
1. Type 192.168.1.1 (default IP address
of DSL-N13) into the address box of
the Web browser and press
Enter
3. When logged in, you can see the home
page of DSL-N13 Web configuration
interface. To setup the router, refer to
Quick Setup in the next section. To
setup the advanced functions, refer
to the following chapters for detailed
information.
8
2. A login window appears. The default
username is
.
admin
admin,
(in lower case).
password is
Page 11

DSL-N13 Wireless ADSL 2/2+ Modem Router User Manual
Quick setup
Log onto the DSL-N13 conguration page
1. Type
192.168.1.1
2. A login window appears for user name and password. The default username is
, password is
admin
3. After logging in, you can see the DSL-N13 conguration page.
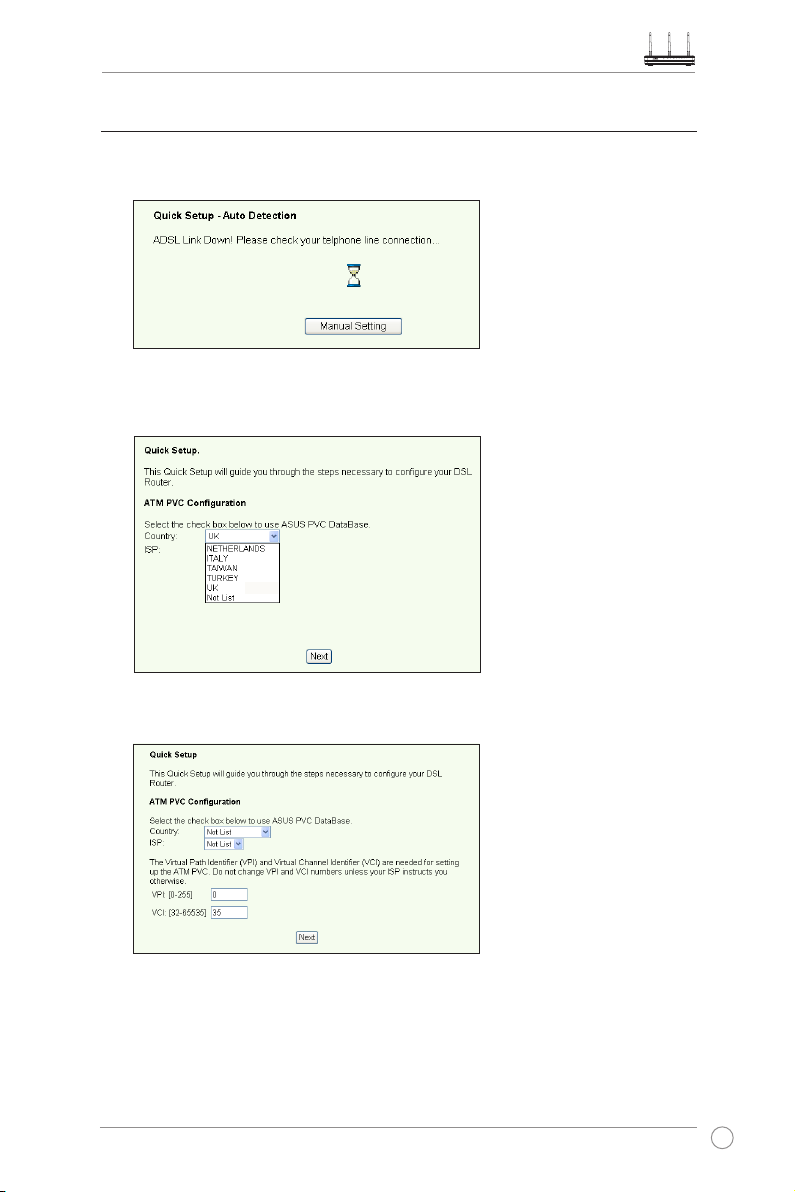
ADSL setup
1. By default, the
detects your ADSL connection type.
2. If ADSL connection is detected, the next page shows your ISP connection type.
into the address box of your Web browser and press Enter.
(in lower case).
admin
Quick Setup
page pops up. The Quick Setup Wizard automatically
If your ADSL connection is not detected, click
Manual Setting
to manually
set up DSL-N13. Refer to Page 11-13 for manual setting instruction.
-- If your connection type is PPPoE or PPPoA
For dynamic IP users, input your user name and password then click Next.
For static IP users, check Use Static IP Address, input your IP address, then
click Next.
Click Next to save the ADSL information to DSL-N13.
If your actual connection is not PPPoE or PPPoA, click
Manual Setting
to
manually set up DSL-N13. Refer to Page 11-13 for manual setting instruction.
9
Page 12
DSL-N13 Wireless ADSL 2/2+ Modem Router User Manual
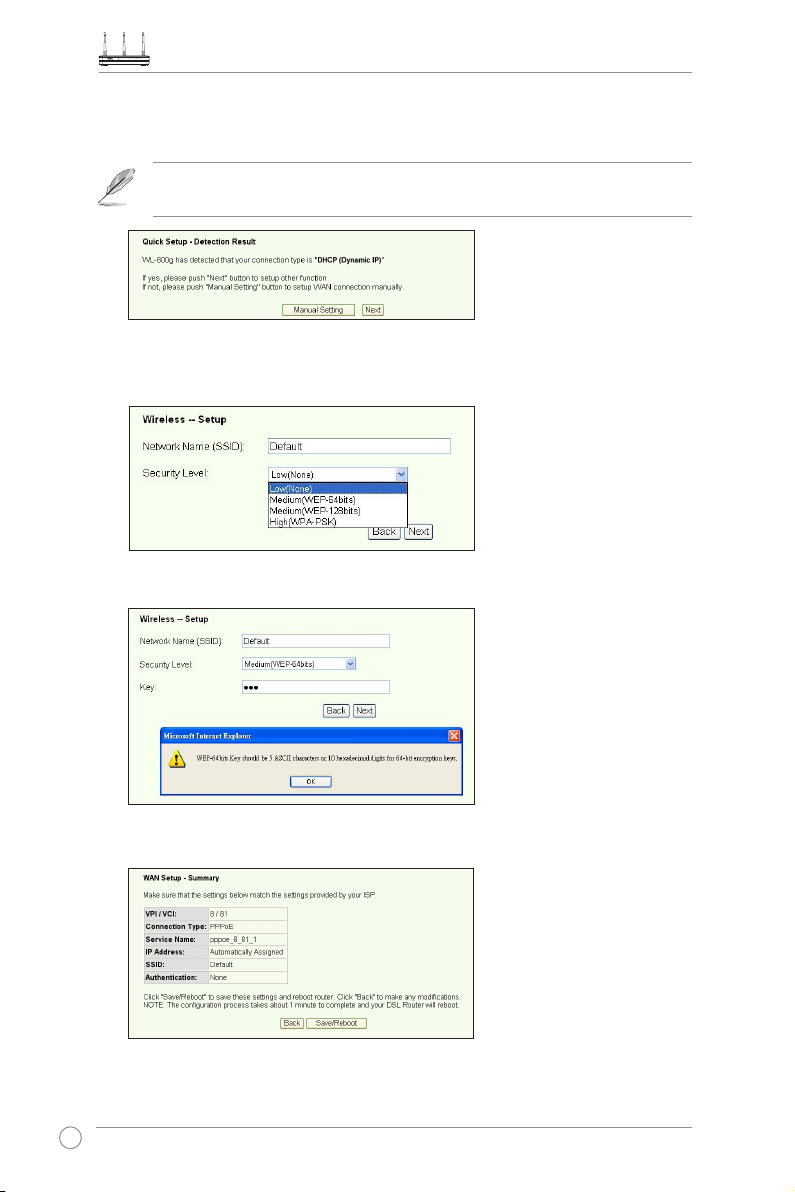
-- If your connection type is MER (DHCP)
Click Next if your connection type is MER (DHCP).
If your actual connection is not MER(DHCP), click
manually set up DSL-N13. Refer to Page 11-13 for manual setting instruction.
Wireless setup
1. Choose a
Security Level
. For detailed security information, refer to Page 21-22.
Manual Setting
to
2. Input a key in the
eld. The number of digit for the key depends on the security
Key
level you choose.
3. The summary page then shows up. If the information displayed is correct, click
Save/Reboot
to nish the setup. Otherwise, click
to modify the settings.
Back
4. Setup complete! Wait for about 60 seconds to reboot. The Web page will refresh to
show device information after reboot.
10
Page 13
DSL-N13 Wireless ADSL 2/2+ Modem Router User Manual
Manual Setup
If you encounter difculty when conguring your ADSL connection with Quick Setup,
click
Manual Setting
ADSL Setup
1. Select your
to manually set up your DSL-N13.
and
Country
and click
ISP
Next
.
2. If your country and ISP are not on the list, select
values and click
. You may ask your ISP for VPI/VCI values.
Next
, key in your VPI and VCI
Not list
11
Page 14
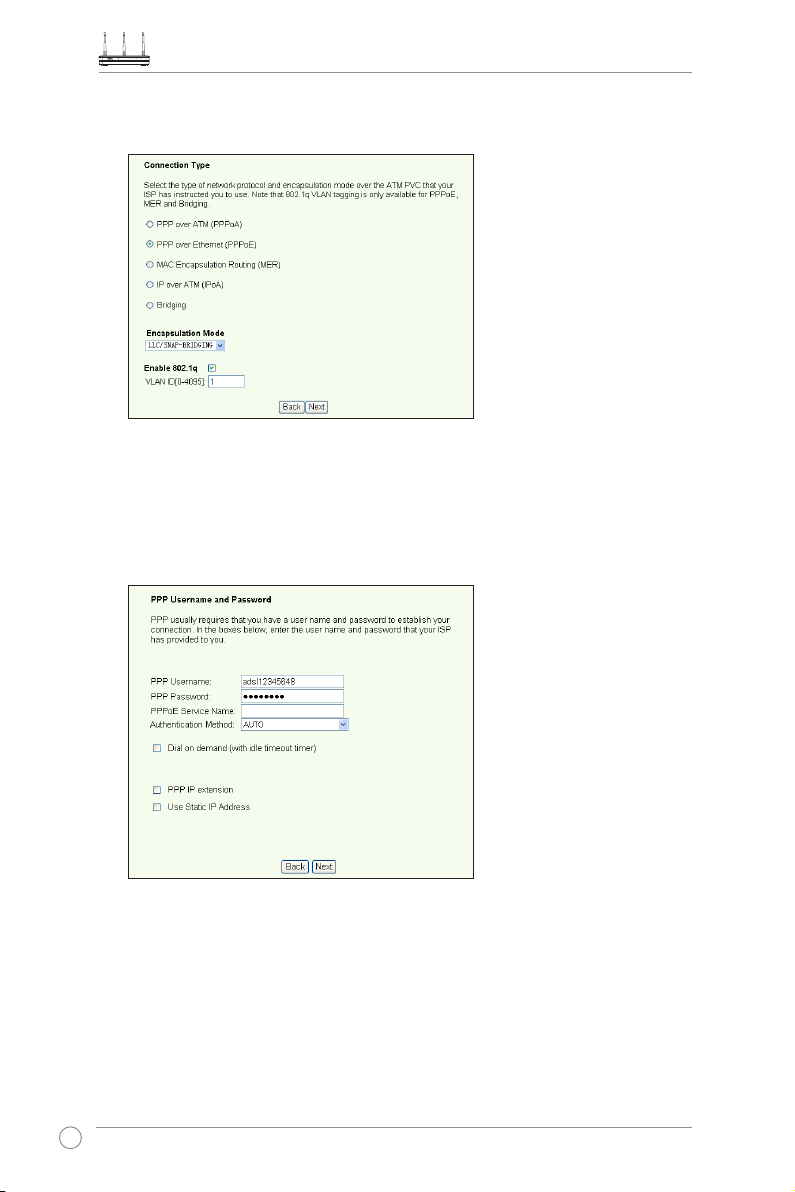
DSL-N13 Wireless ADSL 2/2+ Modem Router User Manual
3. Select your connection type and click
. You can get the connection type from
Next
your ISP.
-- If your connection type is PPPoA or PPPoE
For dynamic IP users, input your PPP user name, password, and service name
then click Next.
For static IP users, check Use Static IP Address then key in your IP address,
then click Next.
12
Page 15
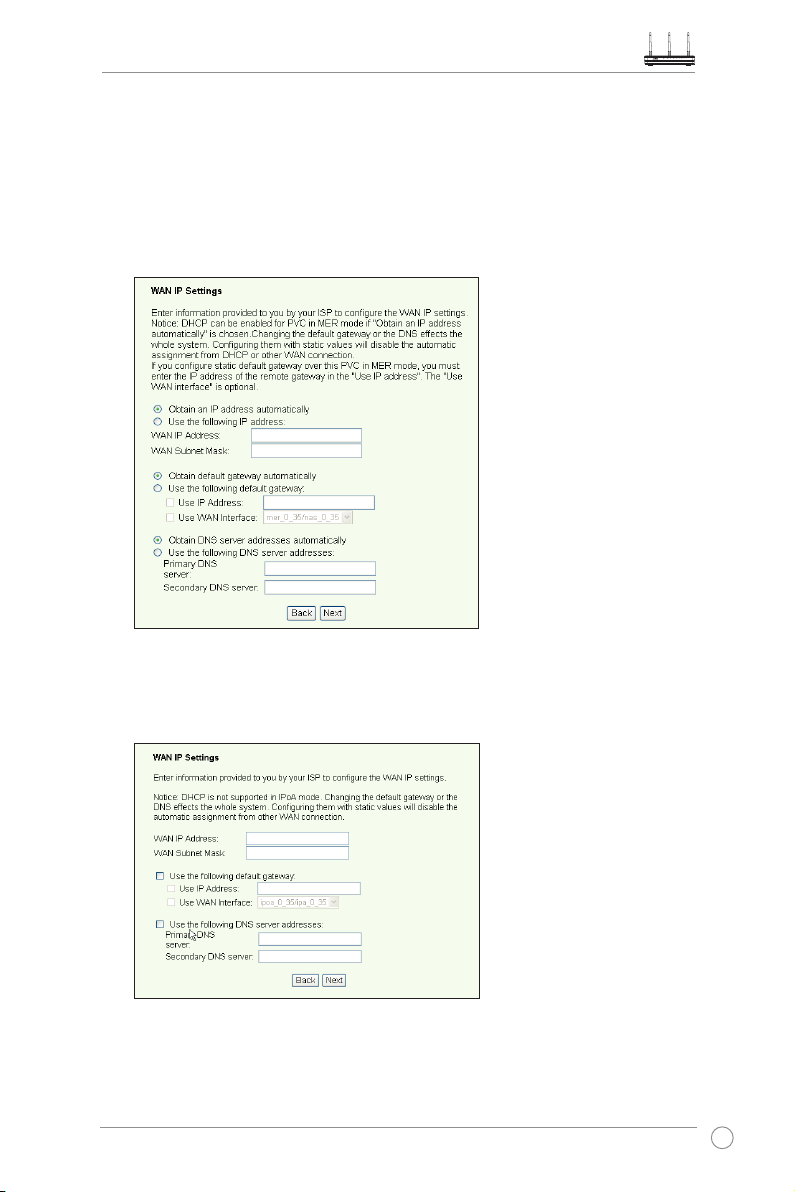
DSL-N13 Wireless ADSL 2/2+ Modem Router User Manual
-- If your connection type is MER
For dynamic IP users, check Obtain an IP address automatically, Obtain
default gateway automatically, and Obtain DNS server address automatically,
then click Next.
For static IP users, check Use the following IP Address, Use the following
default gateway, and Use the following DNS server address, then input the
addresses in correspondent elds.
-- If your connection type is IPoA
Static IP user only. Input the WAN IP address assigned by your ISP, then click
Next.
13
Page 16

DSL-N13 Wireless ADSL 2/2+ Modem Router User Manual
Wireless Setup
1. Designate an SSID (network name) for DSL-N13. Choose the security level then
input a key. The number of digit of your key depends on the security level you
choose. Refer to the note on the web page. When nished, click
2. This page provides a summary of DSL-N13 WAN and wirelss conguration. Click
Save/Reboot
to save and activate your conguration.
Next
.
3. Setup complete! DSL-N13 reboots in about 50 seconds. The green bar shows the
current rebooting status. After reboot, the web page will automatically refresh to
display the settings.
14
Page 17
DSL-N13 Wireless ADSL 2/2+ Modem Router User Manual
EZSetup
ASUS DSL-N13 Wireless ADSL2/2+ Modem Router provides an easy-to-use setup
utility -- EZSetup. With this utility, you can setup your Internet connection, wireless LAN
with just several clicks.
Installing ASUS utility
To use ASUS EZSetup for DSL-N13 conguration, you must install the ASUS utilities
from the support CD included in your package. Insert the CD into your optical drive and
autorun the installation program. If autorun is disabled on your computer, double-click
SETUP.EXE
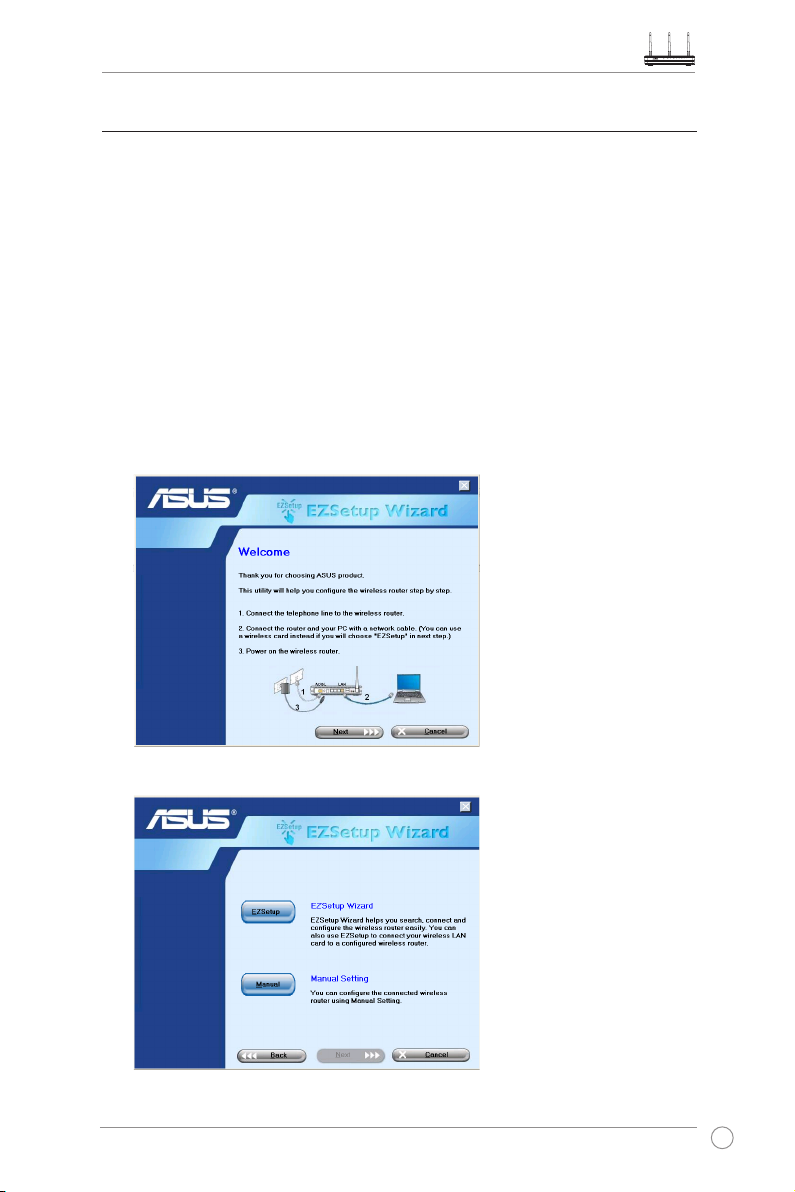
Setup DSL-N13 using EZSetup
1. Before using this utility, make sure that your hardware connections are all set. Click
in the root directory of the CD.
Start -> Program -> ASUS Utility -> DSL-N13 Wireless Router -> EZSetup
to start EZSetup. Click
Wizard
Next
.
2. Click
EZSetup
.
15
Page 18

DSL-N13 Wireless ADSL 2/2+ Modem Router User Manual
3. Push the red EZSetup button on the rear panel of DSL-N13 for over 3 seconds until
the PWR LED is blinking.
EZSetup
4. Click
EZSetup
button.
5. The system generates the SSID and Network key automatically. The network key
is a 128-bit WEP key by default. You can accept the settings, or assign SSID and
keys to your own need. Click
to save the wireless settings.
Next
16
Page 19

DSL-N13 Wireless ADSL 2/2+ Modem Router User Manual
6. Next, EZSetup will guide you to complete the Internet connection settings. Check
Congure ISP settings
then click
to continue.
Next
7. The system detects your Internet connection type. The progress may take several
seconds.
If your ADSL connection is successfully detected by DSL-N13, skip to Step
8. If your ADSL connection can not be detected, you need follow Step 8 and
manually set up your ADSL connection.
8. Select your country and ISP then click
Next
.
17
Page 20

DSL-N13 Wireless ADSL 2/2+ Modem Router User Manual
If your country or ISP are not on the list, select Not listed for both country and
ISP elds. Then select Connection type and ll in VPI and VCI. You can get
VPI/VCI values from your ISP.
9. Input your ISP account User name and Password then click
Next
.
10. Setup complete! This page shows the wireless network setting parameters. You can
either save it or print it out for future reference. Click
to quit EZSetup.
Finish
18
Page 21

DSL-N13 Wireless ADSL 2/2+ Modem Router User Manual
Connecting DSL-N13 with ASUS WLAN Card
Conguring ASUS WLAN Card with One Touch Wizard™
If you have installed ASUS wireless card together with its utilities and drives on your
PC, click
Start -> Programes -> ASUS Utility-> WLAN Card -> One Touch Wizard
launch the One Touch Wizard utility.
to
1. Select Connect to an existing wireless
LAN (Station) radio button and click
Next to continue.
3. Set the authentication and encryption of
your WLAN card the same with those at
DSL-N13. Click Next to continue.
2. One Touch Wizard searches and displays
the available APs in the Available
Networks list. Select DSL-N13 and
press Next to continue.
4. It takes several seconds for the wireless
card to associate with DSL-N13. Press
Next to setup TCP/IP.
19
Page 22

DSL-N13 Wireless ADSL 2/2+ Modem Router User Manual
5. Setup the IP address of the WLAN Card
according to your network condition.
After the setup is complete, click Finish
to exit the One Touch Wizard.
Conguring WLAN card with Windows® WZC service
You can also use Windows® Wireless Zero Conguration service to set up the wireless
connection with DSL-N13.
1. Double-click the wireless network
icon on the task bar to view available
networks. Select your wireless router
and click
Connect
.
2. Input the key you have set on the
DSL-N13 and click
Connect
. The
connection is complete within several
seconds.
20
Page 23

DSL-N13 Wireless ADSL 2/2+ Modem Router User Manual
Wireless settings
This chaper describes how to congure other wireless features of your ASUS DSL-N13
ADSL Wireless Router.
Setting up SSID
SSID stands for Service Set Identier, also known as the name of a wireless network.
To connect a wireless router, or to form a wireless bridge system, all wireless routers or
APs or clients must have the same SSID.To setup SSID:
1. Click
Wireless -> Basic
in the left side menu to open the conguration page.
2. Select
3. You can hide DSL-N13 from wireless scanning by selecting
4. Dene the SSID for DSL-N13. The default SSID is
5. Press
Enable Wireless
but wireless clients still can connect to DSL-N13 by specifying correct SSID.
Save/Apply
checkbox.
to save and activate the settings.
Default
Hide Access Point
.
Setting up wireless security
To protect your wireless network, you need to setup a security mechanism at both
DSL-N13 and the wireless clients.
Network authentication
Network authentication uses certain types of mechanism to identify authenticated
wireless clients. DSL-N13 supports the following authentication methods:
This option disables authentication protection for your wireless network.
Open:
Under the Open mode, any IEEE802.11b/g wireless client can connect to
your wireless network.
Shared means using the same WEP keys for authentication and encryption.
Shared:
802.1X uses RADIUS (Remote Access Dial-Up User Service) server
802.1X:
to authenticate wireless clients with a user name and password. It can
authenticate user with different levels of access right.
,
21
Page 24

DSL-N13 Wireless ADSL 2/2+ Modem Router User Manual
WPA stands for WiFi-Protected Access. WPA provides two security
WPA:
modes for Home/SOHO user and enterprise network. The former
solution adopts Pre-Shared Key for authentication, and the later uses the
existing 802.1X RADIUS server in the enterprise network to process the
authentication requests.
WPA - PSK:
WPA-PSK (Pre-Shared Key) is the solution for home and SOHO users
who have no 802.11X authentication server within the LAN. To setup
WPA-PSK, you need to input a passphrase and let the system generate
the key. Combination of letters, numbers and non-alphnumeric charecters
is recommended for ensuring security.
Encryption
Encryption is used to convert plain text data into unreadable codes with certain type of
algorithm before capsulation for wireless transmission. DSL-N13 supports the following
encryption methods:
WEP stands for Wired Equivalent Privacy. It uses 64 or 128-bit static
WEP:
keys. You can let the system generate the WEP keys by inputting a
Passphrase.
Temporal Key Integrity Protocol (TKIP) dynamically generates unique
TKIP:
keys to encypt every data packet in a wireless session.
Advanced Encryption Standard (AES) is a dependable encryption
AES:
adopted in WPA2 or IEEE802.11i standard. It offers stronger protection
and greatly increases the complexity of wireless encryption.
TKIP + AES:
For a network where WPA clients (using TKIP encryption) and WPA2
clients (using AES encryption) co-exit. Select this option to enable both.
How to setup wireless security
Open
1. Click
2. Select
22
Wireless -> Security
in the
Open
Network Authentication
in the left side menu to open the conguration page.
eld to disable authentication mechanism.
Page 25

DSL-N13 Wireless ADSL 2/2+ Modem Router User Manual
3. Select
Select 64-bit or 128-bit
Encryptioin Keys
select
4. After you click the
page to setup the keys. You can select
Enable
Disable
in the
WEP Encryption
Encryption Strength
eld to use WEP keys for data encryptions.
for key length then click
button to setup the keys. If you do not want to encrypt data,
in
WEP Encryption
Set Encryptioin Keys
and skip to Step 5.
button, you are directed to another
Enable ASUS Passphrass
and input a
passphrase in the rst box below, the system automatically generates four netwrok
keys for you. You can also disable ASUS Passphrass and input four keys manually.
Record the passphrase (if any) and keys in your note.
5. Press
Save/Apply
to save and activate the settings.
Shared
1. Click
2. Select
Wireless -> Security
in the
Shared
in the left side menu to open the conguration page.
Network Authentication
eld to use WEP authentication.
Set
3. The WEP Encryption is fixed to
Enabled
WEP keys for both encryption and authentication.
4. Select 64-bit or 128-bit
Encryption Keys
Encryption Strength
button to setup the keys. Refer to
conguration.
5. Press
Save/Apply
to save and activate the settings.
because Shared mode use the same
for key length then click
mode Step 4 for key
Open
Set
23
Page 26

DSL-N13 Wireless ADSL 2/2+ Modem Router User Manual
802.1X
1. Click
2. Select
Wireless -> Security
in the
802.1X
in the left side menu to open the conguration page.
Network Authentication
RADIUS server in your network.
eld to enable authentication using
3. Input the
RADIUS Server IP address, RADIUS port
(the default value is 1812), and
RADIUS Key.
4. You can choose to enable or disable data encryption. If you want to encrypt data,
select
Strength
5. Refer to
6. Press
Save/Apply
in the
Enable
for key length. Click
Open
WEP Encryption eld
Set Encryptioin Keys
mode Step 4 for key conguration.
to save and activate the settings.
, select 64-bit or 128-bit
button to setup the keys.
Encryption
WPA
1. Click
2. Select
Wireless -> Security
in the
WPA
in the left side menu to open the conguration page.
Network Authentication
field to enable RADIUS server
authentication and advanced encryption methods.
24
Page 27

DSL-N13 Wireless ADSL 2/2+ Modem Router User Manual
3. Set the
4. The
Network Re-auth Interval
WPA2 Preauthentication
to
Enabled
if you want to use this function.
is 36000 seconds by default, you can setup this
value according to your network environment.
5. Set up RADIUS server inforamtion by inputting WPA Group Rekey Interval,
RADIUS server IP address, RADIUS port and RADIUS Key.
6. Set up WPA encryption methods. If there are only WPA2 clients within your network,
select AES, if WPA clients only, select TKIP; if both exist, select TKIP+AES.
7. You can also enable WEP client to access your wireless network. To enable WEP
clients, set
Strength
Refer to
8. Press
WEP Encryption
for key length then click
mode Step 4 for key conguration.
Open
Save/Apply
to save and activate the settings.
to
Enabled
. Select 64-bit or 128-bit
Set Encryptioin Keys
Encryption
button to setup the keys.
WPA-PSK
1. Click
2. Select
Wireless -> Security
WPA-PSK
in the
in the left side menu to open the conguration page.
Network Authentication
eld.
3. Input the WPA Pre-Shared Key. The key is masked by system. To check the key,
press
Save/Apply
link, you can see the key displayed in a seperate window.
display
and wait until the page refreshes. Then click
Click here to
4. Setup the WPA Group Rekey Interval.
5. Set up WPA encryption methods. If there are only WPA2 clients within your network,
select AES, if WPA clients only, select TKIP; if both exist, select TKIP+AES.
6. You can also enable WEP client to access your wireless network. To enable WEP
clients, set
Strength
Refer to
7. Press
WEP Encryption
for key length then click
mode Step 4 for key conguration.
Open
Save/Apply
to save and activate the settings.
to
Enabled
. Select 64-bit or 128-bit
Set Encryption Keys
Encryption
button to setup the keys.
25
Page 28

DSL-N13 Wireless ADSL 2/2+ Modem Router User Manual
MAC lter
You can setup MAC lters to allow or deny wireless clients with known MAC addresses.
To setup MAC lter:
1. Click
Wireless -> MAC Filter
2. Select the restriction mode for the lter: select
the rest; select
to
Disable
Deny
which allows all clients. Click
in the left side menu to open the conguration page.
to allow the client and deny
Allow
to deny the client and allow the rest. By default, the lter is set
to create a lter.
Add
2. Type the MAC address of the wireless client you want to allow or block.
3. Press
Save/Apply
to save and activate the settings.
Wireless bridge
You can connect DSL-N13 to other wireless bridges so as to expand your wireless LAN.
This function is also refer to as Wireless Distribution System (WDS).
To setup WDS, the wireless routers must meet the following requirements:
1. Using the same encryption.
2. Working on the same channel.
3. The IP addresses of all wireless bridges are within the same subnet.
4. WDS enabled.
5. For bridging wireless routers, the MAC Addresses of the uplink wireless router must
be saved to the
Remote Bridge List
all bridging router must be saved.
Example:
DSL-N13 (wireless bridge with Internet access), WL-500gP (wireless bridge),
and WL-500gD (wireless bridge). Refer to the illustration on the next page.
DSL-N13 WL-500gD WL-500gP
SSID ASUS ASUS ASUS
DHCP server Enabled Disabled Disabled
LAN IP address 192.168.1.1 192.168.1.2 192.168.1.3
Authentication Open Open Open
Encryption WEP-128bit WEP-128bit WEP-128bit
Remote bridge 00:01:00:01:01:02
00:01:00:01:01:03
MAC address 00:01:00:01:01:01 00:01:00:01:01:02 00:01:00:01:01:03
Channel 11 11 11
. For uplink wireless router, MAC addresses of
00:01:00:01:01:01 00:01:00:01:01:01
26
Page 29

DSL-N13 Wireless ADSL 2/2+ Modem Router User Manual
WDS setup (DSL-N13)
1. Setting up encryption
If you want to use encryption function, select a
select
Disabled
In this example, set authentication to
Encryption Strength, then click
. Click
Wireless -> Security
to open the conguration page.
and encryption to
Open
Set Encryption Keys
Network Authentication
Enabled,
select
.
mode; if not,
for
128bit
27
Page 30

DSL-N13 Wireless ADSL 2/2+ Modem Router User Manual
You can check
Enable ASUS PassPhrase
and input a string in
Passphrase
eld to let
the system generate the Network Keys. You can also disable Passphrase and input four
keys manually. When nished, click
Save/Apply
.
2. Setting up channel
Click
Wireless -> Advanced
. Set
Channel
to 11 and click
Save/Apply
.
28
Page 31

3. Setting IP address
Click
Advanced Setup -> LAN
Enable DHCP Server
and set
4. Setting WDS
Click
Wireless -> Wireless Bridge
Enabled(Scan)
the checkbox and click
to nd WL-500gD and WL-500gP. If the stations are on the list, check
Save/Apply
DSL-N13 Wireless ADSL 2/2+ Modem Router User Manual
. Set DSL-N13
Start IP address
. Select
IP address
to
192.168.1.4
Wireless Bridge.
to
192.168.1.1
. Click S
.
, select
ave/ Reboot
.
You can select
If you cannot nd WL-500gD by scanning, set
Bridge Restrict
to
Enable
MAC address of WL-500gD and WL-500gP manually. When nished, click
DSL-N13 WDS setup is complete!
and input the
Save/Apply
.
29
Page 32

DSL-N13 Wireless ADSL 2/2+ Modem Router User Manual
WDS setup (WL-500gD and WL-500gP)
Set up WL-500gD and WL-500gP according to the table on Page 26.
1. Wireless Setting
Set WL-500gD, WL-500gP wireless channel, authentication, encryption and keys
the same as DSL-N13.
2. Set IP address to 192.168.1.2 (WL-500gD), 192.168.1.3 (WL-500gP)
3. Disable DHCP Server and set default gateway to 192.168.1.1,
4. WDS Setting
• Open Wireless -> Bridge, set AP Mode to Hybrid.
• Set Channel to 11.
• Add the MAC address of DSL-N13 to Remote Bridge List.
5. Save the settings and reboot.
Wireless advanced settings
Click
Wireless -> Advanced
to congure advanced features of the wireless router such
as communication channel, data rate and WMM.
If you do not know the meaning of these items, use the default setting.
30
Page 33

DSL-N13 Wireless ADSL 2/2+ Modem Router User Manual
Network security
This chapter shows how to set up security defence for your local area network.
Setting up access right to DSL-N13
To protect your wired and wireless LAN, we recommend setting up access protection
so as to prevent DSL-N13 from being viewed or modied by unauthenticated users.
Service restriction
DSL-N13 provides a Service Control List (SCL) that can enable or disable services
which are used to access the router conguration interface. You can choose allowing
HTTP, ICMP from WAN, or allowing HTTP from LAN. After conguration is complete,
click
Save/Apply
IP address restriction
To protect the router from being accessed by unauthenticated user in your LAN, you can
restrict the access right to the hosts with certain IP addresses. Click
Access Control -> IP Addresses
supervisors.
to activate the settings.
Management ->
to setup the IP address for the authenticated network
Before setting up the IP address restriction, make sure addresses of
authenticated hosts are static.
31
Page 34

DSL-N13 Wireless ADSL 2/2+ Modem Router User Manual
Password protection
DSL-N13 ADSL also provides three levels of access right: admin, support, and user.
Account "admin" has full access to change and view configuration of the router,
"support" is for ISP technician to view and keep maintenance to the router, "user" can
view the router settings and statistics, as well as to update the software.
1. Click
Management -> Access Control -> Passwords
setup passwords for these accounts.
2. Select the account username and ll in old password, and new password (twice).
Each passwords contains up to 16 characters or digits.
3. Press
Save/Apply
to save and activate the settings.
in the left side menu to
Setting up port triggering
Some applications such as games, video conferencing, and remote access require
specied ports in the rewall to be opened for remote access. You can congure the
port settings by selecting an existing application or creating your custom applications.
32
Page 35

DSL-N13 Wireless ADSL 2/2+ Modem Router User Manual
1. Click
Advanced Setup -> NAT -> Port Triggering
conguration page. Click
to create a new rule.
Add
in the left side menu to open the
2. Select the service you want to congure and let the system automatically ll in the
external and internal port number and protocol type. You can also select
radio button to designate a certain known server.
Server
Custom
3. Fill in trigger port (range) and protocol, open port (range) and protocol for the
service if you select
4. Press
Save/Apply
Custom Server
to save and activate the settings.
radio button.
Setting up virtual server
Vitual server allows directing WAN incoming trafc to hosts or servers using private IP
addresses within a LAN. With virtual server, the router checks the port number of the
packets sent to the WAN interface, translates the port numbers into private IP address,
and redirects the packets to the corresponding internal hosts and servers. DSL-N13
supports up to 32 virtual server entries. To set up virtual server:
1. Click
Advanced Setup -> NAT -> Virtual Server
conguration page. Click
to create a new rule.
Add
2. Select the service you want to congure and let the system automatically ll in the
external and internal port number and protocol type. You can also select
radio button to designate a certain known server.
Server
3. Fill in external port (range), internal port (range), and protocol for the service if you
select
4. Fill the
Custom Server
Server IP Address
radio button.
box with the network address of the host or server within
your LAN.
5. Press
Save/Apply
to save and activate the settings.
in the left side menu to open the
Custom
33
Page 36

DSL-N13 Wireless ADSL 2/2+ Modem Router User Manual
Setting up DMZ host
The function of DMZ is similar to that of virtual server. The difference between vitual
server and DMZ is that DMZ opens all ports to WAN while virtual server opens ports
according to the demand of the enabled services. To congure DMZ host:
1. Click
2. Enter the IP address of the host to be setup as DMZ host.
3. Press
Advanced Setup -> NAT -> DMZ Host
conguration page.
Save/Apply
to activate the settings.
in the left side menu to open the
Allowing SIP request through NAT
NAT checks IP header only and translate the information into private IP address.
However, for applications that demand many dynamic ports for session control such as
Session Initiation Protocol (SIP), traditional NAT cannot translate the address because
lack of preset service ports. To enable such services while at the same time do not
sacrifice network security, DSL-N13 introduces Application Layer Gateway (ALG) to
allow SIP request going through reware and NAT from WAN. To congure ALG:
1. Click
Advanced Setup -> NAT -> ALG
conguration page.
in the left side menu to open the
2. Select
3. Press
SIP Enabled
Save/Apply
checkbox to allow SIP request, or uncheck to disable.
to save and activate the settings.
Firewall - Outgoing IP lter
By default, all outbound IP trafc is allowed. You can block certain types of IP trafc by
setting up lter rules at DSL-N13.
34
1. Click
Advanced Setup -> Security -> IP Filtering -> Outgoing
menu to open the conguration page. Click
to create a new rule.
Add
in the left side
Page 37

DSL-N13 Wireless ADSL 2/2+ Modem Router User Manual
2. Dene a
Filter Name
for the lter rule. Specify protocol, source IP address, subnet
mask and port (range) and destination IP address, subnet mask and port (range).
3. Press
Save/Apply
to save and activate the settings.
Firewall- Incoming IP lter
By default, all incoming IP trafc is blocked. You can allow certain types of IP trafc by
setting up lter rules at DSL-N13.
1. Click
2. Dene a
Advanced Setup -> Security -> IP Filtering -> Incoming
menu to open the conguration page. Click
Filter Name
for the lter rule. Specify protocol, source IP address, subnet
to create a new rule.
Add
mask and port (range) and destinationi IP address, submask and port (range).
3. Select the WAN interface through which the packets enter the rewall.
4. Press
Save/Apply
to save and activate the settings.
in the left side
35
Page 38

DSL-N13 Wireless ADSL 2/2+ Modem Router User Manual
Access time restriction
This function enables to put time restriction on Internet access by setting up blocking
time table. To congure the access time restriction:
1. Click
Advanced Setup -> Security -> Parental Control
open the conguration page. Click
to create a new rule.
Add
2. Fill in the User name to whom you want to apply the restriction.
3. Fill in the MAC address of the restricted host. If you are accessing this conguration
at the computer of restricted host, select Browser's MAC Address radio button. The
system automatically detects the MAC address of the conguration console. If you
want to congure hosts other than the console computer, enter the MAC address
manually.
in the left side menu to
To get the MAC address of a host, click
the host, select
command
displayed as
ipconfig /all
Physical Address
Run...
, type
into the box and press OK, then type
cmd
and press enter. You can find the MAC address
.
4. Select the days of a week to which the rule shall apply.
5. Fill time into the
Start Blocking Time
and
time.
36
6. Press
Save/Apply
to save and activate the settings.
menu on the desktop of
Start
End Blocking Time
box to set up block
Page 39

DSL-N13 Wireless ADSL 2/2+ Modem Router User Manual
Advanced settings
This chapter shows how to congure other advanced router features of DSL-N13.
WAN
Click Advanced Setup -> WAN in the left side menu to enter the WAN setup page. This
page allows you to edit the WAN settings.
LAN
1. Click
The default settings are:
DHCP server is enabled by default. You can dene which addresses to be assigned to
the LAN computers by DHCP server.
2. Press
Advanced Setup -> LAN
(LAN) Setup
the router, enables or disables UPnP, IGMP snooping and DHCP server.
• IP Address: 192.168.1.1
• Subnet mask: 255.255.255.0
• Enable UPnP: Yes
• Enable IGMP Snooping: No
• Enable DHCP Server: Yes
Start IP Address: 192.168.1.2
End IP Address: 192.168.1.254
Lease Time (hour): 24
settings are complete, press
page. This page allows to change the IP address and subnet mask of
to save the configurations and go on setting up other features. If all
Save
in the left side menu to enter the
Save/ Reboot
to apply the settings and reboot DSL-N13.
Local Area Network
37
Page 40

DSL-N13 Wireless ADSL 2/2+ Modem Router User Manual
Setting up DNS server
Domain Name System (DNS) server is used to translate IP addresses into easy-toremember domain names, such as www.asus.com, and vice versa.
Click A
dvanced Setup -> DNS -> DNS Server
page. By default, the DNS server is set to automatically accept the DNS server assigned
by ISP. If your ISP species certain DNS server addresses, uncheck
Assigned DNS
box and
checkbox and type the DNS addresses into the
Secondary DNS server
box (if any). Click
to open the DNS server conguration
Enable Automatic
Primary DNS server
to save the settings.
Save
Setting up dynamic DNS
Hosts using dynamic IP addresses can associate with a domain name via Dynamic
DNS (DDNS). To use DDNS function, you need rst register at a dynamic DNS service
provider, such as DDNS, to get a valid account.
DDNS acount request procedures
1. Ty pe
R e ad t he p o lic y an d
2. E n t e r y o u r u s e r
38
www.D ynD NS.
to the address box
org
of yo ur Web brows er
and press
select "
I have read...
name, e-mail address,
password , t hen cl ick
Create Account
Enter
.
".
.
Page 41

3. A message prompts out
asking you to check your
mailbox for the activation
letter. Open your mailbox
and read the mail.
4. You can nd the letter in
your E-mail box. Click
the hyperlink.
5. The link directs you to a
login page. Click
login
.
6. Ent er the user name
and password then click
.
Login
7. Aft er log gin g i n, you
can see this welcome
message.
DSL-N13 Wireless ADSL 2/2+ Modem Router User Manual
8. Select
9. Click
DNS Host
Services
Add Dyna mic
tab.
.
10. Ent er t he ho st n ame
then click
Add Host
.
39
Page 42

DSL-N13 Wireless ADSL 2/2+ Modem Router User Manual
11. Y o u c a n s e e t h i s
mes sage wh en your
hostname is successfully
created.
DSL-N13 DDNS settings
1. Click
Advanced Setup -> DNS -> Dynamic DNS
Press Add to congure Dynamic DNS.
2. Choose your DDNS provider and fill in the hostname. The supported DDNS
provider are DynDNS.org and TZO. DynDNS.org settings require username and
password of your DDNS account. TZO requires registered Email address and Key.
to enter the conguration page.
3. Press
Save/Apply
to save and activate the settings.
4. To verify whether DDNS is working, click
and click OK to open the CLI console.
5. Type
ping account.dyndns.org
reply like what is shown in the picture, DDNS is working correctly.
40
menu and select
Start
Run....
Type
cmd
(your DDNS domain name). If you can see the
Page 43

DSL-N13 Wireless ADSL 2/2+ Modem Router User Manual
Setting up default gateway
This section allows to manually setup default gateway of Internet connection.
1. Click
2. By default, automatic assigned default gateway is enabled, that is, the router
3. Press
Advanced Setup -> Routing -> Default Gateway
accepts the first received gateway assignment from ISP. If your ISP specifies a
gateway, uncheck
gateway address.
Save/Apply
Enable Automatic Assigned Default Gateway
to save and activate the settings.
to open the conguration page.
and enter the
Setting up static route
For simple networks that have only one router, you do not need to set up static route.
For more complicated network such as an enterprise network where several routers and
different subnets exist, you need to congure static routes so as to direct the network
trafc correctly.
1. Click
Advanced Setup -> Routing -> Static Route
and view the current static route settings. Press
to open the conguration page
to create a new static route.
Add
2. The congurable settings include:
• Destination Network: input the IP address of destination;
• Subnet Mask: input the subnet mask of destination;
• Use Gateway IP Address: input the gateway network address (optional);
• User Interface: select the interface of your router to which the static route applies.
3. Press
Save/Apply
to save and activate the settings.
41
Page 44

DSL-N13 Wireless ADSL 2/2+ Modem Router User Manual
Setting up routing protocol - RIP
RIP stands for Rounting Information Protocol. DSL-N13 supports RIPv1 and RIPv2.
1. Click
Advanced Setup -> Routing -> RIP
to open the conguration page.
2. To activate RIP, select
radio button for global RIP mode.
Enabled
3. To congure an individual interface, select the desired RIP version and operation
and check the
4. Press
Enabled
Save/Apply
checkbox for the interface.
to save and activate the settings.
42
Page 45

DSL-N13 Wireless ADSL 2/2+ Modem Router User Manual
ASUS AiDisk Setup
Instant AiDisk Sharing
Asus AiDisk helps you remotely share your les with an easy-to-remember link. You
can choose “Instant AiDisk Sharing” or “Secured AiDisk Sharing” rst then set up your
preferred host name.
To let other people to log in your FTP without using any account ID and password:
1. Click
USB Application
gure below). This page displays the default settings.
2. Click
Save/Apply
DSL-N13 will create two shared folders: ftp_pub and ftp_prt.
Now, people can access your FTP without using any account ID and password to read,
write and delete both ftp_pub and ftp_prt folders and other les on the USB disk attached to
DSL-N13.
>
FTP Server
(see gure above) to save and apply the default settings. By default,
>
FTP Settings
to open the
FTP settings
page (see
Secured AiDisk Sharing
To allow only a limited number of selected people to access the FTP les:
1. Select
(see gure above).
behind the
No
Allow Anonymous User to Login
option from the FTP Settings page
43
Page 46

DSL-N13 Wireless ADSL 2/2+ Modem Router User Manual
2. Click
USB Application
>
FTP Server
>
User List
below).
3. Click
Add
from the
User list
page to open the
add users. If you want to remove a user, check the
the
Remove
button.
to open the
User List Add
Remove
User List
page (see gure
page (see gure below) and to
box behind that user and click
4. On the
User List Add
page (see gure above), key in the
User Name
and
allowed user.
5. From the
Login folder (rights)
drop-down list, select the folder (ftp_pub or ftp_prt) that you
allow the user to access and the right (read, write, delete, or any combination) that you want
to assign to the user.
6. Click
44
Apply
button.
Password
for an
Page 47

DSL-N13 Wireless ADSL 2/2+ Modem Router User Manual
ASUS DDNS Service: Set up An Easy-to-Remember Host Name
1. Click
below).
Advanced setup
>
Dynamic DNS
to open the
Dynamic DNS
page (see gure
2. Click
DDNS
3. Input your preferred name in the
from the
Add
Dynamic DNS
page. (see gure below).
page (see gure above) to open the
Hostname
bar. Click
button to see if your
Check
Add dynamic
preferred name is still available.
4. Choose your current Internet settings from the
. DSL-N13 will automatically reboot.
Apply
Interface
drop-down list, then click
Save/
5. You can now have your unique, preferred, and easy-to-remember name to share your
AiDisk! Just tell your friends to type ftp://yourpreferredname.asuscomm.com into the
address box of their web broswer and press Enter key to get onto your AiDisk with
designated user name and password (if any).
45
Page 48

DSL-N13 Wireless ADSL 2/2+ Modem Router User Manual
USB applications
DSL-N13 offers two USB2.0 ports for setting up FTP server and sharing USB printer.
FTP server function
Before setup, you need to prepare a USB disk for FTP storage.
Setting up FTP server
To setup FTP server:
1. Plug your USB storage into the USB2.0 port on the DSL-N13 rear panel. Then click
USB Application -> FTP Server
in the left side menu to open the conguration page.
46
2. Set
Enable FTP Server
3.
Allow Anonymous User to Login
your FTP site, select
user, select No.
4.
Allow Super User to Login
server.
5.
FTP Port
is set to 1111, you can access the FTP server by typing
address box of your Web browser (192.168.1.1 is the default IP address of DSL-N13).
6.
Maximum User Allowed to Login:
your working environment.
7.
Login Timeout in Seconds:
8.
Stay Timeout in Seconds:
9. Press
: Set up the port number of the FTP server. For example, if the port number
Save/Apply
to
.
Yes
: If you want to allow anonymous user to access
; if you want to protect your data from unauthenticated
Yes
: Select
When login times out, the login trail is terminated.
Timeout value for inactive connection.
to save and activate the settings.
to allow super user to access the FTP
Yes
ftp://192.168.1.1:1111
set up the maximum login user according to
into the
Page 49

DSL-N13 Wireless ADSL 2/2+ Modem Router User Manual
Setting up FTP account
You can set up 12 accounts for your FTP site.
1. Click
USB Application -> FTP Server -> User List
conguration page. Click
to create new FTP account.
Add
in the left side menu to open the
2. Dene the
User name, Password
for the new account. Setup the
restrict the access request. Dene the access right to the account.
3. Click
4. Click
to save the new account.
Apply
to save and activate the settings.
Save
Setting up FTP security
You can deny access request from certain IP address by setting up
1. Click
USB Application -> FTP Server -> Banned IP List
open the conguration page. Click
to create a new rule.
Add
2. Input the IP address of the banned host and click
Make sure the banned IP is static.
3. Click
Your FTP site is ready. Type
your Web browser and press
to save and activate the settings.
Save
ftp://192.168.1.1(:port number)
Enter
. When prompted for login, input the username and
password you have set up for FTP account and login.
in the left side menu to
to save the banned IP.
Apply
into the address box of
Max. Login
Banned IP List
to
.
47
Page 50

DSL-N13 Wireless ADSL 2/2+ Modem Router User Manual
Sharing USB printer
You can plug your USB printer to the USB2.0 port of DSL-N13 to share it within your
LAN. After you plug a printer to the USB port, you can see the status of printer by
clicking
USB Application -> Printer Status
Setting up printer client under Windows XP
Follow the steps below to install network printer on your clients.
1. Run Add Printer Wizard from
-> Printers and Faxes -> Add a
.
printer
Start
.
2. Select
Local printer attached to
this computer
and click
Next
.
48
3. Select
Type of port to
, then click
Port
Create a new port
Standard TCP/IP
.
Next
and set
4. Click
to setup TCP/IP port for
Next
accessing the network printer.
Page 51

DSL-N13 Wireless ADSL 2/2+ Modem Router User Manual
5. Input the IP address of DSL-N13 in
the
Printer Name of IP Address
eld and click
7. Set
LPRServer
Click
Pr ot oc ol
Next
.
Next
to
LP R
in
Queue Name
to continue.
an d type
field.
6. Select
8. Press
IP port setting.
and click
Custom
to nish standard TCP/
Next
Settings...
9. Pre ss
to com plete th e
Finis h
settings and return to Add Printer
Wizard.
10. Install printer driver from the vendormodel list. If your printer is not in
the list, click
Have Disk
to manually
assign the location of driver.
49
Page 52

DSL-N13 Wireless ADSL 2/2+ Modem Router User Manual
11. Click Next to accept the default name
for the printer.
13. The installation is complete. Click
Finish to quit the Add Printer Wizard.
If you have already installed the printer locally on your computer, right click
the printer icon and select
port. Click
Add Port
Property -> Port
then select
button. Refer to Step 5-8 for setting procedures.
12. Select Yes to print a test page. Click
Next to print.
tab to add a standard TCP/IP
Standard TCP/IP Port
and click
New Port
If you use Windows® 98 or ME which does not support Standard TCP/IP
port, you need to use Romote Port which is supported by DSL-N13.
50
Page 53

DSL-N13 Wireless ADSL 2/2+ Modem Router User Manual
Management
This chapter describes how to maintain your DSL-N13 wireless ADSL router.
Conguration backup
You can backup the configuration to a file and store it on your computer. Click
Management -> Settings
Settings
backup le is
button. Click
backupsettings.conf
Restore settings from a backup le
You can restore the settings from a backup le when you have reset the wireless router
to factory default. Click
page. Click
Settings
The whole process takes about 80 seconds.
Browse...
button to proceed. When restoring is complete, the wireless router reboots.
to open the configuration page and click the
and dene the destination folder. The default name for
Save
.
Management -> Settings -> Update
to locate the backup le on your computer, then click
to open the conguration
Backup
Update
Reset to factory default
If you want to clear all settings and return to the factory default settings. You can press
the
Management -> Settings -> Restore Default
the
button on the rear panel of the wireless router for 10 seconds; or click
Reset
to open the conguration page and click
Restore Default Settings
button.
51
Page 54

DSL-N13 Wireless ADSL 2/2+ Modem Router User Manual
Setting up time server
You can congure the time setting so that DSL-N13 can always synchronize with a time
server from Internet. Click
synchronize with International servers
and set your time zone. When nished, click
Management -> Time settings
. Select a time server from the drop-down list
Save/Apply
and check
.
Automatically
Firmware update
To update rmware, click M
the rmware le, then click
The update process takes about two minutes.
anagement -> Update Software
Update Software
. Click
Browse...
button to start uploading the rmware.
to locate
52
 Loading...