

ASUS Desktop PC
CG Series
User Manual

ENGLISH
ENGLISH
E6001
Second Edition
August 2010
Copyright © 2010 ASUSTeK Computer Inc. All Rights Reserved.
No part of this manual, including the products and software described in it, may be reproduced,
transmitted, transcribed, stored in a retrieval system, or translated into any language in any form or by any
means, except documentation kept by the purchaser for backup purposes, without the express written
permission of ASUSTeK Computer Inc. (“ASUS”).
Product warranty or service will not be extended if: (1) the product is repaired, modied or altered, unless
such repair, modication of alteration is authorized in writing by ASUS; or (2) the serial number of the
product is defaced or missing.
ASUS PROVIDES THIS MANUAL “AS IS” WITHOUT WARRANTY OF ANY KIND, EITHER EXPRESS
OR IMPLIED, INCLUDING BUT NOT LIMITED TO THE IMPLIED WARRANTIES OR CONDITIONS OF
MERCHANTABILITY OR FITNESS FOR A PARTICULAR PURPOSE. IN NO EVENT SHALL ASUS, ITS
DIRECTORS, OFFICERS, EMPLOYEES OR AGENTS BE LIABLE FOR ANY INDIRECT, SPECIAL,
INCIDENTAL, OR CONSEQUENTIAL DAMAGES (INCLUDING DAMAGES FOR LOSS OF PROFITS,
LOSS OF BUSINESS, LOSS OF USE OR DATA, INTERRUPTION OF BUSINESS AND THE LIKE),
EVEN IF ASUS HAS BEEN ADVISED OF THE POSSIBILITY OF SUCH DAMAGES ARISING FROM ANY
DEFECT OR ERROR IN THIS MANUAL OR PRODUCT.
SPECIFICATIONS AND INFORMATION CONTAINED IN THIS MANUAL ARE FURNISHED FOR
INFORMATIONAL USE ONLY, AND ARE SUBJECT TO CHANGE AT ANY TIME WITHOUT NOTICE,
AND SHOULD NOT BE CONSTRUED AS A COMMITMENT BY ASUS. ASUS ASSUMES NO
RESPONSIBILITY OR LIABILITY FOR ANY ERRORS OR INACCURACIES THAT MAY APPEAR IN THIS
MANUAL, INCLUDING THE PRODUCTS AND SOFTWARE DESCRIBED IN IT.
Products and corporate names appearing in this manual may or may not be registered trademarks or
copyrights of their respective companies, and are used only for identication or explanation and to the
owners’ benet, without intent to infringe.
ii

ENGLISH
Contents
Notices ...........................................................................................................v
Safety information .........................................................................................vii
Conventions used in this guide .................................................................... viii
Where to nd more information ................................................................... viii
Package contents ..........................................................................................ix
Chapter 1 Getting started
Welcome! .................................................................................................... 1-1
Getting to know your computer ................................................................... 1-1
Setting up your computer ............................................................................1-8
Turning your computer ON/OFF ............................................................... 1-10
Chapter 2 Using Windows® 7
Starting for the rst time ..............................................................................2-1
Using Windows® 7 desktop ......................................................................... 2-2
Managing your les and folders .................................................................. 2-7
Restoring your system .............................................................................. 2-10
Protecting your computer ...........................................................................2-11
Getting Windows® Help and Support ........................................................ 2-15
Chapter 3 Connecting devices to your computer
Connecting a USB storage device .............................................................. 3-1
Connecting microphone and speakers ....................................................... 3-2
Connecting multiple external displays ........................................................ 3-5
ENGLISH
Chapter 4 Using your computer
Proper posture when using your Desktop PC............................................. 4-1
Using the memory card reader ................................................................... 4-2
Using the optical drive ................................................................................ 4-3
Using the multimedia keyboard ................................................................. 4-4
Chapter 5 Connecting to the Internet
Wired connection ........................................................................................ 5-1
iii

ENGLISH
Contents
ENGLISH
Chapter 6 Using the utilities
ASUS AI Manager ....................................................................................... 6-1
ASUS Update ............................................................................................. 6-8
ASUS MyLogo2™ ....................................................................................... 6-9
Nero 9 .....................................................................................................
Recovering your system ........................................................................... 6-14
Chapter 7 Troubleshooting
Troubleshooting .......................................................................................... 7-1
6-10
iv

ENGLISH
Notices
REACH
Complying with the REACH (Registration, Evaluation, Authorisation, and Restriction of
Chemicals) regulatory framework, we published the chemical substances in our products at
ASUS REACH website at http://green.asus.com/english/REACH.htm
Federal Communications Commission Statement
This device complies with Part 15 of the FCC Rules. Operation is subject to the following two
conditions:
• This device may not cause harmful interference.
• This device must accept any interference received including interference that may cause
undesired operation.
This equipment has been tested and found to comply with the limits for a Class B digital
device, pursuant to Part 15 of the FCC Rules. These limits are designed to provide
reasonable protection against harmful interference in a residential installation. This
equipment generates, uses and can radiate radio frequency energy and, if not installed
and used in accordance with manufacturer’s instructions, may cause harmful interference
to radio communications. However, there is no guarantee that interference will not occur
in a particular installation. If this equipment does cause harmful interference to radio or
television reception, which can be determined by turning the equipment off and on, the user
is encouraged to try to correct the interference by one or more of the following measures:
• Reorient or relocate the receiving antenna.
• Increase the separation between the equipment and receiver.
• Connect the equipment to an outlet on a circuit different from that to which the receiver is
connected.
• Consult the dealer or an experienced radio/TV technician for help.
ENGLISH
The use of shielded cables for connection of the monitor to the graphics card is required
to assure compliance with FCC regulations. Changes or modications to this unit not
expressly approved by the party responsible for compliance could void the user’s authority
to operate this equipment.
v

ENGLISH
ENGLISH
RF exposure warning
This equipment must be installed and operated in accordance with provided instructions and
the antenna(s) used for this transmitter must be installed to provide a separation distance of
at least 20 cm from all persons and must not be co-located or operating in conjunction with
any other antenna or transmitter. End-users and installers must be provide with antenna
installation instructions and transmitter operating conditions for satisfying RF exposure
compliance.
Canadian Department of Communications Statement
This digital apparatus does not exceed the Class B limits for radio noise emissions from
digital apparatus set out in the Radio Interference Regulations of the Canadian Department of
Communications.
This class B digital apparatus complies with Canadian ICES-003.
Macrovision Corporation Product Notice
This product incorporates copyright protection technology that is protected by method
claims of certain U.S. patents and other intellectual property rights owned by Macrovision
Corporation and other rights owners. Use of this copyright protection technology must be
authorized by Macrovision Corporation, and is intended for home and other limited viewing
uses only unless otherwise authorized by Macrovision Corporation. Reverse engineering
or disassembly is prohibited.
CAUTION: Danger of explosion if battery is incorrectly replaced. Replace only with the
same or equivalent type recommended by the manufacturer. Dispose of used batteries
according to the manufacturer’s instructions.
Lithium-Ion Battery Warning
vi

ENGLISH
Safety information
Disconnect the AC power and peripherals before cleaning. Wipe the Desktop PC using a
clean cellulose sponge or chamois cloth dampened with solution of nonabrasive detergent
and a few drops of warm water then remove any extra moisture with a dry cloth.
• DO NOT place on uneven or unstable work surfaces. Seek servicing if the casing has
been damaged.
•
DO NOT expose to dirty or dusty environments. DO NOT operate during a gas leak.
•
DO NOT place or drop objects on top and do not shove any foreign objects into the
Desktop PC.
•
DO NOT expose to strong magnetic or electrical elds.
•
DO NOT expose to or use near liquids, rain, or moisture. DO NOT use the modem during
electrical storms.
• Battery safety warning:
contacts. DO NOT disassemble the battery.
• Use this product in environments with ambient temperatures between 0˚C (32F)and
35˚C (95F).
•
DO NOT cover the vents on the Desktop PC to prevent the system from overheating.
•
DO NOT use damaged power cords, accessories, or other peripherals.
•
To prevent electrical shock hazard, disconnect the power cable from the electrical outlet
before relocating the system.
•
Seek professional assistance before using an adapter or extension cord. These devices
could interrupt the grounding circuit.
•
Ensure that your power supply is set to the correct voltage in your area. If you are not
sure about the voltage of the electrical outlet you are using, contact your local power
company.
•
If the power supply is broken, do not try to x it by yourself. Contact a qualied service
technician or your retailer.
DO NOT throw the battery in re. DO NOT short circuit the
ENGLISH
vii
ENGLISH
ENGLISH
Conventions used in this guide
To ensure that you perform certain tasks properly, take note of the following symbols used
throughout this manual.
DANGER/WARNING: Information to prevent injury to yourself
when trying to complete a task.
CAUTION: Information to prevent damage to the components
when trying to complete a task.
IMPORTANT: Instructions that you MUST follow to complete a
task.
NOTE: Tips and additional information to help you complete a
task.
Where to nd more information
Refer to the following sources for additional information and for product and software
updates.
ASUS websites
The ASUS website provides updated information on ASUS hardware and software
products. Refer to the ASUS website www.asus.com.
ASUS Local Technical Support
Visit ASUS website at
local Technical Support Engineer.
http://support.asus.com/contact for the contact information of
viii

ENGLISH
C
Package contents
ENGLISH
ASUS Desktop PC
Gaming mouse pad x1 Power cord x1 NERO 9 x1
Recovery CD x1 Support CD x1 Warranty card x1
Gaming cable ties x3 User manual x1
• If any of the above items is damaged or missing, contact your retailer.
• The illustrated items above are for reference only. Actual product specications may vary
with different models.
• Keyboard and mouse may not be included in some regions.
USB gaming keyboard x1
(Optional)
USB gaming mouse x1
(Optional)
ix

ENGLISH
x
Chapter 1
Getting started
Welcome!
Thank you for purchasing the ASUS CG Series Desktop PC!
The ASUS CG Series Desktop PC provides cutting-edge performance, uncompromised
reliability, and user-centric utilities. All these values are encapsulated in a stunningly futuristic
and stylish system casing.
Read the ASUS Warranty Card before setting up your ASUS Desktop PC.
Getting to know your computer
Illustrations are for reference only. The ports and their locations, and the chassis color vary
with different models.
Front panel
1
2
3
14
13
12
11
8
4
5
6
7
8
9
10
Click the number to view its
corresponding description.
ASUS CG Series 1-1

ENGLISH
ENGLISH
1. Front I/O ports cover. Pull this cover up to open the front panel.
2. Optical disk drive.
3. Optical disk drive LED.
4. Optical disk drive emergency eject hole.
insert a pointed object such as a ballpen to ejext the tray.
5. Optical disk drive eject button.
6. Microphone port (pink).
7. Headphone port (lime).
8. USB 2.0 ports.
devices such as a mouse, printer, scanner, camera, PDA, and others.
9. Power sensor.
10. Fingerprint scanner.
computer from unauthorized access.
11. IEEE 1394a port. This port connects to an IEEE 1394 device such as a digital
camcorder.
12. Secure Digital™ / MultiMediaCard/Memory Stick card slot.
card, MultiMediaCard, or a Memory Stick card into this slot.
13. Smart card slot.
14. CompactFlash
into this slot.
These Universal Serial Bus 2.0 (USB 2.0) ports connect to USB 2.0
Lightly touch this sensor to turn on your computer.
This scans and authenticates a ngerprint, which secures your
Before using the ngerprint scanner, ensure that you have set up your user account and
registered your ngerprint.
Insert a Smart card into this slot.
®
/ Microdrive™ card slot. Insert a CompactFlash® / Microdrive™ card
Press this button to eject the optical disk drive tray.
This port connects to a microphone.
This port connects to a headphone or speaker.
If the optical disk drive tray fails to eject,
Insert a Secure Digital™
1-2 Chapter 1: Getting started
ENGLISH
Rear panel
CG7435
7 8 9
13
1
2
3
4
5
6
5
17
22
21
20
14
19
18
ENGLISH
5
10 11 12
Click the number to view its corresponding description.
1. PS/2 mouse port (green). This port is for a PS/2 mouse.
2. PS/2 keyboard port (purple). This port is for a PS/2 keyboard.
3. Clr CMOS button. Press this button to clear the setup information when the system
hangs due to overclocking.
4. USB 3.0 ports. These Universal Serial Bus 3.0 (USB 3.0) ports connect to USB 3.0
devices.
5. USB 2.0 ports. These Universal Serial Bus 2.0 (USB 2.0) ports connect to USB 2.0
devices such as a mouse, printer, scanner, camera, PDA, and others.
6. Power eSATA port. This port connects to Serial ATA (SATA) devices such as hard disk
and optical disk drives.
7. Side Speaker Out port (gray). This port connects to the side speakers in an 8-channel
audio conguration.
14
17
16
15
ASUS CG Series 1-3

ENGLISH
ENGLISH
8. Rear Speaker Out port (black). This port connects to the rear speakers in a 4, 6, and
8-channel audio conguration.
9. Center/Subwoofer port (orange). This port connects to the center/subwoofer
speakers.
10. Microphone port (pink). This port connects to a microphone.
11. Line Out port (lime). This port connects to a headphone or speaker. In a 4, 6, or
8-channel conguration, the function of this port becomes Front Speaker Out.
12. Line In port (light blue). This port connects to a tape, CD, DVD player, or other audio
sources.
Refer to the audio conguration table below for the function of the audio ports in a 2, 4, 6,
or 8-channel conguration.
Audio 2, 4, 6, or 8-channel conguration
Port
Light Blue Line In Line In Line In Line In
Lime Line Out Front Speaker Out Front Speaker Out Front Speaker Out
Pink Mic In Mic In Mic In Mic In
Orange – – Center/Subwoofer Center/Subwoofer
Black – Rear Speaker Out Rear Speaker Out Rear Speaker Out
Gray – – – Side Speaker Out
Headset
2-channel
4-channel 6-channel 8-channel
13. DVI-I ports. These ports connect to a TV or monitor with a different video output.
14. Expansion slot brackets
. Remove the expansion slot bracket when installing an
expansion card.
15. Power connector. Plug the power cord to this connector.
Rating: 100-240V~, 60Hz/50Hz, 10A-5A
16. Power switch. Switch to turn ON/OFF the power supply to your computer.
17. Air vents. These vents allow air ventilation.
DO NOT block the air vents on the chassis. Always provide proper ventilation for your
computer.
18. DisplayPorts.
These ports connect to a display monitor.
19. HDMI ports. These ports connect to an HDMI monitor or other HDMI-compatible
devices.
1-4 Chapter 1: Getting started

ENGLISH
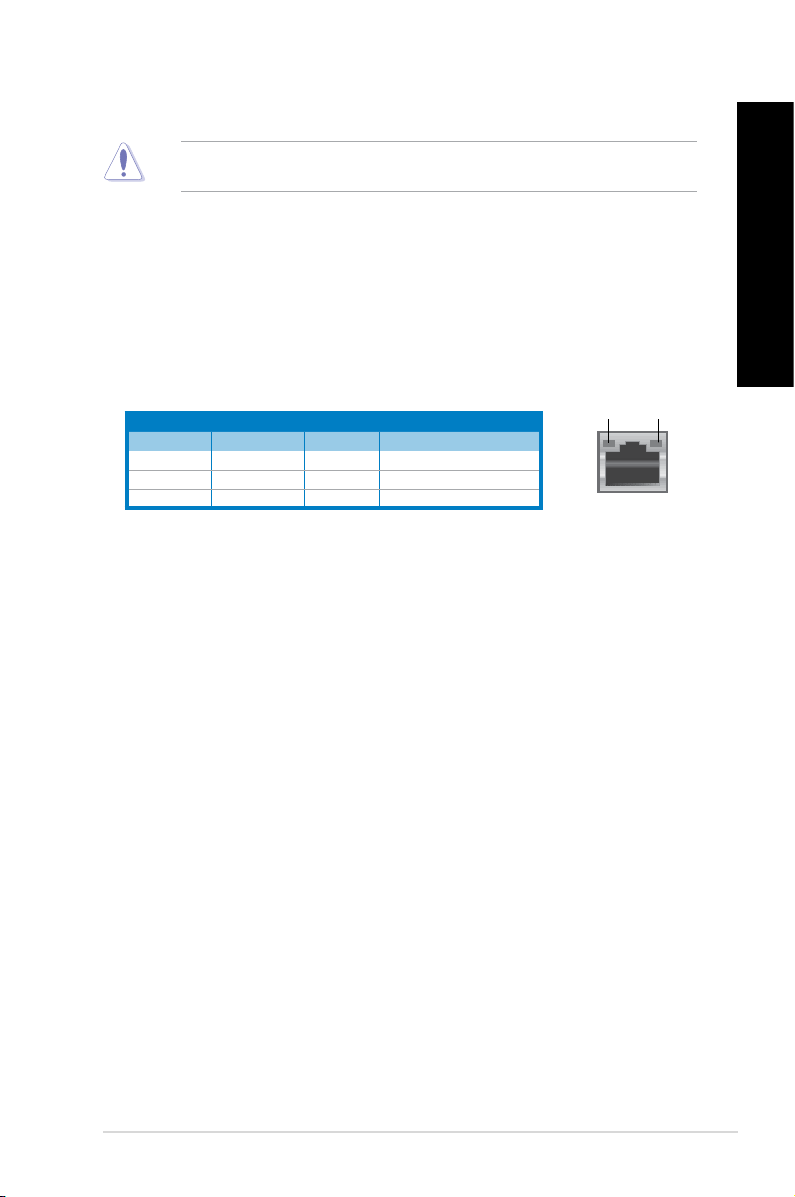
20. LAN (RJ-45) port. This port allows Gigabit connection to a Local Area Network (LAN)
through a network hub.
LAN port LED indications
LED
LAN port
SPEED
LED
ACT/LINK
Activity/Link LED Speed LED
Status Description Status Description
OFF No link OFF 10Mbps connection
ORANGE Linked ORANGE 100Mbps connection
BLINKING Data activity GREEN 1Gbps connection
21. IEEE 1394a port. This port connects to an IEEE 1394 device such as a digital
camcorder.
22. Optical S/PDIF Out port.
This port connects an external audio output device via an
optical S/PDIF cable.
CG8490
1
2
3
4
5
5
6 7 8
12
16
22
21
20
19
13
18
17
ENGLISH
9 10 11
13
16
15
14
Click the number to view its corresponding description.
ASUS CG Series 1-5
ENGLISH
ENGLISH
1. PS/2 mouse port (green). This port is for a PS/2 mouse.
2. PS/2 keyboard port (purple). This port is for a PS/2 keyboard.
3. Clr CMOS button. Press this button to clear the setup information when the system
hangs due to overclocking.
4. USB 3.0 ports. These Universal Serial Bus 3.0 (USB 3.0) ports connect to USB 3.0
devices.
5. USB 2.0 ports. These Universal Serial Bus 2.0 (USB 2.0) ports connect to USB 2.0
devices such as a mouse, printer, scanner, camera, PDA, and others.
6. Side Speaker Out port (gray). This port connects to the side speakers in an 8-channel
audio conguration.
7. Rear Speaker Out port (black). This port connects to the rear speakers in a 4, 6, and
8-channel audio conguration.
8. Center/Subwoofer port (orange). This port connects to the center/subwoofer
speakers.
9. Microphone port (pink). This port connects to a microphone.
10. Line Out port (lime). This port connects to a headphone or speaker. In a 4, 6, or
8-channel conguration, the function of this port becomes Front Speaker Out.
11. Line In port (light blue). This port connects to a tape, CD, DVD player, or other audio
sources.
Refer to the audio conguration table below for the function of the audio ports in a 2, 4, 6,
or 8-channel conguration.
Audio 2, 4, 6, or 8-channel conguration
Port
Light Blue Line In Line In Line In Line In
Lime Line Out Front Speaker Out Front Speaker Out Front Speaker Out
Pink Mic In Mic In Mic In Mic In
Orange – – Center/Subwoofer Center/Subwoofer
Black – Rear Speaker Out Rear Speaker Out Rear Speaker Out
Gray – – – Side Speaker Out
Headset
2-channel
4-channel 6-channel 8-channel
12. DVI-I ports. These ports connect to a TV or monitor with a different video output.
13. Expansion slot brackets.
Remove the expansion slot bracket when installing an
expansion card.
14. Power connector. Plug the power cord to this connector.
Rating: 100-240V~, 60Hz/50Hz, 10A-5A
15. Power switch. Switch to turn ON/OFF the power supply to your computer.
1-6 Chapter 1: Getting started
ENGLISH
16. Air vents. These vents allow air ventilation.
DO NOT block the air vents on the chassis. Always provide proper ventilation for your
computer.
17. DisplayPorts. These ports connect to a display monitor.
18. HDMI ports. These ports connect to an HDMI monitor or other HDMI-compatible
devices.
19. LAN (RJ-45) port.
This port allows Gigabit connection to a Local Area Network (LAN)
through a network hub.
LAN port LED indications
LED
LAN port
SPEED
LED
ACT/LINK
Activity/Link LED Speed LED
Status Description Status Description
OFF No link OFF 10Mbps connection
ORANGE Linked ORANGE 100Mbps connection
BLINKING Data activity GREEN 1Gbps connection
20. IEEE 1394a port. This port connects to an IEEE 1394 device such as a digital
camcorder.
21. Optical S/PDIF Out port.
This port connects an external audio output device via an
optical S/PDIF cable.
22. Coaxial S/PDIF Out port.
This port connects an external audio output device via a
coaxial cable.
ENGLISH
ASUS CG Series 1-7
ENGLISH
ENGLISH
Setting up your computer
This section guides you through connecting the main hardware devices, such as the external
monitor, keyboard, mouse, and power cord, to your computer.
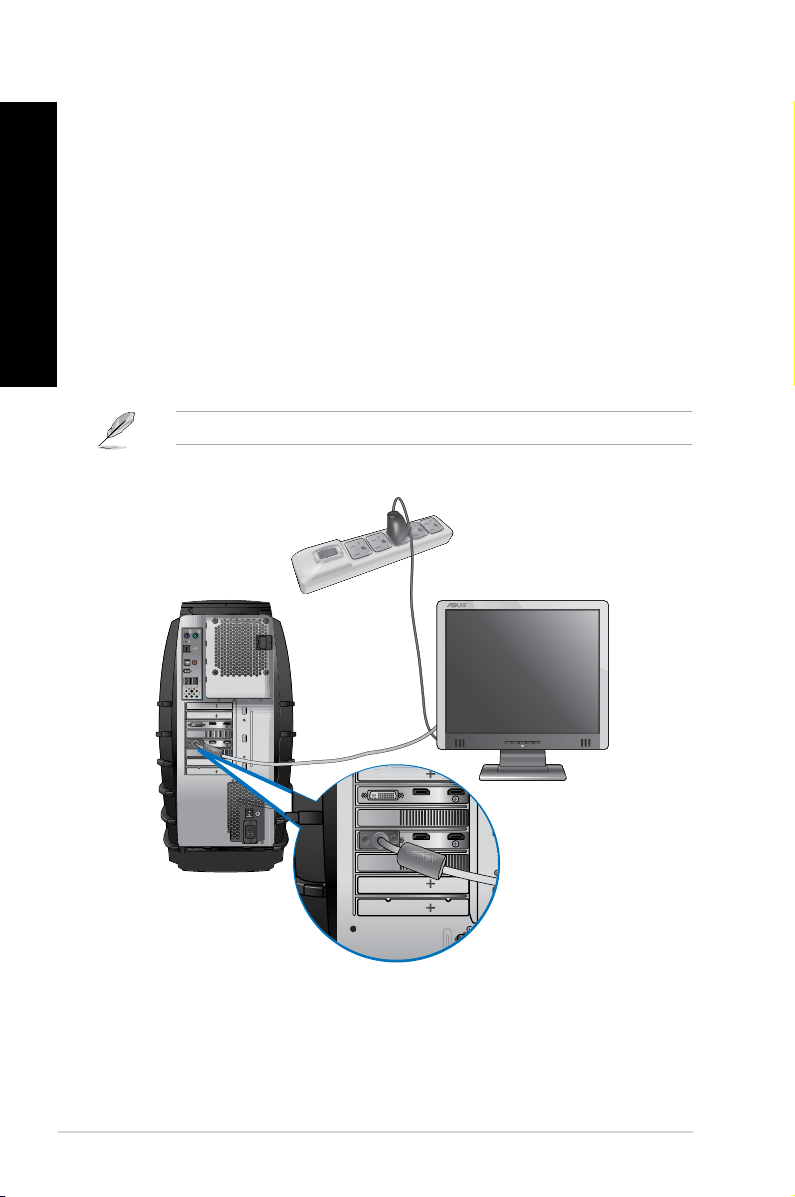
Connecting an external monitor
Using the ASUS Graphics Card
Connect your monitor to a display output port on the discrete ASUS Graphics Card.
To connect an external monitor using the ASUS Graphics Card:
1. Using a DVI-to-VGA adapter, connect a monitor to a display output port on the ASUS
Graphics Card.
2. Plug the monitor to a power source.
The display output ports on the ASUS Graphics Card may vary with different models.
1-8 Chapter 1: Getting started

ENGLISH
Connecting a USB keyboard and a USB mouse
C
Connect a USB keyboard and a USB mouse to the USB ports on the rear panel of your
computer.
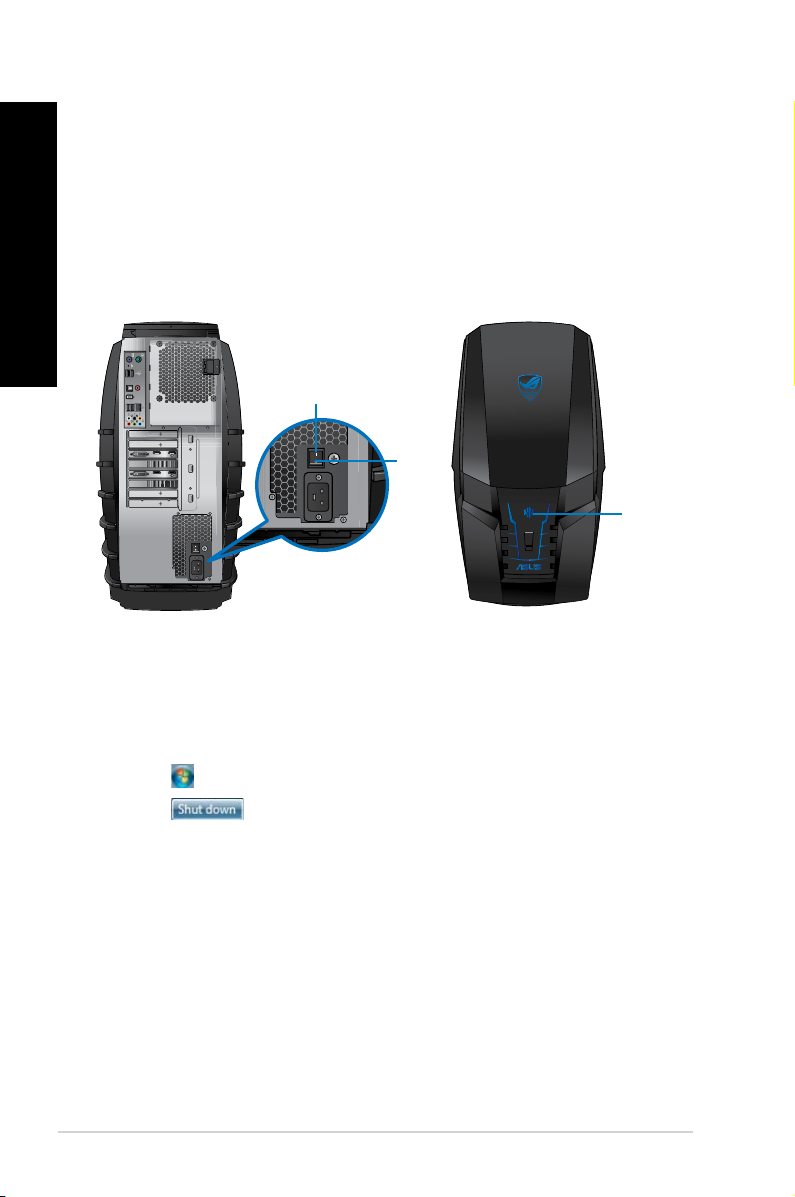
Connecting the power cord
Connect one end of the power cord to the power connector on the rear panel of your
computer and the other end to a power source.
ENGLISH
ASUS CG Series 1-9
ENGLISH
Turning your computer ON/OFF
This section describes how to turn on/off your computer after setting up your computer.
Turning your computer ON
To turn your computer ON:
1. Turn your monitor ON.
2. Turn the power switch ON, then lightly touch the power sensor to turn on your
computer..
ON
OFF
Power
sensor
3. Wait until the operating system loads automatically.
Turning your computer OFF
To turn your computer OFF:
1. Close all running applications.
2. Click
3. Click
4. Turn the power switch OFF.
1-10 Chapter 1: Getting started
on the Windows® desktop.
to shut down the operating system.

Chapter 2
Using Windows® 7
Starting for the rst time
When you start your computer for the rst time, a series of screens appear to guide you in
conguring the basic settings of your Windows® 7 operating system.
To start for the rst time:
1. Turn your computer on. Wait for a few minutes until the
appears.
2. From dropdown list, select your language. Click
3. From the dropdown lists, select your
Keyboard layout. Click Next.
4. Key in unique names for the
5. Key in the necessary information to set up your password, then click
also click Next to skip this step without entering any information.
If you want to set up a password for your account later, refer to the section Setting up a
user account and password in this chapter.
Country or region, Time and currency, and
user name and computer name. Click Next.
Set Up Windows screen
Next.
Next. You may
6. Carefully read the license terms. Tick
7. Select
8. Review your date and time settings. Click
ASUS CG Series 2-1
Use recommended settings or Install important updates only to set up the
security settings for your computer. To skip this step, select Ask me later.
restarts. You may now start using your computer.
I accept the license terms and click Next.
Next. The system loads the new settings and

ENGLISH
Using Windows® 7 desktop
ENGLISH
Click the Start icon > Help and Support to obtain more information about Windows® 7.
Start
menu
Taskbar
Notication area
Using the Start menu
The Start menu gives you access to programs, utilities, and other useful items on your
computer. It also provides you with more information about Windows 7 through its Help and
Support feature.
Launching items from the Start menu
To launch items from the Start menu:
®
1. From the Windows
2. From the Start menu, select the item that you want to launch.
You may pin programs that you want constantly displayed on the Start menu. For more
details, refer to the section Pinning programs on the Start menu or taskbar on this
chapter.
2-2 Chapter 2: Using Windows® 7
taskbar, click the Start icon .
ENGLISH
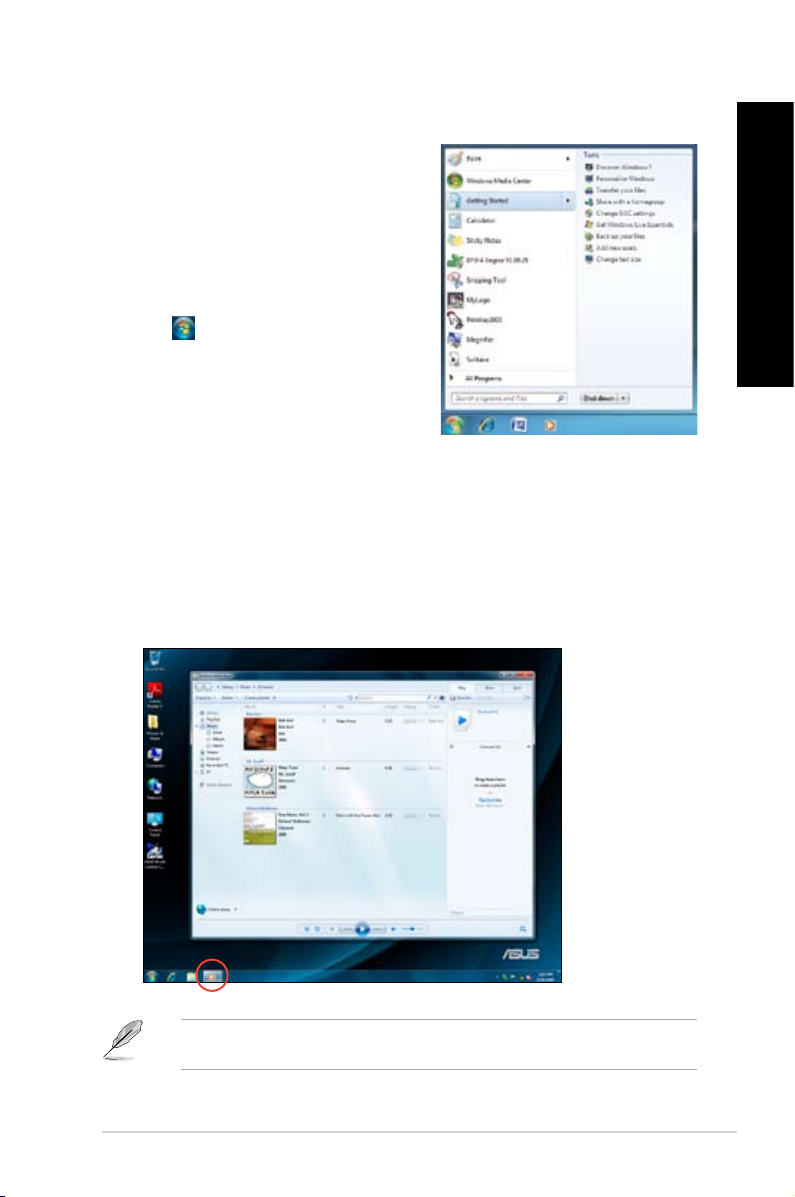
Using the Getting Started item
The Getting Started item on the Start menu
contains information about some basic tasks such
as personalizing Windows®, adding new users, and
transferring les to help you to familiarize yourself
with using Windows® 7.
To use the Getting Started item:
®
1. From the Windows
icon to launch the Start menu.
2. Select
3. Select the task that you want to do.
Getting Started. The list of available
tasks appears.
taskbar, click the Start
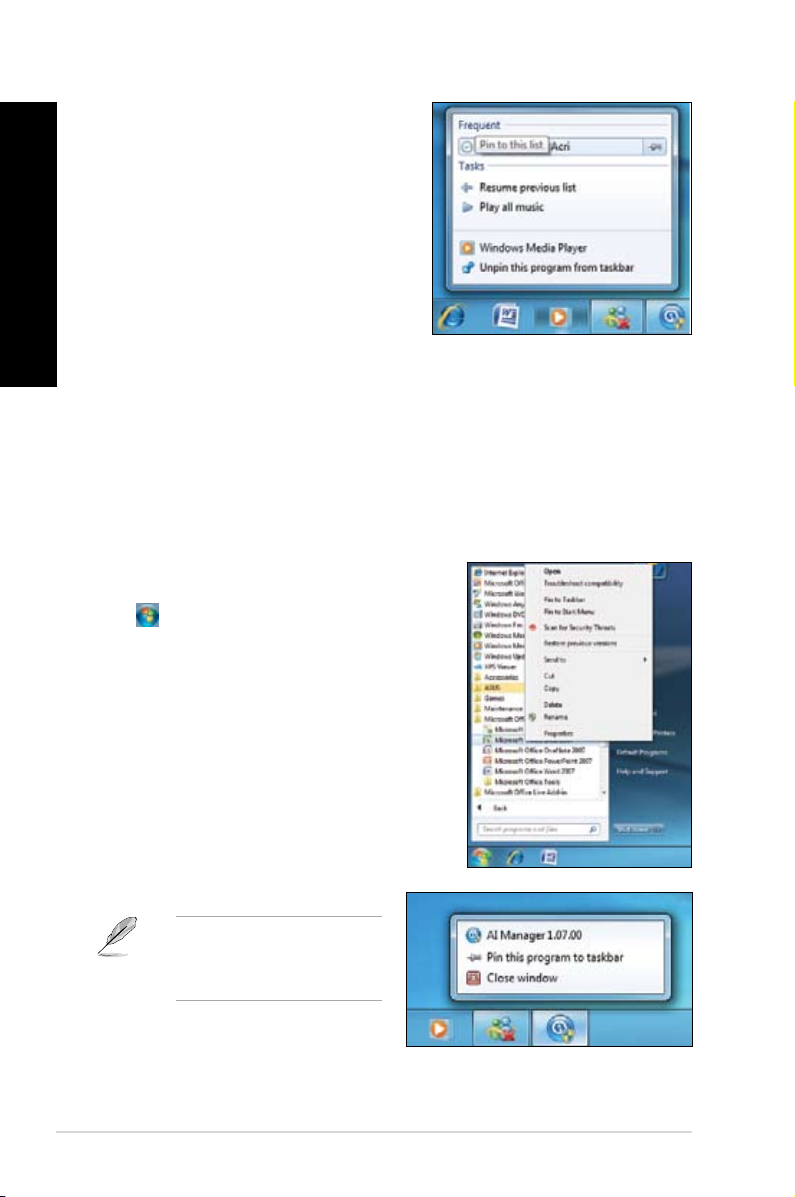
Using the taskbar
The taskbar allows you to launch and manage programs or items installed on your computer.
Launching a program from the taskbar
To launch a program from the taskbar:
®
• From the Windows
program.
taskbar, click an icon to launch it. Click the icon again to hide the
ENGLISH
You may pin programs that you want constantly displayed on the taskbar. For more details,
refer to the section Pinning programs on the Start menu or taskbar on this chapter.
ASUS CG Series 2-3
ENGLISH
ENGLISH
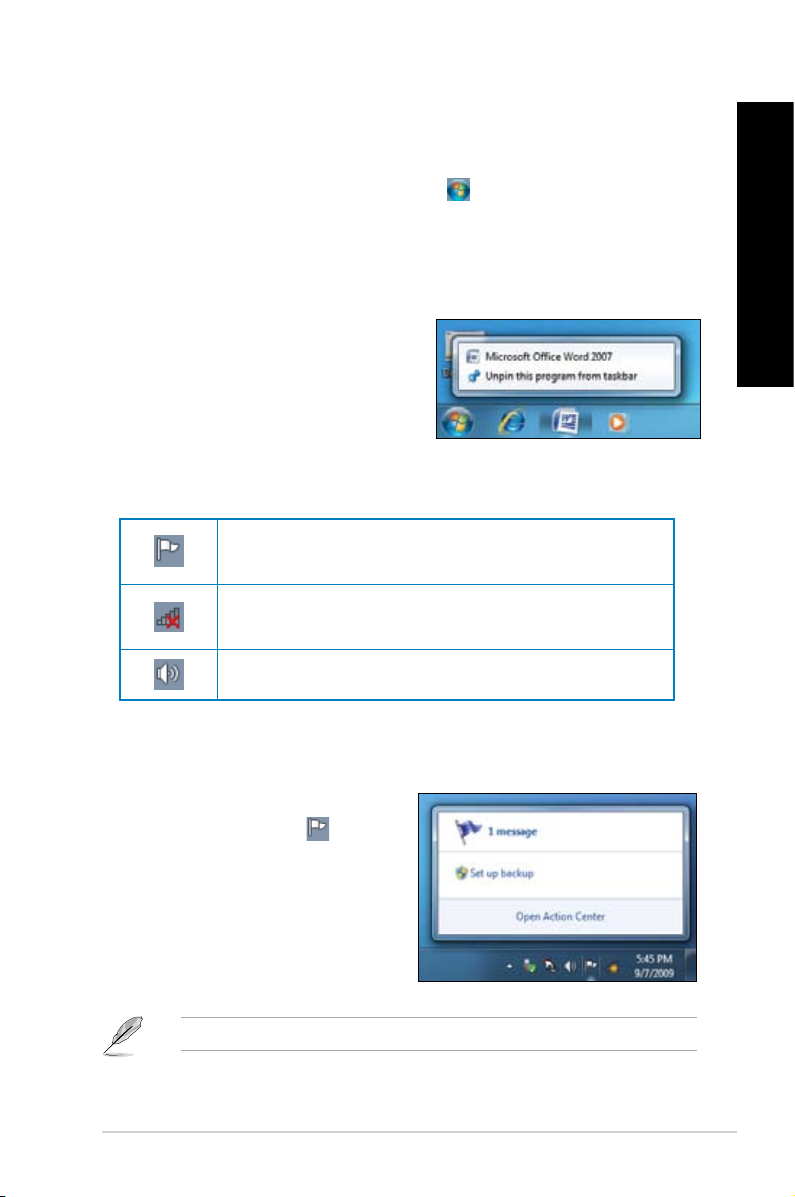
Pinning items on the jumplists
When you right-click an icon on the taskbar, a
jumplist launches to provide you with quick-access
to the program’s or item’s related links.You may
pin items on the jumplist such as favorite websites,
often-visited folders or drives, or recently played
media les.
To pin items to the jumplist:
1. From the taskbar, right-click an icon.
2. From the jumplist, right-click the item that
you want to pin, then select Pin to this list.
Unpinning items from the jumplist
To unpin items from the jumplist:
1. From the taskbar, right-click an icon.
2. From the jumplist, right-click the item that you want to remove from the jumplist, then
select Unpin from this list.
Pinning programs on the Start menu or taskbar
To pin programs on the Start menu or taskbar:
®
1. From the Windows
to launch the Start menu.
2. Right-click the item that you want to pin on the
Start menu or taskbar.
3. Select
Pin to Taskbar or Pin to Start menu.
taskbar, click the Start icon
You may also right-click on the
icon of a running program on
the taskbar, then select Pin this
program to taskbar.
2-4 Chapter 2: Using Windows® 7
ENGLISH
Unpinning programs from the Start menu
To unpin programs from the Start menu:
®
1. From the Windows
taskbar, click the Start icon to launch the Start menu.
2. From the Start menu, right-click the program that you want to unpin, then select
Remove from this list.
Unpinning programs from the taskbar
To unpin programs from the taskbar:
1. From the taskbar, right-click the program
that you want to remove from the taskbar,
then select Unpin this program from
taskbar.
Using the notication area
By default, the notication area shows these three icons:
Action Center notication
Click this icon to display all the alert messages/notications and launch the Windows
Action Center.
Network connection
This icon displays the connection status and signal strength of the wired or wireless network
connection.
Volume
Click this icon to adjust the volume.
®
ENGLISH
Displaying an alert notication
To display an alert notication:
• Click the Notication icon
the message to open it.
For more details, refer to the section Using Windows® Action Center in this chapter.
ASUS CG Series 2-5
, then click

ENGLISH
ENGLISH
Customizing icons and notications
You may choose to display or hide the icons and notications on the taskbar or on the
notication area.
To customize icons and notications:
1. From the notication area, click on the arrow icon
2. Click
3. From the dropdown list, select the behaviors for the icons or items that you want
Customize.
customize.
.
2-6 Chapter 2: Using Windows® 7
ENGLISH
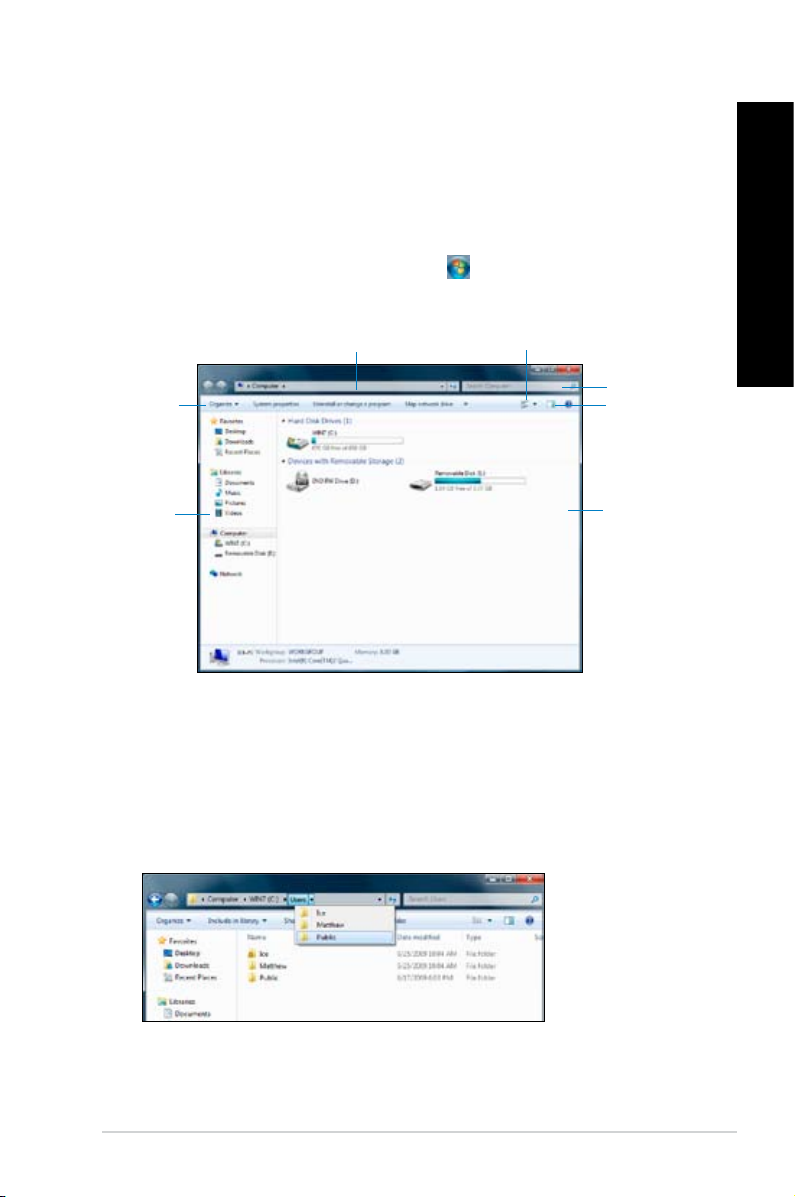
Managing your les and folders
Using Windows® Explorer
Windows® Explorer allows you to view, manage, and organize your les and folders.
Launching Windows® Explorer
To launch Windows Explorer:
®
1. From the Windows
2. Click
Computer to launch Windows Explorer.
taskbar, click the Start icon to launch the Start menu.
ENGLISH
Breadcrumb bar
Toolbar
Navigation
pane
View icon
Search bar
Preview icon
View pane
Exploring les and folders
To explore les and folders:
1. Launch Windows Explorer.
2. From the navigation or view pane, browse for the location of your data.
3. From the breadcrumb bar, click the arrow to display the contents of the drive or folder.
ASUS CG Series 2-7
ENGLISH
ENGLISH
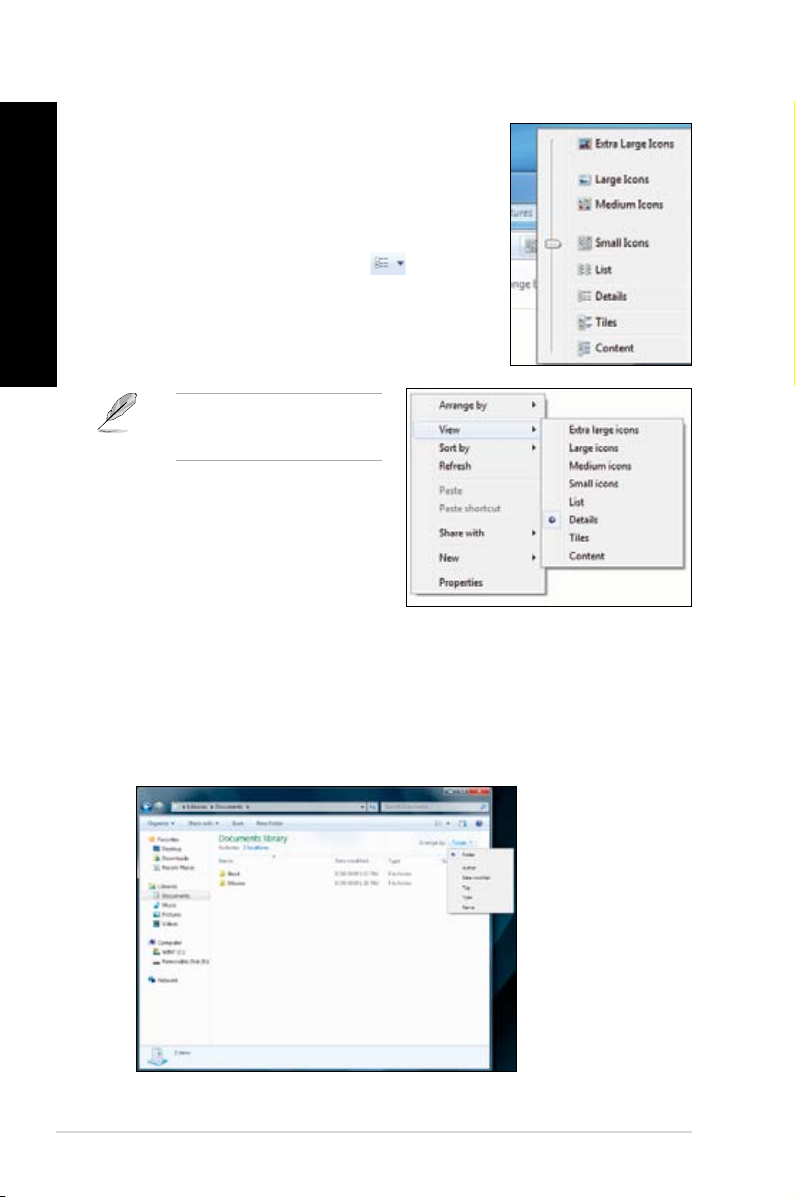
Customizing the le/folder view
To customize the le/folder view:
1. Launch Windows Explorer.
2. From the navigation pane, select the location of your
data.
3. From the toolbar, click the View icon
4. From the View menu, move the slider to select how you
want to view the le/folder.
You may also right-click anywhere
on the View pane, click View, and
select the view type that you want.
.
Arranging your les
To arrange your les:
1. Launch Windows Explorer.
2. From the
3. Select your preferred arrangement type.
Arrange by eld, click to display the dropdown list.
2-8 Chapter 2: Using Windows® 7

ENGLISH
Sorting your les
To sort your les:
1. Launch Windows Explorer.
2. Right-click anywhere on the View pane.
3. From the menu that appears, select
by, then select your preferred sorting type.
Sort
Grouping your les
To group your les:
1. Launch Windows Explorer.
2. Right-click anywhere on the View pane.
3. From the menu that appears, select
Group by, then select your preferred
grouping type.
Adding a new folder
To add a new folder:
1. Launch Windows Explorer.
2. From the toolbar, click
3. Key in a name for the new folder.
New folder.
ENGLISH
You may also right-click anywhere
on the View pane, click New >
Folder.
ASUS CG Series 2-9
ENGLISH
ENGLISH
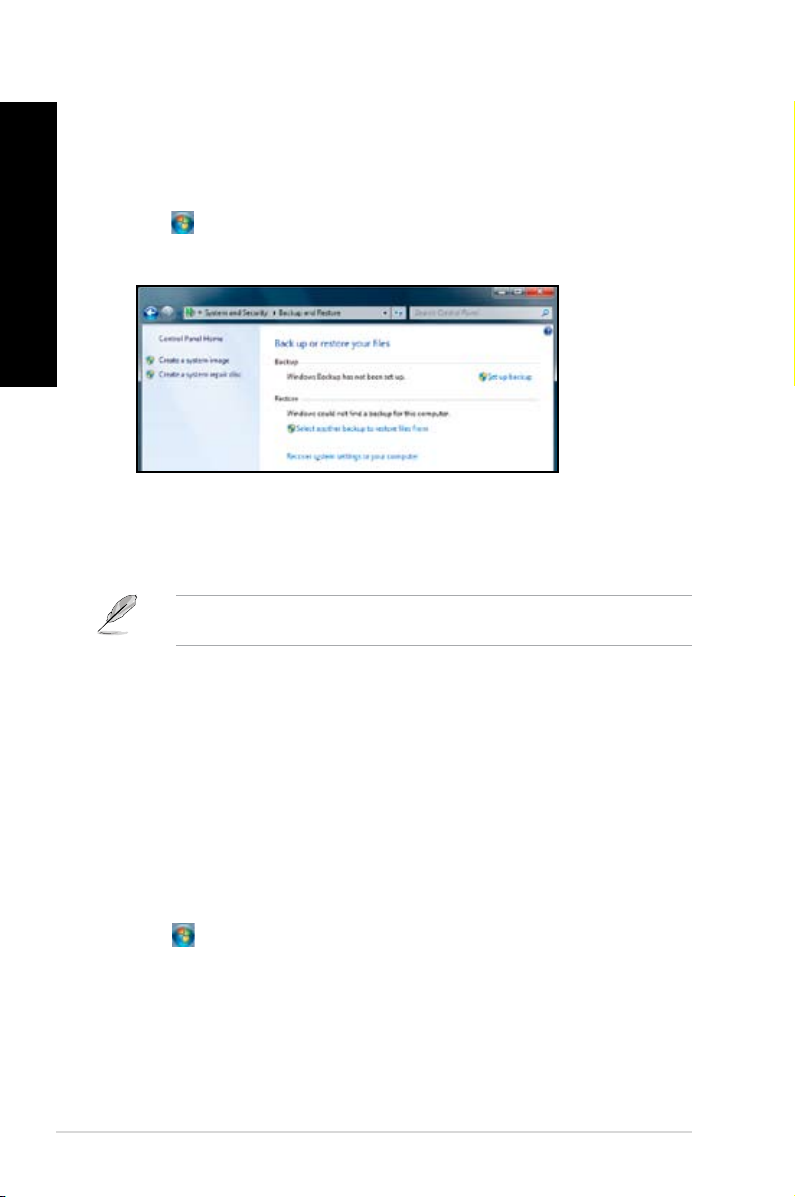
Backing up your les
Setting up a backup
To set up a backup:
1. Click
2. Click
3. Select your backup destination. Click Next.
4. Select
5. Follow the onscreen instructions to nish the process.
> All Programs > Maintenance > Backup and Restore.
Set up backup. Click Next.
Let Windows choose (recommended) or Let me choose as your backup
mode.
If you select Let Windows choose, Windows will not back up your programs, FAT-
formatted les, Recycle Bin les, or temporary les that are 1GB or more.
Restoring your system
The Windows® System Restore feature creates a restore point where the computer’s system
settings are stored at certain time and date. It allows you to restore or undo changes to your
computer’s system settings without affecting your personal data.
To restore your system:
1. Close all running applications.
2. Click
3. Follow the onscreen instructions to complete the process.
2-10 Chapter 2: Using Windows® 7
> All Programs > Accessories > System Tools > System Restore.

ENGLISH
Protecting your computer
Using Windows® 7 Action Center
Windows® 7 Action Center provides you with alert notications, security information, system
maintenance information, and the option to automatically troubleshoot and x some common
computer problems.
You may customize the notications. For more details, refer to the previous section
Customizing icons and notications in this chapter.
Launching Windows® 7 Action Center
To launch Windows® 7 Action Center:
1. To launch Windows 7 Action Center, click
the Notication icon , then click Open
Action Center.
2. From Windows 7 Action Center, click the task that you want to do.
ENGLISH
ASUS CG Series 2-11

ENGLISH
ENGLISH
Using Windows® Update
Windows Update allows you to check and install the latest updates to enhance the security
and performance of your computer.
Launching Windows® Update
To launch Windows® Update:
®
1. From the Windows
2. Select
3. From the Windows Update screen, click the task that you want to do.
All Programs > Windows Update.
taskbar, click the Start icon to launch the Start menu.
2-12 Chapter 2: Using Windows® 7

ENGLISH
Setting up a user account and password
You may create user accounts and passwords for people who will use your computer.
Setting up a user account
To set up a user account:
®
1. From the Windows
2. Select
3. Select
4. Key in the name of the new user.
5. Select either
6. When done, click
Manage another account.
Create a new account.
taskbar, click > Getting Started > Add new users.
Standard user or Administrator as the user type.
Create Account.
ENGLISH
ASUS CG Series 2-13

ENGLISH
ENGLISH
Setting up a user’s password
To set up a user’s password:
1. Select the user that you would like to set a password.
2. Select
3. Key in a password and conrm it. Key in your password’s hint.
4. When done, click
Create a password.
Create password.
2-14 Chapter 2: Using Windows® 7

ENGLISH
Activating the anti-virus software
Trend Micro Internet Security is a pre-installed anti-virus software on your computer. After
activating it, you have a 60-day trial period before the software expires and you need to
purchase a licensed version.
To activate Trend Micro Internet Security:
1. Run the Trend Micro Internet Security application.
2. Carefully read the license terms. Click
3. Key in your e-mail address and select your location. Click
4. Click
Finish to complete the activation.
Agree & Activate.
Next.
Getting Windows® Help and Support
Windows® Help and Support provides you with guides and answers in using the applications
in Windows® 7 platform.
To launch Windows® Help and Support, click > Help and Support.
ENGLISH
Ensure that you are connected to the Internet to obtain the latest Windows
ASUS CG Series 2-15
®
online help.

ENGLISH
2-16 Chapter 2: Using Windows® 7

Chapter 3
Connecting devices to your computer
Connecting a USB storage device
This desktop PC provides USB 2.0/1.1 ports on both the front and rear panels. The USB
ports allow you to connect USB devices such as storage devices.
To connect a USB storage device:
• Insert the USB storage device to your computer.
Front panel
To remove a USB storage device:
1. Click
2. When the
ASUS CG Series 3-1
from the Windows notication area on your
computer, then click Eject USB2.0 FlashDisk.
Safe to Remove Hardware message
pops up, remove the USB storage device from
your computer.
DO NOT remove a USB storage device when data transfer is in progress. Doing so may
cause data loss or damage the USB storage device.
Rear panel

ENGLISH
ENGLISH
Connecting microphone and speakers
This desktop PC comes with microphone ports and speaker ports on both the front and
rear panels. The audio I/O ports located on the rear panel allow you to connect 2-channel,
4-channel, 6-channel, and 8-channel stereo speakers.
Connecting Headphone and Mic
Connecting 2-channel Speakers
3-2 Chapter 3: Connecting devices to your computer

ENGLISH
Connecting 4-channel Speakers
Connecting 6-channel Speakers
ENGLISH
ASUS CG Series 3-3

ENGLISH
ENGLISH
Connecting 8-channel Speakers
3-4 Chapter 3: Connecting devices to your computer

ENGLISH
Connecting multiple external displays
Your desktop PC comes with VGA, HDMI, and DVI ports and allows you to connect multiple
external displays.
When a graphics card is installed in your computer, connect the monitors on the output
ports of the graphics card.
Setting up multiple displays
When using multiple monitors, you are allowed to set display modes. You can use the
additional monitor as a duplicate of your main display, or as an extension to enlarge your
Windows desktop.
To set up multiple displays:
1. Turn off your computer.
2. Connect the two monitors to your computer and connect the power cords to the
monitors. Refer to Setting up your computer section in Chapter 1 for details on how
to connect a monitor to your computer.
ENGLISH
For some graphic cards, only the monitor that is set to be the primary display has display
during POST. The dual display function works only under Windows.
ASUS CG Series 3-5

ENGLISH
3. Turn on your computer.
4. Do any of the following to open the
Screen Resolution setting screen:
• Click
• Right click anywhere on your Windows desktop. When the pop-up menu appears,
5. Select the display mode from the Multiple displays: dropdown list.
•
•
•
•
> Control Panel > Appearance and Personalization > Display >
Change display settings.
click Personalize > Display > Change display settings.
Duplicate these displays: Select this option to use the additional monitor as a
duplicate of your main display.
Extend these displays: Select this option to use the additional monitor as an
extension display. This increases your desktop space.
Show desktop only on 1 / 2: Select this option to show the desktop only on
monitor 1 or monitor 2.
Remove this display: Select this option to remove the selected display.
6. Click Apply or OK, then click Keep Changes on the conrmation message.
3-6 Chapter 3: Connecting devices to your computer
Chapter 4
Using your computer
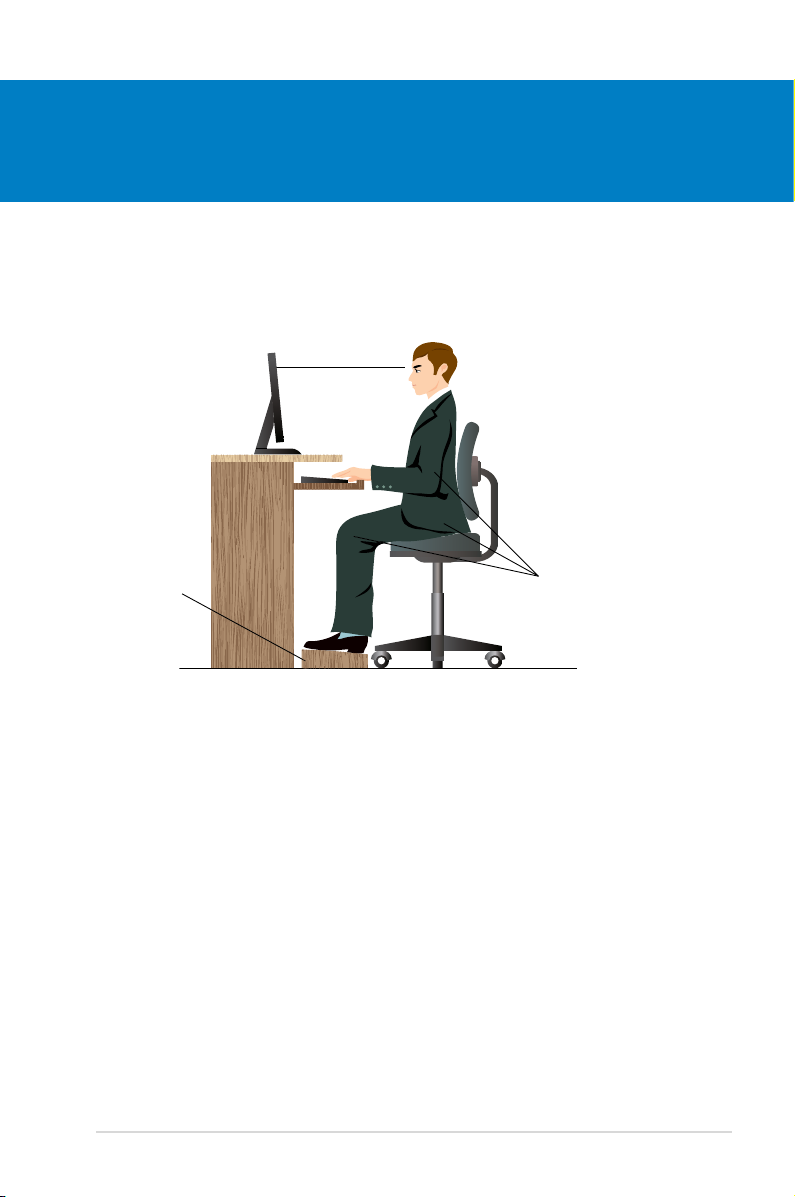
Proper posture when using your Desktop PC
When using your Desktop PC, maintaining the proper posture is necessary to prevent strain
to your wrists, hands, and other joints or muscles. This section provides you with tips on
avoiding physical discomfort and possible injury while using and fully enjoying your Desktop
PC.
Eye level to the top of
the monitor screen
Foot rest
To maintain the proper posture:
• Position your computer chair to ensure that your elbows are at or slightly above the
keyboard to get a comfortable typing position.
• Adjust the height of your chair to make sure that your knees are slightly higher than
your hips to relax the backs of your thighs. If necessary, use a footrest to raise the level
of your knees.
• Adjust the back of your chair so that the base of your spine is rmly supported and
angled slightly backward.
• Sit upright with your knees, elbows, and hips at an approximately 90º angle when you
are in front of your PC.
• Place the monitor directly in front of you, and adjust the top of the monitor screen within
your eye level so that your eyes look slightly downward.
• Keep the mouse close to the keyboard, and if necessary, use a wrist rest for support to
reduce the pressure on your wrists while typing.
• Use your Desktop PC in a comfortably-lit area, and keep it away from sources of glare
such as windows and direct sunlight.
• Take regular mini-breaks from using your Desktop PC.
ASUS CG Series 4-1
90o angle

ENGLISH
ENGLISH
Using the memory card reader
Digital cameras and other digital imaging devices use memory cards to store digital picture or
media les. The built-in memory card reader on the front panel of your system allows you to
read from and write to different memory card drives.
2
1
To use the memory card:
1. Pull up the I/O front cover open it.
2. Insert the memory card into the card slot.
• A memory card is keyed so that it ts in only one direction. DO NOT force the card into a
slot to avoid damaging the card.
• You can place the media in one or more of the card slots and use each media
independently. Place only one memory card in a slot at one time.
3. Select a program from the AutoPlay window to access your les.
• If AutoPlay is NOT enabled in your computer, click Windows® 7 Start button on the
taskbar, click Computer, and then double-click the memory card icon to access the data
on it.
• Each card slot has its own drive icon and it is displayed on the
• The memory card reader LED lights up and blinks when data is being read from or
written to the memory card.
Computer screen.
4. When nished, right-click the memory card drive icon on the Computer screen, click
Eject, and then remove the card.
Never remove cards while or immediately after reading, copying, formatting, or deleting
data on the card or else data loss may occur.
To prevent data loss, use “Safely Remove Hardware and Eject Media” in the Windows
notication area before removing the memory card.
4-2 Chapter 4: Using your computer

ENGLISH
Using the optical drive
2
3
1
Inserting an optical disc
To insert an optical disc:
1. While your system is on, press the eject button to open the tray.
2. Place the disc to the optical drive with the label side facing up.
3. Push the tray to close it.
4. Select a program from the AutoPlay window to access your les.
If AutoPlay is NOT enabled in your computer, click Windows® 7 Start button on the taskbar,
click Computer, and then double-click the CD/DVD drive icon to access the data on it.
Removing an optical disc
To remove an optical disc:
1. While the system is on, do either of the following to eject the tray:
• Press the eject button.
• Right-click the CD/DVD drive icon on the
2. Remove the disc from the disc tray.
Computer screen, and then click Eject.
ENGLISH
ASUS CG Series 4-3

Using the multimedia keyboard
`
6
789 10 11 12 13 14 15 16 17
2
3
4
5
1
18
19
20
21
22
ENGLISH
• The keyboard varies with countries. The illustration below is for reference only.
• Keyboard and mouse may not be included in some regions.
ASUS SK-2045 keyboard
Keys Description Keys Description
1.
Launches Windows® gadgets.
2.
3.
4.
5.
6.
7.
8.
9.
10.
Activates Windows® Flip 3D.
Reduces picture size in Windows®
Photo Viewer.
Increases picture size in Windows®
Photo Viewer.
Functions with keys F1~F12.
Press <Fn + F1> to launch Microsoft®
Word.
Press <Fn + F2> to launch Microsoft®
Excel.
Press <Fn + F3> to launch Microsoft®
PowerPoint.
Press <Fn + F4> to launch Microsoft®
Internet Explorer.
Press <Fn + F5> to launch Microsoft®
Outlook.
Press <Fn + F6> to launch the
11.
Favorites folder in Windows® Internet
Explorer.
12.
13.
14.
15.
16.
17.
18.
19.
20.
21.
22.
Press <Fn + F7> to launch Microsoft®
MSN or, if not installed, connects to the
MSN download page.
Press <Fn + F8> to launch Windows®
Search screen.
Press <Fn + F9> to play or pause
playback in Windows® Media Player.
Press <Fn + F10> to stop playback in
Windows® Media Player.
Press <Fn + F11> to go to the previous
track in Windows® Media Player.
Press <Fn + F12> to go to the next
track in Windows® Media Player.
Decreases the system volume.
Increases the system volume.
Turns the volume’s mute mode on/off.
Launches Windows® Media Player.
Launches Windows® Media Center.
4-4 Chapter 4: Using your computer
The special function keys only work on Windows® Vista / Windows® 7 operating systems.

Chapter 5
Modem
RJ-45 cable
Connecting to the Internet
Wired connection
Use an RJ-45 cable to connect your computer to a DSL/cable modem or a local area network
(LAN).
Connecting via a DSL/cable modem
To connect via a DSL/cable modem:
1. Set up your DSL/cable modem.
Refer to the documentation that came with your DSL/cable modem.
2. Connect one end of an RJ-45 cable to the LAN (RJ-45) port on the rear panel of your
computer and the other end to a DSL/cable modem.
3. Turn on the DSL/cable modem and your computer.
4. Congure the necessary Internet connection settings.
Contact your Internet Service Provider (ISP) for details or assistance in setting up your
Internet connection.
ASUS CG Series 5-1

ENGLISH
LAN
RJ-45 cable
Connecting via a local area network (LAN)
To connect via a LAN:
1. Connect one end of an RJ-45 cable to the LAN (RJ-45) port on the rear panel of your
computer and the other end to your LAN.
2. Turn on your computer.
3. Congure the necessary Internet connection settings.
Contact your network administrator for details or assistance in setting up your Internet
connection.
5-2 Chapter 5: Connecting to the Internet

Chapter 6
Using the utilities
ASUS AI Manager
ASUS AI Manager is a utility which gives you quick and easy access to frequently-used
applications.
Installing AI Manager
To install AI Manager:
1. Place the support DVD in the optical drive. If Autorun is enabled, the Drivers installation
wizard appears.
If Autorun is disabled, double-click the setup.exe le from the ASUS AI Manager folder in
the support DVD.
2. Click the Utilities tab, then click ASUS AI Manager.
3. Follow the onscreen instructions to complete the installation.
Launching AI Manager
To launch AI Manager from the Windows® desktop, click
Manager > AI Manager 1.xx.xx
. The AI Manager quick bar appears on the desktop.
Start > All Programs > ASUS > AI
After launching the application, the AI Manager icon appears in the Windows® taskbar.
Right-click this icon to switch between the quick bar and the
main window, and to launch the AI Manager either from the
quick bar or taskbar.
ASUS CG Series 6-1

ENGLISH
ENGLISH
AI Manager quick bar
The AI Manager quick bar saves the desktop space and allows you to launch the ASUS
utilities or display system information easily. Click any of the Main, My Favorites, Support or
Information tab to display the menu’s contents.
Exit button
Switch to main Window
Add to ToolBar
Main
My Favorites
Click the Maximize/restore button to switch between full window and quick bar. Click the
Minimize button to keep the AI Manager on the taskbar. Click the Close button to quit
the AI Manager.
Main
The Main menu contains four utilities: AI Disk, AI Security, AI Boosting, and AI Probe.
Click the arrow on the Main menu icon to browse through the utilities in the main menu.
Click to extend or restore
Click to display
items on the left
AI Disk
AI Disk allows you to easily clear temporary IE les, IE cookies, IE URLs, IE history,
or the Recycle Bin. Click the AI Disk icon on the quick bar to display the full AI Disk
window and select the items you want to clear. Click Apply when done.
Support
ASUS Utility
Information
Click to display
items on the
right
6-2 Chapter 6: Using the utilities

ENGLISH
AI Security
AI Security enables you to set a password to secure your devices, such as USB ash
disks and CD/DVD disks, from unauthorized access.
To lock a device:
1. When using AI Security for the rst time, you are asked to set a password. Key in
2. Conrm the password.
3. Key in the password hint (recommended).
4. When done, click
a password with at most 20 alphanumeric characters.
Ok.
ENGLISH
5. Select the device you want to lock, then click
6. Key in the password you have set previously, then click
To unlock the device:
1. Deselect the locked device, then click
2. Key in the password you have set previously, then click
To change the password:
• Click
ASUS CG Series 6-3
Change Password, then follow the onscreen instructions to change
password.
Apply.
Ok.
Apply.
Ok.

ENGLISH
ENGLISH
AI Booting
AI Booting allows you to specify the boot device priority sequence.
To specify the boot sequence:
1. Select a device, then click the left/right button to specify the boot sequence.
2. When done, press
AI Probe
AI Probe automatically detects and displays the motherboard and CPU temperatures,
CPU fan speed, and the voltage output. You can adjust the values as you need.
Click the Temperature, Voltage, or Fan Speed tab, then select an item to enable and
change the value by dragging the bar.
Apply.
6-4 Chapter 6: Using the utilities

ENGLISH
My Favorites
My Favorites allows you to add applications that you frequently use, saving you from
searching for the applications throughout your computer.
To add an application:
1. Click
2. Click
Right click on the application icon to launch, delete, or rename the selected application. You
can also double click to launch the selected application.
Add, then locate the application you want to add to My Favorites.
Open on the le location window. The application is added to My Favorites list.
Support
Click any links on the Support window to go to the ASUS website, technical support website,
download support website, or contact information.
ENGLISH
ASUS CG Series 6-5

ENGLISH
ENGLISH
Information
Click the tab on the Information window to see the detailed information about your system,
motherboard, CPU, BIOS, installed device(s), and memory.
ASUS Utility
System Level Up
System Level Up allows you to overclock immediately with OC prole presets in
Windows® environment without the hassle of entering the BIOS setup.
To launch System Level Up:
1. Launch AI Manager.
2. Click
Asus Utility, then double-click System Level Up.
6-6 Chapter 6: Using the utilities

ENGLISH
EPU-6 Engine
ASUS EPU-6 Engine is an energy-efcient tool that provides you with a total system
power-saving solution. It detects the current computer loading and intelligently adjusts
the power in real-time. It automatically adjusts the power usage for the CPU, VGA
card, chipset, memory, hard drives, and CPU fan. It provides you with these modes to
choose from: Auto, Turbo Mode, High Performance, Medium Power Saving Mode,
and Maximum Power Saving Mode.
To launch EPU-6 Engine:
1. Launch AI Manager.
2. Click
Asus Utility, then double-click EPU-6 Engine.
ENGLISH
ASUS CG Series 6-7

ENGLISH
ENGLISH
ASUS Update
The ASUS Update is a utility that allows you to manage, save, and update the motherboard
BIOS in Windows® environment.
• ASUS Update requires an Internet connection either through a network or an Internet
Service Provider (ISP).
• This utility is available in the support DVD that comes with the motherboard package.
Installing ASUS Update
To install ASUS Update:
1. Place the support DVD in the optical drive. The
If Autorun is disabled, double-click the setup.exe le from the ASUS Update folder in the
support DVD.
2. Click the Utilities tab, then click Install ASUS Update.
3. Follow the onscreen instructions to complete the installation.
Quit all Windows® applications before you update the BIOS using this utility.
Drivers menu appears.
Updating the BIOS
To update the BIOS:
®
1. From the Windows
ASUS Update to launch the ASUS Update utility.
2. From the dropdown list, select any of the updating process:
Updating from the Internet
a. Select Update BIOS from the Internet, then click Next.
b. Select the ASUS FTP site nearest you to avoid network trafc, or click Auto
Select
c. From the FTP site, select the BIOS version that you wish to download then click
Next.
desktop, click Start > Programs > ASUS > ASUS Update >
then click Next.
The ASUS Update utility is capable of updating itself through the Internet. Always update
the utility to avail all its features.
Updating from a BIOS file
a. Select Update BIOS from a le, then click Next.
b. Locate the BIOS le from the
3. Follow the onscreen instructions to complete the updating process.
6-8 Chapter 6: Using the utilities
Open window, then click Open.

ENGLISH
ASUS MyLogo2™
The ASUS MyLogo2™ utility lets you customize the boot logo. The boot logo is the image
that appears on screen during the Power-On Self-Tests (POST). ASUS MyLogo2™ is
automatically installed when you install the ASUS Update utility from the Support DVD.
• Obtain the latest BIOS le from the ASUS website at www.asus.com.
• You can create your own boot logo image in GIF le format.
To launch ASUS MyLogo2™:
1. Launch the ASUS Update utility. Refer to the section “
manual for details.
2. Select
3. Check the option
4. Select
5. When prompted, locate the new BIOS le, then click
6. From the left window pane, locate the
7. From the
8. The system starts updating the BIOS and
9. After the updating process, the system
Options from the drop down menu, then click Next.
Launch MyLogo to replace system boot logo before ashing
BIOS, then click Next.
Update BIOS from le from the drop down menu, then click Next.
appears.
image that you want to use as your boot
logo. Click Next.
Ratio dropdown list, select your
desired size for the boot logo. Click Next.
loading the new boot logo.
restarts and displays the new boot logo
during POST.
ASUS Update” in this user
Next. ASUS MyLogo window
ENGLISH
ASUS CG Series 6-9

ENGLISH
ENGLISH
Nero 9
Nero 9 allows you to create, copy, burn, edit, share, and update different kinds of data.
Installing Nero 9
To install Nero 9:
1. Insert the Nero 9 DVD into your optical drive.
2. If Autorun is enabled, the main menu appears automatically.
If Autorun is disabled, double-click the SeupX.exe le from the main directory of your Nero
9 DVD.
3. From the main menu, click Nero 9 Essentials.
6-10 Chapter 6: Using the utilities

ENGLISH
4. Select the language you want to use for Installation Wizard. Click Next.
ENGLISH
5. Click
6. Tick I accept the License Conditions. When done, click Next.
Next to continue.
ASUS CG Series 6-11

ENGLISH
ENGLISH
7. Select Typical then click Next.
8. Tick Yes, I want to help by sending anonymous application data to Nero then click
Next.
9. When done, click Exit.
6-12 Chapter 6: Using the utilities

ENGLISH
Burning les
To burn les:
1. From the main menu, click
2. Select the les that you want to burn. When done, click Add.
Data Burning > Add.
ENGLISH
ASUS CG Series 6-13

ENGLISH
ENGLISH
3. After selecting the les that you want to burn, click Burn to burn the les to a disc.
For more details about using Nero 9, refer to the Nero website at www.nero.com
Recovering your system
Using the Recovery Partition
The Recovery Partition quickly restores your Desktop PC’s software to its original working
state. Before using the Recovery Partition, copy your data les (such as Outlook PST les)
to USB storage devices or to a network drive and make note of any customized conguration
settings (such as network settings).
About the Recovery Partition
The Recovery Partition is a reserved space on your hard disk drive used to restore the
operating system, drivers, and utilities installed on your Desktop PC at the factory.
DO NOT delete the partition named
RECOVERY. The Recovery Partition
is created at the factory and cannot be
restored if deleted. Take your Desktop
PC to an authorized ASUS service
center if you have problems with the
recovery process.
Using the Recovery Partition:
1. Press <
2. Press <
6-14 Chapter 6: Using the utilities
F9> during bootup.
Enter> to select Windows Setup [EMS Enabled].

ENGLISH
3. Select one of the following recovery options.
System Recovery:
This feature allows you to restore the system to the factory default settings.
System Image Backup:
This feature allows you to burn the system image backup in DVD discs, which you can use
later to restore the system to its default settings.
System DVD Backup:
This feature allows you to make a backup copy of the support DVD.
4. Follow the onscreen instructions to complete the recovery process.
Visit the ASUS website at www.asus.com for updated drivers and utilities.
Using the Recovery DVD (on selected models)
Prepare 1~3 blank writable DVDs as instructed to create the Recovery DVD.
Remove the external hard disk drive before performing system recovery on your Desktop
PC. According to Microsoft, you may lose important data because of setting up Windows on
the wrong disk drive or formatting the incorrect drive partition.
To use the Recovery DVD:
1. Insert the Recovery DVD into the optical drive. Your Desktop PC needs to be powered
ON.
2. Restart the Desktop PC and press <
labeled as “CD/DVD”) and press <Enter> to boot from the Recovery DVD.
3. Select OK to start to restore the image.
4. Select OK to conrm the system recovery.
F8> on bootup and select the optical drive (may be
ENGLISH
Restoring will overwrite your hard drive. Ensure to back up all your important data before
the system recovery.
5. Follow the onscreen instructions to complete the recovery process.
DO NOT remove the Recovery disc, unless instructed to do so, during the recovery process
or else your partitions will be unusable.
Visit the ASUS website at www.asus.com for updated drivers and utilities.
ASUS CG Series 6-15

ENGLISH
6-16 Chapter 6: Using the utilities

Chapter 7
Troubleshooting
Troubleshooting
This chapter presents some problems you might encounter and the possible solutions.
My computer cannot be powered on and the power LED on the front
?
panel does not light up
• Check if your computer is properly connected.
• Check if the wall outlet is functioning.
• Check if the Power Supply Unit is switched on. Refer to the section
your computer ON/OFF in Chapter 1.
My computer hangs.
?
• Do the following to close the programs that are not responding:
1. Simultaneously press <Alt> + <Ctrl> + <Delete> keys on the keyboard,
2. Click
3. Select the program that is not responding, then click
• If the keyboard is not responding. Press and hold the Power button on the top
then click Start Task Manger.
Applications tab.
End Task.
of your chassis until the computer shuts down. Then press the Power button to
turn it on.
Turning
I cannot connect to a wireless network using the ASUS WLAN Card
?
(on selected models only)?
• Ensure that you enter the correct network security key for the wireless network
you want to connect to.
• Connect the external antennas (optional) to the antenna connectors on the
ASUS WLAN Card and place the antennas on the top of your computer
chassis for the best wireless performance.
The arrow keys on the number key pad are not working.
?
Check if the Number Lock LED is off. When the Number Lock LED is on,
the keys on the number key pad are used to input numbers only. Press the
Number Lock key to turn the LED off if you want to use the arrow keys on the
number key pad.
ASUS CG Series 7-1

ENGLISH
ENGLISH
No display on the monitor.
?
• Check if the monitor is powered on.
• Ensure that your monitor is properly connected to the video output port on your
computer.
• If your computer comes with a discrete graphics card, ensure that you connect
your monitor to a video output port on the discrete graphics card.
• Check if any of the pins on the monitor video connector is bent. If you discover
bent pins, replace the monitor video connector cable.
• Check if your monitor is plugged to a power source properly.
• Refer to the documentation that came with your monitor for more
troubleshooting information.
When using multiple monitors, only one monitor has display.
?
• Ensure that the both monitors are powered on.
• During POST, only the monitor connected to the VGA port has display. The
dual display function works only under Windows.
• When a graphics card is installed on your computer, ensure that you connect
the monitors to the output port on the graphics card.
• Check if the multiple displays settings are correct. Refer to section
Connecting multiple external displays in Chapter 3 for details.
My computer cannot detect my USB storage device.
?
• The rst time you connect your USB storage device to your computer,
Windows automatically installs a driver for it. Wait for a while and go to My
Computer to check if the USB storage device is detected.
• Connect your USB storage device to another computer to test if the USB
storage device is broken or malfunctions.
I want to restore or undo changes to my computer’s system settings
?
without affecting my personal les or data.
The Windows® System Restore feature allows you to restore or undo changes
to your computer’s system settings without affecting your personal data such
as documents or photos. For more details, refer to the section Restoring your
system in Chapter 2.
Chapter 7: Troubleshooting 7-2

ENGLISH
The picture on the HDTV is stretched.
?
• It is caused by the different resolutions of your monitor and your HDTV. Adjust
the screen resolution to t your HDTV. To change the screen resolution:
1. Do any of the following to open the
• Click
Display > Change display settings.
• Right click anywhere on your Windows desktop. When the pop-up
2. Adjust the resolution. Refer to the documentation came with your HDTV
3. Click
My speakers produce no sound.
?
• Ensure that you connect your speakers to the Line out port (lime) on the front
• Check if your speak is connected to a electrical source and turned on.
• Adjust your speakers’ volume.
• Ensure that your computer’s system sounds are not Muted.
• Connect your speakers to another computer to test if the speakers arer
menu appears, click Personalize > Display > Change display
settings.
for the resolution.
message.
panel or the rear panel.
• If it is muted, the volume icon is displayed as
sounds, click
• If it is not muted, click
working properly.
> Control Panel > Appearance and Personalization >
Apply or OK. Then click Keep Changes on the conrmation
from the Windows notication area, then click .
Screen Resolution setting screen:
. To enable the system
and drag the slider to adjust the volume.
ENGLISH
The DVD drive cannot read a disc.
?
• Check if the disc is placed with the label side facing up.
• Check if the disc is centered in the tray, especially for the discs with
non-standard size or shape.
• Check if the disc is scratched or damaged.
The DVD drive eject button is not respond.
?
1. Click > Computer.
2. Right-click
7-3 ASUS CG Series
, then click Eject from the menu.

ENGLISH
ENGLISH
Power
Problem Possible Cause Action
• Set your computer’s power voltage
No power
(The power
indicator is off)
Incorrect power voltage
Your computer is not
turned on.
Your computer’s power
cord is not properly
connected.
• Adjust the voltage settings. Ensure
Press the power key on the front panel
to ensure that your computer is turned
on.
• Ensure that the power cord is
• Use other compatible power cord.
switch to your area’s power
requirements.
that the power cord is unplugged
from the power outlet.
properly connected.
PSU (Power supply unit)
problems
Try installing another PSU on your
computer.
Display
Problem Possible Cause Action
No display
output after
turning the
computer on
(Black screen)
The signal cable is
not connected to the
correct VGA port on your
computer.
Signal cable problems Try connecting to another monitor.
• Connect the signal cable to the
correct display port (onboard VGA or
discrete VGA port).
• If you are using a discrete VGA
card, connect the signal cable to the
discrete VGA port.
Chapter 7: Troubleshooting 7-4

ENGLISH
LAN
Problem Possible Cause Action
Cannot access
the Internet
The LAN cable is not
connected.
LAN cable problems
Your computer is not
properly connected to a
router or hub.
Network settings
Problems caused by the
anti-virus software
Driver problems Reinstall the LAN driver
Connect the LAN cable to your
computer.
Ensure the LAN LED is on. If not,
try another LAN cable. If it still does
not work, contact the ASUS service
center.
Ensure that your computer is properly
connected to a router or hub.
Contact your Internet Service Provider
(ISP) for the correct LAN settings.
Close the anti-virus software.
Audio
Problem Possible Cause Action
Speaker or headphone is
connected to the wrong
port.
• Refer to your computer’s user
manual for the correct port.
• Disconnect and reconnect the
speaker to your computer.
ENGLISH
No Audio
7-5 ASUS CG Series
Speaker or headphone
does not work.
The front and back audio
ports do not work.
Driver problems Reinstall the audio driver
Try using another speaker or
headphone.
Try both the front and back audio
ports. If one port failed, check if the
port is set to multi-channel.

ENGLISH
ENGLISH
System
Problem Possible Cause Action
Too many programs are
running.
System speed is
too slow
The system often
hangs or freezes.
Computer virus attack
Hard disk drive failure
Memory module problems
There is not enough
air ventilation for your
computer.
Incompatible softwares are
installed.
Close some of the programs.
• Use an anti-virus software to
scan for viruses and repair your
computer.
• Reinstall the operating system.
• Send the damaged hard disk
drive to ASUS Service Center for
servicing.
• Replace with a new hard disk drive.
• Replace with compatible memory
modules.
• Remove the extra memory
modules that you have installed,
then try again.
Move your computer to an area with
better air ow.
Reinstall the OS and reinstall
compatible softwares.
Chapter 7: Troubleshooting 7-6

ENGLISH
CPU
Problem Possible Cause Action
Your computer is booting
up.
Too noisy right
after turning on
the computer.
Computer is too
noisy when in use.
If the problem still persists, refer to your Desktop PC’s warranty card and contact the ASUS
Service Center. Visit the ASUS Support site at http://support.asus.com for the service
center information.
The BIOS settings have
been changed.
Old BIOS version
The CPU fan has been
replaced.
There is not enough
air ventilation for the
computer.
The system temperature is
too high.
It is normal. The fan runs on its
full speed when the computer is
powering on. The fan slows down
after entering the OS.
Restore the BIOS to its default
settings.
Update the BIOS to the latest
version. Visit the ASUS Support
site at http://support.asus.com to
download the latest BIOS versions.
Ensure that you are using a
compatible or ASUS-recommended
CPU fan.
Move your computer to an area with
better air ow.
• Update the BIOS.
• If you know how to reinstall the
motherboard, try to clean the inner
space of the chassis.
ENGLISH
7-7 ASUS CG Series

ENGLISH
Chapter 7: Troubleshooting 7-8

Ordinateur de bureau ASUS
Séries CG
Manuel de l’utilisateur

Français
F6001
Première édition
Août 2010
Français
Copyright © 2009 ASUSTeK COMPUTER INC. Tous droits réservés.
Aucun extrait de ce manuel, incluant les produits et logiciels qui y sont décrits, ne peut être reproduit,
transmis, transcrit, stocké dans un système de restitution, ou traduit dans quelque langue que ce soit sous
quelque forme ou quelque moyen que ce soit, à l’exception de la documentation conservée par l’acheteur
dans un but de sauvegarde, sans la permission écrite expresse de ASUSTeK COMPUTER, INC. (“ASUS”).
La garantie sur le produit ou le service ne sera pas prolongée si (1) le produit est réparé, modié ou altéré,
à moins que cette réparation, modication ou altération ne soit autorisée par écrit par ASUS; ou (2) si le
numéro de série du produit est dégradé ou manquant.
ASUS FOURNIT CE MANUEL “TEL QUE” SANS GARANTIE D’AUCUNE SORTE, QU’ELLE SOIT
EXPRESSE OU IMPLICITE, COMPRENANT MAIS SANS Y ETRE LIMITE LES GARANTIES OU
CONDITIONS DE COMMERCIALISATION OU D’APTITUDE POUR UN USAGE PARTICULIER. EN
AUCUN CAS ASUS, SES DIRECTEURS, CADRES, EMPLOYES OU AGENTS NE POURRONT ÊTRE
TENUS POUR RESPONSABLES POUR TOUT DOMMAGE INDIRECT, SPECIAL, SECONDAIRE OU
CONSECUTIF (INCLUANT LES DOMMAGES POUR PERTE DE PROFIT, PERTE DE COMMERCE,
PERTE D‘UTILISATION DE DONNEES, INTERRUPTION DE COMMERCE ET EVENEMENTS
SEMBLABLES), MEME SI ASUS A ETE INFORME DE LA POSSIBILITE DE TELS DOMMAGES
PROVENANT DE TOUT DEFAUT OU ERREUR DANS CE MANUEL OU DU PRODUIT.
LES SPECIFICATIONS ET INFORMATIONS CONTENUES DANS CE MANUEL SONT FOURNIES
A TITRE INFORMATIF SEULEMENT, ET SONT SUJETTES A CHANGEMENT A TOUT MOMENT
SANS AVERTISSEMENT ET NE DOIVENT PAS ETRE INTERPRETEES COMME UN ENGAGEMENT
DE LA PART D’ASUS. ASUS N‘ASSUME AUCUNE RESPONSABILITE POUR TOUTE ERREUR OU
INEXACTITUDE QUI POURRAIT APPARAITRE DANS CE MANUEL, INCLUANT LES PRODUITS ET
LOGICIELS QUI Y SONT DECRITS.
Les produits et noms de sociétés qui apparaissent dans ce manuel ne sont utilisés que dans un but
d’identication ou d’explication dans l’intérêt du propriétaire, sans intention de contrefaçon. Toutes les
marques mentionnées dans ce manuel sont la propriété de leur propriétaires respectifs.
ii

Français
Table des matières
Notes ...........................................................................................................v
Consignes de sécurité ..................................................................................vii
Conventions utilisés dans ce manuel .......................................................... viii
Où trouver plus d’informations ..................................................................... viii
Contenu de la boîte .......................................................................................ix
Chapitre 1 Démarrer
Bienvenue ! ................................................................................................. 1-1
Faire connaissance avec votre ordinateur .................................................. 1-1
Congurer votre ordinateur ......................................................................... 1-8
Allumer ou éteindre l’ordinateur ................................................................ 1-10
Chapitre 2 Utiliser Windows® 7
Démarrer pour la première fois ................................................................... 2-1
Utiliser le Bureau de Windows® 7 ............................................................... 2-2
Gérer vos chiers et vos dossiers ............................................................... 2-7
Restaurer le système ................................................................................ 2-10
Protéger votre ordinateur ...........................................................................2-11
Centre d’Aide et support Windows® ......................................................... 2-15
Chapitre 3 Connecter des périphériques
Connecter un périphérique de stockage USB ............................................ 3-1
Connecter un microphone ou un système de haut-parleurs ....................... 3-2
Connecter plusieurs périphériques d’afchage........................................... 3-5
Français
Chapitre 4 Utiliser votre ordinateur
Posture recommandée lors de l’utilisation de l’ordinateur .......................... 4-1
Utiliser le lecteur de carte mémoire ............................................................ 4-2
Utiliser le lecteur optique ............................................................................ 4-3
Utiliser le clavier multimédia ...................................................................... 4-4
Chapitre 5 Se connecter à Internet
Connexion laire ......................................................................................... 5-1
iii

Français
Table des matières
Chapitre 6 Utiliser les utilitaires
ASUS AI Manager ....................................................................................... 6-1
ASUS Update ............................................................................................. 6-8
ASUS MyLogo2™ ....................................................................................... 6-9
Nero 9 .....................................................................................................
Restaurer le système ................................................................................ 6-14
6-10
Français
Chapitre 7 Dépannage
Dépannage ................................................................................................. 7-1
iv

Français
Notes
REACH
Conforme avec le Règlement REACH (Enregistrement, Évaluation, Autorisation et Restriction
des produits chimiques), nous avons publié la liste des substances chimiques utilisées
dans nos produits sur le site Web ASUS REACH à l’adresse http://green.asus.com/english/
REACH.htm.
Rapport de la Commission Fédérale des Communications
Ce dispositif est conforme à l’alinéa 15 des règles établies par la FCC. L'opération est sujette
aux 2 conditions suivantes:
• Ce dispositif ne peut causer d'interférence nuisible, et
• Ce dispositif se doit d'accepter toute interférence reçue, incluant toute interférence
pouvant causer des résultats indésirables.
Cet équipement a été testé et s'est avéré être conforme aux limites établies pour un
dispositif numérique de classe B, conformément à l'alinéa 15 des règles de la FCC. Ces
limites sont conçues pour assurer une protection raisonnable contre l’interférence nuisible
à une installation réseau. Cet équipement génère, utilise et peut irradier de l'énergie à
fréquence radio et, si non installé et utilisé selon les instructions du fabricant, peut causer
une interférence nocive aux communications radio. Cependant, il n'est pas exclu qu'une
interférence se produise lors d'une installation particulière. Si cet équipement cause une
interférence nuisible au signal radio ou télévisé, ce qui peut-être déterminé par l'arrêt puis
le réamorçage de celui-ci, l'utilisateur est encouragé à essayer de corriger l'interférence en
s'aidant d'une ou plusieurs des mesures suivantes:
• Réorientez ou replacez l'antenne de réception.
• Augmentez l'espace de séparation entre l'équipement et le récepteur.
• Reliez l’équipement à une sortie sur un circuit différent de celui auquel le récepteur est
relié.
• Consultez le revendeur ou un technicien expérimenté radio/TV pour de l’aide.
Français
L’utilisation de câbles protégés pour le raccordement du moniteur à la carte de graphique
est exigée pour assurer la conformité aux règlements de la FCC. Les changements ou
les modications apportés à cette unité n'étant pas expressément approuvés par la partie
responsable de la conformité pourraient annuler l’autorité de l’utilisateur à manipuler cet
équipement.
v

Français
Avertissement concernant l’exposition aux RF
Cet équipement doit être installé et opéré conformément aux instructions fournies et
l’antenne utilisée par cet émetteur doit être installée de sorte à garantir une distance de
séparation d’au moins 20 cm entre l’antenne et l’utilisateur, et ne doit pas être colocalisée
ou opérée conjointement avec d’autres antennes ou émetteurs. Les utilisateurs et
installateurs doivent être en possession des instruction d’installation de l’antenne et des
conditions d’opération de l’émetteur pour assurer la conformité en matière d’exposition aux
radiofréquences.
Rapport du Département Canadien des Communications
Cet appareil numérique ne dépasse pas les limites de classe B en terme d'émissions
Français
de nuisances sonore, par radio, par des appareils numériques, et ce conformément
aux régulations d’interférence par radio établies par le département canadien des
communications.
(Cet appareil numérique de la classe B est conforme à la norme ICES-003 du Canada.)
Note relative aux produits de Macrovision Corporation
Ce produit comprend une technologie de protection de copyright protégée par certains
brevets déposés aux U.S.A. et autres droits de propriété intellectuelle appartenant à
Macrovision Corporation et autres détenteurs de droits. L’usage de cette technologie doit
être autorisé par Macrovision Corporation, et n’est destiné qu’à un usage familial ou autres
usages limités de même sorte à moins d’une autorisation par Macrovision Corporation.
Rétro-ingénierie et démontage sont interdits.
ATTENTION : Danger d’explosion si la batterie n’est pas remplacée correctement.
Remplacer uniquement avec une batterie de type semblable ou équivalent,
recommandée par le fabricant. Mettez au rebut les batteries usagées conformément
aux instructions du fabricant.
vi
Avertissement relatif aux batterie Lithium-Ion

Français
Consignes de sécurité
Déconnectez le cordon d’alimentation et tous les périphériques avant tout entretien.
Nettoyez l’ordinateur portable avec une éponge en cellulose propre ou un chiffon en peau
de chamois humide et une solution détergeante non abrasive et quelques gouttes d’eau
tiède puis nettoyez les surfaces humides ‘à l’aide d’un chiffon sec.
• NE PAS placer sur une surface irrégulière ou instable. Contactez le service après-vente
si le châssis a été endommagé.
•
NE PAS utiliser dans des environnements sales ou poussiéreux. NE PAS utiliser lors
d’une fuite de gaz.
•
NE PAS placer, faire tomber ou insérer d’objets sur/dans l’ordinateur.
•
NE PAS exposer à des champs magnétiques ou électriques trop forts.
•
NE PAS exposer ou utiliser à proximité de liquides, de la pluie ou d'environnements
humides. NE PAS utiliser le modem lors d'un orage.
• Avertissement de sécurité concernant la batterie :
circuiter les contacts. NE PAS désassembler la batterie.
• Utilisez ce produit dans des environnements dont la température ambiante est comprise
entre 0˚C (32F) et 35˚C (95F).
•
NE PAS bloquer les ouvertures destinées à la ventilation de l’ordinateur pour éviter que
celui-ci ne surchauffe.
•
NE PAS utiliser un cordon d’alimentation, accessoire ou autre périphérique endommagé.
•
Pour éviter tout choc électrique, déconnectez le câble d’alimentation de la prise
électrique avant tout déplacement du système.
•
Demandez l’assistance d’un professionnel avant d’utiliser un adaptateur ou une rallonge.
Ces équipements peuvent interrompre le circuit de mise à la terre.
•
Assurez-vous que le bloc d’alimentation est bien réglé sur le voltage approprié à votre
région. Si vous ‘êtes pas certain du voltage à utiliser, contactez votre fournisseur
électrique.
•
Si le bloc d’alimentation est endommagé, n’essayez pas de le réparer vous-même.
Contactez un technicien électrique qualié ou votre revendeur.
NE PAS jeter au feu. NE PAS court-
Français
vii

Français
Conventions utilisés dans ce manuel
Pour être certains que vous effectuiez certaines tâches correctement, veuillez prendre notes
des symboles suivants.
DANGER/AVERTISSEMENT: Ces informations vous permettront d’éviter de
vous blesser lors de la réalisation d’une tâche.
ATTENTION : Informations destinées à éviter d’endommager le matériel lors
d’une tâche.
IMPORTANT : Instructions que vous devez suivre pour terminer une tâche.
Français
REMARQUE : Informations additionnelles destinées à certaines situations
spéciques..
Où trouver plus d’informations
Consultez les sources suivantes pour plus d’informations ou pour la mise à jour du produit
et/ou des logiciels.
Sites Web ASUS
Le site Web ASUS offre des informations à jour sur le matériel ASUS et sur les logiciels
afférents. Reportez-vous au site Web d’ASUS sur www.asus.com.
Support technique ASUS local
Visitez le site de support d’ASUS sur
contact avec un ingénieur de support technique.
http://support.asus.com/contact pour prendre
viii

Français
Contenu de la boîte
C
Ordinateur de bureau ASUS
Tapis de souris x1 Cordon d’alimentation x1 NERO 9 x1
CD de restauration x1 CD de support x1 Carte de garantie x1
Attaches de câble x3 Manuel de l’utilisateur x1
• Si l’un des éléments est endommagé ou manquant, contactez votre revendeur.
• Les illustrations ci-dessus sont données à titre indicatif. Les spécications du produit
peuvent varier en fonction des modèles.
• Le clavier et la souris peuvent être inclus dans certaines régions.
Clavier de jeu USB x1
(Optionnel)
Souris de jeu x1 (Optionnel)
Français
ix

Français
x

Chapitre 1
Démarrer
Bienvenue !
Merci pour votre achat d’un ordinateur de bureau ASUS Séries CG !
Les séries d’ordinateurs de bureau ASUS Séries CG offrent des performances à la pointe de
l’industrie, une abilité sans faille et des utilitaires variés et conviviaux. Le tout dans un boîtier
au style futuriste et stylisé.
Lisez la carte de garantie ASUS avant de congurer votre ordinateur de bureau ASUS.
Faire connaissance avec votre ordinateur
Les illustrations sont uniquement données à titre indicatif. Les ports et leur emplacement
ainsi que la couleur du châssis peuvent varier en fonction des modèles.
Panneau avant
1
2
3
14
13
12
11
8
4
5
6
7
8
9
10
Cliquez sur un nombre pour
visualiser la description
correspondante.
ASUS Séries CG 1-1

Français
1. Clapet des ports d’E/S. Soulevez pour accéder aux ports d’E/S.
2. Lecteur optique.
3. LED d’activité du lecteur optique.
4. Bouton d’éjection d’urgence du lecteur optique.
s’éjecte pas, insérez un objet pointu tel qu’un stylo à bille pour éjecter le plateau.
5. Bouton d’éjection du lecteur optique.
optique.
6. Port microphone (rose).
Français
7. Port casque (vert).
8. Ports USB 2.0.
périphériques disposant de ports USB 2.0 (souris, imprimante, PDA, appareil photo).
9. Capteur d’alimentation.
10. Lecteur d’empreintes digitales.
digitale pour sécuriser votre ordinateur contre les accès non autorisés.
Ces ports USB (Universal Serial Bus) 2.0 permettent de connecter des
Ce port permet de connecter un micro.
Se connecte à des écouteurs stéréo ou à une paire d’enceintes.
Touchez ce capteur pour allumer l’ordinateur.
Appuyez pour éjecter le plateau du lecteur
Ce lecteur numérise et anthentie une empreinte
Si le plateau du lecteur optique ne
Avant d’utiliser le lecteur d’empreintes digitales, assurez-vous d’avoir congurer un compte
utilisateur et enregistré une ou plusieurs empreintes digitales.
11. Port IEEE 1394a. Ce port IEEE 1394a 6 broches offre une connectivité haut débit pour
les dispositifs audio/vidéo, les périphériques de stockage ou portables et les PC.
12. Fente pour carte Secure Digital™ / MultiMediaCard/Memory Stick.
carte mémoire Secure Digital™, MultiMediaCard ou Memory Stick dans l’une de ces
fentes.
13. Fente pour carte Smart.
14. Fente pour carte CompactFlash
Microdrive™ dans ce slot.
Insérez une carte Smart dans cette fente.
®
/ Microdrive™. Insérez une carte CompactFlash® /
Insérez une
1-2 Chapitre 1 : Mise en route

Français
Panneau arrière
CG7435
7 8 9
13
1
2
3
4
5
6
5
17
22
21
5
20
14
19
18
10 11 12
Cliquez sur un nombre pour visualiser la description correspondante.
1. Port souris PS/2 (vert). Ce port est destiné à la connexion d’une souris PS/2.
2. Port clavier PS/2 (mauve). Ce port est destiné à la connexion d’un clavier PS/2.
3. Bouton d’effacement du CMOS. Appuyez sur ce bouton pour effacer les informations
de conguration lorsque le système plante en raison d’un overclocking.
4. Ports USB 3.0. Ces ports USB (Universal Serial Bus) 3.0 permettent de connecter des
périphériques disposant de ports USB 3.0.
5. Ports USB 2.0. Ces ports USB (Universal Serial Bus) 2.0 permettent de connecter des
périphériques disposant de ports USB 2.0 (souris, imprimante, PDA, appareil photo).
6. Port eSATA. Ce port permet de connecter un périphérique Serial ATA (SATA) tel qu’un
disque dur ou un lecteur optique externe.
7. Port de sortie pour haut-parleurs latéraux (gris). Ce port permet de connecter les
haut-parleurs latéraux d’un système d’enceintes 8 canaux.
14
17
16
15
Français
ASUS Séries CG 1-3

Français
8. Port de sortie pour haut-parleurs arrières (noir). Ce port permet de connecter les
haut-parleurs arrières d’un système d’enceintes 4, 6 et 8 canaux.
9. Port de sortie pour haut-parleur central/Caisson de basse (orange). Ce port
permet de connecter le haut-parleur central ou le caisson de basse d’un système
d’enceintes.
10. Port microphone (rose). Ce port permet de connecter un microphone.
11. Port de sortie audio (vert). Ce port permet de connecter un casque audio ou un haut-
parleur. En conguration audio 4, 6 ou 8 canaux, ce port se connecte aux haut-parleurs
avants d’un système d’enceintes.
12. Port d’entrée audio (bleu clair). Ce port permet de connecter un lecteur CD/DVD ou
Français
toute autre source audio.
Reportez-vous au tableau de conguration audio ci-dessous pour une description de la
fonction des ports audio en conguration 2, 4, 6 ou 8 canaux.
Congurations audio 2, 4, 6 et 8 canaux
Port
Bleu clair Entrée audio Entrée audio Entrée audio Entrée audio
Vert Sortie audio
Rose Entrée micro Entrée micro Entrée micro Entrée micro
Orange – –
Noir –
Gris – – –
Casque/2
canaux
4 canaux 6 canaux 8 canaux
Sortie haut-parleurs
avants
Sortie haut-parleurs
arrières
Sortie haut-parleurs
avants
Haut-parleur central/
Caisson de basse
Sortie haut-parleurs
arrières
Sortie haut-parleurs
Haut-parleur central/
Caisson de basse
Sortie haut-parleurs
Sortie haut-parleurs
avants
arrières
latéraux
13. Ports DVI-I. Ces ports permettent de connecter un téléviseur ou un moniteur disposant
d’un connecteur DVI-I.
14. Supports métalliques
. Retirez ces supports métalliques pour insérer une carte
d’extension.
15. Connecteur d’alimentation. Branchez le cordon d’alimentation sur ce connecteur.
Tension nominale : 100-240V~, 60Hz/50Hz, 10A-5A
16. Interrupteur d’alimentation. Déplacez cet interrupteur pour alimenter ou non
l’ordinateur en courant électrique.
17. Bouches d’aération. Ces ouvertures du châssis permettent la ventilation de l’air.
NE PAS couvrir les bouches d’aération du châssis an de garantir la bonne ventilation de
votre ordinateur
18. DisplayPorts.
Ces ports permettent de connecter un moniteur d’afchage.
19. Ports HDMI. Ces ports permettent de connecter un moniteur HDMI ou tout autre
équipement doté d’un connecteur HDMI.
1-4 Chapitre 1 : Mise en route

Français
20. Port réseau (RJ-45). Ce port permet une connexion Gigabit à un réseau local par le
biais d’un hub réseau.
Indicateurs LED réseau
LED Activité/Lien LED vitesse
État Description État Description
ÉTEINTE Pas de lien ÉTEINTE Connexion 10Mbps
ORANGE Lié ORANGE Connexion 100Mbps
CLIGNOTANTE Activité de
données
VERTE Connexion 1Gbps
LED ACT/
VITESSE
LIEN
Port réseau
LED
21. Port IEEE 1394a. Ce port permet de connecter un périphérique IEEE 1394 tel qu’un
camescope.
22. Port de sortie S/PDIF optique.
Ce port sert à être relié à un périphérique audio
externe via un câble optique S/PDIF.
CG8490
1
2
3
4
5
5
6 7 8
12
16
22
21
20
19
13
18
17
Français
9 10 11
13
16
15
14
Cliquez sur un nombre pour visualiser la description correspondante.
ASUS Séries CG 1-5

Français
1. PS/2 mouse port (green). This port is for a PS/2 mouse.
2. PS/2 keyboard port (purple). This port is for a PS/2 keyboard.
3. Bouton d’effacement du CMOS. Appuyez sur ce bouton pour effacer les informations
de conguration lorsque le système plante en raison d’un overclocking.
4. Ports USB 3.0. Ces ports USB (Universal Serial Bus) 3.0 permettent de connecter des
périphériques disposant de ports USB 3.0.
5. Ports USB 2.0. Ces ports USB (Universal Serial Bus) 2.0 permettent de connecter des
périphériques disposant de ports USB 2.0 (souris, imprimante, PDA, appareil photo).
6. Port de sortie pour haut-parleurs latéraux (gris). Ce port permet de connecter les
haut-parleurs latéraux d’un système d’enceintes 8 canaux.
Français
7. Port de sortie pour haut-parleurs arrières (noir). Ce port permet de connecter les
haut-parleurs arrières d’un système d’enceintes 4, 6 et 8 canaux.
8. Port de sortie pour haut-parleur central/Caisson de basse (orange). Ce port
permet de connecter le haut-parleur central ou le caisson de basse d’un système
d’enceintes.
9. Port microphone (rose). Ce port permet de connecter un microphone.
10. Port de sortie audio (vert). Ce port permet de connecter un casque audio ou un haut-
parleur. En conguration audio 4, 6 ou 8 canaux, ce port se connecte aux haut-parleurs
avants d’un système d’enceintes.
11. Port d’entrée audio (bleu clair). Ce port permet de connecter un lecteur CD/DVD ou
toute autre source audio.
Reportez-vous au tableau de conguration audio ci-dessous pour une description de la
fonction des ports audio en conguration 2, 4, 6 ou 8 canaux.
Congurations audio 2, 4, 6 et 8 canaux
Port
Bleu clair Entrée audio Entrée audio Entrée audio Entrée audio
Vert Sortie audio
Rose Entrée micro Entrée micro Entrée micro Entrée micro
Orange – –
Noir –
Gris – – –
Casque/2
canaux
4 canaux 6 canaux 8 canaux
Sortie haut-parleurs
avants
Sortie haut-parleurs
arrières
Sortie haut-parleurs
avants
Haut-parleur central/
Caisson de basse
Sortie haut-parleurs
arrières
Sortie haut-parleurs
Haut-parleur central/
Caisson de basse
Sortie haut-parleurs
Sortie haut-parleurs
avants
arrières
latéraux
12. Ports DVI-I. Ces ports permettent de connecter un téléviseur ou un moniteur disposant
d’un connecteur DVI-I.
13. Supports métalliques
. Retirez ces supports métalliques pour insérer une carte
d’extension.
14. Connecteur d’alimentation. Branchez le cordon d’alimentation sur ce connecteur.
Tension nominale : 100-240V~, 60Hz/50Hz, 10A-5A
1-6 Chapitre 1 : Mise en route

Français
15. Interrupteur d’alimentation. Déplacez cet interrupteur pour alimenter ou non
l’ordinateur en courant électrique.
16. Bouches d’aération. Ces ouvertures du châssis permettent la ventilation de l’air.
NE PAS couvrir les bouches d’aération du châssis an de garantir la bonne ventilation de
votre ordinateur
17. DisplayPorts. Ces ports permettent de connecter un moniteur d’afchage.
18. Ports HDMI. Ces ports permettent de connecter un moniteur HDMI ou tout autre
équipement doté d’un connecteur HDMI.
19. Port réseau (RJ-45).
Ce port permet une connexion Gigabit à un réseau local par le
biais d’un hub réseau.
Indicateurs LED réseau
LED Activité/Lien LED vitesse
État Description État Description
ÉTEINTE Pas de lien ÉTEINTE Connexion 10Mbps
ORANGE Lié ORANGE Connexion 100Mbps
CLIGNOTANTE Activité de
données
VERTE Connexion 1Gbps
LED ACT/
VITESSE
LIEN
Port réseau
LED
Français
20. Port IEEE 1394a.
Ce port permet de connecter un périphérique IEEE 1394 tel qu’un
camescope.
21. Port de sortie S/PDIF optique.
Ce port sert à être relié à un périphérique audio
externe via un câble optique S/PDIF.
22. Port de sortie S/PDIF coaxial.
Ce port sert à être relié à un périphérique audio
externe via un câble coaxial S/PDIF.
ASUS Séries CG 1-7

Français
Congurer votre ordinateur
Cette section vous offre des informations sur la connexion des composants principaux de
l’ordinateur tels que le moniteur, le clavier, la souris et le cordon d’alimentation.
Connecter un moniteur externe
Pour connecter un moniteur externe à la carte graphique ASUS :
1. Connectez votre moniteur à l’un des ports d’afchage de la carte graphique ASUS.
2. Connectez le moniteur à une source d’alimentation.
Français
Les ports d’afchage de la carte graphique ASUS peuvent varier en fonction des modèles.
1-8 Chapitre 1 : Mise en route

Français
Connecter un clavier et une souris USB
C
Connectez un clavier et/ou une souris USB aux ports USB situés à l’arrière de votre
ordinateur.
Connecter le cordon d’alimentation
Connectez une extrémité du cordon d’alimentation au connecteur d’alimentation situé à
l’arrière de votre ordinateur et l’autre extrémité à une prise électrique.
Français
ASUS Séries CG 1-9

Allumer ou éteindre l’ordinateur
Cette section décrit comment éteindre ou allumer votre ordinateur.
Allumer votre ordinateur
Pour allumer votre ordinateur :
1. Allumez le moniteur.
2. Placez l’ordinateur sous tension en mettant l’interrupteur d’alimentation sur la position
“I”, puis touchez le capteur pour mettre en route l’ordinateur.
Français
Sous tension
Hors
tension
Capteur
d’alimentation
3. Patientez le temps que le système d’exploitation se charge automatiquement.
Éteindre votre ordinateur
Pour éteindre votre ordinateur :
1. Fermez toutes les applications en cours d’exécution.
2. Cliquez sur
3. Cliquez sur
4. Placez l’interrupteur d’alimentation sur la position “
1-10 Chapitre 1 : Mise en route
dans le Bureau de Windows®.
pour fermer le système d’exploitation.
O”.

Chapitre 2
Utiliser Windows® 7
Démarrer pour la première fois
Lorsque vous démarrez votre ordinateur pour la première fois, une série d’écrans
apparaissent pour vous guider dans la conguration des paramètres de base du système
d’exploitation Windows® 7.
Pour démarrer pour la première fois :
1. Allumez votre ordinateur. Patientez quelques minutes jusqu’à ce que l’écran
Congurer Windows apparaisse.
2. Dans le menu déroulant, sélectionnez votre langue. Cliquez sur
3. Dans les menus déroulant, sélectionnez votre
monétaires et Disposition du clavier. Cliquez sur Suivant.
4. Entrez un identiant unique dans les champs
l’ordinateur. Cliquez sur Suivant.
5. Entrez les informations nécessaires à la conguration du mot de passe, puis cliquez
sur Suivant. Vous pouvez aussi cliquer sur Suivant pour ignorer cette étape.
Si vous souhaitez dénir un mot de passe ultérieurement, référez-vous à la section
Congurer un compte d’utilisateur et un mot de passe de ce chapitre.
Pays ou région, Formats d’horaires et
nom d’utilisateur et nom de
Suivant.
6. Lisez attentivement les termes du contrat de licence. Cochez
contrat de licence puis cliquez sur Suivant.
7. Sélectionnez
les mises à jour importantes pour congurer les paramètres de sécurité de votre
ordinateur. Pour ignorer cette étape, sélectionnez Me redemander ultérieurement.
8. Vériez vos paramètres de date et d’heure. Cliquez sur
les nouveaux paramètres et redémarre. Vous pouvez dès lors commencer à utiliser
votre ordinateur.
ASUS Séries CG 2-1
Utiliser les paramètres recommandés ou Installer uniquement
J’accepte les termes du
Suivant. Le système charge

Français
Utiliser le Bureau de Windows® 7
Cliquez sur l’icône Démarrer > Aide et support pour obtenir plus d’informations sur
Windows® 7.
Français
Menu
Démarrer
Barre des tâches
Zone de notication
Utiliser le menu Démarrer
Le menu Démarrer vous donne accès aux programmes, utilitaires et autres outils utiles pour
votre ordinateur. Il permet également d’obtenir plus d’informations sur Windows 7 par le biais
de la fonctionnalité Aide et support.
Lancer des éléments du menu Démarrer
Pour exécuter un élément du menu Démarrer :
®
1. Dans la barre des tâches de Windows
2. Dans le menu Démarrer, sélectionnez l’élément à exécuter.
Vous pouvez épingler les programmes que vous souhaitez voir apparaître dans le menu
Démarrer. Pour plus de détails, référez-vous à la section Épingler des programmes dans
le menu Démarrer ou la barre des tâches de ce chapitre.
2-2 Chapitre 2 : Utiliser Windows® 7
, cliquez sur l’icône Démarrer .

Français
Utiliser l’élément Mise en route
La fonctionnalité Mise en route du menu
Démarrer contient des informations sur les tâches
de base comme la personnalisation de Windows®,
l’ajout de nouveaux utilisateurs et le transfert de
chiers pour vous aider à vous familiariser avec
Windows® 7.
Pour utiliser la fonctionnalité Mise en route :
®
1. Dans la barre des tâches de Windows
cliquez sur l’icône Démarrer pour ouvrir
le menu Démarrer.
2. Sélectionnez
tâches disponibles apparaît.
3. Sélectionnez une tâche.
Mise en route. La liste des
,
Utiliser la barre des tâches
La barre des tâches vous permet de démarrer et de gérer les programmes ou outils installés
sur votre ordinateur.
Lancer un programme depuis la barre des tâches
Pour lancer un programmes depuis la barre des tâches :
®
• Dans la barre des tâches de Windows
programme/utilitaire associé. Cliquez de nouveau sur l’icône pour masquer le
programme.
, cliquez sur une icône pour lancer le
Français
Vous pouvez épingler les programmes que vous souhaitez voir apparaître dans la barre
des tâches. Pour plus de détails, référez-vous à la section Épingler des programmes
dans le menu Démarrer ou la barre des tâches de ce chapitre.
ASUS Séries CG 2-3

Français
Épingler des éléments dans la liste des
liens
Lorsque vous faites un clic droit sur une icône de
la barre des tâches, une liste apparaît pour offrir un
accès rapide à certains liens des programmes ou
éléments. Vous pouvez épingler divers éléments
dans la liste de liens comme la liste de vos sites
Web favoris, les dossiers fréquemment utilisés ou
vos chiers multimédia préférés.
Français
Pour épingler des éléments à la liste de liens :
1. Dans la barre des tâches, faites un clic droit sur une icône.
2. Dans la liste des liens, faites un clic droit sur l’élément à épingler, puis sélectionnez
Épingler à cette liste.
Détacher des éléments de la liste de liens
Pour détacher des éléments de la liste de liens :
1. Dans la barre des tâches, faites un clic droit sur une icône.
2. Dans la liste des liens, faites un clic droit sur l’élément à supprimer de la liste des liens,
puis sélectionnez Détacher de cette liste.
Épingler des programmes au menu
Démarrer ou à la barre des tâches
Pour épingler des programmes au menu Démarrer
ou à la barre des tâches :
®
1. Dans la barre des tâches de Windows
sur l’icône Démarrer pour ouvrir le menu
Démarrer.
2. Faites un clic droit sur l’élément à épingler au
menu Démarrer ou à la barre des tâches.
3. Sélectionnez
Épingler au menu Démarrer.
Épingler à la barre des tâches ou
, cliquez
Vous pouvez aussi faire un clic
droit sur l’icône d’un programme en
cours d’exécution de la barre des
tâches, puis sélectionner Épingler
ce programme à la barre des
tâches.
2-4 Chapitre 2 : Utiliser Windows® 7

Français
Détacher des programmes du menu Démarrer
Pour détacher des programmes du menu Démarrer :
®
1. Dans la barre des tâches de Windows
, cliquez sur l’icône Démarrer pour ouvrir le
menu Démarrer.
2. Dans le menu Démarrer, faites un clic droit sur le programme à détacher, puis
sélectionnez Supprimer de cette liste.
Détacher des programmes de la barre des tâches
Pour détacher des programmes de la barre des
tâches :
1. Dans la barre des tâches, faites un clic
droit sur le programme à supprimer, puis
sélectionnez Détacher ce programme de
la barre des tâches.
Utiliser la zone de notication
Par défaut, la zone de notication afche les trois icônes suivantes :
Centre de maintenance
Cliquez sur cette icône pour afcher tous les messages d’alerte/notications et ouvrir le
Centre de maintenance Windows®.
Connexion réseau
Cette icône afche l’état et la puissance du signal de la connexion avec ou sans l.
Volume
Cliquez sur cette icône pour ajuster le volume.
Français
Afcher une notication d’alerte
Pour afcher une notication d’alerte :
• Cliquez sur l’icône
le message pour l’ouvrir.
Pour plus de détails, reportez-vous à la section Utiliser le Centre de maintenance
Windows® de ce chapitre.
ASUS Séries CG 2-5
, puis cliquez sur

Français
Personnaliser les icônes et les notications
Vous pouvez choisir d’afcher ou de masquer les icônes et les notications de la barre des
tâches ou de la zone de notication.
Pour personnaliser les icônes et les notications :
1. Dans la zone de notication, cliquez sur l’icône
2. Cliquez sur
Français
3. Dans le menu déroulant, sélectionnez le comportement de chaque icône ou élément.
Personnaliser.
.
2-6 Chapitre 2 : Utiliser Windows® 7

Français
Gérer vos chiers et vos dossiers
Utiliser Windows® Explorer
Windows® Explorer vous permet de visualiser, gérer et organiser vos chiers et dossiers.
Lancer Windows® Explorer
Pour démarrer Windows Explorer :
1. Dans la barre des tâches de Windows, cliquez sur l’icône Démarrer
menu Démarrer.
2. Cliquez sur
Barre
d’outils
Volet de
navigation
Ordinateur pour lancer Windows Explorer.
Barre de navigation
Icône Afchage
pour ouvrir le
Barre de recherche
Icône Aperçu
Volet
d’afchage
Explorer les chiers et les dossiers
Pour explorer les chiers et les dossiers de votre ordinateur :
1. Lancez Windows Explorer.
2. Localisez vos données à partir du volet de navigation ou d’afchage.
3. Dans la barre de navigation, cliquez sur la èche pour afcher le contenu du disque
dur ou du dossier.
Français
ASUS Séries CG 2-7

Français
Personnaliser l’afche des chiers/dossiers
Pour personnaliser l’afchage de vos chiers/dossiers :
1. Lancez Windows Explorer.
2. Localisez vos données à partir du volet de navigation.
3. Dans la barre d’outils, cliquez sur l’icône Afchage
4. Dans le menu Afchage, déplacez le curseur pour
sélectionner le mode d’afchage à utiliser.
.
Français
Vous pouvez aussi cliquer n’importe
où sur le volet d’afchage, cliquer
sur Afchage, et sélectionner le
type d’afchage désiré.
Organiser vos chiers
Pour organiser vos chiers :
1. Lancez Windows Explorer.
2. Dans le champ
3. Sélectionnez le type d’organisation désiré.
Organiser par, cliquez pour afcher le menu déroulant.
2-8 Chapitre 2 : Utiliser Windows® 7
 Loading...