

Page 1

Index
English ............................................................................1
Čeština ..........................................................................73
Magyar ........................................................................145
Slovensky ................................................................... 217
Polski ..........................................................................289
Page 2

Page 3
ASUS Essentio Desktop PC
CG8270
User Manual
Page 4

English
English
E7070
First Edition
December 2011
Copyright © 2011 ASUSTeK Computer Inc. All Rights Reserved.
No part of this manual, including the products and software described in it, may be reproduced,
transmitted, transcribed, stored in a retrieval system, or translated into any language in any form or by any
means, except documentation kept by the purchaser for backup purposes, without the express written
permission of ASUSTeK Computer Inc. (“ASUS”).
Product warranty or service will not be extended if: (1) the product is repaired, modied or altered, unless
such repair, modication of alteration is authorized in writing by ASUS; or (2) the serial number of the
product is defaced or missing.
ASUS PROVIDES THIS MANUAL “AS IS” WITHOUT WARRANTY OF ANY KIND, EITHER EXPRESS
OR IMPLIED, INCLUDING BUT NOT LIMITED TO THE IMPLIED WARRANTIES OR CONDITIONS OF
MERCHANTABILITY OR FITNESS FOR A PARTICULAR PURPOSE. IN NO EVENT SHALL ASUS, ITS
DIRECTORS, OFFICERS, EMPLOYEES OR AGENTS BE LIABLE FOR ANY INDIRECT, SPECIAL,
INCIDENTAL, OR CONSEQUENTIAL DAMAGES (INCLUDING DAMAGES FOR LOSS OF PROFITS,
LOSS OF BUSINESS, LOSS OF USE OR DATA, INTERRUPTION OF BUSINESS AND THE LIKE),
EVEN IF ASUS HAS BEEN ADVISED OF THE POSSIBILITY OF SUCH DAMAGES ARISING FROM ANY
DEFECT OR ERROR IN THIS MANUAL OR PRODUCT.
SPECIFICATIONS AND INFORMATION CONTAINED IN THIS MANUAL ARE FURNISHED FOR
INFORMATIONAL USE ONLY, AND ARE SUBJECT TO CHANGE AT ANY TIME WITHOUT NOTICE,
AND SHOULD NOT BE CONSTRUED AS A COMMITMENT BY ASUS. ASUS ASSUMES NO
RESPONSIBILITY OR LIABILITY FOR ANY ERRORS OR INACCURACIES THAT MAY APPEAR IN THIS
MANUAL, INCLUDING THE PRODUCTS AND SOFTWARE DESCRIBED IN IT.
Products and corporate names appearing in this manual may or may not be registered trademarks or
copyrights of their respective companies, and are used only for identication or explanation and to the
owners’ benet, without intent to infringe.
2
Page 5

English
Contents
Notices .......................................................................................................... 5
Safety information .......................................................................................... 7
Conventions used in this guide ...................................................................... 8
Where to nd more information ..................................................................... 8
Package contents .......................................................................................... 9
Chapter 1: Getting started
Welcome! ......................................................................................................11
Getting to know your computer .....................................................................11
Setting up your computer ............................................................................. 15
Turning your computer ON/OFF .................................................................. 18
Chapter 2: Using Windows® 7
Starting for the rst time ............................................................................... 19
Using Windows® 7 desktop .......................................................................... 20
Managing your les and folders ................................................................... 22
Restoring your system settings .................................................................... 24
Protecting your computer ............................................................................. 25
Getting Windows® Help and Support ........................................................... 26
Chapter 3: Connecting devices to your computer
Connecting a USB storage device ............................................................... 27
Connecting microphone and speakers ........................................................ 28
Connecting multiple external displays ......................................................... 31
Connecting an HDTV ................................................................................... 33
English
Chapter 4: Using your computer
Proper posture when using your Desktop PC.............................................. 35
Using the memory card reader .................................................................... 36
Using the optical drive ................................................................................. 37
Using the multimedia keyboard (on selected models only) ......................... 38
Chapter 5: Connecting to the Internet
Wired connection ......................................................................................... 43
Wireless connection (on selected models only) ........................................... 45
3
Page 6

English
Contents
English
Chapter 6: Using the utilities
ASUS AI Suite II ........................................................................................... 47
ASUS AI Manager ........................................................................................ 54
Ai Charger .................................................................................................... 56
ASUS Webstorage ....................................................................................... 57
ASUS Easy Update ..................................................................................... 59
ASUS Instant On ......................................................................................... 60
Nero 9 ........................................................................................................ 61
Recovering your system .............................................................................. 62
Chapter 7: Troubleshooting
Troubleshooting ........................................................................................... 65
ASUS contact information ............................................................................ 72
4
Page 7

English
Notices
ASUS Recycling/Takeback Services
ASUS recycling and takeback programs come from our commitment to the highest standards
for protecting our environment. We believe in providing solutions for you to be able to
responsibly recycle our products, batteries, other components, as well as the packaging
materials. Please go to http://csr.asus.com/english/Takeback.htm for the detailed recycling
information in different regions.
REACH
Complying with the REACH (Registration, Evaluation, Authorisation, and Restriction of
Chemicals) regulatory framework, we published the chemical substances in our products at
ASUS REACH website at http://csr.asus.com/english/REACH.htm
Federal Communications Commission Statement
This device complies with Part 15 of the FCC Rules. Operation is subject to the following two
conditions:
• This device may not cause harmful interference; and
• This device must accept any interference received including interference that may cause
undesired operation.
This equipment has been tested and found to comply with the limits for a Class B digital
device, pursuant to Part 15 of the FCC Rules. These limits are designed to provide
reasonable protection against harmful interference in a residential installation. This
equipment generates, uses and can radiate radio frequency energy and, if not installed
and used in accordance with manufacturer’s instructions, may cause harmful interference
to radio communications. However, there is no guarantee that interference will not occur
in a particular installation. If this equipment does cause harmful interference to radio or
television reception, which can be determined by turning the equipment off and on, the user
is encouraged to try to correct the interference by one or more of the following measures:
• Reorient or relocate the receiving antenna.
• Increase the separation between the equipment and receiver.
• Connect the equipment to an outlet on a circuit different from that to which the receiver is
connected.
• Consult the dealer or an experienced radio/TV technician for help.
English
The use of shielded cables for connection of the monitor to the graphics card is required
to assure compliance with FCC regulations. Changes or modications to this unit not
expressly approved by the party responsible for compliance could void the user’s authority
to operate this equipment.
5
Page 8

English
English
RF exposure warning
This equipment must be installed and operated in accordance with provided instructions and
the antenna(s) used for this transmitter must be installed to provide a separation distance of
at least 20 cm from all persons and must not be co-located or operating in conjunction with
any other antenna or transmitter. End-users and installers must be provide with antenna
installation instructions and transmitter operating conditions for satisfying RF exposure
compliance.
Canadian Department of Communications Statement
This digital apparatus does not exceed the Class B limits for radio noise emissions from
digital apparatus set out in the Radio Interference Regulations of the Canadian Department of
Communications.
This class B digital apparatus complies with Canadian ICES-003.
Macrovision Corporation Product Notice
This product incorporates copyright protection technology that is protected by method
claims of certain U.S. patents and other intellectual property rights owned by Macrovision
Corporation and other rights owners. Use of this copyright protection technology must be
authorized by Macrovision Corporation, and is intended for home and other limited viewing
uses only unless otherwise authorized by Macrovision Corporation. Reverse engineering
or disassembly is prohibited.
CAUTION: Danger of explosion if battery is incorrectly replaced. Replace only with the
same or equivalent type recommended by the manufacturer. Dispose of used batteries
according to the manufacturer’s instructions.
6
Lithium-Ion Battery Warning
Page 9

English
Safety information
Disconnect the AC power and peripherals before cleaning. Wipe the Desktop PC using a
clean cellulose sponge or chamois cloth dampened with solution of nonabrasive detergent
and a few drops of warm water then remove any extra moisture with a dry cloth.
• DO NOT place on uneven or unstable work surfaces. Seek servicing if the casing has
been damaged.
• DO NOT expose to dirty or dusty environments. DO NOT operate during a gas leak.
• DO NOT place or drop objects on top and do not shove any foreign objects into the
Desktop PC.
• DO NOT expose to strong magnetic or electrical elds.
• DO NOT expose to or use near liquids, rain, or moisture. DO NOT use the modem during
electrical storms.
• Battery safety warning: DO NOT throw the battery in re. DO NOT short circuit the
contacts. DO NOT disassemble the battery.
• Use this product in environments with ambient temperatures between 0˚C (32F)and
35˚C (95F).
• DO NOT cover the vents on the Desktop PC to prevent the system from getting
overheated.
• DO NOT use damaged power cords, accessories, or other peripherals.
•
To prevent electrical shock hazard, disconnect the power cable from the electrical outlet
before relocating the system.
•
Seek professional assistance before using an adapter or extension cord. These devices
could interrupt the grounding circuit.
•
Ensure that your power supply is set to the correct voltage in your area. If you are not
sure about the voltage of the electrical outlet you are using, contact your local power
company.
•
If the power supply is broken, do not try to x it by yourself. Contact a qualied service
technician or your retailer.
English
7
Page 10
English
English
Conventions used in this guide
To ensure that you perform certain tasks properly, take note of the following symbols used
throughout this manual.
DANGER/WARNING: Information to prevent injury to yourselfInformation to prevent injury to yourself
when trying to complete a task.
CAUTION: Information to prevent damage to the componentsInformation to prevent damage to the components
when trying to complete a task.
IMPORTANT: Instructions that you MUST follow to complete a
task.
NOTE: Tips and additional information to help you complete aTips and additional information to help you complete a
task.
Where to nd more information
Refer to the following sources for additional information and for product and software
updates.
ASUS websites
The ASUS website provides updated information on ASUS hardware and software
products. Refer to the ASUS website www.asus.com.
ASUS Local Technical Support
Visit ASUS website at http://support.asus.com/contact for the contact information of
local Technical Support Engineer.
8
Page 11
English
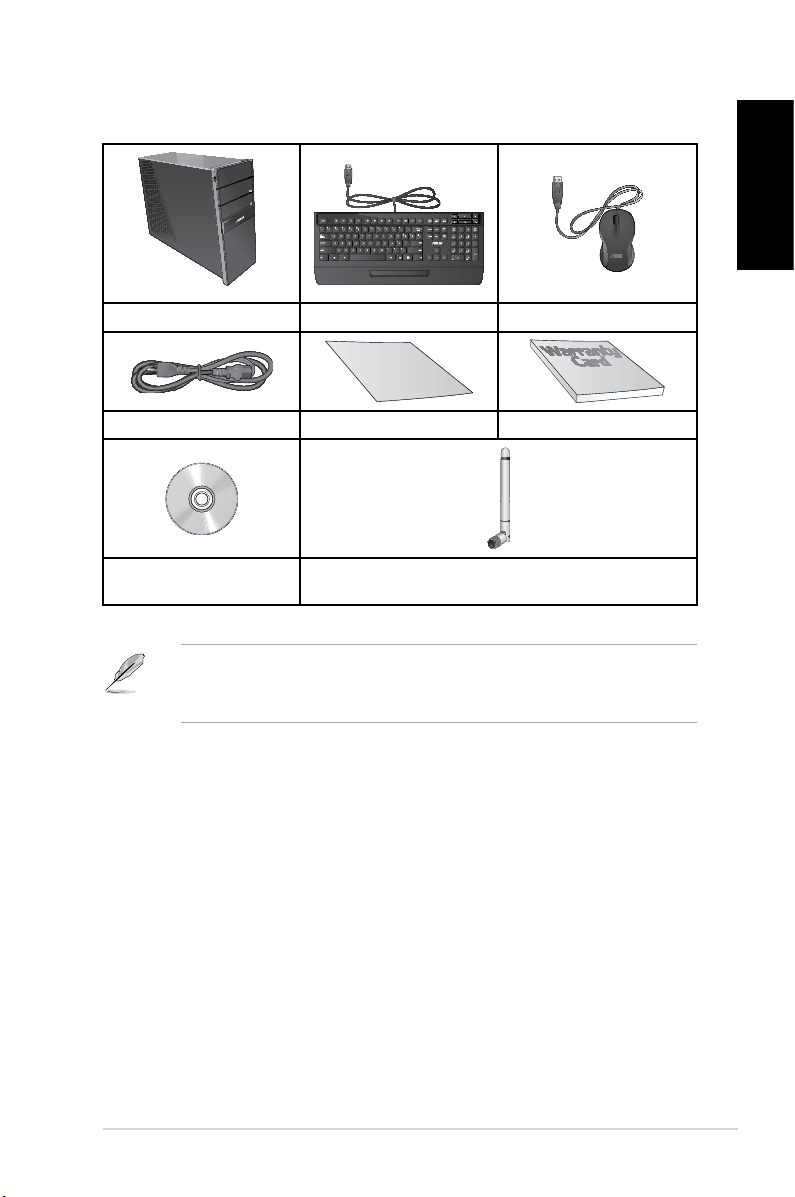
Package contents
Installation Guide
ASUS Essentio Desktop PC Keyboard x1 Mouse x1
Power cord x1 Installation Guide x1 Warranty card x1
English
Nero 9 burning software
DVD x1 (optional)
• If any of the above items is damaged or missing, contact your retailer.
• The illustrated items above are for reference only. Actual product specications may vary
with different models.
Antenna x1 (optional)
9
Page 12

English
10
Page 13
Chapter 1
Getting started
Welcome!
Thank you for purchasing the ASUS Essentio CG8270 Desktop PC!
The ASUS Essentio CG8270 Desktop PC provides cutting-edge performance,
uncompromised reliability, and user-centric utilities. All these values are encapsulated in a
stunningly futuristic and stylish system casing.
Read the ASUS Warranty Card before setting up your ASUS Desktop PC.
Getting to know your computer
Illustrations are for reference only. The ports and their locations, and the chassis color vary
with different models.
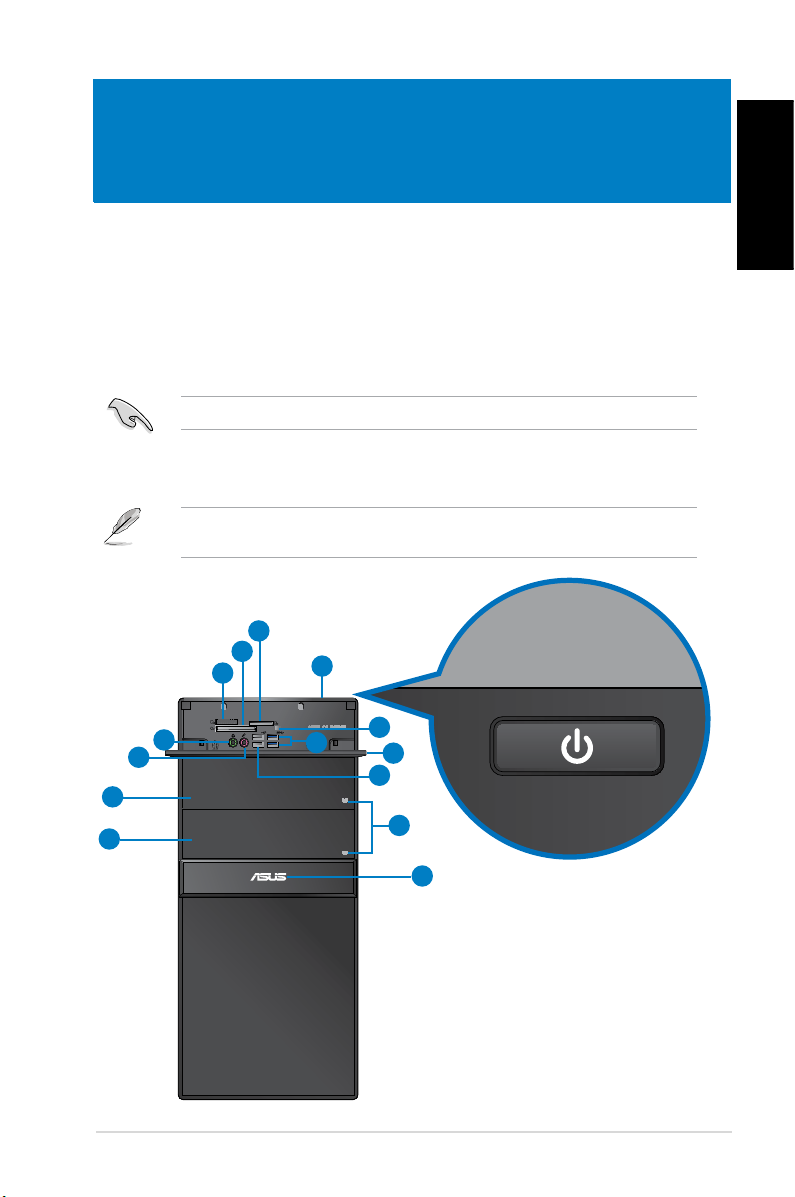
Front panel
2
3
4
1
English
7
8
11
13
ASUS CG8270 11
6
5
9
10
12
14
Page 14

English
English
1. Power button. Press this button to turn on your computer.
2. Secure Digital™ / MultiMediaCard slot. Insert a Secure Digital™ card or
MultiMediaCard into this slot.
3. CompactFlash® / Microdrive™ card slot. Insert your CompactFlash® / Microdrive™
card into this slot.
4. Memory Stick™ / Memory Stick Pro™ card slot. Insert your Memory Stick™ /
Memory Stick Pro™ card into this slot.
5. Memory card reader LED. This LED lights up when a memory card is inserted into
any of the memory card slots and blinks when data is being read from or written to the
memory card.
6. USB 3.0 ports. These Universal Serial Bus 3.0 (USB 3.0) ports connect to USB 3.0
devices such as a mouse, printer, scanner, camera, PDA, and others.
• DO NOT connect a keyboard / mouse to any USB 3.0 port when installing Windows®
operating system.
• Due to USB 3.0 controller limitation, USB 3.0 devices can only be used under Windows®
OS environment and after the USB 3.0 driver installation.
• USB 3.0 devices can only be used as data storage only.
• We strongly recommend that you connect USB 3.0 devices to USB 3.0 ports for faster
and better performance for your USB 3.0 devices.
7. Headphone port (lime). This port connects to a headphone or speaker.
8. Microphone port (pink). This port connects to a microphone.
9. Front I/O ports cover.
10. USB 2.0 ports. These Universal Serial Bus 2.0 (USB 2.0) ports connect to USB 2.0
devices such as a mouse, printer, scanner, camera, PDA, and others.
11. Optical disk drive bay. There is an optical disk drive in this bay.
12. Optical disk drive eject button. Press this button to eject the optical disk drive tray.
13. Optical disk drive bay (empty). You may install an additional optical disk drive in this
bay.
14. Power LED. This LED lights up when you turn on your computer.
12 Chapter 1: Getting started
Page 15
English
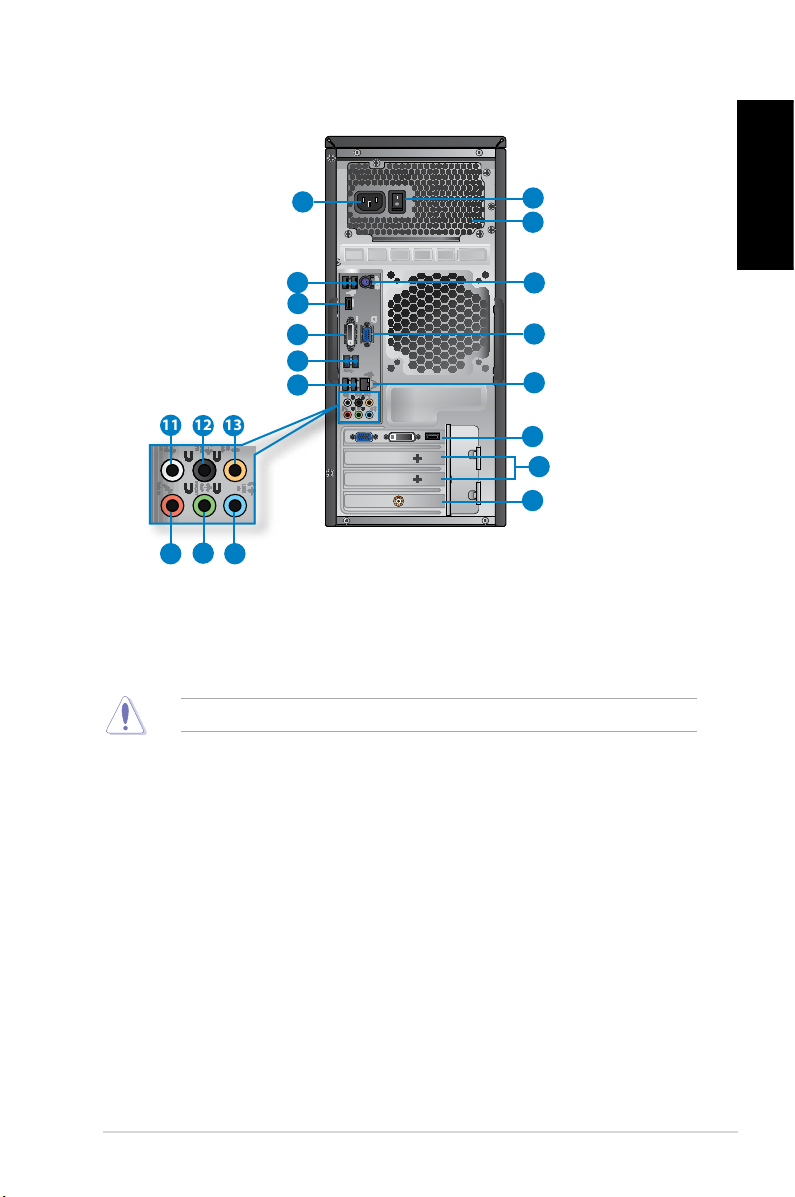
Rear panel
1
5
6
7
9
5
11
14
1. Power connector.Power connector. Plug the power cord to this connector. Power rating: 110~120 /
220~240Vac, 6/3A, 50~60Hz.
2. Power switch.Power switch. Switch to turn ON/OFF the power supply to your computer.
3. Air vents.Air vents. These vents allow air ventilation.
4. PS/2 Keyboard / Mouse Combo port (purple/green).PS/2 Keyboard / Mouse Combo port (purple/green). This port is for a PS/2 keyboard
or mouse.
5. USB 2.0 ports.USB 2.0 ports. These Universal Serial Bus 2.0 (USB 2.0) ports connect to USB 2.0
devices such as a mouse, printer, scanner, camera, PDA, and others.
6. HDMI port. This port is for a High-Denition Multimedia Interface (HDMI) connector,
and is HDCP compliant allowing playback of HD DVD, Blu-ray, and other protected
content.
7. DVI-D port. This port is for any DVI-D compatible device and is HDCP compliant
allowing playback of HD DVD, Blu-ray, and other protected content.
8. VGA port.VGA port. This port is for VGA-compatible devices such as a VGA monitor.
13
12
15
16
DO NOT block the air vents on the chassis.
2
3
4
8
10
17
18
19
English
ASUS CG8270 13
Page 16
English
English
9. USB 3.0 ports.USB 3.0 ports. These Universal Serial Bus 3.0 (USB 3.0) ports connect to USB 3.0
devices such as a mouse, printer, scanner, camera, PDA, and others.
• DO NOT connect a keyboard / mouse to any USB 3.0 port when installing Windows®
operating system.
• Due to USB 3.0 controller limitation, USB 3.0 devices can only be used under Windows®
OS environment and after the USB 3.0 driver installation.
• USB 3.0 devices can only be used as data storage only.
• We strongly recommend that you connect USB 3.0 devices to USB 3.0 ports for faster
and better performance for your USB 3.0 devices.
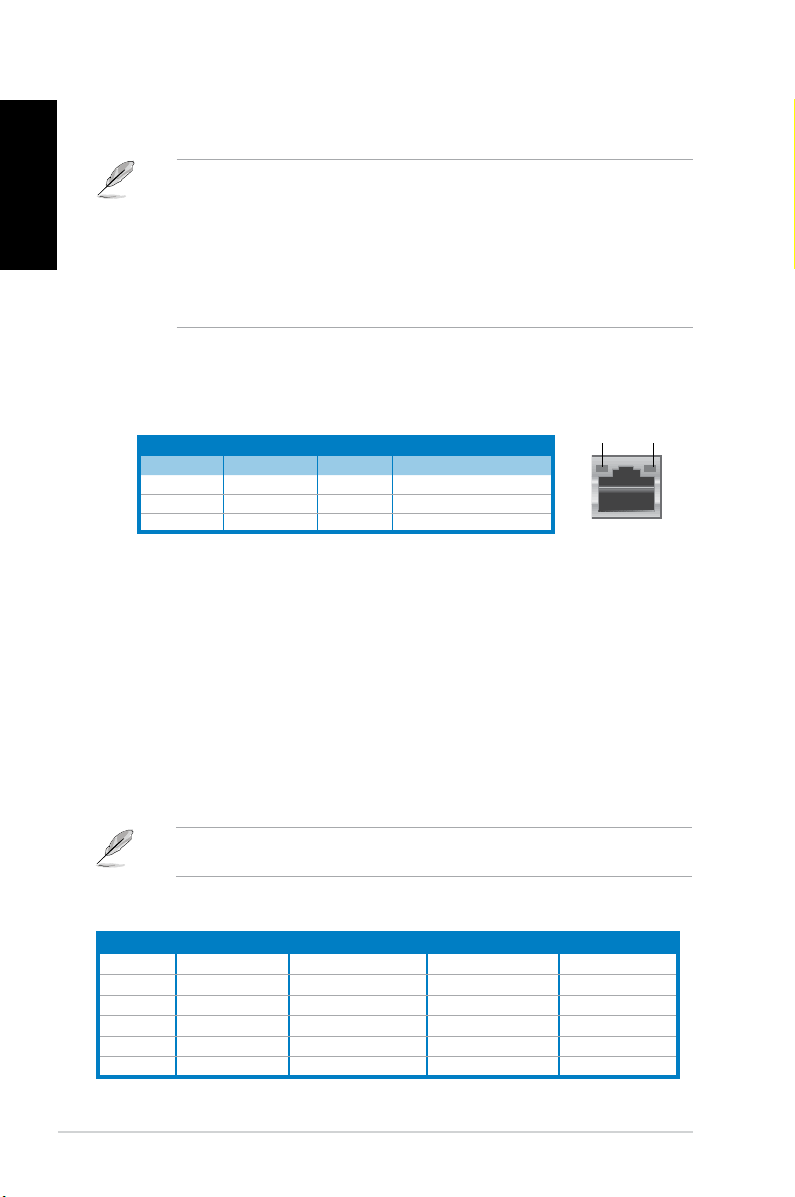
10. LAN (R�-45) port.LAN (R�-45) port. This port allows Gigabit connection to a Local Area Network (LAN)
through a network hub.
LAN port LED indications
Activity/Link LED Speed LED
Status Description Status Description
OFF No link OFF 10Mbps connection
ORANGE Linked ORANGE 100Mbps connection
BLINKING Data activity GREEN 1Gbps connection
ACT/LINK
LED
LAN port
SPEED
LED
11. Side Speaker Out port (gray).Side Speaker Out port (gray). This port connects to the side speakers in an 8-channel
audio conguration.
12. Rear Speaker Out port (black).Rear Speaker Out port (black). This port connects to the rear speakers in a 4, 6, and
8-channel audio conguration.
13. Center/Subwoofer port (orange).Center/Subwoofer port (orange). This port connects to the center/subwoofer
speakers.
14. Microphone port (pink).Microphone port (pink). This port connects to a microphone.
15. Line Out port (lime).Line Out port (lime). This port connects to a headphone or speaker. In a 4, 6, or
8-channel conguration, the function of this port becomes Front Speaker Out.
16. Line In port (light blue).Line In port (light blue). This port connects to a tape, CD, DVD player, or other audio
sources.
Refer to the audio conguration table below for the function of the audio ports in a 2, 4, 6,
or 8-channel conguration.
Audio 2, 4, 6, or 8-channel conguration
Port Headset 2-channel 4-channel 6-channel 8-channel
Light Blue Line In Line In Line In Line In
Lime Line Out Front Speaker Out Front Speaker Out Front Speaker Out
Pink Mic In Mic In Mic In Mic In
Orange – – Center/Subwoofer Center/Subwoofer
Black – Rear Speaker Out Rear Speaker Out Rear Speaker Out
Gray – – – Side Speaker Out
14 Chapter 1: Getting started
Page 17
English
17. ASUS Graphics Card (on selected models only).ASUS Graphics Card (on selected models only). The display output ports on this
optional ASUS Graphics Card may vary with different models.
18. Expansion slot bracket.Expansion slot bracket. Remove the expansion slot bracket when installing an
expansion card.
19. ASUS WLAN Card (on selected models only).ASUS WLAN Card (on selected models only). This optional WLAN card allows your
computer to connect to a wireless network.
Setting up your computer
This section guides you through connecting the main hardware devices, such as the external
monitor, keyboard, mouse, and power cord, to your computer.
Connecting an external monitor
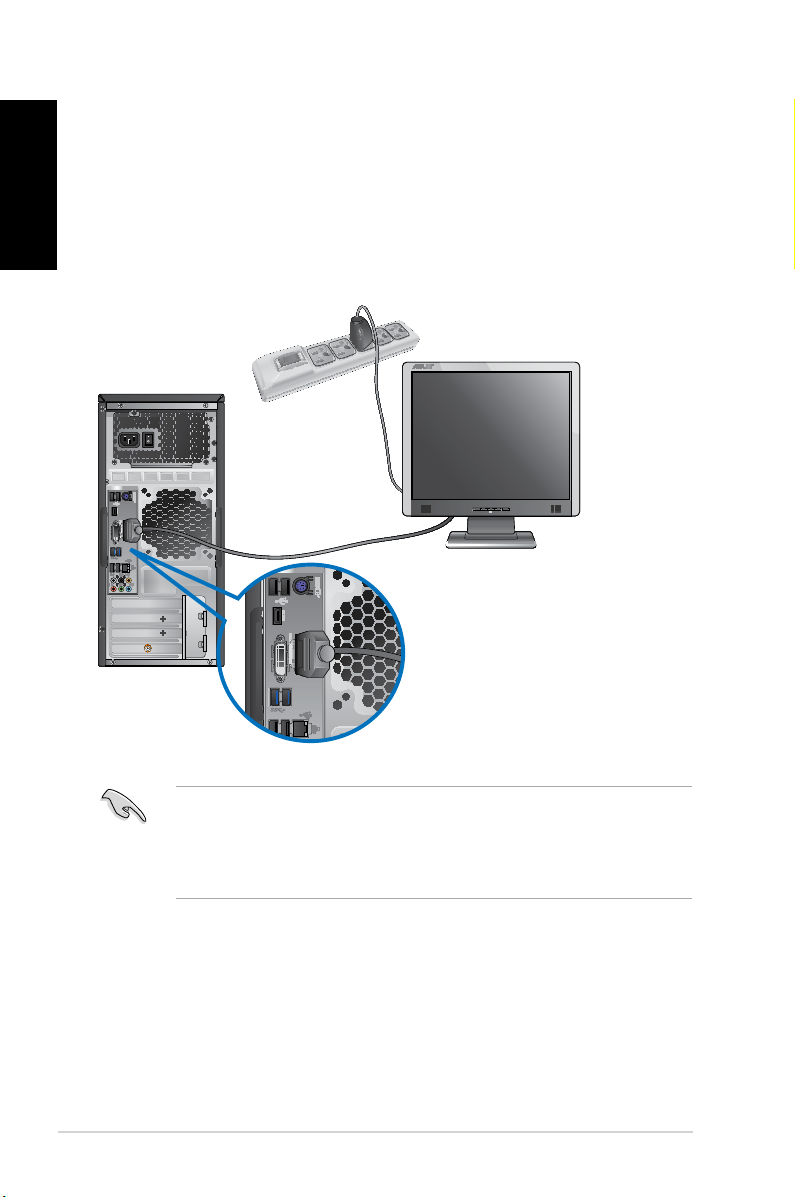
Using the ASUS Graphics Card (on selected models only)
Connect your monitor to the display output port on the discrete ASUS Graphics Card.
To connect an external monitor using the ASUS Graphics Card:
1. Connect a monitor to a display output port on the ASUS Graphics Card.
2. Plug the monitor to a power source.
The display output ports on the ASUS Graphics Card may vary with different models.
English
ASUS CG8270 15
Page 18
English
English
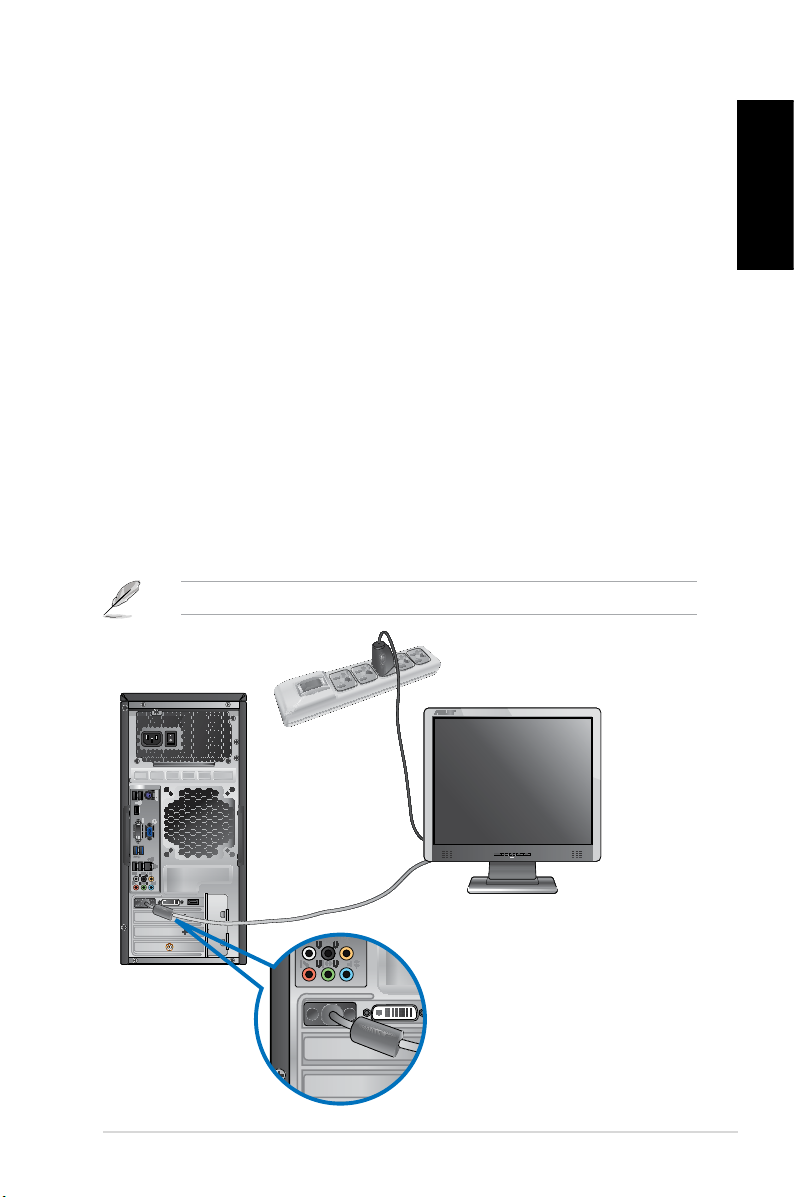
Using the onboard display output ports
Connect your monitor to the onboard display output port.
To connect an external monitor using the onboard display output ports:
1. Connect a VGA monitor to the VGA port, or a DVI-D monitor to the DVI-D port, or an
HDMI monitor to the HDMI port on the rear panel of your computer.
2. Plug the monitor to a power source.
• If your computer comes with an ASUS Graphics Card, the graphics card is set as the
primary display device in the BIOS. Hence, connect your monitor to a display output port
on the graphics card.
• To connect multiple external monitors to your computer, refer to Connecting multiple
external monitors in Chapter 3 of this user manual for details.
16 Chapter 1: Getting started
Page 19
English
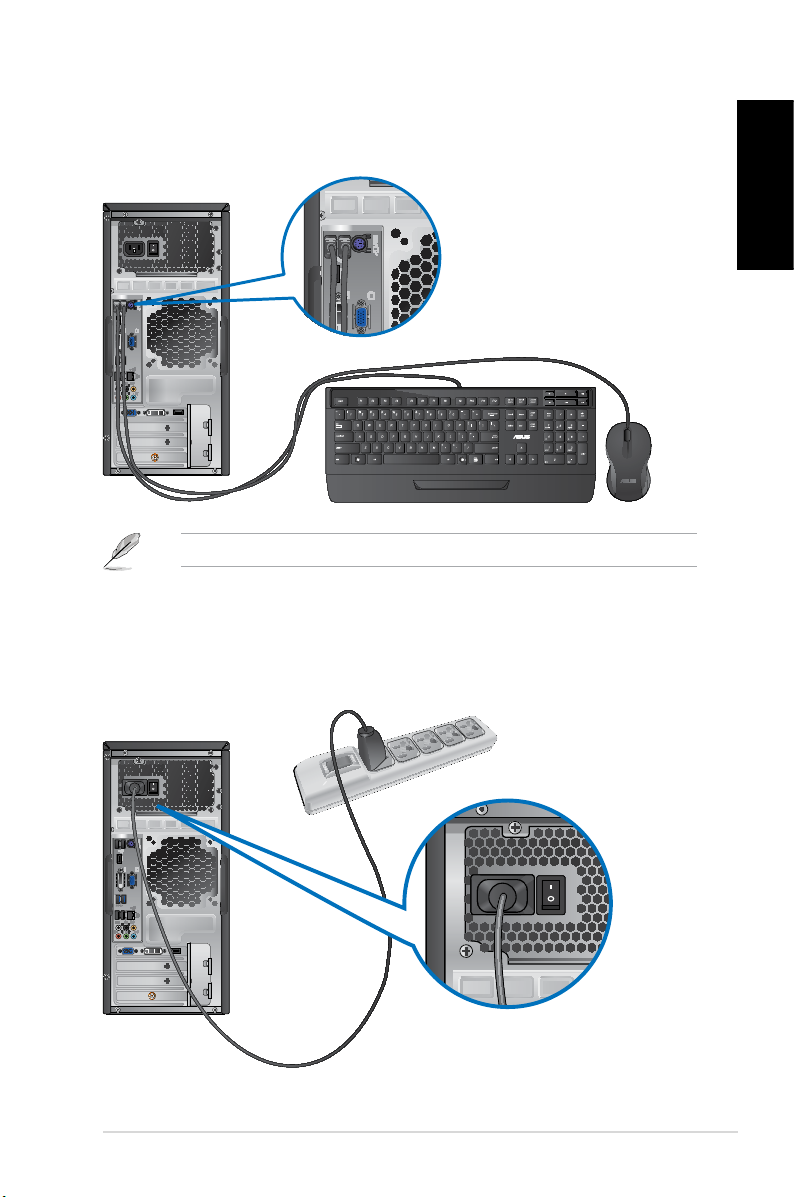
Connecting a USB keyboard and a USB mouse
Connect a USB keyboard and a USB mouse to the USB ports on the rear panel of your
computer.
Connect your USB keyboard and USB mouse to the USB 2.0 ports.
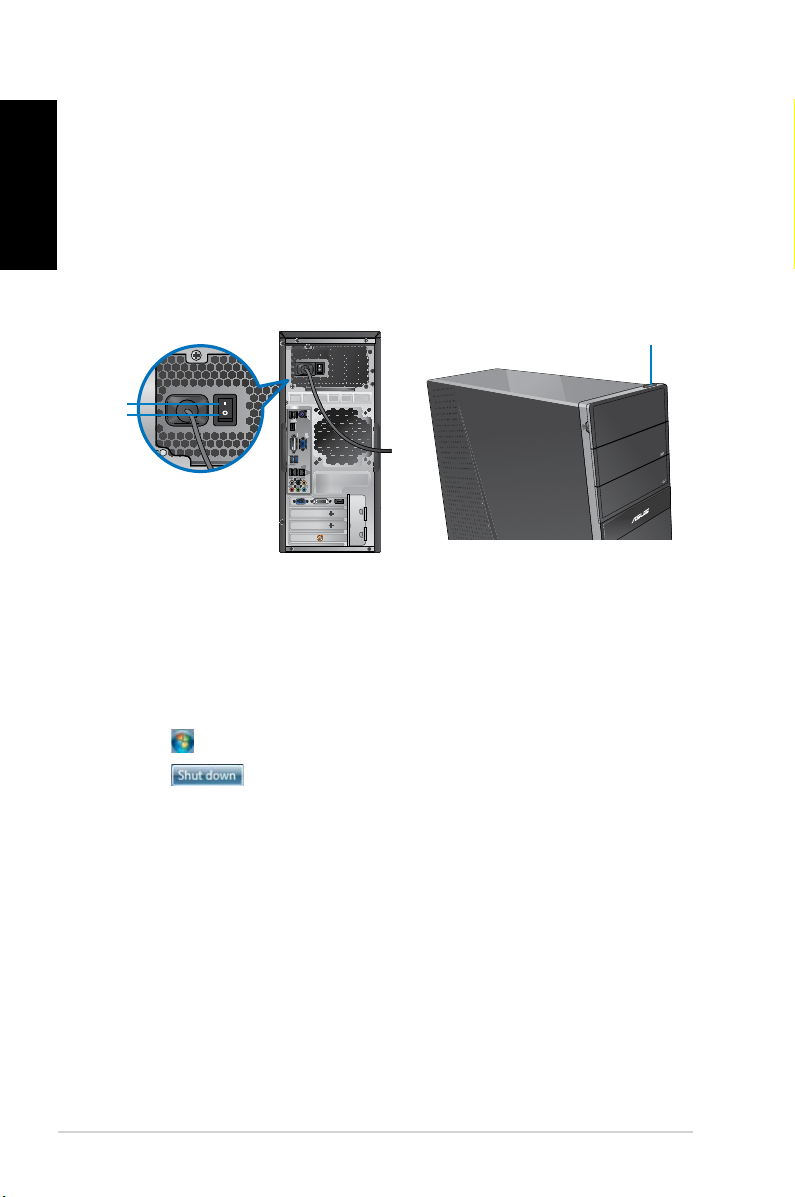
Connecting the power cord
Connect one end of the power cord to the power connector on the rear panel of your
computer and the other end to a power source.
English
ASUS CG8270 17
Page 20
English
Turning your computer ON/OFF
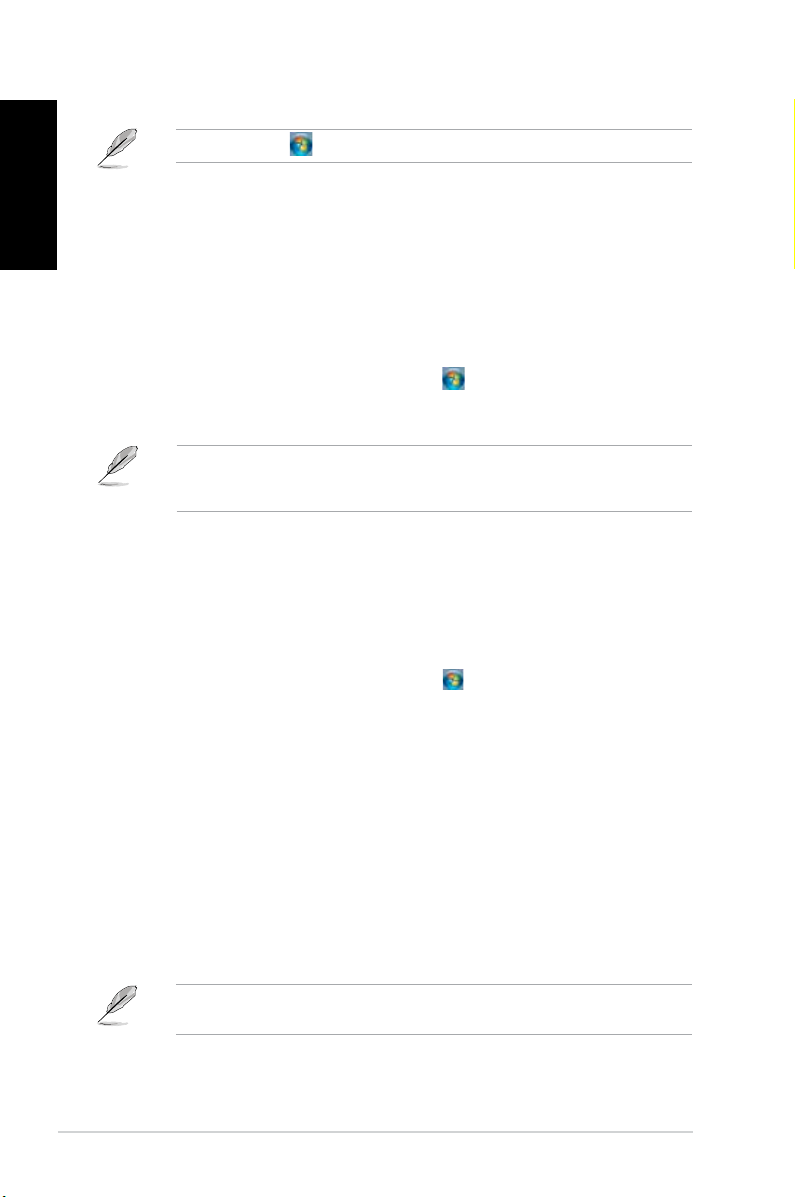
This section describes how to turn on/off your computer after setting up your computer.
Turning your computer ON
To turn your computer ON:
1. Turn on the power switch.
2. Turn your monitor ON.
3. Press the power button on your computer.
Power button
ON
OFF
4. Wait until the operating system loads automatically.
Turning your computer OFF
To turn your computer OFF:
1. Close all running applications.
2. Click on the Windows® desktop.
3. Click to shut down the operating system.
18 Chapter 1: Getting started
Page 21

Chapter 2
Using Windows® 7
Starting for the rst time
When you start your computer for the rst time, a series of screens appear to guide you in
conguring the basic settings of your Windows® 7 operating system.
To start for the rst time:
1. Turn your computer on. Wait for a few minutes until the Set Up Windows screen
appears.
2. From dropdown list, select your language, then click Next.
3. From the dropdown lists, select your Country or region, Time and currency, and
Keyboard layout, then click Next.
4. Key in uniques names for the user name and computer name, then click Next.
5. Key in the necessary information to set up your password, then click Next. You may
also click Next to skip this step without entering any information.
If you want to set up a password for your account later, refer to the section Setting up a
user account and password in this chapter.
6. Carefully read the license terms. Tick I accept the license terms and click Next.
7. Select Use recommended settings or Install important updates only to set up the
security settings for your computer. To skip this step, select Ask me later.
8. Review your date and time settings. Click Next. The system loads the new settings and
restarts. You may now start using your computer.
English
ASUS CG8270 19
Page 22
English
Using Windows® 7 desktop
English
Click the Start icon > Help and Support to obtain more information about Windows® 7.
Using the Start menu
The Start menu gives you access to programs, utilities, and other useful items on your
computer. It also provides you with more information about Windows 7 through its Help and
Support feature.
Launching items from the Start menu
To launch items from the Start menu:
1. From the Windows® taskbar, click the Start icon .
2. From the Start menu, select the item that you want to launch.
You may pin programs that you want constantly displayed on the Start menu. For more
details, refer to the section Pinning programs on the Start menu or taskbar on this
chapter.
Using the Getting Started item
The Getting Started item on the Start menu contains information about some basic tasks
such as personalizing Windows®, adding new users, and transferring les to help you to
familiarize yourself with using Windows® 7.
To use the Getting Started item:
1. From the Windows® taskbar, click the Start icon to launch the Start menu.
2. Select Getting Started. The list of available tasks appears.
3. Select the task that you want to do.
Using the taskbar
The taskbar allows you to launch and manage programs or items installed on your computer.
Launching a program from the taskbar
To launch a program from the taskbar:
• From the Windows® taskbar, click an icon to launch it. Click the icon again to hide the
program.
You may pin programs that you want constantly displayed on the taskbar. For more details,
refer to the section Pinning programs on the Start menu or taskbar on this chapter.
20 Chapter 2: Using Windows® 7
Page 23

English
Pinning items on the jumplists
When you right-click an icon on the taskbar, a jumplist launches to provide you with quickaccess to the program’s or item’s related links.You may pin items on the jumplist such as
favorite websites, often-visited folders or drives, or recently played media les.
To pin items to the jumplist:
1. From the taskbar, right-click an icon.
2. From the jumplist, right-click the item that you want to pin, then select Pin to this list.
Unpinning items from the jumplist
To unpin items from the jumplist:
1. From the taskbar, right-click an icon.
2. From the jumplist, right-click the item that you want to remove from the jumplist, then
select Unpin from this list.
Pinning programs on the Start menu or taskbar
To pin programs on the Start menu or taskbar:
1. From the Windows® taskbar, click the Start icon to launch the Start menu.
2. Right-click the item that you want to pin on the Start menu or taskbar.
3. Select Pin to Taskbar or Pin to Start menu.
You may also right-click on the icon of a running program on the taskbar, then select Pin
this program to taskbar.
English
Unpinning programs from the Start menu
To unpin programs from the Start menu:
1. From the Windows® taskbar, click the Start icon to launch the Start menu.
2. From the Start menu, right-click the program that you want to unpin, then select
Remove from this list.
Unpinning programs from the taskbar
To unpin programs from the taskbar:
1. From the taskbar, right-click the program that you want to remove from the taskbar,
then select Unpin this program from taskbar.
ASUS CG8270 21
Page 24
English
English
Using the notication area
By default, the notication area shows these three icons:
Action Center notication
Click this icon to display all the alert messages/notications and launch the Windows
Action Center.
Network connection
This icon displays the connection status and signal strength of the wired or wireless network
connection.
Volume
Click this icon to adjust the volume.
®
Displaying an alert notication
To display an alert notication:
• Click the Notication icon , then click the message to open it.
For more details, refer to the section Using Windows® Action Center in this chapter.
Customizing icons and notications
You may choose to display or hide the icons and notications on the taskbar or on the
notication area.
To customize icons and notications:
1. From the notication area, click on the arrow icon .
2. Click Customize.
3. From the dropdown list, select the behaviors for the icons or items that you want to
customize.
Managing your les and folders
Using Windows® Explorer
Windows® Explorer allows you to view, manage, and organize your les and folders.
Launching Windows® Explorer
To launch Windows Explorer:
1. From the Windows® taskbar, click the Start icon to launch the Start menu.
2. Click Computer to launch Windows Explorer.
22 Chapter 2: Using Windows® 7
Page 25
English
Exploring les and folders
To explore les and folders:
1. Launch Windows® Explorer.
2. From the navigation or view pane, browse for the location of your data.
3. From the breadcrumb bar, click the arrow to display the contents of the drive or folder.
Customizing the le/folder view
To customize the le/folder view:
1. Launch Windows Explorer.
2. From the navigation pane, select the location of your data.
3. From the toolbar, click the View icon .
4. From the View menu, move the slider to select how you want to view the le/folder.
You may also right-click anywhere on the View pane, click View, and select the view type
that you want.
Arranging your les
To arrange your les:
1. Launch Windows Explorer.
2. From the Arrange by eld, click to display the dropdown list.
3. Select your preferred arrangement type.
English
Sorting your les
To sort your les:
1. Launch Windows Explorer.
2. Right-click anywhere on the View pane.
3. From the menu that appears, select Sort by, then select your preferred sorting type.
Grouping your les
To group your les:
1. Launch Windows Explorer.
2. Right-click anywhere on the View pane.
3. From the menu that appears, select Group by, then select your preferred grouping
type.
ASUS CG8270 23
Page 26
English
English
Adding a new folder
To add a new folder:
1. Launch Windows Explorer.
2. From the toolbar, click New folder.
3. Key in a name for the new folder.
You may also right-click anywhere on the View pane, click New > Folder.
Backing up your les
Setting up a backup
To set up a backup:
1. Click > All Programs > Maintenance > Backup and Restore.
2. Click Set up backup. Click Next.
3. Select your backup destination. Click Next.
4. Select Let Windows choose (recommended) or Let me choose as your backup
mode.
If you select Let Windows choose, Windows will not back up your programs, FAT-
formatted les, Recycle Bin les, or temporary les that are 1GB or more.
5. Follow the onscreen instructions to nish the process.
Restoring your system settings
The Windows® System Restore feature creates a restore point where the computer’s system
settings are stored at certain time and date. It allows you to restore or undo changes to your
computer’s system settings without affecting your personal data.
To restore your system:
1. Close all running applications.
2. Click > All Programs > Accessories > System Tools > System Restore.
3. Follow the onscreen instructions to complete the process.
24 Chapter 2: Using Windows® 7
Page 27
English
Protecting your computer
Using Windows® 7 Action Center
Windows® 7 Action Center provides you with alert notications, security information, system
maintenance information, and the option to automatically troubleshoot and x some common
computer problems.
You may customize the notications. For more details, refer to the previous section
Customizing icons and notications in this chapter.
Launching Windows® 7 Action Center
To launch Windows® 7 Action Center:
1. To launch Windows 7 Action Center, click the Notication icon , then click Open
Action Center.
2. From Windows 7 Action Center, click the task that you want to do.
Using Windows® Update
Windows Update allows you to check and install the latest updates to enhance the security
and performance of your computer.
Launching Windows® Update
To launch Windows® Update:
1. From the Windows® taskbar, click the Start icon to launch the Start menu.
2. Select All Programs > Windows Update.
3. From the Windows Update screen, click the task that you want to do.
English
Setting up a user account and password
You may create user accounts and passwords for people who will use your computer.
Setting up a user account
To set up a user account:
1. From the Windows® taskbar, click > Getting Started > Add new users.
2. Select Manage another account.
3. Select Create a new account.
4. Key in the name of the new user.
5. Select either Standard user or Administrator as the user type.
6. When done, click Create Account.
ASUS CG8270 25
Page 28
English
Setting up a user’s password
To set up a user’s password:
1. Select the user that you would like to set a password.
2. Select Create a password.
3. Key in a password and conrm it. Key in your password’s hint.
4. When done, click Create password.
Activating the anti-virus software
Trend Micro Internet Security is pre-installed on your computer. It is a third-party anti-virus
software protecting your computer from virus. It is purchased separately. You have a 30-day
trial period after activating it.
To activate Trend Micro Internet Security:
1. Run the Trend Micro Internet Security application.
2. Carefully read the license terms. Click Agree & Activate.
3. Input your e-mail address and select your location. Click Next.
4. Click Finish to complete the activation.
Getting Windows® Help and Support
Windows® Help and Support provides you with guides and answers in using the applications
in Windows® 7 platform.
To launch Windows® Help and Support, click > Help and Support.
Ensure that you are connected to the Internet to obtain the latest Windows
26 Chapter 2: Using Windows® 7
®
online help.
Page 29
Chapter 3
Connecting devices to your computer
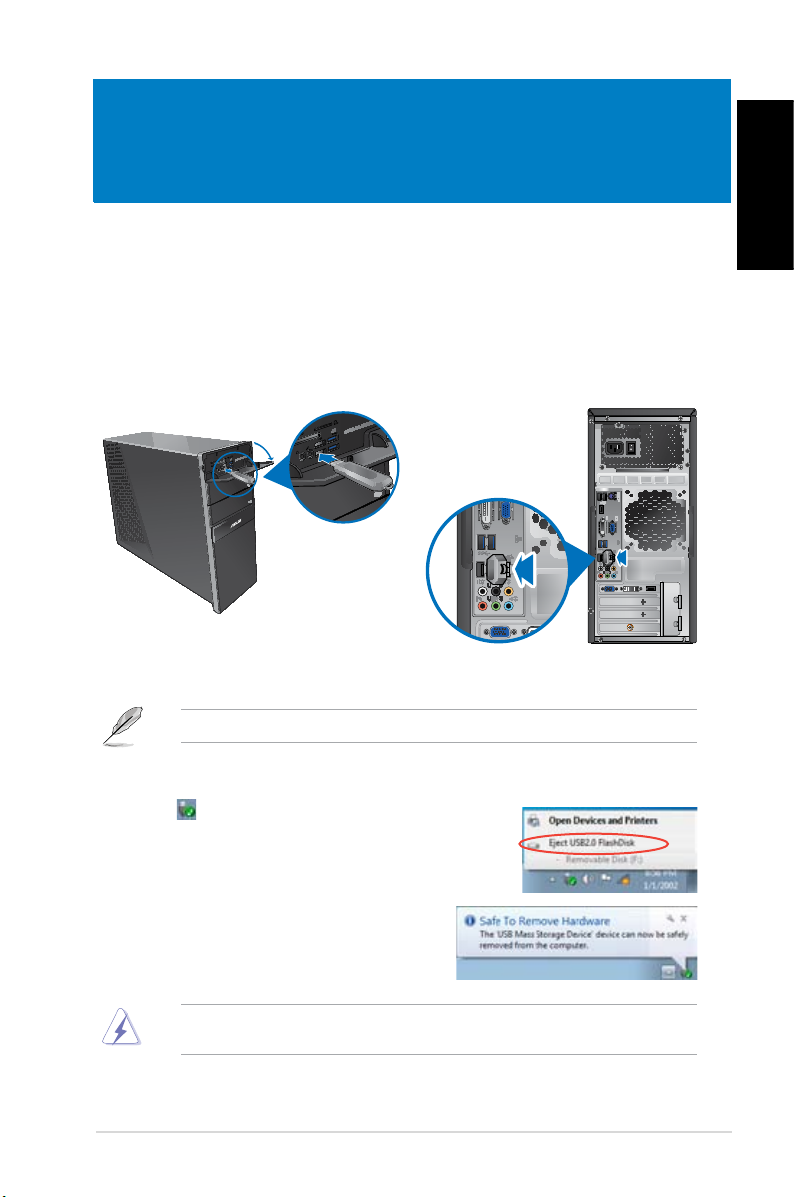
Connecting a USB storage device
This desktop PC provides USB 2.0/1.1 and USB 3.0 ports on both the front and rear panels.
The USB ports allow you to connect USB devices such as storage devices.
To connect a USB storage device:
• Insert the USB storage device to your computer.
English
Front panel
You can connect your USB storage devices to the USB 3.0 ports.
To remove a USB storage device:
1. Click from the Windows notication area on your
computer, then click Eject USB2.0 FlashDisk.
2. When the Safe to Remove Hardware message
pops up, remove the USB storage device from
your computer.
DO NOT remove a USB storage device when data transfer is in progress. Doing so may
cause data loss or damage the USB storage device.
ASUS CG8270 27
Rear panel
Page 30
English
English
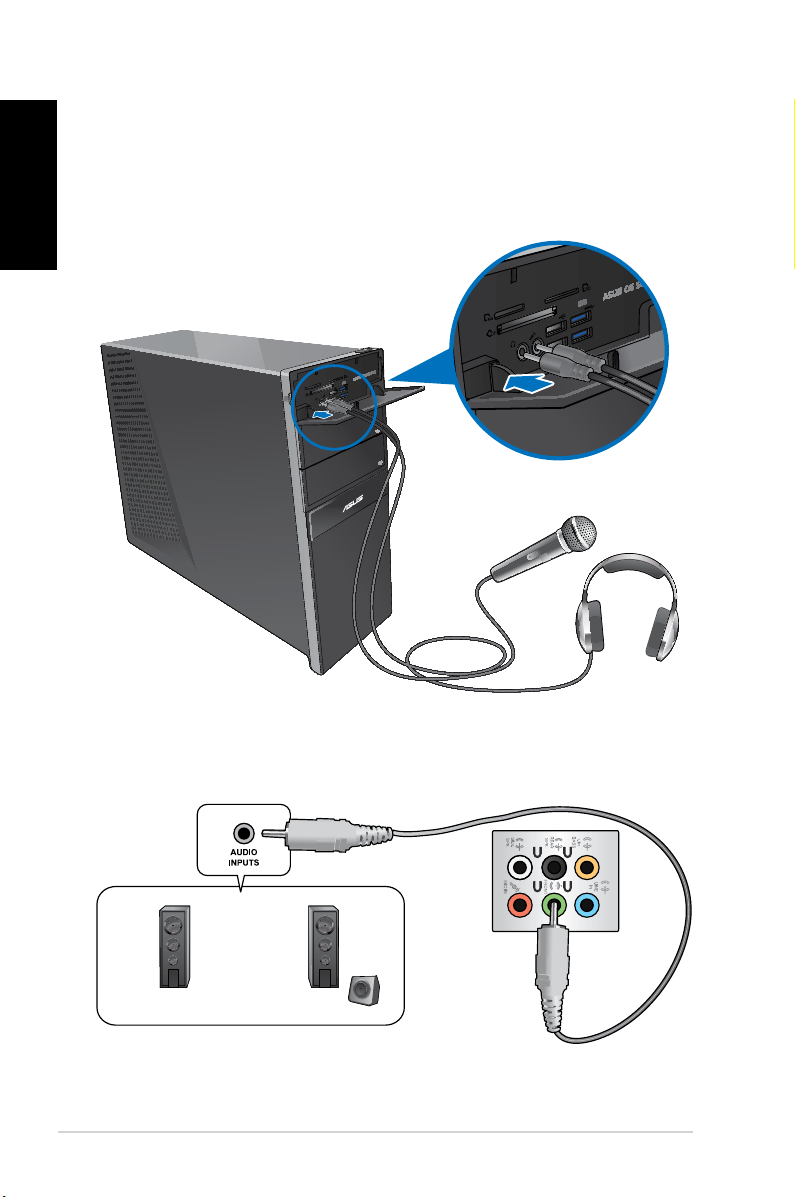
Connecting microphone and speakers
This desktop PC comes with microphone ports and speaker ports on both the front and
rear panels. The audio I/O ports located on the rear panel allow you to connect 2-channel,
4-channel, 6-channel, and 8-channel stereo speakers.
Connecting Headphone and Mic
Connecting 2-channel Speakers
28 Chapter 3: Connecting devices to your computer
Page 31

English
Connecting 4-channel Speakers
Connecting 6-channel Speakers
English
ASUS CG8270 29
Page 32

English
English
Connecting 8-channel Speakers
30 Chapter 3: Connecting devices to your computer
Page 33

English
Connecting multiple external displays
Your desktop PC may come with VGA, HDMI, or DVI ports and allows you to connect multiple
external displays.
When a graphics card is installed in your computer, connect the monitors on the output
ports of the graphics card.
Setting up multiple displays
When using multiple monitors, you are allowed to set display modes. You can use the
additional monitor as a duplicate of your main display, or as an extension to enlarge your
Windows desktop.
To set up multiple displays:
1. Turn off your computer.
2. Connect the two monitors to your computer and connect the power cords to the
monitors. Refer to Setting up your computer section in Chapter 1 for details on how
to connect a monitor to your computer.
English
For some graphic cards, only the monitor that is set to be the primary display has display
during POST. The dual display function works only under Windows.
ASUS CG8270 31
Page 34

English
English
3. Turn on your computer.
4. Do any of the following to open the Screen Resolution setting screen:
• Click > Control Panel > Appearance and Personalization > Display >
Change display settings.
• Right click anywhere on your Windows desktop. When the pop-up menu appears,
click Personalize > Display > Change display settings.
5. Select the display mode from the Multiple displays: drop-down list.
• Duplicate these displays: Select this option to use the additional monitor as a
duplicate of your main display.
• Extend these displays: Select this option to use the additional monitor as an
extension display. This increases your desktop space.
• Show desktop only on 1 / 2: Select this option to show desktop only on monitor
1 or monitor 2.
• Remove this display: Select this options to remove the selected display.
6. Click Apply or OK. Then click Keep Changes on the conrmation message.
32 Chapter 3: Connecting devices to your computer
Page 35

English
Connecting an HDTV
Connect a High Denition TV (HDTV) to the HDMI port of your computer.
• You need an HDMI cable to connect the HDTV and the computer. The HDMI cable is
purchased separately.
• To get the best display performance, ensure that your HDMI cable is less than 15
meters.
English
ASUS CG8270 33
Page 36

English
34 Chapter 3: Connecting devices to your computer
Page 37

Chapter 4
Eye level to the top of
the monitor screen
Foot rest 90˚ angles
Using your computer
Proper posture when using your Desktop PC
When using your Desktop PC, maintaining the proper posture is necessary to prevent strain to
your wrists, hands, and other joints or muscles. This section provides you with tips on avoiding
physical discomfort and possible injury while using and fully enjoying your Desktop PC.
To maintain the proper posture:
• Position your computer chair to make sure that your elbows are at or slightly above the
keyboard to get a comfortable typing position.
• Adjust the height of your chair to make sure that your knees are slightly higher than
your hips to relax the backs of your thighs. If necessary, use a footrest to raise the level
of your knees.
• Adjust the back of your chair so that the base of your spine is rmly supported and
angled slightly backward.
• Sit upright with your knees, elbows and hips at an approximately 90º angle when you
are at the PC.
• Place the monitor directly in front of you, and turn the top of the monitor screen even
with your eye level so that your eyes look slightly downward.
• Keep the mouse close to the keyboard, and if necessary, use a wrist rest for support to
reduce the pressure on your wrists while typing.
• Use your Desktop PC in a comfortably-lit area, and keep it away from sources of glare
such as windows and straight sunlight.
• Take regular mini-breaks from using your Desktop PC.
English
ASUS CG8270 35
Page 38

English
English
Using the memory card reader
Digital cameras and other digital imaging devices use memory cards to store digital picture or
media les. The built-in memory card reader on the front panel of your system allows you to
read from and write to different memory card drives.
1
To use the memory card:
1. Insert the memory card into the card slot.
• A memory card is keyed so that it ts in only one direction. DO NOT force a card into a
slot to avoid damaging the card.
• You can place media in one or more of the card slots and use each media
independently. Place only one memory card in a slot at one time.
2. Select a program from the AutoPlay window to access your les.
• If AutoPlay is NOT enabled in your computer, click Windows® 7 Start button on the
taskbar, click Computer, and then double-click the memory card icon to access the data
on it.
• Each card slot has its own drive icon which is displayed on the Computer screen.
• The memory card reader LED lights up and blinks when data is being read from or
written to the memory card.
3. When nished, right-click the memory card drive icon on the Computer screen, click
Eject, and then remove the card.
Never remove cards while or immediately after reading, copying, formatting, or deleting
data on the card or else data loss may occur.
To prevent data loss, use “Safely Remove Hardware and Eject Media” in the Windows
notication area before removing the memory card.
36 Chapter 4: Using your computer
Page 39

English
Using the optical drive
2
1
3
Inserting an optical disc
To insert an optical disc:
1. While your system is on, press the eject button below the drive bay cover to open the
tray.
2. Place the disc to the optical drive with the label side facing up.
3. Push the tray to close it.
4. Select a program from the AutoPlay window to access your les.
If AutoPlay is NOT enabled in your computer, click Windows® 7 Start button on the taskbar,
click Computer, and then double-click the CD/DVD drive icon to access the data on it.
Removing an optical disc
To remove an optical disc:
1. While the system is on, do either of the following to eject the tray:
• Press the eject button below the drive bay cover.
• Right-click the CD/DVD drive icon on the Computer screen, and then click Eject.
2. Remove the disc from the disc tray.
English
ASUS CG8270 37
Page 40

English
English
Using the multimedia keyboard (on selected models only)
The keyboard varies with models. The illustrations on this section are for reference only.
ASUS PRIMAX/KB2621 keyboard
Keys Description
1.
2.
3.
4.
5.
6.
Decreases the system volume.
Turns the volume’s mute mode on/off.
Increases the system volume.
Goes to the previous track in a media
player.
Plays or pauses playback in a media
player.
Goes to the next track in a media
player.
• There is no driver installation required for this keyboard.
• The special function keys only work on Windows® Vista / Windows® 7 operating systems.
2
4
5
3
31
6
38 Chapter 4: Using your computer
Page 41

English
ASUS KB34211 modern wired keyboard
1 2 3
Hot keys Description
1.
2.
3.
LEDs Indications
4. Scroll Lock LED This LED lights when the scroll lock is enabled.
5. Caps Lock LED This LED lights when the caps lock is enabled.
Turns the volume’s mute mode on/off.
Decreases the system volume.
Increases the system volume.
5
4
6
English
6. Num Lock LED This LED lights when the numeric keypad is enabled.
• There is no driver installation required for this keyboard.
• The special function keys only work on Windows® Vista / Windows® 7 / Windows® XP
operating systems.
ASUS CG8270 39
Page 42

English
English
`
1
234 5
6
7
8
9
10 11
12
13
BTC 6200C keyboard
Keys Description Keys Description
Enters into sleep mode. Press any key
1.
to wake up your computer and return to
the previous working status.
Returns to the last page you viewed.
2.
Goes to the next page you viewed
3.
before.
Launches the default homepage in
4.
Windows® Internet Explorer.
Launches the Favorites folder in
5.
Windows® Internet Explorer.
Launches your default email application.
6.
Decreases the system volume.
7.
8.
9.
10.
11.
12.
13.
Increases the system volume.
Turns the volume’s mute mode on/off.
Goes to the previous track in a media
player.
Plays or pauses playback in a media
player.
Goes to the next track in a media player.
Stops playback in a media player.
• The special function keys work on Windows® ME / 2000 / XP / Vista / 7 operating
systems without installing a driver. For Windows® 98SE operating system, visit the BTC
website at www.btc.com.tw to download the driver.
• Install Microsoft® Internet Explorer 5.0 or later versions before using the Internet keys.
40 Chapter 4: Using your computer
Page 43

English
ASUS RF U79 wireless keyboard
Hot keys Description
1. Power indicator This LED lights when the power is low.
2.
3.
• There is no driver installation required for this keyboard.
• The special function keys only work on Windows® Vista / Windows® 7 / Windows® XP
operating systems.
1 2
Decreases the system volume.
Increases the system volume.
3
English
ASUS CG8270 41
Page 44

English
42 Chapter 4: Using your computer
Page 45

Chapter 5
Modem
RJ-45 cable
Connecting to the Internet
Wired connection
Use an RJ-45 cable to connect your computer to a DSL/cable modem or a local area network
(LAN).
Connecting via a DSL/cable modem
To connect via a DSL/cable modem:
1. Set up your DSL/cable modem.
Refer to the documentation that came with your DSL/cable modem.
2. Connect one end of an RJ-45 cable to the LAN (RJ-45) port on the rear panel of your
computer and the other end to a DSL/cable modem.
English
3. Turn on the DSL/cable modem and your computer.
4. Congure the necessary Internet connection settings.
Contact your Internet Service Provider (ISP) for details or assistance in setting up your
Internet connection.
ASUS CG8270 43
Page 46

English
English
LAN
RJ-45 cable
Connecting via a local area network (LAN)
To connect via a LAN:
1. Connect one end of an RJ-45 cable to the LAN (RJ-45) port on the rear panel of your
computer and the other end to your LAN.
2. Turn on your computer.
3. Congure the necessary Internet connection settings.
Contact your network administrator for details or assistance in setting up your Internet
connection.
44 Chapter 5: Connecting to the Internet
Page 47

English
Wireless connection (on selected models only)
Wireless AP
Modem
Connect your computer to the Internet through a wireless connection.
To establish a wireless connection, you need to connect to a wireless access point (AP).
English
• To increase the range and sensitivity of the wireless radio signal, connect the external
antennas to the antenna connectors on the ASUS WLAN Card.
• Place the antennas on the top of your computer for the best wireless performance.
• The external antennas are optional items.
To connect to a wireless network:
1. Click the network icon in the notication area to display the available wireless
networks.
2. Select the wireless network that you want to connect to, then click Connect.
3. You may need to key in the network security key for a secured wireless network, then
click OK.
4. Wait while your computer is connecting to the wireless network.
5. The wireless connection is established successfully. The connection status is displayed
and the network icon displays the connected status.
ASUS CG8270 45
Page 48

English
46 Chapter 5: Connecting to the Internet
Page 49

Chapter 6
Using the utilities
The Support DVD and Recovery DVD may not be included in the package. You may use
the Recovery Partition feature to create the Support DVD and Recovery DVD. For details,
refer to Recovering your system in this chapter.
ASUS AI Suite II
ASUS AI Suite II is an all-in-one interface that integrates several ASUS utilities and allows
users to launch and operate these utilities simultaneously.
This utility is pre-installed on some models. For models without an operating system, follow
the steps below to install this utility.
Installing AI Suite II
To install AI Suite II:
1. Place the support DVD in the optical drive. The Drivers installation tab appears if
Autorun is enabled.
2. Click the Utilities tab, then click ASUS AI Suite II.
3. Follow the onscreen instructions to complete the installation.
Using AI Suite II
AI Suite II automatically starts when you enter the Windows® operating system. The AI Suite
II icon appears in the Windows® notication area. Click the icon to open the AI Suite II main
menu bar.
Click each button to select and launch a utility, to monitor the system, to update the
motherboard BIOS, to display the system information, and to customize the settings of AI
Suite II.
English
Click to select a utility
Click to monitor sensors
or CPU frequency
• The applications in the Tool menu vary with models.
• The screenshots of AI Suite II in this user manual are for reference only. The actual
screenshots vary with models.
ASUS CG8270 47
Click to update the
motherboard BIOS
Click to show the
system information
Click to show the ASUS
support information
Click to customize
the interface settings
Page 50

English
English
The Tool menu
The Tool menu includes the EPU, Probe II, and Sensor Recorder panels.
Launching and conguring EPU
EPU is an energy-efcient tool that provides you with a total power-saving solution. It detects
the current loading and intelligently adjusts the power usage in real-time. When you select
the Auto mode, the system changes modes automatically according to the current system
status. It allows you to customize each mode through conguring the settings such as CPU
frequency, vCore Voltage, and Fan Control.
To launch EPU:
• Click Tool > EPU on the AI Suite II main menu bar.
Displays the following message
if no VGA power saving engine is
detected.
Multiple system operating modes
The items lighting up
means power saving
engine is activated
Displays the amount
of CO2 reduced
*Shifts between the
display of Total and
Current CO2 reduced
Displays the current
CPU power
Advanced settings for each mode
Displays the system properties of each mode
• * Select From EPU Installation to show the CO2 that has been reduced since you
installed EPU.
• * Select From the Last Reset to show the total CO2 that has been reduced since you
click the Clear button .
48 Chapter 6: Using the utilities
Page 51

English
Launching and conguring Probe II
Probe II is a utility that monitors the computer’s vital components, and detects and alerts you
of any problem with these components. Probe II senses fan rotations, CPU temperature,
and system voltages, among others. With this utility, you are assured that your computer is
always at a healthy operating condition.
To launch Probe II:
• Click Tool > Probe II on the AI Suite II main menu bar.
To congure Probe II:
• Click the Voltage/Temperature/Fan Speed tabs to activate the sensors or to adjust the
sensor threshold values.
• The Preference tab allows you to customize the time interval of sensor alerts, or
change the temperature unit.
English
Saves your
conguration
Loads your saved conguration
ASUS CG8270 49
Loads the default
threshold values for
each sensor
Applies your changes
Page 52

English
English
Launching and conguring Sensor Recorder
Sensor Recorder allows you to monitor the changes in the system voltage, temperature, and
fan speed, as well as recording the changes.
To launch Sensor Recorder:
• Click Tool > Sensor Recorder on the AI Suite II main menu bar.
To congure Sensor Recorder:
• Click the Voltage/Temperature/Fan Speed tabs and select the sensors that you want
to monitor.
• The History Record tab allows you to record the changes in the sensors that you
enable.
Select the
sensors that you
want to monitor
Drag to view the
status during a
certain period
of time
Click to zoom in/out the Y axis
Click to zoom in/out the X axis
Click to return to the default mode
50 Chapter 6: Using the utilities
Page 53

English
The Monitor menu
The Monitor menu includes the Sensor and CPU Frequency panels.
Launching Sensor
The Sensor panel displays the current value of a system sensor such as fan rotation, CPUdisplays the current value of a system sensor such as fan rotation, CPU
temperature, and voltages.
To launch Sensor:
• Click Monitor > Sensor on the AI Suite II main menu bar.
Launching CPU Frequency
The CPU Frequency panel displays the current CPU frequency and CPU usage.displays the current CPU frequency and CPU usage.
To launch CPU frequency:
• Click Monitor > CPU Frequency on the AI Suite II main menu bar.
The Update menu
The Update menu allows you to update the motherboard BIOS and the BIOS boot logo with
the ASUS designed update utilities.
ASUS Update
The ASUS Update is a utility that allows you to manage, save, and update the motherboard
BIOS in Windows® OS. The ASUS Update utility allows you to update the BIOS directlypdate the BIOS directly
from the Internet, download the latest BIOS le from the Internet, update the BIOS from an, download the latest BIOS le from the Internet, update the BIOS from an
updated BIOS le, save the current BIOS le or view the BIOS version information.
English
Updating the BIOS through the Internet
To update the BIOS through the Internet:
1. From the ASUS Update screen, select Update BIOS from Internet, then click Next.
2. Select the ASUS FTP site nearest you to avoid network trafc.
Tick the two items if you want to enable the BIOS downgradable and Auto-BIOS
backup functions.
3. Select the BIOS version that you want to download, then click Next.
When no updated version is detected, a message is displayed informing you that there
is no new BIOS le from the BIOS server.
4. Click Yes if you want to change the boot logo, which is the image appearing on screen
during the Power-On Self-Tests (POST). Otherwise, click Otherwise, click No.
5. Follow the onscreen instructions to complete the update process.
ASUS CG8270 51
Page 54

English
English
Updating the BIOS through a BIOS le
To update the BIOS through a BIOS le:
1. From the ASUS Update screen, select Update BIOS from le, then click Next.
2. Locate the BIOS le from the Open window, click Open, and click Next.
3. Click Yes if you want to change the boot logo, which is the image appearing on screen
during the Power-On Self-Tests (POST). Otherwise, click Otherwise, click No.
4. Follow the onscreen instructions to complete the update process.
MyLogo
ASUS MyLogo allows you to customize the boot logo. The boot logo is the image that
appears on screen during the Power-On Self-Tests (POST). ASUS MyLogo allows you to:ASUS MyLogo allows you to:
• Change the current BIOS boot logo of your motherboard
• Change the boot logo of a downloaded BIOS le and update this BIOS to your
motherboard
• Change the boot logo of a downloaded BIOS le without updating this BIOS to your
motherboard
Ensure that the BIOS item Full Screen Logo is set to [Enabled] to display the boot logo.
See the section Boot Settings Conguration of the BIOS Setup chapter in the user manual.
Changing the BIOS boot logo
1. From the AI Suite II main menu bar, click Update > MyLogo.
2. Select any of these three options, then click Next:
• Change the BIOS boot logo of my motherboard
• Change the boot logo of a downloaded BIOS le and update this BIOS to my
motherboard
• Change the boot logo of a downloaded BIOS le (But do not update this BIOS to
my motherboard)
Before using the last two options, ensure that you download a BIOS le to your computer
using ASUS Update.
3. Locate the picture le that you want to use as the boot logo (and the downloaded BIOS
if required) and then click Next.
4. Move the Resolution slider or click Auto Tune for the system to automatically adjusts
the screen resolution.
5. Click the Booting Preview button to preview the way the picture is displayed during
the POST. Left-click the mouse to return to the setting screen.
6. Click Next when the adjustment is nished.
7. Click Flash and follow the onscreen instructions to complete the process.
52 Chapter 6: Using the utilities
Page 55

English
The System Information screen
The System Information screen displays the information about the motherboard, CPU, and
memory slots.
• Click the MB tab to see the details on the motherboard manufacturer, product name,
version, and BIOS.
• Click the CPU tab to see the details on the processor and the Cache.
• Click the Memory tab and then select the memory slot to see the details on the
memory module installed on the corresponding slot.
• Click the Disk tab and then select each disk to see the details on it.
The Support screen
The Support screen displays the information about the ASUS website, technical support
website, download support website, or contact information.
The Settings screen
The Settings screen allows you to customize the main menu bar settings and the interface’s
skin.
• Application allows you to select the application that you want to enable.
• Bar allows you to modify the bar setting,
• Skin allows you to customize the interface’s contrast, brightness, saturation, hue, and
gamma.
English
ASUS CG8270 53
Page 56

English
English
ASUS AI Manager
ASUS AI Manager is a utility which gives you quick and easy access to frequently-used
applications.
This utility is pre-installed on some models. For models without an operating system, follow
the steps below to install this utility.
Installing AI Manager
To install AI Manager:
1. Place the support DVD in the optical drive. If Autorun is enabled, the Drivers installation
wizard appears.
If Autorun is disabled, double-click the setup.exe le from the ASUS AI Manager folder in
the support DVD.
2. Click the Utilities tab, then click ASUS AI Manager.
3. Follow the onscreen instructions to complete the installation.
Launching AI Manager
To launch the AI Manager from the Windows® desktop, click
AI Manager > AI Manager 1.xx.xx
After launching the application, the AI Manager icon appears in the Windows® taskbar.
Right-click this icon to switch between the quick bar and the main window, and to launch the
AI Manager either from the quick bar or taskbar.
. The AI Manager quick bar appears on the desktop.
AI Manager quick bar
The AI Manager quick bar saves the desktop space and allows you to launch the ASUS
utilities or display system information easily. Click any of the Main, My Favorites, Support or
Information tab to display the menu’s contents.
Start > All Programs > ASUS >
Exit button
Switch to main Window
Add to ToolBar
Main
My Favorites
Click the Maximize/restore button to switch between full window and quick bar. Click the
Minimize button to keep the AI Manager on the taskbar. Click the Close button to quit
the AI Manager.
Support
Information
Main
The Main menu contains three utilities: AI Disk, AI Security, and AI Booting. Click the arrow
on the Main menu icon to browse through the utilities in the main menu.
54 Chapter 6: Using the utilities
Page 57

English
AI Disk
AI Disk allows you to easily clear temporary IE les, IE cookies, IE URLs, IE history,
or the Recycle Bin. Click the AI Disk icon on the quick bar to display the full AI Disk
window and select the items you want to clear. Click Apply when done.
AI Security
AI Security enables you to set a password to secure your devices, such as USB ash
disks and CD/DVD disks, from unauthorized access.
To lock a device:
1. When using AI Security for the rst time, you are asked to set a password. Key in
a password with at most 20 alphanumeric characters.
2. Conrm the password.
3. Key in the password hint (recommended).
4. When done, click Ok.
5. Select the device you want to lock, then click Apply.
6. Key in the password you have set previously, then click Ok.
To unlock the device:
1. Deselect the locked device, then click Apply.
2. Key in the password you have set previously, then click Ok.
To change the password:
• Click Change Password, then follow the onscreen instructions to change
password.
English
AI Booting
AI Booting allows you to specify the boot device priority sequence.
To specify the boot sequence:
1. Select a device, then click the left/right button to specify the boot sequence.
2. When done, press Apply.
My Favorites
My Favorites allows you to add applications that you frequently use, saving you from
searching for the applications throughout your computer.
To add an application:
1. Click Add, then locate the application you want to add to My Favorites.
2. Click Open on the le location window. The application is added to My Favorites list.
Right click on the application icon to launch, delete, or rename the selected application. You
can also double click to launch the selected application.
ASUS CG8270 55
Page 58

English
English
Support
Click any links on the Support window to go to the ASUS website, technical support website,
download support website, or contact information.
Information
Click the tab on the Information window to see the detailed information about your system,
motherboard, CPU, BIOS, installed device(s), and memory.
Ai Charger
Ai Charger is a unique software that allows you to quickly charge your Apple devices such as
iPod, iPhone, and iPad on your ASUS computer’s USB 2.0 / USB 3 .0 port.
• There is no setting screen for Ai Charger. After its installation on your computer, the Ai
Charger icon appears on the Windows® taskbar.
• The Ai Charger icon ( ) shows if an Apple device is connected on your computer’s
USB port.
• Your Apple device can only be detected if its Apple USB driver is properly installed in it.
• The current Apple devices only support USB 2.0 performance. Even when you plug your
Apple device into a USB 3.0 port, the maximum charging rate is still 500mA, which is the
USB 2.0 maximum charging rate. Ai Charger can increase this limit to 700mA~900mA.
• There is no BIOS, hardware, or chipset requirements for Ai Charger.
56 Chapter 6: Using the utilities
Page 59

English
ASUS Webstorage
ASUS webstorage is designed to help you retrieve your data to your notebooks, smartphones
or tablets wherever there is internet connection.
This utility is pre-installed on some models. For models without an operating system, follow
the steps below to install this utility.
Installing webstorage
To install webstorage:
Place the support DVD in the optical drive. Double-click the setup.exe le from the ASUS
WebStorage folder in the Software folder in the support DVD.
Launching Webstorage
To launch the WebStorage from the
Windows® desktop, click
Programs > ASUS > Webstorage
webstorage quick bar appears in the
Windows® taskbar. Right-click this icon to
switch between the quick bar and the main window.
Start > All
. The
English
Drive
Allows your to retrieve all your backups, synced les, share groups and password protected
data from here. Right-click the mouse to preview les before downloading or generating a
sharing URL.
Backup
To backup your most important data with simple steps: preset a backup shcedule with your
preferences in cloud storage; or select “Auto Backup” for complete data backup.
MySyncFolder
To store the updated les to MySyncFolder for easy access and share of all types of les
without the limitation of location or device.
ASUS CG8270 57
Page 60

English
English
Calendar
ASUS WebStorage automatically syncs the most updated calendar events to all personal
computers so that you know the exact events no matter which PC is in use.
BookmarkSyncer
The convenient BookmarkSyncer keeps our browser preference and bookmark to the cloud
automatically synchronized in multiple computer.
MobileApp
ASUS WebStorage mobile applications sync your les between multiple devices. It also
supports transcoding technology that allows preview and les streaming on your mobile
phone.
Go to Web
Experience the value-added cloud service through ASUS WebStorage, without the risk of
losing data.
Settings
1. Click the Settings icon , the settings interface appears.
2. Follow the onscreen instructions to complete the conguration.
58 Chapter 6: Using the utilities
Page 61

English
ASUS Easy Update
ASUS Easy Update is a software tool that automatically detects the latest drivers and
applications for your system.
1. From the Windows ® notication area,
right-click the ASUS Easy Update icon.
2. Select Schedule to set how often you
want to update your system.
3. Select Update to activate the update.
4. Click OK to display the items you can
download.
English
5. Check the item(s) you want to download,
and then click OK.
ASUS CG8270 59
Page 62

English
English
ASUS Instant On
ASUS Instant On gives you with a quick access to the Hybrid Sleep mode.
Using ASUS Instant On
To use ASUS Instant On:
The Instant On utility is pre-installed on your computer and
automatically launches after starting up your computer.
1. When starting up your computer, you can see the utility
icon from Windows taskbar.
2. Press <Alt + F1> and then click OK on
the conrmation message. Your system
will enter the Hybrid Sleep mode.
The default hotkey is <Alt + F1>. To
change it, see the section below.
Tick to not show this message next time.
Setting up ASUS Instant On
To set up ASUS Instant On:
1. Right-click the ASUS Instant On icon
from Windows taskbar. The main
settings screen appears.
You can choose to enable/disable ASUS
Instant On hotkey, and show/hide ASUS
Instant On icon from Windows taskbar.
2. Click Redene button from the main
settings screen. The hotkey settings
screen appears.
3. Key in the combination keys you want to
use for ASUS Instant On hotkey.
4. Click OK to save your changes, and
Cancel to discard the changes you made.
60 Chapter 6: Using the utilities
Page 63

English
Nero 9
Nero 9 allows you to create, copy, burn, edit, share, and update different kinds of data.
Installing Nero 9
To install Nero 9:
1. Insert the Nero 9 DVD into your optical drive.
2. If Autorun is enabled, the main menu appears automatically.
If Autorun is disabled, double-click the SeupX.exe le from the main directory of your Nero
9 DVD.
3. From the main menu, click Nero 9 Essentials.
4. Select the language you want to use for Installation Wizard. Click Next.
5. Click Next to continue.
6. Tick I accept the License Conditions. When done, click Next.
7. Select Typical then click Next.
8. Tick Yes, I want to help by sending anonymous application data to Nero then click
Next.
9. When done, click Exit.
Burning les
To burn les:
1. From the main menu, click Data Burning > Add.
2. Select the les that you want to burn. When done, click Add.
3. After selecting les that you want to burn, click Burn to burn the les to a disc.
English
For more details about using Nero 9, refer to the Nero website at www.nero.com
ASUS CG8270 61
Page 64

English
English
Recovering your system
Using the Recovery Partition
The Recovery Partition quickly restores your Desktop PC’s software to its original working
state. Before using the Recovery Partition, copy your data les (such as Outlook PST les)
to USB storage devices or to a network drive and make note of any customized conguration
settings (such as network settings).
About the Recovery Partition
The Recovery Partition is a reserved space on your hard disk drive used to restore the
operating system, drivers, and utilities installed on your Desktop PC at the factory.
DO NOT delete the partition named
RECOVERY. The Recovery Partition
is created at the factory and cannot be
restored if deleted. Take your Desktop
PC to an authorized ASUS service
center if you have problems with the
recovery process.
Using the Recovery Partition:
1. Press <F9> during bootup.
2. Press <Enter> to select Windows Setup [EMS Enabled].
3. Select one of the following recovery options.
System Recovery:
This feature allows you to restore the system to the factory default settings.
System Image Backup:
This feature allows you to burn the system image backup in DVD discs, which you can use
later to restore the system to its default settings.
System DVD Backup:
This feature allows you to make a backup copy of the support DVD.
4. Follow the onscreen instructions to complete the recovery process.
Visit the ASUS website at www.asus.com for updated drivers and utilities.
62 Chapter 6: Using the utilities
Page 65

English
Using the Recovery DVD (on selected models)
Prepare 1~3 blank writable DVDs as instructed to create the Recovery DVD.
Remove the external hard disk drive before performing system recovery on your Desktop
PC. According to Microsoft, you may lose important data because of setting up Windows on
the wrong disk drive or formatting the incorrect drive partition.
To use the Recovery DVD:
1. Insert the Recovery DVD into the optical drive. Your Desktop PC needs to be powered
ON.
2. Restart the Desktop PC and press <F8> on bootup and select the optical drive (may be
labeled as “CD/DVD”) and press <Enter> to boot from the Recovery DVD.
3. Select OK to start to restore the image.
4. Select OK to conrm the system recovery.
Restoring will overwrite your hard drive. Ensure to back up all your important data before
the system recovery.
5. Follow the onscreen instructions to complete the recovery process.
DO NOT remove the Recovery disc, unless instructed to do so, during the recovery process
or else your partitions will be unusable.
Visit the ASUS website at www.asus.com for updated drivers and utilities.
English
ASUS CG8270 63
Page 66

English
64 Chapter 6: Using the utilities
Page 67

Chapter 7
Troubleshooting
Troubleshooting
This chapter presents some problems you might encounter and the possible solutions.
My computer cannot be powered on and the power LED on the front
?
panel does not light up
• Check if your computer is properly connected.
• Check if the wall outlet is functioning.
• Check if the Power Supply Unit is switched on. Refer to the section Turning
your computer ON/OFF in Chapter 1.
My computer hangs.
?
• Do the following to close the programs that are not responding:
1. Simultaneously press <Alt> + <Ctrl> + <Delete> keys on the keyboard,
2. Click Applications tab.
3. Select the program that is not responding, then click End Task.
• If the keyboard is not responding. Press and hold the Power button on the top
then click Start Task Manager.
of your chassis until the computer shuts down. Then press the Power button
to turn it on.
English
I cannot connect to a wireless nestwork using the ASUS WLAN Card
?
(on selected models only)?
• Ensure that you enter the correct network security key for the wireless network
you want to connect to.
• Connect the external antennas (optional) to the antenna connectors on the
ASUS WLAN Card and place the antennas on the top of your computer
chassis for the best wireless performance.
The arrow keys on the number key pad are not working.
?
Check if the Number Lock LED is off. When the Number Lock LED is on,
the keys on the number key pad are used to input numbers only. Press the
Number Lock key to turn the LED off if you want to use the arrow keys on the
number key pad.
ASUS CG8270 65
Page 68

English
English
No display on the monitor.
?
• Check if the monitor is powered on.
• Ensure that your monitor is properly connected to the video output port on
your computer.
• If your computer comes with a discrete graphics card, ensure that you connect
your monitor to a video output port on the discrete graphics card.
• Check if any of the pins on the monitor video connector is bent. If you discover
bent pins, replace the monitor video connector cable.
• Check if your monitor is plugged to a power source properly.
• Refer to the documentation that came with your monitor for more
troubleshooting information.
When using multiple monitors, only one monitor has display.
?
• Ensure that the both monitors are powered on.
• During POST, only the monitor connected to the VGA port has display. The
dual display function works only under Windows.
• When a graphics card is installed on your computer, ensure that you connect
the monitors to the output port on the graphics card.
• Check if the multiple displays settings are correct. Refer to section
Connecting multiple external displays in Chapter 3 for details.
My computer cannot detect my USB storage device.
?
• The rst time you connect your USB storage device to your computer,
Windows automatically installs a driver for it. Wait for a while and go to My
Computer to check if the USB storage device is detected.
• Connect your USB storage device to another computer to test if the USB
storage device is broken or malfunctions.
I want to restore or undo changes to my computer’s system settings
?
without affecting my personal les or data.
The Windows® System Restore feature allows you to restore or undo changes
to your computer’s system settings without affecting your personal data such
as documents or photos. For more details, refer to the section Restoring your
system in Chapter 2.
66 Chapter 7: Troubleshooting
Page 69

English
The picture on the HDTV is distorted.
?
• It is caused by the different resolutions of your monitor and your HDTV. Adjust
the screen resolution to t your HDTV. To change the screen resolution:
1. Do any of the following to open the Screen Resolution setting screen:
• Click > Control Panel > Appearance and Personalization >
Display > Change display settings.
• Right click anywhere on your Windows desktop. When the pop-up
2. Adjust the resolution. Refer to the documentation came with your HDTV
3. Click Apply or OK. Then click Keep Changes on the conrmation
My speakers produce no sound.
?
• Ensure that you connect your speakers to the Line out port (lime) on the front
• Check if your speak is connected to a electrical source and turned on.
• Adjust your speakers’ volume.
• Ensure that your computer’s system sounds are not Muted.
• Connect your speakers to another computer to test if the speakers arer
menu appears, click Personalize > Display > Change display
settings.
for the resolution.
message.
panel or the rear panel.
• If it is muted, the volume icon is displayed as . To enable the system
sounds, click from the Windows notication area, then click .
• If it is not muted, click and drag the slider to adjust the volume.
working properly.
English
The DVD drive cannot read a disc.
?
• Check if the disc is placed with the label side facing up.
• Check if the disc is centered in the tray, especially for the discs with
non-standard size or shape.
• Check if the disc is scratched or damaged.
The DVD drive eject button is not respond.
?
1. Click > Computer.
2. Right-click , then click Eject from the menu.
ASUS CG8270 67
Page 70

English
English
Power
Problem Possible Cause Action
Incorrect power voltage
No power
(The power
indicator is off)
Your computer is not
turned on.
Your computer’s power
cord is not properly
connected.
• Set your computer’s power voltage
switch to your area’s power
requirements.
• Adjust the voltage settings. Ensure
that the power cord is unplugged
from the power outlet.
Press the power key on the front panel
to ensure that your computer is turned
on.
• Ensure that the power cord is
properly connected.
• Use other compatible power cord.
PSU (Power supply unit)
problems
Try installing another PSU on your
computer.
Display
Problem Possible Cause Action
No display
output after
turning the
computer on
(Black screen)
The signal cable is
not connected to the
correct VGA port on your
computer.
Signal cable problems Try connecting to another monitor.
• Connect the signal cable to the
correct display port (onboard VGA or
discrete VGA port).
• If you are using a discrete VGA
card, connect the signal cable to the
discrete VGA port.
68 Chapter 7: Troubleshooting
Page 71

English
LAN
Problem Possible Cause Action
Cannot access
the Internet
The LAN cable is not
connected.
LAN cable problems
Your computer is not
properly connected to a
router or hub.
Network settings
Problems caused by the
anti-virus software
Driver problems Reinstall the LAN driver
Connect the LAN cable to your
computer.
Ensure the LAN LED is on. If not,
try another LAN cable. If it still does
not work, contact the ASUS service
center.
Ensure that your computer is properly
connected to a router or hub.
Contact your Internet Service Provider
(ISP) for the correct LAN settings.
Close the anti-virus software.
Audio
Problem Possible Cause Action
Speaker or headphone is
connected to the wrong
port.
• Refer to your computer’s user
manual for the correct port.
• Disconnect and reconnect the
speaker to your computer.
English
No Audio
ASUS CG8270 69
Speaker or headphone
does not work.
The front and back audio
ports do not work.
Driver problems Reinstall the audio driver
Try using another speaker or
headphone.
Try both the front and back audio
ports. If one port failed, check if the
port is set to multi-channel.
Page 72

English
English
System
Problem Possible Cause Action
Too many programs are
running.
System speed is
too slow
The system often
hangs or freezes.
Computer virus attack
Hard disk drive failure
Memory module problems
There is not enough
air ventilation for your
computer.
Incompatible softwares are
installed.
Close some of the programs.
• Use an anti-virus software to
scan for viruses and repair your
computer.
• Reinstall the operating system.
• Send the damaged hard disk
drive to ASUS Service Center for
servicing.
• Replace with a new hard disk drive.
• Replace with compatible memory
modules.
• Remove the extra memory
modules that you have installed,
then try again.
Move your computer to an area with
better air ow.
Reinstall the OS and reinstall
compatible softwares.
70 Chapter 7: Troubleshooting
Page 73

English
CPU
Problem Possible Cause Action
Your computer is booting
up.
Too noisy right
after turning on
the computer.
Computer is too
noisy when in use.
If the problem still persists, refer to your Desktop PC’s warranty card and contact the ASUS
Service Center. Visit the ASUS Support site at http://support.asus.com for the service
center information.
The BIOS settings have
been changed.
Old BIOS version
The CPU fan has been
replaced.
There is not enough
air ventilation for the
computer.
The system temperature is
too high.
It is normal. The fan runs on its
full speed when the computer is
powering on. The fan slows down
after entering the OS.
Restore the BIOS to its default
settings.
Update the BIOS to the latest
version. Visit the ASUS Support
site at http://support.asus.com to
download the latest BIOS versions.
Ensure that you are using a
compatible or ASUS-recommended
CPU fan.
Ensure that your computer is
working in an area with good air ow.
• Update the BIOS.
• If you know how to reinstall the
motherboard, try to clean the inner
space of the chassis.
English
ASUS CG8270 71
Page 74

ASUS contact information
ASUSTeK COMPUTER INC.
Address 15 Li-Te Road, Peitou, Taipei, Taiwan 11259
Telephone +886-2-2894-3447
Fax +886-2-2890-7798
E-mail info@asus.com.tw
Web site www.asus.com.tw
Technical Support
Telephone +86-21-38429911
Online support support.asus.com
ASUS COMPUTER INTERNATIONAL (America)
Address 800 Corporate Way, Fremont, CA 94539, USA
Telephone +1-510-739-3777
Fax +1-510-608-4555
Web site usa.asus.com
Technical Support
Telephone +1-812-282-2787
Support fax +1-812-284-0883
Online support support.asus.com
ASUS COMPUTER GmbH (Germany and Austria)
Address Harkort Str. 21-23, D-40880 Ratingen, Germany
Fax +49-2102-959911
Web site www.asus.de
Online contact www.asus.de/sales
Technical Support
Telephone (Component) +49-1805-010923*
Telephone (System/Notebook/Eee/LCD) +49-1805-010920*
Support Fax +49-2102-9599-11
Online support support.asus.com
* EUR 0.14/minute from a German xed landline; EUR 0.42/minute from a mobile
phone.
Manufacturer: ASUSTeK Computer Inc.
Address: No.150, LI-TE RD., PEITOU, TAIPEI 112,
Authorised representative in
Europe:
Address: HARKORT STR. 21-23, 40880 RATINGEN,
TAIWAN
ASUS Computer GmbH
GERMANY
Page 75

Stolní PC ASUS Essentio
CG8270
Uživatelská příručka
Page 76

Čeština
Čeština
CZ7070
První vydání
Leden 2012
Copyright © 2012 ASUSTeK Computer Inc. Všechna práva vyhrazena.
Žádná část této příručky, včetně popsaných výrobků a softwaru, nesmí být kopírována,
přenášena, přepisována, ukládána do paměťového zařízení nebo překládána do jakéhokoliv
jazyka v žádné formě ani žádnými prostředky vyjma dokumentace, které kupující vytvoří jako
zálohu, bez výslovného písemného souhlasu společnosti ASUSTeK Computer Inc. („ASUS“).
V následujících případech nebude záruka na výrobek nebo servis prodloužena: (1) byla
provedena oprava, úprava nebo změna výrobku, která nebyla písemně povolena společností
ASUS; nebo (2) sériové číslo výrobku je poškozeno nebo chybí.
ASUS POSKYTUJE TUTO PŘÍRUČKU „TAK, JAK JE“, BEZ ZÁRUKY JAKÉHOKOLI
DRUHU, AŤ VÝSLOVNÉ NEBO VYPLÝVAJÍCÍ, VČETNĚ, ALE NIKOLI JEN,
PŘEDPOKLÁDANÝCH ZÁRUK NEBO PODMÍNEK PRODEJNOSTI A VHODNOSTI PRO
URČITÝ ÚČEL. V ŽÁDNÉM PŘÍPADĚ NEBUDE FIRMA ASUS, JEJÍ ŘEDITELÉ, VEDOUCÍ
PRACOVNÍCI, ZAMĚSTNANCI ANI ZÁSTUPCI ODPOVÍDAT ZA ŽÁDNÉ NEPŘÍMÉ,
ZVLÁŠTNÍ, NAHODILÉ NEBO NÁSLEDNÉ ŠKODY (VČETNĚ ZA ZTRÁTU ZISKŮ,
ZTRÁTU PODNIKATELSKÉ PŘÍLEŽITOSTI, ZTRÁTU POUŽITELNOSTI ČI ZTRÁTU DAT,
PŘERUŠENÍ PODNIKÁNÍ A PODOBNĚ), I KDYŽ BYLA FIRMA ASUS UPOZORNĚNA NA
MOŽNOST TAKOVÝCH ŠKOD ZPŮSOBENÝCH JAKOUKOLIV VADOU V TÉTO PŘÍRUČCE
NEBO VE VÝROBKU.
TECHNICKÉ ÚDAJE A INFORMACE OBSAŽENÉ V TÉTO PŘÍRUČCE JSOU
POSKYTNUTY JEN PRO INFORMACI, MOHOU SE KDYKOLIV ZMĚNIT BEZ
PŘEDCHOZÍHO UPOZORNĚNÍ, A NEMĚLY BY BÝT POVAŽOVÁNY ZA ZÁVAZEK
FIRMY ASUS. ASUS NEODPOVÍDÁ ZA ŽÁDNÉ CHYBY A NEPŘESNOSTI, KTERÉ SE
MOHOU OBJEVIT V TÉTO PŘÍRUČCE, VČETNĚ VÝROBKŮ A SOFTWARU V PŘÍRUČCE
POPSANÝCH.
Výrobky a názvy rem v této příručce mohou, ale nemusí být obchodními známkami nebo
copyrighty příslušných rem, a používají se zde pouze pro identikaci a objasnění a ve
prospěch jejich majitelů, bez záměru poškodit cizí práva.
74
Page 77

Čeština
Obsah
Upozornění .................................................................................................. 77
Bezpečnostní informace .............................................................................. 79
Konvence použité v této příručce ................................................................ 80
Kde najdete více informací .......................................................................... 80
Obsah balení ............................................................................................... 81
Kapitola 1 Začínáme
Vítejte! 83
Seznámení s počítačem .............................................................................. 83
Příprava počítače k použiti .......................................................................... 87
Zapnutí/Vypnutí počítače ............................................................................. 90
Kapitola 2 Používání Windows® 7
První spuštění .............................................................................................. 91
Používání pracovní plochy Windows® 7 ...................................................... 92
Správa souborů a složek ............................................................................. 94
Obnova systému .......................................................................................... 96
Ochrana počítače ........................................................................................ 97
Získání nápovědy a podpory Windows® ..................................................... 98
Kapitola 3 Připojení zařízení k počítači
Připojení USB paměťového zařízení ........................................................... 99
Připojení mikrofonu a reproduktorů ........................................................... 100
Připojení více vnějších monitorů ................................................................ 103
Připojení HDTV .......................................................................................... 105
Čeština
Kapitola 4 Používání počítače
Správné držení těla při používání stolního PC .......................................... 107
Použití čtečky paměťových karet ............................................................... 108
Používání optické jednotky ........................................................................ 109
Použití multimediální klávesnice (pouze vybrané modely) .........................110
Kapitola 5 Připojení k Internetu
Kabelové připojení ......................................................................................115
Bezdrátové připojení (pouze u vybraných modelů). ...................................117
75
Page 78

Čeština
Čeština
Obsah
Kapitola 6 Použití pomocných programů
ASUS AI Suite II ..........................................................................................119
ASUS AI Manager ...................................................................................... 126
Ai Charger .................................................................................................. 128
ASUS Webstorage ..................................................................................... 129
ASUS Easy Update ................................................................................... 131
ASUS Instant On ....................................................................................... 132
Nero 9 ...................................................................................................... 133
Obnova systému ........................................................................................ 134
Kapitola 7 Řešení potíží
Řešení potíží .............................................................................................. 137
76
Page 79

Čeština
Upozornění
Sběrové služby
Programy pro recyklaci a sběr použitých produktů společnosti ASUS vycházejí z našeho
závazku dodržování nejvyšších standardů pro ochranu našeho životního prostředí. Věříme,
že poskytováním těchto řešení našim zákazníkům umožníme odpovědně recyklovat naše
produkty, baterie a další součásti a také obalové materiály. Podrobné informace o možnosti
recyklace v různých regionech viz http://csr.asus.com/english/Takeback.htm.
REACH
V souladu se směrnicí EU nazvanou REACH (Registration, Evaluation, Authorisation, and
Restriction of Chemicals) jsme na webu ASUS REACH http://green.asus.com/english/
REACH.htm zveřejnili chemické látky obsažené v našich produktech.
Prohlášení pro Federální komunikační komisi
Toto zařízení vyhovuje části 15 předpisů FCC. Provoz vyžaduje splnění následujících dvou
podmínek:
• Toto zařízení nesmí způsobovat škodlivé rušení, a
• Toto zařízení musí snést veškeré vnější rušení, včetně rušení, které by mohlo způsobit
nesprávnou činnost.
Toto zařízení bylo testováno a bylo shledáno, že vyhovuje omezením pro digitální zařízení
třídy B, dle části 15 předpisů Federální komunikační komise (FCC). Tato omezení mají
poskytnout rozumnou ochranu před škodlivým rušením pro instalace v obytných prostorách.
Toto zařízení generuje, používá a může vyzařovat energii na rozhlasové frekvenci, a pokud
není instalováno a používáno podle pokynů, může rušit rozhlasovou/radiovou komunikaci.
Neexistuje žádná záruka, že v konkrétní instalaci nedojde k rušení. Pokud toto zařízení
způsobuje škodlivé rušení příjmu rozhlasu nebo televize, což lze zjistit tak, že zařízení
vypnete a zapnete, uživateli doporučujeme zkusit odstranit rušení pomocí jedné nebo
několika z následujících metod:
• Otočit nebo přemístit přijímací anténu.
• Zvětšit odstup mezi zařízením a přijímačem.
• Připojit zařízení do zásuvky na jiném okruhu, než do kterého je připojen přijímač.
• Poradit se s dodavatelem nebo zkušeným rozhlasovým/TV technikem.
Čeština
Ke splnění požadavků FCC je nutno používat k propojení monitoru s grackou kartou
stíněné kabely. Jakékoliv změny nebo úpravy výslovně neschválené úřadem odpovědným
za shodu mohou zániku oprávnění používat toto zařízení.
77
Page 80

Čeština
Čeština
Varování před rádiovým vyzařováním
Toto zařízení musí být instalováno a používáno v souladu s přiloženými pokyny, antény
vysílače musí být vždy nejméně 20 cm od osob a nesmí být umístěny v blízkosti jiných antén
nebo vysílačů. Koncový uživatel a instalační technik musí respektovat pokyny k instalaci
antény a zajistit dodržení provozních podmínek vysílače tak, aby nedošlo k překročení limitů
rádiového vyzařování.
Prohlášení kanadského úřadu pro komunikace
Toto digitální zařízení nepřekračuje limity rádiového vyzařování digitálních zařízení třídy B
uvedené v Předpisech pro rádiové rušení kanadského Ministerstva komunikací.
Toto digitální zařízení třídy B vyhovuje kanadské normě ICES-003.
Informace o obsaženém produktu Macrovision Corporation.
Tento přístroj obsahuje technologii ochrany autorských práv chráněných přihlášenými
patenty USA a další produkty chráněné právy k duševnímu vlastnictví Macrovision
Corporation a dalších vlastníků práv. Použití technologii ochrany autorských práv podléhá
schválení Macrovision Corporation a je určeno k domácímu použití a dalšímu omezenému
obecenstvu, pokud Macrovision Corporation neschválí něco jiného. Reverzní inženýrink
a disassemblování jsou zakázány.
Varování týkající se lithiumiontové baterie
POZOR: Nebezpečí výbuchu při chybné výměně baterie. Nahraďte jen stejným nebo
ekvivalentním typem doporučeným výrobcem. Použité baterie zlikvidujte podle pokynů
výrobce.
78
Page 81

Čeština
Bezpečnostní informace
Před čištěním odpojte napájení a periferní zařízení. Otřete stolní PC čistou houbou
z celulózy nebo jelenicovým hadrem namočeným v roztoku neobrušujícího detergentu a
trochy teplé vody, a přebytečnou vlhkost otřete suchým hadrem.
• NEPOKLÁDE�TE na nerovné ani nestabilní pracovní povrchy. Pokud je skříň počítače
poškozená, vyhledejte opravnu.
• NEVYSTAVU�TE špinavému ani prašnému prostředí. NEPOUŽÍVE�TE během úniku
plynu.
• NEDÁVE�TE ani neupouštějte předměty na horní stranu skříně ani dovnitř nic
nezastrkujte.
• NEVYSTAVU�TE silným magnetickým ani elektrickým polím.
• NEVYSTAVU�TE ani nepoužívejte blízko tekutin, deště nebo vlhkosti. NEPOUŽÍVE�TE
modem během bouřek.
• Varování o bezpečnosti baterií: NEHÁZE�TE baterii do ohně. NEZKRATU�TE kontakty.
NEROZEBÍRE�TE baterii.
• Počítač používejte jen při teplotě okolí 0 ˚C (32 ˚F) až 35 ˚C (95 ˚F).
• NEZAKRÝVE�TE ventilační otvory stolního PC, aby nedošlo k přehřátí.
• NEPOUŽÍVE�TE poškozené napájecí kabely, doplňky ani jiné periférie.
•
Aby nedošlo k zásahu elektrickým proudem, odpojte napájecí kabel z elektrické zásuvky
před přemístěním počítače.
•
Před použitím prodlužovacího kabelu nebo adaptéru se poraďte s odborníkem.. Tyto
prvky by mohly přerušit obvod uzemnění.
•
Zajistěte nastavení napájecího zdroje na správné napětí místní rozvodné sítě. Pokud si
nejste jisti, jaké napětí je v zásuvce, obraťte se na místního dodavatele elektřiny.
•
Pokud je napájecí zdroj porouchaný, nepokoušejte se jej opravovat. Kontaktujte
kvalikovaného servisního technika nebo prodejce.
Čeština
79
Page 82

Čeština
Čeština
Konvence použité v této příručce
Abyste určité úkony prováděly správně, povšimněte si následujících symbolů používaných v
této příručce.
NEBEZPEČÍ/VAROVÁNÍ: Informace pro předcházení úrazům při provádění
úkolu.
POZOR: Informace pro předcházení poškození součástí při provádění úkolu.
DŮLEŽITÉ: Pokyny, které MUSÍTE respektovat při provádění úkolu.
POZNÁMKA: Tipy a další informace, které se hodí při provádění úkolu.
Kde najdete více informací
Další informace o produktu a aktualizacích softwaru můžete čerpat z níže uvedených zdrojů.
Weby ASUS
Web ASUS nabízí aktualizované informace o hardwarových a softwarových produktech
ASUS. Viz web ASUS na adrese www.asus.com.
Místní technická podpora ASUS
Navštivte web ASUS http://support.asus.com/contact, kde najdete kontakt na místní
technickou podporu.
80
Page 83

Čeština
Obsah balení
Installation Guide
ASUS Essentio Desktop PC Klávesnice x1 x1 Myš x1 x1
Napájecí kabel x1 Instalační příručka x1 Záruční list x1
Čeština
Nero 9 vypalovací software
na DVD x1
• Pokud některá z výše uvedených věcí chybí nebo je poškozena, kontaktujte prodejce.
• Obrázky součástí dodávky jsou pouze orientační. Skutečné provedení se může lišit
podle konkrétního modelu.
Anténa (volitelná) x1
81
Page 84

Čeština
82
Page 85

Kapitola 1
Začínáme
Vítejte!
Děkujeme, že jste zakoupili stolní PC ASUS Essentio CG8270!
Stolní PC ASUS Essentio CG8270 nabízí špičkový výkon, spolehlivost bez kompromisů
a pomocné programy zaměřené na uživatele. Všechny tyto přínosy dostáváte v působivě
futuristické a stylové skříni.
Před přípravou stolního PC k použití si přečtěte záruční list ASUS.
Seznámení s počítačem
Obrázky jsou pouze orientační. Porty, jejich umístění a barva skříně se liší podle modelu.
Přední panel
2
3
4
1
Čeština
7
8
11
13
ASUS CG8270 83
5
6
9
10
12
14
Page 86

Čeština
Čeština
1. Vypínač.Vypínač. Stisknutím zapnete počítač.
2. Slot Secure Digital™ / MultiMediaCard.Slot Secure Digital™ / MultiMediaCard. Lze zasunout kartu Secure Digital™ /
MultiMediaCard.
3. Slot CompactFlashSlot CompactFlash® / Microdrive™. Lze zasunout kartu CompactFlash® /
Microdrive™.
4. Slot pro kartu Memory Stick™ / Memory Stick Pro™.Slot pro kartu Memory Stick™ / Memory Stick Pro™. Lze zasunout kartu Memory
Stick™ / Memory Stick Pro™.
5. Indikátor LED čtečky paměťových karet. Tento indikátor LED svítí, když je do
některého slotu pro paměťové karty vložena paměťová karta, a bliká, když jsou
načítána data z paměťové karty nebo zapisována data na paměťovou kartu.
6. Porty USB 3.0.Porty USB 3.0. Porty Universal Serial Bus 3.0 (USB 3.0) umožňují připojení zařízení s
rozhraním USB 3.0, například myši, tiskárny, skeneru, kamery, PDA apod.
• NEPŘIPOJUJTE klávesnici/myš k portu USB 3.0, když instalujete operační systém
Windows®.
• Rozhraní USB 3.0 začne pracovat se zařízeními USB 3.0 až po instalaci ovladačů do
Windows® OS a funguje jen ve Windows.
• Zařízení USB 3.0 lze využít jen k ukládání dat.
• Silně doporučujeme připojovat zařízení s rozhraním USB 3.0 k portům USB 3.0,
dosáhnete tak rychlejšího přenosu dat a vyššího výkonu.
7. Port sluchátek (žlutý).Port sluchátek (žlutý). Připojení sluchátek nebo reproduktorů se zesilovačem.
8. Port mikrofonu (růžový).Port mikrofonu (růžový). Připojení mikrofonu.
9. Kryt předních portů v/v.Kryt předních portů v/v.
10. Porty USB 2.0.Porty USB 2.0. Porty Universal Serial Bus 2.0 (USB 2.0) umožňují připojení zařízení s
rozhraním USB 2.0, například myši, tiskárny, skeneru, kamery, PDA apod.
11. �ednotka optického disku.�ednotka optického disku. Instalovaná optická jednotka.
12. Tlačítko vysunutí optického disku.Tlačítko vysunutí optického disku. Stiskem tlačítka vysunete plato pro disk.
13. �ednotka optického disku (neobsazená).�ednotka optického disku (neobsazená). Možnost instalace další optické jednotky.
14. Indikátor LED napájení. Tento indikátor LED svítí po zapnutí počítače.
84 Kapitola 1: Začínáme
Page 87

Čeština
Zadní panel
1
5
6
7
9
5
11
12 13
15
16
14
2
3
4
8
10
17
18
19
1. Napájecí zásuvka.Napájecí zásuvka. Připojte napájecí kabel. Jmenovitý výkon: 110~120 /
220~240vac,673A, 50~60HZ.
2. Vypínač zdroje.Vypínač zdroje. Možnost ZAPNUTÍ/VYPNUTÍ napájecího zdroje počítače..
3. Ventilační otvory.Ventilační otvory. Umožňují chlazení vzduchem.t
NEBLOKUJTE ventilační otvory skříně.
4. Port klávesnice PS/2 a myši (alový).Port klávesnice PS/2 a myši (alový). Lze připojit klávesnici nebo myš s konektorem
PS/2.
5. Porty USB 2.0.Porty USB 2.0. Porty Universal Serial Bus 2.0 (USB 2.0) umožňují připojení zařízení s
rozhraním USB 2.0, například myši, tiskárny, skeneru, kamery, PDA apod.
6. Port HDMI.Port HDMI. Tento port umožňuje připojení High-Denition Multimedia Interface (HDMI) a
výstup podporuje HDCP, takže lze přehrávat HD DVD, Blu-ray a další chráněný obsah.
7. Port DVI-D.Port DVI-D. Tento port umožňuje připojení zařízení s rozhraním DVI-D a výstup
podporuje HDCP, takže lze přehrávat HD DVD, Blu-ray a další chráněný obsah.
8. Port VGA.Port VGA. Tento port umožňuje připojení zařízení s rozhraním VGA, například monitoru.
9. Porty USB 3,0.Porty USB 3,0. Porty Universal Serial Bus 3,0 (USB 3,0) umožňují připojení zařízení s
rozhraním USB 3,0, například myši, tiskárny, skeneru, kamery, PDA apod.
Čeština
• NEPŘIPOJUJTE klávesnici/myš k portu USB 3.0, když instalujete operační systém
Windows®.
• Rozhraní USB 3.0 začne pracovat se zařízeními USB 3.0 až po instalaci ovladačů do
Windows® OS a funguje jen ve Windows.
• Zařízení USB 3.0 lze využít jen k ukládání dat.
• Silně doporučujeme připojovat zařízení s rozhraním USB 3.0 k portům USB 3.0,
dosáhnete tak rychlejšího přenosu dat a vyššího výkonu.
ASUS CG8270 85
Page 88

Čeština
Čeština
10. Port LAN (R�-45).Port LAN (R�-45). Tento port umožňuje gigabitové připojení k místní síti (LAN) přes
rozbočovač.
Signalizační LED LAN portuSignalizační LED LAN portu
Activity(přenos dat) Speed (rychlost)
Status (stav) Popis Status
VYP Bez spojení VYP Připojení 10Mbps
ORANŽOVÁ Spojení
BLIKÁ Přenos dat ZELENÁ Připojení 1Gbps
navázáno
(stav)
ORANŽOVÁ Připojení 100Mbps
Popis
ACT/LINK
Port místní sítě LAN
LED
Indikátor
SPEED LED
11. Výstup bočního reproduktoru (šedý).Výstup bočního reproduktoru (šedý). Využívá se k připojení bočních reproduktorů v
konguraci 8kanálového zvuku.
12. Výstup zadního reproduktoru (černý).Výstup zadního reproduktoru (černý). Využívá se k připojení zadních reproduktorů v
konguraci 4, 6 a 8kanálového zvuku.
13. Port středového reproduktoru/subwooferu (oranžový).Port středového reproduktoru/subwooferu (oranžový). Připojení středového
reproduktoru/subwooferu.
14. Port mikrofonu (růžový).Port mikrofonu (růžový). Připojení mikrofonu.
15. Port linkového výstupu (žlutý).Port linkového výstupu (žlutý). Připojení sluchátek nebo reproduktorů se
zesilovačem. V konguraci 4, 6 nebo 8kanálového zvuku slouží jako výstup předních 8kanálového zvuku slouží jako výstup předních8kanálového zvuku slouží jako výstup předních
reproduktorů.
16. Port linkového vstupu (světle modrý).Port linkového vstupu (světle modrý). Připojení magnetofonu, přehrávače CD, DVD
apod.
Funkce audio portů v režimu 2, 4, 6 a 8kanálového zvuku je popsána níže..
Kongurace 2, 4, 6 nebo 8kanálového zvuku
Červený
Světle
modrý
Žlutý
Růžový
Oranžový – – Středový/subwoofer Středový/subwoofer
Černý –
Šedý – – –
86 Kapitola 1: Začínáme
Sluchátka
2kanálový
Linkový vstup Linkový vstup Linkový vstup Linkový vstup
Linkový
výstup
Mikrofonní
vstup
4kanálový 6kanálový 8kanálový
Výstup předního
reproduktoru
Mikrofonní vstup Mikrofonní vstup Mikrofonní vstup
Výstup zadního
reproduktoru
Výstup předního
reproduktoru
Výstup zadního
reproduktoru
Výstup předního
reproduktoru
Výstup zadního
reproduktoru
Výstup bočního
reproduktoru
Page 89

Čeština
17. Použití gracké karty ASUS (pouze vybrané modely).Použití gracké karty ASUS (pouze vybrané modely). Výstupní porty této volitelné
gracké karty ASUS se mohou lišit podle konkrétního modelu
18. Držák rozšiřující karty.Držák rozšiřující karty. Pokud instalujete rozšiřující kartu, vyjměte záslepku.
19. Použití karty bezdrátové sítě ASUS (pouze vybrané modely).Použití karty bezdrátové sítě ASUS (pouze vybrané modely). Volitelná karta WLAN
umožňuje připojení počítače k bezdrátové síti.
Příprava počítače k použiti
Tato sekce vás provede připojením hlavních hardwarových zařízení, například vnějšího
monitoru, klávesnice a napájecího kabelu, k počítači.
Připojení vnějšího monitoru
Použití gracké karty ASUS (pouze vybrané modely)
Připojte monitor k výstupnímu portu samostatné gracké karty ASUS.
Postup připojení vnějšího monitoru ke gracké kartě ASUS:
1. Připojte monitor k výstupnímu portu samostatné gracké karty ASUS.
2. Připojte monitor k napájení.
Výstupní porty gracké karty ASUS se mohou lišit podle konkrétního modelu.
Čeština
ASUS CG8270 87
Page 90

Čeština
Čeština
Použití výstupů graky na základní desce
Připojte monitor k výstupu graky na základní desce.
Postup připojení vnějšího monitoru k výstupu zabudované graky:
1. Monitor VGA připojte k portu VGA nebo monitor DVI-D připojte k výstupu DVI-D,
případně monitor HDMI připojte k výstupu HDMI na zadním panelu skříně počítače.
2. Připojte monitor k napájení.
• Pokud je počítač dodáván se samostatnou grackou kartou ASUS, je v BIOSu
nastavená jako primární zobrazovací zařízení. Připojte proto monitor k výstupnímu portu
samostatné gracké karty.
• Pokud chcete k počítači připojit více monitorů, viz Připojení více vnějších monitorů v
kapitole 3 této uživatelské příručky.
88 Kapitola 1: Začínáme
Page 91

Čeština
Připojení klávesnice a myši s rozhraním USB
Klávesnici a myš s rozhraním USB připojte k portům USB na zadním panelu skříně počítače.
Připojte vaši USB klávesnici a USB myš k portům USB 2.0.
Připojení zdroje napájení
Připojte jeden konec napájecího kabelu připojte k napájecímu konektoru na zadním panelu
skříně počítače a druhý konec k zásuvce elektrického rozvodu.
Čeština
ASUS CG8270 89
Page 92

Čeština
Zapnutí
Vypnutí
Zapnutí/Vypnutí počítače
Tato sekce popisuje zapnutí a vypnutí počítače poté, co jste jej připravili k použití.
Zapnutí počítače
Postup zapnutí počítače:
1. Zapněte monitor.Zapněte monitor.
2. Zapněte vypínač do polohy Zapnutí.Zapněte vypínač do polohy Zapnutí.
3. Stisknutím tlačítka zapnete počítač.Stisknutím tlačítka zapnete počítač..
tlačítka zapnete
4. Vyčkejte, až se spustí operační systém.Vyčkejte, až se spustí operační systém..
Vypnutí počítače
Postup VYPNUTÍ počítače:
1. Ukončete všechny běžící aplikace.
2. Klepněte na na pracovní ploše Windows® .
3. Klepnutím na vypněte operační systém.
90 Kapitola 1: Začínáme
Page 93

Kapitola 2
Používání Windows
®
7
První spuštění
Při prvním spuštění počítače se objeví řada obrazovek, které vás provedou základním
nastavením operačního systému Windows® 7.
Postup prvního spuštění:
1. Zapněte počítač. Vyčkejte několik minut, až se zobrazí obrazovka Instalace systému
Windows.
2. Z rozbalovacího seznamu vyberte jazyk. Klepněte na Další.
3. Z rozbalovacího seznamu vyberte Země nebo region, Čas a měna a Rozložení
kláves. Klepněte na Další.
4. Vepište jedinečné jméno uživatele a název počítače. Klepněte na Další.
5. Vepište potřebné informace k nastavení vlastního hesla, poté klepněte na Další.
Můžete také klepnout na Další bez zadání těchto informací.
Pokud chcete později nastavit heslo ke svému účtu, viz Nastavení uživatelského účtu a
hesla v dalším textu této kapitoly.
6. Pečlivě si přečtěte licenční podmínky. Zaškrtněte Přijímám licenční podmínky a
pokračujte klepnutím na Další.
7. Vyberte Použít doporučená nastavení nebo Instalovat pouze důležité aktualizace
a nastavte tak zabezpečení počítače. Tento krok lze přeskočit volbou Zobrazit dotaz
později.
8. Zkontrolujte nastavené datum a čas. Klepněte na Další. Systém použije nová
nastavení a restartuje se. Poté můžete začít počítač používat.
Čeština
ASUS CG8270 91
Page 94

Čeština
Používání pracovní plochy Windows® 7
Klepněte na ikonu Start > Nápověda a podpora a získáte více informací o Windows® 7.
Používání nabídky Start
Nabídka Start umožňuje spouštění programů, pomocných programů a práci s dalšími
položkami. Zobrazí také další informace o Windows 7 po volbě Nápověda a podpora.
Čeština
Spouštění položek z nabídky Start
Postup spouštění položek z nabídky Start:
1. V hlavním panelu Windows® klepněte na ikonu Start .
2. Z nabídky Start vyberte položku, kterou chcete spustit.
Programy lze připnout k nabídce Start a poté budou trvale dostupné jedním klepnutím.
Podrobnosti viz sekce Připnutí programů k nabídce Start nebo hlavní panel.
Používání položky Začínáme
Položka nabídky Start nazvaná Začínáme popisuje některé základní kroky, jako je
personalizace Windows®, přidávání uživatelů a přenos souborů, takže se seznámíte s
používáním Windows® 7.
Používání položky Začínáme:
1. V hlavním panelu Windows® klepnutím na ikonu Start otevřete nabídku Start.
2. Vyberte Začínáme. Zobrazí se seznam dostupných úkolů.
3. Vyberte úkol, který chcete provést.
Používání hlavního panelu
Hlavní panel umožňuje spouštění a správu programů a položek instalovaných na počítači.
Spuštění programu z hlavního panelu
Postup spuštění programu z hlavního panelu:
• V hlavním panelu Windows® klepněte na ikonu a tím spustíte příslušnou položku.
Dalším klepnutím na ikonu program skryjete.
Programy lze připnout k hlavnímu panelu a poté na něm budou trvale zobrazeny.
Podrobnosti viz sekce Připnutí programů k nabídce Start nebo hlavní panel.
92 Kapitola 2: Používání Windows® 7
Page 95

Čeština
Připnutí položek na seznamy odkazů
Při klepnutí pravým tlačítkem na ikonu na hlavním panelu se zobrazí seznam odkazů na
položky související s programem nebo vybranou položkou. Na seznamy odkazů lze připnout
položky jako jsou oblíbené weby, často navštěvované složky nebo disky nebo naposledy
přehrávané mediální soubory.
Postup připnutí položek na seznam odkazů:
1. V hlavním panelu klepněte na ikonu pravým tlačítkem.
2. V seznamu odkazů klepněte pravým tlačítkem na ikonu, kterou chcete připnout, poté
vyberte Připnout na tento seznam.
Odepnutí položek ze seznamu odkazů
Postup odepnutí položek ze seznamu odkazů:
1. V hlavním panelu klepněte na ikonu pravým tlačítkem.
2. V seznamu odkazů klepněte pravým tlačítkem na ikonu, kterou chcete odepnout, poté
vyberte Odepnout z tohoto seznamu.
Připnutí programů na nabídku Start nebo hlavní panel
Postup připnutí programů na nabídku Start nebo hlavní panel:
1. V hlavním panelu Windows® klepnutím na ikonu Start otevřete nabídku Start.
2. V nabídce Start nebo hlavním panelu klepněte pravým tlačítkem na položku, kterou
chcete připnout.
3. Vyberte Připnout na hlavní panel nebo Připnout k nabídce Start.
Můžete také klepnout pravým tlačítkem na ikonu spuštěného programu na hlavním panelu
a vybrat Připnout tento program na hlavní panel.
Čeština
Odepnutí programů z nabídky Start
Postup odepnutí programů z nabídky Start:
1. V hlavním panelu Windows® klepnutím na ikonu Start otevřete nabídku Start.
2. V nabídce Start klepněte pravým tlačítkem na program, kterou chcete odepnout, poté
vyberte Odstranit z tohoto seznamu.
Odepnutí programů z hlavního panelu
Postup odepnutí programů z hlavního panelu:
1. V hlavním panelu klepněte pravým tlačítkem na program, který chcete odepnout, poté
vyberte Odepnout program z hlavního panelu.
ASUS CG8270 93
Page 96

Čeština
Čeština
Používání oznamovací oblasti
Ve výchozím nastavení oznamovací oblast zobrazuje tři ikony:
Centrum akcí
Klepnutím na ikonu zobrazíte upozornění a hlášení a spustíte Windows® Centrum akcí.
Síťové připojení
Tato ikona zobrazuje stav připojení a intenzitu signálu drátového i bezdrátového připojení
k síti.
Hlasitost
Klepnutím nastavte hlasitost.
Zobrazení upozornění
Postup zobrazení upozornění:
• Klepněte na ikonu upozornění , poté klepněte na hlášení.
Podrobnosti viz sekce Windows® Použití Centra akcí.
Přizpůsobení ikon a oznámení
Můžete se rozhodnout zobrazovat nebo skrýt ikony a oznámení v hlavním panelu a
oznamovací oblasti.
Postup přizpůsobení ikon a oznámení:
1. V oznamovací oblasti klepněte na ikonu šipky .
2. Klepněte na Přizpůsobit.
3. Z rozbalovacího seznamu vyberte chování ikon nebo položek, které chcete přizpůsobit.
Správa souborů a složek
Používání Průzkumníka Windows
Průzkumník Windows® umožňuje prohlížení, správu a organizaci souborů a složek.
Spuštění Průzkumníka Windows
Postup spuštění Průzkumníka Windows:
®
®
1. V hlavním panelu Windows® klepnutím na ikonu Start otevřete nabídku Start.
2. Klepnutím na Počítač spustíte Průzkumníka Windows.
94 Kapitola 2: Používání Windows® 7
Page 97

Čeština
Procházení souborů a složek
Postup procházení souborů a složek:
1. Spusťte Průzkumníka Windows.
2. V okně navigace nebo zobrazení vyhledejte umístění dat.
3. V navigačním panelu s popisem cesty klepnutím na šipku zobrazte obsah souboru
nebo složky.
Přizpůsobení zobrazení souborů/složek
Postup přizpůsobení zobrazení souborů/složek:
1. Spusťte Průzkumníka Windows.
2. V okně navigace nebo zobrazení vyhledejte umístění dat.
3. V pruhu nástrojů klepněte na ikonu Zobrazit .
4. V nabídce Zobrazit posuvníkem vyberte způsob zobrazení souboru/složky.
Můžete také klepnout pravým tlačítkem kamkoli do okna zobrazení, klepnout na Zobrazit a
vybrat požadovaný typ zobrazení.
Uspořádání souborů
Postup uspořádání souborů:
1. Spusťte Průzkumníka Windows.
2. V poli Uspořádat klepnutím zobrazte rozbalovací seznam.
3. Vyberte požadovaný typ uspořádání.
Čeština
Třídění souborů
Postup třídění souborů:
1. Spusťte Průzkumníka Windows.
2. Klepněte pravým tlačítkem kamkoli do okna zobrazení.
3. Ze zobrazené nabídky vyberte Třídit dle a vyberte požadovaný typ třídění.
Seskupení souborů
Postup seskupení souborů:
1. Spusťte Průzkumníka Windows.
2. Klepněte pravým tlačítkem kamkoli do okna zobrazení.
3. Ze zobrazené nabídky vyberte Seskupit dle a vyberte požadovaný typ seskupení.
ASUS CG8270 95
Page 98

Čeština
Čeština
Vytvoření nové složky
Postup vytvoření nové složky:
1. Spusťte Průzkumníka Windows.
2. V pruhu nástrojů klepněte na Nová složka.
3. Zadejte název nové složky.
Můžete také klepnout pravým tlačítkem kamkoli do okna zobrazení, klepnout na Nová >
Složka.
Zálohování souborů
Příprava zálohy
Postup přípravy zálohy:
1. Klepněte na > Všechny programy > Údržba > Zálohování a obnova.
2. Klepněte na Nastavit zálohování. Klepněte na Další.
3. Vyberte místo uložení zálohy. Klepněte na Další.
4. Vyberte Nechat rozhodnout systém Windows (doporučeno) nebo Nechat
rozhodnout mě.
Při volbě Nechat rozhodnout systém Windows® nebudou zálohovány programy, soubory
na discích s formátem FAT, odpadkový koš ani dočasné soubory větší než 1 GB.
5. Dokončete proces podle pokynů na obrazovce.
Obnova systému
Funkce Obnova systému Windows® vytváří bod obnovy, tj. zálohu nastavení počítače k
určitému datu a času. Můžete tak vrátit zpět změny systému, aniž byste přišli o data.
Postup obnovení systému:
1. Ukončete všechny běžící aplikace.
2. Klepněte na > Všechny programy > Příslušenství > Systémové nástroje >
Obnovení systému.
3. Dokončete proces podle pokynů na obrazovce.
96 Kapitola 2: Používání Windows® 7
Page 99

Čeština
Ochrana počítače
Používání Centra akcí Windows® 7
Centrum akcí Windows® 7 nabízí upozornění, informace o zabezpečení, údržbě systému a
možnost automatického odhalování a odstraňování běžných problémů s počítačem.
Upozornění lze přizpůsobit. Podrobnosti viz předchozí sekce Přizpůsobení ikon a
oznámení v této kapitole.
Spuštění Centra akcí Windows® 7
Postup spuštění Centra akcí Windows® 7:
1. Centrum akcí Windows 7 spustíte klepnutím na ikonu oznámení a poté na Spustit
Centrum akcí.
2. V centru akcí Windows 7 klepněte na úkol, který chcete provést.
Čeština
Používání Aktualizace Windows
Aktualizace Windows je nástroj umožňující zjištění dostupnosti a instalaci aktualizací
vylepšujících zabezpečení a výkon počítače.
Spuštění Aktualizace Windows
Postup spuštění Aktualizace Windows®:
1. V hlavním panelu Windows® klepnutím na ikonu Start otevřete nabídku Start.
2. Vyberte Všechny programy > Aktualizace Windows.
3. Na obrazovce Aktualizace Windows klepněte na úkol, který chcete provést.
®
®
Nastavení uživatelského účtu a hesla
Můžete vytvořit účty chráněné hesly pro všechny, kdo budou počítač používat.
Vytvoření uživatelského účtu
Postup vytvoření uživatelského účtu:
1. V hlavním panelu Windows® klepněte na > Začínáme > Přidat nové uživatele.
2. Vyberte Spravovat jiný účet.
3. Vyberte Vytvořit nový účet.
4. Zadejte název nového uživatele.
5. Vyberte typ účtu Standardní uživatel nebo Správce.
6. Po dokončení klepněte na Vytvořit účet.
ASUS CG8270 97
Page 100

Nastavení hesla uživatele
Postup nastavení hesla uživatele:
1. Vyberte uživatele, jemuž chcete nastavit heslo.
2. Vyberte Vytvořit heslo.
3. Zadejte heslo a ještě jednou pro kontrolu. Zadejte nápovědu k heslu.
4. Po dokončení klepněte na Vytvořit heslo.
Čeština
Aktivace antivirového softwaru
Na počítači je předinstalován program Trend Micro Internet Security. Jde o antivirovou
ochranu počítače, dodávanou třetí stranou. Zakoupí se zvlášť. Po aktivaci máte 60 dní na
vyzkoušení zdarma.
Aktivace Trend Micro Internet Security:
1. Spusťte aplikaci Trend Micro Internet Security.
2. Pečlivě si přečtěte licenční podmínky. Klepněte na Souhlasím, aktivovat.
3. Zadejte vaši e-mailovou adresu a vyberte umístění. Klepněte na Další.
4. Dokončete konguraci klepnutím na Dokončit.
Získání nápovědy a podpory Windows
Windows® Nápověda a podpora nabízí rady a odpovědi týkající se používání aplikací ve
Windows® 7.
Ke spuštění nápovědy a podpory Windows® klepněte na > Nápověda a podpora.
Nejnovější nápovědu online pro Windows® získáte, pokud jste připojeni k internetu.
®
98 Kapitola 2: Používání Windows® 7
 Loading...