

Page 1

User Guide
ASUS ZenWiFi AC MiniASUS ZenWiFi AC Mini
Wireless AC1500 Dual Tri band Gigabit Wireless AC1500 Dual Tri band Gigabit
RouterRouter
Model: CD6Model: CD6
Page 2

E17529
First Edition
November 2020
Copyright © 2020 ASUSTeK Computer Inc. All Rights Reserved.
No part of this manual, including the products and software described
in it, may be reproduced, transmitted, transcribed, stored in a retrieval
system, or translated into any language in any form or by any means, except
documentation kept by the purchaser for backup purposes, without the
express written permission of ASUSTeK Computer Inc. (“ASUS”).
Product warranty or service will not be extended if: (1) the product is repaired,
modied or altered, unless such repair, modication of alteration is authorized
in writing by ASUS; or (2) the serial number of the product is defaced or
missing.
ASUS PROVIDES THIS MANUAL “AS IS” WITHOUT WARRANTY OF ANY KIND,
EITHER EXPRESS OR IMPLIED, INCLUDING BUT NOT LIMITED TO THE IMPLIED
WARRANTIES OR CONDITIONS OF MERCHANTABILITY OR FITNESS FOR A
PARTICULAR PURPOSE. IN NO EVENT SHALL ASUS, ITS DIRECTORS, OFFICERS,
EMPLOYEES OR AGENTS BE LIABLE FOR ANY INDIRECT, SPECIAL, INCIDENTAL,
OR CONSEQUENTIAL DAMAGES (INCLUDING DAMAGES FOR LOSS OF PROFITS,
LOSS OF BUSINESS, LOSS OF USE OR DATA, INTERRUPTION OF BUSINESS
AND THE LIKE), EVEN IF ASUS HAS BEEN ADVISED OF THE POSSIBILITY OF
SUCH DAMAGES ARISING FROM ANY DEFECT OR ERROR IN THIS MANUAL OR
PRODUCT.
SPECIFICATIONS AND INFORMATION CONTAINED IN THIS MANUAL ARE
FURNISHED FOR INFORMATIONAL USE ONLY, AND ARE SUBJECT TO CHANGE
AT ANY TIME WITHOUT NOTICE, AND SHOULD NOT BE CONSTRUED AS A
COMMITMENT BY ASUS. ASUS ASSUMES NO RESPONSIBILITY OR LIABILITY
FOR ANY ERRORS OR INACCURACIES THAT MAY APPEAR IN THIS MANUAL,
INCLUDING THE PRODUCTS AND SOFTWARE DESCRIBED IN IT.
Products and corporate names appearing in this manual may or may not be
registered trademarks or copyrights of their respective companies, and are used
only for identication or explanation and to the owners’ benet, without intent
to infringe.
2
Page 3

Table of contents
1 Getting to know your wireless router
1.1 Welcome! ...........................................................................................6
1.2 Package contents ...........................................................................6
1.3 Your wireless router .......................................................................7
1.4 Positioning your router ................................................................8
1.5 Setup Requirements ...................................................................... 9
1.6 Router Setup ................................................................................. 10
1.6.1 Wired connection .................................................................. 10
1.6.2 Wireless connection ............................................................. 11
2 Getting started
2.1 Logging into the Web GUI ........................................................ 13
2.2 Quick Internet Setup (QIS) with Auto-detection.............. 14
2.3 Connecting to your wireless network .................................. 18
3 Conguring the General settings
3.1 Using the Network Map ........................................................... 19
3.1.1 Setting up the wireless security settings ...................... 20
3.1.2 Managing your network clients ....................................... 21
3.2 Creating a Guest Network ........................................................ 22
3.3 AiProtection................................................................................... 24
3.3.1 Network Protection .............................................................. 25
3.3.2 Setting up Parental Controls .............................................29
3.4 Using the Trac Manager ........................................................ 31
3.4.1 Managing QoS (Quality of Service) Bandwidth..........31
4 Conguring the Advanced Settings
4.1 Wireless ........................................................................................... 34
4.1.1 General ...................................................................................... 34
4.1.2 WPS ............................................................................................37
4.1.3 Bridge ........................................................................................ 39
4.1.4 Wireless MAC Filter ............................................................... 41
3
Page 4

Table of contents
4.1.5 RADIUS Setting ...................................................................... 42
4.1.6 Professional .............................................................................43
4.2 LAN ................................................................................................... 46
4.2.1 LAN IP ........................................................................................ 46
4.2.2 DHCP Server ............................................................................47
4.2.3 Route .........................................................................................49
4.2.4 IPTV ............................................................................................ 50
4.3 WAN .................................................................................................. 51
4.3.1 Internet Connection .............................................................51
4.3.2 Port Trigger .............................................................................. 54
4.3.3 Virtual Server/Port Forwarding ........................................ 56
4.3.4 DMZ............................................................................................59
4.3.5 DDNS .........................................................................................60
4.3.6 NAT Passthrough ................................................................... 61
4.4 IPv6 ................................................................................................... 62
4.5 Firewall ............................................................................................ 63
4.5.1 General ...................................................................................... 63
4.5.2 URL Filter ..................................................................................63
4.5.3 Keyword lter .........................................................................64
4.5.4 Network Services Filter .......................................................65
4.6 Administration.............................................................................. 67
4.6.1 Operation Mode .................................................................... 67
4.6.2 System .......................................................................................68
4.6.3 Firmware Upgrade ................................................................70
4.6.4 Restore/Save/Upload Setting ...........................................70
4.7 System Log .................................................................................... 71
5 Utilities
5.1 Device Discovery ......................................................................... 72
6 Troubleshooting
4
Page 5

Table of contents
6.1 Basic Troubleshooting ............................................................... 73
6.2 Frequently Asked Questions (FAQs) .................................... 76
Appendices
Notices ......................................................................................................... 85
ASUS Contact information .................................................................. 122
5
Page 6

1 Getting to know your wireless 1 Getting to know your wireless
routerrouter
1.1 Welcome!
Thank you for purchasing an ASUS ZenWiFi AC Mini Wireless
Router!
The ultra-thin and stylish ZenWiFi AC Mini features a 2.4GHz,
5GHz-1, and 5GHz-2 triple bands for an unmatched concurrent
wireless HD streaming; SMB server, UPnP AV server, and FTP server
for 24/7 le sharing; a capability to handle 300,000 sessions; and
the ASUS Green Network Technology, which provides up to 70%
power-saving solution.
1.2 Package contents
ZenWiFi AC Mini Wireless Router Network cable (RJ-45)
Power adapter Quick Start Guide
NOTES:
• If any of the items are damaged or missing, contact ASUS for
technical inquiries and support. Refer to the ASUS Support Hotline
list at the back of this user manual.
• Keep the original packaging material in case you would need future
warranty services such as repair or replacement.
6
Page 7
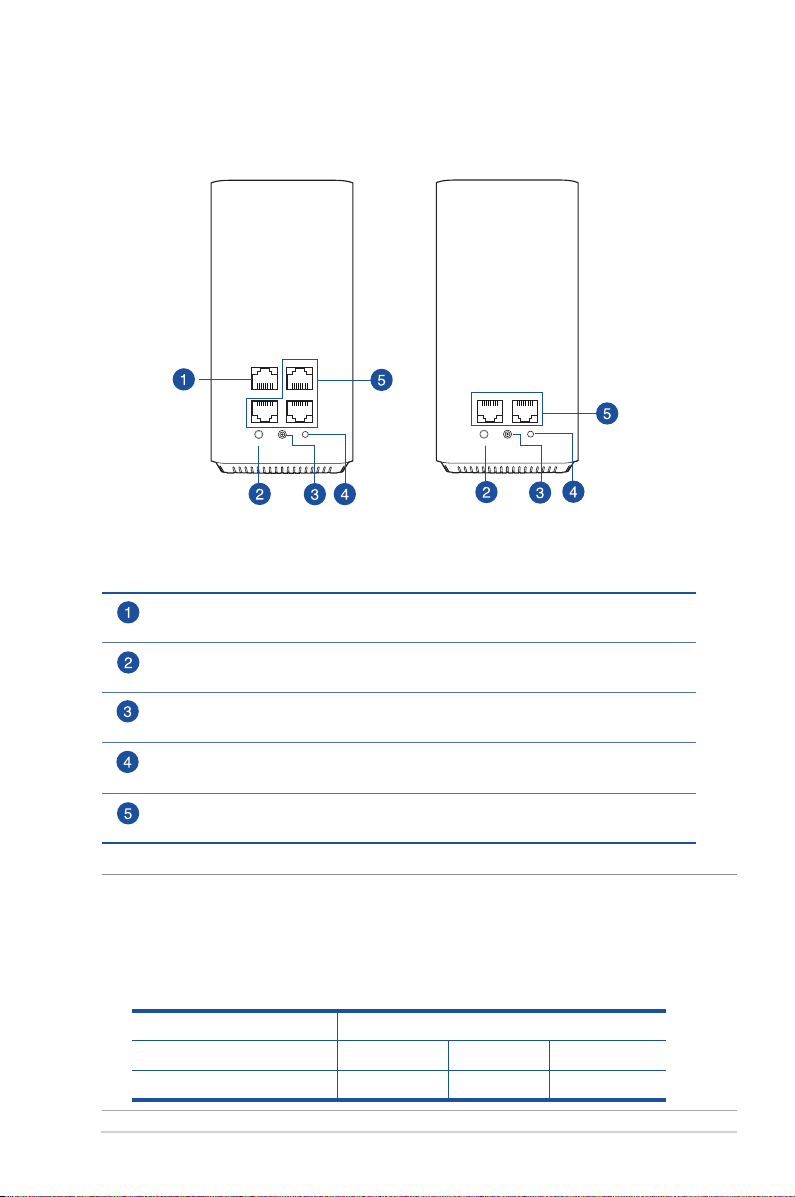
1.3 Your wireless router
WAN
LAN1
LAN2
LAN3
LAN1
LAN2
RESET
WPS
DCIN
AiMesh Router
Router
WPS
DCIN
AiMesh Node
Node
RESET
WAN (Internet) port
Connect a network cable into this port to establish WAN connection.
WPS button
This button launches the WPS Wizard.
Power (DCIN) port
Insert the bundled AC adapter into this port and connect your router to a power source.
Reset button
This button resets or restores the system to its factory default settings.
LAN 1 ~ 3 ports
Connect network cables into these ports to establish LAN connection.
NOTES:
• Use only the adapter that came with your package. Using other adapters
may damage the device.
• Specications:
DC Power adapter DC Output: +19V with max 1.75A current;
Operating Temperature 0~40oC Storage 0~70oC
Operating Humidity 50~90% Storage 20~90%
7
Page 8

1.4 Positioning your router
For the best wireless signal transmission between the wireless
router and the network devices connected to it, ensure that you:
• Place the wireless router in a centralized area for a maximum
wireless coverage for the network devices.
• Keep the device away from metal obstructions and away from
direct sunlight.
• Keep the device away from 802.11g or 20MHz only Wi-Fi
devices, 2.4GHz computer peripherals, Bluetooth devices,
cordless phones, transformers, heavy-duty motors, fluorescent
lights, microwave ovens, refrigerators, and other industrial
equipment to prevent signal interference or loss.
• Always update to the latest firmware. Visit the ASUS website at
http://www.asus.com to get the latest firmware updates.
8
Page 9

1.5 Setup Requirements
To set up your wireless network, you need a computer that meets
the following system requirements:
• Ethernet RJ-45 (LAN) port (10Base-T/100Base-TX/
1000BaseTX)
• IEEE 802.11a/b/g/n/ac wireless capability
• An installed TCP/IP service
• Web browser such as Internet Explorer, Firefox, Safari, or
Google Chrome
NOTES:
• If your computer does not have built-in wireless capabilities, you may
install an IEEE 802.11a/b/g/n/ac WLAN adapter to your computer to
connect to the network.
• With its triple band technology, your wireless router supports
2.4GHz, 5GHz-1, and 5GHz-2 wireless signals simultaneously. This
allows you to do Internet-related activities such as Internet surng
or reading/writing e-mail messages using the 2.4GHz band while
simultaneously streaming high-denition audio/video les such as
movies or music using the 5GHz band.
• Some IEEE 802.11n devices that you want to connect to your network
may or may not support 5GHz band. Refer to the device's manual for
specications.
• The Ethernet RJ-45 cables that will be used to connect the network
devices should not exceed 100 meters.
9
Page 10
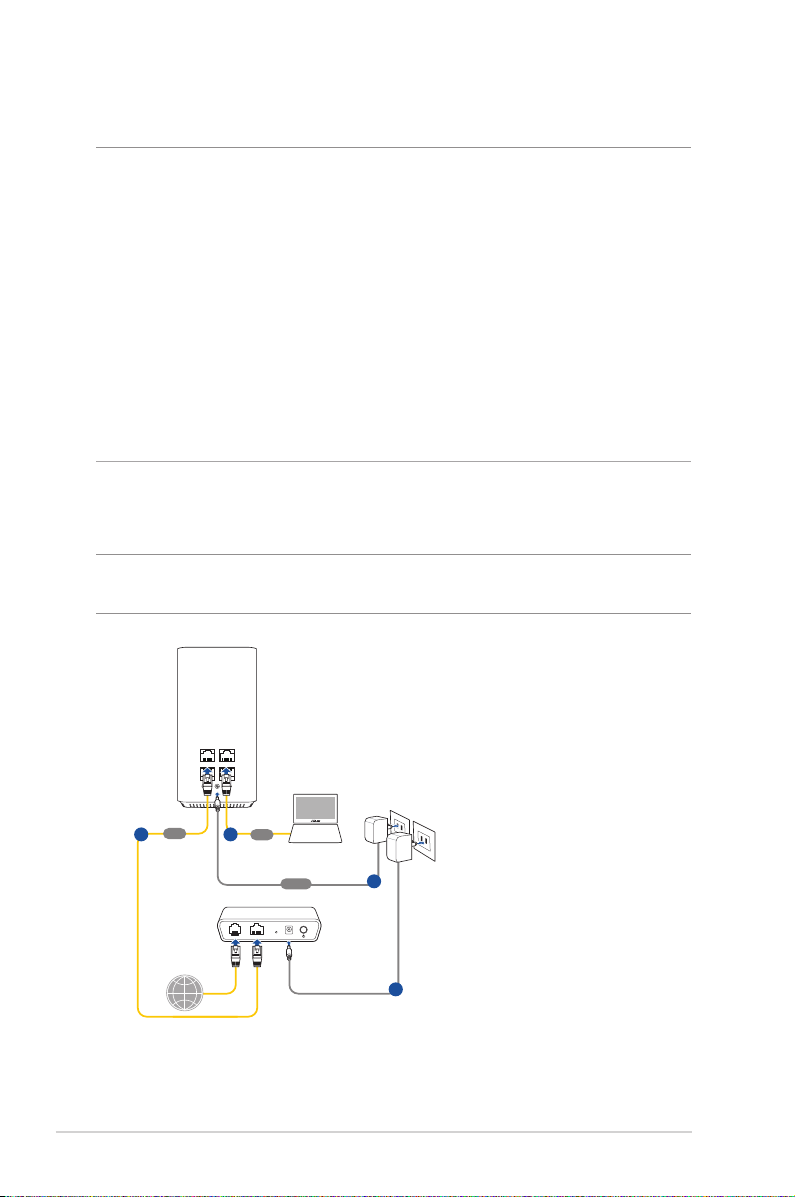
1.6 Router Setup
WAN LAN1
LAN2
WPS
DCIN
RESET
AiMesh Router
ASUS ZenWiFi AC Mini
LAN3
Modem
LINE LAN RESET PWR
Laptop
Power
WAN
LAN
a
d
c b
Wall Power Outlet
IMPORTANT!
• Use a wired connection when setting up your wireless router to
avoid possible setup problems.
• Before setting up your ASUS wireless router, do the following:
• If you are replacing an existing router, disconnect it from your
network.
• Disconnect the cables/wires from your existing modem setup. If
your modem has a backup battery, remove it as well.
• Reboot your cable modem and computer (recommended).
1.6.1 Wired connection
NOTE: You can use either a straight-through cable or a crossover cable
for wired connection.
10
Page 11
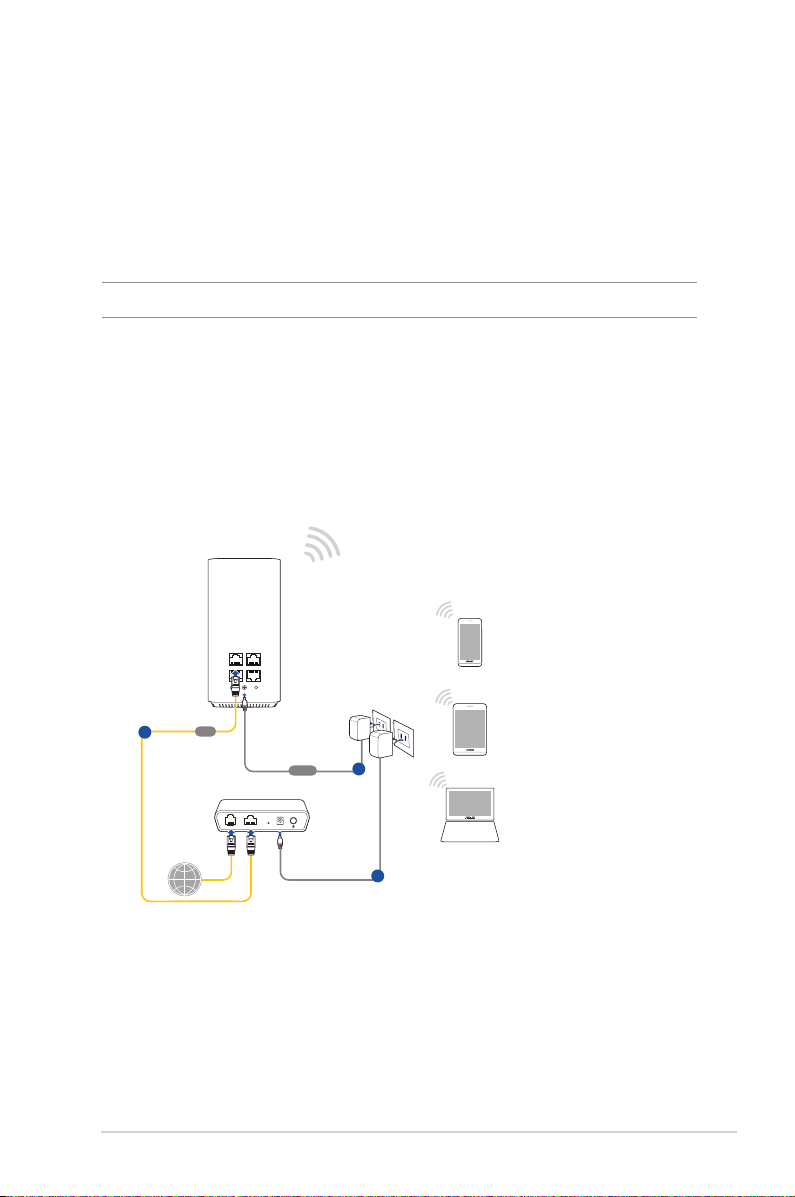
To set up your wireless router via wired connection:
WAN LAN1
LAN2
WPS
DCIN
RESET
AiMesh Router
ASUS ZenWiFi AC Mini
LAN3
Modem
LINE LAN RESET PWR
Power
WAN
a
c
b
Wall Power Outlet
Laptop
Tablet
Smart phone
1. Insert your wireless router’s AC adapter to the DC-IN port and
plug it to a power outlet.
2. Using the bundled network cable, connect your computer to
your wireless router’s LAN port.
IMPORTANT! Ensure that the LAN LED is blinking.
3 Using another network cable, connect your modem to your
wireless router’s WAN port.
4. Insert your modem’s AC adapter to the DC-IN port and plug it
to a power outlet.
1.6.2 Wireless connection
To set up your wireless router via wireless connection:
1. Insert your wireless router’s AC adapter to the DC-IN port and
plug it to a power outlet.
2 Using the bundled network cable, connect your modem to
your wireless router’s WAN port.
11
Page 12

3. Insert your modem’s AC adapter to the DC-IN port and plug it
to a power outlet.
4. Install an IEEE 802.11a/b/g/n/ac WLAN adapter on your
computer.
NOTES:
• For details on connecting to a wireless network, refer to the WLAN
adapter’s user manual.
• To set up the security settings for your network, refer to the section
Setting up the wireless security settings in Chapter 3 of this user
manual.
12
Page 13
2 Getting started2 Getting started
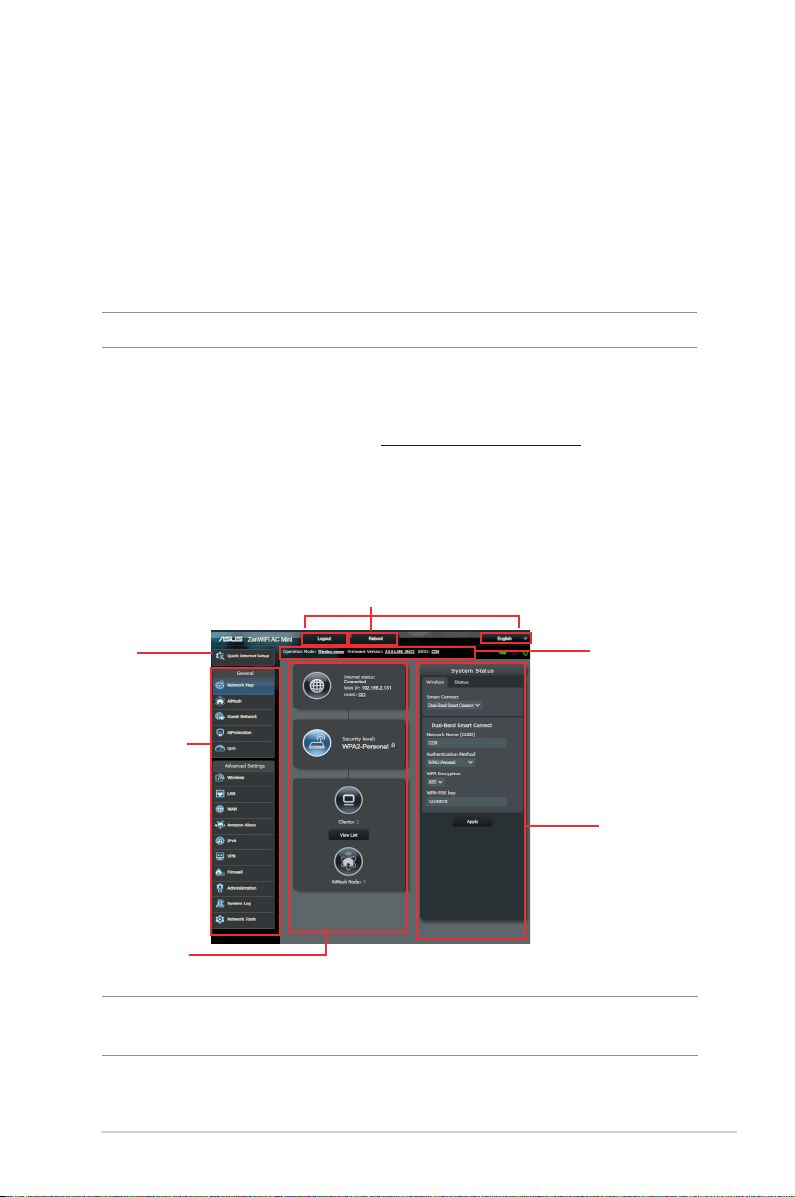
2.1 Logging into the Web GUI
Your ASUS Wireless Router comes with an intuitive web graphical
user interface (GUI) that allows you to easily congure its various
features through a web browser such as Internet Explorer, Firefox,
Safari, or Google Chrome.
NOTE: The features may vary with dierent rmware versions.
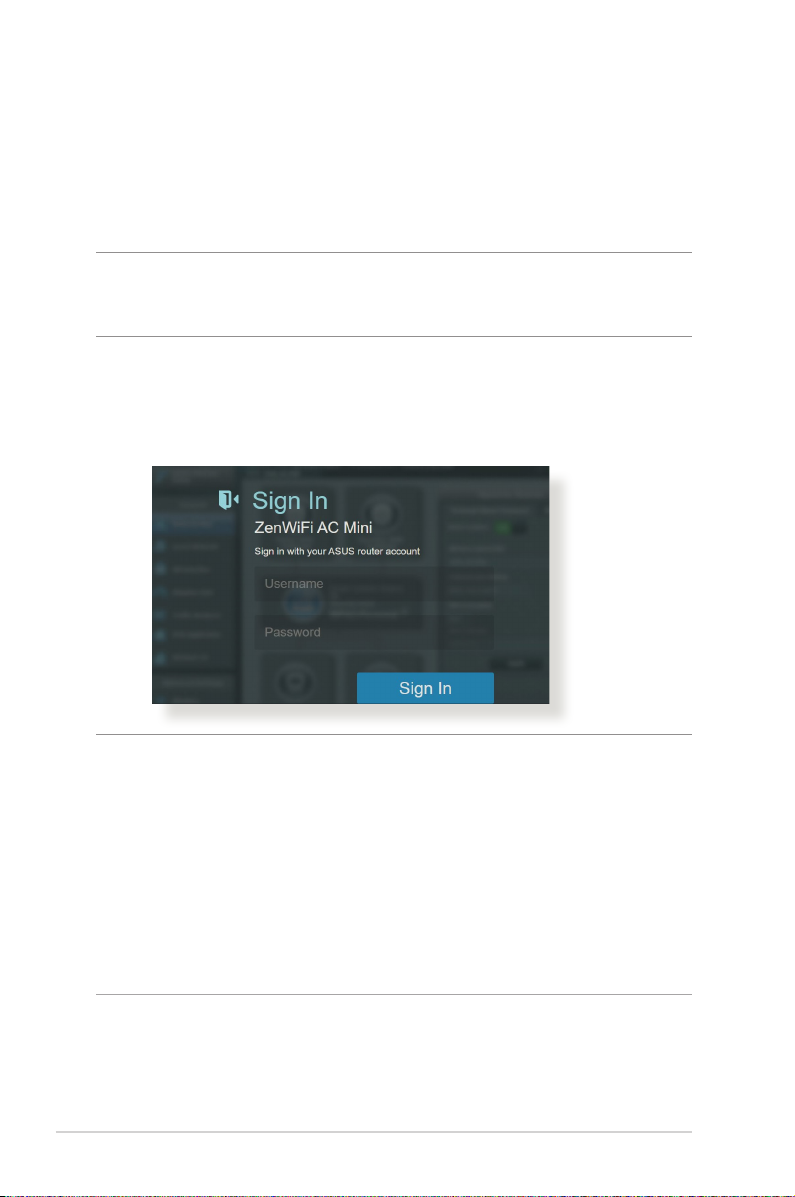
To log into the web GUI:
1. On your web browser, enter http://router.asus.com.
2. On the login page, key in the default user name (admin) and
password (admin).
3. You can now use the Web GUI to congure various settings of
your ASUS Wireless Router.
Top command buttons
QIS
Navigation
panel
middle
column
NOTE: If you are logging into the Web GUI for the rst time, you will be
directed to the Quick Internet Setup (QIS) page automatically.
Information
banner
right column
13
Page 14
2.2 Quick Internet Setup (QIS) with Autodetection
The Quick Internet Setup (QIS) function guides you in quickly
setting up your Internet connection.
NOTE: When setting the Internet connection for the rst time, press
the Reset button on your wireless router to reset it to its factory default
settings.
To use QIS with auto-detection:
1. Log into the Web GUI. The QIS page launches automatically.
NOTES:
• For details on changing your wireless router's login username and
password, refer to section 4.6.2 System.
• The wireless router's login username and password is dierent from
the 2.4GHz/5GHz network name (SSID) and security key. The wireless
router's login username and password allows you to log into your
wireless router's Web GUI to congure your wireless router's settings.
The 2.4GHz/5GHz network name (SSID) and security key allows Wi-Fi
devices to log in and connect to your 2.4GHz/5GHz network.
14
Page 15
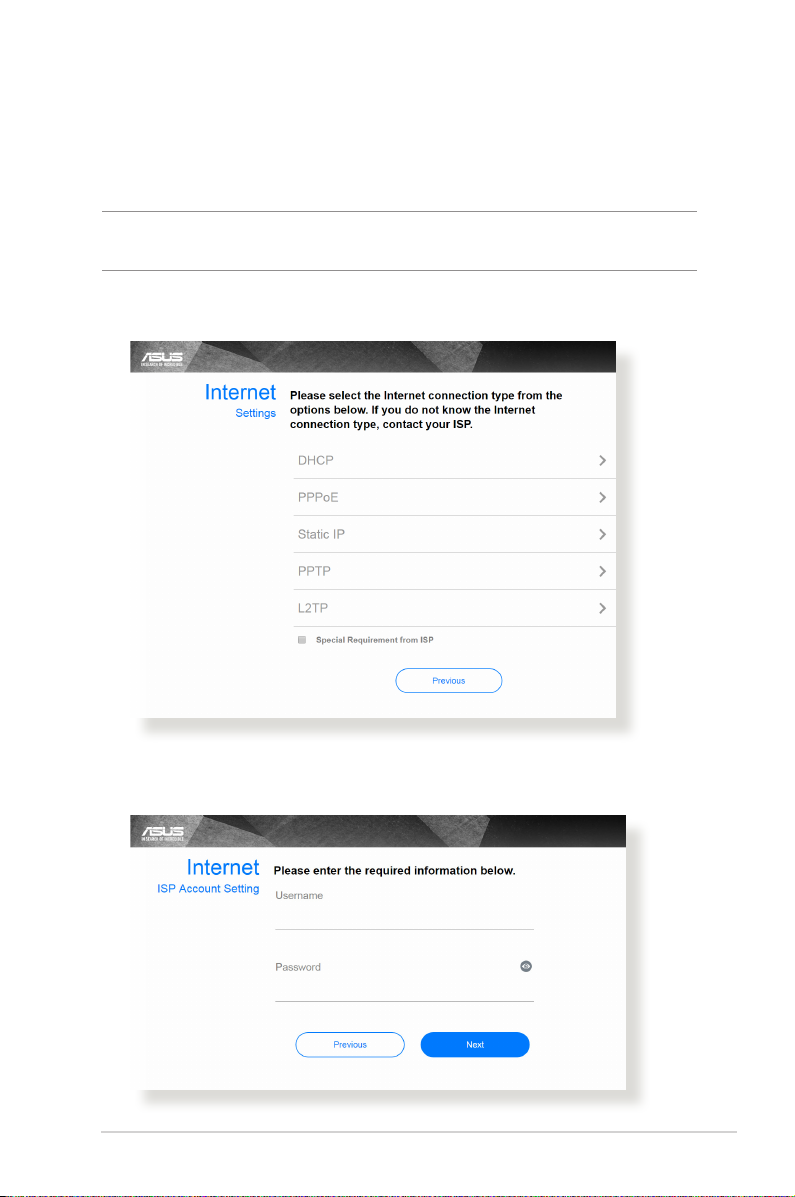
2. The wireless router automatically detects if your ISP connection
type is Dynamic IP, PPPoE, PPTP, L2TP, and Static IP. Key in
the necessary information for your ISP connection type.
IMPORTANT! Obtain the necessary information from your ISP about
the Internet connection type.
for Automatic IP (DHCP)
for PPPoE, PPTP, and L2TP
15
Page 16
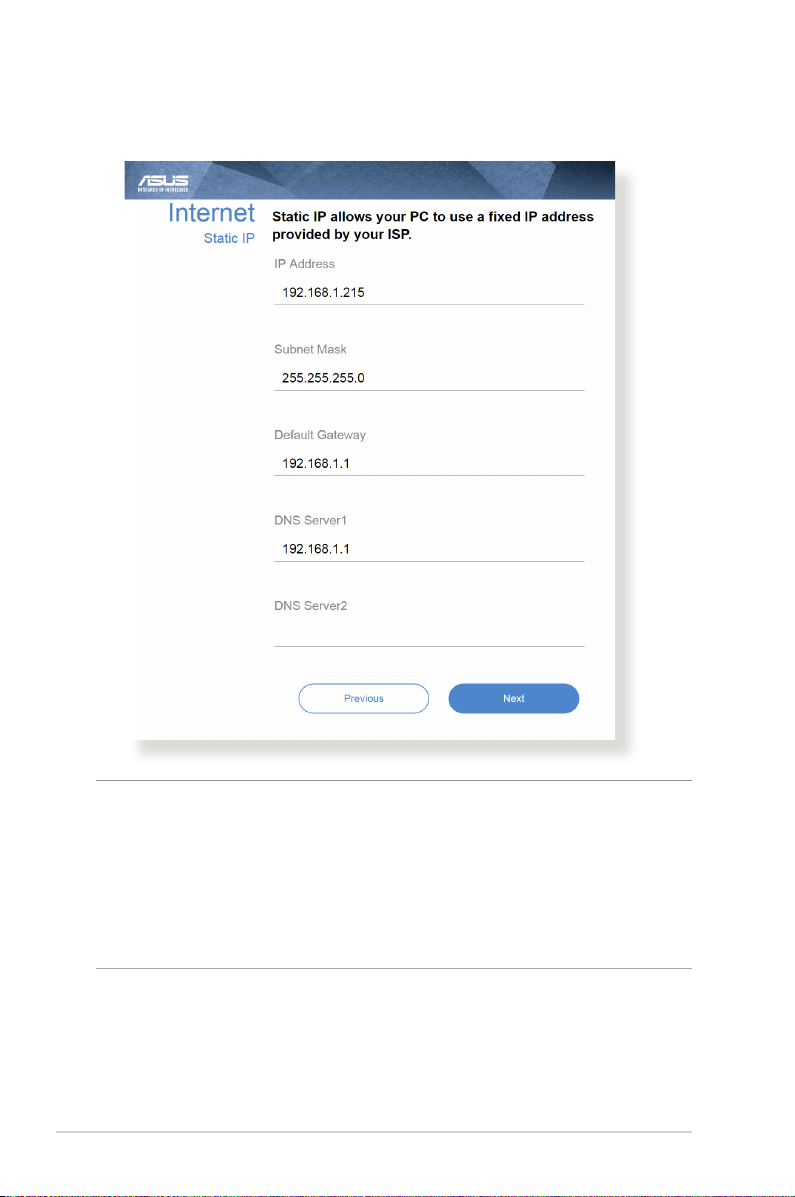
for Static IP
NOTES:
• The auto-detection of your ISP connection type takes place when
you congure the wireless router for the rst time or when your
wireless router is reset to its default settings.
• If QIS failed to detect your Internet connection type, click Skip to
manual setting and manually congure your connection settings.
3. Assign the wireless network name (SSID) and security key for
your 2.4 GHz and 5 GHz wireless connection. Click Apply when
done.
16
Page 17
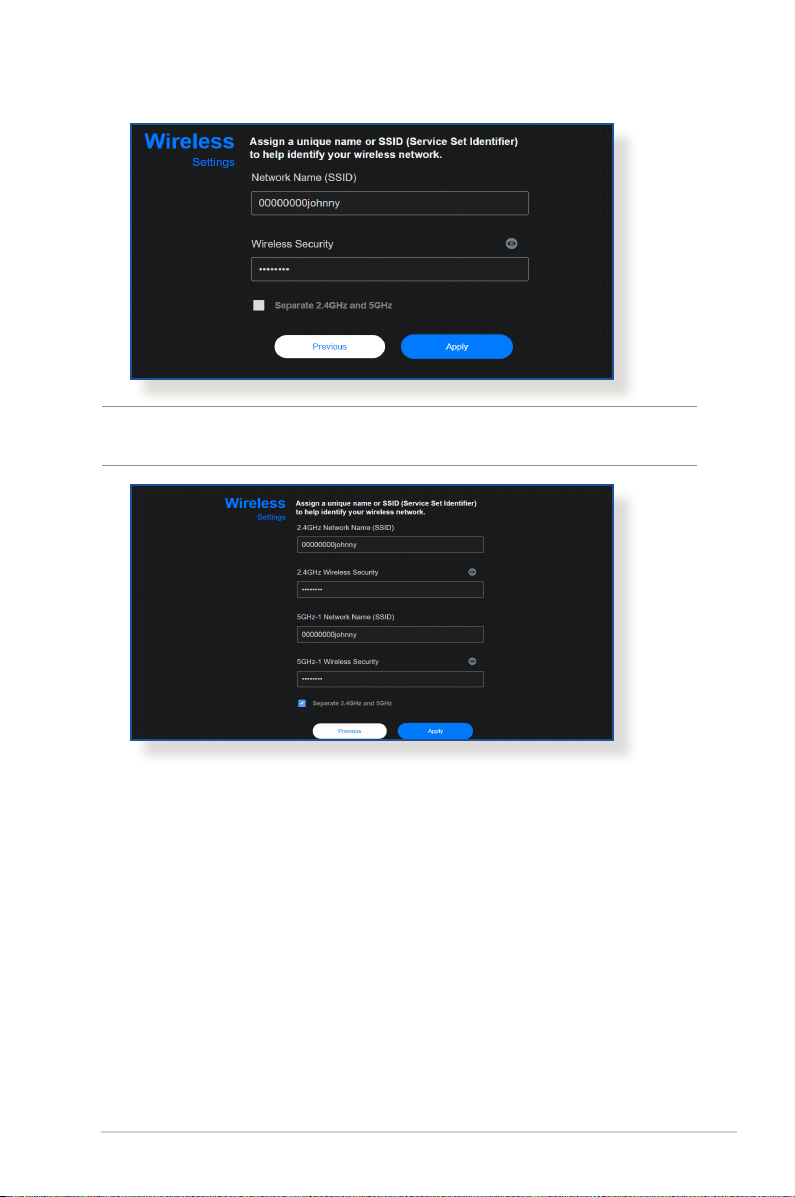
NOTE: If you want to assign dierent SSIDs for your 2.4 GHz and 5 GHz
wireless connection, tick Separate 2.4GHz and 5 GHz.
17
Page 18

2.3 Connecting to your wireless network
After setting up your wireless router via QIS, you can connect your
computer or other smart devices to your wireless network.
To connect to your network:
1. On your computer, click the network icon in the notication
area to display the available wireless networks.
2. Select the wireless network that you want to connect to, then
click Connect.
3. You may need to key in the network security key for a secured
wireless network, then click OK.
4. Wait while your computer establishes connection to the
wireless network successfully. The connection status is
displayed and the network icon displays the connected
status.
NOTES:
• Refer to the next chapters for more details on conguring your
wireless network's settings.
• Refer to your device's user manual for more details on connecting it
to your wireless network.
18
Page 19
3 Conguring the General 3 Conguring the General
settingssettings
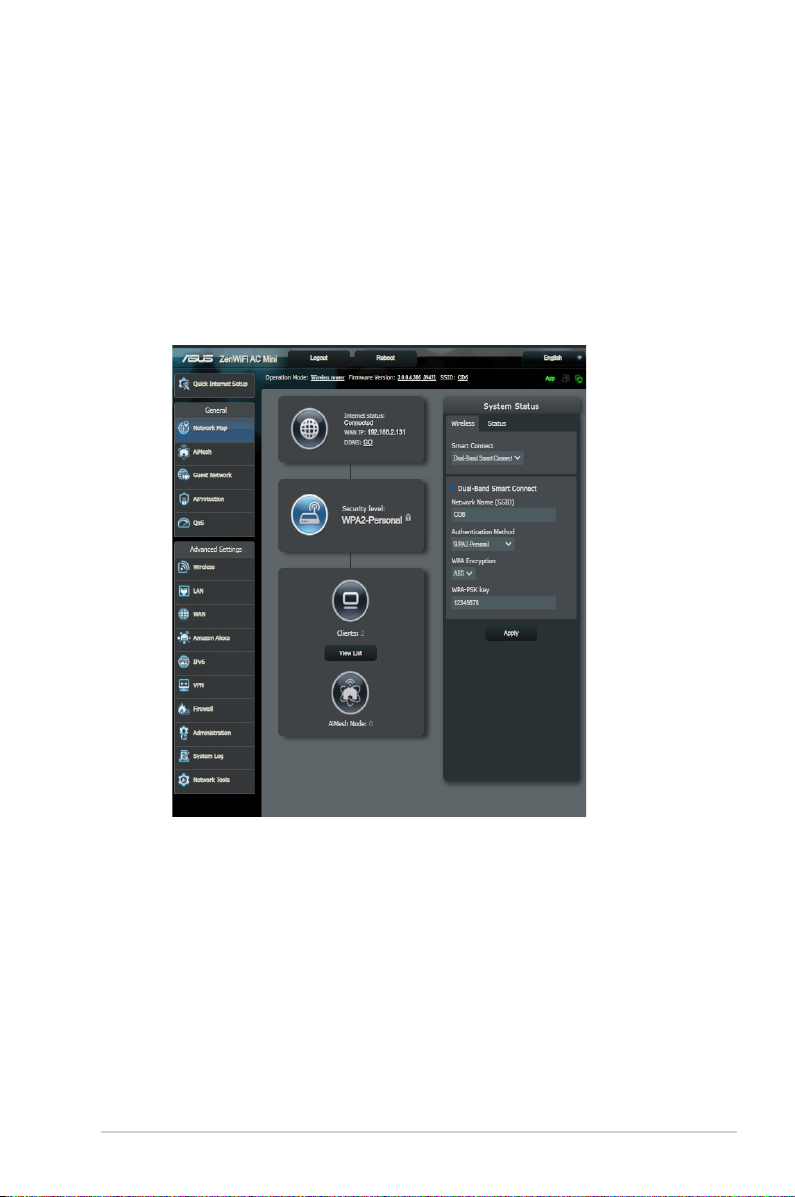
3.1 Using the Network Map
Network Map allows you to congure your network’s security
settings, manage your network clients.
19
Page 20
3.1.1 Setting up the wireless security settings
To protect your wireless network from unauthorized access, you
need to configure its security settings.
To set up the wireless security settings:
1. From the navigation panel, go to General > Network Map.
2. On the Network Map screen and under System status, you can
configure the wireless security settings such as SSID, security
level, and encryption settings.
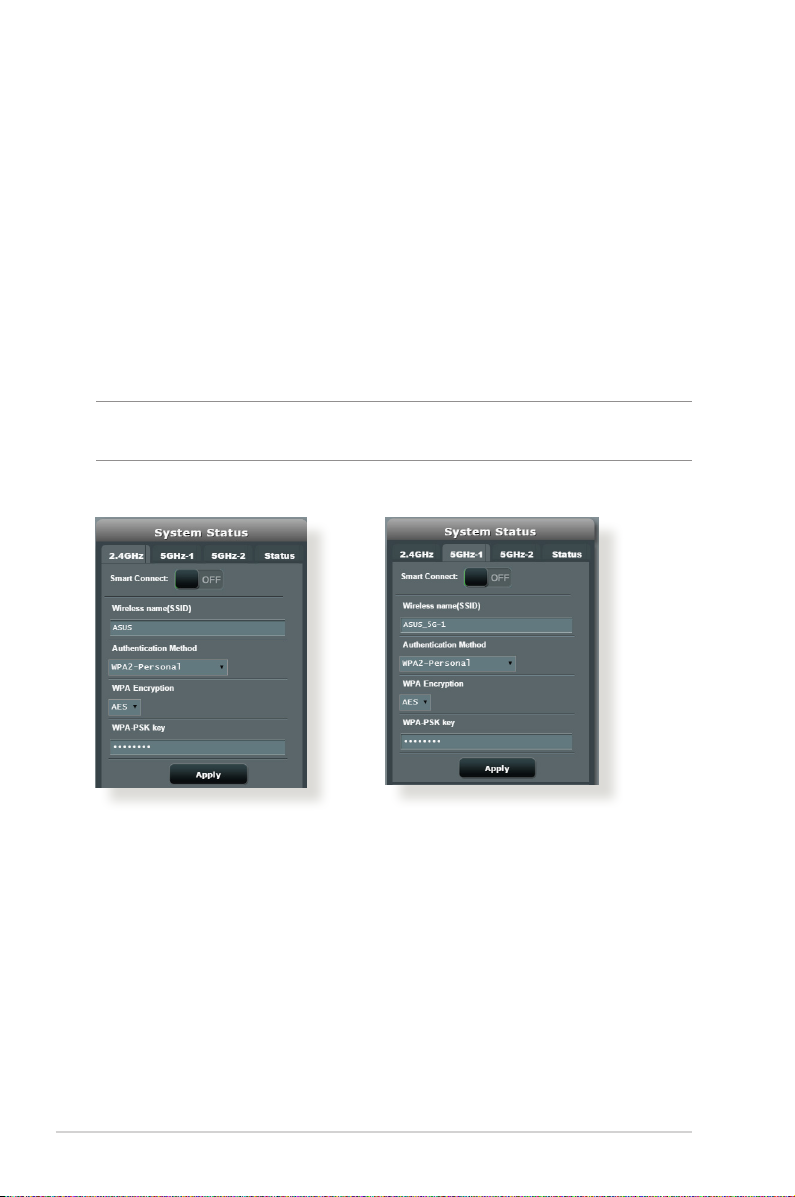
NOTE: You can set up dierent wireless security settings for 2.4GHz and
5GHz bands.
2.4GHz security settings 5GHz security settings
20
Page 21
3. On the Wireless name (SSID) field, key in a unique name for
your wireless network.
4. From the WEP Encryption dropdown list, select the encryption
method for your wireless network.
IMPORTANT! The IEEE 802.11n/ac standard prohibits using High
Throughput with WEP or WPA-TKIP as the unicast cipher. If you use these
encryption methods, your data rate will drop to IEEE 802.11g 54Mbps
connection.
5. Key in your security passkey.
6. Click Apply when done.
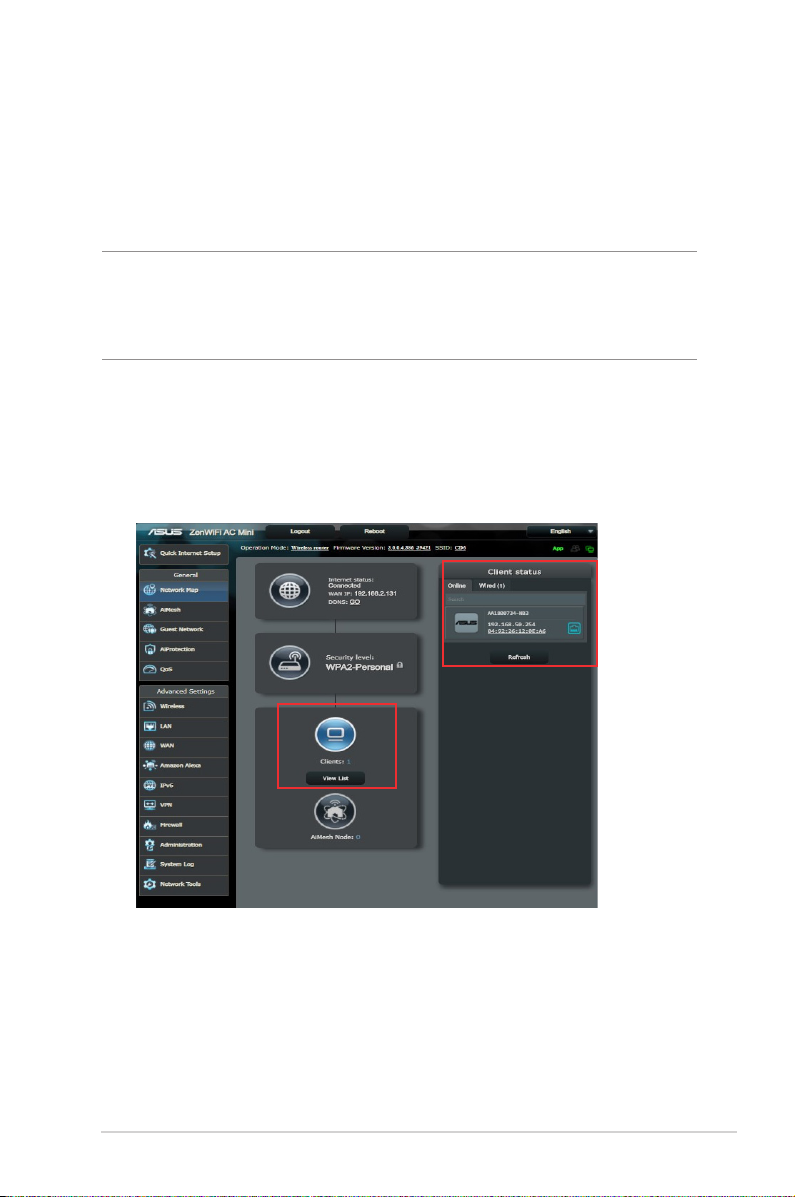
3.1.2 Managing your network clients
To manage your network clients:
1. From the navigation panel, go to General > Network Map tab.
2. On the Network Map screen, select the Client Status icon to
display your network client’s information.
3. To block a client’s access to your network, select the client and
click block.
21
Page 22
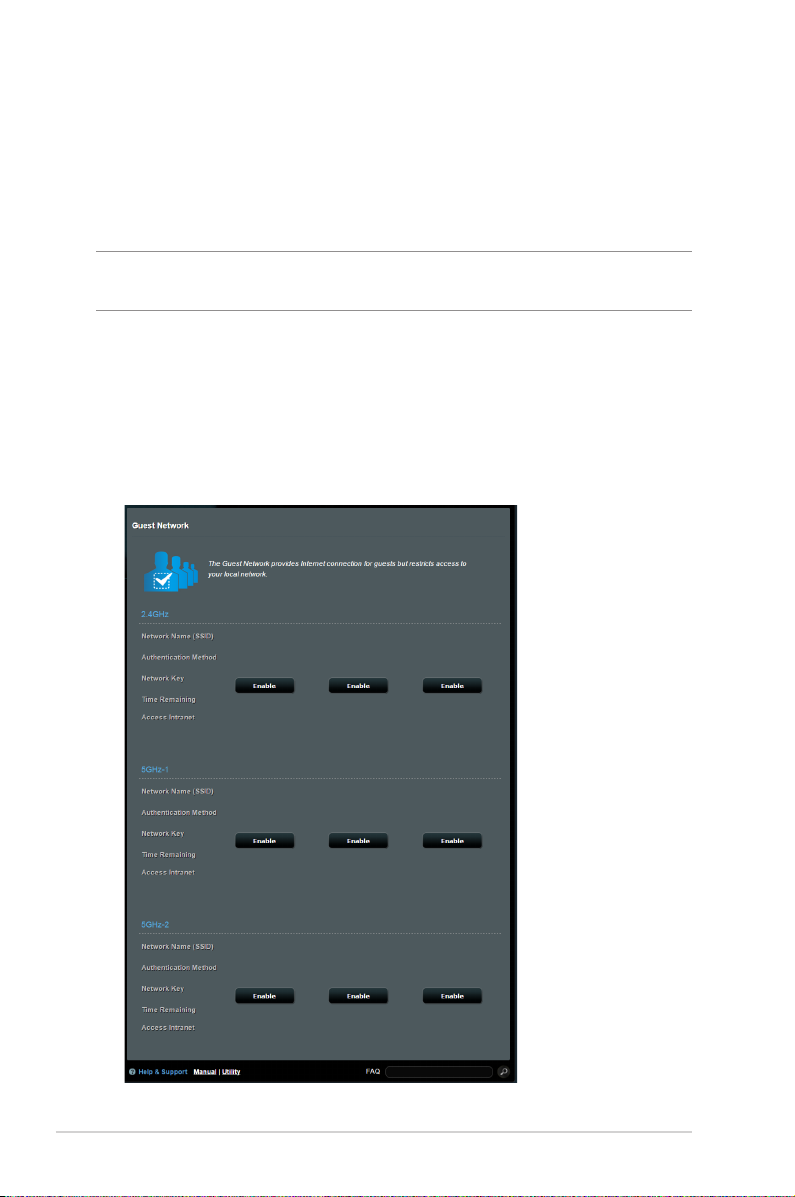
3.2 Creating a Guest Network
The Guest Network provides temporary visitors with Internet
connectivity via access to separate SSIDs or networks without
providing access to your private network.
NOTE: ZenWiFi AC Mini supports up to nine SSIDs (three 2.4GHz, three
5GHz-1, and three 5GHz-2 SSIDs).
To create a guest network:
1. From the navigation panel, go to General > Guest Network.
2. On the Guest Network screen, select 2.4GHz or 5GHz frequency
band for the guest network that you want to create.
3. Click Enable.
22
Page 23
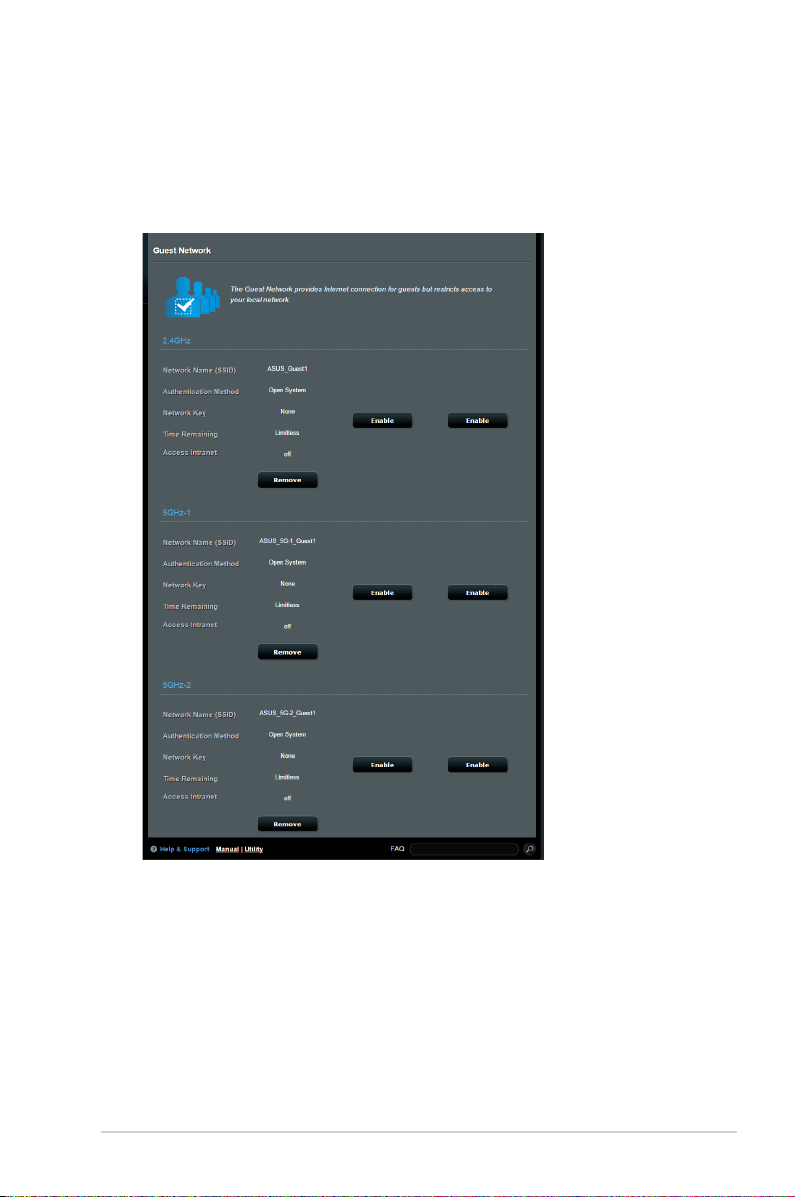
4. To change a guest’s settings, click the guest settings you want
to modify. Click Remove to delete the guest’s settings.
5. Assign a wireless name for your temporary network on the
Network Name (SSID) eld.
6. Select an Authentication Method.
7. If you select a WPA authentication method, select a WPA
Encryption.
8. Specify the Access time or choose Limitless.
9. Select Disable or Enable on the Access Intranet item.
10. When done, click Apply.
23
Page 24
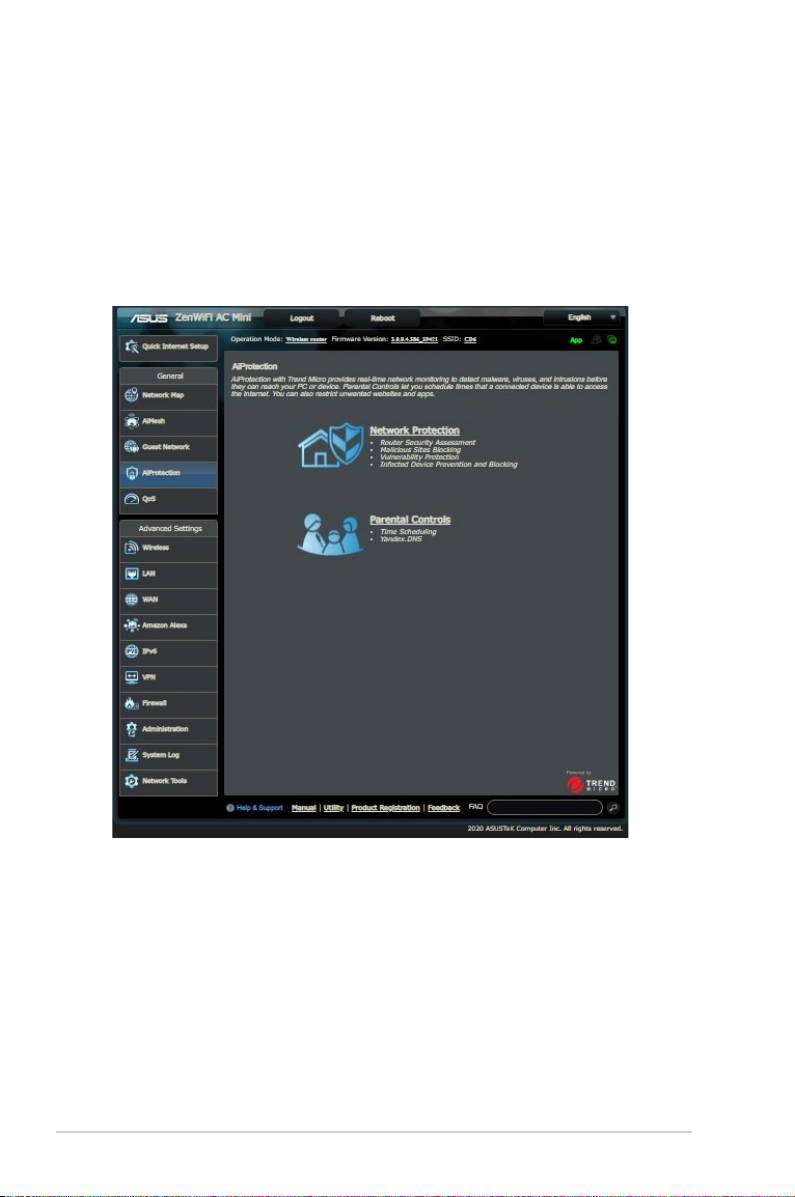
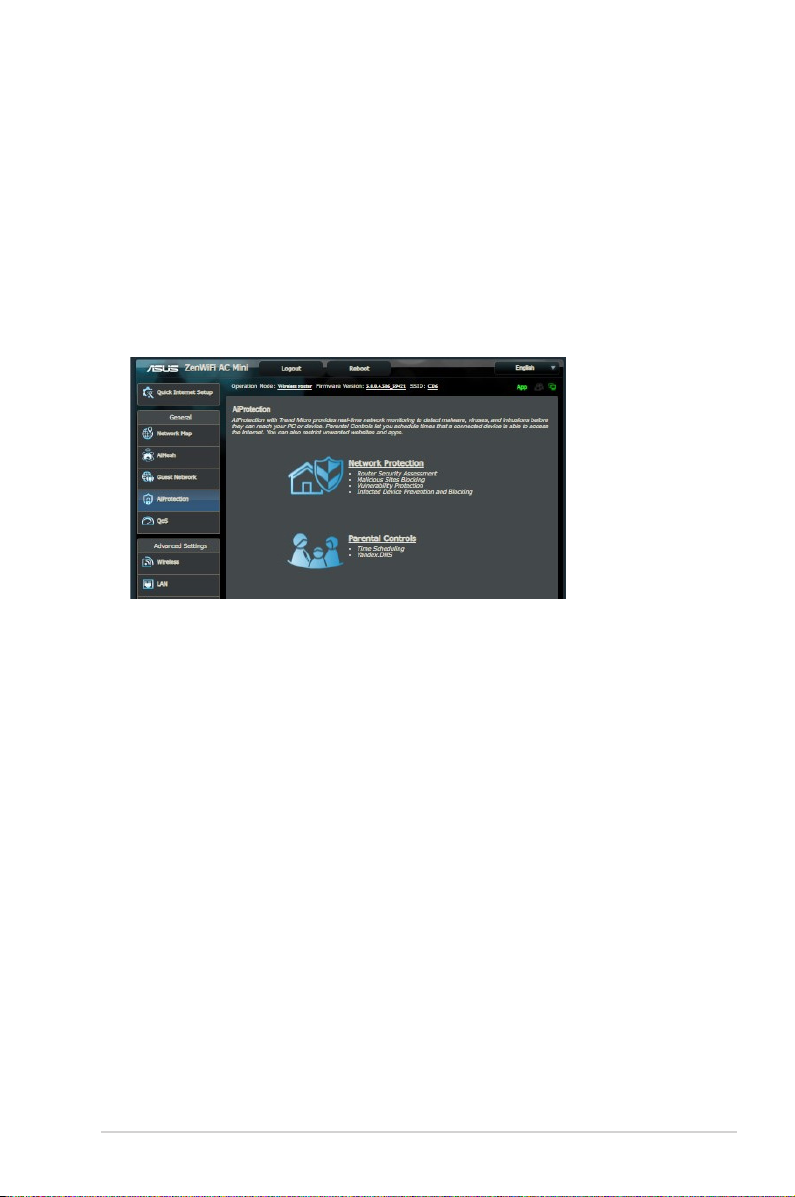
3.3 AiProtection
AiProtection provides real-time monitoring that detects malware,
spyware, and unwanted access. It also lters unwanted websites
and apps and allows you to schedule a time that a connected
device is able to access the Internet.
24
Page 25
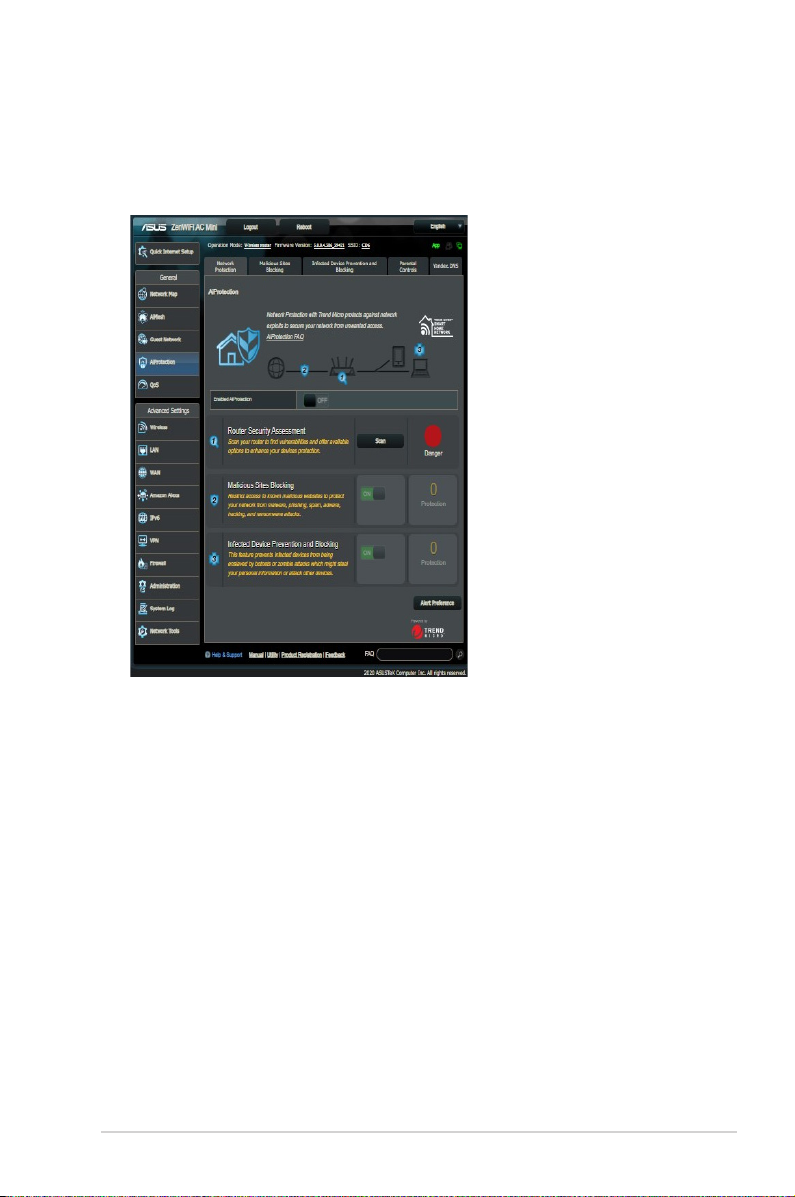
3.3.1 Network Protection
Network Protection prevents network exploits and secures your
network from unwanted access.
Conguring Network Protection
To congure Network Protection:
1. From the navigation panel, go to General > AiProtection.
2. From the AiProtection main page, click on Network
Protection.
3. From the Network Protection tab, click Scan.
When done scanning, the utility displays the results on the
Router Security Assessment page.
25
Page 26
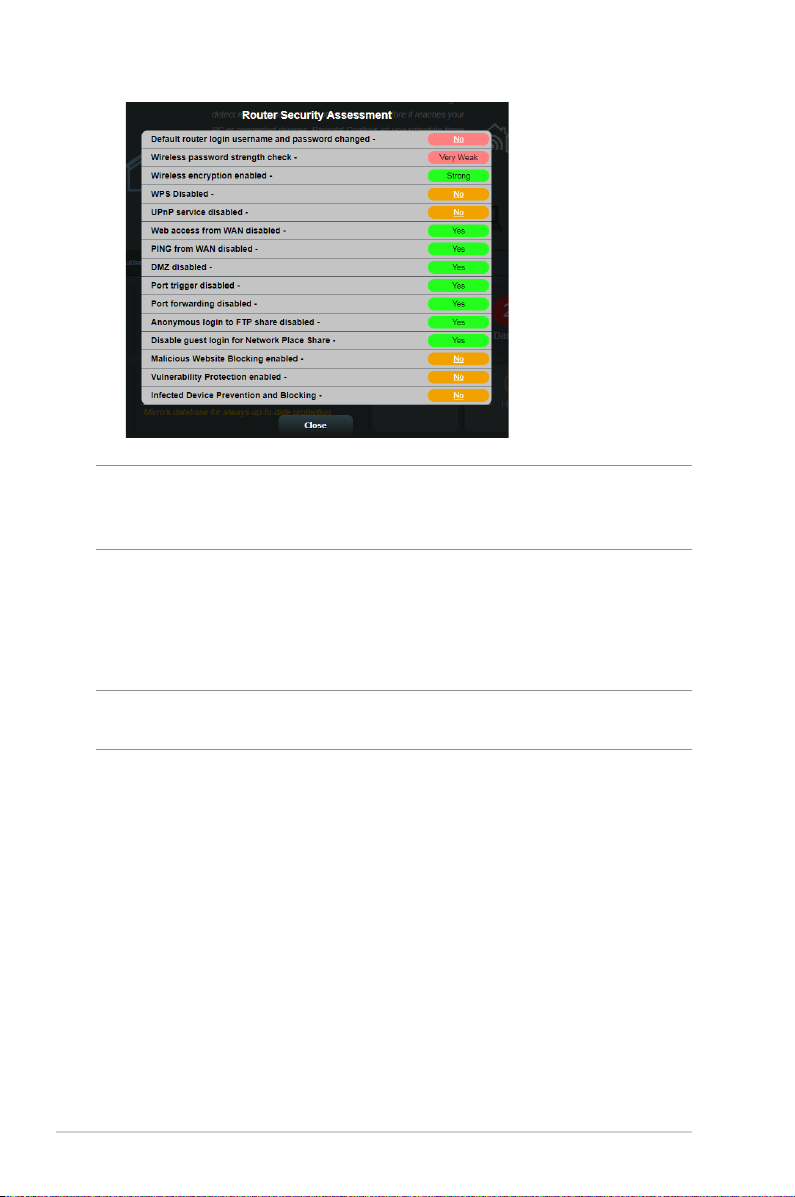
IMPORTANT! Items marked as Ye s on the Router Security Assessment
page is considered to be at a safe status. Items marked as No, Weak, or
Very Weak is highly recommended to be congured accordingly.
4. (Optional) From the Router Security Assessment page,
manually congure the items marked as No, Weak, or Very
Weak. To do this:
a. Click an item.
NOTE: When you click an item, the utility forwards you to the item’s
setting page.
b. From the item’s security settings page, congure and make
the necessary changes and click Apply when done.
c. Go back to the Router Security Assessment page and click
Close to exit the page.
5. To automatically congure the security settings, click Secure
Your Router.
6. When a message prompt appears, click OK.
26
Page 27

Malicious Sites Blocking
This feature restricts access to known malicious websites in the
cloud database for an always-up-to-date protection.
NOTE: This function is automatically enabled if you run the Router
Weakness Scan.
To enable Malicious Sites Blocking:
1. From the navigation panel, go to General > AiProtection.
2. From the AiProtection main page, click on Network
Protection.
3. From the Malicious Sites Blocking pane, click ON.
Two-Way IPS
Two-Way IPS (Intrusion Prevention System) protects your router
from network attacks by both blocking malicious incoming
packets and detecting suspicious outgoing packets.
NOTE: This function is automatically enabled if you run the Router
Weakness Scan.
To enable Two-Way IPS:
1. From the navigation panel, go to General > AiProtection.
2. From the AiProtection main page, click on Network
Protection.
3. From the Two-Way IPS pane, click ON.
27
Page 28

Infected Device Prevention and Blocking
This feature prevents infected devices from communicating
personal information or infected status to external parties.
NOTE: This function is automatically enabled if you run the Router
Weakness Scan.
To enable Infected Device Prevention and Blocking:
1. From the navigation panel, go to General > AiProtection.
2. From the AiProtection main page, click on Network
Protection.
3. From the Infected Device Prevention and Blocking pane,
click ON.
To congure Alert Preference:
1. From the Infected Device Prevention and Blocking pane,
click Alert Preference.
2. Select or key in the e-mail provider, e-mail account, and
password then click Apply.
28
Page 29
3.3.2 Setting up Parental Controls
Parental Control allows you to control the Internet access time or
set the time limit for a client’s network usage.
To go to the Parental Controls main page:
1. From the navigation panel, go to General > AiProtection.
2. From the AiProtection main page, click on the Parental
Controls tab.
29
Page 30

Web & Apps Filters
Web & Apps Filters is a feature of Parental Controls that allows
you to block access to unwanted web sites or applications.
To congure Web & Apps Filters:
1. From the navigation panel, go to General > AiProtection.
2. From the AiProtection main page, click on the Parental
Controls icon to go to the Parental Controls tab.
3. From the Enable Web & Apps Filters pane, click ON.
4. When the End Users License Agreement (EULA) message
prompt appears, click I agree to continue.
5. From the Client List column, select or key in the client’s name
from the drop down list box.
6. From the Content Category column, select the lters from
the four main categories: Adult, Instant Message and
Communication, P2P and File Transfer, and Streaming and
Entertainment.
7. Click to add the client’s prole.
8. Click Apply to save the settings.
30
Page 31

3.4 Using the Trac Manager
3.4.1 Managing QoS (Quality of Service) Bandwidth
Quality of Service (QoS) allows you to set the bandwidth priority
and manage network trac.
To set up bandwidth priority:
1. From the navigation panel, go to General > QoS> QoS tab.
2. Click ON to enable QoS. Fill in the upload and download
bandwidth elds.
NOTE: Get the bandwidth information from your ISP.
3. Click Save.
NOTE: The User Specify Rule List is for advanced settings. If you want
to prioritize specic network applications and network services, select
User-dened QoS rules or User-dened Priority from the drop-down
list on the upper-right corner.
31
Page 32

4. On the user-dened QoS rules page, there are four default
online service types – web surf, HTTPS and le transfers.
Select your preferred service, ll in the Source IP or MAC,
Destination Port, Protocol, Transferred and Priority, then
click Apply. The information will be congured in the QoS rules
screen.
NOTES:
• To ll in the source IP or MAC, you can:
a) Enter a specic IP address, such as "192.168.122.1".
b) Enter IP addresses within one subnet or within the same IP
pool, such as “192.168.123.*”, or “192.168.*.*”
c) Enter all IP addresses as “*.*.*.*” or leave the eld blank.
d) The format for the MAC address is six groups of two
hexadecimal digits, separated by colons (:), in transmission
order (e.g. 12:34:56:aa:bc:ef)
• For source or destination port range, you can either:
a) Enter a specic port, such as “95”.
b) Enter ports within a range, such as “103:315”, “>100”, or
“<65535”.
• The Transferred column contains information about the upstream
and downstream trac (outgoing and incoming network trac) for
one section. In this column, you can set the network trac limit (in
KB) for a specic service to generate specic priorities for the service
assigned to a specic port. For example, if two network clients, PC
1 and PC 2, are both accessing the Internet (set at port 80), but PC 1
exceeds the network trac limit due to some downloading tasks, PC
1 will have a lower priority. If you do not want to set the trac limit,
leave it blank.
32
Page 33

5. On the User-dened Priority page, you can prioritize the
network applications or devices into ve levels from the user-
dened QoS rules’ dropdown list. Based on priority level, you
can use the following methods to send data packets:
• Change the order of upstream network packets that are sent
to the Internet.
• Under Upload Bandwidth table, set Minimum Reserved
Bandwidth and Maximum Bandwidth Limit for multiple
network applications with dierent priority levels. The
percentages indicate the upload bandwidth rates that are
available for specied network applications.
NOTES:
• Low-priority packets are disregarded to ensure the transmission of
high-priority packets.
• Under Download Bandwidth table, set Maximum Bandwidth
Limit for multiple network applications in corresponding order.
The higher priority upstream packet will cause the higher priority
downstream packet.
• If there are no packets being sent from high-priority applications, the
full transmission rate of the Internet connection is available for lowpriority packets.
6. Set the highest priority packet. To ensure a smooth online
gaming experience, you can set ACK, SYN, and ICMP as the
highest priority packet.
NOTE: Ensure to enable QoS rst and set up the upload and download
rate limits.
33
Page 34
4 Conguring the Advanced 4 Conguring the Advanced
SettingsSettings
4.1 Wireless
4.1.1 General
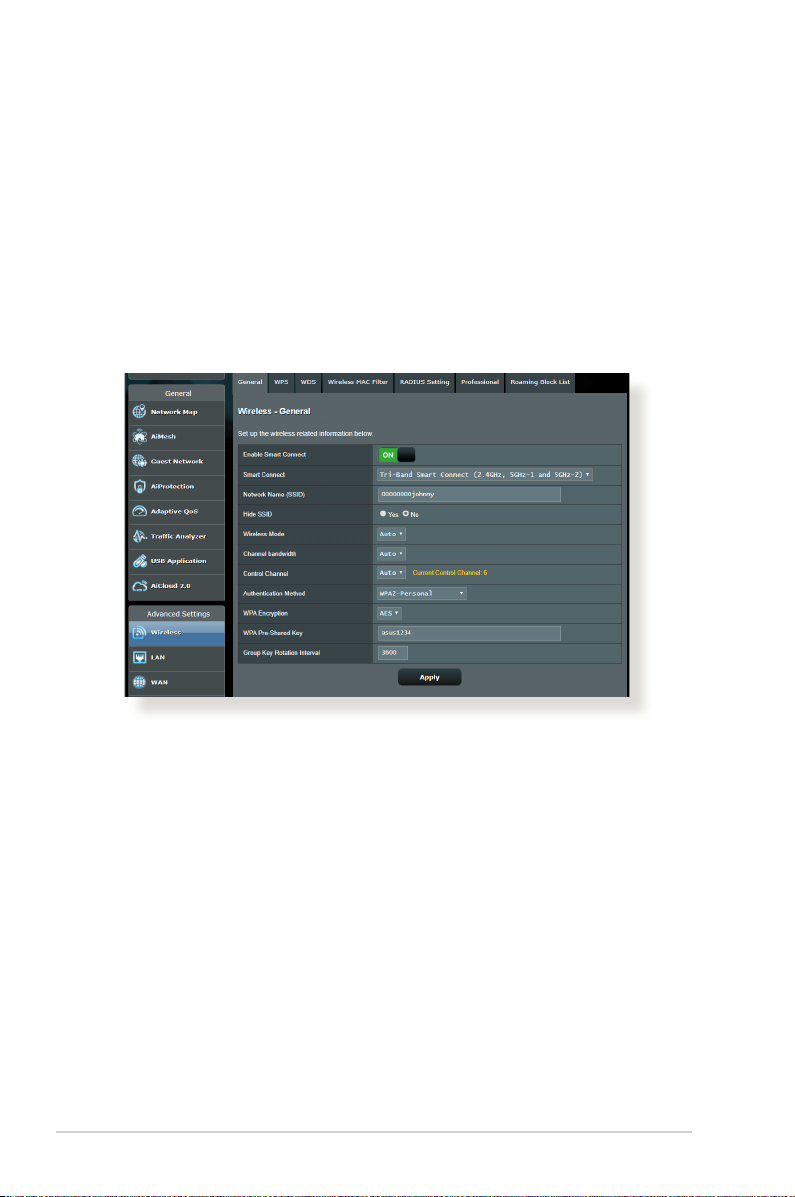
The General tab allows you to congure the basic wireless
settings.
To congure the basic wireless settings:
1. From the navigation panel, go to Advanced Settings >
Wireless > General tab.
2. Select 2.4GHz or 5GHz as the frequency band for your wireless
network.
3. Assign a unique name containing up to 32 characters for your
SSID (Service Set Identier) or network name to identify your
wireless network. Wi-Fi devices can identify and connect to
the wireless network via your assigned SSID. The SSIDs on the
information banner are updated once new SSIDs are saved to
the settings.
34
Page 35

NOTE: You can assign unique SSIDs for the 2.4 GHz and 5GHz frequency
bands.
4. In the Hide SSID eld, select Yes to prevent wireless devices
from detecting your SSID. When this function is enabled, you
would need to enter the SSID manually on the wireless device
to access the wireless network.
5. Select any of these wireless mode options to determine the
types of wireless devices that can connect to your wireless
router:
• Auto: Select Auto to allow 802.11AC, 802.11n, 802.11g, and
802.11b devices to connect to the wireless router.
• Legacy: Select Legacy to allow 802.11b/g/n devices to
connect to the wireless router. Hardware that supports
802.11n natively, however, will only run at a maximum speed
of 54Mbps.
• N only: Select N only to maximize wireless N performance.
This setting prevents 802.11g and 802.11b devices from
connecting to the wireless router.
6. Select any of these channel bandwidth to accommodate higher
transmission speeds:
40MHz: Select this bandwidth to maximize the wireless
throughput.
20MHz (default): Select this bandwidth if you encounter some
issues with your wireless connection.
7. Select the operating channel for your wireless router. Select
Auto to allow the wireless router to automatically select the
channel that has the least amount of interference.
8. Select any of these authentication methods:
• Open System: This option provides no security.
• Shared Key: You must use WEP encryption and enter at least
one shared key.
35
Page 36

• WPA/WPA2 Personal/WPA Auto-Personal: This option
provides strong security. You can use either WPA (with
TKIP) or WPA2 (with AES). If you select this option, you must
use TKIP + AES encryption and enter the WPA passphrase
(network key).
• WPA/WPA2 Enterprise/WPA Auto-Enterprise: This option
provides very strong security. It is with integrated EAP server
or an external RADIUS back-end authentication server.
• Radius with 802.1x
NOTE: Your wireless router supports the maximum transmission rate
of 54Mbps when the Wireless Mode is set to Auto and encryption
method is WEP or TKIP.
9. Select any of these WEP (Wired Equivalent Privacy) Encryption
options for the data transmitted over your wireless network:
• O: Disables WEP encryption
• 64-bit: Enables weak WEP encryption
• 128-bit: Enables improved WEP encryption
10.When done, click Apply.
36
Page 37
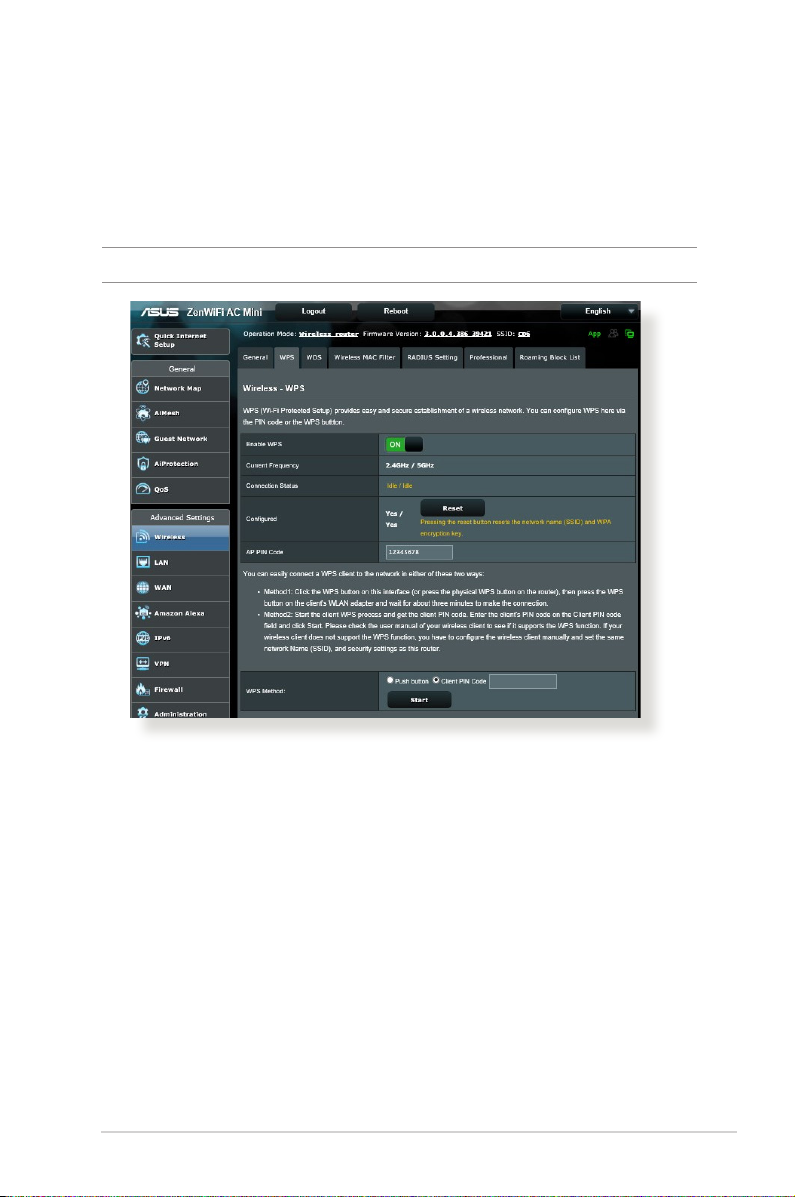
4.1.2 WPS
WPS (Wi-Fi Protected Setup) is a wireless security standard that
allows you to easily connect devices to a wireless network. You
can congure the WPS function via the PIN code or WPS button.
NOTE: Ensure that the devices support WPS.
To enable WPS on your wireless network:
1. From the navigation panel, go to Advanced Settings >
Wireless > WPS tab.
2. In the Enable WPS eld, move the slider to ON.
3. WPS uses 2.4GHz by default. If you want to change the
frequency to 5GHz, turn OFF the WPS function, click Switch
Frequency in the Current Frequency eld, and turn WPS ON
again.
37
Page 38

NOTE: WPS supports authentication using Open System, WPA-Personal,
and WPA2-Personal. WPS does not support a wireless network that uses
a Shared Key, WPA-Enterprise, WPA2-Enterprise, and RADIUS encryption
method.
3. In the WPS Method eld, select Push Button or Client PIN
code. If you select Push Button, go to step 4. If you select
Client PIN code, go to step 5.
4. To set up WPS using the router’s WPS button, follow these
steps:
a. Click Start or press the WPS button found at the rear of the
wireless router.
b. Press the WPS button on your wireless device. This is
normally identied by the WPS logo.
NOTE: Check your wireless device or its user manual for the location of
the WPS button.
c. The wireless router will scan for any available WPS devices.
If the wireless router does not nd any WPS devices, it will
switch to standby mode.
5. To set up WPS using the Client’s PIN code, follow these steps:
a. Locate the WPS PIN code on your wireless device’s user
manual or on the device itself.
b. Key in the Client PIN code on the text box.
c. Click Start to put your wireless router into WPS survey mode.
The router’s LED indicators quickly ash three times until the
WPS setup is completed.
38
Page 39

4.1.3 Bridge
Bridge or WDS (Wireless Distribution System) allows your ASUS
wireless router to connect to another wireless access point
exclusively, preventing other wireless devices or stations to access
your ASUS wireless router. It can also be considered as a wireless
repeater where your ASUS wireless router communicates with
another access point and other wireless devices.
To set up the wireless bridge:
1. From the navigation panel, go to Advanced Settings >
Wireless > WDS tab.
2. Select the frequency band for the wireless bridge.
3. In the AP Mode eld, select any of these options:
• AP Only: Disables the Wireless Bridge function.
• WDS Only: Enables the Wireless Bridge feature but prevents
other wireless devices/stations from connecting to the
router.
39
Page 40

• HYBRID: Enables the Wireless Bridge feature and allows
other wireless devices/stations to connect to the router.
NOTE: In Hybrid mode, wireless devices connected to the ASUS wireless
router will only receive half the connection speed of the Access Point.
4. In the Connect to APs in list eld, click Yes if you want to
connect to an Access Point listed in the Remote AP List.
5. In the Control Channel eld, select the operating channel
for the wireless bridge. Select Auto to allow the router to
automatically select the channel with the least amount of
interference.
NOTE: Channel availability varies per country or region.
6. On the Remote AP List, key in a MAC address and click the Add
button to enter the MAC address of other available Access
Points.
NOTE: Any Access Point added to the list should be on the same Control
Channel as the ASUS wireless router.
7. Click Apply.
40
Page 41

4.1.4 Wireless MAC Filter
Wireless MAC lter provides control over packets transmitted to
a specied MAC (Media Access Control) address on your wireless
network.
To set up the Wireless MAC lter:
1. From the navigation panel, go to Advanced Settings >
Wireless > Wireless MAC Filter tab.
2. Tick Ye s in the Enable Mac Filter eld.
3. In the MAC Filter Mode dropdown list, select either Accept or
Reject.
• Select Accept to allow devices in the MAC lter list to access
to the wireless network.
• Select Reject to prevent devices in the MAC lter list to
access to the wireless network.
4. On the MAC lter list, click the Add button and key in the
MAC address of the wireless device.
5. Click Apply.
41
Page 42

4.1.5 RADIUS Setting
RADIUS (Remote Authentication Dial In User Service) Setting
provides an extra layer of security when you choose WPAEnterprise, WPA2-Enterprise, or Radius with 802.1x as your
Authentication Mode.
To set up wireless RADIUS settings:
1. Ensure that the wireless router’s authentication mode is set to
WPA-Enterprise, WPA2-Enterprise, or Radius with 802.1x.
NOTE: Please refer to section 4.1.1 General section for conguring your
wireless router’s Authentication Mode.
2. From the navigation panel, go to Advanced Settings >
Wireless > RADIUS Setting.
3. Select the frequency band.
4. In the Server IP Address eld, key in your RADIUS server’s IP
Address.
5. In the Connection Secret eld, assign the password to access
your RADIUS server.
6. Click Apply.
42
Page 43

4.1.6 Professional
The Professional screen provides advanced conguration options.
NOTE: We recommend that you use the default values on this page.
In the Professional Settings screen, you can congure the
following:
• Frequency: Select the frequency band that the professional
settings will be applied to.
• Enable Radio: Select Ye s to enable wireless networking.
Select No to disable wireless networking.
• Enable wireless scheduler: You can choose clock format as
24-hour or 12-hour. The color in the table indicates Allow or
Deny. Click each frame to change the settings of the hour of
the weekdays and click OK when done.
43
Page 44

44
• Set AP isolated: The Set AP isolated item prevents wireless
devices on your network from communicating with each
other. This feature is useful if many guests frequently join or
leave your network. Select Yes to enable this feature or select
No to disable.
• Multicast rate (Mbps): Select the multicast transmission
rate or click Disable to switch o simultaneous single
transmission.
• Preamble Type: Preamble Type denes the length of time
that the router spent for CRC (Cyclic Redundancy Check). CRC
is a method of detecting errors during data transmission.
Select Short for a busy wireless network with high network
trac. Select Long if your wireless network is composed of
older or legacy wireless devices.
Page 45

• RTS Threshold: Select a lower value for RTS (Request to
Send) Threshold to improve wireless communication in a
busy or noisy wireless network with high network trac and
numerous wireless devices.
• DTIM Interval: DTIM (Delivery Trac Indication Message)
Interval or Data Beacon Rate is the time interval before a
signal is sent to a wireless device in sleep mode indicating
that a data packet is awaiting delivery. The default value is
three milliseconds.
• Beacon Interval: Beacon Interval is the time between one
DTIM and the next. The default value is 100 milliseconds.
Lower the Beacon Interval value for an unstable wireless
connection or for roaming devices.
• Enable TX Bursting: Enable TX Bursting improves
transmission speed between the wireless router and 802.11g
devices.
• Enable WMM APSD: Enable WMM APSD (Wi-Fi Multimedia
Automatic Power Save Delivery) to improve power
management between wireless devices. Select Disable to
switch o WMM APSD.
45
Page 46

4.2 LAN
4.2.1 LAN IP
The LAN IP screen allows you to modify the LAN IP settings of your
wireless router.
NOTE: Any changes to the LAN IP address will be reected on your
DHCP settings.
To modify the LAN IP settings:
1. From the navigation panel, go to Advanced Settings > LAN >
LAN IP tab.
2. Modify the IP address and Subnet Mask.
3. When done, click Apply.
46
Page 47

4.2.2 DHCP Server
Your wireless router uses DHCP to assign IP addresses
automatically on your network. You can specify the IP address
range and lease time for the clients on your network.
To congure the DHCP server:
1. From the navigation panel, go to Advanced Settings > LAN >
DHCP Server tab.
2. In the Enable the DHCP Server eld, tick Yes .
3. In the Domain Name text box, enter a domain name for the
wireless router.
4. In the IP Pool Starting Address eld, key in the starting IP
address.
5. In the IP Pool Ending Address eld, key in the ending IP
address.
6. In the Lease Time eld, specify in seconds when an assigned
IP address will expire. Once it reaches this time limit, the DHCP
server will then assign a new IP address.
47
Page 48

NOTES:
• We recommend that you use an IP address format of 192.168.1.xxx
(where xxx can be any number between 2 and 254) when specifying
an IP address range.
• An IP Pool Starting Address should not be greater than the IP Pool
Ending Address.
7. In the DNS and Server Settings section, key in your DNS
Server and WINS Server IP address if needed.
8. Your wireless router can also manually assign IP addresses to
devices on the network. On the Enable Manual Assignment
eld, choose Yes to assign an IP address to specic MAC
addresses on the network. Up to 32 MAC Addresses can be
added to the DHCP list for manual assignment.
48
Page 49
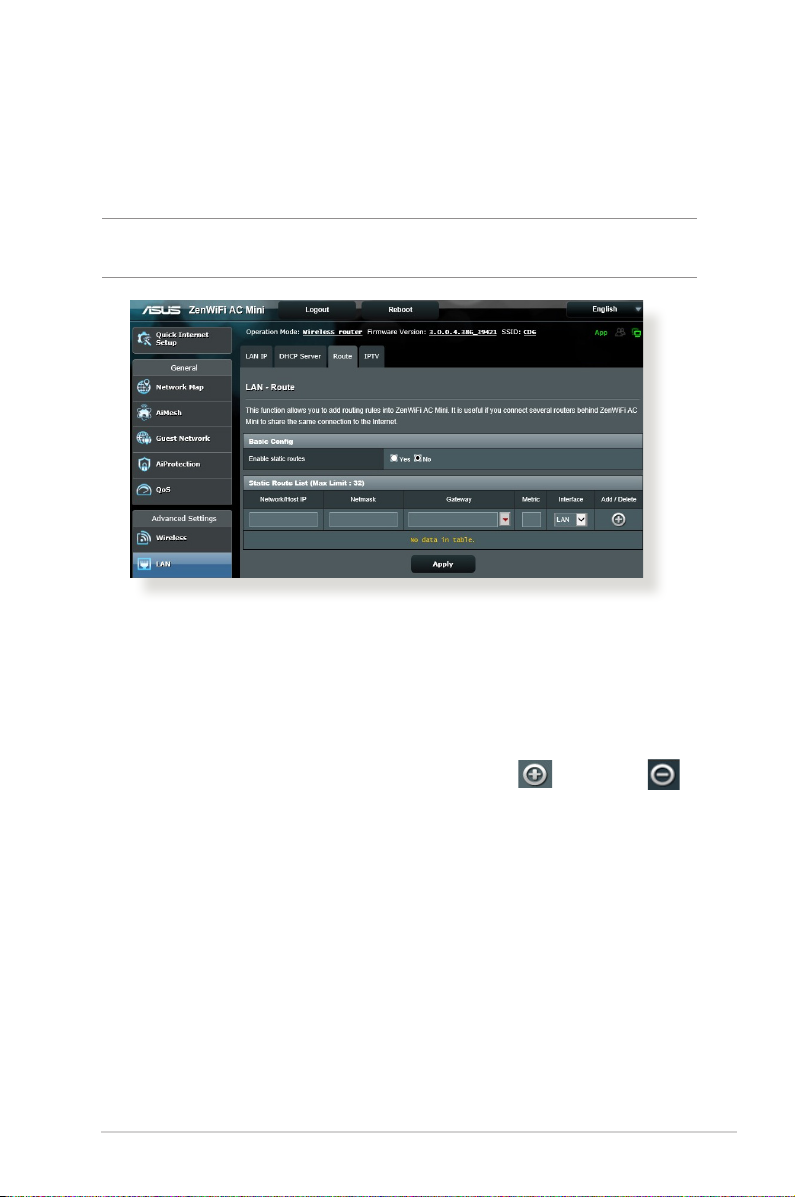
4.2.3 Route
If your network makes use of more than one wireless router, you
can congure a routing table to share the same Internet service.
NOTE: We recommend that you do not change the default route
settings unless you have advanced knowledge of routing tables.
To congure the LAN Routing table:
1. From the navigation panel, go to Advanced Settings > LAN >
Route tab.
2. On the Enable static routes eld, choose Yes.
3. On the Static Route List, enter the network information of
other access points or nodes. Click the Add or Delete
button to add or remove a device on the list.
4. Click Apply.
49
Page 50

4.2.4 IPTV
The wireless router supports connection to IPTV services through
an ISP or a LAN. The IPTV tab provides the conguration settings
needed to set up IPTV, VoIP, multicasting, and UDP for your
service. Contact your ISP for specic information regarding your
service.
50
Page 51
4.3 WAN
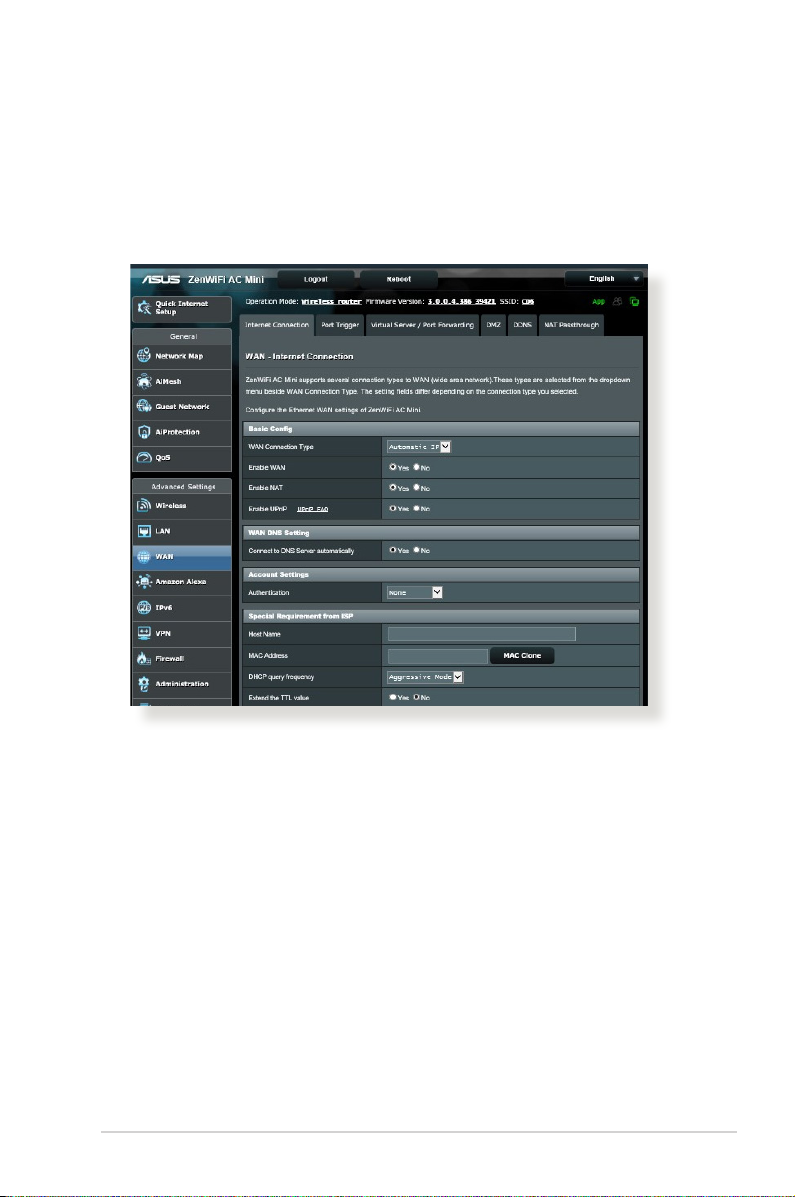
4.3.1 Internet Connection
The Internet Connection screen allows you to congure the
settings of various WAN connection types.
To congure the WAN connection settings:
1. From the navigation panel, go to Advanced Settings > WAN >
Internet Connection tab.
2. Congure the following settings below. When done, click
Apply.
• WAN Connection Type: Choose your Internet Service
Provider type. The choices are Automatic IP, PPPoE, PPTP,
L2TP or xed IP. Consult your ISP if the router is unable
to obtain a valid IP address or if you are unsure the WAN
connection type.
• Enable WAN: Select Ye s to allow the router Internet access.
Select No to disable Internet access.
51
Page 52

• Enable NAT: NAT (Network Address Translation) is a system
where one public IP (WAN IP) is used to provide Internet
access to network clients with a private IP address in a LAN.
The private IP address of each network client is saved in a NAT
table and is used to route incoming data packets.
• Enable UPnP: UPnP (Universal Plug and Play) allows several
devices (such as routers, televisions, stereo systems, game
consoles, and cellular phone), to be controlled via an IP-based
network with or without a central control through a gateway.
UPnP connects PCs of all form factors, providing a seamless
network for remote conguration and data transfer. Using
UPnP, a new network device is discovered automatically.
Once connected to the network, devices can be remotely
congured to support P2P applications, interactive gaming,
video conferencing, and web or proxy servers. Unlike Port
forwarding, which involves manually conguring port
settings, UPnP automatically congures the router to accept
incoming connections and direct requests to a specic PC on
the local network.
• Connect to DNS Server: Allows this router to get the DNS
IP address from the ISP automatically. A DNS is a host on
the Internet that translates Internet names to numeric IP
addresses.
• Authentication: This item may be specied by some ISPs.
Check with your ISP and ll them in if required.
• Host Name: This eld allows you to provide a host name for
your router. It is usually a special requirement from your ISP.
If your ISP assigned a host name to your computer, enter the
host name here.
52
Page 53

• MAC Address: MAC (Media Access Control) address is a
unique identier for your networking device. Some ISPs
monitor the MAC address of networking devices that connect
to their service and reject any unrecognized device that
attempt to connect. To avoid connection issues due to an
unregistered MAC address, you can:
• Contact your ISP and update the MAC address associated
with your ISP service.
• Clone or change the MAC address of the ASUS wireless router
to match the MAC address of the previous networking device
recognized by the ISP.
53
Page 54

4.3.2 Port Trigger
Port range triggering opens a predetermined incoming port for a
limited period of time whenever a client on the local area network
makes an outgoing connection to a specied port. Port triggering
is used in the following scenarios:
• More than one local client needs port forwarding for the
same application at a dierent time.
• An application requires specic incoming ports that are
dierent from the outgoing ports.
To set up Port Trigger:
1. From the navigation panel, go to Advanced Settings > WAN >
Port Trigger tab.
2. Congure the following settings below. When done, click
Apply.
• Enable Port Trigger: Choose Yes to enable Port Trigger.
• Well-Known Applications: Select popular games and web
services to add to the Port Trigger List.
• Description: Enter a short name or description for the service.
54
Page 55

• Trigger Port: Specify a trigger port to open the incoming
port.
• Protocol: Select the protocol, TCP, or UDP.
• Incoming Port: Specify an incoming port to receive inbound
data from the Internet.
NOTES:
• When connecting to an IRC server, a client PC makes an outgoing
connection using the trigger port range 66660-7000. The IRC server
responds by verifying the username and creating a new connection
to the client PC using an incoming port.
• If Port Trigger is disabled, the router drops the connection because
it is unable to determine which PC is requesting for IRC access.
When Port Trigger is enabled, the router assigns an incoming port to
receive the inbound data. This incoming port closes once a specic
time period has elapsed because the router is unsure when the
application has been terminated.
• Port triggering only allows one client in the network to use a
particular service and a specic incoming port at the same time.
• You cannot use the same application to trigger a port in more than
one PC at the same time. The router will only forward the port back
to the last computer to send the router a request/trigger.
55
Page 56
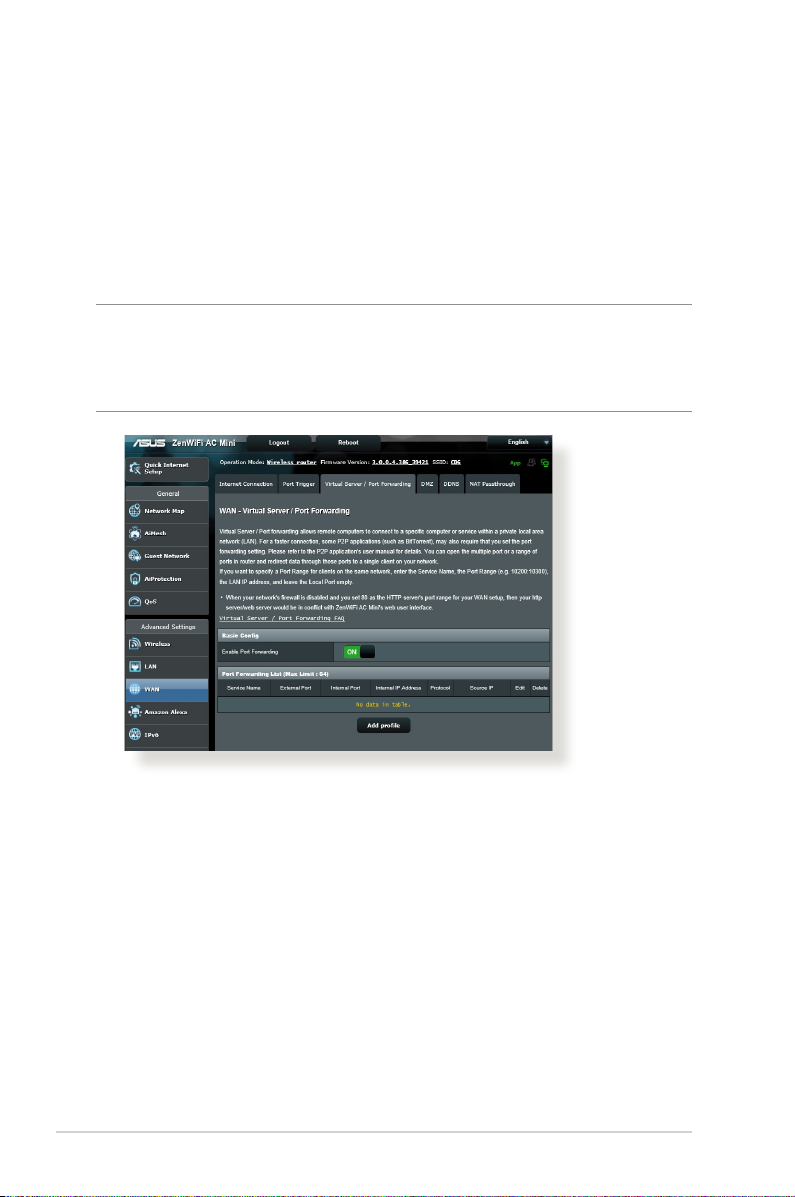
4.3.3 Virtual Server/Port Forwarding
Port forwarding is a method to direct network trac from the
Internet to a specic port or a specic range of ports to a device
or number of devices on your local network. Setting up Port
Forwarding on your router allows PCs outside the network to
access specic services provided by a PC in your network.
NOTE: When port forwarding is enabled, the ASUS router blocks
unsolicited inbound trac from the Internet and only allows replies
from outbound requests from the LAN. The network client does not
have access to the Internet directly, and vice versa.
To set up Port Forwarding:
1. From the navigation panel, go to Advanced Settings > WAN >
Virtual Server / Port Forwarding tab.
2. Slide the bar to ON to enable Port Forwarding, then click Add
Prole. After conguring the following settings, click OK.
56
Page 57
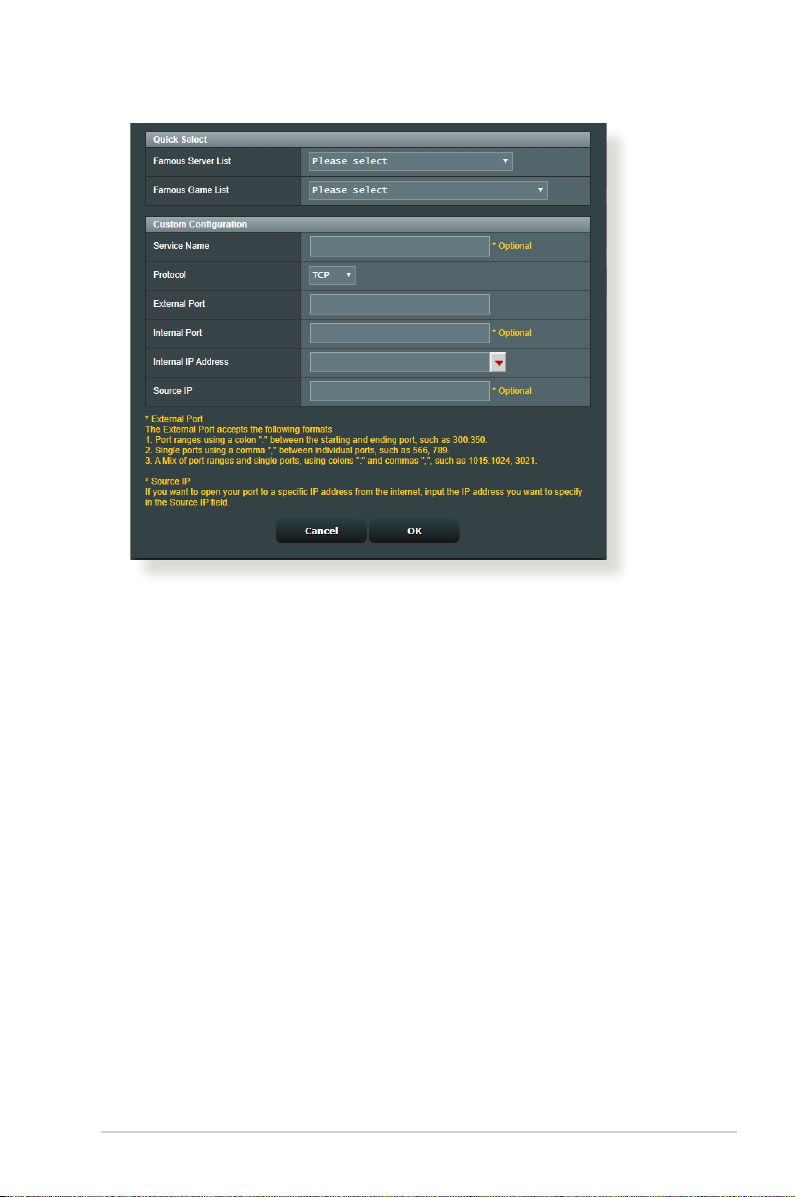
• Famous Server List: Determine which type of service you
want to access.
• Famous Game List: This item lists ports required for popular
online games to work correctly.
• Service Name: Enter a service name.
• Protocol: Select the protocol. If you are unsure, select BOTH.
• External Port: Accept the following formats:
1) A port range using a colon “:” in the middle to specify the
upper and lower limits of the range, such as 300:350;
2) Individual port numbers using a comma “,” to separate
them, such as 566, 789;
3) A Mix of port ranges and individual ports, using colons “:”
and commas “,”, such as 1015:1024, 3021.
• Internal Port: Enter a specic port to receive forwarded
packets. Leave this eld blank if you want the incoming
packets to be redirected to the specied port range.
57
Page 58

• Internal IP Address: Key in the client’s LAN IP address.
• Source IP: If you want to open your port to a specic IP
address from the Internet, input the IP address you want to
give access to in this eld.
NOTE: Use a static IP address for the local client to make port forwarding
work properly. Refer to section 4.2 LAN for information.
To check if Port Forwarding has been congured successfully:
• Ensure that your server or application is set up and running.
• You will need a client outside your LAN but has Internet
access (referred to as “Internet client”). This client should not
be connected to the ASUS router.
• On the Internet client, use the router’s WAN IP to access the
server. If port forwarding has been successful, you should be
able to access the les or applications.
Dierences between port trigger and port forwarding:
• Port triggering will work even without setting up a specic
LAN IP address. Unlike port forwarding, which requires a
static LAN IP address, port triggering allows dynamic port
forwarding using the router. Predetermined port ranges are
congured to accept incoming connections for a limited
period of time. Port triggering allows multiple computers
to run applications that would normally require manually
forwarding the same ports to each PC on the network.
• Port triggering is more secure than port forwarding since the
incoming ports are not open all the time. They are opened
only when an application is making an outgoing connection
through the trigger port.
58
Page 59

4.3.4 DMZ
Virtual DMZ exposes one client to the Internet, allowing this
client to receive all inbound packets directed to your Local Area
Network.
Inbound trac from the Internet is usually discarded and routed
to a specic client only if port forwarding or a port trigger has
been congured on the network. In a DMZ conguration, one
network client receives all inbound packets.
Setting up DMZ on a network is useful when you need incoming
ports open or you want to host a domain, web, or e-mail server.
CAUTION: Opening all the ports on a client to the Internet makes the
network vulnerable to outside attacks. Please be aware of the security
risks involved in using DMZ.
To set up DMZ:
1. From the navigation panel, go to Advanced Settings > WAN >
DMZ tab.
2. Congure the setting below. When done, click Apply.
• IP address of Exposed Station: Key in the client’s LAN IP
address that will provide the DMZ service and be exposed
on the Internet. Ensure that the server client has a static IP
address.
To remove DMZ:
1. Delete the client’s LAN IP address from the IP Address of
Exposed Station text box.
2. When done, click Apply.
59
Page 60

4.3.5 DDNS
Setting up DDNS (Dynamic DNS) allows you to access the router
from outside your network through the provided ASUS DDNS
Service or another DDNS service.
To set up DDNS:
1. From the navigation panel, go to Advanced Settings > WAN >
DDNS tab.
2. Congure the following settings below. When done, click
Apply.
• Enable the DDNS Client: Enable DDNS to access the ASUS
router via the DNS name rather than WAN IP address.
• Server and Host Name: Choose ASUS DDNS or other DDNS.
If you want to use ASUS DDNS, ll in the Host Name in the
format of xxx.asuscomm.com (xxx is your host name).
• If you want to use a dierent DDNS service, click FREE TRIAL
and register online rst. Fill in the User Name or E-mail
Address and Password or DDNS Key elds.
60
Page 61

• Enable wildcard: Enable wildcard if your DDNS service
requires one.
NOTES:
DDNS service will not work under these conditions:
• When the wireless router is using a private WAN IP address (192.168.
x.x, 10.x.x.x, or 172.16.x.x), as indicated by a yellow text.
• The router may be on a network that uses multiple NAT tables.
4.3.6 NAT Passthrough
NAT Passthrough allows a Virtual Private Network (VPN)
connection to pass through the router to the network clients.
PPTP Passthrough, L2TP Passthrough, IPsec Passthrough and RTSP
Passthrough are enabled by default.
To enable / disable the NAT Passthrough settings, go to the
Advanced Settings > WAN > NAT Passthrough tab. When done,
click Apply.
61
Page 62

4.4 IPv6
This wireless router supports IPv6 addressing, a system that
supports more IP addresses. This standard is not yet widely
available. Contact your ISP if your Internet service supports IPv6.
To set up IPv6:
1. From the navigation panel, go to Advanced Settings > IPv6.
2. Select your Connection Type. The conguration options vary
depending on your selected connection type.
3. Enter your IPv6 LAN and DNS settings.
4. Click Apply.
NOTE: Please refer to your ISP regarding specic IPv6 information for
your Internet service.
62
Page 63

4.5 Firewall
The wireless router can serve as a hardware rewall for your
network.
NOTE: The Firewall feature is enabled by default.
4.5.1 General
To set up basic Firewall settings:
1. From the navigation panel, go to Advanced Settings >
Firewall > General tab.
2. On the Enable Firewall eld, select Yes.
3. On the Enable DoS protection, select Yes to protect your
network from DoS (Denial of Service) attacks though this may
aect your router’s performance.
4. You can also monitor packets exchanged between the LAN
and WAN connection. On the Logged packets type, select
Dropped, Accepted, or Both.
5. Click Apply.
4.5.2 URL Filter
You can specify keywords or web addresses to prevent access to
specic URLs.
NOTE: The URL Filter is based on a DNS query. If a network client has
already accessed a website such as http://www.abcxxx.com, then the
website will not be blocked (a DNS cache in the system stores previously
visited websites). To resolve this issue, clear the DNS cache before
setting up the URL Filter.
63
Page 64
To set up a URL lter:
1. From the navigation panel, go to Advanced Settings >
Firewall > URL Filter tab.
2. On the Enable URL Filter eld, select Enabled.
3. Enter a URL and click the button.
4. Click Apply.
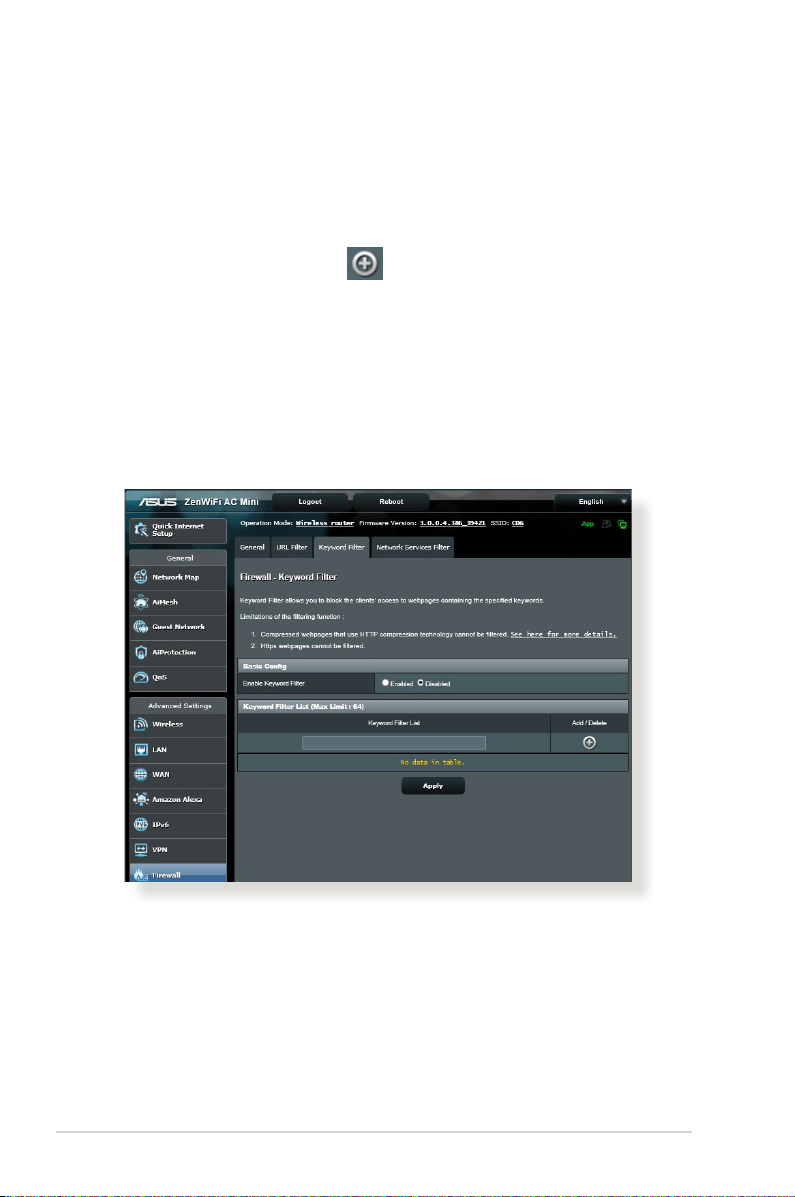
4.5.3 Keyword lter
Keyword lter blocks access to webpages containing specied
keywords.
To set up a keyword lter:
1. From the navigation panel, go to Advanced Settings > Firewall > Keyword Filter tab.
2. On the Enable Keyword Filter eld, select Enabled.
64
Page 65
3. Enter a word or phrase and click the Add button.
4. Click Apply.
NOTES:
• The Keyword Filter is based on a DNS query. If a network client has
already accessed a website such as http://www.abcxxx.com, then
the website will not be blocked (a DNS cache in the system stores
previously visited websites). To resolve this issue, clear the DNS cache
before setting up the Keyword Filter.
• Web pages compressed using HTTP compression cannot be ltered.
HTTPS pages also cannot be blocked using a keyword lter.
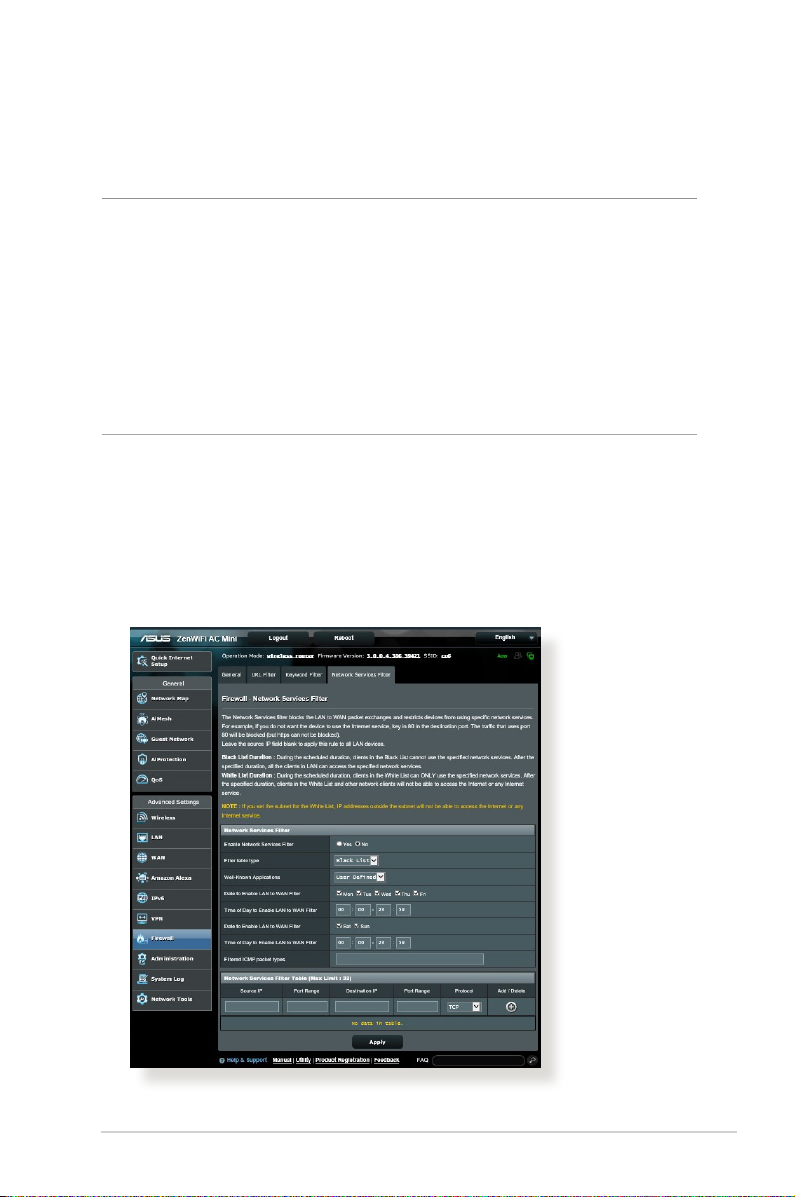
4.5.4 Network Services Filter
The Network Services Filter blocks LAN to WAN packet exchanges
and restricts network clients from accessing specic web services
such as Telnet or FTP.
65
Page 66

To set up a Network Service lter:
1. From the navigation panel, go to Advanced Settings >
Firewall > Network Service Filter tab.
2. On the Enable Network Services Filter eld, select Yes .
3. Select the Filter table type. Black List blocks the specied
network services. White List limits access to only the specied
network services.
4. Specify the day and time when the lters will be active.
5. To specify a Network Service to lter, enter the Source IP,
Destination IP, Port Range, and Protocol. Click the button.
6. Click Apply.
66
Page 67
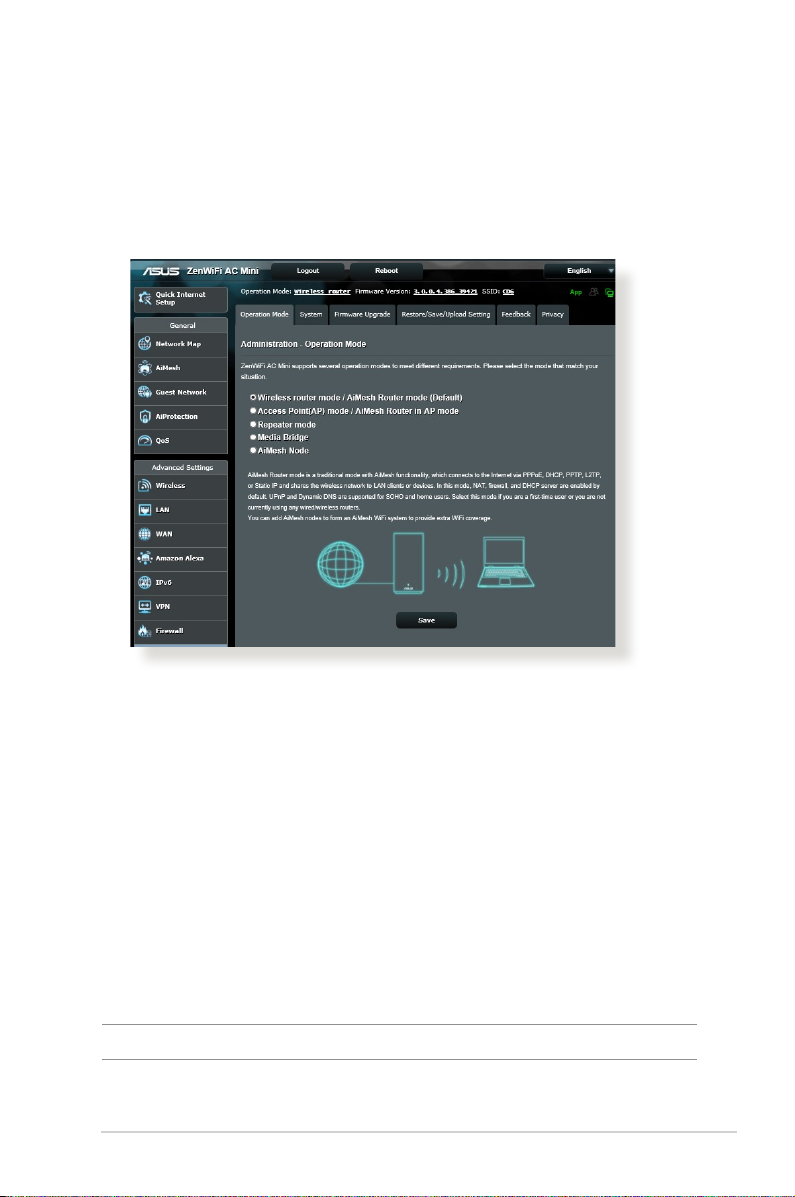
4.6 Administration
4.6.1 Operation Mode
The Operation Mode page allows you to select the appropriate
mode for your network.
To set up the operating mode:
1. From the navigation panel, go to Advanced Settings >
Administration > Operation Mode tab.
2. Select any of these operation modes:
• Wireless router mode (default): In wireless router mode,
the wireless router connects to the Internet and provides
Internet access to available devices on its own local network.
• Repeater mode: This mode turns the router into a wireless
repeater to extend the range of your signal.
• Access Point mode: In this mode, the router creates a new
wireless network on an existing network.
3. Click Save.
NOTE: The router will reboot when you change the modes.
67
Page 68

4.6.2 System
The System page allows you to congure your wireless router
settings.
To set up the System settings:
1. From the navigation panel, go to Advanced Settings >
Administration > System tab.
2. You can congure the following settings:
• Change router login password: You can change the
password and login name for the wireless router by entering
a new name and password.
• USB setting: You can Enable HDD Hibernation and change
USB mode.
• WPS button behavior: The physical WPS button on the
wireless router can be used to activate WPS.
• Time Zone: Select the time zone for your network.
• NTP Server: The wireless router can access a NTP (Network
time Protocol) server in order to synchronize the time.
• Network Monitoring: You can enable DNS Query to check
Resolve Hostname and Resolved IP Addresses, or enable
Ping, then check your Ping Target.
• Auto Logout: You can set the time of auto-logout.
• Enable WAN down browser redirect notice: This feature
allows the browser to display a warning page when the
router is disconnected from Internet. When disabled, the
warning page will not appear.
• Enable Telnet: Click Yes to enable Telnet services on the
network. Click No to disable Telnet.
• Authentication Method: You can select HTTP, HTTPS, or
both protocols to secure router access.
• Enable Reboot Scheduler: When enabled, you can set the
Date to Reboot and Time of Day to Reboot.
• Enable Web Access from WAN: Select Ye s to allow devices
outside the network to access the wireless router GUI
settings. Select No to prevent access.
• Enable Access Restrictions: Click Yes if you want to specify
68
Page 69

the IP addresses of devices that are allowed to access to the
wireless router GUI settings from WAN/LAN.
• Service: This feature allows you to congure Enable Telnet/
Enable SSH/SSH Port/Allow Password Login/Authorized
Keys/Idle Timeout.
3. Click Apply.
69
Page 70

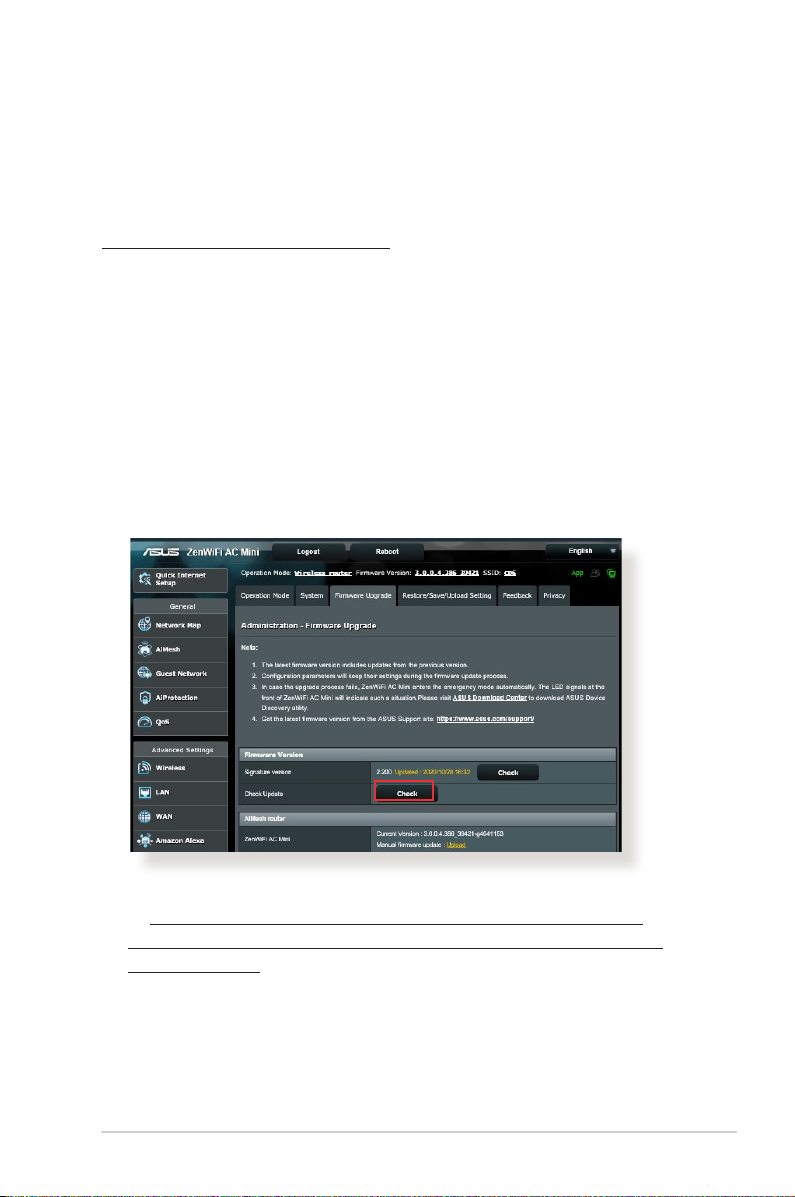
4.6.3 Firmware Upgrade
NOTE: Download the latest rmware from the ASUS website at
http://www.asus.com.
To upgrade the rmware:
1. From the navigation panel, go to Advanced Settings >
Administration > Firmware Upgrade tab.
2. In the New Firmware File eld, click Browse to locate the
downloaded le.
3. Click Upload.
NOTES:
• When the upgrade process is complete, wait for some time for the
system to reboot.
• If the upgrade process fails, the wireless router automatically enters
rescue mode and the power LED indicator on the front panel starts
ashing slowly. To recover or restore the system, refer to section 5.2
Firmware Restoration.
4.6.4 Restore/Save/Upload Setting
To restore/save/upload wireless router settings:
1. From the navigation panel, go to Advanced Settings >
Administration > Restore/Save/Upload Setting tab.
2. Select the tasks that you want to do:
• To restore to the default factory settings, click Restore, and
click OK in the conrmation message.
• To save the current system settings, click Save, navigate to
the folder where you intend to save the le and click Save.
• To restore from a saved system settings le, click Browse to
locate your le, then click Upload.
If issues occur, upload the latest rmware version and congure new
settings. Do not restore the router to its default settings.
70
Page 71
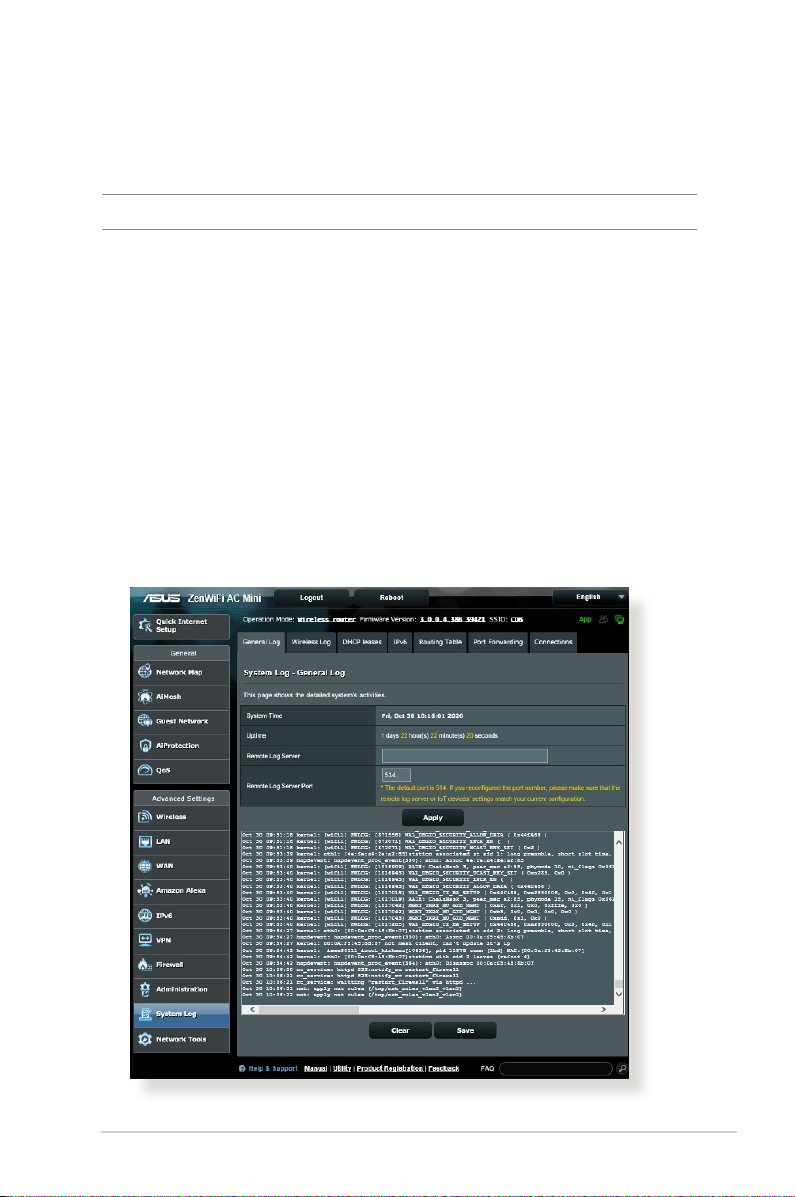
4.7 System Log
System Log contains your recorded network activities.
NOTE: System log resets when the router is rebooted or powered o.
To view your system log:
1. From the navigation panel, go to Advanced Settings > System
Log.
2. You can view your network activities in any of these tabs:
• General Log
• DHCP Leases
• Wireless Log
• Port Forwarding
• Routing Table
• IPv6
• Connections
71
Page 72

5 Utilities5 Utilities
NOTES:
• Download and install the wireless router's utilities from the ASUS
website:
• Device Discovery v1.4.7.1 at http://dlcdnet.asus.com/pub/ASUS/
LiveUpdate/Release/Wireless/Discovery.zip
• Firmware Restoration v1.9.0.4 at http://dlcdnet.asus.com/pub/
ASUS/LiveUpdate/Release/Wireless/Rescue.zip
• Windows Printer Utility v1.0.5.5 at http://dlcdnet.asus.com/pub/
ASUS/LiveUpdate/Release/Wireless/Printer.zip
• The utilities are not supported on MAC OS.
5.1 Device Discovery
Device Discovery is an ASUS WLAN utility that detects an ASUS
wireless router device, and allows you to congure the wireless
networking settings.
To launch the Device Discovery utility:
• From your computer’s desktop, click
Start > All Programs > ASUS Utility > Wireless Router >
Device Discovery.
NOTE: When you set the router to Access Point mode, you need to use
Device Discovery to get the router’s IP address.
72
Page 73
6 Troubleshooting6 Troubleshooting
This chapter provides solutions for issues you may encounter with
your router. If you encounter problems that are not mentioned in
this chapter, visit the ASUS support site at:
https://www.asus.com/support/ for more product information
and contact details of ASUS Technical Support.
6.1 Basic Troubleshooting
If you are having problems with your router, try these basic steps
in this section before looking for further solutions.
Upgrade Firmware to the latest version.
1. Launch the Web GUI. Go to Advanced Settings >
Administration > Firmware Upgrade tab. Click Check to
verify if the latest rmware is available.
2. If the latest rmware is available, visit the ASUS global website
at https://www.asus.com/Networking-IoT-Servers/WholeHome-Mesh-WiFi-System/All-series/ASUS-ZenWiFi-AC-MiniCD6/HelpDesk to download the latest rmware.
3. From the Firmware Upgrade page, click Browse to upload the
rmware le.
4. Click Upload to upgrade the rmware.
73
Page 74

Restart your network in the following sequence:
1. Turn o the modem.
2. Unplug the modem.
3. Turn o the router and computers.
4. Plug in the modem.
5. Turn on the modem and then wait for 2 minutes.
6. Turn on the router and then wait for 2 minutes.
7. Turn on computers.
Check if your Ethernet cables are plugged properly.
• When the Ethernet cable connecting the router with the
modem is plugged in properly, the WAN LED will be on.
• When the Ethernet cable connecting your poweredon computer with the router is plugged in properly, the
corresponding LAN LED will be on.
Check if the wireless setting on your computer matches that
of your router.
• When you connect your computer to the router wirelessly,
ensure that the SSID (wireless network name), encryption
method, and password are correct.
Check if your network settings are correct.
• Each client on the network should have a valid IP address. ASUS
recommends that you use the wireless router’s DHCP server to
assign IP addresses to computers on your network.
74
Page 75

• Some cable modem service providers require you to use
the MAC address of the computer initially registered on
the account. You can view the MAC address in the web GUI,
Network Map > Clients page, and hover the mouse pointer
over your device in Client Status.
75
Page 76

6.2 Frequently Asked Questions (FAQs)
I cannot access the router GUI using a web browser
• If your computer is wired, check the Ethernet cable connection
and LED status as described in the previous section.
• Ensure that you are using the correct login information. The
default factory login name and password is “admin/admin”.
Ensure that the Caps Lock key is disabled when you enter the
login information.
• Delete the cookies and les in
your web browser. For Internet
Explorer, follow these steps:
1. Launch Internet Explorer,
then click Tools > Internet
Options.
2. In the General tab, under
Browsing history, click
Delete…, select Temporary
Internet les and website
les and Cookies and
website data then click
Delete.
NOTES:
• The commands for deleting cookies and les vary with web
browsers.
• Disable proxy server settings, cancel the dial-up connection, and set
the TCP/IP settings to obtain IP addresses automatically. For more
details, refer to Chapter 1 of this user manual.
• Ensure that you use CAT5e or CAT6 ethernet cables.
76
Page 77

The client cannot establish a wireless connection with the
router.
NOTE: If you are having issues connecting to 5GHz network, make
sure that your wireless device supports 5GHz or features dual band
capabilities.
• Out of Range:
• Move the router closer to the wireless client.
• Try to adjust antennas of the router to the best direction as
described in section 1.4 Positioning your router.
• DHCP server has been disabled:
1. Launch the web GUI. Go to General > Network Map>
Clients and search for the device that you want to connect
to the router.
2. If you cannot nd the device in the Network Map, go to
Advanced Settings > LAN > DHCP Server, Basic Cong
list, select Yes on the Enable the DHCP Server.
77
Page 78

• SSID has been hidden. If your device can nd SSIDs from other
routers but cannot nd your router’s SSID, go to Advanced
Settings > Wireless > General, select No on Hide SSID, and
select Auto on Control Channel.
• If you are using a wireless LAN adapter, check if the wireless
channel in use conforms to the channels available in your
country/area. If not, adjust the channel, channel bandwidth,
and wireless mode.
• If you still cannot connect to the router wirelessly, you can reset
your router to factory default settings. In the router GUI,click
Administration > Restore/Save/Upload Setting and click
Restore.
78
Page 79

Internet is not accessible.
• Check if your router can connect to your ISP’s WAN IP address.
To do this, launch the web GUI and go to General> Network
Map, and check the Internet Status.
• If your router cannot connect to your ISP’s WAN IP address,
try restarting your network as described in the section
Restart your network in following sequence under Basic
Troubleshooting.
• The device has been blocked via the Parental Control function.
Go to General > AiProtection >Parental Control and see
if the device is in the list. If the device is listed under Client
Name, remove the device using the Delete button or adjust
the Time Management Settings.
79
Page 80

• If there is still no Internet access, try to reboot your computer
and verify the network’s IP address and gateway address.
• Check the status indicators on the ADSL modem and the
wireless router. If the WAN LED on the wireless router is not ON,
check if all cables are plugged properly.
You forgot the SSID (network name) or network password
• Setup a new SSID and encryption key via a wired connection
(Ethernet cable). Launch the web GUI, go to Network Map,
click the router icon, enter a new SSID and encryption key, and
then click Apply.
• Reset your router to the default settings. Launch the web GUI,
go to Administration > Restore/Save/Upload Setting, and
click Restore. The default login account and password are both
“admin”.
How to restore the system to its default settings?
• Go to Administration > Restore/Save/Upload Setting, and
click Restore.
The following are the factory default settings:
Enable DHCP: Yes (if WAN cable is plugged in)
IP address: 192.168.50.1
Domain Name: (Blank)
Subnet Mask: 255.255.255.0
DNS Server 1: router.asus.com
DNS Server 2: (Blank)
SSID: ASUS_XX
Firmware upgrade failed.
Launch the rescue mode and run the Firmware Restoration utility.
Refer to section 5.2 Firmware Restoration on how to use the
Firmware Restoration utility.
80
Page 81
Cannot access Web GUI
Before conguring your wireless router, do the steps described in
this section for your host computer and network clients.
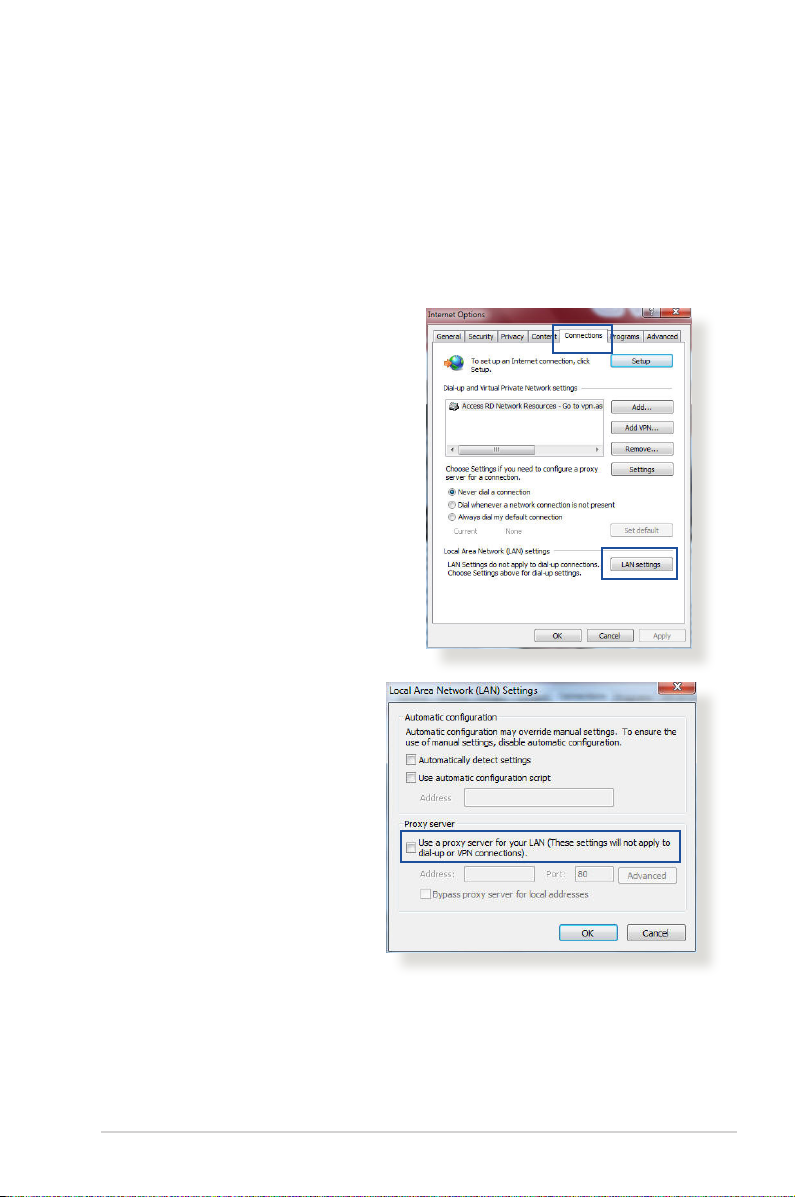
A. Disable the proxy server, if enabled.
Windows®
1. Click Start > Internet Explorer
to launch the browser.
2. Click Tools > Internet options
> Connections tab > LAN
settings.
3. From the Local Area
Network (LAN) Settings
screen, untick Use a proxy
server for your LAN.
4. Click OK when done.
81
Page 82
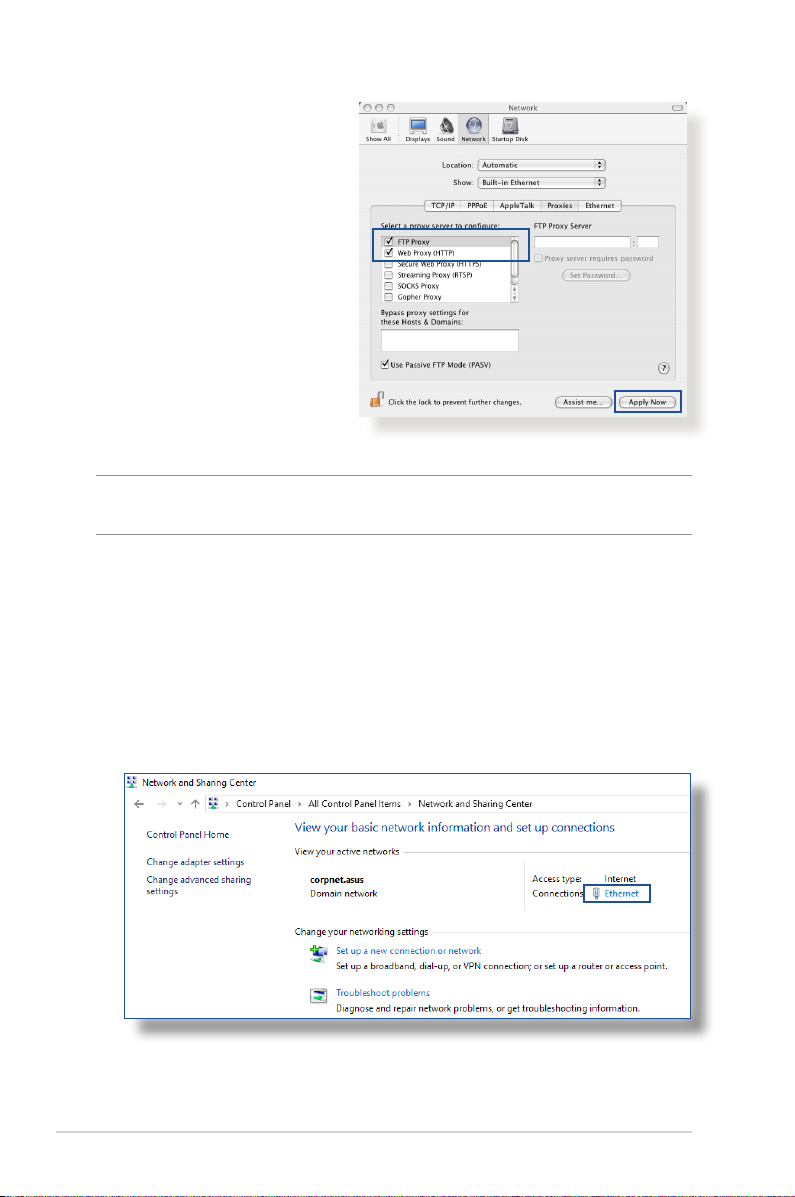
MAC OS
1. From your Safari
browser, click Safari
> Preferences >
Advanced > Change
Settings...
2. From the Network
screen, deselect FTP
Proxy and Web Proxy
(HTTP).
3. Cllick Apply Now when
done.
NOTE: Refer to your browser's help feature for details on disabling the
proxy server.
B. Set the TCP/IP settings to automatically obtain an IP
address.
Windows®
1. Click Start > Control Panel > Network and Sharing Center,
then click the network connection to display its status window.
82
Page 83
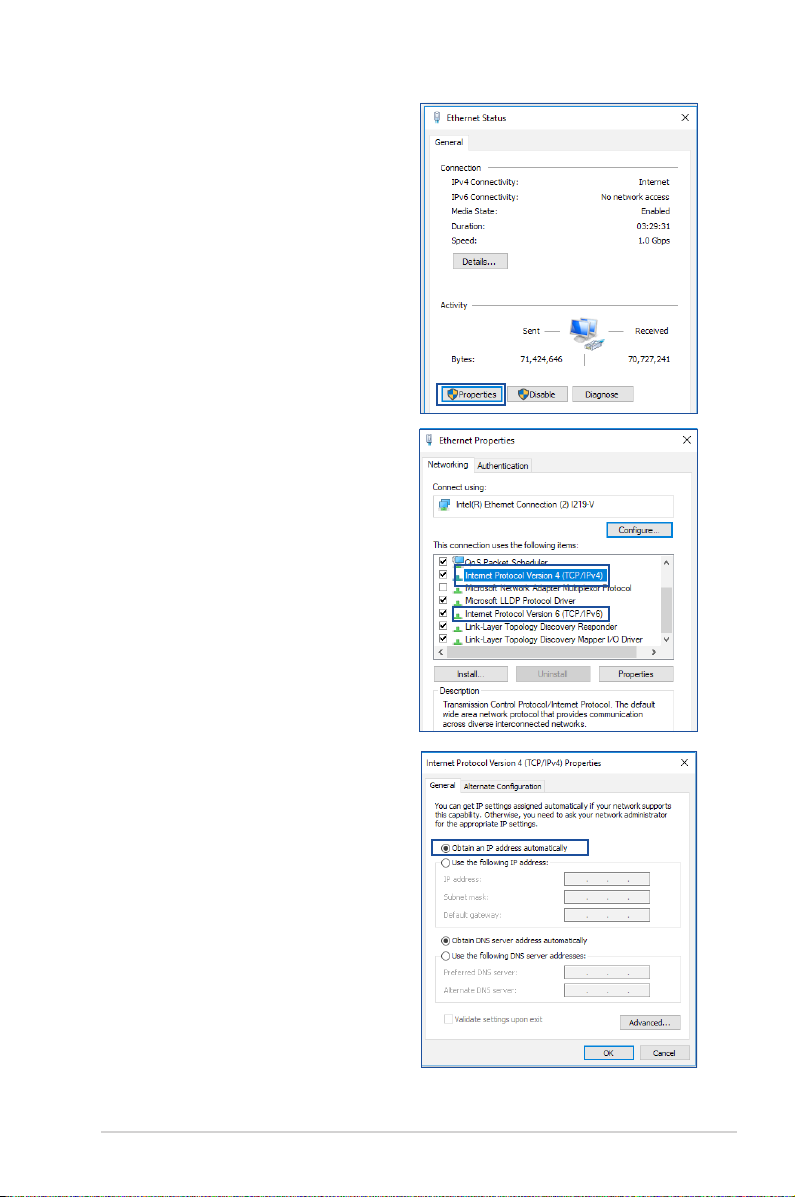
2. Click Properties to display
the Ethernet Properties
window.
3. Select Internet Protocol
Version 4 (TCP/IPv4) or
Internet Protocol Version
6 (TCP/IPv6), then click
Properties.
4. To obtain the IPv4 IP settings
automatically, tick Obtain an
IP address automatically.
To obtain the IPv6 IP settings
automatically, tick Obtain an
IPv6 address automatically.
5. Click OK when done.
83
Page 84
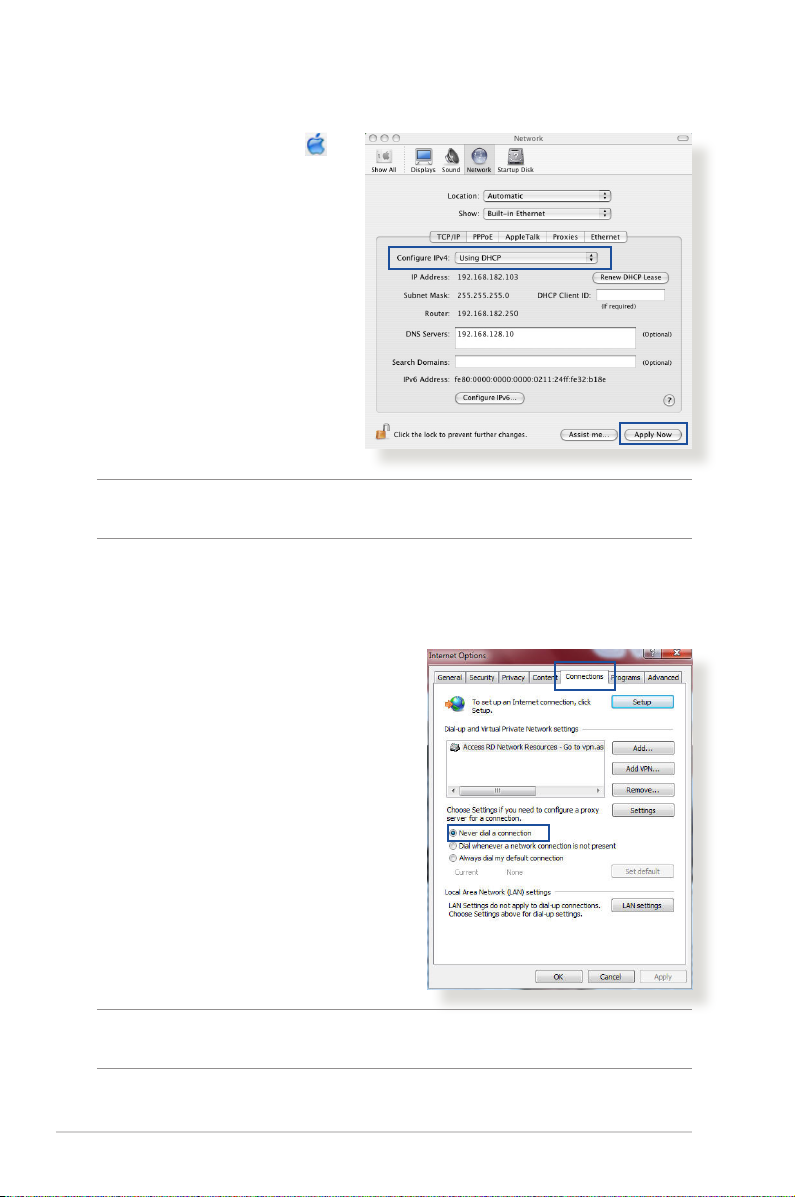
MAC OS
1. Click the Apple icon
located on the top left of
your screen.
2. Click System
Preferences > Network
> Congure...
3. From the TCP/IP tab,
select Using DHCP in
the Congure IPv4
dropdown list.
4. Cllick Apply Now when
done.
NOTE: Refer to your operating system’s help and support feature for
details on conguring your computer’s TCP/IP settings.
C. Disable the dial-up connection, if enabled.
Windows
®
1. Click Start > Internet Explorer
to launch the browser.
2. Click Tools > Internet options >
Connections tab.
3. Tick Never dial a connection.
4. Click OK when done.
NOTE: Refer to your browser's help feature for details on disabling the
dial-up connection.
84
Page 85

AppendicesAppendices
Notices
This device is an Energy Related Product (ErP) with High Network
Availability (HiNA), the power consumption will be less than 12
watts when the system is in network standby mode (idle mode).
ASUS Recycling/Takeback Services
ASUS recycling and takeback programs come from our
commitment to the highest standards for protecting our
environment. We believe in providing solutions for you to be able
to responsibly recycle our products, batteries, other components,
as well as the packaging materials. Please go to http://csr.asus.
com/english/Takeback.htm for the detailed recycling information
in dierent regions.
REACH
Complying with the REACH (Registration, Evaluation,
Authorisation, and Restriction of Chemicals) regulatory
framework, we published the chemical substances in our
products at ASUS REACH website at http://csr.asus.com/english/
index.aspx
Federal Communications Commission Statement
This device complies with Part 15 of the FCC Rules. Operation is
subject to the following two conditions:
• This device may not cause harmful interference.
• This device must accept any interference received, including
interference that may cause undesired operation.
This equipment has been tested and found to comply with the
limits for a class B digital device, pursuant to part 15 of the FCC
85
Page 86

Rules. These limits are designed to provide reasonable protection
against harmful interference in a residential installation.
This equipment generates, uses and can radiate radio frequency
energy and, if not installed and used in accordance with
the instructions, may cause harmful interference to radio
communications. However, there is no guarantee that interference
will not occur in a particular installation. If this equipment does
cause harmful interference to radio or television reception, which
can be determined by turning the equipment o and on, the user
is encouraged to try to correct the interference by one or more of
the following measures:
• Reorient or relocate the receiving antenna.
• Increase the separation between the equipment and receiver.
• Connect the equipment into an outlet on a circuit dierent
from that to which the receiver is connected.
• Consult the dealer or an experienced radio/TV technician for
help.
IMPORTANT! This device within the 5.15 ~ 5.25 GHz is restricted to
indoor operations to reduce any potential for harmful interference to
co-channel MSS operations.
CAUTION: Any changes or modications not expressly approved by
the party responsible for compliance could void the user’s authority to
operate the equipment.
Prohibition of Co-location
This device and its antenna(s) must not be co-located or operating
in conjunction with any other antenna or transmitter.
IMPORTANT NOTE:
Radiation Exposure Statement: This equipment complies
with FCC radiation exposure limits set forth for an uncontrolled
environment. End users must follow the specic operating
86
Page 87

instructions for satisfying RF exposure compliance. To maintain
compliance with FCC exposure compliance requirement, please
follow operation instruction as documented in this manual. This
equipment should be installed and operated with a minimum
distance of 15 cm between the radiator and any part of your body.
NCC 警語
經型式認證合格之低功率射頻電機,非經許可,公司、商號或使用者均不得
擅自變更頻率、加大功率或變更原設計之特性及功能。
低功率射頻電機之使用不得影響飛航安全及干擾合法通信;經發現有干擾現
象時,應立即停用,並改善至無干擾時方得繼續使用。
前項合法通信,指依電信法規定作業之無線電通信。
低功率射頻電機須忍受合法通信或工業、科學及醫療用電波輻射性電機設
備之干擾。
「產品之限用物質含有情況」之相關資訊,請參考下表:
限用物質及其化學符號
單元
印刷電路板及電子組件
結構組件(金屬 / 塑膠)
其他組件(如天線/ 指
示燈/連接線)
其他及其配件(如電源
供應器)
備考1.“○”係指該項限用物質之百分比含量未超出百分比含量基準值。
備考2.“-”係指該項限用物質為排除項目。
鉛
(Pb)汞(Hg)鎘(Cd)
-
○ ○ ○ ○ ○
○ ○ ○ ○ ○ ○
○ ○ ○ ○ ○ ○
-
○ ○ ○ ○ ○
六價鉻
(Cr+6)
多溴聯苯
(PBB)
多溴二苯醚
(PBDE)
安全說明:
- 請在溫度為0°C(32°F)至40°C(104°F)之間的環境中使用
本產品。
- 請依照產品上的電源功率貼紙說明使用正確的電源適配器,如
果使用錯誤規格的電源適配器可能會造成內部零件的損壞。
- 請勿將產品放置於不平坦或不穩定的表面,若產品的外殼損
壞,請聯繫維修服務人員。
- 請勿在產品上放置其他物品,請勿將任何物品塞入產品內,以
87
Page 88

避免引起組件短路或電路損壞。
- 請保持机器在干燥的環境下使用,雨水、濕氣、液体等含有礦
物質會腐蝕電子線路,請勿在雷電天气下使用調製解調器。
- 請勿堵塞產品的通風孔,以避免因散熱不良而導致系統過熱。
- 請勿使用破損的電源線、附件或其他周邊產品。
- 如果電源已損壞,請不要嘗試自行修復,請將其交給專業技術
服務人員或經銷商來處理。
- 為了防止電擊風險,在搬動主機前,請先將電源線插頭暫時從
電源插座上拔除。
使用警語:使用警語:
- 推薦您在環境溫度為 0°C(32°F) ~ 40°C(104°F)的情況下使用
本產品。
- 請依照產品底部的電源功率貼紙說明使用符合此功率的電源變壓器。
- 請勿將產品放置在不平坦或不穩定的物體表面。若產品外殼有所損毀,
請將產品送修。
- 請勿將任何物體放置在產品上方,並不要將任何外物插入產品。
- 請勿將產品置於或在液體、雨天或潮濕的環境中使用。雷暴天氣請不要
使用數據機。
- 請勿擋住產品的散熱孔,以防止系統過熱。
- 請勿使用損毀的電源線、配件或其他周邊裝置。
- 若電源變壓器已損毀,請不要嘗試自行修復,請聯絡專業的服務技術人
員或您的零售商。
- 為防止觸電,在重新放置產品前,請從電源插座上拔下電源線。
- 無線資訊傳輸設備避免影響附近雷達系統之操作 。
華碩聯絡資訊
華碩電腦公司 ASUSTeK COMPUTER INC. (台灣)
市場訊息
地址:台灣臺北市北投區立德路15號1樓
電話:+886-2-2894-3447
傳真:+886-2-2890-7698
電子郵件:info@asus.com.tw
全球資訊網:https://www.asus.com/tw
技術支援
電話:+886-2-2894-3447(0800-093-456)
線上支援:https://www.asus.com/tw/support/
88
Page 89

Precautions for the use of the device
a. Pay particular attention to the personal safety when use this
device in airports, hospitals, gas stations and professional
garages.
b. Medical device interference: Maintain a minimum distance
of at least 15 cm (6 inches) between implanted medical
devices and ASUS products in order to reduce the risk of
interference.
c. Kindly use ASUS products in good reception conditions in
order to minimize the radiation’s level.
d. Keep the device away from pregnant women and the lower
abdomen of the teenager.
Précautions d'emploi de l'appareil
a. Soyez particulièrement vigilant quant à votre sécurité
lors de l'utilisation de cet appareil dans certains lieux (les
avions, les aéroports, les hôpitaux, les stations-service et les
garages professionnels).
b. Évitez d'utiliser cet appareil à proximité de dispositifs
médicaux implantés. Si vous portez un implant
électronique (stimulateurs cardiaques, pompes à insuline,
neurostimulateurs…),veuillez impérativement respecter
une distance minimale de 15 centimètres entre cet appareil
et votre corps pour réduire les risques d'interférence.
c. Utilisez cet appareil dans de bonnes conditions de
réception pour minimiser le niveau de rayonnement. Ce
n'est pas toujours le cas dans certaines zones ou situations,
notamment dans les parkings souterrains, dans les
ascenseurs, en train ou en voiture ou tout simplement dans
un secteur mal couvert par le réseau.
d. Tenez cet appareil à distance des femmes enceintes et du
bas-ventre des adolescents.
89
Page 90

Условия эксплуатации:
- Температура эксплуатации устройства: 0-40 °C. Не
используйте устройство в
условиях экстремально высоких или низких температур.
- Не размещайте устройство вблизи источников тепла,
например, рядом с микроволновой печью, духовым
шкафом или радиатором.
- Использование несовместимого или
несертифицированного адаптера питания может
привести к возгоранию, взрыву и прочим опасным
последствиям.
- При подключении к сети электропитания устройство
следует располагать близко к розетке, к ней должен
осуществляться беспрепятственный доступ.
- Утилизация устройства осуществляется в соответствии
с местными законами и положениями. Устройство
по окончании срока службы должны быть переданы
в сертифицированный пункт сбора для вторичной
переработки или правильной утилизации.
- Данное устройство не предназначено для детей. Дети
могут пользоваться устройством только в присутствии
взрослых.
- Не выбрасывайте устройство и его комплектующие
вместе с обычными бытовыми отходами.
90
UA.TR.028
Page 91

AEEE Yönetmeliğine Uygundur. IEEE Yönetmeliğine Uygundur.
- Bu Cihaz Türkiye analog şebekelerde çalışabilecek şekilde
tasarlanmıştır.
- Cihazın ayrıntılı kurulum rehberi kutu içeriğinden çıkan CD
içerisindedir. Cihazın kullanıcı arayüzü Türkçe’dir.
- Cihazın kullanılması planlanan ülkelerde herhangi bir kısıtlaması
yoktur. Ülkeler simgeler halinde kutu üzerinde belirtilmiştir.
Manufacturer
Authorised
representative
in Europe
Authorised
distributors in
Turkey
ASUSTeK Computer Inc.
Tel: +886-2-2894-3447
Address:
1F., No. 15, Lide Rd., Beitou Dist., Taipei City
112, Taiwan
ASUS Computer GmbH
Address: HARKORT STR. 21-23, 40880 RATINGEN, GERMANY
BOGAZICI BILGISAYAR TICARET VE SANAYI A.S.
Tel./FAX No.: +90 212 331 10 00 / +90 212 332 28 90
Address: ESENTEPE MAH. BUYUKDERE CAD. ERCAN HAN B
BLOK NO.121 SISLI, ISTANBUL 34394
CIZGI Elektronik San. Tic. Ltd. Sti.
Tel./FAX No.: +90 212 356 70 70 / +90 212 356 70 69
Address: GURSEL MAH. AKMAN SK.47B 1 KAGITHANE/
ISTANBUL
KOYUNCU ELEKTRONiK BiLGi iSLEM SiST. SAN. VE DIS
TIC. A.S.
Tel. No.: +90 216 5288888
Address: EMEK MAH.ORDU CAD. NO:18, SARIGAZi,
SANCAKTEPE ISTANBUL
ENDEKS BİLİŞİM SAN VE DIŞ TİC LTD ŞTİ
Tel./FAX No.: +90 216 523 35 70 / +90 216 523 35 71
Address: NECIP FAZIL BULVARI, KEYAP CARSI SITESI, G1
BLOK, NO:115 Y.DUDULLU, UMRANIYE, ISTANBUL
PENTA TEKNOLOJI URUNLERI DAGITIM TICARET A.S
Tel./FAX No.: +90 216 528 0000
Address: ORGANIZE SANAYI BOLGESI NATO YOLU
4.CADDE NO:1 UMRANIYE, ISTANBUL 34775
91
Page 92

GNU General Public License
Licensing information
This product includes copyrighted third-party software licensed
under the terms of the GNU General Public License. Please see The
GNU General Public License for the exact terms and conditions of
this license. All future rmware updates will also be accompanied
with their respective source code. Please visit our web site for
updated information. Note that we do not oer direct support for
the distribution.
GNU GENERAL PUBLIC LICENSE
Version 2, June 1991
Copyright (C) 1989, 1991 Free Software Foundation, Inc.
59 Temple Place, Suite 330, Boston, MA 02111-1307 USA
Everyone is permitted to copy and distribute verbatim copies of
this license document, but changing it is not allowed.
Preamble
The licenses for most software are designed to take away your
freedom to share and change it. By contrast, the GNU General
Public License is intended to guarantee your freedom to share
and change free software--to make sure the software is free for all
its users. This General Public License applies to most of the Free
Software Foundation’s software and to any other program whose
authors commit to using it. (Some other Free Software Foundation
software is covered by the GNU Library General Public License
instead.) You can apply it to your programs, too.
When we speak of free software, we are referring to freedom, not
price. Our General Public Licenses are designed to make sure that
you have the freedom to distribute copies of free software (and
charge for this service if you wish), that you receive source code or
92
Page 93

can get it if you want it, that you can change the software or use
pieces of it in new free programs; and that you know you can do
these things.
To protect your rights, we need to make restrictions that forbid
anyone to deny you these rights or to ask you to surrender the
rights. These restrictions translate to certain responsibilities for
you if you distribute copies of the software, or if you modify it.
For example, if you distribute copies of such a program, whether
gratis or for a fee, you must give the recipients all the rights that
you have. You must make sure that they, too, receive or can get
the source code. And you must show them these terms so they
know their rights.
We protect your rights with two steps: (1) copyright the software,
and (2) oer you this license which gives you legal permission to
copy, distribute and/or modify the software.
Also, for each author’s protection and ours, we want to make
certain that everyone understands that there is no warranty for
this free software. If the software is modied by someone else and
passed on, we want its recipients to know that what they have is
not the original, so that any problems introduced by others will
not reect on the original authors’ reputations.
Finally, any free program is threatened constantly by software
patents. We wish to avoid the danger that redistributors of a free
program will individually obtain patent licenses, in eect making
the program proprietary. To prevent this, we have made it clear
that any patent must be licensed for everyone’s free use or not
licensed at all.
The precise terms and conditions for copying, distribution and
modication follow.
Terms & conditions for copying, distribution, & modication
0. This License applies to any program or other work which
contains a notice placed by the copyright holder saying it may
be distributed under the terms of this General Public License.
93
Page 94

The “Program”, below, refers to any such program or work, and
a “work based on the Program” means either the Program or
any derivative work under copyright law: that is to say, a work
containing the Program or a portion of it, either verbatim or
with modications and/or translated into another language.
(Hereinafter, translation is included without limitation in the
term “modication”.) Each licensee is addressed as “you”.
Activities other than copying, distribution and modication are
not covered by this License; they are outside its scope. The act
of running the Program is not restricted, and the output from
the Program is covered only if its contents constitute a work
based on the Program (independent of having been made by
running the Program). Whether that is true depends on what
the Program does.
1. You may copy and distribute verbatim copies of the Program’s
source code as you receive it, in any medium, provided that
you conspicuously and appropriately publish on each copy
an appropriate copyright notice and disclaimer of warranty;
keep intact all the notices that refer to this License and to the
absence of any warranty; and give any other recipients of the
Program a copy of this License along with the Program.
You may charge a fee for the physical act of transferring a
copy, and you may at your option oer warranty protection in
exchange for a fee.
2. You may modify your copy or copies of the Program or any
portion of it, thus forming a work based on the Program, and
copy and distribute such modications or work under the
terms of Section 1 above, provided that you also meet all of
these conditions:
a) You must cause the modied les to carry prominent
notices stating that you changed the les and the date of any
change.
b) You must cause any work that you distribute or publish, that
in whole or in part contains or is derived from the Program or
any part thereof, to be licensed as a whole at no charge to all
third parties under the terms of this License.
c) If the modied program normally reads commands
interactively when run, you must cause it, when started
94
Page 95

running for such interactive use in the most ordinary way, to
print or display an announcement including an appropriate
copyright notice and a notice that there is no warranty (or
else, saying that you provide a warranty) and that users may
redistribute
the program under these conditions, and telling the user how
to view a copy of this License. (Exception: if the Program itself is
interactive but does not normally print such an announcement,
your work based on the Program is not required to print an
announcement.)
These requirements apply to the modied work as a whole.
If identiable sections of that work are not derived from the
Program, and can be reasonably considered independent and
separate works in themselves, then this License, and its terms,
do not apply to those sections when you distribute them as
separate works. But when you distribute the same sections
as part of a whole which is a work based on the Program, the
distribution of the whole must be on the terms of this License,
whose permissions for other licensees extend to the entire
whole, and thus to each and every part regardless of who
wrote it.
Thus, it is not the intent of this section to claim rights or contest
your rights to work written entirely by you; rather, the intent is
to exercise the right to control the distribution of derivative or
collective works based on the Program.
In addition, mere aggregation of another work not based on
the Program with the Program (or with a work based on the
Program) on a volume of a storage or distribution medium
does not bring the other work under the scope of this License.
3. You may copy and distribute the Program (or a work based on
it, under Section 2) in object code or executable form under the
terms of Sections 1 and 2 above provided that you also do one
of the following:
a) Accompany it with the complete corresponding machine-
readable source code, which must be distributed under the
terms of Sections 1 and 2 above on a medium customarily used
for software interchange; or,
95
Page 96

b) Accompany it with a written oer, valid for at least three
years, to give any third party, for a charge no more than your
cost of physically performing source distribution, a complete
machine-readable copy of the corresponding source code, to
be distributed under the terms of Sections 1 and 2 above on a
medium customarily used for software interchange; or,
c) Accompany it with the information you received as to the oer
to distribute corresponding source code. (This alternative is
allowed only for noncommercial distribution and only if you
received the program in object code or executable form with
such an oer, in accord with Subsection b above.)
The source code for a work means the preferred form of
the work for making modications to it. For an executable
work, complete source code means all the source code for all
modules it contains, plus any associated interface denition
les, plus the scripts used to control compilation and
installation of the executable. However, as a special exception,
the source code distributed need not include anything that
is normally distributed (in either source or binary form) with
the major components (compiler, kernel, and so on) of the
operating system on which the executable runs, unless that
component itself accompanies the executable.
If distribution of executable or object code is made by
oering access to copy from a designated place, then oering
equivalent access to copy the source code from the same place
counts as distribution of the source code, even though third
parties are not compelled to copy the source along with the
object code.
4. You may not copy, modify, sublicense, or distribute the
Program except as expressly provided under this License. Any
attempt otherwise to copy, modify, sublicense or distribute
the Program is void, and will automatically terminate your
rights under this License. However, parties who have received
copies, or rights, from you under this License will not have
their licenses terminated so long as such parties remain in full
compliance.
5. You are not required to accept this License, since you have
96
Page 97

not signed it. However, nothing else grants you permission to
modify or distribute the Program or its derivative works. These
actions are prohibited by law if you do not accept this License.
Therefore, by modifying or distributing the Program (or any
work based on the Program), you indicate your acceptance
of this License to do so, and all its terms and conditions for
copying, distributing or modifying the Program or works based
on it.
6. Each time you redistribute the Program (or any work based
on the Program), the recipient automatically receives a license
from the original licensor to copy, distribute or modify the
Program subject to these terms and conditions. You may not
impose any further restrictions on the recipients’ exercise of
the rights granted herein. You are not responsible for enforcing
compliance by third parties to this License.
7. If, as a consequence of a court judgment or allegation of patent
infringement or for any other reason (not limited to patent
issues), conditions are imposed on you (whether by court order,
agreement or otherwise) that contradict the conditions of this
License, they do not excuse you from the conditions of this
License. If you cannot distribute so as to satisfy simultaneously
your obligations under this License and any other pertinent
obligations, then as a consequence you may not distribute
the Program at all. For example, if a patent license would not
permit royalty-free redistribution of the Program by all those
who receive copies directly or indirectly through you, then the
only way you could satisfy both it and this License would be to
refrain entirely from distribution of the Program.
If any portion of this section is held invalid or unenforceable
under any particular circumstance, the balance of the section
is intended to apply and the section as a whole is intended to
apply in other circumstances.
It is not the purpose of this section to induce you to infringe
any patents or other property right claims or to contest
validity of any such claims; this section has the sole purpose
of protecting the integrity of the free software distribution
system, which is implemented by public license practices.
Many people have made generous contributions to the wide
range of software distributed through that system in reliance
97
Page 98

on consistent application of that system; it is up to the author/
donor to decide if he or she is willing to distribute software
through any other system and a licensee cannot impose that
choice.
This section is intended to make thoroughly clear what is
believed to be a consequence of the rest of this License.
8. If the distribution and/or use of the Program is restricted in
certain countries either by patents or by copyrighted interfaces,
the original copyright holder who places the Program under
this License may add an explicit geographical distribution
limitation excluding those countries, so that distribution is
permitted only in or among countries not thus excluded. In
such case, this License incorporates the limitation as if written
in the body of this License.
9. The Free Software Foundation may publish revised and/or new
versions of the General Public License from time to time. Such
new versions will be similar in spirit to the present version, but
may dier in detail to address new problems or concerns.
Each version is given a distinguishing version number. If the
Program species a version number of this License which
applies to it and “any later version”, you have the option of
following the terms and conditions either of that version or of
any later version published by the Free Software Foundation. If
the Program does not specify a version number of this License,
you may choose any version ever published by the Free
Software Foundation.
10. If you wish to incorporate parts of the Program into other free
programs whose distribution conditions are dierent, write to
the author to ask for permission.
For software which is copyrighted by the Free Software
Foundation, write to the Free Software Foundation; we
sometimes make exceptions for this. Our decision will be
guided by the two goals of preserving the free status of all
derivatives of our free software and of promoting the sharing
and reuse of software generally.
98
Page 99

NO WARRANTY
11 BECAUSE THE PROGRAM IS LICENSED FREE OF CHARGE,
THERE IS NO WARRANTY FOR THE PROGRAM, TO THE EXTENT
PERMITTED BY APPLICABLE LAW. EXCEPT WHEN OTHERWISE
STATED IN WRITING THE COPYRIGHT HOLDERS AND/OR OTHER
PARTIES PROVIDE THE PROGRAM “AS IS” WITHOUT WARRANTY
OF ANY KIND, EITHER EXPRESSED OR IMPLIED, INCLUDING,
BUT NOT LIMITED TO, THE IMPLIED WARRANTIES OF
MERCHANTABILITY AND FITNESS FOR A PARTICULAR PURPOSE.
THE ENTIRE RISK AS TO THE QUALITY AND PERFORMANCE OF
THE PROGRAM IS WITH YOU. SHOULD THE PROGRAM PROVE
DEFECTIVE, YOU ASSUME THE COST OF ALL NECESSARY
SERVICING, REPAIR OR CORRECTION.
12 IN NO EVENT UNLESS REQUIRED BY APPLICABLE LAW OR
AGREED TO IN WRITING WILL ANY COPYRIGHT HOLDER, OR
ANY OTHER PARTY WHO MAY MODIFY AND/OR REDISTRIBUTE
THE PROGRAM AS PERMITTED ABOVE, BE LIABLE TO YOU FOR
DAMAGES, INCLUDING ANY GENERAL, SPECIAL, INCIDENTAL
OR CONSEQUENTIAL DAMAGES ARISING OUT OF THE USE
OR INABILITY TO USE THE PROGRAM (INCLUDING BUT NOT
LIMITED TO LOSS OF DATA OR DATA BEING RENDERED
INACCURATE OR LOSSES SUSTAINED BY YOU OR THIRD PARTIES
OR A FAILURE OF THE PROGRAM TO OPERATE WITH ANY OTHER
PROGRAMS), EVEN IF SUCH HOLDER OR OTHER PARTY HAS
BEEN ADVISED OF THE POSSIBILITY OF SUCH DAMAGES.
END OF TERMS AND CONDITIONS
99
Page 100

[English] CE statement
EU Declaration of Conformity
Manufacturer:
Address:
Authorized representative in Europe:
Address, City:
Country:
ASUSTeK COMPUTER INC.
ASUS COMPUTER GmbH
HARKORT STR. 21-23, 40880 RATINGEN
GERMANY
declare the following apparatus:
Product name:
Model name:
Wireless AC1500 Dual Band Gigabit Router
CD6R, CD6N, CD6
We, the undersigned,
The object of the declaration described above is in conformity with the relevant Union harmonisation legislation:
Additional information: ANNEX I
1F., No. 15, Lide Rd., Beitou Dist., Taipei City 112, Taiwan
Radio Equipment Directive – 2014/53/EU
Article 3.1(a)
EN 50385:2017 , EN 50665:2017 , EN 62311:2008 , EN 62368-1:2014
Article 3.1(b)
Draft EN 301 489-1 V2.2.0 , Draft EN 301 489-17 V3.2.0 , EN 55024:2010/A1:2015 , EN 55032:2015/AC:2016 ,
EN 55035:2017 , EN 61000-3-2:2014 , EN 61000-3-3:2013
Article 3.2
EN 300 328 V2.2.2 , EN 301 893 V2.1.1
Radio Equipment Class
Class 2
Ecodesign Directive – 2009/125/EC
(EU) 2019/1782 , 1275/2008/EC , EU 801/2013
RoHS Directive – 2011/65/EU
2015/863/EU , EN 50581:2012
S.y. Shian, CEO
Place of issue:
Date of issue:
Taipei, Taiwan
31/08/2020
Signature:
100
 Loading...